If you’ve got a 10-year-old who wants their art to look “pretty grown-up,” canvas painting is the sweetest spot—big impact without needing perfect realism. These canvas painting ideas for 10 year olds are all about bold colors, easy shapes, and a few simple tricks that make the whole thing feel like magic.
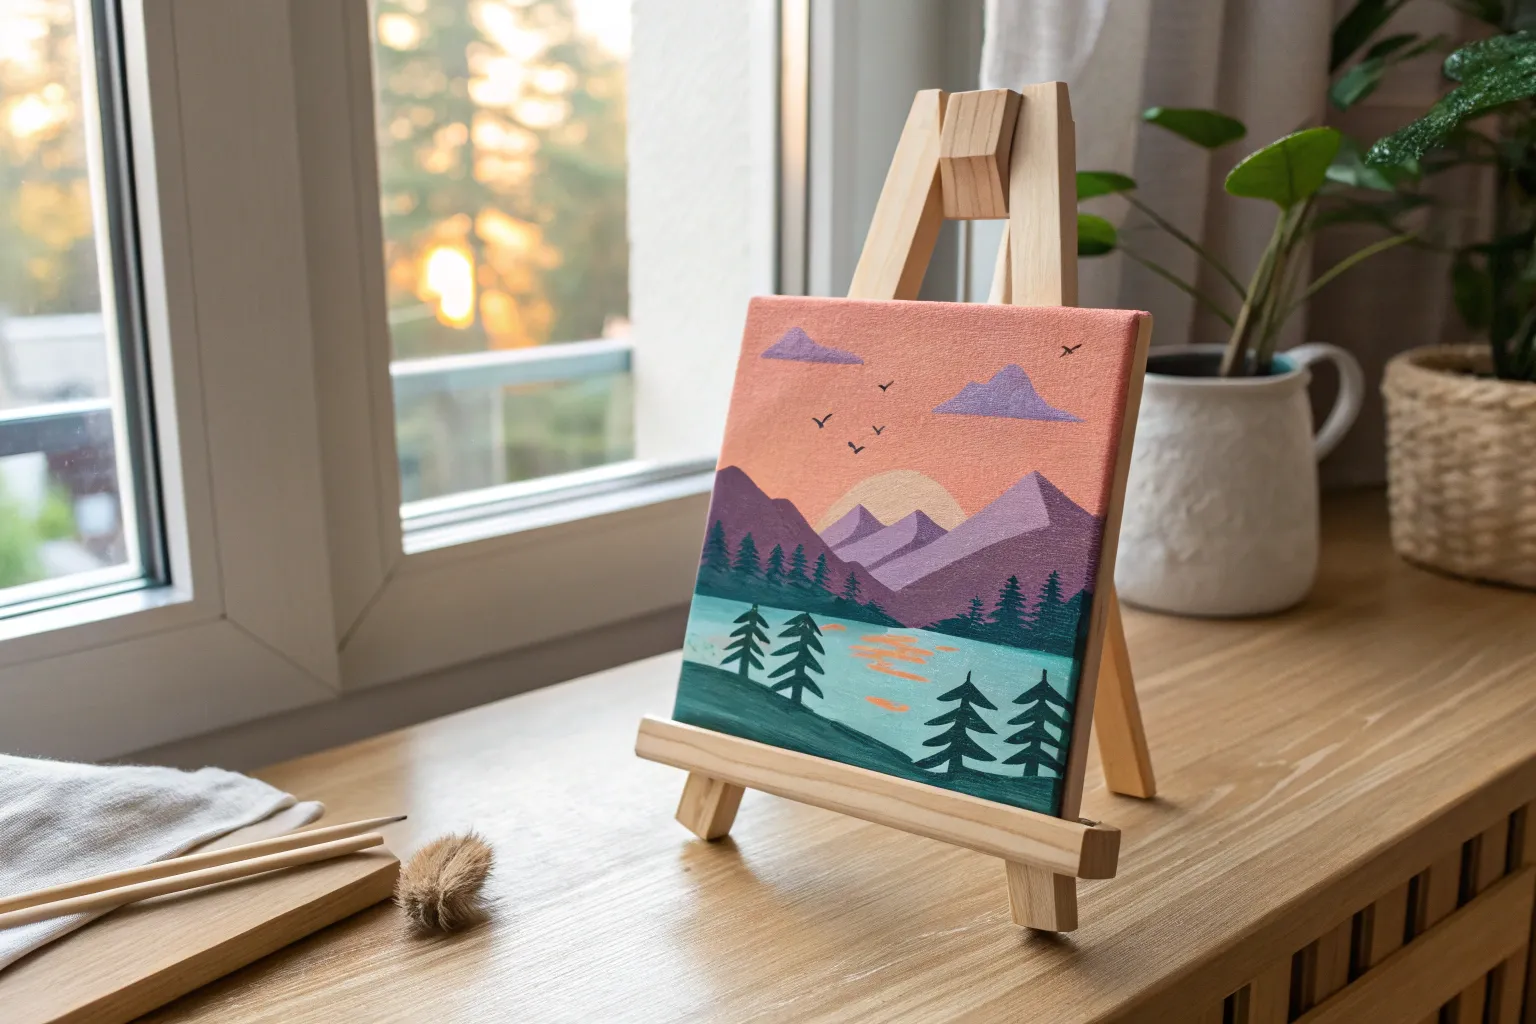
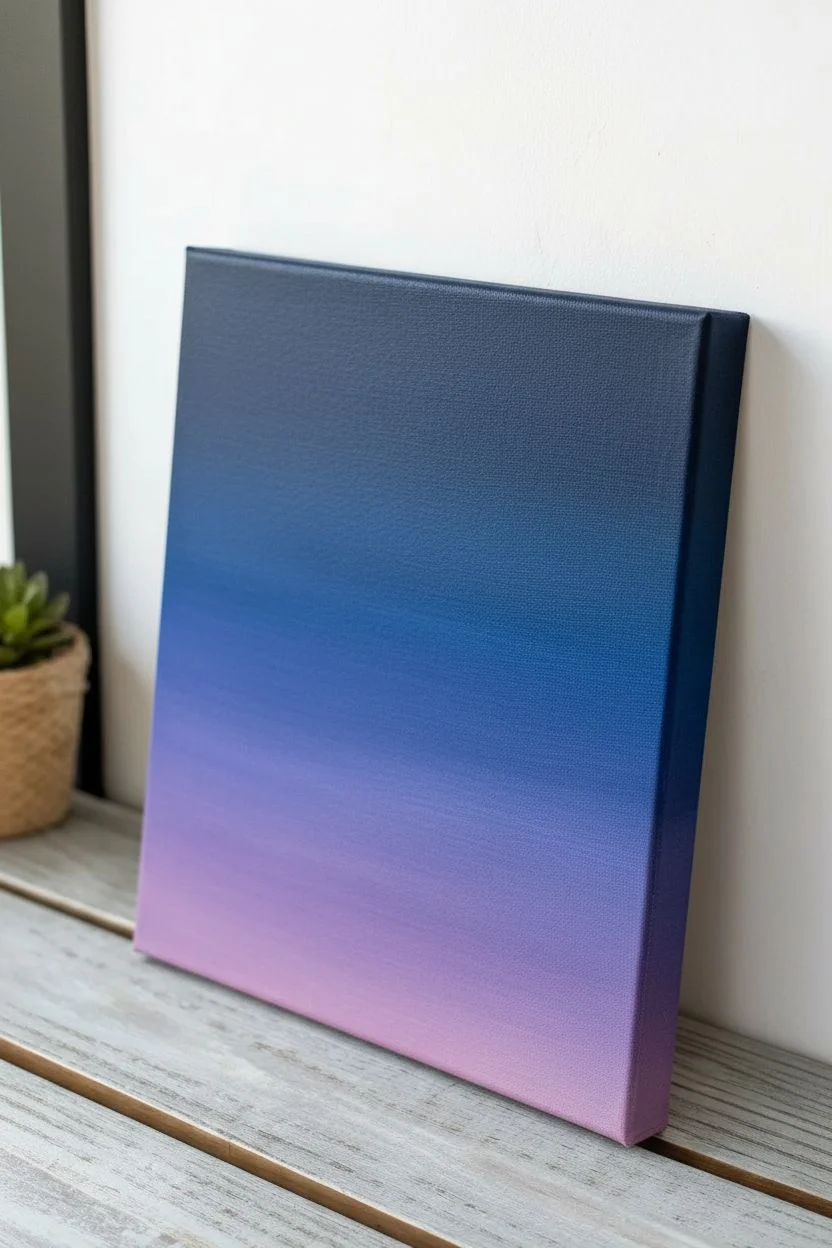
Sunset Gradient With Simple Horizon

Capture the magic of twilight with this vibrant gradient painting that transitions from deep purple to glowing yellow. This project teaches the essential skill of blending acrylics while creating a stunning backdrop for a simple, high-contrast silhouette.
Step-by-Step Tutorial
Materials
- Rectangular stretched canvas (e.g., 11×14 or 12×16 inches)
- Acrylic paints: Purple/Violet, Magenta/Deep Pink, Orange, Bright Yellow, Titanium White, Black
- Large flat brush (1-2 inches) for blending
- Medium flat brush
- Small round detail brush (size 0 or 1)
- Cup of water
- Paper towels
- Palette or paper plate
Step 1: Creating the Sky Gradient
-
Prepare your colors:
Squeeze out generous amounts of your sky colors—purple, pink, orange, yellow, and white—onto your palette. You want them ready to go because blending works best while the paint is still wet. -
Start with purple:
Using your large flat brush, paint a wide band of purple across the very top of the canvas. Use horizontal back-and-forth strokes for smooth coverage. -
Add the pink layer:
Without washing your brush completely (just wipe it slightly), pick up the magenta or deep pink. Paint a band directly below the purple, allowing the two colors to overlap slightly. -
Blend the transition:
Where the purple and pink meet, work your brush back and forth quickly. The leftover purple on your brush will mix with the fresh pink to create a soft, seamless transition. -
Move to orange:
Wipe your brush clean on a paper towel. Pick up the orange paint and apply a band below the pink section. Blend the seam between the pink and orange using horizontal strokes until the line disappears. -
Introduce yellow:
Clean your brush thoroughly in water this time and dry it well. Paint a band of bright yellow below the orange. Blend the transition carefully so the orange fades gently into the yellow. -
Final glowing horizon:
Mix a little white into your yellow to create a pale lemon color. Paint the remaining bottom section of the sky with this mixture to make the horizon look bright and glowing. Let the canvas dry completely before moving on.
Choppy Blending?
If your gradient looks like stripes instead of a smooth fade, your paint is likely drying too fast. Dip your brush tip in water or use a ‘slow-dry medium’ to keep the colors wet and workable longer.
Step 2: Painting the Landscape
-
Mix the distant hills color:
Create a very dark purple by mixing your purple paint with a tiny dot of black. You want it dark, but not pitch black yet, to create atmospheric depth. -
Paint the river/mist line:
Using a medium brush, paint a jagged, uneven horizontal strip near the bottom third of the canvas. Keep the top edge rough to look like distant trees or bushes. Leave a gap of sky showing between this and the very bottom. -
Add reflection highlights:
While the dark strip is drying, use a small amount of watered-down pink or light purple. Gently brush some horizontal streaks right below the dark tree line to suggest a river reflecting the sky or low-lying mist. -
Paint the foreground:
Switch to pure black paint. Fill in the very bottom section of the canvas solid black. This represents the ground closest to the viewer. -
Merge the ground layers:
Blend the top edge of this black foreground slightly into the lighter river/mist area you painted earlier, creating a soft, grassy texture rather than a sharp line.
Make It 3D
Add texture to the silhouette! Instead of painting it flat black, mix in some sand or use heavy body acrylics to dab on ‘foliage’ texture, making the dark foreground pop off the smooth sky.
Step 3: Adding the Details
-
Practice your birds:
On a scrap piece of paper, practice painting small ‘V’ shapes with your smallest detail brush and black paint. Vary the width of the wings to make them look natural. -
Paint the leading bird:
Paint the largest bird on the right side of the canvas, roughly in the middle of the yellow/orange transition. This anchors your composition. -
Create the flock:
Paint a diagonal line of smaller birds trailing behind the leader, moving downwards toward the left. Vary their spacing—some close together, some further apart—to simulate movement. -
Refine the wings:
I like to make the wingtips sharp and pointy. Use only the very tip of your brush and lift it gently at the end of each stroke for a crisp finish. -
Final check:
Look at your foreground silhouette. If the black looks patchy, add a second coat to make it opaque and stark against the bright sunset.
Once dry, frame your artwork to give this beautiful evening scene a professional exhibit look


Twilight Sky With Moon And Stars
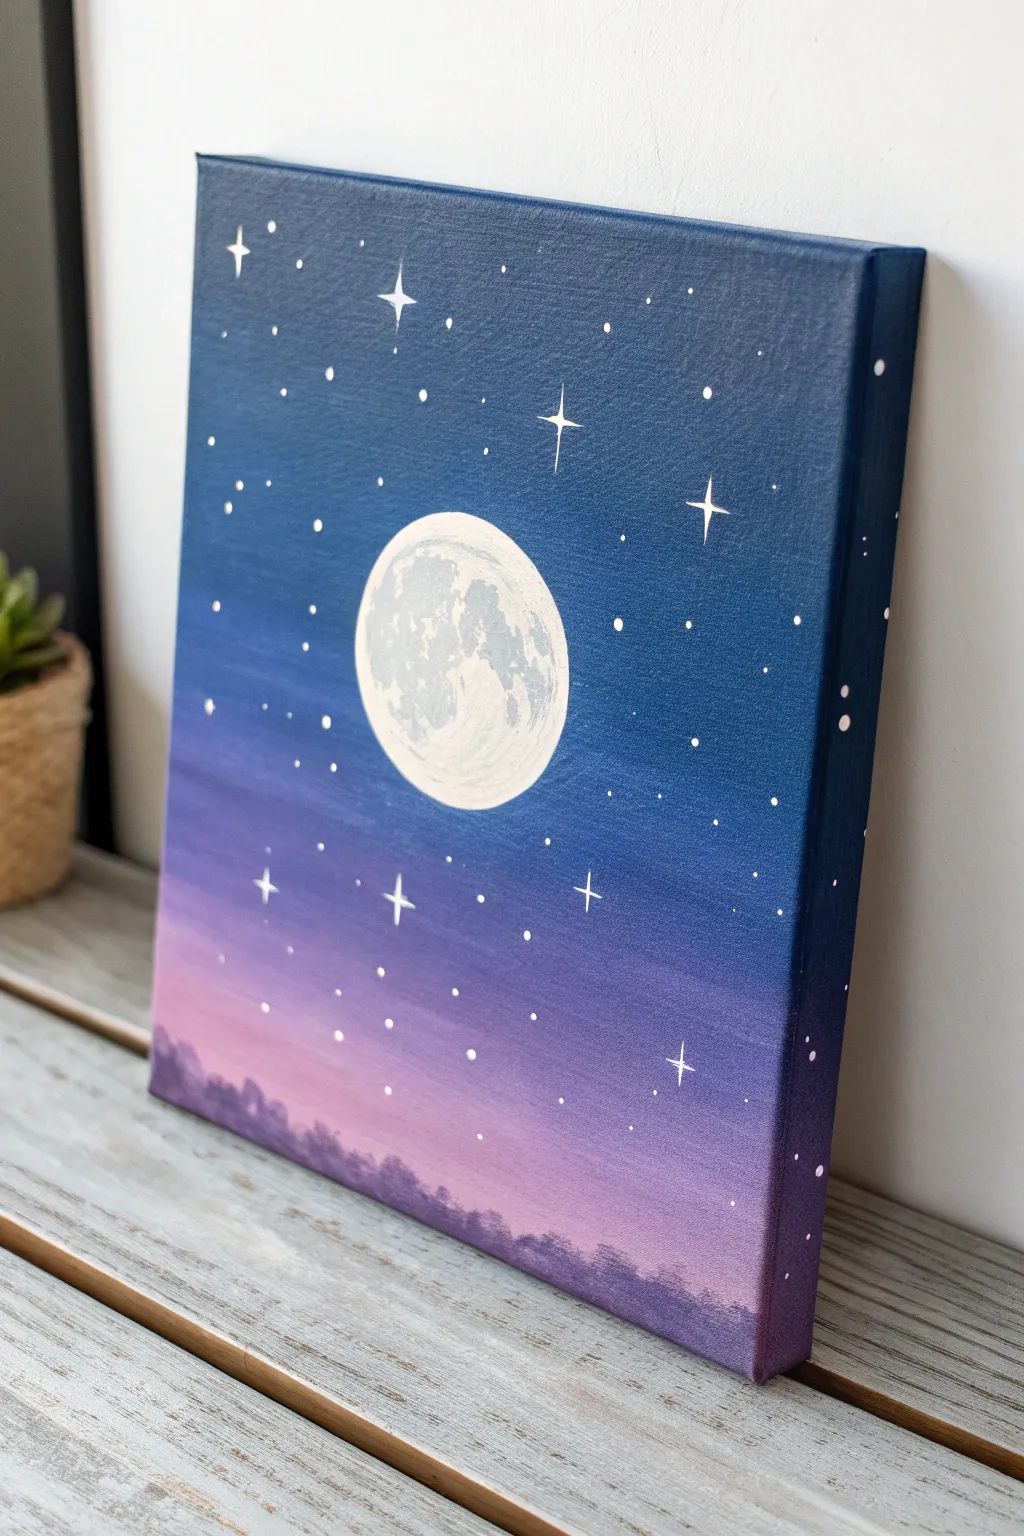
Capture the magic of a quiet evening with this stunning gradient night sky painting. Featuring a glowing, detailed moon and a field of twinkling stars, this project teaches excellent blending techniques for young artists.
How-To Guide
Materials
- Square canvas (e.g., 8×8 or 10×10 inches)
- Acrylic paints: Navy blue, royal blue, white, light purple/lilac, black
- Large flat paintbrush
- Medium round paintbrush
- Small liner or detail paintbrush
- Paper plate or palette
- Cup of water
- Paper towels
- A circular object for tracing (like a jar lid or roll of tape)
Step 1: Creating the Ombré Sky
-
Prepare the gradient colors:
Squeeze out your paint colors onto the palette: navy blue, royal blue, light purple, and plenty of white. You’ll want them ready to go so you can blend while the paint is still wet. -
Paint the top section:
Start at the very top of the canvas with the darkest navy blue. Paint horizontal strokes back and forth, covering about the top quarter of the canvas. Don’t forget to paint the top and side edges of the canvas too for a finished look. -
Blend in the mid-tones:
Without cleaning your brush completely, pick up some royal blue. Paint the next section down, overlapping slightly with the wet navy blue to create a smooth transition. -
Add the purple horizon:
Clean your brush, then load it with the light purple paint. Start at the bottom of the canvas and paint upwards. As you meet the blue section, mix a tiny bit of white or blue on your brush to help the purple fade softly into the darker sky above. -
Smooth the transitions:
With a clean, slightly damp brush, gently sweep back and forth over the lines where colors meet. Keep brushing horizontally until there are no hard stripes, just a gentle fade from dark blue to soft purple. -
Let the background dry:
Allow the sky to dry completely. This is crucial—if the background is wet, your moon will turn light blue instead of bright white.
Smooth Blending
If your acrylic paint is drying too fast to blend smoothly, dip your brush in a tiny bit of water or use a ‘slow-drying medium’ to keep the paint workable longer.
Step 2: Painting the Moon
-
Trace the moon shape:
Place your circular object (like a jar lid) in the center of the canvas. Hold it steady and lightly trace around it with a pencil or very thinned-down white paint. -
Fill the base layer:
Using a medium round brush, fill in the moon circle with solid white paint. You might need two coats to make it opaque enough to cover the blue background. -
Mix a light gray:
On your palette, mix a tiny dot of black or dark blue into a large amount of white to make a very pale gray color. -
Add moon craters:
Dab the pale gray paint onto the white moon in random blotches. Focus on the left side and bottom edge to create shadows. Use a distinct dabbing motion rather than smooth strokes to mimic crater texture. -
Highlight the surface:
Go back with pure white paint and dab over parts of the gray while it’s still wet. This blends the edges and makes the moon look glowing and three-dimensional.
Step 3: Adding Stars and Landscape
-
Dot the small stars:
Dip the handle end (the non-brush end) of a thin paintbrush into white paint. Gently touch the canvas sky in random spots to create perfect, tiny round stars. -
Paint twinkling stars:
Switch to your smallest detail brush. Choose a few spots to paint larger four-point stars. Paint a vertical line crossed by a horizontal line, tapering the ends so they look sharp like diamonds. -
Vary star sizes:
Add a few more tiny dots with the tip of your brush for variety, making sure to place some near the sides and corners. -
Mix the landscape color:
Mix a dark purple shade by combining purple with a small drop of black or navy blue. You want a color that is darker than the sky but not completely black. -
Paint the tree line:
along the very bottom edge of the canvas, use your brush to dab paint in an uneven, bumpy line. This creates the silhouette of distant treetops or bushes. -
Fill the bottom edge:
Fill in the space below your bumpy tree line with the same dark purple mixture, ensuring the bottom of the canvas is completely covered. -
Final dry:
Check for any bald spots and let the entire painting dry completely before displaying it.
Glow Up
Mix a tiny bit of glow-in-the-dark paint with your white paint for the stars and moon. When the lights go out, your night sky will actually shine!
Hang your masterpiece on a wall to enjoy a peaceful view of the moon every night


Palm Tree Silhouette Sunset
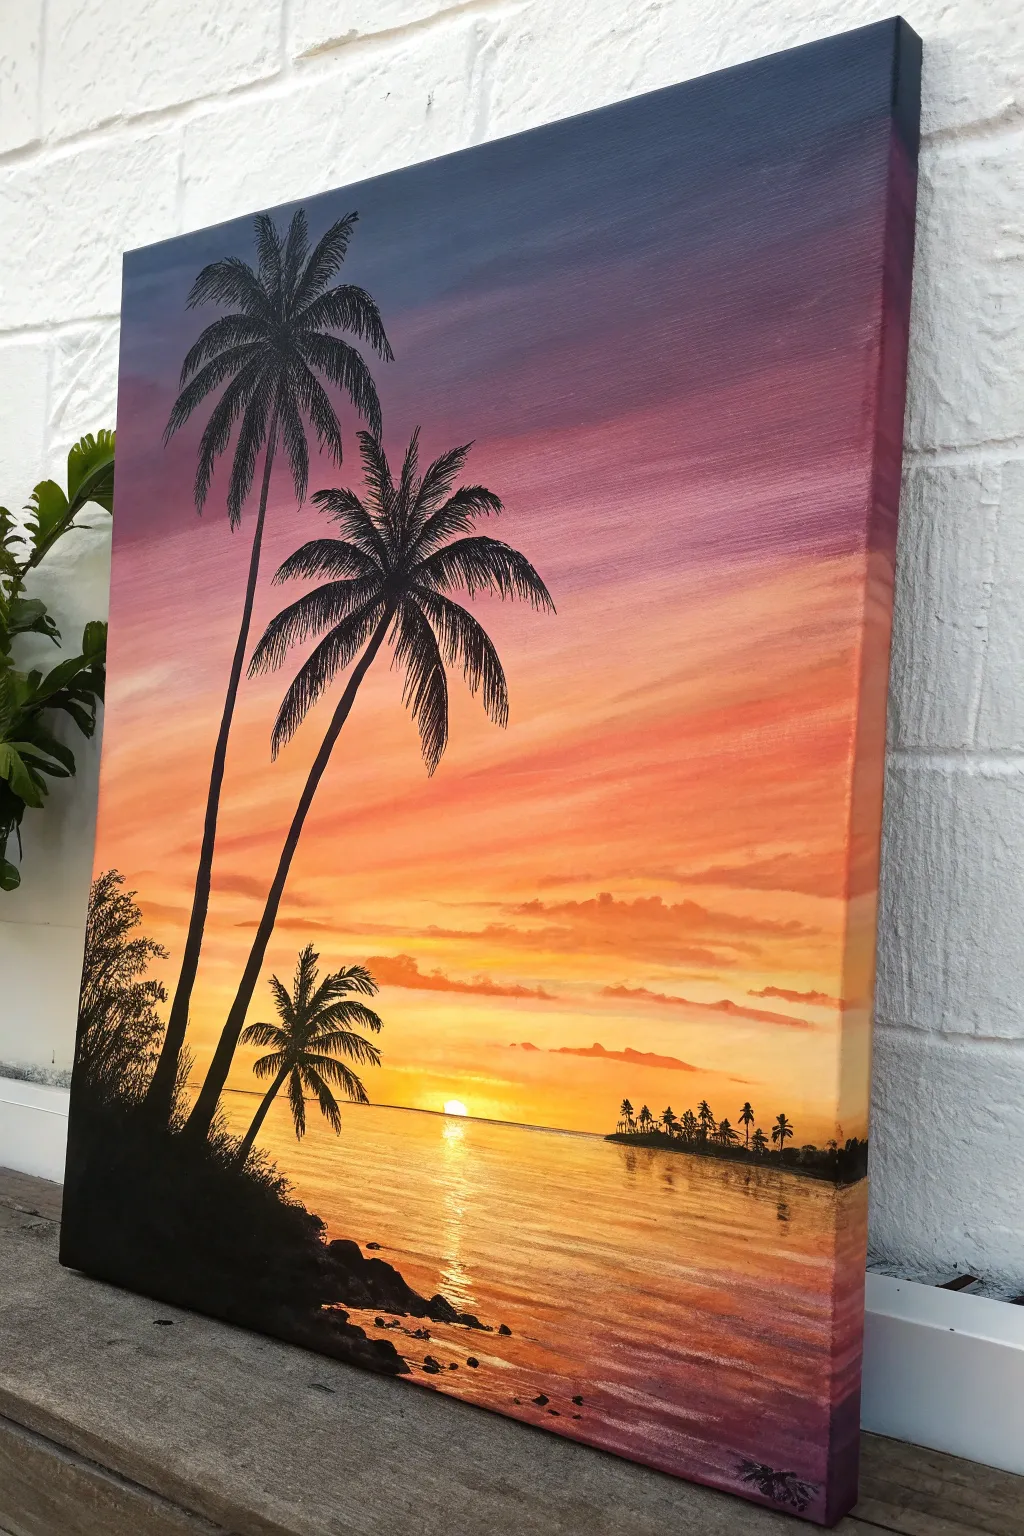
Capture the magic of a beach evening with this vibrant canvas painting that features a glowing sun dipping below the horizon. You will learn how to blend a stunning gradient sky and use black paint to create dramatic silhouettes.
Detailed Instructions
Materials
- Rectangular stretched canvas (e.g., 16×20 inch)
- Acrylic paints: Titanium White, Lemon Yellow, Orange, Red, Purple (Violet), Phthalo Blue, Mars Black
- Large flat brush or sponge brush (for blending)
- Medium round brush
- Small liner brush or detail brush
- Cup of water and paper towels
- Palette or paper plate
Step 1: Painting the Sky Gradient
-
Start at the top:
Begin by painting a strip of Phthalo Blue mixed with a tiny bit of Purple at the very top edge of your canvas. Paint focusing on horizontal strokes that go all the way across. -
Blend into purple:
While the blue is still wet, rinse your brush and pick up pure Purple paint. Paint just below the blue, slightly overlapping the two colors so they blend together smoothly. -
Warm up the colors:
Next, introduce Red paint below the purple section. Use long, sweeping left-to-right strokes to merge the red into the bottom edge of the purple for a soft transition. -
Create the golden glow:
Switch to Orange, creating a band below the red. Finally, mix Yellow with a lot of White for the area closest to the horizon line, making sure the brightest part is in the center where the sun will be. -
Add wispy clouds:
Before the background dries completely, use a clean, dry brush with a tiny amount of watered-down red or orange to streak in subtle cloud lines across the yellow sections.
Muddy colors?
If your sky colors turn brown while blending, wash your brush thoroughly between colors. Wait for the orange layer to dry slightly before adding blue nearby.
Step 2: Creating the Ocean Reflection
-
Establish the horizon line:
About one-third of the way up from the bottom, use masking tape or a steady hand to paint a straight distinct horizon line where the sky touches the water. -
Mirror the sky:
Paint the water using the same colors as the sky but in reverse order. Start with the bright yellow-white mix right under the horizon, then fade into orange, and finally reddish-purple at the very bottom. -
Add sun sparkles:
Dip a small brush in pure white paint. Make tiny horizontal dashes down the center of the water to create the reflection of the sunlight dancing on the waves. -
Paint the sun:
Right on the horizon line in the middle of your bright yellow patch, paint a small half-circle using thick White paint mixed with a touch of Yellow. This is your setting sun.
Step 3: Painting the Silhouettes
-
Create the land mass:
Wait for the background to be totally dry. Paint a sloping hill of solid Black in the bottom left corner, making the edge uneven to look like rocks and grass. -
Draw the main trunks:
Using your medium round brush and black paint, paint two tall, curving lines growing out of your hill. These will be the trunks of the large palm trees. Make them slightly thicker at the bottom and thinner at the top. -
Outline the fronds:
At the top of each trunk, paint 5 to 7 curved lines radiating outward like fireworks. These serve as the spines for your palm leaves. -
Fill in the leaves:
Switch to your smallest liner brush. Along each curved spine, flick quick, short strokes of black paint downward to create the jagged, feathery look of palm leaves. -
Add the baby palm:
Paint a short, small palm tree near the bottom right of your hill, using the same technique but with smaller strokes. -
Paint the distant island:
On the horizon line to the right, paint a very small, low strip of black land. Add tiny vertical stick-trees to show an island far away in the distance.
Make it yours
Try adding a silhouette of a sailboat on the horizon line or painting a hammock swinging between the two large palm trees for a relaxing vibe.
Step 4: Final Details
-
Add rocky texture:
Mix a tiny drop of grey or white into your black paint. Dab this lightly onto the top edges of the bottom hill to make it look like moonlight hitting the rocks. -
Paint side bushes:
Use the tip of an old or rough brush to dab black spots on the left edge of the canvas, creating the look of messy bushes framing the scene. -
Wrap the edges:
Don’t forget to paint the sides of your canvas! Extend the sky, water, and black silhouette colors around the edges for a professional finished look.
Hang your masterpiece on the wall and enjoy the warmth of your personal sunset all year round


Layered Mountain Silhouette Scene
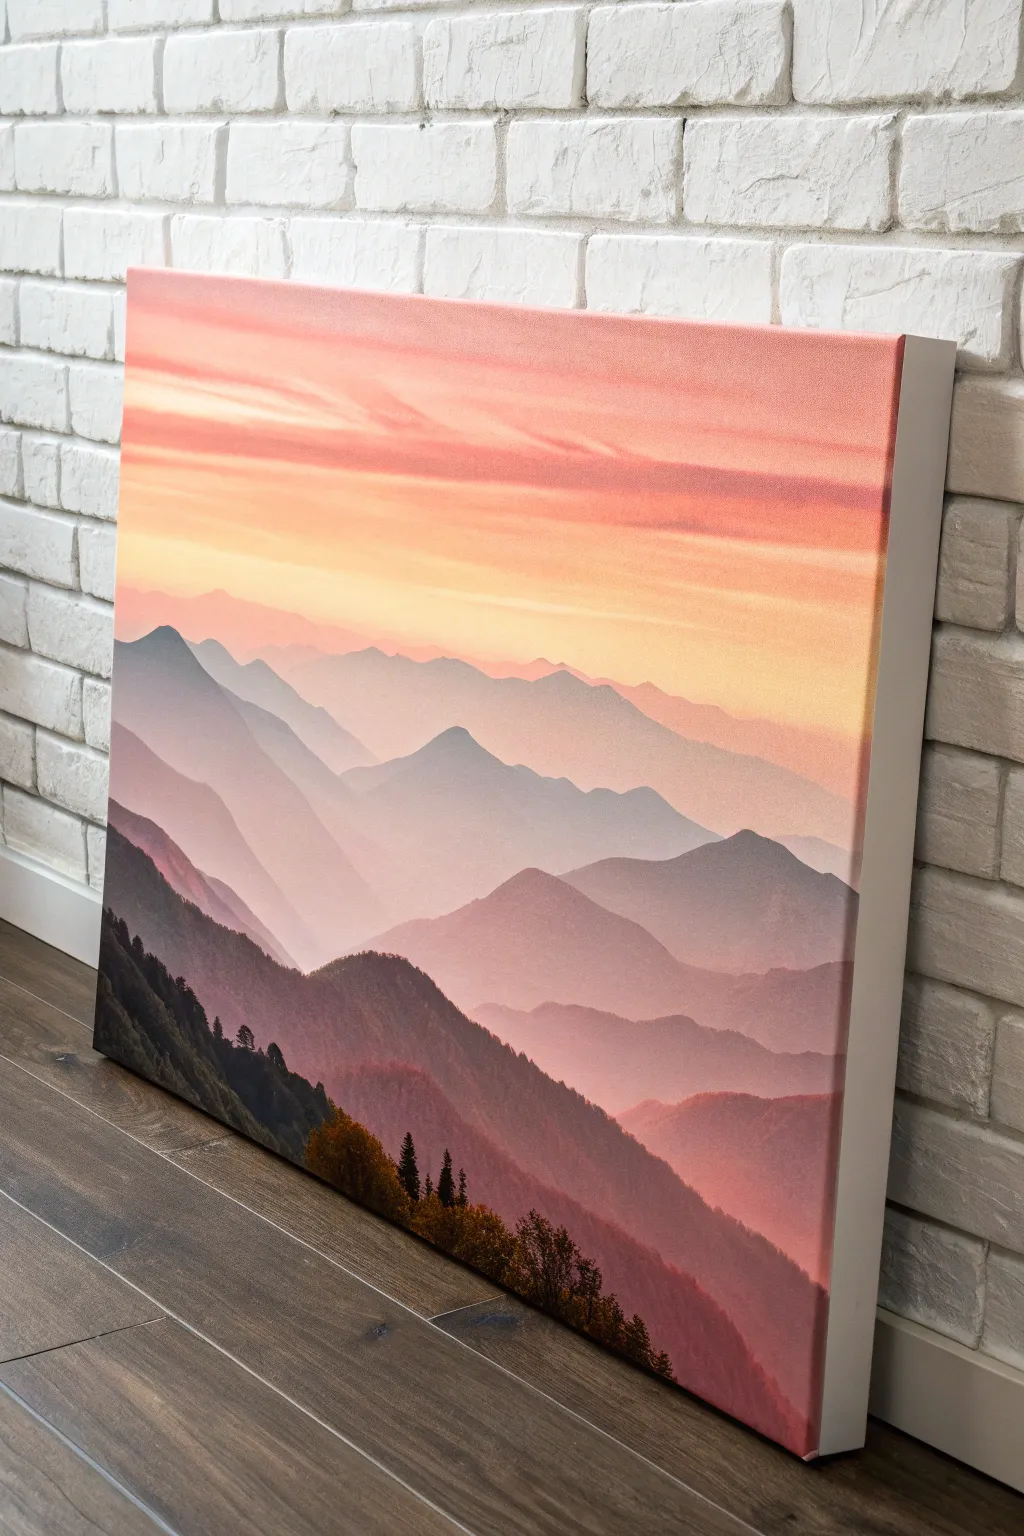
Capture the magic of a fading sunset over misty mountains with this stunning layered landscape. By using atmospheric perspective—where things get lighter and hazier the further away they are—you’ll create incredible depth on a flat canvas.
Step-by-Step Tutorial
Materials
- Stretched canvas (rectangular)
- Acrylic paints (primary colors + extra white and black)
- Wide flat wash brush (for the sky)
- Medium round brush
- Small liner brush (for trees)
- Palette or paper plate
- Cup of water and paper towels
- Pencil (optional)
Step 1: Painting the Sky
-
Mix your sunset colors:
Start by preparing three pools of color on your palette: a soft creamy yellow, a warm peach/orange, and a muted pinkish-red. You want these colors to be fairly light, so mix plenty of white into each one. -
Apply the yellow horizon:
Using your wide flat brush, paint a horizontal band of the creamy yellow across the middle of the canvas. This will be the brightest part of the sky where the sun has just set. -
Blend upwards:
While the yellow is still wet, clean your brush slightly and pick up the peach color. Paint a stripe directly above the yellow, overlapping them slightly. Use long, horizontal strokes to blend the peach into the yellow for a smooth transition. -
Add the upper sky:
Repeat the previous step with your pinkish-red color at the very top of the canvas, blending it down into the peach layer. At this stage, I like to ensure my brush strokes go all the way across the canvas for a streaky, cloud-like effect. -
Create soft clouds (optional):
If you want wispy clouds like in the example, take a tiny bit of darker pink or light purple on a dry brush and lightly sweep in a few horizontal streaks across the upper sky. Let the entire background dry completely before moving on.
Muddy Colors?
If layers are blending when they shouldn’t, stop! The paint underneath must be 100% dry. Use a hair dryer on a low setting to speed things up between mountain ridges.
Step 2: Building the Distant Mountains
-
Mix the lightest mountain shade:
The rule for this painting is: further away equals lighter and bluer. Mix a very pale lavender color using white, a tiny dot of blue, and a tiny dot of red. -
Paint the first ridge:
Start about halfway down the canvas (overlapping your yellow sky slightly). Paint a jagged, uneven line all the way across to represent the furthest mountain peaks. Fill in everything below this line with that pale lavender color. -
Let it dry:
It is crucial to let this layer dry to the touch so your colors don’t muddy together. -
Mix the second layer color:
Add just a little bit more blue and perhaps a touch of purple to your previous mix. It should be slightly darker than the first layer but still very pastel and hazy. -
Paint the middle ground:
Paint a new mountain ridge below the first one. Make the peaks different shapes—some sharp, some rolling—so it looks natural. Fill in below this new line.
Step 3: The Foreground Details
-
Darken the mix progressively:
Continue this process for 2 or 3 more layers. Each time, add less white and more blue/purple to your paint mix. The mountains should get darker and more vibrant as they get closer to the bottom of the canvas. -
Create the darkest ridge:
For the bottom-most mountain shape (the foreground), mix a deep purple or dark blue-grey. Don’t use pure black yet; a deep color looks more natural. -
Paint the main slope:
Paint a large, sloping mountain shape entering from the bottom left or right corner. This one should be the largest and darkest shape, covering the bottom section of the canvas. -
Add texture to the slope:
While the dark paint is wet, you can dab your brush slightly to make the edge look rough, like rocky terrain or distant tree tops.
Color Pop
For the very last layer of trees, try mixing a tiny drop of dark green into your black. It’s subtle, but adds a rich, realistic feel to the forest shadows.
Step 4: Adding the Forest
-
Switch to the liner brush:
Now for the tiny details. Use your smallest brush and mix a very dark, nearly black color (you can mix black with your dark purple). -
Paint tiny tree silhouettes:
Along the spine of the darkest foreground mountain, paint tiny vertical lines. Then, use tiny dabbing motions to paint branches angling downward from those lines to create distinct pine tree shapes. -
Vary sizes:
Make some trees taller and some shorter to create a realistic forest line. Group a few together in clusters for visual interest. -
Add foreground foliage:
In the very bottom corner, you can dab larger, darker shapes to suggest bushes or trees that are closest to the viewer. This anchors the whole scene.
Step back and admire how the colors fade into the distance to create a peaceful mountain view
BRUSH GUIDE
The Right Brush for Every Stroke
From clean lines to bold texture — master brush choice, stroke control, and essential techniques.
Explore the Full Guide
City Skyline At Dusk
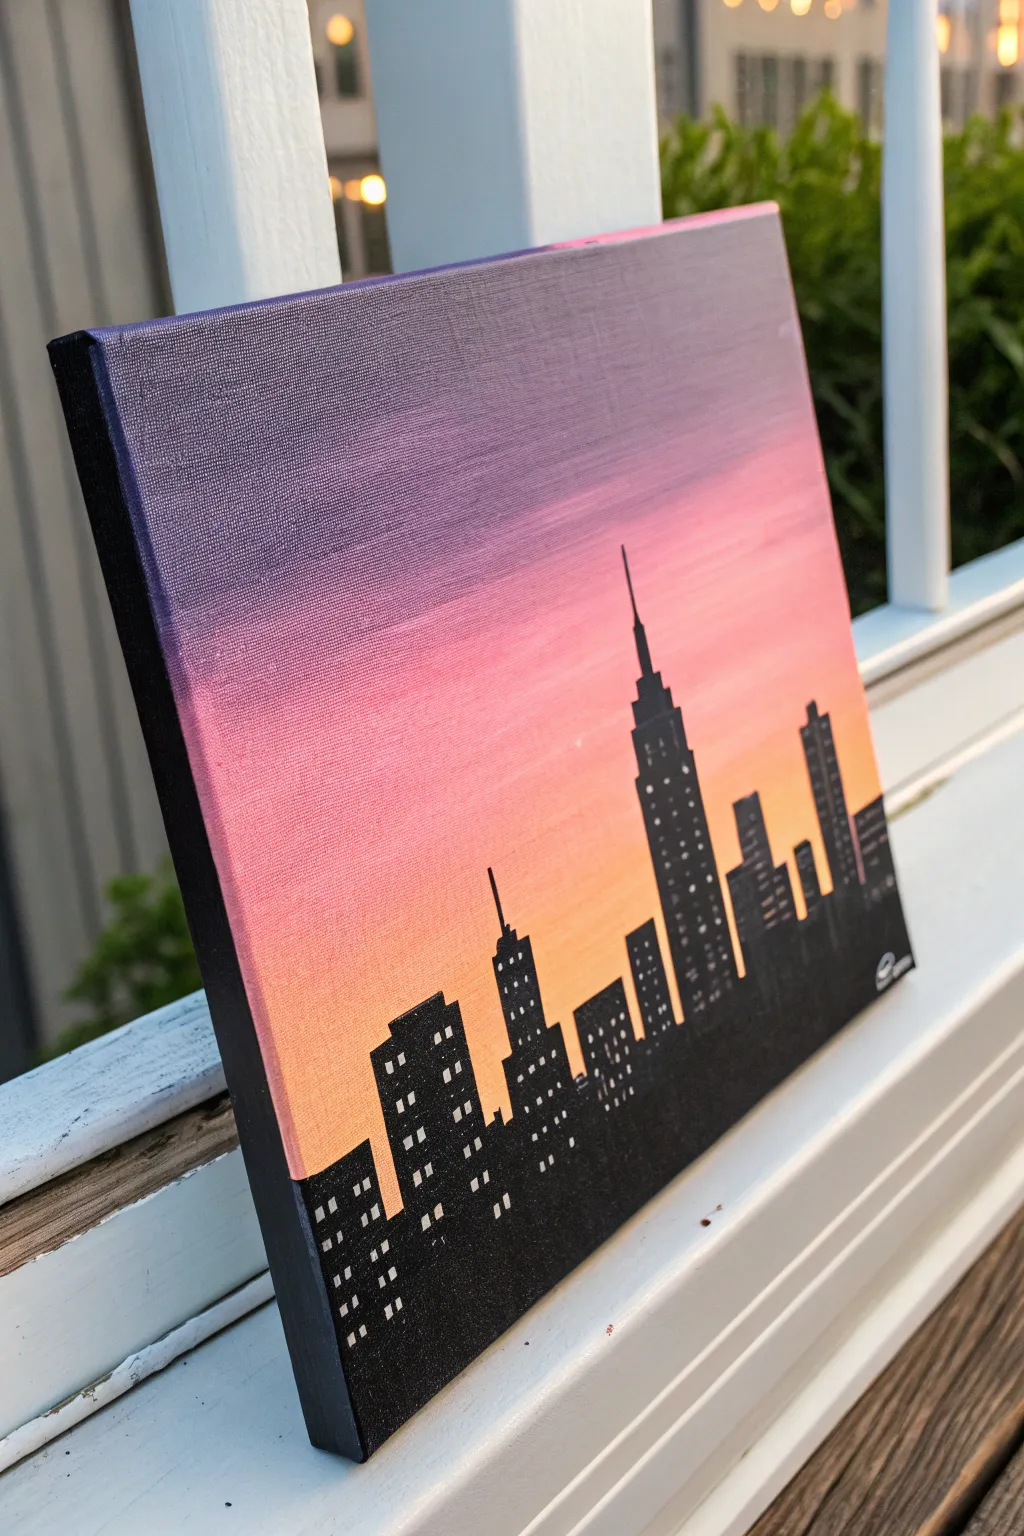
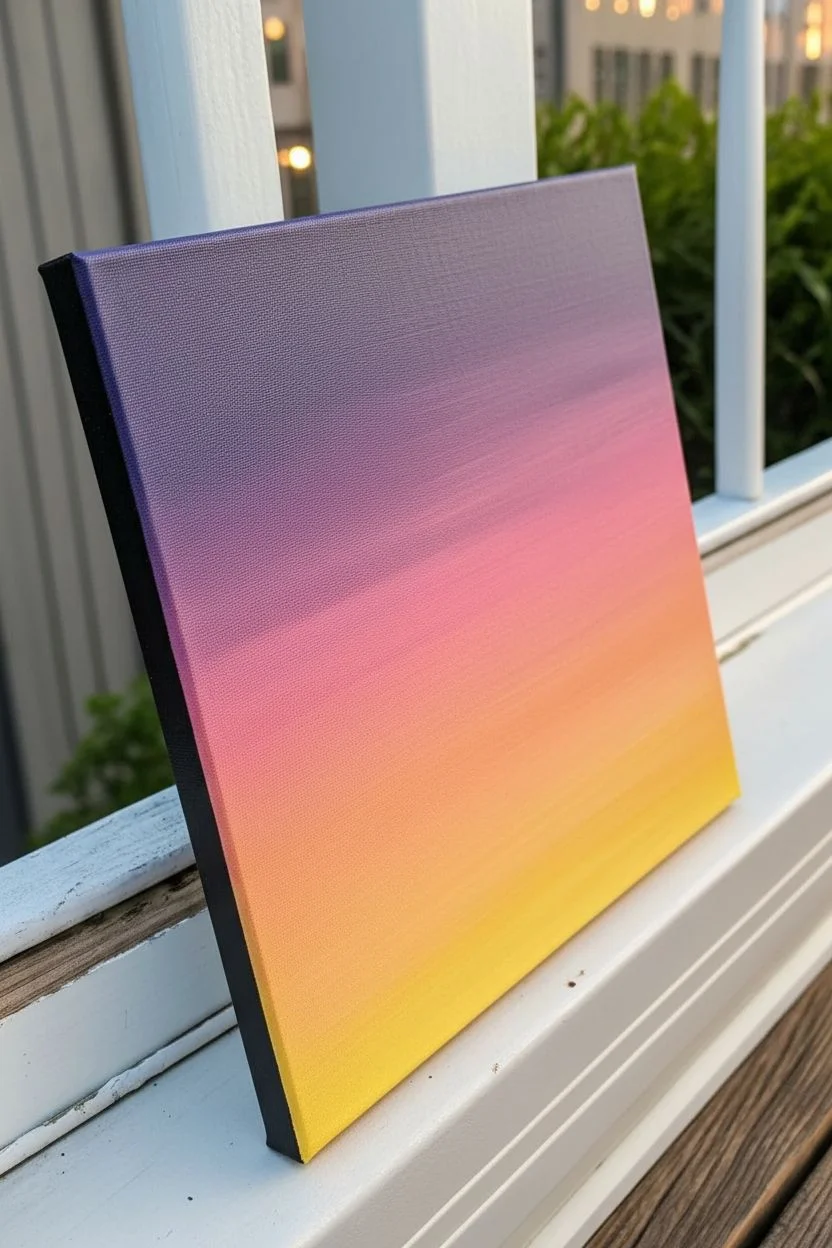
Capture the magic of twilight with this stunning city skyline painting that creates a beautiful contrast against a colorful sky. The blending of warm oranges and cool purples creates a perfect backdrop for the sharp, black shapes of the skyscrapers.
Step-by-Step
Materials
- Square stretched canvas (e.g., 8×10 or 10×10 inches)
- Acrylic paints: Deep purple, magenta/pink, orange, yellow, black, and white
- Large flat brush (1 inch)
- Small flat brush (1/2 inch)
- Fine detail brush or lining brush
- Ruler or straight edge (optional)
- Cup of water and paper towels
- Palette or paper plate
Step 1: Painting the Sunset Sky
-
Prepare the canvas:
Start with a clean, dry canvas. If you want the colors to be extra bright, you can apply a quick coat of white gesso or white paint first and let it dry, but painting directly on the canvas works great too. -
Start at the top:
Squeeze out your deep purple paint. Using your large flat brush, paint a horizontal band across the top 1/4 of the canvas. Use side-to-side strokes to keep it smooth. -
Add the pink layer:
Without washing your brush completely (just wipe off the excess purple), pick up the magenta or deep pink paint. Paint the next section below the purple. -
Blend the transition:
While both paint stripes are still wet, gently brush back and forth where the purple meets the pink. The colors should mix slightly to create a soft, blurry line rather than a hard edge. -
Introduce the orange:
Wipe your brush clean on a paper towel. Pick up the orange paint and apply a band below the pink section. Blend the wet pink edge into the wet orange edge just like you did before. -
Finish with yellow:
For the bottom section of the sky, use yellow paint. Blend it seamlessly into the orange above it. The sky should now look like a smooth gradient from dark night to bright sunset. -
Let it dry completely:
This step is crucial. The sky must be 100% dry before you paint the buildings, or the black paint will mix with the sunset colors and look muddy. It usually takes about 20 minutes.
Step 2: Building the City Skyline
-
Plan your horizon:
Decide how tall your buildings will be. The bottom third of the canvas is usually a good height for the tallest skyscrapers. -
Outline the shapes:
Using a smaller flat brush and black paint, draw the outline of your buildings. You can make simple rectangles of different heights. -
Add a skyscraper spire:
Choose one building to be the tallest, like the Empire State Building. Use your fine detail brush to carefully pull a thin black line straight up from the center of its roof to create an antenna. -
Fill in the silhouettes:
Use the black paint to fill in all the building shapes completely. Make sure the paint is opaque so no sunset colors show through the buildings. -
Creating varied rooflines:
To make the city look realistic, vary the tops of the buildings. Give some flat roofs, some slanted roofs, and maybe a few ‘stepped’ sides on the wider buildings. -
Crisp up the edges:
Go back over the top edges of the buildings with your fine brush to make sure the lines are sharp and crisp against the bright background. -
Paint the sides:
Don’t forget to paint the black silhouette wrapped around the sides and bottom edge of the canvas for a finished, professional look.
Smooth Skies
Work quickly while painting the sky! Acrylics dry fast, and the colors will only blend smoothly while they are still wet. Have all your sky colors ready on the palette before you start.
Step 3: Adding the City Lights
-
Prepare the windows:
Once the black silhouette is fully dry to the touch, get your fine detail brush and a tiny bit of white paint ready. -
Dotting the windows:
Gently tap small squares or dots of white paint onto the black buildings. I find it looks best if these are random—some clusters here, a vertical line there. -
Varying the patterns:
Keep some buildings mostly dark, while others can be fully lit up. This variety makes the city look alive and busy. -
Final touches:
Add a few tiny white dots in the upper purple section of the sky to represent the first stars coming out at dusk.
Level Up: Reflection
Leave the bottom inch of the canvas unpainted initially, then mirror the black buildings downward and glaze with blue to create water reflecting the city lights.
Hang your masterpiece on the wall and enjoy the view of your own personal city sunset
Swing On A Tree Silhouette
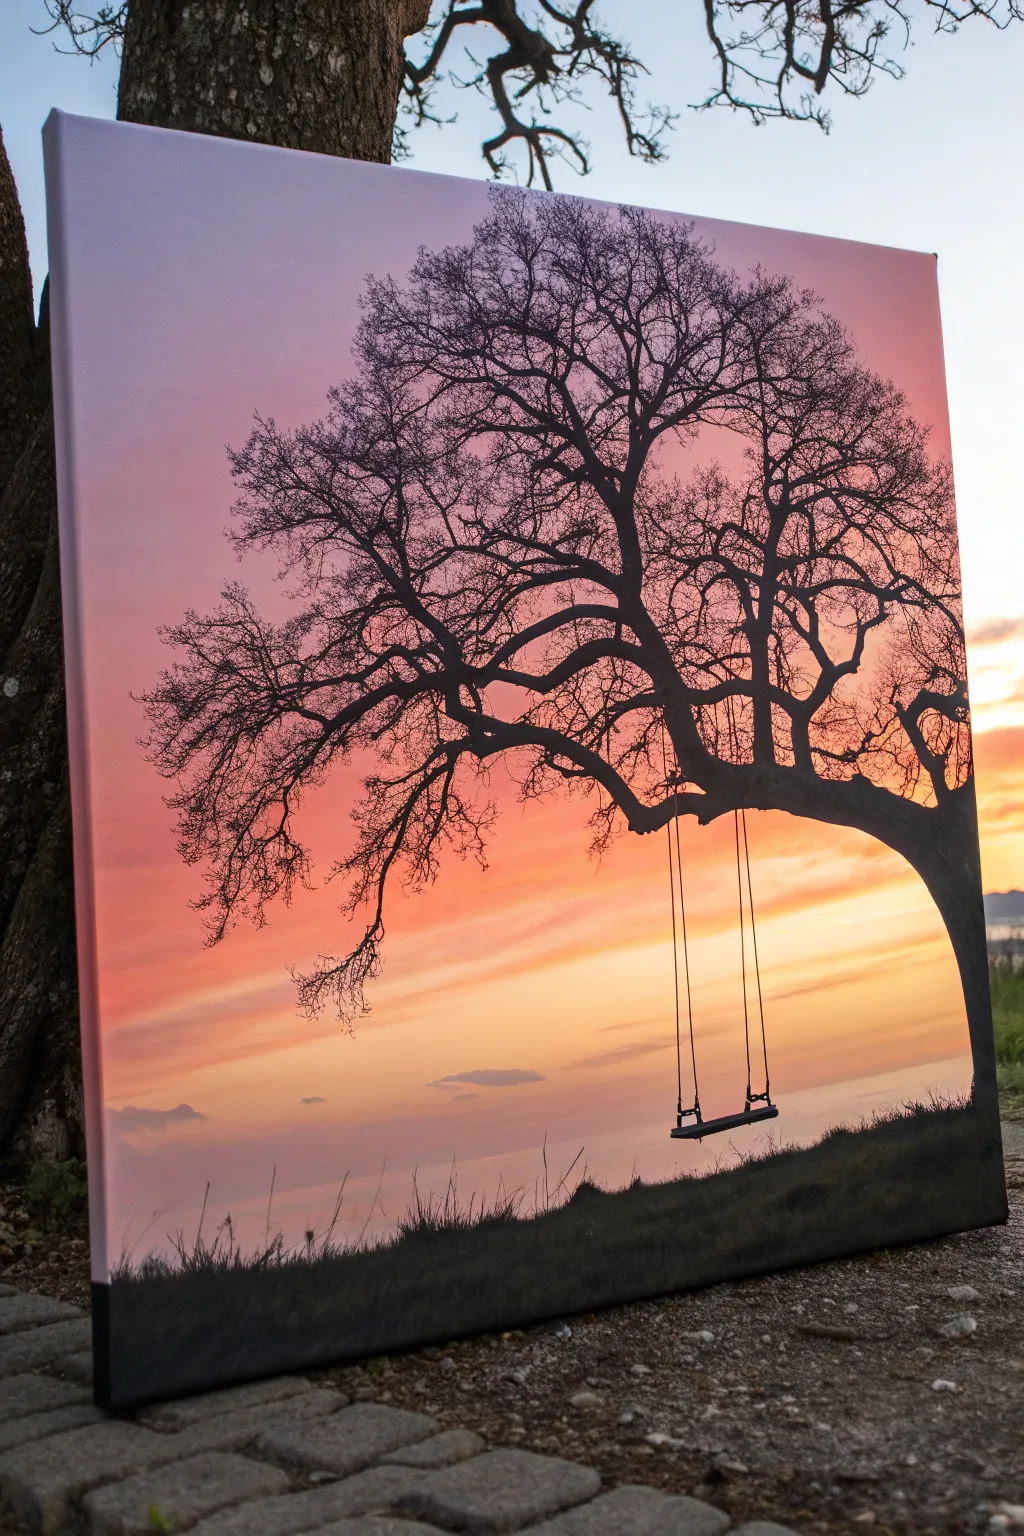
This captivating painting project features a dramatic black tree silhouette contrasting sharply against a vibrant gradient sky. The sunset background blends pinks, oranges, and soft yellows to create a peaceful evening atmosphere perfect for dreaming.
Step-by-Step Tutorial
Materials
- Rectangular stretched canvas (e.g., 16×20 inches)
- Acrylic paints (Titanium White, Magenta or Pink, Orange, Yellow, Black)
- Wide flat brush for background blending
- Medium round brush for the trunk
- Fine detail brush or liner brush for branches
- Cup of water and paper towels
- Pencil
- Palette or paper plate
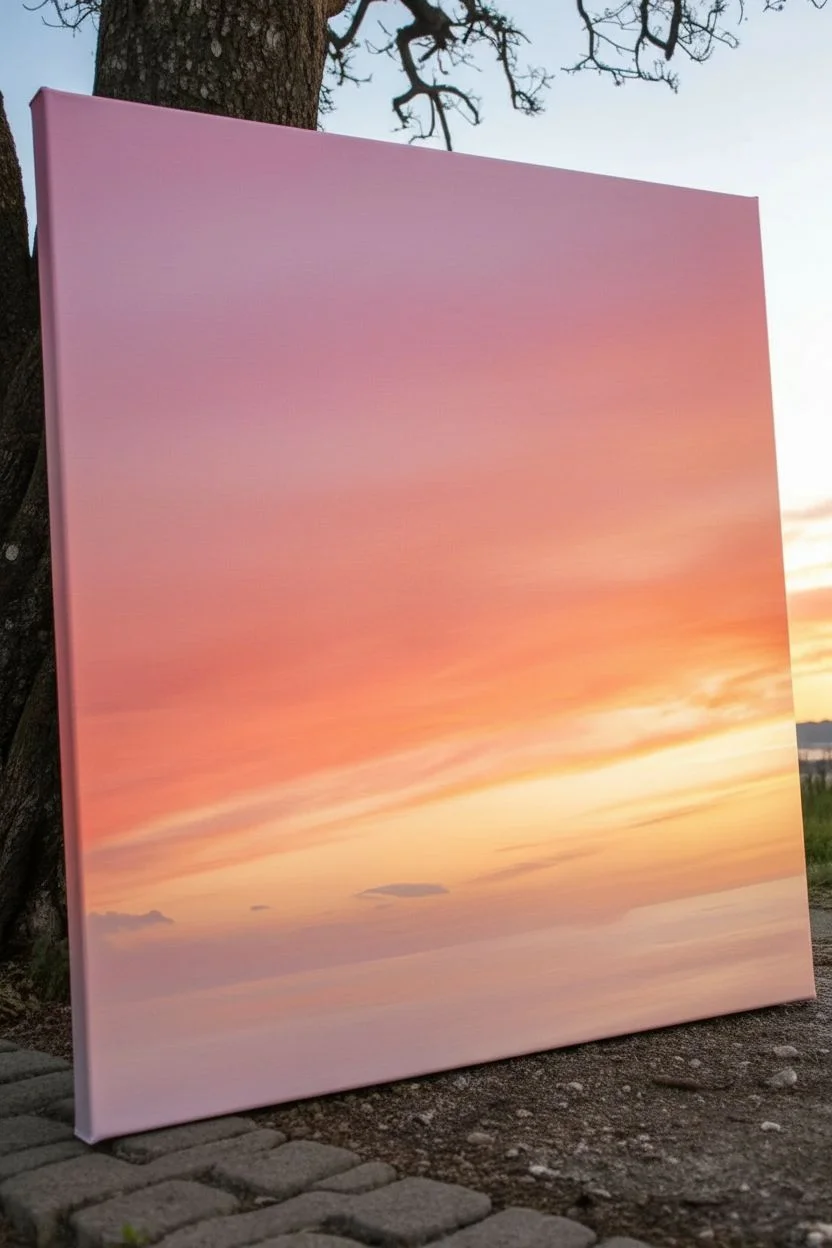
Step 1: Painting the Sunset Sky
-
Prepare the Colors:
Squeeze out generous amounts of white, magenta (or pink), orange, and yellow paint onto your palette. Keep the black paint separate for later so it doesn’t accidentally dirty your bright sunset colors. -
Start at the Top:
Using a wide flat brush, mix a little magenta with plenty of white to create a soft, pale pink. Paint the very top section of the canvas using long, horizontal strokes that go all the way from the left edge to the right. -
Blend in the Pinks:
While the top layer is still wet, add slightly more pure magenta to your brush. Paint the next section down, overlapping slightly with the pale pink above to blend the colors together smoothly. -
Transition to Orange:
Rinse your brush quickly and pick up the orange paint. Apply this below the pink section, blending the line where they meet so there isn’t a hard stripe, but a soft transition. -
Add the Golden Glow:
As you move towards the bottom third of the canvas, switch to yellow mixed with a touch of white. This represents the brightest part of the sunset near the horizon. -
Create the Horizon Clouds:
If you want that wispy cloud look near the bottom, take a very small amount of diluted purple or greyish-pink and streak it gently horizontally across the yellow area while it’s still tacky. -
Let it Dry Completely:
This is crucial. The background must be 100% dry before you paint the black silhouette, or the black will turn muddy. A hairdryer can speed this up if you are impatient.
Muddy Sky Fix
If your sunset colors are mixing into brown, clean your brush more thoroughly between colors and let layers dry slightly before blending.
Step 2: Creating the Silhouette
-
Sketch the Ground:
Lightly use a pencil to draw a sloping hill at the very bottom of the canvas. It doesn’t need to be straight; a natural, bumpy line looks more like real grass. -
Fill the Landscape:
Using the black paint and a medium brush, fill in the ground area completely solid black. Add tiny flicking strokes upward along the top edge to mimic blades of grass. -
Outline the Trunk:
On the right side of the canvas, paint a thick, sturdy trunk curving upwards and inwards towards the center. The trunk should be thickest at the base and taper slightly as it reaches the middle. -
Extend the Main Branches:
Branch out from the main trunk. Paint one large, horizontal branch reaching left—this will hold the swing. Make other thick branches reach upward towards the sky. -
Add Fine Details:
Switch to your finest detail brush. Add many small, spindly twigs coming off the larger branches. I find that shaking my hand just a tiny bit as I paint these lines makes the twigs look more organic and natural. -
Paint the Swing Ropes:
Locate the sturdy horizontal branch you painted earlier. Very carefully paint two thin, straight vertical lines dropping down from it. Use the very tip of your detail brush for this. -
Add the Seat:
At the bottom of the ropes, paint a small horizontal rectangle for the wooden seat. Make sure it looks like it is hanging freely. -
Final Touches:
Check your silhouette for any spots where the sunset shows through the trunk and fill them in with an extra coat of black paint for a solid, opaque look.
Starry Night Option
Once the sky is dry, flick a toothbrush loaded with watered-down white paint to add tiny stars before painting the tree.
Now you have a serene sunset scene that captures the beauty of twilight.

PENCIL GUIDE
Understanding Pencil Grades from H to B
From first sketch to finished drawing — learn pencil grades, line control, and shading techniques.
Explore the Full Guide
Butterfly Close-Up With Symmetry Trick
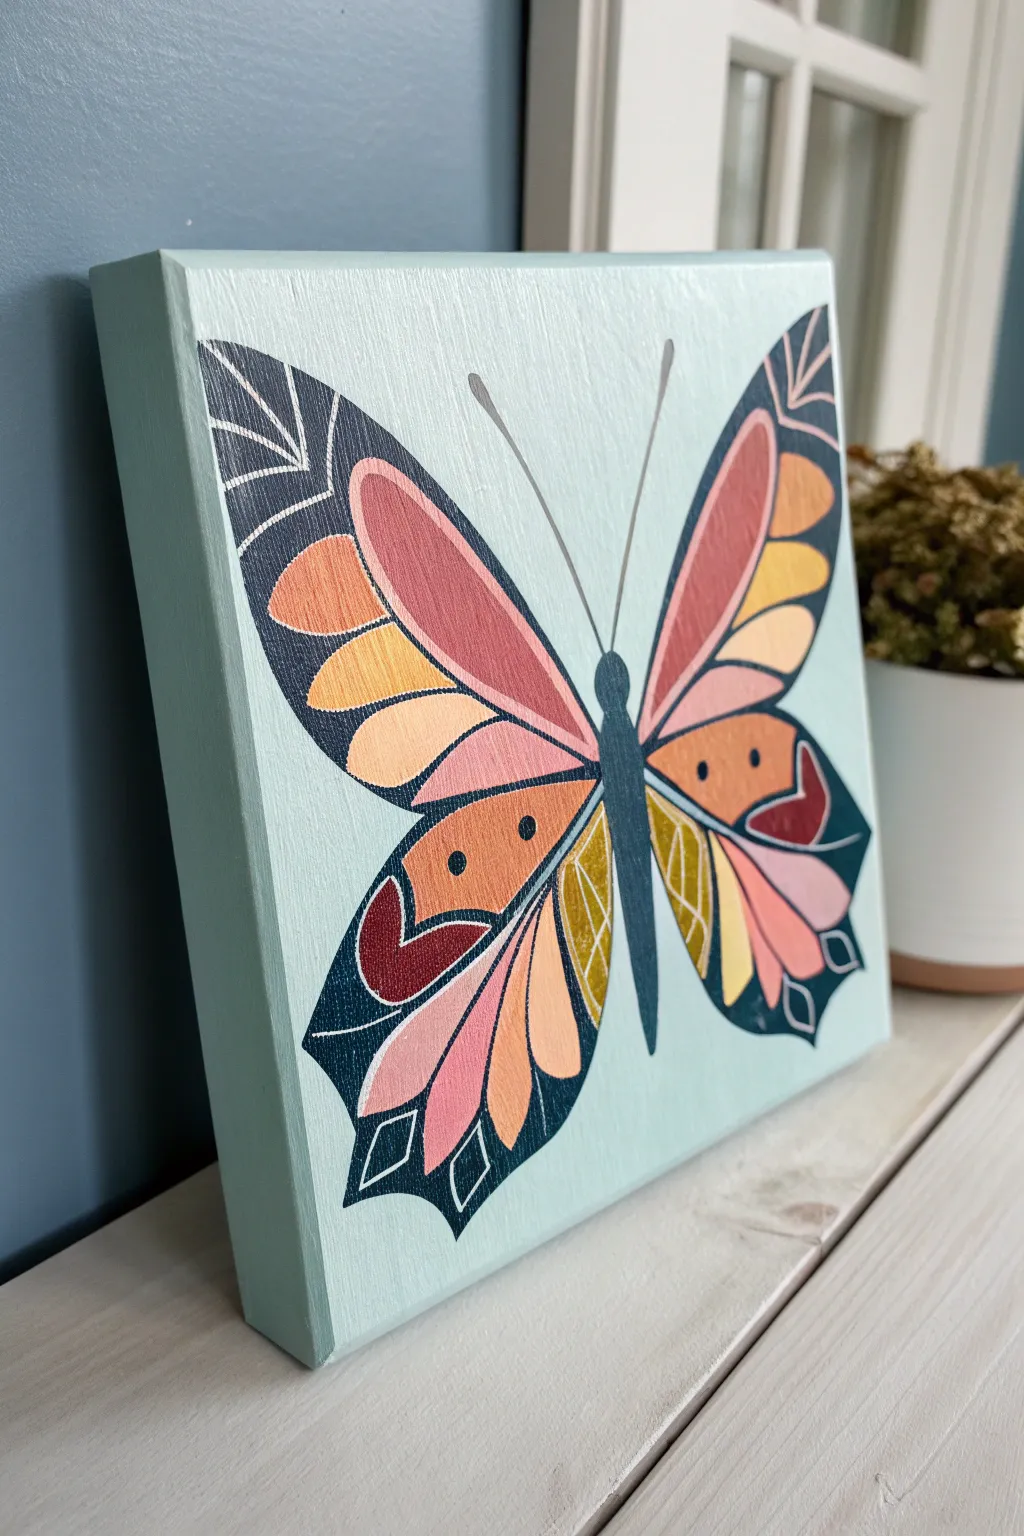
This project features a bold, graphical butterfly design painted on a chunky canvas or wood block. With its warm autumn colors popping against a cool mint background, it results in a modern piece of decor that looks much more complex than it actually is.
How-To Guide
Materials
- Small square deep-edge canvas or wood painting panel (approx. 6×6 inches)
- Acrylic paints (Mint/light teal, dark navy blue, mustard yellow, coral pink, terracotta, burgundy)
- Pencil and eraser
- Ruler
- Paper for template (optional)
- Variety of small paintbrushes (flat and liner brushes)
- White paint marker or fine detail brush
- Palette or paper plate
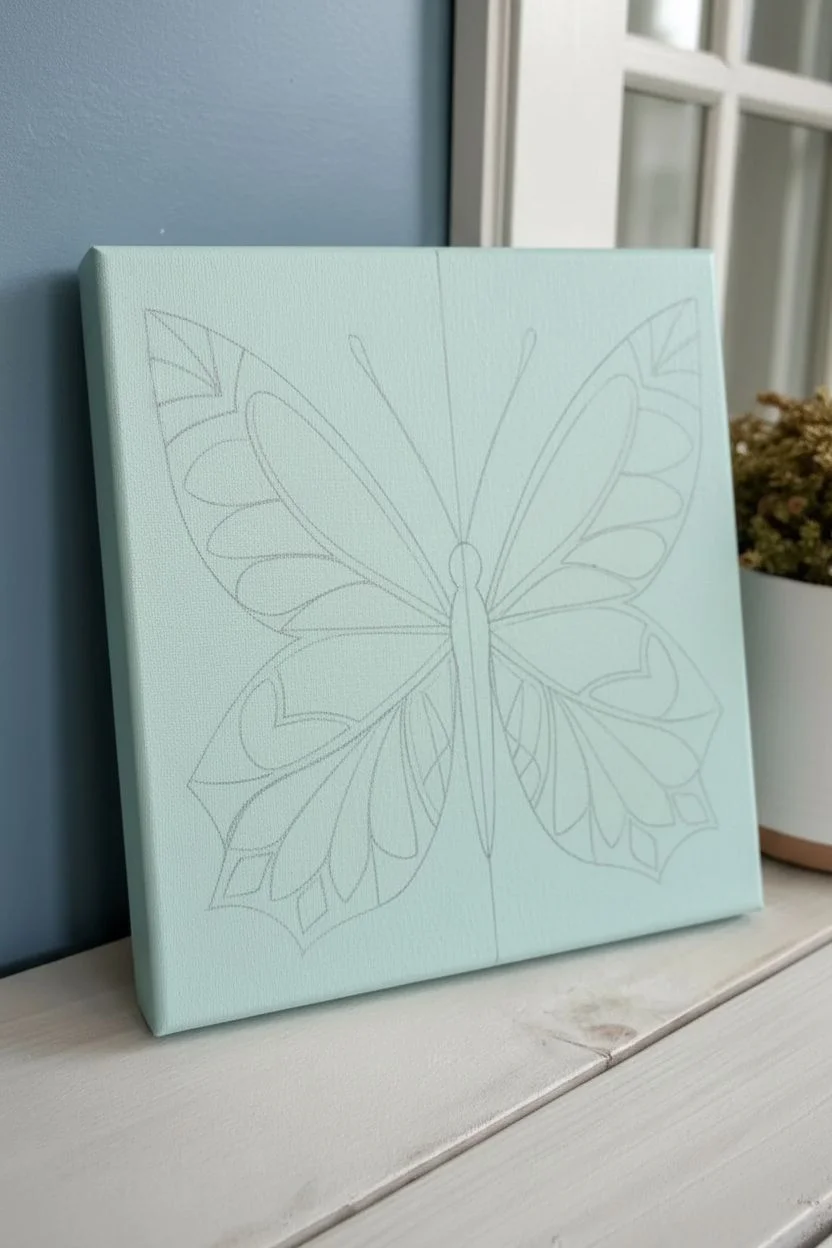
Step 1: Base and Sketch
-
Prepare the background:
Start by painting the entire front and sides of your canvas with a light mint or soft teal color. This fresh background makes the warm wing colors stand out. You might need two coats for opaque coverage. -
Dry thoroughly:
Make sure the background is completely dry before moving on. If standard acrylics feel tacky, give them another 10 minutes. -
Establish the symmetry line:
Using a ruler, lightly draw a vertical line straight down the center of the canvas. This is your guide to keeping the butterfly perfectly balanced. -
Sketch the body:
Draw a long, slender oval for the thorax and abdomen right on that center line. Add a small circle at the top for the head. -
Draft the wings:
Sketch the large upper wings first, sweeping up and out to the corners. Then draw the smaller, rounded lower wings. I find it easiest to draw one side, then measure key points to the other side to match them up. -
Segment the design:
Inside the wings, draw the “stained glass” sections. Create long tear-drop shapes and curved bands that radiate from the body outward.
Fixing Uneven Wings
If one wing looks bigger than the other, don’t erase! Just thicken the dark navy outline on the smaller wing to visually expand it until they match.
Step 2: Color Blocking
-
Paint the body:
Fill in the butterfly’s body with your dark navy blue paint. Use a small round brush to keep the edges neat. -
Paint the outer wing contours:
Carefully paint the outer edges of the wings with the same dark navy blue. This acts as a frame for the colorful inner sections. -
Fill the primary large sections:
Start with your darkest warm color—the burgundy or deep red. Paint the large, curved sections nearest the body on the upper wings and the heart-like shapes on the lower wings. -
Add the mid-tones:
Move to the coral and terracotta shades. Fill in the next concentric ring of shapes. Painting ‘inside out’ helps you see the gradient develop. -
Apply the highlights:
Use your lightest colors—mustard yellow and pale peach—for the outermost or smallest sections of the wing segments. -
Check for gaps:
Look closely where colors meet. If there are unintentional white gaps, carefully touch them up with the appropriate color. A second coat on the yellow sections usually makes them pop.
Metallic Magic
Swap the mustard yellow paint for a metallic gold. When the light hits the finished butterfly, the wings will shimmer like real insect scales.
Step 3: Detailing
-
Define the segments (Optional):
If your color edges are messy, you can outline the colored sections with a very thin line of the dark navy blue to clean them up. -
Add the antennae:
Using a very fine liner brush and grey or thinned black paint, paint two long, delicate antennae curving outward from the head. -
Paint thin veins:
Switch to a white paint pen or a liner brush with white paint. Draw thin veins over the mustard and olive sections near the bottom of the wings for texture. -
Add geometric accents:
Use the white pen to draw small diamond shapes or simple lines on the dark navy tips of the wings. This geometric detail gives it a modern, folk-art feel. -
Final dots:
Place two small black or dark navy dots on the lower orange wing sections to mimic the false ‘eye spots’ many butterflies have.
Once the final details are dry, display your colorful block on a shelf to brighten up the room
Owl On A Branch
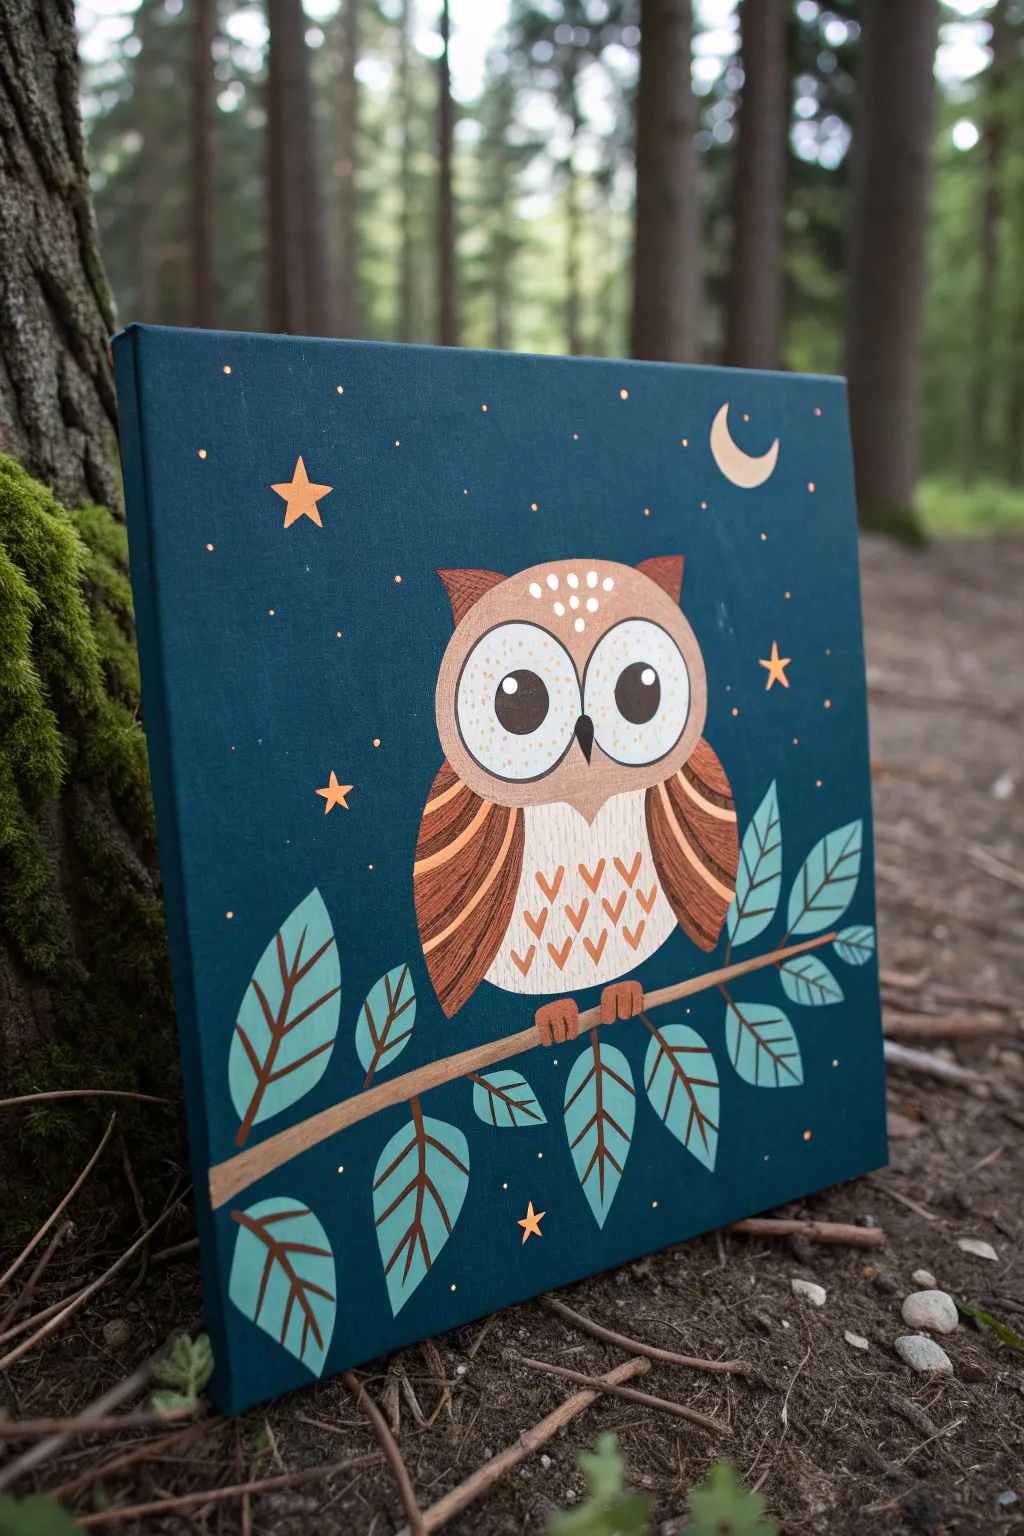
This charming project features a stylized owl with big, friendly eyes perched on a leafy branch against a deep teal night sky. The clean lines and folk-art aesthetic make it a perfect painting exercise for practicing steady brushwork and simple shapes.
Step-by-Step
Materials
- Square stretched canvas (10×10 or 12×12 inches)
- Acrylic paints: dark teal/navy blue, light brown, dark brown, cream/off-white, orange-gold, sage green, light blue-green
- Flat shader brushes (medium and small)
- Detail round brush (size 0 or 1)
- Pencil for sketching
- Palette or paper plate
- Cup of water and paper towels
- Ruler (optional)
Step 1: Setting the Scene
-
Background Base:
Start by mixing a deep teal color using navy blue and a touch of green. Paint the entire surface of the canvas, ensuring you cover the sides as well for a finished look. Let this base coat dry completely before moving on. -
Initial Sketch:
Once the blue background is dry, use a pencil to lightly sketch the main shapes. Draw a horizontal line for the branch across the bottom third. For the owl, draw a large oval shape resting on the branch, adding small tufts at the top for ears. -
Painting the Branch:
Mix a light brown paint and fill in the branch shape you sketched. Use a flat brush to keep the edges straight and crisp. The branch should stretch across the entire width of the canvas.
Step 2: Building the Owl
-
Owl Base Shape:
Paint the main body of the owl with a medium-light brown tone. Fill in the large oval shape, carefully painting around the ear tufts. You might need two coats here to cover the dark background fully. -
Belly Patch:
Mix a cream or off-white color. Paint a gentle U-shape or shield shape on the owl’s lower center to create its chest and belly area. -
Wing Definition:
Using a slightly darker brown than the body, paint two curved wing shapes on either side of the belly. These should sweep downward and curve inward slightly. -
Wing Details:
Switch to your detail brush. With the light brown or cream color, paint simple curved lines inside the dark brown wings to simulate feathers. Keep the lines parallel for a neat, graphic look. -
The Eyes Have It:
Paint two large circles near the top of the body using your cream or off-white paint. These should touch in the middle. Inside these circles, paint two smaller dark brown circles for the pupils, leaving small white dots as reflected highlights to bring the owl to life. -
Beak and Ears:
With a fine brush and dark brown paint, add a small diamond or upside-down teardrop shape between the eyes for the beak. Paint the darker inner triangle shapes of the ear tufts using a reddish-brown or dark orange.
Uneven Lines?
If your painted lines feel shaky, try resting your pinky finger on a dry part of the canvas to stabilize your hand while painting details.
Step 3: Feathers and Foliage
-
Chest Feathers:
On the cream belly patch, use an orange or golden-brown paint to create small ‘V’ shapes. Arrange them in alternating rows to look like soft chest feathers. -
Head Spots:
Dip the handle end of a paintbrush into white paint and dot a few small spots on the owl’s forehead, just above the eyes, for added texture. -
Leaf Outlines:
Using a light blue-green or sage color, paint simple almond-shaped leaves extending from the branch. Place them in pairs or alternating along the stem, ensuring some overlap the branch slightly. -
Leaf Veins:
Once the leaves are dry, take your thinnest brush with dark brown paint. Draw a central line down each leaf and add small diagonal veins branching off to finish the foliage. -
Talons:
Paint two small sets of three vertical lines in orange or brown over the branch, right under the owl’s belly, to represent its claws gripping the wood.
Pro Tip: Sharp Edges
For the crispest edges on the branch or geometric shapes, you can use small strips of painter’s tape or washi tape to mask off the areas before painting.
Step 4: Starry Finish
-
Stars and Moon:
Using a golden-orange or yellow paint, add a crescent moon near the top right corner. Paint several five-pointed stars scattered across the sky. -
Tiny Sparkles:
For the finishing touch, use the tip of your smallest brush or a toothpick to add tiny dots of gold or white paint around the stars, creating a magical, twinkling night sky effect.
Now hang your masterpiece on the wall and enjoy the wise gaze of your new feathered friend


Flamingo With Tropical Leaves
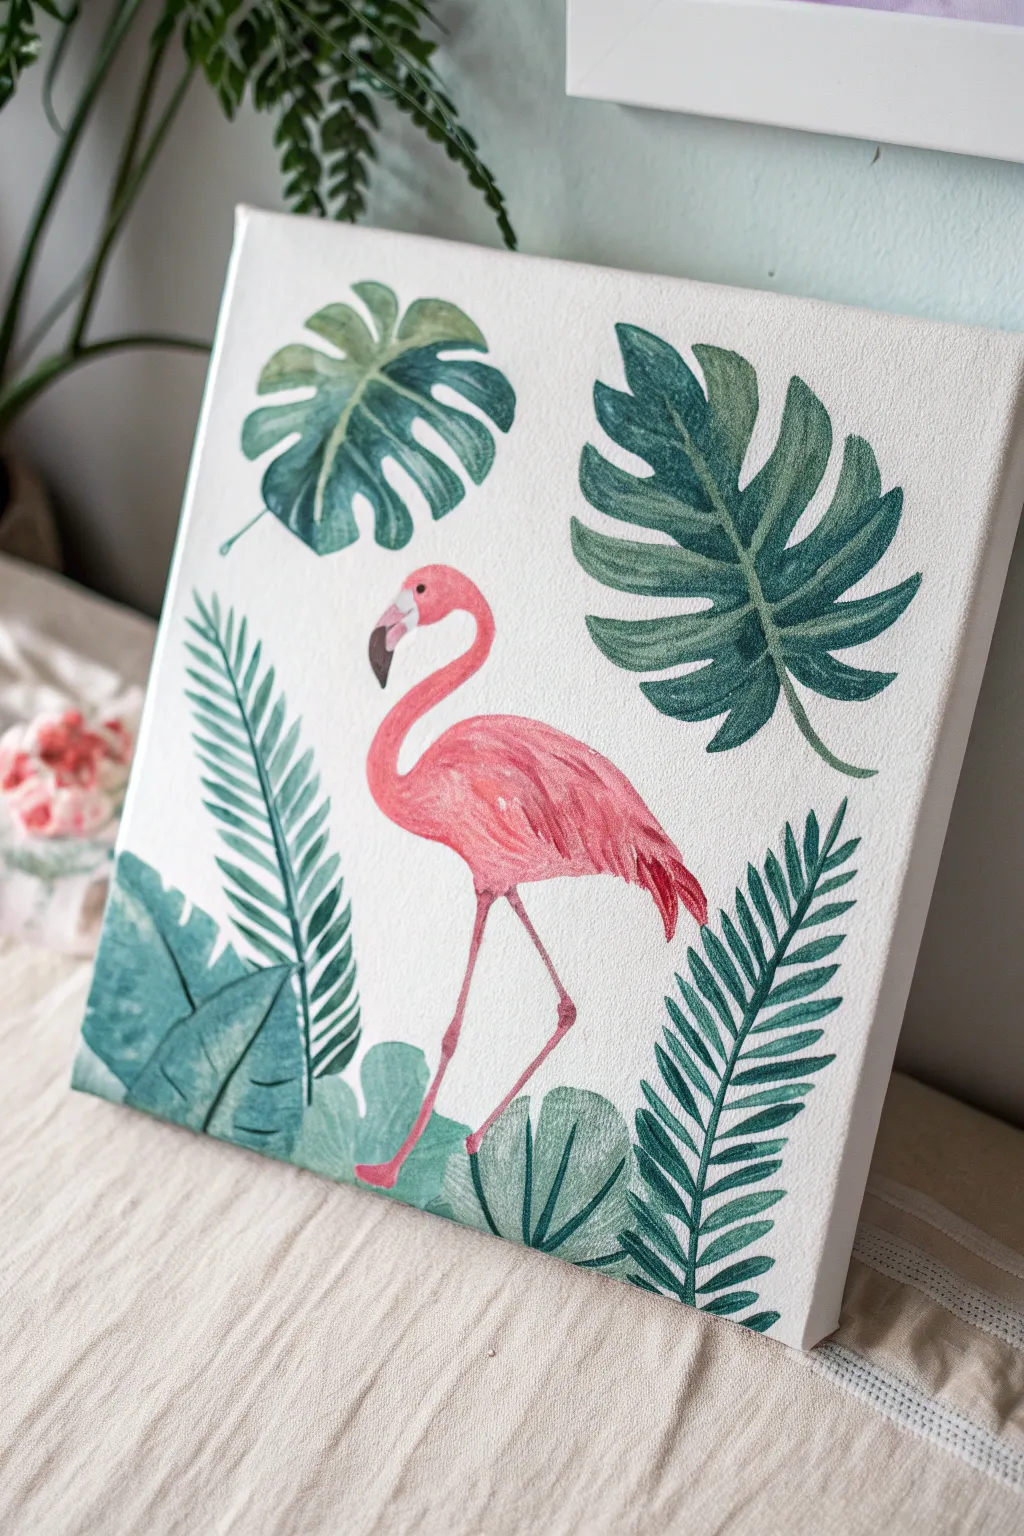
Transport yourself to a sunny destination with this vibrant canvas painting featuring a classic pink flamingo surrounded by lush greenery. The crisp white background makes the tropical colors pop, creating a modern and cheerful piece of art.
How-To Guide
Materials
- Square stretched canvas (e.g., 12×12 inches)
- Acrylic paints: Pink, White, Dark Green, Light Green, Yellow, Black
- Pencil and eraser
- Paintbrushes: Large flat brush, medium round brush, fine liner brush
- Cup of water and paper towels
- Palette or paper plate
Step 1: Sketching the Scene
-
Planning the layout:
Visualize where your flamingo will stand. It should be the star of the show, placed slightly off-center in the middle. Imagine space around it for big, leafy greens. -
Drawing the flamingo body:
Start with a light pencil sketch. Draw a large oval for the body and a curved ‘S’ shape for the neck leading up to a smaller oval for the head. Add a curved beak pointing downward. -
Adding legs:
Draw two long, thin legs. One leg should be straight down, and the other bent at the knee, as if the flamingo is taking a step or resting. -
Sketching the leaves:
Fill the empty white spaces with pencil outlines of leaves. Draw a large Monstera leaf (the one with splits) in the top right, another rounded leaf top left, and tall, feathery palm fronds on the sides and bottom.
Uneven Coverage?
If your pink or green paint looks streaky or semitransparent, don’t pile on thick globs. Let the first coat dry completely, then apply a second thin layer for a solid, opaque finish.
Step 2: Painting the Foliage
-
The dark Monstera leaf:
Mix a deep jungle green using dark green with a tiny touch of black. Use your medium round brush to carefully fill in the large Monstera leaf shape on the top right, following the curves of the leaf segments. -
Painting round leaves:
For the leaf on the top left, mix a slightly lighter green by adding a drop of yellow to your dark green. Paint the broad leaf shape, leaving the vein lines unpainted for now if you can, or paint over them and add details later. -
Creating palm fronds:
Switch to your fine liner brush for the tall, spiky leaves on the bottom sides. Use a medium green tone. Start from the center stem and flick the brush outward to create sharp, thin leaves. -
Bottom filler leaves:
Paint the clustered leaves at the very bottom using a mix of light green and white to create a soft seafoam color. This adds variety and depth to the jungle floor. -
Adding leaf details:
Once the green base coats are dry, take a slightly lighter shade of green and paint fine lines down the center of the dark leaves to represent veins. This makes them look more realistic.
Steady Hand Trick
For those super thin stems and leg lines, rest your pinky finger on a dry part of the canvas to balance your hand while you paint the delicate details.
Step 3: Bringing the Flamingo to Life
-
Base pink layer:
Mix a bright pink with a little bit of white to get a bubblegum color. Paint the entire body, neck, and head of the flamingo with this smooth base color. -
Adding feathers and texture:
While the pink is still tacky or after it dries, mix a darker, hotter pink. Use a small brush to paint short, curved strokes on the wing area to mimic layered feathers. -
Highlighting the back:
Add a few strokes of very light pink (almost white) on the top of the curved back and the neck where the sun would hit. -
Painting the legs:
Use a mix of pink and a tiny dot of brown or orange to get a darker ‘leg’ color. Carefully trace over your pencil lines for the legs with your finest brush. -
Beak details:
Paint the section of the beak closest to the face white or very light pink. Paint the tip of the beak black. Blend the middle slightly where the colors meet. -
The eye:
dip the very tip of your smallest brush handle or a fine brush into black paint and add a small dot for the eye on the side of the head.
Step 4: Final Touches
-
Check the background:
Look closely at the canvas. If any pencil lines are showing through the white background where you didn’t paint, carefully erase them or dab a little white paint over them. -
Refining edges:
I like to go back with a tiny brush and sharpen any leaf tips or smooth out the curve of the flamingo’s neck if the paint went outside the lines.
Now you have a piece of tropical paradise ready to hang on your wall
Rainbow Heart Tape Resist
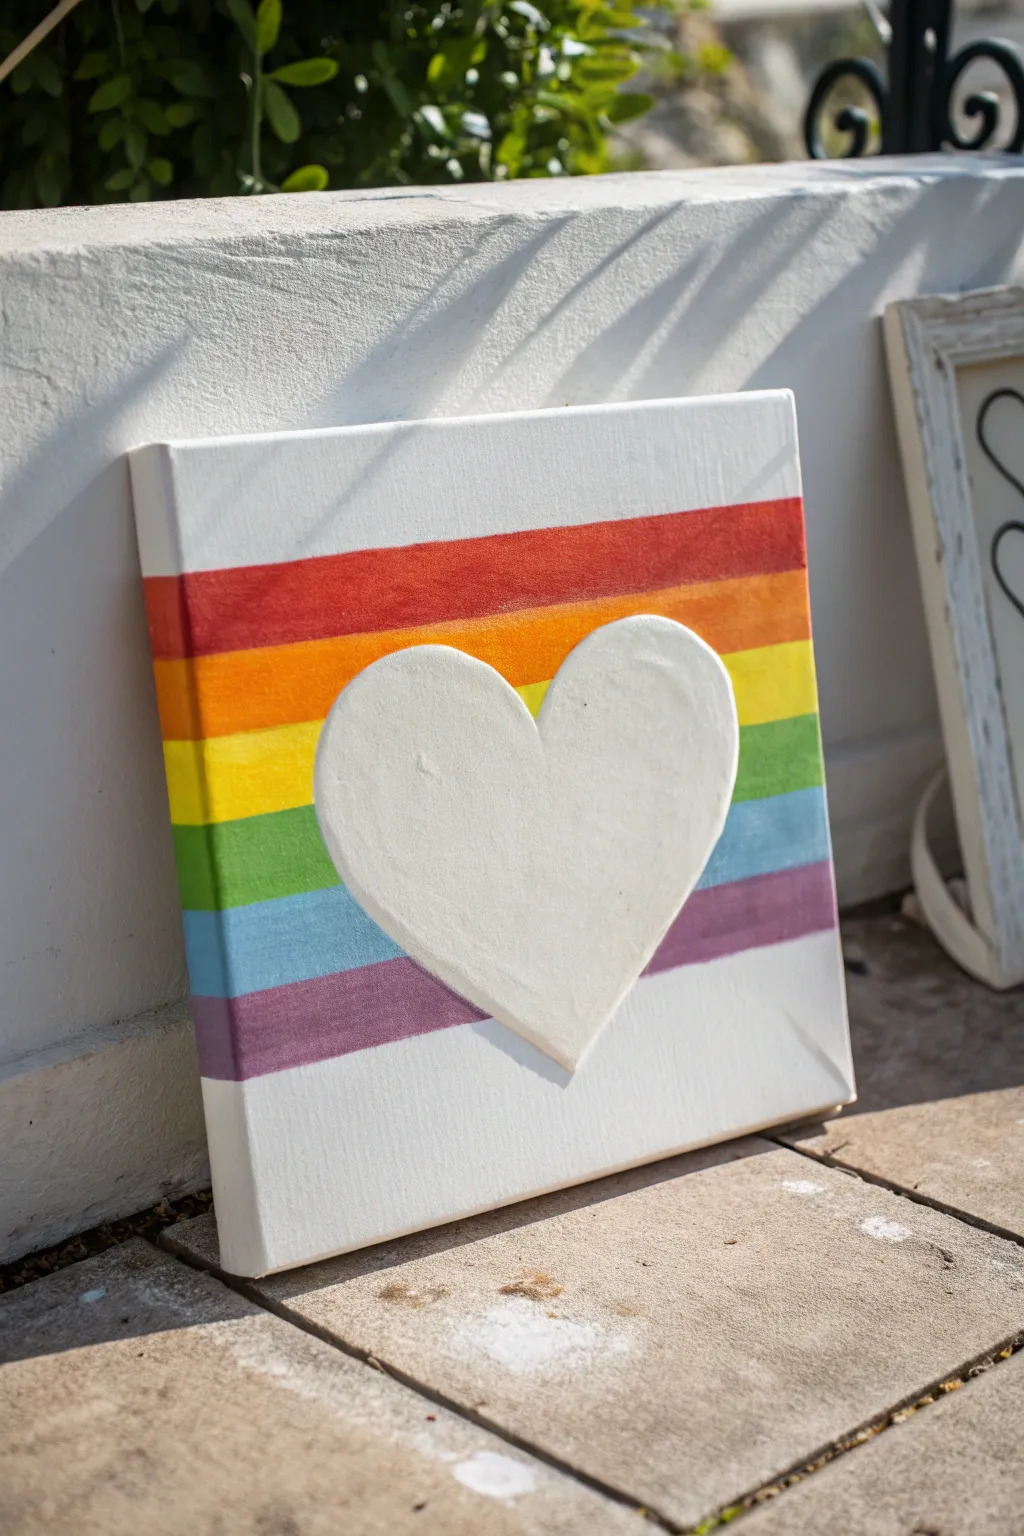
This cheerful canvas project combines bright watercolor-style stripes with a unique, textured 3D element. It’s a wonderful way to explore mixed media by merging flat painting techniques with a tactile, raised centerpiece.
Detailed Instructions
Materials
- Square blank canvas (approximately 8×8 or 10×10 inches)
- Acrylic paints (Red, Orange, Yellow, Green, Blue, Purple, White)
- Painter’s tape or masking tape (low tack)
- Flat paintbrush (medium width)
- Cardstock or thick paper (for the stencil)
- Pencil and scissors
- Lightweight air-dry clay or modeling paste
- Palette knife or plastic scraper
- Sandpaper (fine grit, optional)
- Clear glue (if using a separate clay piece)
Step 1: Preparing the Canvas
-
Create the heart stencil:
Fold a piece of cardstock in half and draw a half-heart shape against the fold. Cut it out to reveal a perfectly symmetrical heart. It should be large enough to fill the center of your canvas. -
Trace the heart:
Center your paper heart on the canvas. Lightly trace the outline with a pencil so you know exactly where your central design will sit. -
Mask the heart area:
Using painter’s tape, carefully cover the inside of the heart shape you just drew. This protects the center of the canvas and keeps it perfectly white while you paint the background. -
Check the edges:
Run your fingernail firmly along the edges of the tape, especially around the curves of the heart. This creates a tight seal to prevent paint from bleeding underneath.
Tape Trouble?
If paint bleeds under the heart tape, don’t panic. Once the paint is dry, use a small flat brush with white paint to carefully ‘erase’ the mistakes.
Step 2: Painting the Rainbow
-
Tape the horizon lines:
Apply strips of painter’s tape horizontally across the canvas to block off the white areas at the very top and very bottom. This leaves the middle section open for your rainbow. -
Start with red:
Load your flat brush with red acrylic paint. Paint a bold horizontal stripe near the top of your workable area. You can water the paint down slightly for a softer, washed look if you prefer. -
Continue the spectrum:
Working your way down, paint stripes in rainbow order: orange, yellow, green, blue, and finally purple. Try to keep the stripes roughly the same width, but don’t worry about perfection. -
Paint over the tape:
Don’t be afraid to paint right over the tape masking the heart in the center. This ensures the color goes all the way to the edge of the heart shape. -
Let it dry completely:
Allow the paint to fully cure. Since there are several colors close together, waiting ensures they won’t smudge when we peel the tape. -
Reveal the white space:
Gently peel away all the tape—both the horizontal strips and the central heart mask. You should now have a rainbow background with a crisp white heart in the middle.
Add Some Sparkle
While the white paint on the final 3D heart is still wet, sprinkle on some iridescent white glitter for a magical, shimmering finish.
Step 3: Creating the 3D Heart
-
Prepare the texture medium:
Grab a handful of lightweight air-dry clay or scoop out some thick modeling paste. Knead the clay briefly until it is pliable and smooth. -
Fill the heart shape:
Press the clay or paste onto the white heart area on the canvas. Use your fingers to push it all the way to the painted edges, following the outline exactly. -
Flatten and smooth:
Use a palette knife or a plastic scraper to flatten the surface of the heart. I like to leave it slightly textured rather than perfectly smooth for visual interest. -
Refine the edges:
Use a damp finger to smooth out any rough edges where the clay meets the canvas. The goal is a nice, raised relief that pops off the surface. -
Partial dry time:
Let the heart dry for about an hour. If you notice any cracks forming as the clay shrinks, smooth them over with a barely damp finger. -
Paint the heart white:
Once the clay is fully hard (this might take overnight), paint the heart with a coat of white acrylic paint. This brightens the clay and seals the surface. -
Final touches:
Inspect the edges one last time. If any rainbow paint got covered by the clay, you can do tiny touch-ups with a small brush.
Display your vibrant creation on a shelf where the light can catch the texture of the raised heart
Galaxy Canvas With Splatter Stars
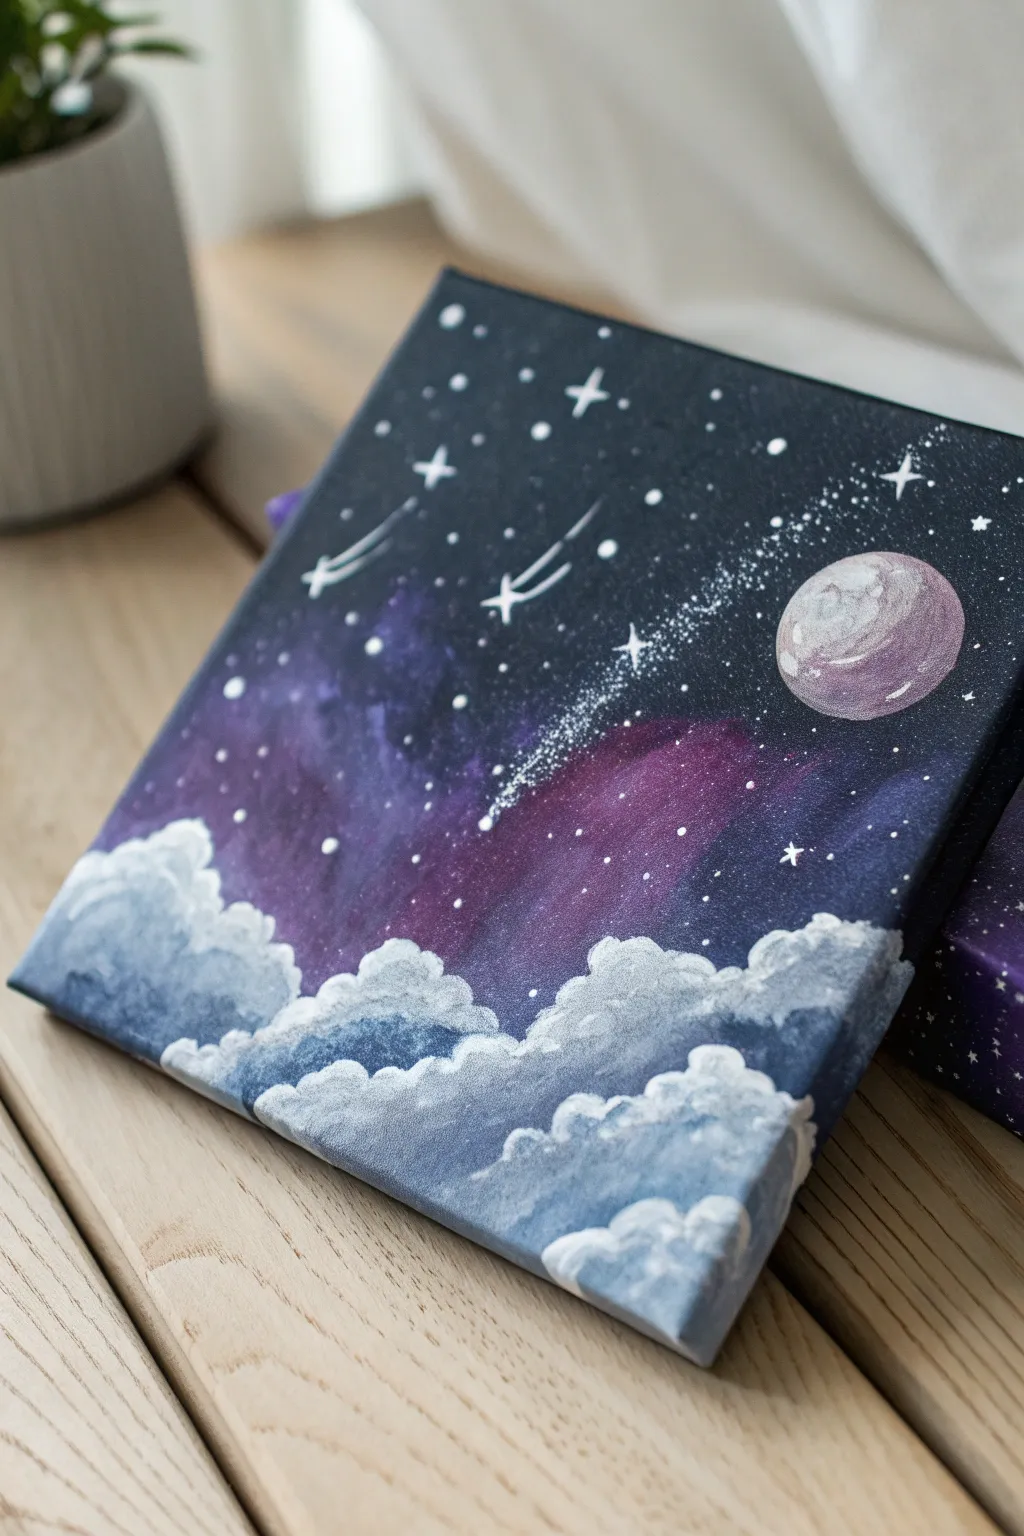

Create a dreamy slice of the galaxy featuring soft, glowing clouds and sparkling shooting stars. This project uses fun painting techniques to blend deep space colors with bright, puffy clouds at the bottom.
How-To Guide
Materials
- Small square canvas (e.g., 6×6 or 8×8 inches)
- Acrylic paints: Black, Midnight Blue, Purple, Magenta, White
- Flat paintbrush (medium size)
- Small round detail brush
- Sponge or older scruffy brush (for clouds)
- Water cup and paper towels
- Palette or paper plate
Step 1: Creating the Galaxy Background
-
Start with the darkest corners:
Squeeze out black and midnight blue paint. Using your flat brush, paint the top right and top left corners of the canvas with a mix of these dark colors to create the deep space effect. -
Blend downward:
While the paint is still wet, start adding pure midnight blue as you move towards the center of the canvas. Use horizontal strokes to keep the blending smooth. -
Introduce the nebula colors:
Wipe your brush slightly (don’t wash it fully). Pick up some purple paint and blend it into the blue just below the center line. Let the dark blue and purple mix naturally on the canvas. -
Add a magenta glow:
Mix a tiny bit of white with magenta to make it opaque. Paint diagonal streaks of this reddish-purple color through the purple section to create a glowing gas cloud effect. -
Smooth the transitions:
If the lines between colors look too sharp, use a clean, slightly damp brush to gently feather the edges where the blue, purple, and magenta meet. -
Let the background dry:
Allow the galaxy background to dry completely to the touch. This prevents the stars and lower clouds from turning muddy later.
Splatter Star Pro-Tip
For a natural starry sky, dip an old toothbrush in watered-down white paint. Aim it at the canvas and run your thumb over the bristles to spray tiny specks.
Step 2: Painting the Cloud Base
-
Mix a stormy grey-blue:
On your palette, mix white with a small drop of midnight blue and a tiny touch of black to create a medium grey-blue shade. -
Establish the cloud shape:
Using a sponge or a scruffy brush, dab this grey-blue color along the bottom edge of the canvas. Make the top edge irregular and bumpy to look like fluffy cloud tops. -
Add depth to the clouds:
Mix a slightly darker version of your blue-grey. Dab this into the bottom-most areas of the clouds to create shadow and weight. -
Highlight the cloud tops:
Wash your brush well. Dip it into pure white paint and dab it strictly on the very tops of the cloud bumps. Blend it slightly downward into the grey-blue so it looks like soft light hitting the fluff. -
Refine the edges:
I like to use a smaller brush here to tap bright white paint right along the sharpest curves of the cloud tops for extra definition.
Step 3: Stars and Details
-
Paint the moon base:
Mix a very pale lavender color (white with a dot of purple). Paint a circle in the upper right quadrant for the moon. -
Texture the moon:
While the moon is wet, add a tiny swish of darker purple on the bottom left side for shadow, and a swirl of pure white on the top right for a crater effect. -
Add the stars:
Dip your smallest brush into water, then into white paint to make it fluid. Gently tap dots across the dark sky area. Make some dots bigger than others for variety. -
Create the shooting stars:
Using the detail brush, paint two small ‘x’ shapes or crosses. Then, quickly flick the brush backward from the center of the cross to create a tail for your shooting stars. -
Adding the sparkle trail:
Paint a diagonal band of very tiny, concentrated white dots flowing behind the moon or shooting stars to look like cosmic dust or the Milky Way. -
Final twinkle:
Select three or four of your larger round stars and paint long, thin intersecting lines through them to turn them into twinkling four-point stars.
Level Up: Glitter
Mix a pinch of silver or iridescent biodegradable glitter into your white paint before brushing on the Milky Way trail for a galaxy that truly sparkles in the light.
Now you have a stunning window into deep space right on your wall
Cherry Blossom Tree With Dabbed Paint
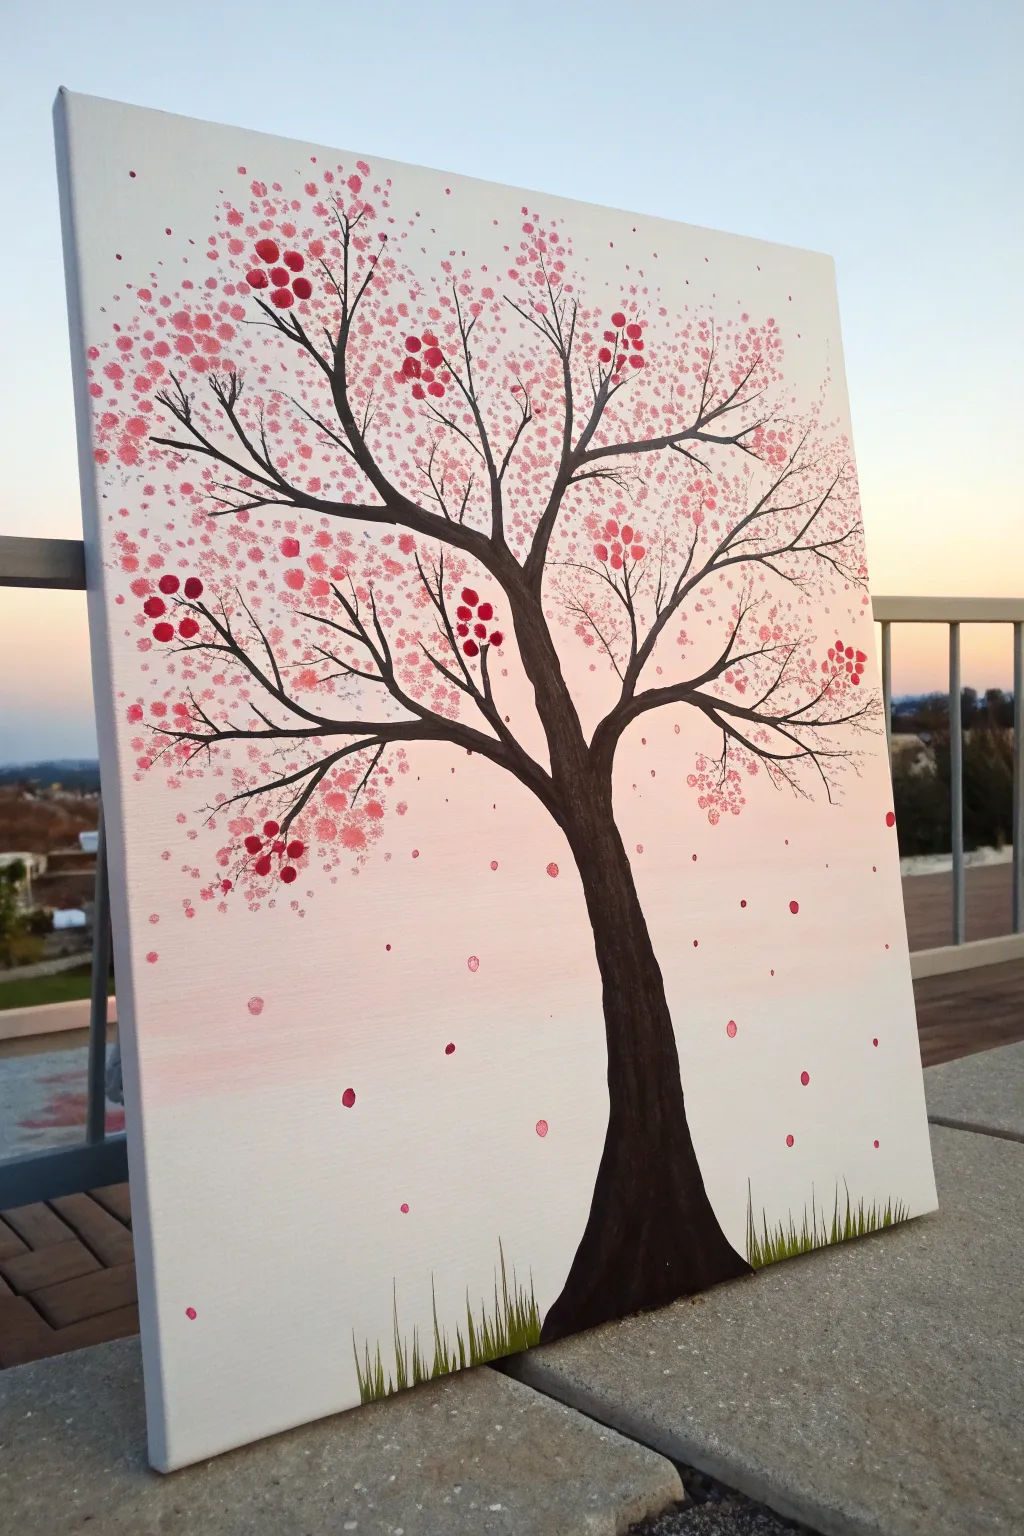
Capture the beauty of spring with this elegant yet simple canvas painting. Using easy dabbing techniques with brushes or fingertips, you’ll create a vibrant tree filled with pink blossoms and falling petals.
Step-by-Step Guide
Materials
- Rectangular stretched canvas (e.g., 16×20 inches)
- Acrylic paint: black, dark brown, white, and 2-3 shades of pink (or red to mix)
- Medium flat brush (for the trunk)
- Small round detail brush (for small branches)
- Round foam sponge brush (optional, for clusters)
- Q-tips (cotton swabs) or just your fingertips
- Paper towel and water cup
- Palette or paper plate
Step 1: Planning the Background and Base
-
Prepare the dreamy background:
Start with a clean white canvas. If you want a subtle glow like the example, mix a tiny drop of pink into a large amount of white paint. Use a large brush to sweep this very pale pink color lightly across the bottom third of the canvas, fading it into white as you go up. -
Sketch the trunk outline:
Once the background is dry, use a pencil to very lightly sketch the curve of the tree trunk. Start wide at the bottom right and curve it gently towards the center as it rises. -
Map out the main branches:
Draw three or four main branch lines extending from the top of the trunk. Let them reach out towards the top corners and sides, like spread-out fingers.
Step 2: Painting the Tree Structure
-
Fill in the trunk:
Mix your black paint with a little bit of dark brown to get a natural, deep bark color. Using a medium flat brush, paint vertical strokes to fill in the trunk shape you sketched. -
Ensure a solid base:
Make the base of the trunk wider than the middle. I like to add a slight flare at the very bottom so the tree looks firmly rooted int the ground. -
Paint the heavy branches:
Switch to a smaller brush to paint the thickest parts of the main branches. Remember, branches are always thicker near the trunk and get thinner as they grow outward. -
Add delicate twigs:
Use your smallest round detail brush (or even a black fine-point marker if painting is tricky) to add many small ‘Y’ shaped twigs coming off the main branches. These should be thin and squiggly, reaching into the empty white spaces. -
Let the structure dry:
Wait for the black paint to dry completely. This is crucial because wet black paint will muddy up your pretty pink blossoms if you start too soon.
Finger Painting Pro Tip
If using fingers, rotate your wrist slightly between dabs. This ensures each ‘petal’ print looks slightly different and not like identical stamps.
Step 3: Dabbing the Blossoms
-
Prepare your pink palette:
Squeeze out three shades of pink onto your plate: a dark magenta, a medium bubblegum pink, and a light pastel pink. -
Dab the first layer:
Dip your fingertip or a Q-tip into the medium pink paint. Gently press or ‘dab’ spots all around the ends of the branches. Don’t drag the paint; just press down and lift up. -
Create distinct clusters:
Group your dots together in small clouds rather than spreading them perfectly evenly. This mimics how real cherry blossoms grow in bunches. -
Add depth with dark pink:
Using a fresh fingertip or Q-tip, add a few dots of the darkest pink near the center of your flower clusters. This creates a shadow effect and adds richness. -
Highlight with light pink:
Finally, add dots of the lightest pink (or even pure white) on the top edges of the clusters. This acts as a highlight where the sun hits the petals. -
Paint falling petals:
Add singular dots floating in the empty air beneath the branches and near the ground. Vary the size of these dots so it looks like leaves drifting in the wind.
Make It 3D
Glue small pink tissue paper balls or plastic sequins onto the largest flower clusters for a textured, mixed-media masterpiece.
Step 4: Final Touches
-
Add some grass:
Mix a dark green or olive color. Using your smallest brush, flick quick, short strokes upwards at the base of the tree to create individual blades of grass. -
Overlay grass on the trunk:
Paint a few blades of grass slightly overlapping the bottom of the black trunk. This helps the tree look like it is sitting *in* the grass, not just floating on top of it. -
Review and refine:
Step back and look at your tree. If any branch looks too bare, add a few more pink dabs. Ensure your falling petals look random and natural.
Allow your beautiful spring scene to dry fully before hanging it up to admire the season anytime you want
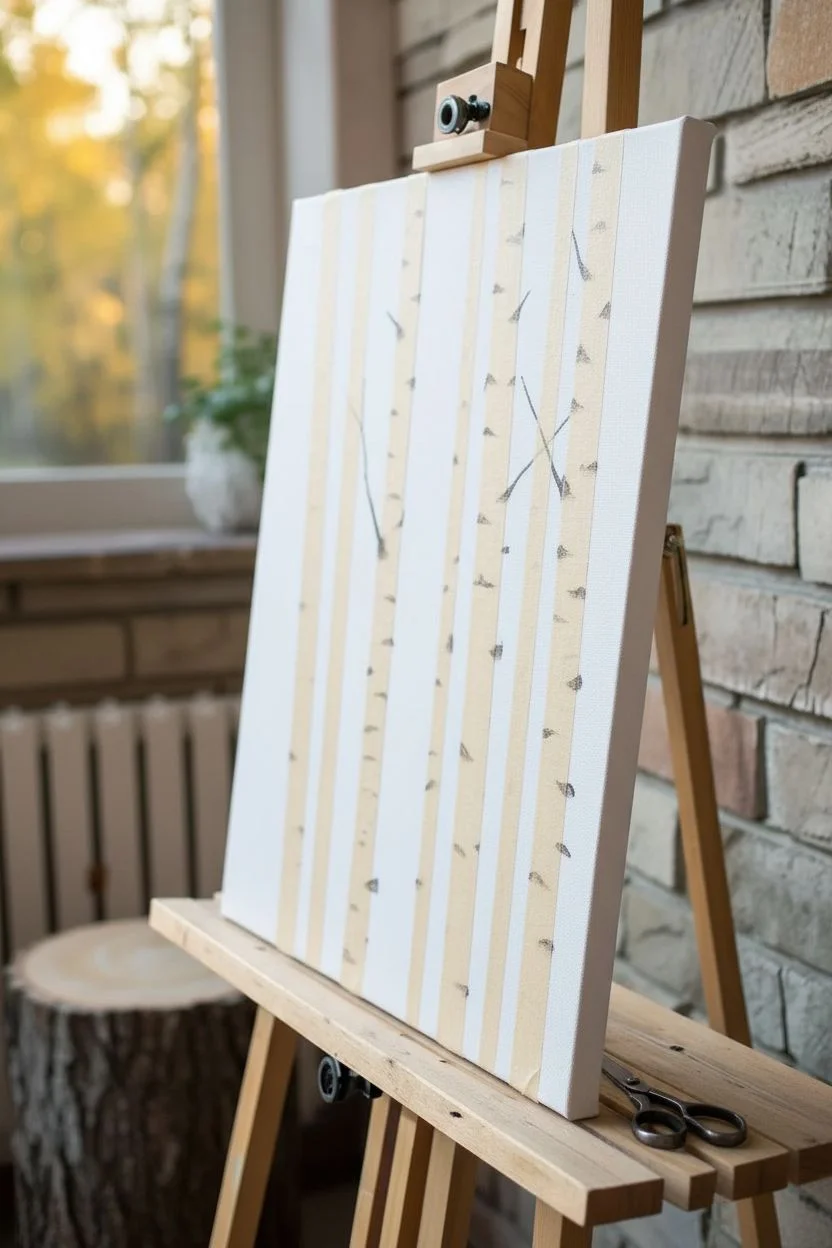
Birch Tree Forest With Resist Lines
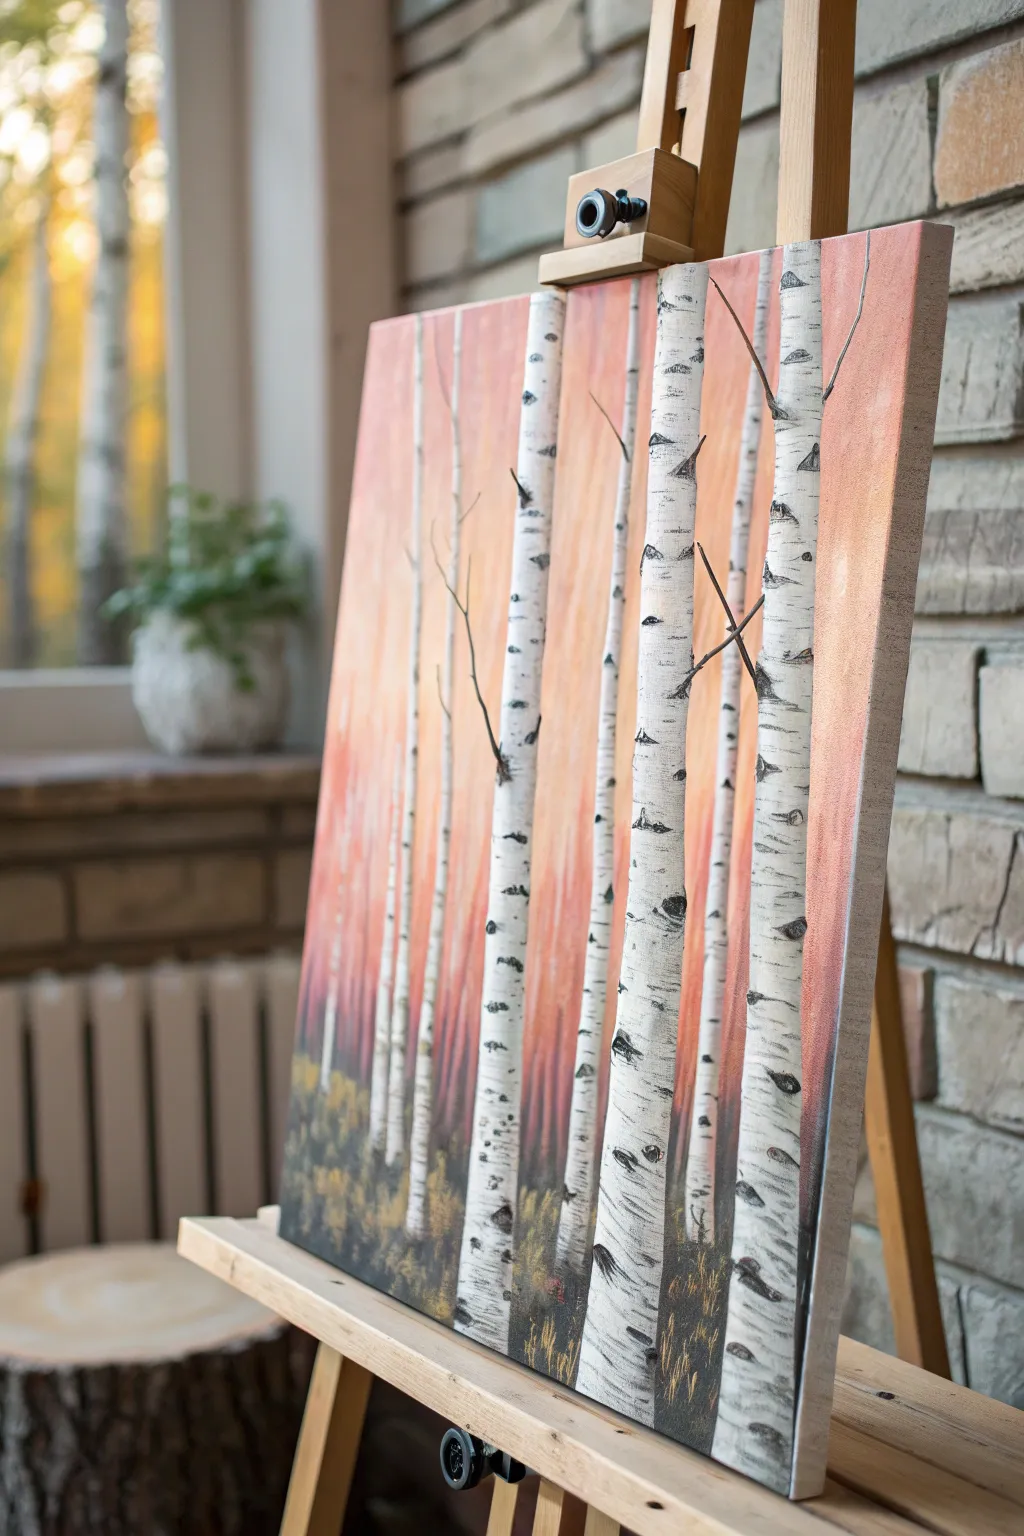
Capture the golden hour glow of an autumn afternoon with this beautiful birch tree painting. Using a clever resist technique with painter’s tape, you will create crisp white tree trunks that stand out perfectly against a warm, blended sunset background.
Step-by-Step
Materials
- Stretched canvas (11×14 or similar size)
- Painter’s tape or masking tape (roughly 1 inch wide)
- Acrylic paints: Titanium White, Mars Black, Burnt Sienna, Orange, Cadmium Yellow, and a touch of Red
- Large flat paintbrush
- Small round detail brush
- Old credit card or palette knife (optional)
- Scissors
- Water cup and paper towels
Step 1: Setting the Scene with Tape
-
Map out your forest:
Begin with a blank white canvas. Tear off strips of painter’s tape that are slightly longer than the height of your canvas. These will represent your main birch trees. -
Create tree shapes:
Stick the tape strips vertically onto the canvas. To make them look like real trees, don’t put them straight up and down; angle a few slightly so they look natural. -
Vary the sizes:
For thinner trees in the distance, cut a strip of tape in half lengthwise before sticking it down. Place standard-width strips in the front for a sense of depth. -
Seal the edges:
Press down firmly on all the tape edges with your fingernail or the back of a spoon. This is crucial to prevent the background paint from leaking underneath later. -
Add heavy branches:
If you want thicker branches coming off the main trunks, cut small, thin slivers of tape and connect them to the main vertical strips, angling them upward.
Bleeding Paint?
If paint leaked under the tape, don’t worry. Wait for it to dry, then use opaque Titanium White paint to touch up the edges of the tree trunks for a clean look.
Step 2: Painting the Sunset Background
-
Mix your warm tones:
Squeeze out your yellow, orange, red, and a tiny bit of burnt sienna onto your palette. You want colors that remind you of a cozy fall evening. -
Start at the top:
Using your large flat brush, paint horizontal strokes of your lightest yellow/orange mix at the very top of the canvas. -
Blend downwards:
As you move down the canvas, gradually mix in more orange and red. Paint right over the tape! Don’t be shy—cover the entire canvas surface. -
Add deep contrast:
Near the bottom third of the canvas, mix in some burnt sienna or a tiny touch of black to create a darker, shadowy forest floor color. Blend this upward into the orange. -
Let it dry completely:
This is the hardest part—waiting. The paint must be 100% dry to the touch before moving to the next step. I usually take a 20-minute break here.
Step 3: The Big Reveal & Details
-
Peel the tape:
Once dry, carefully peel off the tape strips. You should see crisp white lines of canvas underneath, which are now your birch tree trunks. -
Paint the bark texture:
Mix a small amount of black paint with a drop of water so it flows easily. Using the small round brush or the edge of an old credit card, make short horizontal scrapes across the white trunks. -
Emphasize the eye spots:
Birch trees have distinct markings. Paint small, curved ‘eye’ shapes or dark notches randomly up the trunks. -
Add delicate branches:
Using your tiniest brush and the thinned black paint, draw very fine, wiggly lines extending from the trunks toward the top corners of the canvas. -
Ground the trees:
The bottom of the trees might look like they are floating. Dab some dark brown or black paint around the base of each trunk to ‘plant’ them into the ground. -
Add forest floor texture:
Use an old, scruffy brush to tap (stipple) some dark green or brown grassy texture along the very bottom edge of the painting. -
Final highlights:
If your taped areas weren’t perfectly white, or if you want extra brightness, paint a thin highlight of pure white on the sunny side (left or right) of each tree trunk.
Golden Leaf Magic
Use a scrunched-up piece of aluminum foil dipped in gold paint to stamp shimmering leaves around the tops of your branches.
Step back and admire your glowing autumn forest, ready to hang on the wall
Geometric Tape Triangles Color Blocks
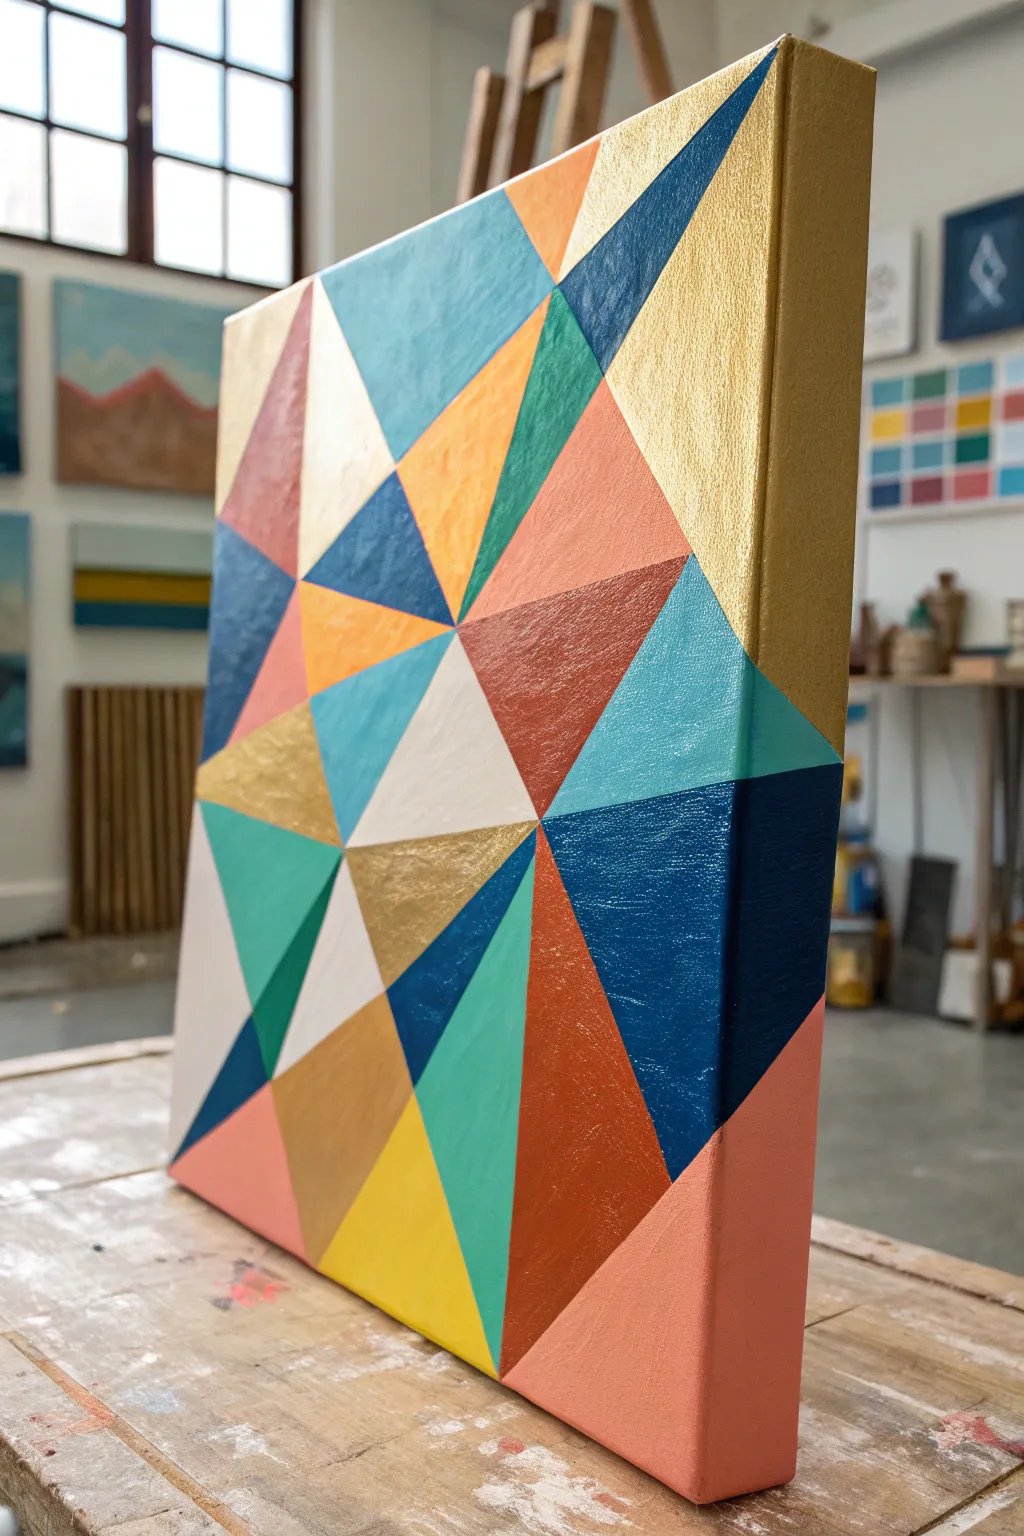
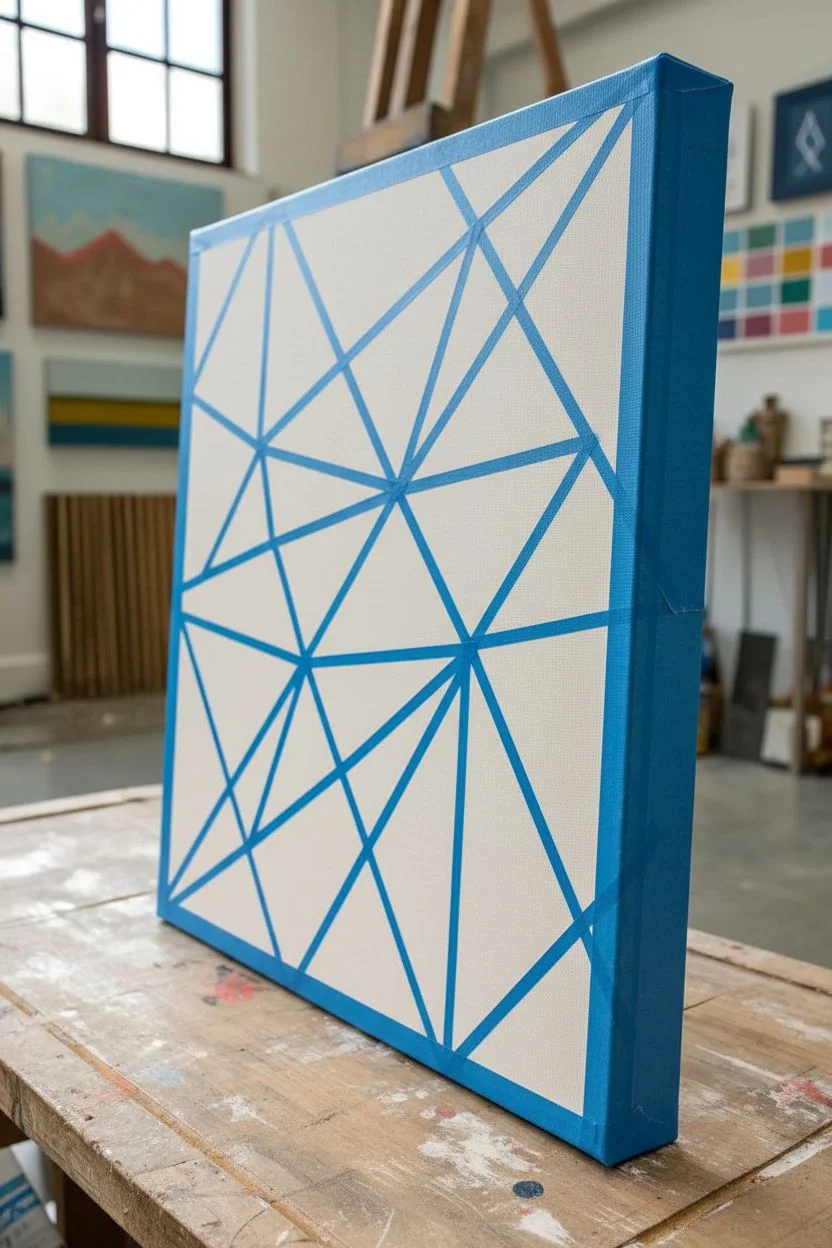
Transform a plain canvas into a modern masterpiece using nothing but masking tape and bright acrylics. This project creates distinct, crisp triangles that fit together like a puzzle, featuring shimmering gold accents against bold blues, oranges, and teals.
Step-by-Step Tutorial
Materials
- Square stretched canvas (gallery depth preferred for the cool side effect)
- Painter’s tape (0.25 to 0.5 inch width works best)
- Acrylic paints (gold, teal, navy blue, light pink, orange, rust red, white, yellow)
- Flat paint brushes (various sizes to fit different triangles)
- Palette or paper plate
- Paper towels
- Cup of water
- Scissors
Step 1: Planning the Pattern
-
Prepare the canvas:
Wipe down your canvas with a dry cloth to ensure it’s dust-free. -
Apply the first tape lines:
Start by placing long strips of painter’s tape across the canvas. Criss-cross them randomly from edge to edge. -
Wrap the edges:
Don’t stop at the front! Pull the tape all the way down the sides of the canvas and secure it to the back. This makes the design wrap around for a professional 3D look. -
Create smaller shapes:
Add shorter strips of tape connecting existing lines to break up large shapes into smaller triangles. -
Seal the deal:
Run your finger or the back of a spoon firmly along every edge of the tape. This is crucial to prevent paint from bleeding underneath.
Bleeding Lines?
If paint leaks under the tape, wait for it to dry fully. Then, gently scrape the excess off with a fingernail or paint over the mistake with white acrylic for a clean fix.
Step 2: Painting the Triangles
-
Select your palette:
Squeeze out your paint colors. I like to keep the metallic gold separate so it doesn’t get muddy. -
Start with light colors:
Begin painting a few scattered triangles with your lightest colors, like white and yellow. -
Add warm tones:
Fill in several triangles with your warm shades: orange, rust red, and pink. Try not to put two of the same color right next to each other. -
Introduce cool tones:
Paint remaining sections with your cool colors: teal, navy blue, and green-blue mixes. -
The gold touch:
Choose specific triangles to be your ‘feature’ spots and paint them with the metallic gold. This adds that special shimmer. -
Paint the sides:
Remember to paint the sides of the canvas, extending the color from the front face down to the back edge. -
Check for coverage:
Some colors, especially yellow and orange, might need a second coat. Let the first layer dry to the touch before adding more.
Glittter & Glow
Mix loose glitter into your wet paint for extra sparkle, or use glow-in-the-dark acrylics for a few triangles to make your artwork shine at night.
Step 3: The Reveal
-
Let it dry completely:
Wait until the paint represents a ‘skin’ and isn’t tacky. This usually takes about 20-30 minutes for acrylics. -
Find a tape end:
Locate an end of a tape strip on the back or side of the canvas. -
Peel slowly:
Gently pull the tape off at a 45-degree angle. Pulling slowly helps keep the paint lines crisp. -
Remove all layers:
Continue peeling until all tape is removed, revealing the stark white canvas lines between your colors. -
Touch ups:
If any paint seeped under the tape, you can use a tiny brush with white paint to carefully cover the smudge.
Now you have a striking geometric art piece ready to hang on your wall
Acrylic Pour Marble Mini Canvas
Create a mesmerizing, high-end marble effect that looks professional but is surprisingly easy for beginners to master using just a bucket of water and spray paint. This hydro-dipping technique captures swirling ribbons of teal, copper, and white for a glossy, abstract masterpiece.
Step-by-Step
Materials
- Small square canvas (8×8 or 10×10 inches)
- Black floating frame (sized to fit canvas)
- Spray paint: Deep Teal or Emerald Green
- Spray paint: Metallic Copper or Burnt Orange
- Spray paint: Matte White
- Large plastic tub or bucket (deep enough to submerge canvas)
- Water
- Rubber gloves
- Painter’s tape
- Stick or skewer for swirling
- Drop cloth or cardboard
- Clear spray sealant (gloss finish)
Step 1: Preparation
-
Set up your station:
Since spray paint has strong fumes, work outdoors or in a very well-ventilated garage. Lay down a large drop cloth to protect the ground from overspray. -
Prepare the water bath:
Fill your plastic tub with water. You don’t need it to be full, just deep enough that you can dip the face of the canvas without hitting the bottom used. Room temperature water works best. -
Prep the canvas:
Tape off the back wooden frame of your canvas with painter’s tape to keep it clean. You can also create a ‘handle’ on the back using a loop of heavy-duty tape, which makes dipping easier. -
Base coat application:
Spray the entire front and sides of your canvas with a solid coat of white paint. Let this dry completely; having a primed base helps the dipped colors pop.
Water Temperature Matters
Use lukewarm water (around 70-80°F). If the water is too cold, the spray paint will clump up instantly instead of spreading into a thin, dippable film.
Step 2: The Hydro-Dip
-
Lay the first color:
Wearing your gloves, shake the Deep Teal spray paint can vigorously. Hold it about 8-10 inches from the water and spray the surface until a film of color forms. -
Add the contrast:
Immediately spray the Metallic Copper into the center of the teal. You aren’t painting the bottom of the bucket; you are floating the paint on top of the water tension. -
Introduce the highlight:
Spray bursts of White paint sporadically across the surface. Don’t overdo it, or the colors will turn to mud. Speed is key here so the paint doesn’t skin over. -
Create the pattern:
Here I prefer to use a stick to drag gently through the floating paint once or twice to create marble-like veins. Don’t mix it; just disrupt the circles. -
Dip the canvas:
Hold your canvas face down, parallel to the water. In one smooth motion, push the canvas straight down into the water through the paint film. -
Clear the surface:
While the canvas is still submerged underwater, use your hand or a piece of cardboard to sweep away the remaining paint film on the surface of the water. -
Remove and inspect:
Once the surface water is clear, pull your canvas back up. The paint design will have adhered perfectly to the canvas face.
Add Metallic Leaf
After the paint dries but before sealing, gently apply adhesive size and small flakes of gold leaf to the copper veins for a true luxury marble texture.
Step 3: Finishing Touches
-
Water removal:
Gently shake off excess water droplets. If there are stubborn drops on the paint, you can lightly dab them with a paper towel corner or simply let them air dry. -
Dry time:
Set the canvas upright in a safe, dust-free area to dry completely. This usually takes about 24 hours to ensure all moisture has evaporated from the canvas fibers. -
Seal the deal:
Once bone dry, spray a coat of clear gloss sealant over the artwork. This protects the finish and deepens the contrast of the metallic copper. -
Frame it up:
Remove the tape from the back. Place your artwork into the black floating frame. -
Secure the frame:
Turn the assembly over and use the screws provided with your floating frame to secure the canvas through the back. This gap creates a shadow line that enhances the gallery look.
Now you have a stunning piece of abstract art that captures the fluid beauty of marble stone.
Spin-And-Swirl Abstract Canvas

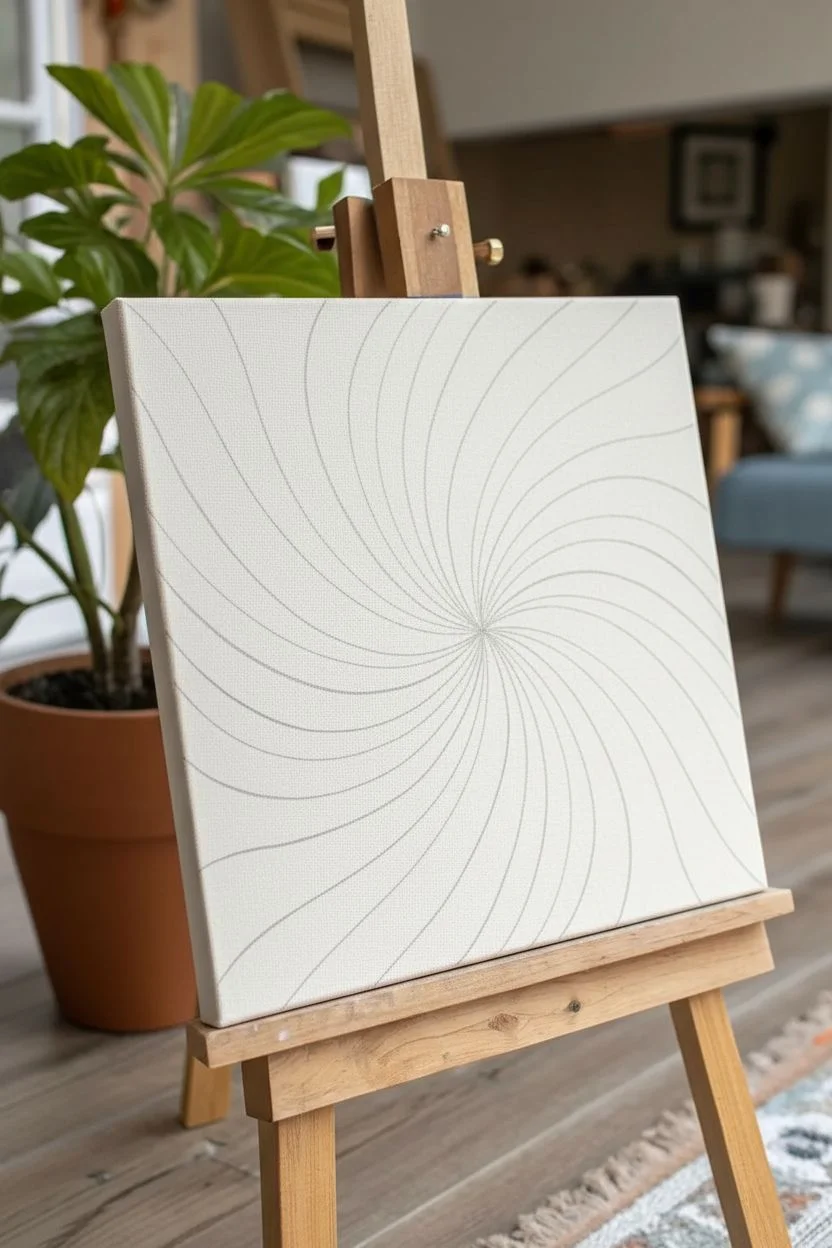
This mesmerizing abstract painting uses earthy, muted tones and curving lines to create a spinning optical illusion that looks fantastic on any wall. By carefully layering curved stripes from a central point, young artists can learn great brush control while making a sophisticated piece of art.
Detailed Instructions
Materials
- Square canvas (10×10 or 12×12 inches)
- Acrylic paints (Terracotta, Mustard Yellow, Sage Green, Deep Teal, Cream/Off-White)
- Pencil
- Ruler (optional)
- Round synthetic brushes (sizes 4 and 6)
- Flat shader brush (size 8)
- Palette or paper plate
- Cup of water and paper towels
Step 1: Mapping the Swirl
-
Find the center:
Start by finding the exact middle of your canvas. You can do this by lightly laying a ruler diagonally from corner to corner and making a tiny mark where they cross. -
Draw guide lines:
Using a pencil, lightly draw 12 to 16 curved lines radiating out from that center dot to the edges of the canvas. Imagine the spokes of a bicycle wheel, but give them a gentle twist so they look like they are spinning. -
Adjust the width:
Make sure the spaces between your lines get wider as they reach the outer edge of the canvas. This creates that expanding ‘burst’ effect. -
Check the spacing:
Before you pick up a brush, count your sections. You want an even number of sections so you can alternate colors nicely without two of the same color touching unexpectedly.
Steady Hand Trick
Rest your pinky finger on a dry part of the canvas while painting. It acts like a kickstand to stabilize your hand for perfect curves.
Step 2: Applying the Base Colors
-
Prepare your palette:
Squeeze out your acrylic paints: Terracotta, Mustard Yellow, Sage Green, Deep Teal, and Cream. Using a palette keeps your colors separate and clean. -
Plan your pattern:
Decide on a repeating color order. For the example shown, try a sequence like: Teal, Cream, Terracotta, Cream, Green, Cream, Yellow, Cream. I find writing the sequence down on a scrap piece of paper helps me stay on track. -
Start painting the first color:
Choose your first non-cream color (like the Deep Teal). Using the size 6 round brush, carefully fill in every 4th or 5th section according to your pattern. -
Mind the edges:
When painting near the center point, switch to a smaller size 4 brush. The sections get very tiny here, and a smaller brush helps keep the point sharp. -
Fill the remaining colors:
Clean your brush thoroughly and move to the next color in your sequence (like Terracotta). Fill in the appropriate sections, being careful not to touch wet wet paint.
Make It Sparkle
Mix a tiny pinch of gold glitter into the yellow paint or use metallic gold paint for the mustard stripes to make the swirl shimmy in the light.
Step 3: Refining and Layering
-
Add the cream separators:
Once your main colors are blocked in, use the Cream or Off-White paint to fill the alternate stripes. This acts as a bright separator that makes the other colors pop. -
Let it dry:
Allow the entire canvas to dry for about 15-20 minutes. Taking a break here ensures you don’t accidentally smudge colors together during the second coat. -
Apply a second coat:
Acrylics often need two layers to look opaque. Go back over your colored stripes (especially the yellow and cream) with a second layer of paint to cover any pencil marks or canvas texture. -
Clean up the lines:
Use your flat shader brush or a steady hand with the round brush to crisp up the edges where colors meet. Smooth, confident strokes work best here. -
Wrap the edges:
Don’t forget the sides of the canvas! Extend your stripes over the edge and paint the sides so the artwork looks finished from every angle.
Step 4: Final Details
-
Check the center point:
The very center can get messy. Take a tiny bit of your Cream paint on the tip of your smallest brush and touch up the central point to make it look distinct and neat. -
Erase stray marks:
If any pencil lines are still visible through lighter paint colors, gently erase them or add one more thin layer of paint to hide them. -
Add texture (optional):
For a sandy look like the photo, you can gently dry-brush a tiny bit of white over the colored sections, or just leave the paint thick and textured.
Now step back and watch your colorful optical illusion spin on the easel
Three-Panel Story Landscape

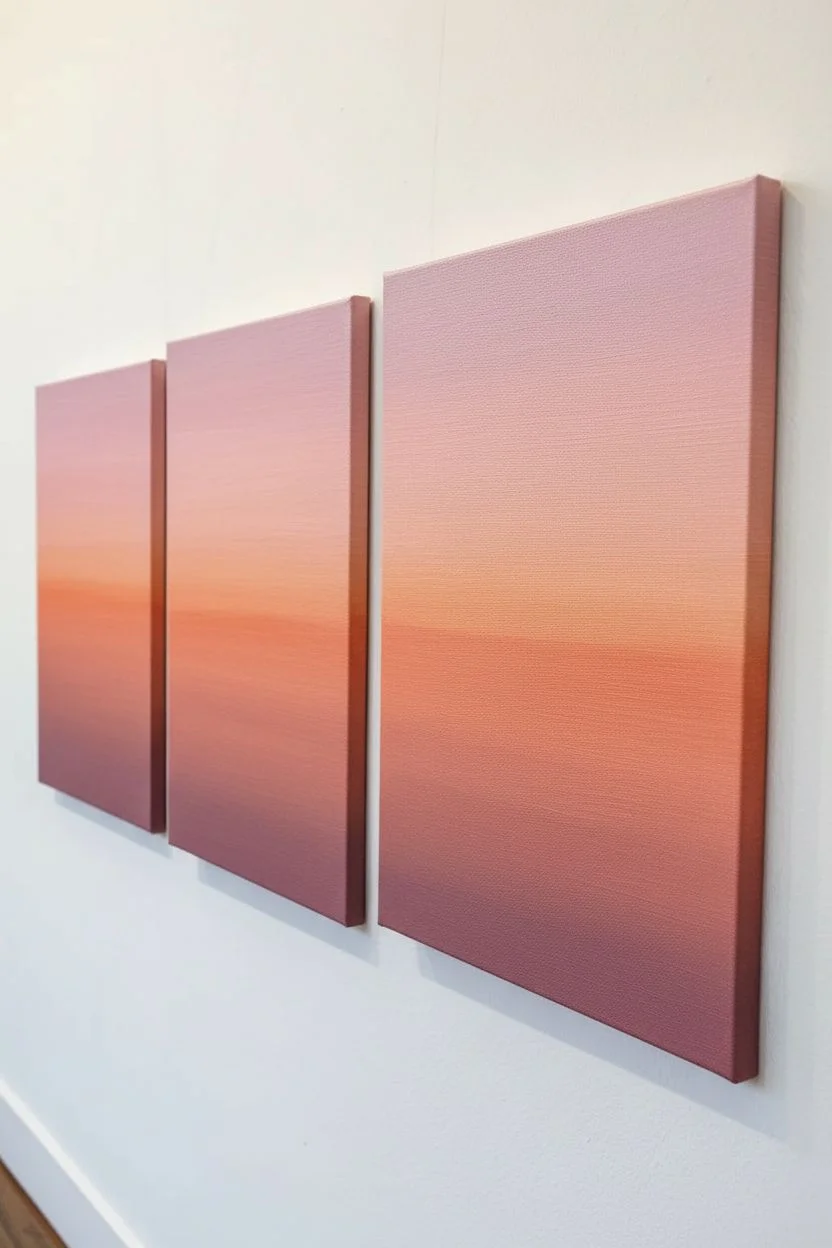
Create a stunning landscape that flows seamlessly across three separate canvases, telling a visual story of a peaceful mountain sunset. Using soft gradients for the sky and bold silhouettes for the trees, you’ll learn how to break one big picture into a modern triptych display.
Step-by-Step Guide
Materials
- Three stretched canvases (8×10 or 11×14 inches recommended)
- Acrylic paints (Titanium White, Lavender/Light Violet, Cadmium Orange, Magenta, Deep Purple, Black)
- Large flat brush (1-2 inch) for backgrounds
- Medium round brush
- Small detail brush or liner brush
- Masking tape (for backs of canvases)
- Palette or paper plate
- Cup of water and paper towels
Step 1: Setting the Sky Gradation
-
Prepare the workspace:
Lay out your three canvases side-by-side on your work surface. Push them together so they are touching; this ensures your horizon lines and color bands match perfectly across the gaps. -
Secure the trio:
Flip the canvases over carefully and place a strip of masking tape across the back frames to temporarily hold them together as one unit. Flip them back over to the front. -
Mix the top sky color:
Mix a soft, dusky pink by combining Titanium White with a tiny touch of Magenta and Lavender. It should be very pale. -
Paint the upper sky:
Using your large flat brush, paint the top third of all three canvases with long, horizontal strokes, spanning smoothly across the gaps. -
Create the middle sunset band:
Clean your brush and mix a warm sunset tone using Titanium White and Cadmium Orange. Blend this below the pink layer while the paint is still wet to create a soft, seamless transition. -
Finish the lower sky:
For the area just above the horizon, mix a slightly deeper orange-pink. Blend this into the orange layer above, bringing the sky down to about the halfway mark of the canvas.
Step 2: Layering the Mountains
-
Paint the distant mountains:
Mix Lavender with a little White to make a hazy, light purple. Using a medium round brush, paint a jagged mountain range line across the middle of the canvases, overlapping the bottom of your sky. -
Fill the distant range:
Fill in the shape below that mountain line with the light purple mix. Don’t worry about the bottom edge of this shape yet. -
Add the middle range:
Create a darker purple by mixing Deep Purple with a touch of Magenta. Paint a second mountain range below the first one. Make the peaks slightly lower so the distant mountains peek out from behind. -
Define the foreground hills:
Mix Deep Purple with a tiny dot of Black to create a very dark plum color. Paint a large, rolling hill shape that occupies the bottom third of the canvas, covering the bottom of the middle range.
Tape Trick
Use blue painter’s tape to mask the sides of the canvases before you start. Peel it off at the end for crisp, clean white edges that look professional without needing a frame.
Step 3: Silhouettes and Key Details
-
Separate the canvases:
Once the background layers are tacky but mostly dry, gently remove the tape from the back and separate the canvases by an inch or two to paint the inner edges if desired, then push them back together. -
Start the main tree trunk:
Using black paint and a small round brush, paint a vertical line on the right-hand canvas for the main tree trunk. Make it thicker at the bottom and thinner as it goes up. -
Add main branches:
Extend branches outward from the trunk. Remember that nature isn’t perfect—make lines slightly crooked and varying in thickness. -
Create the faraway tree:
On the far-left canvas, paint a much smaller, thinner tree silhouette. This difference in size helps create the illusion of depth. -
Stipple the leaves:
Use an old, frayed brush or dab a round brush lightly to stipple black paint onto the branches. Leave plenty of open space so the beautiful sunset colors show through the foliage. -
Add ground details:
Using your smallest detail brush, flick tiny upward strokes of black paint along the very bottom edge of the canvases to create the look of tall grass. -
Paint a small pine:
Add a small triangular pine tree silhouette on the middle or right canvas near the bottom for extra variety in the landscape. -
Clean up edges:
Check the sides of your canvases. Paint the edges to match the front colors (wrapping the image) or paint them solid black for a framed look.
Starry Night Twist
Wait for the sky to dry completely, then use an old toothbrush dipped in watered-down white paint to flick tiny stars across the purple sections for a twilight galaxy effect.
Now you have a professional-looking triptych ready to hang with spacing in between for a panoramic window effect
Textured Mixed-Media Pattern Canvas
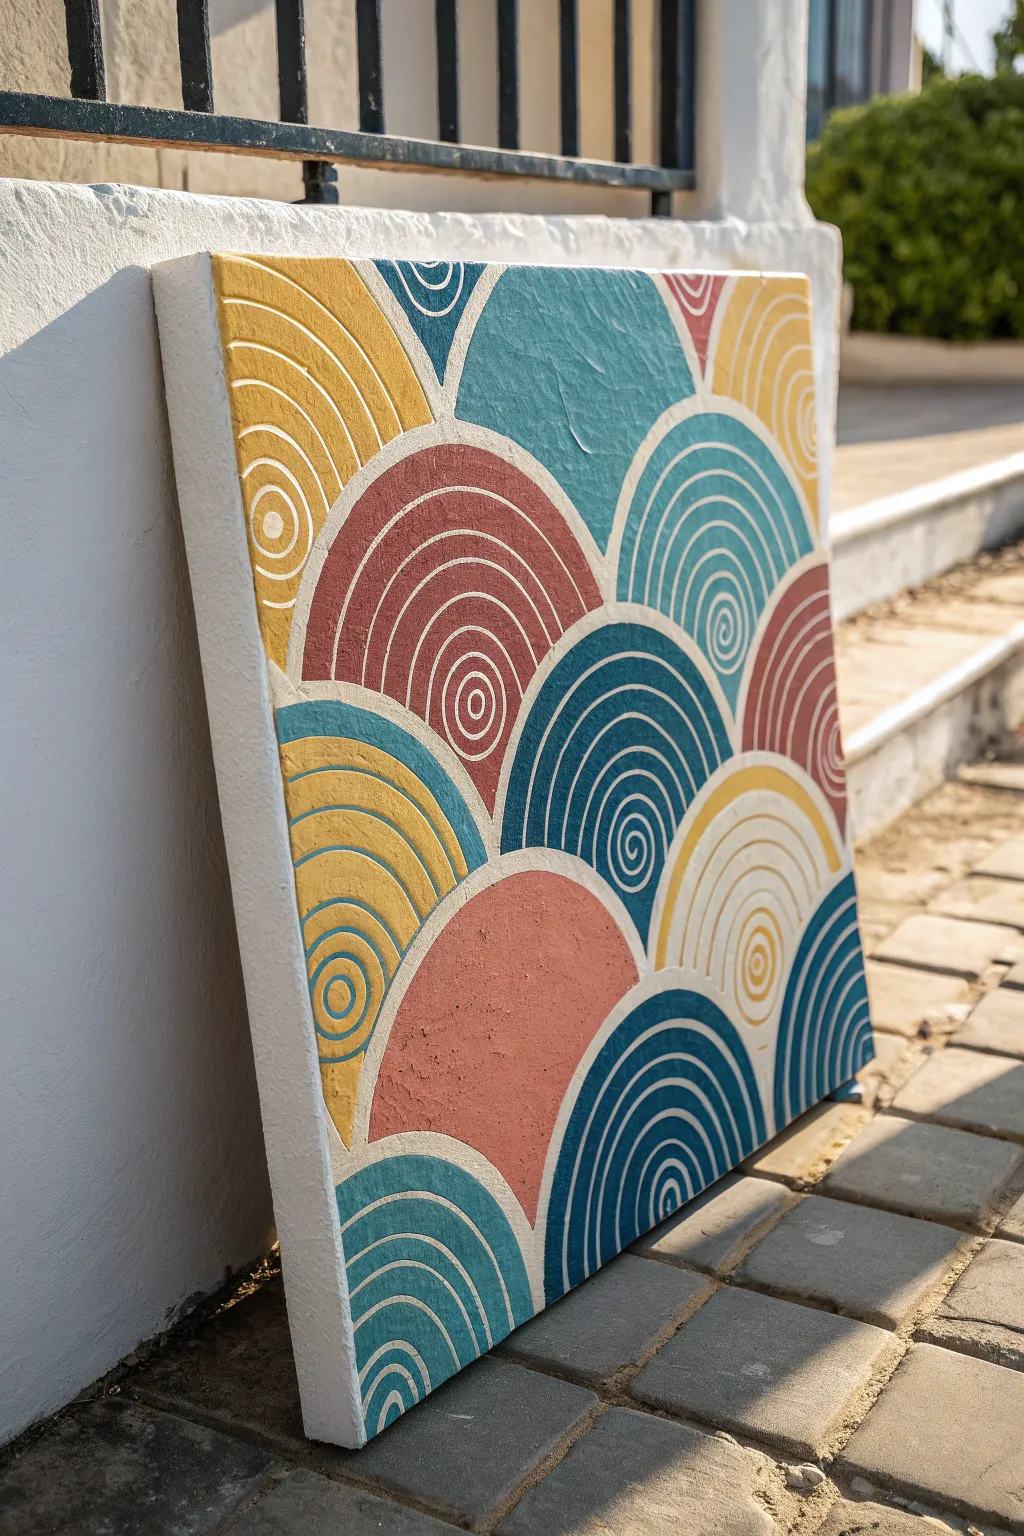
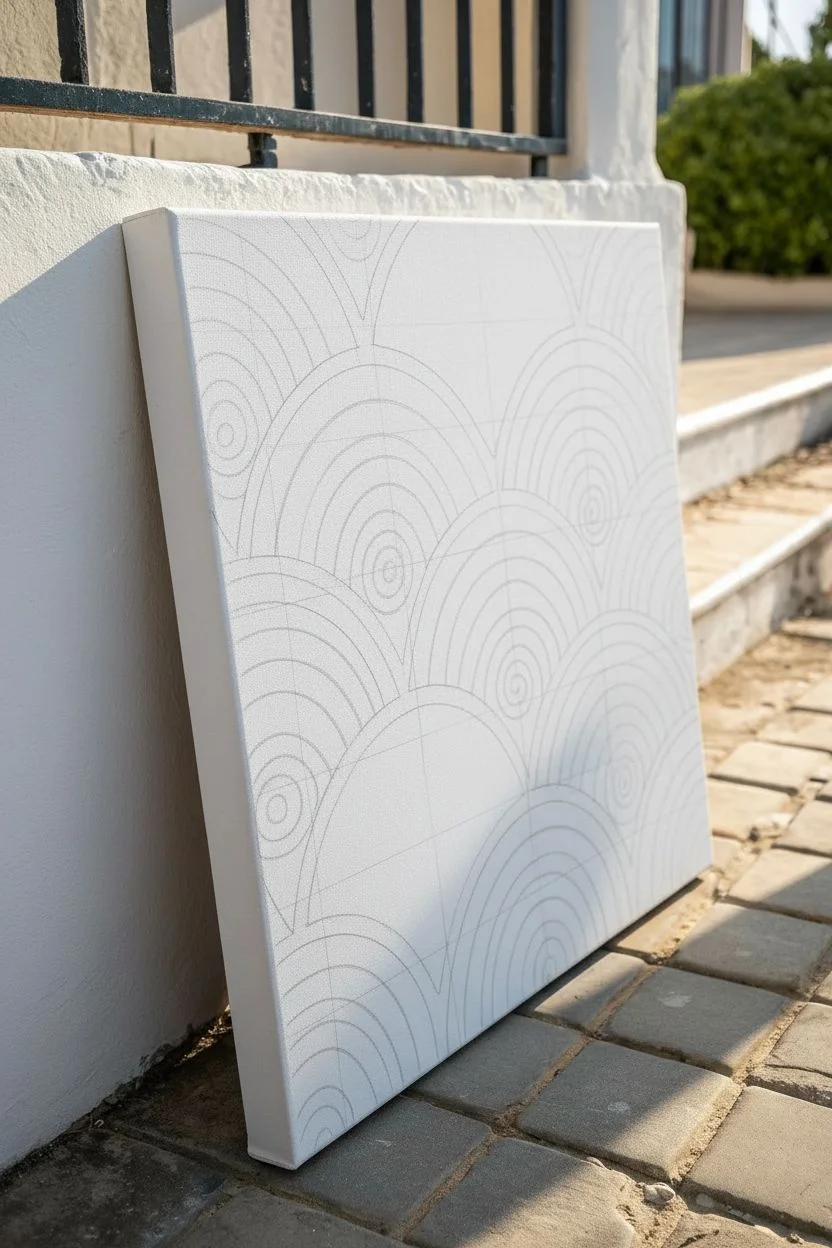
This project combines soothing arched wave patterns with a delightful, tactile surface that feels as good as it looks. Using a simple household secret ingredient, you’ll transform standard acrylic paint into a thick, plaster-like mixture perfect for carving intricate designs.
Step-by-Step Tutorial
Materials
- Stretched canvas (12×12 or similar square size)
- Modeling paste or baking soda
- Acrylic paints (Teal, Mustard Yellow, Terracotta, Navy Blue)
- Palette knife or stiff cardboard
- Round synthetic paintbrushes (medium and small)
- Pencil
- Compass or round objects for tracing (cups, bowls)
- Scraping tool (toothpick, empty pen, or stiff wire)
- Palette or paper plate for mixing
Step 1: Planning the Pattern
-
Map out the grid:
Start by laying your canvas flat on a protected surface. Lightly sketch horizontal lines across the canvas to create rows where your arches will sit. -
Sketch the arches:
Using a compass or by tracing round objects like jar lids or cups, draw semi-circles along your horizontal lines. Make sure they overlap slightly like fish scales, creating a continuous scalloped pattern. -
Alternate the alignment:
For the second row, position the center of each arch directly above the meeting point of the two arches below it. This offset pattern is key to the traditional wave look. -
Fill the canvas:
Continue this overlapping process until the entire canvas is filled with pencil outlines of your arches.
Step 2: Mixing and Applying Texture
-
Create the texture paste:
Squeeze a generous amount of your first paint color (let’s start with Mustard Yellow) onto your palette. Mix in modeling paste or baking soda bit by bit until the paint is as thick as frosting. -
Apply the first color:
Use a palette knife to scoop up the textured yellow mix. Spread it thickly inside one of your planned arch shapes, aiming for a layer about 2-3mm thick. -
Carve the design:
Immediately after spreading the wet paste, take your scraping tool (a toothpick or the back of a paintbrush works well). Gently carve concentric semi-circles into the wet paint, revealing the white canvas underneath. -
Add spiral details:
For some variety, instead of just lines, carve a small spiral right in the center bottom of an arch, then draw lines radiating out from it. -
Clean the tool:
Wipe your scraping tool clean with a paper towel after every few lines to keep your carved channels sharp and free of globs.
Paste Too Runny?
If your carving lines disappear because the paint oozes back together, your mix is too thin. Add more baking soda or wait 5 minutes for the paint to ‘set’ slightly before carving.
Step 3: Building the Colorful Mosaic
-
Mix the next color:
Prepare your next texture mix using Terracotta paint and your thickening agent. Aim for that same frosting-like consistency. -
Fill adjacent arches:
Apply the Terracotta mix to the arches next to your yellow ones. Be careful near the edges where colors meet; use the tip of the palette knife to push the paint right up to the line without overlapping. -
Carve the second set:
Etch your curved lines into the fresh Terracotta paste. I really enjoy varying the spacing here—some arches look great with tightly packed lines, while others look bold with wider spacing. -
Introduce the blues:
Repeat the mixing process for your Teal and Navy Blue paints. These cooler tones will balance out the warm yellow and red hues. -
Complete the pattern:
Systematically fill in the remaining arches with your blue texture mixes. If you’re right-handed, working from left to right helps prevent your hand from smudging finished sections. -
Touch up edges:
Inspect the borders between your arches. If there are gaps showing too much plain canvas, use a small brush to dab a little extra coloured paste into the voids.
Make It Sparkle
Mix fine gold or silver glitter into one of your paint colors before applying it. The texture will hide the glitter slightly, creating a subtle, magical shimmer when the light hits.
Step 4: Finishing Touches
-
Let it cure:
Because the paint is thick, it needs significant drying time. Let the project sit undisturbed for at least 24 hours to ensure the texture hardens completely. -
Check for cracks:
Once dry, baking soda mixes can sometimes show tiny hairline cracks. This adds to the rustic look, but if any chunks feel loose, dab a mixture of white glue and water over them to seal it. -
Paint the sides:
For a professional gallery look, paint the sides of the canvas white or continue the pattern over the edge if you used enough paste.
Display your textured masterpiece near a window where natural light can cast shadows across the ridges just like in the photo


Have a question or want to share your own experience? I'd love to hear from you in the comments below!