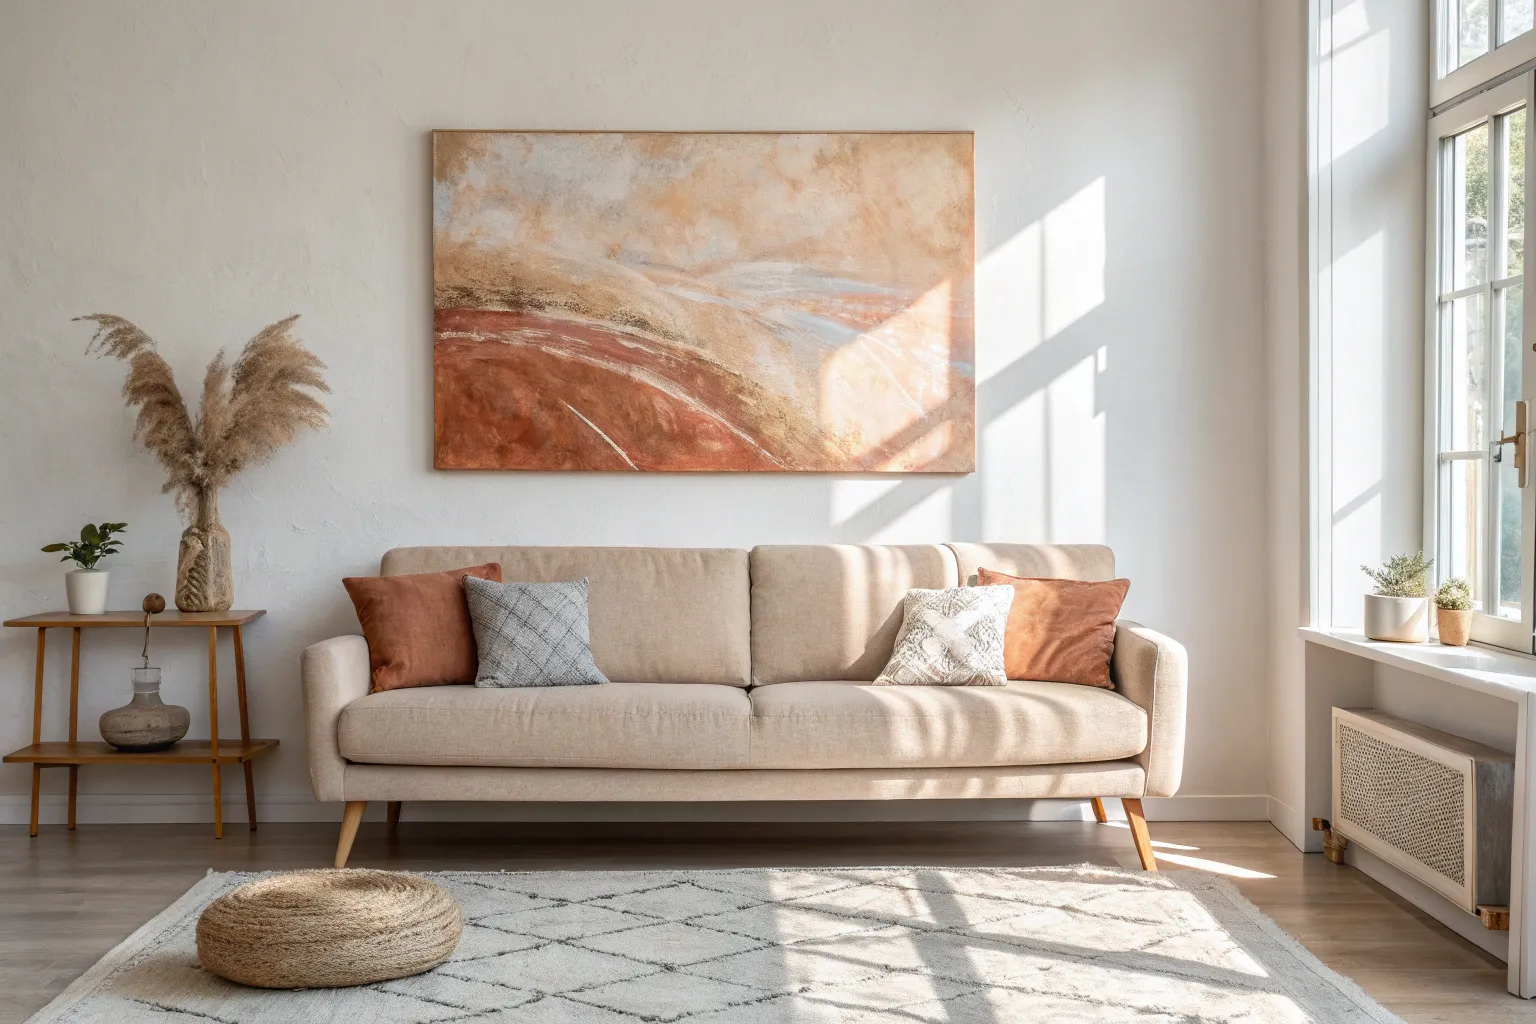
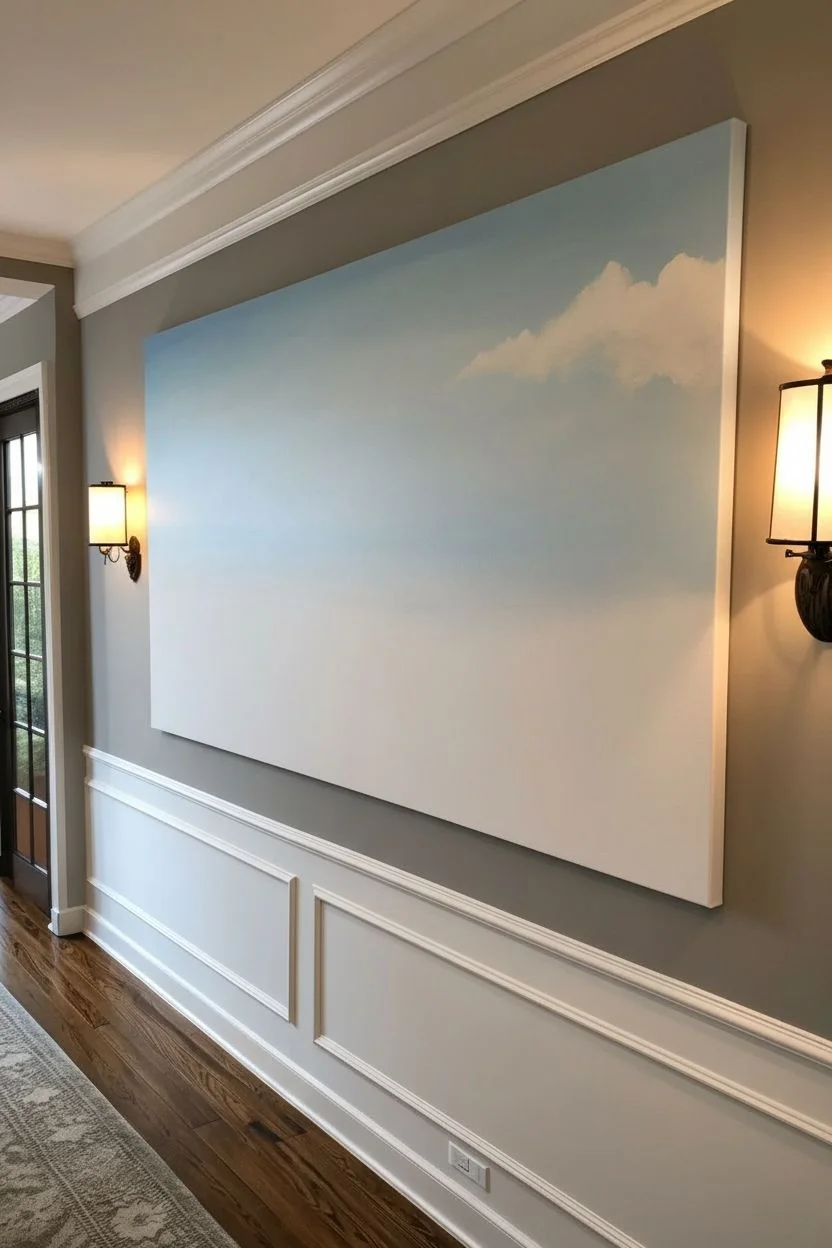
A great canvas painting can turn your living room into the coziest, most “you” space in the house. Here are my favorite ideas for making art that looks right at home above the sofa, ties into your color palette, and instantly elevates the room.
Oversized Abstract Color Wash as a Sofa Anchor
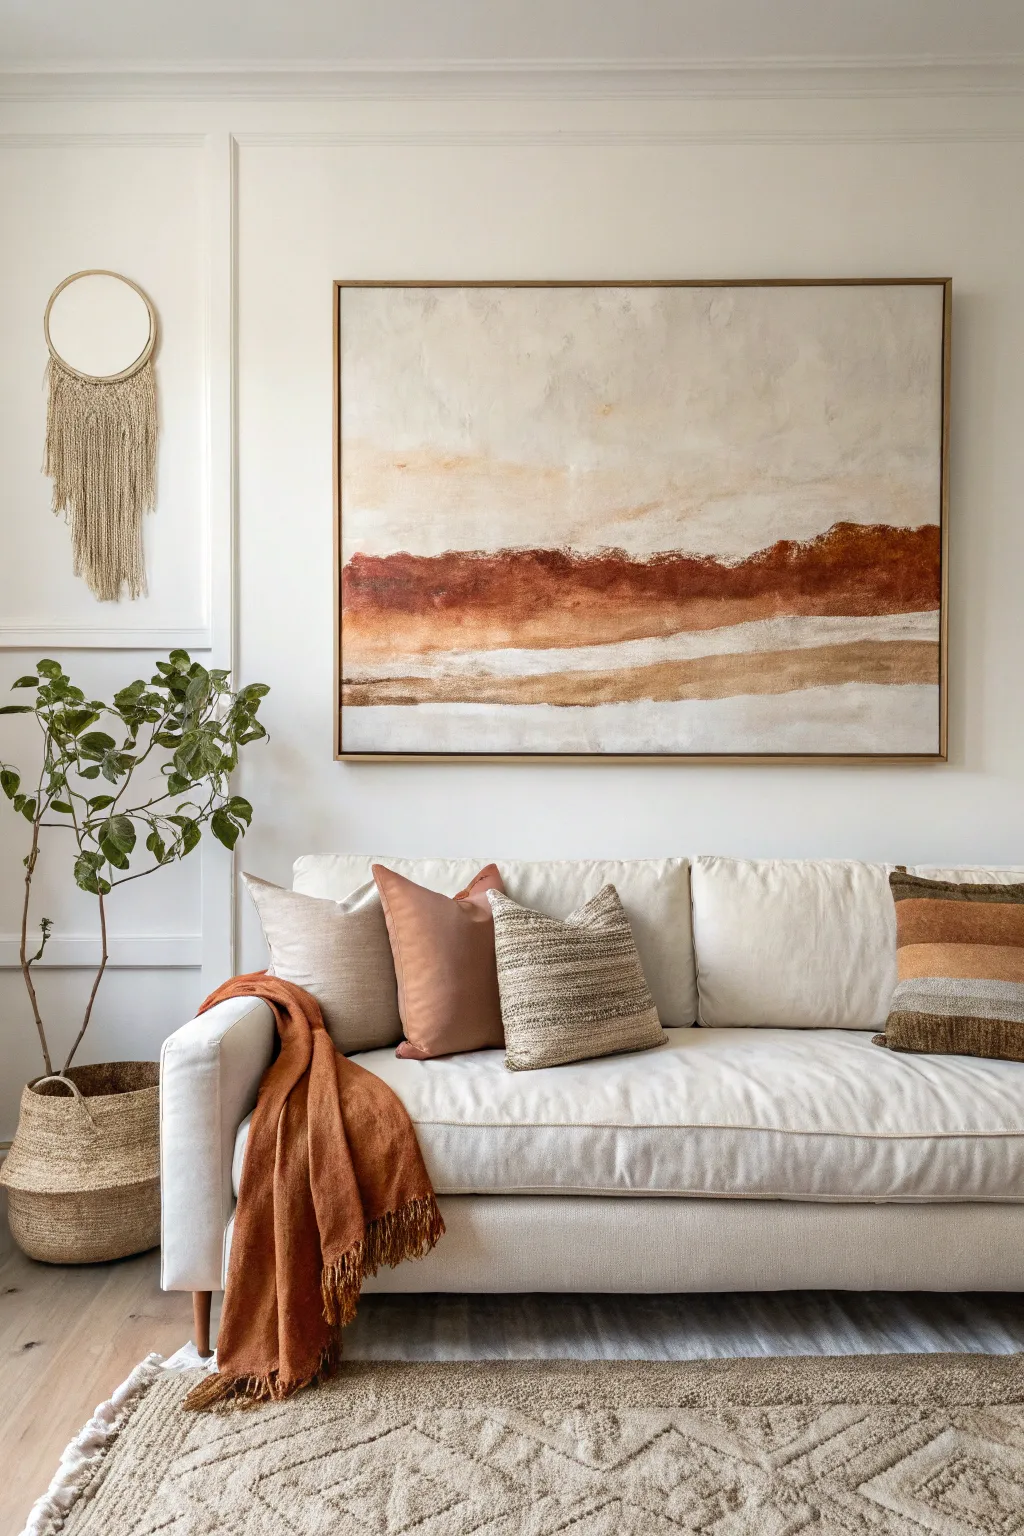
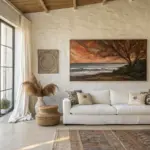
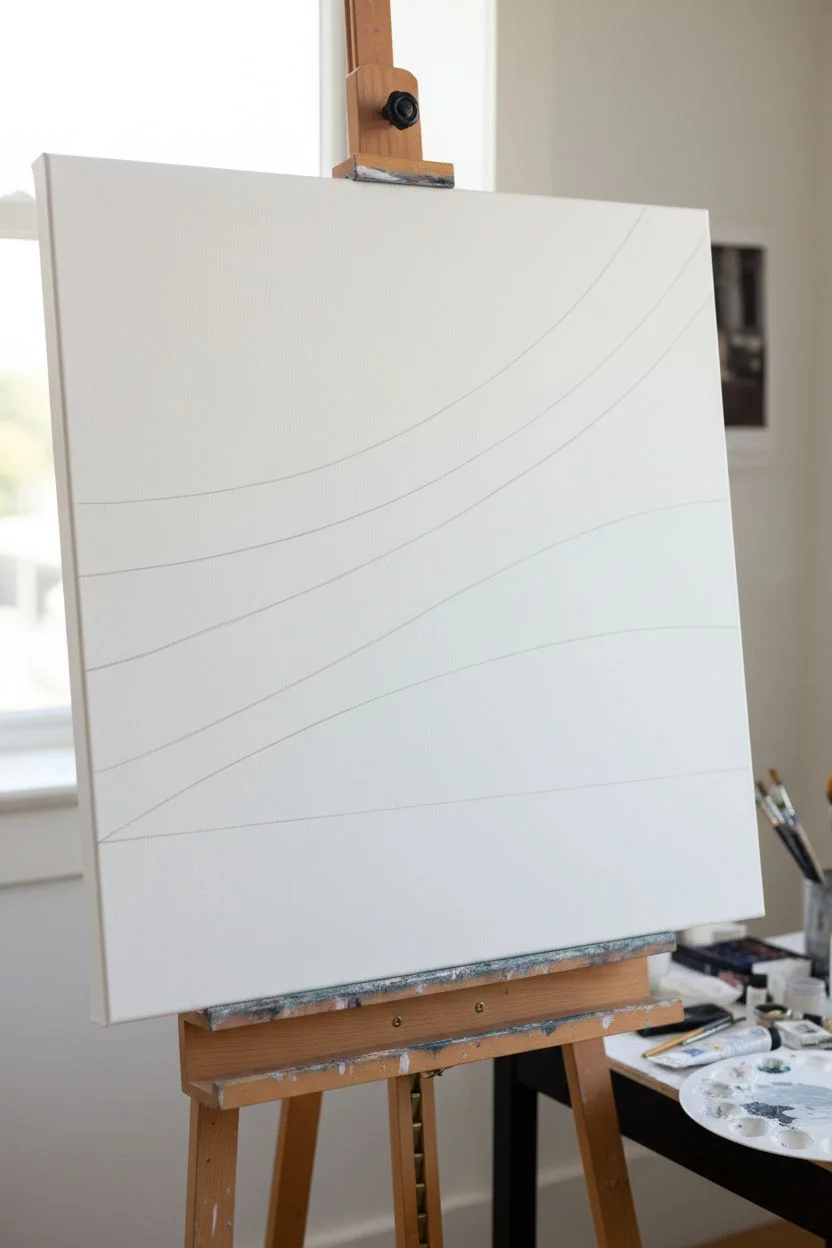
This oversized canvas project serves as a stunning focal point, using a warm palette of terracotta, rust, and beige to create a soothing, abstracted landscape. The layered color wash technique gives it an organic, horizon-like feel that anchors the room beautifully.
Detailed Instructions
Materials
- Large canvas (approx. 48×36 inches or similar ratio)
- Acrylic paints: Titanium White, Burnt Sienna, Yellow Ochre, Raw Umber, Unbleached Titanium
- Large flat paintbrush (2-3 inch)
- Medium round brush
- Spray bottle with water
- Glazing medium (optional but recommended for transparency)
- Palette knife
- Mixing palette or paper plates
- Painter’s tape (optional for edges)
- Clean rag or paper towels
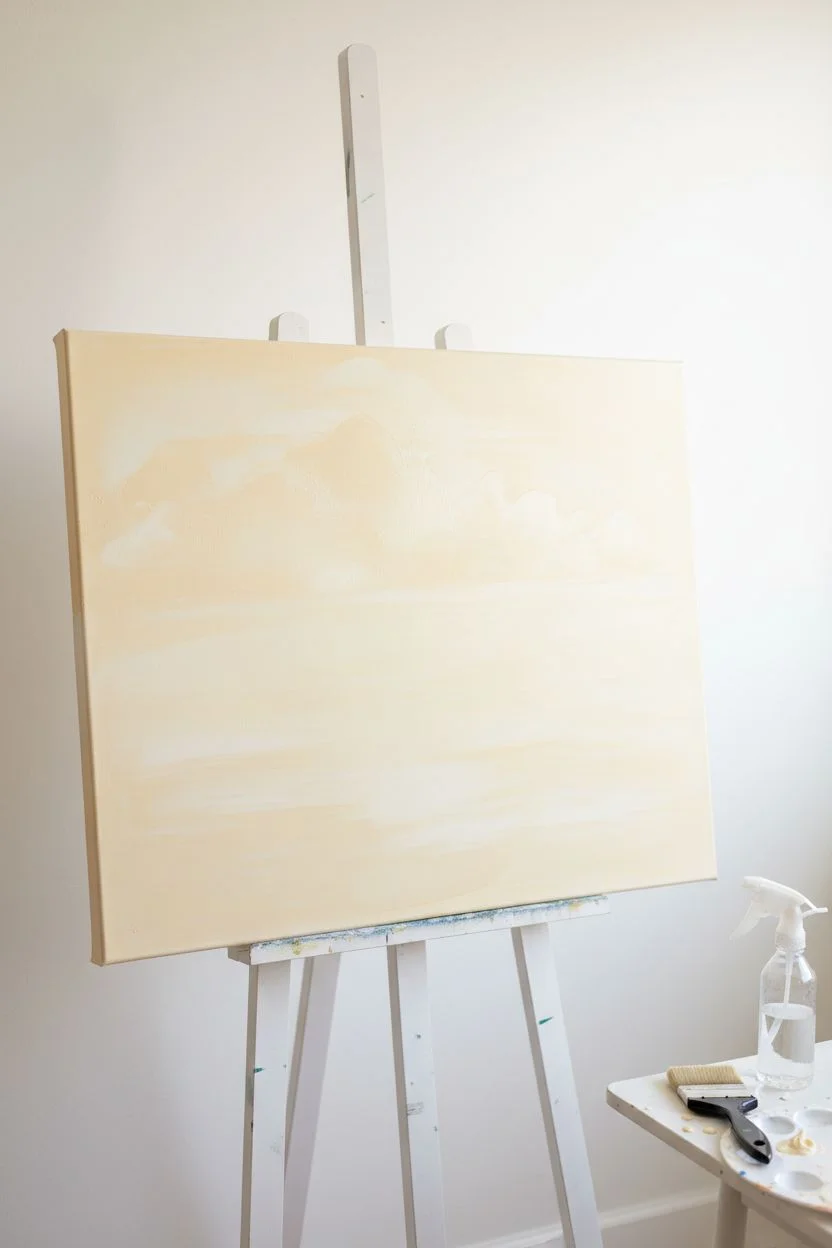
Step 1: Setting the Background
-
Prepare the canvas:
Ensure your canvas is clean and taut. If you prefer a framed look like the example, tape off the very edges if you plan to strip-frame it later, or simply paint loosely to the edge. -
Mix the base cream:
Create a mixture of Titanium White and a small dot of Unbleached Titanium. You want a warm, creamy off-white, not a stark hospital white. -
Apply the first wash:
Using your large flat brush, cover the top two-thirds and the bottom fifth of the canvas with this cream mixture. Keep the strokes horizontal and loose. -
Blend the sky:
While the paint is still wet, spritz a little water onto the canvas. Use a clean, damp brush to soften the brushstrokes in the upper section, creating a hazy, cloud-like atmosphere.
Muddy colors?
If your blending turns gray or muddy, stop and let the bottom layer dry completely. Apply the next color as a thin glaze over the dry paint instead of wet-on-wet.
Step 2: Building the Horizon
-
Mix the rust tone:
Combine Burnt Sienna with a touch of Raw Umber to deepen it. This will be the darkest, most vibrant ‘mountain’ band across the middle. -
Paint the main band:
Apply this rust color in a thick, uneven horizontal band across the center of the canvas. Don’t make a straight line; let the top edge undulate slightly like a distant ridge. -
Texture the rust layer:
Before it dries, use a palette knife or a dry brush to scrape or stipple along the top edge of this rust band. This breaks up the solid color and adds organic texture. -
Create a lighter earth tone:
Mix Yellow Ochre with plenty of Unbleached Titanium and a little glazing medium or water to create a semi-transparent beige. -
Add the secondary bands:
Paint a stripe of this beige mixture directly below the dark rust band. I like to overlap the wet edges slightly so the colors bleed into each other effectively. -
Repeat for depth:
Add another thinner, lighter band below the beige one using a mix of White and just a hint of Burnt Sienna. This creates the illusion of receding sandy layers.
Level Up: Texture
Mix modeling paste or sand into your rust-colored paint before applying the central band. This adds physical grit that makes the ‘landscape’ feel real.
Step 3: Refining and Washing
-
Soften harsh lines:
Dip your large brush in water and drag it horizontally across the transition points between color bands. The goal is a blurry, washed-out look rather than crisp stripes. -
Enhance the ‘sky’:
Mix a very watery glaze of White and a tiny drop of Yellow Ochre. Generally brush this over parts of the upper cream section to add subtle warmth and depth to the empty space. -
Deepen the contrast:
Go back to your dark rust mix. Add a few dabs of concentrated color into the darkest part of the central band to reinstate richness that might have been lost during blending. -
Add the bottom anchor:
At the very bottom of the canvas, paint a faint, washed-out echo of the rust color. Keep it very transparent to suggest a reflection or foreground details. -
Review and unify:
Step back five feet. Look for any areas that feel too structured. Use a damp rag to blot or rub sections that need to feel more weathered or faded. -
Final drying:
Let the entire piece dry completely for at least 24 hours before framing or hanging to ensure thick areas of paint are set.
Once framed in a simple floating wood frame, your masterpiece is ready to bring warmth to your living space


Soft Coastal Horizon for an Instant Calm Living Room

Bring the calming influence of the ocean into your home with this large-scale acrylic seascape. Using simple blending techniques, you will create a soft expanse of sky, turquoise waves, and a warm, sandy beach that feels like a window to paradise.
Step-by-Step
Materials
- Large rectangular canvas (e.g., 24×48 inches)
- Acrylic paints: Titanium White, Phthalo Blue, Cerulean Blue, Raw Sienna, Burnt region, Unbleached Titanium
- Large flat brush (2-3 inch) for blending
- Medium filbert brush
- Small round brush
- Palette knife
- Clean water container
- Paper towels
- Mist spray bottle
- Easel or flat working surface
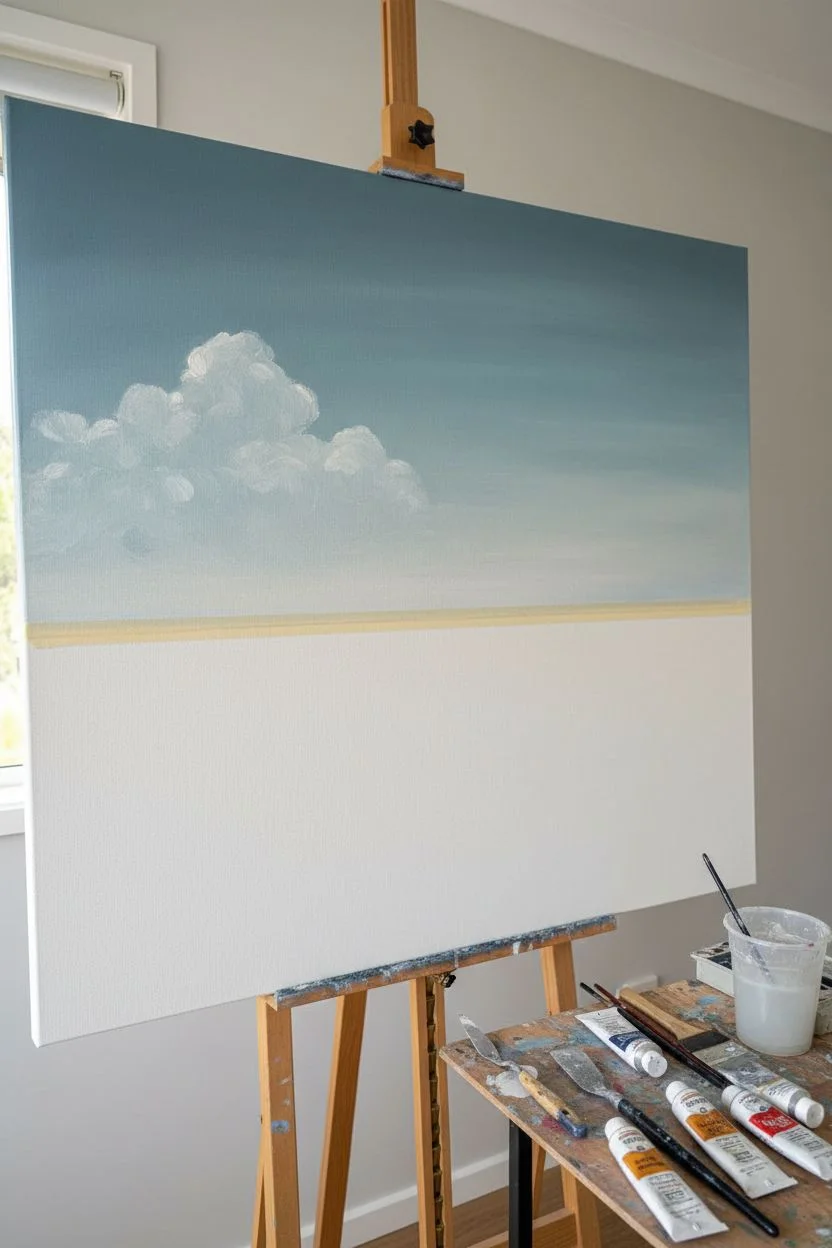
Step 1: Setting the Sky
-
Prime the Horizon:
Begin by deciding where your horizon line will sit. For this composition, place strips of painter’s tape or draw a light pencil line about one-third of the way up from the bottom of the canvas. This ensures a crisp separation between sea and sky. -
Mix the Upper Sky:
On your palette, mix a soft, muted blue-grey using Titanium White, a touch of Cerulean Blue, and a tiny dot of Burnt Umber to desaturate the color. Apply this to the top third of the canvas using your large flat brush. -
Blend Downward:
Gradually add more White to your brush without cleaning it. Paint the middle section of the sky, blending it upward into the darker blue while wet. Use long, horizontal strokes to ensure a smooth gradient. -
Create the Horizon Haze:
As you reach the horizon line, the sky should be almost pure white with a hint of warmth. Mix a little Unbleached Titanium into your white and blend this right down to your horizon line. This creates atmospheric perspective. -
Add Cloud Structures:
Switch to a medium filbert brush. Load it with pure Titanium White. Gently dab in cloud shapes in the upper left and center, using a circular scrubbing motion. Keep the edges soft and indistinct. -
Refine the Clouds:
I like to take a clean, dry brush and very lightly sweep over the cloud edges to feather them into the blue background. This makes them look distant and fluffy rather than stamped on.
Keep it Misted
Acrylics dry fast! Keep a spray bottle of water handy and mist your canvas lightly. This keeps the paint workable for smoother color gradients in the sky and water.
Step 2: Painting the Ocean
-
Establish the Deep Water:
Peel off your tape if you used it. Mix Phthalo Blue with a little White and a touch of Cerulean to get a rich, deep teal. Paint a horizontal band right below the horizon line. Keep this line as straight as possible. -
Transition to Turquoise:
As you move down the canvas, gradually mix more White and Cerulean Blue into your deep teal. Paint the middle section of the water, blending it seamlessly into the darker band above. -
Create the Shallows:
For the water nearest the shore, mix a very pale aqua using mostly White and a tiny amount of Phthalo Blue. Paint this band, blending it into the turquoise section above. -
Dry Blending:
While the paint is still tacky, mist it lightly with water if needed. Use a clean, large brush to lightly sweep horizontally across the transition zones in the water to remove harsh lines.
Step 3: The Sandy Beach
-
Base Sand Color:
Mix Raw Sienna, Unbleached Titanium, and White. Paint the bottom section of the canvas, curving the top edge slightly to mimic the natural shoreline. -
Add Wet Sand:
Where the water meets the sand, mix a slightly darker version of your sand color by adding a touch of Burnt Umber. Paint this directly adjacent to the pale aqua water to represent wet, packed sand. -
Texture the Beach:
Use a dry brush with a tiny amount of lighter beige paint. Scumble (lightly scrub) this over the dried sand area to create texture and variation in the beach surface.
Fixing a Wobbly Horizon
If your horizon line isn’t perfectly straight, place a strip of painter’s tape across the dry painting and re-paint the edge where the sky meets the sea for a sharp fix.
Step 4: Waves and Foam Details
-
Paint the Shoreline Wave:
Using a small round brush and pure Titanium White, paint a thin, irregular line where the water meets the sand. Make this line thicker in some spots to show foam gathering. -
Create Seafoam Texture:
Load a palette knife with thick bold white paint. Gently drag the knife sideways along the shoreline to create the broken, frothy texture of crashing waves. -
Add Distant Waves:
Back in the turquoise water area, use your smallest brush with watered-down white paint. Add extremely thin, faint horizontal lines to suggest small breaking waves in the distance. -
Shadows and Depth:
Underneath the main white foam line at the shore, paint a very thin, transparent line of diluted dark brown/grey. This fake shadow lifts the foam off the sand visually. -
Final Glaze:
Once completely dry, mix a tiny amount of ultramarine blue with clear glazing medium. lightly brush this over the deep water area only to enrich the color depth without covering your details.
Hang your new coastal masterpiece and enjoy the view


Classic Triptych Landscape to Fill a Wide Living Room Wall
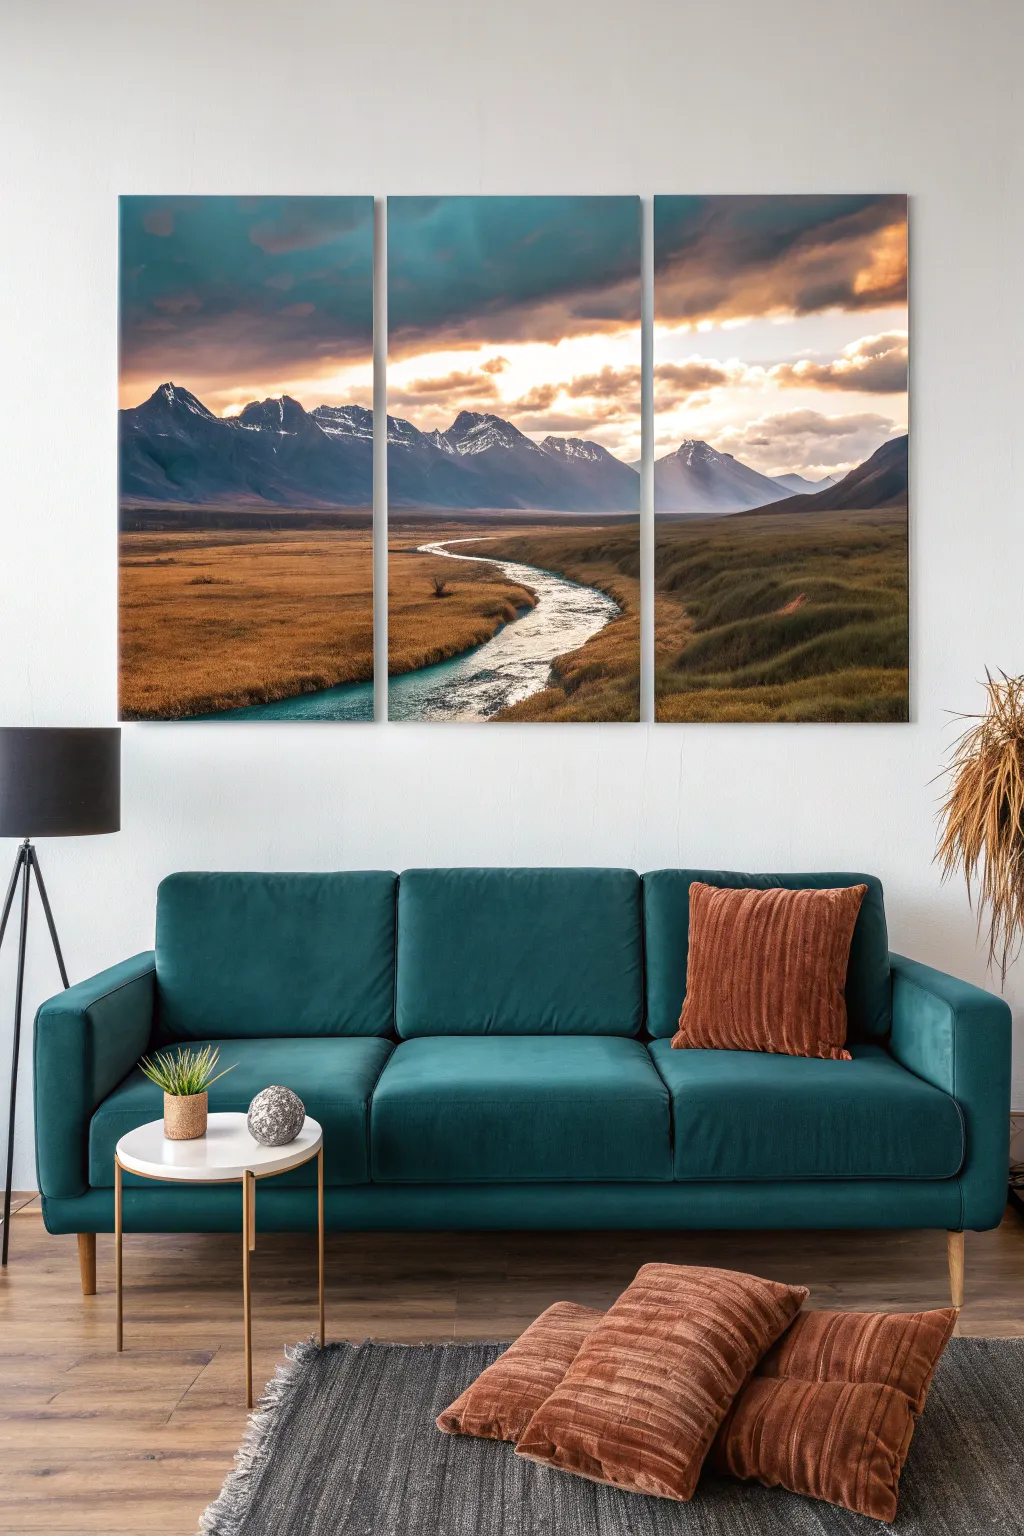
Bring the grandeur of the outdoors inside with this sweeping three-panel landscape painting. By splitting the scene across multiple canvases, you create a modern, expansive feel that perfectly anchors a large living room wall.
Step-by-Step
Materials
- 3 large stretched canvases (equal size, e.g., 24×36 inches)
- Acrylic paints (Titanium White, Mars Black, Burnt Sienna, Yellow Ochre, Ultramarine Blue, Phthalo Green, Burnt Umber)
- Wide flat wash brush (2-3 inch)
- Medium flat brush (1 inch)
- Small round detail brush
- Palette knife
- Masking tape or painter’s tape
- Large palette or mixing plate
- Water container and paper towels
- Easel or large flat workspace
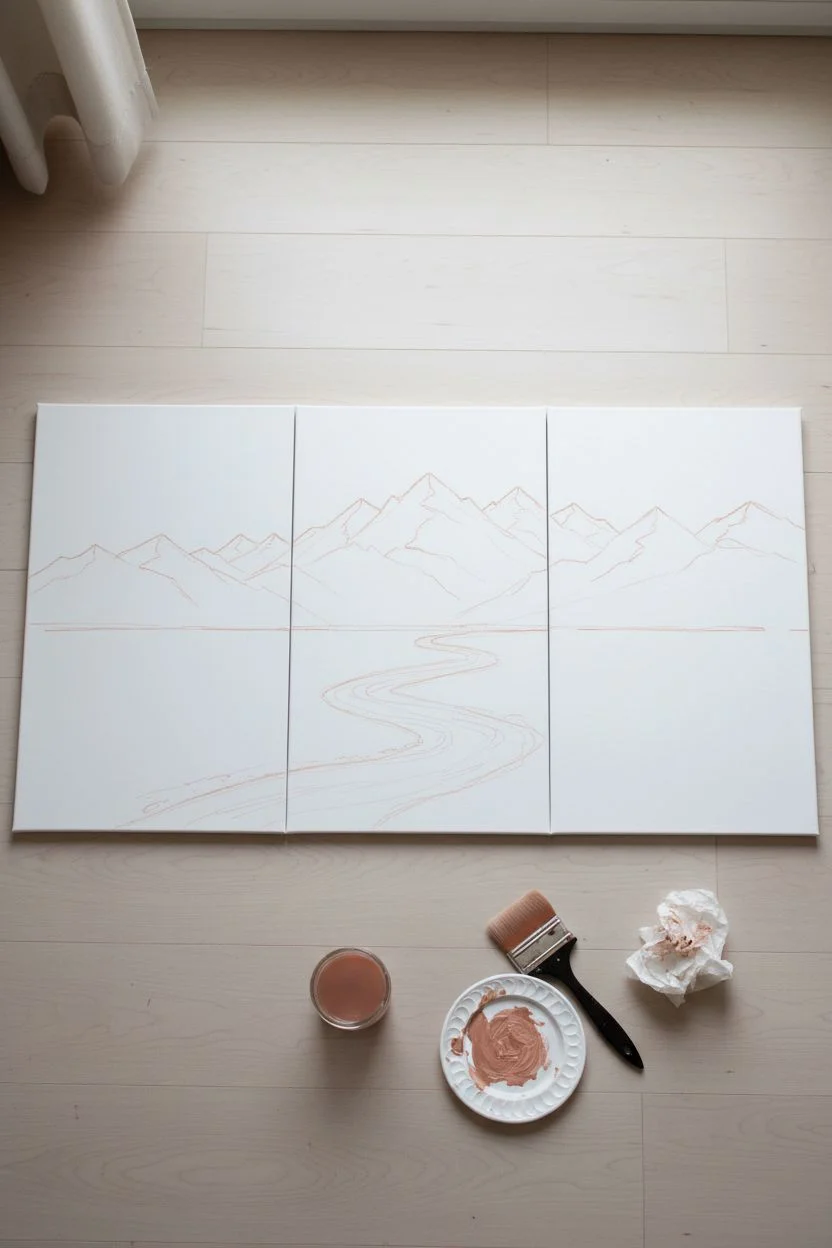
Step 1: Preparation and Sketching
-
Align the Canvases:
Lay your three canvases side-by-side on your workspace or floor, pushing them together so they touch. This is crucial for sketching a continuous image that flows seamlessly across the gaps. -
Sketch the Horizon:
Lightly sketch the horizon line about one-third of the way up from the bottom using a diluted Burnt Sienna mix. Ensure this line runs straight across all three panels. -
Map the Mountains:
Outline the mountain peaks in the background. Make sure the slopes of the mountains continue logically from the left canvas, through the center, and into the right canvas. -
Outline the River:
Sketch the winding river starting wide in the center foreground and snake it back toward the mountains in the middle panel. Let the riverbanks tease into the side panels slightly to connect the composition. -
Separate the Panels:
Once sketched, separate the canvases slightly (about an inch) to paint them individually while keeping the full picture in mind. I find this prevents paint from bridging the gaps and sticking them together.
Fixing Alignment Issues
If a line (like the horizon) jumps awkwardly between panels, paint over the specific transition area with a matching opaque color and redraw the line while panels are pushed together.
Step 2: Painting the Sky and Mountains
-
Base Coat the Sky:
Mix Titanium White with a touch of Ultramarine Blue and a tiny bit of Burnt Sienna to gray it down. Apply this to the upper sky area on all three canvases using your large wash brush. -
Create the Sunset Glow:
While the blue is still slightly wet, blend in a mix of Yellow Ochre and White near the horizon line and just above the mountain peaks. Use horizontal strokes to create soft, cloudy transitions. -
Add Cloud Drama:
Mix a darker gray-purple using Ultramarine Blue, Burnt Sienna, and White. Scumble in darker cloud formations at the very top and corners to frame the sunset light. -
Block in Mountains:
Mix a deep slate blue color using Ultramarine Blue, Black, and White. Fill in the mountain shapes. Use a flatter, more solid color for the distant peaks to push them back in perspective. -
Highlight the Peaks:
Using a palette knife or small flat brush, apply pure White mixed with a speck of blue to the sun-facing slopes of the mountains. Drag the paint firmly so it breaks slightly, resembling rocky snow textures.
Step 3: Foreground and Details
-
Underpaint the Ground:
Cover the grassy areas with a base layer of Burnt Sienna mixed with Yellow Ochre. This creates that warm, autumnal marsh look. -
Paint the River Water:
Fill the river shape with a mix of Titanium White and a tiny drop of Phthalo Green and Blue. Keep the strokes horizontal to mimic water flow. -
Add Water Reflections:
Glaze over parts of the river with a watery mix of the sky colors. Add brilliant white streaks in the center of the river where the sunset hits the water most intensely. -
Texture the Grass:
Switch to your medium flat brush. Mix a dark olive green (Phthalo Green + Burnt Sienna). Use short, upward flicking strokes to create shadowed grasses, particularly on the right panel’s hillside. -
Layer Golden Highlights:
Mix Yellow Ochre with White. Dry brush this over the tops of the marshy areas and the right-side hill to catch the imaginary light source. -
Refine the River Banks:
Use a dark brown mix (Burnt Umber + Black) to paint a thin, sharp line along the river’s edge. This separation makes the water look recessed and realistic. -
Paint the Panel Edges:
Don’t forget the sides! Extend your painting around the deep edges of each canvas. This gallery-wrap style means you won’t need frames later. -
Final Varnish:
Allow the painting to cure for at least 72 hours. Apply a coat of satin or gloss varnish to unify the sheen across all three panels and protect the colors.
Add Metallic Touches
Mix a tiny amount of gold leaf paint or iridescent medium into your sunset yellow mix. It adds a subtle, luminous shimmer to the sky when the living room lights hit the canvas.
Hang your masterpiece with about 2 to 3 inches of space between each canvas to complete the panoramic effect


Botanical Leaf Silhouettes That Echo Houseplants
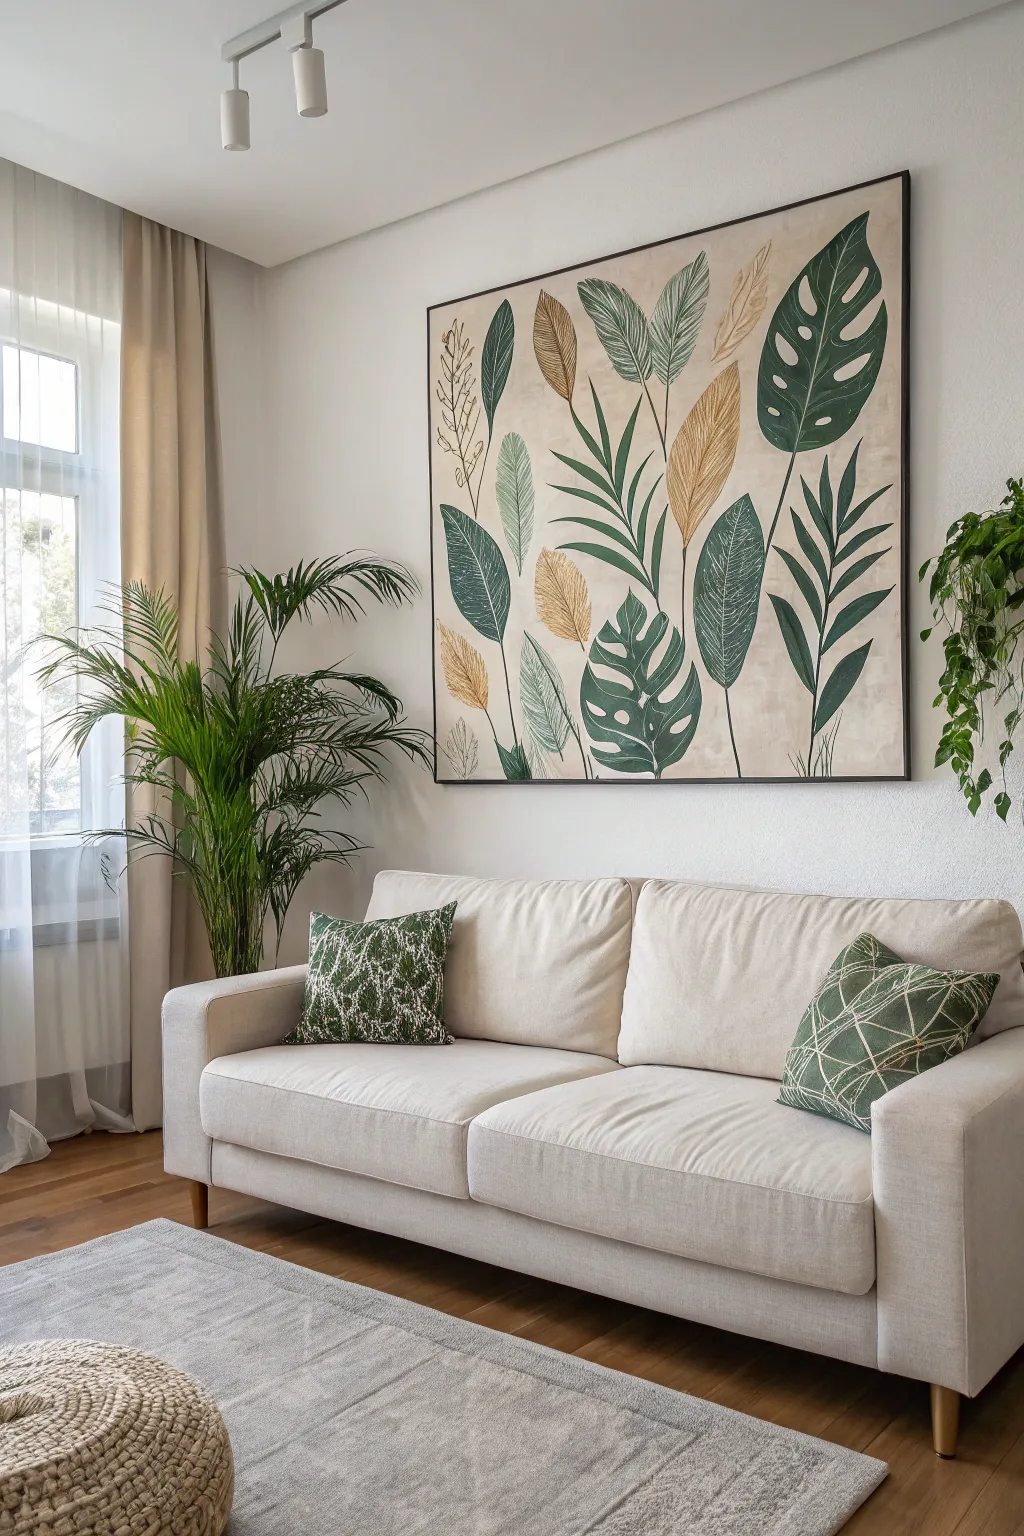
Bring the calming influence of nature indoors with this stunning large-scale canvas project featuring graceful leaf forms. The mix of deep greens and shimmering gold tones on a textured cream background creates a sophisticated, gallery-worthy focal point that perfectly echoes real houseplants.
How-To Guide
Materials
- Large canvas (at least 36×48 inches)
- Acrylic paints: Deep hunter green, emerald green, sage green, cream, white, burnt umber, metallic gold
- Gesso (white)
- Texture paste or modeling paste
- Large flat paintbrush (2-3 inch)
- Medium round brushes (sizes 6 and 8)
- Fine liner brush (size 0 or 1)
- Pencil and eraser
- Palette knife
- Palette or large plate
- Tracing paper (optional)
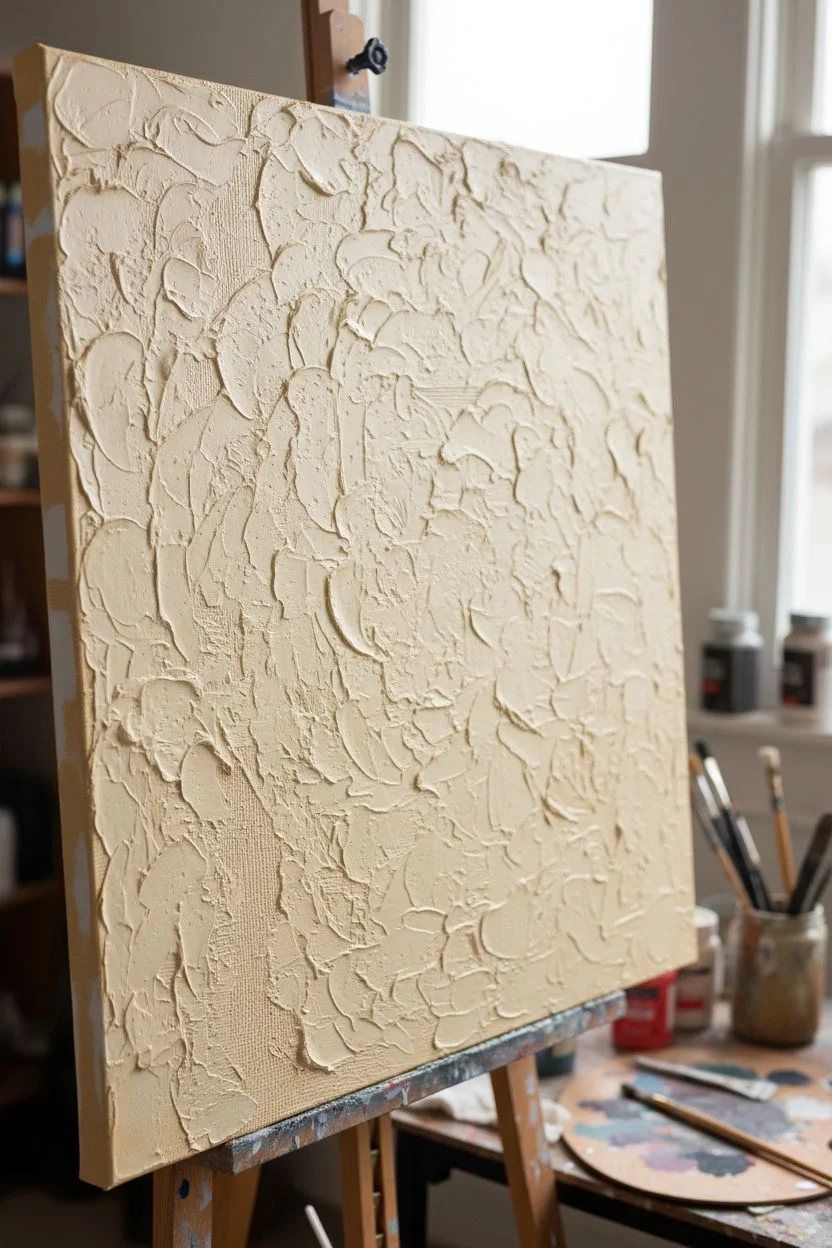
Step 1: Prepping the Canvas
-
Prime the Surface:
Even if your canvas is pre-primed, apply an extra coat of white gesso to ensure a smooth, durable base. Let it dry completely. -
Create Texture:
Mix a generous amount of texture paste with cream acrylic paint. Using a large palette knife, spread this mixture across the entire canvas in random, sweeping motions to create a subtle, uneven background that mimics linen or plaster. -
Add Depth:
While the texture paste is still slightly wet, I like to gently drag a dry, wide brush vertically through certain areas to suggest a subtle grain. Allow this layer to dry overnight to ensure it is rock-hard. -
Apply the Base Coat:
Paint a wash of cream mixed with a tiny drop of burnt umber over the textured surface. This warms up the background and ensures no stark white canvas shows through.
Step 2: Sketching the Composition
-
Plan Your Layout:
The key to this look is variety. Lightly sketch the main stems first with a pencil, aiming for a mix of heights. Place taller stems toward the sides and vary the leaf types—include broad monstera leaves, feathery palms, and simple ovate leaves. -
Refine Leaf Shapes:
Flesh out the leaves on your stems. Don’t worry about perfect symmetry; natural leaves have irregularities. Sketch some leaves overlapping others slightly to create a sense of depth. -
Review Balance:
Step back from the canvas to check the balance of the composition. Ensure there isn’t too much empty space in one corner and that the ‘weight’ of the leaves feels distributed evenly.
Pro Tip: Stencil Hack
Not confident drawing leaves freehand? Gather real leaves from your garden, press them flat under books for a day, and trace their outlines directly onto the canvas for instant, realistic shapes.
Step 3: Blocking in Color
-
Mix Your Greens:
Prepare three distinct green mixtures on your palette: a dark hunter green for the largest leaves, a medium olive tone, and a lighter sage. Keep them separate for now. -
Paint Darkest Leaves:
Using a medium round brush, fill in the largest leaf shapes (like the monstera) with your darkest hunter green. Use smooth strokes that follow the direction of the veins. -
Add Medium Tones:
Switch to your medium olive green for the feathery palm-style leaves. If the paint feels too thick, add a drop of water to help it flow into the texture of the canvas. -
Layer in Accents:
Identify the leaves you want to be gold or tan. Mix burnt umber with a lot of cream for a base tan color and block these shapes in.
Troubleshooting: Textured Edges
Painting straight lines over texture paste can be tricky. If your edges look jagged, dilute your paint slightly with water or flow medium so the brush glides over the bumps rather than skipping.
Step 4: Adding Detail and Dimension
-
Apply Metallic Highlights:
Once the tan base layer is dry, paint over those specific leaves with metallic gold acrylic. You may need two coats to get a solid, shimmering finish. -
Detail the Veins:
Use your fine liner brush and a lighter shade of green (mix your base green with a little white/cream) to draw the central veins and branching veins on the dark leaves. This creates the ‘skeleton’ look seen in the inspiration image. -
Create Texture on Leaves:
For the broad leaves, use a dry brush technique with a very small amount of lighter green to gently scuff over the painted surface. This highlights the texture from your background layer underneath. -
Refine Edges:
Go back with a small flat brush and touch up the edges of any leaves that look too messy. Crisp edges will make the silhouette style pop. -
Paint the Stems:
Using a steady hand and a liner brush, paint the long stems connecting your leaves to the bottom edge. Use a dark brownish-green color to ground them. -
Final Wash (Optional):
To give the painting an aged, cohesive look, you can apply an extremely watery wash of burnt umber over the entire dried painting and immediately wipe it back with a rag. This settles into the crevices of the texture. -
Seal the Work:
Once absolutely dry (I recommend waiting 24 hours), apply a matte or satin varnish to protect the paint and unify the sheen.
Hang this botanical masterpiece in your living area to enjoy a serene, evergreen view all year round
BRUSH GUIDE
The Right Brush for Every Stroke
From clean lines to bold texture — master brush choice, stroke control, and essential techniques.
Explore the Full Guide
Big Florals in a Limited Palette for a Cozy Living Room
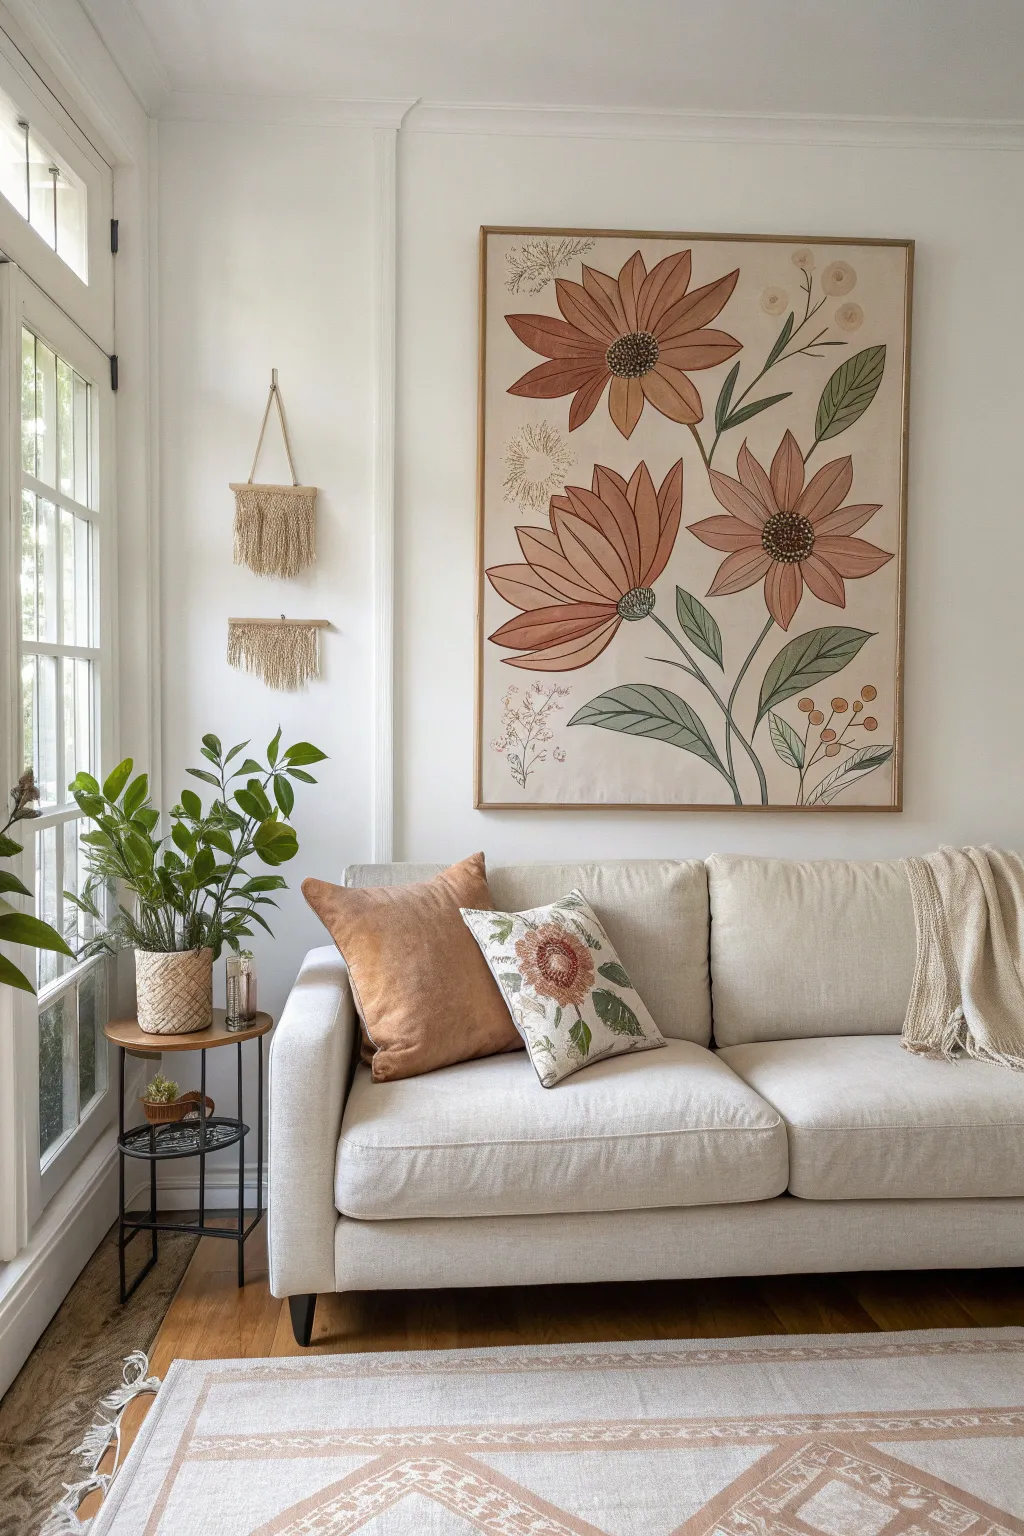

Bring the warmth of a vintage botanical illustration into your living space with this oversized floral painting. Using a limited palette of terracotta, sage, and cream, you’ll create a statement piece that feels both cozy and sophisticated.
Step-by-Step Guide
Materials
- Large stretched canvas (at least 36×48 inches)
- Acrylic paints (Terracotta/Burnt Sienna, Sage Green, Deep Green, Cream/Off-White, Black, Metallic Gold)
- Large flat paintbrushes (2-3 inch)
- Medium round brushes (size 8-10)
- Fine liner brush (size 0 or 1)
- Graphite pencil and eraser
- Ruler or yardstick
- Palette or paper plates
- Cup of water and paper towels
Step 1: Preparation and Base
-
Prep the canvas background:
Begin by squeezed a generous amount of cream or off-white acrylic paint onto your palette. Using your largest flat brush, cover the entire canvas in a smooth, even coat. This warm neutral base mimics the look of aged paper. -
Allow to cure:
Let this base layer dry completely. Since the canvas is large, it may take upwards of an hour. If you see streaks, apply a second coat for a truly opaque finish. -
Sketch the flower placement:
Using a light hand and a graphite pencil, sketch three large circles to represent the flower heads. Place one high near the top right, one in the middle left, and one slightly lower on the right to create a balanced, asymmetrical composition.
Wobbly Lines?
If your hand shakes while outlining with the liner brush, try bracing your pinky finger against the dry canvas for stability. You can also thin the paint with a drop of water for smoother flow.
Step 2: Drawing the Design
-
Refine the petals:
Around each circle center, draw long, pointed petals. Keep them slightly irregular—some overlapping, some curved—to capture a natural, organic feel rather than perfect symmetry. -
Add stems and leaves:
Connect your flower heads with long, sweeping curved lines for stems that meet near the bottom center. Add large, teardrop-shaped leaves branching off the stems, filling the negative space between the blooms. -
Include filler details:
Lightly sketch in faint outlines for the background sprigs—some wispy dandelion-style puffs and a few berry branches—filling the empty corners without overcrowding.
Step 3: Blocking in Color
-
Paint the petals:
Mix a warm terracotta shade. Use a medium round brush or smaller flat brush to fill in the petals of all three flowers. I prefer to work from the center outward to keep the strokes consistent. -
Paint the leaves:
Switch to a sage green for the leaves. Fill them in completely, ensuring crisp edges where the paint meets the background. You may need two coats here if your green is semi-transparent. -
Detail the centers:
For the flower centers, use a dark brown or black mixed with a touch of gold. Stipple the paint on with the tip of your brush to create a textured, seeded appearance.
Add Texture
Mix modeling paste into your acrylics for the flower centers to create actual 3D texture. It makes the seeds pop off the canvas and adds a tactile quality.
Step 4: Outlining and Definition
-
Mix your outline color:
Create a dark, almost-black grey or deep charcoal color. This looks softer and more illustrative than pure black from the tube. Thicken it slightly if it’s too runny, but keep it fluid enough for long lines. -
Outline the main flowers:
Using your fine liner brush, carefully trace the outline of every petal. Add a straight center line down the middle of each petal to give it dimension. -
Define the leaves:
Outline the leaves and stems with the same dark shade. Add a central vein to each leaf and smaller veins branching off for a realistic botanical look. -
Create the background sprigs:
For the delicate background elements, use a very light touch. Outline the berry branches in brown and paint the berries in a muted gold or soft orange. -
Add wispy details:
Use a dry brush technique or extremely fine lines to draw the ‘dandelion’ puffs in a faint beige or grey, making them look like faint pencil sketches behind the bold flowers.
Step 5: Final Touches
-
Enhance texturing:
Go back to the flower centers. Add tiny dots of white or cream over the dark textured base to simulate light hitting the seeds. -
Clean up edges:
Check your background for any accidental smudges. touch them up with your original cream base color to keep the artwork looking crisp. -
Varnish (Optional):
Once fully dry (give it 24 hours), apply a matte varnish to protect your large masterpiece from dust and UV light.
Hang your new oversized art piece behind your sofa to instantly anchor the room with warm, organic energy
Moody Mountain Layers for a Modern Neutral Space
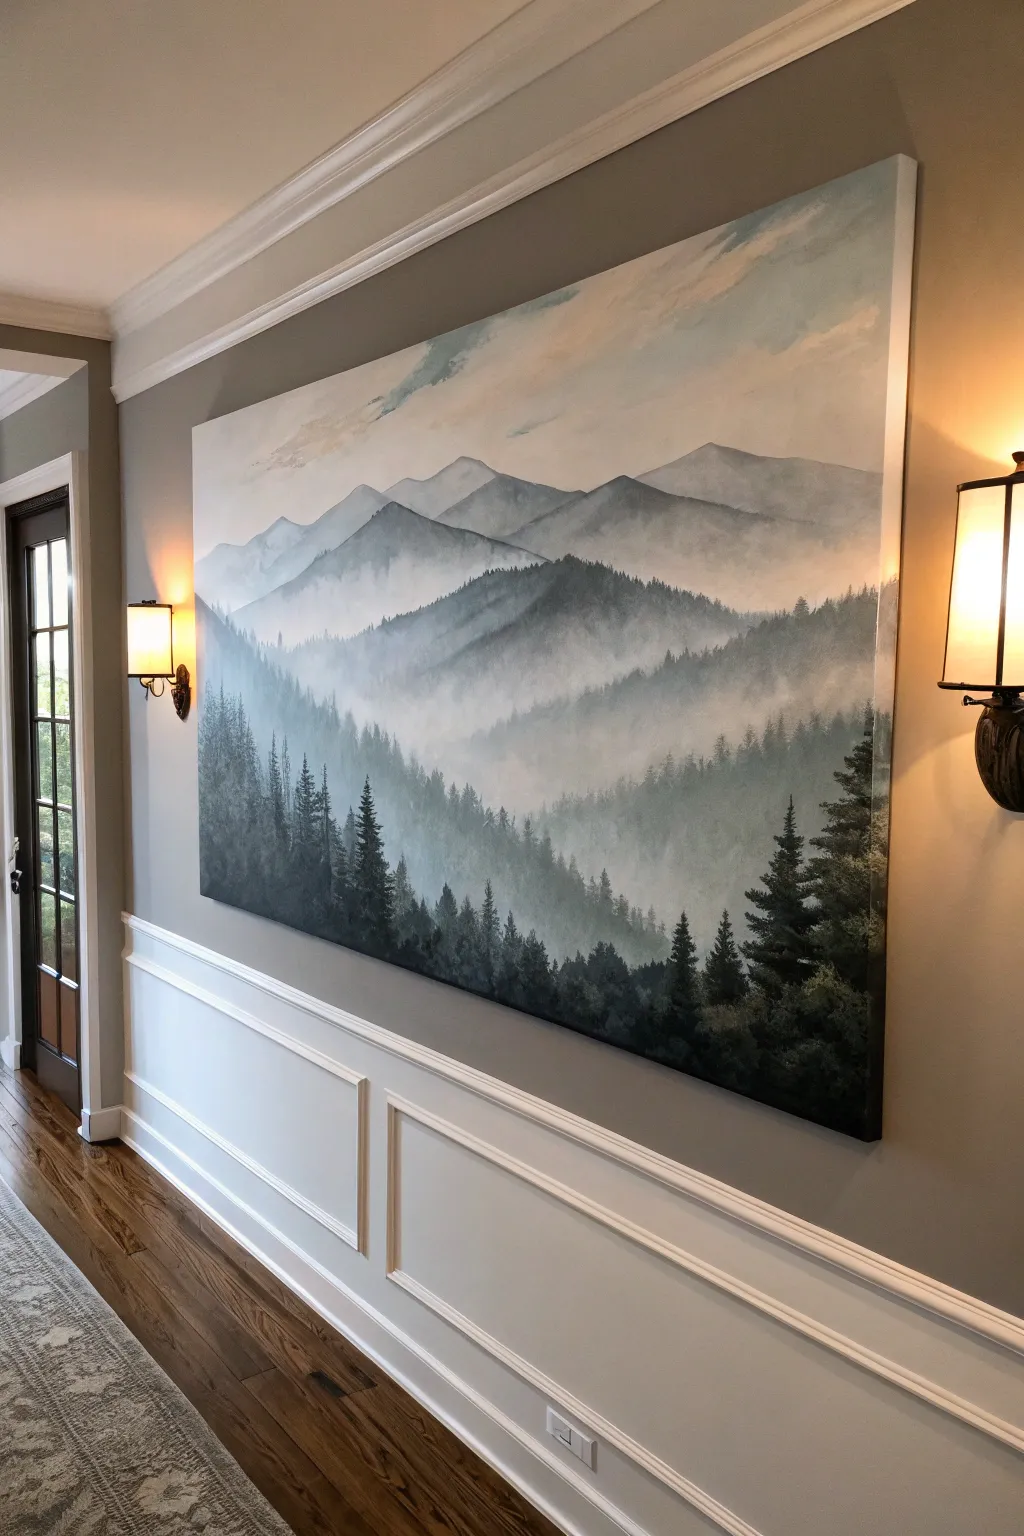
Bring the serene majesty of a fog-covered mountain range into your home with this large-scale acrylic landscape. By mastering simple layering techniques and atmospheric perspective, you can create a piece that adds depth, mood, and a modern touch to any neutral wall.
Step-by-Step
Materials
- Large panoramic canvas (e.g., 36”x60” or custom stretched)
- Acrylic paints: Titanium White, Mars Black, Phthalo Blue (or Prussian Blue), Sap Green, Burnt Umber
- Large flat brush (2-3 inch) for blending
- Medium flat brush (1 inch)
- Small flat or filbert brush
- Fan brush (optional for trees)
- Detail liner brush
- Palette knife
- Water spray bottle
- Mixing palette or paper plates
- Easel or drop cloth for floor painting
Step 1: Setting the Atmosphere
-
Prepare the sky gradient:
Begin by determining your horizon line, roughly 1/3 down from the top. Mix a very large amount of Titanium White with the tiniest dot of Phthalo Blue to create an icy, pale blue. -
Paint the sky:
Using your largest brush, paint the top portion of the canvas. Start with the blue mix at the very top and gradually add more white as you move downward, blending smoothly so the sky becomes almost pure white near the first mountain ridge. -
Add faint clouds:
While the sky is still slightly tacky, mix a tiny bit of Burnt Umber into your white to create a warm cream color. Scumble in soft, wispy clouds near the top right, keeping brushstrokes loose and indistinct.
Step 2: Painting the Distant Ridges
-
Mix the furthest mountain color:
The key to this painting is atmospheric perspective—things get lighter and bluer as they recede. Mix clear water with a small amount of Phthalo Blue and white to create a very transparent, pale wash. -
Shape the first ridge:
Paint the outline of the furthest, highest peaks. Keep these shapes simple and geometric—mostly triangles with softened tops. Fill them in with your pale wash. -
Create the heavy mist:
Immediately while the paint is wet, dip a clean, damp brush into white paint. Blend the bottom edge of these mountains downward until they disappear completely into the white background canvas, simulating thick fog.
Pro Tip: Master the Mist
Keep a separate, dry 2-inch brush exclusively for blending. Use it to feather out wet paint edges into the white background to create that soft, ‘fogged-in’ look without muddying your colors.
Step 3: The Middle Ground Layers
-
Darken the mixture:
For the next layer of mountains, take your previous blue-white mix and add a touch more blue and a tiny bit of black. The value should be slightly darker than the previous ridge. -
Paint the second ridge:
Create a new mountain line that overlaps the first one. Ensure these peaks are slightly lower on the canvas to create depth. -
Introduce texture:
As you fill in this layer, use vertical brush strokes to suggest distant tree lines, but keep them extremely blurry. I find misting the canvas lightly with water helps keep the paint workable for blending. -
Blend the fog line:
Just like the first layer, use a clean brush and white paint to vigorously blend the bottom edge of this ridge into a misty, undefined haze. -
Create the third ridge:
Mix a distinctly darker grey-blue by adding more black and a touch of Sap Green to your base color. Paint this ridge lower down, making the mountain slopes longer and more sweeping.
Level Up: Metallic Glint
Mix a tiny amount of iridescent pearl medium or silver paint into your lightest mountain layer. It will catch the light subtly as you walk by, mimicking sun hitting a snowy peak.
Step 4: The Foreground Forest
-
Mix deep forest greens:
For the closest elements, color saturation returns. Mix a dark, moody value using Sap Green, Phthalo Blue, and Mars Black. It should look almost black on the palette but green when spread thin. -
Establish the tree line base:
Paint a rolling hill shape at the very bottom of the canvas. Unlike the upper layers, do not fade this bottom edge out; fill it solidly down to the frame. -
Paint individual tree trunks:
Using your smallest flat brush or a liner brush, paint thin vertical lines rising from the dark hill mass. Vary their heights—some tall majestic pines, some shorter saplings. -
Add pine branches:
Using a small flat brush turned on its chisel edge (or a fan brush), tap horizontal zig-zag patterns down the vertical lines. Start narrow at the top and get wider at the base of the tree. -
Vary the tree density:
On the far right and left edges, group the trees densely to frame the composition. In the center valley area, keep the trees slightly sparser and lighter in value to suggest the mist is creeping in. -
Highlight the tips:
Mix a slightly lighter, muted green (add a touch of white and yellow to your dark mix). Lightly tap this color onto the tops of the foreground trees on the right side only, simulating a soft light source. -
Final mist integration:
To seat the foreground trees into the scene, dry brush a tiny amount of white glaze horizontally across the base of the trees to make them look like they are rising out of the fog.
Step back and admire the tranquil depth you have created in your space

PENCIL GUIDE
Understanding Pencil Grades from H to B
From first sketch to finished drawing — learn pencil grades, line control, and shading techniques.
Explore the Full Guide
City Skyline Lines for a Sleek Living Room Statement
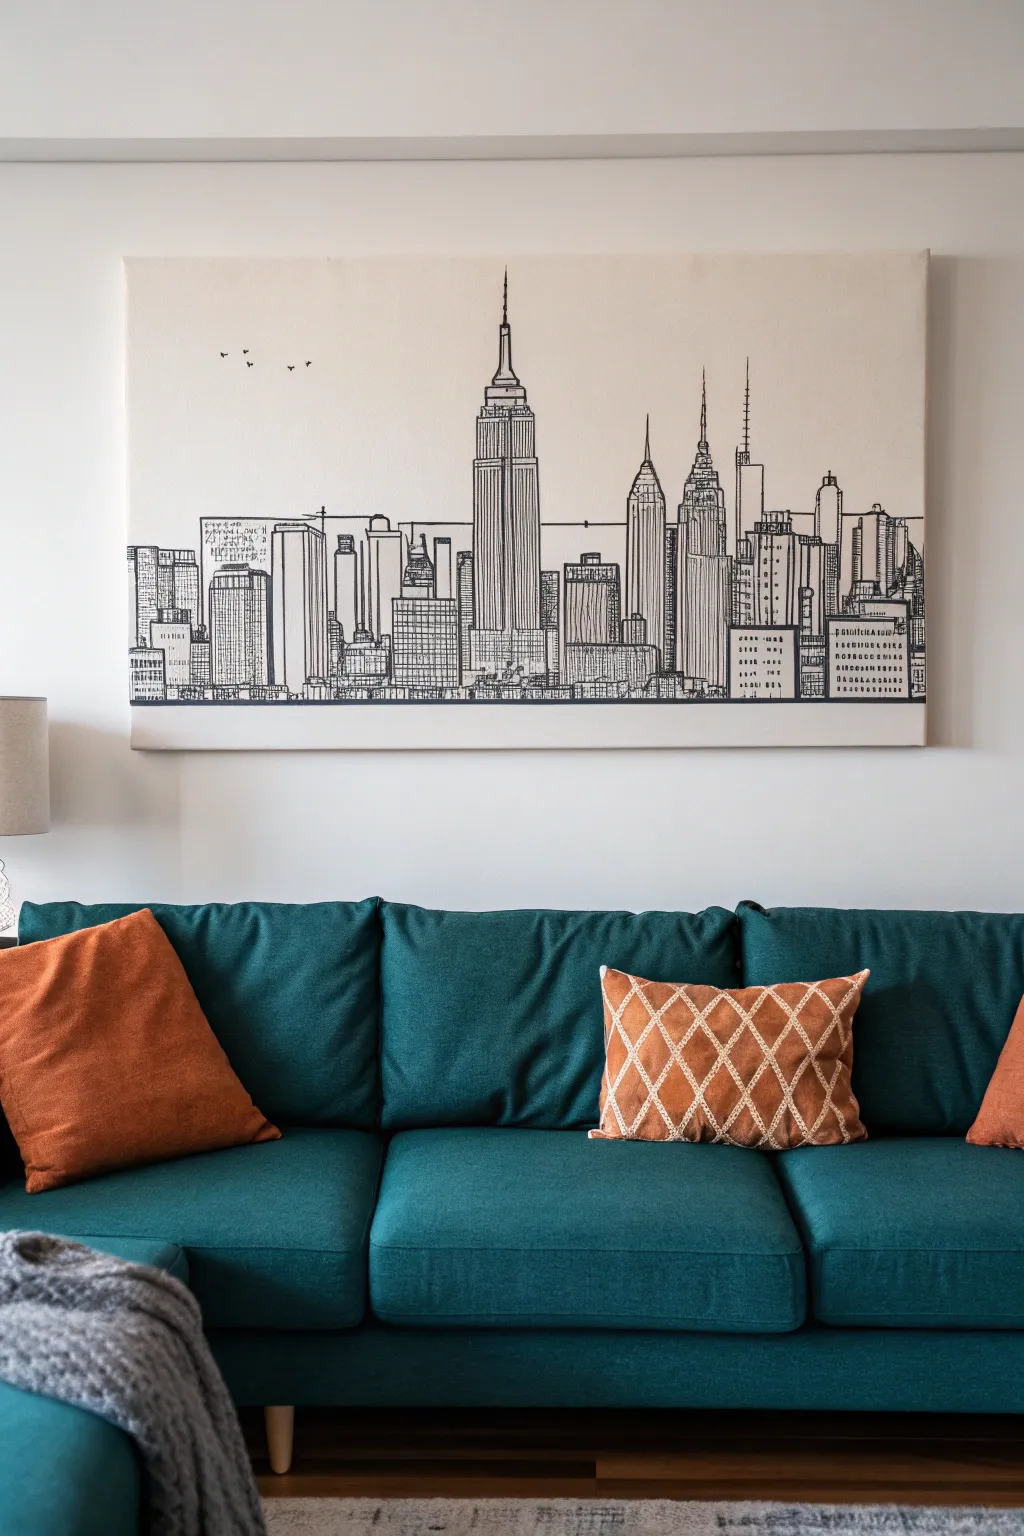
Capture the architectural elegance of a bustling metropolis with this clean, line-art style canvas. Using simple black markers or paint pens on a large scale creates a sophisticated focal point that anchors your living room with modern urban flair.
Step-by-Step Guide
Materials
- Large stretched canvas (e.g., 24×48 inches)
- Black acrylic paint markers (fine and medium tips)
- Black acrylic paint (matte)
- Fine liner brush (size 0 or 00)
- Graphite transfer paper
- Pencil and eraser
- Long ruler or T-square
- Masking tape
- Reference photo of a skyline (NYC depicted here)
- Computer or local print shop for reference enlargement
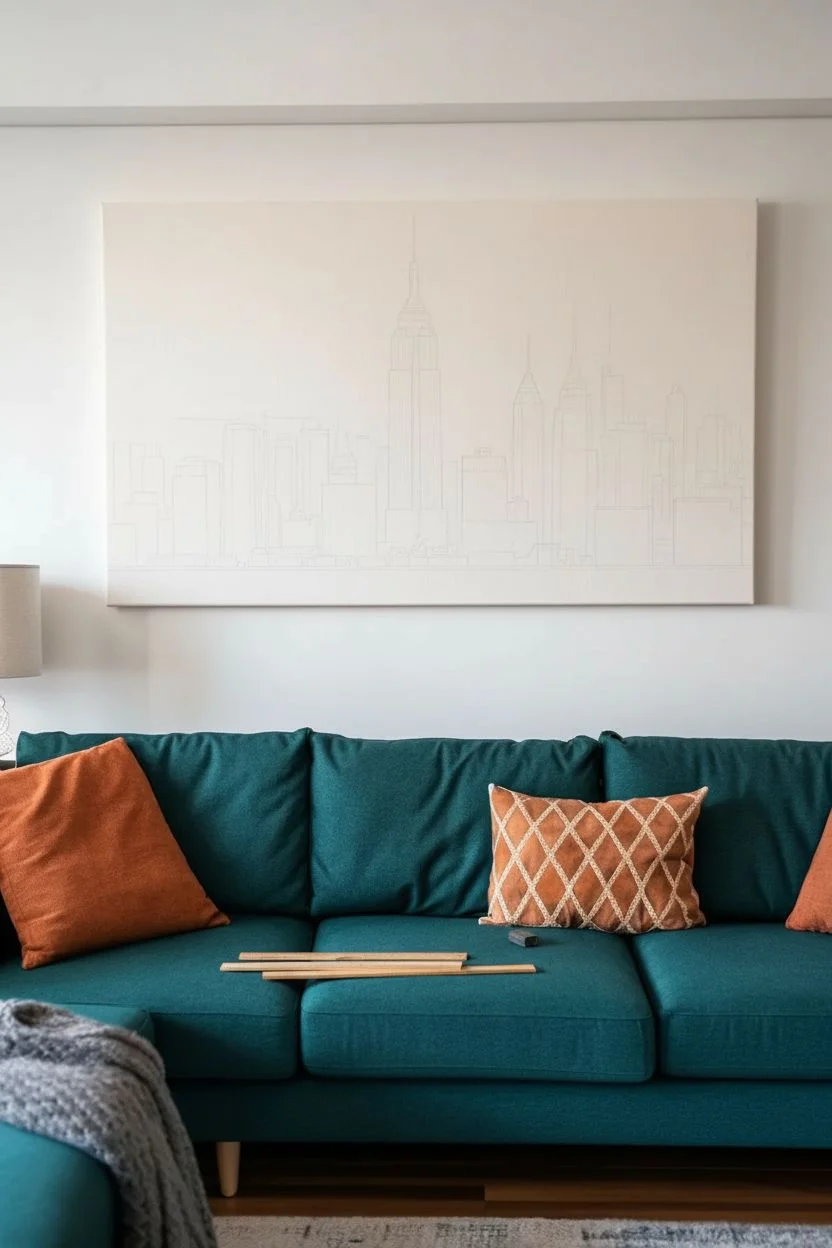
Step 1: Preparation & Layout
-
Choose your view:
Select a high-contrast skyline photo. The example uses classic NYC architecture, but any city with distinct silhouettes works well. Convert your image to black and white on your computer to see the lines clearly. -
Create the scale template:
Since drawing freehand on a large canvas is risky, print your skyline image across multiple sheets of paper (tiled printing) to match the size of your canvas. Tape these sheets together to form one large paper template. -
Position the horizon:
Decide where the ground line sits. In the example, the buildings start quite low, leaving plenty of negative space above for an airy feel. Measure and mark a light horizontal line across the bottom third of the canvas using your ruler. -
Transfer the design:
Place graphite transfer paper dark-side down on the canvas. Tape your paper template over it. I prefer to tape the top edge securely so I can lift the bottom like a flap to check my progress without shifting alignment. -
Trace the outlines:
Using a pencil, trace the major outlines of the buildings. Don’t worry about every single window yet; focus on the main vertical lines, distinct roof shapes, spires, and the overall silhouette. -
Clean and refine:
Remove the template and transfer paper. If the graphite lines are too heavy, lightly dab them with a kneaded eraser until they are just faint guides. Use a ruler to straighten any vertical lines that look shaky.
Don’t Be Perfect
Embrace the ‘sketchy’ look. If a line isn’t perfectly straight or a window fill is messy, leave it. These imperfections imitate an architectural study and add character.
Step 2: Inking the Structures
-
Establish the main verticals:
Using a medium-tip black acrylic paint marker, go over the primary vertical structural lines of the skyscrapers. Use a ruler for the long straight edges to keep them crisp. -
Detail the spires:
Switch to a fine-tip marker or a liner brush with black acrylic paint for delicate areas like the antenna needle on the Empire State Building or the Art Deco details of the Chrysler Building. -
Add horizontal definitions:
Draw the horizontal dividers between floors or sections of buildings. These don’t need to be perfectly uniform; slight variations add to the hand-drawn, sketched aesthetic shown in the photo. -
Fill in the windows:
This step requires patience. For the ‘filled’ windows, use short, quick vertical hatching lines rather than coloring in solid blocks. This keeps the texture light. Vary the density of lines to suggest shadows or reflections. -
Create distinct textures:
Give different buildings different personalities. Use grid patterns for modern towers, vertical stripes for older skyscrapers, and jagged zig-zags for more detailed facades.
Step 3: Finishing Touches
-
Ground the city:
Along the very bottom edge where the buildings meet the ‘ground,’ thicken the line work slightly. You can add a few scribbled, erratic horizontal lines to suggest street level activity or trees without drawing specifics. -
Add atmospheric elements:
In the large negative space above the skyline, add three or four tiny, simple bird silhouettes. Keep them small and off-center to balance the composition. -
Check line weight consistency:
Step back five feet from the canvas. Identify any buildings that look too faint and go over key outlines with the medium marker to ensure they pop against the white background. -
Erase and clean:
Once the ink is completely dry (give it at least an hour to be safe), gently erase any remaining visible pencil guide marks. -
Seal the work:
Apply a clear matte varnish spray over the entire canvas. This protects the marker ink from fading and smudging over time.
Marker Flow Issues?
If acrylic markers skip on the canvas texture, switch to a liner brush with thinned black paint for long lines. It flows over the weave better than felt tips.
Hang your new cityscape above the sofa and enjoy the urban sophistication it brings to your space
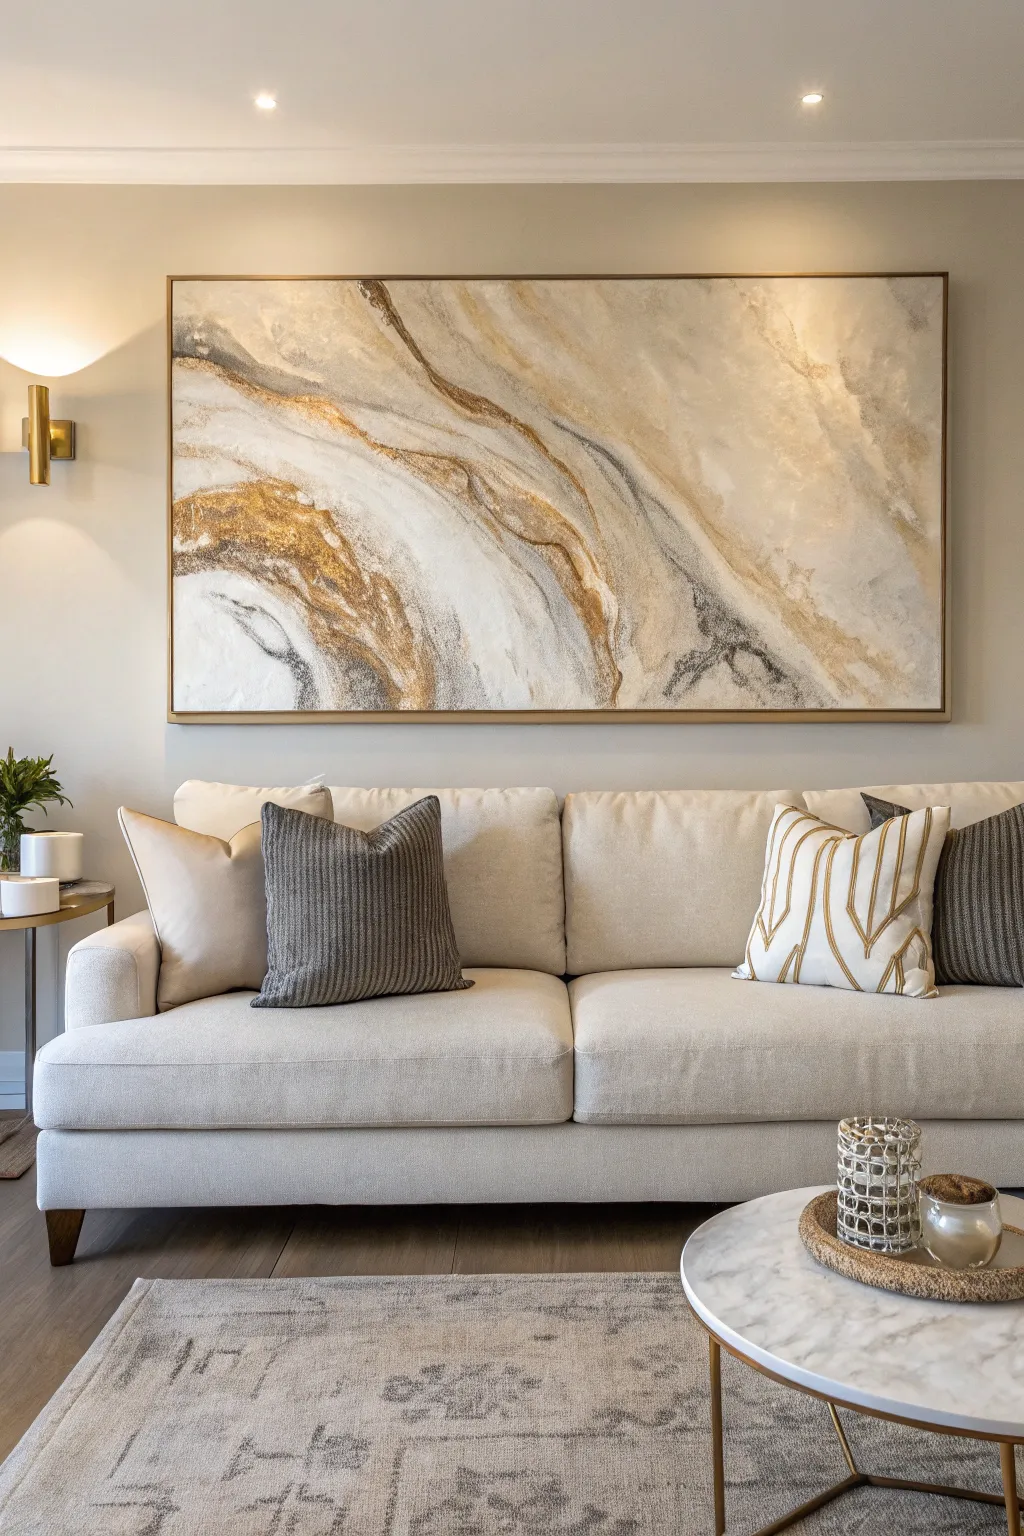
Geometric Blocks That Match Your Living Room Accent Colors
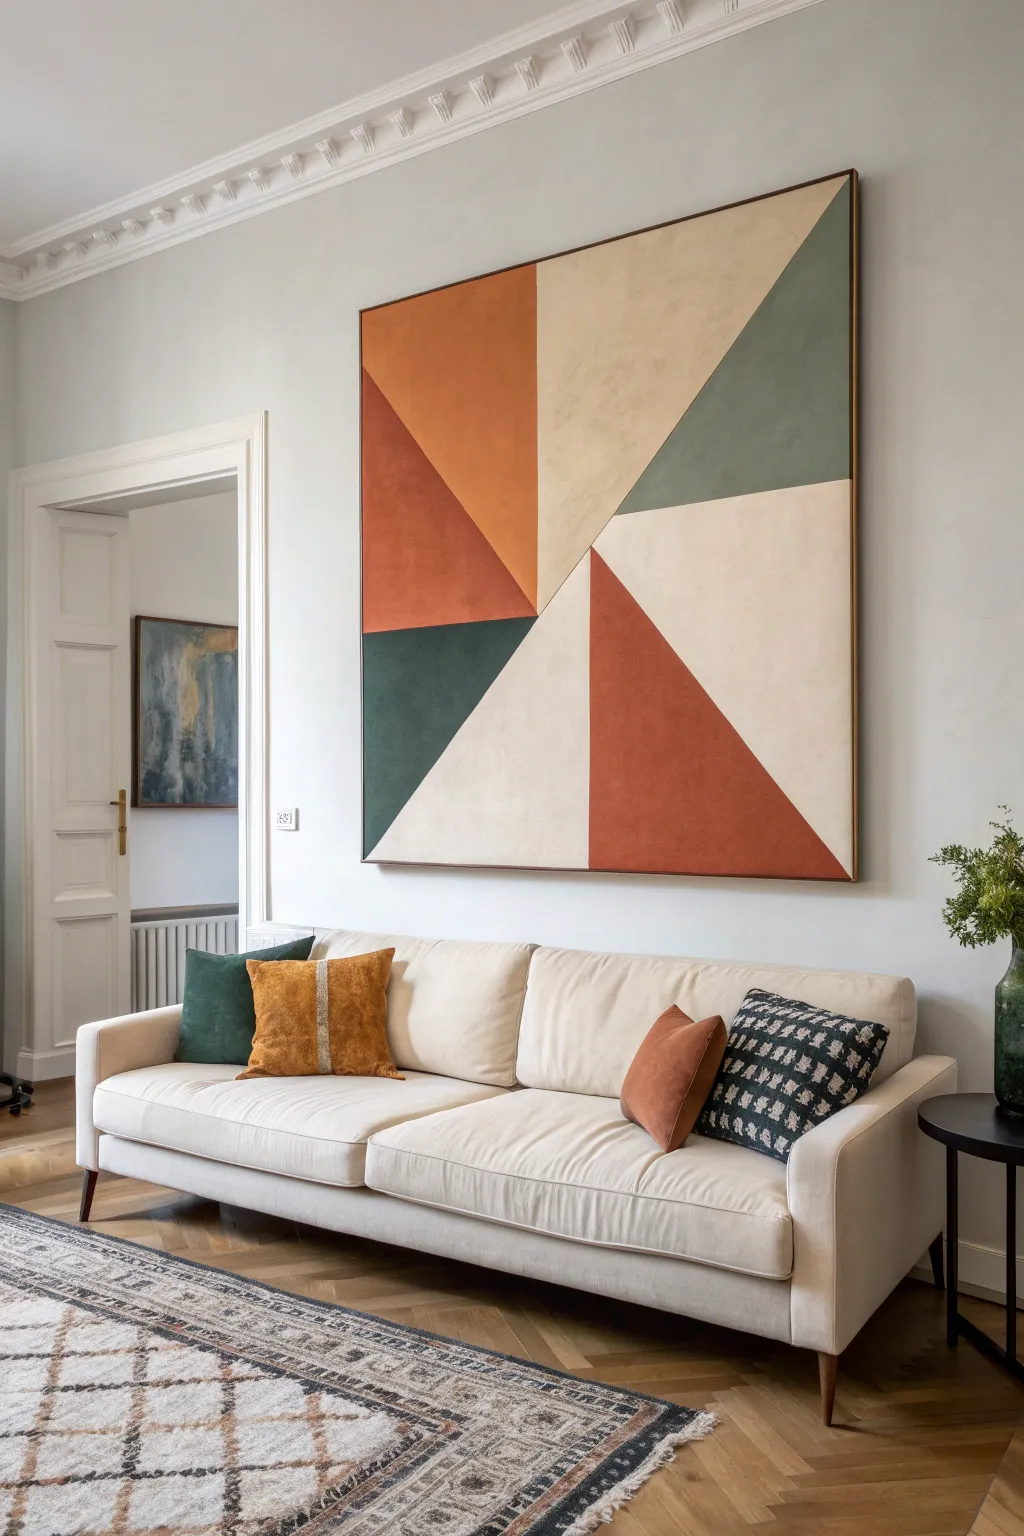
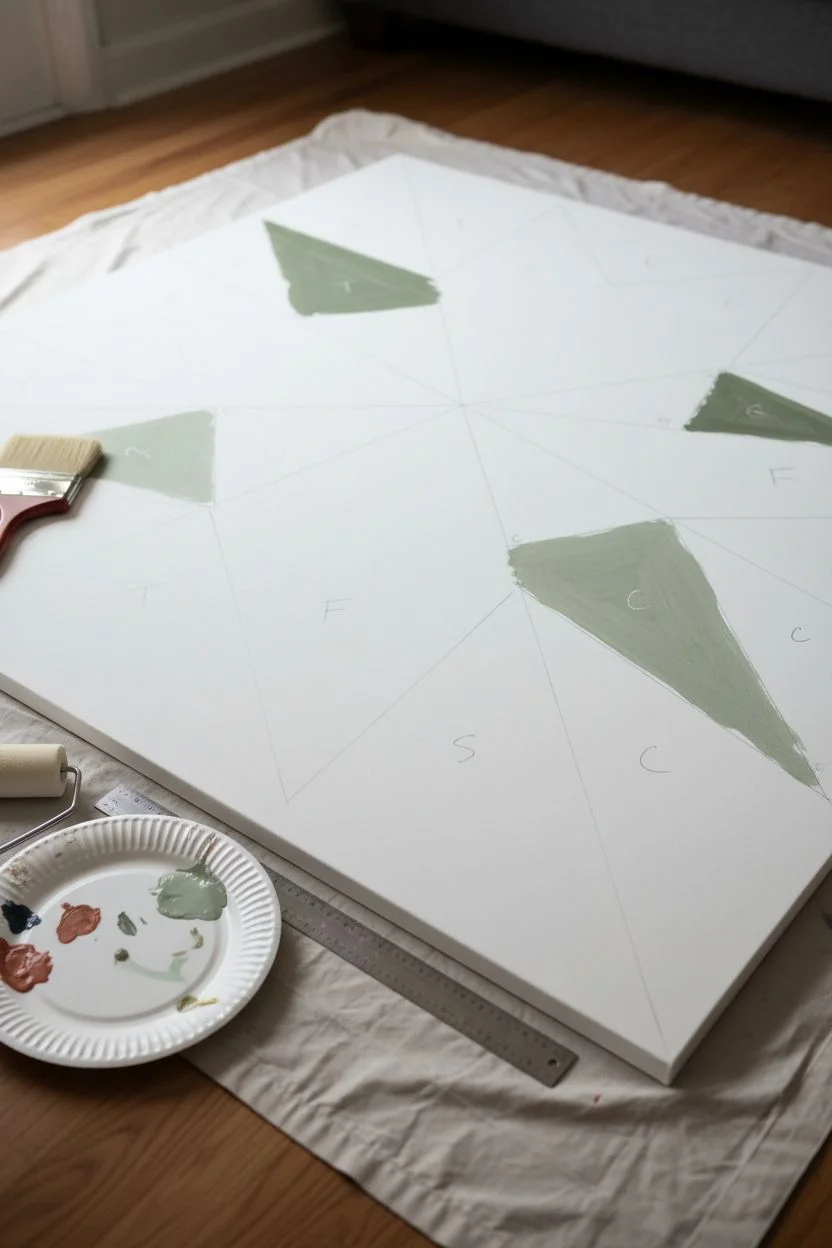
This striking large-scale artwork uses bold, angular geometry to anchor your living space with warmth and sophistication. By echoing the terracotta and sage tones found in your accent pillows, you can create a cohesive custom piece that feels simultaneously modern and timeless.
Step-by-Step Tutorial
Materials
- Large square canvas (48×48 inches recommended)
- Acrylic paints (terracotta, forest green, sage green, cream/off-white)
- White gesso
- Painter’s tape (1-inch width, delicate surface grade)
- Large flat paint brushes (2-3 inches)
- Pencil
- Long straight edge or yardstick
- Paint rollers (small foam rollers work best)
- Palette or paper plates
- Matte varnish (optional)
Step 1: Planning and Priming
-
Prepare the canvas:
Start by applying a coat of white gesso to your entire canvas. Even if the canvas came pre-primed, an extra layer adds tooth and ensures your geometric lines stay crisp later on. -
Smooth the surface:
Once the gesso is completely dry, lightly sand the surface with fine-grit sandpaper if you prefer a smoother finish, then wipe away any dust with a tack cloth. -
Map the center point:
Using your yardstick, measure and mark the exact center of the canvas lightly with a pencil. This central point will be the convergence zone for your triangular spikes. -
Sketch the primary lines:
Draw lines radiating from that center point to the outer edges of the canvas. Don’t worry about perfect symmetry; vary the width of the triangles to create dynamic movement like a pinwheel. -
Define the color zones:
Lightly write a letter code (like ‘T’ for terracotta, ‘C’ for cream) inside each triangle section so you don’t lose track of your color balance while painting.
Bleeding Lines?
If paint seeps under the tape, wait for it to dry fully. Then, place a piece of tape precisely over the ‘good’ line and paint over the mistake with the correct color to fix it.
Step 2: Taping and Painting
-
Tape the first batch:
Apply painter’s tape along the pencil lines for your first set of non-adjacent triangles. You can’t paint touching shapes simultaneously, or the colors will bleed. -
Seal the tape edges:
To get razor-sharp lines, brush a very thin layer of your base cream color (or matte medium) over the edge of the tape. This seals any gaps so the colored paint won’t seep underneath. -
Mix your palette:
Prepare your acrylic colors. For that earthy, matte look seen in the photo, mixing a tiny bit of white into your dark greens and oranges can soften them just enough. -
Paint the first sections:
Using a flat brush or foam roller, fill in the exposed triangles. Apply the paint in smooth, even strokes, working from the tape inward to avoid pushing paint under the edge. -
Apply a second coat:
Let the first layer dry to the touch, then apply a second coat to ensure rich, opaque coverage, especially for the deep forest green and rust sections. -
Remove tape immediately:
I prefer to pull the tape while the paint is still slightly tacky rather than fully dry. Peel it back slowly at a sharp 45-degree angle to reveal crisp lines.
Add Texture
Mix a texture gel or modeling paste into your acrylics before painting. This mimics the heavy canvas feel and adds tactile depth to the large color blocks.
Step 3: Finishing the Composition
-
Allow thorough drying:
Wait until the painted sections are completely dry. This is crucial because you will now need to place tape over these fresh areas to paint the remaining triangles. -
Tape the remaining sections:
Apply fresh tape along the dry painted edges to mask off the remaining blank triangles. Press the edges down firmly. -
Paint the final triangles:
Fill in the remaining sections with your cream, sage, and terracotta colors, following the same sealing and painting process as before. -
Detail tight corners:
Use a smaller angled brush to carefully fill in the very center point where all the triangles meet, ensuring no white gaps are left visible. -
Remove final tape:
Peel the final strips of tape to reveal the complete geometric pattern. -
Touch up:
Inspect your lines. If any paint bled through, use a small detail brush and the appropriate background color to tidy up the edges. -
Seal the artwork:
Once the entire piece has cured for 24 hours, apply a clear matte varnish to protect the surface and unify the sheen across all colors.
Hang your new masterpiece prominently behind the sofa to instantly pull the room’s color story together


Fluid Acrylic Swirls for Movement Across a Long Wall
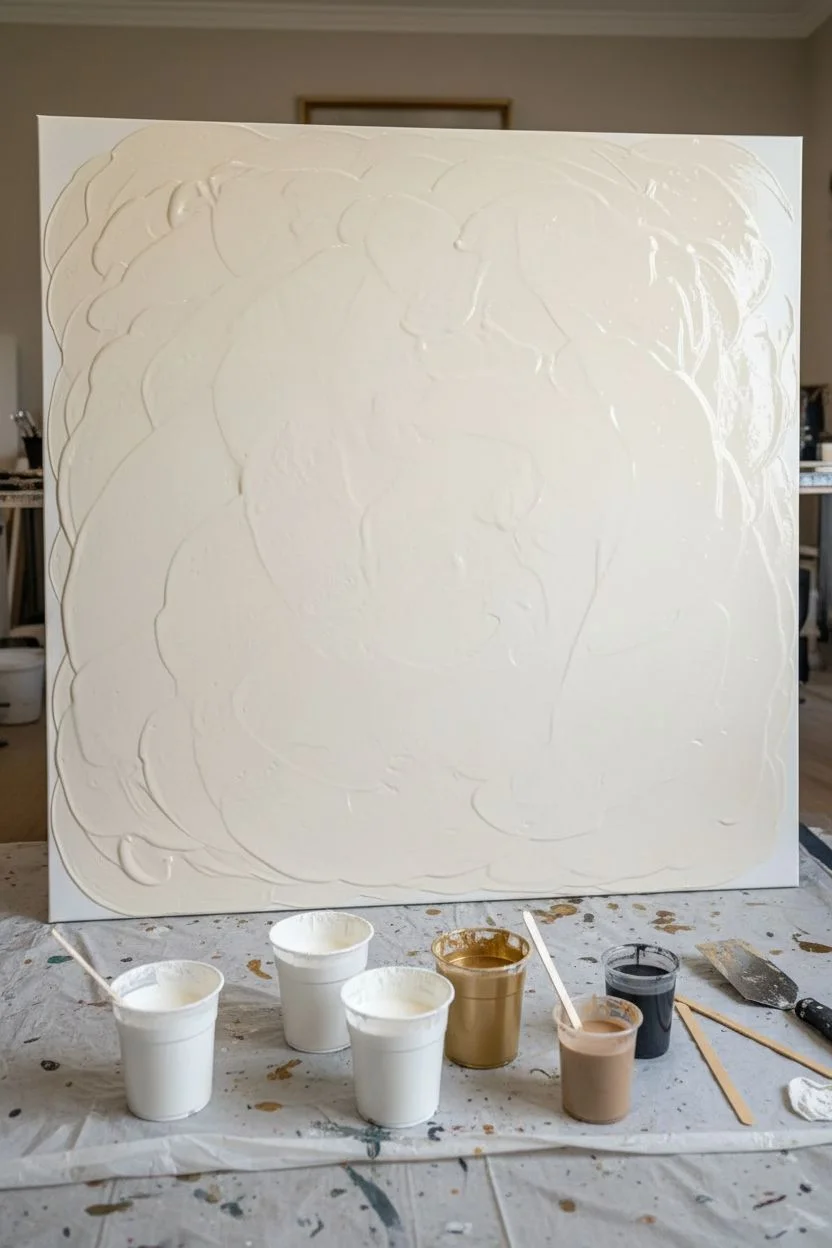
Transform a large, blank canvas into a sophisticated statement piece that mimics natural stone with soft, fluid movements. This project uses high-flow acrylics and metallic accents to create organic veins of gold and grey through a sea of calming creams and whites, perfectly capturing that high-end gallery aesthetic.
Detailed Instructions
Materials
- Large rectangular canvas (e.g., 60″ x 40″)
- Gesso (white)
- Heavy body acrylic paints (Titanium White, Unbleached Titanium, Raw Umber, Paynes Grey)
- Metallic Gold acrylic paint or Gold fluid acrylic
- Pouring medium (Floetrol or Liquitex)
- Silicone oil (optional, for cells)
- Plastic cups and stirring sticks
- Hairdryer with a cool setting
- Large palette knife or spreading trowel
- Gold leaf sheets and gilding adhesive (optional)
- High-gloss varnish
- Drop cloth and gloves
Step 1: Preparation and Base Layer
-
Prime the Surface:
Even if your canvas is pre-primed, apply an extra coat of white gesso to ensure a smooth, non-absorbent surface. Let this dry completely before starting the pour. -
Mix Your Paints:
In separate cups, mix your acrylic paints with the pouring medium. Aim for a ratio of roughly 1 part paint to 2 parts medium, adjusting until the consistency is like warm honey. You want it fluid but not watery. -
Create the Color Palette:
Prepare large cups of White and Unbleached Titanium (cream). Prepare smaller cups of Metallic Gold, Raw Umber mixed with a little white for a beige tone, and a small amount of Paynes Grey. -
Lay the Foundation:
Pour a generous amount of the White and Unbleached Titanium mixture across the canvas. You don’t need to cover every inch yet, but create large puddles that will serve as the lubricated surface for the colors to glide on. -
Spread the Base:
Use a large palette knife or trowel to spread the white and cream base evenly across the canvas, ensuring the edges and corners are covered. This ‘wet canvas’ technique is crucial for soft transitions.
Muddy Colors?
If your colors are blending into a brown mess, you are over-working the paint. Stop blowing the dryer over the same spot repeatedly; let the layers sit on top of each other.
Step 2: Creating the Fluid Composition
-
Pour the Color Ribbons:
Drizzle ribbons of your colored paints (Gold, Beige, Grey) diagonally across the canvas. I like to follow a natural, winding path rather than straight lines to mimic geological formations. -
Add Contrast:
Add very thin, deliberate veins of the Paynes Grey or dark Raw Umber within the gold and beige ribbons. Less is more here; these dark accents define the composition. -
The Air Manipulation:
Using a hairdryer on the ‘cool’ and ‘low’ setting, gently push the white base paint *over* parts of your colored ribbons. This creates a hazy, submerged effect. -
Reveal the Color:
Now, blow the paint back out from the center of the ribbons towards the edges, feathering the colors into the white background. Use quick, sweeping motions with the dryer to create those wispy, smoke-like edges found in marble. -
Refine with Breath:
For detailed areas where the hairdryer is too powerful, use a straw or just your own breath to manipulate small veins of gold or grey, branching them out into delicate fractals.
Step 3: Gilding and Finishing
-
Inspect and Tilt:
If the composition looks too static, gently tilt the canvas slightly to encourage slow movement and elongation of the shapes. Be careful not to let the paint run off the edge entirely. -
The Long Dry:
Allow the painting to dry undisturbed for at least 48 to 72 hours. Since the paint is thick, drying it too quickly can cause cracking, so keep it away from direct heat or fans. -
Enhance with Leaf (Optional):
Once fully dry, look for the gold painted areas. Use a small brush to apply gilding adhesive to specific highlights, creates texture and a true metallic shine that catches the light. -
Apply Gold Leaf:
Press the gold leaf sheets onto the tacky adhesive. Let it set for an hour, then use a dry, soft brush to dust away the excess leaf, leaving behind brilliant metallic veins. -
Seal the Artwork:
Finish with two coats of high-gloss varnish. This not only protects the acrylics and gold leaf but specifically enhances the ‘wet stone’ look, deepening the contrast between the greys and golds.
Pro Tip: Metallic Pop
Mix a tiny drop of orange ink into your gold paint mixture. It makes the gold look richer and warmer against the cool grey and white background.
Hang your new masterpiece in a well-lit area to watch the gold veins shimmer throughout the day
Palette-Knife Impasto for Light-Catching Texture
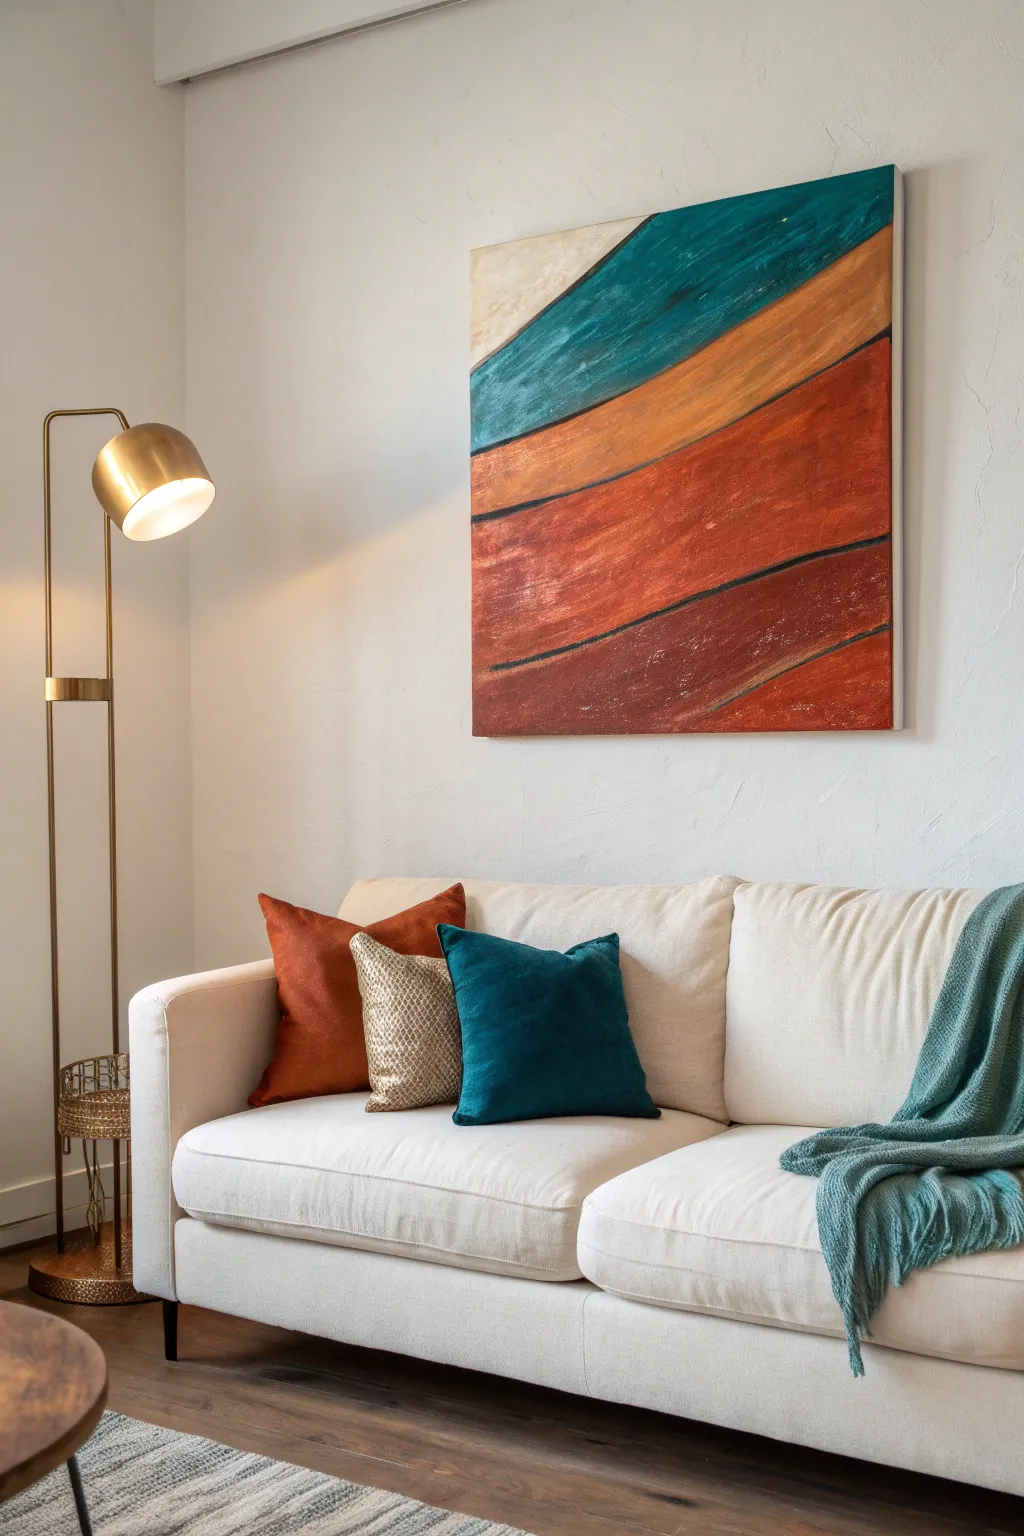
This striking abstract statement piece brings together the warmth of desert hues with cool, oceanic teal in bold, sweeping layers. By using heavy body acrylics and texturing tools, you’ll recreate the look of weathered strata or rolling dunes right on your canvas.
How-To Guide
Materials
- Large square gallery-wrapped canvas (approx. 36×36 inches)
- Heavy body acrylic paints: Titanium White, Teal/Turquoise, Yellow Ochre, Burnt Sienna, Burnt Umber, Cadmium Red, Deep Red/Maroon
- Modeling paste or gel medium
- Large flat paintbrush (2-3 inch)
- Palette knives (several sizes, focusing on wide blending knives)
- Pencil
- Mixing palette or paper plates
- Spray bottle with water (optional)
- Painter’s tape or cloth for wiping tools
Step 1: Preparation and Sketching
-
Prepare the canvas:
Place your large square canvas on an easel or a flat, protected work surface. Ensure the surface is clean and free of dust. -
Sketch the flow:
Using a pencil, lightly draw four flowing, curved lines across the canvas. These lines should start from the left side and slope gently upward toward the right, dividing the canvas into five distinct sections of varying thickness. -
Check the composition:
Step back to ensure the curves feel organic and rhythmic. The top sections should be slightly thinner, widening as you move towards the bottom to create a sense of weight.
Sticky Situation?
If the modeling paste drags too much, mist the canvas lightly with water. This lubricates the surface, allowing the knife to glide smoothly without lifting the layer underneath.
Step 2: Mixing and Texture Base
-
Mix the texture medium:
For a true impasto feel, mix a 50/50 ratio of your acrylic paints with modeling paste. This will hold the tool marks and create that rough, tactile surface. -
Create the top corner color:
Mix Titanium White with a tiny touch of Yellow Ochre to create a warm off-white cream color for the very top left corner. -
Mix the teal band:
Combine Teal and a touch of Burnt Umber to slightly desaturate the blue, making it look more like deep ocean water or aged turquoise stone. -
Mix the earth tones:
Prepare three separate warm mixtures: a golden Ochre for the middle band, a Burnt Sienna combined with Cadmium Red for the next layer, and a deep, dark Maroon/Rust for the bottom section.
Gilded Edge
For a luxe twist, apply gold leaf along the dark dividing lines once the paint is fully dry. The metallic shine will contrast beautifully against the matte, earthy textures.
Step 3: Applying Color
-
Paint the cream corner:
Use a large flat brush to apply the cream mixture to the top left section. Don’t worry about perfect smoothness; brushstrokes add character. -
Apply the teal wave:
Switch to the teal mixture. Fill the second section, allowing the paint to be thick. Use long, sweeping strokes that follow the curve of your pencil line. -
Fill the ochre band:
Apply the golden ochre mix to the middle strip. I like to let this color overlap the teal line ever so slightly to ensure there are no unintended white gaps. -
Add the terracotta layers:
Paint the remaining two bottom sections with the Burnt Sienna and Deep Maroon mixtures respectively, maintaining the directionality of the curves.
Step 4: Refining and Texturing
-
Introduce the palette knife:
While the paint is still tacky, use a clean palette knife to scrape and drag across the surface. This reveals the canvas tooth in spots and creates a weathered look. -
Create the dividing lines:
Load the edge of a palette knife with dark Burnt Umber or Black paint. Carefully drag this edge along the boundaries between your color bands to create distinct, dark separation lines. -
Feather the dark lines:
Gently pull the dark paint from the dividing lines slightly into the color bands below them. This creates a shadow effect and integrates the lines so they don’t look like cartoons. -
Add highlights:
Mix a little white into your original terracotta and ochre colors. Lightly skim the palette knife over the dried textured areas to catch the raised ridges, adding depth and a sun-bleached effect. -
Scumble for texture:
Take a dry brush with a tiny amount of light paint and ‘scumble’ (scrub lightly) over the maroon and teal sections to create a worn, vintage appearance. -
Refine the edges:
Ensure the design wraps around the sides of the canvas for a professional, frameless finish, carrying the bands of color all the way to the back staples. -
Final cure:
Because the paint application is thick with medium, allow the painting to dry flat for at least 24-48 hours before hanging.
Hang your new textured masterpiece in a well-lit area to let the shadows play across the impasto ridges
Warm Sunset Gradient to Make the Living Room Glow
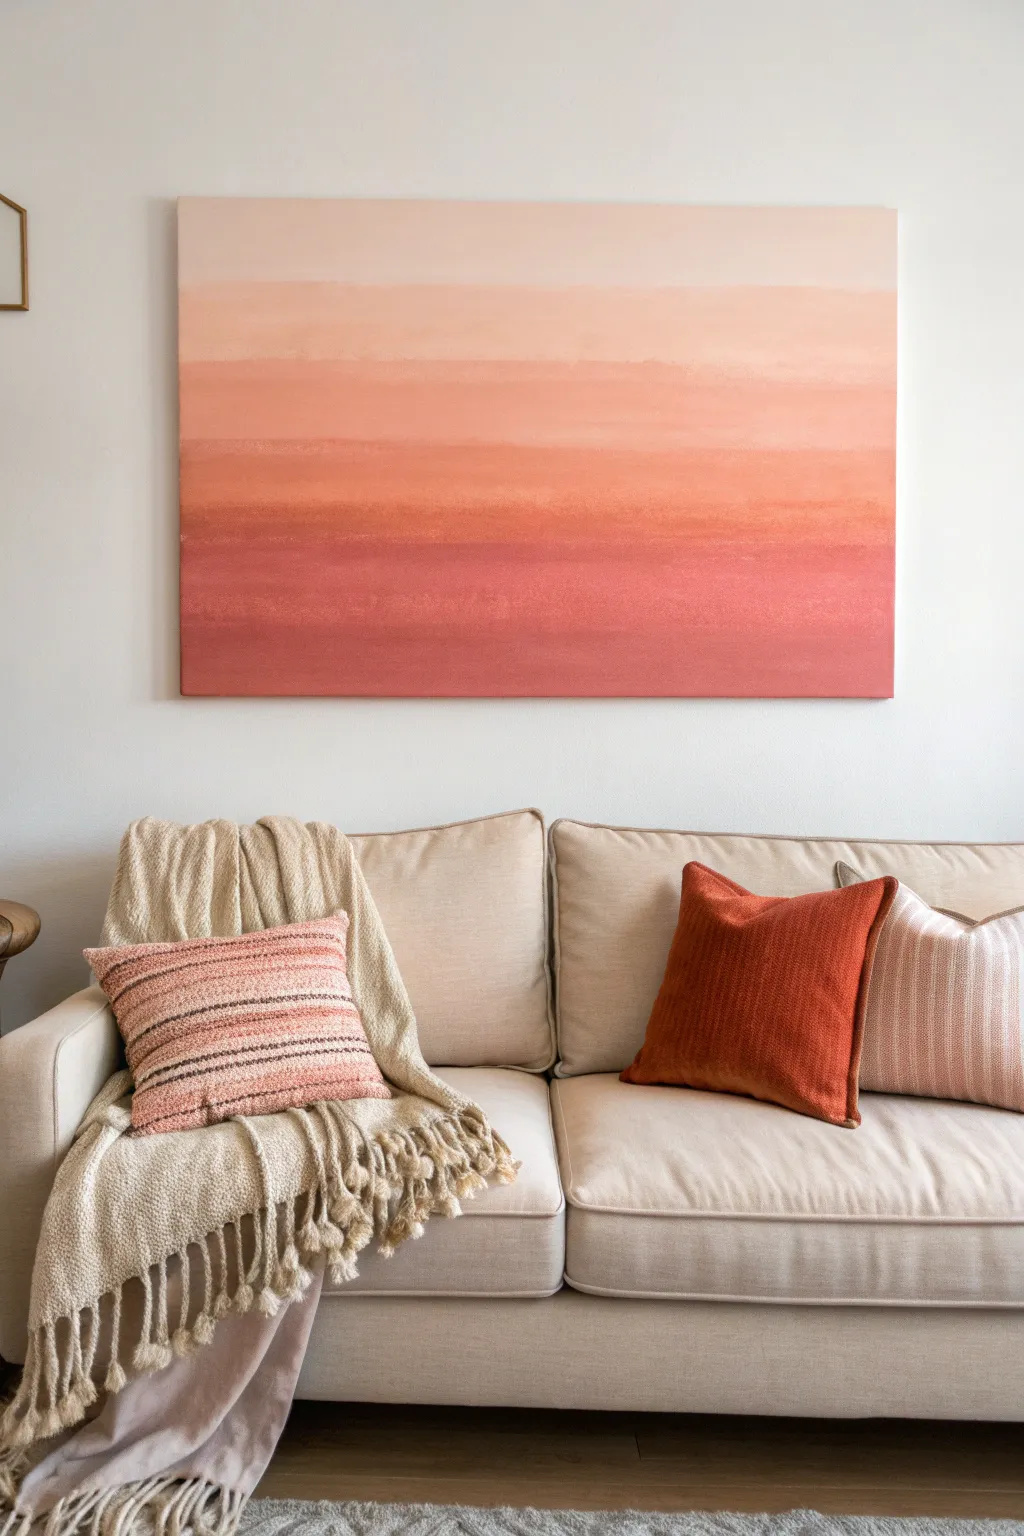

Bring the warmth of golden hour into your living space with this soothing, large-scale gradient painting. This project focuses on subtle blending techniques to create a seamless transition from pale blush to deep terracotta, adding an instant glow to any room.
Step-by-Step
Materials
- Large stretched canvas (at least 36×48 inches)
- Acrylic heavy body paints (Titanium White, Unbleached Titanium, Light Pink, Cadmium Orange, Burnt Sienna, Alizarin Crimson)
- Large flat paintbrush (2-3 inch width)
- Medium flat paintbrush (1 inch width)
- Spray bottle with water
- Palette knife
- Large mixing palette or disposable plates
- Drop cloth
- Easel or flat work surface
Step 1: Preparation and Color Mixing
-
Set up your workspace:
Lay down your drop cloth and position your large canvas. If you don’t have an easel large enough, laying the canvas flat on a table or clean floor works perfectly for this wet-on-wet technique. -
Pre-mix your gradient values:
To ensure a smooth workflow, pre-mix five distinct shades before you start painting. You’ll need enough paint for each horizontal band. -
Mix the lightest shade:
Create your top color by mixing a large amount of Titanium White with a tiny dot of Unbleached Titanium and the smallest hint of Light Pink. It should look like a very pale, warm cream. -
Mix the mid-tones:
For the second color, darken your cream mix with more Light Pink and a touch of Cadmium Orange. For the middle band, mix equal parts Light Pink and Cadmium Orange for a vibrant salmon color. -
Mix the darkest shades:
Create the lower mid-tone using Cadmium Orange and Burnt Sienna. Finally, mix your bottom anchoring color using Burnt Sienna with a touch of Alizarin Crimson for that deep, rich rust tone.
Keep It Wet
Acrylics dry fast! Keep a spray bottle on hand to mist the canvas lightly every few minutes. This keeps the paint workable for smoother, seamless gradients.
Step 2: Applying the Base Layers
-
Dampen the canvas:
Lightly mist the entire canvas with your spray bottle. This stops the acrylics from drying too fast and helps the colors glide across the surface. -
Apply the top band:
Using your large 3-inch flat brush, apply the lightest cream mixture to the top 20% of the canvas. Use long, horizontal strokes from edge to edge. -
Apply the second band:
Clean your brush quickly (or grab a second large brush) and apply the soft pink-orange mix immediately below the cream section. Don’t worry about blending them perfectly yet; just get the paint on the canvas. -
Continue down the canvas:
Work your way down, applying the salmon, terracotta, and deep rust colors in successive horizontal bands. The bands should be roughly equal in height. -
Cover the edges:
Don’t forget to wrap the paint around the sides of the canvas as you go for a finished, gallery-wrapped look.
Step 3: Blending and Refining
-
Begin the wet blend:
Starting from the top, use a slightly damp, clean large brush to work the seam between the cream and the light pink. Use long, sweeping horizontal strokes. -
Feathering technique:
I like to use a very light hand here, lightly ‘feathering’ the brush back and forth over the transition line until the hard edge disappears. -
Working downwards:
Move to the next transition line (light pink to salmon). If the paint has become tacky, give it a very light mist of water to reactivate it. -
Create variation:
While blending the lower terracotta sections, allow some slightly unblended horizontal streaks to remain. This unevenness mimics the natural stratification of a sunset or horizon line. -
Intensify colors if needed:
Step back and assess the gradient. If a section looks too washed out, add a fresh layer of paint on top and re-blend edges gently. -
Smooth the final texture:
Take a large, dry brush and run it across the entire width of the canvas in one continuous motion for each colored section to smooth out distinct brush marks. -
Final drying check:
Acrylics dry darker, so wait about 20 minutes to see the true colors. -
Varnish protection:
Once fully cured (wait at least 48 hours), apply a matte or satin varnish to protect the surface and unify the sheen of the different paint mixtures.
Muddy Colors?
If your blend looks brown or muddy, wash your brush thoroughly between blending different color zones. A dirty brush drags dark pigment into light areas.
Enjoy the calming atmosphere your new gradient masterpiece brings to the room
Monochrome Blue Study for a Cool, Collected Living Room


Bring the calming influence of the ocean into your home with this large-scale abstract seascape. Using a monochromatic palette of blues and whites, this project focuses on layering and blending to create a serene, atmospheric horizon that anchors any room.
How-To Guide
Materials
- Large rectangular canvas (e.g., 36” x 60” or larger)
- Acrylic paints: Titanium White, Phthalo Blue (Green Shade), Ultramarine Blue, Prussian Blue, and Payne’s Gray
- Large flat paintbrush (2-3 inch width)
- Medium filbert brush
- Palette knife or plastic scraper
- Mixing palette or large paper plates
- Spray bottle with water
- Cup of water and paper towels
- Floetrol or acrylic glazing medium (optional, for smoother blending)
- Floating frame (optional, for finishing)
Step 1: Preparation and Sky Layer
-
Prepare your palette:
Squeeze out generous amounts of Titanium White and your lightest blue (Phthalo mixed with plenty of white). You will need large quantities for this expansive canvas, so prepare more than you think you need. -
Establish the sky zone:
Starting at the very top of the canvas, use your large flat brush to apply a horizontal band of the pale blue mixture. Don’t worry about perfect coverage yet; broad, sweeping strokes are best. -
Blend downwards:
As you move about a third of the way down the canvas, start mixing more Titanium White into your brush. Blend this into the blue above while the paint is still wet to create a soft, ombre fade. -
Create the atmospheric haze:
For the area just above the midway point, use almost pure Titanium White. Apply this horizontally with loose, uneven strokes. I find misting the canvas lightly with your spray bottle helps the white paint drift and blur like clouds.
Step 2: The Horizon and Mid-Ground
-
Define the horizon line:
Mix a mid-tone blue using Ultramarine and White. Paint a distinct, uneven line roughly across the middle of the canvas. This doesn’t need to be ruler-straight; a slightly organic wave looks more natural. -
Create texture with a palette knife:
While the horizon line is wet, use a palette knife or scraper to drag some white paint horizontally across the blue. This mimics the look of distant waves or foam catching the light. -
Deepen the color:
Below this horizon strip, introduce pure Ultramarine Blue. Paint a wide band that spans the width of the canvas, ensuring your brushstrokes run horizontally to maintain the water effect. -
Blend the transition:
Use a clean, damp brush to gently feather the edge where the mid-tone blue meets the darker Ultramarine. You want a perceptible shift in color, but not a hard, jarring line.
Uneven Blending?
If acrylics dry too fast and leave choppy lines, mist the canvas with water or mix a slow-drying medium into your paint to keep it workable longer.
Step 3: The Deep Ocean
-
Mix the darkest tones:
Combine Prussian Blue with a touch of Payne’s Gray to create a deep, moody navy color. This will anchor the bottom of your painting. -
Apply the base depth:
Fill the bottom third of the canvas with this dark mixture. Use heavy, confident horizontal strokes. Allow the texture of the brush bristles to show through slightly, adding richness to the ‘water’. -
Layering for complexity:
Dip your filbert brush into pure Prussian Blue (without the gray). Add streaks of this color into the dark bottom section while it’s still tacky. This adds dimension so the dark area isn’t just a flat block of color. -
Dry brushing technique:
Wipe most of the paint off your large brush. Lightly drag the dry brush horizontally across the transition zone between the deep water and the mid-ground water to marry the two sections together. -
Revisiting the white:
Once the blue layers are mostly dry, load a small amount of white onto a palette knife. Gently scrape it horizontally over select dark areas in the bottom half to suggest cresting waves or light hitting the water surface.
Pro Tip: Depth Perception
Make the bottom (closest) brushstrokes larger and more textured, and the top (distant) strokes smoother and flatter to create convincing depth.
Step 4: Refining and Finishing
-
Check the balance:
Step back about ten feet from your canvas. Look for any areas that feel too blocky or unblended. The goal is a dreamy, ethereal transition between the layers. -
Softening harsh lines:
If any horizontal lines look too sharp, mix a glazing medium with a tiny bit of the adjacent color and wash it over the line to soften the edge. -
Final highlights:
Add tiny touches of pure white potentially mixed with a speck of yellow (for warmth) or blue (for coolness) to the lightest part of the sky to make it glow. -
Seal the artwork:
Allow the painting to dry for at least 24-48 hours. Apply a satin or matte varnish to protect the surface and even out the sheen. -
Frame it:
Install the canvas into a thin, natural wood floating frame to complete the modern, gallery-worthy look shown in the inspiration image.
Hang your new masterpiece in a well-lit spot and enjoy the calm atmosphere it creates
Earthy Desert Shapes for a Modern Organic Look
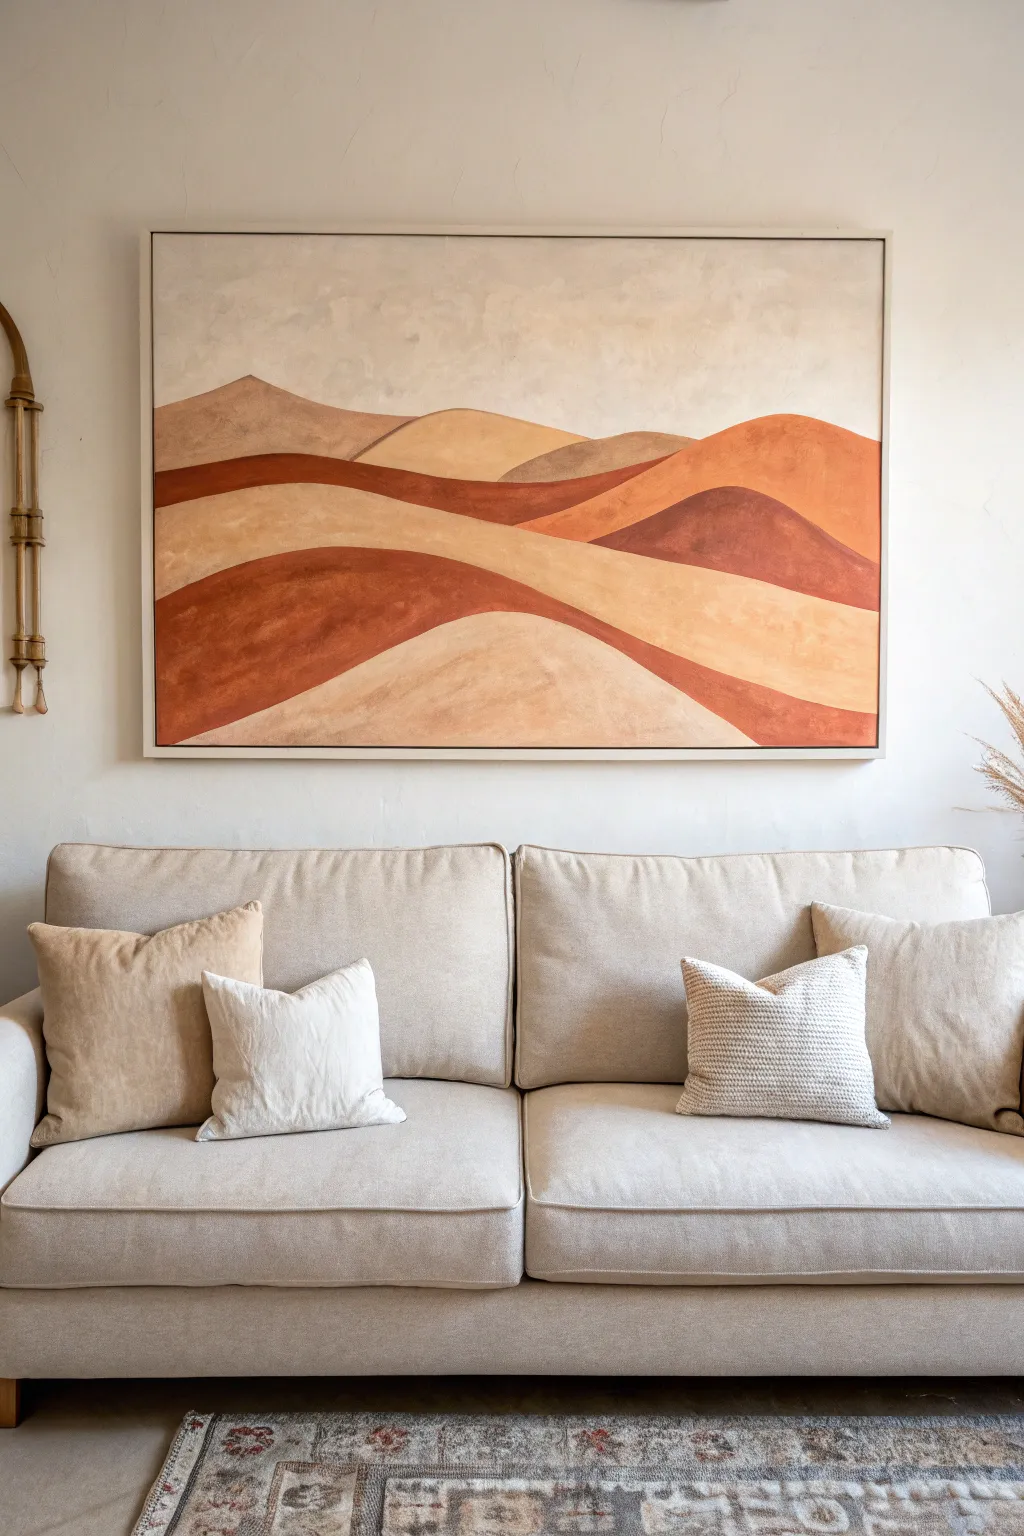
Bring the serene warmth of the desert into your home with this large-scale abstract landscape featuring flowing lines and a rich terracotta palette. This layered, organic painting captures the peaceful movement of sand dunes, creating a stunning modern statement piece that feels both grounded and ethereal.
Step-by-Step Guide
Materials
- Large stretched canvas (40×60 inches recommended)
- Acrylic paints (Titanium white, burnt sienna, yellow ochre, raw umber, burnt umber)
- Matte medium or gesso
- Large flat brushes (2-3 inches)
- Medium round brush
- Pencil and eraser
- Palette knife (optional for mixing)
- Water cups and paper towels
- easel or drop cloth for floor work
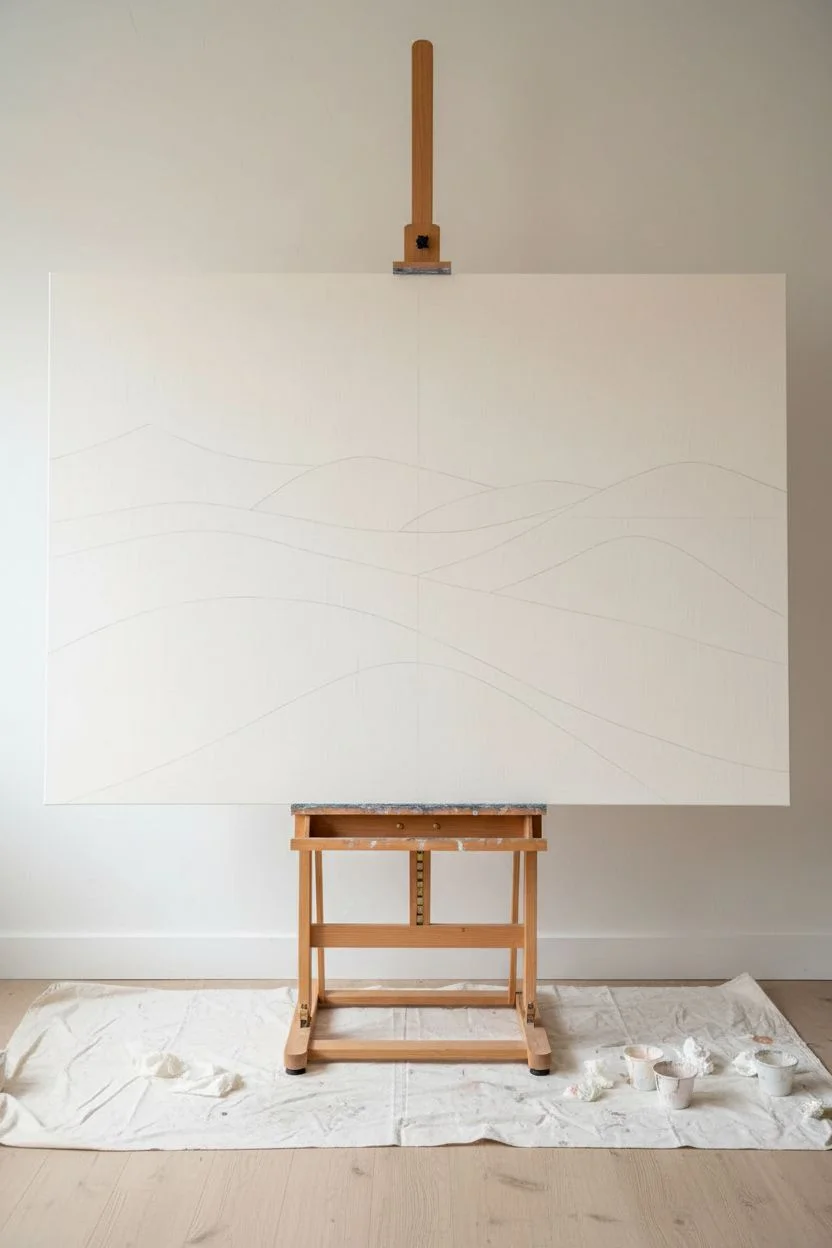
Step 1: Preparation and Sketching
-
Prime the surface:
Even if your canvas comes pre-primed, apply an extra coat of gesso to ensure a smooth, uniform texture. Let this dry completely before moving forward. -
Mix your base colors:
Prepare your palette by mixing four distinct shades: a creamy off-white for the sky, a light sandy beige, a medium terracotta, and a deep rust brown. You’ll want large amounts of each. -
Establish the horizon:
Using a pencil, lightly draw a rolling horizon line about one-third of the way down from the top of the canvas. This doesn’t need to be straight; a gentle curve works best for organic landscapes. -
Map out the dunes:
Draw flowing, intersecting S-curves starting from the sides and bottom, moving toward the center. Create about 4-5 distinctive ‘layers’ or dune shapes that overlap, ensuring the lines are smooth and continuous.
Clean Lines Hack
For ultra-crisp edges between the dunes, use painter’s tape or artist tape along your pencil lines. Seal the tape edge with a clear matte medium before painting to prevent bleed-under.
Step 2: Blocking in Color
-
Paint the sky:
Start at the top using your creamy off-white mixture (white plus a tiny touch of yellow ochre and raw umber). Use a large flat brush with horizontal strokes, blending slightly unevenly to suggest subtle atmospheric texture. -
Apply the lightest dune tones:
Identify the sections of your sketch that will be the sun-hit sandy areas. Fill these in with your light beige mixture. Don’t worry about perfect edges yet; just get the color on the canvas. -
Add the mid-tones:
Use your terracotta mix (burnt sienna plus yellow ochre and white) to fill in the secondary dune shapes. These usually sit between the lightest and darkest areas to create depth. -
Fill the deep shadows:
Paint the remaining dune shapes with your deep rust brown (burnt sienna plus burnt umber). This strong contrast is crucial for the graphic look of the piece. -
First drying phase:
Allow this initial block-in layer to dry completely. Acrylics dry darker, so assess if your colors need adjusting after this step.
Step 3: Building Texture and Depth
-
Refine the edges:
Go back over the contour lines where colors meet. Use a smaller round brush and careful hand to create crisp, clean separations between the hills. This sharpness gives the painting its modern feel. -
Create textural variety:
Mix a little matte medium or even a pinch of baking soda into your paint for specific sections. Re-apply a second coat to the lighter dunes, using erratic brushstrokes to mimic the graininess of sand. -
Add tonal variation:
While the paint is slightly wet on the darker dunes, blend in a tiny amount of raw umber near the bottom edges of the shapes. This creates a subtle gradient that hints at 3D form without being fully realistic. -
Soften the sky:
Create a wash by watering down some white paint. Lightly glaze over the sky area again with a large brush to push back any harsh brushstrokes and create a soft, cloud-like haze. -
Deepen the foreground:
The bottom-most shapes should feel closest to the viewer. Apply a final, saturated coat of your darkest rust color here to anchor the composition visually.
Muddy Colors?
If your rust colors look dull or grey, you likely added too much black. Instead of black, darken your oranges and reds using Burnt Umber or a touch of blue to keep the warmth rich.
Step 4: Final Touches
-
Review contrast:
Step back about ten feet from the canvas. Check if the differentiation between the beige and rust tones is strong enough. If they look too similar, lighten the beige with more white. -
Fix uneven patches:
Look for any areas where the canvas weave shows through unintentionally. Dab paint into these spots to ensure solid, opaque coverage. -
Frame the work:
The image features a slim floating frame which elevates the look. Once dry, install a natural wood floating frame to complement the earthy tones.
Hang your finished masterpiece and enjoy the calming, spacious atmosphere it adds to your living space.
Negative Space Line Art on Canvas for Subtle Sophistication
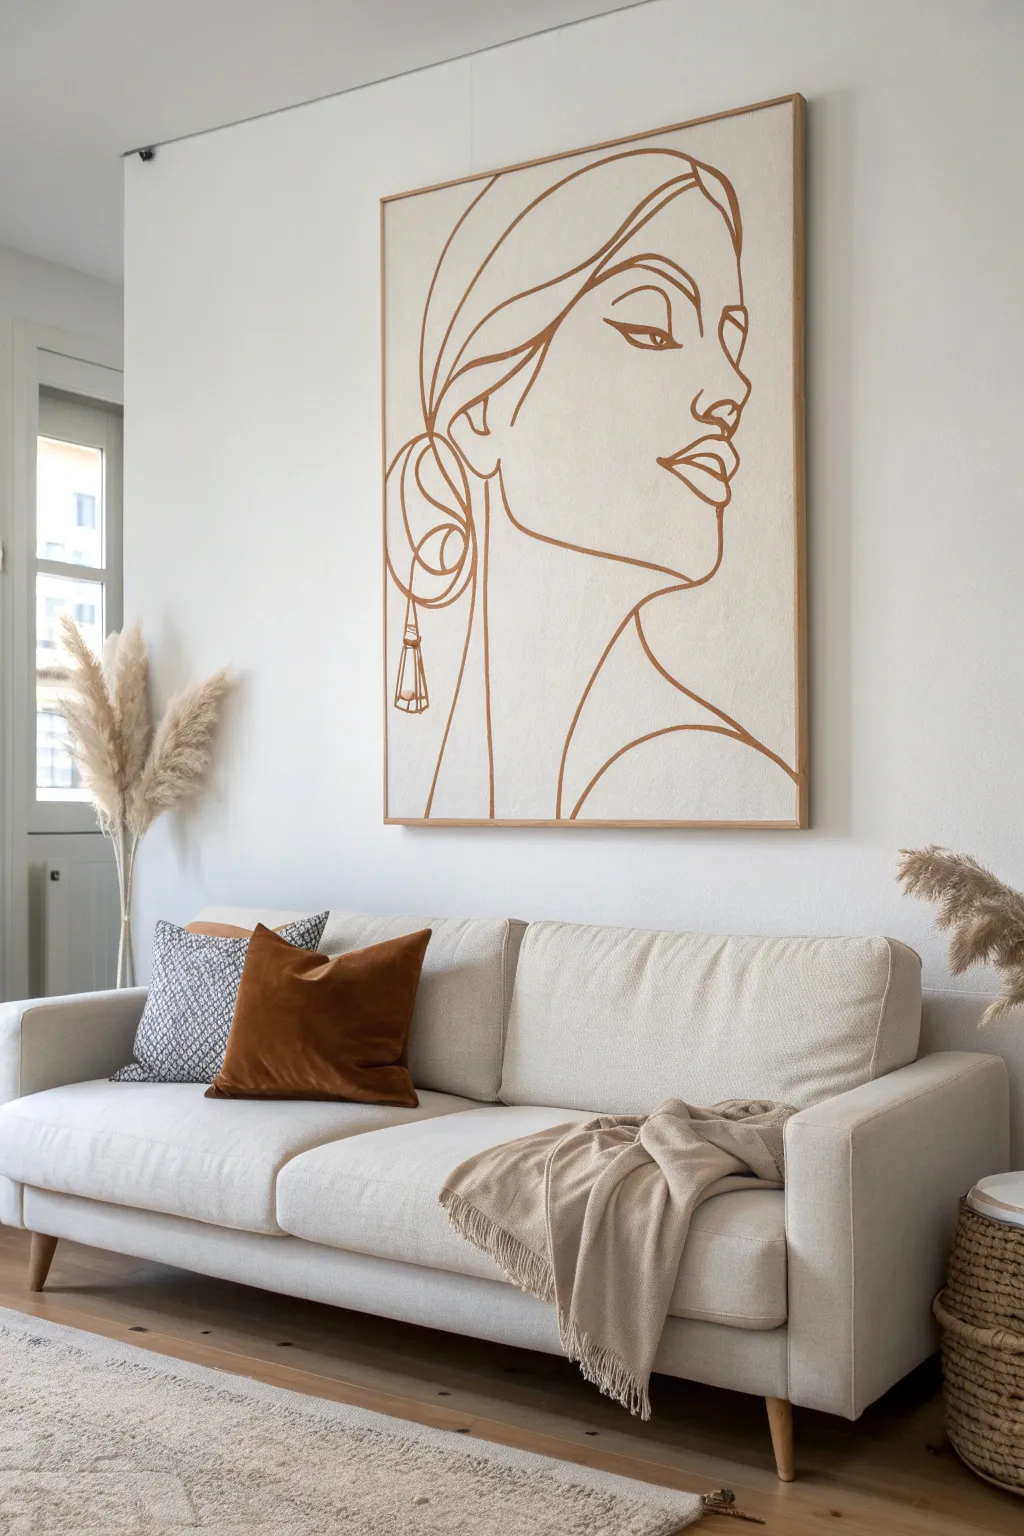
Bring an air of modern elegance to your living space with this striking continuous line art piece. Using rich terracotta tones against a textured cream background, this technique creates a sophisticated focal point that feels both artistic and effortless.
How-To Guide
Materials
- Large canvas (at least 36×48 inches)
- Acrylic heavy gel medium or modeling paste
- Gesso (white or cream)
- Wide palette knife or putty knife
- Pencil (HB or lighter)
- Reference image of a face profile
- Burnt Sienna or Terracotta acrylic paint
- Fluid medium or water (to thin painting paint)
- Round detail brushes (sizes 4 and 6)
- Painter’s tape
- Long leaning stick (maulstick) or ruler
- Thin wood framing strips (optional for framing)
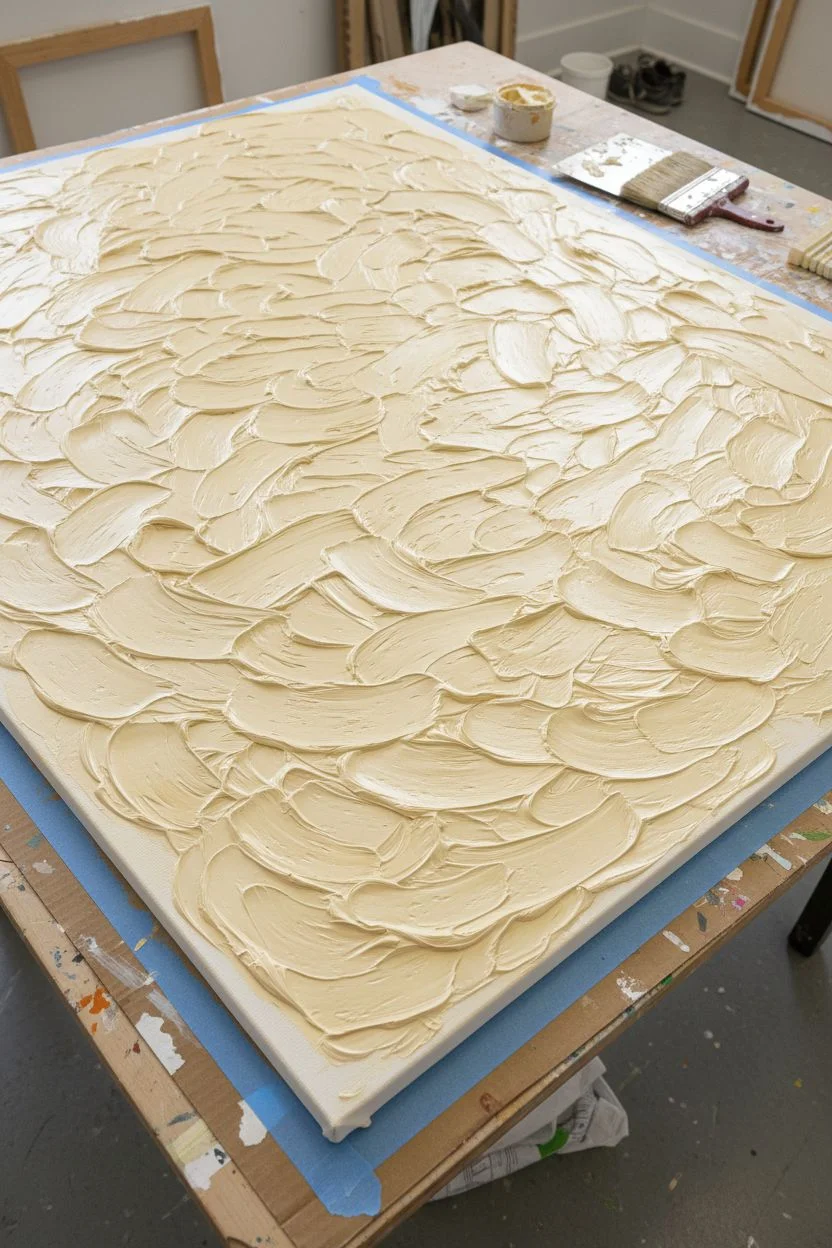
Step 1: Preparing the Textured Base
-
Surface Preparation:
Begin by cleaning your canvas surface. If the canvas texture is too uniform, we want to disrupt it slightly to give it that high-end, gallery feel. Lay the canvas flat on a protected work surface. -
Apply Texture Medium:
Scoop out a generous amount of heavy gel medium or modeling paste onto the canvas. Using a wide palette knife, spread this across the surface. -
Create Movement:
Instead of smoothing it perfectly, use sweeping, multi-directional strokes with the knife to create subtle ridges and valleys. This mimics the look of thick plaster or heavy weave fabric. -
Base Color Mixing:
While the texture dries (which can take 12-24 hours depending on thickness), mix a warm cream base color. Combine white gesso with a tiny drop of yellow ochre or raw sienna. -
Painting the Background:
Once the texture is fully cured and hard to the touch, apply two coats of your cream mixture. Use a large brush to ensure the paint gets into all the texture crevices.
Step 2: Drafting the Design
-
Choose Your Face:
Select a reference photo of a face in profile or three-quarter view. Look for high-contrast images where the jawline, nose bridge, and hairline are distinct. -
Simplify the Lines:
Before drawing on canvas, practice sketching your reference on paper. Try to reduce the complex features into single, flowing lines. Focus on the ‘negative space’—the open areas that define the shape. -
Scale Up:
Lightly sketch the design onto the dried canvas using a pencil. I like to start with the nose and forehead line to center the composition. -
Refine the Flow:
Step back frequently. The goal isn’t anatomical perfection, but graceful curvature. Keep the lines for the hair and neck loose and sweeping. -
Check Distances:
Ensure there is balanced white space around the figure. The image shouldn’t feel cramped against the edges.
Steady Stream
Load your brush fully with thinned paint before starting a long line. Stopping to semantic re-load in the middle of a curve can cause visible breaks or blobs.
Step 3: Executing the Line Work
-
Prepare the Paint:
Mix your Burnt Sienna or Terracotta acrylic paint with a flow medium or a little water. You want an ink-like consistency that flows smoothly off the brush but remains opaque. -
Test the Flow:
Test your paint consistency on a scrap piece of paper. If the line breaks or drags, add more medium. If it drips, add more paint. -
Start Painting Lines:
Using a size 6 round brush, begin tracing your pencil lines. Start from the top (the hair) and work your way down to avoid smudging your work. -
Maintain Line Weight:
Keep your pressure consistent. The beauty of this style relies on a relatively uniform line thickness, perhaps slightly thicker on the outer contours like the hair. -
Steady Your Hand:
For long, sweeping curves (like the neck or hair strands), use a maulstick or rest your pinky finger on a dry part of the canvas to stabilize your stroke. -
Refine Details:
Switch to a size 4 brush for tighter areas like the lips or the eye details. The earring detail can be geometric and simple. -
Second Pass:
Once the first layer of line work is dry, go over it a second time. This deepens the color and covers any transparency caused by the canvas texture. -
Clean Up:
If you made any mistakes, use your cream background paint to carefully ‘erase’ or shape the terracotta lines from the outside in.
3D Effect
Instead of painting the lines, use a piping bag with thick modeling paste to draw the face, then paint the raised lines terracotta once they are dry.
Step 4: Finishing Touches
-
Drying Time:
Allow the line work to dry completely, preferably overnight, to ensure the paint has bonded with the textured surface. -
Optional Framing:
To mimic the inspiration image, attach thin strips of light wood to the outer edges of the canvas using wood glue and small finish nails for a floating frame effect.
Hang your new masterpiece in a well-lit spot where the textures can catch the light and start a conversation
Layered Mixed-Media Collage Canvas for a Conversation Starter Wall
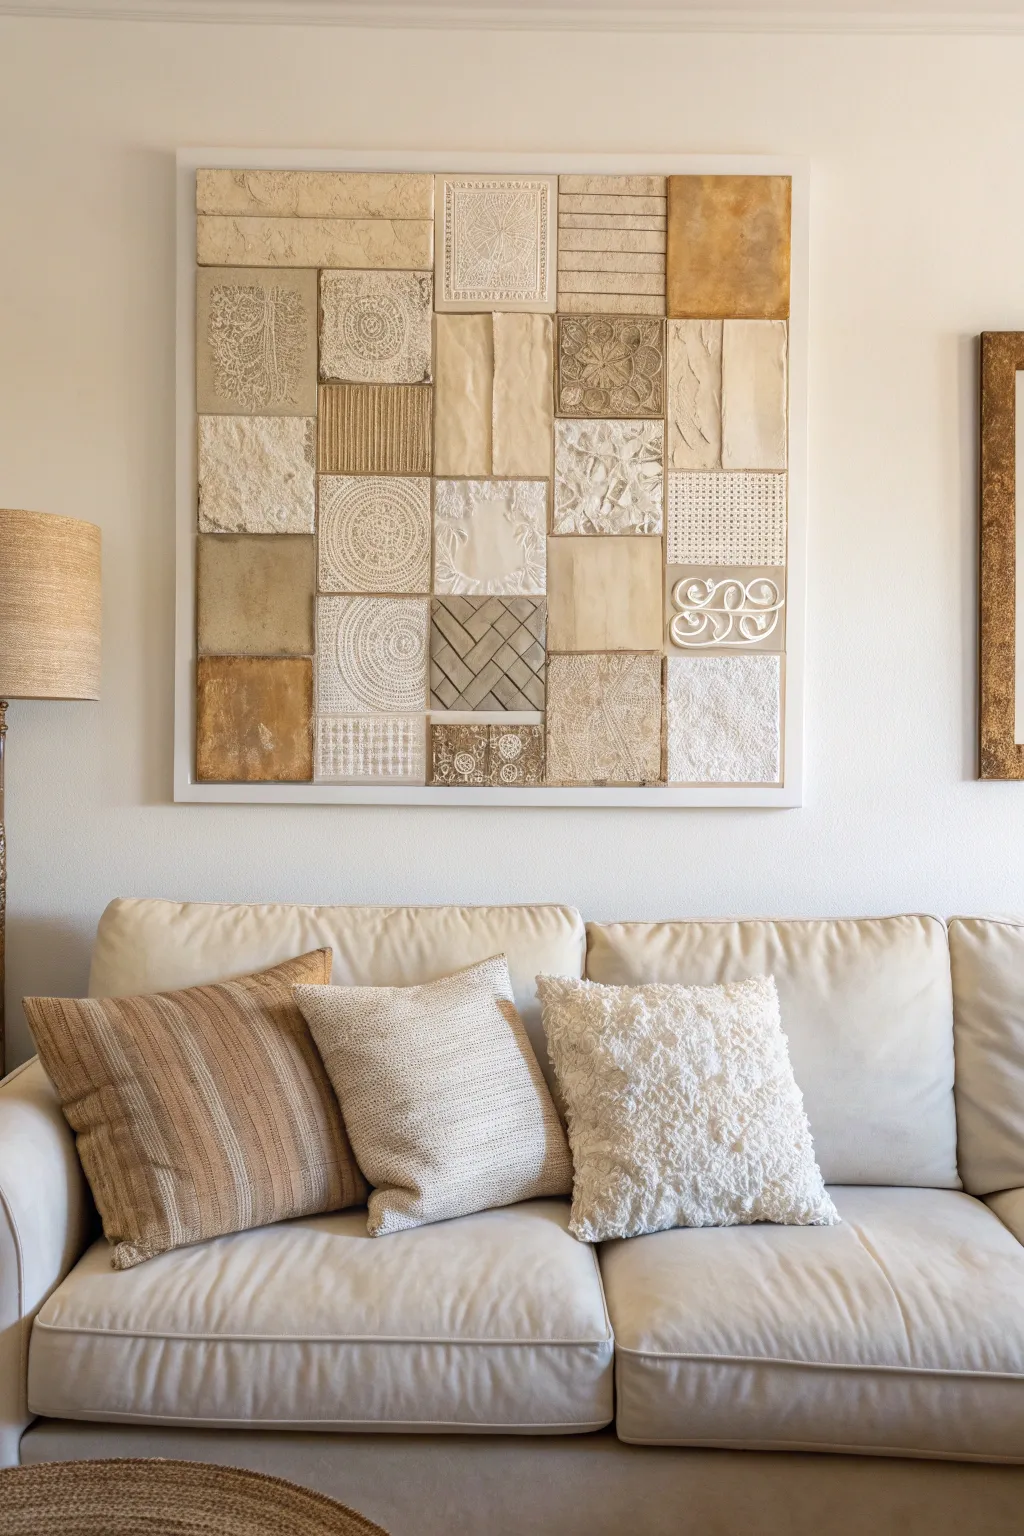
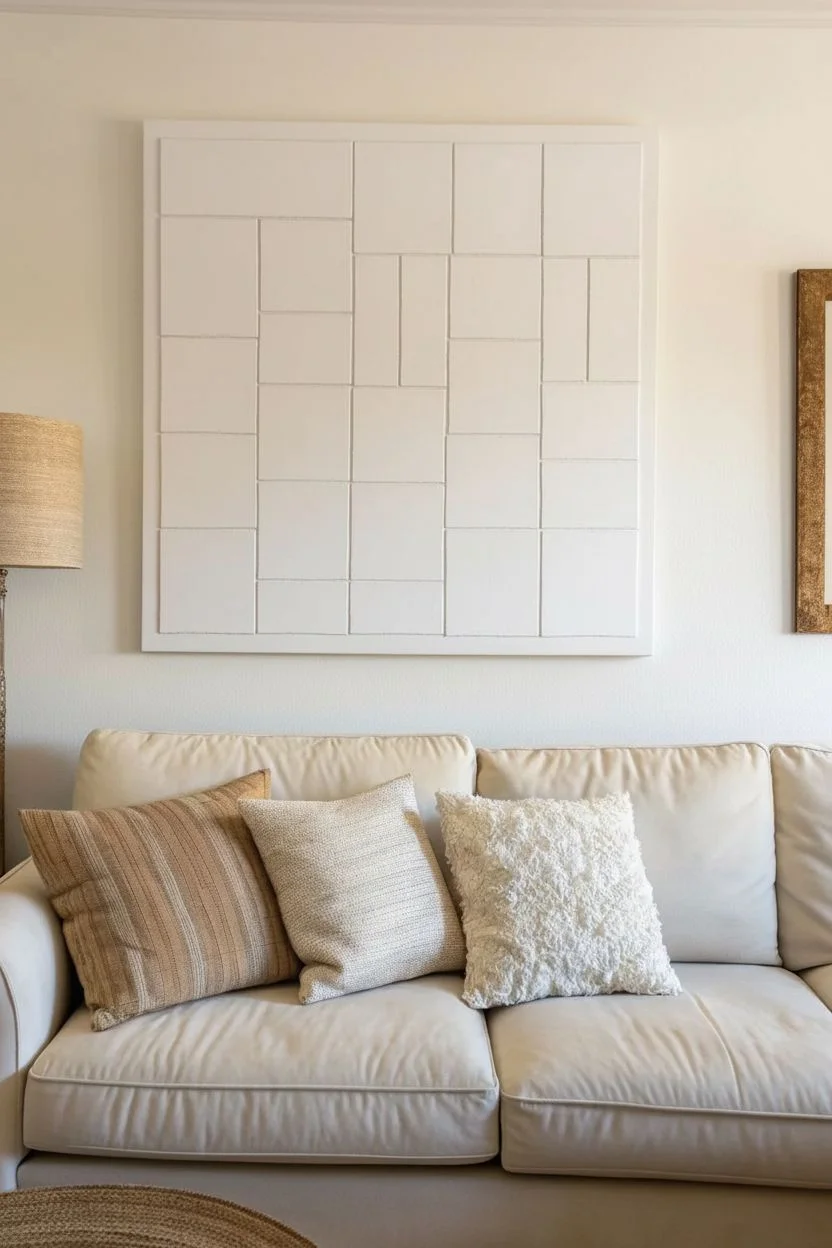
Transform a plain canvas into a sculptural masterpiece using plaster, fabric scraps, wallpaper samples, and paint. This sophisticated tone-on-tone collage mimics the look of high-end ceramic tiles and adds incredible depth to neutral interiors.
Step-by-Step Guide
Materials
- Large square canvas (e.g., 36×36 inches)
- Lightweight spackle or modeling paste
- Various texture tools (notched trowel, combs, stamps, doilies)
- Scrap materials (textured wallpaper, burlap, lace, corrugated cardboard)
- Cardstock or thin cardboard for tile bases
- Acrylic paints (Titanium White, Unbleached Titanium, Raw Sienna, Metallic Gold)
- Heavy body acrylic gel or strong craft glue
- Matte varnish
- Palette knives
- Ruler and pencil
- Scissors
Step 1: Preparation & Layout
-
Measure and Map:
Begin by measuring your large canvas. Sketch a grid layout on a piece of paper first to plan where your different sizes of ’tiles’ will go. Aim for a mix of larger squares, smaller squares, and rectangular strips to keep the eye interested. -
Cut the Base Tiles:
Using thin cardboard or heavy cardstock, cut out shapes that correspond to your grid plan. You don’t need to cover every single inch—leaving some gaps for the canvas to show through acts as ‘grout’ later. -
Dry Fit the Arrangement:
Lay your cut cardboard pieces directly onto the canvas to finalize the spacing. Ensure you have about 1/4 inch of space between each tile for a clean, gridded look.
Step 2: Creating Texture
-
Plaster Texturing:
Select about half of your cardboard tiles to be plaster-based. Spread a thick layer of lightweight spackle or modeling paste onto these pieces using a palette knife. -
Imprint Designs:
While the spackle is wet, press objects into it to create patterns. Use lace doilies for intricate floral looks, a notched trowel for linear grooves, or stamps for geometric shapes. Remove the objects and let the spackle dry completely. -
Fabric Wrapping:
For a softer texture, wrap several cardboard tiles in fabric. Apply glue to the card face, press on burlap, linen, or lace, and wrap the excess fabric around the back, securing it with glue. -
Paper and Wallpaper Application:
Cut textured wallpaper samples or corrugated cardboard to fit the remaining tile shapes. Glue these directly onto your cardstock bases. I usually like to distress the edges of the paper slightly for a worn, vintage feel. -
Sculptural Accents:
If you have any 3D elements like wooden filigree shapes or thick cord, glue these onto plain tiles now. These provide excellent high-relief focal points.
Don’t Rush the Dry
Thick spackle can take 24+ hours to fully cure. If you paint over it while the center is damp, the surface creates spiderweb cracks.
Step 3: Assembly & Painting
-
Affix the Tiles:
Using heavy body gel or a strong craft adhesive, glue all your prepared tiles onto the large canvas according to your original dry-fit layout. Press firmly and allow the adhesive to cure overnight. -
Base Coat Application:
Once secure, paint the entire artwork—tiles and the gaps between them—with a base coat of Titanium White or a very warm off-white. This unifies the disparate materials into one cohesive piece. -
Applying Washes:
Mix Raw Sienna with a lot of water or glazing medium to create a wash. Brush this unevenly over specific tiles, focusing on the ones with heavy texture so the pigment settles into the crevices. -
Dry Brushing Highlights:
Dip a dry, stiff brush into Unbleached Titanium white paint. Lightly drag it over the raised textures (like the burlap and plaster ridges) to make the details pop against the darker wash. -
Adding Metallic Warmth:
Select 3-5 specific tiles to feature a metallic accent. Using a soft cloth or your finger, rub a small amount of Metallic Gold paint onto flat surfaces or specific raised areas for a subtle luster. -
Detailing the Grout Lines:
If your ‘grout’ lines got messy during painting, re-paint the spaces between tiles with a clean, opaque white or cream to sharpen the grid. -
Seal the Work:
Finish with a coat of matte spray varnish to protect the various textures and prevent dust from permanently settling into the fabric weaves.
Warped Tiles?
Moisture from glue or plaster can curl cardboard. Counteract this by painting a large ‘X’ with glue on the BACK of the tile before starting.
Hang your new textural artwork in a spot with good side lighting to really show off the shadows and depth you created


Have a question or want to share your own experience? I'd love to hear from you in the comments below!