Transforming a face into a living canvas is one of the most joyful parts of any carnival celebration. Whether you are a beginner looking for simple designs or an experienced painter seeking fresh inspiration, this collection covers everything from whimsical cheek art to elaborate masquerade works.
The Classic Symmetrical Butterfly
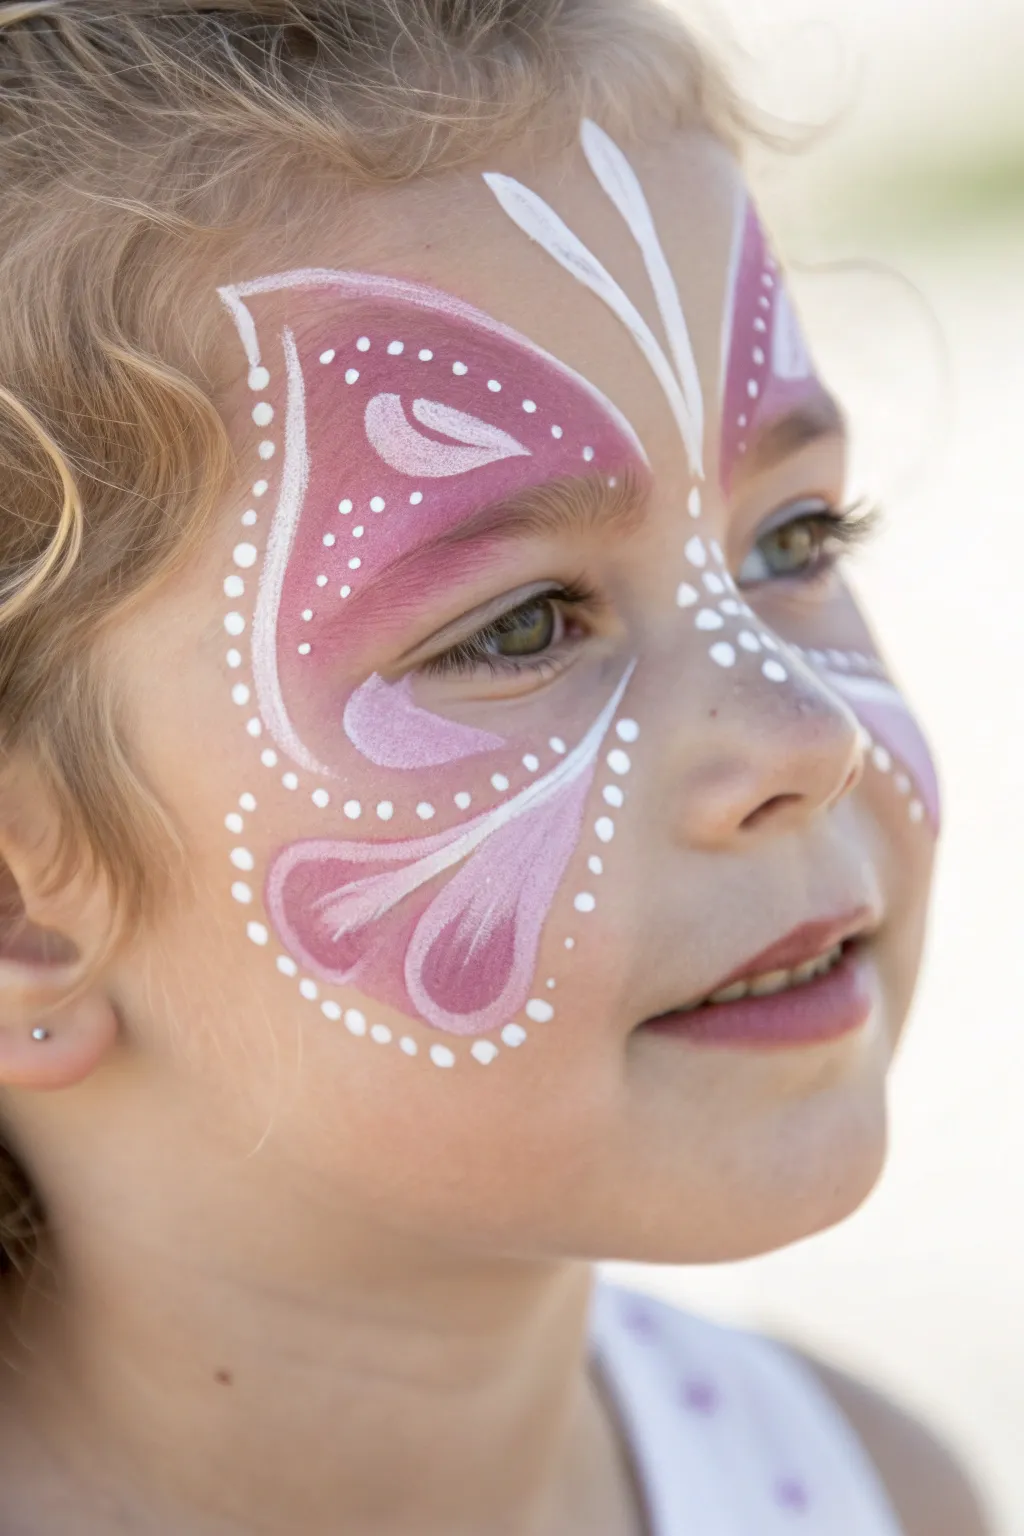
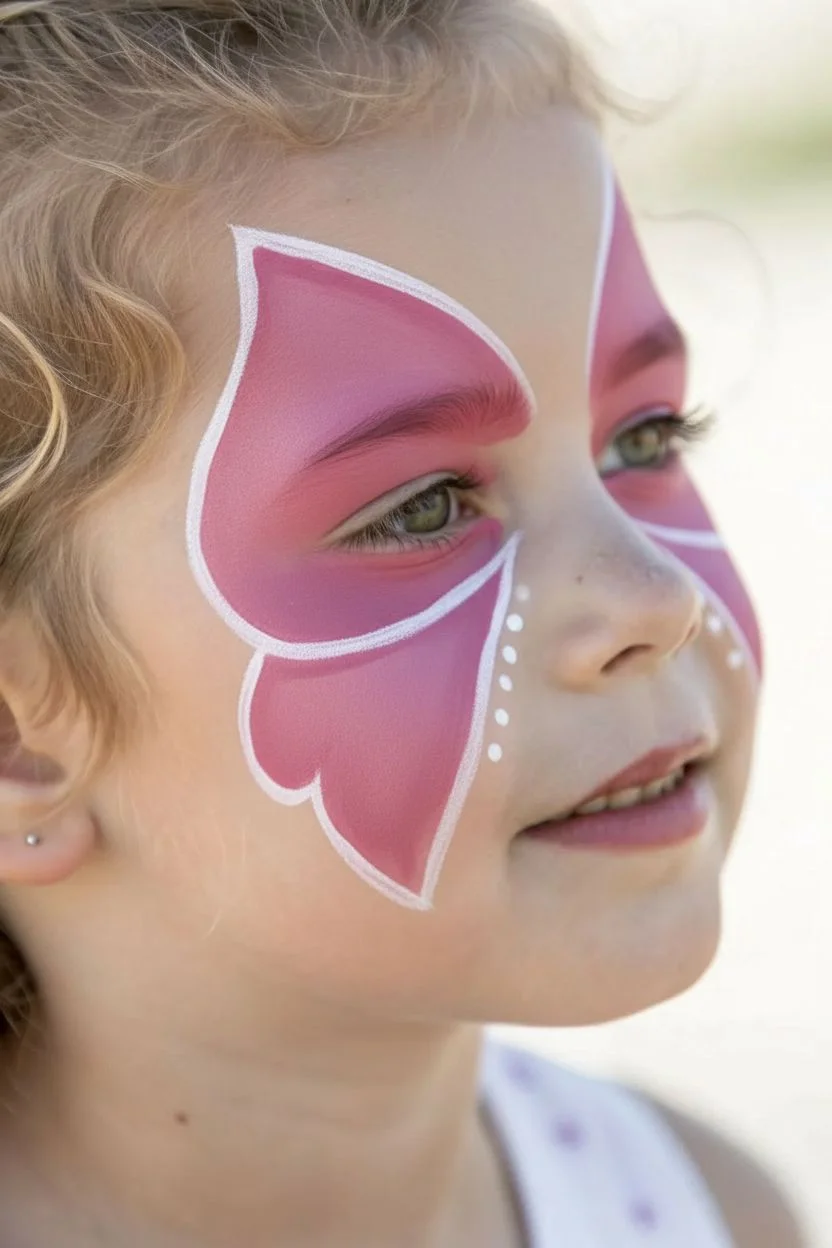
This gentle, symmetrical design uses soft pinks and crisp white linework to create a delicate butterfly mask perfect for any carnival. The look relies on smooth blending and varied dot sizes to frame the face beautifully.
Step-by-Step
Materials
- Rose-pink face paint
- Opaque white face paint
- High-density face painting sponge (wedge or petal)
- Round brush (size 4)
- Round brush (size 2)
- Water container
- Spray bottle
Step 1: Laying the Pink Foundation
-
Prepare the sponge:
Mist your rose-pink paint with water and swirl your high-density sponge until it picks up a creamy, rich pigment. -
Create the upper wings:
Close the eyes gently and press the sponge over the eyelid, sweeping upwards and outwards toward the hairline to form a large, rounded wing shape. -
Verify opacity:
If the pink looks too sheer, pat a second layer over the eyelid area to ensure the color pops against the skin. -
Form the lower wings:
Reload the sponge and press a smaller, teardrop-shaped wing just below the outer corner of the eye, angling it down onto the cheekbone. -
Check symmetry:
Repeat both upper and lower shapes on the other side of the face, stepping back momentarily to ensure they are even.
Step 2: Painting the Centerpiece
-
Load the white paint:
Switch to a size 4 round brush and load it with opaque white paint until the bristles are fully coated but still form a sharp point. -
Draw the antennas:
Between the eyebrows, paint two long, curved lines sweeping upward onto the forehead to create the butterfly’s antennas. -
Define the nose bridge:
Paint a small cluster of white dots or a tiny teardrop shape on the bridge of the nose to connect the two butterfly wings visually.
Sponge Moisture Control
Squeeze your sponge almost completely dry before loading paint. If it’s too wet, the pink will bleed into fine lines. Test on your hand first to ensure a creamy, opaque coverage.
Step 3: Adding White Details
-
Outline the upper wing:
Using the tip of your round brush, paint a curved line along the top inner edge of the pink wing, following the eyebrow arch. -
Create inner texture:
Paint a large, horizontal teardrop shape inside the upper pink wing, starting near the inner eye corner and sweeping out toward the temple. -
Detail the lower wing:
On the cheek wing, paint a white outline that defines the bottom edge, curving it slightly inward to mimic a flower petal. -
Add petal veins:
I like to add a central white stroke inside the lower pink section to give the wing dimension and a flowery texture. -
Separate the sections:
Paint a distinct, curved white line between the upper and lower pink sections at the outer corner of the eye to separate the wings clearly.
Sparkle Finish
Before the pink paint fully dries, puff some cosmetic-grade iridescent glitter over the eyelids. This adds a magical shimmer that catches the light without needing extra glue.
Step 4: The Dotted Frame
-
Refresh your brush:
Rinse your brush and reload with fresh white paint to ensure your final dots are perfectly round and opaque. -
Start the dot border:
Begin placing dots along the outer curve of the lower wing on the cheek, moving upwards towards the ear. -
Continue upward:
Extend the line of dots past the temple, framing the outer edge of the upper wing. -
Vary dot sizes:
Apply different amounts of pressure to create a variety of dot sizes; keep them larger near the cheeks and smaller as they fade out near the forehead. -
Highlight the eyes:
Add three tiny, delicate dots at the very inner corner of each eye to brighten the expression. -
Final inspection:
Look for any gaps in the white linework and smooth them out with the very tip of your size 2 brush.
Now you have a beautifully sweet butterfly design ready for a day of fun


Roaring Tiger Stripes
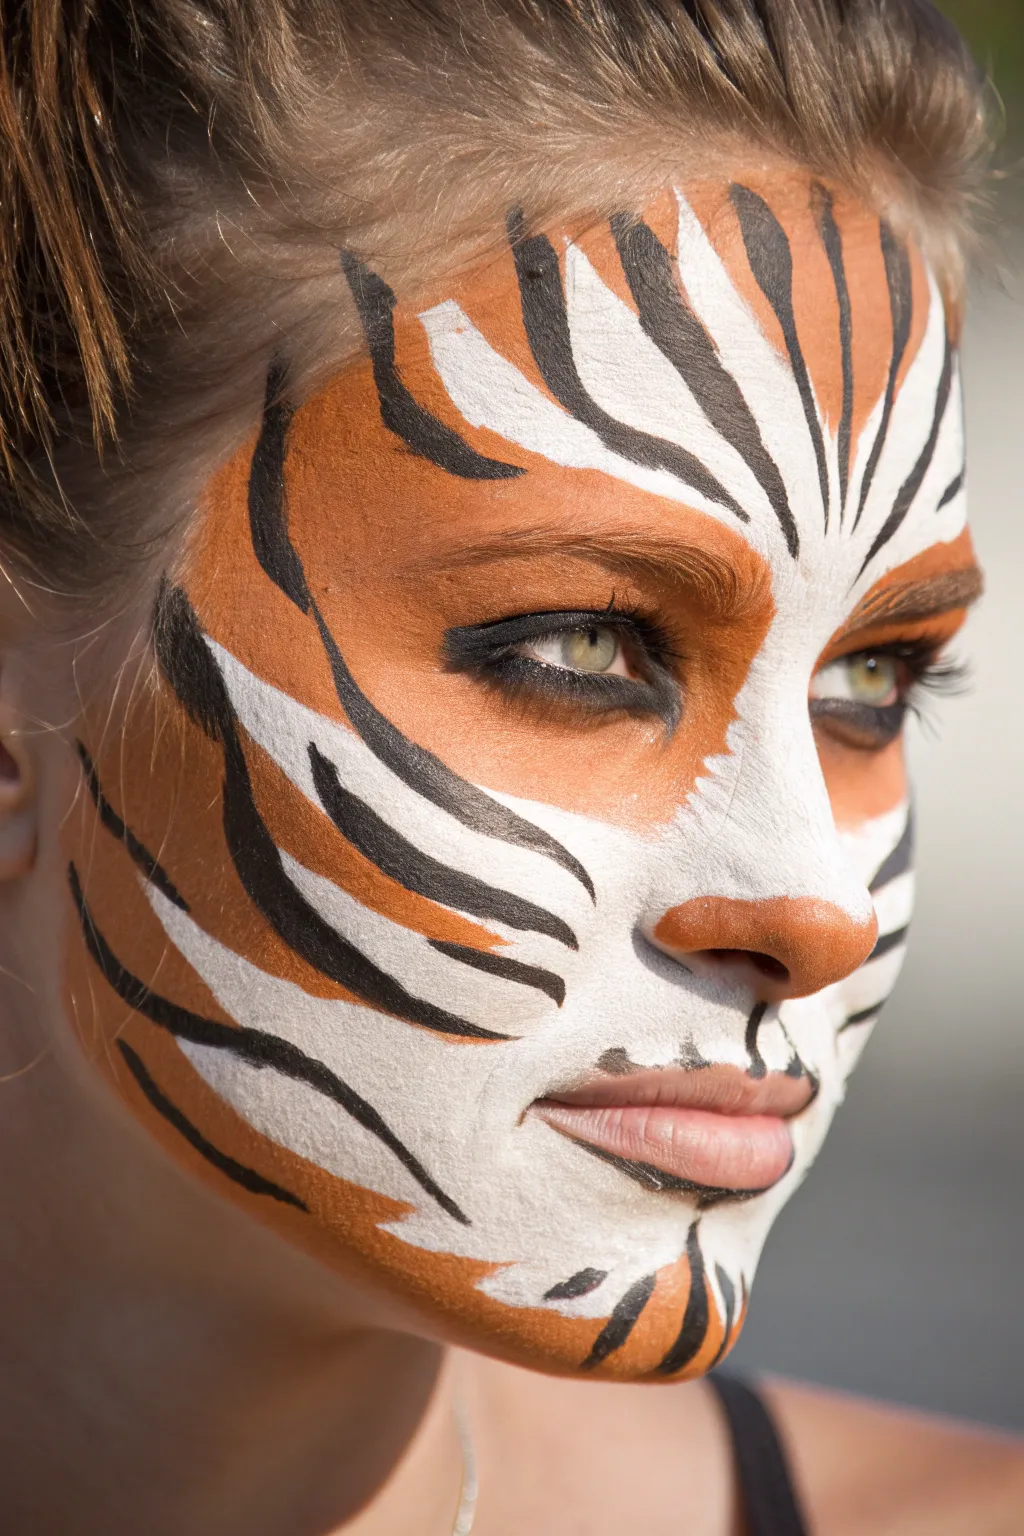
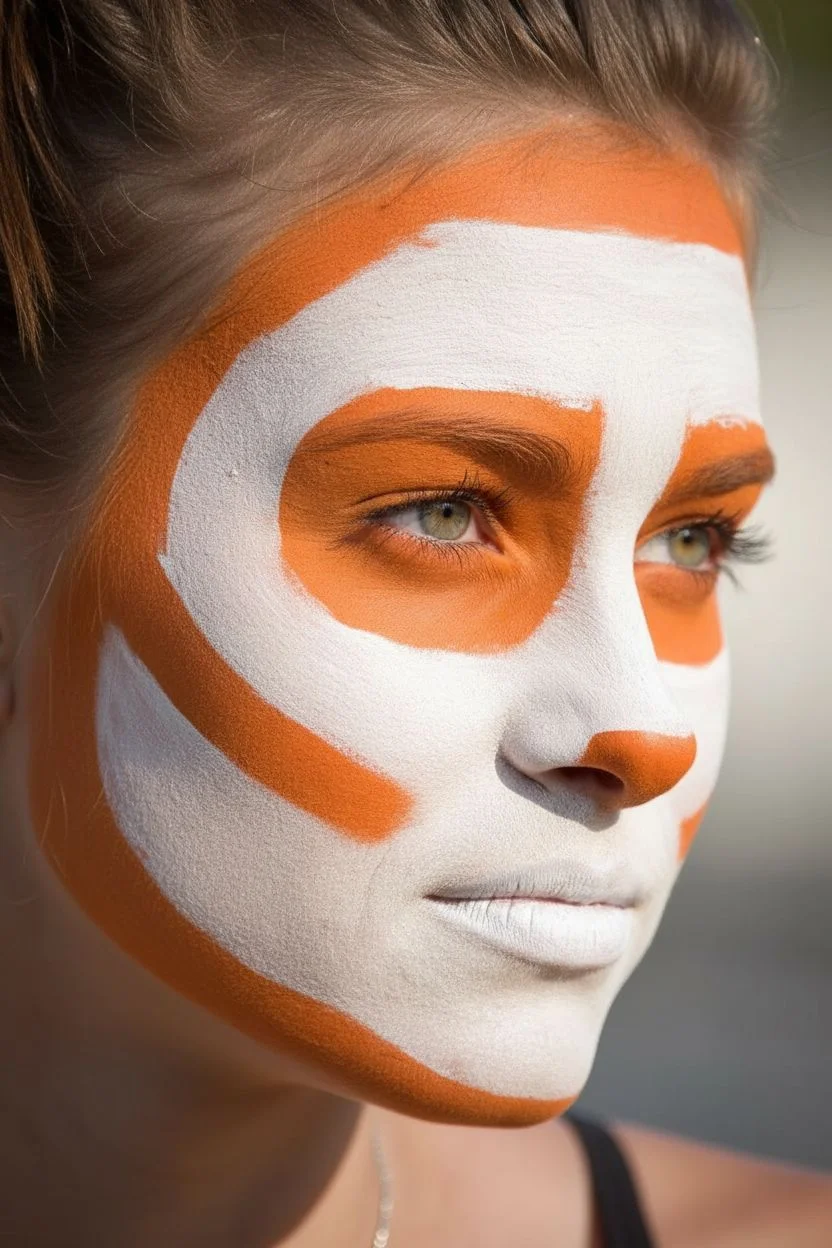
Transform into the king of the jungle with this striking, high-contrast face paint design. This look relies on blending bold orange and white zones before layering on distinct, tapered black stripes for a dimensional finish.
How-To Guide
Materials
- High-density face paint sponges (cut in half)
- Round brush (size 4 or 5)
- Fine detail brush (size 1 or 2)
- Water-activated face paints (White, Bright Orange, Black)
- Cup of water
- Paper towels
Step 1: Setting the Base
-
Load the white:
Dampen a clean sponge and load it thoroughly with white face paint until it is creamy but not dripping. -
Highlight the center:
Sponge the white paint in a T-shape: cover the center of the forehead, down the bridge of the nose, and the entire upper lip area. -
Brighten the eyes:
Extend the white sponge work underneath the eyes and sweep it outwards across the high points of the cheekbones. -
Define the chin:
Dab the remaining white paint onto the center of the chin to balance the face. -
Apply the orange:
Load a fresh sponge with bright orange paint. Apply this to the sides of the forehead, temples, and the outer hollows of the cheeks. -
Blend the gradient:
Where the white and orange meet, use the clean side of a slightly damp sponge to gently tap the seam. This creates a soft, fuzzy transition rather than a hard line.
Step 2: Features and Definition
-
Paint the nose:
Using a brush or the edge of your orange sponge, paint the tip of the nose orange. I prefer to mix a tiny bit of black into the orange here for a deeper terracotta tone. -
Cat-eye shape:
Load a round brush with black paint. Paint a thick line along the upper lash line, extending it outward into a sharp wing. -
Inner corner definition:
Use the fine detail brush to carefully extend the black eyeliner downward past the tear duct towards the nose, creating a sharp feline point. -
Connect the mouth:
Draw a thin vertical line from the base of the nose to the center of the upper lip (the philtrum) using the black detail brush.
Fixing Muddy Colors
If the orange and white start mixing into a beige mess, stop blending immediately. Let the white layer dry completely (about 60 seconds) before sponging the orange next to it.
Step 3: Stripes and Details
-
Center forehead stripes:
Using the round brush loaded with black, paint curved stripes starting from the hairline down toward the center brows. Press down to start thick, then lift the brush as you flick to create a tapered point. -
Temple stripes:
Add smaller floating stripes on the white part of the forehead, keeping them symmetrical and pointing inward. -
Cheek framing:
Paint three to four thick, swooping stripes on the orange part of the cheeks. Curve them inward to follow the natural contour of the cheekbone. -
Jawline accents:
Add a few smaller stripes along the jawline and chin area, ensuring the tapered ends point toward the mouth. -
Muzzle marking:
Paint a small, curved line or loop at the bottom of the nose tip to separate it from the white muzzle area. -
Whisker spots:
Use the tip of your fine brush to place two rows of small black dots on the white upper lip area on both sides. -
Lip finish:
Optionally, lightly outline the natural lip shape with a brownish-orange hue to make the mouth pop without looking like lipstick.
Add Fur Texture
Take a nearly dry brush with a little white paint and flick rapid, tiny strokes over the orange edges of the forehead and cheeks. This creates a realistic fur effect.
You now have a prowl-worthy tiger face that’s ready for any carnival or party


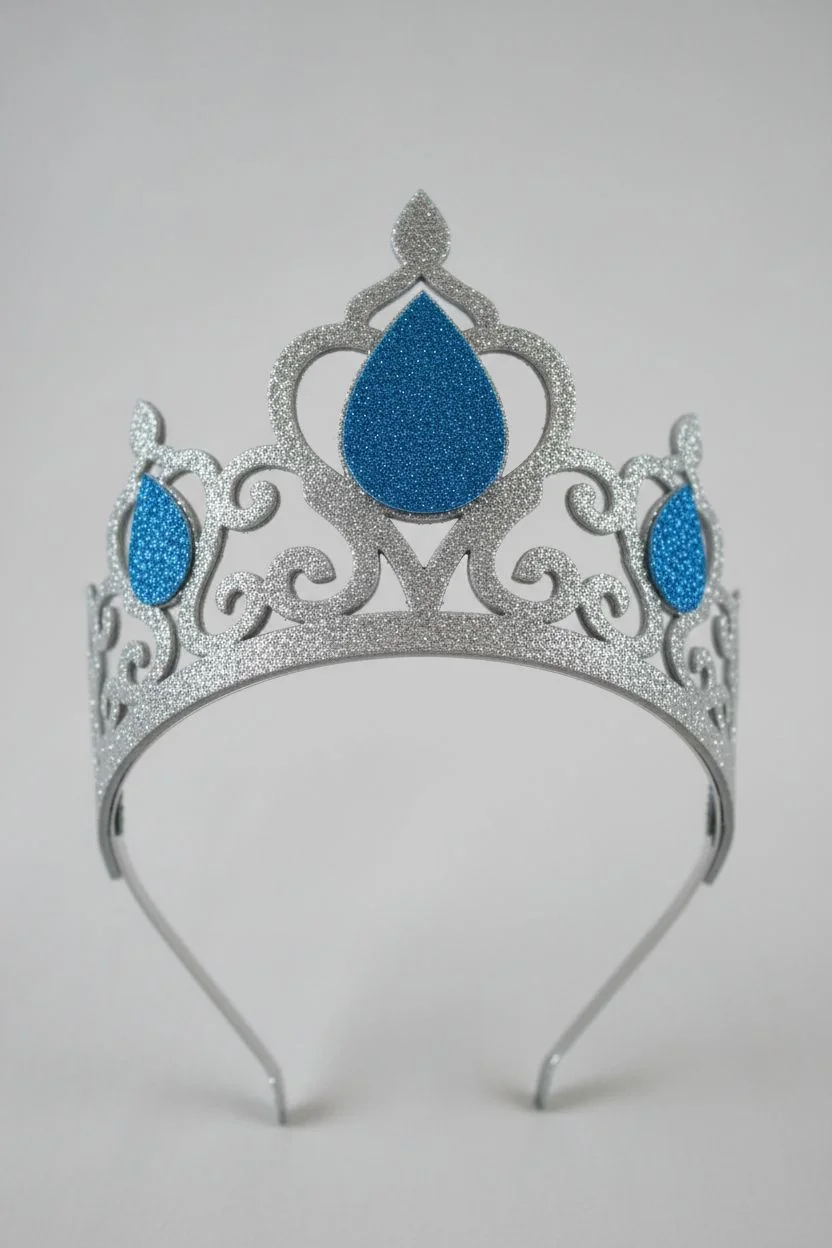
Magical Ice Princess Crown
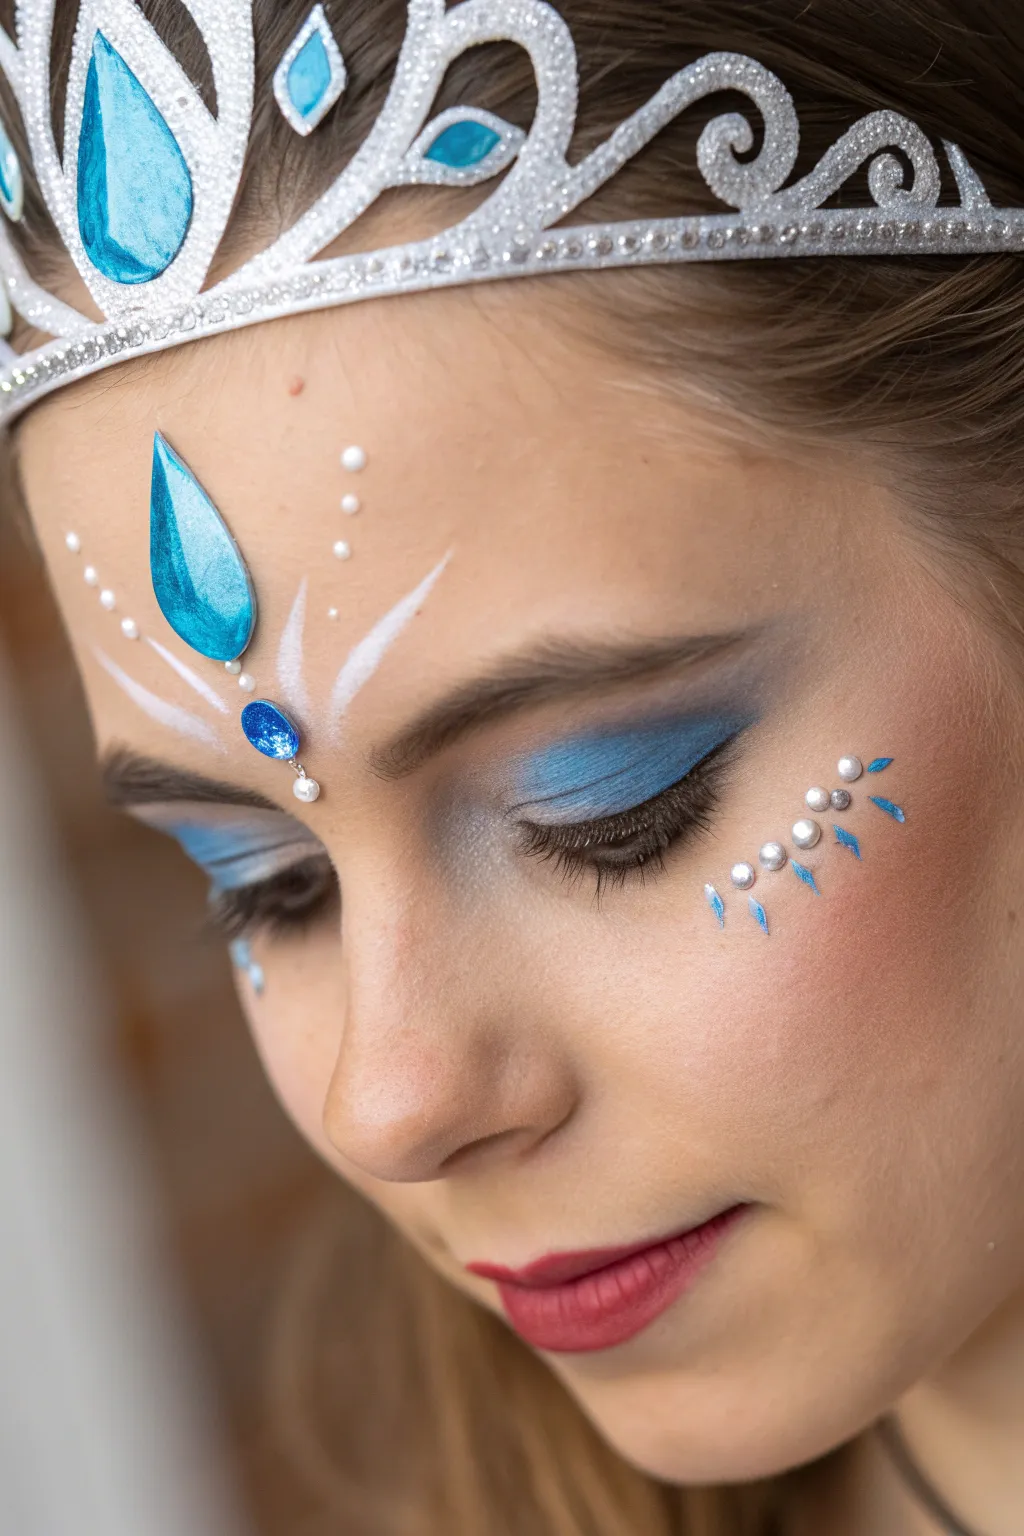
Transform yourself into winter royalty with this sparkling combination of a handcrafted glitter crown and ethereal face art. This look blends cool blue tones with pearl accents to create a magical, frozen aesthetic perfect for any carnival celebration.
How-To Guide
Materials
- Silver glitter EVA foam sheet
- Blue glitter cardstock or foam
- Craft glue or hot glue gun
- Headband or elastic cord
- Blue eyeshadow palette (light and dark)
- White face paint
- Fine liner brush
- Large adhesive blue gems (teardrop and oval shaped)
- Adhesive half-pearls (various sizes)
- Pink lipstick
- Black mascara
Step 1: Crafting the Crown
-
Cut the base:
Sketch a tiara shape onto your silver glitter foam, incorporating swirling filigree curves and a central peak, then carefully cut the silhouette out with sharp scissors. -
Create the jewels:
Cut three teardrop shapes from the blue glitter cardstock—one large piece for the center and two smaller ones for the sides to mimic inlaid gemstones. -
Assemble the crown:
Glue the blue teardrops securely onto the corresponding peaks of your silver foam base. -
Attach the band:
Measure the wearer’s head and attach the foam crown to a plain headband or secure an elastic cord to the back corners so it sits comfortably.
Step 2: The Frozen Gaze
-
Apply base color:
Sweep a shimmering sky-blue eyeshadow across the entire mobile eyelid, blending it softly upward toward the brow bone. -
Deepen the crease:
Use a darker denim-blue shade in the outer corner and crease of the eye to add dimension and drama to the look. -
Highlight the brow:
Dab a matte white or pearl eyeshadow right under the arch of the eyebrow to lift the eyes and create a frosty glow. -
Define lashes:
Apply a coat of black mascara to upper lashes to frame the eyes against the cool tones.
Stay Glued
Self-adhesive gems can slip if you dance or sweat. For all-day hold, use a tiny dot of clear eyelash glue on the back of each gem before placing it on your skin.
Step 3: Forehead Centerpiece
-
Place the main gem:
Position a large blue teardrop gem directly in the center of the forehead, just above the eyebrows. -
Add the drop detail:
Place a smaller blue oval gem directly beneath the teardrop, and finish the vertical line with a tiny single pearl hanging at the bottom. -
Paint the frost rays:
Using a fine liner brush and white face paint, paint three curved lines fanning out from the gems on each side, flicking the brush at the ends to taper them elegantly. -
Add pearl accents:
Stick small white pearls in the spaces between your painted white lines to create a textural tiara effect on the skin. -
Create floating details:
Place three graduated pearls in a vertical line above the outer arch of each eyebrow for extra sparkle.
Extra Frost
While the white face paint strokes are still wet, carefully tap a little loose iridescent glitter over them to make the design catch the light like real ice crystals.
Step 4: Cheeks and Finishing Touches
-
Create the cheek swirl:
On the left cheekbone (or both), apply a curved line of adhesive pearls, starting with larger ones near the eye and getting smaller as they curve down. -
Paint blue sparks:
Using a small brush and blue face paint (or wet eyeshadow), paint small dash marks radiating downward from the pearl line. -
Blush the cheeks:
I like to gently tap a soft rose blush onto the apples of the cheeks to give the skin a cold-kissed flush. -
Apply lip color:
Finish the look with a creamy pink lipstick that complements the cool blue tones without overpowering them.
Pair your shimmering makeup and crown with a blue costume to complete your winter reign


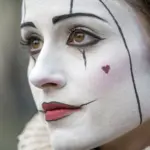
Whimsical Cheek Art Creatures
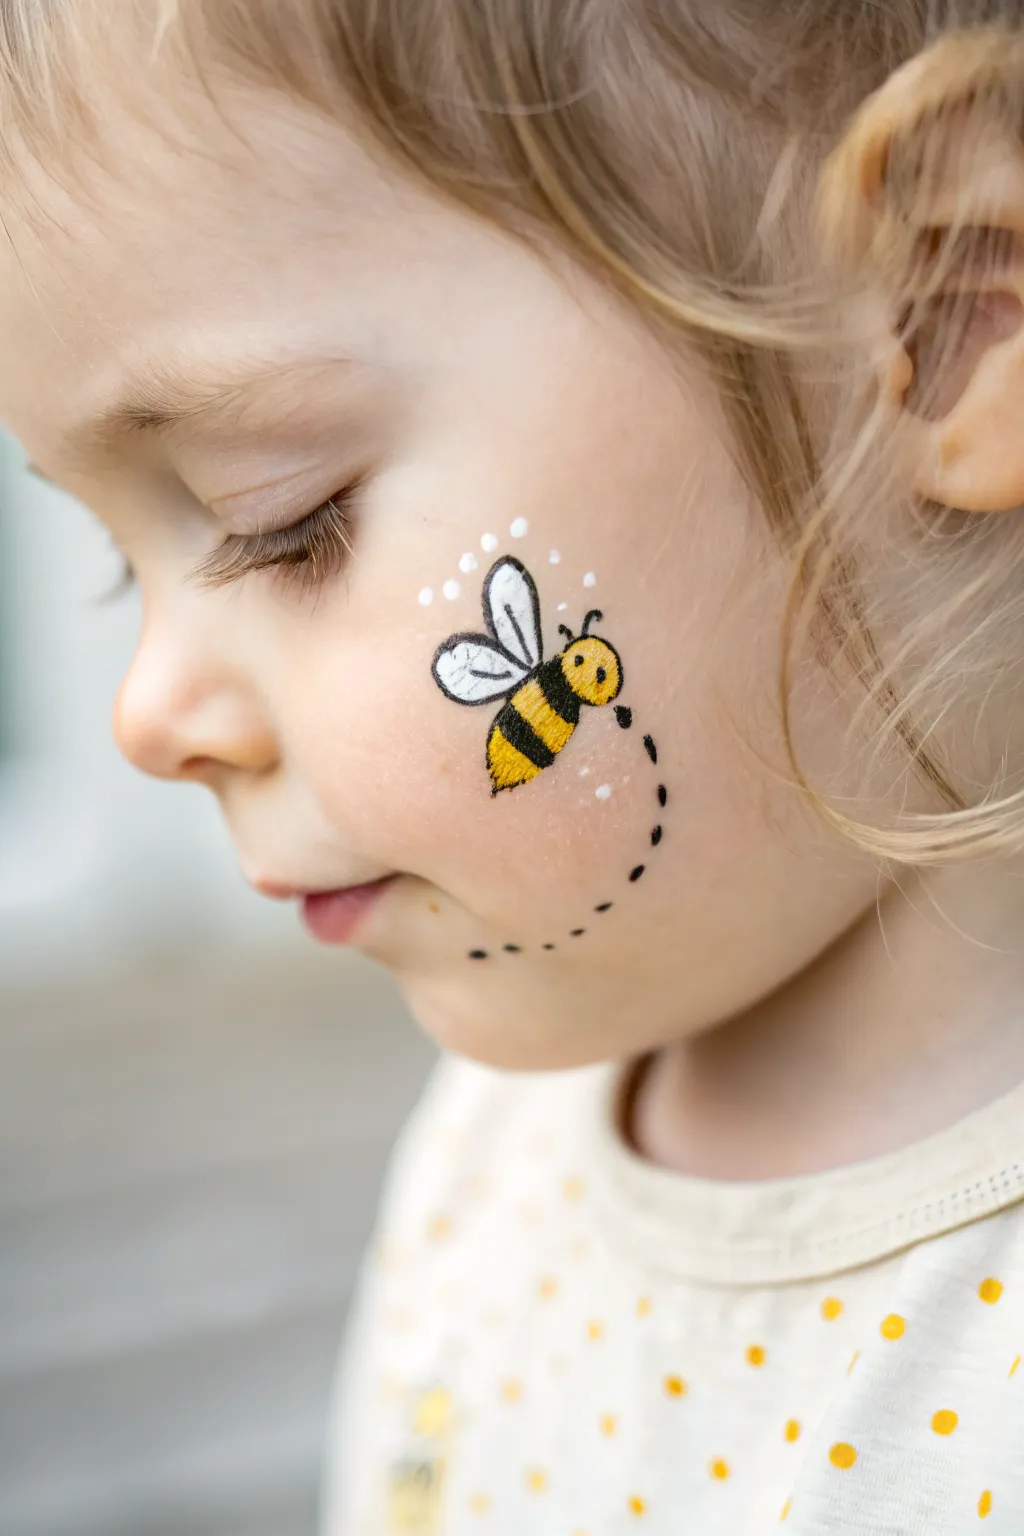
This charming cheek art captures a bumblebee in mid-flight, complete with a whimsical dotted trail that follows the jawline. It uses simple geometric shapes, making it a perfect quick design for energetic children who cannot sit still for long.
Step-by-Step
Materials
- Face paint cake (Bright Yellow)
- Face paint cake (Stark White)
- Face paint cake (True Black)
- Round synthetic brush (size 4)
- Fine liner or detail brush (size 1)
- Cup of water
- Spray bottle (optional for activating paint)
Step 1: Laying the Yellow Base
-
Activate the yellow:
Spray your yellow face paint cake lightly with water and swirl your size 4 round brush until the consistency resembles melted ice cream. -
Paint the body:
On the apple of the cheek, paint a plump oval shape for the bee’s abdomen, angled slightly upward. -
Add the head:
Paint a slightly smaller circle attached directly to the upper front end of your oval to create the head. -
Smooth the shape:
Use the brush to fill in any gaps between the head and body so it looks like one continuous peanut-like shape. -
Allow to set:
Let this yellow base dry for about a minute; the surface should look matte before you add contrasting colors.
Muddy Stripes?
If the black stripes look green, your yellow base wasn’t dry enough. Wait until the yellow has no shine before applying black, or use a drier consistency for the black paint.
Step 2: Wings and Outline
-
Load the white:
Rinse your brush thoroughly and load it with white paint. -
Create the front wing:
Press the brush down and lift up to create a teardrop shape starting from the upper back of the bee, pointing upwards. -
Add the rear wing:
Paint a second, slightly smaller teardrop shape just behind the first one, angled a bit further back. -
Switch to black liner:
Load your fine liner brush (size 1) with black paint. I prefer to keep the paint slightly inky here for sharp lines. -
Outline the body:
Carefully trace the outer edge of the yellow shapes with a thin black line. -
Define the wings:
Outline the white wing shapes, ensuring you separate the front wing from the back wing clearly. -
Wing details:
Add two very thin, curved lines inside the white area of the wings to suggest texture and movement.
Glitter Upgrade
Before the white wing paint dries completely, tap a small amount of cosmetic-grade iridescent white glitter onto them with a dry finger to make the wings shimmer in the light.
Step 3: Stripes and Personality
-
Paint the stripes:
Using the black liner, paint two bold, curved vertical stripes across the yellow abdomen. -
Create the stinger:
Add a tiny triangular point at the very back of the yellow body for the stinger. -
Add antennae:
Paint two small curved lines coming off the top of the head, adding tiny dots at the tips. -
Draw the face:
Place a single black dot on the head for the eye. -
The flight path:
Starting from the stinger, paint a trail of small black dots that curves downward along the cheek towards the chin. -
Determine line flow:
Make the dots progressively smaller as they get further from the bee to create a fading effect. -
Final magic touches:
Clean your fine brush, reload with white, and add tiny decorative dots around the wings and antennae for sparkle.
Now you have a happy little pollinator ready for the carnival
BRUSH GUIDE
The Right Brush for Every Stroke
From clean lines to bold texture — master brush choice, stroke control, and essential techniques.
Explore the Full Guide
Flowing Floral Vines
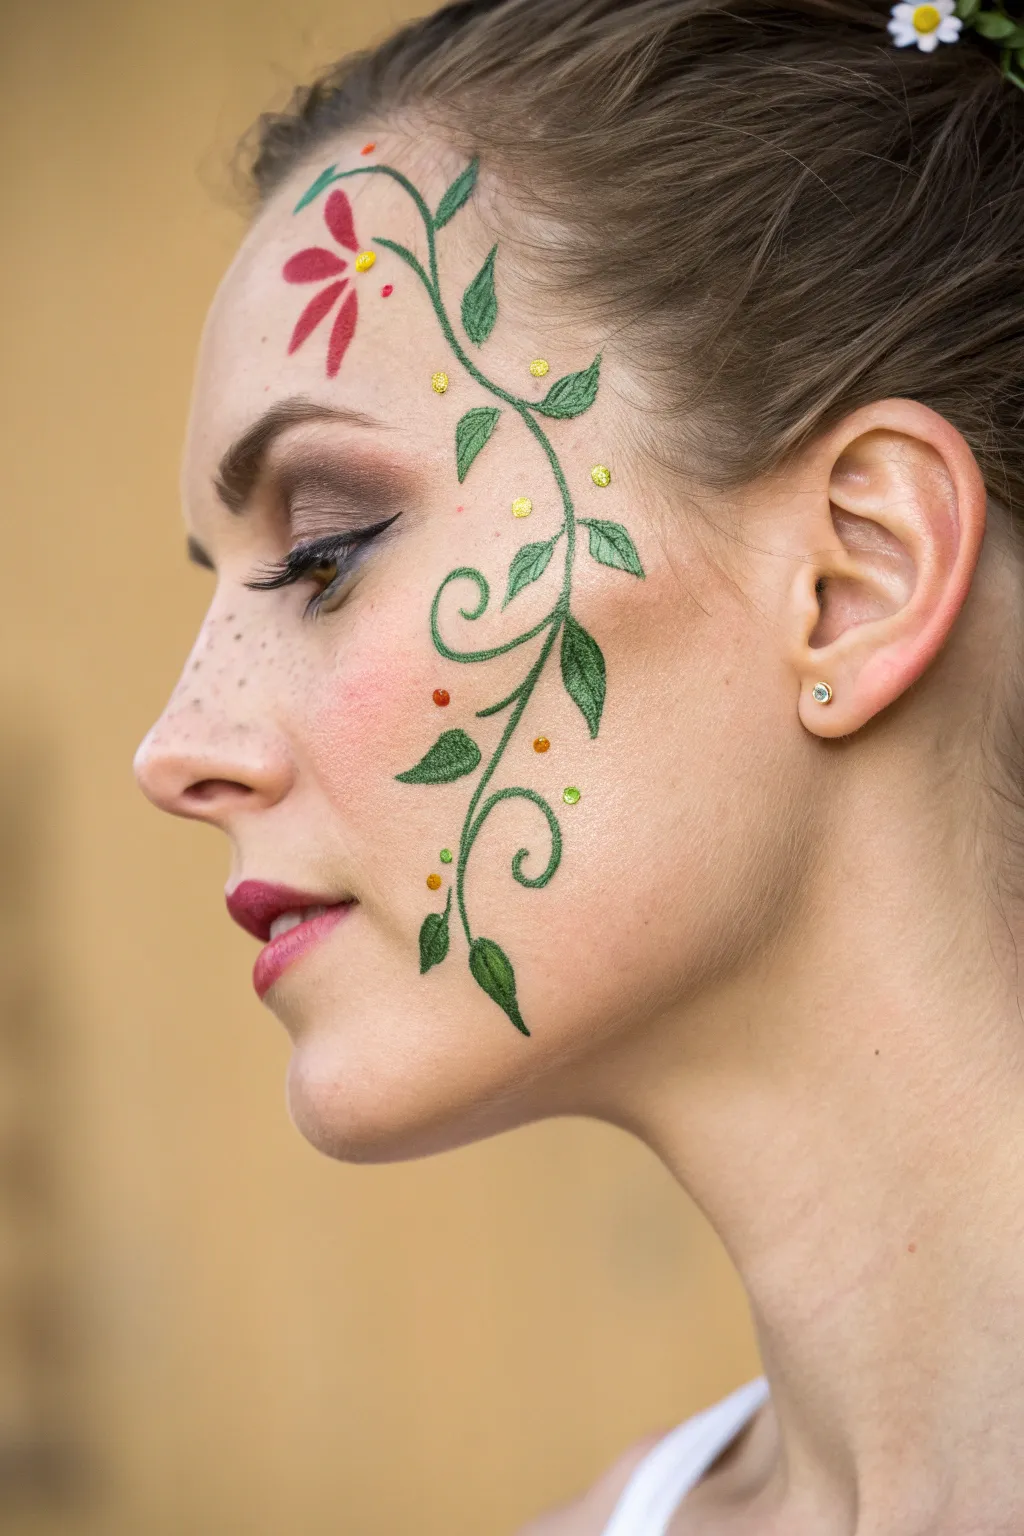
Transform your profile into a delicate work of art with this design that mimics the texture of satin-stitch embroidery. This look combines soft, cottagecore-inspired beauty makeup with precise face painting techniques for a whimsical carnival style.
Step-by-Step Guide
Materials
- Water-activated face paints (Deep Green, Forest Green, Berry Red, Golden Yellow)
- Fine liner brush (size 00 or 0)
- Small round brush (size 1)
- Black liquid eyeliner
- Berry-colored lipstick
- Brown eyebrow pencil or freckle pen
- Matte brown eyeshadow
- Setting spray
Step 1: The Base Makeup
-
Prep the canvas:
Apply a light foundation or tinted moisturizer to even out your skin tone, ensuring the area around the temples and cheeks is dry and not too powdery. -
Add a flush:
Sweep a dusty rose blush high on the cheekbones, blending it softly towards the temples to create a romantic, flushed base for the vines. -
Create freckles:
Using a brown brow pencil or a specialized freckle pen, dot faux freckles across the nose bridge and upper cheeks, varying the pressure for a natural look. -
Define the eyes:
Apply a matte brown eyeshadow into the crease and outer corner of the eye to add depth without overpowering the face paint. -
Wing it out:
Draw a sharp, classic wing using black liquid eyeliner, extending the tail slightly upward to lift the eye shape. -
Apply lip color:
Dab a berry-colored lipstick onto the lips, focusing on the center and blending outwards for a soft, stained effect.
Clean Lines Only
If a vine line gets too thick or messy, don’t wipe it while wet. Wait for it to dry completely, then use a damp Q-tip or an angled brush with concealer to ‘erase’ and sharpen the edge.
Step 2: Painting the Structure
-
Map the main vine:
Load a fine liner brush with Deep Green face paint and drawing a long, S-shaped curve starting near the jawline, winding up the cheek, and ending above the eyebrow. -
Add scrolling details:
Paint delicate, spiraling curls branching off the main stem, placing one near the cheekbone and another curling inward on the cheek. -
Outline the leaves:
Using the very tip of your brush, draw thin outlines of almond-shaped leaves attached to the vine, pointing them in the direction of growth. -
Position the flower:
On the upper forehead near the hairline, draw five teardrop shapes arranging them in a fan or half-flower pattern using a diluted red outline.
Level Up: Real Texture
For a mixed-media 3D effect, stick tiny flat-back rhinestones over the yellow painted dots using eyelash glue, or use liquid dimensional fabric paint for the vines to create actual raised texture.
Step 3: The Embroidery Technique
-
Fill leaves with texture:
This is the secret to the embroidered look: instead of filling the leaves solidly, use Forest Green to paint tiny, closely packed diagonal lines inside each leaf outline. -
Mimic thread direction:
Ensure your diagonal strokes generally angle towards the tip of the leaf, just like real satin stitching would on fabric. -
Layer the stems:
Go back over the main stems with a second pass of Deep Green to clean up edges and add slight dimension, making them look like thicker thread. -
Stitch the petals:
Switch to your Berry Red paint and fill the flower petals on the forehead using the same diagonal hatching technique used for the leaves. -
Add spacing variance:
I like to leave microscopically small gaps between some of the paint strokes so the skin shows through slightly, enhancing the illusion of individual threads. -
Detail the intersections:
Where a leaf meets the stem, place a tiny dot of the darker green to simulate the knot or connection point of the embroidery.
Step 4: Highlights & Accents
-
Add yellow pistils:
Use the back end of a brush or a detail tool dipped in Golden Yellow to stamp distinct dots at the base of the red flower petals. -
Scatter decorative knots:
Place small yellow dots sporadically along the green vine and near the curly cues to act as decorative French knots. -
Set the design:
Mist the face lightly with a setting spray, holding the bottle at arm’s length to prevent water droplets from running the paint.
Enjoy wearing this floral masterpiece that blurs the line between makeup and textile art
Glitter and Gem Embellishments
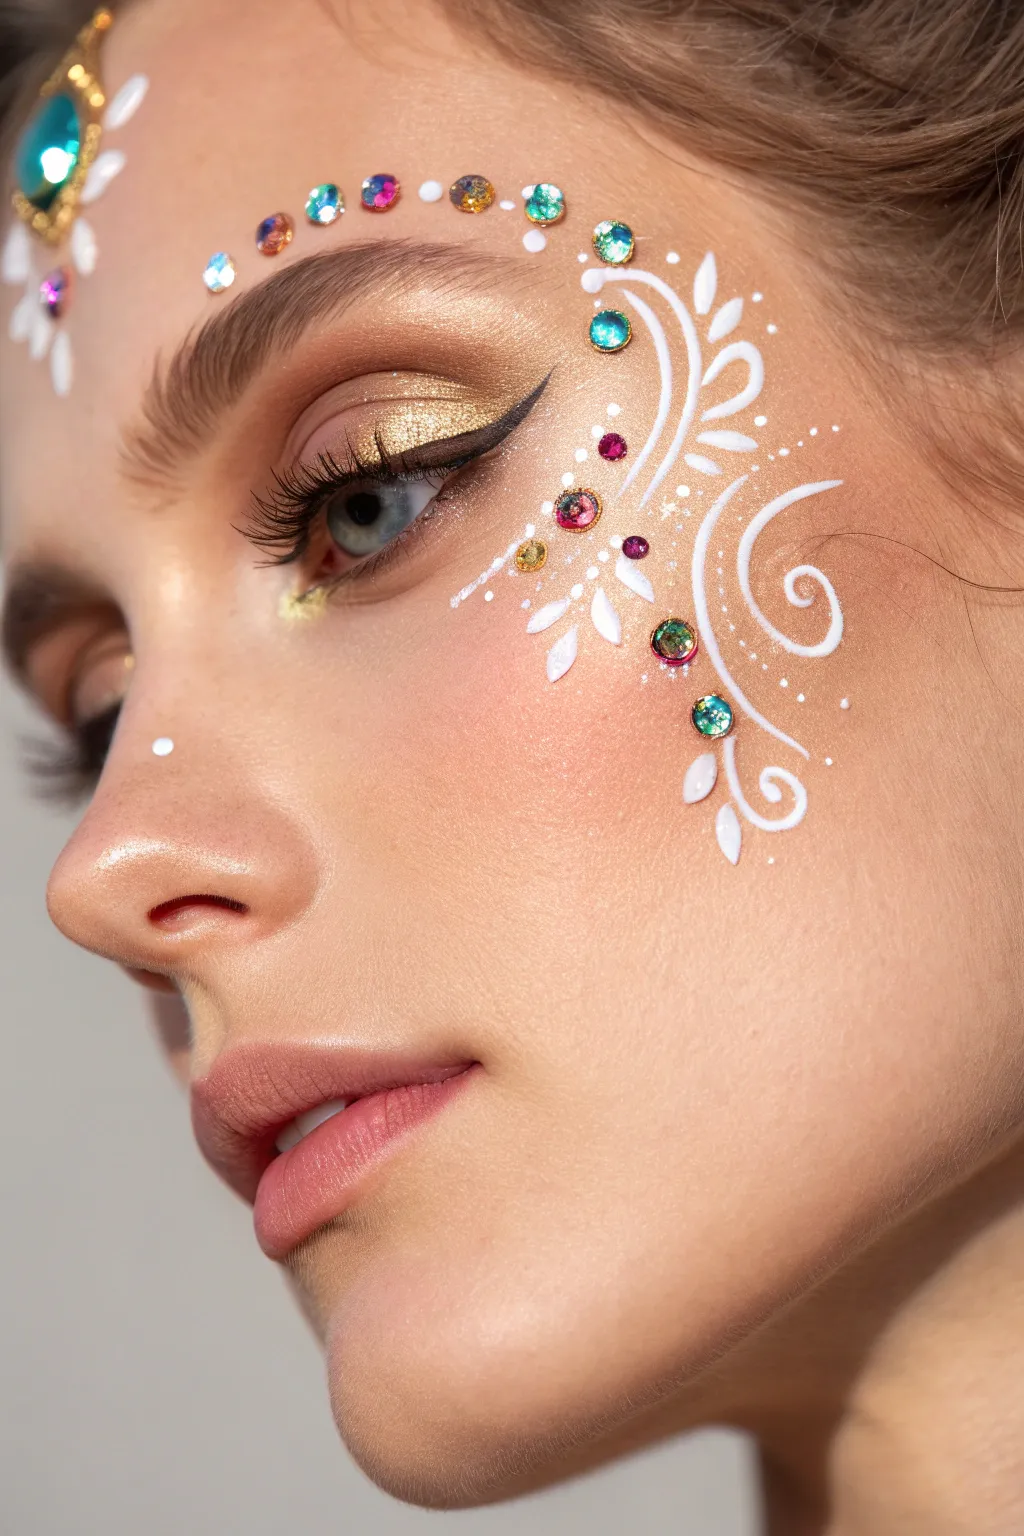
Capture the magic of carnival season with this ethereal look that combines warm golden eyes with cool, intricate white linework and dazzling gemstones. This tutorial guides you through painting delicate swirls and placing jewels to create a festival-ready masterpiece.
How-To Guide
Materials
- Metallic gold eyeshadow
- Matte soft brown eyeshadow
- Black liquid eyeliner
- Mascara
- Water-activated white face paint (or white liquid liner)
- Fine detail brush (size 0 or 00)
- Flat-back sparkling rhinestones (teal, pink, gold, clear)
- Skin-safe eyelash glue or spirit gum
- Tweezers or wax rhinestone picker
- Setting spray
Step 1: The Golden Gaze
-
Prep the base:
Start with your usual foundation and concealer routine to create a flawless, even canvas for the art. -
Apply gold pigment:
Pack a metallic gold eyeshadow onto your entire mobile eyelid. I find using a fingertip applies the shimmer more densely than a brush. -
Define the crease:
Blend a soft matte brown shade into the socket line to add subtle depth without overpowering the gold. -
Draw the wing:
Create a sharp, classic cat-eye using black liquid eyeliner, extending the wing slightly upward toward the tail of your brow. -
Enhance lashes and brows:
Apply two coats of black mascara and brush your eyebrows upward with a clear brow gel for a fluffy, feathery look.
Steady Hand Secret
Rest your pinky finger on your cheekbone while painting the fine lines. This anchors your hand and prevents shakiness, giving you smoother, crisp curves.
Step 2: Whimsical White Lines
-
Prepare your paint:
Mix your water-activated white face paint until it reaches a creamy, ink-like consistency that flows easily off the brush. -
Map the temple swirl:
Using a fine detail brush, paint a large, elegant ‘C’ curve starting near the outer corner of the eye and curving up towards the hairline. -
Extend the design:
Paint a secondary swirl flowing downwards from the cheekbone towards the jawline, creating an organic, vine-like flow. -
Add teardrop leaves:
Press the belly of your brush down and lift sharply to create teardrop shapes branching off the main swirls. -
Detail with dots:
Use the very tip of your brush to place tiny white dots around the swirls to add texture and an airy feel to the design. -
Accentuate the brow:
Paint a series of small, spaced-out dots or tiny dashes arching just above your natural eyebrow line.
Step 3: Jeweled Embellishments
-
Dot the adhesive:
Apply small dots of eyelash glue along the space above the eyebrow and at key points within your white cheek design. -
Wait for tackiness:
Let the glue sit for about 30 seconds until it becomes clear and tacky to prevent the gems from sliding. -
Place brow gems:
Using tweezers, place a row of rhinestones above the eyebrow, alternating colors generally between warmth and cool tones like teal and amber. -
Embellish the cheek:
Nestle round gems into the curves of your white paint swirls on the cheek to act as focal points or flower centers. -
Add the forehead centerpiece:
Glue a larger statement gem or a cluster of stones in the center of the forehead or near the hairline for a regal touch. -
Set the look:
Finish with a generous mist of setting spray to lock the makeup and face paint in place for the whole event.
Level Up: Fairy Dust
While your setting spray is still damp, gently tap some loose iridescent glitter over the high points of your cheeks to add an extra dimensional sparkle.
Now you are ready to shine with this stunning, handcrafted festival look.

PENCIL GUIDE
Understanding Pencil Grades from H to B
From first sketch to finished drawing — learn pencil grades, line control, and shading techniques.
Explore the Full Guide
Delicate White Lace Linework
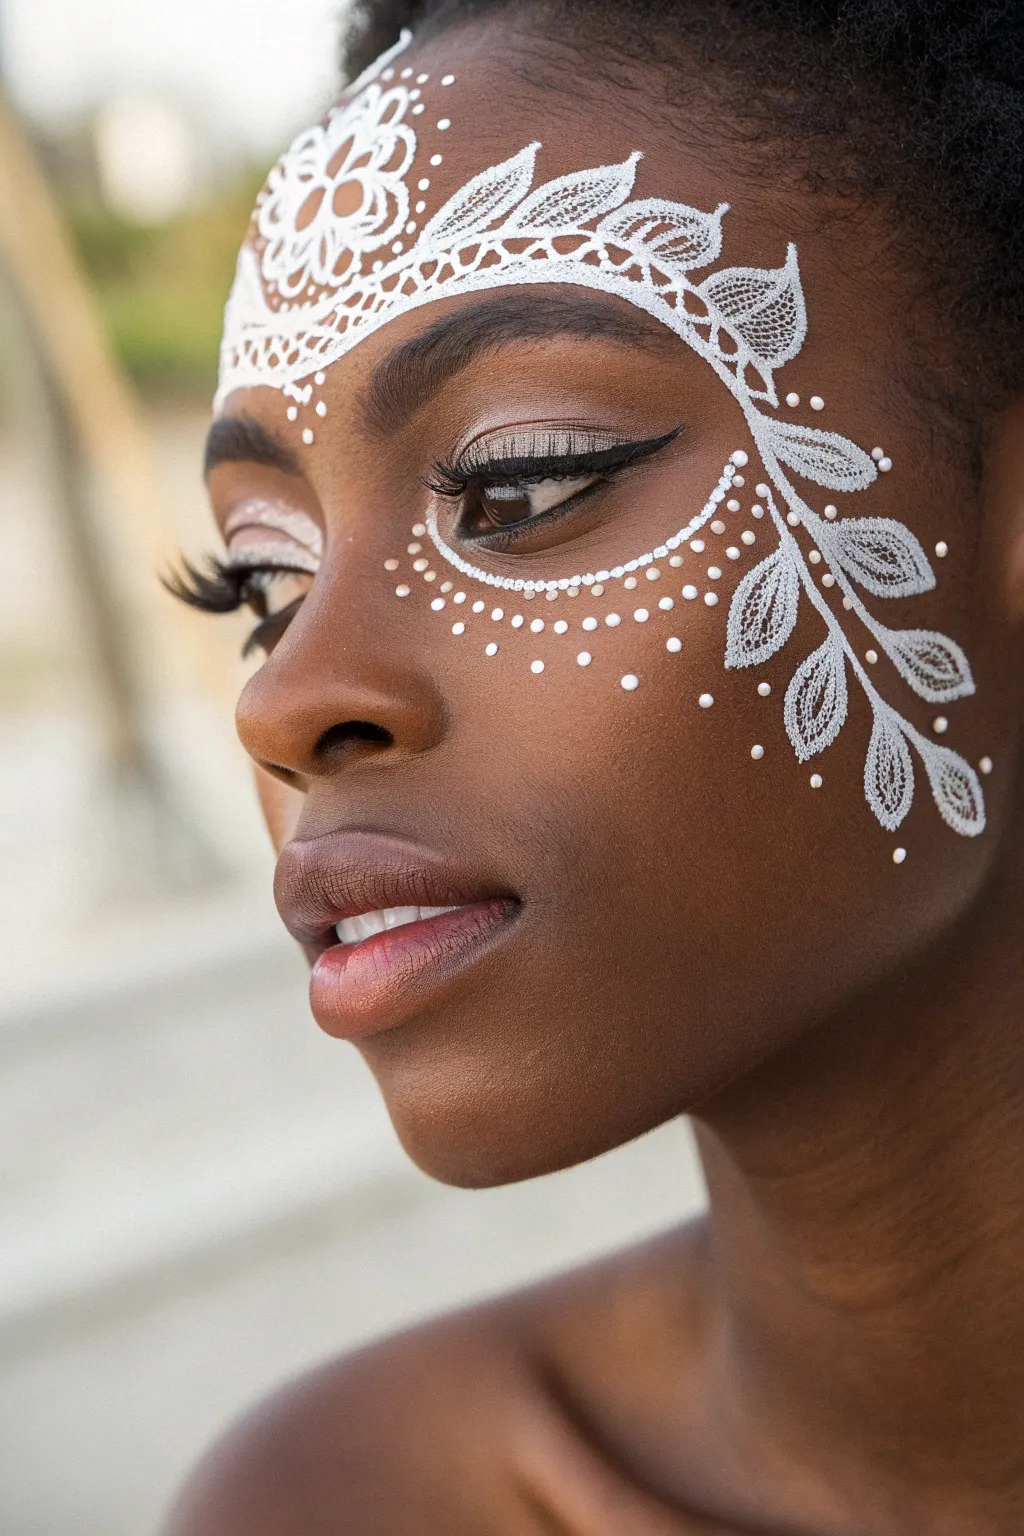
Transform your face into a delicate work of art with this intricate lace-inspired design. By combining fine white linework with cross-hatching techniques, you will create a high-contrast, elegant mask that mimics the texture of real fabric.
Step-by-Step Guide
Materials
- High-pigment white face paint (water-activated)
- Detail brush (size #0 or #00)
- Round brush (size #1 or #2)
- Black liquid eyeliner
- Champagne or gold shimmer eyeshadow
- False eyelashes (wispy style)
- Small cup of water
- Spray bottle
- Dotting tool (optional)
Step 1: Base and Definition
-
Prep the canvas:
Begin with clean, moisturized skin. Apply a sheer foundation or tinted moisturizer to evne out your complexion while keeping the skin looking natural and radiant. -
Apply eyeshadow:
Sweep a champagne or soft gold shimmer eyeshadow across the entire eyelid. This subtle glow complements the white paint without overpowering the intricate linework. -
Create the wing:
Using black liquid eyeliner, draw a sharp, dramatic wing along the upper lash line. Keep the line crisp, as it provides a necessary anchor for the delicate white patterns. -
Lash application:
Apply a pair of wispy false eyelashes. I prefer to do this before painting the face design so my hand doesn’t smudge the artwork later while fiddling with glue.
Step 2: The Centerpiece
-
Paint consistency:
Activate your white face paint with water. Mix until you achieve an inky, fluid consistency that flows easily from the bristles but is opaque enough to cover in one pass. -
Central floral shape:
Starting in the center of your forehead, just above the brows, paint a small floral medallion shape. Outline distinct petal shapes radiating outward. -
Create the mesh:
This is the secret to the lace look: inside your petal outlines, use your finest #00 brush to paint tiny diagonal cross-hatches. This grid pattern mimics actual lace netting. -
Top flourish:
Extend a scalloped edge along the top of the forehead, framing the hairline. Connect this to your central flower with delicate looping lines.
Troubleshooting: Paint Cracking?
If the white paint cracks when you smile, your layer is too thick. Use more water to thin the paint to an ink-like consistency rather than a paste when applying.
Step 3: Vines and Leaves
-
The main vine:
Draw a sweeping, curved line starting from the forehead design, arching over the eyebrow, and flowing down toward the temple and cheekbone. -
Outline the leaves:
Along this main vine, paint the outlines of large, teardrop-shaped leaves. Place larger leaves near the temple and gradually smaller ones as the vine descends. -
Fill with texture:
Just as you did with the forehead flower, fill these leaf outlines with fine cross-hatching or tiny stippling to maintain that semi-transparent fabric illusion. -
Thicken the edges:
Go back over the outer perimeter of your leaves with a slightly thicker line to make the shapes pop against the skin. -
Add connecting swirls:
Connect the leaves to the main stem with small, fluid S-curves to give the design an organic, flowing movement.
Pro Tip: The Lace Effect
Don’t fill shapes completely solid! Leaving empty space or drawing tiny grids inside the outlines is crucial to making the paint look like delicate fabric lace.
Step 4: Dotted Details
-
Under-eye guides:
Visualize three swooping curves starting from the inner corner of the eye and hugging the orbital bone underneath the lower lash line. -
Primary dots:
Load your round brush or use a dotting tool. Stamp a row of medium-sized opaque white dots following the lowest curve along the cheekbone. -
Secondary dots:
Create a second row closer to the eye using slightly smaller dots. Ensure the spacing is even for a polished look. -
Micro-dots:
With your finest brush tip, add tiny micro-dots in the spaces between the larger designs or at the very tips of the leaves to create a fading, airy effect. -
Final check:
Review the symmetry and opacity. If any white lines look jagged or sheer, carefully go over them one last time with a freshly loaded brush.
Now you have a stunning, intricate lace design that looks fragile but creates a powerful visual impact.
Feathered Plume Illusions
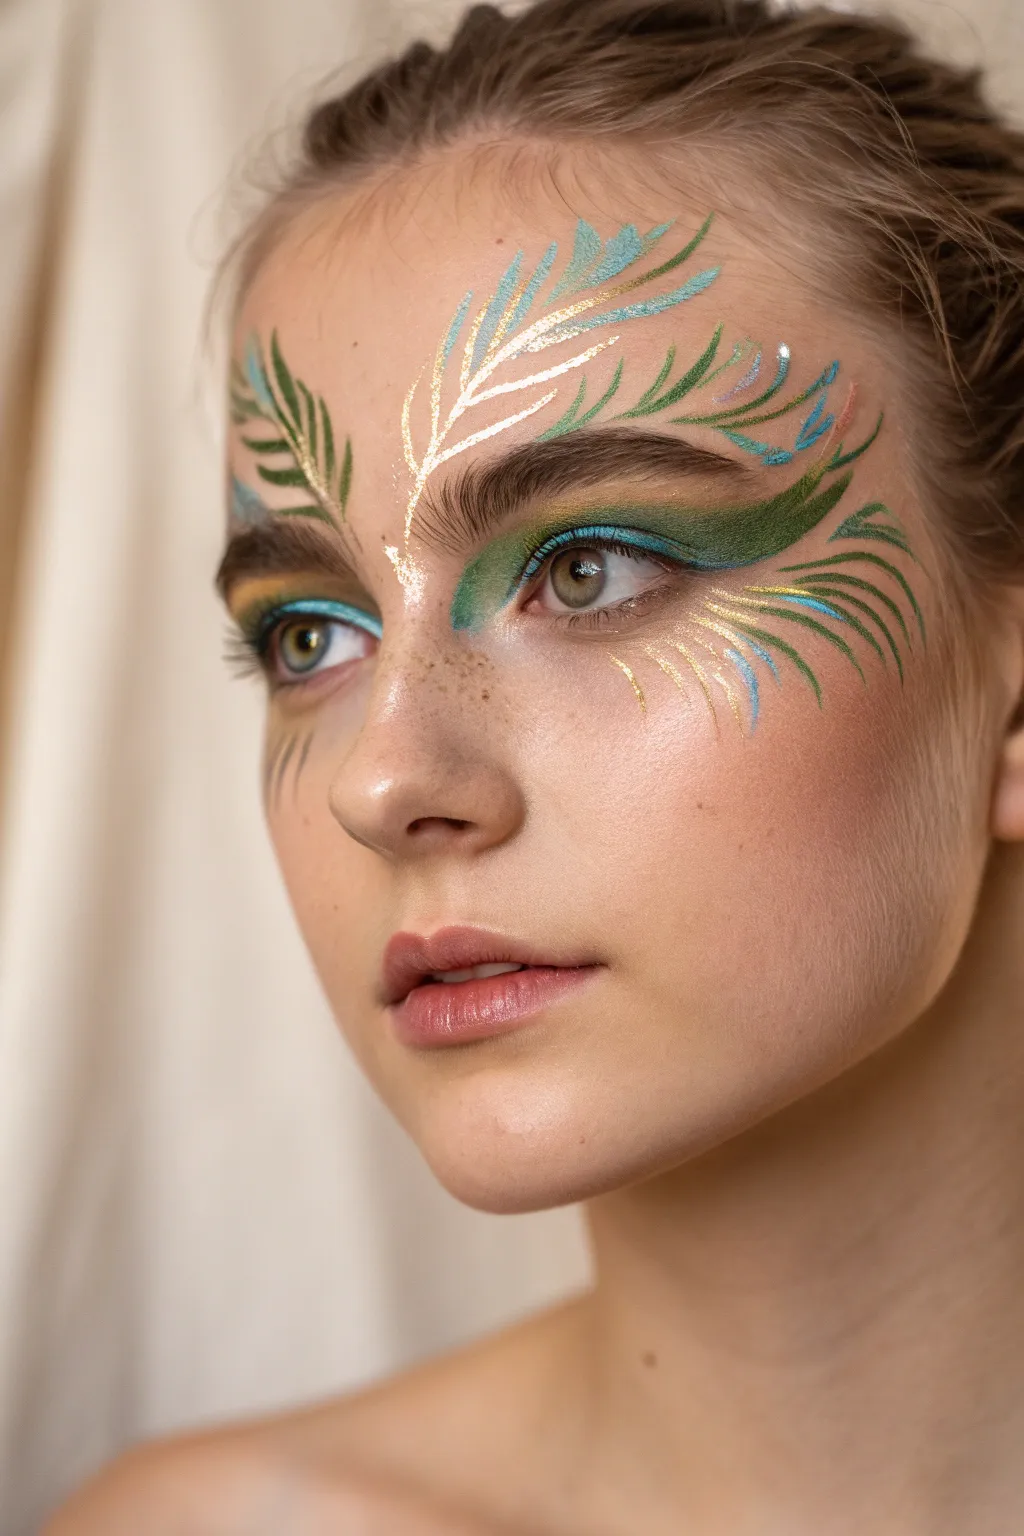
Transform into an ethereal creature with this delicate face paint design that mimics the intricate texture of feathers. By layering metallic gold, teal, and forest green, you will create a sweeping illusion that frames the eyes and forehead with elegant, organic movement.
Step-by-Step
Materials
- Water-activated face paints: Forest Green, Teal, White, Metallic Gold
- Matte eyeshadow: Moss Green
- Shimmer eyeshadow: Turquoise or Aqua
- Round synthetic brush (size 4)
- Fine liner brush (size 0 or 00)
- Fluffy eyeshadow blending brush
- Small pencil brush (for eyes)
- Cup of water
- Paper towels
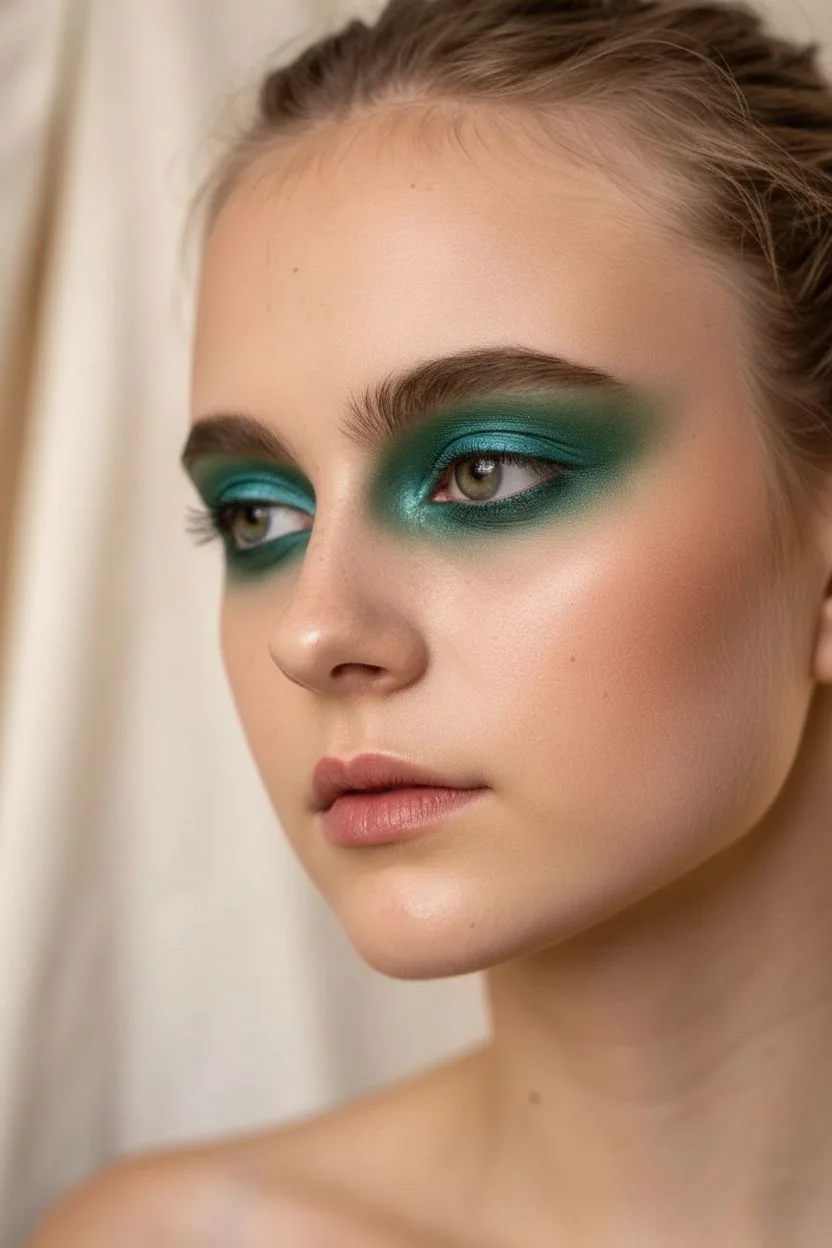
Step 1: The Verdant Gaze
-
Prep the canvas:
Start with clean, moisturized skin. Apply a light layer of sheer foundation or tinted moisturizer to evne out the tone while keeping natural features like freckles visible. -
Deepen the crease:
Using a fluffy blending brush, sweep matte moss green eyeshadow into the crease of your eyelids, blending upwards and outwards toward the temple to create a winged shape. -
Add lid shimmer:
Pack a turquoise shimmer eyeshadow onto the mobile lid, blending it seamlessly into the darker green crease color. -
Define lower lash line:
Take a small pencil brush and smudge the turquoise shadow along the lower lash line, connecting it to the outer wing. -
Inner corner highlight:
Dab a tiny amount of metallic gold paint or shadow in the inner corners of the eyes to open them up.
Step 2: Feather Structure
-
Frame the eyebrow:
Load a size 4 round brush with forest green face paint. On one side (above the brow), paint three to four curved, leaf-like strokes that follow the arch of the eyebrow upwards. -
Create the eye wing:
On the opposite eye, use the same green paint to create a large, sweeping wing shape starting from the outer corner and curving up toward the hairline. -
Forehead spine:
Switch to a fine liner brush tailored for details. Using white paint mixed with a tiny drop of gold, draw a thin, curved line starting from the center of the forehead branching upwards. -
Paint the barbs:
Using the liner brush and teal paint, flick short, quick strokes outward from the forehead spine you just painted, mimic the delicate barbs of a feather. -
Cheek details:
With the forest green paint and liner brush, paint three small, curved wisps on the cheekbone opposite the large eye wing to balance the composition. -
Layering teal tones:
Load your round brush with teal paint. Add a second layer of strokes slightly overlaying the forest green shapes above the eyebrow to add dimension and color variety.
Clean Lines
To get those sharp, tapered ends on your feather strokes, press the brush down at the start of the line and lift it vertically off the skin as you flick it outward.
Step 3: Gilded Details
-
Forehead highlights:
Clean your liner brush thoroughly. Load it with white face paint and add very thin, crisp lines between the teal feather barbs on the forehead for high contrast. -
Gold veining:
I particularly enjoy this step as it brings the design to life; load a liner brush with wet metallic gold paint to an inky consistency. -
Gild the eye wing:
Paint delicate gold veins running through the dark green wing at the outer corner of the eye, following the curve of the shape. -
Accentuate the brow:
Add thin gold outlines or internal veins to the green leaf-shapes above the eyebrow. -
Create floating wisps:
Under the main eye wing, paint very fine, detached gold lines curving down onto the cheek to simulate loose feather strands catching the light. -
Final white accents:
Add tiny dots or micro-strokes of white at the very base of the forehead feather design to act as a focal point. -
Set the look:
Allow all paint to dry completely, then lightly mist with a setting spray to prevent the delicate lines from smudging.
Level Up
Apply lash glue to the back of small clear rhinestones and place them along the spine of the forehead feather for a sparkling, 3D carnival finish.
Wear your shimmering plumage with pride and watch as the gold catches the light with every turn of your head


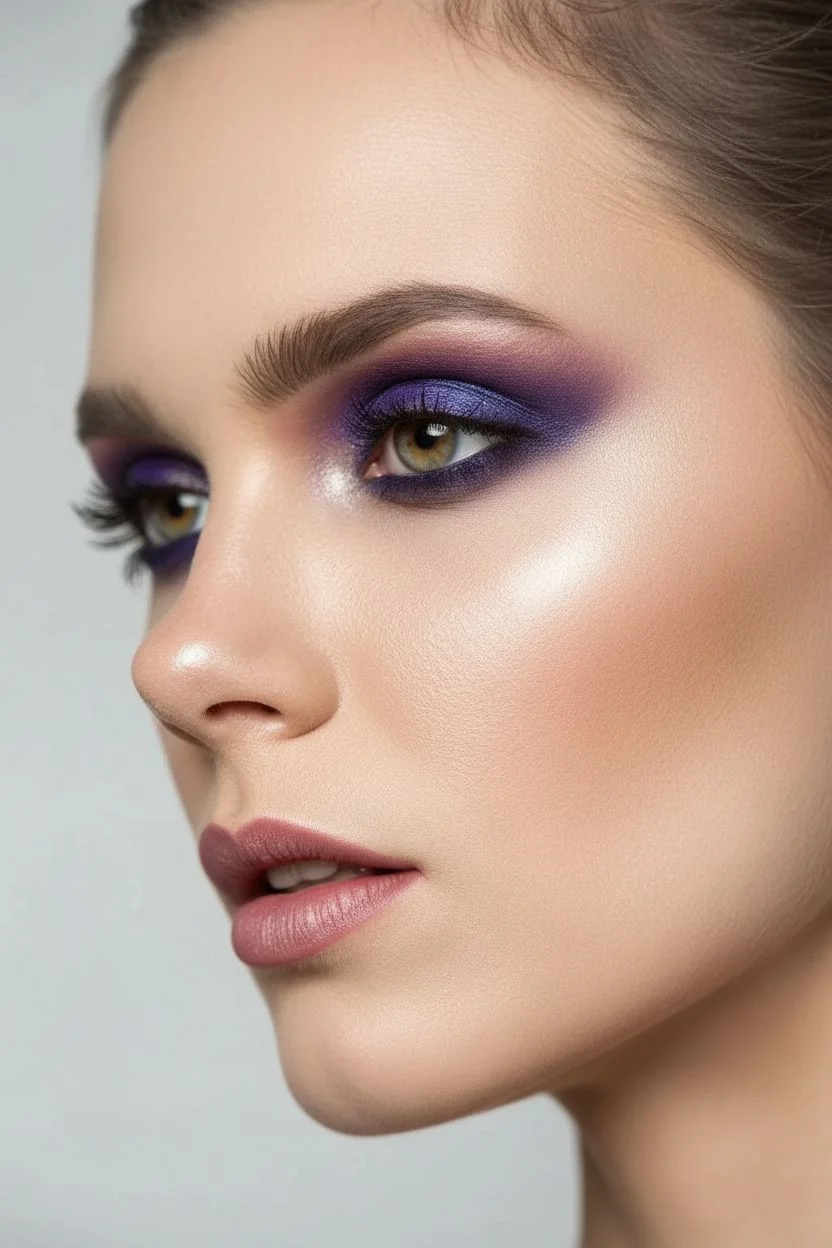
Mermaid Scale Stenciling
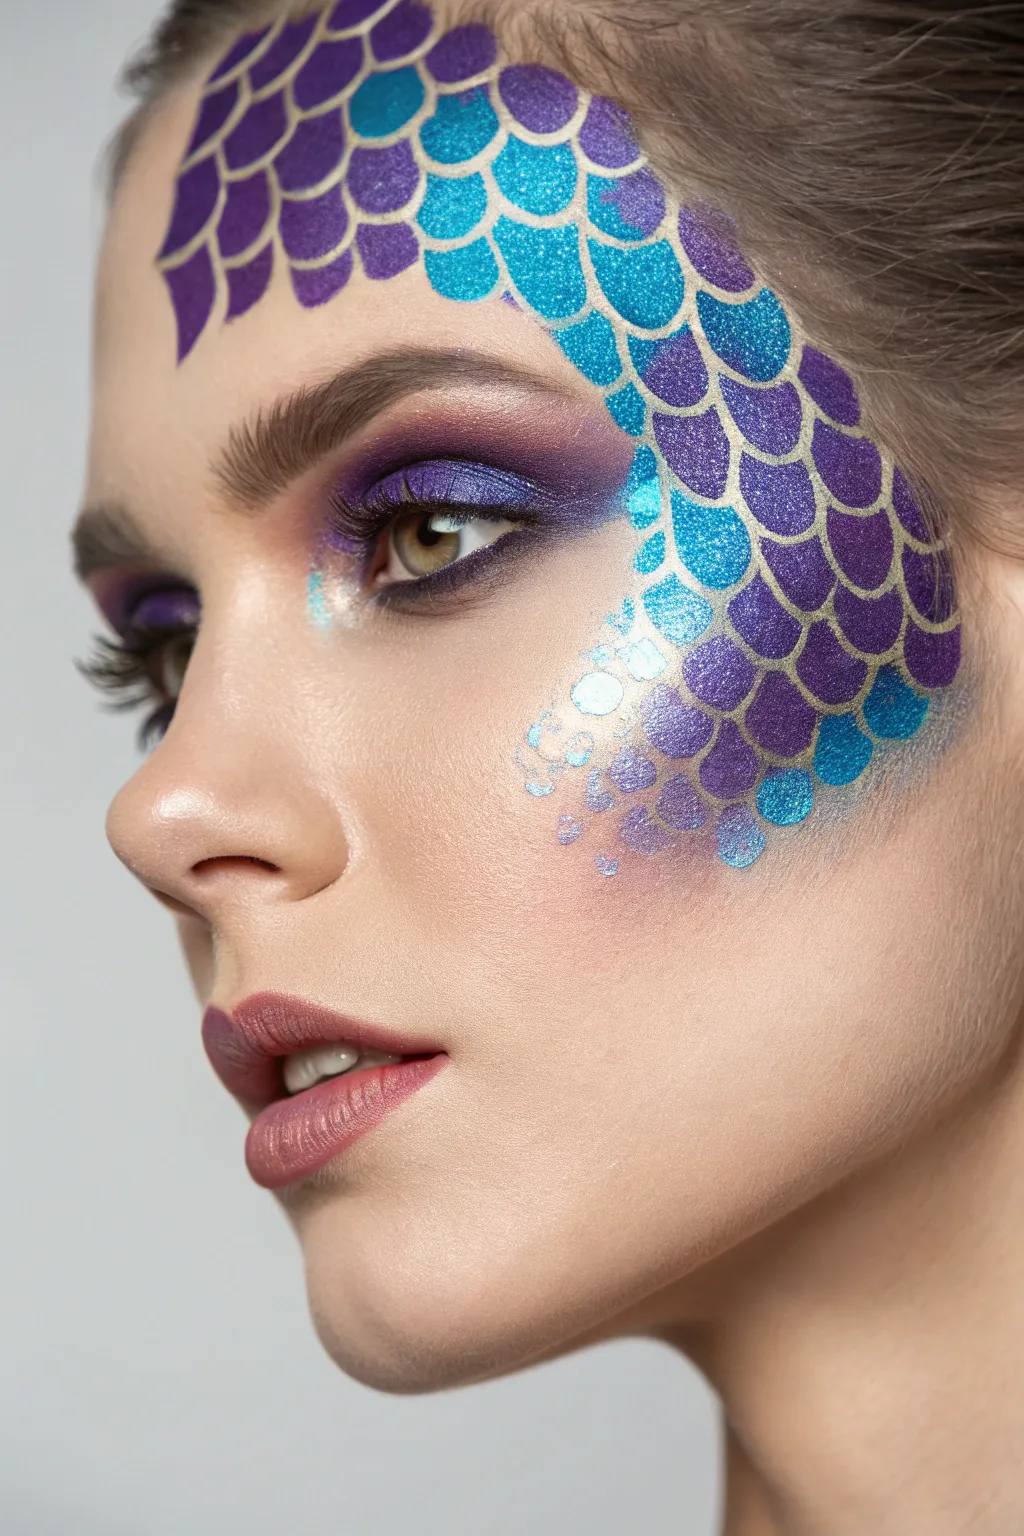
Transform into an ethereal sea creature with this striking look that combines sultry, smokey eyes with crisp, metallic scales. Using a simple household netting technique, you will achieve professional-grade definition that contours the forehead and cheekbone.
Step-by-Step Guide
Materials
- Matte eyeshadow palette (deep purple, plum, indigo)
- Metallic face paint (purple, cyan, teal)
- Fishnet stocking or scale stencil
- High-density makeup sponges
- Eye primer
- Black mascara
- Mauve matte lipstick
- Cosmetic grade glitter (optional)
- Setting spray
Step 1: The Deep Sea Gaze
-
Prime the lids:
Begin with a clean eye area and apply a thin layer of eye primer to ensure the heavy pigments stay vibrant and crease-free. -
Define the crease:
Pack a matte deep purple eyeshadow into the crease of your eye, blending it upward toward the brow bone in a soft, diffused gradient. -
Deepen the lid:
Apply a shimmering indigo or dark blue shadow across the entire mobile lid, blending it seamlessly into the purple crease color. -
Smoke the lower lash line:
Using a pencil brush, run the deep purple shadow along your lower lash line to balance the heaviness of the upper lid. -
Highlight inner corners:
Pop a bright silver or iridescent white pigment into the inner corner of the eye to open up the gaze. -
Lash definition:
Curl your lashes and apply two generous coats of black mascara to both top and bottom lashes. -
Groom the brows:
Brush your eyebrows upward and fill them in slightly for a defined but natural frame.
Blurry scales?
Result looks messy? Your sponge was likely too wet. Let it dry completely, wipe it off, and try again with a sponge that feels almost dry to the touch.
Step 2: Stenciling the Scales
-
Prepare the stencil:
Stretch a piece of fishnet stocking or a specialized scale stencil over your forehead and temple. It must be pulled very taut so it doesn’t shift. -
Load the sponge:
Dampen a high-density sponge and load it with metallic purple face paint. Ensure the sponge is tacky, not dripping wet, to prevent bleeding. -
Apply the darker scales:
Firmly dab—do not drag—the purple sponge over the stencil starting at the hairline and working down to the temple. -
Transition colors:
Load a fresh side of your sponge with metallic cyal or teal paint. -
Create the gradient:
Stipple the teal paint starting at the cheekbone and working upward to meet the purple, blending slightly where they overlap. -
Fade the edges:
As you reach the outer edges of the design on the cheek, use lighter pressure so the scales appear to fade into the skin. -
Add texture:
While the paint is still tacky, I like to gently press a bit of cosmetic glitter over the stencil for extra dimension. -
Reveal the design:
Carefully lift the stencil straight up and away from the face to reveal the crisp scale pattern underneath.
Step 3: Finishing Touches
-
Clean up fallout:
Use a cotton swab with micellar water or a bit of concealer to sharpen the edges of the makeup if any paint migrated. -
Extend the shimmer:
Dip a small brush into the teal paint and manually add a few loose ‘dots’ or single scales at the bottom of the design for a scattered effect. -
Apply lips:
Define your lips with a rose-colored liner and fill them in with a matte mauve lipstick. -
Set the look:
Mist the face with a setting spray to seal the face paint and eyeshadow for long-lasting wear.
Level Up
Apply self-adhesive pearl stickers or rhinestones along the hairline curve to mimic water droplets caught in the scales.
Now you are ready to surface and show off this stunning aquatic transformation.
Classic Harlequin Diamonds
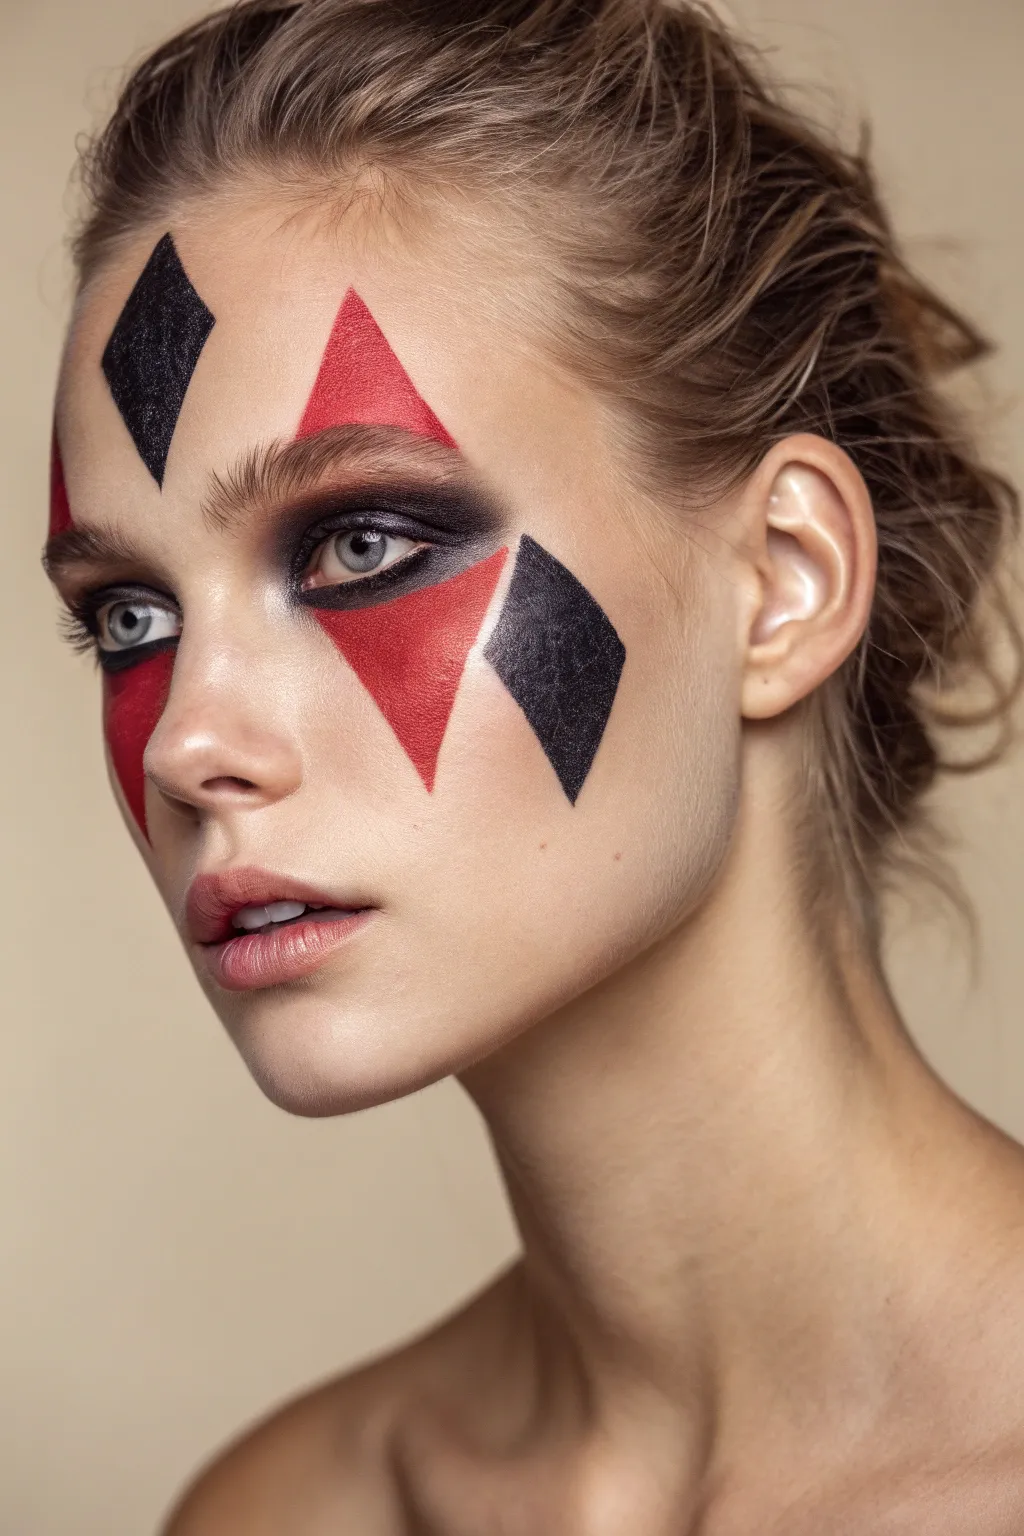
Merging high-fashion aesthetics with carnival tradition, this look relies on razor-sharp precision and a classic color palette. It features a sultry smoky eye paired with crisp, matte harlequin diamonds for a striking, modern masquerade appearance.
Step-by-Step Tutorial
Materials
- Matte foundation and concealer
- Translucent setting powder
- Black kohl eyeliner pencil
- Matte black eyeshadow
- Water-activated body paint (Red and Black)
- Fine liner brush (size 0 or 1)
- Small flat angled brush
- Brow gel
- Mauve or nude lip stain
- Setting spray
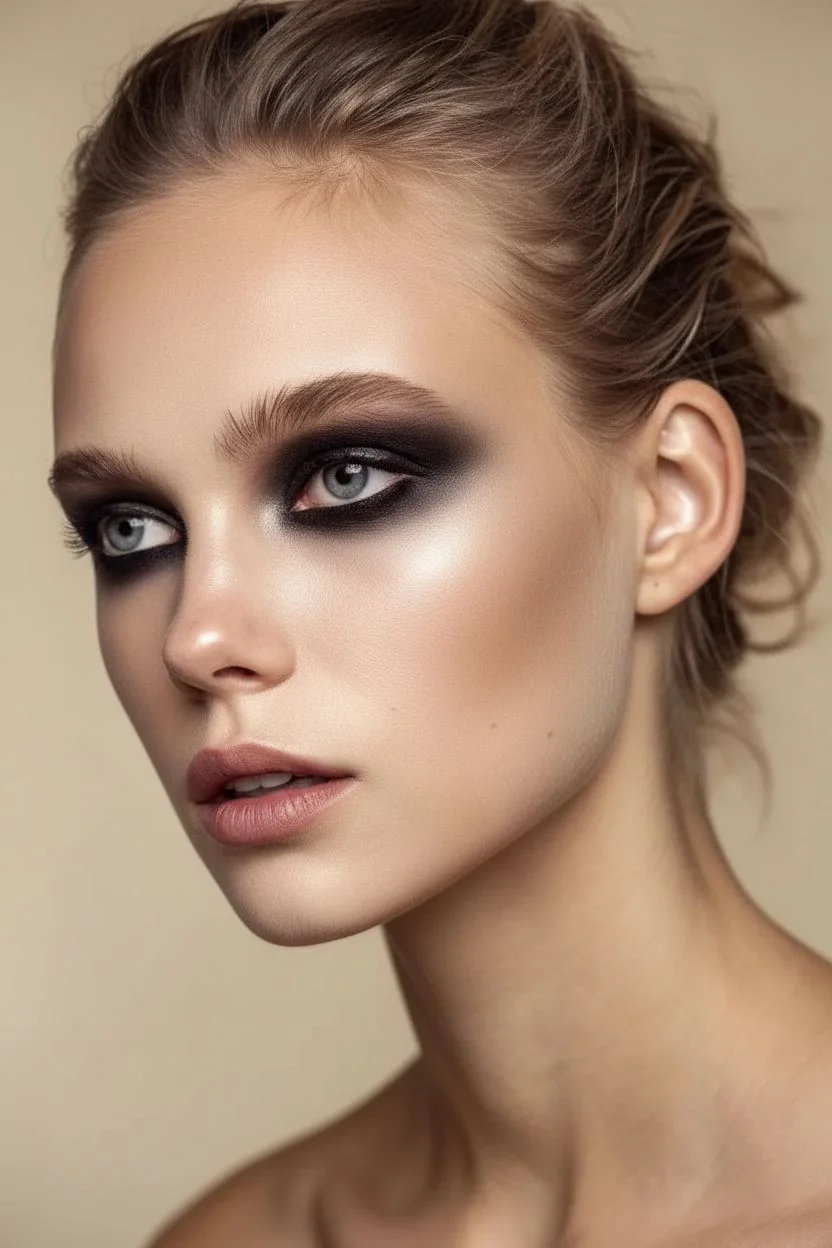
Step 1: The Canvas & Eyes
-
Prepare the base:
Apply your regular primer and a matte finish foundation to create a uniform canvas. Use concealer to brighten the under-eye area, ensuring any darkness is covered. -
Set the skin:
Dust translucent powder over your T-zone and eyelids to prevent creasing and help the face paint adhere better later on. -
Groom the brows:
Brush your eyebrows upward using a clear brow gel or soap brow technique to create a fluffy, feathery texture that frames the geometric shapes. -
Line the eyes:
Apply a black kohl pencil liberally along the upper lash line and the outer corner of the lower lash line. Perfection isn’t necessary here as we will smudge it. -
Create the smoke base:
With a small pencil brush, smudge the kohl liner upwards onto the mobile lid to create a dark, creamy base. -
Intensify with shadow:
Pack matte black eyeshadow over the smudged liner using a flat shader brush to set the cream and intensify the pigment. -
Blend the edges:
Using a clean blending brush, soften the edges of the black shadow into the crease, creating a seamless gradient. -
Define the waterline:
Apply the black kohl pencil to your upper and lower waterlines (tightlining) to enclose the eye for maximum drama. -
Finish the lashes:
Apply two generous coats of black mascara to top and bottom lashes. If you wear contacts, grey lenses add a haunting touch here.
Wobbly Lines?
Prepare a small angled brush with concealer. If your hand shakes while painting a diamond edge, immediately use the concealer brush to ‘erase’ the mistake and sharpen the line.
Step 2: Painting the Diamonds
-
Map the shapes:
Visualise where your diamonds will sit. You want one black diamond above the left brow, a red one near the hairline, and a cascading pattern on the cheeks. -
Outline the forehead black diamond:
Activate your black face paint with a little water until it’s an inky consistency. Using a fine liner brush, carefully outline the diamond shape above your left eyebrow. -
Fill in the black diamond:
Fill the shape with the black paint using a small flat brush for even coverage, keeping the edges crisp. -
Paint the red forehead diamond:
Clean your brush or switch to a new one. Mix your red paint and create a diamond shape on the upper center forehead, slightly offset to the right. -
Start the cheek pattern:
On the right cheek, paint a red diamond directly beneath the eye makeup. I like to let the top point of this diamond merge slightly with the smoky lower lash line. -
Add the lower black diamond:
Paint a black diamond on the right cheek, positioned diagonally below and slightly outward from the red one you just painted. -
Create the left cheek accent:
On the left side, paint a single red diamond extending down from the outer corner of the eye or temple area. -
Sharpen the edges:
Dip a small angled brush into a tiny bit of concealer and drag it carefully along the outside edges of your painted diamonds to clean up any fuzzy lines. -
Stain the lips:
Apply a mauve or nude lipstick, focusing on the center of the lips and blotting it out with your finger for a soft, diffused look rather than a crisp lip line. -
Set the look:
Mist the face lightly with a setting spray to lock the face paint and eyeshadow in place for the duration of your event.
Vinyl Effect
To make the diamonds look like shiny decals, wait for the paint to dry completely, then add a tiny, straight line of white liquid liner to one upper corner of each diamond.
Now you have a stunningly precise harlequin look that is ready for the spotlight.
Refined Teardrop Swirls
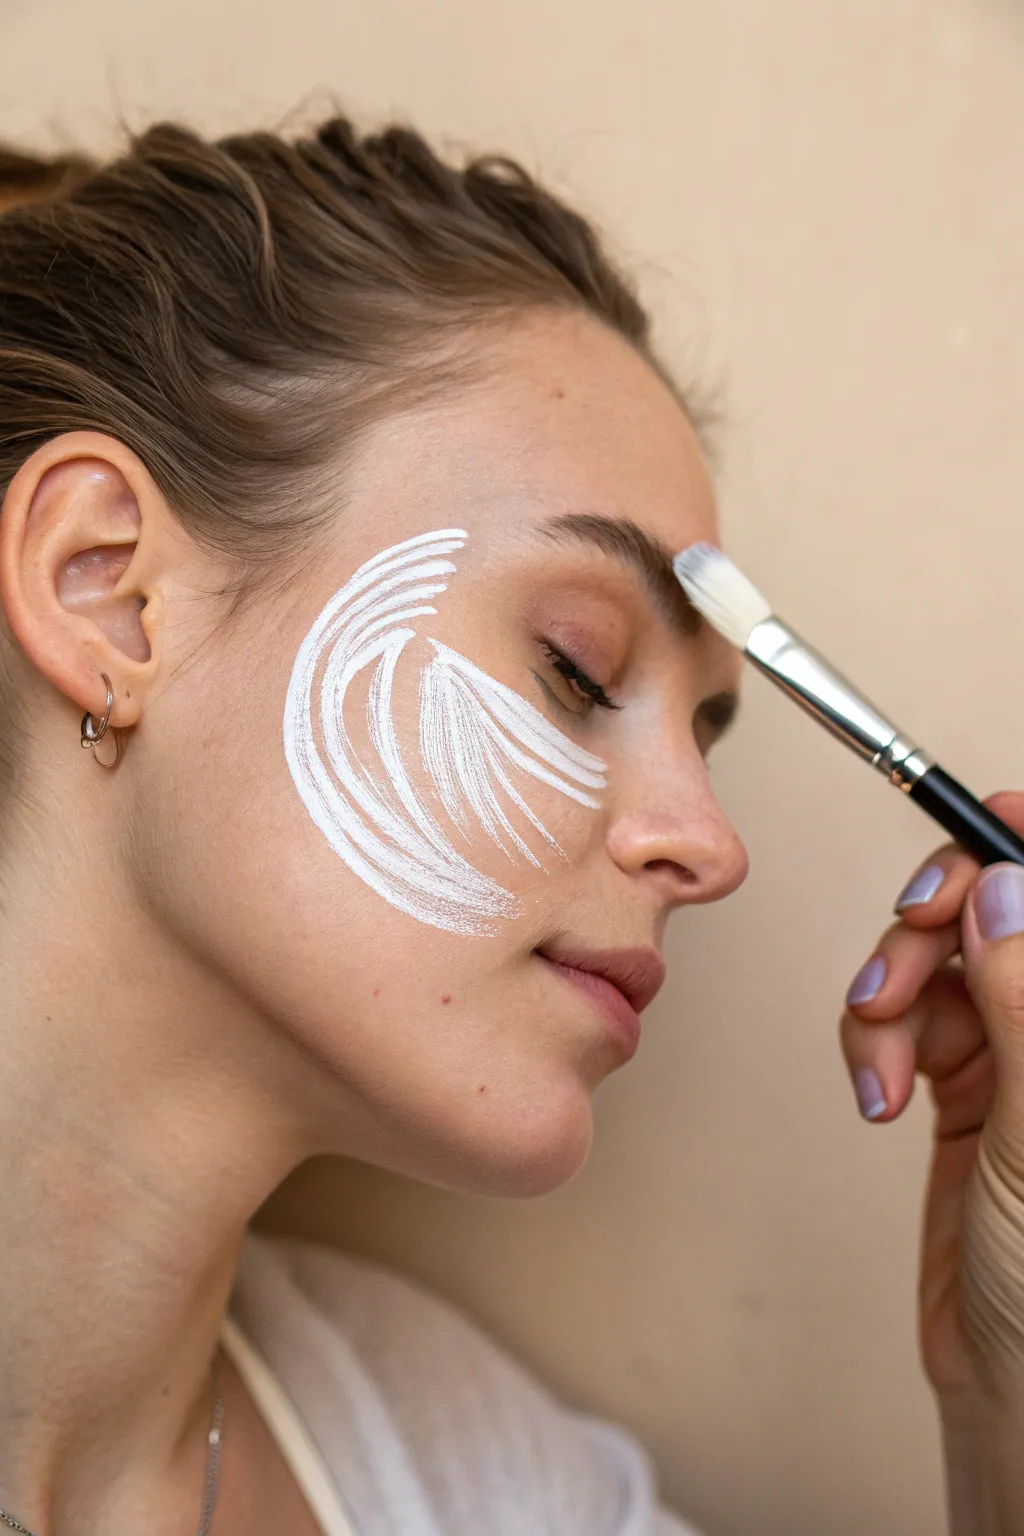

Achieve an ethereal, high-fashion carnival look with this minimalist white brushstroke design. This technique relies on visible bristle texture to create a dynamic, feathery motion that highlights the cheekbones elegantly.
Detailed Instructions
Materials
- High-pigment white face paint (water-activated cake or cream)
- Flat synthetic foundation brush (medium size)
- Small cup of water
- Paper towels
- Makeup setting spray (optional)
- Headband or hair clip
Step 1: Preparation and Consistency
-
Prepare the canvas:
Start with clean, dry skin. Use a headband or clip to pull hair back securely away from your temples and cheeks. -
Apply base makeup (optional):
If you prefer a full foundation base, apply that now and let it set completely, but bare skin works beautifully for this raw artistic look. -
Wet the brush:
Dip your flat synthetic brush into water, then squeeze out almost all the excess moisture against the rim of the cup. -
Activate the paint:
Swirl the damp brush into your white face paint cake. You want a thick, creamy consistency like toothpaste, not a watery ink. -
Test the texture:
Swipe the brush on the back of your hand. If the line is solid and dripping, it’s too wet. You are looking for a ‘dry brush’ effect where visible streaks appear. -
Blot excess:
I like to tap the bristles quickly on a dry paper towel to remove just a tiny bit of product, ensuring those individual bristle marks will show up on the skin.
Too SOLID?
If your strokes look like solid white blocks without texture, the paint is too wet. Wipe the brush on a towel to remove moisture, reload with thick paint, and try again.
Step 2: Creating the Swirls
-
Position the first stroke:
Place the flat edge of the brush near your temple, angling it downwards towards the nose. -
Execute the top arch:
Sweep the brush in a confident, C-shaped curve ending right below the eye socket. Apply firm pressure at the start and lighten your touch as you lift off. -
Start the second layer:
Position the brush slightly below your starting point for the next stroke, overlapping the first one slightly. -
Create the middle volume:
Drag the brush down along the cheekbone, following the natural curve of your face. This stroke should be the widest and most opaque. -
Feather the edges:
Use the very tip of the brush to flick lighter strokes at the tail end of the design towards the nose, creating a feathery, untamed look. -
Add lower definition:
Add a third main stroke starting near the ear tragus, curving upward to meet the middle section, completing the rounded shape. -
Enhance the texture:
If some areas look too sheer, carefully streak a second layer over them, but ensure you maintain the gaps and bristle lines that give the design character. -
Check symmetry:
Step back and view your profile in a mirror. The shape should hug the cheekbone prominently without dipping too low onto the jawline. -
Let it dry:
Allow the paint to air dry for about two minutes. Try to keep your face relatively still to prevent cracking while it sets. -
Clean up details:
If any stray marks went too close to the eye, clean them up precisely with a damp cotton bud. -
Set the look:
Mist a light layer of setting spray over the face to lock the white pigment in place for the duration of your event.
Add Some Magic
While the paint is still tacky, gently press loose biodegradable silver glitter onto the thickest part of the white strokes for a sparkling, frost-bitten finish.
Now you have a striking, art-gallery-worthy face paint design ready to turn heads!
Celestial Moon and Stars
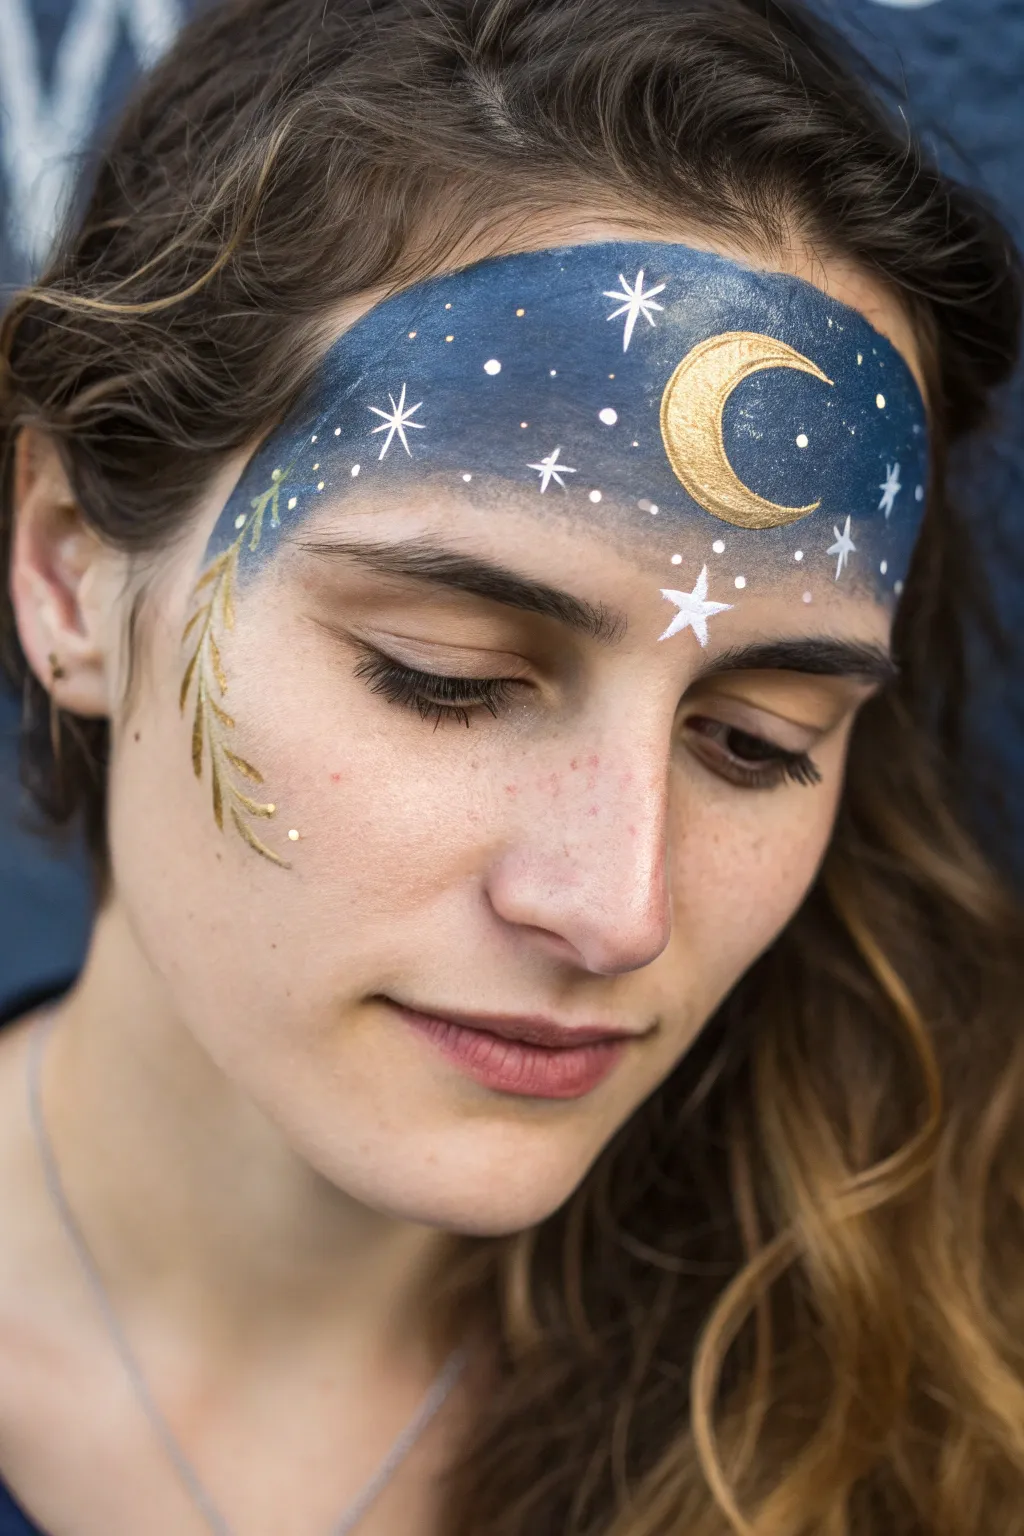
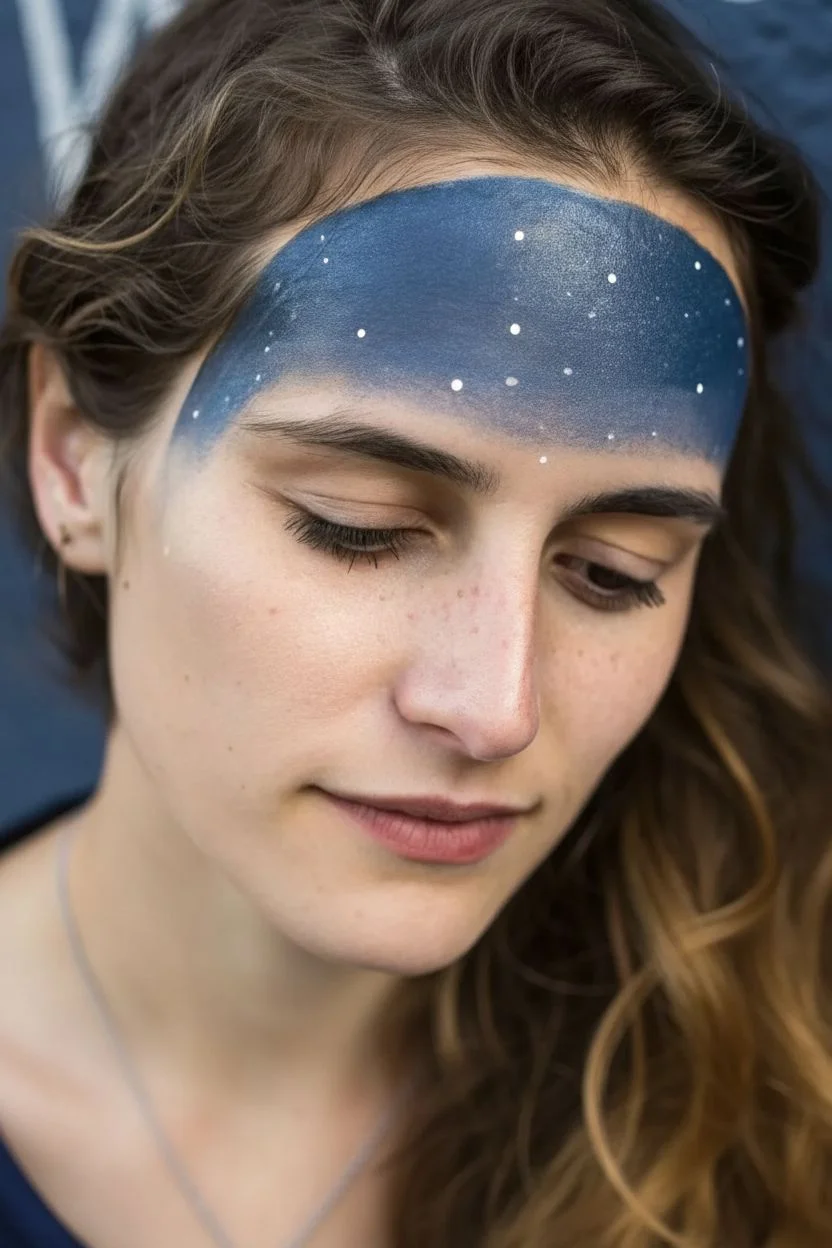
Transform your forehead into a mesmerizing celestial canvas with this elegant design. By blending deep blue hues with metallic gold accents, you will create a sophisticated look that captures the magic of a starry night.
Step-by-Step Tutorial
Materials
- Midnight blue face paint
- Metallic gold face paint
- White face paint
- High-density face painting sponge
- Round brush (size 4)
- Fine liner brush (size 1 or 0)
- Cup of water
- Spray bottle (optional)
Step 1: Setting the Atmosphere
-
Activate the base color:
Dampen your high-density sponge slightly with water or a spray bottle. Rub it in a circular motion on the midnight blue paint cake until you have a creamy implementation. -
Apply the forehead band:
Gently pat the blue paint across the entire forehead. Start near the hairline to deposit the most pigment there, working your way from temple to temple. -
Create the fade:
As you move downwards toward the eyebrows, use a lighter touch with the sponge. We want the blue to fade out naturally rather than stopping at a hard line. -
Clean the fade edge:
I like to use a completely clean, slightly damp corner of the sponge to dab along the bottom edge of the blue, softening the transition into the natural skin tone. -
Allow to set:
Wait about a minute for the blue base to dry completely. This is crucial so the gold and white details don’t mix with the blue and turn muddy.
Muddy Colors?
If your white stars are turning light blue, your base layer wasn’t dry enough. Wait until the blue feels dry to the touch, and ensure your white paint is thick and creamy, not watery.
Step 2: The Golden Moon
-
Load the gold:
Wet a size 4 round brush and load it thoroughly with metallic gold paint. Ensure the consistency is creamy enough to be opaque. -
Outline the crescent:
Position the moon off-center, slightly above the left eyebrow area. Use the tip of the brush to outline a C-shape for the crescent moon. -
Fill the shape:
Fill in the moon completely with gold. You can dab the brush gently while filling it to create a slightly cratered texture. -
Refine the points:
Use the very tip of your brush to taper the top and bottom points of the moon so they look sharp and elegant.
Step 3: Starlight Details
-
Prepare the white:
Switch to your fine liner brush (size 0 or 1). Create a fairly fluid texture with white paint so it flows easily off the bristles. -
Paint the hero star:
Draw a large twinkling star. Start with a vertical line, cross it with a horizontal line, and add a smaller ‘X’ through the center. -
Add secondary stars:
Scatter a few medium-sized 4-point stars (just a simple cross shape) across the blue background. -
Dot the constellations:
Using the very tip of the liner brush, add tiny white dots in clusters to represent distant galaxies and constellations. -
Fill the negative space:
Fill any large empty blue areas with varying sizes of dots to make the sky look full and magical.
Pro Tip: Sharp Points
To get those needle-sharp points on your stars, roll the wet bristles of your liner brush into a fine point on a paper towel before touching the skin. This keeps the lines crisp.
Step 4: The Celestial Vine
-
Start the stem:
Clean your size 4 round brush and reload it with metallic gold. Draw a thin, curving line starting from the temple area down onto the cheekbone. -
Paint the leaves:
Use the teardrop technique for leaves: press the belly of the brush down against the skin and lift up quickly to a point. -
Review the flow:
Add leaves alternating along both sides of the gold stem, following the curve of the face. -
Final accents:
Add three small gold dots at the very end of the vine and near the hairline to connect the gold theme with the stars.
Step back and admire your beautiful, ethereal night sky design
Metallic Steampunk Gears
Transform into an elegant Victorian-industrial vision with this high-shine steampunk look. By combining metallic textures with precise geometric shapes, you will create a style that looks part human, part machine.
Step-by-Step
Materials
- Metallic gold face paint (cake or cream)
- Rust or copper face paint
- Black liquid eyeliner
- Bronze and gold eyeshadow palette
- Fine detail brushes (size 0 and 00)
- Stippling sponge or kabuki brush
- Metal gear charms or cog accessories
- Bobby pins
- Setting spray
- Mascara or false lashes
Step 1: Setting the Canvas
-
Prime and perfect:
Start with a clean, moisturized face and apply a matte primer to ensure your metallic paints adhere smoothly without sliding. -
Apply foundation:
Even out your skin tone with a medium-to-full coverage foundation, blending it down the neck since we will add body art there later. -
Soft contour:
Sweep a cool-toned contour powder under your cheekbones to add dimension, keeping the color subtle so it doesn’t compete with the face paint.
Pro Tip: Perfect Circles
Drawing perfect gears freehand is tough. Use clean bottle caps or round household items as stamps. Dip the rim in paint and press gently onto skin to create flawless circular guides for your gears.
Step 2: The Gilded Mask
-
Load the gold:
Activate your metallic gold face paint with a little water until it reaches a creamy consistency, or scoop out a cream-based pigment. -
Create the gradient:
Using a stippling sponge, tap the gold paint onto your right temple, curving down onto the cheekbone and up above the brow; I like to keep the edges slightly diffused for an airbrushed effect. -
Intensify the shine:
Layer a second coat of gold in the center of the masked area to create a high-impact, molten metal look. -
Set the sheen:
Lightly dust a matching gold shimmer eyeshadow over the wet paint to lock it in place and amp up the reflection.
Step 3: Industrial Eyes
-
Deepen the crease:
Blend a rich matte chocolate brown or dark bronze shadow into the crease of your eyelid to create depth. -
Gild the lid:
Pack a sparkly gold pigment onto the entire mobile eyelid, blending it seamlessly into the darker crease color. -
Define the lash line:
Draw a sharp, winged line using black liquid eyeliner, extending it slightly outward to elongate the eye shape. -
Highlight the inner corner:
Pop a tiny amount of pale gold or champagne highlighter in the inner corner of the eye to open up the gaze. -
Add detail dots:
Using a fine detail brush and dark brown or black paint, place three ascending dots under the outer corner of the eye on the gold background.
Level Up: Real Texture
Instead of just painting, use eyelash glue to adhere tiny, lightweight scrapbooking gears or watch parts directly onto your face in the center of your painted designs for true texture.
Step 4: Painting the Mechanisms
-
Draft the cheek gear:
On the apple of the cheek, paint a circular gear outline using rust-colored face paint and a fine liner brush. -
Add spokes and details:
Fill in the spokes of the gear, leaving small negative spaces to mimic the look of a real mechanical cog. -
Create the forehead collage:
Above the eyebrow, paint a larger, ornamental gear shape in bronze, surrounding it with smaller floating circles and dots in contrasting red and gold tones. -
Highlight for 3D effect:
Use a tiny amount of white or pale yellow paint to add small distinct highlights to the top edges of your painted gears, making them look metallic and raised.
Step 5: Final Assembly
-
Accessorize the hair:
Pull your hair back securely and slide real metal gear charms onto bobby pins, arranging them in a cluster on the side of your head opposite the face paint. -
Paint the neck piece:
Using gold and rust paint, mimic the shape of a necklace or medallion on the side of the neck, adding intricate circular patterns to match the face. -
Apply mascara:
Finish the eyes with two coats of volumizing black mascara or apply a pair of natural-looking false lashes. -
Seal the look:
Mist the entire face with a strong-hold setting spray to prevent the metallic pigments from transferring or creasing.
Step back and admire your handiwork, as you are now perfectly geared up for any steampunk gala or carnival event
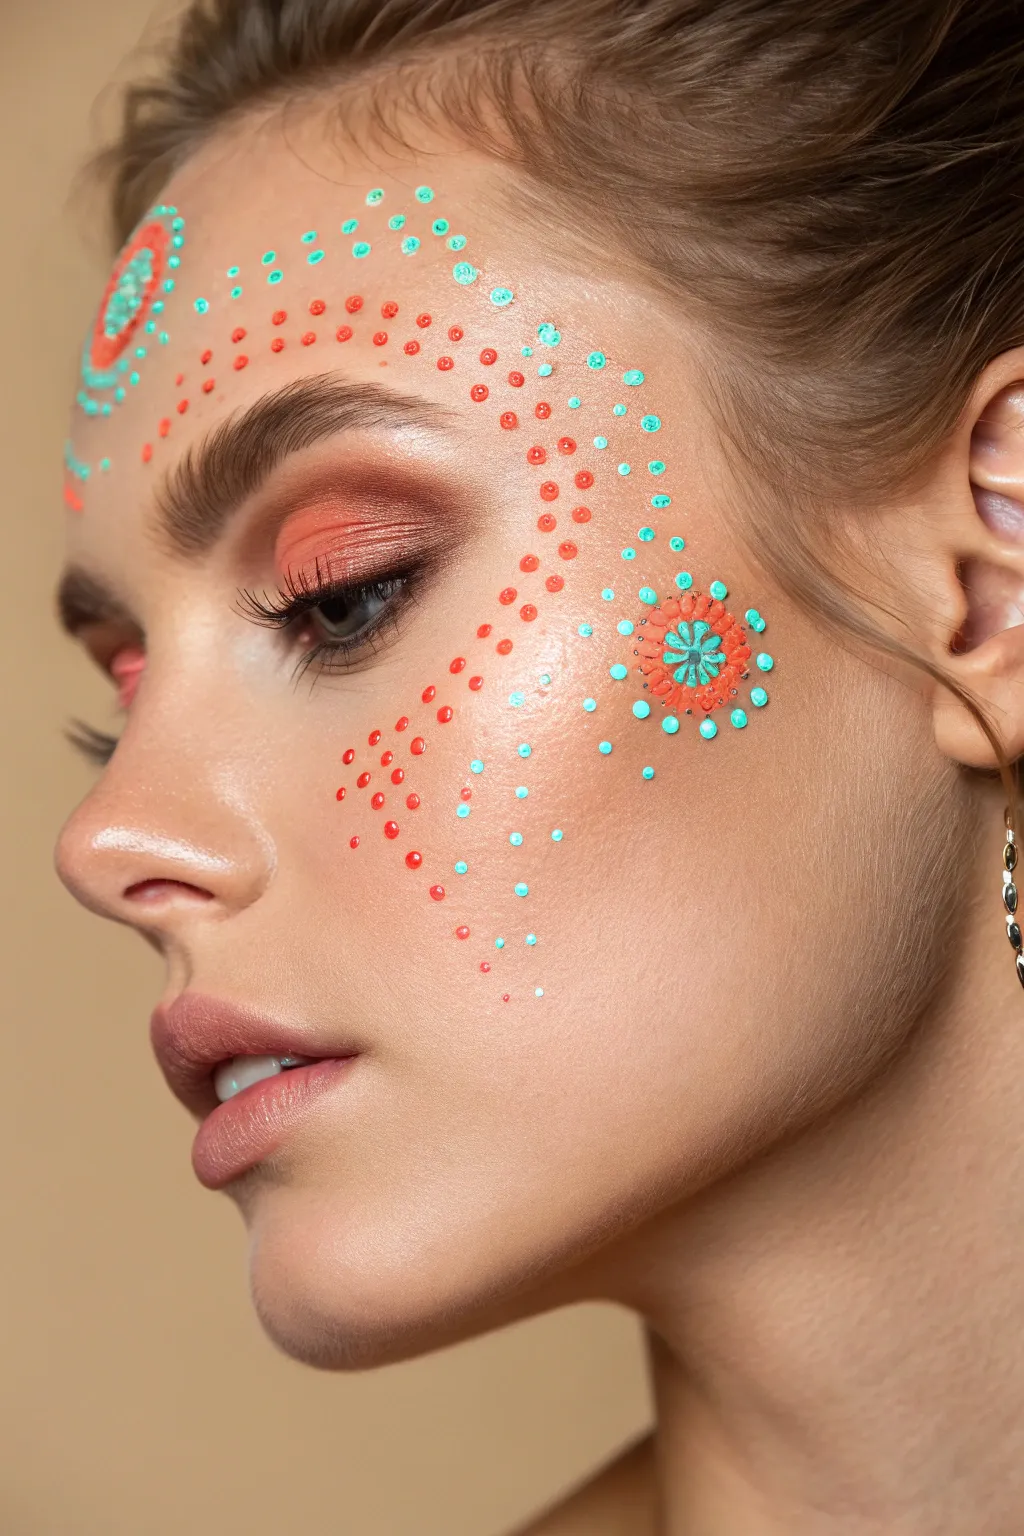
Neon Pointillism Details

This festival-ready look combines warm, sunset-hued eyeshadow with intricate face paint detailing. By using contrasting neon coral and teal dots, you will create a stunning mandala-inspired mask that flows naturally with your bone structure.
Detailed Instructions
Materials
- Matte foundation and concealer
- Coral and warm brown eyeshadows
- Water-activated face paints (Neon Coral, Teal/Turquoise)
- Set of dotting tools (or the back of paintbrush handles)
- Fine detail brush (size 0 or 00)
- Highlighter
- Mascara
- Setting spray
Step 1: Base and Eyes
-
Prime the canvas:
Apply your standard foundation and concealer to create an even skin tone, ensuring the cheek and temple areas are well-covered. -
Apply lid color:
Pack a vibrant matte coral eyeshadow onto the entire mobile eyelid using a flat shader brush. -
Add definition:
Blend a warmer, slightly darker terracotta brown into the crease to add depth to the eyes. -
Highlight the face:
Sweep a generous amount of highlighter across the high points of the cheekbones and down the bridge of the nose to give the skin a dewy glow. -
Lashes and brows:
Groom your eyebrows with a gel and apply two coats of mascara to define the lashes.
Fixing Smudges
If a dot smears, wait for it to dry completely. Once dry, use a damp cotton swab to gently lift the flake of paint off without ruining the foundation underneath.
Step 2: Forehead Design
-
Prep the paint:
Activate your teal and coral face paints with a little water until they reach a creamy, opaque consistency. -
Forehead center:
Using a medium-sized dotting tool, place a central teal dot on the left side of the forehead. -
First ring:
Dip a smaller tool into the neon coral paint and create a ring of small dots tightly circling the central teal dot. -
Expand the pattern:
create a larger semi-circle or arch of teal dots above the coral ring, spacing them slightly further apart. -
Add accents:
Place tiny coral dots in the negative spaces between the larger teal dots to make the design look intricate.
UV Glow Upgrade
Swap the standard neon paints for UV-reactive water cakes. Your intricate dot work will look bright in daylight but essentially glow in the dark under blacklight.
Step 3: Cheek Mandala
-
Paint the flower center:
Locate the center of your cheekbone. I find it helpful to use a fine brush here to paint five to six small teal petal shapes to form a flower. -
Inner detail:
Once the teal is dry, place a tiny coral dot in the center of the teal flower. -
Outline the flower:
Switch back to your dotting tool and surround the teal flower with a ring of medium-sized coral dots. -
Outer radiance:
Add a second, wider ring of alternating teal and coral dots around the flower to expand the mandala shape.
Step 4: Cascading Dots
-
Connect the zones:
Start applying a stream of mixed teal and coral dots flowing from the forehead design down the temple towards the cheek. -
Vary the sizes:
Use different sized tools to create variety; allow the dots to curve naturally around the eye socket. -
Cheek scatter:
Below the main cheek mandala, apply smaller, scattered coral dots fading down toward the jawline. -
Tiny fillers:
Use your smallest tool to fill any large empty gaps with tiny specks of teal for a ‘stardust’ effect. -
Set the look:
Gently mist the face with a setting spray, holding the bottle at arm’s length to avoid smudging the water-based paint.
You now have a mesmerizing, artistic makeup look that perfectly captures the spirit of carnival season.


Have a question or want to share your own experience? I'd love to hear from you in the comments below!