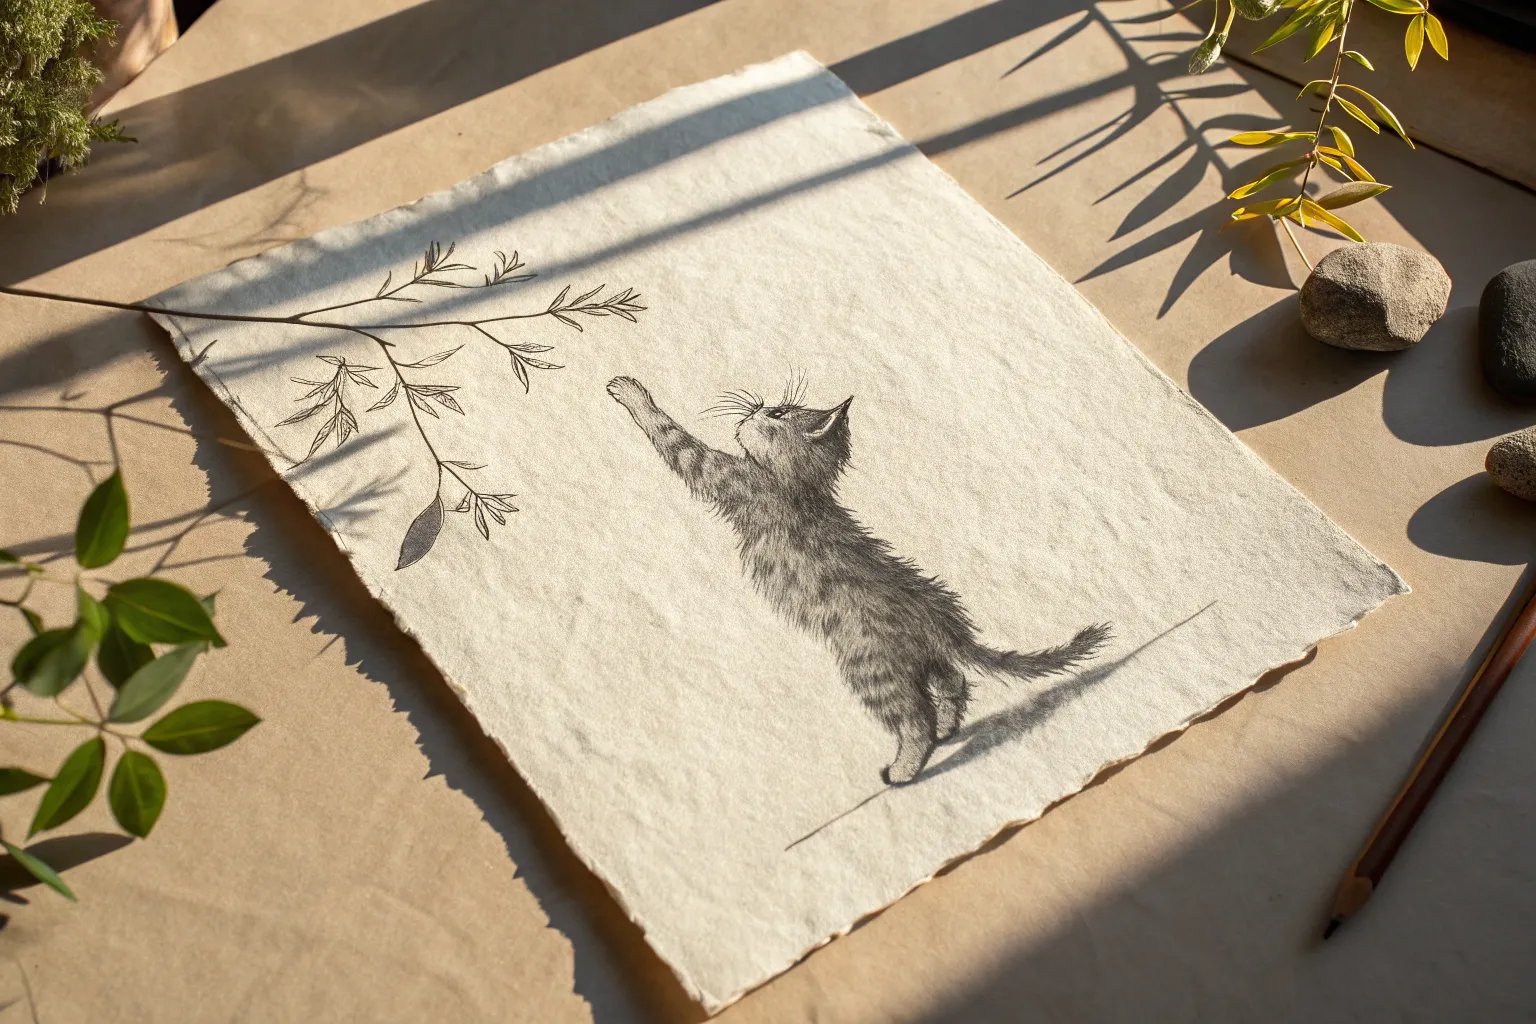
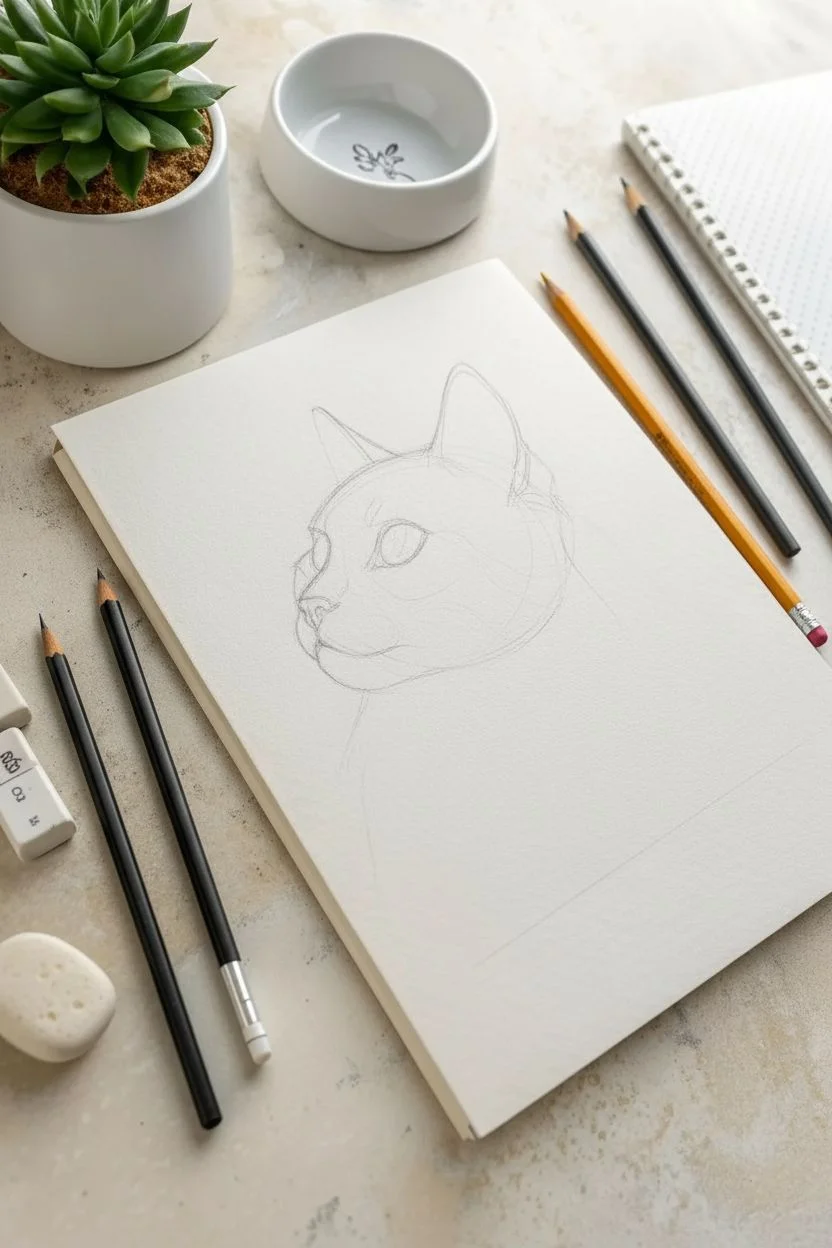
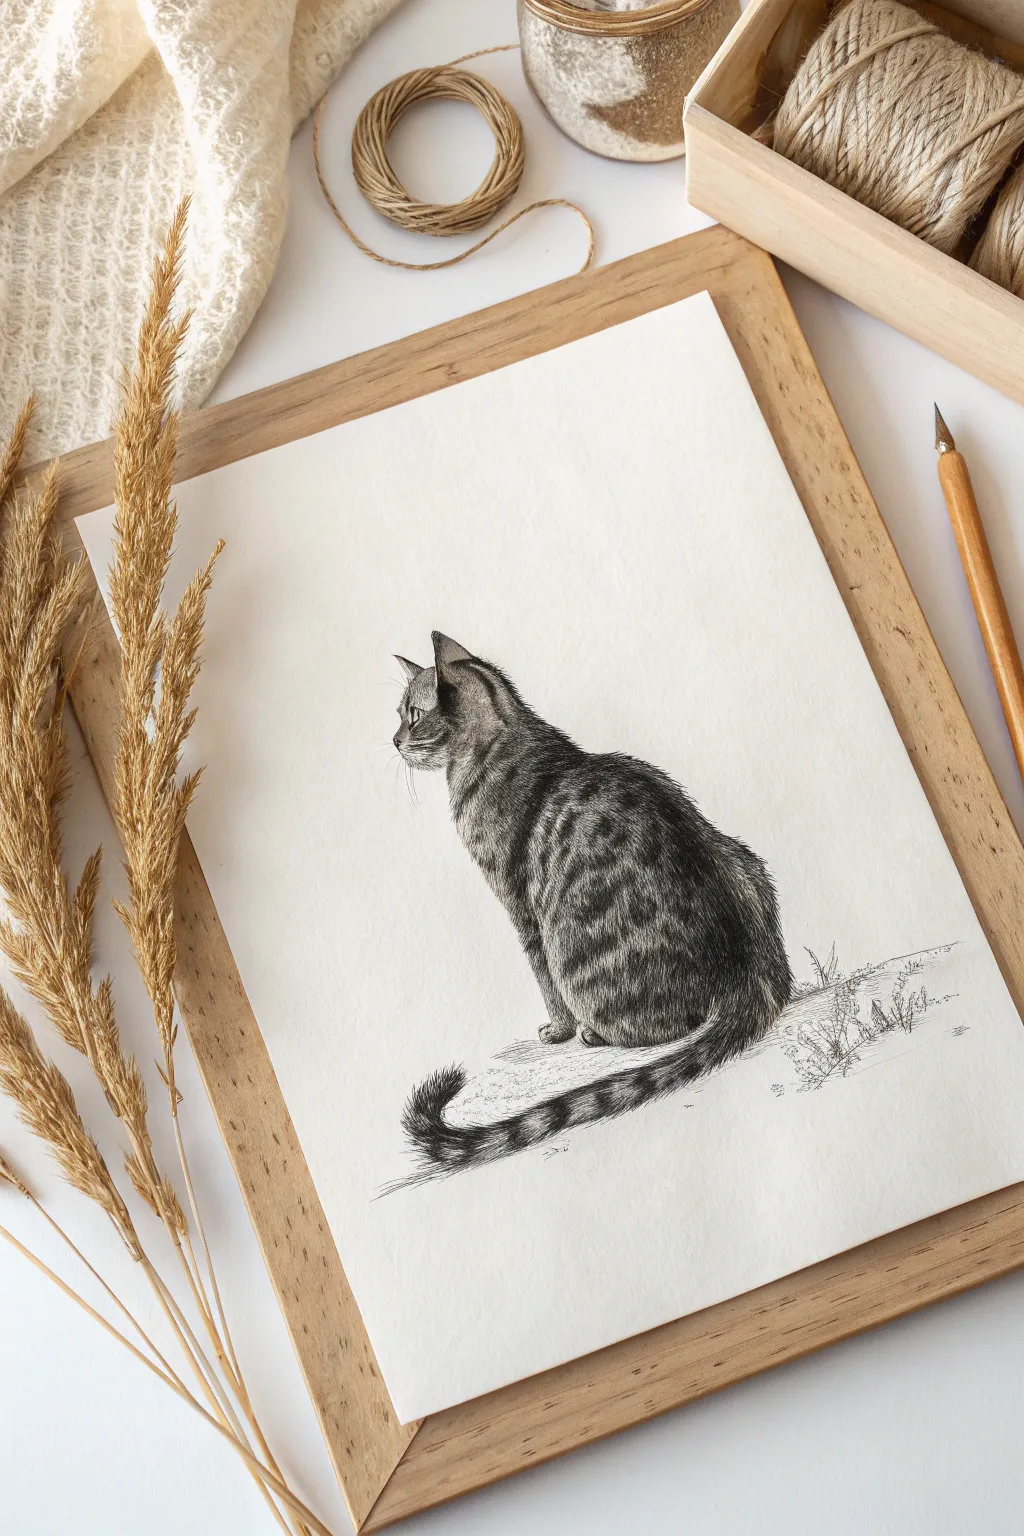
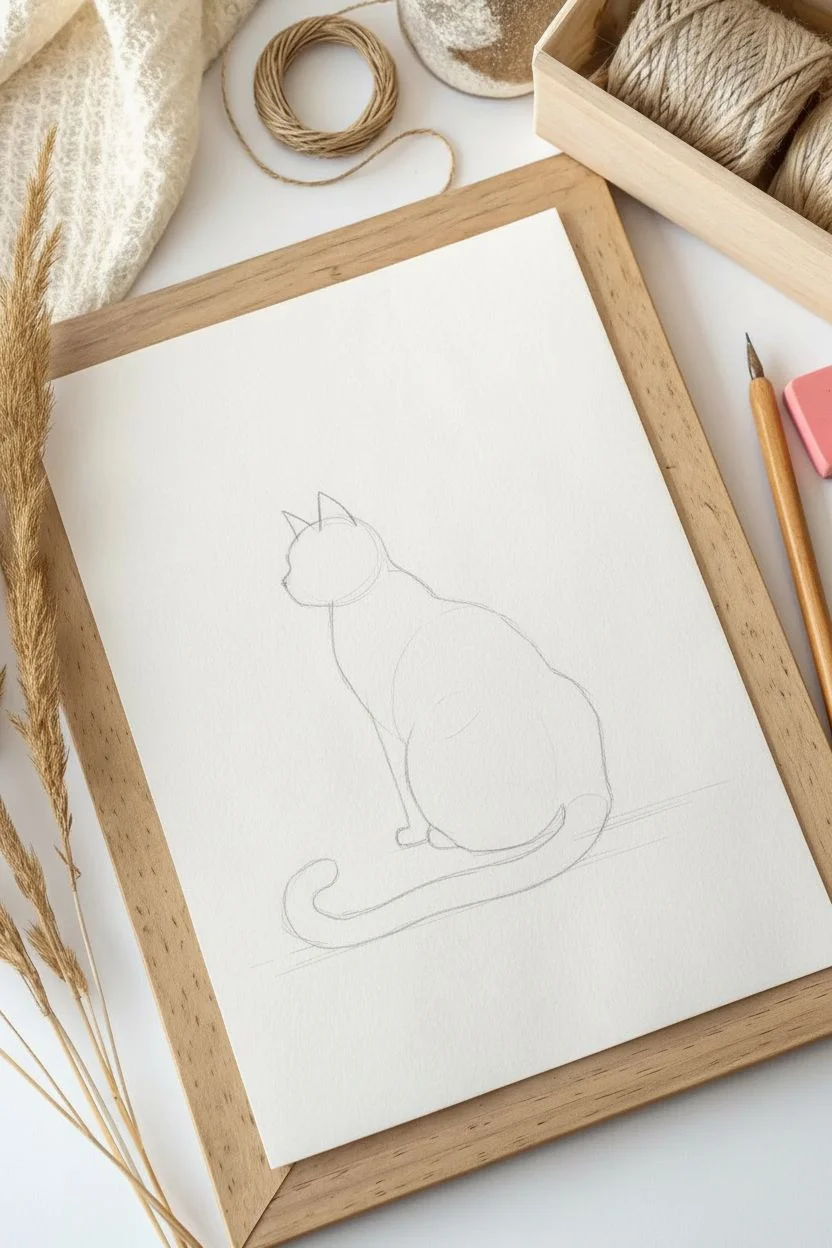
Capturing the unique personality of our feline friends on paper is one of the most rewarding ways to practice your artistic skills and unwind after a long day. Whether you are looking for a quick five-minute sketch or a detailed study of anatomy, these concepts will help you fill your sketchbook with life and charm.
Start with Simple Geometric Shapes
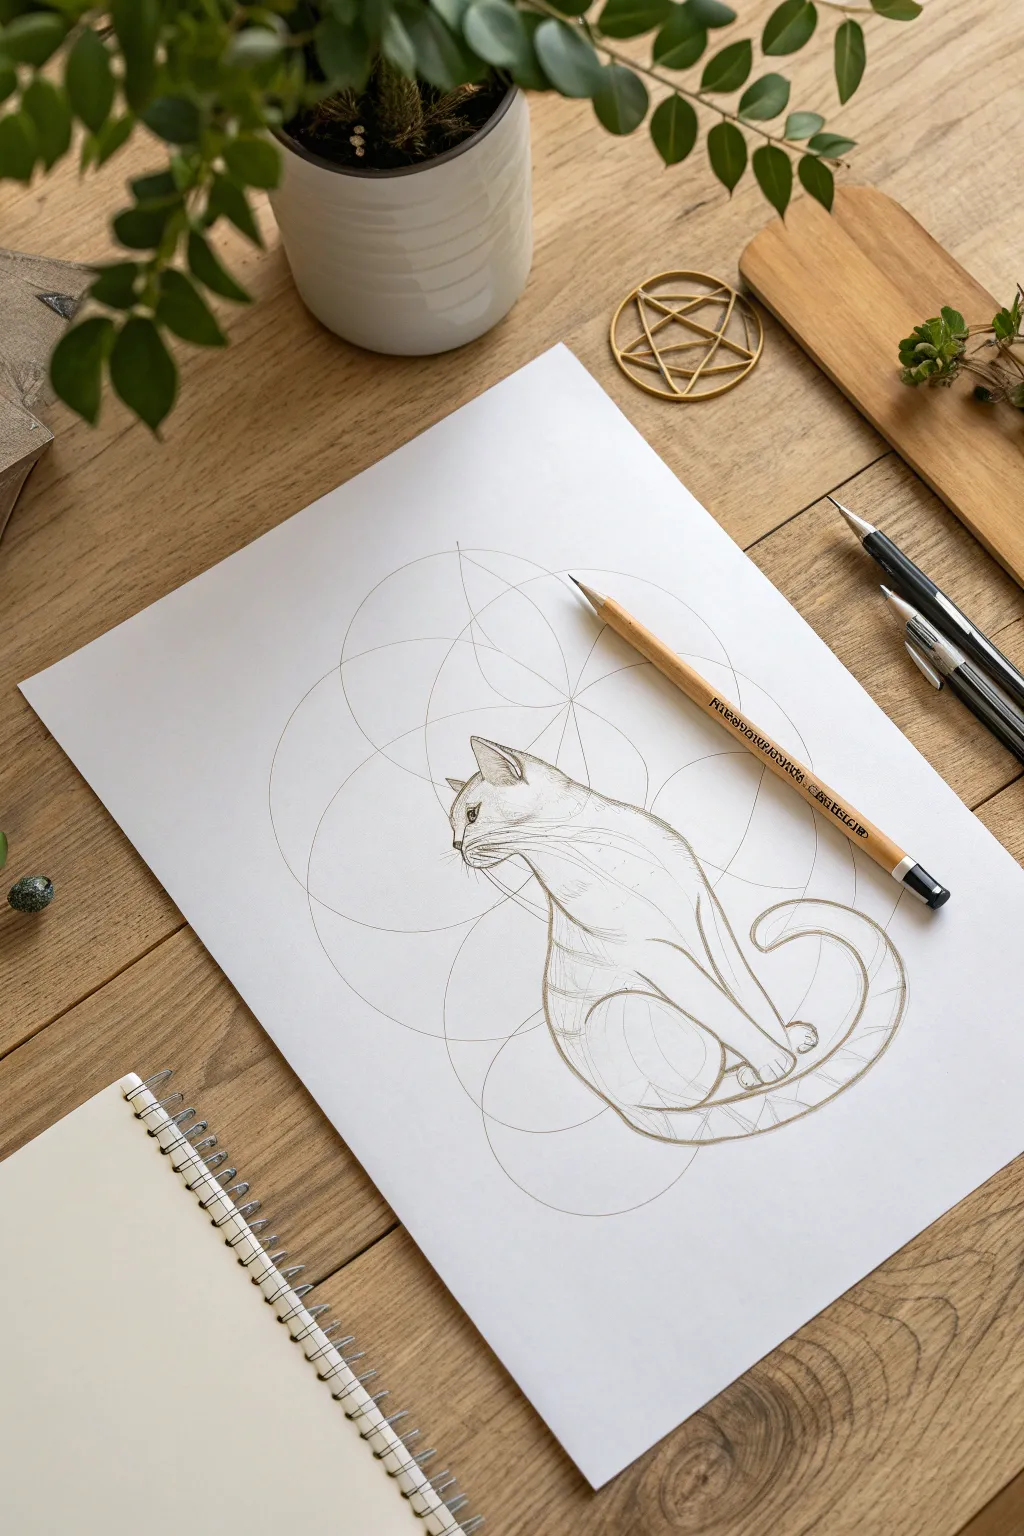
This elegant project bridges the gap between technical drafting and organic illustration by using the ‘Flower of Life’ pattern as a foundation. You will learn how to structure a realistic cat pose using a grid of overlapping circles, resulting in a drawing that feels both mathematically balanced and naturally fluid.
Step-by-Step
Materials
- Smooth heavyweight drawing paper
- Compass with sharp lead
- Graphite pencils (2H for construction, 2B and 4B for shading)
- Fine-point mechanical pencil (optional for details)
- Kneaded eraser
- Ruler
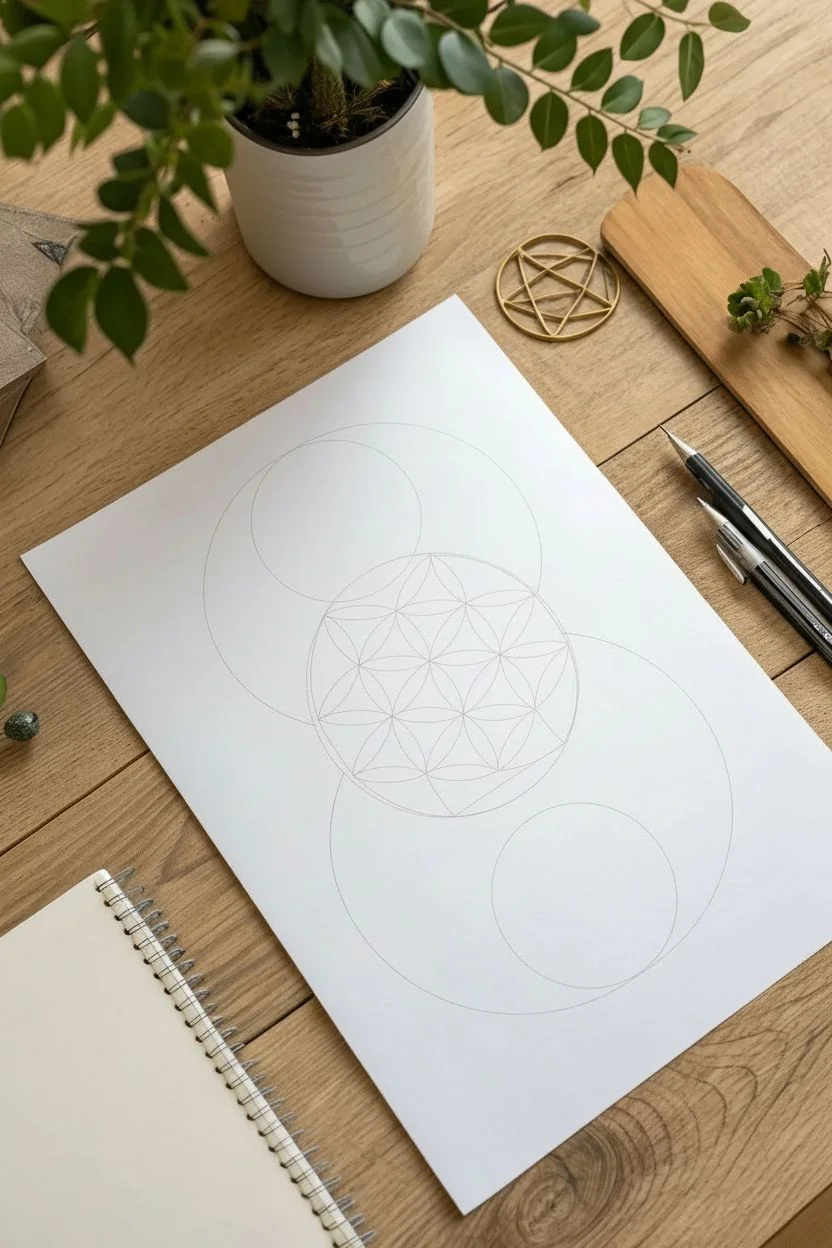
Step 1: Constructing the Geometry
-
Establish the center:
Mark a small point in the center of your page to serve as the anchor for your geometric grid. -
Set the radius:
Open your compass to a medium width, roughly 1.5 to 2 inches. I find this size gives enough room for detail without cramping the page. -
Draw the central circle:
Using a hard pencil (like a 2H) in your compass, draw a wide, light central circle. Keep the pressure very light, as these lines create the aesthetic background but shouldn’t overpower the cat. -
Create the first intersection:
Place the compass point anywhere on the edge of your first circle and draw a second circle that passes through the center point of the first. -
Expand the grid:
Place your compass point at the intersection where the two circles meet. Draw a third circle. Continue this pattern around the center until you have a cluster of overlapping circles resembling a flower. -
Widen the field:
Add a few outer circles extending downward and to the right, creating a wider geometric field where the cat’s body and tail will eventually sit.
Pivot Point Protection
If your compass needle starts enlarging the holes in the paper, place a small piece of masking tape on the back of the sheet at the center point to reinforce it.
Step 2: Sketching the Feline Form
-
Locate the head:
Choose an intersection near the top left of your grid. Lightly sketch a rounded triangle shape for the head, referencing the curve of the underlying circle for the forehead. -
Define the spine:
Follow the arc of the central circles downward to draw a sweeping line for the cat’s back. The geometric curves naturally guide a perfect posture. -
Draw the haunches:
Use the lower circles of your grid to define the heavy, rounded shape of the seated rear leg and thigh. -
Add the front legs:
Drop two nearly vertical lines from the chest area. Contrast these straight lines against the varying curves of the geometric background. -
Curve the tail:
Sweep the tail around the base of the cat, letting it hug the curve of one of the lowest circles in your grid before curling upward at the tip.
Step 3: Refining and Shading
-
Detail the face:
Switch to a 2B pencil. Draw the eye in profile, looking backward over the shoulder. Add the small nose and mouth line. -
Add ears and whiskers:
Sharpen the triangular ears on top of the head and flick simple, quick lines for whiskers specifically near the muzzle. -
Darken the contour:
Go over the outline of the cat with a 4B pencil, using varying line weight—thicker on the shadowed side (the back and bottom), thinner on the face. -
Suggest muscle tone:
Add very faint, curved hatching lines inside the body to suggest the shoulder blade and the roundness of the thigh. -
Integrate the geometry:
Do not erase your compass lines! Instead, take your ruler and strengthen a few key geometric arcs that intersect nicely with the cat’s body to emphasize the construction style. -
Final touches:
Use a kneaded eraser to lift up any graphite smudges, but allow the construction grid to remain visible as part of the artwork’s charm.
Metallic Accent
Trace the geometric construction lines with a gold gel pen or metallic marker to make the ‘sacred geometry’ elements shimmer against the graphite cat.
Step back and appreciate how the rigid circles transformed into a graceful, living creature.


The Classic “Loaf” Position
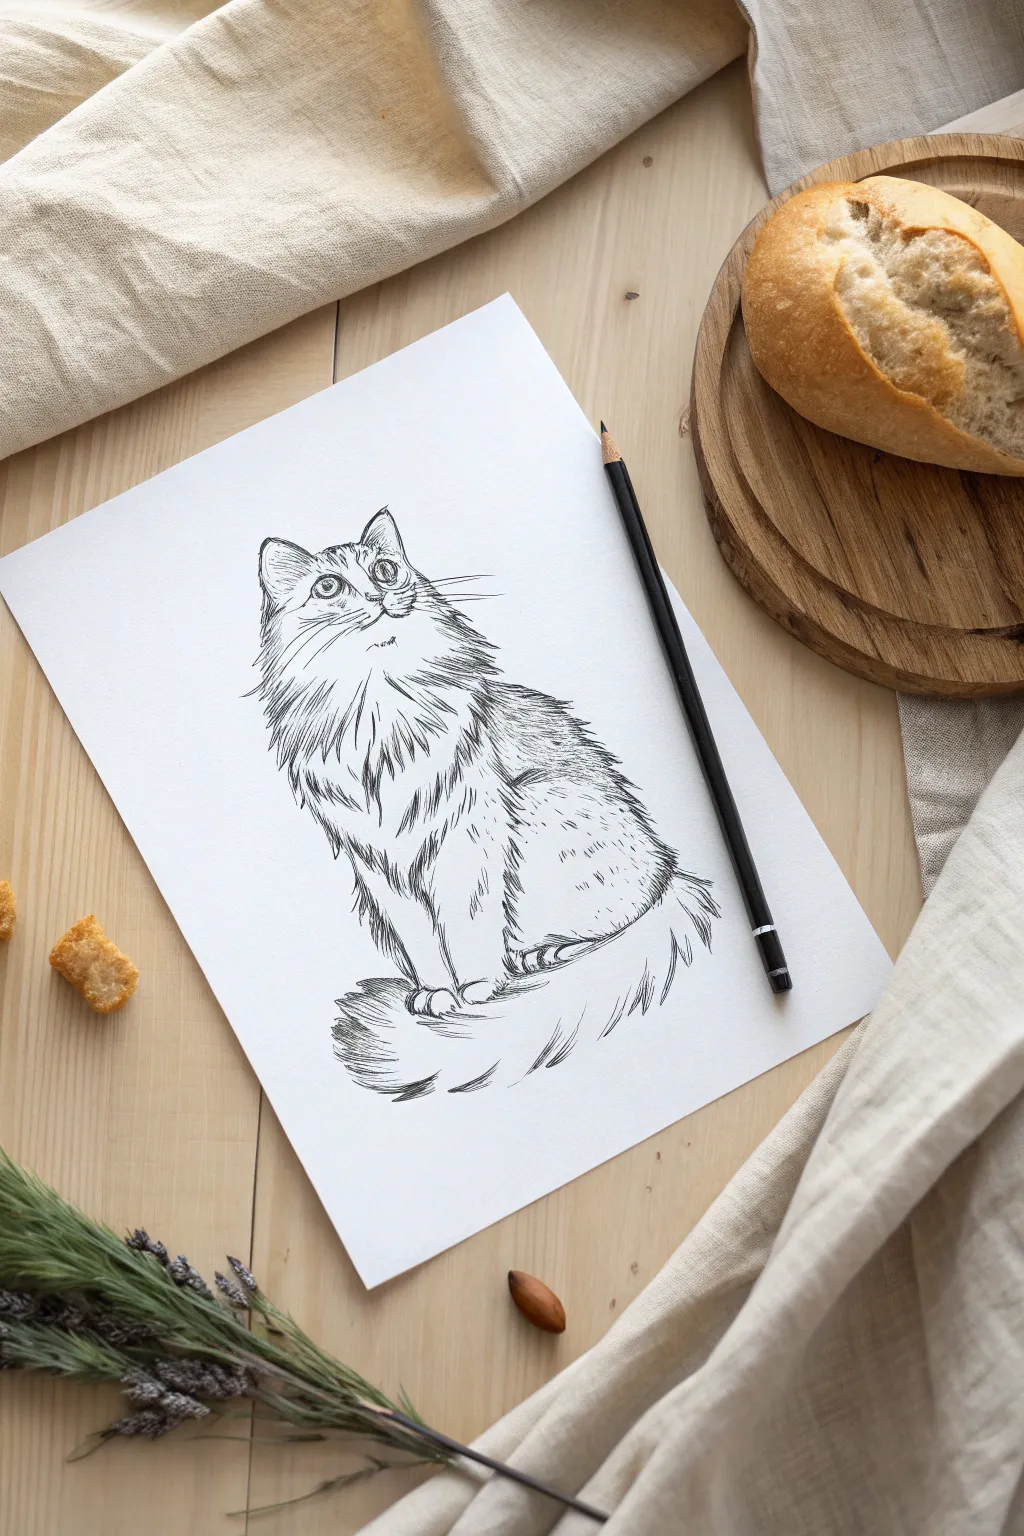
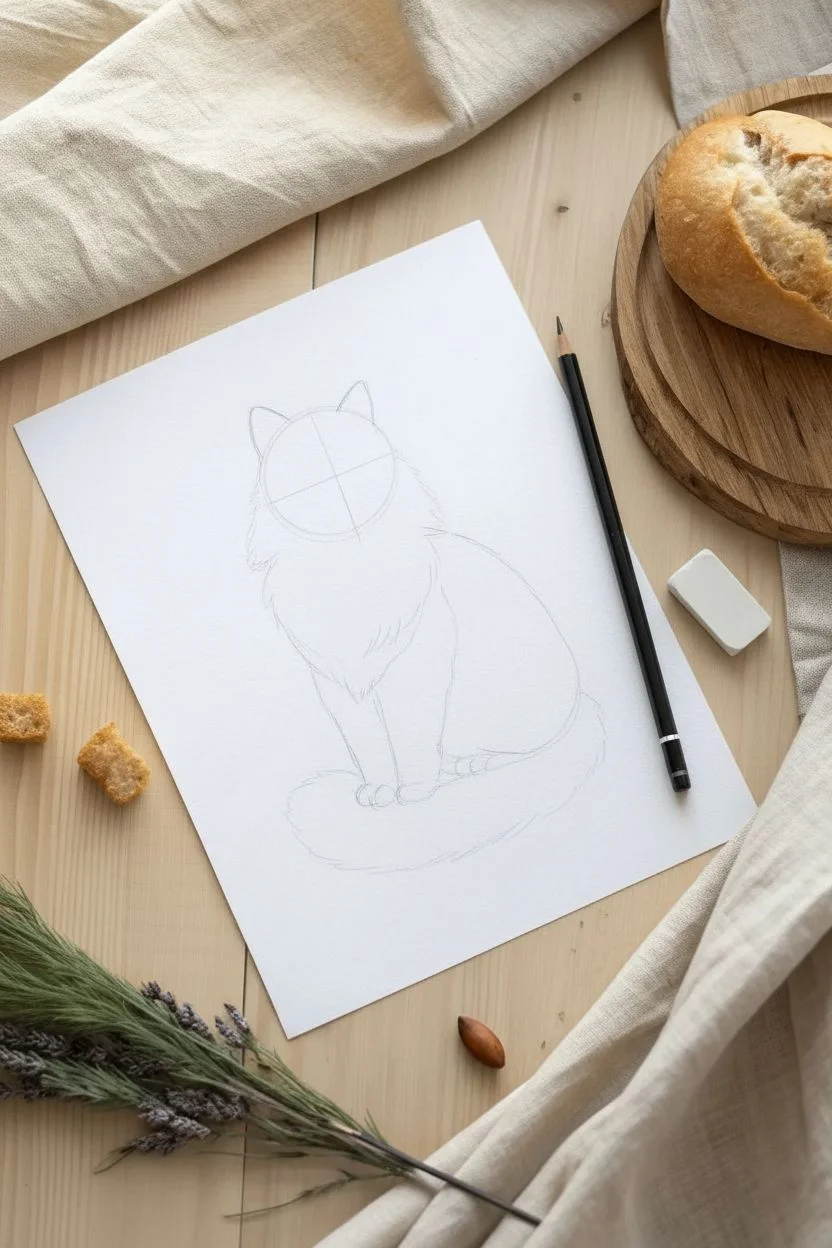
Capture the elegance and undeniable cuteness of a long-haired cat gazing upward with this detailed sketching tutorial. Using simple hatching techniques, you will create rich textural fur and a soulful expression that jumps off the page.
Step-by-Step Guide
Materials
- Smooth heavyweight drawing paper
- HB Graphite pencil (for sketching)
- Black fine liner pens (sizes 0.1 and 0.5)
- Kneaded eraser
- Pencil sharpener
Step 1: Constructing the Frame
-
Head and body alignment:
Begin with a lightly sketched circle for the head in the upper center of your page. Draw a faint curved line extending down from the chin to establish the chest’s direction. -
Torso shape:
Below the head, sketch a large, elongated oval that tilts slightly to the right to represent the main body and sitting posture. -
Face guidelines:
lightly mark a horizontal line across the lower third of the head circle and a vertical line dividing the face, curving it to the left to indicate the cat is looking sideways. -
Ear placement:
Triangle shapes sit atop the head; make the left ear slightly narrower than the right to account for the perspective.
Fur looks stiff?
Avoid drawing individual hairs parallel to each other. Vary the direction, length, and angle of your hatching strokes to create a natural, organic messy-fluff texture.
Step 2: Defining Features
-
The eyes:
Draw two almond shapes along your horizontal guide. The eye on the left should look slightly more compressed. Sketch large round irises inside, looking upward. -
Nose and mouth:
Place a small inverted triangle for the nose just below the eye line. Connect a small ‘W’ shape underneath for the mouth. -
Legs and paws:
Sketch two vertical columns descending from the chest oval for the front legs. At the base, draw rounded oval shapes for the paws. -
Tail curve:
Sweep a large, curving line from the right hip, wrapping around the front of the paws to create a luxurious tail shape.
Add a Calm Vibe
To enhance the project, use a watercolor brush to add a very faint, warm beige or grey wash behind the cat, mimicking the soft fabric tones seen in the reference.
Step 3: Inking and Texture
-
Inking the eyes:
Using your 0.1 fine liner, outline the eyes. I like to draw the pupil carefully, ensuring I leave a distinct white highlight circle untouched for that spark of life. -
Face fur:
Switch to short, flicking strokes to outline the head. Unlike a smooth line, these broken lines simulate the short fur on the face. -
Ear details:
Draw long, wispy strokes coming from inside the ears to create fluff. Outline the outer ear edges with slightly darker, firmer lines. -
Chest ruff:
This cat has a magnificent mane. Use long, downward zig-zag motions with your pen to create layers of fur cascading from the neck over the chest. -
Body contouring:
Outline the back and sides using varying line weights. Press harder in shadow areas (like where the leg meets the body) and lighter on the fluffy edges. -
Leg texture:
Ink the front legs with vertical hatching strokes that follow the curvature of the limb, suggesting roundness under the fur. -
Paws and toes:
Define the toes with small C-curves on the paws. Add tiny strokes between the toes to show separation. -
The tail:
Use your 0.5 pen for bolder strokes here. Create a jagged, flowing outline for the tail to make it look thick and bushy. -
Shadows and depth:
Add diagonal hatching lines under the chin, beneath the tail, and on the right side of the body to ground the drawing and add volume. -
Whiskers:
With quick, confident flicks of the wrist, draw long whiskers extending from the muzzle. Start pressure heavy and lift off quickly for a tapered look. -
Clean up:
Wait for the ink to dry completely, then gently erase all your pencil construction lines to reveal the crisp illustration.
Step back and admire the personality you’ve captured in that gaze—this drawing frames beautifully for a cozy corner.


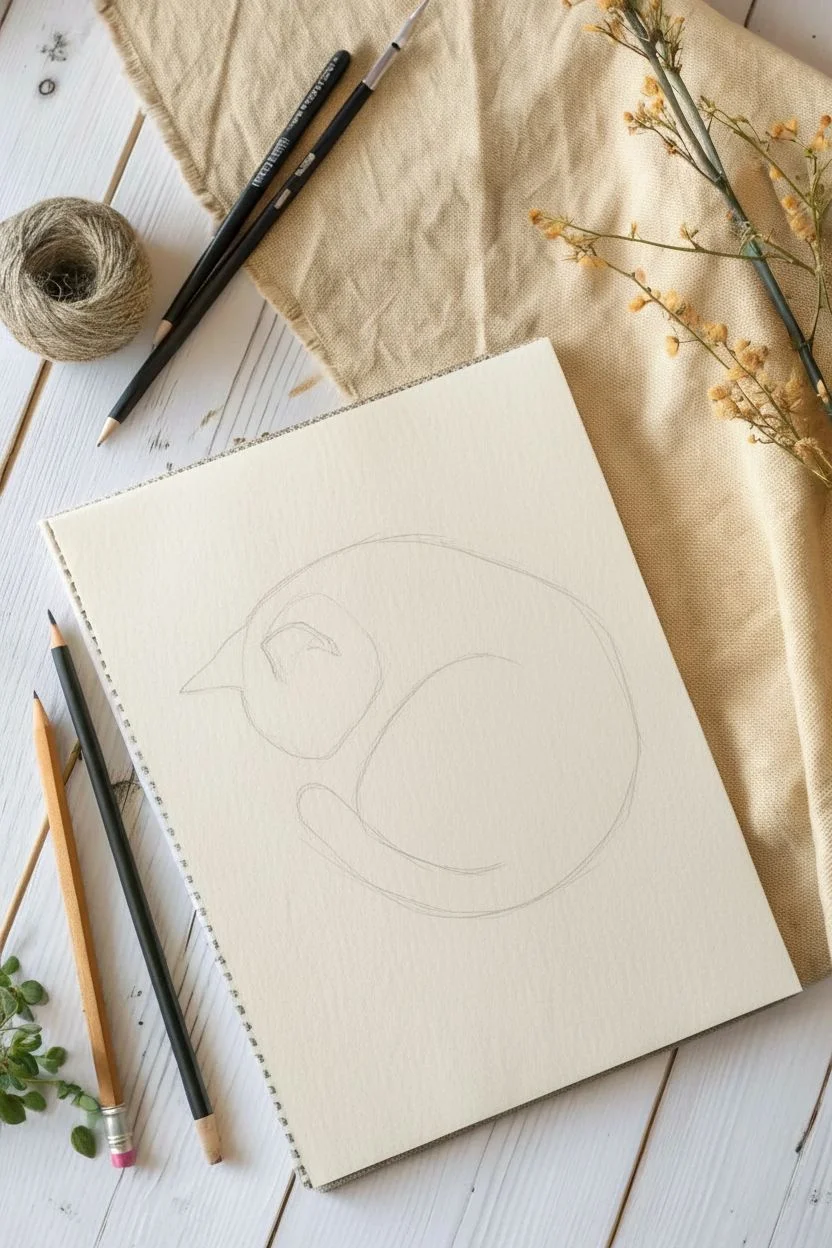
Curled Up for a Nap
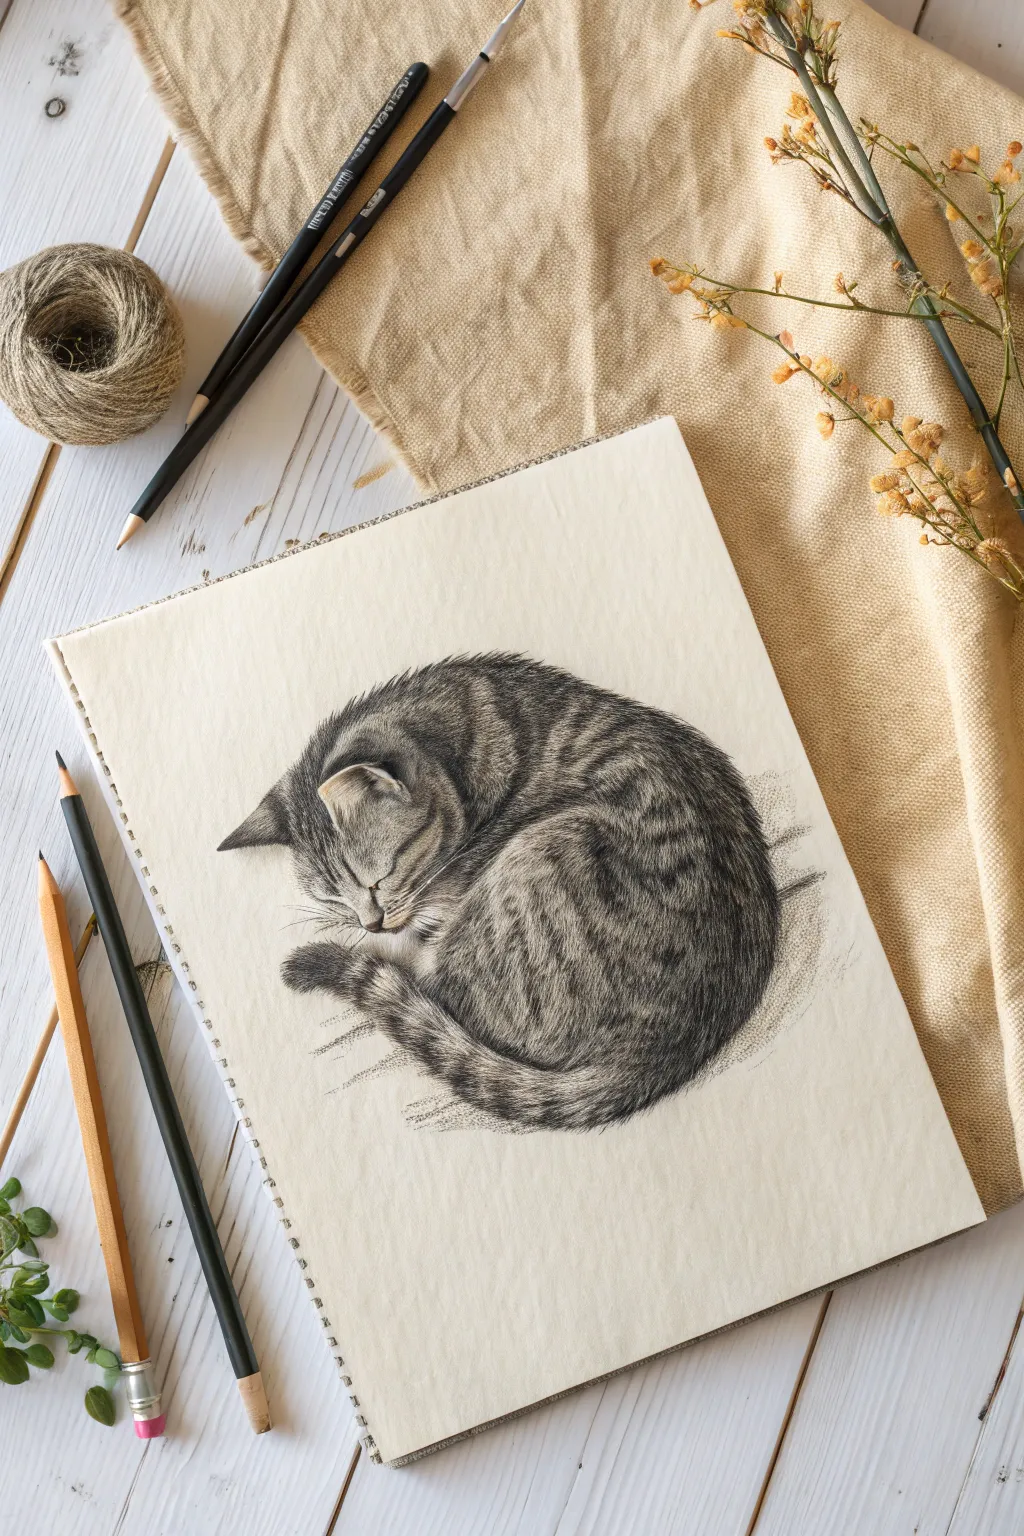
Capture the serene beauty of a nap with this detailed pencil drawing tutorial. You will focus on building realistic fur textures and subtle shading to bring this curled-up tabby cat to life on the page.
How-To Guide
Materials
- Sketchbook with cream or off-white drawing paper
- Graphite pencils (H, HB, 2B, 4B, 6B)
- Kneaded eraser
- Precision eraser or eraser stick
- Pencil sharpener
- Tissues or blending stump (optional)
Step 1: Basic Structure
-
Outline the body mass:
Start lightly with a hard pencil (H or HB). Sketch a large, slightly flattened oval shape to represent the main bulk of the cat curled up. -
Position the head:
Draw a smaller circle overlapping the upper left side of your oval. This will become the head tucked into the body. -
Connect and refine:
Join the head and body shapes with gentle curves to form the neck. Sketch the general shape of the tail wrapping around the bottom curve.
Step 2: Defining Features
-
Place facial features:
Sketch a centerline on the head face, curving downward. Mark the triangular ear, flattened slightly to show the relaxed pose. -
Draw the face:
Lightly indicate the closed eye with a simple angled line, the small nose, and the muzzle split. -
Sketch the paws:
Outline the visible paw tucked just beneath the chin, peeking out from the curled form. -
Map fur direction:
Using very faint directional arrows or lines, map out how the fur flows—radiating from the face and curving along the spine.
Troubleshooting: Stiff Fur?
If the fur looks like wire, try flicking your wrist at the end of every pencil stroke. This tapers the line naturally. Avoid drawing parallel ‘picket fence’ lines; vary the angles slightly.
Step 3: Fur Texture and Pattern
-
Establish the pattern:
Lightly sketch the boundaries of the tabby stripes on the forehead (the classic ‘M’ shape), back, and tail. -
Begin fur strokes:
Switch to a sharpened 2B pencil. Start drawing individual fur strokes on the face, keeping them very short and close together. -
Lengthen the strokes:
As you move to the body, lengthen your pencil strokes. Always follow the curves you mapped earlier to give the body volume. -
Layering density:
Build up the fur density in layers. I prefer to lift my pencil at the end of each stroke to create a tapered hair effect.
Level Up: Indented Whiskers
Before shading the muzzle, use a stylus or dry ballpoint pen to press whisker lines into the paper paper. When you shade over them, the graphite will skip the grooves, leaving bright white whiskers!
Step 4: Shading and Depth
-
Darken the stripes:
Use a softer 4B or 6B pencil to fill in the tabby stripes. Apply these dark marks with the same fur-like hatching technique, not solid blocks. -
Deepen shadows:
Add heavy shading where the body parts overlap—specifically between the head and hind leg, and under the tail. -
Refine the tail:
Add texture to the tail, darkening the rings or tip. Ensure the edges look soft and fluffy, not outlined with a hard line. -
Highlighting:
Use a kneaded eraser to gently dav and lift graphite from the top of the head and the curve of the back to simulate light hitting the fur.
Step 5: Final Details
-
The whiskers:
With a freshly sharpened HB pencil, draw long, confident strokes for the whiskers and eyebrow vibrissae. -
Grounding shadow:
Lightly hatch a soft cast shadow underneath the cat to anchor it to the page. -
Final contrast check:
Step back and review your drawing. Darken the deepest blacks in the stripes one last time to make the lighter fur pop.
Now you have a cozy, textured drawing that captures the peacefulness of a sleeping cat.


The Big Morning Stretch
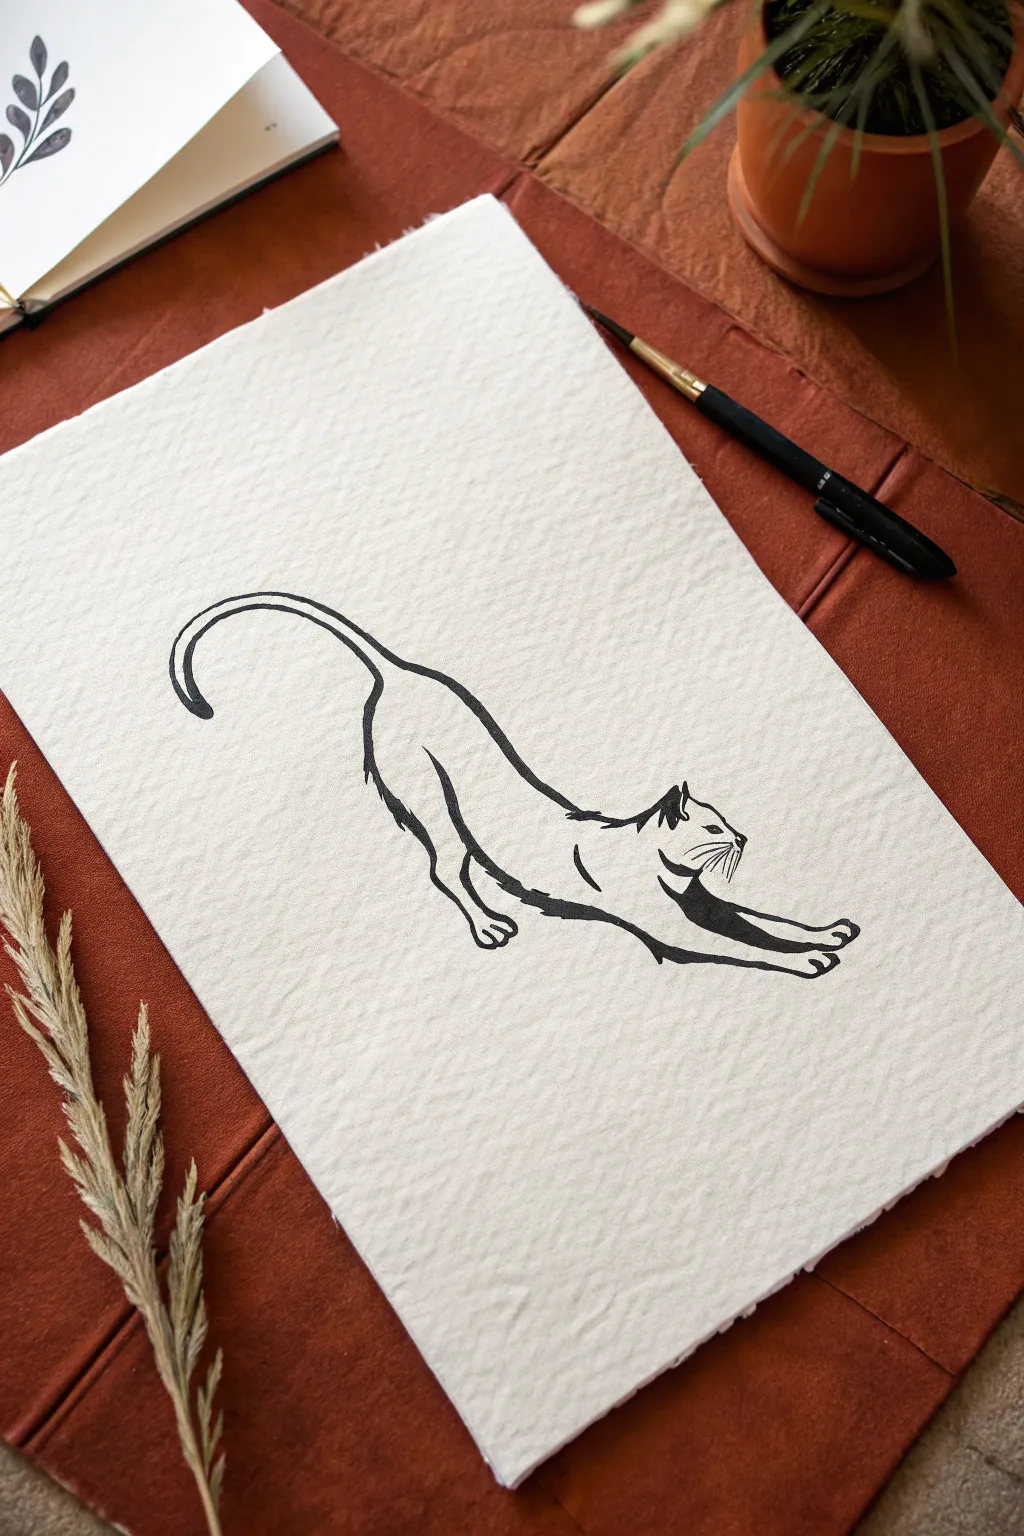
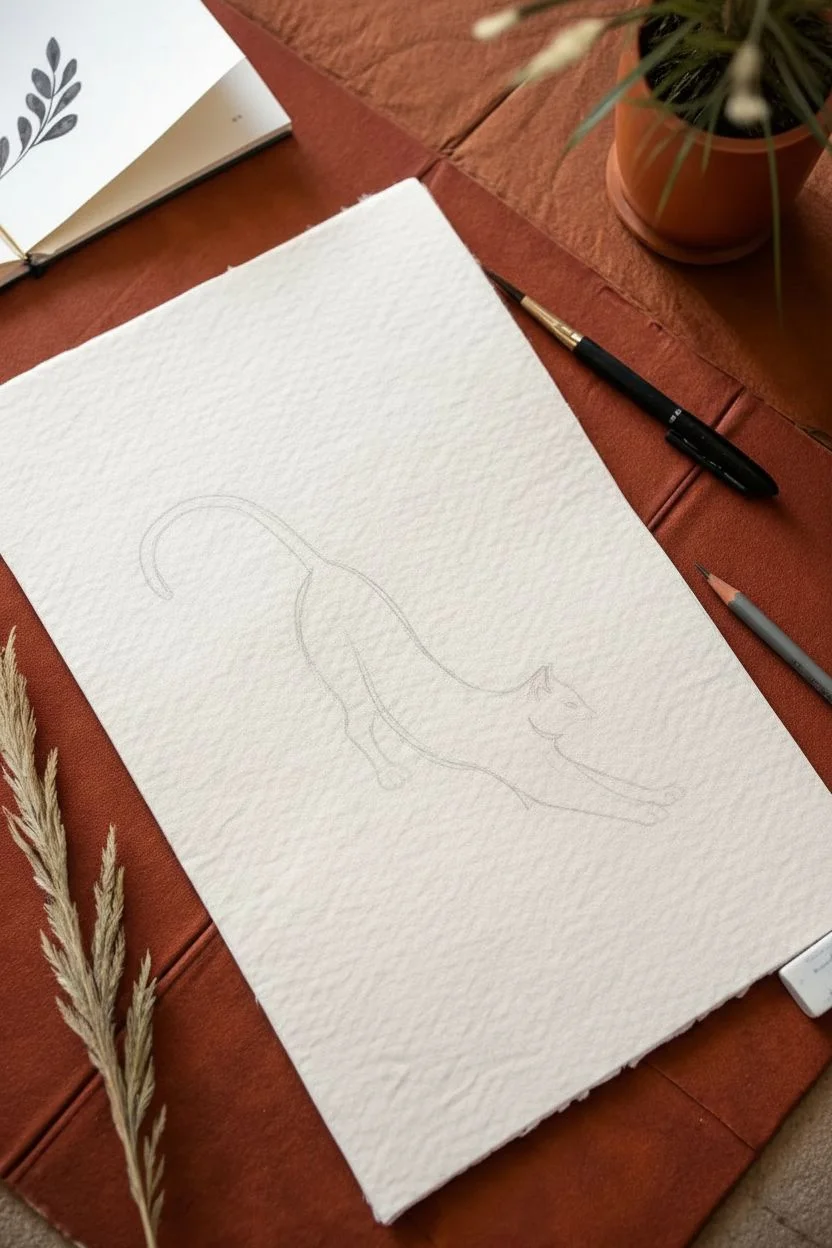
This minimalist ink drawing captures the fluid elegance of a cat’s morning yoga routine. Using strong line weight variations on textured paper gives the piece a sophisticated, classic illustration style.
Step-by-Step Tutorial
Materials
- Cold-press watercolor paper (heavy texture)
- HB or 2H pencil
- Kneaded eraser
- Black brush pen
- Fine liner pen (0.1mm or 0.3mm)
Step 1: Sketching the Gesture
-
Establish the spine:
Begin with your pencil by drawing a long, sweeping curve that dips in the middle. This represents the cat’s concave back during a stretch. -
Place the head:
At the lower end of your curve, lightly sketch a circle for the head, positioning it slightly raised as if looking forward. -
Map the hips:
At the higher end of the curve, sketch an oval shape to represent the hips, which are elevated during this pose. -
Extend the legs:
Draw two straight lines extending forward from the chest area for the front legs, and sketch the angled bend of the hidden back leg pushing up from the ground. -
Add the tail gesture:
Sweep a large, question-mark shaped curve extending up and out from the hips to map out the long tail.
Confident Curves
Practice the tail swoop on scrap paper first. The elegance of this style relies on smooth lines; a hesitant hand creates shaky strokes, while a fast hand creates clean curves.
Step 2: Defining the Form
-
Refine the profile:
add two triangles on the head circle for ears, and flatten the front of the circle slightly to create the snout profile. -
Shape the paws:
At the end of the front leg lines, sketch the paws spreading out. Indicate the separation of toes as they grip the surface. -
Connect the contours:
Smooth out the connections between the head, neck, and back. Add a slight ragged line on the belly area to suggest fur texture where the skin stretches. -
Prepare for ink:
Use your kneaded eraser to dab the sketch, lightening the graphite until the lines are faint guides rather than solid strokes.
Level Up
Dilute a single drop of black ink with water to paint a very soft, transparent grey shadow underneath the cat. This grounds the figure and gives the drawing dimension.
Step 3: Inking and Details
-
Outline the head:
Switch to your brush pen. Start at the ears, using the tip of the brush for sharp points, and trace the profile of the face. -
Ink the spine:
Using a confident, continuous motion, draw the long curve of the back. Press down slightly harder in the middle of the stroke to thicken the line, tapering off near the tail. -
Flow into the tail:
Ink the tail in one or two long, swooping strokes. I like to keep the line thicker at the base and let it taper naturally to a point. -
Draw the front legs:
Ink the extended front arms. Keep these lines relatively uniform, but add boldness to the paws where they press against the ground. -
Add texture lines:
On the belly and the bend of the hind leg, use short, quick flicks of the brush pen to simulate the ruffled fur texture shown in the reference. -
Detail the face:
Switch to your fine liner pen for better control. Draw a small, slanted oval for the eye and a tiny triangle for the nose. -
Add whiskers:
Still using the fine liner, flick three or four quick, curved lines outward from the snout for the whiskers. Fast strokes ensure they look sharp, not shaky. -
Clean up:
Allow the ink to dry completely to avoid smudging. Once safe, gently erase any remaining pencil guidelines.
Now you have a lively, elegant artwork that perfectly captures the character of a cat.
BRUSH GUIDE
The Right Brush for Every Stroke
From clean lines to bold texture — master brush choice, stroke control, and essential techniques.
Explore the Full Guide
Detailed Paws and “Toe Beans”
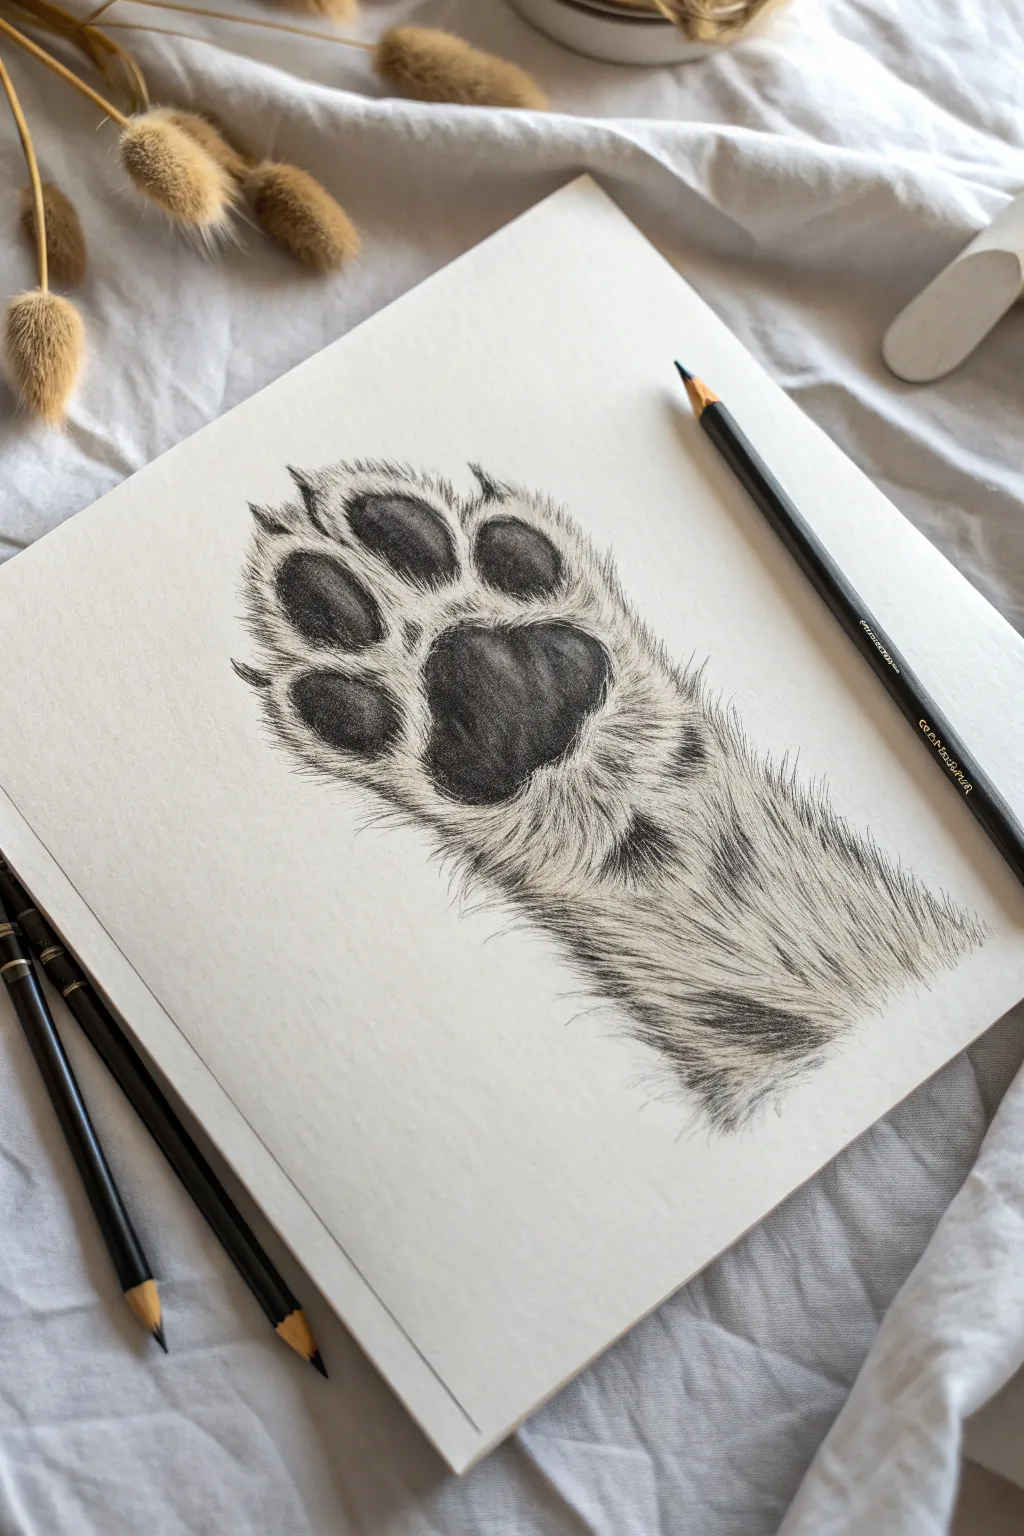
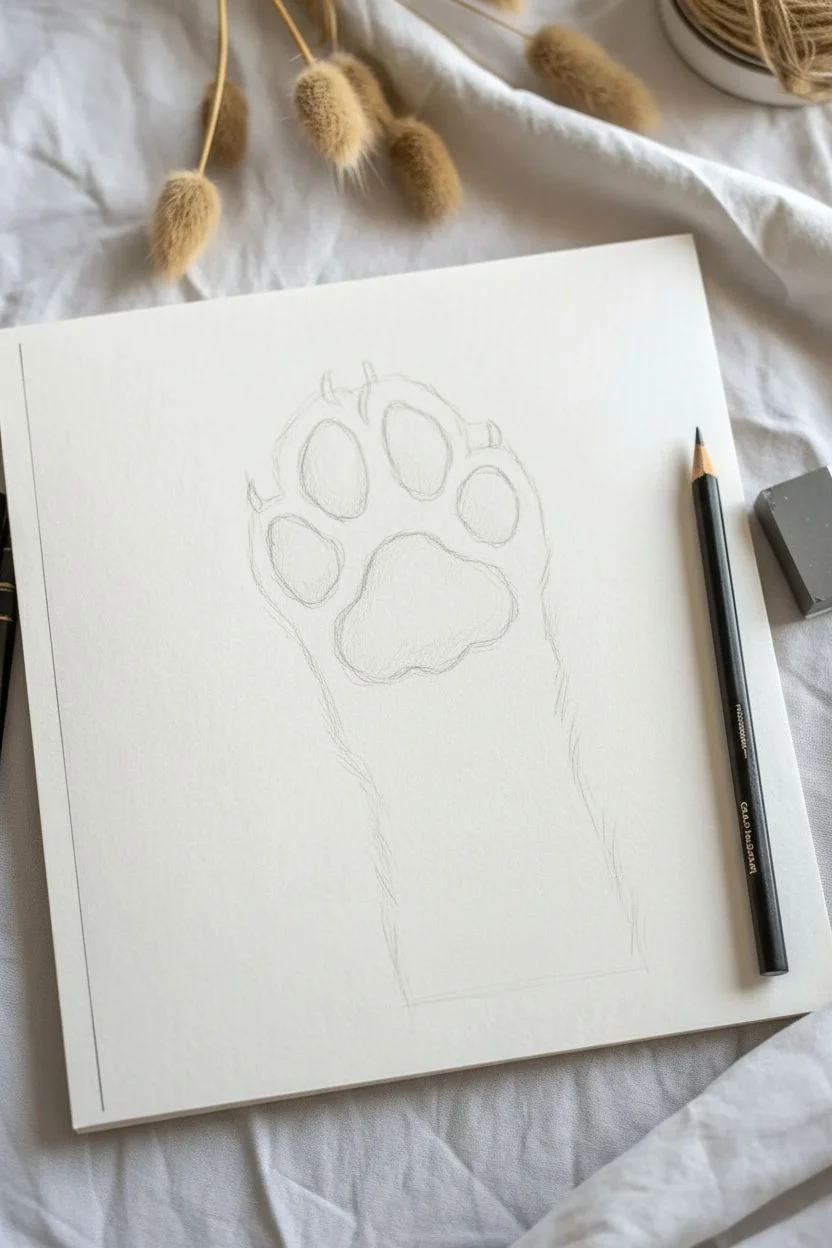
Capture the distinct contrast between soft, flowing fur and the leathery texture of a cat’s paw pads in this graphite study. This project focuses on directional shading and building layers to create a lifelike, tactile result perfect for any sketchbook.
Step-by-Step Tutorial
Materials
- Heavyweight drawing paper (smooth or vellum finish)
- Graphite pencils (H, HB, 2B, and 4B)
- Kneaded eraser
- Precision eraser or eraser shield
- Paper blending stump (optional)
Step 1: Structuring the Shapes
-
Map the central pad:
Using an H pencil and very light pressure, sketch a rounded, soft triangular shape for the main metacarpal pad (the large ‘palm’ bean). -
Position the toes:
Draw four smaller oval shapes arranged in a gentle arc above the main pad. These don’t need to be perfect circles; generic organic shapes are better. -
Outline the silhouette:
Lightly sketch the outer boundary of the paw. This isn’t a hard line, but a guide for where the fur tips will eventually end, including the wrist area below. -
Refine the contours:
Go back over your pads to give them more specific character, adding slight indentations or bulges natural to animal anatomy.
Step 2: Rendering the Pads
-
Base tone application:
Switch to an HB pencil and fill in the pads with a soft, even layer of graphite. I like to use small circular motions here to avoid directional streaks. -
Establishing light source:
Decide where the light hits (usually top-left or top-right) and gently wipe away a small area on each pad with a kneaded eraser to create a subtle highlight. -
Deepening shadow:
Using a 2B pencil, darken the bottom edges and the crevices between the sections of the main pad to create volume. -
Texturing the beans:
Create a leathery texture by stippling or drawing tiny, tight squiggles over the shaded areas, darker near the bottom and lighter near the highlight. -
Blending:
Softly smooth the pad shading with a blending stump or tissue, then re-establish the darkest cracks with a 4B pencil for pop.
Fixing Stiff Fur
If fur looks like wire, loosen your grip. Use quick, confident flicks of the wrist rather than slow lines. Lift the pencil at the end of each stroke to taper it.
Step 3: Creating the Fur
-
Marking growth direction:
Before drawing individual hairs, lightly draw arrows or guide lines showing how the fur radiates outward from the center of the paw. -
Inner tufts:
Using a sharp H or HB pencil, draw short, fine strokes originating from the very edge of the toe pads, overlapping slightly onto the white paper. -
Structuring the toe fur:
Work around each toe bean, drawing strokes that curve around the pad shape. The fur is usually shorter here. -
Deepening inter-digital spaces:
Between the toes, press harder or use a 2B pencil to create darker, dense shadows where the fur is less exposed to light. -
Wrist and arm fur:
Lengthen your pencil strokes as you move down the wrist. These lines should flow vertically but angle slightly outward. -
Layering for density:
Go back over the initial fur texturing with a darker pencil (2B). Add sporadic dark strokes to simulate depth layers within the coat.
Level Up: Extended Claws
For a predatory look, draw thin, curved claws extending from the fur above the toes. Keep the claw values lighter than the pads but darker than the highlights.
Step 4: Final Details
-
Softening edges:
Ensure there are no hard outlines on the fur. Add tiny, faint flicks at the very ends of the hair clumps to make the paw look fluffy. -
Contrast check:
Use your 4B pencil to darken the immediate contact point where the fur tucks under the pads, maximizing the contrast against the ‘beans’. -
Highlight recovery:
Tap your kneaded eraser into a point and lift out tiny specks of graphite on the pads to simulate a moist or shiny texture. -
Cleanup:
Erase any initial construction lines that are still visible and clean up smudges from the surrounding white paper.
Now you have a beautifully textured paw study that captures the delicate nature of feline anatomy.
Rendering Fluffy Fur Textures
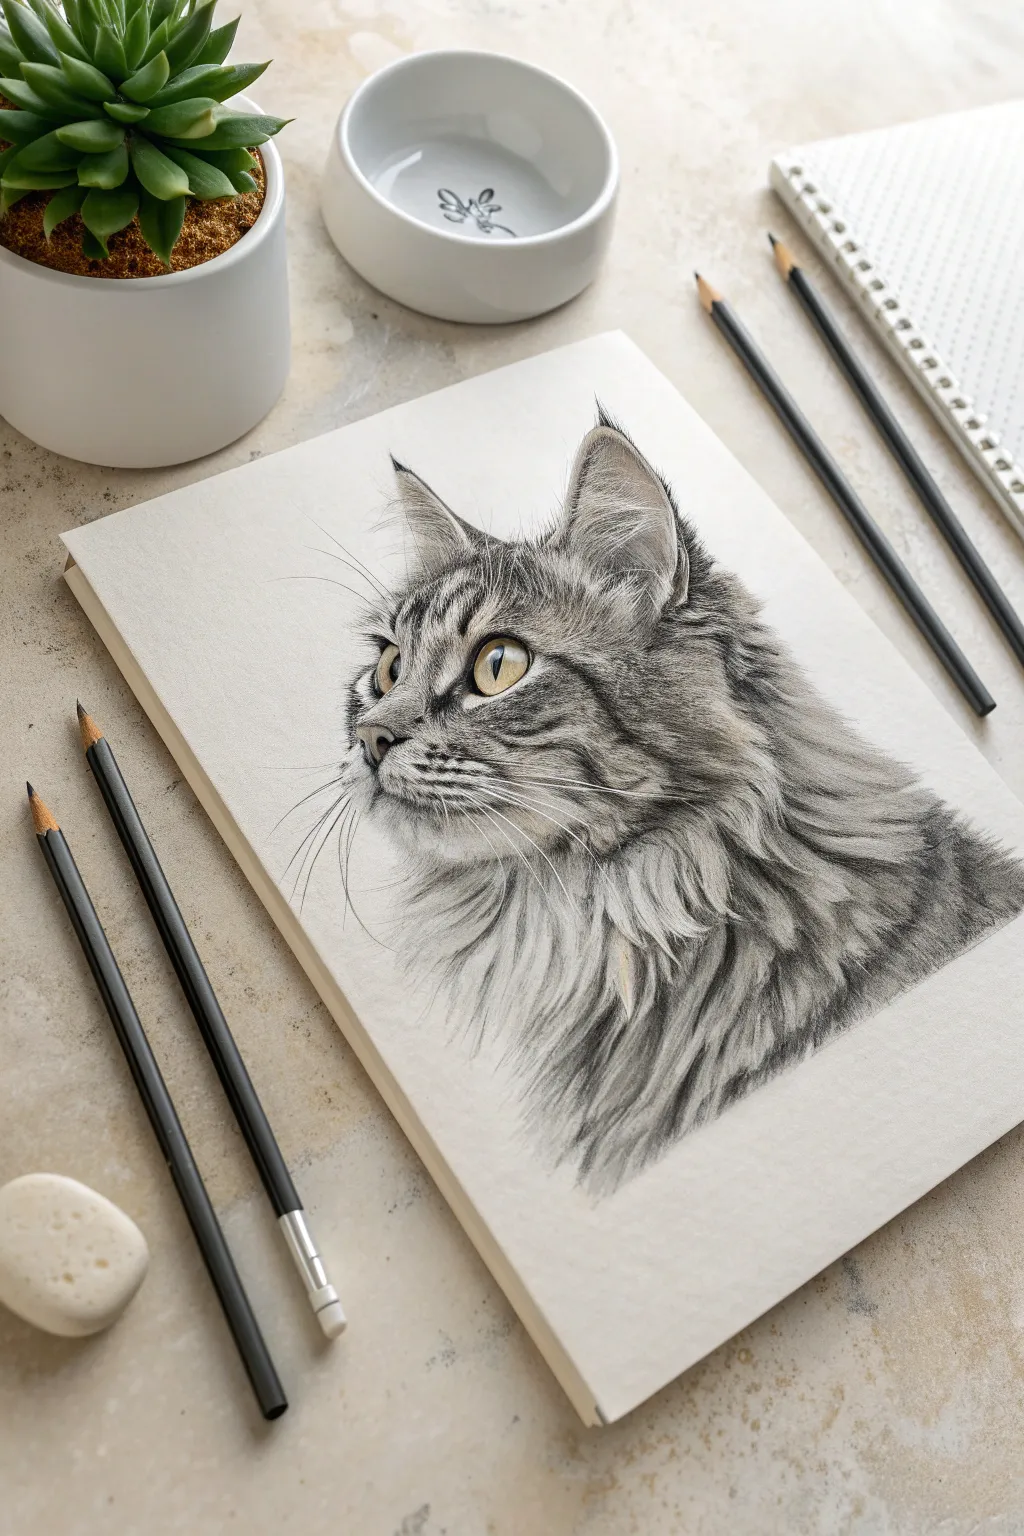
Capture the majestic elegance of a long-haired tabby with this textural drawing guide. You will learn to layer graphite to build deep, realistic fur that looks soft enough to touch, punctuated by a striking golden eye.
Step-by-Step
Materials
- Graphite Pencils (2H, HB, 2B, 4B, 6B)
- Heavyweight Drawing Paper (Vellum surface)
- Kneaded Eraser
- Precision Eraser (Mono Zero or similar)
- Yellow Colored Pencil or Pastel
- Blending Stump
Step 1: Structural Sketch
-
Basic Shapes:
Start lightly with a 2H pencil. Draw a circle for the cranial mass and a smaller oval attached to the lower left for the muzzle area. -
Profile Alignment:
Connect the shapes to form the profile. Mark the slope of the nose bridge and the angle of the chin just below the muzzle circle. -
Ear Placement:
Sketch a large triangle on top of the head. Since the cat is in profile, position the ear slightly back, curving the front edge to show the inner ear depth. -
Eye Positioning:
Place an almond shape midway down the face, slightly angled. It should sit deep between the bridge of the nose and the cheekbone.
Pro Tip: Pencil sharpness
Keep your pencils needle-sharp! Dull pencils create disjointed, fuzzy lines that look like smudge marks rather than individual hairs. Rotate your pencil every few strokes to maintain the point.
Step 2: The Focal Point
-
Pupil Definition:
Draw the pupil as a thin vertical slit using a 4B pencil. Leave a tiny white geometric shape near the top for the reflection catchlight. -
Iris Detailing:
Use an HB pencil to draw lines radiating from the pupil like wheel spokes. Shade the top of the iris darker to show the eyelid’s cast shadow. -
Adding Color:
Gently layer your yellow colored pencil or pastel over the iris, avoiding the pupil and the white highlight. This splash of color brings the drawing to life. -
The Tear Duct:
Outline the eye with a 4B pencil, thickening the line at the inner corner (tear duct) and the upper lash line to create depth.
Level Up: Texture Variety
Vary your stroke speed. Fast flicks create smooth, silky outer coats, while slow, squiggly organic lines mimic the crimped, fluffy undercoat often seen on a cat’s chest.
Step 3: Short Fur Textures
-
Nose and Muzzle:
Switch to an HB pencil. Use tiny, stippled dots and very short dashes on the nose bridge where the fur is velvety and extremely short. -
Mapping Direction:
Lightly sketch arrows indicating fur flow: up from the nose, sweeping back across the cheeks, and down the neck. -
Forehead Markings:
Using a 2B pencil, create the ‘M’ shape tabby markings on the forehead. I prefer drawing these not as solid lines, but as clusters of short, directional fur strokes. -
Cheek Layering:
Work down the cheek using medium-length strokes. Overlap them like shingles on a roof to hide the paper texture underneath.
Step 4: Long Fur & Finishing
-
Ear Furnishings:
Draw long, sweeping curved lines coming out of the ear. These should be light and wispy, contrasting with the darker inner ear shadow. -
Neck Ruff Foundation:
For the fluffy chest (the ruff), use loose, long S-curve strokes with a 2B pencil to establish the clumps of hair. -
Deepening Shadows:
Switch to a 4B or 6B pencil. darken the areas between the fur clumps on the neck to create volume. The fur itself stays lighter; the shadows define the shape. -
Variable Stroke Pressure:
When drawing the long neck fur, press down at the start of the stroke and flick your wrist up at the end to create a tapered hair tip. -
Tabby Stripes:
Integrate darker patches into the cheek and neck fur to verify the tabby pattern. Ensure these dark patches follow the fur direction exactly. -
Highlights:
Use your precision eraser to ‘draw’ light back into the fur by erasing thin, sharp lines in the direction of hair growth. -
Whiskers:
With a sharp hand or mechanical eraser, strike through the muzzle shading with confidence to create long, white whiskers. -
Final Contrast:
Do one last pass with your 6B pencil to darken the pupil, nostrils, and deepest fur crevices to make the form pop.
Now you have a stunning, texturally rich portrait that captures the softness of your feline subject

PENCIL GUIDE
Understanding Pencil Grades from H to B
From first sketch to finished drawing — learn pencil grades, line control, and shading techniques.
Explore the Full Guide
If It Fits, I Sits

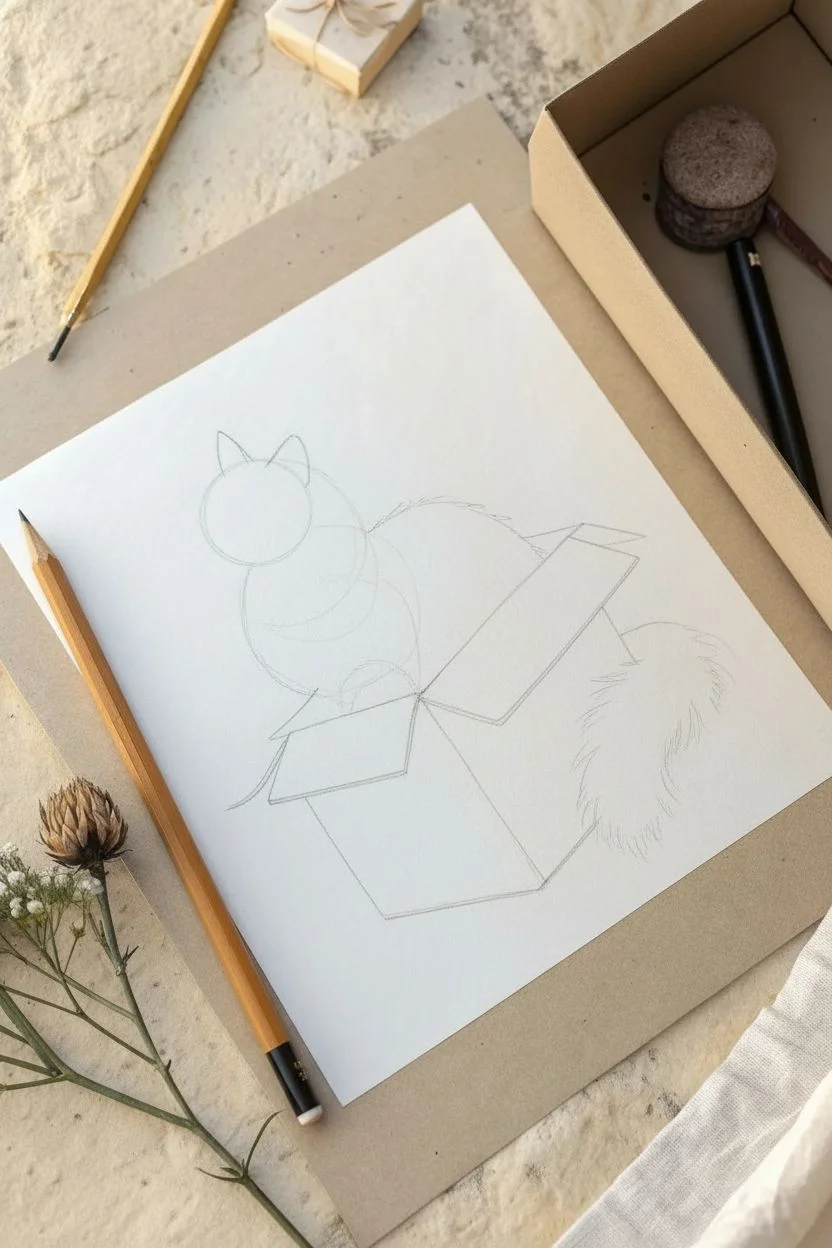
Capture the classic feline philosophy of “if it fits, I sits” with this realistic graphite drawing. You’ll explore the contrast between the rigid, geometric shading of cardboard and the soft, organic flow of fluffy fur.
How-To Guide
Materials
- High-quality drawing paper (smooth or vellum surface)
- Graphite pencils (Range: 2H, HB, 2B, 4B, 6B)
- Kneaded eraser
- Pencil sharpener
- Ruler
- Blending stump (optional)
Step 1: Structural Sketching
-
Block in the box:
Use a 2H pencil to lightly sketch the perspective of the cardboard box. Start with a rectangle for the front face, then add the angled lines for the side and flaps to create a 3D open-box effect. -
Establish the cat’s form:
Lightly draw a large oval sitting inside the box opening for the body, and a smaller circle overlapping the top left for the head. Add triangular shapes for the ears. -
Map the tail:
Sketch a large, sweeping curved shape spilling out of the back right side of the box to represent the fluffy tail. -
Refine the outline:
Go over your geometric shapes to connect the cat’s head to the body. Instead of a solid line, use short, broken strokes to suggest the texture of fur right from the start.
Troubleshooting: Flat Fur
If the fur looks like wire, your strokes might be too uniform. Vary your pencil pressure and stroke length. Use a kneaded eraser to tap out random highlights for depth.
Step 2: Rendering the Box
-
Define the cardboard edges:
Use a ruler and an HB pencil to darken the lines of the box. Leave the lines slightly imperfect in places to mimic worn cardboard edges. -
Shade the interior:
Shade the inside walls of the box using a 2B pencil. Vertical hatching works well here. Make the corners darker to show depth. -
Texturize the exterior:
Lightly shade the outside of the box with an HB pencil. I like to use the side of the lead to create a slightly grainy texture that resembles kraft paper. -
Add flap shadows:
Draw cast shadows under the open flaps using a 4B pencil to make them look like they are popping outward.
Pro Tip: Smudge Control
Place a clean sheet of scrap paper under your drawing hand. This prevents the oils in your skin from smearing the graphite you’ve already laid down on the paper.
Step 3: Fur and Features
-
Draw the eyes:
This is the focal point. Outline the almond shapes and draw the pupils. Leave a tiny white circle in each eye for the reflection highlights, then shade the iris with a sharp B pencil. -
Nose and muzzle:
Sketch the small triangular nose and the mouth line. Use short, outward strokes from the nose bridge to establish the direction of the facial fur. -
Layering the mane:
Using an HB pencil, draw the long chest fur (the ruff). Use long, sweeping strokes that flow generally downward but curve slightly to show volume. -
Adding the stripes:
Switch to a 4B pencil. identifying where the dark tabby markings go on the forehead, cheeks, and back. Draw these as clusters of dark hair strokes rather than solid blocks of color. -
Mid-tone fur filling:
Fill in the lighter fur areas between the dark stripes using a 2B pencil. Keep your pencil sharp to ensure individual hairs are visible.
Step 4: Final Depth and Details
-
Fluffing the tail:
The tail should look very soft. Use long, curved strokes radiating outward from the center of the tail shape. Darken the center of the tail mass and fade out at the edges. -
Deepen the contrast:
With a 6B pencil, go back into the darkest areas—specifically the pupils, the deepest distinct stripes, and the shadow where the cat’s body meets the inside of the box. -
Refine the ear tufts:
Add wispy, upward strokes coming out of the ears. This specific detail gives the cat that distinct Maine Coon or Forest Cat look. -
Whiskers:
Make sure your pencil is extremely sharp. Execute the whiskers with quick, confident flicking motions. Press harder at the base near the muzzle and lift off as you move outward. -
Grounding shadow:
Lightly shade a shadow on the surface underneath the box to ground the object and prevent it from looking like it’s floating. -
Clean up:
Use your kneaded eraser to lift any smudges from the white paper surrounding the drawing and to tap highlights back into the fur if it became too dark.
Once you sign your name, you’ll have a charming piece of art that perfectly captures cat logic.
Continuous Line Art
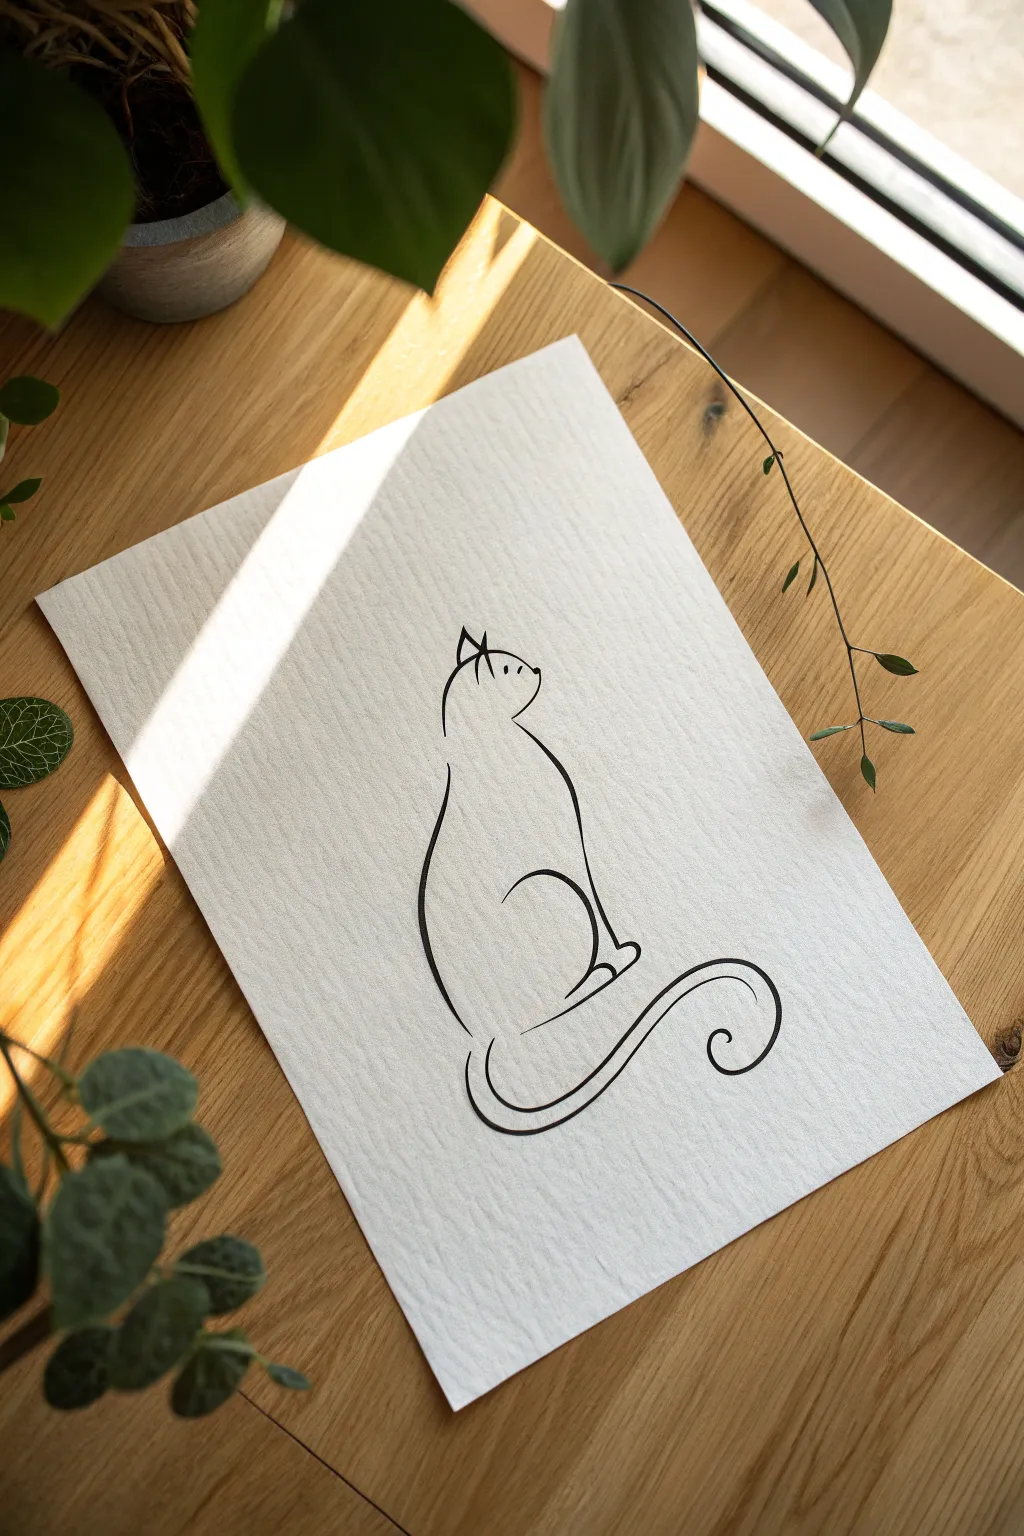
Capture the graceful essence of a cat using confident, sweeping strokes in this elegant art project. The contrast of bold black ink against textured white paper creates a sophisticated piece that looks deceptively simple yet is full of character.
Detailed Instructions
Materials
- Heavyweight cold press watercolor paper (A4 size)
- Black brush pen or flexible calligraphy marker
- HB pencil
- Soft white eraser
- Scrap paper for testing strokes
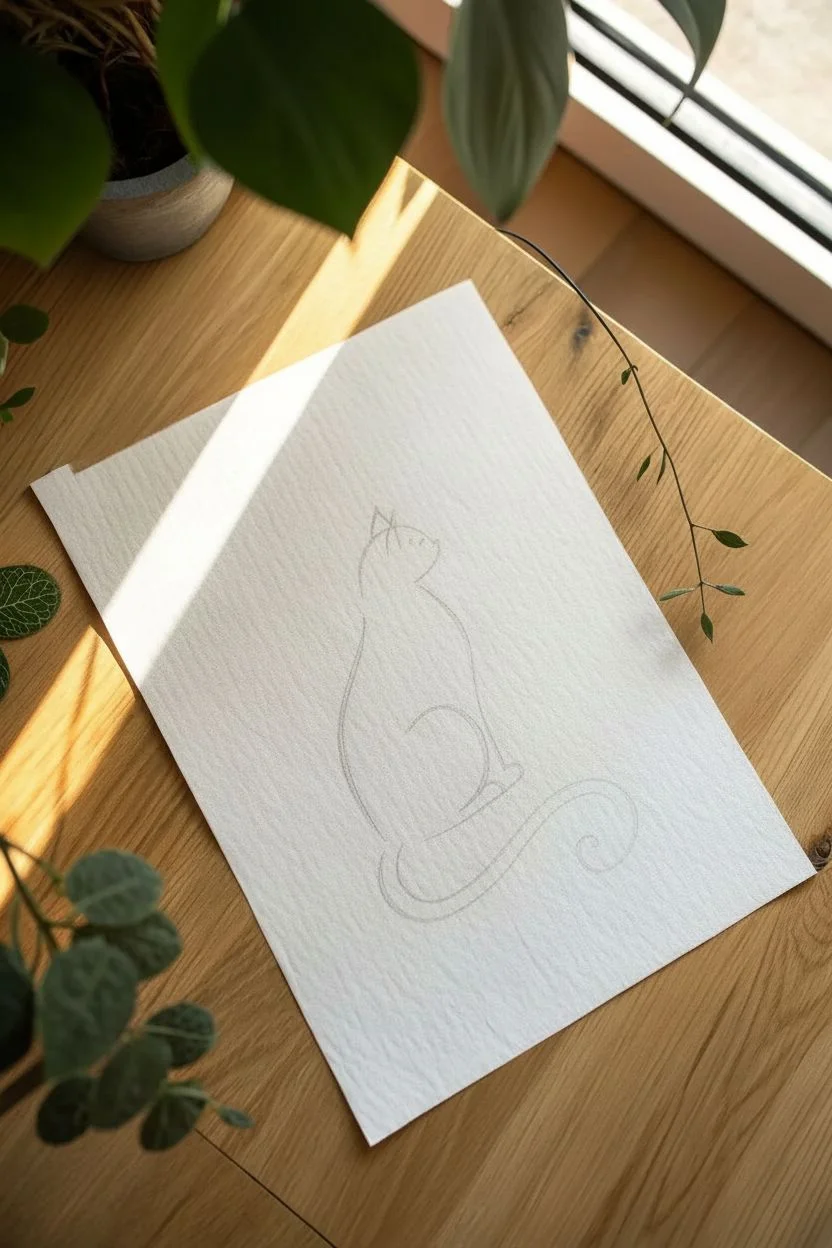
Step 1: Sketching the Foundations
-
Prepare your surface:
Place your textured paper on a flat, well-lit surface, oriented vertically to accommodate the cat’s upright posture. -
Outline the body:
Using your pencil, lightly sketch a large, elongated teardrop shape to represent the cat’s body, leaning slightly back. -
Head placement:
Rest a smaller oval on top of the teardrop for the head, tilting it upwards to simulate the cat looking up. -
Ear guides:
Mark two small triangle shapes on top of the head oval to indicate the ears. -
Tail planning:
Sketch a swirling line starting from the base of the body to plan the tail’s playful curve. -
Leg detail:
Indicate the position of the hind leg with a simple curved line inside the lower body shape. -
Fade the sketch:
Gently run your eraser over the entire sketch until the lines are barely visible, serving only as a faint ghost guide.
Step 2: Mastering the Ink Flow
-
Practice strokes:
Take your scrap paper and practice making strokes with your brush pen, pressing down for thickness and lifting for thin tapered ends. -
Ink the ears:
Begin the final artwork at the top; use the tip of the pen for sharp, precise triangles for the ears. -
Profile outline:
Draw the profile of the face with a light touch, outlining the forehead and a small bump for the nose. -
The back curve:
Start the main back stroke at the neck with light pressure to keep the line thin. -
Adding weight:
As you move down the curve of the spine, gradually increase pressure on the brush pen to widen the line significantly. -
Tapering off:
Lighten your pressure as you reach the bottom of the cat’s seated form to taper the line back to a fine point. -
Chest definition:
Draw the chest line starting from under the chin, sweeping downwards with a consistent, medium width. -
Hind leg arch:
Create the hind leg detail with a ‘C’ shaped stroke that starts thin, thickens in the middle, and thins out again. -
Tail motion:
I prefer to rotate the paper slightly here to get a better angle for the long tail curve. -
Executing the tail:
Draw the tail in one fluid motion, starting from the base and swirling it upwards into a loose spiral. -
Face details:
Add the final personality by placing two tiny, vertical dashes to suggest the eyes.
Breathe for Smoothness
Exhale slowly as you draw long curves like the back and tail. This steadies your hand and prevents the jittery lines that often come from holding your breath while concentrating.
Step 3: Final Polish
-
Drying time:
Allow the ink to dry completely for at least 30 minutes, especially if your paper has deep texture where ink can pool. -
Clean up:
Carefully erase any remaining pencil guidelines, holding the paper taut to avoid crinkling your finished piece.
Jagged Lines?
If your lines look shaky, try drawing faster! Moving the pen too slowly allows the paper texture to grab the nib. A confident, quick sweep rides over the texture smoothly.
Frame your minimalist masterpiece in a simple wood frame to highlight the organic lines and texture.


The Playful Pounce Crouch
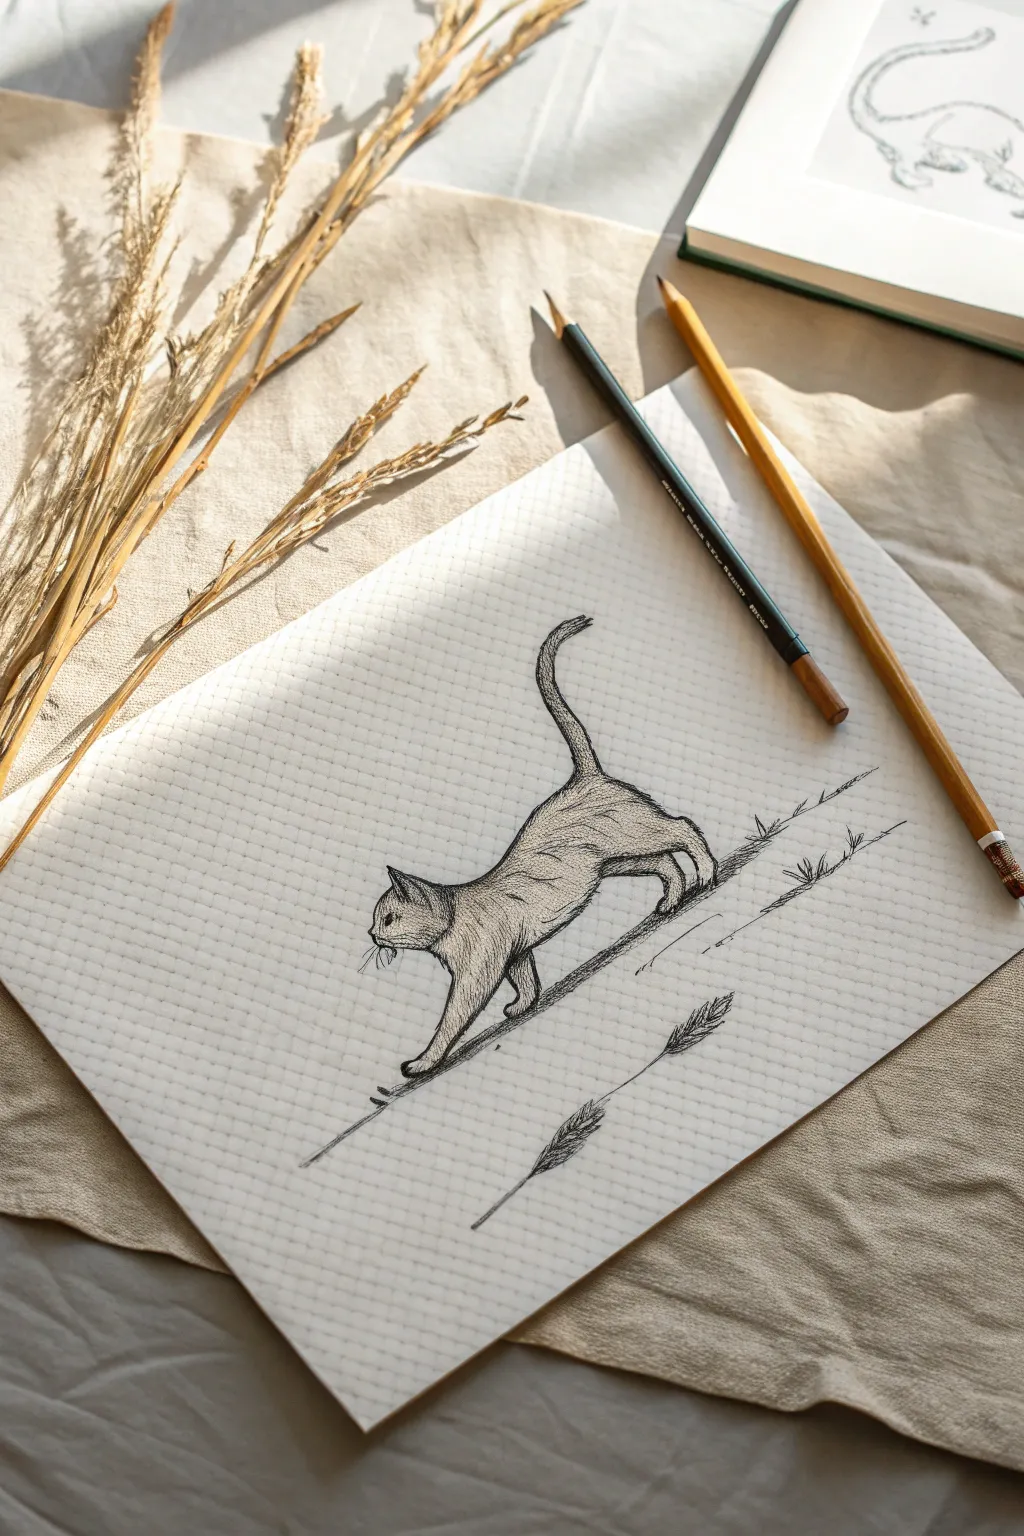
Capture the graceful tension of a feline on the move with this textured ink drawing. By utilizing the rough surface of the paper, you’ll create a dynamic, sketchy style that brings the cat’s fur and movement to life.
Step-by-Step Guide
Materials
- Cold press watercolor paper (or textured drawing paper)
- HB Graphite pencil
- Fine liner pen (0.3mm or 0.5mm, black)
- Soft gum eraser
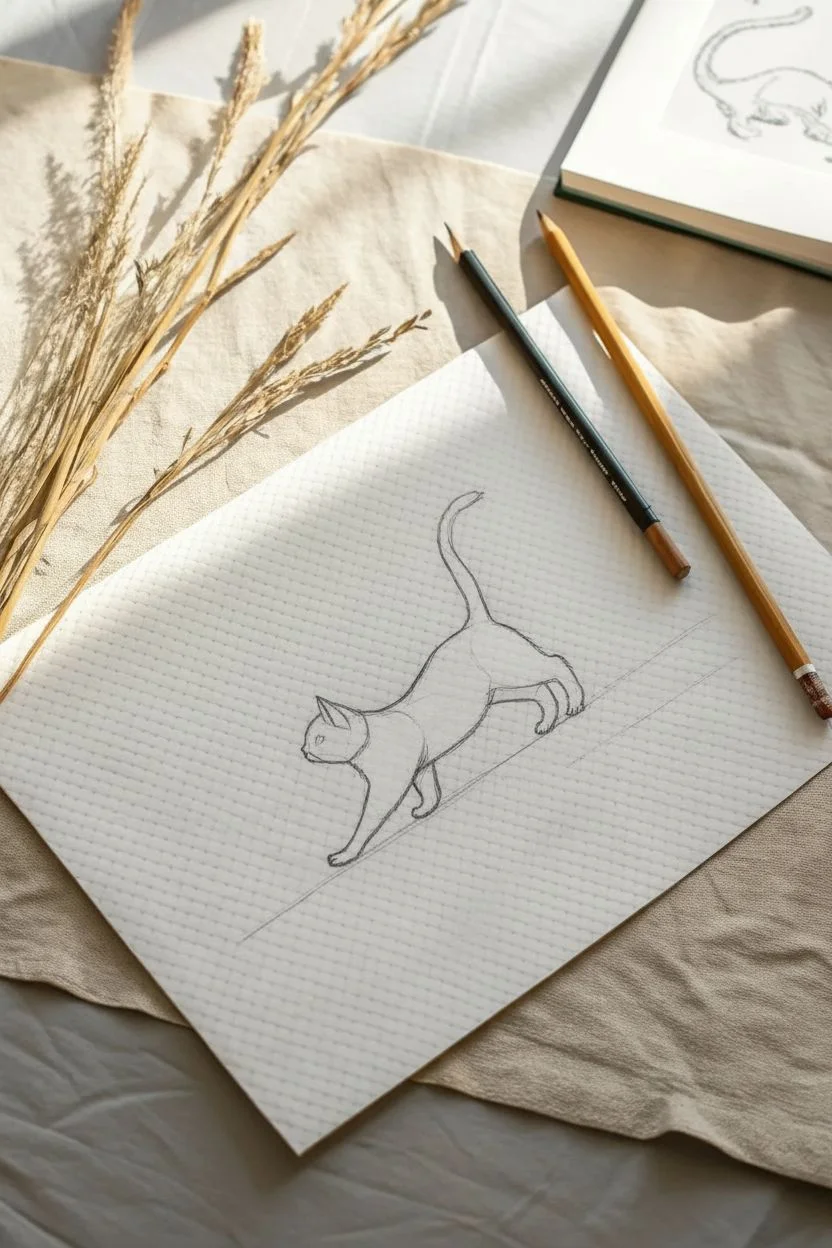
Step 1: Drafting the Structure
-
Establish the ground:
Begin with your pencil by lightly drawing a long, straight diagonal line across the lower third of your paper. This slope gives the cat a sense of downward movement. -
Position the head:
Draw a small circle slightly above the middle of your diagonal line to represent the cat’s head. Add a small triangular wedge to the left side for the snout. -
Map the body:
Sketch two overlapping ovals behind the head. One vertical oval for the shoulder girdle, and a slightly larger, horizontal oval further back for the hips. -
Connect the spine:
Draw a smooth, arched line connecting the top of the head through the shoulders and down to the hips. It should dip slightly between the shoulder blades. -
Add the tail:
Extend a long, curved line upward from the rear. Give it a gentle ‘S’ curve or question mark shape to imply balance and alertness. -
Sketch the legs:
Block in the legs using simple stick lines and cylinders. The front right leg should be extended forward, placing weight on the slope, while the back legs remain bunched and ready to push off. -
Refine the outline:
Lightly trace over your shapes to create the final silhouette. Add triangular ears on top of the head and define the paws where they meet the diagonal line.
Step 2: Inking and Texture
-
Begin inking the head:
Switch to your fine liner pen. Start with the ears, using short, quick flicks of the pen rather than a solid line to suggest tufts of fur. -
Define the back:
Work your way down the spine. Keep your pen lines broken and somewhat scratchy. This technique utilizes the paper’s texture to mimic a coat of fur. -
Shade the underbelly:
When outlining the stomach and under the neck, make your hatch marks denser and closer together to create a natural shadow. -
Texture the legs:
Outline the legs with smoother lines near the paws but keep the upper thighs sketchy. Add small curved lines at the toes to define the separation of the paws. -
Ink the tail:
Outline the tail with long, flowing strokes on one side and shorter hatch marks on the shadowed side to give it cylindrical volume. -
Draw the face:
Place a small dark dot for the eye, leaving a tiny speck of white paper for the highlight. Add a small ‘V’ for the nose and a distinct line for the mouth. -
Add whiskers:
Here, I like to rotate the paper slightly to get a better angle. Draw the whiskers with quick, confident flicks outward from the snout so line tapers at the end.
Use the Tooth
Let the textured paper do the work. Don’t press too hard with your pen; skimming the surface allows the ink to skip slightly, creating instant organic texture.
Step 3: Environment and Finishing
-
Create the ground:
Instead of tracing the solid pencil diagonal, use short, horizontal hatching lines along the path. Concentrate these marks under the paws to ground the subject. -
Add foliage details:
Sketch two simple sprigs of wild grass or wheat in the foreground below the slope line. Use a chevron pattern for the seed heads. -
Strengthen shadows:
Go back over the cat’s rear thigh and under the chin with extra hatch marks to deepen the contrast and make the figure pop. -
Clean up:
Wait until the ink is completely dry to the touch to avoid smudging. Gently rub your eraser over the entire drawing to remove the graphite guidelines.
Level Up
Dilute a drop of black ink (or watercolor) with plenty of water to create a pale grey wash. Brush this loosely over the shadowed side of the cat for 3D volume.
Now you have a dynamic sketch that captures the silent grace of a cat on the prowl.
Peeking Over the Edge
Capture the playful curiosity of a cat peering over a ledge with this minimalist ink drawing. Using clean lines and textured paper, you will create a charming piece focused on expression and simplicity.
Detailed Instructions
Materials
- Heavyweight textured paper (cold press watercolor or mixed media)
- HB pencil
- Soft eraser
- Black drawing pens (sizes 05 and 01)
- Ruler (optional)
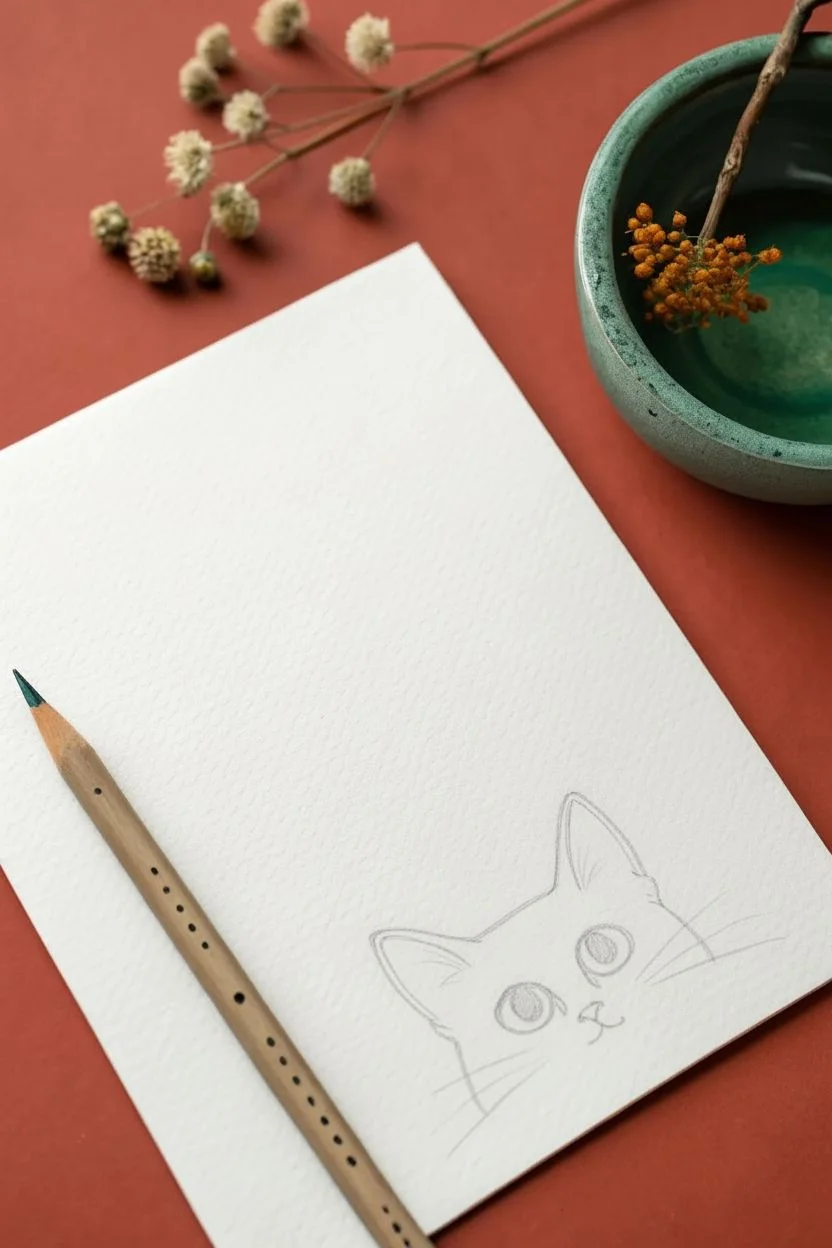
Step 1: Sketching the Foundation
-
Positioning:
Begin by lightly sketching a horizontal guideline near the bottom right of your page if you aren’t using the paper’s physical edge as the boundary. -
Head shape:
Draw a gentle, wide arch centered above your baseline to represent the top of the cat’s head. -
Ear placement:
Sketch two large triangles on top of the arch, tilting them slightly outward to show an alert posture. -
Eye outlines:
focused on the center of the face, lightly draw two large ovals for the eyes, spacing them wide apart for a cute look. -
Face details:
Mark the position of the nose with a small inverted triangle and a simple anchor shape below it for the mouth. -
Refining the sketch:
Lightly indicate where the whiskers and forehead markings will go to ensure everything fits before committing to ink.
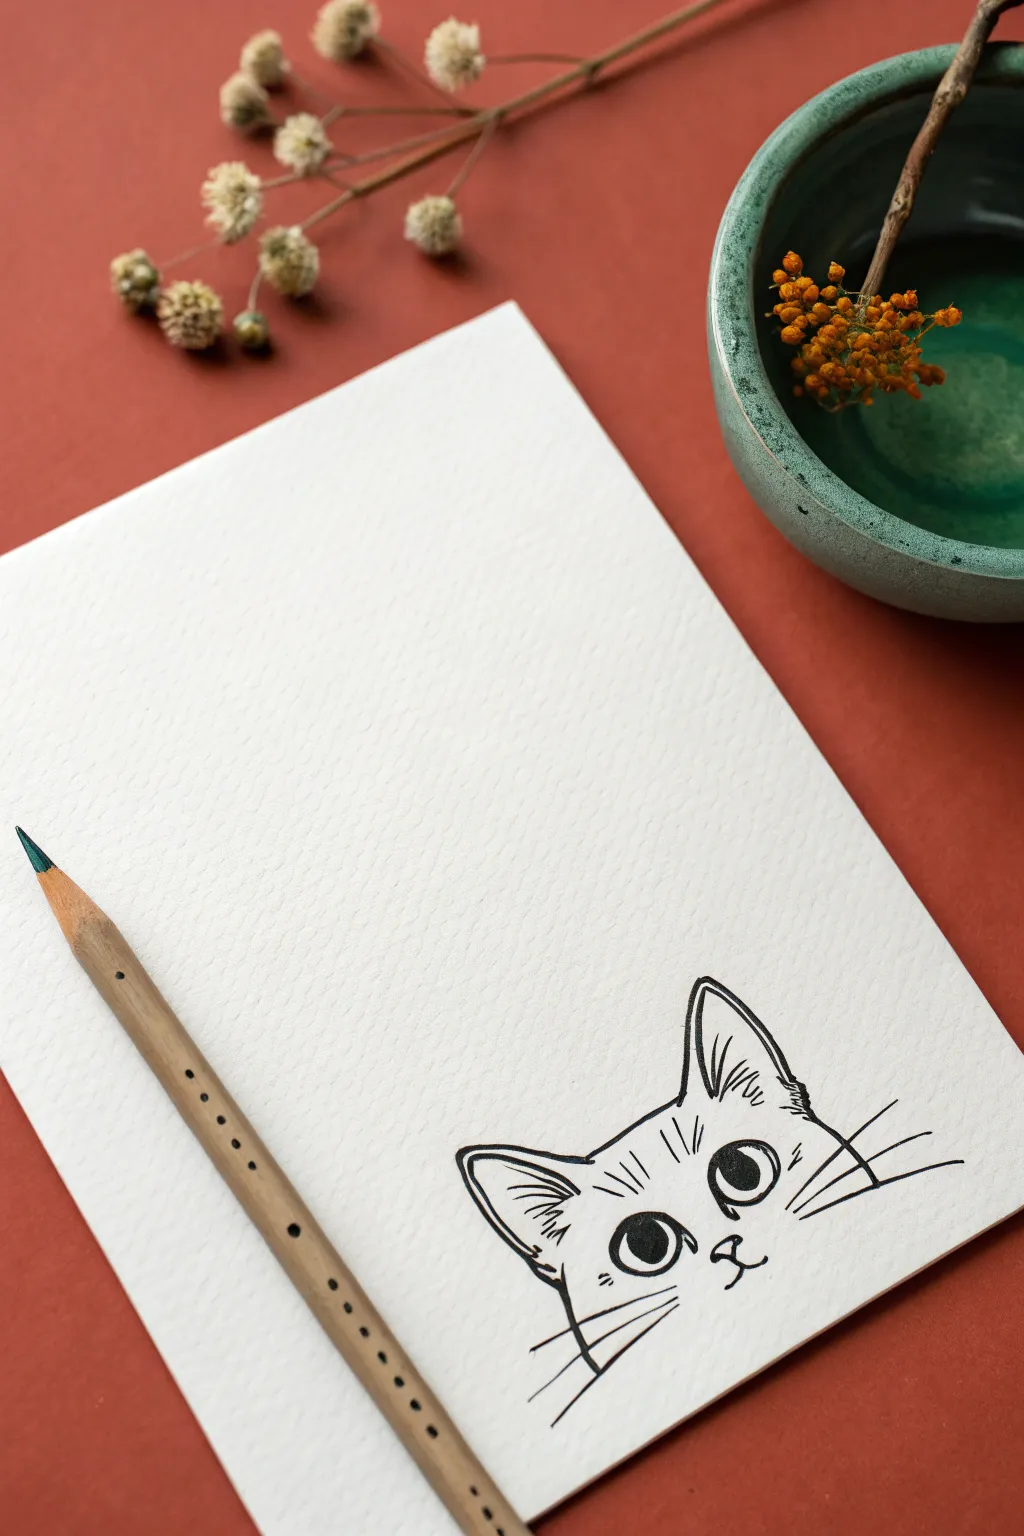
Step 2: Inking the Outline
-
Main contours:
Switch to your thicker pen (like a size 05). Trace the outer shape of the ears, using a confident stroke to keep the lines smooth. -
Ear details:
Draw the inner ear lines, adding quick, broken strokes at the base to suggest tufts of fur. -
Forehead texture:
Ink the stripes on the forehead using short, tapered lines that mimic the direction of fur growth. -
Eye definition:
Carefully outline the eye ovals. I find that making the top line slightly thicker helps mimic a lash line. -
Pupils and highlights:
Draw the large round pupils inside the eyes, but crucial—map out a small circle for the highlight first. -
Filling the eyes:
Fill in the pupils with solid black ink, being extremely careful to leave the highlight circle purely white. -
Nose and mouth:
Ink the small triangle nose and the mouth lines, keeping these shapes minimal and clean.
Wobbly Lines?
If your long lines (like whiskers) look shaky, try moving your entire arm from the shoulder rather than just planting your wrist. Speed helps smooth out curves.
Step 3: Adding Fine Details
-
Switching pens:
Change to a thinner pen (like a size 01) for the delicate whiskers and fine textures. -
Muzzle spots:
Add a few tiny dots on the muzzle area on both sides of the nose. -
Main whiskers:
Draw the long whiskers extending from the muzzle spots using quick, flicking motions for a natural taper. -
Eyebrow whiskers:
Add the longer, thinner whiskers emerging from above the eyes, keeping them slightly curved. -
Head boundary:
If you drew a guideline at the bottom, carefully ink the bits of the face that touch it, or let the drawing fade off naturally. -
Cleanup:
Allow the ink to dry completely for several minutes to prevent smudging the textured paper. -
Final erase:
Gently erase all underlying pencil sketches to reveal the crisp black and white contrast.
Add a Splash
Once the black ink is 100% dry and waterproof, use a small brush to add a drop of emerald green or amber watercolor to the irises for a pop of life.
Hang this charming sketch on your wall to add a touch of whimsy to your room
The Seated Back View
Capture the quiet elegance of a cat in a seated profile using precise pen strokes to build realistic texture. This project focuses on drawing convincing tabby markings and mastering the direction of fur growth for a lifelike finish.
Step-by-Step
Materials
- Smooth Bristol board or hot-press watercolor paper
- Graphite pencil (HB or H)
- Kneaded eraser
- Fine liner pens (sizes 0.05, 0.1, and 0.3 mm)
- Ruler (optional)
Step 1: Structural Sketch
-
Basic Shapes:
Start with a light pencil sketch. Draw a large, slightly angled oval for the body and a smaller circle for the head mostly overlapping the top left of the body oval. -
Connect the Form:
Draw curving lines to connect the head to the body, creating a sloping back and a sturdy neck. -
Tail Placement:
Sketch a thick, tubular shape that wraps around the base of the cat, tapering slightly at the end to suggest a relaxed tail. -
Profile Details:
Refine the head shape by drawing a triangular ear pointing upward and a subtle profile view of the nose and chin on the left side. -
Mapping Markings:
Very lightly sketch guidelines for the stripe patterns on the back, the distinctive ‘M’ on the forehead, and the ring shapes on the tail.
Stroke Direction
Always draw your pen strokes in the direction the fur grows (from nose to tail). This flow is critical for realism; chaotic strokes will make the coat look matted rather than sleek.
Step 2: Inking Fundamentals
-
The Eye and Face:
Using your 0.05 mm pen, carefully ink the visible eye, leaving a tiny white dot for the highlight. Outline the nose and mouth with delicate, broken lines. -
Defining the Ears:
Draw the contours of the ears using short, upward flicks to mimic fur at the tips and inner edges. -
Contour Fur:
Go over your pencil body outline with the 0.1 mm pen. Instead of a solid continuous line, use short, jagged strokes that follow the direction the fur would naturally lie. -
Erase Basics:
I like to let the initial ink dry briefly, then gently roll the kneaded eraser over the paper to lift the heaviest graphite lines, leaving just a faint guide for the texture.
Step 3: Building Texture
-
Head Markings:
Switch to the 0.1 mm pen to darken the stripes on the head. Use tight, dense hatching strokes to create the dark values while keeping the strokes short. -
Neck and Shoulders:
Create the dense fur around the neck using slightly longer strokes. Ensure the lines curve around the form of the neck to establish volume. -
Body Stripes:
Move to the main body stripes using the 0.3 mm pen for deeper blacks. Instead of filling them in solid, build them up with many parallel hatched lines to maintain the fur texture clarity. -
Spine Highlights:
Leave the area along the spine with fewer marks and more white space. This implies lighting hitting the top of the cat. -
Flank Texture:
On the side of the body, stipple small dashes and spots to create the mottled tabby pattern, transitioning from the dark back to a lighter belly area.
Level Up: Mixed Media
Once the ink is fully dry, paint a very light wash of watercolor in ochre or brown over the body. The ink drawing will act as a detailed underpainting for a beautiful illustration style.
Step 4: Grounding and Finalizing
-
Tail Rings:
Render the wide stripes on the tail with curved strokes that wrap around the form, emphasizing the cylindrical shape. -
Deep Shadows:
Use the 0.3 mm pen to add the darkest accents where the legs meet the body and under the tail to anchor the figure. -
Ground Elements:
Sketch quick, scratchy horizontal lines and a few vertical grass blades under the cat to create a simple ground plane. -
Details and Whiskers:
With the finest 0.05 pen, add the whiskers with quick, confident flicks and add tiny loose hairs along the back for softness. -
Final Cleanup:
Wait at least ten minutes for the ink to cure completely, then thoroughly erase any remaining pencil sketches for a crisp, high-contrast look.
Step back and admire distinct personality and texture you have captured in your feline portrait
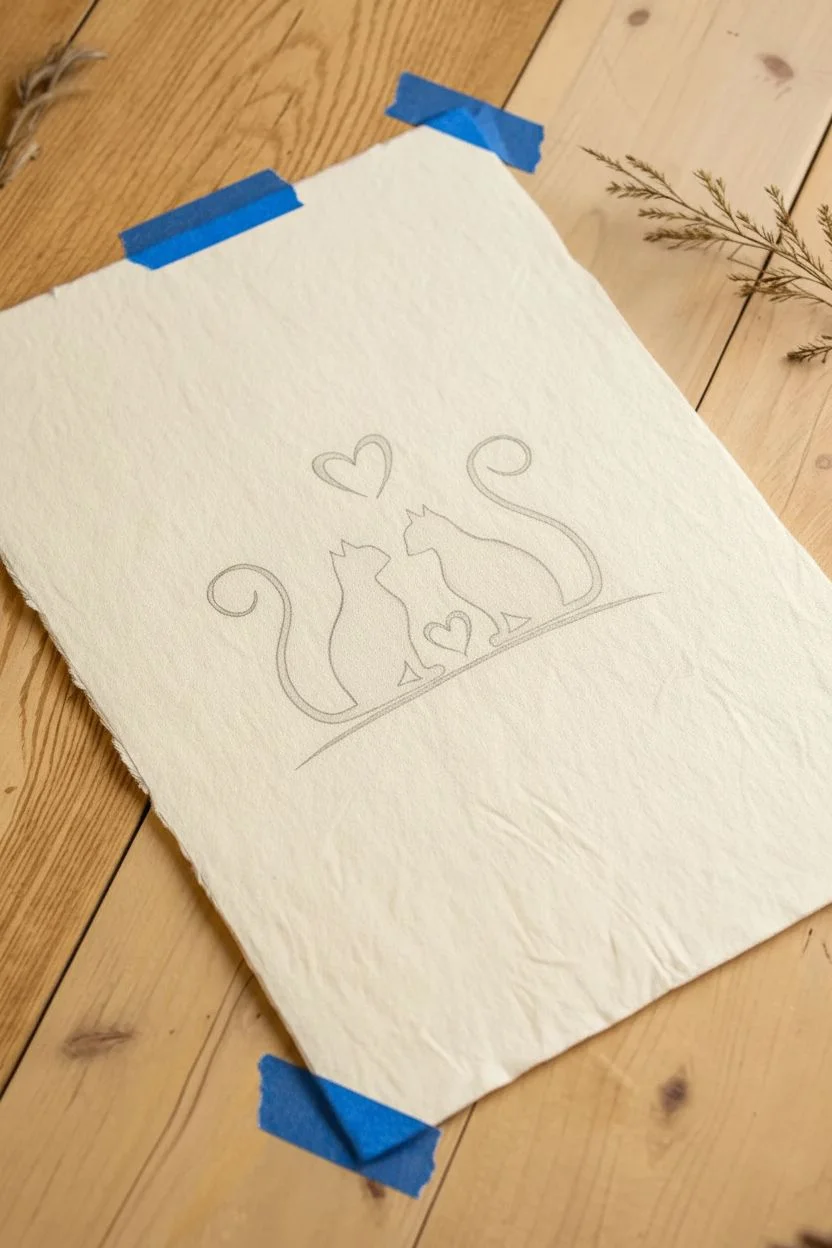
Best Friends with Intertwined Tails
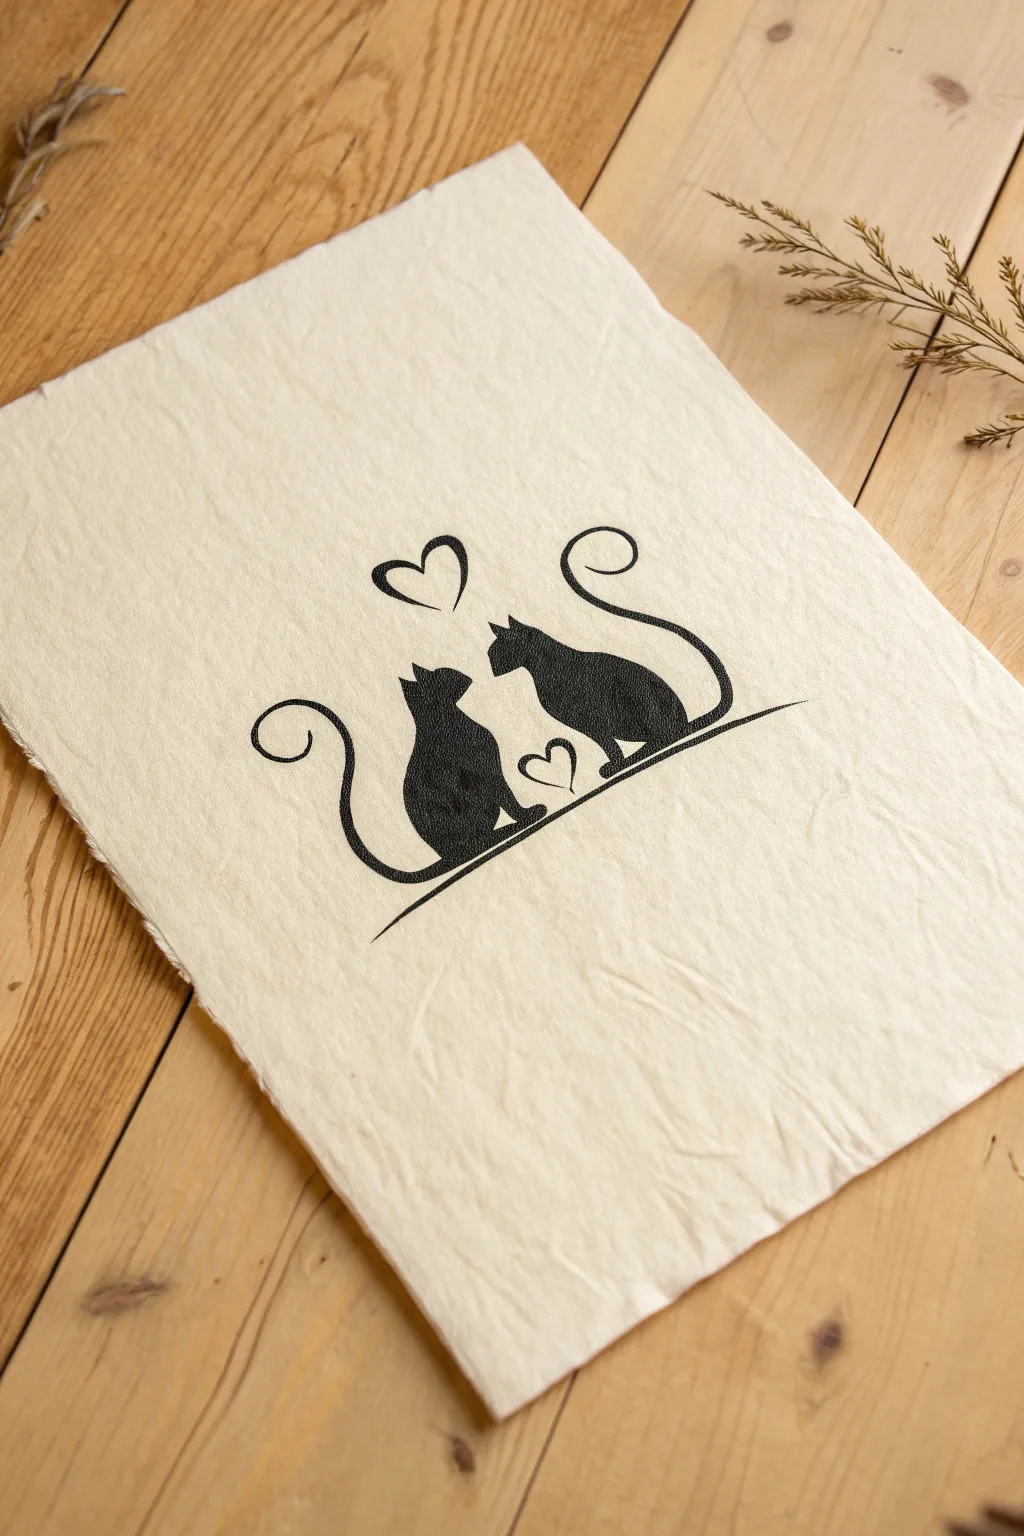
Capture the elegant simplicity of two feline friends with this high-contrast silhouette project. Using handmade paper adds a beautiful, textured element that makes the bold black ink stand out wonderfully.
How-To Guide
Materials
- Handmade cotton rag paper (deckle edge)
- HB pencil
- Kneaded eraser
- Waterproof black fine liner (0.5mm)
- Black India ink or high-pigment black gouache
- Small round paintbrush (size 2)
- Ruler
Step 1: Sketching the Composition
-
Prepare the surface:
Place your handmade paper on a flat, clean surface. Since this paper is textured, tape the corners lightly with painters tape to keep it steady while you draw. -
Draft the foundation line:
About one-third of the way up from the bottom edge, lightly sketch a long, gently curved line using your HB pencil. This line serves as the ground for your cats. -
Position the bodies:
Sketch two pear-shaped ovals resting on the curved line, leaving a small gap between them so their noses will almost touch but not overlap. -
Define the heads:
Add a smaller circle on top of each pear shape for the heads. The cat on the left should be looking slightly up, and the cat on the right looking down or straight ahead. -
Add the ears:
Draw small triangular ears on top of the head circles. Keep the lines crisp to ensure the silhouette reads clearly later on. -
Refine the profiles:
Connect the head and body shapes with smooth neck lines. Shape the snouts so they are facing each other, maintaining a tiny sliver of negative space between them. -
Sketch the left tail:
Draw a long, sweeping tail for the left cat that curves outward and then spirals inward, creating a large loop. -
Sketch the right tail:
Mirror the motion for the right cat’s tail, curling it upward and outward in a large ‘S’ curve or spiral that balances the composition. -
Place the hearts:
Sketch a small floating heart in the negative space between the cats’ chests, and a larger, slightly tilted heart centered above their heads.
Bleeding Lines?
Handmade paper is absorbent. If your ink starts feathering, switch to a waterproof drawing pen or marker instead of liquid ink. Pens offer more control and sit on top of the fibers rather than soaking in.
Step 2: Inking and Filling
-
Outline delicate areas:
Take your fine liner pen and carefully trace the outlines of the ears, snouts, and the small heart. The fine tip helps maintain precision in these tight areas. -
Trace the curves:
Continue using the fine liner to trace the long curves of the tails and the baseline. Go slowly over the textured paper bumps to ensure a continuous line. -
Define the body edges:
Outline the main body shapes of both cats. I prefer to outline everything first to create a ‘barrier’ before filling in the large areas. -
Prepare the fill medium:
Dip your small round brush into the India ink. If using gouache, mix it with a tiny drop of water until it has a heavy cream consistency. -
Fill the left silhouette:
Starting from the center and working outward, paint the inside of the left cat completely black. Use the brush tip to push ink into the paper’s texture. -
Fill the right silhouette:
Repeat the filling process for the right cat. Be extra careful near the nose gap; you want them distinct, not merged. -
Thicken the tail lines:
Go back over the tail lines with your brush to add varying line weight—thicker at the base and tapering comfortably toward the tip. -
Fill the hearts:
Carefully fill in both hearts with the black ink. A steady hand is key here to keep the heart shapes symmetrical. -
Check for white spots:
Handmade paper has deep tooth (texture). Inspect your black areas and dab extra ink into any tiny white creates that the brush missed. -
Let it dry fully:
Allow the artwork to sit undisturbed for at least 30 minutes. Cotton paper absorbs liquid deeply, so it may feel dry to the touch before it is fully set. -
Erase guidelines:
Once you are absolutely certain the ink is dry, gently dab (don’t rub hard) with a kneaded eraser to lift any visible pencil markings.
Level Up: Metallic Pop
Once the black ink is completely dry, trace just the outline of the hearts or the tails with a gold gel pen. The metallic shimmer adds a luxurious contrast against the matte black and rustic paper.
Now you have a charming piece of textured art ready to frame or give to your favorite cat lover.
Cute Chibi Style Proportions

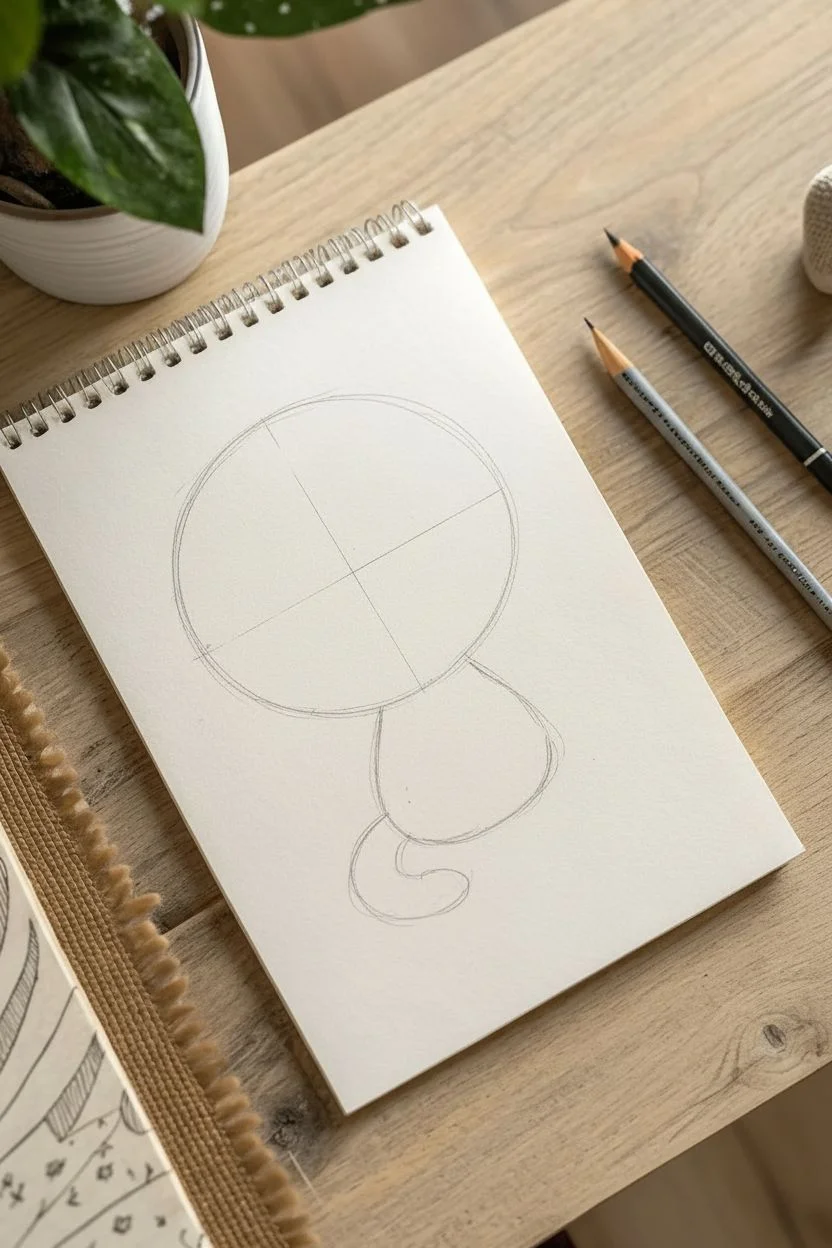
Master the art of cute proportions with this adorable chibi cat sketch featuring oversized eyes and a tiny body. This pencil drawing relies on soft shading and expressive line work to create a character that jumps off the page.
Step-by-Step
Materials
- Sketchbook paper (smooth or medium tooth)
- HB pencil (for initial sketching)
- 2B or 4B pencil (for dark shading)
- Kneaded eraser
- Pencil sharpener
Step 1: Structural Basics
-
Head shape:
Start by drawing a large, slightly flattened circle for the head. This should take up about half of your drawing space to get that chibi look. -
Body outline:
Draw a much smaller, bean-shaped oval directly underneath the head for the body. The body should be roughly half the size of the head. -
Face guidelines:
Lightly sketch a vertical centerline and a horizontal line low on the face. This horizontal line will guide where those massive eyes sit.
Uneven Eyes?
Drawing symmetrical eyes is tough. If they look wonky, look at your drawing in a mirror or hold it up to a light backwards to spot the error.
Step 2: Features and Fur
-
Eye placement:
Sketch two very large circles resting on your horizontal guide line. Leave a wide space between them for the nose. -
Ear shapes:
Add two large, triangular shapes on top of the head. Curve the outer lines slightly outwards to make them feel organic rather than geometric. -
Defining the fur:
Go over the outline of the cheeks, replacing the smooth circle with jagged, zig-zag lines to create tufts of fur. -
Chest tuft:
Draw a fluffy patch of fur on the chest area just below the head, using downward pointing spikes. -
Paws and legs:
Sketch two small oval shapes at the base of the body for the front paws. Add curved lines for the hind legs tucked behind them. -
Tail sketch:
Draw a sweeping, curved tail coming from the backside, wrapping slightly forward. Make the tip pointed and furry.
Step 3: Details and Shading
-
Facial features:
Draw a tiny, triangular nose right between the eyes and add a small, ‘w’ shaped mouth. -
Eye highlights:
Inside the large eye circles, draw two smaller circles (one large, one small) for light reflections. Do not shade these areas. -
Pupil shading:
Draw large pupils inside the eyes. I prefer switching to a softer 4B pencil here to fill them in solid black, making the eyes pop. -
Iris gradients:
Shade the rest of the eye (iris) lightly, getting darker near the top and lighter near the bottom. -
Ear depth:
Shade the inside of the ears using diagonal hatching lines to show depth and the inner ear flap. -
Body shading:
Add soft hatching lines on the side of the body, the chest, and the tail. Follow the curve of the body with your strokes. -
Final definition:
Darken your main outlines with the 2B pencil. Add three long whiskers on each cheek and short toe lines on the paws. -
Grounding shadow:
Sketch a horizontal shadow heavily underneath the cat’s bottom and paws to place the figure on the ground.
Personalize It
Make this kitty your own by adding specific markings like tabby stripes, calico spots, or a patch over one eye during the shading phase.
You have created an irresistibly cute companion ready to leap out of your sketchbook.


Have a question or want to share your own experience? I'd love to hear from you in the comments below!