
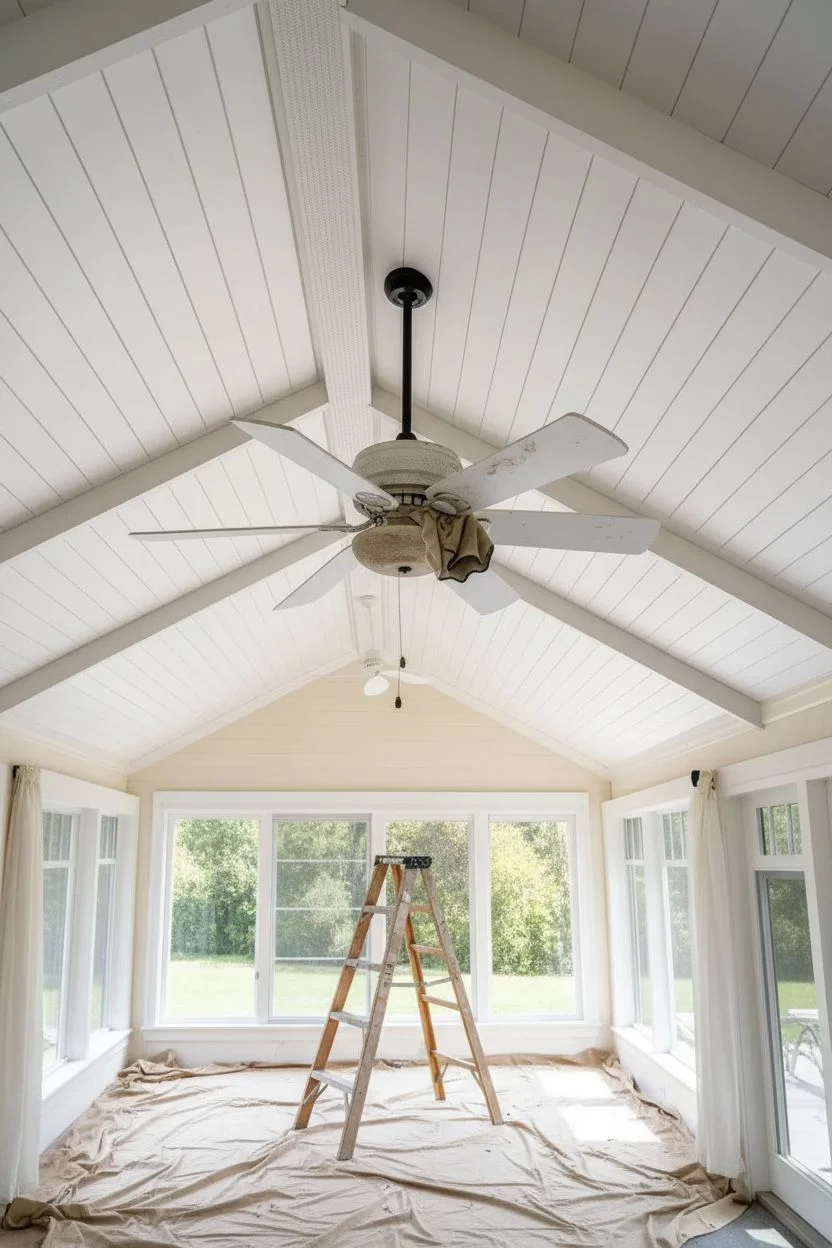
If your ceiling fan feels like the one outdated thing you can’t unsee, paint is the fastest way to flip the vibe without replacing the whole fixture. I’m sharing my favorite ceiling fan painting ideas—from classic blend-in finishes to artsy blade patterns that turn that spinner into real décor.
Ceiling-White Blend-in Makeover
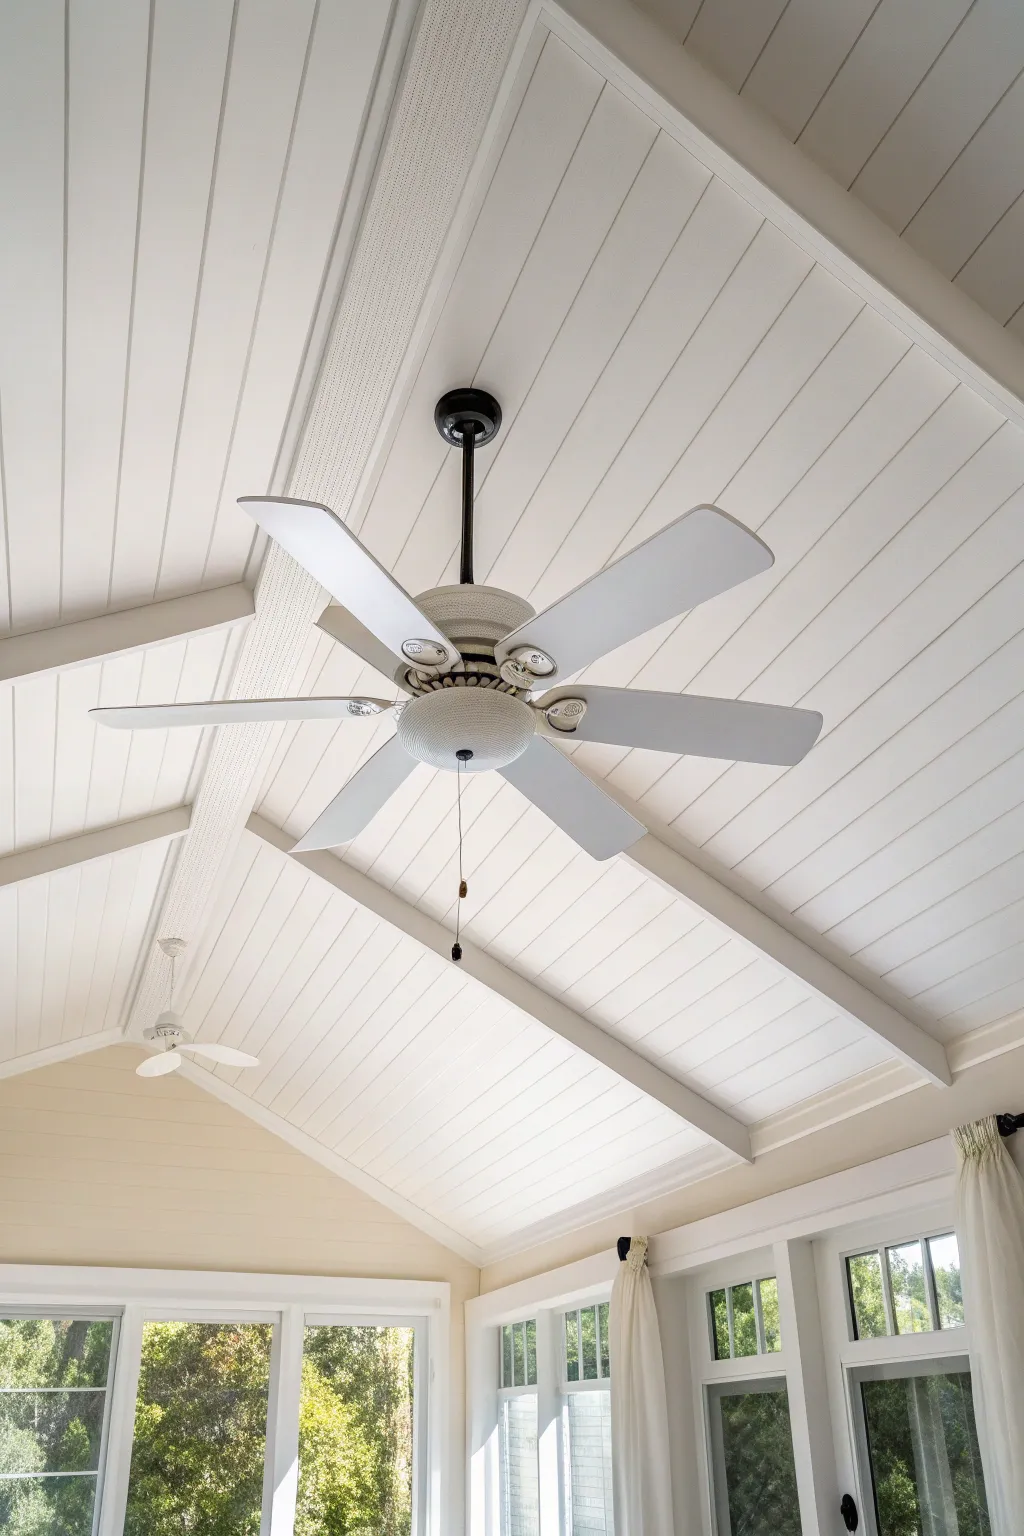
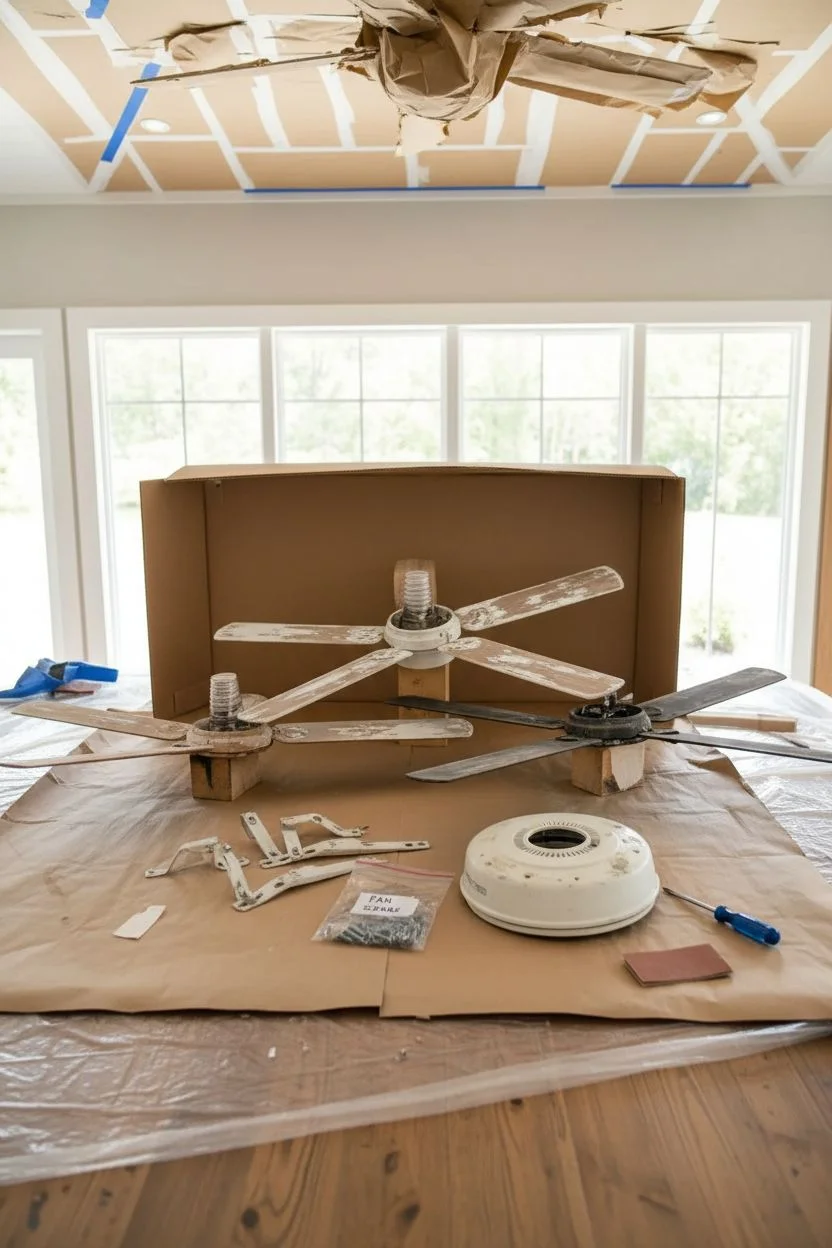
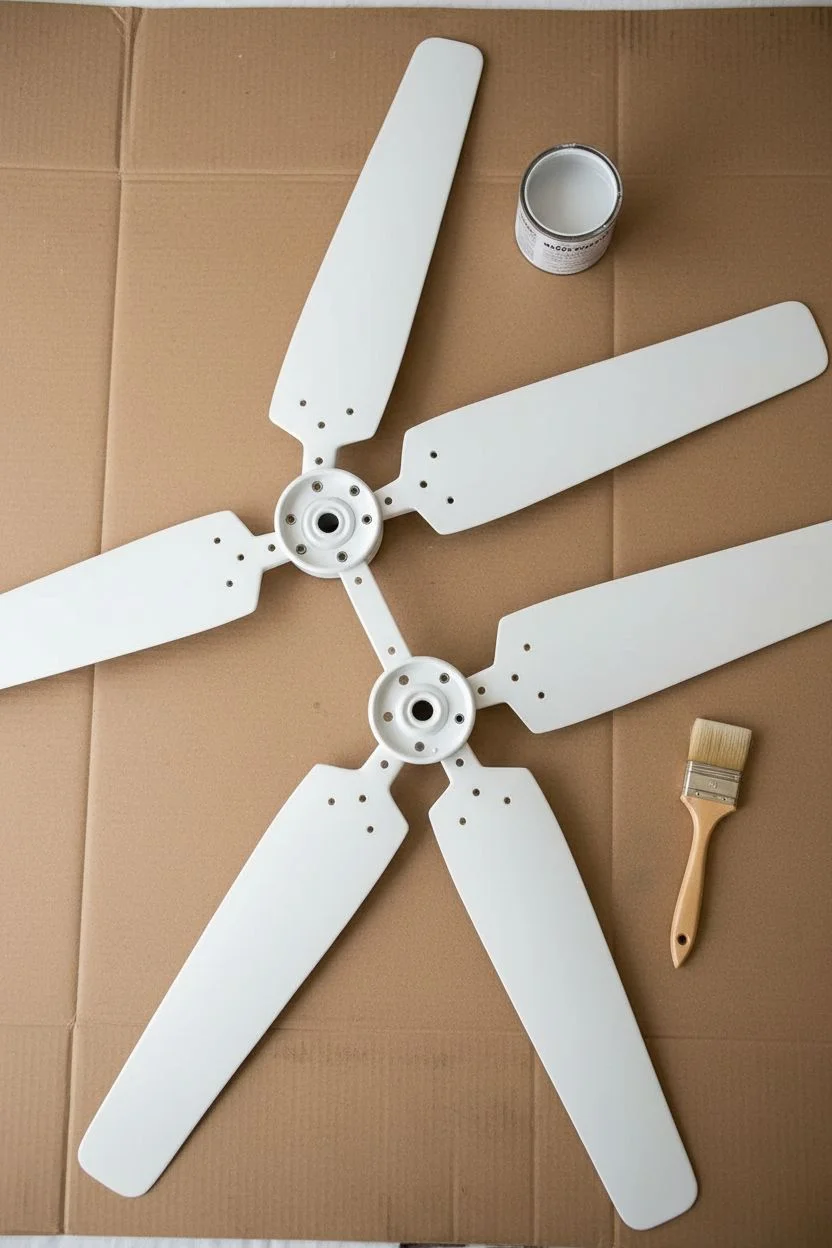
Achieve a seamless, airy look by giving your old ceiling fan a monolithic white makeover that lets it disappear into your ceiling architecture. This project transforms a dated fixture into a modern, unobtrusive element perfect for vaulted or beadboard ceilings.
How-To Guide
Materials
- Screwdriver set
- Degreaser cleaner (TSP substitute)
- Fine-grit sandpaper (220-grit)
- Tack cloth
- Painter’s tape
- Masking paper or plastic sheeting
- High-quality bonding primer spray
- Flat white enamel spray paint
- Cardboard box or drop cloth
- Step ladder
- Wrench or pliers
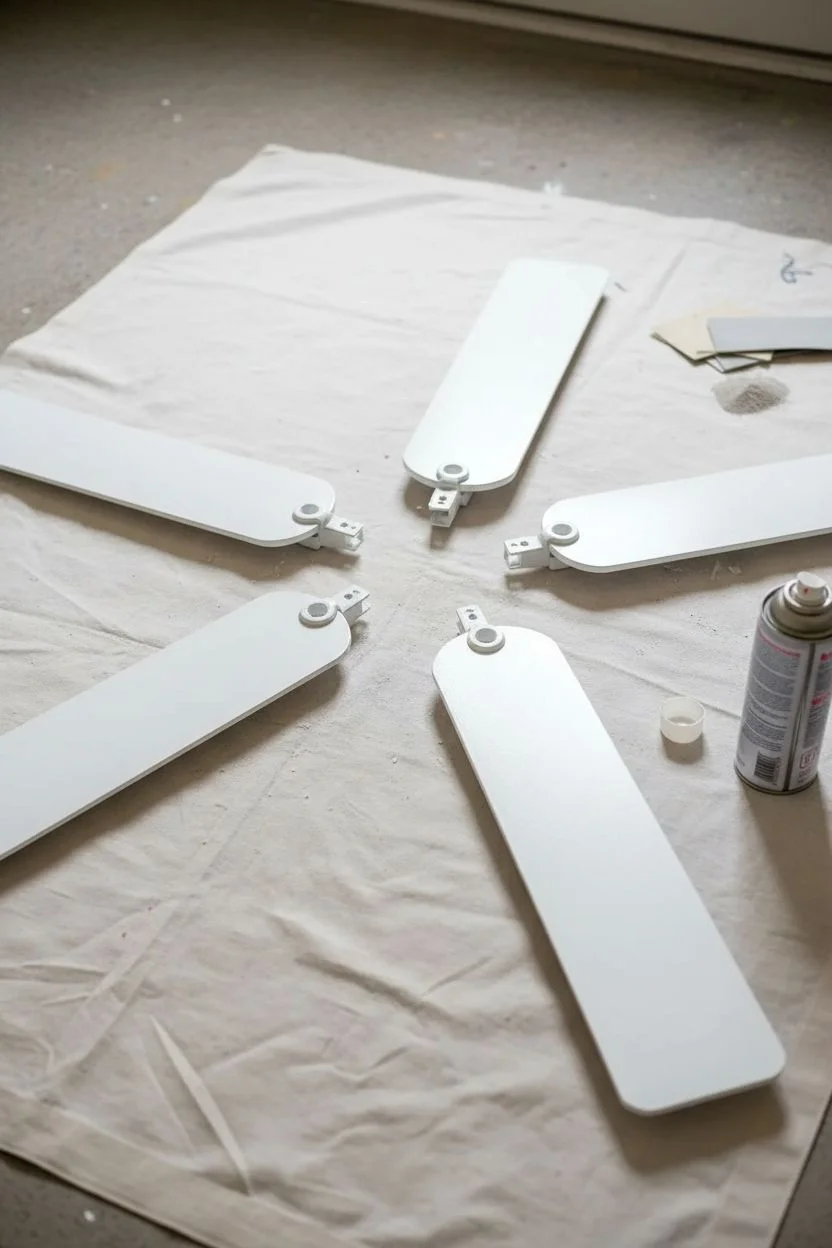
Step 1: Disassembly & Prep
-
Safety check:
Turn off the power to the fan at the breaker box before beginning any work. Confirm the power is off by flipping the wall switch. -
Remove the blades:
Using your screwdriver, carefully detach the fan blades from their metal brackets. Keep the screws in a labeled baggie so they don’t get lost. -
Remove the brackets:
Unscrew the metal blade brackets (the arms) from the motor housing. These often have a different finish than your desired end result, so they will need painting too. -
Clean everything thoroughly:
Wipe down the blades, brackets, and the motor housing remaining on the ceiling with a degreaser. Ceiling fans accumulate a surprising amount of oily dust that will ruin your paint adhesion if left behind. -
Sand for grip:
Lightly scuff all surfaces—blades, brackets, and the motor housing—with 220-grit sandpaper. You aren’t trying to strip the old finish, just creating tiny scratches for the new primer to bite into. -
Remove dust:
Wipe every sanded surface with a tack cloth to remove the fine sanding dust. Do not use water here, as you want the surfaces bone dry for painting.
Smooth Operator
For the flattest finish on blades, hang them vertically from a clothesline using wire through the screw holes. This lets you spray both sides at once and avoids dust settling.
Step 2: Masking & Painting
-
Protect the ceiling:
Since we are painting the motor housing in place, use painter’s tape and plastic sheeting to create a large protective canopy around the base of the fan on the ceiling. Cover the floor below with a drop cloth. -
Mask the motor:
Tape off any vents on the motor housing to prevent paint from getting inside the mechanics. If there is a downrod ball joint, tape that off carefully to ensure the fan can still wobble freely without cracking the paint later. -
Set up a spray booth:
Arrange your blades and brackets on a large piece of cardboard or a drop cloth outside or in a well-ventilated garage. Elevate the blades on small cups so the edges usually don’t stick to the ground. -
Apply the primer:
Spray a light, even coat of bonding primer onto the blades, brackets, and the masked-off motor housing. Keep the can moving to avoid drips. I prefer to wait about 45 minutes before judging if a second light coat is needed for dark original finishes. -
Paint the first coat:
Once the primer is fully dry, apply the first coat of flat white enamel. Use long, sweeping motions, starting the spray before you hit the object and ending after you pass it. -
Flip and repeat:
For the blades, allow the top side to dry completely to the touch before flipping them over to paint the underside. Don’t rush this flip or you’ll mar the first side. -
Apply final coats:
Apply two to three thin coats of white enamel rather than one heavy coat. This prevents the ‘orange peel’ texture and ensures a smooth, factory-like finish. -
Let it cure:
This is likely the hardest part, but allow all parts to cure for at least 24 hours. The paint needs to harden so it doesn’t get scratched during reassembly.
Step 3: Reassembly
-
Remove masking:
Carefully peel away the painter’s tape and plastic sheeting from the ceiling and motor vents. -
Reattach hardware:
Screw the freshly painted metal brackets back onto the motor housing first. Ensure they are tightened securely to prevent rattling. -
Install the blades:
Attach the white blades to the brackets. Be gentle with your screwdriver to avoid chipping the fresh paint around the screw holes. -
Final balance check:
Turn the power back on and run the fan on low. If you notice any new wobbling, you may need to use a balancing kit, as paint can add uneven weight to blades.
Drip Disaster?
If you get a paint run on a blade, don’t wipe it wet! Let it dry completely, sand the drip flat with fine sandpaper, wipe clean, and respray that specific area.
Now you can enjoy a cooling breeze from a fan that perfectly complements your serene, all-white ceiling aesthetic


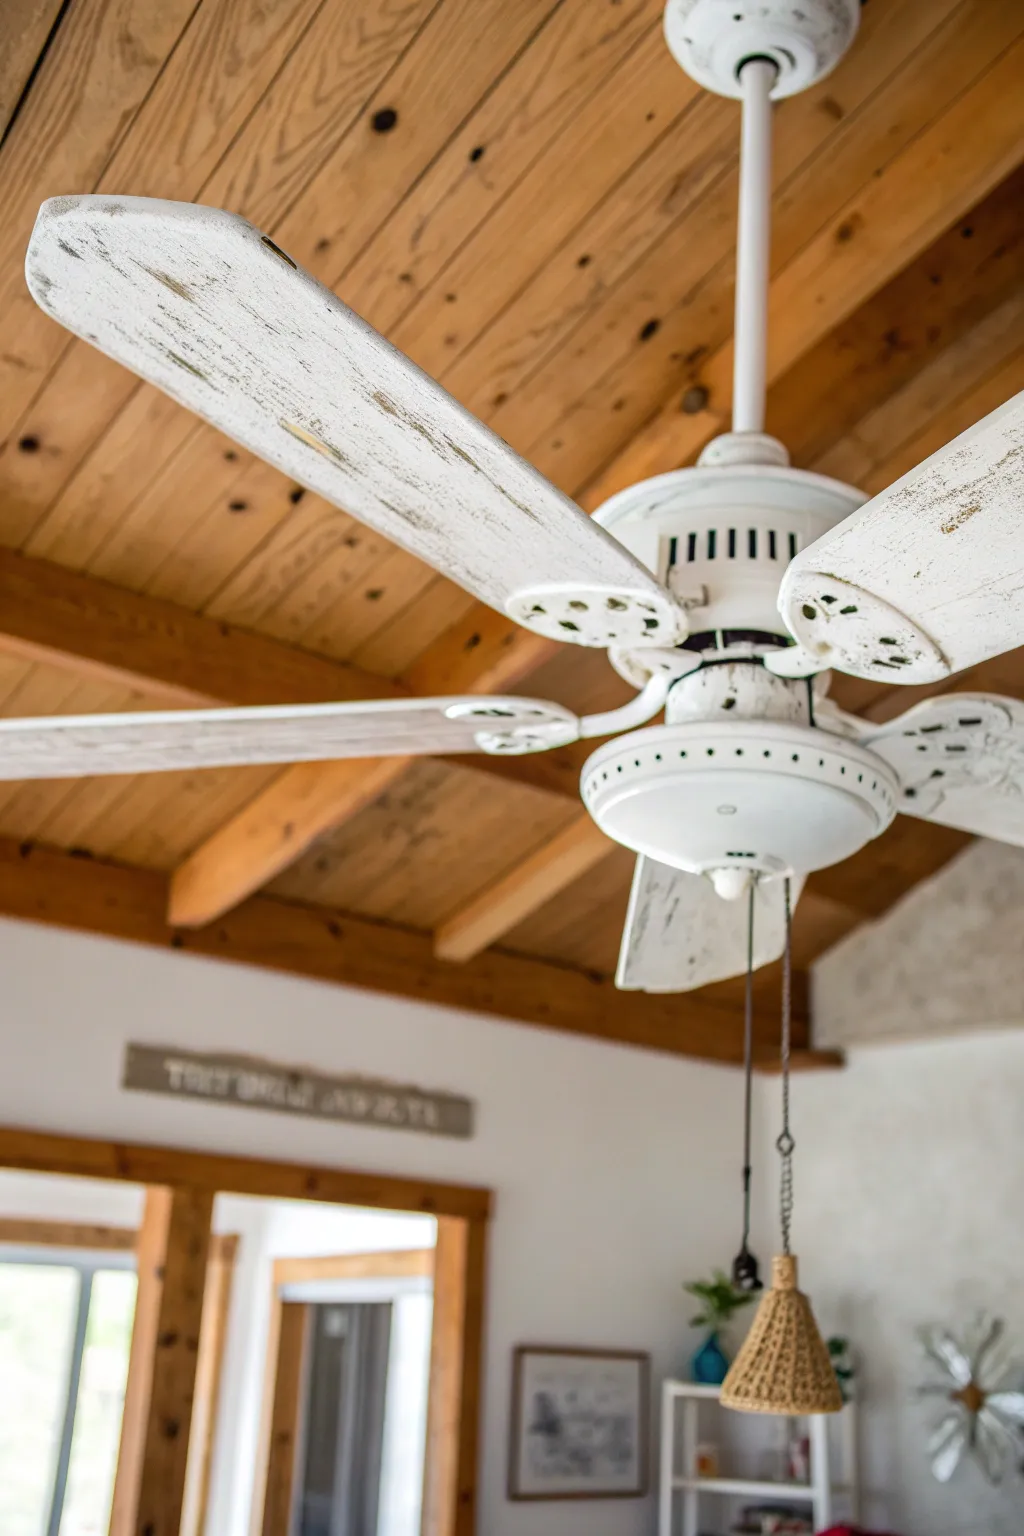
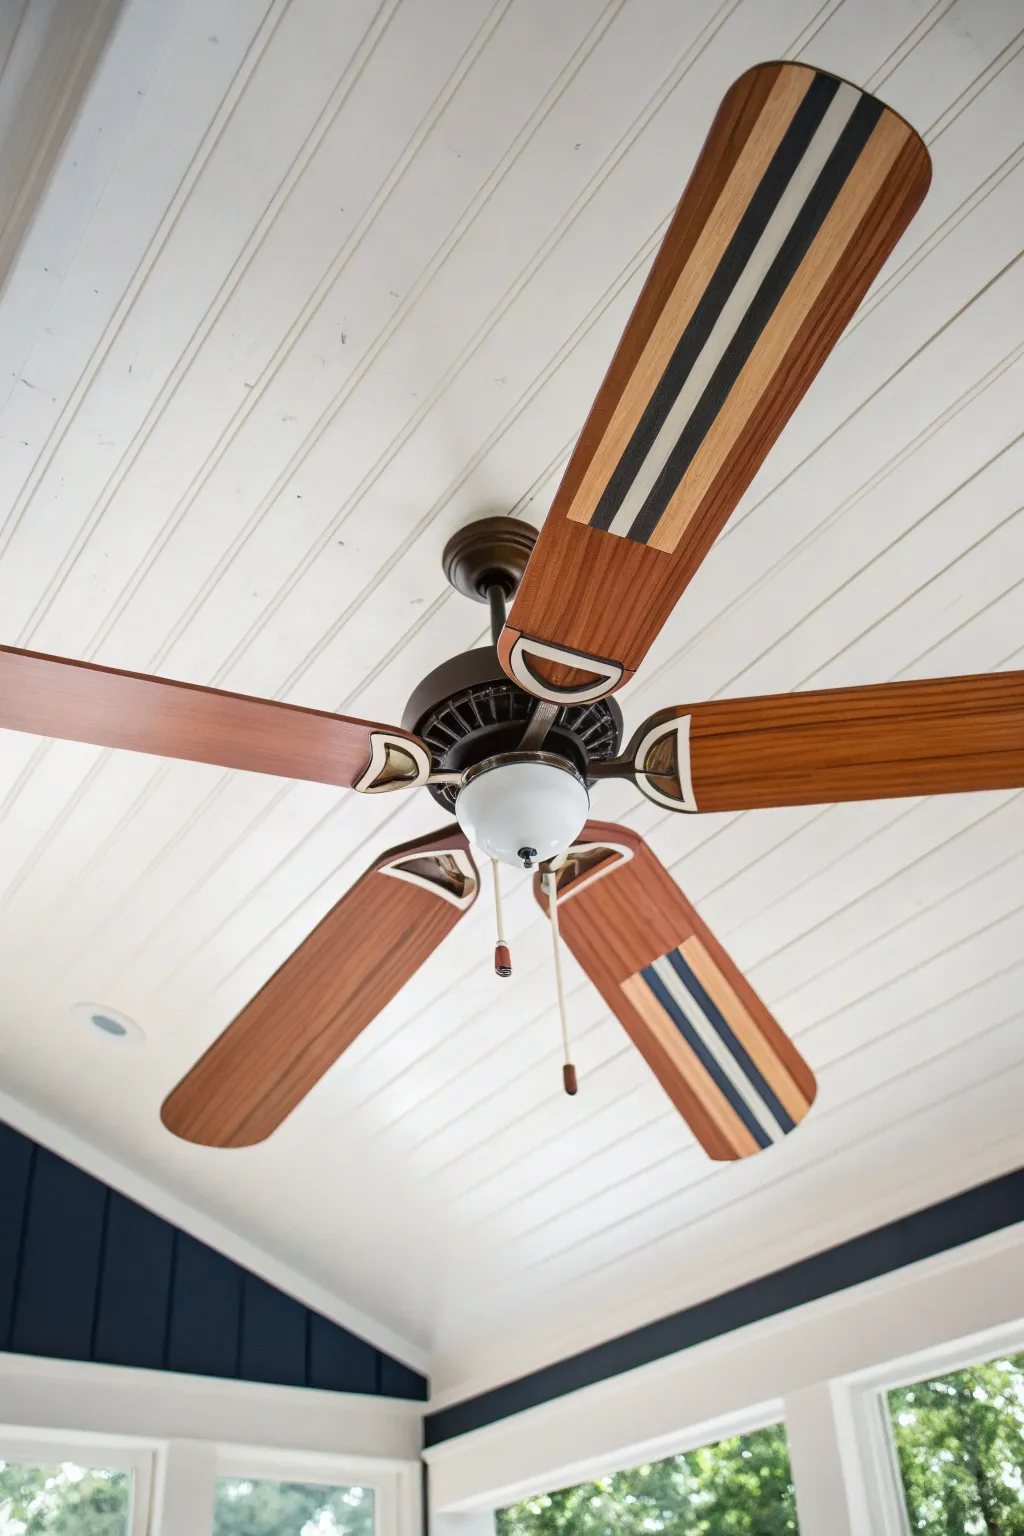
Classic Matte Black Refresh
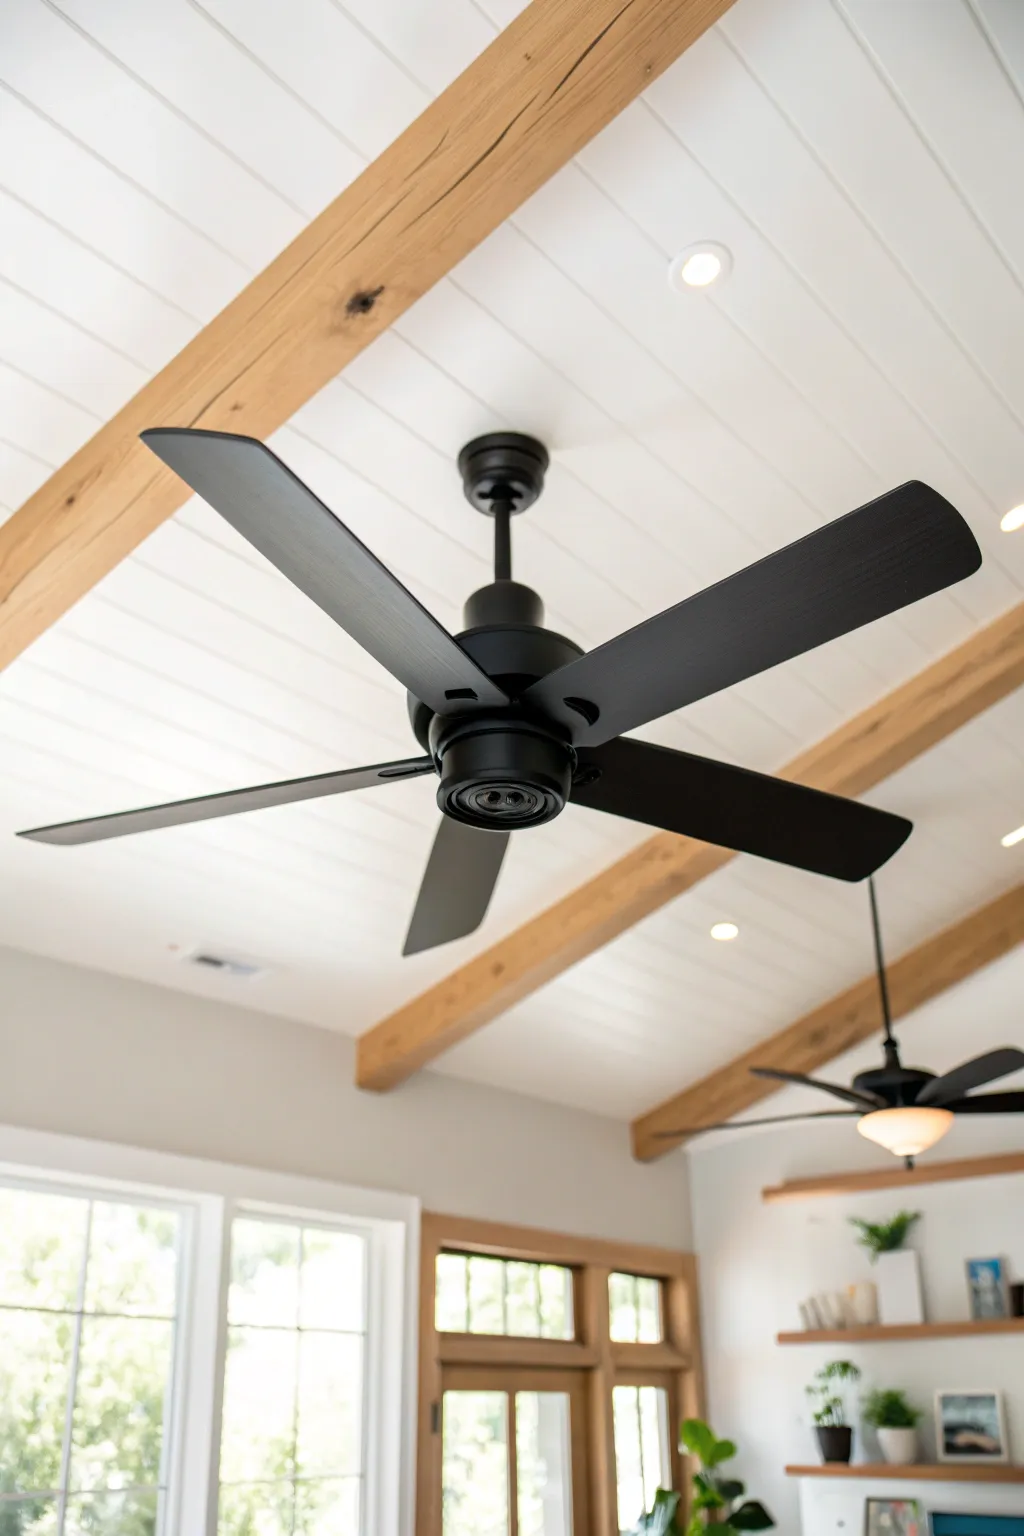
Transform a dated or mismatched ceiling fan into a sleek, modern fixture with a simple coat of paint. This project delivers a high-contrast industrial look that pairs beautifully with wood beams and shiplap ceilings.
Step-by-Step Guide
Materials
- Ceiling fan (existing)
- Screwdriver set
- Degreaser cleaner (TSP or similar)
- Fine-grit sandpaper (220-grit)
- Tack cloth or microfiber rags
- Painter’s tape
- Drop cloth or masking paper
- Matte black spray paint (enamel formula recommended)
- Spray primer (metal/plastic appropriate)
- Ladder
- Cardboard box or painting stand
Step 1: Preparation & Disassembly
-
Safety First:
Turn off the power to the ceiling fan at the circuit breaker box. Verify the power is off by flipping the wall switch before starting any work. -
Remove Blades:
Using your screwdriver, carefully detach the fan blades from the motor housing brackets. Keep all screws in a labeled baggie so they don’t get lost. -
Detach Housing:
Remove the light kit (if applicable) and the motor housing cover. You may need to leave the actual motor hanging if you aren’t comfortable rewiring, but taking down the removable shell pieces makes painting much easier. -
Clean Thoroughly:
Wipe every surface down with a strong degreaser. Ceiling fans accumulate a surprising amount of oily dust that can prevent paint adhesion. -
Sand Surfaces:
Lightly scuff all paintable surfaces—blades, brackets, and housing—with 220-grit sandpaper. You aren’t trying to strip the old color, just creating a rough texture for the new paint to grip. -
Wipe Clean:
Remove all sanding dust using a tack cloth. This step is crucial for that smooth, professional matte finish.
Smooth Operator
Hang fan blades from a clothesline using wire through the screw holes. This lets you spray both sides at once without waiting for one side to dry.
Step 2: Priming & Painting
-
Set Up Station:
Taking the project outside or into a well-ventilated garage is best. I like to prop the blades up on small blocks or cups inside a large cardboard box to paint the edges easily. -
Mask the Motor:
If you left the motor component on the ceiling, carefully wrap the entire motor and surrounding ceiling area in masking paper and plastic to protect against overspray. -
Prime the Metal:
Apply a light coat of primer to the metal brackets and housing. While many spray paints are paint-and-primer in one, a dedicated primer helps with durability on metal moving parts. -
First Coat on Blades:
Spray the first coat of matte black on the fan blades using long, sweeping motions. Start spraying off the edge of the blade and end off the other edge to avoid drips. -
First Coat on Hardware:
Spray the brackets and housing components. Ensure you get into the crevices of the blade irons without flooding them with paint. -
Dry and Assess:
Let the first coat dry for about 15-20 minutes. It might look patchy, but resist the urge to touch it up while wet. -
Second Coat:
Apply a second thin coat to all pieces. This should solidify the color. Matte paint hides imperfections well, but multiple thin coats are always better than one thick one. -
Final Inspection:
Check for any missed angles, especially the sides of the blades that will be visible from below. Apply a third light dusting if necessary. -
Cure Time:
Allow all parts to dry for at least 24 hours. The paint needs to harden completely so it doesn’t chip when you reassemble the fan.
Luxurious Upgrade
For a two-tone look like the background fan, stain the wood blades a rich walnut color instead of painting them black, keeping only the hardware matte black.
Step 3: Reassembly
-
Reattach Brackets:
Screw the painted metal irons back onto the dried fan blades. -
Install Housing:
Carefully mount the motor housing back onto the ceiling unit, removing your masking tape and paper. -
Mount Blades:
Secure the blades back to the motor. Double-check that all screws are tight to prevent wobbling or clicking sounds later. -
Restore Power:
Flip the breaker back on and test the fan at low speed to ensure it is balanced and operating smoothly.
Now you can enjoy the cool breeze from your stylish new fixture without the cost of a replacement


Farmhouse Chalky Matte Finish

Transform a dated or basic ceiling fan into a rustic centerpiece with this chalky finish technique. The distressed white layers over the original surface create a charming, weathered look that perfectly complements farmhouse decor.
Step-by-Step Tutorial
Materials
- Ceiling fan focused cleaner or degreaser
- Medium-grit sandpaper (120-150 grit)
- Painter’s tape
- Chalk-style paint (Warm White or Antique White)
- Clear matte sealer (polycrylic or wax)
- Dark antique wax or brown glaze (optional, for aging)
- Small angled paintbrush (1.5 – 2 inch)
- Chip brush (for distressing)
- Clean lint-free rags
- Screwdriver (for dismantling)
Step 1: Preparation
-
Safety First:
Before touching the fan, ensure the wall switch is off and check the breaker box to cut power to the fixture completely. -
Dismantle the Fixture:
Using your screwdriver, carefully remove the fan blades from their brackets. It’s much easier to achieve a detailed finish on a worktable than overhead. -
Remove Brackets:
Unscrew the metal blade irons (brackets) from the motor housing if possible, as these will need to be painted separately. -
Deep Clean:
Ceiling fans accumulate greasy dust. Scrub every piece down thoroughly with a degreaser and a rag. Paint won’t adhere to years of ceiling dust. -
Protect the Motor:
If painting the motor housing while it hangs, tape off the ceiling medallion and any vents on the motor to prevent paint from clogging the mechanics.
Paint Peeling?
If paint peels off the metal brackets immediately, the surface wasn’t prepped enough. Sand the area down to bare metal and use a specifically formulated metal primer before re-applying the chalk paint.
Step 2: Applying the Finish
-
Initial Scuff Sanding:
Lightly sand the blades and metal housing with medium-grit sandpaper to give the slick factory finish some ‘tooth’ for the chalk paint to grab. -
First Coat Application:
Load your angled brush with chalk paint. Apply a thin, even coat to the blades. Don’t worry about perfect coverage here; a little transparency helps the distressed look later. -
Painting the Hardware:
While the blades dry, paint the metal brackets and the hanging motor housing. dab the brush into crevices to ensure the white covers darker metal tones. -
Dry Time:
Allow the first coat to dry completely, which usually takes about 30 to 60 minutes depending on your humidity. -
Second Coat for Texture:
Apply a second, slightly thicker coat. Instead of long smooth strokes, use shorter, cross-hatch strokes to build up a bit of texture that mimics old wood. -
Distressing the Edges:
Once the paint is dry to the touch but not fully cured, use your sandpaper or a wet rag to gently rub away paint along the edges of the blades and raised details on the housing. -
Creating the ‘Chipped’ Look:
For the heavy chipping seen in the photo, use a coarser sandpaper on random flat spots of the blades, revealing the original color underneath.
Step 3: Antiquing and Assembly
-
Apply Dark Wax (Optional):
To get that dirty, aged effect in the crevices, dip a rag into dark antique wax. Rub it over the painted surface. -
Wipe Back Excess:
Immediately wipe the dark wax off with a clean cloth, leaving the darkness only in the grooves and brush strokes for depth. -
Sealing the Blades:
Apply a coat of clear matte sealer or clear wax to the blades. This is crucial to prevent dust from sticking permanently to the chalky texture. -
Seal the Motor Housing:
Don’t forget to seal the metal parts as well, ensuring a consistent sheen across the entire fan. -
Reassembly:
Once everything is fully cured (give it 24 hours if possible), screw the blade irons back onto the motor and reattach the blades. -
Final Check:
Turn the power back on and test the fan, ensuring it’s balanced and the paint hasn’t affected its movement.
Dry Brush Technique
To add extreme weathering, dip a dry chip brush lightly into grey or brown paint, offload most on a paper towel, and whisk it over the dried white paint to simulate surface dirt and age.
Enjoy the breezy, rustic charm your newly updated fan brings to the room


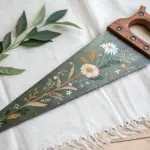
Solid Color Pop on the Blades
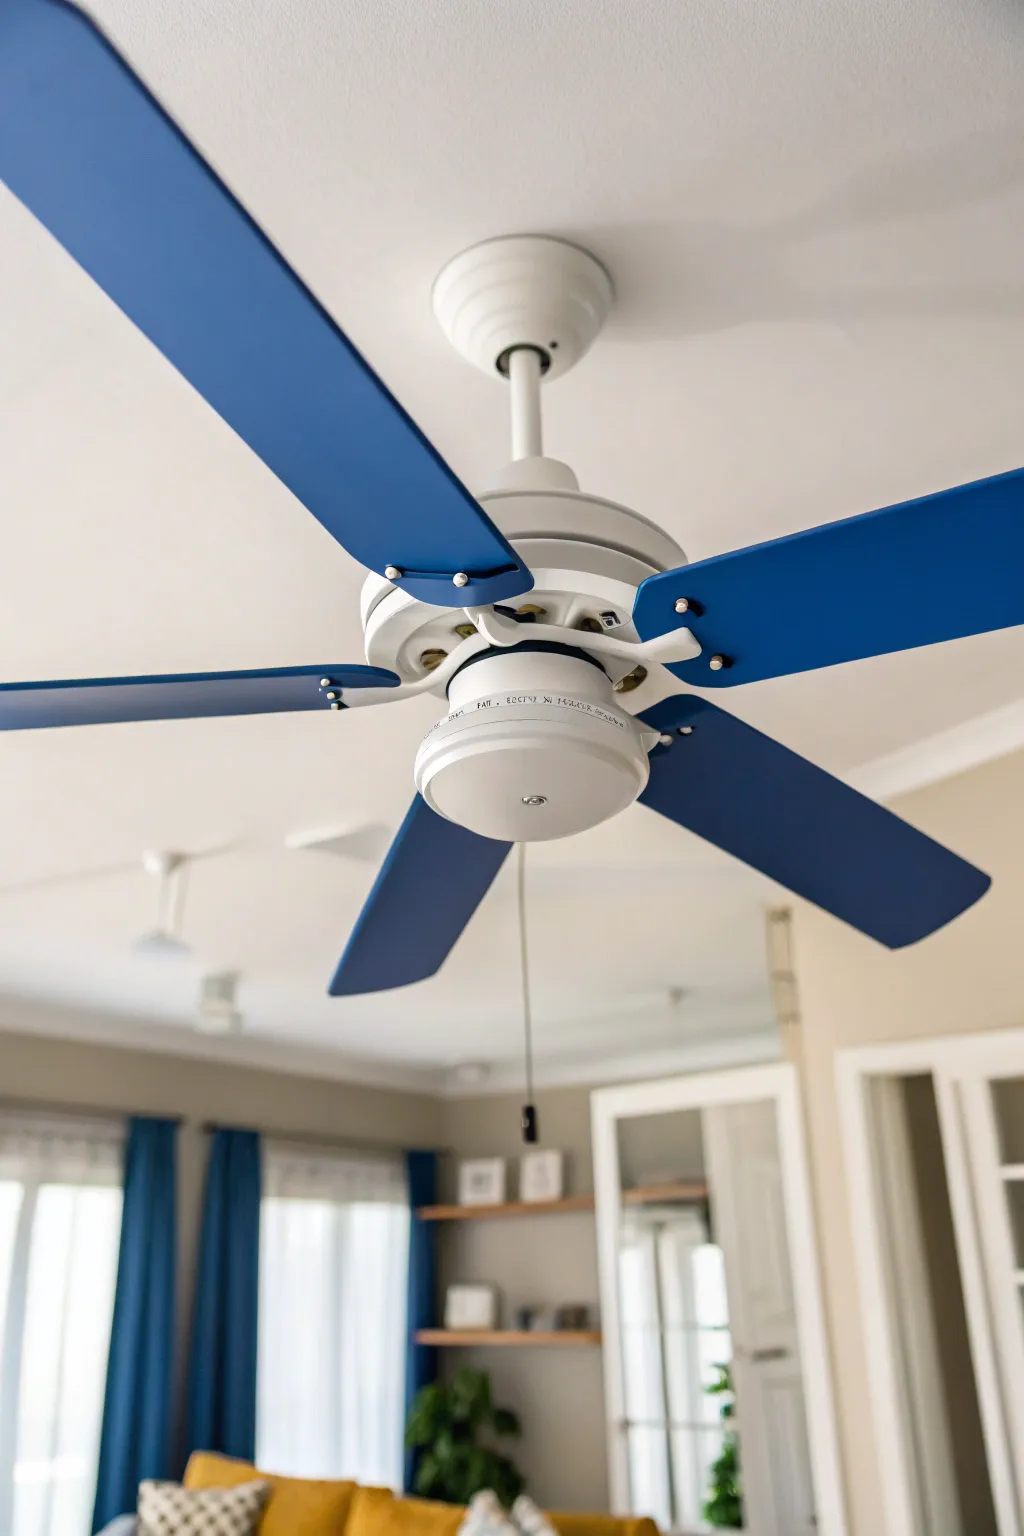

Transform a standard white ceiling fan into a striking modern fixture with just a splash of color. This project uses a bold, solid blue on the blades to create a clean, crisp pop that perfectly coordinates with matching accents in the room.
Step-by-Step Guide
Materials
- Screwdriver (Phillips head usually)
- Mild degreaser or soapy water
- Cleaning cloths
- Fine-grit sandpaper (220-grit)
- Painter’s tape
- High-quality spray primer (bonding primer recommended)
- Matte or Satin finish spray paint (Cobalt Blue or similar)
- Clear protective topcoat (spray)
- Drop cloths or old sheets
- Stepladder
- Facial mask for sanding/painting
Step 1: Preparation & Removal
-
Safety check:
Before doing anything else, turn off the power to the fan at the breaker box to ensure total safety while working near the fixture. -
Remove the blades:
Using your stepladder and screwdriver, carefully unscrew the brackets holding the fan blades to the motor housing. Keep all screws in a ziplock bag so nothing gets lost. -
Detach blade irons:
Most fan blades are attached to metal brackets (blade irons). Unscrew the blades from these metal brackets so you are left with just the wooden or composite paddles. -
Deep clean:
Ceiling fans accumulate a surprising amount of greasy dust. Scrub the blades thoroughly with a mild degreaser or soapy water and a cloth, then let them dry completely. -
Sand for adhesion:
Lightly scuff the surface of the blades with 220-grit sandpaper. You aren’t trying to strip the old finish, just creating a ‘tooth’ for the new paint to grab onto. -
Wipe down:
Use a tack cloth or a slightly damp rag to remove all sanding dust. Any leftover dust will create bumps in your final finish.
Hardware Hack
Make a cardboard template of the blade holes before painting. Poke skewers through the cardboard and slide blades onto them to spray all sides at once without flipping.
Step 2: Priming & Painting
-
Set up your spray zone:
Take the blades outdoors or to a very well-ventilated garage. Lay down drop cloths and prop the blades up on small blocks or boxes so the edges don’t stick to the ground. -
Apply primer:
Shake your bonding primer can vigorously. Apply a thin, even coat to the top side of the blades. I find that starting with the edges first ensures better coverage later. -
Flip and prime:
Once the first side is dry to the touch (check your can’s instructions, usually 30-60 minutes), flip the blades and prime the reverse side. -
First color coat:
Shake your blue spray paint can for at least a minute. Apply the first coat using long, sweeping motions, starting and ending the spray off the edge of the blade to prevent drips. -
Technique check:
Maintain a distance of about 8-10 inches from the surface. Multiple thin coats are far superior to one heavy coat, which will almost certainly drip. -
Dry and repeat:
Allow the first coat to dry completely. Apply a second coat of blue to deepen the color and cover any white spots showing through. -
Reverse side:
Don’t forget the other side! Once the tops are cured enough to handle safely, flip them over and repeat the two-coat painting process on the bottom instructions. -
Seal the deal:
After the blue paint has cured for 24 hours (or as directed), apply a clear matte or satin protective topcoat. This protects against dust buildup and makes future cleaning easier.
Drip Disaster?
If you get a paint run, don’t wipe it wet! Let it dry completely, adhere a small piece of fine sandpaper to a block, sand it flush, and re-spray that area lightly.
Step 3: Reassembly
-
Inspect the hardware:
While the blades are drying, wipe down the metal blade irons and the main motor housing hanging from the ceiling to ensure they are bright white and clean. -
Reattach brackets:
Screw the fully cured blue blades back onto the metal blade irons. Hand-tighten the screws first, then secure them firmly with the screwdriver. -
Mount the blades:
Climb back up the ladder and reattach the blade assemblies to the motor housing. Double-check that all connections are tight to prevent wobbling. -
Power up:
Turn the breaker back on, flip the switch, and enjoy the cool breeze from your custom-colored fan.
Now you have a custom fixture that ties your room’s color palette together effortlessly
BRUSH GUIDE
The Right Brush for Every Stroke
From clean lines to bold texture — master brush choice, stroke control, and essential techniques.
Explore the Full Guide
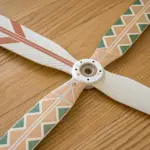
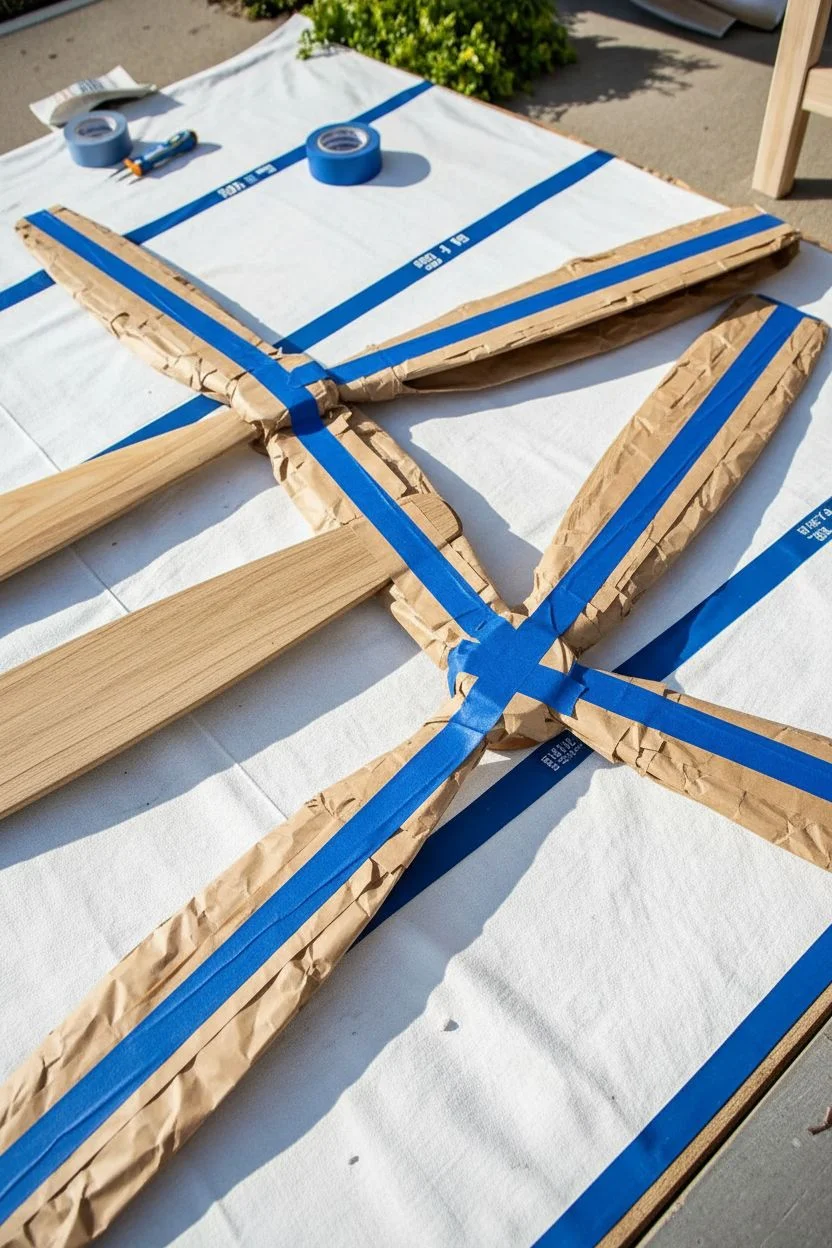
Crisp Pinstripes with Tape Masking
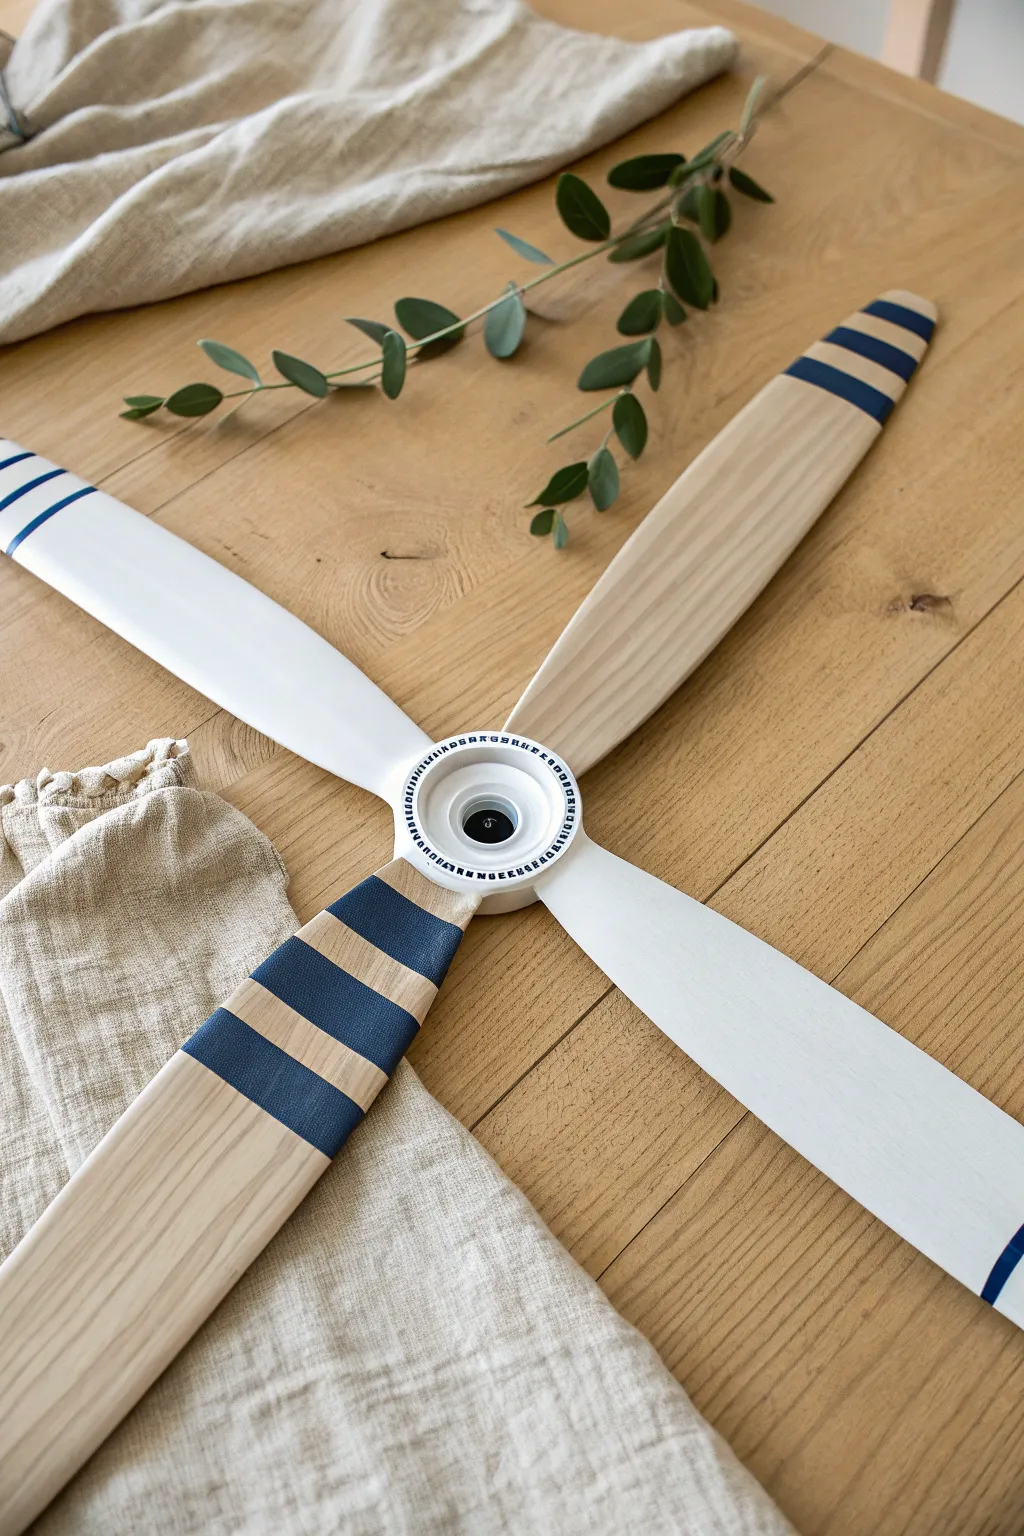
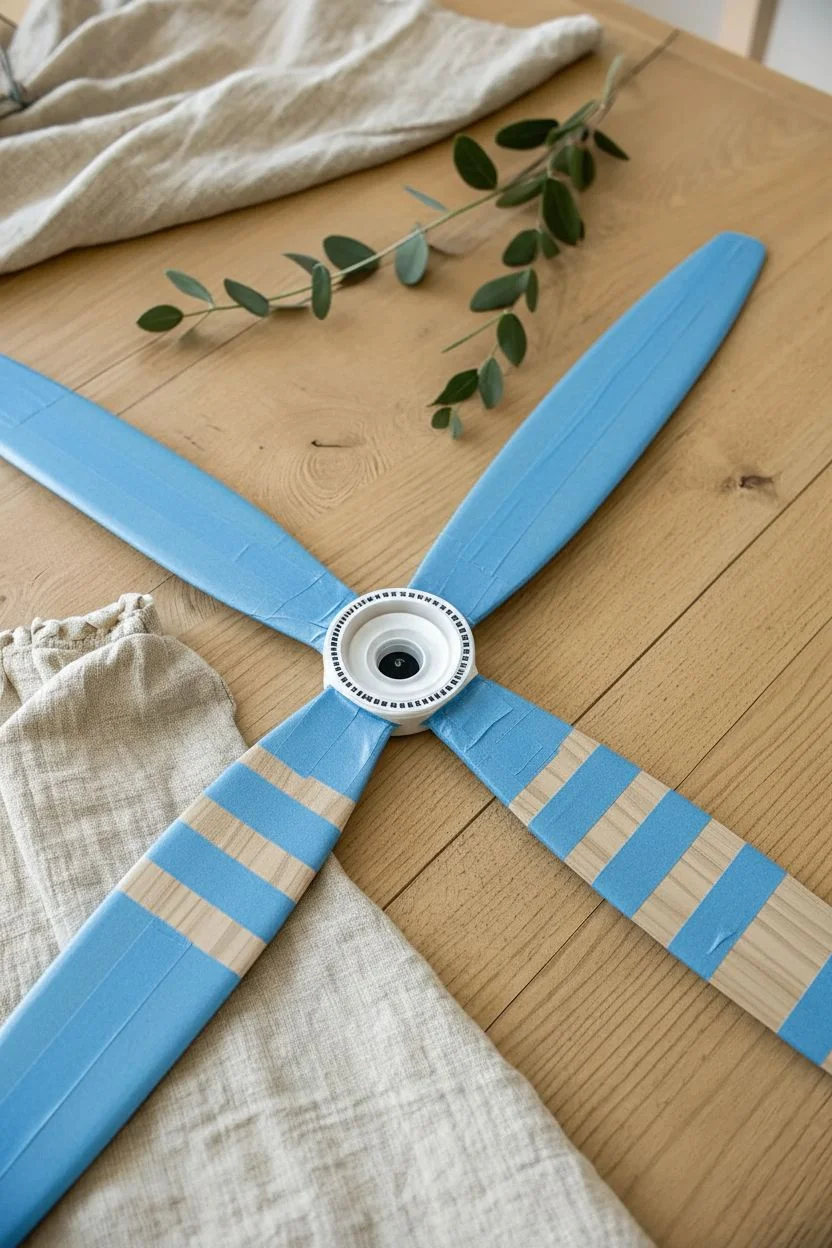
Transform plain fan blades into a statement piece with this crisp, nautical-inspired design. By combining natural wood tones with bright white paint and navy stripes, you’ll create a perfectly balanced look that feels both coastal and modern.
Step-by-Step Tutorial
Materials
- Unfinished wooden fan blades or propeller decor
- Fine-grit sandpaper (180 or 220 grit)
- Painter’s tape (various widths recommended)
- White acrylic or latex paint (matte finish)
- Navy blue acrylic or latex paint
- Clear matte sealer or polyurethane
- Flat paintbrushes (1-inch and 2-inch)
- Ruler or measuring tape
- Pencil
- Tack cloth or clean rag
Step 1: Preparation & Planning
-
Sand the surfaces:
Begin by lightly sanding all wooden blades to ensure a smooth texture. This helps the paint adhere better and keeps the natural wood sections looking polished. Wipe away all dust thoroughly with a tack cloth. -
Map out your design:
Decide which two opposing blades will be painted full white and which two will remain natural wood. Mark them lightly on the back with a pencil so you don’t lose track of your pattern.
Bleeding Lines?
If paint bled under the tape, wait for it to dry completely. Then, gently scrape the excess away with an X-Acto knife or use a small brush to touch up the base color.
Step 2: Painting the White Blades
-
Apply base coats:
On the two designated ‘white’ blades, apply a smooth, even coat of white matte paint. Brush in long strokes from the center hub to the tip to minimize texture. -
Review and recoat:
Allow the first coat to dry completely. If the wood grain is showing through more than you’d like, add a second coat for solid, opaque coverage. -
Mask the tips:
Once the white paint is fully cured (give it at least 2-4 hours), measure about 2-3 inches from the tip. Apply two thin strips of painter’s tape to create the negative space for your pinstripes. Press the edges down firmly. -
Paint the tip stripes:
Using a smaller flat brush, carefully paint the spaces between the tape with navy blue paint. Use a fairly dry brush to prevent the paint from bleeding under the tape edges.
Step 3: Striping the Natural Blades
-
Measure the hub stripes:
On the two natural wood blades, you are creating thick stripes near the center hub. Measure about 4 inches out from the center hole and mark your starting point. -
Apply tape masks:
Place strips of painter’s tape across the width of the blade to block off the sections that should remain wood. You want to leave two wide gaps (about 1.5 inches each) exposed for the blue paint. I like to use a ruler to ensure these lines are perfectly perpendicular to the blade’s edge. -
Seal the tape edges:
A great trick is to brush a tiny amount of clear matte sealer over the edges of your tape before painting blue. This creates a barrier that ensures razor-sharp lines on the bare wood. -
Paint the heavy stripes:
Fill in the exposed wood sections with your navy blue paint. You may need two coats here to get a rich, deep color against the wood grain. -
Paint the tip detail:
Mirror the design from the white blades by adding a single thin blue stripe near the tip of these wooden blades. Use tape just as before to ensure it matches the other set.
Add Subtle Age
For a vintage aviation look, lightly sand the painted stripes with 220-grit sandpaper after they dry to distress them and reveal bits of wood or white beneath.
Step 4: Finishing and Assembly
-
Remove the tape:
While the blue paint is still slightly tacky (not fully dry), carefully peel back your painter’s tape at a 45-degree angle. This prevents the dried paint from cracking or lifting. -
Detail the hub:
If your center hub piece is separate, you can add small dashed lines around the rim using a fine-point paintbrush or even a paint pen for precision. -
Seal the protect:
Once all paint is totally dry (overnight is best), apply a coat of clear matte sealer over the entire project. This protects the raw wood and equalizes the sheen across the different painted sections. -
Final inspection:
Check for any stray paint marks or rough spots. You can gently scrape away tiny errors with a fingernail or touch them up with a small brush before the sealer fully cures.
Mount your finished blades to the fan motor or hang the propeller as wall art to enjoy your custom craftsmanship
Bold Diagonal Stripes for Instant Energy
Transform a standard wooden ceiling fan into a modern statement piece with high-contrast diagonal stripes. This project adds a dynamic, sporty touch that looks especially striking when the fan is in motion.
Detailed Instructions
Materials
- Ceiling fan blades (removed from unit)
- Screwdriver
- Degreaser or mild soap solution
- Fine-grit sandpaper (220-grit)
- Painter’s tape (high quality)
- Ruler or measuring tape
- Pencil
- Primer (spray or brush-on)
- Black acrylic or enamel paint
- Cream or off-white acrylic or enamel paint
- Clear protective topcoat (matte or satin)
- Small foam roller or high-quality synthetic brush
- Drop cloth
Step 1: Preparation and Cleaning
-
Remove blades:
Turn off the power to the fan at the breaker. Carefully unscrew the blade brackets from the motor housing using your screwdriver, then detach the wooden blades from the metal brackets. Keep all screws in a labeled baggie so they don’t get lost. -
Clean surfaces:
Wipe down both sides of every blade thoroughly with a degreaser or soapy water to remove years of dust and oily buildup. This step is crucial for paint adhesion. -
Light sanding:
Once dry, lightly scuff the surface of the blades with 220-grit sandpaper. You aren’t trying to remove the existing finish completely, just creating a ‘tooth’ for the new paint to grab onto. -
Wipe away dust:
Use a tack cloth or a damp microfiber rag to remove every speck of sanding dust before proceeding.
Step 2: Designing the Stripes
-
Decide on placement:
Determine which blades will get the stripe treatment. In the reference image, the pattern alternates, appearing on every other blade, which creates a balanced look. -
Mark the angle:
On your chosen blades, measure about halfway down the length. Use a ruler to draw a faint pencil line at a sharp diagonal angle across the blade width. -
Tape the boundaries:
Apply painter’s tape along your pencil line to mask off the wood section you want to remain unpainted. Press the tape edge down firmly with your fingernail or a credit card to prevent bleed-under. -
Protect the wood:
Cover the remaining wood section (the part attaching to the motor) with paper or plastic and tape it down securely so no stray paint lands on the natural finish.
Precision Pro Tip
Use automotive detailing tape (fineline tape) instead of standard painter’s tape for the stripes. It’s more flexible and creates significantly sharper lines on curved wood surfaces.
Step 3: Painting the Pattern
-
Prime the tips:
Apply a thin coat of primer to the exposed area of the blade. This ensures your light cream colors will pop against the dark wood background. Let the primer dry completely according to the can’s instructions. -
Apply base color:
Paint the entire primed tip area with your dark black paint first. Alternatively, if you prefer less taping later, paint the whole tip white/cream first. For this specific look, I prefer painting the black base first, then adding the light stripes on top. -
Let it cure:
Allow the base coat to dry fully—wait overnight if possible. Applying tape to tacky paint will ruin your finish. -
Tape the stripe pattern:
Once the black base is rock hard, apply parallel strips of painter’s tape to mark out where the black stripes should remain. The gaps between the tape will become your cream stripes. -
Seal the tape edges:
Lightly brush a tiny amount of the base color (black) over the tape edges. This seals the tape so the next color won’t bleed under, ensuring razor-sharp lines. -
Paint the cream stripes:
Apply your cream or off-white paint in the gaps between the tape. Use multiple thin coats rather than one thick gloppy one. -
Reveal the design:
Carefully peel back the tape while the final coat of paint is still slightly wet. Pull the tape away at a 45-degree angle for the cleanest edge.
Uneven Wobbling?
If the fan wobbles after reinstalling, the paint might have added uneven weight. Use a fan balancing kit (small adhesive weights) to correct any rotation issues.
Step 4: Finishing Up
-
Seal the work:
Once the stripes are fully dry, apply a clear protective topcoat (matte or satin) over the painted section—or the entire blade for a uniform sheen—to protect against dust friction. -
Reattach hardware:
Screw the blades back onto their metal brackets, ensuring they are tight. -
Reinstall blades:
Mount the brackets back onto the ceiling fan motor housing. Double-check that all screws are secure to prevent wobbling.
Flip the switch and enjoy the optical illusion your new custom blades create

PENCIL GUIDE
Understanding Pencil Grades from H to B
From first sketch to finished drawing — learn pencil grades, line control, and shading techniques.
Explore the Full Guide
Dipped Tips for a Color-Block Effect
Give your ceiling fan a modern, custom update with this stylish dipped-tip effect. By combining natural wood tones with crisp white paint, you can achieve a sophisticated two-tone look that adds personality without overwhelming your space.
Step-by-Step Guide
Materials
- Ceiling fan blades (disassembled)
- Painter’s tape (high quality)
- Sandpaper (220-grit)
- Tack cloth or microfiber rag
- Primer spray paint (white)
- Enamel spray paint (white or color of choice)
- Clear polyurethane sealer (matte or satin)
- Drop cloth or cardboard
- Measuring tape
- Pencil
Step 1: Preparation & Masking
-
Clean the surfaces:
Begin by removing the fan blades from the motor housing. Wipe them down thoroughly with a damp cloth to remove years of accumulated dust and grease, then let them dry completely. -
Light sanding:
Scuff the surface of the blades gently with 220-grit sandpaper. You aren’t trying to strip the finish entirely, but rather creating a ‘tooth’ for the new paint to adhere to. -
Remove dust:
Wipe away all sanding residue using a tack cloth or a clean microfiber rag ensuring a smooth base. -
Measure the dip:
Decide how far you want the color block to extend. A good rule of thumb is to paint either the outer third or the inner third. Measure from the tip towards the center and mark a small dot with a pencil on each blade. -
Apply tape:
Place a strip of painter’s tape across the blade at your mark. Ensure the tape is perfectly straight and press the edge down firmly with your fingernail or a credit card to prevent paint bleed. -
Protect the wood:
Wrap the rest of the wood section (the part you want to keep natural) with paper or plastic, taping it securely to your original tape line so no overspray lands on the wood grain.
Step 2: Painting & Finishing
-
Set up the workspace:
Lay down a drop cloth in a well-ventilated area, preferably outdoors or in a garage, to catch overspray. -
Prime the tips:
Spray a light coat of primer onto the exposed section of the blades. Keep the can about 8-10 inches away and use sweeping motions to avoid drips. -
Let primer dry:
Allow the primer to dry according to the can’s instructions, usually about 30 minutes to an hour. -
Apply first color coat:
Apply your white enamel spray paint over the primer. I find that doing multiple thin coats yields a much smoother finish than one heavy coat. -
Apply second coat:
Once the first coat is tacky dry, apply a second coat to ensure full coverage and opacity, hiding the wood grain underneath. -
Remove tape immediately:
This is crucial: carefully peel back the painter’s tape while the final coat of paint is still slightly wet. This helps ensure a crisp, clean line without peeling up dried paint chips. -
Cure time:
Let the paint cure fully for at least 24 hours before handling the blades again. -
Seal the deal:
For durability, especially on the leading edges of the fan blades, spray a light coat of clear polyurethane sealer over the entire blade (optional, but recommended for longevity). -
Reassembly:
Once everything is bone dry, reattach the blades to the fan housing brackets and reinstall your newly updated fan.
Bleeding Lines?
If paint bled under the tape, wait for it to dry fully. Then, use a small craft knife to gently scrape away the excess paint, or use a tiny artist brush to touch up the line.
Smooth Operator
Between paint coats, very lightly sand with a brown paper bag instead of sandpaper. The texture is just rough enough to smooth out nibs without scratching the fresh paint.
Now reattach your blades and enjoy the dizzying display of your custom handiwork
Geometric Triangles for a Modern Pattern
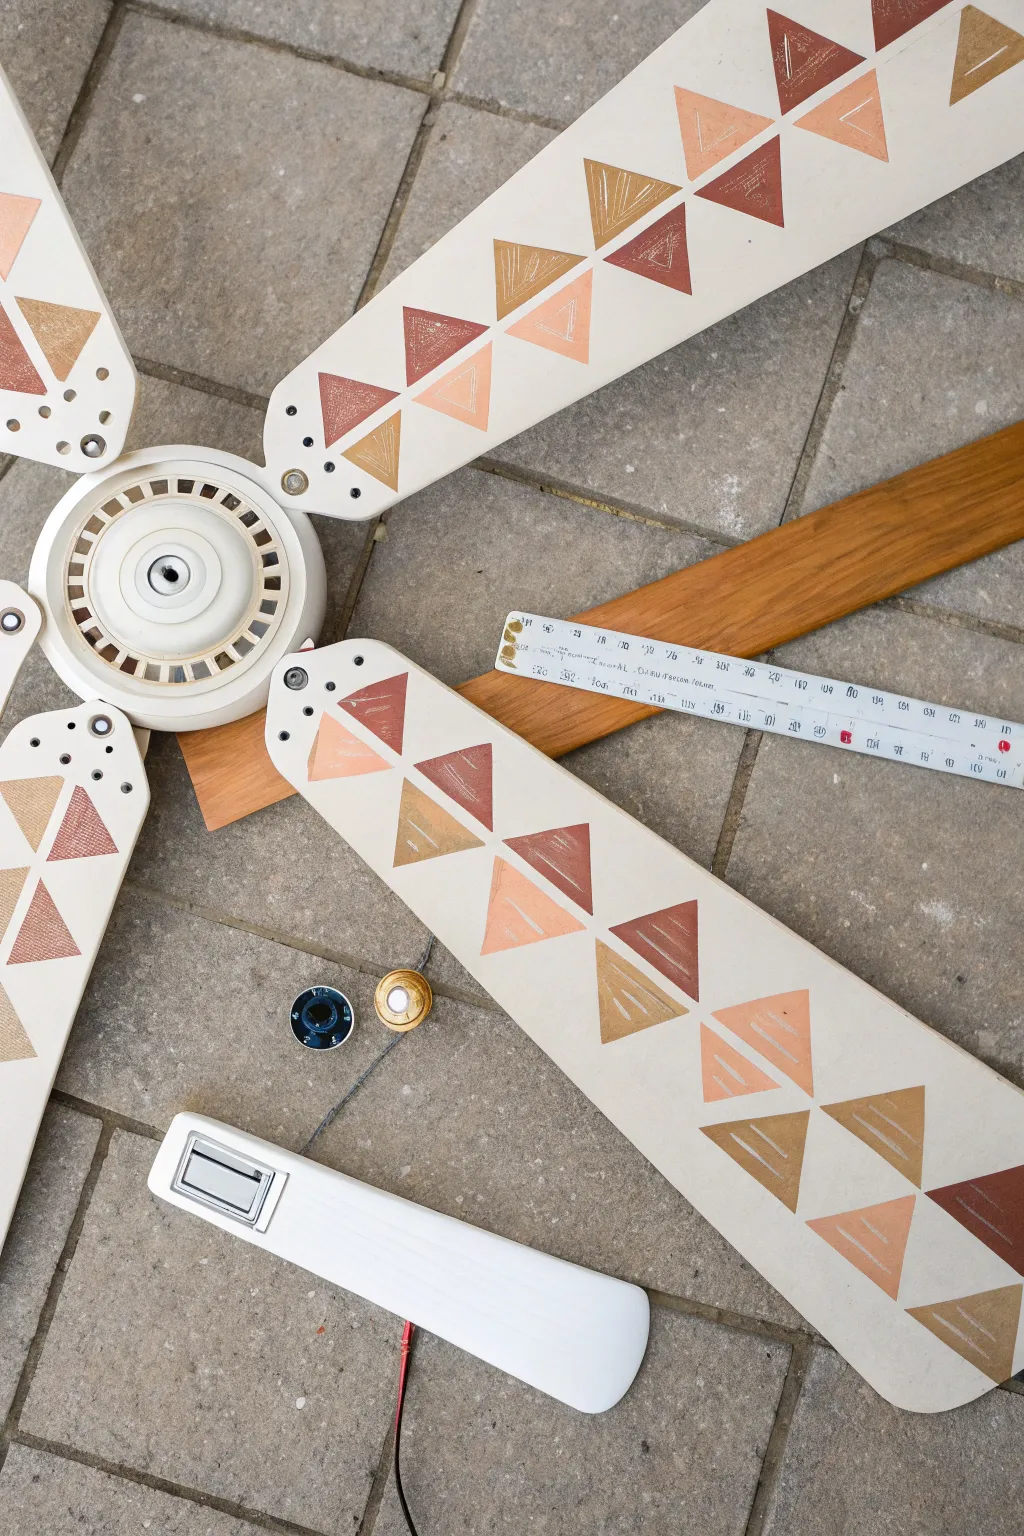
Transform a plain ceiling fan into a piece of modern art with this stylish geometric makeover. By using a warm palette of metallic and earthy tones in a repeating triangle pattern, you’ll create a custom look that adds character to any room.
How-To Guide
Materials
- Ceiling fan blades (removed from unit)
- Sanding sponge or fine-grit sandpaper (220-grit)
- Degreaser or mild soap and water
- Primer (spray or brush-on)
- Off-white or cream acrylic paint (base coat)
- Acrylic paints in 4 shades: Gold, Copper, Rose Gold, Bronze
- Painter’s tape or stencil tape
- Small flat artist brush
- Clear sealant spray (polyurethane or acrylic)
- Ruler or tape measure
- Pencil
Step 1: Preparation and Base Coat
-
Remove Blades:
Carefully unscrew the fan blades from the fan motor housing and take off any metal brackets attached to the blades themselves. Keep all screws in a labeled ziplock bag so you don’t lose the hardware. -
Clean Surfaces:
Wipe down each blade thoroughly with a degreaser or soapy water to remove years of dust and oily buildup. This step is crucial for paint adhesion. -
Light Sanding:
Once dry, gently scuff the surface of the blades using fine-grit sandpaper or a sanding sponge. You just want to remove the sheen, not strip the finish completely. -
Remove Dust:
Wipe away all sanding recoil using a tack cloth or a slightly damp microfiber rag to ensure a perfectly smooth surface. -
Prime the Blades:
Apply an even coat of primer to the blades. If the original blades are dark wood like the one shown in the photo, you might need two coats to prevent bleed-through. -
Apply Base Color:
Paint the blades with your chosen off-white or cream base color. Use smooth long strokes to minimize brush marks, or use spray paint for a factory-finish look. Let this dry completely overnight.
Step 2: Creating the Geometric Pattern
-
Mark Center Line:
Using a ruler and a pencil, lightly mark a centerline longitudinally down the entire length of the blade to help align your pattern. -
Draft the Triangles:
Starting near the bracket end, draw a series of alternating triangles along the blade. The points of the triangles should meet at your centerline. Don’t worry if the pencil lines are faint; they just need to be guides. -
Tape Off Sections:
Tape off the borders of the first set of triangles you intend to paint. Since the triangles touch, you will have to paint in stages—painting every other triangle first—so the wet paint doesn’t smear. -
Paint First Color:
Load your flat brush with the darkest bronze shade and fill in the corresponding triangles according to your planned pattern. I find painting the edges first helps keep lines crisp. -
Apply Metals:
While waiting for the first sections to dry slightly, paint non-adjacent triangles with your gold and copper metallic paints. Ensure good coverage, as metallics can sometimes be semi-transparent. -
Add Accent Color:
Paint the remaining triangles in the rose gold or soft pink shade to soften the look. -
Remove Tape:
Carefully peel back the tape while the paint is still slightly tacky to avoid pulling up dried chips of paint. -
Fill Remaining Shapes:
Once the first batch of triangles is fully dry to the touch, tape off the remaining empty triangles and fill them with your alternating colors until the pattern runs the full length of the blade. -
Touch Ups:
Check for any uneven edges. Use a very fine detail brush and your base color to clean up any spots where the metallic paint might have bled under the tape.
Stamp It Out
To save time on measuring, cut a triangle stamp from a kitchen sponge. Use this to stamp the basic shapes, then fill them in with a brush for a solid, opaque finish.
Step 3: Finishing
-
Seal the Blades:
To protect your design from dust and centrifugal force, spray a clear topcoat over the entire blade. A satin finish works beautifully with the metallic paints. -
Reassemble:
Once the sealer has cured for at least 24 hours, reattach the metal brackets and screw the blades back onto the fan motor housing.
Uneven Edges?
If paint bleeds under the tape, wait for it to dry fully. Then, gently scrape the excess away with an X-Acto knife or paint over the mistake with the base color.
Now you have a stunning, customized focal point ready to cool your room in style


Splatter-Paint Blades for Studio Style
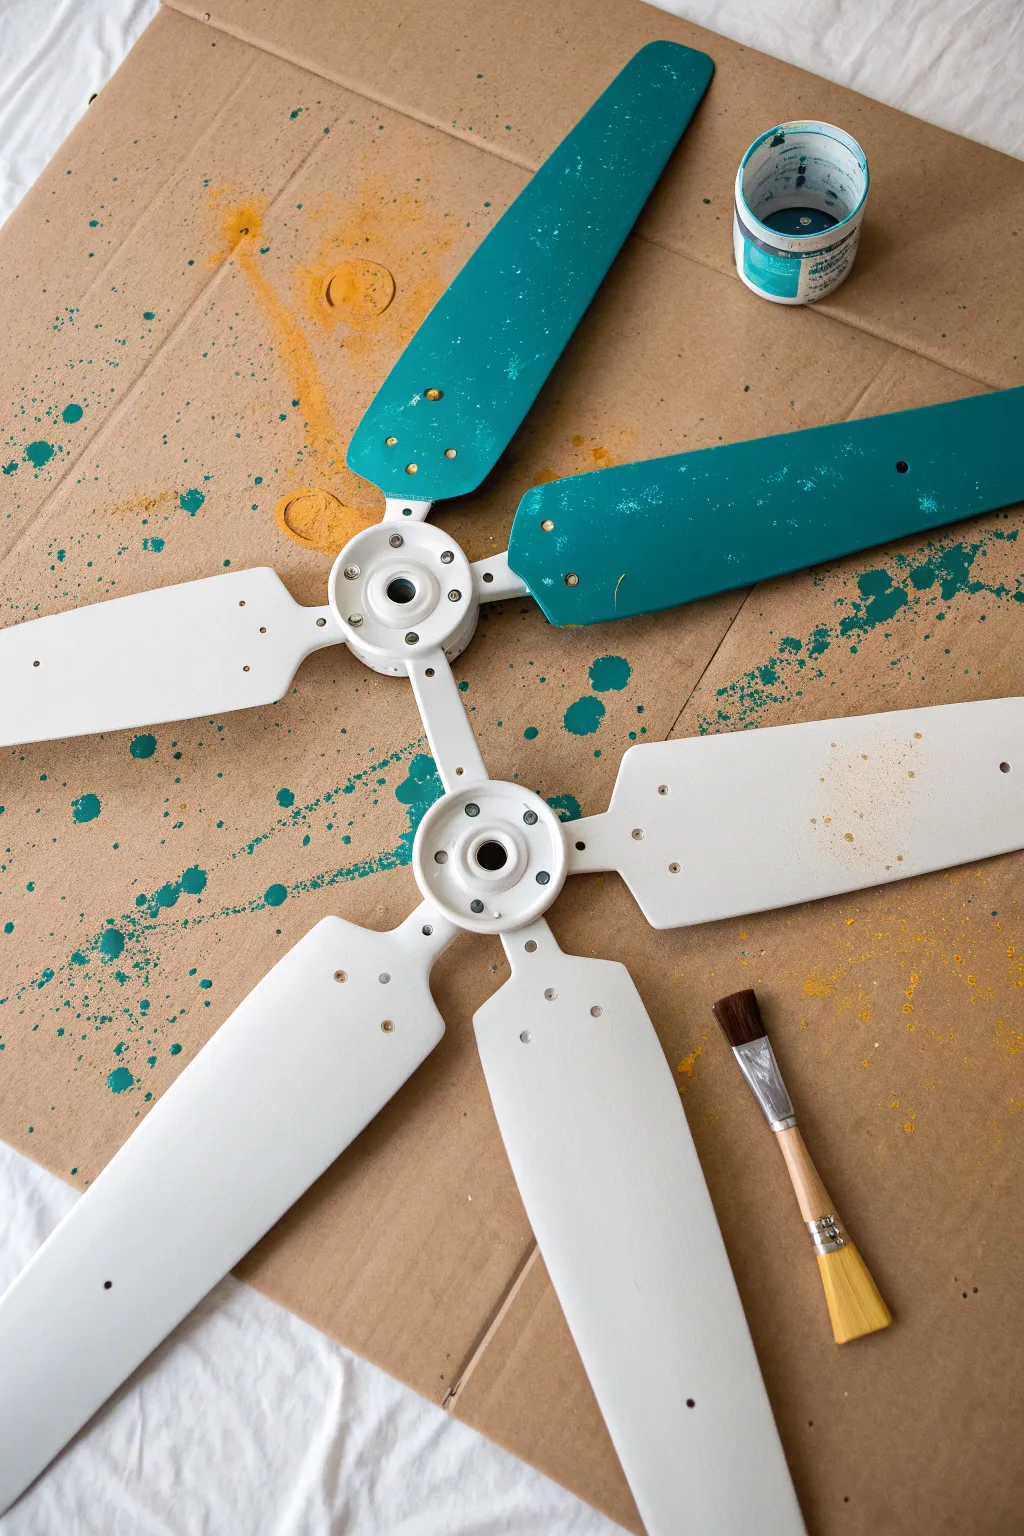
Bring an artistic, studio-inspired vibe to your ceiling with this playful splatter-paint technique. By combining solid blocks of color with improvised splashes of teal and gold, you can transform a standard white fan into a dynamic kinetic sculpture.
Step-by-Step Guide
Materials
- Ceiling fan blades (disassembled)
- Fan motor hub/brackets (optional to keep attached)
- White spray paint or chalk paint (base coat)
- Teal acrylic or latex paint
- Gold or mustard yellow acrylic paint
- Flat paintbrush (1-inch)
- Large cardboard sheet or drop cloth
- Sandpaper (medium grit)
- Painter’s tape
- Clear sealant spray (polyurethane)
Step 1: Preparation & Base Coat
-
Disassemble the Fan:
Carefully remove the fan blades from the ceiling mount. For this specific look, you can leave the blades attached to the central bracket irons, or remove them completely if you prefer getting paint under the screws. -
Clean and Sand:
Wipe down all surfaces with a damp cloth to remove dust and grease. Lightly sand the existing finish on the blades to ensure the new paint adheres properly. -
Set Up Your Workspace:
Lay down a large piece of cardboard or a drop cloth flattened on the floor. This project gets messy, so ensure you have a wide perimeter protected from splatter. -
Apply the White Base:
Paint all the blades with a fresh coat of white paint. I prefer using a matte chalk paint for a modern look, but spray paint works quickly too. Let this dry completely before moving forward.
Control the Chaos
For finer mist-like splatters, use an old toothbrush instead of a paintbrush. Run your thumb over the bristles to create a delicate spray of color.
Step 2: Color Blocking
-
Plan Your Pattern:
Decide which blades will be accent colors. In the example, two blades are fully painted teal while the others remain white. This asymmetry creates a cool visual effect when spinning. -
Paint Accent Blades:
Using your flat brush, paint two of the blades with the teal paint. Apply smooth, even strokes moving from the bracket outward to the tip. -
Apply Second Coat:
Allow the first teal coat to dry to the touch, then apply a second coat for rich, opaque coverage. -
Paint the Tips (Optional):
For the white blades, consider painting just the very tips or edges in white to ensure any factory finish is covered, giving it a seamless custom look.
Spinning Optical Illusion
Paint a spiral or concentric circles on the blade tips in a bright contrasting color. When the fan spins, it will create a mesmerizing bullseye effect.
Step 3: The Splatter Technique
-
Prepare Teal Splatter:
Dip your brush heavily into the teal paint. You want the brush wet but not dripping uncontrollably. -
Practice Your Flick:
Test your flicking motion on a scrap piece of cardboard first. Use your finger to pull back the bristles and release them to spray fine dots, or swing the brush forcefully for larger drops. -
Splatter the White Blades:
Stand over the white blades and flick the teal paint across them. Aim for an uneven, organic distribution—some clusters of drops here, varying sizes there. -
Add Cross-Splatter:
Don’t be afraid to let the splatter cross over onto the cardboard background; this ensures the pattern goes right to the edge of the blade. -
Add Gold Accents:
Clean your brush or grab a new one. Dip it into the gold or mustard yellow paint. -
Layer the Colors:
Flick the gold paint over both the white and teal blades. The gold pops beautifully against the teal background and adds warmth to the white sections. -
Create ‘Visual Noise’:
Focus some heavier gold splatters near the center brackets to visually tie the different colored blades together. -
Let Gravity Work:
Allow the paint drops to sit and flatten slightly. Do not brush them out. If a drop is too large, you can dab it lightly with a paper towel corner, but imperfections add character.
Step 4: Finishing Up
-
Dry Completely:
Let the blades sit undisturbed for at least 24 hours. The thick splatter drops take significantly longer to dry than a thin coat of paint. -
Seal the Deal:
Once fully dry, spray the entire assembly with a clear polyurethane sealer. This protects the paint from dust and makes cleaning the fan easier in the future. -
Reinstall:
Reattach the blades to your ceiling fan motor and enjoy your new functional art piece.
Now flip the switch and watch your colorful creation whirl into a blur of artistic motion
Galaxy Night-Sky Ceiling Fan

Transform a plain white ceiling fan into a breathtaking window to the cosmos with this galaxy-inspired makeover. Using sponge layering and splatter techniques, you will create a deep, dimensional night sky that brings an adventurous spirit to any bedroom or playroom.
How-To Guide
Materials
- Ceiling fan (disassembled blades)
- Sandpaper (220-grit)
- Degreasing cleaner (like TSP substitute)
- Primer spray paint (white or grey)
- Black acrylic craft paint
- Navy blue acrylic craft paint
- Purple acrylic craft paint (plum or violet)
- Teal or turquoise acrylic craft paint
- White acrylic craft paint
- Gold acrylic craft paint (optional)
- Assorted synthetic sponges
- Stiff bristle toothbrush
- Detail paintbrush (size 0 or 1)
- Clear protective topcoat spray (matte or satin)
- Drop cloth or cardboard
- Screwdriver
Step 1: Preparation
-
Remove the Blades:
Turn off the power to your fan at the breaker. Carefully unscrew the blade arms from the motor housing using your screwdriver, then detach the blades from the metal arms so you are working with just the wooden paddles. -
Clean Thoroughly:
Wipe down each blade with a degreasing cleaner to remove years of dust, grease, and grime. This step is crucial because paint won’t stick to oily surfaces. -
Sand for Adhesion:
Lightly scuff the surface of each blade with 220-grit sandpaper. You don’t need to strip the old finish completely; just create a rough texture for the primer to grip. -
Prime the Surface:
Lay the blades on a drop cloth in a well-ventilated area. Apply a thin, even coat of primer to the side you intend to paint. Let this dry completely according to the can’s instructions.
Muddy Galaxy Fix
If colors blend into gray, stop! Your paint is too wet. Let the layer dry completely, then sponge fresh bright color on top. Acrylics are forgiving; you can just paint over mistakes.
Step 2: Creating the Nebula
-
Base Coat:
Paint the entire surface of the blades with your black acrylic paint or a very deep navy. This dark background creates the necessary depth for space scenes. Two coats may be needed for solid coverage. -
Sponge Layer 1: Navy:
Dampen a sponge and ring it out until it’s almost dry. Dip it into navy blue paint and dab off the excess on a paper towel. Lightly pounce the sponge randomly across about 70% of the blade, leaving some black showing through. -
Sponge Layer 2: Teal:
Using a fresh corner of the sponge or a new one, sponge on the teal or turquoise paint. Focus this lighter color in cloud-like clusters rather than covering the whole blade. This creates the glowing gases of the nebula. -
Sponge Layer 3: Purple:
Add patches of purple near the edges of your teal clouds. Blend the wet edges slightly by dabbing gently where the colors meet to create a soft, hazy transition. -
Intensify the Black:
If your colors got too bright or muddy, take a small piece of sponge with black paint and dab it back into the negative spaces to re-establish the deep void of space. -
Add Highlight Clouds:
Mix a tiny drop of white into your teal paint to create a very pale blue. Sponge this sparingly into the centers of your brightest nebula patches to make them look like they are glowing.
Glow in the Dark
Mix glow-in-the-dark medium with your white star paint. Use it for the final splatter step so the stars actually shine when you turn off the lights at night.
Step 3: Stars and Details
-
Make the Star Field:
Dilute a small amount of white paint with water until it is the consistency of ink. Dip an old stiff toothbrush into this mixture. -
Splatter Technique:
Hold the toothbrush over the fan blade and run your thumb across the bristles to flick tiny droplets of paint onto the surface. Practice on cardboard first to control the spray size. -
Hand-Paint Major Stars:
Use your fine detail brush to paint a few larger, distinct stars. Simple cross shapes or four-pointed diamonds work well to mimic the ‘twinkle’ effect seen in the reference image. -
Add Golden Accents:
If you want the subtle warmth shown in the photo, repeat the splatter technique lightly with diluted gold paint, focusing near the base where the blade attaches to the arm. -
Dry Time:
Allow your artwork to cure fully for at least 24 hours. The thick layers of acrylic needs to be completely hard before sealing.
Step 4: Assembly
-
Seal the Deal:
Spray the blades with a clear protective topcoat. A matte or satin finish looks best for space scenes, as high gloss can cause distracting reflections. -
Reattach Hardware:
Once the sealer is dry and not tacky, screw the metal arms back onto the blades. -
Reinstall:
Mount the assembled blades back onto the motor housing, turn the power back on, and enjoy your new view.
Looking up at your new ceiling fan will feel like drifting through deep space right from the comfort of bed
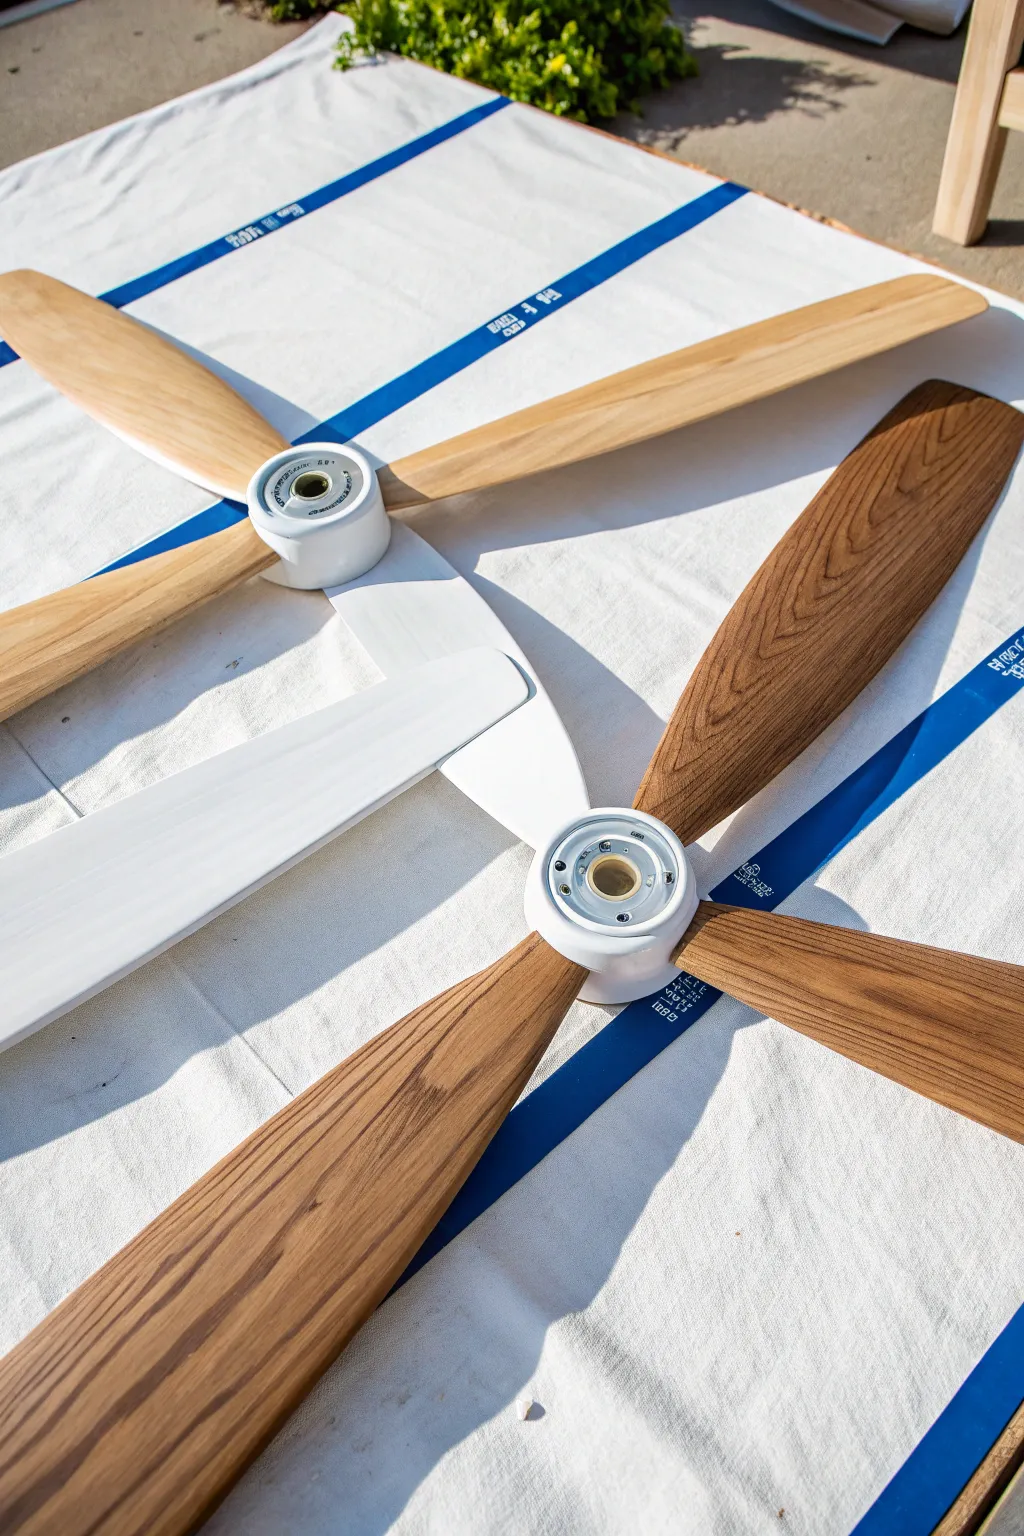
Faux Wood Grain Painted Blades
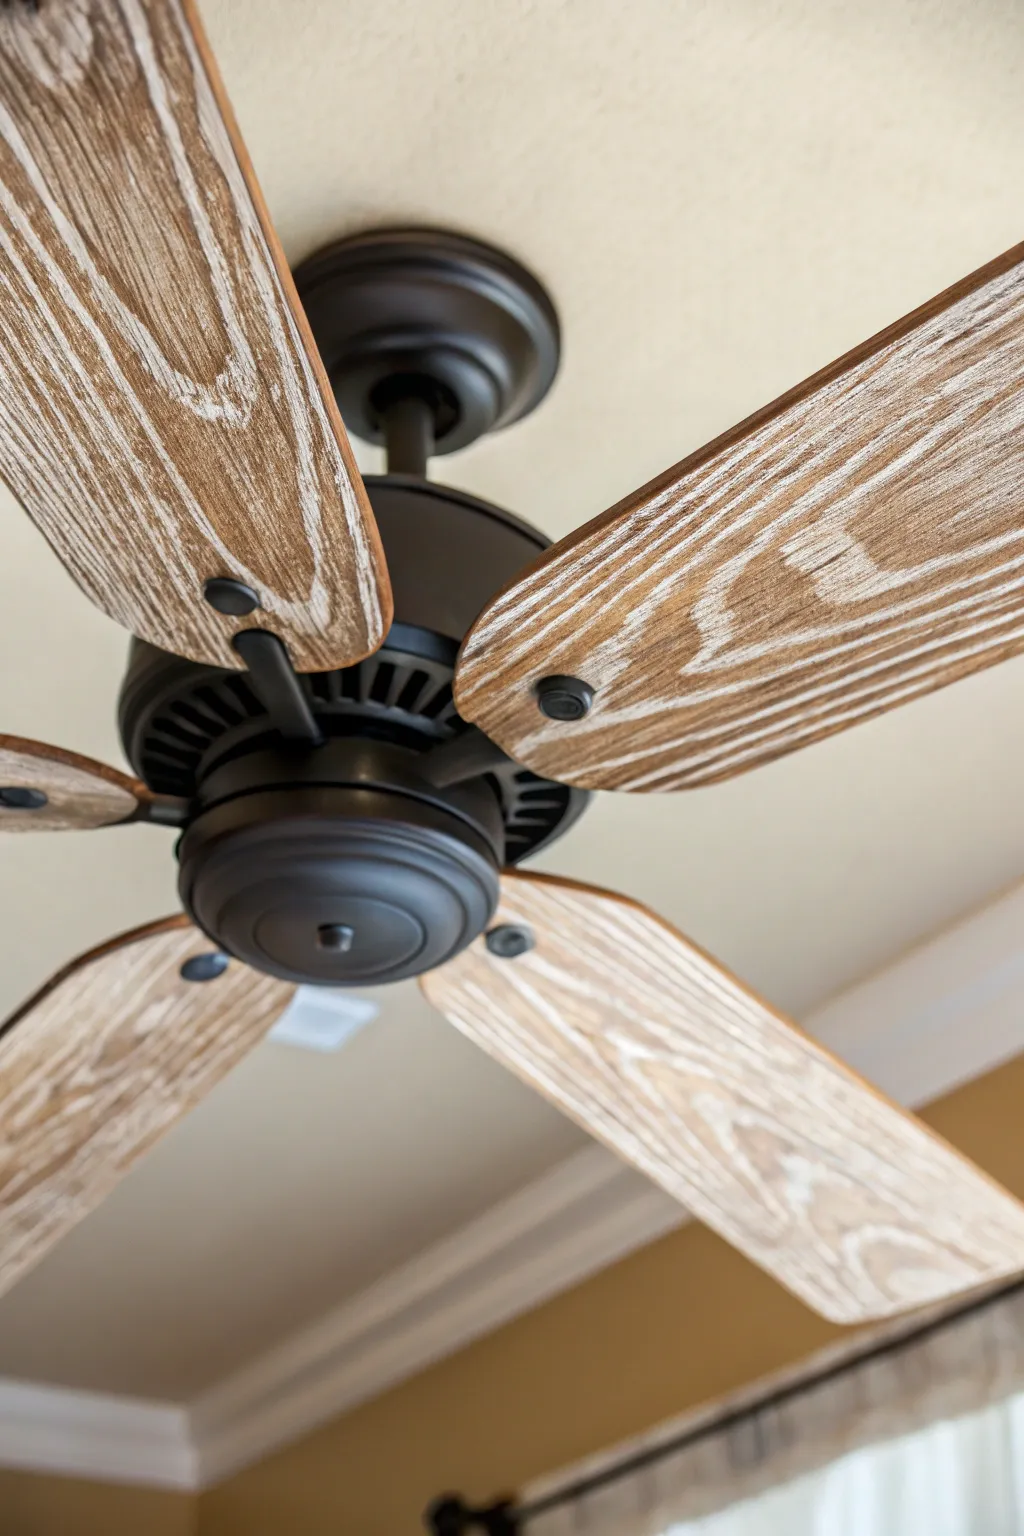
Transform dated or plain ceiling fan blades into stylish farmhouse décor with this faux wood graining technique. By layering paints and dry-brushing, you can achieve that sought-after driftwood look without harsh sanding or expensive replacements.
Step-by-Step
Materials
- Ceiling fan blades (removed from fan)
- Screwdriver
- Sandpaper (220 grit)
- Degreaser or TSP cleaner
- Adhesion primer
- Beige or tan acrylic paint (base coat)
- Dark brown acrylic paint or glaze
- White or cream acrylic paint
- Chip brush (2-inch)
- Small round brush
- Clean lint-free rags
- Matte clear sealer spray
- Drop cloth
Step 1: Preparation
-
Remove the blades:
Using a screwdriver, carefully detach each fan blade from the metal irons. Place the screws in a marked baggie so you don’t lose them. -
Clean thoroughly:
Wipe down both sides of the blades with a degreaser or TSP solution. Kitchen fans often have a layer of unseen grease that will prevent paint from sticking. -
Light sanding:
Scuff the surface of the blades gently with 220-grit sandpaper. You aren’t trying to strip the old finish, just creating ‘tooth’ for the primer to grab onto. -
Prime the surface:
Apply a thin, even coat of adhesion primer. Let this potential life-saver dry completely according to the can’s instructions before moving on.
Use a Chip Brush
Don’t use a high-quality soft brush for this. Cheap chip brushes have stiff, uneven bristles that naturally create separate lines perfect for mimicking wood grain texture.
Step 2: Creating the Base
-
Apply the base color:
Paint the blades with your beige or tan acrylic paint. Use long, smooth strokes moving from the base to the tip of the blade. -
Check coverage:
Once the first coat is dry, assess if you need a second coat. You want a solid, opaque background for your wood grain. -
Prepare the glaze:
Mix a small amount of dark brown paint with a little water or glazing medium to thin it out. It should be semi-transparent, not solid.
Too Much Paint?
If a streak looks too heavy or dark, don’t panic. While the paint is wet, wipe it gently with a damp rag to lift the color, or wait for it to dry and dry-brush the base color over it.
Step 3: Faux Wood Graining
-
Apply the dark streaks:
Dip your chip brush lightly into the thinned dark brown mixture. Offload most of the paint onto a paper towel until the brush is almost dry. -
Create grain lines:
Drag the chip brush down the length of the blade in long, confident swipes. Wiggle the brush slightly in random spots to mimic natural wood imperfections. -
Add knot details:
Using a small round brush, paint elongated oval shapes or ‘knots’ in the wood. Keep these random and sparse so the effect doesn’t look like a pattern. -
Feather the knots:
Immediately use your chip brush to lightly sweep over the knots you just painted, blending them slightly into the surrounding grain lines. -
Let the darkness set:
Allow the dark brown grain layer to dry completely. This usually takes about 20-30 minutes depending on humidity.
Step 4: Highlighting and Sealing
-
Prepare the highlight:
Load your clean chip brush with white or cream paint. Again, wipe almost all of it off on a rag—this is a classic dry-brush technique. -
Apply the whitewash:
Lightly drag the white paint over the top of the brown grain. This creates the ‘weathered’ dimension and softens the contrast. -
Focus on edges:
I like to hit the edges of the blades a little harder with the white paint, as real wood tends to wear and fade more on the corners. -
Final inspection:
Step back and look at all blades together. Ensure the intensity of the grain matches across the set so the fan looks cohesive once reassembled. -
Seal the deal:
Take the blades outside or to a well-ventilated area and spray them with a matte clear sealer to protect your artwork from dust and cleaning. -
Reassembly:
Once fully cured (give it at least 24 hours to be safe), screw the blades back onto the fan irons and enjoy your new look.
Enjoy the refreshing, organic vibe your new faux wood fan brings to the room
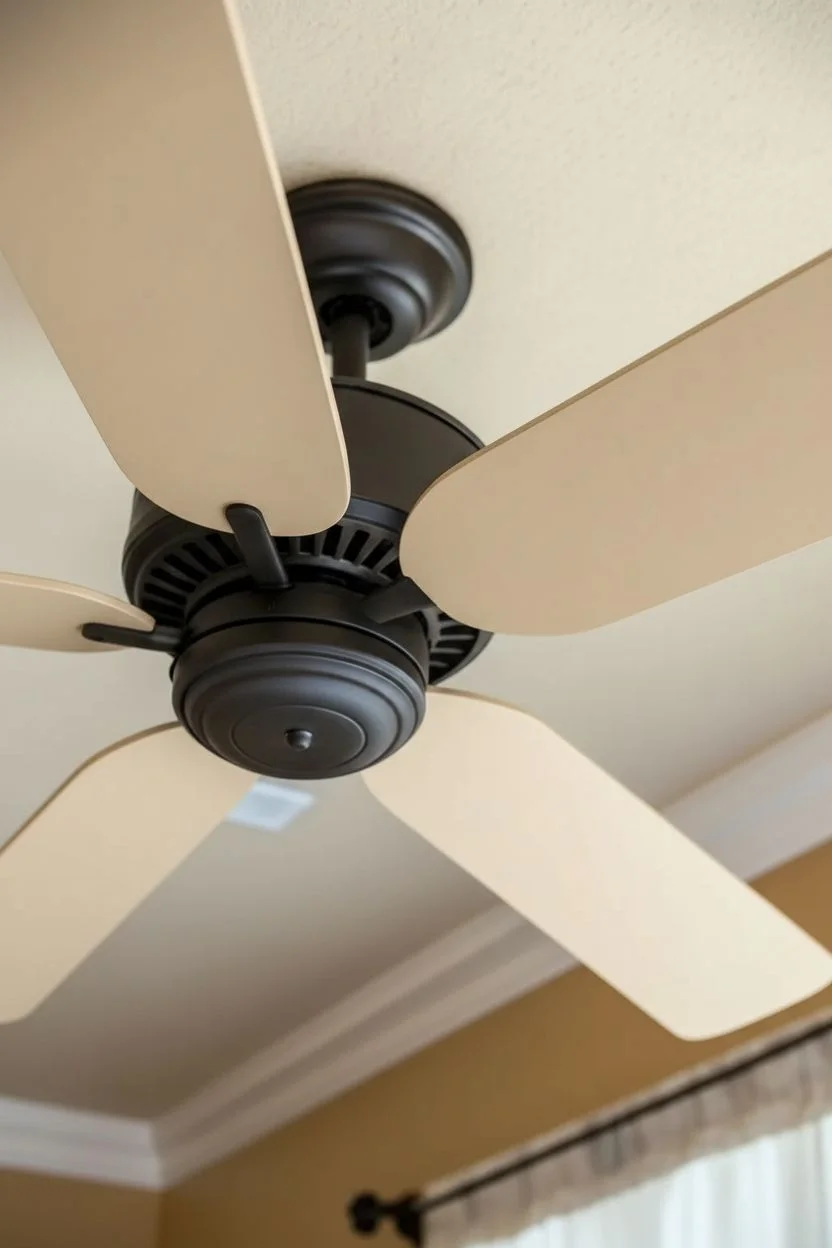
Aged Metallic Motor Housing Accent
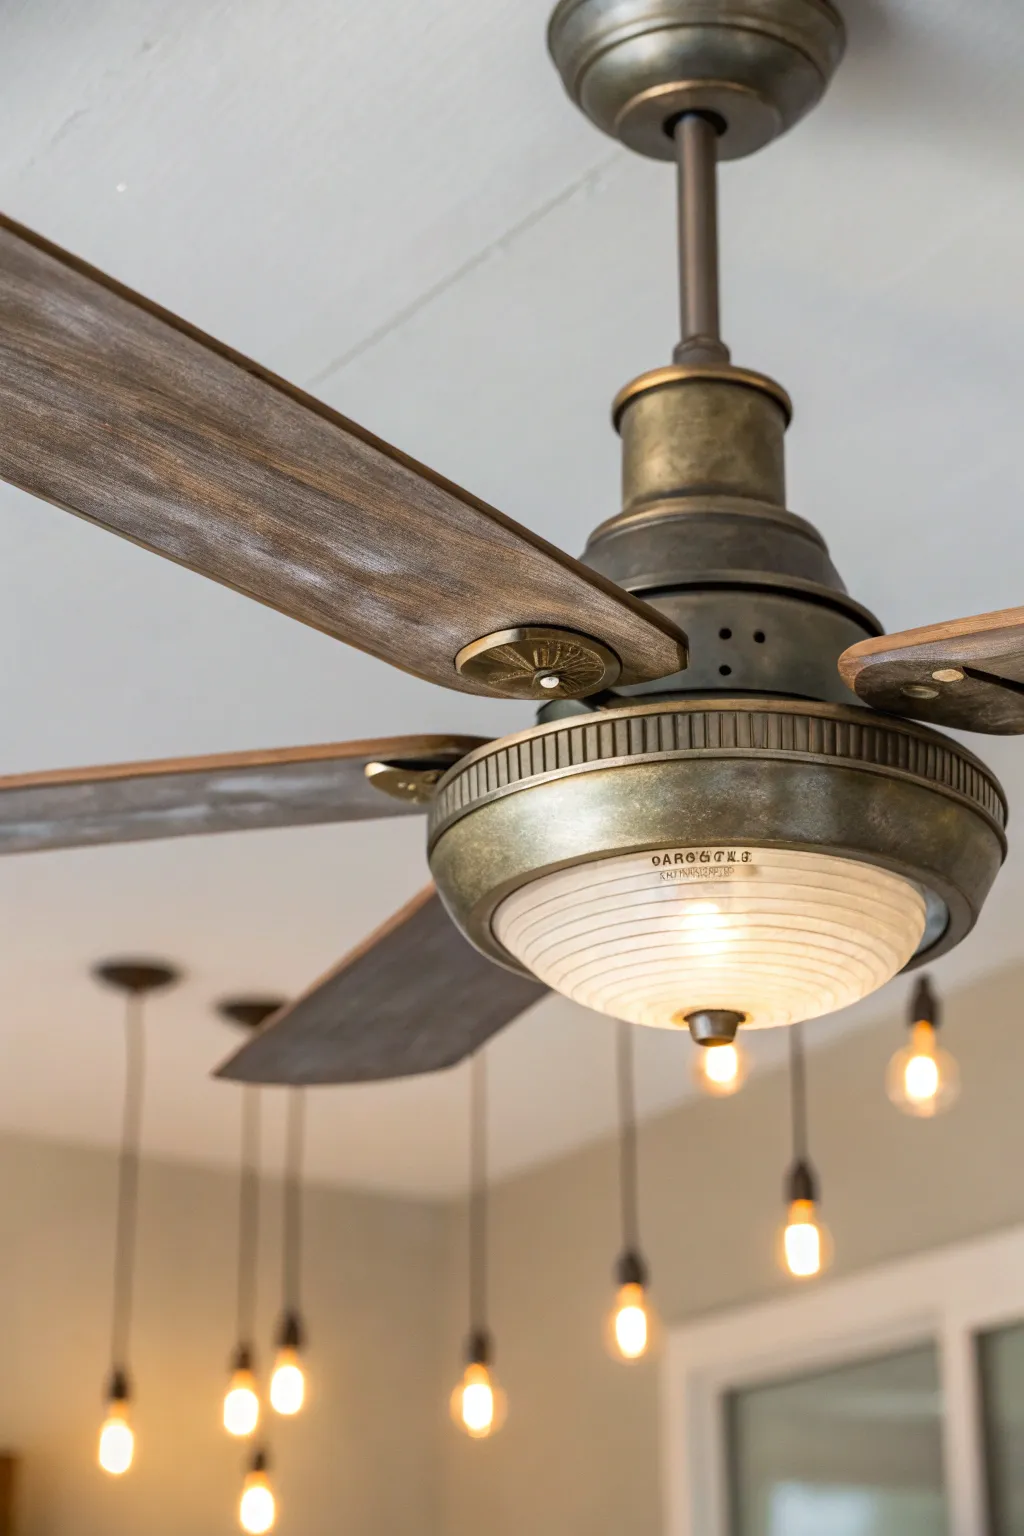
Transform a standard ceiling fan into a vintage masterpiece with this sophisticated aged metallic finish. By layering metallic paints and glazes over the motor housing and hardware, you can achieve a convincing antique brass look that adds instant character to any room.
Step-by-Step Tutorial
Materials
- Ceiling fan (disassembled)
- Medium-grit sandpaper (120-150 grit)
- Painter’s tape
- Self-etching metal primer spray paint
- Antique Gold or Brass metallic spray paint
- Dark brown or umber acrylic paint (for aging)
- Clear acrylic glaze medium
- Water
- Small sea sponge or lint-free rags
- Small detail brush
- Matte clear coat sealer spray
- Wood stain (optional, for blades)
Step 1: Preparation & Base Coat
-
Safety First:
Before beginning any work, ensure the power to the fan is turned off at the breaker. Carefully disassemble the fan, removing the blades, light fixture glass, and motor housing. Keep screws organized in labeled bags. -
Clean Surfaces:
Wipe down all metal parts of the motor housing and blade brackets with a degreaser or soapy water to remove accumulated dust and oils. Let everything dry completely. -
Scuff Sanding:
Lightly sand the metal surfaces with medium-grit sandpaper. You don’t need to remove the old finish entirely, just create enough texture for the new primer to grip effectively. -
Masking:
Use painter’s tape to cover any electrical components, sockets, or internal motor parts that shouldn’t be painted. Being thorough here saves cleanup time later. -
Prime the Metal:
In a well-ventilated area, spray a coat of self-etching metal primer onto the housing and brackets. Keep the can moving to avoid drips and apply thin, even coats. -
Apply Gold Base:
Once the primer is dry, apply your antique gold or brass metallic spray paint. I prefer doing two or three light coats rather than one heavy one to ensure a smooth, professional finish. -
Dry Time:
Allow the gold base coat to cure fully for at least 24 hours. This is crucial because the next steps involve rubbing the surface, which could peel soft paint.
Paint Peeling?
If paint lifts during glazing, the base coat wasn’t fully cured. Sand the spot, touch up with gold spray, wait 48 hours, and reglaze gently.
Step 2: Creating the Aged Patina
-
Mix the Glaze:
Combine one part dark brown acrylic paint with three parts clear acrylic glaze. Add a few drops of water to thin it slightly until it has a fluid consistency. -
Apply Glaze:
Working in small sections, brush the dark glaze mixture liberally over the gold surface, ensuring it gets into crevices, ridges, and details like the vent holes. -
Wipe Back:
Immediately use a damp lint-free rag or sea sponge to wipe away the excess glaze. The goal is to leave the dark color in the recessed areas while revealing the gold on the raised surfaces. -
Stipple for Texture:
If the finish looks too streaky, gently stipple (dab up and down) with a dry sponge or brush to soften the transition between the dark recesses and the bright gold highlights. -
Detail Work:
For the decorative band around the motor (the vertical ribs shown in the photo), use a small detail brush to add extra darkness between the ridges to exaggerate the depth. -
Blade Brackets:
Don’t forget to repeat the exact same glazing process on the metal blade brackets so they match the motor housing perfectly. -
Sealing:
Once you are happy with the aged effect and the paint is fully dry, spray the entire assembly with a matte clear coat. This protects your faux finish and reduces the metallic shine to a realistic vintage luster.
Pro Tip: Rub n’ Buff
For extreme highlights, lightly rub ‘Antique Gold’ Rub ‘n Buff wax on the highest ridges after sealing. It adds a subtle, authentic metallic sparkle.
Step 3: Blade Treatment (Optional)
-
Sand Blades:
If your blades don’t match your new vintage look, sand them down lightly to remove the factory sheen. -
Apply Wash:
Apply a diluted grey or walnut wood stain using a rag. Wipe it on and immediately wipe it off to create a weathered, driftwood appearance that complements the aged brass. -
Reassembly:
Once all components are dry (give them another 24 hours to be safe), carefully reassemble the fan and turn the power back on to admire your work.
Enjoy the warm, sophisticated atmosphere your custom-finished fan brings to your living space
Glow-in-the-Dark Constellations on the Blades
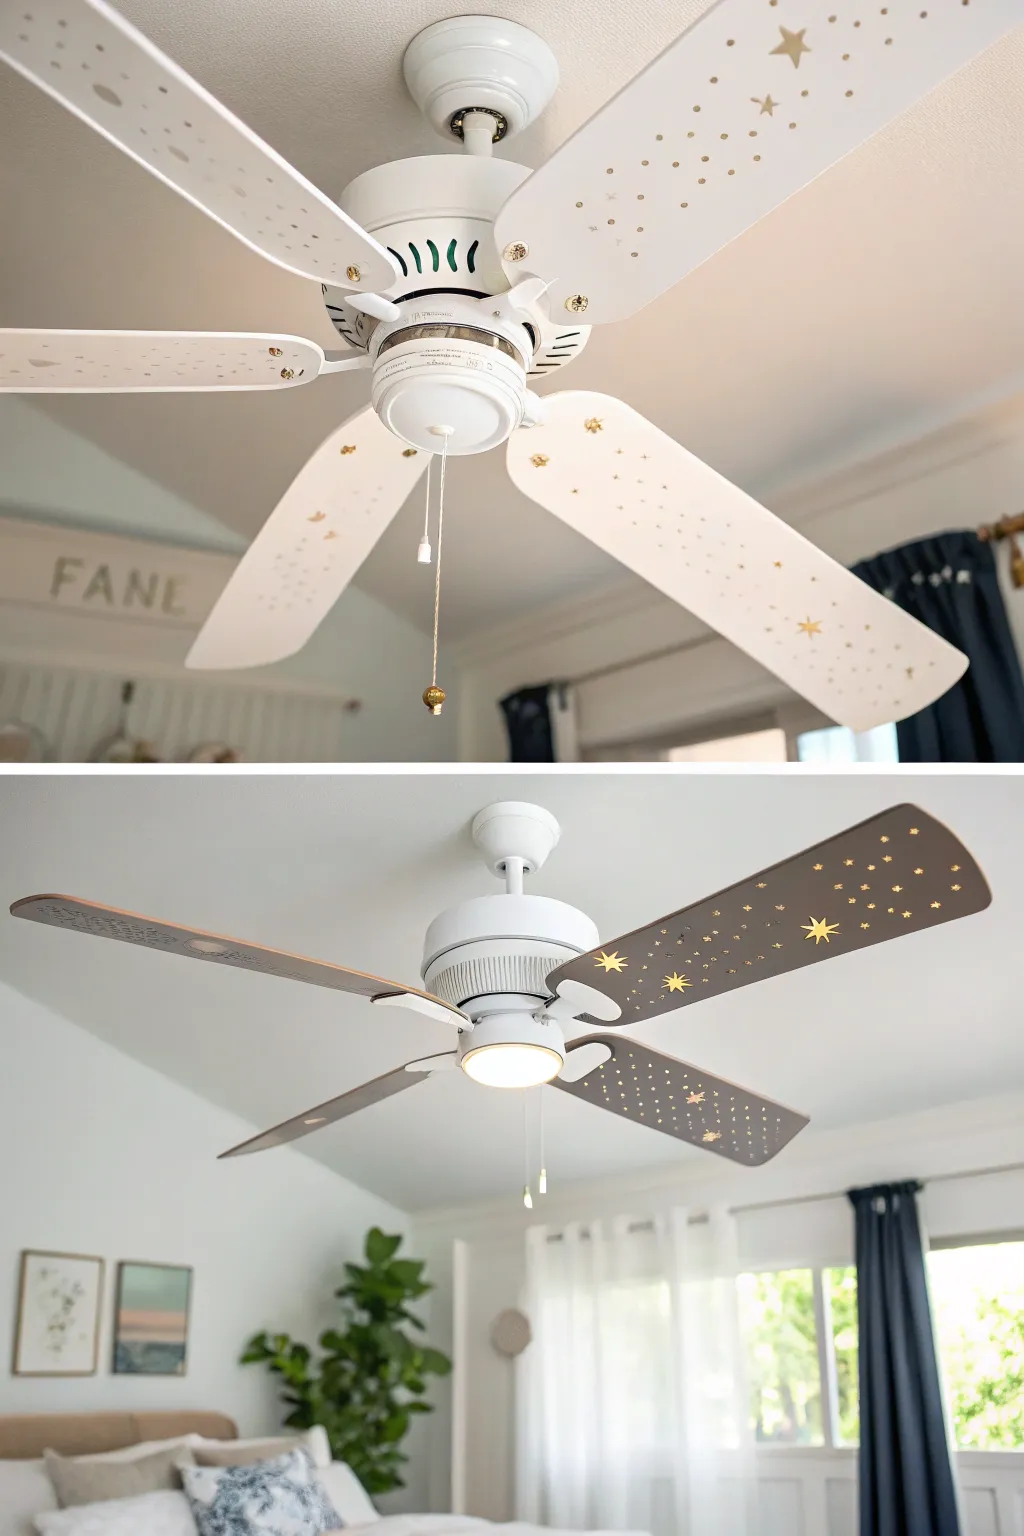
Transform a standard ceiling fan into glowing night sky art with this celestial upgrade. By painting the blades a deep color and adding metallic and glow-in-the-dark constellations, you’ll create a hidden galaxy that shines beautifully day or night.
Step-by-Step Guide
Materials
- Ceiling fan (existing or new)
- Screwdriver
- Mild degreaser or soapy water
- Fine-grit sandpaper (220-grit)
- Painter’s tape
- Primer (spray or brush-on suitable for wood/laminate)
- Charcoal grey or deep navy acrylic paint/spray paint
- Gold metallic paint pen (medium tip)
- White or glow-in-the-dark paint pen (fine tip)
- Star stencils (optional)
- Clear matte sealer spray
- Drop cloth
Step 1: Preparation
-
Safety First:
Turn off the power to the ceiling fan at the circuit breaker to ensure safety before starting any work. -
Remove Blades:
Using your screwdriver, carefully detach the fan blades from the motor housing brackets. Keep the screws in a labeled baggie so they don’t get lost. -
Clean Thoroughly:
Wipe down each blade with a mild degreaser or warm soapy water. You need to remove years of dust and potential kitchen grease for the paint to stick properly. -
Light Sanding:
Scuff the surface of the blades lightly with 220-grit sandpaper. You aren’t trying to strip the old finish, just creating a ‘tooth’ for the primer to grab onto. -
Wipe Down:
Remove all sanding dust with a damp tack cloth or microfiber towel and let the blades dry completely.
Step 2: Base Coat
-
Prime the Surface:
Apply a thin, even coat of primer to the side of the blade you plan to paint (or both, if you want a reversible look). Let it cure according to the can’s instructions. -
Apply Dark Base:
Paint the blades with your chosen deep charcoal or navy color. Two thin coats are always better than one thick coat to avoid drips. I find spray paint gives the smoothest factory-like finish here. -
Dry Time:
Allow the base color to dry for at least 24 hours. The surface must be hard and non-tacky before you start drawing the delicate star details.
Uneven Glow paint?
Glow paint is often thin. If it dries streaky, dab it on in thick dots rather than brushing it. This creates concentrated ‘stars’ that hold more light charge.
Step 3: Creating the Galaxy
-
Plan Your Layout:
Before marking the blades, sketch out a rough idea of where your constellations will flow. You want the stars to look random but balanced across the fan’s diameter. -
Draw Major Stars:
Using a gold metallic paint pen, draw the larger, five-point stars first. If you aren’t confident freehanding, standard star stencils work wonders here. -
Connect Constellations:
Look up real constellations or invent your own, using fine lines to connect specific gold stars. This adds an educational or mythological touch to the design. -
Add the Milky Way:
Fill in the empty spaces with tiny gold dots and specks. Vary the pressure on your pen to create different sizes of ‘distant stars’ for depth. -
Apply Glow Details:
Trace over select white stars or add new invisible dots with your glow-in-the-dark paint pen. This secret layer will only reveal itself when the lights go out. -
Seal the Work:
Once the artwork is fully dry, spray a coat of clear matte sealer over the entire blade. This protects your galaxy from dust and cleaning abrasion later on.
Level Up: Fiber Optics
Drill tiny holes through the blade and push fiber optic strands through for real light points, wiring them to a small battery pack on the top side of the blade.
Step 4: Reassembly
-
Reattach Brackets:
Screw the blade irons (brackets) back onto your newly painted blades. -
Mount Blades:
Secure the blades back onto the fan motor housing, ensuring all screws are tightened firmly to prevent wobbling. -
Final Test:
Turn the power back on and give it a spin to see your galaxy in motion.
Enjoy drifting off to sleep under your custom-painted night sky


Have a question or want to share your own experience? I'd love to hear from you in the comments below!