Ceiling tiles are basically a grid of blank canvases hiding in plain sight, and they’re begging for a little personality. Whether you want a clean, cozy upgrade or a full-on mural moment, painting your tiles can turn a boring drop ceiling into something you actually want to look up at.
Classic All-Over Solid Color Refresh
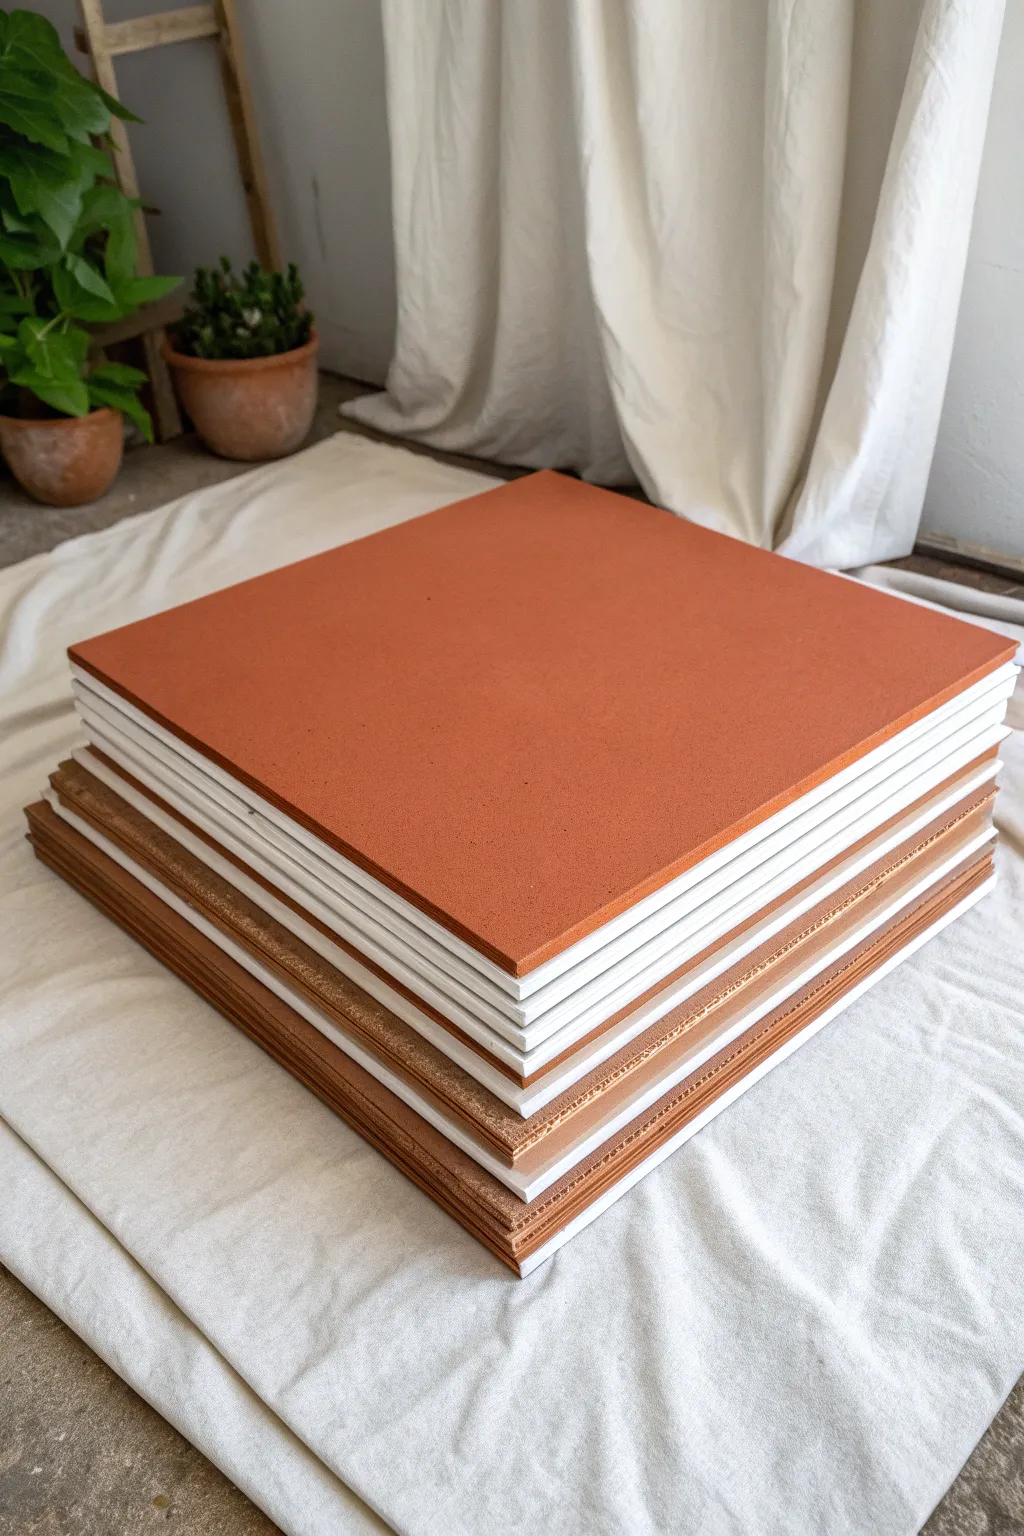
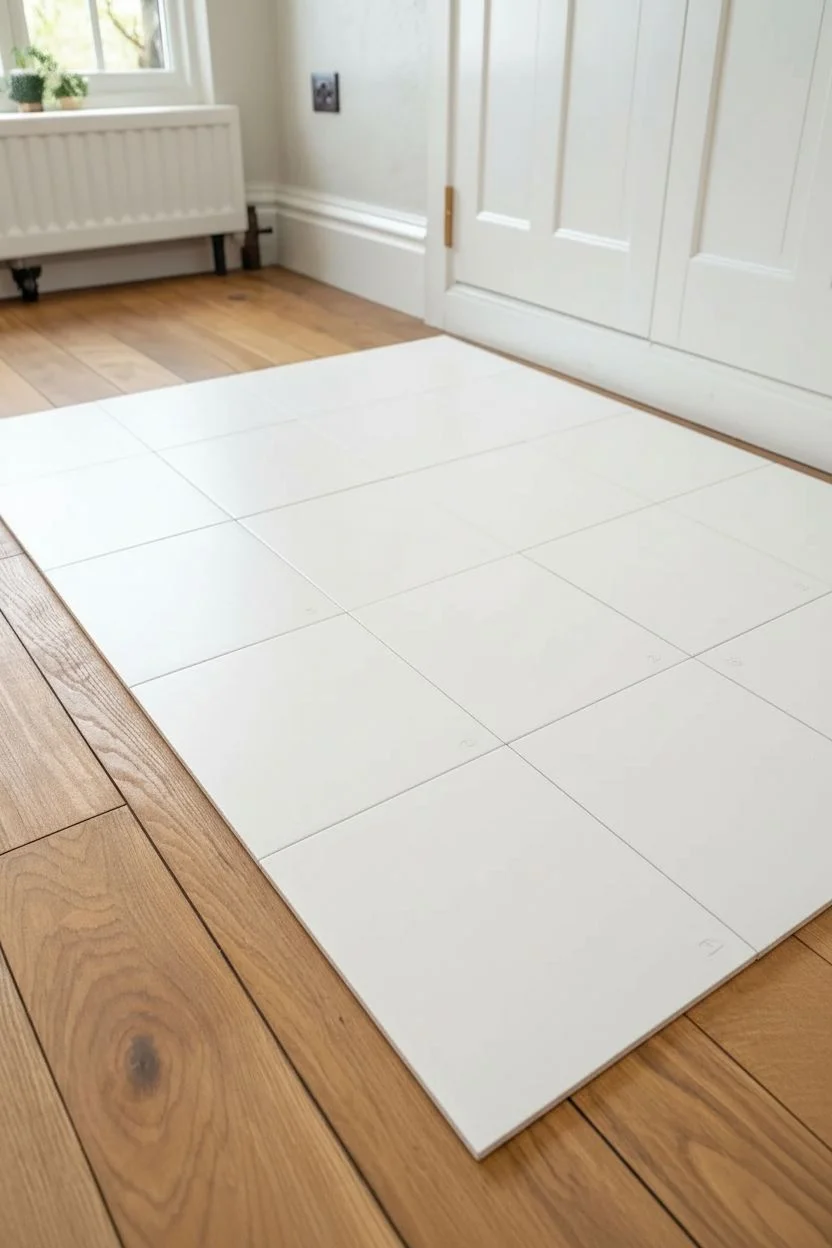
Transform boring acoustic ceiling tiles into a warm, modern statement with a simple terracotta update. This project focuses on achieving a smooth, matte finish that brings earthy elegance to a standard drop ceiling.
Detailed Instructions
Materials
- Fiberboard ceiling tiles (square edge)
- Matte terracotta or rust-orange acrylic latex paint
- High-quality white primer (stain-blocking)
- Small foam roller (4-inch)
- Paint tray
- Angled sash brush (2-inch)
- Drop cloth or canvas sheet
- Fine-grit sandpaper (220-grit)
- Tack cloth
- Painter’s tape (optional)
Step 1: Cleaning and Priming
-
Clean the surface:
Begin by removing any loose dust or debris from your ceiling tiles. If they are old tiles being reused, gently vacuum them with a brush attachment. For new tiles, a quick wipe with a dry tack cloth does the trick. -
Set up the workspace:
Lay down your canvas drop cloth on a flat, stable surface. Arrange your tiles in a stack or spread them out if you have the space. -
Prepare the edges:
Inspect the edges of the tiles. If they are rough or fibrous, lightly sand them with 220-grit sandpaper to knock down loose fibers. Wipe away the dust immediately. -
Apply the first coat of primer:
Using your foam roller, apply a thin, even coat of stain-blocking white primer to the face of the tile. Don’t press too hard, as you want to avoid soaking the porous material. -
Prime the edges:
While the face is drying slightly, use the angled sash brush to carefully prime the sides of the tile. This white edge creates a crisp, professional look when installed. -
Let primer cure:
Allow the primer to dry completely according to the manufacturer’s instructions. This usually takes about an hour, but properly cured primer ensures the topcoat adheres perfectly.
Clean Edges Solution
To keep the white edges pristine while rolling the colored face, stack the tiles and use a single strip of wide painter’s tape along the side to shield it from roller slip-ups.
Step 2: Applying the Terracotta Finish
-
Mix your paint:
Stir your terracotta acrylic paint thoroughly. You want a consistent, rich pigment without any separation. -
Load the foam roller:
Pour the paint into your tray and load the 4-inch foam roller. Roll it back and forth on the textured part of the tray to remove excess paint; you want the roller damp, not dripping. -
Roll the first coat:
Apply the first coat of terracotta paint to the face of the tile. Use long, smooth strokes in one direction (e.g., vertical). I find that keeping a ‘wet edge’ helps prevent lap marks. -
Check coverage:
Ceiling tiles can be thirsty. Don’t worry if the first coat looks a bit patchy or uneven; this is normal. -
Dry time:
Let this first color coat dry for at least 2 hours. It needs to be dry to the touch before you add more. -
Apply the second coat:
Roll on the second coat of paint, this time moving perpendicular to your first coat (e.g., horizontal). This cross-hatching technique ensures complete coverage and a uniform texture. -
Detail the edges:
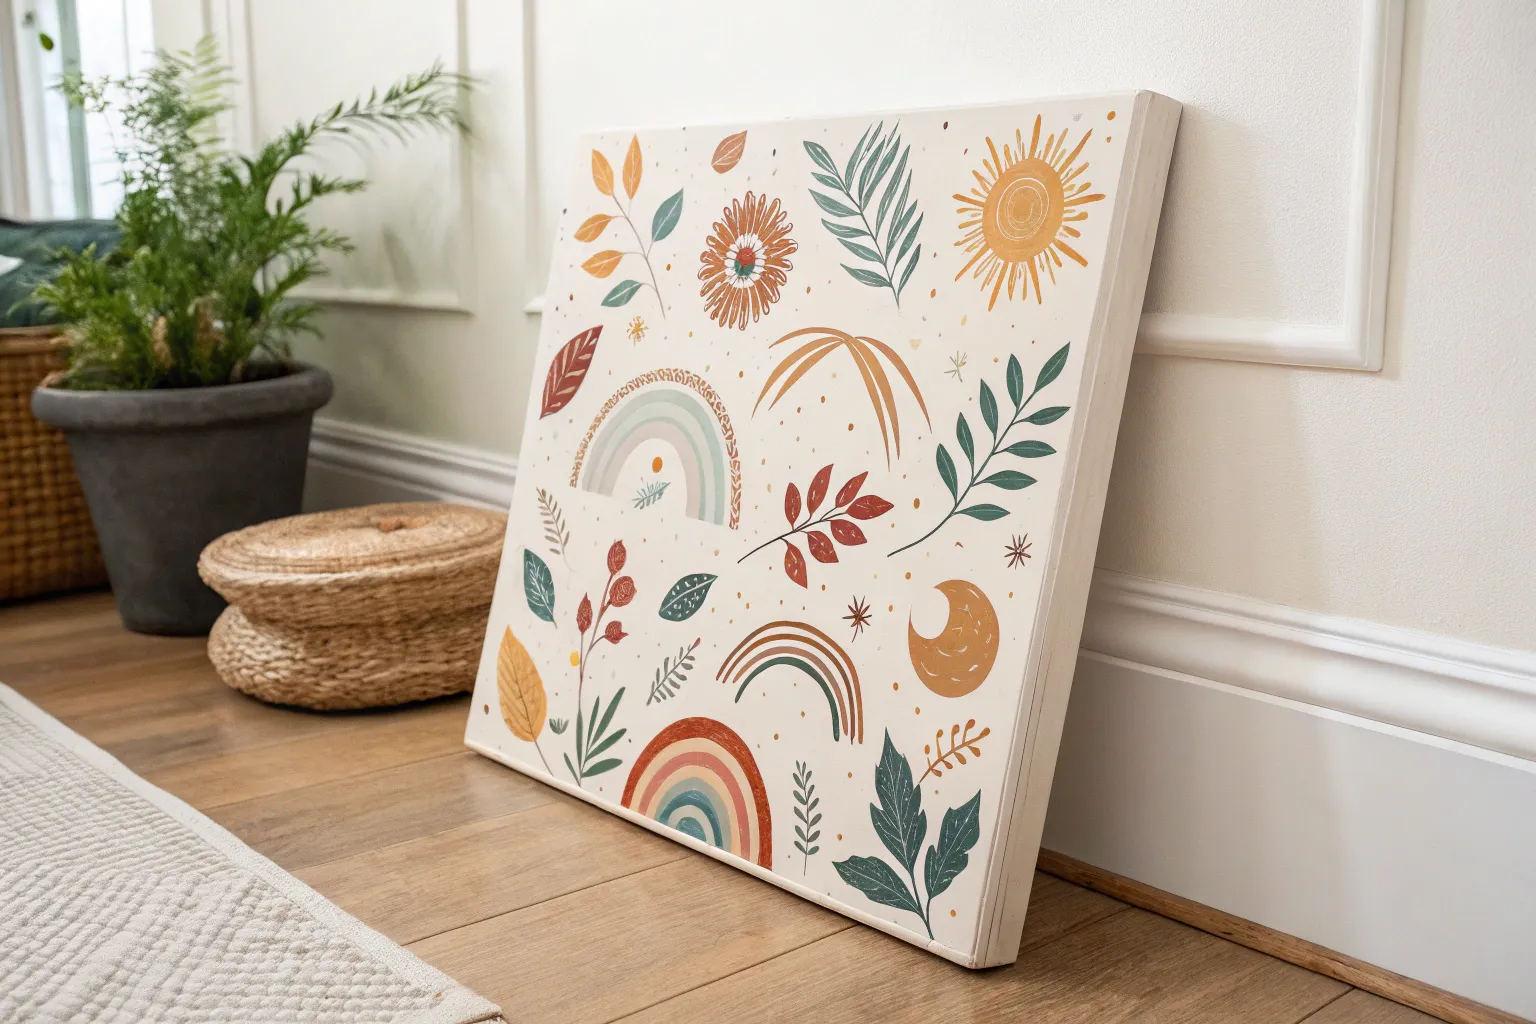
Decide if you want the edges painted or left white. For the look in the image, keep the edges crisp white. If you got any terracotta on the sides, touch it up with a small brush and white paint now. -
Inspect for drips:
Quickly scan the edges and surface for any paint pooling or drips. Smooth them out lightly with the roller before the paint sets. -
Final cure:
Allow the tiles to cure fully for 24 hours in a well-ventilated area before attempting to install them. Handling them too soon can leave fingerprints in the matte finish.
Create a Pattern
Mix up the design by painting half your tiles in the terracotta shade and leaving the other half white or painting them a soft cream for a checkerboard ceiling effect.
Once dry, these colorful tiles will add immediate warmth and architectural interest to your room


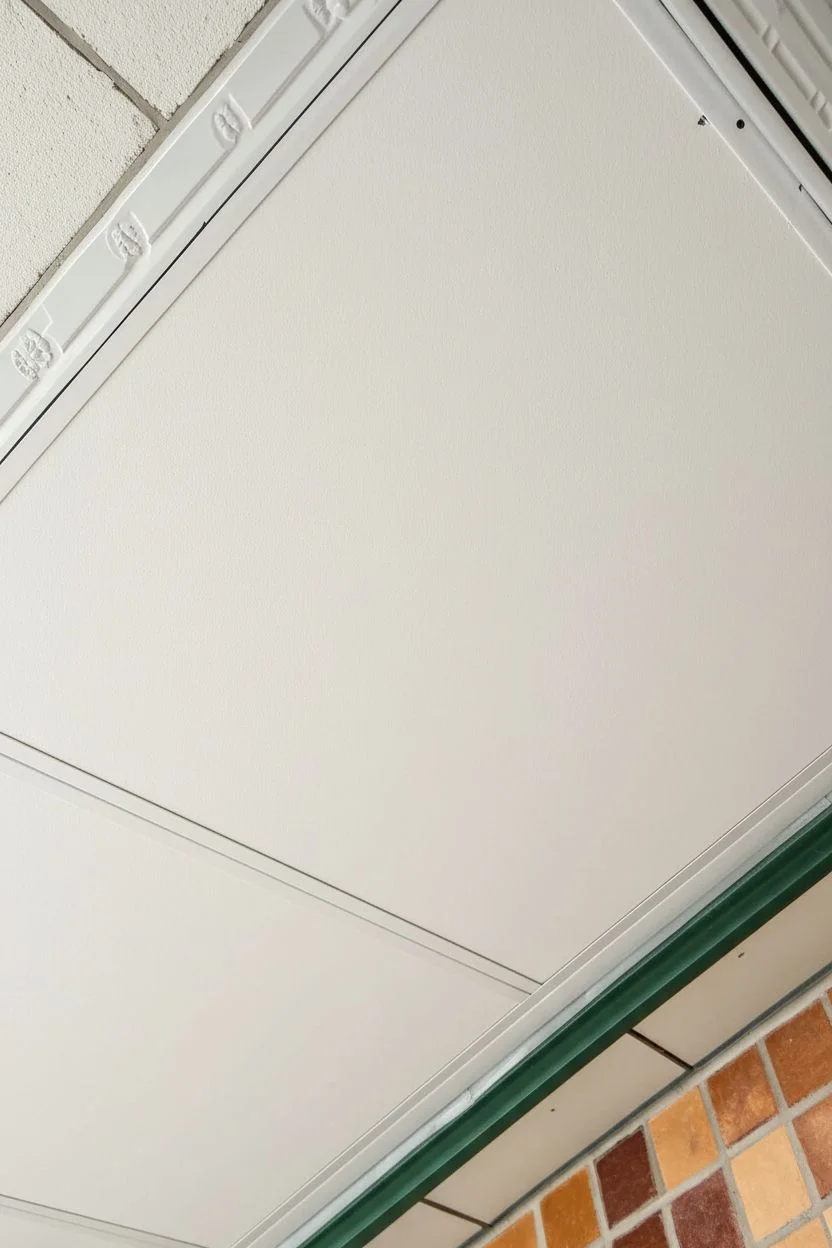
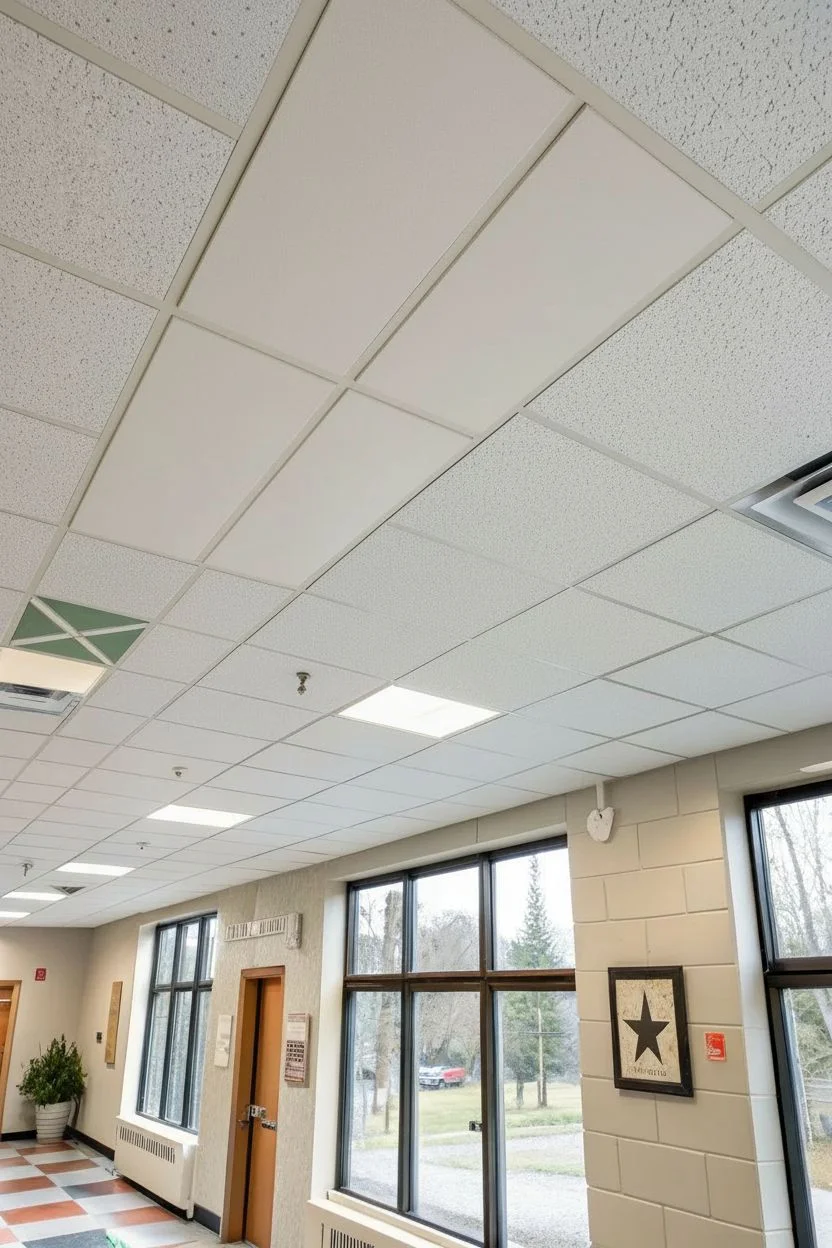
Bright White With Subtle Warm Undertones

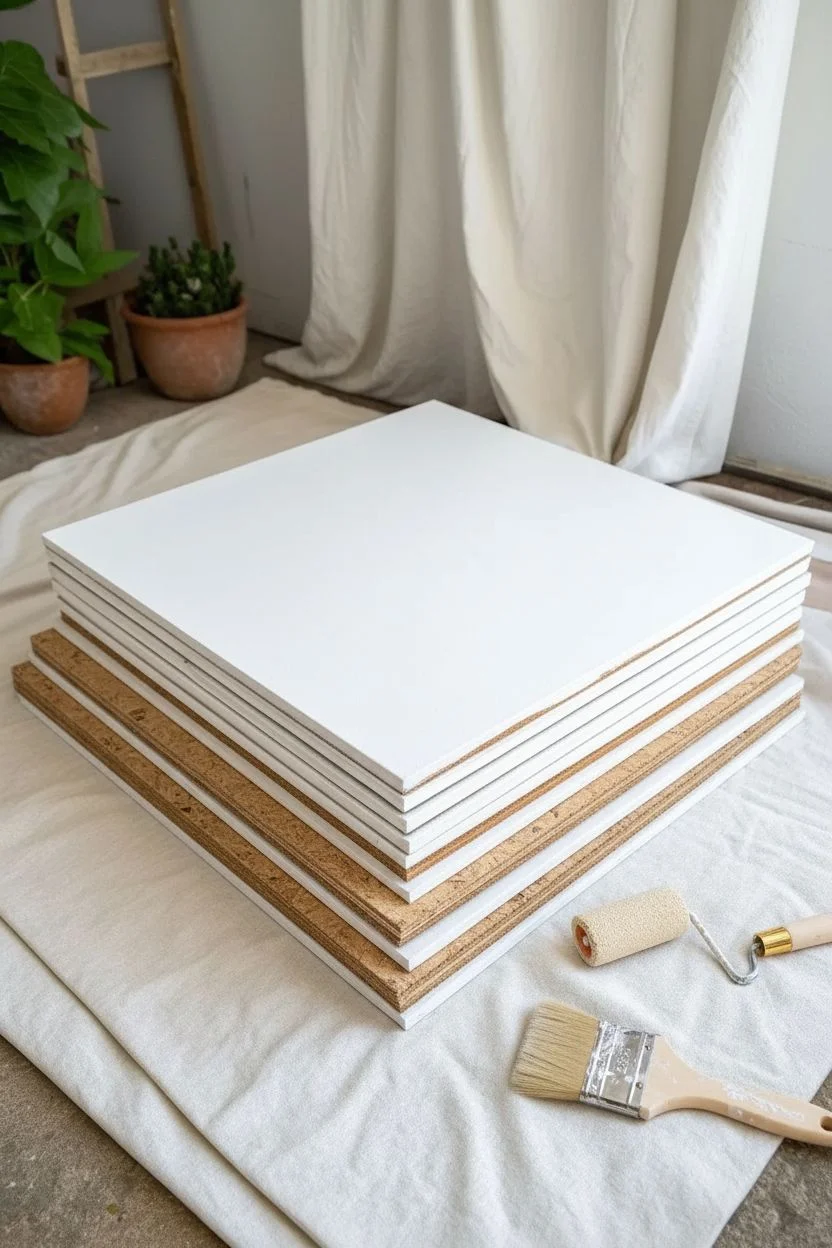
Transform a tired, yellowed drop ceiling into a fresh, architectural feature without losing that cozy atmosphere. This project focuses on achieving a crisp, clean finish that brightens the room while maintaining a subtle warmth that prevents the space from feeling sterile.
Step-by-Step
Materials
- High-quality flat ceiling paint (bright white base with warm undertone)
- Stain-blocking primer (spray can or roller application)
- Paint roller frame with extension pole
- Medium nap roller covers (1/2 to 3/4 inch for textured surfaces)
- Angled sash brush (2-inch)
- Drop cloths or plastic sheeting
- Painter’s tape
- Ladder
- Safety glasses and dust mask
- Screwdriver (for removing vent covers)
- Cleaning rag and mild detergent solution
Step 1: Preparation and Cleaning
-
Clear the room:
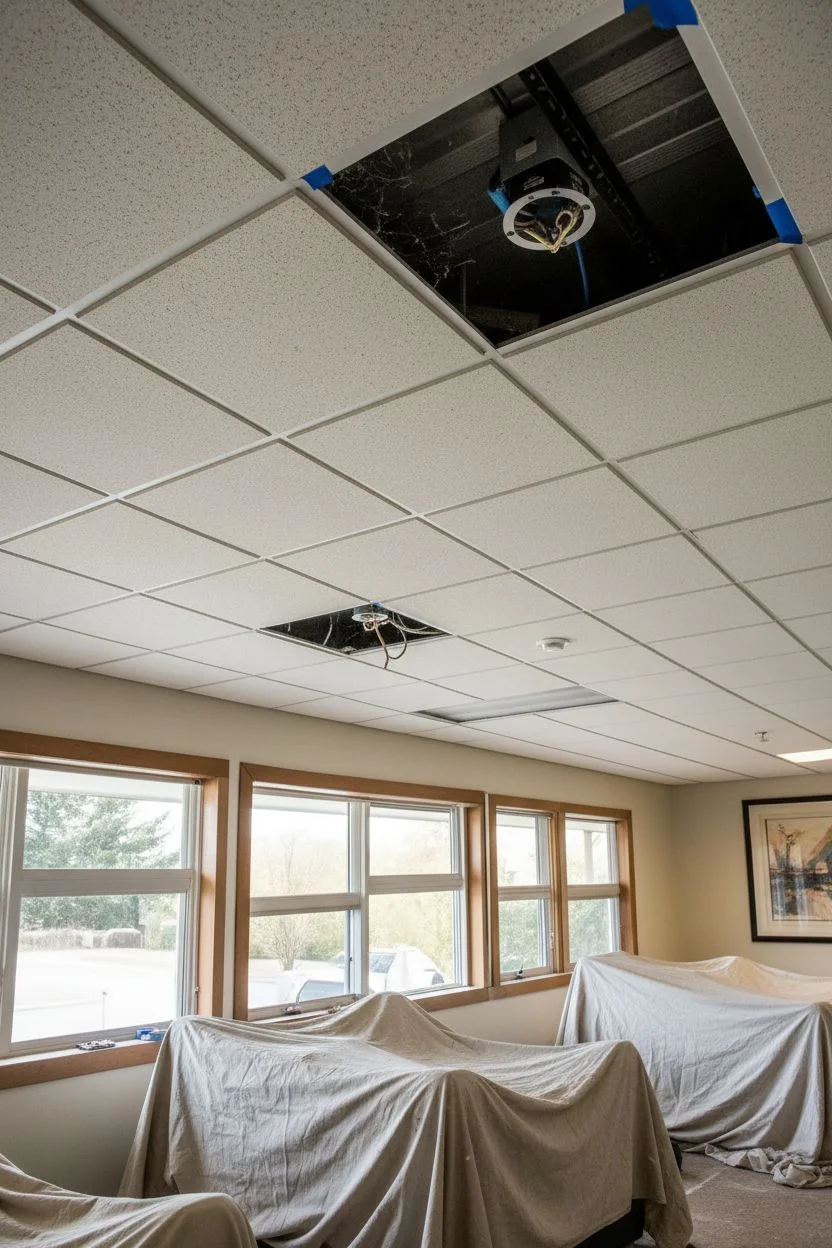
Since you will be working overhead, remove furniture or group it in the center of the room and cover everything thoroughly with heavy-duty drop cloths to catch falling dust and paint drips. -
Assess the grid:
Inspect the metal grid system. If the paint on the grid is chipping or rusted, you may need to sand it lightly. If the grid is in good shape, simply wipe it down with a damp rag and mild detergent to remove dust and grease. -
Remove fixtures:
Carefully remove any vent covers, smoke detectors, or sprinkler escutcheons. Loosen the covers on the fluorescent light fixtures or tape them off meticulously if they cannot be removed. -
Clean the tiles:
Use a vacuum with a soft brush attachment to gently remove loose dust and cobwebs from the textured surface of the tiles. Do not use water on standard acoustic tiles as they can stain or warp.
Step 2: Priming for Success
-
Spot prime stains:
Look closely for water stains or old discoloration. Use a stain-blocking primer (oil-based spray primer works best here) to hit these spots specifically. This prevents the yellow stains from bleeding through your new white paint. -
Prime the grid:
If painting the grid to match, apply a coat of bonding primer to the metal strips. This is crucial for adhesion on the slick metal surface. -
Decide on removal:
You have a choice: paint the tiles in place or remove them. For the most professional look seen in the photo, painting them in place seals the gap between tile and grid, creating a unified look, but be careful not to glue them to the grid if you need future access.
Grid Adhesion Tip
If painting the metal grid, lightly scuff it with fine-grit sandpaper before priming. This ‘keys’ the surface, ensuring your paint doesn’t peel off the slick metal later.
Step 3: Painting the Ceiling
-
Cut in the edges:
Using your angled sash brush, paint along the perimeter where the ceiling grid meets the wall. I find doing this first allows me to roll close to the edge without worrying about hitting the wall later. -
Load the roller:
Pour your warm white flat paint into a tray. Saturate the medium nap roller evenly. The thicker nap is essential for getting paint into the deep fissures and texture of acoustic tiles. -
First pass technique:
Roll the paint onto the tiles and grid simultaneously in one direction (e.g., North to South). Apply gentle upward pressure but don’t squeeze the roller, as you don’t want to push the tiles up out of the grid. -
Watch for drips:
Because the grid is non-absorbent metal, paint can pool and drip. Keep a small brush or a rag handy to smooth out the grid lines immediately after rolling a section. -
Let it dry:
Allow the first coat to dry completely according to the manufacturer’s instructions. Acoustic tiles are porous and soak up a lot of paint, so don’t be alarmed if the first coat looks uneven. -
Apply the second coat:
Roll the second coat perpendicular to the first (East to West). This cross-hatching technique ensures full coverage in all the little nooks of the texture. -
Check coverage:
Inspect the ceiling from different angles in the room to ensure you haven’t missed any spots or left roller marks on the metal grid.
Level Up: Two-Tone Effect
For architectural depth, paint the grid a contrasting color like charcoal or black, and keep the tiles white. This creates a modern, industrial-chic vibe.
Step 4: Finishing Touches
-
Paint vents separately:
Take the vent covers you removed earlier and spray paint them with a matching metal spray paint for a factory-finish look before reinstalling. -
Clean up lights:
If you got any paint on the light lenses, gently scrape it off with a fingernail or plastic scraper once dry. -
Reinstall fixtures:
Once the ceiling is fully dry (give it at least 24 hours to cure), replace the vent covers and light lenses.
Step back and enjoy how your freshly painted ceiling reflects light and instantly opens up the entire room


Moody Charcoal or Soft Black Ceiling Tiles
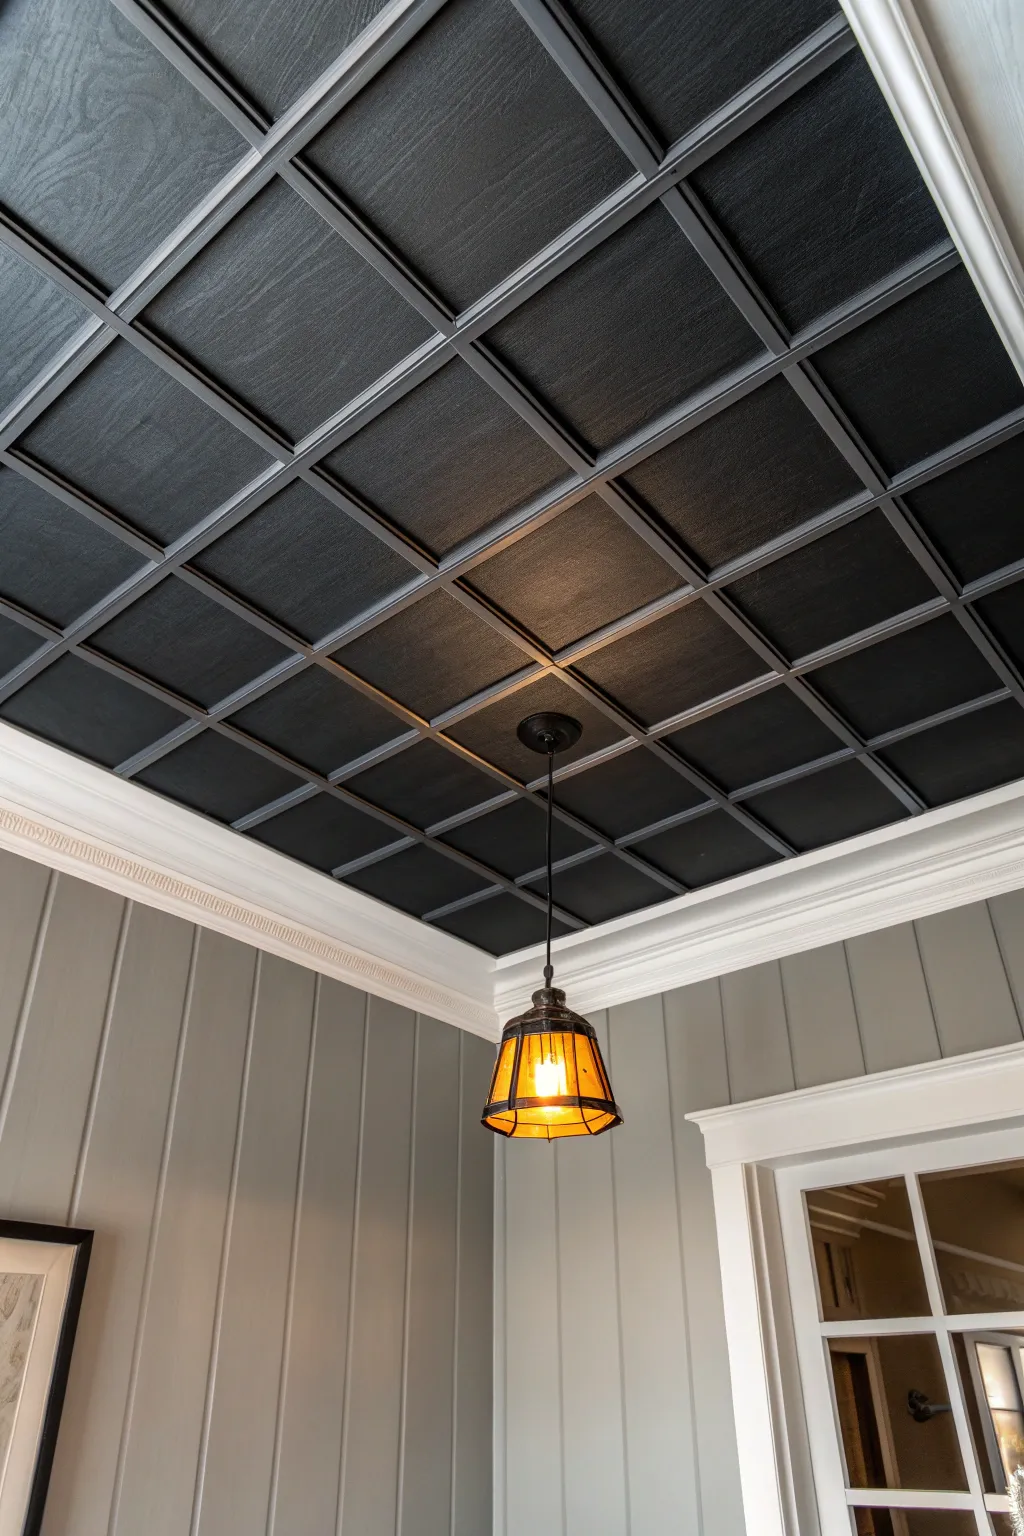
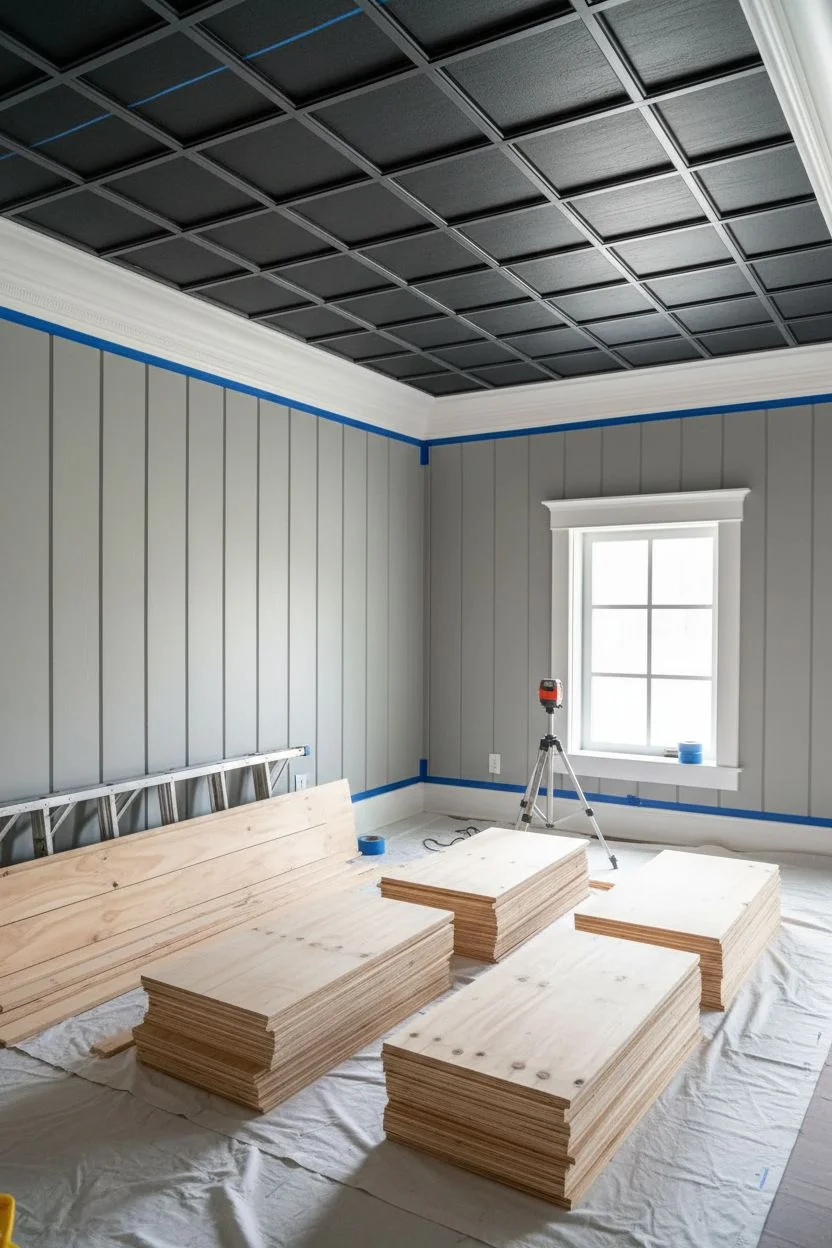
Transform a plain ceiling into a sophisticated focal point with this moody, monochromatic coffered look. By engaging deeply saturated charcoal tones and highlighting natural wood grain, you adds architectural depth and modern elegance to any room.
Step-by-Step Tutorial
Materials
- Faux wood ceiling tiles or plywood panels (cut to grid size)
- Pine boards or MDF strips (for the grid/beams)
- Black/Charcoal chalk-style paint or matte latex paint
- High-quality angled sash brush (2.5 inch)
- Small foam roller
- Construction adhesive (Liquid Nails)
- Brad nailer and 1.5-inch brad nails
- Painter’s tape
- Fine-grit sandpaper (220 grit)
- Drop cloths
- Caulk and caulk gun (paintable)
- Laser level or chalk line
Step 1: Preparation and Layout
-
Plan the grid:
Measure your ceiling’s total width and length. Calculate a square or rectangular grid pattern that fits your dimensions evenly, aiming for squares roughly 24×24 inches for a balanced look. -
Mark the lines:
Using a laser level or a chalk line, snap the grid pattern directly onto the existing ceiling to guide your beam placement. -
Protect the room:
Cover the floor and furniture completely with drop cloths. Apply painter’s tape to the top edge of the crown molding or walls where the ceiling meets the perimeter. -
Cut the panels:
Cut your plywood panels or faux wood tiles to fit exactly inside the grid squares you calculated. Test fit a few to ensure your measurements are precise before cutting the entire batch.
Step 2: Painting the Components
-
Prime bare wood:
If you are using raw wood or unfinished plywood, apply a coat of dark-tinted primer. This helps the topcoat achieve that deep, moody saturation without needing five coats of paint. -
Paint the panels:
Using a foam roller, paint the flat panels with your charcoal or soft black paint. I like to do this on saw horses before installation to save neck strain. -
Apply a second coat:
Once the first coat is dry to the touch, apply a second coat to the panels to ensure rich, even coverage without streaks. -
Paint the grid strips:
Paint the sides and faces of your pine boards or MDF strips that will serve as the beams. Painting these beforehand makes the final touch-up much easier.
Keep the Grain Visible
Don’t over-prime! To keep the wood grain texture visible through the black paint, thin your paint slightly with water or use a semi-transparent stain instead of heavy latex.
Step 3: Installation
-
Install the perimeter:
Secure the border strips around the edge of the room first, nailing them into the ceiling joists where possible. -
Affix the panels:
Apply construction adhesive to the back of a painted panel and press it into position on the ceiling. Secure it with a few brad nails to hold it while the glue cures. -
Mount the main beams:
Install the long beams running the length of the room first, covering the seams between your panels. Use the brad nailer to secure them into the joists. -
Install cross beams:
Measure and cut small cross-pieces to fit snugly between the long beams. Install these individually to create the full grid effect. -
Fill the gaps:
Use paintable caulk to fill any small gaps where the beams meet the panels or where the cross beams meet the main beams.
Visible Seams?
If gaps between cross beams are too wide for standard caulk, use a wood filler first. Sand it flush once dry, then paint. This creates a solid, joinery-quality look.
Step 4: Finishing Touches
-
Touch up caulk:
Once the caulk is fully dry, use a small artist’s brush to paint over the caulk lines with your charcoal paint so they blend seamlessly. -
Final inspection:
Turn on a bright work light and inspect the ceiling from different angles to spot any missed patches or light spots in the grain. -
Re-install lighting:
carefully re-hang your pendant light or fixture, ensuring the canopy sits flush against the newly deepened ceiling surface.
Enjoy the cozy, refined atmosphere your new statement ceiling brings to the space


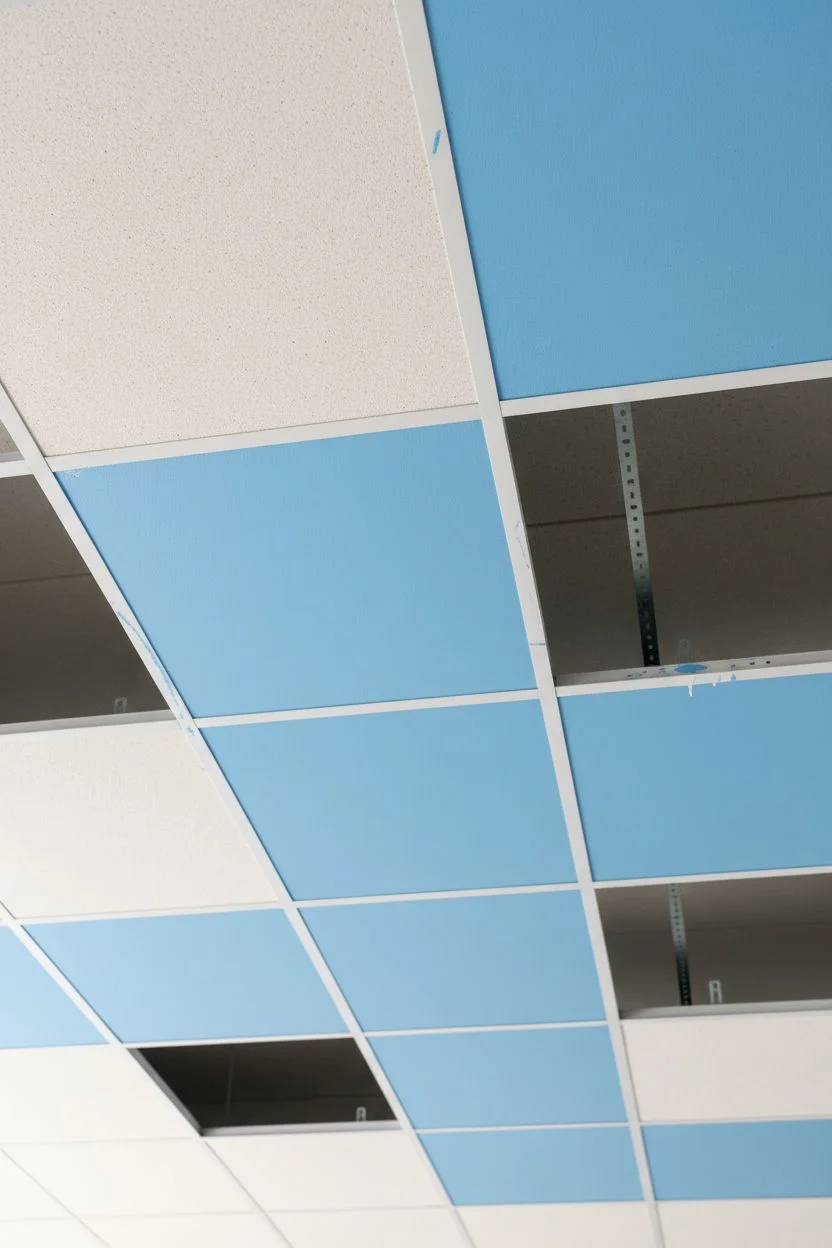
Two-Tone Checkerboard Tile Pattern
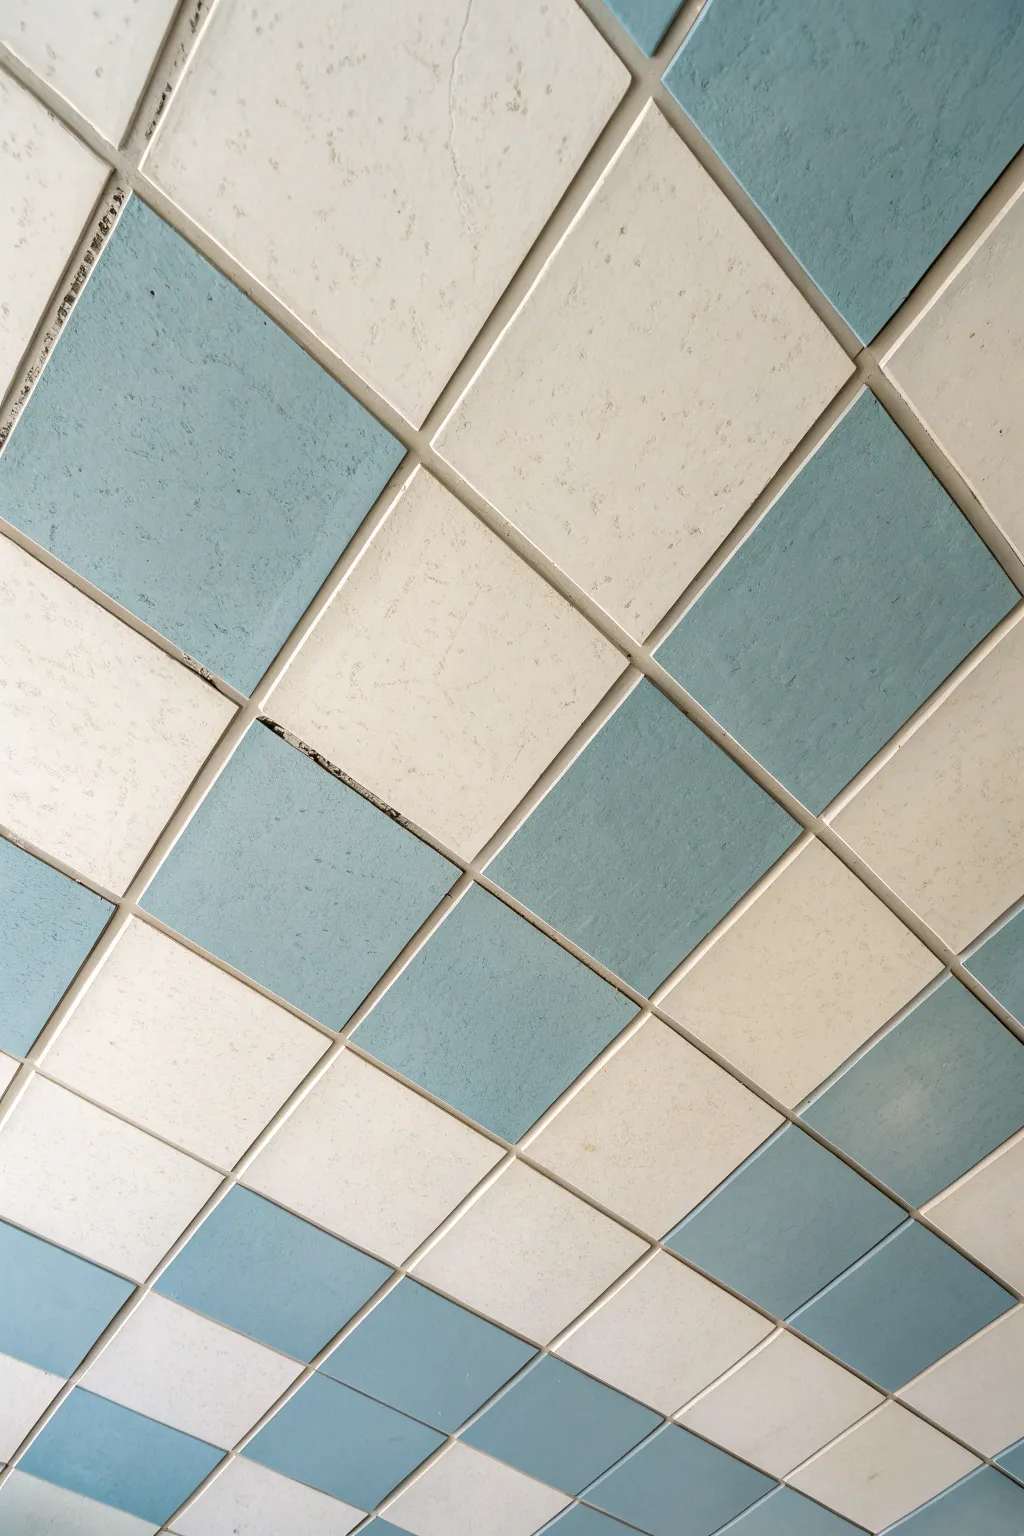
Transform a plain drop ceiling or tiled surface into a charming, retro-inspired focal point with this simple two-tone painting technique. The alternating cool blue and creamy white squares create a spacious, airy feel that brightens up any room.
Detailed Instructions
Materials
- Ceiling tiles (existing or new)
- Latex paint (Eggshell or Satin finish) in White
- Latex paint (Eggshell or Satin finish) in Light Blue
- High-quality angled sash brush
- Small foam roller set (4-inch width)
- Painter’s tape (automotive or sensitive surface grade)
- Drop cloths
- Screwdriver (specifically for drop ceiling removal)
- Tri-sodium phosphate (TSP) substitute cleaner
- Clean rags
- Stepladder
Step 1: Preparation
-
Assess your surface:
Determine if you are painting removable drop-ceiling tiles or tiles that are glued/nailed directly to the ceiling. If they are removable drop tiles, carefully push them up and angle them out of the grid system. -
Safety first:
If working with drop tiles, move them to a well-ventilated garage or workspace. If painting fixed tiles overhead, lay down drop cloths to cover the entire floor area and secure them with tape to prevent slips. -
Clean the tiles:
Ceiling tiles accumulate dust and grease over time. Wipe each tile down with a rag dampened in a TSP substitute solution. This step is crucial for paint adhesion, so don’t skip it. -
Dry thoroughly:
Allow the tiles to air dry completely. They must be bone-dry before you apply any primer or paint, as trapped moisture can cause warping or peeling later. -
Prime (Optional but recommended):
If your tiles are very porous or have water stains, roll on a coat of stain-blocking primer. This ensures your blue and white finish coats will look even and vibrant.
Step 2: Base Coat & Mapping
-
Calculate the pattern:
For removable tiles, simply sort them into two piles: one for white, one for blue. For fixed ceilings, you’ll need to count your rows and columns to determine which squares will get which color. -
Mark the blue squares:
I find it helpful to place a small piece of painter’s tape on the center of every tile that needs to be painted blue. This prevents mix-ups once you start painting overhead. -
Paint the white tiles:
Start with the lighter color. Pour your white latex paint into a tray and use a 4-inch foam roller to apply the first coat. The foam roller helps get paint into the texture without soaking the tile.
Paint Choice Matter
Avoid standard flat ceiling paint. Use eggshell or satin latex. It resists dust better and is easier to wipe clean later.
Step 3: Painting the Blue & Finishing
-
Paint texture details:
If the tiles have deep fissures or heavy texture, use your angled brush to dab white paint into the crevices before rolling the surface smooth. -
Apply second white coat:
Once the first coat is dry to the touch, apply a second coat of white for full, bright coverage. -
Paint the blue tiles:
Switch to a clean roller and tray for your light blue paint. Apply the first coat to the tiles designated for the blue checkerboard spots. -
Handle edges carefully:
If painting fixed tiles, use your angled brush to carefully cut in the edges where the tile meets the grid or neighboring tiles. Take your time here for crisp lines. -
Second blue coat:
Apply a second coat of blue paint to ensure the color is solid and matches the intensity of your reference image. -
Dry completely:
Let all tiles dry for at least 24 hours. Ceiling tiles are often made of fiberboard which can soften when wet; full drying restores their rigidity. -
Address the grid:
If you have a metal grid system (T-bar), consider how it looks against your new colors. Painting the grid white usually looks best to separate the colors cleanly, though leaving it metallic adds an industrial vibe. -
Reinstall tiles:
Carefully lift your painted drop tiles back into the grid, following your alternating pattern. Handle them by the edges to avoid smudging the fresh surface.
Stuck Tiles?
If a drop tile is stuck to the grid, run a utility knife gently around the edge before pushing up to prevent tearing the painted surface.
Step back and admire how a simple alternating pattern completely refreshes the geometry of your ceiling
BRUSH GUIDE
The Right Brush for Every Stroke
From clean lines to bold texture — master brush choice, stroke control, and essential techniques.
Explore the Full Guide
Soft Ombre Fade Across the Ceiling Grid

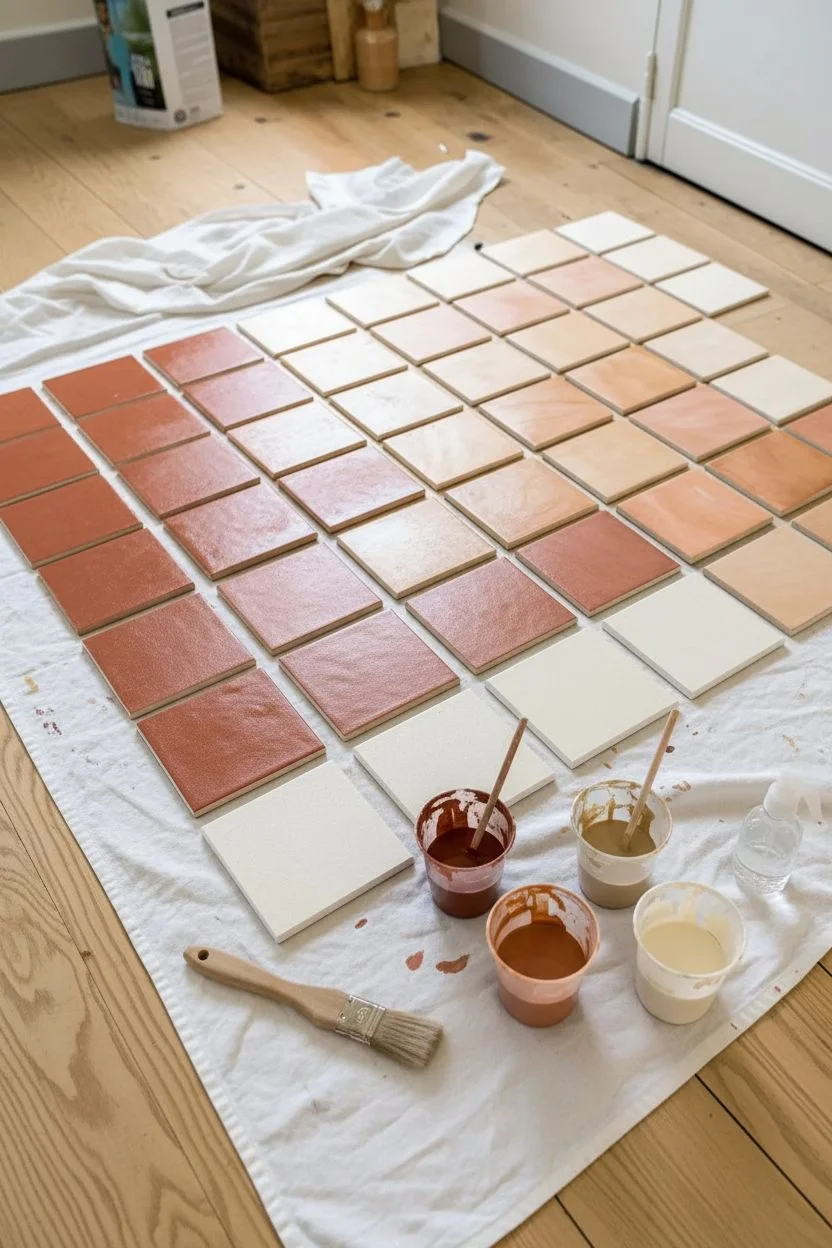
Transform a standard drop ceiling into a warm, inviting canvas by painting individual tiles in a gradient of earthy terracottas, soft peaches, and creamy whites. This project mimics the varied, handmade look of artisan zellige tiles, bringing texture and warmth to an often overlooked surface.
Step-by-Step Tutorial
Materials
- Standard drop ceiling tiles (white, porous type)
- Latex or chalk paint in 3-4 distinct colors: Terracotta/Rust, Peach, Tan/Beige, and Warm White
- Mixing cups or small plastic containers
- Stir sticks
- Wide flat paintbrush (2-3 inch)
- Drop cloth or old sheet
- Water for thinning paint
- Spray bottle with water (optional)
- Clear matte sealant spray (optional)
Step 1: Preparation and Palette Setup
-
Clean the tiles:
Before laying anything out, ensure your ceiling tiles are free of dust and cobwebs. A quick vacuum with a brush attachment works wonders; avoid getting them too wet during cleaning as they are porous. -
Protect your workspace:
Lay down a large drop cloth on a flat surface. You need enough room to lay out at least a 4×4 section of your grid to visualize the color flow before you start painting. -
Prepare your base colors:
Pour your main paint colors—Terracotta, Peach, Tan, and White—into separate containers. These will serve as your ‘pure’ pigments. -
Create custom blends:
To achieve a smooth gradient, you need bridge colors. Mix a little Terracotta into the Peach to create a dark blush. Mix Tan with White to create a sandy cream. The goal is to have about 6-8 distinct but related shades.
Uneven Color Fix
If a tile absorbs color unevenly, don’t panic. Mist it lightly with water, then apply a second dilute wash. The moisture helps redistribute the pigment for a smoother look.
Step 2: The Wash Technique
-
Thin the paint:
Ceiling tiles are thirsty! Thin your mixed paints with a small amount of water (about 10-20% water). This creates a wash that stains the tile rather than sitting heavily on top, preserving the texture. -
Test the absorption:
Take a spare tile or the back of one and test your first color. If it soaks in instantly and looks blotchy, mist the tile lightly with your water spray bottle first to help the paint glide. -
Establish the anchor tiles:
Start by painting a few tiles in your darkest Terracotta shade. These will likely form the corners or the center of your ombre pattern, depending on your vision. -
Apply the mid-tones:
Using the Peach and Tan blends, paint the next batch of tiles. Brush in different directions—horizontal, vertical, and diagonal—to create a subtle, organic texture rather than uniform strokes. -
Paint the lightest tiles:
Finish with your creamy White and sandy blends. I like to keep these quite sheer, letting a tiny bit of the original tile texture show through for depth.
Step 3: Refining the Gradient
-
Lay out the grid:
Once the base coats are touch-dry, arrange the painted tiles on the floor in their installation pattern. This is crucial for seeing how the colors transition. -
Identify jarring transitions:
Look for spots where a dark tile sits next to a very light one without a mid-tone in between, unless that high contrast is what you’re aiming for. -
Feathering technique:
To soften a transition, dry-brush a little of the lighter color onto the edge of a darker tile, or vice-versa. This mimics the natural variation found in fired clay tiles. -
Add ‘imperfections’:
Dip your brush tip into a slightly darker shade and dab random spots on a few tiles, quickly wiping it back with a rag. This adds that aged, pottery-like character. -
Let them cure:
Allow all tiles to dry completely flat for at least 24 hours. If they are slightly warped from moisture, weight them down gently with books on the corners once they are dry to the touch. -
Seal (Optional):
If you want to prevent future staining or dust accumulation, give the tiles a light coat of clear matte spray sealant. Keep the can moving to avoid shiny spots. -
Re-install:
Pop the tiles back into your ceiling grid, following the pattern you laid out on the floor. Take a step back and enjoy your new ‘skylight’ view.
Faux Grout Lines
Paint the metal grid strips of your drop ceiling in a flat matte color that matches your darkest tile shade. This creates a cohesive, high-end tiled look.
Enjoy the warm, custom atmosphere created by your new artistic ceiling
Faux Tin-Look Painted Details on Flat Tiles
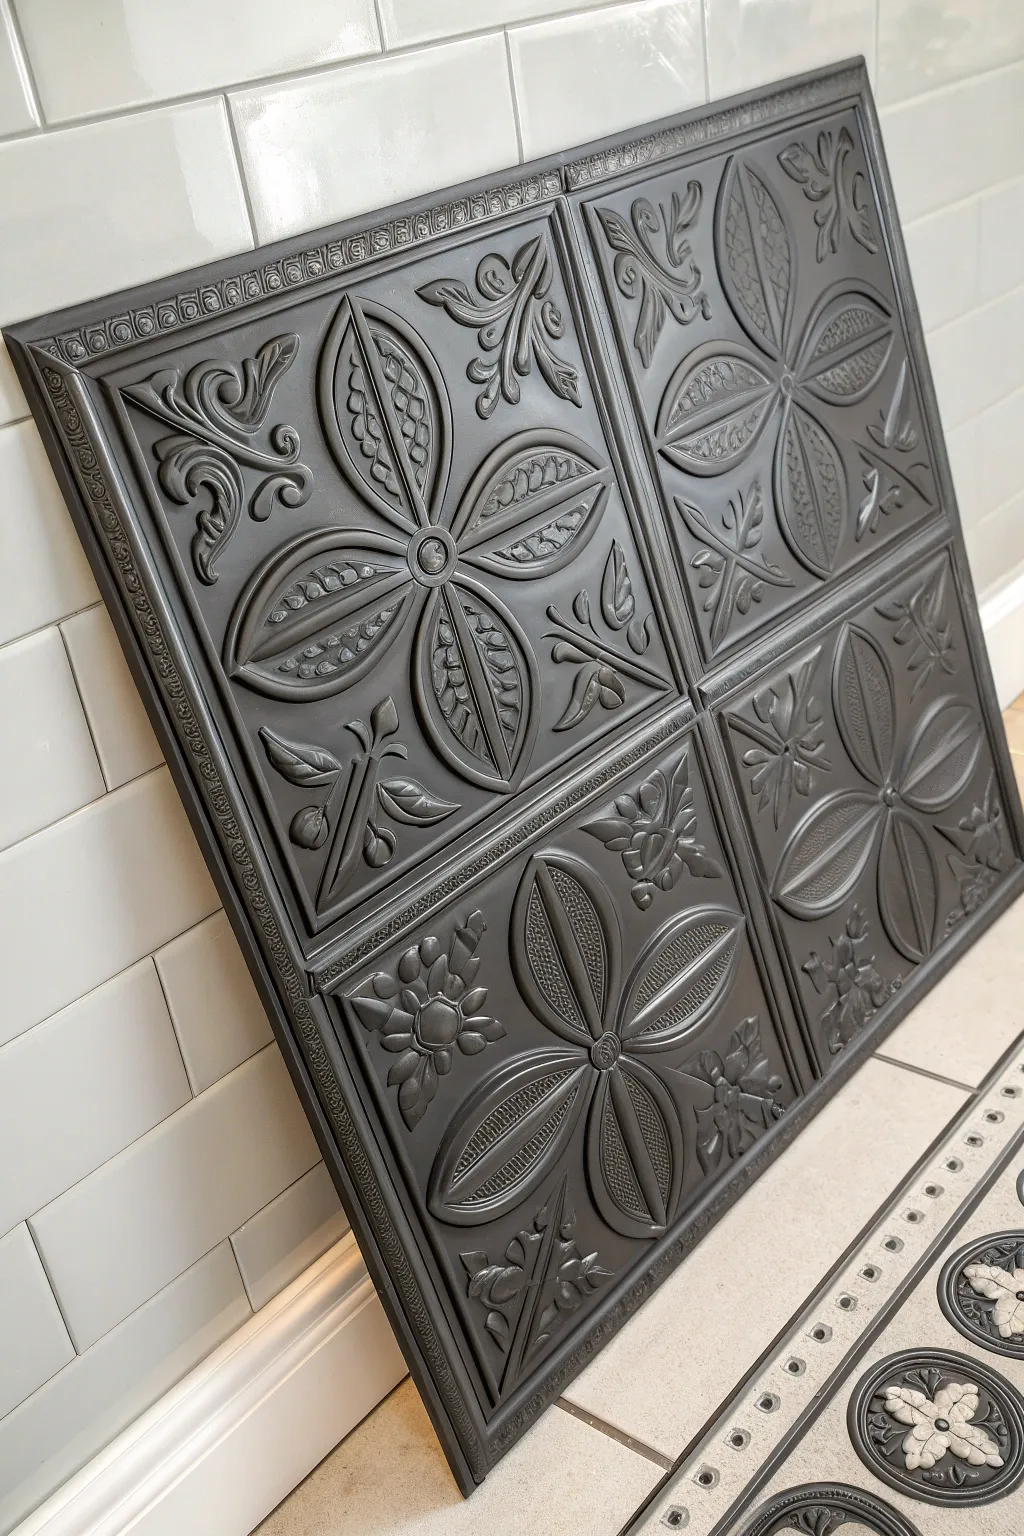
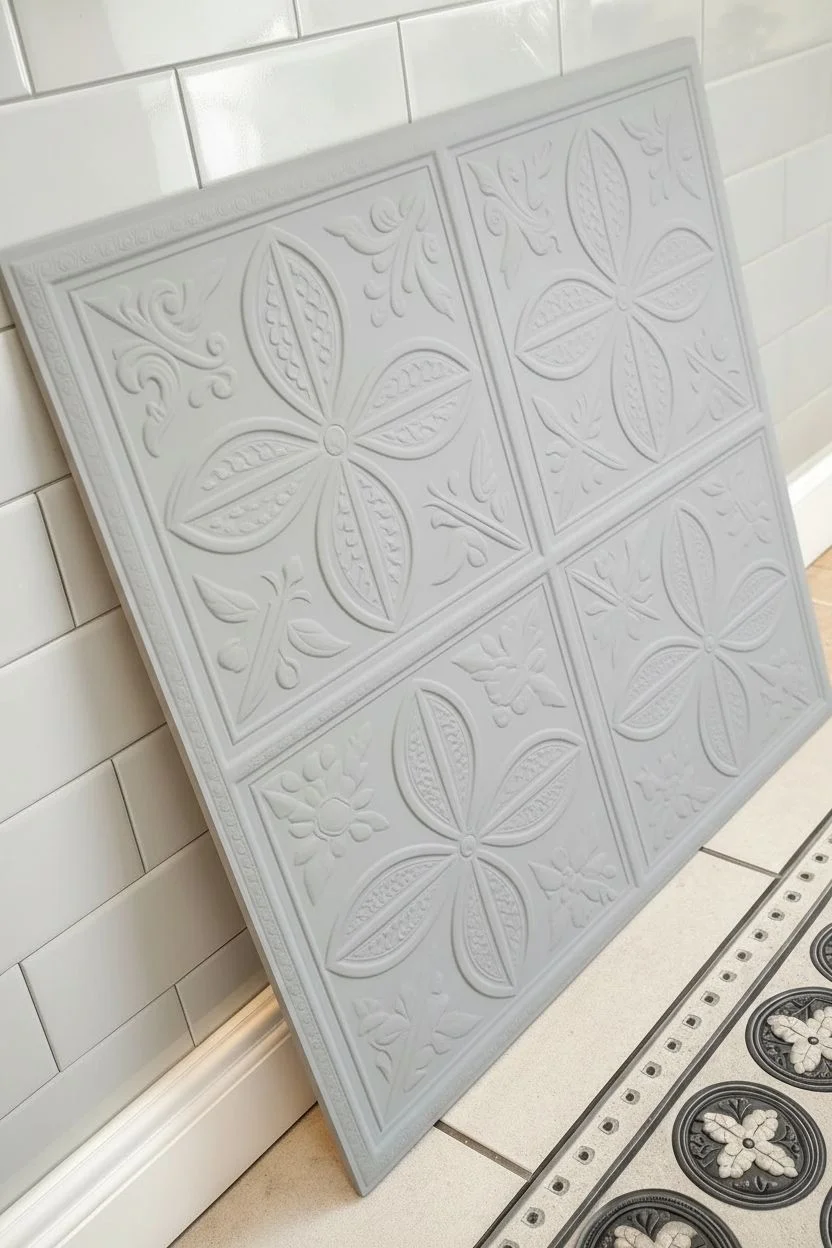
Transform standard styrofoam or PVC ceiling tiles into convincing industrial artifacts with this moody, monochromatic finish. By layering dark matte paint over a textured surface, you can mimic the heavy, substantial look of cast iron without the weight or cost.
How-To Guide
Materials
- Textured PVC or Styrofoam ceiling tiles (24″x24″) in a floral pattern
- Adhesion primer spray (grey or white)
- Flat or ultra-matte black spray paint
- Dark charcoal gray chalk paint
- 2-inch synthetic bristle brush
- Dry rag or lint-free cloth
- Drop cloth
- Fine-grit sanding block (optional)
- Matte clear coat sealer spray
Step 1: Preparation and Priming
-
Clean the surface:
Before starting, wipe down your ceiling tiles with a slightly damp cloth to remove any manufacturing dust or oils. This ensures your paint adheres properly. Let them dry completely. -
Set up your workspace:
Lay down a drop cloth in a well-ventilated area, preferably outdoors or in a garage. If you are working with lightweight foam tiles, weigh down the corners with small stones so they don’t blow away while spraying. -
Apply primer:
Spray a light, even coat of adhesion primer over the entire tile. Focus on getting the spray into the deep crevices of the floral pattern. Don’t worry about full opacity yet; you just need a gripping surface. -
Inspect and touch up:
Once the first coat is dry to the touch (usually 15-20 minutes), check for any missed spots in the intricate details. Apply a second light coat of primer if necessary to ensure uniform coverage.
Don’t Overwork It
When dry brushing, less is more. It’s easy to add more gray highlights later, but very hard to remove them once applied. Start subtle.
Step 2: Creating the Base Coat
-
Apply the black base:
Using your flat/matte black spray paint, cover the entire tile. Hold the can about 10-12 inches away and use sweeping motions to avoid drips. The goal is a solid, deep black foundation. -
Check the angles:
Because these tiles have raised relief patterns, paint can easily miss the sides of the embossed shapes. Rotate the tile or your body to spray from different angles—top, bottom, left, and right—to hit every nook. -
Dry thoroughly:
Allow the black base coat to cure fully according to the can’s instructions. This usually takes at least an hour. I like to let this dry briefly in the sun if possible to speed up the process.
Create Rust Effects
For an aged look, dab cinnamon or paprika mixed with matte sealer onto random crevices before the final clear coat for instant rust texture.
Step 3: Adding Depth and Texture
-
Mix your secondary color:
Pour a small amount of charcoal gray chalk paint onto a paper plate. Chalk paint is excellent here because it dries with a very matte, powdery finish that mimics old metal perfectly. -
Load the brush:
Dip just the tips of your 2-inch brush into the charcoal paint. Dab the excess off onto a paper towel until the brush is almost ‘dry.’ You want very little paint on the bristles. -
Dry styling technique:
Lightly drag the brush over the raised surfaces of the tile. Do not press down into the recesses; keep your hand flat and parallel to the tile. The gray will catch the high points, highlighting the floral design against the black background. -
Buffing and blending:
Immediately after applying the dry brush strokes, take a dry, clean rag and gently buff the painted areas. This softens the brush strokes and blends the charcoal into the black, creating a weathered iron look rather than a ‘painted’ look. -
Evaluate the contrast:
Step back and look at the tile. If the design feels too dark, add another very light layer of the dry-brushed gray. If it’s too light, you can lightly mist black spray paint from a distance to knock it back.
Step 4: Sealing and Installation Prep
-
Seal the finish:
To protect your faux finish from scratches or dust (especially if these will be on a wall or ceiling), spray the entire tile with a matte clear coat. Do not use gloss or satin, as sheen ruins the cast iron illusion. -
Final cure:
Let the clear coat dry for at least 24 hours before handling extensively. This prevents tacky fingerprints on your new finish. -
Ready for mounting:
Your faux metal tiles are now ready to be glued up. Because they are lightweight plastic or foam, you have achieved a high-end industrial look without needing heavy-duty anchors.
Now you have a stunning architectural piece that adds instant character to any room

PENCIL GUIDE
Understanding Pencil Grades from H to B
From first sketch to finished drawing — learn pencil grades, line control, and shading techniques.
Explore the Full Guide
Painted Tile Borders to Frame the Room
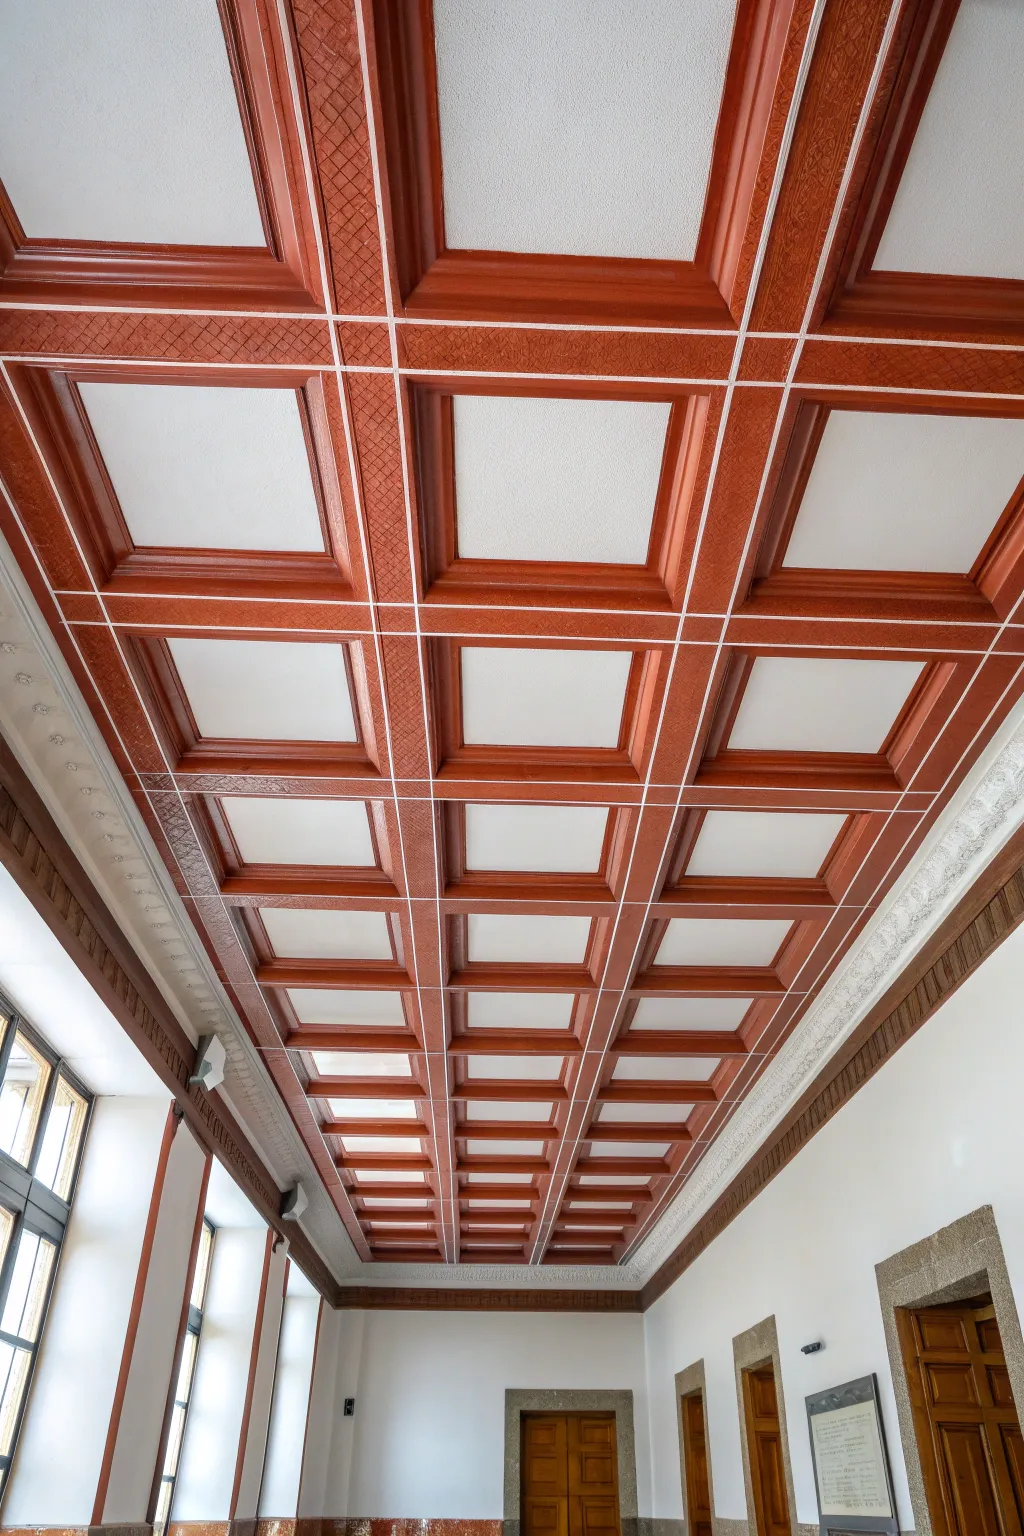
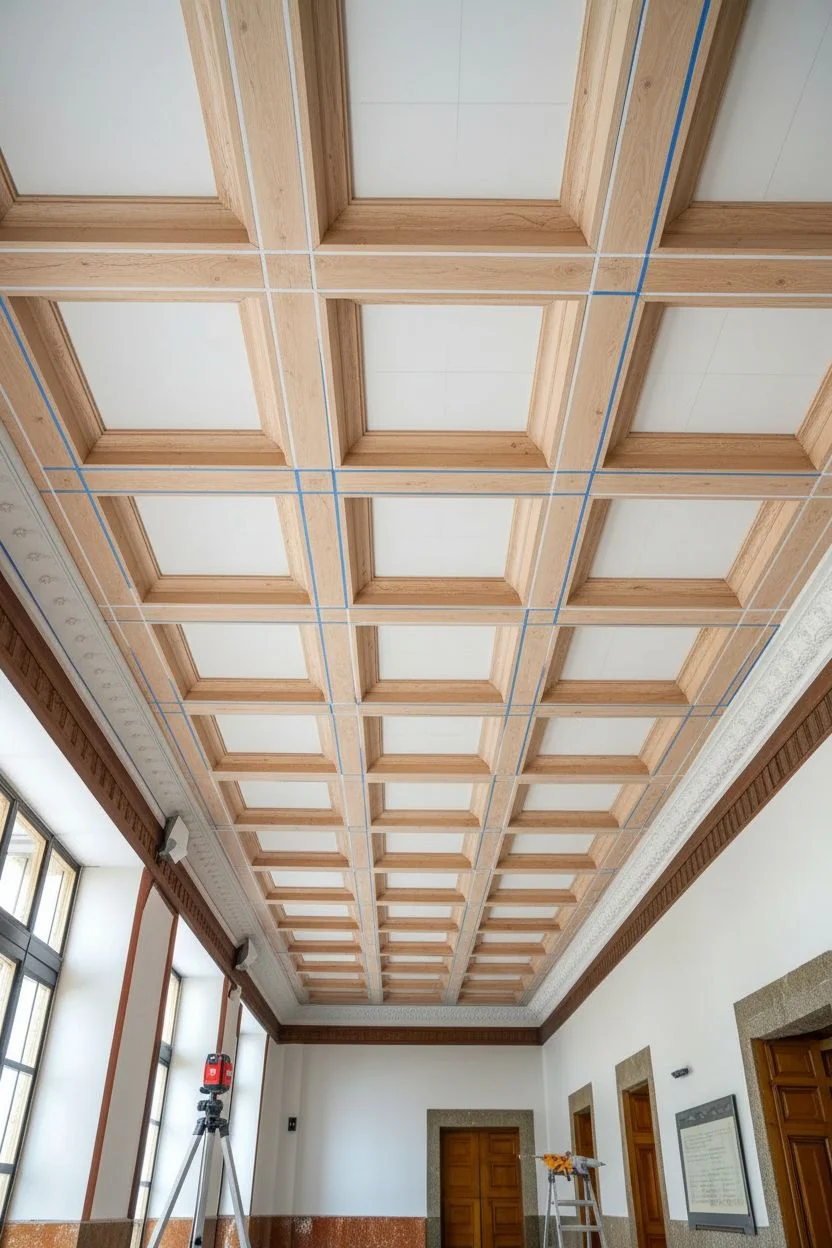
Transform a plain ceiling into a stunning display of architectural depth using nothing but paint and trim. This project mimics the grandeur of traditional coffered ceilings by combining physical molding with strategic painting to create rich, textured borders that frame bright white panels.
Detailed Instructions
Materials
- 1×4 Primed Pine or MDF boards (for grid layout)
- Base cap molding or cove molding (for inside edges)
- Construction adhesive
- Brad nailer and 2-inch brad nails
- Paintable caulk and caulk gun
- Wood filler
- Fine-grit sandpaper (220-grit)
- Painter’s tape (high quality)
- High-gloss or semi-gloss latex paint (Terracotta/Brick Red)
- Flat white ceiling paint
- Angled sash brush (2.5 inch)
- 4-inch foam roller & tray
- Laser level (highly recommended)
- Chalk line
- Measuring tape
- Stencil brush or sponge (optional for texture effect)
Step 1: Preparation & Grid Layout
-
Measure and plan:
Begin by measuring your ceiling’s total dimensions. You need to calculate a grid of equal squares or rectangles. It helps to sketch the layout on paper first to ensure the borders around the room’s perimeter remain balanced. -
Mark the grid:
Using a laser level and a chalk line, snap the lines onto your existing ceiling where the center of each beam will sit. This creates your roadmap for installation. -
Install the main beams:
Apply construction adhesive to the back of your 1×4 boards. Press them along your chalk lines and secure them into the ceiling joists using a brad nailer. Start with the longest continuous runs first, then fill in the cross-pieces. -
Add dimension with molding:
To give the flat boards a true coffered look, cut mitered lengths of base cap or cove molding. Install these along the inner edges of each grid square, attaching them to the side of the 1x4s so they bridge the gap between the beam and the original ceiling surface.
Step 2: Refining the Surface
-
Fill the gaps:
Use wood filler on all nail holes and joints where boards meet. I prefer to overfill slightly to account for shrinkage. -
Caulk the seams:
Run a thin bead of paintable caulk along every edge where the molding meets the ceiling and where the molding meets the beam. Smooth it immediately with a damp finger for a seamless transition. -
Sand for smoothness:
Once the filler is dry, sand the wood surfaces with 220-grit sandpaper until completely smooth. Wipe away all dust with a tack cloth or damp rag. -
Prime the construction:
Apply a coat of high-quality primer to all the wood and molding elements. This ensures your finish color will look rich and adhere properly.
Crisp Line Secret
Paint over the edge of your painter’s tape with the base white color first. This seals the gap, meaning any bleed is white-on-white, leaving the red line perfect.
Step 3: Painting the Design
-
Paint the panels:
Before tackling the complex woodwork, roll two coats of flat white ceiling paint onto the inner ‘panels’ (the original ceiling surface inside the boxes). It is much easier to cut in the dark color later than to try and keep white off a dark frame. -
Tape the edges:
Once the white paint is fully cured (give it at least 24 hours), apply painter’s tape to the white ceiling surface exactly where it meets the molding. Press the tape edge down firmly with a putty knife to prevent bleed. -
Cut in the color:
Open your Terracotta or Brick Red paint. Using an angled sash brush, carefully paint the molding profiles and the corners of the beams. -
Roll the flat faces:
Use a 4-inch foam roller to apply paint to the flat faces of the 1×4 beams. This provides a smoother finish than brushing and speeds up the process. -
Apply the second coat:
Allow the first coat to dry according to the can’s instructions, then apply a second coat for full opacity and depth of color. -
Create the textured cross-sections:
In the reference image, the cross-beams have a subtle pattern. You can mimic this by dabbing a slightly lighter shade of red with a textured sponge or stencil brush onto the flat intersection points of the grid while the base coat is tacky, or use a patterned roller for a subtle relief effect. -
Remove the tape:
Pull the painters tape off slowly at a 45-degree angle while the final coat of paint is still slightly wet. This creates the crispest possible line. -
Touch up:
If any red paint bled onto the white panels, wait for it to dry completely, then use a small artist’s brush and white paint to conceal the mistake.
Faux Wood Grain
Instead of solid red paint, use a gel stain and a wood-graining tool on the flat beams to give the illusion of expensive mahogany woodwork.
Step back and admire how this structured grid adds instant history and sophistication to your space
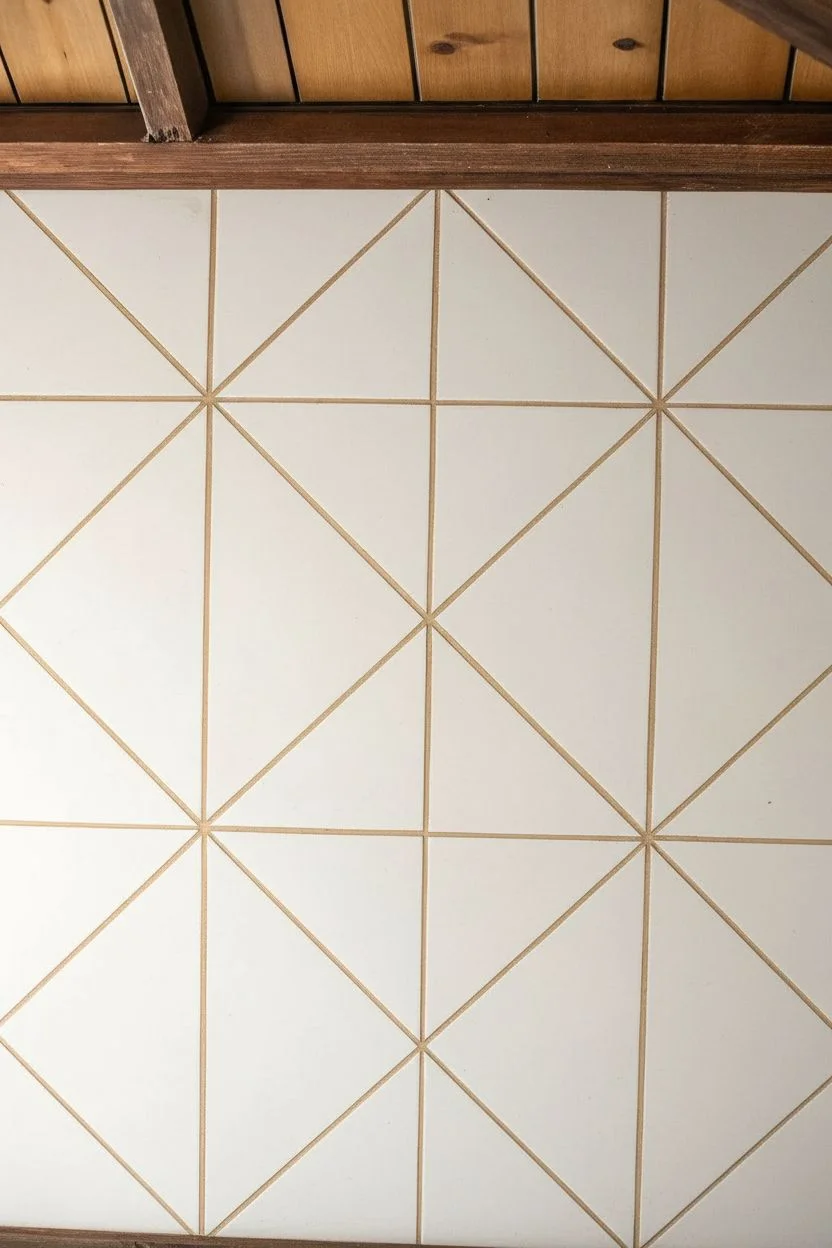
Geometric Color-Block Tiles for Modern Style
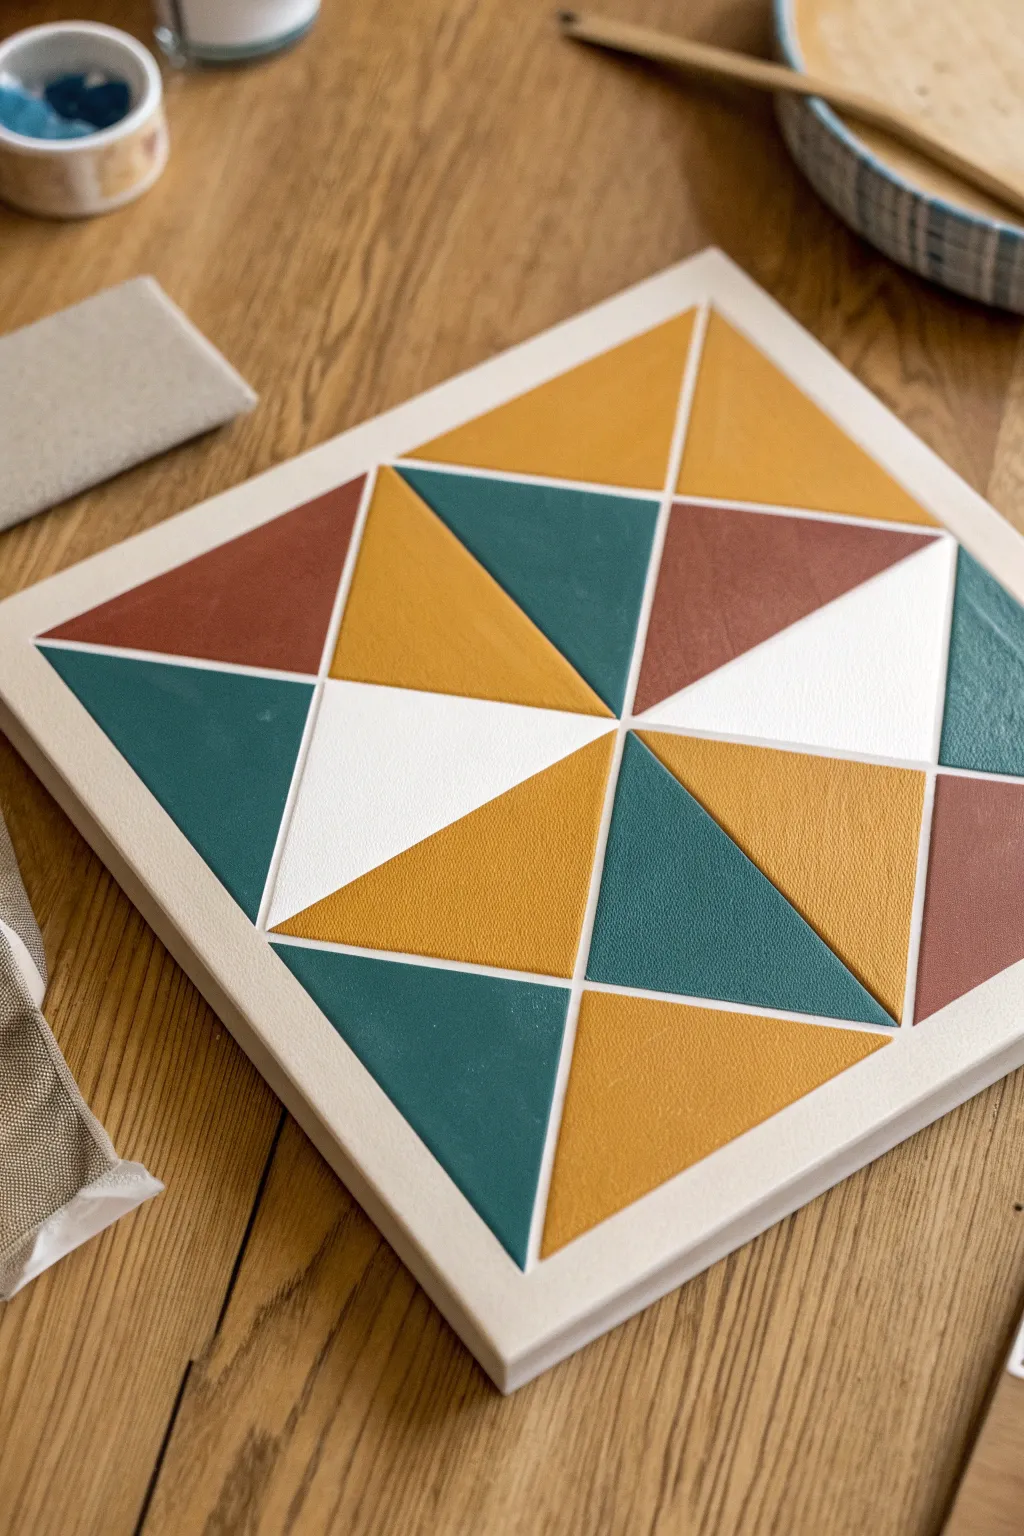
Transform a plain ceiling tile into a piece of modern art with this bold geometric design. By using simple masking techniques and a warm, earthy color palette, you can create a striking 3D prism effect that adds instant character to any room.
Step-by-Step Guide
Materials
- Square ceiling tile (fiber or polystyrene)
- Painter’s tape (various widths, ideally 0.5 inch and 1 inch)
- Acrylic craft paints (Deep Teal, Burnt Sienna/Terracotta, Mustard Yellow, White)
- Flat artist brushes (medium size)
- Small angled brush (for touch-ups)
- Ruler or straight edge
- Pencil
- Palette or paper plate
- Sealer or clear varnish (optional)
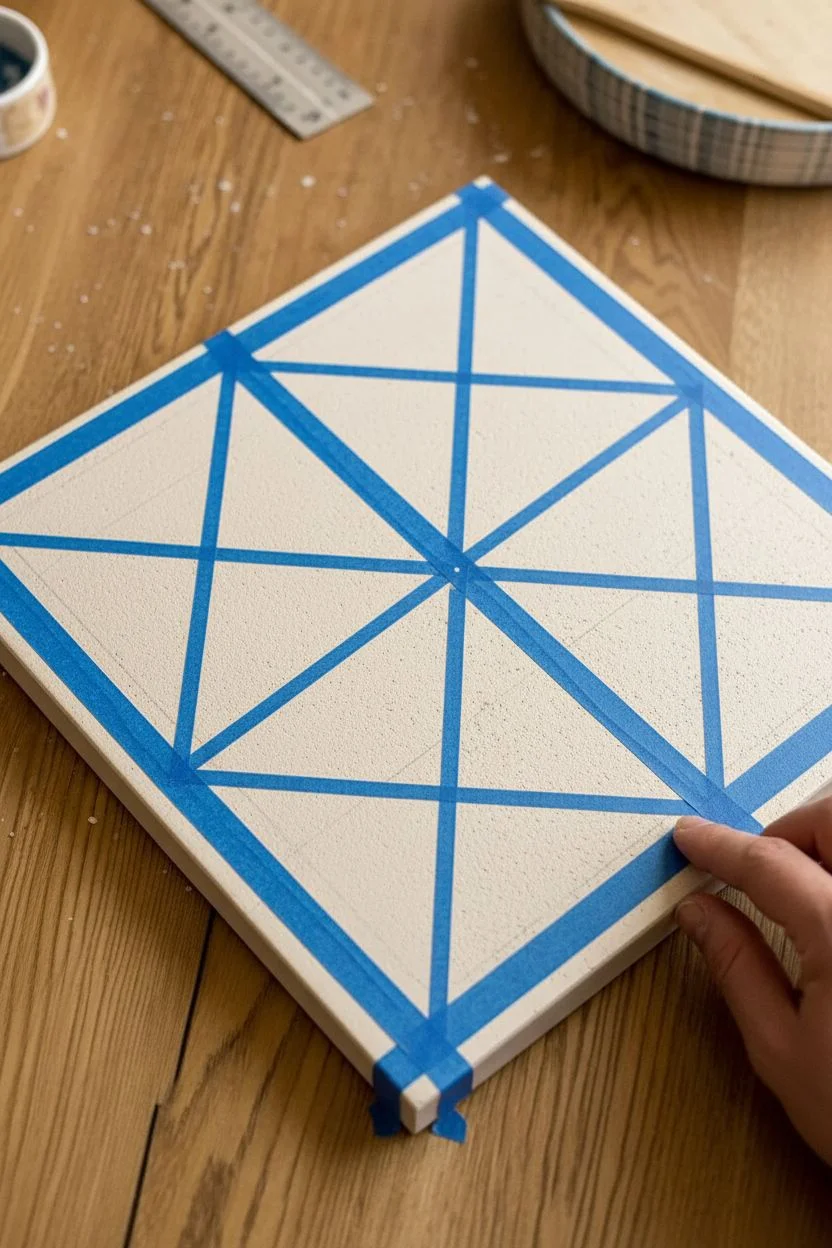
Step 1: Planning and Taping
-
Clean the surface:
Before starting, ensure your ceiling tile is free of dust or loose debris. A quick wipe with a dry microfiber cloth usually does the trick to help the tape adhere properly. -
Find the center:
Use your ruler to lightly mark the exact center point of the tile with a pencil. This single dot will be the anchor for your entire radial design. -
Mark the edges:
Measure and mark the midpoint on each of the four outer edges of the tile. You will likely connect lines to these points to create the diamond shape. -
Draft the grid:
Lightly sketch the main lines: a large diamond connecting the edge midpoints, and an ‘X’ crossing through the center. Don’t worry about perfection; the tape will fix straightness later. -
Apply first tape lines:
Apply painter’s tape along your pencil lines to mask off the white grout lines between shapes. I find it easiest to tape off all the lines going in one direction first (e.g., all vertical or diagonal slants). -
Seal the tape edges:
Run your fingernail or the back of a spoon firmly along the edges of the tape. This is crucial on textured ceiling tiles to prevent paint from bleeding underneath.
Step 2: Painting the Colors
-
Start with Mustard Yellow:
Identify the triangles meant for yellow based on the reference photo. Apply two thin coats of Mustard Yellow acrylic paint, allowing the first to specificially dry to the touch before adding the second. -
Apply Burnt Sienna:
Move on to the reddish-brown triangles. Use your flat brush to fill these sections with Burnt Sienna or Terracotta paint, being careful not to overload the brush near the tape edges. -
Paint the Deep Teal:
Fill in the teal sections next. This dark color often covers well, but if your tile is porous, a second coat will ensure the color looks rich and opaque. -
Brighten with White:
For the designated white triangles, apply a crisp white acrylic. Even if the tile is already white, painting these sections ensures the texture and sheen match the other colored areas. -
Let the first batch dry:
Allow the paint to dry completely. Since the tape lines cross over each other, you can’t paint adjacent shapes until you move the tape.
Crisp Lines on Texture
On bumpy tiles, paint a thin layer of the *base* tile color (white) over the tape edge first. This seals gaps so the colored paint can’t bleed under.
Step 3: Finishing and Revealing
-
Remove initial tape:
Carefully peel back the painter’s tape at a 45-degree angle. Do this slowly to avoid ripping the surface of the tile. -
Retape for remaining shapes:
Once the first set of painted shapes is fully dry, apply fresh tape over the dried paint edges to mask off the remaining unpainted triangles. -
Paint remaining sections:
Repeat the painting process for the remaining triangles, following the color pattern. Ensure you are getting good coverage in the corners of the shapes. -
Final peel:
Remove the second round of tape to reveal the complete geometric pattern with crisp white lines separating the colors. -
Touch up edges:
Use a small angled brush and a tiny bit of white paint to fix any bleed-through or uneven lines where the colors meet the faux grout lines. -
Apply sealer:
If these tiles will be in a humid area like a bathroom, brush on a coat of clear matte or satin varnish to protect your work.
Peeling Paint?
If paint lifts with the tape, score the edge gently with a craft knife before peeling, or wait until the paint is tacky but not fully hardened.
Step back and admire how a simple geometric pattern completely reinvented the surface


Sky Ceiling Tiles With Soft Clouds
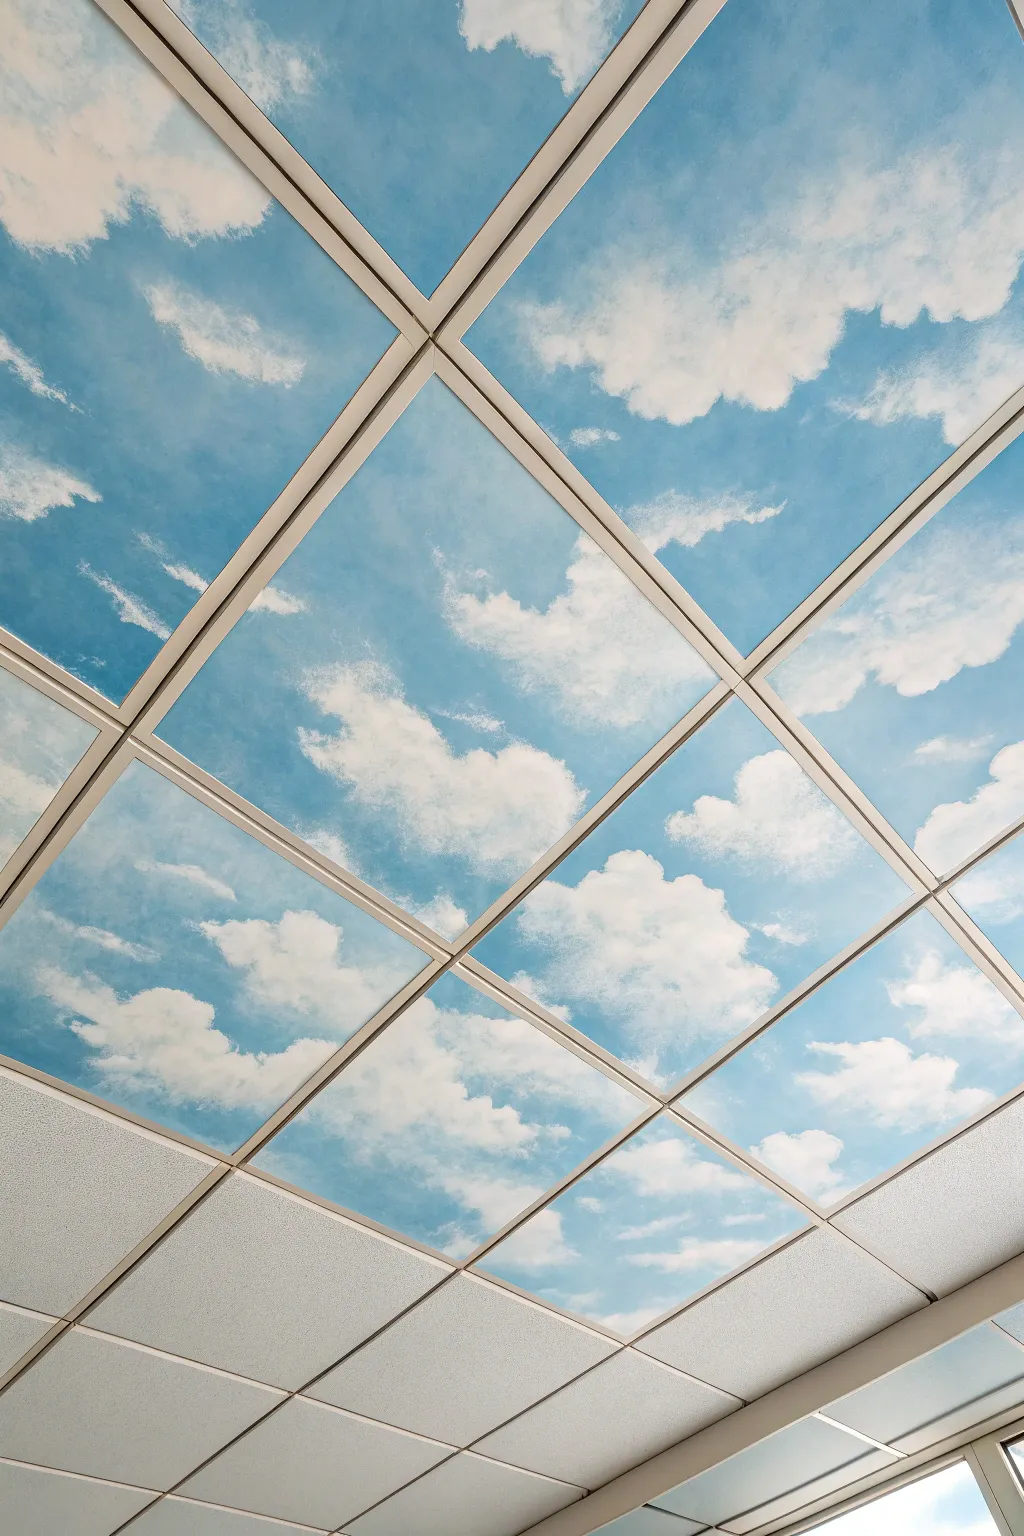
Transform a drab office or basement ceiling into a breathtaking view of the outdoors with this simple yet effective painting project. By replacing standard acoustic tiles with a seamless cloudscape, you can create a bright, airy atmosphere that instantly opens up any enclosed space.
How-To Guide
Materials
- Standard acoustic ceiling tiles (2×2 or 2×4)
- Matte white latex primer
- Sky blue acrylic or latex paint (matte finish)
- Titanium white acrylic paint
- Large foam roller and tray
- Natural sea sponge
- Large blending brush (soft bristle)
- Painter’s tape or numbering system
- Drop cloth
- Glaze medium (optional but recommended)
Step 1: Preparation and Base Coat
-
Map Layout:
Before removing any tiles, decide on the orientation. If you want a continuous mural effect across multiple tiles, number the back of each tile corresponding to a simple grid map drawn on paper. This ensures the clouds flow seamlessly from one square to the next. -
Clean Surface:
Remove the tiles carefully from the grid and lay them on a flat, protected surface. Gently brush off any loose dust or debris with a dry cloth or soft brush to ensure paint adhesion. -
Prime Tiles:
Apply a coat of matte white primer using a foam roller. Acoustic tiles are very porous and will soak up paint quickly, so this step seals the surface and provides a bright base for your blue sky. -
Dry Completely:
Allow the primer to dry fully according to the manufacturer’s instructions. If the tiles still look gray or uneven, apply a second coat of primer. -
Apply Blue Base:
Roll on your sky blue base color. Work in sections if you are doing many tiles, but aim for a smooth, solid coverage. I prefer using a slightly lighter blue than you might think necessary, as ceiling corners can be shadowy.
Step 2: Creating the Cloudscape
-
Prepare Cloud Mixture:
Mix a small amount of titanium white paint with a glaze medium (about 1 part paint to 2 parts glaze). Even a little water works in a pinch. This translucency helps create the soft, wispy edges characteristic of real cumulus clouds. -
Sponge Shapes:
Dampen your sea sponge and wring it out well. Dip it lightly into the white mixture and dab it onto the blue tile to form the main bodies of your clouds. Focus on creating varied shapes—some large and fluffy, some small stripes. -
Drift and Flow:
Think about the direction of the wind in your imaginary sky. Angle your clouds so they seem to drift diagonally across the tile, rather than sitting straight in the center. If working across multiple tiles, align the edges so a cloud starts on one tile and finishes on its neighbor. -
Soften Edges:
Immediately after sponging, take your dry blending brush and very gently pounce or swirl over the wet white paint. This blurs the hard sponge marks and creates a misty, out-of-focus look. -
Brighten Highlights:
Dip a smaller brush or a clean corner of the sponge into pure, undiluted white paint. Dab this onto the ‘tops’ of the cloud formations (where the sun would hit) to create depth and volume. -
Blend Highlights:
Use the soft blending brush again to feather the bright white highlights downward into the misty base of the cloud. Leave the very top edge crisp for contrast against the blue. -
Check Perspective:
Stand back or prop the tiles up occasionally to view them from a distance. Clouds often look better when they aren’t perfectly symmetrical or too crowded. -
Add Wisps:
Use a nearly dry brush with a tiny amount of white paint to drag very faint, streaky lines across the empty blue spaces. These act as high-altitude cirrus clouds and add realism.
Natural Edges
Don’t stop painting at the tile edge. Continue the cloud shape off the side of the tile so that when placed next to its neighbor, the visual flow isn’t interrupted by the grid lines.
Step 3: Final Assembly
-
Final Cure:
Let the painted tiles cure for at least 24 hours. The paint needs to be completely hard so it doesn’t stick to the grid or scratch during installation. -
Reinstall Tiles:
Using your numbered map, carefully lift the tiles back into the ceiling grid. Be gentle with the edges to avoid chipping the paint.
Sunset Mode
For a ‘golden hour’ variation, mix a tiny drop of pale pink or peach into the bottom edges of the clouds. It adds warmth and creates a cozy evening atmosphere.
Look up and enjoy the permanent sunny weather inside your newly refreshed room
Night Sky Galaxy Tiles With Stars and Nebulas
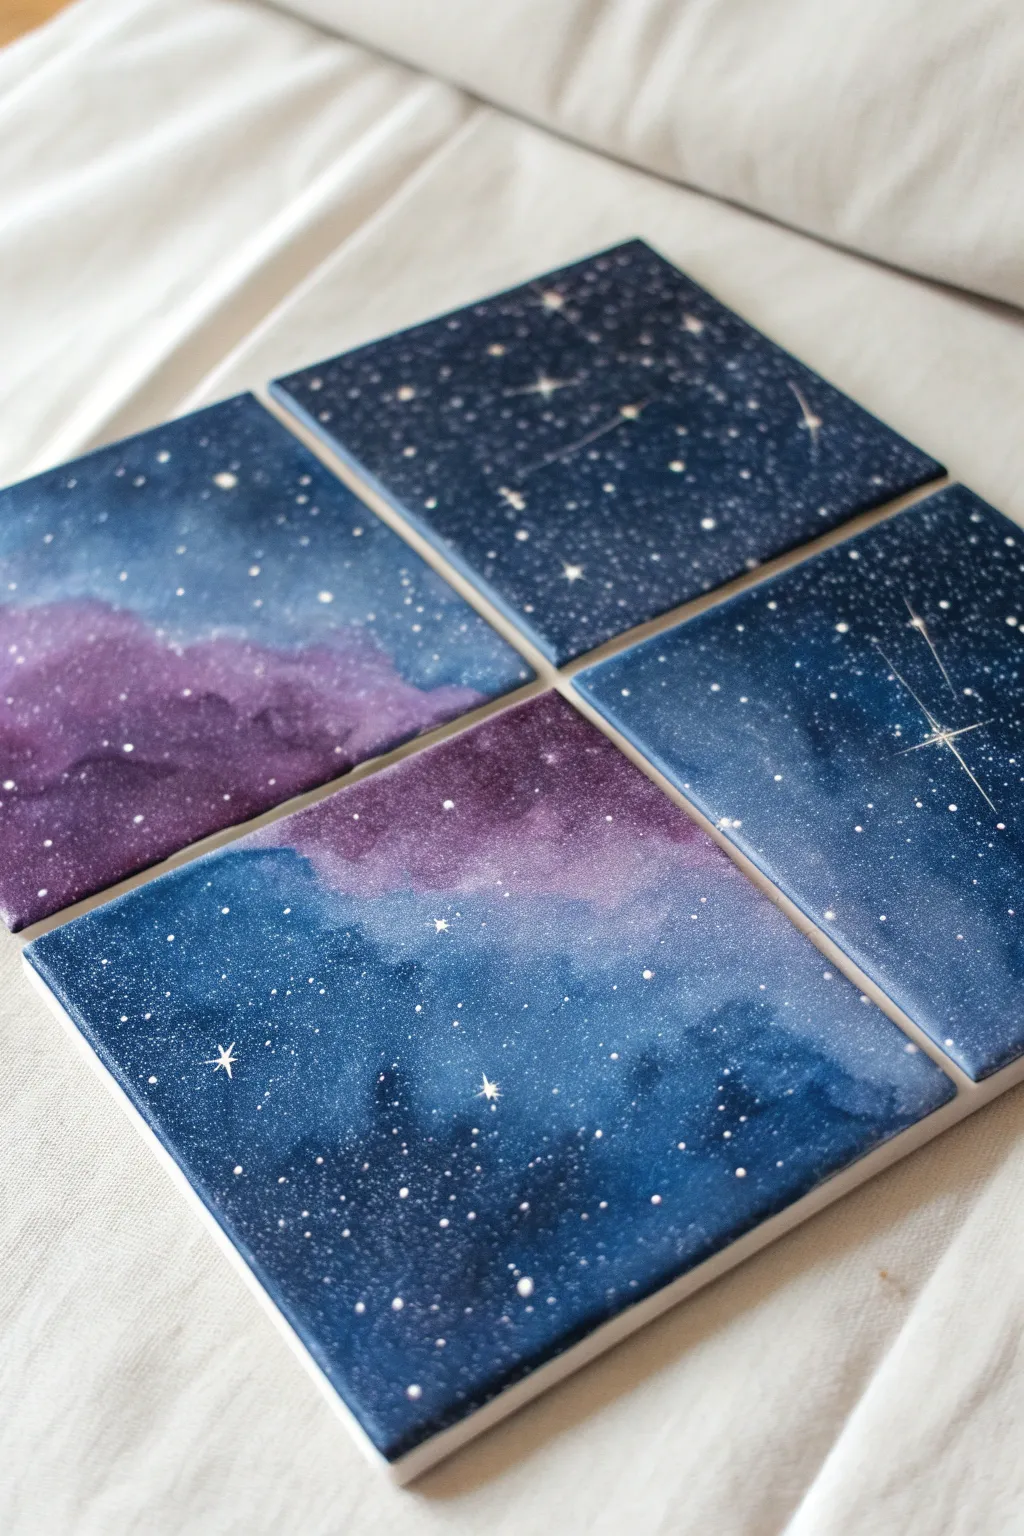
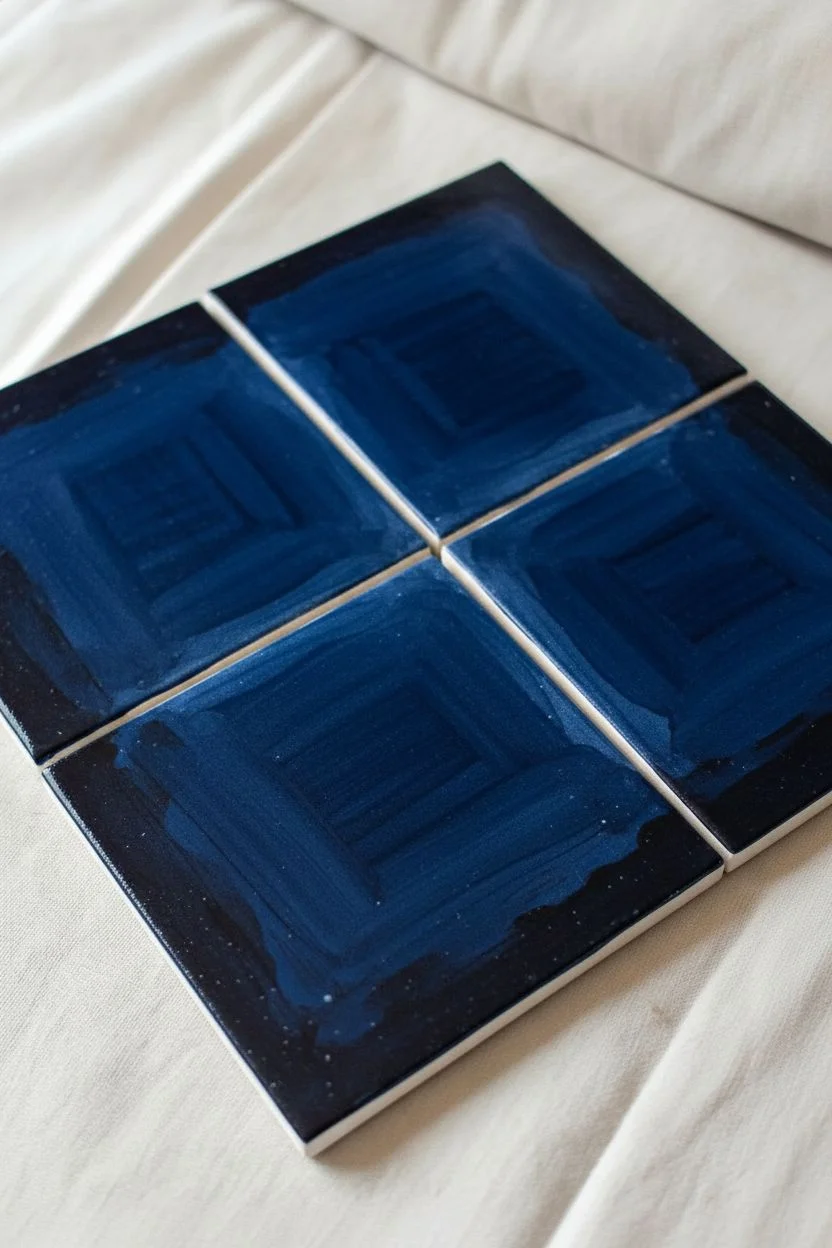
Transform plain tiles into a breathtaking window on the universe with this galaxy painting project. Deep blues and vibrant purples blend seamlessly to create nebulas, accented by sparkling star fields that span across your ceiling or wall art.
Step-by-Step Tutorial
Materials
- 4 square ceramic tiles or canvas panels (4×4 or 6×6 inches)
- Acrylic paints (Navy Blue, Phthalo Blue, Purple, Black, Titanium White)
- Soft synthetic brushes (flat shader and small round)
- Sponge or older stippling brush
- Water cups
- Paper towels
- Old toothbrush
- Clear spray varnish (optional)
Step 1: Setting the Background
-
Prime the surface:
If you are using ceramic tiles, ensure they are clean and dry. If using glossy tiles, specific primers or surface sandings might help paint adhere, though unglazed bisque tiles work best. Arrange your four tiles in a square formation on your work surface so you can paint across the seams. -
Base coat application:
Start by mixing a small amount of black with your darkest navy blue. Apply this dark mixture to the outer corners and edges of the entire four-tile square, creating a vignette effect that frames the artwork. -
Establishing the deep space:
While the edges are still wet, blend pure navy blue inward from those dark corners. Use broad, sweeping strokes that cross from one tile to another to ensure the design flows naturally across the gaps.
Star Splatter Mess
If you get big blobs instead of stars, dab them up immediately with a damp paper towel corner. You can touch up the background blue later.
Step 2: Creating the Nebula
-
Adding mid-tones:
Load your brush with a brighter Phthalo Blue. Paint irregular cloud shapes in the central areas, blending the edges softly into the darker navy background. Don’t worry about perfect shapes; organic blobs look more realistic. -
Introducing color variance:
While the blue is tacky but not dry, introduce the purple paint. Focus the purple in a specific band or cloud formation, like the diagonal swath seen in the bottom left and top right tiles. Gently dab this color on rather than brushing it to build texture. -
Softening the transitions:
Take a slightly damp sponge or a dry, fluffy brush and gently tap along the borders where the purple meets the blue. This stippling motion blurs the harsh lines, mimicking the gaseous look of a nebula. -
Highlighting the clouds:
Mix a tiny drop of white into your purple or blue to create a pale lavender or light blue. Lightly dab this highlight into the center of your nebula clouds to give them volume and luminosity. -
Check the flow:
Step back and look at the four tiles together. Ensure the purple cloud physically crosses the gap between tiles convincingly. If a line breaks too sharply, dab more paint over the seam to bridge the visual gap.
Glow in the Dark
Mix glow-in-the-dark medium with your white star paint. The nebula will look normal by day but reveal a hidden galaxy when lights go out.
Step 3: Stars and Details
-
Creating the star field:
Dilute a small dollop of white acrylic paint with water until it has the consistency of ink or heavy cream. Dip an old toothbrush into this mixture. -
Splattering stars:
Hold the toothbrush over your tiles and run your thumb across the bristles to flick tiny specks of paint downward. Do a test spray on paper first to control the droplet size. Focus denser clusters of stars over the darker blue areas. -
Painting major stars:
Using your smallest round brush, manually dot a few larger stars throughout the composition. Keep them irregular—some tiny, some slightly bigger—to create depth. -
Adding starbursts:
Select one or two spots for a ‘hero’ star, like the one on the right-hand tile. Paint a small white cross, then carefully extend the lines outward to thin, tapering points. Add a tiny diagonal cross in the center for extra sparkle. -
Final highlights:
If some areas look too flat, I find adding a very sheer glaze of watered-down white over the brightest parts of the nebula adds a magical glow. Use barely any paint on your brush for this. -
Sealing the work:
Allow the tiles to dry completely, preferably overnight. Once cured, spray them with a clear varnish (matte or satin works best for space) to protect the paint from chipping and to deepen the dark colors.
Your custom galaxy is now ready to be mounted, bringing the infinite wonder of space into your room
Botanical Ceiling Tiles With Leaves and Vines
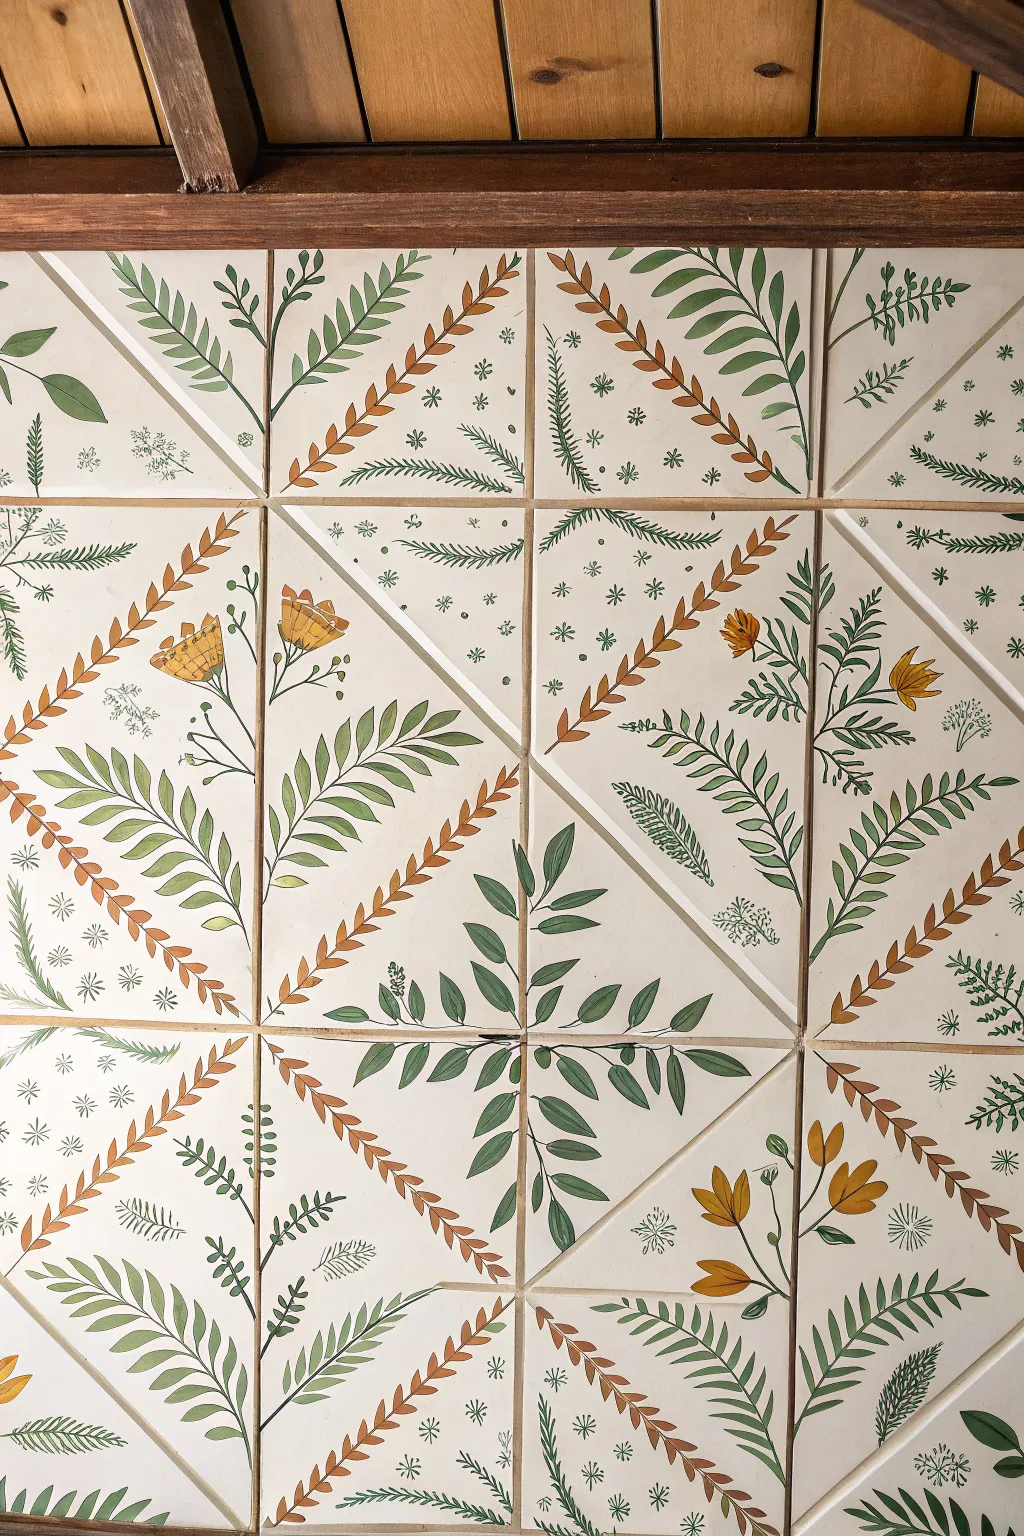
Bring the charm of an English conservatory into your home with these hand-painted ceiling tiles features delicate ferns, trailing vines, and sunny wildflowers. The geometric diagonal layout adds a modern structural element to the organic flow of the greenery, creating a balanced and airy pattern.
Step-by-Step Guide
Materials
- White ceiling tiles (fiberboard or tin)
- Primer spray paint (if tiles are unfinished)
- Acrylic craft paints (olive green, forest green, burnt orange, golden yellow, brown)
- Small round brushes (sizes 2 and 4)
- Fine liner brush (size 0 or 00)
- Long ruler or straight edge
- Pencil
- Painter’s tape (optional)
- Clear matte acrylic sealer spray
Step 1: Preparation & Layout
-
Prime the surface:
Ensure your ceiling tiles are clean and dust-free. If they are raw material, apply a coat of white primer and let it cure completely to prevent the paint from soaking in too quickly. -
Mark the diagonals:
Using a long ruler and a pencil, lightly draw a diagonal line from corner to corner on each tile. In the reference pattern, the direction of the diagonal alternates or meets in the center, so plan your grid layout on the floor first to ensure the triangles meet correctly. -
Define the structure:
Paint over your pencil diagonal lines using a thin round brush and a very pale, watered-down brown or grey. This creates the ‘grout’ line or separation between the triangular sections without being too harsh.
Fixing Wobbly Vines
If your long stems look shaky, try painting them faster. A quick, confident stroke is usually smoother than a slow, careful one. You can always thicken the line later to hide jitters.
Step 2: Painting the Foliage
-
Start with the orange vines:
Mix a burnt orange color. Along one side of your diagonal divide, paint a central vine stem. Then, use short, firm brushstrokes to create small leaves angling off the stem, mimicking a fern or wheat pattern. These should act as a border for the triangle. -
Add the large ferns:
Using your olive green paint and a size 4 round brush, paint a long, curved stem arching into the center of the white space. Add long, sweeping almond-shaped leaves along this stem. -
Layer in darker greens:
Switch to forest green. Paint alternate botanical shapes, such as sprigs of pine or darker, shorter leafy branches. This variation in green tones adds depth to the illustration. -
Paint the central specimen:
Notice how four tiles meet to create a diamond shape in the center. I like to focus on this area to ensure the darker green leaves connect visually across the tile seams, forming a unified centerpiece.
Step 3: Flowers & Details
-
Paint flower heads:
Mix a golden yellow with a touch of orange. Paint small, cup-shaped flowers (like poppies) at the ends of thin green stems. Keep the shapes loose and organic rather than perfectly circular. -
Add petal details:
Once the yellow base is dry, use a fine liner brush with thinned brown paint to add tiny vertical lines on the petals, giving them texture and definition. -
Incorporate filler elements:
Look for empty white spaces. Use your finest brush to paint delicate details like tiny starbursts, floating seeds, or miniature pine needles in a pale gray-green. -
Add delicate stems:
Connect your floating flowers and leaves to the main composition with hair-thin lines using the liner brush and a watery green mix.
Level Up: Antique Effect
For an aged, historic look, apply a very light wash of watered-down raw umber paint over the entire dried tile (glazing), then wipe it off immediately with a rag.
Step 4: Finishing Touches
-
Check consistency:
Step back and look at the tiles as a group on the floor. Ensure the density of the leaves is relatively consistent across all tiles so one doesn’t look heavier than the others. -
Seal the artwork:
Once the acrylic paint is fully dry (give it at least 24 hours), spray the tiles with a clear matte acrylic sealer. This protects the finish from humidity and makes them easier to dust later. -
Installation:
Install the tiles into your ceiling grid or glue them up, paying close attention to the orientation of your diagonal lines to complete the geometric pattern.
Once installed, your ceiling will feel like a permanent garden canopy regardless of the season
Mosaic Illusion Tiles Using Painted Grout Lines
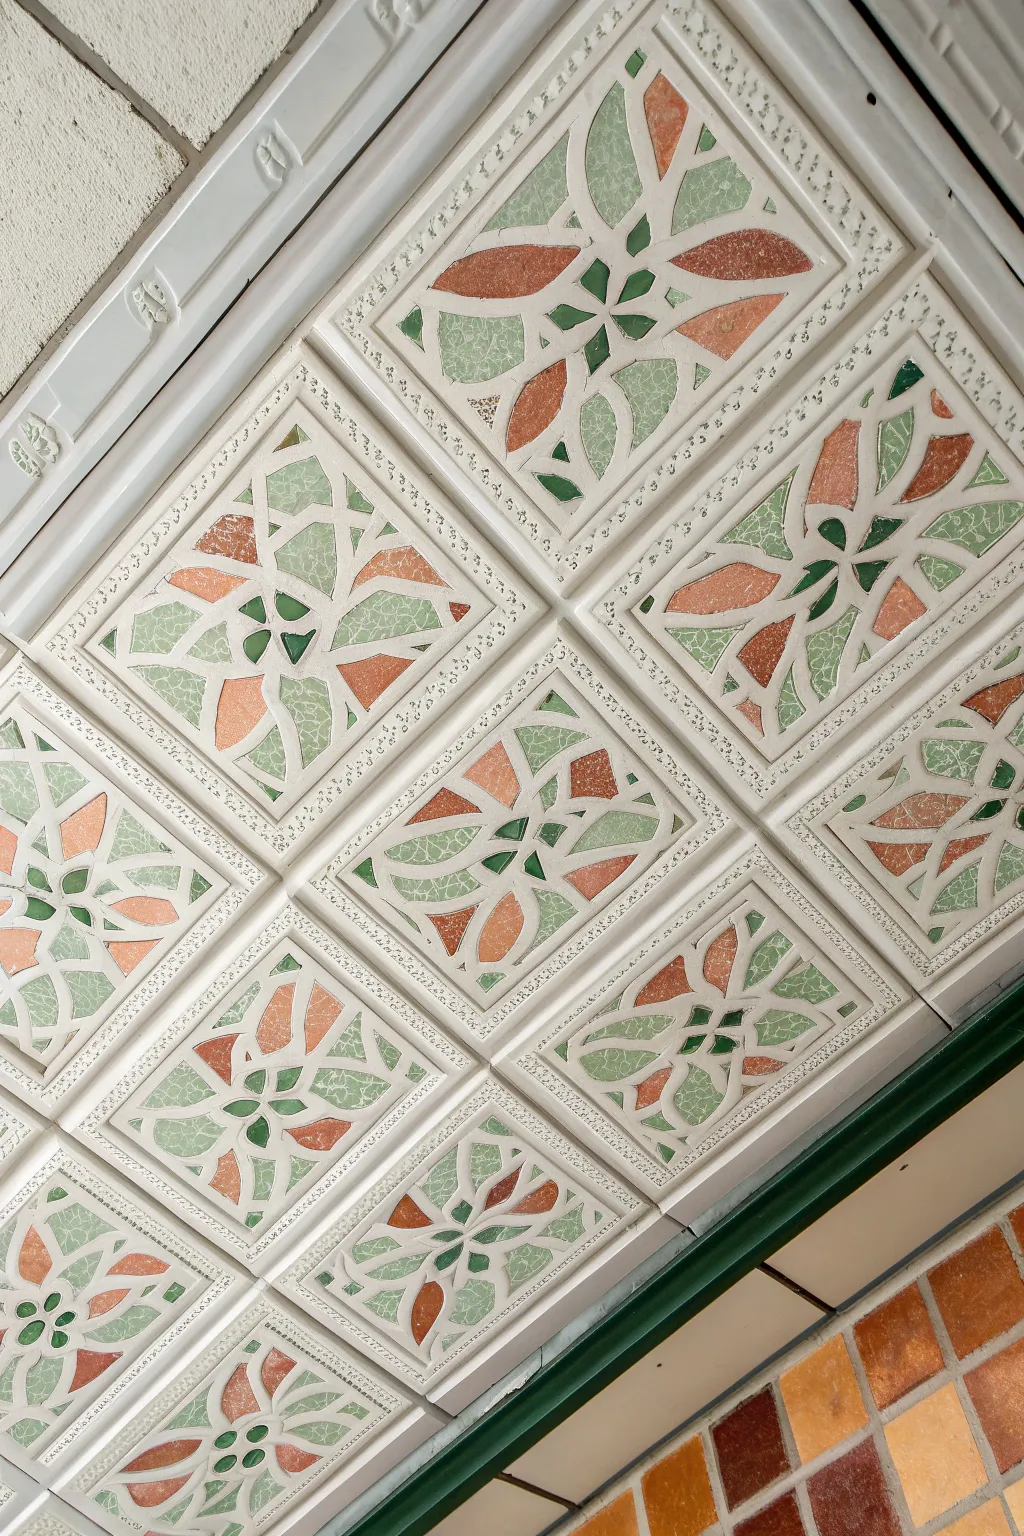
Transform plain drop-ceiling tiles into a stunning architectural feature that mimics the look of vintage ceramic mosaics. By using clever stenciling and a dimensional paint technique to create faux grout lines, you can achieve an intricate, high-end finish without the weight or cost of real tile.
Detailed Instructions
Materials
- Drop ceiling tiles (standard 2×2 or 2×4 size)
- White latex primer
- Acrylic craft paints (Terra cotta, sage green, forest green)
- Puffy paint or dimensional fabric paint (white or off-white)
- Large custom stencil (flower/starburst motif)
- Stencil adhesive spray
- High-density foam roller
- Small stencil brushes or sponge daubers
- Painter’s tape
- Clear matte or satin spray sealer
- Drop cloth
- Rags or paper towels
Step 1: Preparation and Base Coat
-
Clean the surface:
If you are using existing ceiling tiles, remove them carefully and wipe away any dust or cobwebs with a dry cloth. For new tiles, simply lay them out on a large drop cloth in a well-ventilated workspace. -
Prime the tiles:
Roll on a coat of high-quality white latex primer over the entire front surface of each tile. This seals the porous material and ensures your paint colors will pop. -
Let it dry completely:
Allow the primer to dry for at least 2-4 hours. The surface needs to be completely dry before you apply any stencils to prevent peeling.
Bleeding Lines?
If paint bleeds under the stencil, wait for it to dry completely. Then, use a small artist’s brush and your white base color to touch up the edges before applying the dimensional puffy paint.
Step 2: Creating the Pattern
-
Position the stencil:
Spray the back of your custom stencil with a light mist of stencil adhesive. Wait a moment for it to get tacky, then press it firmly onto the center of the tile. This adhesion is crucial for keeping those crisp lines essential for a mosaic look. -
Apply the first color:
Load a small stencil brush with your sage green paint. Offload most of the paint onto a paper towel until the brush is almost dry—this ‘dry brush’ technique prevents paint from bleeding under the stencil edges. -
Stipple the green sections:
Dab the sage green paint onto the corresponding petal sections of the stencil. Use an up-and-down pouncing motion rather than a brushing stroke to maintain sharp edges. -
Add the terra cotta accents:
Using a fresh brush, apply the terra cotta paint to the longer, contrasting petals. I like to apply this color slightly heavier in the center of the shape and lighter toward the edges to mimic the natural variation of ceramic glaze. -
Paint the dark details:
Use a small detail brush or a very small dauber to apply the forest green paint to the central star accents and any small geometric details. -
Create the faux texture:
While the paint is still slightly wet, gently dab a crumpled plastic bag or sea sponge over the painted areas. This lifts a tiny bit of pigment and adds a mottled texture that looks like aged stone or ceramic. -
Remove the stencil:
Carefully lift the stencil straight up to avoid smudging. Wipe the stencil clean between every few tiles to prevent paint buildup from distorting the pattern.
Metallic Touch
Mix a tiny amount of gold or copper metallic paint into your sealer or glaze the final tile lightly. This adds a subtle shimmer that catches the light like authentic glazed ceramic tiles.
Step 3: Grout Lines and Finishing
-
Define the grout lines:
Once the colored paint is fully dry, take your bottle of white puffy paint (dimensional paint). Carefully trace the outline of every painted shape, as well as the border of the tile design. -
Simulate grout texture:
Squeeze the bottle with consistent pressure to create a raised bead of paint. This physical ridge mimics the cement grout found in real mosaics and adds incredible realism. -
Fix imperfections:
If the line creates a peak, dampen your finger slightly and gently tap it down to flatten the top, making it look more like sanded grout. -
Create the ‘crackle’ (optional):
For an even more antique look, use a fine-tip dark grey pen to draw tiny, jagged cracks within the larger colored shapes, simulating crazing on old tiles. -
Seal the artwork:
After the dimensional paint has cured (usually 24 hours), spray the entire tile with a clear matte sealer. This unifies the sheen and protects your artwork from dust. -
Reinstall:
Place the dried tiles back into the ceiling grid. Step back and admire your new overhead art installation.
Once reinstalled, these hand-painted tiles will add a sophisticated, historical charm to your room that completely disguises the industrial grid above
Classroom Legacy Name Tiles With Dates and Icons
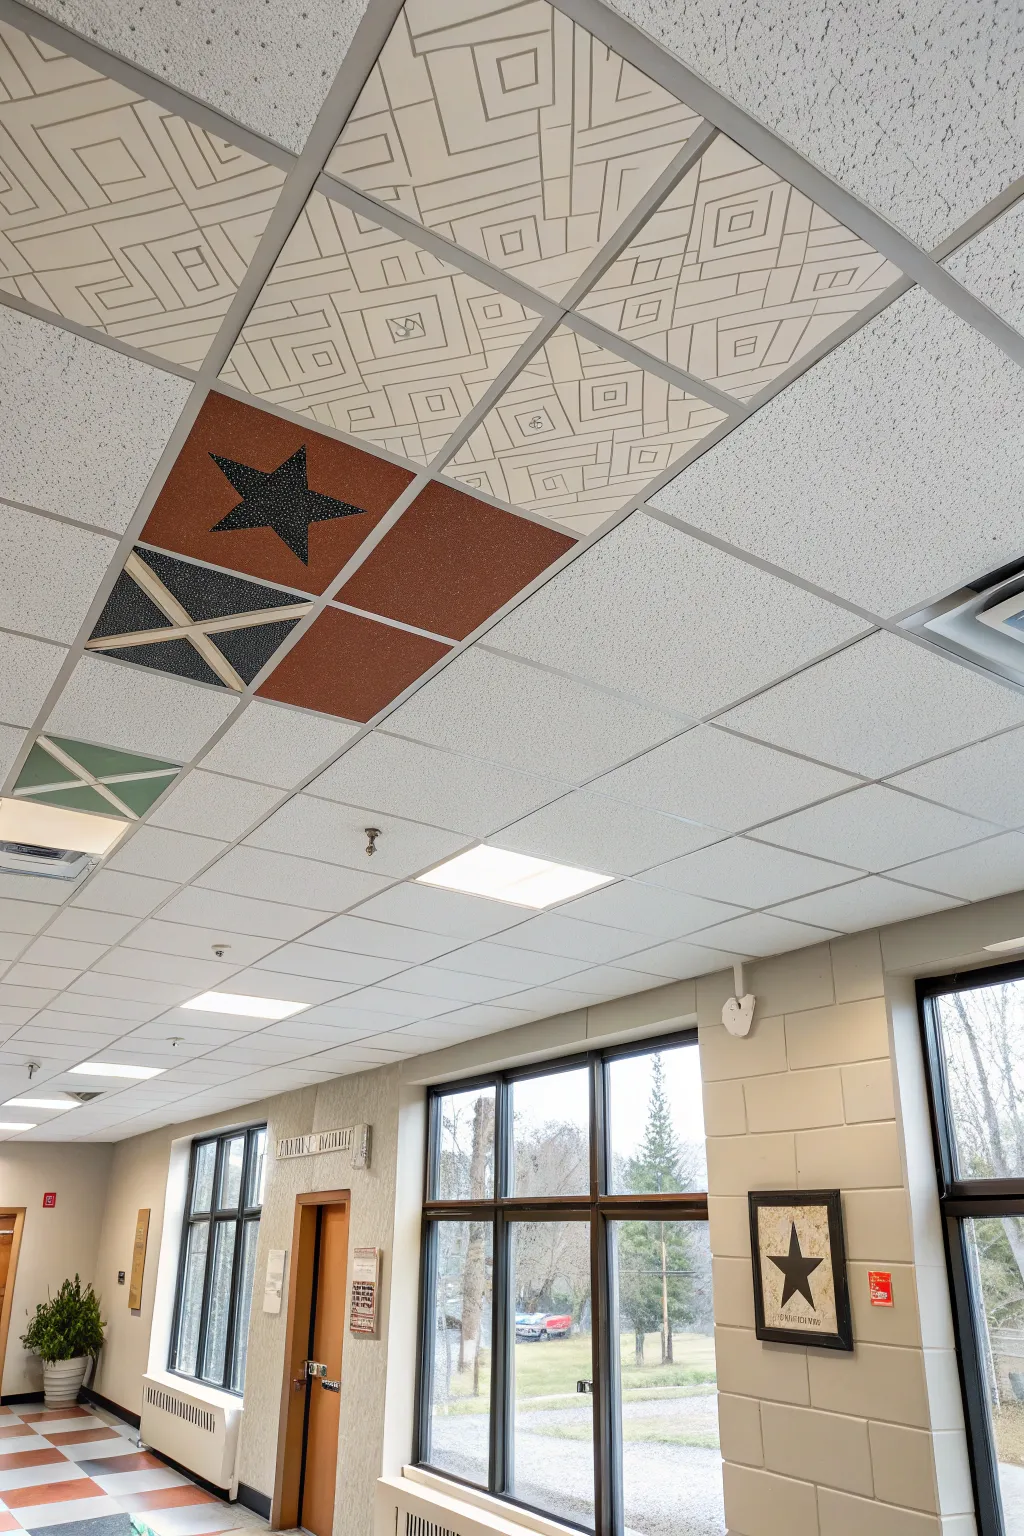
Transform boring acoustic ceiling tiles into a vibrant overhead gallery that brightens up any classroom or hallway. This project combines geometric precision with bold color blocking to create custom designs that leave a lasting legacy.
Step-by-Step Guide
Materials
- Standard drop ceiling tiles (2×2 or 2×4 feet)
- Acrylic craft paints (black, terracotta/rust, navy blue, sage green, cream)
- Wide painter’s tape (1.5 or 2 inch)
- Fine line tape (1/4 inch or similar)
- High-density foam roller and tray
- Assorted paintbrushes (1-inch flat, medium flat)
- Ruler or T-square
- Pencil
- Primer (white or clear gesso)
- Star stencils (various sizes)
Step 1: Preparation & Priming
-
Clean the surface:
Remove the ceiling tile from the grid and lay it on a flat, protected work surface. Gently brush off any loose dust or debris with a dry cloth. -
Prime the tile:
Since acoustic tiles are very porous, apply a generous coat of primer using a foam roller. This seals the surface and prevents your colored paint from soaking in too deeply. -
Let it dry completely:
Wait for the primer to fully cure according to the manufacturer’s instructions. If the tile still feels rough or porous, I usually add a second coat just to be safe.
Step 2: Creating the Linear Geometric Design
-
Plan the grid:
For the linear pattern tiles, use a pencil and ruler to lightly sketch a wandering geometric path. Think of creating a maze-like structure with varying squares and rectangles. -
Paint the lines:
Using a thin detail brush and diluted grey or beige paint, trace over your pencil lines. Keep the lines consistent in width to mimic an architectural drawing. -
Add detail squares:
Inside select larger squares of your ‘maze,’ paint smaller concentric squares or tiny icons like books or geometric shapes to add visual interest.
Paint Soaking In?
If the tile drinks up paint, stop and apply a coat of white latex wall paint first. It acts as a heavy-duty sealer, creating a better canvas for detailed work.
Step 3: Creating the Color Block & Star Design
-
Mark the quadrants:
For the bold colored tiles, use a ruler to find the center and divide the tile into four equal quadrants with a pencil line. -
Tape off sections:
Apply painter’s tape along your pencil lines to create crisp boundaries between the color blocks. Press the edges of the tape down firmly to prevent bleeding. -
Paint the first colors:
Fill two diagonal quadrants with terra cotta (rust) paint using a flat brush or small roller. Apply two coats for solid, opaque coverage. -
Paint the contrasting section:
Fill a third quadrant with navy blue paint. Leave the tape in place until the paint is tacky but not fully dry, then carefully peel it back to reveal clean lines. -
Create the striped section:
For the fourth quadrant (or a separate tile), apply base color first. Once dry, use fine line tape to create an ‘X’ or cross pattern. Paint over the tape with a contrasting color, then peel the tape to reveal the stripes.
Pro Tip: Crisp Lines
After applying painter’s tape, brush a thin layer of the *base* color over the tape edge first. This seals the gap, so the new color won’t bleed underneath.
Step 4: Adding Stars & Details
-
Position the star stencil:
Place a star stencil over the dry terra cotta or navy sections. Secure it lightly with tape so it doesn’t shift. -
Stipple the star:
Using a stencil brush or cosmetic sponge with a very small amount of black or contrasting paint, tap (don’t brush) the paint into the stencil opening. -
Add texture:
To mimic the speckled look in the photo, dip an old toothbrush in watered-down white or cream paint and flick the bristles to splatter tiny dots over the dark start or navy sections. -
Final touches:
Use a small brush to touch up any bleed-through on your straight lines or grid borders. Ensure all edges are crisp. -
Reinstall:
Once the tile is 100% dry (give it overnight to be sure), carefully lift it back into the ceiling grid system.
Looking up at your finished work will give the room a wonderful sense of personalized character
Positive Quote Tiles for a Motivational Ceiling
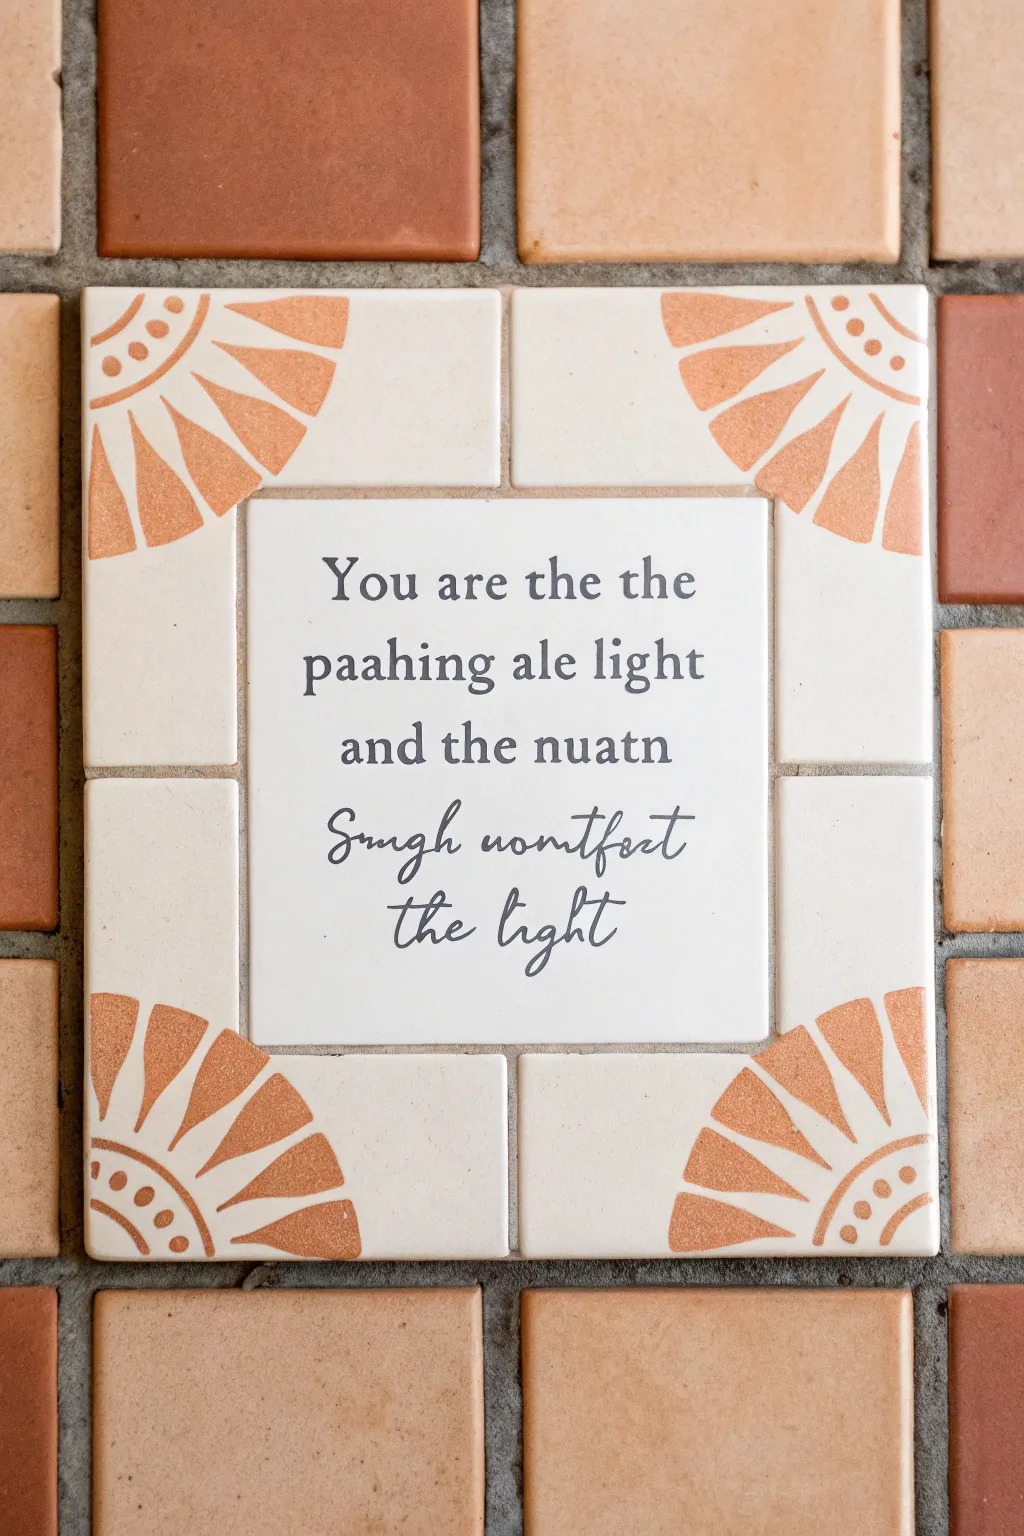
Transform a plain ceiling with these hand-painted tiles that mimic the look of traditional ceramic mosaic work. Featuring warm terracotta tones and a stylized sunburst pattern, this design frames your favorite uplifting quote in a classic, elegant style.
Step-by-Step Tutorial
Materials
- Square ceiling tile (white or cream)
- Painter’s tape (various widths)
- Acrylic craft paint: Terracotta/burnt orange
- Acrylic craft paint: Dark grey or charcoal
- Fine liner brush (size 0 or 00)
- Small flat brush (1/4 inch)
- Small round brush
- Ruler
- Pencil
- Letter stencils or transfer paper
- Matte clear topcoat spray
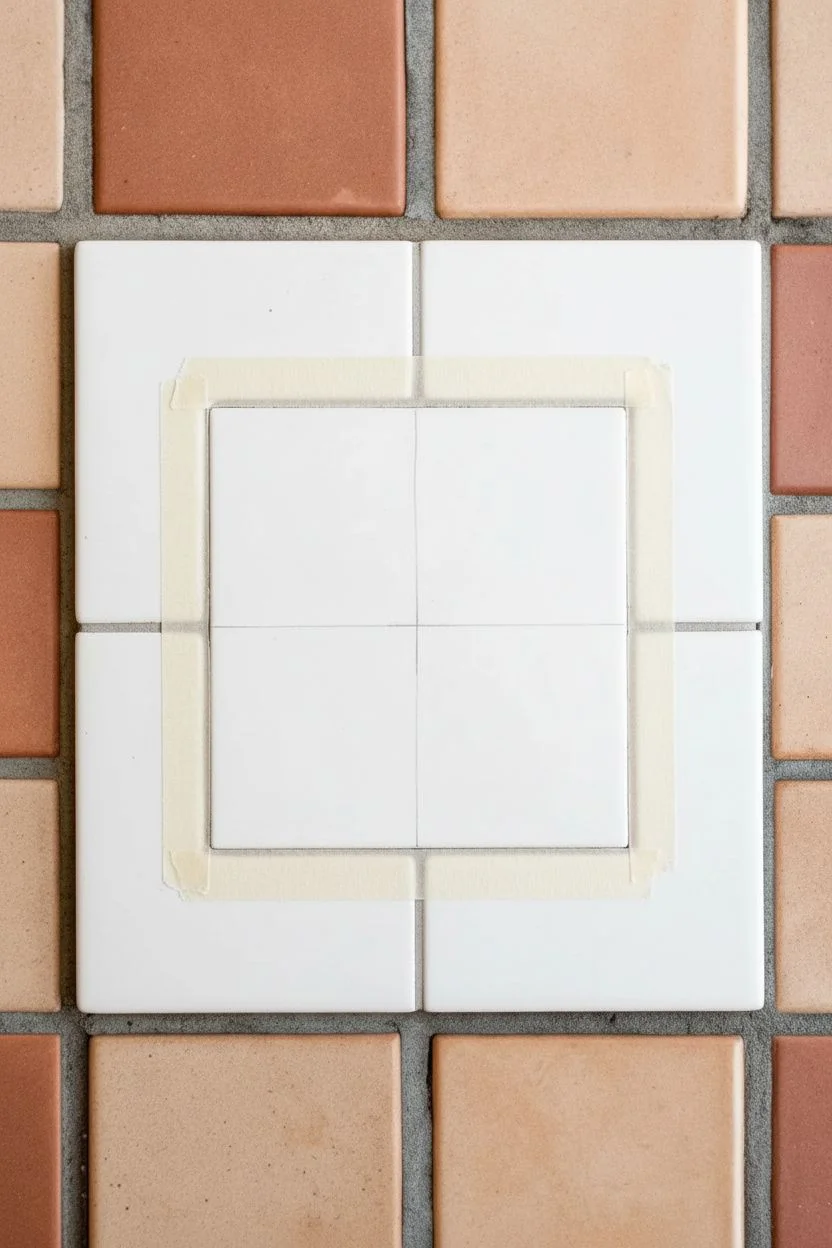
Step 1: Planning the Layout
-
Mark the center:
Begin by finding the exact center of your square tile using a ruler and pencil, marking it lightly. -
Define the central frame:
Measure and draw a square in the middle of the tile to serve as the quote area. A 5×5 or 6×6 inch square works well for a standard 12-inch tile. -
Draw the borders:
Extend lines from the corners of your central square out to the edges of the tile, creating four rectangular ‘border’ sections around the middle. -
Tape the boundaries:
Apply thin painter’s tape along these penciled lines to simulate grout lines and keep your sections distinct.
Uneven Lines?
If your hand shakes during lettering, try stabilizing your painting wrist with your other hand, or rest your pinky finger on a dry spot of the tile for support.
Step 2: Painting the Sunburst Motifs
-
Sketch the corners:
In each of the four outer corners of the tile, lightly sketch a quarter-circle arc radiating inward. -
Plan the rays:
Divide that quarter-circle arc into wedge shapes to create the sunburst rays. Aim for about 5-7 rays per corner. -
Paint the first ray layer:
Load your small round brush with terracotta paint and fill in the wedge shapes carefully. I usually start from the center and pull the stroke outward for a cleaner edge. -
Add decorative dots:
Once the main rays are dry, use the handle end of a brush or a stylus to place 3-4 graduating dots along the very corner edge, nestled between the rays. -
Create the inner arc:
Paint a thin, curved line connecting the base of all your rays to define the quarter-circle shape clearly. -
Refine edges:
Use a barely damp, clean brush to tidy up any paint that might have bled under the tape before it sets completely. -
Remove tape:
Gently peel away the painter’s tape while the paint is tacky to reveal crisp white ‘grout’ lines separating your sections.
Step 3: Adding the Lettering
-
Sketch the text:
Lightly pencil your chosen quote into the central square. Use a stencil for the serif font at the top and freehand the script signature at the bottom for authenticity. -
Paint standard text:
Using a dark grey or charcoal paint and a fine liner brush, carefully trace over the serif letters. Keep your paint consistency fluid, like ink, to ensure smooth lines. -
Paint script text:
Switch to the script section. Apply slightly more pressure on the downstrokes to thicken them, and lighter pressure on upstrokes for delicate hairlines. -
Clean up details:
Check for any uneven letters. You can use a bit of white paint to erase and reshape mistakes if the background is plain white.
Antique Effect
Mix a drop of beige into a glazing medium and wash it over the white areas. Wipe it back immediately with a rag to leave ‘age’ in the corners.
Step 4: Finishing Touches
-
Simulate texture:
If you want a faux-worn look, lightly dry-brush a tiny amount of grey paint along the very edges of the ’tile’ sections to mimic age. -
Seal the work:
Allow the paint to cure for 24 hours. -
Apply topcoat:
Finish with a light misting of matte clear spray to protect the design and unify the sheen without making it too glossy.
Once installed, these tiles act as a lovely daily reminder to look up and stay positive
One Big Mural Spanning Multiple Ceiling Tiles
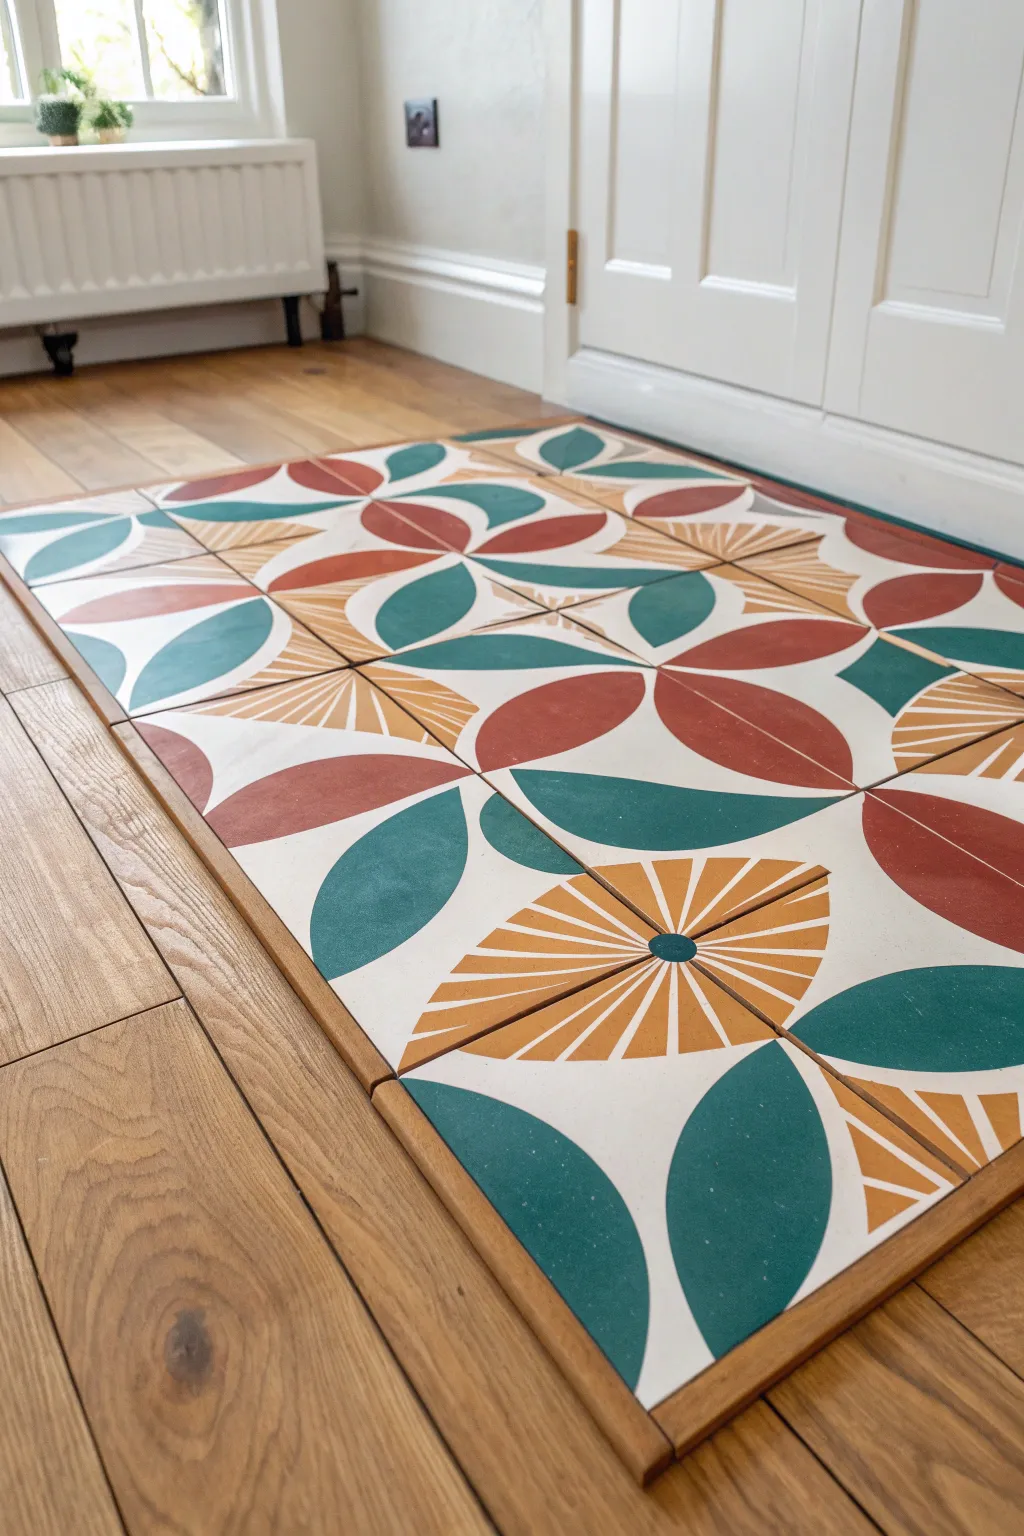
Transform plain acoustic ceiling tiles into a stunning, walkable art piece or wall feature with this retro-inspired mural. The design uses bold interlocking leaf and sunburst patterns in teal, rust, and mustard to create a seamless, large-scale motif across multiple squares.
Step-by-Step Guide
Materials
- 9-12 Plain ceiling tiles (12×12 inch squares recommended)
- Acrylic paints (Teal, Rust Red, Mustard Yellow, White)
- Plywood backing board (sized to fit your total grid)
- Wooden trim moulding (for the frame)
- Wood glue or heavy-duty construction adhesive
- Painter’s tape (various widths)
- Ruler and T-square
- Compass or circular stencils
- Pencil
- Medium and fine synthetic paintbrushes
- Clear polyurethane sealer (matte or satin)
- Fine-grit sandpaper
Step 1: Preparation and Planning
-
Prepare the Tiles:
Begin by gently sanding the surface of your ceiling tiles if they have a rough texture. Wipe away any dust with a dry cloth to ensure a clean painting surface. -
Prime the Surface:
Coat each tile with a layer of white acrylic paint or gesso. This not only provides a bright background but also seals the porous material, preventing your colors from bleeding later. -
Arrange the Grid:
Lay your tiles out on a flat surface in your desired grid formation (e.g., 3×4). Number the back of each tile lightly with a pencil so you can maintain their order throughout the painting process.
Clean Curves Secret
If you struggle with painting smooth curves, cut a stencil from cardstock for the repeated petal shapes. Trace and paint inside the stencil for uniformity.
Step 2: Drafting the Design
-
Mark the Centers:
Use your ruler to find the exact center point of each tile edge. Draw light guidelines connecting opposite edges to create a crosshair on every tile. -
Draft the Curves:
This design relies on quarter-circles. Place the point of your compass at the corners of the tiles. Draw arcs that meet at the center point of the tile edges to create the petal shapes. -
Create the Fan Shapes:
In alternating sections where petals don’t meet, draw straight lines radiating from a corner point to the arc’s edge to form the ‘sunburst’ or fan pattern. Space these lines evenly. -
Connect the Flow:
Double-check that lines on one tile line up perfectly with the tile next to it. I always line them up physically on the floor for this step to ensure the larger circles flow seamlessly across the seams.
Step 3: Painting the Pattern
-
Tape Off Sections:
For crisp lines, apply painter’s tape along the straight edges of your geometric shapes. You’ll need to paint in stages, letting one section dry before taping over it to paint the neighbor. -
Apply the Base Colors:
Start with the ‘rust red’ leaf shapes. Use a medium brush to fill these areas, applying two thin coats rather than one thick one to avoid cracking. -
Add the Teal Elements:
Once the red needs no further attention, move on to the teal sections. Use a steady hand near the curved edges, or use a flexible masking tape designed for curves if you aren’t confident freehanding. -
Detail the Sunbursts:
Paint the background of the fan shapes white (if not already primed) and then carefully paint the radiating lines in mustard yellow. Use your fine liner brush for these sharp triangular rays. -
Paint the Center Dots:
Where the yellow fan shapes meet at a corner, paint a small teal circle to anchor the design visually.
Fixing Bleeds
Paint bled under the tape? Re-wet the area slightly with a clean damp brush to lift fresh acrylic, or wait for it to dry and touch up with the base white.
Step 4: Assembly and Finishing
-
Seal the Artwork:
Allow the paint to cure for 24 hours. Apply two to three coats of clear polyurethane sealer over each tile. This is crucial if the piece will be used as a mat or floor covering. -
Mount the Tiles:
Apply construction adhesive to the back of each tile and press them firmly onto your plywood backing board, following your numbered grid. -
Cut the Frame:
Measure the outer dimensions of your adhered tile grid. Cut your wooden trim moulding to fit these dimensions using 45-degree miter cuts for the corners. -
Stain the Wood:
Stain or paint your wooden frame pieces to match your decor. Let them dry completely before attaching them. -
Attach the Frame:
Glue and nail the frame around the perimeter of the tiles, ensuring a snug fit that protects the edges of the ceiling tiles. -
Final Touch:
Inspect the seams between tiles. If there are glaring gaps, you can carefully touch them up with a tiny bit of paint to bridge the visual continuity.
Enjoy the sophisticated, custom look this geometric mural brings to your space
Patchwork Quilt Ceiling With Mixed Mini-Paintings
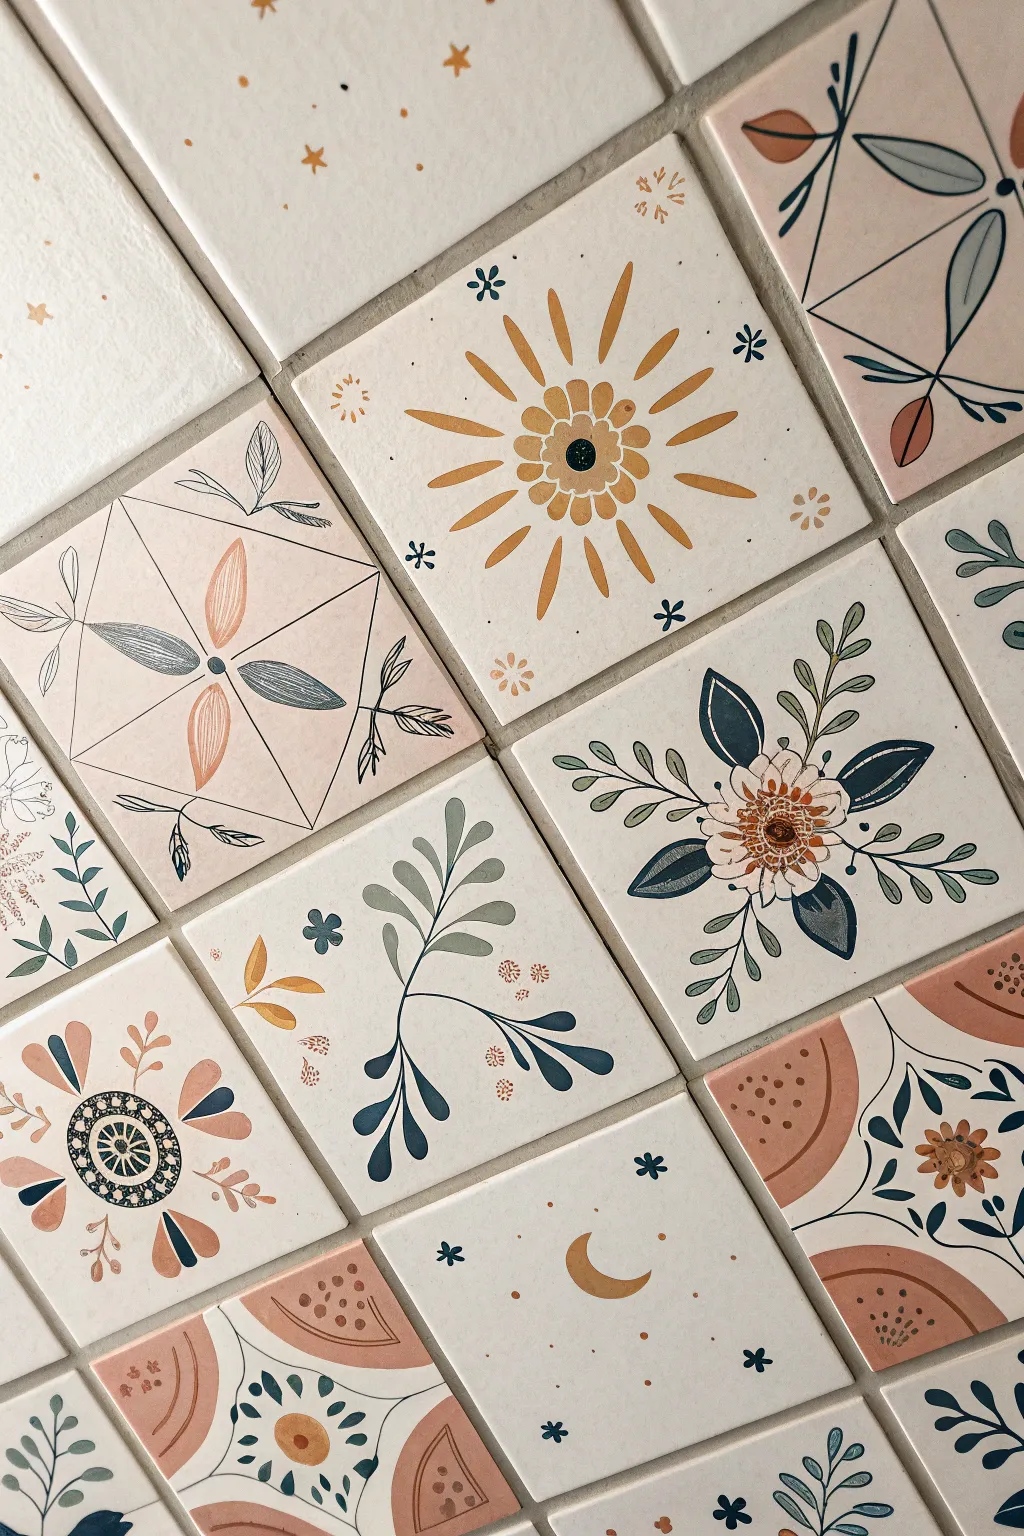
Transform a plain ceiling into a stunning overhead gallery with this patchwork-style project featuring celestial motifs and botanical line art. The result is a warm, cohesive quilt of hand-painted tiles that adds instant charm and artistry to any room.
How-To Guide
Materials
- Square ceiling tiles (styrofoam, PVC, or wood)
- Pencil and eraser
- Acrylic craft paints (terracotta, mustard yellow, sage green, navy blue, cream/off-white)
- Fine liner brushes (sizes 0 and 00)
- Flat shader brush (size 4 or 6)
- Ruler or straight edge
- Compass (optional for circles)
- Matte clear coat sealer spray
- Mixing palette
Step 1: Preparation & Base Layout
-
Prepare the surface:
Clean your ceiling tiles thoroughly to remove dust or oils. If they are glossy, give them a very light sanding to help the paint adhere better. -
Apply the base coat:
Paint all your tiles with a solid coat of off-white or cream acrylic paint. This unifies the background and creates that ceramic look. Let this dry completely before moving on. -
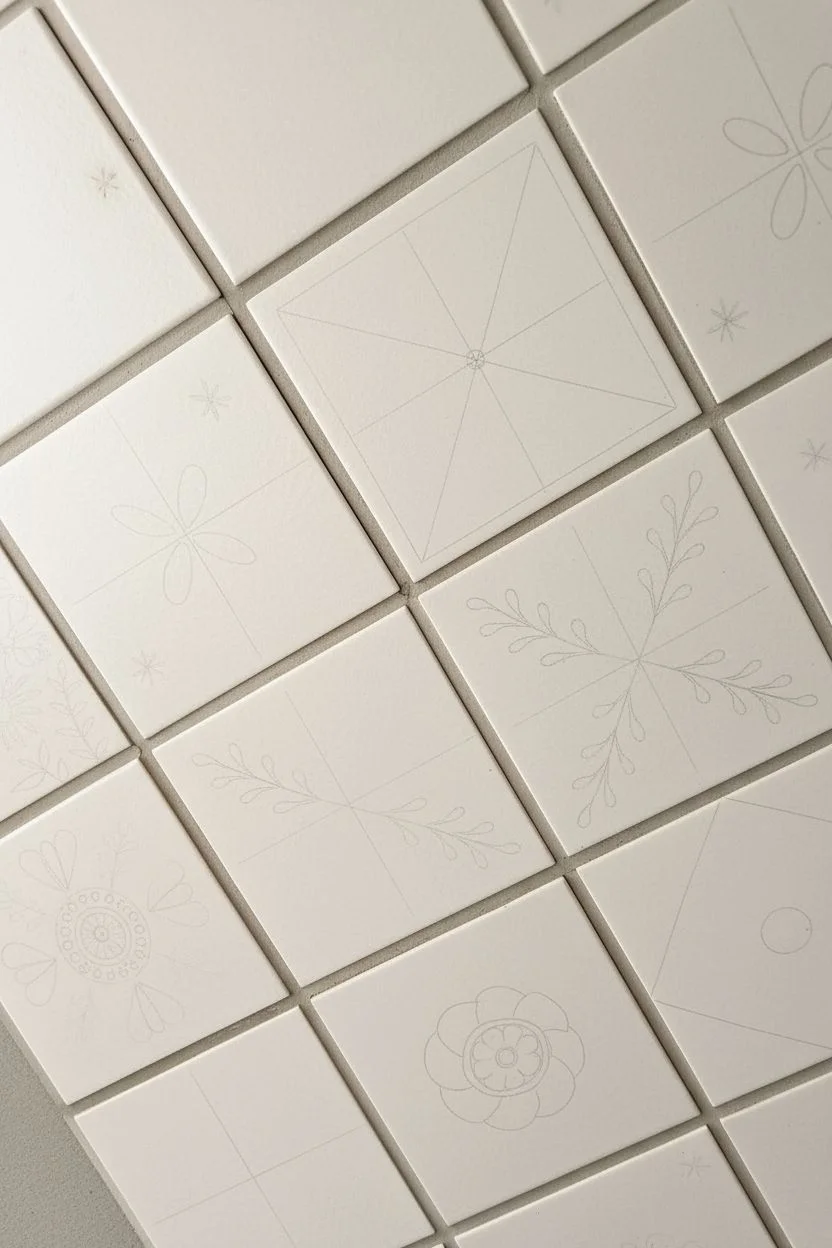
Sketch the grid:
Lightly trace the outer edge of each tile. Decide on your patterns: some tiles have geometric borders (diamonds or triangles), while others are open. Use a ruler to lightly pencil in these geometric guidelines first. -
Draft the motifs:
Pencil in your main subjects. Alternate between botanical sprays, celestial suns, simple stars, and abstract flowers. I find sketching lightly helps avoid deep grooves in the tile surface.
Keep It Loose
Don’t aim for perfect symmetry. The charm of this style comes from the hand-drawn, slightly organic imperfections in the lines and spacing.
Step 2: Painting the Celestial Sun
-
Paint the center:
For the sun tile, mix a warm mustard yellow. Paint a central circle, then add a smaller black dot in the very middle using a fine brush. -
Add the petals:
Use the mustard yellow to paint rounded petals directly around the center circle, creating a flower-like core. -
Create the rays:
Radiating outward, paint long, tapered spikes for sun rays. Alternate between longer and shorter rays to give it dynamic movement. -
Add detail accents:
Using a tiny dot of navy blue, add small starbursts or asterisks in the empty corners of the tile to balance the composition.
Wobbly Lines?
If your fine lines are shaky, try diluting your acrylic paint with a tiny drop of water. This improves flow for smoother, sharper linework.
Step 3: Painting Botanical & Geometric Tiles
-
Block in geometric shapes:
For tiles with diamond patterns, outline the diamond shape with a very thin black line. Inside, paint large teardrop leaf shapes in contrasting colors like terracotta and sage green. -
Paint structural stems:
For the leafy tiles, use your fine liner brush and navy or dark green paint to create the main flowing stems. Keep your hand loose to get natural curves. -
Fill the leaves:
Add leaves to your stems using a ‘press and lift’ motion with your round brush. Some leaves can be filled in solid colors (sage or grey-blue), while others look great as simple outlined shapes. -
Create the central flower:
For the large floral tile, start with a textured center using small dots of brown and orange. Paint the petals in white or cream, then outline them in navy blue for definition. -
Add line details:
Once the base colors are dry, go back in with your thinnest brush and dark paint to add veins to the leaves and definition to the flower petals. -
Paint the moon tile:
On a simpler tile, paint a crescent moon in a muted gold or brown tone. Surround it with tiny scattered dots and small four-point stars in blue and clay colors.
Step 4: Finishing Touches
-
Erase pencil lines:
Ensure the paint is absolutely bone dry. Gently erase any visible pencil sketch lines that weren’t covered by paint. -
Check for consistency:
Line up your tiles on the floor to see how they look together. If one color feels too dominant, add small accents of that color to neighboring tiles to balance the ‘quilt’ effect. -
Seal the artwork:
Spray the tiles with a matte clear coat. This protects your handiwork from dust and makes the ceiling easier to clean later. -
Installation:
Adhere the tiles to your ceiling according to the manufacturer’s instructions, ensuring the patterns are oriented correctly.
Now you have a custom, hand-painted ceiling masterpiece that brings a cozy, artisanal atmosphere to your space
Textured Illusions That Use the Tile’s Bumps and Pits
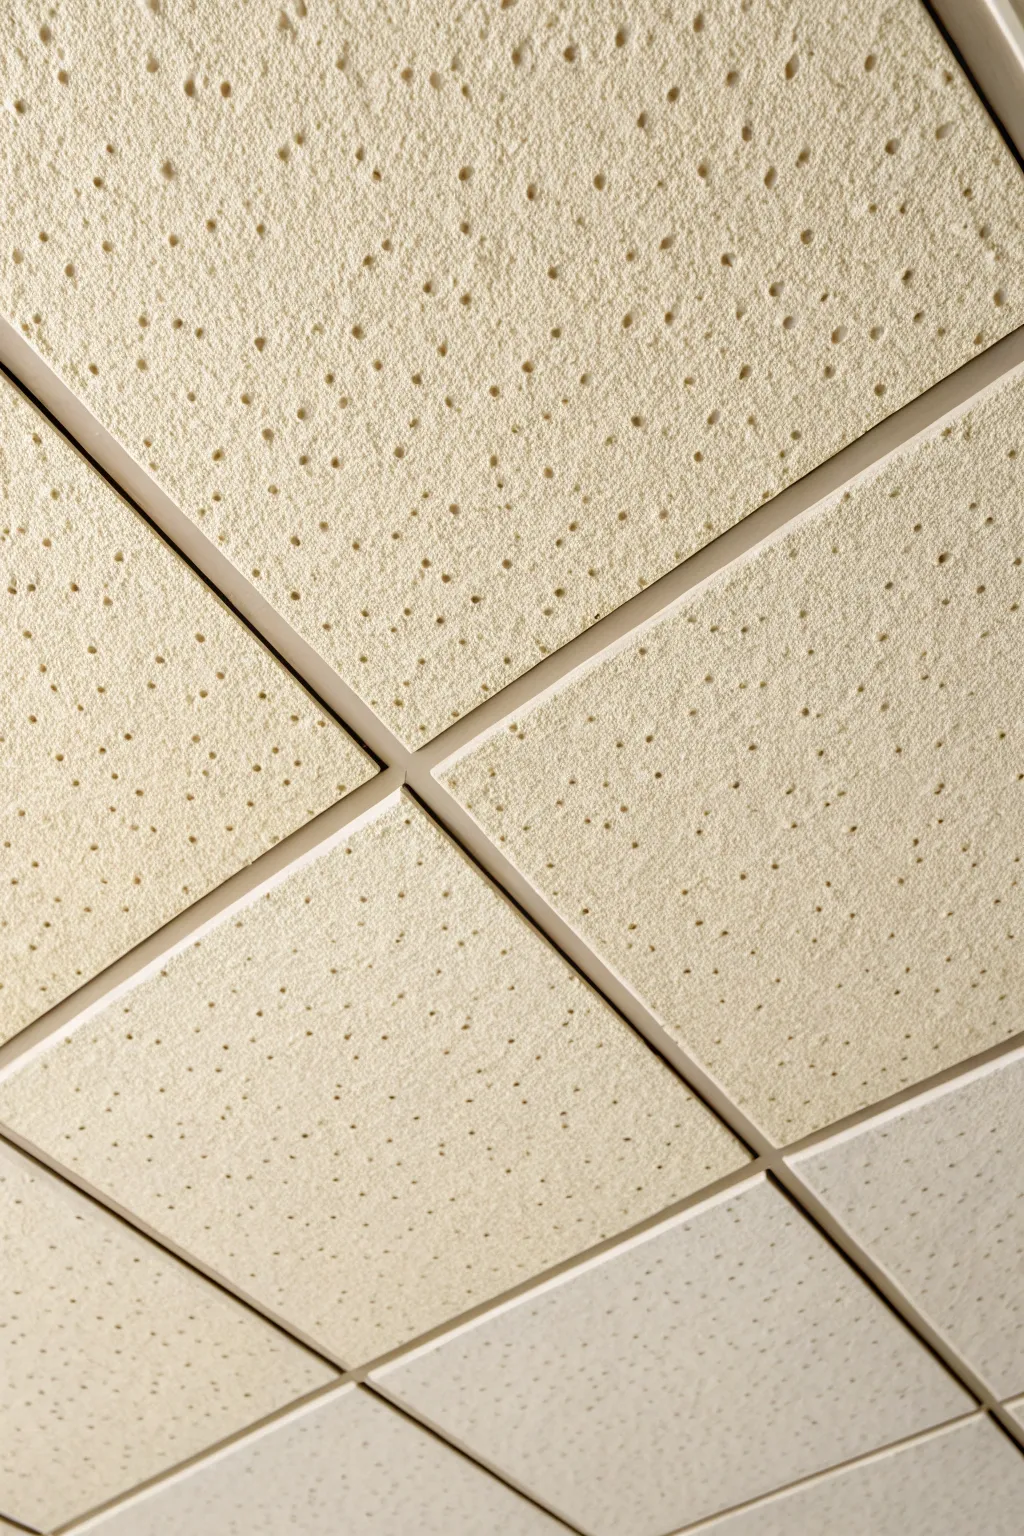
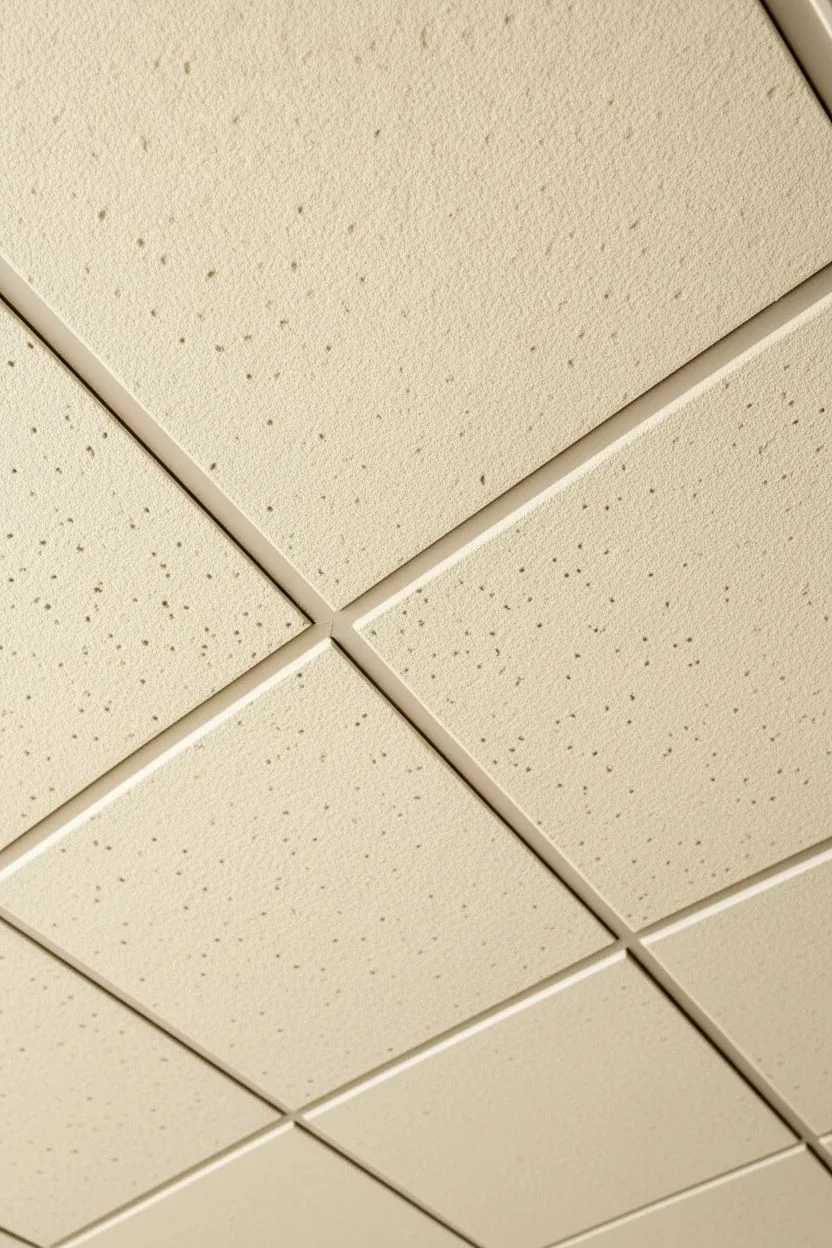
This technique transforms standard acoustic ceiling tiles by enhancing their natural cratered texture with a warm, sandy glaze. Instead of covering the unique bumps and pits, this method uses a wash to settle into the recesses, creating depth and a sophisticated, stone-like appearance.
Step-by-Step Tutorial
Materials
- Acoustic ceiling tiles (fissured or textured)
- Latex wall paint (warm cream or beige base)
- Latex glaze medium
- Raw Umber or Burnt Sienna acrylic paint (for tinting)
- Short-nap paint roller (3/8 inch)
- Large sponge or lint-free rag
- Paint tray and liners
- Drop cloths
- Step ladder
- Painters tape (for grid system)
Step 1: Preparation and Base Coat
-
Prepare the workspace:
Begin by clearing the area below the ceiling or covering furniture with drop cloths. If you are painting tiles already installed in a grid, ensure your ladder is stable. I like to remove the tiles to paint them on a flat surface, as it prevents neck strain and drips. -
Clean the tiles:
Dust the ceiling tiles gently with a soft brush or a vacuum with a brush attachment. Removing loose dust ensures the paint adheres properly to the textured surface. -
Tape the grid:
If you are painting the tiles while they are still in the ceiling, carefully apply painter’s tape to the metal grid system to protect it from roller splatters. -
Mix the base color:
Pour your warm cream or beige latex paint into the tray. This base color should be slightly lighter than your desired final look, as the glaze will darken it. -
Apply the base coat:
Using the short-nap roller, apply an even coat of the base paint over the entire tile. Press firmly enough to get paint into the shallow textures but don’t flood the deep fissures. -
Roll in multiple directions:
Roll vertically and then horizontally to ensure full coverage. This cross-hatching technique helps avoid visible roller lines. -
Let it dry:
Allow the base coat to dry completely, following the manufacturer’s time recommendations, usually about 2-4 hours. The surface must be dry before applying the glaze.
Step 2: Creating the Shadow Glaze
-
Mix the glaze:
In a separate container, mix one part latex paint (a shade or two darker than your base, like a soft tan) with four parts latex glaze medium. For more depth, add a drop of Raw Umber or Burnt Sienna. -
Test the consistency:
The mixture should be translucent and runny enough to flow into the pits but thick enough to stay put. Test it on a spare piece of cardboard or a scrap tile if possible. -
Apply the glaze wash:
Dip a sponge or rag into the glaze mixture. Wring it out slightly so it’s damp but not dripping. -
Wipe over the surface:
Gently wipe the glaze over the dried base coat. Use circular motions to work the darker pigment into the pinholes, fissures, and ‘wormholes’ of the tile texture. -
Wipe back the excess:
Immediately take a clean, slightly damp rag and wipe over the high points of the tile surface. The goal is to remove the glaze from the top flat areas while leaving it pooled in the indentations. -
Assess the contrast:
Step back and look at the tile. If the pits aren’t dark enough, dap a little more glaze specifically into the larger craters and lightly wipe the surface again.
Too dark overall?
If the glaze made the whole tile too dark, lightly dry-brush the original creamy base coat over just the highest points to bring back the contrast.
Step 3: Finishing Touches
-
Check for pooling:
Inspect the deep fissures to ensure the glaze hasn’t pooled too thickly, which can cause cracking when it dries. Dab excess away with a dry brush corner. -
Dry the tiles:
Allow the glazed tiles to dry fully, preferably overnight. The glaze extends drying time significantly compared to standard paint. -
Reinstall or remove tape:
Once fully dry to the touch, reinstall the tiles into the grid or carefully peel away the painter’s tape from the grid runners.
Add metallic flair
Mix a small amount of metallic pearl or gold paint into your final glaze. It adds a subtle shimmer that catches light in the texture pits.
Enjoy the refined, stone-like ambiance your new ceiling brings to the room


Have a question or want to share your own experience? I'd love to hear from you in the comments below!