I’m obsessed with how ceramic Christmas trees can look totally classic one minute and wildly modern the next, just based on your paint choices. Here are my favorite ceramic Christmas tree painting ideas to help you nail that cozy vintage vibe—or push into something fresh and unexpected.
Traditional Green With Snow-Capped Tips
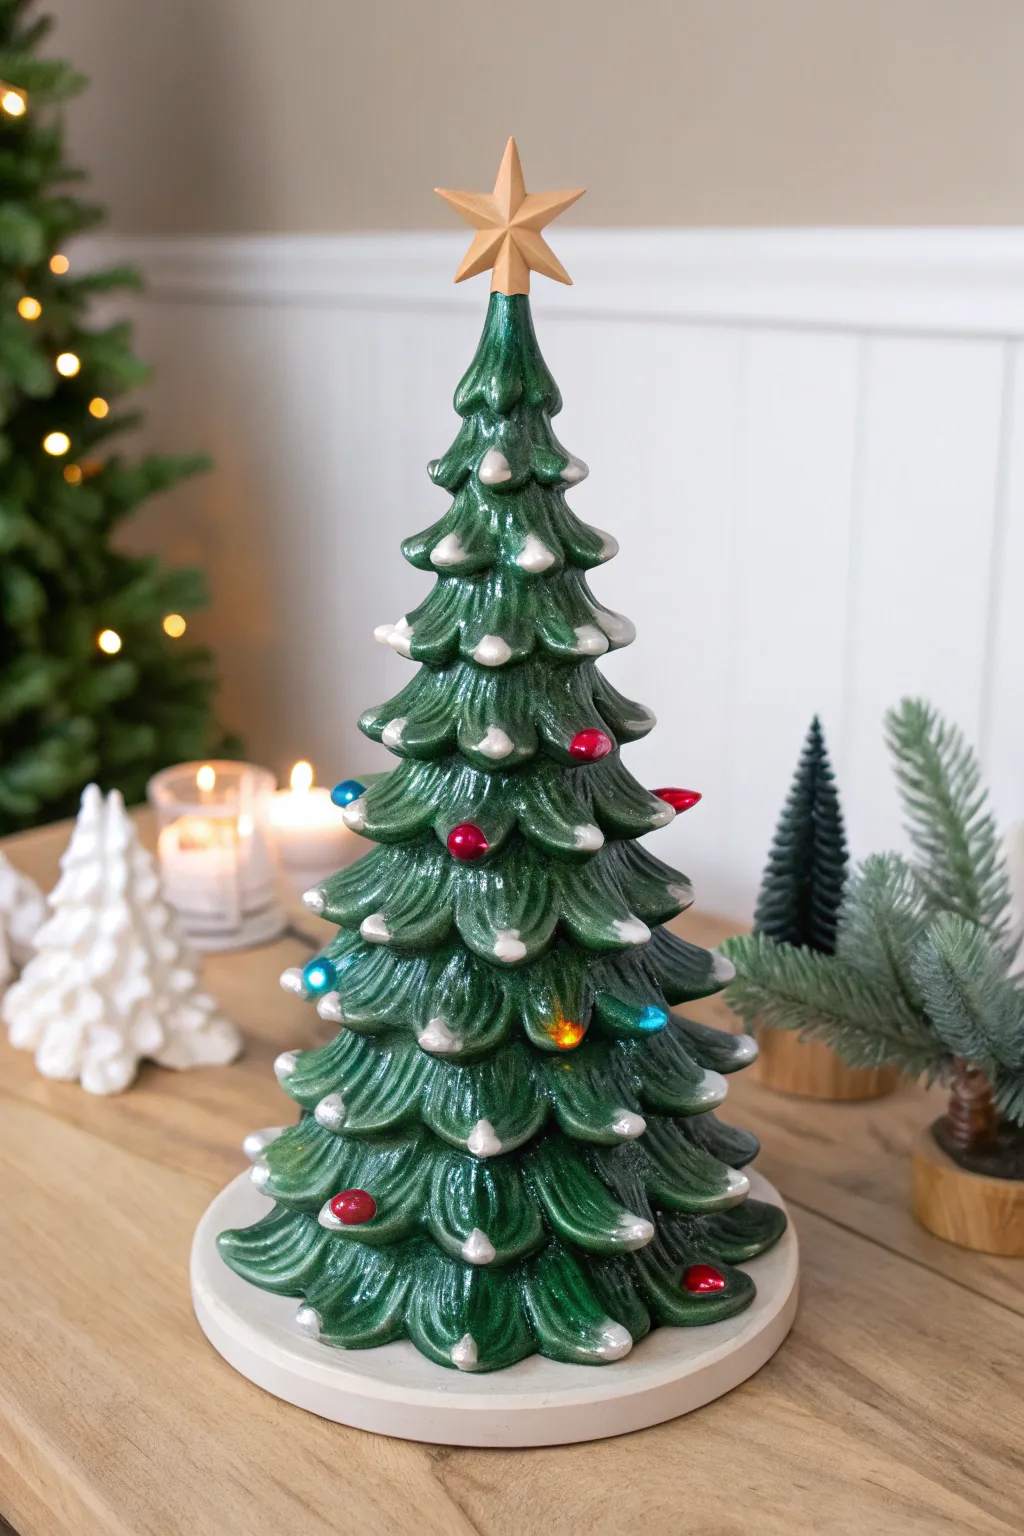
Capture the magic of vintage holidays with this quintessential ceramic tree project. By combining deep forest greens with crisp white accents, you’ll create a timeless centerpiece that looks as if it was just dusted with fresh snow.
Detailed Instructions
Materials
- Bisque ceramic Christmas tree with base
- Acrylic paints: Dark forest green, bright white, metallic gold
- Glazing medium or water for thinning
- Glossy clear acrylic sealer (spray or brush-on)
- Small twist bulbs (red, blue, orange, green mixed)
- Plastic star topper (gold or yellow)
- Wide flat brush (for base)
- Small round brush (for details)
- Small sponge (optional for texture)
- Super glue or craft glue
- Light kit (cord and bulb)
Step 1: Laying the Foundation
-
Clean and reset:
Begin by wiping down your bisque tree with a slightly damp sponge to remove any ceramic dust. Let it dry completely for about 10 minutes to ensure the paint adheres properly. -
Mixing the base green:
Pour a generous amount of dark forest green acrylic paint onto your palette. If the paint feels too thick, mix in a tiny drop of water or glazing medium—you want it fluid enough to get into the crevices but opaque enough to cover well. -
Initial green coat:
Using your wide flat brush, paint the entire body of the tree green. Don’t worry about being perfect; just get the color into all the deep grooves between the branches. -
Painting the base:
While the tree body dries, paint the separate ceramic base in a clean, bright white. This simulates a snowy ground and helps reflect the light upwards. -
Touch-up layer:
Once the first coat on the tree is dry to the touch, inspect it for white spots. Apply a second coat of green to ensure a rich, solid color foundation. -
Adding the dry brush shading:
To give the branches dimension, dip a dry brush into a slightly lighter shade of green (or mix white into your base green). Offload most of the paint on a paper towel, then lightly whisk it over the raised areas of the branches. This makes the texture pop.
Step 2: Snow & Shine
-
Prepping the snow:
Load a small round brush with thick, un-thinned white acrylic paint. You want the consistency to be heavy so it sits on the surface. -
Applying snow tips:
Carefully dab the white paint onto the very tips of each branch. I like to twist the brush slightly as I lift off to create a small peak, mimicking distinct piles of snow. -
Refining the snowfall:
Go back and check for consistency. Ensure the snow marks are varied—some slightly larger, some smaller—to keep the look organic rather than uniform. -
Star treatment:
If your plastic star isn’t already the right shade, paint it with metallic gold acrylic. Two thin coats are usually better than one thick one to maintain the plastic’s translucency. -
Sealing the deal:
Once all paint is completely dry (give it at least an hour), apply a glossy clear acrylic sealer over the entire green part of the tree. This gives it that classic ceramic shine.
Paint Peeling?
If paint lifts off the bisque, the ceramic was likely too dusty or oily. Sand the spot lightly with fine-grit sandpaper, wipe with alcohol, and repaint to fix the bond.
Step 3: Assembly
-
Sorting the bulbs:
Organize your plastic twist bulbs by color. The example uses a mix of red, blue, and orange for a traditional look. -
Gluing the pieces:
Apply a tiny dot of glue to the stem of each plastic bulb and insert them into the holes on the tree. Hold each for a few seconds to set. -
Attaching the star:
Secure the gold star topper into the topmost hole with a drop of glue. -
Base assembly:
Install the light kit into the white ceramic base according to the manufacturer’s instructions, ensuring the cord exits through the notch. -
Final reveal:
Place the green tree onto the white base, plug it in, and admire the glow through your newly painted branches.
Add Glittery Frost
While the white snow-tip paint is still wet, sprinkle ultra-fine iridescent glitter over it. This creates a sparkling frost effect that catches the light beautifully.
Now turn on the lights and enjoy the warm, vintage glow of your handcrafted masterpiece


Black Underpainting for Vintage Depth

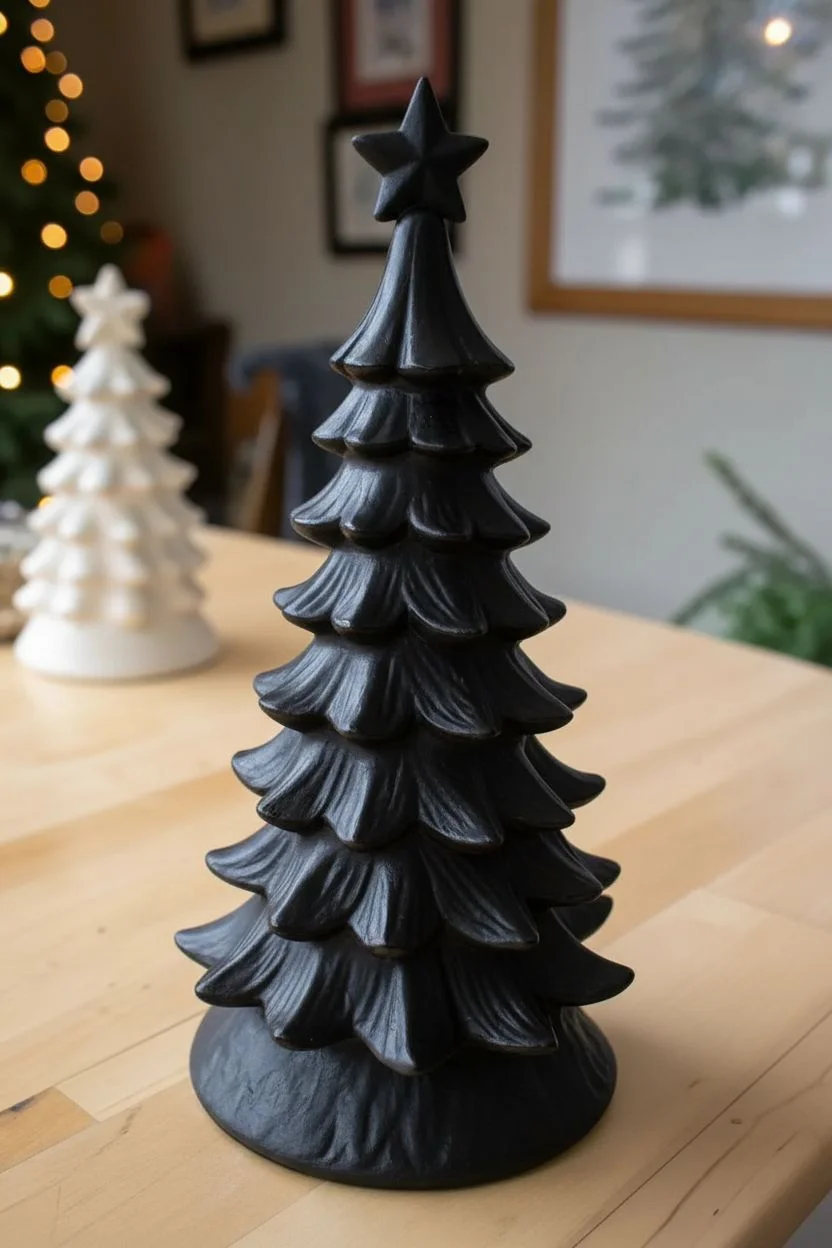
This technique uses a strong black base coat to create incredible depth and shadow, giving your ceramic tree an instant vintage, heirloom quality. The dark recesses contrast beautifully with the glossy green branches, mimicking the look of aged ceramics found in antique shops.
Step-by-Step Tutorial
Materials
- Bisque ceramic Christmas tree (ready to paint)
- Black acrylic paint (matte or satin)
- Deep emerald green acrylic paint (glossy or satin)
- Lighter sage or mint green acrylic paint (for highlights)
- High-gloss glaze or spray sealer
- Wide flat brush (for base coating)
- Medium round brush
- Soft cloth or paper towels (for wiping back)
- Small detail brush
- Plastic palette or paper plate
Step 1: Base Coating
-
Prepare the surface:
Begin by wiping the entire bisque tree with a slightly damp sponge to remove any ceramic dust. Let it dry completely for a few minutes. -
Apply the black base:
Using a wide flat brush, paint the entire tree in solid black. Don’t worry about being neat; the goal is to cover every inch, ensuring the paint gets deep into the crevices and under the branches. -
Check for missed spots:
Turn the tree upside down and inspect it from different angles. Bisque is porous and can hide white spots easily, so dab extra black paint into any deep recesses you missed. -
Paint the base:
Continue the black paint down onto the trunk and the base of the tree. This area will remain black, so ensure a solid, even coat here. -
Let it dry completely:
Allow the black base coat to dry fully. It should be dry to the touch before you proceed to the next step to prevent muddying your green colors.
Pro Tip: Shadow Control
Work in small sections. If you apply the green while the black is still slightly tacky (not wet), they will blend slightly for a softer, moodier transition rather than a stark contrast.
Step 2: Layering the Green
-
Load your brush:
Load a medium round brush with your deep emerald green paint. I prefer not to dilute the paint here; you want good coverage. -
Apply the first green layer:
Start painting the branches, beginning at the bottom and working upward. Brush the green onto the prominent parts of the boughs, leaving the black visible in the deep cracks and underneath the tips. -
Use a dry-brush motion:
As you move up the tree, use less pressure. Let the bristles glide over the texture so the green catches the raised surfaces while the black stays dark in the valleys. -
Refine the shadows:
If you accidentally cover too much black, use a clean, damp brush or a cotton swab to gently lift the wet green paint out of the crevices. -
Paint the star:
Using a small detail brush, paint the star at the top. You can keep it black for a silhouette look as shown, or add a touch of dark metallic silver if you want a subtle shimmer. -
Let the green dry:
Allow this primary green layer to dry completely.
Step 3: Adding Highlights & Finish
-
Prepare the highlight color:
Put a small amount of the lighter sage or mint green onto your palette. Dab most of the paint off onto a paper towel until your brush is almost dry. -
Highlight the tips:
Very lightly dry-brush this lighter color just onto the very tips and highest ridges of the branches. This simulates light hitting the tree and accentuates the ceramic texture. -
Focus on the top:
Add slightly more of the highlight color near the top of the tree, as if an overhead light is shining down on it. -
Inspect the contrast:
Step back and look at the tree. You should see a gradient: black in the deep shadows, emerald green on the branches, and sage on the tips. -
Seal the piece:
Once all paint is perfectly dry (wait at least 4-6 hours), apply a coat of high-gloss glaze. This mimics the fired glaze look of vintage kiln-fired ceramics. -
Double-check the finish:
Ensure the glaze doesn’t pool in the crevices; you want those black shadows to remain crisp, not cloudy. -
Paint the bottom rim:
For a professional finish, paint the very bottom rim of the base black if any green dripped down, creating a clean edge.
Level Up: Snowy Tips
For a wintry touch, use a textured snow paint or white puff paint on just the very tips of the branches after sealing. Sprinkle iridescent glitter on the wet snow for extra sparkle.
Now you have a stunning, vintage-inspired centerpiece that captures the charm of classic holiday decor


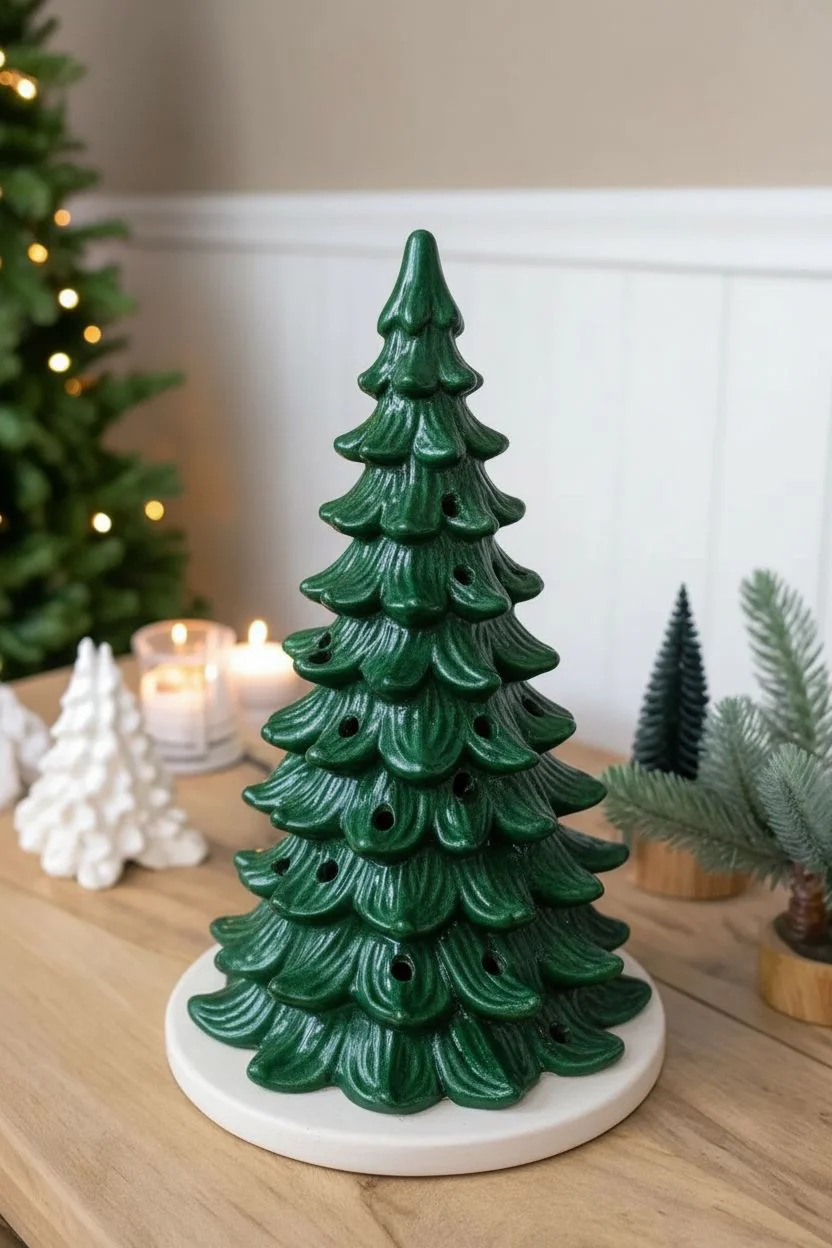
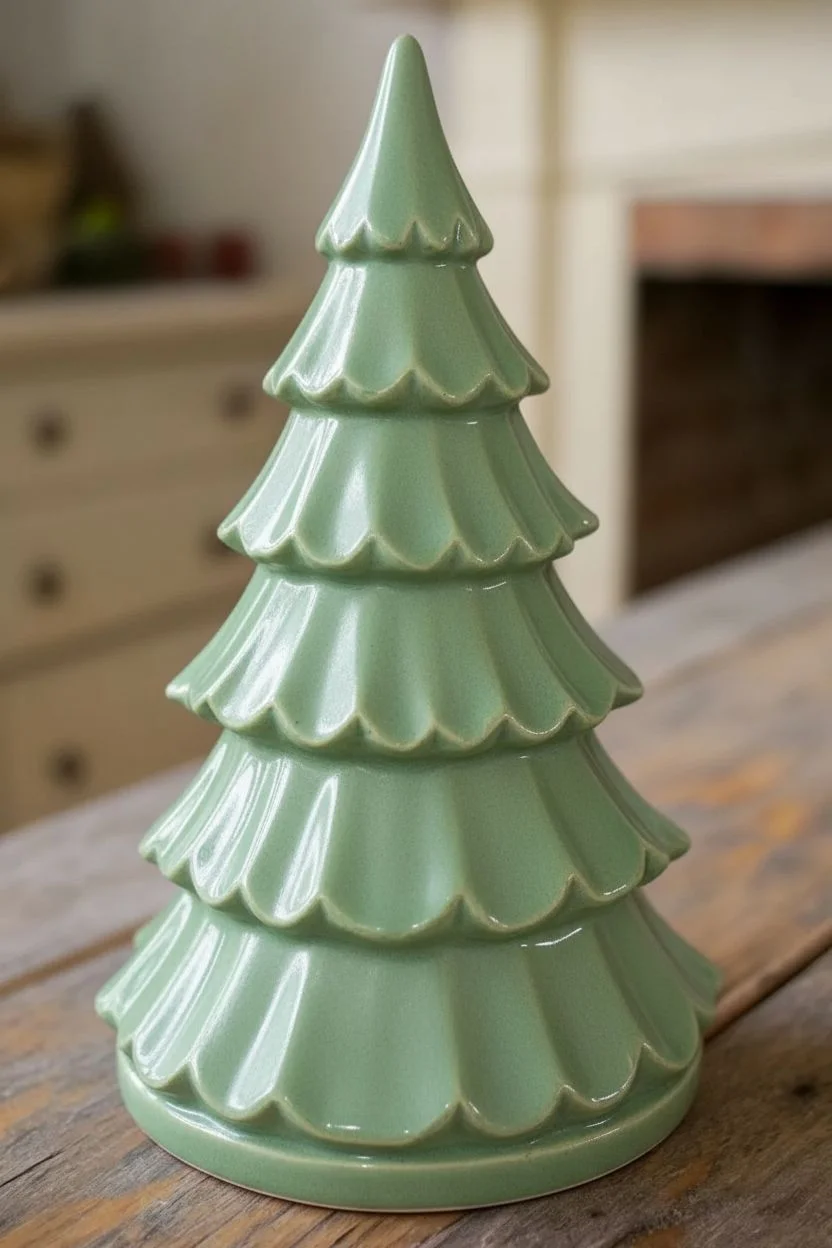
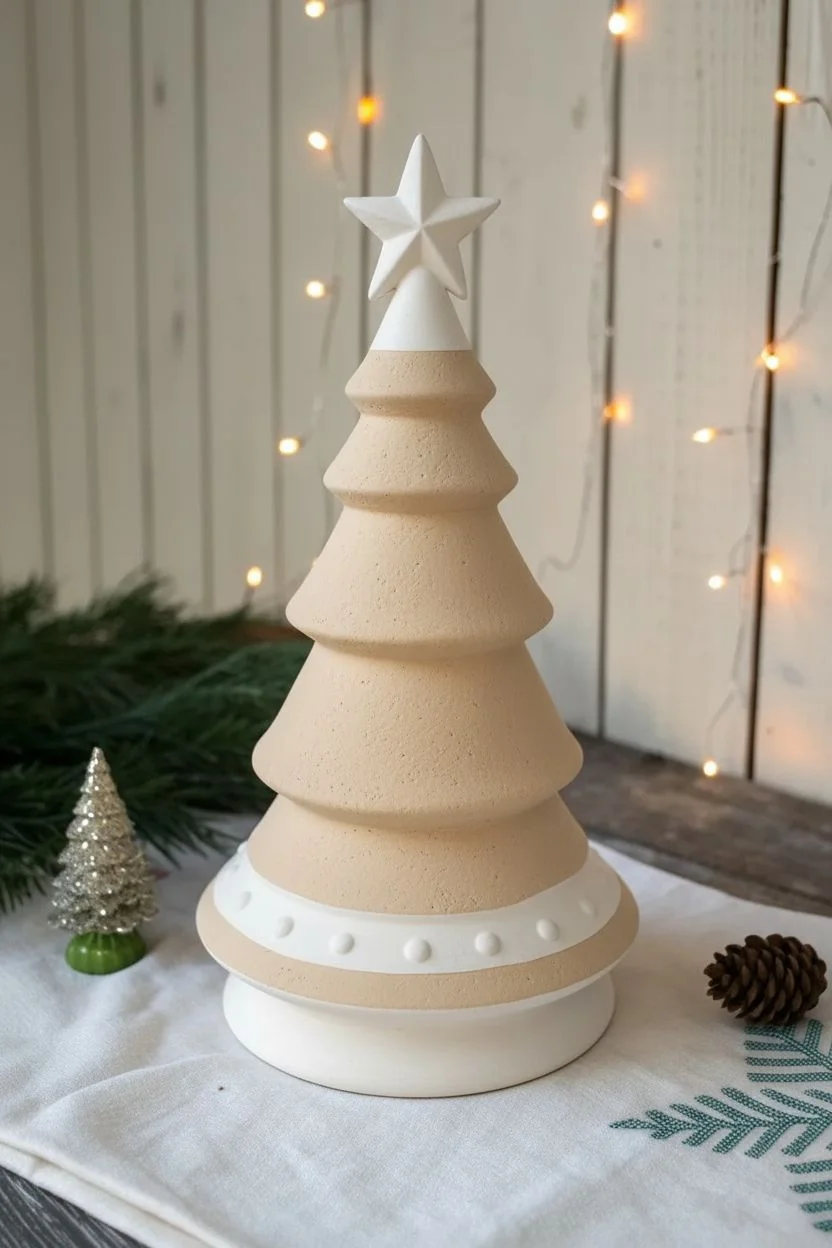
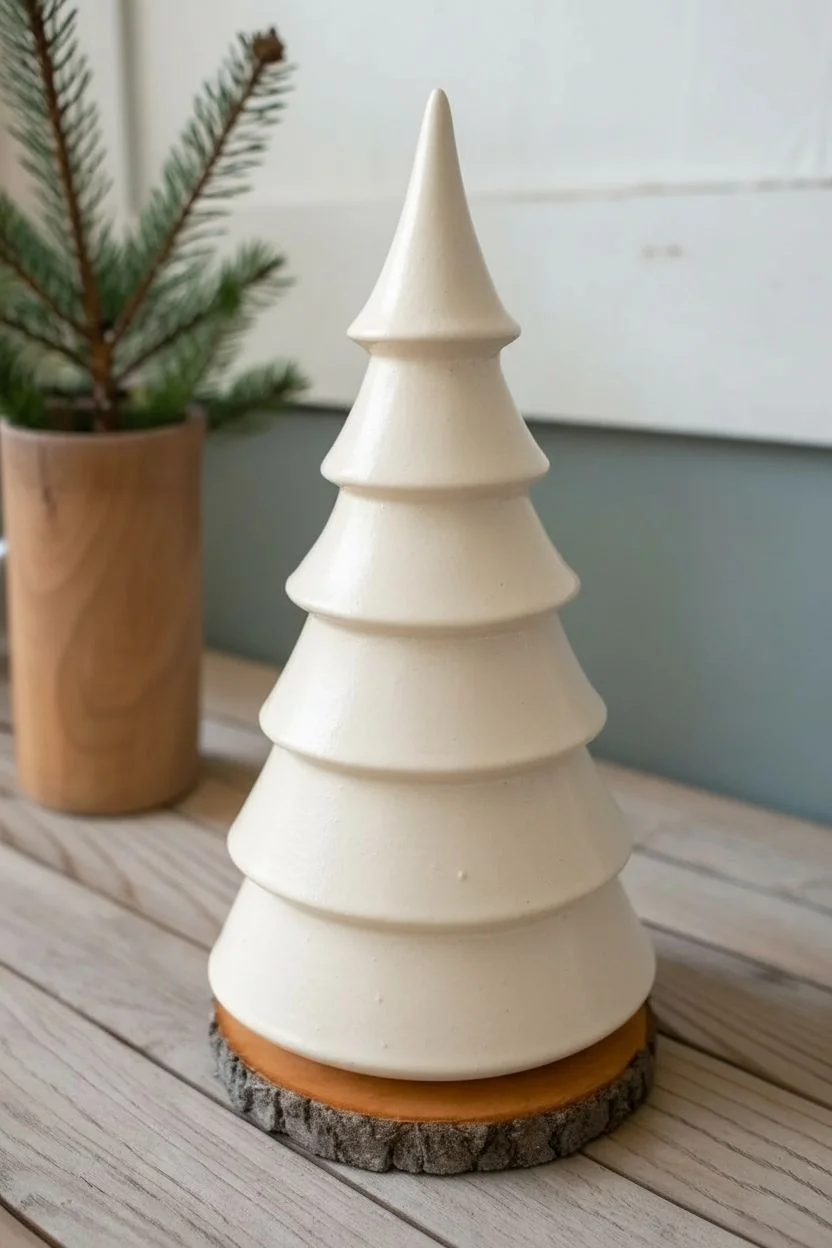
Multi-Green Ombre From Base to Star
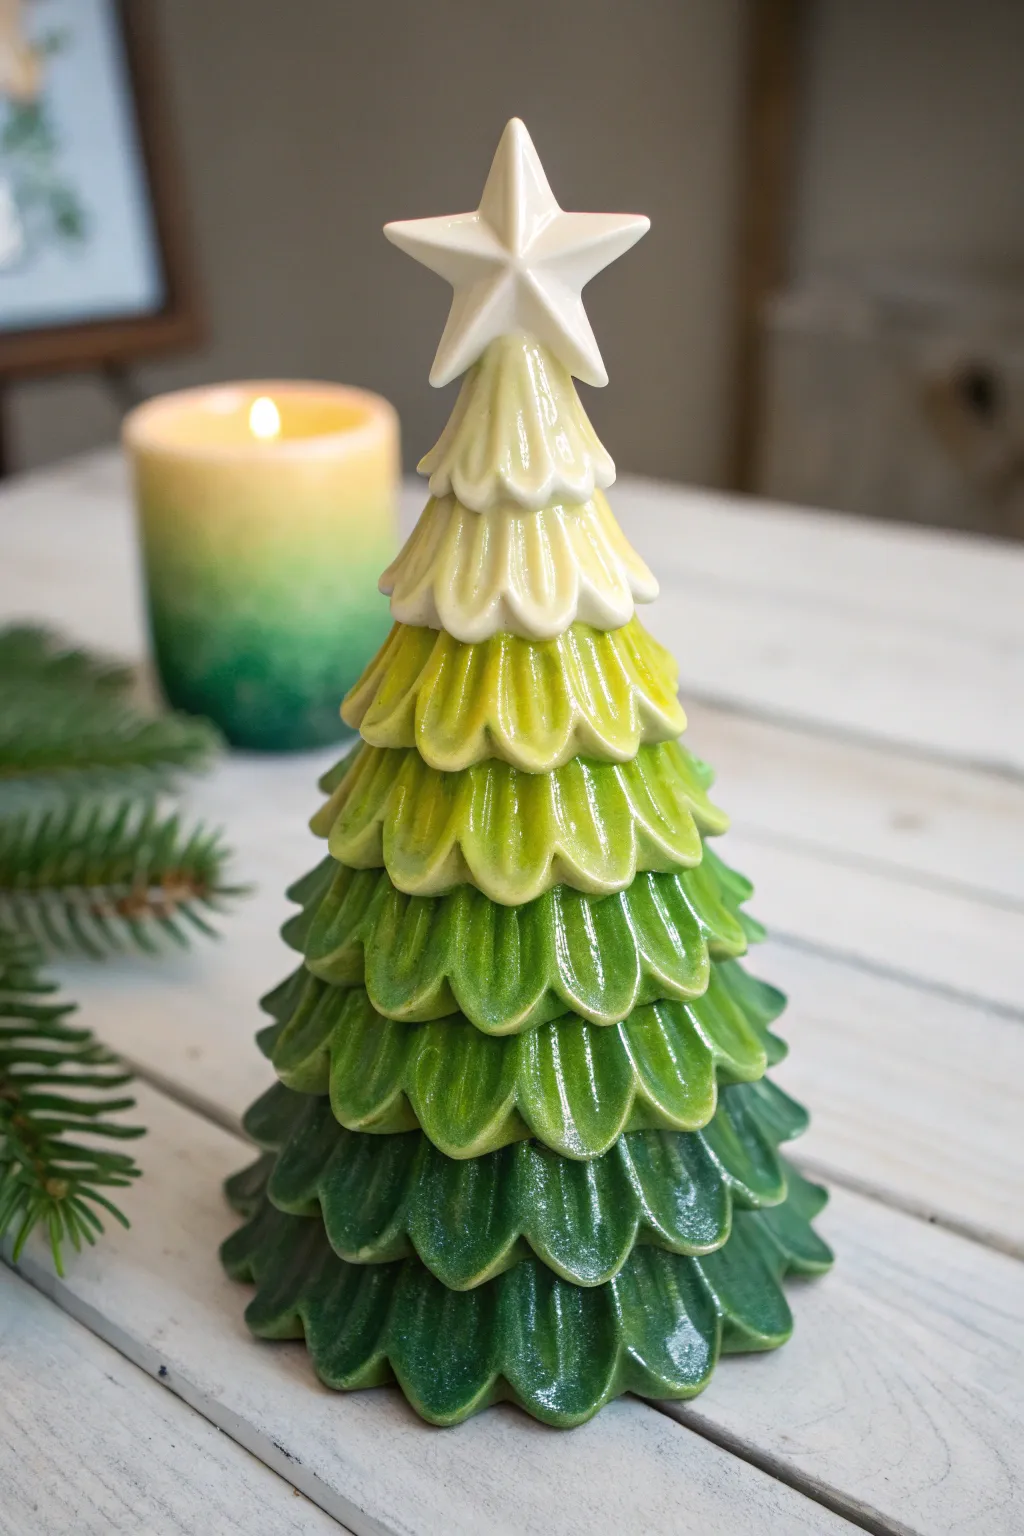
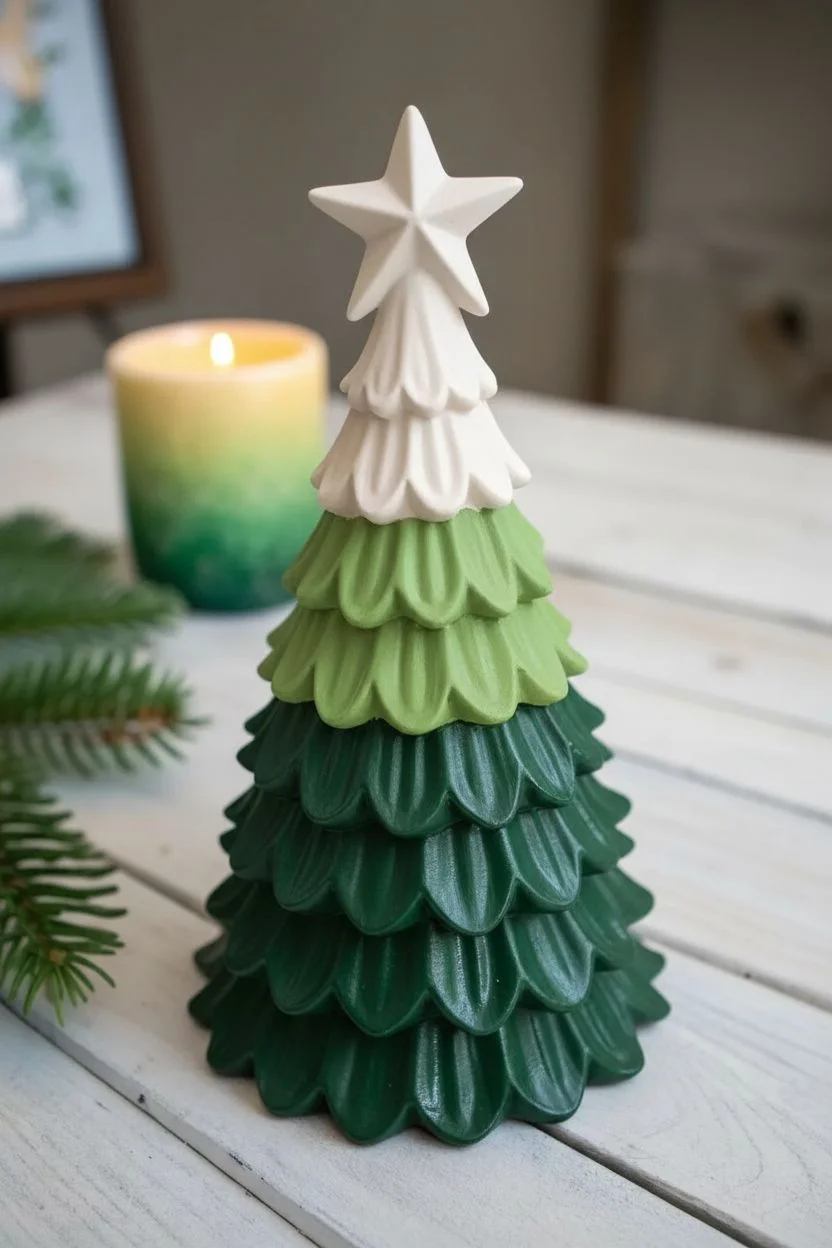
Capture the essence of a serene forest with this elegant, gradient-painted ceramic tree. The design features a smooth transition from deep evergreen at the base to a soft, creamy white at the star, perfect for a modern mantelpiece.
Detailed Instructions
Materials
- Bisque ceramic Christmas tree (tiered style)
- Acrylic paints: Dark forest green, Kelly green, Lime green, Cream or Ivory, White
- Glazing medium or slow-drying medium (optional)
- Small flat brush (size 4 or 6)
- Detail brush (size 0 or 1)
- Make-up sponge or small painting sponge
- Gloss varnish or clear sealer
- Palette for mixing
- Water cup and paper towels
Step 1: Preparation and Base Shades
-
Clean the bisque:
Before dipping your brush, wipe the ceramic bisque down with a slightly damp sponge to remove any dust or kiln debris. Let it dry completely for about 10 minutes. -
Map the gradient:
Look at your tree’s tiers. Plan to divide them into four distinct color zones: the bottom two tiers (darkest), the middle two (medium), the upper two (light), and the very top/star (cream). -
Mix the darkest green:
Squeeze out your dark forest green. If it feels too bright, add a tiny drop of black or brown to deepen it. This anchors the look. -
Paint the base tiers:
Using a flat brush, paint the bottom two rows of branches with the dark forest green. Ensure you get the paint into the deep crevices between the boughs for solid coverage. -
Create the transition color:
On your palette, mix the forest green with the kelly green in a 50/50 ratio. This bridges the gap between the dark base and the lighter middle. -
Apply the second zone:
Paint the next two tiers up with your mixed medium-green shade. Don’t worry about perfect blending just yet; solid blocks of color act as our foundation.
Step 2: Lightening the gradient
-
Mix the lime shade:
Now, mix your kelly green with a significant amount of lime green. You want a fresh, spring-like color for the upper middle section. -
Paint the upper boughs:
Apply this bright lime mixture to the next tier of branches. As the tree narrows, use the smaller flat brush to maintain control. -
Prepare the palest green:
For the very top branches (just below the star), mix a tiny dot of lime green into a large dollop of cream paint. It should look like a whisper of pale pistachio. -
Paint the top tier:
Carefully coat the highest branches with this pale mixture. I find using a smaller brush here prevents accidental smudges on the star. -
Wet blending (optional):
If harsh lines formed between tiers, use a slightly damp, clean brush to gently feather the wet edges where two colors meet, softening the transition.
Seamless Blending Tip
Add a drop of ‘slow-dry medium’ to your acrylics. This keeps the paint wet longer, allowing you to blend the tiers together directly on the ceramic without dried streaks.
Step 3: The Star and Finishing Touches
-
Paint the star:
Clean your brush thoroughly. Paint the star topper with solid Titanium White or a very light Ivory. Apply two coats for opacity. -
Highlight the tips:
Dip a small makeup sponge lightly into the next lightest color for each section. For example, sponge a little medium green onto the tips of the dark base branches. -
Continued highlighting:
Continue this upward, sponging the lime color onto the medium green tips, and the cream color onto the lime tips. This enhances the texture. -
Dry thoroughly:
Allow the entire tree to dry for at least 2-3 hours. The paint must be completely cured before sealing. -
Apply the gloss:
Using a clean, wide brush, apply a coat of high-gloss varnish. This mimics the look of fired glazed ceramic shown in the photo. -
Second coat of gloss:
Once the first coat is tacky-dry (usually about 20-30 minutes), apply a second thin coat of gloss for that ultra-shiny, professional finish.
Fixing Patchy Paint
Ceramic bisque is thirsty! If your first coat looks streaky or absorbs too fast, apply a second thin coat rather than globbing on thick paint, which leaves brush marks.
Now step back and admire the festive glow of your beautifully graduated evergreen masterpiece


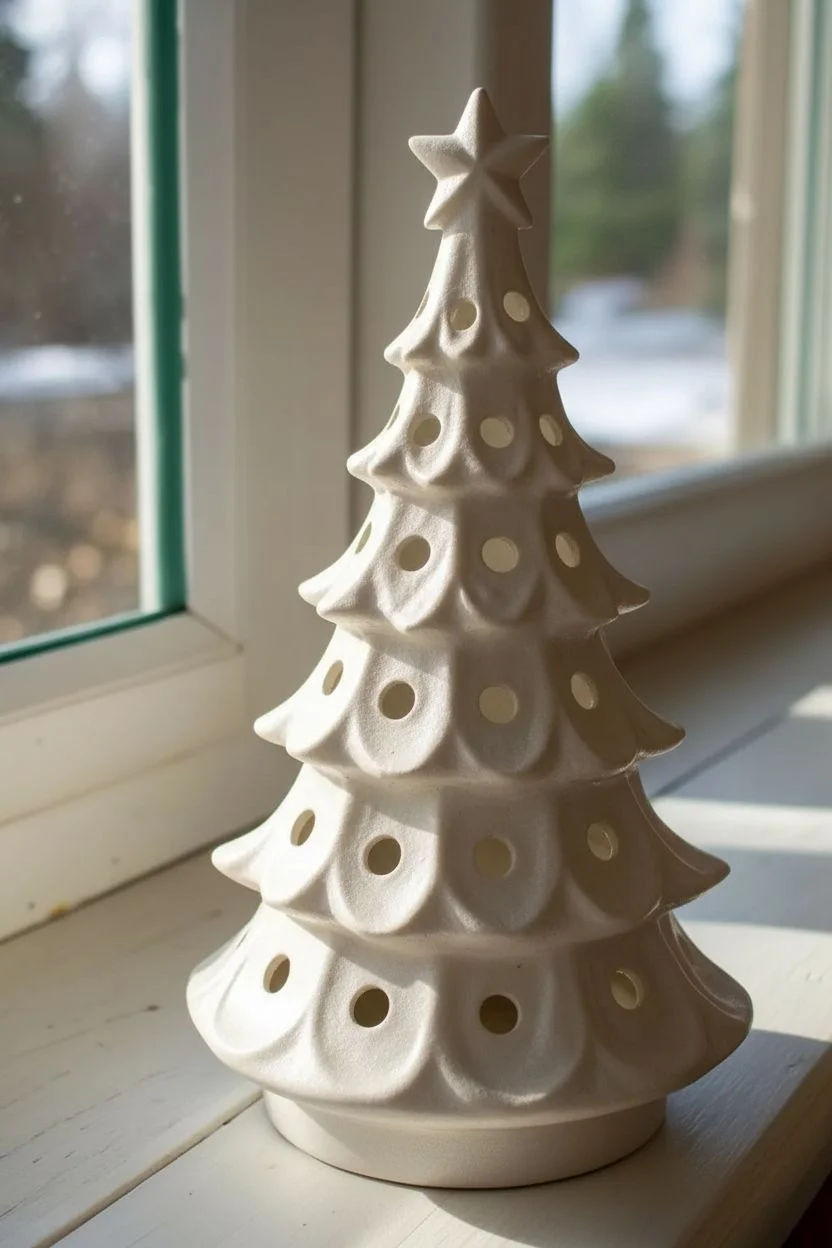
All-White Tree With Gold-Tipped Branches
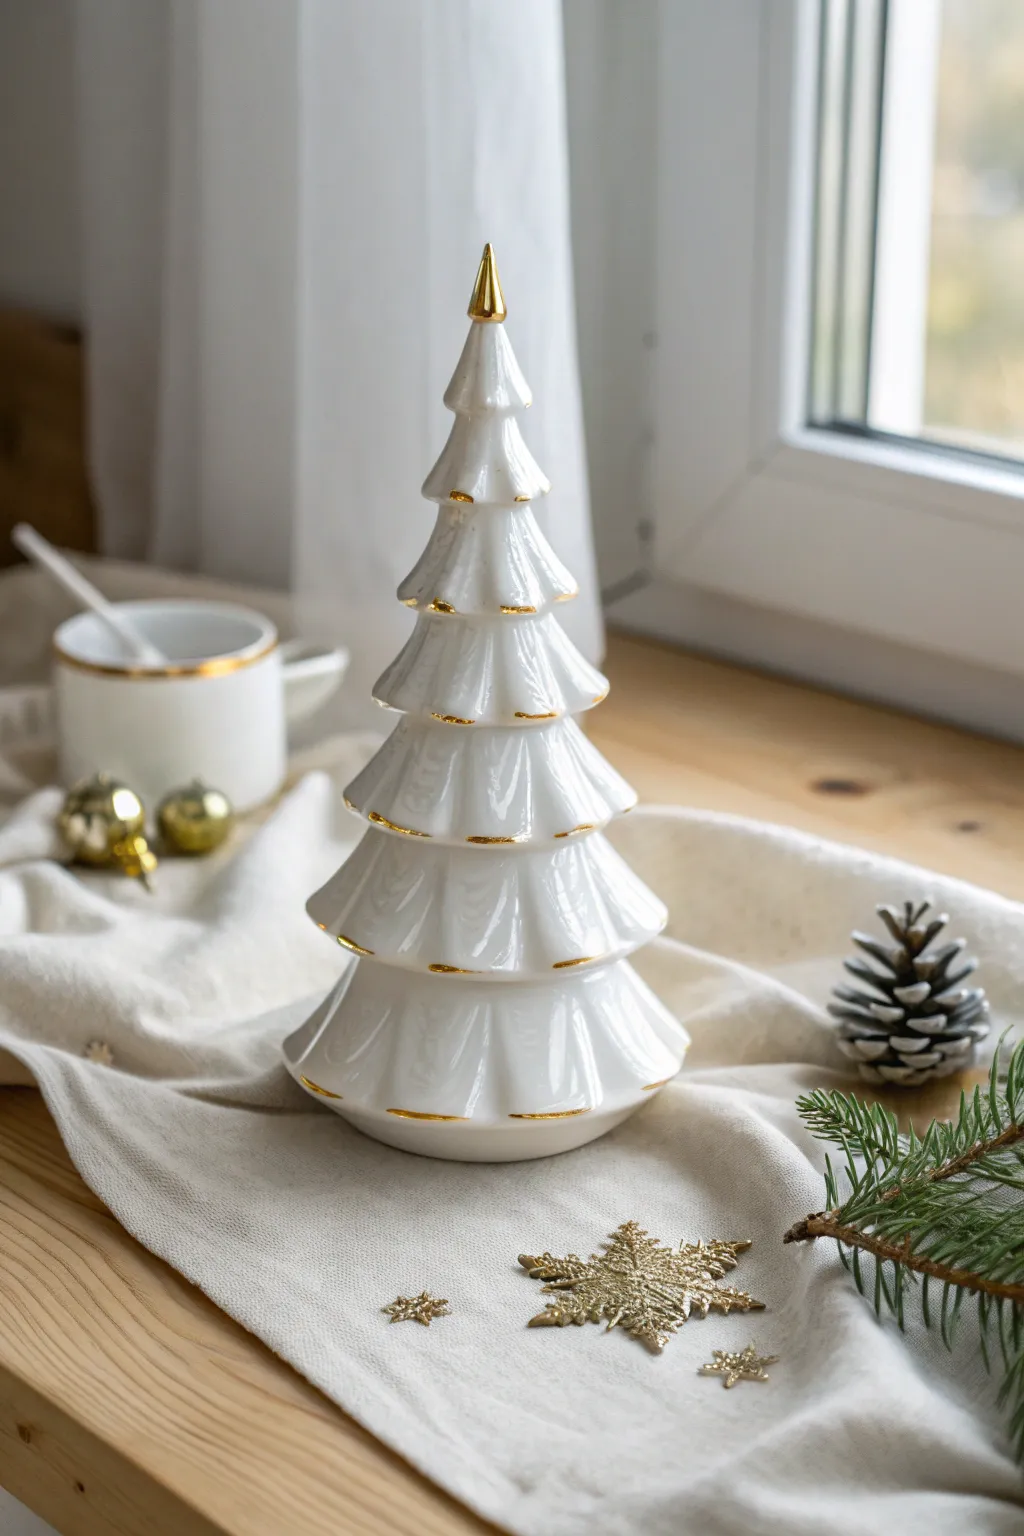
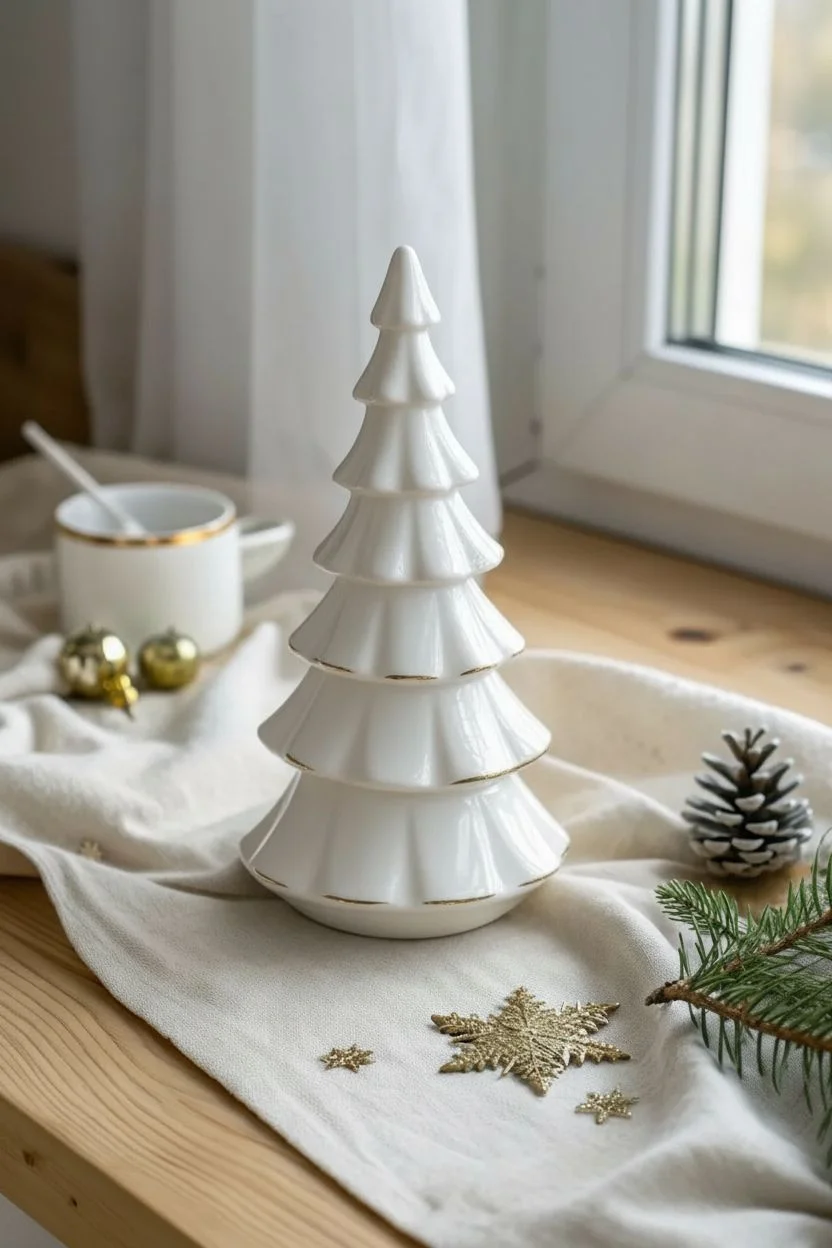
Capture the pristine beauty of winter with this glossy white ceramic tree, accented by luxurious gold detailing. This minimalist design elevates any holiday display, mimicking the look of fine china with just a few simple coats of glaze.
Step-by-Step Guide
Materials
- Bisque ceramic Christmas tree (ready-to-pain)
- High-gloss white ceramic glaze (opaque)
- Metallic liquid gold leaf or gold overglaze (premium luster)
- Soft fan brush (for large areas)
- Fine liner brush (size 0 or 00)
- Clean water and sponge
- Palette or small dish
- Kiln (if using fired glazes) or clear acrylic sealant (if using acrylics)
Step 1: Preparation & Base Coat
-
Clean the Bisque:
Begin by wiping down your ceramic bisque tree with a damp sponge. This removes any dust or oils from manufacturing that could prevent the glaze from adhering properly. -
Prepare the White Glaze:
Shake your high-gloss white glaze thoroughly. Pour a generous amount into your palette. If it feels too thick, you can thin it very slightly with a drop of water, but you want good opacity. -
Apply the First Coat:
Using a soft fan brush, apply the first coat of white glaze to the entire tree. Use long, smooth strokes starting from the top and working your way down to avoid drips. -
Check Coverage:
Ensure you get the glaze into the recessed areas under the boughs, but be careful not to let it pool too heavily in the crevices, as this can cause bubbling during firing. -
Dry and Repeat:
Let the first coat dry until it is chalky to the touch. Apply a second coat, moving your brush in a cross-hatch direction (perpendicular to the first coat) to ensure a solid, streak-free finish. -
Final White Layer:
Apply a third and final coat of white glaze. This ensures that deep, milky porcelain look. Allow the piece to dry completely before moving to the firing stage (or sealing stage if using non-fired paints). -
Fire the Base (If applicable):
If you are using kiln-fire glazes, fire the tree to the specific cone temperature recommended on your glaze bottle (usually Cone 06). This creates the glossy white canvas.
Fixing Wobbly Lines
Hand shaking? Don’t stress. Use a rubber-tipped clay tool or a toothpick to gently scrape away excess wet gold paint to refine the edge back to a sharp line.
Step 2: Gilding the Details
-
Prepare the Gold:
Once your tree is fired and cooled (or fully dried if using acrylics), shake your liquid gold leaf or gold overglaze. This material is precious, so pour only a tiny drop onto a clean surface. -
Load the Liner Brush:
Dip your fine liner brush (size 0) into the gold. You want the bristles coated but not dripping. I find it helpful to twist the brush on the palette to create a sharp point. -
Paint the Topper:
Start at the very top. Carefully paint the entire spire or star topper in solid gold. Use smooth vertical strokes to cover it completely. -
Outline the Tiers:
Moving down the tree, carefully run the side of your brush along the very edge of each branch tier. Support your hand on the table to keep it steady. -
Vary the Line Thickness:
For a natural look, let the gold line be slightly thicker in the center of the scalloped edge and taper off to a whisper at the corners. It doesn’t need to be mathematically perfect. -
Add Base Details:
At the bottom rim of the tree, add a continuous gold distinct line to ground the piece. If your mold has raised details like the stars shown, gently dab gold onto their raised surfaces. -
Clean Up Mistakes:
If you smudge the gold, quickly use a secondary clean brush dipped in gold essence (or appropriate thinner) to wipe it away before it sets. -
Final Cure / Fire:
If using real ceramic gold overglaze, fire the piece again at a much lower temperature (usually Cone 018-019). If using liquid gold leaf, simply let it cure in a dust-free area for 24 hours.
Add Vintage Sparkle
While the gold paint on the tips is still tacky (if not firing), lightly dust a tiny pinch of gold mica powder or superfine glitter for extra holiday shimmer.
Now your sophisticated ceramic tree is ready to bring a touch of class to your mantle or holiday table setting
BRUSH GUIDE
The Right Brush for Every Stroke
From clean lines to bold texture — master brush choice, stroke control, and essential techniques.
Explore the Full Guide
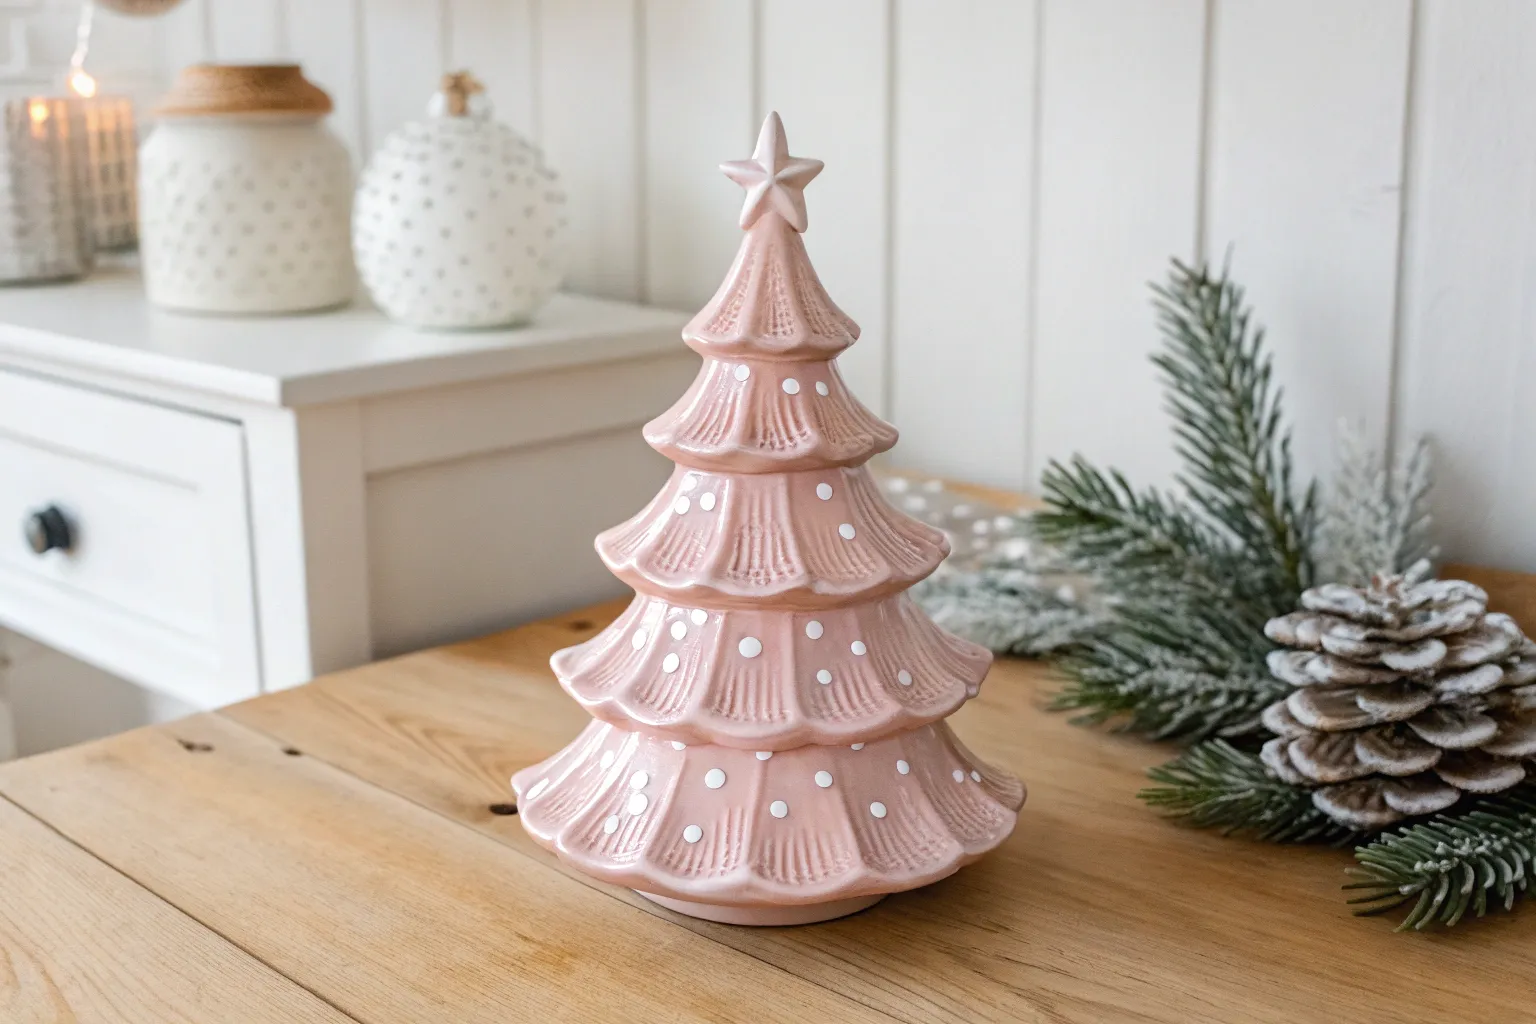
Pastel Pink Tree With Pearly Highlights


Transform a plain ceramic bisque tree into a soft, romantic holiday centerpiece with a delicate blush hue. This project features a glossy pastel pink finish with subtle pearlescent shimmer and classic pearl accents for a vintage-inspired look.
How-To Guide
Materials
- Ceramic bisque Christmas tree (with star topper)
- Acrylic paint: Pastel Pink or Blush
- Acrylic paint: Pearl White or Iridescent Medium
- High-gloss clear glaze or spray sealant
- Fine glitter (optional, iridescent)
- Faux pearl beads (sized to fit tree holes)
- Strong craft glue (e.g., E6000)
- Soft synthetic flat brush (medium)
- Small round detail brush
- Palette for mixing
- Damp sponge
Step 1: Base Coat Application
-
Wipe the bisque:
Before you begin painting, take a slightly damp sponge and gently wipe down the entire ceramic tree to remove any dust or ceramic powder. Let it dry completely for about 10 minutes. -
Mix the base color:
Squeeze out a generous amount of your pastel pink acrylic paint onto the palette. To achieve that dimensional look, I like to mix in a tiny drop of pearl medium right into the pink paint. -
Apply first layer:
Using your medium flat brush, apply the pink mixture to the tree. Start from the bottom branches and work your way up towards the top. -
Paint the star:
Don’t forget the star topper. Paint it with the same pink mixture, ensuring you get into all the crevices of the star points. -
Let dry:
Allow this first coat to dry for at least 20-30 minutes. The ceramic absorbs moisture quickly, but you want it dry to the touch. -
Apply second layer:
Apply a second coat of pink to ensure solid, opaque coverage. Look for any white spots you might have missed in the deep grooves of the branches.
Sticky Situation
Gluing pearls can get messy. Use tweezers to handle small beads precisely, and keep a damp cloth nearby to wipe glue off the glossy finish instantly before it dries cloudy.
Step 2: Adding Shimmer and Glaze
-
Prepare the shimmer glaze:
Mix a small amount of clear gloss varnish with a pinch of fine iridescent glitter or liquid pearl medium. You want a subtle sparkle, not a heavy glitter coat. -
Detail the branches:
With the round brush, lightly brush this shimmer mixture specifically on the raised ridges of the branches. This highlights the texture like snow glinting in the light. -
Coat the whole tree:
Once the highlights are tacky-dry, apply a full coat of high-gloss clear glaze over the entire tree. This gives it that fired-ceramic shine without actual kiln firing. -
Check for drips:
While the glaze is wet, watch closely for drips pooling at the tips of the branches. Gently brush them away before they harden. -
Full cure time:
Let the tree sit undisturbed for at least 24 hours. A fully cured glossy surface is essential before you start gluing on the decorations.
Step 3: Finishing Touches
-
Sort your pearls:
Select faux pearl beads that fit snugly onto the tips of the ceramic branches. You might need different sizes if your tree’s branches taper significantly. -
Apply adhesive:
Using a toothpick or fine applicator, place a tiny dot of strong craft glue onto the very tip of a branch. -
Place the pearl:
Press a pearl bead onto the glue dot. hold it for a few seconds to ensure it grabs the surface securely. -
Work in sections:
Move row by row, starting from the top and working down, gluing pearls to every branch tip. This prevents your hand from knocking off wet pearls. -
Final inspection:
Check the star topper. If you prefer, add a small distinct pearl to the center or points of the star, or leave it solid pink as shown in the inspiration.
Glow Up
For a magical twist, use a translucent pearl paint and drill holes in the branch tips instead of gluing beads. Insert plastic lites and add an LED kit inside!
Place your shimmering pink tree on a mantel or serve as a centerpiece that radiates soft, vintage charm
Icy Blue Tree With Frosted Dry-Brush
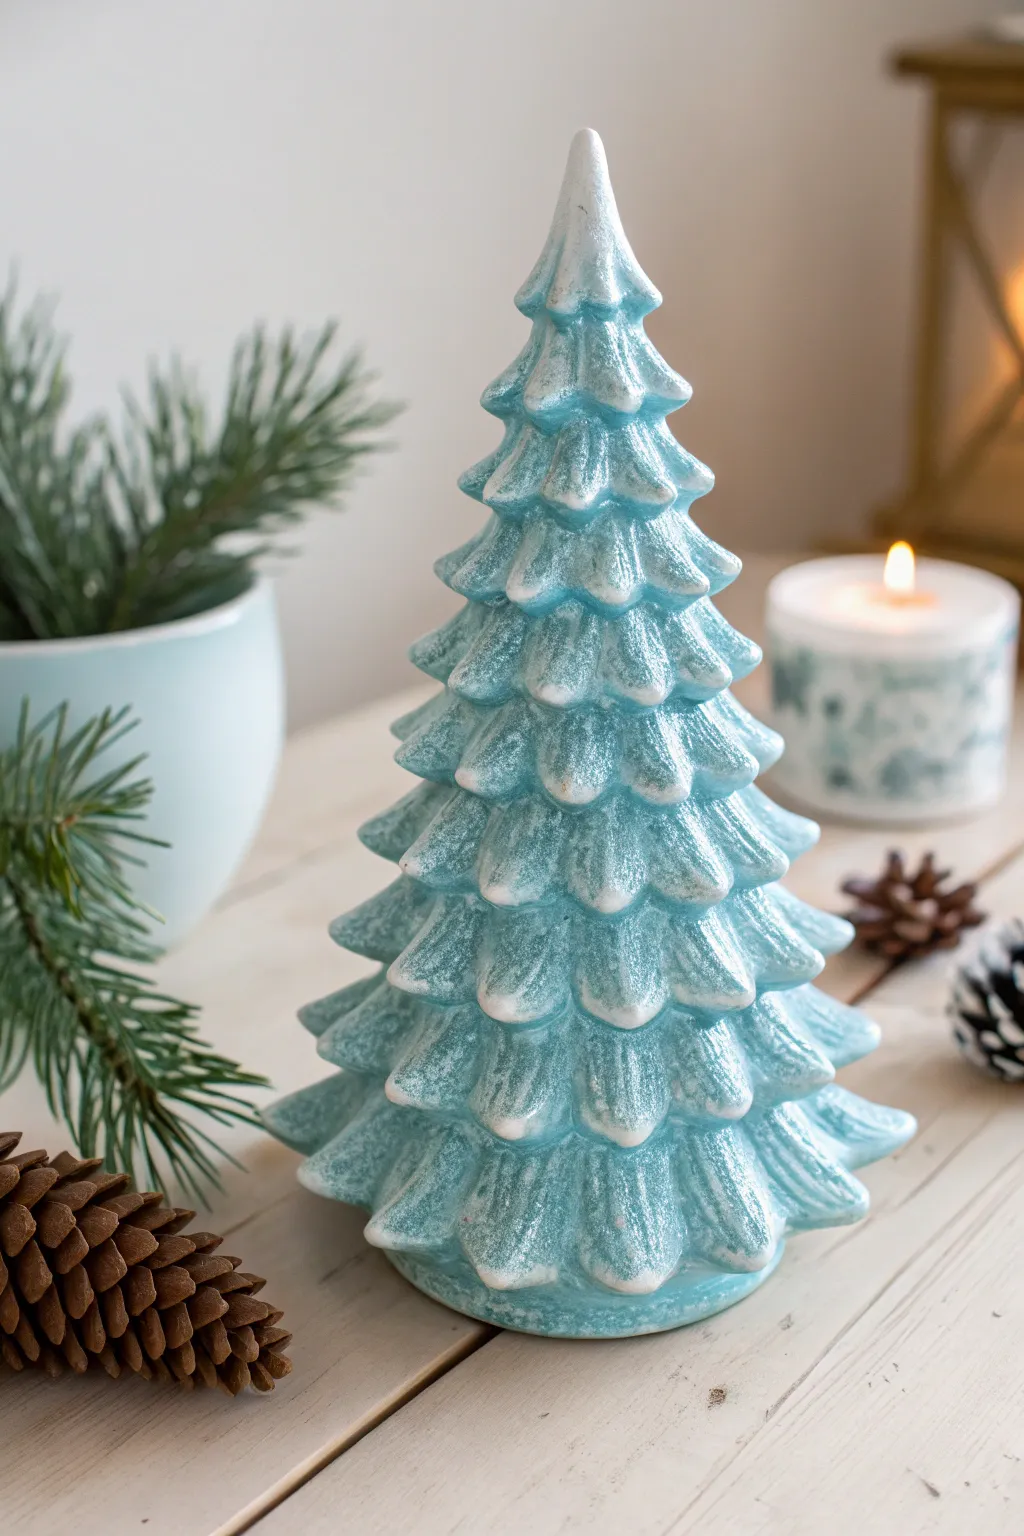
Transform a simple ceramic tree into a frozen masterpiece that captures the serene beauty of a snowy forest. This project uses a soft teal-blue base and heavy white dry-brushing to create a crisp, wintry texture that sparkles without needing glitter.
Step-by-Step Tutorial
Materials
- Bisque ceramic Christmas tree (cleaned and dust-free)
- Acrylic paint: Light Teal or Turquoise (base color)
- Acrylic paint: Titanium White (for frosting)
- Acrylic paint: Slightly Darker Teal (optional, for shading drift)
- Wide flat brush (approx. 1 inch)
- Medium round brush
- Stiff-bristled dry brush (fan brush or old flat brush)
- Paper towels
- Palette or paper plate
- Spray sealant (matte or satin finish)
Step 1: Base Coat Application
-
Prepare the surface:
Begin by wiping down your ceramic tree with a slightly damp sponge to remove any ceramic dust. Let it dry completely before applying any paint, as moisture can affect adhesion. -
Mix your base color:
Squeeze out a generous amount of your Light Teal paint. If it feels too vivid, dampen the saturation by mixing in a tiny drop of white or grey to achieve that muted, icy tone seen in the reference. -
Apply the first layer:
Using the medium round brush, apply the teal paint to the entire tree. Work the brush deep into the crevices between the branches to ensure no white bisque shows through. -
Smooth out pooling:
Watch for paint pooling in the deep grooves. Use your brush to scoop out excess paint so you don’t lose the definition of the pine needles. -
Apply second coat:
Once the first layer is dry to the touch (usually 15-20 minutes), apply a second thin coat of the teal base to ensure solid, opaque coverage. -
Optional depth shading:
While the second coat is still slightly tacky, I sometimes mix a very small amount of darker teal with water to create a thin wash. Dab this into the deepest recesses for extra dimension. -
Full drying time:
Allow the base coat to dry completely. This is crucial—if the base is wet, the next steps will turn muddy instead of crisp.
Step 2: Creating the Frosted Effect
-
Prepare for dry-brushing:
Place a blob of Titanium White paint on your palette. Take your stiff-bristled brush and dip just the tips into the paint. -
Offload the paint:
Vigorously wipe the brush onto a paper towel until almost no paint comes off. It should feel dry and barely leave a mark. -
First frosting pass:
Gently sweep the brush horizontally across the branches, starting from the bottom and working up. Use a very light hand to catch only the raised textures of the needles. -
Target the tips:
Focus your strokes on the tips of the branches where snow would naturally settle. The goal is a soft, dusting effect rather than solid white stripes. -
Build intensity slowly:
Reload your brush, offload on the towel again, and repeat the process. Multiple light layers create a much more realistic frost than one heavy layer. -
Highlight the peak:
At the very top of the tree, intensify the white application. Use a slightly heavier hand or a smaller brush to make the tip look like it’s capped with fresh snow.
Too Much White Paint?
If you accidentally apply a heavy blob of white, don’t wipe it! Wet a clean brush slightly and gently feather the edges out to blend it into a soft highlight.
Step 3: Finishing Touches
-
Inspect from all angles:
Rotate the tree and look for any spots where the blue looks too flat. Add touches of dry-brushed white to balance the look. -
Refine the bottom edge:
Don’t forget the very bottom rim of the branches. A little white dry-brushing here helps ground the piece visually. -
Initial cure:
Let the white paint cure for at least an hour. Acrylics dry fast, but you want them fully set before sealing. -
Seal the artwork:
Take the tree to a well-ventilated area and spray it with a clear matte or satin sealant. This protects your paint job and gives it that finished, professional ceramic feel.
Add Some sparkle
While the white paint is still wet on the tips, sprinkle a pinch of iridescent embossing powder or fine clear glitter for a magical, glittering frost effect.
Place your icy creation near a warm candlelight glow to see those frosted textures really shine.

PENCIL GUIDE
Understanding Pencil Grades from H to B
From first sketch to finished drawing — learn pencil grades, line control, and shading techniques.
Explore the Full Guide
Metallic Sheen Tree for Glam Holiday Decor

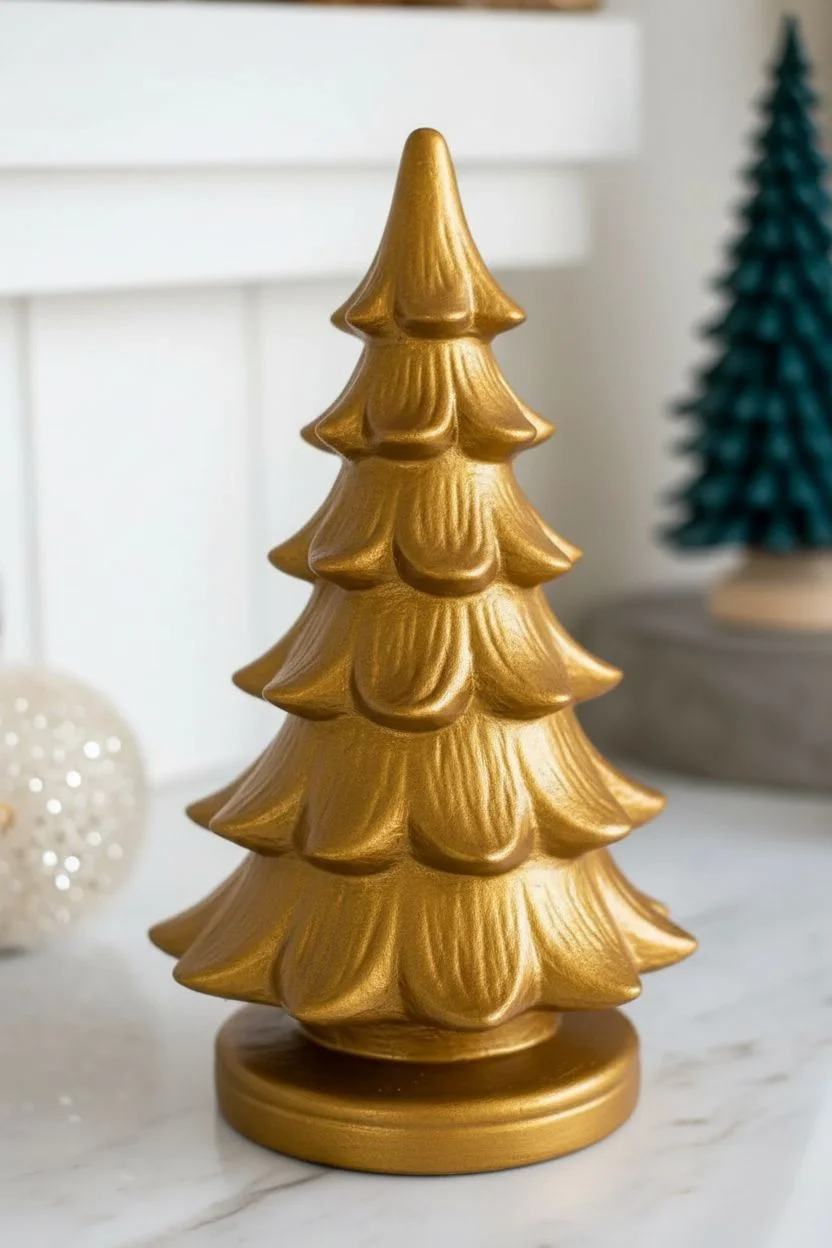
Transform a standard bisque ceramic tree into a luxurious holiday centerpiece that radiates warmth and sophistication. This project uses layers of metallic gold and subtle glitter to achieve a high-end, vintage-inspired look perfect for a glam Christmas theme.
Step-by-Step Guide
Materials
- Unpainted ceramic Christmas tree (bisque)
- Metallic gold acrylic paint (rich gold)
- Champagne gold acrylic paint (lighter shade)
- fine gold glitter or glitter glaze
- Glossy clear acrylic sealer (spray or brush-on)
- Small plastic twist lights (teal, purple, amber/gold)
- Plastic star topper (light pink or champagne)
- Paintbrushes: 1-inch flat brush, small round brush
- Super glue or craft glue (optional)
- Paper towels
- Water cup
Step 1: Base Coating
-
Clean and prep:
Begin by wiping down your ceramic bisque with a slightly damp paper towel to remove any manufacturing dust. Let it dry completely for about 10 minutes to ensure the paint adheres properly. -
First gold layer:
Load your 1-inch flat brush with the darker, rich metallic gold paint. Apply a smooth base coat over the entire tree, working from the top down. Don’t worry about complete opacity yet; just get good coverage. -
Working the crevices:
Use the tip of your brush to push the gold paint into the deep grooves under the boughs. I find dabbing the brush vertically helps get paint into those tight textured spots without creating drips. -
Dry and repeat:
Allow the first coat to dry for roughly 20-30 minutes. Apply a second coat of the rich gold to ensure a solid, opaque metallic finish. Let this base cure fully for an hour.
Fixing Gloopy Paint
If metallic paint settles thick in the grooves, use a barely damp brush to lift the excess while it’s still wet. Don’t wait for it to dry or you’ll lose the texture.
Step 2: Highlighting and Glazing
-
Add dimension:
Squeeze out a small amount of the lighter champagne gold paint. Using a ‘dry brush’ technique (wipe most paint off on a paper towel), lightly whisk the brush over the raised tips of the branches. -
Soft transitions:
This highlighting step shouldn’t be stark. Feather the lighter gold gently so it blends with the darker base, mimicking how light naturally hits the curves of the ceramic. -
Apply glitter glaze:
For that subtle sparkle seen in the photo, brush a thin layer of glitter glaze (or clear medium mixed with very fine gold glitter) over the entire tree surface. -
Avoiding glitter clumps:
Watch out for pools of glitter in the crevices. Use a clean, dry brush to sweep out any excess glaze from the deep grooves before it dries. -
Painting the base:
Don’t forget the circular base. Paint it with the rich gold tone, applying two to three coats so it looks solid and weighted visually. -
Seal the work:
Once all paint and glitter layers are bone dry, apply a glossy acrylic sealer. This protects the finish and amplifies the metallic sheen, making it look more like metal than painted clay.
Step 3: Final Assembly
-
Sort your lights:
Gather your small plastic twist lights. For this specific look, select a palette of jewel tones: deep teal, amethyst purple, and amber. Avoid primary reds or greens to keep the glam aesthetic. -
Test fit light pegs:
Before gluing, insert the plastic pegs into the holes to check the fit. If some holes are clogged with dried paint, gently clear them with a toothpick or a small drill bit twisted by hand. -
Secure the lights:
Apply a tiny dot of super glue or strong craft glue to the stem of a light peg and insert it into a hole. I like to alternate colors randomly rather than creating rows, keeping the distribution balanced. -
Attach the star:
Locate the top hole for the star. If your star is plastic, you can lightly paint it a pale metallic pink or champagne to match the photo before gluing it in place. -
Final check:
Rotate the tree and check for any missing lights or loose pieces. Let the glue set undisturbed for several hours before displaying.
Level Up: Electrify It
Make this a functional lamp by buying a light kit base! Use translucent plastic twists so the bulb inside illuminates them for a true vintage ceramic tree effect.
Place your shimmering creation on a mantel or side table to add a touch of golden elegance to your holiday season
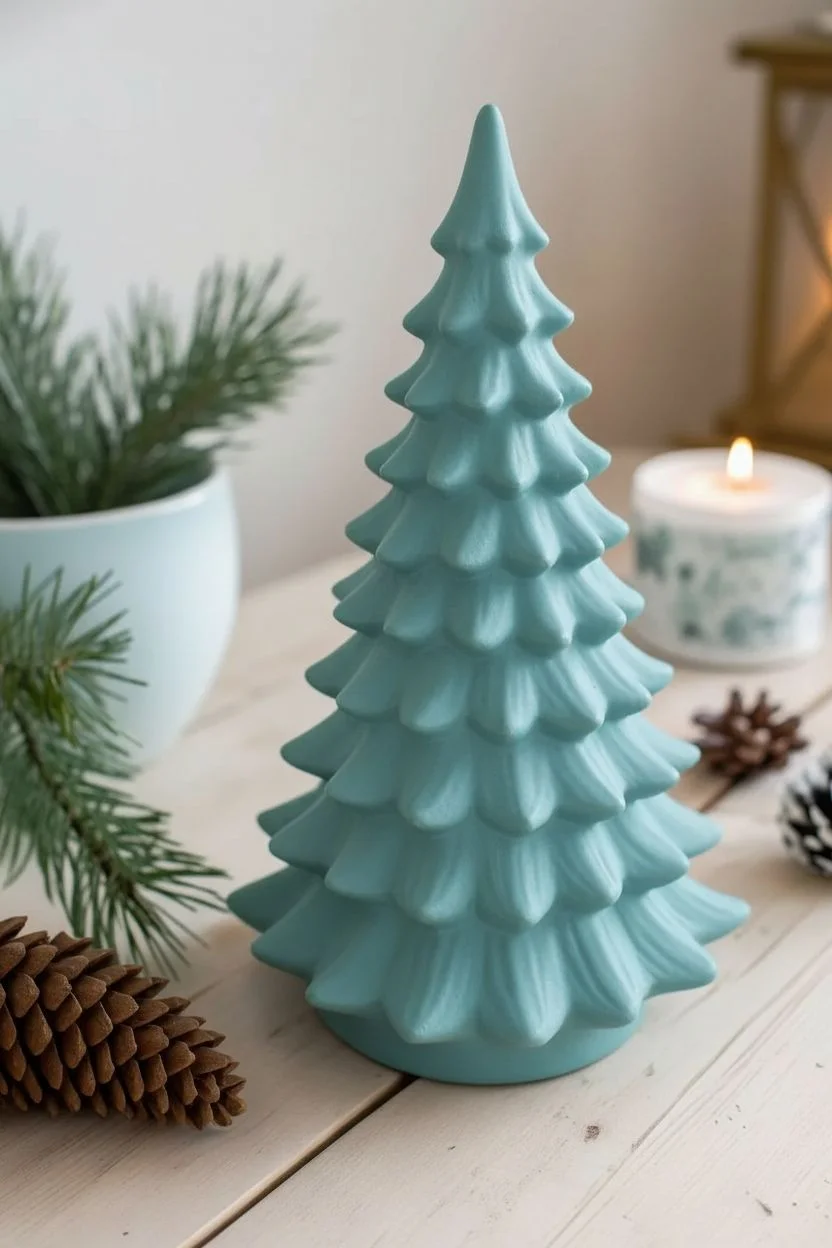
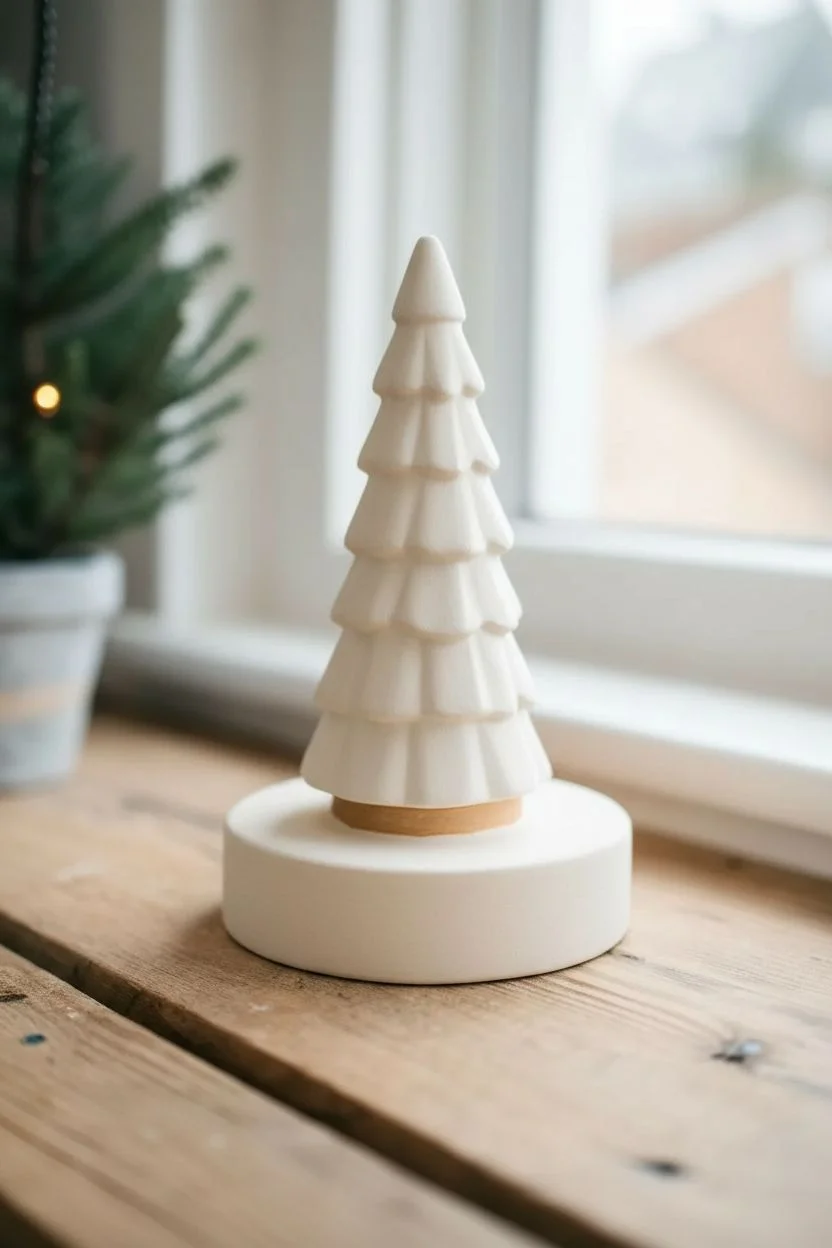
Matte Scandinavian Tree With Minimal Lights
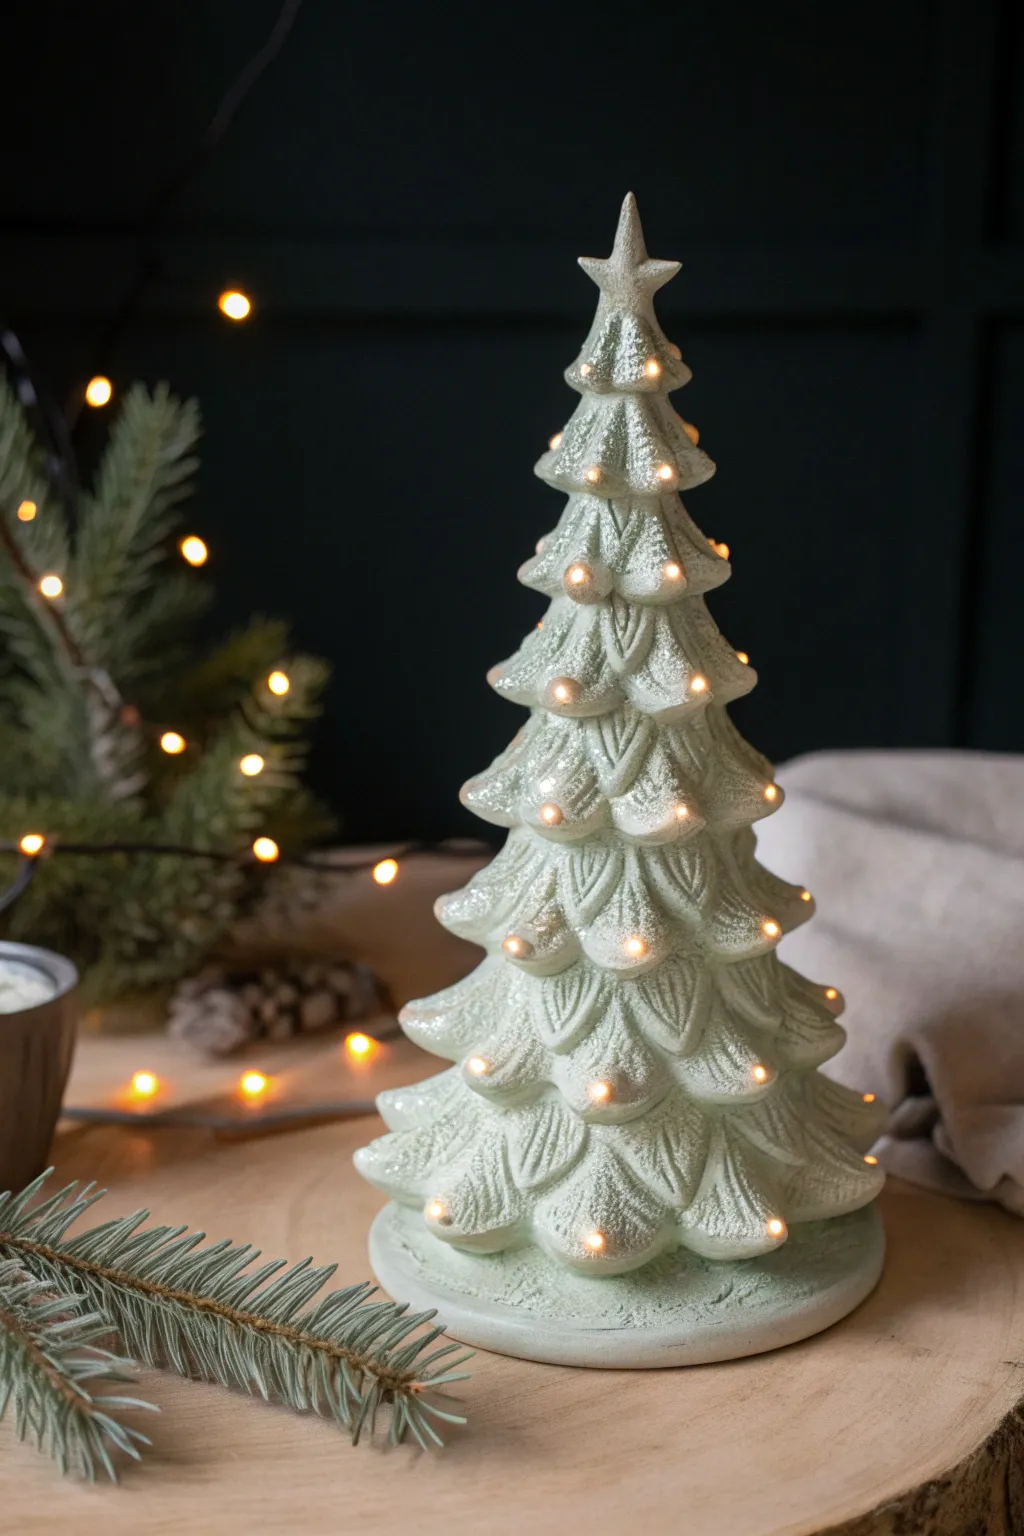
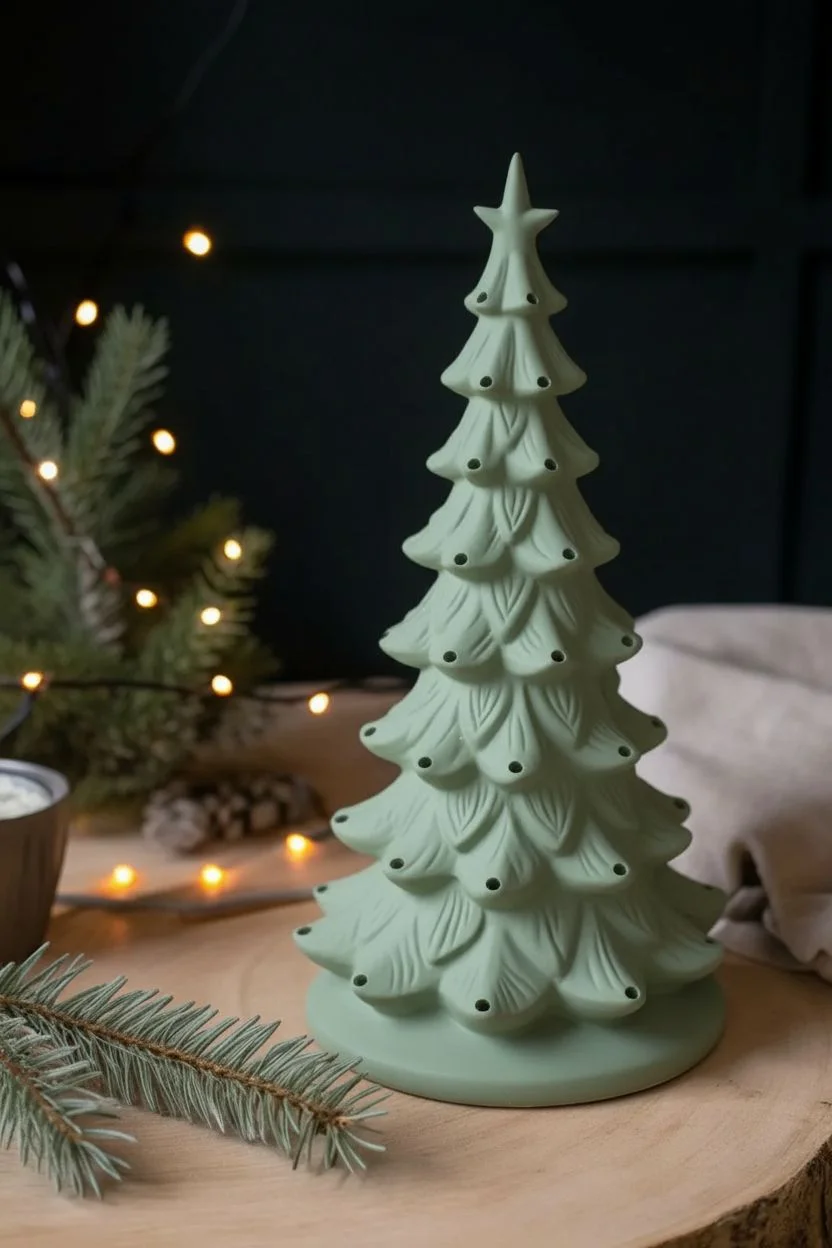
Embrace the serene beauty of winter with this minimalist ceramic tree project. By combining matte pastel greens with a crystallized, snow-distressed finish, you’ll create a sophisticated centerpiece that feels like a quiet forest morning.
Step-by-Step
Materials
- Unfinished ceramic Christmas tree (bisque)
- Acrylic paint: Sage Green or Pale Mint
- Acrylic paint: Warm White or Ivory
- Matte finish spray sealant
- White texture paste or snow medium (fine grain)
- Iridescent glitter (extra fine)
- Small LED bulb replacements (warm white)
- Medium flat brush
- Dry brush (stiff bristles)
- Small fan brush
- Palette
- Paper towels
Step 1: Base Coat Application
-
Clean surface:
Begin by wiping down your ceramic bisque with a slightly damp paper towel. This removes any ceramic dust that might interfere with paint adhesion. -
Mix base color:
On your palette, mix your Sage Green acrylic paint with a tiny drop of Warm White. You want a very pale, muted vegetal color, not a bright forest green. -
Apply first layer:
Using a medium flat brush, paint the entire tree with your green mixture. Don’t worry if it looks slightly streaky; thin layers are better than thick ones. -
Dry and repeat:
Allow the first coat to dry completely for about 20 minutes. Apply a second coat to ensure solid, opaque coverage across all the branches. -
Paint the base:
Don’t forget the bottom stand. Paint it the same sage green color to maintain a monochromatic, modern look. -
Seal preliminarily:
Once fully dry, lightly mist the tree with a matte sealant spray. This gives the paint some ‘tooth’ for the dry brushing steps.
Uneven Snow Texture?
If your dry brushing looks blotchy, your brush was too wet. Let the mistake dry completely, paint over it with the base sage color, and try again with a drier brush.
Step 2: Creating the Frosted Effect
-
Prepare dry brush:
Take a clean, dry brush with stiff bristles. Dip just the very tip into your Warm White paint. -
Offload paint:
Rub the brush vigorously on a paper towel until almost no paint comes off. This is crucial for the subtle ‘frosted’ look. -
Highlight ridges:
Gently sweep the brush over the raised ridges of the branches. Focus on the tips and textured lines, using a downward motion. -
Build intensity:
Repeat the dry brushing process, gradually building up the white on the most prominent edges until they visually pop. -
Add texture paste:
Using a small fan brush or your finger, dab tiny amounts of white texture paste onto the very tips of the branches where snow would naturally settle. -
Soften edges:
While the paste is wet, feather the edges slightly so it looks like drifted powder rather than distinct blobs.
Step 3: Sparkle and Assembly
-
Apply glitter:
Before the texture paste or final white highlights dry, sprinkle a pinch of extra-fine iridescent glitter over the tree. Let it catch on the wet areas. -
Shake off excess:
Gently tap the base of the tree on your table to dislodge loose glitter. I like to catch the excess on a paper plate to reuse later. -
Final seal:
Spray the entire piece with one final coat of matte sealant to lock the glitter and texture in place. -
Install lights:
Once the sealant is cured (wait at least an hour), insert the small warm white plastic bulbs into the holes. -
Inner light:
Insert the lighting kit into the base. The warm glow will filter through the plastic bulbs, contrasting beautifully with the cool matte green paint.
Level Up: Icy Tips
Mix a small amount of clear glossy gel medium with your glitter and apply it to just the very sharpest points of the branches for a wet, melting ice effect.
Place your finished tree on a wooden charger or linen cloth to complete the tranquil Scandinavian aesthetic


Candy Cane Stripe Accents on Branch Ridges
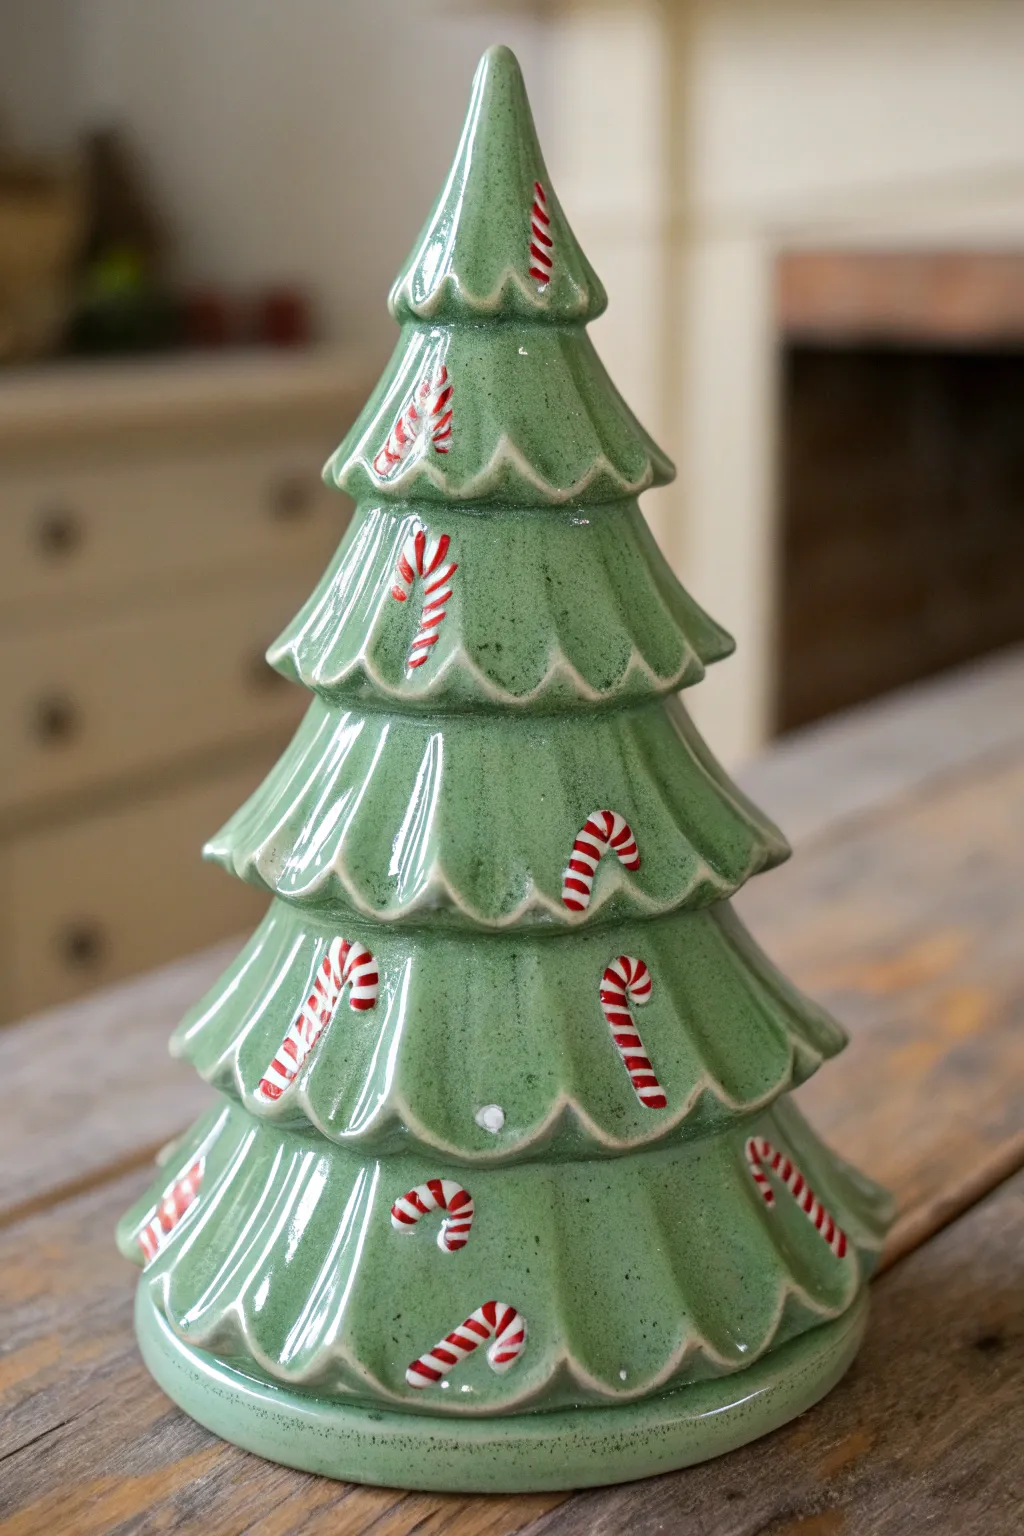
Transform a simple green ceramic tree by adding whimsical candy cane details that pop against the glossy finish. This classic holiday design uses careful placement of red and white glaze to create a nostalgic, textured look that feels instantly festive.
Detailed Instructions
Materials
- Bisque ceramic Christmas tree
- Underglaze spray or brush-on glaze (Light Sage Green)
- Small detail brush (liner or #0 round)
- Red underglaze or glaze
- White underglaze or glaze
- Clear dipping glaze (if using underglazes)
- Damp sponge
- Palette or small dish
Step 1: Base Coat Application
-
Clean the bisque:
Start by wiping down your ceramic bisque with a damp sponge. This removes any dust or oils from handling and ensures your first layer of color adheres perfectly. -
Prepare the green base:
Select a light sage or spearmint green glaze. If you want that speckled, organic look seen in the photo, look for a glaze labeled ‘speckled’ or ‘stone’ finish. -
Apply the first coat:
Using a soft fan brush or a medium round brush, apply an even coat of green over the entire tree. Work into the deep grooves between the branch layers carefully. -
Layer up the color:
Allow the first coat to dry until it’s chalky to the touch. Apply a second and third coat to ensure rich, opaque coverage, letting each layer dry in between. -
Check coverage:
inspect the piece for any missed spots, especially under the boughs of the tree. Touch up any bare bisque.
Pro Tip: Steady Hands
Rest your painting hand’s pinky finger on a dry section of the tree while painting the tiny stripes. This anchors your hand and prevents shakes for sharper lines.
Step 2: Painting the Candy Canes
-
Plan your placement:
Visualize where the candy canes will sit. They look best scattered randomly on the broad, smooth surfaces of the boughs, angled slightly to follow the curve of the branches. -
Paint the white base:
Using your finest detail brush, paint small, curved cane shapes using white glaze. I like to make the hook of the cane fairly pronounced for that classic silhouette. -
Thicken the shape:
Go over the white line a second time to build up a tiny bit of thickness. This helps the decoration stand out physically from the green background. -
Let the white dry:
It is crucial to let the white base dry completely before adding stripes. If it’s still wet, the red will bleed into pink. -
Load the red glaze:
Clean your detail brush thoroughly or switch to a fresh liner brush. Dip just the very tip into your red glaze. -
Add the stripes:
Carefully paint tiny diagonal hash marks across the white cane shape. Keep your hand steady and apply very light pressure. -
Refining the pattern:
Ensure there is still visible white space between your red stripes. The contrast is what makes them readable as candy canes.
Step 3: Finishing Touches
-
Highlight the ridges:
For extra definition, use a clean, slightly damp sponge to very gently wipe the very edges of the branch tips. This thins the glaze slightly, allowing the clay body to peek through as a highlight after firing. -
Clean the bottom:
Use a sponge to wipe any glaze off the foot or bottom rim of the tree to prevent it from sticking to the kiln shelf. -
Clear glaze application:
If you used underglazes for the design, dip the entire piece in clear glaze now. If you used gloss glazes, you can skip this step. -
Final inspection:
Check one last time for any smudges or unwanted drips. Use a craft knife to gently scrape away any stray specks of red. -
Fire the piece:
Load the tree into the kiln and fire according to the glaze manufacturer’s cone specifications.
Troubleshooting: Blurry Stripes
If stripes look messy, switching to a ‘glaze writer’ or precision applicator bottle with a fine metal tip can offer better control than a brush for tiny lines.
Once fired, the candy canes will shine brightly against the ceramic green, creating a timeless decoration you’ll enjoy unpacking every year
Classic Plaid Panels on the Base
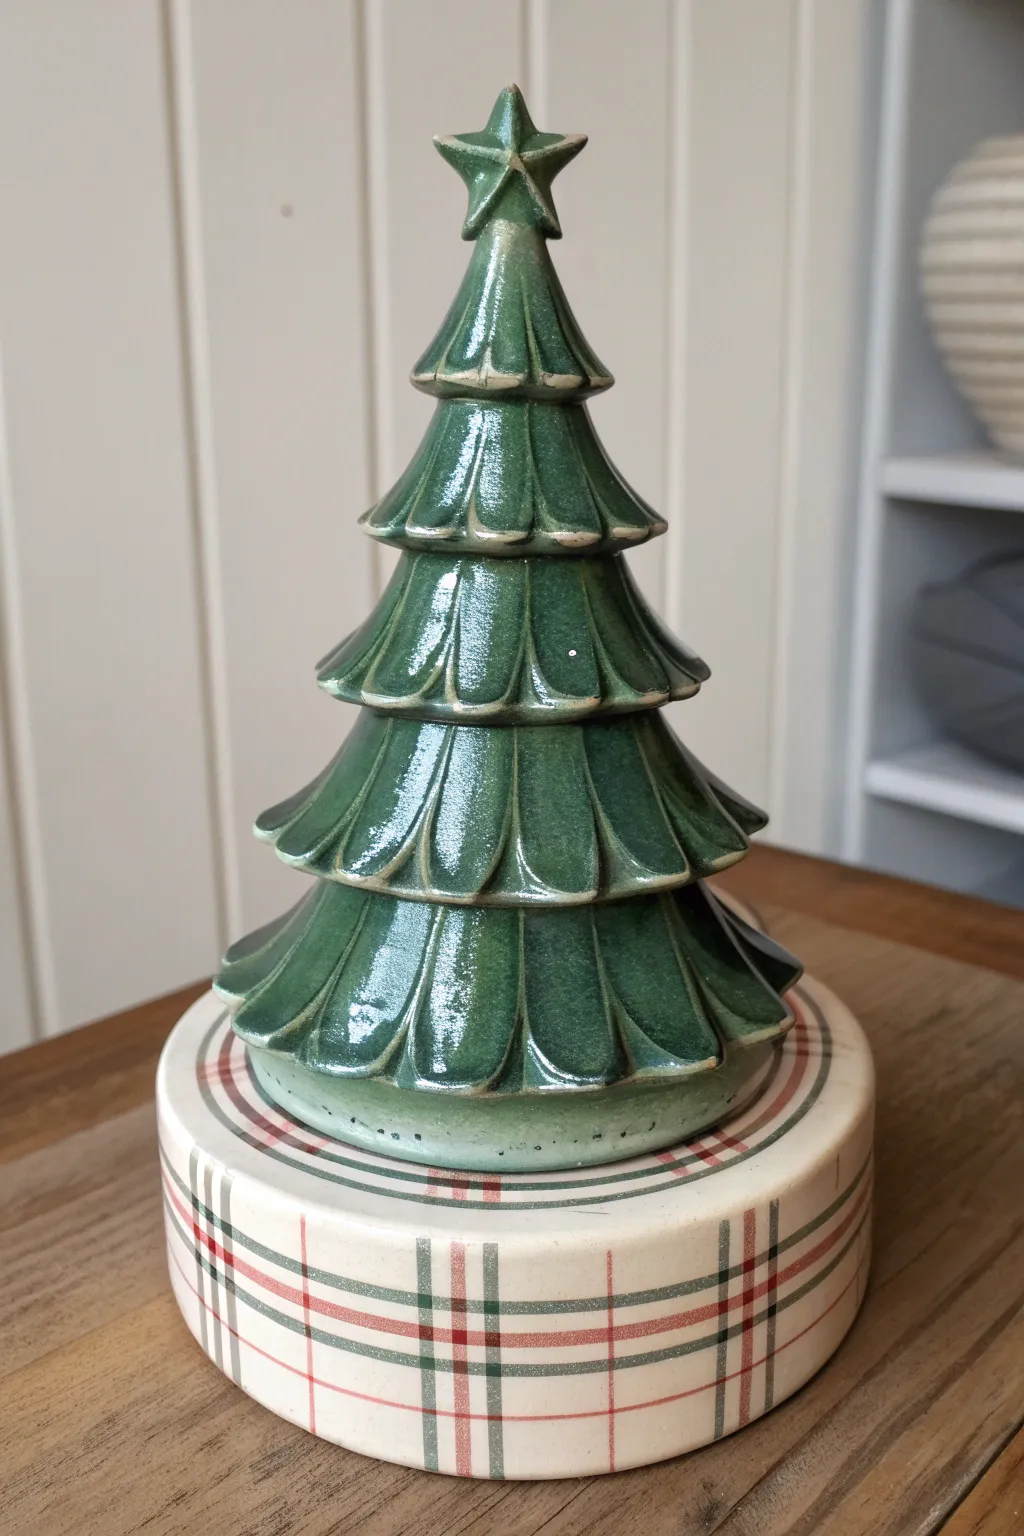
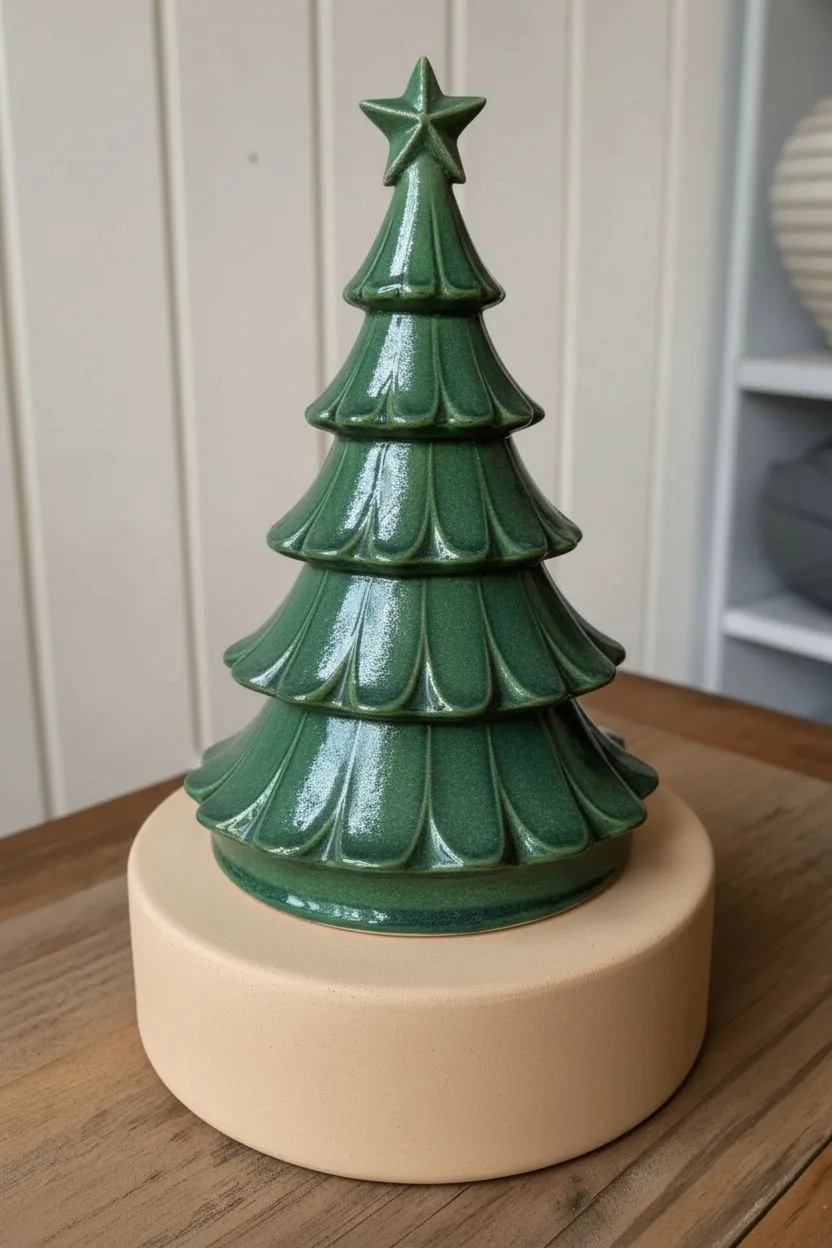
This project combines a beautifully glazed fir tree with a tailored, hand-painted base that mimics classic holiday fabric. The contrast between the glossy, deep green foliage and the matte, structured plaid pattern creates a timeless centerpiece perfect for a mantel or side table.
Step-by-Step Tutorial
Materials
- Bisque ceramic Christmas tree with attached round base
- Deep emerald green crystal glaze (for the tree)
- Cream or off-white opaque acrylic paint (for the base background)
- Deep red acrylic paint
- Forest green acrylic paint
- Flat shader brush (medium size)
- Fine liner brush or detail brush
- Pencil
- Ruler or flexible measuring tape
- Clear spray sealer (matte or satin)
- Palette
Step 1: Glazing the Tree
-
Prep the surface:
Begin by wiping down your bisque piece with a damp sponge to remove any dust or ceramic debris. This ensures your glaze and paint adhere perfectly. -
Apply the green glaze:
Using your medium flat brush, apply a generous coat of deep emerald green crystal glaze to the tree portion only. Work the glaze into the recessed grooves between the branches. -
Add secondary coats:
Let the first coat dry until it loses its sheen. Apply two more coats of the green glaze, ensuring even coverage. The crystals in the glaze will burst during firing to create that textured, organic look. -
Clean the edges:
Carefully wipe away any green glaze that may have dripped onto the round base. You want a sharp, clean line where the tree meets the stand. -
Fire the piece:
Since we are using glaze for the top, the piece needs to be kiln-fired according to the glaze manufacturer’s instructions (usually cone 06). Once fired and cooled, you’re ready to paint the base.
Steady Hand Trick
Rest your pinky finger on the table or the dry part of the ceramic base to anchor your hand while pulling the long stripe lines.
Step 2: Creating the Plaid Base
-
Base coat the stand:
Using acrylic paint now (no more firing needed), cover the entire round base with the cream or off-white paint. I find two thin coats cover better than one thick, gloopy one. -
Dry thoroughly:
Wait for the cream base coat to be completely dry to the touch before starting any line work. -
Mark vertical guides:
Lightly use a pencil and a flexible ruler to mark vertical spacing around the circumference of the base. Keep the gaps relatively wide to accommodate the open plaid design. -
Paint vertical green stripes:
Load a liner brush with forest green acrylic. Paint thin, vertical double lines at your measured intervals. These don’t need to be perfectly machine-straight; a little hand-painted character is lovely. -
Add horizontal green stripes:
Paint corresponding horizontal double lines around the base, intersecting the vertical ones. This creates the windowpane foundation of the plaid. -
Start the red verticals:
Switch to your deep red paint. Paint single vertical lines centered directly between your green double-stripe sets. -
Add red horizontals:
Paint single horizontal red lines centered between the green horizontal sets. You should see the plaid pattern emerging now. -
Thicken intersection points:
Where the lines intersect, you can slightly darken the color or thicken the line just a hair to mimic the way threads weave over each other in real fabric. -
Clean up smudges:
If you made any mistakes or lines got too wobbly, touch them up carefully with the cream background paint once the stripes are dry. -
Seal the base:
Once all acrylic paint is bone dry (give it a few hours), spray the base area with a clear matte or satin sealer to protect the paint and give it a finished look that contrasts nicely with the glossy tree.
Wobbly Lines?
If your stripes aren’t straight, use painter’s tape or a rubber band around the base as a physical guide for horizontal lines.
Now you have a stunning, dual-texture holiday heirloom ready to display
Night-Sky Galaxy Tree With Star Splatter
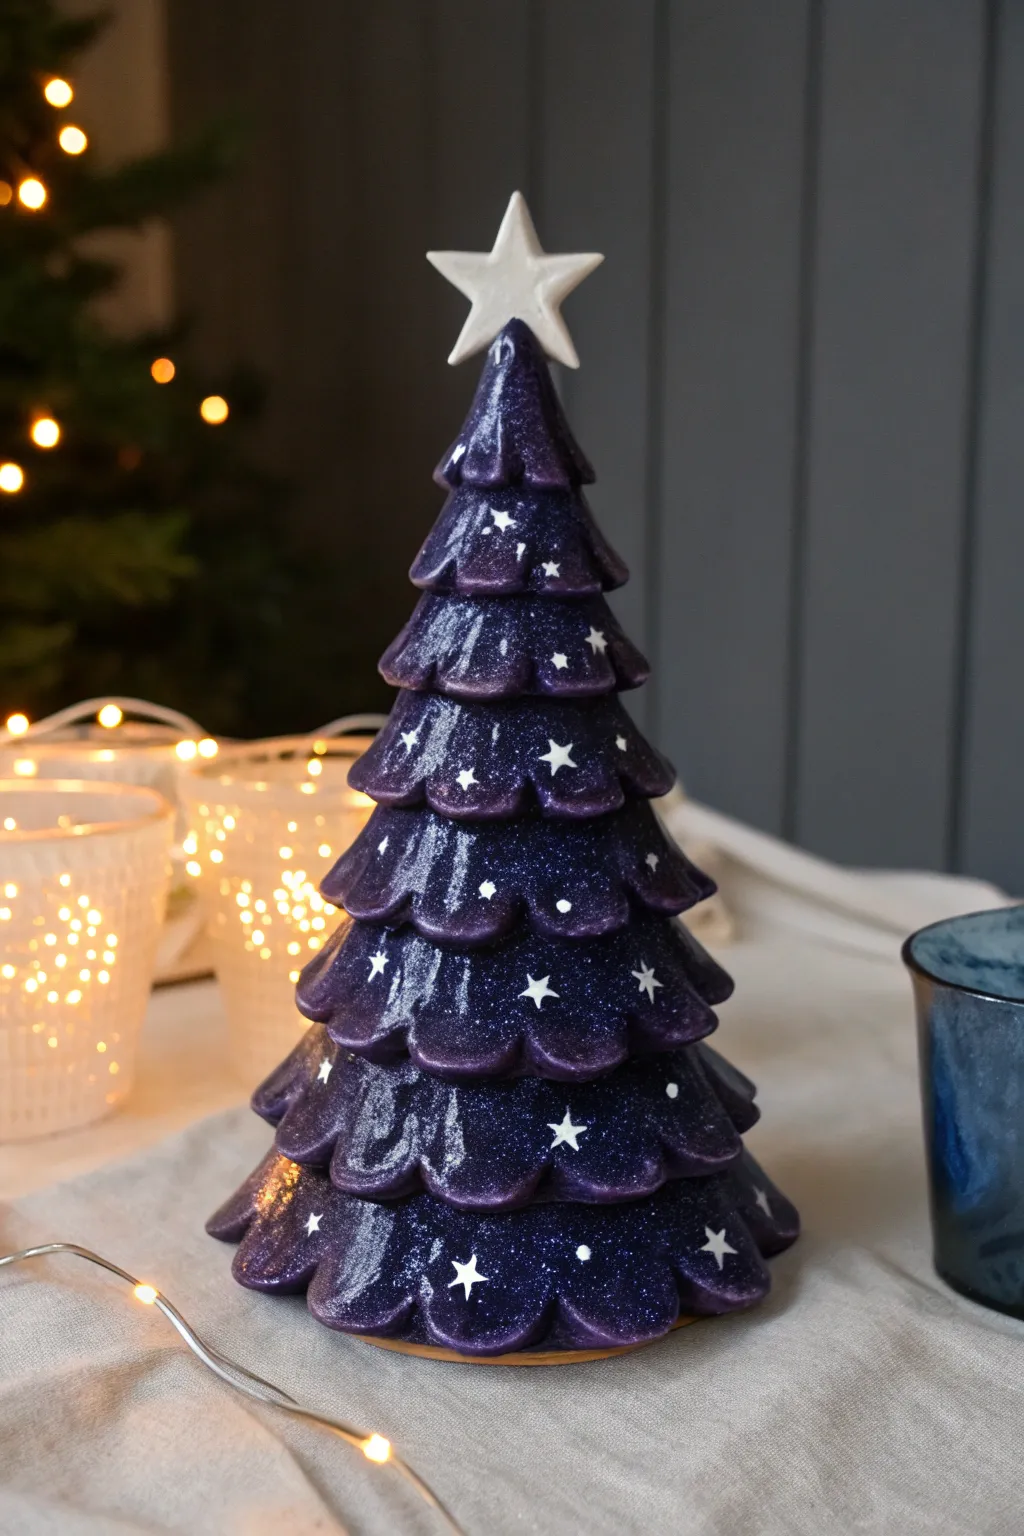
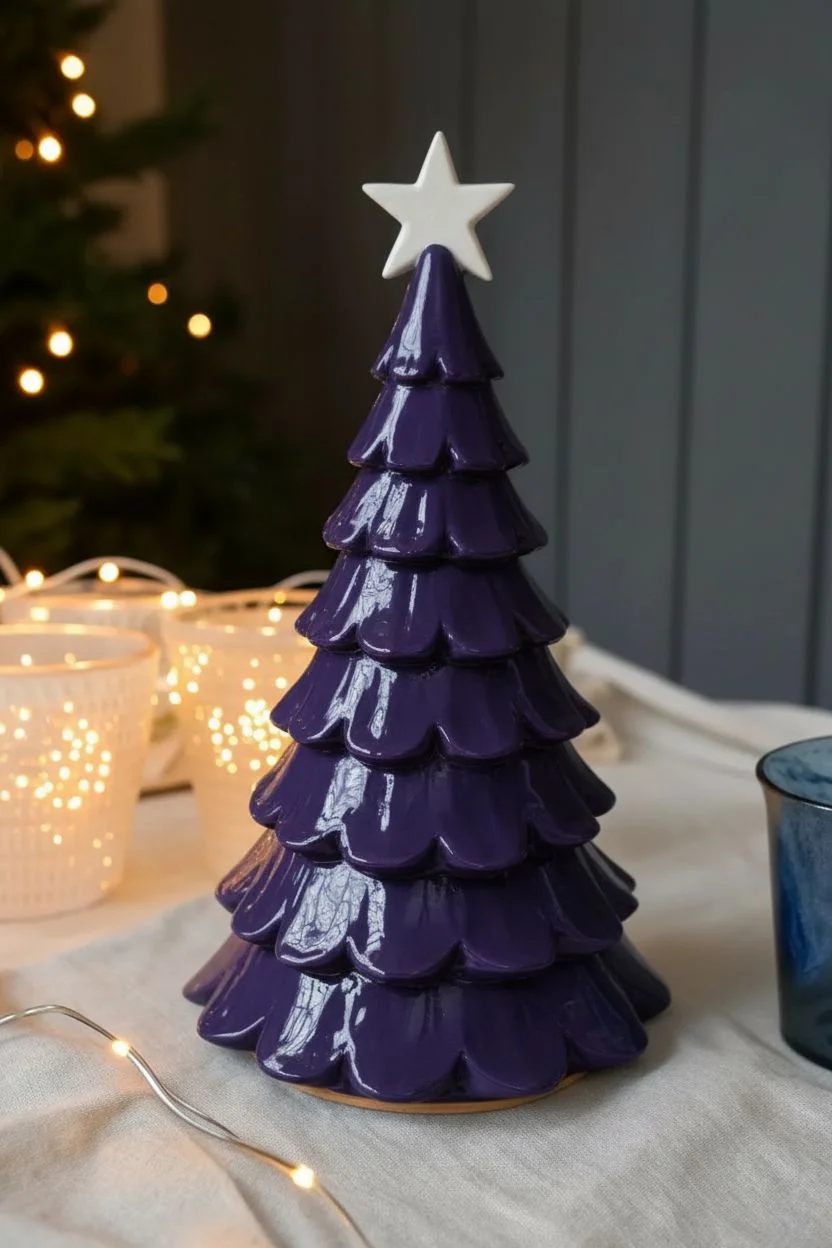
Transform a standard ceramic tree into a mesmerizing piece of the cosmos with this rich purple and glittery design. The deep, glossy finish contrasts beautifully with crisp white stars, creating a sophisticated night-sky effect that stands out on any mantel.
Step-by-Step Guide
Materials
- Bisque ceramic Christmas tree with star topper
- Deep violet or eggplant acrylic paint (gloss finish preferred)
- White opacity acrylic paint
- Fine galaxy glitter (silver or iridescent)
- Gloss glaze or varnish
- Wide flat brush
- Fine detail liner brush (size 0 or 00)
- Small round brush
- Palette
- Water cup and paper towels
- Stiff bristle brush (optional for texture)
Step 1: Base Coat Application
-
Clean surface:
Begin by wiping down your ceramic bisque with a slightly damp sponge to remove any kiln dust, which ensures the paint adheres smoothly. -
Mix base color:
Squeeze a generous amount of deep violet paint onto your palette. If your purple feels too bright, mix in a tiny drop of black to deepen the tone to a true night-sky hue. -
Paint underside:
Turn the tree upside down or on its side and paint the bottom edges first using your flat brush, so you don’t have to handle wet paint later. -
First coat:
Apply the purple paint to the entire body of the tree. Use long, sweeping strokes with the flat brush to get into the crevices between the boughs. -
Dry and repeat:
Let the first coat dry completely (about 15-20 minutes). If you can still see the white bisque through the purple, apply a second coat for full opacity. -
Paint the topper:
While the tree body dries, paint the separate ceramic star topper with solid white paint. It may need 2-3 coats to look bright and opaque.
Star Precision
If you struggle painting stars by hand, use a small star-shaped loose sequins as a stencil or stamps. Dip them lightly in white paint and press onto the surface.
Step 2: Glitter and Galaxy Effect
-
Prepare glaze:
Pour a small amount of gloss glaze or varnish onto your palette. -
Mix in sparkle:
Sprinkle your fine iridescent or silver glitter directly into the wet glaze on your palette and mix well. You want a high density of glitter for that starry effect. -
Apply glitter glaze:
Brush this glitter-glaze mixture over the entire purple tree. The gloss will seal the paint and give it that wet, shiny ceramic look shown in the photo. -
Check coverage:
Turn the tree in the light to ensure the glitter is distributed evenly. Add a little extra to the tips of the branches where light naturally hits. -
Let it cure:
Allow this glossy layer to dry completely. It creates the smooth surface needed for painting the sharp stars in the next phase.
Step 3: Starry Details
-
Load fine brush:
Wet your fine liner brush and load it with opaque white paint. Use a twisting motion on the palette to get the bristles to a sharp point. -
Paint main stars:
Identify 5-7 spots on the front of the tree for larger stars. Paint these by drawing a simple five-point star shape. I find it helps to draw an inverted ‘V’ first, then cross the arms. -
Add medium stars:
Fill in some gaps with slightly smaller four-point stars (like a diamond or cross shape). -
Dot small stars:
Using the very tip of the liner brush or a toothpick, place tiny white dots randomly across the branches to represent distant stars. -
Final assembly:
Once all paint is perfectly dry, place the white ceramic star topper into the hole at the peak of the tree.
Nebula Cloud Effect
Before the glitter coat, sponge on subtle patches of dark blue or magenta over the purple base while it’s still slightly tacky to create misty nebula clouds.
Place your finished galaxy tree near some fairy lights to watch the glitter surface come to life
Retro Color-Block Tree With Bold Bands
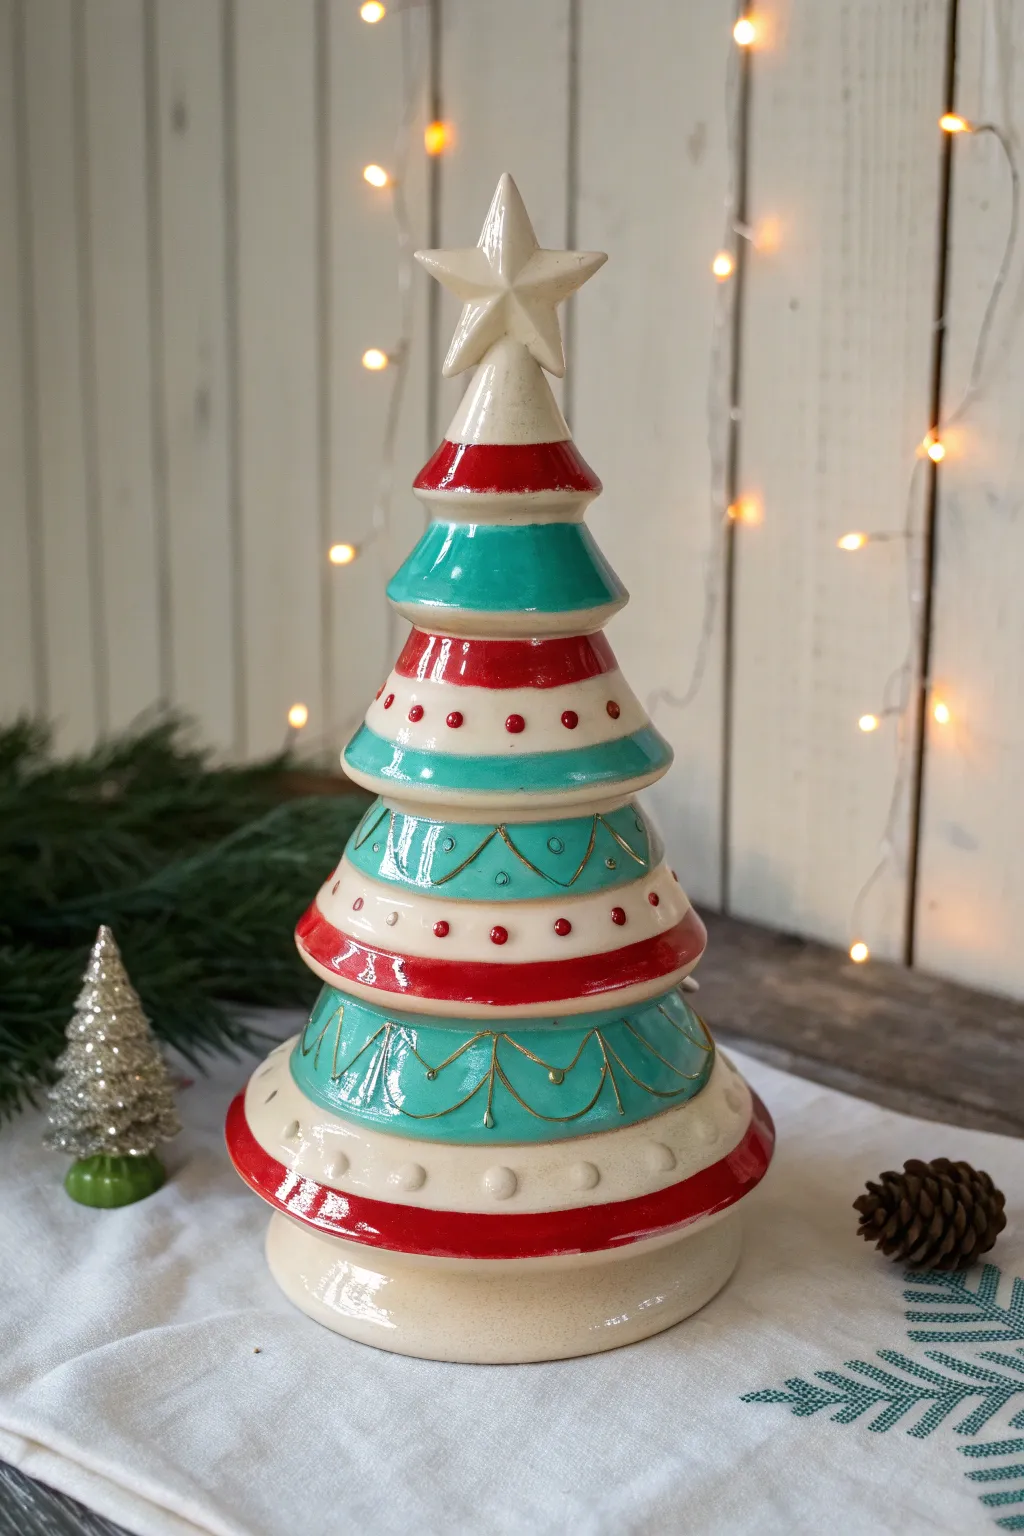
Embrace a playful, retro vibe with this ceramic Christmas tree featuring bold bands of teal and red, accented by charming dots and scalloped gold details. The glossy finish and alternating patterns give it a delightful, hand-painted folk art feel perfect for a cozy holiday display.
Step-by-Step Tutorial
Materials
- Bisque ceramic Christmas tree (smooth, tiered style)
- Acrylic paints: Cherry Red, Teal/Turquoise, Creamy White (Warm White)
- Metallic Gold paint or gold paint pen (fine tip)
- Gloss glaze or spray sealant (high gloss)
- Assorted paintbrushes: Flat shader (medium), Round brush (small), Liner brush (very fine)
- Dotting tool or toothpick
- Palette
- Water cup and paper towels
Step 1: Base Coating the Creamy Tiers
-
Wipe the bisque:
Start by wiping down your ceramic bisque with a slightly damp sponge to remove any dust. This ensures your paint adheres smoothly. -
Identify the cream zones:
Looking at the tiers of the tree, identify which ones will be white. In this design, it’s the very bottom base, the tier just above the bottom red band, the middle tier with the red dots, and the top star section. -
Apply the cream base:
Using a flat shader brush, apply 2-3 coats of Warm White to these specific sections. Let each coat dry completely to avoid lifting the previous layer. -
Paint the star:
While you have the white paint out, carefully paint the star topper. I like to use a smaller round brush here to get into the crevices without clumping.
Wobbly Lines?
If your horizontal bands aren’t perfectly straight, use the gold pinstriping step to your advantage. Make the gold line slightly thicker to cover uneven transitions between colors.
Step 2: Adding Bold Color Blocks
-
Paint the red bands:
Select the tiers intended for red. This includes the wide bottom rim, the thin band above the middle cream section, and the high band near the top. Use the Cherry Red paint. -
Refine the red edges:
Go slowly around the edges where the red meets the cream. A steady hand and a smaller brush help keep these lines crisp. -
Paint the teal bands:
Now fill in the remaining unpainted tiers with Teal paint. These are primarily the second tier from the bottom (the one with the gold swags later) and the two upper sections below the star. -
Build opacity:
Teal and red can sometimes be translucent. Apply a second or third coat as needed until the color is solid and rich.
Paint Pen Magic
For the delicate gold swags and pinstripes, use an oil-based metallic paint marker rather than a brush. It offers much better control for precise, consistent line work.
Step 3: Detailed Folk Art Accents
-
Add red dots:
Find the middle cream tier. Dip a dotting tool or the handle end of a paintbrush into the Cherry Red paint and stamp a row of evenly spaced dots around the center of the band. -
Create teal dots:
On the cream tier above that (the one with the gold swags), add tiny Teal dots inside the painted area. Keep these small and delicate. -
Detail the red dots on the cream band:
For the upper cream section, add very small red dots in a single horizontal row. -
Paint the bottom bumps:
For the raised ‘bumps’ or texture on the lowest cream tier, carefully dab a large dot of cream or lightly highlight them to make them pop against the cream background.
Step 4: Gilded Finishes
-
Draw gold swags:
Using a very fine liner brush and metallic gold paint (or a shaker paint pen), draw scalloped ‘swag’ lines on the main teal tier. Connect the points of the scallops roughly where the texture changes. -
Add gold dots:
Place a tiny gold dot at the peak of each swag and in the center of the teal tier above it. This mimics hanging ornaments. -
Rim the edges:
Carefully run a thin line of gold along the horizontal ridges that separate the colored tiers. This pinstriping defines the segments beautifully. -
Highlight the star:
Does your star look a little flat? Dry brush a tiny amount of gold onto the raised edges of the star to give it dimension. -
Final clear coat:
Once all paint is bone dry (give it at least 24 hours to be safe), apply a high-gloss clear glaze or spray sealer. This mimics the fired ceramic look and protects your work.
Now display your beautiful tree alongside some pine cones and fairy lights for a festive vignette
Speckled Stoneware Look With Terrazzo Dots
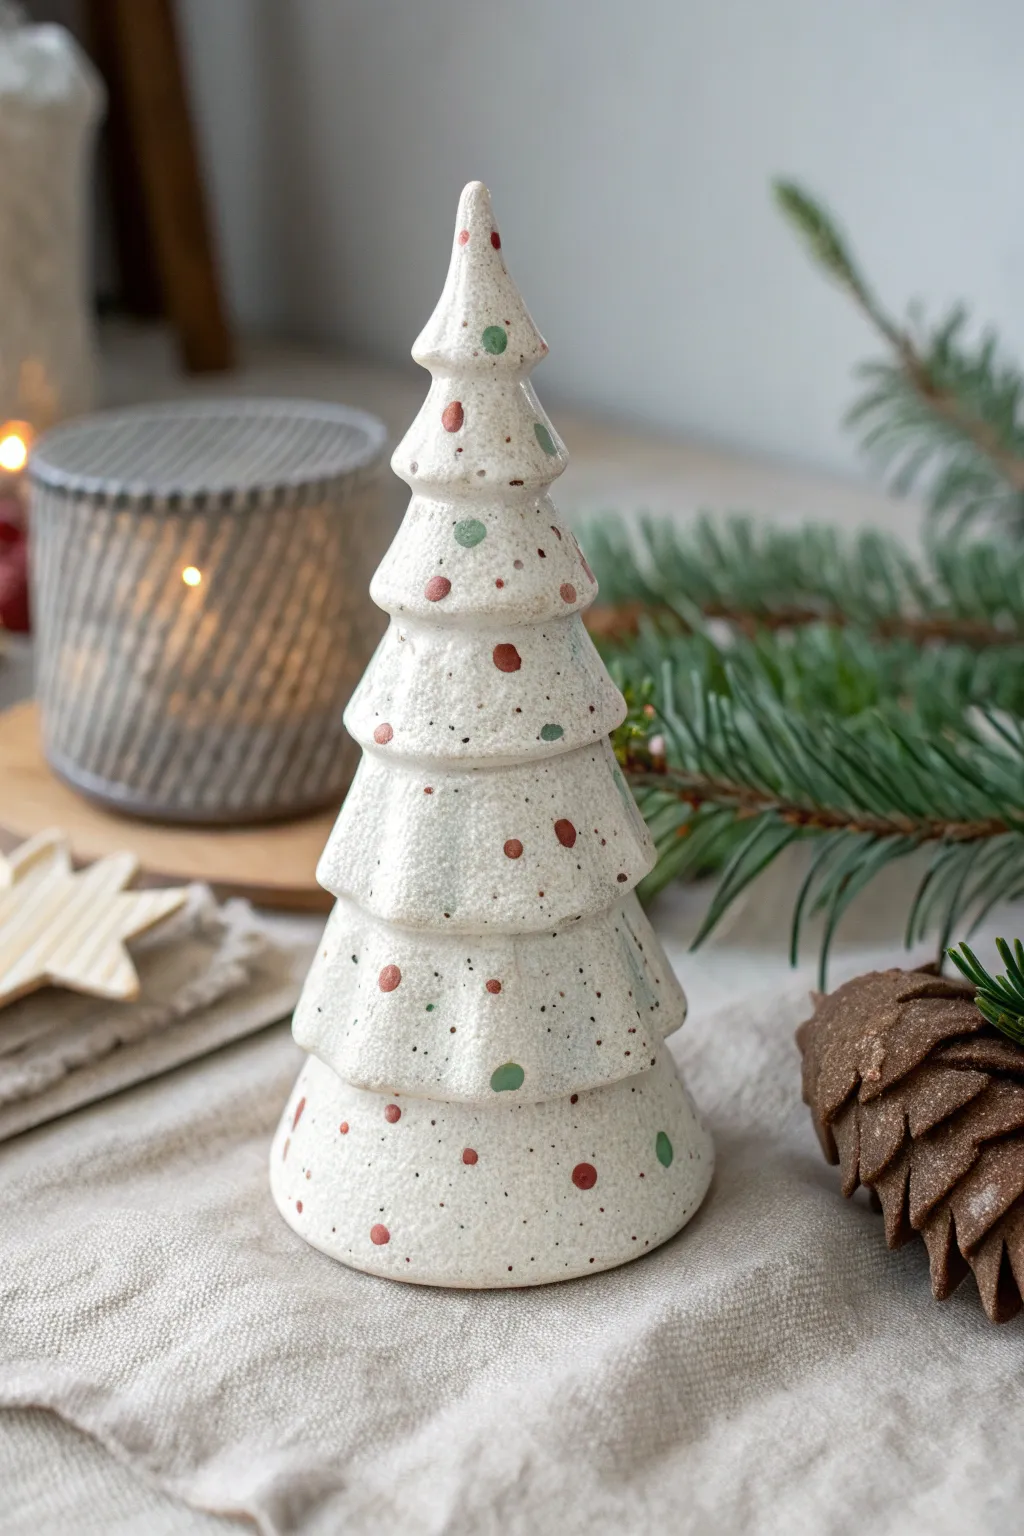
Transform a plain ceramic bisque tree into a modern, minimalist masterpiece that mimics expensive stoneware. This project uses strategic speckling and carefully placed dots to achieve an earthy, high-end terrazzo effect perfect for a cozy Scandinavian holiday display.
Detailed Instructions
Materials
- Unpainted ceramic Christmas tree (bisque ware)
- Cream or off-white acrylic paint (matte finish)
- Dark grey or black acrylic paint (thinned)
- Terracotta/rust orange acrylic paint
- Sage green acrylic paint
- Old toothbrush
- Small round detail brush
- Flat basecoating brush
- Matte spray sealer or varnish
- Paper towels
- Water cup
- Cardboard box (for splatter containment)
Step 1: Basecoating
-
Clean the ceramic:
Begin by wiping down your ceramic tree with a slightly damp paper towel. This removes any dust or oils from the bisque surface that might prevent the paint from adhering properly. -
First coat:
Load your flat brush with the cream or off-white acrylic paint. Apply a smooth, even layer over the entire tree, working from the top point down to the base. Don’t worry if it looks a bit streaky initially. -
Let it dry:
Allow the first coat to dry completely. This usually takes about 15-20 minutes depending on the thickness of the paint and humidity. -
Second coat:
Apply a second coat of the cream paint. To get that solid, stoneware appearance, ensure full coverage so no raw ceramic shows through. Pay special attention to the crevices under the boughs. -
Final smooth out:
Check for any brush strokes or drips. Smooth them out gently with a slightly damp brush while the paint is still wet to create a surface that looks like glazed pottery.
Splatter Control Tips
Running your thumb closer to the brush head creates larger, chunkier splatters, while flicking from the very tips of the bristles creates a fine mist.
Step 2: Creating the Speckle
-
Prepare splatter paint:
On a palette or paper plate, mix a small amount of dark grey or black paint with water. You want a very fluid, inky consistency—think melted ice cream. -
Test the splatter:
Dip an old toothbrush into this watery mix. Hold it over a piece of scrap paper and run your thumb across the bristles to flick the paint. Adjust the consistency if the drops are too big or too faint. -
Apply the speckles:
Place your tree inside a cardboard box to catch overspray. Systematically flick the toothbrush bristles to spray fine speckles all over the tree. Aim for a dense, even distribution. -
Rotate and repeat:
Turn the tree frequently as you splatter to ensure every side is covered. I often find it helpful to tilt the tree slightly to get speckles on the underside of the branches as well. -
Blot large drips:
If a large blob lands accidentally, quickly but gently dab it with the corner of a paper towel to lift it, or blend it in if you prefer a rougher look. Let the speckles dry fully before moving on.
Level Up: Texture
Mix a teaspoon of baking soda into your cream base coat paint. This creates a gritty, stone-like texture that feels incredibly realistic once dry.
Step 3: Painting the Terrazzo Dots
-
Select your colors:
Prepare your terracotta (rust) and sage green paints. You want these to be undiluted so they are opaque and stand out against the speckled background. -
Start with rust dots:
Using a small round detail brush, paint random circular shapes with the terracotta paint. Keep them imperfect and varying in size, ranging from tiny dots to small peas. -
Strategic placement:
Space the rust dots out generously. Try not to create a recognized pattern; the goal is random, organic placement like natural stone aggregate. -
Add sage green dots:
Clean your brush and switch to the sage green paint. Fill in the open spaces with green dots, keeping a similar size variation to the rust ones. -
Check balance:
Step back and look at the tree from a distance. If you see large empty areas, add a few tiny dots of either color to balance the composition without overcrowding it. -
Dry thoroughly:
Allow these painted dots to dry completely. Since they are thicker than the splatter, give them at least 30 minutes to cure.
Step 4: Finishing Touches
-
Inspect the finish:
Look closely at the surface. If the dots look too flat, you can add a whisper of a second coat on just the larger dots to give them a slight texture. -
Seal the piece:
Take the tree to a well-ventilated area. Apply a light coat of clear matte spray sealer. This protects the paint and unifies the sheen, making it look truly like ceramic stoneware. -
Final dry:
Let the sealer cure according to the can’s instructions before handling or displaying your new decoration.
Place your new faux-stoneware tree alongside some fresh greenery for a sophisticated, modern holiday vignette
Birch-Bark Tree With Painted Knots and Lines
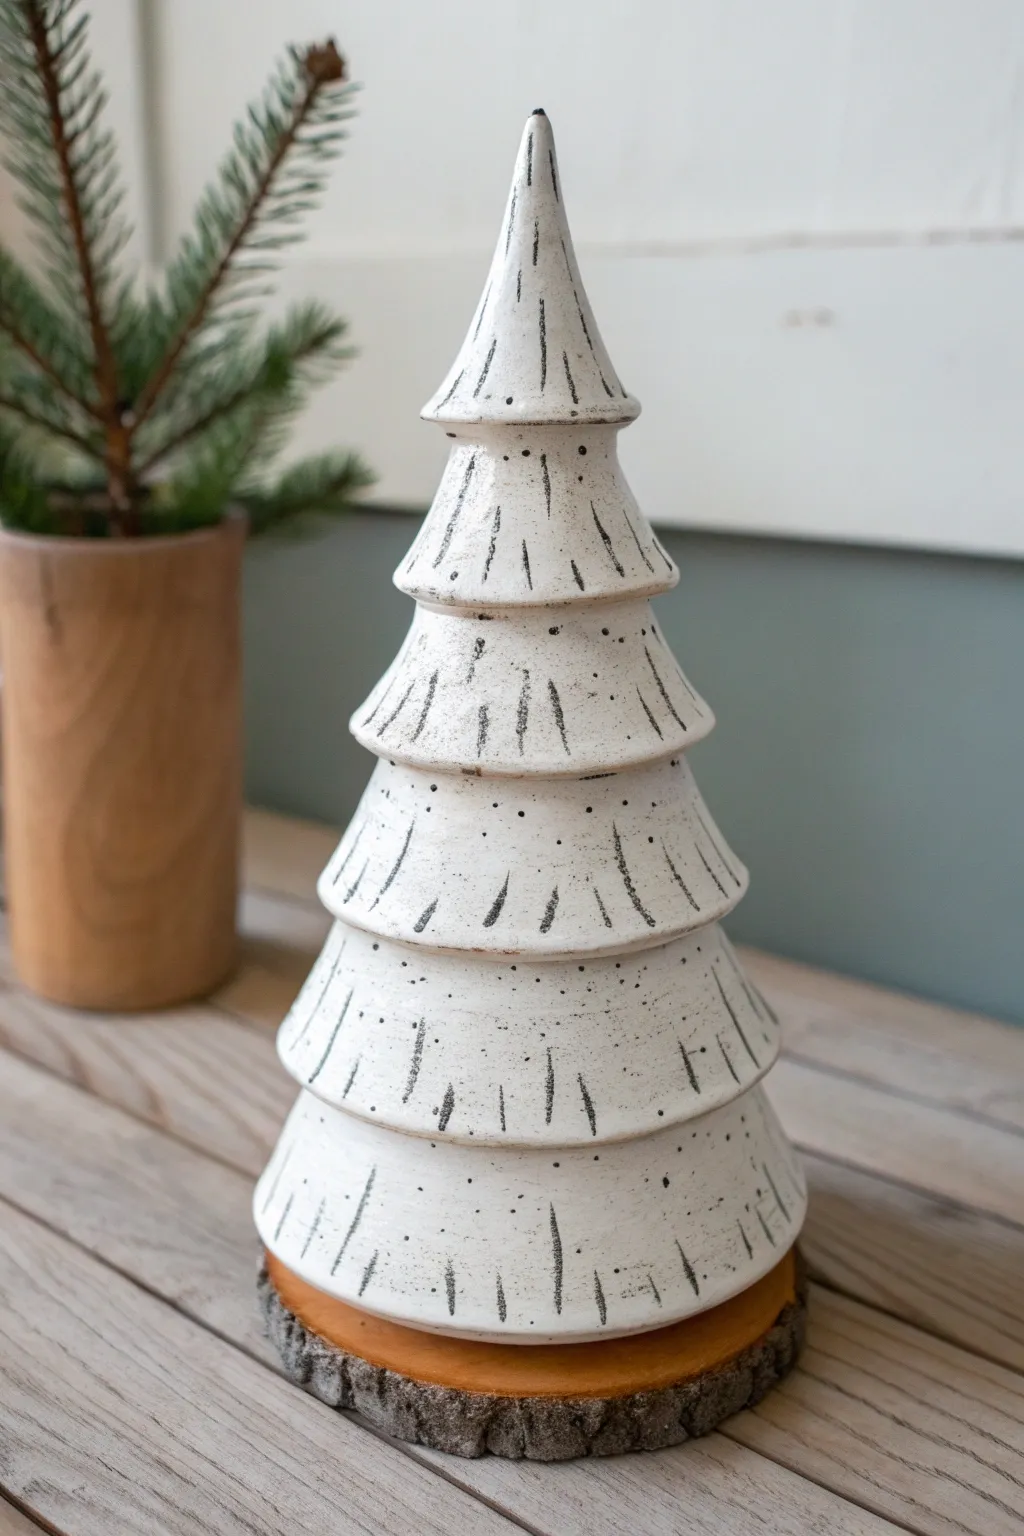
Transform a standard ceramic tree into a rustic woodland accent with this elegant birch bark finish. The combination of creamy off-white base coats and deliberate charcoal markings mimics the natural beauty of birch trees for a sophisticated holiday look.
Step-by-Step Guide
Materials
- Bisque ceramic Christmas tree (unpainted)
- Acrylic paints: Warm White (or Cream), Charcoal Black, Burnt Umber (dark brown)
- Wide flat brush
- Small fine liner brush (size 0 or 00)
- Old toothbrush or stiff bristle brush
- Matte finish sealer spray
- Wood slice with bark edge (slightly larger than tree base)
- Strong craft glue (like E6000)
- Water cup and palette
- Paper towels
Step 1: Preparation & Base Coat
-
Clean the Bisque:
Start by wiping down your ceramic tree with a slightly damp sponge to remove any kiln dust or oils from your hands. Let it dry completely for a few minutes. -
Mix the Base Color:
On your palette, mix a large amount of Warm White with just a tiny drop of Burnt Umber. You want a creamy, natural off-white, not a stark hospital white. -
Apply First Coat:
Using the wide flat brush, apply a smooth, even coat of your mixed off-white paint over the entire tree. Brush in the direction of the tree’s tiers (horizontally) for better coverage. -
Dry and Repeat:
Allow the first coat to dry until it’s no longer cool to the touch. Apply a second coat to ensure complete opacity so no bare ceramic shows through. -
Smooth the ridges:
Inspect the edges of each tiered layer. If paint has pooled in the crevices, use a clean, slightly damp brush to gently smooth it out before it hardens.
Natural Variation
Don’t make your black dashes perfectly vertical. Birch markings naturally have a slight curve or slant. Tilting your brush slightly adds organic realism.
Step 2: Creating Texture & Splotches
-
Prepare Speckling Paint:
Water down a small amount of Charcoal Black paint until it has an inky consistency. -
Splatter Technique:
Dip an old toothbrush into the watery black paint. Test on a paper towel first, then run your thumb across the bristles to flick tiny speckles onto the tree. Go lightly; you want subtle texture, not a polka-dot pattern. -
Add Brown Speckles:
Repeat the splatter process with a very watered-down Burnt Umber. These brown specks add warmth and depth to the ‘bark’ surface. -
Let Speckles Set:
Wait for about 10-15 minutes for the fine splatter to dry completely so you don’t smudge it during the next steps.
Step 3: Painting the Birch Markings
-
Load the Liner Brush:
Switch to your fine liner brush and load it with undiluted Charcoal Black paint. Remove excess paint so the brush comes to a sharp point. -
Paint Vertical Dashes:
Starting near the bottom, paint thin, varying vertical lines. These mimic the lenticels (pores) on birch bark. Keep them random in length and thickness. -
Vary the Pressure:
I find it helpful to vary my pressure—start light, press down a bit, and lift off quickly to create a tapered line. Avoid making them perfectly straight. -
Work in Sections:
Rotate the tree as you work, moving up tier by tier toward the top point. Ensure the markings are distributed evenly but randomly. -
Highlight the Edges:
Use the very tip of your brush to drag a faint, thin line of black along the bottom lip of a few of the tiers. This defines the shape and adds dimension. -
Soften Harsh Lines:
If any black marks look too bold, quickly dab them with your finger or a slightly damp paper towel to distress them and blend them into the white background.
Splotch Control
Splattering too messy? Cut a hole in a piece of paper and hold it over the tree as a stencil, spraying only small sections at a time to control where the dots land.
Step 4: Finishing & Assembly
-
Seal the Ceramic:
Once all paint is bone dry, spray the entire tree with a matte finish sealer. This protects the paint and unifies the sheen without making it look plastic. -
Prepare the Base:
Clean off your wood slice to ensure the top surface is free of sawdust. -
Apply Adhesive:
Apply a generous ring of strong craft glue (like E6000) to the bottom rim of the ceramic tree. -
Attach to Wood:
Center the tree onto the wood slice and press down firmly. Let the glue cure according to the manufacturer’s instructions (usually 24 hours) before moving the piece.
Place your birch tree on a mantel or centerpiece arrangement to bring a quiet, wintry calmness to your decor
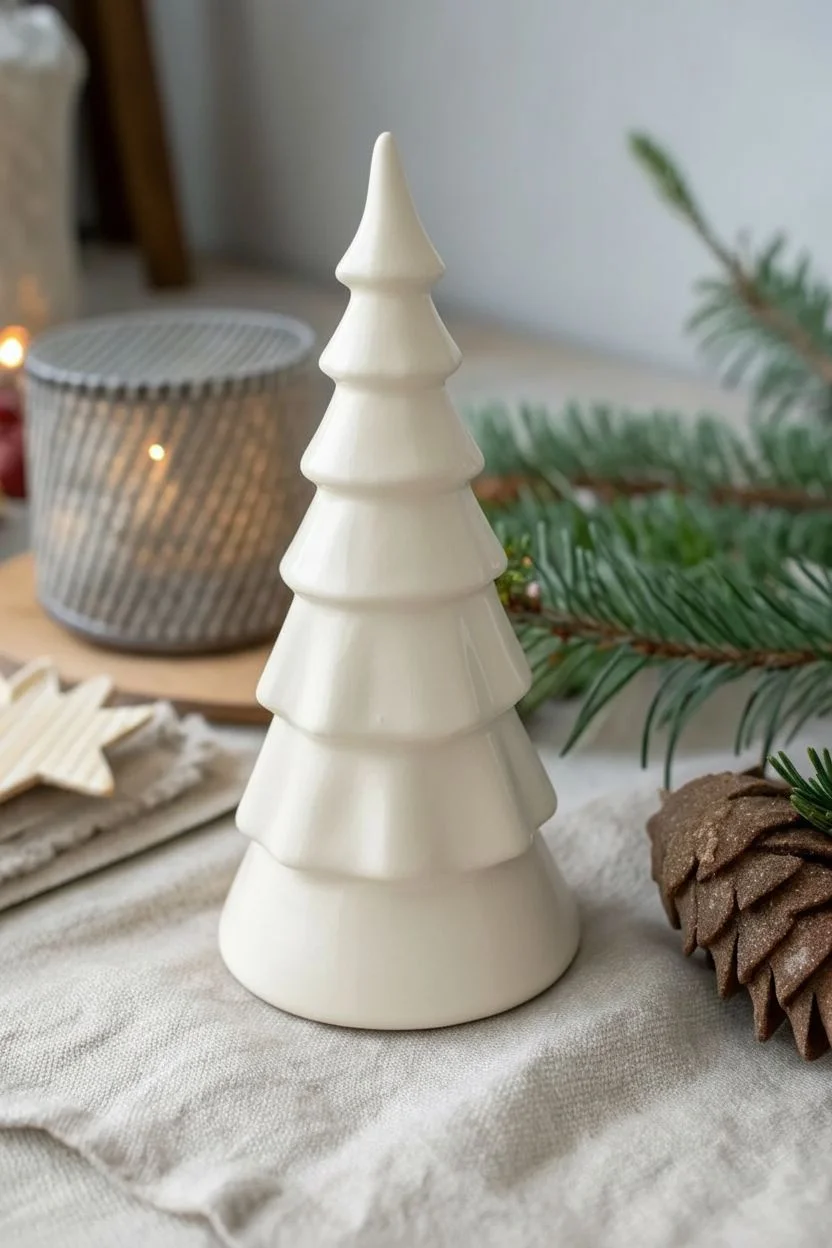
Stained-Glass Look Around Each Bulb Hole
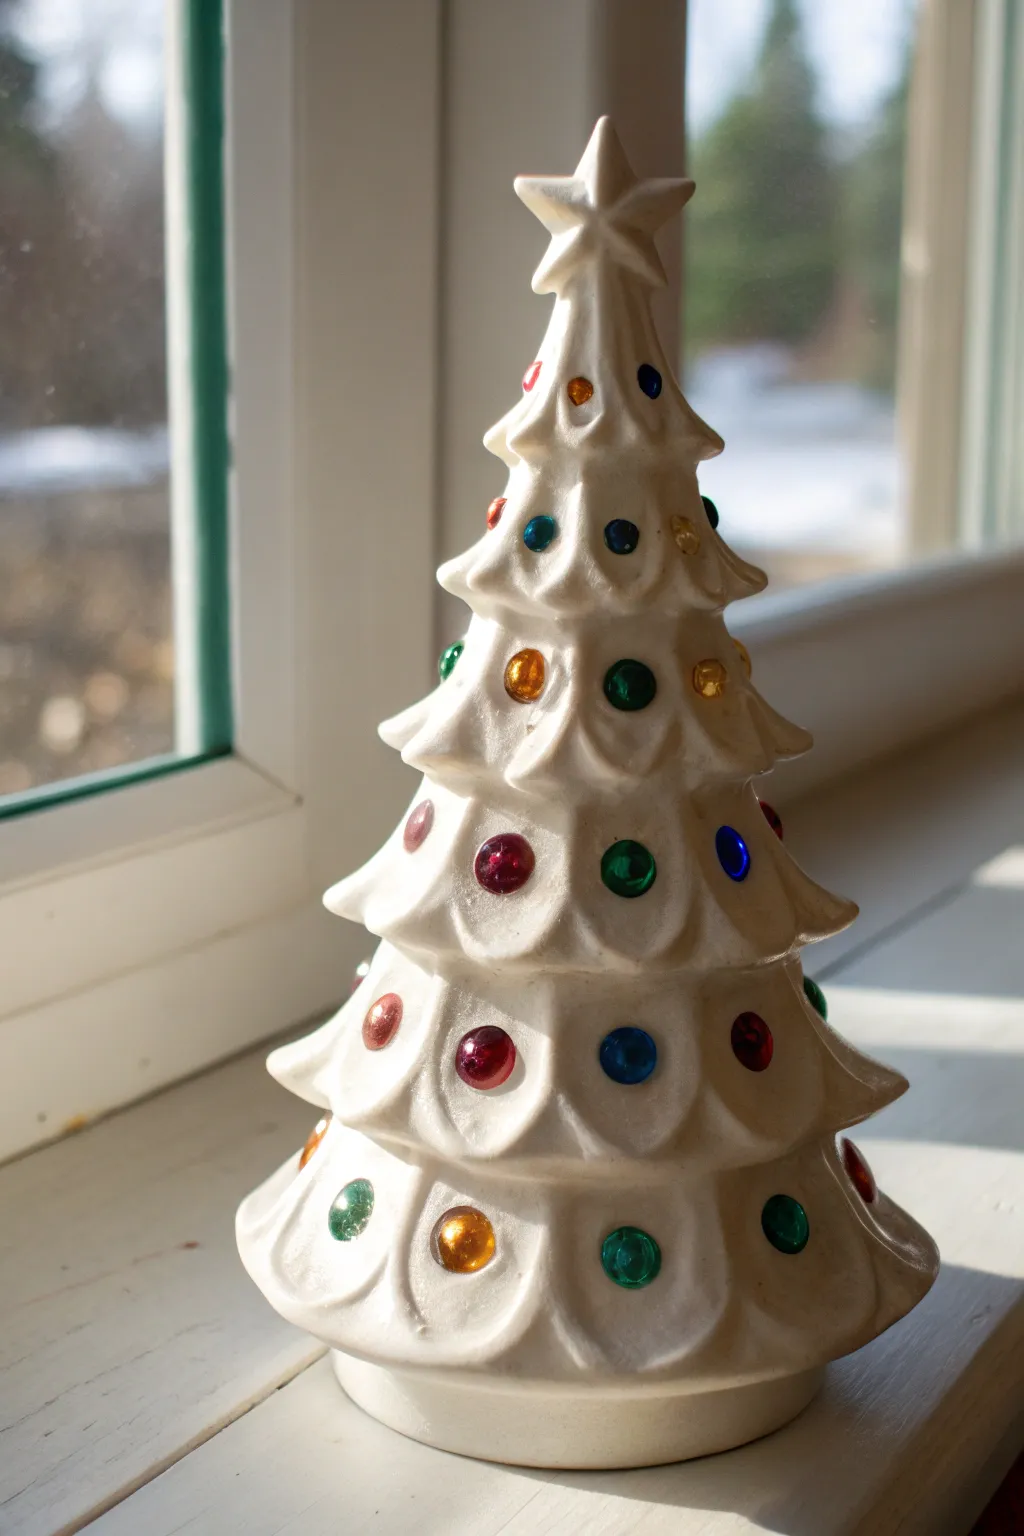
Transform a classic holiday decoration into a sophisticated, minimalist centerpiece with this glossy white ceramic tree project. Rather than the traditional heavy green glaze, this version uses a pearlescent finish that makes the jewel-toned bulbs truly pop against the clean background.
Detailed Instructions
Materials
- Unpainted bisque ceramic Christmas tree (with base)
- White pearlescent or metallic pearl acrylic craft paint
- High-gloss clear glaze (brush-on)
- Assorted small plastic twist bulbs (multi-color)
- Plastic star topper (clear or light gold)
- Wide flat brush (for base coats)
- Small round detail brush
- Ceramic glue or strong craft adhesive
- Light kit (cord and bulb for the interior)
- Microfiber cloth
- Fine-grit sanding sponge
Step 1: Preparation and Base Coat
-
Clean the Bisque:
Begin by wiping down your unpainted bisque tree with a slightly damp sponge. This removes any ceramic dust that might interfere with paint adhesion. -
Sand Rough Spots:
Check the edges of the branches and the bulb holes. If you find any sharp burrs or rough patches, gently smooth them out with a fine-grit sanding sponge. -
First Layer:
Using your wide flat brush, apply the first coat of pearlescent white paint. Don’t worry about full coverage yet; keep the layer thin to avoid globs settling in the branch crevices. -
Dry and Repeat:
Allow the first coat to dry completely, which usually takes about 20 minutes. Apply a second coat, brushing in the direction of the branch curves to enhance the sculpted shape. -
Check Coverage:
Hold the tree up to a light source. If you see any raw bisque peeking through, add a third thin coat where needed. I find that three thin coats always look smoother than two thick ones.
Step 2: Glazing and Sealing
-
Apply Gloss Glaze:
Once the paint is fully cured (give it at least an hour), switch to a clean flat brush. Apply a layer of high-gloss clear glaze over the entire tree. -
Focus on the Holes:
Be careful not to let the glaze pool inside the bulb holes, as this can make fitting the plastic lights difficult later. Use a dry detail brush to scoop out any excess. -
Gloss the Base:
Don’t forget the separate base piece. Paint and glaze it to match the tree exactly, ensuring the finish is consistent from top to bottom. -
Final Cure:
Let the glaze dry for at least 24 hours. This ensures a hard, durable shell that mimics the look of fired ceramic glaze without the kiln.
Pearl Perfection Tip
To get that extra shimmer seen in the photo, mix a tiny drop of silver metallic paint into your white pearl paint. It catches the light better than plain white.
Step 3: Assembly and Lighting
-
Sort Your Bulbs:
While the tree cures, organize your plastic twist bulbs. Ensuring you have a good mix of red, blue, green, and gold ready will speed up the assembly process. -
Fit the Bulbs:
Push the plastic bulbs into the holes. They should fit snugly. If a hole is too tight due to paint buildup, gently twist a small drill bit by hand inside the hole to clear it. -
Secure the Bulbs:
For a permanent hold, place a tiny dot of ceramic glue on the stem of each bulb before inserting it. This prevents them from getting lost during storage. -
Top it Off:
Insert the star topper into the large hole at the peak. Secure it with glue if desired, or leave it loose if you need to fit the tree into a smaller storage box later. -
Install the Light:
Insert the light kit into the base of the tree. Assemble the tree on top of the base and plug it in to see your work illuminated.
Paint Pooling?
If paint pools in the branch crevices, don’t wipe it! Use the corner of a dry paper towel to wick up the excess liquid immediately for a smooth finish.
Plug in your tree near a window to enjoy how the natural light plays off the pearl finish during the day and the internal light glows at night
Personalized Name or Date Banner on the Base

This charming project combines a classic hand-painted tree with a customized, gallery-style label on the base. The look is clean and modern, featuring precise lettering that turns a simple holiday figurine into a personalized keepsake or display piece.
Step-by-Step
Materials
- Unfinished ceramic Christmas tree with attached round base
- Acrylic paints: Dark forest green, bright red, creamy off-white/beige, deep slate grey
- Small flat brush (size 4 or 6)
- Fine detail brush (size 0 or 00)
- Pencil
- Kneaded eraser
- Fine-grit sandpaper
- Clear matte varnish
- Palette or small plate
- Water cup and paper towels
Step 1: Preparation and Base Coat
-
Surface Prep:
Begin by lightly sanding any rough raised seams on your ceramic bisque, particularly around the tree branches and the rim of the base. -
Clean Up:
Wipe the entire figurine down with a slightly damp paper towel to remove all ceramic dust, ensuring your paint will adhere smoothly. -
Painting the Base:
Using the flat brush, apply a creamy off-white or beige paint to the round base. Don’t worry about the tree part yet, but try to keep the top edge of the base clean. -
Second Coat:
Allow the first layer to dry for about 15 minutes. Apply a second coat of the cream color to ensure solid, opaque coverage where you’ll be writing later. -
Stem Detail:
Mix a tiny amount of brown into your cream paint to create a darker tan. Paint the very short ‘trunk’ section visible between the bottom branches and the white base.
Use a Steady Hand
For steadier lettering, rest your pinky finger on the table or the back of the base while you paint to stabilize your hand.
Step 2: Painting the Tree
-
Tree Base Coat:
Load your flat brush with dark forest green acrylics. Paint the entire tree section, working the bristles into the deep grooves between the boughs. -
Texture Technique:
I find that dabbing the wet paint slightly with a fairly dry brush can help mimic the texture of needles rather than leaving smooth brushstrokes. -
Edge Highlighting:
While you have the green paint out, mix a drop of white into it to lighten it. Use a dry-brush technique to very lightly catch the edges of the branches for dimension. -
Drying Time:
Let the green section dry completely before moving on to avoid smearing dark paint onto your clean white base. -
Adding Ornaments:
Dip the handle end of your paintbrush into bright red paint. Dot it onto the tree to create the round ornaments; this ensures perfectly circular shapes. -
Painting the Star:
Use your smallest detail brush to carefully paint the star topper in the same bright red shade.
Step 3: Lettering and Finishing
-
Drafting Text:
Once the base is 100% dry, lightly sketch your desired text—like ‘Ceramic Christmas Tree Figurine’—onto the front using a pencil. Keep the letters capitalized and slightly rustic. -
Loading the Liner:
Thin your deep slate grey paint slightly with a drop of water so it flows like ink. Load your size 00 detail liner brush. -
Inking the Letters:
Carefully trace over your pencil lines. Apply gentle pressure on the downstrokes and barely touch the surface for horizontal lines to mimic a printed font. -
Refining Lines:
Go back and thicken the vertical strokes of the letters just slightly to give the text visual weight and legibility. -
Removing Guides:
Wait at least an hour for the lettering to cure fully. Gently dab a kneaded eraser over the text to lift any remaining visible pencil graphite. -
Sealing:
Apply a coat of clear matte varnish over the entire piece to protect the paint and give it a unified, professional finish.
Make it Personal
Swap the generic label for a specific family name, the current year, or a short holiday phrase like ‘Merry & Bright’ for a custom gift.
Now you have a timeless holiday decoration with a unique, gallery-worthy label to display on your mantle
Neon Pop-Art Tree With Unexpected Color Lights
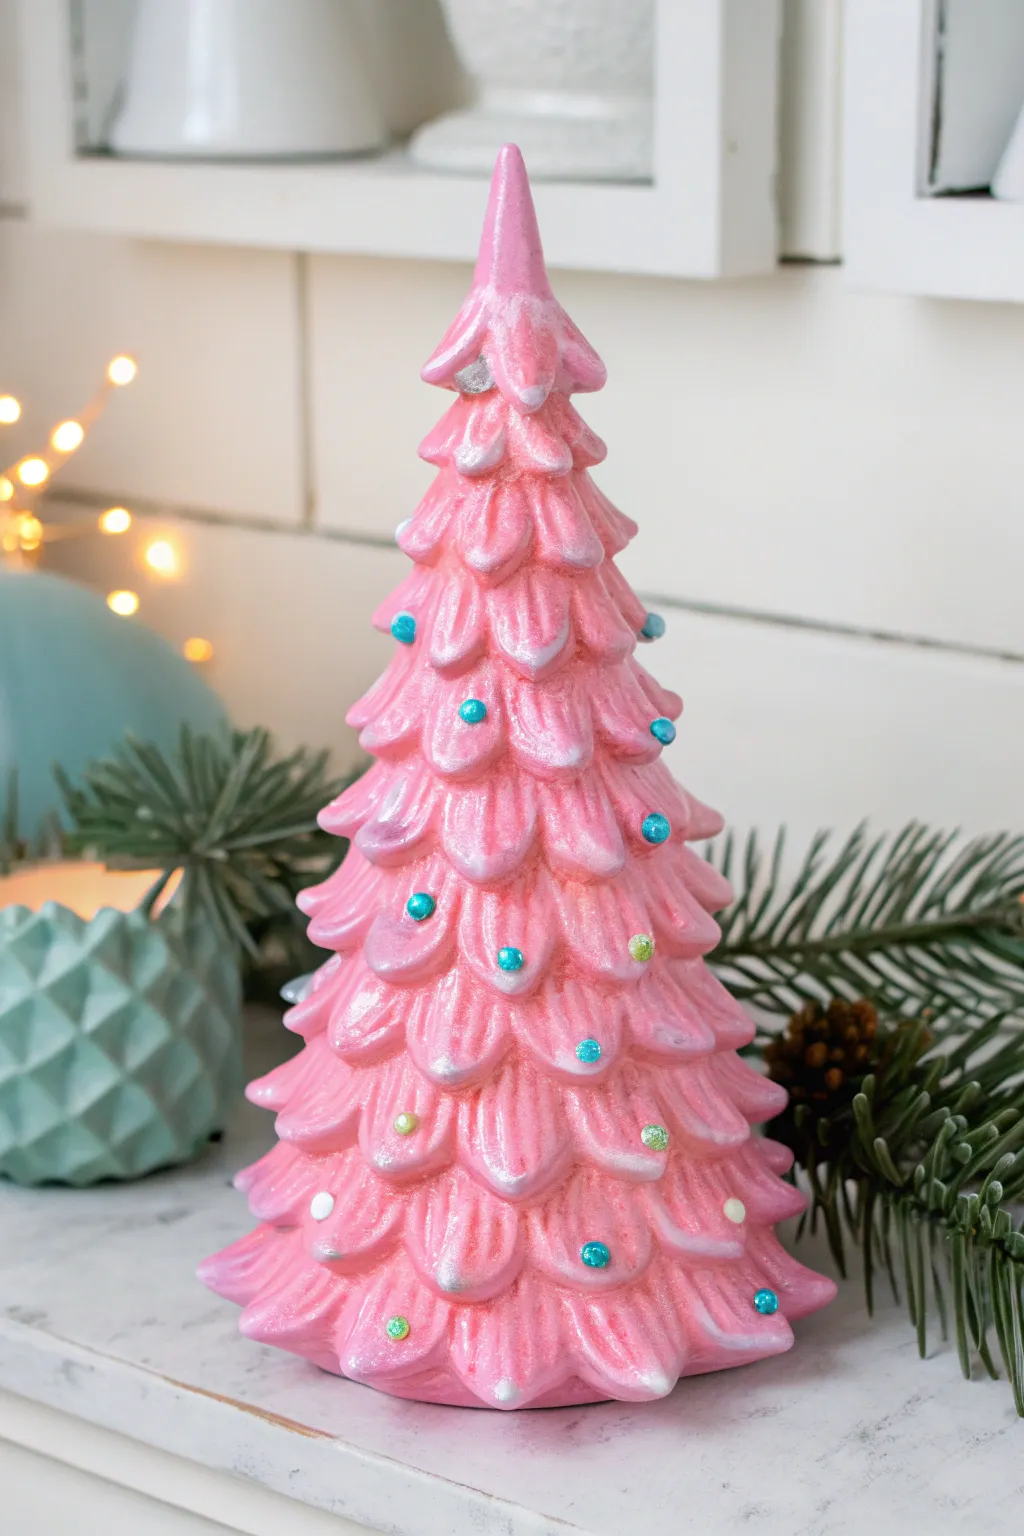
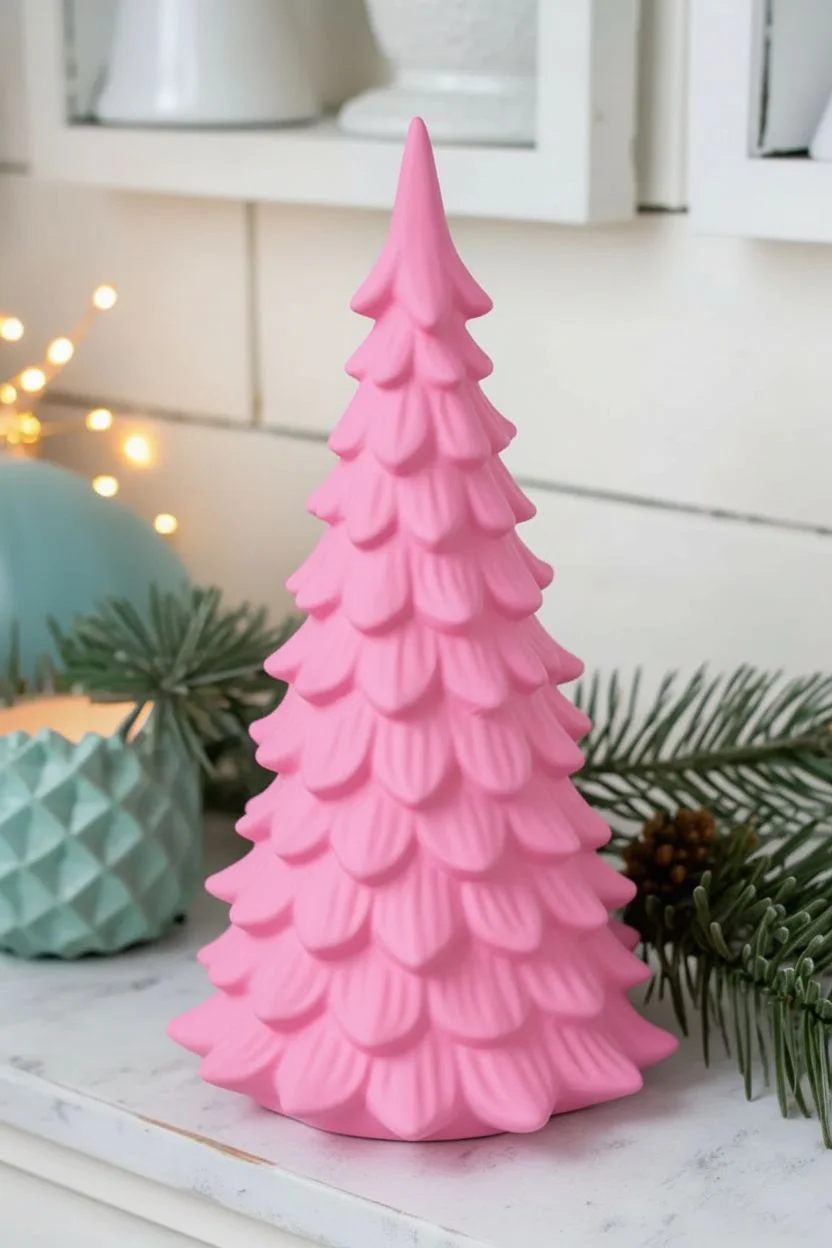
Ditch the traditional forest green for something sugary sweet with this retro-inspired pink ceramic tree. Featuring frosted white tips and pop-art teal accents, this project transforms a standard bisque shape into a playful, candy-coated holiday centerpiece.
Detailed Instructions
Materials
- Unpainted ceramic tree bisque (cleaned and dust-free)
- Acrylic paint: Bright bubblegum pink
- Acrylic paint: White pearl or shimmering silver
- Acrylic paint: White (matte)
- Small round beads, nail art rhinestones, or plastic ceramic tree ‘lights’ (teal and lime green)
- Strong craft glue (e.g., E6000 or super glue gel)
- Medium flat paintbrush
- Small detail paintbrush
- Dry brush (stiff bristle)
- Gloss sealer spray or varnish
- Paper towels
- Cup of water
Step 1: Base Coating
-
Prepare the Bisque:
Before you begin, wipe down your ceramic tree with a slightly damp cloth to remove any ceramic dust. Let it dry completely. -
Apply the First Pink Layer:
Using your medium flat brush, apply a coat of bubblegum pink paint to the entire tree. Don’t worry if it looks streaky; ceramics absorb the first coat quickly. -
Layer for Opacity:
Once the first coat is dry to the touch (usually 15 minutes), apply a second, thicker coat of pink to ensure solid, opaque coverage. Check inside the deep crevices between branches to make sure no white bisque shows through. -
Add a Third Coat (Optional):
If your pink paint is slightly translucent, a third coat might be necessary for that rich, saturated pop-art look. Allow this base layer to dry fully before moving on.
Paint Not Sticking?
If the paint beads up on the bisque, the ceramic might have oil or dust on it. Wipe it gently with rubbing alcohol and let it dry before trying again.
Step 2: Highlighting & Frosting
-
Mix the Highlight Shade:
On a palette, mix a small amount of matte white paint with just a drop of your pink base color to create a very pale, almost white pink. -
Dry Brush Technique:
Dip a stiff-bristled dry brush into your pale mixture, then wipe almost all of the paint off onto a paper towel. You want the brush to feel nearly dry. -
Frost the Branches:
Lightly sweep the dry brush downward over the textures of the tree branches. This catches the raised areas and mimics snow or frosting. -
Accentuate the Tips:
Switch to your white pearl or silver shimmer paint. Use a smaller detail brush to paint just the very tips of each branch ‘leaf’ to make them glisten. -
Refine the Gradient:
I find it helpful to use a clean, slightly damp brush to feather the edges where the shimmering tips meet the pink base, creating a softer transition.
Step 3: Finishing Details
-
Seal the Paint:
Take the tree to a well-ventilated area and spray it with a clear gloss sealer. This gives it that shiny, glazed ceramic look without needing a kiln firing. Let dry completely. -
Plan Your Ornaments:
Lay out your teal and lime green beads or plastic lights. Planning the distribution ensures you don’t end up with clumps of the same color. -
Apply Glue Dots:
Using a toothpick or a fine-tip glue applicator, place tiny dots of strong craft glue onto the tree wherever you want an ornament to sit. -
Place the Accents:
Carefully press the teal and lime beads into the glue dots. Using tweezers can help with precision if the beads are very small. -
Final Cure:
Allow the glue to cure according to the manufacturer’s instructions (usually 24 hours) before handling or displaying your new retro masterpiece.
Add Extra Sparkle
While the sealer is still wet, sprinkle ultra-fine iridescent glitter over the tree. It will stick to the gloss and look like freshly fallen magical snow.
Now you have a stunning, candy-colored decoration that is ready to brighten up your holiday shelf


Have a question or want to share your own experience? I'd love to hear from you in the comments below!