Ceramic frogs are the kind of blank that instantly sparks ideas—realistic, silly, elegant, or totally wild. Here are my favorite ceramic frog painting ideas to help you give your little amphibian a personality that feels 100% yours.
Classic Garden Toad in Mossy Greens
Capture the earthy charm of a garden toad with this layered glazing technique that mimics the texture of damp, mossy skin. By combining specific moss-green glazes with rusty-brown sponging, you’ll transform plain bisque into a lifelike amphibian perfect for an autumn display.
How-To Guide
Materials
- Ceramic bisque frog figurine (cleaned)
- Underglaze: Dark Olive Green
- Underglaze: Rust or Burnt Sienna
- Underglaze: Cream or Pale Beige
- Semi-transparent ‘Moss’ reactive glaze (speckled green)
- Clear high-gloss glaze
- Fine liner brush (size 0 or 00)
- Medium round brush (size 4 or 6)
- Natural sea sponge
- Palette for mixing
- Damp sponge for wiping
- Kiln (or access to a firing service)
Step 1: Base Coat and Texture
-
Clean the bisque:
Before laying down any color, wipe the entire ceramic frog with a slightly damp sponge to remove any kiln dust or oils from your hands. This ensures the glaze adheres perfectly to the surface. -
Apply the belly base:
Using your medium round brush, apply two coats of Pale Beige underglaze to the underside and lower jaw of the frog. Feather the edges slightly where the belly meets the sides so there isn’t a harsh line. -
Apply the green base:
Cover the rest of the frog’s body with two solid coats of Dark Olive Green underglaze. Make sure to get into the crevices of the legs and behind the eyes. Let this dry until chalky to the touch. -
Sponge on the moss texture:
Dampen a small piece of natural sea sponge and dip it lightly into the ‘Moss’ reactive glaze. Dab this gently over the olive base, focusing on the back and head. The irregular texture of the sponge mimics toad skin perfectly.
Natural Variation
Don’t over-mix your green glazes. Allowing the brushstrokes to be slightly uneven creates natural highs and lows that look more like real amphibian skin after firing.
Step 2: Creating the Spots
-
Prepare the rust color:
Pour a small amount of Rust or Burnt Sienna underglaze onto your palette. It needs to be thick enough to hold its shape slightly, not watery. -
Map out large warts:
Using a smaller round brush, identify the raised ‘bumps’ or warts molded into your ceramic piece. Paint the tops of these raised areas with the Rust color. Don’t be too neat; organic shapes look more natural. -
Add random spotting:
I find it helpful to look at real toad photos for this part. Add smaller, random dots of the Rust color on the back and legs, even where there are no raised bumps. This creates visual depth. -
Create the heavy speckling:
Dip an old toothbrush into a watered-down mix of Dark Olive paint. Flick the bristles with your thumb to spray a fine mist of tiny dark dots over the rusty spots and the beige belly area. This integrates the colors.
Step 3: The Eyes and Mouth
-
Outline the mouth:
Take your finest liner brush and a dark brown or black underglaze. carefully trace the deep crease of the mouth line to accentuate the frog’s expression. -
Paint the golden iris:
Fill the eye area with a bright Gold or Honey underglaze. Apply three coats to ensure it is opaque and vibrant against the green skin. -
Add the pupil:
Once the gold is dry, paint a large, horizontal oval pupil in the center of the eye using solid Black underglaze. -
The crucial highlight:
With the tip of a toothpick or your smallest brush, place a tiny dot of white on the upper right side of the black pupil to bring the frog to life. -
Defining the eyelids:
Use the Rust color to gently shade around the rim of the eye socket, blending it outward into the green skin.
Autumn Texture
Before the final firing, sit the wet-glazed frog on a real textured leaf for a minute. The glaze will pick up the vein patterns on the unparalleled belly/legs.
Step 4: Glazing and Firing
-
Dry completely:
Ensure all your underglaze layers are bone dry before moving to the final gloss step, usually waiting at least 20 minutes. -
Apply clear glaze:
Apply two to three even coats of Clear High-Gloss glaze over the entire piece. Be gentle so you don’t smear the detailed eye painting. -
Check the feet:
Wipe the very bottom contact points of the feet clean with a sponge to prevent the frog from fusing to the kiln shelf during firing. -
Fire the piece:
Fire the frog according to the clear glaze manufacturer’s instructions (typically cone 06 or cone 6, depending on your clay body and glaze choice).
Once cooled from the kiln, your ceramic toad will have a wet, glossy sheen ready to hide among your potted plants


Speckled Frog Skin With Soft Mottling
This project captures the charming, warty texture of a toad using a clever layering technique on bisque ware. The result is a vibrant, earthy green frog with distinct tan speckles that look naturally raised under a high-gloss finish.
Step-by-Step
Materials
- Ceramic bisque frog figurine
- Underglaze (Light Tan or Beige)
- Underglaze (Moss Green)
- Underglaze (Dark Forest Green)
- Clear transparent dipping glaze (or brush-on)
- Small round brush (size 2 or 4)
- Detail liner brush
- Medium soft shader brush
- Sponge
- Water cup
- Palette
- Clean cloth
Step 1: Base Preparation
-
Clean the bisque:
Begin by wiping down your ceramic frog with a slightly damp sponge. This removes any dust from the shelf that might prevent the glaze from adhering properly. -
Map out the speckles:
Identify the raised bumps on the frog’s back and legs. These will be your tan spots. If your bisque doesn’t have raised texture, decide where you want to paint faux bumps.
Muddled Colors?
If your spots look muddy, the green might have bled. Next time, apply wax resist over the beige spots before painting the green background.
Step 2: Detailed Spot Work
-
Apply the spot color:
Using your small round brush, dip into the Light Tan or Beige underglaze. Carefully dab this color onto the top of every raised bump or ‘wart’ on the frog’s skin. -
Second coat on spots:
Let the first coat dry until it loses its sheen. Apply a second coat to the spots to ensure the color remains opaque and bright against the green background later. -
Add variance:
For a more natural look, I like to mix a tiny drop of brown into the beige and paint a few selected larger spots with this darker tone to create variety.
Natural Variation
Dilute a tiny bit of brown underglaze with water to make a ‘wash’ and dab it into the deep crevices before glazing for extra antique depth.
Step 3: Creating the Green Skin
-
Prepare the base green:
Pour out a good amount of Moss Green underglaze. Thin it slightly with a drop of water if it feels too thick, as you want it to flow around the spots easily. -
Paint around the spots:
Using the medium shader brush, paint the green skin, carefully cutting in around the beige spots you previously painted. It is okay if you slightly overlap the very edges, but try to keep the centers clean. -
Layering the green:
Apply two to three coats of the Moss Green to the entire body (except the belly and spots), allowing each coat to dry to the touch in between. -
Mottling effect:
Take a small piece of sponge and dip it lightly into the Dark Forest Green. Dab off the excess on a paper towel until it is almost dry. -
Applying the texture:
Gently stipple the sponge over the dried Moss Green base. Focus on the back and the ridges of the legs to create a mottled, textured depth. -
Enhancing the eyes:
Use the detail liner brush to carefully paint the rim of the eyes with the lighter green, and use a dark brown or black for the pupil, leaving a tiny white dot for a catchlight. -
Clean up spots:
If any green paint accidentally covered your nice beige spots, use a clean, damp detail brush to gently wipe the green away from the top of the bump.
Step 4: Glazing and Firing
-
Dry thoroughly:
Allow the underglaze design to dry completely, ideally overnight or for at least several hours, until it is chalky and room temperature. -
Refining the surface:
Lightly brush off any loose crumbs of underglaze with a soft, dry brush to prevent them from clouding the clear coat. -
Applying clear glaze:
Apply two coats of brush-on clear glaze, or dip the piece into clear dipping glaze. Ensure the glaze gets into the crevices between the bumps but doesn’t pool too thickly. -
Checking the foot:
Wipe the bottom of the frog cleanly with a sponge to ensure no glaze is left on the foot, which would stick to the kiln shelf. -
Final Fire:
Fire the piece in the kiln according to the clay and glaze specifications (usually Cone 06 or 04 for low-fire ceramics) to achieve that brilliant, wet-looking shine.
Place your finished frog near a sunny window to let the light play off the glossy texture and bring the garden vibes indoors


Big Cute Eyes With Cartoon Charm
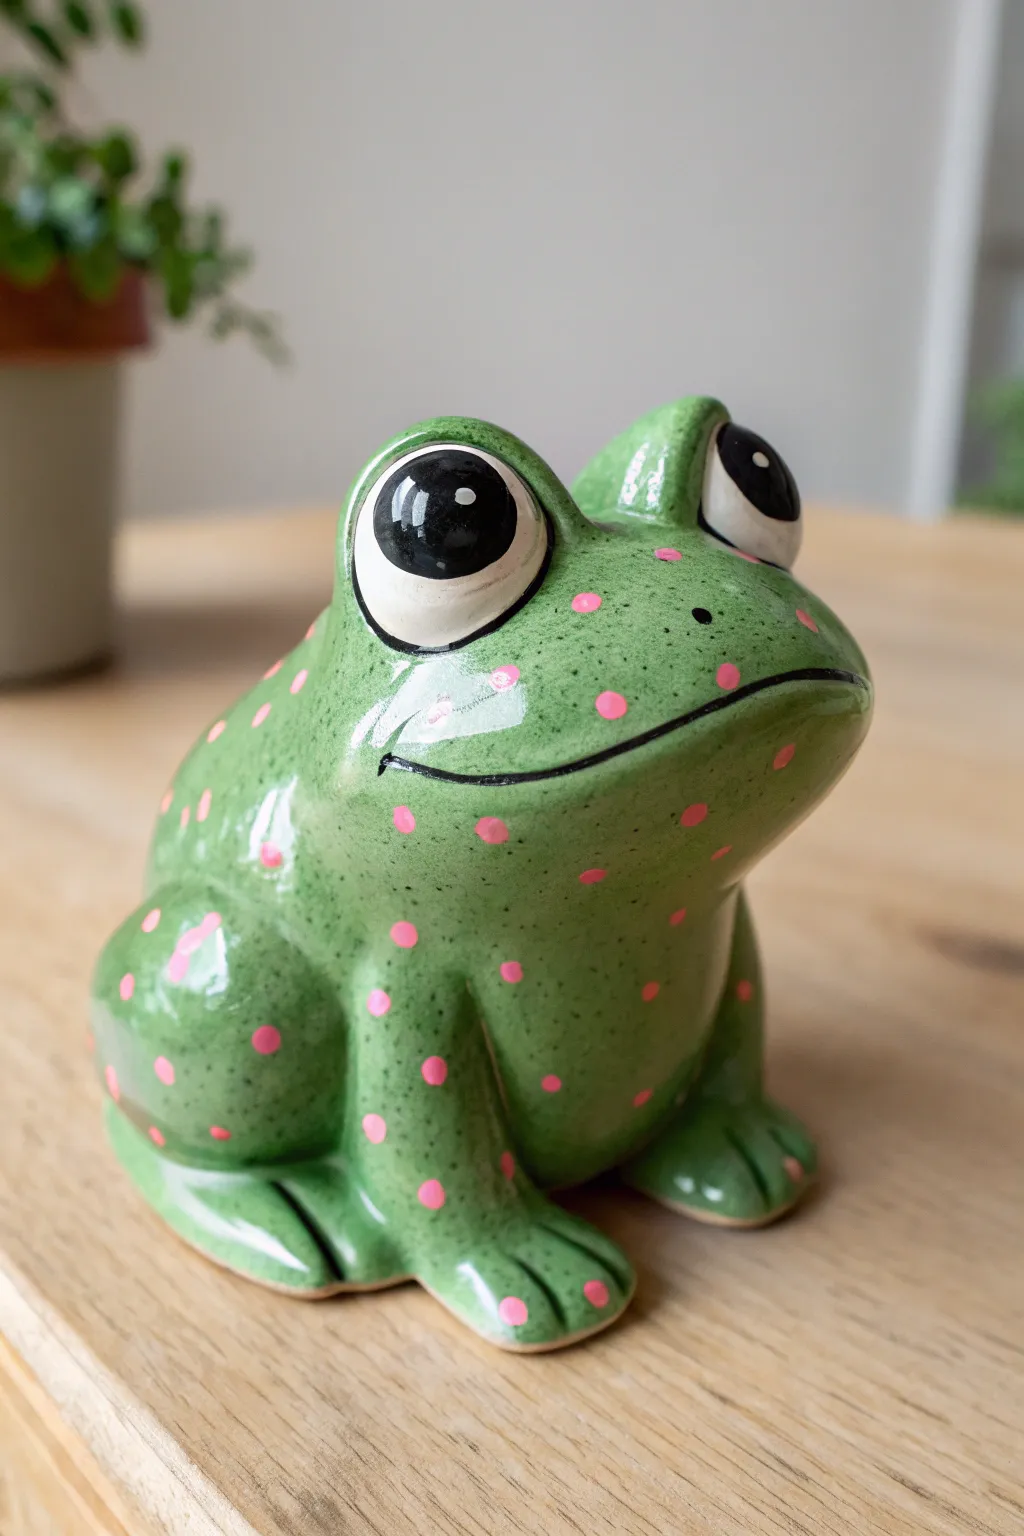
This whimsical project transforms a plain ceramic bisque frog into a charming character with oversized, expressive eyes and a playful pattern. Using simple dotting techniques and bright glazes, you’ll achieve a glossy, professional finish that really brings this little amphibian to life.
Step-by-Step Tutorial
Materials
- Ceramic bisque frog figurine
- Underglaze (bright green, light pink, white, black)
- Clear dipping or brush-on glaze
- Fan brush or wide flat brush
- Small round detail brush (size 0 or 1)
- Medium round brush (size 4 or 6)
- Sponge
- Water cup
Step 1: Base Preparation
-
Clean surface:
Begin by wiping down your ceramic bisque frog with a damp sponge. This removes any dust from the shelf that could prevent the glaze from adhering properly. -
Outline the eyes:
Before laying down your base color, carefully paint the large oval shapes of the eyes with white underglaze using a medium round brush. This ensures the white stays bright and isn’t muddied by the green later. -
Second coat for eyes:
Let the first coat dry until chalky, then apply a second and third coat of white to the eyes for solid, opaque coverage.
Dotting Perfection
If you don’t have dotting tools, use household items like the end of a chopstick or a pencil eraser to stamp perfectly round pink circles.
Step 2: Applying Color
-
Base coat green:
Using your larger brush, apply a bright green underglaze to the entire body of the frog, carefully working around the white eye ovals you just painted. -
Build opacity:
Allow the green layer to dry to the touch. Apply a second coat of green to deepen the color and eliminate prominent brushstrokes. For a rich finish like the photo, a third coat is often necessary. -
Check coverage:
Inspect the crevices around the legs and mouth. Use a smaller brush to dab extra green paint into any deep textures that the larger brush might have missed. -
Paint the pupils:
Once the white eyes are fully dry, use a small detail brush and black underglaze to paint large circular pupils inside the white ovals. Position them slightly off-center for a quirky look. -
Add eye highlights:
This is the secret to ‘cartoon charm’. Dip the handle end of a paintbrush into white underglaze and dot a small reflection catchlight onto the black pupil. I like to add a second, tinier dot nearby for extra sparkle. -
Define the mouth:
With a steady hand and your finest liner brush, paint a thin, long black smile line stretching across the frog’s face. -
Clean up lines:
Paint a thin black outline around the outer edge of the eyes where the white meets the green to separate the shapes distinctively.
Add a Crown
Before firing, sculpt a tiny crown from clay or paint a golden crown on top of the head to turn your frog into a fairytale prince.
Step 3: Decorating & Glazing
-
Create pink dots:
Dip the handle end of a medium-sized paintbrush into pink underglaze. Press this round tip onto the green body to create perfect polka dots. -
Vary the pattern:
Distribute the pink dots randomly across the back and legs. vary the pressure slightly; harder pressure makes larger dots, while lighter touches make smaller ones. -
Add texture speckles:
To mimic the speckled skin texture seen in the image, load an old toothbrush or stiff brush with slightly watered-down dark green or black paint. Run your thumb over the bristles to flick tiny speckles onto the frog’s green skin. -
Dry completely:
Allow the entire piece to dry for at least 24 hours to ensure all moisture has evaporated from the bisque. -
Clear glaze application:
Apply two coats of clear brush-on glaze over the entire piece, or dip it into a clear dipping glaze if you have access to a studio setup. -
Kiln firing:
Fire the ceramic piece in a kiln according to the specifications of your glaze (usually Cone 06 for low-fire earthenware). This final step transforms the dull paint into a shiny, glass-like surface.
Once cooled from the kiln, your glossy frog friend is ready to brighten up a shelf or garden corner


Realistic Frog Eyes With Multi-Tone Irises
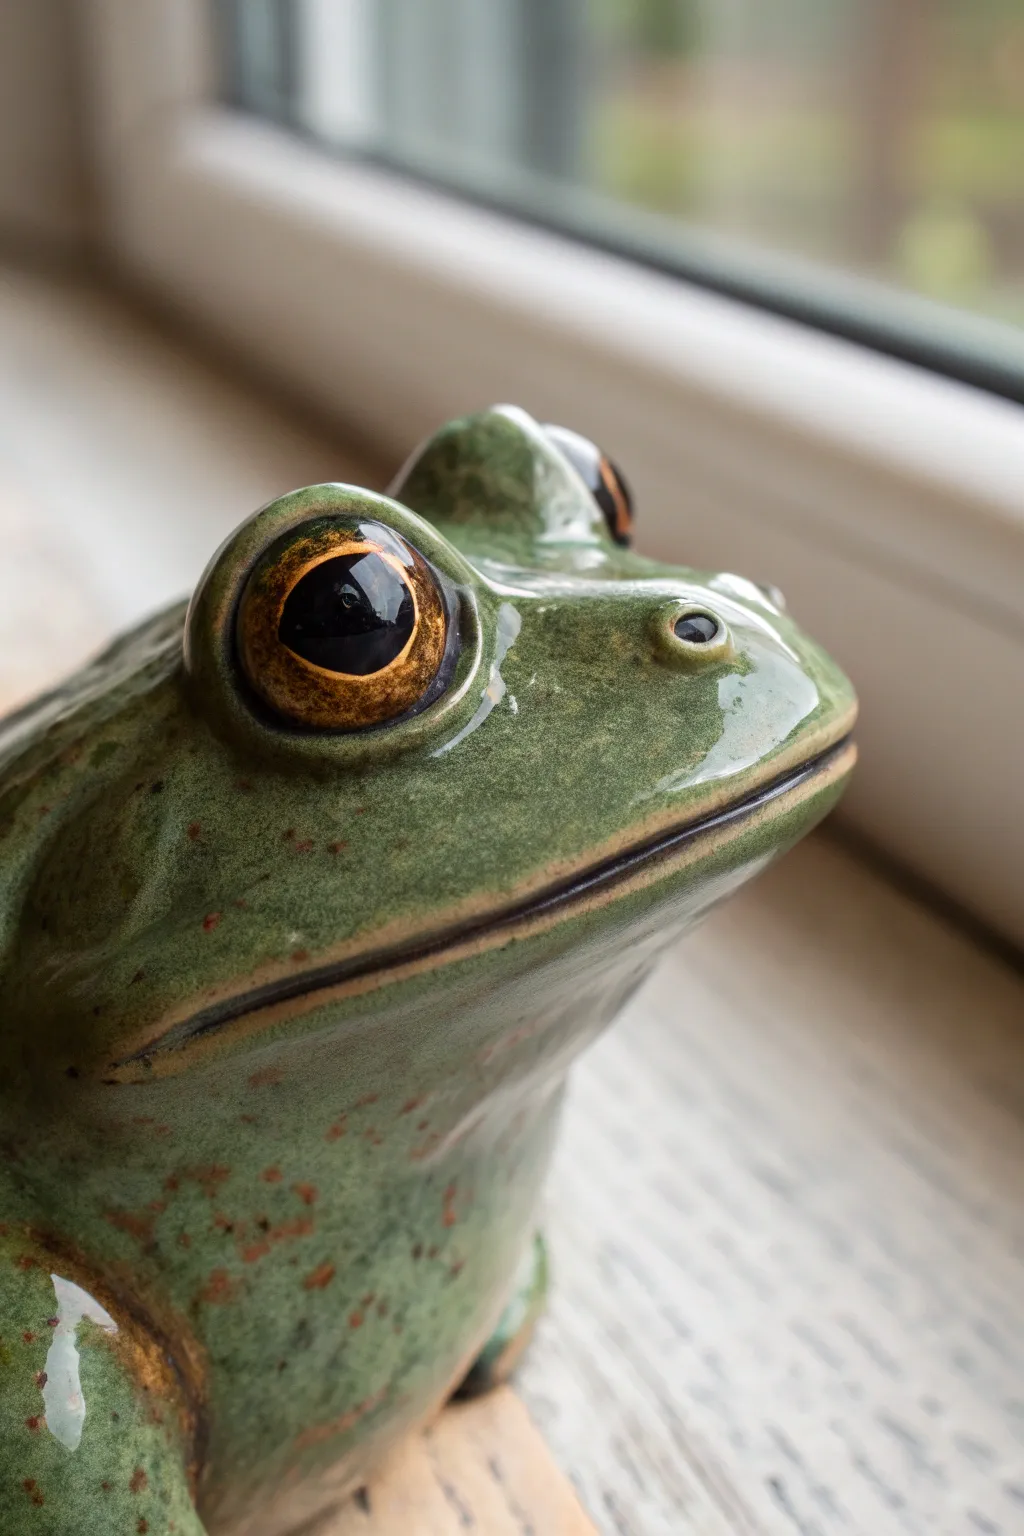
This project focuses on transforming a plain ceramic frog bisque into a lifelike amphibian using specific glazing techniques to achieve deep, glassy eyes and realistic skin texture. You will layer translucent glazes to create a multi-tone iris that captures light just like the real thing.
Step-by-Step Guide
Materials
- Ceramic bisque frog
- Underglazes: Jet Black, Warm Amber, Deep Orange, Dark Brown
- Translucent Olive Green glaze (for body)
- Small round brushes (Size 0 and 2)
- Detail liner brush (Size 000)
- Clear gloss glaze
- Sponge
- Water container
- Palette
- Kiln (or access to a firing service)
Step 1: Base Coat & Skin Texture
-
Prepare the bisque:
Wipe down your ceramic frog with a slightly damp sponge to remove any dust. This ensures the underglaze adheres properly to the porous surface. -
Apply initial speckling:
Dip an old toothbrush or stiff bristle brush into watered-down Dark Brown underglaze. Run your thumb across the bristles to flick tiny speckles across the frog’s back and cheeks, mimicking natural skin variation. -
Glaze the body:
Using a soft fan brush or medium round brush, apply three even coats of Translucent Olive Green glaze over the entire body, carefully avoiding the eye sockets. Allow each coat to dry to the touch before adding the next. -
Define the mouth:
With a fine liner brush and Dark Brown underglaze, carefully trace the line of the mouth. Keep the line thin but distinct to separate the upper and lower jaw.
Uneven Glaze Check
If the green body glaze looks streaky after drying, you applied it too thin. Add one more cross-hatched layer before firing for solid coverage.
Step 2: Creating the Multi-Tone Iris
-
Base the eye:
Paint the entire eyeball area with two coats of Warm Amber underglaze. This provides a glowing, light-reflective base for the darker tones. -
Add outer depth:
Using a size 0 brush, lightly dab Dark Brown around the very outer rim of the eye orb creates a shadow effect where the eye meets the eyelid. -
Create the tonal gradient:
Mix a small amount of Deep Orange with the Warm Amber. Apply this blend in a ring shape, leaving the very center of the amber base untouched. -
Detail the iris texture:
Using the 000 liner brush and pure Deep Orange, paint tiny, hair-thin lines radiating from the center of the eye outward. These striations add incredible realism. -
Paint the pupil:
With Jet Black underglaze, paint a large, solid black oval in the center of the eye. Ensure the edges are crisp and smooth. -
The highlight:
This is the most critical step. Dip the handle end of a paintbrush into pure White underglaze and place a single, tiny dot on the upper right side of the pupil, overlapping slightly onto the iris. -
Secondary reflection:
I like to add a much smaller, fainter dot or a tiny crescent shape on the opposite side (lower left) of the pupil to imply curved glassiness.
Step 3: Glazing & Firing
-
Clear coat the eyes:
Once the eye detail is completely dry, carefully apply two thick coats of Clear Gloss glaze only over the eyeball. Do not let it run onto the green skin. -
Check for drips:
Inspect the bottom of the frog and wipe away any glaze that may have dripped onto the footring to prevent it from sticking to the kiln shelf. -
Firing:
Fire the piece in the kiln according to the glaze manufacturer’s instructions (typically Cone 06 or 04 for low-fire glazes).
Wet-Look Skin
To make the frog look like it just emerged from a pond, apply a coat of clear gloss over the green skin glaze before the final firing.
Place your finished frog near a window to let natural light catch those brilliant, glossy eyes
BRUSH GUIDE
The Right Brush for Every Stroke
From clean lines to bold texture — master brush choice, stroke control, and essential techniques.
Explore the Full Guide
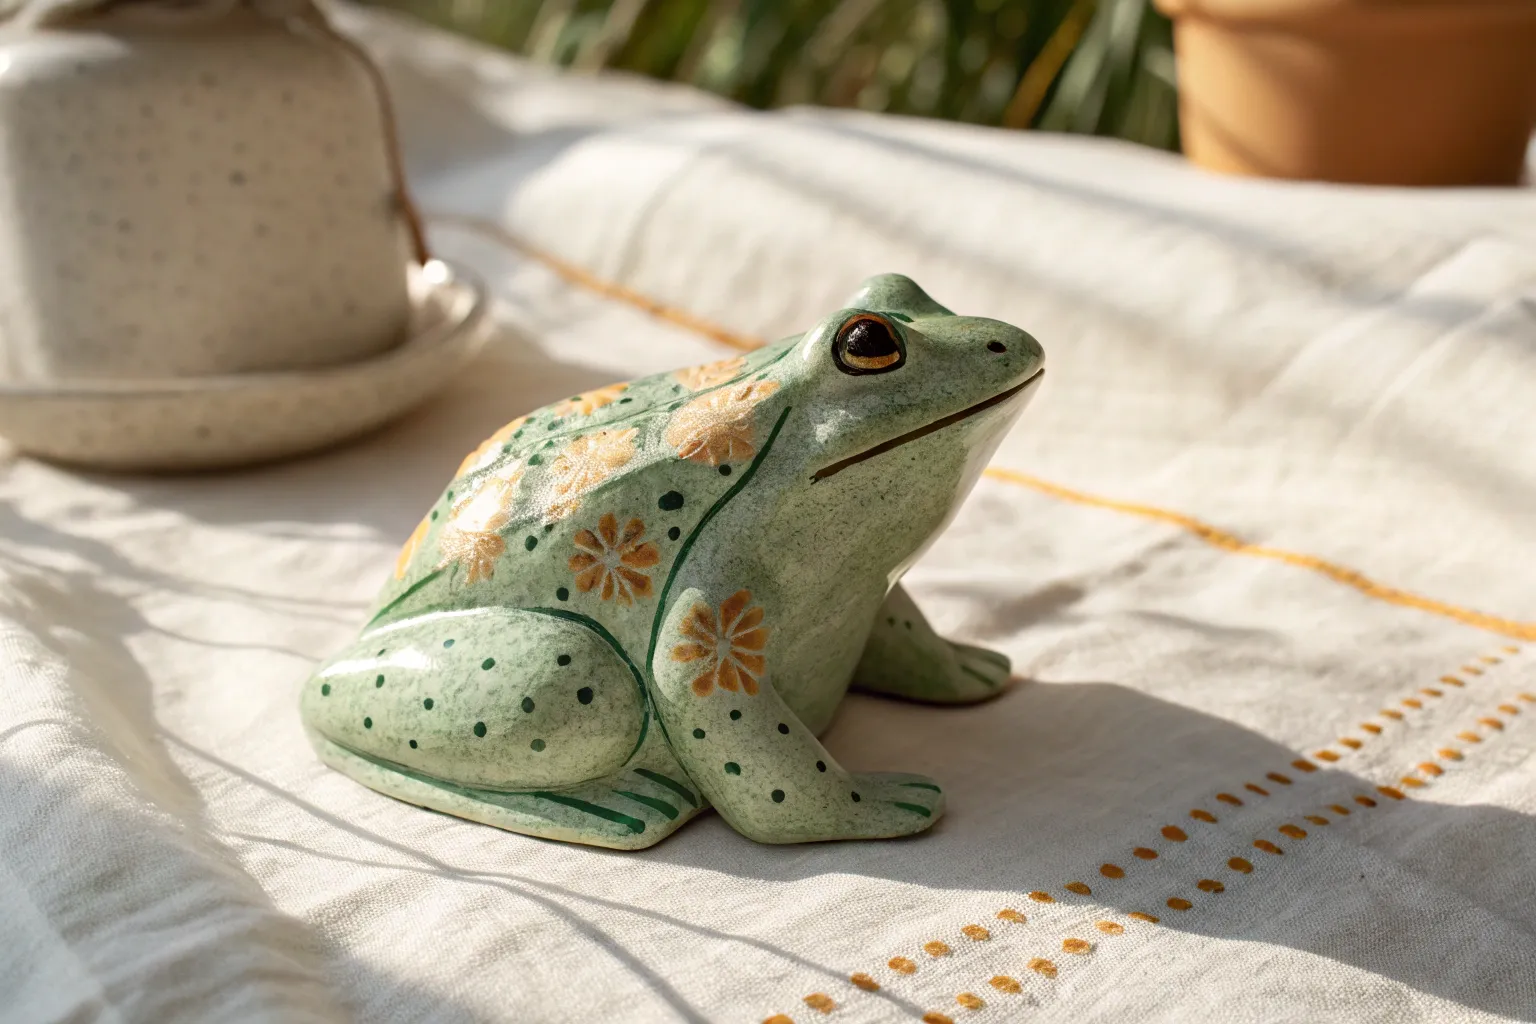
Soft Pastel Frog for Shelf Decor
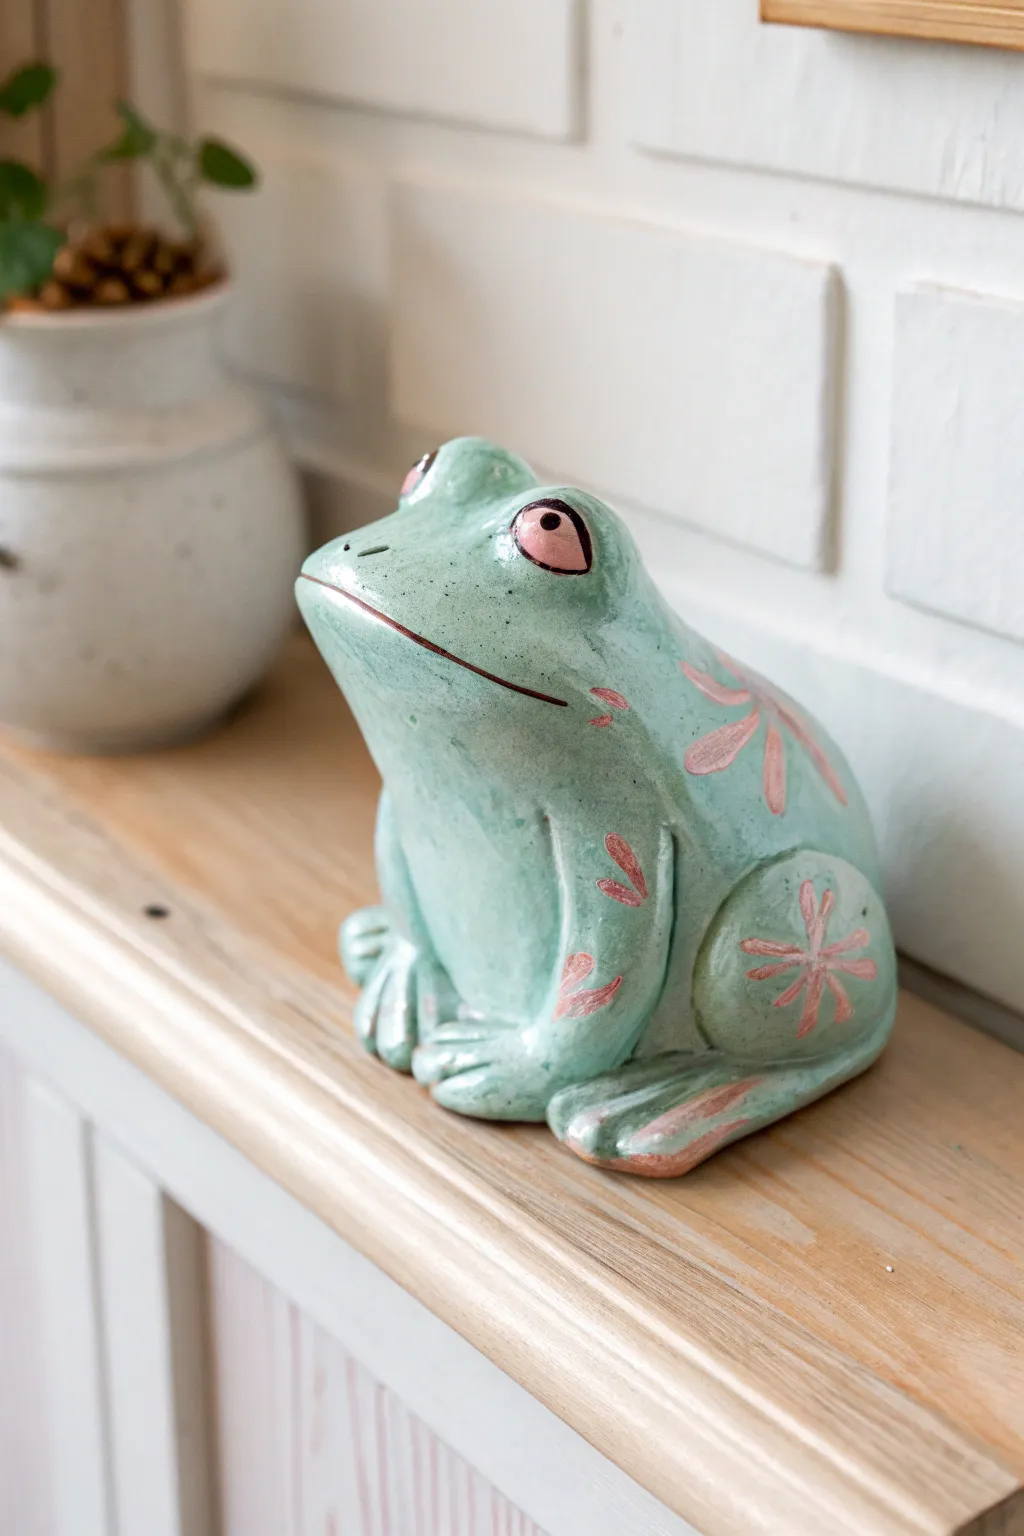
Transform a plain ceramic bisque frog into a charming shelf companion using a soft, mint-green palette and delicate floral accents. This project captures the essence of vintage pottery with its gentle pastel tones and perfectly imperfect hand-painted details.
How-To Guide
Materials
- Unfinished ceramic frog bisque
- Acrylic paints: Mint green, pale pink, black, and white
- Glazing medium or gloss varnish
- Medium flat brush (size 6 or 8)
- Small round brush (size 2 or 3)
- Fine detail brush (size 0 or 00)
- Palette for mixing
- Water cup and paper towels
- Pencil (optional for sketching)
Step 1: Base Coat Application
-
Prepare the surface:
Begin by wiping down your ceramic frog with a slightly damp paper towel to remove any dust or ceramic debris. This ensures your paint adheres smoothly. -
Mix the base color:
Create a custom mint shade by mixing your primary mint green with a touch of white. I like to make this slightly lighter than the final desired color, as acrylics often dry a shade darker. -
Apply the first layer:
Using the medium flat brush, apply a thin, even coat of the mint mixture over the entire frog. Don’t worry if it looks streaky; thin layers are key to a professional finish. -
Dry and repeat:
Allow the first coat to dry completely for about 15-20 minutes. Apply a second and, if necessary, a third coat until you have opaque, solid coverage without visible brushstrokes.
Step 2: Adding Facial Features
-
Paint the eyes:
Switch to your small round brush to paint the large, oval eye sockets. Use a soft, pale pink paint for the lids and surrounding area, creating a gentle contrast against the mint skin. -
Detail the pupils:
Once the pink area is dry, use the fine detail brush and black paint to carefully add the pupils. Keep them centered or slightly looking upward for a curious expression. -
Define the mouth:
Mix a small amount of reddish-brown or dark pink paint. With a steady hand and your finest brush, trace the line of the frog’s mouth, extending it slightly at the corners for a subtle smile. -
Add nose dots:
Using the very tip of the detail brush, place two tiny, symmetrical black dots for the nostrils just above the mouth line.
Streaky Base Coat?
If your mint paint looks uneven, don’t glop on thick paint. Instead, sand it lightly with fine-grit paper once dry, wipe clean, and apply another very thin layer.
Step 3: Floral Patterning
-
Plan the flowers:
Visualize where you want your floral pattern to sit. The reference uses the rounded haunches and back of the frog as canvases for the blooms. -
Paint flower petals:
Using the small round brush and the same pale pink used for the eyes, paint simple, elongated teardrop shapes to form flower petals. Arrange them in a radial starburst pattern on the frog’s leg. -
Add floating petals:
Scatter loose, individual petals or small clusters of leaves across the frog’s back and sides to create an organic, falling-blossom effect. -
Detail the flower centers:
Once the pink petals are dry, take your fine detail brush with a slightly darker pink or thin red line to draw a simple star or asterisk shape in the center of the main flower. -
Highlight the toes:
For a cute finishing touch, lightly brush a tiny amount of the pale pink paint onto the tips of the frog’s toes to mimic the blush seen in the image.
Loose & Lively Petals
Don’t try to make the flowers perfectly symmetrical. Slight variations in petal size and spacing give it that hand-painted, folk-art charm.
Step 4: Finishing Touches
-
Dry completely:
Let the entire piece sit for at least an hour to ensure all detail work is thoroughly cured. -
Apply gloss finish:
To mimic the look of glazed pottery without a kiln, apply a coat of high-gloss varnish or glazing medium. Use a soft brush and apply quickly to avoid drag marks. -
Check for bubbles:
Immediately after applying the gloss, inspect the surface for tiny bubbles and gently brush them out before the varnish sets.
Place your shiny new friend on a shelf near some greenery to perfectly complement those minty tones
Glossy Green Frog With Shiny Highlights
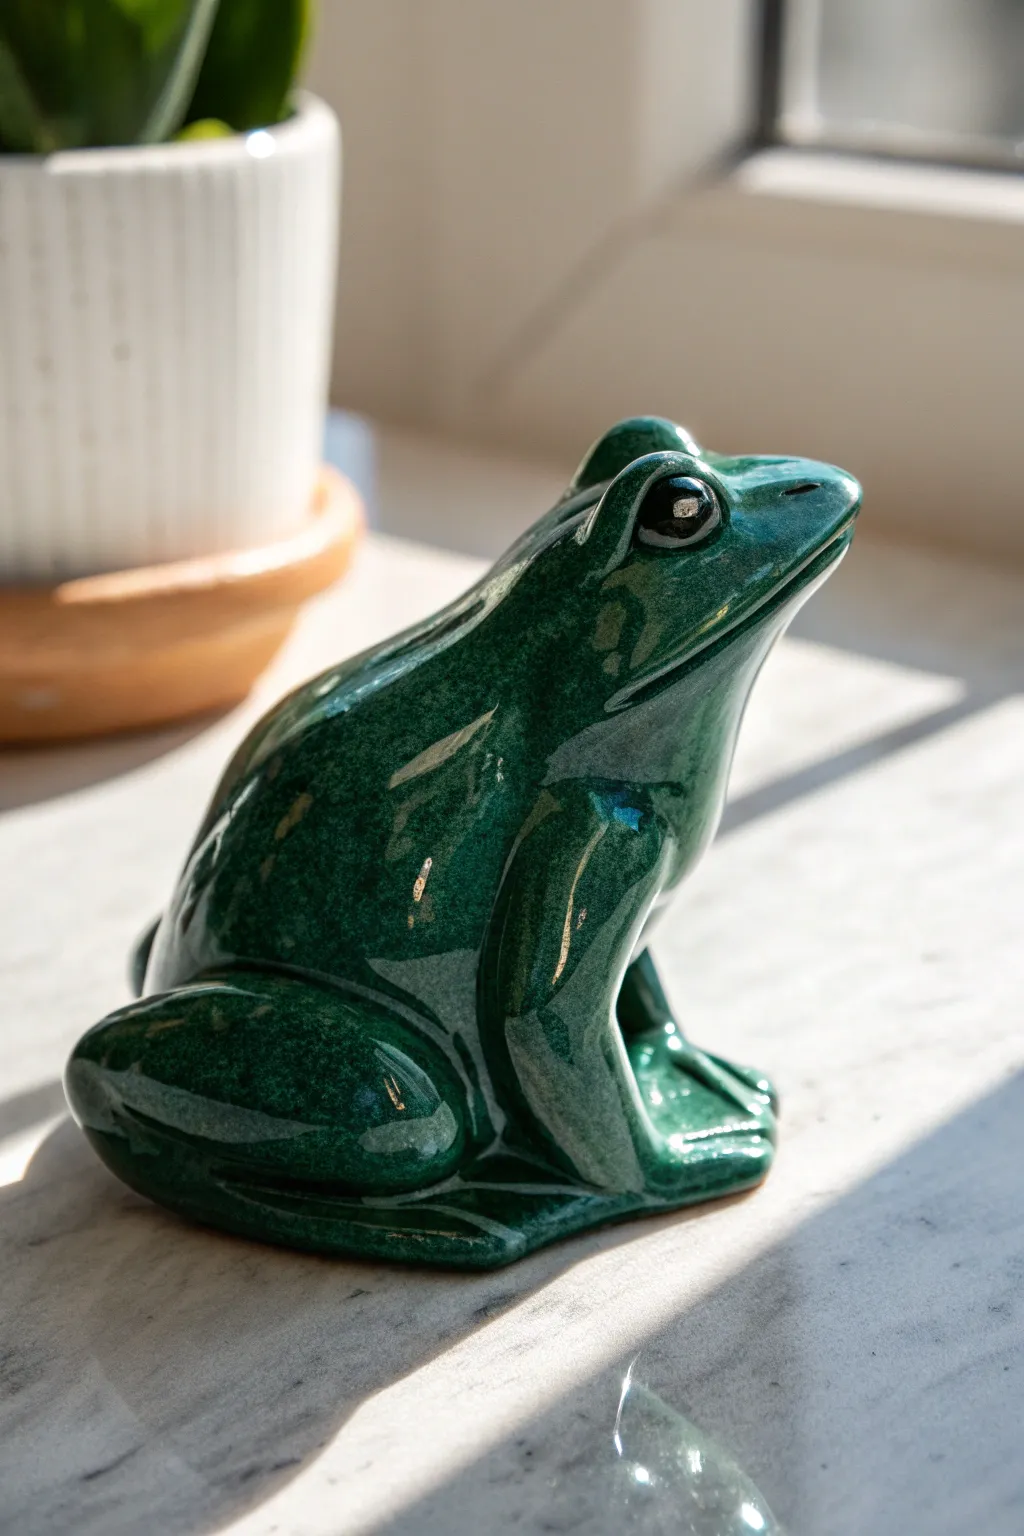
Capture the charm of amphibian life with this incredibly shiny, deep green ceramic project. The finish mimics a high-end reactive glaze using simple acrylic techniques and a heavy-duty gloss topcoat, resulting in a piece that looks wet and ready to hop.
Detailed Instructions
Materials
- Bisque ceramic frog figurine
- Acrylic paints: Dark Hunter Green, Forest Green, Lime Green, Black, White
- Ceramic glaze medium (or glazing liquid)
- Wide flat brush
- Small round detail brush
- Sea sponge (natural)
- Paper towels
- High-gloss varnish or polyurethane sealer (brush-on preferred)
- Water cup and palette
Step 1: Base Coating
-
Clean the bisque:
Before painting, wipe your ceramic frog down with a slightly damp paper towel to remove any kiln dust or oils from your hands. Let it air dry completely. -
Mix the base color:
Create a rich, dark base by mixing your Dark Hunter Green with a tiny drop of Black. You want a deep, shadowy forest floor color. -
Apply the first coat:
Using a wide flat brush, cover the entire frog with this dark mixture. Don’t worry about streaks yet; just ensure all white ceramic is covered. -
Add a second coat:
Once the first layer is dry to the touch, apply a second coat of the dark green mix to ensure opaque, solid coverage. Let this base dry thoroughly.
Step 2: Creating Texture
-
Prepare the sponge:
Dampen your natural sea sponge and wring it out fully. It should be soft but not dripping wet. -
Load the mid-tone:
Pour some Forest Green onto your palette. Dip the sponge lightly into the paint and blot the excess onto a paper towel until the texture looks open and airy. -
Sponge the body:
Gently dab the sponge over the frog’s back, legs, and head. Rotate your hand as you work so the pattern doesn’t look repetitive. -
Layer the lighter green:
While the previous layer is still tacky, repeat the sponging process with a small amount of Lime Green mixed with Forest Green. Focus this lighter mottling on the highest points of the back and the tops of the legs. -
Blend the transition:
I like to take a clean, slightly damp brush and very lightly feather the edges where the sponge marks meet the dark belly area, softening the look.
Glazing Liquid Tip
Mix a glazing liquid into your acrylics instead of water. This extends drying time and increases transparency, making your sponge layers look more like fired ceramic glaze.
Step 3: Detailing the Face
-
Paint the eyes black:
Using your small round detail brush, fill in the entire eye socket area with pure Black paint. Make the edges crisp and clean. -
Define the mouth:
Use the very tip of your detail brush and a thinned-down Black paint to run a fine line along the mouth crease to deepen the expression. -
Add the eye shine:
Dip the handle end of a paintbrush into pure White paint. Dot a single reflection point on the upper right side of each black eye. This instantly brings the frog to life. -
Refine the highlights:
If needed, add a tiny, faint curved line of white opposite the dot on the eye to suggest spherical volume.
Level Up: Swampy Base
Glue the finished frog onto a flat river stone or a piece of driftwood. Use clear resin around the feet to create permanent ‘puddles’ for extra realism.
Step 4: The High-Gloss Finish
-
Dry completely:
This is crucial: allow the acrylic paint to cure for at least 2-4 hours. Check that there is absolutely no moisture before proceeding. -
Apply gloss coat 1:
Using a soft, clean brush, apply a thick, even layer of high-gloss varnish. Work in long, smooth strokes to avoid bubbles. -
Check for pools:
Watch areas where the legs meet the body; if varnish pools there, wick it away with the corner of your brush so it doesn’t dry cloudy. -
Apply gloss coat 2:
After the first coat is fully dry (refer to your bottle’s instructions), apply a second coat. This builds that ‘wet frog’ look seen in the photo. -
Inspect reflections:
Hold the frog under a light to ensure the gloss is consistent. The finished piece should look almost like glazed porcelain.
Now you have a brilliantly glossy amphibian friend ready to brighten up any windowsill or shelf

PENCIL GUIDE
Understanding Pencil Grades from H to B
From first sketch to finished drawing — learn pencil grades, line control, and shading techniques.
Explore the Full Guide
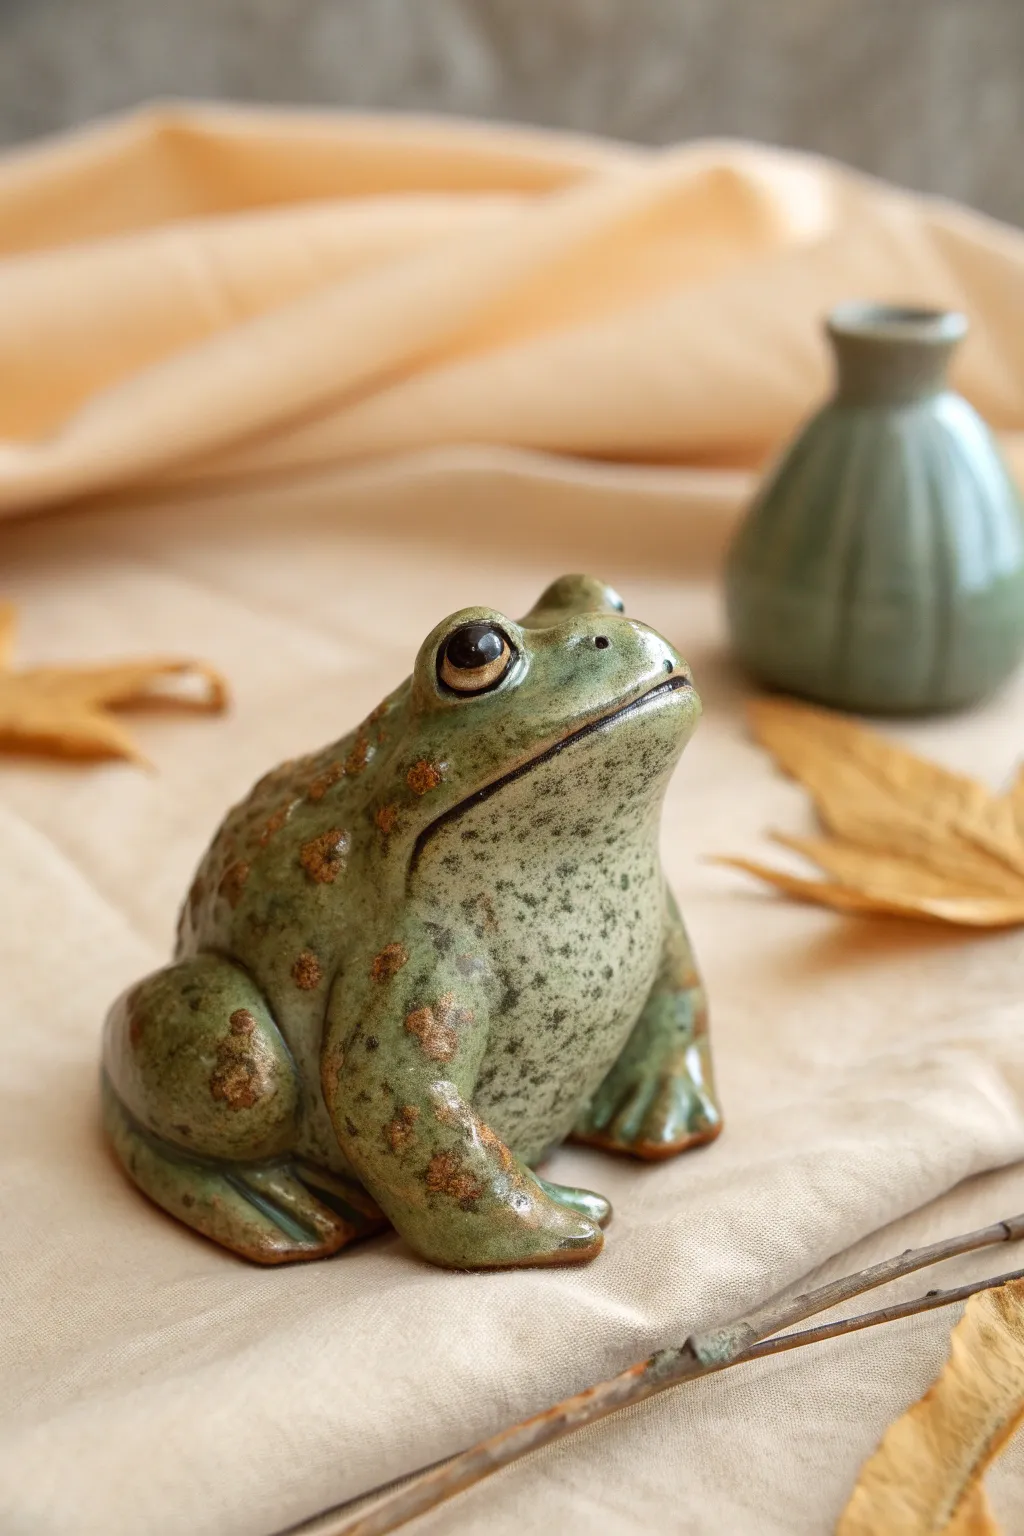
Matte Woodland Frog in Olive and Clay
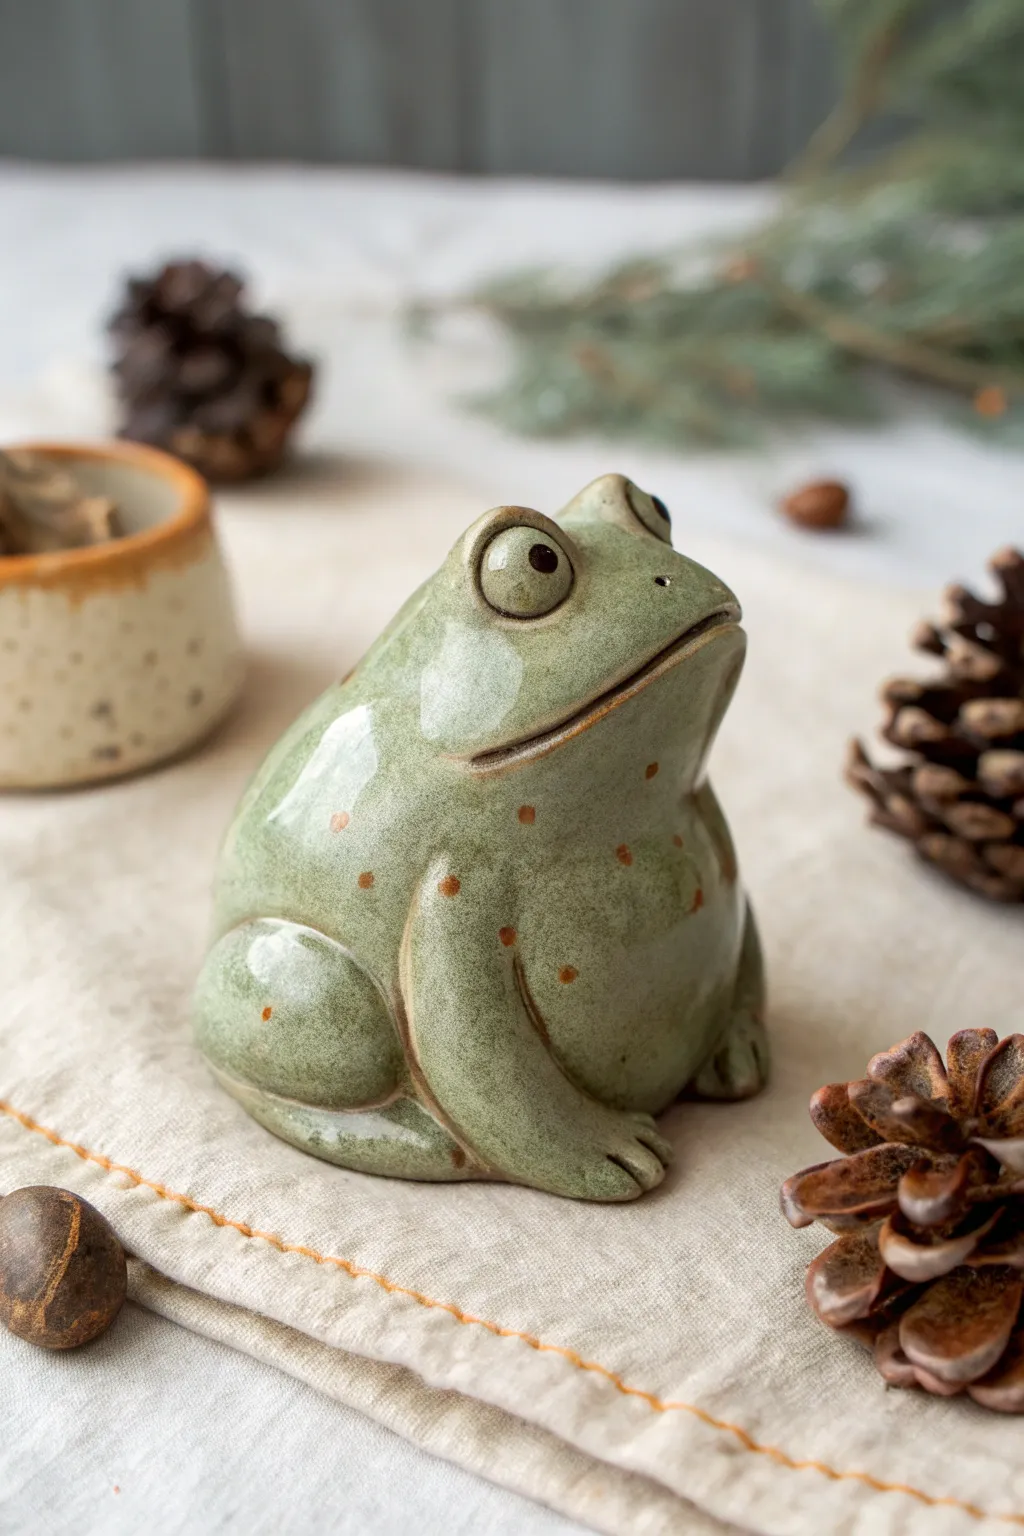
This project captures the quiet beauty of the forest floor, transforming a standard ceramic bisque frog into a piece of rustic art. With subtle glazes in muted olive tones and delicate clay-colored speckles, this frog looks perfectly at home nestled among pinecones and moss.
Step-by-Step Tutorial
Materials
- Ceramic frog bisque (greenware or fired bisque)
- Underglaze: muted olive green
- Underglaze: warm terracotta/clay brown
- Underglaze: dark burnt umber (for eyes/crevices)
- Clear matte glaze
- Medium soft shader brush
- Fine detail liner brush
- Small sea sponge or toothbrush (for speckling)
- Damp sponge for wiping
- Palette or tile for mixing
- Water container
Step 1: Base Preparation & Primary Coat
-
Clean the bisque:
Begin by wiping down your ceramic frog with a damp sponge. This removes any dust or oils from handling, ensuring the glaze adheres perfectly to the surface. -
Mix the olive tone:
If you don’t have a premixed muted olive, create a custom shade by mixing a standard leaf green with a touch of brown and a tiny drop of white to soften it. Aim for a natural, desaturated sage or olive color. -
Apply the first layer:
Using your medium shader brush, apply a smooth, even coat of the olive underglaze over the entire body of the frog. Brush in long strokes following the curves of the sculpture. -
Let it dry:
Allow this first coat to dry until it feels chalky to the touch. This usually takes about 10-15 minutes depending on the humidity. -
Build the opacity:
Apply a second and possibly third coat of the olive green. Layering is key here to get that rich, solid ceramic look without streaking. Make sure each layer is dry before adding the next. -
Reveal the high points:
Once the final green coat is dry, take a slightly damp, clean sponge and very gently wipe the highest points of the frog—the top of the head, the back, and the knee joints. This creates a natural highlight by thinning the paint slightly in those areas.
Natural Variation
Don’t aim for perfect uniformity. Allowing the brushstrokes to be slightly visible creates a hand-thrown pottery aesthetic that enhances the rustic vibe.
Step 2: Adding Depth & Details
-
Define the mouth:
Switch to your fine detail liner brush and load it with the warm terracotta brown. Carefully trace the line of the frog’s mouth. If the line gets too thick, you can clean it up with a damp brush. -
Shadow the crevices:
Using a very watered-down wash of the terracotta or a darker brown, paint into the deep creases where the legs meet the body. Gently wipe away the excess with a damp brush, leaving pigment only in the recessed lines. -
Paint the eyes:
Fill in the eye sockets with a creamy off-white or very pale green. Let this dry completely before moving to the next step. -
Add pupils:
Using the dark burnt umber and the tip of your liner brush or a dotting tool, place a solid dark circle in the center of the eye. I like to add a tiny white reflection dot once the dark paint is dry to bring the frog to life. -
Highlight the eyelids:
Mix a lighter version of your base olive green (add a bit more white) and carefully dry-brush the ridges around the eyes to make them pop.
Mossy Patina
Before the final clear glaze, sponge a tiny bit of watered-down dark green into the pitted textures to simulate moss growth in the frog’s skin.
Step 3: Texturing & Final Glaze
-
Create the speckles:
Pour a small amount of terracotta underglaze onto your palette. Dip a stiff toothbrush or a coarse sponge into the paint, then test it on paper first to ensure you aren’t holding too much liquid. -
Flick the paint:
Gently flick the bristles or dab the sponge randomly across the frog’s back and sides. Focus the speckles on the lower back and sides of the belly for an organic, earthy texture. -
Inspect the underside:
Flip the frog carefully and clear any glaze from the bottom foot pads. This is crucial so your piece doesn’t fuse to the kiln shelf during firing. -
Apply clear matte glaze:
Once all underglaze decoration is bone dry, apply two coats of a clear matte glaze. The matte finish is essential for replicating the soft, non-glossy woodland look seen in the photo. -
Fire the piece:
Fire the frog according to the specific cone requirements of your clay and glaze (typically Cone 04 or 06). Consult your local studio if you are unsure about temperature settings.
Your charming new friend is now ready to add a peaceful touch to your garden shelf or table display
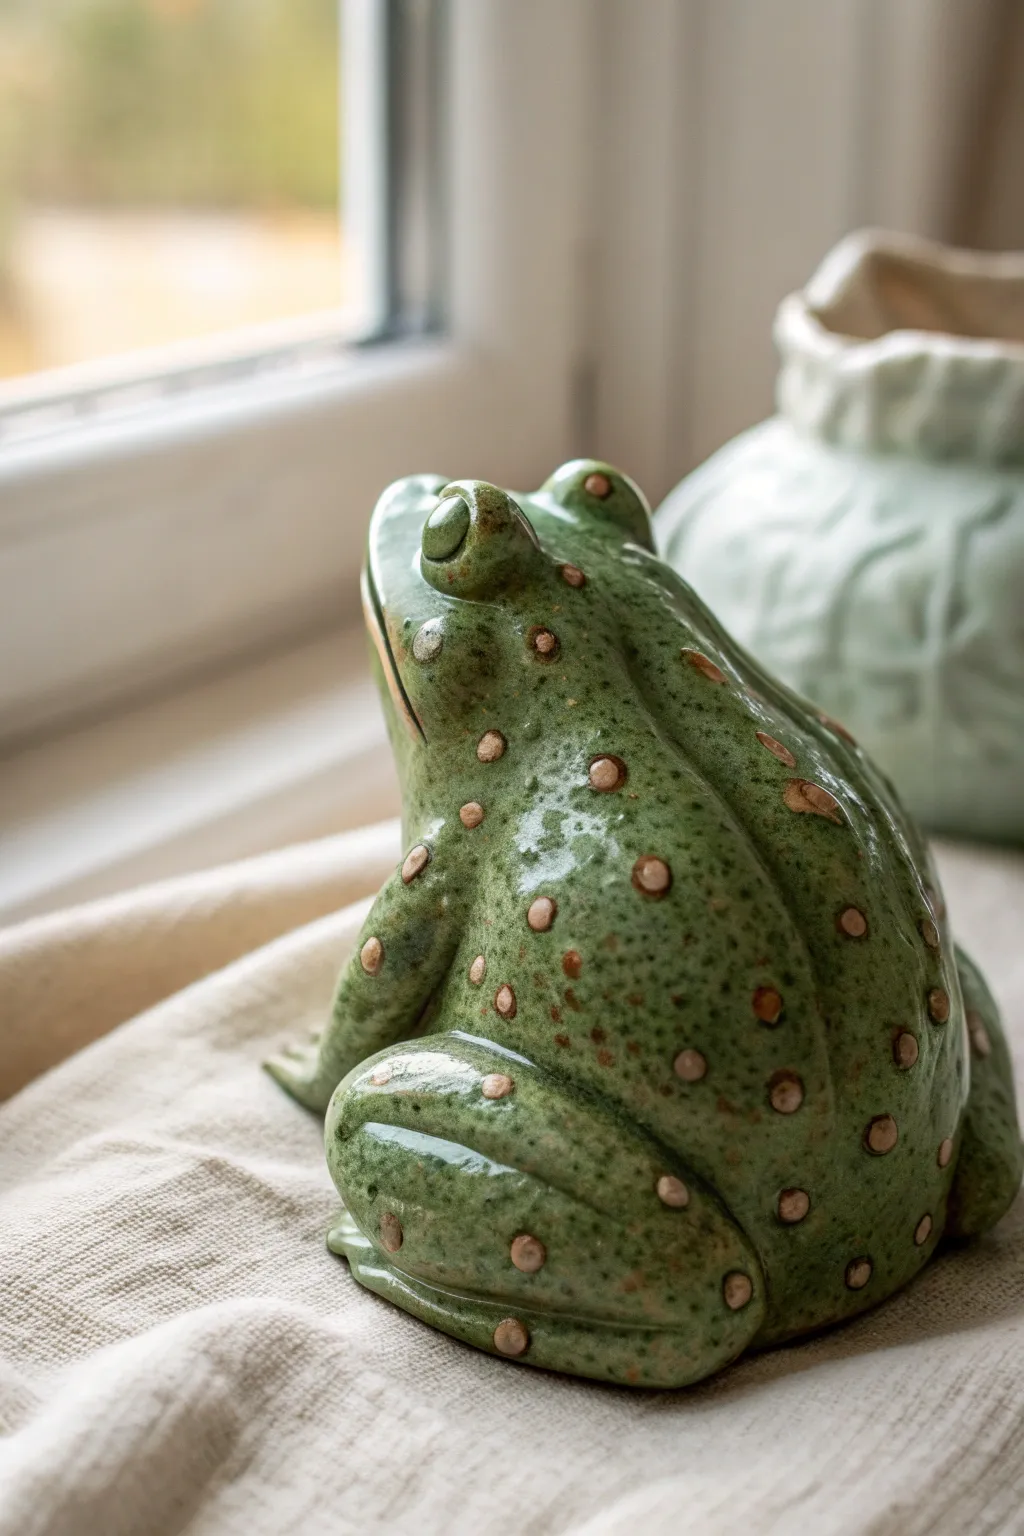
Polka-Dot Frog With Playful Contrast
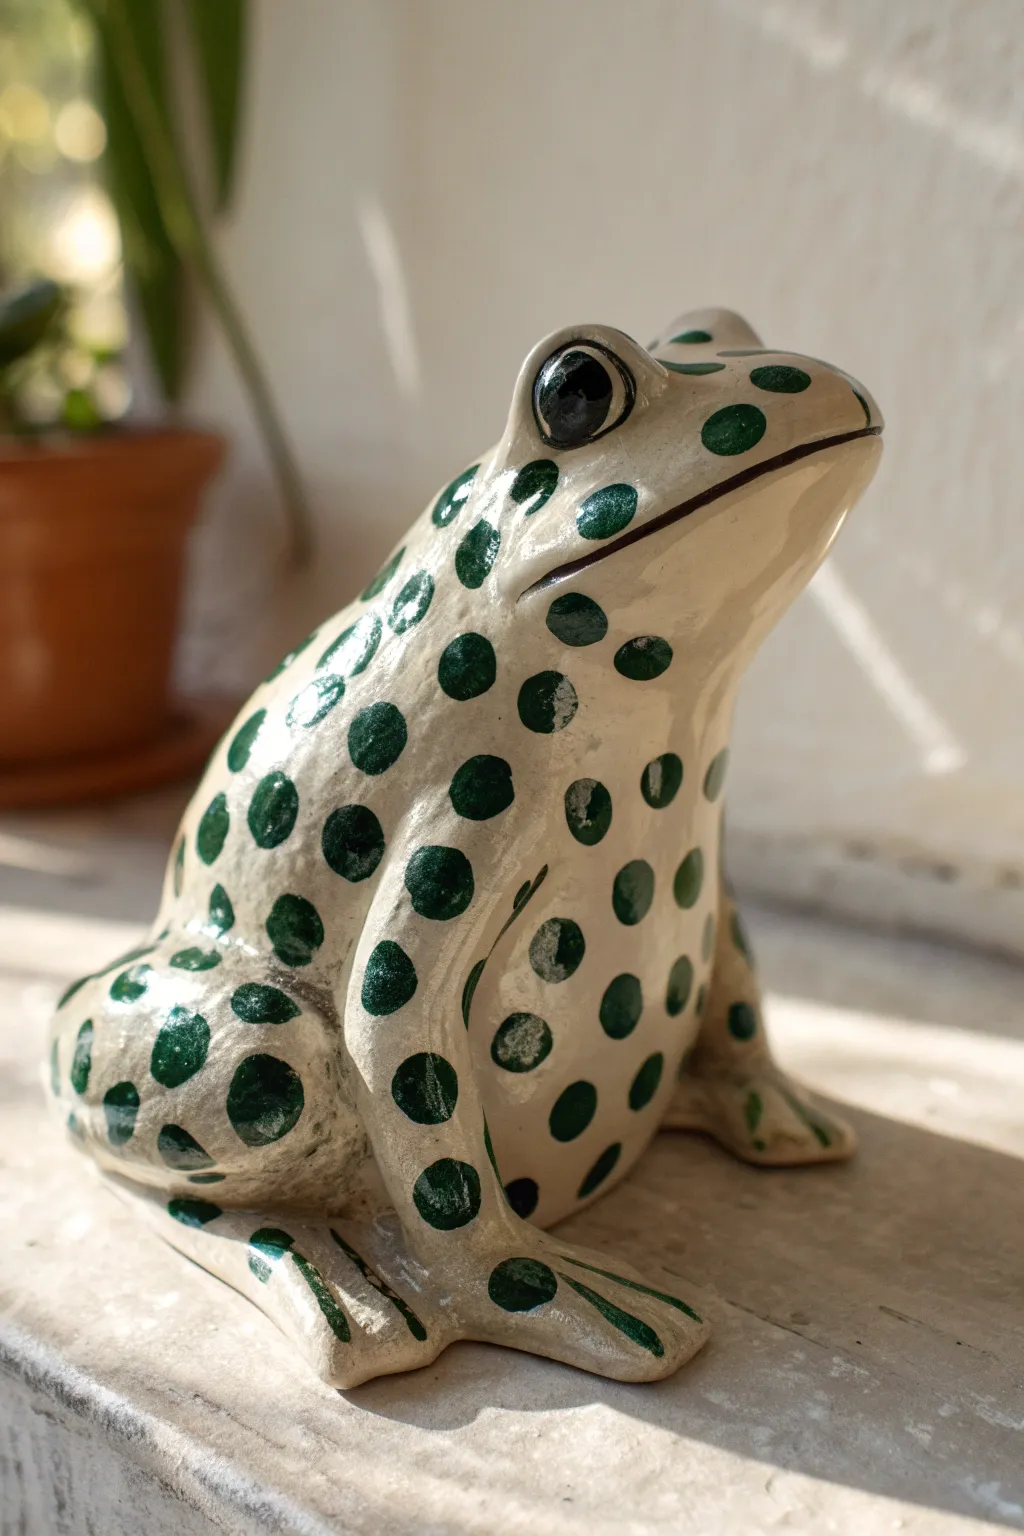
Bring a touch of playful charm to your garden or shelf with this delightful polka-dot ceramic frog. The contrast between the creamy off-white base and the deep forest green spots creates a vintage-inspired look that feels both classic and fresh.
How-To Guide
Materials
- Bisque ceramic frog figurine (smooth finish)
- Acrylic paints (Cream/Off-White, Forest Green, Black, White)
- High-gloss polyurethane varnish or clear glaze
- Medium flat brush (size 6-8)
- Small round brush (size 2-3)
- Detail liner brush (size 0 or 00)
- circular foam pouncer (small size) or pencil eraser
- Palette or paper plate
- Water cup and paper towels
Step 1: Base Preparation
-
Clean the surface:
Before you begin painting, ensure your ceramic frog bisque is completely free of dust. Wipe it down firmly with a slightly damp paper towel or sponge. Let it air dry for about 10 minutes to ensure no moisture is trapped in the porous material. -
Mix the base color:
Create a warm, creamy base tone. If you don’t have a pre-mixed antique white, mix a large amount of white acrylic with just a tiny drop of yellow ochre or light brown. You want a color that looks like aged ivory, not stark bright white. -
Apply the first coat:
Using your medium flat brush, apply an even coat of the cream paint over the entire frog. Brush in consistent strokes following the contours of the frog’s body. Don’t worry if it looks a bit streaky initially; acrylics often need layers. -
Layer for opacity:
Allow the first coat to dry to the touch (usually 15-20 minutes). Apply a second coat, possibly painting in the opposite direction (cross-hatching) to eliminate brush marks and ensure full coverage. I find a third thin coat is often necessary for light colors to be fully opaque.
Stamp for Uniformity
Struggling with hand-painting circles? Use the eraser end of a standard pencil as a stamp. Dip it in green paint and press onto the frog for perfectly uniform polka dots every time.
Step 2: Dotting the Pattern
-
Prepare the green paint:
Pour out a small amount of deep forest green paint. Ensure it has a fluid consistency—if it’s too thick, the dots will have raised ridges. Add a drop of water if needed to make it flow like heavy cream. -
Start on the back:
Using a small round brush (or a foam pouncer if you want perfect circles), begin placing dots along the center of the frog’s back. The dots in the reference image are imperfect and hand-painted, which adds character, so don’t stress about mechanical precision. -
Vary the spacing:
Continue adding green dots down the sides and legs. Notice how the spots follow the curve of the body. Leave generous cream space between them so the pattern doesn’t look cluttered. -
Paint partial dots:
Where the legs fold against the body or near the bottom edge, paint ‘half dots’ or partial circles. This creates the illusion that the pattern wraps naturally around the form rather than just sitting on top. -
Detail the toes:
Switch to your smaller detail brush. Instead of full dots, paint elongated green stripes or smaller dashes along the ridges of the toes and feet to accentuate the frog’s anatomy. -
Check for consistency:
Step back and look at the frog from a distance. If any areas look too empty, add a small dot. If some green spots look thin, carefully dab a second layer of green over them once the first is dry.
Make it Weatherproof
If this frog will live in your garden, skip standard varnish. Use a spray-on UV-resistant clear coat or a marine-grade spar urethane to protect the paint from sun and rain damage.
Step 3: Facial Features & Finishing
-
Outline the mouth:
Using the liner brush and black paint (or a very dark mix of green and black), carefully trace the indented line of the mouth. Use a steady hand and very light pressure to keep the line thin and crisp. -
Base the eyes:
Fill in the large protruding eye sockets with solid black paint. Use the small round brush for this, being careful not to get black on the cream eyelids. -
Add eye definition:
Once the black is dry, you can add a very thin ring of the Forest Green around the outer edge of the black pupil if you want extra depth, or simply leave it distinct against the cream skin. -
Create the reflection:
This is the most crucial step for life-like eyes. Dip the handle end of a paintbrush into pure white paint. Dot a single, crisp white highlight onto the upper right side of each black eye pupil. This ‘catchlight’ brings the frog to life. -
Let it cure:
Allow the entire painted piece to dry for at least 24 hours. The paint needs to be fully cured before sealing to prevent smudging or cloudiness. -
Apply the gloss:
To achieve the ceramic look shown in the photo, apply a high-gloss polyurethane varnish. Use a soft, clean brush and apply in long, smooth strokes. Watch out for pooling in the crevices between the legs.
Place your shiny new amphibian friend in a sunny spot near a potted plant to enjoy its cheerful expression


Floral Pattern Frog With Folk-Art Energy
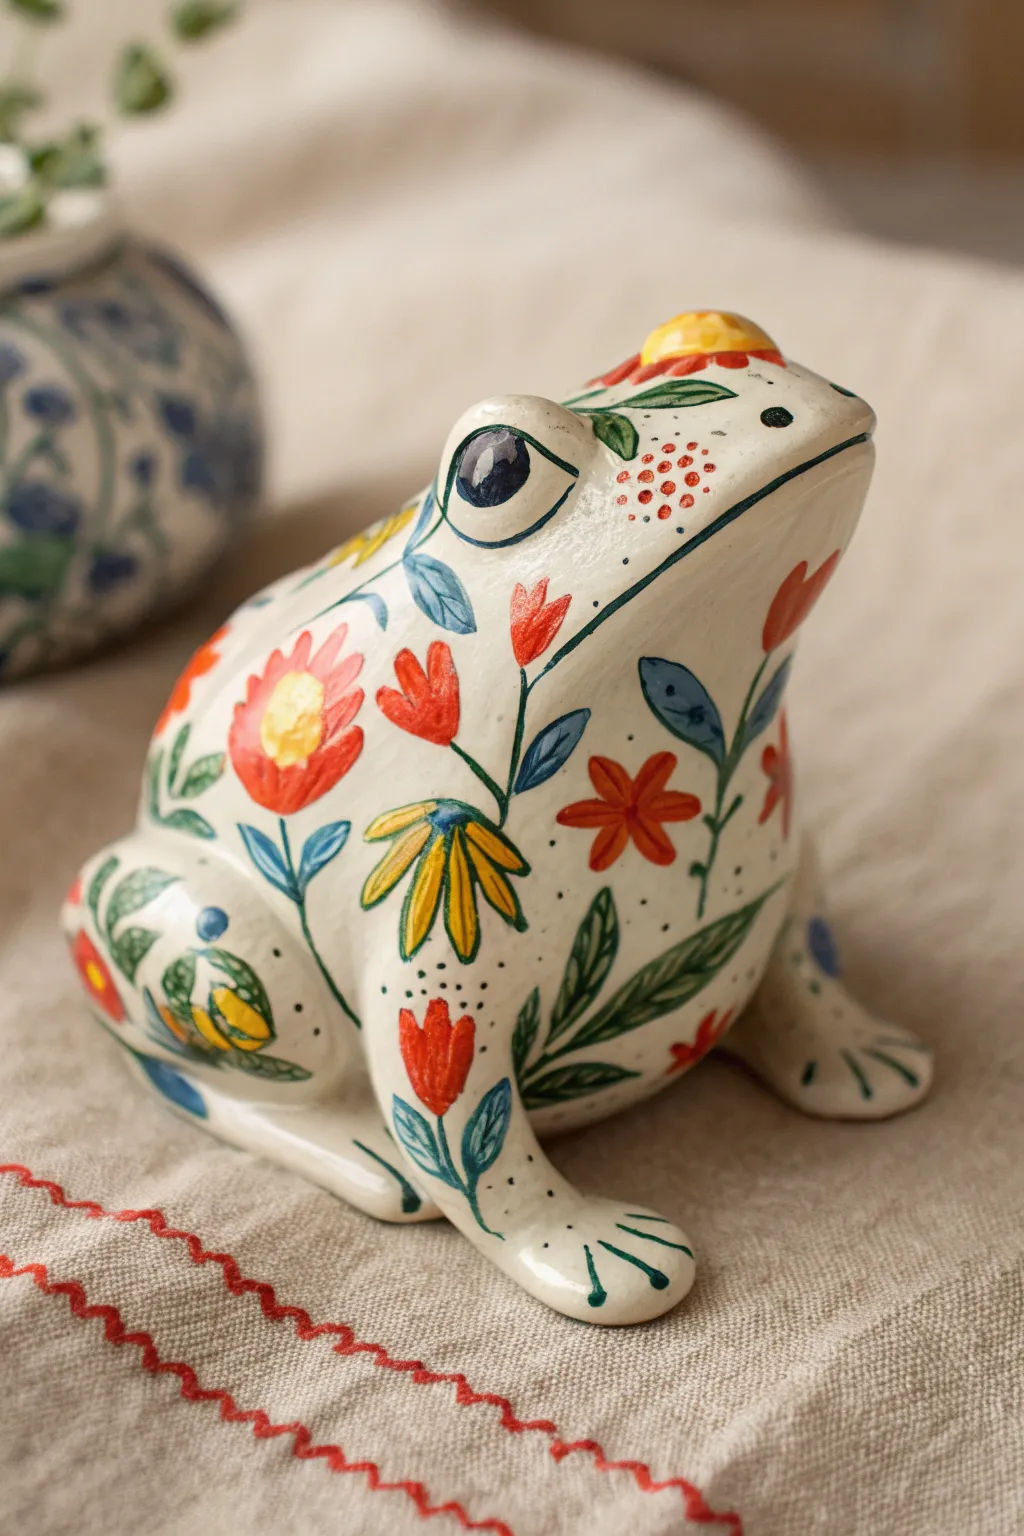
Bring a touch of cottagecore charm to your space with this hand-painted ceramic frog featuring vibrant, folk-art inspired florals. The creamy white base allows the red, yellow, and blue wildflowers to pop, creating a joyful centerpiece that feels both rustic and refined.
Step-by-Step
Materials
- Bisque ceramic frog figurine (smooth finish)
- Acrylic paints (Creamy White/Eggshell, bright Red, deep Yellow, Navy Blue, Forest Green/Leaf Green, Black)
- High-gloss varnish or glaze (brush-on)
- Round brushes (sizes 2, 4, and 0 for details)
- Pencil for sketching
- Palette for mixing
- Water cup and paper towels
Step 1: Base Coat & Outlining
-
Preparation:
Wipe down your bisque frog with a slightly damp sponge to remove any dust or ceramic powder. Let it dry completely for a few minutes before starting. -
Apply the base color:
Using a larger brush, coat the entire frog in a creamy white or eggshell acrylic paint. Apply two to three thin coats rather than one thick one to avoid brushstrokes, allowing about 15 minutes of drying time between layers. -
Sketch the design:
Once the base coat is fully dry to the touch, lightly sketch your floral placement with a pencil. Focus on placing the larger flowers on the back and legs first, connecting them with vine-like stems later. -
Map the stems:
Draw the curving lines for the stems. Let them follow the natural contours of the frog’s body, like up the curve of the back and wrapping around the thigh.
Fixing Wobbly Lines
If your stems look shaky, wait for the green to dry. Then, use the cream base color to ‘cut in’ along the edges, refining the line width from the outside.
Step 2: Painting the Florals
-
Start with the main red flowers:
Load a size 4 round brush with bright red paint. Fill in the tulip-shaped blooms and the larger round flowers on the back and chest. Use simple, bold strokes to keep that folk-art feel. -
Add yellow centers and petals:
Paint the centers of the open flowers with deep yellow. Extend yellow petals downward for the drooping flower on the side, creating a two-tone effect if desired. -
Paint the greenery:
Switch to your forest green paint. Using a size 2 brush, carefully trace over your pencil lines for the stems. Add leaf shapes attached to the stems, varying them between simple ovals and more detailed, vein-filled leaves. -
Incorporate blue accents:
Use navy blue to add smaller leaves or buds for contrast. This cool tone balances the warmth of the red and yellow. -
Detail the eye:
Paint the large pupil of the eye using navy blue or black. Leave a small white highlight dot near the top, or paint it in later if you accidentally cover it. -
Add the eye outline:
Circle the eye with a thin line of green or blue to define the eyelid area.
Step 3: Details & Finishing Touches
-
Create texture with dots:
Dip the handle end of a small brush into red paint. Dot small clusters near the face and neck area to mimic freckles or pollen. Repeat this with black paint for the tiny specks on the body. -
Add floral details:
Using your smallest size 0 detailing brush, add tiny lines inside the yellow flower centers and fine veins on the green leaves. -
Refine the mouth and nose:
Paint a thin, dark line for the mouth slit and two small dots for the nostrils. -
Clean up edges:
I find it helpful to look over the whole piece now; if any red or green smeared onto the white background, touch it up with your base cream color. -
Initial drying:
Let the painted frog sit for at least an hour (or according to your paint brand’s instructions) to ensure no moisture is trapped. -
Varnishing:
Apply a coat of high-gloss varnish. This mimics the look of fired glazed ceramic and protects your painting. Brush it on smoothly in one direction. -
Final cure:
Allow the varnish to cure fully overnight before handling or displaying your new amphibian friend.
Getting Folk Style
Don’t overblend colors! Folk art relies on distinct blocks of color. Let the brushstrokes show slightly to enhance the hand-painted, rustic aesthetic.
Now you have a charming, glossy frog that looks like a vintage ceramic treasure ready to brighten your shelf
Geometric Frog With Modern Color Blocking
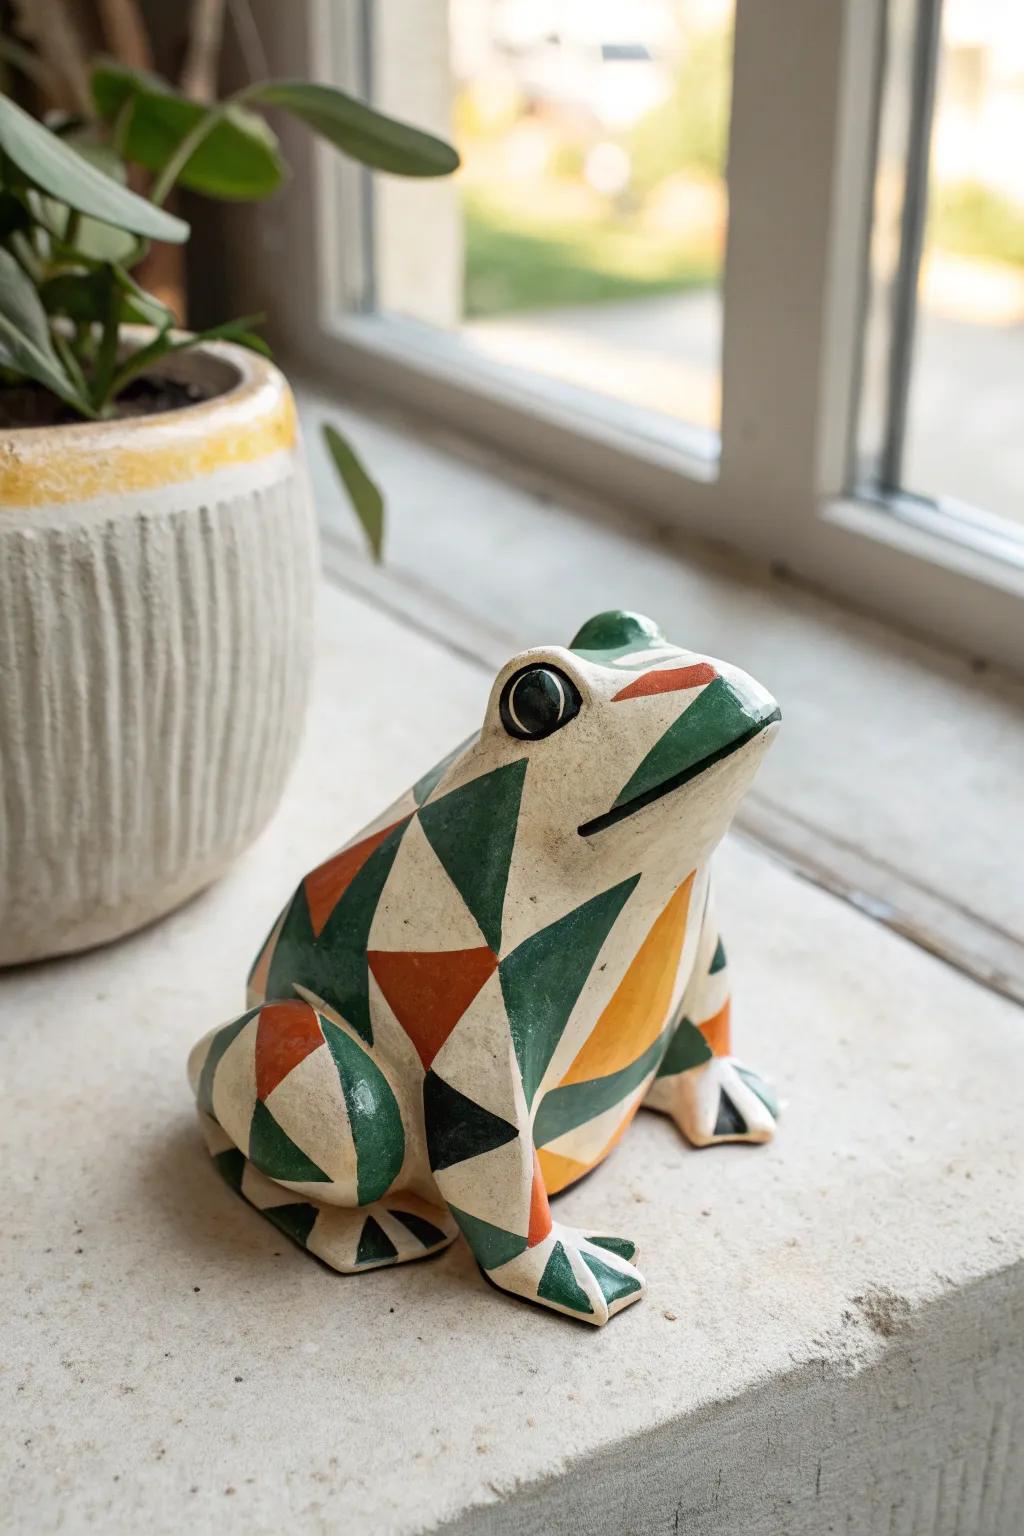
Transform a plain ceramic frog into a sophisticated piece of decor using a geometric triangle pattern. This design combines the charm of nature with modern color blocking, featuring earthy greens, burnt orange, and mustard yellow against a creamy white background.
Step-by-Step Guide
Materials
- Unpainted bisque ceramic frog figurine
- Acrylic paints (Cream/Off-White, Forest Green, Burnt Orange, Mustard Yellow, Black)
- Pencil for sketching
- Fine liner paintbrush (size 0 or 00)
- Small flat paintbrush (size 2 or 4)
- Medium flat paintbrush (for base coat)
- Palette or paper plate
- Clear acrylic sealant (matte or satin finish)
- Water cup and paper towels
Step 1: Preparation and Base Coat
-
Clean surface:
Begin by wiping down your ceramic frog with a slightly damp paper towel to remove any dust or ceramic powder. Let it dry completely. -
Apply base color:
Using your medium flat brush, apply an even coat of Cream or Off-White paint over the entire frog. This creates a neutral canvas for the geometric pattern. -
Second coat:
Once the first layer is touch-dry (usually about 15 minutes), apply a second coat of the cream paint to ensure full coverage and opacity. Don’t forget the underside and the little crevices around the legs. -
Full dry:
Allow the base coat to cure fully for at least an hour before moving on to sketching, so your pencil doesn’t dig into soft paint.
Step 2: Drafting the Pattern
-
Plan heavy areas:
Using a pencil, lightly lightly sketch the outline of where your geometric clusters will go. Notice on the reference image how the pattern is denser on the back and legs, but sparse on the chest and face. -
Draw the triangles:
Begin sketching interconnected triangles within your planned areas. Vary the sizes slightly—some large, some small—to create visual interest. -
Connect the shapes:
Draw the triangles so they share edges or points with neighboring shapes, creating a mosaic effect. Leave small channels of negative space (the cream base) between some clusters. -
Wrap the curves:
Pay special attention to the legs and rounded back. Draw your triangles slightly curved to follow the contour of the frog’s body, which helps the pattern look natural rather than flat.
Clean Lines Hack
If you struggle with shaky hands, try using a specialized painting tape or thin strips of washi tape to mask off the triangles before painting for razor-sharp geometric edges.
Step 3: Painting the Design
-
Start with Forest Green:
Load your small flat brush with Forest Green. Paint the largest triangles first, scattering them evenly across the design so the color is balanced. -
Add Burnt Orange:
Rinse your brush thoroughly. Fill in about a third of the remaining triangles with Burnt Orange. I find it helpful to place these adjacent to green triangles for high contrast. -
Fill with Mustard Yellow:
Paint most of the remaining empty triangles with Mustard Yellow. Use this color sparingly compared to the green to keep the earthy tone grounded. -
Refine edges:
Switch to your fine liner brush (size 0) to crisp up the edges of your triangles. The lines should be sharp and straight against the cream background. -
Add black accents:
Select a few very small, strategic triangles—particularly near the center of the back and on the legs—and paint them Black. This adds depth and anchors the lighter colors.
Texture Twist
Mix a tiny amount of baking soda into your base cream paint before applying it. This creates a gritty, stone-like texture that makes the ceramic look more rustic and aged.
Step 4: Details and Finishing
-
Paint the eyes:
Use the fine liner brush and black paint to carefully fill in the eyes. Leave a tiny dot of the underlying cream paint (or add a dot of white later) for a reflection highlight. -
Define the mouth:
Paint a thin, sweeping black line to define the frog’s mouth. Keep the line steady and smooth. -
Checking opacity:
Look closely at your colored triangles. If the brush strokes look streaky, carefully apply a second coat to those specific shapes for a solid, opaque look. -
Erase guidelines:
Once the paint is absolutely bone-dry (wait several hours), gently erase any visible pencil marks that are showing in the cream gaps between triangles. -
Seal the piece:
Apply a coat of clear acrylic sealant. A matte or satin finish works best to maintain the modern, ceramic feel without making it look like plastic.
Now you have a stylish, geometrically patterned frog that adds a perfect touch of artistry to your windowsill or bookshelf
Galaxy Frog With Starry Night Speckles
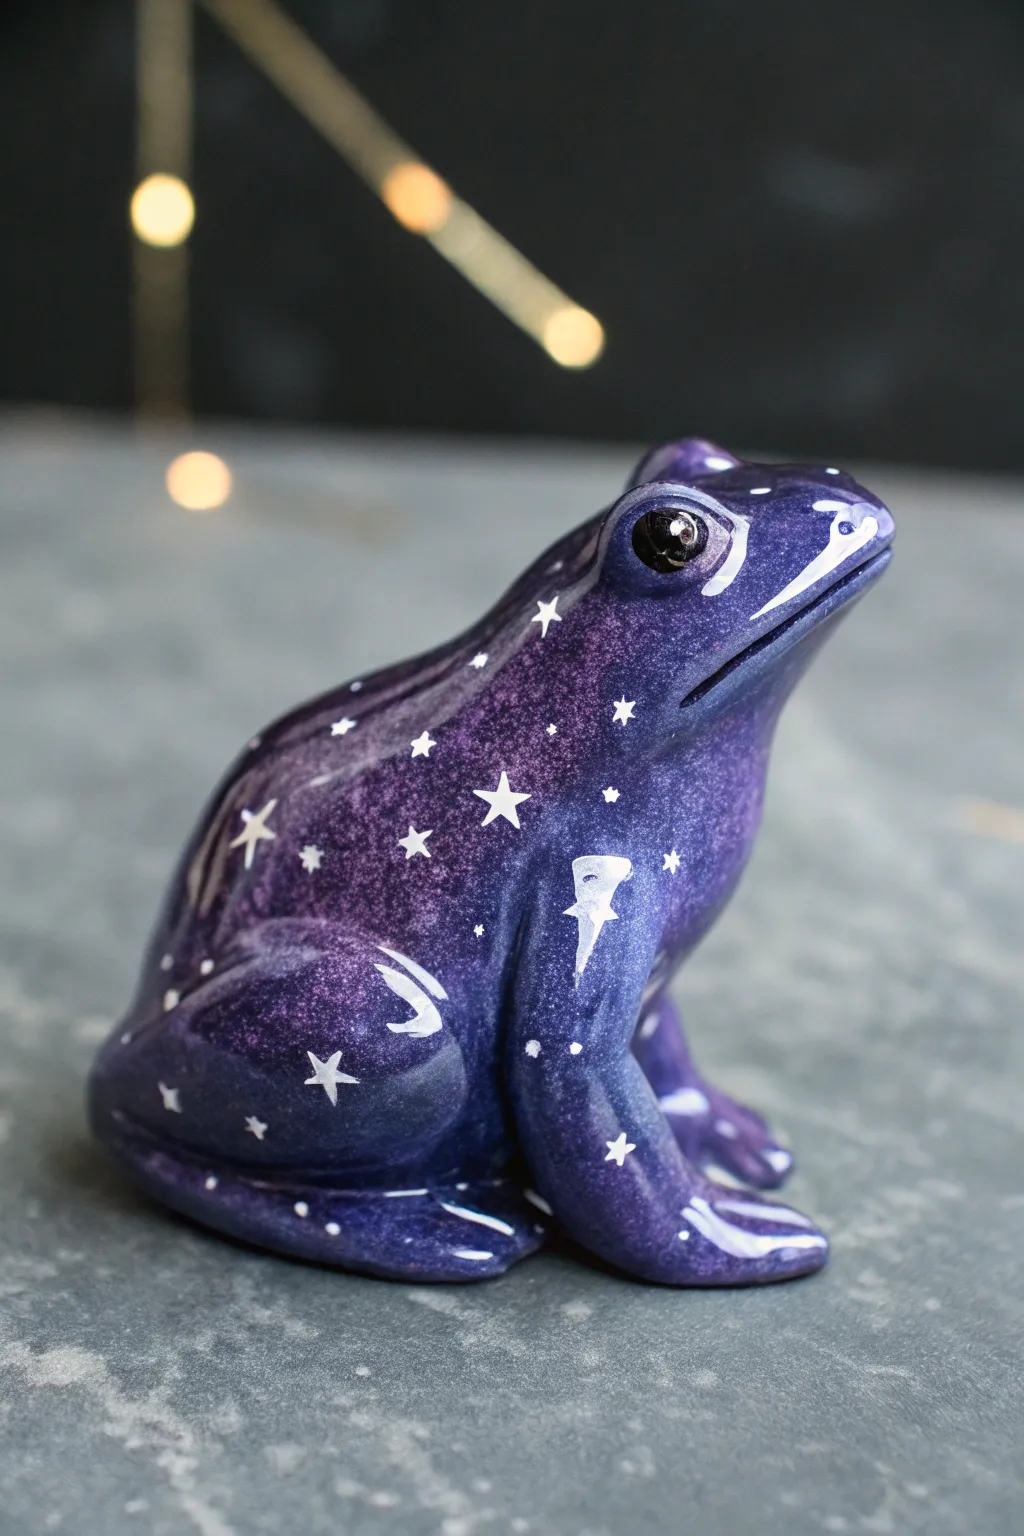
Transform a plain ceramic frog into a celestial masterpiece with this deep purple galaxy design. Featuring delicate white stars and a glossy finish, this piece brings a touch of the night sky into your home decor.
Step-by-Step
Materials
- Bisque ceramic frog figurine
- Deep violet or eggplant purple acrylic paint
- Black acrylic paint
- Titanium white acrylic paint
- High-gloss varnish or glaze (brush-on or spray)
- Medium flat brush
- Fine detail liner brush (size 00 or 000)
- Small piece of sea sponge or cosmetic sponge
- Water cup and palette
- Paper towels
Step 1: Base Coat Preparation
-
Clean surface:
Begin by wiping down your ceramic frog with a slightly damp paper towel to remove any dust or bisque debris. Let it dry completely. -
Mix base color:
On your palette, mix your deep violet paint with a tiny drop of black. You want a rich, dark aubergine shade that mimics the deep background of space. -
Apply first coat:
Using the flat brush, cover the entire frog in this dark purple mixture. Brush in smooth strokes following the curve of the frog’s body. -
Dry and repeat:
Allow the first layer to dry for about 15-20 minutes. Apply a second coat to ensure solid, opaque coverage without any streaks showing the ceramic underneath.
Starry Splatter
For a natural starry dust look, dip an old toothbrush in thinned white paint and flick the bristles with your thumb over the frog to create tiny, random speckles.
Step 2: Creating the Galaxy Texture
-
Sponge texture:
Dip a small corner of your sponge into slightly lighter purple paint (the violet without the black added). Blot off most of the paint on a paper towel until almost dry. -
Dab nebulae:
Gently dab this sponge sporadically over the frog’s back and legs. This creates a subtle mottling effect that adds depth, rather than a flat color. -
Darken the shadows:
Clean your flat brush and pick up a small amount of pure black paint. Carefully paint along creases, under the legs, and deep in the eye sockets to define the anatomy.
Iridescent Magic
Mix a small amount of iridescent medium or fine glitter into your gloss varnish topcoat. This will make the galaxy shimmer subtly when the light hits it.
Step 3: Painting the Constellations
-
Prep liner brush:
Switch to your fine detail liner brush. Thin down a bit of titanium white paint with water until it has an ink-like consistency. -
Paint large stars:
Paint a few prominent five-pointed stars on the flattest areas of the back. Start with a simple cross, then add the diagonal points. -
Add a moon:
Near the hip or shoulder area, paint a small crescent moon shape. Two curved strokes meeting at points is the easiest way to achieve this. -
Add tiny stars:
Using the very tip of the brush, dot tiny stars throughout the purple areas. Vary the pressure to create different sizes of dots. -
Create starbursts:
Select a few of your larger white dots and gently pull four tiny lines outward from the center (north, south, east, west) to create twinkling starbursts. -
Cluster the stars:
Group some tiny dots closer together to mimic the look of the Milky Way, leaving other areas sparse for contrast.
Step 4: Defining Features
-
Paint the eyes:
Paint the eyeballs solid glossy black. I find it helps to use a fresh, clean brush for this to keep the edges crisp against the purple skin. -
Eye reflection:
Once the black eye paint is dry, add a tiny white reflection dot in the upper corner of each eye to bring the frog to life. -
Highlight the mouth:
Run a very thin line of diluted black paint along the mouth seam to separate the lips visually.
Step 5: Finishing Touches
-
Final dry time:
Let all paint dry completely for at least one hour. The thickest white stars need to be totally set before varnishing. -
Varnishing:
Apply a coat of high-gloss varnish over the entire piece. This step is crucial as it mimics the wet look of an amphibian and deepens the galaxy colors. -
Check for gaps:
Inspect the frog for any missed spots in the varnish, especially around the toes and underbelly. Add a second thin coat if needed for extra shine.
Place your finished cosmic frog near a light source to show off that beautiful glossy sheen and starry detail
Mushroom-Cottage Frog With Tiny Details
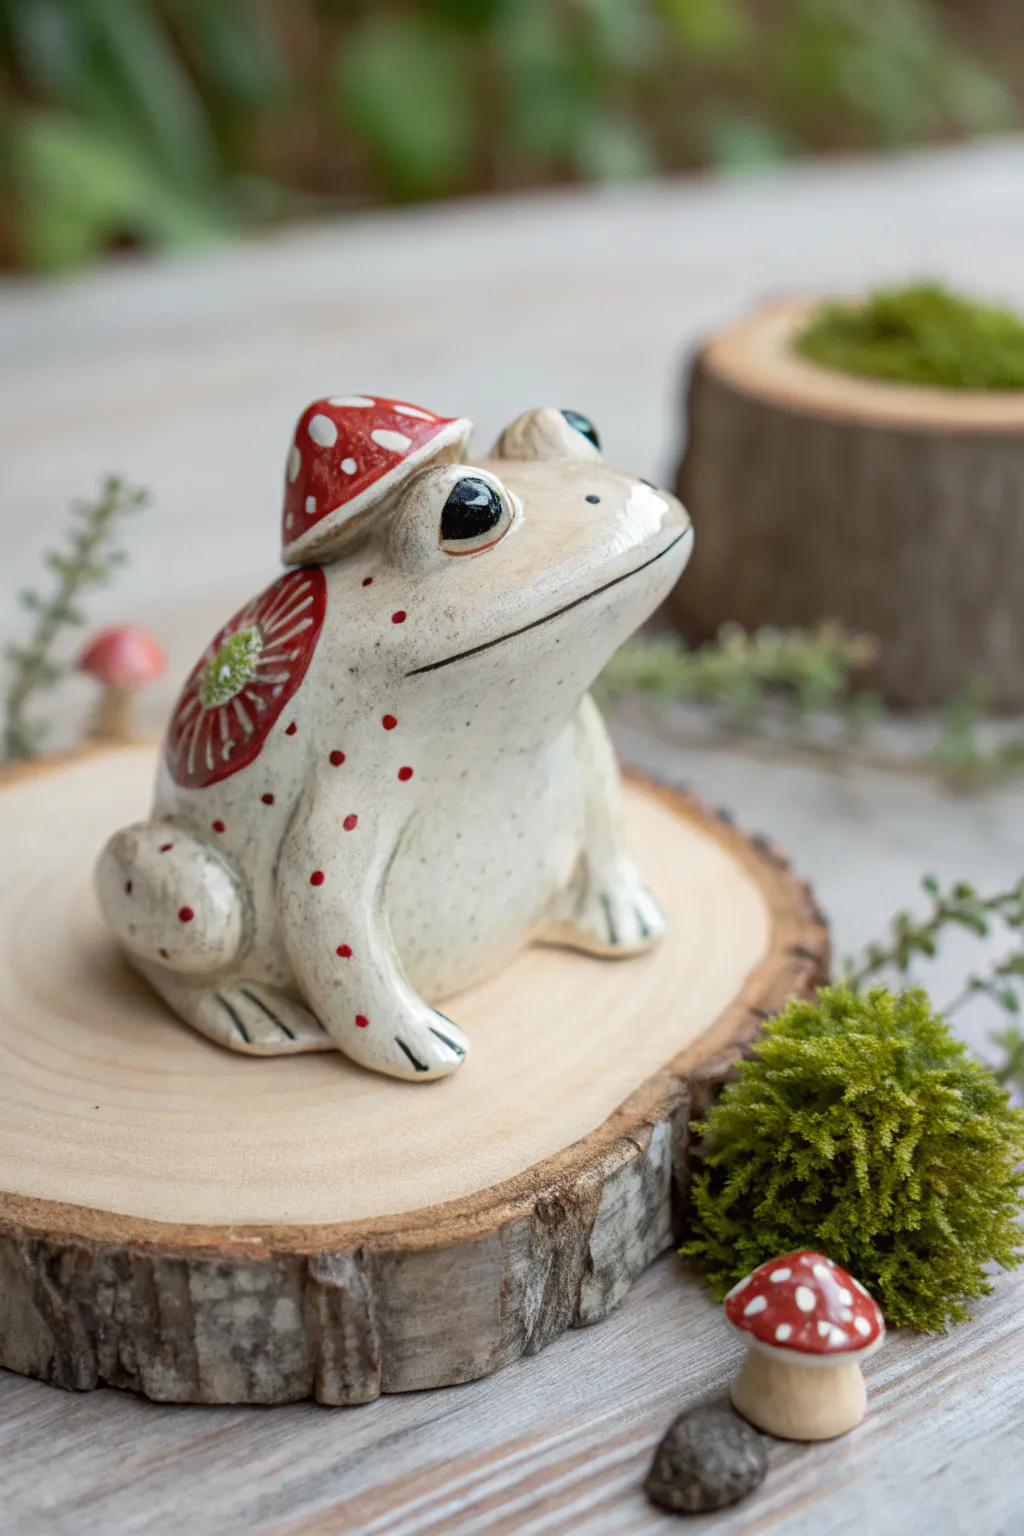
Transform a simple ceramic frog bisque into an enchanted forest dweller with this charming design. Featuring a distinct red amanita mushroom cap and delicate spore-patterned back details, this project combines glossy accents with a natural, speckled stoneware finish.
How-To Guide
Materials
- Unpainted ceramic frog bisque (smooth finish)
- Underglaze (Cream/Off-White for body)
- Underglaze (Bright Red for mushroom elements)
- Underglaze (Sage Green for moss details)
- Underglaze (Black for eyes and pupils)
- Detail brushes (liner, round size 0 and 2)
- Old toothbrush (for speckling)
- Palette or small dishes
- Clear dipping glaze or brush-on gloss glaze
- Sponge and water
- High-grit sandpaper (optional for rough spots)
Step 1: Preparation & Base Coat
-
Clean the bisque:
Begin by wiping down your ceramic frog with a damp sponge. This is crucial as it removes any kiln dust or oils from your hands that might repel the glaze, ensuring a smooth application. -
Sand imperfections:
Check for any sharp seams or rough bumps on the ceramic body. Gently sand these down now, then wipe again with a damp sponge to remove the dust. -
Apply the body color:
Load a medium round brush with your cream or off-white underglaze. Apply 2-3 even coats to the entire frog, avoiding the eyes and the specific mushroom areas if you have a steady hand, though painting over them is fine since the red will cover the cream easily. -
Create the speckled texture:
To mimic the natural stone look seen in the photo, dilute a tiny drop of brown or dark grey underglaze with water. Dip an old toothbrush into this mixture, run your thumb across the bristles, and gently splatter fine speckles over the cream body. Test on paper first to control the spray.
Step 2: Painting the Mushroom Cap
-
Outline the cap:
Using a small brush, carefully outline the raised ‘hat’ area on the frog’s head. If your bisque doesn’t have a sculpted hat, you can paint a curved semi-circle shape on top of the head to simulate one. -
Fill in the red:
Fill the mushroom cap and the round patch on the frog’s back with bright red underglaze. Depending on the opacity of your paint, apply 3 coats, letting each dry until it’s chalky before adding the next. -
Add white spots:
Once the red is completely dry, use the handle end of a paintbrush dipped in white underglaze to dot perfectly round spots onto the red hat. Vary the sizes slightly for a natural look. -
Detail the back patch:
For the mushroom detail on the back, paint fine white lines radiating from the center outward on top of the red circle. In the very center, dab a small amount of sage green and texture it with a needle tool or dry brush to look like a fuzzy moss center.
Spot Surgeon
Mess up a white dot on the mushroom cap? Don’t panic. Let it dry completely, then gently scratch the white circle off with a toothpick to reveal the red layer beneath.
Step 3: Facial Features & Body Details
-
Paint the eyes:
Using your smallest liner brush, paint the entire eye socket black. Make it deep and glossy. Once the black is dry, add a tiny white reflection dot near the top right of each pupil to bring the frog to life. -
Define the mouth:
Mix a very thin wash of black or dark brown. Run your liner brush along the mouth crease. It should be subtle, just enough to emphasize the frog’s smile. -
Add body spots:
Switch back to your red underglaze. Using a fine point brush, add tiny, random red polka dots scattered across the frog’s back and legs, clustering them slightly near the legs and back patch. -
Highlight the toes:
Add definition to the toes by painting very thin, short lines between the webbing using a dark grey or black wash.
Forest Floor Base
Before glazing, glue a small circle of felt to the bottom after firing, or during the display phase, sit him on a wood slice with preserved moss to complete the cottagecore aesthetic.
Step 4: Finishing Touches
-
Check your work:
Look over the piece for any stray smudges. If you find a spot of red on the cream body, you can usually scrape it off gently with a crafting knife or stiff brush. -
Apply clear glaze:
Once all underglaze is bone dry, apply a coat of clear brush-on glaze or dip the piece into clear dipping glaze. This will seal the paint and make the colors pop after firing. -
Kiln firing:
Fire the piece according to the clay and glaze specifications (usually cone 06 or 04 for earthenware). If you are painting at a pottery cafe, hand it over to the staff for this step.
Place your finished glossy friend on a windowsill or garden shelf to add a touch of fairytale magic to your home
Koi Pond Frog With Water-Inspired Swirls
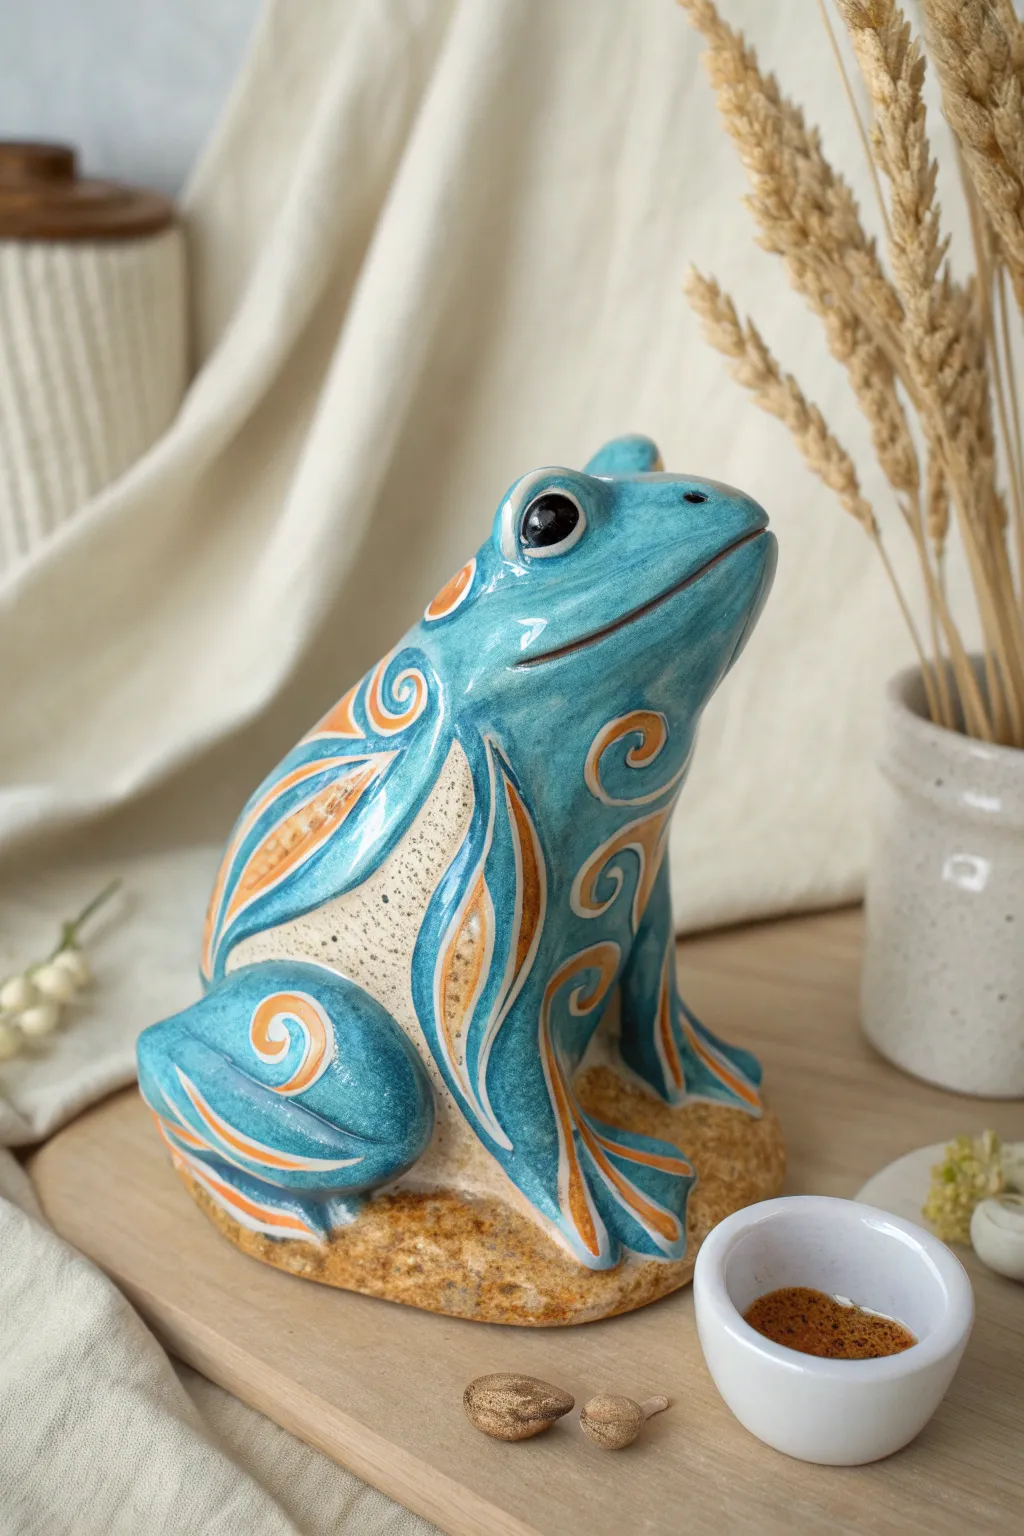
Transform a plain ceramic bisque frog into a stunning decorative piece with this stylized design featuring bold teal glazes and water-inspired swirls. The contrast between the glossy blue body, the warm orange accents, and the raw speckled clay creates a sophisticated, folk-art aesthetic perfect for any shelf.
Step-by-Step Tutorial
Materials
- Ceramic bisque frog figurine (smooth surface)
- Underglaze or acrylic paints: Teal/Turquoise, Tangerine Orange, Cream/Beige, White, Black
- Speckled tan paint (or toothbrush for splattering)
- Detail brushes (liner brush, size 0 or 1 round)
- Medium flat brush for base coats
- Gloss varnish or clear glaze (if using acrylics)
- Palette for mixing
- Water cup and paper towels
- Pencil for sketching pattern
Step 1: Base Preparation
-
Clean surface:
Begin by wiping down your ceramic frog with a damp sponge to remove any dust or bisque firing debris. This ensures your paint adheres smoothly. -
Apply speckled base:
Mix a warm cream or beige color. Paint the entire belly area, the lower sides, and the base (the rock the frog sits on). Let this dry completely. -
Create texture:
To mimic the speckled clay look seen in the photo, dip an old toothbrush into diluted brown or tan paint. Run your thumb over the bristles to flick tiny speckles onto the beige areas you just painted. I like to practice on a paper towel first to control the spray. -
Paint the rock base:
While the speckles dry on the body, paint the rock base with a textured golden-brown or sandy color. Stipple the paint on with an old brush to create a rough, stone-like texture.
Shaky Hands?
If you struggle painting swirls freehand, draw them lightly with a pencil first. Or, use a white paint pen instead of a brush for steadier, cleaner lines.
Step 2: Blocking Colors
-
Sketch the design:
Lightly sketch the outlines of the teal areas on the frog’s back and legs using a pencil. Note the sweeping curves where the blue meets the beige belly. -
Apply the teal body:
Using your teal or turquoise paint, fill in the upper body, head, and legs. Paint carefully around the beige ‘negative space’ areas on the flanks. You may need two coats for a rich, opaque color. -
Refine the edges:
Go back with a small brush to sharpen the lines where the teal meets the beige. Smooth, confident curves are key to this style. -
Paint the orange patches:
Identify the teardrop shapes within the design (on the back and legs). Fill these with a bright tangerine orange. Leave a small gap between the orange and the teal for now.
Embrace Metallic
Replace the tangerine orange paint with a metallic copper or gold. The metallic shine against the teal creates a luxurious, high-end pottery finish.
Step 3: Detailing & Line Work
-
White outlining:
This is the most crucial step for the stylized look. Using a fine liner brush and white paint (thinned slightly with water for better flow), outline the orange shapes. -
Create the swirls:
Paint the decorative swirls within the teal sections. Notice the spirals on the shoulder and hip—start from the center of the spiral and pull the brush outward. -
Accentuate the legs:
Add sweeping white curved lines along the legs to emphasize the frog’s musculature and movement. -
Define the mouth:
Paint a thin, dark line (dark brown or black) along the mouth crease to give the frog expression. -
Paint the eyes:
Fill the eye sockets with solid black. Once dry, add a small white dot near the top of the black circle to create a lively reflection or ‘catchlight’.
Step 4: Finishing Touches
-
Clean up lines:
Check your white outlines. If any lines look shaky, use a clean damp brush to gently tidy them up or paint over mistakes with the background color. -
Final highlights:
Add a few very subtle, watery white highlights on the highest points of the teal back to suggest wet skin. -
Seal the piece:
Once fully dry (give it at least 24 hours if using acrylics), apply a high-gloss varnish. This mimics the wet, amphibious look of a real frog and protects your detailed work.
Place your newly painted frog near a plant or window to let the glossy finish catch the light
Seasonal Frog Costume Paint Theme

Transform a plain ceramic bisque frog into a dapper character ready for crisp weather with this layered painting project. You’ll create a warm, textured look featuring a mustard-yellow scarf and a folk-art inspired floral vest.
Detailed Instructions
Materials
- Ceramic bisque frog figurine (standing pose)
- Acrylic paints: Forest Green, Mustard Yellow, Burnt Orange, Maroon/Rust Red, Cream/Off-White, Black, Pink, Gold metallic (optional)
- Flat shader brushes (sizes 4 and 6)
- Fine detail liner brush (size 0 or 00)
- Dotting tool or toothpick
- Water cup and palette
- Spray gloss or satin sealant
Step 1: Base Coating
-
Clean the bisque:
Begin by wiping down your ceramic frog with a slightly damp sponge to remove any dust or ceramic powder, which helps the paint adhere smoothly. -
Paint the skin:
Load a size 6 flat brush with Forest Green. Apply a solid base coat to the head, face, hands, and feet. Be careful to paint neatly around the edges of the clothing. -
Second skin layer:
Once the first coat is dry to the touch, apply a second coat of green to ensure full opacity, especially in the deep textures of the mouth and eye sockets. -
Clothing base colors:
Switch to a clean brush. Paint the scarf with Mustard Yellow. Since yellows can be semi-transparent, this may require three thin coats for vibrant coverage. -
Vest and pants:
Paint the vest section with Burnt Orange and the pants/legs with a deep Maroon or Rust Red. Let all base coats dry completely for at least 20 minutes.
Step 2: Adding Detail and Texture
-
Scarf shadows:
Mix a tiny drop of brown into your Mustard Yellow. Use a smaller brush to paint inside the folds of the scarf, creating depth where the fabric wraps around the neck. -
Vest flowers:
Using a fine liner brush and Cream paint, create simple daisy shapes on the orange vest. Paint a small circle for the center, then pull small strokes outward for petals. -
Pants pattern:
For the pants, apply clusters of three small dots using the tip of your brush or a dotting tool dipped in Cream to create a subtle floral print. -
Scarf polka dots:
Dip the handle end of a paintbrush or a large dotting tool into Black paint. Carefully stamp scattered dots across the yellow scarf. -
Fringe detail:
Use your liner brush with dark yellow or light brown paint to define the individual strands of fringe at the end of the scarf, painting thin vertical lines.
Uneven Coverage?
If your yellow or orange paint looks streaky, don’t gloop it on. Let it dry fully and sand lightly with 1000-grit sandpaper before the next coat.
Step 3: Facial Features and Finishing
-
Buttons:
Paint small circles on the edge of the vest for buttons using Gold or dark yellow. Outline them thinly with black to make them pop. -
Cheeks:
I find a soft pink works best here—paint two oval ‘blush’ marks on the cheeks for a sweet, friendly expression. -
Eyes and mouth:
Paint the pupils solid black. Once dry, add a tiny white reflection dot at the top of each eye. Use the liner brush to deepen the mouth line with black. -
Antiquing wash (optional):
To age the piece, mix black paint with water (90% water). Brush it over the green skin areas and immediately wipe it off with a paper towel, leaving dark pigment only in the crevices. -
Seal the project:
Take the finished frog to a well-ventilated area and apply a clear satin or gloss spray sealer to protect the paint and give it a finished ceramic shine.
Perfect Petals
For the vest flowers, think of a clock face. Paint a petal at 12, 3, 6, and 9 first, then fill in the gaps. This keeps flowers symmetrical.
Place your dapper frog on a shelf or among your houseplants to add a touch of whimsy to your decor


Have a question or want to share your own experience? I'd love to hear from you in the comments below!