When I’m craving a quick creative reset, I reach for clay because it turns messy play into something you can actually use. These ceramic ideas are the kind I’d make in my own studio—cute, functional, and totally doable even if you’re still getting comfy with the basics.
Everyday Mug With a Personal Twist
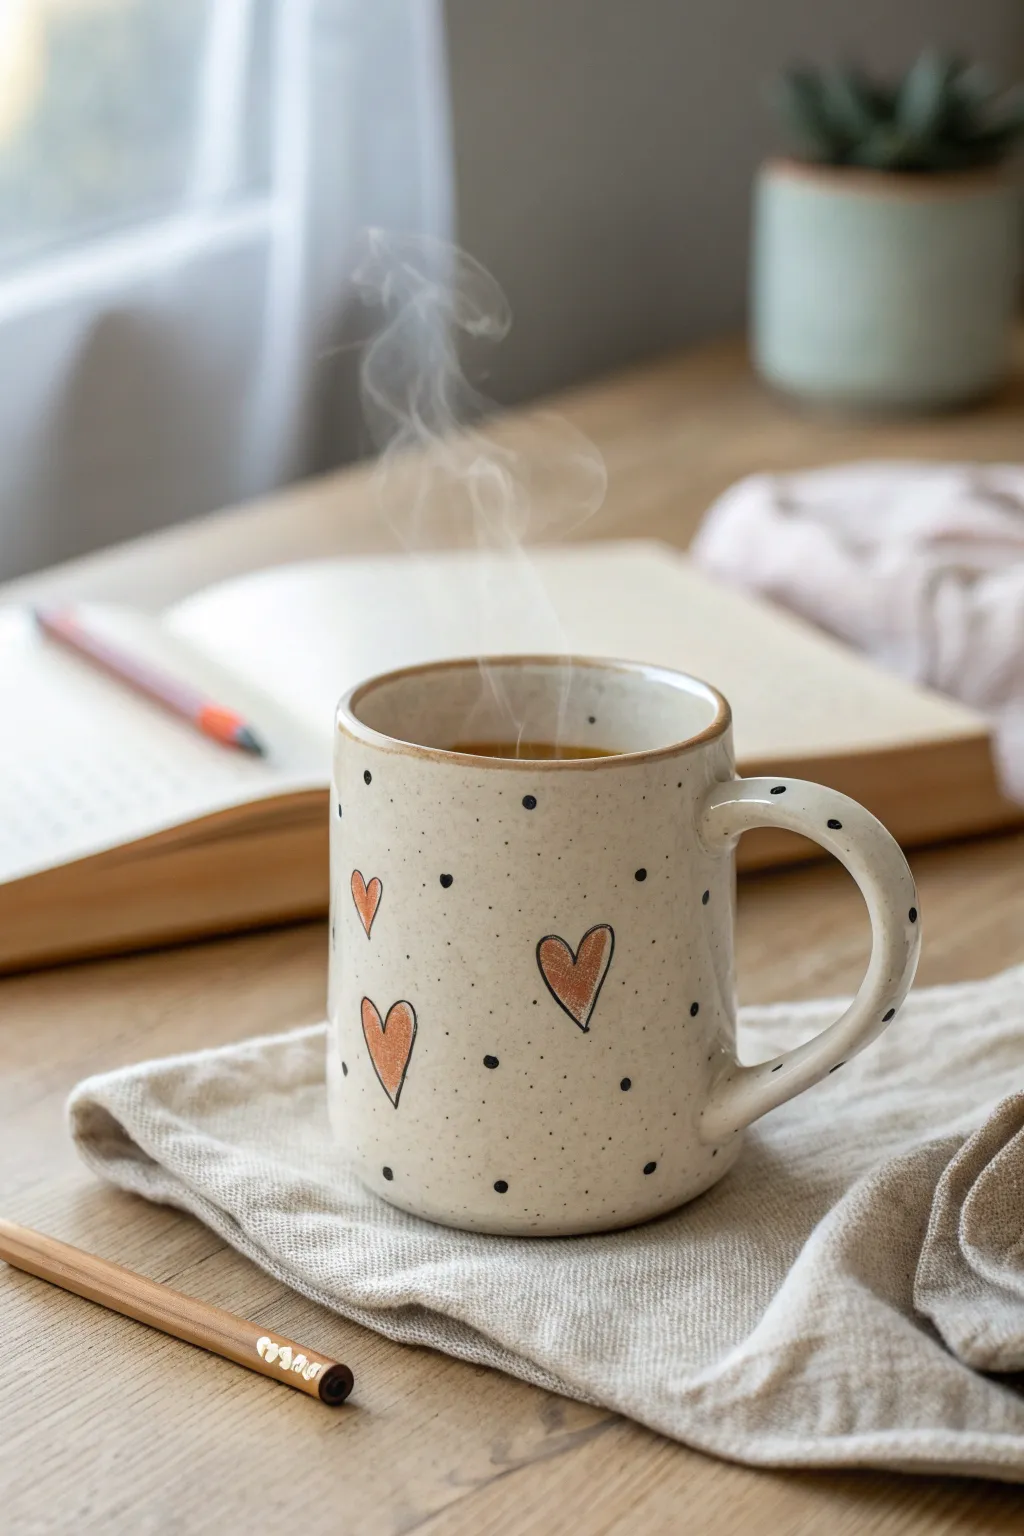
Transform a simple slab of clay into your new favorite morning companion with this cozy, rustic design. This project focuses on simple hand-building techniques and sketched-on surface decoration that feels effortlessly charming.
Step-by-Step Tutorial
Materials
- Stoneware clay body (white or light buff)
- Rolling pin and guide strips (approx. 1/4 inch)
- Kidney scraper (smooth rib)
- Needle tool
- Fettling knife
- Scoring tool or serrated rib
- Slip (clay slurry)
- Underglaze pencil or fine liner brush (black)
- Underglaze (terracotta or reddish-brown)
- Small round paintbrush
- Clear or transparent milky glaze
Step 1: Forming the Mug Body
-
Roll the slab:
Begin by rolling out your clay slab between guide strips to ensure an even thickness of about 1/4 inch. Smooth both sides with a kidney scraper to compress the clay particles, which helps prevent future warping during the firing process. -
Cut the rectangle:
Measure and cut a rectangle roughly 10-11 inches long and 4-5 inches tall. This size will shrink during firing, resulting in a standard-sized mug. Use a ruler to ensure your top and bottom edges are perfectly straight parallel lines. -
Bevel the edges:
On the short sides of your rectangle, cut 45-degree bevels in opposite directions. This allows the seam to overlap cleanly without creating a thick lump in the wall of your mug. -
Score and slip:
Score the beveled edges aggressively and apply a generous amount of slip. Bring the ends together to form a cylinder, pressing the seam firmly. I like to use a wooden tool or my thumb to smooth the seam inside and out until it’s invisible. -
Attach the base:
Roll a small piece of clay for the base. Place your cylinder on top, trace around it slightly wider than the wall, and cut out the circle. Score and slip both the bottom of the cylinder and the base edge, then press them firmly together.
Smudged Lines?
If your underglaze pencil smudges easily, lightly mist the bisque ware with water or hairspray to set the drawing before dipping it into the clear glaze bucket.
Step 2: Adding the Handle
-
Pull or roll a coil:
Create a coil for your handle. You can roll one on the table or ‘pull’ a handle from a lump of clay for a more organic feel. Flatten it slightly so it’s comfortable to hold, aiming for an oval cross-section. -
Shape the curve:
Bend the coil into a ‘C’ or ear shape and hold it up to your cylinder to check proportions. Allow it to stiffen slightly on the table for 15-20 minutes so it holds its shape during attachment. -
Attach firmly:
Score and slip the contact points on both the mug and the handle. Press the handle on firmly, smoothing the clay connection with a modeling tool to ensure there are no cracks where stress might occur.
Gold Luster Accent
For a luxe touch, apply a rim of real gold luster over the fired glaze and do a third, lower-temperature firing (cone 018). It adds a beautiful metallic shine.
Step 3: Decoration & Glazing
-
Bisque fire:
Allow your mug to dry slowly and completely under loose plastic before bisque firing it to cone 04. This prepares the surface for the underglaze decoration. -
Sketch the hearts:
Using a black underglaze pencil or a very fine brush with black underglaze, sketch the outlines of three or four hearts. Let the lines be sketchy and imperfect; overlap a line or two to give it that hand-drawn illustration vibe. -
Add the dots:
Dip the non-brush end (the handle tip) of a paintbrush into black underglaze. Dot it randomly around the hearts to create the scattered polka dot pattern. Vary the spacing to keep it looking organic. -
Color the hearts:
With a reddish-brown or terracotta underglaze, fill in the hearts. Don’t worry about staying perfectly within the lines—a little overlap adds to the charm. You might want two thin coats for opacity. -
Apply clear glaze:
Once the underglaze decoration is dry, dip the entire mug into a clear or semi-transparent milky glaze. This will seal the clay and make the mug food safe while letting the speckles and drawings show through. -
Clean the foot:
Wipe the very bottom (the foot ring) of the mug with a damp sponge to remove any glaze. This prevents the mug from sticking to the kiln shelf during the final firing. -
Final fire:
Fire the mug to maturity (usually cone 6 for stoneware, but check your clay specifications). Once cooled, sand the bottom lightly if there are any rough spots.
Enjoy that first warm sip of coffee from your beautifully handcrafted mug


Cute Planter for a Tiny Plant Buddy
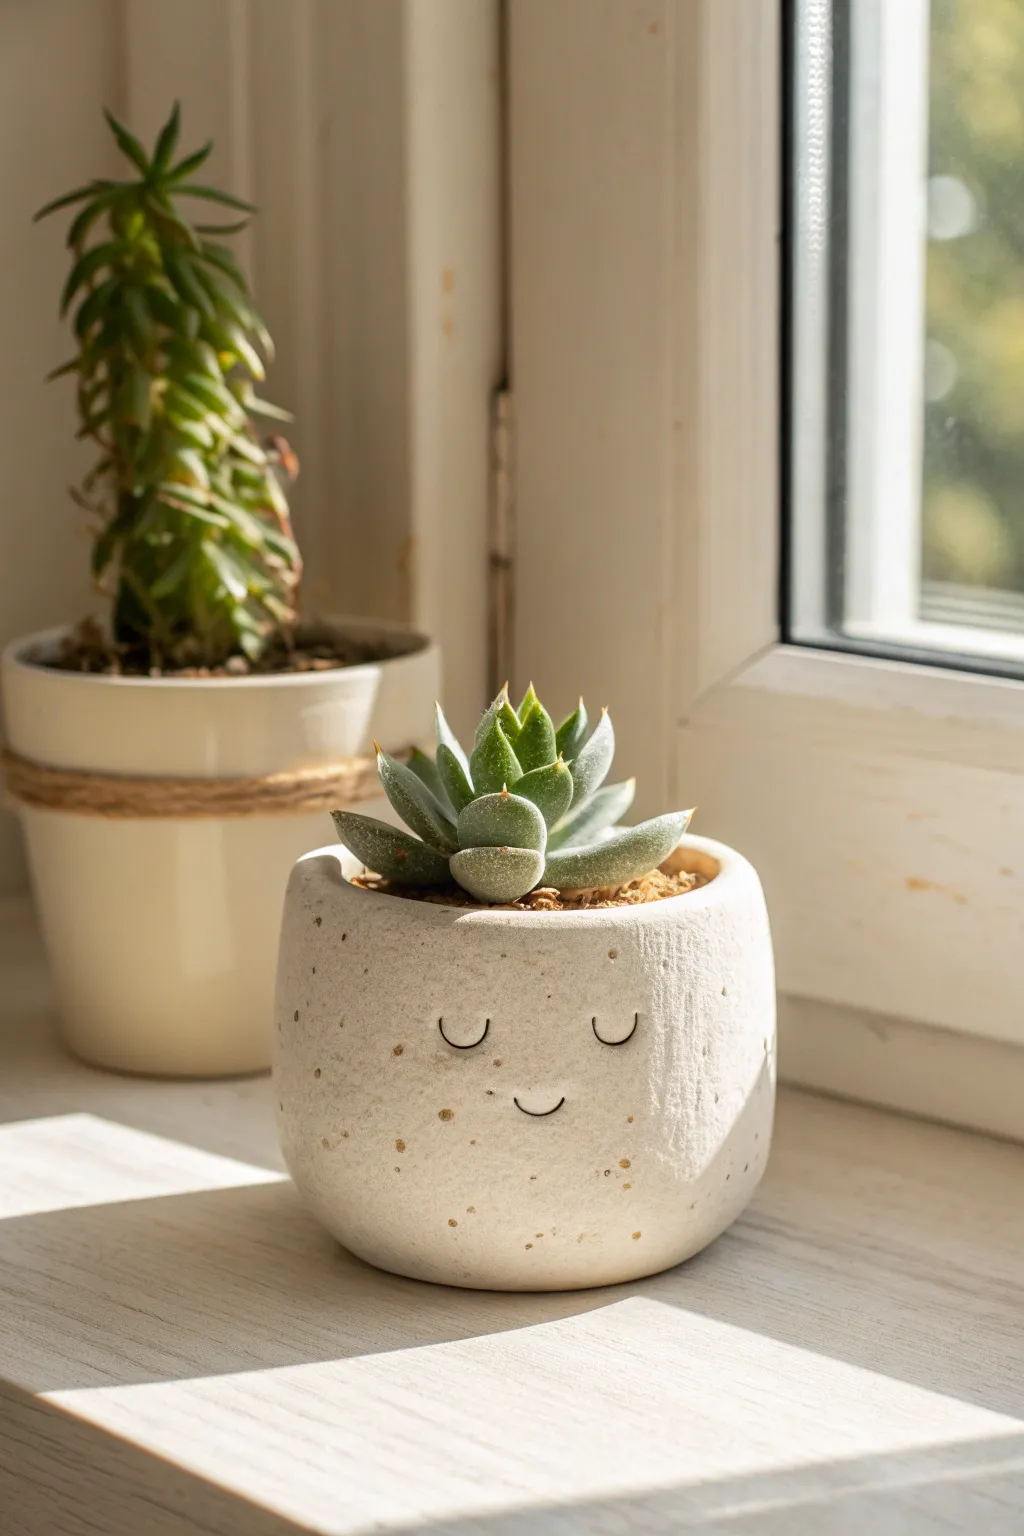
Bring a little personality to your windowsill with this adorable, sleepy-faced succulent planter. This hand-built pinch pot features a charming speckled finish and a simple, minimalist expression that feels both modern and sweet.
Step-by-Step Guide
Materials
- White stoneware clay or air-dry clay (approx. 1 lb)
- Speckled clay addition (or coarse sand/grog for texture)
- Rolling pin (optional)
- Modelling tool or smooth wooden spoon
- Fine-grit sandpaper
- Small sponge
- Black underglaze (if firing) or fine-tip black marker (if air-dry)
- Clear matte glaze (or matte sealant)
- Fine detail paintbrush
Step 1: Forming the Pot Base
-
Prepare the Clay:
Start by wedging your ball of white clay to remove air bubbles. This ensures your pot won’t crack during drying or firing. If you want that natural speckled look seen in the photo and aren’t using pre-speckled clay, knead in a small amount of grog or sand now. -
Start the Pinch Pot:
Roll the clay into a smooth sphere about the size of a large orange. Hold it in one palm and push your thumb into the center, stopping about half an inch from the bottom. -
Pinch the Walls:
Gently pinch the clay between your thumb and fingers, rotating the ball as you work. The goal is to thin the walls evenly while moving upwards. -
Refine the Shape:
Continue pinching until the walls are roughly 1/4 inch thick. Aim for a rounded bowl shape rather than a straight cylinder to match the chubby look of the inspiration photo. -
Flatten the Base:
Gently tap the bottom of your pot against your work surface to create a flat, stable base so it won’t wobble on your windowsill. -
Smooth the Rim:
The rim in the image is slightly irregular but soft. Run a damp sponge or your finger along the top edge to round it off, removing any sharp angles. -
Dry to Leather Hard:
Set the pot aside until it reaches a ‘leather hard’ stage. This means it’s firm enough to handle without deforming but still has moisture.
Clean Lines
For the crispest black lines on the face, use an underglaze precision applicator bottle or a needle tip instead of a brush.
Step 2: Adding the Details
-
Sand for Texture:
Once fully bone dry (or leather hard depending on your preference), lightly sand the exterior. This exposes the grog or speckles you added earlier, mimicking that beautiful stone-like surface. -
Clean the Surface:
Wipe away all dust with a slightly damp sponge. A dusty surface will prevent the glaze or paint from adhering properly. -
Draft the Face:
Using a very light pencil sketch, mark the position of the face. Place the eyes about halfway down the pot and the mouth centered just below them. -
Paint the Expression:
Dip a fine detail brush into black underglaze (or use your marker for air-dry clay). Paint two small downward-facing semi-circles for sleeping eyes. -
Add the Smile:
Paint a small, simple upward curve between the eyes for the smile. I find that keeping the lines thin and delicate makes the face look cuter. -
Bisque Fire (Ceramic Only):
If using proper ceramic clay, fire the piece to bisque temperature (usually cone 04) to set the shape and underglaze.
Wobbly Pot?
If the pot rocks after drying, gently sand the bottom in a circular motion on a flat piece of sandpaper to level it out.
Step 3: Finishing Touches
-
Apply Glaze:
Dip the pot into a clear matte glaze or brush on a matte sealant. The matte finish is crucial here—a high gloss would hide the lovely texture and change the soft vibe. -
Final Firing or Drying:
Fire the piece again to the glaze temperature appropriate for your clay body (e.g., cone 5 or 6). If using air-dry clay, simply let the sealant cure completely. -
Plant Your Succulent:
Add a small layer of gravel for drainage, then potting soil. Nestle your tiny succulent inside to give your pot its spiky hairstyle.
Enjoy your new little plant friend sitting peacefully in the sunlight


Pinch Pot Bowl You’ll Actually Use
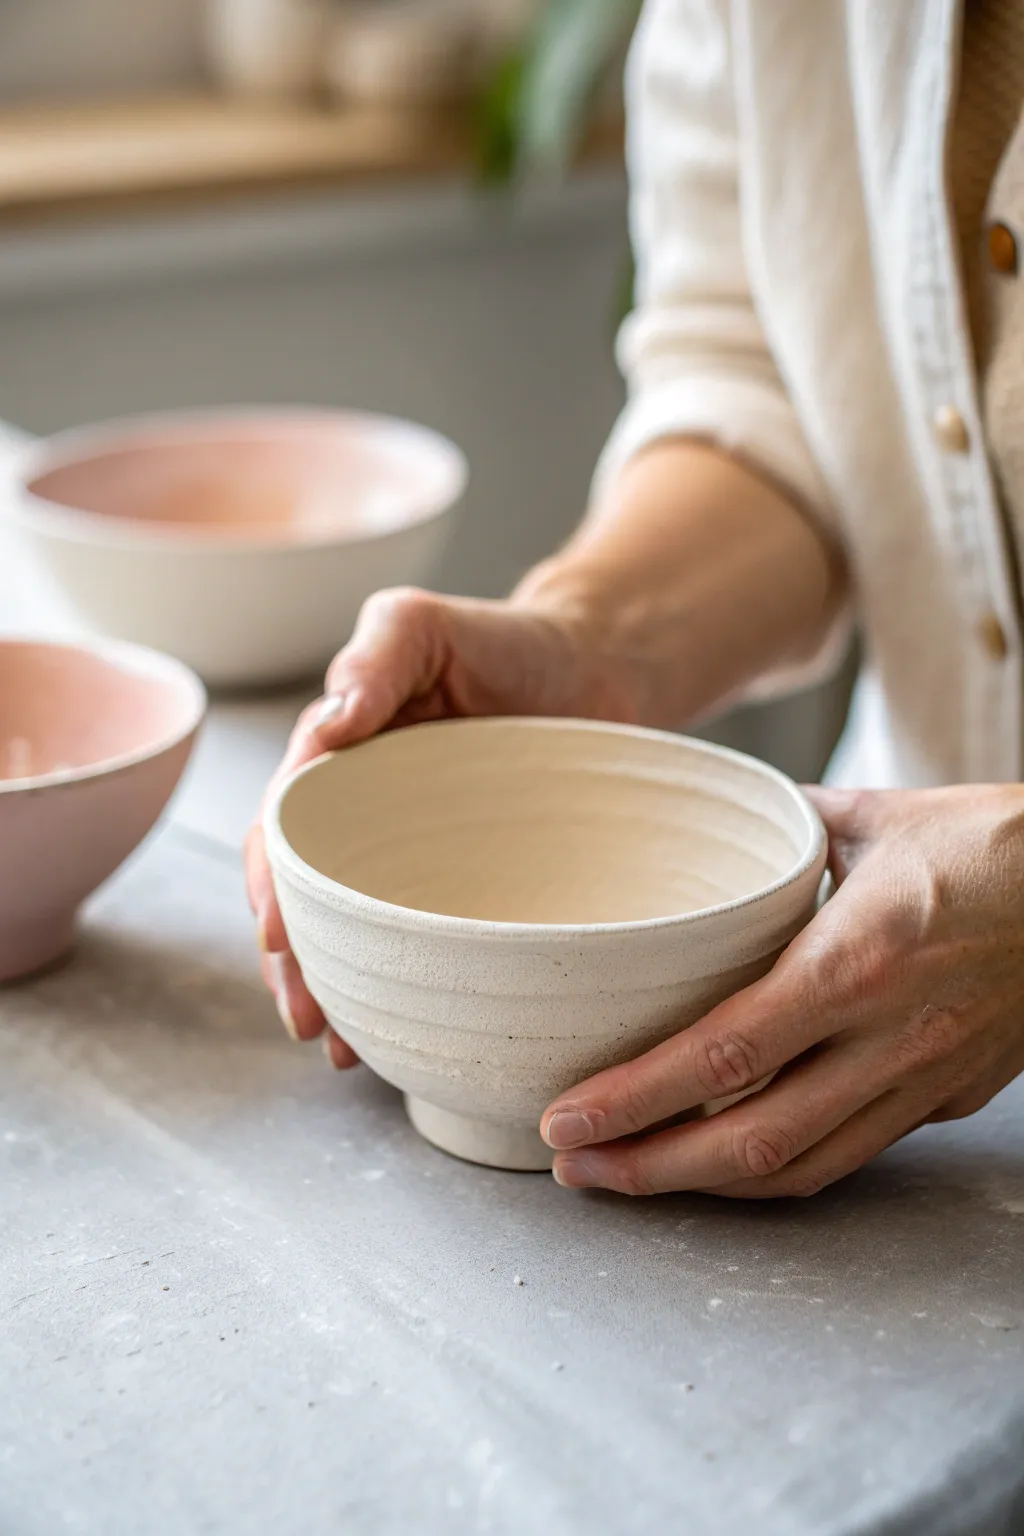
This project transforms a simple ball of clay into an elegant, functional bowl with subtle horizontal ridges and a grounded foot ring. Its creamy, matte finish and organic imperfections make it a timeless addition to any kitchen table.
Step-by-Step
Materials
- White stoneware clay (cone 6)
- Wooden modeling tool
- Serrated metal rib
- Soft rubber rib
- Sponge
- Cutting wire
- Lazy Susan or banding wheel (optional)
- Small bowl of water
- Matte white or eggshell glaze
Step 1: Forming the Base
-
Preparing the clay:
Begin with a ball of well-wedged clay roughly the size of a grapefruit. Pat it into a smooth sphere to ensure the clay particles are aligned. -
Opening the pot:
Hold the ball in one palm and push your thumb into the center, stopping about half an inch from the bottom. This thickness is crucial for creating the foot later. -
Pinching the walls:
Rotate the ball slowly while rhythmically pinching the clay between your thumb and fingers. Start low at the base and work your spiral upwards, thinning the walls evenly.
Wobble Check
If the rim looks uneven, place the bowl upside down on a flat board while it’s still soft. Gently tap the base to align the rim.
Step 2: Shaping and Refining
-
Establish the curve:
Once the walls are thinned, gently press outward from the inside using a soft rubber rib to create a wide, open curve rather than a vertical cylinder. -
Leveling the rim:
If the rim has become uneven during pinching, use a needle tool or knife to trim the top edge flat while rotating the bowl on a banding wheel. -
Smoothing the lip:
Run a damp sponge or a strip of chamois leather over the cut rim to round it off softly, ensuring it feels comfortable to the touch. -
Adding texture:
While the clay is still leather-hard, use a wooden modeling tool or the corner of a rib to gently press horizontal lines into the exterior, spaced about half an inch apart. -
Refining the surface:
Where the texture feels too rough, lightly sponge the exterior to soften the ridges without erasing them completely. You want that tactile, handmade feel.
Step 3: Adding the Foot
-
Drafting the foot ring:
Turn the bowl upside down. I find it helpful to place it on a foam bat so the rim doesn’t get distorted. Mark a circle on the bottom where your foot will sit. -
Attaching a coil:
Roll a small coil of clay. Score and slip the marked circle, then firmly press the coil onto the base to form the foot ring. -
Blending the seams:
Use your thumb or a wooden tool to smudge the inside and outside edges of the coil into the bowl base until the seam disappears completely. -
Shaping the foot:
Pinch the foot ring to shape it into a slight bevel, ensuring it sits flat. Use a flat board to gently press down on the foot to level it.
Color Pop
For the two-tone look seen in the background collection, dip just the interior in a transparent pink glaze and leave the exterior raw or white.
Step 4: Finishing
-
Slow drying:
Cover the bowl loosely with plastic to let it dry slowly for a few days. This prevents the rim from warping as the moisture evaporates. -
Bisque firing:
Once bone dry, fire the piece to cone 04 (or your clay body’s recommendation) in a bisque kiln. -
Glazing:
Dip the bowl into a matte white or cream glaze. Shake off excess drips and ensure the foot ring is wiped clean of any glaze. -
Final smooth:
Before the final firing, rub out any pinholes in the dry glaze with a clean finger to ensure that buttery smooth surface shown in the photo. -
Glaze firing:
Fire the bowl to cone 6 (mid-fire) to mature the clay and melt the glaze.
Enjoy the simple pleasure of serving a meal in a vessel you shaped with your own hands


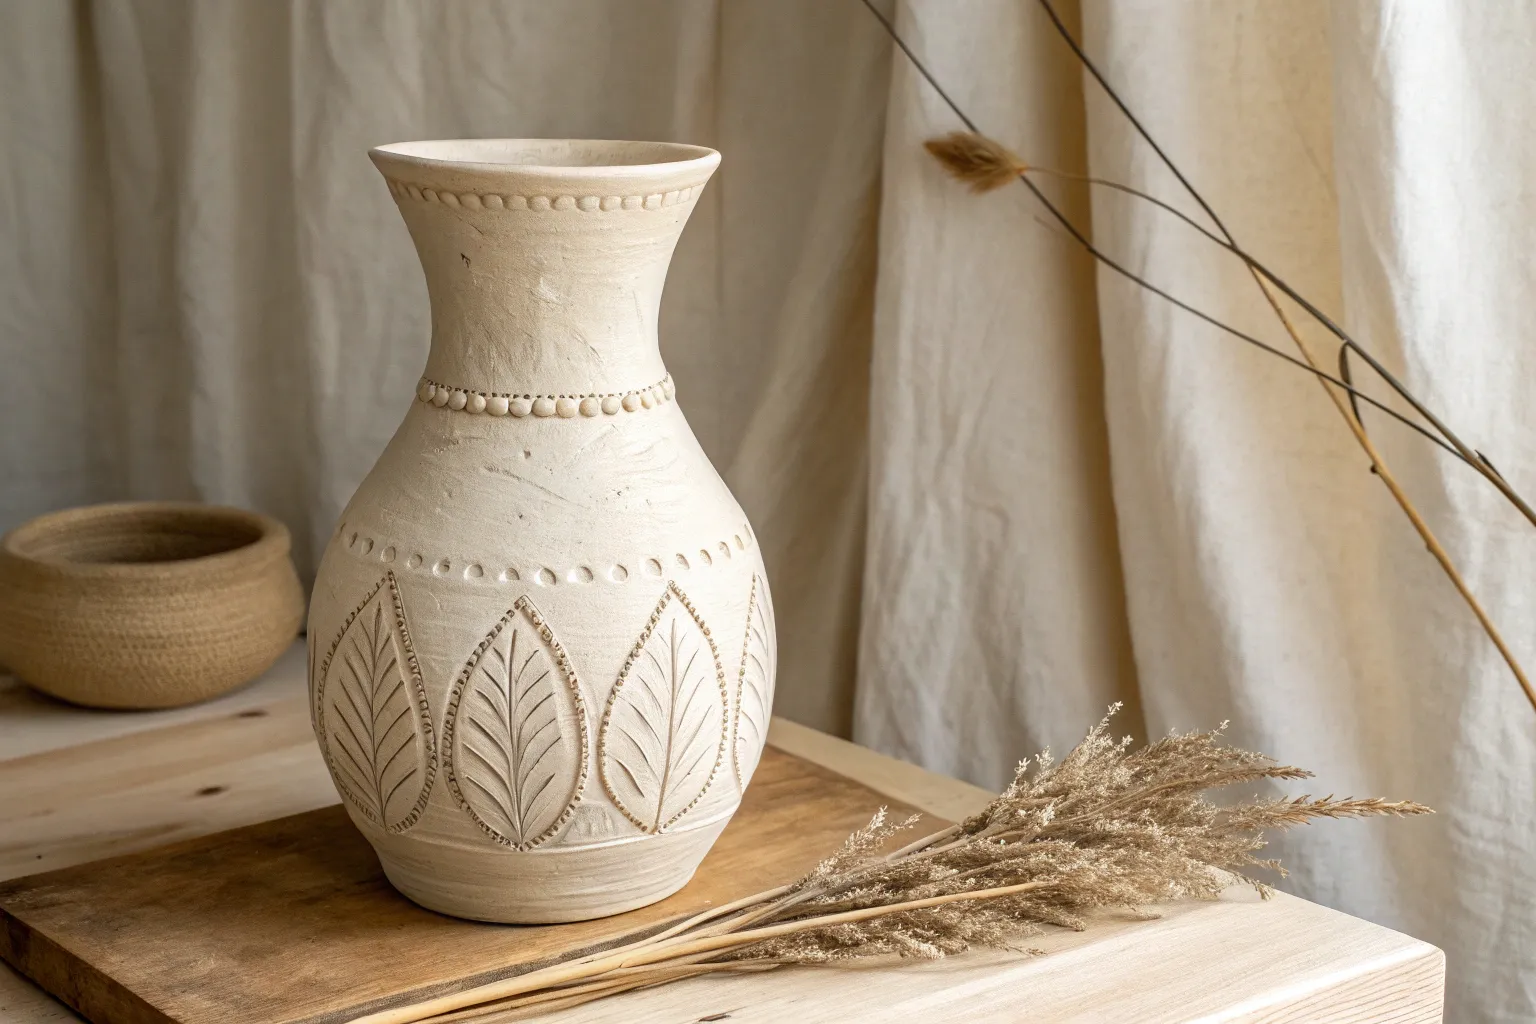
Coil-Built Vase With Soft Curves
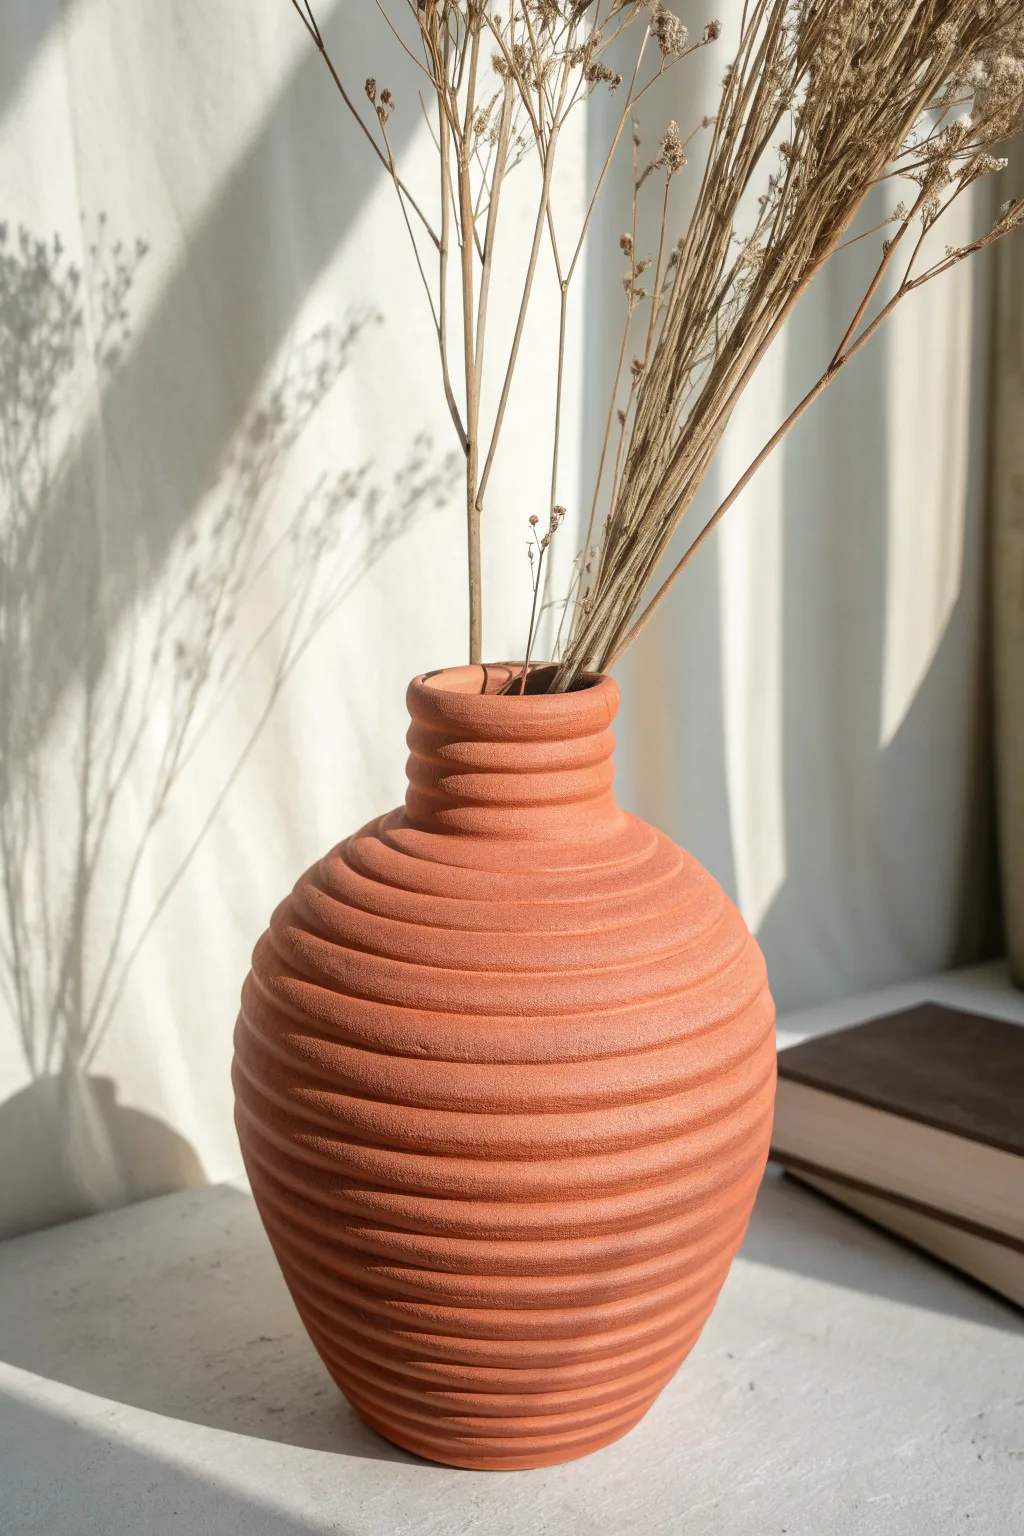
This project embraces the meditative nature of coil building to create a vase with a warm, tactile appeal. The repeating horizontal ridges give the piece a modern, textural look while highlighting the natural beauty of red stoneware clay.
Step-by-Step Guide
Materials
- Red stoneware or terracotta clay (low to mid-fire)
- Wooden modeling tool
- Metal rib / kidney tool
- Serrated rib / scoring tool
- Slip (clay mixed with water)
- Sponge
- Cutting wire
- Canvas work surface or banding wheel
Step 1: Creating the Base
-
Prepare the bottom slab:
Begin by rolling out a small slab of clay, roughly 1/4 inch thick. Use a circular template or a jar lid to cut a perfect circle, about 4 inches in diameter, which will serve as the heavy base for your vase. -
Score and slip edge:
Take your serrated rib or a needle tool and rough up the outer edge of the circular base. Apply a generous amount of slip to these scored marks to act as your glue for the first coil.
Uneven Walls?
If one side starts slumping or getting higher than the other, gently tap the high spots down with a flat wooden paddle while the clay is still plastic to level the rim.
Step 2: Building the V-Shape Walls
-
Roll consistent coils:
Roll out several long ropes of clay on your table. Aim for a thickness slightly thinner than your pinky finger. Try to keep the pressure even so the coil doesn’t have thick and thin spots. -
Attach the first ring:
Place your first coil directly on top of the slipped edge of the base. Cut the ends at an angle where they meet and smudge them together for a seamless join. -
Blend the interior:
Using your thumb or a wooden tool, firmly smudge the clay from the coil down onto the base on the *inside* of the pot only. This secures the structure. -
Leave the exterior texture:
Crucially, do *not* smudge the outside of the coil. To achieve the ribbed look shown in the photo, you want each coil to remain distinct on the exterior surface. -
Build upward and outward:
Continue stacking coils. For the first few layers, place each new coil slightly toward the outer edge of the one below it. This will make the walls expand outward to create the bulbous belly of the vase. -
Refine the join:
After every 2-3 coils, stop to smooth the interior walls completely. I find that supporting the outside with one hand while smoothing the inside prevents the shape from warping.
Add Subtle Color
Before firing, brush red iron oxide wash into the deep crevices of the ribs and wipe the surface back with a sponge to accentuate the depth of the texture.
Step 3: Shaping the Curve and Neck
-
Transition inward:
Once you have reached the widest point of the belly (about 5-6 inches high), begin placing your coils slightly inward relative to the previous layer. This will start closing the form. -
Sharpen the ridges:
As you build, take a wooden tool or your finger and run it gently along the grooves between the exterior coils. Deepening these grooves slightly enhances the ribbed effect. -
Form the neck:
Continue tapering inward until the opening is roughly 3 inches wide. Create a vertical neck by stacking the next 3-4 coils directly on top of one another, rather than stepping them in. -
Create the rim:
For the final coil, create a slightly thicker ring. Smooth this top coil carefully with a damp sponge to create a soft, rounded lip that is comfortable to touch.
Step 4: Finishing Touches
-
Clean the texture:
Let the vase firm up to a ‘leather hard’ state. Use a damp sponge to gently wipe the exterior ribs. This removes any sharp burrs of clay without erasing the definition of the coils. -
Refine the foot:
Look at the bottom edge. If it looks uneven, use a modeling tool to create a clean undercut, giving the vase a slight shadow at the base so it appears to lift off the table. -
Dry slowly:
Place a plastic bag loosely over the vase for the first two days. Coil pots have variable thickness and tension, so slow drying prevents cracks from forming between the layers. -
Fire appropriately:
Bisque fire the piece once bone dry. For the finish shown, leave the exterior unglazed (raw clay) and fire to temperature, or apply a clear matte glaze to the interior only for water-tightness.
Once fired, fill your new vessel with dried grasses or wildflowers to complement the earthy tones.
BRUSH GUIDE
The Right Brush for Every Stroke
From clean lines to bold texture — master brush choice, stroke control, and essential techniques.
Explore the Full Guide
Slab Tray for Jewelry and Little Things
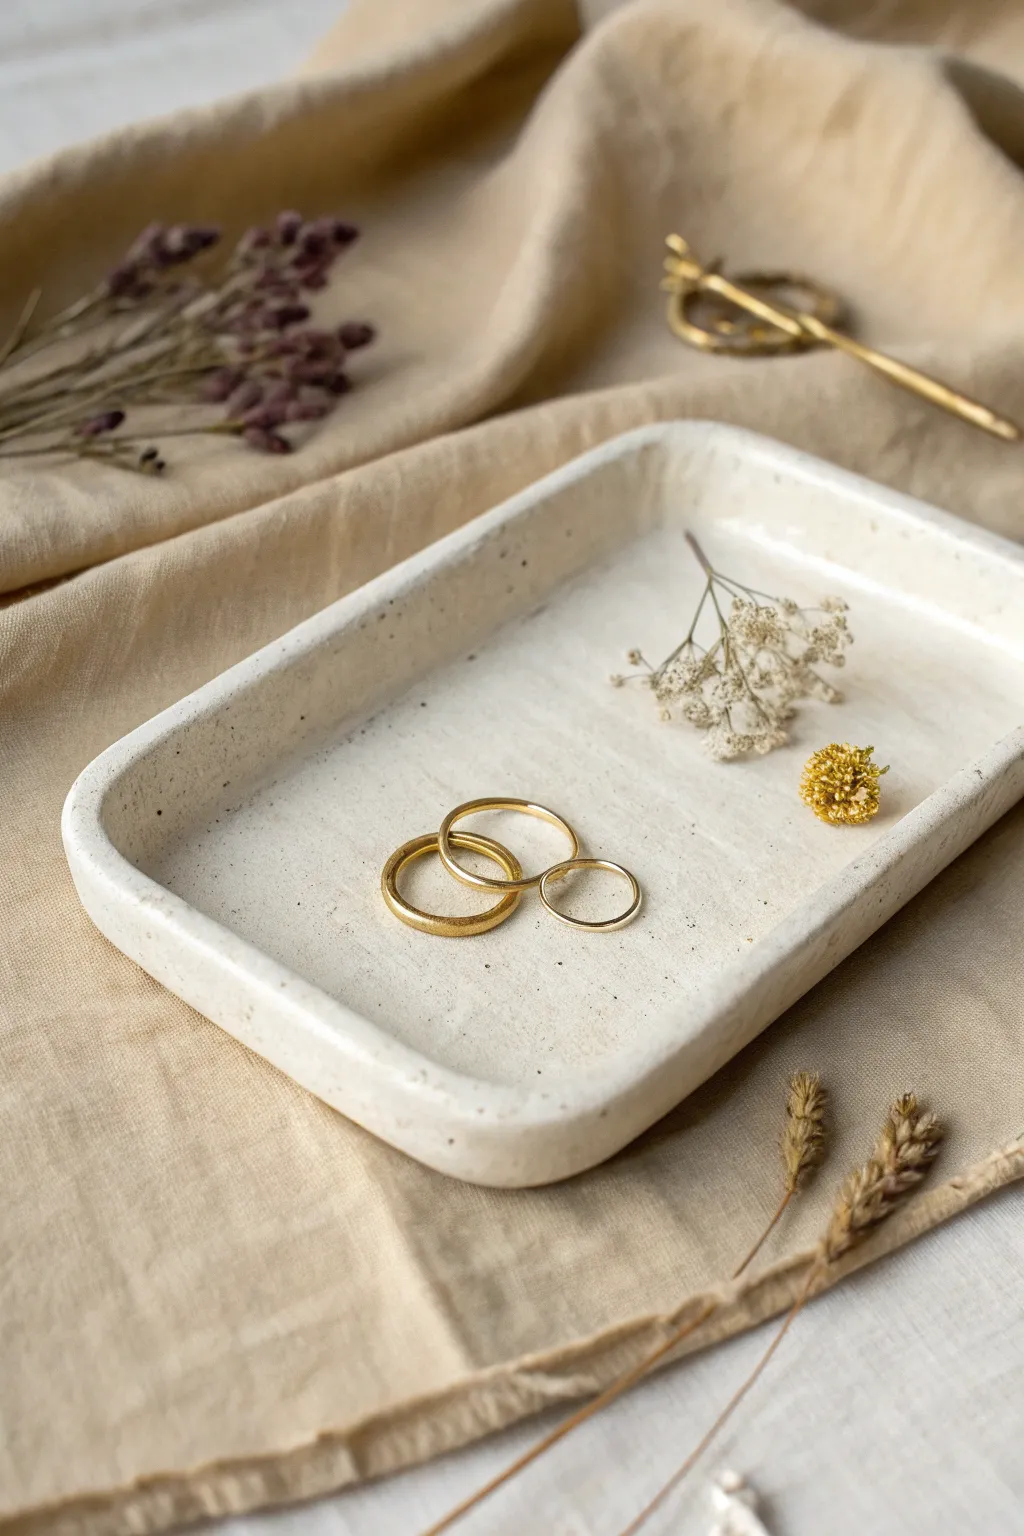
This minimalist rectangular tray showcases the natural beauty of speckled clay with a soft, organic form. Perfect for holding rings, earrings, or dried blooms, its simple construction relies on clean slab-building techniques to achieve that effortlessly chic look.
Detailed Instructions
Materials
- Speckled white stoneware clay
- Rolling pin
- Guide sticks (approx. 1/4 inch thick)
- Fettling knife or needle tool
- Rectangular paper template (approx. 4×6 inches)
- Rib tool (kidney shaped, soft rubber)
- Scoring tool or fork
- Slip (clay and water slurry)
- Sponge
- Clear transparent glaze
- Kiln access
Step 1: Creating the Base Slab
-
Wedge the clay:
Start by wedging a ball of speckled clay thoroughly to remove air bubbles and ensure particle alignment. This prevents warping later. -
Roll out the slab:
Place your guide sticks on either side of the clay ball. Using the rolling pin, roll the clay out until the pin rests flat on the guides, creating a perfectly even slab about 1/4 inch thick. -
Compress the slab:
Take your soft rib tool and gently drag it across the surface of the clay in multiple directions. This compression step is crucial for preventing cracking during drying and firing. -
Cut the base shape:
Lay your rectangular paper template onto the slab. Using the fettling knife, cut cleanly around the template. Do not discard the excess clay yet, as you will need it for the walls.
Warping Woes?
If your tray bows upward while drying, place a small fabric bag filled with rice or sand in the center to weigh it down gently until it’s bone dry.
Step 2: Building the Walls
-
Cut clay strips:
From the remaining slab remnants, cut long strips that are approximately 3/4 inch tall. I find that cutting them slightly longer than the sides of the base helps ensure a good fit. -
Score the edges:
Using your scoring tool, rough up the top perimeter of the rectangular base and the bottom edge of your clay strips. Be generous with the texture here. -
Apply slip:
Dab a generous amount of slip onto the scored areas of the base. This acts as the glue for your join. -
Attach the walls:
Place the strips onto the base, pressing them down firmly to adhere. Ensure the strips sit directly on top of the base edge, not against the side. -
Join the corners:
Where the wall strips meet at the corners, cut them at a 45-degree angle (miter cut) or overlap and slice through both layers for a seamless join. Score, slip, and press these vertical seams together.
Step 3: Refining and Shaping
-
Blend the seams:
Use a modeling tool or your finger to smooth the clay from the wall down onto the base on the inside, and from the base up onto the wall on the outside. The seam should disappear completely. -
Reinforce the interior:
Run a thin coil of soft clay along the interior bottom seam if you notice any gaps, blending it in smoothly to create a gentle curve rather than a sharp 90-degree angle. -
Soften the rim:
Use a damp sponge to gently round over the top rim of the tray. The tray in the image has a soft, organic edge, not a sharp, geometric one. -
Curve the corners:
While the clay is still plastic, gently press evenly on the corners to round them out slightly. This creates that friendly, pillowed look seen in the photo. -
Final smooth:
Wring out your sponge until it is barely damp and wipe the entire piece to remove any finger marks or rough texture.
Gilded Touch
Apply a gold luster to the rim after the glaze firing for a luxurious finish. This requires a third, lower-temperature firing but adds incredible elegance.
Step 4: Firing and Glazing
-
Slow drying:
Cover the tray loosely with plastic and let it dry slowly over a few days to prevent the thin slab from warping. -
Bisque fire:
Once bone dry, fire the piece to bisque temperature (usually cone 04) to prepare it for glazing. -
Glaze application:
Dip the tray into a clear, glossy transparent glaze. If you prefer the raw clay look on the outside, only pour glaze into the interior and wipe any drips off the exterior. -
Glaze fire:
Fire the projected again to the maturity temperature of your clay body (likely cone 5 or 6 for stoneware). The heat will bring out the natural iron specks in the clay.
Once cooled, your tray is ready to organize your treasures with subtle, handmade sophistication
Soap Dish With Drainage Ridges
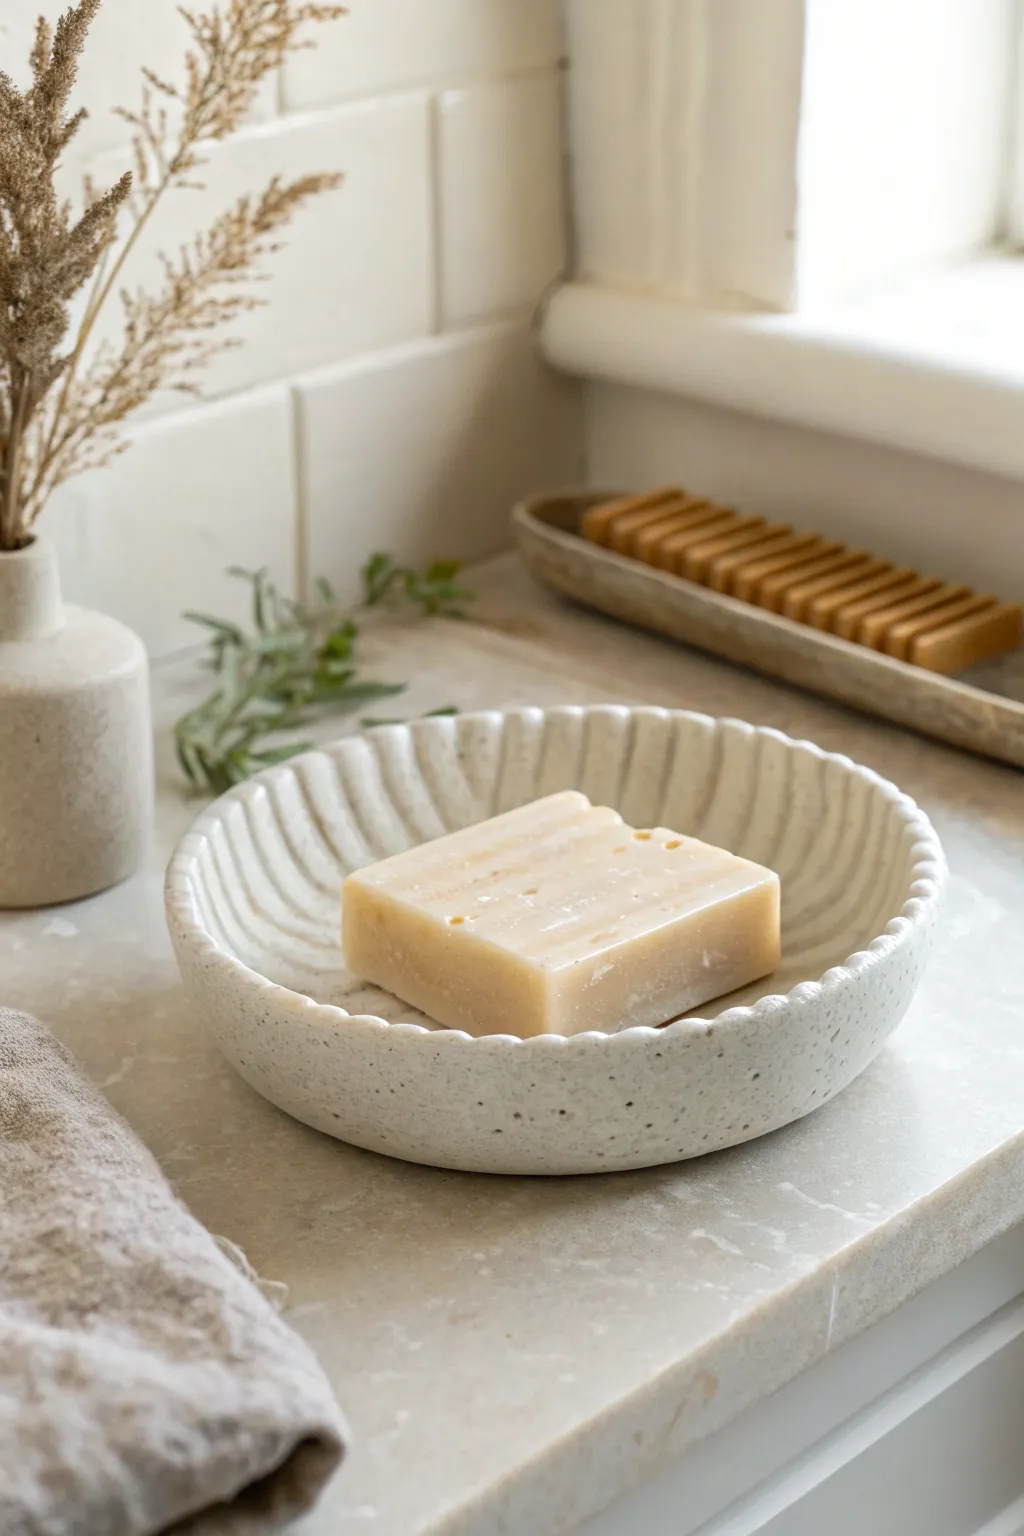
This charming soap dish combines organic textures with simple utility, featuring a beautifully ridged interior that allows your soap to dry perfectly. The speckled cream glaze and hand-built imperfections give it a serene, earthy quality that elevates any bathroom sink.
Detailed Instructions
Materials
- Speckled cream clay (stoneware)
- Small rolling pin
- Circle template or bowl (approx. 5-6 inches)
- Needle tool
- Carving tool (loop tool or fluting tool)
- Sponge
- Smoothing rib (soft silicone)
- Low-profile hump mold or small bowl
- Transparent or glossy white glaze (food safe optional)
- Kiln
Step 1: Preparing the Clay Slab
-
Roll out the slab:
Begin by wedging your speckled clay to remove air bubbles. Roll it out into a flat, even slab about 1/4 inch thick. I suggest rolling in multiple directions to ensure the clay particles are compressed well. -
Cut the shape:
Place your circle template or an inverted bowl onto the clay. Using a needle tool held vertically, trace around the template to cut out a perfect circle. -
Smooth the edges:
Run a damp finger or a soft sponge gently around the cut rim to soften the sharp edge left by the needle tool. This prevents sharpness after firing.
Step 2: Forming and Fluting
-
Establish the curve:
Gently lift your clay circle and drape it into a shallow slump mold or over a hump mold to give it a concave shape. Press gently from the center outwards to ensure it conforms to the curve. -
Mark the ridges:
Before carving, you might want to lightly mark equal spacing around the rim with your needle tool to guide your fluting, though eyeballing it adds organic charm. -
Carve the flutes:
Using a loop tool or a specialized fluting tool, start at the center bottom of the dish and carve upward toward the rim. Apply even pressure to create deep, consistent grooves. -
Maintain boundaries:
Stop your craving stroke just shy of the very edge of the rim, leaving a smooth lip around the top perimeter of the dish. -
Refine the texture:
Go over the ridges with a slightly damp sponge to smooth out any clay burrs or crumbs created during carving, but be careful not to wash away the texture definition. -
Add exterior texture (optional):
If you wish, you can repeat a similar carving process on the exterior, or leave it smooth to focus attention on the inside. -
Create a distinct rim:
Use your thumb and forefinger to slightly pinch and define the rim, creating a subtle ‘beaded’ effect that frames the fluted interior nicely.
Warping Woes?
If your dish isn’t sitting flat, gently tap the leather-hard piece on a flat board before bone-drying. Drying it on a slat board helps airflow underneath.
Step 3: Drying and Firing
-
Slow drying:
Loosely cover the dish with plastic and let it dry slowly for a few days to reach the leather-hard stage. This prevents warping, which circular forms are prone to. -
Bisque fire:
Once bone dry, load the piece into the kiln for a bisque firing (typically Cone 04 or 06, depending on your clay body). -
Clean the bisque:
Wipe the fired piece with a damp sponge to remove any dust that might interfere with glaze adhesion. -
Glaze application:
Dip the dish into a transparent or milky white glaze. Shake off excess glaze firmly so it doesn’t pool too thickly in the bottom of the grooves. -
Wipe the foot:
Ensure the bottom of the dish is completely free of glaze. Use a wax resist before dipping or wipe it clean with a sponge afterward. -
Glaze fire:
Fire the piece again to the maturity temperature of your clay and glaze (often Cone 5 or 6 for stoneware). -
Final smooth:
After the kiln cools, check the bottom for any rough spots and sand them down with wet-dry sandpaper to protect your countertops.
Make it a Set
Create a matching toothbrush holder by rolling a cylinder of the same speckled clay and carving vertical flutes to mirror the dish design.
Enjoy the calming ritual of using your handmade dish every time you wash your hands

PENCIL GUIDE
Understanding Pencil Grades from H to B
From first sketch to finished drawing — learn pencil grades, line control, and shading techniques.
Explore the Full Guide
Little Trinket Dish With a Wavy Rim
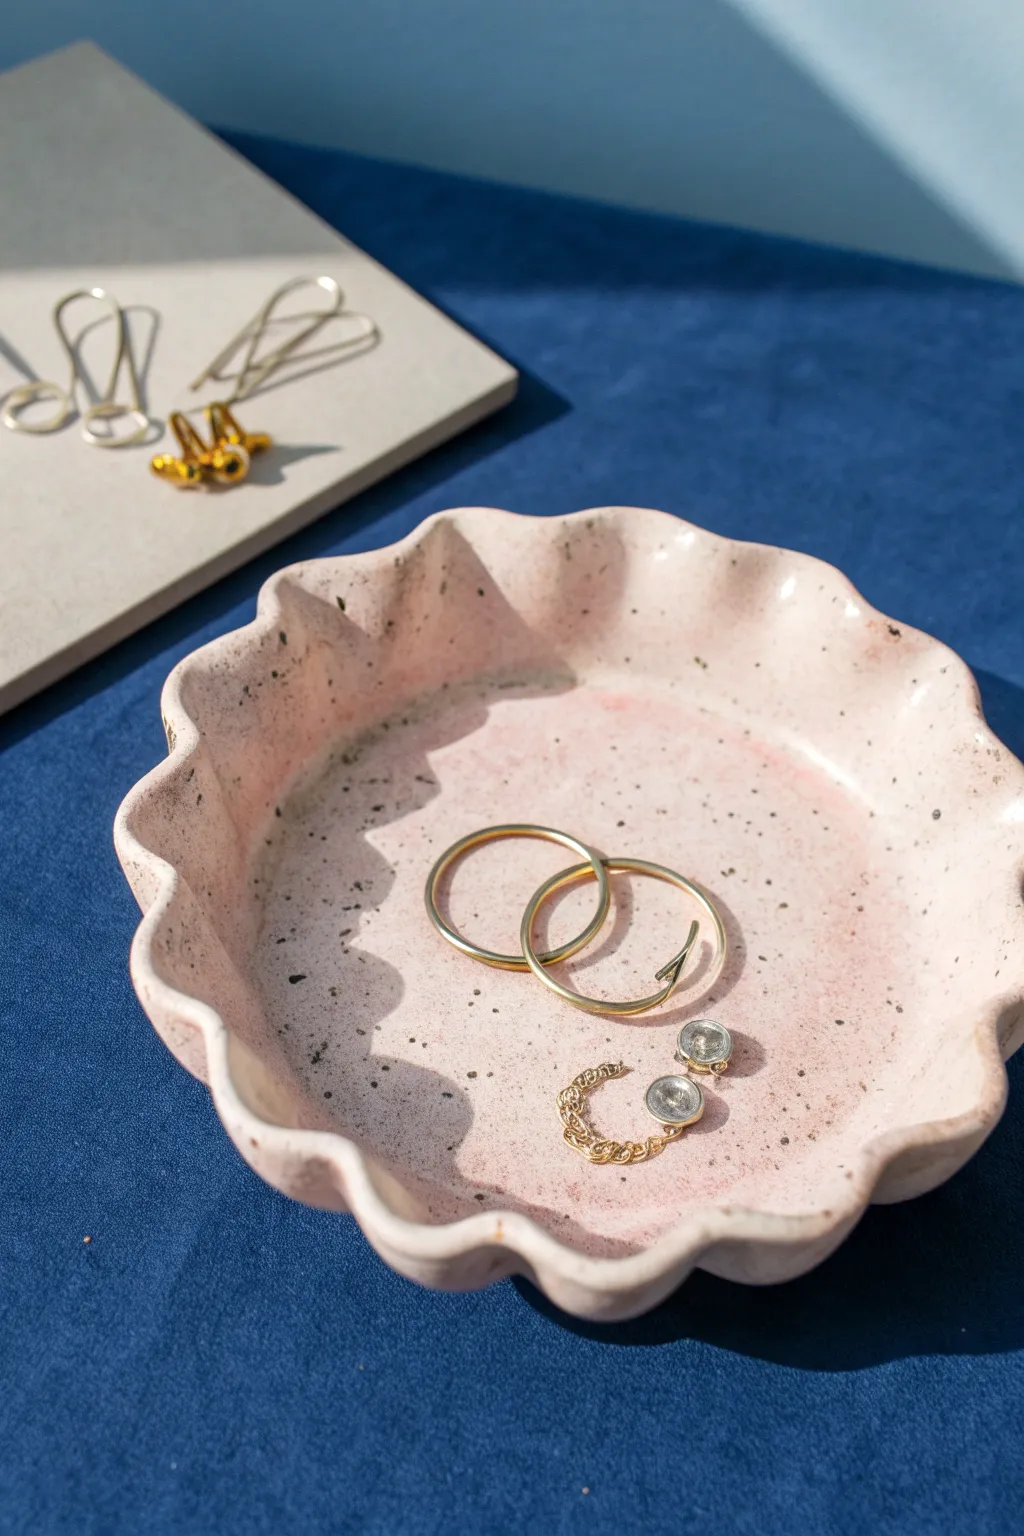
Embrace organic forms with this delightful trinket dish, featuring gentle undulations and a playful speckled finish. The soft pink glaze creates a lovely backdrop for gold jewelry, making it both functional and decorative.
Step-by-Step Tutorial
Materials
- White stoneware clay (about 1 lb)
- Black specialty clay or dried coffee grounds (for speckling, optional)
- Rolling pin
- Canvas or slab mat
- Needle tool
- Round template (approx 5-6 inches, paper or cardboard)
- Small bowl or hump mold
- Soft rib tool (rubber or silicone)
- Sponge
- Kiln
- Transparent pink glaze
Step 1: Prepping and Rolling the Slab
-
Prepare your clay:
Begin with a ball of white stoneware clay. If your clay doesn’t already have speckles (like the example image), you can wedge in a very small amount of black specialty clay or even dried granular manganese to create that spotted effect throughout the body. -
Roll the slab:
Flatten the clay ball slightly with your palm on your canvas. Using the rolling pin, roll out an even slab that is roughly 1/4 inch thick. Turn the clay frequently to ensure even thickness and prevent sticking. -
Compress the clay:
Take your soft rib tool and gently drag it across the surface of the slab. This compression step is crucial as it aligns the clay particles, reducing the chance of warping later and giving you a smooth surface to work on. -
Cut the shape:
Place your round template on top of the smooth clay slab. Holding your needle tool vertically, trace around the template to cut out a perfect circle, then peel away the excess clay.
Use a Foam Pad
When forming the wavy rim, place the clay circle on a piece of foam. This supports the underside while you press down to create waves, preventing the center from stretching too thin.
Step 2: Forming the Dish
-
Soften the edges:
Before shaping, dip your finger in a little water or use a damp sponge to gently round off the sharp cut edge of your circle. This makes the finished rim feel much nicer to the touch. -
Initial shaping:
Lift your clay circle and gently drape it over a small bowl or hump mold to give it a shallow curve. Alternatively, you can form it inside a bowl if you prefer using a slump mold method. -
Create the waves:
This is the fun part. Using your thumb and forefinger, gently pinch sections of the rim to create undulations. I like to work opposites—pinch one side, then the direct opposite—to keep the waves somewhat symmetrical. -
Refine the curves:
Once the basic waves are established, go back around and smooth the transitions. The goal is a soft, flowing ruffle rather than sharp, jagged peaks. -
Dry slowly:
Set the dish aside to dry to the leather-hard stage. Because the rim is thin and wavy, it may dry faster than the center; loosely covering it with plastic can help equalize the drying process.
Step 3: Firing and Glazing
-
Bisque fire:
Once bone dry, load the piece into the kiln for a bisque fire. This initial firing hardens the clay and prepares it to accept glaze. -
Clean the bisque:
After the kiln cools, wipe down the bisque ware with a damp sponge to remove any dust that might prevent the glaze from adhering properly. -
Apply glaze:
Dip your dish into a transparent pink glaze, or brush on three even coats. The transparency is key here—it allows those dark speckles in the clay body to show through the pink tint. -
Wipe the foot:
Turn the dish over and meticulously wipe any glaze off the bottom (the foot) where it will touch the kiln shelf. Glaze acts like glue when hot. -
Glaze fire:
Load the kiln for the final glaze firing, following the temperature guidelines for your specific clay and glaze combination. -
Final inspection:
Once cool, check the rim for any sharp spots. If you find a tiny sharp bit of glaze, it can often be smoothed down with a diamond sanding pad or a sanding stone.
Add Gold Accents
For a luxe touch, apply gold luster to the very edge of the rim after the glaze firing. You’ll need to fire it a third time at a much lower temperature to set the gold.
Now you have a charming, custom spot to keep your favorite earrings safe and stylishly displayed
Simple Candle Holder Made From Slabs
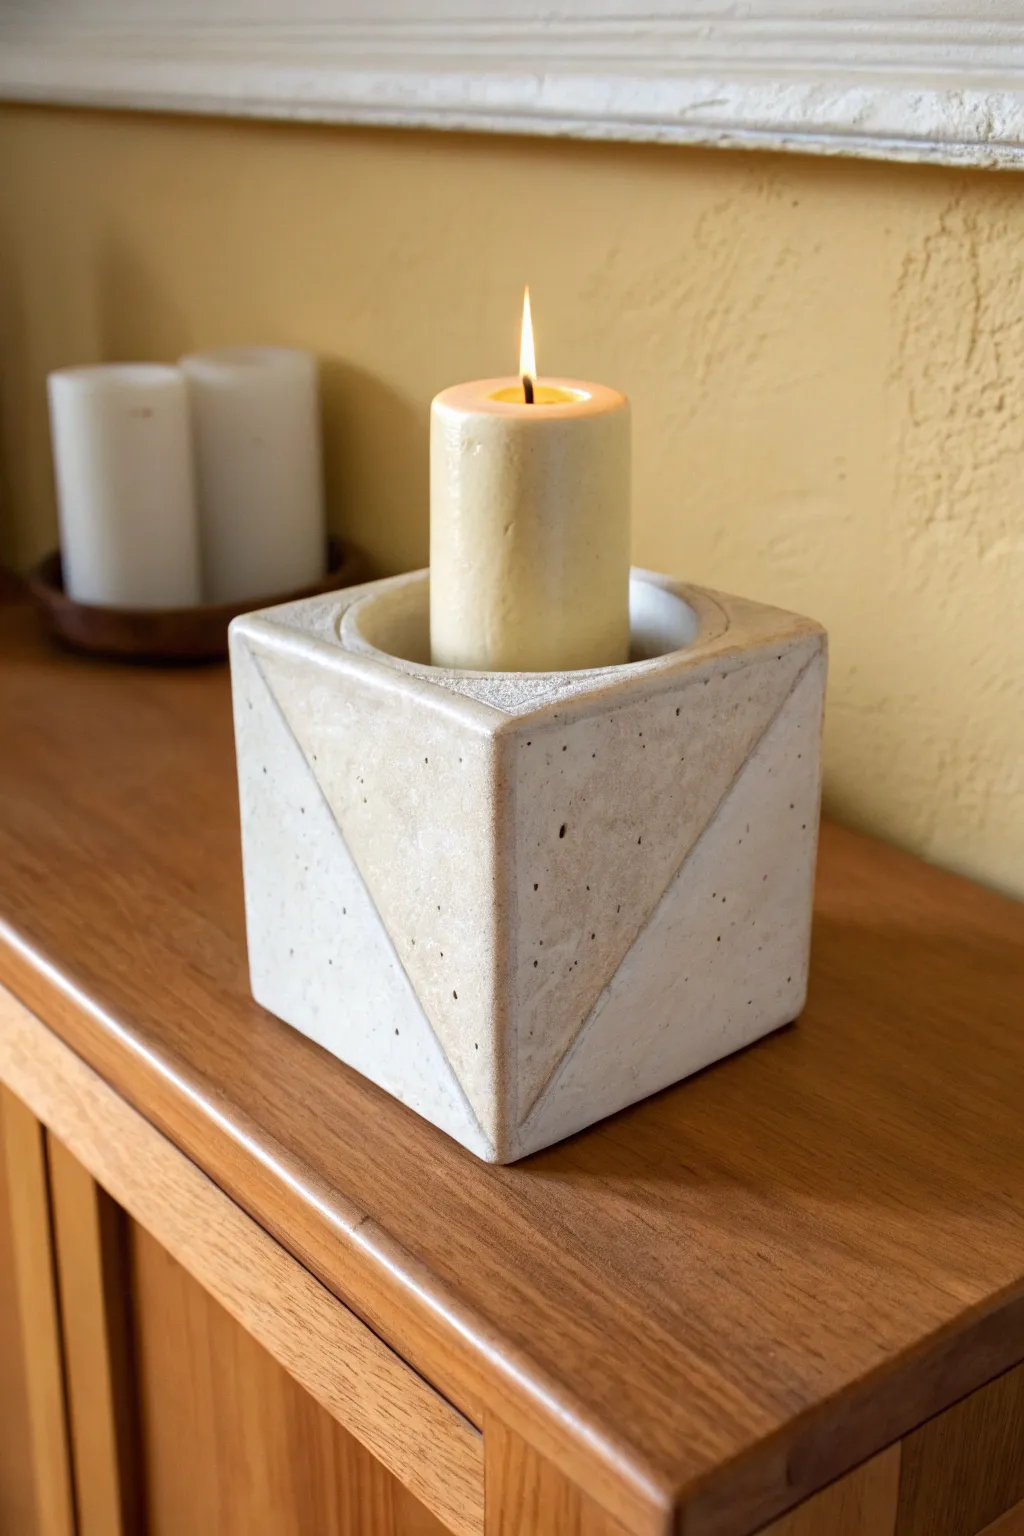
Embrace clean lines and architectural beauty with this modern cube candle holder. Using simple slab construction techniques, you’ll create a striking geometric piece with a warm, speckled finish that perfectly frames a pillar candle.
How-To Guide
Materials
- Stoneware clay (preferably with grog or speckles)
- Rolling pin
- Two wooden guide strips (approx. 1/4 inch thick)
- Ruler
- X-acto knife or fettling knife
- Needle tool
- Scoring tool (or serrated rib)
- Slip (clay mixed with water)
- Cardboard or foam core for templates
- Sponge
- Small wooden paddle (optional)
- Matte white or light stone glaze
Step 1: Preparation & Templates
-
Design your template:
Before touching clay, cut five squares from cardboard measuring 4×4 inches each for the sides and bottom. You will also need a top piece with a circular cutout sized for your candle (usually 3 inches diameter). -
Create the triangle details:
Cut four additional triangles from cardboard. These should be right-angled triangles that fit exactly over half of your square templates, running from corner to corner. These will be used for the relief detail. -
Roll out the slab:
Place your wooden guide strips on your canvas working surface. Roll out a large slab of clay until the rolling pin rests flat on the guides, ensuring an even thickness throughout. -
Compress the clay:
Run a rubber rib firmly over the surface of the clay in multiple directions. I find this critical not just for texture, but to align the clay particles and prevent warping during firing.
Step 2: Cutting & Assembly
-
Cut the components:
Using your templates and a fettling knife, carefully cut out five squares (four walls, one base) and the top piece with the circular opening. -
Cut the decorative triangles:
Using the same slab, cut out four triangle pieces. These will be attached to the exterior walls to create the layered geometric effect shown in the image. -
Leather hard stage:
Let all your pieces dry to a stiff leather-hard state. They need to be firm enough to stand up without sagging but soft enough to score and slip. -
Miter the edges:
For a really crisp corner similar to the photo, use your knife to cut the vertical edges of your four wall panels at a 45-degree angle. This allows them to join seamlessly. -
Score and slip the base:
Score the edges of your base square and the bottom edges of your four wall panels. Apply a generous amount of slip to the scored areas. -
Assemble the walls:
Attach the four walls to the base and to each other. Press the mitered corners firmly together. Use a small coil of clay in the interior corners to reinforce the joints. -
Refine the cube:
Use a paddle to gently tap the outside walls to ensure the cube is perfectly square and the joints are tight. -
Attach the top:
Score and slip the top edges of the walls and attach the final square piece with the candle hole cutout. Smooth the seams.
Crack Prevention
If seams crack during drying, score the crack deeply, fill with vinegar-spiked slip, and compress. Dry extremely slowly under plastic.
Step 3: Detailing & Finishing
-
Add the triangles:
Score the surface of the cube walls where the triangles will go. Apply slip to the back of your clay triangles and press them onto the faces of the cube, aligning the corners perfectly. -
Clean up seams:
Use a damp sponge to wipe away excess slip. Run a finger or tall tool along the edges of the added triangles to make them look distinct and sharp. -
Slow drying:
Cover the piece loosely with plastic plastic to let it dry very slowly. This helps prevent cracks at the seams where thick and thin sections meet. -
Bisque fire:
Once bone dry, fire the piece in the kiln to cone 04 (or your clay’s bisque temperature). -
Glazing:
Apply a matte, stone-colored glaze. To achieve the separation seen in the photo, you might wax the triangle overlays to leave them raw or use a slightly different glaze shade on them. -
Final wipe:
Wipe the bottom of the piece clean of any glaze to prevent it from sticking to the kiln shelf. -
Glaze fire:
Fire for a final time to the maturation temperature of your specific clay body and glaze.
Texture Play
Before cutting your slabs, try rolling the clay onto coarse canvas or pressing sand into the surface for a rugged, stone-like texture.
Place a beeswax pillar candle inside your new holder and enjoy the warm, architectural ambiance it brings to your space


Ceramic Paint Palette for Studio Days
Elevate your painting sessions with this beautiful, handmade ceramic palette featuring a creamy glaze and distinctive speckles. Its thoughtful design includes a large central mixing area surrounded by smaller wells, perfect for keeping your watercolors or gouache organized and accessible.
Detailed Instructions
Materials
- Speckled Stoneware Clay (e.g., Laguna B-Mix with Speckles or similar)
- Rolling Pin
- Canvas Work Surface
- Large Circle Template (7-8 inches)
- Small Circle Cutters or Templates (approx. 1.5 inches)
- Needle Tool
- Sponge
- Rib Tool (flexible metal or rubber)
- Loop Tool or Carving Tool
- Clear or White Transparent Glaze
- Kiln access
Step 1: Preparing the Slab Base
-
Wedge the clay:
Begin by thoroughly wedging your speckled stoneware clay to remove air bubbles and ensure a uniform consistency. -
Roll out a slab:
On your canvas surface, roll the clay out into a smooth, even slab. Aim for a thickness of about 3/4 of an inch to 1 inch; you need significant thickness to carve out the wells without piercing the bottom. -
Smooth the surface:
Use a flexible rib tool to compress the clay slab on both sides. This aligns the clay particles, preventing warping during firing, and creates a pristine surface for your palette. -
Cut the main circle:
Place your large circle template over the slab. Using a needle tool held vertically, cut around the template to define the outer edge of your palette.
Smooth Surface Secret
Burnish the wells with a smooth stone or back of a spoon when leather-hard. This compresses the clay further, ensuring the final glazed surface is ultra-smooth for mixing.
Step 2: Forming the Wells
-
Mark the layout:
Lightly trace your design onto the clay surface using your smaller templates. Mark a large circle in the center for mixing, and arrange smaller circles around the perimeter for individual colors. -
Begin excavation:
Using a loop tool, start carving out the clay from the marked areas. I like to start in the center of each circle and work my way outward to the traced line. -
Refine the central well:
Carve the large central mixing area first. Aim for a gentle, shallow curve rather than steep walls, making it easier to clean paint out later. -
Carve pigment wells:
Proceed to carve the smaller surrounding wells. Ensure they are deep enough to hold liquid paint but not so deep that they compromise the palette’s base. -
Smooth the interiors:
Dip your finger or a small piece of sponge in water and smooth the inside of every carved well. Remove any tool marks or jagged distinct edges, as these can trap pigment.
Add a brush rest
Before drying, carve small notches or grooves on the right side of the palette rim. This creates a dedicated resting spot for your wet brushes so they don’t roll away.
Step 3: Refining and Drying
-
Clean the rim:
Use a damp sponge to round over the sharp top edge of the entire palette. A rounded rim is more durable and resistant to chipping. -
Slow drying phase:
Place the palette on a board and cover it loosely with plastic. Let it dry very slowly over several days to prevent the thick slab from warping or cracking. -
Bisque fire:
Once bone dry, fire the piece in the kiln to cone 04 (or your clay body’s specific bisque temperature).
Step 4: Glazing and Finishing
-
Clean and prep:
Rinse the bisqueware quickly under water or wipe with a damp sponge to remove any dust that might resist the glaze. -
Apply glaze:
Pour a glossy clear or semi-transparent white glaze over the piece. Pouring often results in a smoother coating than brushing, which is crucial for a mixing surface. -
Wipe the foot:
Thoroughly wipe away any glaze from the bottom of the palette and about 1/4 inch up the side to prevent it from sticking to the kiln shelf. -
Glaze fire:
Fire the palette again to the maturity temperature of your clay and glaze (typically Cone 5 or 6 for stoneware).
Now you have a durable, custom palette ready for your next watercolor masterpiece
Brush Holder That Doubles as Desk Decor
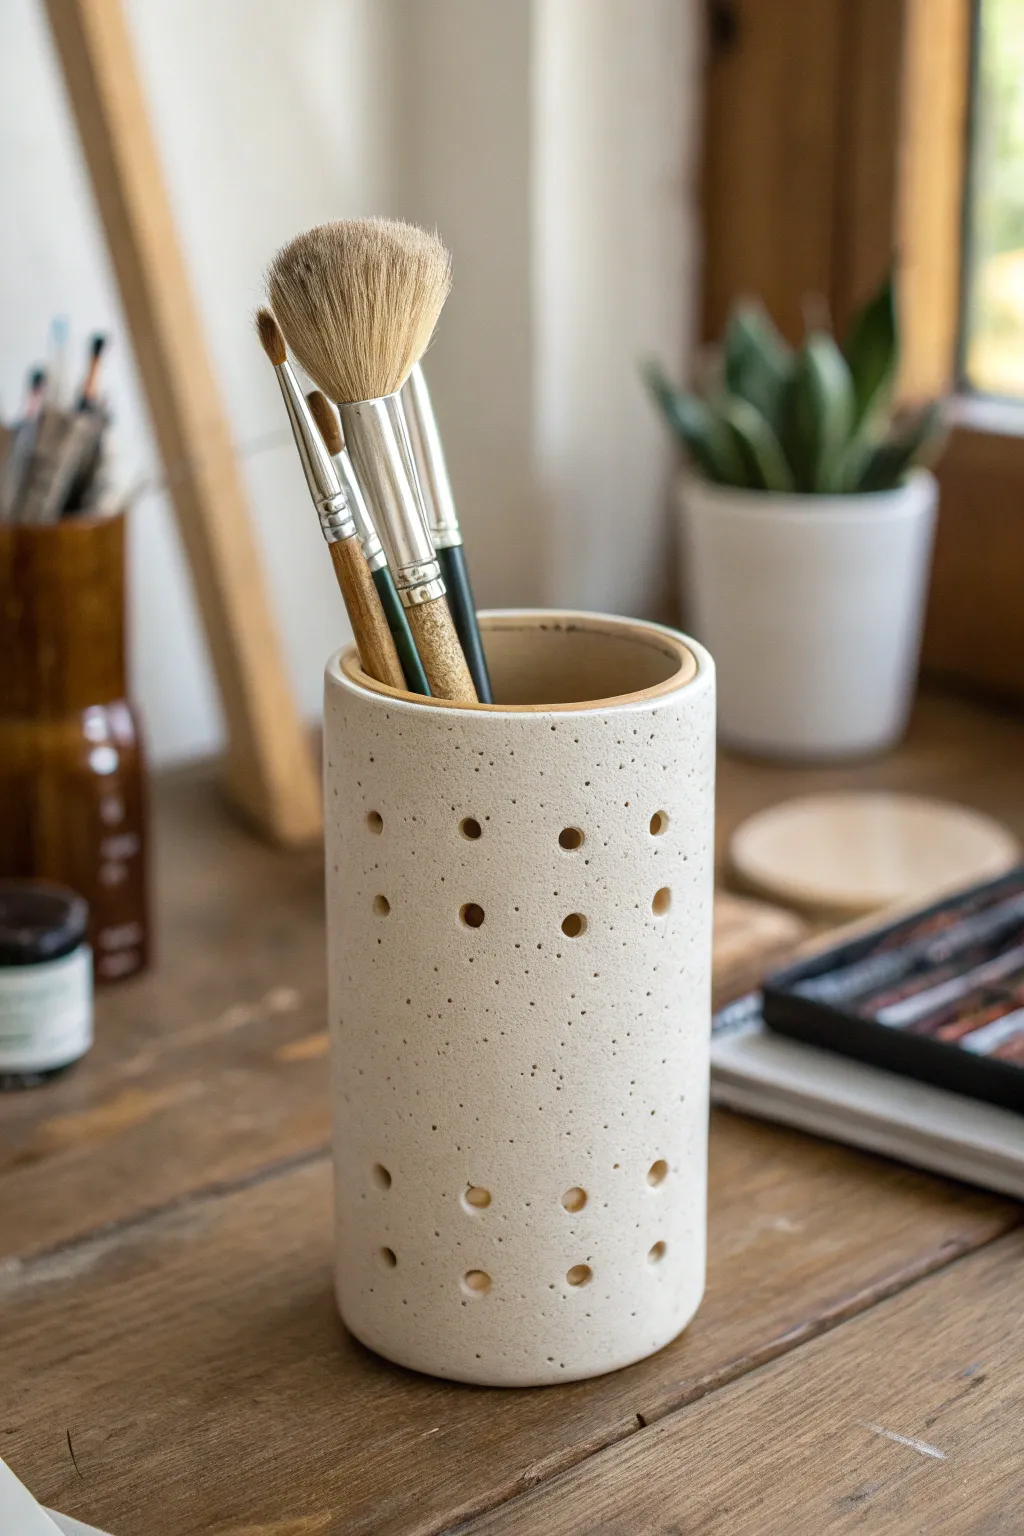
This minimalist brush holder combines the raw beauty of speckled clay with functional, geometric design. Its perforated surface ensures proper airflow for your tools while adding a sophisticated texture to any creative workspace.
Step-by-Step Tutorial
Materials
- Speckled Stoneware Clay
- Rolling pin with guide sticks (approx. 5-7mm thickness)
- Clay slab roller (optional)
- Fettling knife
- Ruler
- Scoring tool (serrated rib or needle tool)
- Slip (made from the same clay body)
- Hole cutter tool or straw (approx. 5mm diameter)
- Sponge
- Wooden rib tool
- Template (paper or cardstock)
- Soft paintbrush
- Clear matte glaze
Step 1: Slab Preparation
-
Wedge the clay:
Begin by thoroughly wedging your speckled stoneware clay to remove any air bubbles. This step is crucial for ensuring the structural integrity of your cylinder. -
Create a slab:
Roll out a slab of clay to a uniform thickness, ideally around 5-7mm. Using guide sticks on either side of your rolling pin helps keep the thickness consistent. -
Smooth the surface:
Compress the slab on both sides using a soft rib tool. This smooths out canvas textures and aligns the clay particles to prevent warping later. -
Cut the rectangle:
Measure and cut a rectangle from your slab based on your desired height and diameter. For a standard brush holder, 15cm tall by 25cm wide works well. -
Form the base:
Cut a circular disc from the remaining slab to serve as the base. Use a circular cutter or trace a lid that matches the diameter of your eventual cylinder.
Step 2: Assembly
-
Bevel the edges:
Cut the two short vertical ends of your rectangular slab at a 45-degree angle. This allows them to overlap seamlessly when you roll the clay into a tube. -
Score and slip:
Score the beveled edges aggressively and apply a generous amount of slip. I like to let this sit for just a moment to get tacky before joining. -
Form the cylinder:
Stand the rectangle up and curve it into a cylinder, pressing the scored beveled edges together firmly. -
Reinforce the seam:
Use a wooden tool to blend the seam on both the inside and outside until the join is invisible. Support the wall from the inside with your other hand while doing this. -
Attach the base:
Score and slip the bottom edge of the cylinder and the outer rim of your base disc. Press the cylinder onto the base. -
Blend the bottom:
Use a modeling tool to drag clay from the base up onto the wall, smoothing it out to create a seamless transition.
Clean Hole Cutting
Wait until the clay is leather hard before punching holes. If the clay is too soft, the cylinder will deform; too dry, and it may crack.
Step 3: Detailing and Finishing
-
Refine the rim:
Use a damp sponge or a chamois strip to compress and round off the top rim of the cylinder for a soft, finished look. -
Mark the grid:
Lightly mark a grid pattern on the clay surface using a needle tool or ruler to guide where your perforations will go. -
Punch the holes:
Using a small circular hole cutter or a clean straw, punch holes at the grid intersections. Support the wall from the inside to prevent it from collapsing. -
Clean the edges:
Once the clay is leather hard, use a slightly damp sponge to smooth any sharp burs created around the punched holes. -
Initial firing:
Allow the piece to dry completely before bisque firing it to the appropriate cone for your clay body. -
Glazing:
Apply a clear matte glaze to the interior and exterior to highlight the natural speckles of the clay. -
Final firing:
Glaze fire the piece according to the glaze manufacturer’s instructions.
Rim Contrast
Leave the very top rim unglazed or use a contrasting tenmoku glaze on just the lip to frame the piece and add visual definition.
Place your brushes inside and enjoy the organized aesthetic on your desk
Ring Cone or Ring Dish With Personality
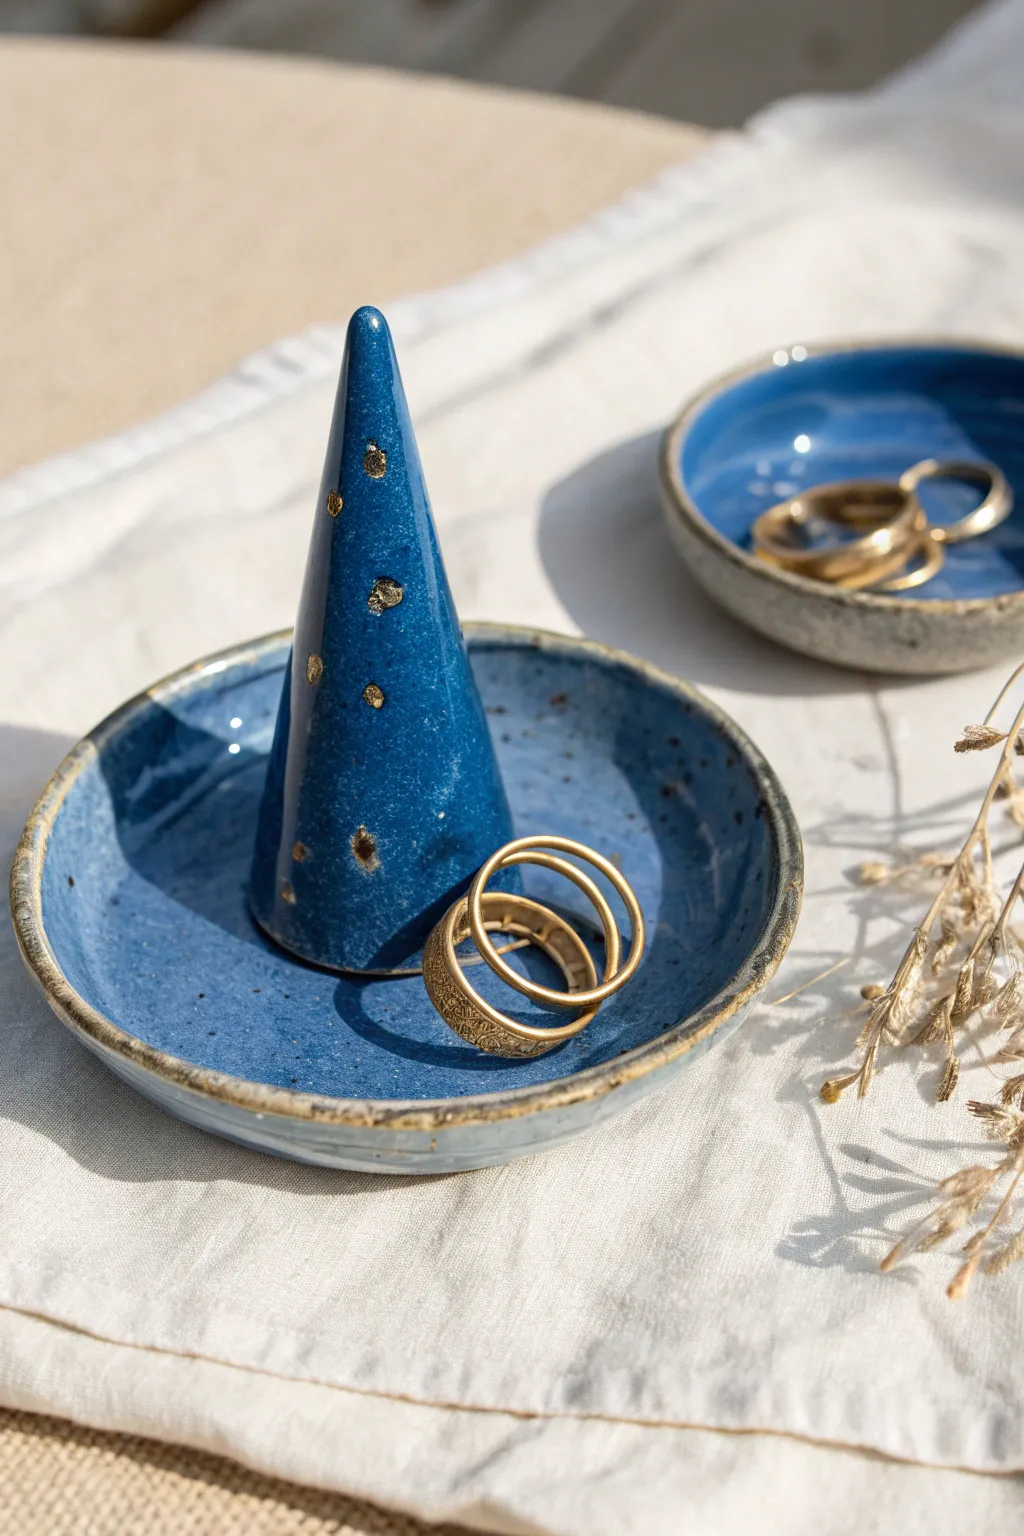
This charming two-piece jewelry holder combines a functional ring cone with a matching catch-all dish, perfect for keeping small treasures organized. The deep, speckled blue glaze is accented with delicate touches of real gold luster, creating a look reminiscent of a starry night sky.
Step-by-Step Guide
Materials
- White or light-colored easy-fire clay (low fire earthenware or stoneware)
- Small rolling pin
- Rolling guide sticks (approx. 1/4 inch thick)
- Needle tool or fettling knife
- Paper cone template (can be made from cardstock)
- Slip (clay and water mixture)
- Scoring tool (or an old toothbrush)
- Sponge
- Deep glossy blue glaze (speckled variety preferred)
- Gold luster (low-fire overglaze)
- Small fine-point liner brush for gold
- Kiln access
Step 1: Shaping the Cone
-
Prepare the Clay:
Begin by wedging a small amount of clay to remove any air bubbles. Roll it out into a slab about 1/4 inch thick, using guide sticks to ensure an even surface. -
Cut the Shape:
Place your paper cone template (which looks like a pie slice with a rounded edge) onto the slab. Trace around it with a needle tool and cut out the shape cleanly. -
Form the Cone:
Gently curl the triangle piece around your finger to form a cone shape. Bring the two straight edges together until they meet. -
Score and Slip:
Score the meeting edges thoroughly with your needle tool or serrated rib, apply a dab of slip, and press the seam firmly together. -
Smooth the Seam:
Use your thumb or a small wooden tool to smooth over the seam on the outside until it’s invisible. I like to reach a finger inside to support the wall while smoothing the exterior. -
Refine the Tip:
Gently pinch and roll the top of the cone to create a softly rounded point, ensuring it isn’t too sharp or fragile.
Seam Splitting?
If the cone seam opens during drying, you likely didn’t score deep enough. In the future, scratch the edges vigorously and use plenty of slip to create a true bond.
Step 2: Creating the Base Dishes
-
Roll the Base Slabs:
Roll out two more slabs of clay for the dishes. One will act as the holder for the cone, and the other as a standalone dish. -
Cut Circles:
Place a round cookie cutter or a small bowl upside down on the clay and cut out two circles. These should be slightly wider than you want the finished dish to be. -
Create the Rim:
Gently pinch the edges of the circles upward to create a lip. For a rustic look similar to the photo, allow the rim to be slightly uneven or organic rather than perfectly machine-smooth. -
Attach the Cone (Optional):
You can leave the cone loose, but to secure it, score the bottom of the cone and the center of one dish. Apply slip and press the cone firmly into the center of the dish. -
Clean and Dry:
Use a damp sponge to smooth any rough edges on the rims. Let all pieces dry slowly under plastic for a day, then uncover until bone dry. -
Bisque Fire:
Fire the pieces in the kiln to cone 04 (or according to your clay’s bisque specifications).
Luster Logic
Gold luster is precious! Use a dedicated brush just for gold and clean it with essence of lavender, never water, to preserve the metallic properties.
Step 3: Glazing and Gold Accents
-
Apply Base Glaze:
Stir your deep blue speckled glaze well. Pour glaze inside the dish and swirl it to coat, then pour out excess. Dip the cone or brush the glaze onto the cone’s surface. Wipe the very bottom (foot) clean with a wet sponge. -
Glaze Fire:
Fire the pieces again to the maturity temperature of your glaze (typically cone 5 or 6 for stoneware). -
Apply Gold Luster:
Once the pieces are cool, use a very fine liner brush to dab small, irregular spots of gold luster onto the cone and perhaps a few around the rim of the dish. -
Third Firing:
Place the pieces back in the kiln for a final low-fire luster firing (usually cone 018 or 019). Ensure you have good ventilation as luster fumes can be strong.
Your finished ring cone set will bring a touch of celestial elegance to any nightstand or vanity
Set of Mix-and-Match Ceramic Coasters
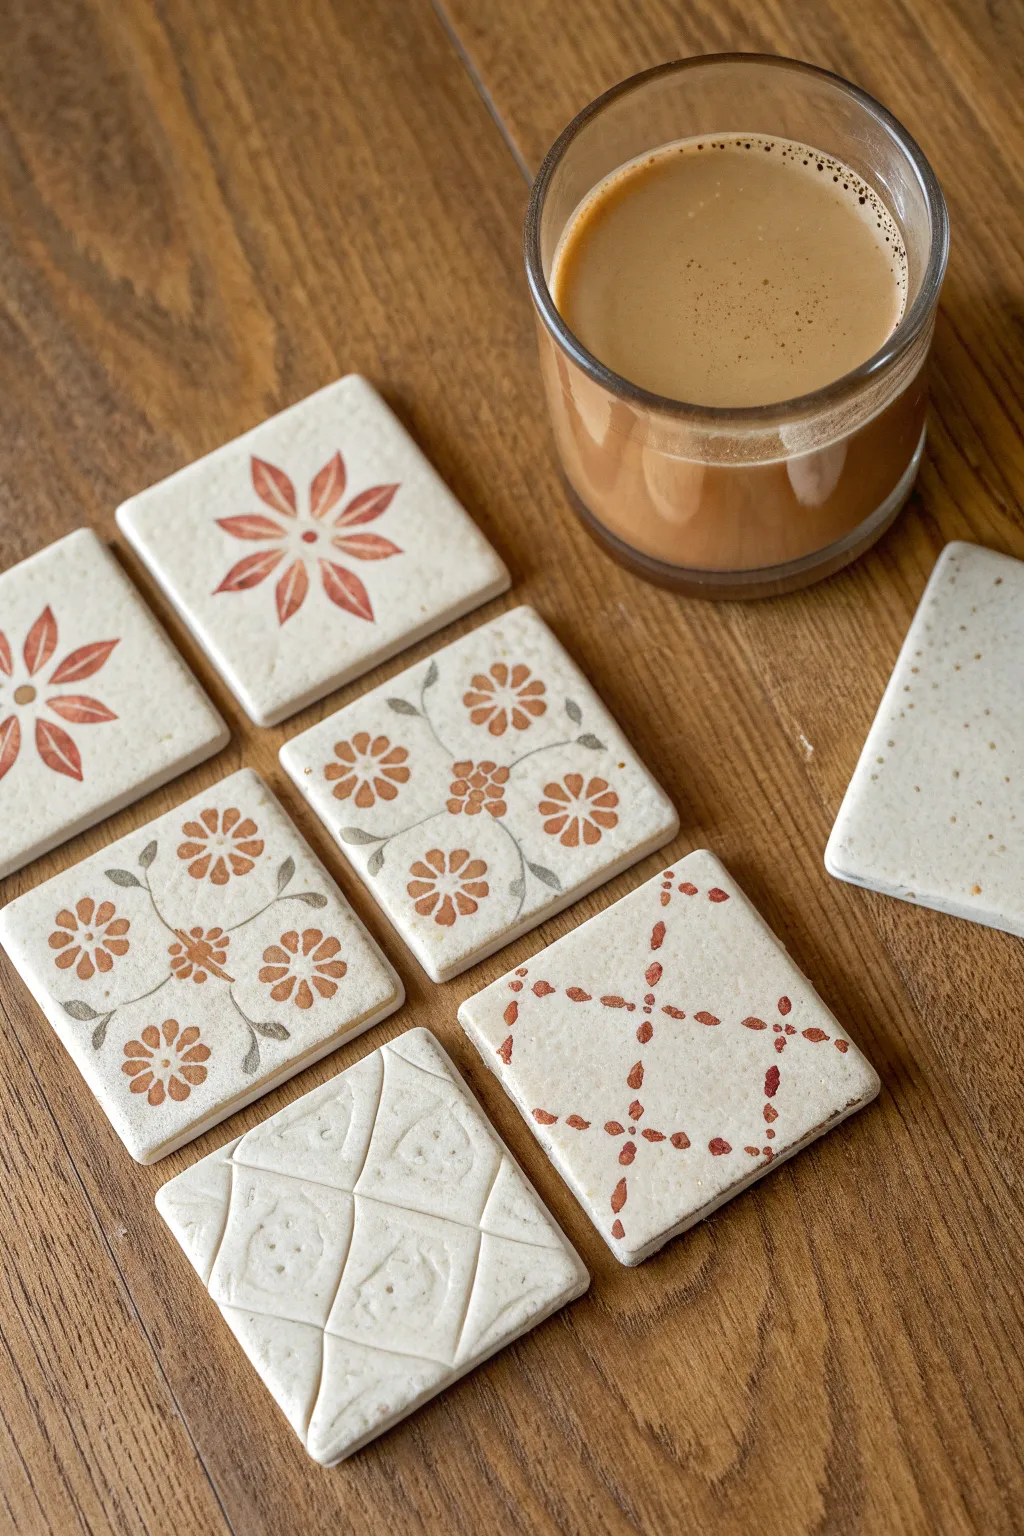
Bring a touch of artisan warmth to your coffee table with this set of handcrafted ceramic coasters, featuring a delightful mix of painted botanical motifs, geometric patterns, and embossed textures. The earthy cream clay body paired with simple rust-red and sage-green glazes creates a cohesive yet eclectic collection perfect for any cozy home.
Step-by-Step
Materials
- White or cream stoneware clay (grogged for stability)
- Rolling pin
- Two wooden guide strips (approx. 5-6mm thick)
- Square cookie cutter (approx. 3.5 – 4 inches) or ruler and needle tool
- Pottery sponge
- Underglazes: Rust Red/Terracotta and Sage Green/Grey-Green
- Fine detail paintbrush (size 0 or 1 round)
- Small carving tool or fettling knife
- Clear matte or satin transparent glaze (food safe)
- Canvas or slab mat for rolling
- Kiln
Step 1: Slab Preparation & Cutting
-
Roll the slab:
Begin by wedging your clay thoroughly to remove air bubbles. Place the clay on a canvas surface between your two wooden guide strips. Roll the clay out until the rolling pin rests flat on the guides, ensuring an even thickness of about 5-6mm across the entire slab. -
Smooth the surface:
Before cutting, take a slightly damp sponge or a rubber rib and gently compress the clay surface. This removes the canvas texture and aligns the clay particles, preventing warping later. -
Cut the squares:
Using your square cutter or a ruler and needle tool, cut out at least 6-8 squares. I always cut a few extras just in case a design doesn’t go as planned or a piece cracks during drying. -
Refine the edges:
Once cut, gently tap the edges of each square against your work surface to square them up. Use a damp finger or sponge to soften the sharp corners slightly so they are pleasant to touch.
Dry Slow & Even
To prevent these flat slabs from warping as they dry, sandwich them between two pieces of drywall board. The drywall absorbs moisture evenly from both sides.
Step 2: Designing & Decorating
-
Emboss design (Textured Coaster):
For the white-on-white textured coaster, choose a square while the clay is leather-hard. Use a blunt modeling tool or the back of a knife to gently press geometric lines—creating triangles and diamonds—into the surface. Do not cut all the way through; just compress the clay to create relief. -
Sketching delicate vines:
For the botanical vine coasters, lightly sketch your layout with a pencil directly on the bone-dry clay. Use the rust-red underglaze to paint small, five-petaled flowers scattered across the square. Keep the consistency like heavy cream for opaque coverage. -
Adding foliage:
Switch to your sage green underglaze. Paint thin, curving stems connecting the rust flowers. Add small, paired leaves along the stems. Use a very light touch with the tip of your brush for the stems to keep them delicate. -
Painting the starburst:
On separate tiles, create a central focal point. Paint a large, eight-petal starburst flower in the center using the rust-red underglaze. Start from the center and pull your brush outward to create tapered petal shapes. -
Dotted geometric pattern:
For the geometric dotted coaster, visualize an ‘X’ crossing the tile. Dip the back end of your paintbrush or a dotting tool into the rust underglaze. Stamp rows of dots to form intersecting diamond shapes and lines, keeping the spacing organic but rhythmic. -
Speckled finish (Optional):
Leave one or two coasters plain or minimally decorated. You can flick a stiff toothbrush dipped in diluted brown underglaze over them to create a subtle speckled effect that mimics natural stone.
Step 3: Firing & Finishing
-
Bisque firing:
Allow all coasters to dry slowly and completely. Covering them loosely with plastic for the first day helps prevent corners from curling. Once bone dry, bisque fire them to your clay body’s recommended temperature (usually Cone 04). -
Glazing:
Wipe the bisque-fired tiles with a damp sponge to remove dust. Dip or brush on a clear matte or satin transparent glaze. A matte finish looks best here as it preserves the earthy, tactile aesthetic of the clay. -
Glaze wiping:
For the textured embossed coaster, ensure the glaze doesn’t pool too thickly in the grooves, which might obscure the pattern. Wiping the high points gently with a sponge can accentuate the relief. -
Final firing:
Clean the bottoms and sides of the coasters carefully to prevent sticking to the kiln shelf. Glaze fire the pieces according to the clear glaze instructions (typically Cone 5 or 6 for stoneware). -
Adding protection:
Once cooled, attach small cork or felt pads to the bottom corners of each coaster. This protects your wooden furniture and prevents the ceramic from sliding around.
Level Up: Mishima
Try the Mishima technique for the vines: carve the lines first, fill them with underglaze, let it dry, then scrape the surface back to reveal crisp inlaid lines.
Now you have a stunning custom set ready to hold your morning coffee or to be gifted to a friend.
Botanical Impressions Pressed Into Clay
Capture the delicate vein structure of nature with this elegant ceramic plate project. By pressing a fresh fern frond into soft clay and highlighting the impression with an oxide wash, you create a timeless piece of functional art that celebrates botanical beauty.
Detailed Instructions
Materials
- Speckled stoneware clay (mid-fire)
- Rolling pin
- Canvas or slab mat
- Two wooden guide strips (approx. 1/4 inch thick)
- Fresh fern frond (sturdy variety like a Sword Fern)
- Small pony roller or brayer
- Needle tool
- Fettling knife
- GR Pottery Form (round) or a large bowl for slumping
- Red iron oxide or mason stain (dark brown)
- Sponge
- Clear or translucent matte glaze
- Rubber kidney rib
Step 1: Preparing the Slab
-
Roll the slab:
Begin by wedging your speckled stoneware clay to remove any air bubbles. Place it on your canvas workspace between your two wooden guide strips. -
Flatten evenly:
Roll the clay out using your rolling pin until the pin rests on the guide strips, ensuring a perfectly even thickness across the entire slab. -
Compress the surface:
Take your rubber kidney rib and gently swipe it across the clay surface in multiple directions. This aligns the clay particles and creates a smooth ‘canvas’ for your print while removing canvas texture.
Clean Leaf Removal
If the leaf tears and gets stuck in the clay, wait for the clay to dry slightly. Once leather hard, tease the stuck bits out with a needle tool.
Step 2: Creating the Botanical Impression
-
Position the fern:
Lay your fresh fern frond face down onto the slab. I find that placing the underside of the leaf against the clay yields the most detailed vein patterns. -
Initial press:
Gently press the central stem and larger leaves down with your fingertips just enough so they don’t shift. -
Roll the impression:
Using a small pony roller or brayer, firmly roll over the entire fern. You want to press the plant material flush with the clay surface, but avoid pressing so hard that you distort the slab’s thickness. -
Remove the plant:
Carefully lift the stem end of the fern and peel it away from the clay. Do this slowly to ensure no pieces of the leaf break off and get stuck in the fine details. -
Cut the shape:
Place your round form or a template over the impression, centering the fern design. Use your needle tool held vertically to trace and cut the circle.
Adding Definition
After basic wiping, use a tiny brush to re-apply oxide to the central stem line. This adds visual weight and anchors the delicate leaf design.
Step 3: Forming and Finishing
-
Smooth the rim:
Run a damp sponge or your finger along the cut edge to round it off. Sharp edges can chip easily after firing, so a smooth rim is essential for durability. -
Shape the plate:
Lift the slab and gently slump it into your shallow bowl mold or over a pottery form. Press gently from the center outwards to establish the curve. -
Slow drying:
Cover the piece loosely with plastic and allow it to dry slowly to the leather-hard stage before removing it from the mold. Once bone dry, bisque fire the piece according to your clay body’s instructions.
Step 4: Glazing and Highlighting
-
Apply the oxide wash:
Mix a small amount of red iron oxide or dark mason stain with water. Brush this mixture generously into the fern impression, ensuring it gets into every tiny vein. -
Wipe back:
Using a clean, damp sponge, wipe away the excess oxide from the surface. You want the color to remain only deep within the textured lines of the leaf, leaving the surface clay clean. -
Glaze application:
Dip the entire plate into a clear or transparent creamy matte glaze. Alternatively, brush on three even coats if using commercial brushing glazes. -
Rim cleanup:
If desired, wipe the very edge of the rim with a damp sponge to expose the raw, speckled clay body, creating a nice frame for the artwork. -
Final fire:
Load the kiln and fire to the maturity temperature of your clay and glaze (typically cone 5 or 6 for stoneware).
Enjoy using your custom botanical plate for serving or displaying as a natural centerpiece
Sgraffito Carving for Bold Line Art

This striking ceramic project uses the sgraffito technique to reveal crisp white floral designs against a deep midnight blue background. The contrast between the dark underglaze and the bright clay body beneath creates a bold, illustrative look that’s perfect for functional ware.
Step-by-Step
Materials
- Leather-hard stoneware clay bowl (white clay body)
- Deep blue or navy underglaze
- Soft fan brush or wide hake brush
- Sgraffito carving tools (loop tool, needle tool, or specialized sgraffito stylus)
- Pencil (optional for sketching)
- Clear transparent glaze
- Sponge and water
- Banding wheel (helpful but optional)
Step 1: Preparation & Underglazing
-
Prepare the bowl:
Ensure your thrown or hand-built bowl is at the leather-hard stage. It should be firm enough to handle without warping but still hold moisture. Smooth the surface with a rib tool to remove any grog or bumps that might interfere with carving. -
Apply the underglaze:
Using a soft fan brush, apply a generous coat of deep blue underglaze to the entire interior and exterior of the bowl. Make sure your brushstrokes are smooth and even. -
Layering for opacity:
Let the first coat dry until it loses its sheen, then apply a second and strictly perpendicular third coat. You want a solid, opaque layer of blue so no white clay shows through unexpectedly. -
Check moisture levels:
Allow the underglaze to dry to a ‘wax-hard’ consistency. It shouldn’t be sticky to the touch, but the clay underneath must not be bone dry, or the underglaze will chip when carved.
Step 2: Designing & Carving
-
Plan the layout:
Lightly sketch your design directly onto the underglaze using a regular pencil. The graphite marks will burn off in the kiln, so don’t worry about being messy. I like to map out the main flower centers first to ensure balance. -
Carve the exterior flower:
Start on the outside with the large lotus-style flower. Use a fine loop tool or stylus to carve the outline of the petals. Apply steady pressure to slice through the blue layer and reveal the white clay. -
Detail the petals:
Inside each petal, carve fine parallel lines or veins. Varying the pressure here creates lovely line weight differences—press harder for the outline, lighter for the inner details. -
Add exterior leaves:
Carve large, sweeping leaf shapes alongside the flower. Use a hatching technique (diagonal lines) to fill the interior of the leaves, contrasting them with the solid blue background. -
Move to the interior:
Carefully support the bowl and begin carving the interior design. Create tall stems rising from the bottom center, topped with stylized leaf and bud shapes. -
Carve interior vines:
Add smaller vines with simple almond-shaped leaves branching off the main stems. Keep your wrist loose to get organic, flowing curves. -
Texture the interior leaves:
Instead of simple veins, try using a small loop tools to carve horizontal stripes or ‘ladder’ patterns inside the buds for visual interest. -
Clean up crumbs:
As you carve, ‘burrs’ of clay will accumulate. Do not brush them away with your hand, as this can smear the blue onto the white lines. Instead, use a soft, fluffy dry brush to gently sweep the crumbs away or blow them off.
Chipping Lines?
If the underglaze chips flakily rather than carving smoothly, the clay is too dry. Mist it lightly with water and wrap it in plastic for a few hours to rehydrate the surface before trying again.
Step 3: Finishing & Firing
-
Rim clean-up:
Inspect the rim of the bowl. You can either leave it blue or gently sponge it back to white for a clean frame around your artwork. -
Slow drying:
Because you’ve removed surface tension by carving, dry the bowl slowly under loose plastic for a day or two to prevent warping or cracking. -
Bisque fire:
Once bone dry, fire the piece to bisque temperature (usually cone 04 or 06). This sets the shape and makes the underglaze permanent. -
Clear glazing:
Wipe the bisque ware with a damp sponge to remove dust. Dip or brush on a clear transparent glaze over the entire piece. Avoid zinc-heavy clear glazes if they tend to cloud your specific brand of underglaze. -
Final firing:
Fire the bowl to your clay body’s maturity temperature (e.g., cone 5/6 for stoneware) to finish the piece.
Add Depth
Make the design pop by varying line thickness. Use a wide loop tool for the main flower outlines and a sharp needle tool for the delicate interior veins.
Once fired, the glossy clear coat will deepen the blue and make your white line work shine brilliantly on your new favorite bowl
Raised Slip-Trailed Squiggles and Doodles
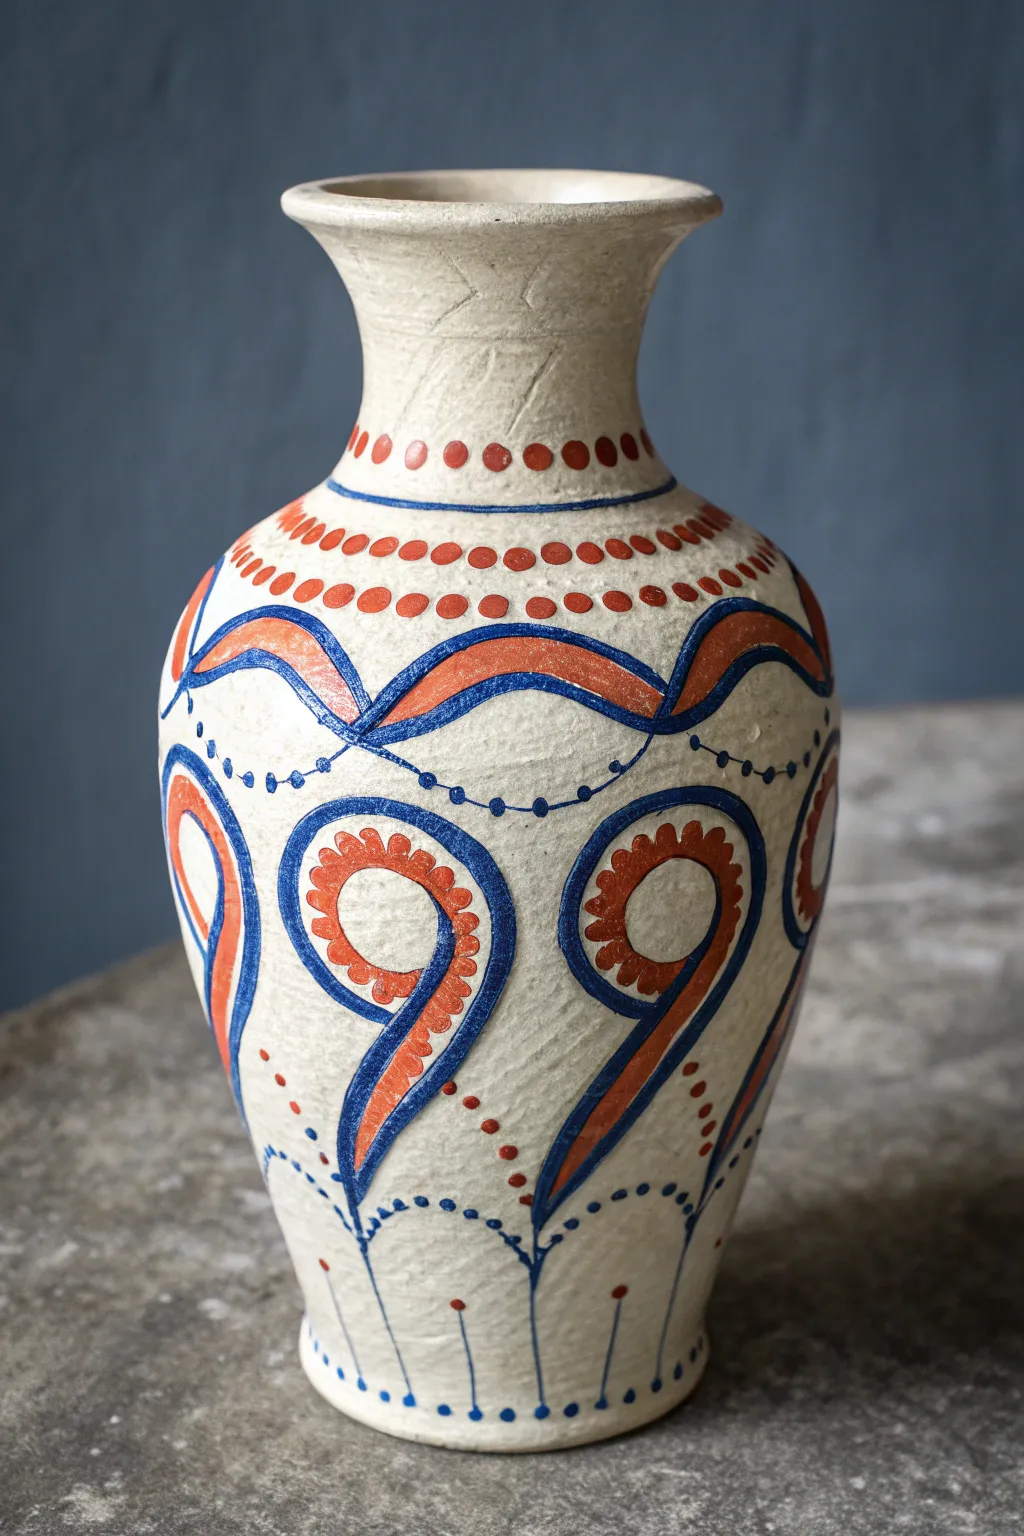
Bring a touch of whimsical folk art to your pottery collection with this charming slip-trailed vase project. Using contrasting navy and burnt orange slips on a beige body creates a wonderfully tactile surface full of playful swirls and rhythmic dots.
Step-by-Step Guide
Materials
- Bisque-fired ceramic vase (smooth stoneware or porcelain body)
- Underglaze or decorating slip (Navy Blue)
- Underglaze or decorating slip (Burnt Orange/Terracotta)
- Slip trailer bottles with fine precision tips
- Pencil (HB or soft)
- Damp sponge
- Clear matte glaze
- Loop tool (optional for carving faint guides)
- Small round brush
Step 1: Planning the Pattern
-
Surface Preparation:
Before you begin, ensure your bisque-fired vase is clean and free of dust by wiping it down gently with a damp sponge. -
Defining the Sections:
Visualize the vase in three main bands: the neck, the shoulder, and the main body. Lightly pencil in horizontal guidelines to separate these areas, ensuring your pattern stays level around the circumference. -
Marking Main Swirls:
On the main body, sketch out the large, tear-drop shaped swirling loops. These should repeat evenly around the vase, curving upwards and to the left like large paisley shapes.
Smooth Operator
Sift your slip or underglaze through a fine mesh strainer before filling bottles. Even tiny clumps can clog precision tips and ruin your smooth lines.
Step 2: Slip Trailing the Shoulders
-
Starting the Neck Ring:
Using your Burnt Orange slip in a bottle with a medium tip, create a ring of evenly spaced dots right at the base of the neck where it meets the shoulder. -
Adding the Blue Bands:
Switch to the Navy Blue slip. Carefully trail a continuous line just below your orange dots, and another parallel line about an inch down on the shoulder. -
Shoulder Decoration:
Between these two blue bands, create rows of orange dots. The top row should be a simple single line of dots. Below that, create a slightly looser, wavy blue line that connects at points, creating a scalloped effect. -
Filling the Waves:
Inside the crest of each blue wave on the shoulder, fill the space with a thick, bold stroke of orange slip to add visual weight.
Clogged Tip Rescue
Keep a thin needle or paperclip taped to your work table. If the slip stops flowing, clear the nozzle immediately rather than squeezing harder, which causes globs.
Step 3: Creating the Main Body Motif
-
Outlining the Loops:
Moving to the main body, use the Navy Blue slip to trace the large, paisley-like teardrop shapes you sketched earlier. Keep your hand steady to maintain a consistent line thickness. -
Inner Loop Detail:
Inside each large blue loop, pipe a centered line of Burnt Orange. This line should follow the curve of the blue outline but stop short of the pointed top. -
Texturing the Orange:
To give the orange shapes that distinct ‘stitched’ look, use a small tool or just the tip of your nozzle to gently pull tiny dashes of slip outward from the orange line while it’s still wet, or pipe tiny perpendicular dashes along its edge. -
Connecting Swags:
Connect the large loops with draped blue lines—think of them like bunting hanging between posts. Add a row of tiny blue dots along these draped lines for extra texture.
Step 4: Base Details and Finishing
-
Vertical Stems:
From the bottom of the loops down toward the base of the vase, trail vertical blue lines. These act as ‘stems’ that ground the design. -
Base Scallops:
Connect these vertical stems near the foot of the vase with shallow, upside-down blue arches to frame the bottom edge. -
Final Dot Accents:
Add small orange dots at the top of vertical lines or in negative spaces to balance the color distribution. I find stepping back every few minutes helps spot where a dot is needed. -
Drying:
Allow the slip decoration to dry completely. It will look chalky and lighter in color. -
Glazing:
Dip or brush a clear matte glaze over the entire piece. A matte finish preserves the folk-art aesthetic better than a glossy one, which might distract from the raised texture. -
Firing:
Fire the vase in the kiln according to the temperature requirements of your chosen clay and glaze combination.
Once fired, fill your vase with fresh wildflowers to complement the organic, handcrafted vibe of your new centerpiece
Luminary Lantern With Cutout Shapes
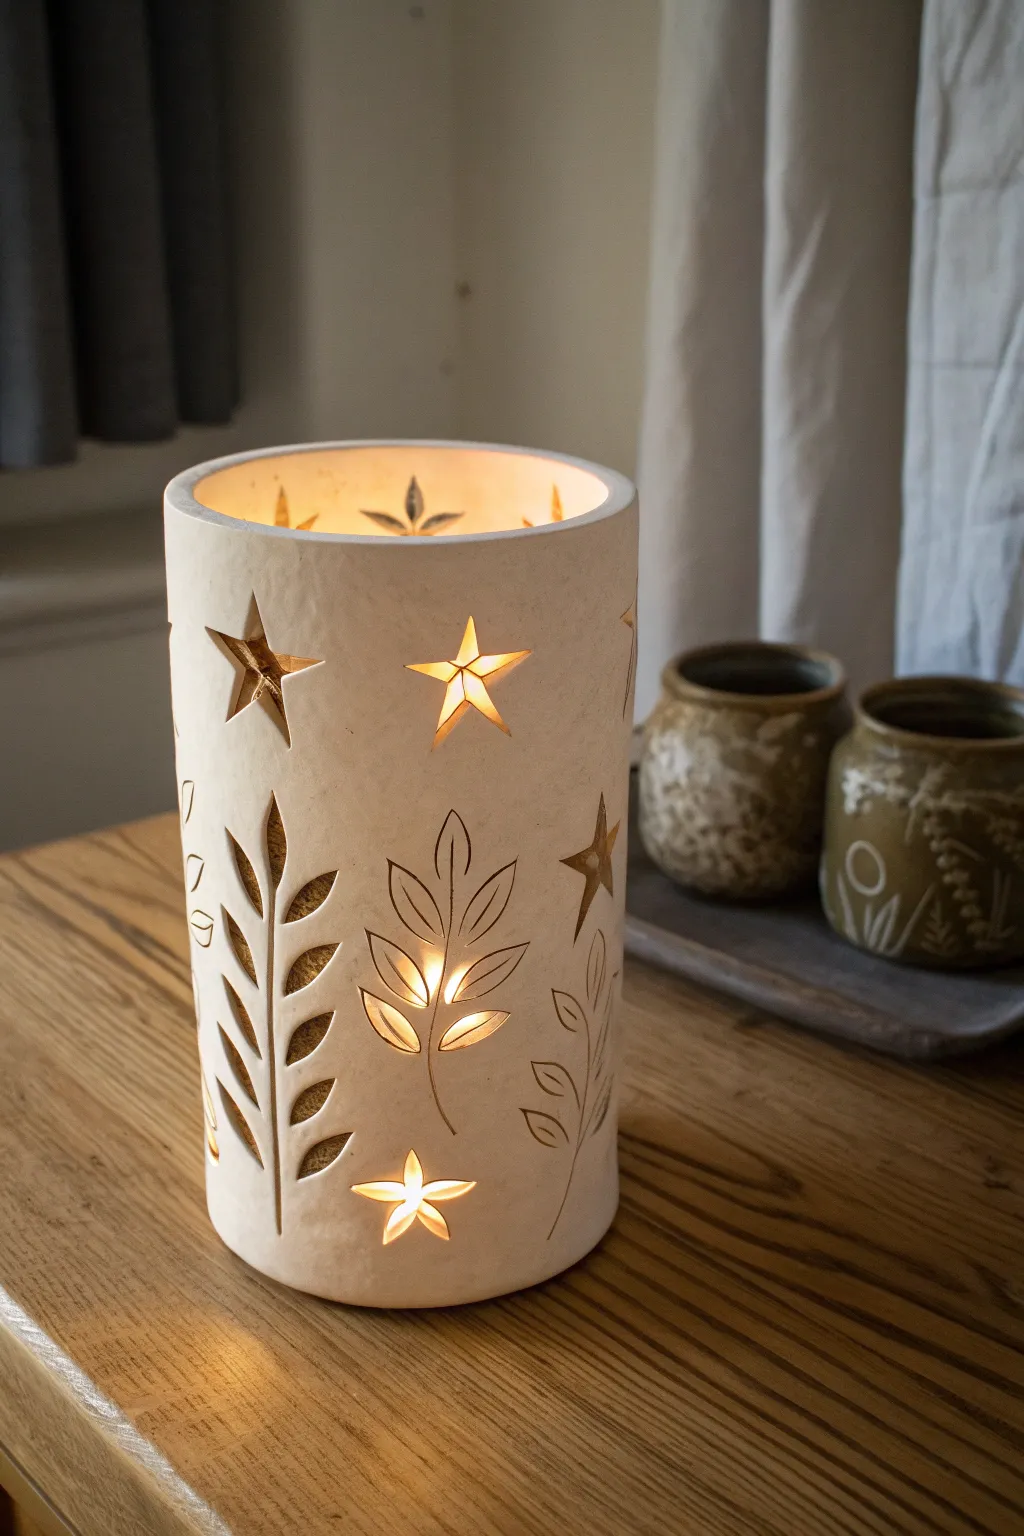
Bring a warm, celestial glow to your home with this handcrafted ceramic lantern, featuring intricate star and leaf cutouts that cast dancing shadows when lit. The clean, cylindrical form allows the light to take center stage, making it a perfect cozy accent or centerpiece.
Step-by-Step
Materials
- White stoneware or porcelain clay
- Rolling pin
- Canvas mat or cloth
- Pottery knife or fettling knife
- Needle tool
- Small star-shaped cookie cutters (optional)
- X-Acto knife or sharp scalpel tool
- Ruler
- Slip (clay and water mixture)
- Scoring tool (or serrated rib)
- Sponge
- Smooth PVC pipe or rolling pin (for forming)
- Newspaper or paper towel
Step 1: Preparing the Slab
-
Roll out the clay:
Begin by wedging your white clay to remove air bubbles, then place it on your canvas mat. Roll it out into a uniform slab, aiming for a thickness of about 1/4 inch. It’s crucial that the thickness is even so the lantern dries without warping. -
Measure and cut:
Determine the desired height and circumference of your cylinder. Using a ruler and a potter’s knife, cut a clean rectangle from your slab. Remember to add a little extra length to the circumference for the overlap seam. -
Smooth the surface:
Take a damp sponge or a soft rib tool and gently compress both sides of the slab. This aligns the clay particles, preventing future cracks, and gives you a pristine canvas for your carving. -
Let it firm up:
Allow the slab to dry slightly until it reaches a ‘soft leather-hard’ state. This is that sweet spot where the clay is still flexible enough to bend but firm enough to hold its shape while you work.
Collapsing Cylinder?
If the clay slumps while cutting, it’s too wet. Let it stiffen or keep a paper-wrapped cardboard tube inside as a support structure while you carve the detailed shapes.
Step 2: Forming the Cylinder
-
Bevel the edges:
On the two short ends of your rectangle, cut 45-degree angles in opposite directions. This creates a stronger, more seamless join when you roll the clay into a tube. -
Score and slip:
Rough up the beveled edges with your scoring tool and apply a liberal amount of slip. This acts as the glue for your ceramic piece. -
Shape the tube:
Carefully lift the slab and wrap it around a PVC pipe or shipping tube covered in newspaper to help hold the shape. Press the scored edges together firmly. -
Reinforce the seam:
Use a wooden tool or your thumb to smooth over the seam on both the inside and outside ensuring the join is invisible. I usually run a rib over the join to ensure it’s perfectly flush. -
Add a base (optional):
If you want a bottom, cut a circle of clay slightly larger than the cylinder. Score and slip the bottom of the tube and the circle, press them together, and trim the excess.
Make it Shine
For extra warmth, apply a gold luster overglaze to the inside rim or the interior back wall after the final firing. This reflects the candlelight superbly.
Step 3: Carving the Design
-
Sketch the pattern:
While the cylinder is still on the support or standing upright, lightly sketch your stars and leaf vines onto the surface using a needle tool. Keep the pressure very light so mistakes can be sponged away. -
Cut the larger stars:
Using a sharp X-Acto knife or a small star cutter, remove the clay for the main star shapes. If using a knife, cut straight through the wall and push the clay piece inward to remove it. -
Carve the leaves:
For the leaf patterns, carefully drag the scalpel through the clay to create the outlines. Remove the interior leaf shapes, keeping the lines fluid and organic. -
Detail the vines:
Connect the leaves with carved stem lines. You can make these lines slightly wider by going over them twice, allowing more light to peek through the thin stems. -
Clean the edges:
Once the clay is fully leather-hard, use a small, damp sponge or a dry paintbrush to gently smooth the sharp edges cut by the knife. This tidies up the look without distorting your crisp shapes.
Step 4: Finishing
-
Dry slowly:
Loosely cover the lantern with plastic to ensure it dries slowly and evenly. Rapid drying can cause warping, especially around the delicate cutout areas. -
Bisque fire:
Once bone dry, fire the piece to bisque temperature in a kiln. This hardens the clay and prepares it for the final stage. -
Glaze or leave raw:
For the look in the photo, leave the exterior unglazed to highlight the natural texture of the clay, or apply a very matte white glaze. You can apply a clear glaze to the inside for durability. -
Final firing:
Fire the piece one last time to the maturation temperature of your specific clay body.
Place a tea light or LED candle inside and enjoy the peaceful ambiance created by your handiwork


Have a question or want to share your own experience? I'd love to hear from you in the comments below!