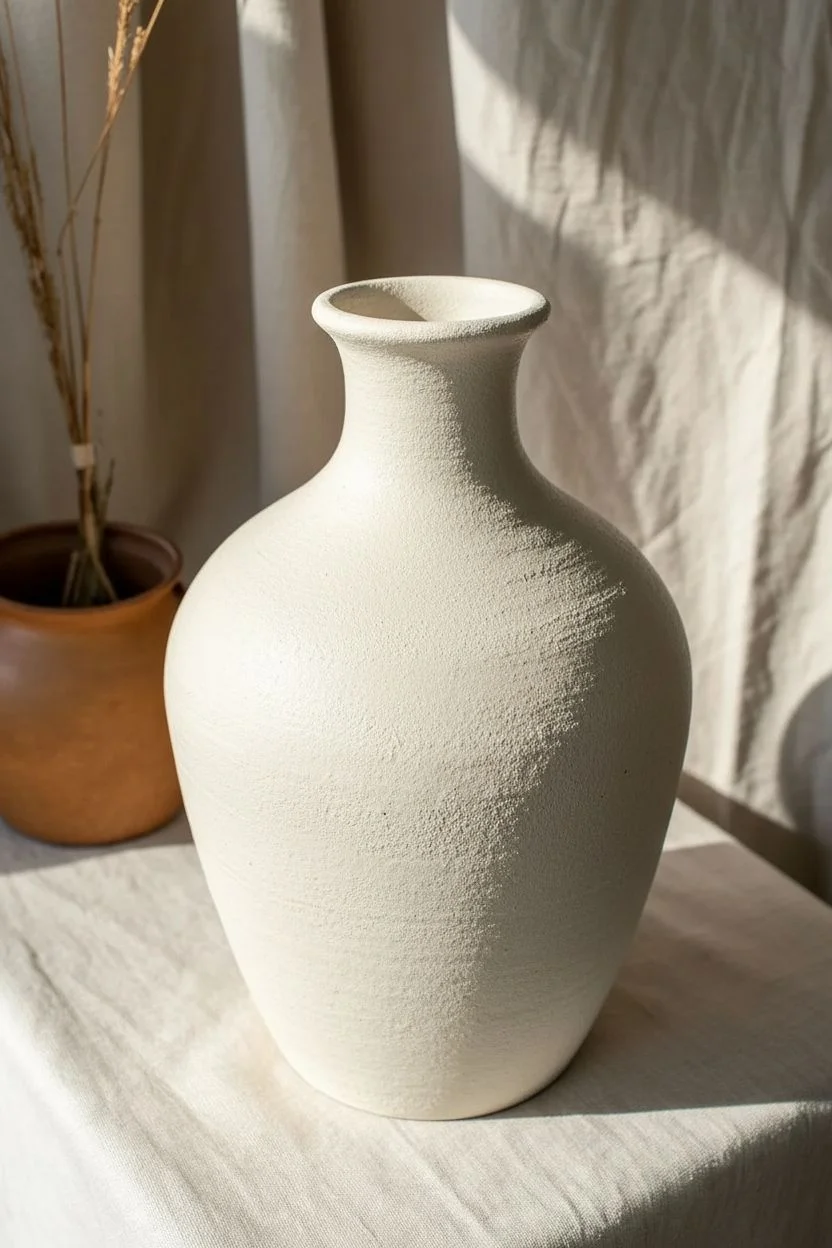
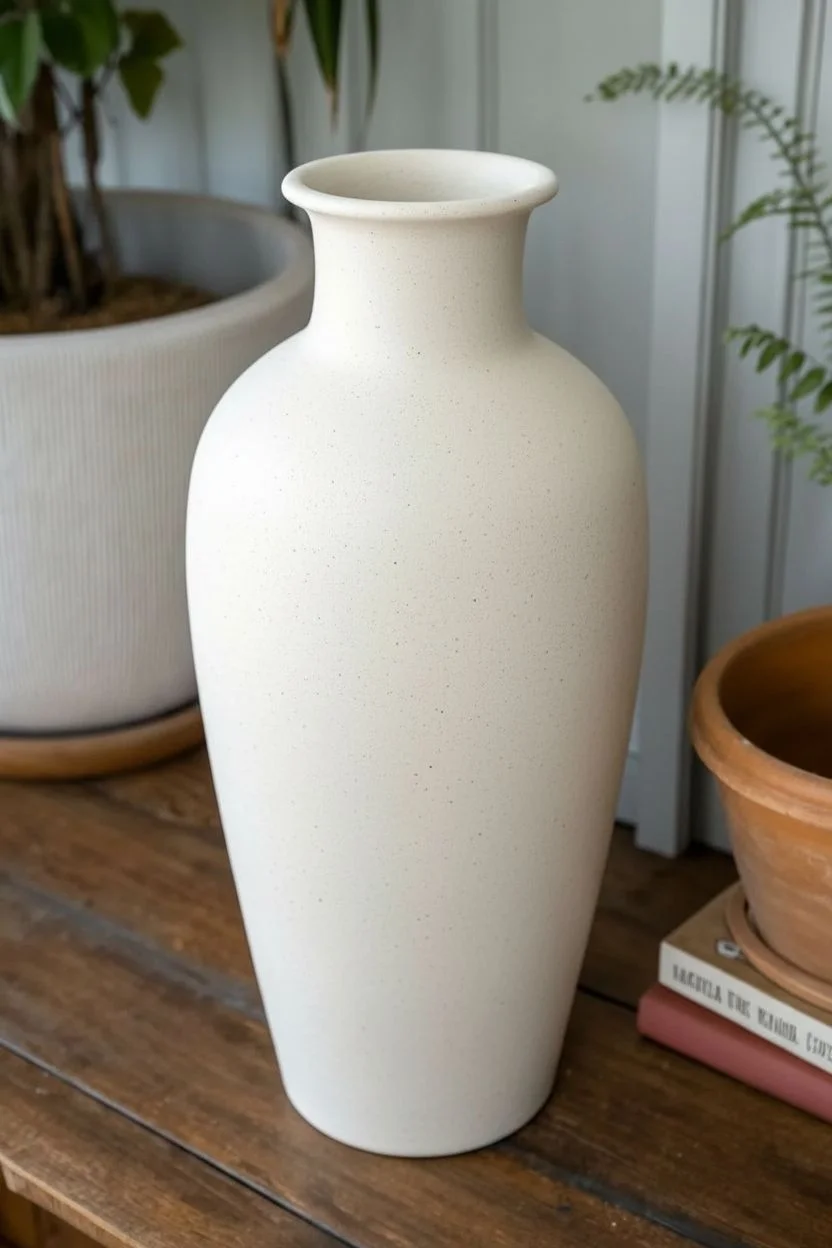
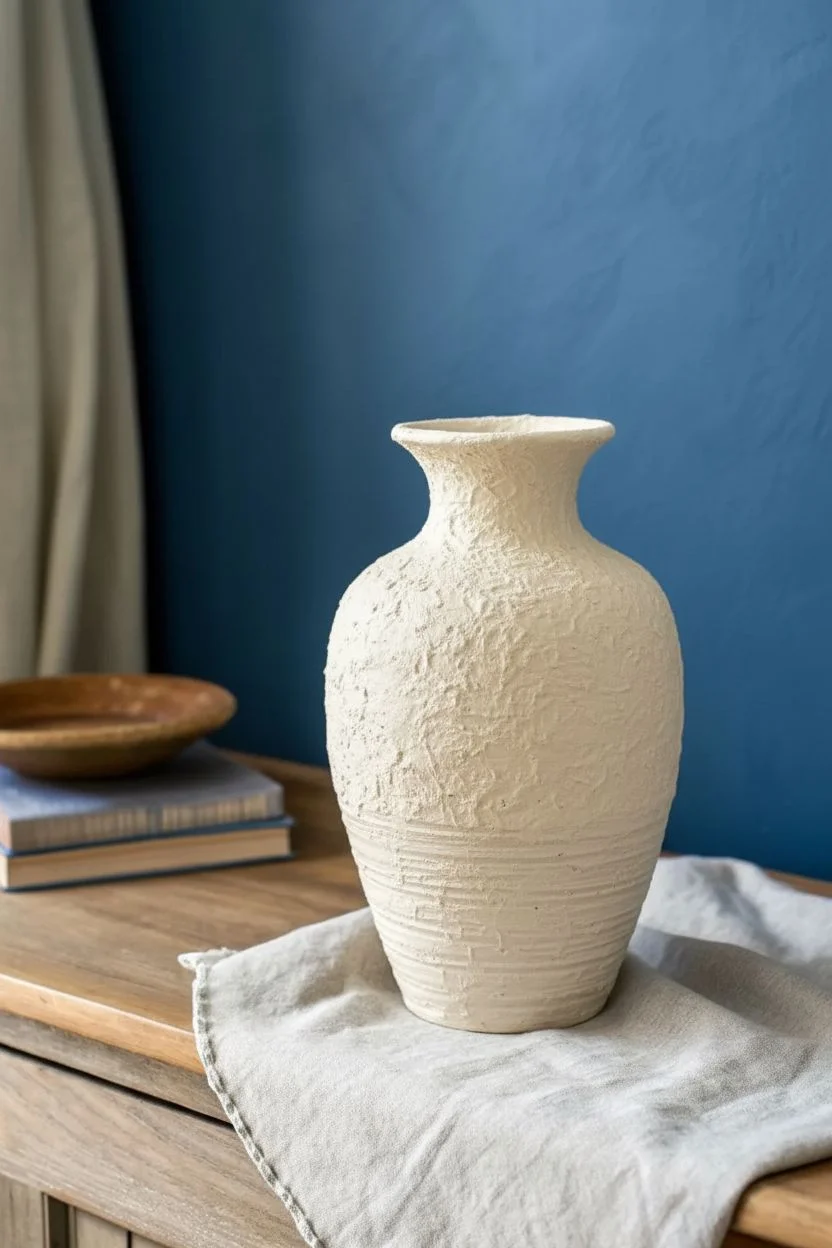
A plain ceramic vase is basically a 3D canvas, and I love how fast it can go from “meh” to “centerpiece.” Here are my favorite ceramic vase painting ideas—starting with the classics everyone reaches for, then sliding into the more playful, studio-experiment vibes.
Clean Color Blocking With Crisp Edges
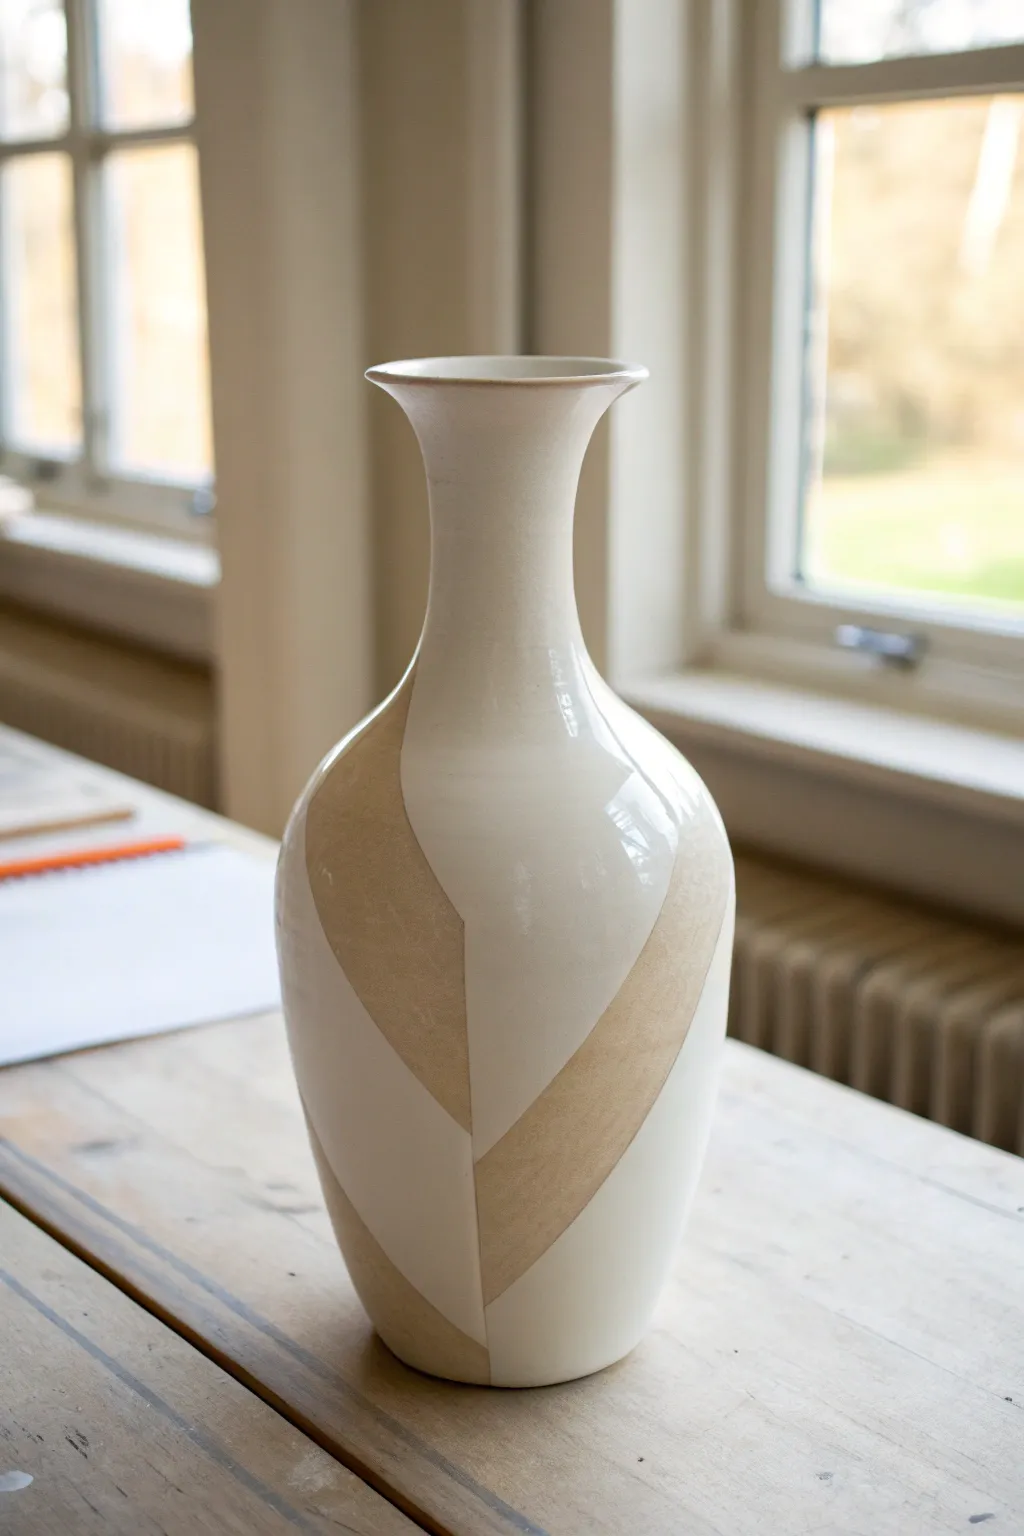
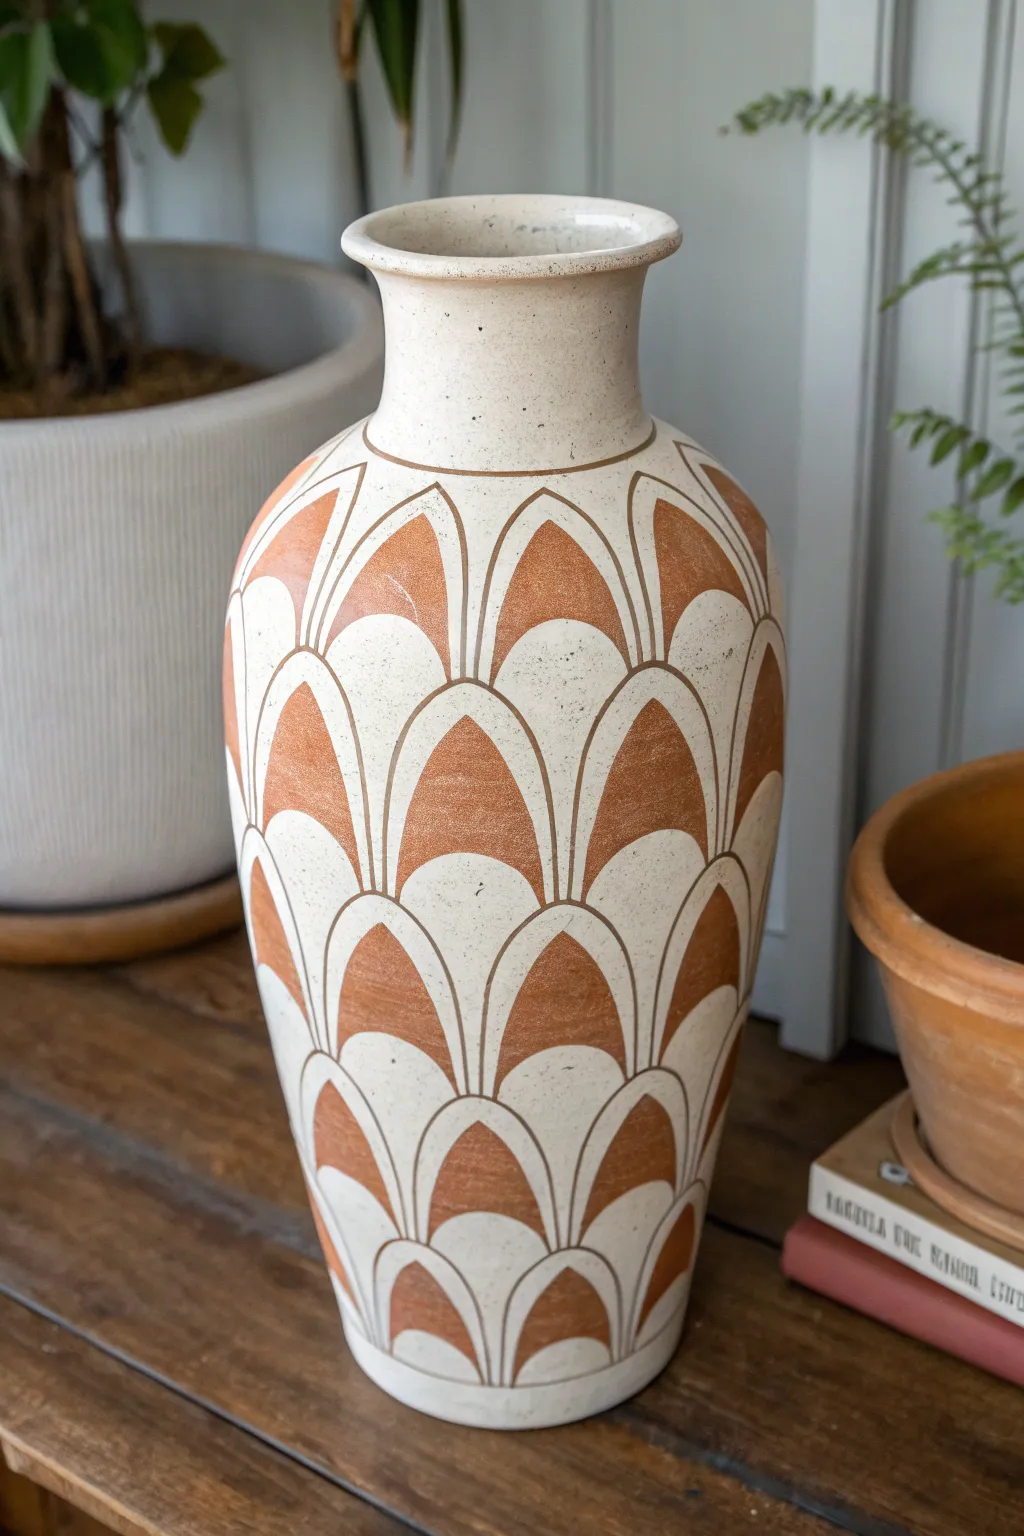
Achieve a stunning, gallery-worthy look by combining the raw, matte beauty of exposed clay with creamy, high-gloss glaze. This project uses precise masking to create elegant chevron color blocking that feels both modern and organic.
Detailed Instructions
Materials
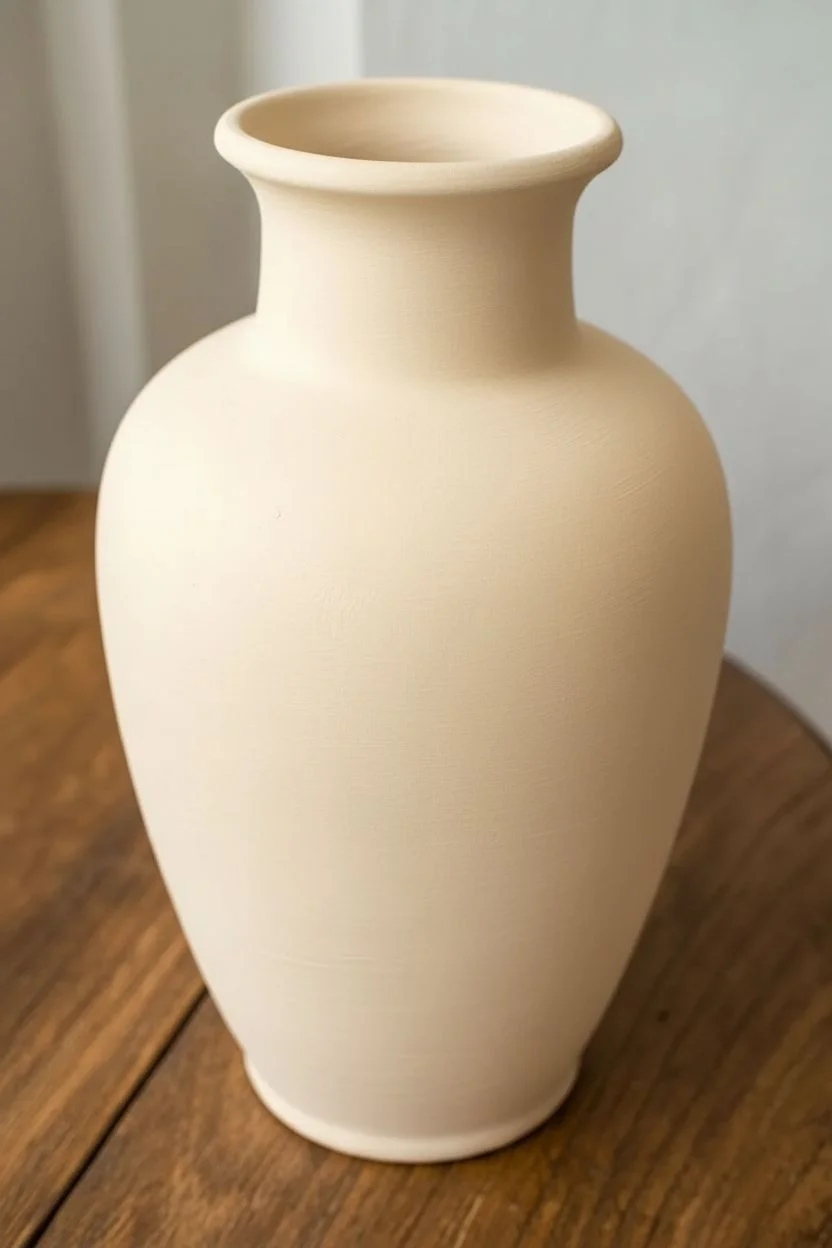
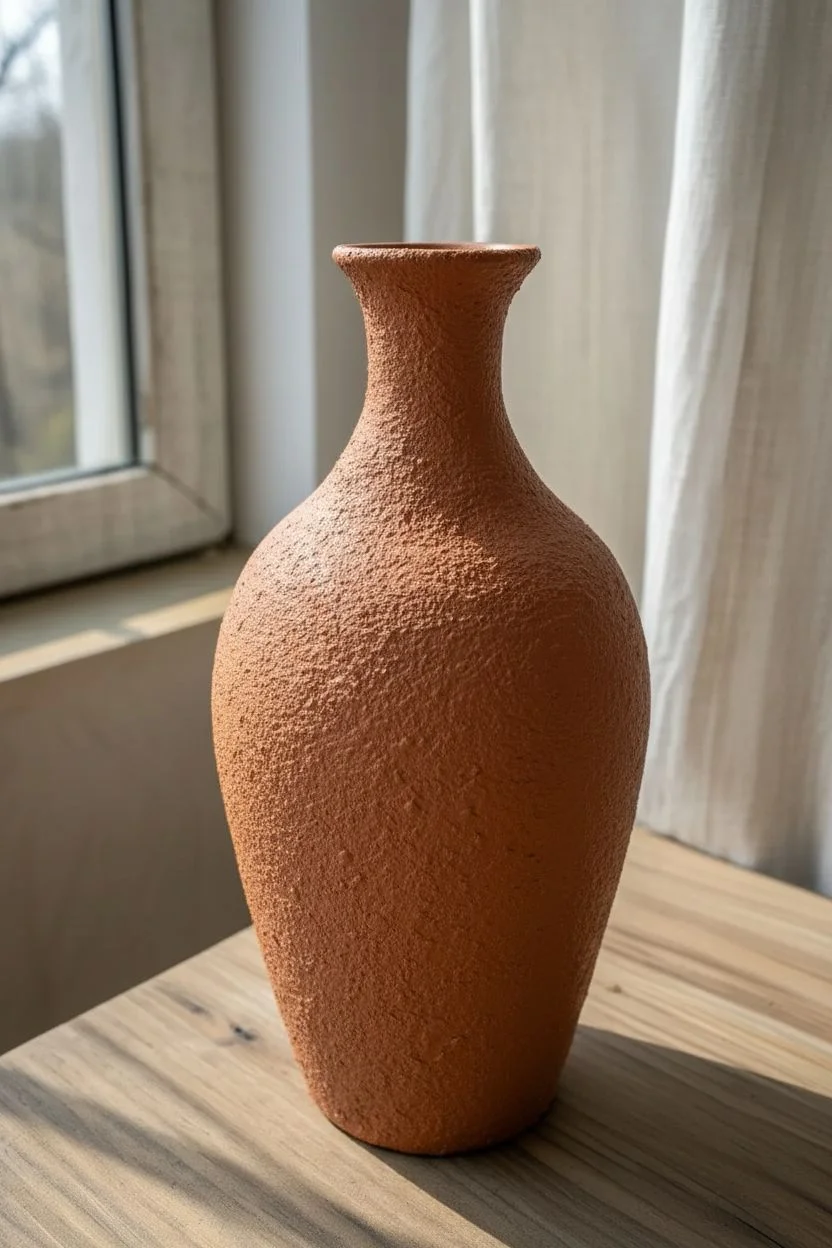
- Tall, unglazed ceramic bisque vase (white stoneware or porcelain)
- Painter’s tape (high-quality, low-tack)
- Glossy white ceramic glaze
- Soft fan brush
- Medium flat brush
- X-Acto knife or craft blade
- Scissors
- Damp sponge
- Pencil
- Measuring tape (flexible, for sewing)
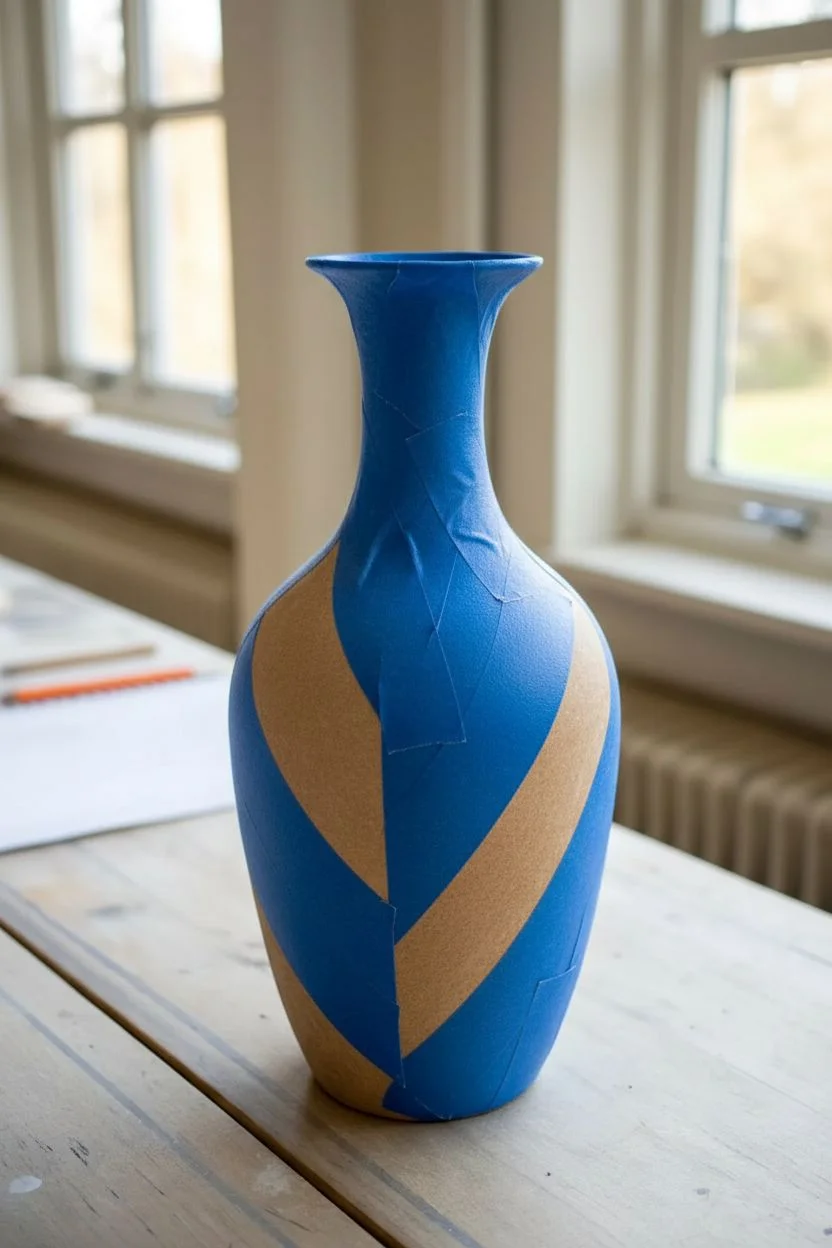
Step 1: Planning and Masking
-
Clean the surface:
Begin by wiping down your unglazed bisque vase with a slightly damp sponge. This removes any dust or oils from handling that might repel the glaze. -
Visualize the pattern:
The design features a large, diagonal chevron or leaf-like pattern. Hold the vase and visualize where you want the raw clay sections to overlap. The key feature is a central vertical ‘spine’ where the geometric shapes meet. -
Mark the center line:
Using a flexible measuring tape, lightly mark a vertical center line with your pencil on the front of the vase. This will serve as the meeting point for your geometric blocks. -
Apply the first tape strip:
Cut a long strip of painter’s tape. Place it diagonally, starting from the side of the vase and angling down towards your center line. Smooth it down firmly. -
Create the mirrored angle:
Apply a second strip of tape coming from the opposite side, meeting the first strip at the center line to create a V-shape. Don’t worry about perfect symmetry; a slightly organic feel works well here. -
Build the negative space:
You are taping off the areas that will remain *brown/raw clay*. Add more strips parallel to your first ones to thicken the masked area. The goal is to create wide bands of tape where no glaze will go. -
Trim the intersections:
Where your tape strips meet at the center vertical line or overlap awkwardly, use your X-Acto knife to gently slice the tape. Peel away the excess to create a sharp, clean intersection point. Be careful not to score the clay deep enough to weaken it. -
Seal the edges:
Run your fingernail or the back of a spoon firmly along all edges of the tape. This is the most crucial step to prevent glaze from bleeding under the mask.
Step 2: Glazing and Finishing
-
Prepare the glaze:
Stir your glossy white glaze thoroughly. It should have the consistency of heavy cream to ensure opaque coverage without running. -
First coat application:
Using the soft fan brush, apply a generous coat of glaze to the exposed areas of the vase. Brush away from the tape edges whenever possible to minimize seepage. -
Mind the neck:
Don’t forget the inside of the neck. Glaze the interior rim and down into the neck for a finished, professional look. -
Let it dry:
Allow the first coat to dry until it is chalky and cool to the touch, but no longer wet. This usually takes about 15-20 minutes. -
Apply second and third coats:
Apply two more coats of glaze, allowing drying time between each. I find that three coats usually provide that deep, rich white color seen in the photo. -
Peel the tape:
Remove the tape while the final coat is still slightly damp (leathery), not bone dry. Pull the tape slowly at a 45-degree angle away from the glazed area. This prevents the dried glaze from chipping along the line. -
Clean up edges:
If any tiny spots of glaze crept under the tape, use a stiff, damp brush or a needle tool to gently scrape them away from the raw clay sections. -
Fire the vase:
Load the vase into the kiln and fire according to the glaze manufacturer’s instructions (typically Cone 06 or Cone 6, depending on your clay body).
Tape Sealing Trick
Before applying your white glaze, brush a tiny amount of clear wax resist (or clear acrylic medium) along the tape edge. This creates an invisible barrier for perfect lines.
Texture Contrast
Use a clear matte glaze on the ‘raw’ sections instead of leaving them bare. This keeps the color contrast but makes the whole vase waterproof and smoother to touch.
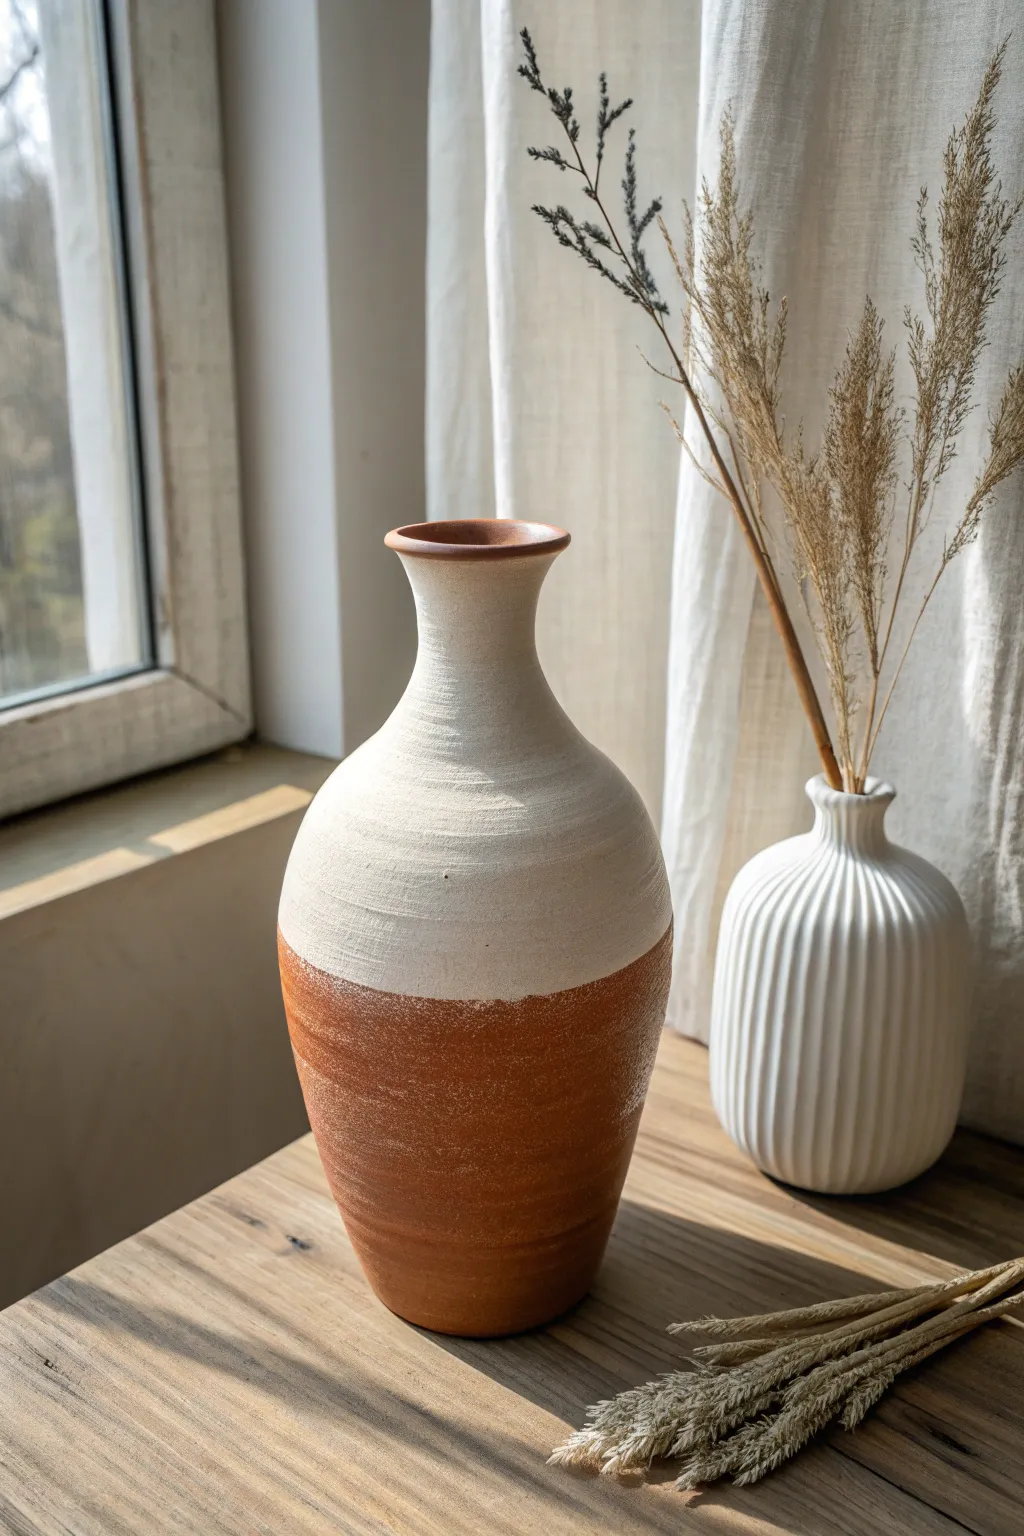
Once fired, the contrast between the glossy white surface and the warm, matte earth tones of the clay creates a sophisticated centerpiece ready for your favorite blooms


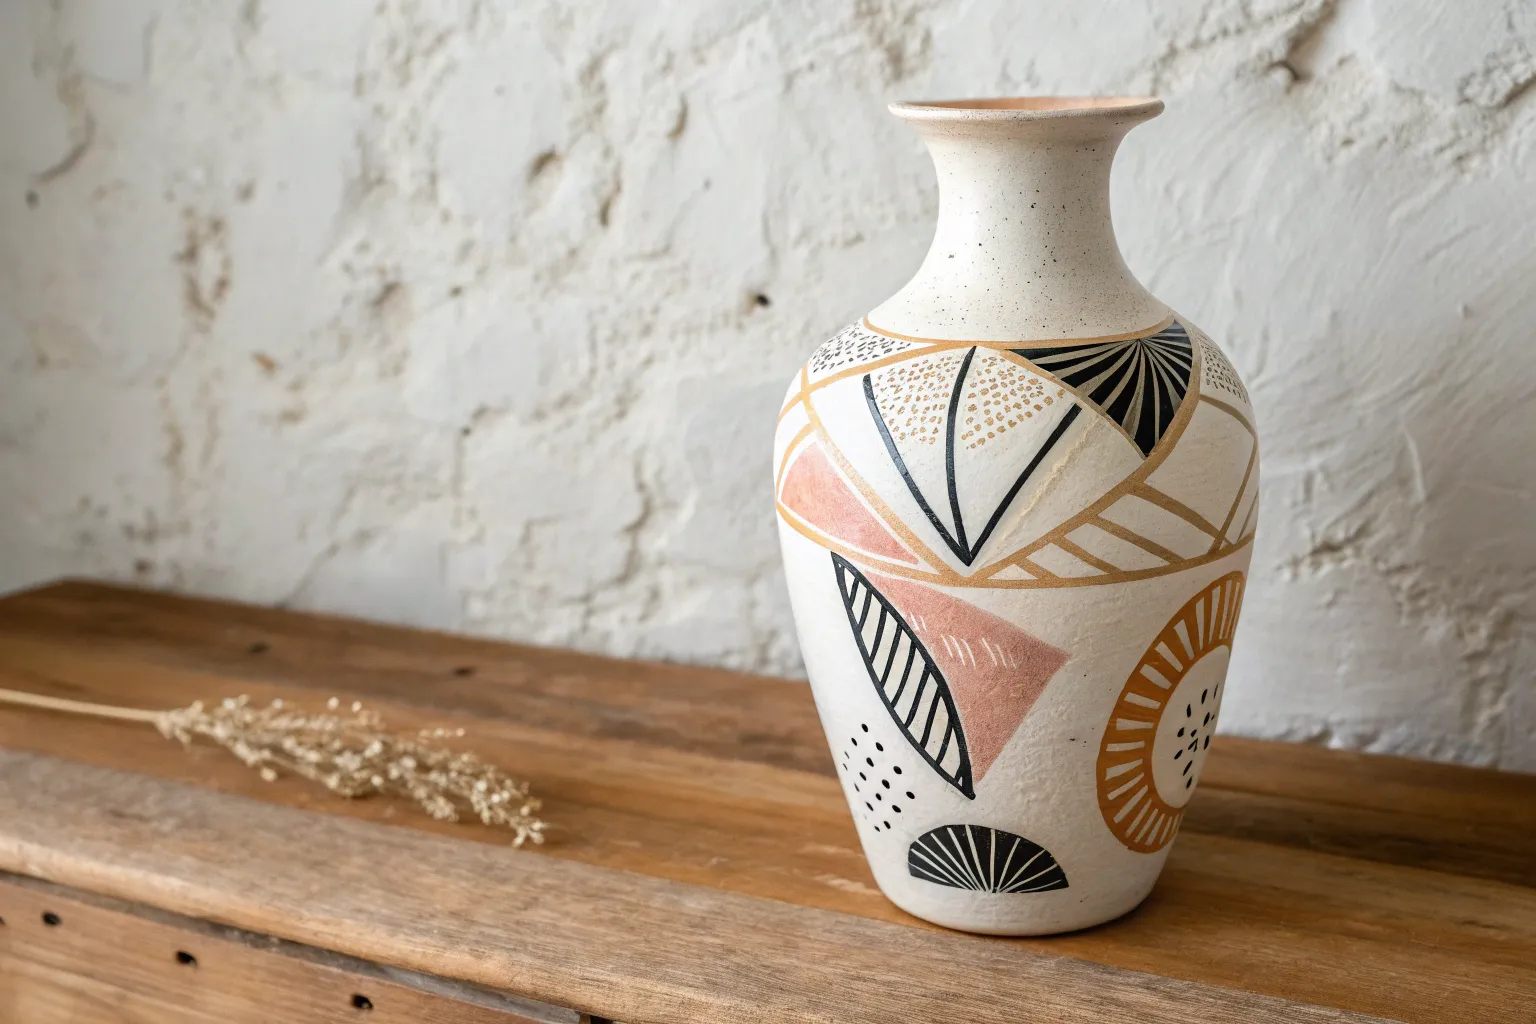
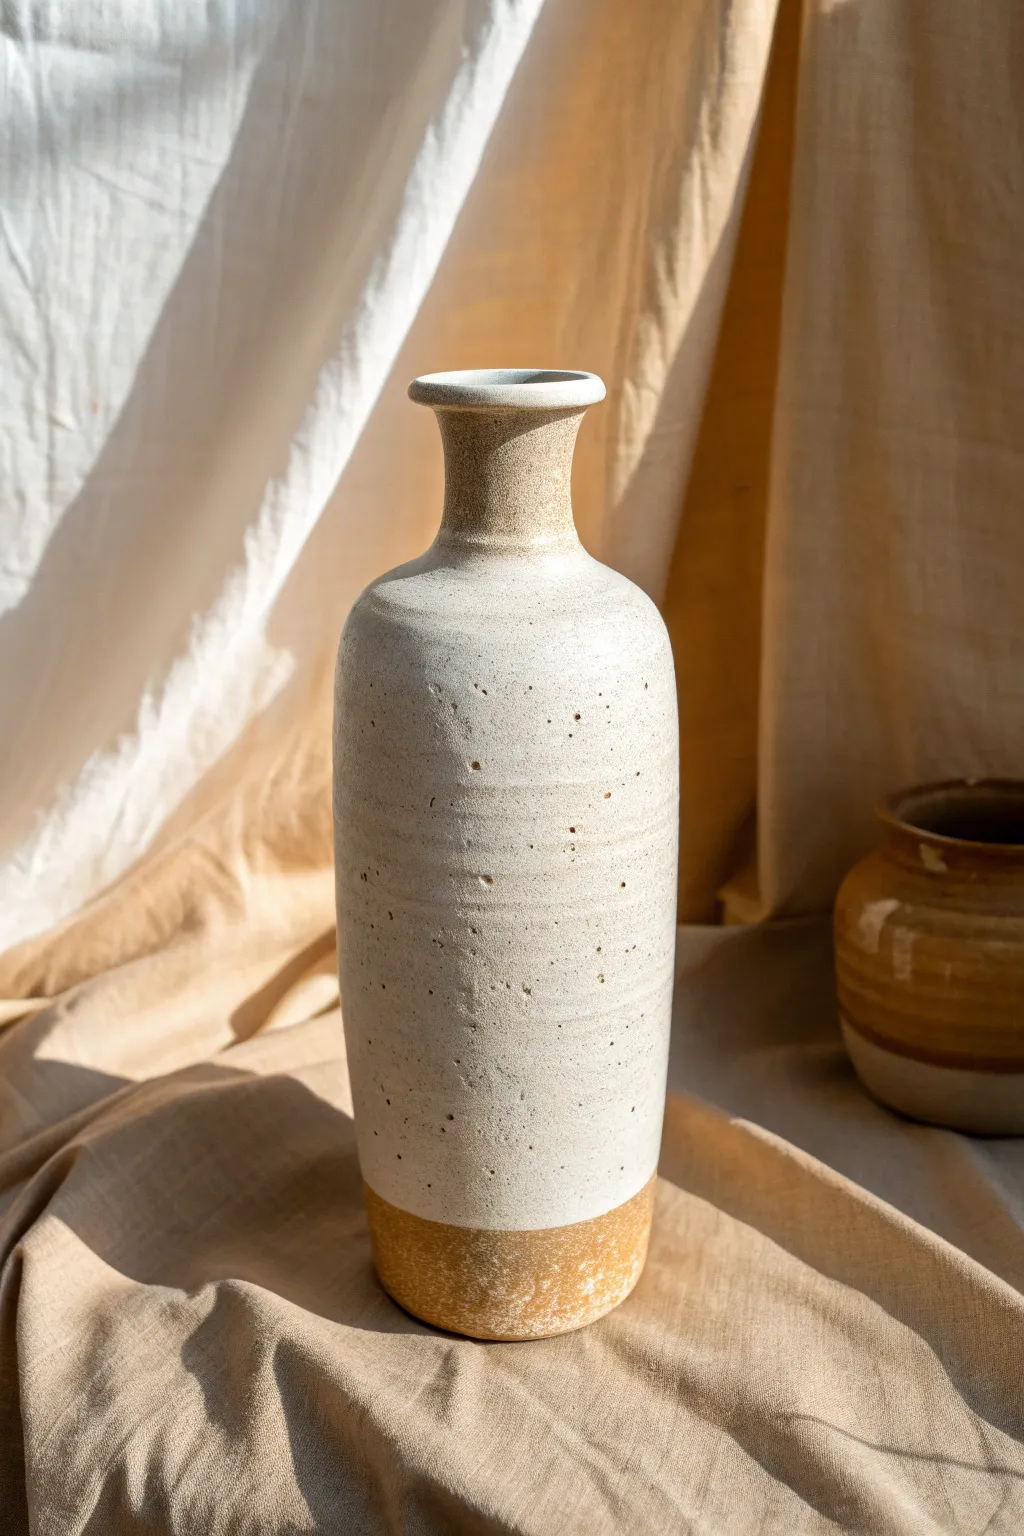
Classic Stripes in Mixed Widths
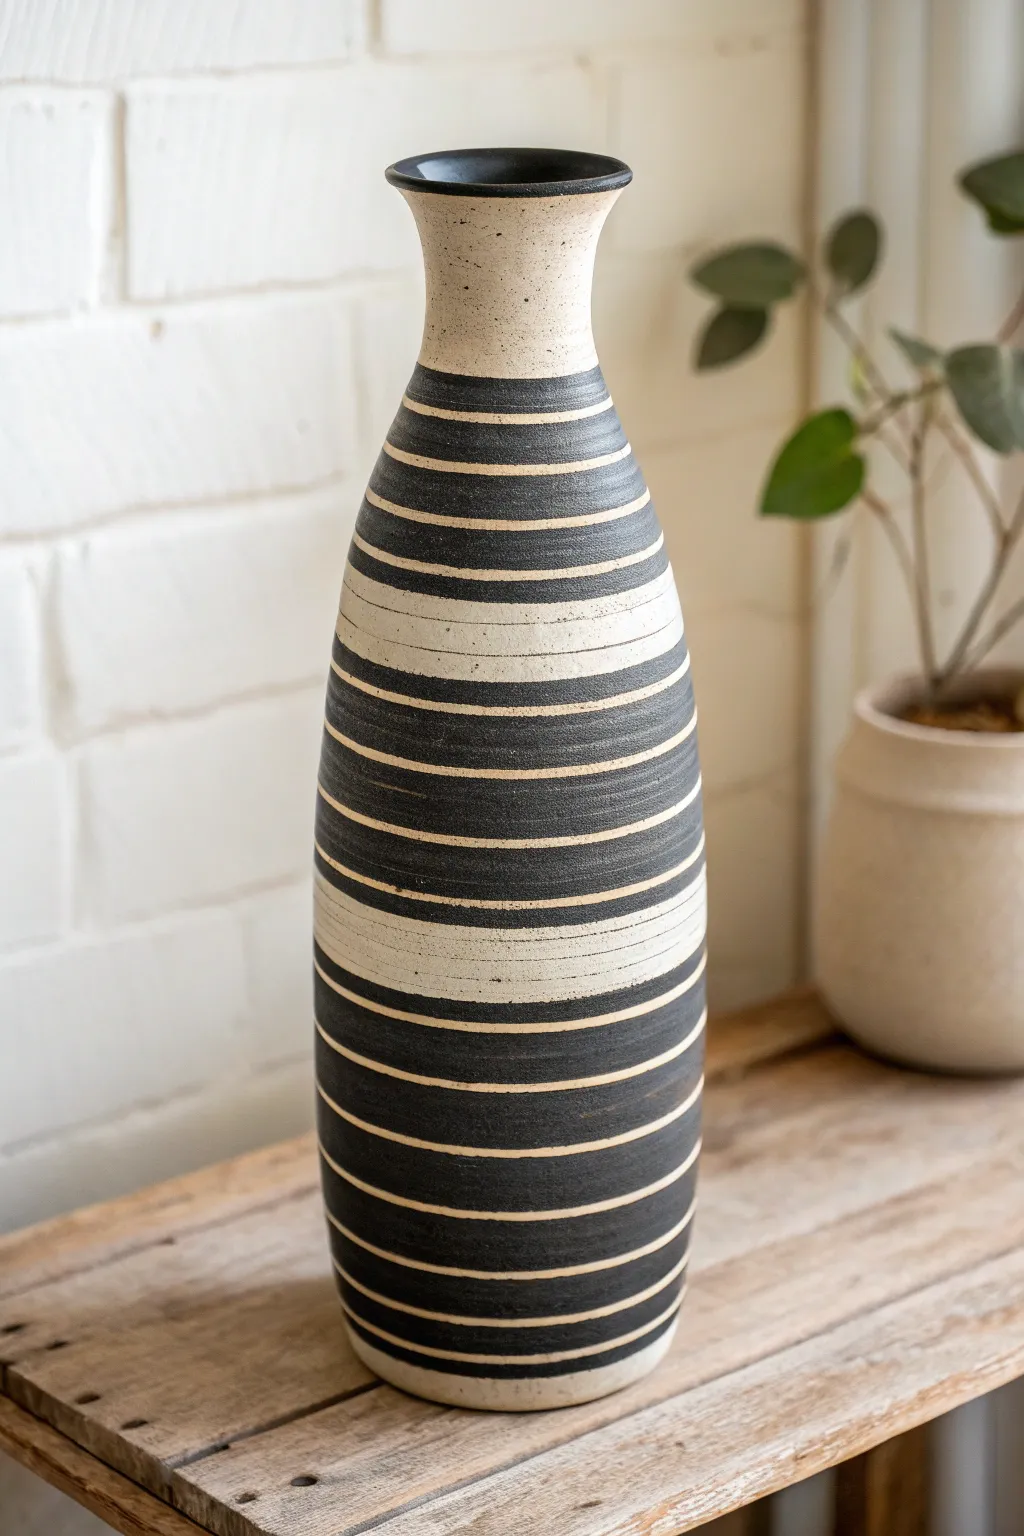
Embrace the beauty of imperfection with this striking project that pairs rhythmic black bands against a speckled, creamy stone-like base. The varying widths of the negative space create a dynamic, modern feel that recalls mid-century pottery without needing a kiln.
Step-by-Step Guide
Materials
- Tall, bisque or unfinished ceramic vase
- Cream or off-white acrylic paint (matte finish)
- Speckle medium or brown spray paint (for misting effect)
- Black acrylic paint (matte or satin)
- Painter’s tape or automotive striping tape (various widths)
- Flat shader brushes (medium and wide)
- Fine liner brush
- Matte spray sealant
- Lazy Susan (optional but highly recommended)
Step 1: Base Preparation
-
Clean the surface:
Before you begin, wipe your bisque vase down with a slightly damp cloth to remove any ceramic dust. Let it dry completely for about 10 minutes. -
Apply the base coat:
Using a wide flat brush, paint the entire vase with your cream or off-white acrylic paint. You want solid, opaque coverage, so apply two to three thin coats rather than one thick one. Allow 20 minutes of drying time between layers. -
Create the texture:
To achieve that authentic stoneware look, you need speckles. You can use a dedicated speckle medium mixed into a topcoat, or use my favorite trick: take a toothbrush dipped in watered-down brown paint and flick the bristles to splatter tiny dots across the surface. -
Subtle misting alternative:
Alternatively, you can stand back about 3 feet and very lightly ‘mist’ the vase with brown spray paint, pressing the nozzle only halfway down to encourage sputtering. Let the texture layer cure for at least an hour.
Spin It Right
For the straightest lines, hold your brush steady in one spot and rotate the lazy Susan, rather than moving your hand around the vase.
Step 2: Planning the Stripes
-
Visualize the pattern:
Study the reference image. Notice how the design relies on ‘negative space’ stripes—the cream lines are actually the unpainted base showing through, while the black is painted on top. -
Set up your station:
Place your vase on a lazy Susan. This tool is a lifesaver for painting continuous bands around a cylinder without smudging your work. -
Masking the large cream bands:
The image shows two prominent cream sections: one near the neck and a wider band in the lower middle. Use painter’s tape to mask off these areas completely to protect your base coat. -
Masking the thin lines:
Now, apply thin automotive striping tape around the vase to create the delicate cream pinstripes. Be firm when pressing down the edges of the tape to prevent paint bleed. -
Vary spacing:
Don’t make the spacing perfectly uniform. Position some tape lines close together and others further apart to mimic the organic, hand-thrown feel seen in the original artwork. -
Seal the tape edges:
Brush a very thin layer of your cream base color over the tape edges. This seals the gap so that if any paint bleeds under, it matches the base coat, leaving you with crisp lines later.
Step 3: Painting and Finishing
-
Apply the black layers:
Load a medium flat brush with matte black acrylic. Paint the exposed areas of the vase between your tape lines. Paint horizontally, following the curve of the vase. -
Refining the texture:
While painting the black, don’t worry about it being perfectly opaque like plastic. A slightly streaky application adds to the ceramic aesthetic. -
Respect the rim:
Carefully paint the inside of the rim black, extending down about an inch into the neck, to give the piece a finished, solid appearance. -
Remove the tape:
This is crucial: peel off the tape while the final coat of black paint is still slightly tacky, not bone dry. This prevents the paint from chipping or peeling away with the adhesive. -
Touch-ups:
Once the tape is removed, use a fine liner brush and a steady hand to fix any jagged edges or areas where the cream base was accidentally covered. -
Softening edges:
If the lines look too sharp and manufactured, you can gently sand the transitions with very fine-grit sandpaper (1000 grit) to weather the piece slightly. -
Final seal:
Finish the project by spraying the entire vase with a matte clear sealant. This unifies the sheen of the different paints and protects your hard work from dust and scratches.
Texture Twist
Mix baking soda into your cream base paint before applying. This creates a gritty, tangible texture that feels like real stoneware clay.
Place your new vase near a window where the natural light can highlight the contrast between the dark bands and the speckled stone texture


Playful Polka Dots From Tiny to Jumbo
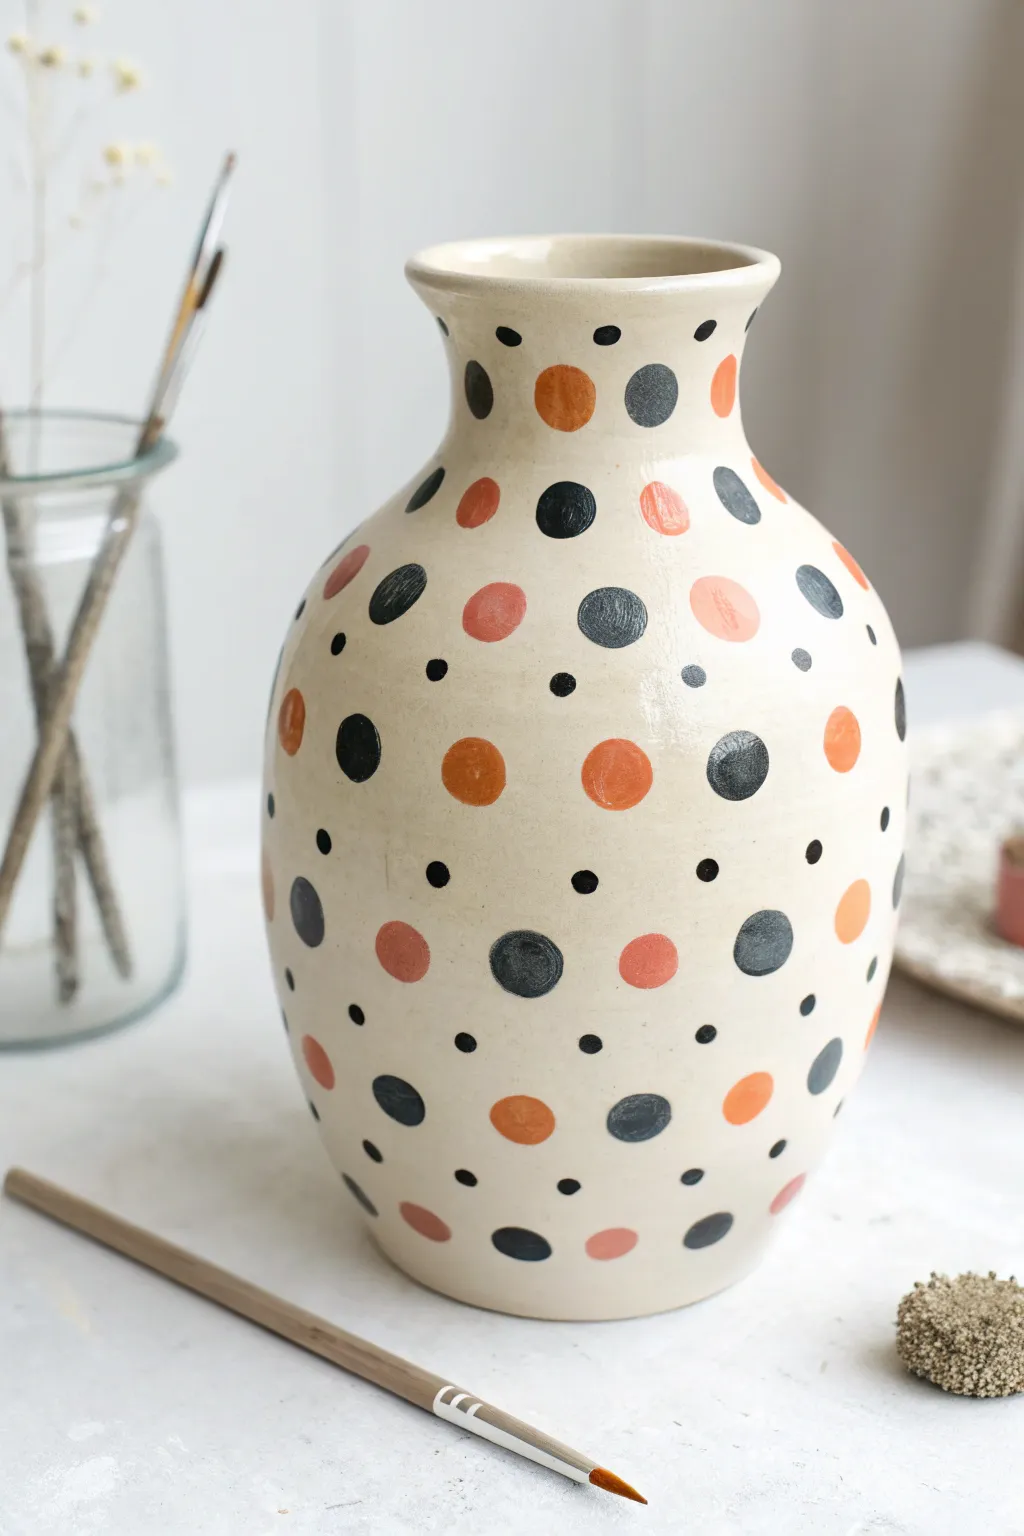

Transform a plain ceramic vase into a playful centerpiece with this charming polka dot design. Using a warm, earthy palette of oranges and blacks on a creamy base, you’ll create a lively pattern that feels both modern and handcrafted.
Step-by-Step
Materials
- Bisque or glazed ceramic vase (cream or off-white)
- Acrylic paints (burnt orange, coral/peach, black, dark grey)
- Round paintbrushes (size 2, 6, and 10)
- Dotting tool or pencil eraser (optional)
- Palette or small dish
- Water cup
- Paper towels
- Clear acrylic sealant spray (gloss or matte)
Step 1: Preparation & Planning
-
Clean surface:
Begin by wiping down your vase with a damp cloth or a mixture of water and rubbing alcohol to remove any oils or dust. Let it dry completely. -
Palette setup:
Squeeze out your paint colors. You need a true black, a dark charcoal grey, a deep burnt orange, and a softer coral or peach tone to match the original look. -
Practice grouping:
Before touching the vase, practice making dots on a piece of paper. Get comfortable with creating three distinct sizes: large coin-sized dots, medium finger-tip sized dots, and tiny speckles.
Fixing Wonky Circles
If a circle looks too oval or messy, wait for it to dry completely. Gently scrape the excess away with a craft knife or paint over the edge with a cream color that matches your vase base.
Step 2: Painting the Large Dots
-
Start the pattern:
Using your largest round brush (size 10), load it with burnt orange paint. Paint a few large, random circles around the fat ‘belly’ of the vase. -
Add black accents:
Rinse your brush or switch to a clean large brush. Paint large black circles interspersed among the orange ones, keeping them roughly equidistant but random. -
Incorporate grey:
Mix a little black with white if you don’t have grey paint, aiming for a charcoal tone. Add large grey dots to the mix, ensuring you leave plenty of creamy negative space between all these main elements. -
Refine the shapes:
Go back over your large circles while the paint is wet to smooth out the edges. They don’t need to be geometrically perfect stencils; a little hand-painted wobble adds charm.
Step 3: Adding Medium Details
-
Switch brushes:
Move to a medium round brush (size 6). This will bridge the gap between your statement dots and the tiny accents. -
Apply peach tones:
Use the coral/peach color to paint medium-sized dots. Place these in the larger gaps between the big black and orange circles. -
Add medium darks:
Add medium-sized black and grey dots now. I like to place some of these near the neck and the base, where the curvature changes. -
Check balance:
Step back and look at the vase from a distance. Rotate it slowly to ensure no side looks too heavy with one color or size.
Paint Consistency Tip
If your acrylics are too thick, the dots might look lumpy. Mix in a singular drop of water or flow medium to get a creamy consistency that self-levels slightly for smoother dots.
Step 4: The Tiny Accents
-
Select the smallest tool:
Switch to your size 2 brush, or for very uniform tiny dots, use the back end of a paintbrush handle or a dotting tool. -
Fill the voids:
Dip into the black paint and dab tiny specks into the empty cream spaces. These act like confetti, tying the whole design together. -
Vary density:
Keep these tiny dots somewhat sparse. You want them to look like floating particles rather than a dense texture. -
Neck detail:
Pay attention to the rim and neck of the vase. Adding a few tiny or medium dots right up near the collar draws the eye upward.
Step 5: Finishing Touches
-
Second coat:
Some colors, especially the oranges, might look streaky once dry. Carefully apply a second coat to any dots that need more opacity. -
Full dry:
Allow the vase to sit undisturbed for at least 24 hours to ensure the paint cures fully onto the ceramic surface. -
Seal the work:
Take the vase to a well-ventilated area. Spray a light, even coat of clear acrylic sealant over the entire surface to protect your paint from chipping.
Once dry, fill your new spotted creation with dried florals or let it stand alone as a cheerful art piece


Tape-Resist Geometric Shapes
Transform a plain ceramic vase into a modern statement piece using crisp lines and rich earth tones. This tape-resist technique creates satisfyingly sharp triangles in deep teal and mustard yellow against a creamy white background.
Step-by-Step Tutorial
Materials
- Tall white ceramic bisque vase
- Painter’s tape or dedicated masking tape (various widths)
- Acrylic craft paints (Deep Teal, Mustard Yellow, Antique White)
- Flat shader paintbrushes (medium and small)
- Sponge dabber or stippling brush
- Matte clear sealant spray
- Scissors or craft knife
- Palette or paper plate
Step 1: Design & Masking
-
Prep the surface:
Begin by wiping down your ceramic vase with a damp cloth to remove any dust or oils. If your vase is unglazed bisque, you can paint directly; if it’s glazed, give it a quick sanding or use a primer designed for glass and ceramic. -
Establish the grid:
Visualize your vase in horizontal bands. Apply strips of painter’s tape horizontally around the vase to mark where the points of your triangles will align. You don’t need to cover the whole vase, just create guidelines. -
Create the triangles:
Using narrower strips of tape, create diagonal lines connecting your horizontal bands to form a network of triangles. I like to crisscross the tape to ensure sharp points. -
Seal the edges:
Once your geometric pattern is taped out, firmly press down all the edges of the tape with your fingernail or a credit card. This prevents paint bleed and ensures those crisp lines we’re aiming for. -
Double-check the negative space:
Look at the exposed ceramic areas. These are the shapes you will be painting. Ensure the triangles vary slightly in orientation—some pointing up, some down—to match the dynamic look of the example.
Bleeding Lines?
Paint a thin layer of the base white color over the tape edges first. This seals the tape, so if any paint bleeds under, it matches the vase.
Step 2: Painting
-
Start with Mustard Yellow:
Pour a small amount of mustard yellow acrylic paint onto your palette. Select specific triangles to paint, spacing them out so no two yellow triangles touch. -
Apply the first coat:
Using a flat shader brush, paint the chosen triangles. Brush from the tape inward toward the center of the shape to avoid forcing paint under the tape edge. -
Add the Deep Teal:
Switch to a clean brush and your deep teal paint. Fill in the majority of the remaining large triangular spaces, leaving a few spots open for the textured effect. -
Create visual weight:
Aim to have the darker teal triangles anchor the design, perhaps placing slightly larger teal shapes near the middle and base of the vase. -
Layer for opacity:
Acrylics can be translucent on ceramics. Let the first coat dry for about 10-15 minutes, then apply a second coat to both the yellow, and especially the teal sections, to get a solid, rich color. -
Mix the textured grey:
For those lighter textured triangles seen in the image, mix a tiny drop of black into your antique white paint to create a very pale grey. -
Apply texture:
Use a dry sponge dabber or a stippling brush with very little paint on it. Dab this pale grey mixture lightly into the remaining empty triangles to create a speckled, stone-like texture.
Modern Texture
Mix baking soda into your mustard or teal paint before applying. It creates a gritty, terra-cotta feel that adds tactile depth to the smooth ceramic.
Step 3: reveal & Finish
-
Remove tape carefully:
Wait until the paint is dry to the touch but not fully cured (usually about 30 minutes). Peel the tape off slowly at a 45-degree angle. This prevents the dried paint from peeling up with the tape. -
Touch up lines:
If any paint bled under the tape, don’t worry. Dip a precise detail brush into your base white color (or use a craft knife for glazed surfaces) to gently clean up the edges. -
Dry completely:
Let the vase sit overnight to ensure all paint layers are thoroughly dry and hardened. -
Seal the artwork:
Take the vase to a well-ventilated area. Apply a light, even coat of matte clear sealant spray. This protects the geometric design from scratches and gives the whole piece a unified, professional finish.
Place your new geometric vase on a wooden table or shelf to let those earthy colors shine
BRUSH GUIDE
The Right Brush for Every Stroke
From clean lines to bold texture — master brush choice, stroke control, and essential techniques.
Explore the Full Guide
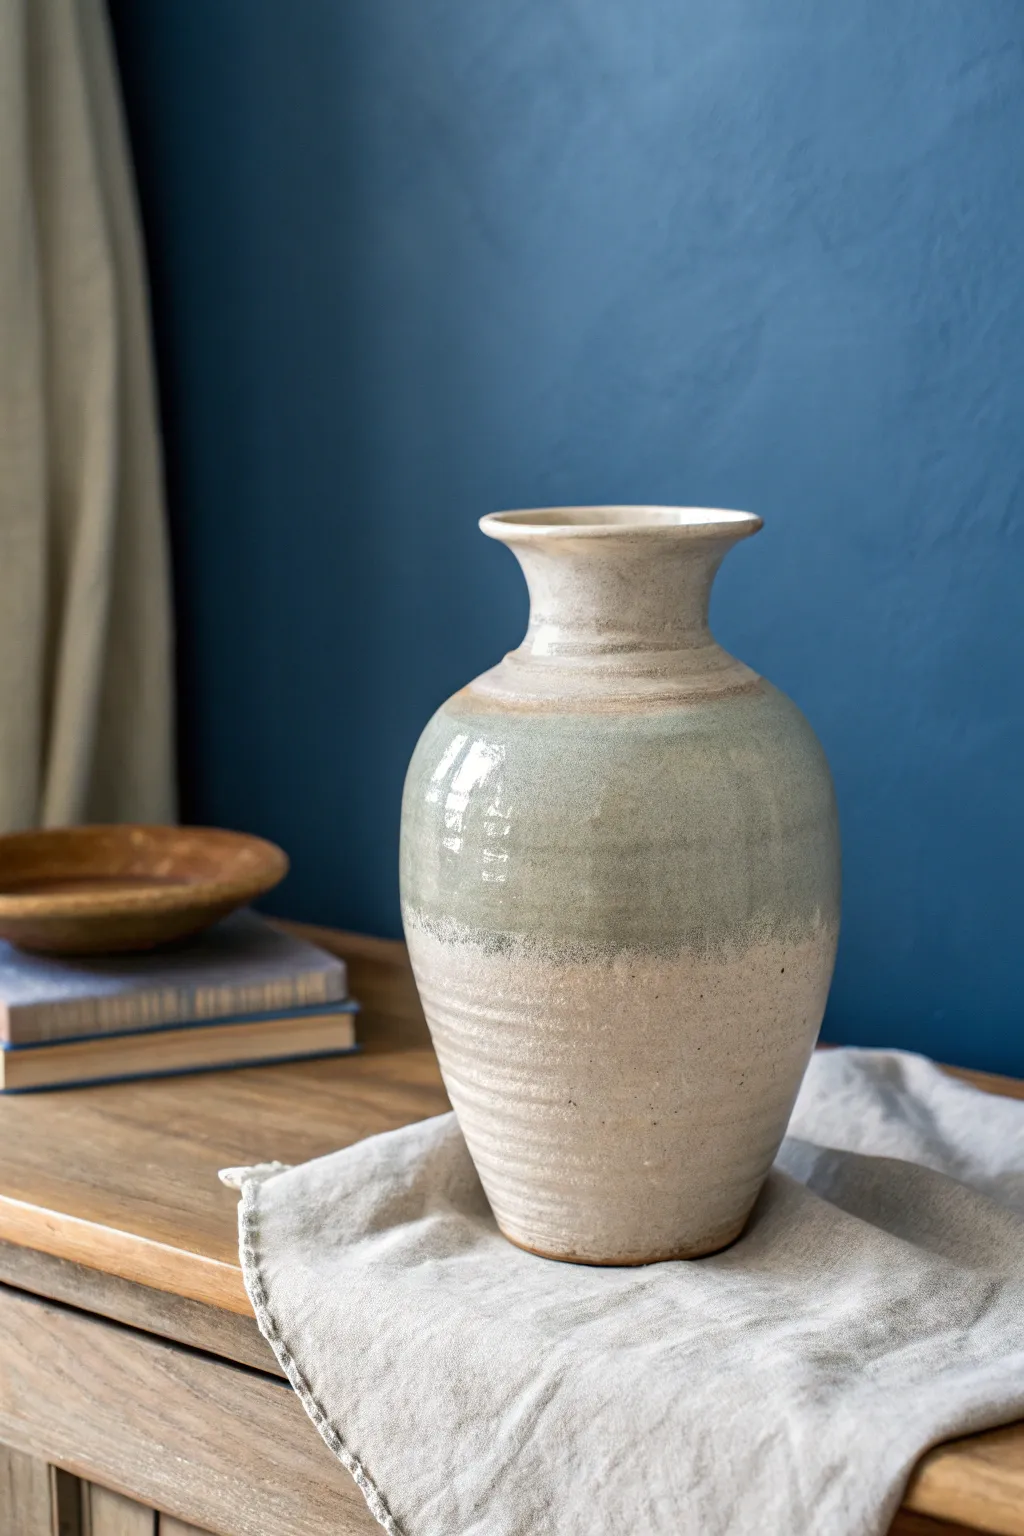
Soft Ombre Gradient Fade
Recreate the serene transition of a coastal sky with this soft ombre gradient vase. This project uses a subtle three-tone palette to transform a plain bisque vessel into a piece of modern, minimalist decor.
How-To Guide
Materials
- Tall bisque ceramic vase (sake bottle shape preferred)
- Acrylic paints (Cream/Off-White, Slate Blue, Warm Tan)
- Textile medium or glazing medium
- Soft synthetic flat brushes (1 inch)
- Small round detail brush
- Natural sea sponge
- Palette or mixing plate
- Water cups
- Paper towels
- Spray matte sealer
Step 1: Preparation and Base Coat
-
Clean the Surface:
Begin by wiping down your bisque vase with a slightly damp cloth to remove any ceramic dust. Let it dry completely for a few minutes. -
Mix the Middle Tone:
Prepare a large amount of your cream or off-white acrylic paint. Mix in a tiny drop of warm tan to take the blinding brightness out of the white, creating a natural stoneware look. -
Apply the Main Base:
Coat the entire middle section of the vase with this cream mixture. I like to feather the edges upwards towards the neck and downwards towards the base rather than creating harsh stop lines. -
Second Coat:
Once the first layer is dry to the touch, apply a second coat of cream to ensure opacity, again keeping the top and bottom edges soft and feathered.
Uneven Blending?
If your gradient looks streaky, use a damp sea sponge to stipple (dab repeatedly) over the transition line while the paint is wet. This softens harsh brushstrokes.
Step 2: Creating the Ombre Dip
-
Mix the Base Color:
On your palette, mix a slate blue with a touch of grey to achieve that stormy, grounded color seen at the bottom of the vase. -
Apply the Bottom Section:
Paint the bottom third of the vase with your slate blue mixture. Don’t worry about a perfect line at the top yet; just get good solid coverage around the base. -
Blend the Transition:
While the blue paint is still wet, dip a clean, damp sponge into a mixture of the blue and your original cream color. Dab gently at the meeting point of the two colors to blur the hard line. -
Refine the Gradient:
Use a nearly dry brush to lightly drag the blue paint upward into the cream section very sparingly. You want a soft transition, not a messy smear.
Add Faux Texture
Mix baking soda into your cream base paint before applying. This creates a gritty, ceramic-like texture that feels more authentic than smooth acrylic alone.
Step 3: Adding the Warm Upper Glow
-
Mix the Top Glaze:
Combine your warm tan paint with a generous amount of glazing medium or water to create a translucent wash. -
Apply to Shoulder:
Brush this warm wash onto the ‘shoulder’ of the vase (where it starts to curve inward) and fade it gently upwards toward the neck. -
Sponge for Texture:
Immediately use your natural sea sponge to dab at this tan wash. This removes excess paint and leaves behind that speckled, reactive-glaze texture visible in the reference. -
Rim Detail:
Using your small detail brush, paint the very rim of the vase with a slightly more concentrated version of the warm tan to define the opening.
Step 4: Finishing Touches
-
Speckling Effect (Optional):
To mimic genuine pottery clay, load an old toothbrush with thinned brown paint and gently flick it over the cream section to add tiny speckles. -
Dry Time:
Allow the vase to dry completely, preferably overnight, to ensure all layers have settled. -
Seal the Work:
In a well-ventilated area, spray the vase with a matte clear acrylic sealer. This unifies the sheen of the different paints and protects the finish.
Place your new vase on a wooden tray or beside natural textures to highlight its earthy elegance
Simple Leafy Botanicals Around the Curve
Embrace the natural curves of your pottery with this delicate botanical design that feels both organic and refined. Using a smooth, matte-finish vase as your canvas, you’ll learn to paint flowing vines that seem to grow upward with graceful energy.
Step-by-Step Guide
Materials
- Tall ceramic vase (bisque fired)
- Underglaze pencil (dark green)
- Underglaze (sage green and forest green)
- Fine liner brush (size 0 or 00)
- Round brush (size 2 or 4)
- Clear transparent glaze (dipping or brushing)
- Clean water container
- Sponge
- Pencil (HB or lighter) for sketching
Step 1: Preparation & Planning
-
Clean the surface:
Before you begin, wipe down your bisque-fired vase with a damp sponge. This removes any kiln dust or oils from your hands that might repel the underglaze. -
Map the central stem:
Visualize a gentle ‘S’ curve or a straight vertical line traveling from the base to the neck. Using a very light touch with a regular pencil, sketch this main spine. Don’t worry about mistakes; the graphite will burn off in the kiln. -
Sketch lead placement:
Mark small ticks along the spine where you want your leaves to originate. Alternating them left and right creates a more natural, organic look than placing them directly opposite each other.
Smudged Lines?
If you smear the underglaze lines, wait for it to fully dry. Then, gently scrape the error away with an X-Acto knife or sandpaper rather than wiping, which spreads it.
Step 2: Painting the Foliage
-
Mix your greens:
On a palette, mix a small amount of sage green underglaze with a drop of forest green to get that vintage, earthy tone shown in the image. Dilute it slightly with water until it has the consistency of heavy cream. -
Draft the stems:
Dip your fine liner brush into the mixture. Starting from the bottom, trace over your pencil spine with a steady hand. I like to keep the pressure light to ensure the stem remains delicate and doesn’t become too thick. -
Outline the leaves:
Switch to the underglaze pencil or keep using the fine liner brush to draw the outline of each leaf. Create an elongated almond shape that tapers to a sharp point. -
Fill the leaves:
Using your size 2 round brush, gently fill in the leaf shapes. Instead of a solid block of color, use directional strokes that mimic the veins of a leaf—brushing from the stem toward the tip. -
Add texture:
While the underglaze is still slightly damp, you can carefully scratch thin lines through the paint with a needle tool or a stiff bristle brush to exaggerate the vein texture, revealing the clay body underneath. -
Create secondary branches:
Look for empty spaces in your composition. Use your liner brush to add very fine, thread-like stems branching off the main vine. These don’t need full leaves; tiny buds or mere suggestions of growth work perfectly. -
Add floating details:
To enhance the whimsical feel, add tiny detached floating seeds or pollen specks near the tips of the leaves using the very tip of your brush.
Add Depth
Dilute a darker green underglaze (like a wash) and paint it only at the very base of each leaf where it meets the stem. This adds instant 3D volume.
Step 3: Finishing & Glazing
-
Dry thoroughly:
Allow the underglaze design to dry completely. It should look chalky and matte to the touch. This usually takes about 20-30 minutes. -
Check density:
If the green looks too transparent or streaky, apply a second thin coat of underglaze, but be careful not to obscure the brushstroke texture you created. -
Sponge away mistakes:
If you have any smudges on the plain background, use a barely damp clean sponge or a sanding stick to gently remove the unwanted pigment. -
Apply clear glaze:
once dry, coat the entire vase in a clear transparent glaze. If brushing, apply 2-3 even coats, alternating direction (horizontal then vertical) to ensure full coverage without streaks. -
Wipe the foot:
Using a wet sponge, clean the bottom ‘foot’ of the vase completely. Any glaze left here will fuse the vase to the kiln shelf during firing. -
Final fire:
Load the vase into the kiln for a glaze firing according to the clay and glaze manufacturer’s temperature recommendations (usually cone 5/6 or cone 06).
Once fired, fill your new vase with dried stems or fresh wildflowers to complete the natural aesthetic

PENCIL GUIDE
Understanding Pencil Grades from H to B
From first sketch to finished drawing — learn pencil grades, line control, and shading techniques.
Explore the Full Guide
Loose Watercolor-Style Florals With Washed Acrylic
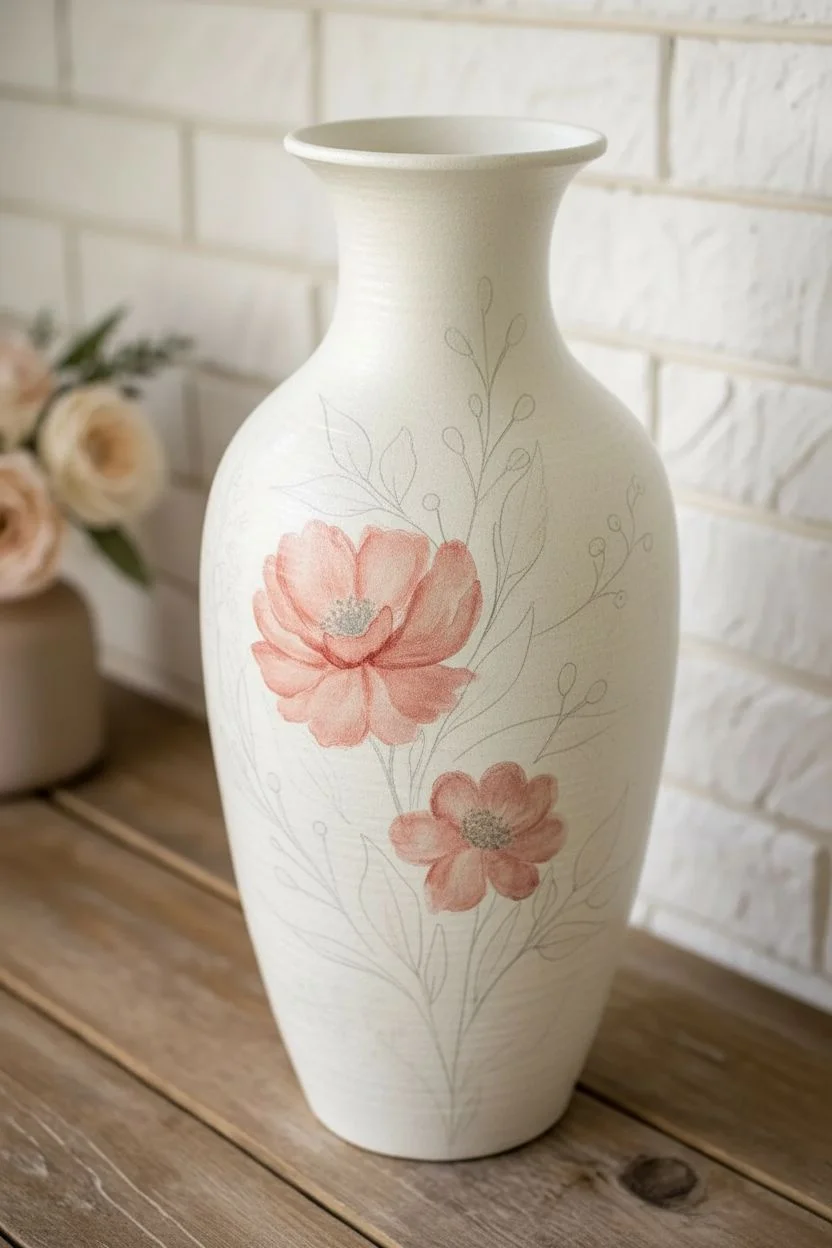
Capture the delicate beauty of watercolor painting directly onto ceramic with this loose floral project. By using thinned acrylics and soft brushstrokes, you’ll transform a plain vase into a botanical masterpiece featuring dreamy pink blooms and sweeping foliage.
Detailed Instructions
Materials
- Tall ceramic vase (white or cream, matte finish preferred)
- Acrylic paints: Coral Pink, Salmon, Dusty Rose, Sap Green, Olive Green, Burnt Umber, Cream
- Acrylic glazing medium or flow improver
- Round synthetic brushes (sizes 2, 4, and 6)
- Fine liner brush (size 0 or 00)
- Palette for mixing
- Water cups (two: one for rinsing, one for thinning)
- Paper towels
- Matte spray sealant (optional)
Step 1: Preparation & Base Tones
-
Prep the Surface:
Ensure your vase is clean and free of oils. If the ceramic is very glossy, lightly sand it with fine-grit sandpaper to give the paint some tooth, then wipe away any dust with a damp cloth. -
Mix Your Washes:
Prepare your ‘watercolor’ acrylics by mixing small amounts of Coral Pink and Dusty Rose with water and a drop of glazing medium. Aim for a milky consistency that is translucent but not dripping. -
Draft the Composition:
Lightly sketch the main floral placement using a very watered-down gray paint or a watercolor pencil. Plan for one large bloom slightly off-center and a smaller companion bloom below it.
Glazing Medium Is Key
Don’t just use water to thin acrylics; it breaks the binder. Glazing medium keeps the paint sticky enough to adhere to slick ceramic surfaces.
Step 2: Painting the Blooms
-
Lay Down the First petals:
Using a size 6 round brush loaded with your thinned Coral Pink mix, paint the large upper flower. Start from the center and press the belly of the brush down to create wide, loose petal shapes. -
Create Varied Opacity:
While the paint is still wet, lift a little pigment from the edges of the petals with a clean, damp brush. This mimics the transparency of watercolor paper. -
Paint the Lower Flower:
Repeat the petal process for the smaller flower below, perhaps using a slightly darker mix of Dusty Rose to add visual weight to the bottom of the composition. -
Add Depth to Centers:
Once the base petals are touch-dry, mix a more saturated version of your pinks. Paint smaller, darker petal shapes near the center of each bloom to create a cupped, 3D effect. -
Define the Petal Edges:
Take a size 2 brush with very watery dark pink or light brown. Outline a few random petals loosely—don’t outline everything, just suggest the shapes to keep it organic.
Step 3: Leaves & Foliage
-
Mix Green Tones:
Create two green puddles on your palette: one Sap Green mixed with a touch of Olive, and a cooler, more blue-toned green. Thin both with glazing medium. -
Paint Main Leaves:
Use the size 4 brush to paint the large leaves framing the flowers. Use a ‘press and lift’ motion: touch the tip, press down to widen the leaf body, and lift while dragging to create a sharp point. -
Add Shadowy Foliage:
Mix a very faint, watery grey-green. Paint a few ‘ghost’ leaves or stems behind the main flowers. These should look like they are fading into the background. -
Create Flowing Stems:
Using the liner brush and your Olive Green mix, draw long, sweeping stems extending upwards from the flowers. Allow your hand to wobble slightly for a natural, imperfect line. -
Add Berry Accents:
Dip the back end of your brush or a small dotting tool into Burnt Umber or a deep red. Dot small berries onto the thin upper stems for contrast.
Splatter Effect
For an artistic touch, load a toothbrush with watered-down green paint and flick fine speckles near the leaves to enhance the loose, organic feel.
Step 4: Details & Finishing
-
Stipple the Centers:
Mix a dark Burnt Umber with very little water. Use the tip of your smallest brush to stipple tiny dots in the center of the flowers for stamens. -
Add Pollen Highlights:
Once the brown dots dry, add a few tiny dots of Cream or White over the dark centers to make them pop. -
Vein the Leaves:
I like to use a very watery darker green to paint a simple center vein on just the largest leaves, leaving the smaller ones solid. -
Background Texture:
If desired, dry brush a tiny amount of Cream or watered-down beige horizontally across the empty spaces of the vase to mimic a textured canvas look. -
Seal the Work:
Because we used watered-down acrylics, the paint film is delicate. Once fully cured (24 hours), spray with a matte clear coat to protect your work.
Now you have a stunning, hand-painted vessel that brings a touch of eternal spring to any room in your home
Blue-and-White Porcelain-Inspired Motifs
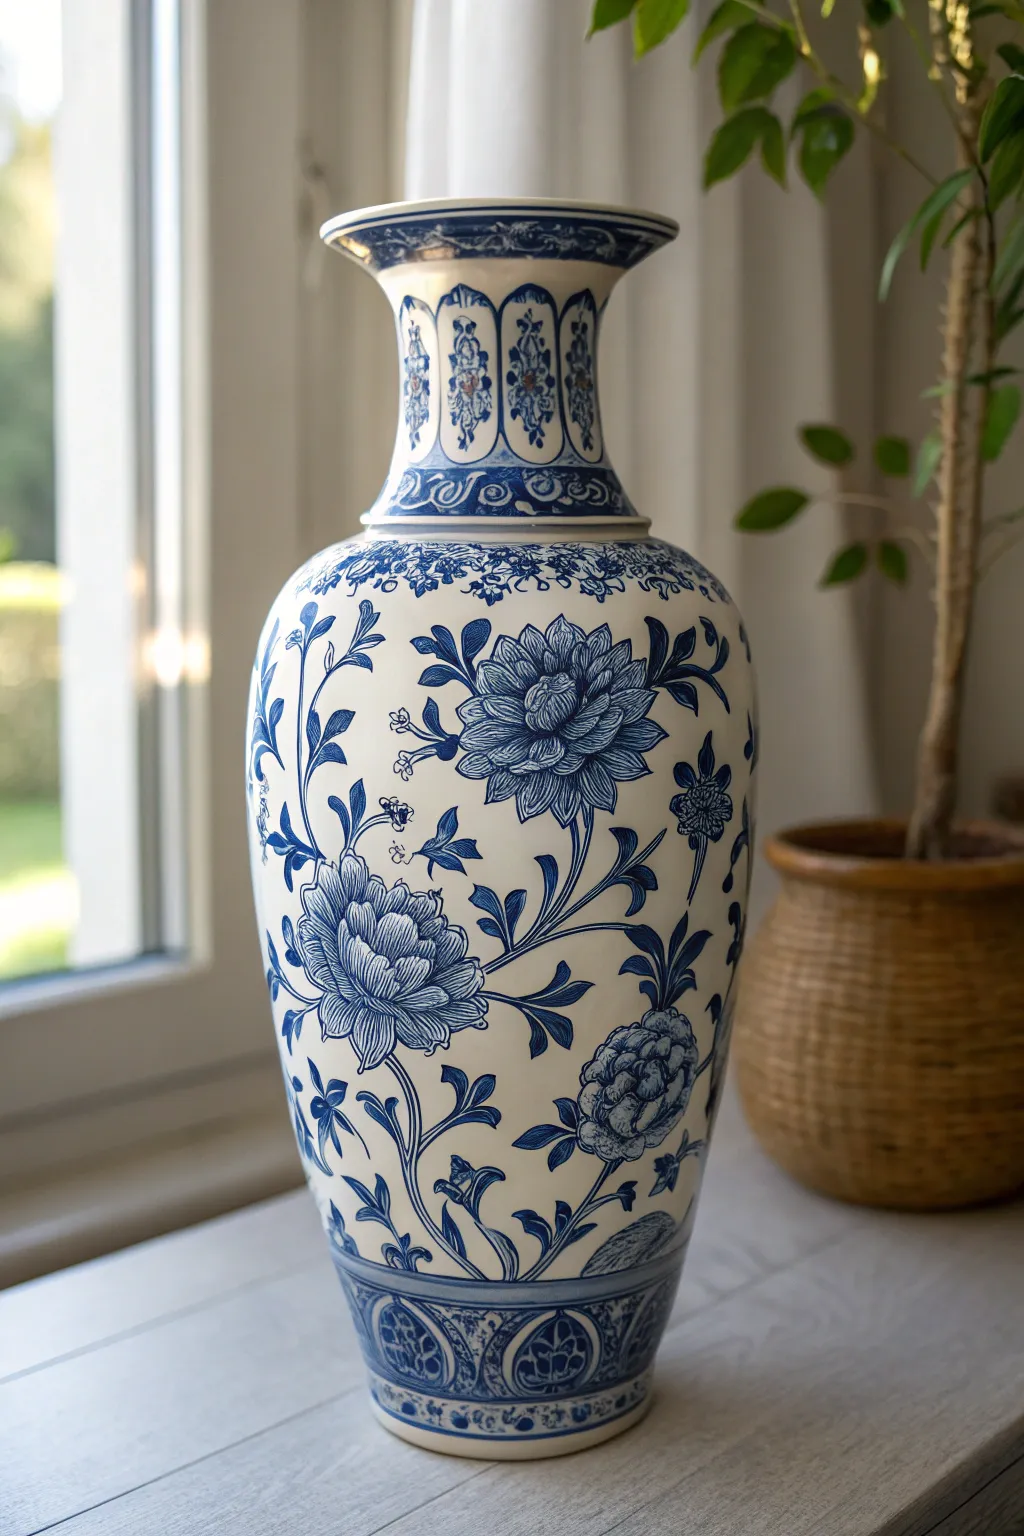
Transform a plain ceramic vase into a classic masterpiece featuring the elegance of traditional porcelain motifs. This project captures the sophisticated beauty of cobalt blue florals and ornate borders, creating a striking centerpiece that looks like a priceless heirloom.
Step-by-Step
Materials
- Tall white ceramic vase (bisque or glazed)
- High-gloss ceramic paint (Cobalt Blue or Navy Blue)
- Porcelain paint medium (optional, for flow)
- Fine liner brushes (sizes 0 and 00)
- Round watercolor brushes (sizes 2 and 4)
- Pencil or disappearing fabric marker
- Tracing paper and transfer paper (optional)
- Cotton swabs and rubbing alcohol
- Palette for mixing paint
- Gloss varnish or clear sealant spray
Step 1: Preparation and Mapping
-
Clean surface:
Begin by wiping down your ceramic vase with rubbing alcohol on a cotton pad to remove any oils or dust, ensuring maximum paint adhesion. -
Section the vase:
Using a pencil, lightly mark horizontal guidelines around the neck, the shoulder (where the vase widens), and just above the base. This creates distinct zones for your borders and the main floral display. -
Sketch the neck borders:
In the top neck section, lightly sketch evenly spaced vertical arches or ‘lappet’ shapes that point downward. Fill the space inside these arches with small, symmetrical scroll designs. -
Draft the central florals:
For the large main body, sketch three large, open peony-style blooms. Place one facing forward and two slightly turned away for variety. Connect them with long, sweeping curved lines representing stems. -
Add foliage details:
Draw slender, pointed leaves extending from the stems, ensuring they curve naturally with the shape of the pot to emphasize its roundness.
Uneven Lines?
If your brush gets jittery on the curved surface, try resting your pinky finger on a dry part of the vase for stability while painting fine lines.
Step 2: Painting the Motifs
-
Outline the neck details:
Load your size 00 liner brush with cobalt blue paint thinned slightly with medium or a drop of water. Carefully trace the architectural arches on the neck, keeping your hand steady. -
Fill neck patterns:
Switch to a size 2 brush to fill in the darker blue sections between the arches, creating high contrast against the white ceramic. -
Paint flower centers:
Move to the main floral area. Start at the center of the large flowers, painting tight clusters of curved lines that radiate outward to form the petals. -
Layering petals:
Using the size 2 round brush, paint the outer petals using a ‘press and lift’ stroke. Press the belly of the brush down for the wide part of the petal, then lift as you pull back to create a sharp tip. -
Variable shading:
I prefer to dilute the blue paint heavily for one layer of very pale blue wash on the petals, letting it dry, and then adding darker, concentrated blue lines on top for depth. -
Stem work:
Use your liner brush to trace the long, sweeping stems. Vary the pressure: push down slightly for thicker parts of the stem and lift up for delicate ends.
Step 3: Refining and Sealing
-
Leaf details:
Paint the leaves in solid blue or detail them with veins, depending on your preference. Keep the edges crisp and sharp to mimic traditional transferware styles. -
Base border:
Create the heavy border at the bottom. Paint a thick horizontal band, then add semi-circles or repeating geometric motifs inside the band to anchor the design visually. -
Clean up edges:
Inspect your work. Use a damp cotton swab to wipe away any pencil marks or errant paint smudges while the paint is still tacky. -
Dry thoroughly:
Allow the vase to dry completely. For most ceramic paints, this takes at least 24 hours to cure fully before handling. -
Bake or seal:
If your paint requires baking (check the manufacturer’s label), place the vase in a cool oven, heat to the specified temperature (usually 300°F/150°C), bake for 30 minutes, and let it cool in the oven. Otherwise, apply a high-gloss spray sealant.
Level Up: Crackle Effect
Apply a crackle medium over the finished and sealed painting, then wipe with antiquing wax to simulate the aged look of centuries-old porcelain artifacts.
Display your stunning new vase near a window where natural light can highlight the crisp blue detailing against the glossy white surface


Bold Abstract Brushstrokes as a Statement Piece
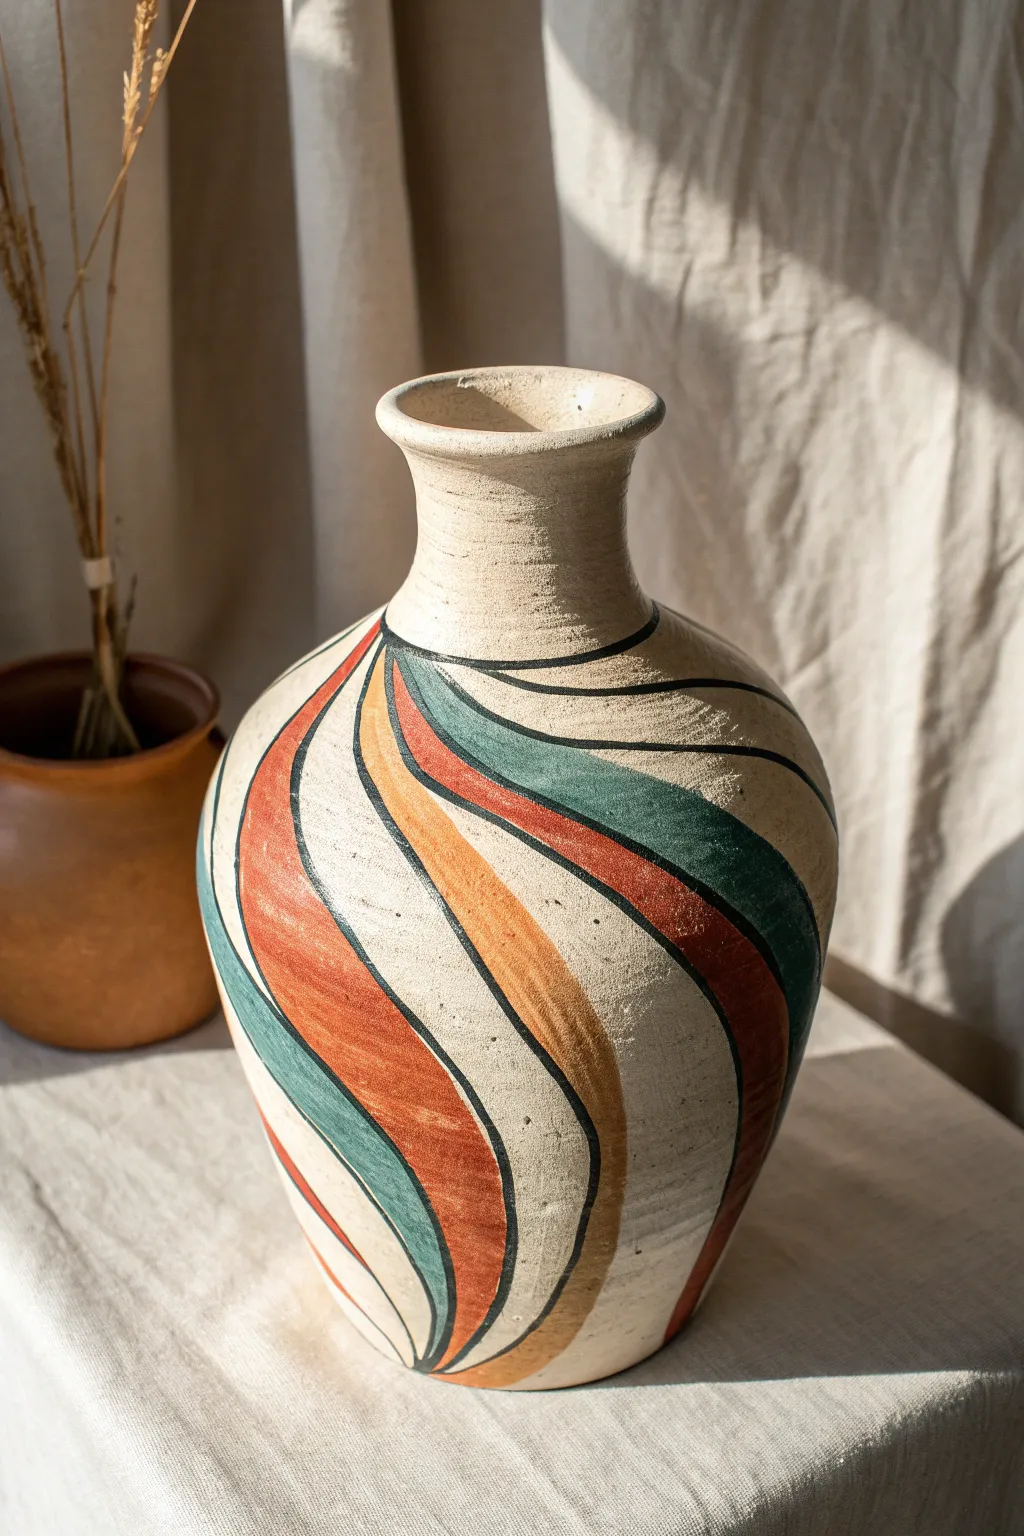
Transform a plain bisque vase into a statement piece featuring bold, sweeping curves in earthy tones. This project embraces organic motion and texture, using a harmonious palette of burnt orange, deep teal, and mustard yellow outlined in sharp black lines.
Step-by-Step Tutorial
Materials
- Bisque ceramic vase (classic urn shape with flared rim)
- Acrylic paints (matte finish): Burnt Sienna, Teal/Deep Green, Mustard Yellow, Cream/Off-White
- Carbon paper and pencil (for transferring design)
- Black paint pen (fine or medium tip) or liner brush
- Assorted synthetic brushes (filbert sizes 4 and 8, round size 2)
- Palette
- Water cup and paper towels
- Matte spray sealant (optional)
Step 1: Base Preparation
-
Clean the Surface:
Wipe down your bisque ceramic vase with a slightly damp cloth to remove any dust or kiln debris. Let it dry completely for about 10 minutes. -
Apply the Base Coat:
Mix a Cream or Off-White acrylic paint. Using a larger filbert brush, cover the entire vase, including the rim and slightly inside the neck. -
Paint for Texture:
For that rustic, textured look seen in the photo, dab the brush slightly rather than using long smooth strokes. This layer doesn’t need to be perfectly opaque; a little transparency adds character. -
Dry and Repeat:
Allow the first coat to dry for 20 minutes. If the ceramic color shows through too much, add a second, lighter coat using the same dabbing technique.
Keeping Curves Smooth
When painting long curves, move your entire arm from the shoulder, not just your wrist. This prevents shaky, jagged lines and keeps the swooping motion fluid.
Step 2: Mapping the Flow
-
Plan the Curves:
Lightly sketch the swooping design directly onto the vase with a pencil. Start the lines at the base of the neck and curve them dramatically downward and outward to the left, wrapping around the belly of the vase. -
Refine the Shapes:
Ensure your sections vary in width. In the reference, the colored bands start narrow at the top and widen significantly as they reach the bottom curve. -
Check the Flow:
Step back and view the vase from a distance. The lines should feel fluid, like ribbons caught in the wind. Adjust your pencil lines until the motion feels right.
Step 3: Applying Color
-
Start with Teal:
Load a size 4 filbert brush with your Teal or Deep Green paint. I like to dilute the paint very slightly with water to help it glide over the textured base. -
Fill the Green Bands:
Fill in the specific sections designated for green. Paint carefully along your pencil lines, using smooth strokes that follow the direction of the curve. -
Add Burnt Sienna:
Switch to clean brush and the Burnt Sienna (rusty orange) paint. Fill in the alternating bands. Notice how the orange sections often sit adjacent to the cream negative space in the design. -
Apply Mustard Accents:
Using the same technique, fill in the final colored sections with Mustard Yellow. These bands act as a bright bridge between the darker teal and rich orange. -
Create Texture:
While the paint is wet, you can dry-brush a tiny bit of the base cream color over the colored sections to make them look weathered, or just let the paint texture remain slightly uneven for a handmade feel. -
Initial Drying:
Let all colored sections dry completely. This is crucial before adding the black definition lines to prevent smudging.
Fixing Wobbly Outlines
If your black outline goes astray, wait for it to dry completely. Then, paint over the mistake with the adjacent color (cream or teal/orange) to crisp up the edge.
Step 4: Defining the Design
-
Outline Main Curves:
Using a black paint pen or a very fine liner brush with black acrylic, trace over the boundaries between your colors and the cream background. -
Vary Line Thickness:
Don’t make the line perfectly uniform. Press slightly harder on the downward curves to thicken the line, and lift up for lighter, thinner lines at the tapered ends. -
Add Neck Detail:
Paint a solid black ring around the base of the vase’s neck where the curve begins. This grounds the design and separates the pattern from the rim. -
The Final Touch:
Inspect the vase for any gaps between the black lines and the colored fills. Carefully touch up with the appropriate color if needed. -
Seal:
Once fully cured (usually 24 hours), spray the vase with a matte clear coat to protect the paint and unify the sheen.
Now you have a stunning, earth-toned vessel ready to hold dried stems or stand alone on a shelf
Minimal Line Art Faces on a Neutral Base
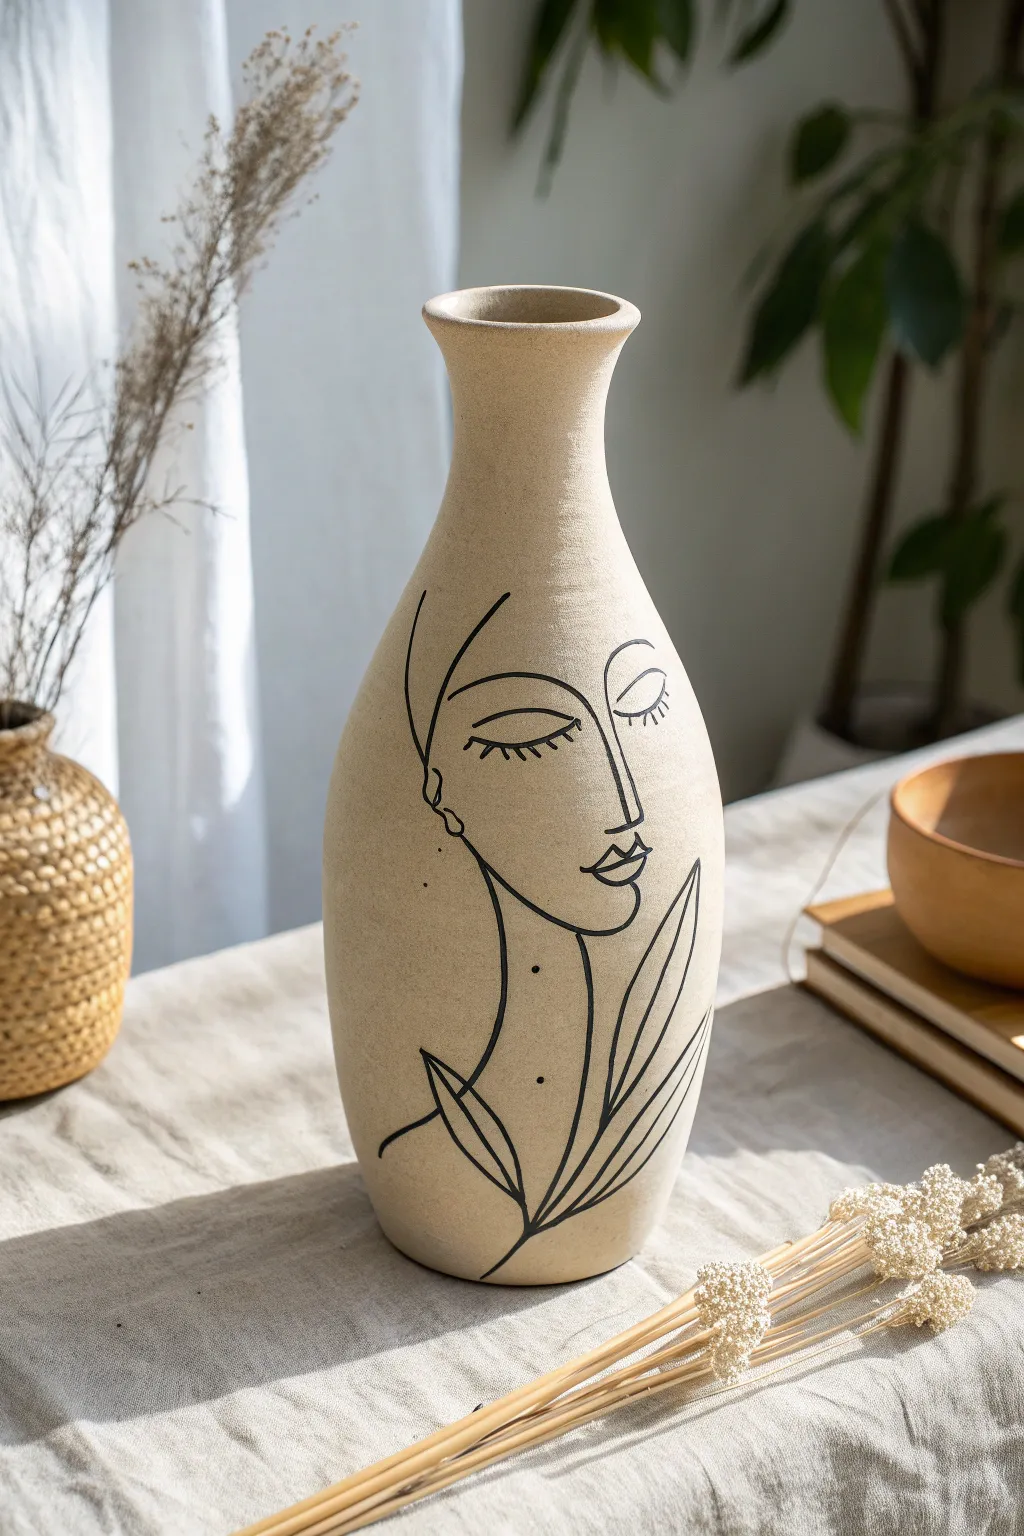

Transform a plain ceramic vessel into a piece of modern art with this elegant line drawing technique. The sandy-beige texture combined with crisp black fluid lines creates a sophisticated, gallery-worthy look that is surprisingly achievable for beginners.
Step-by-Step Guide
Materials
- Tall ceramic vase (smooth or lightly textured)
- Sandpaper (fine grit, 220)
- Surface cleaner (rubbing alcohol or soapy water)
- Matte spray primer (white or gray)
- Beige or oatmeal textured spray paint
- Soft dark lead pencil (2B or 4B)
- Oil-based black paint marker (medium tip)
- Oil-based black paint marker (fine tip)
- Kneaded eraser
- Matte clear sealant spray
Step 1: Base Preparation
-
Clean the surface:
Before doing anything, ensure your vase is completely free of dust, oils, or price tag residue. A quick wipe with rubbing alcohol works best to create a pristine surface for the paint to adhere to. -
Light sanding:
If your vase has a glossy glaze, gently scuff the surface with fine-grit sandpaper. You don’t need to remove the finish entirely, just create enough ‘tooth’ for the primer to grip. -
Apply primer:
In a well-ventilated area, apply a thin, even coat of matte primer. Hold the can about 8-10 inches away and use sweeping motions to avoid drips. Let this dry completely according to the can’s instructions. -
Create the stone texture:
Apply your textured stone-effect spray paint. I like to do two light coats rather than one heavy one to keep the texture even. Aim for a sandy, oatmeal-like color as your base. -
Final cure:
Allow the base color to cure for at least 24 hours. This is crucial—if the base paint is soft, your paint marker might dig into it or clog.
Steady Hand Trick
Rest your pinky finger on the vase surface as you draw to stabilize your hand. This acts as a pivot point for smoother curves.
Step 2: Drafting the Design
-
Mark the boundaries:
Visualize where the face will sit. The nose usually protrudes at the widest part of the curve, while the neck naturally follows the vase’s tapered base. -
Sketch the profile:
Using a soft pencil, lightly sketch the profile line first. Start with the forehead, curve in for the eye socket, out for the nose, and curve the lips. -
Add facial features:
Draw the closed eye with eyelashes next. Place it slightly back from the bridge of the nose. Keep the lines sweeping and organic rather than rigid. -
Extend the neck:
Draw a long, elegant line down for the neck, connecting it to the jawline. This anchors the portrait to the bottom of the vase. -
Incorporate foliage:
Sketch a stylized leaf branch rising from the bottom, overlapping the neck area. The leaves should point upward, mirroring the vertical flow of the vase. -
Refine the sketch:
Step back and look at your vase from a distance. Use your kneaded eraser to gently lift incorrect lines without damaging the textured paint. Adjust proportions until the balance feels right.
Step 3: Inking the Art
-
Prepare the marker:
Shake your medium-tip oil-based paint marker well and depress the nib on a piece of scrap paper until the ink flows smoothly. -
Trace main contours:
Begin tracing your pencil lines with the medium marker. Commit to long, confident strokes. It’s better to have a slightly wobbly confident line than a sketchy, broken one. -
Detail the eyes:
Switch to the fine-tip marker for delicate areas like the eyelashes and the small dots on the neck. These require precision to avoid looking clunky. -
Thicken select lines:
Go back over the main profile line (forehead to chin) to add subtle line weight variation. A slightly thicker line here makes the face pop against the background. -
Leaf details:
Trace the leaf outlines. Ensure the stems connect fluidly to the main branch line. Keep the tips of the leaves sharp and tapered. -
Cleanup:
Wait at least an hour for the ink to fully dry. Then, very gently use the kneaded eraser to dab away any visible pencil marks that weren’t covered by ink. -
Seal the work:
Finish by spraying a light coat of clear matte sealant over the entire vase to protect the design from scratches and dust.
Ink Bleeding?
If the marker ink bleeds into the texture, your base coat is too porous. Spray a layer of clear matte sealer BEFORE drawing to create a barrier.
Place your finished vase near a window where the natural light can highlight the textures and your beautiful line work
Boho Folk Patterns in Earthy Tones
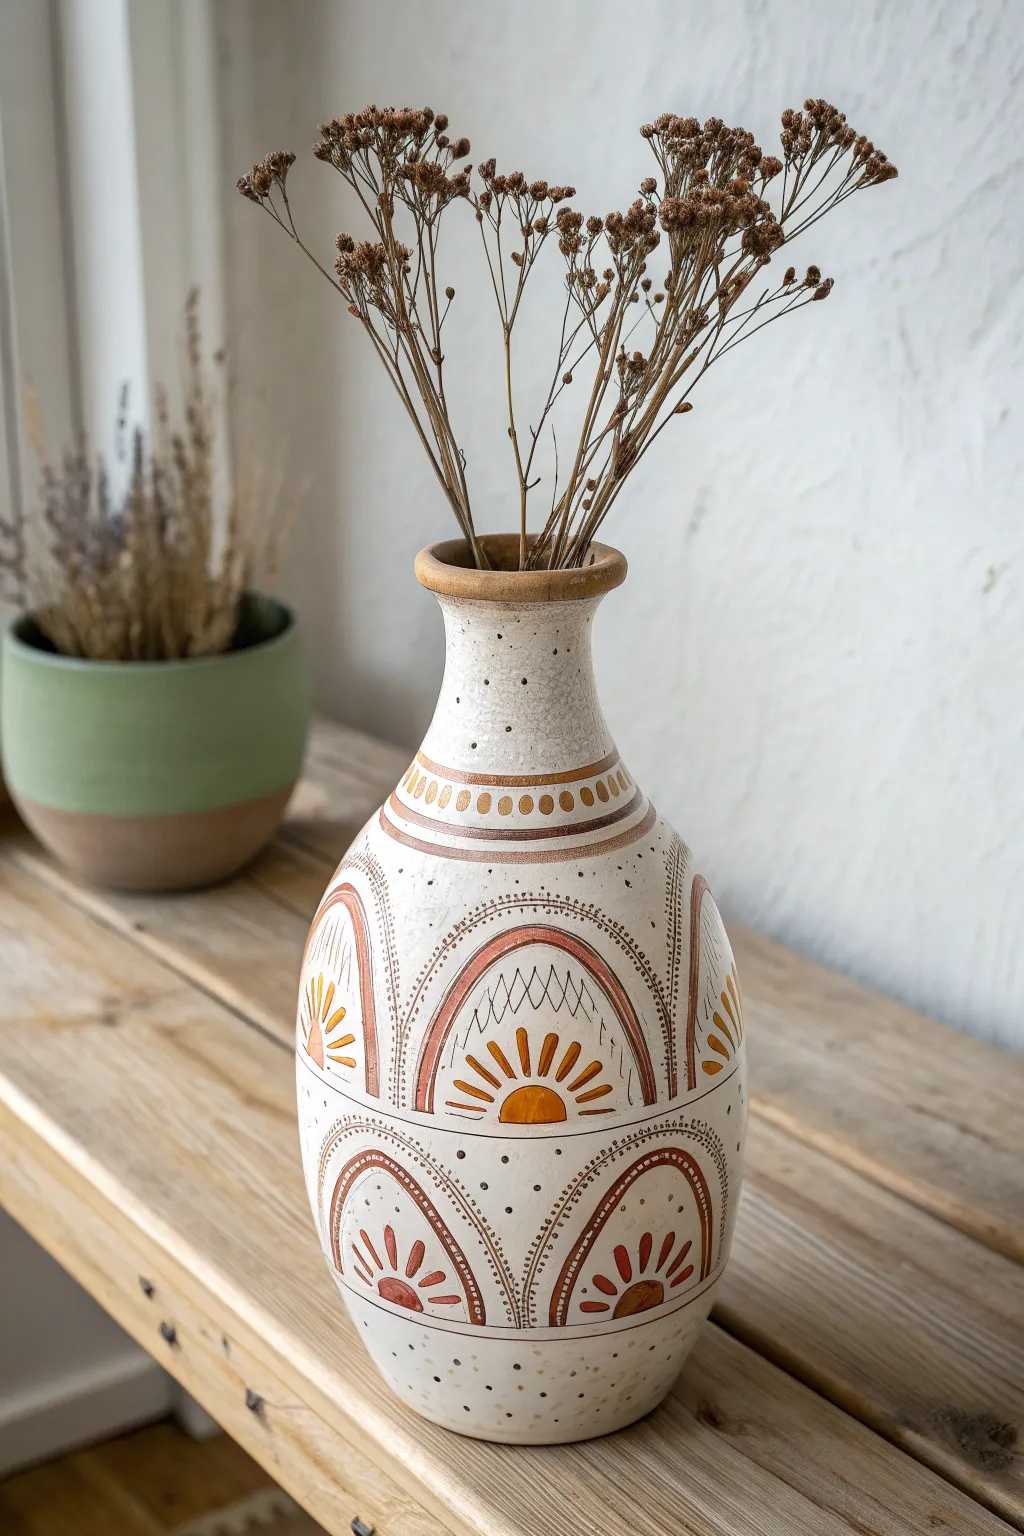

Transform a plain white vase into a piece of desert-inspired art with warm earth tones and repeating arches. This project mimics the look of hand-thrown pottery using layers of paint and deliberate, whimsical brushwork to create a cozy folk pattern.
Step-by-Step
Materials
- Tall white ceramic vase (clean and dry)
- Acrylic paints: Burnt Sienna (terracotta), Yellow Ochre (mustard), Cream/Off-White, Dark Brown
- Matte sealant or clear coat spray
- Fine liner brush (size 0 or 00)
- Small round brush (size 2 or 4)
- Pencil and eraser
- Sponge or paper towel (for texture)
- Palette or small plate
- Water cup
Step 1: Base Preparation & Initial Texture
-
Prepare the surface:
Ensure your vase is completely clean of dust and oils. If the original surface is very glossy, give it a light scuff-sanding with fine-grit sandpaper to help the new paint adhere better. -
Adding the speckled base:
Mix a small amount of off-white paint with a tiny drop of brown to create a warm ‘pottery’ white. Apply an even coat over the entire vase. -
Creating the speckled effect:
While the base is drying, dilute dark brown paint with water until it’s very thin. Load a stiff brush or old toothbrush and gently flick the bristles to spray tiny, random speckles across the vase surface to mimic clay flecks. -
Painting the neck rim:
Use your round brush and Burnt Sienna mixed with a touch of brown to paint the top rim of the vase. Don’t worry about being perfectly crisp; a slightly uneven line adds to the handmade feel.
Wobbly Lines?
Don’t panic! If a line isn’t straight, thicken it slightly or embrace the irregularity. Folk art relies on the human touch, so imperfections actually make it look more authentic
Step 2: Planning the Pattern
-
Visualize the sections:
Mentally divide the vase into three main horizontal bands: the neck, the upper bulb, and the lower bulb. Lightly sketch horizontal guide lines with a pencil if you need help keeping things straight. -
Sketching the arches:
Using a pencil, lightly draw the large arches. Place a row of arches around the widest part of the vase, and another row inverted or offset near the bottom. The arches should be wide and rounded, like desert sunrises.
Pro Tip: Texture Trick
Mix a teaspoon of baking soda into your base white paint before applying. This creates a gritty, ceramic-like texture that makes the vase look like authentic stoneware.
Step 3: Painting the Motifs
-
Neck details:
Start at the neck. Paint a thin Burnt Sienna ring below the rim. Underneath that, use your liner brush to add a row of small circles in Yellow Ochre. -
Defining the main bands:
Paint two parallel horizontal lines in dark brown to frame the neck pattern area. Add a thicker Burnt Sienna band beneath the circles. -
Outlining the main arches:
Moving to the main body, paint the outer curve of your penciled arches using Burnt Sienna. Keep the line weight consistent but organic. -
Adding the inner details:
Inside each large arch, paint a smaller, concentric arch using a thin dark brown line. This creates a frame for the sun motif inside. -
Creating the sunbursts:
In the center bottom of each arch, paint a solid semi-circle in Yellow Ochre. Radiating outward from this sun, paint thick hash marks or ‘rays’ in the same yellow tone. -
Detailing the negative space:
Above the sun rays but inside the brown arch line, use your fine liner brush to add a quick sawtooth or zigzag pattern in black or dark brown. -
Connecting vertical dots:
Between the large arches, vertical spaces remain. Fill these gaps with vertical lines of tiny dark brown dots, running from the top of the section to the bottom. -
Painting the bottom tier:
Repeat the arch process on the lower section of the vase. Outline large arches in Burnt Sienna and fill them with the same sunburst motif—a yellow semi-circle with radiating rays. -
Adding the dotted frames:
On the exterior of the lower arches, paint a decorative border of small dots following the curve of the arch. This adds that intricate folk-art touch.
Step 4: Finishing Touches
-
Review and refine:
Step back and look at the whole piece. If any pencil lines are still visible, gently erase them once the paint is 100% dry. Touch up any speckles that got covered by the pattern if desired. -
Sealing the work:
To protect your intricate work and give it a unified finish, apply a coat of matte clear spray sealant. A glossy finish would distract from the earthy, clay-like vibe we are aiming for.
Fill your new vase with dried grasses or lavender to complete the warm, bohemian aesthetic
Terrazzo Speckles for a Trendy Finish
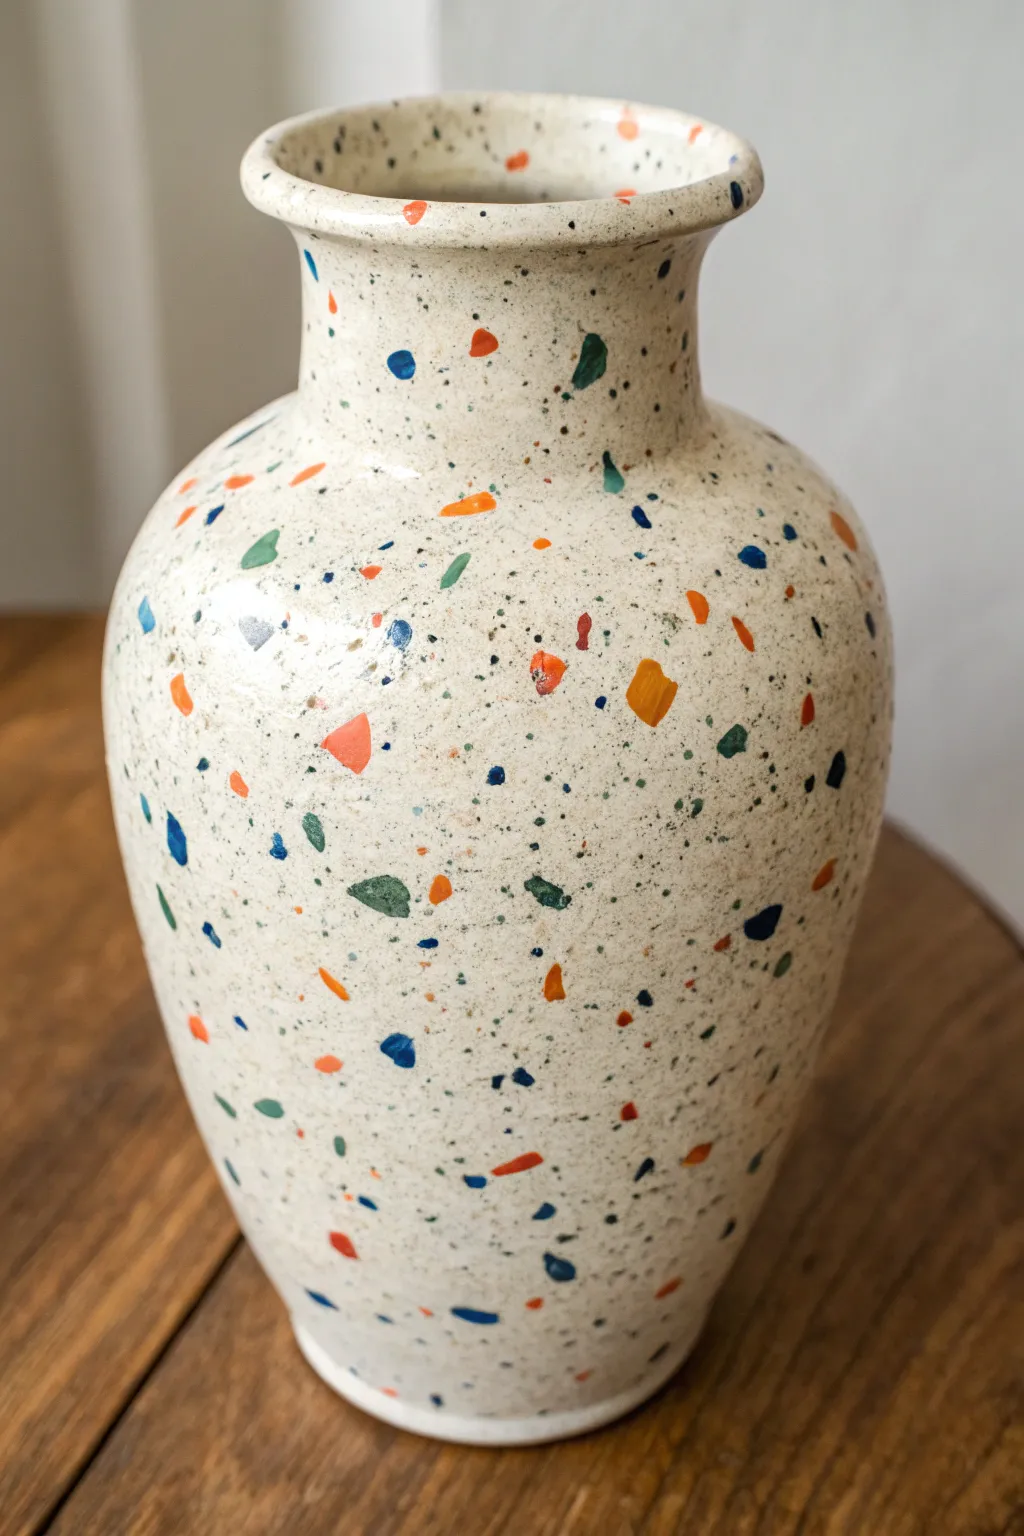
Transform a plain ceramic vase into a modern statement piece with this faux terrazzo technique. The look features a creamy base dotted with colorful, organic shards that mimic widely popular terrazzo flooring without the heavy stonework.
Step-by-Step Guide
Materials
- Ceramic vase (plain bisque or previously glazed)
- Primer spray paint (white or light grey)
- Acrylic craft paints (Cream/Beige base, Orange, Deep Blue, Forest Green)
- Small flat paintbrushes (for shards)
- Old toothbrush or stiff fan brush (for speckles)
- Palette or paper plate
- Gloss or satin clear sealant spray
Step 1: Preparation and Base Coat
-
Clean surface:
Begin by thoroughly cleaning your vase with mild soap and water to remove any dust or oils. Let it dry completely. -
Prime the vase:
In a well-ventilated area, apply a light, even coat of primer spray paint. This is crucial if you are painting over a shiny glazed surface, as it gives the acrylics something to stick to. -
Mix the base color:
Mix a creamy, off-white or light beige acrylic paint. You want a warm, stone-like background color, so avoid stark white. -
Apply base layers:
Paint the entire vase with your base color. You will likely need two to three coats to get full, opaque coverage. Allow about 20 minutes of drying time between each coat.
Uneven Splatter?
If you accidentally create a large, unsightly blob while flicking paint, immediately dab it gently with a damp paper towel to lift it, or just paint over it with your base color once dry.
Step 2: Creating the Fine Texture
-
Prepare the speckle mix:
Dilute a small amount of dark grey or black paint with a few drops of water until it has an inky consistency. -
Splatter technique:
Dip an old toothbrush or a stiff fan brush into the diluted mixture. Hold it near the vase and run your thumb across the bristles to flick tiny, mist-like speckles onto the surface. -
Control the density:
Go lightly at first. You want a fine, sandy texture, not large blobs. Rotate the vase constantly to ensure even coverage around the neck and base. -
Dry the speckles:
Let these fine background speckles dry completely before moving on to the larger shapes to prevent smearing.
Step 3: Painting the Terrazzo Shards
-
Select your palette:
Pour out small amounts of your accent colors: bright orange, deep blue, and forest green. This triad creates a classic mid-century terrazzo look. -
Paint geometric blobs:
Using a small flat brush, paint irregular, angular shapes on the vase. Think of them as broken shards of tile—triangles, trapezoids, and rough squares work best. -
Vary the sizes:
Mix up the sizes of your shards. Paint a few relatively large ‘hero’ shards (about the size of a fingernail) and surround them with medium and small sized pieces. -
Distribute colors evenly:
I prefer to work one color at a time, moving around the vase to ensure the orange doesn’t clump together in one spot. -
Add secondary colors:
Rinse your brush and repeat the process with the deep blue, placing these shapes in the negative spaces left by the orange. -
Fill gaps with green:
Finally, add the green shards. If you see any large empty areas, fill them with smaller bits of these colors to balance the composition. -
Refine the shapes:
Terrazzo isn’t perfectly round. If a shape looks too blob-like, use the edge of your brush to sharpen the corners or flatten a side.
Shard Strategy
Don’t overthink the placement! Real terrazzo is random. Try not to let shapes of the same color touch each other, and keep the edges of your painted ‘stones’ sharp rather than round.
Step 4: Sealing and Finishing
-
Check for opacity:
Some lighter colors, like the orange, may need a second coat once the first layer is dry to make them pop against the background. -
Final cure:
Allow the vase to sit for at least 24 hours. Acrylic paint dries to the touch quickly but takes longer to fully cure onto the ceramic. -
Apply sealant:
Finish with two coats of a clear spray sealant. A gloss finish mimics polished terrazzo stone perfectly, while satin offers a more modern, matte look.
Place your favorite flowers inside and enjoy the custom, architectural flair this vase adds to your room
Two-Tone “Dipped” Paint Look
Transform a plain vase into a modern statement piece with this faux-ceramic technique that mimics the look of raw clay and stoneware. The finish combines a warm terracotta base with a textured cream top for a high-end, artisanal aesthetic.
Detailed Instructions
Materials
- Glass or smooth ceramic vase (thrifted is perfect)
- Terracotta colored acrylic paint or spray paint
- Cream or off-white acrylic paint
- Baking soda
- Painter’s tape (frog tape works well)
- Medium flat paintbrush
- Small mixing cup
- Matte clear sealant spray
- Sandpaper (medium grit)
Step 1: Preparation and Base Coat
-
Clean the surface:
Start by thoroughly washing your vase with warm soapy water to remove any dust, grease, or price sticker residue. Dry it completely to ensure the paint adheres properly. -
Scuff the surface:
If your vase is glossy glass or glazed ceramic, lightly sand the entire surface with medium-grit sandpaper. This creates ‘tooth’ for the paint to grip. -
Wipe down:
Use a damp cloth to remove all sanding dust. The surface must be perfectly clean before painting. -
Mix the texture paint:
In your mixing cup, combine your terracotta-colored acrylic paint with baking soda. Aim for a ratio of about 1 part baking soda to 2 parts paint. Stir until it reaches a fluffy, mousse-like consistency. -
Apply the first layer:
Paint the entire vase with your terracotta mixture. Don’t worry about brush strokes; the texture is part of the charm. Let this layer dry fully, which usually takes about 30-40 minutes. -
Apply the second layer:
Add a second coat of the terracotta texture paint to ensure full coverage and deepen the color. I find that dabbing the brush rather than stroking creates a more authentic stone-like texture. -
Dry completely:
Allow the base color to dry completely, preferably overnight or for at least 2-3 hours. The paint must be hard before applying tape.
Step 2: Creating the Dipped Effect
-
Mark the line:
Decide where you want the color split to be. In the inspiration image, the line sits slightly below the widest part of the vase belly. -
Apply painter’s tape:
Carefully wrap painter’s tape around the vase at your chosen height. Press the edge of the tape down firmly to seal it against the textured surface and prevent bleeding. -
Mix the cream paint:
Prepare a fresh mixture using cream acrylic paint and baking soda, maintaining that same 1:2 ratio for consistent texture. -
Paint the top section:
Apply the cream texture paint to the area above the tape line, covering the neck and rim of the vase. Brush away from the tape edge initially to avoid forcing paint under it. -
Refine the texture:
Work horizontally around the vase, using horizontal brush strokes to mimic the turning lines found on wheel-thrown pottery. -
Apply a second top coat:
Once the first cream layer is touch-dry, apply a second coat if the terracotta color is showing through. The texture should look thick and matte. -
Remove the tape:
This is crucial: peel off the tape while the final coat of cream paint is still slightly wet. Pull slowly at a 45-degree angle to get a crisp line. -
Touch up:
If any paint bled under the tape, use a small detail brush dipped in the terracotta paint to carefully correct the line once the cream section is dry. -
Seal the piece:
Because baking soda paint can be fragile, finish with a light coat of matte clear sealant spray to protect your artwork from chipping.
Bleeding Lines?
If texture prevents a seal, paint a thin layer of the BASE color (terracotta) over the tape edge first. This fills the gaps. Then, paint the top color.
Level Up: Aged Look
Before sealing, dry brush a tiny amount of watered-down brown paint into the crevices of the cream section to give it an antiqued, weathered appearance.
Place your dried wheat or faux stems inside to complete this warm, organic display
Fruit-and-Citrus Motifs That Feel Fresh
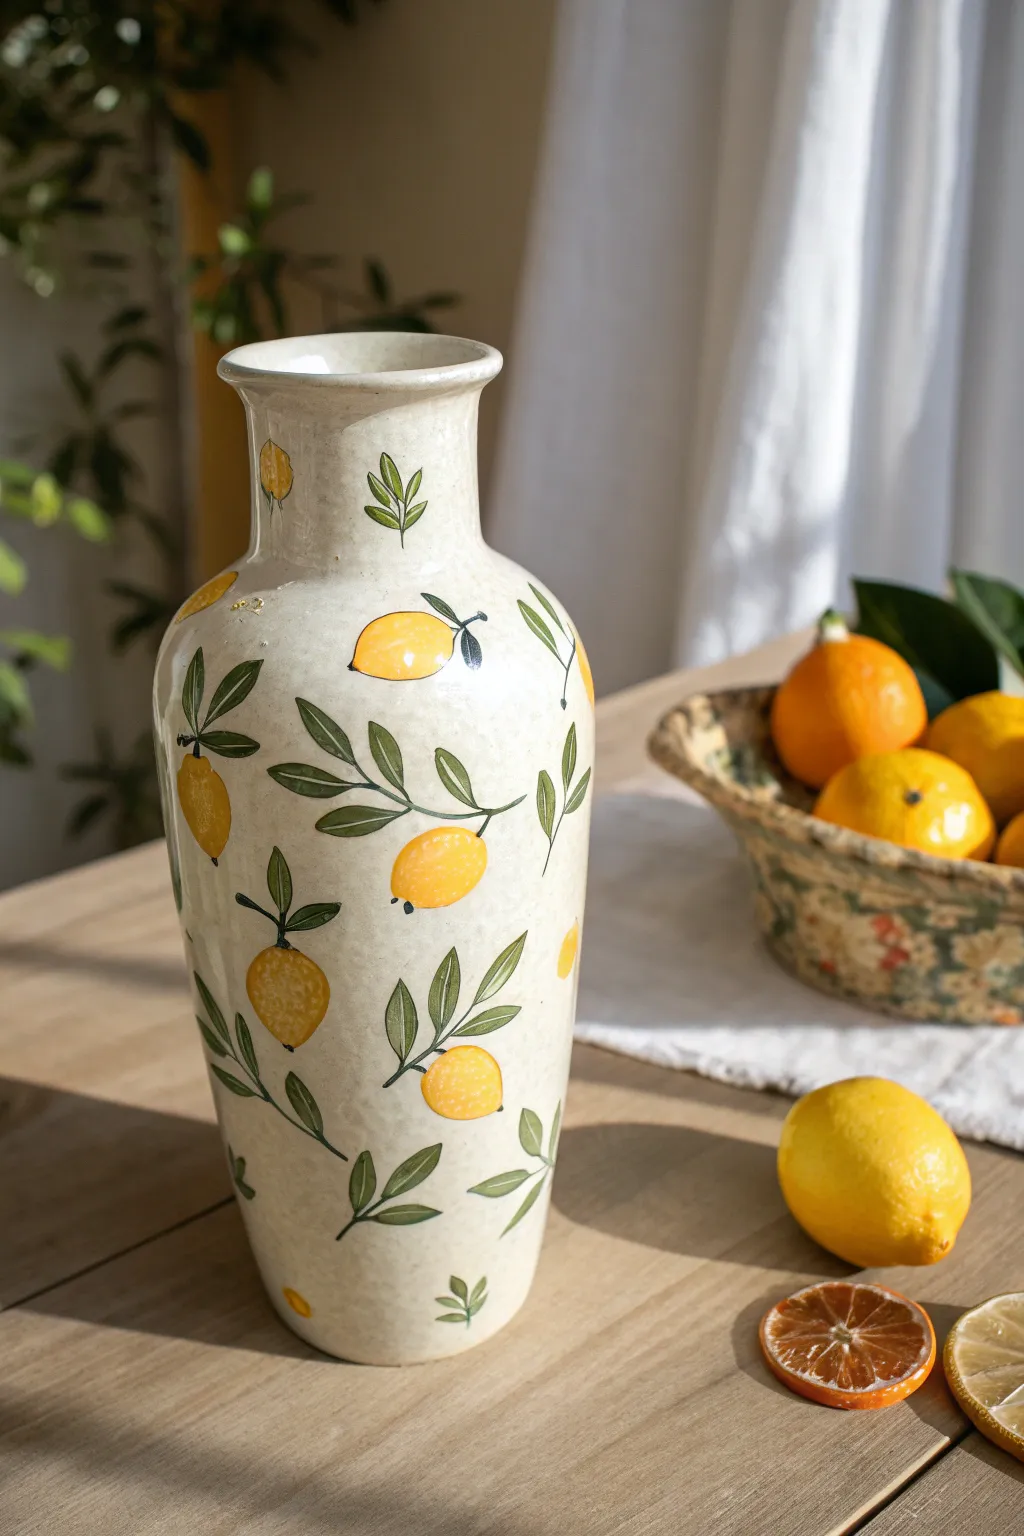

Bring the zest of a Mediterranean summer indoors with this hand-painted ceramic vase, featuring cheerful lemons and lush greenery on a speckled cream base. The effortless, organic repeating pattern adds a touch of fresh elegance to any room.
Step-by-Step
Materials
- Raw bisque ceramic vase (or a primed thrifted vase)
- Acrylic paints (Cream/Off-White, Butter Yellow, Golden Yellow, Olive Green, Hunter Green, Black)
- Ceramic sealant or gloss varnish
- Medium flat brush
- Small round detail brush (size 2 or 4)
- Fine liner brush
- Pencil
- Palette
- Old toothbrush (for speckling)
Step 1: Base Preparation
-
Clean surface:
Begin by wiping down your ceramic vase with a damp cloth to remove any dust or oils. Let it dry completely. -
Apply base coat:
Using the medium flat brush, apply a coat of Cream or Off-White acrylic paint to the entire exterior. I like to brush endlessly in vertical strokes to minimize texture. -
Second coat:
Once the first layer is dry to the touch, apply a second coat for full opacity. The goal is a smooth, even canvas for your fruit. -
Add speckle texture:
Dilute a tiny drop of brown or black paint with water. Dip an old toothbrush into this mixture, stand back, and gently flick the bristles with your thumb to spray tiny speckles across the vase for that classic stoneware look.
Natural Spacing
Avoid placing lemons in perfect rows. Create triangular groupings to keep the eye moving around the vase naturally.
Step 2: Painting the Fruit
-
Pencil placement:
Lightly sketch the outlines of lemons scattered around the vase. Vary their angles—some horizontal, some vertical—to create natural movement. -
Yellow base:
Fill in the lemon shapes with Butter Yellow using your small round brush. Don’t worry about perfection; organic shapes look best. -
Add dimension:
While the yellow is still slightly wet, blend in a touch of Golden Yellow on the bottom curves of the lemons to suggest shadow and roundness. -
Highlighting:
Mix a tiny bit of white into your yellow and dab it onto the upper curve of each fruit to create a soft highlight.
Step 3: Adding Foliage and Detail
-
Map the stems:
Using a thin brush and dark Hunter Green mixed with a little brown, paint thin stems connecting to your lemons. -
Leaf shapes:
Paint elongated, almond-shaped leaves extending from the stems using Olive Green. Vary the groupings—some lemons get one leaf, others get a cluster of three. -
Leaf detailing:
Once the green base is dry, use your fine liner brush and the darker Hunter Green to paint a central vein down the middle of each leaf. -
Shadowing leaves:
Add depth by painting one half of the leaf slightly darker than the other, mimicking how light hits foliage. -
Lemon ends:
With the finest point of your liner brush and black paint, add a tiny dot or small ‘u’ shape at the bottom tip of each lemon. -
Stem connection:
Add a small dark cap where the fruit connects to the stem to ground the lemons.
Fixing Smudges
If you smudge paint on the cream base, wait for it to dry completely, then paint over the mistake with your base color.
Step 4: Finishing Touches
-
Final cure:
Allow the paint to cure for at least 24 hours to ensure everything is completely set. -
Sealing:
Brush on a coat of clear ceramic sealant or gloss varnish. This protects your work and gives the fruit a juicy, ceramic-glaze shine.
Now fill your lovely new vase with fresh blooms or display it as a standalone piece of art on your mantel
Stenciled Repeats for Super Clean Patterns
Achieve a high-end pottery look by transforming a plain ceramic vase with this striking scallop pattern. The result combines the warmth of terracotta tones with the crisp elegance of Art Deco-inspired repeating shapes.
Step-by-Step Guide
Materials
- Tall white or cream ceramic vase (smooth surface)
- Adhesive stencil vinyl (or pre-made scallop masking tape)
- Craft knife or stencil cutting machine
- Terracotta or burnt orange acrylic paint (matte finish)
- Cream or off-white acrylic paint (matte finish)
- Flecked stone texture spray (optional, for the base)
- High-density foam pouncers or stencil brushes
- Fine-grit sandpaper
- Matte clear sealant spray
- Painter’s tape
- Ruler or soft measuring tape
Step 1: Base Preparation
-
Clean the Surface:
Begin by thoroughly cleaning your vase with soapy water or rubbing alcohol to remove any grease or oils. Let it dry completely. -
Establish the Base Tone:
If your vase isn’t already the desired creamy off-white color, apply two coats of cream acrylic paint. Allow full drying time between coats. -
Add Subtle Texture:
To mimic the speckled stoneware look seen in the photo, lightly mist the vase with a stone texture spray or flick diluted dark brown paint onto the surface using a toothbrush. Keep this extremely subtle.
Step 2: Stenciling Strategy
-
Create the Scallop Mask:
Design a repeating scallop or ‘fish scale’ pattern on stencil vinyl. You want the negative space (the gaps between scales) to remain connected so you can peel them off later. -
Cut the Stencils:
Using a craft knife or a cutting machine, cut out your vinyl stencils. I prefer cutting them in strips of 3-4 scales wide to make handling easier around the vase’s curve. -
Mark Guidelines:
Use a soft measuring tape and a pencil to lightly mark horizontal guidelines around the vase. This ensures your rows of scallops don’t start to slope downwards as you work. -
Apply the Vinyl Masks:
Peel and stick your vinyl stencils onto the vase. You are masking off the areas that will remain cream (the outlines and the bottom half of the scales). Press down firmly on all edges. -
Check the Seals:
Run your fingernail or a burnishing tool over every single edge of the vinyl. This step is critical for preventing paint bleed and achieving those crisp lines.
Bleeding Lines?
Before painting the terracotta color, seal your stencil edges by painting a thin layer of the *base* cream color over them first.
Step 3: Painting the Pattern
-
Load the Pouncer:
Dip your foam pouncer into the terracotta paint, then offload most of the paint onto a paper towel until the foam is almost dry. -
Apply First Layer:
Dab the paint vertically onto the exposed areas of the vase. Do not drag the sponge; straight up-and-down motions prevent paint from being pushed under the stencil. -
Build Color Density:
Apply a second and third coat of terracotta paint as needed. Thin layers dry faster and create a smoother finish than one thick gloop. -
Create the Top Rim:
While the scales dry, use painter’s tape to mark off a thin line around the neck of the vase. Paint this thin band terracotta to frame the pattern at the top.
Level Up: Ombré Effect
Mix varying amounts of white into your terracotta paint for each row, creating a gradient from dark scales at the bottom to light at the top.
Step 4: Finishing Touches
-
Remove Stencils:
Carefully peel away the vinyl stencils before the final coat of paint is 100% hard-cured. Pulling while slightly tacky helps keep the edges clean. -
Tidy Up Edges:
If any paint bled through, use a very small detail brush with the cream base color to touch up the lines. You can also gently scrape away dried terracotta drips with a toothpick. -
Sand for Texture:
Once fully dry, lightly scuff the painted surface with very fine-grit sandpaper. This distresses the paint slightly and unifies the sheen levels. -
Seal the Project:
Finish with a clear matte sealant spray to protect the paint against scratches and dust without adding unwanted gloss.
Place your new vase on a mantel or bookshelf where the warm tones can catch the light
Chalky Matte Farmhouse Finish With Gentle Distressing
Recreate the look of high-end studio pottery with this textured, two-tone paint technique. This project combines a rough, matte stone base with a soft, semi-gloss sage green top for a beautifully balanced, artisanal finish.
Step-by-Step
Materials
- Old ceramic or glass vase (thrift store find)
- White or cream chalk paint
- Baking soda or plaster of paris
- Stone textured spray paint (optional base)
- Sage green acrylic paint
- Glazing medium or water
- Glossy polyurethane sealer or decoupage glue
- Medium flat brush
- Small foam brush
- Sandpaper (medium grit)
- Painter’s tape
Step 1: Creating the Textured Base
-
Prep the Surface:
Clean your vase thoroughly with soapy water and rubbing alcohol to remove any grease or oil. If the vase is very glossy, give it a quick scuff with sandpaper to help the primer adhere. -
Prime the Surface:
Apply a base coat of primer or a flat white spray paint. This ensures your textured layers will stick properly and gives you a neutral canvas to work on. -
Mix Texture Medium:
Mix your cream chalk paint with baking soda in a 1:1 ratio. You want a thick, pasty consistency that resembles cupcake frosting—this is the secret to getting that raw ceramic feel. -
Apply Base Texture:
Brush the baking soda mixture over the entire vase. Apply it thickly, dabbing the brush rather than stroking it smooth to create divots and organic bumps. -
Carve the Ridges:
While the paint is still wet and tacky on the bottom half, use the stiff bristles of a dry brush or a plastic fork to gently drag horizontal lines around the vase. These ridges mimic wheel-thrown pottery. -
Let it Cure:
Allow this textured layer to dry completely. Because of the baking soda, it may take a few hours or even overnight. It needs to be rock hard before the next step.
Fixing Cracks
Baking soda paint can crack if applied too thick. If large cracks appear, fill them with spackle, sand lightly, and re-paint that spot.
Step 2: Adding the Glazed Effect
-
Create the Glaze Color:
Mix your sage green acrylic paint with a gloss glazing medium. If you don’t have medium, mix the paint with a little water and a clear gloss varnish to create a semi-transparent, shiny finish. -
Apply the Top Color:
Using a soft foam brush, paint the upper portion of the vase with your sage mixture. Start from the neck and work your way down to about the halfway point of the vase. -
Feather the Transition:
Where the green meets the cream texture, don’t create a hard line. Use a dry brush to gently feather the green paint downward, allowing some of the cream ridges to peek through. -
Define the Rim:
Carefully paint the rim of the vase. You can choose to leave the very top edge cream for a ‘worn’ look, or paint it sage to match the upper body. -
Add Depth:
While the green is drying, I sometimes like to blot off tiny spots with a paper towel to simulate uneven glaze absorption found in real pottery. -
Simulate High Gloss:
Once the sage paint is dry, apply two coats of high-gloss polyurethane or specific ‘triple thick’ glaze ONLY over the green section. This creates the visual contrast between the matte ‘clay’ bottom and glazed ‘ceramic’ top.
Step 3: Distressing and Finishing
-
Highlight the Texture:
Return to the cream bottom section. Take fine-grit sandpaper and very lightly sand the raised horizontal ridges you created earlier. -
Dry Brushing:
Dip a dry, stiff brush into a tiny amount of white paint. Offload almost all the paint onto a paper towel, then lightly whisk it over the green section to catch the high points of the texture. -
Final Seal:
To protect the bottom half without making it shiny, apply a matte spray sealer over just the cream section. Mask off the glossy green top with paper to keep it shiny. -
Cleaning Up:
Check for any unwanted drips where the gloss meets the matte area and touch up with cream paint if necessary.
Faux Kiln Speckles
Flick a toothbrush dipped in diluted brown paint over the dried piece to add tiny speckles resembling iron deposits in clay.
Place your new artisan-style vase locally with some dried stems to complete the look
Stoneware Texture Using a Gritty Paint Mix
Transform a smooth, inexpensive glass or ceramic vase into a piece that looks like high-end, hand-thrown stoneware. This technique uses a gritty baking soda paint mix to achieve that authentic, earthy texture and a clever two-tone layering process to mimic raw clay.
Step-by-Step Guide
Materials
- Tall, smooth vase (glass or ceramic)
- Acrylic paint (warm white/cream)
- Acrylic paint (tan/ochre or caramel)
- Acrylic paint (dark brown/burnt umber)
- Baking soda
- Matte finish clear sealant spray
- Paintbrushes (flat soft bristle and an old stiff bristle)
- Painter’s tape
- Disposable mixing cups
- Water
- Paper towels
Step 1: Preparation and Base Coat
-
Clean the surface:
Begin by thoroughly washing your vase with soap and warm water to remove any grease or dust. Dry it completely ensuring no lint remains. -
Mix the ‘clay’ color:
In a mixing cup, combine your tan or ochre acrylic paint with a small amount of white to soften it. You want a color that closely resembles natural terracotta or raw stoneware clay. -
Add the texture agent:
Sprinkle baking soda into your tan paint mixture. Start with a ratio of about 1 part baking soda to 2 parts paint. Stir well until you have a consistency similar to fluffy frosting or mousse. -
Apply the bottom layer:
Paint the bottom third of the vase and the very top rim (inside the neck) with this gritty tan mixture. Don’t worry about being neat at the transition line yet; apply it thick enough to hide the original surface. -
Create horizontal striations:
While the paint is still wet, drag your brush horizontally around the vase to create subtle ridges. This mimics the ‘throwing lines’ found on wheel-turned pottery. -
Let it cure:
Allow this base layer to dry completely. The baking soda mix can take longer than standard acrylics, so give it at least an hour or use a hair dryer on a low setting.
Step 2: The Glazed Layer
-
Mix the ‘glaze’ color:
In a fresh cup, mix your warm white or cream acrylic paint. Add baking soda again, but use slightly less than before—perhaps a 1:3 ratio so the texture is present but smoother than the ‘raw clay’ base. -
Tape the bottom line:
Once the tan base is bone dry, place a strip of painter’s tape around the bottom third of the vase. This will reserve that beautiful raw clay look at the base. -
Paint the main body:
Apply the creamy white gritty mix to the entire body of the vase, stopping just above the taped line and just below the top rim. I like to overlap the tan paint slightly at the neck for a natural dipped look. -
Blend the neck transition:
Using a slightly damp brush, gently feather the white paint where it meets the tan rim at the top, creating a soft, organic line rather than a harsh stop. -
Peel and reveal:
Carefully peel off the painter’s tape while the white paint is still slightly tacky to ensure a cleanish edge, but don’t worry if it’s imperfect; pottery is rarely perfectly straight. -
Enhance the texture:
Inspect the white section. If it looks too flat, stipple a little more gritty paint onto random areas to build up visual interest.
Uneven Texture?
If the baking soda clumps up, your paint was too dry. Add a drop of water to smooth it out, but keep the mix thick enough to hold brush strokes.
Step 3: Speckling and Finishing
-
Prepare the speckle mix:
Dilute a small amount of dark brown paint with water until it’s very distinct and runny, seemingly almost like ink. -
Load the splatter tool:
Dip an old, stiff-bristled brush or even an old toothbrush into this watery brown mixture. -
Test your splatter:
Flick the bristles with your thumb over a piece of scrap paper first. You want fine mists and tiny dots, not giant blobs. -
Apply the speckles:
Gently flick the paint onto the white section of the vase. Rotate the vase constantly to ensure even, random distribution of the ‘iron spots’ typical in stoneware. -
Address any large blobs:
If a droplet lands that is too large, quickly dab it gently with the corner of a paper towel to lift it, or smudge it slightly to look like a clay imperfection. -
Seal the work:
Once all paint layers are completely dry, spray the entire vase with a matte clear coat. This protects the baking soda texture from flaking off over time.
Level Up: Aged Look
Mix a very watery brown wash and brush it over the dried white section, then immediately wipe it off. Ideally, pigment stays only in the texture grooves.
Place your new stoneware-style vase in a sunny spot to highlight that beautiful, handcrafted texture
Marbled Swirl Pour for a One-of-a-Kind Look

Transform a plain ceramic vase into a mesmerizing work of art using a simple swirling technique that mimics the organic beauty of agate stone. This project captures fluid movement in earthy tones of terracotta, sage green, and cream, ensuring no two pieces are ever exactly alike.
Step-by-Step
Materials
- Plain bisque or glazed ceramic vase (white or cream)
- Acrylic pouring paints (terracotta/burnt sienna, sage green, cream/off-white, iridescent gold – optional)
- Pouring medium
- Large plastic bin or deep bucket (big enough to submerge the vase)
- Water
- Stirring sticks or skewers
- Gloves
- Cardboard or drop cloth
- Clear acrylic sealant spray (gloss or satin finish)
- Sandpaper (fine grit)
Step 1: Preparation
-
Clean surface:
Begin by thoroughly cleaning your ceramic vase with mild soapy water to remove any dust or oils. Dry it completely with a lint-free cloth. -
Sanding (optional):
If your vase has a very slick glazed surface, lightly scuff it with fine-grit sandpaper. This creates a better tooth for the paint to adhere to. -
Prepare the workspace:
Lay down your cardboard or drop cloth. This process involves dipping, so set up your large bin on a stable surface where spills won’t be a disaster. -
Mix paints:
In separate cups, mix your acrylic paints with the pouring medium according to the medium’s instructions. A common ratio is 1:1, but aiming for a consistency like warm honey ensures the best flow.
Muddy Waters?
If your colors are blending into brown muck, you are over-swirling the water. Use fewer strokes with the skewer and let the natural movement of the water create the pattern.
Step 2: The Marble Dip
-
Fill the basin:
Fill your large plastic bin with room-temperature water. Fill it deep enough to submerge the vase up to the neck, but leave room for displacement so it doesn’t overflow. -
Drop the colors:
Gently drip your prepared paint colors onto the surface of the water. Start with the cream as a base, then add drops of terracotta and sage green. -
Create the swirl:
Using a skewer or stirring stick, very gently drag through the floating paint. Create wide, lazy swirls rather than mixing it vigorously; you want distinct ribbons of color, not a muddy blend. -
Check the pattern:
Look for areas where the colors mimic the photo—long, elegant curves rather than tight circles. If the paint sinks rapidly, your mixture might be too heavy, so adjust the next batch if needed. -
The dip technique:
Holding the vase by the inside of the rim (wearing gloves is helpful here), slowly lower the vase into the water at a slight angle. The paint skin on the surface will wrap around the ceramic. -
Submerge and spin:
Continue pushing the vase down while slowly rotating it to catch the paint on all sides. I find a slow, steady rotation prevents air bubbles from getting trapped under the paint. -
Clear the surface:
Once the vase is fully submerged to the desired line, blow on the water’s surface or use your hand to sweep away the remaining floating paint before pulling the vase back up. This prevents a double-layer of paint from ruining the design. -
Remove carefully:
Pull the vase out of the water. Inspect the design immediately; while wet, you can sometimes gently manipulate a drip, but it’s usually best to let gravity do the work.
Step 3: Finishing Touches
-
Initial dry:
Place the vase onto a piece of cardboard or a drying rack. Let it sit undisturbed for at least 24 hours. The thick layers of swirled paint need time to cure fully. -
Inspect for imperfections:
Once dry, check for any rough bumps or bubbles. You can very gently smooth these out with your finger if the paint is still slightly tacky, or wait until fully dry to lightly sand. -
Apply sealant:
Take the vase to a well-ventilated area. Apply a light coat of clear acrylic sealant spray. -
Second coat:
Wait for the first coat to dry (usually 15-20 minutes), then apply a second coat for durability and a consistent sheen. -
Clean the rim:
If paint got onto the inside rim where you held it, use a damp cloth or a bit of rubbing alcohol to clean that edge for a crisp, professional finish.
Touch of Glamour
Add fine gold mica powder to your clear sealant spray, or paint a thin gold rim around the mouth of the vase after drying for an elegant, high-end finish.
Place your newly marbled vase by a sunny window to let those organic swirls shine
Celestial Night Sky With Splattered Stars
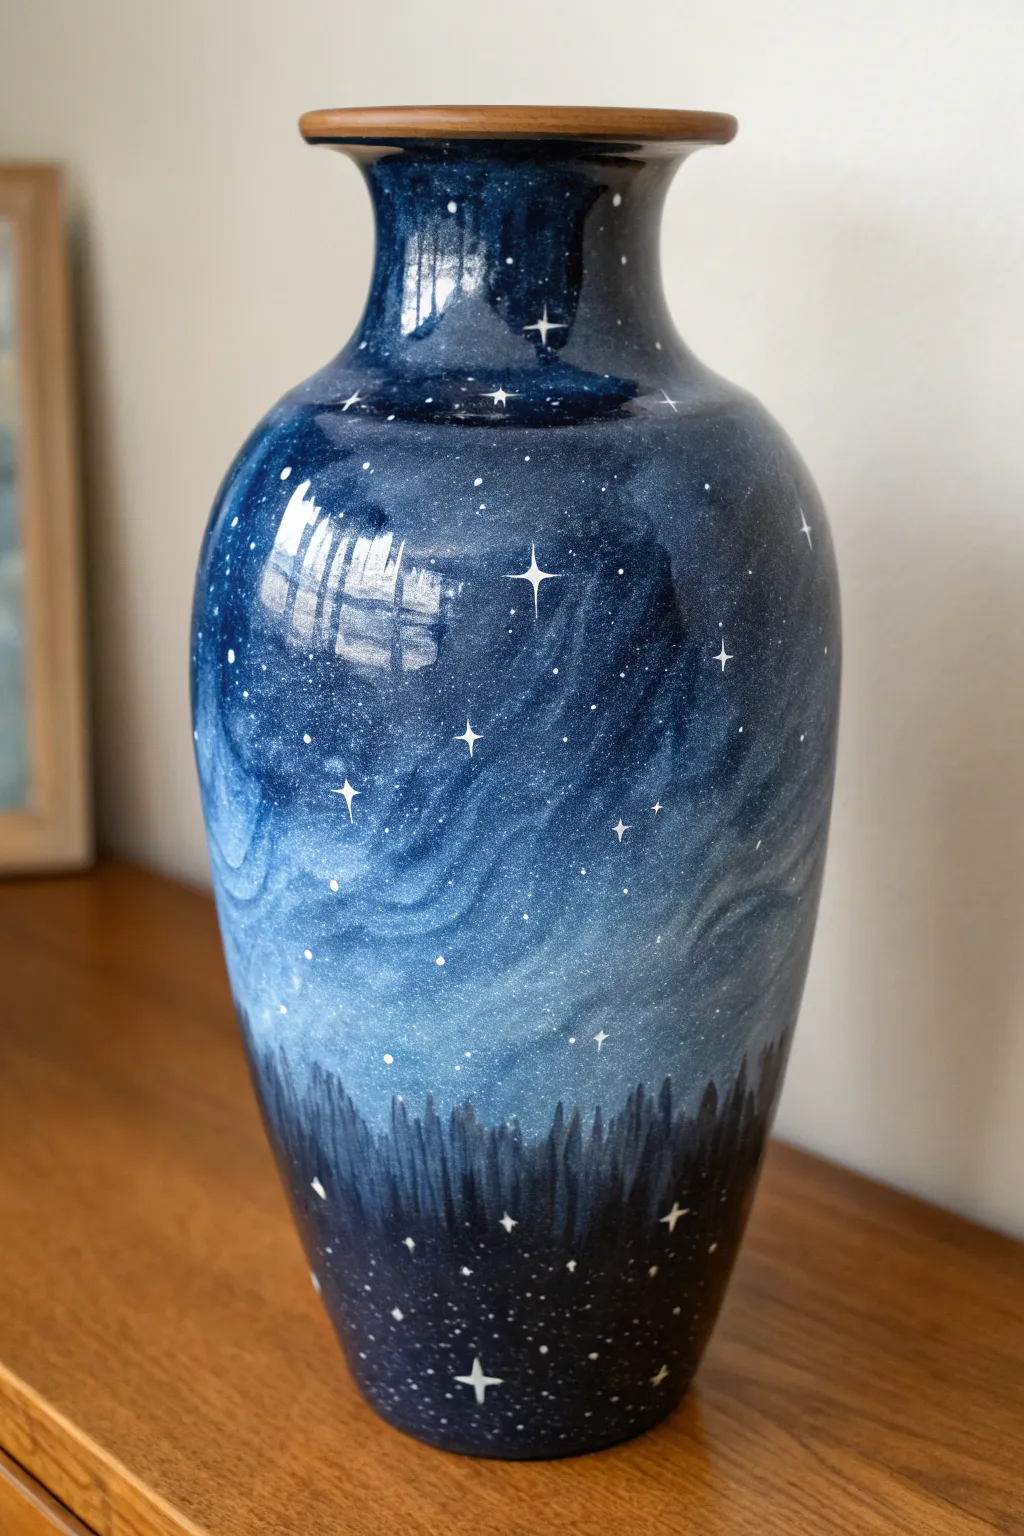
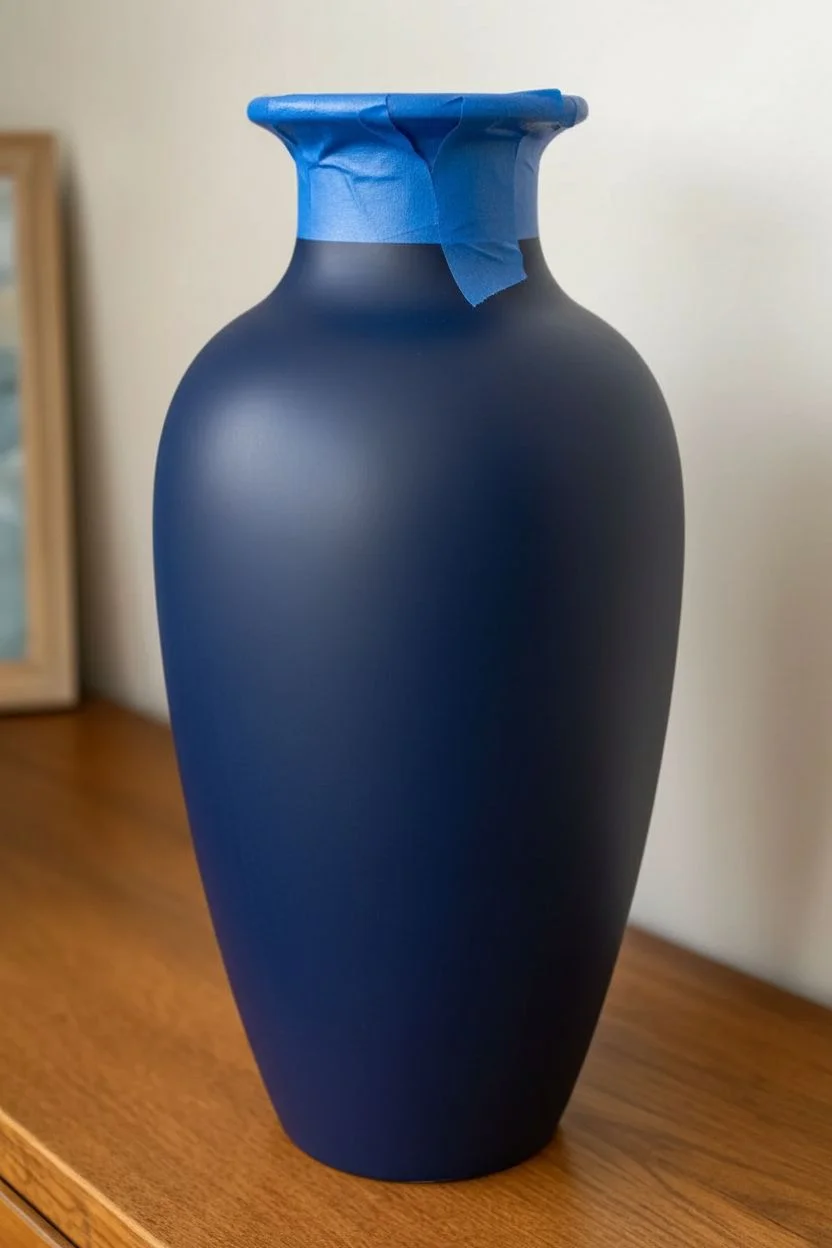
Transform a plain ceramic vessel into a breathtaking window into the galaxy. This project combines deep, moody gradients with delicate celestial details and a grounding forest silhouette for a truly magical piece of decor.
How-To Guide
Materials
- Bisque or glazed ceramic vase (urn shape works well)
- Acrylic paints (Phthalo Blue, Prussian Blue, Black, Titanium White, Teal)
- Glazing medium or water (for thinning)
- Assorted synthetic brushes (large flat brush, medium filbert, fine liner)
- Old toothbrush (for spattering)
- Painter’s tape
- Palette for mixing
- Paper towels
- Gloss varnish or spray sealer
- Wooden lid (optional, if your vessel allows)
Step 1: Setting the Stage
-
Prep the surface:
Ensure your ceramic vase is completely clean and dry. If the surface is very slick or previously glazed, give it a light sanding with fine-grit sandpaper to help the acrylics adhere better. Wipe away any dust with a damp cloth. -
Protect the rim:
Since the example features a clean wooden lid or rim, use painter’s tape to mask off the very top edge of the vase if you want to keep that raw ceramic look or if you plan to attach a wooden element later. -
Base coat application:
Mix a dark midnight blue using Prussian Blue with a touch of Black. Apply this color over the entire vase using a large flat brush to create a solid, opaque foundation. Let this base layer dry completely before moving on.
Galaxy Depth Trick
Mix a tiny drop of purple into your black for the deepest shadows. It adds a richness that pure black lacks and makes the white stars pop vividly.
Step 2: Creating the Nebula
-
Establish the gradient:
Squeeze out fresh Phthalo Blue, Teal, and White. Using a damp sponge or a large soft brush, start dabbing lighter blue patches in the middle section of the vase, blending the edges into the dark base coat while the paint is still wet. -
Build the milky way:
Mix a small amount of Titanium White with glazing medium to make it translucent. With a filbert brush, gently sweep this milky mixture across the vase in a diagonal, waving motion to mimic galactic clouds. -
Softening the transitions:
While the white glaze is still tacky, use a dry, clean brush to feather the edges. You want a soft, smoky look rather than hard lines. If it gets too bright, wash over it with a very watered-down blue to push it back into the distance. -
Deepening the shadows:
To make the bright parts pop, go back in with your darkest black-blue mix. Carefully darken the areas around the nebula swirls and the very top of the vase neck, creating high contrast.
Step 3: The Forest Floor
-
Roughing in the trees:
Load a medium round brush with pure Black. Around the bottom third of the vase, paint vertical strokes of varying heights to create the dense background of a forest. I find keeping the tops uneven makes it look more natural. -
Adding definition:
Switch to a smaller brush. At the top of your black mass, flick upward with quick, short strokes to create pointed tree tops. Vary the height so some trees reach up into the ‘nebula’ area. -
Detailing the canopy:
For the taller trees, use the very tip of your brush to tap in tiny horizontal branches near the peaks, giving them a distinct pine tree silhouette against the lighter blue background. -
Grounding the base:
Ensure the very bottom of the vase is solid black, blending seamlessly up into the tree line you just created. Let the forest layer dry completely.
Metallic Magic
Use metallic silver or pearlescent white paint for the larger stars. When the light hits the curved vase, the stars will actually shimmer as you move.
Step 4: Celestial Details
-
Prepare the stars:
Dilute Titanium White paint with water until it reaches an ink-like consistency. It needs to be fluid enough to fly off bristles but opaque enough to show up against the black. -
Spatter technique:
Dip an old toothbrush into your thinned white paint. Hold it near the vase surface and run your thumb across the bristles to flick a fine mist of stars over the upper two-thirds of the vase. Focus on the darker areas for better visibility. -
Painting larger stars:
Using a fine liner brush or a dotting tool, place individual white dots of varying sizes randomly throughout the sky. These represent closer, brighter planets or stars. -
Adding twinkles:
Select a few of your larger dots to turn into twinkling stars. Paint a thin cross ‘t’ shape through the dot, then add a smaller diagonal ‘x’ through the center to create a radiant 8-point starburst. -
Forest fireflies:
Don’t forget the bottom section. Add just a few tiny specks of white among the black tree trunks to suggest fireflies or stars peeking through the dense branches.
Step 5: Finishing Touches
-
Sealing the work:
Once the paint is cured (wait at least 24 hours), apply two coats of high-gloss varnish. This deepens the dark blues and gives the vase that polished, ceramic-kiln look. -
Clean up borders:
Remove the painter’s tape from the rim carefully. If you have a wooden lid, place it on top now to complete the urn aesthetic.
Now you have a stunning piece of celestial art that captures the infinite beauty of the night sky right on your shelf.


Have a question or want to share your own experience? I'd love to hear from you in the comments below!