A chair rail is basically an instant “before-and-after” button—one simple line that makes a wall feel designed on purpose. If you’re craving a polished two-tone paint look (or a subtle, modern twist), these ideas will help you play with color, finish, and mood without overthinking it.
Classic Dark Below, Light Above
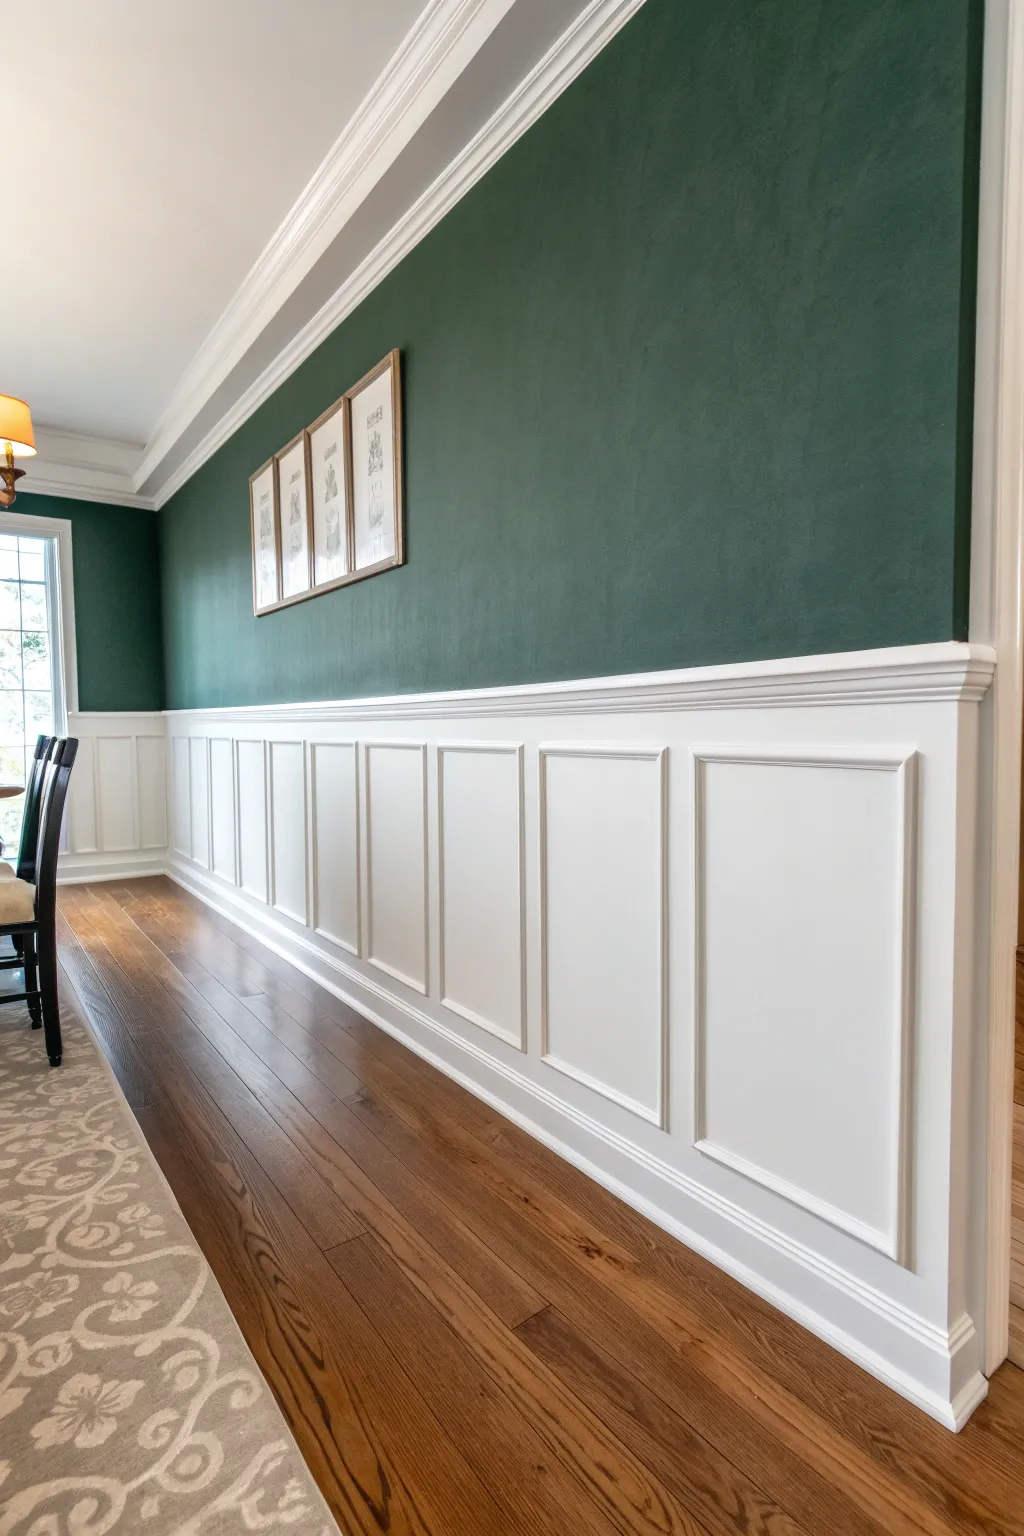
Contrast is king in this sophisticated hallway makeover, where deep forest green walls meet crisp, bright white wainscoting. This tutorial guides you through installing classic judge’s paneling to achieve a high-end, architectural look that instantly elevates any dining room or corridor.
Step-by-Step
Materials
- Deep green interior latex paint (matte or eggshell finish)
- Bright white semi-gloss trim paint
- 1×4 primed MDF or wood boards (for top and bottom rails)
- 1×3 primed MDF or wood boards (for vertical stiles)
- Baseboard moulding
- Chair rail moulding
- Panel moulding (small decorative trim for inside boxes)
- Construction adhesive
- Brad nailer and 2-inch brad nails
- Miter saw
- Level and tape measure
- Wood filler and sandpaper
- Caulk and caulk gun
- Paint rollers, brushes, and painter’s tape
- Spackle knife
Step 1: Preparation & Upper Wall
-
Clear and Clean:
Begin by removing existing baseboards and any electrical outlet covers. Ensure the walls are clean, dry, and free of any major imperfections that might affect the board installation later. -
Mark the Height:
Determine the desired height for your wainscoting. A standard height is around 32 to 36 inches, or roughly one-third of the wall’s total height. Use a level to draw a horizontal reference line around the room at this height. -
Paint the Upper Wall:
Before installing any wood, paint the wall area above your reference line with the deep green paint. Painting now saves you from tedious cutting-in around the chair rail later. Two coats usually provide the richest color saturation.
Step 2: Installing the Framework
-
Install the Baseboard:
Install your new baseboard along the floor first. Secure it to the studs using your brad nailer. This acts as the foundation for the rest of the paneling. -
Attach Top Rail:
Install the 1×4 top rail horizontally so its top edge aligns with your level line. Apply construction adhesive to the back and nail it into the studs for a secure hold. -
Install Bottom Rail:
Place a 1×4 rail directly on top of, or just above, the baseboard depending on your design preference. Secure it in the same manner as the top rail. -
Plan Stile Spacing:
Measure the total length of the wall and decide on the spacing for your vertical stiles (1x3s). Aim for boxes that are roughly uniform in width, masking tape can help you visualize the layout before cutting. -
Install Vertical Stiles:
Cut the 1×3 boards to fit snugly vertically between the top and bottom rails. Apply adhesive and nail them into place at your determined intervals, ensuring each one is perfectly plumb with a level.
Uneven Walls?
If gaps appear behind your boards due to wavy walls, don’t force the wood back. Shim behind the board to keep it straight, then use caulk to hide the gap.
Step 3: Adding Detail & Finishing
-
Install Inner Panel Moulding:
To create the recessed ‘picture frame’ look, measure the inside rectangle formed by your rails and stiles. Cut your decorative panel moulding with 45-degree mitered corners to fit inside this space. -
Secure the Moulding:
Install these inner moulding pieces using adhesive and shorter brad nails. I prefer to leave a consistent 2-3 inch gap between the moulding and the stile/rail frame for a balanced look. -
Cap with Chair Rail:
Install the decorative chair rail moulding on top of the upper 1×4 rail. This cap piece hides the top edge of the board and provides a finished transition to the green wall. -
Fill and Sand:
Fill all nail holes with wood filler and let it dry. Once dry, sand the filler smooth and lightly scuffs sand the primed boards to ensure good paint adhesion. -
Caulk the Seams:
This is crucial for a seamless professional look. Apply a thin bead of paintable caulk to every seam where wood meets wall or wood meets wood. Smooth it with a wet finger and let it cure fully. -
Prime the Lower Wall:
If your drywall texture is heavy, you might want to skim coat it smooth or cover it with thin hardboard before this step. Otherwise, prime the exposed drywall inside the boxes and all raw wood areas. -
Apply the Finish Coat:
Paint the entire lower section—baseboards, rails, stiles, trim, and the wall inside the boxes—with bright white semi-gloss paint. The sheen difference against the matte green wall creates beautiful visual tension. -
Second Coat & Touch Up:
Apply a second coat of white paint for durability and even coverage. Once dry, remove painter’s tape and do any tiny touch-ups along the green edge with an artist’s brush.
Luxurious Depth
For a richer look, paint the recessed wall area a slightly darker shade of gray or beige before installing the inner moulding, creating a subtle two-tone shadow effect.
Step back and admire how this elegant architectural detail completely transforms the character of your room


White Lower Wall With Color Above
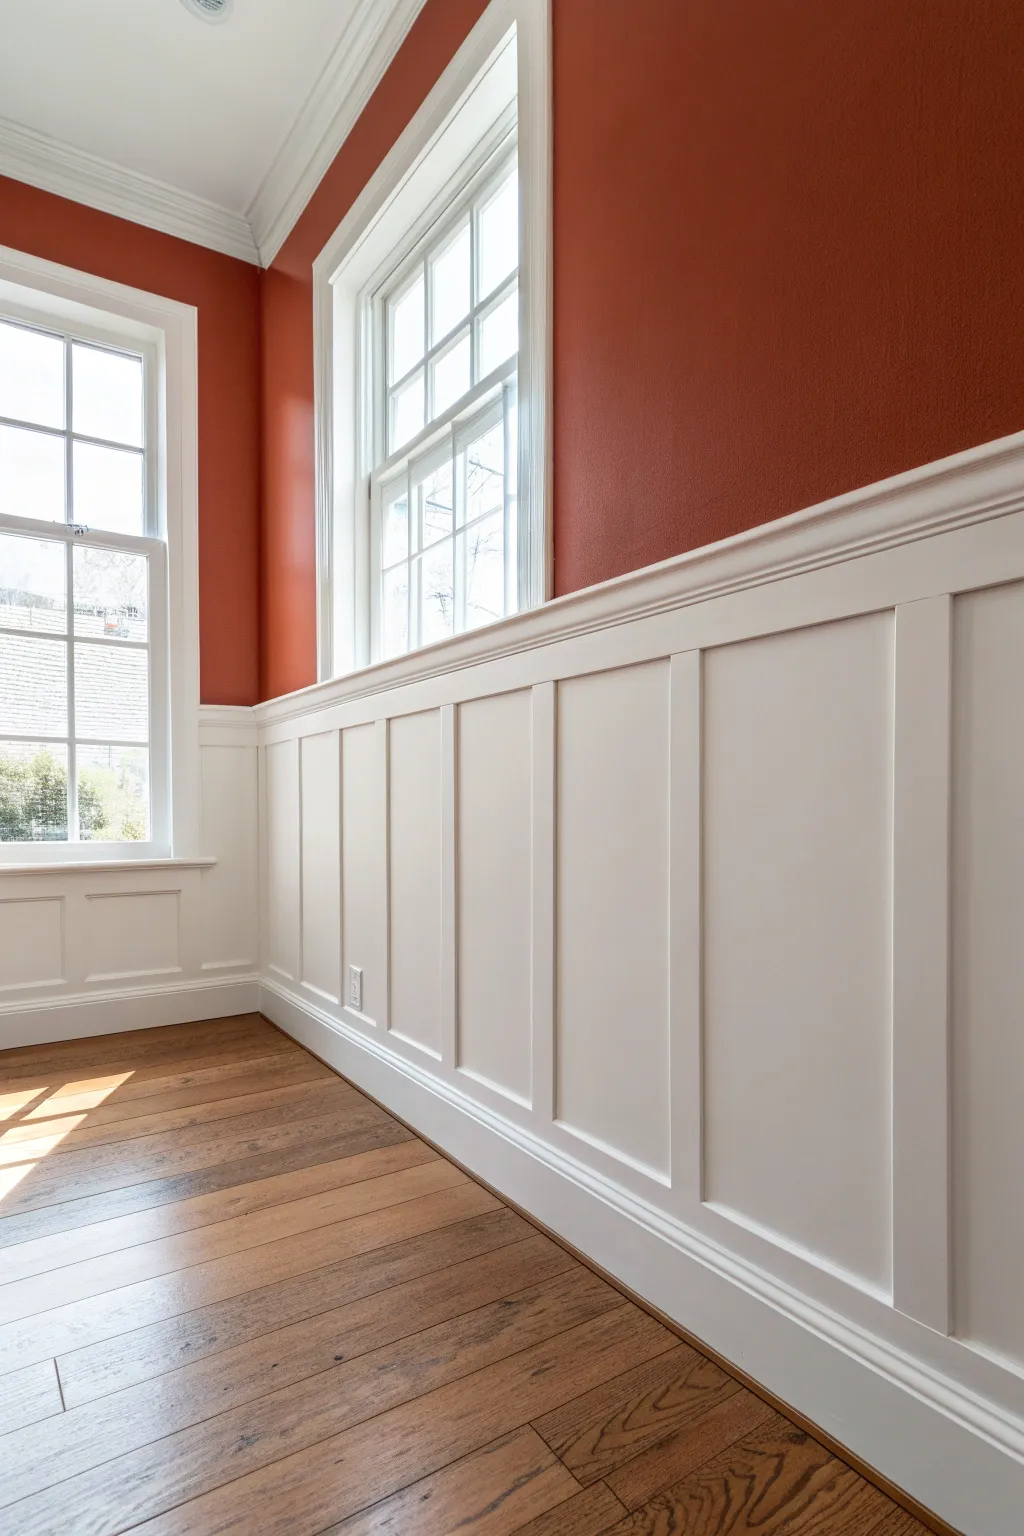
Achieve a sophisticated, timeless look by pairing crisp white board and batten wainscoting with a warm, bold wall color. This project transforms a plain room into an architectural statement, balancing bright woodwork with deep, inviting tones.
How-To Guide
Materials
- 1×4 MDF or primed pine boards (for battens and top rail)
- 1×6 MDF or primed pine boards (for baseboards)
- Panel molding or cap molding
- Construction adhesive
- Finishing nails (2 inch)
- Nail gun and compressor
- Spackle or wood filler
- Paintable caulk and caulk gun
- Fine-grit sandpaper (220 grit)
- Painter’s tape
- Interior latex paint (Semi-gloss White)
- Interior latex paint (Matte or Eggshell Terracotta/Burnt Orange)
- Paint roller and tray
- Angled sash brush (2.5 inch)
- Level (4-foot)
- Tape measure
- Miter saw
Step 1: Preparation and Base Layout
-
Prepare the walls:
Begin by removing any existing baseboards and chair rails. Patch major holes and sand the drywall smooth, as the wall itself will serve as the panel backing. Clean the surface thoroughly to ensure good adhesion for paint and glue. -
Determine wainscoting height:
Decide on the height of your wainscoting. A classic choice is about one-third of the wall height, or roughly 32 to 36 inches from the floor. Use a level and pencil to mark a horizontal line around the room at this height. -
Install the new baseboards:
Measure the length of each wall and cut your 1×6 boards to fit. Secure them to the bottom of the wall using construction adhesive and finishing nails, ensuring they are level. Nailing into studs is ideal, but crossing nails at angles works well for drywall gripping. -
Install the top rail:
Cut your 1×4 boards to match the wall lengths. Install these horizontally so the top edge aligns with your level line. This creates the upper boundary for your board and batten grid.
Spacer Block Trick
Cut a scrap board to the exact width of your desired gap between battens. Use this as a spacer to quickly position each vertical board without measuring every single time.
Step 2: Creating the Grid
-
Plan batten spacing:
Measure the horizontal wall distance and divide it to find equal spacing for your vertical stiles (battens). Spacing between 16 and 24 inches usually looks balanced. Mark the locations on the wall lightly with a pencil. -
Cut and attach battens:
Measure the vertical distance between the top of the baseboard and the bottom of the top rail. Cut your 1×4 boards to this exact length for each spot. Apply adhesive to the back of a batten and place it on your mark. -
Secure the battens:
Use your level to ensure the batten is perfectly plumb before nailing it in place. Repeat this process for all vertical stiles around the room. -
Add the cap molding:
To give the wainscoting a finished, substantial look, install a piece of cap molding or a projecting ledge on top of the horizontal top rail. Miter the corners for a seamless turn.
Gaps at the Wall?
If your walls aren’t perfectly straight and the boards don’t sit flush, don’t force them. Use extra caulk to bridge the gaps; forcing the wood can bow the board.
Step 3: Finishing and Painting
-
Fill nail holes:
Go over every board and fill the nail gun holes with spackle or wood filler. I find overfilling slightly helps, as it shrinks when drying. -
Caulk all seams:
This is crucial for a professional look. Run a bead of paintable caulk along every edge where wood meets wall or wood meets wood. Smooth it with a wet finger to eliminate gaps. -
Sand smooth:
Once the filler is dry, sand the patched holes flush with the wood. run the sandpaper lightly over the wood surfaces to remove any raised grain or burrs. -
Prime the wainscoting:
Apply a coat of primer to the raw wood and the drywall sections between the battens. This ensures the topcoat will have an even sheen. -
Paint the upper wall:
While the wainscoting prep dries, paint the upper portion of the wall with your terracotta color. Cut in carefully along the ceiling and corners, then roll the rest. Two coats usually provide the richest depth. -
Protect the upper wall:
Once the terracotta paint is fully cured (give it at least 24 hours), apply painter’s tape along the top edge of your wainscoting cap to protect the new color. -
Paint the wainscoting:
Using a semi-gloss white paint, brush the corners and edges first. Then, use a small foam roller on the flat surfaces of the boards and the wall sections between them for a smooth, brush-free finish. -
Remove tape:
Peel off the painter’s tape while the final coat of white paint is still slightly tacky to prevent peeling dry paint film.
Step back and admire how the crisp architectural lines elevate the warmth of your room’s new color.


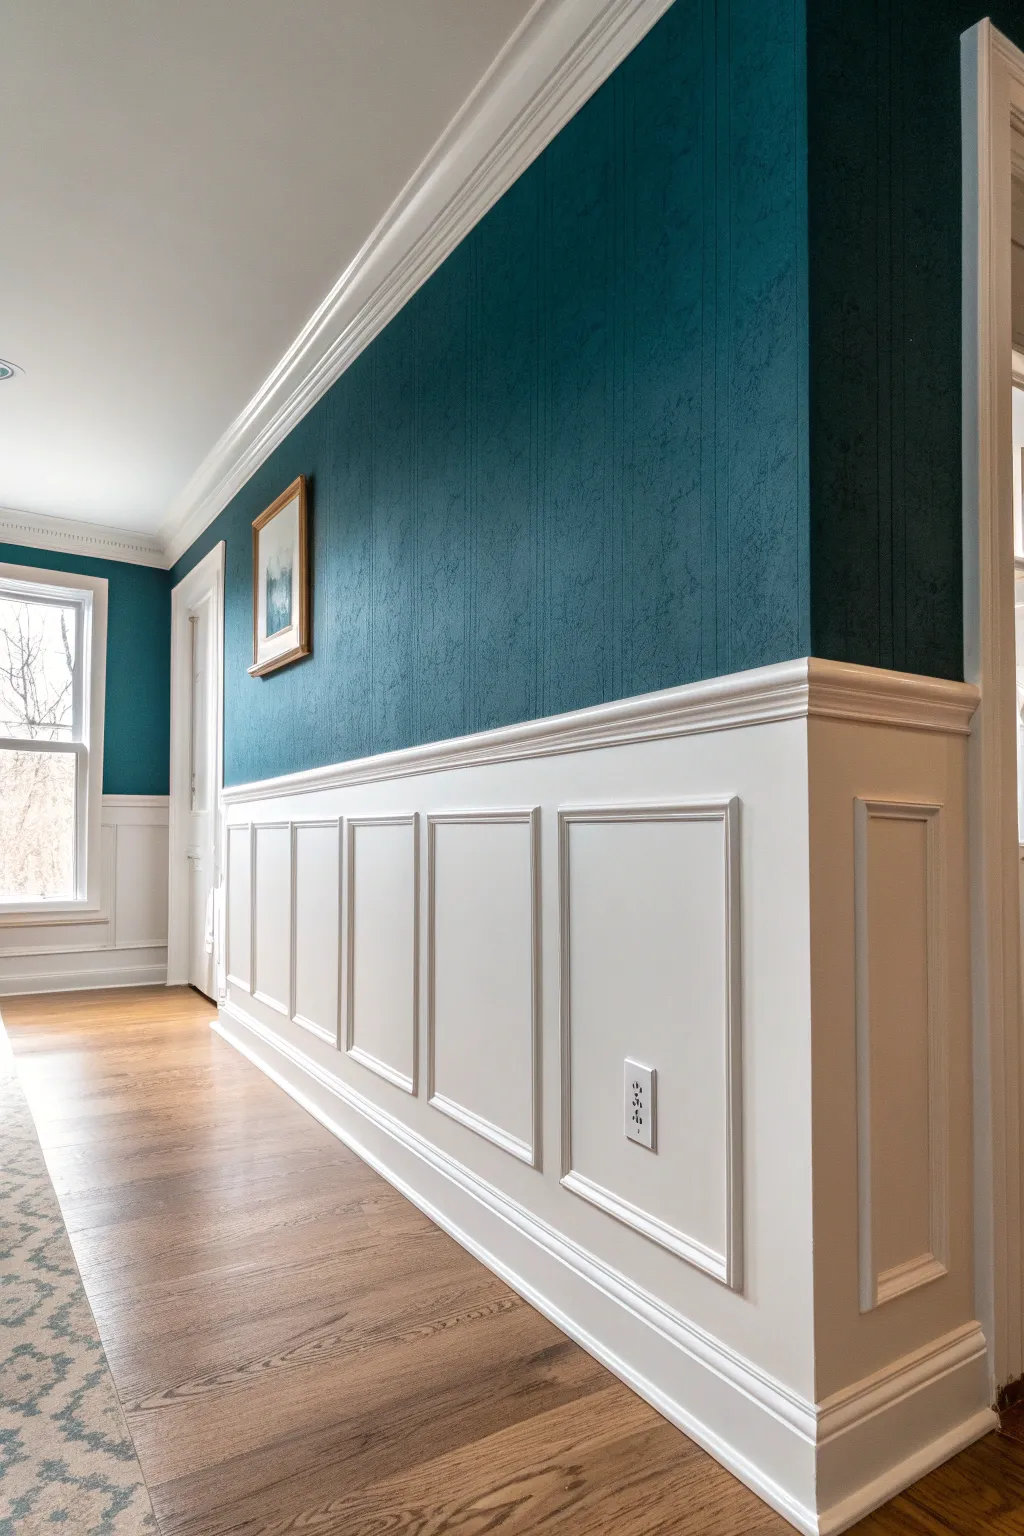
One Color Walls, Contrasting Chair Rail
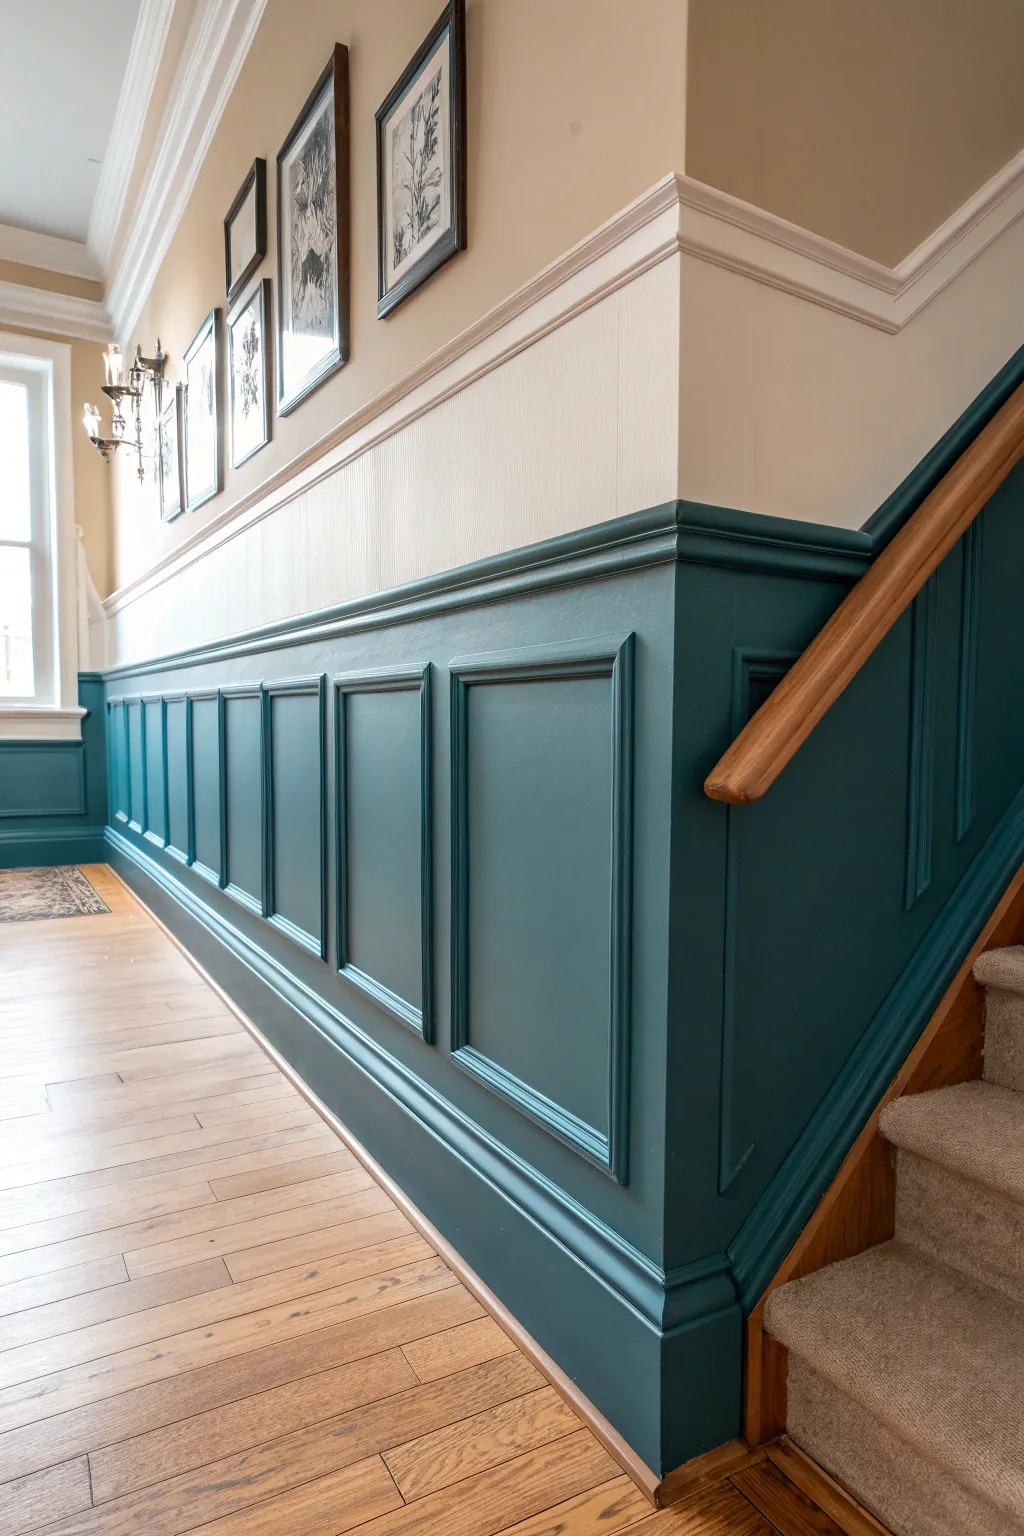
Transform a plain hallway into a sophisticated passage with this classic raised panel wainscoting project. By painting the lower section and trim in a rich, moody teal while keeping the upper walls light, you create a stunning architectural feature that adds depth and history to your home.
How-To Guide
Materials
- Primed MDF or wood stiles and rails (1×4 inch)
- Baseboard molding (5-inch height)
- Chair rail molding with a deep profile
- Panel molding (small profile for inner boxes)
- Construction adhesive (Liquid Nails)
- Finishing nails (1.5 inch and 2 inch)
- Wood filler
- Caulk (paintable)
- Fine-grit sandpaper (220 grit)
- Painter’s tape (delicate surface)
- Interior Satin or Semi-Gloss paint (Deep Teal/peacock blue)
- Interior Eggshell paint (Cream/Light Beige)
- Paint rollers (foam for smooth finish)
- Angled sash brush (2.5 inch)
- Level (4-foot)
- Miter saw
Step 1: Planning and Layout
-
Determine panel height:
Decide on the total height for your wainscoting. A standard height is about 32-36 inches, but going slightly higher, around 40 inches like in this project, adds more drama. -
Mark the wall:
Use your level to draw a horizontal line across the entire length of the wall at your chosen chair rail height. This will be your definitive guide. -
Calculate panel spacing:
Measure the total wall length. Determine how many boxes you want and calculate the spacing between them. Aim for odd numbers of panels per section if possible, keeping stiles (vertical pieces) consistent at about 3.5 to 4 inches wide. -
Sketch the layout:
Draw the boxes directly on the wall with a pencil. This helps visualize the final look and ensures you don’t end up with a tiny sliver of a box at the end of the hallway.
Spacer Block Trick
Cut a block of wood to the exact width needed between your panel molding and the outer stile. Use this as a jig to position every inner rectangle instantly without measuring.
Step 2: Painting Preparation
-
Paint the upper wall first:
Before installing any wood, paint the upper portion of the wall with your light cream or beige eggshell paint. Bring the paint down a few inches below your level line so you don’t have to cut in perfectly later. -
Paint wall background:
Paint the lower wall section (where the wainscoting will be) with your deep teal color. Since the wall itself serves as the flat panel, painting it now saves time trying to get into tight corners later.
Step 3: Installation
-
Install baseboards:
Remove existing baseboards if necessary and install your new, taller baseboard molding along the floor using construction adhesive and finish nails into the studs. -
Attach the top rail:
Install a horizontal 1×4 board just below your level line. This acts as the backing for your chair rail cap. Nail it into the studs. -
Install vertical stiles:
Cut your 1×4 vertical stiles to fit snugly between the baseboard and the top horizontal rail. Adhere them to the wall at your measured intervals with adhesive and nails. -
Add the bottom rail:
Install a horizontal rail directly on top of the baseboard, fitting between the vertical stiles, or simply let the baseboard serve as the bottom edge if it has a flat top profile. -
Install panel molding:
Cut the small panel molding with 45-degree miters to create rectangles. Fit these inside the ‘boxes’ created by your stiles and rails. I find using a scrap wood spacer block helps ensure every inner box is perfectly centered. -
Cap with chair rail:
Place your decorative chair rail molding on top of the upper horizontal 1×4 rail. This creates the finished ledge and adds that essential architectural detail.
Staircase Customization
For the stair wall, follow the rake angle of your stairs. Use an angle finder to transfer the exact slope to your miter saw so your vertical stiles remain plumb while rails follow the ascent.
Step 4: Finishing Touches
-
Fill holes:
Go over every nail hole with wood filler. Overfill slightly as it shrinks when drying. -
Sand smooth:
Once dry, sand the wood filler flush with the surface using 220-grit sandpaper. -
Caulk gaps:
Run a thin bead of paintable caulk along every seam where wood meets wall and where trim pieces meet each other. Smooth with a damp finger for a seamless look. -
Final paint coats:
Apply your deep teal semi-gloss paint to all the trim work. Use a sash brush for the panel molding crevices and a small foam roller for the flat stile surfaces to avoid brush marks. -
Touch ups:
Check for any drips or missed spots on the panel interiors. A second coat usually gives that rich, deep saturation seen in the photo.
Step back and admire how this dual-tone architectural feature completely redefines the character of your space.


Black-and-White Hallway Split
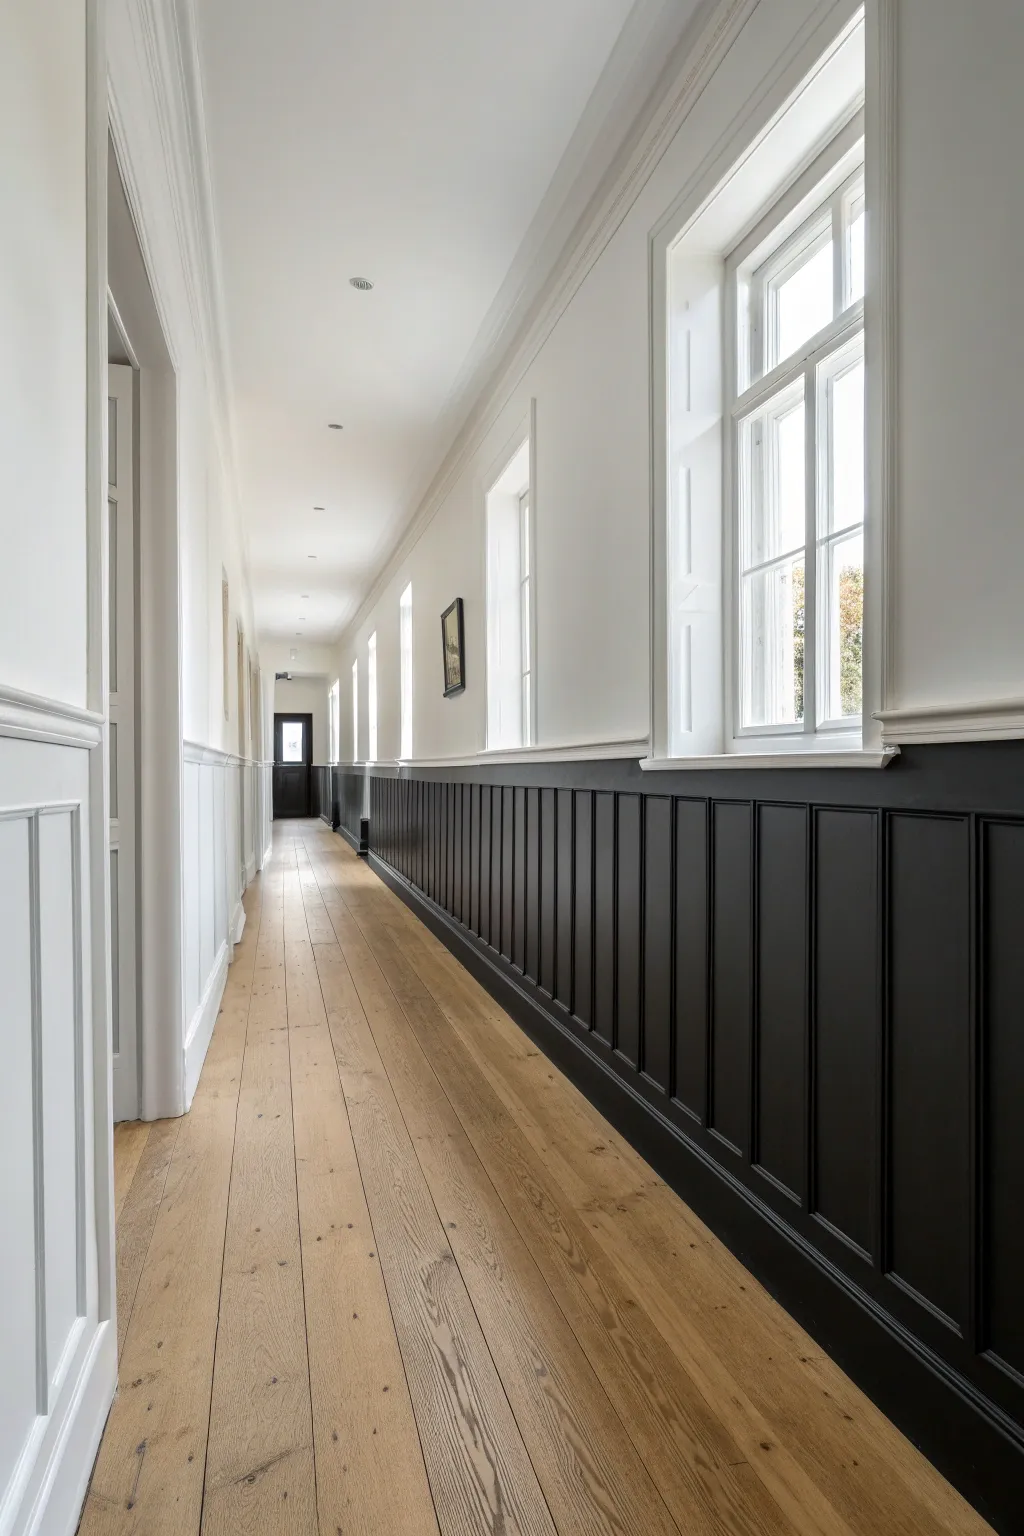
Transform a plain hallway into a sophisticated architectural statement with this bold black-and-white treatment. By combining crisp white walls with dramatic black wainscoting, you create a timeless look that elongates the space and adds serious character.
Step-by-Step Tutorial
Materials
- High-quality painter’s tape (like FrogTape)
- Interior latex paint (bright white, eggshell or satin finish)
- Interior latex paint (true black, matte or satin finish)
- Wainscoting panels or beadboard sheets
- Chair rail molding
- Baseboard molding
- Construction adhesive (Liquid Nails)
- Finishing nails
- Hammer or nail gun
- Caulk and caulking gun
- Wood filler
- Sandpaper (120 and 220 grit)
- Paint roller with extension pole
- Angled sash brush (2-inch)
- Drop cloths
- Measuring tape
- Level
Step 1: Preparation & Wall Treatment
-
Clear and clean:
Remove all existing artwork, outlet covers, and switch plates from your hallway walls. Wipe down the walls with a damp cloth and mild detergent to remove dust and grease, ensuring a clean surface for adhesion. -
Measure your height:
Decide on the height of your chair rail. A classic height is around 32 to 36 inches from the floor, but for a modern twist like this project, you might go slightly higher. Mark a level line around the entire perimeter of the hallway at this chosen height. -
Install wainscoting:
If your walls are plain drywall, measure and cut your wainscoting panels or beadboard to fit below your marked line. Apply construction adhesive to the back of each panel and press firmly against the wall. -
Secure the panels:
Use a nail gun or hammer and finishing nails to secure the top and bottom of the panels into the wall studs. This ensures they won’t warp or pull away over time.
Seamless Seams
For invisible joints between wainscoting panels, miter the edges at 45 degrees where they meet instead of butt-joining them. This overlap hides expansion gaps.
Step 2: Molding Installation
-
Add the baseboards:
Install your baseboard molding along the floor. If you already have baseboards, you might need to build them out slightly so the wainscoting sits recessed, or simply butt the paneling into the existing trim if it’s thick enough. -
Install the chair rail:
Place your chair rail molding directly over the top edge of the wainscoting, aligning it with your level line. This cap piece hides the raw edge of the paneling and creates the definitive visual split. -
Fill and sand:
Fill all nail holes with wood filler and let it dry completely. I prefer to overfill slightly and sand it back flush. Sand the filler smooth with 220-grit sandpaper. -
Caulk the gaps:
Run a thin bead of finish caulk along every seam: where the chair rail meets the wall, where the baseboard meets the paneling, and in corners. Smooth it with a wet finger for a seamless look.
Matte Magic
Choose a ‘scuff-x’ or durable matte finish for the black section. It absorbs light for a velvety look but resists the shoe scuffs common in hallways.
Step 3: Painting the Upper Wall
-
Protect the trim:
Apply painter’s tape along the top edge of the chair rail to protect it from white paint splatters. Lay down drop cloths to protect your beautiful wood floors. -
Cut in the edges:
Using your angled sash brush and bright white paint, carefully cut in around the ceiling line, corners, and window frames. Create a border of about 2-3 inches. -
Roll the white:
Use a roller on an extension pole to paint the upper walls. Apply a smooth, even coat of white paint. Let it dry according to the manufacturer’s instructions, usually 2-4 hours. -
Second coat:
Apply a second coat of white for full opacity and a crisp finish. Remove the tape from the chair rail while the paint is still slightly tacky to prevent peeling.
Step 4: The Dramatic Finish
-
Tape for black:
Once the upper wall is fully cured (give it at least 24 hours), tape off the wall just above the chair rail very precisely. Press the tape edge firmly to prevent bleed-through. -
Prime the woodwork:
If your wainscoting is raw wood or MDF, apply a high-quality primer first. If it came pre-primed, you can skip this, but a quick scuff sand is always helpful for grip. -
Brush the details:
Dip your clean angled brush into the black paint. Carefully paint the chair rail first, then work into the grooves and detailed recesses of the wainscoting where a roller won’t reach. -
Roll the flat surfaces:
Use a small foam roller or a short-nap roller to paint the flat faces of the wainscoting and baseboards. This ensures a smooth, brush-mark-free finish. -
Check for holidays:
Black paint can reveal missed spots easily. inspect the surface from different angles under good light to catch any ‘holidays’ or skipped areas. -
Apply final coat:
Apply a second coat of black paint to ensure a deep, rich color saturation. Remove the tape carefully pulling away from the paint edge at a 45-degree angle.
Enjoy the incredible depth and architectural interest your new hallway brings to your home
BRUSH GUIDE
The Right Brush for Every Stroke
From clean lines to bold texture — master brush choice, stroke control, and essential techniques.
Explore the Full Guide
Dining Room Dark Above, Light Below
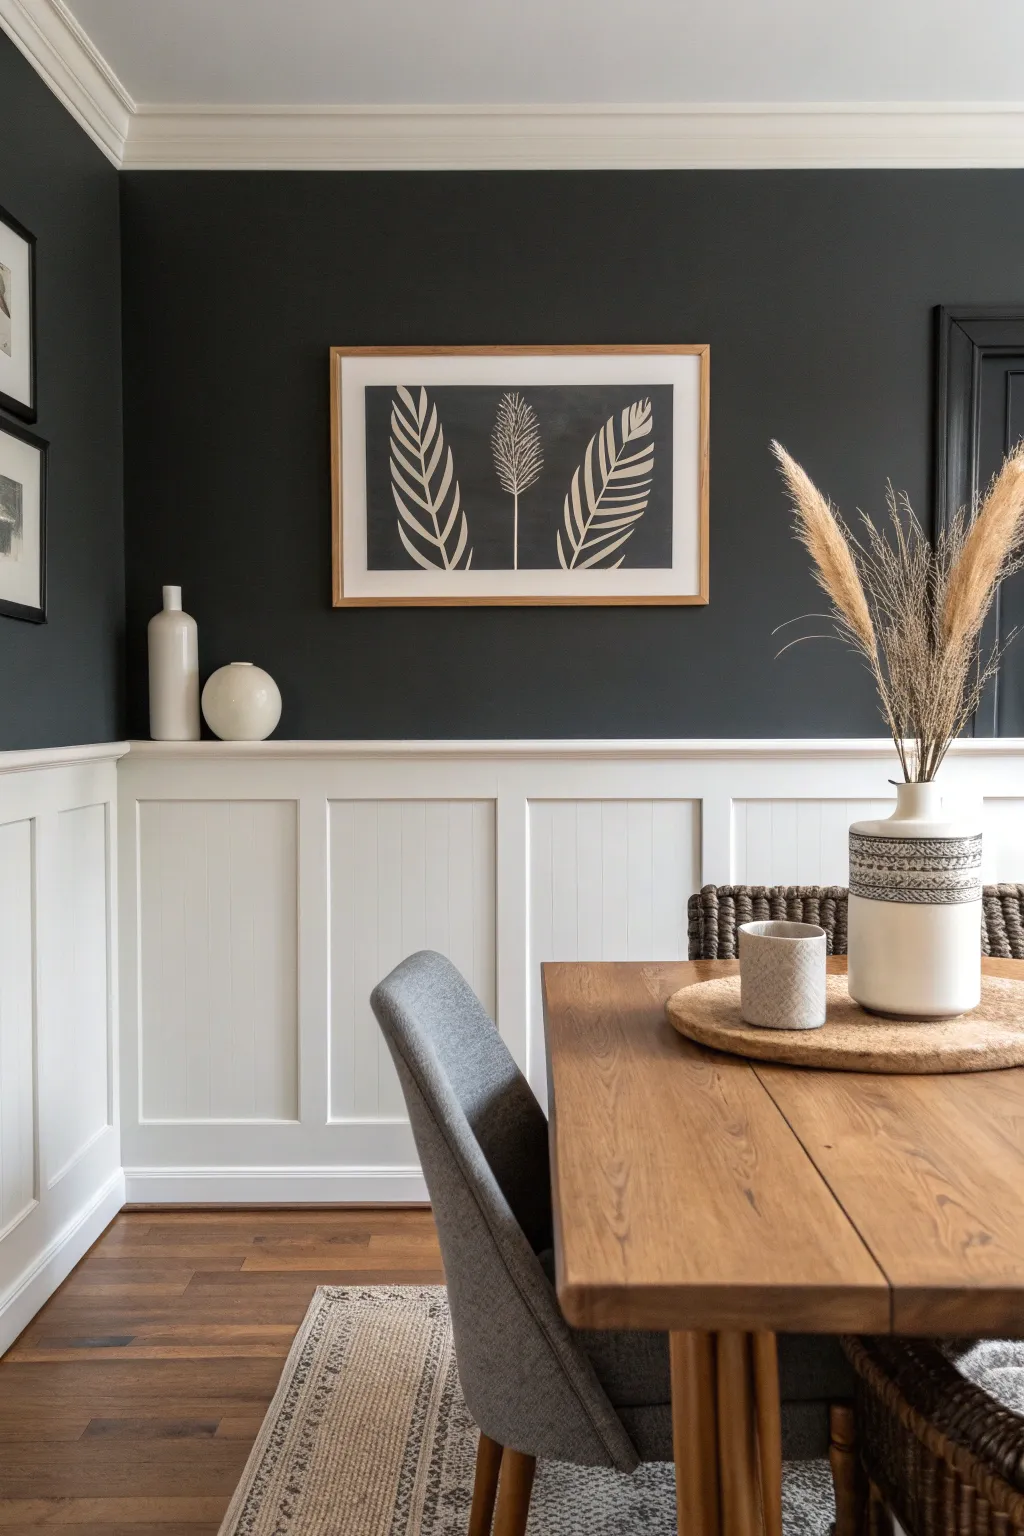
Transform your dining space with this dramatic, high-contrast wall treatment that pairs moody sophistication with crisp, traditional woodwork. The combination of deep charcoal paint above and bright white wainscoting below creates an elegant architectural backdrop that instantly elevates any room.
How-To Guide
Materials
- High-quality interior paint (Charcoal/Black matte finish)
- High-quality interior trim paint (Bright White semi-gloss or satin)
- Primer (tinted gray for top, white for bottom)
- Chair rail molding
- Battens (1×3 or 1×4 trim boards)
- Top cap molding (optional for ledge effect)
- Baseboard molding
- Construction adhesive
- Finishing nails
- Wood filler
- Paintable caulk
- Medium and fine grit sandpaper
- Painter’s tape
- Level and laser level
- Stud finder
- Miter saw
- Nail gun and compressor
- Caulk gun
- Paint rollers (smooth nap for trim, standard for walls)
- Angled sash brush
Step 1: Planning and Prep
-
Determine Wainscoting Height:
Decide on the height of your chair rail. A common rule of thumb is one-third the height of the room, often around 32-36 inches, but taller wainscoting creates a modern look. -
Mark Level Lines:
Use a laser level to project a horizontal line around the entire room at your chosen chair rail height. Mark this clearly with a pencil or chalk line. -
Locate Studs:
Use a stud finder to locate and mark all wall studs above and below your level line. This is crucial for securely attaching your horizontal rails and vertical battens.
Uneven Walls?
Walls are rarely perfectly flat. If gaps appear behind your boards, don’t force the wood back. Instead, fill the gaps with caulk for small spaces or use shims behind the board for larger gaps.
Step 2: Painting the Upper Wall
-
Prime the Upper Wall:
Since you are using a dark color, apply a gray-tinted primer to the wall space above your level line. This helps achieve true color depth with fewer topcoats. -
Cut In Edges:
Using an angled sash brush, carefully cut in the dark charcoal paint along the ceiling line and corners. Bring the cut-in line down slightly past where your chair rail will sit so no old wall color peeks through. -
Roll the Dark Color:
Apply the dark charcoal paint using a roller with a standard nap. Maintain a wet edge to avoid varying sheens. Two coats are usually necessary for a rich, solid finish; allow proper drying time between coats.
Step 3: Installing the Wainscoting
-
Install Baseboards:
If existing baseboards were removed or don’t match the new style, install new flat-stock baseboards first, nailing them into the studs. -
Install Top Rail:
Install the horizontal top rail along your marked level line. Apply construction adhesive to the back and nail it securely into the studs. -
Measure and Cut Battens:
Measure the distance between the top of the baseboard and the bottom of the top rail. Cut your vertical battens to this length. -
Space the Battens:
Determine your spacing typically 16 to 24 inches apart works well. I like to dry-fit a few first to ensure the spacing looks balanced around outlets or corners. -
Install Battens:
Attach the vertical battens using construction adhesive and nails. Check each one with a handheld level before nailing to ensure it is perfectly plumb. -
Attach Cap Molding:
For a finished look, install a cap molding or a small ledge piece on top of the horizontal rail. Miter the corners for clean, professional joints.
Add a Picture Ledge
Increase the depth of your top cap molding to 2-3 inches to create a functional picture ledge. This lets you lean artwork against the dark wall without hanging it.
Step 4: Finishing and Painting Trim
-
Fill Nail Holes:
Fill all nail holes with wood filler. Overfill slightly to account for shrinkage, then sand flush once completely dry. -
Caulk Seams:
Apply a thin bead of paintable caulk to every seam where wood meets wood or wood meets wall. Smooth the bead with a damp finger or rag for a seamless transition. -
Sand for Smoothness:
Lightly sand all wood surfaces with fine-grit sandpaper to remove any raised grain or adhesive residue. Wipe away all dust with a tack cloth. -
Prime the Woodwork:
Apply a high-quality primer to the raw wood and the drywall sections between the battens. This ensures an even sheen for your final white coat. -
Paint the Wainscoting:
Apply your bright white semi-gloss paint. Use a brush for corners and crevices first, then follow up with a small foam or velour roller on the flat sections for a sprayed-like finish. -
Final Touch-Ups:
Once the white paint is fully dry, inspect the line where the dark wall meets the white chair rail. Use a small artist’s brush to touch up any dark paint that may have strayed.
Step back and admire the sophisticated balance you’ve created in your dining room
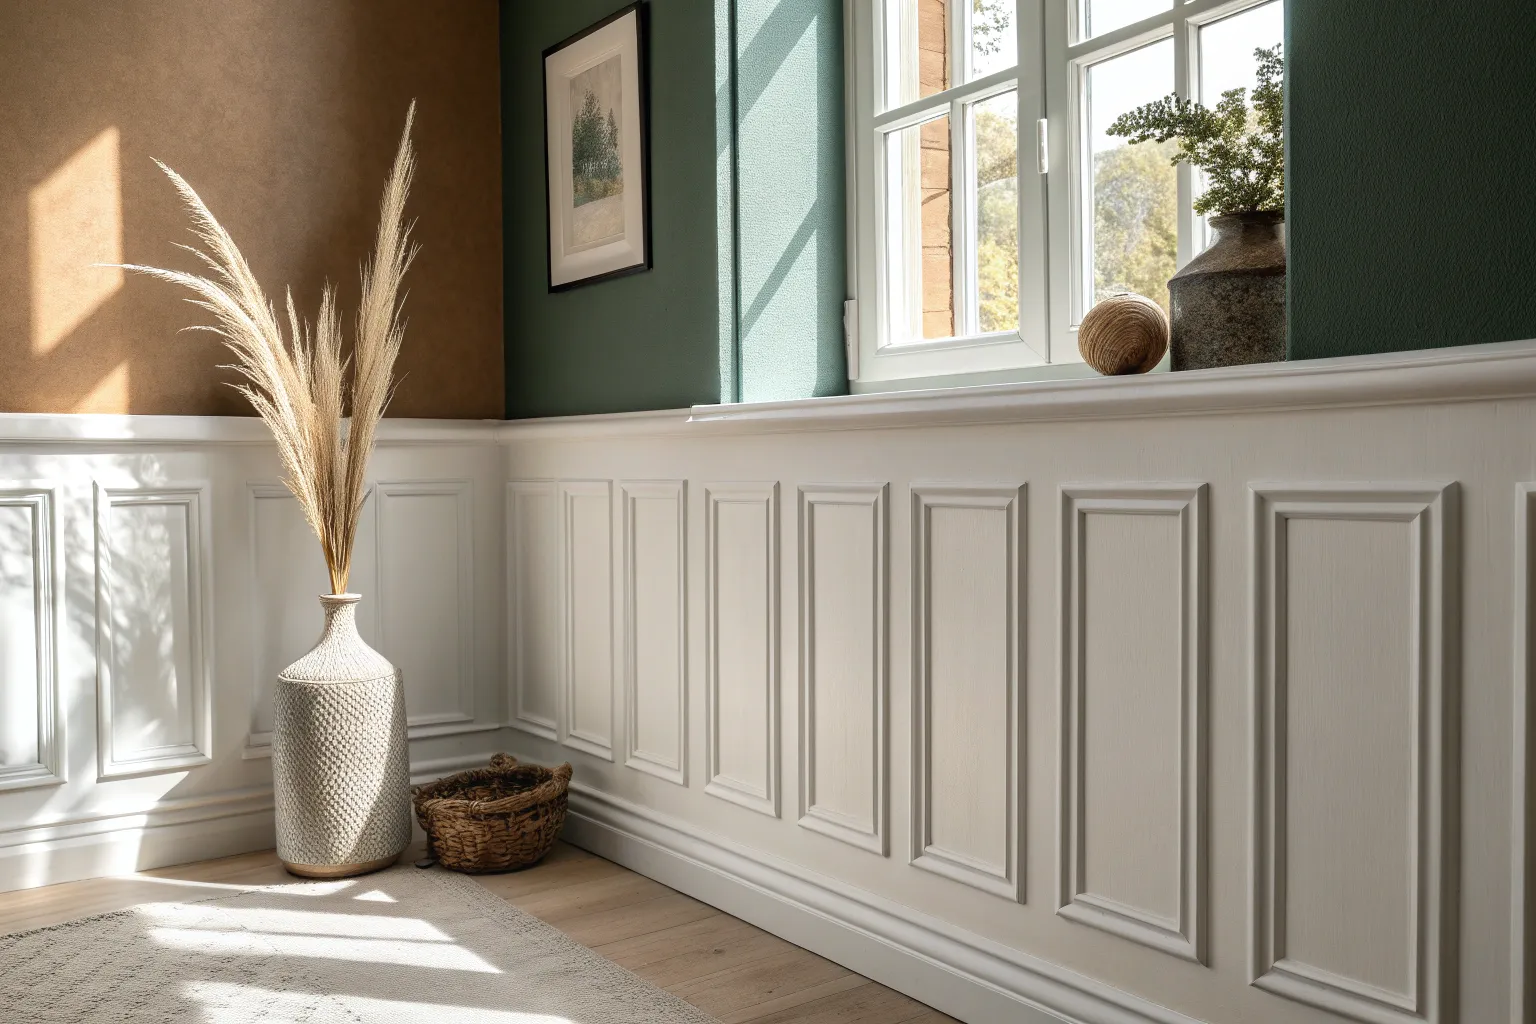
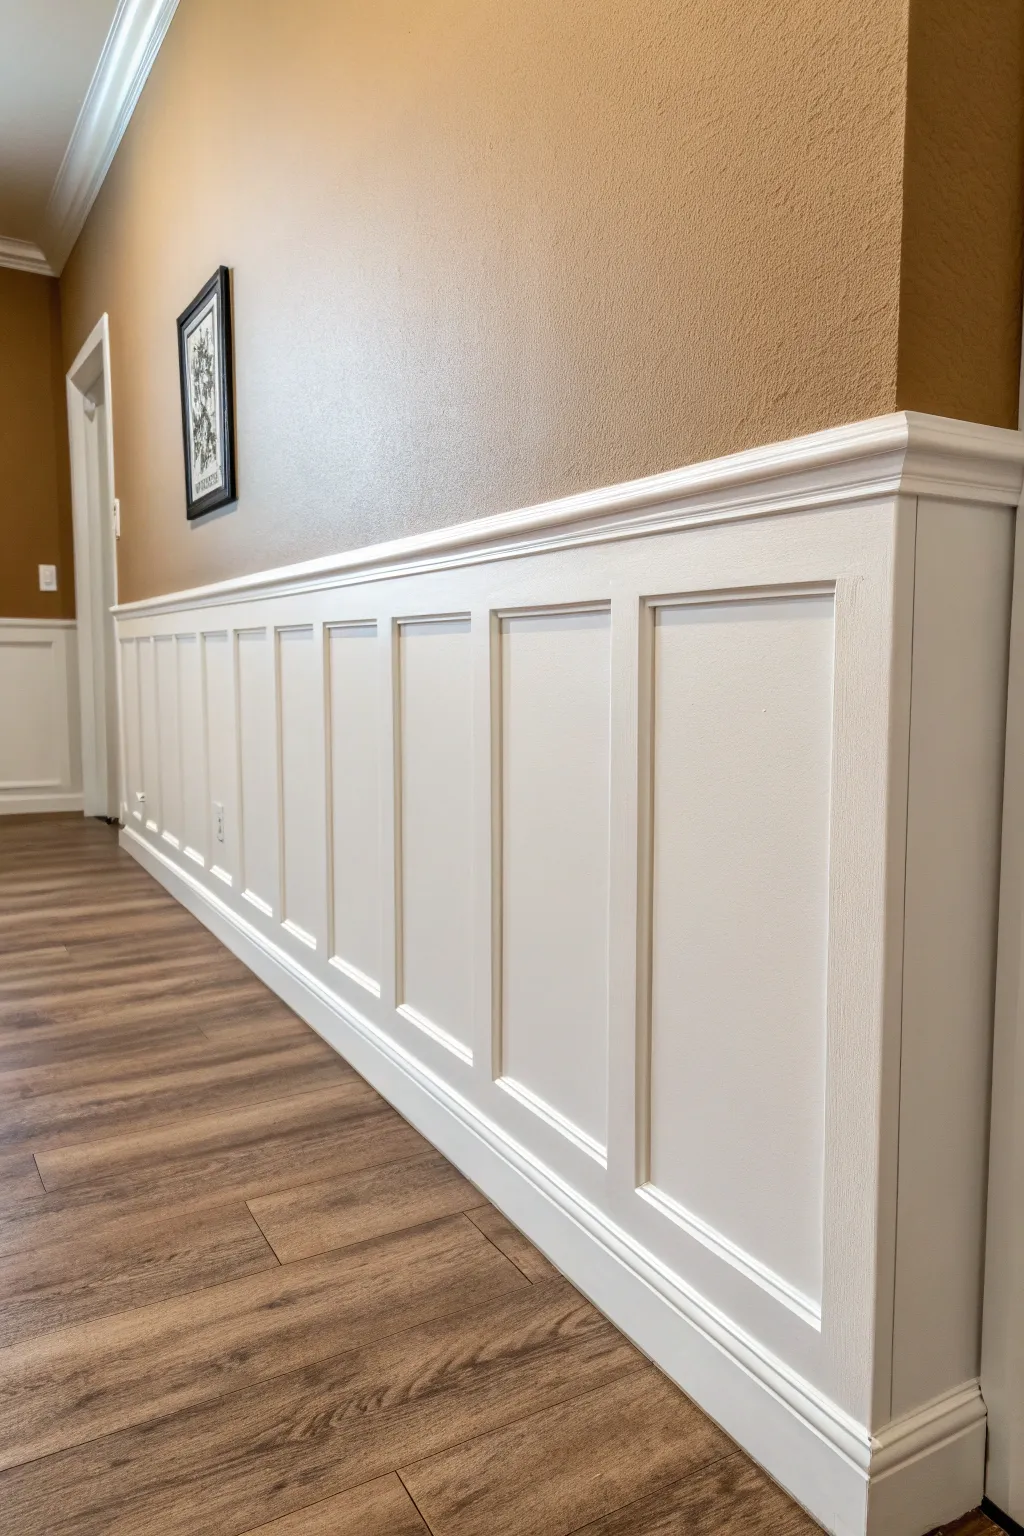
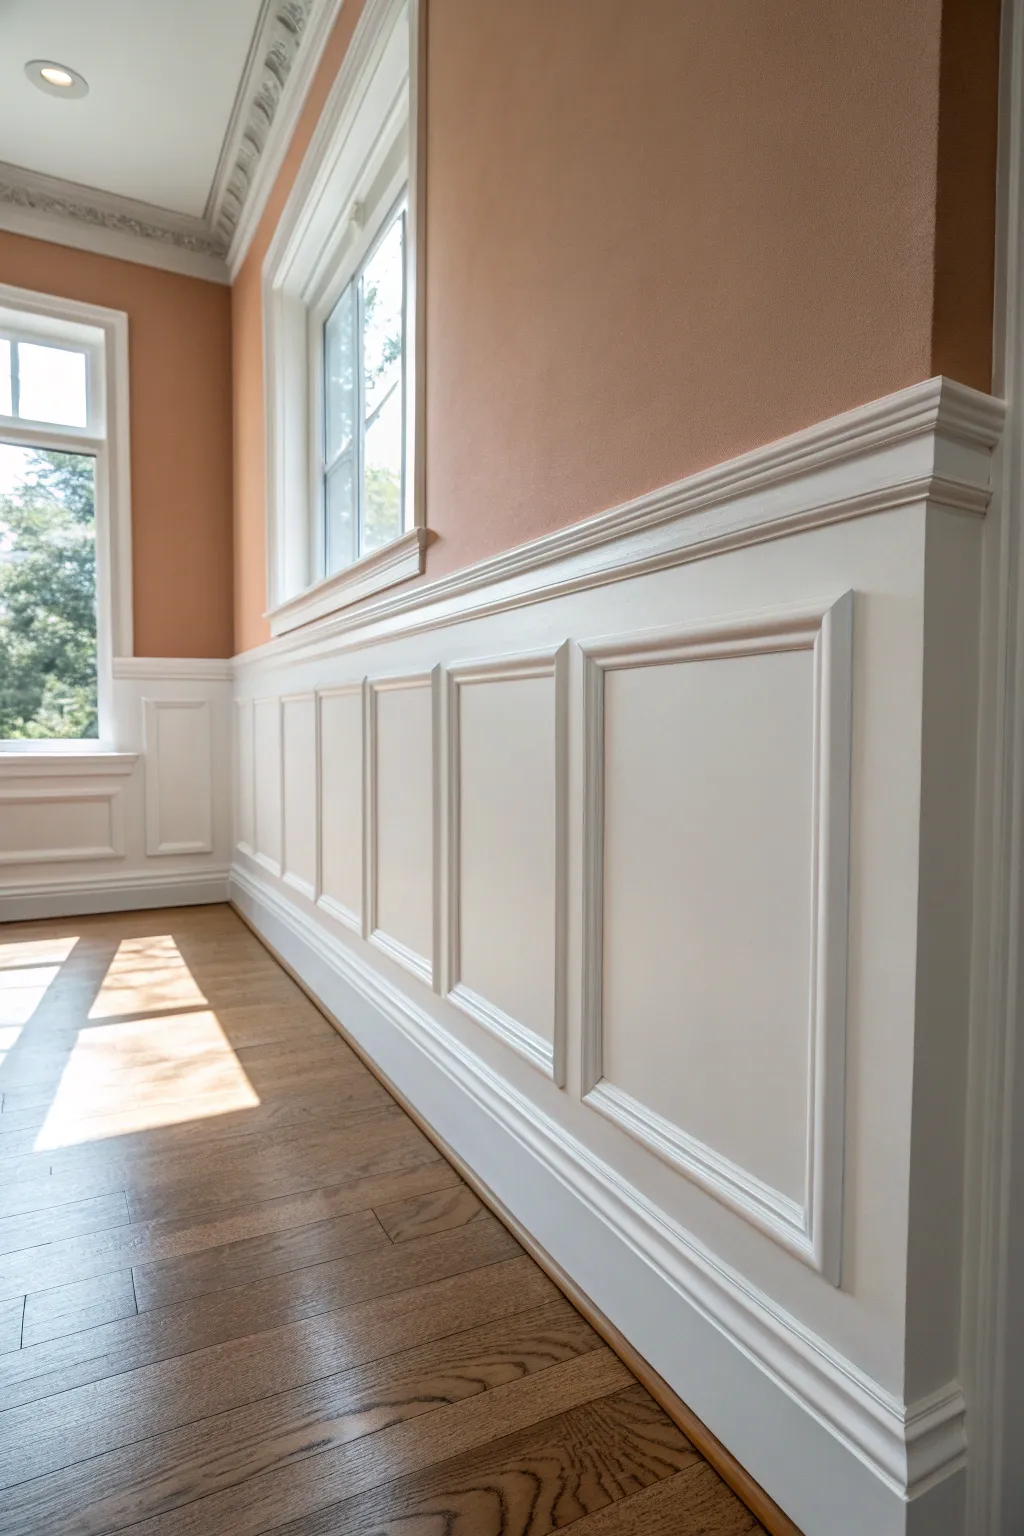
Soft Neutrals With a Clean Divider
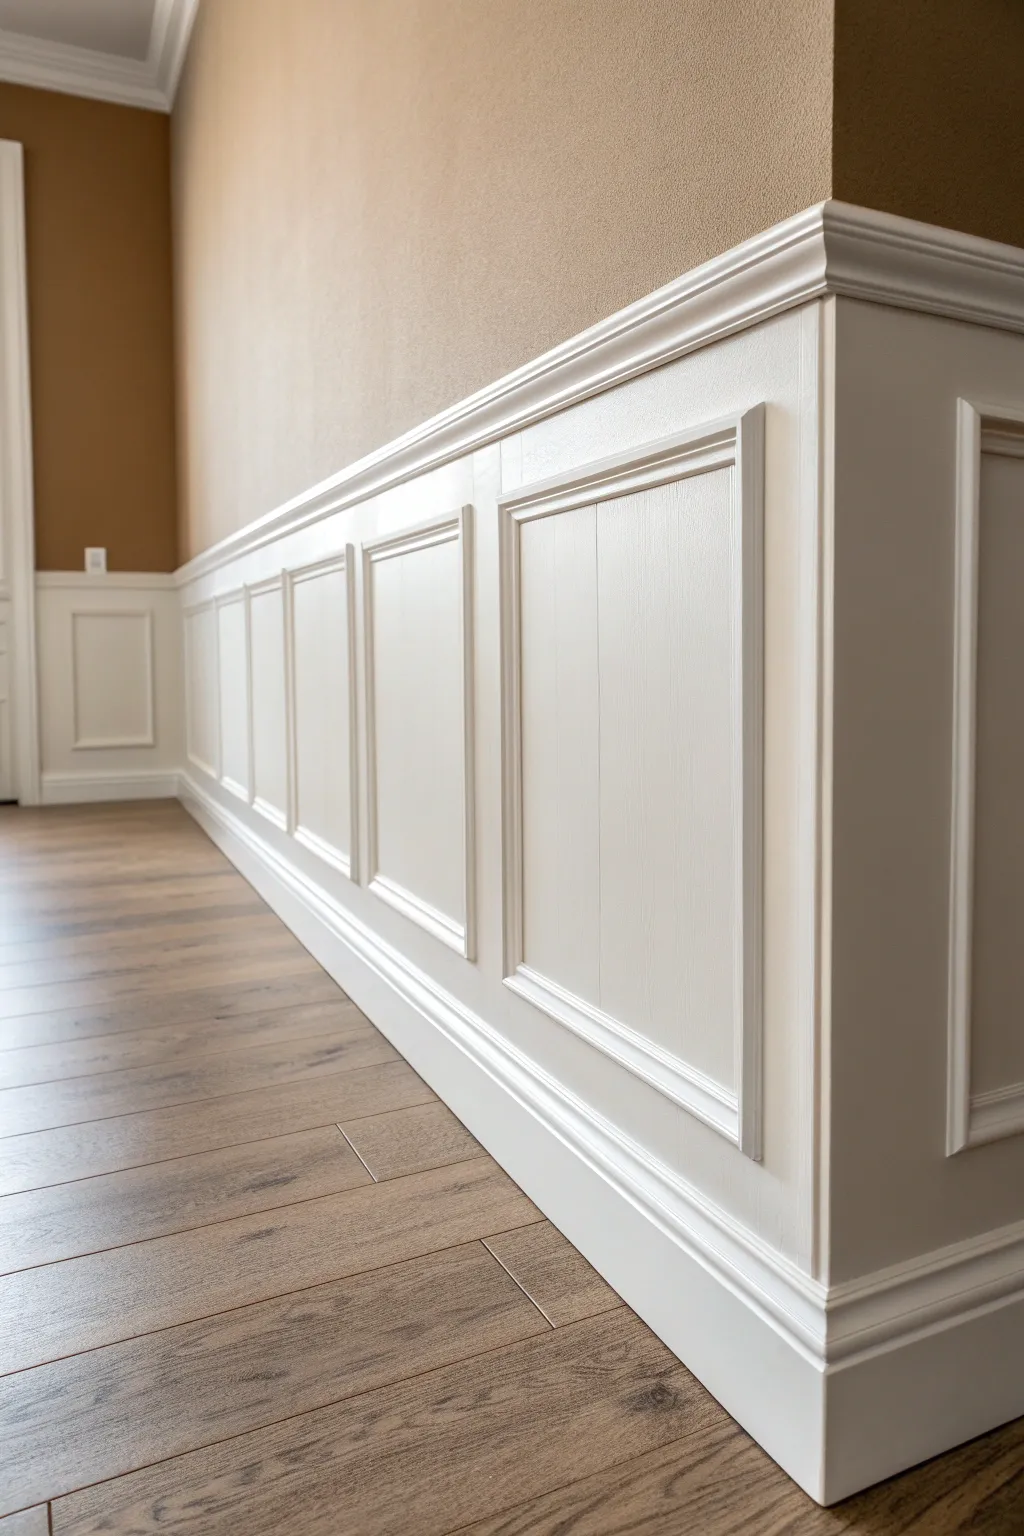
This classic wainscoting style brings instant architectural depth and a refined atmosphere to any hallway or dining room. By painting both the trim and the lower wall in a unified, bright white, you create a seamless and high-end look that beautifully contrasts with the warm neutral tones above.
Step-by-Step
Materials
- Chair rail molding
- Base cap molding (for the frames)
- Tall baseboard molding
- Measuring tape
- Level (2-foot and 4-foot)
- Pencil
- Miter saw
- Construction adhesive (Liquid Nails)
- Brad nailer with 1.5-inch and 2-inch nails
- Wood filler
- Fine-grit sandpaper (220-grit)
- Caulk and caulking gun
- Painter’s tape
- Primer
- Semi-gloss white interior paint
- Paintbrush (2-inch angled)
- Paint roller with smooth nap
Step 1: Planning and Layout
-
Establish the height:
Decide on the height of your chair rail. A standard height is usually around 32-36 inches from the floor, but for taller ceilings, you might push this to 40 inches. Mark this level line horizontally around the room using a long level or laser level. -
Determine box spacing:
Measure the total length of your wall. Subtract the desired spacing between boxes (typically 3-4 inches) and the spacing from the corners. Divide the remaining length by the number of desired boxes to find the width of each frame. Sketch this layout on paper first to ensure symmetry. -
Mark the wall:
Transfer your layout directly onto the wall using a pencil and level. Draw the rectangles where the molding frames will sit. This crucial step lets you visualize the final look and catch any spacing errors before cutting wood.
Uneven Walls?
If corners don’t meet due to wavy drywall, glue the miter joints together first, let them dry, and install the box as one pre-assembled unit. The molding forces the wall to conform slightly.
Step 2: Installing the Rails
-
Install the baseboard:
If you are replacing old trim, remove it first. Cut your new tall baseboard to length, mitering the corners at 45 degrees. Secure it to the wall studs using your brad nailer and 2-inch nails, ensuring it sits flush against the floor. -
Attach the chair rail:
Cut the chair rail molding to fit the length of the wall. Align the top edge with your previously marked level line. Apply a bead of construction adhesive to the back for extra hold, then nail it into the studs. I find that locating studs ahead of time with painter’s tape saves a lot of frustration here.
Step 3: Creating the Shadow Boxes
-
Cut the frame molding:
Set your miter saw to a precise 45-degree angle. Cut the base cap molding pieces according to the dimensions from your wall layout. Remember, for a box, the ‘long point’ of the miter needs to match your exterior measurement. -
Test fit the pieces:
Before nailing, hold the four pieces of a single box up against your pencil marks to ensure the corners meet tightly. If your walls aren’t perfectly flat, the miters might need slight adjustments. -
Install the top and bottom pieces:
Apply a small dab of construction adhesive to the back of the top and bottom molding pieces. Position them on your layout lines, check for level, and secure them with 1.5-inch brad nails. Nailing at a slight angle helps lock them in place. -
Install the side pieces:
Place the vertical side pieces to complete the frame. Apply adhesive, fit them snugly against the miters of the horizontal pieces, and nail them in. Wiggle the joint slightly to ensure the corners are perfectly aligned before firing the nail.
Spacer Block Trick
Cut a scrap piece of wood to the exact width of your desired spacing (e.g., 3.5 inches). Use this block to quickly space your boxes without measuring every single time.
Step 4: Finishing Touches
-
Fill the holes:
Use wood filler to cover all nail holes and any small gaps in the corner miters. Overfill slightly, as the filler shrinks when drying. Let it dry completely according to the manufacturer’s instructions. -
Sand smooth:
Once the filler is dry, gently sand the spots smooth with 220-grit sandpaper so they are flush with the molding profile. Wipe away all dust with a tack cloth or damp rag. -
Caulk the seams:
Run a thin bead of finish caulk where the molding meets the wall (inside and outside edges) and where the chair rail and baseboard meet the wall. Smooth the bead with a wet finger for a seamless transition. This step is what makes the molding look like it’s part of the wall. -
Prime the area:
If you are using raw wood or if your wall color was dark, apply a coat of high-quality primer over the molding and the drywall section below the chair rail. This ensures the topcoat will have an even sheen. -
Paint the trim:
Using a 2-inch angled sash brush, paint the detailed profiles of the chair rail, baseboard, and picture frames first. Use long, smooth strokes to minimize brush marks. -
Roll the flat surfaces:
While the brushwork is still wet (to maintain a ‘wet edge’), use a small roller to paint the flat wall sections inside and around the frames. Apply two coats of semi-gloss white paint for that durable, classic wainscoting finish.
Step back and admire how this elegant architectural detail transforms the entire character of your room

PENCIL GUIDE
Understanding Pencil Grades from H to B
From first sketch to finished drawing — learn pencil grades, line control, and shading techniques.
Explore the Full Guide
Moody Lower Wall With Washable Finish
Transform a plain hallway into an elegant gallery space by combining crisp, bright white wainscoting with a rich, moody teal textured wall covering. This dual-tone approach not only protects your walls from scuffs in high-traffic areas but also adds architectural depth and sophisticated drama without requiring a full renovation.
Step-by-Step Tutorial
Materials
- 1×4 MDF or primed pine boards (for top rail and stiles)
- Baseboard molding (to match existing or new)
- Chair rail molding (with a lip to sit on top of the 1×4)
- Panel molding trim (for inner boxes)
- Construction adhesive (e.g., Liquid Nails)
- Brad nailer and brad nails
- Wood filler
- Caulk and caulk gun
- Fine-grit sandpaper (220 grit)
- Primer (high-quality bonding primer)
- Semi-gloss white paint (for wainscoting)
- Teal textured wallpaper (or paintable textured wallpaper + teal paint)
- Wallpaper paste and smoothing tool
- Level and measuring tape
- Miter saw
Step 1: Planning and Layout
-
Determine Height:
Decide on the total height of your wainscoting. A standard height is often around 32-36 inches, or roughly one-third of the wall height, but going slightly higher can add a modern touch. -
Map the Boxes:
Measure the total length of your wall. Subtract the width of your vertical stiles (the upright boards) to find the remaining space, then divide by your desired number of boxes to ensure even spacing. -
Mark the Wall:
Using a level and a pencil, draw the exact layout directly onto the drywall. This is a crucial sanity check before you cut any wood.
Step 2: Installing the Framework
-
Install Baseboards:
If you removed old baseboards, install the new flat blocking or baseboard trim first using construction adhesive and your brad nailer. -
Attach Top Rail:
Install the horizontal top rail (usually a 1×4) at your marked height line. Ensure it is perfectly level across the entire span of the wall. -
Place Vertical Stiles:
Measure the distance between the top rail and baseboard for each vertical stile location. Cut your 1×4 pieces to fit snugly and nail them into place over your pencil marks. -
Add the Chair Rail Cap:
Place the decorative chair rail molding on top of the flat horizontal 1×4 rail. Use a miter saw to cut 45-degree angles for any corners.
Spacer Block Trick
Cut a scrap piece of wood to the exact width of the gap between your rail and panel molding. Use it as a jig to position the inner molding perfectly fast.
Step 3: Creating the Interior Panels
-
Measure Inner Boxes:
Measure the open rectangular wall space inside each ‘box’ you’ve created with the framing. Decide on the reveal—how much space to leave between your new molding and the frame (standard is about 2 inches). -
Cut Panel Molding:
Cut your decorative panel molding to size, creating 45-degree miters at all four corners for picture-frame perfection. -
Install Panel Molding:
Apply a small bead of glue to the back of the molding and pin it to the drywall with brad nails. I like to use a spacer block of wood cut to the exact reveal width to keep positioning consistent without measuring every time.
Paintable Texture Hack
Can’t find teal textured paper? Buy ‘paintable’ textured wallpaper, install it, and then paint it with a scrubbable satin teal paint.
Step 4: Finishing the Woodwork
-
Fill Holes:
Fill every nail hole and potential dent with wood filler. Overfill slightly as it shrinks when drying. -
Caulk Seams:
Run a bead of paintable caulk along every seam where wood meets wood or wood meets wall. Smooth it with a wet finger or rag for a seamless, built-in look. -
Sand Smooth:
Once dry, sand the wood filler flat and give all the wood surfaces a light sanding to ensure the primer adheres. -
Prime and Paint:
Apply a coat of primer to the entire lower wall section. Follow up with two coats of semi-gloss white paint. The semi-gloss finish is key for durability and washability.
Step 5: Applying the Moody Upper Details
-
Prepare Upper Wall:
Clean the upper wall surface and patch any imperfections. If using wallpaper, apply size or primer specifically meant for wall coverings. -
Apply Textured Paper:
Hang your textured teal wallpaper, carefully matching the pattern at the seams. Use a smoothing tool to push out air bubbles, working from the center outward. -
Trim Edges:
Use a sharp utility knife and a straight edge to trim the excess wallpaper cleanly along the top of the chair rail and the ceiling crown molding. -
Final Clean Up:
Wipe down any wayward paste from the woodwork immediately with a damp sponge and reinstall your electrical outlet covers.
Step back and admire how the crisp white woodwork makes the deep teal color truly pop while adding sophisticated value to your home
Add Picture-Frame Molding Below
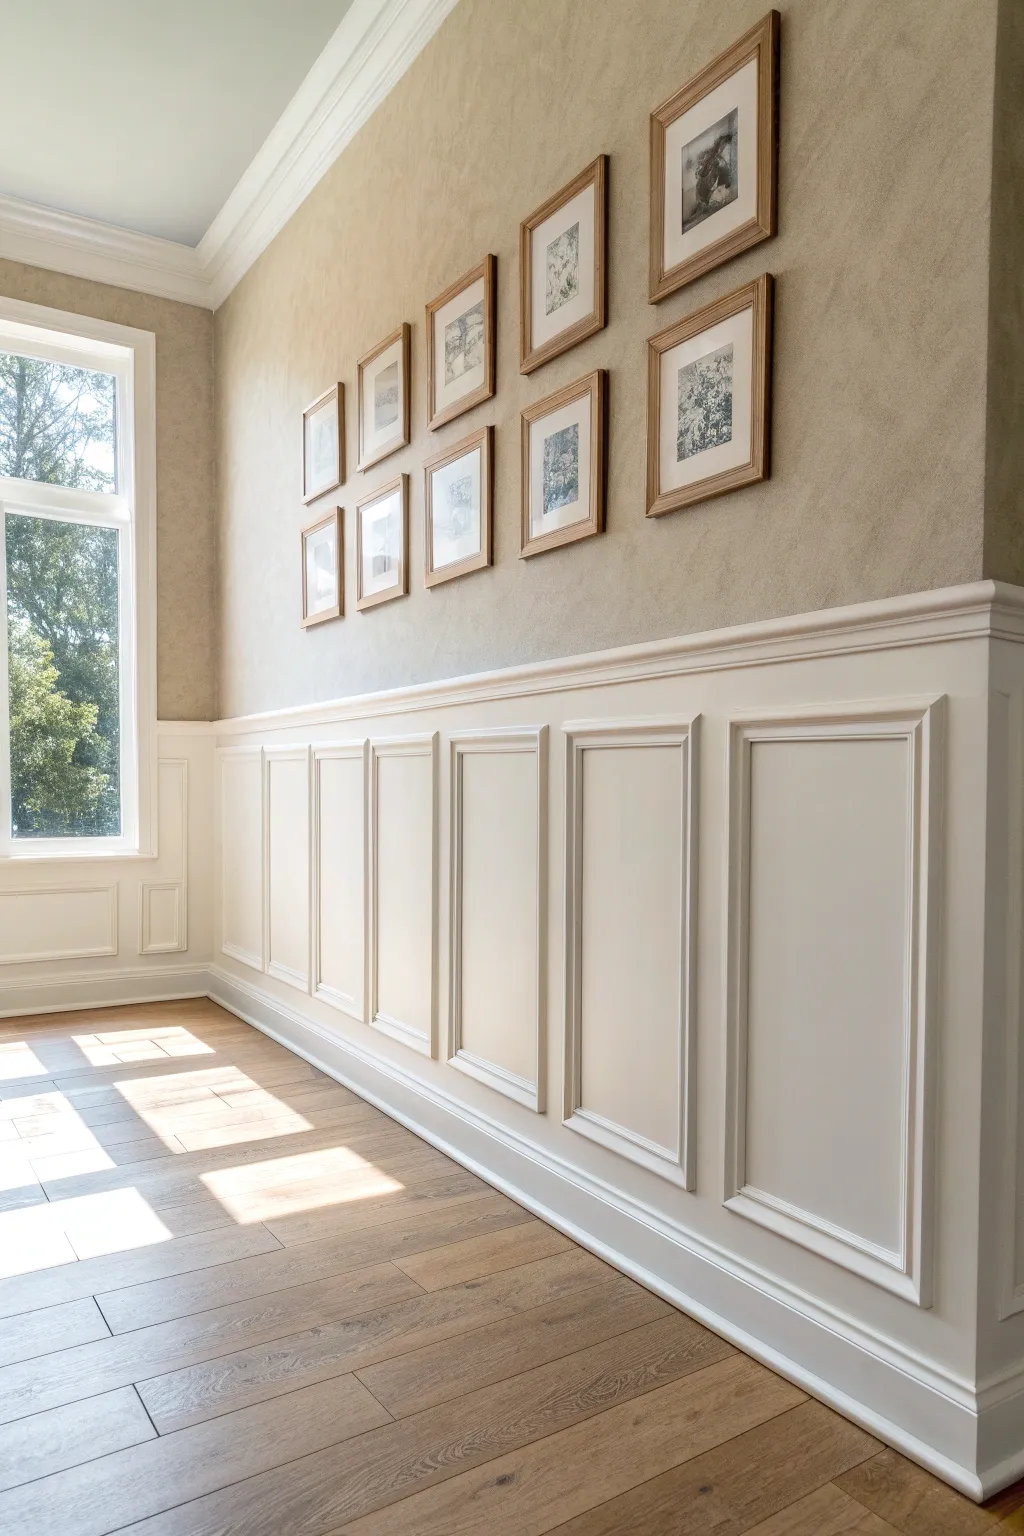
Transform a plain hallway or room into a classically sophisticated space by installing decorative picture-frame molding beneath a chair rail. This project creates stunning architectural depth and bright, clean lines that elevate the entire room’s aesthetic.
Step-by-Step
Materials
- Chair rail molding
- Base cap molding (for the picture frames)
- Baseboard molding
- High-quality wood filler
- Paintable caulk
- Construction adhesive (like Liquid Nails)
- Painter’s tape
- Semi-gloss white interior paint
- Primer (if wood is bare)
- Compound miter saw
- Brad nailer with 1-1/4 inch nails
- Level and measuring tape
- Sandpaper (120 and 220 grit)
- Stud finder
- Laser level (optional but helpful)
Step 1: Planning and Layout
-
Determine molding height:
Decide on the height of your chair rail. A classic rule of thumb is about one-third up the wall, often between 32 to 36 inches from the floor. -
Map out the boxes:
Measure the total length of your wall. Subtract the width of your desired spacing between boxes (usually 3-4 inches) multiplied by the number of spaces. -
Calculate box width:
Divide the remaining length by the number of boxes you want to determine the width of each frame. I find sketching this on paper first saves a lot of headaches later. -
Mark the wall:
Use a pencil and a long level (or laser level) to draw the exact outlines of your chair rail top and the boxes directly onto the wall. Mark the stud locations within these areas.
Step 2: Installation
-
Install the chair rail:
Cut your chair rail molding to length. Apply a bead of construction adhesive to the back and nail it into the studs along your top horizontal line. -
Cut the picture frame molding:
Set your miter saw to a precise 45-degree angle. Cut the four sides for your first box using the base cap molding, ensuring the outer edges match your pencil marks. -
Test fit the frame:
Hold the pieces up to the wall to check the fit of the corners. Walls are rarely perfectly flat, so you might need slight micro-adjustments. -
Attach the molding:
Apply adhesive to the back of the molding pieces. Secure them to the wall with the brad nailer, angling nails slightly to catch the drywall or studs firmly. -
Repeat the process:
Continue measuring, cutting, and installing each box along the wall, maintaining consistent spacing between each frame.
Spacer Block Trick
Cut a scrap piece of wood to the exact width of your spacing (e.g., 3.5 inches). Use this block between frames instead of measuring every time to ensure perfect consistency.
Step 3: Finishing Touches
-
Fill the nail holes:
Use wood filler to cover every brad nail hole. slightly overfill them as the filler will shrink when drying. -
Sand smooth:
Once dry, sand the filled holes flush with the molding. Also lightly sand the joints of your miters to ensure the corners feel like a single continuous piece. -
Caulk the seams:
Apply a thin bead of paintable caulk along every edge where the molding meets the wall and inside the miter joints. Smooth it out with a damp finger for a seamless look. -
Prime the woodwork:
If your molding is unprimed wood, apply a coat of high-quality primer to seal the grain and ensure even paint absorption. -
Apply the first coat:
Using a high-quality angled sash brush, paint the molding and the wall space inside and around the frames with your semi-gloss white paint. -
Sand between coats:
Provide a quick, light sanding with 220-grit paper once the first coat is fully dry to knock down any brush marks. -
Final coat:
Apply the second coat of semi-gloss paint. Long, smooth strokes will give you that professional, furniture-like finish.
Two-Tone Upgrade
For a bold, modern twist, paint the wall inside the frames a shade slightly darker than the molding itself to make the architectural details pop even more.
Step back and admire how this architectural detail completely redefines the character of your room


Faux Wainscoting With an Extra Horizontal Strip
Transform a plain hallway into a sophisticated architectural feature with this faux wainscoting project. By combining simple lattice strips and an extra horizontal molding detail, you achieve a thick, custom-paneled look without the heavy cost of solid wood sheets.
How-To Guide
Materials
- 1×4 MDF boards or pine (for top rail and baseboard)
- 1×3 MDF boards or pine (for vertical battens)
- Small decorative chair rail molding (the ‘extra strip’)
- Wood glue or construction adhesive
- Painter’s tape
- Caulk and caulking gun
- Wood filler
- Interior semi-gloss paint (bright white)
- Interior eggshell paint (wall color)
- Sandpaper (120 and 220 grit)
- Level and measuring tape
- Nail gun with 18-gauge brad nails
- Paint rollers and angled brushes
Step 1: Planning and Surface Prep
-
Measure and calculate:
Begin by deciding the height of your wainscoting. A standard height is usually around 36 to 42 inches from the floor, roughly one-third of the wall height. Measure your total wall length to determine how many vertical battens you need, aiming for spacing between 16 and 24 inches on center. -
Prep the workspace:
Clear the area and remove any existing baseboards carefully if you plan to reuse them, though installing new, taller baseboards often looks better with this style. Remove outlet covers and patch any major holes in the drywall. -
Clean the walls:
Wipe down the lower portion of the wall to ensure it is dust-free. This is crucial because your drywall will serve as the flat ‘panel’ inside the frames, so painting it directly requires a clean surface.
Step 2: Installation of Rails and Battens
-
Install the top rail:
Draw a level line across the wall at your chosen height. Install the 1×4 horizontal top rail right along this line using construction adhesive and your nail gun. Ensure it is perfectly level, as this sets the standard for the whole project. -
Install the baseboard:
Attach your bottom baseboard (also a 1×4 or taller profile) securely to the studs. If your floor isn’t perfectly level, scribe the bottom of the board to fit the floor contours so the top edge remains level. -
Mark vertical batten positions:
Mark the positions for your vertical 1×3 battens on the wall. I find it helpful to use spare blocks of wood cut to the exact spacing distance as spacers to keep things consistent without constant measuring. -
Attach the vertical battens:
Cut your vertical 1×3 boards to fit snugly between the top rail and the baseboard. Apply adhesive to the back, place them on your marks, and nail them securely. Check each one with a level to ensure it isn’t tilting. -
Add the extra horizontal strip:
This is the signature step for this specific look. Install the small decorative chair rail molding directly on top of the 1×4 top rail. This adds depth and creates a professional ‘cap’ that makes the wainscoting feel thicker and more substantial.
Spacer Block Trick
Cut a piece of scrap wood to exactly the width you want between battens. Use this as a physical guide to space your boards instantly without needing a tape measure for every single gap.
Step 3: Finishing Touches and Paint
-
Fill holes and gaps:
Use wood filler to cover all nail holes, slightly overfilling them to account for shrinkage. Once dry, sand them flush. Use paintable caulk to seal every seam where wood meets wall and where boards meet each other. -
Sand for smoothness:
Once the filler is cured, sand all wooden surfaces with 220-grit sandpaper. This ensures your final painted finish will feel silky to the touch rather than rough. -
Prime the wood:
If you are using raw wood or unprimed MDF, apply a high-quality primer to the boards. If you’re painting over a dark wall color, prime the drywall sections inside the boxes as well. -
Paint the upper wall:
Before finishing the wainscoting, paint the upper portion of the wall with your chosen contrasting color (like the warm tan shown). Cut in carefully along the top edge of your new chair rail cap. -
Paint the wainscoting:
Apply your semi-gloss white paint to the entire lower section—both the wood trim and the drywall ‘panels’ in between. The sheen difference between the semi-gloss wainscoting and the matte or eggshell upper wall creates the convincing illusion of solid woodwork. -
Second coat application:
After the first coat dries completely, lightly sand any rough spots and apply a second coat of semi-gloss for a durable, washable finish. -
Cleanup and hardware:
Remove your painter’s tape slowly while the paint is still slightly tacky to get a crisp line. Reinstall your outlet covers and enjoy the new architectural depth of your hallway.
Add Interior Trim
For an even more traditional look, add small ‘base cap’ molding inside each square rectangle. This ‘picture framing’ technique adds shadows and makes the wainscoting look incredibly high-end.
This classic architectural upgrade adds significant value and timeless character to your home with just a weekend of work
Wallpaper Above the Chair Rail
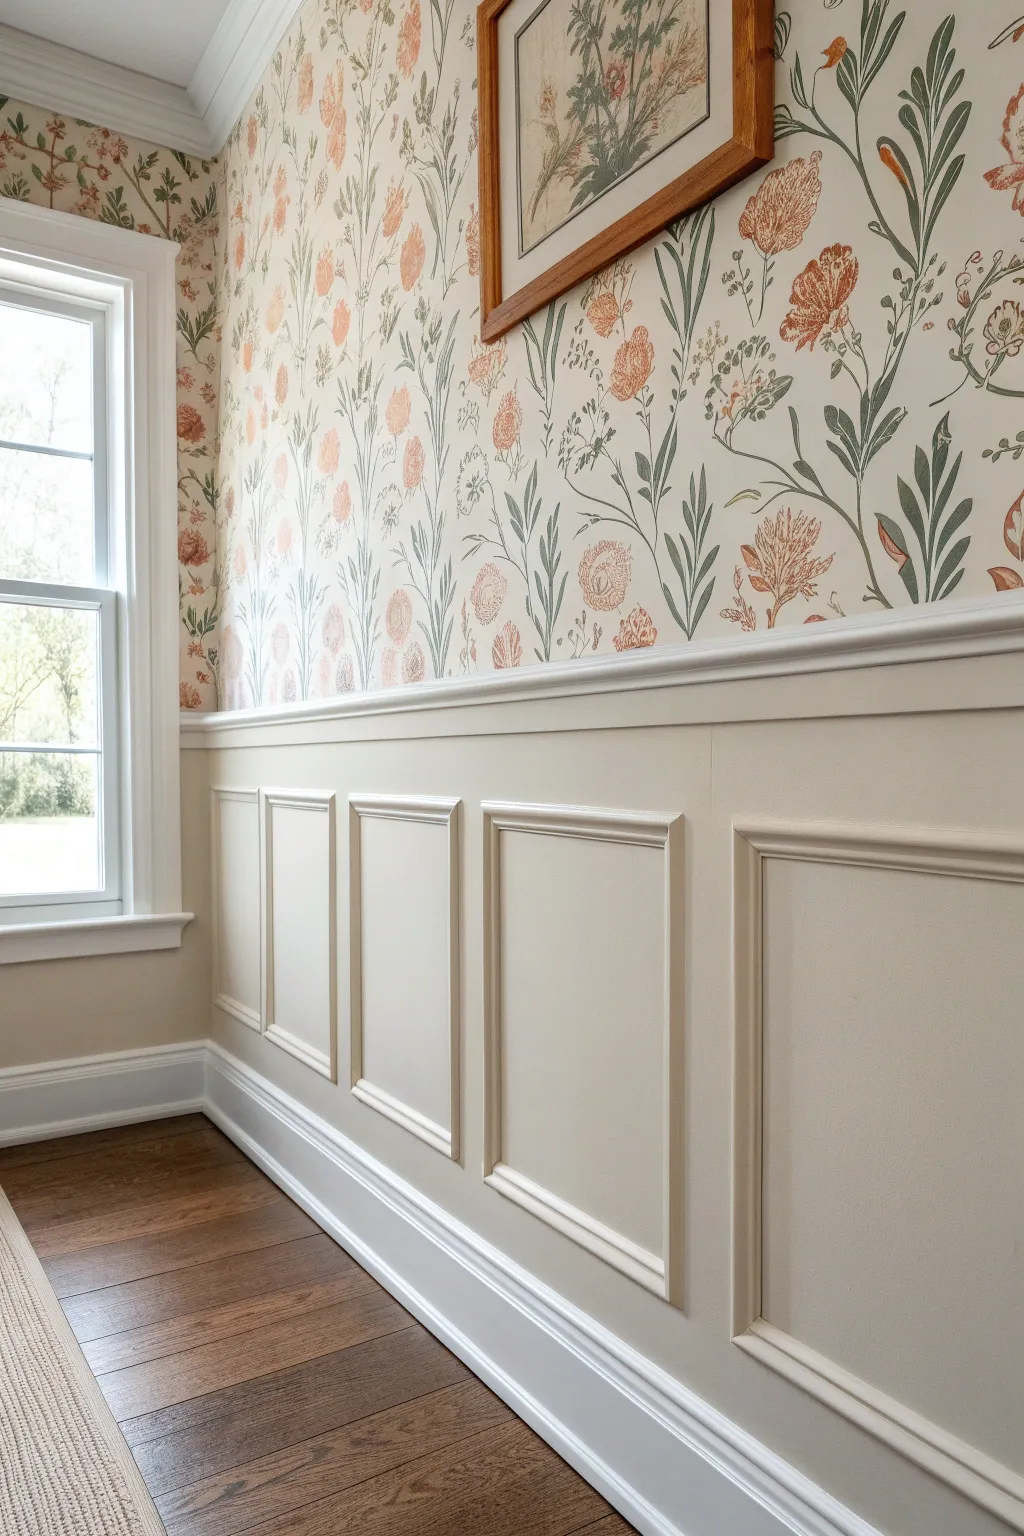
This project combines the timeless structure of picture frame wainscoting with the organic beauty of botanical wallpaper. The result is a sophisticated, layered wall treatment that feels both traditional and fresh, perfect for elevating a dining room or hallway.
Step-by-Step Guide
Materials
- Botanical floral wallpaper (pre-pasted or unpasted)
- Wallpaper paste (if required) and primer
- Smoothing tool and seam roller
- Utility knife with fresh blades
- Level and measuring tape
- Pre-primed chair rail molding
- Pre-primed picture frame molding
- Construction adhesive (Liquid Nails)
- Brad nailer with 1.5-inch nails
- Wood filler and sandpaper (220 grit)
- Painter’s tape
- High-quality interior paint (Satin or Semigloss finish)
- Angled sash brush (2-inch)
- Caulk gun and paintable caulk
Step 1: Preparation and Planning
-
Measure and calculate:
Begin by determining the height of your chair rail. A standard height is typically 32 to 36 inches from the floor, but adjusting it to roughly one-third of your total ceiling height usually feels most balanced. -
Mark layout lines:
Use a level to draw a horizontal line around the entire room at your chosen chair rail height. This will serve as the top guide for your molding and the bottom edge for your wallpaper. -
Plan box spacing:
Sketch out the placement of your lower picture frame boxes. Aim for consistent spacing—usually 3 to 4 inches between boxes and from the chair rail and baseboard. I find sketching this on the wall with a pencil helps visualize the final look.
Step 2: Installing the Wainscotting
-
Cut the chair rail:
Measure the length of each wall section and cut your chair rail molding to size using a miter saw. For inside corners, cope the joints for a tight fit; for outside corners, miter them at 45 degrees. -
Attach the rail:
Apply a bead of construction adhesive to the back of the molding. Position it on your level line and secure it into the wall studs using a brad nailer. -
Cut picture frame molding:
Cut your thinner picture frame molding into four pieces for each ‘box’ section, mitering the corners at 45 degrees to create perfect rectangles. -
Install the boxes:
Adhere the box pieces to the wall below the chair rail using adhesive and brad nails. Use a level on every single piece to ensure your squares don’t look crooked. -
Fill and sand:
Fill all nail holes and corner joints with wood filler. Once dry, lightly sand the filler smooth with 220-grit sandpaper so the joints become invisible. -
Caulk the seams:
Run a thin bead of paintable caulk along every edge where the molding meets the wall. Smooth it with a wet finger for a seamless transition.
Clean Cuts Matter
Snap off your utility knife blade after every few cuts. Wet wallpaper can tear easily if the blade is even slightly dull, ruining your crisp edge.
Step 3: Painting the Lower Wall
-
Prime the wall:
Clean the wall surface to remove dust. Apply a coat of primer to the entire lower section—including the drywall inside the boxes and the molding itself—to ensure an even sheen. -
Cut in edges:
Using your angled sash brush and a creamy off-white paint (satin finish works best for durability), carefully paint the intricate edges of the molding and along the baseboard. -
Roll the surfaces:
Use a small roller to paint the flat wall sections inside and outside the boxes. This eliminates brush strokes and speeds up the process. -
Apply second coat:
Allow the first coat to dry completely according to the can’s instructions, then apply a second coat for full, rich coverage. Let this cure fully before starting the wallpaper.
Dimension Boost
Paint the wall inside the picture frame boxes a shade slightly darker or lighter than the molding for subtle, sophisticated depth.
Step 4: Applying the Wallpaper
-
Prime upper walls:
Apply a wallpaper primer (sizing) to the wall space above the chair rail. This seals the drywall and allows you to slide the paper into position more easily. -
Establish a plumb line:
Draw perfectly vertical plumb line using your level about 20 inches from a corner to guide your first strip. Never rely on the room’s corners being straight. -
Hang the first strip:
Apply paste to the paper (or activate pre-pasted backing) and hang your first strip along the plumb line, leaving a little excess paper at the ceiling and extending slightly over the top of the chair rail. -
Match the pattern:
Hang the second strip, carefully sliding it up or down to align the floral pattern with the previous strip. Butt the seams tightly against each other without overlapping. -
Smooth air bubbles:
Use a plastic smoothing tool to gently press the paper against the wall, working from the center outward to push out air bubbles and excess glue. -
Trim excess:
Once the paper is smoothed, use a very sharp utility knife and a straight edge to trim the excess paper cleanly at the ceiling line and directly on top of the chair rail ledge. -
Clean residue:
Immediately wipe away any stray paste from the face of the wallpaper or the painted chair rail using a clean, damp sponge.
Step back and admire how the crisp woodwork anchors the whimsical floral patterns above.
Matte Above, Satin Below Sheen Mix
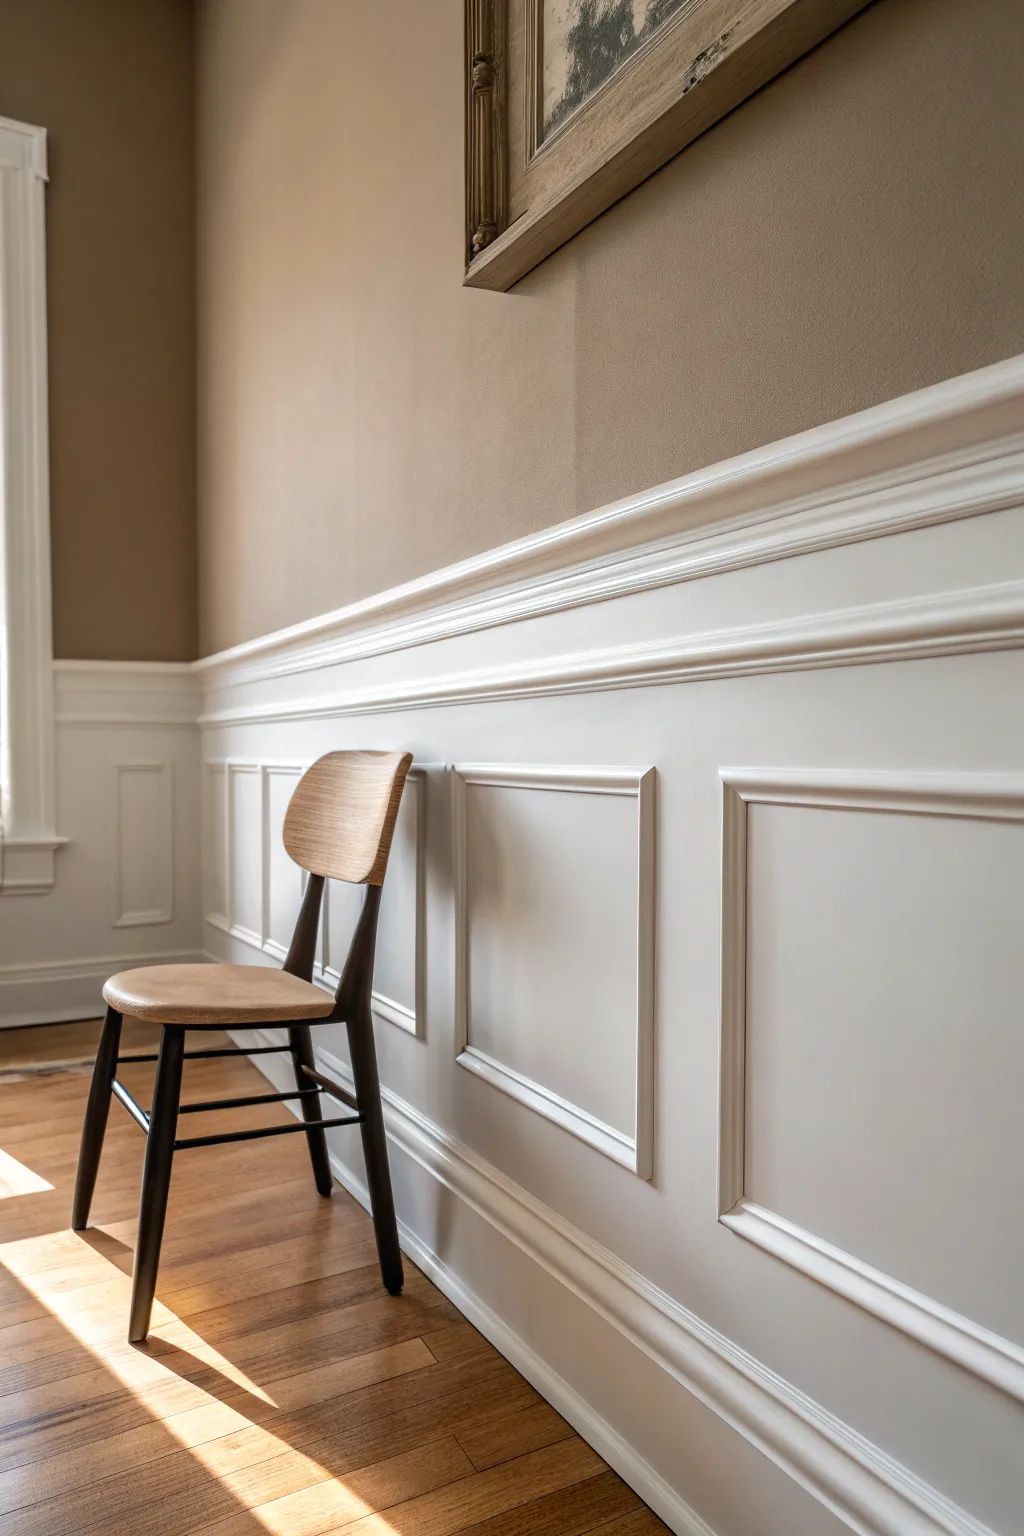
Elevate a plain wall with this sophisticated wainscoting project that relies on a clever play of light. By combining a matte finish on the upper wall with a durable, lustrous satin on the woodwork below, you create a subtle yet stunning textural contrast.
Step-by-Step Guide
Materials
- Interior paint (Matte finish, taupe/beige)
- Interior paint (Satin or Semi-Gloss finish, white)
- Chair rail molding
- Baseboard molding
- Panel molding (for the boxes)
- Miter saw
- Carpenter’s level
- Stud finder
- Construction adhesive (e.g., Liquid Nails)
- Brad nailer with 1-1/2 inch and 2-inch nails
- Paintable latex caulk & caulk gun
- Wood filler
- Sandpaper (120 and 220 grit)
- Painter’s tape
- Angled sash brush (2.5 inch)
- Microfiber paint roller (3/8 inch nap)
- Drop cloths
Step 1: Planning and Layout
-
Establish the height:
Decide on the height of your chair rail. A classic rule of thumb is one-third up the wall, typically around 32-36 inches from the floor, but you can adjust based on your ceiling height. -
Mark the level line:
Use a level and a pencil to draw a faint horizontal line across the entire wall at your chosen chair rail height. This will be the top edge of your molding. -
Plan the boxes:
Measure the total length of the wall to determine the spacing for your wainscoting boxes. Aim for equal spacing between boxes (stiles) of about 3-4 inches. -
Sketch the layout:
Draw the boxes directly on the wall with a pencil to visualize the final look. I always double-check these measurements to ensure the boxes won’t look squashed near corners.
Step 2: Painting the Upper Wall
-
Prep the surface:
Lightly sand the entire wall if it has a previous glossier finish, then wipe it down with a damp cloth to remove dust. -
Apply the matte paint:
Cut in along the ceiling line and corners with the matte taupe paint using an angled brush. -
Roll the top section:
Roll the upper portion of the wall, extending slightly below your pencil line for the chair rail so there are no gaps later. Apply two coats for a rich, velvety finish.
Uneven Walls?
If your walls are wavy, the molding might not sit flush. Don’t force it; instead, use caulk to fill the gaps between the molding and the wall. It hides shadows perfectly after painting.
Step 3: Installing the Molding
-
Install the chair rail:
Cut your chair rail molding to length. Apply construction adhesive to the back, align it with your level line, and secure it into the studs using 2-inch brad nails. -
Add the baseboard:
If you are replacing baseboards, install the new taller baseboard now, securing it heavily into the wall studs. -
Cut the picture frame molding:
Set your miter saw to 45 degrees. Cut the four sides of each box frame according to your layout measurements. -
Assemble the frames:
I find it easier to glue and pin the four sides of the frame together on a flat surface first, rather than nailing them individually to the wall. -
Attach the frames:
Apply adhesive to the back of your assembled frames. Position them according to your pencil marks and secure with 1-1/2 inch brad nails.
Level Up: Double Layer
Add a smaller molding profile inside the existing picture frame box. This ‘double-panel’ look adds incredible depth and makes the woodwork feel much more expensive and custom.
Step 4: Finishing and Painting Below
-
Fill the nail holes:
Fill every nail hole with wood filler. Overfill slightly, as the filler shrinks when drying. -
Caulk the seams:
Run a thin bead of paintable caulk along every edge where molding meets the wall. Smooth it with a wet finger for a seamless transition. -
Sand smooth:
Once the filler is dry, sand the filled holes flush and lightly sand the molding to ensure paint adhesion. -
Prime the lower wall:
Apply a high-quality primer to the entire lower section—molding, frames, and the drywall in between. This unifies the texture. -
Apply satin paint:
Using a high-quality angled sash brush, paint the interior edges and profiles of the molding first with your white Satin (or Semi-Gloss) paint. -
Roll the flat areas:
Immediately follow up with a small microfiber roller on the flat drywall sections inside and outside the boxes to smooth out brush marks. -
Final coat:
After the first coat is dry, lightly sand any rough spots and apply a final coat of Satin paint for that durable, professional sheen.
Step back and admire how the light catches the sheen on the lower woodwork while softening on the matte wall above.
Match the Rail to the Lower Color
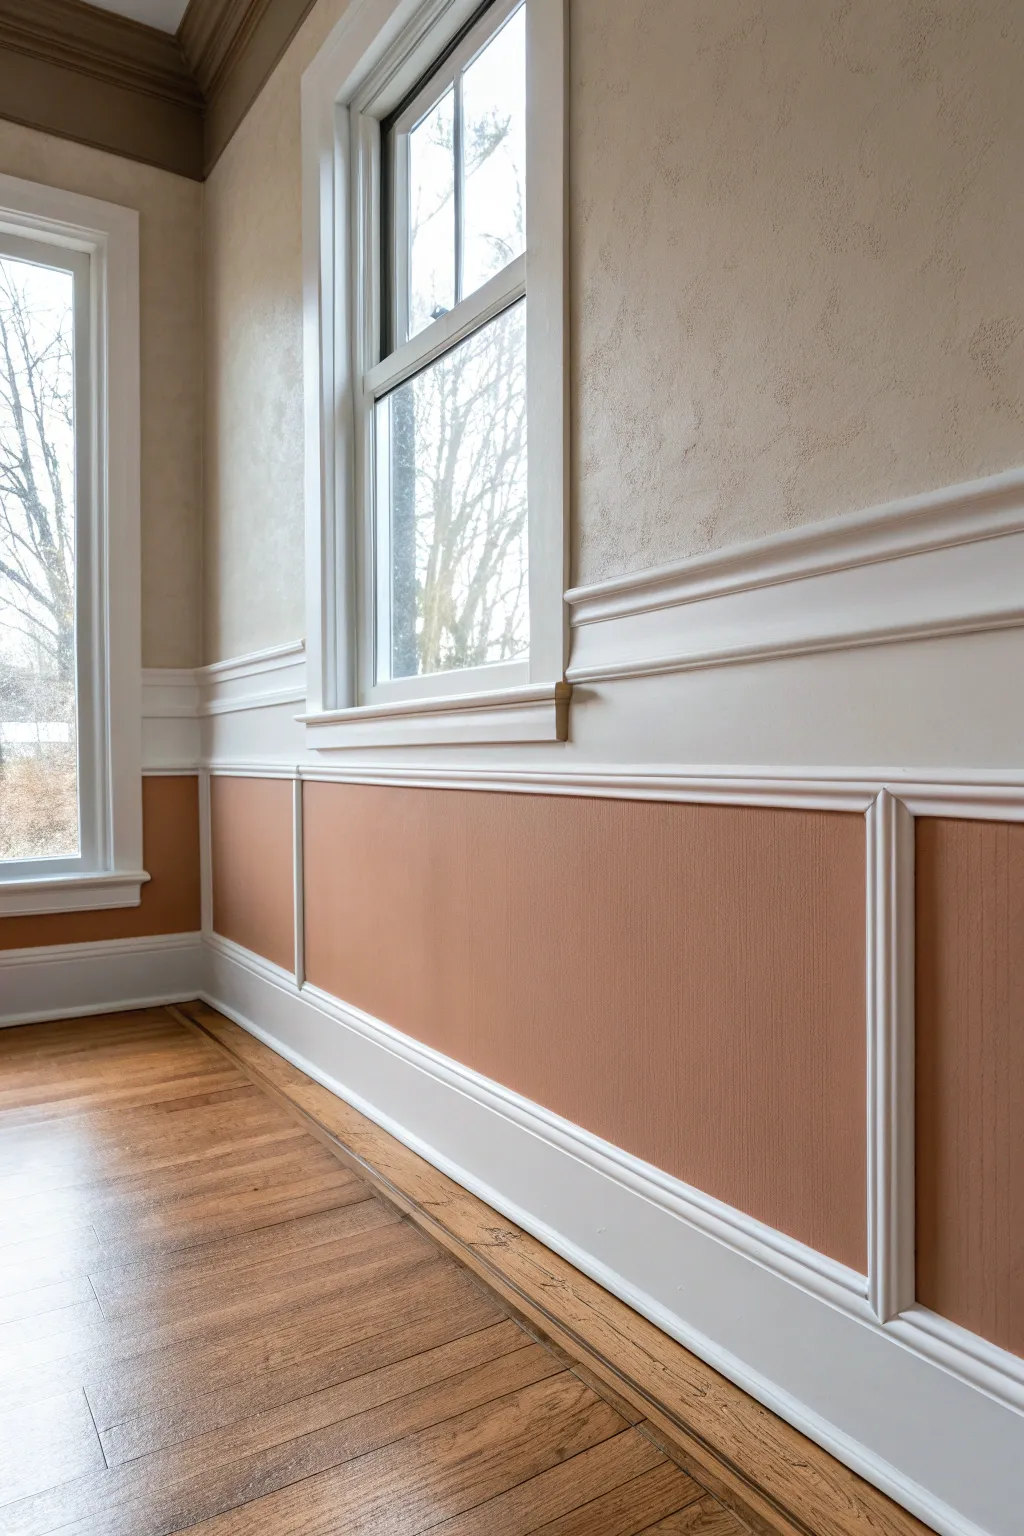
Elevate a room’s architecture by combining crisp white molding with warm, inviting tones. This project recreates a timeless wainscoting look where wainscot panels are painted in a rich terracotta-brown, framed by bright white trim.
Step-by-Step Tutorial
Materials
- Interior semi-gloss paint (bright white for trim)
- Interior eggshell or satin paint (terracotta/warm brown for lower wall)
- Interior flat or eggshell paint (textured beige for upper wall)
- Painter’s tape (high quality)
- 2-inch angled sash brush
- 4-inch foam roller or short nap roller
- Canvas drop cloths
- Sanding sponge (fine grit)
- Spackle or wood filler
- Caulk and caulk gun
- Damp rags
Step 1: Preparation & Repairs
-
Clear and Protect:
Clear the area of furniture and lay down canvas drop cloths to protect that beautiful hardwood flooring from splatters. -
Inspect Trim:
Closely examine the chair rail, baseboard, and picture frame molding for any nail holes or dents. -
Fill Imperfections:
Apply a small amount of wood filler or spackle to any holes using a putty knife or your finger, smoothing it flush with the surface. -
Sand Smooth:
Once dry, lightly sand the filled areas and the existing trim with a fine-grit sanding sponge to ensure a good mechanical bond for the paint. -
Clean Surfaces:
Wipe down all woodwork and walls with a damp rag to remove sanding dust and any household grime. -
Caulk Gaps:
Run a thin bead of paintable caulk along the edges where the trim meets the wall to create seamless lines; smooth it instantly with a wet finger.
Step 2: Painting the Trim
-
Tape the Floor:
Apply painter’s tape carefully along the floor edge where it meets the quarter-round or baseboard. -
Cut In Trim:
Using the 2-inch angled brush, paint the detailed profiles of the chair rail, baseboards, and window casing with the bright white semi-gloss paint. -
Roll Flat Surfaces:
For wider flat sections of the baseboard or window jams, I find using a small foam roller helps eliminate brush marks. -
Second Coat:
Allow the white paint to dry completely, then apply a second coat for a solid, opaque finish.
Crisp Lines Secret
To prevent bleed-under, seal the tape edge with a thin layer of the *base* color (white) before applying the wall color paint.
Step 3: Painting the Wall Sections
-
Tape Trim Edges:
Once the white trim paint has cured (wait at least 24 hours), apply tape specifically for delicate surfaces along the edges of the rail and moldings. -
Cut In Lower Wall:
Use a clean angled brush to cut in the terracotta color inside the picture frame molding and along the baseboard and chair rail. -
Roll Lower Wall:
Roll the lower wall sections with the terracotta paint using a small roller, ensuring even coverage within the panels. -
Cut In Upper Wall:
Switch to the beige paint and cut in along the top of the chair rail and around the window casing. -
Roll Upper Wall:
Roll the upper wall section with the beige paint. If your wall has texture like the one shown, ensure you use a nap thickness that can get into the crevices. -
Review and Touch Up:
Inspect for light spots or missed texture divots and apply a second coat to both wall sections if needed. -
Remove Tape:
Carefully peel away the painter’s tape while the paint is still slightly tacky to prevent peeling sticking layers.
Texture Match
If your upper walls are smooth but you want this look, add a texture additive to your paint or use a textured roller cover.
Step back and enjoy the sophisticated contrast of your freshly painted architectural details
Match the Rail to the Upper Color
Transform a plain room into an elegant space by installing and painting traditional picture frame wainscoting. This project combines crisp white millwork with a warm, contrasting upper wall for a timeless, architectural look.
Detailed Instructions
Materials
- Interior latex paint (Eggshell finish for walls, Semi-gloss for trim)
- Chair rail molding
- Baseboard molding
- Panel molding (for boxes)
- Painter’s tape
- Miter saw
- Brad nailer
- Wood filler
- Caulk and caulk gun
- Sandpaper (120 and 220 grit)
- Level and measuring tape
- Angle finder
- Primer
Step 1: Planning and Layout
-
Determine chair rail height:
Decide on the height for your chair rail, typically about one-third up the wall (around 32-36 inches). Mark this line around the room using a level and a pencil. -
Calculate box spacing:
Measure the horizontal wall length below your chair rail line. Determine how many framing boxes will fit, aiming for consistent spacing (stiles) of about 3-4 inches between boxes. -
Sketch the layout:
Draw the boxes directly on the wall with a pencil to visualize the final look. This helps you avoid awkward half-boxes near corners or outlets.
Step 2: Installing Base and Chair Rail
-
Install baseboards:
If not already present, cut and install your baseboard molding along the floor. Miter the corners for a seamless fit and secure with a brad nailer. -
Cut the chair rail:
Measure and cut the chair rail molding for each wall section. Use an angle finder to get precise miter cuts for inside and outside corners. -
Mount the rail:
Position the top of the chair rail along your leveled line. Nail into the studs where possible, or use construction adhesive and cross-nails for drywall sections.
Spacer Block Trick
Cut a scrap piece of wood to the exact width of the gap between your boxes. Use it as a jig to space every panel perfectly without using a tape measure.
Step 3: Creating the Picture Frames
-
Cut panel molding:
Set your miter saw to exactly 45 degrees. Cut the four sides for your first box based on your layout measurements. -
Test fit the frame:
Assemble the pieces dry on the floor or hold them against the wall to ensure the corners meet perfectly. -
Install the first box:
Apply a thin bead of construction adhesive to the back of the molding pieces. Press them onto your pencil lines and secure with brad nails. -
Use a spacer block:
Cut a scrap piece of wood to the exact width of your spacing (e.g., 3.5 inches). Use this block to quickly and accurately position the next box without constantly measuring. -
Handle outlets:
If a box intersects with an outlet, you may need to adjust the box size locally or cut the molding to butt against the outlet cover, though shifting the layout is usually cleaner.
Two-Tone Option
For a moody look, paint the inside of the picture frame boxes the same color as the upper wall, leaving only the trim itself white.
Step 4: Prep and Paint
-
Fill nail holes:
Dab a small amount of wood filler into every nail hole. Overfill slightly as it shrinks when drying. -
Sand smooth:
Once dry, sand the filler flush with 220-grit sandpaper. Also lightly sand any rough miter joints. -
Caulk the seams:
Run a bead of paintable caulk along every edge where molding meets the wall, and inside the miter joints. Smooth it with a wet finger for a seamless look. -
Prime the woodwork:
Apply a high-quality primer to the raw wood and the drywall sections inside the boxes to ensure an even finish. -
Paint the upper wall:
Cut in along the top of the chair rail with your upper wall color (a warm terracotta or peach works beautifully). Roll the rest of the upper wall. -
Paint the wainscoting:
Using a semi-gloss white paint, carefully brush the trim pieces first, then use a small roller for the flat wall spaces inside the boxes and between the rails. -
Apply second coat:
I always find that a second coat on the trim makes the white really pop against the darker wall color. Allow proper drying time between coats.
Step back and admire how this architectural detail completely changes the character of your room
Painted Band Stripe Centered on the Rail
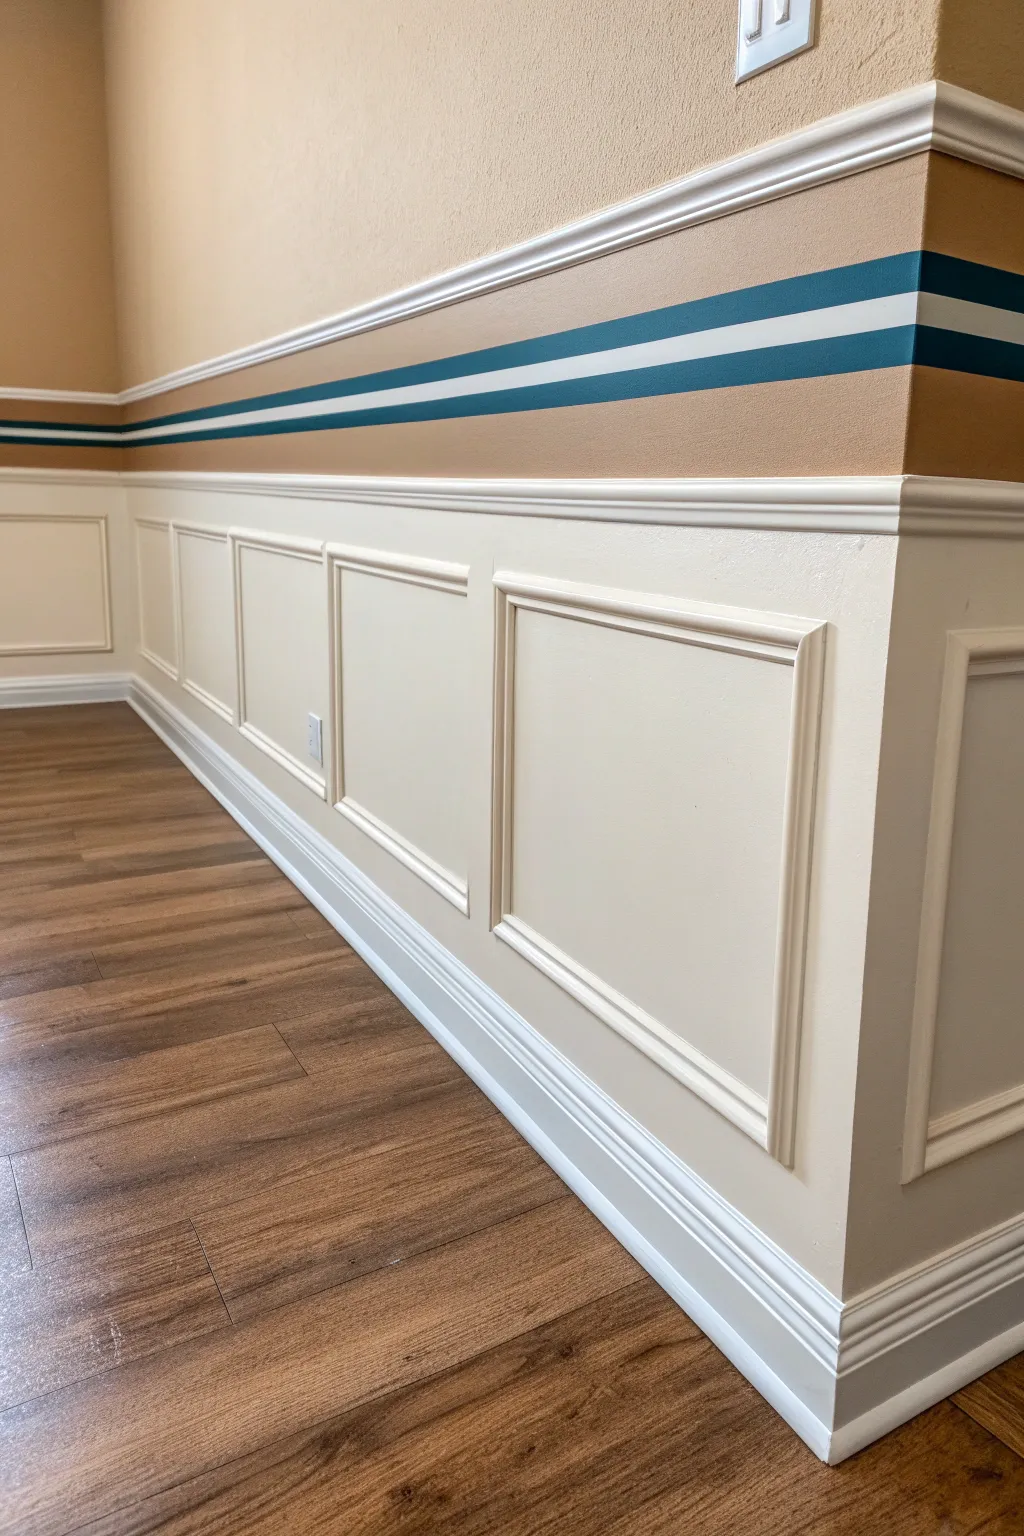
Elevate a standard beige wall by adding a bold, sporty stripe detail just above the chair rail. This project combines classic wainscoting with a modern triple-stripe accent in teal and white, creating a tailored look that feels custom and sophisticated.
How-To Guide
Materials
- Painters tape (high quality, meant for fresh paint)
- Laser level or long spirit level
- Measuring tape
- Pencil
- Base wall paint (beige/tan)
- Teal satin or semi-gloss paint
- White satin or semi-gloss paint
- Small foam roller
- Angled sash brush (1.5 or 2 inch)
- Damp rag
Step 1: Preparation & Measuring
-
Clean the surface:
Ensure the wall area above the chair rail is clean, dust-free, and dry. If the beige base coat is old, you may want to give it a fresh coat now and let it cure for at least 24 hours before taping. -
Determine stripe height:
Decide on the placement of your band stripe. For this look, the bottom of the lowest teal stripe should hover about 1.5 to 2 inches above the top edge of your chair rail molding. -
Mark the first line:
Using your measuring tape, make small pencil marks at your chosen height (e.g., 2 inches up from the rail) at several intervals along the wall. -
Establish a level line:
Set up a laser level to align with your pencil marks. This is crucial because floors and chair rails aren’t always perfectly level, but your painted stripe needs to be straight to the eye. -
Tape the bottom edge:
Apply a long strip of painter’s tape along the laser line. This piece of tape will form the bottom edge of your lowest teal stripe. Press the edge down firmly.
Step 2: Creating the Stripe Pattern
-
Mark the stripe widths:
For this specific design, measure up from your bottom tape line. The pattern consists of a bottom teal stripe (approx. 1.5 inches), a middle white stripe (approx. 1 inch), and a top teal stripe (approx. 1.5 inches). -
Apply the spacer tape:
Place a strip of tape to define the top of the bottom teal stripe. Then, measure the gap for the middle white stripe and place tape to define its top and bottom edges. Use a spacer block of wood cut to size if you want to speed this process up. -
Finish taping the pattern:
Apply the final strip of tape that will define the top edge of the upper teal stripe. You should now have exposed wall areas for two thick stripes and one thin middle stripe. -
Seal the tape edges:
This is the most important step for crisp lines. Take a small amount of your *base wall color* (the beige) and brush it lightly over the edges of the tape. This seals any gaps so that any paint that bleeds under is the wall color, not the stripe color. -
Let the seal dry:
Allow this sealing coat to dry completely, usually about 30 to 60 minutes depending on humidity.
Bleeding Lines?
If paint bleeds under the tape, wait for it to dry fully. Then, apply a piece of tape over the stripe, and use the base wall color to touch up the edge for a perfect line.
Step 3: Painting & Reveal
-
Paint the white stripe:
Using a small brush or mini roller, fill in the middle thin stripe with your white paint. Apply two light coats if necessary for full coverage, letting it dry between coats. -
Paint the teal stripes:
I like to switch to a fresh brush for the color. Carefully fill in the top and bottom stripes with the teal paint. Watch out for drips that might cross over the masked area into the white section. -
Apply a second coat:
Once the first teal coat is dry to the touch, apply a second coat to ensure a rich, consistent color without brush strokes showing. -
Remove tape while damp:
Do not wait for the paint to fully cure. Carefully peel off the painter’s tape at a 45-degree angle while the final coat is still slightly tacky. This prevents the paint from peeling up with the tape. -
Touch up:
Inspect the lines closely. If any tiny bleeds occurred, use a very small artist’s brush and the background beige color to correct them. -
Clean the wainscoting:
Wipe down the chair rail below to ensure no paint splatters landed on the molding during the process.
Gloss it Up
Use a high-gloss finish for the stripe paint only. This subtle difference in sheen against a matte wall adds a high-end, surprisingly luxurious texture to the design.
Step back and admire how this sharp, colorful detail completely transforms the room’s architecture
Geometric Color Blocking Anchored to the Rail
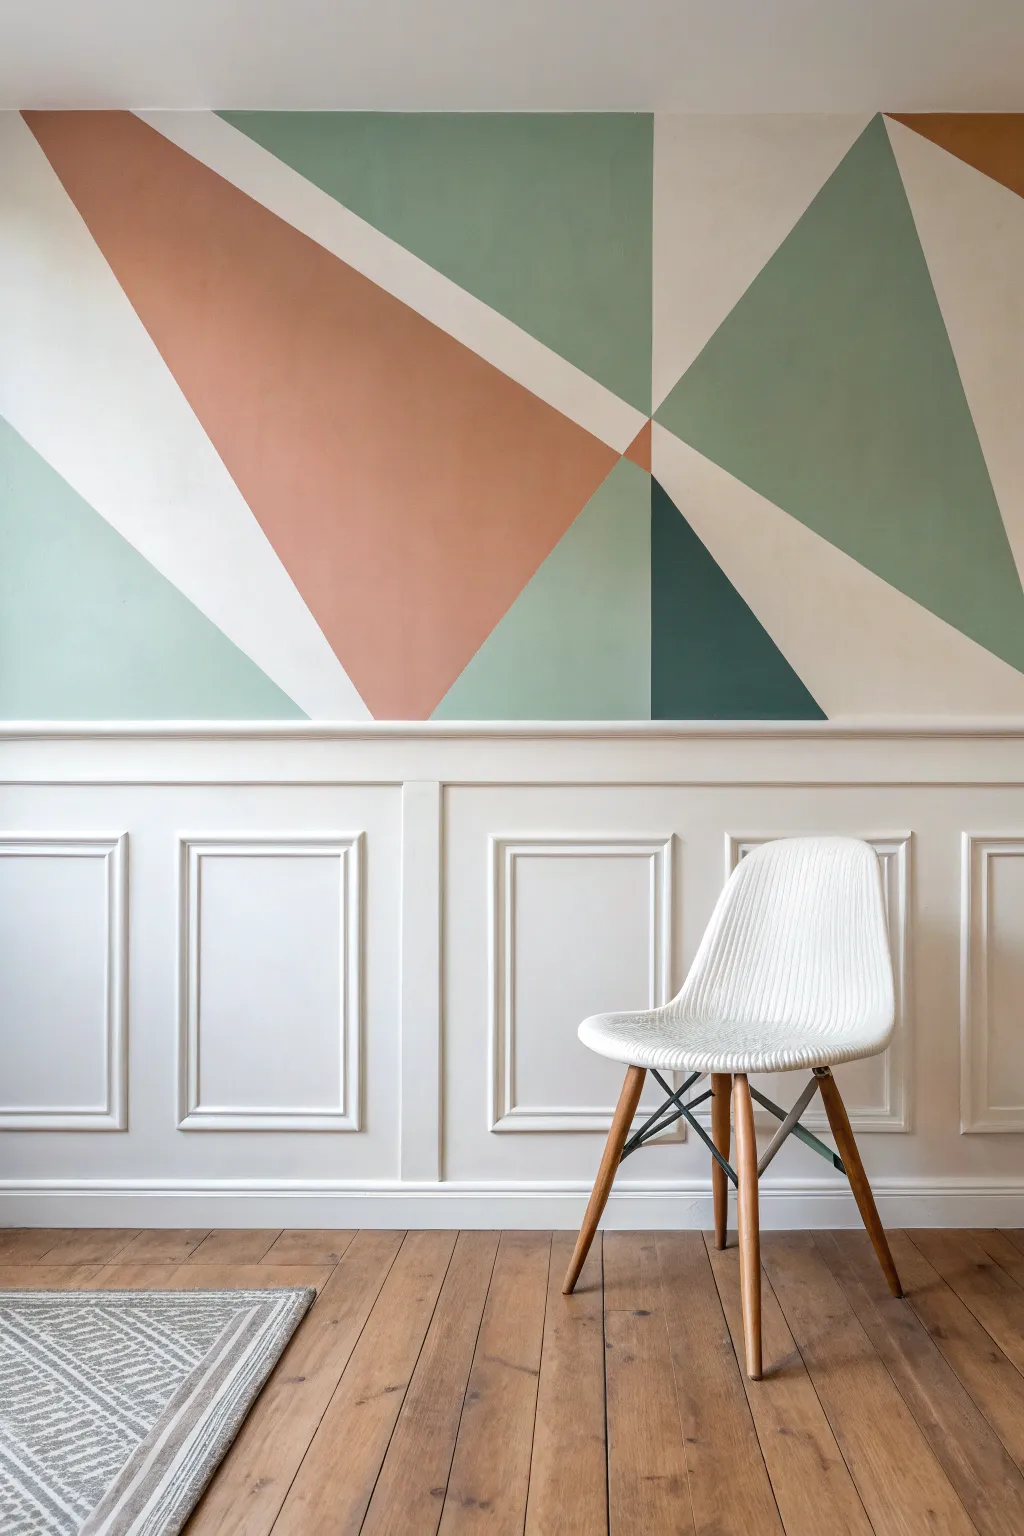
Bring sophisticated color blocking to your space with this dynamic geometric mural that anchors perfectly to classic wainscoting. The sharp triangles and muted earth tones create a stunning contrast against the traditional white molding below.
Detailed Instructions
Materials
- Latex interior wall paint (White base, Terracotta, Sage Green, Dark Forest Green)
- Painter’s tape (high-quality delicate surface tape recommended)
- Small foam roller and tray
- Angled sash brush (2-inch)
- Pencil and eraser
- Straight edge or level (2-4 ft)
- Drop cloth
- Damp rag for clean-up
Step 1: Preparation & Base Coat
-
Clear and clean:
Begin by removing all furniture from the wall area and laying down your drop cloth to protect the flooring. Wipe down the upper wall surface with a damp cloth to remove dust, ensuring a clean surface for adhesion. -
Tape the molding:
Apply painter’s tape carefully along the top edge of your wainscoting or chair rail. Press the edge down firmly with your fingertip to prevent any paint from bleeding onto your woodwork. -
Apply the base color:
Paint the entire upper wall section with your white base color. Using a roller for the main areas and a brush for the corners ensures even coverage. I like to let this dry overnight to ensure the tape won’t peel it up later.
Crisp Line Secret
Always seal your tape! Painting the base color over the tape edge before applying the accent color blocks creates the sharpest possible lines.
Step 2: Mapping the Design
-
Visualize the triangles:
Study the reference image to understand the composition. Notice how the design relies on large, intersecting triangles that span from the ceiling to the chair rail. -
Mark anchor points:
Lightly mark your key vertices with a pencil. Place a central point roughly in the middle of the wall, another high up near the ceiling, and several along the chair rail line. -
Connect the dots:
Use your long straight edge or level to connect these points with light pencil lines. Create the large diagonal sweeping down from left to right, and the opposing diagonals that form the main triangles. -
Refine the shapes:
Stand back to review your pencil lines. The design should feel balanced but asymmetrical. Adjust the angles now before any tape is applied.
Uneven Coverage?
If the darker greens look patchy after drying, resist the urge to touch up spots. Simply apply a full second coat to the entire shape for uniformity.
Step 3: Taping and Painting
-
Apply initial tape lines:
Apply painter’s tape over your pencil lines. Important: Place the tape on the *outside* of the shape you intend to paint first. Because the shapes touch, you can’t paint them all at once. -
Seal the tape edges:
To get those razor-sharp lines, brush a very light coat of your *base wall color* (white) over the edge of the tape. This seals any gaps so the colored paint won’t bleed underneath. -
Paint the Terracotta section:
Start with the large terracotta triangle. Use your brush for the edges near the tape and ceiling, then fill the center with a small roller for a smooth texture. -
Apply the Sage Green:
Identify the non-touching sage green sections (like the bottom left) and paint those simultaneously. Apply two thin coats rather than one thick one for the best finish. -
Remove tape while damp:
Carefully peel back the tape while the paint is still slightly tacky to avoid pulling up dried paint chunks. Pull the tape away from the painted area at a 45-degree angle. -
Dry and re-tape:
Wait for these first sections to dry completely (check your paint can for cure times). Then, apply fresh tape over the *newly painted* colored edges to define the boundaries for the remaining adjacent shapes. -
Paint remaining sections:
Paint the Dark Forest Green triangle and the remaining Sage Green section. Be gentle when painting near the intersections to keep your previous work safe. -
Final reveal:
Slowly remove the urgency of the final tape strips. Check for any tiny imperfections; a small artist’s brush requires just a dab of paint to fix any line wobbles.
Step back and admire how this modern geometric feature completely revitalizes the room personality
Scallop or Wave Border Along the Chair Rail
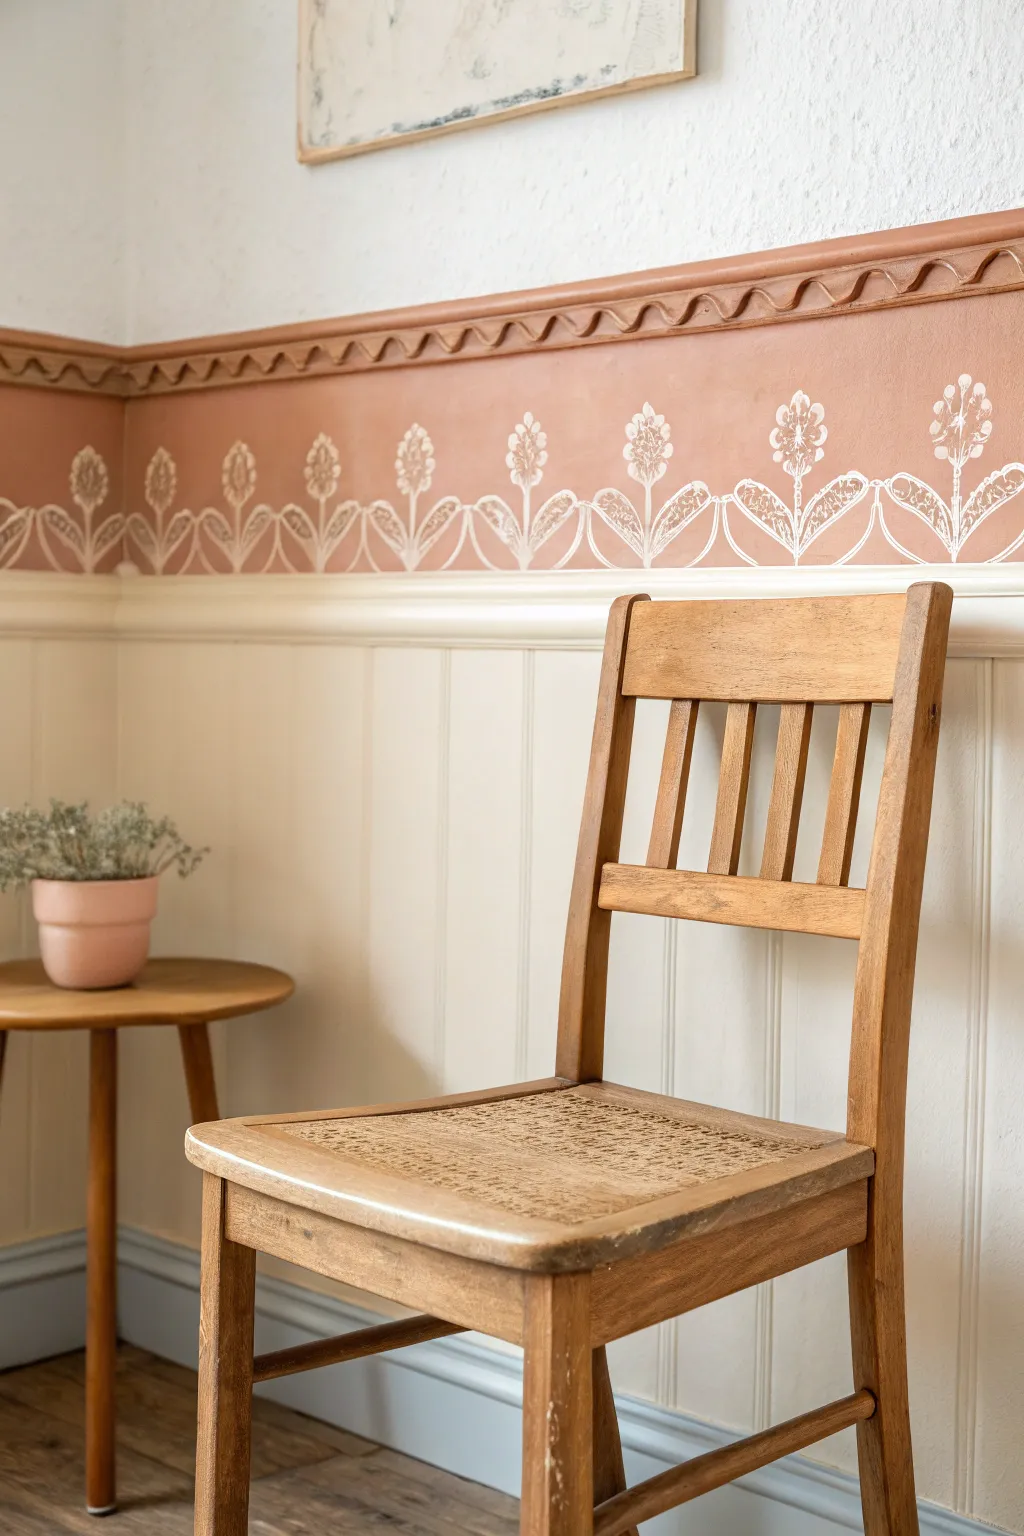
Bring warmth and whimsical charm to your room with this layered border treatment that combines a dusty terracotta band with delicate white floral linework. This project bridges the gap between traditional wainscoting and the upper wall, adding a tactile scalloped trim for extra dimension.
Step-by-Step
Materials
- Dusty terracotta/mid-tone pink interior latex paint (satin finish)
- White or cream paint for floral details (acrylic or latex)
- Painter’s tape (high quality)
- Level and tape measure
- Pencil
- Scalloped wooden trim molding
- Construction adhesive or finishing nails/nail gun
- Wood filler (if using nails)
- Fine-grit sandpaper
- Small fine-line paintbrushes (size 0 or 1)
- Medium sash brush or roller
- Floral stencil (optional, custom scallop & flower design)
- Chalk or transfer paper (if sketching freehand)
Step 1: Preparation & Base Color
-
Measure and mark:
Begin by measuring the height of your desired border above the existing chair rail. A height of about 8-10 inches works beautifully for visual balance. Use a level and a pencil to draw a faint, straight horizontal line around the room at this height. -
Tape the boundaries:
Apply painter’s tape firmly along the top of your existing white chair rail molding to protect it. Then, apply tape just above your pencil line on the upper wall to create a crisp upper edge for the paint band. -
Establish the color band:
Using your medium sash brush or a small roller, apply the dusty terracotta paint to the area between lines of tape. I find two thin coats always offer a richer finish than one thick coat. -
Remove tape:
Peel off the tape while the second coat is still slightly tacky to prevent the paint from bridging and pulling up chunks. Let this base area dry completely, preferably overnight, before moving to the detailed work.
Uneven Hand Painting?
Don’t panic if your lines wobble! This folk-art style thrives on imperfection. If a mistake is too big, simply paint over it with the terracotta color, wait to dry, and try again.
Step 2: Painting the Decorative Pattern
-
Choose your method:
You can either use a custom floral stencil that features this specific scalloped connection, or sketch the design freehand for an organic, folk-art feel like the image shows. -
Mark the spacing:
If drawing freehand, use a measuring tape to make small tick marks every 6-8 inches along the bottom edge of the terracotta band. These marks indicate where each flower stem will originate. -
Sketch the scallops:
Lightly sketch connecting swoops (scallops) between your stem points using white chalk. The lowest point of the swoop should almost touch the top of the white chair rail. -
Draw the stems:
Extend a vertical line upward from each connecting point. Make these lines slightly imperfect to mimic hand-drawn botanical illustrations. -
Add the blooms:
At the top of each stem, sketch a stylized flower head. The design shown uses a simple oval shape filled with smaller dots or fan-like petals. -
Paint the linework:
Dip a fine-line brush into your white or cream paint. Carefully trace over your chalk lines. Keep the paint fluid but not runny to maintain control. -
Detail the leaves:
Add symmetrical leaves branching off the stems. The style here is similar to block printing—outlined shapes with light hash marks inside for texture. -
Refine the flowers:
Fill in the flower heads with delicate stippling or small strokes. Vary the opacity slightly; lighter touches make the artwork feel more artisanal. -
Clean uph:
Once the white paint is fully dry, gently wipe away any remaining visible chalk guide lines with a slightly damp cloth.
Step 3: Installing the Trim
-
Paint the trim:
Pre-paint your decorative scalloped wooden trim in the same terracotta shade as the wall band. Doing this before installation saves you from tricky edging work later. -
Cut to length:
Measure your wall lengths and cut the wooden trim to fit. If you have corners, miter them at a 45-degree angle for a seamless professional look. -
Apply adhesive:
Run a bead of construction adhesive along the back of the trim pieces. -
Install the top border:
Press the trim firmly against the wall, aligning its bottom edge perfectly with the top edge of your terracotta paint band. This creates a architectural ‘cap’ to the design. -
Secure the trim:
For extra security, use a nail gun or finishing nails to tack the trim in place. If using nails, tap them just below the surface. -
Final touch-ups:
Fill any nail holes with wood filler, lightly sand once dry, and dab a tiny bit of the terracotta paint over the filler to hide it completely.
Pro Tip: Consistent Scallops
Make a simple cardboard template for the curve of the painted scallop. Trace this template repeatedly along the wall rather than freehanding to ensure your waves stay uniform.
Step back and admire how this layered combination of texture and pattern transforms a simple wall into a piece of art
Mini Mural Panel Above or Below
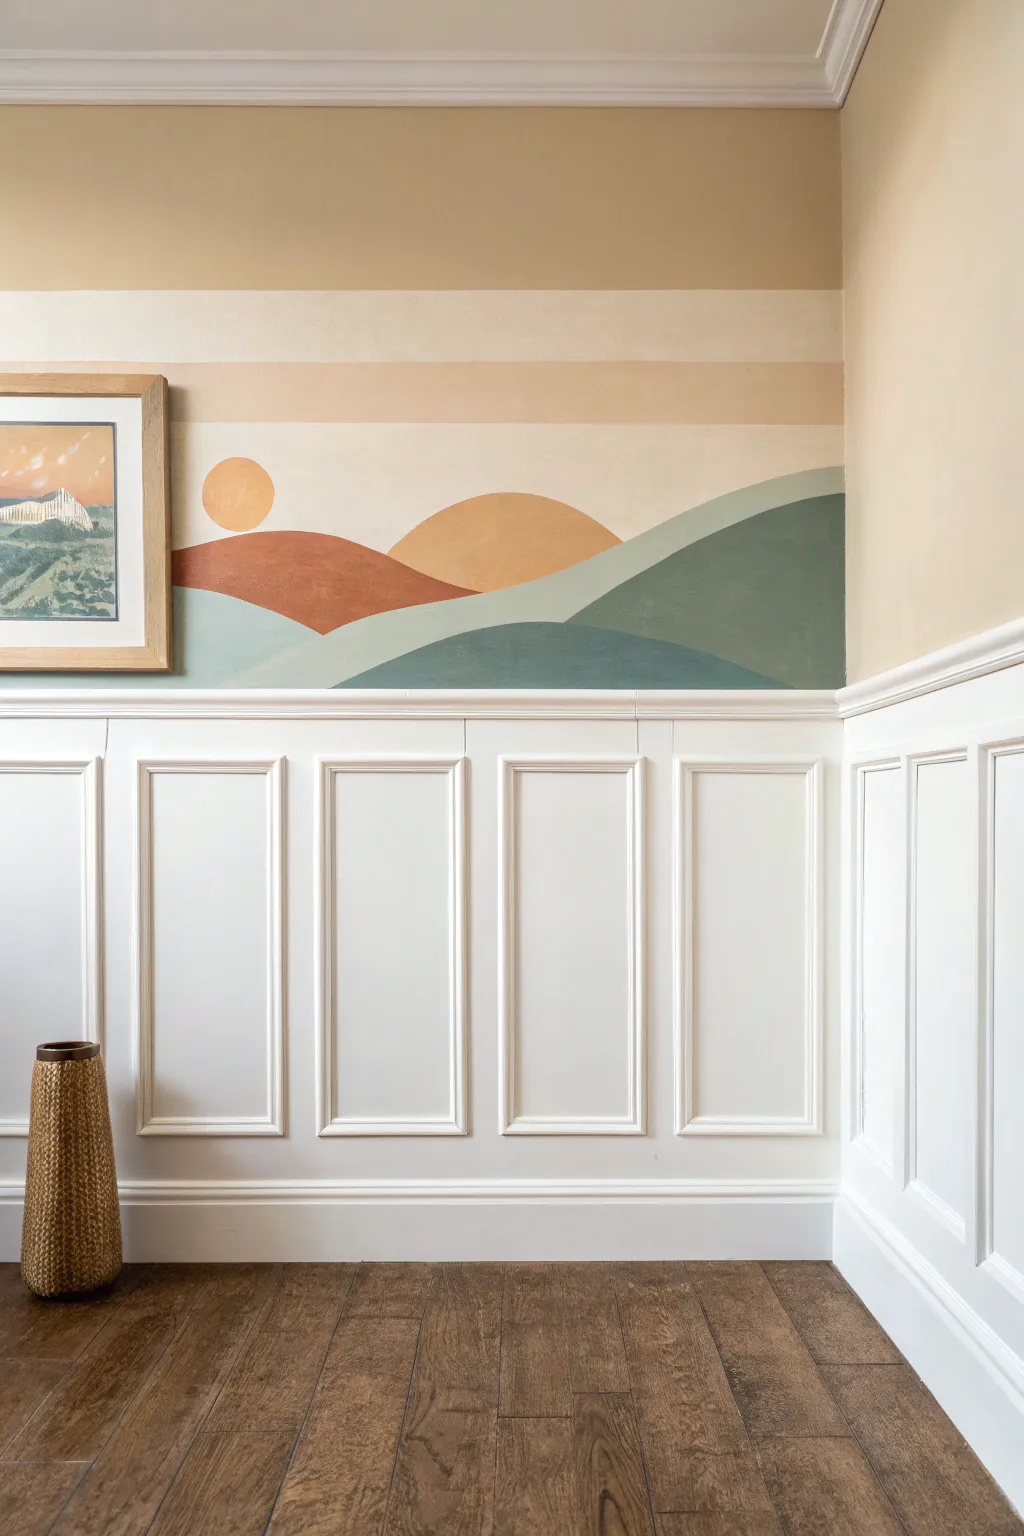
Bring the calming warmth of desert horizons into your home with this abstract landscape mural. Sitting perfectly above your chair rail, its soft curves and earthy palette create a serene focal point that mimics the golden hour.
Step-by-Step Guide
Materials
- Interior painter’s tape (high quality)
- Pencil and eraser
- 4-foot level or laser level
- Assorted flat artist brushes (1-inch and 2-inch)
- Small angled sash brush for cutting in
- Paint roller (small foam roller)
- Latex interior wall paint (White base)
- Sample pots in: Terra Cotta, Golden Ochre, Sage Green, Deep Teal, and Pale Peach
- Drop cloth
Step 1: Preparation & Sky Canvas
-
Prep the workspace:
Begin by clearing the wall area and laying down a drop cloth to protect your flooring. If you have existing wainscoting like the photo, apply painter’s tape along the top edge of the chair rail to ensure a crisp separation between the mural and the woodwork. -
Establish the background:
Roll a fresh coat of warm, creamy white or very pale beige over the entire wall section above the chair rail. This acts as your sky and ensures all subsequent colors pop correctly. Allow this base coat to dry completely, preferably overnight. -
Mark the horizon lines:
Using a level and a light pencil, draw three horizontal guidelines across the upper portion of the wall. These don’t need to be perfectly spaced—the variation adds interest—but they should represent the stratified layers of the sky. -
Tape the sky horizons:
Apply painter’s tape along your pencil lines. To get the clean stripes seen in the inspiration photo, tape *outside* the area you intend to paint for each specific stripe. Press the edges of the tape firmly to prevent bleeding. -
Paint the sky stripes:
Mix a very small amount of your pale peach paint with your white base to create a barely-there blush tone. Paint the horizontal stripes, alternating between the original wall color and this new subtle blush. Peel the tape while the paint is still slightly tacky for the sharpest lines.
Step 2: Drafting the Landscape
-
Sketch the rolling hills:
Once the sky stripes are fully dry, use a pencil to lightly sketch the outlines of your hills. Start with the foreground hills (the oversized teal shapes) which should overlap the background hills. Draw large, sweeping curves rather than jagged peaks. -
Draw the sun:
Use a round object, like a dessert plate or the lid of a paint can, to trace a perfect circle on the left side of the composition. Position it so it appears to be rising from behind the terra cotta hill. -
Refine the composition:
Step back and look at your pencil marks from across the room. I find this perspective shift usually reveals if a hill feels too steep or if the spacing is unbalanced. Erase and adjust until the flow feels natural.
Seal the Tape
Before painting the horizon stripes, paint a quick layer of the *base wall color* over the tape edge first. This seals the gap, ensuring perfectly crisp lines.
Step 3: Painting the Layers
-
Paint the sun:
Using a flat artist brush, carefully fill in the sun circle with the golden ochre paint. Work from the center outward to the edge to maintain a smooth curve without shaky lines. -
Start with the furthest hills:
Identify the hills that appear ‘furthest back’—in this design, it is the terra cotta hill on the left and the golden ochre hill in the center. Carefully cut in the curved edges with an angled artist brush, then fill the centers. -
Layer the lighter green:
Moving forward in the landscape, paint the swooping hill that cuts across the middle using the sage green. This shape connects the left and right sides, so ensure your brushstrokes are long and confident to minimize visible stop-start marks. -
Add the foreground:
Paint the large, dominant hills at the bottom right using the deep teal color. Since this is the darkest color, it anchors the mural. You may need two coats here to ensure full opacity over the lighter wall color. -
Fill the bottom gap:
Ensure the paint extends all the way down to the tape line on your chair rail. Use your small sash brush to push paint right into that corner for a gap-free finish. -
Touch up edges:
Once the layout is blocked in, inspect the boundaries where colors meet. If you have shaky lines, use a small detail brush to clean up the curves. A steady hand and a tiny amount of paint work best here. -
Final reveal:
Slowly peel away the painter’s tape along the wainscoting at a 45-degree angle. If any paint bridged the tape, lightly score the edge with a utility knife before pulling to prevent lifting the mural paint.
Add Texture
For a plaster-like effect, mix a small amount of baking soda or texture additive into your terra cotta and ochre paints to give the hills a tactile, earthy finish.
Step back and admire how a few simple curves have transformed your wall into a permanent sunset view


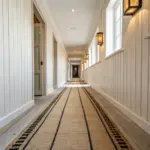

Have a question or want to share your own experience? I'd love to hear from you in the comments below!