
If you love that soft, velvety chalk paint finish, you’re in the right headspace—this medium is basically made for dramatic makeovers without the drama. Here are my favorite chalk paint ideas that start with classic furniture transformations and slowly wander into the extra-fun, creative corners of the studio.
Classic Dresser Makeover With a Matte Chalk Paint Finish
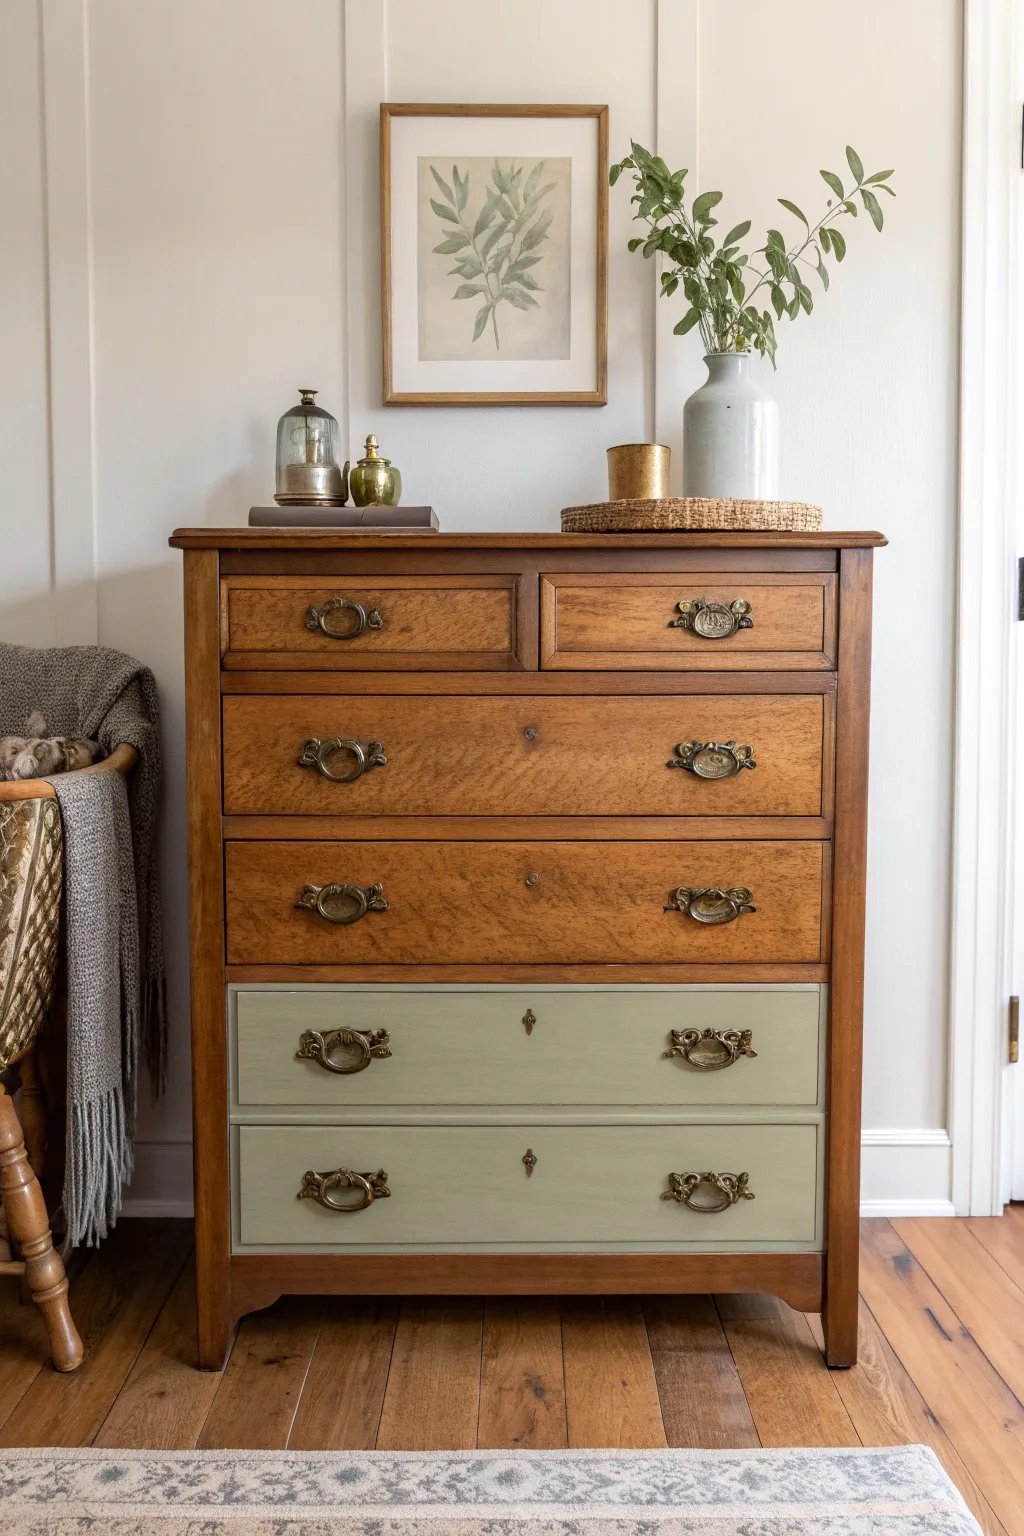
This DIY project breathes new life into a classic wooden dresser by combining the warmth of original wood grain with a soft, modern touch of color. Using a matte sage green chalk paint on just the bottom drawers creates a grounded, two-tone aesthetic that is both trendy and timeless.
Detailed Instructions
Materials
- Wooden dresser (preferably with good structure)
- Sage green chalk paint (e.g., Annie Sloan ‘Chateau Grey’ or similar)
- Clear furniture wax
- Medium-grit sandpaper (120-150 grit)
- Fine-grit sandpaper (220 grit)
- Painter’s tape
- High-quality synthetic bristle brush
- Wax brush or lint-free cotton cloth
- Screwdriver
- Mild degreaser or TSP substitute
- Tack cloth
- Wood polish or oil (for the unpainted sections)
Step 1: Preparation & Cleaning
-
Remove hardware:
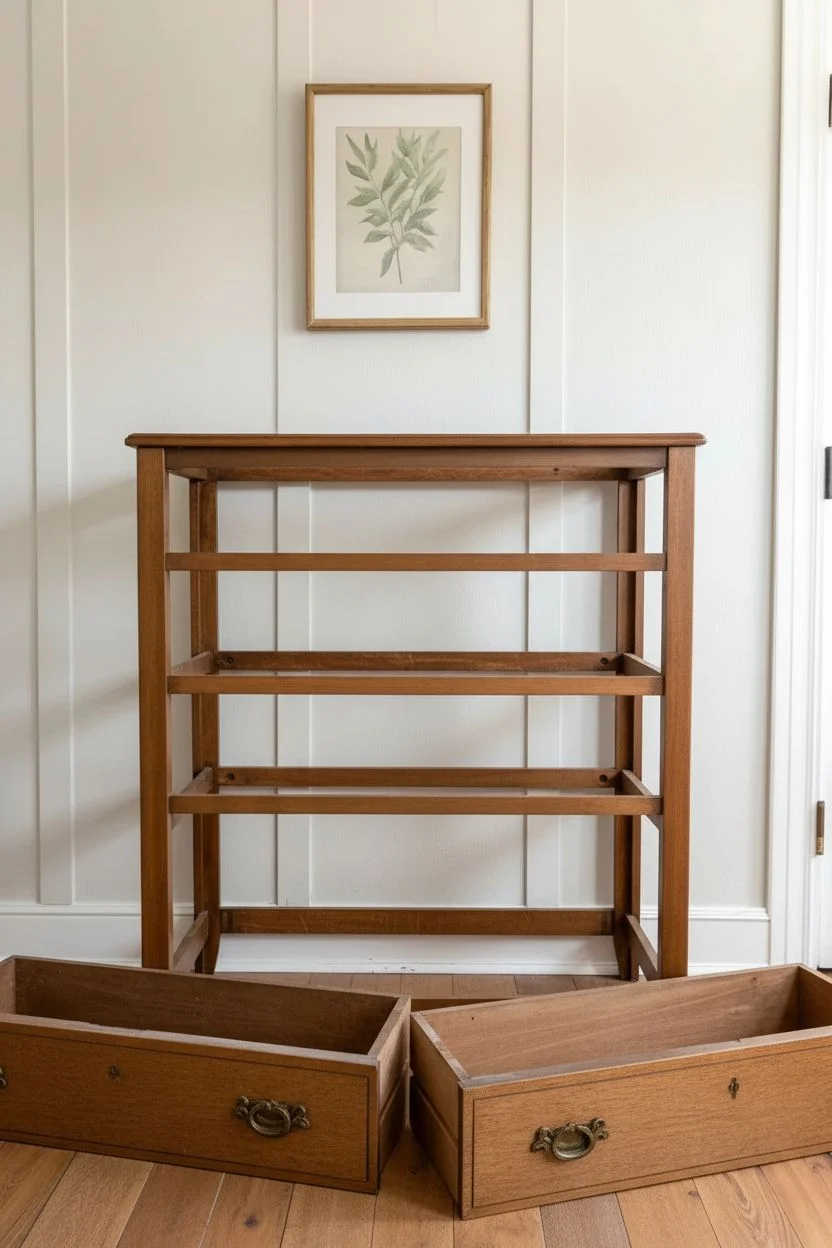
Begin by removing all drawers from the dresser shell. Use a screwdriver to carefully take off all pulls, handles, and knobs. Keep these safe in a labeled baggie so you don’t lose any screws -
Deep clean:
Since vintage furniture often accumulates years of oil and grime, wipe down the entire piece—especially the drawers you intend to paint—with a mild degreaser or TSP substitute. Let it dry completely. -
Scuff sand the paint zones:
Take your medium-grit sandpaper and lightly scuff the surfaces of the bottom two drawers. You aren’t trying to strip the finish entirely, just creating ‘tooth’ for the chalk paint to adhere to. -
Clean unpainted areas:
For the top drawers and the main frame that will remain wood, gently clean them. If the original finish is rough, you might do a very light sanding with fine-grit paper to smooth it out without removing the stain. -
Remove dust:
Wipe away all sanding residue using a tack cloth. Any leftover dust will create a gritty texture in your final finish, so be thorough here.
Step 2: Painting the Bottom Drawers
-
Tape edges:
If your drawers have sides that shouldn’t be painted, apply painter’s tape along the edges to keep your lines crisp. This isn’t always necessary if you have a steady hand, but it helps ensure a clean look. -
First coat application:
Stir your sage green chalk paint well. Using a synthetic bristle brush, apply the first coat to the bottom two drawers. Brush in the direction of the wood grain for the smoothest finish. -
Let it dry:
Allow this first coat to dry fully. Chalk paint dries quickly, usually within 30 to 60 minutes, but I prefer to give it a full hour to be safe. -
Smooth imperfections:
Once dry, run your hand over the surface. If you feel any bumps or brush strokes, very lightly sand with fine 220-grit paper and wipe away the dust. -
Second coat application:
Apply a second coat of paint to ensure full, opaque coverage. Chalk paint is thick, so two coats are usually sufficient to hide the original wood tone completely.
Bleed-Through Blues?
If stains seep through your wet chalk paint, stop immediately. Apply a coat of clear shellac or stain-blocking primer over the affected area, let it dry, and then resume painting.
Step 3: Finishing & Reassembly
-
Wax the painted drawers:
To seal the matte paint and protect it from scratches, use a wax brush or lint-free cloth to massage a layer of clear furniture wax into the painted surface. Work in small sections. -
Buff the wax:
Let the wax cure for about 15 minutes, then buff it briskly with a clean cloth. This hardens the finish and gives it a subtle, beautiful sheen. -
Revive the wood:
For the unpainted top drawers and the dresser frame, apply a wood polish or restoring oil. This will moisturize the old wood and make the grain pop, creating a nice contrast with the new paint. -
Clean hardware:
While the dresser dries, give your original hardware a quick clean. If the brass is very tarnished, a mixture of lemon juice and baking soda can brighten it up without making it look too new. -
Reattach hardware:
Screw the pulls and handles back onto all the drawers. -
Final assembly:
Slide the drawers back into their respective slots—painted ones on the bottom, wood ones on top—to complete the two-tone transformation.
Level Up: Drawer Liners
Add a hidden pop of joy by lining the inside of the painted drawers with a vintage floral wallpaper or patterned contact paper that complements the sage green exterior.
Step back and admire how this simple partial-paint technique completely refreshes the piece while honoring its original character


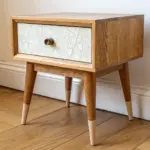
Chalk Painted Nightstand With Light Distressed Edges
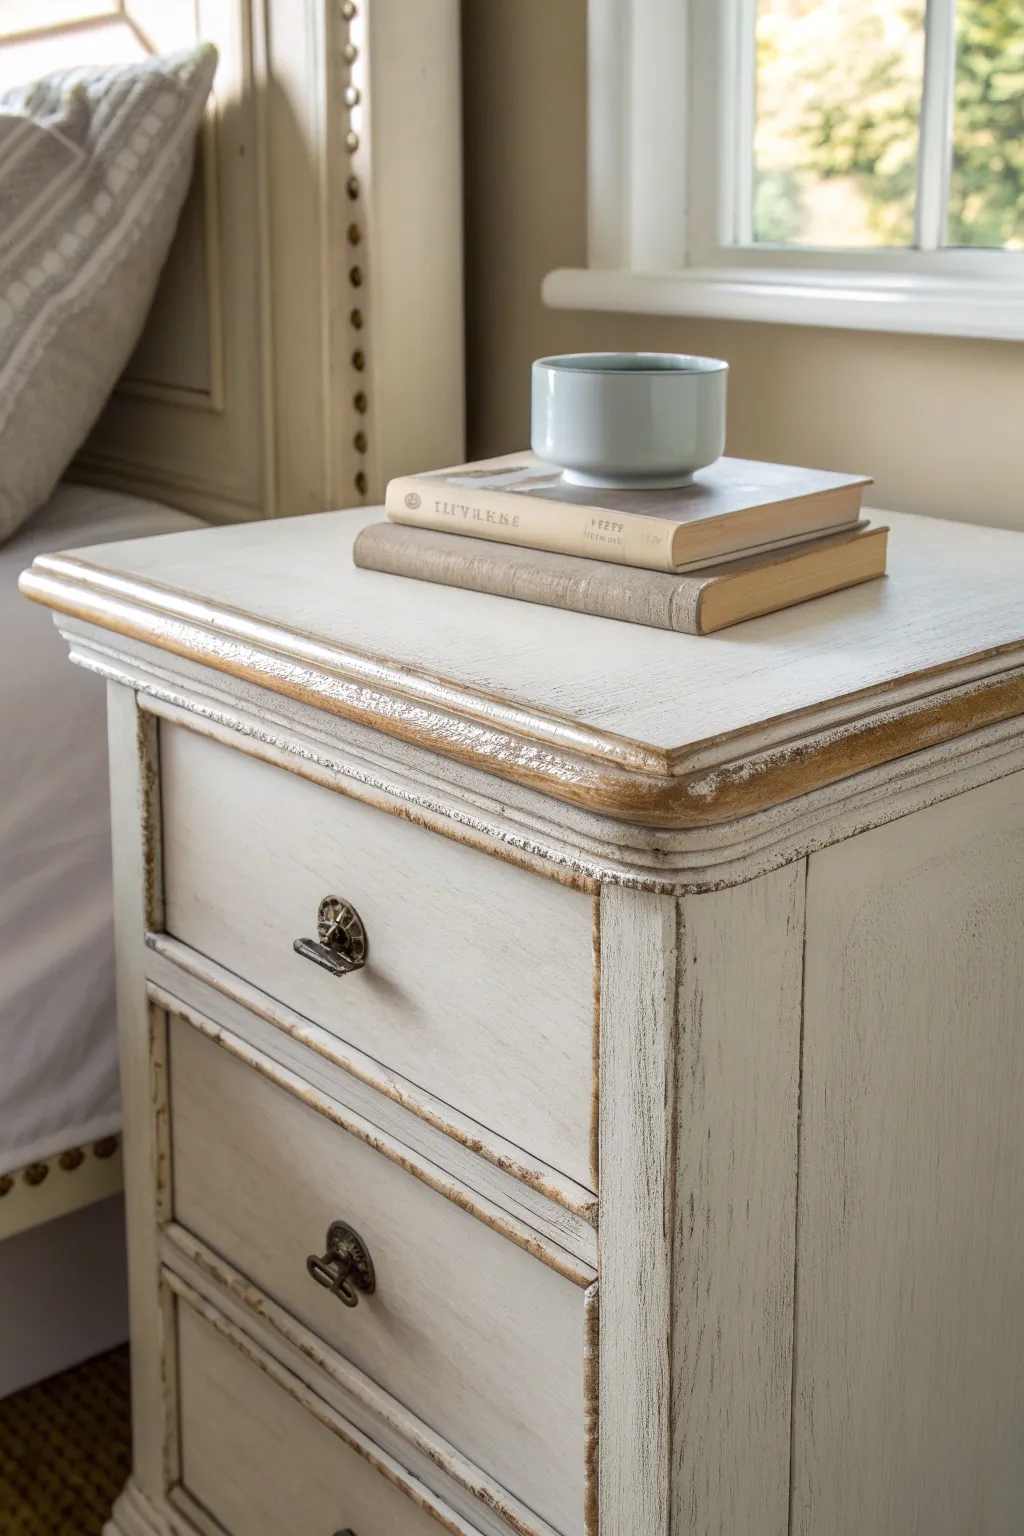

This project transforms a plain wooden nightstand into a character-rich piece using creamy chalk paint and intentional distressing. The soft white finish contrasts beautifully with the exposed warm wood edges, creating that coveted farmhouse chic aesthetic.
Step-by-Step
Materials
- Wooden nightstand (vintage or reproduction)
- Medium-grit sandpaper (120-150 grit)
- Fine-grit sandpaper (220 grit)
- Creamy white chalk paint (e.g., Old White or Cream)
- Dark or clear furniture wax
- Synthetic oval paint brush
- Wax brush or lint-free cotton rags
- Screwdriver
- Mild cleaner and cloth
- Drop cloth
Step 1: Preparation
-
Remove Hardware:
Begin by removing all drawers from the nightstand. Locate the screws holding the handles or knobs in place on the drawer fronts and unscrew them completely. Place all hardware and screws in a labeled bag so nothing gets lost. -
Clean Thoroughly:
Wipe down the entire piece with a mild cleaner or a water-vinegar mixture to remove oils, dust, and old furniture polish. Chalk paint adheres well, but a clean surface ensures the best bond. -
Light Scuffing:
While primer isn’t strictly necessary with chalk paint, I like to give glossy surfaces a quick scuff with medium-grit sandpaper to give the paint something extra to grab onto. Wipe away the sanding dust with a damp cloth.
Step 2: Painting
-
First Coat Application:
Dip your oval brush into the creamy white chalk paint. Apply a thin, even coat over the entire nightstand body and drawer fronts. Brush in the direction of the wood grain for a natural look. -
Drying Time:
Let this first coat dry completely, usually about 30 to 60 minutes depending on humidity. Don’t worry if the wood shows through slightly; coverage builds with the next layer. -
Second Coat Application:
Apply a second coat of paint. This layer provides full opacity and that rich, chalky texture. Pay attention to corners and recessed areas on the drawer fronts. -
Smooth the Finish:
Once the second coat is fully dry, take a fine-grit sandpaper (220 grit) and very lightly sand the flat surfaces. This knocks down brush strokes and makes the paint feel velvety smooth to the touch.
Uneven Distressing?
If you sanded off too much paint, simply dry-brush a tiny amount of paint back over the spot, let it dry, and try sanding again more gently.
Step 3: Distressing
-
Identify Distressing Zones:
Look at the nightstand and identify areas that would naturally wear over time—corners, raised edges, molding details, and the lip of the top surface. -
Sanding the Edges:
Using your medium-grit sandpaper, apply firm pressure to sand along the edges of the top surface. Sand until the raw wood underneath is clearly visible, creating a worn halo effect. -
Detailing the Drawers:
Move to the drawer fronts. Run your sandpaper along the perimeter of the drawer faces and any raised trim. Vary your pressure to create an organic, non-uniform look. -
Vertical Edges:
Don’t forget the vertical corners of the nightstand legs and body. A few strategic swipes of sandpaper here tie the whole look together. -
Clean Up Dust:
Distressing creates a lot of fine powder. Use a vacuum with a brush attachment or a tack cloth to remove every speck of dust before sealing.
Wet Distressing Alternative
For a smoother finish without dust, use a damp kitchen sponge instead of sandpaper to wipe away paint on the edges before it fully cures.
Step 4: Sealing and Assembly
-
Apply Wax:
Load a wax brush or lint-free rag with clear furniture wax. Massage it into the paint in small sections, working it into the pores of the paint and the exposed wood areas. -
Buffing:
Let the wax sit for about 10-15 minutes, then buff it vigorously with a clean cotton cloth. This hardens the finish and creates a subtle, beautiful sheen. -
Reinstall Hardware:
Retrieve your hardware. If desired, you can clean the metal pieces or rub a little dark wax on them to enhance their age before screwing them back onto the drawers. -
Final Polish:
Give the top surface one last buffing to ensure it’s durable enough for books and lamps, and slide the drawers back into place.
Now step back and enjoy the timeless, weathered character you’ve just added to your bedroom


Two-Tone Chalk Paint Cabinet for Instant Farmhouse Charm

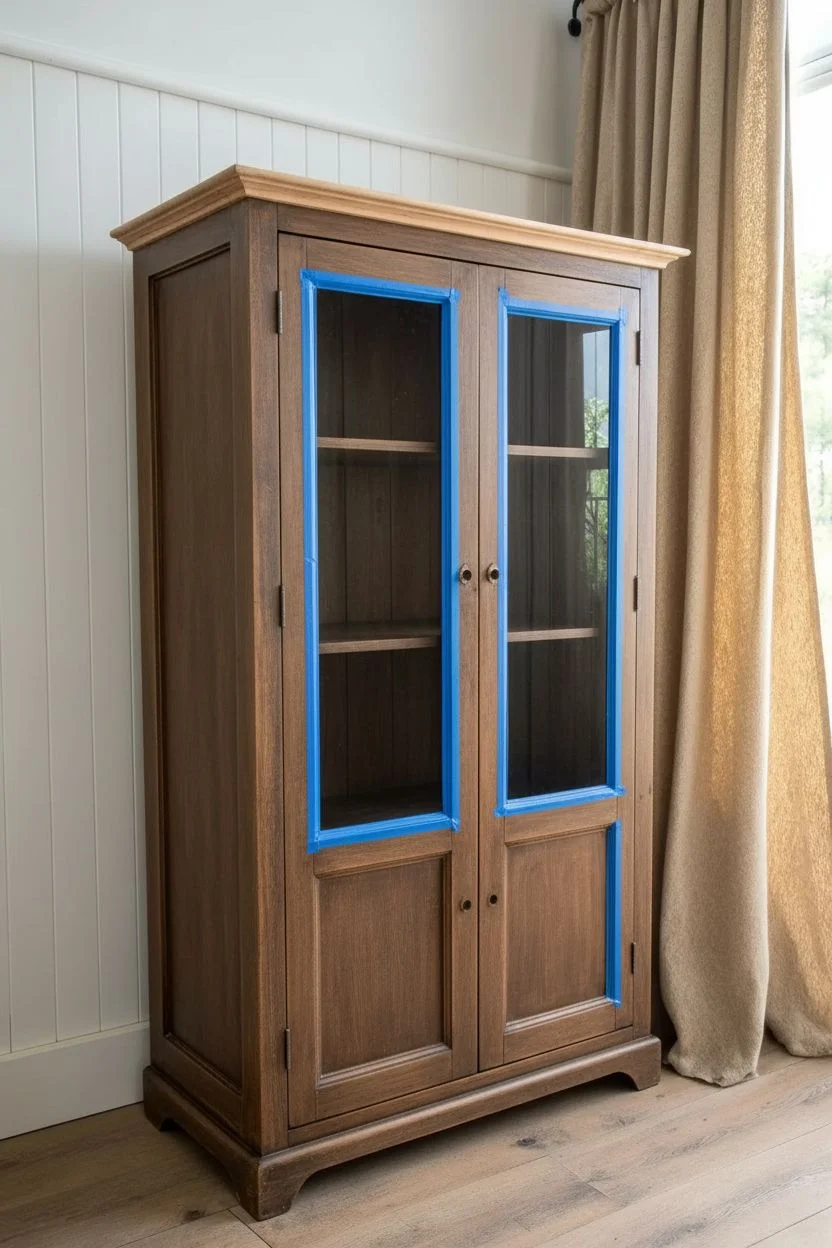
Transform a dated or plain wooden cabinet into a stunning farmhouse statement piece using the magic of chalk paint. This project balances a soft, creamy body with a restored natural wood top for that classic country-chic aesthetic.
How-To Guide
Materials
- Wooden display cabinet or hutch
- Cream or off-white chalk-style paint (e.g., Annie Sloan Old White)
- Clear furniture wax
- Dark furniture wax (optional for aging)
- Medium and fine grit sandpaper (120 and 220 grit)
- Orbital sander (optional but recommended)
- Wood stain (e.g., Antique Walnut or Early American)
- Lint-free rags
- Painter’s tape
- Round chalk paint brush
- Wax brush
- Screwdriver (for hardware removal)
- TSP or degreasing cleaner
Step 1: Preparation & Sanding
-
Remove hardware:
Begin by taking off all knobs, handles, and hinges using your screwdriver. Place them in a labeled bag so nothing gets lost during the renovation process. -
Clean surface:
Wipe down the entire cabinet with a TSP solution or a strong degreaser to remove years of dust, oils, and furniture polish that could prevent paint adhesion. -
Strip top:
Since we want a two-tone look, use an orbital sander with 120-grit paper to sand the top cornices or flat top surface down to bare wood. Be thorough here to remove the old finish completely. -
Scuff sand body:
For the body of the cabinet, you don’t need to strip it bare. Simply hand-sand with 120-grit paper to scuff the existing finish, creating a ‘tooth’ for the chalk paint to grab onto. -
Tape glass:
Carefully apply painter’s tape to the glass panes on the inside and outside edges. It takes time, but I find it’s much faster than scraping dried paint off glass later.
Bleed-Through Blues?
If pink or yellow stains appear through your cream paint, the wood has tannins. Stop painting and apply a coat of shellac-based primer to seal them in.
Step 2: Staining the Top
-
Apply stain:
Using a lint-free rag, wipe your chosen wood stain onto the raw wood top you sanded earlier. Work with the grain, ensuring even coverage. -
Wipe excess:
After letting the stain sit for about 5-10 minutes (check your can’s instructions), wipe away any excess liquid with a clean cloth to prevent tackiness. -
Seal top:
Once the stain is fully dry, apply a thin coat of clear wax or a matte polycrylic sealer to protect the natural wood finish.
Step 3: Painting the Body
-
First coat:
Dip your round chalk paint brush into the cream paint. Apply a thin, even coat over the entire body of the cabinet, working quickly to avoid drag marks. -
Paint interior (optional):
If you want the interior to match, paint the back panel and shelves now. Leaving the interior natural wood can add depth, but painting it cream brightens the display. -
Dry time:
Allow the first coat to dry completely, which usually takes about 1-2 hours depending on humidity. -
Second coat:
Apply a second coat of cream paint. This should provide solid, opaque coverage. Watch for drips in corners or near the molding details. -
Distress edges:
Once dry, take 220-grit sandpaper and gently rub the edges, corners, and raised details. This reveals the wood underneath for that signature farmhouse wear.
Pro Tip: Wax On
Always pour a small amount of wax onto a paper plate rather than dipping your brush into the tin. This keeps your main supply clean from paint dust.
Step 4: Finishing Touches
-
Apply clear wax:
Work a layer of clear wax into the painted areas using a wax brush. Use circular motions to massage it into the paint’s pores. -
Wipe excess wax:
Immediately wipe off excess wax with a clean lint-free rag. The surface should feel smooth, not sticky. -
Buff to sheen:
Wait 24 hours for the wax to harden slightly, then buff vigorous with a soft cloth to achieve a subtle, satin sheen. -
Reattach hardware:
Screw the hinges and knobs back into place. If the old hardware looks too shiny, consider spray painting them oil-rubbed bronze before reinstalling. -
Remove tape:
Peel off the painter’s tape from the glass. If any paint bled through, scrape it gently with a razor blade.
Now you have a beautifully refreshed cabinet ready to showcase your favorite dinnerware or collectibles


Chalk Painted Kitchen Cabinets for a Budget-Friendly Refresh
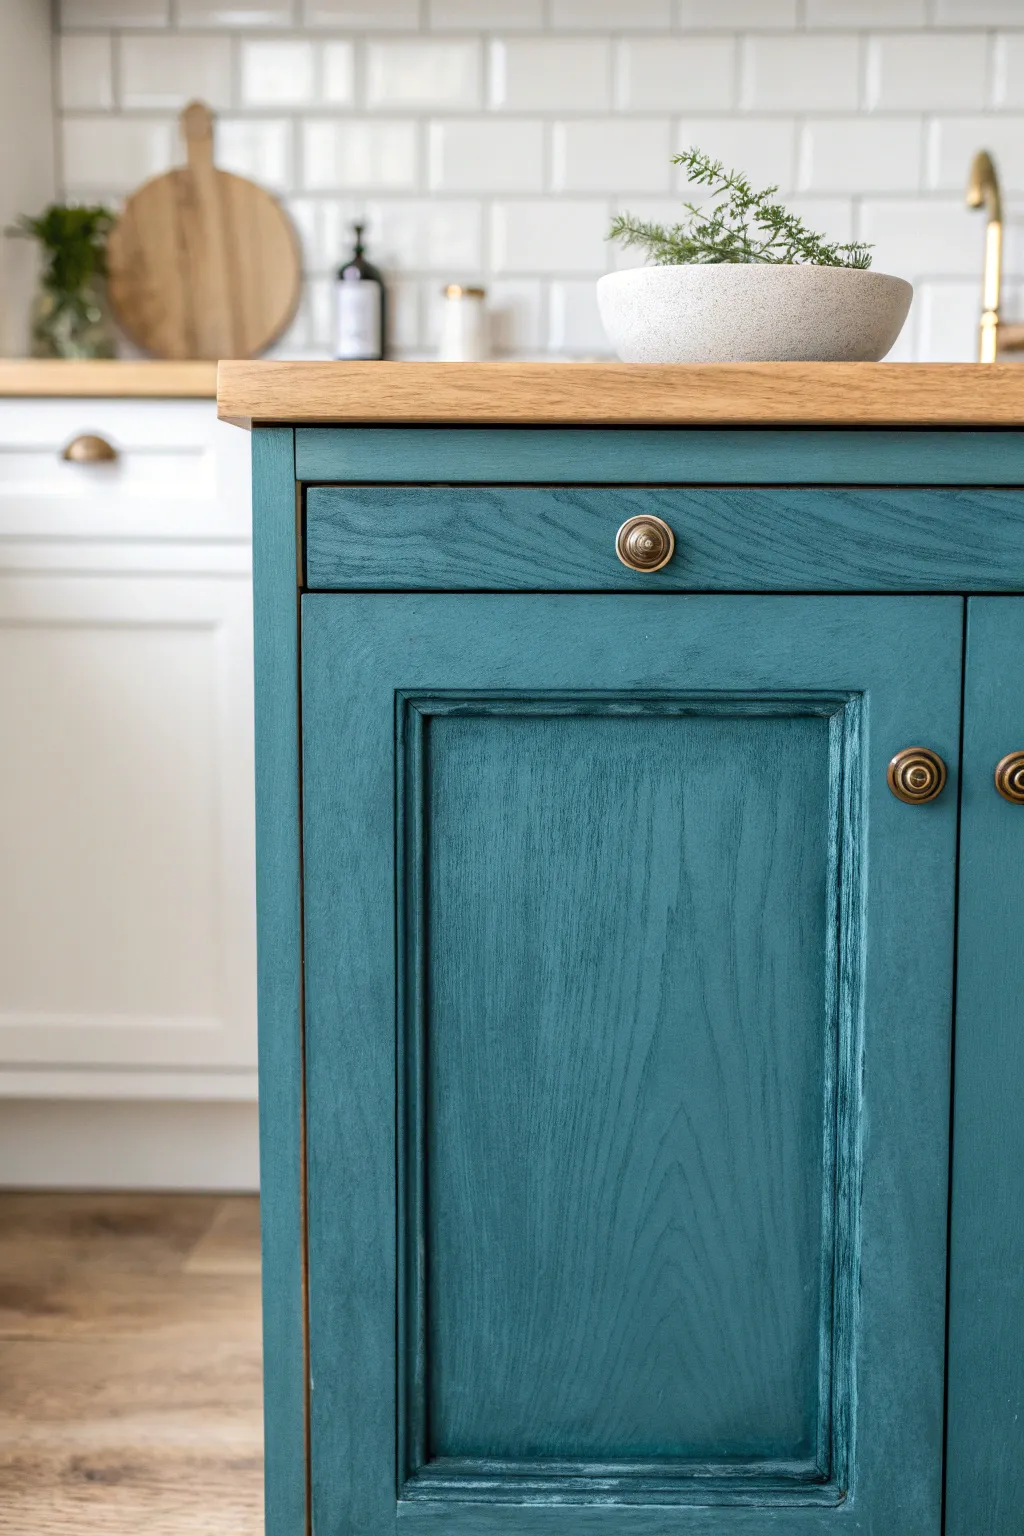
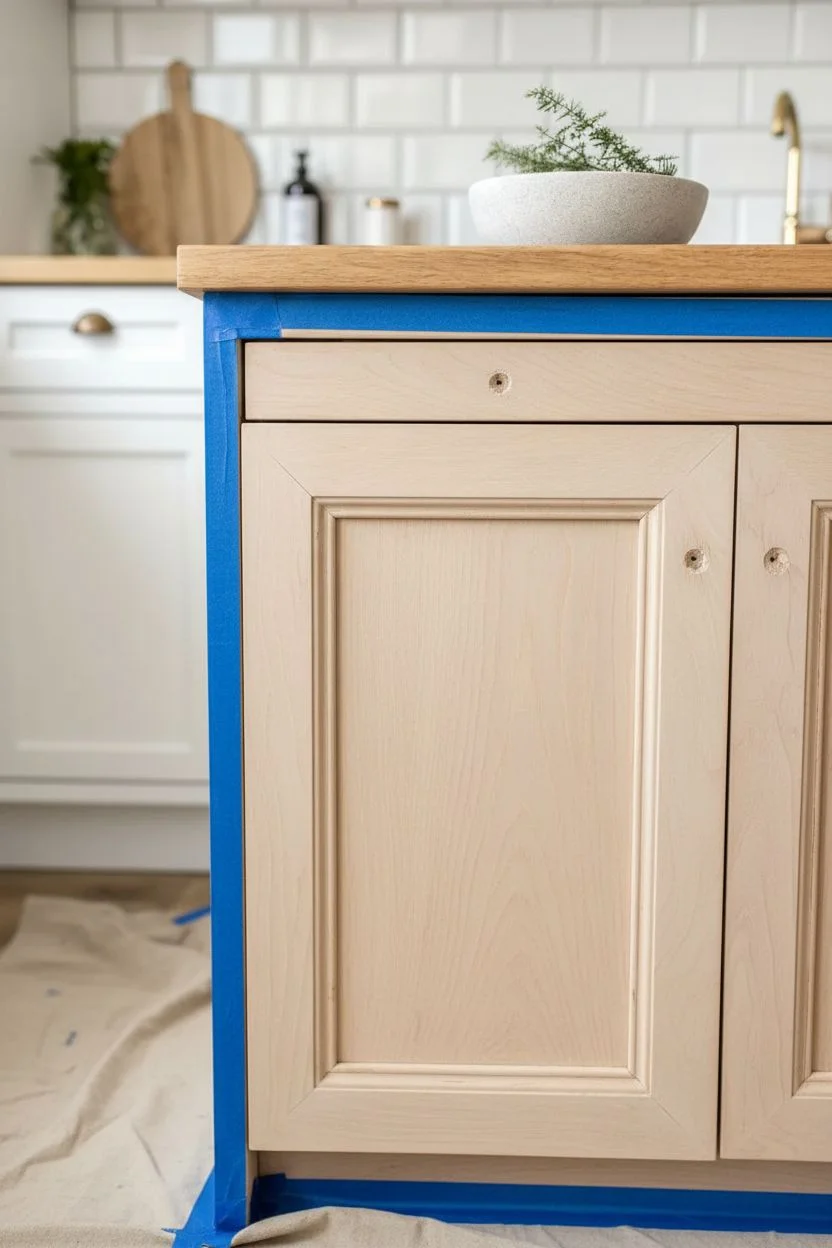
Give your kitchen island a stunning makeover with this rich, jewel-toned chalk paint finish that allows the natural wood grain to shine through. This project perfectly balances modern color with rustic texture, creating a custom look without the high-end price tag.
Step-by-Step
Materials
- Teal or emerald green chalk paint
- Clear furniture wax
- Dark antiquing wax
- High-quality oval chalk paint brush
- Wax brush or lint-free cotton cloth
- Mild degreaser (like TSP substitute)
- Sanding block (medium and fine grit)
- Painter’s tape
- Drop cloth
- Screwdriver (for hardware removal)
- Antique brass knobs (optional replacement)
Step 1: Preparation
-
Remove Hardware:
Start by unscrewing all knobs and pulls from the drawers and doors. Keep these screws in a small bag so they don’t get lost, even if you plan on swapping the hardware later. -
Clean Surfaces:
Thoroughly wipe down the wood with a mild degreaser or TSP substitute. Kitchen cabinets often have invisible layers of cooking grease that will prevent paint from adhering properly. -
Light Scuffing:
Once the wood is dry, give the entire surface a light sanding with a medium-grit block. You don’t need to strip the old finish, just roughen it up slightly to give the chalk paint something to grip. -
Wipe Clean:
Remove all sanding dust with a damp cloth or tack cloth. A dust-free surface is crucial for a smooth final finish. -
Tape Edges:
Apply painter’s tape along the floor, walls, or the underside of the countertop to protect areas you don’t want painted.
Step 2: Painting
-
First Coat Application:
Dip your oval brush into the teal chalk paint. Apply a thin, even coat, painting in the direction of the wood grain. Don’t worry if it looks streaky at this stage; chalk paint covers well but often needs two rounds. -
Work in Sections:
Paint the recessed panel first, then move to the frame, and finally the drawer front. This helps manage wet edges and prevents lap marks. -
Dry Time:
Allow the first coat to dry completely. This usually takes about 1-2 hours depending on humidity, but check your specific paint’s instructions. -
Second Coat Application:
Apply a second coat to ensure full, opaque coverage. This deeper layer brings out the richness of the teal color. -
Smooth Sanding:
After the second coat is fully dry, very lightly run a fine-grit sanding block over the flat surfaces. This knocks down any brush strokes and creates that buttery-smooth professional feel.
Wet Brush Tip
Keep a misting bottle of water handy. If the chalk paint drags or feels too thick, a light spritz on your brush helps it glide smoothly over large surfaces.
Step 3: Finishing Touches
-
Clear Wax Base:
Using a wax brush or clean cloth, massage a layer of clear furniture wax into the paint. This seals the chalk finish and provides a workable base for the dark wax. -
Apply Dark Wax:
To get the dimension seen in the photo, lightly apply dark antiquing wax, focusing on the crevices, corners, and wood grain indentations. I find less is more here—you can always add, but it is hard to remove. -
Buff and Blend:
Before the dark wax dries, use a clean cloth to wipe away excess from the raised surfaces. This leaves the darkness in the grooves and texture, highlighting the wood grain effect. -
Final Buffing:
Let the wax cure for a few hours or overnight, then buff the entire piece vigorously with a soft cloth to create a soft, satin sheen. -
Reinstall Hardware:
Reattach your knobs or pulls. In the inspiration image, antique brass hardware complements the teal beautifully.
Level Up: Hardware Contrast
Swap standard silver knobs for brushed gold or antique brass. The warm metallic tones pop against the cool teal for an instantly high-end designer look.
Step back and admire how a simple coat of paint has completely revitalized your kitchen space
BRUSH GUIDE
The Right Brush for Every Stroke
From clean lines to bold texture — master brush choice, stroke control, and essential techniques.
Explore the Full Guide
Dining Chair Set Updated With Smooth Chalk Paint Coats
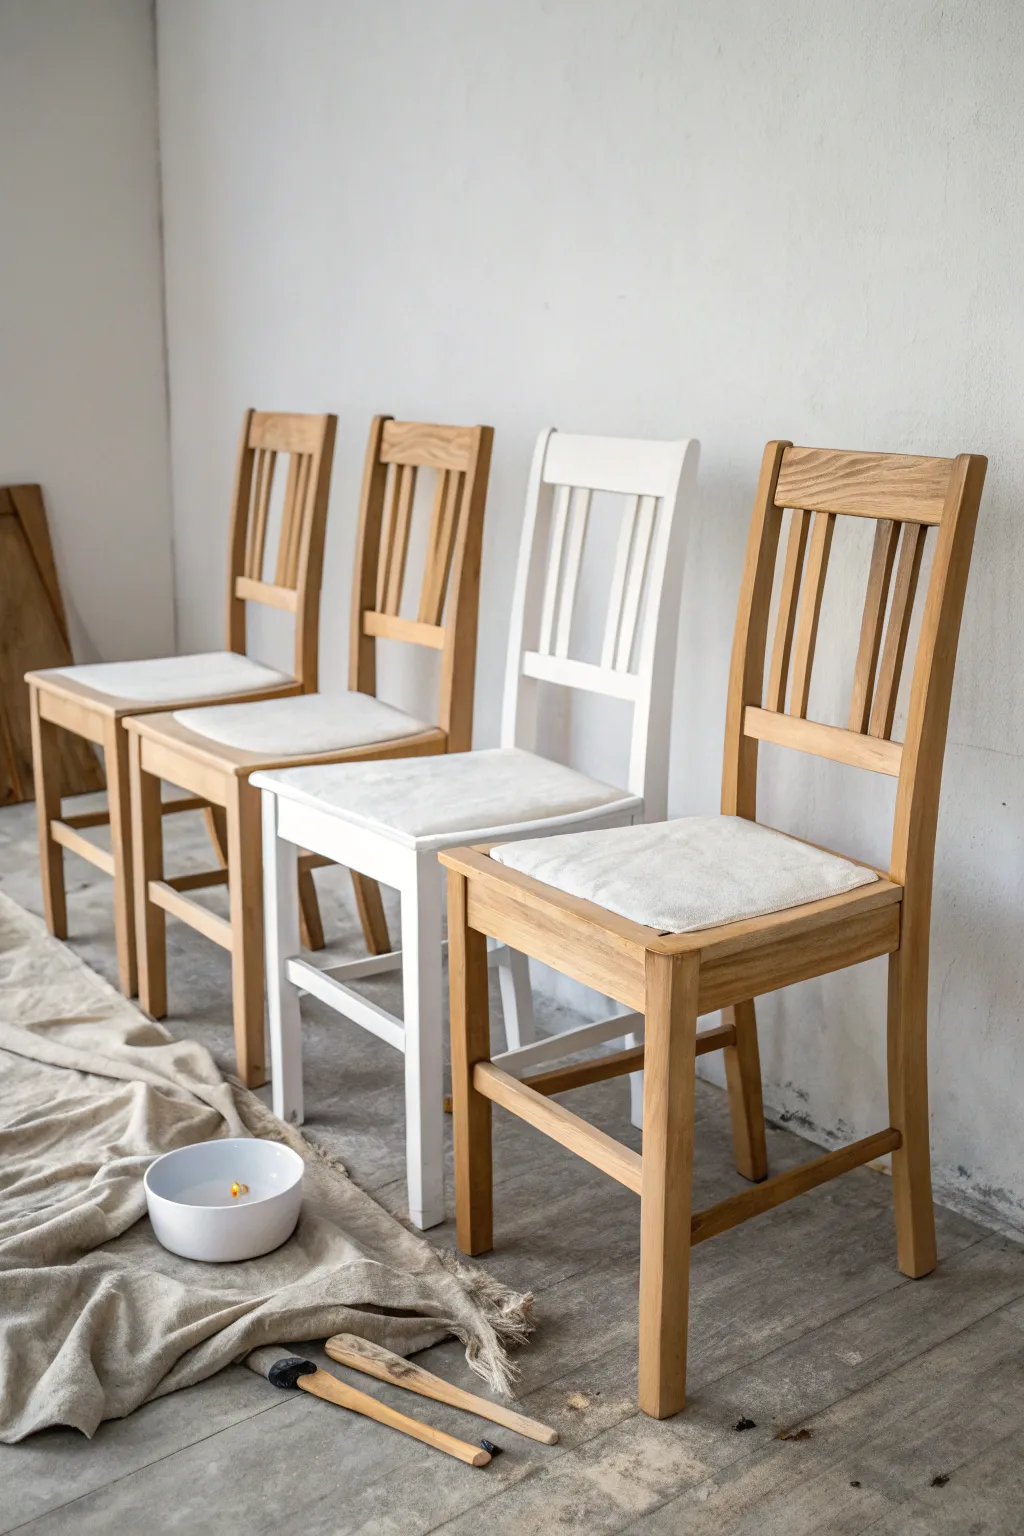
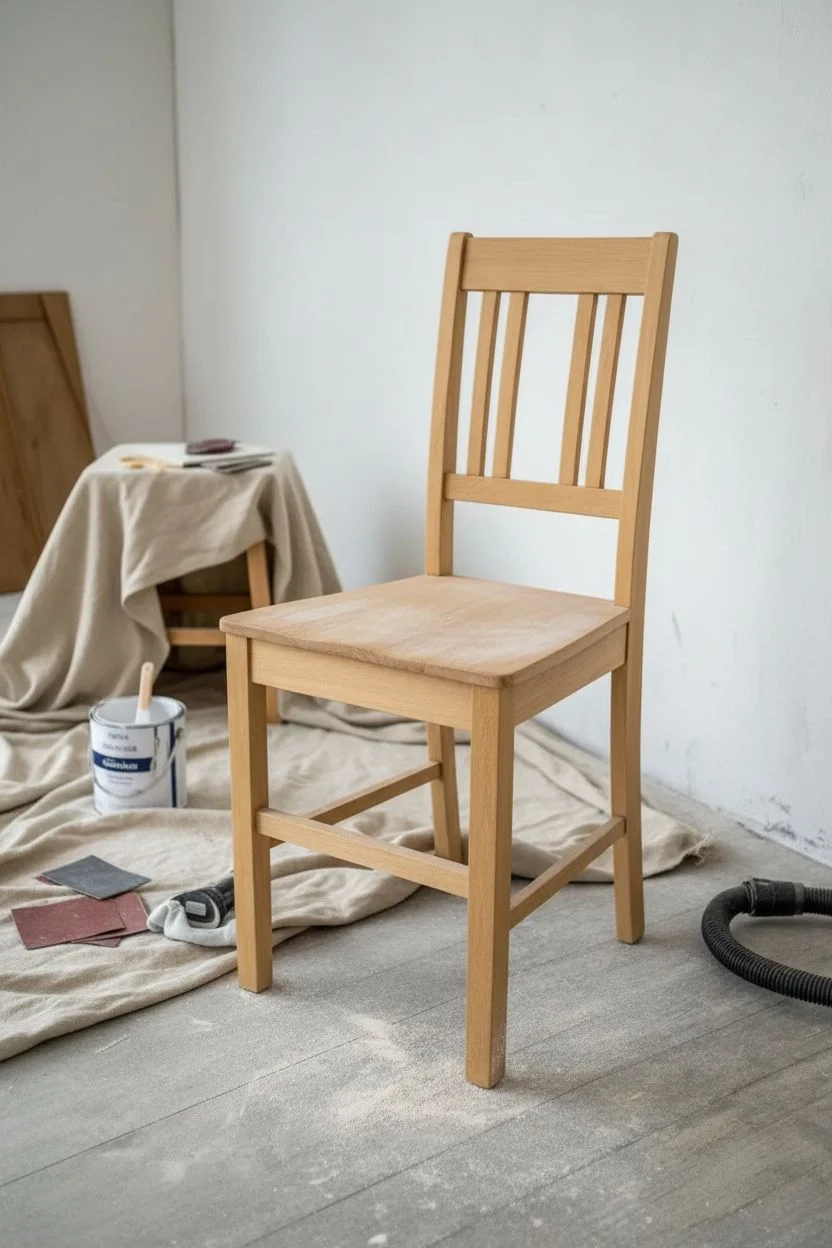
Transform a tired wooden chair into a stunning accent piece with the soft, matte finish characteristic of chalk paint. This project demonstrates how a single white chair can brighten a dining set while retaining the charm of the original wood grain underneath.
How-To Guide
Materials
- Wooden dining chair
- White chalk paint (e.g., Old White or Pure White)
- Clear furniture wax
- Medium-grit sandpaper (120-150 grit)
- Fine-grit sandpaper (220 grit)
- Oval chalk paint brush (medium size)
- Clean lint-free cloths
- Mild degreasing cleaner (e.g., dish soap and water)
- Drop cloth or masking paper
- Stirring stick
Step 1: Preparation
-
Create a workspace:
Lay down your drop cloth in a well-ventilated area to catch any drips or dust. Set your chair in the center, ensuring you have enough room to move around all sides comfortably. -
Clean the surface:
Thoroughly wipe down the entire chair with a mild degreaser or soapy water. Old chairs often have built-up oils from hands or furniture polish that can repel paint, so scrubbing is key here. -
Remove residue:
Wipe the chair again with a cloth dampened only with clean water to remove any soapy residue, then let the wood dry completely before moving on. -
Light sanding:
Although chalk paint adheres well, I find a quick scuff sand with medium-grit sandpaper helps ensure the best durability. Focus on breaking the seal of any old shiny varnish. -
Dust off:
Vacuum the chair or use a tack cloth to remove every speck of sanding dust. Any leftover dust will create a gritty texture in your final finish.
Bleed-through Blues?
If you see pink or yellow stains seeping through the white paint, stop. Apply a coat of clear shellac or stain-blocking primer over the affected area, let dry, and then repaint.
Step 2: Painting
-
Stir the paint:
Open your can of white chalk paint and stir it thoroughly. The minerals in chalk paint can settle at the bottom, so mix until the consistency is creamy and uniform. -
Flip the chair:
Turn the chair upside down and place it on the seat or table. Painting the legs and undersides first ensures you don’t miss any obscure spots. -
First coat application:
Apply the first coat of paint using your oval brush. Paint with the grain of the wood, using long, smooth strokes. Don’t worry if coverage looks patchy or streaky; the first coat is just a base. -
Flip and finish first coat:
Turn the chair right-side up and paint the seat, backrest, and spindles. Watch for potential drips around the vertical slats and brush them out immediately. -
Dry time:
Allow the first coat to dry for at least one hour, or until it is dry to the touch. Chalk paint dries quickly, but humidity can affect the timing. -
Second coat:
Apply a second coat of paint. This layer will provide the solid, opaque white coverage seen in the photo. Work methodically from top to bottom. -
Smooth the finish:
Once the second coat is fully dry, take a piece of fine-grit sandpaper (220 grit) and very lightly sand the painted surfaces. This knocks down brush strokes and makes the paint feel velvety smooth.
Step 3: Sealing and Protection
-
Prepare the wax:
Scoop a small amount of clear wax onto a lint-free cloth or a dedicated wax brush. -
Apply wax:
Massage the wax into the paint using circular motions, working in small sections at a time. The wax penetrates the porous chalk paint to harden and protect it. -
Wipe away excess:
Immediately after applying the wax to a section, wipe off any excess with a clean, dry cloth. You want the surface to feel smooth, not tacky. -
Buffing:
Let the wax cure for a few hours or overnight. Then, use a clean cloth to vigorously buff the chair. This creates a subtle sheen and hardens the finish for daily use.
Distress for Character
Before waxing, use sandpaper to gently rub away paint on edges and corners where wear would naturally occur. This reveals the wood underneath for a rustic farmhouse look.
Enjoy the fresh, clean look your newly painted chair brings to the table
Chalk Painted Table Base With a Natural Wood Top Contrast
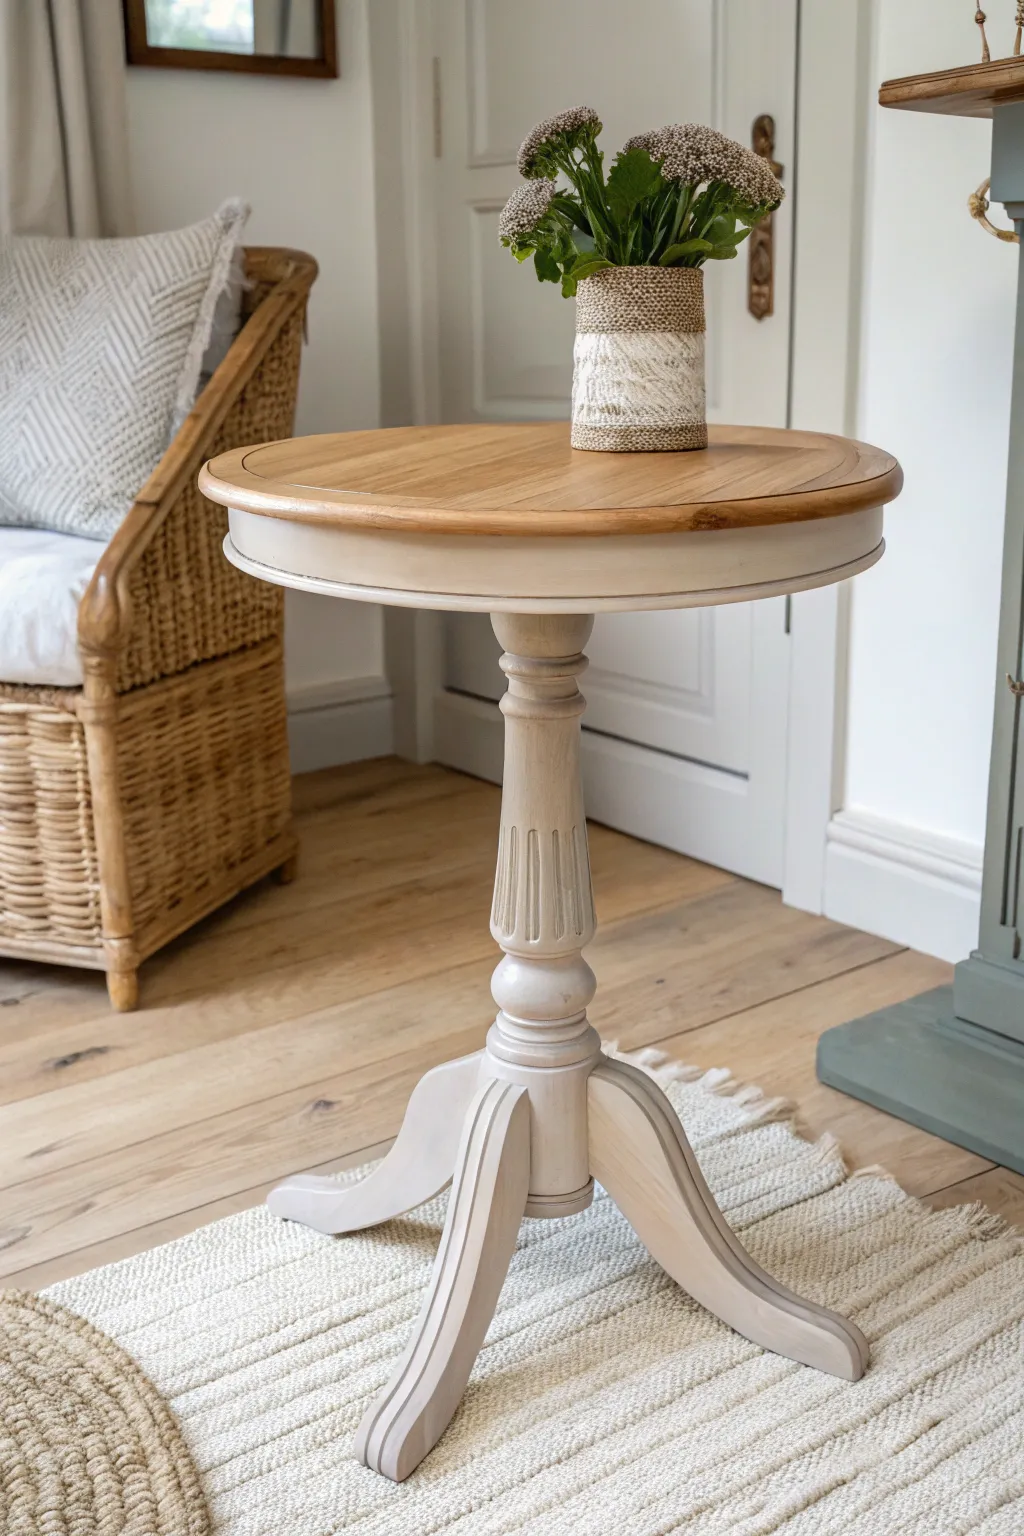
This project creates a beautiful, timeless contrast by pairing a soft, distressed chalk-painted base with the warmth of a natural wood top. It’s the perfect way to modernize a dated pedestal table while preserving its organic character.
Detailed Instructions
Materials
- Pedestal table (solid wood)
- Medium-grit sandpaper (100-120 grit)
- Fine-grit sandpaper (220 grit)
- Orbital sander (optional but recommended)
- Chalk paint (warm beige or ‘greige’ color)
- Clear wax or matte polyurethane sealer
- Paintbrush (oval or round bristle brush preferred)
- Painter’s tape
- Lint-free rags
- Wood stain (optional, if natural color needs enhancement)
- Tack cloth
- Drop cloth
Step 1: Preparing the Surface
-
Assess the table:
Begin by inspecting your table. Determine if the top has a thick varnish that needs stripping or if sanding alone will suffice. Remove any hardware if present. -
Sand the tabletop:
Using an orbital sander with medium-grit sandpaper, carefully remove the existing finish from the tabletop only. Move in the direction of the wood grain to avoid scratches. -
Refine the surface:
Once the old finish is gone, switch to fine-grit sandpaper to smooth out the wood grain. The surface should feel silky to the touch. -
Clean dust thoroughly:
Use a vacuum to remove the bulk of the sawdust, then follow up with a tack cloth to pick up fine particles. Any leftover dust will ruin your finish. -
Clean the base:
Clean the pedestal base with a mild degreaser or soapy water to remove oils and dirt. Chalk paint adheres well, but a clean surface ensures longevity. -
Tape off the top:
Apply painter’s tape carefully around the underside edge of the tabletop where it meets the base. This protects your freshly sanded wood from stray paint strokes.
Bleed-Through Blues?
If pink or yellow stains appear through the light paint (common with mahogany or oak), stop painting. Apply a coat of shellac-based primer to block the tannins before repainting.
Step 2: Painting the Base
-
Apply the first coat:
Stir your chalk paint thoroughly. Using your brush, apply a thin, even coat to the pedestal base and legs. -
Reach the crevices:
Don’t worry about full coverage yet; focus on getting paint into the carved details and ornate grooves of the pedestal. -
Allow to dry:
Let the first coat dry completely. This usually takes about 30 to 60 minutes depending on humidity. -
Apply the second coat:
Apply a second coat to ensure solid opacity. Watch for drips, especially around the vertical curves of the pedestal leg. -
Distress (optional):
If you want the look shown in the image, lightly sand raised edges and carvings with fine-grit sandpaper once dry to reveal a tiny bit of wood underneath.
Step 3: Sealing and Finishing
-
Wax the painted base:
Apply a clear wax over the painted sections using a wax brush or lint-free rag. Work in small sections, massaging it into the paint. -
Buff the wax:
Let the wax cure for a few minutes, then buff it vigorously with a clean cloth to achieve a soft, protective sheen. -
Seal the wooden top:
Apply a clear matte polyurethane or furniture wax to the natural wood top. Since this surface sees more use (drinks, vases), I prefer a matte poly for durability. -
Smooth between top coats:
If using polyurethane, lightly sand with very fine grit sandpaper between dry coats to ensure a professional, smooth finish. -
Final cure:
Remove the painter’s tape carefully. Allow the entire piece to cure for at least 24 hours before placing heavy objects on it.
White Wash Finish
For a lighter, beachy vibe on the wood top, dilute white paint with water (1:1 ratio). Brush it on the raw wood and immediately wipe it back with a rag before sealing.
Enjoy styling your new table with fresh flowers or a stack of books to highlight that lovely wood contrast

PENCIL GUIDE
Understanding Pencil Grades from H to B
From first sketch to finished drawing — learn pencil grades, line control, and shading techniques.
Explore the Full Guide
Bookshelf Glow-Up Using Chalk Paint and Subtle Aging
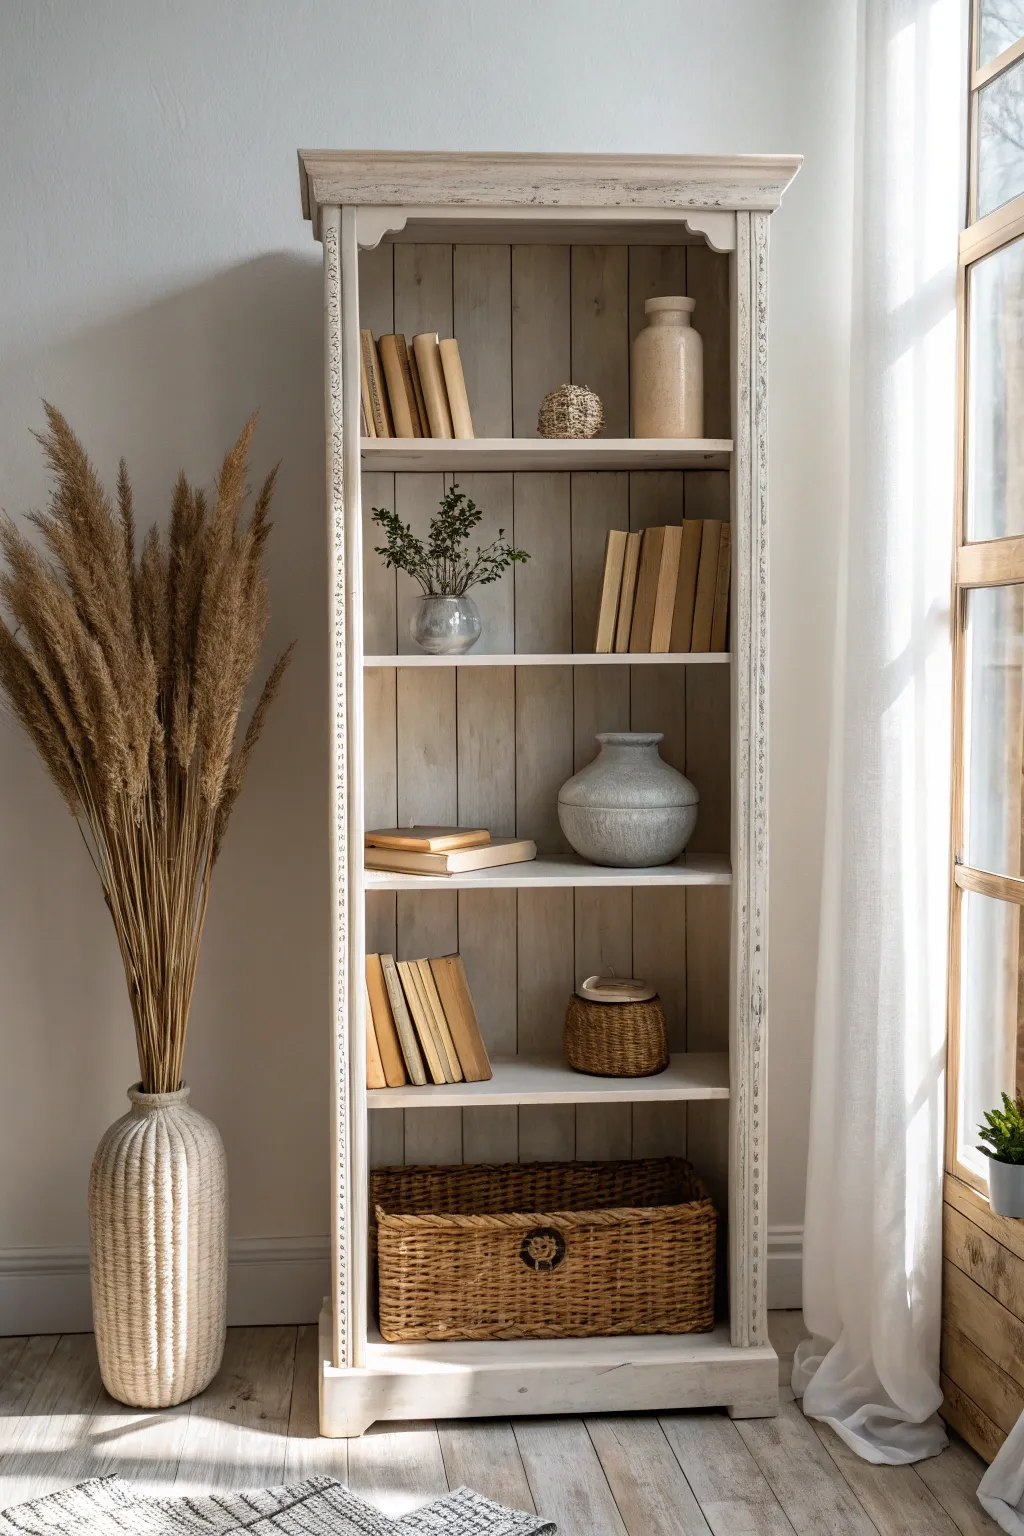
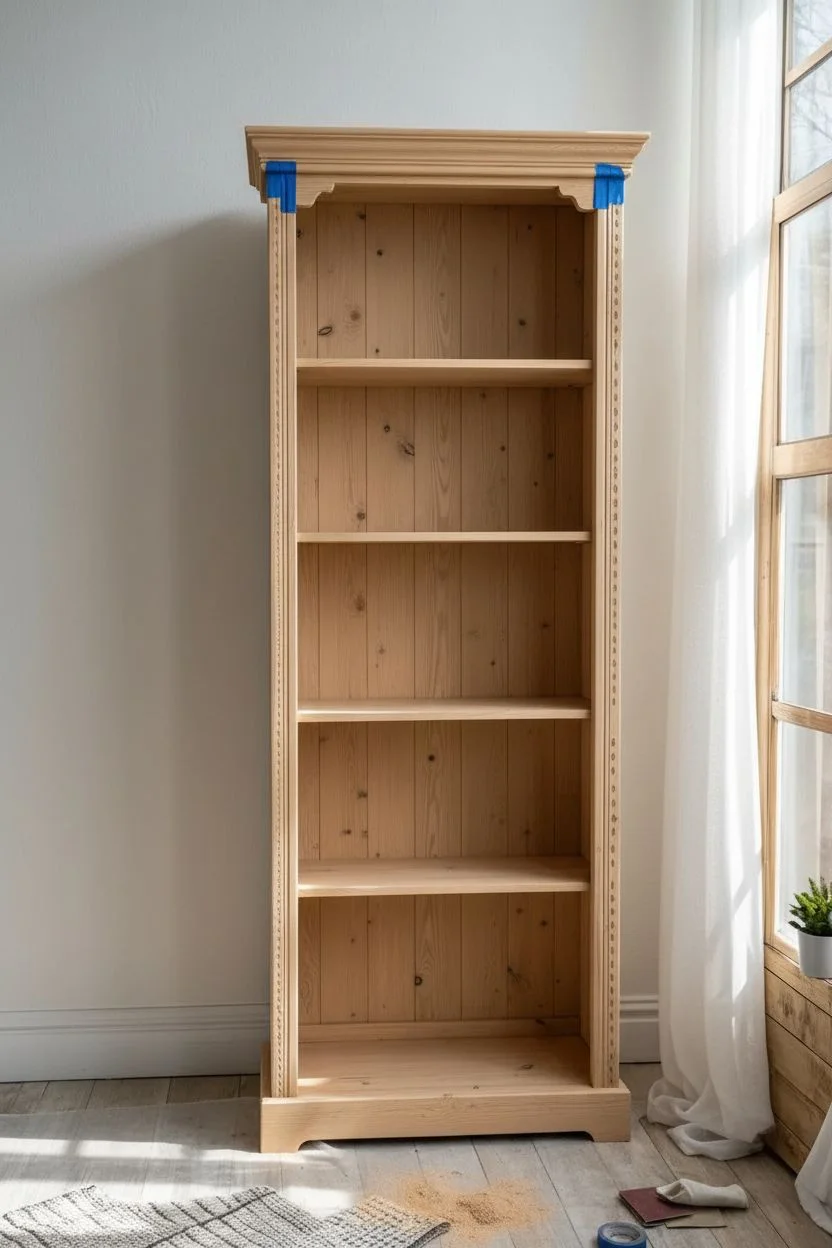
Transform a plain wooden bookshelf into a piece of airy, rustic elegance with this whitewashing technique. Using chalk paint diluted with water creates a soft, hazy finish that allows the natural wood grain to peek through, adding instant character and age.
Step-by-Step Guide
Materials
- Tall wooden bookshelf (unfinished or sanded)
- Cream or off-white chalk paint
- Water (for dilution)
- Two containers (one for paint, one for mixing)
- Clear soft wax
- Dark wax (optional, for aging)
- Wide flat synthetic paintbrush
- Lint-free cotton rags
- Fine-grit sandpaper (220-grit)
- Drop cloth
- Painter’s tape
Step 1: Cleaning & Preparation
-
Clean surface:
Before painting, ensure the bookshelf is completely free of dust, grease, and grime. Wipe it down thoroughly with a damp cloth and mild soap solution. -
Light sanding:
Even if your shelf is prepped, give it a quick scuff sand with 220-grit sandpaper to help the wash adhere. Wipe away all sanding dust with a tack cloth or clean rag. -
Protect surroundings:
Lay down your drop cloth and use painter’s tape to mask off any hardware or areas you don’t want the wash to touch.
Keep it Moving
Work in small sections (e.g., one shelf at a time). The wash dries fast! If it dries before you wipe it back, wet your rag slightly to reactivate the paint and blend.
Step 2: The Whitewash Technique
-
Mix the wash:
In your mixing container, combine your cream chalk paint with water. I usually start with a 1:1 ratio for a semi-transparent look. If you want it more opaque, use less water; for a subtler look, add more. -
Test patch:
Always test your mixture on the back or bottom of the shelf first. This lets you verify if the opacity is right for your wood tone before committing to the visible areas. -
Paint interior back panel:
Start with the back panel of the bookshelf. Dip your brush into the wash and apply it in long, vertical strokes following the wood grain. Work in sections. -
Wipe back:
While the paint is still wet, take a clean, lint-free rag and gently wipe over the painted area in the direction of the grain. This pushes pigment into the crevices and removes excess paint, revealing the wood texture. -
Paint interior sides:
Move to the interior side panels, repeating the paint-and-wipe process. Ensure you get into the corners, but don’t let paint pool there. -
Paint shelves:
Apply the wash to the tops and bottoms of the shelves. If the shelves are removable, take them out to make this easier. -
Exterior application:
Finish by applying the wash to the exterior sides, top molding, and legs. Pay special attention to any carved details or trim, as the wash will settle beautifully here. -
Drying time:
Let the entire piece dry completely. Because chalk paint dries quickly and the layers are thin, this process usually takes about an hour or two.
Step 3: Distressing & Sealing
-
Assessment:
Once dry, look at the finish. If you want a whiter look, you can repeat the wash process for a second layer. If you’re happy with the transparency, proceed to distressing. -
Distress edges:
Take your fine-grit sandpaper and gently gently sand along sharp edges, corners, and raised moldings. The goal is to simulate natural wear patterns where paint would rub off over time. -
Dust off:
Wipe the bookshelf down again to remove all sanding dust. This step is crucial for a smooth wax application. -
Apply clear wax:
Using a wax brush or a clean lint-free cloth, apply a thin coat of clear soft wax over the entire piece. Work in small sections, massaging the wax into the paint. -
Buff the finish:
Allow the wax to cure for about 20-30 minutes, then use a clean cloth to buff the surface. This creates a soft sheen and hardens the protective layer. -
Add dark wax (optional):
For an antique look like the photo, dip a small brush into dark wax and dab it sparingly into corners, recesses, and carved details. Follow up immediately with a cloth to blend it out so it doesn’t look like a solid stripe. -
Final cure:
Let the wax fully cure according to the manufacturer’s instructions before placing heavy books or decor items back onto the shelves.
Too Opaque?
If you applied too much paint and can’t see the wood grain, use a damp sanding sponge to wet-sand the surface gently. This removes pigment without creating dust.
Now enjoy styling your beautifully aged bookshelf with neutral decor for a calming, cohesive look
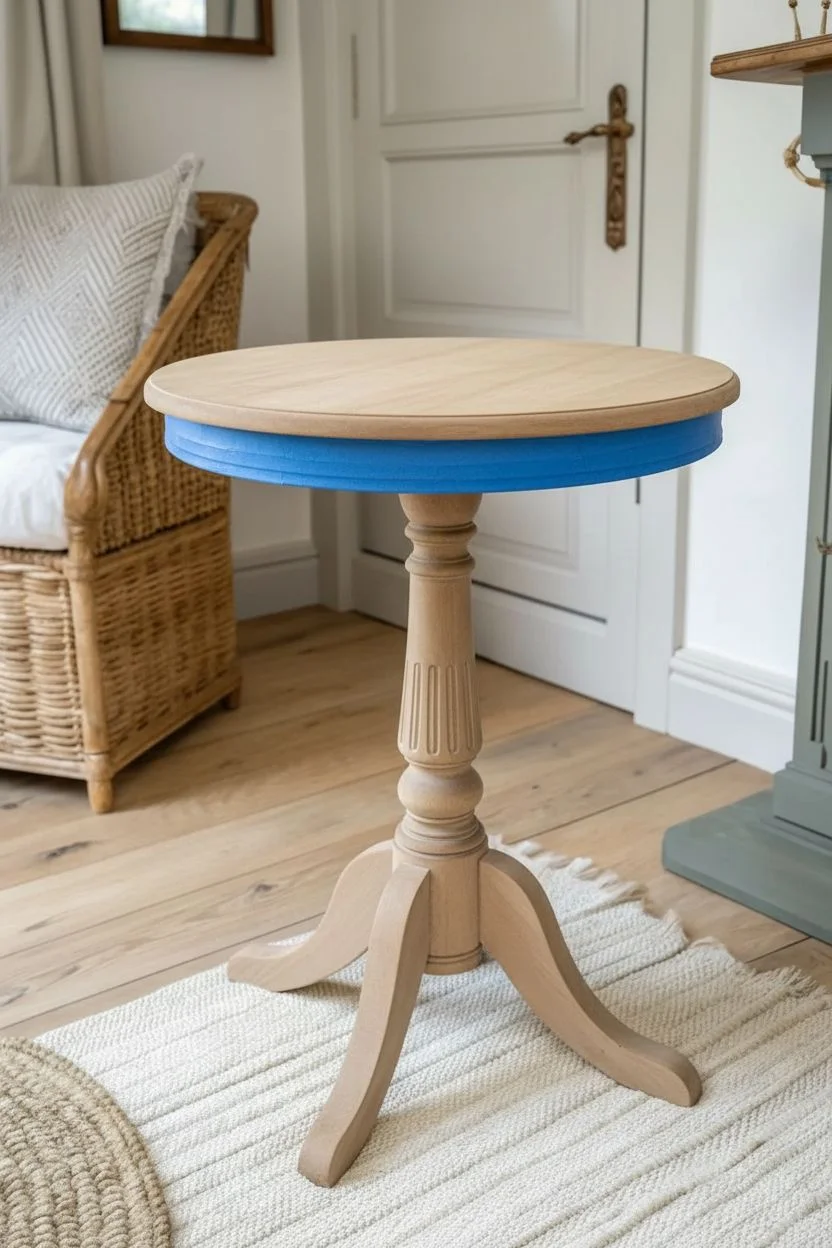
Chalk Painted Coffee Table With Layered Color Under-Show
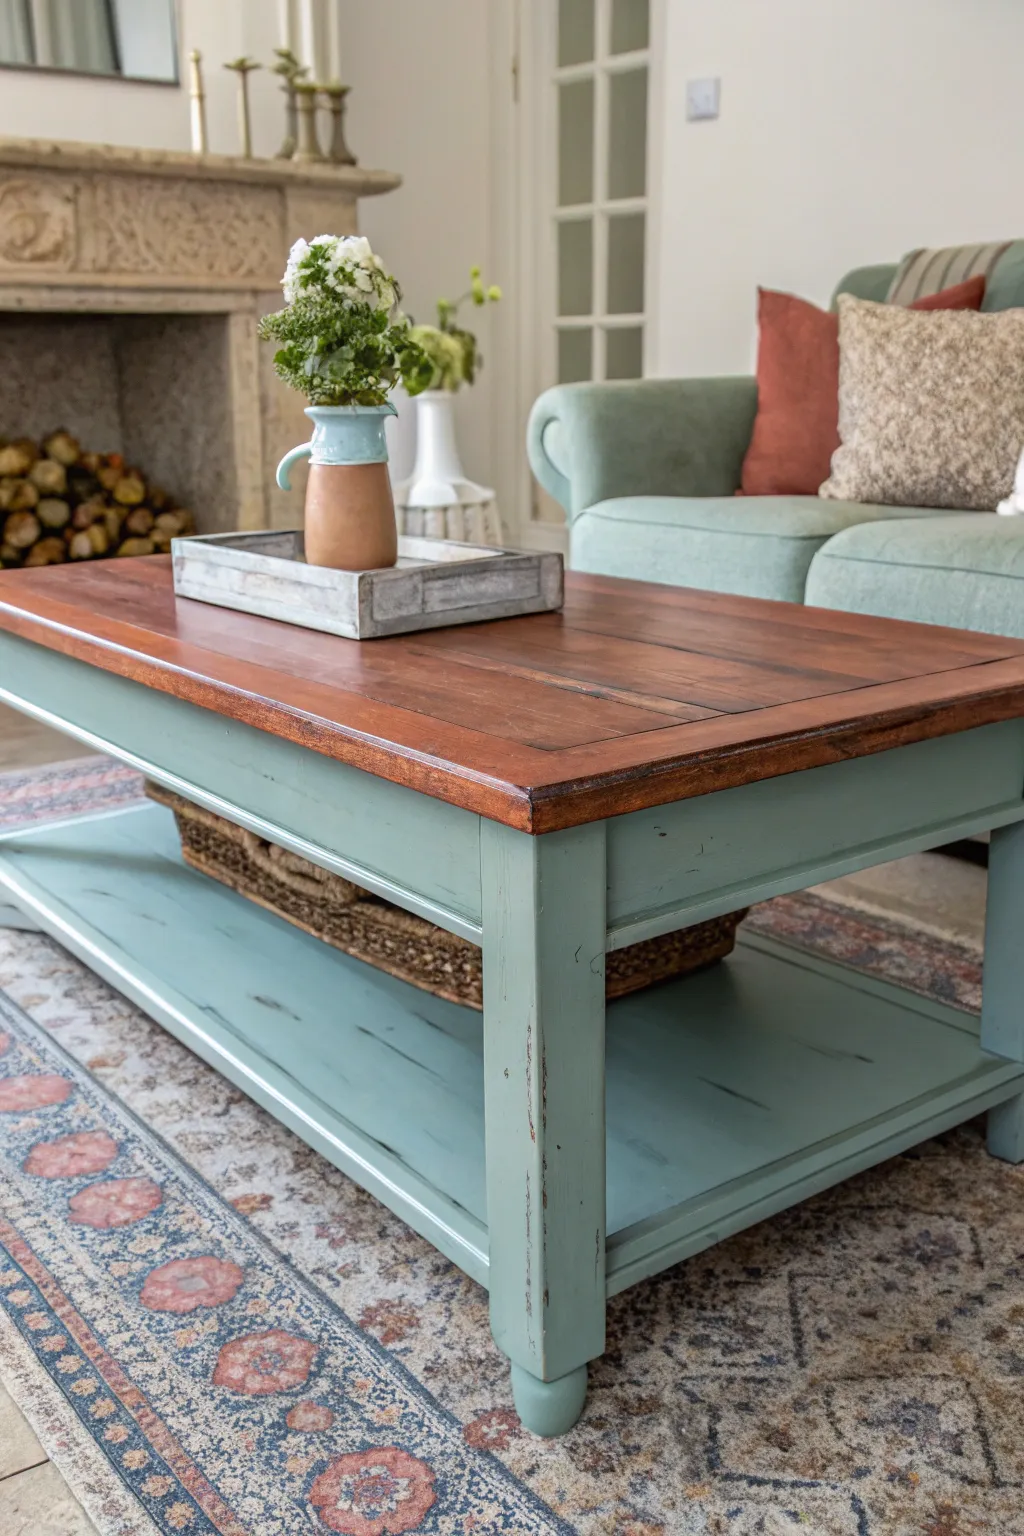
Transform a dated coffee table into a breezy coastal centerpiece with this two-tone chalk paint makeover. By pairing a rich, warm wood stain with a distressed, muted aqua base, you achieve a sophisticated layered look that feels effortlessly lived-in.
How-To Guide
Materials
- Solid wood coffee table with a bottom shelf
- Orbital sander with 80, 120, and 220-grit sandpaper
- Pre-stain wood conditioner
- Oil-based wood stain (dark walnut or warm chestnut)
- Chalk paint in a muted aqua or sage green tone
- Clear matte polyurethane or polycrylic
- Clear furniture wax
- Dark antique furniture wax
- Lint-free rags
- Foam brushes and high-quality synthetic paintbrushes
- Painter’s tape
- Tack cloth
- Fine-grit sanding block
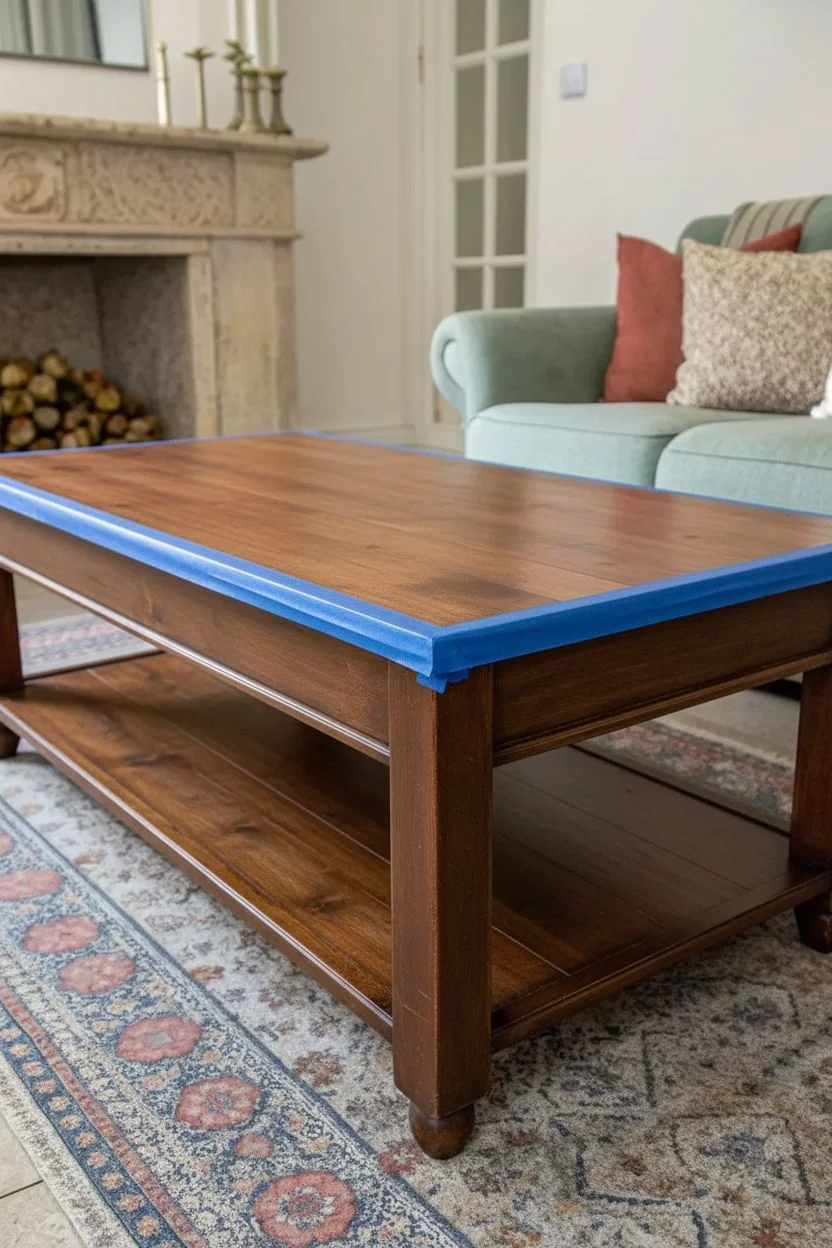
Step 1: Restoring the Top
-
Prep the workspace:
Move your coffee table to a well-ventilated area, preferably outdoors or a garage. Lay down a drop cloth to protect your floor from dust and drips. -
Sand the tabletop:
Using an orbital sander, completely remove the old finish from the tabletop. Start with 80-grit paper to strip the varnish, move to 120-grit, and finish with 220-grit for a buttery smooth surface. You want to see raw, bare wood. -
Clean surface:
Wipe down the entire table with a tack cloth to remove every speck of sawdust. This is crucial for a smooth stain application. -
Condition the wood:
Apply a coat of pre-stain wood conditioner to the raw tabletop using a foam brush or rag. This prevents blotchiness, especially on softwoods like pine. Let it penetrate for about 10-15 minutes, then wipe off excess. -
Apply the stain:
Dip a lint-free rag or foam brush into your dark wood stain and apply it in the direction of the grain. Work in manageable sections. -
Wipe and dry:
After letting the stain sit for a few minutes (depending on how dark you want it), wipe away the excess with a clean rag. Allow the stain to dry completely according to the manufacturer’s instructions, usually overnight. -
Seal the top:
Protect your hard work with a clear polyurethane. Apply a thin coat with a high-quality brush, let it dry, lightly sand with fine 220-grit paper, and repeat for a total of 3 coats.
Wet Distressing
Instead of sandpaper, use a damp kitchen sponge to rub paint off the edges while it’s still tacky. This creates a softer, more authentic worn look without creating dust
Step 2: Painting the Base
-
Clean and scuff:
While the top dries, focus on the base. Clean it thoroughly with a degreaser to remove oils. Lightly scuff-sand the existing finish on the legs and shelf with medium-grit sandpaper to give the paint something to grab onto. -
Tape it off:
Once the stained top is fully dry and cured, use painter’s tape to carefully mask off the underside edge of the tabletop where it meets the apron. This ensures crisp lines. -
First coat of paint:
Stir your muted aqua chalk paint well. Apply the first coat to the legs, apron, and bottom shelf. Don’t worry if coverage isn’t perfect yet; chalk paint builds initially. -
Second coat:
Allow the first coat to dry to the touch (usually 30-60 minutes). Apply a second coat for full, opaque coverage. Watch for drips around the spindles or detailed edges. -
Distress layers:
Once the paint is completely dry, use a fine-grit sanding block to distress. Focus on high-traffic areas: corners, edges of legs, and raised details. Sand until the dark wood underneath peeks through, mimicking natural wear. -
Smooth the finish:
Run the sanding block continuously over the flat painted surfaces very lightly. This doesn’t remove paint but knocks down brush strokes for a professional feel. -
Clear wax application:
Apply a layer of clear furniture wax over all painted areas using a wax brush or clean rag. This seals the chalk paint and deepens the color slightly. -
Antique shading (optional):
For added depth, I occasionally mix a tiny bit of dark wax into clear wax and apply it only into the crevices and corners. Buff it back quickly so it doesn’t look dirty, just shadowed. -
Final buff:
Let the wax cure for 24 hours, then buff the painted surfaces vigorously with a soft cloth to achieve a beautiful satin sheen.
Plank Effect
If your bottom shelf is a solid flat piece, use a straight edge and a pencil to draw lines before painting. This mimics the look of individual wood planks for extra farmhouse charm
Now you have a stunning custom focal point for your living room that combines rustic warmth with fresh color


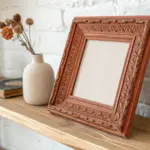
Picture Frame Collection Painted in Coordinated Chalk Paint Tones
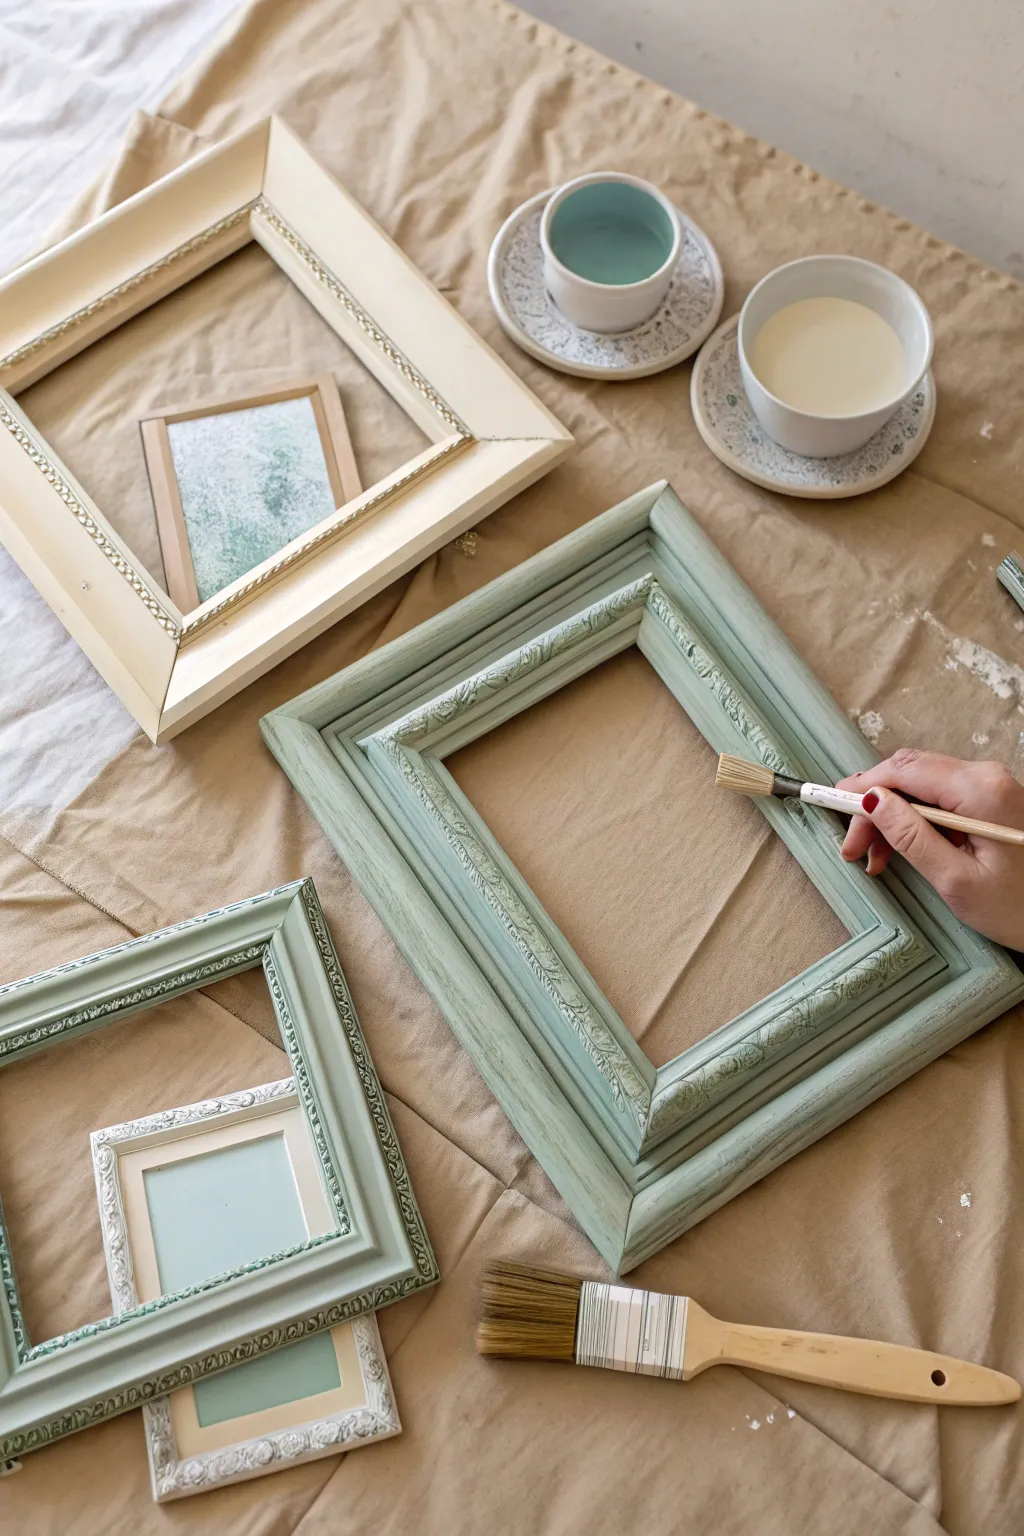
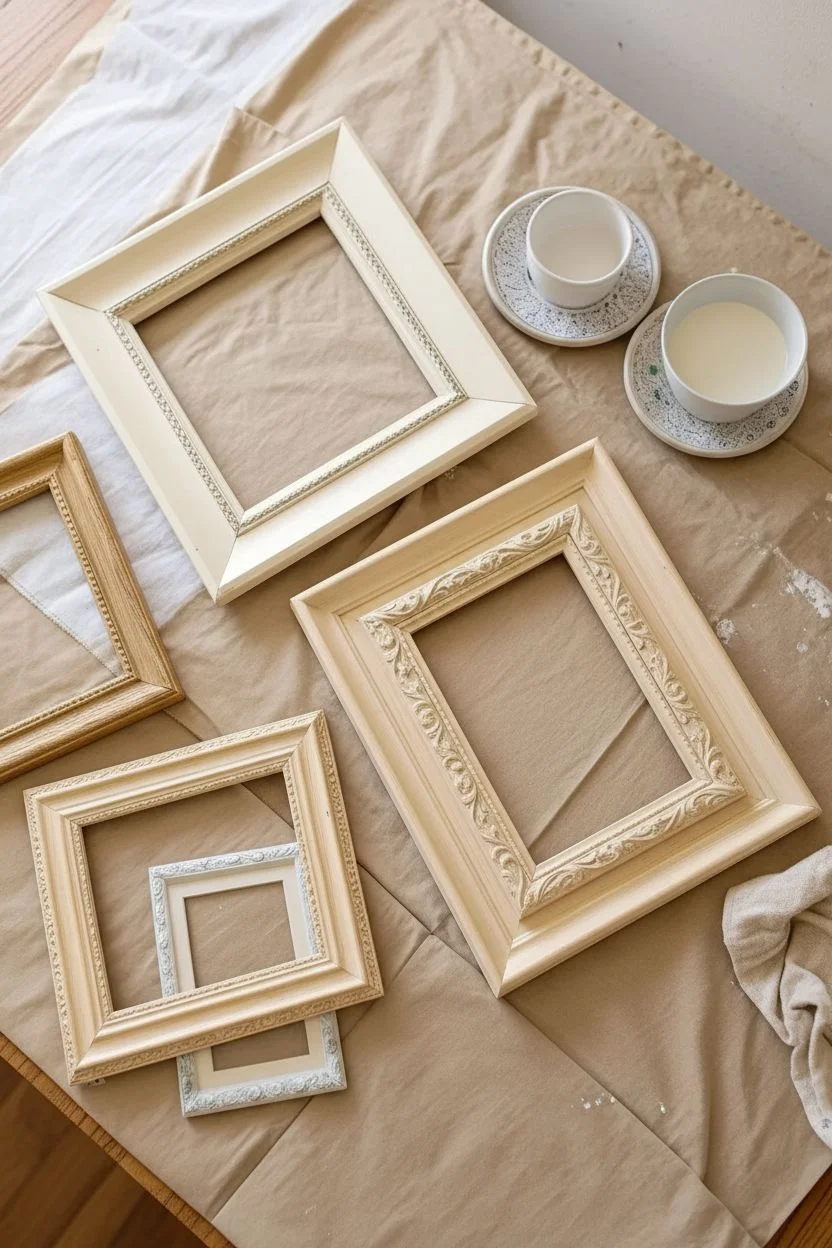
Transform a mismatched collection of picture frames into a cohesive gallery wall set using soft, coordinated chalk paint tones. This beginner-friendly project celebrates the matte, dusty texture of chalk paint and allows you to experiment with layering colors for a charming, time-worn aesthetic.
Step-by-Step Guide
Materials
- Assorted picture frames (wood, plastic, or resin)
- Chalk finish paint in ‘Duck Egg Blue’ or Sage Green
- Chalk finish paint in Cream or Off-White
- Small round bristle brush
- Medium flat synthetic brush
- Fine-grit sandpaper (220-grit)
- Clean lint-free rag
- Drop cloth or kraft paper
- Clear furniture wax (optional)
Step 1: Preparation
-
Set up your workspace:
Lay down kraft paper or a drop cloth on a flat table to protect the surface from drips. Ensure you have good lighting to see the details in the frames. -
Clean the frames:
Remove the glass and backing from all your frames. Wipe down the frame surfaces thoroughly with a damp rag to remove dust, oils, or old wax. Let them dry completely. -
Sort your collection:
Group your frames by size and style. Decide which frames will be primarily blue-green and which will be accents in cream. This helps balance the final look. -
Pour your paints:
Pour small amounts of your chalk paint colors into separate cups or saucers. Chalk paint thickens quickly when exposed to air, so only pour what you need for the immediate session.
Dry Brushing Secret
Use a stiff-bristled brush for dry brushing highlights. It catches the raised textures better than soft synthetic brushes, creating that perfect dusty, aged look.
Step 2: Painting Base Coats
-
Start with the main color:
Using the medium flat brush, apply the ‘Duck Egg Blue’ paint to your largest frames. Work in long, smooth strokes along the flat sides. -
Get into the details:
Switch to the small round brush to dab paint into the ornate corners and deep grooves. Don’t worry about complete opacity yet; chalk paint often needs two coats. -
Paint the accent frames:
Apply the Cream paint to the smaller frames or the nested inserts. I find that painting the inner bevels first prevents messy overlaps later. -
Allow to dry:
Let the first coat dry thoroughly, typically about 30 to 60 minutes. Chalk paint dries fast, but thick areas in corners might take a bit longer.
Paint Peeling?
If the paint peels off plastic frames, the surface was likely too slick. Lightly sand the glossy plastic before painting to give the chalk paint something to grip.
Step 3: Layering and Distressing
-
Apply the second coat:
Add a second layer of paint to deepen the color. For a textured look, you can use cross-hatch brush strokes rather than straight lines. -
Mix a custom wash:
Create a wash by mixing a tiny bit of cream paint with water (about 50/50 ratio). This will be used to highlight details on the blue frames. -
Dry brush highlights:
Dip just the tips of your dry round brush into the cream wash. Wipe most of it off on a paper towel, then lightly whisk it over the raised details of the blue frames to catch the texture. -
Distress the edges:
Once the paint is fully bone-dry, use the 220-grit sandpaper to gently rub the edges and raised floral motifs. This reveals the wood or base color underneath for a vintage effect. -
Clean off dust:
Use a clean, dry brush or a microfiber cloth to sweep away all the sanding dust from the crevices.
Step 4: Finishing Touches
-
Inspect for missed spots:
Look at the frames from different angles. Touch up any glaring bare spots inside complicated carvings with a tiny artist’s brush. -
Apply wax (optional):
If you want a smoother finish and protection, apply a thin layer of clear furniture wax with a lint-free cloth. Buff it gently after 15 minutes. -
Reassemble:
Once the paint and wax are fully cured, place the glass, artwork, and backing boards back into the frames. -
Nest the frames:
For a unique display like the photo, try placing a smaller cream frame directly inside the opening of a larger blue frame before adding your art.
Arrange your newly painted collection on a shelf or wall to enjoy the harmonious blend of colors and textures
Mirror Frame Makeover With Chalk Paint and Soft Waxed Patina
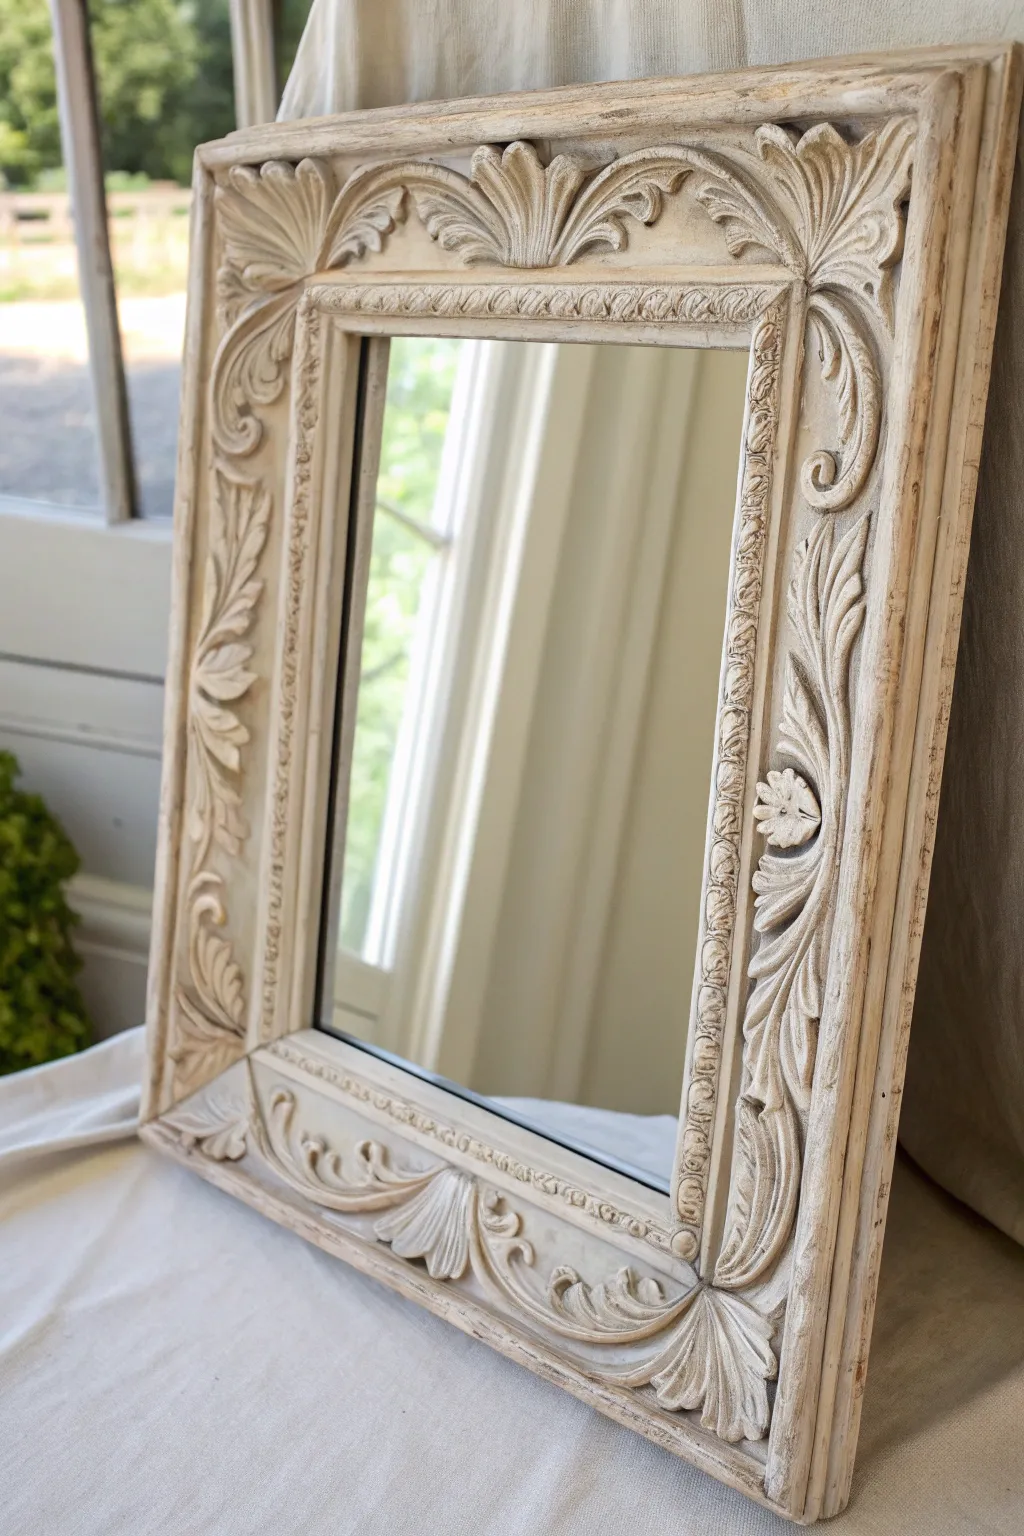
Transform a heavily carved frame into an antique masterpiece using this soft, French-inspired chalk paint technique. The interplay of cream tones and dark wax settles perfectly into every groove, creating depth and a history that looks centuries old.
Detailed Instructions
Materials
- Ornate carved wood or composite mirror frame
- Chalk paint in ‘Cream’ or ‘Old White’
- Chalk paint in ‘Coco’ or a light taupe (optional for base)
- Clear soft wax
- Dark antique wax (brown/espresso tone)
- Painter’s tape
- Medium-grit sandpaper (120-150 grit)
- Round chalk paint brush
- Small artist brush for crevices
- Lint-free cotton rags
- Water spray bottle
Step 1: Preparation and Base Coat
-
Clean the surface:
Begin by thoroughly cleaning the frame to remove any dust, oils, or grime. A simple solution of warm water and mild dish soap works well, but ensure you get into all the deep carvings with a stiff brush. -
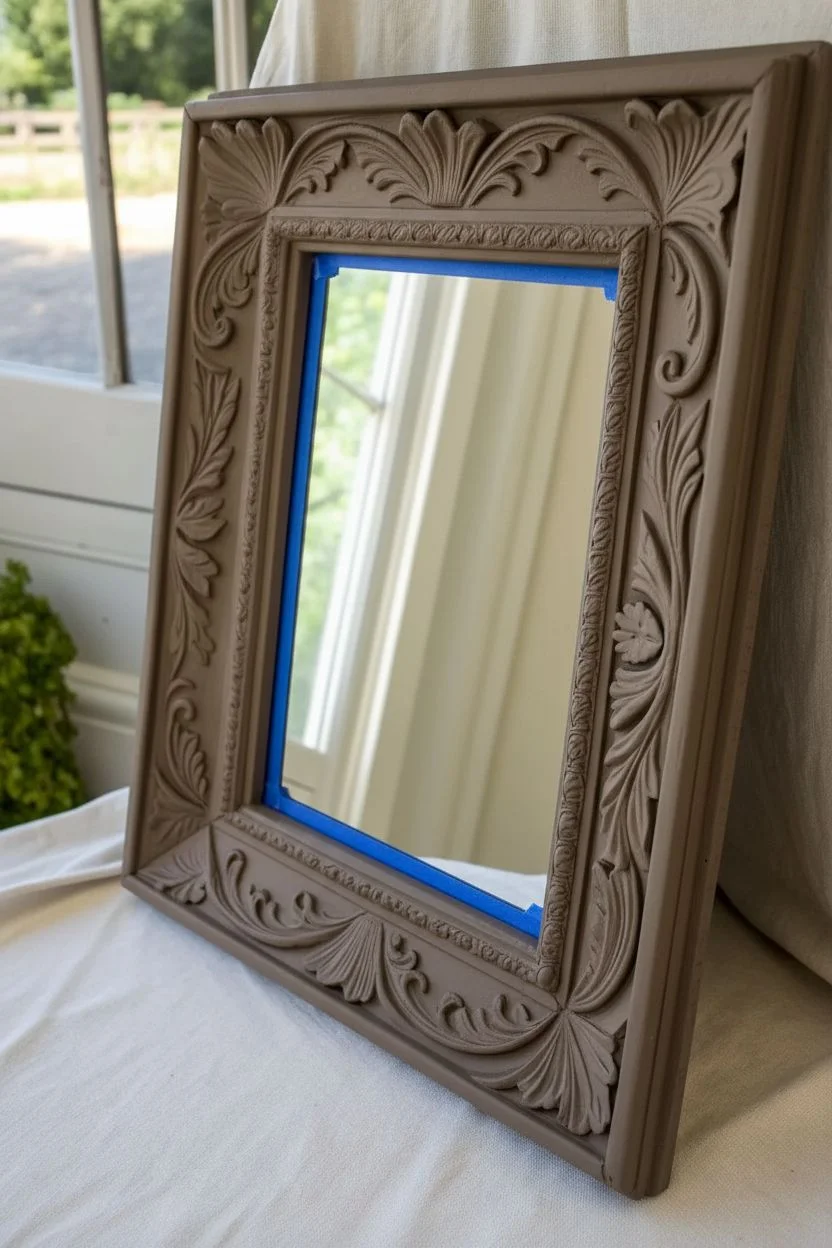
Protect the glass:
Carefully apply painter’s tape around the inner edge of the frame to shield the mirror glass. Slide the tape slightly under the rim if possible for a clean line. -
Mix the base color:
If you want extra depth, start by mixing a small amount of water into your taupe or ‘Coco’ chalk paint. It should be slightly thinner than standard viscosity. -
Apply the first layer:
Paint the entire frame with this darker base coat. Don’t worry about perfect coverage; the goal is to have a darker underlying tone that might peek through later. -
Let it dry completely:
Allow this base layer to dry for at least one hour. Chalk paint dries quickly, but humid conditions may require a bit more patience.
Too Heavy Handed?
If the dark wax looks too muddy or intense, apply a dollop of clear wax onto a rag and rub it over the dark area. The clear wax lifts the excess pigment instantly.
Step 2: Creating the Chalk Finish
-
Prepare the top coat:
Open your cream or ‘Old White’ chalk paint. I like to leave this layer thick and unthinned to create texture. -
Apply the cream coat:
Using your round chalk paint brush, stipple and dab the paint into the intricate carvings. You want the paint to settle into the recesses. -
Brush out the flat areas:
On the flatter sections of the frame, use long, smooth strokes to smooth out the paint, but don’t overwork it. -
Create texture:
While the paint is still wet, lightly drag your brush tips over the surface in random directions to add slight ridges that the wax will catch later. -
Dry time:
Let this main coat dry fully, preferably for 2-4 hours, until it is hard to the touch.
Pro Tip: Layering
For a ‘chippy’ look, rub a candle wax stick over the dark base coat before applying the cream top coat. The paint will flake off effortlessly in those spots when sanded.
Step 3: Distressing and Waxing
-
Wet distress technique:
Take a damp, lint-free rag and gently rub the high points of the carvings. This reveals the darker base coat or wood underneath without the dust of sanding. -
Sand for definition:
For sharper contrast, use your 150-grit sandpaper on the most prominent edges and corners. This mimics natural wear patterns. -
Clean dust:
Wipe the frame down with a dry cloth or use a vacuum brush attachment to remove all sanding dust. -
Apply clear wax:
Brush a layer of clear soft wax over the entire frame. This seals the paint and acts as an ‘eraser’ or buffer for the dark wax coming next. -
Introduce dark wax:
Using a smaller brush, dab dark antique wax specifically into the deepest crevices, corners, and floral details. -
Wipe back excess:
Immediately use a clean rag to wipe away the dark wax from the high points. The clear wax you applied earlier helps you glide the dark wax off easily, leaving it only in the shadows. -
Buff to a sheen:
Wait 15-20 minutes for the wax to harden slightly, then buff the frame vigorously with a soft cloth to create a soft, satin patina. -
Final reveal:
Remove the painter’s tape carefully and clean any stray smudges off the glass with vinegar and water.
Hang your stunning new mirror in a well-lit spot to let those shadows and highlights truly shine
Storage Boxes and Crates Made Pretty With Chalk Paint Labels
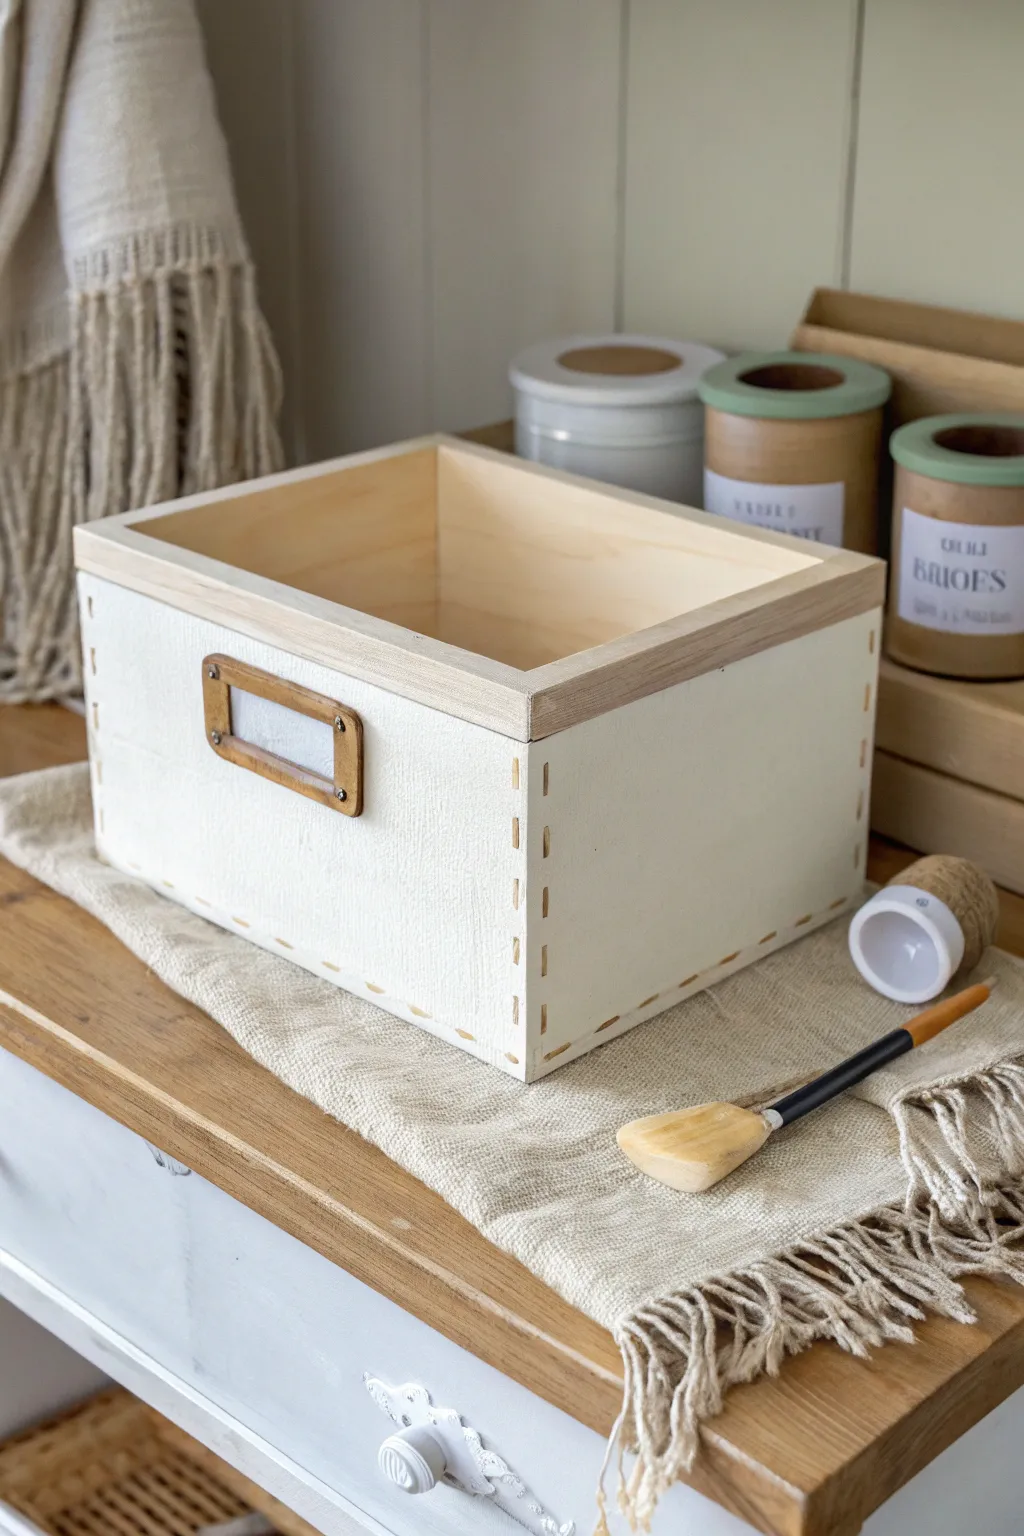
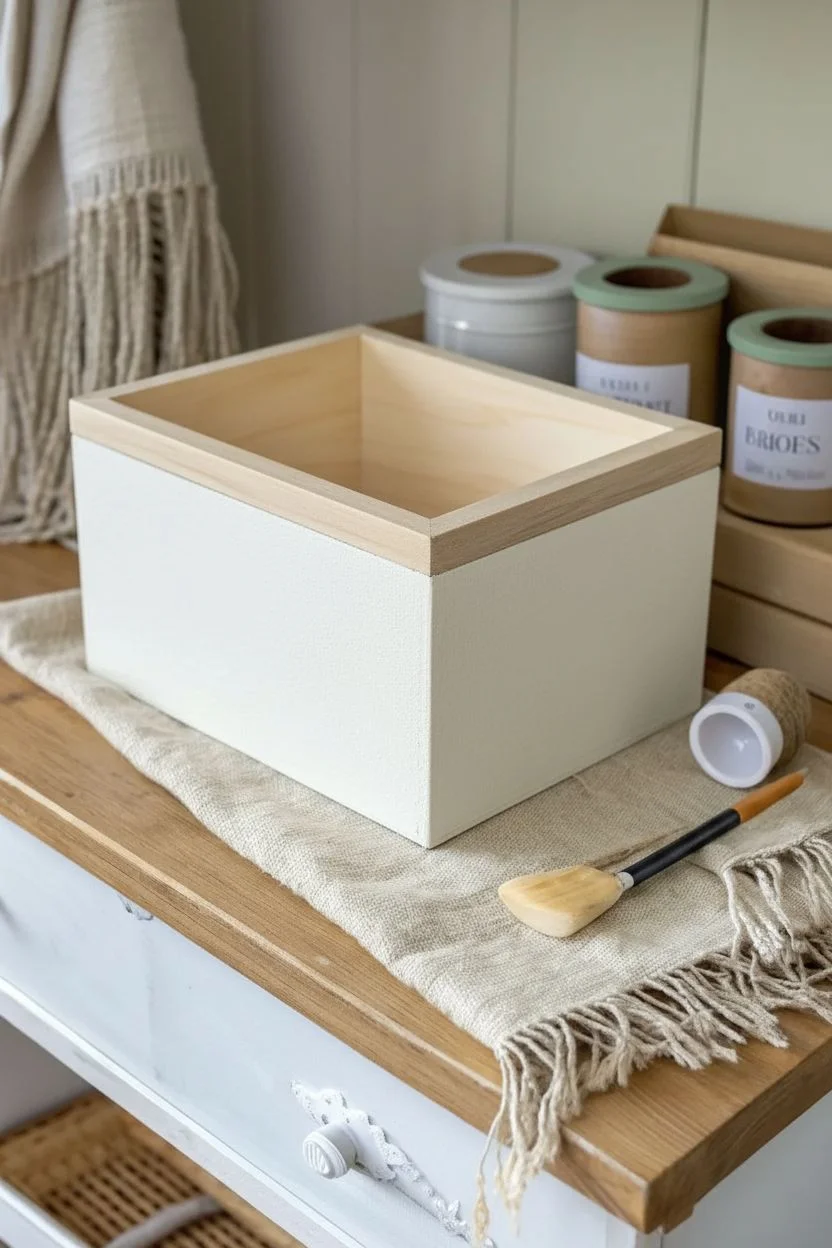
Transform a plain wooden crate into a charming, boutique-style storage solution using nothing more than chalk paint and a steady hand. This project features a clever faux-stitch detail that adds texture and personality without picking up a needle, giving your organization a custom, handcrafted look.
Step-by-Step Guide
Materials
- Unfinished wooden box or crate
- White or cream chalk paint
- Gold or light brown paint (acrylic or metallic)
- Small flat paintbrush
- Fine detail paintbrush or paint pen
- Painter’s tape
- Brass label holder with screws
- Screwdriver
- Sandpaper (fine grit)
- Clear matte wax or sealer
Step 1: Prep and Base Coat
-
Surface Preparation:
Begin by giving your wooden box a light sanding with fine-grit sandpaper. This removes any rough splinters and ensures the paint will adhere smoothly to the surface. -
Clean Up:
Wipe away all sanding dust thoroughly using a tack cloth or a slightly damp rag. A clean surface is crucial for a smooth finish. -
Protect the Rim:
This design features a natural wood rim, so carefully apply painter’s tape around the top edge of the box. Press the tape down firmly to prevent paint bleed. -
First Coat Application:
Load your flat brush with white chalk paint and apply an even coat to the exterior sides of the box. Brush in the direction of the wood grain for the best result. -
Initial Drying:
Let the first coat dry completely, which usually takes about 30 to 60 minutes depending on the brand of chalk paint you are using. -
Second Coat Coverage:
Apply a second coat of chalk paint to ensure full opacity. Chalk paint is wonderfully thick, but two thin coats generally look better than one heavy, gloopy one. -
Tape Removal:
While the second coat is still slightly tacky—but not wet—gently peel off the painter’s tape at a 45-degree angle to reveal the crisp natural wood edge.
Stitch Stability
If you are nervous about free-handing the stitches, use a small piece of masking tape as a spacer between each dash to keep them uniform.
Step 2: Adding the Details
-
The Faux Stitching Strategy:
Plan out your ‘stitches’ along the vertical corners of the box. You want them to look like heavy thread binding the wood joints together. -
Painting the Stitches:
Using a fine detail brush and your gold or light brown paint, create short, diagonal dashes across the corners. I find it easiest to start at the top and work my way down to keep spacing consistent. -
Lower Edge Stitching:
Repeat the faux stitching process along the bottom horizontal edges of the box, mirroring the angle of your vertical stitches for a cohesive look. -
Drying the Detail Work:
Allow the painted stitch details to dry completely. Since these are small strokes, 20 minutes should be sufficient. -
Sealing the Paint:
To protect the chalk finish from scuffs, apply a thin layer of clear matte wax or sealer over the painted areas using a lint-free cloth or wax brush. -
Buffing:
Once the wax has hazed over, gently buff it with a clean cloth to achieve a soft, protective sheen. -
Positioning the Hardware:
Center your brass label holder on the front face of the box. Measure from both sides to ensure it is perfectly symmetrical. -
Marking Holes:
Use a pencil to lightly mark the spots for the screw holes through the label holder openings. -
Attaching the Label Holder:
Place the label holder back over your marks and carefully drive the small screws into the wood. If the wood is hard, create pilot holes first with a small nail or drill bit. -
Final Touch:
Slide a handwritten cardstock label into the holder to categorize your new storage.
Antique Texture
Before sealing, dry brush a tiny amount of brown wax over the white paint to give the box an aged, farmhouse aesthetic.
Now you have a stylish customized crate ready to organize your shelves
Chalk Painted Terracotta Pots for a Soft, Vintage Garden Look

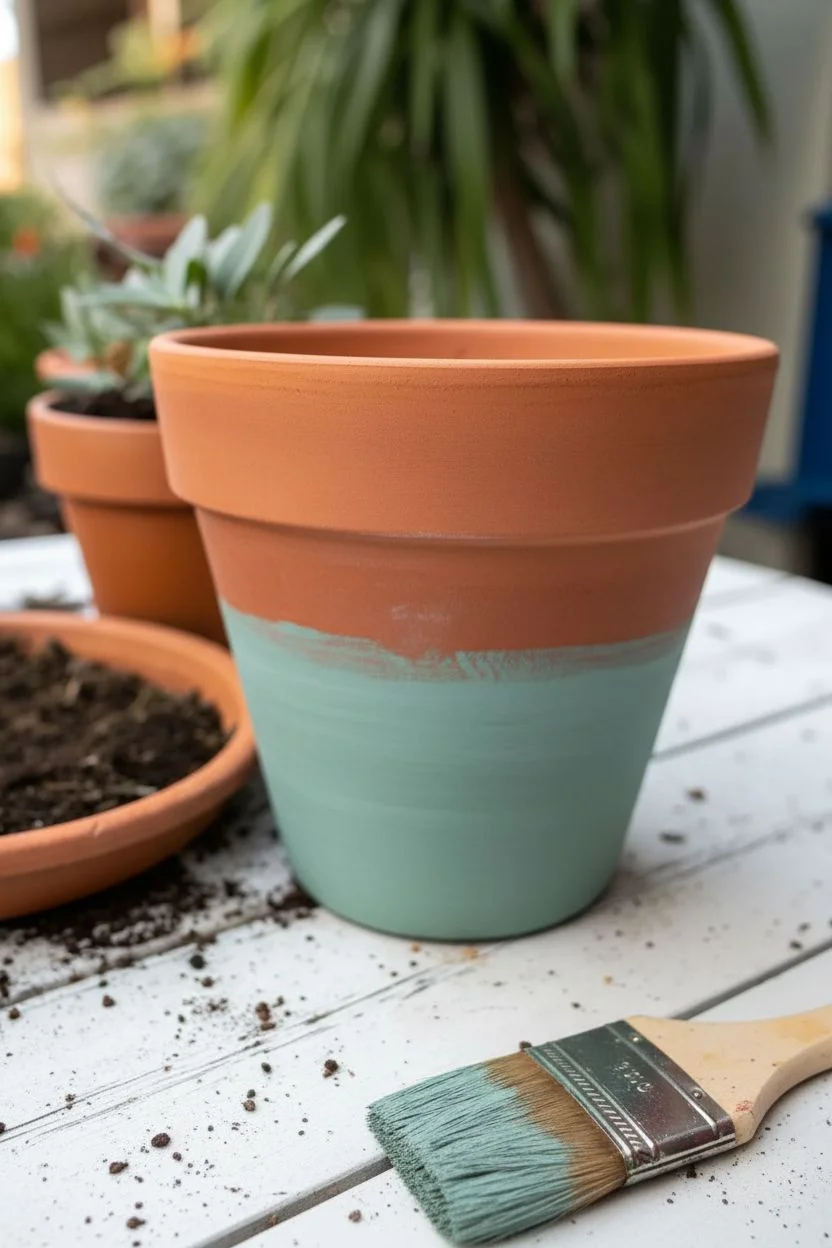
Transform standard terracotta pots into charming garden accents with a soft, weathered patina using chalk paint. This project layers subtle hues of sage green, pale peach, and muted blue to create a timeless, aged ceramic look.
Step-by-Step Tutorial
Materials
- Terracotta pot (clean and dry)
- Chalk paint in Sage Green
- Chalk paint in Pale Peach or Salmon
- Chalk paint in Muted Blue-Grey
- White chalk paint (for whitewashing)
- Medium flat synthetic paintbrush
- Small detail brush
- Fine-grit sandpaper (220-grit)
- Clean cotton rag or paper towels
- Water container for rinsing and thinning
- Painters tape (optional)
Step 1: Preparation and Base Coat
-
Clean surface:
Ensure your terracotta pot is completely free of dust and dirt. Wipe it down with a damp cloth and let it dry fully before starting. -
Paint the main body:
Dip your medium flat brush into the Sage Green chalk paint. Apply a solid coat to the bottom two-thirds of the pot, starting from the base and working upwards. -
Feather the edge:
As you reach the upper section of the green band, use lighter brush strokes to avoid a harsh ridge of paint where the next color will begin. -
Let it dry:
Allow the green layer to dry completely, which should take about 20-30 minutes. Chalk paint dries quickly, but I prefer waiting a bit longer to ensure it doesn’t lift.
Wet Distressing Trick
Instead of sandpaper, use a damp kitchen sponge to gently rub away paint while it is drying. This creates a softer, naturally weathered look without scratch marks.
Step 2: Adding the Middle Bands
-
Apply the peach band:
Using a clean brush, paint a band about 1.5 inches wide directly above the green section using the Pale Peach paint. Don’t worry about a perfectly straight line; a slightly organic edge adds to the vintage charm. -
Blend the transition:
While the paint is still slightly tacky, verify the meeting point between the peach and green. If you want a softer look, you can lightly smudge the line with a dry brush. -
Paint the blue stripe:
Switch to your small detail brush and the Muted Blue-Grey paint. Carefully paint a thin stripe, approximately half an inch wide, right at the top edge of the peach band, just below the pot’s rim. -
Dry the bands:
Let these new colored bands dry thoroughly for at least 30 minutes.
Garden Stencils
Use a small stencil to add a botanical number or a French bee logo in a contrasting dark grey over the painted surface before the final sanding step.
Step 3: Creating the Distressed Rim
-
Mix a whitewash:
In a small container, mix white chalk paint with water in a 1:1 ratio until it has a milky consistency. -
Apply wash to rim:
Brush this watered-down white mixture over the top rim of the pot, covering the bare terracotta. -
Wipe back:
Immediately use a clean cotton rag to wipe away most of the white paint, leaving it settled only in the texture and pores of the clay for a dusty look. -
Extend the wash:
Lightly drag your dry rag with a tiny bit of the white residue over the blue and peach bands to unify the look.
Step 4: Distressing and Finishing
-
Sand for texture:
Take your 220-grit sandpaper and gently sand over the painted areas. Focus on the raised rings and edges where natural wear would occur. -
Reveal the clay:
Continue sanding until small flecks of the original terracotta show through the green and peach paint, enhancing the aged effect. -
Clean up dust:
Wipe the entire pot with a dry cloth to remove all sanding dust. -
Apply sealer (optional):
If this pot will live outdoors, apply a clear matte polycrylic sealer to protect your work from the elements. -
Final cure:
Let the pot sit for 24 hours to fully cure before filling it with soil and plants.
Your new pot now has the history and character of a vintage garden find.
Metal Cart or Locker Revived With Chalk Paint for Industrial Style
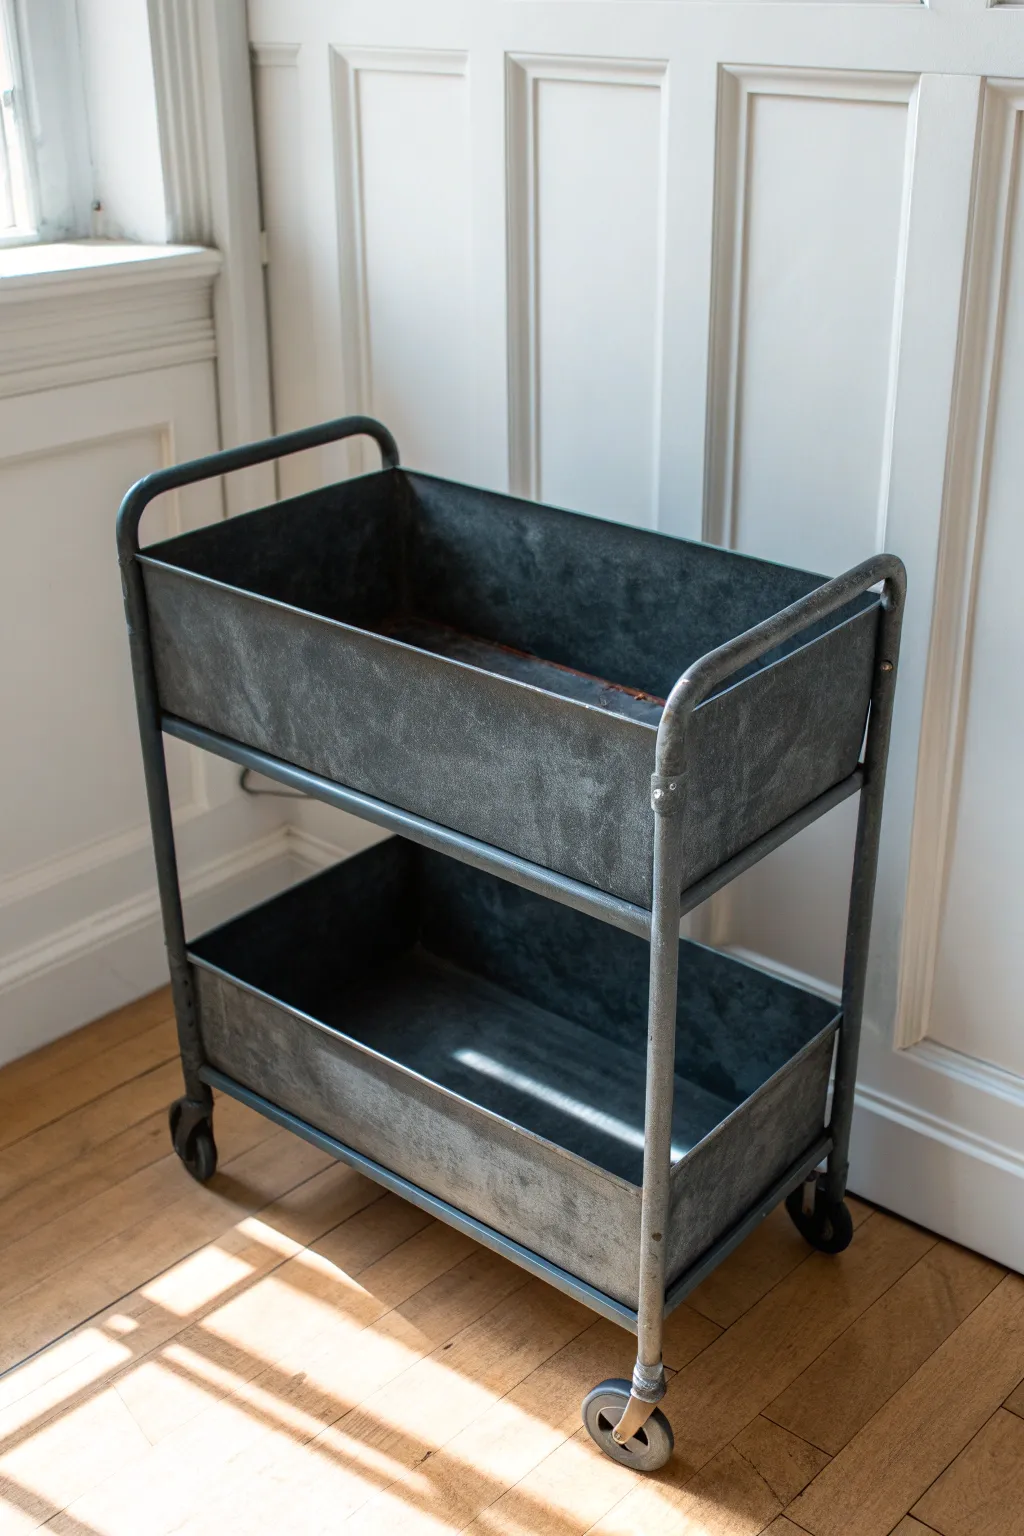
Transform a generic rolling cart into a striking industrial accent piece using the versatile power of chalk paint. This project creates a moody, slightly distressed finish that perfectly mimics the look of vintage galvanized steel or heavy iron.
Detailed Instructions
Materials
- Metal utility cart (rolling)
- Black or Graphite chalk paint
- Dark grey chalk paint
- Metallic silver or gunmetal wax
- Clear furniture wax
- Medium-grit sanding block (120-150 grit)
- Lint-free cloth or rag
- Medium round paintbrush
- Small chip brush
- TSP or degreasing cleaner
- Painter’s tape (optional for wheels)
Step 1: Preparation
-
Clean the surface:
Before painting metal, you must remove any factory oils or grime. Wipe the entire cart down thoroughly with a degreasing cleaner like TSP alternative. -
Scuff sand:
To help the chalk paint adhere to the slick metal surface, lightly scuff the entire cart with your medium-grit sanding block. You aren’t removing the old finish, just creating ‘tooth’ for the new paint. -
Remove dust:
Wipe away all sanding dust with a damp cloth and let the metal dry completely. -
Protect hardware:
If your wheels are rubber or plastic and you want to keep them clean, wrap them in painter’s tape now.
Step 2: Base Coat Application
-
First layer of black:
Using your medium round brush, apply a coat of the black or Graphite chalk paint. Don’t worry about perfect coverage here; a slightly uneven application adds to the eventual industrial look. -
Stipple for texture:
While the paint is wet, bounce the tips of the bristles up and down (stippling) on flat areas. This breaks up brush strokes and mimics the texture of cast iron. -
Dry time:
Allow this first coat to dry for at least one hour. Metal surfaces can take slightly longer to cure than wood. -
Second coat:
Apply a second coat of black to ensure full opacity, continuing the stippling technique on the larger tray areas.
Rust Effect
For an aged look, dab a mix of burnt orange and brown chalk paint into the inside corners of the trays before waxing.
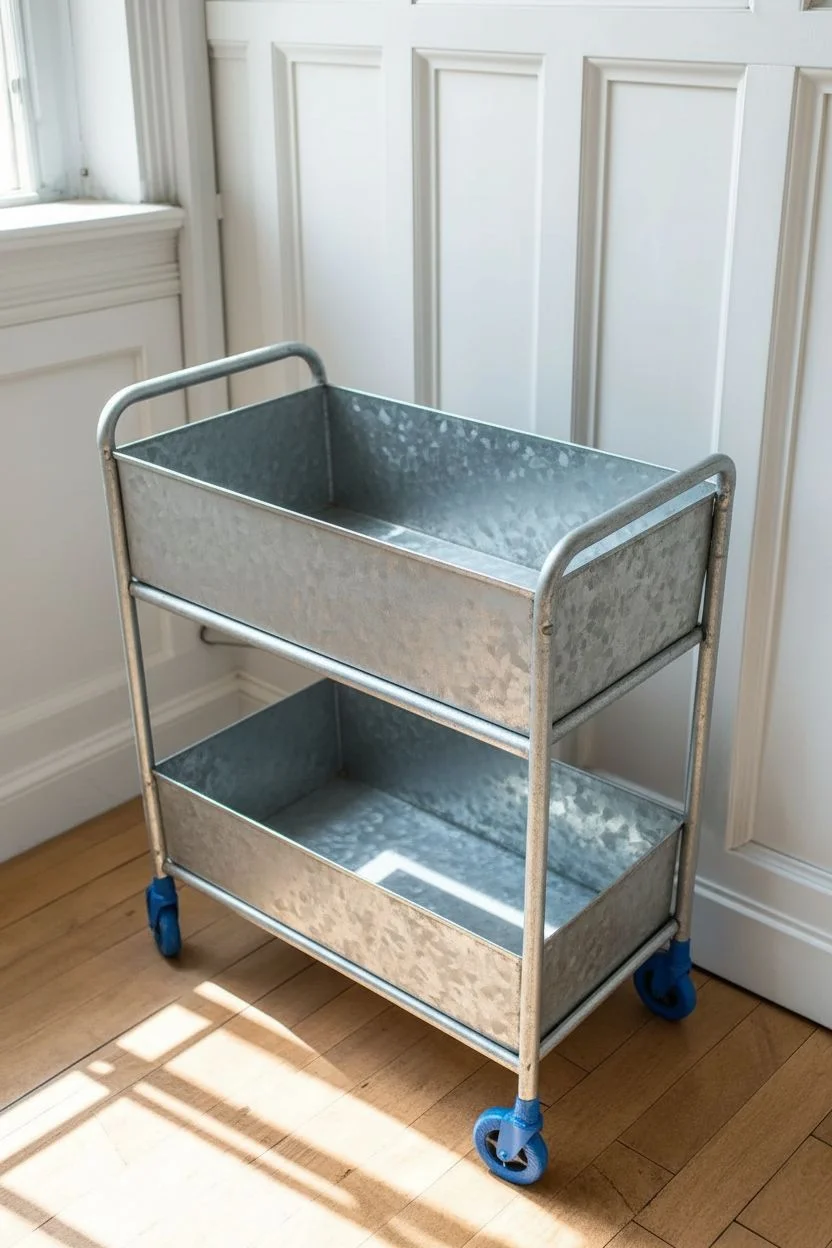
Step 3: Creating the Industrial Patina
-
Dry brush grey:
Dip just the very tips of a dry chip brush into your dark grey chalk paint. Offload almost all the paint onto a paper towel until barely any color remains. -
Highlight edges:
Lightly drag the dry brush over the raised edges, corners, and handles of the cart. This simulates wear and highlights the structure. -
Add random distress:
Swipe the dry brush randomly across the flat sides of the trays in cross-hatch motions. This creates that cloudy, galvanized metal appearance. -
Let it cure:
Let these decorative layers dry completely, ideally for a few hours or overnight, to ensure the paint bonds hard to the metal.
Wooden Shelf Insert
Cut a piece of plywood to fit the bottom of the trays, stain it dark walnut, and drop it in for a mixed-material vibe.
Step 4: Finishing Touches
-
Apply clear wax:
Brush on a thin layer of clear wax over the entire piece to seal the chalk paint. Work in small sections. -
Wipe back:
I like to use a lint-free cloth to immediately wipe away excess wax, ensuring there is no sticky residue left behind. -
Add metallic accents:
Using your finger or a small cloth, rub a tiny amount of metallic silver or gunmetal wax onto the rivets, screws, and sharpest corners for a realistic steel glint. -
Buff to sheen:
Once the wax has hardened (usually after 24 hours), buff the surfaces briskly with a clean cloth to achieve a subtle, industrial sheen. -
Remove tape:
Peel off the painter’s tape from the wheels and check for any touch-ups needed near the floor.
Now you have a rugged, functional storage piece that brings authentic factory style to your space
Dry Brush Chalk Paint Highlights to Emphasize Carved Details
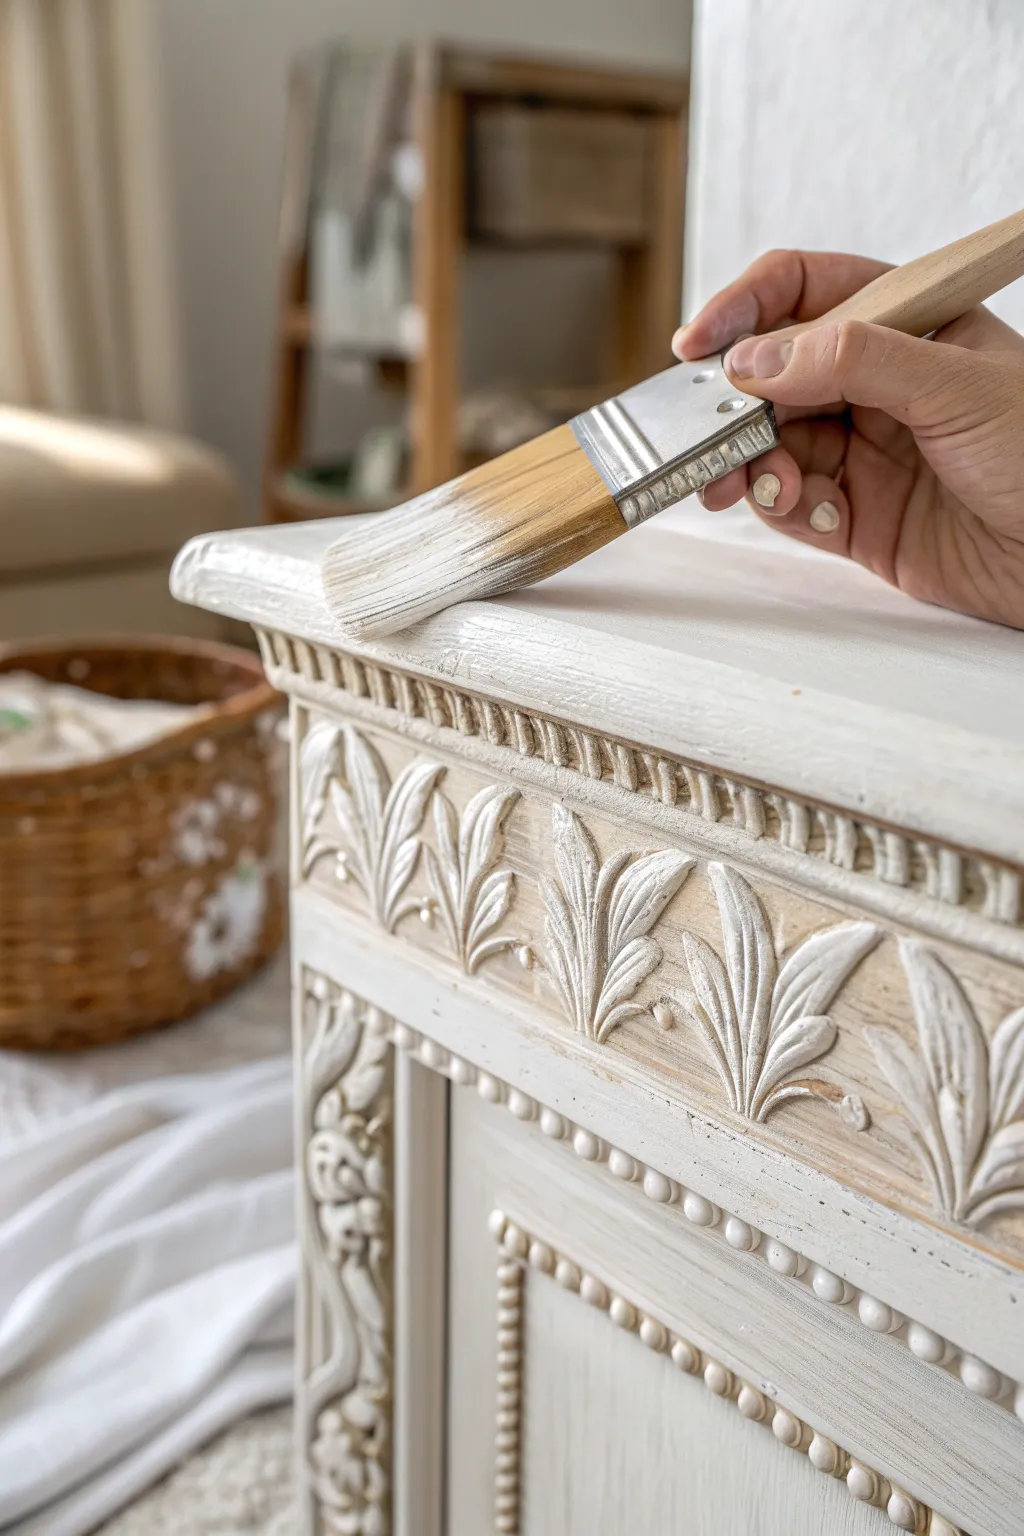
Transform a simple piece of furniture into an ornate masterpiece by mastering the art of dry brushing. This technique gently dusts raised carvings with white chalk paint, creating a stunning, weathered highlight effect that emphasizes texture without completely covering the wood grain.
How-To Guide
Materials
- Ornate wood furniture piece (dresser, cabinet, or nightstand)
- White chalk paint (e.g., Annie Sloan ‘Old White’ or similar)
- Medium-grit sandpaper (120-150 grit)
- Clean, lint-free cloth
- Flat paintbrush (natural bristle preferred)
- Paper plate or cardboard palette
- Paper towels
- Clear furniture wax (optional, for sealing)
Step 1: Preparation
-
Assess the Surface:
Begin by inspecting your furniture piece. Ensure the wood is clean and dry. If there’s an existing glossy varnish, give it a quick scuff with medium-grit sandpaper to help the paint adhere, though chalk paint is generally very forgiving. -
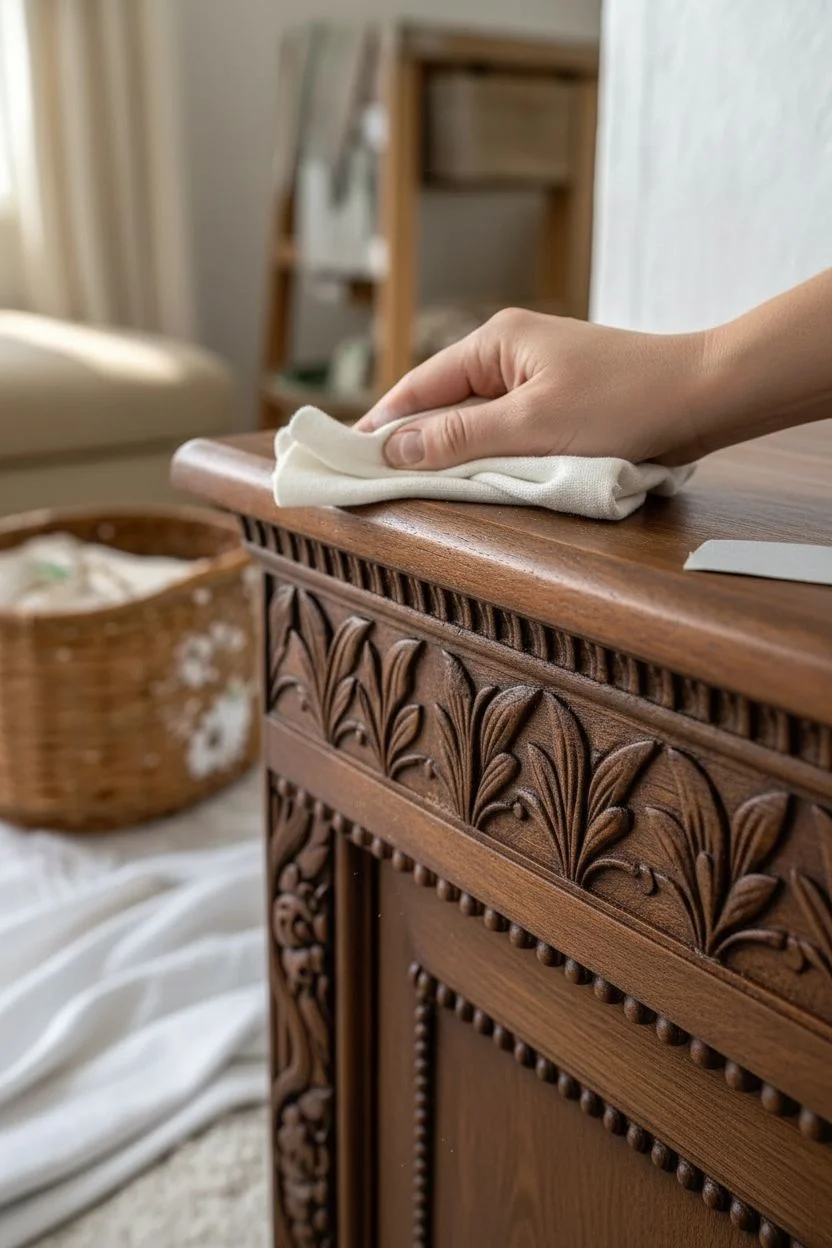
Clean Thoroughly:
Wipe down the entire surface, paying special attention to the deep crevices of the carvings. Dust and grime can get trapped here, which will muddy your paint job later. Use a damp cloth and let it dry completely.
Step 2: The Dry Brush Technique
-
Load the Brush:
Dip just the very tip of your flat paintbrush into the white chalk paint. You need a surprisingly small amount—think ‘less includes more’ for this specific look. -
Offload Excess Paint:
This is the crucial step: drag your brush back and forth vigorously on a paper plate or piece of cardboard. Remove almost all the paint until the brush bristles look nearly dry. -
Test on a Rag:
Do a final check by swiping the brush across a paper towel. If you see solid streaks of white, keep offloading. You want a faint, powdery whisper of color, not a wet stroke. -
Begin Brushing:
Holding the brush at a low angle, lightly sweep it across the raised carved details. Move against the grain or cross-hatch over the ornate sections to catch just the high points. -
Feather the Edges:
For the flat edges and corners, use a feather-light touch. I prefer to use quick, short strokes here to mimic natural wear and light accumulation. -
Build Slowly:
Don’t try to get the full white effect in one pass. It’s much easier to add another layer than to remove too much paint. Let the first pass sit for a minute, then re-assess. -
Target the Details:
Go back over the most intricate carvings—like the leaf patterns shown in the photo—add a second light layer to make those specific shapes pop against the darker wood background. -
Soften Heavy Spots:
If you accidentally apply a glob of paint, quickly wipe it back with a slightly damp cloth while it is still wet, blending it into the surrounding area.
Keep It Dry
If your brush feels damp or clumpy, wash it and dry it thoroughly with a hair dryer before continuing. Any moisture will ruin the dry-brush effect.
Step 3: Finishing Touches
-
Review Contrast:
Step back about five feet from the piece. Check that the highlights are balanced and that the contrast between the white paint and the raw wood looks intentional and organic. -
Optional Distressing:
Once the paint is fully dry (chalk paint dries fast, usually within 30 minutes), you can take fine-grit sandpaper and lightly sand the highest points again to reveal a bit more wood if the white looks too heavy. -
Wax Application:
To protect your handiwork, apply a thin coat of clear furniture wax using a wax brush or lint-free cloth. Work it into the crevices gently. -
Buff to Shine:
Allow the wax to cure for the manufacturer’s recommended time (often overnight), then buff with a soft cloth to achieve a subtle, professional sheen.
Metallic Accent
For a glamorous twist, mix a tiny amount of gold gilding wax into your clear wax to add a subtle shimmer over the white highlights.
This simple technique breathes new life into vintage finds, giving them a sophisticated, time-worn character that looks custom-made
Chalk Painted Stencil Pattern on Drawer Fronts or Cabinet Doors
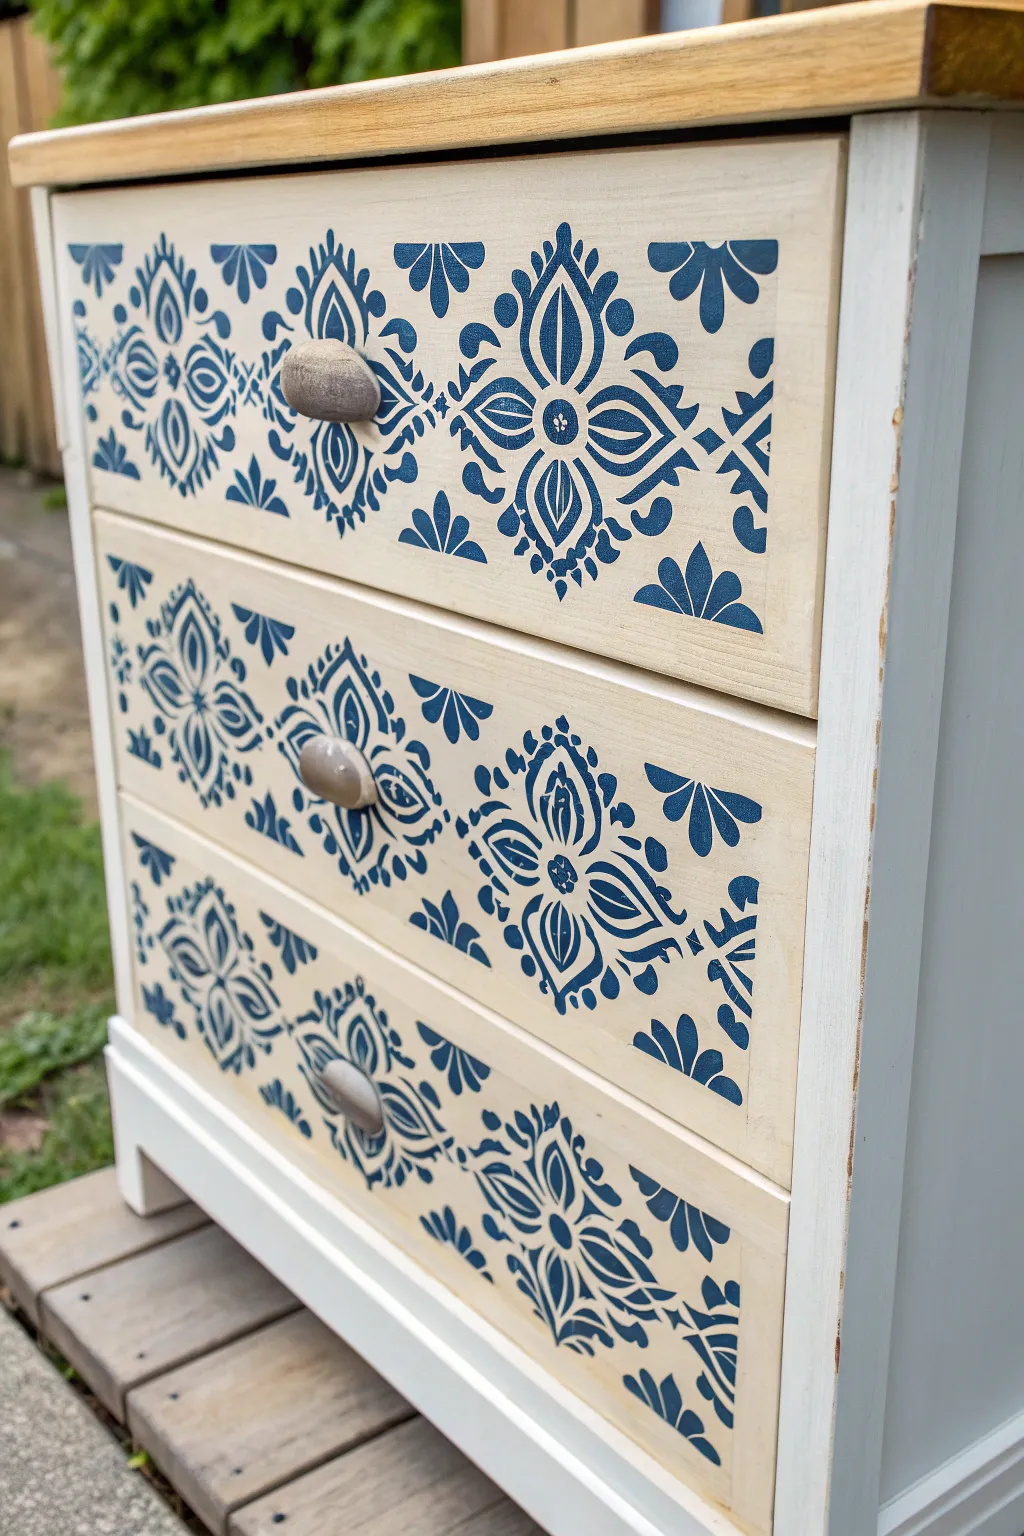

Transform a plain dresser into a statement piece with this intricate, tile-inspired stencil design. The combination of a natural wood top, creamy chalk-painted base, and bold blue patterns creates a fresh, bohemian look that instantly upgrades any bedroom.
Step-by-Step
Materials
- Wooden dresser or nightstand
- Sander or sandpaper (120 and 220 grit)
- Clean rags or tack cloth
- Cream or off-white chalk paint
- Navy blue chalk paint
- Large mandala or tile pattern stencil
- Painter’s tape
- Dense foam roller or stencil brush
- Small artist brush
- Clear matte wax or polycrylic sealer
- Paint brushes (synthetic bristles)
- Paper towels
Step 1: Preparation
-
Remove Hardware:
Begin by unscrewing and removing all knobs or handles from the drawers. Place them in a labeled bag so you don’t lose any screws. -
Clean the Surface:
Wipe down the entire piece with a damp cloth or a degreasing cleaner to remove dust, grime, and any old furniture polish. Let it dry completely. -
Sand the Drawers:
Lightly scuff sand the drawer fronts and the sides of the cabinet using 120-grit sandpaper to give the paint something to grip. You don’t need to strip it to bare wood, just de-gloss the finish. -
Prepare the Top:
If you want the natural wood look shown in the photo, sand the top surface completely down to raw wood using an orbital sander, starting with 80-grit and working up to 220-grit for a smooth finish. -
Protect Edges:
Use painter’s tape to mask off the beautifully sanded wood top so you don’t accidentally get paint on it while working on the base.
Step 2: Base Painting
-
Paint the Frame:
Apply a coat of cream chalk paint to the sides and frame of the dresser. Chalk paint covers well, but work in smooth strokes to avoid brush marks. -
Paint the Drawer Fronts:
Paint the drawer fronts with the same cream color. Ensure you get into any grooves, but keep the paint thin to avoid drips. -
Second Coat:
Allow the first coat to dry for about 1-2 hours. Apply a second coat to ensure solid, opaque coverage on both the frame and drawers. -
Stain or Seal the Top:
While the paint dries, seal the raw wood top with a clear matte sealer or a light stain if you prefer a darker tone. I find a clear wax brings out the grain beautifully without darkening it too much.
Crisp Lines Secret
Use spray adhesive on the back of your stencil, not just tape. A light mist helps the intricate plastic bits stick flat to the drawer, preventing paint bleed-under.
Step 3: Stenciling
-
Position the Stencil:
Lay the drawer fronts flat on a table. Center your mandala stencil on the first drawer. Measure from the sides to ensure it is perfectly symmetrical. -
Secure the Template:
Tape the stencil down securely with painter’s tape so it doesn’t shift while you work. -
Load the Roller:
Dip your foam roller into the navy blue chalk paint, then roll it off onto a paper towel until it feels almost dry. This ‘off-loading’ is the secret to crisp lines. -
Apply the Pattern:
Roll over the stencil with light, even pressure. Build up the color slowly with multiple thin passes rather than one heavy one. -
Lift and Repeat:
Carefully lift the stencil straight up to avoid smearing. Reposition it to continue the pattern across the drawer if the design extends to the edges, matching up the registration marks. -
Touch Ups:
Once dry, inspect your work. Use a tiny artist brush and a bit of the cream base paint to tidy up any areas where the blue paint might have bled under the stencil.
Bleeding Paint?
If paint bleeds, you likely have too much paint on your roller. Let the bleed dry, sand it lightly, touch up with the base cream color, and try again with a drier roller.
Step 4: Finishing Touches
-
Seal the Paint:
Once the stencil design has cured (usually 24 hours), apply a layer of clear wax or polycrylic over the painted parts to protect your artwork from scratches. -
Distress (Optional):
If you want a more aged look, gently sand the edges of the drawers with 220-grit paper to reveal a little bit of the wood underneath, focusing on corners and high points. -
Reinstall Hardware:
Screw the knobs back onto the drawers. If the old ones don’t match, consider spray painting them a brushed nickel or stone color to complement the blue. -
Final Buff:
Give the waxed surfaces a final buff with a soft, lint-free cloth to create a soft, professional sheen.
Now you have a stunning, custom piece of furniture that looks like an expensive boutique find
Chalk Paint Wash for a Soft, Translucent Stained Wood Effect
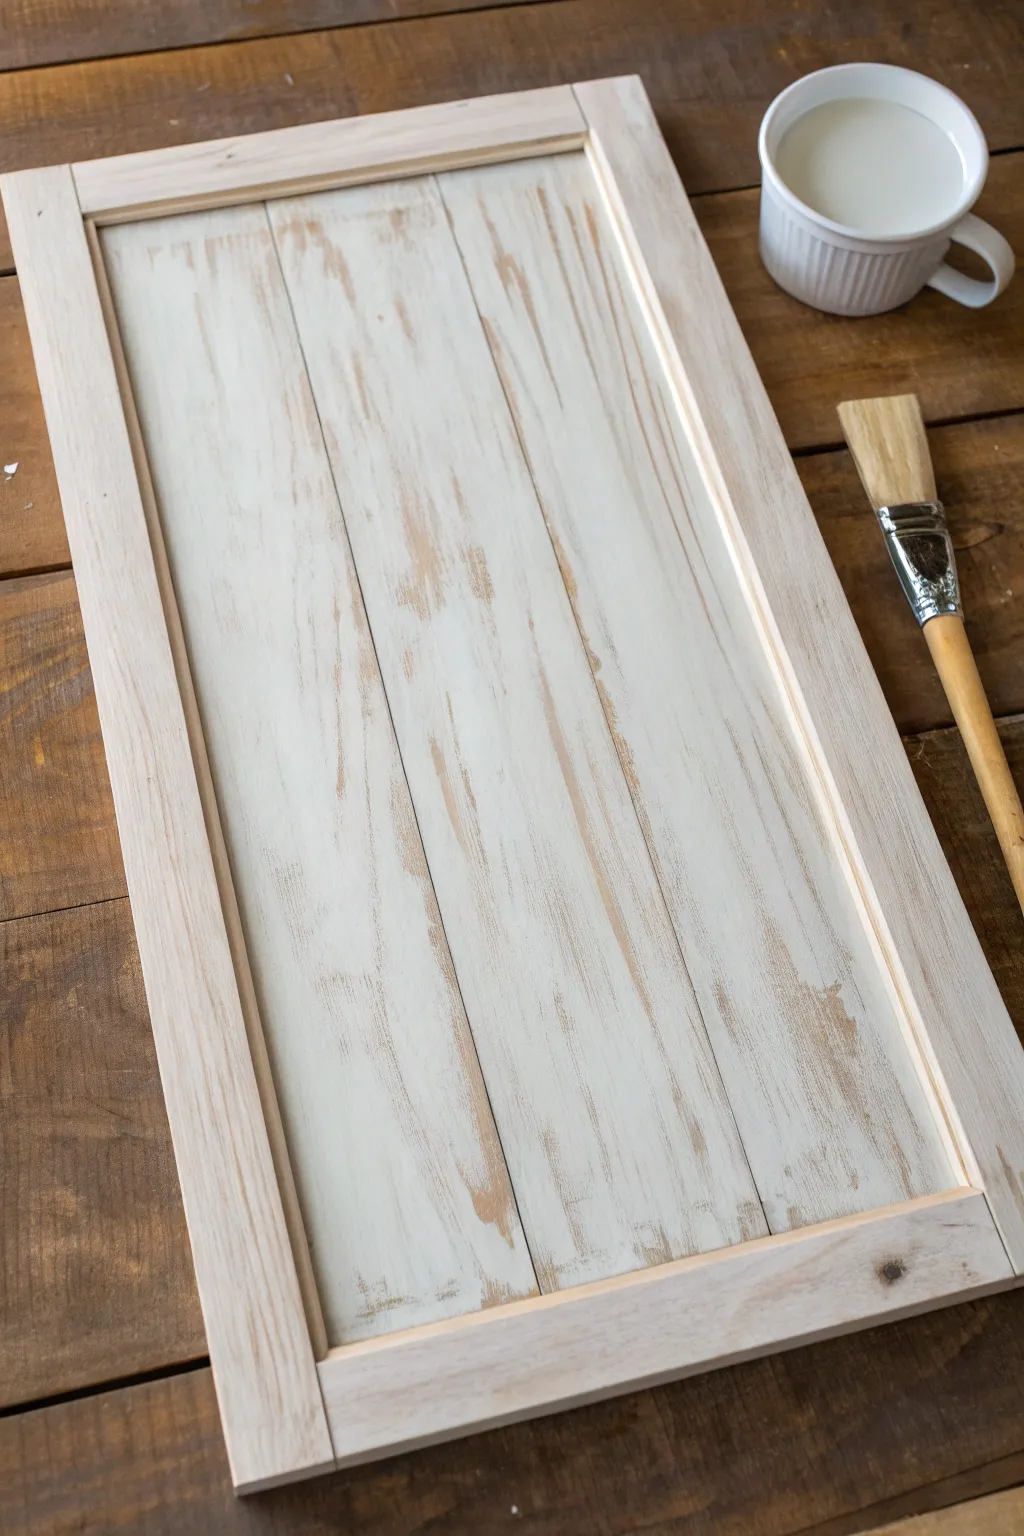
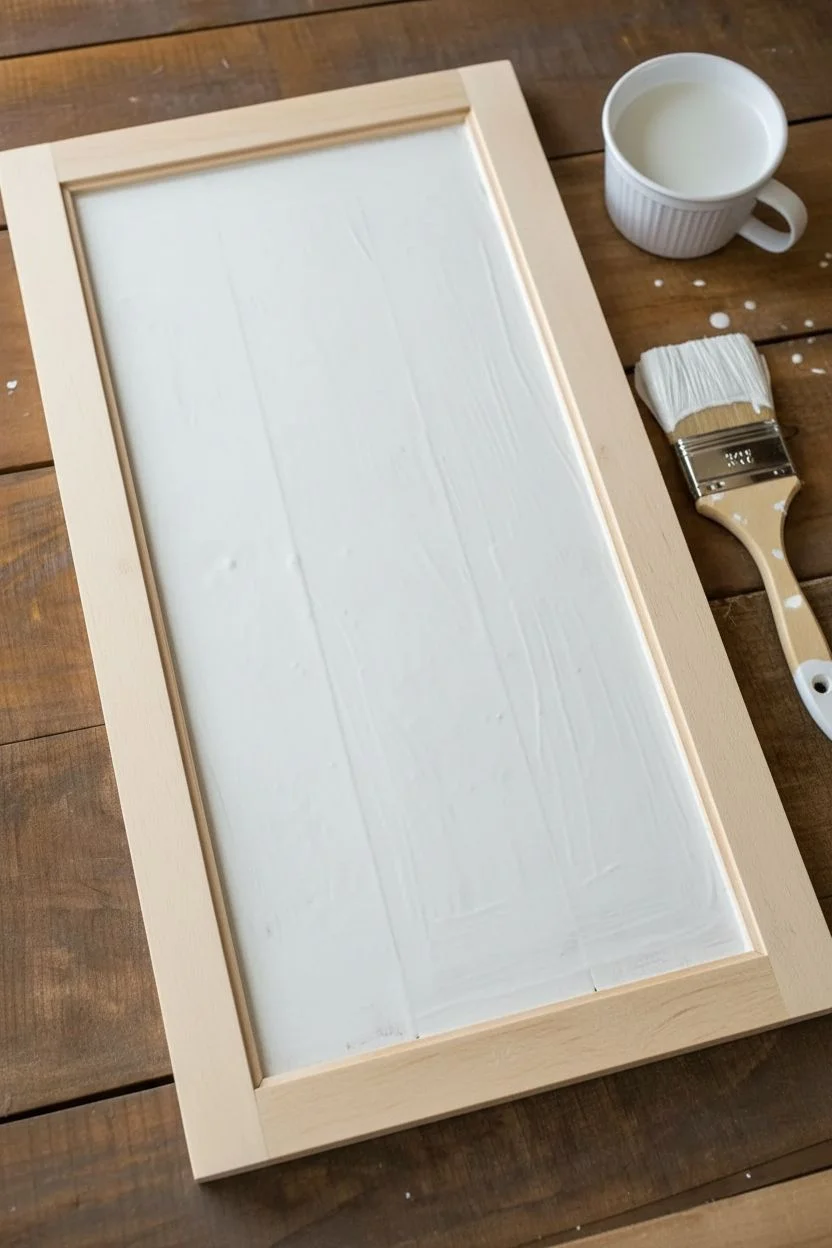
Create a rustic, time-worn foundation for your next sign project using a simple chalk paint wash technique. This method allows the natural wood grain to peek through a soft veil of white, achieving that perfect farmhouse charm without completely hiding the wood’s character.
How-To Guide
Materials
- Unfinished wood sign surface (framed panel)
- White chalk style paint
- Water
- Small container for mixing
- Wide flat synthetic paintbrush (1.5 – 2 inch)
- Stir stick
- Paper towels or lint-free rag
- Sandpaper (220 grit)
- Clear matte wax or polycrylic (optional)
Step 1: Preparation & Mixing
-
Prepare the surface:
Ensure your wooden panel is clean and free of dust. If the wood is rough, give it a quick sanding with 220-grit sandpaper to smooth out any splinters. -
Mix the wash:
In your small container, combine your white chalk paint with water. A good starting ratio is 1 part paint to 1 part water. -
Stir thoroughly:
Mix the solution well until the consistency resembles thin milk. The thicker the mixture, the more opaque the coverage will be. -
Test the consistency:
Dab a tiny amount on the back of the wood or a scrap piece. If it’s too solid, add more water; if it’s too invisible, add a touch more paint.
Wet Rag Trick
Keep a damp rag handy while working. If a section looks too opaque, rubbing it with the damp rag will reactivate the paint and lift it off cleanly.
Step 2: Applying the Wash
-
Dip the brush:
Dip your wide flat brush into the diluted paint mixture. You don’t need to overload the brush; a moderate amount works best. -
Apply to the center panel:
Brush the wash onto the inner slatted area of the wood panel. Use long, unidirectional strokes that follow the natural grain of the wood. -
Work in sections:
Paint one slat or section at a time so the wash doesn’t dry before you have a chance to manipulate it. -
Wipe back excess:
Immediately after brushing, take your lint-free rag or paper towel and gently wipe over the wet paint in the direction of the grain to remove excess liquid. -
Assess the coverage:
Evaluate the look. If you wiped away too much, apply another light coat. If it’s too heavy, wipe harder with a damp cloth. -
Finish the center:
Continue until the entire central area is covered, ensuring the coverage looks consistent but organic across the slats.
Create Contrast
For a bolder look, stain the wood with a dark walnut stain and let it dry completely before applying the white wash. The contrast will be striking.
Step 3: Finishing the Frame
-
Wash the frame:
Using the same brush, apply the wash to the raised outer frame. I prefer to use a slightly drier brush here to keep the liquid from pooling in the corners. -
Wipe the frame:
Wipe the frame with your rag, again following the grain, blending it nicely where the frame pieces join. -
Check for drips:
Inspect the inner corners where the frame meets the panel. Use the corner of your rag or a dry brush to soak up any wash that has pooled there. -
Let it dry:
Allow the entire piece to dry completely. Because chalk paint dries quickly and the layers are thin, this should only take about 30 minutes.
Step 4: Distressing & Sealing
-
Sand for distress:
Once dry, take your 220-grit sandpaper and lightly sand high spots, edges, and random areas on the slats to reveal more raw wood and enhance the rustic effect. -
Clean up dust:
Wipe away all sanding dust with a clean, dry cloth or tack cloth. -
Seal (optional):
If this sign will be handled frequently, apply a thin coat of clear matte wax or polycrylic to protect the finish without adding unwanted shine.
This beautifully weathered surface is now ready for your favorite stencil, vinyl lettering, or hand-painted quote


Have a question or want to share your own experience? I'd love to hear from you in the comments below!