If your headboard is feeling dated, chalk paint is my favorite shortcut to a soft, velvety makeover with tons of character. Here are 19 chalk painted headboard ideas—starting with the classic finishes everyone loves, then drifting into artsier, bolder looks for when you want a real statement.
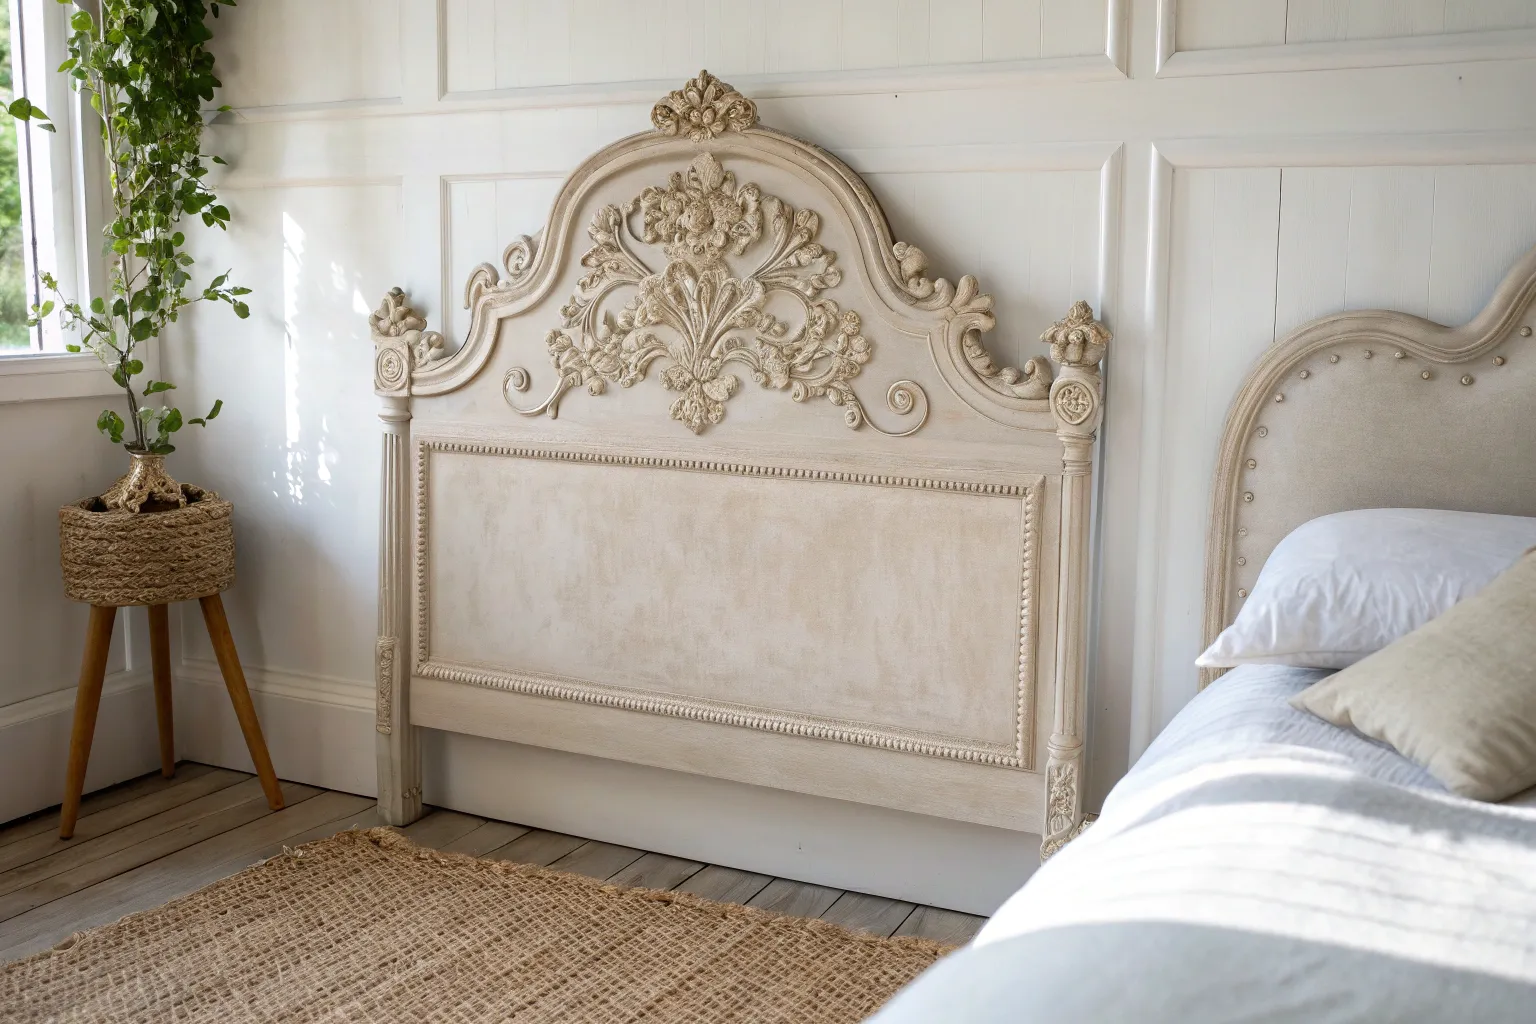
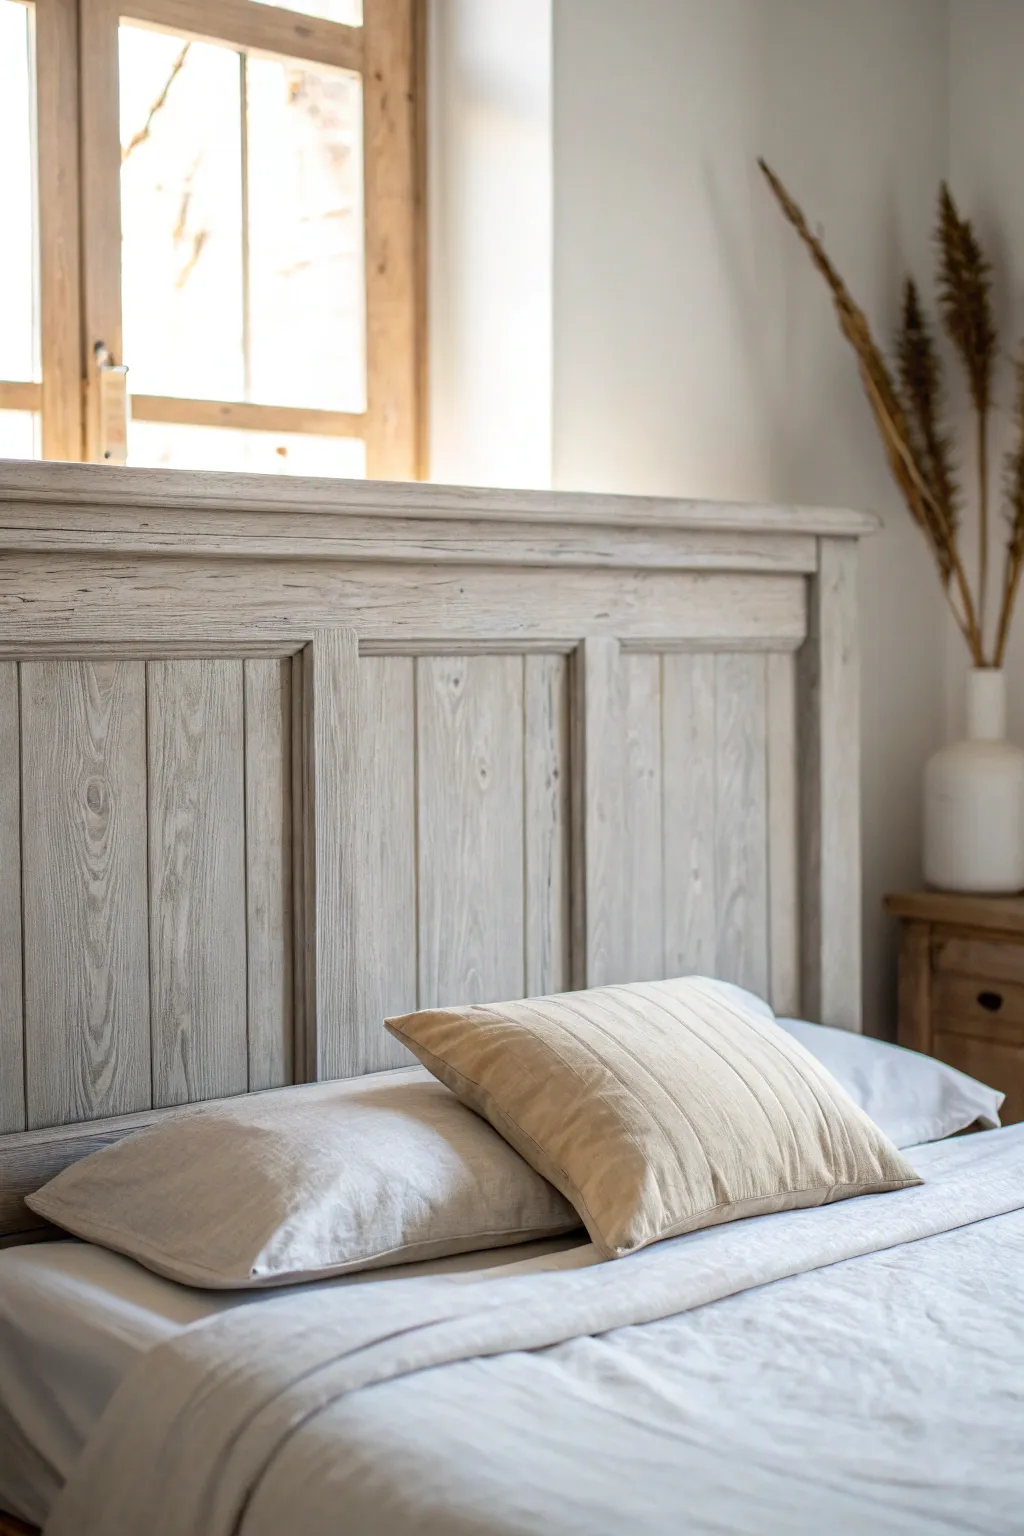
Chalk-Painted White Distressed Headboard
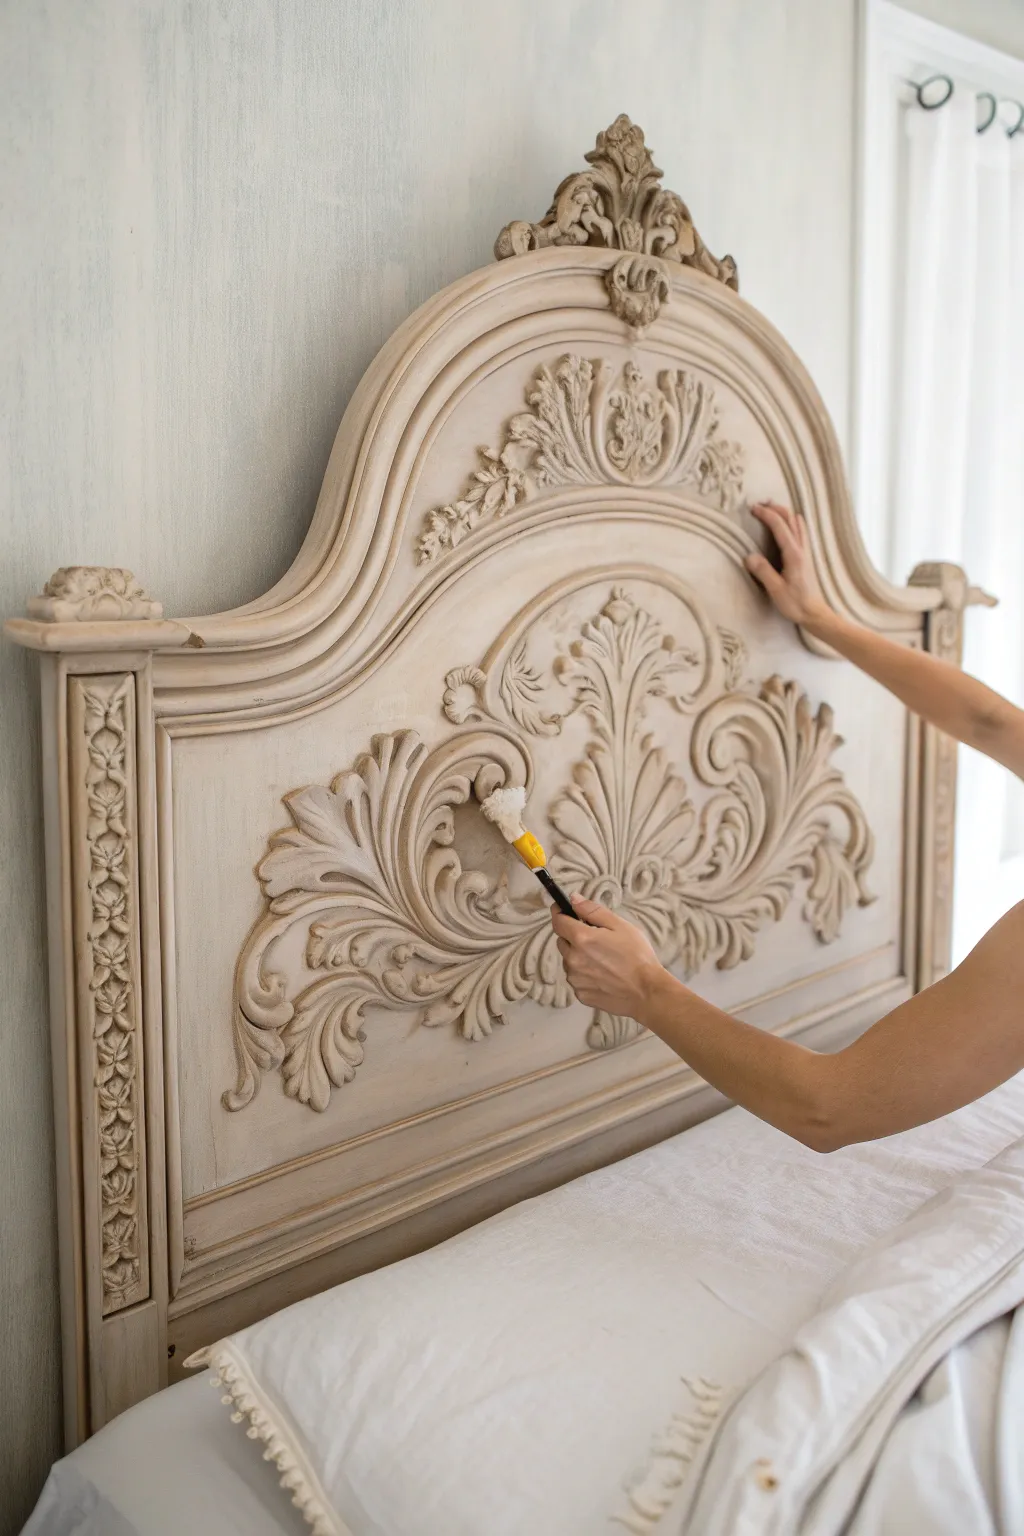
Transform a dark, heavy wooden bed frame into a light and airy farmhouse masterpiece with this simple chalk paint technique. The finish features a creamy antique white coat that has been artfully sanded back to reveal charming peeks of the original wood grain.
Step-by-Step Guide
Materials
- Ornate wooden headboard (pre-cleaned)
- Creamy white chalk-style paint (e.g., Old White or similar)
- Medium-grit sandpaper (120-150 grit)
- Fine-grit sandpaper (220 grit) or sanding block
- Synthetic oval paint brush (2-inch)
- Clear furniture wax
- Dark furniture wax (optional for extra aging)
- Lint-free cotton rags
- Painter’s tape
- Drop cloth
- Mild degreaser or TSP substitute
Step 1: Preparation & Cleaning
-
Clean thoroughly:
Begin by wiping down the entire headboard with a TSP substitute or mild degreaser to remove oils and furniture polish. This step is crucial because chalk paint adheres best to a clean, grease-free surface. -
Rinse and dry:
Wipe the surface again with a clean, damp cloth to remove any soapy residue. Allow the wood to dry completely before opening your paint can. -
Protect surroundings:
Lay down your drop cloth and tape off any areas you don’t want painted, such as side rails if you are painting the headboard in place.
Wet Distressing Trick
If you hate sanding dust, use a damp kitchen sponge to rub paint off the edges while it’s barely dry. It creates a smoother, more natural distressed line.
Step 2: Painting the Base
-
First coat application:
Load your oval brush with the creamy white chalk paint. Apply the first coat using long, smooth strokes in the direction of the wood grain. -
Focus on crevices:
Use the tip of the brush to stipple or push paint into the deep carvings, egg-and-dart moulding, and floral details. Don’t worry about complete opacity yet; coverage will build up. -
Dry time:
Let this first coat dry for about an hour, or until it is dry to the touch. Chalk paint dries quickly, which is one of the reasons I love working with it. -
Second coat application:
Apply a second coat to ensure solid coverage, paying extra attention to the large flat panels. This layer should be slightly thicker to build a durable finish. -
Check for drips:
While the paint is still wet, scan the ornate carvings for any paint that may have pooled or dripped and smooth it out. -
Full cure:
Allow the painted headboard to dry completely, preferably overnight, so the paint hardens sufficiently for the sanding phase.
Step 3: Distressing & Finishing
-
Initial distressing:
Take your medium-grit sandpaper (120-150) and begin sanding the high points of the carvings. Focus on the raised floral motifs, the finials, and the fluted column edges. -
Create natural wear:
Sand the sharp corners and edges of the flat panels where natural wear would occur over time. Apply varying pressure to reveal different amounts of the dark wood underneath. -
Smooth the flat surfaces:
Switch to a fine-grit sanding block (220) and lightly go over the large flat panels. You aren’t trying to remove paint here, just smoothing out brush strokes for a buttery finish. -
Dust off:
Use a vacuum with a brush attachment or a dry lint-free cloth to remove all sanding dust. Every speck of dust must be gone before waxing. -
Apply clear wax:
Dip a wax brush or clean rag into the clear furniture wax. Massage it into the paint in small sections, working it into the grain. -
Buff the wax:
After letting the wax sit for a few minutes, use a fresh lint-free cloth to buff the surface vigoriously. This creates a soft sheen and seals the paint. -
Optional dark wax:
To enhance the antique look, lightly apply a tiny amount of dark wax only into the deepest crevices of the carvings, then wipe back the excess immediately with clear wax.
Add Subtle Depth
Mix a tiny drop of grey paint into your white for the first coat only. When you distress the top white layer, a hint of grey will peek through before the wood.
Step back and admire the soft, timeworn elegance your new headboard brings to the bedroom


Chalk-Painted French Gray Wash Headboard
Transform a standard wooden headboard into a serene, weathered centerpiece with this sophisticated wash technique. By layering diluted paint and wax, you’ll achieve that coveted, sun-bleached driftwood effect without hiding the beautiful natural wood grain.
Step-by-Step
Materials
- Wooden headboard (raw or sanded to bare wood)
- Chalk paint (warm gray tone)
- Chalk paint (creamy white)
- Clear furniture wax
- White or liming wax
- Orbital sander with 120 and 220 grit pads
- Wire brush (brass bristles)
- Wide synthetic bristle brush
- Clean lint-free rags
- Water for dilution
- Tack cloth
- Plastic drop cloth
Step 1: Preparation & Grain Opening
-
Clean surface:
Begin by removing any dust or debris from your headboard. If the wood has a previous shiny finish, strip it chemically or sand it down to bare wood completely. -
Sand smooth:
Using an orbital sander with 120-grit paper, even out the surface. Follow this immediately with 220-grit to create a smooth, touchable base. -
Open the grain:
This is the secret sauce: take a brass-bristled wire brush and firmly scrub the wood following the direction of the grain. This digs out the soft fibers and creates deep channels for the white wax to sit in later. -
Remove dust:
Wipe the entire piece down thoroughly with a tack cloth. Wood dust in the crevices will turn your wash into mud, so be diligent here.
Wire Brush Direction
Always wire brush WITH the grain, never across it. Going against the grain creates ugly scratch marks that ruin the linear driftwood effect.
Step 2: The Gray Wash Phase
-
Mix the wash:
In a plastic container, mix your warm gray chalk paint with water. Aim for a 50/50 ratio initially; you want the consistency of skim milk. -
Test the opacity:
Test your gray wash on a hidden back leg or scrap wood. If it’s too opaque, add more water; too thin, add a dollop of paint. -
Apply the wash:
Brush the gray wash onto a small section of the headboard, like a single panel or section of trim. Work quickly to keep a wet edge. -
Wipe back:
Immediately after applying, take a clean rag and wipe off the excess paint. You are staining the wood, not painting it solid, so rub firmly to reveal the grain. -
Repeat process:
Continue painting and wiping section by section until the entire headboard has a cohesive gray tint. Let this layer dry completely, usually about an hour.
Step 3: Dry Brushing & Texture
-
Prepare dry brush:
Dip just the very tips of a dry synthetic brush into your creamy white paint. Offload almost all the paint onto a paper towel until the brush seems nearly empty. -
Highlight edges:
Lightly drag the brush over the raised moldings and edges of the paneling. This ‘catching’ technique highlights the architectural details. -
Feather the panels:
Very softly whisk the dry brush vertically down the center panels. Do not aim for full coverage; just a whisper of white to create depth. -
Soften harsh lines:
If any dry brush marks look too stark, gently buff them with a clean, slightly damp rag before the paint cures.
Uneven Wash Color?
If the gray wash looks blotchy, the wood might be absorbing unevenly. Dampen the wood slightly with a water mist bottle before applying the next wash layer.
Step 4: Waxing & Finishing
-
Apply clear wax:
Once the paint is fully dry, brush on a thin layer of clear furniture wax over the entire piece. This primes the surface so the subsequent colored wax doesn’t grab too dark. -
Apply white wax:
I like to work the white or liming wax deep into the wood grain using a specialized wax brush. Push hard to get it into those wire-brushed grooves. -
Wipe excess:
Using a fresh lint-free cloth, buff off the excess white wax. The white should remain mostly in the grain lines and corners, enhancing the weathered look. -
Final buffing:
Let the wax cure for at least 24 hours, then buff roughly with a clean cotton cloth to achieve a soft, satin sheen. -
Reassemble:
Once the finish is no longer tacky, move the headboard back into place and style your bedding.
Now you have a stunning, timeless headboard that brings a breath of fresh styling to your bedroom


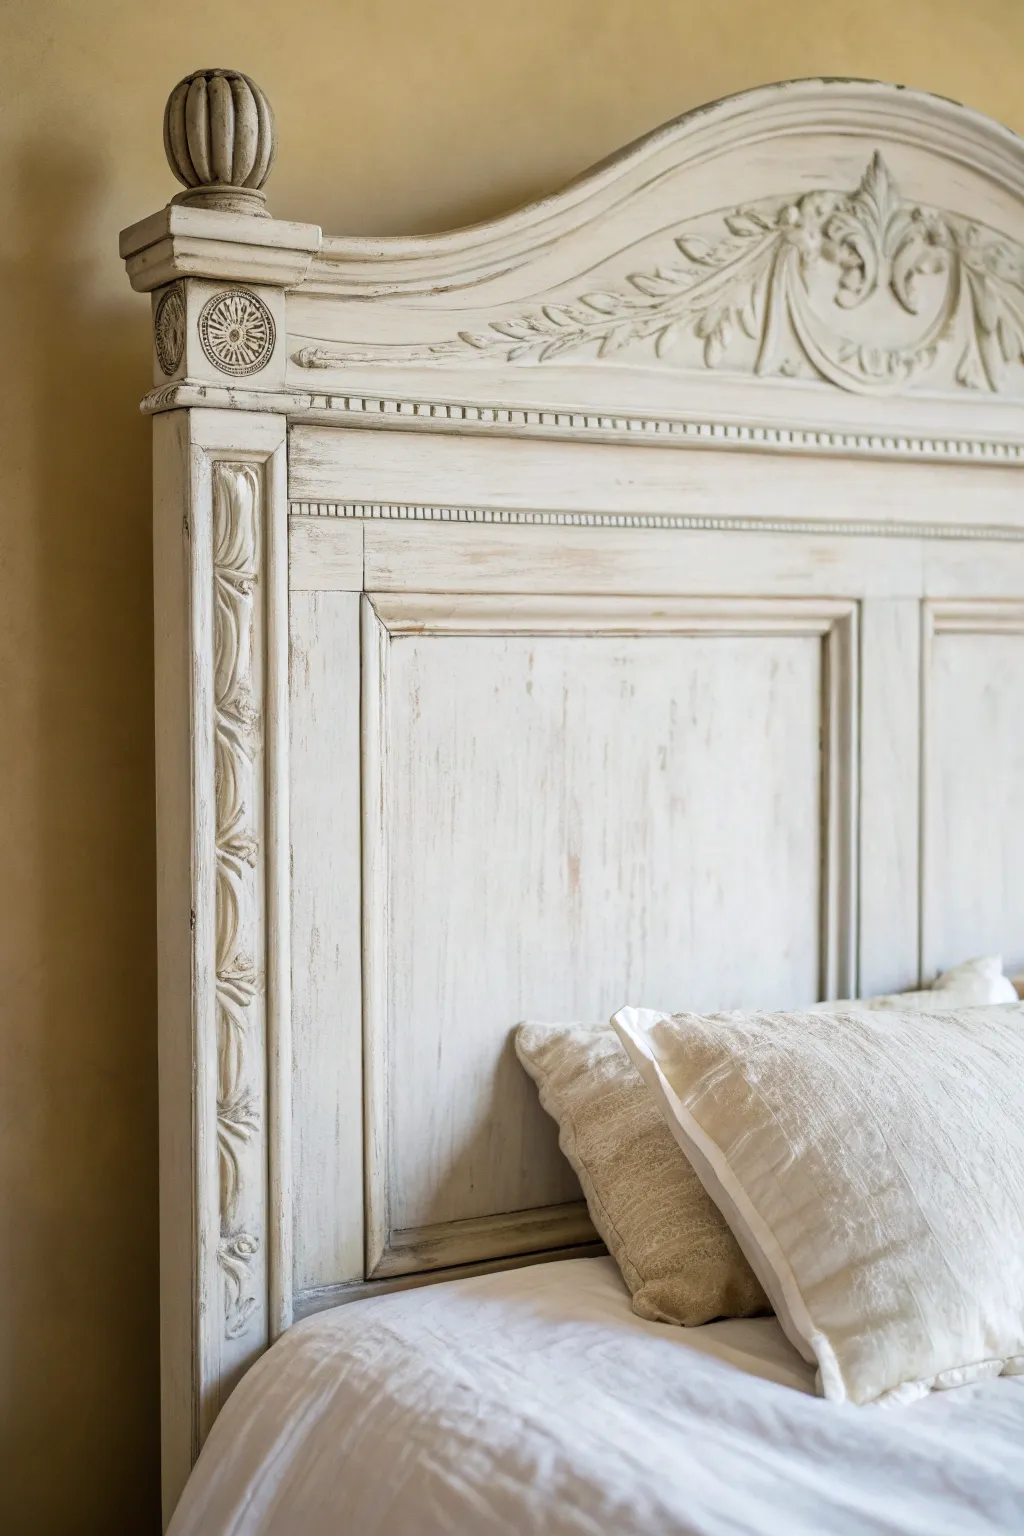
Antiqued Chalk-Painted Headboard With Dark Wax
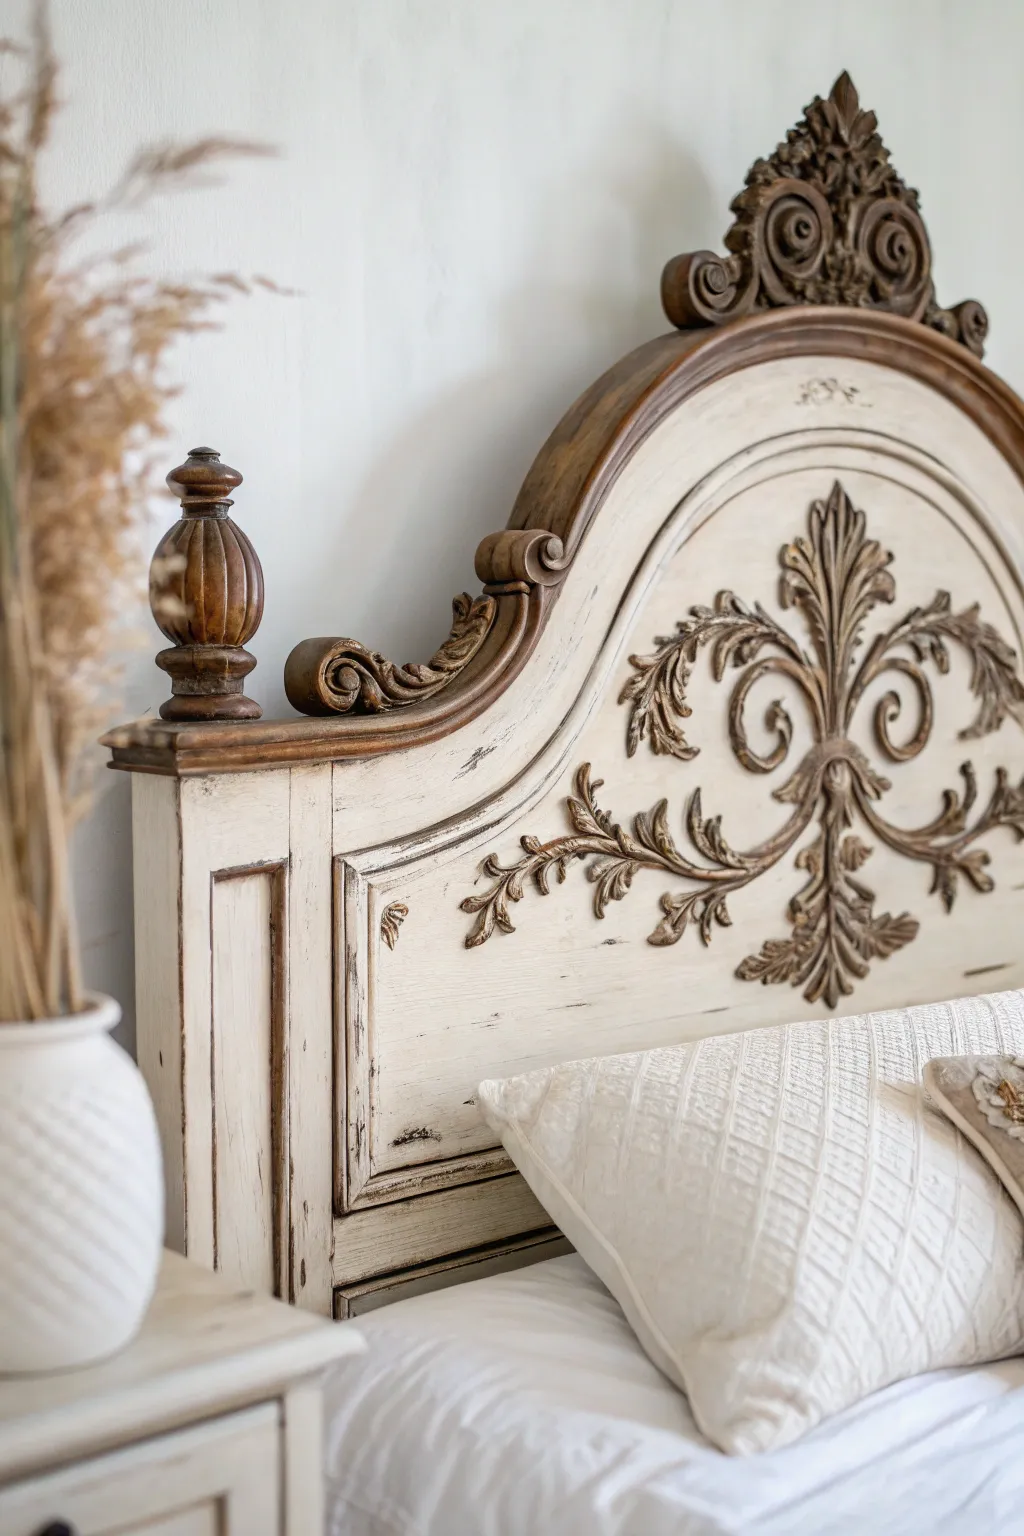
Transform a standard wooden headboard into a French country masterpiece using off-white chalk paint and strategically applied dark wax. This technique highlights carved details and creates a sophisticated, aged patina that feels authentic and lived-in.
Step-by-Step Tutorial
Materials
- Ornate wooden headboard (clean and dry)
- Cream or off-white chalk paint (e.g., Annie Sloan Old White)
- Dark wood stain (optional, for bare wood spots)
- Clear wax
- Dark antique wax
- Medium-grit sandpaper (120-150 grit)
- Fine-grit sandpaper (220 grit)
- Lint-free rags or cheesecloth
- Oval chalk paint brush
- Wax brush or stiff bristle brush
- Painter’s tape
Step 1: Preparation & Base Coat
-
Assess the wood:
Begin by inspecting your headboard. If the original finish is very shiny or lacquered, give it a quick scuff-sand with medium-grit paper to help the paint adhere, then wipe away all dust with a damp cloth. -
Plan your exposed areas:
Notice how the top rails and finials in the inspo image remain dark wood. Use painter’s tape to mask off any areas you want to keep as original natural wood, specifically the top curved rail and the finial posts. -
Apply the first coat:
Load your oval brush with cream chalk paint. Apply the first coat over the main panel and carvings. It doesn’t need to be perfectly opaque; chalk paint is forgiving, and brush strokes add character. -
Let it dry completely:
Wait about 1-2 hours for the first coat to dry. Chalk paint dries quickly, but if it feels cool to the touch, give it more time. -
Apply the second coat:
Paint a second layer for fuller coverage. Pay special attention to getting paint into the crevices of the scrollwork and floral carvings, but avoid letting it pool too thickly in the deep recesses.
Too dark?
If the dark wax looks too heavy or muddy, apply a dollop of clear wax onto a rag and rub it over the dark spot. The clear wax acts as a solvent and will lift the pigment right off.
Step 2: Distressing & Texture
-
Wet distress technique:
While the second coat is just slightly tacky or freshly dry, use a damp lint-free rag to gently rub paint off high points of the carvings. This reveals the dark wood underneath more naturally than sandpaper. -
Structural sanding:
Once fully dry, use fine-grit sandpaper to distress the flat edges, corners, and raised moldings. Focus on areas where natural wear would occur over decades of use. -
Reveal the grain:
For the flat panels, you can lightly sand in the direction of the wood grain. This creates the ‘scratched’ texture seen in the reference image, allowing the dark wax to catch later. -
Clean up:
Vacuum the headboard thoroughly or use a tack cloth to remove every speck of sanding dust. This is crucial for a smooth wax application.
Step 3: The Waxing Process
-
Apply clear wax first:
I always recommend starting with a thin layer of clear wax over the entire painted surface using a wax brush. This seals the paint and acts as a lubricant (or ‘eraser’) for the dark wax so it doesn’t stain the paint too intensely. -
Prepare the dark wax:
Dip just the tip of your brush into the dark antique wax. You need very little product for this step; tap off any excess onto a cardboard scrap or paper towel. -
Work into crevices:
Push the dark wax deep into the scrollwork, floral carvings, and corners. The goal is to create shadows and depth, mimicking accumulated age. -
Wipe back:
Immediately wipe over the area with a clean, lint-free cloth. The clear wax base allows you to wipe away the dark wax from the high points, leaving it only in the texture and grooves. -
Feather the flat surfaces:
Lightly drag the dirty wax cloth over the flat white panels to leave faint streaks. This replicates the aged, dirty look seen in the photo without overpowering the cream color. -
Unmask and refine:
Remove the painter’s tape from the natural wood rails. If the paint line is too stark, lightly sand the transition edge to soften it. You can rub a little dark wax on the natural wood to unify the sheen. -
Final buffing:
Allow the wax to cure overnight. The next day, use a soft, clean cloth to buff the surfaces to a soft, satin sheen.
Pro Tip: Depth of Field
Don’t wax evenly! Leave the center of panels lighter and concentrate the dark wax heavily in corners and deep carvings. This creates realistic shadowing and depth.
Step back and admire how the dark wax has instantly added a century of character to your piece.


Clean Matte Chalk-Painted Headboard With Clear Wax
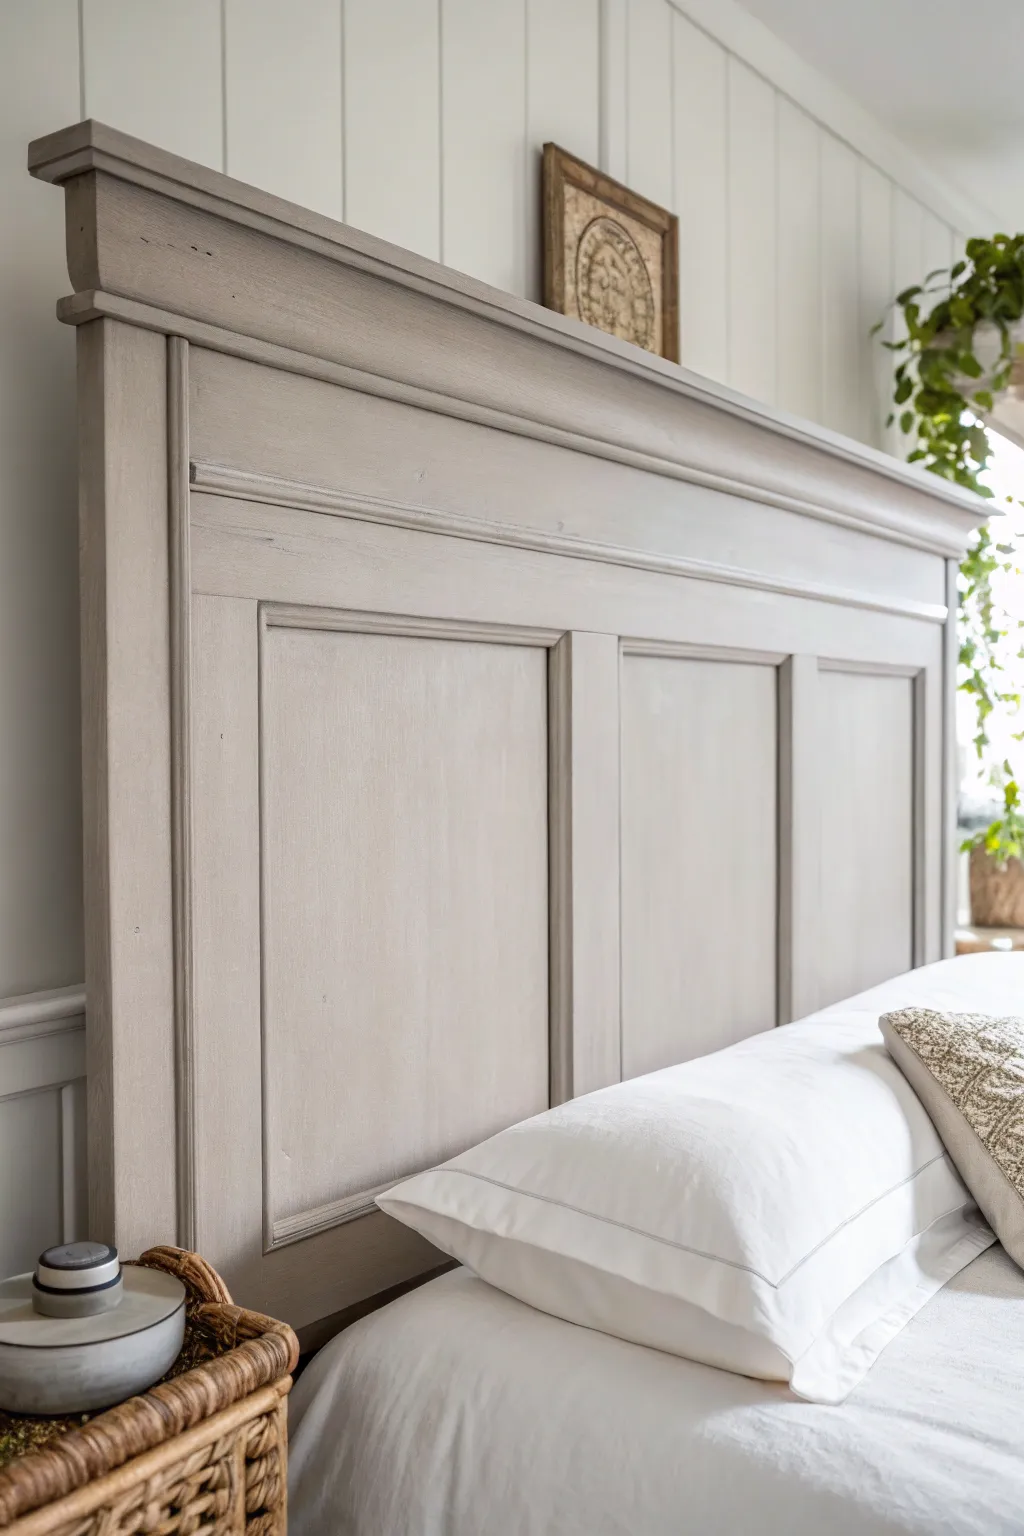
Transform a standard wooden headboard into a sophisticated focal point with this soft, matte greige finish. Using chalk paint and clear wax creates that velvety, modern farmhouse texture that feels both timeless and fresh.
Step-by-Step
Materials
- Wooden headboard (paneled style preferred)
- Greige chalk paint (e.g., Annie Sloan French Linen or similar)
- Clear furniture wax
- Degreasing cleaner (like TSP or sugar soap)
- Medium-grit sandpaper (120-150 grit)
- Fine-grit sandpaper (220 grit)
- Oval chalk paint brush (medium size)
- Clean, lint-free wax cloth or waxing brush
- Painter’s tape
- Drop cloth
Step 1: Preparation
-
Clean surface:
Before dipping your brush, thoroughly wipe down the entire headboard with a degreasing cleaner to remove oils and dust that could repel the paint. -
Protect area:
Slide a drop cloth under the headboard legs and apply painter’s tape to any areas you want to keep paint-free, such as metal rails or adjacent wall molding. -
Light scuffing:
If the original finish is very glossy, give it a quick scuff with medium-grit sandpaper to give the chalk paint extra grip, then wipe away the dust.
Uneven Coverage?
If you see brush strokes or patchiness after the wax dries, you likely used too much wax. wait for it to cure fully, then lightly sand and re-wax sparingly.
Step 2: Painting
-
First coat application:
Stir your greige chalk paint thoroughly, ensuring pigment at the bottom is mixed in. Apply the first coat using an oval brush, painting in the direction of the wood grain. -
Detail work:
Use the tip of your brush to push paint into the crevices of the molding and recessed panel corners, ensuring no bare wood peeks through. -
Smooth the surface:
Once the panel is covered, run long, light keystrokes across the wet paint from top to bottom to minimize brush marks. -
drying time:
Let this first coat dry completely, usually about 1-2 hours depending on humidity; chalk paint dries fast, but patience here prevents peeling later. -
Second coat:
Apply a second coat for full opacity, focusing on any areas that look translucent; the color will look richer and more solid now. -
Light sanding:
After the second coat is bone dry, run a fine-grit sandpaper (220) very lightly over the flat surfaces to knock down any texture and create a buttery smooth base. -
Dust removal:
Wipe the entire piece down with a dry, lint-free cloth or a tack cloth to remove every speck of sanding dust before the waxing stage.
Add Depth
For an aged look, apply dark wax only in the recessed molding grooves after the clear wax is dry, then wipe it back immediately so it just sits in the shadows.
Step 3: Sealing
-
Wax application:
Dip your wax brush or cloth into the clear wax—you only need a small amount—and massage it into the paint in small sections. -
Working it in:
Push the wax fairly aggressively into the paint pores; think of it like applying lotion to dry skin rather than painting a layer on top. -
Remove excess:
Immediately wipe over the waxed section with a clean, lint-free cloth to remove any excess wax sitting on the surface. -
Buffing:
Once you have waxed the entire headboard, let it sit for about 24 hours, then buff it briskly with a clean cotton cloth to achieve a subtle, soft sheen.
Enjoy the calm, sophisticated atmosphere your new custom headboard brings to the bedroom
BRUSH GUIDE
The Right Brush for Every Stroke
From clean lines to bold texture — master brush choice, stroke control, and essential techniques.
Explore the Full Guide
Dry-Brushed Detail Chalk-Painted Headboard
Transform an ornate headboard into a faux-antique masterpiece by using subtle layers of chalk paint and dry-brushing techniques. This method highlights intricate wood carvings, giving them depth and a soft, weathered patina that feels effortlessly chic.
Step-by-Step Tutorial
Materials
- Ornate wooden headboard (clean and dry)
- Chalk paint (Base color: Beige or Taupe)
- Chalk paint (Highlight color: White or Off-White)
- Clear furniture wax
- Dark antique wax (optional for deeper crevices)
- Large round chalk paint brush
- Small stiff-bristled detail brush
- Lint-free rags
- Fine-grit sandpaper (220-grit)
- Drop cloth
- Mild degreaser or TSP alternative
Step 1: Preparation and Base Coat
-
Clean the Surface:
Begin by thoroughly cleaning the headboard with a mild degreaser or TSP alternative to remove any oils, dust, or furniture polish. This ensures the chalk paint adheres properly to the wood. -
Light Sanding:
Although chalk paint rarely requires priming, give the surface a quick scuff sand with 220-grit sandpaper to create a better ‘tooth’ for the paint, especially if the original finish is glossy. -
Wipe Down:
Remove all sanding dust with a damp lint-free cloth and let the wood dry completely before opening your paint cans. -
Apply Base Coat:
Using your large round brush, apply the beige or taupe chalk paint over the entire headboard. Work the paint into the carvings, but don’t worry about perfect coverage yet. -
Second Coat Coverage:
Once the first coat is dry to the touch (usually about 30-60 minutes), apply a second coat for full opacity. Ensure the flat panels and raised details are evenly covered. -
Full Cure:
Allow the base coat to dry completely, preferably overnight, to ensure a hard foundation for the dry-brushing steps.
Don’t Overload!
For true dry brushing, your brush should feel almost empty. Test it on cardboard first; if you see solid streaks, wipe off more paint.
Step 2: Accenting the Details
-
Prepare for Dry Brushing:
Dip just the tip of your small, stiff-bristled brush into the white or off-white chalk paint. Off-load almost all the paint onto a paper towel or cardboard until the brush feels dry. -
Highlighting Raised Areas:
Gently sweep the dry brush over the highest points of the ornate carvings. The goal is to catch only the raised textures, leaving the recesses in the darker base color. -
Feathering the Flat Surfaces:
On the flat panels surrounding the carvings, use extremely light, sweeping strokes to add a subtle, cloudy texture. This prevents the finish from looking too uniform or flat. -
Building Intensity:
I prefer to work in thin layers here; repeat the dry-brushing process on the most prominent carvings to make them pop against the background. -
Softening Edges:
If any brush strokes look too harsh or heavy, use a clean, dry cloth to gently buff them out while the paint is still slightly tacky. -
Detailing Deep Crevices:
For added dimension, you can use a fine artist’s brush to stipple small amounts of the highlight color into specific corners or scrollwork centers.
Step 3: Sealing and Finishing
-
Apply Clear Wax:
Once the paint is fully dry, use a wax brush or lint-free cloth to massage clear furniture wax over the entire piece. -
Work in Sections:
Apply the wax in manageable sections, rubbing it into the wood’s pores and over the painted finish. -
Buffing:
After the wax has sat for about 10-15 minutes, buff the surface vigorously with a clean cotton cloth to achieve a soft, satin sheen. -
Optional Aging:
If you want a more antique look, apply a tiny amount of dark wax into the deepest recesses of the carvings, then wipe back the excess immediately with clear wax. -
Final Inspection:
Check the piece from different angles to ensure the finish is even and the highlights catch the light just right.
Gilded Touch
After sealing, rub a small amount of gold or metallic wax (Gilding Wax) onto the absolute highest points for a regal, French-country shimmer.
Step back and admire how a simple paint technique has revealed the hidden beauty of your furniture
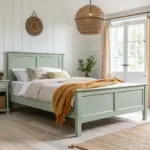
Soft Blue Chalk-Painted Spindle Headboard
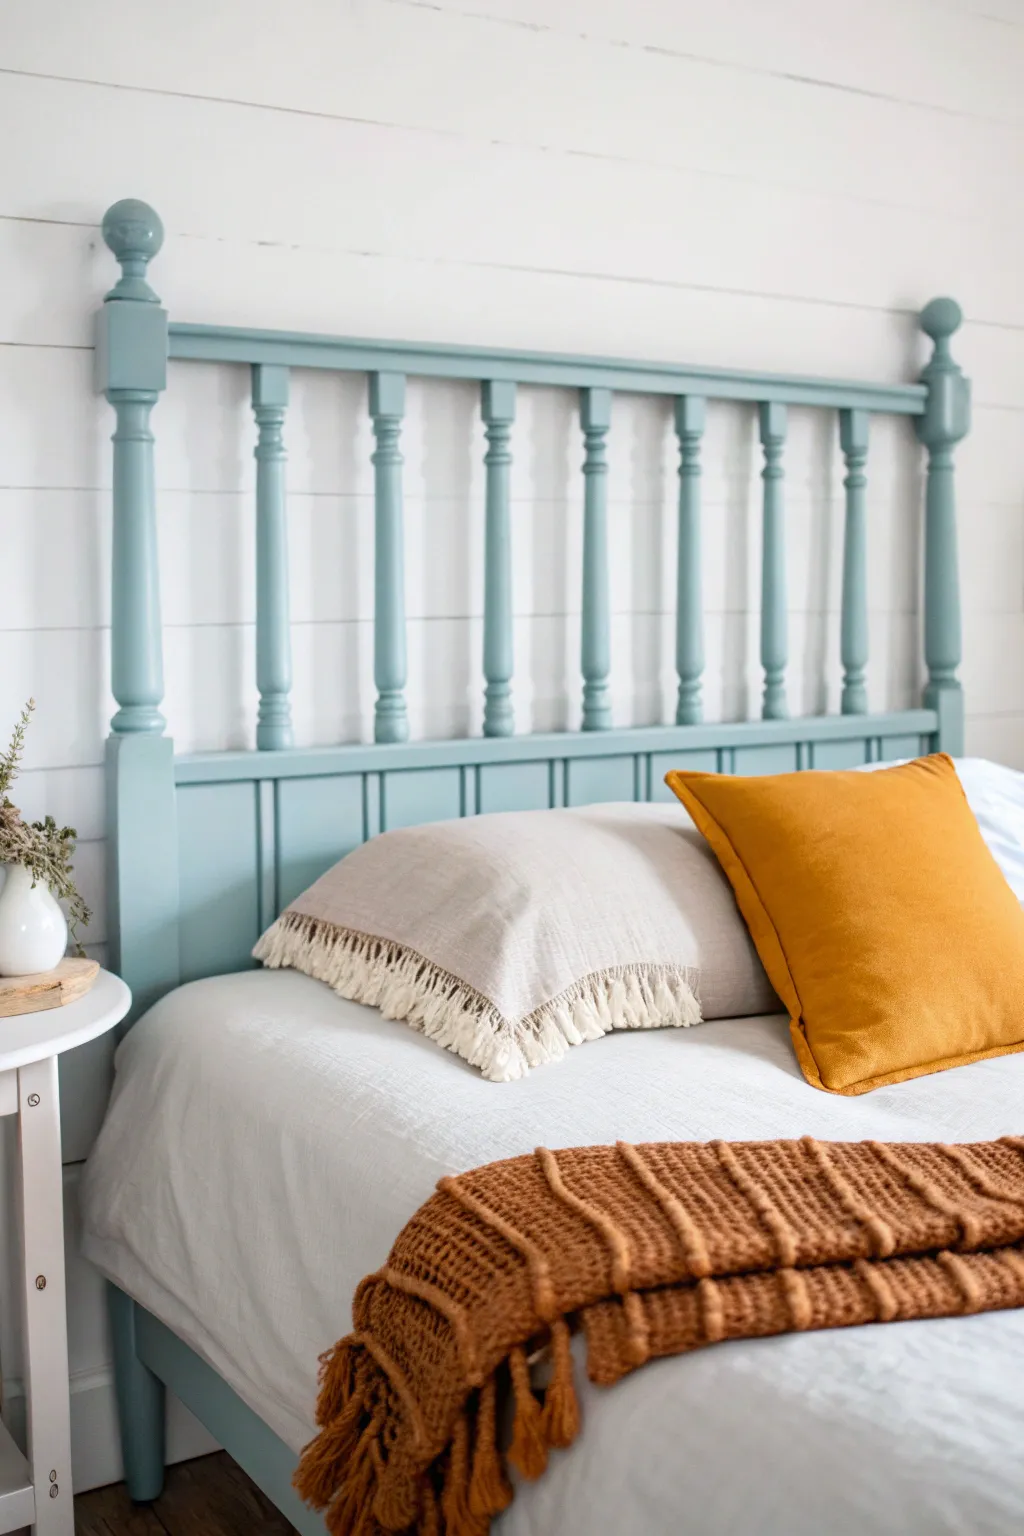
Transform a dated wooden headboard into a coastal farmhouse centerpiece with this soft blue chalk paint finish. The matte texture emphasizes the elegant turnings of the spindles while bringing a calming pop of color to your bedroom.
How-To Guide
Materials
- Wooden spindle headboard (thrifted or existing)
- Chalk paint in a soft teal or slate blue color
- Clear furniture wax
- Medium-grit sandpaper (120-150 grit)
- Fine-grit sandpaper (220 grit)
- Oval chalk paint brush (medium size)
- Small round craft brush (for tight corners)
- clean lint-free rags
- TSP substitute or degreaser
- Painter’s tape
- Drop cloth
Step 1: Preparation and Cleaning
-
Set up your workspace:
Lay down a drop cloth in a well-ventilated area. If possible, move the headboard away from the wall or disassemble it from the bed frame to ensure you can reach all angles comfortably. -
Clean the surface thoroughly:
Mix your TSP substitute or degreaser with warm water. Scrub the entire headboard, paying special attention to the nooks and crannies of the spindles where dust and oils collect. This step is crucial for adhesion. -
Rinse and dry:
Wipe down the wood with a clean, damp rag to remove any soapy residue. Let the wood dry completely before moving on. -
Light scuff sanding:
Using medium-grit sandpaper, lightly scuff the entire surface. You aren’t trying to remove the old finish, just creating ‘tooth’ for the paint to grab onto. Wipe away all sanding dust with a tack cloth or damp rag.
Step 2: Painting the Spindles
-
Load your oval brush:
Open your chalk paint and give it a good stir. Dip just the tip of your oval brush into the paint; overloading the brush causes drips, especially on vertical spindles. -
Paint the difficult areas first:
Start by painting the turned details and crevices of the spindles. The round shape of the oval brush helps cuddle the curves. Use a lighter touch to avoid paint pooling in the grooves. -
Smooth out the lengths:
Once the detailed crevices are coated, use long, vertical strokes to paint the straight sections of the spindles. Check constantly for drips on the underside of the rounds. -
Tackle the main frame:
Paint the top rail, bottom rail, and the larger side posts. I like to work from top to bottom so I can catch any drips that travel downward. -
Let the first coat dry:
Allow the first coat to dry completely, usually about 1-2 hours depending on humidity. Don’t worry if it looks streaky; chalk paint often needs a second pass. -
Apply the second coat:
Repeat the painting process for a second coat to ensure full, opaque coverage. Use the small craft brush to touch up any missed spots in deep corners where the spindles meet the rails.
Drip Patrol
Spindles are notorious for hidden drips. Check the undersides of the turned wood 5-10 minutes after painting. Smooth them out with a dry brush while the paint is still wet.
Step 3: Finishing and Sealing
-
Smooth the finish:
Once the final coat is bone dry, take a piece of fine-grit sandpaper (220) and very gently sand the flat surfaces. This knocks down brush strokes and makes the paint feel buttery soft. -
Prepare the wax:
Scoop a small amount of clear furniture wax onto a clean, lint-free rag or a wax brush. You only need a little bit. -
Massage the wax in:
Work the wax into the paint in small sections. Use a circular motion to push it into the pores of the chalk paint, ensuring you get into the spindle grooves. -
Wipe off excess:
Immediately after applying wax to a section, use a fresh clean rag to wipe away any excess. You want the surface to feel smooth, not tacky or sticky. -
Buff to a sheen:
For a bit of shine, wait 24 hours for the wax to cure slightly, then buff the surface vigorously with a soft cloth. This creates that lovely, professional satin glow.
Super Smooth Finish
Dip your paintbrush in water before dipping in paint for the final coat. This slightly thins the chalk paint, helping it self-level and reducing visible brush strokes.
Style your new bed with contrasting warm textiles like mustard or rust to make that blue hue really sing

PENCIL GUIDE
Understanding Pencil Grades from H to B
From first sketch to finished drawing — learn pencil grades, line control, and shading techniques.
Explore the Full Guide
Matte Black Chalk-Painted Headboard With Edge Distress
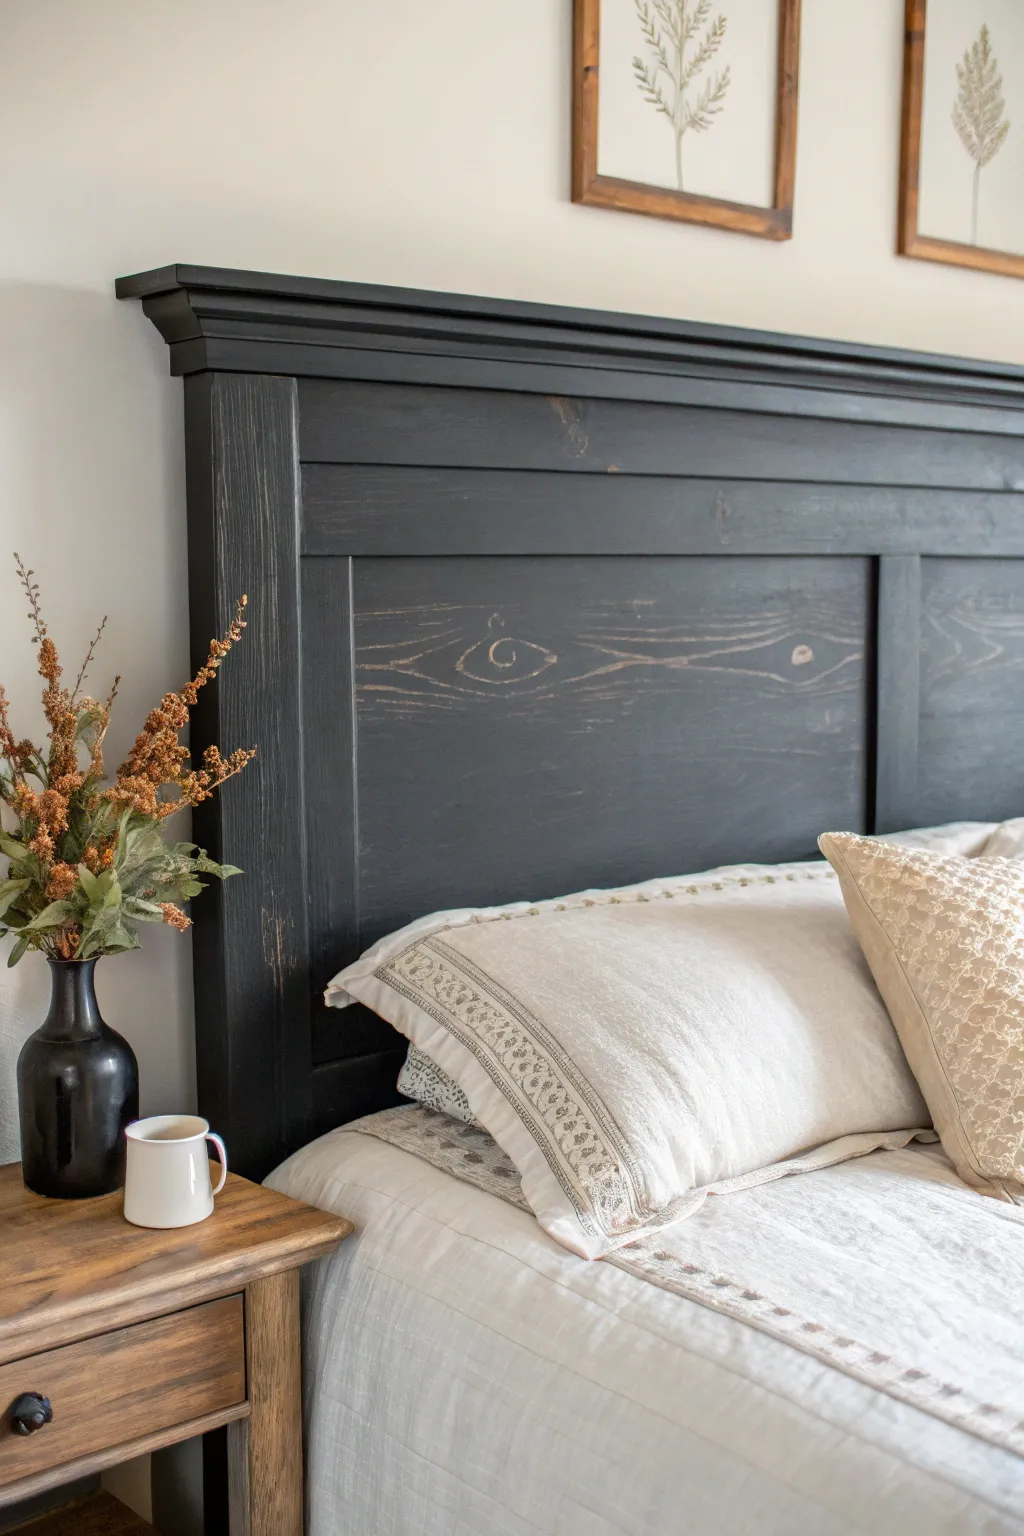
Transform a basic wooden headboard into a stunning focal point with this matte black chalk paint finish. The subtle edge distressing reveals the natural wood tones underneath, adding depth and a cozy, lived-in character to your bedroom.
Step-by-Step
Materials
- Wooden headboard (existing or new)
- Matte black chalk paint
- Medium-grit sandpaper (120-150 grit)
- Fine-grit sandpaper (220 grit)
- Painter’s tape
- Drop cloths
- 2-inch angled sash brush
- Small foam roller (optional for flat areas)
- Clean, lint-free rags
- Clear matte wax or polycrylic sealer
- Mild degreaser or TSP substitute
Step 1: Preparation
-
Clean surface:
Begin by thoroughly cleaning the wood surface with a mild degreaser or TSP substitute to remove any oils, dust, or furniture polish that could prevent the paint from adhering properly. -
Protect area:
Lay down drop cloths to protect your floor and wall. If the headboard is attached to bedposts or rails you don’t want to paint, mask them off carefully with painter’s tape. -
Scuff sand:
Lightly scuff the entire surface with medium-grit sandpaper giving the paint extra ‘tooth’ to grab onto, especially if the original finish is glossy. -
Wipe away dust:
Use a damp, lint-free cloth or a tack cloth to remove every speck of sanding dust, ensuring a smooth foundation for your paint.
Natural Wear Trick
Close your eyes and run your hands over the headboard edges. Everywhere your hand naturally grabs or bumps is exactly where you should focus your sanding efforts for realism.
Step 2: Painting
-
First coat application:
Open your matte black chalk paint and stir it well. Using an angled sash brush, begin painting the recessed areas, molding, and corners first. -
Fill flat surfaces:
Once the details are cut in, switch to a small foam roller for the large flat panels to get a smooth finish, or continue with the brush using long, even strokes in the direction of the wood grain. -
Dry time:
Allow the first coat to dry completely according to the manufacturer’s instructions, usually about 2-4 hours. -
Second coat:
Check coverage after the first coat dries. Being dark paint, you will likely need a second light coat to ensure deep, opaque color without streaks. -
Final dry:
Let the final coat cure overnight if possible, but at least for 4-6 hours, so the paint hardens enough to handle distressing without peeling.
Step 3: Distressing & Finishing
-
Edge distressing:
Take your medium-grit sandpaper and gently run it along the raised edges, corners, and molding lines where natural wear would occur. -
Reveal the wood:
Apply slightly more pressure in random spots to sand through the black paint down to the raw wood underneath, creating that signature farmhouse contrast. -
Panel distressing:
If you want to highlight the wood grain on the flat panels like in the photo, lightly sand over any raised grain patterns or knots. -
Clean up:
Thoroughly wipe down the headboard again with a dry cloth to remove all sanding dust before sealing. -
Apply wax:
Using a wax brush or clean rag, apply a thin layer of clear matte wax. Clear wax protects the finish without adding shine. -
Buffing:
Once the wax is dry to the touch (usually 15-20 minutes), buff it gently with a soft cloth to harden the surface.
Add Warmth
For a richer look, use a dark brown wax over the clear wax on the distressed areas. This ages the exposed raw wood so it doesn’t look too ‘fresh’ against the black paint.
Step back and admire the sophisticated yet rustic charm this updated piece brings to your bedroom
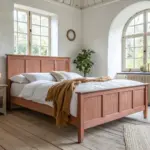
Ombre Blend Chalk-Painted Headboard
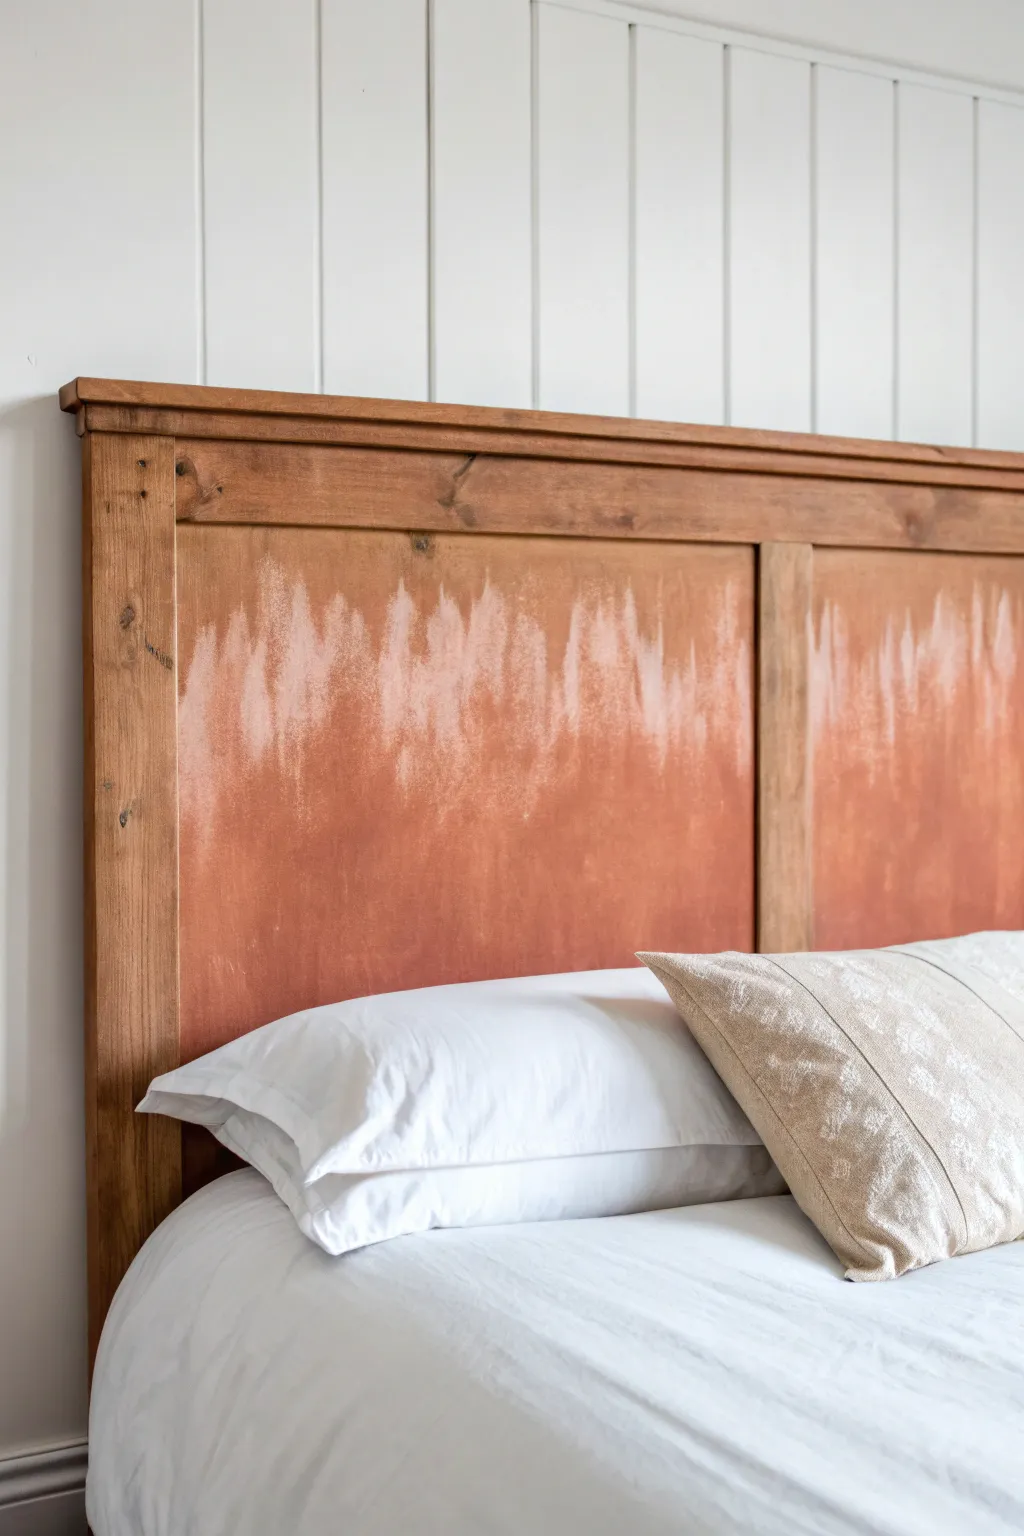
Transform a plain wooden headboard into a warm statement piece using a simple ombre blending technique. This project combines rustic terracotta tones with a soft, whitewashed fade to create an artistic, sunset-inspired backdrop for your bedroom.
How-To Guide
Materials
- Wooden headboard (raw or sanded)
- Terracotta or rust-colored chalk paint
- White or cream chalk paint
- Wide chip brushes (2-3)
- Medium grit sandpaper (120-150 grit)
- Painter’s tape
- Clean rags
- Water spray bottle (optional)
- Clear furniture wax or matte sealer
Step 1: Preparation & Framing
-
Assess the Surface:
Begin by inspecting your headboard. If it has a glossy finish, scuff it lightly with sandpaper to give the chalk paint something to grip. Wipe away all dust with a damp rag. -
Protect the Frame:
Since this design features painted panels inside a natural wood frame, apply painter’s tape carefully along the inner edges of the vertical and horizontal frame pieces to keep them paint-free. -
Seal the Tape:
Press down firmly on the edge of the tape with your fingernail or a credit card to prevent paint from bleeding underneath onto the bare wood.
Blending Too Fast?
If paints dry before blending, dampen your brush slightly—not the wood. A moist brush reactivates chalk paint just enough to smooth out harsh lines without creating drips.
Step 2: Base Color Application
-
Apply the Dark Base:
Dip a wide chip brush into the terracotta or rust-colored chalk paint. Start painting from the bottom of the panel, working your way upward. -
Create the Lower Coverage:
Focus on getting solid, opaque coverage on the bottom two-thirds of the panel. Use vertical strokes to mimic the grain of the wood. -
Feather the Edge:
As you reach the upper third of the painted section (where the fade will begin), lighten your hand pressure. Instead of a solid line, create varied, uneven brushstrokes that extend upward.
Step 3: Creating the Ombre Fade
-
Introduce the Light Color:
While the terracotta paint is still slightly tacky, take a fresh brush and dip it into your white or cream chalk paint. I find using a dry brush technique works best here—don’t overload the bristles. -
Start from the Top:
Paint the very top section of the panel with the white paint, brushing downward toward the rust color. -
Blend the Meeting Point:
Where the white meets the rust, use quick, vertical sweeping motions to drag the white paint down into the rust and pull some rust paint up into the white. -
Mist for Flow:
If the paint is dragging too much or drying too fast, give the area a very light mist with your water spray bottle. This helps the chalk paints manipulate and bleed into each other more naturally. -
Enhance the Streaks:
Use a clean, dry chip brush to feather the transition area further. The goal is to see distinct vertical brush streaks rather than a perfect, seamless blur. -
Check for Balance:
Step back to view the gradient. Add small touches of white or rust as needed to ensure the fade looks organic and not like a distinct horizon line.
Add Metallic Depth
For a luxe twist, dry-brush a tiny amount of copper or burnished gold metallic paint right at the transition line where the rust meets the white.
Step 4: Finishing Touches
-
Remove Tape:
Carefully peel away the painter’s tape while the paint is still slightly damp to avoid peeling off any dry chips of paint. -
Distress for Texture:
Once fully dry, take your sandpaper and lightly run it over the painted area, focusing on raised grain or edges. This reveals hints of the wood beneath and softens the look. -
Wipe Clean:
Use a tack cloth or clean rag to remove all sanding dust from the surface. -
Seal the Work:
Apply a coat of clear furniture wax or a matte polycrylic sealer to protect the paint finish and make it durable for daily use. -
Buff to Shine:
If using wax, let it cure for a few hours and then buff it gently with a soft cloth for a smooth, professional sheen.
This warm, weathered finish brings a perfect touch of bohemian elegance to your sleeping space


Geometric Color-Block Chalk-Painted Headboard
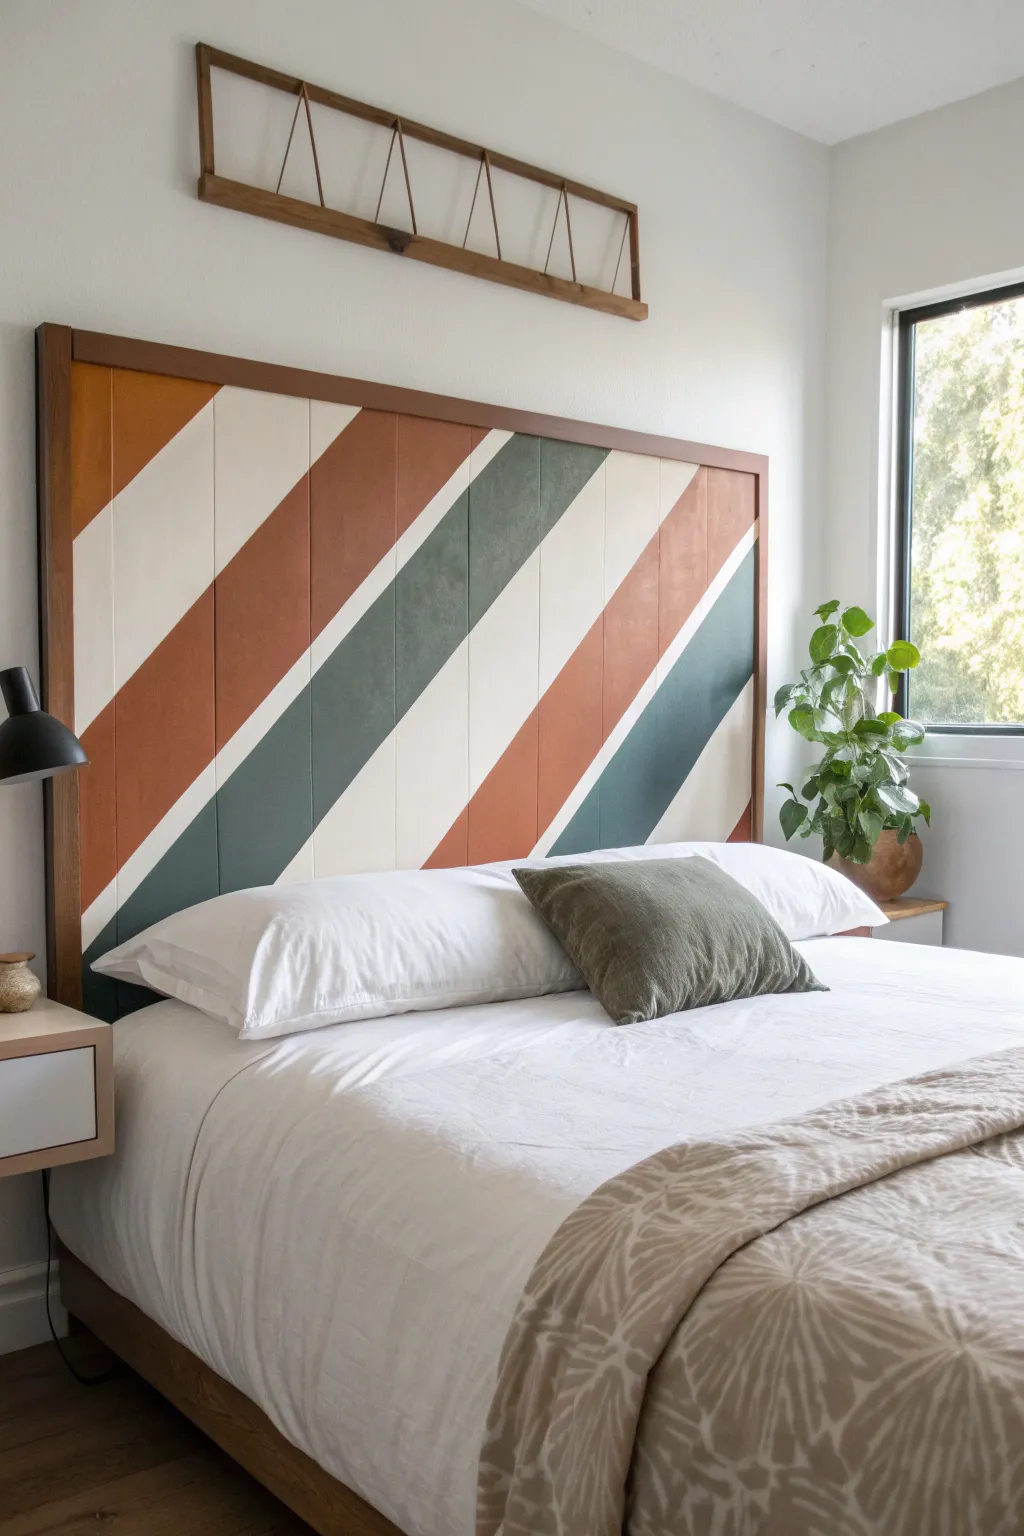
Transform a plain wooden headboard into a stunning focal point with this bold, geometric design inspired by mid-century modern aesthetics. Using chalk paint allows for a gorgeous, matte finish that adds texture and warmth to the crisp lines of the diagonal stripes.
Step-by-Step Tutorial
Materials
- Plywood sheet (cut to bed width)
- 1×2 inch lumber for framing
- Wood glue
- Brad nailer or finishing nails
- Wood filler
- Sandpaper (120 and 220 grit)
- Painter’s tape (high quality)
- Chalk paint (White, Terra Cotta, Deep Teal)
- Small foam rollers
- Angle sash paintbrush
- Measuring tape
- Long straight edge or level
- Pencil
- Clear matte wax or polycrylic sealer
Step 1: Building the Base
-
Prepare the panel:
Start with a sheet of plywood cut to the dimensions of your bed. Sand the entire surface with 120-grit sandpaper to remove any rough spots or splinters. -
Cut the frame pieces:
Measure and cut your 1×2 lumber to frame the plywood panel. You’ll need two vertical side pieces and two horizontal pieces for the top and bottom. -
Attach the frame:
Apply wood glue to the edge of the plywood and align your frame pieces. Secure them using a brad nailer, spacing nails every 6-8 inches for a solid hold. -
Fill and seamless:
Fill any nail holes or gaps where the frame meets the plywood with wood filler. Once dry, sand everything smooth with 220-grit sandpaper for a seamless look.
Step 2: Mapping the Design
-
Base coat application:
Roll on a coat of white chalk paint over the entire inside panel. This acts as a primer and becomes the white stripes later without needing intricate taping. -
Mark the center:
Find the exact center of your headboard and make a small mark. This will be the anchor point for your primary diagonal stripe. -
Draw diagonal guidelines:
Using a long straight edge, draw your first diagonal line from the top left area down towards the bottom right. I find it helpful to stand back after drawing the first line to ensure the angle feels energetic but balanced. -
Measure stripe widths:
Measure out from your first line to create parallel guidelines. Aim for wide, bold stripes—about 6 to 8 inches each—to match the visual impact of the original inspiration.
Tape Like a Pro
For crisp lines on textured wood, apply a thin bead of clear paintable caulk along the tape edge before painting. Let it dry, then paint your color.
Step 3: Painting the Stripes
-
Tape firmly:
Apply painter’s tape along the OUTSIDE of the areas you intend to paint colored (orange and teal). Press the edges down firmly with a credit card to prevent bleed-through. -
Seal the tape edges:
Lightly brush a tiny amount of the white base paint over the edge of the tape. This seals the tape, ensuring your colored lines will be razor-sharp. -
Apply the first color:
Using a small foam roller or brush, fill in the stripes designated for the terra cotta color. Chalk paint is thick, so apply two thin coats rather than one heavy one for the best texture. -
Apply the second color:
Repeat the process for the deep teal stripes. Make sure you are painting within the correct taped-off sections to maintain the alternating pattern. -
Remove tape while damp:
Carefully peel back the painter’s tape while the final coat is still slightly tacky. Pulling at a 45-degree angle helps cut through the paint film cleanly. -
Touch up edges:
Inspect your lines once dry. Use a small artist’s brush to tidy up any tiny bleeds or imperfections in the stripes.
Add Visual Texture
Before the paint dries completely, drag a dry, tough-bristled brush lightly through the colored stripes to create a subtle linen-weave effect.
Step 4: Finishing Touches
-
Stain the frame:
Ideally, stain the outer frame a medium walnut tone. Use a small rag to apply stain carefully, avoiding your freshly painted masterpiece. -
Seal the surface:
Apply a clear matte wax or polycrylic topcoat over the entire painted area. This protects the chalk paint from scuffs and makes it easier to dust later. -
Buff to finish:
If you used wax, let it cure for a few hours and then buff it gently with a lint-free cloth to achieve a soft, professional sheen. -
Mount the headboard:
Attach heavy-duty D-rings or a French cleat system to the back of the headboard to hang it securely on the wall behind your bed.
Step back and admire the vibrant, modern energy this simple DIY brings to your bedroom space
Stenciled Pattern Chalk-Painted Headboard
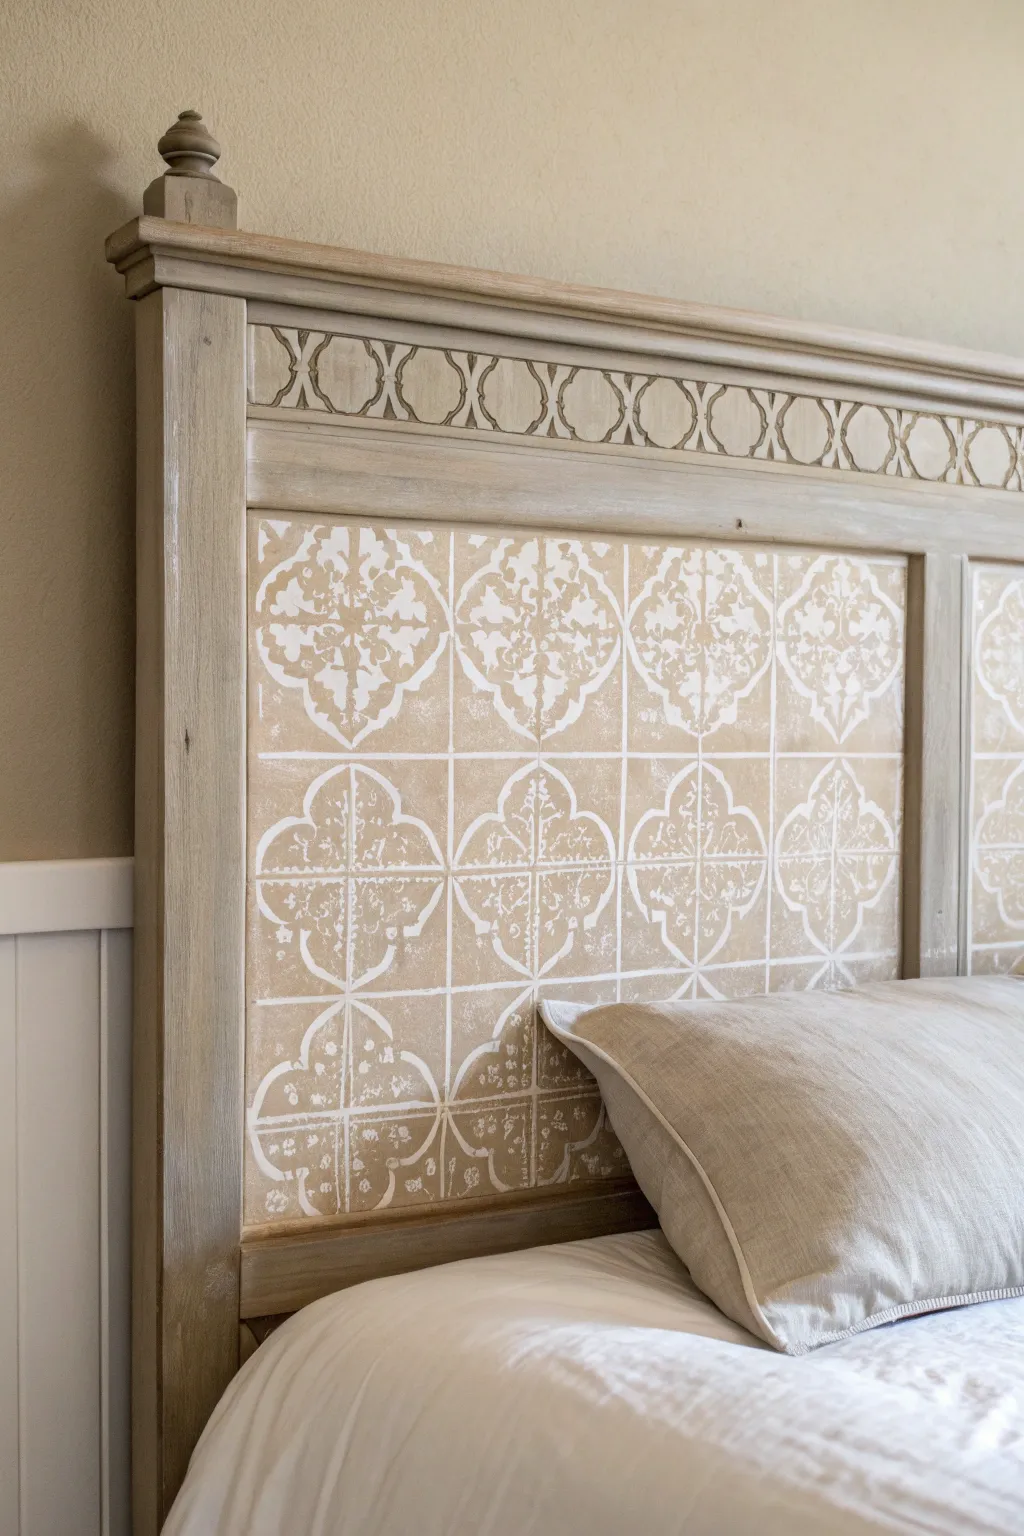
Transform a plain wooden headboard into an elegant statement piece featuring a sun-bleached, old-world aesthetic. With the clever use of stencils and chalk paint, you can mimic the look of expensive encaustic tiles and weathered architectural salvage.
Step-by-Step Guide
Materials
- Wooden headboard with inset panels
- Medium-grit sanding block
- Chalk style paint in ‘Greige’ (gray-beige base)
- Chalk style paint in ‘Cream’ or ‘Antique White’
- Large Moroccan or quatrefoil tile stencil (sized to fit your panels)
- Geometric border stencil (optional, for top rail)
- Stencil brushes (dense foam or bristle)
- Painter’s tape
- Paper towels
- Dark antique wax or glaze
- Lint-free rags
- Clear matte sealer or wax
Step 1: Preparation & Base Coat
-
Clean surface:
Begin by thoroughly cleaning the headboard with a degreaser to remove oils and dust that could repel paint. -
Scuff sand:
Lightly sand the entire piece with a sanding block to scuff up the existing finish, giving the chalk paint a better grip. -
Wipe down:
Remove all sanding dust with a damp cloth and let the wood dry completely. -
Paint the frame:
Apply a coat of the Greige chalk paint to the main structural frame of the headboard (the posts, top rail, and dividers), avoiding the inner flat panels for now. -
Paint the panels:
Paint the flat inset panels with a slightly warmer beige or tan tone if desired, or continue with the Greige for a monochromatic base; two coats offer the best coverage. -
Distress edges:
Once dry, gently sand the edges and raised details of the frame to reveal a little of the original wood underneath, establishing that weathered look.
Less is More
The biggest mistake in stenciling is too much paint. Your brush should be ‘dry’ to the touch before hitting the wood to ensure crisp, clean lines.
Step 2: Stenciling the Panels
-
Position the stencil:
Place your large tile stencil in the center of the first panel. Secure it firmly with painter’s tape on all sides to prevent shifting. -
Load the brush:
Dip your stencil brush into the Cream chalk paint, then offload almost all the paint onto a paper towel until the brush feels dry. -
Stipple the design:
Apply the paint over the stencil using a vertical up-and-down stippling motion or a gentle swirling motion, keeping the layer thin to avoid bleed-under. -
Repeat the pattern:
Carefully lift the stencil and reposition it to continue the pattern across the panel, lining up registration marks if your stencil has them. -
Create the weathered look:
I find that lightly sanding the stenciled areas after they dry knocks back the brightness of the white paint, making the ’tiles’ look aged rather than freshly painted. -
Stencil the top rail:
For the upper rail detail, use a smaller geometric or chain-link stencil with a darker paint or glaze to add the subtle repetitive border shown in the image.
Step 3: Antiquing & Sealing
-
Apply clear wax:
Brush a thin layer of clear wax over the entire headboard to seal the chalk paint and provide a workable base for the dark wax. -
Apply dark wax:
Work dark antique wax into the grooves, corners, and over the stenciled areas using a wax brush. -
Wipe back:
Immediately wipe away the excess dark wax with a clean lint-free rag, leaving the darkness only in the recessed areas and lightly shading the stenciling. -
Buff finish:
Allow the wax to cure for 24 hours, then buff firmly with a soft cloth to achieve a subtle, satin sheen.
Fixing Bleeds
If paint bleeds under the stencil, wait for it to dry, then gently sand the blurry edge away or touch it up with a small artist brush and your base color.
Step back and admire how a simple paint technique has given your bedroom a sophisticated, traveled vibe
Hand-Painted Botanical Chalk-Painted Headboard
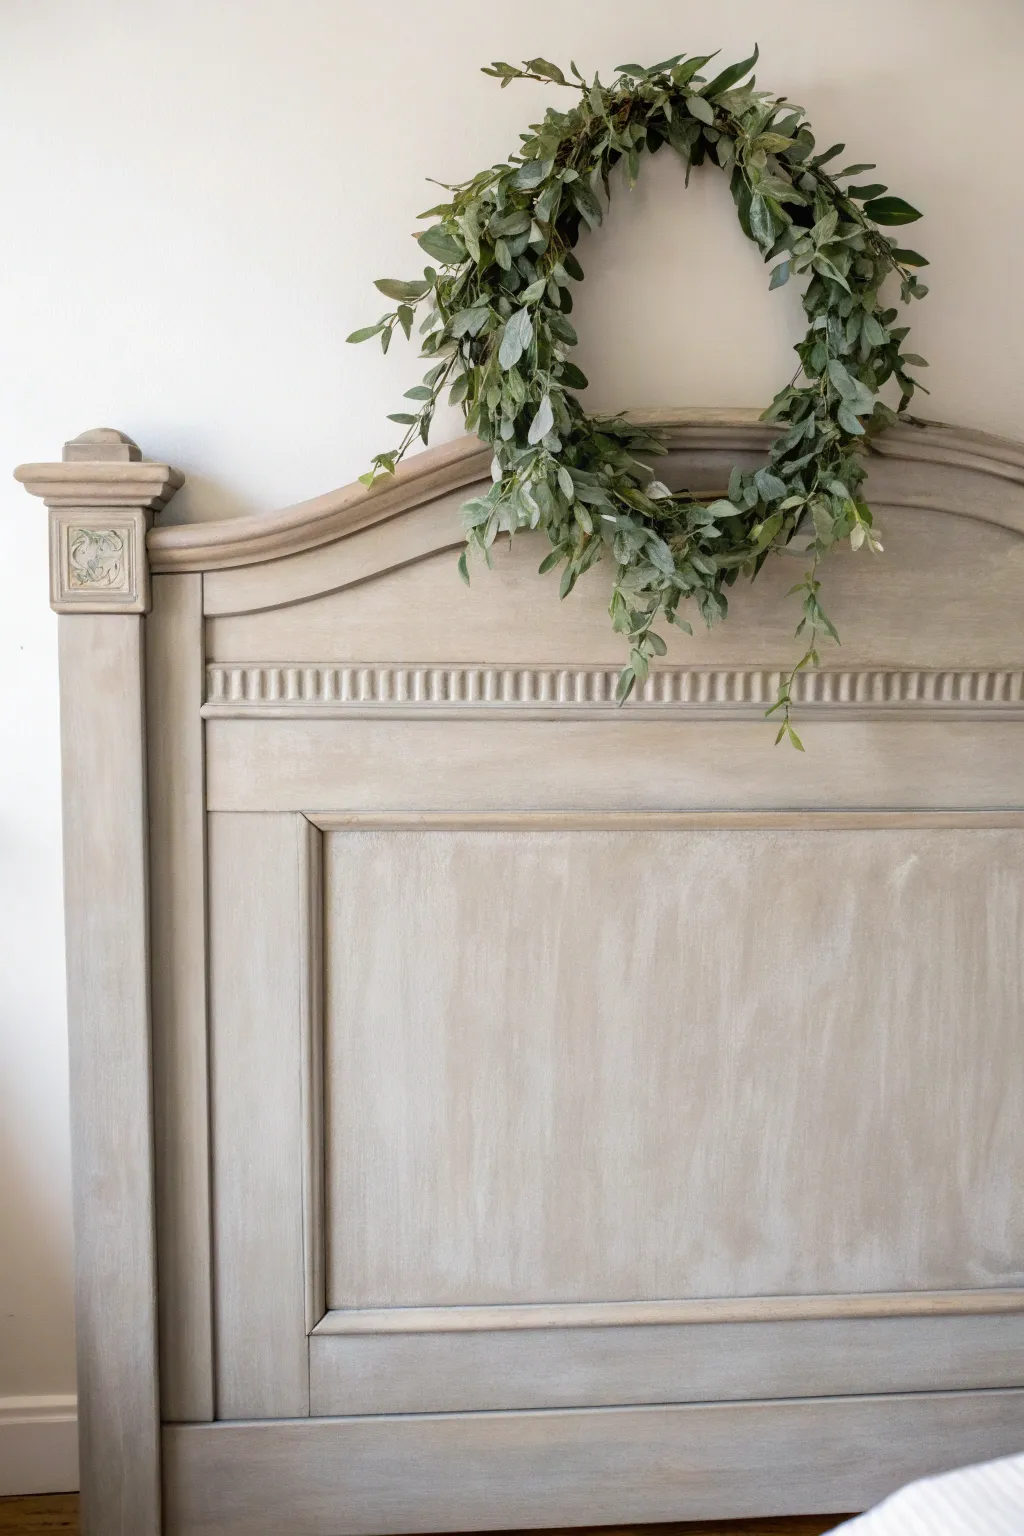
Transform a dated wooden headboard into a serene focal point with this elegant, weathered technique. By layering diluted chalk paint and waxes, you can achieve a soft, driftwoody finish that feels timeless and sophisticated.
Step-by-Step
Materials
- Wooden headboard (raw or previously finished)
- Medium grit sandpaper (120-150 grit)
- Degreasing cleaner (like TSP or simple dish soap)
- Chalk paint in a warm grey (like ‘French Linen’ or ‘Paris Grey’)
- Chalk paint in a creamy white (like ‘Old White’)
- Clear furniture wax
- Dark or antique furniture wax
- Round chalk paint brush
- Lint-free cotton rags
- Water for diluting
- Plastic containers for mixing
Step 1: Preparation
-
Clean surface:
Begin by thoroughly cleaning the entire headboard with a degreasing cleaner to remove oils and dust that could repel the paint. -
Light scuffing:
Using your medium grit sandpaper, lightly scuff the entire surface. You aren’t trying to strip it bare, just creating enough tooth for the paint to adhere properly. -
Dust removal:
Wipe away all sanding residue with a damp cloth and let the wood dry completely before opening your paint cans.
Don’t Over-Mix
When diluting chalk paint for a wash, don’t worry if it separates slightly. That variation creates natural looking texture on the wood.
Step 2: Base Coat Application
-
Mix the wash:
Create a wash by mixing your warm grey chalk paint with water in a 1:1 ratio. You want a consistency similar to skim milk. -
Apply grey wash:
Brush the grey wash over a section of the headboard, working with the grain of the wood. The original wood tone should still peek through slightly. -
Wipe back:
While the paint is still wet, use a lint-free rag to wipe back the excess. This pushes the pigment into the wood grain and creates that stained, rather than painted, look. -
Finish base layer:
Continue this brush-and-wipe method across the entire headboard. Ensure you get into any grooves or detailed molding, but don’t let the paint pool there. -
Dry time:
Allow this base layer to dry fully, which usually takes about 30–60 minutes depending on humidity.
Step 3: Creating Dimension
-
Dry brush highlights:
Dip just the tips of a dry brush into your creamy white paint. Offload most of the paint onto a paper towel until the brush is almost clean. -
Highlighting details:
Lightly drag the brush over raised areas, moldings, and the center parts of flat panels. This technique, dry brushing, catches the high points and adds a sun-bleached effect. -
Softening colors:
If the white highlights look too stark, lightly dampen a rag and smudge them out to blend seamlessly with the grey base. -
Second grey layer:
For more depth, I like to apply a very thin, watery second coat of the grey wash just in the corners and recessed areas to mimic natural aging shadows.
Add a Little Greenery
Drill a tiny, hidden pilot hole at the very top center of the headboard to easily secure a eucalyptus wreath with wire for the exact look.
Step 4: Sealing and Finishing
-
Clear wax application:
Once the paint is bone dry, apply a liberal coat of clear furniture wax using a wax brush or clean rag. Work in small sections. -
Buffing:
Wipe off excess clear wax immediately. The surface should feel smooth to the touch, not tacky. -
Antique wax accents:
To deepen the finish, apply a tiny amount of dark antique wax into the grooves, corners, and carved details like the rosette blocks on the posts. -
Blending back:
If the dark wax is too intense, use a dab of clear wax on your rag to erase and blend it back. Clear wax acts as an eraser for dark wax. -
Final buff:
Allow the wax to cure for at least 24 hours, then buff the entire piece vigorously with a clean cotton cloth to achieve a soft, professional sheen.
Enjoy the calm, breezy atmosphere your new custom headboard brings to the bedroom
Coastal Line-Art Chalk-Painted Headboard

Bring the calming vibes of the ocean into your bedroom with this serene, chalk-painted headboard project featuring delicate coastal line art. The soft blue-grey finish and simple, hand-drawn motifs create a sophisticated yet relaxed focal point perfect for any beach-inspired space.
How-To Guide
Materials
- Wooden headboard (unfinished or stripped)
- Chalk paint (Soft Blue-Grey or Duck Egg Blue)
- Dark grey or charcoal acrylic paint pen (medium tip)
- Pencil and eraser
- Tracing paper (optional)
- Projector (optional)
- Sandpaper (220 grit and 120 grit)
- Paintbrush (synthetic bristle for chalk paint)
- Clear furniture wax
- Wax brush or lint-free cloth
- Ruler or straight edge
- Damp rag
Step 1: Preparation and Base Coat
-
Clean surface:
Begin by wiping down your entire headboard with a damp rag to remove any dust or grease. If the previous finish is glossy, scuff it lightly with 120 grit sandpaper to help the chalk paint adhere better. -
First coat application:
Stir your blue-grey chalk paint thoroughly. Apply the first coat using a synthetic bristle brush, following the grain of the wood. Don’t worry about perfect opacity yet; chalk paint is forgiving. -
Dry and reassess:
Allow the first coat to dry completely, which usually takes about 30 to 60 minutes. Check for any patchy areas where the wood shows through too much. -
Second coat:
Apply a second coat of paint for full, rich coverage. Pay special attention to the recessed panels and trim edges where paint might pool. Let this layer dry fully, preferably overnight to ensure a hard surface for drawing.
Step 2: Distressing the Finish
-
Sanding the edges:
To achieve that weathered coastal look, take your 220 grit sandpaper and gently run it along the raised edges, corners, and trim of the headboard. -
Reveal the wood:
Apply slightly more pressure in areas where natural wear would occur until the raw wood just starts to peek through the blue paint. Wipe away all sanding dust with a clean, dry cloth.
Uneven Ink Flow?
If your paint pen starts skipping over the chalky texture, scribble on a scrap piece of paper to re-prime the nib, or gently sand the specific line path to smooth the surface before drawing.
Step 3: Creating the Design
-
Sketching the waves:
Using a pencil, lightly sketch horizontal, undulating lines across the main panels to represent the ocean waves. I like to vary the height of the curves to keep the movement feeling organic and fluid. -
Adding marine life:
Sketch your main focal points—the scallop shells and starfish—in the upper section of the panel. If you aren’t confident drawing freehand, print out outlines and transfer them using tracing paper or project the image onto the wood. -
Detailing the flora:
Draw vertical stalks of seaweed and sea grass rising from the ‘ocean floor’ at the bottom. Mix tall, slender blades with leafy stems that overlap slightly with your wave lines. -
Review and refine:
Step back and look at your pencil composition. Erase and adjust any lines that feel unbalanced or too crowded before making them permanent.
Custom Shades
To make the darker line art feel more integrated and less stark, try mixing a tiny drop of your blue wall paint into a black paint marker refill for a softer, custom charcoal-navy tone.
Step 4: Inking and Sealing
-
Tracing lines:
Shake your dark grey acrylic paint pen well. Carefully trace over your pencil lines, using a steady hand. Start at the top (starfish and shells) and work your way down to avoid smudging wet ink with your hand. -
Varying line weight:
For the wave lines, try to keep a consistent, smooth pressure. For the plants, you can press slightly harder at the base and lift off at the tips to mimic natural growth tappering. -
Drying time:
Allow the paint pen ink to cure for at least an hour to ensure it won’t smear during the waxing process. -
Wax application:
Load a wax brush or lint-free cloth with a small amount of clear furniture wax. Massage it into the paint in small sections, working it well into the grain. -
Buffing:
Wait about 15 minutes for the wax to haze over, then buff the surface vigorously with a clean cloth to create a soft, protective sheen.
Now your bedroom has a custom piece of furniture that captures the tranquility of the seaside


Have a question or want to share your own experience? I'd love to hear from you in the comments below!