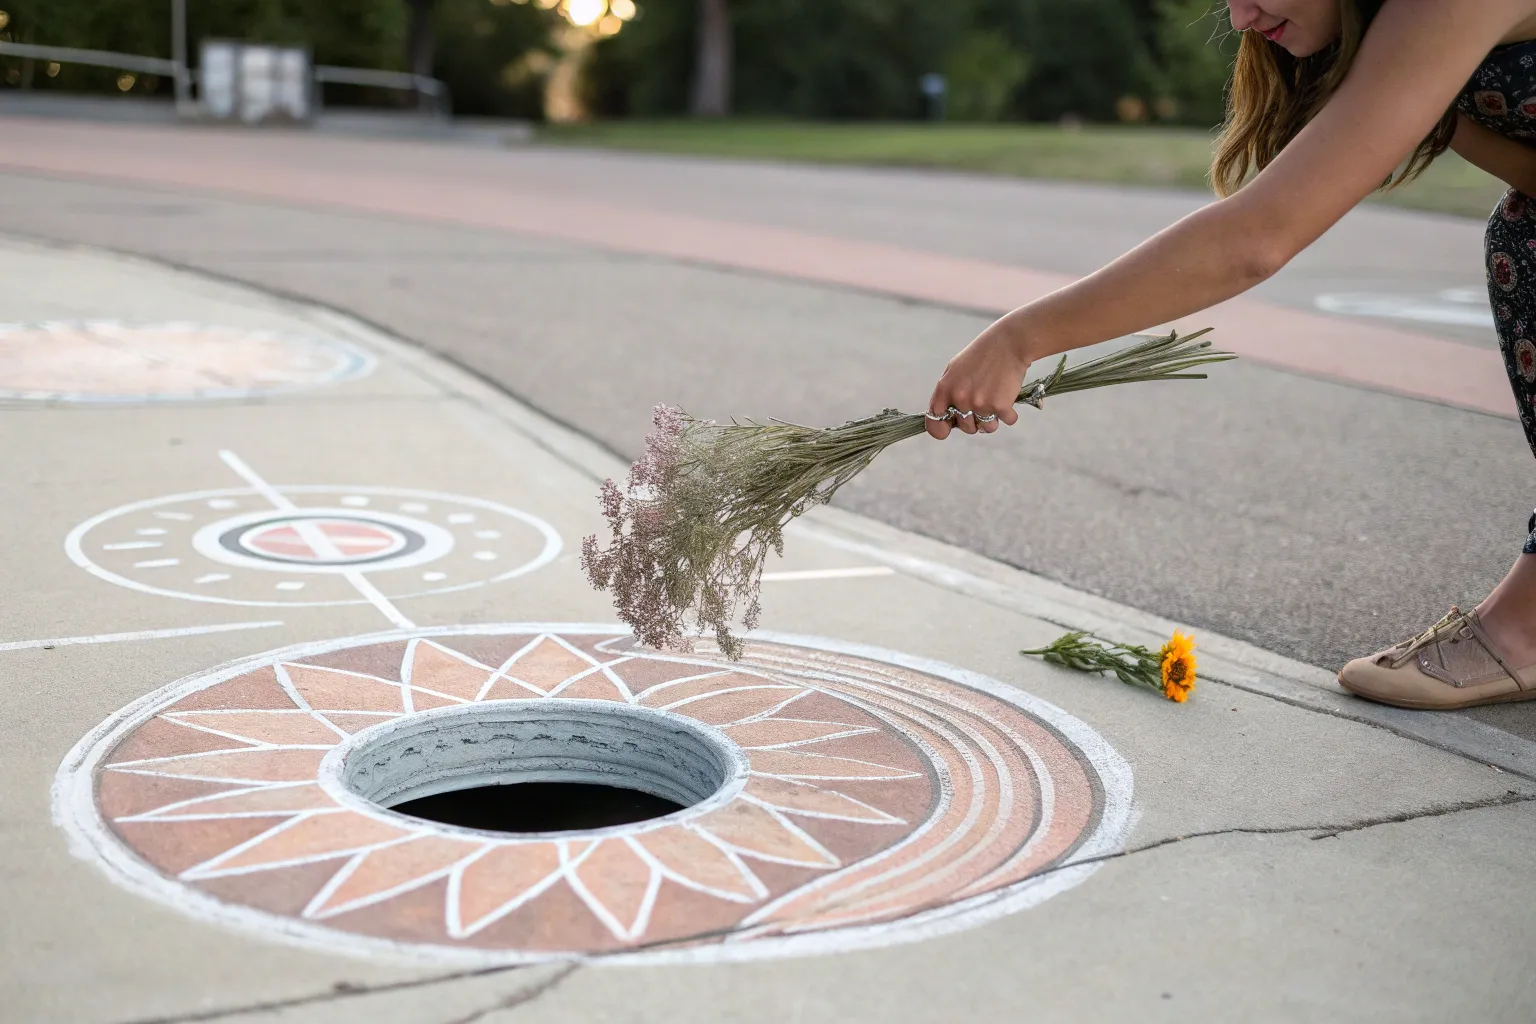
When I’m craving quick, colorful creativity, I reach for sidewalk chalk because it turns any plain patch of concrete into a playful picture in minutes. The best part is making interactive chalk pictures where you (or your kiddo) can pose inside the drawing for a totally believable photo illusion.
Hopscotch With Doodle Frames

Transform a plain driveway or sidewalk into an enchanting play area with this extended hopscotch board featuring decorative doodles. Instead of simple numbers, each square becomes a canvas for hearts, stars, and playful patterns, all framed by crisp, white grid lines.
Step-by-Step Tutorial
Materials
- Thick white sidewalk chalk (jumbo size recommended)
- Pastel colored sidewalk chalk (pink, yellow, light blue)
- Tape measure or yardstick
- Knee pads (optional but recommended for comfort)
- Broom or leaf blower
Step 1: Preparing the Canvas
-
Clean the surface:
Start by sweeping the asphalt thoroughly with a broom or using a leaf blower. Removing loose pebbles and dust ensures your chalk lines will be crisp and won’t flake away immediately. -
Plan the grid width:
Decide on the width of your hopscotch path. A standard width is about 18 to 24 inches for a single square. You can use a yardstick to make small tick marks every two feet along the length of the path to guide you. -
Draw the main vertical lines:
Using your thick white chalk, draw two long, parallel lines down the driveway to define the outer edges of the hopscotch board. Try to keep them as straight as possible, but don’t worry about perfection; hand-drawn charm is part of the look.
Step 2: Drawing the Grid
-
Create horizontal dividers:
Connect your two vertical lines with horizontal bars spaced evenly apart to create square boxes. Aim for squares that are roughly equal in size. -
Add the vertical center line:
Draw a straight line right down the middle of the entire path, splitting your single large column into two side-by-side columns of squares. This creates the double-box layout shown in the image. -
Thicken the grid:
Go back over every single white line you’ve drawn so far. Apply firm pressure to make the lines bold, opaque, and highly visible against the dark asphalt. I like to run the chalk back and forth a few times to really pack the pigment in.
Chalk Snapping?
If your chalk sticks keep breaking, try soaking them in a bucket of water for 5-10 minutes before drawing. This softens them and makes the color application much creamier.
Step 3: Adding the Doodles
-
Draw a dotted heart:
In the bottom-left square, draw a large heart outline using white chalk. Inside the heart, add small, evenly spaced dots to fill the negative space. -
Create a pink star:
In the bottom-right square, use pink chalk to draw a five-pointed star. Fill the star in solidly with the pink chalk. -
Add detail to the star:
Once the pink base is down, take a piece of charcoal or darker chalk (or press hard with a pencil/stick to scratch through) to add small texture dots on the star’s surface. -
Sketch a simple outline heart:
Move up to the next row. In the right-hand square, draw a simple, large heart outline using white chalk. -
Draw a filled pastel heart:
In the square adjacent to the outline heart, draw another heart shape but fill this one in completely with pale pink chalk. Use the side of the chalk stick for smoother coverage. -
Add numerical markers:
Hopscotch needs numbers! In the next row up, draw a large number ’10’ in the left box and an ‘8’ in the right box using white chalk. Position them at an angle for a playful feel.
Make It Glow
For a magical evening twist, trace over your white grid lines with glow-in-the-dark chalk or paint so the game can continue after sunset.
Step 4: Finishing Touches
-
Create a radiating star:
In one of the upper squares, draw a small yellow star. Switch to white chalk and draw short lines radiating outward from the star’s center to make it look like it’s shining. -
Vary your star shapes:
Draw a five-pointed star outline in another square using yellow or white chalk. Mixing up solid shapes, outlines, and different colors keeps the design interesting. -
Continue the pattern:
Fill the remaining squares further up the path with alternating designs: simple stripes, more hearts, or additional numbers if you are playing a specific game. -
Clean up edges:
Walk along the outside of your grid. If any chalk lines smeared or went too far, act as an eraser by scuffing the excess away with the sole of your shoe or a little water.
Enjoy watching the neighborhood kids jump through your custom-designed gallery of hearts and stars


Up-and-Away Balloon Bouquet Illusion
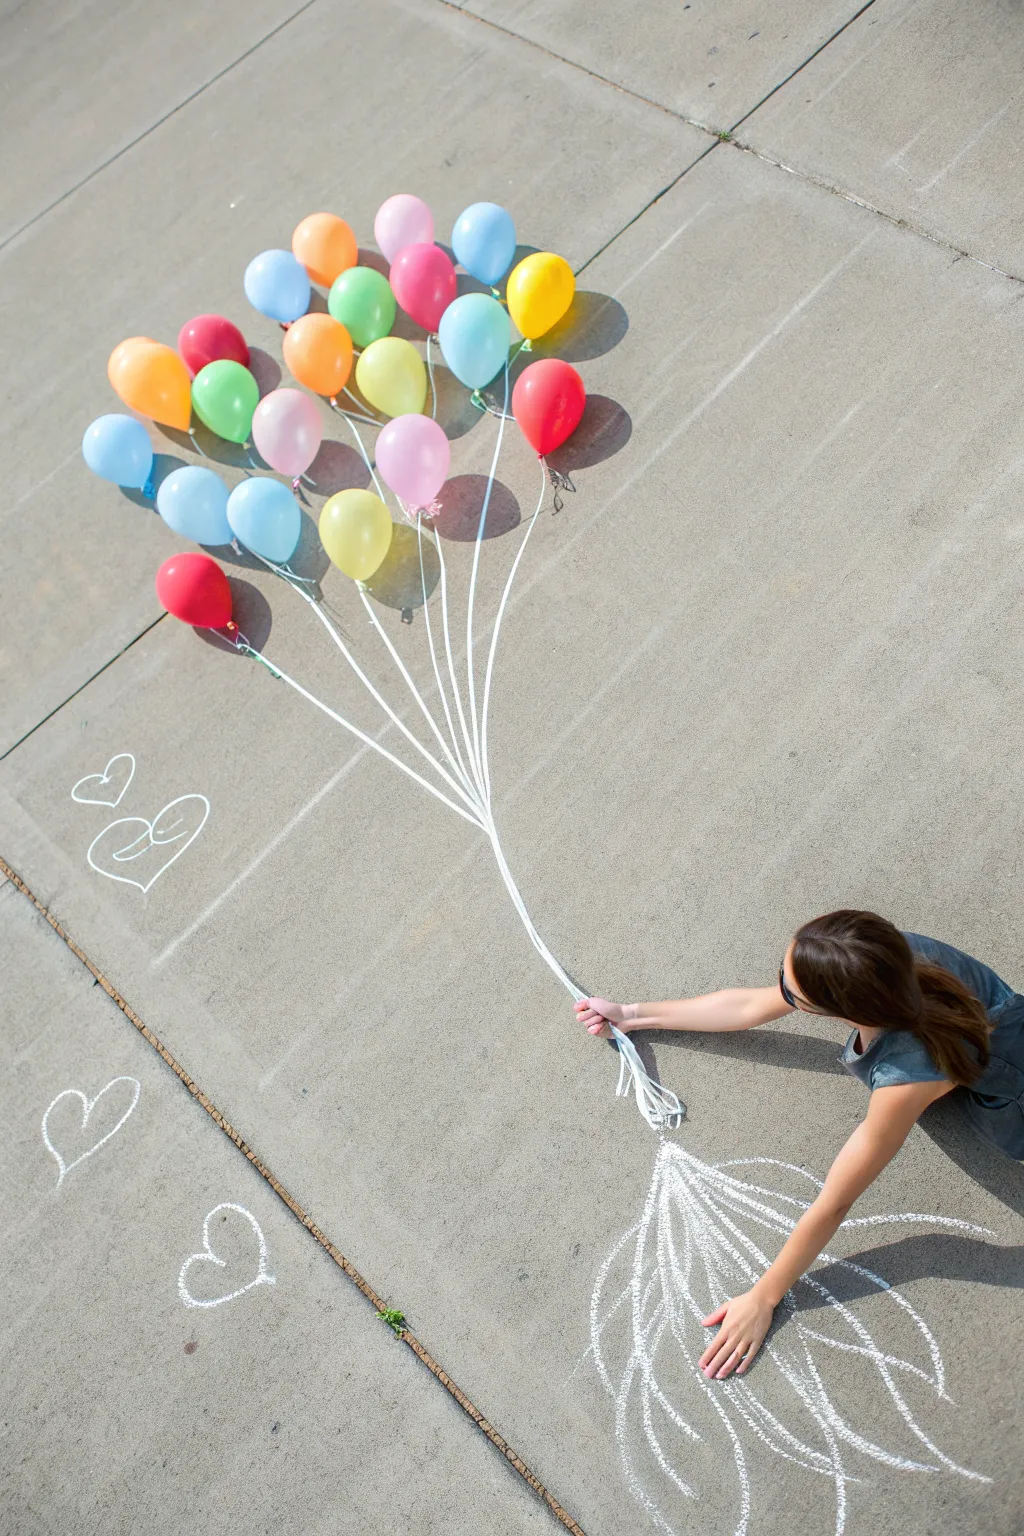
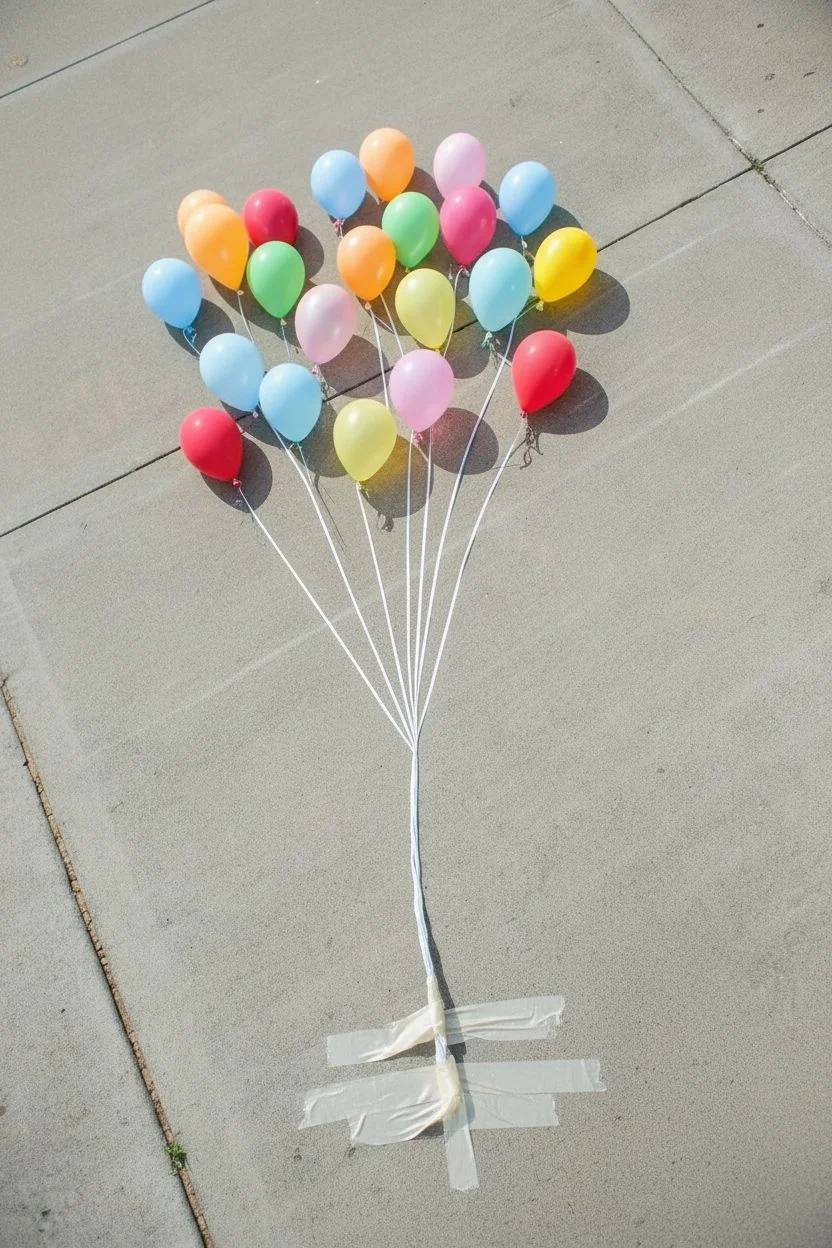
Transform a simple sidewalk into a whimsical flight scene with this clever forced perspective photo op. By combining real party balloons with chalk drawings and physical props, you’ll create a seamless illusion of being lifted into the sky.
Step-by-Step
Materials
- 20-25 colorful latex balloons
- Helium tank or pre-inflated helium balloons
- White ribbon or string
- White sidewalk chalk (thick jumbo sticks recommended)
- Scissors
- Clear heavy-duty tape (duct tape or packing tape)
- Camera or smartphone
- A helper/photographer
Step 1: Preparation & Layout
-
Inflate the balloons:
Begin by inflating your balloons with helium. You want a vibrant mix of colors—pinks, blues, yellows, and oranges work beautifully against grey concrete. Tie each one off securely. -
Attach ribbons:
Cut lengths of white ribbon, roughly 4 to 5 feet long each. Tie one ribbon to the knot of each balloon. Ensure the knots are tight so you don’t lose any into the sky. -
Bundle and secure:
Gather all the ribbons together to form a large bouquet. The helium will naturally pull them upward. Arrange the balloons so they form a nice, round cluster without too many gaps. -
Anchor the bouquet:
This is the most critical step for the illusion. Take the gathered end of the ribbons and tape them securely to the concrete surface. Use heavy-duty tape and make sure the point where they are taped is exactly where the model’s hand will be placed.
Windy Woes?
If wind keeps tangling your balloons, use a tiny piece of double-sided tape between balloons to stick them together in a perfect cluster.
Step 2: Creating the Chalk Art
-
Position the model:
Have your model lie down on the concrete. She should extend one arm straight up towards the balloon anchor point, grasping the bundle of ribbons right above where they are taped to hide the adhesive. -
Plan the skirt:
With the model in place, visualize where the ‘skirt’ or dress train will flow. The idea is that the balloon strings continue through her hand and transform into a flowing garment. -
Draw the main lines:
Using your white chalk, start drawing lines from the model’s waist and hips, extending downwards and outwards. These lines should mimic the flow and texture of a fabric skirt blowing in the wind. -
Add volume and texture:
Fill in the skirt area with more chalk lines. I like to use varying pressures to create depth—press harder for folds and lighter for sheer areas. The lines should all radiate from the waist area. -
Create the ‘ribbon’ effect:
Extend a few chalk lines from the model’s hand downwards into the skirt drawing. This visual trick connects the real ribbons above to the drawn skirt below, selling the illusion. -
Add decorative elements:
Draw a few simple hearts or cloud shapes off to the side of the main composition to balance the frame and add to the dreamy atmosphere.
Pop of Color
Level up by shading the chalk skirt with colored chalks that match one or two of the balloon colors for a cohesive look.
Step 3: Capturing the Shot
-
Check the angle:
The photographer needs to stand on a ladder or a chair to get a high angle. You want to shoot directly downwards or from a steep angle to flatten the perspective. -
Adjust the ribbons:
Have a helper gently untangle the real ribbons so they fan out nicely from the balloons to the model’s hand. They shouldn’t be too twisted. -
Direct the model:
Ask the model to look up towards the balloons or close her eyes for a dreamy expression. Her free arm can reach out as if balancing. -
Style the clothing:
Ensure the model’s real clothing (like her top) isn’t bunched up. It should transition smoothly into the chalk drawing. -
Frame and shoot:
Frame the shot to include the balloons at the top and the bottom of the chalk skirt. Take multiple photos, adjusting the framing slightly each time. -
Review and refine:
Check your photos immediately. If the chalk lines look too faint in the sunlight, go back over them with a second layer of chalk to make them pop.
Enjoy your floating masterpiece and the magical photos you’ve created together


Underwater Jellyfish Drift Picture
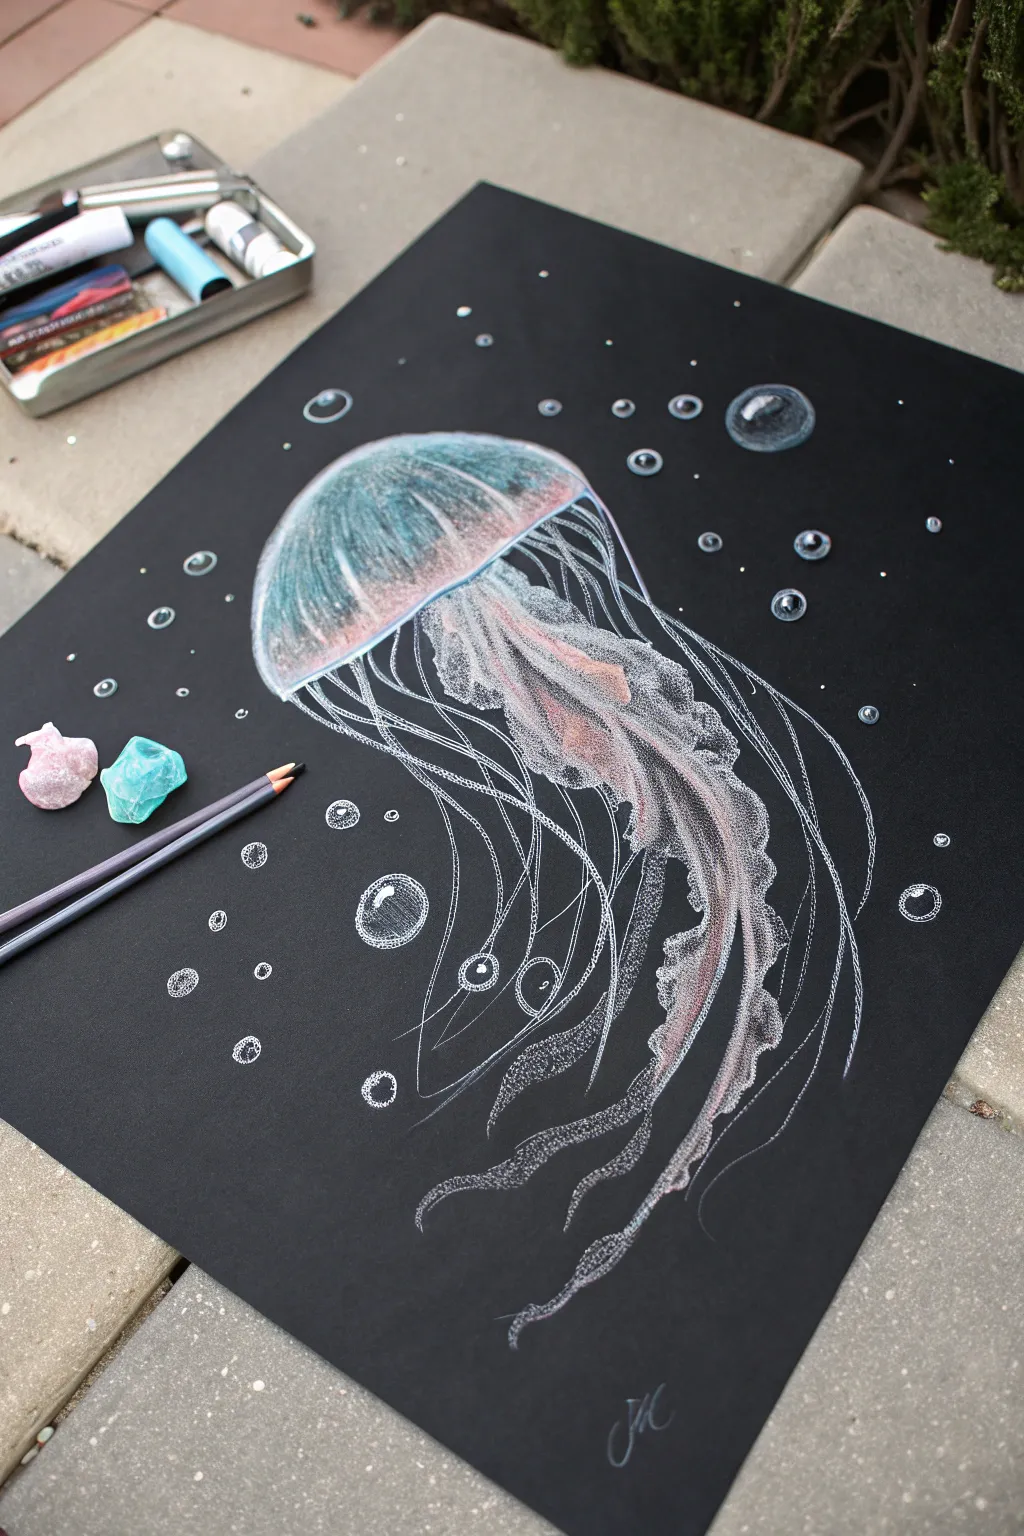
Capture the ethereal beauty of deep-sea life with this striking high-contrast drawing. The dramatic black background allows the delicate, translucent tendrils of the jellyfish to glow with life using simple white and pastel shading.
How-To Guide
Materials
- Black mixed media or pastel paper (heavyweight)
- White charcoal pencil or white pastel pencil
- Soft pastels or chalk (teal, pink/coral, light blue)
- Blending stump or cotton swab
- Kneaded eraser
- Pencil sharpener
Step 1: Shaping the Bell
-
Outline the dome:
Begin by lightly sketching a wide, upside-down ‘U’ shape near the upper middle of your black paper using your white charcoal pencil. Connect the bottom with a gently curving line to form the bell of the jellyfish. -
Add the rim:
Draw a second curved line just inside the bottom edge of the bell. This double line creates the thickness of the jellyfish’s rim, giving it a sense of volume. -
Apply base color:
Take a teal soft pastel and gently rub it onto the left side of the bell’s dome. Switch to a soft pink or coral pastel for the center and right side. Keep the application light; we want the black paper to show through slightly. -
Blend the gradients:
Use your finger or a blending stump to smooth the colors together where they meet. I like to blend upward toward the top of the dome, letting the color fade out so the top edge looks transparent. -
Define the structure:
With the white pencil, draw fine vertical rib lines curving down the dome over your color. Press harder near the rim to make these ribs distinct, and softer near the top to let them disappear.
Smudged Lines?
If your fine lines get blurry, your pencil point is too dull. Keep a sharpener handy and sharpen frequently. Use a piece of paper under your hand to prevent dragging your palm across finished areas.
Step 2: Creating the Tentacles
-
Sketch the oral arms:
Draw the thick, ruffled ribbons (oral arms) hanging from the center of the bell. Use a zig-zag or wavy motion with your white pencil to suggest a frilly texture. -
Add pastel accents:
Lightly smudge some pink/coral pastel into the center of these thick ruffled arms. This adds dimension and connects them visually to the bell above. -
Detail the ruffles:
Go back over the pink areas with the white pencil, adding sharp, scribbly details to the edges of the ribbons. This ‘stippling’ or dotting technique makes them look lace-like. -
Draw long tentacles:
Using long, confident strokes, draw the thin, hair-like tentacles sweeping downward. Vary your pressure: press hard for bright white lines and ease off for faint, ghostly strands. -
Layering lines:
Don’t be afraid to cross the lines over each other. Draw some lines originating from behind the oral arms and others from the outer rim of the bell to create depth. -
Varying line weight:
Make some tentacles wavy and others straighter. The variety in line shape mimics the movement of the jellyfish drifting through water.
Pro Tip: glowing effect
To make the jellyfish really glow, rub a tiny amount of white chalk dust into the background immediately surrounding the brightest parts of the bell, creating a subtle halo.
Step 3: Atmosphere and Bubbles
-
Drafting bubbles:
Draw circles of various sizes scattered around the jellyfish. Make large ones near the top and tiny ‘fizz’ bubbles lower down. -
Highlighting bubbles:
For the larger bubbles, thicken the white line only on the bottom-right curve and add a small reflective dot on the top-left. This creates a glossy, spherical look. -
Adding transparency:
Very lightly smudge a tiny bit of teal or white inside the larger bubbles, keeping the center mostly black so they look hollow. -
Final highlights:
Review your drawing and add bright white accents to the rim of the bell and the tips of the longest tentacles to make them pop against the dark background. -
Clean up:
Use a black colored pencil or a clean eraser to tidy up any stray chalk dust or smear marks on the background, keeping the negative space deep black.
Sign your name in the corner with a white swirl and enjoy your deep-sea masterpiece


Outer Space Zero-Gravity Float
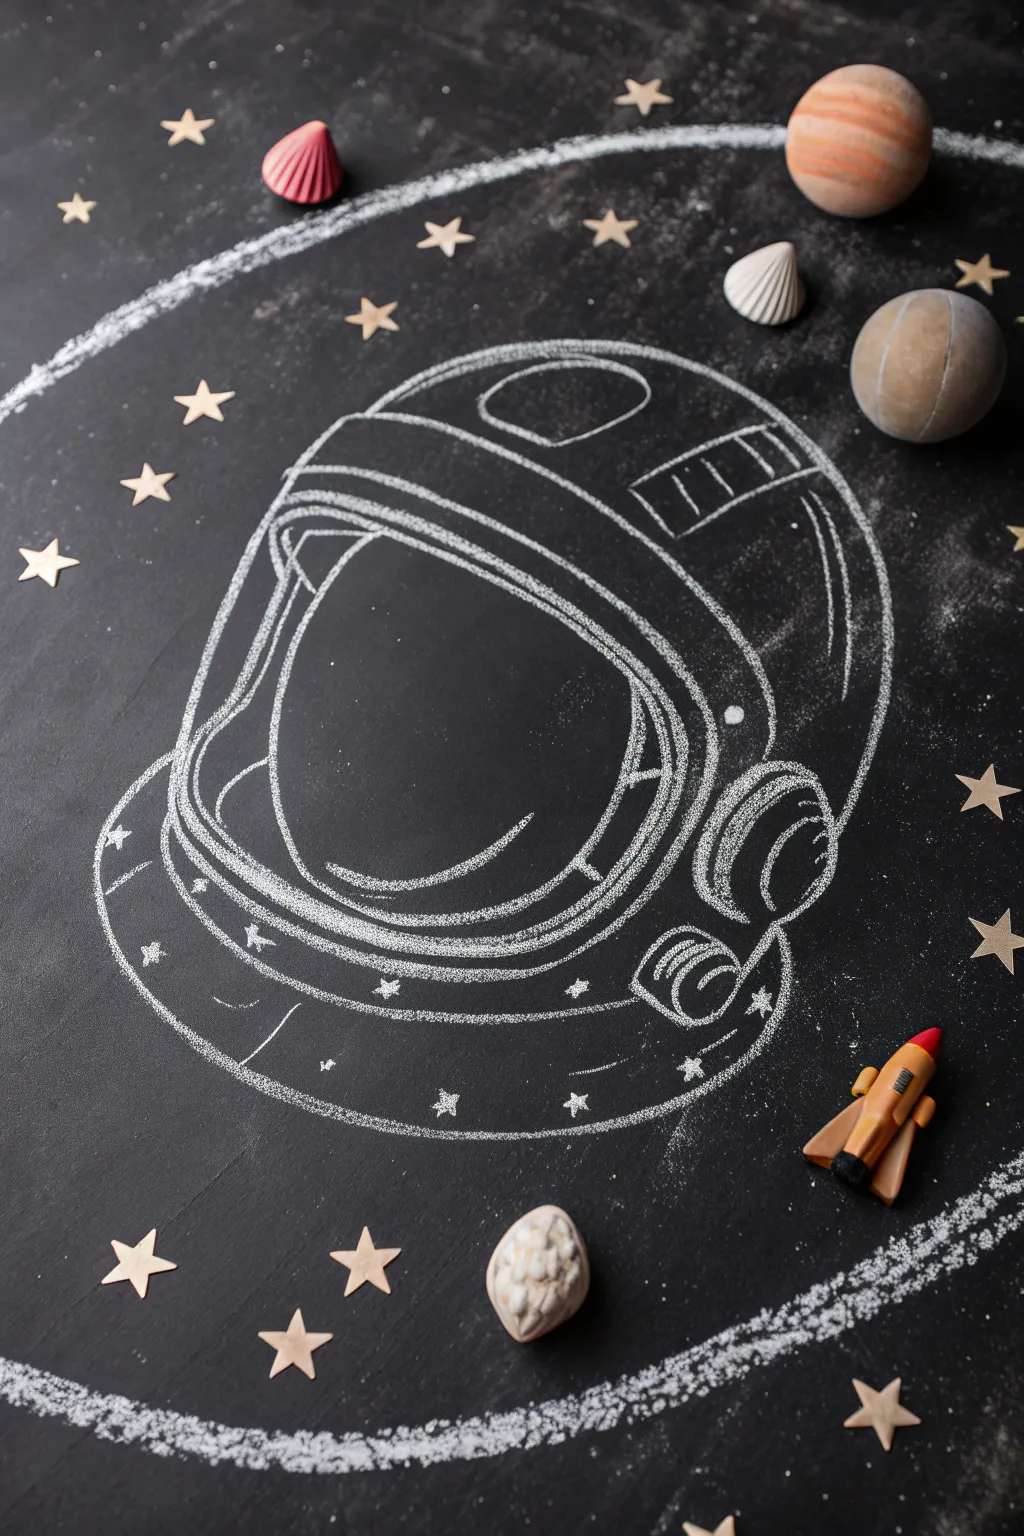

Blast off into creativity with this mixed-media chalkboard art piece featuring a detailed astronaut helmet surrounded by the wonders of the cosmos. This project combines simple chalk illustration with playful 3D props like wooden stars and planets for a scene that truly pops off the surface.
Detailed Instructions
Materials
- Large blackboard or chalkboard surface
- White drawing chalk (sharpened for details)
- Damp cloth or sponge
- Small wooden star cutouts
- Small wooden toy rocket
- Wooden craft balls or spheres (various sizes)
- Paints (orange, beige, white for planets)
- Hot glue gun or adhesive putty (if displaying vertically)
Step 1: Setting the Scene
-
Prep the Surface:
Begin by wiping down your chalkboard with a slightly damp cloth to remove any old dust. Let it dry completely to ensure your lines are crisp and bright. -
Draw the Orbit:
Using the side of a piece of chalk, lightly sketch a large, sweeping circular line that frames the central area. Rub it gently with your finger to soften the edges, creating a glowing ‘orbit’ effect.
Smudge Control
Work from the center outwards to avoid resting your hand on finished chalk lines. Or, place a piece of clean paper under your hand while drawing.
Step 2: Drawing the Helmet
-
Basic Dome Shape:
In the center of your orbit circle, draw a large, rounded dome shape for the top of the helmet. Keep your lines light at first so they are easy to correct. -
Define the Visor:
Draw a large U-shape inside the dome to create the face visor. This should take up most of the front area. Add a second line parallel to the first to give the visor rim some thickness. -
Add Dimension:
Sketch a curved line across the top of the visor area to show the top edge of the glass opening. Connect this to the back of the helmet with a sweeping curve to define the helmet’s side profile. -
Neck Ring Detail:
At the bottom of the helmet, draw a thick, curved band. This acts as the connection point to a spacesuit. I find drawing two parallel curves and connecting the ends works best here. -
Side Ear Piece:
On the right side of the helmet, draw a circular ‘ear’ mechanism. Add concentric circles inside it to make it look like a piece of technical equipment or a hinge. -
Top Ventilation:
Draw a small rectangular or oval shape near the very top of the helmet for a vent or light detail. -
Side Stripes:
Add a few diagonal stripes or vents on the side of the helmet, just behind the visor area, to suggest mechanical details. -
Reflections:
Inside the empty visor space, draw a smooth, curved line near the bottom left to suggest a reflection on the glass. This simple line instantly makes the visor look curved and shiny.
Sharper Lines
Dip the tip of your chalk in water for 10 seconds before drawing. It goes on like paint and dries bright white and smudge-resistant.
Step 3: Final Touches and Props
-
Strengthen Lines:
Go back over your main outline traces with firmer pressure on the chalk to make the white pop against the black background. -
Decorative Stars:
Draw tiny five-pointed stars along the bottom neck ring of the helmet for a playful, decorative touch. -
Paint the Planets:
Take your wooden spheres and paint them to look like planets. Use orange and white stripes for a Jupiter-like gas giant, and beige or grey for moons. -
Arrange the Stars:
Scatter your small wooden star cutouts around the helmet. Place them randomly but keep them mostly within or near the chalk orbit line. -
Position the Planets:
Place your painted wooden planets in the upper corners. If your board is flat, just rest them there; if vertical, use a dab of hot glue or adhesive putty to secure them. -
Launch the Rocket:
Place the small toy rocket near the bottom right of the composition, angling it upwards as if it’s zooming through space. -
Add Shell Details:
If you have small sea shells or textured stones, paint them white or silver and add them to the scene as mysterious space debris or asteroids. -
Dust Clean Up:
Blow away any loose chalk dust carefully so you don’t smudge your drawing. Use a dry cotton swab to clean up any tiny smudges for a professional finish.
Step back and admire your interstellar creation as it floats perfectly in its chalky galaxy
BRUSH GUIDE
The Right Brush for Every Stroke
From clean lines to bold texture — master brush choice, stroke control, and essential techniques.
Explore the Full Guide
Giant Sunbeam Smile Corner

Brighten up the neighborhood with this oversized, cheerful sun that beams happiness right from the pavement. Its simple, bold lines and friendly expression make it an inviting project for artists of any age to tackle together.
Step-by-Step Guide
Materials
- Jumbo sidewalk chalk (yellow)
- Standard sidewalk chalk (black or dark charcoal)
- Broom or leaf blower
- Knee pads or a gardening kneeling mat (optional but recommended)
Step 1: Setting the Stage
-
Choose your canvas:
Find a smooth, dry patch of asphalt or concrete. A sweeping curve or a corner of a driveway works particularly well for this radiating design. -
Clean surface:
Use a broom to sweep away loose dirt, pebbles, and debris. A clean surface helps the chalk adhere better and prevents your lines from skipping.
Chalk Rubbing Technique
Wear an old glove while rubbing the chalk into the pavement. It saves your skin and pushes the pigment into the asphalt grooves for intense color.
Step 2: Drawing the Sun Face
-
Outline the face:
Using your yellow jumbo chalk, draw a large circle on the pavement. It doesn’t need to be geometrically perfect; a hand-drawn oval adds character. -
Fill the base:
Color in the entire circle very densely with yellow chalk. Use the side of the chalk stick rather than the tip to cover more ground quickly and create a solid base. -
Smooth the color:
For a really popped look, I like to rub the yellow dust into the asphalt with my hand or a rag to saturate the color before moving on. -
Draw the eyes:
Take your black or dark charcoal chalk. Draw two large ovals near the top center of your yellow circle. -
Add pupils:
Inside the eye ovals, draw smaller filled-in circles for pupils. Place them slightly to the right or left to give the sun a playful, side-glancing look. -
Create the nose:
Draw an ‘L’ shape or a simple curved hook between and slightly below the eyes to form a nose. -
Add the smile:
Draw a wide, upward-curving line near the bottom of the circle. Add a small ‘cheek’ line at the end of the smile for extra friendliness. -
Add eyebrows:
Sketch two small arches floating above the eyes to give the face an expressive, surprised, or happy demeanor.
Glow Up
Outline the yellow sun rays with a second color, like orange or bright blue, to make the design vibrate visually and pop off the ground.
Step 3: Radiating Rays
-
Start the rays:
Switch back to the yellow chalk. Starting from the edge of the face, draw long, triangular spikes extending outward. -
Vary the lengths:
Make some rays long and others slightly shorter. Drawing them slightly wavy or curved adds a sense of movement and energy. -
Define the edges:
Go over the outline of each ray heavily to ensure they stand out against the dark pavement. -
Hollow centers:
Unlike the face, leave the inside of the rays empty (uncolored) so the black asphalt shows through. This creates a high-contrast design. -
Clean up borders:
If you smudged any yellow outside the lines, use a little water or simply rub it away with a clean cloth to sharpen the edges.
Step 4: Background Elements
-
Create a path:
To mimic the full scene, use orange or yellow chalk to draw a long, dashed line running past your sun, creating a playful lane or border. -
Add distant details:
Further down your ‘lane,’ sketch a smaller, simple white sunburst or white text bubbles to create depth and a sense of a journey along the pavement.
Step back and enjoy the huge splash of sunshine you have added to the street
Chalk Whirlpool Pull-In Picture
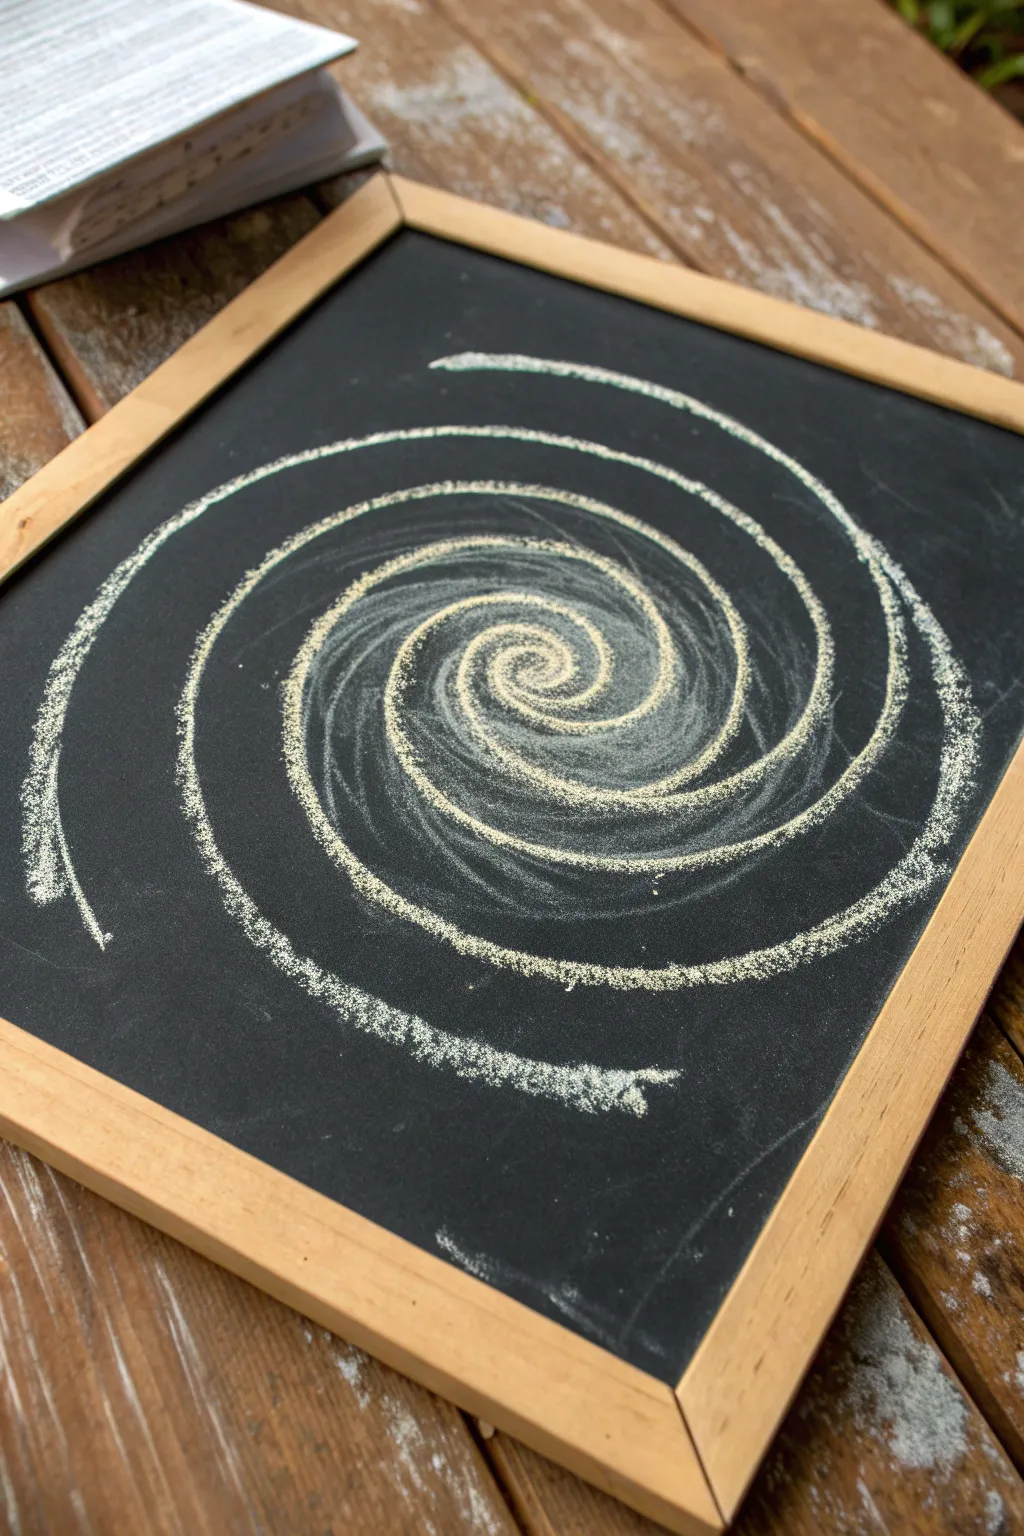
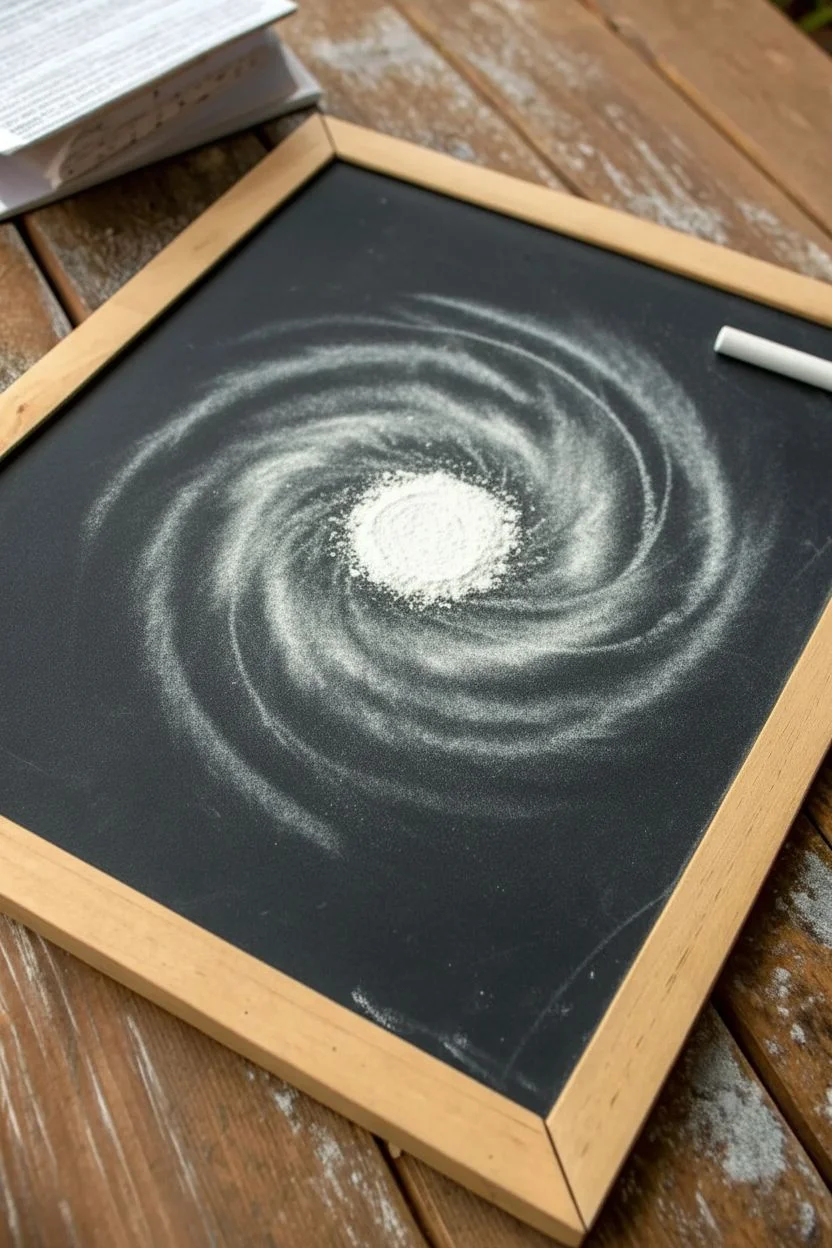
This mesmerizing whirlpool design captures the hypnotic motion of deep water or a distant galaxy using nothing but white chalk and clever smudging. The contrast between the dusty, ghostly center and the sharp outer spirals creates a wonderful sense of depth and movement on a simple blackboard.
Step-by-Step
Materials
- Small blackboard with wooden frame
- White stick chalk (standard sidewalk or chalkboard chalk)
- Dry paper towel or soft cloth
- Cotton swab (optional)
- Damp cloth (for erasing mistakes)
Step 1: Setting the Center Stage
-
Clean the surface:
Begin with a perfectly clean, dry blackboard. Wipe away any old ghost images with a damp cloth and let it dry completely to ensure the new chalk adheres crisply. -
Mark the epicenter:
Place a small dot in the exact center of the board. This doesn’t need to be heavy; it’s just a visual anchor for your spiral. -
Create the dense core:
Around your center dot, draw a tight, heavy circle about the size of a coin. Press firmly to lay down a thick layer of chalk dust. -
Smudge the aura:
Using your fingertip or a dry paper towel, gently rub this central circle in a circular motion. You want to smear the dust outwards to create a hazy, glowing nebula effect in the middle. -
Layer the blurred spiral:
Draw two or three loose, faint spiral loops originating from that smudged center. I like to immediately rub these lines gently with a cloth to soften them into a background texture.
Chalk Texture Secret
Don’t blow away the loose chalk dust! Leaving the crumbled bits on the board adds a gritty, real-life texture that makes the drawing feel dynamic.
Step 2: Drawing the Main Spiral
-
Start the primary line:
Take a fresh piece of white chalk. Starting right in the middle of your glowing center, begin drawing a tight spiral line. -
Vary the pressure:
As you wind outwards, press harder to create a defined, white line that stands out against the smudged background. -
Expand the loops:
Continue spiraling outward, increasing the distance between the lines slightly as you get further from the center. This mimics the natural expansion of a vortex. -
Utilize the chalk edge:
Instead of using the sharp tip, try using the flat edge or corner of the chalk stick for some sections. This creates that wonderful rough, ‘broken’ texture seen in the outer arms. -
Add a second arm:
Go back to the center and start a second spiral line interleaved between the first one. This ‘double spiral’ adds visual complexity and density. -
Thicken the curves:
Review your lines. Go over the outer curves again, making them thicker and more textured to emphasize the momentum of the spin.
Galaxy Upgrade
Add tiny dots of colored chalk (blue or purple) in the smudged background areas to turn this water whirlpool into a deep space galaxy.
Step 3: Refining Texture and Depth
-
Dust the gaps:
Lightly tap the chalk stick over the areas between the spiral arms to drop small specks of dust, looking like stars or sea foam. -
Soften the transitions:
Use a clean finger to very lightly drag across just the inner edges of your spiral lines towards the center. This ‘pull-in’ effect enhances the 3D suction look. -
Reinforce the highlights:
Find the spots where the light would hit the water or galaxy arms. Press very hard with the tip of the chalk to create bright white highlights on the top curves. -
Review the flow:
Step back and look at the overall shape. Ensure the spiral doesn’t look too perfect or geometric; a little wobble adds organic character. -
Clean the perimeter:
If your hand smudged the empty black space in the corners, use a slightly damp cotton swab or corner of a cloth to wipe those areas back to jet black for high contrast.
Now you have a dynamic, spiraling centerpiece that feels like it’s spinning right on the board

PENCIL GUIDE
Understanding Pencil Grades from H to B
From first sketch to finished drawing — learn pencil grades, line control, and shading techniques.
Explore the Full Guide
Kite String in Your Hand Scene

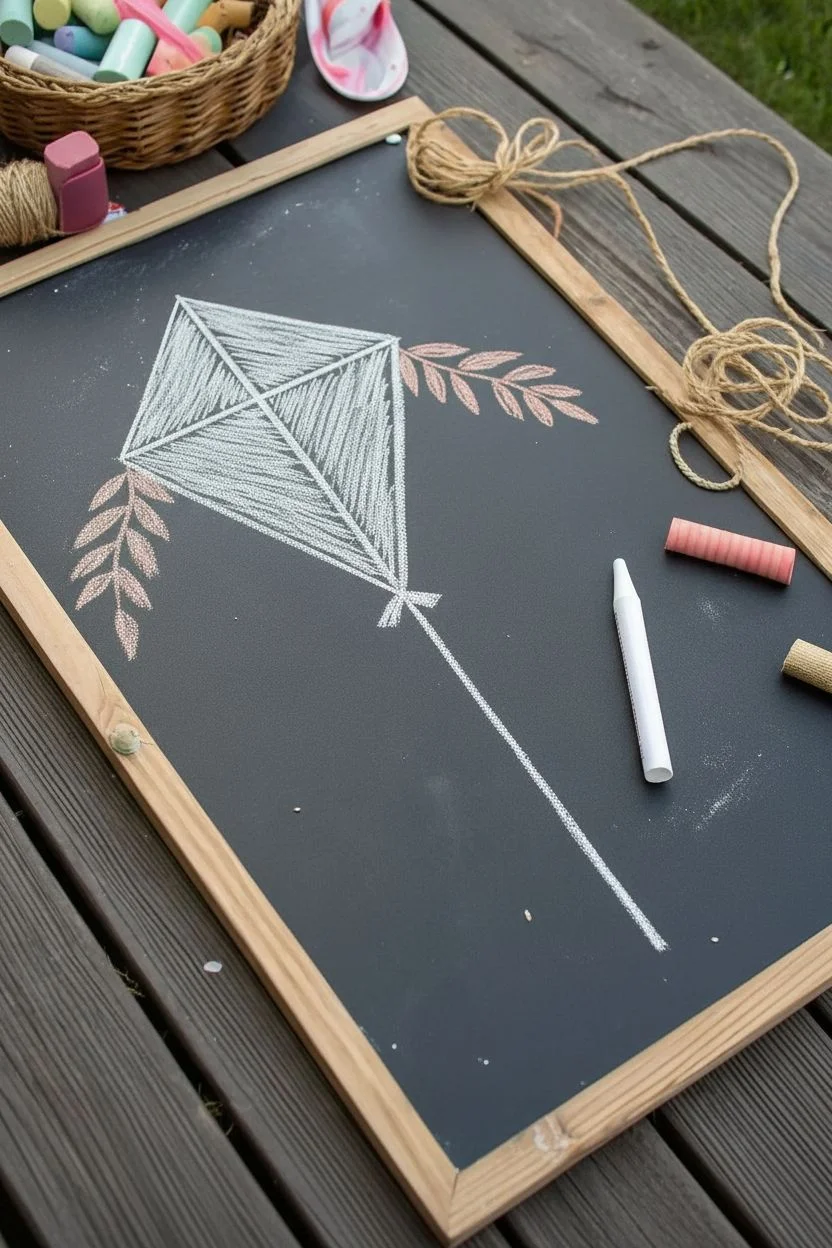
Capture the breezy joy of a summer day with this whimsical chalkboard illustration. Featuring a crisp white kite adorned with delicate leafy branches and a trailing floral string, this design brings a touch of outdoor magic to your slate.
Step-by-Step Tutorial
Materials
- Wooden-framed chalkboard
- White chalk marker or pastel stick
- Pink chalk pastel
- Bronze or light brown chalk pastel
- Damp cloth or paper towel
- Cotton swabs (optional, for blending)
Step 1: Drafting the Kite Frame
-
Outline the diamond:
Begin by drawing a classic diamond shape in the upper center of your board using your white chalk. Make the top triangle slightly shorter than the bottom one for that traditional kite look. -
Add the crossbars:
Draw a vertical line straight down the center from the top point to the bottom point. Next, draw a horizontal line connecting the two side corners, creating a cross in the middle. -
Fill the sections:
Gently shade inside the four triangular sections with white chalk. Use light, diagonal strokes to create a texture that looks like fabric stretched tight. -
Define the edges:
Go back over the outer perimeter and the inner cross lines with a heavier hand to make the white frame pop against the shading.
Sharpen Your Act
If you are using standard stick chalk, rub the side of the tip on a piece of scrap paper to create a flat, angled edge. This helps enormously when drawing the thin needles on the fern branches.
Step 2: Adding Natural Elements
-
Draw the side streamers:
Using a bronze or light brown pastel, sketch two long, curved lines extending outward from the side corners of the kite, draping downwards. -
Create the leaves:
Along these bronze lines, draw small, needle-like leaves branching off on both sides. Angle them downward slightly to mimic the look of wheat or fern fronds. -
Sketch the top ribbon:
With white chalk, draw a loose, swirling loop at the very top of the kite to suggest a decorative ribbon caught in the wind. -
Add the top bow:
Right where the top ribbon meets the kite’s tip, draw a simple pink bow using two teardrop shapes for loops.
Make It 3D
Glue actual jute twine over the white chalk string line and tie real fabric bows where drawn. The mix of 2D drawing and 3D materials creates a stunning mixed-media effect.
Step 3: Creating the Tail
-
Start the string:
From the bottom point of the kite, draw a long, wandering white line that loops and curves down towards the bottom of the board. -
Draw the main bow:
About halfway down the string, add a large, floppy bow in white. Detail the loops with small interior lines to show the curve of the ribbon. -
Texture the string:
I find that going over the string line with small, dashed strokes or a slightly jittery hand gives it a nice rope-like texture rather than a perfect line. -
Complete the loops:
Continue the string to the bottom edge, adding one final large loop near the end for visual interest.
Step 4: Floral Details
-
Position the flowers:
along the lower half of the kite string, sketch five or six small circles where you want your flowers to sit. Space them out unevenly for a natural look. -
Draw petals:
Using pink chalk, draw five simple rounded petals around each circle center. -
Add flower centers:
Dot the center of each pink flower with white chalk to make them stand out. -
Final clean up:
Check for any smudges or stray chalk dust. Use a slightly damp cotton swab to sharpen the edges of the kite or wipe away mistakes without ruining the background.
Step back and admire your breezy creation, ready to fly on a sunny afternoon
Full-Body Outline Self-Portrait Picture
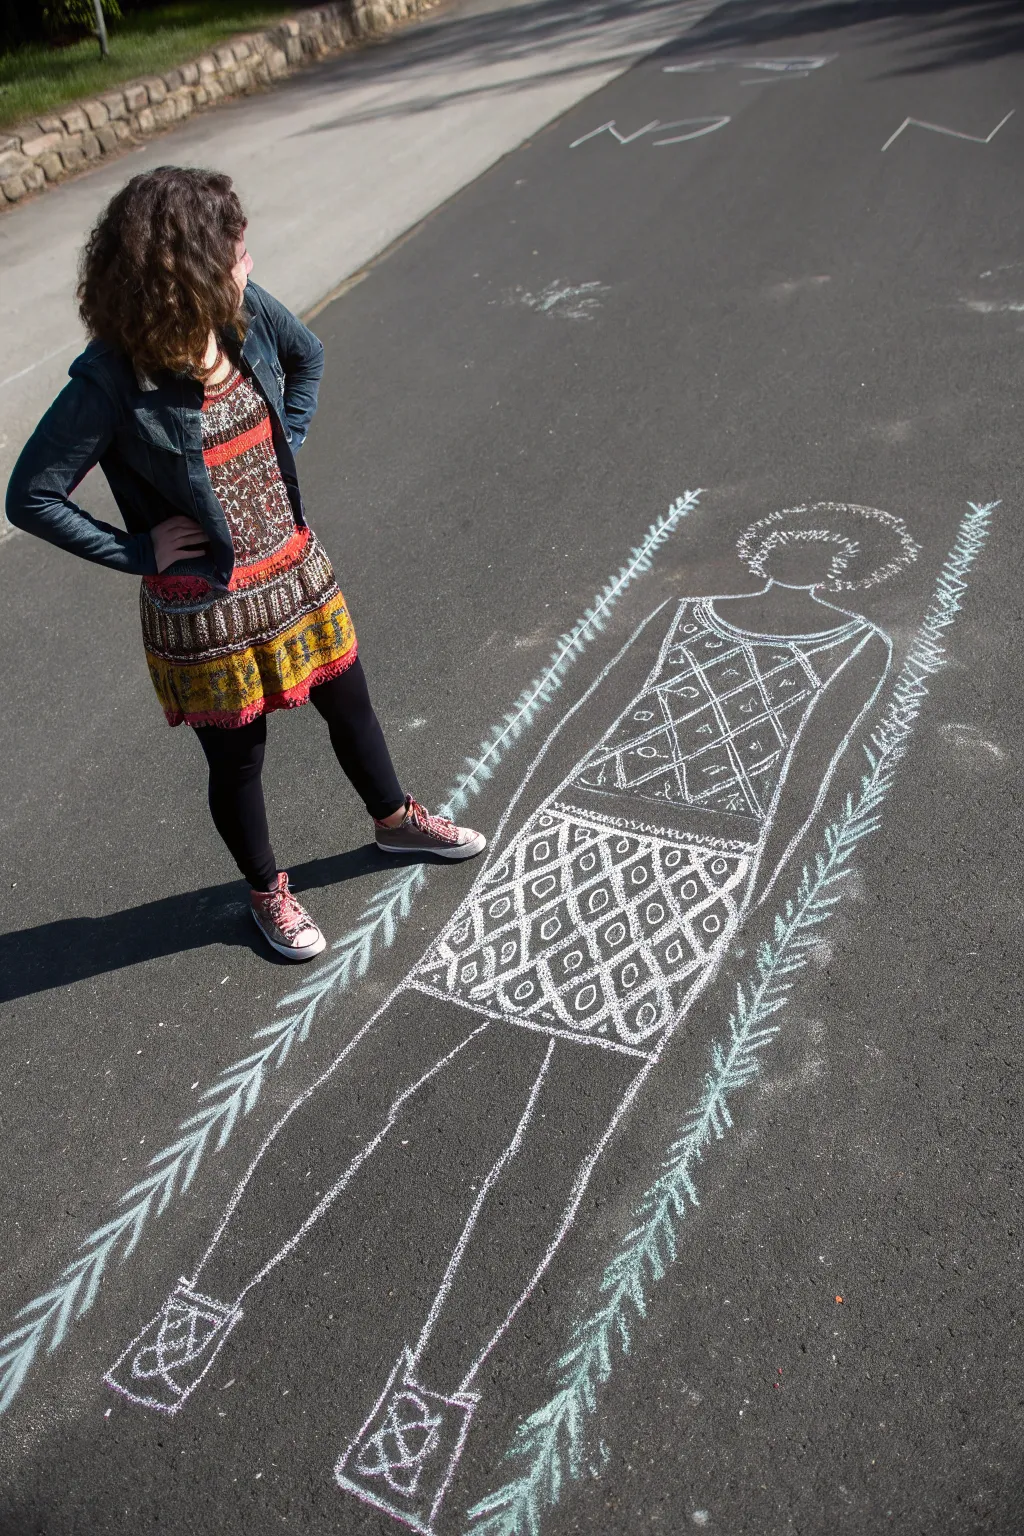
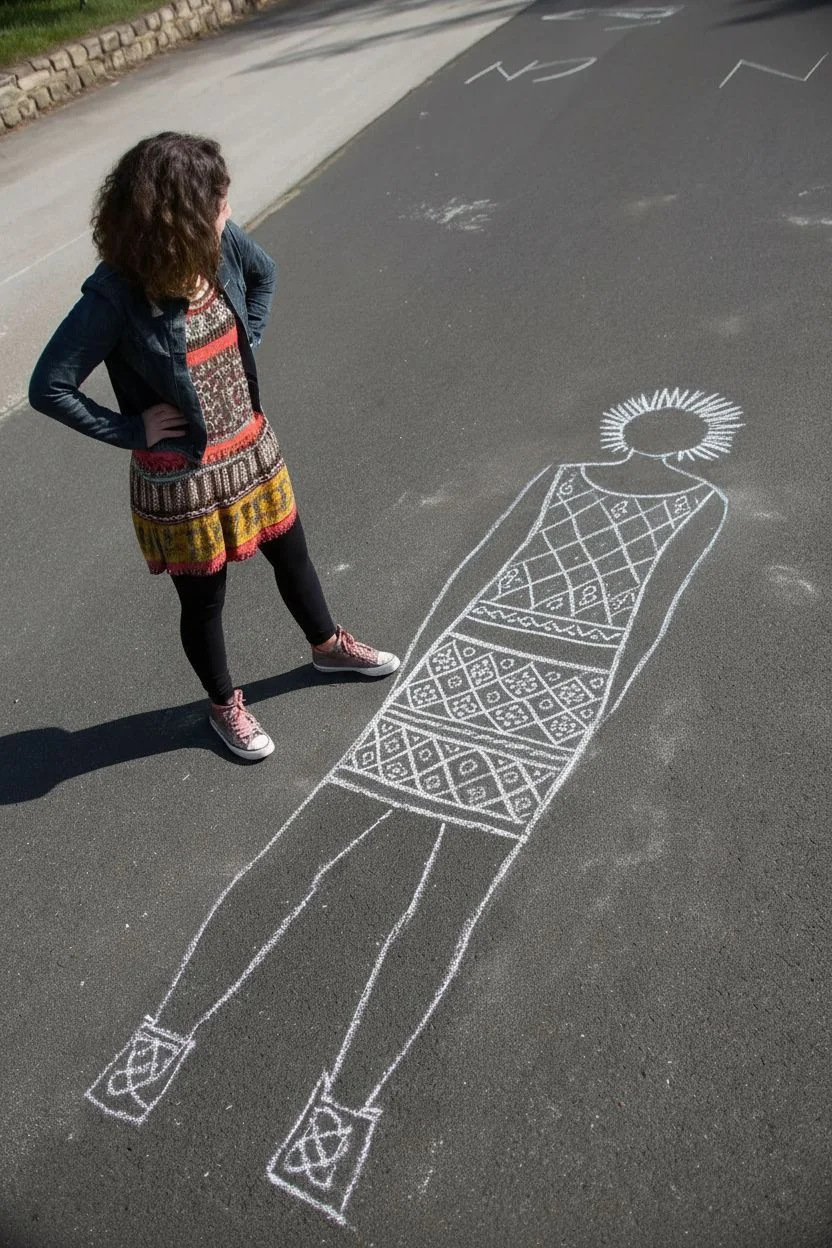
Transform a sunny spot of driveway into a personal canvas with this life-sized chalk portrait project. By tracing a real body and filling it with intricate geometric patterns, you create a striking, stylized mirror image that pops against the asphalt.
Step-by-Step
Materials
- Sidewalk chalk in white
- Sidewalk chalk in light blue or teal
- A smooth patch of pavement or asphalt
- A friend to help with tracing
- Comfortable clothes you don’t mind getting dusty
Step 1: Setting the Stage
-
Find your canvas:
Scout out a section of driveway or quiet street that is relatively smooth and free of loose gravel. Sweep away any large debris or pebbles so your chalk lines will be crisp. -
Position the model:
Have the subject (or yourself) lie down flat on their back on the pavement. Position the arms slightly away from the body so there is clear space to draw the torso definition later. Legs should be straight but comfortable. -
Trace the outline:
Ask a friend to trace the entire shape of the body using white chalk. Keep the chalk stick upright to ensure a consistent line width. Trace around the head, torso, arms, legs, and feet. -
Stand up and review:
Once the outline is complete, carefully stand up without smudging the lines. Examine the silhouette and touch up any faint areas or gaps where clothing might have bunched up during tracing.
Chalk Texture Trick
Soak your chalk in water for 5 minutes before drawing. It creates a creamy, paint-like paste that dries super bright and opaque.
Step 2: Defining the Features
-
Add hair volume:
Draw the hair shape. For curly hair like in the example, use a loose, bumpy line around the head outline to suggest volume and texture, rather than individual strands. -
Draw the neckline:
Sketch a curved double line near the shoulders to create the neckline of the dress or top. This anchors the clothing design. -
Section the torso:
Draw a horizontal line across the waist area to separate the top from the skirt. This helps you plan different patterns for each section of the outfit.
Step 3: Creating Patterns
-
Design the bodice:
Start drawing a diamond pattern on the upper torso section using diagonal white lines. Try to keep the spacing relatively even, but don’t worry about perfection; the hand-drawn look adds character. -
Fill the diamonds:
Inside each diamond shape on the bodice, add small details. You can alternate between dots, small circles, or tiny squiggles to create visual interest. I like to leave a few blank for contrast. -
Outline the skirt grid:
Move down to the skirt area. Draw a grid of squares or slightly rounded rectangles. Make these shapes larger than the diamonds on the top to distinguish the two pieces of clothing. -
Decorate the skirt:
Inside each square of the skirt grid, draw a concentric circle or oval. This repetition creates a bold, textile-like appearance that mimics patterned fabric. -
Refine the legs:
Where the skirt creates a hemline, draw a solid horizontal line. Below this, re-trace the leg lines to ensure they look like legs emerging from the skirt, rather than just empty space. -
Detail the shoes:
At the feet, draw shoe details. Simple rectangles with ‘X’ laces or geometric patterns work well to represent sneakers or boots.
Smudged Lines?
If you accidentally smear a line with your hand, use a dry, stiff paintbrush or an old toothbrush to sweep the dust out of the pores of the asphalt.
Step 4: Finishing Touches
-
Start the vine border:
Switch to your light blue or teal chalk. Begin drawing a long, continuous line running parallel to the left side of the body, leaving about six inches of space between the figure and the line. -
Repeat on the right:
Draw a matching vertical line on the right side of the figure. These lines frame the portrait and ground the composition. -
Add leaves:
along both blue lines, distinct, short strokes angling outward and upward to create a leafy vine effect. Keep the strokes quick and feathery. -
Final cleanup:
Blow away any excess chalk dust. If any white lines got smudged while you were working on the detailed patterns, give them one last pass to make the bright white pop against the asphalt.
Step back and pose next to your chalk twin for a fantastic photo opportunity


Big Letter Quote With Pose Spot
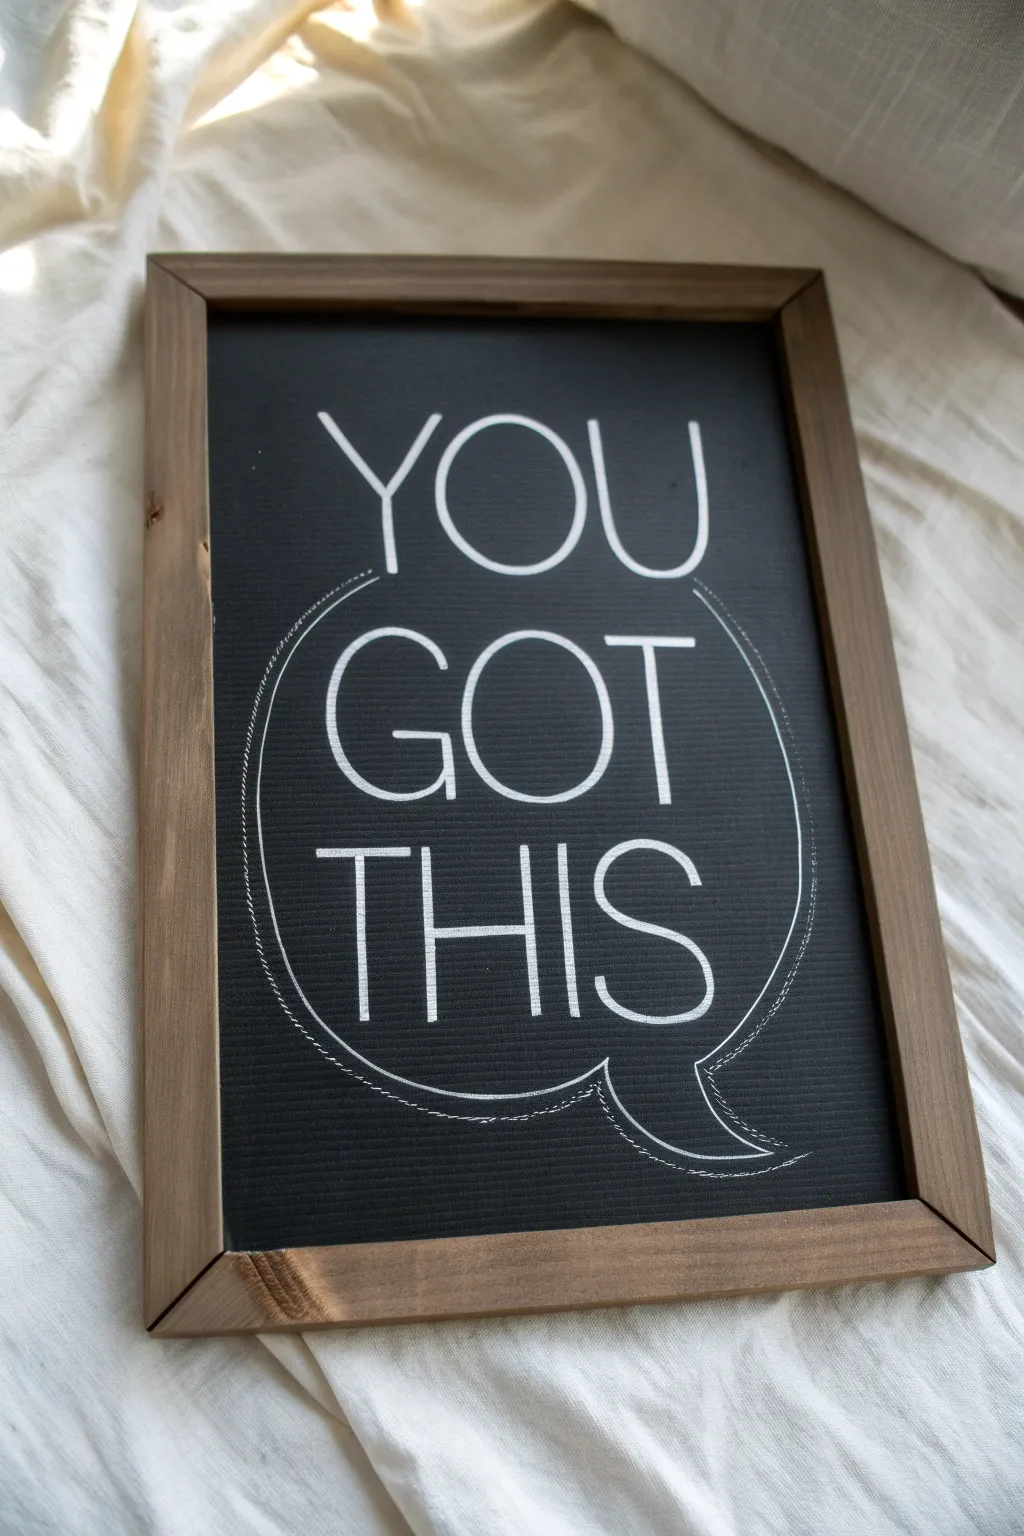
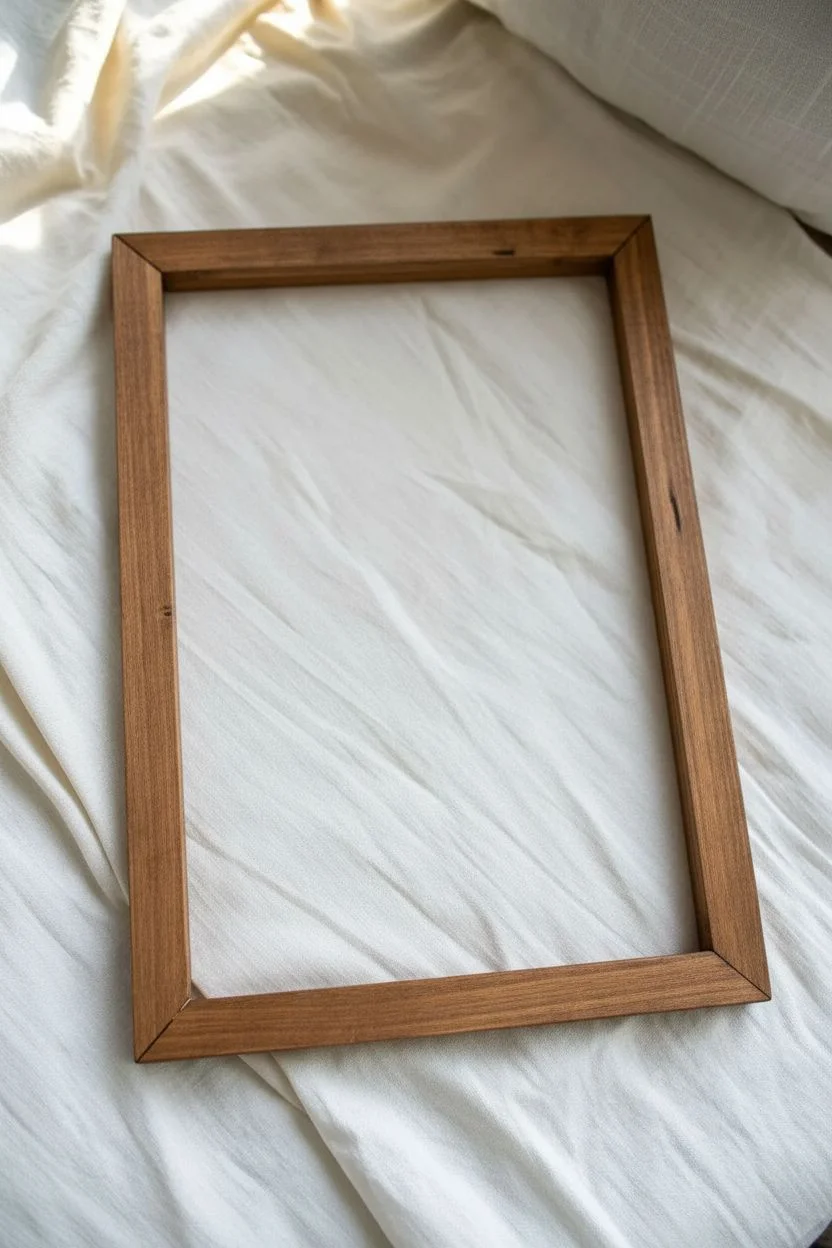
Boost your confidence with this sleek, modern motivational sign featuring a stitched-style speech bubble. This project combines a chalkboard aesthetic with crisp, high-contrast lettering and a warm wood frame for a piece that fits perfectly in a home office or bedroom.
Step-by-Step Guide
Materials
- Rectangular wooden frame (approx. 11×14 inches)
- Black textured cardstock or blackboard contact paper
- Backing board (cardboard or thin MDF to fit frame)
- White paint marker (medium tip)
- White paint marker (fine tip)
- Ruler
- Pencil
- White chalk (for drafting)
- Wood stain (walnut or similar shade)
- Rag or foam brush for staining
- Eraser
- Craft glue or double-sided tape
Step 1: Preparing the Frame
-
Dissassemble the frame:
Begin by removing any existing glass, backing, or artwork from your chosen wooden frame. You will only need the outer wooden rim and a sturdy backing board. -
Clean surface:
Wipe down the raw wood frame with a clean, dry cloth to remove any dust or debris that might interfere with the stain absorption. -
Apply stain:
Using a foam brush or a rag, apply a generous coat of walnut wood stain to the entire frame face and sides. I like to work in long strokes to match the grain. -
Wipe excess:
After letting the stain sit for about 2-3 minutes, wipe away any excess liquid with a clean rag. This reveals the wood grain and prevents blotches. -
Dry completely:
Set the frame aside on a protected surface to dry completely according to the manufacturer’s instructions, usually at least 4-6 hours.
Chalk Rub Trick
Before using paint markers, rub the side of a chalk stick over the entire black paper and wipe it off. This gives it an authentic, dusty chalkboard look.
Step 2: Creating the Background
-
Cut the backing:
While the frame dries, cut your sturdy backing board to fit precisely inside the frame’s opening. -
Prepare the surface:
Cut a piece of black textured cardstock or blackboard contact paper to the same size as your backing board. -
Mount the black layer:
Adhere the black material to the backing board using craft glue or double-sided tape. Smooth it out meticulously to ensure there are no air bubbles or wrinkles.
Shadow Effect
Use a light gray fine-tip marker to add a thin shadow line to the right of each letter. It makes the white text pop off the black background.
Step 3: Drafting the Design
-
Measure center:
Using a ruler, lightly mark the vertical center of your black board with a piece of white chalk. This will help align the text. -
Sketch guides:
Draw three horizontal guidelines with chalk where your three lines of text (‘YOU’, ‘GOT’, ‘THIS’) will sit. -
Draft the letters:
Lightly sketch the words in a tall, thin sans-serif font using chalk. Ensure ‘GOT’ and ‘THIS’ are stacked closely, while ‘YOU’ sits slightly higher. -
Sketch the bubble:
Draw a large circle or oval shape encompassing ‘GOT’ and ‘THIS’, adding a small tail pointing downward at the bottom right to create a speech bubble shape.
Step 4: Inking the Final Art
-
Paint ‘YOU’:
Using the medium tip white paint marker, trace over your chalk draft for the word ‘YOU’. Use steady, vertical strokes for clean lines. -
Paint ‘GOT THIS’:
Continue tracing ‘GOT’ and ‘THIS’ with the medium marker. Go over the lines a second time once dry if the white isn’t fully opaque. -
Create the stitching effect:
Switch to your fine tip paint marker. Trace the speech bubble outline, but instead of a solid line, create small, consistent dashes to mimic stitching. -
Double the stitch:
To enhance the stitched look, draw a second ring of dashed lines just slightly inside the first one. This adds depth and realism to the ‘thread’ effect. -
Dry and clean:
Allow the paint marker ink to dry completely for at least 30 minutes. Once dry, gently wipe away any remaining chalk guide marks with a slightly damp cloth.
Step 5: Final Assembly
-
Insert artwork:
Place your finished black board into the back of your dry, stained wooden frame. -
Secure backing:
Secure the board in place using the frame’s tabs or framer’s points. Ensure it creates a tight fit so the artwork doesn’t shift.
Now you have a stylish piece of encouraging art ready to hang on your wall
Drawn Spotlight and Shadow Trick
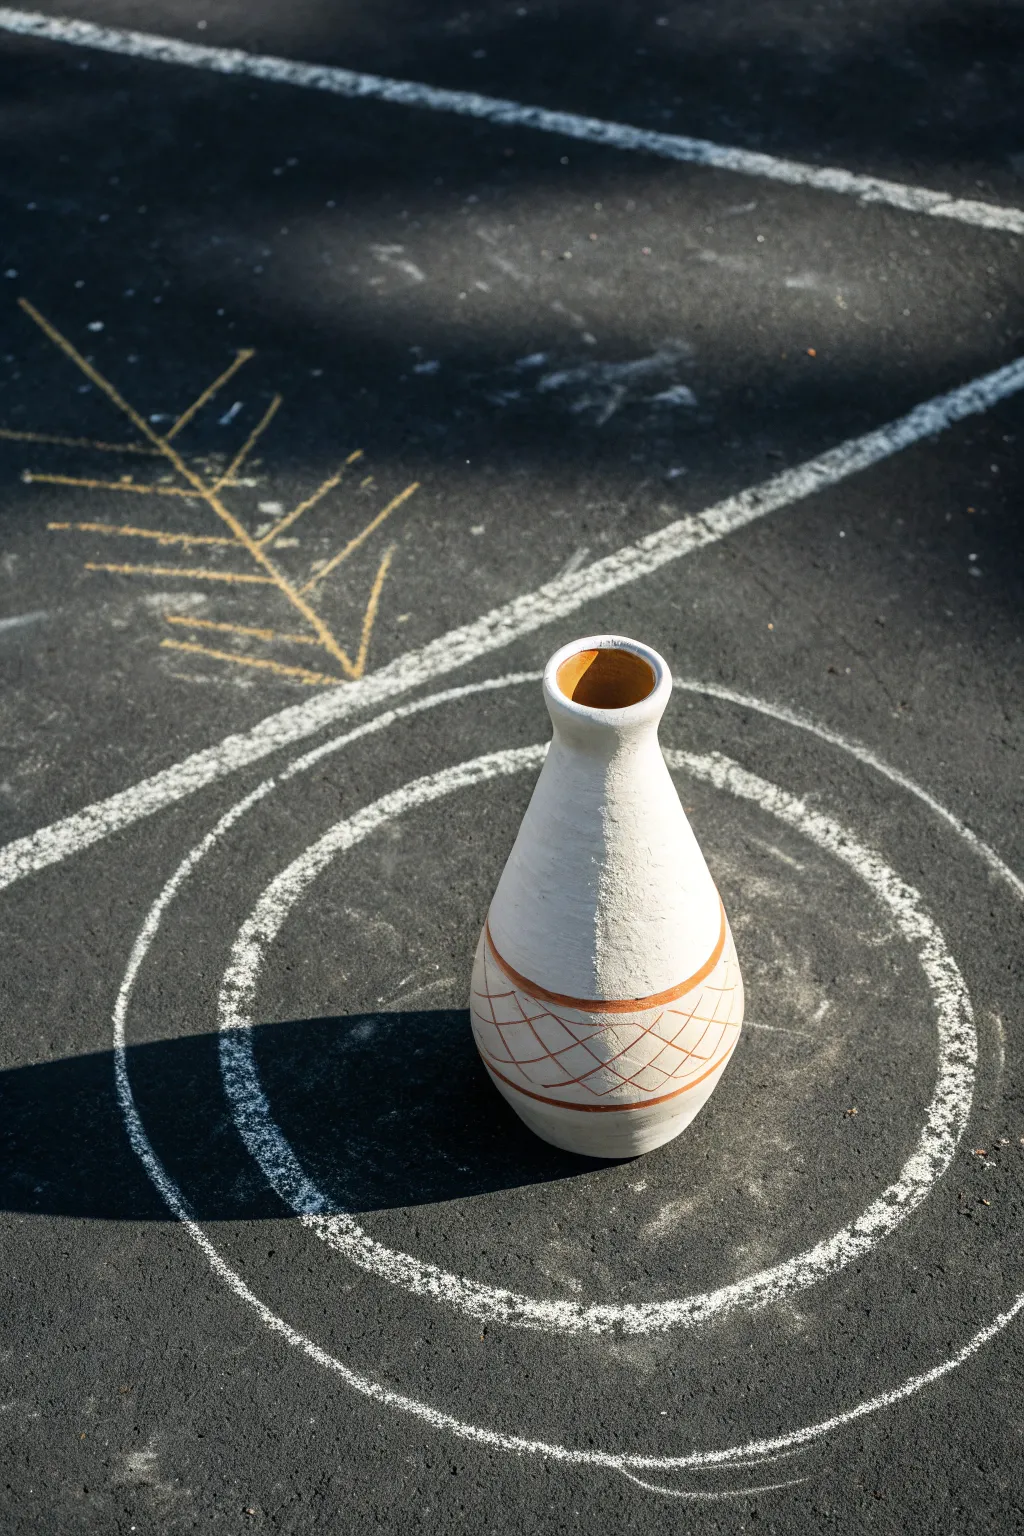
Transform a simple object into a dramatic centerpiece using nothing but pavement and chalk. This clever trick uses concentric circles to create a faux spotlight effect that interacts beautifully with the natural sunlight and cast shadows.
Step-by-Step
Materials
- White sidewalk chalk (thick stick)
- Yellow sidewalk chalk
- A tall object (vase, bottle, or toy)
- Rough pavement or asphalt surface
- Sunny day (crucial for the shadow)
Step 1: Planning the Scene
-
Find the light:
Scout a location on your driveway or sidewalk that is currently in direct sunlight. You need a spot where your object will cast a long, distinct shadow. -
Clean the canvas:
Use a broom to quickly sweep away loose pebbles, dirt, or leaves from your chosen square of pavement to ensure smooth chalk lines. -
Place the object:
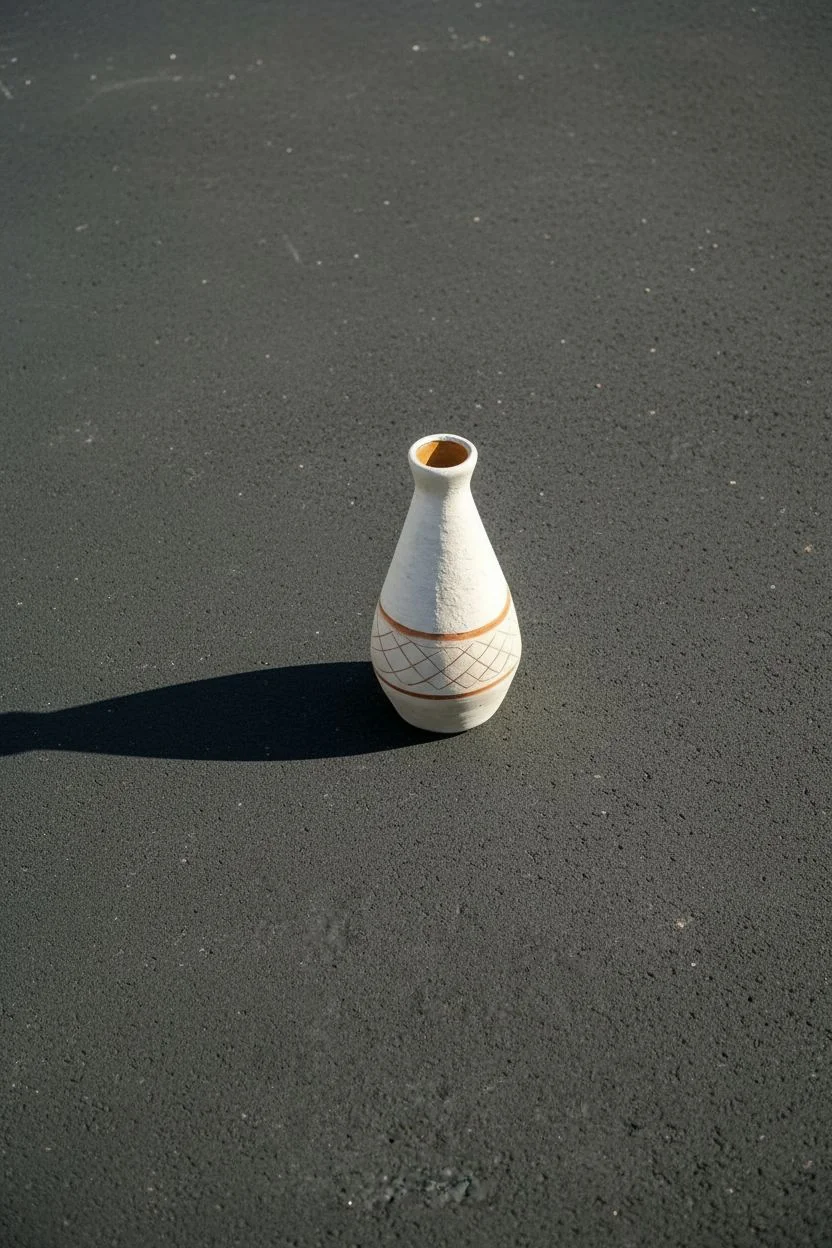
Set your chosen object (like the white vase shown here) directly in the middle of your clean space. Observe where the shadow falls; you want plenty of room around it.
Uneven Circles?
Tie a string to a piece of chalk. Hold one end at the vase’s base and pull tight to use as a compass for perfect rings.
Step 2: Drawing the Spotlight
-
Mark the center:
Take your thick white chalk relative to the base of your vase. You want to draw a tight circle right around the bottom of the object first to establish your center point. -
Draw the first ring:
Draw a larger circle around the vase, keeping about 4-6 inches of distance from the object. Don’t worry if it’s not a perfect geometric circle; a slightly organic hand-drawn look adds charm. -
Create the second ring:
Draw another circle outside the first one, maintaining roughly the same gap width. Press down firmly on the chalk to make the white really pop against the dark asphalt. -
Add the outer ring:
Sketch a third, final large circle. This one frames the entire scene. Go over this line a second time to ensure it looks like a bright beam of light. -
Check the shadow:
Stand back and look at how the real shadow of the vase cuts across your white rings. This intersection is what creates the visual interest of the piece.
Level Up
Trace the vase’s shadow on the ground with a different color, freezing that specific moment in time permanently.
Step 3: Adding Decorative Elements
-
Start the arrow design:
To the left of your spotlight circles, use yellow chalk to draw a long, straight line that angles toward the vase. -
Add the branches:
Draw shorter diagonal lines coming off the main yellow line, creating a shape that resembles a stylized pine tree, a feather, or an arrow fletching. -
Thicken the yellow lines:
Go back over your yellow design. Since yellow can sometimes be faint on grey asphalt, a second pass helps the color stand out against the white spotlight. -
Draw background lines:
Using the white chalk again, draw a long, straight horizontal line in the background, crossing behind the vase area. This helps ground the image. -
Add a diagonal accent:
Draw another straight white line intersecting the background, perhaps mirroring the angle of a shadow or a pavement crack.
Step 4: Final Touches
-
Clean up dust:
Blow away any loose chalk dust that may have settled inside the black negative space of your circles. You want distinct contrast. -
Refine the vase position:
Double-check that your vase is perfectly centered in the rings. -
Capture the photo:
Wait for the sun to be bright. Take your photo from a high angle looking down to emphasize the geometry of the circles against the organic shadow.
Enjoy watching how the shifting sun changes your artwork throughout the afternoon
Tiny City With Giant Perspective Pose
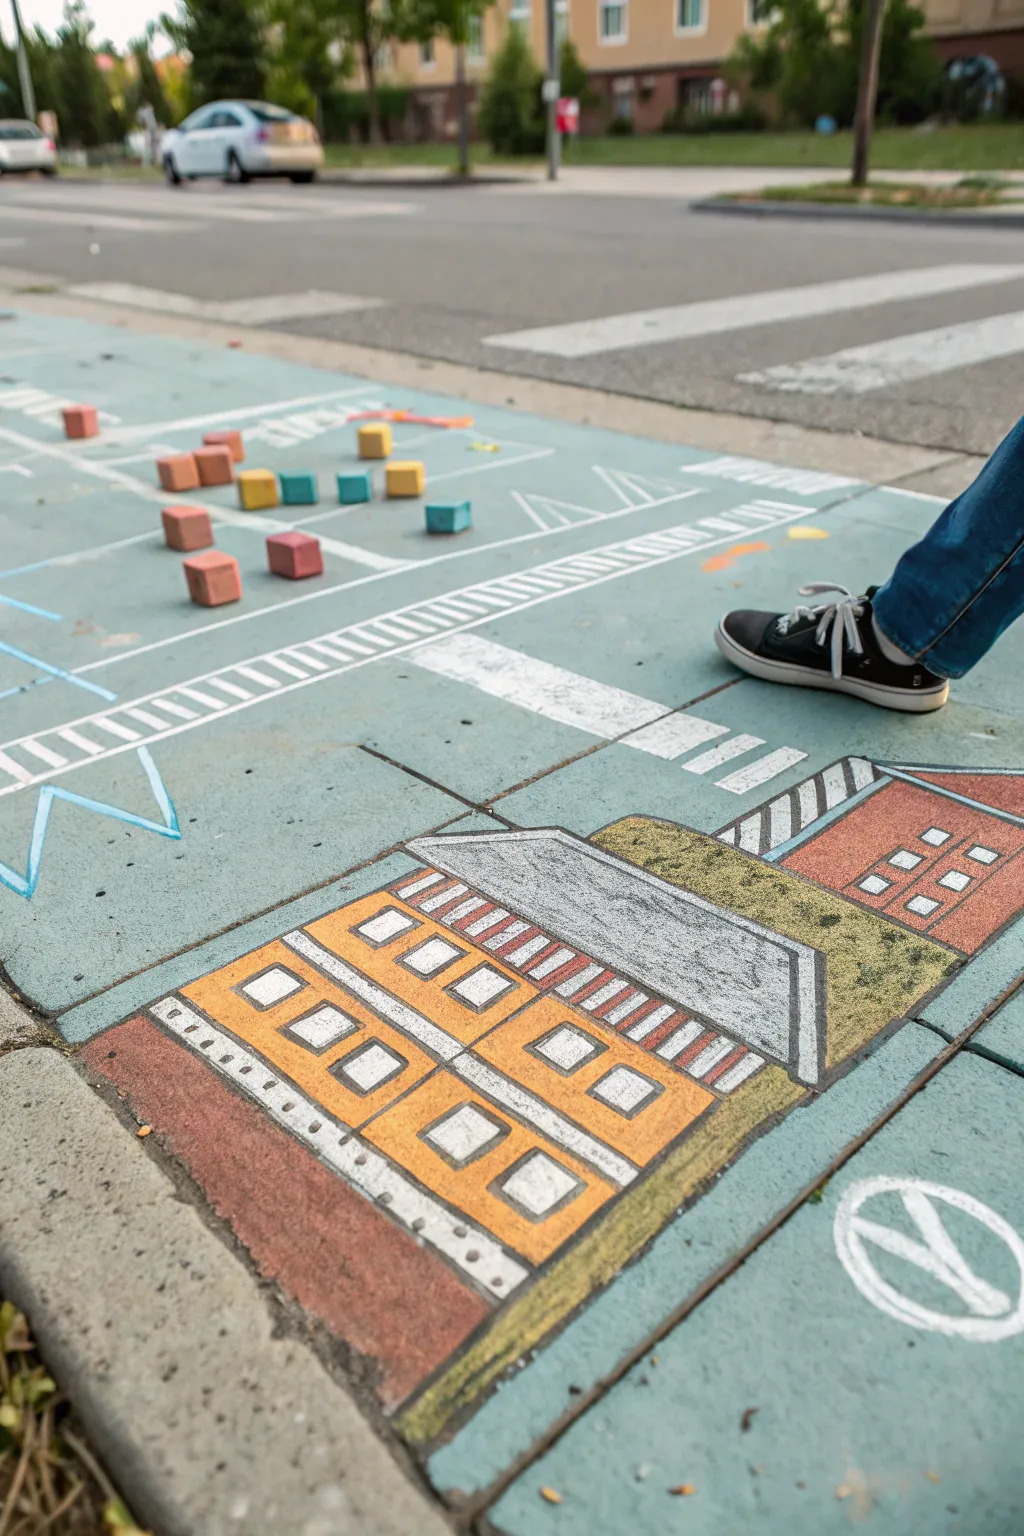
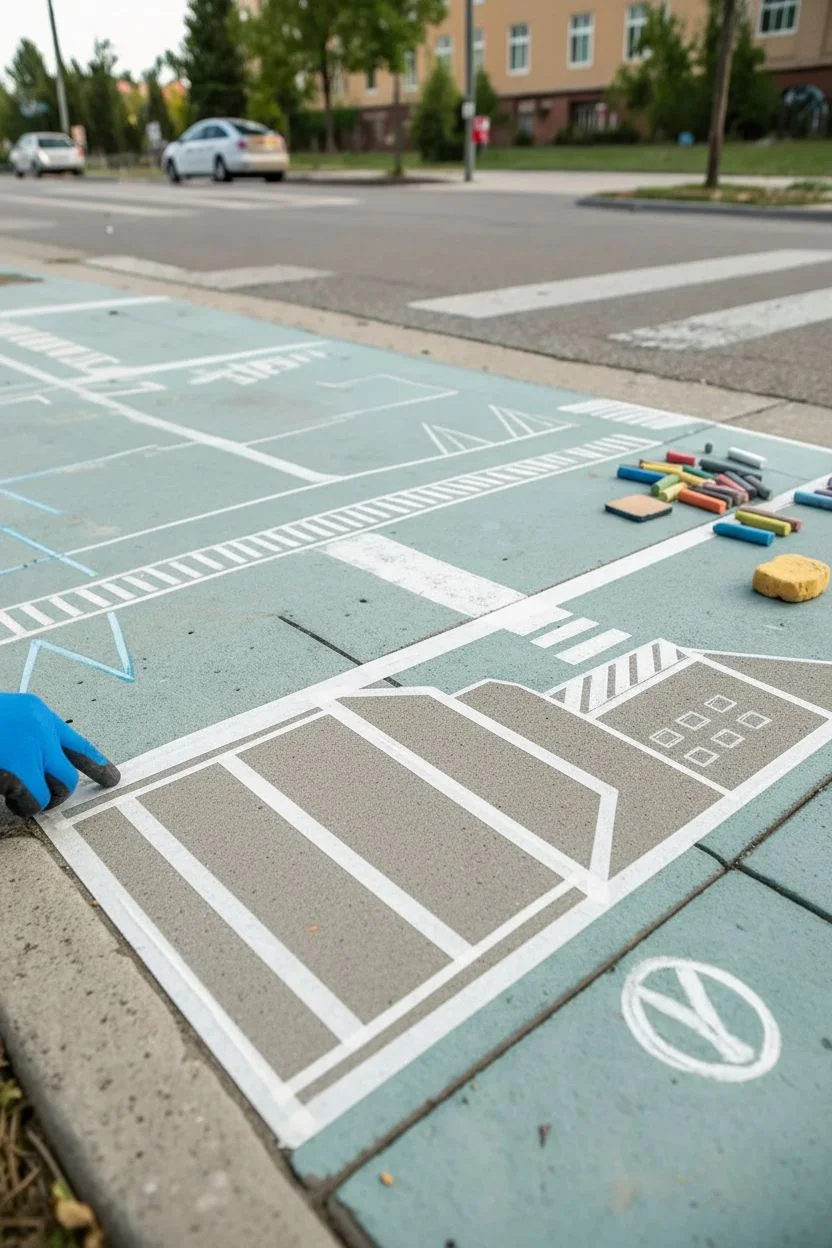
Transform an ordinary sidewalk square into a bustling mini-metropolis with this clever perspective drawing. By sketching small buildings and roads, you can create a playful scene where anyone standing nearby looks like a gentle giant visiting a tiny city.
How-To Guide
Materials
- Sidewalk chalk (various colors)
- Painter’s tape or masking tape (1-inch width)
- Knee pads or a gardening cushion
- Small blending sponge or rag
- Measuring tape or yardstick (optional)
Step 1: Planning and Taping
-
Clean your canvas:
Find a smooth, dry section of sidewalk or pavement. Sweep away any loose dirt, pebbles, or leaves to ensure your tape sticks well and your chalk goes on smoothly. -
Establish the horizon line:
Decide where the ‘back’ of your city will be. Lay down a strip of painter’s tape horizontally to mark the end of the drawing block; this will keep your top edge crisp. -
Tape the main street:
Create the main road running diagonally or vertically through your space. Lay two long strips of tape parallel to each other, leaving about 5-6 inches of space between them for the road surface. -
Outline the buildings:
Use your tape to create the basic geometric shapes of the buildings near the front edge of the sidewalk square. Think in rectangles and squares, focusing on angled rooflines to mimic a 3D perspective.
Clean Lines Hack
Before coloring, run a wet finger or damp cloth over the edge of the tape. This seals the tape to the concrete and prevents chalk dust from sneaking underneath.
Step 2: Drawing the Infrastructure
-
Fill the road base:
Color in the space between your main road tape lines with a light blue or grey chalk. I like to use the side of the chalk stick here for broad, even coverage. -
Blend the pavement:
Take your sponge or rag and gently rub the chalk into the concrete texture. This pushes the pigment into the pores and creates a solid, painted look rather than a sketchy one. -
Add road markings:
Using a bright white chalk stick with a sharpened tip, draw the dashed lane lines down the center of your blue road. Add thicker white stripes perpendicular to the road for a pedestrian crosswalk. -
Create secondary paths:
Sketch smaller intersecting paths or thinner white lines branching off the main road to suggest a grid system.
Step 3: Building the Architecture
-
Color the first building:
Choose a warm yellow or orange for the large building in the foreground. Fill in the taped-off rectangle completely, applying heavy pressure for vibrant color. -
Add the roof:
Color the shape above your building rectangle with grey or black to distinguish the roof. If you want depth, smudge the bottom edge of the roof color slightly into the building color. -
Neighboring structures:
Fill in the adjacent building shapes with contrasting colors like brick red or terracotta. Variety in building color helps distinguish the individual structures in your tiny skyline. -
Detail the windows:
Once the base colors are drawn and blended, take a white chalk stick and draw rows of small squares for windows. Keep them uniform in size to maintain the sense of scale. -
Outline for crispness:
Use a dark grey or black piece of chalk to trace around the edges of your buildings and the window frames. This pop of contrast makes the cartoon style really stand out against the pavement.
Night Vision
Outline your roads and buildings with glow-in-the-dark chalk. When the sun goes down, your tiny city will light up like a real metropolis at night.
Step 4: Finishing Touches
-
Remove the tape:
Carefully peel up your painter’s tape. Pull it slowly at a 45-degree angle to reveal the sharp, clean edges of your city grid. -
Touch up edges:
Tape removal might lift small bits of chalk. Go back with your specific colors and carefully fill in any gaps right up to the crisp lines you just revealed. -
Add landscape elements:
Draw patches of green around the buildings to represent grass or parks. A little bit of texture here works well—don’t blend it as smoothly as the roads. -
Scatter the materials:
For a fun ‘work in progress’ photo op, leave a few colorful chalk cubes scattered on the playing field as if they are giant construction materials for the tiny town. -
Pose for the shot:
Have someone stand just at the edge of the artwork, placing their foot near the crosswalk. The size difference between the real shoe and the tiny drawn road creates the forced perspective illusion.
Step back and snap a photo to capture your giant-sized adventure in this miniature world


Have a question or want to share your own experience? I'd love to hear from you in the comments below!