
If you’ve got an empty champagne bottle (or one you’re gifting), it’s basically a blank canvas with built-in celebration vibes. Here are my favorite champagne bottle painting ideas—starting with the classics everyone loves, then drifting into the artsy, unexpected stuff that turns a bottle into a real keepsake.
Monogram in a Painted Wreath
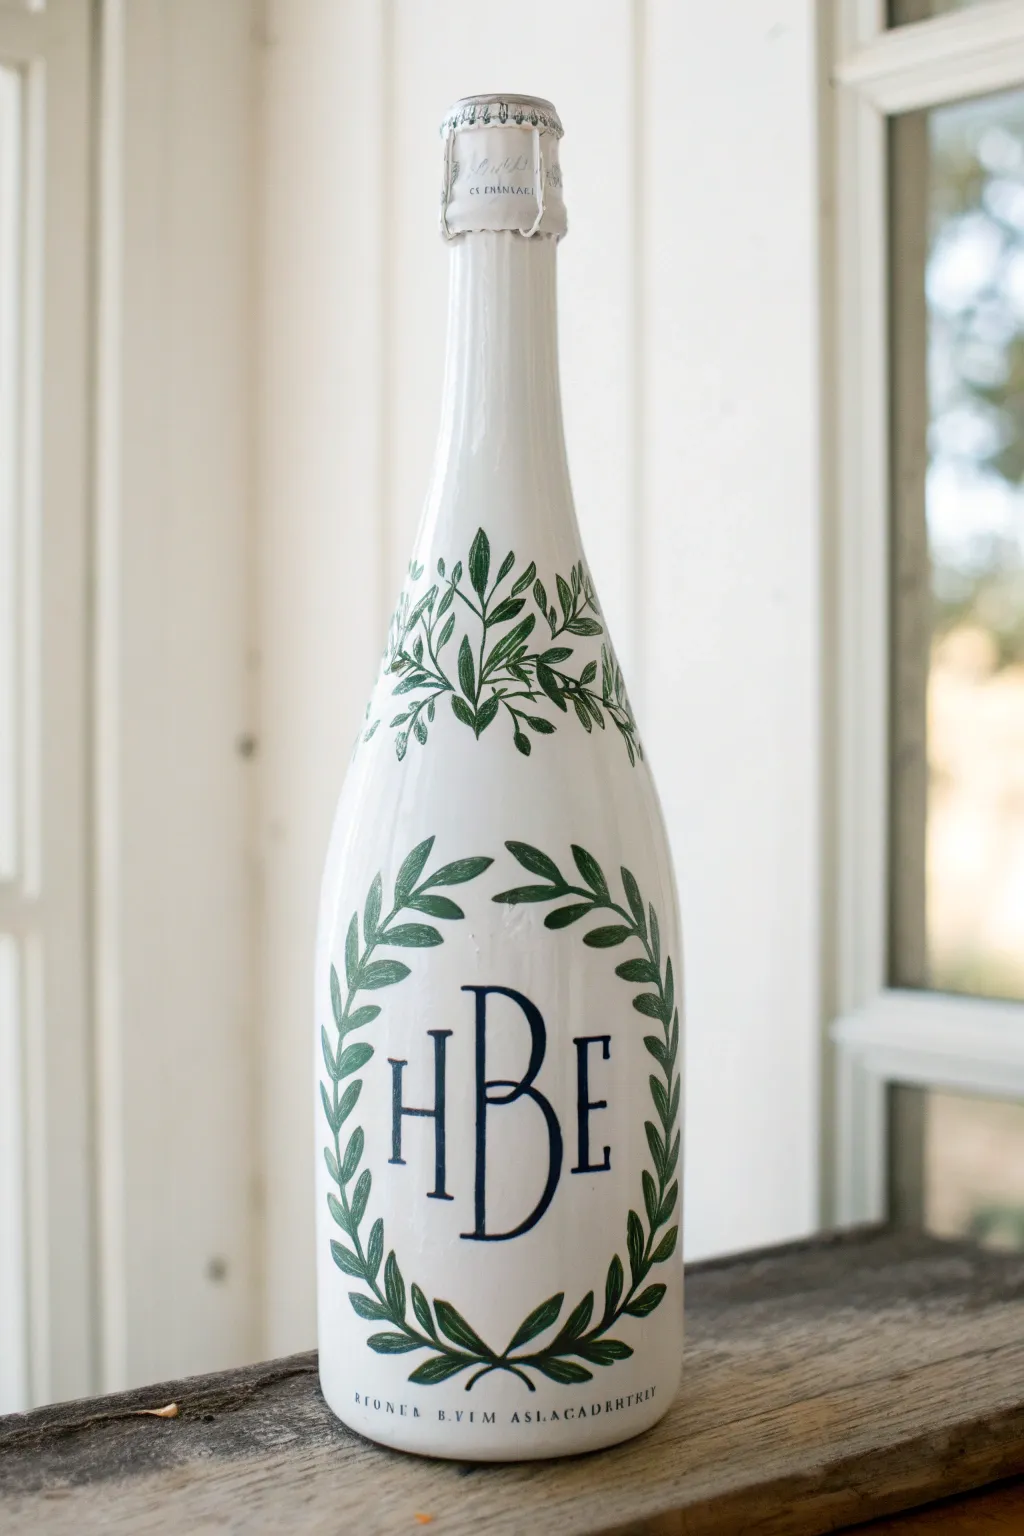

Transform a standard champagne bottle into a sophisticated keepsake with this crisp white design featuring a classic laurel wreath and bold monogram. The contrast between the stark white background, deep navy lettering, and organic green foliage creates a timeless look perfect for weddings or anniversaries.
Step-by-Step
Materials
- Full champagne bottle (labels removed)
- Rubbing alcohol
- White spray paint (matte or satin finish)
- Acrylic paints: Dark Navy Blue, Forest Green, Olive Green
- Small flat brush (for monogram)
- Fine liner brush (size 0 or 00)
- Small round brush (size 2)
- Pencil
- Printed monogram stencil or transfer paper (optional)
- Clear acrylic sealer spray (matte or gloss)
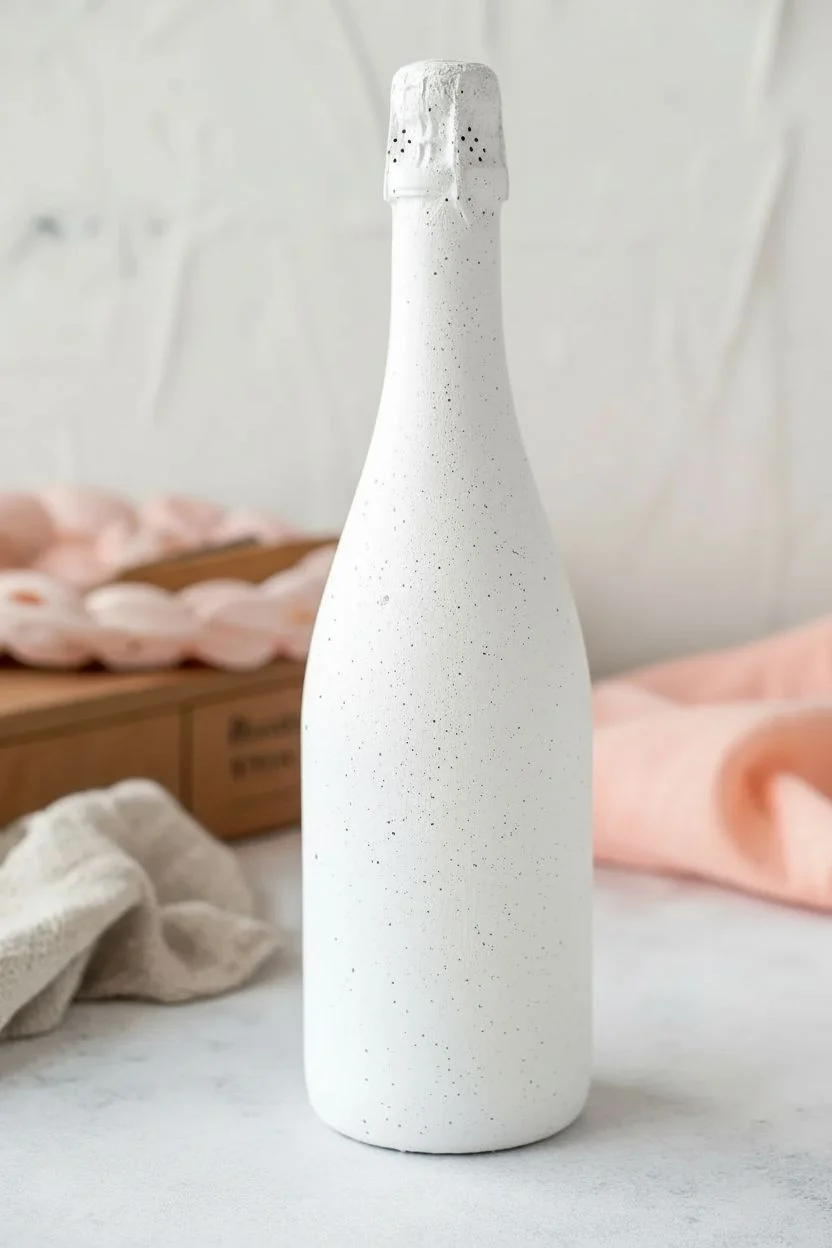
Step 1: Base Preparation
-
Clean the surface:
Start by removing all labels and adhesive residue from your bottle. Once clear, wipe the entire glass surface down with rubbing alcohol to remove any oils or fingerprints, ensuring a perfect bond for the paint. -
Prime the background:
In a well-ventilated area, spray the bottle with your white primer or base coat. I find that holding the can about 8-10 inches away helps avoid drips. -
Apply subsequent coats:
Let the first coat dry completely (usually 15-20 minutes). Apply a second and possibly third coat until the glass is fully opaque and the finish is smooth and even. -
Allow full cure:
Let the base layer cure for at least 24 hours. This step is crucial; painting on tacky spray paint will ruin your finish.
Fixing Wobbly Lines
If a paint edge looks uneven, dampen a clean, stiff angled brush with water (or alcohol if the paint is dry) and run it along the edge to ‘erase’ and sharpen the line.
Step 2: Designing the Monogram
-
Position the letters:
Lightly sketch your three-letter monogram in the center of the bottle using a pencil. If freehand isn’t your strength, tape a printed stencil over the area and trace the outline heavily, or use transfer paper. -
Paint the letter structure:
Using your small flat brush and navy blue paint, carefully fill in the vertical strokes of the letters first to establish the font’s weight. -
Refine the edges:
Switch to your fine liner brush to paint the serifs (the little feet on the letters) and the curved sections of the ‘B’. Keep your hand steady and your paint consistency creamy. -
Second coat for opacity:
Navy blue can sometimes look streaky over white. Once the first layer is dry, apply a second coat to make the letters bold and solid.
Metallic Accent Upgrade
Make the bottle pop by outlining your monogram letters with a very fine gold paint marker, or adding tiny gold berries into the greenery wreath.
Step 3: Painting the Foliage
-
Sketch the wreath shape:
Lightly pencil two curved lines stemming from the bottom center, curving up around the monogram to form the main stems of your wreath. -
Paint the main stems:
Mix a small amount of Forest Green with a touch of Olive. Use the liner brush to paint over your penciled stem lines, keeping them thin and delicate. -
Add basic leaves:
Using the size 2 round brush, paint small almond-shaped leaves along the stems. Press down at the base of the leaf and lift up as you drag to create a pointed tip. -
Layering the neck design:
Repeat the leaf process on the neck of the bottle. Create a cascading effect where leaves point downwards and outwards from the foil line. -
Adding texture:
I like to go back in with a slightly darker green shade and add thin center veins to the larger leaves using your finest brush. -
Highlighting for depth:
Mix a tiny bit of white into your green. Add subtle highlights to the tips of a few leaves to make the foliage look more dimensional.
Step 4: Finishing Touches
-
Add bottom text:
If you wish to include a date or small phrase at the very bottom, use a sharpened pencil to create a guideline, then use your finest liner brush or even a paint pen for these tiny details. -
Clean up details:
Check for any stray pencil marks. If the paint is fully dry, you can gently erase them with a white eraser. -
Seal the artwork:
Once all acrylic paint is bone dry (give it a few hours), spray the entire bottle with a clear acrylic sealer to protect your design from scratches and moisture.
Now you have a stunning, personalized centerpiece ready to be gifted or displayed.


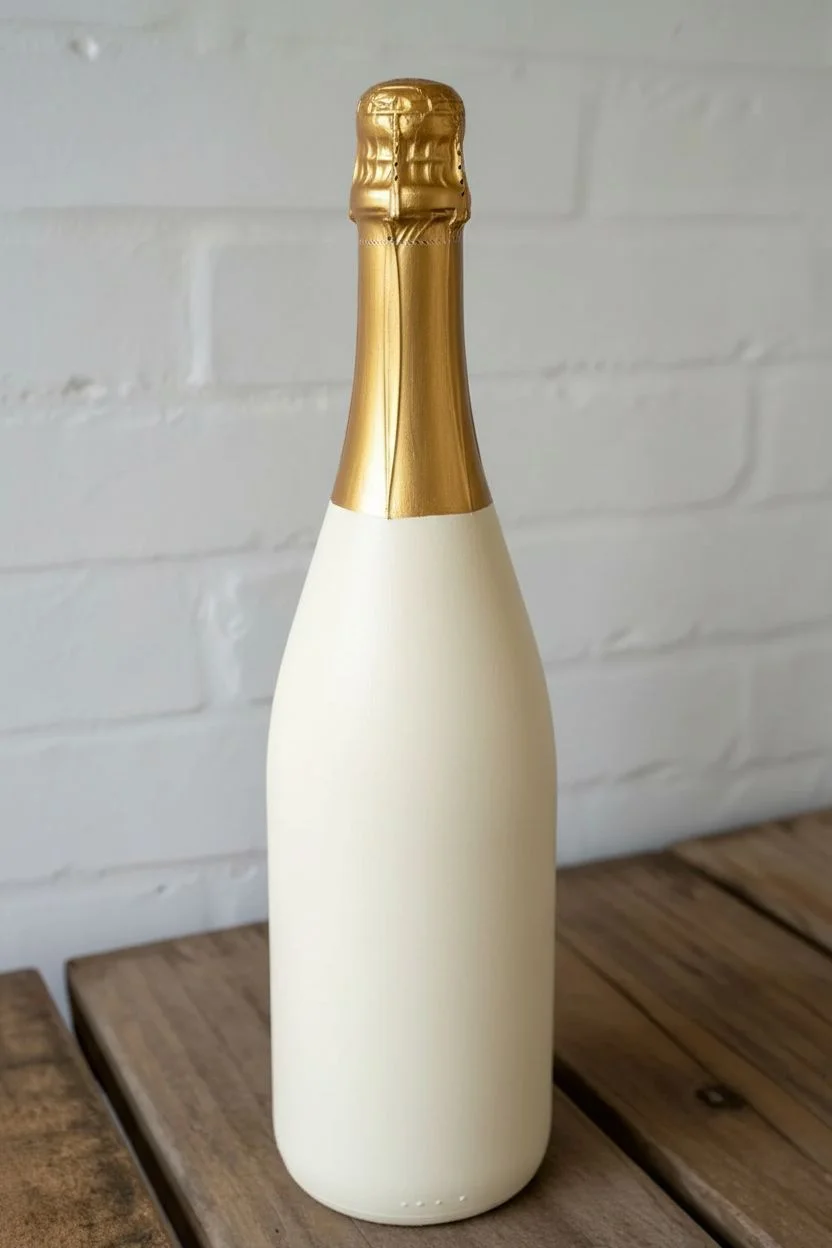
Gold Accents and Celebration Details

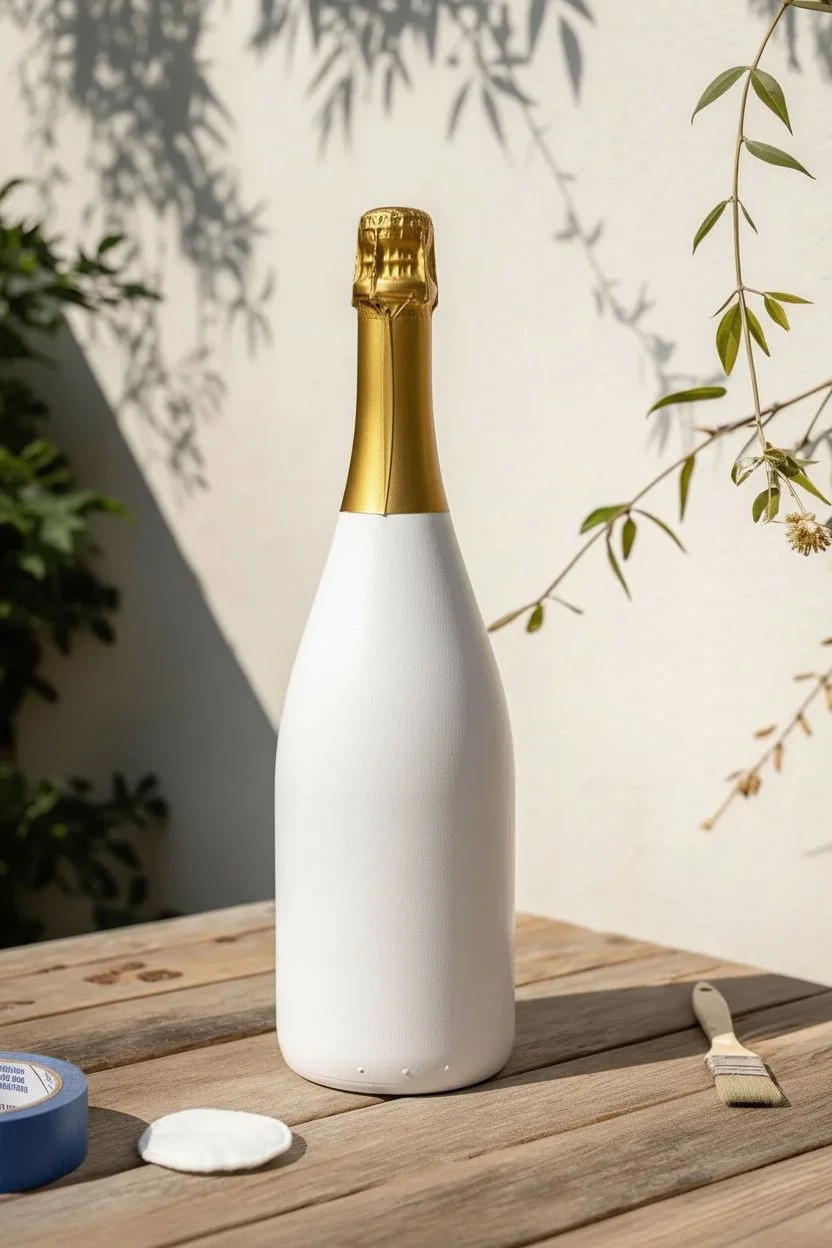
Transform a standard champagne bottle into a luxurious centerpiece with creamy matte paint and delicate gold detailing. This elegant project combines freehand botanical illustrations with a festive splatter effect for a sophisticated finish perfect for weddings or New Year’s Eve.
How-To Guide
Materials
- Full champagne bottle (labels removed)
- White chalk paint or matte acrylic paint
- Liquid gold leaf or high-quality metallic gold acrylic paint
- Gold spray paint (metallic finish)
- Painter’s tape
- Flat paintbrush (medium size)
- Fine liner paintbrush (size 0 or 00)
- Small stiff-bristled brush (for splattering)
- Sealer spray (matte or satin finish)
- Rubbing alcohol
- Cotton pads
Step 1: Preparation & Base Coat
-
Clean the surface:
Before painting, ensure the glass is perfectly clean. Wipe the entire bottle down with rubbing alcohol on a cotton pad to remove any oils or sticky residue from the labels. -
Tape the neck:
Decide where you want the gold neck to transition to the white body. Apply a strip of painter’s tape horizontally around the bottle’s shoulder, pressing down firmly to seal the edge. -
Paint the first white layer:
Using your flat brush, apply a coat of white chalk paint to the body of the bottle below the tape line. Don’t worry if it looks streaky; coverage will improve with subsequent coats. -
Dry and repeat:
Allow the first coat to dry completely, usually about 30-45 minutes. Apply a second and possibly third coat until you have a solid, opaque white finish with no glass showing through. -
Paint the foil top:
While the body dries, carefully paint the existing foil wrapper at the top of the bottle with liquid gold leaf or metallic gold paint. This gives it a cohesive, custom look that matches your artwork. -
Spray the neck:
Once the white paint is fully dry, mask off the white painted area with paper and tape. Spray the exposed glass neck with metallic gold spray paint for a smooth, flawless finish. Alternatively, brush on liquid gold leaf for a more textured look. -
Remove the tape:
Peel away the painter’s tape carefully while the gold paint is still slightly tacky to ensure a crisp, clean line between the gold neck and white body.
Fixing Smudges
If you smudge gold paint on the white base, wait for it to dry completely. Then, carefully paint over the mistake with a tiny bit of your white base paint to act as an eraser.
Step 2: Golden Details & Artwork
-
Create the transition band:
Dip a small round brush into your liquid gold leaf. Dab it gently along the transition line where the gold neck meets the white body to create a textured, uneven border that hides any tape imperfections. -
Start the splatter effect:
Dip a stiff-bristled brush or an old toothbrush into slightly thinned gold paint. Run your thumb across the bristles to flick tiny speckles onto the upper section of the white body, fading them out as you move down. -
Paint the bottom border:
Using your fine liner brush, paint a thin, organic gold line near the bottom edge of the bottle. Add small dots or dashes underneath it to frame the design. -
Draft the stems:
With the fine liner brush, paint long, sweeping curved lines rising from the bottom border. These will serve as the main stems for your botanical design. -
Add leaves to the vines:
Along the curved stems, paint small, simple tear-drop shapes to form leaves. Vary the angles and sizes to make the vines feel natural and organic. -
Paint decorative sprigs:
In between the leafy vines, add different botanical elements like straight lines with tiny dots on the ends to resemble berry sprigs or wildflowers. -
Draw starbursts:
Fill the empty spaces in the middle section of the bottle with small starbursts or snowflake shapes. Paint a simple cross, then add diagonal lines through the center. -
Add floating stars:
Scatter a few tiny five-pointed stars or simple crosses among the lower botanical elements to add a touch of magic and sparkle. -
Final drying time:
Let all the hand-painted gold details cure for at least 24 hours to ensure they are fully set and won’t smudge. -
Seal the artwork:
To protect your beautiful handiwork from chipping, lightly mist the entire bottle with a clear matte or satin sealer spray in a well-ventilated area.
Make It Sparkle
While the gold paint on the stars or berries is still wet, sprinkle a tiny pinch of super-fine gold glitter onto them for extra texture and shimmer that catches the light.
This stunning custom bottle is now ready to serve as a memorable gift or a beautiful centerpiece for your celebration


Full-Coverage Solid Color Bottle
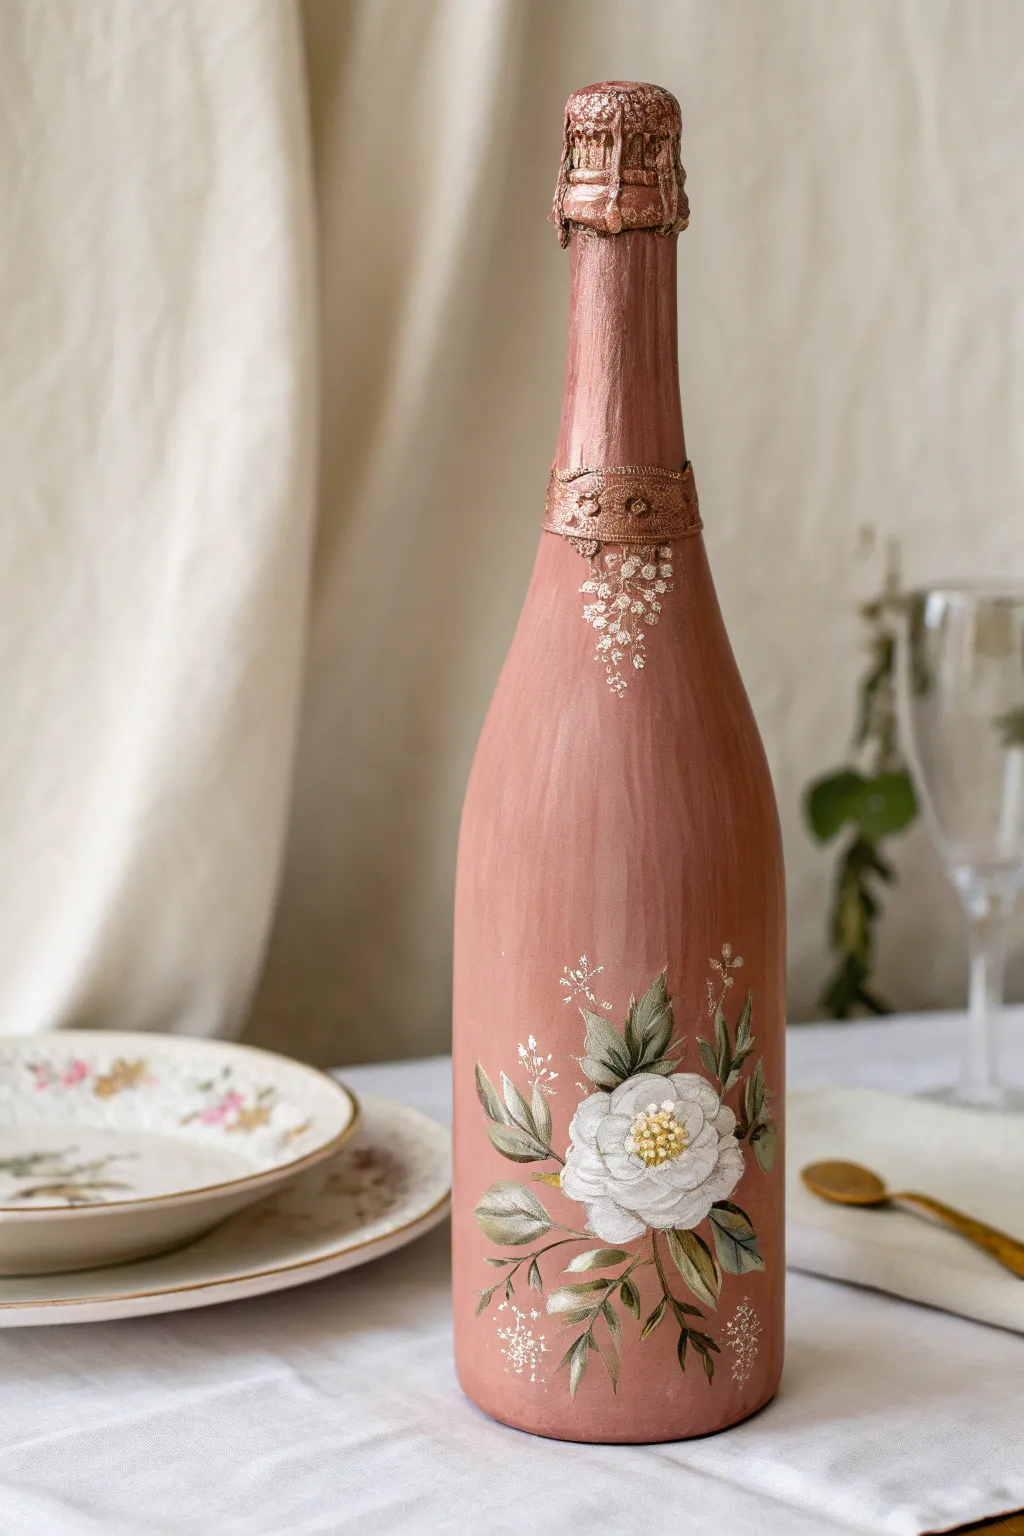
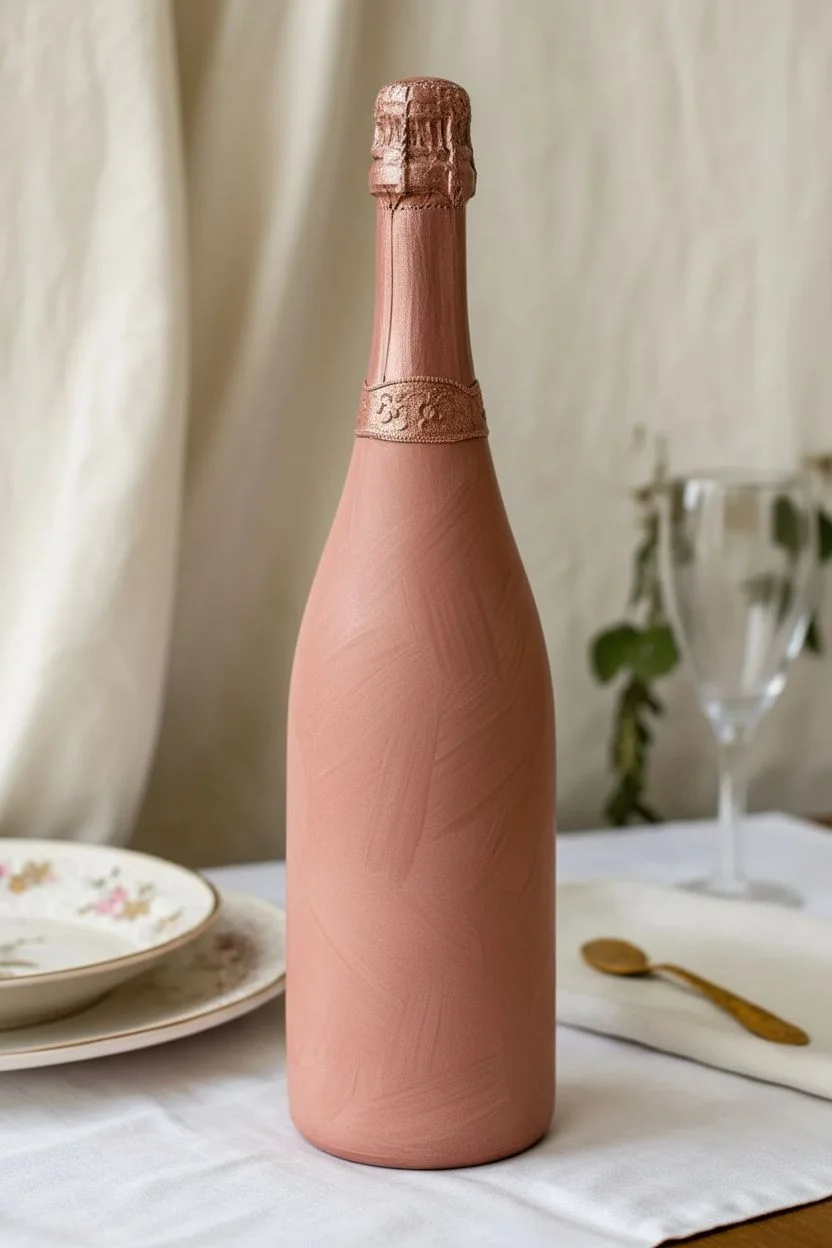
Transform an ordinary champagne bottle into a romantic centerpiece featuring soft terracotta tones and delicate floral artistry. This project combines a full-coverage matte base with intricate white and green hand-painted details for a sophisticated, antique look.
Detailed Instructions
Materials
- Full champagne bottle (label removed)
- Rubbing alcohol
- Soft terracotta or dusty rose chalk paint
- Gold metallic acrylic paint
- White acrylic paint
- Olive green and dark green acrylic paint
- Yellow ochre acrylic paint
- Adhesive texture paste or modeling paste and stencil (optional for neck ring)
- Wide flat synthetic brush
- Small round detail brush (size 0 or 1)
- Fine liner brush
- Matte spray varnish
- Sponge dabber
Step 1: Preparation & Base Coat
-
Clean the surface:
Begin by removing all labels and adhesive residue from your champagne bottle. Wipe the entire glass surface down with rubbing alcohol on a lint-free cloth to remove any oils, ensuring the paint will adhere properly. -
Leave the foil intact:
Unlike many bottle projects, keep the foil wrapper on the neck. We will be painting over this to create a seamless, sculptural look at the top. -
Apply the first base layer:
Using a wide flat brush, apply your terracotta or dusty rose chalk paint to the entire bottle, including the foil neck. Chalk paint adheres well to glass, acting as its own primer. -
Build opacity:
Let the first coat dry completely. Apply a second—and possibly third—coat until you have a solid, opaque finish with no glass showing through. I like to use crisscross brushstrokes here to add a subtle texture. -
Create the neck detail:
At the base of the bottle neck, where the foil usually ends, apply a thick band of texture paste or heavy body acrylics to mimic a decorative ring. You can create a raised pattern by pressing a stamp into it while wet or piping it on.
Chalk Paint Textures
Apply the base coat using a stiff bristle brush in random directions. The brush marks add a vintage, stone-like texture that enhances the antique look.
Step 2: Painting the Floral Motif
-
Outline the main flower:
Sketch the large white rose shape lightly with a pencil or very diluted paint. Place it prominently on the lower wide section of the bottle. -
Base the leaves:
Mix olive green with a touch of white to get a soft sage color. Paint the basic leaf shapes extending outward from your central flower area. -
Layer the rose petals:
Using your round brush and white paint, fill in the rose petals. Don’t aim for solid white immediately; let the petals possess some translucency. -
Add petal definition:
Once the white base is dry, mix a tiny bit of gray or utilize the underlying terracotta color to shade the base of each petal, creating depth and separation. -
Highlight the leaves:
Add veins and highlights to your leaves using a fine liner brush and a lighter green mixture. Add darker green lowlights near the stem for contrast. -
Paint the flower center:
Dab small dots of yellow ochre in the center of the rose. Add tiny white highlights on top of the yellow dots to simulate pollen texture. -
Add delicate sprigs:
Using a liner brush and white paint, draft very fine stems extending from the floral cluster. Add tiny dots at the ends to resemble baby’s breath.
Step 3: Metallic Accents & Finishing
-
Gild the foil top:
Take a sponge dabber with a small amount of gold metallic paint. Lightly sponge over the textured foil area at the top of the bottle to highlight the ridges. -
Highlight the neck ring:
Brush the metallic gold over the textured band you created on the neck. Wipe back some paint immediately with a paper towel so the gold settles into the recesses. -
Add cascading gold details:
Paint small, delicate cascading dots or vines falling from the neck ring using your fine liner brush and gold paint. This connects the top design to the body. -
Refine the main flower:
Go back to your main rose and add final crisp white edges to the petals to make them pop against the terracotta background. -
Seal the artwork:
Once all paint is thoroughly dry (give it at least 24 hours), spray the entire bottle with a matte varnish. This protects the finish and unifies the sheen of the different paints.
Fixing Paint Strips
If paint peels off the glass while working, lightly sand that specific spot, wipe clean, and dab paint on with a sponge rather than dragging a brush.
Now your bottle is ready to serve as a stunning art piece for your table setting or mantel


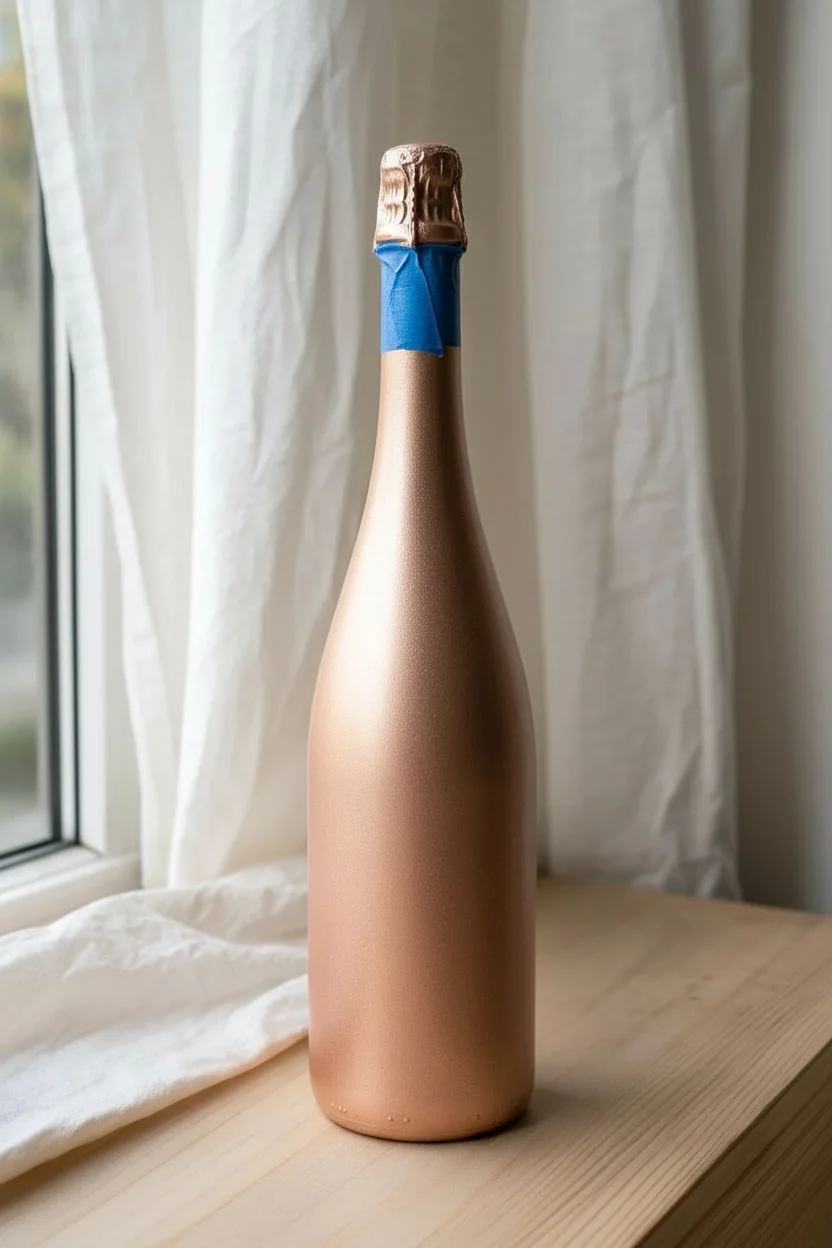
Soft Ombre Fade From Base to Neck
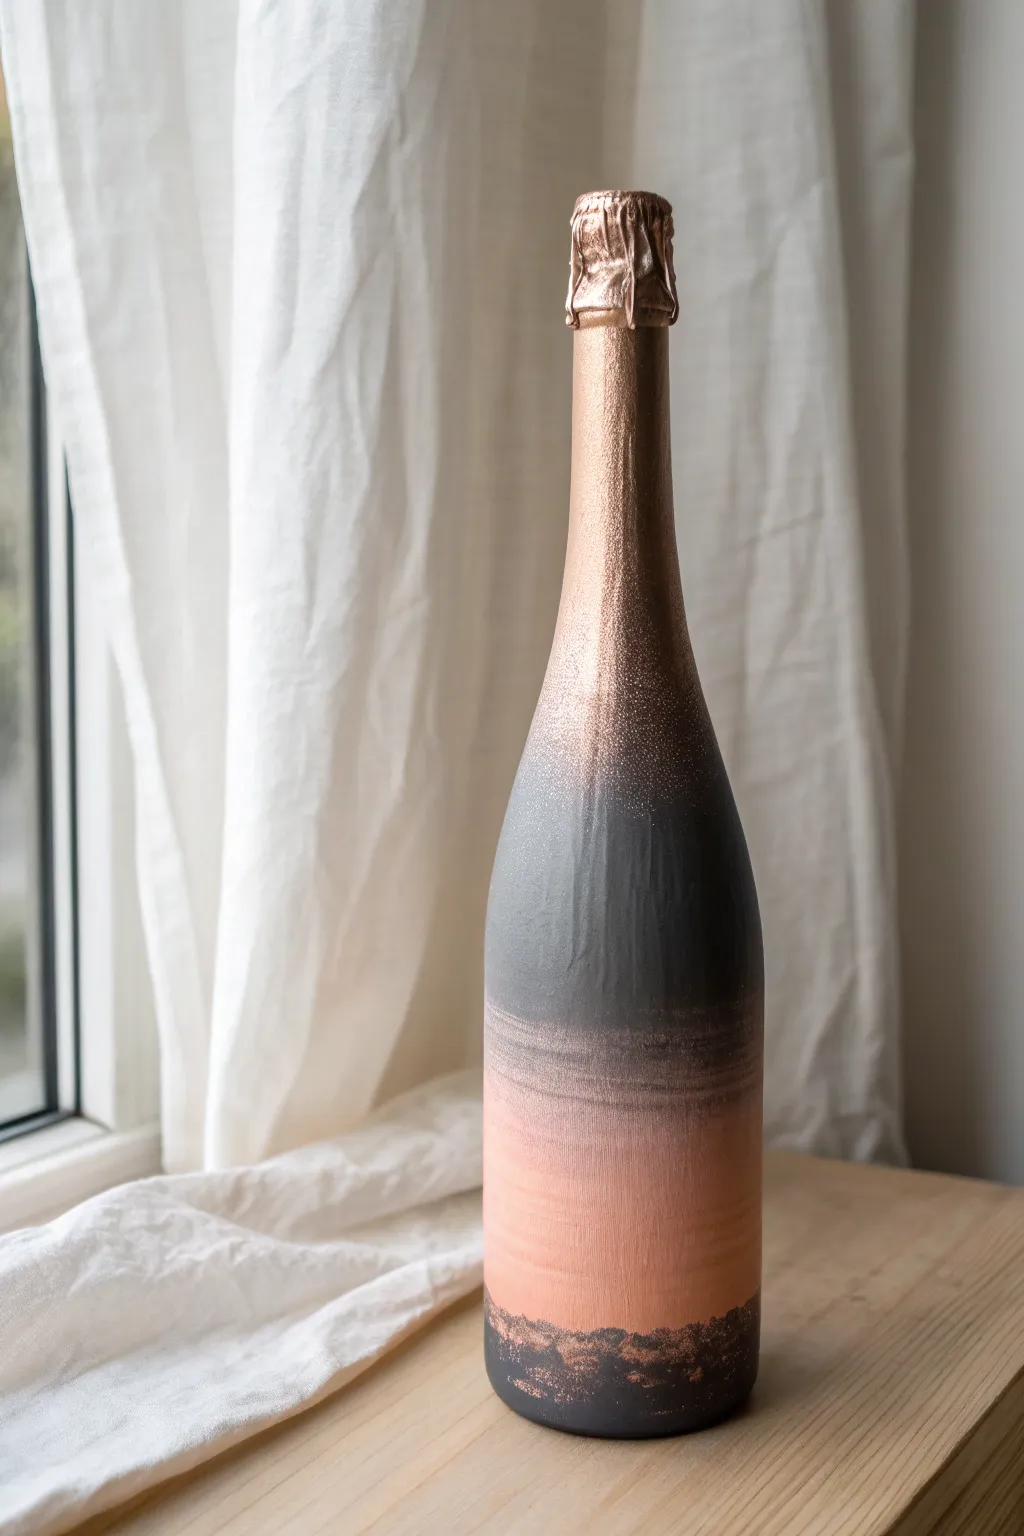
This elegant champagne bottle transformation combines the warmth of rose gold with the modern edge of matte charcoal. The unique double-ombre effect, fading from metallic to dark and back to a soft peach, creates a sophisticated centerpiece perfect for weddings or New Year’s Eve.
How-To Guide
Materials
- Full champagne bottle (foil intact)
- Painter’s tape
- Rose gold or copper spray paint (metallic finish)
- Matte charcoal or dark slate gray spray paint
- Soft peach or salmon acrylic paint (matte)
- Small foam sponge or stippling brush
- Clear matte sealant spray
- Cardboard box or drop cloth
- Gloves and mask
Step 1: Preparation & Metallic Base
-
Clean the surface:
Begin by removing any paper labels from the main body of the bottle. Soak the bottle in warm soapy water if needed, but be very careful to keep the foil wrapper at the top completely dry and intact. -
Mask the foil:
Once the glass is bone dry, wrap painter’s tape thoroughly around the bottom edge of the foil neck wrapper to protect it. You want a crisp line where the foil meets the glass. -
Apply the metallic coat:
In a well-ventilated area, spray the entire glass surface with the metallic rose gold spray paint. I prefer doing two light coats rather than one heavy one to avoid drips. -
Let it cure:
Allow the metallic base coat to dry completely according to the can’s instructions, usually about an hour.
Step 2: Creating the Ombre Effects
-
Start the charcoal fade:
Using your matte charcoal spray paint, aim the nozzle at the middle section of the bottle. Hold the can about 10-12 inches away to create a light mist rather than a solid block of color. -
Blend upward:
Gently mist the charcoal paint upward towards the neck, letting the spray naturally feather out as it reaches the copper section. The goal is to see speckles of copper still shining through the gray transition. -
Solidify the middle:
Apply a slightly heavier coat of charcoal to the center of the bottle to create a solid band of dark gray, verifying that you have fully covered the metallic base in this specific 3-inch section. -
Prepare the peach tone:
While the spray paint is drying, pour a small amount of matte peach acrylic paint onto a palette or paper plate. -
Sponge application:
Dip a foam sponge lightly into the peach paint and dab off the excess on a paper towel until the sponge is almost dry. -
Create the lower fade:
Start applying the peach paint just below the solid charcoal band. Use a dabbing motion to drag the peach color downward, creating a textured, brushed look. -
Blend the transition:
Where the peach meets the charcoal, use a very light touch with the sponge to blend the two colors. You want the charcoal to look like it is gently descending into the peach tone. -
Establish the peach band:
Continue painting down until you have a solid section of peach, but stop about 2 inches from the bottom of the bottle.
Paint Dripping?
If you sprayed too heavily and see drips, wait for the paint to dry completely, then lightly sand the drip smooth with fine-grit sandpaper before re-spraying that area.
Step 3: Final Touches & Texture
-
Add the bottom charcoal:
To ground the design, take a clean sponge or a small brush and apply charcoal acrylic paint (or spray paint sprayed into a cup) to the very bottom of the bottle. -
Rough up the edge:
Dab the dark paint upward into the peach section to create a rough, ‘torn’ landscape effect along the bottom edge. -
Dry brushing details:
To unify the look, take a dry brush with a tiny amount of the rose gold paint (if you have acrylic) or spray a puddle of gold and use that. Lightly flick or dab it over the charcoal sections to add subtle shimmer. -
Remove the tape:
Carefully peel away the painter’s tape from the neck. Do this slowly to ensure paint doesn’t chip at the seam. -
Seal the work:
Finish the project with a light coat of clear matte sealant spray. This protects the acrylic layers from scratching and evens out the finish. -
Final drying:
Let the bottle sit undisturbed for at least 24 hours before handling or gifting to ensure the paint is fully cured.
Add Texture
Mix a teaspoon of baking soda into your peach acrylic paint before applying it. This creates a ceramic-like, terracotta texture that contrasts beautifully with the smooth metallic neck.
Now you have a stunning custom bottle that looks as expensive as the champagne inside
BRUSH GUIDE
The Right Brush for Every Stroke
From clean lines to bold texture — master brush choice, stroke control, and essential techniques.
Explore the Full Guide
Blue-and-White Porcelain Look
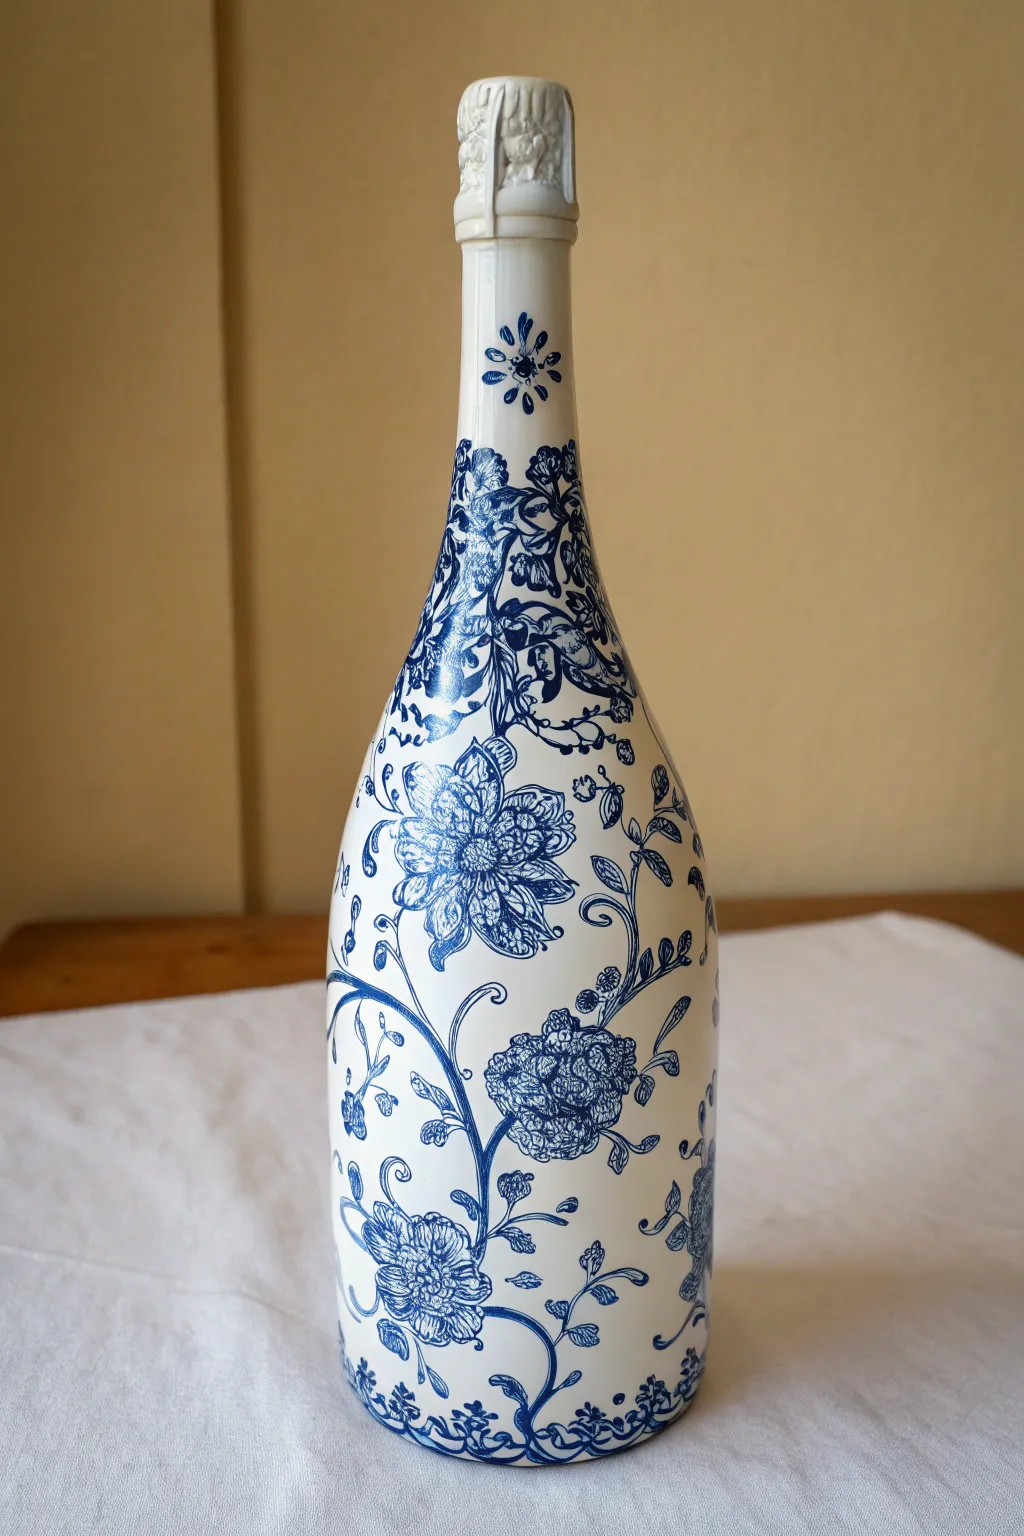

Transform an ordinary glass champagne bottle into a stunning piece of faux Delftware or Chinoiserie pottery. This elegant blue-and-white design mimics the intricate beauty of classic porcelain using nothing but paint and decoupage.
Step-by-Step
Materials
- Champagne bottle (empty, clean, labels removed)
- White chalk paint or matte spray paint (primer & base)
- Decoupage medium (e.g., Mod Podge, satin finish)
- Blue-patterned paper napkins (chinoiserie or floral motifs)
- Small detail scissors
- Soft flat brush (for decoupage)
- Clear acrylic sealer spray (gloss)
- Rubbing alcohol
- Lint-free cloth
- White acrylic paint (for touch-ups)
Step 1: Preparation & Base Coat
-
Clean the surface:
Thoroughly wash your champagne bottle to remove all label residue. Wipe the entire surface down with rubbing alcohol and a lint-free cloth to remove any oils or fingerprints, ensuring maximum paint adhesion. -
Prime the bottle:
Apply a coat of white chalk paint or matte spray paint to the entire bottle, including the foil neck if you wish to cover it. Chalk paint works best for gripping glass. -
Apply the second coat:
Once dry, apply a second coat of white paint to ensure full, opaque coverage. You want a solid, ceramic-like finish with no glass showing through. -
Smooth the surface:
If there are brush strokes, lightly sand the bottle with very fine-grit sandpaper (400+) and wipe away the dust. A smooth base is crucial for the porcelain look.
Wrinkle Rescue
If the napkin wrinkles badly, wait for it to dry completely, then lightly sand the wrinkle down with fine sandpaper before applying the final gloss coat.
Step 2: Preparing the Motifs
-
Select your patterns:
Examine your blue-and-white decorative paper napkins. Look for varying sizes of floral clusters, vines, and individual leaves to create a natural, flowing composition. -
Separate the layers:
Most napkins are 2-ply or 3-ply. Carefully peel away the white backing layers until you are left with only the single, printed top sheet. It will be very thin and fragile. -
Cut out the designs:
Using small detail scissors, cut closely around your chosen floral motifs. You don’t need to be perfect, but try to minimize the white border around the blue ink. -
Plan the layout:
Lay your cutouts on a table to visualize the design. Place larger flowers near the bottom and middle, and use trailing vines to travel up the neck.
Step 3: Decoupage Application
-
Start the main clusters:
Dip your soft flat brush into the decoupage medium. Apply a thin layer of medium directly onto the bottle where your first large flower will go. -
Place the motif:
Gently lay the napkin cutout onto the wet area. Since the paper is thin, I like to tap it down lightly with a dry finger to position it before sealing. -
Seal the cutout:
Load your brush with more medium and gently sweep it over the top of the napkin, starting from the center and working outward to smooth any wrinkles. -
Build the pattern:
Continue adding elements, working your way around the bottle. Leave significant white space between clusters to mimic the aesthetic of hand-painted porcelain. -
Navigate the curves:
As you move up to the neck, use smaller cutouts or make tiny slits in the paper edges so the design wraps smoothly around the curve without bunching. -
Add connecting vines:
Use thin strips of vines or leaves to connect the larger floral groups. This creates movement and stops the design from looking like isolated stickers. -
Refine the edges:
If you see a distinct ridge where the napkin ends, dip a tiny brush in white acrylic paint and carefully stipple over the edge to blend it into the background.
Pro Tip: The Water Trick
Instead of cutting with scissors, use a wet paintbrush to outline the shape on the napkin. The paper tears easily along the wet line for a softer, feathered edge.
Step 4: Finishing Touches
-
Dry thoroughly:
Allow the decoupage medium to dry completely, preferably overnight. It will turn from milky to clear. -
Clean the neck:
If you painted over the cork area, ensure the foil or wire cage is neatly painted or cleaned up for a professional presentation. -
Seal for shine:
To achieve that high-gloss ceramic look, spray the entire bottle with two coats of clear high-gloss acrylic sealer. This unifies the surface texture.
Place your new porcelain-style masterpiece on a mantle or dining table for an instant touch of classic elegance
Chinoiserie-Inspired Blossoms and Branches

Transform an ordinary bottle of bubbly into a stunning centerpiece with this elegant Chinoiserie-inspired design. The soft white background provides the perfect canvas for winding branches, blushing pink blossoms, and delicate blue birds that seem to flutter right on the glass.
Detailed Instructions
Materials
- Champagne bottle (label removed)
- White multistrasform spray paint or primer (for glass)
- White matte acrylic paint
- Acrylic paints: Burnt Umber or metallic bronze (for branches), various pinks (light to mauve), soft blue, sage green, gold leaf paint
- Fine detail brushes (sizes 0, 00, and 1)
- Small flat brush
- Painter’s tape
- Gloss or satin clear varnish spray
- Rubbing alcohol
- Palette for mixing
Step 1: Preparing the Canvas
-
Clean and mask:
Begin by removing the main bottle labels. Soak the bottle in warm soapy water to peel them off, then use Goo Gone or oil to remove sticky residue. Wipe the entire surface with rubbing alcohol to ensure it’s free of oils. Carefully wrap painter’s tape around the bottom edge of the gold foil neck to protect it. -
Prime the surface:
In a well-ventilated area, spray the glass body of the bottle with a glass-appropriate primer or a white ‘multistrasform’ spray paint. Apply thin, even coats to avoid drips. Two light coats are usually better than one heavy one. -
Apply base coat:
Once the primer is fully dry, use a flat brush to apply a layer of matte white acrylic paint if the spray finish looks too glossy or uneven. This gives you a nice, toothy surface for the detailed painting. Let this cure completely, ideally overnight.
Step 2: Painting the Structure
-
Sketch the branches:
Lightly sketch your branch composition using a very faint pencil line directly on the white paint. Aim for an organic flow that starts from the base and winds upwards, avoiding perfect symmetry. -
Paint main branches:
Mix Burnt Umber with a tiny drop of water to improve flow. Using a size 1 brush, paint the main thick branches following your pencil lines. Vary the pressure on your brush—press down for thicker sections and lift up for tapering ends. -
Add intricate twigs:
Switch to a size 0 or 00 liner brush. Extend smaller, jagged twigs off the main branches. Chinoiserie style often features slightly angular, gnarled wood, so don’t make the lines too smooth or straight. -
Highlight the wood:
For a bit of dimension, mix a tiny bit of metallic bronze or gold with your brown paint. run very thin highlights along the upper edges of the branches where the light would hit.
Paint Slipping?
If acrylics slide around on the glass, your base coat is too slick. Lightly sand the area with fine-grit sandpaper to give the paint something to grip.
Step 3: Bringing it to Life
-
Block in blossoms:
Using a soft pink shade, dab small clusters of five petals along the branches. Don’t worry about perfect shapes yet; just establish the position of the flowers. I like to cluster them heavily near the bottom and let them get sparse near the top. -
Add varied tones:
While the pink is still slightly tacky, mix a darker mauve or deep pink. Add tiny dots or strokes near the center of each flower to create depth. -
Create delicate buds:
Paint small, singular oval shapes at the very tips of the thinnest twigs to represent un-opened buds. Use the lighter pink shade for these. -
Paint flower centers:
Once the petals are dry, use your smallest brush to add tiny stamen details in the center using a dark brown or black, perhaps tipped with tiny dots of yellow or gold. -
Add fluttering birds:
If you are feeling confident, sketch a small bird silhouette perched on a branch or flying. Fill it in with a soft, dusty blue. Keep the shape simple—a teardrop body and a small circle head work well. -
Detail the birds:
Add a darker blue to the wing area and a tiny beak in yellow. A grey or black dot serves as the eye. These small details make the bottle feel like a storybook illustration.
Pro Tip: Flow Aid
Mix a clear acrylic flow improver into your branch paint. This allows you to pull long, uninterrupted lines without the brush drying out mid-stroke.
Step 4: Finishing Touches
-
Strategic gold accents:
Using pure gold leaf paint, add tiny leaves or accent strokes near the flower clusters. This ties the design back to the gold foil on the bottle neck. -
Clean up:
If you made any mistakes or smudges on the white background, use a small brush with your base white paint to ‘erase’ them. -
Remove tape:
Carefully peel away the painter’s tape from the neck. Do this slowly to ensure you don’t chip the edge of your new white paint. -
Seal the work:
To protect your art from moisture and handling, spray the entire painted area with a clear satin mist varnish. Do two light coats, allowing drying time in between.
Now you have a breathtaking, hand-painted bottle that serves as both a thoughtful gift and a permanent piece of decor even after the toast is over.

PENCIL GUIDE
Understanding Pencil Grades from H to B
From first sketch to finished drawing — learn pencil grades, line control, and shading techniques.
Explore the Full Guide
Modern Abstract Brushstroke Wrap
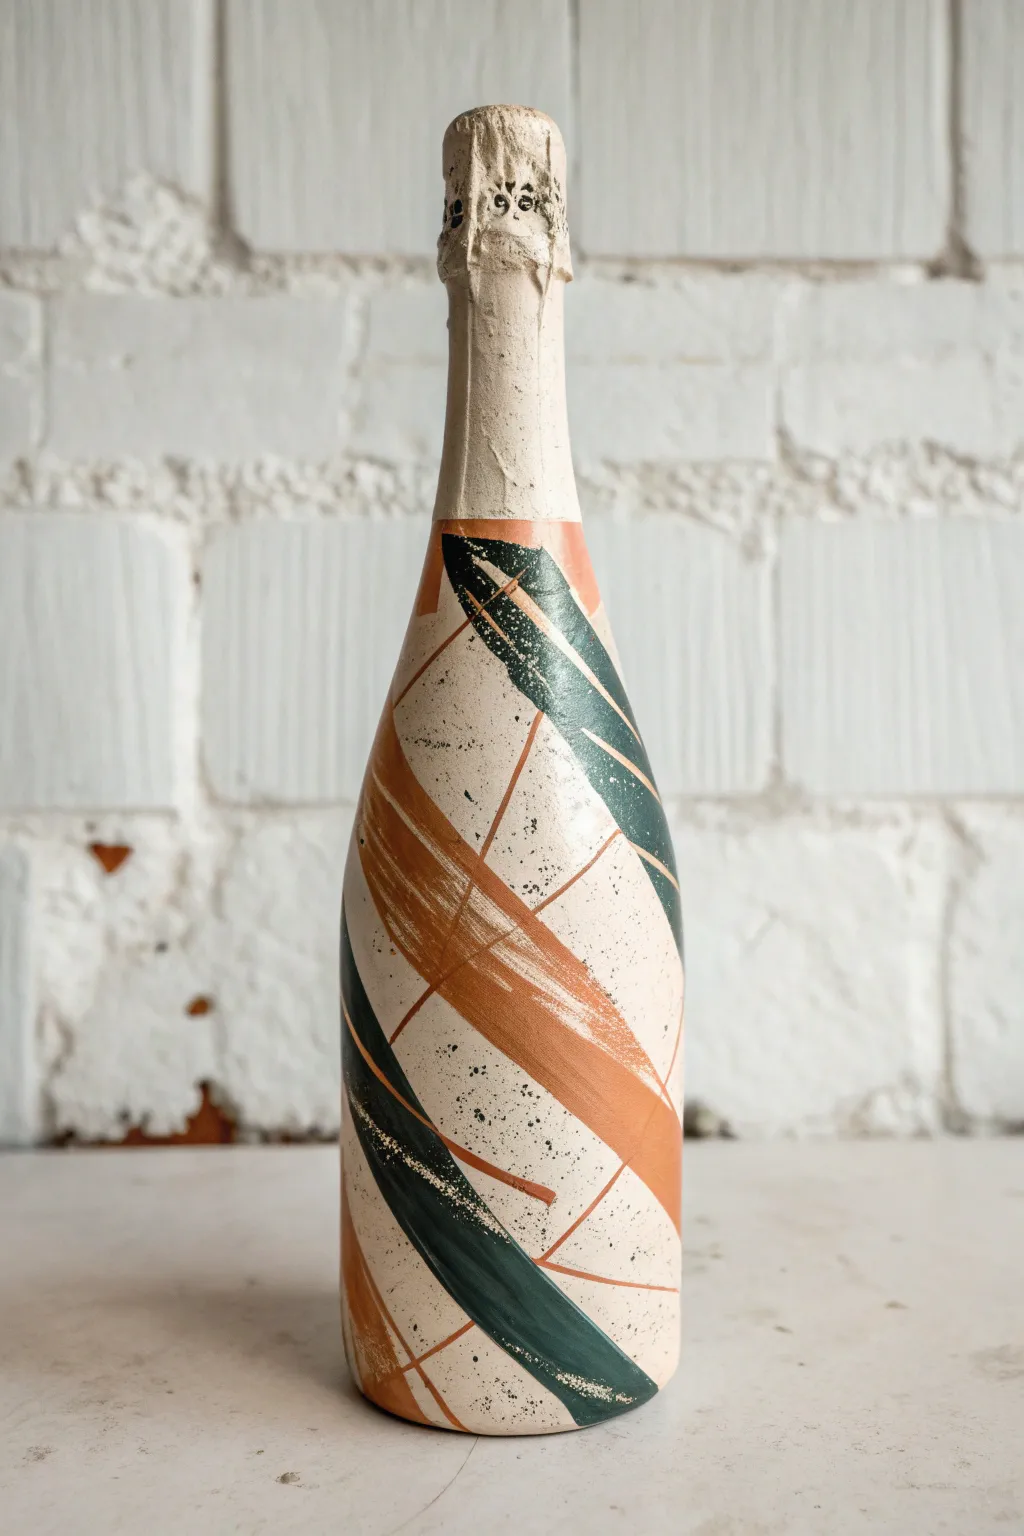
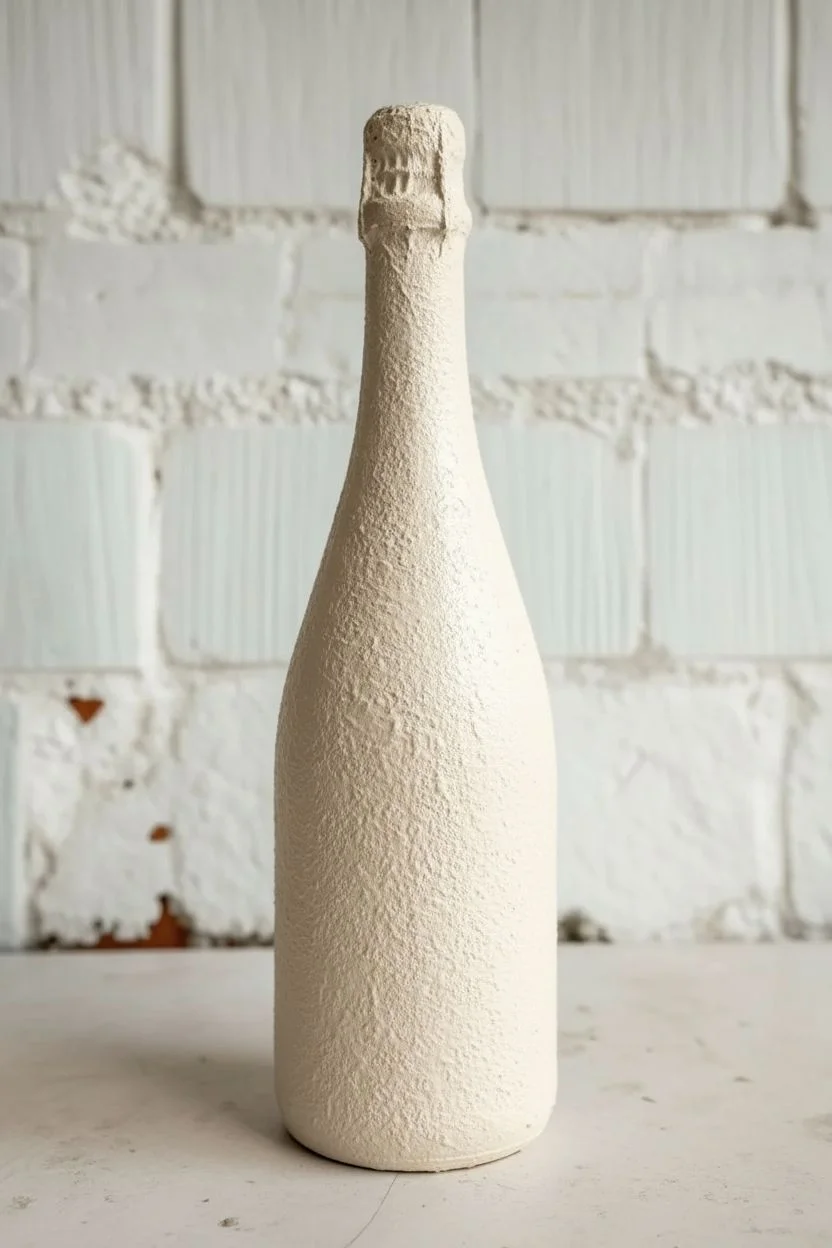
Transform a standard champagne bottle into a piece of modern art with this textured, abstract painting technique. The design features bold, sweeping brushstrokes in earth tones and deep greens over a stone-like base, perfect for a sophisticated gift or centerpiece.
Step-by-Step
Materials
- Full champagne bottle (foil intact)
- White or beige chalk paint
- Baking soda (for texture)
- Wide flat paintbrush
- Medium round paintbrush
- Fine liner paintbrush
- Acrylic paints: Terra cotta, deep forest green, black
- Mixing palette or paper plate
- Clear matte sealer spray (optional)
- Paper towels
Step 1: Preparing the Base
-
Clean the surface:
Start by wiping down the entire bottle with rubbing alcohol or warm soapy water to remove oils and dust. Dry it thoroughly with a lint-free cloth. -
Mix the textured base:
Create your ‘stone’ effect by mixing white or beige chalk paint with baking soda. Aim for a ratio of roughly 1 part baking soda to 2 parts paint. Stir until you have a fluffy, mousse-like consistency. -
Apply the first coat:
Using a wide flat brush, apply your textured mixture all over the bottle. Paint right over the foil neck wrapper as well. Don’t worry about being smooth—a little dabbed texture adds to the ceramic look. -
Allow to dry:
Let this first layer dry completely. It will look matte and chalky once dry. This usually takes about an hour depending on humidity. -
Second coat application:
Apply a second coat of your textured mix to ensure full opacity. No glass or original foil color should be peeking through. Let this layer dry fully, preferably overnight for a rock-hard finish.
Dry Brushing Tip
To get that scratchy, faded look at the ends of your strokes, wipe most of the paint off onto a paper towel before touching the bottle.
Step 2: Painting the Abstract Shapes
-
Plan your composition:
Visualize large, diagonal swoops wrapping around the bottle. The design works best if the strokes feel continuous and dynamic, moving from bottom to loop around the back. -
Mix your forest green:
Prepare a deep forest green acrylic paint. If your green is too bright, mix in a tiny dot of black or red to deepen and de-saturate it. -
First large stroke:
Dip a medium round brush into the green paint. Paint a broad, decisive stroke starting from the lower third of the bottle, swooping diagonally upward. -
Vary paint opacity:
Don’t reload your brush constantly. Let the paint drag and fade at the tail end of the stroke (dry brushing) to create that wonderful distressed texture seen in the image. -
Add terra cotta accents:
Using a clean round brush, pick up your terra cotta paint. Add a similar swooping stroke that intersects or runs parallel to your green shape. Allow them to overlap slightly for visual depth. -
Balance the design:
Step back and look at the bottle. Add smaller, perhaps thinner strokes of both colors near the neck or base to balance the composition. Remember to leave plenty of negative beige space.
Paint Peeling Off?
If the textured base lifts while painting, you likely didn’t let the first layer cure long enough. Let it harden overnight before adding patterns.
Step 3: Details & Finish
-
Create fine lines:
Switch to your fine liner brush and load it with thinned terra cotta paint (add a drop of water). Paint thin, delicate lines that intersect the larger shapes, creating a geometric web effect. -
Add speckling:
Dilute a small amount of black paint with water until it is inky. Dip a stiff brush (or an old toothbrush) into it, then run your thumb across the bristles to flick tiny specks of paint onto the bottle. -
Control the splatter:
Focus the splatter mostly around the main brushstrokes to integrate them into the background. Keep the splatter fine and subtle rather than large blobs. -
Dry completely:
Allow all the acrylic details to dry for at least 2-3 hours. The textured base absorbs paint differently, so give it extra time. -
Optional sealing:
If this bottle will be handled frequently, spray a light coat of clear matte sealer over the entire piece to protect your work without adding shine.
Once dry, your bottle is ready to be gifted or displayed as a stunning modern centerpiece
Geometric Tape Lines and Color Blocks
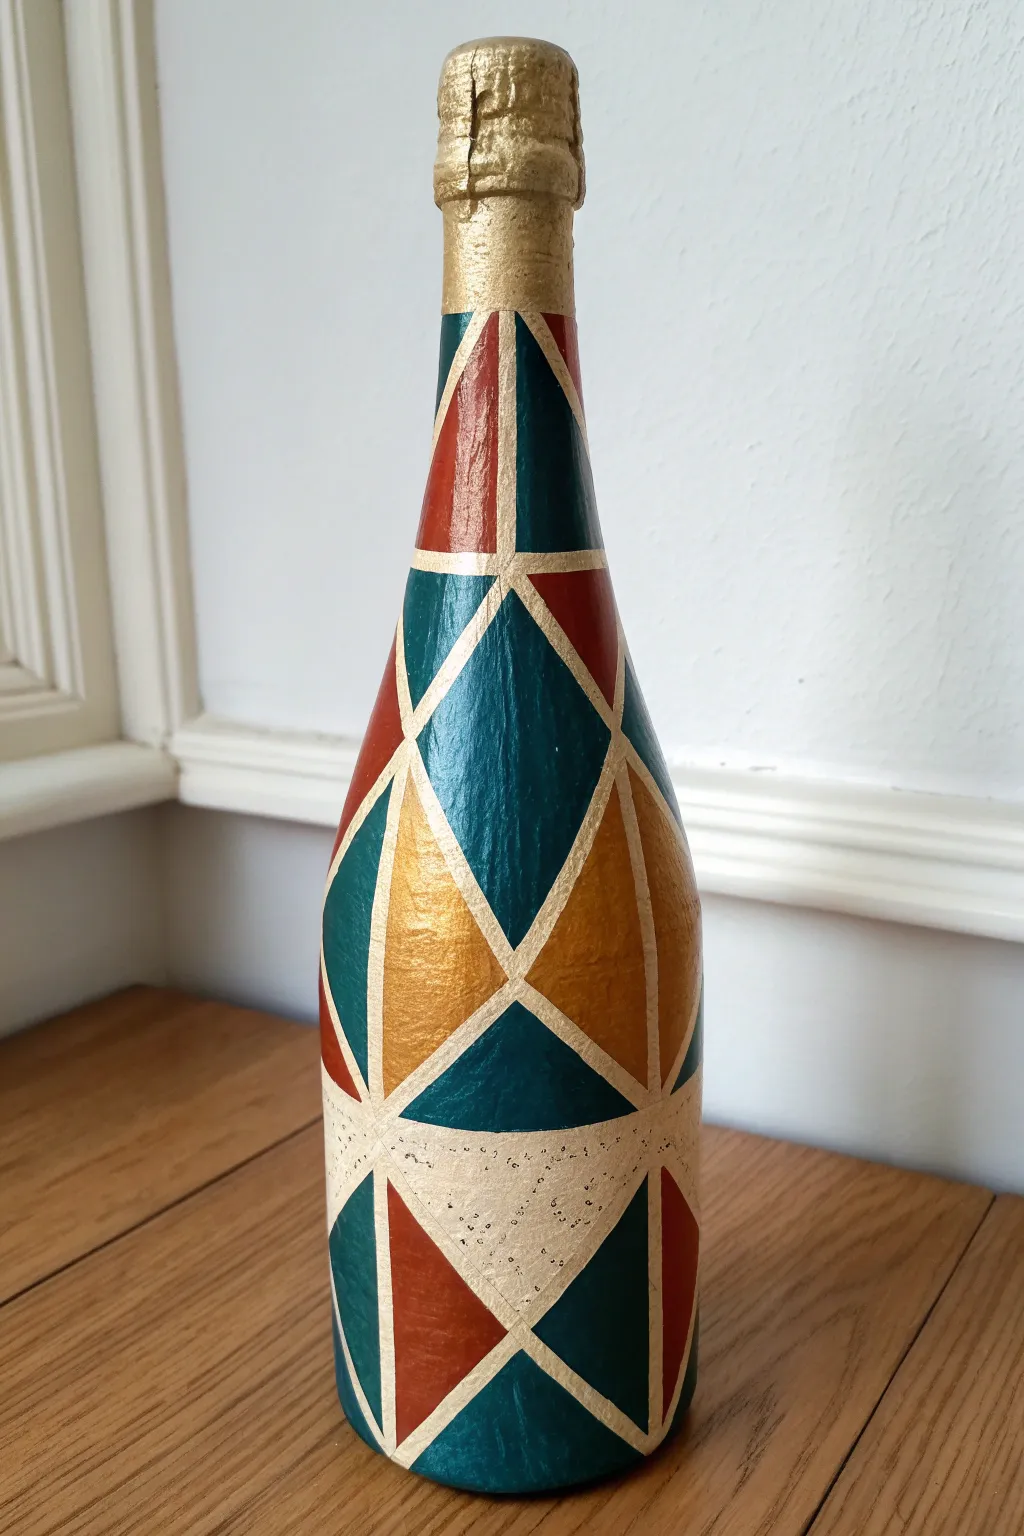
Transform an ordinary glass bottle into a sophisticated centerpiece featuring bold triangles and rich jewel tones. This project uses masking tape to create crisp lines between teal, rust, gold, and cream sections for a striking geometric look.
Detailed Instructions
Materials
- Clean champagne bottle (labels removed)
- Painter’s tape or masking tape (1/4 inch width is ideal)
- Acrylic craft paints (Deep Teal, Burnt Sienna/Rust, Metallic Gold, Cream)
- Paintbrushes (flat shader brush and a liner brush)
- Mod Podge or white craft glue (optional for texture)
- Tissue paper (optional for texture base)
- Spray sealer or varnish (gloss or satin)
- Scissors or craft knife
- Gold foil or gold spray paint (for the neck/cork area)
Step 1: Preparation and Texture
-
Clean the surface:
Start by soaking your bottle in warm soapy water to remove all paper labels and adhesive residue. Dry the glass thoroughly with a lint-free cloth or paper towel to ensure your base sticks properly. -
Create the textured base (Optional):
Looking at the finished piece, there’s a lovely, slight texture beneath the paint. To recreate this, apply a thin layer of Mod Podge to the glass and smooth sheets of white tissue paper over it. Let this dry completely. If you prefer a smooth, modern look, you can skip this and apply a coat of primer instead. -
Paint the base coat:
Apply a base coat of cream or off-white acrylic paint over the entire bottle, stopping just at the neck foil. This color will eventually become the ‘lines’ between the geometric shapes. Two coats are usually needed for full opacity.
Bleeding Lines?
Paint leaking under tape? Before applying color, seal the tape edges with a thin layer of the BASE color (cream). This creates a barrier so any bleed is invisible.
Step 2: Taping the Design
-
Establish the vertical lines:
Once the base coat is bone dry—I usually wait overnight just to be safe—apply long strips of painter’s tape vertically from the neck down to the base to divide the bottle into sections. Aim for 6-8 vertical divisions depending on the bottle’s width. -
Create the diagonal grid:
Now, apply tape diagonally across the vertical lines to form large diamond shapes. You want the tape lines to intersect cleanly. Press the edges of the tape down firmly with your fingernail or a credit card to prevent paint bleed. -
Refine the triangles:
Add horizontal tape lines or additional diagonals to bisect the diamonds into triangles. The goal is a tessellated pattern of triangles and kite shapes. Don’t worry if they aren’t perfectly symmetrical; the hand-painted look adds charm.
Level Up: Texture
Add depth to the cream triangles by mixing fine sand or baking soda into the acrylic paint before applying it. This creates a tactile contrast against the smooth metallics.
Step 3: Painting the Shapes
-
Plan your color palette:
Select your acrylic colors. For this specific look, you need a deep teal, a metallic gold, a rust or burnt sienna, and a speckled cream or beige. -
Paint the teal sections:
Using a flat shader brush, fill in scattered triangles with the deep teal paint. Try to space them out so two teal shapes rarely touch. Apply 2-3 thin layers rather than one thick one to avoid ridges. -
Add the rust accents:
Next, paint selected triangles with the burnt sienna/rust color. This warm tone contrasts beautifully with the cool teal. Be careful not to paint over the tape lines. -
Apply the gold triangles:
Fill in remaining sections with metallic gold paint. Metallic paints often require an extra coat to achieve a solid, shiny finish, so be patient here. -
Paint the lower cream sections:
For the bottom sections, use a cream color. The reference image shows a speckled texture on the cream parts; you can achieve this by flicking a toothbrush with diluted brown paint over these specific dried sections before removing the tape. -
Gild the neck:
Paint the entire neck and cork area with the metallic gold paint. For a more authentic foil look, you could use gold leaf adhesive and a sheet of gold leaf.
Step 4: Finishing Touches
-
Remove the tape:
The moment of truth! Carefully peel off the tape while the final coat of paint is still slightly tacky—this helps prevent the dried latex paint from peeling up with the tape. Pull at a 45-degree angle. -
Touch up the lines:
Inspect your grid lines. If any paint bled under the tape, use a fine liner brush and your base cream color to tidy up the edges and sharpen the geometry. -
Seal the artwork:
Protect your hard work by applying a clear spray sealer in a satin or gloss finish. This will unify the sheen of the different paints and protect the bottle from chipping.
Place your geometrically patterned bottle on a shelf or bar cart to enjoy its modern, stylish flair


Evergreen and Snowflake Holiday Bottle
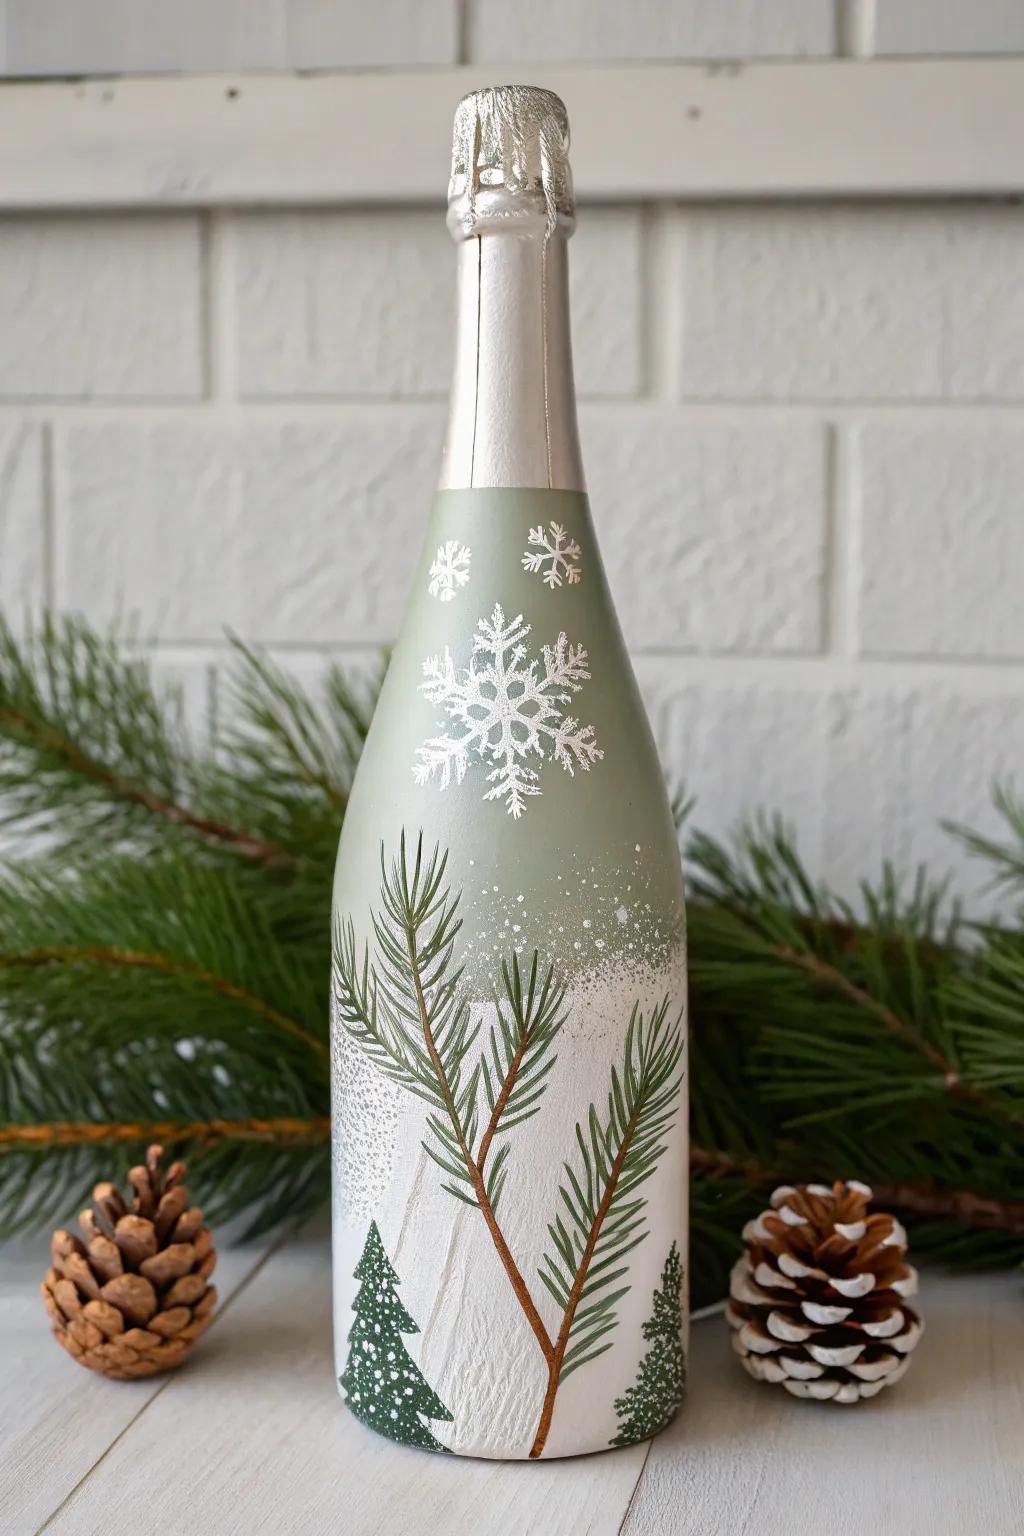
Transform an ordinary champagne bottle into a winter wonderland centerpiece with this serene, nature-inspired design. The soft sage-to-white ombré background mimics a snowy evergreen forest, complete with delicate pine branches and intricate snowflakes.
Step-by-Step
Materials
- Full champagne bottle (with silver or neutral foil)
- Rubbing alcohol and cotton pads
- painter’s tape
- Gesso primer (white)
- Acrylic paints: Sage green, Titanium white, burnt umber brown, dark forest green
- Sponge daubers or makeup wedge sponges
- Fine liner brush (size 0 or 00)
- Small flat brush
- White or silver paint pen (fine tip) – optional but helpful for snowflakes
- Snowflake stencils (optional)
- White glitter (fine) or texture paste for snow effect
- Matte or satin spray varnish
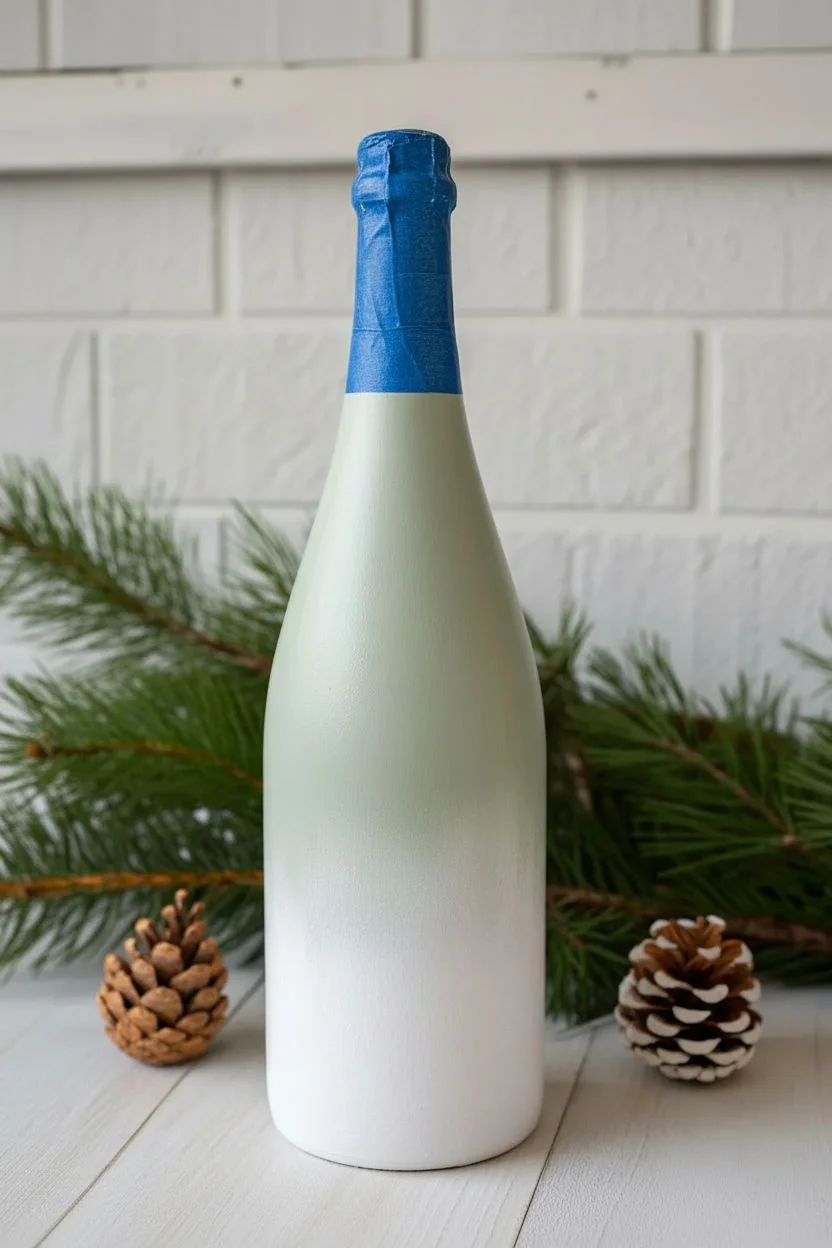
Step 1: Prep and Base Gradient
-
Clean surface:
Before starting, wipe down the entire glass surface of the bottle with rubbing alcohol to remove oils and fingerprints. This ensures your paint adheres properly. -
Protect the foil:
Wrap a strip of painter’s tape carefully around the bottom edge of the neck foil. Press it down firmly to create a clean line where your painting will start. -
Apply primer:
Using a sponge or brush, apply a thin, even coat of white Gesso to the glass area below the tape. Let this dry completely; I usually give it about 30 minutes to be safe. -
Start the gradient:
Mix your sage green paint. Using a sponge wedge, dab the green paint onto the top third of the bottle, right below the tape line. -
Create the transition:
While the green is still wet, load a clean sponge with white paint. Start dabbing at the bottom and work your way up. Where the white meets the green, use a light tapping motion to blend the two colors, creating a soft, misty transition in the middle. -
Build opacity:
Once the first layer is dry, repeat the ombré sponging process. Two or three thin coats are better than one thick one to avoid streaks. Let it dry fully.
Step 2: Painting the Foliage
-
Sketch the branches:
Mix a small amount of burnt umber with a drop of water to make it flow easily. Using a fine liner brush, paint two main branch structures extending upwards from the lower center of the bottle. -
Add pine needles:
Switch to your dark forest green paint. Using quick, short strokes with your liner brush, flick paint outward from the brown branches to create pine needles. Keep them angled upward. -
Layer the needles:
To add depth, mix a slightly lighter green by adding a touch of white to your forest green. Add a second layer of needles over the first, filling in gaps but letting the darker green show through. -
Create mini trees:
At the very base of the bottle, paint small triangle shapes using dark forest green to represent distant trees. Stipple the edges with the tip of your brush to give them a rough, leafy texture. -
Add snow to trees:
Dip a very small brush or the tip of a sponge into white paint. Lightly dab the tops of your mini trees and some of the pine branches to look like a fresh dusting of snow.
Bleeding Lines?
If paint seeps under your tape, don’t panic. Dip a stiff, flat brush in rubbing alcohol or water and gently scrub the excess paint away to sharpen the line.
Step 3: Snowflakes and Finishing Touches
-
Splatter effect:
Dilute a bit of white paint with water on your palette. Load an old toothbrush or stiff brush, and run your thumb across the bristles to flick tiny white speckles across the middle section for a falling snow effect. -
Paint the snowflakes:
Using a fine white paint pen or your smallest liner brush with white paint, draw a large distinct snowflake on the upper green section. Add simpler asterisk-style flakes around it. -
Add shimmer details:
If you want extra sparkle, retrace the main snowflake lines with silver paint, or sprinkle a tiny pinch of fine glitter onto the wet white paint. -
Remove tape:
Carefully peel off the painter’s tape near the neck. Do this slowly at a 45-degree angle to keep a crisp edge. -
Seal the artwork:
Once everything is bone dry (wait at least a few hours), spray the painted area with a clear matte varnish to protect your work from scratches and handling.
Pro Tip: Texture
Mix baking soda into your white paint for the bottom ‘snow’ layer. It creates a realistic, gritty texture that looks and feels just like real snowdrifts.
Now you have a stunning, hand-painted bottle perfect for gifting or displaying on your holiday table
Heart Motifs for a Sweet Gift Bottle
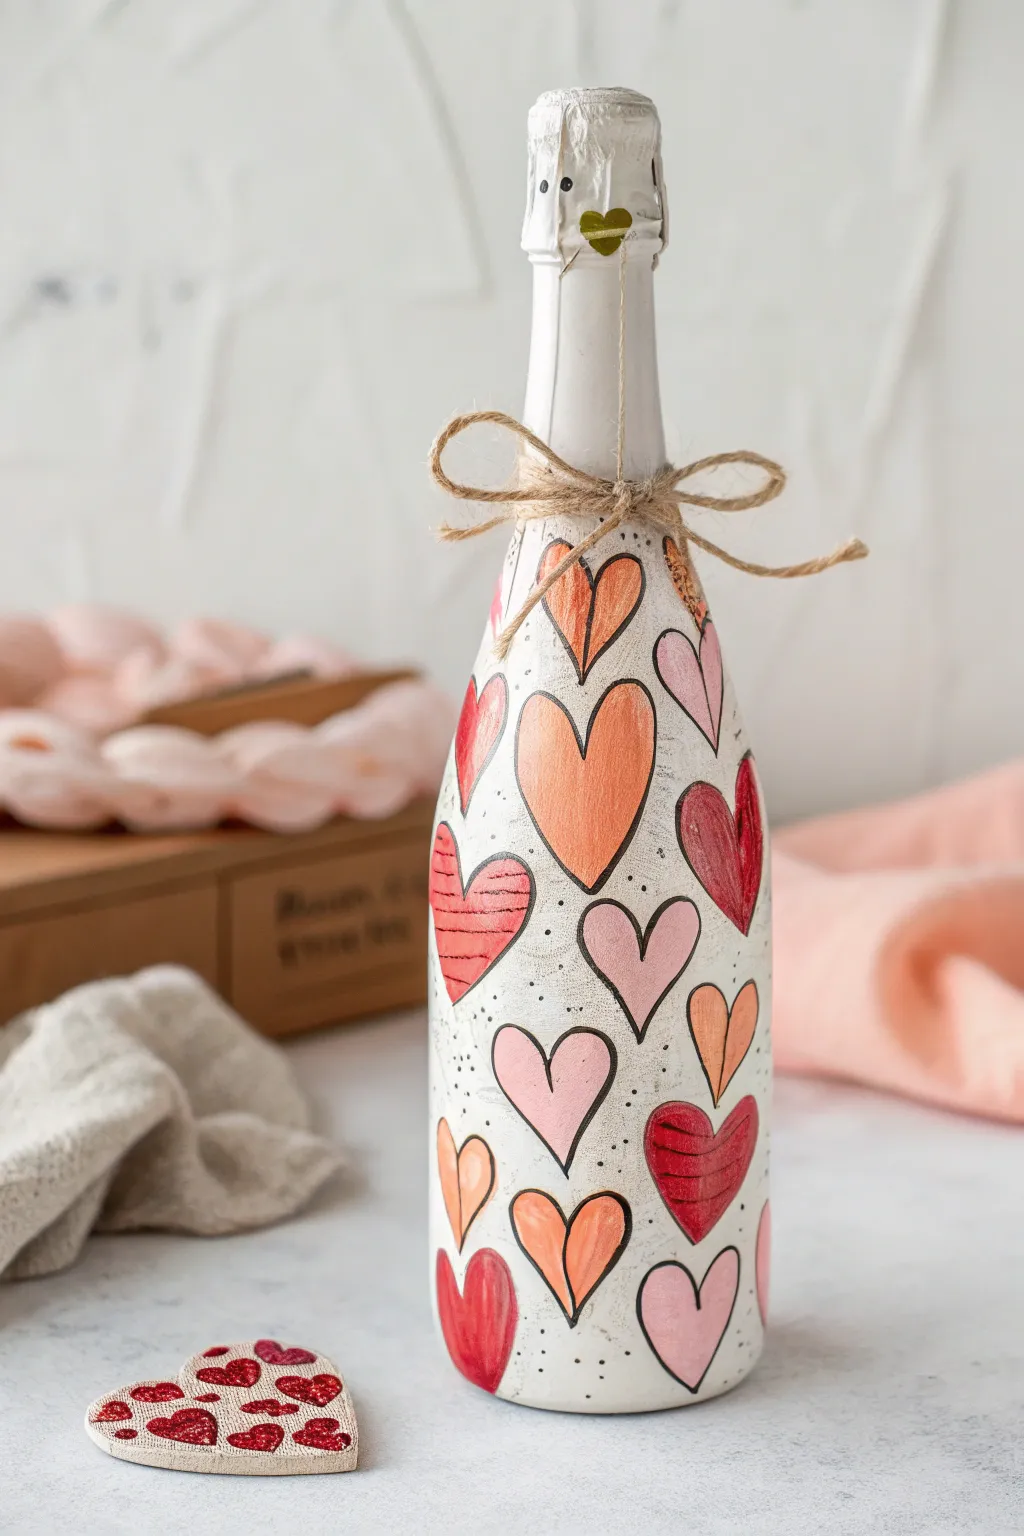
Transform a plain glass bottle into a delightful Valentine’s centerpiece with this playful heart motif. Featuring hand-painted hearts in shades of coral, deep red, and soft pink on a speckled white background, this project combines loose, sketchy outlines with a rustic matte finish.
Detailed Instructions
Materials
- Clean, empty champagne or wine bottle
- Rubbing alcohol
- White or cream chalk paint (or matte acrylic paint)
- Acrylic paints (coral, pale pink, deep red, orange)
- Fine-grit sandpaper (optional)
- Soft flat paintbrush (1 inch)
- Small round paintbrush (size 2 or 4)
- Fine-tip black permanent marker or waterproof paint pen
- Old toothbrush
- Jute twine
- Matte clear sealant spray
Step 1: Preparing the Canvas
-
Clean the surface:
Begin by removing all labels and adhesive from your bottle. Once clear, wipe the entire glass surface down with rubbing alcohol to remove any oily residues that might prevent paint adhesion. -
Apply the base coat:
Using your flat brush, paint the entire bottle with white or cream chalk paint. Apply thin, even layers rather than one thick one. Let the first coat dry completely for about 30 minutes. -
Add coverage:
Apply a second or third coat of the white base until the glass is fully opaque. For that slightly rustic look seen in the photo, don’t worry if brushstrokes are faintly visible. -
Create the speckle effect:
Once the base is bone dry, dip an old toothbrush into slightly watered-down black paint. Run your thumb across the bristles to flick tiny speckles onto the bottle. Practice on a piece of cardboard first to control the spray.
Clean Lines
For the crispest outlines, use a permanent marker AFTER the paint dries completely. Paint pens are great, but markers offer more control for that “sketched” look.
Step 2: Designing the Hearts
-
Plan placement:
Visualize where your main hearts will go. You want a random, scattered pattern with various sizes. You can lightly sketch the shapes with a pencil if you’re nervous about freehanding. -
Outline the shapes:
Using your fine-tip black marker or paint pen, draw loose, slightly imperfect heart outlines all over the bottle. Vary the sizes significantly—some large focal hearts and smaller fillers work best. -
Embrace imperfection:
When outlining, let your hand be relaxed. The charm of this design comes from the sketchy, doodle-like quality where lines might overlap or double up slightly.
Step 3: Adding Color
-
Mix your palette:
Prepare your acrylic colors: a vibrant coral, a soft blush pink, and a deep red. I like to mix a tiny bit of white into the red to soften it just a touch. -
Paint the first color:
Start with your coral paint and fill in about one-third of the hearts using the small round brush. Stay mostly within the lines, but don’t stress about perfect edges. -
Fill remaining hearts:
Switch to your pinks and deep reds, filling the rest of the outlines. Distribute the colors evenly so you don’t have clumping of one shade in a single area. -
Add details:
Identify a few red hearts to detail. Using a slightly lighter shade of red (or mixing in more white/pink), paint faint horizontal stripes or small hatch marks inside one or two hearts for visual interest. -
Refine the outlines:
After the colored paint is fully dry (give it 20 minutes), go back over any black outlines that got covered up by paint errors. This makes the doodle style pop again.
Level Up: 3D Texture
Mix baking soda into your acrylic paint before filling the hearts. It creates a puffy, matte texture that makes the hearts stand out tactiles.
Step 4: Finishing Touches
-
Seal the artwork:
Take the bottle to a well-ventilated area and spray it with a clear matte sealant. This protects the paint from chipping and keeps the marker from smudging over time. -
Wrap the neck:
Cut a length of jute twine. This adds a crucial rustic texture to balance the sweet heart design. -
Tie the bow:
Wrap the twine around the neck of the bottle two or three times to create a small band, then tie it off in a simple shoelace bow. Trim the ends to be equal length. -
Decorate the top (optional):
If your bottle still has foil on top, you can paint a tiny heart directly onto the foil or the cork cage wire for an extra hidden detail.
Enjoy displaying your charming, hand-painted bottle alongside some sweet treats or flowers
Fireworks Night Sky Celebration Bottle
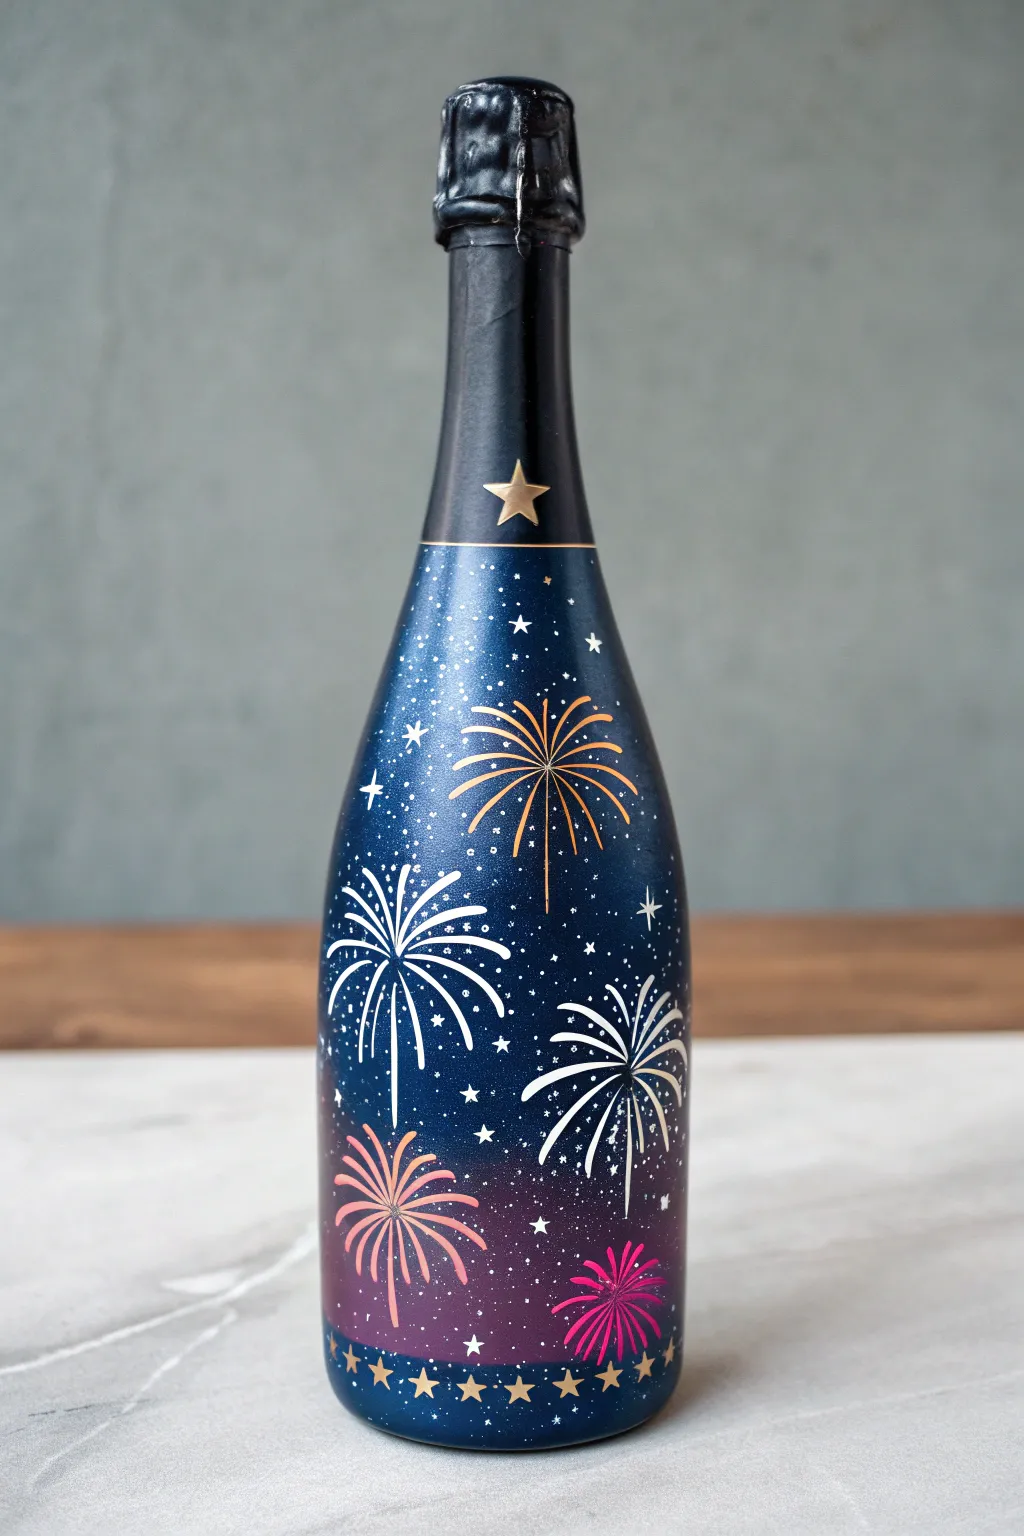
Transform an ordinary champagne bottle into a sparkling centerpiece perfect for New Year’s Eve or a Fourth of July celebration. This design features a deep, starry ombré background illuminated by hand-painted bursts of colorful fireworks.
Step-by-Step Tutorial
Materials
- Champagne bottle (label removed, glass cleaned)
- Rubbing alcohol
- Gesso primer (clear or white)
- Acrylic paints: Navy Blue, Deep Purple, Magenta, Gold, White, Pink
- Sponge applicators or cosmetic wedges
- Fine liner detail brushes (sizes 0 and 00)
- Small flat brush
- Old toothbrush (for spattering)
- Spray sealant (glossy or satin)
Step 1: Preparing the Canvas
-
Clean the surface:
Begin by removing all labels and adhesive residue from your bottle. Soak it in warm soapy water if needed, then wipe the entire glass surface down with rubbing alcohol to remove any oils. -
Prime the glass:
Apply a thin, even coat of gesso primer over the main body of the bottle where you intend to paint. This gives the acrylics something to grip onto so they don’t slide off the smooth glass.
Paint Consistency Tip
For the thin firework lines, mix a tiny drop of water into your paint. It should be inky consistency to flow smoothly off the liner brush without breaking.
Step 2: Creating the Ombré Sky
-
Base coat application:
Start by painting the top two-thirds of the bottle with a rich Navy Blue acrylic paint. Use a flat brush for broad coverage, ensuring you leave the foil neck exposed if you wish to keep it. -
Adding the gradient:
While the blue is still slightly wet, apply Deep Purple paint to the bottom third of the bottle. Where the blue and purple meet, use a damp sponge to dab and blend the colors together, creating a seamless transition. -
Deepening the base:
Blend a small amount of Magenta into the very bottom edge of the purple section for a warm glow. Let this base layer dry completely before moving on. -
Adding atmospheric sparkle:
Dip an old toothbrush into slightly watered-down white paint. Run your thumb across the bristles to flick a fine mist of ‘distant stars’ across the entire bottle. Keep the spray light for a subtle galaxy effect.
Step 3: Painting the Fireworks
-
Planning placement:
Visualize where your main firework bursts will go. You’ll want about 4-5 large bursts spaced irregularly around the bottle. -
Gold burst center:
Using a fine liner brush and Gold paint, create the first large firework near the top. Start from a central point and flick the brush outward in curved lines to mimic an exploding shape. -
White starburst:
Paint a second large burst in White on the left side. Make these lines slightly thicker at the center and tapering off at the ends to create movement. -
Lower color bursts:
Add a pinkish-coral firework and a magenta firework near the bottom purple section. I find that varying the size of these bursts makes the composition feel more dynamic. -
Layering the sparks:
Go back over your main fireworks with a second, thinner layer of lines in contrasting colors (like silver over white, or lighter gold over dark gold) to add dimension.
Add Real Sparkle
While the firework paint is still wet, sprinkle ultra-fine loose glitter over specific bursts to make the bottle catch the light beautifully.
Step 4: Final Details
-
Painting distinct stars:
Use your smallest detail brush to paint individual four-point or five-point stars scattered throughout the empty blue spaces using white paint. -
The neck accent:
Paint a single, prominent gold star right at the base of the bottle neck, centering it on the front as a focal point. -
Border accents:
If you want a polished look, add a thin gold line separating the painted area from the foil neck. At the very bottom edge of the bottle, paint a row of tiny gold stars. -
Protecting your work:
Once all paint is fully dry (give it a few hours just to be safe), take the bottle to a well-ventilated area and apply a clear spray sealant to protect the artwork from chipping.
This custom bottle creates a memorable keepsake long after the celebratory toast is finished
Character Bottle Using the Neck as a Hat
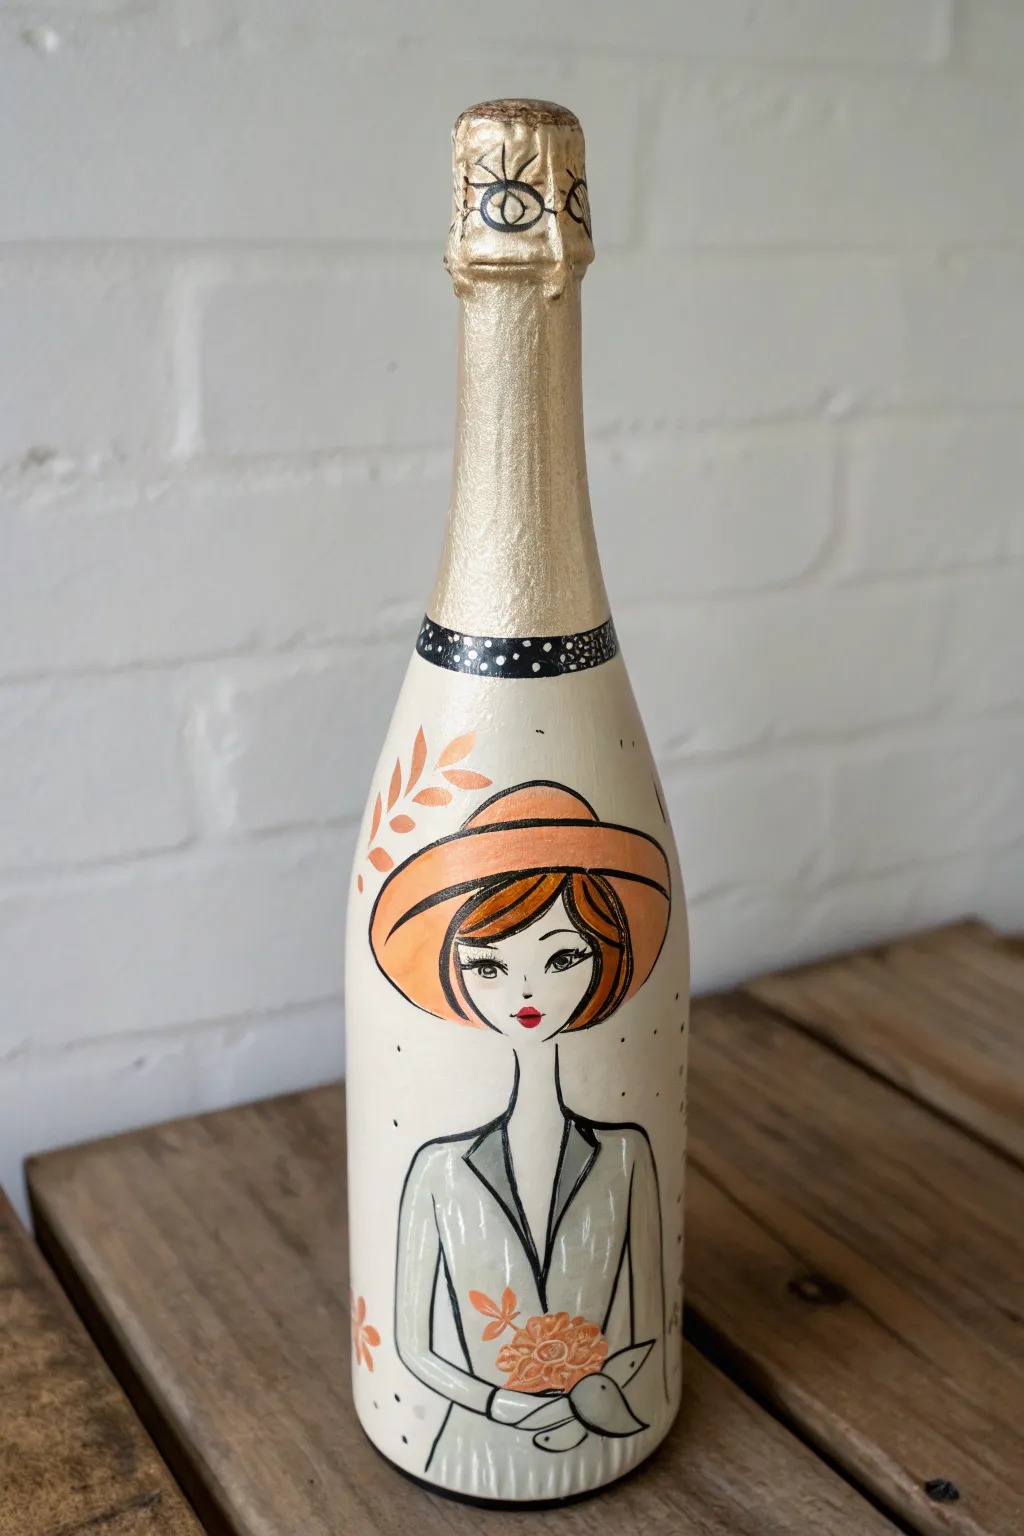
Transform a standard champagne bottle into a sophisticated character that exudes vintage charm. This project uses the bottle’s natural shape to create a towering golden hat, while the body showcases a stylized portrait in warm autumn tones.
Step-by-Step Guide
Materials
- Clean champagne bottle (labels removed)
- Rubbing alcohol
- Gesso or multi-surface primer (white)
- Acrylic paints: Cream/Off-white, Metallic Gold, Black, Burnt Orange, Light Grey, Peach/Flesh tone
- Assorted paintbrushes: 1-inch flat brush, small round brush, fine liner brush
- Pencil
- Clear acrylic sealer (spray or brush-on)
- Painter’s tape or masking tape
Step 1: Base Preparation
-
Clean the Surface:
Before you start, thoroughly clean the glass bottle with rubbing alcohol to remove any oils or residue. This ensures your paint adheres properly and doesn’t peel later. -
Prime the Bottle:
Apply two generous coats of white gesso or multi-surface primer over the entire bottle, including the foil and cork area. Let the first coat dry completely before adding the second for a solid, opaque base. -
Paint the Body Color:
Once primed, paint the body of the bottle (from the shoulders down) with a creamy off-white acrylic paint. You might need two coats to get a smooth, porcelain-like finish. -
Create the Golden Neck:
Paint the entire neck, foil wrapper, and cork area with metallic gold paint. Use vertical brush strokes to keep the texture smooth. The bottom edge of the gold should sit right where the bottle begins to widen.
Uneven Lines?
If your black outlines look shaky, switch to a fine-tip permanent marker or paint pen instead of a brush. It offers much more control on the curved glass character.
Step 2: Sketching and Blocking
-
Define the Hat Brim:
Using a pencil, lightly sketch a horizontal line where the gold neck meets the cream body. Just below this, sketch a wide-brimmed hat shape for the painted character. -
Sketch the Portrait:
Draw the character’s face inside the painted hat brim, then sketch flowing hair, a simple neck, and the lapels of a coat extending down the bottle. Keep the lines faint so they are easy to cover. -
Paint the Decorative Neck Band:
Using black paint and a small flat brush, create a thick band separating the gold neck from the cream body. Once dry, use a fine tip or the back of your brush to add tiny white or cream dots for a patterned effect. -
Fill the Hat:
Paint the sketched hat brim with a vibrant burnt orange or terracotta color. This creates a beautiful contrast against the cream background and the gold top.
Add Dimension
Make the project tactile by gluing a real ribbon or a strip of lace where the gold neck meets the bottle body, replacing the painted black band.
Step 3: Detailed Character Work
-
Paint the Hair:
Fill in the hair shape with a warm brown or copper tone. I like to add a few darker streaks while the paint is still slightly wet to suggest volume and movement. -
Block in the Coat:
Paint the coat area with a soft, light grey. Leave the lapel lines unpainted for now, or paint over them and re-outline later if you prefer a cleaner look. -
Add Facial Features:
Using your finest liner brush and black paint, carefully outline the eyes and eyebrows. Add a small pop of red for the lips and a touch of peach for the cheeks. -
Outline the Figure:
With steady hands and thinned black paint, outline the entire illustration—the hat, hair, face, and coat lapels. Vary the line thickness slightly; thicker lines on the outer edges make the character pop. -
Add Decorative Flora:
Paint small orange leaves floating above the hat and a floral bouquet in the character’s hands near the bottom. Outline these with fine black ink or paint once the color is dry.
Step 4: The Crowning Touch
-
Paint the Cork Face:
Turn your attention to the gold cork. Paint whimsical glasses using black circles, adding stylized eyes inside them. Draw a simple nose and mouth directly onto the gold foil texture. -
Add Texture Details:
Use white or a lighter grey to add small vertical scratch marks on the grey coat to mimic fabric texture. Add black specks around the background for an artistic, speckled egg effect. -
Seal the Artwork:
Allow the bottle to dry overnight. Finish by applying a clear acrylic sealer (spray is easiest for rounded surfaces) to protect your work from scratches and dust.
This charming bottle makes a perfect centerpiece or a customized gift for an art lover
Faux Stained-Glass Mosaic Panels
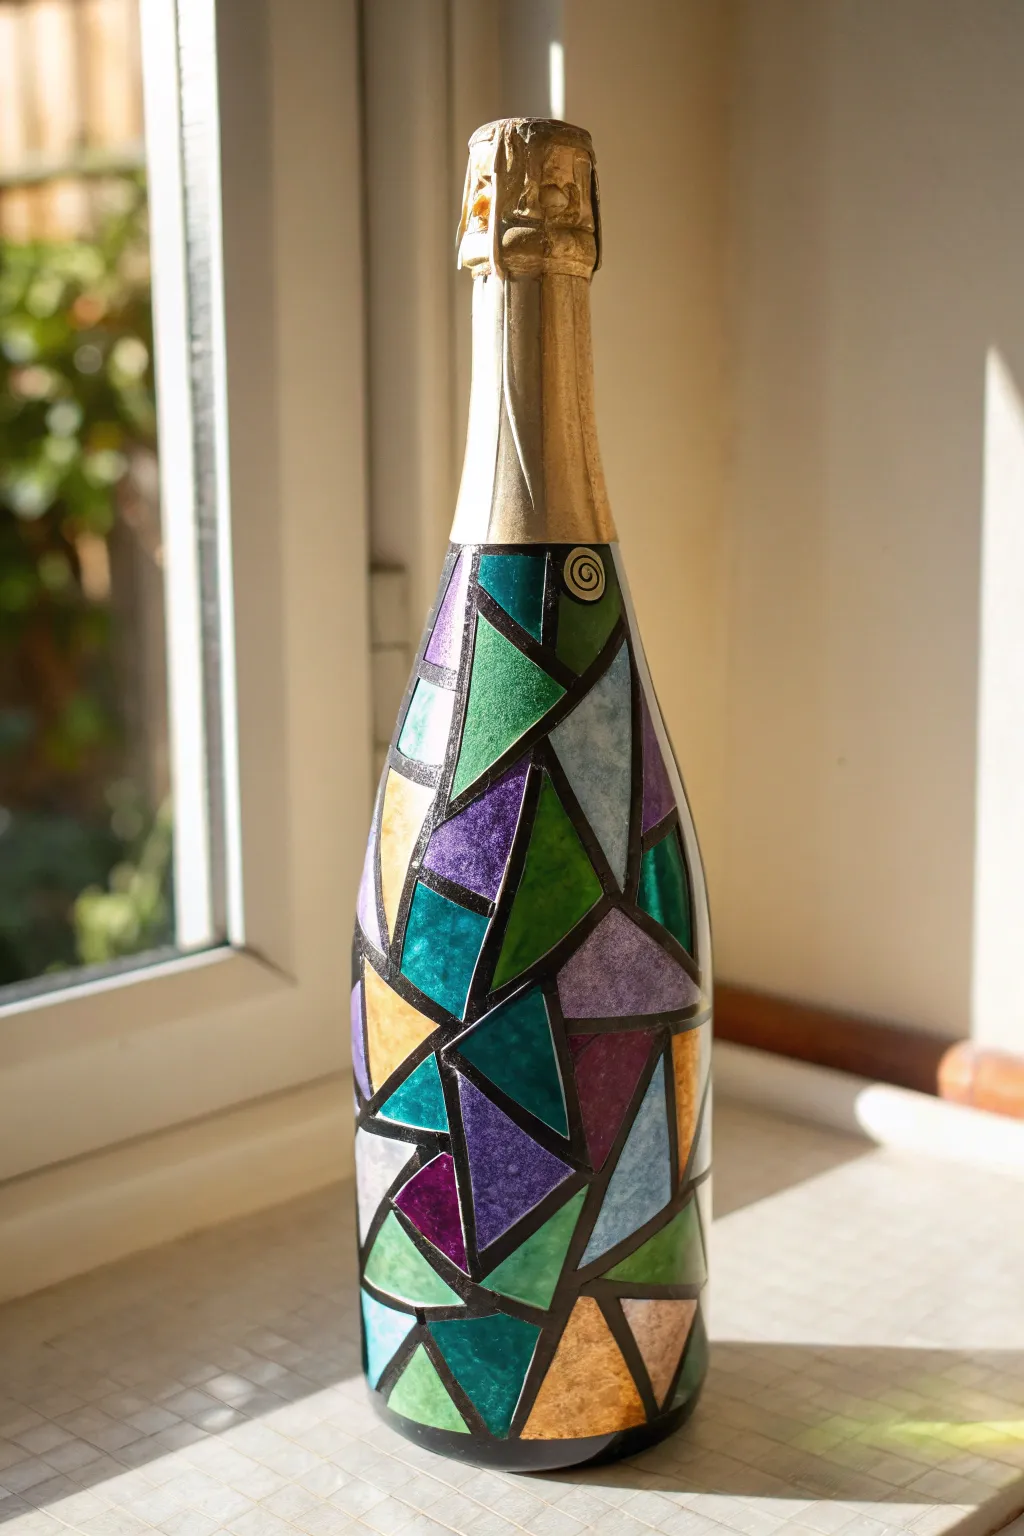
Transform an empty celebration bottle into a stunning piece of light-catching decor with this geometric faux stained-glass technique. Using simple paper collage methods and dimensional paint, you’ll create a vibrant, translucent finish that glows beautifully in a sunny window.
Step-by-Step Tutorial
Materials
- Empty champagne or wine bottle (label removed)
- Faux stained glass paints (transparent/crystalline glass paints) OR tissue paper in jewel tones
- Decoupage medium (Mod Podge Gloss)
- Black liquid leading or 3D dimensional fabric paint (black)
- Small flat paintbrush
- Gold spray paint (optional for the neck)
- Detail scissors
- Isopropyl alcohol
- Cotton pads
Step 1: Preparation & Planning
-
Clean the surface:
Start by ensuring your champagne bottle is completely free of adhesive residue. Wipe the entire glass surface down with isopropyl alcohol on a cotton pad to remove invisible oils and fingerprints. -
Refine the neck:
If the existing foil on your bottle is damaged or doesn’t match your vision, peel it off. You can either leave the neck bare glass or spray paint just the neck area gold to mimic the original foil look shown in the inspiration. -
Plan the pattern:
Visualize a geometric mosaic. The design relies on interlocking triangles and irregular quadrilaterals. You don’t need to draw this on the glass first, but sketching a rough idea on paper can help you balance the shapes.
Fixing Wobbly Lines
If your black outline goes astray, don’t wipe it while wet—it smears. Let it dry partially for 20 minutes, then use a toothpick to gently lift or nudge the semi-solid paint back into place.
Step 2: Creating the Mosaic Base
-
Preparing the color blocks:
If using tissue paper (the easier method for beginner texture), cut various shades of purple, teal, emerald green, and amber tissue paper into small, sharp-edged triangles and shards. Vary the sizes from 1 to 2 inches. -
Apply the first shape:
Brush a thin layer of glossy decoupage medium onto a spot on the bottle’s body. Place a tissue paper shape onto the wet medium. -
Seal the shape:
Immediately brush another coat of decoupage medium over the top of the paper, smoothing out any major wrinkles, though a little texture adds to the antique glass effect. -
Build the mosaic:
Continue adding shapes one by one. Leave a small gap (about 1/8th inch) of clear glass between each shape. These gaps will become your ‘lead’ lines later. -
Mind the curvature:
As you move up toward the neck where the bottle curves, cut your paper shapes smaller. Smaller triangles lie flatter against the curve than large ones, preventing unsightly buckling. -
Completing the coverage:
Work your way around the entire body of the bottle until you reach the bottom edge of the foil neck. Ensure you have a nice mix of colors distributed evenly so no single hue dominates one side. -
Drying time:
Let the decoupage layer dry completely. It needs to be hard to the touch before you apply the lining. I usually wait about 2-3 hours to be safe.
Level Up: Illumination
Push a string of battery-operated fairy lights (cork style) into the finished bottle. The light will diffuse through the colored panels, making the texture glow like a lamp.
Step 3: The Leading Technique
-
Test your flow:
Using black liquid leading or 3D puffy paint, squeeze a small line onto a scrap paper first. You want a steady, even stream without air bubbles. -
Outline the shapes:
Begin carefully tracing the gaps between your colored shapes. The goal is to cover the clear glass gaps and slightly overlap the edges of the paper. -
Create the top border:
Draw a horizontal line separating the mosaic section from the gold neck foil. This creates a clean, finished boundary for your artwork. -
Fill the verticals:
Work in small sections, drawing the lines fairly thick to mimic real lead caming used in stained glass windows. Keep the bottle horizontal if possible to prevent drips while the paint is wet. -
Touch up intersections:
Pay distinct attention to where corner points meet. Add a tiny extra dot of paint at these intersections to make the ‘solder joints’ look realistic and structural. -
Add a signature detail:
Looking at the original piece, notice the spiral detail near the top. Use the tip of your liner bottle to draw a small gold or black spiral button near the neck for a whimsical touch. -
Final cure:
Set the bottle in a safe, dust-free place to dry upright. Dimensional paint takes much longer to cure than acrylics—often requiring 24 hours to fully harden.
Place your finished bottle on a bright windowsill to enjoy the colorful play of light through the glass


Have a question or want to share your own experience? I'd love to hear from you in the comments below!