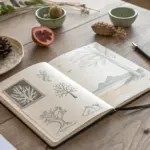
Whenever I’m craving drama, mood, and those velvety darks, I reach for charcoal—it’s basically instant atmosphere. Here are my favorite charcoal drawing ideas that let you play with bold contrast, soft blending, and satisfying smudgy textures.
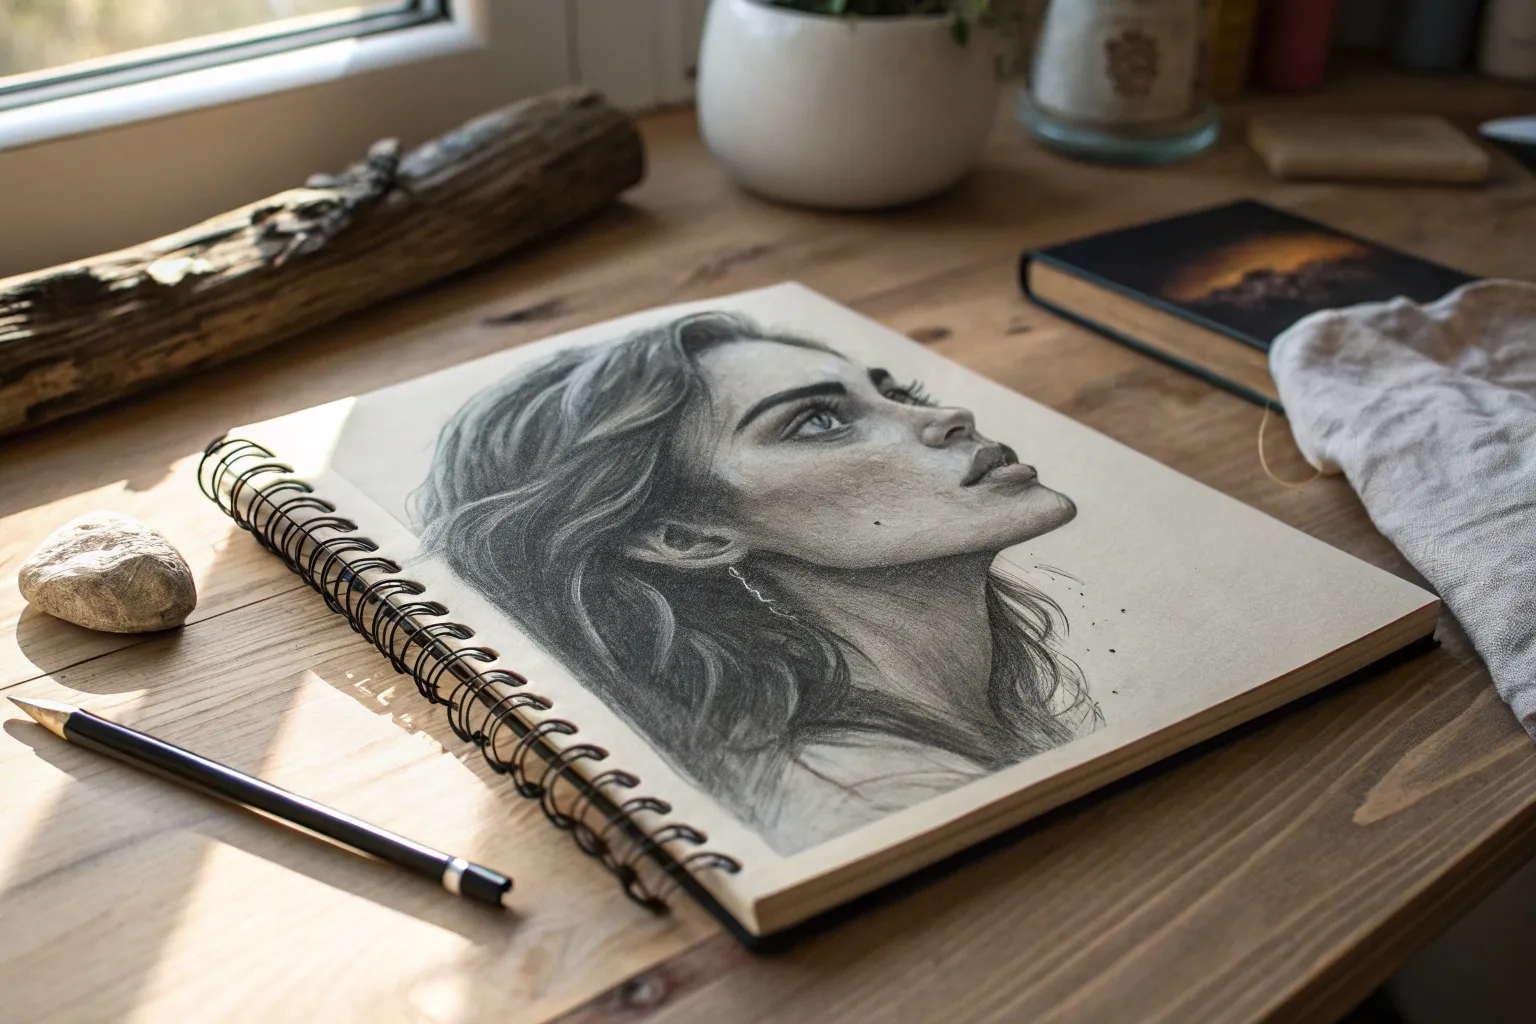
Classic Portrait With Soft Blending

Master the delicate art of soft blending with this atmospheric charcoal portrait, capturing a moment of quiet contemplation. By using smooth transitions and dramatic value contrast, you’ll create a lifelike woman’s face that seems to emerge from the shadows.
How-To Guide
Materials
- High-quality charcoal paper (smooth or vellum finish)
- Vine charcoal sticks (soft and medium)
- Compressed charcoal (2B and 4B)
- White charcoal pencil or pastel pencil
- Kneaded eraser
- Blending stumps (tortillons) in various sizes
- Soft synthetic brush for blending
- Workable fixative
Step 1: Laying the Foundation
-
Establish the proportions:
Begin with a very light sketch using a sharpened vine charcoal stick. Map out the oval of the face, the axis for the eyes, and the position of the nose and mouth. Keep your hand loose and avoid pressing hard. -
Refine features:
Lightly define the almond shape of the eyes, the subtle curve of the nose bridge, and the line of the lips. The subject is looking up and to the right, so ensure the pupils are placed accordingly. -
Initial value mapping:
Using the side of a medium vine charcoal stick, gently shade the large shadow areas: under the chin, the side of the face away from the light, and the sockets of the eyes. This creates your initial map of light and dark.
Step 2: Creating Depth and Skin Texture
-
Deepen the background:
To make the face pop, apply compressed charcoal to the background behind the head. I like to use broad strokes here, blending it outward to create a hazy, atmospheric vignette. -
Soft blend the skin:
Use a large blending stump or a soft brush to gently smooth out the initial vine charcoal shading on the face. Follow the contours of the cheekbones and jawline to maintain the facial structure. -
Define the eyes:
Switch to a sharpened compressed charcoal pencil for the eyes. Darken the pupil and the upper lash line. Leave the white of the eye clean, but shade the corners slightly to show the spherical shape. -
Sculpt the nose:
Instead of drawing lines for the nose, merely shade the side planes. Use a small tortillon to soften the shadow under the nose tip and the nostril, keeping edges soft. -
Render the lips:
Shade the upper lip darker than the bottom lip. Use the kneaded eraser to pick out a highlight on the center of the lower lip to give it volume.
Clean Hands, Clean Art
Place a scrap piece of paper under your drawing hand. This acts as a bridge, preventing natural oils and friction from smearing your carefully blended skin tones.
Step 3: Hair and Finishing Touches
-
Block in hair masses:
Using the side of a vine charcoal stick, block in the main shapes of the hairstyle. Follow the direction of hair growth, sweeping back from the forehead. -
Darken hair shadows:
Apply compressed charcoal to the darkest areas of the hair—mist often near the neck and behind the ear—to create depth and separation from the face. -
Lift hair highlights:
Mold your kneaded eraser into a thin wedge. Use a sweeping motion to lift off charcoal where the light hits the hair strands, creating soft, natural-looking shine. -
Refine the neck and shoulders:
Lightly suggest the clothing and neck muscles with loose, gestural strokes. Keep this area less detailed than the face to ensure focus remains on the eyes. -
Add wisps and strays:
Use a sharp charcoal pencil to draw fine, individual stray hairs escaping the bun at the nape of the neck and around the temples for realism. -
Enhance highlights:
For maximum contrast, use a white charcoal pencil sparingly on the very brightest points: the tear duct, the tip of the nose, and the highest point of the cheekbone. -
Clean up edges:
Use a hard eraser to clean up the white space around the portrait, ensuring a crisp presentation against the paper’s edge. -
Final assessment:
Step back and check your values. If the shadows look washed out, re-apply dark compressed charcoal and blend again. -
Preserve the work:
Once satisfied, spray the drawing with a light coat of workable fixative in a well-ventilated area to prevent smudging.
Powder Power
Sand a charcoal stick onto a palette to create loose powder. Apply this with a soft makeup brush for ultra-smooth skin transitions without visible pencil strokes.
Now you have a stunning, soulful portrait that captures both light and emotion.


Eye Study With Crisp Highlights
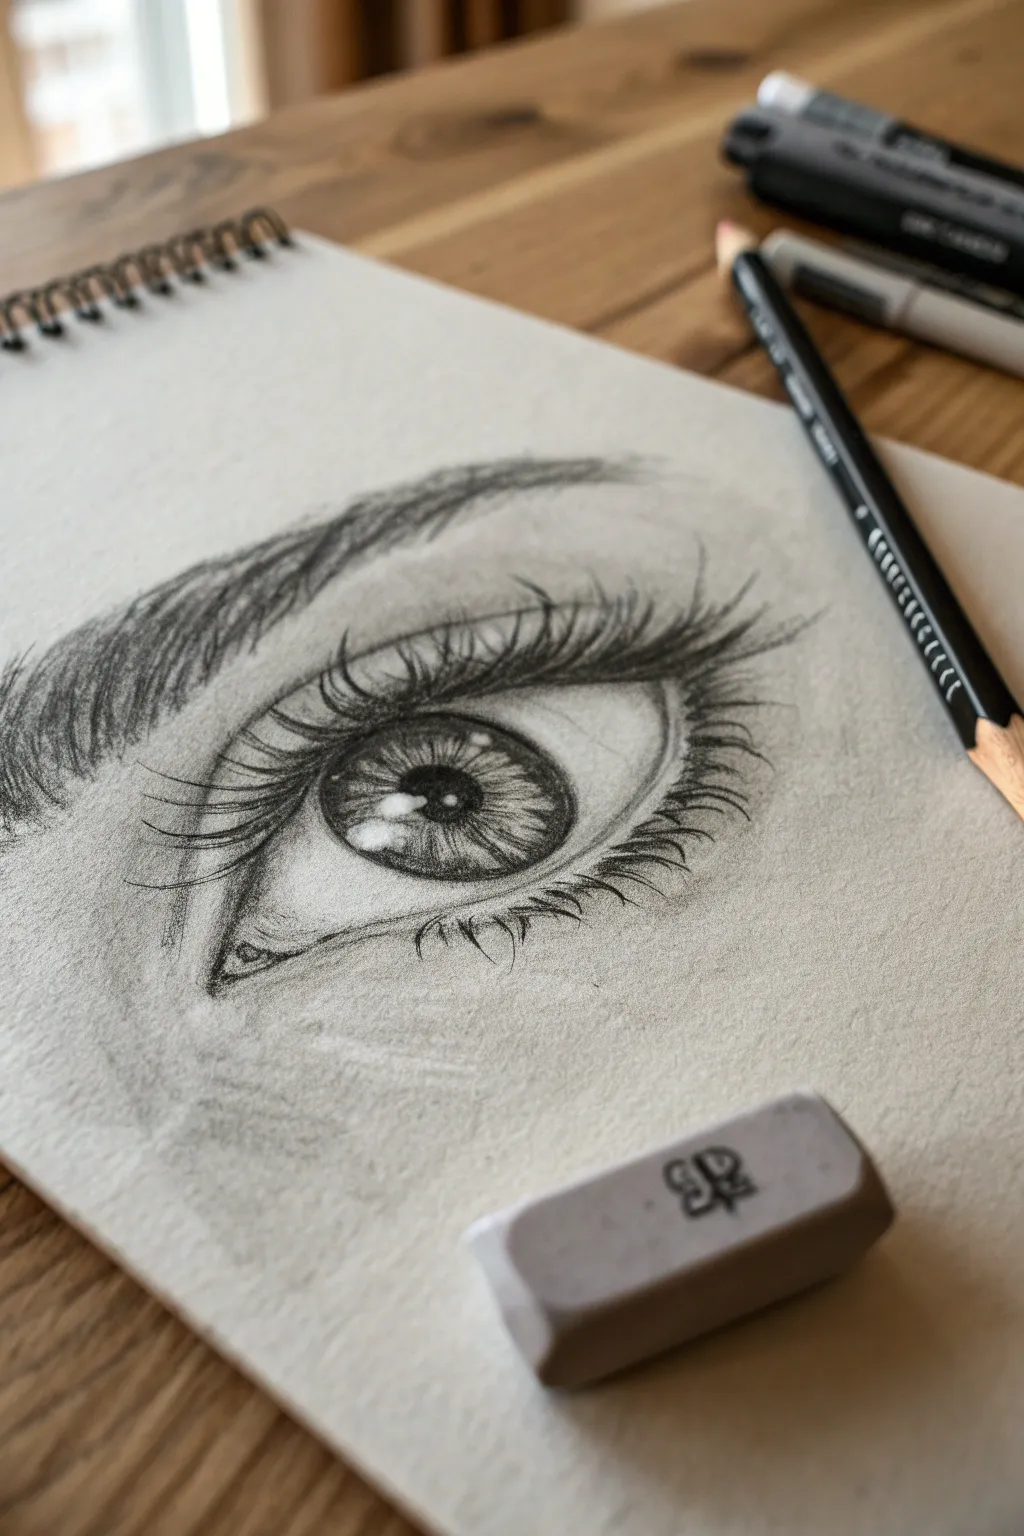
Master the art of contrast and texture with this stunningly realistic charcoal eye drawing. By focusing on deep blacks and preserving pristine white paper for highlights, you’ll create a gaze that feels alive and three-dimensional.
Detailed Instructions
Materials
- Textured sketch paper or charcoal paper
- Soft charcoal pencil (4B or 6B)
- Hard charcoal pencil (HB or 2B)
- Kneaded eraser
- Block eraser or eraser pencil (for sharp highlights)
- Blending stump or tortillon
- Tissue or soft cloth
Step 1: Building the Structure
-
Outline the shape:
Begin with your hard charcoal pencil, using very light pressure to sketch the almond shape of the eye. Don’t press hard; these lines need to be faint guidelines. -
Map the iris and pupil:
Draw a perfect circle for the iris, slightly cut off by the upper eyelid. Place a smaller circle in the absolute center for the pupil. -
Reserve the highlights:
This is the most critical step for those crisp reflections. Lightly outline the organic, window-like shapes of the reflection on the iris. You must not shade inside these areas at all. -
Define the crease:
Sketch the fold of the upper eyelid above the eye, following the curve of the upper lash line but tapering it slightly differently at the ends.
Smudge Prevention
Charcoal loves to smear. Place a clean sheet of scrap paper under your drawing hand to protect finished areas while you work on details.
Step 2: Adding Depth and Tone
-
Darken the pupil:
Switch to your soft charcoal pencil. Fill in the pupil with a deep, solid black, being careful to work strictly around your reserved highlight shapes. -
Shade the iris rim:
Thicken the outer ring (limbal ring) of the iris with dark charcoal. It should be distinct but soft. -
Create the iris spokes:
Using the hard pencil, draw fine lines radiating from the pupil toward the outer rim. Vary the pressure to create a natural, fibrous texture. -
Blend the iris:
Take your blending stump and gently smudge the iris shading. Pull the dark charcoal from the outer rim inward and from the pupil outward, creating a gradient. -
Shade the sclera:
The white of the eye isn’t flat white. Lightly shade the corners of the eyeball with the hard pencil and blend immediately to create a spherical form.
Wet Charcoal Trick
For the absolute blackest pupil, dip the tip of your charcoal pencil in a tiny drop of water before drawing. It dries pure matte black.
Step 3: Texture and Details
-
Establish the eyebrow:
Using short, flicking strokes that follow the hair growth direction, lay down the eyebrow shape. Start lighter near the nose and get denser toward the arch. -
Refine visible skin texture:
Add subtle shading around the tear duct and under the eye. A little shading here goes a long way to show the skin’s volume. -
Draw the upper lashes:
Sharpen your soft pencil to a fine point. Draw the upper lashes in curved, sweeping motions. Start at the lash line and flick upward, lifting your pencil at the end for a taper. -
Cluster the lashes:
Lashes rarely stand alone; they clump together. Draw some lashes crossing over others or originating from the same point to look natural. -
Add lower lashes:
Draw the lower lashes, making them shorter and more sparse than the top ones. Remember they grow from the outer edge of the waterline, not directly from the eyeball. -
Deepen the crease:
Revisit the eyelid crease with the soft pencil to deepen the shadow, reinforcing the fold of the skin.
Step 4: Final Polish
-
Boost the highlights:
If any charcoal dust has drifted into your reserved white highlights or the waterline, use the eraser pencil or a sharp edge of a regular eraser to clean them back to pure white. -
Enhance contrast:
Do a final pass with the softest charcoal to ensure the pupil and upper lash line are the darkest points on the page.
Step back and admire the intense gaze you have captured on the paper


Gesture Figure in Fast Strokes
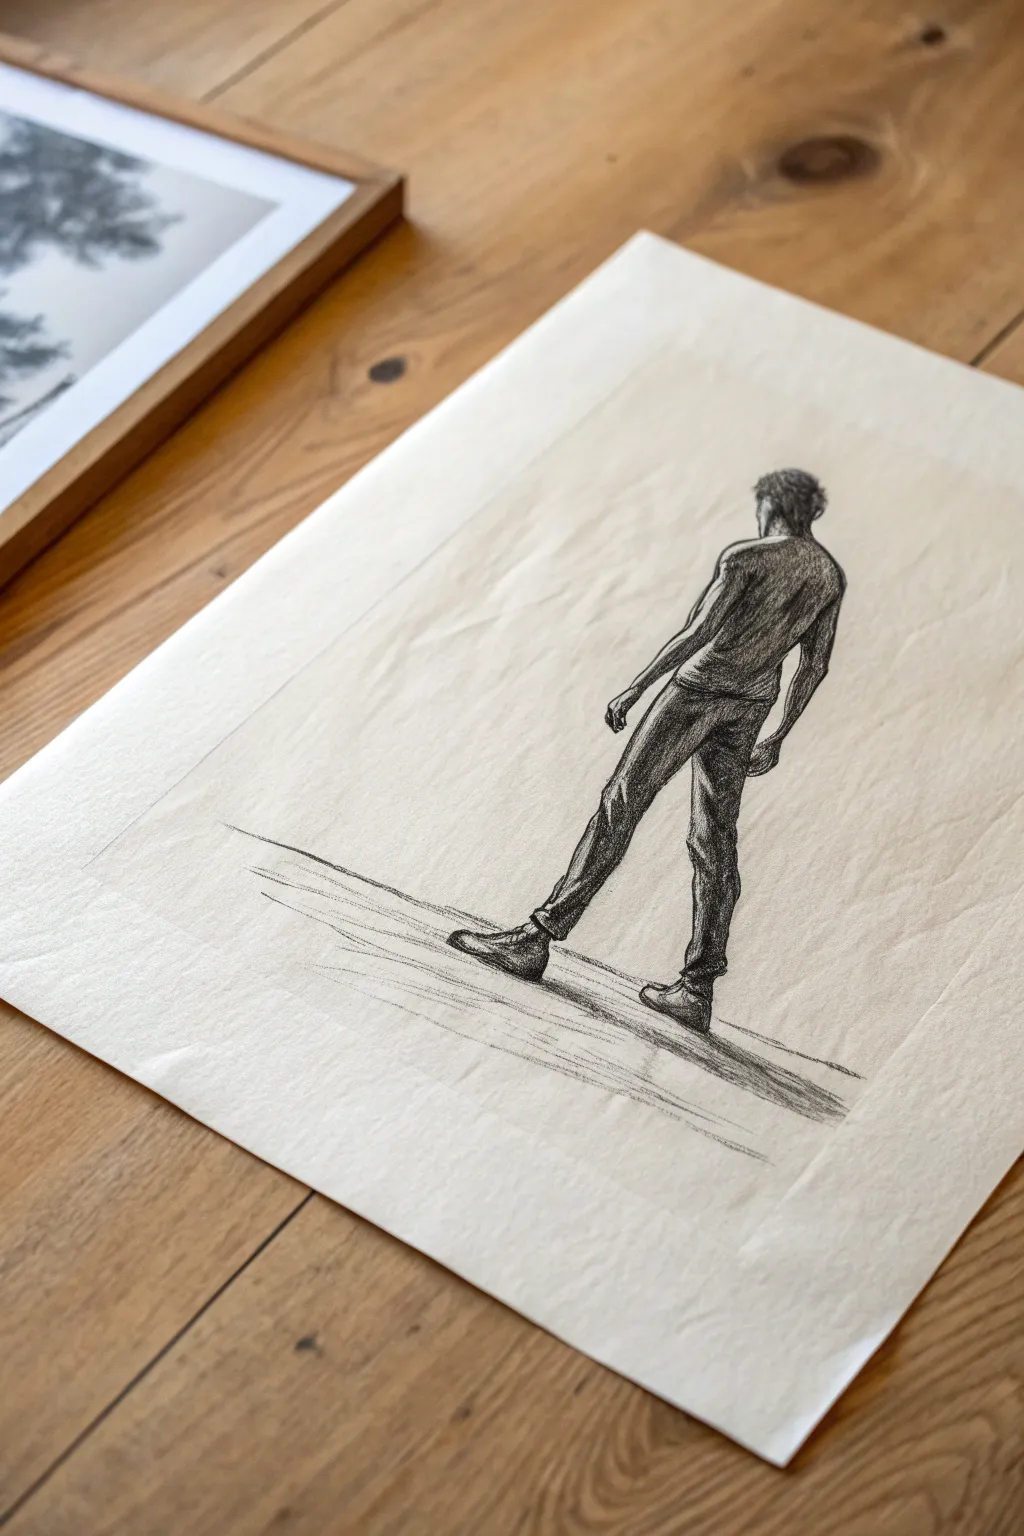
Capture the fluid motion of a figure in stride using bold charcoal strokes and subtle shading on textured paper. This project balances loose, gestural energy with grounded anatomy, resulting in a timeless, expressive study of the human form.
Detailed Instructions
Materials
- Heavyweight textured drawing paper or printmaking paper (cream or off-white)
- Willow charcoal sticks (medium)
- Compressed charcoal (soft and medium)
- Kneaded eraser
- Paper blending stump (tortillon)
- Drafting tape or masking tape
- Workable fixative spray
Step 1: Setting the Foundation
-
Prepare the paper border:
Begin by creating a defined rectangular border on your sheet. You can either lightly draw this with a pencil or, for a crisp edge like the reference, mask off the outer margin with drafting tape. This frames the composition beautifully. -
Establish the gesture line:
Using a stick of willow charcoal, lightly sketch a sweeping ‘S’ curve or a vertical line of action. This represents the spine and the leg bearing the weight. Keep your grip loose on the charcoal to encourage fluid movement. -
Block in major masses:
Roughly map out the head, the tilt of the shoulders, and the angle of the hips using simple ovals and box shapes. The figure is facing away, so focus on the trapezoid shape of the back. -
Sketch the limbs:
Extend lines for the arms and legs from your masses. Pay close attention to the negative space between the legs to ensure the stance looks believable. -
Refine the silhouette:
Go over your initial faint lines with a slightly firmer stroke to define the contour of the jeans and t-shirt. Don’t worry about details yet; just get the proportions of the clothing right against the body.
Step 2: Building Form and Tone
-
Start shading the darks:
Switch to compressed charcoal for deeper tones. Begin blocking in the darkest areas: the shadowed side of the shirt, the deep folds behind the knees, and the hair. I find creating these anchors early helps balance the rest of the drawing. -
Define the shirt folds:
Use the side of your charcoal stick to shade the t-shirt. The light source appears to be coming from the left, so keep the right side of the torso significantly darker. Add diagonal strokes to suggest fabric stretching across the back. -
Sculpt the jeans:
The pants require strong contrast to look three-dimensional. Shade the inner legs and the area below the glutes heavily. Leave the outer thigh and calf edges lighter to simulate a rim light effect. -
Blend for softness:
Take your paper blending stump and gently smudge the charcoal on the shirt and pants. This creates the smooth, fabric-like texture seen in the reference, distinct from the rougher background paper texture. -
Lift out highlights:
Form your kneaded eraser into a point or wedge. Press and lift the charcoal from the left shoulder blade, the top of the head, and the folds of the jeans to reclaim the paper’s light.
Smudge Control
If your hand keeps smearing the drawing, place a clean scrap piece of paper under your drawing hand. This acts as a bridge, protecting your artwork from accidental oils and friction.
Step 3: Refining and Grounding
-
Detail the head and neck:
Use a sharpened piece of compressed charcoal to add texture to the hair. Use short, scribbling strokes. Define the nape of the neck and the ear to give the head proper orientation. -
Define the shoes:
Draw the shoes with distinct outlines. Ensure the left foot is angled properly as it pushes off the ground, while the right foot is planted. Darken the soles heavily. -
Create the cast shadow:
Ground your figure by adding horizontal, sweeping strokes underneath the feet. These shouldn’t be detailed—just quick, energetic lines that suggest the floor plane and shadow. -
Sharpen edges:
Revisit the outline of the figure with a sharp charcoal edge. Crisp up the silhouette where the dark clothing meets the light background, specifically around the waist and legs. -
Final texture pass:
Lightly drag a piece of willow charcoal over the main body one last time without blending. This allows the grain of the paper to show through, adding that classic charcoal drawing atmosphere. -
Seal the work:
Once satisfied, carefully remove your tape if you used it. Spray the drawing with a workable fixative in a well-ventilated area to prevent smudging.
Pro Tip: Contrast Check
Squint your eyes at the drawing periodically. If the figure disappears into the paper, you need to darken your deepest shadows with more compressed charcoal to increase the value range.
Step back and admire how a few simple dark strokes have brought a sense of movement to the page


Tree Bark and Leaf Texture Study
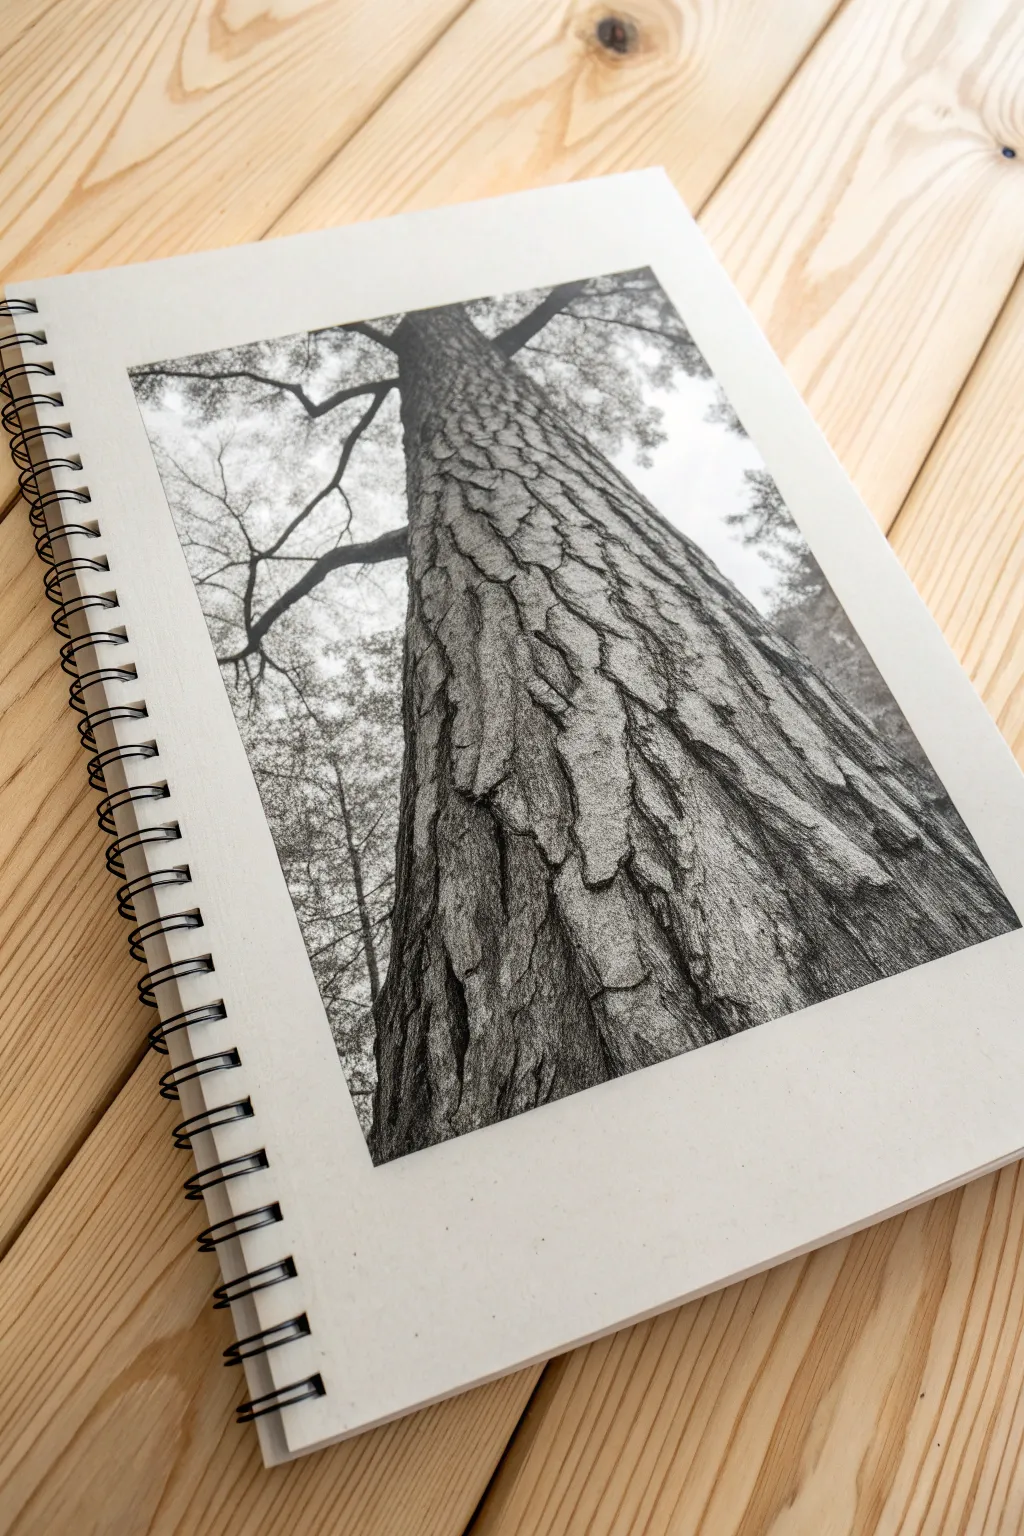
Capture the majestic height and rugged texture of a pine tree with this dramatic charcoal study. By using a worm’s eye view perspective and focusing heavily on the fissures of the bark, you’ll create a drawing that feels both grounded and towering.
Step-by-Step Guide
Materials
- Heavyweight drawing paper or sketchbook (smooth or vellum finish)
- Vine charcoal (soft/medium)
- Compressed charcoal sticks (medium/hard)
- Charcoal pencils (HB, 2B, 4B)
- Kneaded eraser
- Blending stump (tortillon)
- White pastel or charcoal pencil (optional for highlights)
- Workable fixative spray
Step 1: Planning the Structure
-
Establish the Perspective:
Start by lightly sketching the main trunk using a piece of soft vine charcoal. Draw two slightly converging lines that start wide at the bottom of your page and narrow as they reach the top, creating that towering, upward-looking perspective. -
Map the Main Branches:
Lightly indicate where the upper branches will split off near the top of the page. Keep these lines faint and gestural, as they will be mostly obscured by foliage or fade into the atmospheric background later. -
Divide the Bark Plates:
Using the side of your vine charcoal, block in the large, irregular shapes of the bark plates. These should be larger and more distinct at the bottom (foreground) and get smaller and flatter as they move up the trunk.
Smudge Control
Place a scrap piece of paper under your drawing hand. This acts as a bridge, preventing your palm from smearing the charcoal you’ve already laid down as you move across the page.
Step 2: Developing the Texture
-
Initial Tone Application:
Smudge your initial vine charcoal sketch gently with a tissue or chamois cloth to create a mid-tone grey base across the entire trunk. This eliminates the stark white of the paper. -
Darken the Crevices:
Switch to a compressed charcoal stick or a 4B charcoal pencil. Draw firm, dark lines into the cracks and fissures between the bark plates. These ‘valleys’ are the darkest parts of the drawing. -
Shape the Plates:
Use a medium charcoal pencil to shade the sides of each individual bark plate. Imagine the light source is coming from above or the side, leaving the top edges of the plates lighter. -
Review Contrast:
Step back and check your values. The bark closest to the bottom viewer should have the highest contrast—deepest blacks and brightest highlights—while the top of the tree should look slightly softer.
Texture Pro-Tip
Don’t draw every crack perfectly. Let your hand shake slightly or roll the charcoal pencil unevenly to create organic, accidental marks that look more like natural wood.
Step 3: Refining Details
-
Creating Surface Grain:
Take a sharper charcoal pencil (HB or 2B) and add fine vertical lines and scribbles on the surface of the bark plates to mimic the rough, fibrous wood grain. -
Lifting Highlights:
Take your kneaded eraser and mold it into a sharp wedge. Dab and swipe it along the ridges of the bark plates to lift off the charcoal, revealing the paper underneath for natural highlights. -
Blending for Depth:
Use a blending stump (tortillon) to soften the transition between your deep black cracks and the grey sides of the bark. I find this works best if you don’t over-blend; keep some texture visible. -
Adding the background branches:
Return to the upper branches. Draw them with a lighter touch using vine charcoal, keeping them slightly blurry to suggest they are further away and out of focus. -
Hinting at Foliage:
Lightly stipple or scumble soft vine charcoal around the upper branches to suggest pine needles or leaves without drawing every single detail.
Step 4: Final Touches
-
Deepening Shadows:
Do a final pass with your darkest compressed charcoal. Re-state the deepest cracks at the bottom of the trunk to anchor the drawing. -
Atmospheric Perspective:
Ensure the very top of the tree is lighter in value than the bottom. You can gently tap a kneaded eraser over the top section to lighten it if it became too dark. -
Clean Up:
Use a clean eraser to tidy up the white space surrounding the tree, removing any accidental smudges or fingerprints. -
Preserve the Work:
Once fully satisfied, spray a coat of workable fixative over the drawing in a well-ventilated area to prevent the charcoal from smearing.
Step back and enjoy the dizzying height of the forest giant you have created on paper

PENCIL GUIDE
Understanding Pencil Grades from H to B
From first sketch to finished drawing — learn pencil grades, line control, and shading techniques.
Explore the Full Guide
Landscape With Atmospheric Perspective
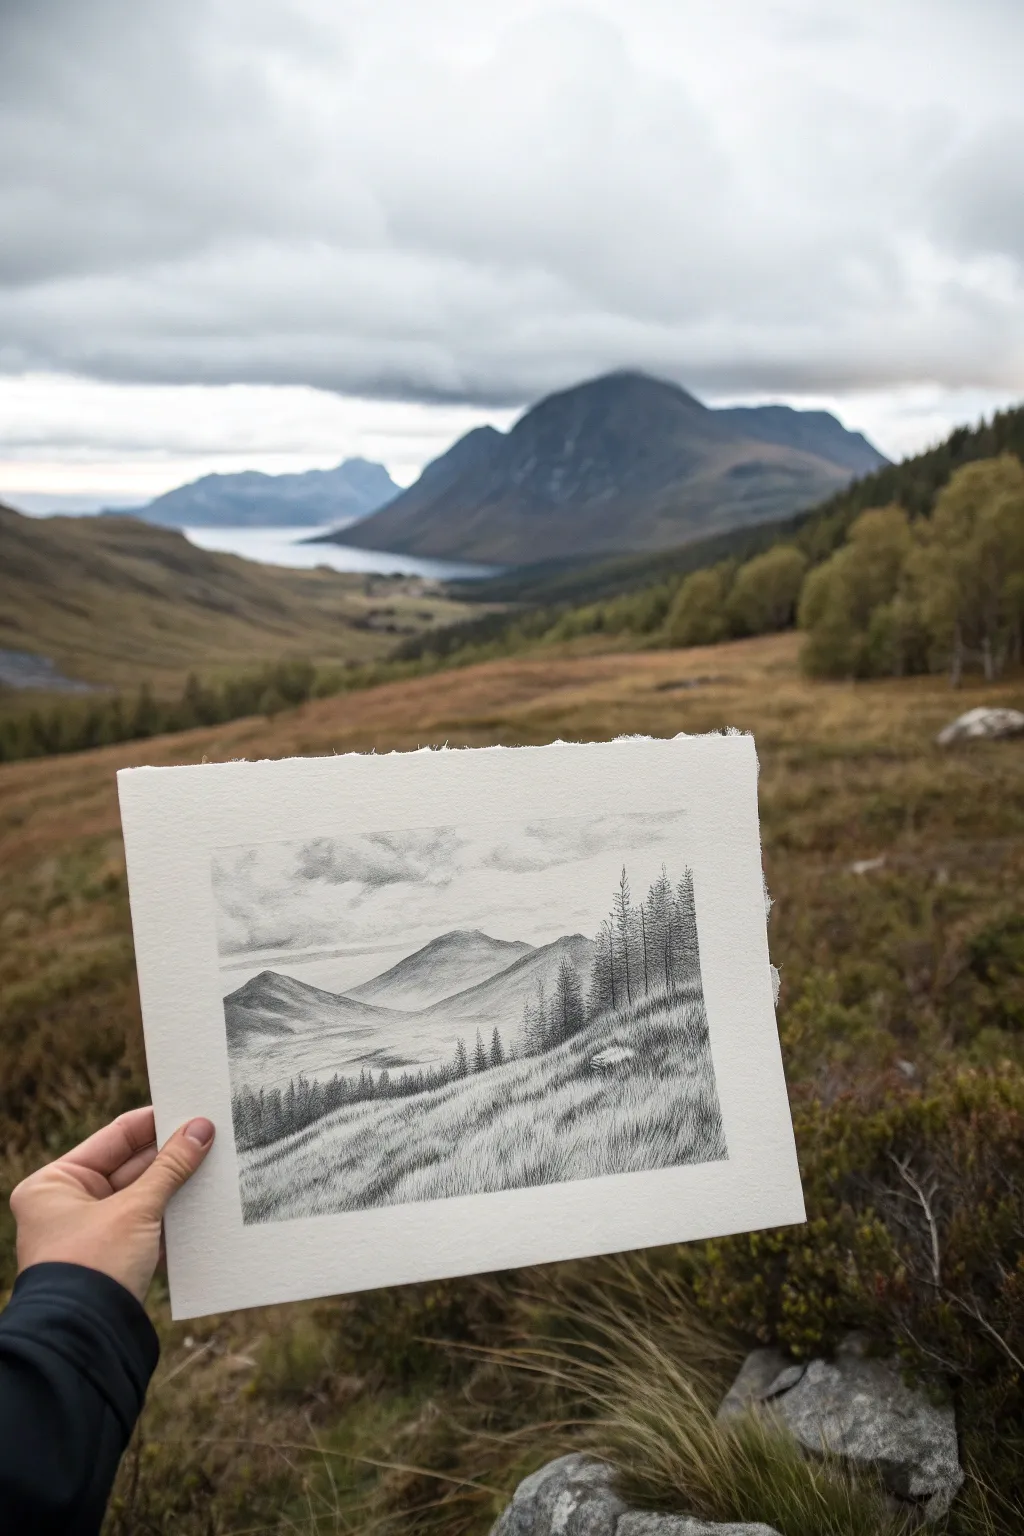
Capture the moody serenity of a Scottish highland landscape using atmospheric perspective to create depth and distance. This project balances soft, sweeping mountain forms with the intricate textures of windswept grass and pine trees in the foreground.
Step-by-Step Tutorial
Materials
- Heavyweight textured drawing paper (approx. 300gsm with deckle edge)
- Willow charcoal sticks (soft and medium)
- Charcoal pencils (soft/HB, medium/2B, dark/4B)
- Kneaded eraser
- Blending stump or tortillon
- Soft tissue or chamois cloth
- Fixative spray
- Masking tape (optional)
Step 1: Laying the Foundations
-
Establish the Horizon:
Begin by lightly marking your horizon line slightly above the center of the paper using a soft charcoal pencil. Keep the line faint, as mountains will overlap it. -
Map the Mountain Shapes:
Sketch the outline of the distant mountain range. Create rolling, organic shapes rather than sharp peaks to mimic the eroded ancient hills shown in the reference. -
Define the Mid-Ground:
Draw the swooping curves of the valley floor and the nearer hills below the main mountain range. These lines should guide the eye inward toward the implied lake or valley center. -
Block in the Foreground Slope:
Mark out the steep diagonal slope in the immediate foreground. This will serve as the stage for your detailed grasses and trees later. -
Create the Sky Gradient:
Using a piece of soft willow charcoal on its side, gently sweep across the sky area. Use a tissue to rub this graphite into the paper, creating a soft, cloudy haze that is slightly darker at the top.
Step 2: Building Atmospheric Depth
-
Shade the Distant Mountains:
Apply a light, even layer of charcoal to the furthest mountains. Use a blending stump to smooth this out completely; apart from the outline, there should be very little detail here to suggest distance. -
Darken the Mid-Ground Hills:
Move to the next range of hills closer to the viewer. Apply slightly more pressure with your charcoal, making these darker than the distant mountains but lighter than the foreground. -
Add Subtle Valley Shadows:
In the valley floor area, use the side of your charcoal stick to create broad, soft shadows that suggest undulating terrain. -
Lift Out Mist:
Take your kneaded eraser and gently tap or dab at the base of the mountains where they meet the valley. This lifting technique simulates mist or light reflecting off a distant body of water. -
Refine the Clouds:
Go back to the sky and use the kneaded eraser to lift out organic shapes, creating fluffy white clouds against the grey sky tone you established earlier.
Control Your Values
Make a value scale on scrap paper before starting. Ensure your ‘distant’ grey is significantly lighter than your ‘foreground’ black to sell the illusion of depth.
Step 3: Foreground Details and Texture
-
Base Tone for the Foreground:
Apply a medium-dark layer of charcoal to the entire foreground slope. Scumble the charcoal (move in small circular motions) to begin building a rough, earthy texture. -
Draw the Grasses:
Sharpen a 2B charcoal pencil to a fine point. Start making quick, upward flickering strokes all along the foreground slope to create windswept tall grass. Vary the angle slightly to show movement. -
Add the Pine Trees:
Using your darkest 4B pencil, draw vertical lines for tree trunks on the right side of the slope. Add branches using short, jagged strokes that angle downward, keeping the silhouettes distinct against the paler background. -
Deepen Foreground Shadows:
Identify the distinct rock formation in the grass. Darken the area beneath the rock and the roots of the trees to ground them. -
Highlight the Grass:
Use a precision eraser (or a sharp edge of your kneaded eraser) to erase thin, sharp strokes through the dark grass. I find this ‘negative drawing’ really makes the vegetation look sun-bleached and three-dimensional. -
Plant Distant Trees:
On the mid-ground hill (left side), add tiny, vertical tick marks. These represent a distant forest and help establish the vast scale of the landscape. -
Final Contrast Check:
Assess the whole image. Ensure the foreground trees are the darkest elements and the distant peak is the lightest grey. Add a final touch of dark charcoal to the nearest grass clumps to pull them forward.
Add a Lake Reflection
If you want to suggest water more clearly in the valley, use horizontal eraser strokes to create flat, bright highlights that mimic reflections on a lake surface.
Once you are happy with the depth and details, protect your atmospheric masterpiece with a light coat of fixative spray
River or Lake With Reflections
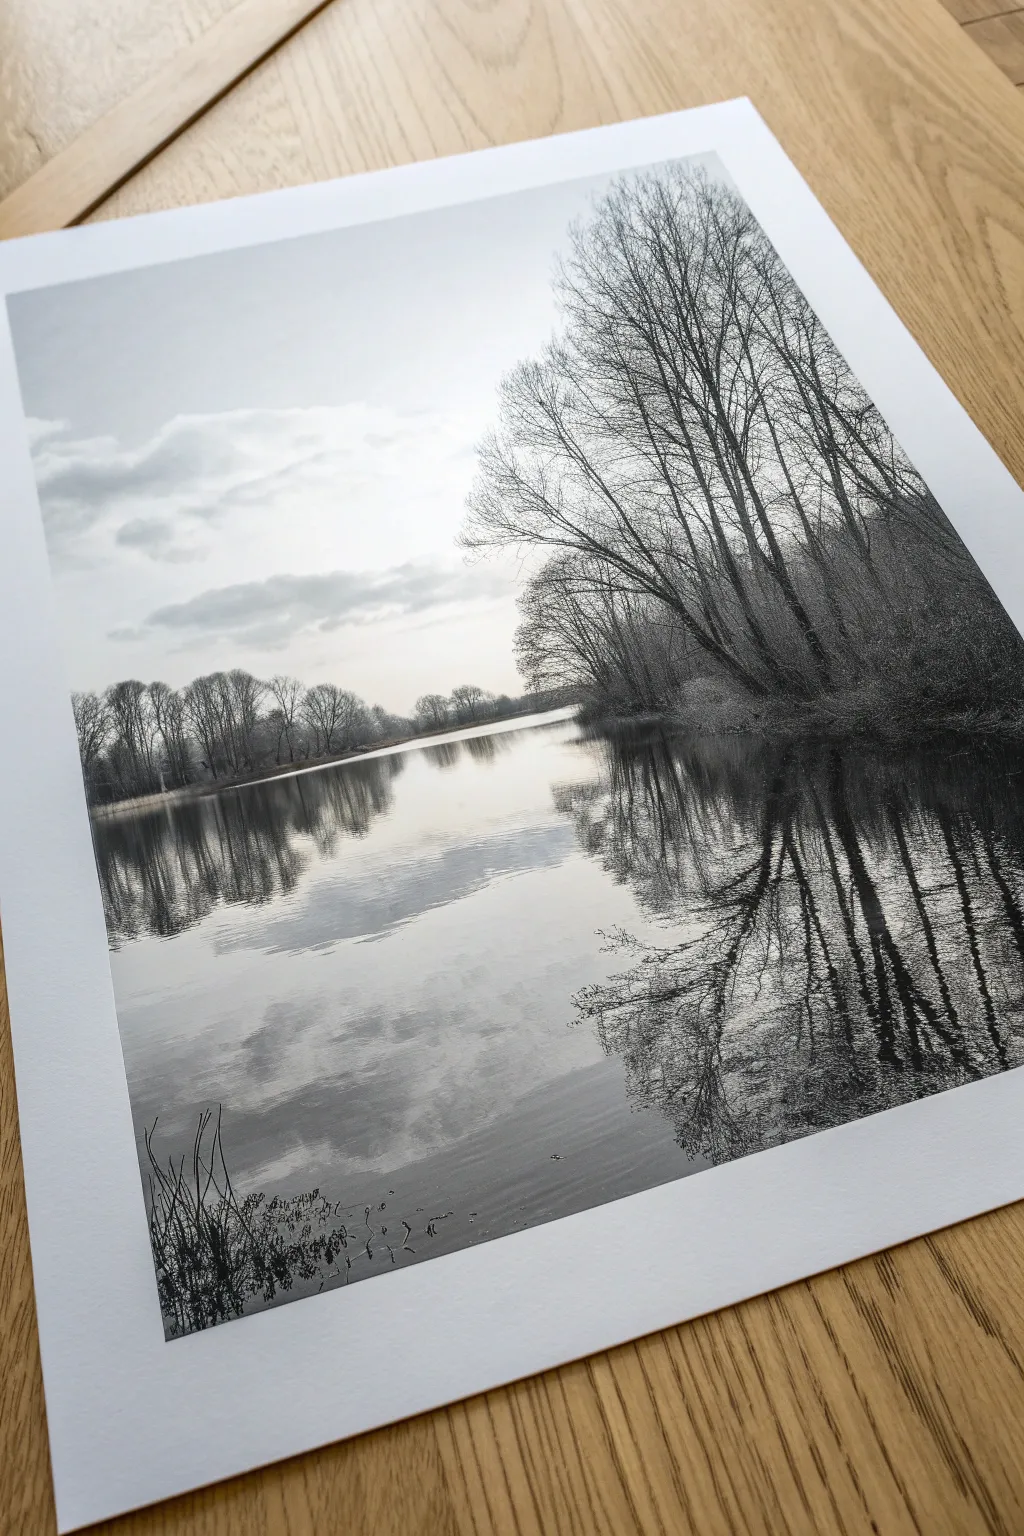
This project captures the quiet stillness of a river at dawn using the rich, tonal range of charcoal. By focusing on the interplay between the crisp tree silhouettes and their softened reflections, you’ll create a landscape filled with depth and atmosphere.
Step-by-Step Guide
Materials
- High-quality charcoal paper (smooth or fine tooth)
- Vine or willow charcoal sticks (soft and medium)
- Compressed charcoal pencils (HB, 2B, 4B)
- White charcoal pencil or pastel pencil
- Kneaded eraser
- Blending stumps (tortillons) and a soft chamois cloth
- Artist tape
- Workable fixative spray
Step 1: Planning and Foundation
-
Establish the Horizon:
Begin by lightly taping down your paper to a board. Using a hard vine charcoal stick, sketch a very faint horizon line about one-third of the way up from the bottom of the page. This low horizon prioritizes the sky and trees. -
Map the Tree Line:
Lightly gesture in the shapes of the tree masses on the far bank. Don’t worry about individual branches yet; just block in where the darker values will eventually go, particularly the large dominant tree group on the right side. -
Plan the Water’s Edge:
Sketch the shoreline. Notice how it curves gently into the distance on the left. Mark the boundary where the land meets the water clearly but softly.
Step 2: Building the Sky and Atmosphere
-
Lay the Base Tone:
Using a soft vine charcoal stick on its side, gently sweep a very light layer of gray across the entire sky area. Use your chamois cloth to rub this into the paper, creating a smooth, cloud-like haze. -
Create Cloud Definition:
Lift out brighter areas of the clouds using your kneaded eraser. Shape the eraser into a wedge to carve out the soft tops of the clouds on the left side, leaving the darker charcoal tone as the shadow underneath. -
Refine the Gradient:
Darken the upper corners of the sky slightly to create a vignette effect, drawing the eye toward the center light source. Blend this seamlessly with a clean tortillon.
Keep it Clean
Place a scrap piece of paper under your drawing hand as you work. This prevents oils from your skin transferring to the paper and stops your hand from smudging completed sections.
Step 3: The Far Bank and Reflections
-
Block in Distant Trees:
Using medium willow charcoal, fill in the distant tree line on the left. These trees should be a mid-gray, not solid black, to suggest atmospheric perspective. Keep the edges slightly fuzzy. -
Start the Reflection Base:
Mirror the general shapes of the trees into the water below the horizon line. Apply charcoal using vertical strokes here, pulling the pigment downward to simulate the liquid surface. -
Soften the Water:
Take a wide blending stump and horizontally smudge the vertical strokes you just made in the water. This cross-hatching of smudges creates the illusion of a flat, reflective surface.
Add Winter Mood
To create a frosty morning look, use a white charcoal pencil to add highlights on the tops of the foreground branches and along the riverbank edge for a dusting of snow.
Step 4: Detailing the Focal Point
-
Construct the Main Trees:
Switch to your compressed charcoal pencils (2B and 4B) for the large trees on the right. Start with the trunks, pressing firmly to get deep, rich blacks. Taper the lines as they reach upward. -
Add intricate Branches:
With a sharpened HB charcoal pencil, draw the fine network of branches extending from the main trunks. Use quick, confident flicks of the wrist to keep the lines organic and twig-like. -
Layering Depth:
Add density to the base of the right-side trees with the 4B pencil. Establish the dark undergrowth and bushes along the bank where the trees are rooted.
Step 5: The Water’s Surface
-
Reflecting the Main Trees:
Draw the reflection of the large right-side trees into the water. Unlike the crisp trees above, these lines should be slightly wavy and distorted. Breaks in the lines suggest gentle ripples. -
Deepen the Contrast:
The reflection often appears slightly darker than the object being reflected. Go back into the water reflection on the right and deepen the darkest areas with your 4B pencil. -
Carve the Ripples:
Using your kneaded eraser pinched to a fine point, lift out thin, horizontal slivers of light across the water’s surface to break up the dark reflections and show the water’s movement.
Step 6: Final Touches
-
Foreground Vegetation:
In the bottom left corner, use the sharp HB pencil to sketch delicate grasses and weeds emerging from the water. Keep these crisp and distinct to establish the immediate foreground. -
Verify Values:
Step back and squint at your drawing. Ensure your darkest darks are in the foreground trees and reflection, and your lightest lights are in the sky and water highlights. -
Preserve:
Once satisfied, protect your work with a light mist of workable fixative spray to prevent the rich charcoal dust from smudging.
Now you have a stunning, atmospheric landscape that perfectly captures the quiet interplay of light and water
BRUSH GUIDE
The Right Brush for Every Stroke
From clean lines to bold texture — master brush choice, stroke control, and essential techniques.
Explore the Full Guide
Cityscape With Hard Edges and Glow
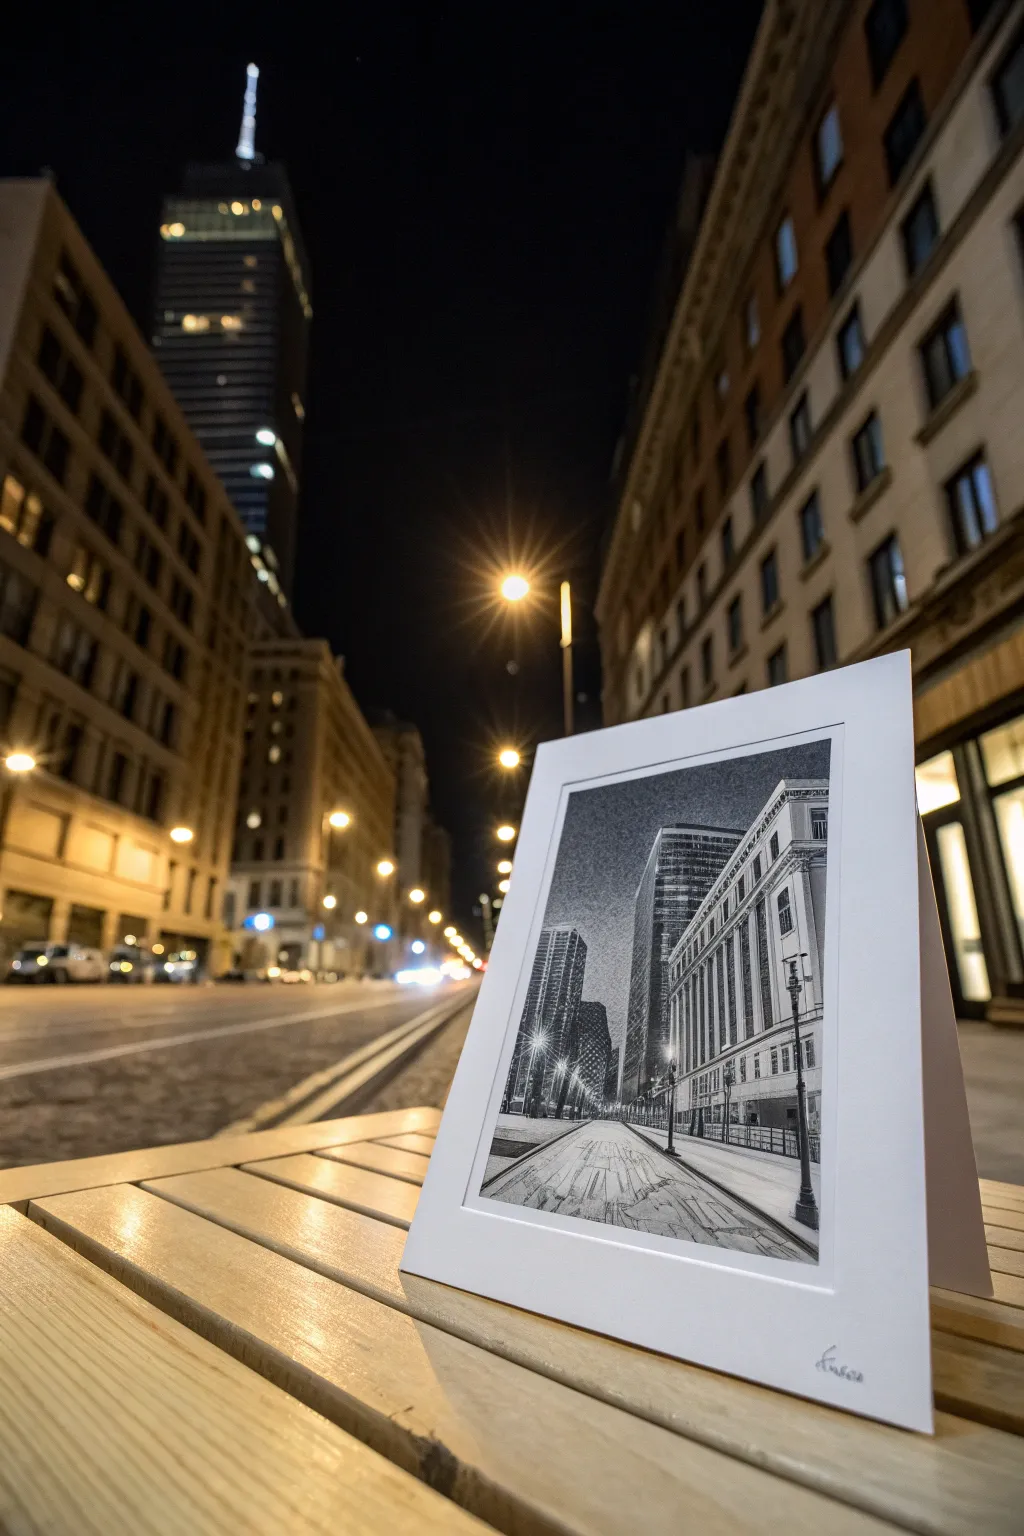
Capture the stark beauty of a city street at night using only charcoal and paper. This project balances deep, velvety shadows against crisp architectural lines to create a dramatic, atmospheric cityscape.
Step-by-Step Tutorial
Materials
- Heavyweight drawing paper (smooth or vellum finish)
- Vine charcoal (soft)
- Compressed charcoal sticks (black and white)
- Charcoal pencils (hard, medium, soft)
- White pastel pencil or white charcoal pencil
- Blending stumps (tortillons)
- Kneaded eraser
- Precision eraser stick (i.e., Tombow Mono Zero)
- Ruler or straightedge
- Fixative spray
- White mat board for mounting
Step 1: Laying the Groundwork
-
Establish the horizon line:
Begin by lightly sketching a horizon line about one-third of the way up your paper. This low placement emphasizes the towering height of the skyscrapers. -
Map the perspective:
Using your ruler and a hard charcoal pencil, draw vanishing points on the horizon line. Sketch the basic geometric blocks of the buildings on the left and right, ensuring all receding lines converge to your vanishing point. -
Block in major shapes:
Lightly outline the distinct curved building on the right and the more rectangular skyscrapers on the left. Don’t worry about windows yet; just focus on the solid forms. -
Create a mid-tone base:
Using a piece of soft vine charcoal on its side, gently rub a textured gray layer across the sky and the shadowed sides of the buildings. -
Smooth the foundation:
Take a large blending stump or a piece of chamois cloth and smooth out the vine charcoal layer. This establishes a ‘nighttime’ atmosphere rather than a stark white page.
Smudge Control
Charcoal gets messy fast. Place a sheet of glassine or scrap paper under your drawing hand. This prevents the oils in your skin from ruining the paper and stops your palm from dragging charcoal into clean areas.
Step 2: Building the Architecture
-
Deepen the sky:
Switch to compressed charcoal to darken the night sky. Press firmly near the top corners for a vignette effect, but leave the areas around where streetlights will go slightly lighter. -
Define the building edges:
Use a medium charcoal pencil and your ruler to draw the definitive vertical lines of the buildings. These hard edges are crucial for the distinct urban look. -
Shade the dark masses:
Fill in the darkest faces of the buildings using compressed charcoal. Pay attention to which way the imaginary light source is hitting; the sides facing away from the streetlights should be pitch black. -
Draw the window grids:
With a sharpened hard charcoal pencil, draw the rhythmical lines of the windows on the large right-hand building. Keep your pressure consistent so the lines look architectural. -
Add reflection to the glass:
Lightly shade inside the window frames, but lift out small streaks with a kneaded eraser to suggest glass reflecting the street below.
Step 3: Creating the Glow
-
Render the streetlights:
Draw the lamp posts in the foreground using a soft charcoal pencil. These should be high-contrast and sharp. -
Add the light source:
Where the street lamps are, use your white pastel or white charcoal pencil to draw distinct, bright orbs. -
Create the halo effect:
Smudge the area immediately surrounding the white orbs with a clean tortillon to create a soft, glowing halo against the dark background. -
Render the street surface:
Use sweeping horizontal strokes with vine charcoal for the ground. Mimic the look of wet pavement by adding vertical streaks of white charcoal directly under the light sources. -
Detail the foreground texture:
I find that adding a few scribbly, loose lines in the immediate foreground suggests the texture of cobblestones or cracks in the road without needing photorealism.
Wet Pavement Trick
For realistic wet streets, drag your kneaded eraser vertically downward directly under light sources. This ‘pulls’ the light down into the pavement, creating convincing reflections.
Step 4: Finishing Touches
-
Clean up the edges:
Use your precision eraser stick to clean up the edges of the buildings where they meet the sky. A sharp, high-contrast edge makes the drawing pop. -
Final highlights:
Apply touches of pure white pastel to the brightest points: the tops of the street lamps, the edges of the nearest curb, and the brightest window reflections. -
Sign and seal:
Add your signature to the bottom corner. Once satisfied, spray the drawing with fixative in a well-ventilated area to prevent smudging. -
Mount the artwork:
Once dry, carefully mount the drawing behind a clean white mat board. This white border increases the perceived contrast of the dark charcoal.
Now you have a moody, atmospheric city scene that looks great on a desk or wall
Moonlit Night Sky With Deep Blacks

This dramatic drawing balances deep, velvety blacks with luminous highlights to capture the quiet beauty of a moonlit night. By using charcoal and possibly white charcoal or chalk on toned paper, focusing on high contrast, you can achieve this glowing atmospheric effect.
How-To Guide
Materials
- High-quality white drawing paper or mixed media paper (heavyweight, textured)
- Vine or willow charcoal (soft)
- Compressed charcoal stick (medium and soft)
- White charcoal pencil or white pastel pencil
- Kneaded eraser
- Blending stump or tortillon
- Paper towel or chamois cloth
- Drafting tape
- Fixative spray (workable or final)
Step 1: Preparation and Initial Layout
-
Secure the paper:
Begin by taping down all four edges of your paper to a hard board or drawing surface. This creates the crisp, clean white border seen in the reference image and keeps the paper flat while you work. -
Sketch the composition:
Using a stick of vine charcoal, very lightly sketch the placement of your main elements. Draw a circle for the moon in the upper right quadrant and a loose, flowing line to mark where the cloud bank meets the dark foreground. -
Refine the moon shape:
Since the moon is the focal point, take a moment to ensure your circle can serve as a guide. You don’t need it perfect yet, but gently erase and redraw until the size feels balanced against the negative space.
Step 2: Establishing the Deep Darks
-
Block in the sky:
Using a soft compressed charcoal stick, begin filling in the night sky around the moon. Avoid the moon circle itself and the area directly beneath it where the clouds will be brightest. -
Darken the foreground:
apply a heavy layer of compressed charcoal to the bottom third of the paper. This area needs to be the darkest part of the drawing to represent the silhouette of the grass against the night. -
Blend the atmosphere:
Take a paper towel or a chamois cloth and rub the charcoal into the paper grain. This creates a smooth, unified base tone. Don’t worry if it looks grainy; we will add more layers. -
Deepen the blacks:
Go back over the sky and foreground with your softest compressed charcoal. You want a true, deep black. I find that layering the charcoal in different directions before blending again helps get that solid, void-like darkness.
Keep it Clean
Place a spare sheet of paper under your hand while drawing. This prevents oils from your skin transferring to the paper and stops your hand from smudging completed areas.
Step 3: Creating the Moon and Clouds
-
Lift out the cloud structure:
Take your kneaded eraser and mold it into a wedge shape. Start ‘lifting’ or erasing charcoal away from the middle section to form the cloud tops. Use a tapping motion to create a fluffy, textured edge. -
Define the moon:
Clean your eraser and lift out the charcoal inside your moon circle. It doesn’t need to be perfectly white, as the moon has shadowed craters, but clear away the heavy darks. -
Add lunar details:
Using a white charcoal pencil or pastel pencil, gently draw the bright rim of the moon. Use a smudge stick to swirl varying shades of grey inside the moon to suggest craters and maria (seas). -
Highlight the clouds:
Use the white pencil to accentuate the tops of the clouds you erased earlier. Apply the white purposefully on the upper edges where the moonlight would hit, fading it out as you move down into the shadowed base of the clouds. -
Refining the sky transition:
Use a vine charcoal stick to bridge the gap between the deep black sky and the lighter clouds. create a soft gradient so the clouds look like they are emerging from the darkness rather than being cut out of it.
Level Up: Celestial Glow
Use a dry, clean brush to softly sweep a tiny amount of powdered white pastel around the moon’s edge. This creates a hazy ‘halo’ effect, simulating glowing moonlight.
Step 4: Final Details and Textures
-
Draw the stars:
With a sharpened white charcoal pencil, dot in your stars. vary your pressure to create stars of different brightness. Add tiny cross shapes for the brightest twinkling stars. -
Create the grass silhouette:
Return to the black foreground. Using the sharp edge of a hard compressed charcoal stick or a charcoal pencil, flick upward strokes from the bottom. These quick, tapered lines will mimic tall grass blades. -
Add variety to the foliage:
Make some grass tufts taller and some shorter. Ensure the silhouette is opaque black so it stands starkly against the misty clouds behind it. -
Brighten main highlights:
Do one final pass with your white material. Strengthen the brightest curve of the moon and the most illuminated peaks of the clouds to maximize contrast. -
Clean overlap areas:
Check where the stars meet the dark sky. If any charcoal dust has dulled your stars, carefully re-dot them. Gently blow away any loose dust. -
Reveal the border:
Before fixing, slowly peel away the drafting tape. Pull it away from the center of the drawing to prevent tearing the paper, revealing your crisp white frame.
Once sealed with a fixative spray, your nocturnal landscape is ready to display its striking atmosphere


Silhouette Against a Light Background
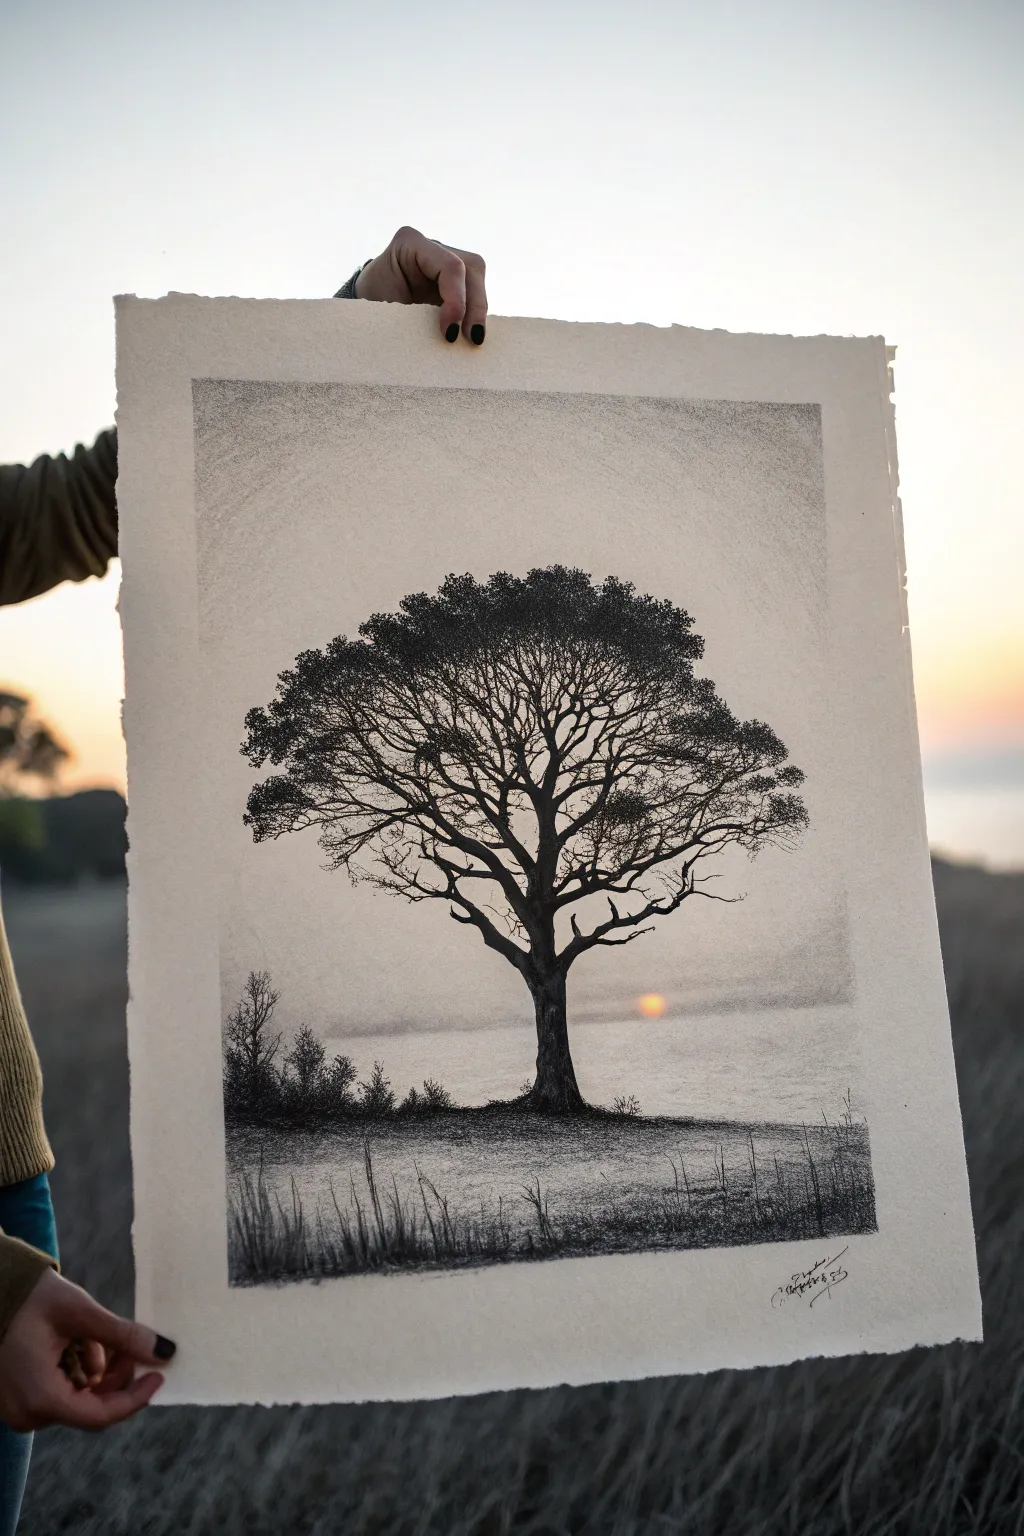
Capture the stark beauty of a lone tree against a glowing horizon with this moody charcoal study. By contrasting deep blacks against soft, hazy grays, you’ll create a striking silhouette that feels backlit by a fading sun.
Detailed Instructions
Materials
- Heavyweight textured paper with deckled edges
- Compressed charcoal stick (soft)
- Vine charcoal (medium)
- Charcoal pencils (soft and medium)
- Kneaded eraser
- Blending stump or tortillon
- Soft tissue or chamois cloth
- Workable fixative spray
Step 1: Setting the Atmosphere
-
Tone the Sky:
Begin by rubbing a stick of vine charcoal lightly across a scrap piece of paper to create dust. Pick up this dust with a chamois or tissue and gently buff it onto the upper two-thirds of your paper in a circular motion to create a smooth, light gray sky. -
Establish the Horizon:
Mark a low horizon line about one-third up from the bottom. Darken the area beneath this line slightly more than the sky to represent the ground and water, blending horizontally to suggest a flat landscape. -
Sun Placement:
Using your kneaded eraser, lift out a small, perfect circle just above the horizon line on the right side. This negative space will become your setting sun. -
Create the Glow:
Gently erase a faint halo around the sun circle to simulate diffused light, blending the edges softly so the transition into the gray sky is seamless.
Clean Edges Matter
Keep a piece of paper under your hand while drawing to avoid smearing the sky. For the sharpest silhouette, sharpen your charcoal pencil frequently to a fine point.
Step 2: Constructing the Tree
-
Drawing the Trunk:
Using a soft charcoal pencil, sketch the main trunk in the center. Start wide at the base and taper upward, ensuring the trunk has a slight, organic curve rather than a ruler-straight line. -
Map Main Branches:
Extend 3-4 major branches outward from the top of the trunk. Let them spread wide and angularly, creating the ‘skeleton’ of the canopy. -
Darkening the Core:
Switch to compressed charcoal for the trunk and main branches to get that deep, absolute black. Press firmly to ensure no paper texture shows through the silhouette. -
Adding Texture:
While darkening, add small bumps or knots to the trunk’s edge to imply bark texture, keeping the silhouette crisp against the lighter background.
Add a Pop of Color
After the black and white drawing is finished, use a single orange or yellow pastel chalk to lightly tint the sun and its reflection for a stunning mixed-media effect.
Step 3: Details and Foliage
-
Secondary Branches:
With a sharpened medium charcoal pencil, draw thinner branches growing off your main limbs. These should be more intricate and twisting, reaching towards the edges of the canopy area. -
Stippling Foliage:
To create the leaves, hold a soft charcoal pencil sideways or use the dull point. Use a stippling motion—lots of small dots and scumbles—to form dense clusters of leaves at the ends of the branches. -
Varying Density:
Keep the leaf clusters dense near the center and top, but allow gaps where the sky peeks through. This ‘sky holes’ effect is crucial for a realistic tree silhouette. -
Refining Edges:
Use the very tip of your pencil to add tiny, singular twigs extending beyond the leaf clusters. I find this creates a delicate, lacy edge that makes the tree look ancient and weathered.
Step 4: Foreground and Finish
-
Grounding the Tree:
Darken the area immediately around the base of the trunk with compressed charcoal to anchor the tree firmly. -
Adding Grasses:
Use quick, upward flicking motions with a sharp pencil along the bottom edge of the paper to simulate tall grasses in the immediate foreground. -
Distant Shrubs:
On the left side of the horizon, lightly sketch some low, bushy shapes using vine charcoal. Blur them slightly with a blending stump to push them into the distance. -
Final Contrast Check:
Step back and check your values. If the sky has become smudged or dark, use the kneaded eraser to reclaim the light, especially near the center of the tree where the light would shine through the branches. -
Seal the Work:
Once satisfied, spray the drawing with a workable fixative in a well-ventilated area to prevent the heavy charcoal from smearing.
Frame your silhouette with a wide mat to let the stark contrast really take center stage
Animal Portrait With Fur Textures
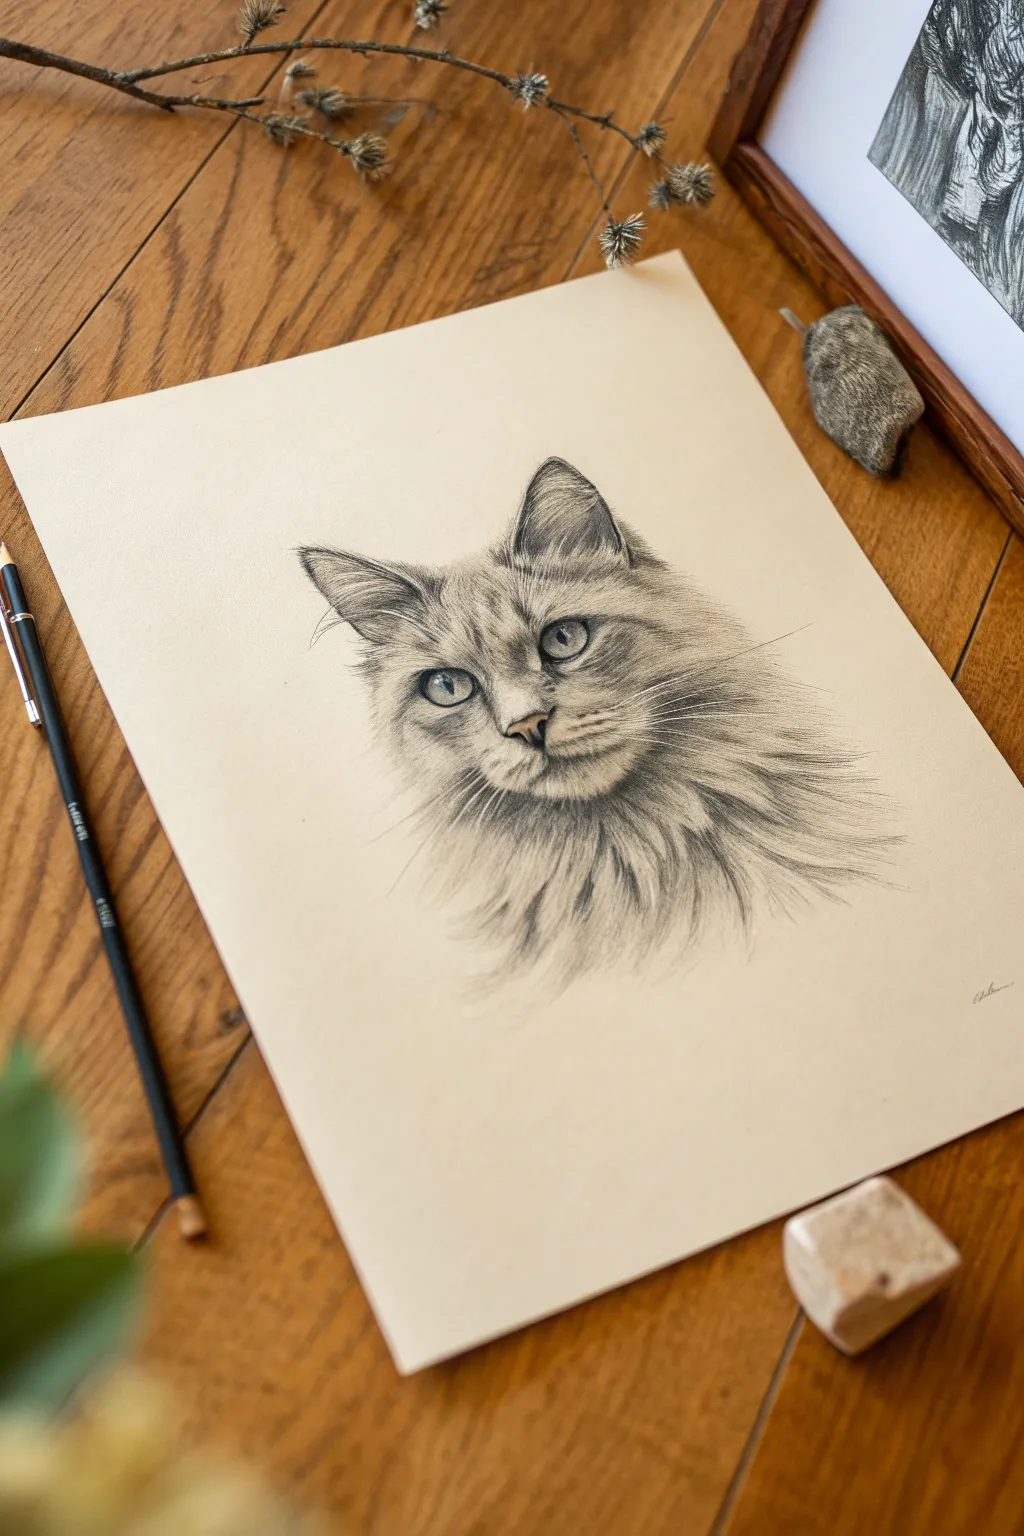
Capture the soft gaze and luxurious mane of a cat in this detailed charcoal portrait. Using toned paper allows you to build both deep shadows and striking highlights for a truly three-dimensional effect.
Step-by-Step Guide
Materials
- Toned drawing paper (tan or light grey)
- Charcoal pencils (HB, 2B, 4B)
- White charcoal pencil or white pastel pencil
- Kneaded eraser
- Blending stump or tortillon
- Drafting tape
- Graphite pencil (HB) for initial sketch
Step 1: Laying the Foundations
-
Light Outline:
Begin with a very faint outline using your HB graphite pencil. Focus on simple geometric shapes first—a circle for the head and triangles for the ears—before refining the contours of the cat’s face and mane. -
Checking Proportions:
Double-check the placement of the eyes, nose, and mouth. The eyes should be spaced about one eye-width apart. Lightly mark the direction of the fur growth with faint arrows or lines, especially around the cheeks and chest. -
First Layer of Shadow:
Switch to a harder charcoal pencil (HB). Very lightly shade the darkest areas: the pupils, the inside of the ears, and the nostrils. Use gentle, circular motions to avoid scratching the paper.
Keep it Sharp
Charcoal dulls quickly. Sand your pencil tip frequently on a sanding block or scrap paper to maintain the needle-point necessary for fine detailed hairs.
Step 2: Developing the Features
-
The Eyes:
Deepen the pupils with a 2B charcoal pencil. Important: Leave a tiny spot of bare paper (or erase later) for the catchlight in each eye. This brings the cat to life immediately. -
Iris Detail:
Shade the iris lightly, darkening the top edge where the eyelid casts a shadow. Use a blending stump to smooth the charcoal, creating a glassy look. -
Nose and Mouth:
Define the nose shape, shading darker at the bottom and lighter on the bridge. Add the separation line of the mouth and the small dots where the whiskers will eventually emerge.
Tinting
For a mixed-media twist, lightly glaze the iris of the eyes with a colored pastel pencil (like amber or green) to make the gaze even more piercing.
Step 3: Creating Texture with Fur
-
Mapping Direction:
Observe where the fur changes direction, particularly on the forehead and cheeks. Using the HB charcoal, start making short, quick strokes that follow these growth patterns. -
Layering Mid-Tones:
Switch to a 2B pencil to add density. Concentrate on the areas under the chin and the side of the face. Do not draw every single hair; instead, draw clumps of fur by shading the spaces *between* the lighter tufts. -
Blending for Softness:
Take your blending stump and gently smudge the charcoal strokes in the direction of the fur growth. This creates a soft undercoat layer, essential for a fluffy appearance. -
Re-defining Darks:
Now that you have a soft base, come back with a sharp 4B pencil. Add crisp, dark lines over the blended areas to suggest individual hairs sitting on top of the undercoat. Focus this contrast near the eyes and ears. -
The Mane:
The chest fur is longer and wispier. Use long, sweeping strokes with the side of your pencil lead to create broader locks of hair, letting them fade out into the paper at the bottom.
Step 4: Highlights and Final Details
-
Adding Highlights:
Using the white charcoal pencil, add strokes in the lightest areas: the bridge of the nose, the white of the muzzle, above the eyes, and selected tufts in the chest mane. -
Refining the Eyes:
Brighten the catchlights in the eyes with the white pencil. If the white isn’t popping enough, touch it gently with the kneaded eraser first to remove grey residue before reapplying. -
The Whiskers:
Whiskers require confidence. Ensure your white pencil is extremely sharp. With a quick, fluid wrist motion, flick the long whiskers out from the muzzle. Do the same for the eyebrow whiskers. -
Ear Furnishings:
Add the long, unruly hairs inside the ears using a mix of your darkest charcoal and brightest white strokes to create depth and overlap. -
Final Cleanup:
Use your kneaded eraser to pick up any stray smudges on the background paper, keeping the negative space clean so the portrait stands out.
Step back and admire the soulful expression you have captured in your feline portrait
Flower in Soft, Smoky Petals
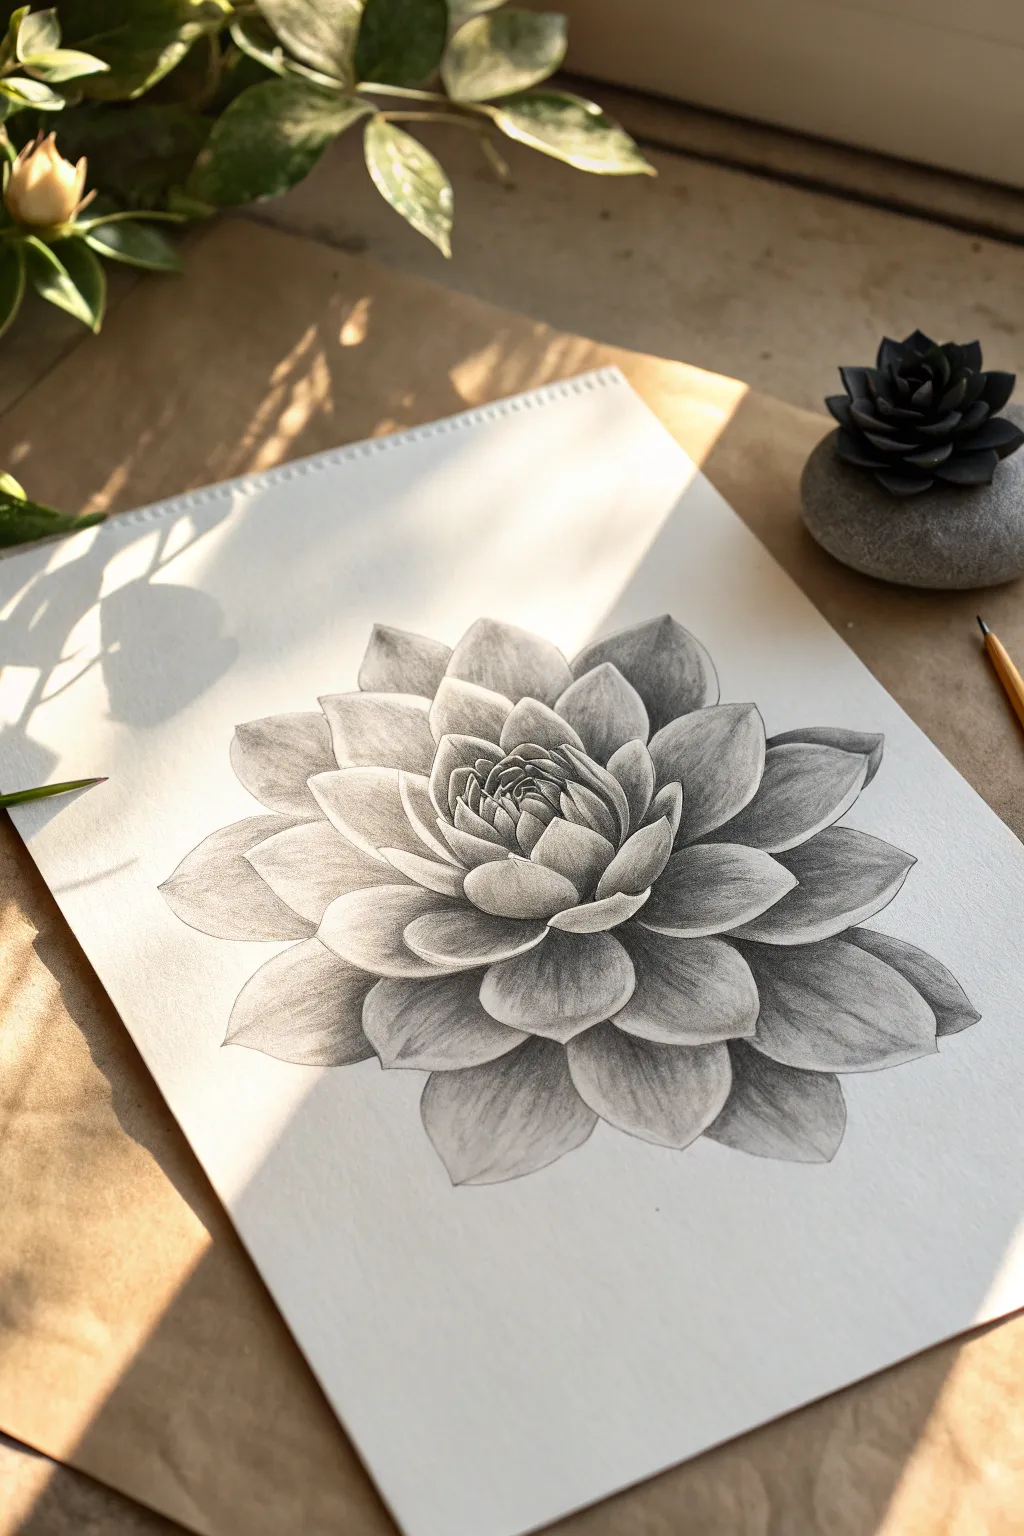
Capture the delicate unfolding layers of this rosette-style flower using the rich tonal range of charcoal. This study emphasizes light and shadow play, creating a realistic, sculptural feel with soft, smoky gradients on textured paper.
How-To Guide
Materials
- Heavyweight drawing paper or mixed media paper
- Willow charcoal sticks
- Charcoal pencils (soft, medium, hard)
- Kneaded eraser
- Paper blending stump (tortillon)
- Soft brush (for sweeping away dust)
- Workable fixative spray
Step 1: Laying the Foundation
-
Establish the Center:
Begin by lightly sketching a small, rough circle in the center of your page using a hard charcoal pencil. This will serve as the anchor point for the tightly packed inner petals. -
Map the Petal Geometry:
Draw faint guidelines extending outward from the center like spokes on a wheel. Use these guides to place the larger, outer petals in a spiral or alternating pattern, ensuring the flower looks balanced and symmetrical. -
Outline the Shapes:
Refine the petal shapes, moving from the tiny, curled center petals to the expansive outer ones. Keep your lines incredibly light; charcoal can be unforgiving if pressed too hard this early. -
Define the Light Source:
Decide where your light is coming from—in this reference, it’s hitting from the top left. Mark tiny ‘x’s or faint circles on the tips of the petals that will remain the brightest white.
Step 2: Building Depth and Tone
-
Apply Initial Shadows:
Take a willow charcoal stick and gently lay down broad areas of mid-tone grey on the shadowed sides of the larger petals. Avoid the highlighted tips completely. -
Deepen the Crevices:
Switch to a soft charcoal pencil to darken the deepest recesses where the petals overlap. The center of the flower needs the most contrast, so don’t be afraid to go quite dark in the tiny gaps between the inner petals. -
Blend for Smoothness:
Use a paper blending stump to smudge the charcoal from the dark crevices outward toward the petal tips. I find this creates that signature ‘smoky’ look where the shadow seamlessly fades into the white of the paper. -
Establish the Core Shadows:
Identify the ‘core shadow’ on each petal—the darkest band just before the reflected light on the edge. Strengthen these areas with your medium charcoal pencil to give the petals a curved, 3D volume. -
Soften the Edges:
If any outlines look too harsh or like a cartoon outline, gently run your blending stump over them. The goal is for the flower to be defined by the contrast of light and shadow, not by lines.
Keep it Clean
Place a spare sheet of paper under your drawing hand to prevent smudging your work or transferring oils from your skin to the paper.
Step 3: Refining Details and Contrast
-
Work the Center Detail:
Sharpen a hard charcoal pencil to a fine point. Carefully draw the precise edges of the central rosette, ensuring the separation between the tight inner leaves is crisp and distinct. -
Lift Out Highlights:
Shape your kneaded eraser into a wedge or point. Press and lift (don’t rub) the charcoal off the tips and upper edges of the petals to reclaim the bright white highlights. -
Add Texture to Petals:
Lightly drag a medium charcoal pencil across the mid-tones of the petals to suggest faint striations or veins. Blend these very softly so they look like part of the petal structure rather than surface scratches. -
Enhance the Outer Leaves:
The outermost petals should be slightly softer and less detailed than the center to create a depth-of-field effect. Use willow charcoal here and blend aggressively for a hazy finish. -
Final Contrast Check:
Step back and squint at your drawing. Identify any areas that need deeper blacks to make the white highlights pop, and re-apply soft charcoal pencil only in the darkest nooks. -
Clean Up:
Use a clean eraser to remove any accidental smudges on the background paper, leaving a pristine white space around your flower.
Tinted Paper
Try this drawing on grey or tan toned paper. You can then use a white charcoal pencil for the highlights to make drawings pop.
Finish by lightly spraying the drawing with fixative to preserve your delicate shading
Subtractive Drawing From a Midtone
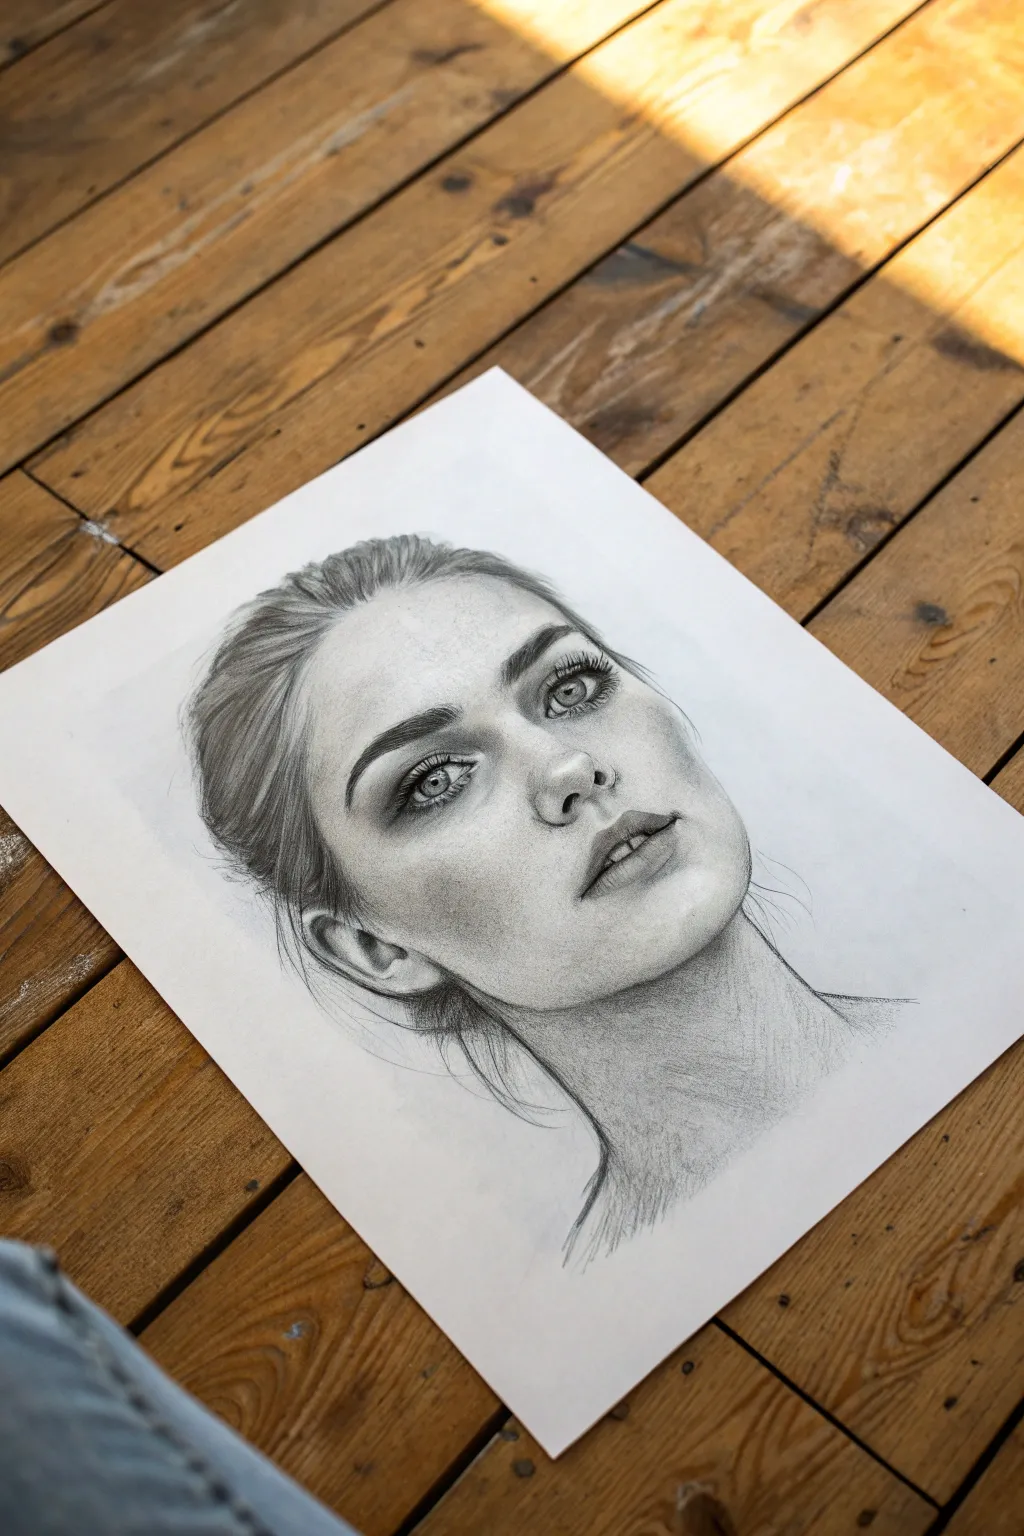
This project explores the subtractive drawing method to create a striking, realistic female portrait full of depth and emotion. By starting with a graphite powder or charcoal base, you will lift out highlights to reveal the form before defining the darkest details.
Detailed Instructions
Materials
- Smooth bristol board or heavy drawing paper (A3 or 11×14 inches)
- Graphite powder or soft vine charcoal
- Soft makeup brush or chamois cloth
- Kneaded eraser
- Tombow Mono Zero eraser (for fine details)
- Graphite pencils (HB, 2B, 4B, 6B)
- Charcoal pencil (black)
- Blending stumps (tortillons)
- Tissue or paper towel
Step 1: Creating the Base & Mapping
-
Lay the midtone:
Begin by applying a soft, even wash of graphite powder or vine charcoal dust across the entire area where the face will be. Use a large makeup brush or chamois to buff it into the paper, creating a smooth, light grey midtone skin base. -
Sketch the outline:
Lightly sketch the basic proportions of the face using an HB pencil. Focus on placing the eyes, nose, and lips correctly, but keep your lines incredibly faint so they don’t show through later shading. -
Initial reductive lighting:
Take your kneaded eraser and shape it into a rounded point. Gently dab or wipe away the graphite from the highest points of the face: the bridge of the nose, the forehead, the chin, and the cheekbones. This immediately establishes the 3D form.
Step 2: Developing Facial Features
-
Define the eyes:
With a sharp 2B pencil, draw the iris and pupil. Remember to leave the small white reflection spots completely clean—or use your precision eraser to bright them back out. Darken the upper lash line significantly. -
Shape the nose:
Avoid drawing hard outlines for the nose. Instead, build the shadows around the nostrils and under the tip using a 2B pencil and a blending stump, letting the initial midtone serve as the skin of the nose. -
Sculpt the lips:
Use a 4B pencil to darken the line where the lips meet, slightly parting them as shown in the reference. Shade the upper lip darker than the lower lip, leaving a highlight on the center of the bottom lip to simulate moisture. -
Deepen the shadows:
Switch to a 4B or 6B pencil to deepen the shadows in the eye sockets, under the nose, and beneath the jawline. Gently blend these outwards using a soft tissue to ensure smooth transitions. -
Refine eye details:
Draw the eyelashes now using quick, curved flicks with a sharp charcoal pencil or 6B graphite. Ensure the lashes vary in direction and sometimes clump together for realism. -
Add the eyebrows:
Using short, hair-like strokes, build up the eyebrows. Start with a harder pencil (HB) for the base hairs and layer darker strokes (4B) on top to create density and texture.
Muddy Shadows?
If shadows look shiny or muddy, you’ve pressed too hard with graphite. Lift excess with a kneaded eraser and re-layer slowly, or switch to matte charcoal for deeper blacks.
Step 3: Hair and Final Textures
-
Block in hair masses:
For the hair, identify the major dark shapes first. Use broad strokes with a 6B pencil or charcoal stick to lay down the underlying dark values of the hair swept back from the face. -
Create hair strands:
Use the edge of your eraser to lift out sweeping highlights in the hair, following the curve of the skull. Then, go back in with a sharp pencil to draw individual dark strands over these highlighted areas. -
Blend the skin:
I like to take a clean blending stump now to smooth out any patchy areas on the skin, paying close attention to the transition between the jawline and the neck. -
Refine the neck:
Add shading to the neck, keeping it slightly rougher or less focused than the face to push it visually backward. Cross-hatching can work well here to suggest shadow without overwhelming detail. -
Add skin texture:
Tap your kneaded eraser lightly over the cheeks and nose to lift tiny specks of graphite, creating the illusion of skin pores and natural imperfections. -
Final contrast check:
Step back and assess the darkest darks. Use your black charcoal pencil to re-emphasize the pupils and the deepest corners of the mouth for maximum impact.
Level Up: Freckles
For realistic freckles, don’t draw dots. Instead, use a dirty tortillon (blending stump) to stamp random, faint spots across the nose and cheeks for natural variegation.
Now stepping back, you should see a portrait that feels alive with dimension and soft, realistic lighting
Powdery Fog or Mist Scene
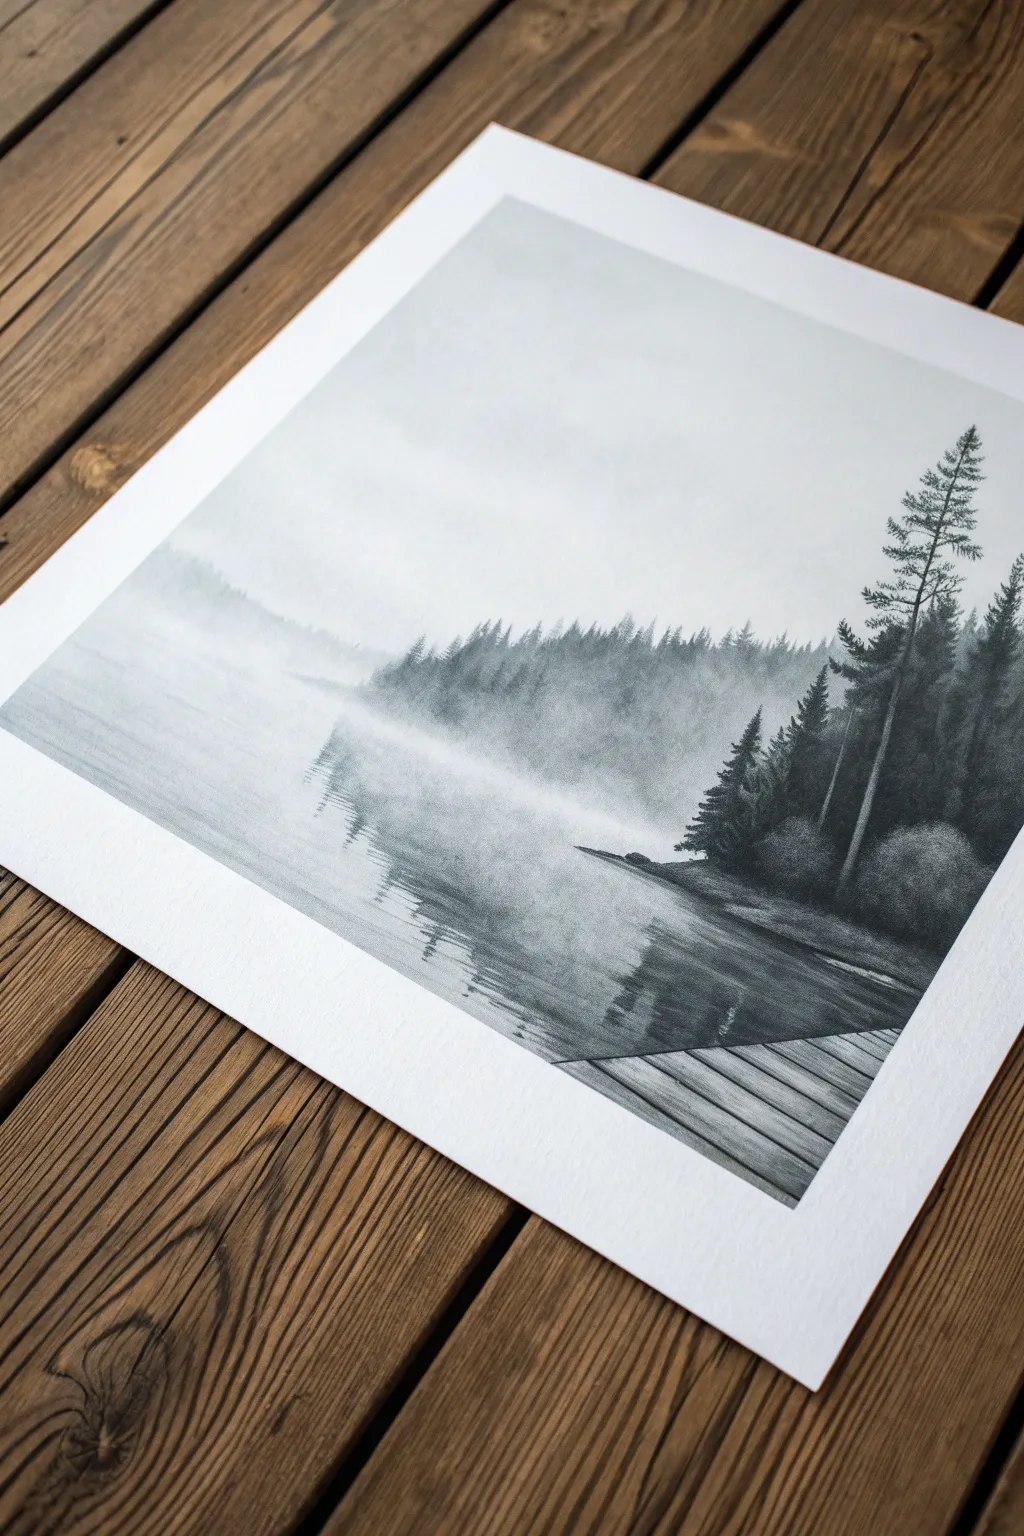
Capture the serene stillness of a foggy morning by the water with this atmospheric charcoal drawing. Using soft blending techniques, you will create depths of mist that drift through pine trees, contrasted against the crisp details of a wooden dock.
Step-by-Step Guide
Materials
- Smooth bristol board or fine-grain drawing paper
- Vine charcoal (soft and medium)
- Compressed charcoal sticks or charcoal pencils (2B, 4B, 6B)
- White pastel pencil or charcoal white
- Blending stumps (tortillons) in various sizes
- Soft makeup brush or mop brush for blending
- Kneaded eraser
- Precision eraser (block or stick style)
- Workable fixative
Step 1: Setting the Atmosphere
-
Establish the horizon:
Lightly sketch a straight horizontal line across the lower third of your paper to separate the water from the distant treeline. Keep this line faint as it will eventually disappear into the mist. -
Lay down the base tone:
Take a piece of soft vine charcoal and lightly shade the entire upper two-thirds of the paper. Use the side of the stick rather than the tip to avoid harsh lines. -
Create the heavy fog:
Using a soft makeup brush or a cloth, gently buff the vine charcoal into the paper. The goal is a seamless, light grey wash that represents the overcast sky and the thickest part of the fog.
Step 2: Building the Distant Forest
-
Sketch the distant treeline:
With medium vine charcoal, roughly block in the shapes of the distant pine trees along the horizon. Focus on silhouettes rather than individual branches; they should vanish into the fog on the left side. -
Diffuse the trees:
Use a large blending stump to smudge the bottom of the treeline downward into the water area, creating the initial reflection. Blur the tops of the trees slightly to make them look further away. -
Add separation:
Use your kneaded eraser to lift out faint vertical streaks between the distant tree groups. This adds the illusion of mist gathering between the layers of the forest.
Powder Power
Make your own powdered charcoal by sanding a stick over a small jar. Dip your brush into this powder to apply ultra-smooth, cloud-like fog layers without leaving any stroke marks.
Step 3: The Water and Reflections
-
Extend the reflections:
Using compressed charcoal for a darker tone, darken the water directly beneath the treeline. Pull vertical strokes downward with a stump to mirror the trees above. -
Create water ripples:
With a fine blending stump or a charcoal pencil, cut horizontal lines across the reflections. These breaks interrupt the vertical flow and simulate the calm movement of water. -
Soften the transition:
Gently glaze over the water surface with your large blending brush to unify the reflections and ripples, ensuring nothing looks too sharp or jagged.
Level Up: Morning Light
Use a white charcoal pencil or white pastel to draw faint, diagonal ‘god rays’ breaking through the upper left mist, hitting the water surface for a dramatic morning effect.
Step 4: Foreground Elements
-
Draw the main pine tree:
On the right side, use a 4B or 6B charcoal pencil to draw the large pine tree. Press firmly to get deep blacks. Detail the jagged branches and needle clusters, making them distinct against the pale background. -
Anchor the shoreline:
Darken the small patch of land closer to the viewer on the right side. Use the side of a charcoal stick to create the texture of rocks and low bushes. -
Construct the dock:
In the bottom right corner, draft the perspective lines of the wooden dock floorboards. Ensure the lines converge slightly as they move away from you to create depth. -
Texture the wood:
Shade the planks using a mid-tone charcoal. Add wood grain details with a sharp pencil, including cracks and knots. -
Add definition to the planks:
Darken the gaps between the floorboards with a 6B pencil. This high contrast separates the planks and solidifies the structure.
Step 5: Final Balancing
-
Enhance the mist:
Take a clean kneaded eraser and gently tap across the lower treeline where it meets the water. This lifts pigment to create the ‘rolling fog’ effect. -
Refine the background:
I like to go back in with a white pastel pencil to add just a few subtle highlights on the water surface and the tips of the distant trees for extra dimension. -
Final check:
Review your values. Ensure the foreground tree and dock are the darkest elements (closest to black) and the distant left side fades almost entirely to white. -
Preserve the work:
Spray the drawing with workable fixative in a well-ventilated area to prevent the charcoal from smudging.
Step back and breathe in the calm atmosphere of your finished misty landscape.
Circular Vignette Mini Composition
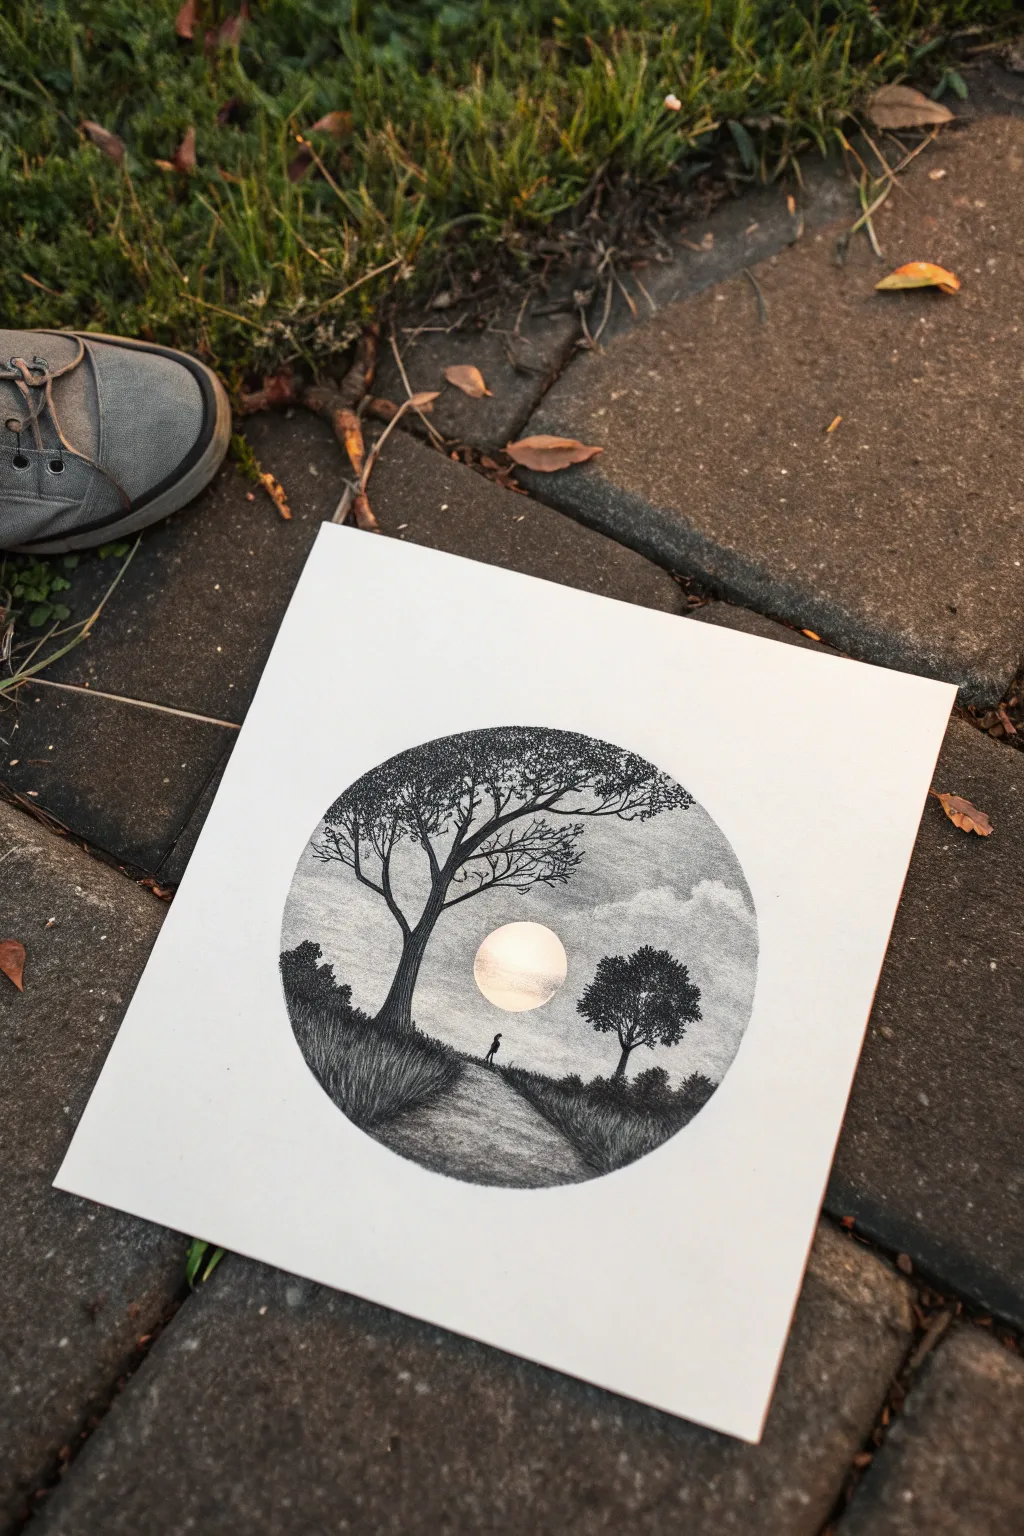
Capture the serene mood of a nighttime walk with this circular landscape drawing. Using a combination of charcoal shading and precise stippling, you will create a dramatic silhouette scene centered around a glowing moon.
Step-by-Step
Materials
- Heavyweight drawing paper or Bristol board (smooth surface recommended)
- Compass or circular object (approx. 4-5 inches diameter)
- Graphite pencils (HB for sketching)
- Fine liner pens (0.05mm, 0.1mm, 0.3mm) or very sharp charcoal pencils
- Soft charcoal stick or compressed charcoal
- Blending stump (tortillon)
- Kneaded eraser
- Ruler
Step 1: Setting the Scene
-
Outline the circle:
Begin by lightly tracing a perfect circle in the center of your paper using a compass or by tracing around a bowl. Keep this line faint, as it serves only as a boundary for your composition. -
Place the moon:
Inside the main circle, slightly below the center line, trace a smaller circle (about the size of a coin) to represent the moon. This area must remain pristine white paper to achieve the glowing effect. -
Sketch the horizon:
Lightly sketch a sloping horizon line that dips down from the left and rises slightly to the right. Add faint guidelines for the path winding from the bottom center toward the moon. -
Map the trees:
Draft the skeleton of the large tree on the left, curving its trunk inward over the path. Sketch a smaller, bushier tree on the right side to balance the composition.
Moon Protection
Accidentally smudged the moon? Cut a small circle of sticky note or masking tape to cover the moon area before you start shading. Remove it only at the very end.
Step 2: Creating Atmosphere
-
Shade the sky:
Using a soft graphite pencil or light charcoal dust, gently shade the upper portion of the large circle. Keep the shading darkest near the top edge and fade it out completely as you approach the horizon and the moon. -
Blend the sky:
Take a blending stump and smooth out the sky shading. I find circular motions work best here to eliminate distinct pencil strokes. Be extremely careful not to smudge darker graphite into the white moon circle. -
Add cloud texture:
Use a kneaded eraser to lift out soft, horizontal shapes in the sky shading. This creates the illusion of wispy clouds drifting across the moonlight.
Step 3: Detailed Ink & Stippling
-
Outline major forms:
Switch to your fine liner pens or a sharpened charcoal pencil. Carefully ink the silhouette of the large tree trunk and branches on the left, ensuring the branches taper off naturally. -
Start the foliage stippling:
Begin adding leaves to the large tree using a stippling technique (tiny dots). Concentrate the dots heavily on the undersides of leaf clusters to suggest shadow, and space them out near the top of clusters where moonlight hits. -
Build canopy density:
Continue dotting to create a dense canopy. The tree should look like a silhouette against the lighter sky, so don’t be afraid to make the core of the foliage clusters solid black. -
Draw the second tree:
Repeat the stippling process for the smaller tree on the right. Give it a rounder, fuller shape compared to the sprawling branches of the left tree. -
Fill the horizon shrubs:
Use short, vertical strokes and stippling to create a line of distant bushes and tall grass along the horizon line, connecting the two trees visually.
Stippling Patience
If your hand gets tired while stippling the leaves, take a break. Rushing leads to ‘tails’ on your dots, looking like dashes. Keep the pen vertical for perfect circles.
Step 4: Foreground and Finishing
-
Render the grass:
On the left foreground slope, use long, sweeping upward strokes to mimic tall grass bending slightly. Make the base of the grass clumps dense and dark, fading slightly at the tips. -
Define the path:
Add texture to the path using horizontal hatching and stippling. Keep the path lighter than the surrounding grass but darker than the moon to maintain depth. -
Insert the figure:
Draw the tiny silhouette of a person standing on the path. Keep the figure simple—just a suggest of a head, torso, and legs—positioned so they are looking toward the moon. -
Refine the edges:
Go around the main outer circle boundary one last time. Ensure the drawing stops cleanly at this edge to maintain the crisp, ‘porthole’ vignette look. -
Final contrast check:
Step back and look at your tonal values. Darken the tree trunks and nearest grass clumps to deep black to maximize the contrast against the bright white moon.
Remove any stray eraser crumbs and admire your tranquil moonlit landscape

Have a question or want to share your own experience? I'd love to hear from you in the comments below!