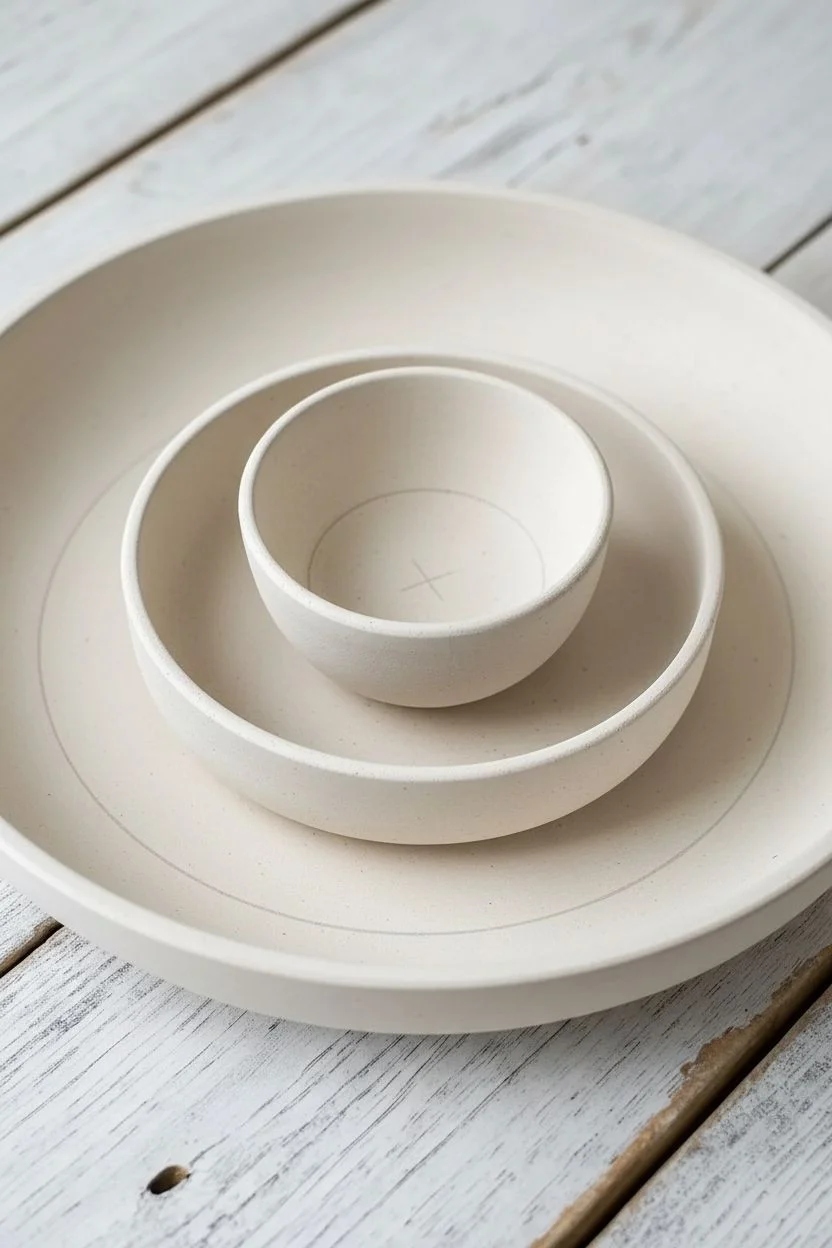
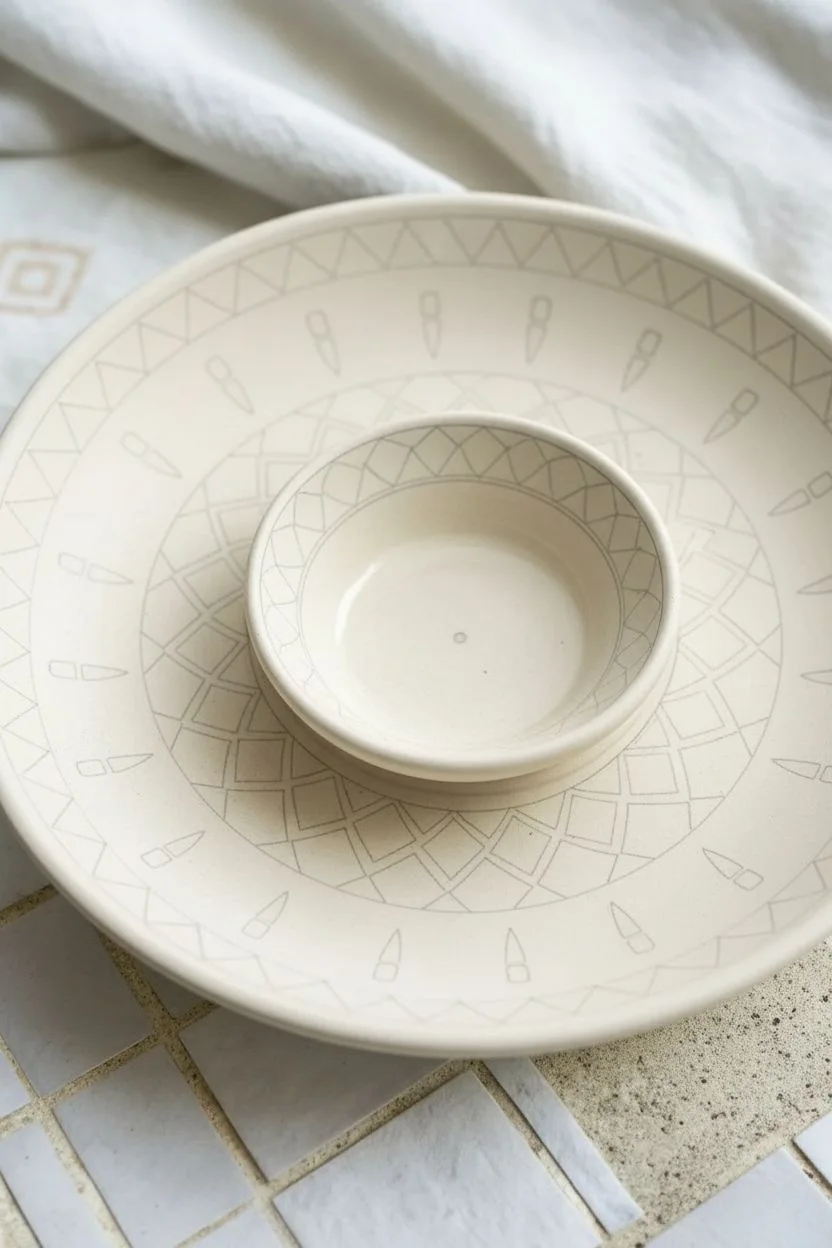
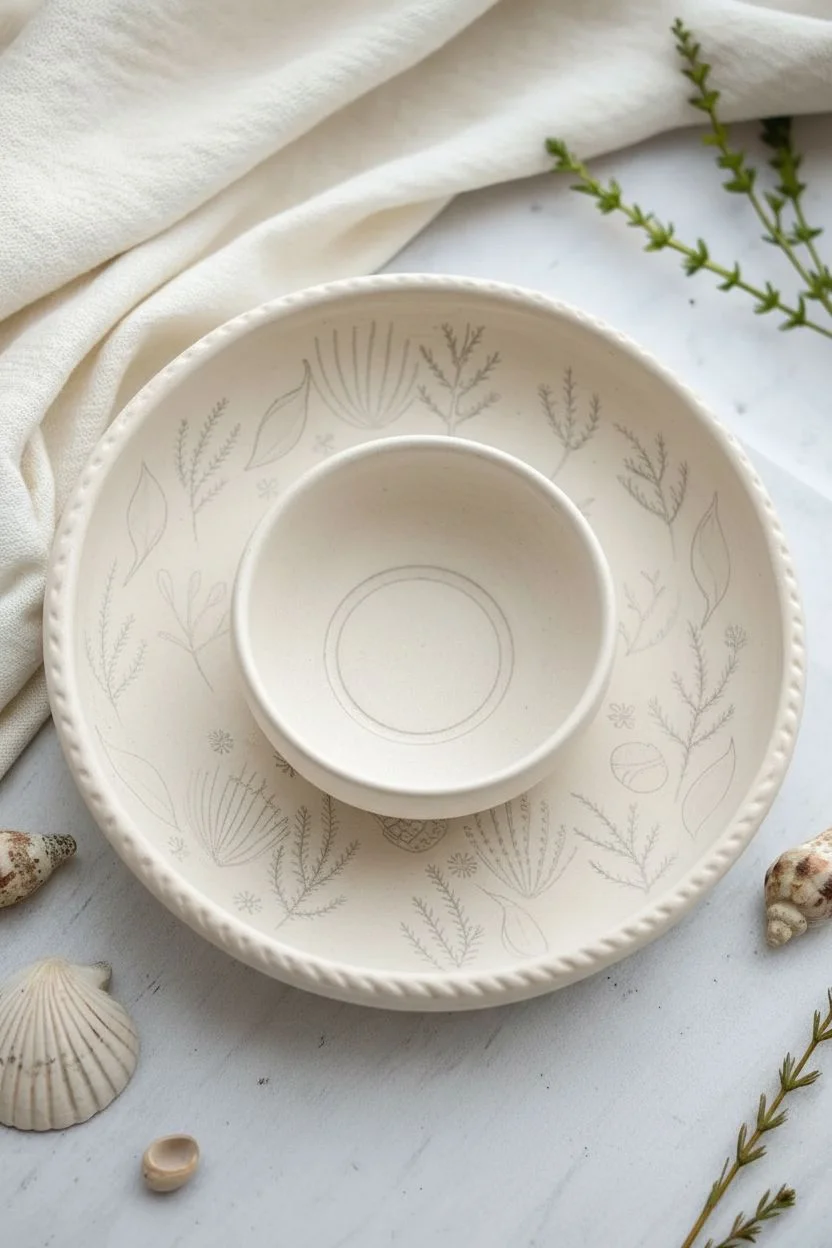
A chip and dip bowl is basically the most fun ceramic canvas because it already has built-in “main character” energy with that center well. Here are my favorite chip and dip bowl painting ideas that play up the two-part shape so the chips and dip feel like one cohesive little artwork.
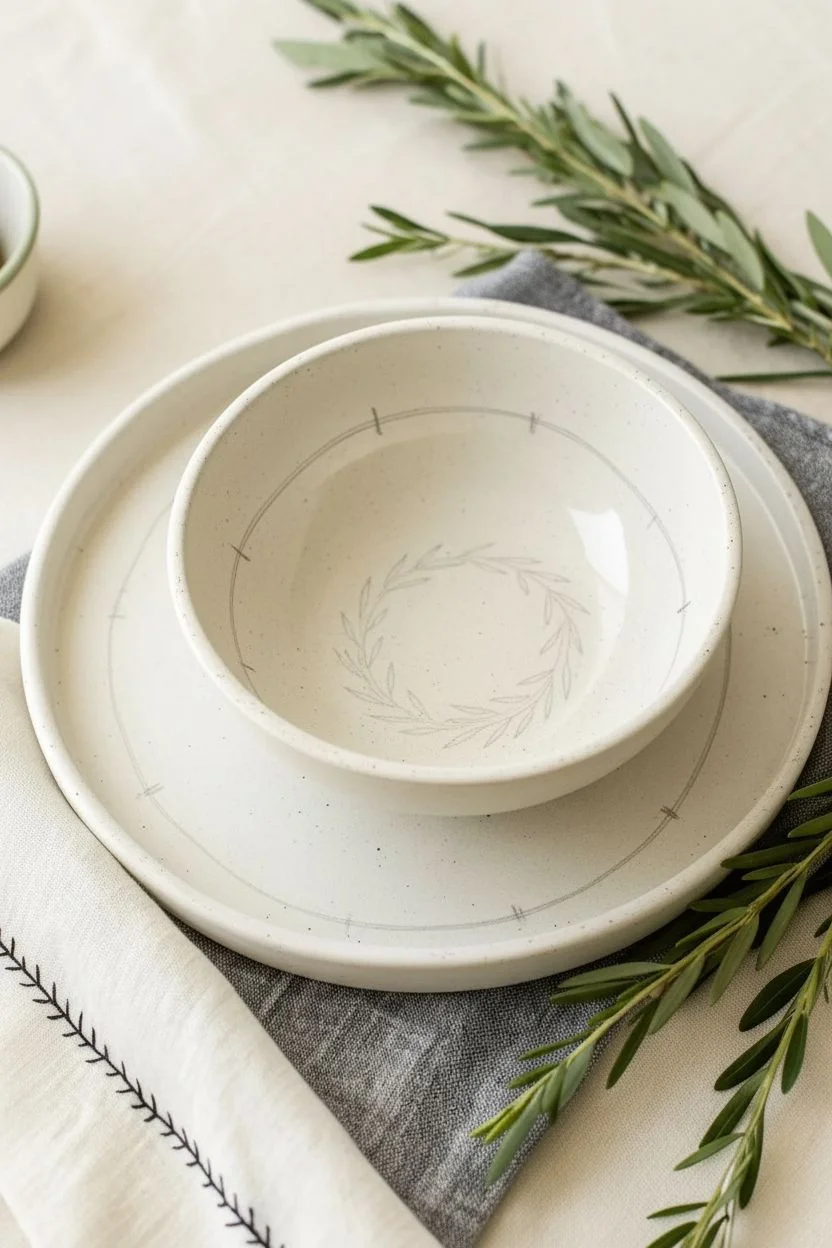
Classic Blue-and-White Floral Rim
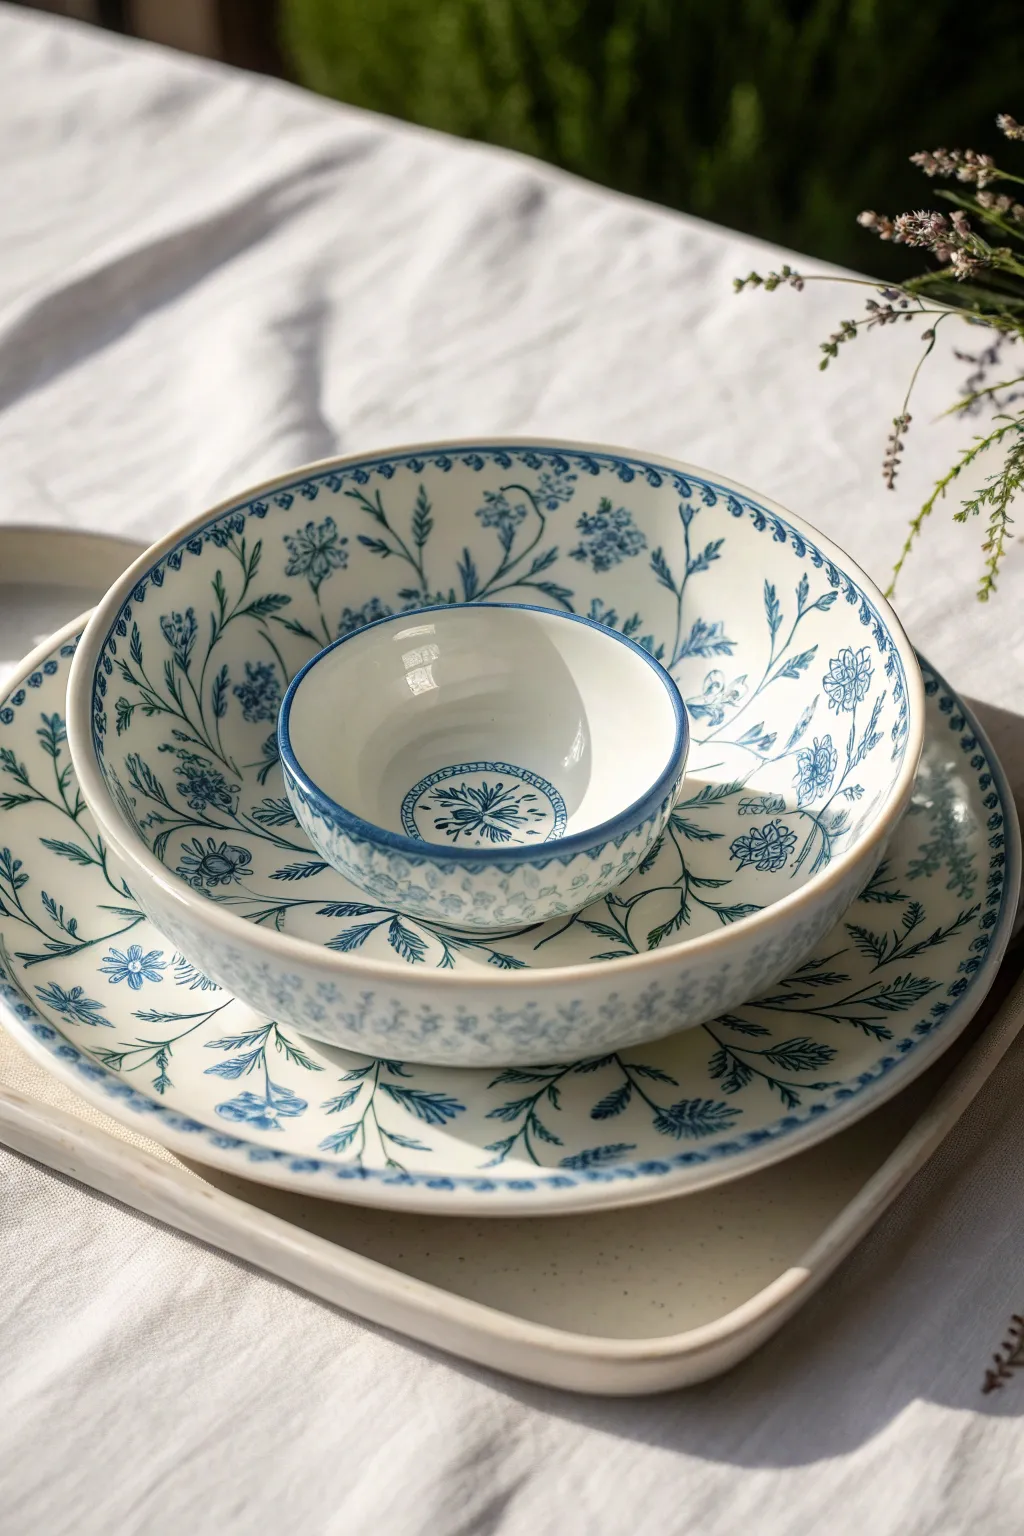
Achieve the timeless elegance of classic porcelain with this hand-painted ceramic project. Featuring intricate blue wildflowers and vines on a creamy white base, this nested set is perfect for serving chips and dip with a sophisticated touch.
How-To Guide
Materials
- White ceramic plate, medium bowl, and small dip bowl (bisque or glazed)
- Porcelain paint or ceramic overglaze (glossy cobalt blue)
- Fine liner brush (size 0 or 00)
- Small round brush (size 1)
- Alcohol wipes or soapy water for cleaning
- Pencil for sketching (optional)
- Paper towels
- Oven (if using heat-set paints)
Step 1: Preparation & Planning
-
Clean the surfaces:
Before you begin, wipe down all your ceramic pieces thoroughly with alcohol wipes or wash them with soapy water to remove any oils or dust. Let them dry completely. -
Establish a flow:
Study the floral pattern. Notice how the stems curve gently and don’t just go straight up. Mentally map out where your main vines will flow on the plate rim and the interior of the bowls. -
Optional sketching:
If you’re nervous about freehanding, use a pencil to very lightly sketch the main curved stems. Don’t press hard, or you might scratch the surface; the pencil lines will burn off or wash away later.
Brush Control Secret
Load your liner brush with ink-like consistency paint. Roll it on your palette to form a sharp point before touching the ceramic for crisp, thin lines.
Step 2: Painting the Large Plate
-
Start the rim vines:
Using your fine liner brush and the cobalt blue paint, draw long, sweeping curves around the rim of the large plate. These are the backbones of your floral design. -
Add leaves:
Along these stems, paint small, elongated leaves using a simple press-and-lift motion with the brush. Vary the angle slightly so they look natural and organic. -
Create main blooms:
Switch to the size 1 round brush to dab in the larger flower heads. Think of simple shapes: clusters of dots for berries or small fan shapes for open petals. -
Detailing the flowers:
Once the flower shapes are laid down, go back in with your liner brush to add tiny details like stamens or petal outlines to give them definition.
Step 3: Painting the Main Bowl
-
Interior pattern:
For the medium bowl, the pattern is on the inside. Start your stems from the bottom center and curve them upwards toward the rim, creating a radial effect. -
Rim border:
Paint a delicate border right along the top edge of the bowl. Tiny dots or a simple dash pattern works beautifully to frame the inner artwork. -
Fill the empty space:
Add smaller sprigs of greenery and tiny floating petals between the main stems to ensure the bowl looks lush and full, but leave plenty of white space for balance.
Antique Effect
Mix a tiny drop of water into your blue paint for wash-like petals. This creates varied opacity, making the piece look like vintage watercolor pottery.
Step 4: The Small Dip Bowl
-
Center motif:
On the very bottom inside of the small bowl, paint a circular medallion. Start with a crossed flower shape in the middle and encircle it with a ring of tiny geometric patterns or dots. -
Solid rim:
Paint the very top rim of this small bowl with a solid but thin line of blue. This grounds the piece and differentiates it from the other two. -
Exterior texture:
For the outside of the small bowl, create a subtle pattern by painting very faint, small crosses or dots that mimic the texture of fabric or lace.
Step 5: Finishing Touches
-
Check consistency:
Look at all three pieces together. If one area looks too sparse, add a few drifting petals or a tiny leaf to balance the visual weight across the set. -
Clean up errors:
If you made a smudge, use a damp cotton swab or a toothpick to carefully scrape or wipe away the paint before it sets. -
Curing:
Follow the instructions on your specific paint bottle. Most porcelain paints require air drying for 24 hours followed by baking in a home oven to make the design food-safe and dishwasher resistant.
Now you have a stunning, cohesive serving set that looks like a family heirloom ready for your next gathering


Fiesta Peppers With a Bold Dip Center
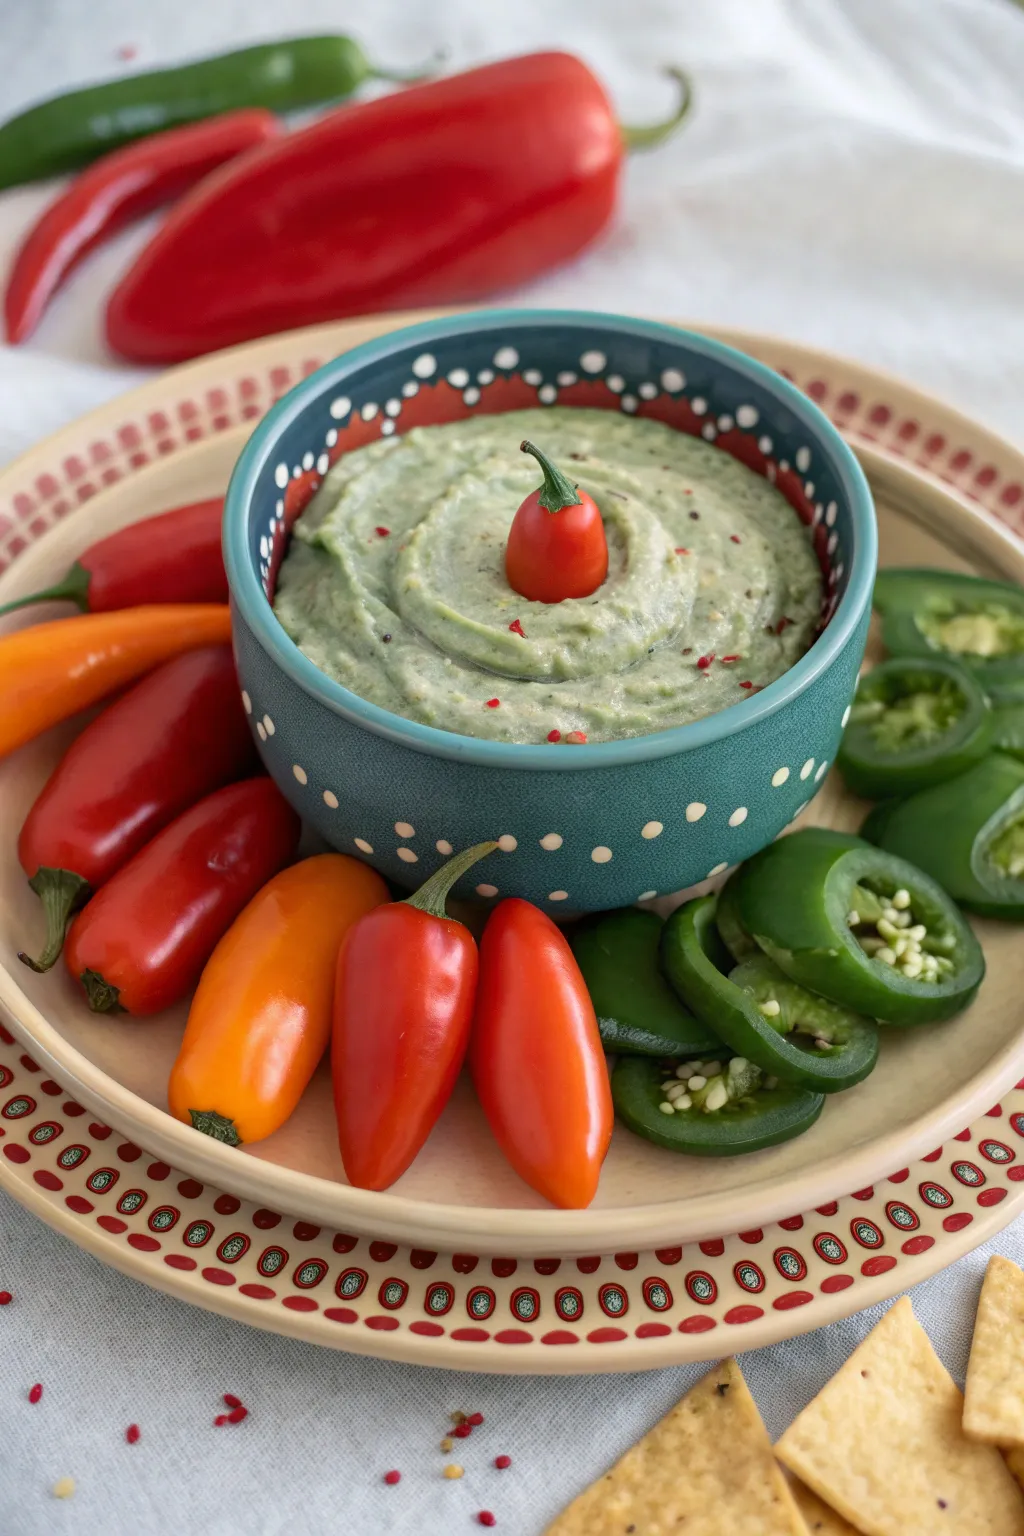
Bring the heat to your table setting with this vibrant, custom-painted chip-and-dip set featuring a festive pepper theme. The centerpiece is a stunning teal bowl adorned with delicate white dots and a painted rim, perfectly complemented by a plate rimmed with a matching pepper-seed pattern.
Detailed Instructions
Materials
- Bisque ceramic chip-and-dip set (one bowl, one large platter)
- Non-toxic ceramic glazed (teal, burnt orange, deep red, cream/off-white)
- Small round sponge dobbers (various sizes)
- Fine liner brush (size 0 or 00)
- Medium flat brush (size 6)
- Pencil for sketching
- Clear dipping glaze (food safe)
- Kiln for firing (or access to a pottery studio)
Step 1: Prepping and Base Coat
-
Clean the bisque:
Before you start painting, wipe down your bisque pottery with a damp sponge to remove any dust or debris that might prevent the glaze from adhering properly. -
Paint the bowl exterior:
Using your medium flat brush, apply three even coats of the teal glaze to the entire outside of the bowl. Allow each coat to dry until it loses its sheen before applying the next. -
Paint the plate rim:
Paint the rim of the large platter with a soft cream or beige base color if your bisque isn’t already the desired tone. This provides a neutral background for the pattern.
Glaze Smearing?
If your dots look runny, your sponge was too wet or overloaded. Dab it on paper first to remove excess glaze before touching the pottery.
Step 2: Painting the Bowl Details
-
Dot the bowl:
Take a small round sponge dobber or the handle end of a paintbrush, dip it into the cream glaze, and create a polka-dot pattern around the bottom half of the teal bowl. -
Add the rim design:
Along the top rim of the bowl, paint a scalloped or wavy line using the burnt orange glaze. This mimics the look of the plate’s border. -
Detail the rim dots:
Inside each scallop on the bowl’s rim, add a tiny white dot using your fine liner brush to tie the design together.
Step 3: Creating the Pepper Seed Border
-
Draft the pattern:
Lightly sketch two concentric circles around the rim of the large plate using a pencil. These lines will guide your border pattern. -
Paint the red ovals:
Using the deep red glaze and a small brush, paint a series of small ovals between your pencil lines. These represent the stylized pepper seeds or cross-sections. -
Add inner details:
Once the red ovals are dry, use your fine liner brush to paint a smaller concentric oval or ‘seed’ shape inside each red oval using a lighter orange or cream color. -
Fill the gaps:
In the spaces between the red ovals, add small dots of green or teal to reference the jalapeño theme and coordinate with the central bowl. -
Outline for crispness:
I like to outline the red ovals very faintly with a darker brown or black underglaze to make them pop against the cream background, though this step is optional.
Spicy Surprise
Paint a tiny red chili pepper at the very bottom interior of the dip bowl so it’s revealed only when the dip is finished.
Step 4: Finishing Touches
-
Clean the foot:
Use a damp sponge to wipe away any glaze that may have gotten onto the bottom ‘foot’ of the bowl and plate. This prevents the pottery from sticking to the kiln shelf. -
Clear glaze application:
Once all your painted designs are completely dry, dip the entire piece into a clear, food-safe dipping glaze. This seals the design and makes it functional for food. -
Fire the piece:
Load the ceramics into the kiln and fire according to the glaze manufacturer’s instructions (usually Cone 06 for earthenware).
Now you have a festive, custom-painted serving set ready for your next taco night or party


Coastal Crab in the Center Well
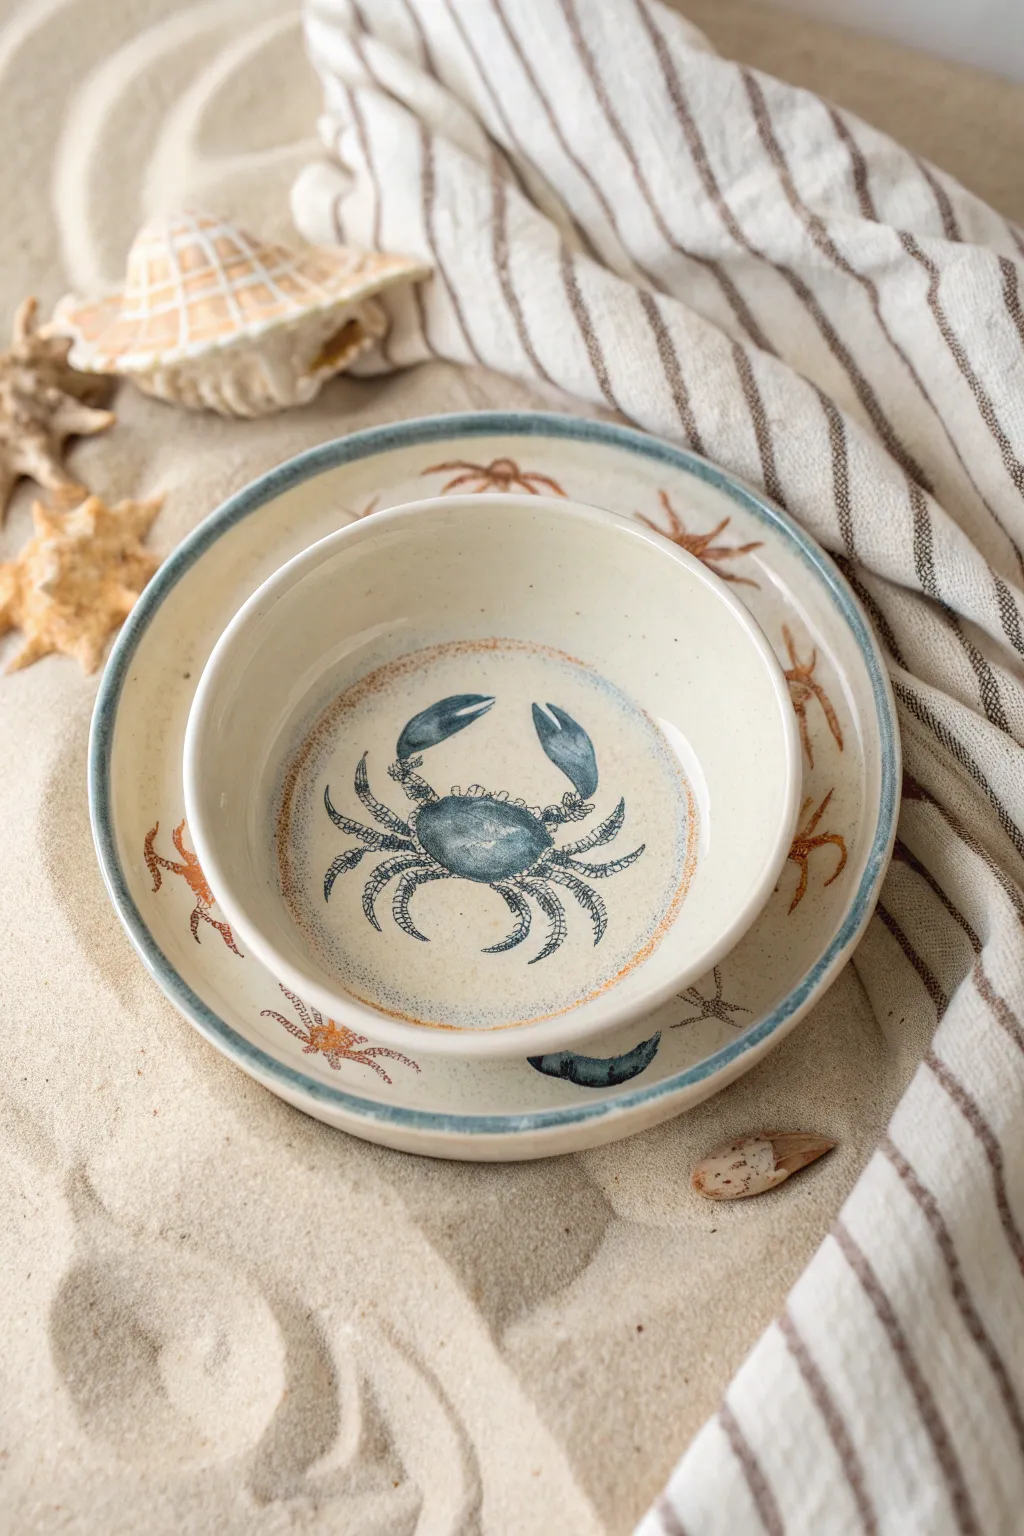
Bring the serene vibes of the shoreline to your table with this elegantly painted ceramic set. The creamy speckled glaze and delicate blue crab illustration make this pair perfect for serving seaside snacks or simply displaying as nautical decor.
How-To Guide
Materials
- Bisque ceramic bowl and plate set (or integrated chip-and-dip bowl)
- Underglaze pencil (Blue or dark grey)
- Underglaze paints (Navy Blue, Denim Blue, Rust Orange, Cream/White)
- Clear dipping glaze
- Speckled transparent glaze (optional, for that sandy texture)
- Fine detail brush (00 or 000 size)
- Medium round brush
- Sponge
- Water container
- Pencil and tracing paper
Step 1: Preparation & Base
-
Clean the bisque:
Wipe down your ceramic bowl and plate with a slightly damp sponge to remove any kiln dust or oil from your hands. This ensures the underglaze adheres perfectly. -
Apply the base color:
Using a soft fan brush or sponge, apply three even coats of a cream or sandy-white underglaze to the entire piece. Allow each coat to dry until it’s chalky and not cool to the touch before adding the next. -
Add texture (optional):
If you don’t have a speckled top glaze, you can create a faux-sand look now. Dip an old toothbrush into diluted brown underglaze and gently flick tiny specks across the surface. I prefer to keep this subtle to not overpower the design.
Pro Tip: Watercolor Effect
To get that translucent, watery look on the crab’s shell, dampen the bisque with a sponge right before applying your blue wash. This helps the color bleed softly.
Step 2: Painting the Centerpiece
-
Sketch the crab:
Lightly sketch your central crab design into the bottom of the bowl using a regular pencil. The graphite will burn off in the kiln, so don’t worry about mistakes. Focus on the oval body shape and the positioning of the two large front claws. -
Outline the legs:
Draw the four smaller walking legs on each side. Notice how they curve downward and taper to sharp points. -
Block in the blue:
Using your medium round brush and the Denim Blue underglaze, fill in the main body carapace and the larger sections of the pincers. Don’t aim for perfect opacity; a slightly watery application mimics a watercolor look. -
Add the details:
Switch to your fine liner brush and Navy Blue. Carefully outline the entire crab. Use short, hatched lines on the legs to suggest tiny hairs and texture. -
Define the shell:
Add small scalloped details along the front edge of the crab’s shell and shading where the legs join the body using the darker Navy shade. -
Create the sandy ring:
Mix a small amount of Rust Orange with plenty of water. Paint a loose, broken circle around the crab to ground it, stippling the brush to create a sandy texture.
Level Up: Hidden details
Paint a tiny hermit crab or seashell on the very bottom of the bowl on the outside. It’s a delightful surprise for guests when they lift the bowl to pass it.
Step 3: Accents & Rim
-
Paint the hidden rim icon:
On the inside rim of the plate (partially hidden by the bowl), paint a small, blue claw or shell detail to tie the two pieces together. -
Add starfish accents:
Around the rim of the bottom plate, paint simple five-point starfish using the Rust Orange underglaze. Keep them loose and organic rather than perfectly symmetrical. -
Connect the starfish:
Use a very faint wash of the Rust Orange to create thin, leg-like lines connecting or radiating from the starfish, giving the impression of movement in the water. -
Rim the edges:
Load your medium brush with a mix of Denim and Navy Blue. Hold the brush steady and spin the banding wheel (or rotate the plate manually) to paint a consistent blue rim on both the bowl and the plate. -
Distress the rim:
While the rim paint is still slightly damp, dab it gently with a dry sponge in random spots to give it a weathered, sea-worn appearance.
Step 4: Glazing & Firing
-
Dry thoroughly:
Let all your underglaze work dry completely, preferably overnight, to prevent smearing during the glazing process. -
Apply clear glaze:
If dipping, submerge the piece quickly and evenly into clear glaze. If brushing, apply two coats of clear brushing glaze, using a fan brush in a cross-hatch pattern. -
Clean the distinct foot:
Use a wet sponge to wipe away valid glaze from the bottom ‘foot’ of both the bowl and plate so they don’t stick to the kiln shelf. -
Fire the piece:
Fire the ceramics according to the manufacturer’s instructions for your specific clay and glaze, typically to Cone 06 or Cone 6.
Once fired, fill your beautiful new serving set with fresh dip and enjoy a taste of the coast at home


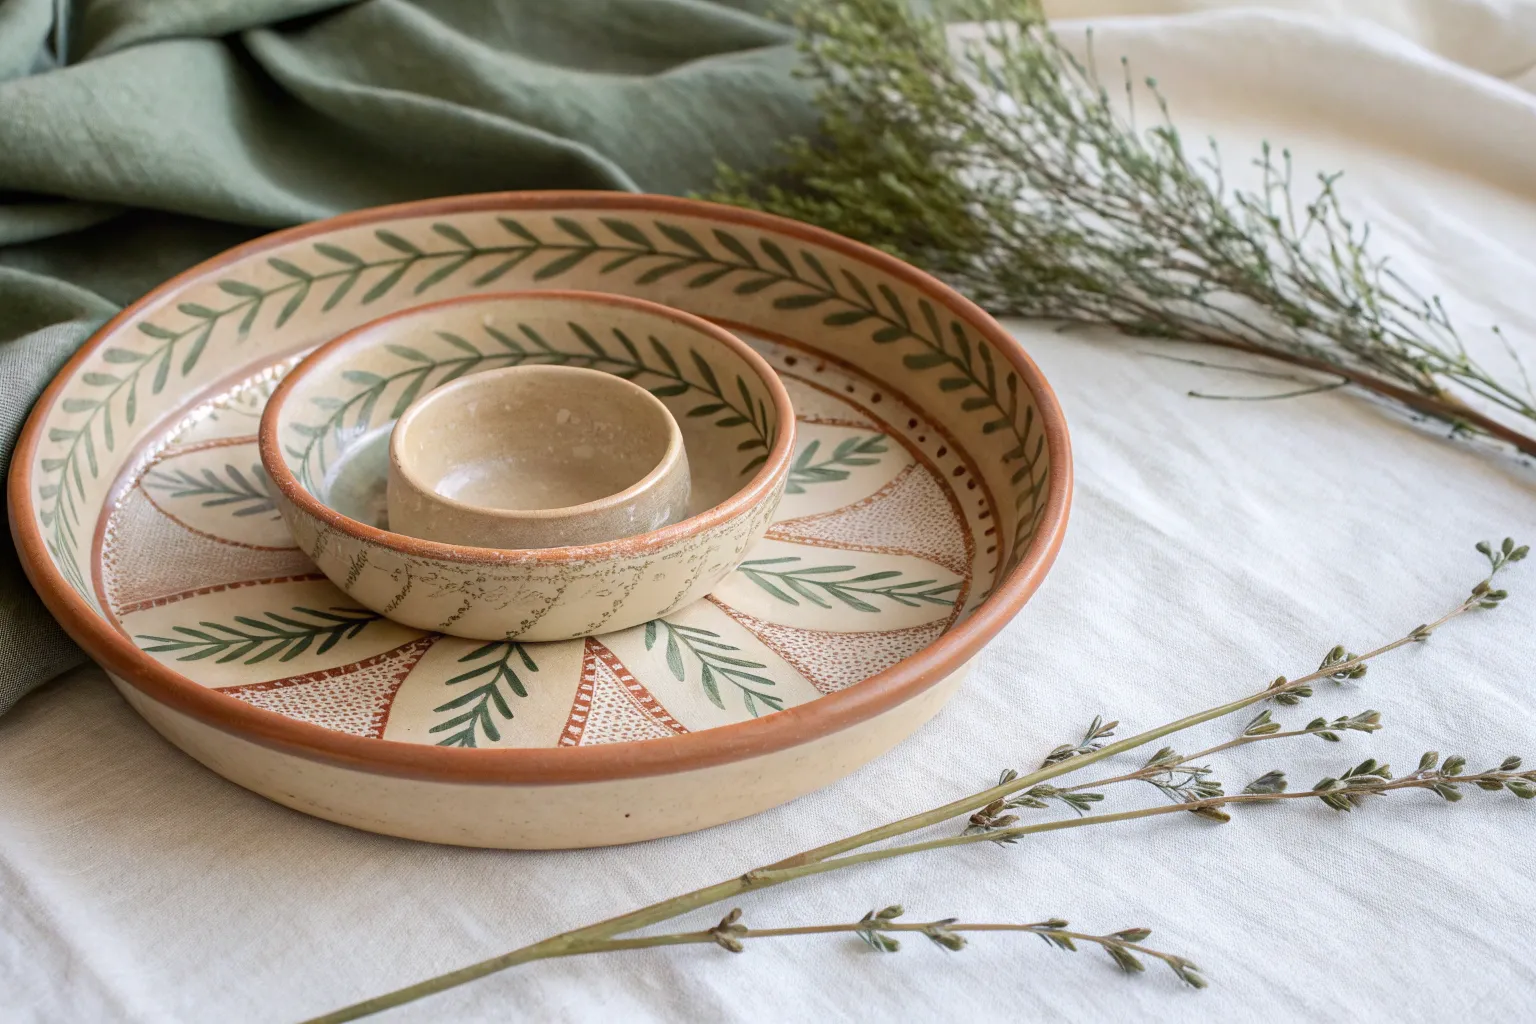
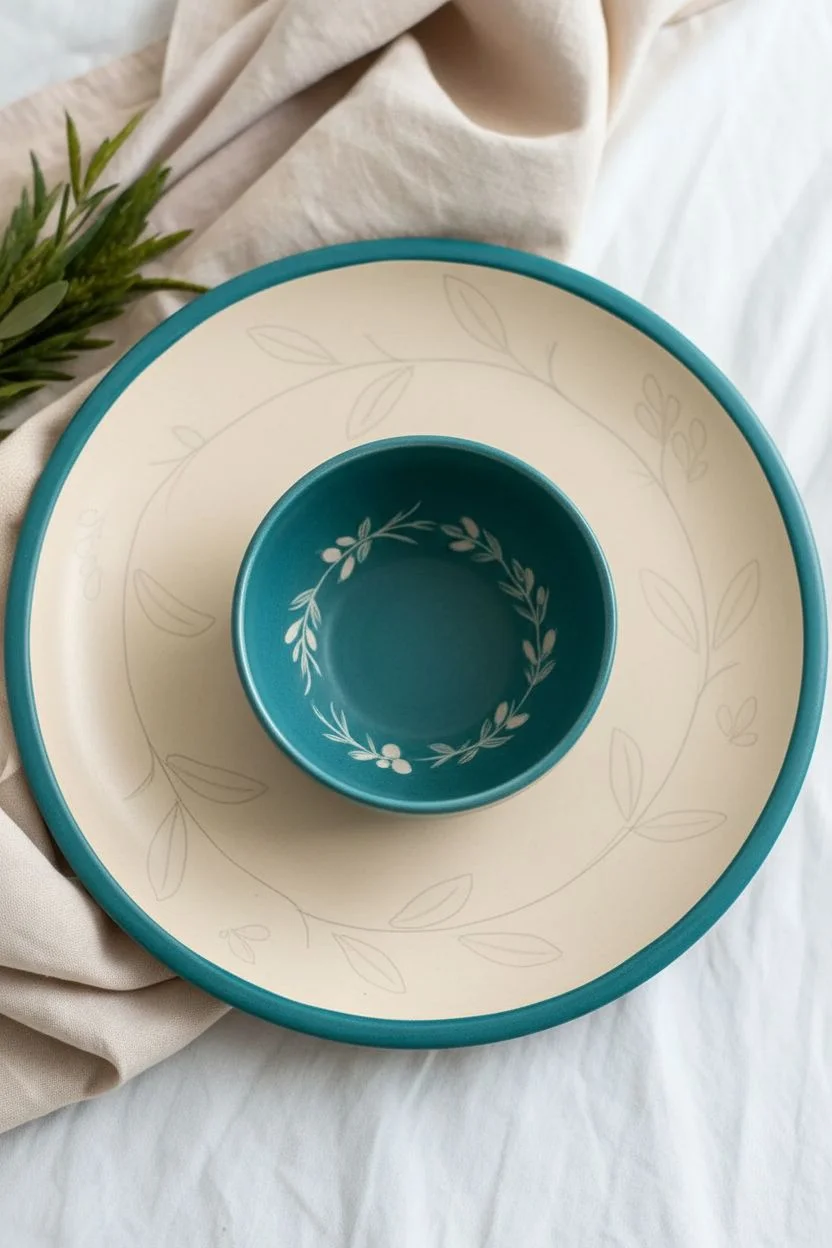
Simple Olive Branch Border
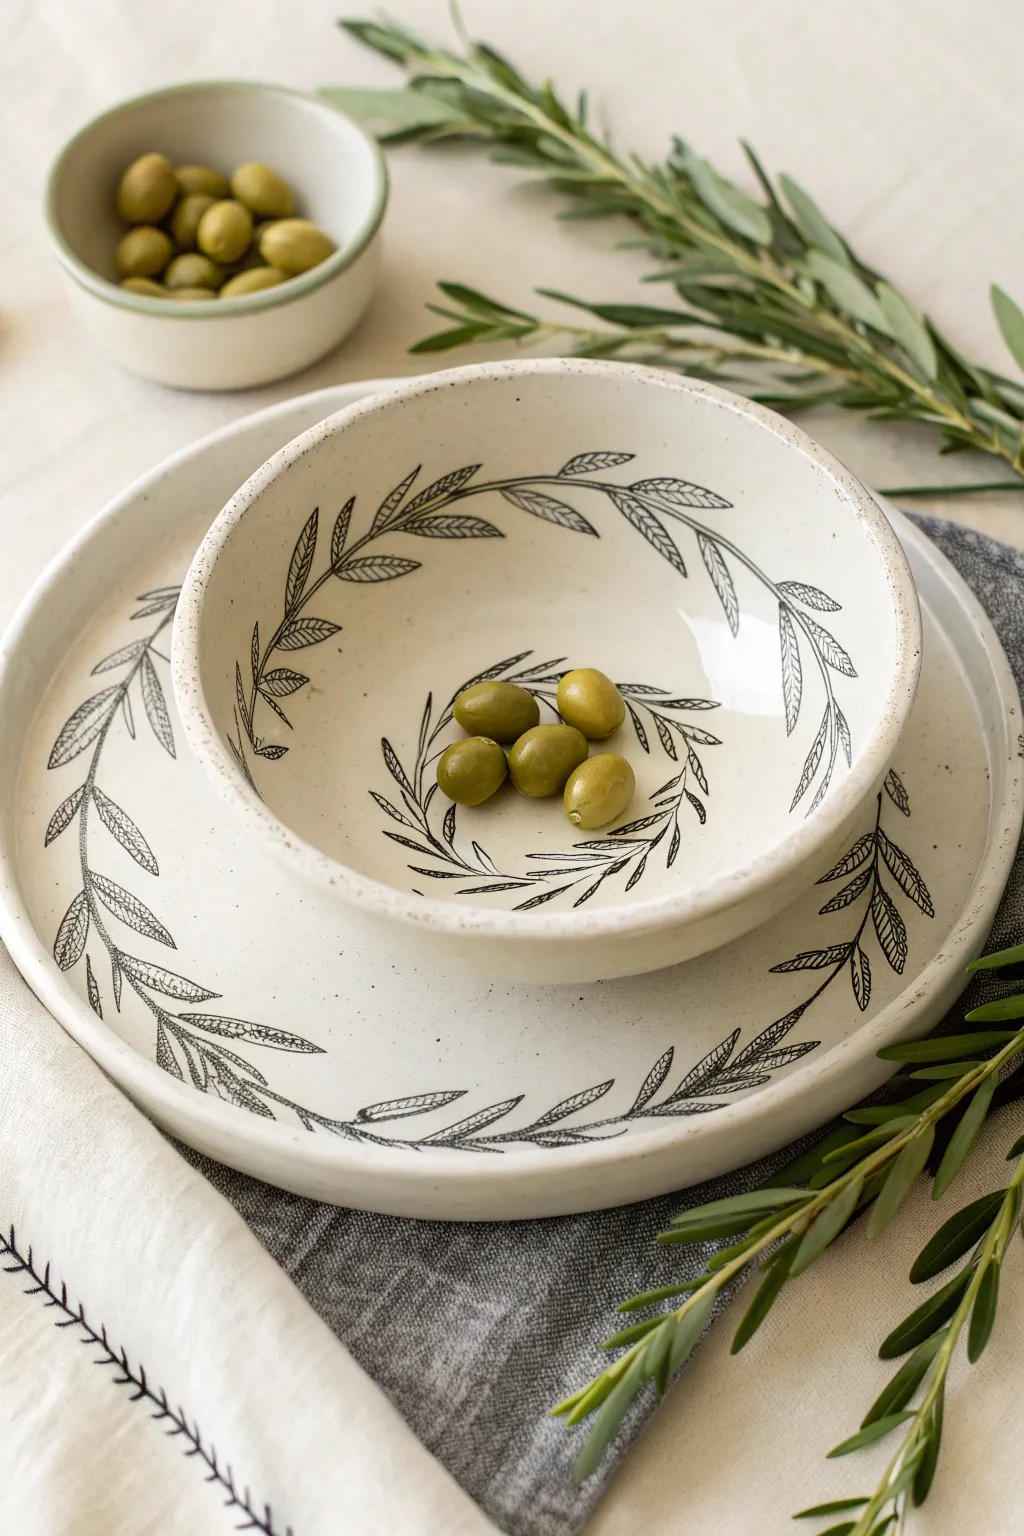
Bring a touch of Tuscan elegance to your table with this deceptively simple olive branch design. By using fine lines and negative space on speckled stoneware, you can create a sophisticated chip and dip set that looks handmade by an artisan.
Detailed Instructions
Materials
- Bisque-fired ceramic plate and bowl set (speckled clay body preferred)
- Black underglaze (or a specialized ceramic ink pen)
- Fine liner brush (size 0 or 00)
- Pencil (HB or lighter)
- Clear dipping glaze
- Damp sponge
- Paper towel
- Rotating banding wheel (optional but helpful)
Step 1: Planning the Composition
-
Clean surface:
Begin by wiping down your bisque ware with a damp sponge. This removes any dust that might interfere with the glaze adhering to the clay. -
Mark quadrants:
Using a light pencil, gently mark four equidistant points around the rim of the large plate and the interior rim of the bowl. This helps ensure your vine pattern stays balanced and doesn’t end up overcrowded on one side. -
Sketch the vine spine:
Lightly sketch a single, continuous wavy line that connects your markings. On the plate, keep this about an inch from the edge. Inside the bowl, drop the line slightly lower so the leaves can curve upwards.
Fixing Smudges
If you smudge a black line, let it dry completely. Then, gently scratch the mistake off with a craft knife or needle tool before re-painting. Do not wipe wet paint.
Step 2: Painting the Outline
-
Prepare the underglaze:
Shake your black underglaze well. Place a small amount on a palette and dilute it with a drop or two of water until it has an ink-like consistency that flows smoothly off the brush. -
Trace the spine:
Load your fine liner brush and carefully trace over your pencil spine line. I find it easiest to pull the brush toward me rather than pushing it away. -
Start the leaves:
Beginning at one end of the vine, paint small, elongated almond shapes extending from the spine. Stagger them so they alternate sides—left, then right, then left. -
Leaf orientation:
Ensure the leaves point generally forward in the direction the vine is ‘growing.’ This creates a natural sense of movement. -
Add variance:
Avoid making every leaf identical. Make some slightly curved, some flatter, and vary the spacing slightly to mimic nature. -
Connect the leaves:
Draw tiny stems connecting each leaf to the main vine. These should be very delicate lines.
Step 3: Adding Detail & Texture
-
Dry briefly:
Let the basic outlines dry for about 5-10 minutes so you don’t smudge work while adding details. -
Interior veins:
Using the very tip of your brush, draw a central vein down the middle of each leaf. Don’t connect it fully to the tip or base; leaving it floating slightly creates a lighter feel. -
Cross-hatching texture:
Add tiny diagonal lines branching off the central leaf vein on just a few select leaves. This adds the illustrative, sketched quality seen in the photo. -
Check density:
Step back and look at the overall density. If a section looks too sparse, add a small, stray leaf or a tiny twig branching off.
Pro Tip: Pen Control
If brushwork feels too intimidating for fine lines, use a specialized underglaze pen or trailing bottle with a fine tip for more control over the detailed leaves.
Step 4: Finishing and Glazing
-
Clean up sketch lines:
Once the underglaze is fully dry to the touch, use a clean damp sponge to gently dab away any visible pencil marks. Don’t rub, or you might smear the black design. -
Glaze application:
Dip the entire piece into a clear dipping glaze. Ensure you shake off excess glaze to prevent dripping, which can blur fine lines. -
Final wipe:
Wipe the foot (bottom) of the bowl and plate completely clean of glaze with a sponge so it doesn’t stick to the kiln shelf. -
Fire:
Fire the pieces according to the clay and glaze specifications (usually Cone 5 or 6 for stoneware).
Once fired, these elegant dishes are ready to serve your favorite olives and dips with a timeless style
BRUSH GUIDE
The Right Brush for Every Stroke
From clean lines to bold texture — master brush choice, stroke control, and essential techniques.
Explore the Full Guide
Polka Dot Party Confetti Ring
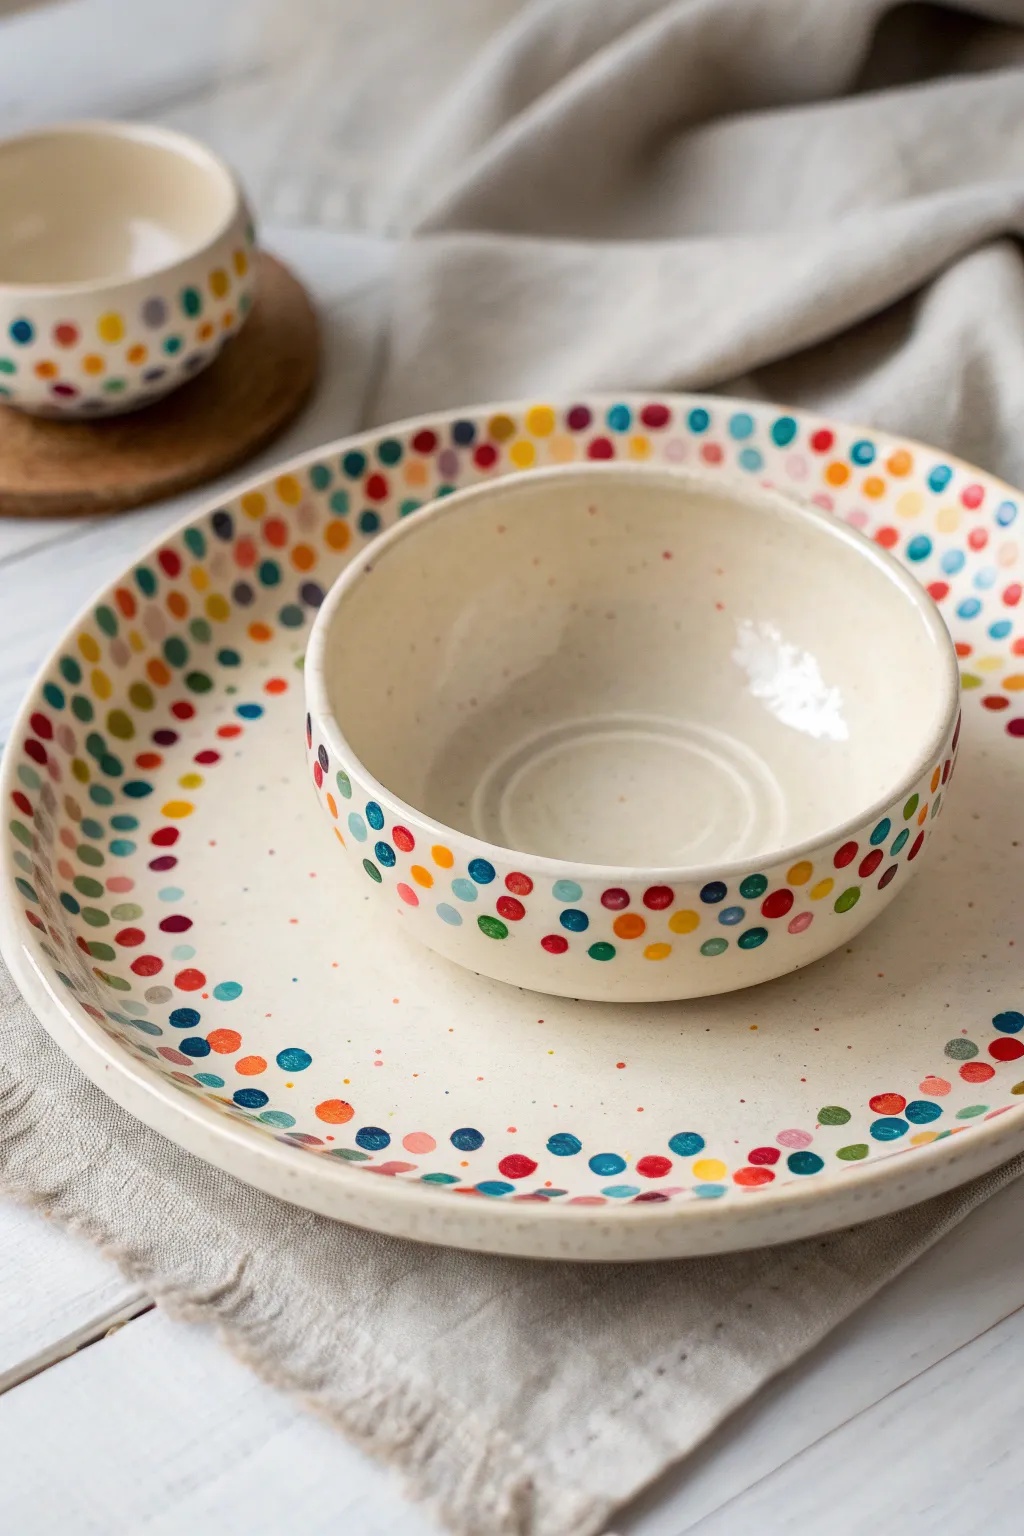
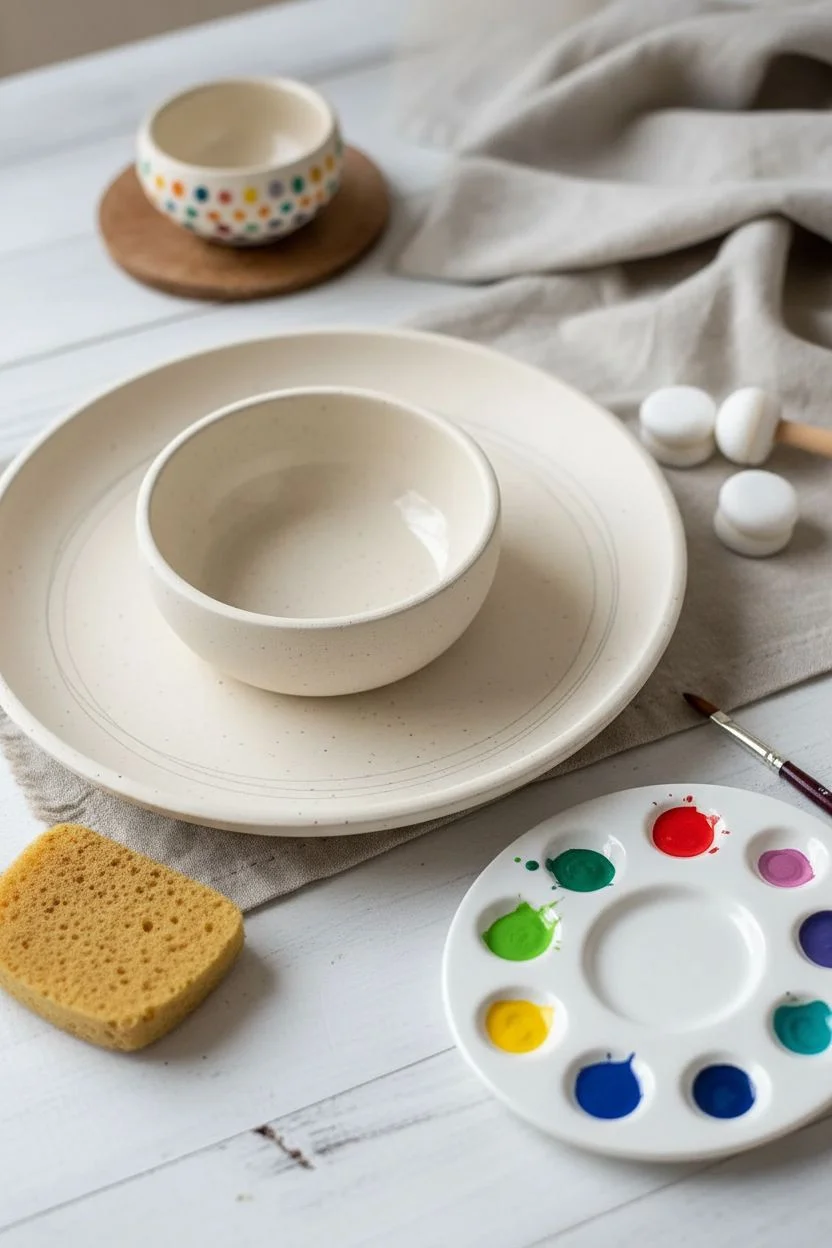
Bring a festive splash of color to your table with this cheerful polka dot design that mimics tossed confetti. The playful arrangement of vibrant dots creates a lively ring pattern on a warm, speckled cream background, perfect for a modern yet handcrafted look.
How-To Guide
Materials
- Bisque ceramic plate and matching bowl set (dipping bowl size)
- Underglaze paints in a rainbow palette (red, orange, yellow, bright green, teal, dark blue, purple, pink)
- Creamy off-white speckled glaze (or a clear glaze if using speckled clay)
- Various sizes of round foam pouncers (sponges on sticks)
- Small round synthetic brush (size 2 or 4)
- Damp sponge
- Pencil
- Glazed ceramic surface or palette for paints
- Kiln for firing (or access to a pottery studio)
Step 1: Preparation & Planning
-
Clean the bisque:
Start by wiping down your bisque plate and bowl with a damp sponge. This is a crucial first step to remove any dust or ceramic crumbs that could prevent the glaze from adhering properly. -
Map the ring:
Lightly sketch a circle on the plate with a pencil to guide where your confetti ring will sit. The pencil marks will burn off in the kiln, so don’t worry about being perfect. Aim for a wide band around the rim. -
Plan the palette:
Squeeze a small amount of each underglaze color onto your palette. Having all your colors ready helps you work fluidly and keep the ‘random’ confetti look balanced.
Step 2: Painting the Dots
-
Start with the largest dots:
Select your largest foam pouncer. Dip it into one of your dominant colors—like the deep blue or bright red—and press it gently onto the rim of the plate. -
spacing technique:
Space these large dots out generously. You want to leave plenty of room for all the other colors and sizes without them touching. -
rotate colors:
Clean your pouncer or switch to a fresh one, then add large dots in your next color. Repeat this until you have a loose framework of large dots around the plate rim and the exterior of the bowl. -
Add medium dots:
Switch to a medium-sized pouncer or the back end of a large paintbrush. Begin filling in the gaps with your secondary colors like teal, orange, and purple. -
Create the gradient effect:
Concentrate the darker and larger dots near the very edge of the plate. As you move slightly inward towards the center, space them out more to create a fading ‘scattered’ effect. -
Addressing the bowl:
For the bowl, apply the dots in a band around the upper half of the exterior. I find it helpful to hold the bowl upside down on my hand to easily rotate it while stamping. -
Layering small details:
Using your smallest round brush, dip the tip into bright yellow or pink paint. delicately dot these into the smallest empty spaces. -
Tiny speckles:
To enhance the festive feel, add tiny micro-dots using a toothpick or a fine-point detail tool. These should look like distant bits of confetti caught in the mix. -
Check for balance:
Step back and look at your piece. Ensure no two identical colors are clumped too close together. -
Initial drying:
Allow the underglaze dots to dry completely. They should look chalky and matte before you move on to glazing.
Smudged Dots?
If a dot smudges while wet, wait for it to dry completely. Then, gently scratch the mistake off with a craft knife or toothpick before re-applying the dot.
Step 3: Glazing & Firing
-
Prepare the dipping glaze:
Stir your clear or speckled cream glaze thoroughly. If you want the specific look in the photo, use a ‘speckled vanilla’ style dipping glaze which adds those tiny brown flecks automatically. -
Dip the pieces:
Using dipping tongs, dip the entire plate into the clear glaze, holding it for a counted three seconds. Lift it out and let the excess drip off. Repeat with the bowl. -
Clean the foot:
Once the glaze is dry to the touch, use a damp sponge to meticulously wipe the glaze off the bottom ‘foot’ of the plate and bowl so they don’t stick to the kiln shelf. -
Fire the kiln:
Load your pieces into the kiln. Fire according to the specifications of your clay and glaze—typically to cone 5 or 6 for stoneware durability. -
Cooling:
Allow the kiln to cool completely before opening. This patience prevents thermal shock and ensures your glaze is perfectly glossy and crazing-free.
Make it Sparkle
For a magical twist, use a translucent shimmering glaze over just the colored dots, or add a tiny dot of metallic luster (like gold overglaze) to the center of a few random circles.
Once fired, these cheerful dishes are ready to make every snack feel like a celebration
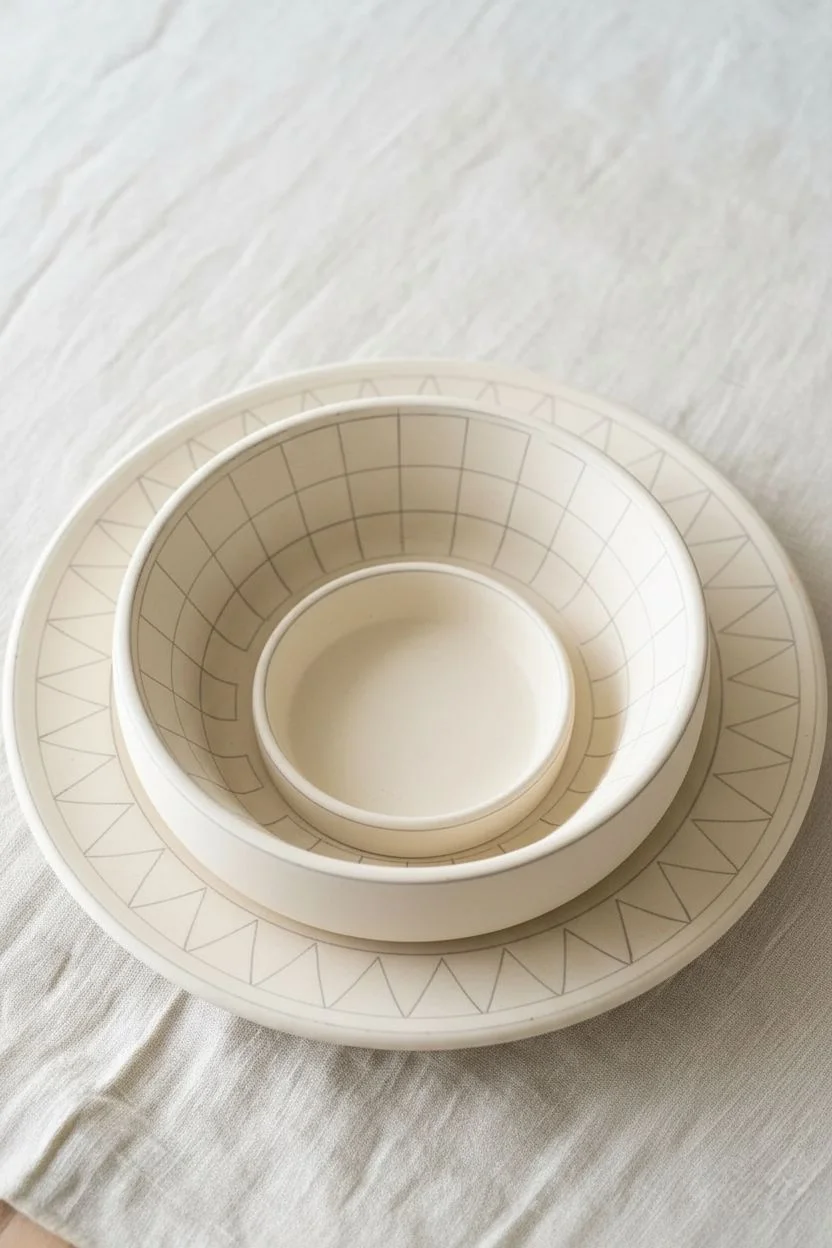
Monochrome Lines for Modern Minimalists
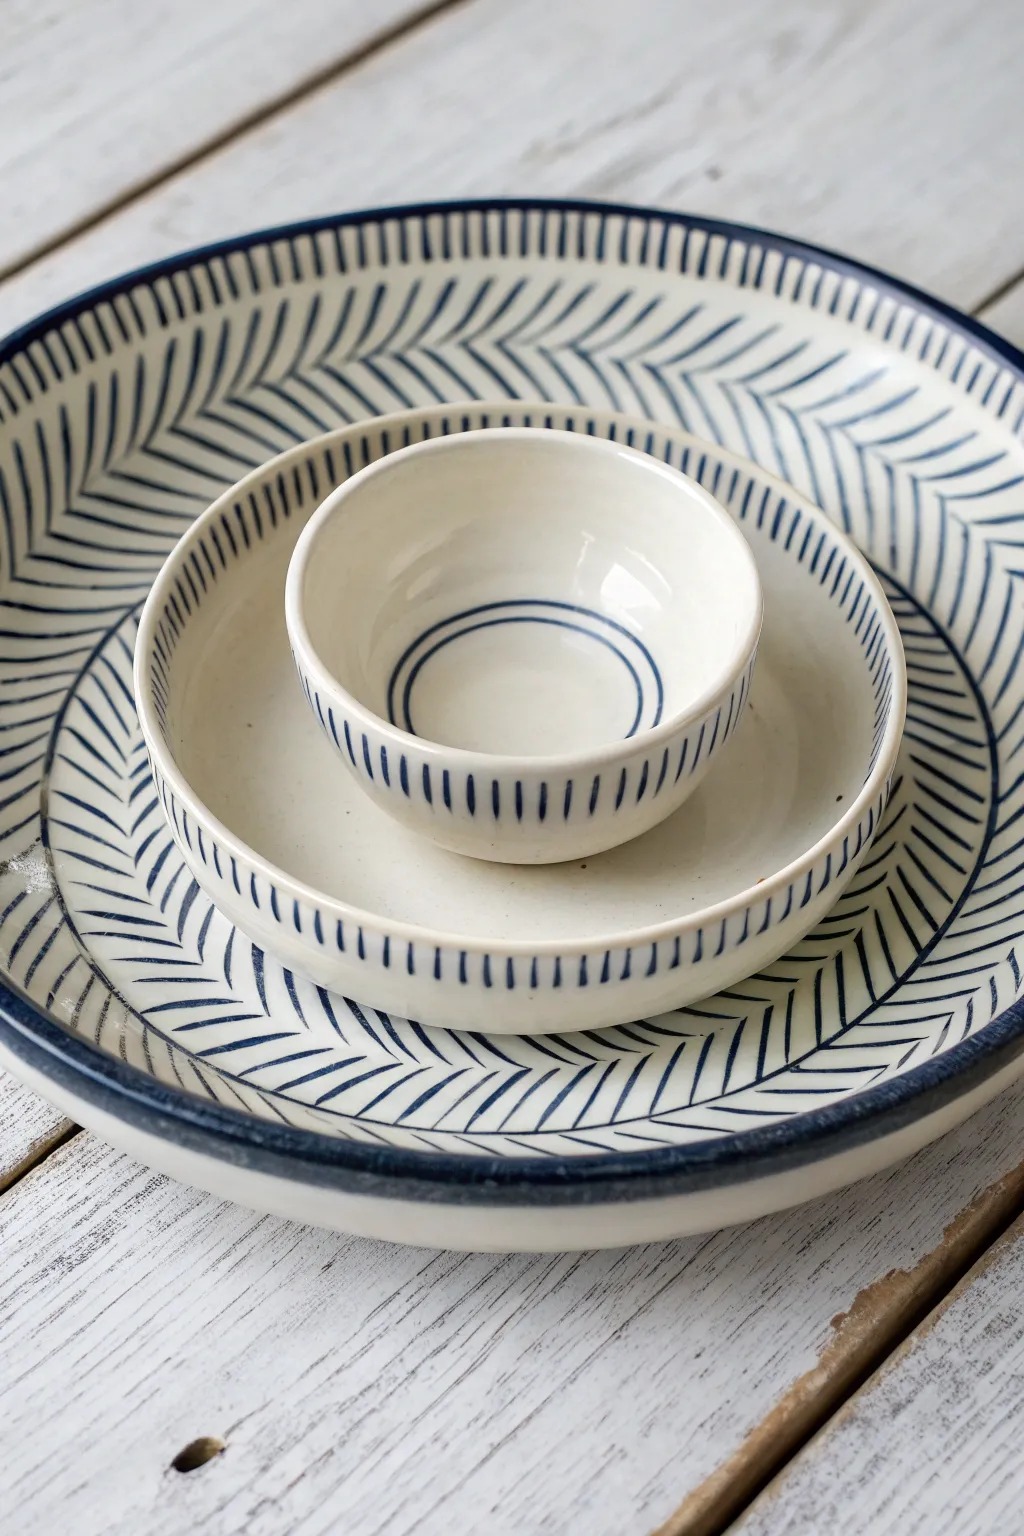
Achieve a high-end pottery look with simple, rhythmic line work in deep navy blue. This nesting set balances organic, hand-painted charm with clean, modern geometry, perfect for effortless entertaining.
Detailed Instructions
Materials
- Bisque ceramic bowl set (large platter, medium shallow bowl, small dip bowl)
- Navy blue underglaze (e.g., Duncan Concepts or Mayco)
- Clear dipping glaze or brushing glaze
- Fine liner brush (size 0 or 00)
- Medium round brush (size 4 or 6)
- Pencil for sketching
- Damp sponge
- Band styling wheel (optional but helpful)
Step 1: Preparation & Mapping
-
Wipe down bisque:
Start by gently wiping all three bisque pieces with a damp sponge. This removes any dust that could prevent the glaze from adhering properly. -
Mark the centers:
Lightly find the center of each bowl with your pencil. You won’t see these marks after firing, so don’t worry about being perfectly invisible. -
Sketch the rim guides:
On the large platter and medium bowl, lightly sketch a circle about an inch inward from the rim. This will serve as the spine for your chevron pattern.
Use a Banding Wheel
Place your bowl on a heavy banding wheel. Give it a gentle spin while painting rim lines to keep them steady and evenly spaced.
Step 2: Painting the Small Dip Bowl
-
Paint the interior rings:
Using your fine liner brush loaded with navy underglaze, paint two concentric circles at the bottom of the smallest bowl. The lines should be thin and crisp. -
Add the rim dashes:
Around the exterior or upper interior rim of the small bowl, paint short vertical dashes. Space them evenly, about 3-4mm apart. -
Keep the brush varied:
Don’t stress about mechanical perfection; slight variations in line thickness add to the handmade aesthetic.
Fixing Wobbly Lines
If a line gets too thick or wobbly, let it dry completely. Then, use a stiff brush dampened with water to ‘erase’ and tidy the edge.
Step 3: Painting the Medium Bowl
-
Paint the rim border:
On the medium bowl, use the liner brush to create vertical hash marks along the top edge of the rim, extending slightly down the outside. -
Establish the spine:
Revisit that pencil circle you drew earlier. You don’t need to paint a solid line here, but use it as a visual guide for where your chevron leaves will meet. -
Create the inner markings:
Paint small, vertical dashed lines along the inner wall of the bowl, similar to what you did on the dip bowl but slightly longer.
Step 4: Painting the Large Platter
-
Paint the dark rim:
Using the medium round brush, paint a solid, thick navy line along the very edge of the platter rim to frame the piece. -
Start the chevron V’s:
Starting from your invisible center circle guide, paint diagonal lines moving outward toward the rim. Think of these like veins on a leaf. -
Complete the chevron texture:
Paint corresponding diagonal lines moving inward from the rim to meet your first set of lines. They should meet at a sharp angle to form the chevron ‘V’ shape. -
Fill the surface:
Continue this pattern all the way around the platter. I find it helpful to rotate the piece constantly to keep my hand angle consistent. -
Add vertical rim details:
Just under the solid navy rim you painted, add a row of short vertical dashes that follow the curve of the plate, mirroring the texture of the smaller bowls.
Step 5: Glazing & Firing
-
Dry completely:
Allow the navy underglaze to dry until it is chalky and light in color. This usually takes about 20 minutes. -
Sponge off mistakes:
If you see any smudges or huge errors, now is the time to gently scratch them off with a toothpick or lightly sponge them away. -
Apply clear glaze:
Dip the pieces into a clear transparent glaze, or brush on three even coats of clear brushing glaze. Ensure the coat is even so the white clay body shines through. -
Fire the pieces:
Load the pieces into the kiln. Since these nest, paint stilts are rarely needed unless you glazed the very bottom foot rings. Fire to cone 06 (or per your clay’s instructions).
Once fired, stack your beautiful new set and get ready to serve snacks in style

PENCIL GUIDE
Understanding Pencil Grades from H to B
From first sketch to finished drawing — learn pencil grades, line control, and shading techniques.
Explore the Full Guide
Sunburst Rays Pointing to the Dip
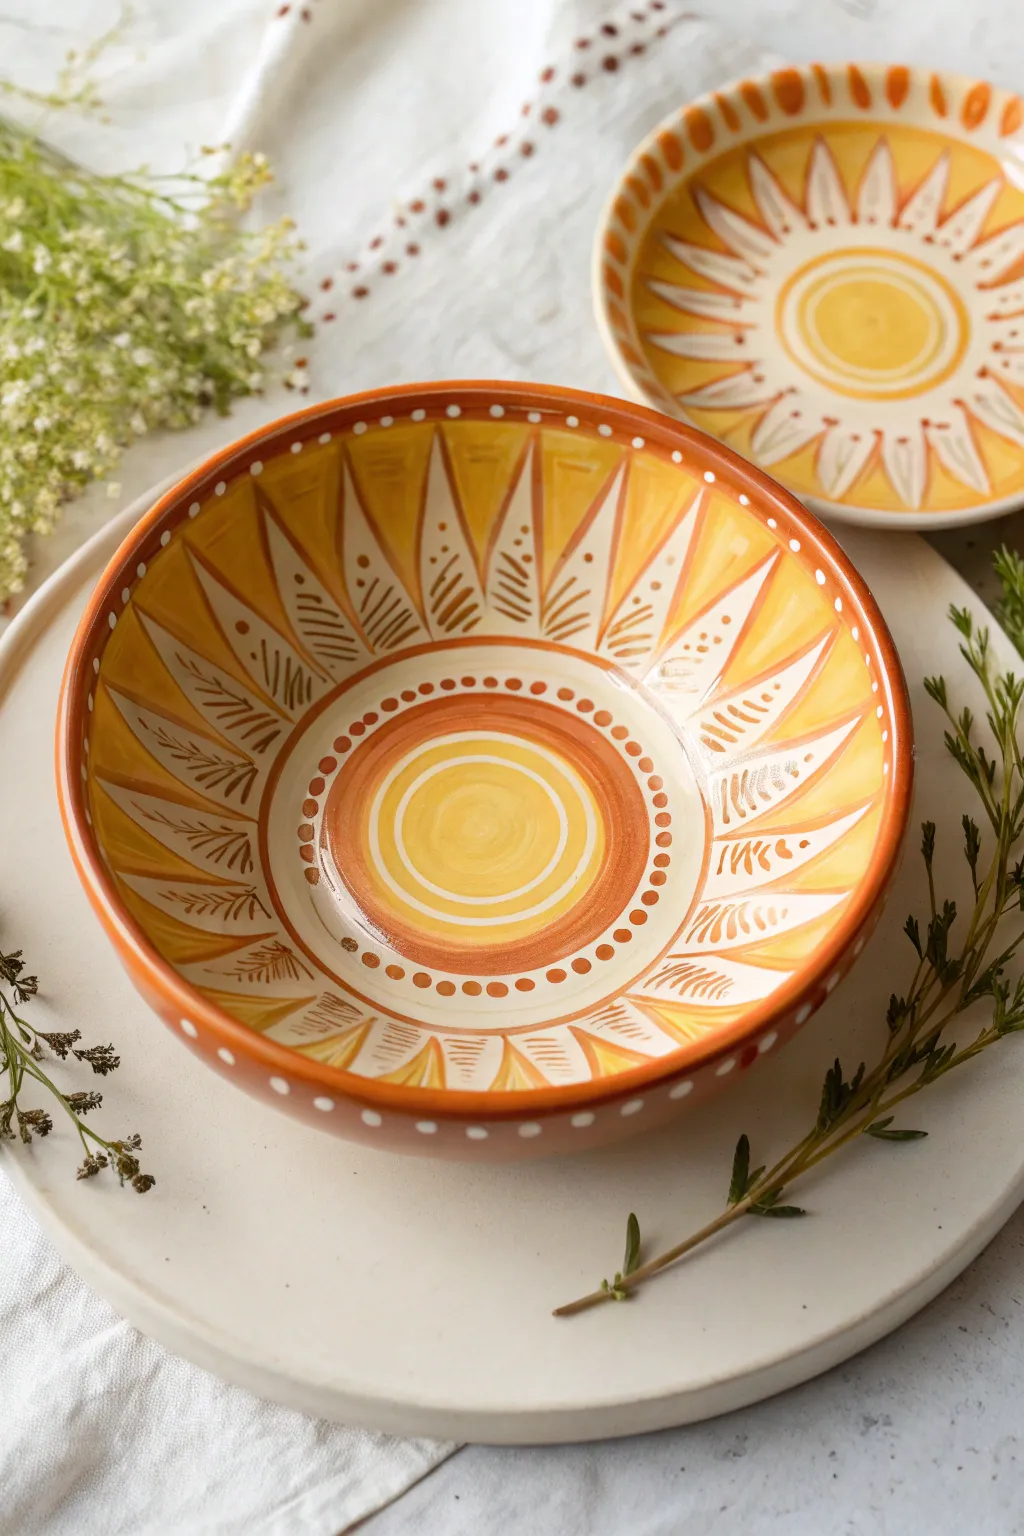
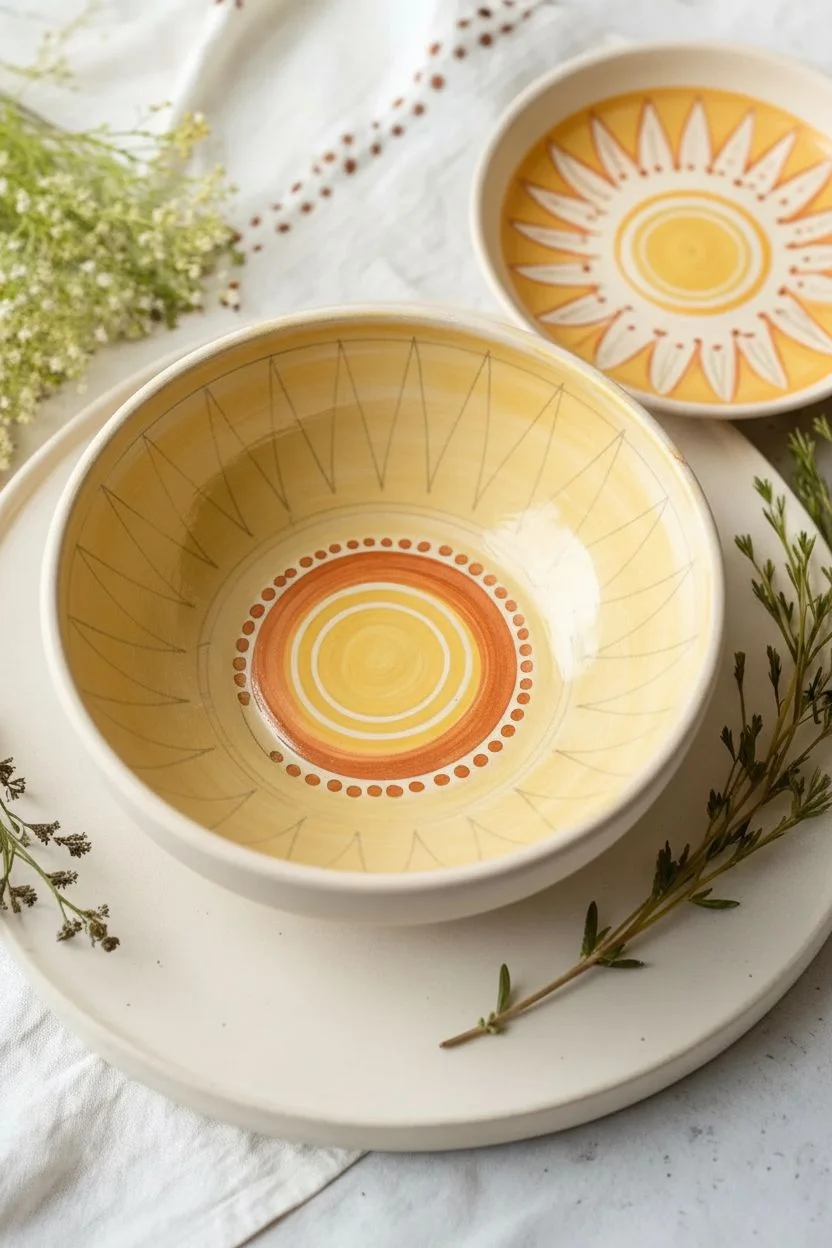
Brighten your table setting with this cheerful, hand-painted ceramic bowl featuring a radiating sunburst design. The warm yellows, oranges, and crisp white details create a piece that feels like a captured summer day.
Step-by-Step Guide
Materials
- Bisque ceramic bowl (ready to glaze) or a plain white ceramic bowl (for porcelain paint)
- Ceramic underglazes or porcelain paints: Golden Yellow, Bright Orange, Rust Red, White
- Round brushes: Sizes 4 and 8
- Fine liner brush: Size 1 or 0
- Pencil (HB)
- Damp sponge
- Palette
- Lazy Susan or banding wheel (optional but helpful)
Step 1: Base and Center
-
Prepare the surface:
Wipe your bisque bowl down with a damp sponge to remove any dust or oils. This ensures your paint adheres smoothly. -
Draft the design:
Using a pencil, lightly sketch a small circle in the very center of the bowl’s interior. Draw a larger ring around it about an inch wide to create a band. Then, sketch tall, triangular ‘rays’ reaching from that band up to the rim. -
Paint the center sun:
With a size 8 round brush, fill the center circle with Golden Yellow. Apply two coats for opacity, letting the first coat dry to the touch before adding the second. -
Add inner rings:
Paint a thin ring of white inside that yellow circle. Then, using Rust Red mixed with a touch of Bright Orange, paint the wide band surrounding the center sun. I like to keep my brush strokes circular to follow the form of the bowl. -
Highlight the center:
Once the red-orange band is dry, use a smaller brush to paint a thin yellow ring right in the middle of that band, breaking up the solid color.
Step 2: Painting the Rays
-
Fill the background:
Paint the negative space between your sketched rays with a wash of Golden Yellow. It doesn’t need to be perfectly solid; a slightly translucent wash adds depth. -
Create the white rays:
Using the size 4 brush and White paint, fill in the triangular ray shapes you sketched earlier. You might need three coats of white to cover the bisque completely. -
Define the outlines:
Load your fine liner brush with Rust Red. Carefully outline each white triangular ray to make them pop against the yellow background. -
Clean up edges:
If your lines wobble, wait for them to dry, then use a damp, stiff brush to gently scrub away the mistake, or cover it with part of the background color.
Wobbly Lines?
Steady your hand by resting your pinky finger on a dry part of the bowl while painting fine details with the liner brush.
Step 3: Details and Rim
-
Add internal details:
Switch back to the liner brush with Rust Red paint. Inside each white ray, paint small, feathery lines—like veins on a leaf or stylized sunbeams—starting from the wide base and flicking upward. -
Dot the inner border:
Dip the handle end of a paintbrush into Rust Red paint. Use this to stamp a circle of dots around the outer edge of the central orange band. -
Paint the rim:
Use the size 8 brush to paint the top rim of the bowl in solid Rust Red. Bring the color down slightly onto the outside of the bowl as well. -
Add rim dots:
Once the rim color is dry, use the handle end of a brush dipped in White to stamp evenly spaced dots all along the red rim. -
Paint the exterior:
Paint the exterior of the bowl a solid Rust Red or leave it natural, adding a row of white dots near the bottom for continuity. -
Final check:
Inspect your work for any missed spots or uneven coverage. Touch up as needed before the firing process or final setting. -
Finish:
If using underglaze, dip in clear glaze and fire according to clay type. If using porcelain paint, bake in a home oven according to manufacturer instructions.
Color Consistency
For translucent colors like yellow, alternate brush stroke items (horizontal then vertical) between layers for a streak-free solid finish.
Enjoy serving your favorite dips in this radiant piece of handmade art
Painted Mosaic Tile Look
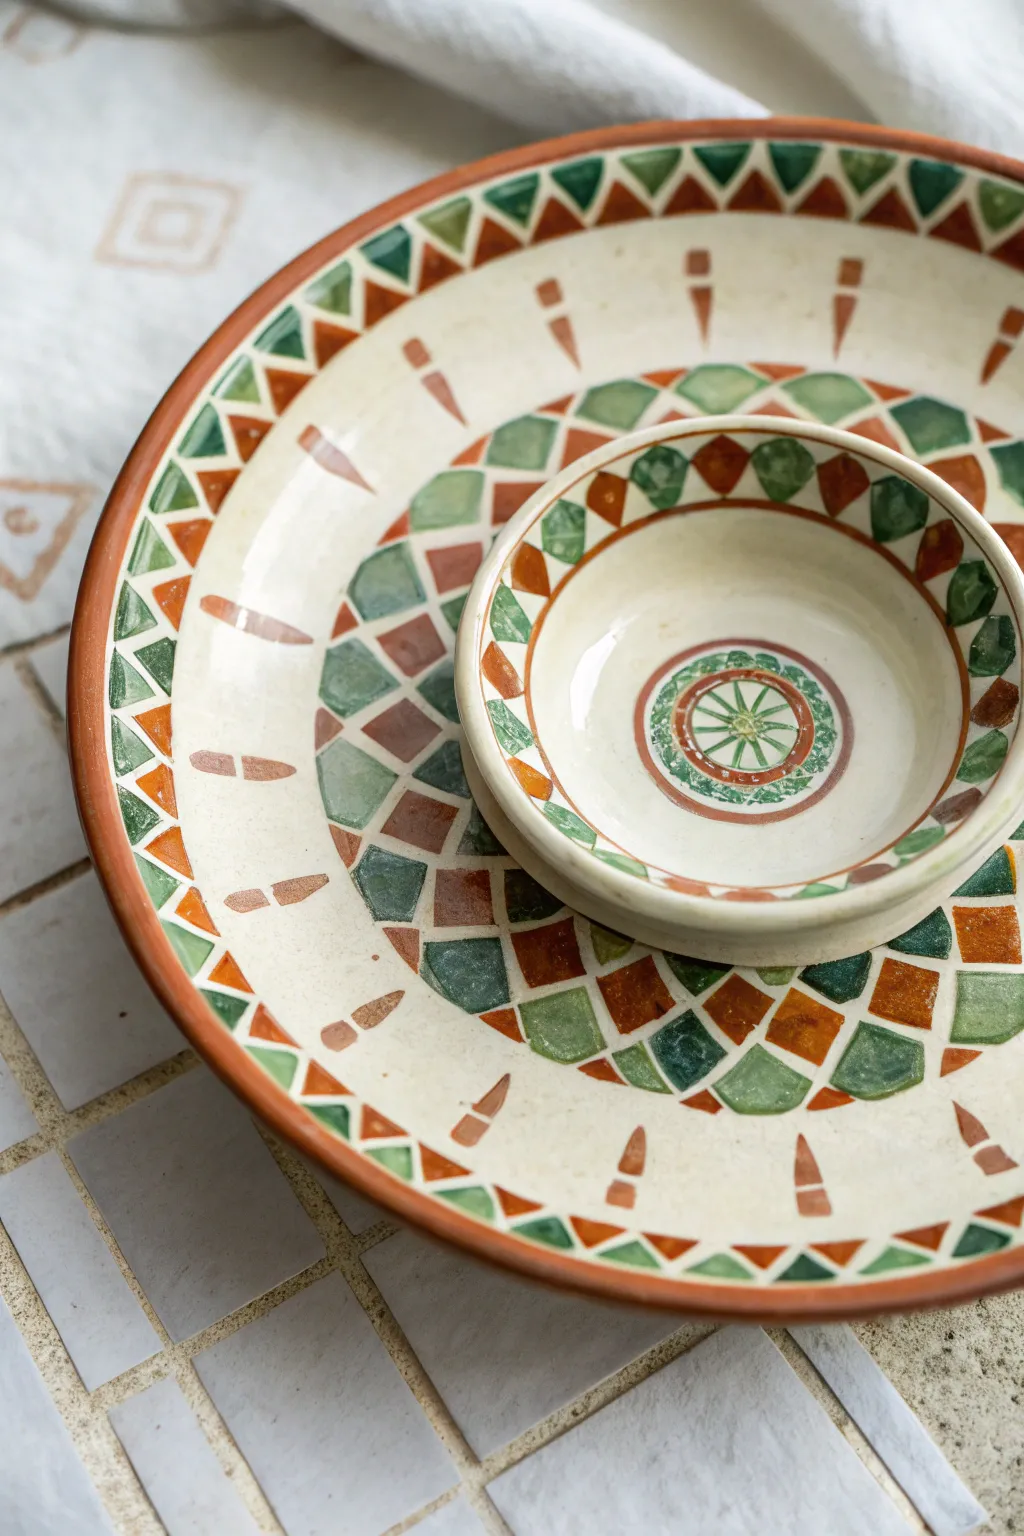
Transform a plain ceramic chip and dip set into a Mediterranean-inspired masterpiece by mimicking the look of inlaid mosaic tiles. This technique uses geometric precision and earthy glazes to create a stunning, cohesive serving piece that looks far more expensive than it is.
Step-by-Step
Materials
- Bisque fired chip and dip bowl set (platter and small bowl)
- Ceramic underglazes (Terracotta/Rust Orange, Forest Green, Emerald Green)
- Small flat shader brush (size 2 or 4)
- Fine liner brush (size 0 or 00)
- Pencil (HB or lighter)
- Flexible ruler or measuring tape
- Paper towels or sponge
- Clear dipping glaze
- Kiln (or access to a firing service)
Step 1: Planning the Geometry
-
Mark the center:
Start by finding the exact center of both the large platter and the small bowl. Mark a small dot lightly with your pencil to serve as your anchor point for the radiating patterns. -
Map the concentric rings:
Using a measuring tape or a compass, lightly sketch the boundaries for your main design bands. On the large platter, you’ll need an outer rim band, a wide middle band for the large mosaic tiles, and an inner decorative ring. -
Sketch the rim triangles:
Along the outer edge of the platter and the rim of the small bowl, mark even intervals about 1 inch apart. Play connect-the-dots to draw a zig-zag line, creating a series of alternating triangles that will form the border. -
Draft the mosaic grid:
For the wide middle band on the platter, draw radial lines extending from the center like wheel spokes. Then, draw curved lines intersecting them to create four rows of trapezoid shapes that will become your ’tiles’.
Step 2: Painting the Mosaic Pattern
-
Base coat the rim:
Dip your flat shader brush into the Terracotta underglaze. Carefully fill in every other triangle on the rim of the large platter. Do the same for the small bowl’s rim to ensure they match perfectly. -
Add the green accents:
Switch to your Forest Green underglaze. unexpected pops of color are key here, so fill the remaining empty triangles on the rims with alternating shades of Forest and Emerald green. -
Paint the tile band:
Moving to the wide mosaic band on the platter, start filling in your drawn trapezoids. Use a checkerboard-style logic, alternating between the rust, dark green, and light green hues, leaving a thin line of unpainted white space between each shape to mimic grout lines. -
Create the radial dashes:
In the negative space between the rim and the mosaic band, use the flat edge of your brush to stamp short, tapered dashes pointing toward the center. Use the Terracotta color for this to guide the eye inward. -
Detail the center bowl:
Inside the small dip bowl, paint a small circle in the very bottom. fill the bottom center with a wagon-wheel design using the fine liner brush and green underglaze, surrounded by two thin concentric rings in rust.
Grout Line Trick
Use thin automotive detailing tape (1/8 inch or smaller) to mask off your grid lines before painting to ensure perfectly even white ‘grout’ spacing.
Step 3: Refining and Sealing
-
Clean up the lines:
Take a slightly damp, clean brush or a specialized cleanup tool and gently wipe away any paint that strayed into your ‘grout’ lines. The separation between colors needs to be crisp for the mosaic effect to work. -
Add the edge banding:
Using a steady hand or a banding wheel if you have one, paint a solid, thick line of Terracotta along the very outer lip of the platter and the top lip of the dip bowl. -
Let it dry completely:
Allow the underglaze to dry until it is chalky and cool to the touch. Any moisture left in the underglaze can cause smearing during the glazing process. -
Glaze application:
Dip the entire piece into a clear transparent glaze. If dipping isn’t an option, brush on three even coats of clear brushing glaze, letting each coat dry in alternate directions. -
Fire the piece:
Load the pieces into the kiln. Follow the manufacturer’s firing schedule for your specific clay and glaze combination—typically Cone 06 or Cone 6—to reveal the glossy, finished colors.
Varied Color Depth
Dilute your green glaze slightly with water for some tiles to create a watercolor effect, making identical tiles look naturally distinct.
Once fired, you will have a durable, food-safe serving set that brings a warm, artisanal touch to your table setting


Under-the-Sea Rim With a Coral Dip Well

Bring the calming spirit of the tide pools to your table with this delightfully delicate chip-and-dip set. Featuring a loose, illustrative style with teal seaweeds and coral-pink shells, this project transforms plain bisque into a seaside treasure.
How-To Guide
Materials
- Bisque ceramic chip and dip bowl (attached or separate pieces)
- Underglaze paints: Teal/turquoise, coral pink, soft sage green, and white
- Clear dipping or brush-on glaze
- Food-safe ceramic kiln (for firing)
- Small round paintbrush (size 2 or 4)
- Fine liner brush (size 00 or 0)
- Pencil for sketching
- Small sponge
- Palette or tile for mixing
Step 1: Preparation and Planning
-
Wipe down the bisque:
Start by using a slightly damp sponge to wipe the entire bowl surface. This removes any ceramic dust that might prevent the glaze from adhering properly. -
Lightly sketch the layout:
Using a pencil, lightly map out where your main seaweed stalks and larger shells will go. Don’t worry about perfection; pencil lead burns off in the kiln. -
Define the dip well:
On the inner bowl (the dip well), lightly sketch a concentric circle a bit larger than the center bottom. This will guide your painted rings later.
Step 2: Painting the Sea Flora
-
Paint the seaweed spines:
Load your fine liner brush with teal underglaze. Paint thin, slightly wavy vertical lines scattered around the main bowl to serve as the ‘spines’ for your seaweed. -
Add the fronds:
Using short, flicking strokes branching off the spines, add the tiny leaves. Vary the angles to make them look like they are floating in water. -
Introduce a second green:
Mix a little white into your teal or switch to a soft sage green. Paint fan-shaped coral plants by making several strokes that all meet at a single bottom point, like a sunburst. -
Scatter small sprigs:
Fill in empty negative spaces with tiny, floating plant bits using the tip of your smallest brush. Keep these delicate and sparse to maintain an airy feel.
Watercolor Effect
To get that translucent look shown in the image, water down your underglazes slightly. Treat the bisque like watercolor paper for soft washes.
Step 3: Adding Shells and Creatures
-
Paint the mussel shells:
Using the coral pink underglaze and a round brush, paint elongated teardrop shapes. These represent mussel shells. Let the color be slightly translucent to look like watercolor. -
Add round shells:
Paint small circles or oval shapes in coral pink. Once dry, use a darker mix of pink (or red) to add tiny texture lines across them. -
Draw tiny starfish:
With the fine liner brush and coral pink, add small, simple five-pointed stars scattered near the rim and base of the bowl. -
Detail the kelp:
Go back to your teal kelp plants. I like to add tiny dots of dark green or blue at the connection points of the leaves for a bit of extra depth.
Make it a Set
Paint matching spoons! Dip the handles in the teal glaze and paint a tiny coral pink starfish on the scoop part for a cohesive serving set.
Step 4: The Dip Well and Finishing Touches
-
Paint the center rings:
In the small dip bowl, paint a thick, watery circle of teal at the bottom. Add a smaller, concentric ring inside it for a ripple effect. -
Rim the small bowl:
Carefully paint the rim of the dip bowl with the coral pink. Allow the brush to be slightly uneven to give it a handmade, rustic charm. -
Rim the large platter:
If your large bowl has a textured rim like the example, use a sponge or side of your brush to lightly drag white or cream glaze over it to highlight the texture. -
Speckling (Optional):
Dilute a tiny bit of brown or grey underglaze on an old toothbrush. Run your thumb over the bristles to flick tiny speckles across the bowl for a sandy texture. -
Clear glaze application:
Once all underglaze is bone dry, apply two to three coats of clear brushing glaze over the entire piece, or dip it if you have a large enough container. -
Firing:
Load the kiln carefully. Use stilts if you glazed the bottom, and fire according to the specifications of your clay and glaze (usually Cone 06 or Cone 6).
Now you have a serene serving piece ready for your next summer gathering
Floral Wreath With a Pop-Color Center
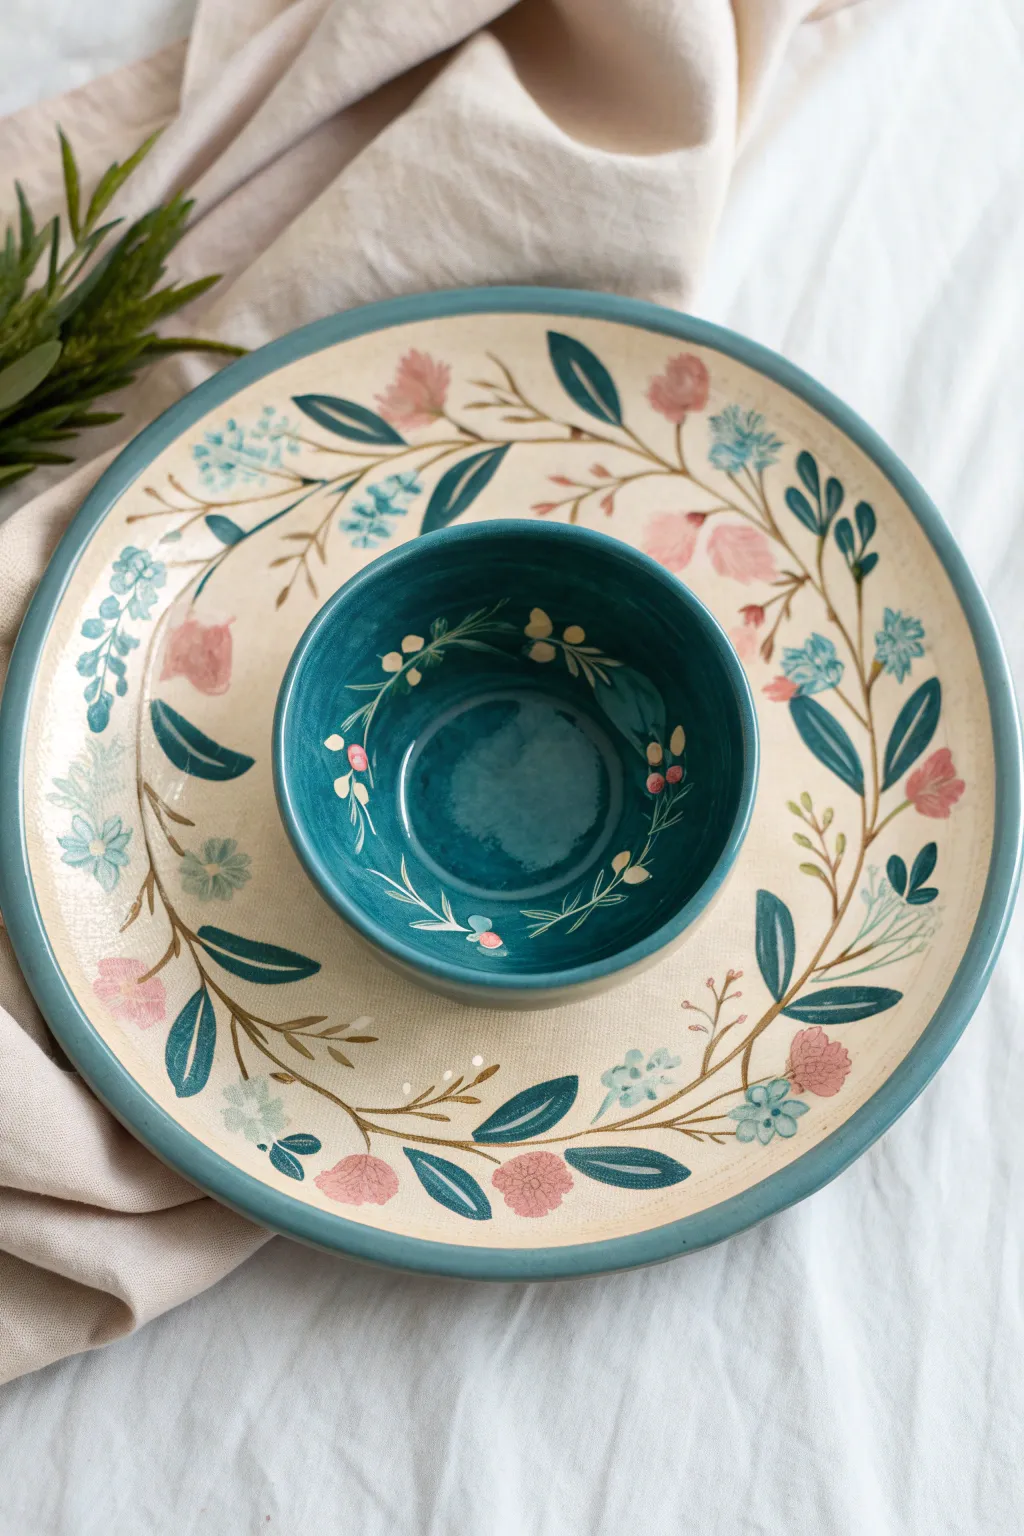
This charming chip and dip set features a creamy bisque canvas encircled by a delicate wreath of teal leaves and blush pink blooms. The striking pop of deep teal in the center bowl creates a beautiful depth that draws the eye inward.
Detailed Instructions
Materials
- Ceramic bisque chip and dip bowl set
- Underglaze colors: Deep teal, sage green, blush pink, light blue, cream/white
- Round brush (size 6 or 8) for larger leaves
- Fine liner brush (size 0 or 00) for stems and details
- Wide flat brush for the center bowl
- Pencil for sketching
- Clear dipping glaze
- Sponge and water bucket
Step 1: Preparation & Base Coat
-
Clean the bisque:
Wipe down the entire ceramic piece with a damp sponge to remove any dust or oils from your hands, ensuring a smooth painting surface. -
Paint the rim:
Using a steady hand and a medium round brush, apply a band of deep teal underglaze along the very outer edge of the large platter. You may need two to three coats for full opacity. -
Flood the center bowl:
With your wide flat brush, coat the entire interior and exterior of the small center bowl with the same deep teal. Apply three even coats, letting each dry until matte before adding the next to avoid streaking.
Step 2: Drafting the Floral Patterns
-
Sketch the main vine:
Lightly sketch a winding, circular vine path around the main platter area with a pencil. Don’t worry about perfection; the pencil marks will burn off in the kiln. -
Add inner details:
Inside the dark teal center bowl, lightly sketch a smaller, simple wreath pattern along the inner walls to mirror the outer design.
Fixing Smudges
If you drip dark teal onto the cream background, let it dry completely. Then, scratch it off gently with a toothpick or a stiff brush rather than wiping it wet.
Step 3: Painting the Wreath Elements
-
Paint the main stems:
Using your fine liner brush and brown or dark sage underglaze, trace over your pencil vine lines. Keep the pressure light to create thin, delicate stems. -
Add large teal leaves:
Load your round brush with deep teal. Press down firmly at the base of the leaf and lift as you pull outward to create a point. Scatter these larger leaves sporadically along the vine. -
Paint secondary foliage:
Switch to a sage green or a lighter teal mix. Paint smaller, filler leaves and fern-like fronds in the empty spaces between the large leaves. -
Create the blush flowers:
Using the blush pink underglaze, dab small, fluffy cloud shapes to form the main flowers. They don’t need much detail; the shape itself suggests the bloom. -
Add blue floral accents:
With a light blue underglaze, paint clusters of tiny dots or small three-petal flowers to add variety and coolness to the color palette. -
Layering details:
Once the pink flowers are dry, use a tiny amount of darker pink or red on a liner brush to add subtle texture lines or centers to the blooms.
Level Up: Sgraffito
Paint the center bowl teal, let it dry to leather hard, then carve the wreath design *into* the paint to reveal the white clay beneath instead of painting white on top.
Step 4: Finishing the Center Bowl
-
Paint the inner wreath:
Using a creamy white or very light sage underglaze (so it shows up against the dark teal), paint delicate vines and small leaves inside the center bowl. -
Add pop accents:
Dot small berries in pink or yellow along the interior white vine. The contrast of the light colors against the dark bowl makes the design pop.
Step 5: Glazing & Firing
-
Final dry:
Allow all underglaze to dry completely, ideally for a few hours, until it is powdery to the touch. -
Re-sponge the rim:
If any paint smudged onto the unpainted background during the process, gently wipe those spots clean with a damp sponge or a clay eraser tool. -
Clear glaze application:
Dip the entire piece into clear dipping glaze, or brush on two to three coats of brush-on clear glaze depending on the manufacturer’s instructions. -
Fire the piece:
Fire the ceramic in a kiln to cone 06 (or the temperature specified by your clay and glaze manufacturer) to vitrify the piece and make it food-safe.
Now you have a stunning, food-safe centerpiece ready for your next gathering
Checkerboard Rim for Graphic Contrast
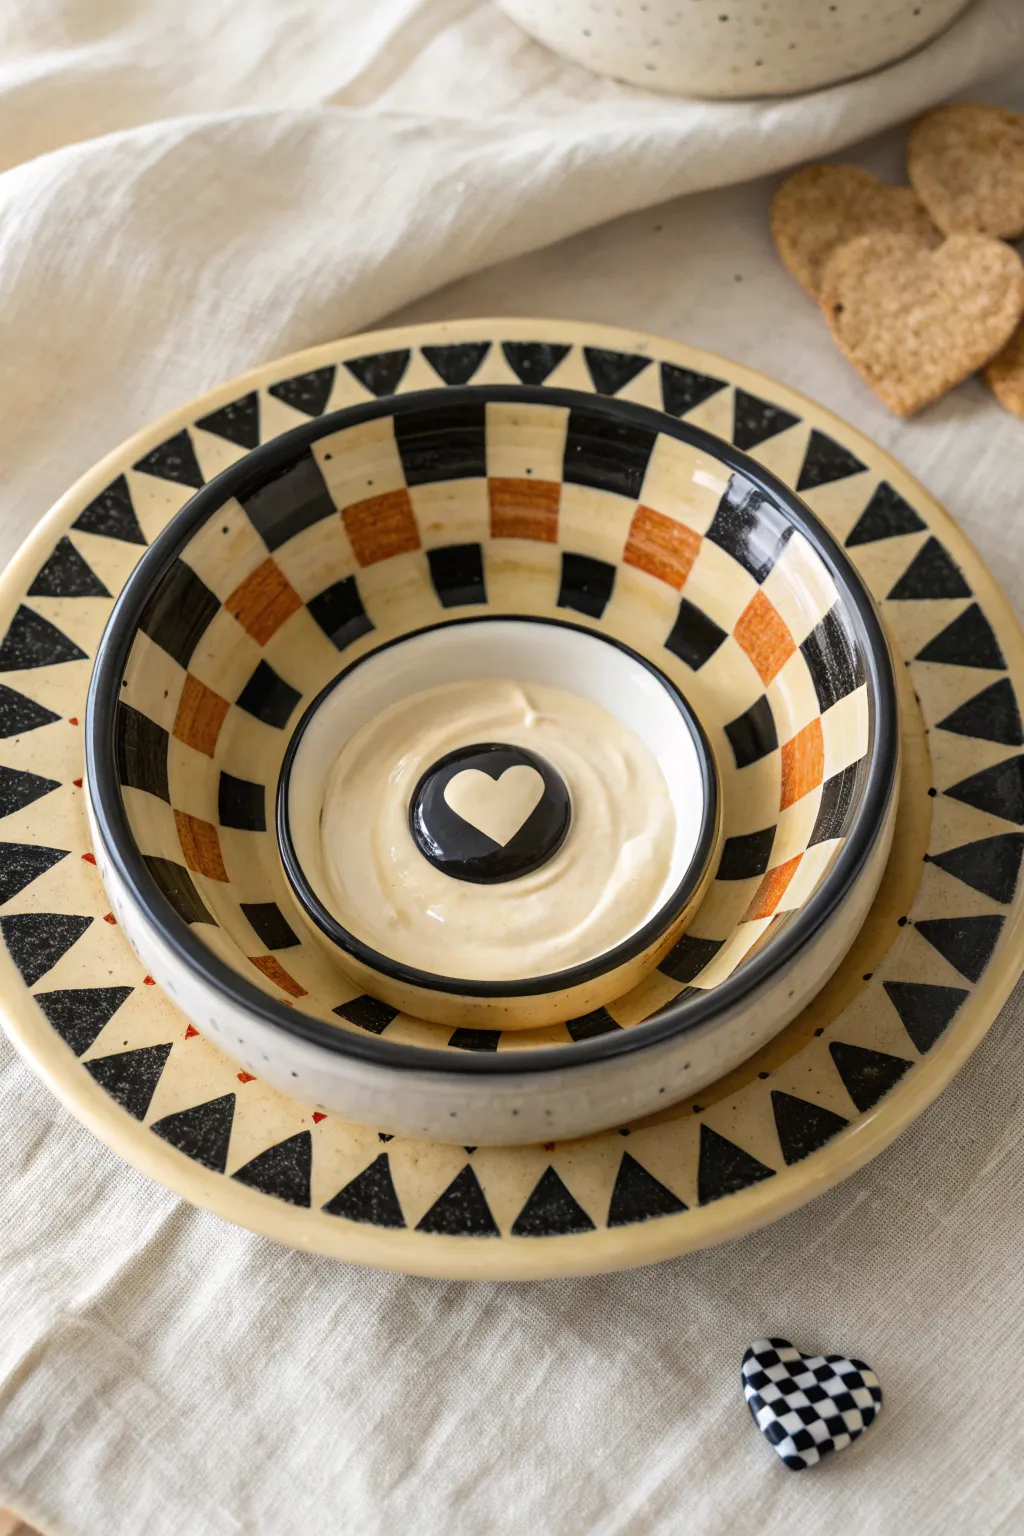
This charming chip-and-dip set combines bold geometric contrasts with warm, earthy tones for a playful yet sophisticated look. By mixing a classic checkerboard pattern with a radiating triangle rim, you create a piece that feels both modern and handcrafted.
Step-by-Step Guide
Materials
- Bisque ceramic chip-and-dip bowl (integrated well style) and matching plate
- Underglaze paints: Deep charcoal black, warm terracotta orange, creamy off-white
- Ceramic glossy clear glaze
- Small flat shader brush (size 4 or 6)
- Fine liner brush (size 0 or 00)
- Pencil for sketching
- Measuring tape (flexible)
- Stylus or dotting tool (optional)
- Sponge and water bowl
Step 1: Planning and Sketching
-
Prep the bisque:
Begin by wiping down your ceramic bisque with a damp sponge to remove any dust, which ensures the glaze adheres properly. -
Measure the plate rim:
On the large plate’s rim, use your flexible measuring tape to mark even intervals all the way around the outer edge. These will become the bases of your triangles. -
Sketch the triangles:
Draw lines connecting your rim marks to a central imaginary circle, creating a sawtooth or radiating triangle pattern pointing inward. -
Grid the bowl:
Move to the bowl section. Lightly sketch horizontal rings around the interior walls, spacing them evenly. Then, draw vertical lines from the rim down to the center well to create a grid for your checkerboard.
Clean Lines Pro Tip
For ultra-crisp checkerboard lines, use thin automotive masking tape or fineline tape to grid off your squares before painting.
Step 2: Painting the Plate
-
Apply the base coat:
Using the creamy off-white underglaze, paint the entire surface of the plate and bowl, leaving only the areas you intend to paint black or orange blank if you want a crisper color, or paint over everything for a softer look. I prefer painting the whole piece cream first for a unified background tone. -
Fill the triangles:
With your flat shader brush and the charcoal black underglaze, carefully fill in the triangles on the plate rim. -
Refine the edges:
Switch to your fine liner brush to crisp up the points and edges of the black triangles. -
Add detail dots:
Using the handle end of a brush or a dotting tool, add small red or orange dots between the triangle points near the inner edge of the rim for a subtle pop of color.
Step 3: Painting the Checkered Bowl
-
Start the black checks:
On the interior of the bowl, identify which squares will be black. Use the flat shader brush to fill them in, working in a checkerboard pattern. -
Add the terracotta checks:
Select a row or specific squares to be the accent color. Fill these with the warm terracotta orange underglaze, creating a nice variation against the black and cream. -
Detail the rim:
Paint a thin black line along the very top edge of the bowl rim to frame the checkerboard design. -
Paint the dip well:
For the center dip well, paint the rim black to define the separation. Leave the interior cream.
Level Up: Texture
Before the first firing, use a needle tool to scratch gently into the orange squares, adding a woven texture that glaze will pool into.
Step 4: The Center Surprise
-
Create the center motif:
In the very bottom of the dip well, use black underglaze to paint a small circle. -
Add the heart:
Once the black circle is touch-dry, carefully paint a cream heart in the center, or scrape away the black paint to reveal the cream base underneath if you haven’t fired it yet (sgraffito technique). -
Check for coverage:
Review your work. Most underglazes require three coats for solid opacity, so re-apply over the black and orange areas as needed. -
One final check:
Look for any stray pencil lines or smudges; pencil marks usually burn off, but heavy graphite can repel glaze.
Step 5: Glazing and Finishing
-
Dip or brush clear glaze:
Apply a clear glossy glaze over the entire piece. If brushing, apply two even coats in opposite directions. -
Stilt and fire:
Wipe the foot of the bowl clean so it doesn’t stick to the kiln shelf. The piece is now ready for firing according to the clay and glaze specifications.
Once fired, fill that center well with your favorite dip and enjoy the handmade charm at your next gathering
Gradient Ombré That Flows Into the Dip
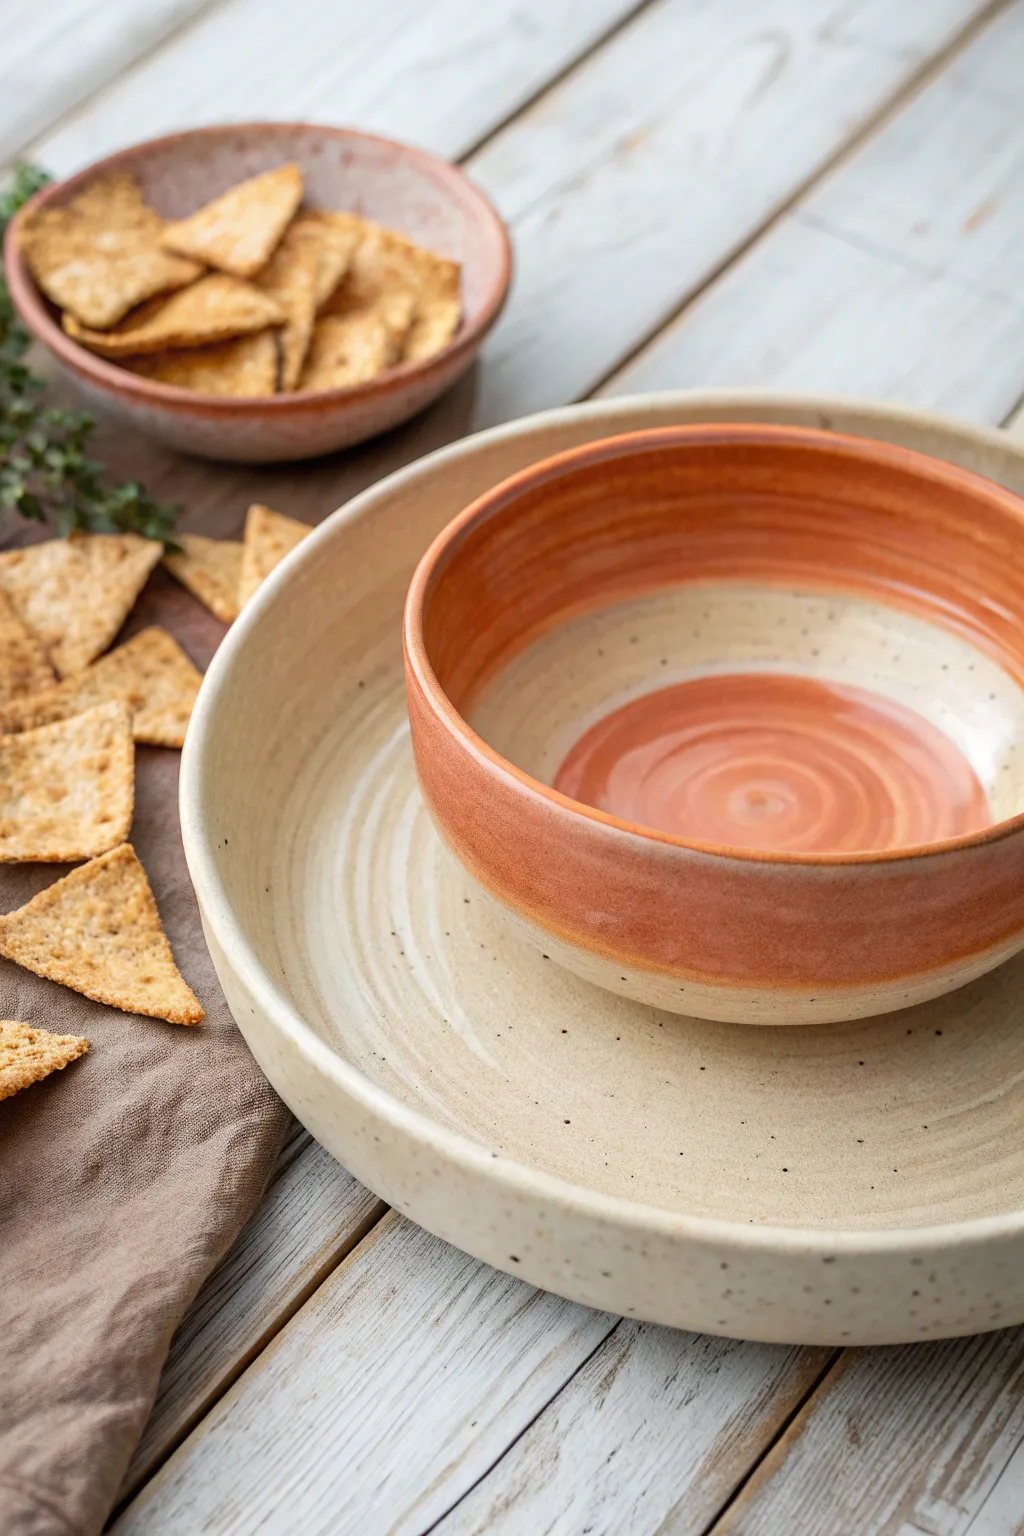

Create a warm, inviting chip and dip set featuring a beautiful gradient that mimics the soft glow of a sunset. This project uses a two-piece bisque approach to achieve a versatile serving station where the color flows seamlessly from the rim of the dip bowl into its center.
How-To Guide
Materials
- Large, shallow ceramic platter (bisque)
- Small companion ceramic bowl (bisque)
- Sponge or damp cloth
- Underglaze (Terracotta/Burnt Orange)
- Underglaze (Warm Cream/Off-White)
- Medium soft fan brush
- Small detail brush
- Clear transparent glaze
- Turnbanding wheel (optional)
- Old toothbrush (for speckling)
- Kiln (or access to firing service)
Step 1: Preparation & Base Coat
-
Clean the bisque:
Start by wiping down both the platter and the small bowl with a damp sponge. This removes any dust that could prevent the glaze from adhering properly. -
Apply the cream base on the platter:
Using a soft fan brush, apply three thin, even coats of the Warm Cream underglaze to the entire interior of the large platter. Allow each coat to dry until it loses its sheen before applying the next. -
Coat the small bowl interior:
Apply the same Warm Cream underglaze to the interior of the small bowl, but stop about halfway up the wall. You want the bottom half and the center to be this creamy base color. -
Smooth the brushstrokes:
If you notice heavy brushstrokes, gently dampen your finger and smooth them out while the underglaze is still slightly cool to the touch.
Uneven Blending?
If your gradient looks streaky, use a soft, damp sponge to dab the transition line rather than brushing it. This creates a softer, cloud-like fade between the colors.
Step 2: Creating the Gradient Bowl
-
Start the rim color:
Load your fan brush with the Terracotta underglaze. On the small bowl, paint the top rim and the upper half of the interior walls. -
Blend the transition:
While the terracotta is still wet, dip your brush in water (or a mix of water and a tiny bit of the cream glaze) and gently drag the paint downward where the two colors meet. Use horizontal strokes to blur the line. -
Paint the exterior:
Paint the entire exterior of the small bowl with the Terracotta underglaze. I find that three coats provide the most opaque, rich coverage here. -
Create the center swirl:
Dip a small detail brush into the Terracotta underglaze. Place the bowl on a banding wheel (or just rotate it manually on a table) and paint a spiral starting from the very center of the bowl floor, expanding outward about an inch. -
Soften the center spiral:
Clean your brush, leave it damp, and firmly wipe the edges of your center spiral. You want it to look like a watercolor stain rather than a hard line.
Go Rustic
Leave the exterior of the large platter unglazed (raw clay) for a textural contrast against the smooth, shiny glazed interior. It adds a wonderful tactile element.
Step 3: Texturing the Platter
-
Create the platter spiral:
To mimic the texture seen in the image, mix a tiny drop of Terracotta into your Cream glaze to make a very pale beige. Using a stiff brush, paint a wide, loose spiral on the floor of the large platter. -
Add the speckled effect:
Dip an old toothbrush into watered-down Terracotta underglaze. Hold the brush over the large platter and run your thumb across the bristles to flick tiny specks onto the cream surface. -
Speckle the bowl:
Repeat this speckling process inside the cream section of the small bowl to tie the two pieces together visually. -
Clean the rims:
Use a damp sponge to clean the very bottom foot of both pieces so they don’t stick to the kiln shelf.
Step 4: Finishing & Firing
-
Dry completely:
Let both pieces dry for at least 24 hours to ensure all moisture has evaporated from the clay body. -
Bisque fire:
Fire the pieces to cone 04 (or your clay’s specific bisque temperature) to set the underglaze. -
Apply clear glaze:
Once cooled, dip or brush a coat of clear transparent glaze over both pieces. This will make them food-safe and shiny. -
Glaze fire:
Fire the pieces again to the glaze temperature (usually cone 06 or cone 6, depending on your clay type). -
Final inspection:
Check the rims and surfaces for any sharp spots. If needed, sand the unglazed foot lightly with wet sandpaper.
Now you have a stunning, cohesive serving set perfect for tacos, hummus, or your favorite movie snacks
Night Sky Rim With a Moon Dip Well
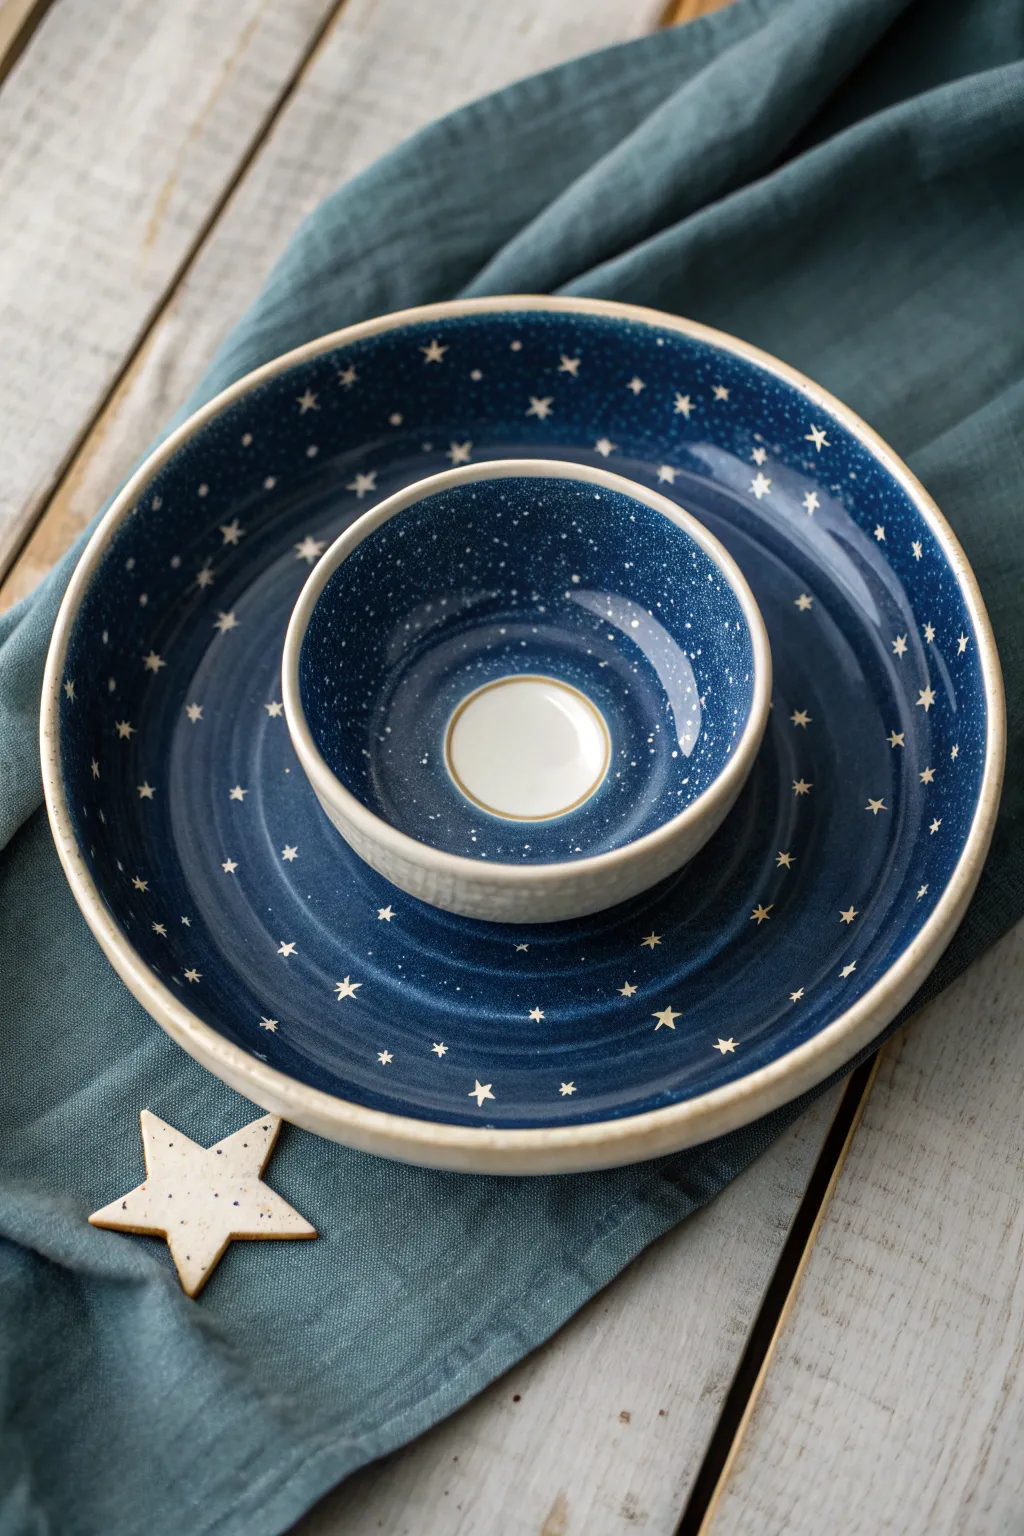

Transform a simple bisque set into a cosmic masterpiece with this deep indigo glazing technique. The glossy finish captures the depth of the night sky, featuring scattered constellations and a bright moon-like center for your favorite dips.
Step-by-Step Tutorial
Materials
- Bisque-fired chip and dip bowl set (or one large plate and one small bowl)
- Deep indigo or midnight blue ceramic glaze (glossy)
- Cream or off-white ceramic glaze (opaque)
- Small fine-point detail brush
- Medium soft fan brush
- Old toothbrush or stiff bristle brush
- Wax resist (liquid emulsion)
- Sponge and water
- Lazy Susan or banding wheel (optional but helpful)
Step 1: Preparation and Masking
-
Clean surface:
Begin by wiping down your bisque ware with a damp sponge. This removes any kiln dust or oils from your hands that might prevent the glaze from adhering properly. -
Map the rim:
Dip your fine detail brush into the wax resist. Carefully paint a thin line along the very top edge of the rim on both the large bowl and the small dip bowl. This will keep the raw clay exposed or allow for a contrasting rim later. -
Define the moon:
If you want the center ‘moon’ at the bottom of the dip bowl to remain perfectly crisp, paint a circle of wax resist right in the center basin. Alternatively, you can carefully paint around this area later. -
Dry the resist:
Allow the wax resist to dry completely. It should turn transparent and feel slightly tacky or hard to the touch before you move on to glazing.
Starry Depth Pro-Tip
For a ‘Milky Way’ effect, sponge a very faint, watery layer of light blue or teal across the dark blue before adding your white stars.
Step 2: Applying the Night Sky
-
First coat of blue:
Pour a small amount of deep indigo glaze onto your palette. Using the soft fan brush, apply a smooth, even coat to the interior of the large bowl and the interior walls of the small bowl. -
Create depth:
I like to brush in a circular motion following the shape of the bowl to minimize visible brushstrokes. Avoid the center circle of the small bowl if you didn’t wax it. -
Second coat:
Once the first coat has lost its sheen (is dry to the touch), apply a second coat of the indigo glaze. This thicker application is crucial for achieving that deep, void-like blue color. -
Cleaning the rim:
If any blue glaze got onto the waxed rim, use a damp sponge to gently wipe it away. The wax will protect the clay underneath, making cleanup easy.
Step 3: The Moon and Stars
-
Paint the moon:
Using a clean medium brush, fill the bottom center of the small dip bowl with the cream or off-white glaze. Apply 2-3 coats to ensure it is opaque and solid. -
Mix star consistency:
Take a small amount of the cream glaze and thin it slightly with a few drops of water. You want a consistency similar to heavy cream or melted ice cream for the spattering effect. -
Spatter the galaxy:
Dip an old toothbrush into the thinned cream glaze. Hold it over the blue sections of the bowls and run your thumb across the bristles to flick tiny specks of ‘stardust’ onto the dark background. -
Hand-paint major stars:
For the larger, brighter stars, dip the fine-point detail brush into the un-thinned cream glaze. Paint small five-pointed stars or cross-shapes randomly across the surface. -
Add constellations:
Look for empty spaces that need balance and place a few carefully painted dots or tiny stars there. Varying the size of the stars creates a sense of visual depth. -
Final rim check:
If you want a glazed rim instead of raw clay, you can now carefully paint the rim with the cream glaze. The wax resist will burn off in the kiln, but painting over wax can be tricky, so stripping the wax or painting over raw clay is better.
Pinholing Issues?
If you see tiny bubbles in the dried glaze before firing, rub them smooth with a dry finger. This prevents ‘pinholes’ or craters in the final fired surface.
Step 4: Finishing and Firing
-
Check the foot:
Flip both bowls over and ensure the bottom foot rings are completely free of glaze. Wipe them with a clean, wet sponge to prevent the bowls from sticking to the kiln shelf. -
Dry completely:
Let the piece dry for at least 24 hours to ensure all moisture has evaporated from the clay body before firing. -
Fire the piece:
Fire the bowls according to the specific cone instructions on your glaze bottle (typically Cone 5 or 6 for stoneware). This allows the glazes to melt and interact properly.
Once cooled, your celestial serving set is ready to bring a touch of starlight to your next gathering
Koi or Goldfish Circling the Center
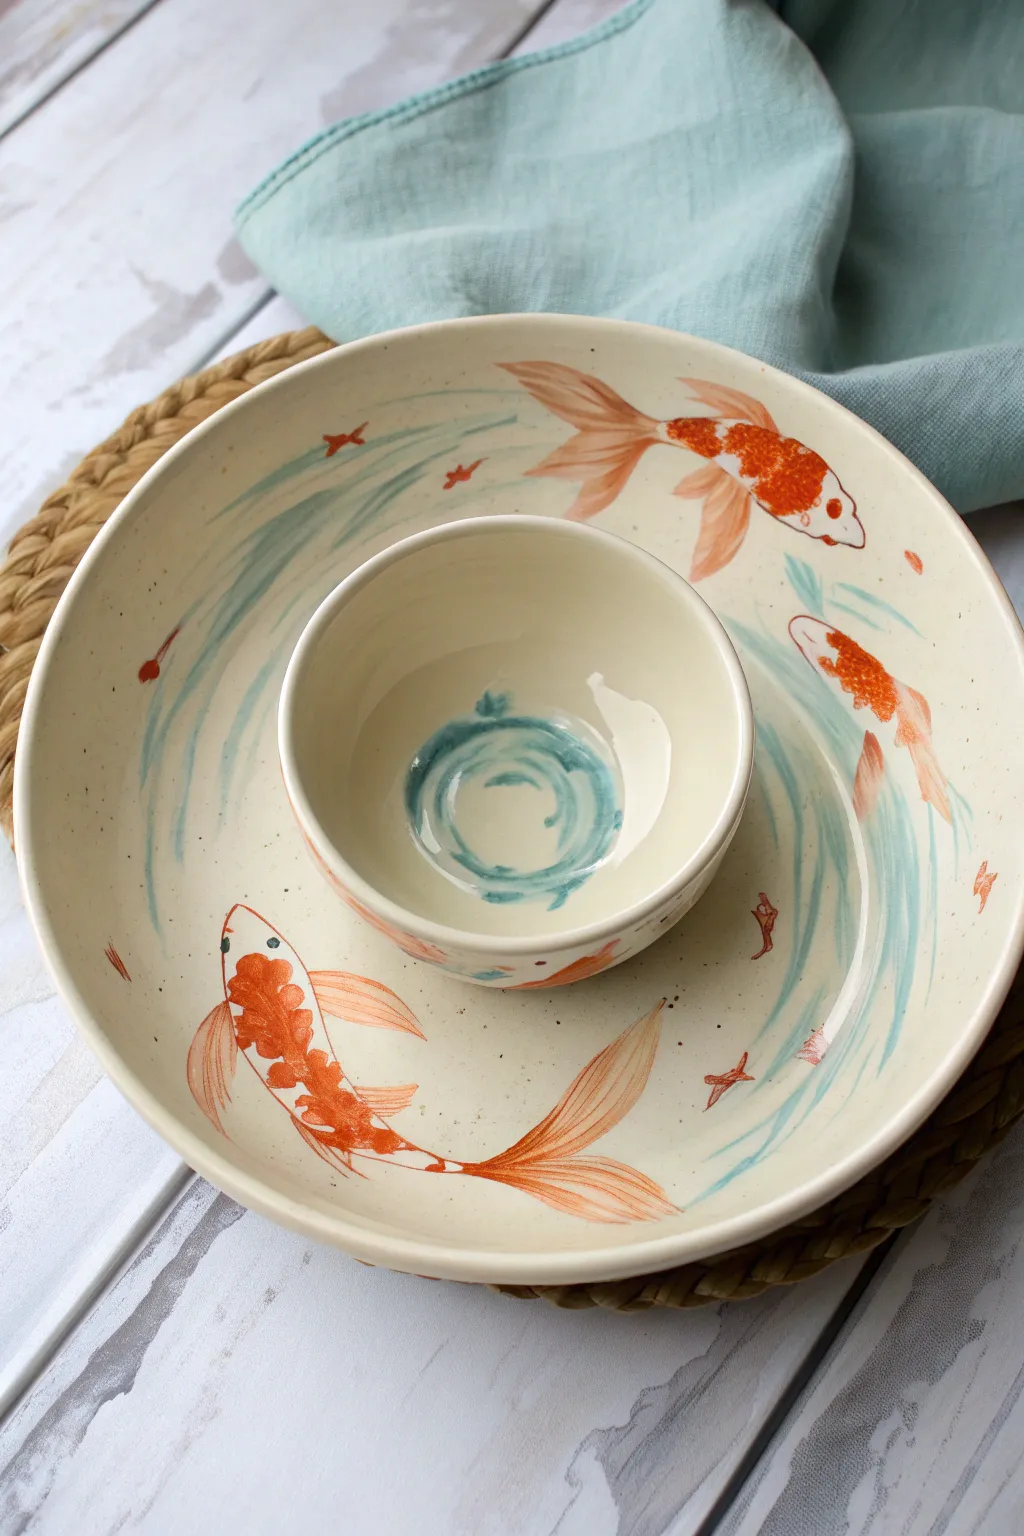
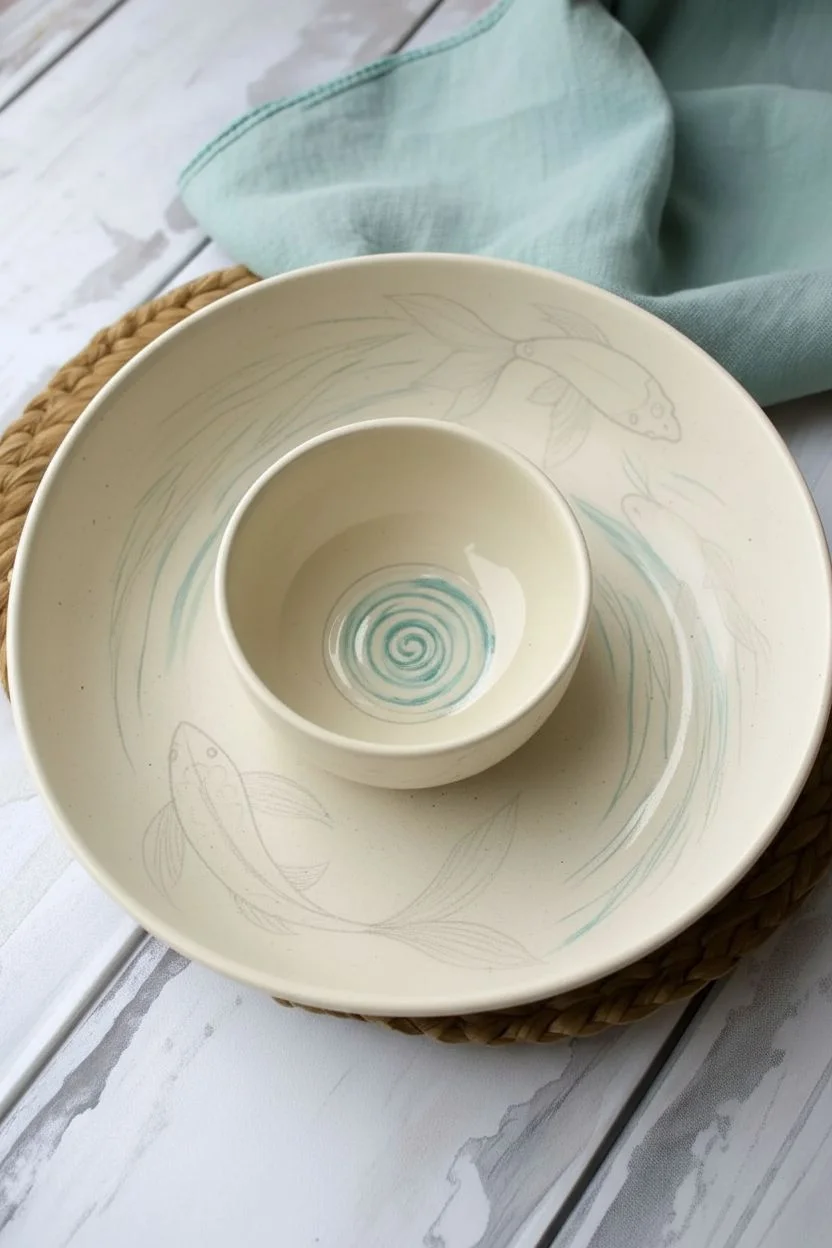
Bring a sense of movement and tranquility to your table with this elegantly hand-painted chip and dip set. The flowing lines of swimming koi fish and gentle water ripples create a cohesive design that seamlessly connects the central dip bowl with the larger serving platter.
How-To Guide
Materials
- Bisque-fired ceramic chip and dip bowl set (integrated or separate)
- Underglaze paints: Bright Orange, Pearl Grey, Teal/Light Blue, Black
- Round watercolor brushes (sizes 4 and 6)
- Fine liner brush (size 0 or 00 for details)
- Pencil for sketching
- Clear dipping glaze
- Sponge and water bowl
- Palette or small dishes for mixing
- Kiln access (or use food-safe ceramic paints for a bake-at-home version)
Step 1: Planning and Sketching
-
Surface Preparation:
Begin by wiping down your bisque ware with a clean, slightly damp sponge. This removes any ceramic dust that could prevent the glaze from adhering properly. -
Map Out the Flow:
Using a light pencil, gently sketch the path of the water currents. Imagine the water swirling around the central bowl like a whirlpool. Draw long, sweeping curves to represent this flow. -
Position the Fish:
Sketch three koi fish swimming in a counter-clockwise circle on the larger rim. Vary their positions slightly so they aren’t perfectly symmetrical. -
Connect the Design:
Ensure at least one fish or water line visually connects the outer bowl to the inner bowl. In the center of the small bowl, sketch a simple ripple circle.
Step 2: Painting the Water
-
Dilute the Blue:
Mix your teal or light blue underglaze with a little water to create a watercolor-like consistency. We want a wash, not an opaque line. -
Create Current Lines:
Using a size 6 round brush, paint freely along your sketched water lines. Apply more pressure at the start of the stroke and lift off at the end to create tapered, elegant swooshes. -
Center Ripples:
Inside the small chemical dip bowl, paint concentric, broken circles with the same watery blue. This mimics a drop of water hitting the center surface. -
Add Accents:
Paint a few tiny, scattered ‘x’ shapes or small leaf shapes floating in the current using a reddish-orange tone to suggest fallen leaves or petals.
Watery effects
To get that translucent fin look, I like to mix one drop of water into every two drops of orange paint. Test opacities on a spare tile first.
Step 3: Creating the Koi
-
Base Body Shape:
With the bright orange underglaze and a size 4 brush, block in the main body of the fish. Use a stippling motion (dotting) rather than smooth strokes to suggest scales and texture. -
Variation is Key:
Leave some areas of the fish body unpainted or very lightly washed with orange to represent white patches, giving the koi a classic mottled look. -
Painting the Tails:
Switch to a diluted orange wash for the tails and fins. Use long, wispy strokes that trail behind the fish to emphasize movement. The tail looking ‘transparent’ adds realism. -
Detailing the Fins:
Once the initial tail wash is dry, come back with a slightly darker, undiluted orange. Paint thin lines inside the fins and tail to mimic the structural spines.
Fixing heavy lines
If your water ripples look too thick and heavy, dip a stiff brush in clean water and scrub the edges of the painted line to soften and fade them out.
Step 4: Defining Details
-
Outline Work:
Using a very fine liner brush and black underglaze (or a very dark grey), add the eyes. Keep them simple—just a small dot often works best. -
refine the Face:
Add tiny outlines around the head area and gills if desired, but keep the lines broken and organic rather than cartoony solid outlines. -
Clean Up:
Check for any stray smudges. If you made a mistake, you can gently scrape it off with a craft knife or wipe with a damp Q-tip once dry. -
Glazing and Firing:
Once the underglaze is completely bone dry, dip the entire piece in a clear gloss glaze. Fire according to your clay and glaze specifications (usually Cone 06 or Cone 6).
Once fired, this serene bowl set is ready to serve up tranquility alongside your favorite snacks
Trompe-l’Oeil Dip Illusion
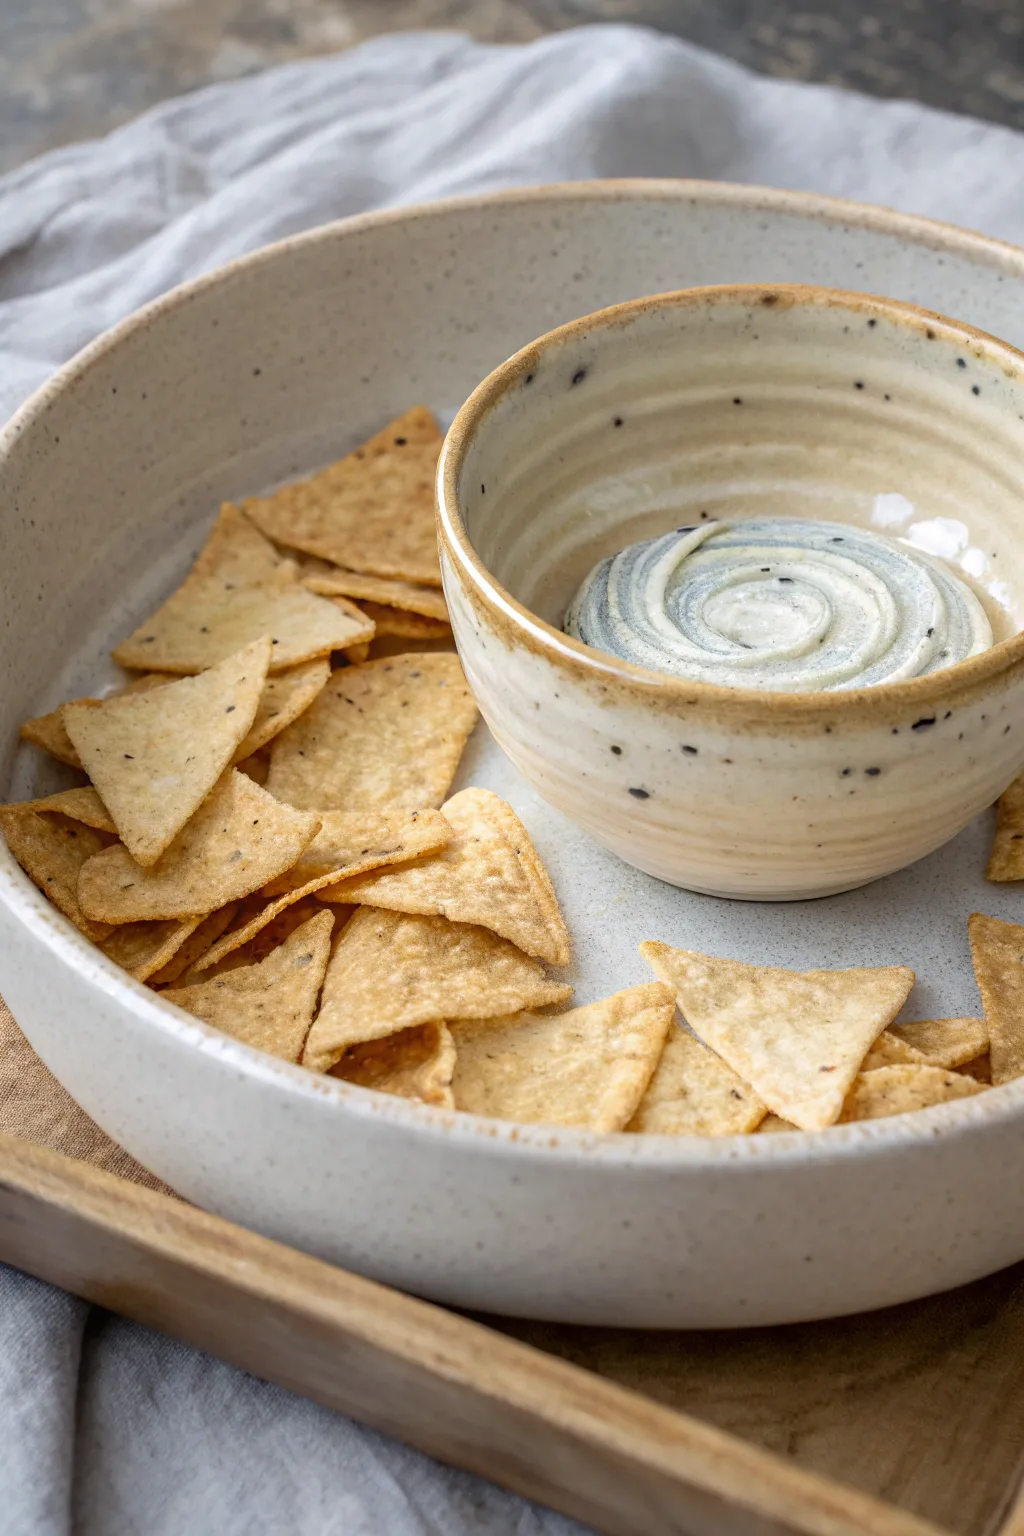
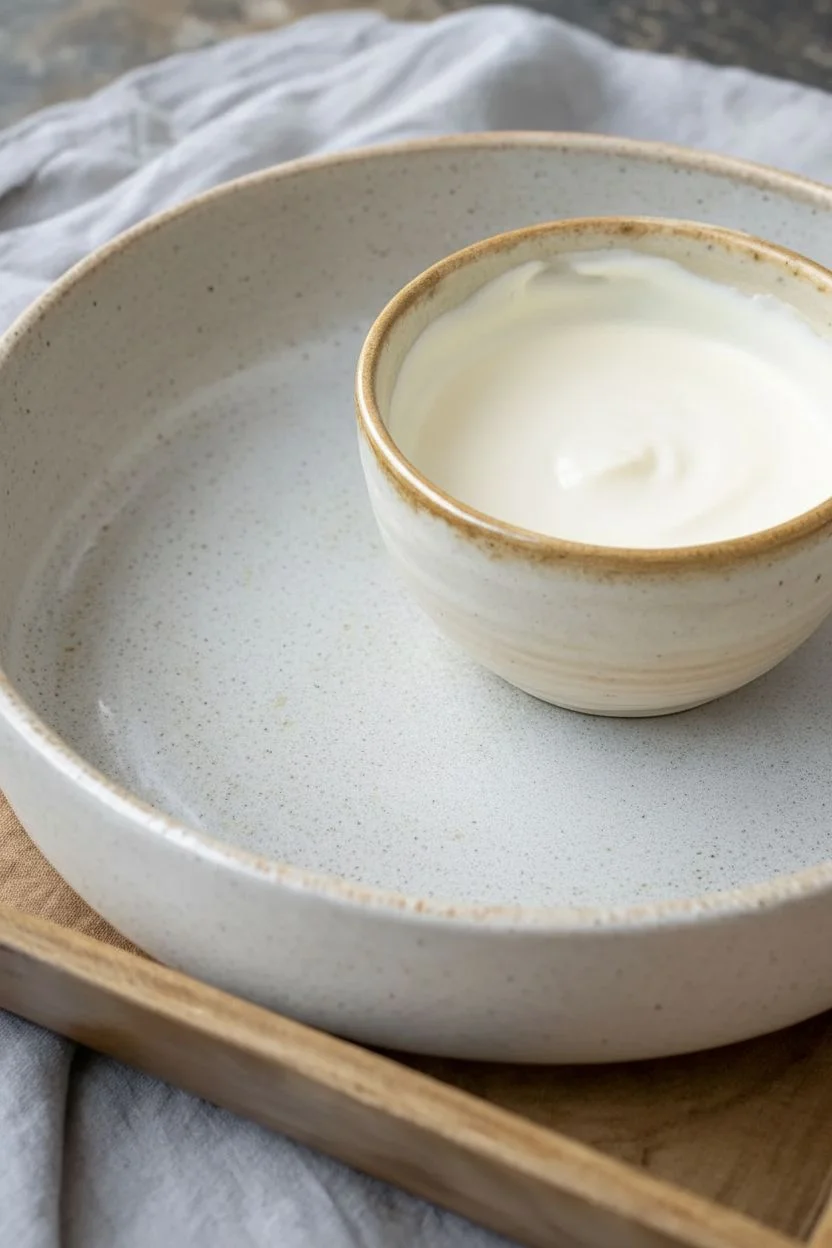
Transform a standard chip-and-dip set into a cheeky conversation piece with this clever trompe-l’œil painting project. By painting a realistic swirl of dip permanently into the bottom of the attached bowl, you’ll ensure the party never truly runs out of snacks.
Step-by-Step Guide
Materials
- Combined ceramic chip and dip bowl (bisque or glazed)
- Ceramic paints or porcelain markers (cream, white, light grey, sage green)
- Pebeo Porcelaine 150 paints (optional, for durability)
- Fine liner brush (size 0 or 00)
- Small flat brush (size 2 or 4)
- Rubbing alcohol
- Paper towels
- Clear gloss food-safe ceramic glaze (if firing)
- Oven (for curing)
Step 1: Preparation & Base Coat
-
Clean the surface:
Before you begin, wipe the interior of the dip bowl thoroughly with rubbing alcohol. This removes any oils or residues that might prevent the paint from adhering properly to the ceramic surface. -
Mix your dip color:
Create a base color that mimics a creamy ranch or onion dip. Mix a generous amount of white with a tiny drop of yellow ochre or cream to warm it up. The color should be off-white but not stark white. -
Paint the dip puddle:
Using the small flat brush, paint a circular ‘puddle’ at the bottom of the dip bowl. It doesn’t need to be perfectly round; a slightly organic shape looks more natural. -
Build opacity:
Let the first layer dry to the touch, then apply a second coat. You want a solid, opaque base where the ceramic underneath doesn’t show through.
Highlight Hack
Add a tiny dot of pure white ‘gloss’ reflection on the highest ridge of your painted dip. It makes the ‘creamy’ texture look wet and incredibly realistic.
Step 2: Creating the Swirl Illusion
-
Mix shadow tones:
While the base dries, mix a shadow color. Take your base cream color and add a tiny touch of grey and sage green. This will create the depth needed for the ridges of the dip. -
Map the spiral:
Using a very faint pencil line or just visualizing it, plan a tight spiral starting from the center and winding outward. This mimics how a spoon leaves a trail in thick dip. -
Paint the shadow spiral:
With your fine liner brush and the shadow mixture, paint the ‘valley’ of the spiral. Keep your hand steady and let the line vary slightly in thickness to look organic. -
Blend the edges:
Before the shadow paint dries completely, use a clean, slightly damp brush to soften one edge of the shadow line. I find this helps the ridges look rounded rather than sharp. -
Add highlights:
Mix a pure white highlight color. Paint a thin line along the ‘peak’ of the spiral ridge, right next to the shadow but on the opposite side of the blend. This high contrast creates the 3D effect.
Step 3: Texture & Speckles
-
Create seasoning speckles:
Most dips have herbs or pepper. Mix a dark grey/black and a dark green on your palette. -
Apply the speckles:
Using the very tip of your smallest brush or a toothpick, dot tiny specks into the painted dip. Concentrate them slightly in the shadow valleys where herbs would naturally settle. -
Add rim details:
To integrate the painting with the bowl, add a few tiny speckles of black or dark brown on the ceramic rim of the bowl itself, matching the aesthetic of the painted dip. -
Final shadow depth:
Go back in with your darkest shadow tone and deepen the very center of the spiral and the outer edges where the dip meets the bowl wall. This anchors the illusion.
Flavor Variations
Change the color palette to mimic different dips! Use reddish-pinks for salsa, bright green for guacamole, or warm yellow-orange for cheesy queso.
Step 4: Curing & Sealing
-
Dry completely:
Allow the painting to dry for at least 24 hours. The paint must be moisture-free before curing to prevent bubbling. -
Bake to cure:
Place the bowl in a cold oven. Set the temperature to 300°F (150°C) or according to your specific paint instructions. Once it reaches temperature, bake for 35 minutes. -
Cool down:
Turn the oven off and leave the bowl inside until it is completely cool. Removing it while hot can cause cracking. -
Food safe consideration:
If you plan to put real food on top of this art, apply a coat of clear, non-toxic, food-safe gloss glaze over the painted area and re-fire/cure according to the glaze manufacturer’s directions.
Now you have a perpetual party trick that looks ready to eat even when the bowl is empty


Have a question or want to share your own experience? I'd love to hear from you in the comments below!