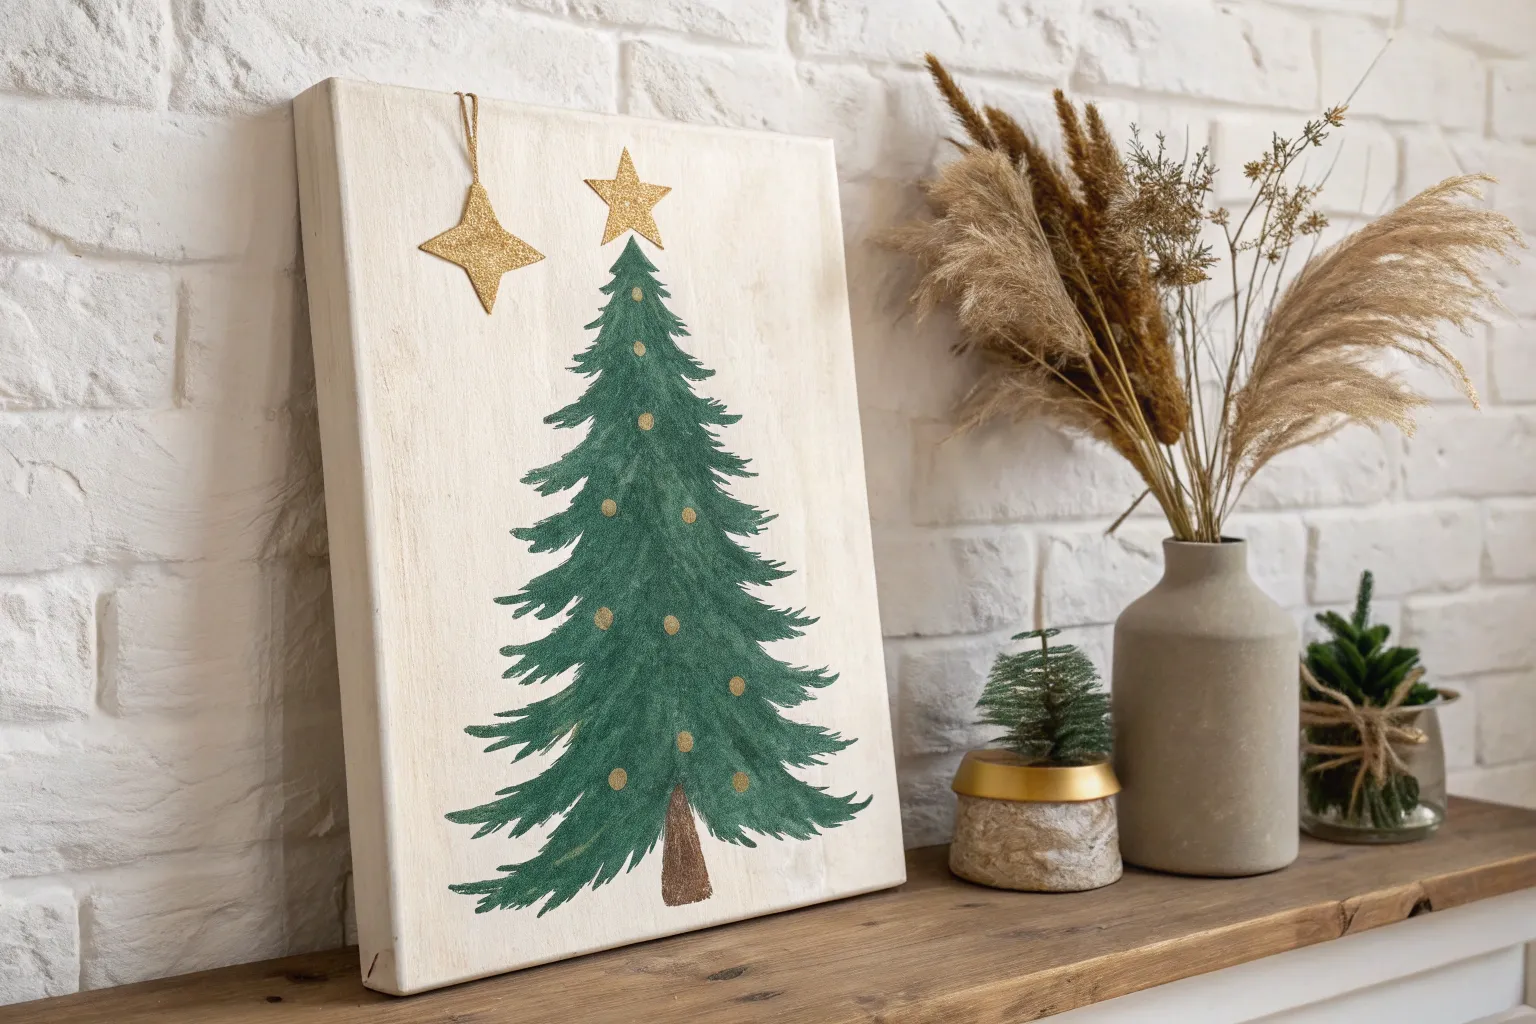
There is something truly magical about capturing the holiday spirit with a paintbrush in hand, turning a blank canvas into a festive masterpiece. Whether you are planning a lively paint and sip party or just want to create cozy DIY holiday decor for your mantelpiece, these ideas will inspire you to mix those reds and greens with confidence.
Whimsical Snowman Gazing Up
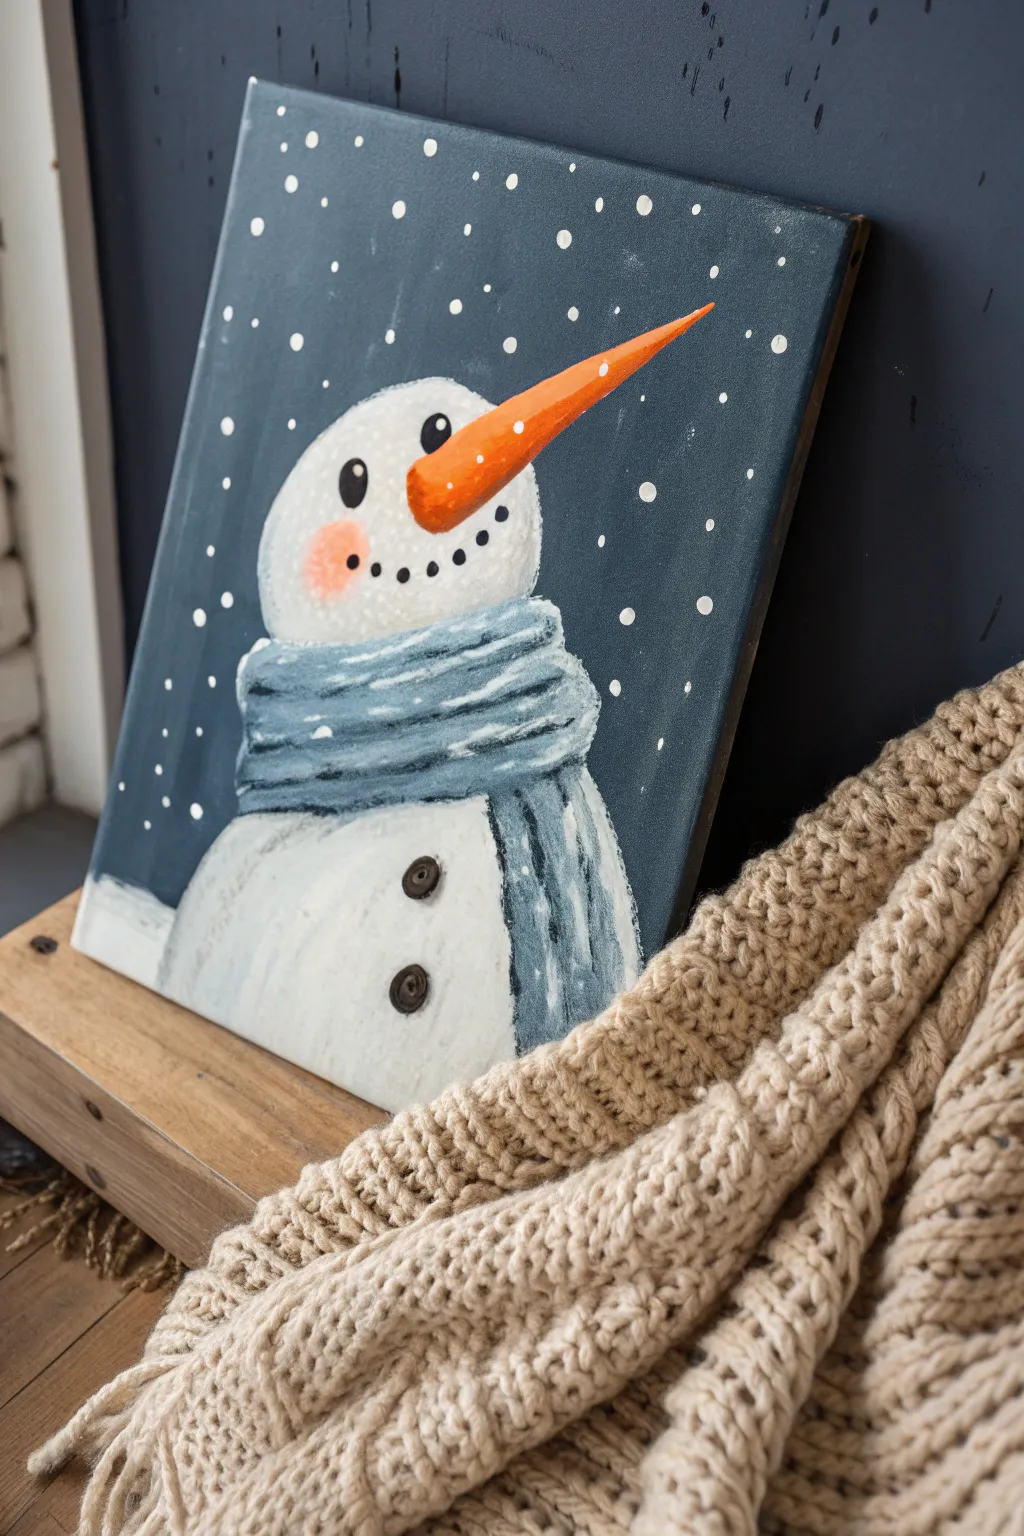
Capture the wonder of the first snowfall with this charming mixed-media artwork featuring a snowman looking skyward. The combination of textured acrylic painting and real wooden buttons gives this piece a delightful handcrafted feel perfect for holiday décor.
Step-by-Step Guide
Materials
- Stretched canvas (e.g., 11×14 inches)
- Acrylic paints: Midnight Blue, Titanium White, Burnt Orange, Lamp Black, Dusty Blue, Light Pink
- Assorted paintbrushes (1-inch flat, medium filbert, small round detail)
- Old toothbrush (optional for splatter)
- Two medium brown wooden buttons
- Strong craft glue or hot glue gun
- White chalk or watercolor pencil
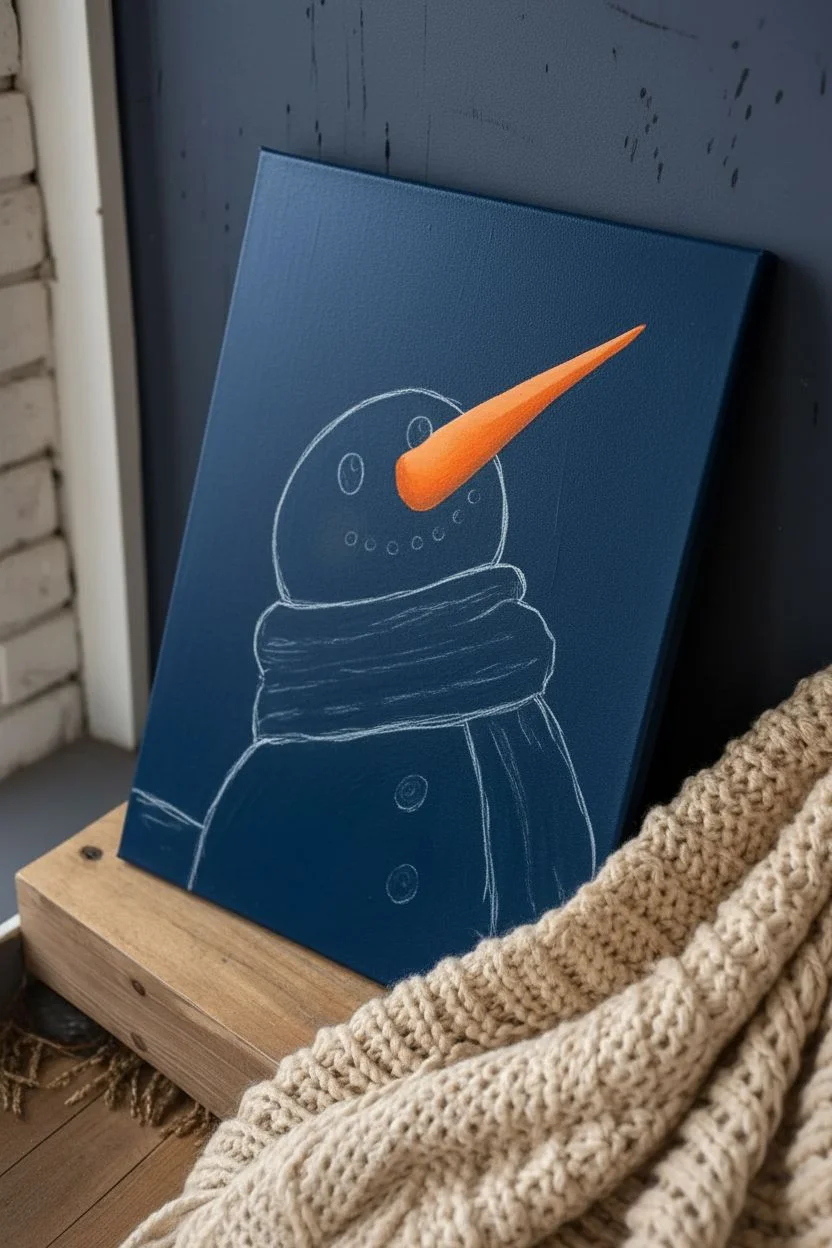
Step 1: Setting the Scene
-
Background base:
Begin by coating your entire canvas with Midnight Blue. Use your large flat brush and smooth strokes to create a solid, dark evening sky. -
Ensure opacity:
If the white of the canvas shows through after the first layer, let it dry completely and apply a second coat for a deep, rich color. -
Sketching the shape:
Once the background is fully dry, use a piece of white chalk to lightly outline your snowman. Draw a large rounded mound at the bottom for the body and a round circle resting on top for the head. -
Mapping features:
Lightly sketch the long, carrot nose pointing diagonally upward toward the top right corner to establish the ‘looking up’ perspective.
Pro Tip: Dry Brushing
For the rosy cheek, wipe almost all the paint off your brush onto a paper towel first. It’s much easier to build up the color slowly than to fix a cheek that is too bright pink!
Step 2: Painting the Snowman
-
Blocking the body:
Load a filbert brush with Titanium White and fill in the head and body shapes. Don’t smooth the paint out perfectly; a little texture mimics packed snow. -
Adding dimension:
While the white is still wet, mix a tiny dot of black into your white to make a very pale grey. Gently blend this along the left side and bottom of the head and body to create shadowy roundness. -
Scarf base layer:
Using Dusty Blue, paint a thick, curved band between the head and body for the scarf, letting the ends trail down the front of the chest. -
Scarf texture:
Mix a little white into your Dusty Blue. Use a smaller round brush to paint horizontal ridges and folds on the scarf loop, and vertical lines on the hanging tails to simulate knit ribbing. -
Deepening shadows:
I like to take a bit of the Midnight Blue and carefully paint thin lines between the ‘folds’ of the scarf to make the lighter sections pop.
Level Up: Knit Texture
To make the scarf look realistically fuzzy, tap your stiffest brush lightly over the blue paint while wet to stipple the surface, breaking up smooth brushstrokes.
Step 3: Face & Details
-
The carrot nose:
Paint the long nose shape with Burnt Orange. Make sure the base is wide near the center of the face and tapers to a sharp point extending beyond the face outline. -
Snowy highlight:
Add a thin line of white along the top edge of the carrot nose to show that snow has landed on it. -
Rosy cheek:
Mix a very small amount of Light Pink with white or use a watered-down pink. Scumble (dry brush) a soft, transparent circle on the cheek area below the eye. -
Eyes and smile:
Using your smallest detail brush and Lamp Black, paint two solid ovals for eyes (one slightly higher than the other) and a dotted curve for the coal mouth. -
Eye sparkles:
Once the black paint is dry, add a tiny white dot near the top of each eye to bring the character to life.
Step 4: Finishing Touches
-
Splatter snow:
Thin down some Titanium White paint with water. dip an old toothbrush or stiff brush into it, and flick the bristles to create a spray of fine snow across the whole canvas. -
Heavy snowflakes:
Use the handle end of a paintbrush dipped in white paint to dot larger, distinct snowflakes randomly over the background and the snowman itself. -
Adding the buttons:
For the final 3D element, apply a dab of strong craft glue to the back of two brown wooden buttons and press them firmly onto the chest area of the snowman. -
Final cleanup:
If any chalk lines are still visible, wipe them away gently with a damp cotton swab once the painting is completely dry.
Let your finished masterpiece dry flat overnight to ensure the heavy buttons stay perfectly in place on your new winter friend.


Classic Red-Nosed Reindeer Portrait
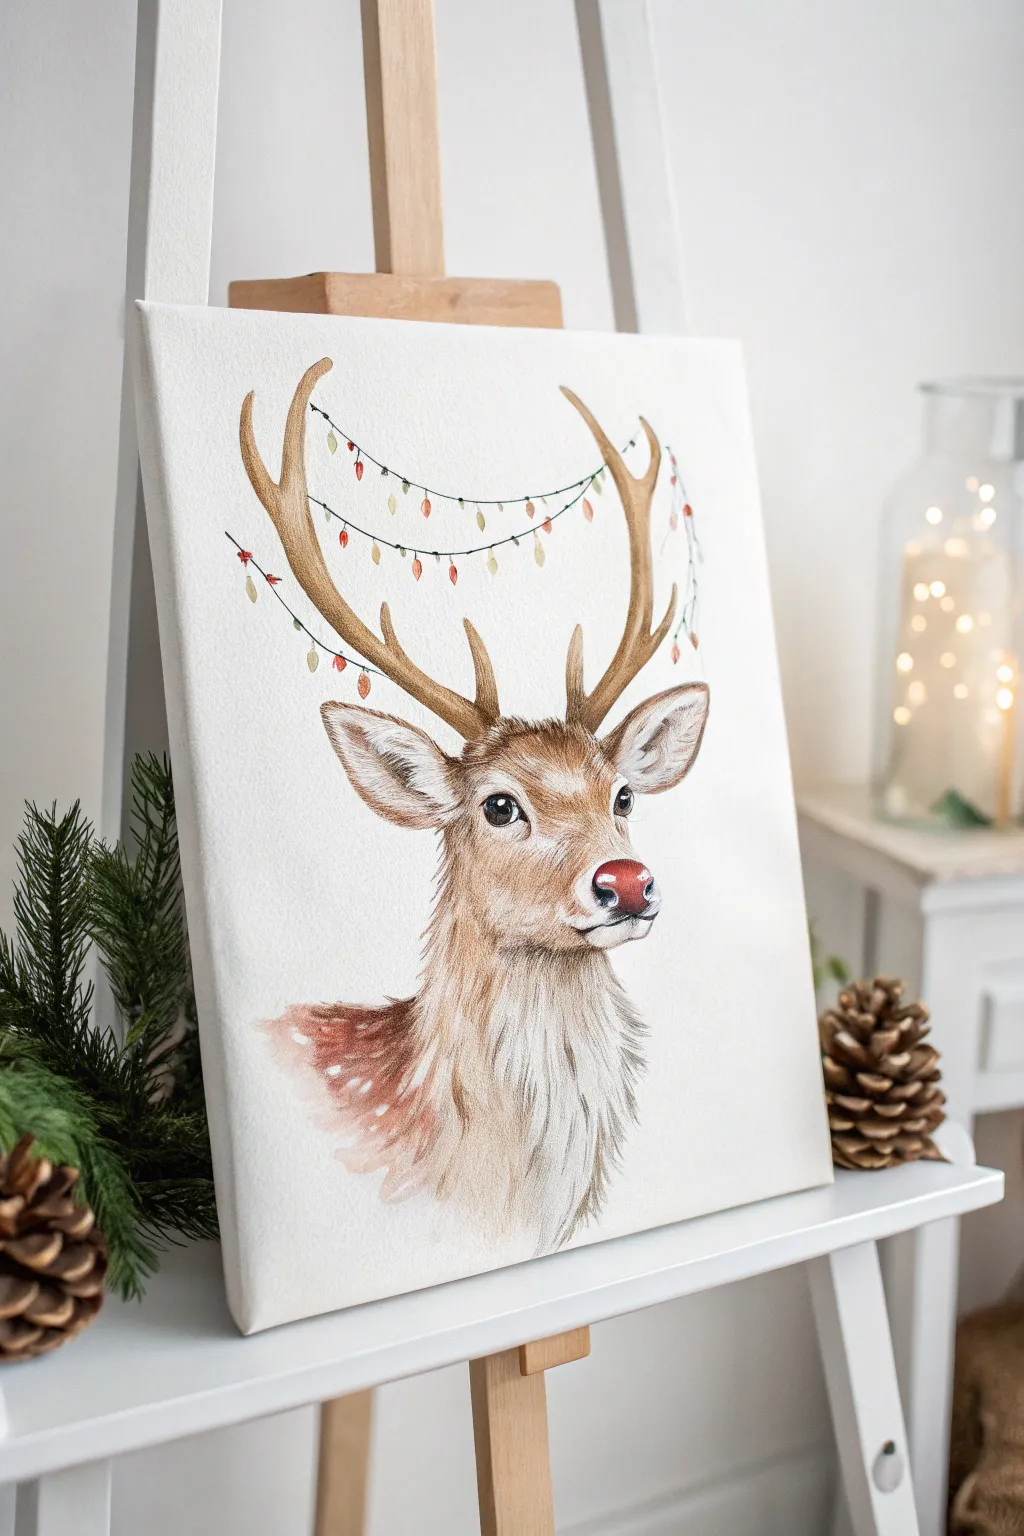
This elegant project combines the soft, airy look of watercolor with the defined texture of drawing to create a festive masterpiece. The result is a charming, realistic reindeer portrait adorned with delicate holiday lights, perfect for a mantel display.
How-To Guide
Materials
- Primed canvas (11×14 or similar)
- Light pencil (HB) and eraser
- Fluid acrylic paints (Burnt Sienna, Raw Umber, Titanium White, Bright Red, Sap Green, Yellow)
- Watercolor pencils or colored pencils (Dark Brown, Black, Warm Grey)
- Soft round brushes (sizes 4, 8)
- Detail liner brush (size 0 or 00)
- Paper towels and water cup
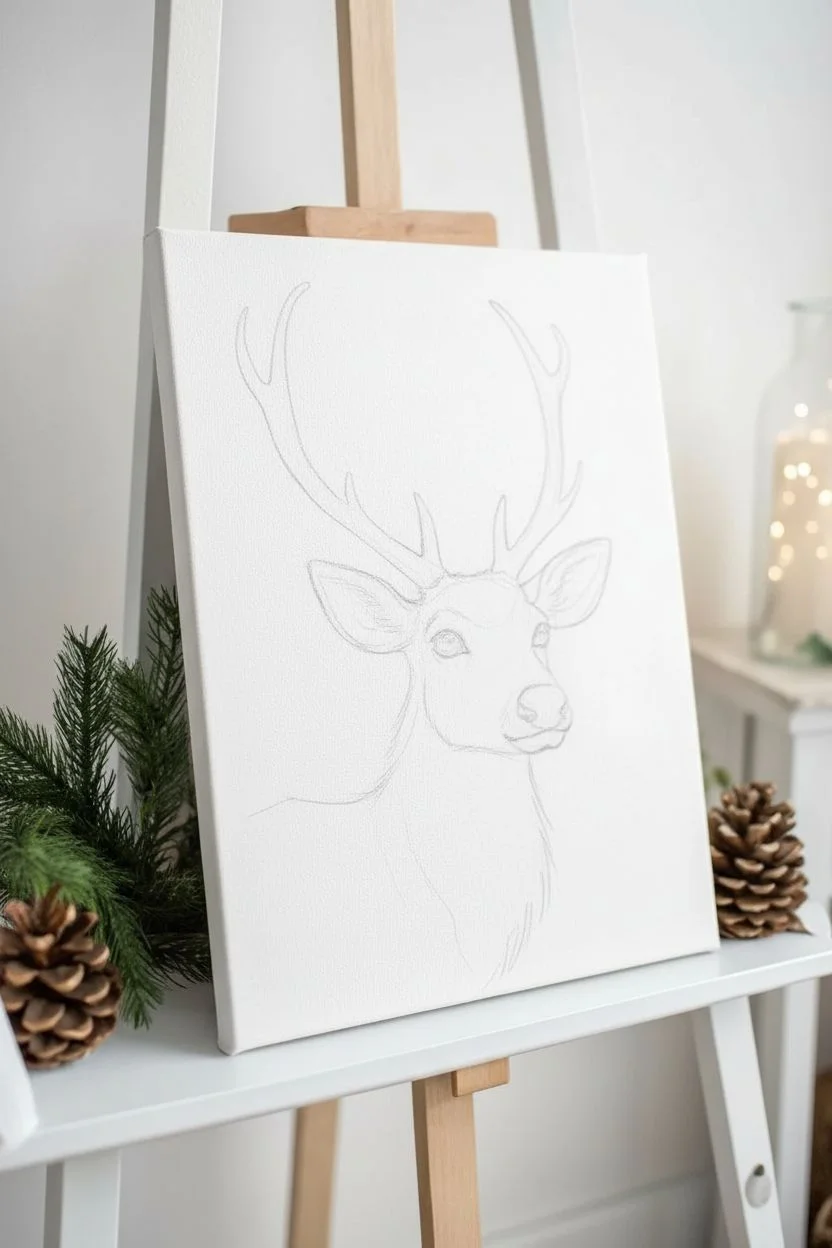
Step 1: Sketching the Composition
-
Outline the head shape:
Begin by lightly sketching the reindeer’s head in the center of the canvas. Draw a teardrop shape for the head, tapering down to the muzzle. -
Add facial features:
Sketch the large, almond-shaped eyes on the sides of the head and a round oval circle for the nose at the tip of the snout. -
Draw the antlers:
Extend two curved lines upward from the forehead to form the main beams of the antlers. Add smaller tines branching off, keeping them organic and slightly asymmetrical. -
Refine the neck and ears:
Sketch the large, leafy ears just below the antlers and draw the neck extending downward, fading out at the bottom for a vignette effect.
Fix Flat Fur
If the fur looks too flat, don’t press harder. instead, use a darker colored pencil in the deepest shadow areas only. Contrast creates depth more effectively than pressure.
Step 2: Applying Base Washes
-
Mix a watery glaze:
Dilute your Burnt Sienna acrylic paint with plenty of water until it mimics the consistency of watercolor tea. -
Wash the face:
Using a size 8 round brush, gently apply this wash over the head, ears, and neck. Leave the area around the eyes and the chin lighter/unpainted. -
Create the chest gradient:
While the paint is wet, add a touch of dilute Red or Burnt Sienna to the bottom left of the neck, letting it fade into the white canvas to create that dreamy, unfinished edge. -
Base coat the antlers:
Mix Raw Umber with water and fill in the antler shapes. I allow this layer to dry completely before moving on to ensure crisp details later.
Pro Tip: Pencil Prep
Make sure your colored pencils are extremely sharp before starting the fur texture phase. A blunt tip will create a fuzzy, blurry look rather than the crisp hair lines shown here.
Step 3: Creating Texture and Detail
-
Start the fur texture:
Once the paint is bone dry, use a Dark Brown colored pencil to draw short, flicking strokes following the direction of hair growth on the face and neck. -
Deepen the shadows:
Concentrate your pencil strokes around the base of the ears, under the chin, and along the bridge of the nose to build dimension. -
Detail the eyes:
Using black paint or a black pencil, fill in the eyes, leaving the corners white. Darken the pupil significantly. -
Add the eye sparkle:
With a fine detail brush and pure Titanium White, place a small, crisp dot in the upper part of the pupil. This brings the reindeer to life. -
Paint the nose:
Fill the nose area with Bright Red. For a 3D effect, blend a tiny bit of white into the top center while the red is wet to create a highlight. -
Highlight the fur:
Use a white colored pencil or a thicker white paint mixture to add fluffy hair texture inside the ears and on the chest patch.
Step 4: Festive Finishes
-
Enhance the antlers:
Use your liner brush and slightly watered-down Raw Umber to paint faint ridges and cracks on the antlers for a realistic horn texture. -
String the lights:
With the detail brush and Sap Green (or a black fine liner), draw delicate looping wires draped loosely between the antler tines. -
Paint the bulbs:
Dab small teardrop shapes along the wire using yellow, red, and orange paints to represent the light bulbs. -
Add bulb highlights:
Wait for the bulbs to dry, then add a tiny speck of white to one side of each bulb to make them look like shiny glass.
Step back and admire your endearing holiday portrait, ready to bring warmth to any room.


Vintage Red Truck with Pine
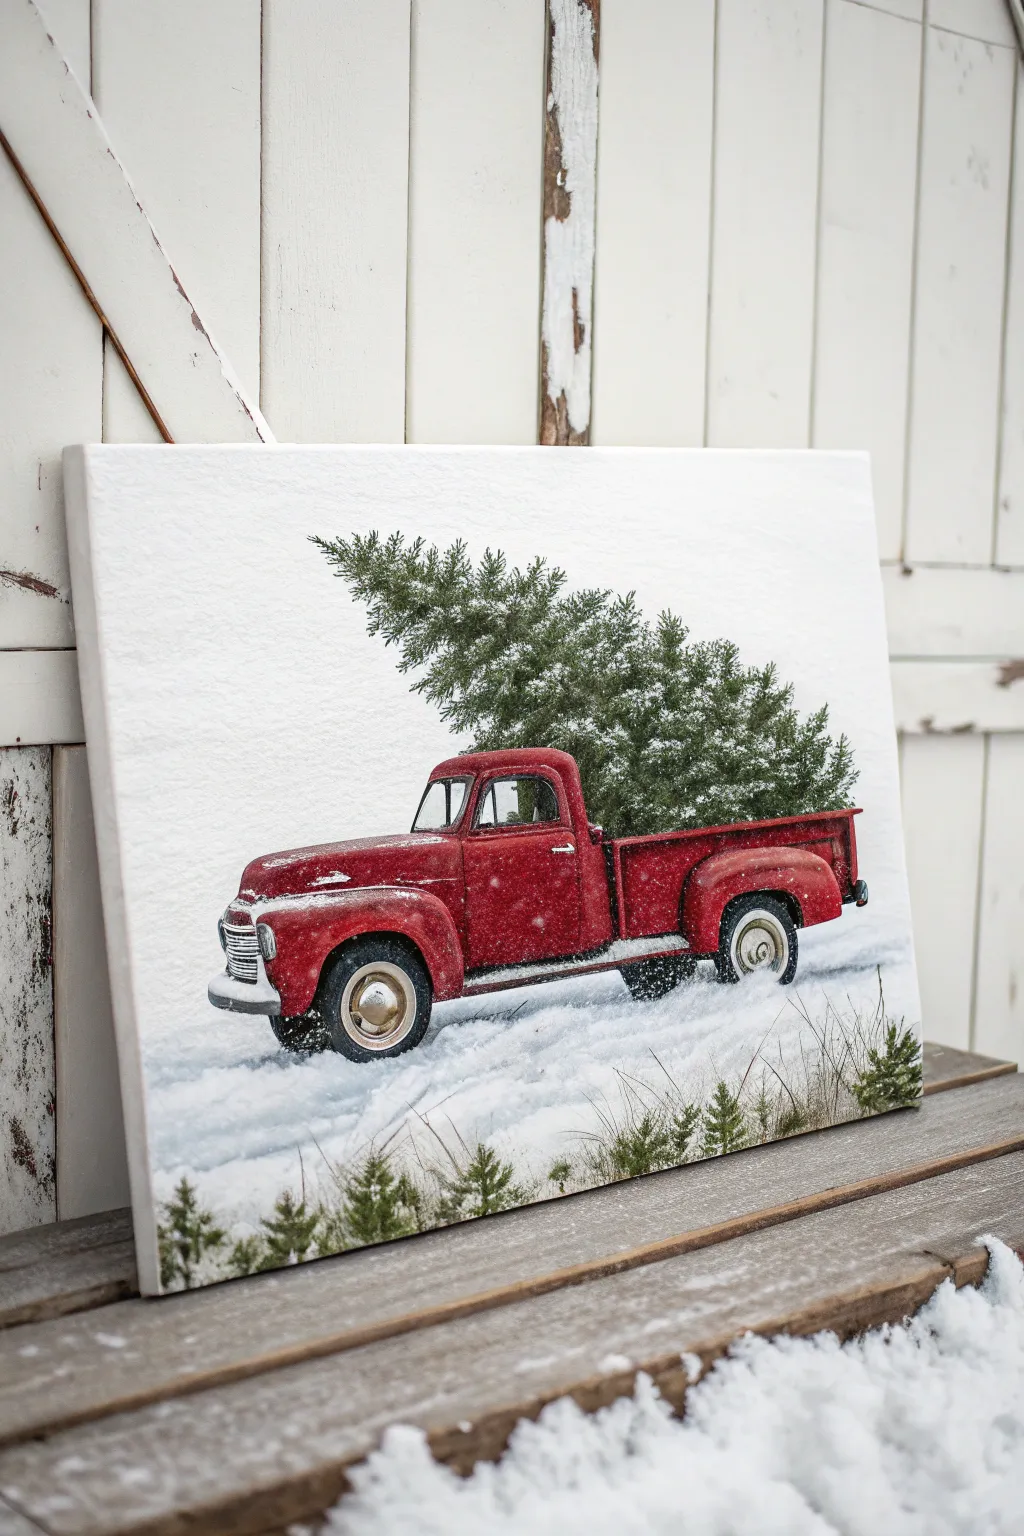
Capture the magic of a country Christmas with this classic scene of a red pickup hauling the perfect tree. This tutorial focuses on creating realistic distressed metal effects and a soft, snowy atmosphere.
Step-by-Step
Materials
- Canvas (16×20 inches recommended)
- Acrylic paints: Cadmium Red, Titanium White, Mars Black, Burnt Umber, Phthalo Green, Ultramarine Blue, Silver/Grey
- Brushes: 1-inch flat, angle shader, fan brush, fine liner
- Pencil and eraser
- Old toothbrush (optional)
- Palette and water cup
Step 1: Setting the Scene
-
Prime the background:
Mix a large amount of Titanium White with a tiny speck of Ultramarine Blue to create a cool, white winter sky. Paint the entire upper two-thirds of the canvas with this mix. -
Establish the ground:
For the bottom third, add just a touch more blue and a microscopic dot of black to your white mix to create the snowy ground tone, blending the horizon line softly so it isn’t too sharp. -
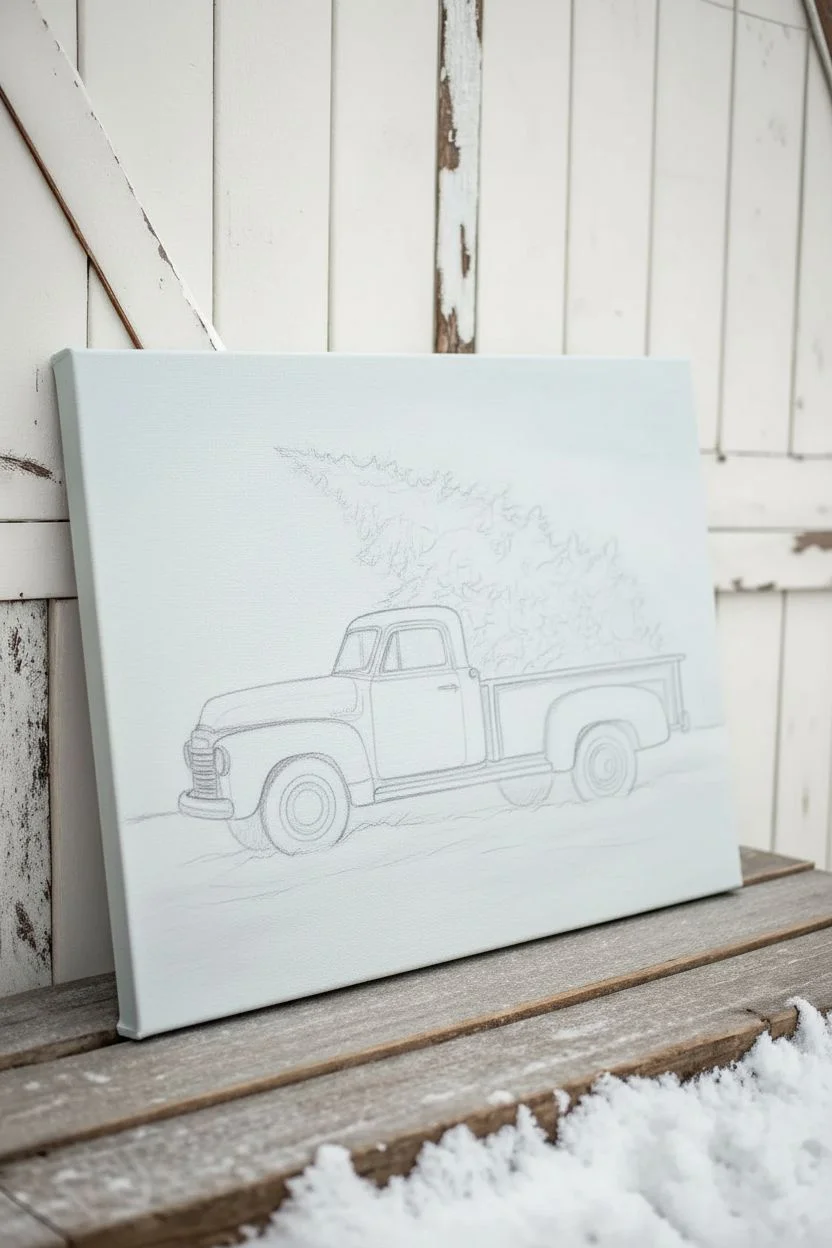
Sketch the subject:
Once the base is dry, lightly sketch the outline of the vintage truck in a 3/4 view and the large triangular shape of the pine tree sitting in the bed.
Pro Tip: Perspective
Make the truck look heavy by keeping the shadow underneath it quite dark and close to the tires. This ‘grounds’ the vehicle so it doesn’t look like it’s floating.
Step 2: Painting the Truck
-
Block in the body:
Fill in the main body of the truck with Cadmium Red, using your angle shader brush to cut in sharply around the windows and fenders. -
Add dimension:
Mix a little Burnt Umber into your red to create a shadow tone. Paint this along the bottom of the doors, inside the wheel wells, and under the smooth fender curves to give the truck weight. -
Create highlights:
Mix Red with a little White or Orange and paint the tops of the fenders, the hood, and the roof where the light naturally hits the metal. -
Paint the wheels:
Paint the tires with Mars Black. For the hubcaps, use a cream color (White + tiny dot of yellow) for a vintage look, painting a smaller circle inside the black tire. -
Detail the chrome:
Use a fine round brush and Silver or Light Grey to paint the front grille horizontal bars, the bumper, and the door handles. Add pure white highlights to make them shine. -
Fill the windows:
Paint the window shapes with a dark grey-blue. Once dry, add a few sharp diagonal white streaks to mimic glass reflections.
Step 3: The Christmas Tree
-
Base layer:
Mix Phthalo Green with a bit of Black for a deep forest green. Paint the main triangular shape of the tree, keeping the edges rough and irregular. -
Add texture:
I find a fan brush works best here: load it with multiple shades of green and tap it lightly over the tree shape to build volume and create the look of fluffy pine needles. -
Snowy branches:
Wipe your brush clean, load it with thick Titanium White, and gently tap the tops of the tree branches to show accumulated snow.
Level Up: 3D Texture
Mix a little baking soda or flexible modeling paste into your white paint for the snow on the truck’s hood and bumper to create real, raised texture.
Step 4: Winter Atmosphere
-
Ground shadows:
Mix a cool grey-blue glaze (lots of water) and paint shadows on the snow directly underneath the truck and tires, pulling them slightly to the right. -
Foreground foliage:
Using a liner brush and dark green/brown paint, flick upward from the bottom edge to create small grasses or mini pine saplings peeking through the snow. -
Snow on the truck:
Dab thick white paint along the top of the truck cab, the hood, and the upper edges of the truck bed to show heavy snowfall. -
Motion effects:
Stipple white paint around the base of the tires to simulate snow being kicked up as the truck moves. -
Falling snow:
Dip an old toothbrush into watered-down white paint. Hold it over the canvas and flick the bristles with your thumb to spray a fine mist of snowflakes over the entire scene.
Hang your snowy masterpiece and enjoy the cozy winter vibe it brings to your space


Snow-Dusted Christmas Tree
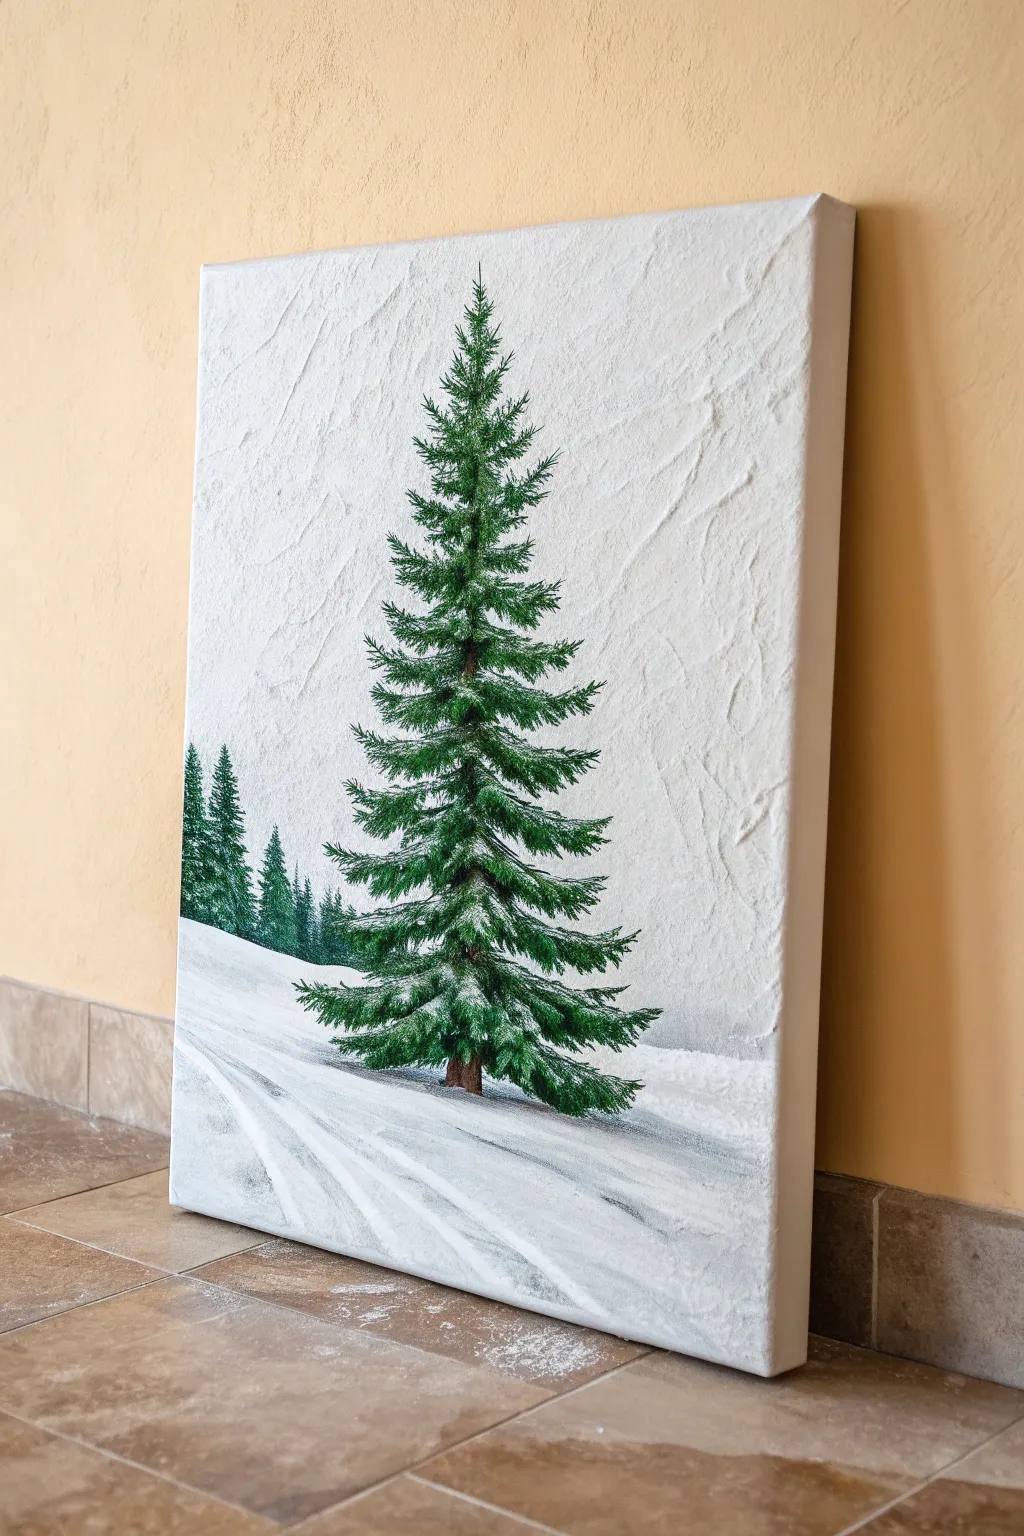

Capture the serene silence of a winter forest with this highly textured acrylic painting. By building up a relief surface before painting, you will create a dimensional, snowy backdrop that makes the crisp evergreen truly pop.
Step-by-Step Tutorial
Materials
- Stretched canvas (16×20 or similar)
- Modeling paste or heavy structure gel
- Palette knife
- Acrylic paints: Titanium White, Phthalo Green, Burnt Umber, Mars Black, Payne’s Grey
- Fan brush (size 4 or 6)
- Small flat brush
- Fine liner brush
- Cup of water and paper towels
Step 1: Building the Snowy Texture
-
Apply the paste:
Begin by scooping a generous amount of modeling paste onto the canvas using a palette knife. You want a relatively thick layer, roughly the thickness of a coin. -
Create the background relief:
Spread the paste across the entire white space. Use the flat edge of your knife to create random, jagged ridges and vertical scrapes in the upper area to simulate frosty air or distant falling snow. -
Form the ground texture:
For the bottom third of the canvas, change your wrist motion to create long, sweeping horizontal curves. This will mimic the natural drifts and slopes of a snow-covered field. -
Dry completely:
This is crucial: allow the canvas to dry fully. Depending on the thickness of your paste, this could take a few hours or overnight. The surface must be hard to the touch before painting.
Pro Tip: Palette Knife
Don’t over-smooth the modeling paste. The rougher the ridges, the more realistic the snow shadows will look when you glaze over them later.
Step 2: Background Elements
-
Base coat:
Once dry, paint a solid layer of Titanium White over the textured paste to seal it and ensure a bright, crisp snowy foundation. -
Mix the distant green:
Mix a small amount of Phthalo Green with a touch of Black and a significant amount of White. You want a desaturated, hazy grey-green color for the background trees. -
Paint the background trees:
On the left side, about a third of the way up, use the small flat brush to dab in two or three small, simple tree shapes. Keep the edges soft and blurry to make them look far away. -
Anchor the distance:
Add a very faint horizontal wash of grey-white at the base of these small trees to settle them into the snow, blending it downwards so no hard line remains.
Troubleshooting
If your white snow blends into the green branches and turns light green, stop! Let the green paint dry completely before adding the snow layer.
Step 3: The Main Tree
-
Paint the trunk:
Mix Burnt Umber with a tiny dot of Black. Using a liner brush or the edge of your flat brush, paint a thin vertical line down the center of the canvas where the main tree will stand. -
Mix the shadow green:
Prepare your darkest value by mixing Phthalo Green with a little Mars Black. This deep evergreen shade will act as the interior shadow of the tree. -
Start the top branches:
Using the corner of a fan brush or a small flat brush, tab small, downward-sloping strokes starting at the very top of the trunk. Keep the top distinct and narrow. -
Build the width:
Work your way down the trunk, gradually widening your strokes to create the conical spruce shape. Leave small gaps between branch layers so the white background peeks through. -
Add mid-tones:
Clean your brush and pick up pure Phthalo Green. Lightly layer this over the dark branches, focusing on the tips and the areas that would catch more light. -
Texture the foliage:
I like to use a dabbing motion with a dry brush here to separate the bristles, creating the look of individual needles rather than solid blocky shapes.
Step 4: Snow and Shadows
-
Dust the branches:
Load a clean brush with thick Titanium White (do not add water). Gently dab the paint onto the tops of the green branch clusters to look like settled fresh snow. -
Refine the tree base:
Ensure the bottom branches overlap the snow slightly. Paint a small, dark shadow directly under the trunk using a watered-down black/brown mix to ground the tree. -
Create snow tracks:
Mix a wash of Titanium White with a tiny drop of Payne’s Grey. Using a large brush, gently glaze along the ridges of the texture paste at the bottom to accentuate the ‘tracks’ in the snow. -
Deepen the drift shadows:
Strengthen the shadows on the left side of the tracks to add depth, following the sweeping curves you created with the modeling paste earlier. -
Final highlights:
Add a few final heavily-textured bright white strokes on the sun-facing side of the snow drifts to maximize the contrast against the grey shadows.
Hang your finished textured canvas in a spot with good lighting to let those raised snowy ridges cast their own natural shadows.
BRUSH GUIDE
The Right Brush for Every Stroke
From clean lines to bold texture — master brush choice, stroke control, and essential techniques.
Explore the Full Guide
Jolly Saint Nick Close-Up
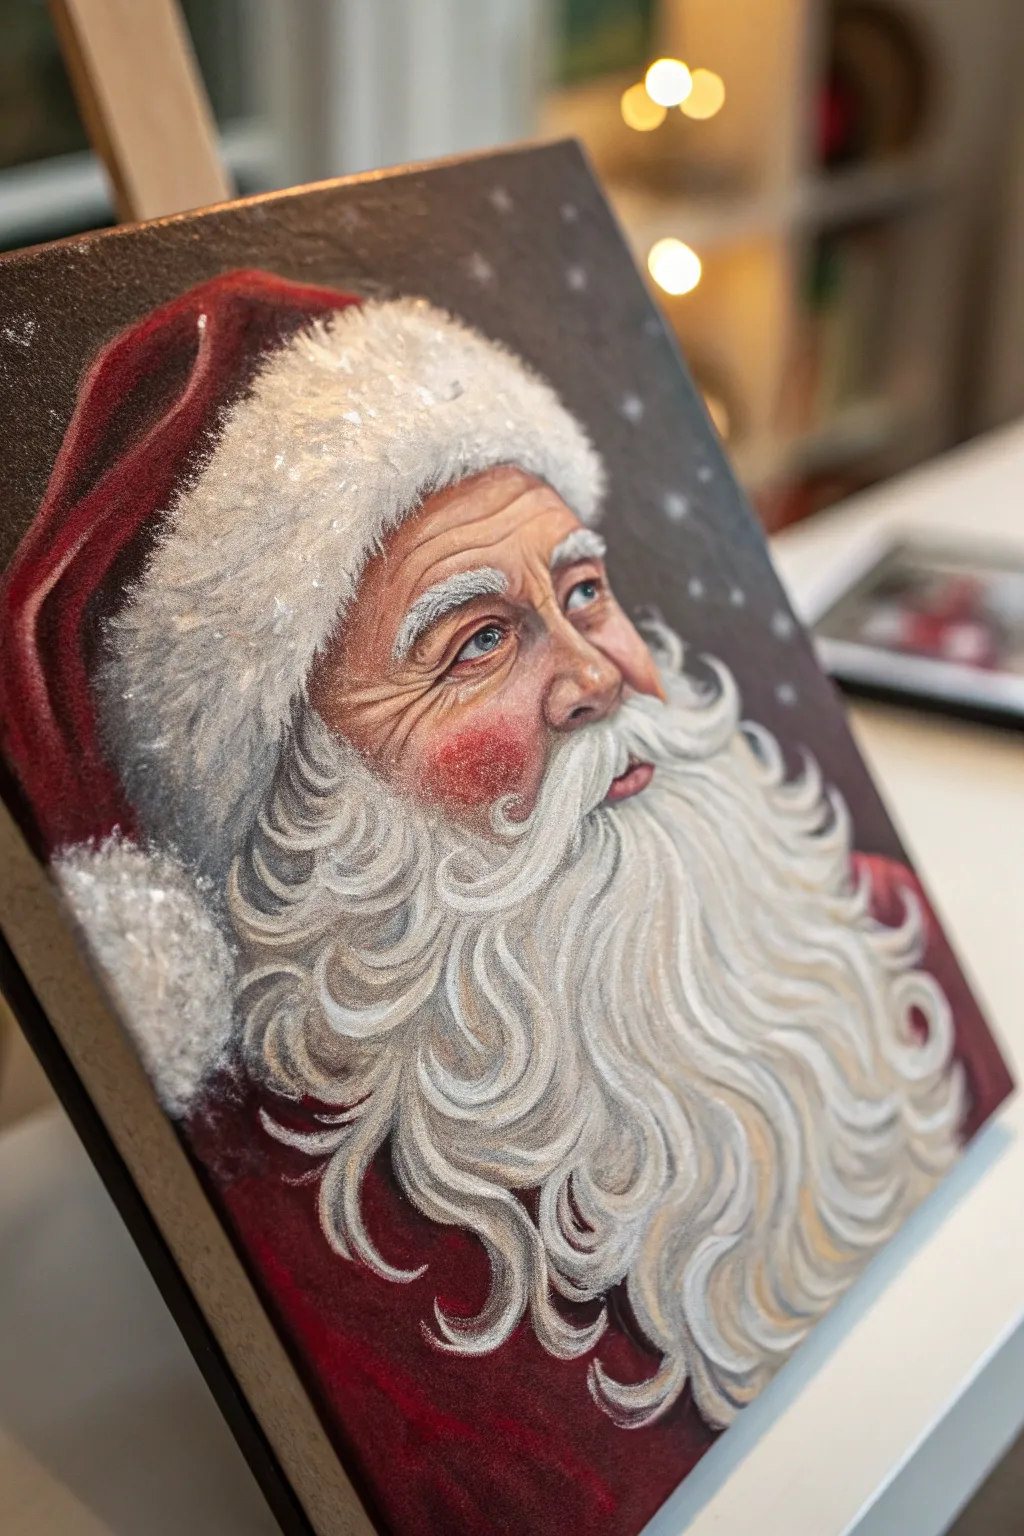
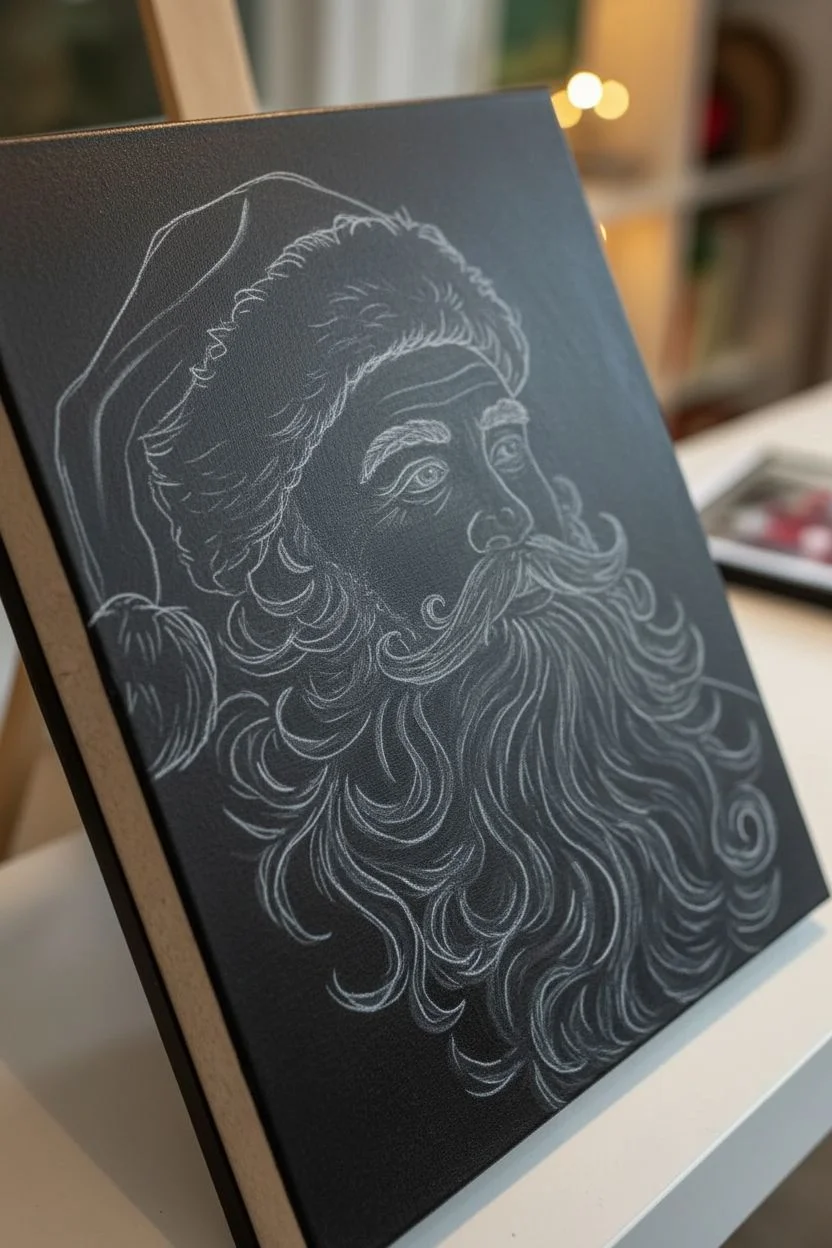
Capture the magic of Christmas with this striking close-up portrait of Jolly Old Saint Nick. This project focuses on realistic skin tones, expressive eyes, and building distinct, voluminous textures for Santa’s iconic beard and fur trim.
Detailed Instructions
Materials
- Stretched canvas (11×14 or similar)
- Acrylic paints: Titanium White, Mars Black, Cadmium Red, Alizarin Crimson, Burnt Sienna, Yellow Ochre, Ultramarine Blue
- Brushes: Large flat brush, medium filbert, small round brush, fine liner brush
- Palette and water cup
- Chalk or soft pencil for sketching
Step 1: Background & Sketch
-
Set the atmosphere:
Mix a dark, stormy grey using Mars Black, Ultramarine Blue, and a tiny touch of Burnt Sienna. Paint the entire background with your large flat brush to create a moody, contrasting backdrop for the bright figure. -
Rough outline:
Once the background is fully dry, use chalk or a light pencil to sketch Santa’s profile. Map out the large oval for the face, the sweeping curve of the hat, and the cascading shape of the beard.
Flat Beard?
If the beard looks like a solid white blob, you lost your shadows. Wait for it to dry, glaze it with a watery grey wash, and then re-apply just the bright white highlights on the very tips of the curls.
Step 2: Face & Skin Tones
-
Base flesh tone:
Mix Titanium White with a small amount of Burnt Sienna and a dot of Yellow Ochre. paint the entire face area with a medium filbert brush to establish a smooth base. -
Adding shadow:
While the base is slightly tacky, mix a little Alizarin Crimson and Burnt Sienna into your flesh tone. Apply this to the temple, the side of the nose, and under the eye socket to create depth. -
Rosy cheeks:
Create a glaze by watering down a mix of Cadmium Red and Alizarin Crimson. Gently blend this onto the cheek area and the tip of the nose using a soft, dry brush to simulate that cold-weather flush. -
Deep wrinkles:
Using a small round brush and a mix of Burnt Sienna and purple (Blue + Red), carefully paint the creases in the forehead and the ‘crow’s feet’ around the eyes. -
The eyes:
Paint the eye shape white, then add a blue iris and a black pupil. I like to add a tiny white dot at the 10 o’clock position on the pupil—this ‘catchlight’ brings the character to life. -
Facial highlights:
Use pure Titanium White mixed with a tiny drop of flesh tone to highlight the bridge of the nose, the top of the cheekbone, and the ridges of the forehead wrinkles.
Pro Tip: Tinting White
Pure white can look severe. For the beard shadows, try mixing a tiny dot of blue into your grey. Cool shadows complement the warm orange/red skin tones perfectly.
Step 3: Hat & Clothing
-
Red base coat:
Paint the main body of the hat and the visible shoulder area with Cadmium Red. -
Fabric folds:
Mix Alizarin Crimson with a touch of black to create a deep burgundy. Paint shadowy stripes where the fabric folds on the hat and shoulder to suggest heavy velvet material. -
Hat highlights:
Mix Cadmium Red with a little White and Orange. Dry-brush this highlight onto the tops of the fabric folds to make the velvet look soft.
Step 4: The Beard & Fur
-
Beard underpainting:
Mix a medium grey using White and Black. Paint the entire shape of the beard and the hat’s fur trim with this solid grey color to act as a shadow layer. -
Defining curls:
Switch to a lighter grey. Using a round brush, paint thick, swirling ‘S’ shapes throughout the beard area to establish the direction of the hair flow. -
Building volume:
With a mix of 80% White and 20% Grey, paint smaller, thinner strokes inside the previous curls. This layering creates the illusion of thick hair. -
Brightest hairs:
Using your fine liner brush and pure Titanium White with a drop of water for flow, paint crisp, individual hair strands on top of the lightest areas of the beard. -
Fur texture:
For the hat brim, use an old, scruffy brush. Load it with thick White paint and use a stippling (dabbing) motion over the grey base to create a fluffy, wooly texture. -
Mustache details:
Don’t forget the mustache. Use the liner brush to sweep white hairs outward from the nose, curling slightly over the beard.
Step 5: Final Touches
-
Snowy speckles:
If you want the glistening snow effect on the hat shown in the image, gently tap pure white onto the upper parts of the fur trim using the corner of a sponge or a stiff brush. -
Background magic:
Create soft ‘bokeh’ snowflakes in the background by mixing a very transparent, watery white and dabbing a few soft, out-of-focus circles behind Santa.
Step back and admire the festive spirit you have captured on canvas
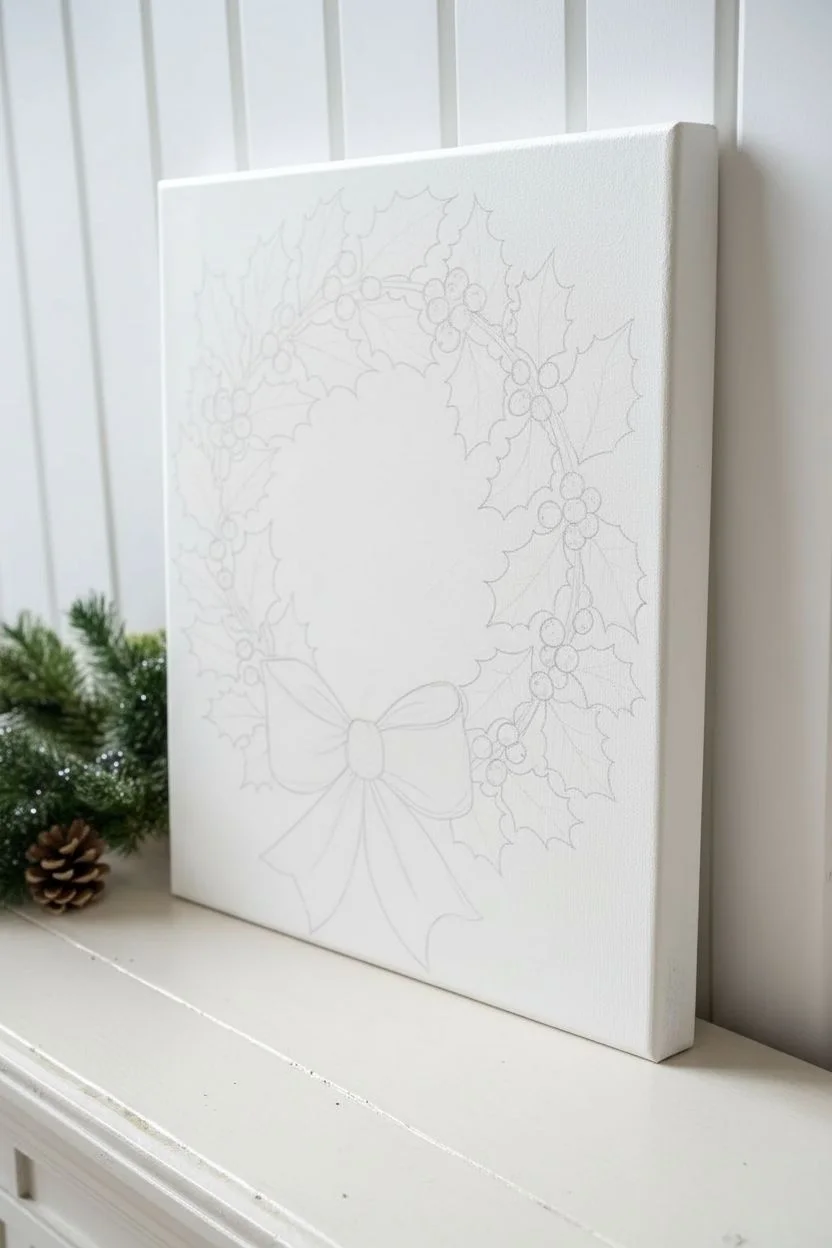
Festive Holly Wreath
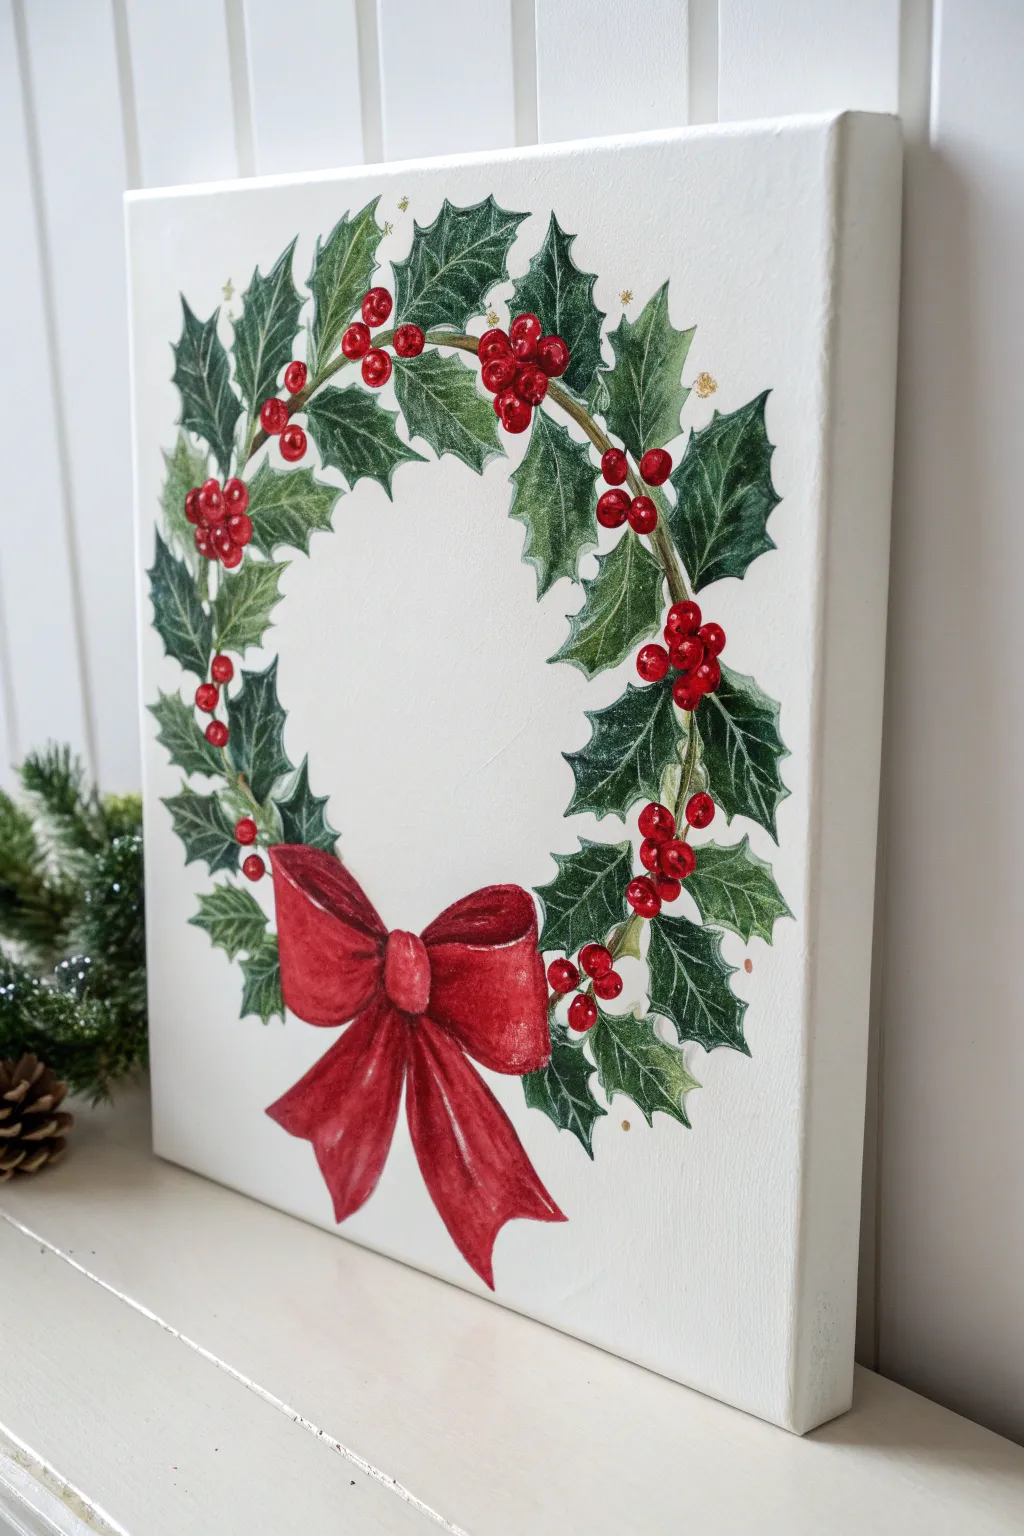
Capture the traditional spirit of the season with this elegant holly wreath painting, featuring deep green foliage and a vibrant red bow. This project focuses on layering acrylics to create depth in the leaves and a realistic shine on the festive berries.
Step-by-Step Tutorial
Materials
- Square canvas (12×12 or similar)
- Acrylic paints: Titanium White, Mars Black, Sap Green, Phthalo Green, Cadmium Red, Alizarin Crimson, Burnt Umber, Metallic Gold
- Brushes: 3/4 inch flat, #6 round, #2 round, and a fine liner brush
- Pencil and eraser
- A round dinner plate (to trace)
- Palette and water cup
Step 1: Preparation and Sketching
-
Prime the Surface:
Start by applying a fresh coat of Titanium White over the entire canvas using your large flat brush. Even if the canvas is already white, this ensures a smooth, non-porous surface for blending. -
Trace the Shape:
Once the background is completely dry, place a dinner plate in the center of the canvas and lightly trace around it with a pencil to get a perfect circle guide. -
Sketch Key Elements:
Draw the large bow at the bottom center first. Then, loosely sketch spiky holly leaf shapes along the circular line, angling them outward and inward to create a natural, somewhat messy flow. -
Place the Berries:
Sketch small clusters of three or four circles for the berries, scattering them evenly around the wreath to balance the composition.
Fixing Sheer Red
Red paint is often translucent. If your bow looks streaky, paint the area with white or primer first, let it dry, and then apply the red on top for maximum vibrancy.
Step 2: Painting the Greenery
-
Mix Your Base Green:
Mix Phthalo Green with a distinct touch of Burnt Umber and Black. This will create a very deep, shadowed forest green. -
Block in Leaves:
Using the #6 round brush, fill in the leaf shapes with your dark base mixture. Don’t worry about details yet; just focus on getting sharp, pointed edges. -
Add Mid-Tones:
Mix Sap Green with a little original base color. Paint the left or right side of each leaf with this lighter green to establish a light source direction. -
Paint Veins and Edges:
With a liner brush and pure Sap Green mixed with a tiny bit of White, paint the central vein of each leaf and carefully highlight the spiky edges. -
Connect with Stems:
Load your liner brush with watered-down Burnt Umber. Sketch a thin, woody line threading through the center of the leaves to connect the wreath visually.
Step 3: The Bow and Berries
-
Base Coat the Bow:
Paint the entire bow shape with Cadmium Red. I like to apply two thin coats here to ensure the color is solid and opaque. -
Add Deep Shadows:
Mix Alizarin Crimson with a tiny dot of Black or Green (to darken it without making it muddy). Paint this into the crevices of the bow knots and the folds of the ribbon tails. -
Highlight the Ribbon:
Mix Cadmium Red with a touch of White or Yellow. Apply this to the highest points of the bow loops and ribbons where the light would naturally hit. -
Paint the Berries:
Fill in the berry circles with bright Cadmium Red. If you want them darker, use Alizarin Crimson for the bottom half of each berry.
Stamp the Berries
Struggling to paint perfect circles? Dip the handle end of a paintbrush into your red paint and ‘stamp’ it onto the canvas to create uniform, round berries instantly.
Step 4: Final Details
-
Adding Shine:
Dip the very tip of your detail brush into pure Titanium White. Add a tiny dot on the upper right side of every single berry to make them look glossy. -
Refining the Bow:
Add subtle white rim lighting to the edges of the bow to separate it clearly from the background greenery. -
Gold Splatter:
Dilute a small amount of Metallic Gold paint with water. Load a brush, hold it over the canvas, and tap the handle to sprinkle tiny gold specs around the wreath for magic. -
Clean Up:
Once dry, gently erase any visible pencil lines from the initial circle guide that weren’t covered by paint.
Hang your beautiful canvas in the entryway or lean it on a mantle to enjoy a touch of handmade holiday elegance

PENCIL GUIDE
Understanding Pencil Grades from H to B
From first sketch to finished drawing — learn pencil grades, line control, and shading techniques.
Explore the Full Guide
Vibrant Red Poinsettia
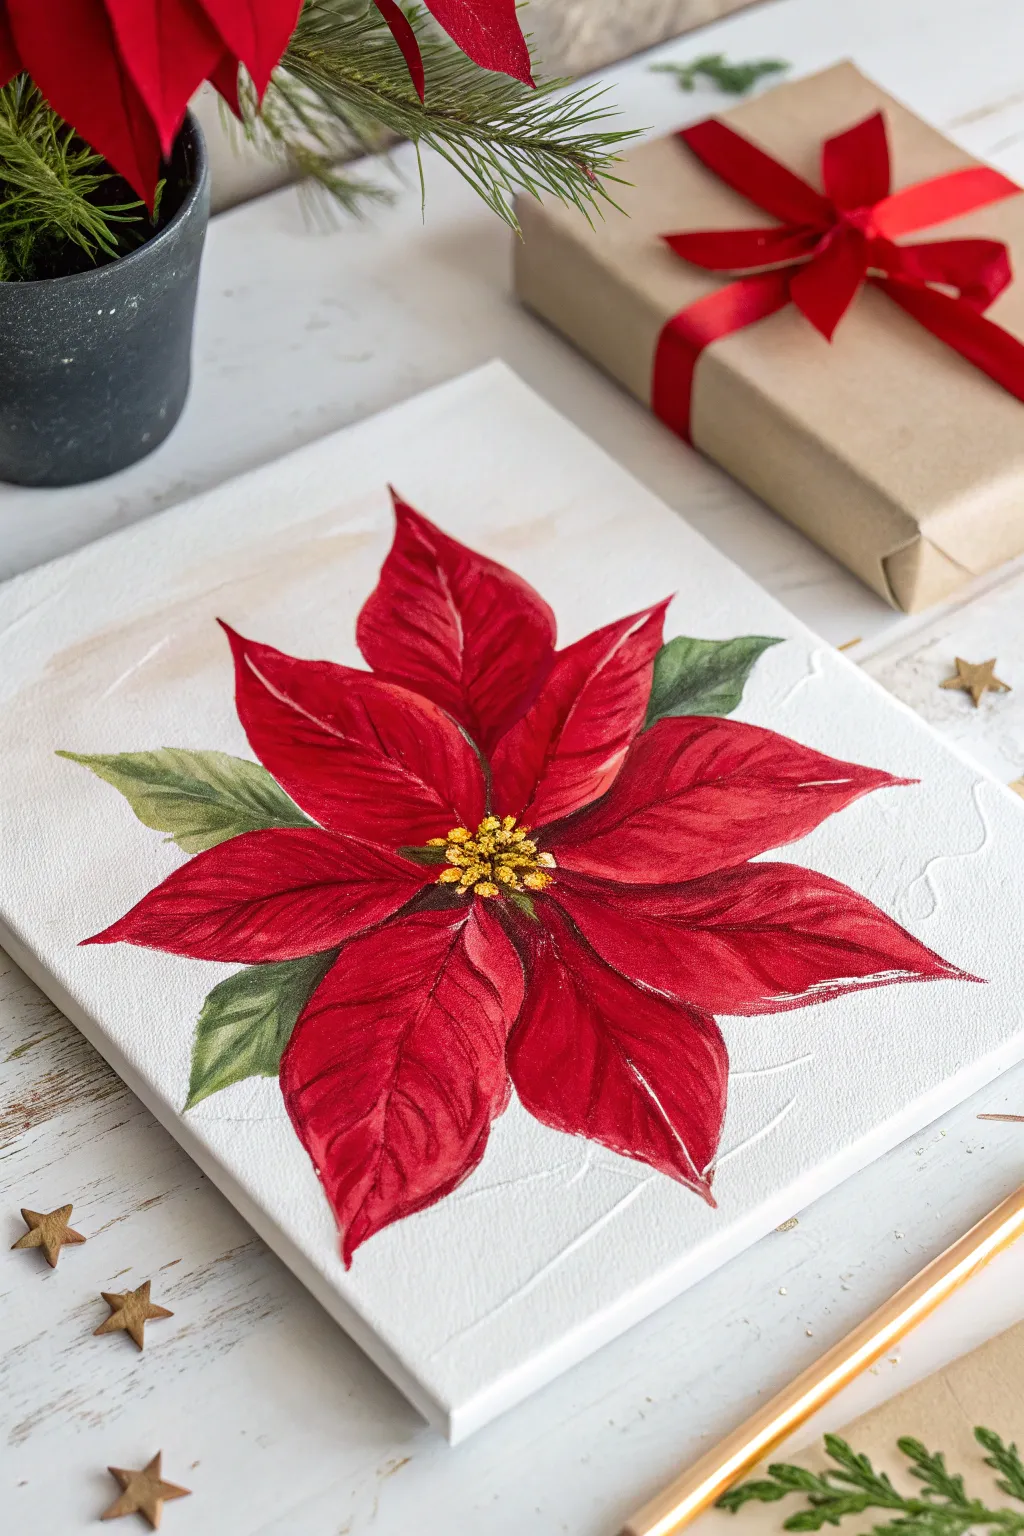
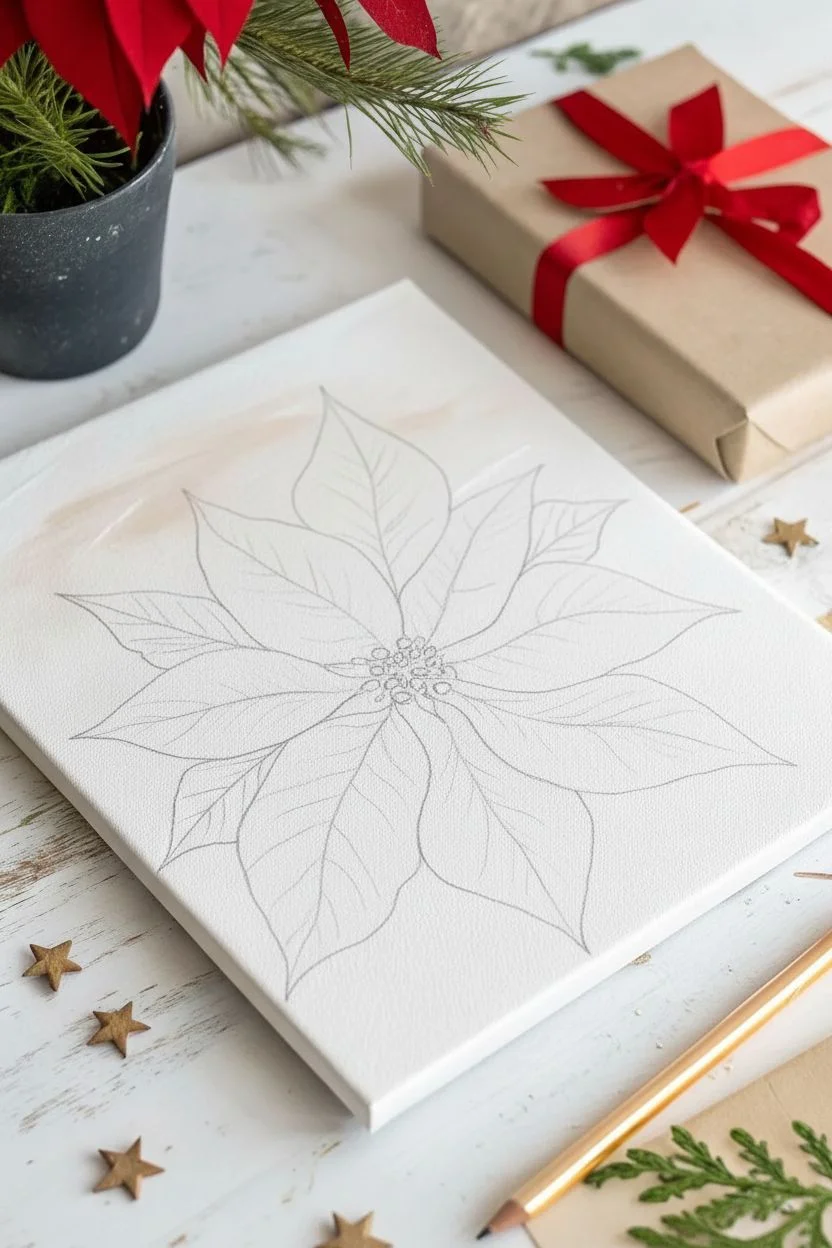
Capture the classic beauty of the holidays with this vibrant poinsettia painting. With its rich red bracts and subtle white textured background, this piece makes for elegant festive decor or a heartfelt handmade gift.
Step-by-Step Guide
Materials
- Square stretched canvas (8×8 or 10×10 inches)
- Acrylic paints: Titanium White, Cadmium Red, Alizarin Crimson, Sap Green, Hooker’s Green, Cadmium Yellow, Burnt Umber
- Filbert brushes (sizes 6 and 8)
- Small round brush (size 2)
- Palette and water cup
- Paper towels
- Pencil for sketching
- Optional: Texture paste or modeling paste
Step 1: Preparation and Sketching
-
Prime the background:
Paint the entire canvas with a coat of Titanium White. To mimic the look in the reference, blend in a tiny drop of diluted Burnt Umber or Ochre in random patches for a very faint, warm vintage wash. -
Sketch the center:
Once dry, lightly use your pencil to draw a small cluster of circles in the absolute center of the canvas for the cyathia (the yellow flower parts). -
Outline the petals:
Sketch large, teardrop-shaped petals (bracts) radiating from the center. Make some overlapping others to create depth. -
Add the greenery:
Draw three to four jagged leaves peeking out from behind the red petals, primarily positioning them at the sides for visual balance.
Step 2: Painting the Greenery
-
Base coat the leaves:
Mix Sap Green with a touch of white and fill in the leaf shapes. Use a filbert brush to keep the edges slightly soft. -
Add leaf shadows:
While the green is still slightly tacky, brush Hooker’s Green along the center vein line and where the leaf tucks under the red petals. -
Highlight the edges:
Mix a light yellow-green and gently sweep it along the outer jagged edges of the leaves to make them pop against the white background.
Fixing Transparency
Red acrylic paint is often naturally transparent. If your pencil lines show through or the color looks weak, don’t rush—let the first coat dry completely and apply a second coat for true opacity. troubleshoot_bg
Step 3: Creating the Red Bracts
-
Dark base layer:
Start with the petals that appear furthest back (the ones physically behind others). Paint these with Alizarin Crimson to establish the shadows. -
Primary red layer:
For the prominent top petals, fill them in with pure Cadmium Red. I find that applying this fairly broadly gives a great vibrant base. -
Deepening the center:
Mix Alizarin Crimson with a tiny speck of Hooker’s Green to create a deep burgundy. Paint this color near the center of the flower and blend outward towards the middle of the petals. -
Creating petal veins:
Using your small round brush and the burgundy mix, paint a central line down each red petal. Feather small strokes outward from this line to suggest texture. -
Adding brightness:
Mix Cadmium Red with a little orange or yellow. Apply this to the widest part of the petals to create a glowing mid-tone. -
Edge highlights:
Mix Titanium White with Cadmium Red to create a soft pink. Use the very edge of your brush to outline the tips and upper edges of the petals where the light would hit. -
Refining the strokes:
Ensure your brushstrokes follow the curve of the petal, moving from the center vein toward the outer edge. This mimics the natural growth pattern. -
Separation shadows:
On the top layer of petals, add a thin line of your darkest red mix right where one petal overlaps another. This cast shadow separates the layers effectively.
Make it Sparkle
For a magical holiday touch, mix a tiny amount of gold glitter into your yellow center paint, or lightly brush metallic gold paint onto the very tips of the red petals creates a festive shimmer.
Step 4: Details and Background
-
Center details:
Dip the handle end of a brush into Cadmium Yellow and dot the center cluster heavily. -
Golden accents:
Add smaller dots of Burnt Umber mixed with yellow in between the bright yellow dots to create volume and shadow in the center. -
Final center highlights:
Add tiny pinpoints of pure white to the tops of the yellow dots to make them look wet and fresh. -
Background texture:
Mix a watery white paint or use white texture paste. With a very thin brush or palette knife, create subtle, swirling, thread-like lines on the white background around the flower for artistic flair.
Allow your painting to dry fully before displaying it on a mantle or wrapping it as a stunning handmade gift.
The Grinch’s Furry Hand
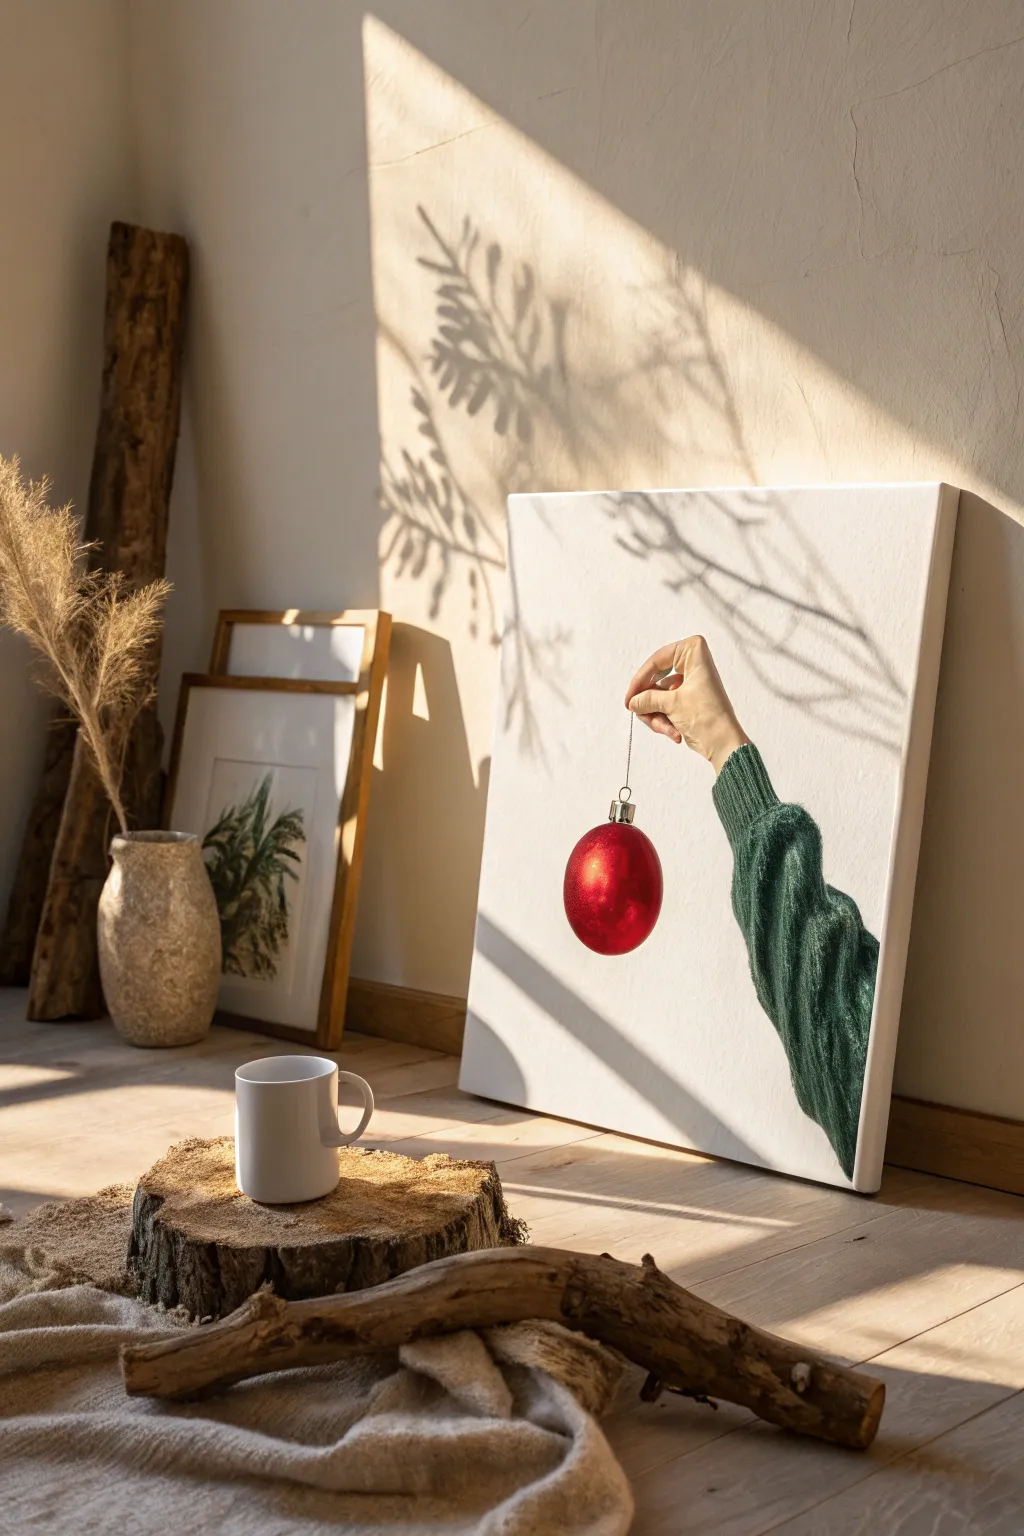
Capture the essence of holiday anticipation with this minimalist yet striking canvas featuring a realistic hand offering a bright red ornament. You will learn to paint skin tones, textured knitwear, and the glossy sheen of a Christmas bauble against a clean white background.
Step-by-Step Tutorial
Materials
- Stretched canvas (16×20 or similar)
- Acrylic paints: Titanium White, Burnt Umber, Yellow Ochre, Cadmium Red, Hooker’s Green, Phthalo Green, Crimson
- Brushes: Flat shader, small round, liner brush, and an old scruffy brush
- Pencil and eraser
- Mixing palette
- Cup of water
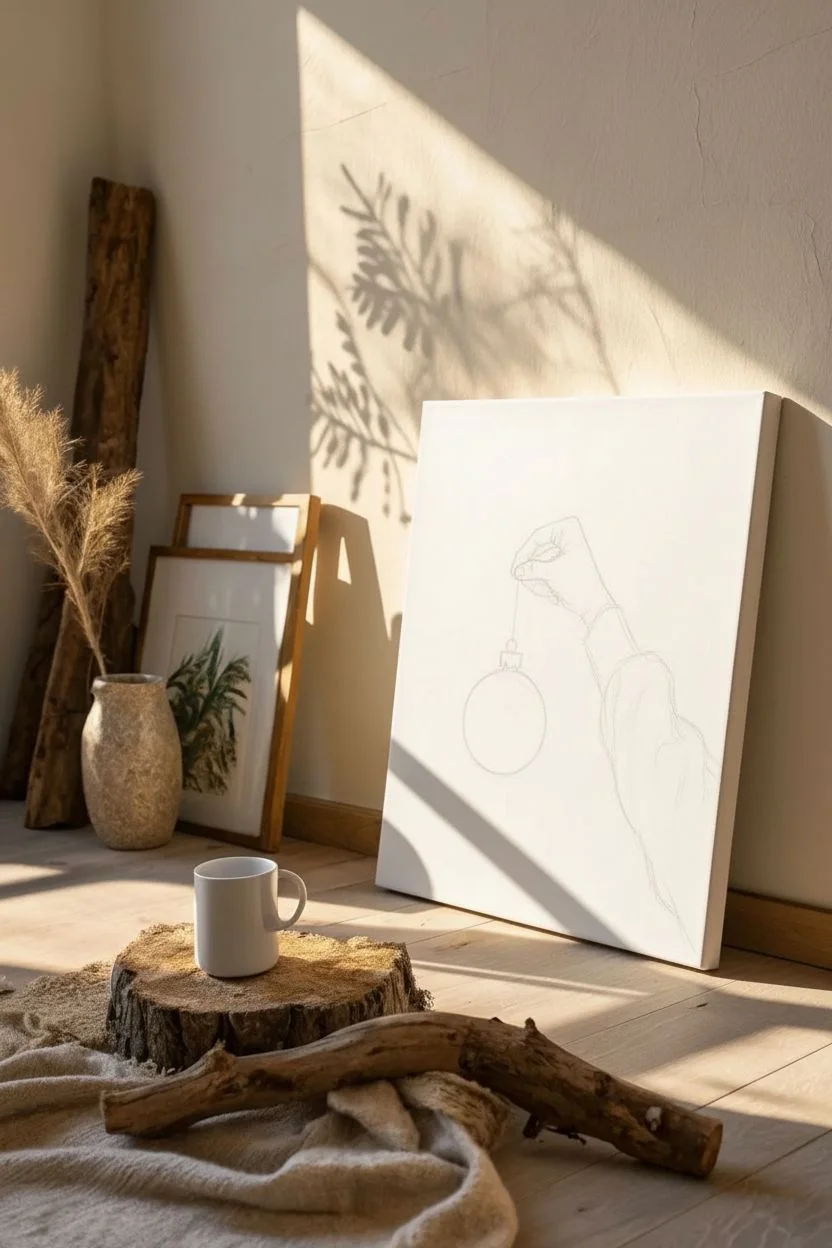
Step 1: Composition & Sketching
-
Map the arm:
Begin by lightly sketching the outline of the sweater sleeve entering from the bottom right corner of the canvas, extending upward at a slight diagonal. -
Sketch the hand:
Draw the hand emerging from the sleeve cuff. The hand should be reaching upward in a pinching motion, with thumb and index finger close together. -
Position the ornament:
Sketch a perfect circle dangling just below the thumb and forefinger to represent the red bauble. -
Add fine details:
Lightly draw the small metallic cap on top of the ornament and a straight vertical line to represent the string held by the fingers.
Step 2: Painting the Hand
-
Mix base flesh tone:
Create a skin base color using Titanium White mixed with a very small amount of Yellow Ochre and a tiny dot of Burnt Umber. -
Apply base coat:
Fill in the hand sketch with your base mixture, ensuring smooth, even coverage. -
Add shading:
Mix a slightly darker tone by adding more Burnt Umber and a touch of Red. Apply this to the areas between the fingers, under the knuckles, and where the wrist meets the sweater. -
Define highlights:
Mix Titanium White with just a whisper of your base tone. Dab this onto the knuckles, fingertips, and the back of the hand to create volume. -
Blend the transitions:
While the paint is still tacky, use a soft, damp brush to gently blur the lines between your shadows and highlights for a natural skin look.
Pro Tip: Reference Reality
Take a quick photo of your own hand pinching a string in similar lighting. Use this photo while painting to see exactly where the shadows fall on the palm and knuckles.
Step 3: The Knit Texture
-
Base coat the sweater:
Mix Hooker’s Green with a little Phthalo Green for a rich forest color. Paint the entire sleeve shape with this solid dark color. -
Create texture:
Mix a lighter green by adding white to your base green. Using an old, dry scruffy brush, dab the paint vertically over the sleeve to simulate fuzz. -
Add knit definition:
I like to use a small round brush here to paint tiny, overlapping V-shapes in the lighter green to mimic the direction of the knitting stitches. -
Highlight the fuzz:
Take a very pale green (mostly white) and lightly stipple the very top edge of the sleeve to show where the light catches the wool fibers. -
Shadow the sleeve:
glaze a mix of green and black along the bottom edge of the arm to round out the form, ensuring the sleeve looks cylindrical rather than flat.
Level Up: Real Shimmer
Mix a high-gloss gel medium into your red paint for the final coat on the ornament. This gives the painted bauble a genuine reflective shine that contrasts with the matte background.
Step 4: The Ornament & Background
-
Paint the red base:
Fill in the ornament circle with bright Cadmium Red. -
Create roundness:
Mix slightly darker red (add variable Crimson or a dot of brown) and paint the edges of the bauble, blending inward toward the brighter center. -
The crucial highlight:
Using pure Titanium White, paint a distinct soft spot of light on the upper left curve of the sphere to make it look like shiny glass. -
Paint the hardware:
Use grey (White mixed with Black) to paint the small rectangular cap on top of the ornament. -
Connect the string:
Use your finest liner brush and thinned grey paint to draw the taut string connecting the ornament cap to the pinching fingers. -
Clean the background:
Use fresh Titanium White to paint around the arm and ornament, cleaning up any rough edges for a crisp, gallery-style finish.
Step back and admire your ultra-modern, cozy Christmas artwork suitable for any wall.


Abstract Bokeh Lights Background
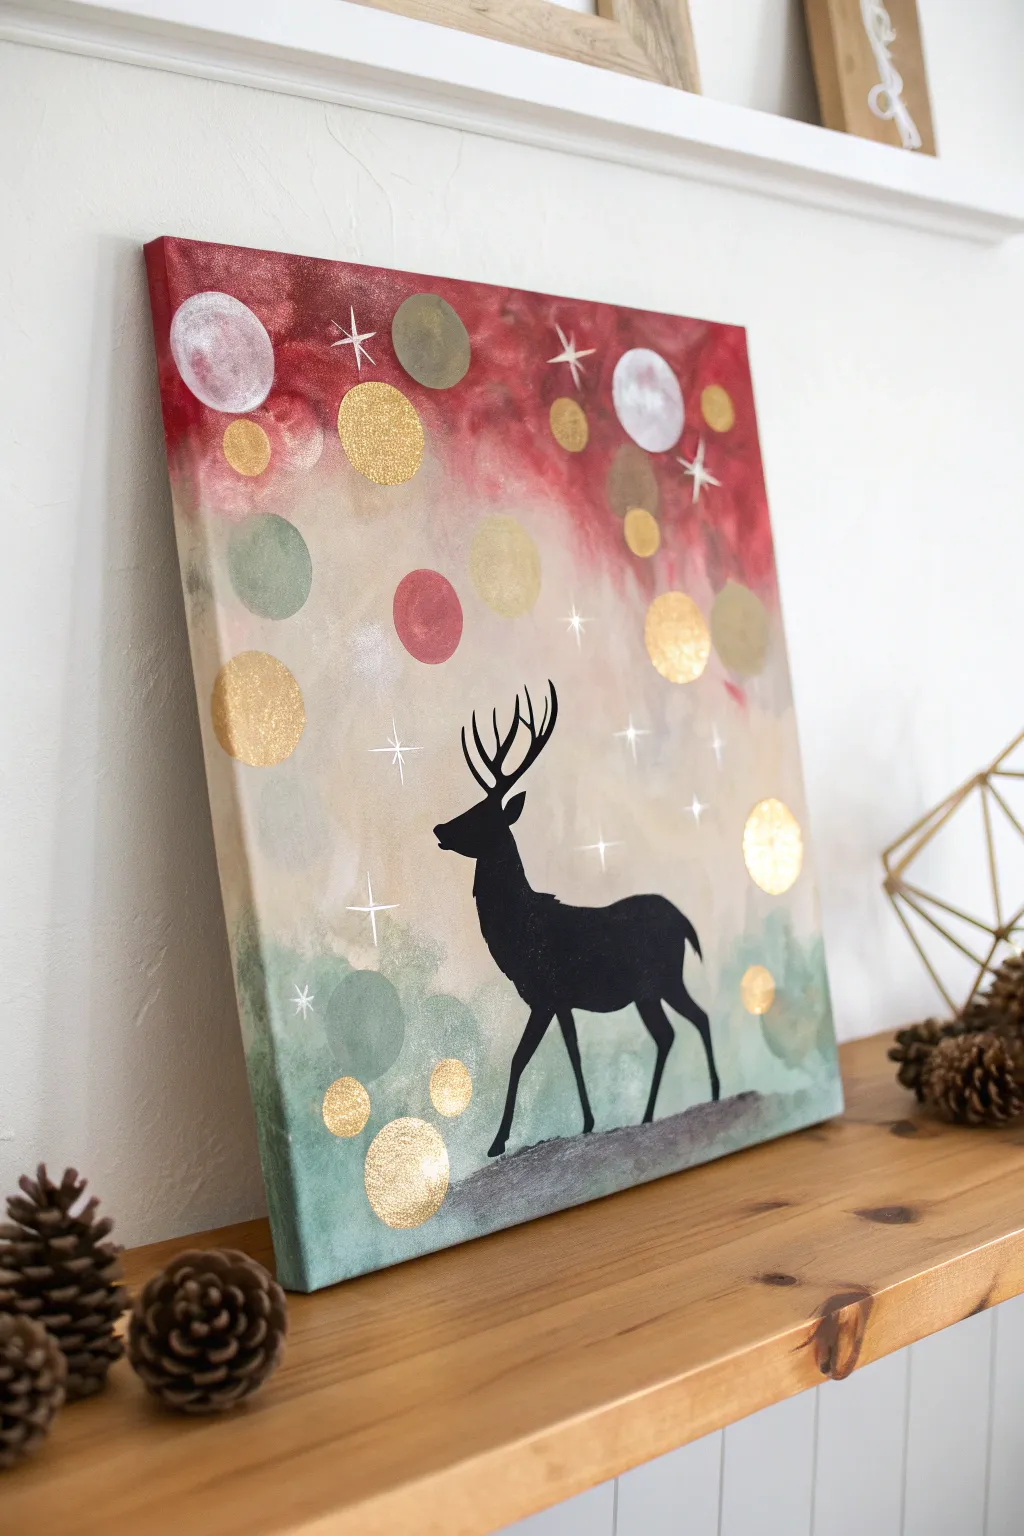

Create a magical winter scene combining a moody, soft-focus background with a crisp black silhouette. This project uses fun stamping techniques to achieve the glowing “bokeh” light effect that makes the golden accents truly pop.
Detailed Instructions
Materials
- Stretched canvas
- Acrylic paints: burgundy, cream/beige, sage green, black
- Metallic acrylic paints: gold, silver
- Foam pouncers (sponges on sticks) in various sizes
- Large flat paintbrush
- Fine liner brush
- Small round brush
- Chalk or pencil
- Palette and paper towels
Step 1: Setting the Background Gradient
-
Apply the top color:
Start by brushing your deep burgundy or red acrylic paint across the top third of the canvas using your large flat brush. -
Apply the bottom color:
Clean your brush, then paint the bottom third of the canvas with the sage green, keeping the strokes horizontal and smooth. -
Fill the center:
Paint the middle section with your cream or beige tone, leaving a small gap between it and the red and green sections. -
Blend the transitions:
While the paint is still wet, use a slightly damp brush to blend the cream upwards into the red and downwards into the green to create a soft, foggy gradient. -
Let it cure:
Allow the background to dry completely. If the colors look too sheer, apply a second coat to deepen the moodiness.
Clean Circles Pro Tip
To avoid sloppy edges or paint ridges, load your foam pouncer lightly and dab the excess onto a paper towel before pressing it onto the canvas.
Step 2: Creating Bokeh Lights
-
Prepare your pouncers:
Squeeze out your metallic gold, silver, and some of the background colors onto your palette. -
Stamp the gold:
Dip a medium-sized foam pouncer into the metallic gold paint. Stamp firm, random circles mainly in the upper and middle sections. -
Add silver accents:
Using a separate or cleaned pouncer, add a few silver or pearlescent white circles near the top to mimic bright moonlight reflections. -
Layer colored circles:
I like to mix a little white into the red and green paints to make pastel versions, then stamp these circles in the background for depth. -
Create overlapping effects:
Once the first set of circles is dry to the touch, overlap a few new gold or silver ones on top to create a sense of distance and layering.
Step 3: Painting the Silhouette
-
Sketch the deer:
Use a piece of chalk or a light pencil to outline the shape of the stag standing on the right side of the canvas. -
Paint the ground:
Use a round brush and black paint to create a textured, uneven strip of ground at the very bottom for the deer to stand on. -
Outline the body:
Switch to a smaller brush to carefully paint over your chalk outline of the deer’s body with black acrylic. -
Fill the shape:
Fill in the body of the deer with solid black paint, ensuring there are no transparent patches. -
Detail the antlers:
Using your finest liner brush, paint the intricate antlers. Use very light pressure to keep the tips of the antlers sharp and thin.
Troubleshooting Shapes
If you struggle to draw the deer freehand, print a silhouette from the internet, cut it out, and lightly trace around it with a pencil.
Step 4: Magical Details
-
Add starbursts:
With the fine liner brush and white paint, create a few four-pointed stars (cross shapes) scattered in the sky area. -
Final sparkles:
Dip the tip of a brush handle or a stylus into white paint and dot tiny stars randomly around the background to finish the scene.
Place your finished canvas on a mantel or shelf to add a sophisticated festive touch to your room
Winter Cabin in the Woods
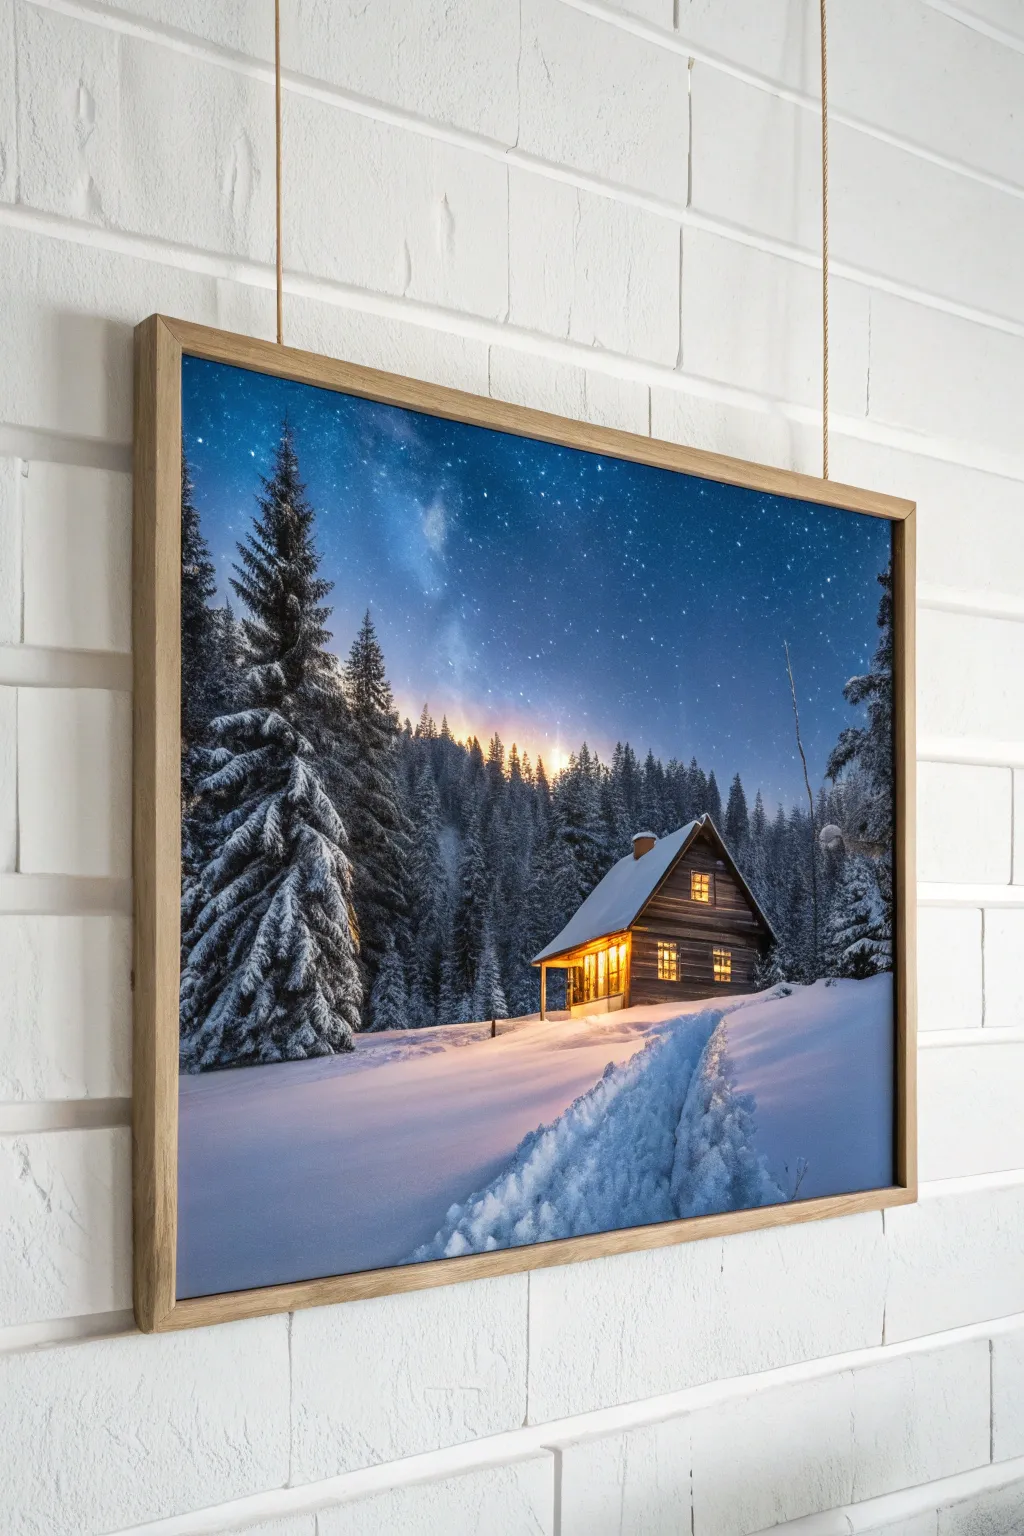
Capture the serene magic of a mid-winter night with this acrylic painting tutorial. You will create a stunning contrast between a deep, starry galaxy sky and the inviting warmth of a rustic log cabin nestled in the snow.
Step-by-Step
Materials
- Canvas (16×20 or similar)
- Acrylic paints (Phthalo Blue, Ultramarine, Black, Titanium White, Burnt Umber, Yellow Ochre, Cadmium Yellow, Burnt Sienna)
- Brushes: Large flat brush, medium fan brush, small flat brush, detail liner brush
- Old toothbrush
- Palette and water cup
- Paper towels
Step 1: Setting the Scene
-
Sky gradient:
Begin by dampening your canvas slightly. Using your large flat brush, paint the top third of the canvas with a mix of Phthalo Blue and a touch of Black to create a deep night sky. -
Blending down:
Without cleaning your brush, pick up Ultramarine Blue and blend it downwards from the dark section. As you reach the middle of the canvas, mix in a little Titanium White to create a lighter, hazy blue horizon line. -
Milky Way effect:
While the sky is still slightly tacky, take a clean, dry brush with a tiny amount of white paint. Gently scrub a diagonal cloud-like streak across the upper left to create the galaxy band. -
Starry night:
Dilute some Titanium White paint with water until it’s inky. Load an old toothbrush, aim it at the sky area, and flick the bristles with your thumb to create a spray of distant stars. -
Horizon glow:
Add a faint wash of Yellow Ochre mixed with white just above where your tree line will be, suggesting a distant radiance or moonrise behind the forest.
Step 2: The Forest & Cabin
-
Tree silhouettes:
Mix Black with a touch of Burnt Umber. Using a fan brush held vertically, tap in the background tree shapes along the horizon, making them smaller and less detailed to push them into the distance. -
Foreground pines:
On the left side, paint larger, prominent pine trees. Use the corner of the fan brush to tap darker branches, keeping the center of the tree dense and the edges airy. -
Cabin structure:
Switch to a small flat brush. Outline the basic shape of the cabin in the lower right quadrant using Burnt Umber. Block in the walls, leaving small squares empty for the windows. -
Wooden texture:
Mix Burnt Sienna with a little black. Paint horizontal lines across the cabin walls to mimic logs, varying the pressure to create a rough wood texture. -
Roof base:
Paint the roof shape with a solid coat of Grey (White mixed with a dot of Black) to serve as a shadow layer for the snow.
Starry Success
Test your toothbrush splatter on a piece of cardboard first. The consistency of the paint determines if you get fine mist (stars) or big blobs (snowballs)!
Step 3: Winter Details
-
Snow on trees:
I like to use a clean fan brush loaded with thick Titanium White for this part. Gently tap the tops of your pine branches to deposit ‘snow’, leaving the undersides dark for visual depth. -
Thick roof snow:
Layer thick Titanium White on top of the grey roof base, intentionally leaving the edges uneven to look like heavy snow accumulation. Leave a thin line of grey visible at the bottom edge for shadow. -
Window glow:
Fill the window squares with Cadmium Yellow. While wet, blend a tiny dot of White in the center of each distinct pane to make the light look intense. -
Window frames:
Using your finest liner brush and black paint mixed with water for flow, carefully paint the grid lines (muntins) over the yellow windows.
Level Up: Glazing
Use a glazing medium instead of water for the yellow light reflection step. It makes the paint transparent without breaking down the binder, creating a richer glow.
Step 4: Foreground & Finish
-
Snowy ground:
Paint the entire foreground with a mix of White and the tiniest speck of Ultramarine Blue. This blue tint creates the feeling of cold shadow. -
Reflected light:
Mix a glaze of water with Yellow Ochre. Gently brush this transparent color onto the snow directly in front of the cabin and under the windows to show the warm light spilling out. -
The path:
Create a path leading to the door by painting subtle shadowy troughs using a slightly darker blue-grey mix. Build up ‘mounds’ of snow on either side using pure white highlights. -
Final touches:
Add a chimney with a small puff of smoke, and perhaps a few deliberate footprints in the snow path using your shadow color to make the scene look lived-in.
Hang your finished canvas and enjoy the peaceful, frosty atmosphere you have created.
Stylized Christmas Angel
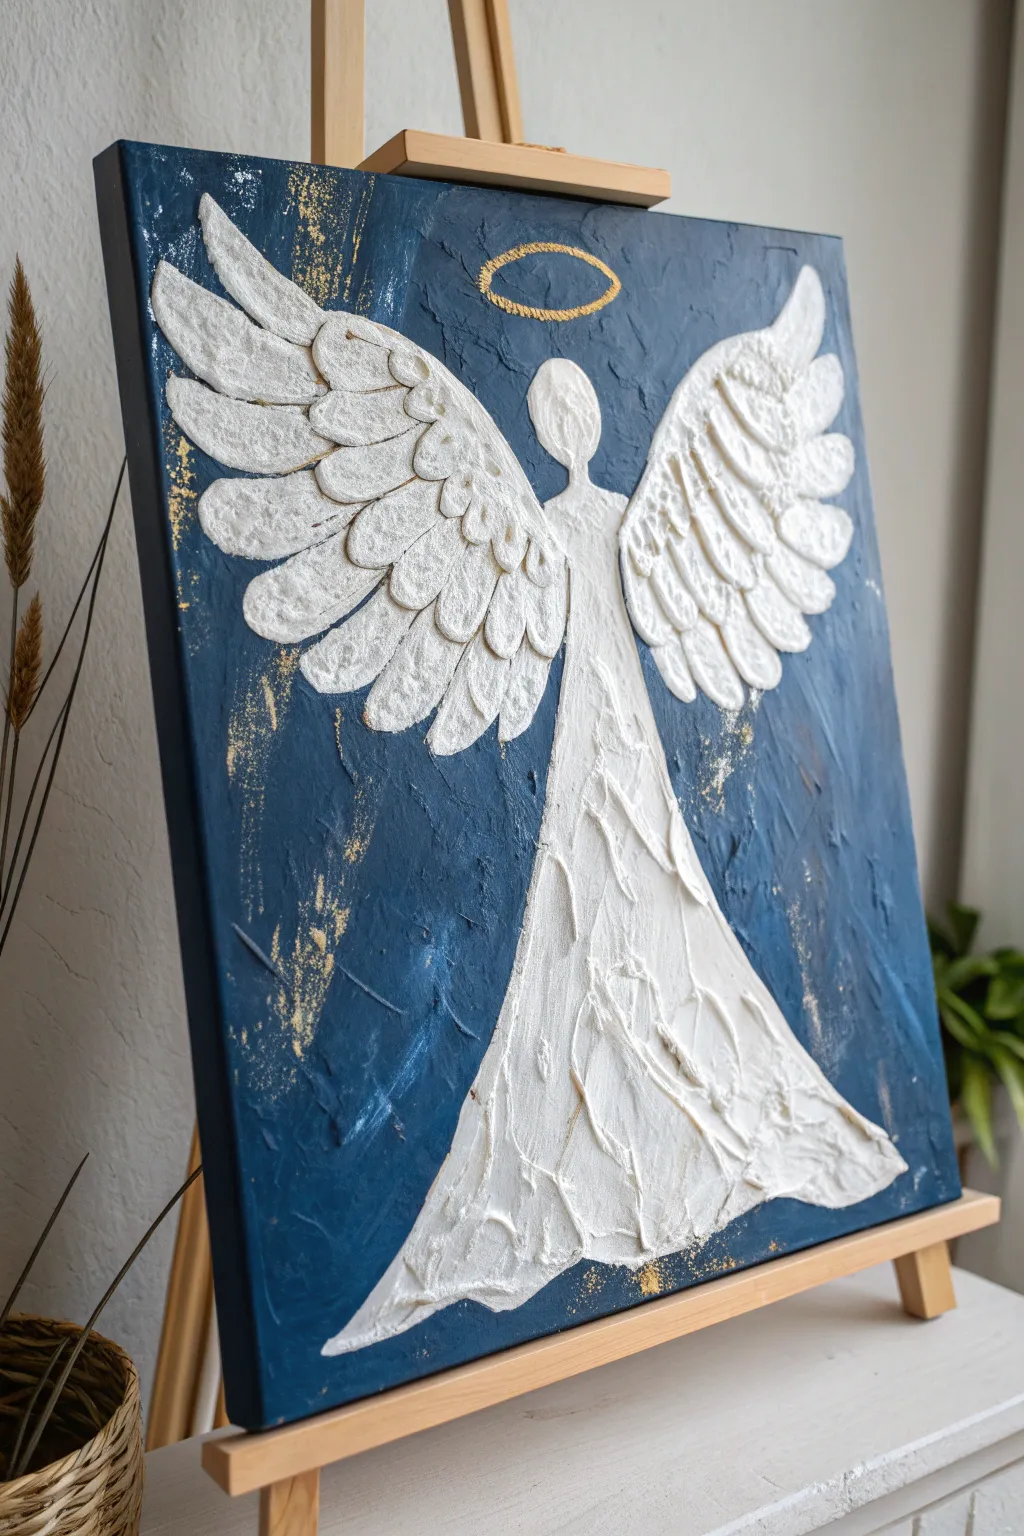
This striking festive centerpiece contrasts a deep, moody background with the high-relief texture of a sculpted angel. You will use modeling paste and palette knives to build 3D dimension for the wings and gown, finished with elegant gold accents.
Detailed Instructions
Materials
- Stretched canvas (16×20 or similar)
- Acrylic modeling paste or texture paste
- Heavy body acrylic paint: Navy Blue, Titanium White, Black
- Metallic gold acrylic paint
- Set of palette knives (specifically a teardrop shape)
- Wide flat brush
- Small round brush
- Chalk or pastel pencil
- Gold leaf flakes (optional)
Step 1: Setting the Atmosphere
-
Mix the background color:
Squeeze a generous amount of navy blue paint onto your palette, mixing in a tiny touch of black to deepen the hue without making it lifeless. -
Apply the base coat:
Using a wide flat brush, cover the entire canvas with your dark blue mix. Don’t worry about being too smooth; visible brushstrokes add character. -
Add background texture:
While the paint is still wet, take clean palette knife and lightly scrape across the canvas in random, crisscross directions to create a distressed, weathered look. -
Integrate gold specks:
Dip an old toothbrush or stiff brush into gold paint and flick fine splatters onto the wet blue background, focusing on the left side and bottom corners. -
Dry completely:
Let this background layer dry fully. This is crucial so your white angel doesn’t turn light blue later.
Step 2: Sculpting the Angel
-
Outline the figure:
Use a white chalk pencil to lightly sketch the angel’s form: a small oval for the head, a long triangle for the dress, and two large wing shapes spanning outward. -
Sculpt the head:
Scoop a small amount of modeling paste with a palette knife and fill in the head oval, smoothing the surface so it is slightly raised but flat. -
Form the dress bodice:
Apply a thicker layer of paste for the torso, tapering it down into the waist. -
Create the flowing skirt:
Spread a generous layer of paste for the skirt. Use the edge of your knife to drag vertical lines downward, creating the look of heavy, folded fabric. -
Start the wings:
For the wings, you will work from the bottom row of feathers upward. Scoop a marble-sized dollop of paste directly onto the bottom of the wing outline. -
Shape the feathers:
Press the back of a teardrop-shaped palette knife into the dollop and pull slightly outward to flattened it into a feathery scale shape. -
Layer the texture:
Repeat this process, creating rows of paste ‘scales’ that overlap each other like roof shingles, moving from the bottom of the wing up to the shoulder. -
Refine the edges:
Use the tip of your knife to ensure the tips of the feathers on the outer edges are pointy and defined. -
Allow to cure:
Let the modeling paste dry. Thick applications may need overnight drying; the paste will turn opaque and hard when ready.
Crack Control
Thick modeling paste can crack if it dries too fast. If cracks appear, simply fill them with a mix of paste and white paint, smooth it out, and let it dry again.
Step 3: Gilding and Refining
-
Paint the relief:
Once hard, paint over the modeling paste angel with pure Titanium White to brighten it and seal the texture. -
Paint the halo:
Using a small round brush and metallic gold paint, create a rough, floating oval above the angel’s head. -
add distressed gold edges:
I like to use a dry brush with a little gold paint to scuff the edges of the canvas and random spots on the blue background, highlighting the texture you made in step 3. -
Highlight the angel:
Add very subtle highlights to the tops of the wing feathers using a mix of white and a tiny pearl medium or just a fresh bright white coat to make them pop.
Level Up
Mix a pinch of ultra-fine iridescent glitter into your white paint for the final coat on the wings to make them sparkle subtly under Christmas tree lights.
Display your textured masterpiece on a mantel or easel where the holiday lights can catch the ridges of the wings
Playful Penguin in a Scarf
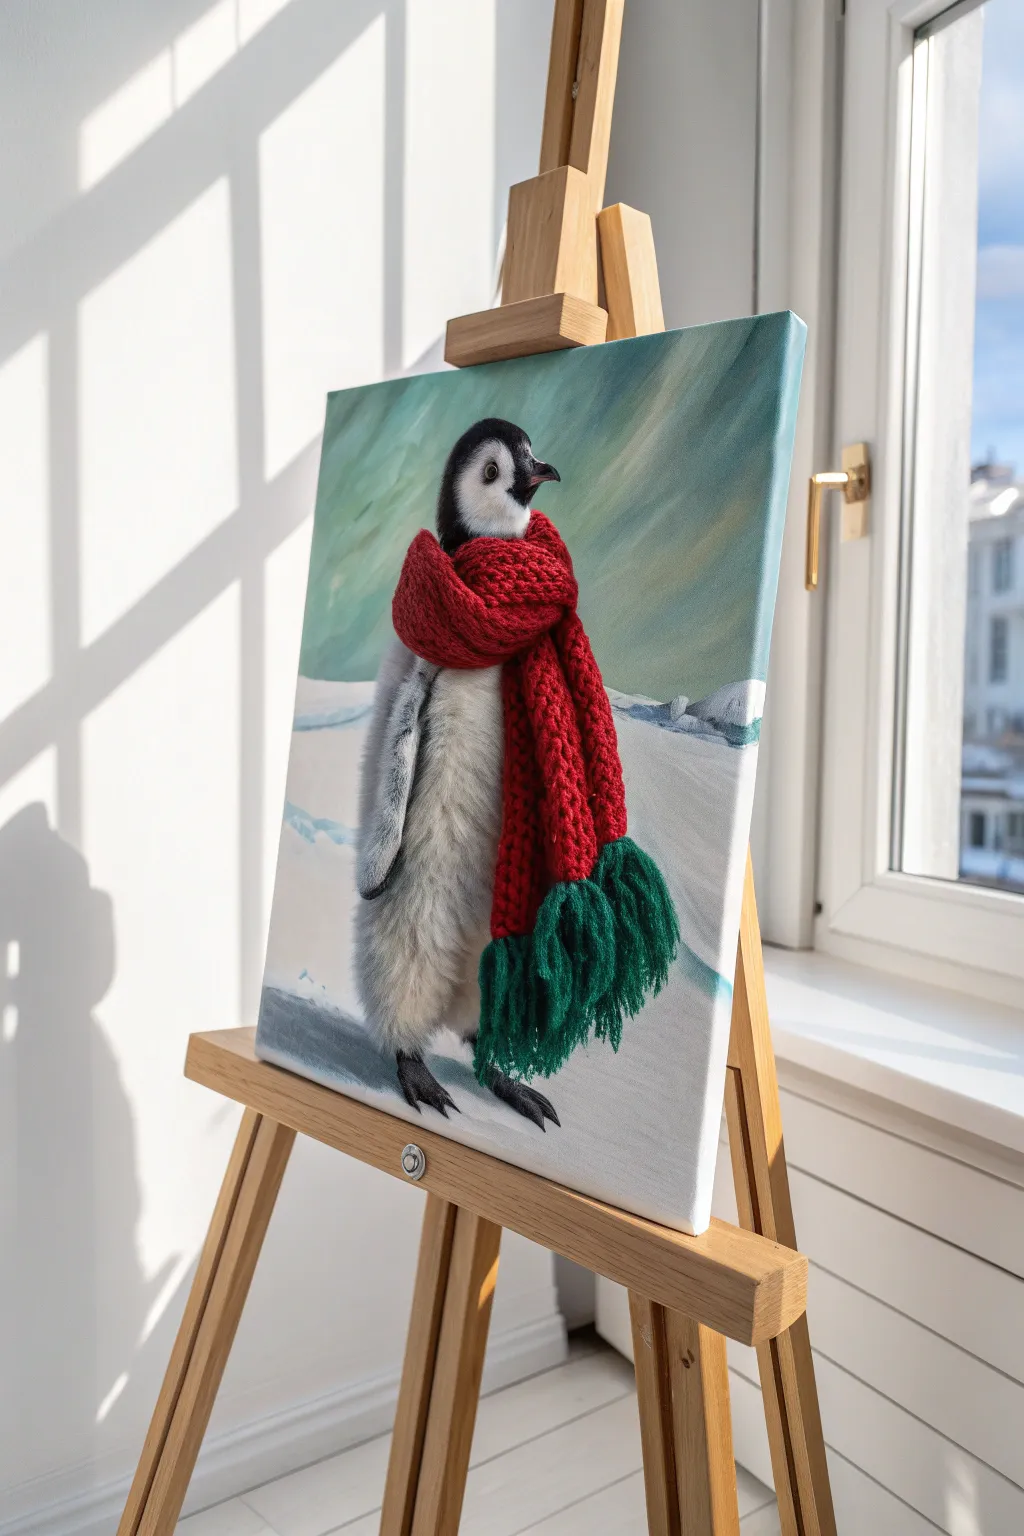
Bring winter whimsy to your easel with this adorable portrait of a baby penguin bundled up for the season. You will focus on creating two distinct textures: the soft, downy feathers of the chick and the chunky, woven look of the oversized scarf.
Step-by-Step
Materials
- Stretched canvas (square format recommended)
- Acrylic paints: Titanium White, Mars Black, Cool Grey, Cadmium Red, Alizarin Crimson, Phthalo Green, Phthalo Blue
- Brushes: Large flat, medium filbert, small round liner
- Chalk or soft pencil for sketching
- Palette and water cup
- Paper towels
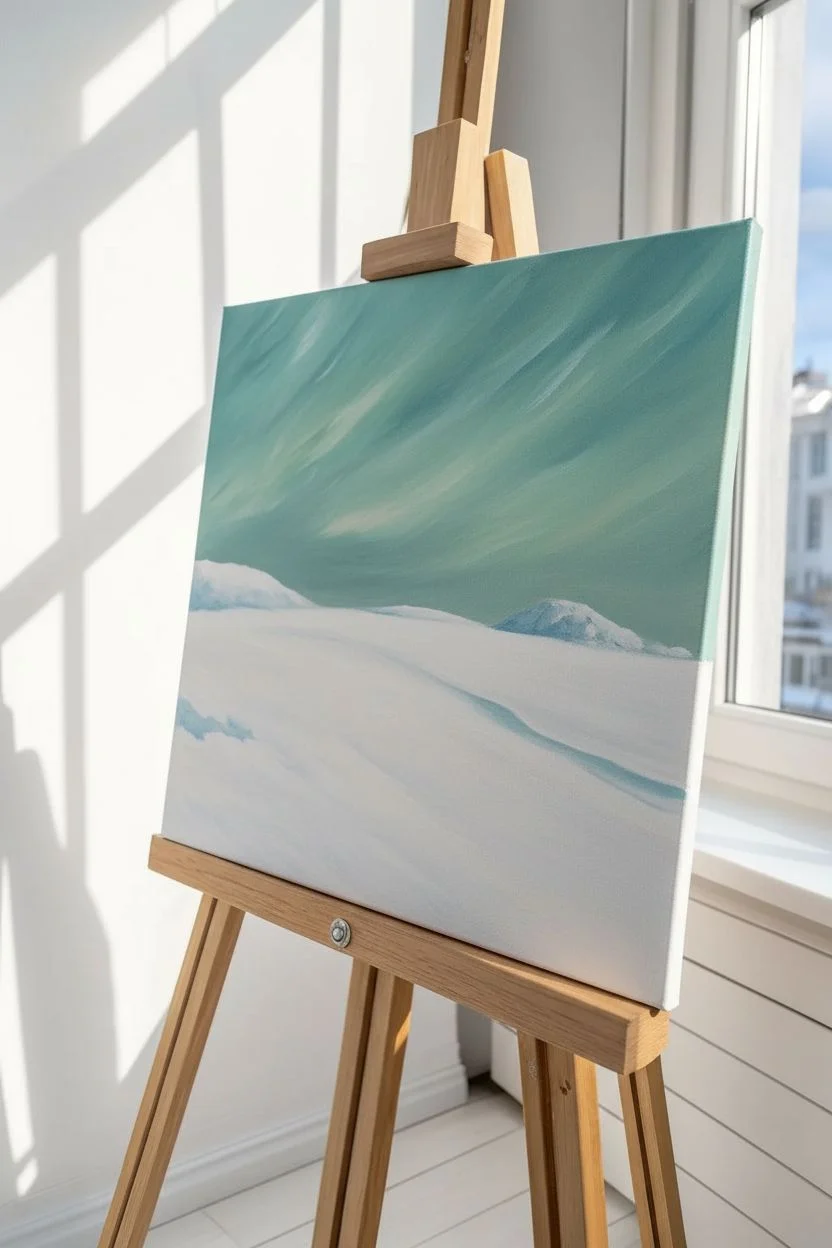
Step 1: Setting the Icy Scene
-
Sketch the outlines:
Lightly sketch a large oval for the body, a smaller circle for the head, and the winding shape of the scarf draping down. -
Mix the sky color:
Combine Titanium White with a very small amount of Phthalo Green and Phthalo Blue to get a pale teal tint. -
Paint the background:
Apply the teal mix to the sky area using long, diagonal strokes to suggest an atmospheric, breezy aurora. -
Create the snowy ground:
Paint the bottom section with Titanium White, blending in soft streaks of pale blue to denote shadows and distant ice mounds.
Flat looking knit?
If the scarf looks flat, ensure you leave enough of the dark red base showing between your lighter ‘V’ strokes. This contrast creates the depth of real wool.
Step 2: Painting the Penguin
-
Block in the body:
Use a mid-tone Cool Grey to fill in the main body shape of the penguin, ensuring opaque coverage. -
Define the head:
With Mars Black, paint the head shape and the beak, carefully leaving the cheek patch pattern unpainted. -
Add white markings:
Fill the cheek patch and the center of the belly with Titanium White paint. -
Blend the form:
While the paint is still damp, gently blend the edges of the white belly into the grey sides to create a rounded, cylindrical look. -
Stipple the fur:
Using a dry filbert brush with a small amount of light grey paint, stipple (dab repeatedly) over the grey body to create a fuzzy, downy texture. -
Detail the face:
Refine the beak with black, adding a tiny white highlight on top for shine, and place a small white dot in the eye to bring it to life.
Step 3: Knitting the Scarf
-
Base coat the red:
Fill the entire scarf shape with Alizarin Crimson to establish a dark shadow base for the knitting. -
Base coat the fringe:
Paint the dangling ends of the scarf with a deep shade of Phthalo Green. -
Create the knit pattern:
Mix Cadmium Red with a touch of White. Using a small round brush, paint rows of small ‘V’ shapes or braided lines over the dark red base. -
Highlight the loops:
Add extra White to your red mix and dab small highlights on the very tops of the ‘V’ loops to give the wool volume. -
Detail the fringe:
Switch to a liner brush and pull long strokes of lighter green over the dark base to mimic individual yarn tassels.
Make it Fluffy
For the most realistic baby feathers, let the gray base layer dry completely before stippling the lighter texture on top. This keeps the ‘fur’ strokes crisp.
Step 4: Final Frosty Details
-
Cast shadows:
Mix a watery glaze of Phthalo Blue and grey. Paint sheer shadows on the snow underneath the penguin’s feet and the scarf fringe. -
Shadow the neck:
I like to add a thin line of dark grey right under where the scarf sits on the feathers to make the scarf feel heavy and grounded. -
Final inspection:
Enhance any white highlights on the snow or fur that may have faded during drying.
Step back and admire your adorable, frosty friend ready for the holidays.
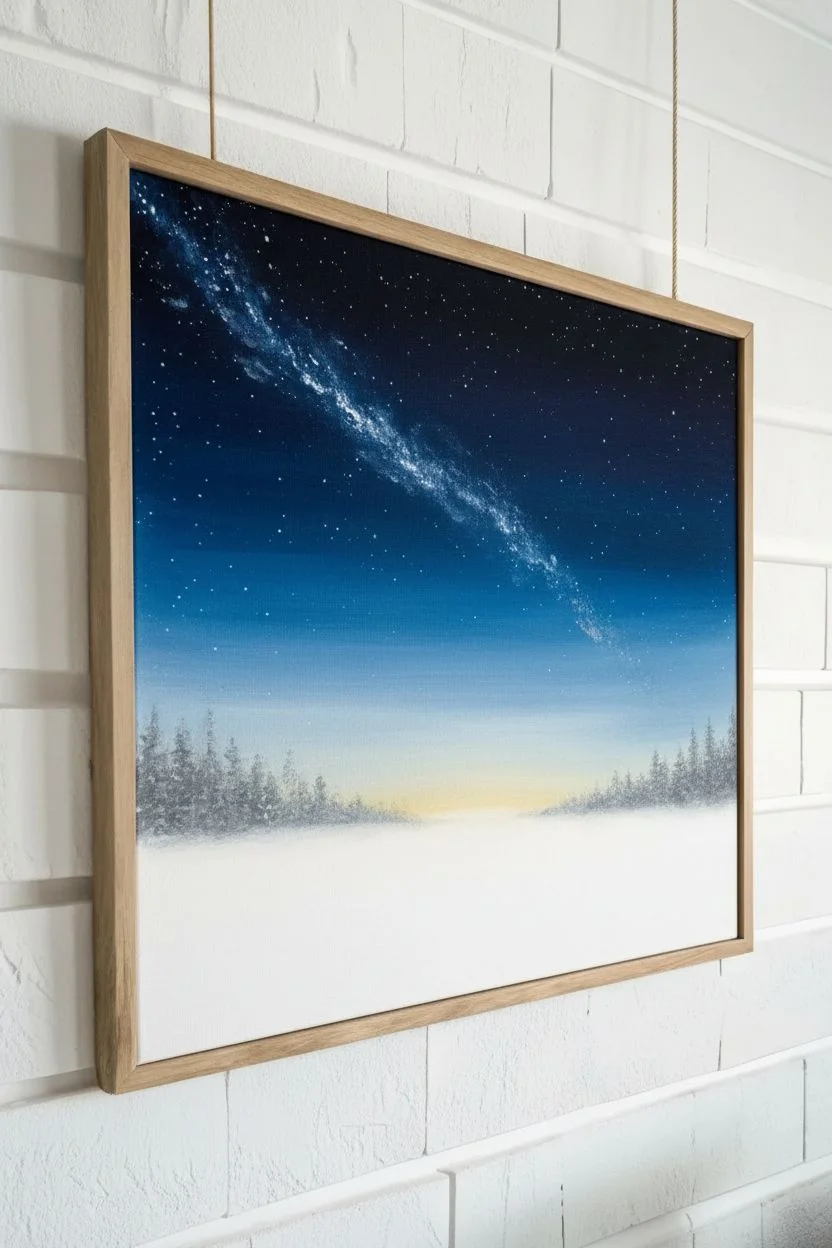
Silhouette Moonlit Night
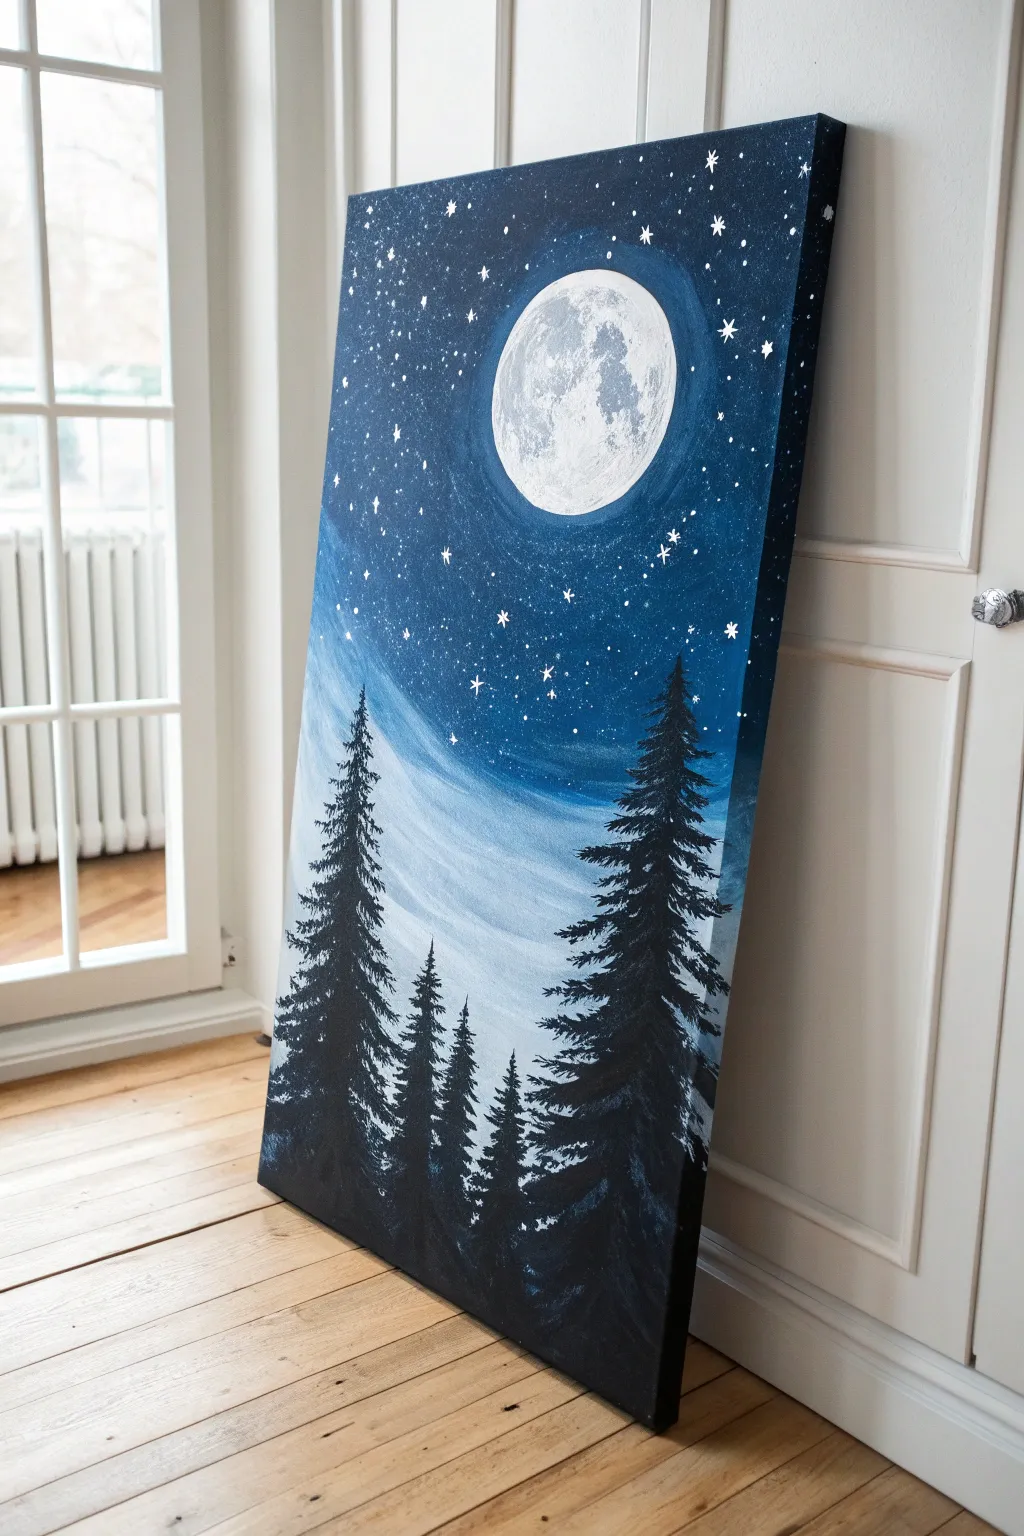
Capture the serene beauty of a crisp winter night with this stunning vertical landscape. You’ll layer acrylics to create a glowing moonlit sky and use simple brush techniques to paint realistic pine tree silhouettes.
How-To Guide
Materials
- Stretched vertical canvas (e.g., 12×24 or 16×32)
- Acrylic paints: Titanium White, Mars Black, Phthalo Blue, Navy Blue
- Large flat brush (2-inch)
- Medium flat brush
- Fan brush
- Small round detail brush
- Old toothbrush
- Small sponge or paper towel
- Cup or compass for tracing
Step 1: The Midnight Sky
-
Create the darkest depths:
Start by mixing Navy Blue with a touch of Mars Black. Using your large flat brush, paint the top third of the canvas and the upper corners, using long, cross-hatch strokes to ensure full coverage. -
Blend the mid-tones:
Load your brush with pure Phthalo Blue (without washing it first). Paint the middle section of the canvas, blending it upwards into the dark navy while the paint is still wet to create a smooth gradient. -
Add the diagonal glow:
Mix a generous amount of Titanium White with a little Phthalo Blue to make an icy blue. Paint a broad, diagonal swooping motion across the lower third of the sky, mimicking the flow of the Milky Way or mist. -
Smooth the transition:
Wipe your large brush dry. lightly sweep over the area where the icy blue meets the darker blue to soften the edges, giving the sky a dreamy, atmospheric look. -
Dry the background:
Allow the sky layer to dry completely before moving on. This usually takes about 15-20 minutes, or you can use a hair dryer to speed it up.
Fan Brush Pro Tip
For realistic trees, don’t hold the fan brush flat.Rotate it slightly and use the corner edge to tap. This creates distinct, needle-like textures rather than solid blobs.
Step 2: Moon and Stars
-
Position the moon:
Place a cup or circular object in the upper center of the dark sky area. Lightly trace around it with a pencil or chalk to establish your moon’s shape. -
Base coat the moon:
Fill in the circle using your medium flat brush and pure Titanium White. You may need two coats to ensure it is bright and opaque against the dark background. -
Add lunar texture:
Mix a light grey (White + tiny dot of Black). Dab a small piece of sponge or crumpled paper towel into the grey, blot off the excess, and gently tap texture onto the moon to create craters. -
Create the star field:
Thin down white paint with water until it’s inky. Dip an old toothbrush into it, face the bristles toward the canvas, and run your thumb over them to spray fine mist stars over the upper dark blue section. -
Detail brighter stars:
Using a small round detail brush, dip into pure white paint and manually add a few larger stars. I like to paint small ‘plus signs’ or crosses to make these specific stars look like they are twinkling.
Level Up: Lunar Glow
Before painting the black trees, dry-brush a very faint ring of translucent white around the outside of your moon to create a glowing atmospheric halo effect.
Step 3: The Pine Forest
-
Establish tree lines:
Load a fan brush or flat brush with pure Mars Black. Paint vertical lines starting from the bottom to indicate the height of your trees. Make the tree on the right the tallest, and vary the heights for interest. -
Form the canopy:
Using the fan brush, start at the top of a trunk line. Tap the brush corners gently in a zig-zag pattern, getting wider as you move down the trunk to create the pine bough shape. -
Building density:
Continue tapping downwards. Allow some of the blue background to peek through the upper branches, but make the tapping denser as you reach the bottom of the tree. -
Fill the forest floor:
Use the black paint to fill in the entire bottom section of the canvas, covering the base of the trees to ground them in a dark forest floor. -
Refine the silhouettes:
Use your small detail brush to add very fine, tip-top vertical points to the trees and fill in any gaps where the trunk looks too bare.
Hang your finished canvas vertically to add a peaceful, majestic winter atmosphere to any room.


Have a question or want to share your own experience? I'd love to hear from you in the comments below!