When I want a little creative reset in December, I reach for my sketchbook and a handful of christmas drawing ideas that feel simple, cozy, and instantly festive. Here are my go-to prompts—starting with the classic icons and gradually leveling up into more playful, “wow” drawings you’ll actually want to finish.
Cute Santa Face Sketch

Capture the jolly spirit of the holidays with this adorable, cartoon-style Santa Claus face. With soft rounded lines and cheerful rosy cheeks, this sketch is perfect for greeting cards or festive journaling.
How-To Guide
Materials
- Spiral-bound sketchbook (tan or off-white paper recommended)
- Fine liner pen (black, 0.4mm or 0.5mm)
- Pencil (HB for sketching)
- Soft eraser
- Colored pencils or markers (red, pink, peach/flesh tone)
Step 1: Sketching the Base Outline
-
Start with the nose:
Begin your drawing right in the center of the page by sketching a small, slightly flattened circle for Santa’s nose. -
Draw the mustache:
From the bottom sides of the nose, draw a sweeping, curved line outward to the left and right that curls up slightly at the tips, creating a classic handlebar mustache shape. -
Connect the mustache:
Bring those curved lines back toward the center underneath the nose, meeting contentedly in the middle. -
Add the mouth:
Tuck a small, open mouth directly under the center of the mustache. Shade the inside dark, leaving a tiny curve at the bottom for his tongue. -
Outline the face shape:
Draw a U-shape starting from the top edge of the mustache on the left, going down around the mouth, and connecting to the mustache on the right to form the lower face area. -
Create the beard:
Surround the lower face with a large, fluffy beard. Use a series of connected scalloped or bumpy lines that extend from the ears down to a point and back up.
Keep it Fluffy
Make the scallops on the beard and hat irregular in size. Perfect uniformity looks unnatural; mixing small and large bumps makes the fur look softer.
Step 2: Adding Hat and Details
-
Draw the hat brim:
Above the nose area, draw a fluffy, cloud-like band for the fur trim of Santa’s hat. Make it bumpy like the beard, extending wider than his face. -
Add the hat structure:
Sketch a curved line upward from the left side of the brim, looping it over and down to the left to create a drooping stocking cap shape. -
Finish with a pom-pom:
At the very tip of the drooping hat, draw a round, fluffy ball using the same scalloped line texture as the brim and beard. -
Draw the ears:
Tuck two small C-shapes on either side of the face, right between the beard and the hat brim, for his ears. -
Place the eyes:
Draw two vertical oval shapes sitting just above the mustache on either side of the nose. Add small eyebrows above them using short, curved dashes.
Step 3: Inking and Coloring
-
Trace with ink:
Carefully go over your pencil lines with a fine liner pen. Use confident, smooth strokes for the hat and face, and lighter, loopier strokes for the fluffy textures. -
Erase pencil marks:
Wait a moment for the ink to dry completely to avoid smudging, then gently erase all the underlying pencil sketches. -
Color the hat:
Fill in the main body of the hat with a vibrant red colored pencil or marker. Leave the brim and pom-pom uncolored to represent white fur. -
detail the face:
Lightly color the face and ears with a peach or flesh-tone pencil. I like to keep this layer soft so the ink lines remain crisp. -
Add rosy cheeks:
Using a pink pencil, draw small circular blushes on his cheeks, just below the eyes. -
Color the nose:
Add a slightly darker red or deep pink to the nose to give him that cold-weather glow. -
Add highlights:
If you have a white gel pen, add a tiny dot to the nose and cheeks for a shiny, lively look.
Ink Smearing?
If your fine liner smears when erasing, switch to a waterproof archival ink pen, or wait at least 15 minutes before touching the eraser to the paper.
Now you have a cheerful holiday character ready to decorate your seasonal pages


Classic Christmas Tree Layers
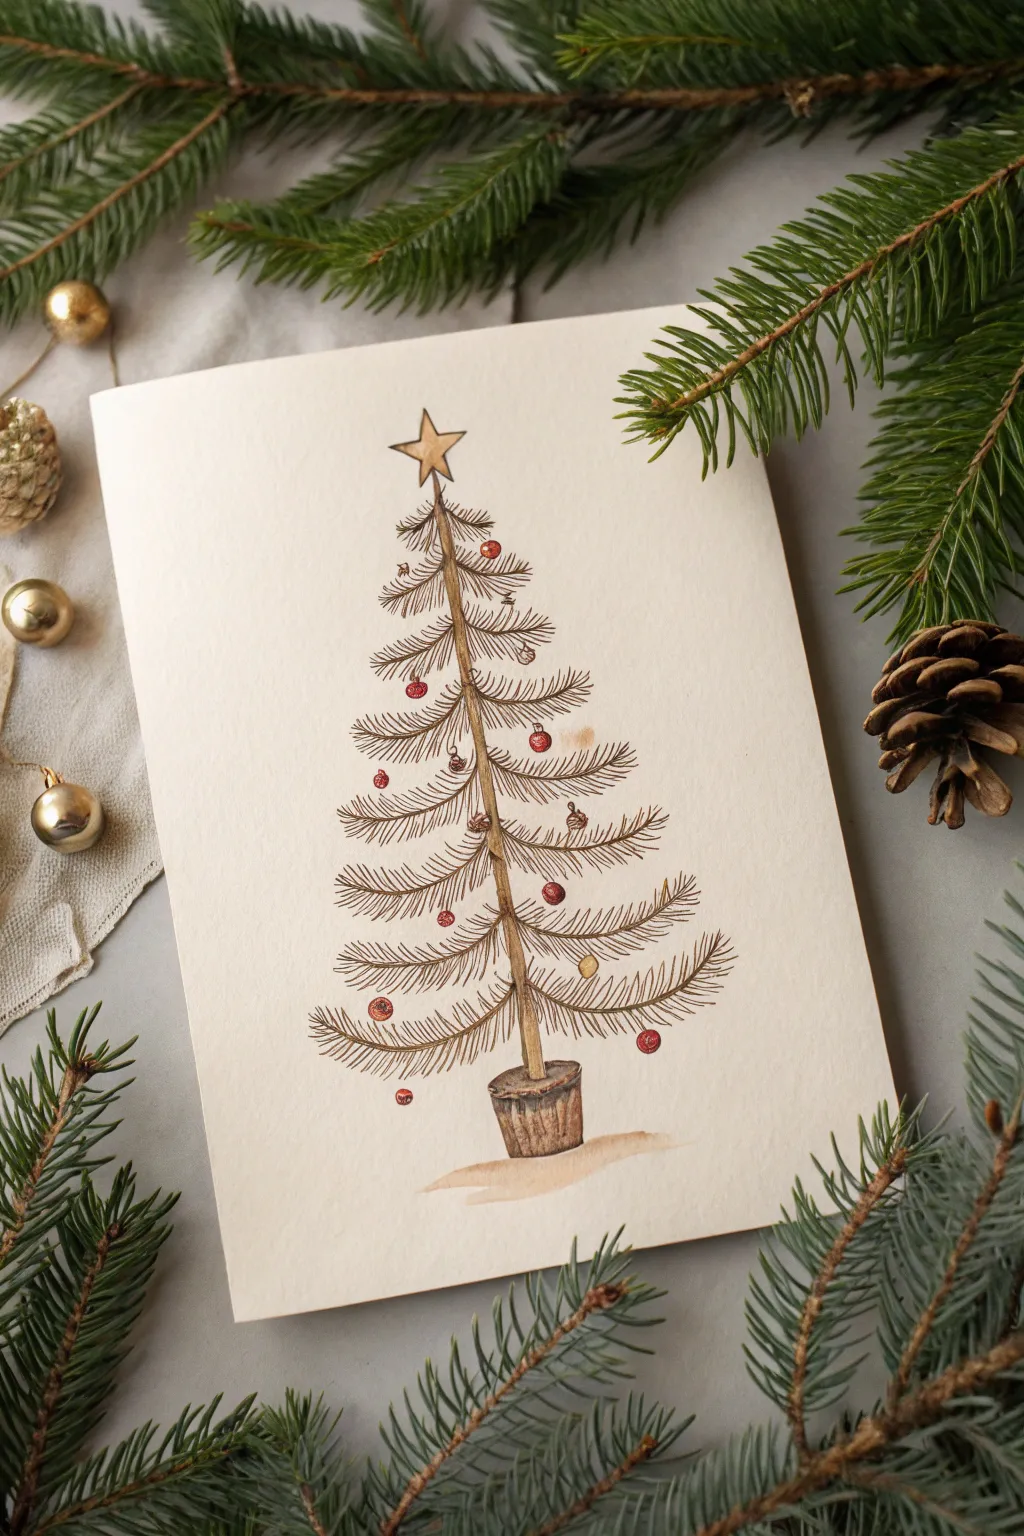
Capture the nostalgic charm of a traditional Christmas with this delicate ink and watercolor illustration. The sparse, layered branches allow for white space that gives the piece an elegant, airy feel perfect for holiday cards.
Step-by-Step
Materials
- Cold press watercolor paper (A5 size or folded card)
- Fine liner pen (brown or sepia, 0.3mm or 0.5mm)
- Watercolor paints (Sap Green, Burnt Sienna, Alizarin Crimson, Yellow Ochre)
- Small round watercolor brush (size 2 or 4)
- Pencil and eraser
- Water cup and paper towel
Step 1: Structural Sketching
-
Establish the centerline:
Begin by lightly tracing a vertical line down the center of your paper with a pencil. This will act as the trunk guides to keep your tree symmetrical. -
Mark layer points:
Make small tick marks along the centerline where you want each tier of branches to originate. Spacing them further apart at the bottom and closer together at the top creates a natural perspective. -
Sketch the framework:
Lightly sketch the main swooping curves of the branches. Start narrow at the top and flare out wider as you reach the bottom, creating that classic triangular silhouette without being too rigid. -
Add the star and pot:
Draw a simple five-pointed star at the very peak. At the base, sketch a slightly tapered cylindrical bucket shape for the tree stand.
Step 2: Inking the Details
-
Outline the trunk:
Using your sepia fine liner, draw the trunk segments between the branch tiers. Make the lines slightly wavy rather than ruler-straight to simulate organic bark texture. -
Structure the main branches:
Trace over your pencil branch lines with ink. Instead of a single smooth line, use short, overlapping strokes to suggest the rough texture of wood. -
Add pine needles:
This is the most time-consuming but meditative part. Draw hundreds of tiny, short dashes extending from the top and bottom of each branch line. Angling them slightly outward mimics real pine growth. -
Detail the ornaments:
Draw small circles hanging from various branch tips. Keep them scattered randomly rather than perfectly aligned. Include tiny loops or hooks where they attach to the wood. -
Texture the base:
Ink the pot at the bottom, adding vertical wood grain lines to give it a rustic, bucket-like appearance. -
Erase pencil guides:
Wait at least five minutes for the ink to full bond with the paper fibers, then gently erase all visible pencil marks to clean up the drawing.
Needle Direction Matters
Make sure your pen strokes for the needles all point away from the trunk. Needles pointing inward will make the tree look prickly and unnatural.
Step 3: Watercolor Wash
-
Paint the trunk:
Mix a watery wash of Burnt Sienna. Carefully fill in the trunk segments, allowing the color to be slightly uneven for a natural look. -
Wash the branches:
Dilute your Sap Green significantly so it is very pale. Run a thin line of this color over your inked needles. You don’t need to stay perfectly inside the lines; a loose wash adds charm. -
Add shadows:
While the green is still damp, dab a tiny bit of darker green or brown near the trunk on each branch to create depth. -
Color the ornaments:
Use Alizarin Crimson for the ornaments. Paint a small red dot inside each inked circle, leaving a tiny speck of white paper unpainted to represent a glossy highlight. -
Finish the star and pot:
Paint the star with a light wash of Yellow Ochre. Use a darker mix of Burnt Sienna for the wooden bucket at the base. -
Ground the tree:
Mix a very watery beige or grey and swipe a horizontal brushstroke underneath the pot. This casts a soft shadow so the tree doesn’t look like it’s floating.
Ink Smearing?
Check if your pen is waterproof before painting. If not, do the watercolor steps first, let it fully dry, and then add your ink details specifically on top.
Now you have a timeless holiday illustration ready to be gifted or framed


Snowflake Symmetry Practice
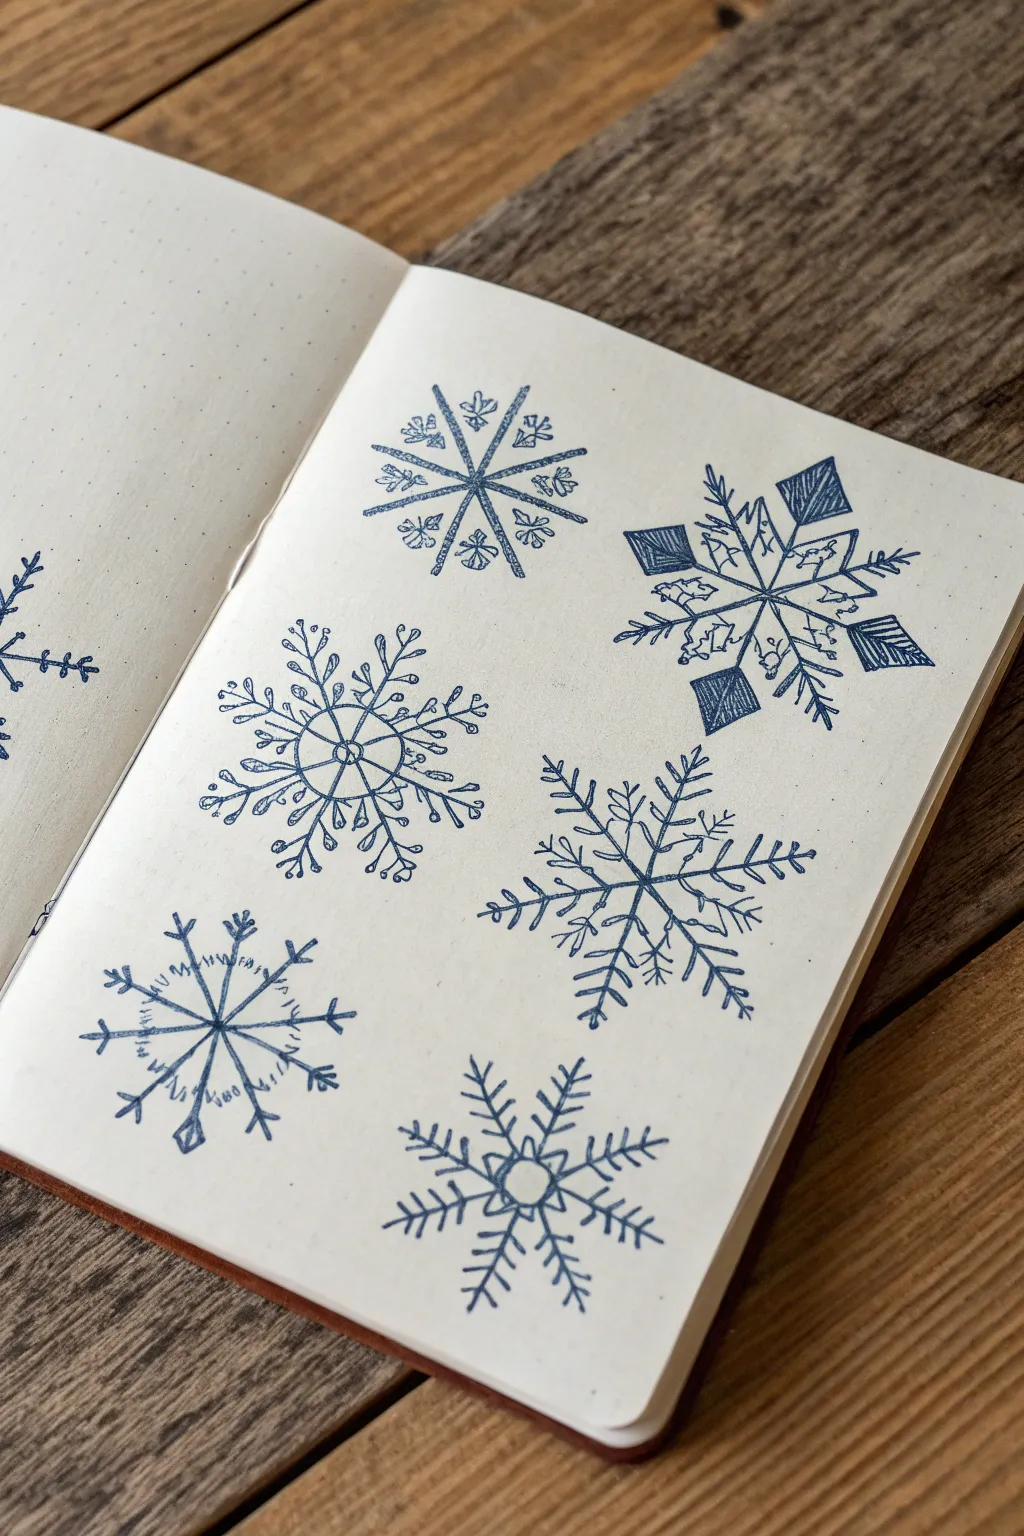
Practice your fine-line precision with these six distinct snowflake designs, ranging from classic geometric shapes to more whimsical, botanical-inspired crystals. Drawn in deep indigo ink on dotted paper, this study is a relaxing way to explore radial symmetry.
Detailed Instructions
Materials
- Dotted or grid notebook (or plain paper)
- Blue fine liner pen (approx. 0.3mm or 0.5mm)
- Ruler (optional but helpful)
- Pencil and eraser (for preliminary guidelines)
Step 1: Setting the Structure
-
Establish the centers:
Visualize or lightly pencil mark six evenly spaced center points on your page where each snowflake will live. Make sure you leave enough breathing room between them so the protruding arms won’t collide. -
Draw the base spines:
For every snowflake, start by drawing three intersecting lines that cross at the center point. This creates a six-armed star shape, which is the foundation for almost every real snowflake. I prefer to do this freehand for a natural look, but you can use a ruler if you want machine-perfect lines.
Wobbly Lines?
Don’t stress over imperfection. Real snowflakes are often asymmetrical due to wind or melting. Keep your wrist loose and rotate the notebook as you draw each arm to maintain a consistent angle.
Step 2: Top Left: The Classic Crystal
-
Add V-shapes:
Draw medium-sized ‘V’ shapes facing outward on each of the six spines, positioned about halfway down the arm. -
Cap the ends:
At the very tip of each spine, draw a small, three-pronged ‘crow’s foot’ shape to finish the arm. -
Decoration details:
In the spaces between the main arms, draw tiny floating diamond shapes or dots to fill the negative space.
Add Some Sparkle
Once the blue ink is fully dry, trace over the very center of each snowflake with a silver or white gel pen. It adds a subtle, icy shimmer that catches the light.
Step 3: Top Right: Broad Geometric
-
Create diamond tips:
On alternating arms (arms 1, 3, and 5), draw large diamond shapes at the tips. Fill these diamonds with tight, parallel hatching lines for a dark, bold look. -
Create arrow tips:
On the remaining three arms, draw two backward-facing V-shapes to create an arrow fletching effect. -
Connect the center:
Draw a hexagon connecting all six arms near the center to unify the design.
Step 4: Middle Left: The Wheel
-
Draw the inner circle:
Draw a circle that connects all six arms about a third of the way out from the center. -
Add curled prongs:
Along the length of each arm, add sets of curved branches. Curl the ends into tiny loops or heavy dots, giving it a playful, fern-like appearance. -
Detail the intersections:
Where the circle meets the arms, add tiny cross-hatches or double lines to reinforce the structure.
Step 5: Middle Right: The Fir Tree
-
Draw evergreen branches:
Treat each spine like a tree branch. Draw three or four sets of straight lines coming off the main spine at a 45-degree angle, getting smaller as you reach the tip. -
Connect the base:
Near the center, connect the first set of branches to their neighbors with a curved, scalloped line, creating a star-flower shape in the middle.
Step 6: Bottom Row: Web & Star
-
Bottom Left: The Spiderweb:
Draw faint, messy zigzag lines connecting the arms, spiraling outward. Unlike the other exact shapes, sketch this loosely to look like icy frost webbed between the spines. Add small circles at the arm tips. -
Bottom Right: The Star Burst:
Draw a distinct small hexagon in the very center. From there, double-line the first half of each arm to make them thick, then switch to a single line. Add multiple arrow-feather shapes pointing outward near the tips.
Now you have a full page of frosty designs ready to decorate your winter journals or holiday cards


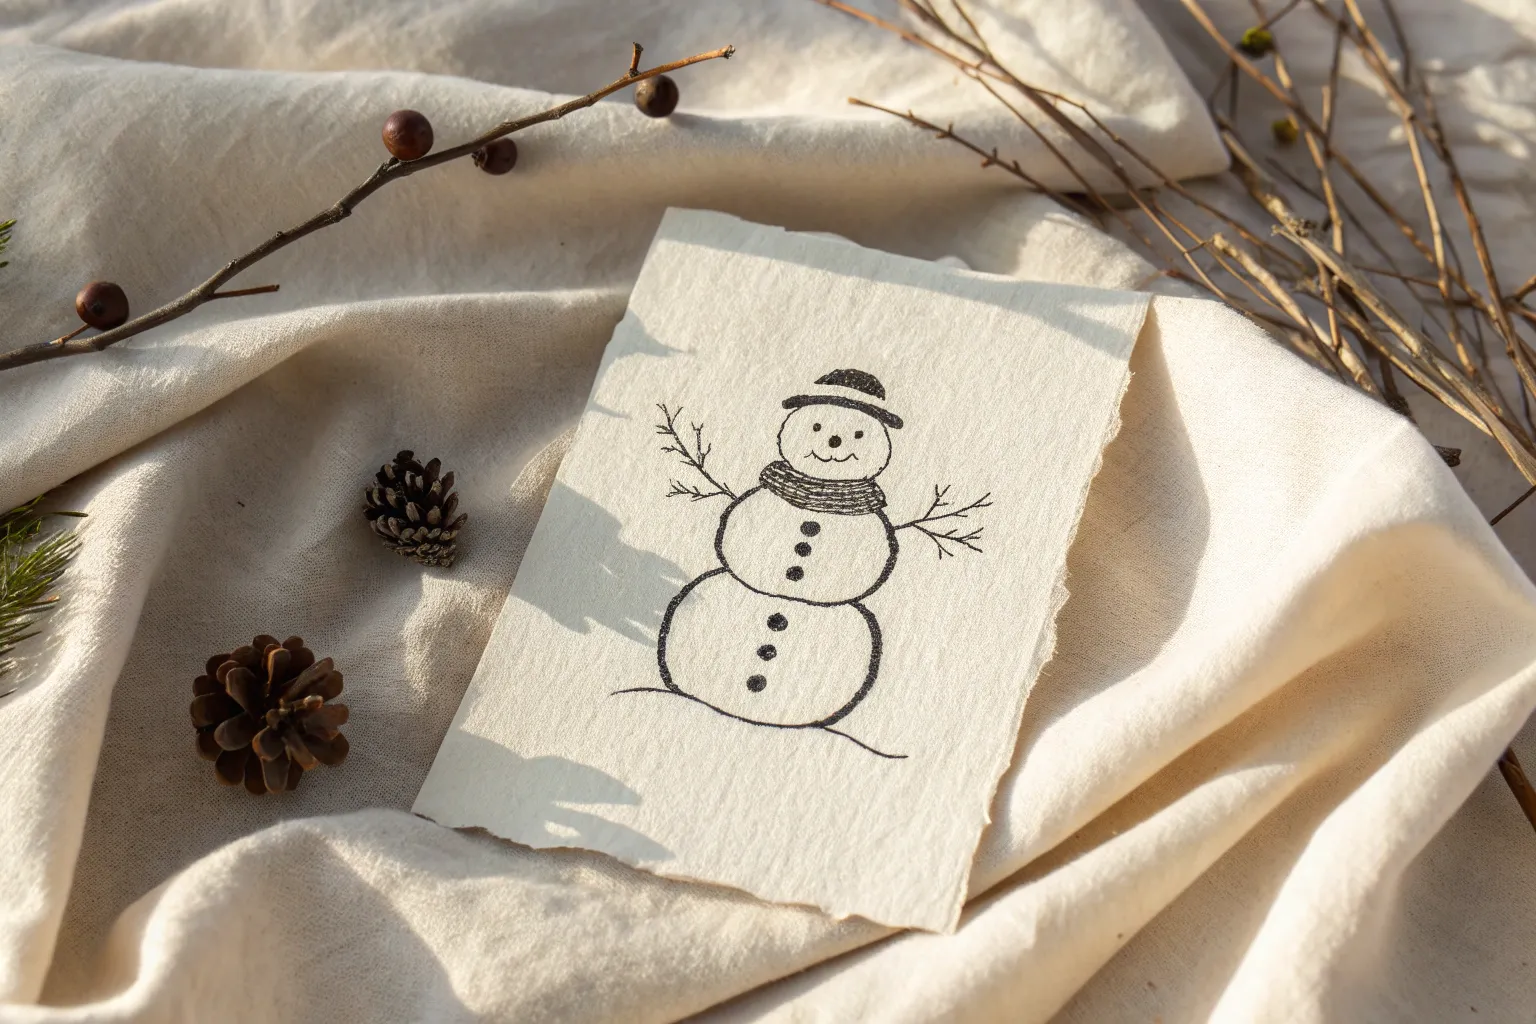
Cozy Snowman Character
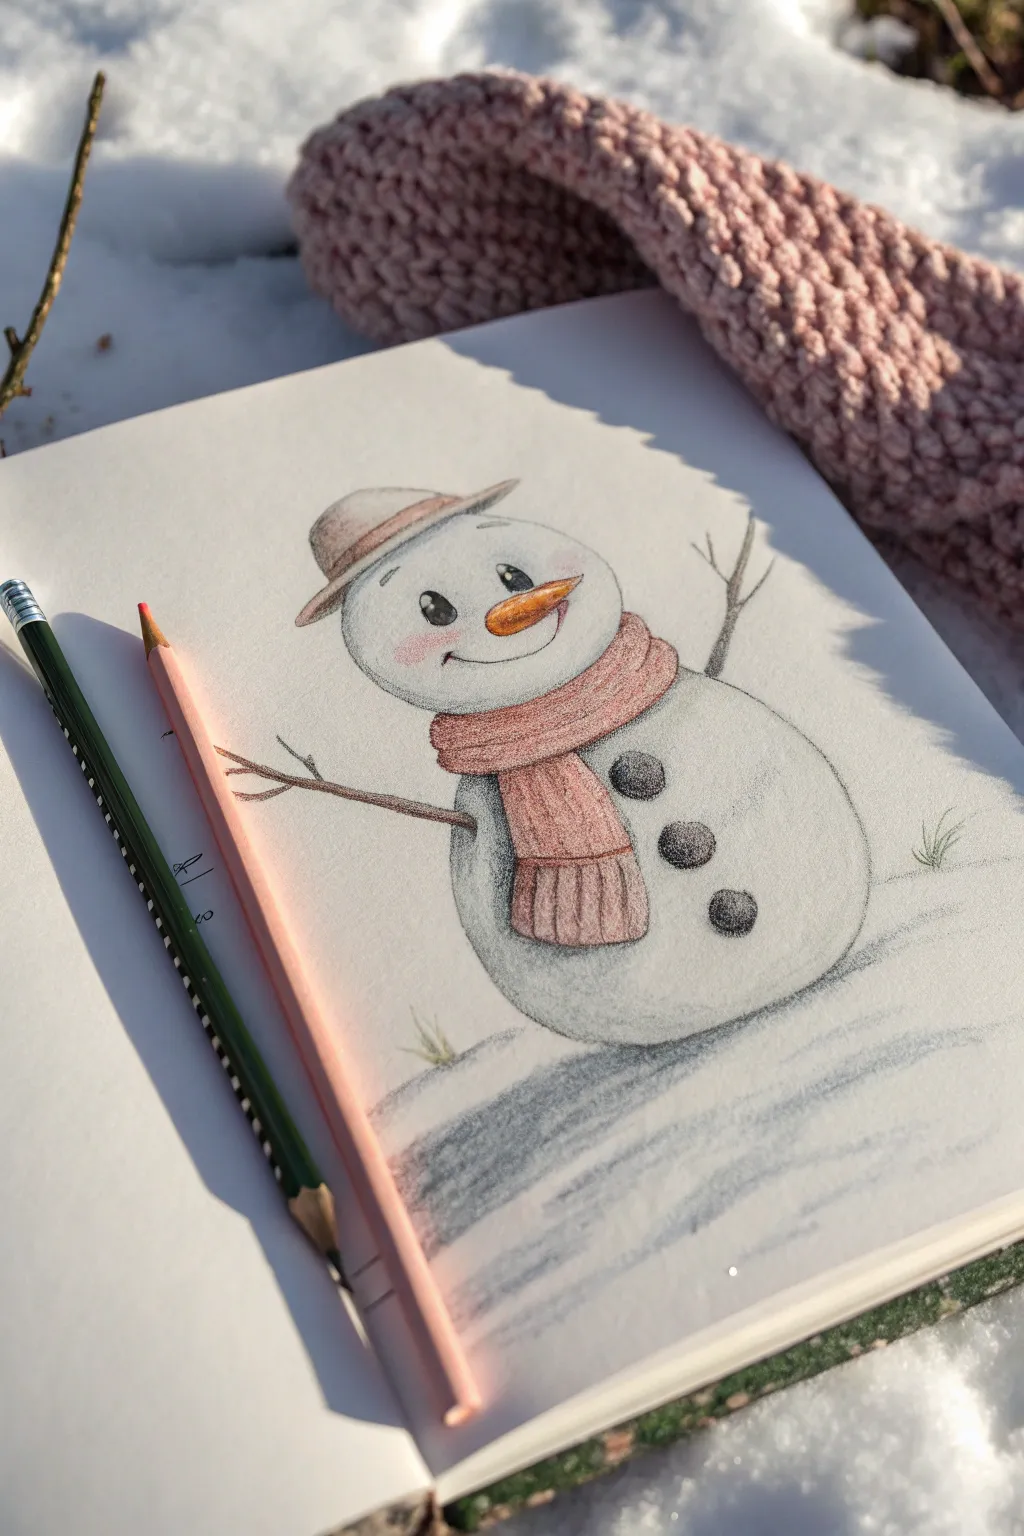
Capture the magic of the season with this endearing snowman illustration, rendered softly in colored pencil. This project focuses on gentle shading and charming character design to create a cozy friend that pops right off the page.
Step-by-Step Tutorial
Materials
- Sketchbook or drawing paper (heavyweight preferred)
- Graphite pencil (HB or H)
- Eraser
- Colored pencils (grey, pink/peach, orange, black, white)
- Blending stump or tissue
- Pencil sharpener
Step 1: Basic Structure
-
Head and Body:
Start by lightly sketching two overlapping circles. Draw a smaller circle on top for the head and a larger, slightly squashed circle below it for the body. Don’t press too hard; these are just guides. -
Hat Outline:
Sit a shallow, curved oval on top of the head circle for the hat brim. Add a rounded dome shape above that for the crown of the hat. -
Scarf Shape:
Draw a thick, curved band right where the head meets the body. Let two rectangular strips hang down from the front of this band to create the scarf tails. -
Stick Arms:
Sketch simple lines extending from the sides of the body. Add little ‘V’ fork shapes at the ends and midway down the branches to make them look like real twigs.
Step 2: Face and Details
-
Facial Features:
Place two tall ovals for eyes in the middle of the face. Between and slightly below them, draw a carrot shape pointing towards the right. Add a simple curved line for a smile. -
Buttons and Ground:
Sketch three round circles down the center of the body for coal buttons. Add a few light, sketchy horizontal lines at the base to indicate the ground.
Smudged Snow?
If your grey shading gets messy, lift excess graphite with a kneaded eraser. Avoid rubbing with your hand, as oils can smear the pencil work.
Step 3: Adding Color
-
The Carrot Nose:
Use an orange pencil to fill in the nose. Press harder on the bottom edge for shadow and leave the very top lighter for a highlight. -
Scarf Base Layer:
Fill the scarf with a soft pink or peach colored pencil. Use gentle, circular motions to keep the texture smooth. -
Scarf Texture:
With a slightly sharper point of the same pink pencil (or a slightly darker shade), draw vertical lines along the scarf to mimic knitting ribbing. Add fringe lines at the very bottom. -
Hat and Cheeks:
Color the hat with a light brown or beige. Take your pink pencil and lightly dust some color in circles underneath the eyes to create rosy cheeks. -
Eyes and Mouth:
Use a black pencil to fill the eyes, leaving two tiny white circles in each for lively reflection. Trace the smile line and button outlines carefully with black.
Sparkle Effect
Use a white gel pen to add extra bright highlights to the eyes, the top of the nose, and the ‘wet’ parts of the coal buttons for a glossy look.
Step 4: Shading and Finishing
-
Snowman Shading:
Using a grey pencil, shade the left side and bottom of both snowballs (head and body). This gives the drawing dimension. I like to keep the right side pure white to suggest a light source. -
Texture Spots:
Lightly stipple or speckle a little grey texture over the white parts of the snowman to make it look like packed snow, rather than just empty paper. -
Ground Shadows:
Use the side of your grey pencil lead to create broad, soft shadows on the ground beneath the snowman. Make the shadow darkest right under the bottom snowball. -
Arm Definition:
Go over the stick arms with a dark brown pencil. Vary your pressure to make the twigs look knobby and organic. -
Final Contrast:
Deepen the shading on the buttons using black, but keep the centers slightly lighter or textured like coal. Refine any edges that got disconnected. -
Grass Tufts:
Add a few tiny sprigs of grass poking through the snow near the base using a sharp green or grey pencil for realistic detail.
Now you have a frosty companion ready to greet the winter days
BRUSH GUIDE
The Right Brush for Every Stroke
From clean lines to bold texture — master brush choice, stroke control, and essential techniques.
Explore the Full Guide
Friendly Reindeer Portrait
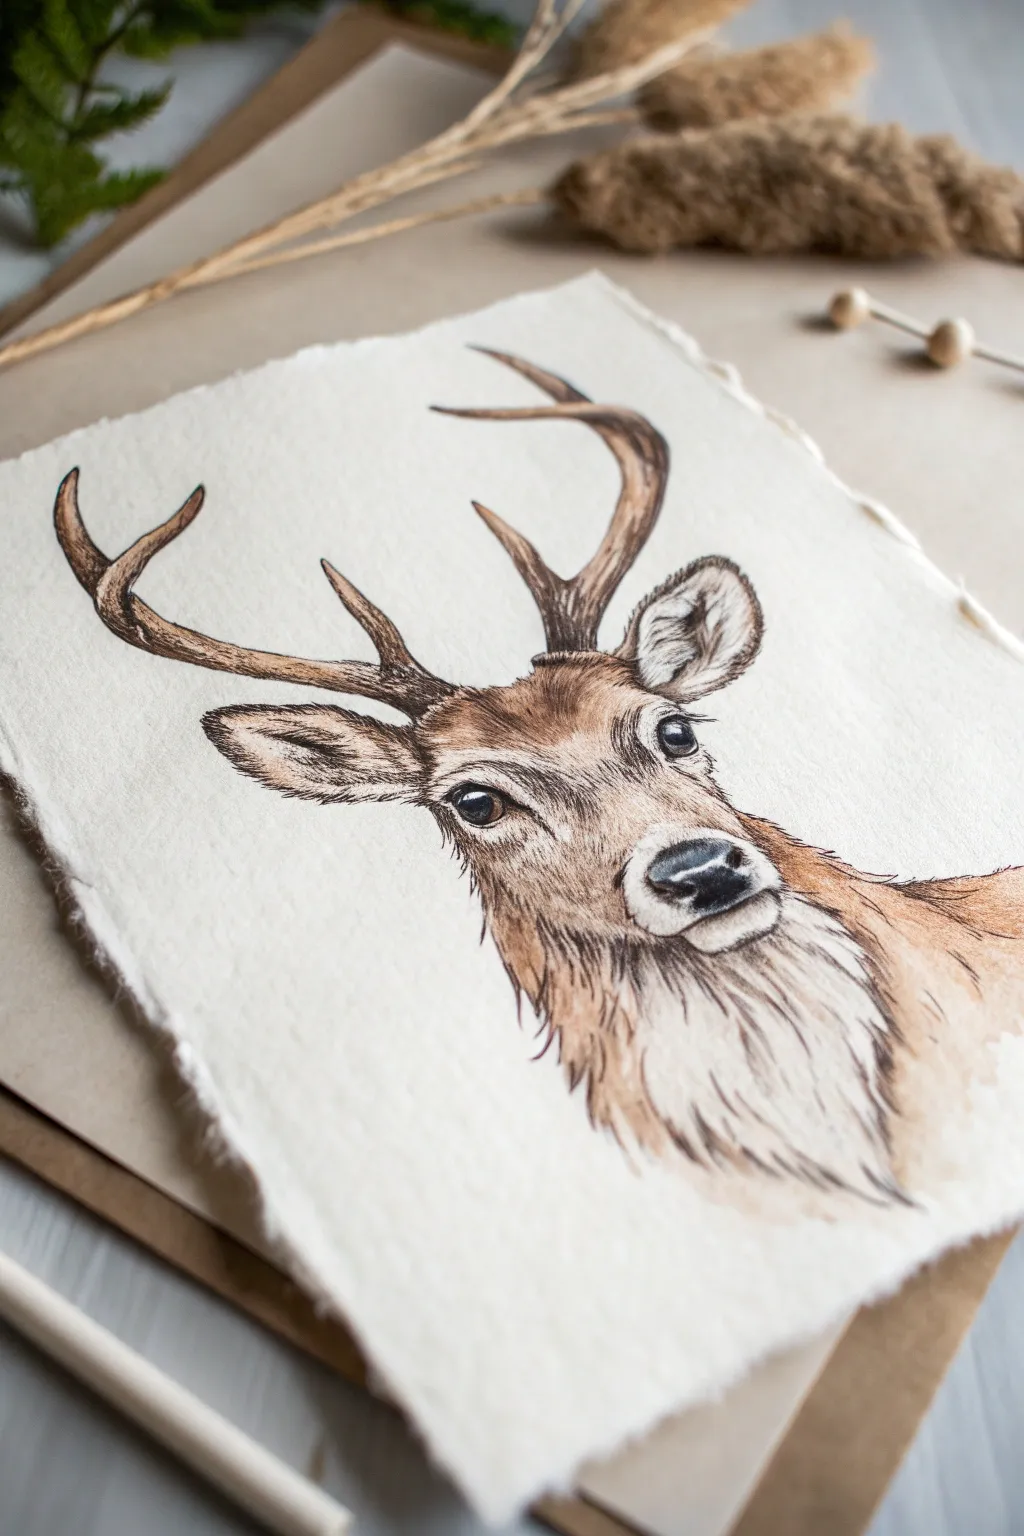
Capture the gentle spirit of the season with this realistic yet approachable stag portrait. Using a mix of delicate ink liner work and soft watercolor washes, you’ll create a piece that feels both rustic and refined on textured cotton rag paper.
Step-by-Step
Materials
- Heavyweight cold-press watercolor paper with deckled edges (approx. 5×7 inches)
- Pencil (HB) and kneaded eraser
- Fine liner pens (black or sepia, sizes 0.1 and 0.3)
- Watercolor paints (Burnt Sienna, Yellow Ochre, Burnt Umber, Payne’s Grey)
- Small round brushes (sizes 2 and 4)
- Clean water and paper towels
Step 1: Sketching the Framework
-
Map basic shapes:
Start with a light pencil sketch. Draw a sloping oval for the head and a smaller rounded rectangle for the snout area to establish the angle. -
Position the features:
Lightly mark a horizontal line about halfway down the head oval for the eyes. Add the triangular shape of the nose near the bottom of the snout. -
Draft the antlers:
Sketch the main beams of the antlers curving upward and outward. Add the tines branching off—keep them organic and slightly asymmetrical for realism. -
Add ears and neck:
Place large, teardrop-shaped ears just below the antler base. Suggest the thick, furry neck extending downward, widening at the shoulders. -
Refine the pencil lines:
Go over your shapes to add detail, defining the eye separation and the nostrils. Keep these lines faint as they are just guides.
Eye Focus
The eyes make the character. Make the top eyelid line thicker and darker than the bottom rim. This creates a natural ‘shadow’ from the lashes and deeper expression.
Step 2: Ink Detailing
-
Outline the eyes:
Using your 0.1 fine liner, carefully ink the eyes, leaving a tiny white circle in each pupil for the highlight. This spark of life is crucial. -
Texture the fur:
Switch to short, flicking strokes to ink the outline of the face. Instead of a solid line, use these dashes to mimic the texture of fur, especially around the cheeks and ears. -
Detail the antlers:
Outline the antlers with a slightly broken line to suggest rough texture. Add small hatching marks along the curves to indicate roundness and shadow. -
Define the neck ruff:
Use longer, sweeping pen strokes for the chest and neck fur. Let the lines fade out at the bottom edge to create a vignette effect. -
Erase pencil guides:
Once the ink is completely dry—give it a few minutes to be safe—gently lift the pencil sketches with your kneaded eraser.
Rustic Frame
Mount your finished piece on a sheet of brown kraft paper or recycled cardboard to enhance the woodland aesthetic before framing.
Step 3: Watercolor Washes
-
Base layer for fur:
Mix a watery wash of Yellow Ochre and a touch of Burnt Sienna. Paint this loosely over the face and neck, avoiding the white patch on the chin and around the eyes. -
Deepen the tones:
While the first layer is still slightly damp, drop in pure Burnt Sienna on the forehead and the bridge of the nose to create warmth. -
Shadowing the ears:
Paint the inner ears with a very pale grey wash, adding darker brown touches to the outer edges and tips. -
Painting the antlers:
Use a mix of Burnt Umber and water for the antlers. I like to keep the tips slightly lighter and darken the base where they meet the head. -
Adding contrast:
Mix Burnt Umber with a tiny bit of Payne’s Grey. Apply this darker mix to the nose, the pupils (around the highlight), and the deepest shadows under the chin. -
Refining texture:
Use a nearly dry size 2 brush with dark brown paint to add tiny fur strokes on top of the dry wash, particularly on the snout and eyebrows. -
Final drying details:
If any ink lines look faded under the paint, strengthen them with the 0.3 pen once the paper is bone dry to make the portrait pop.
Now you have a charming woodland portrait ready to frame or gift
Christmas Stocking Full of Treats
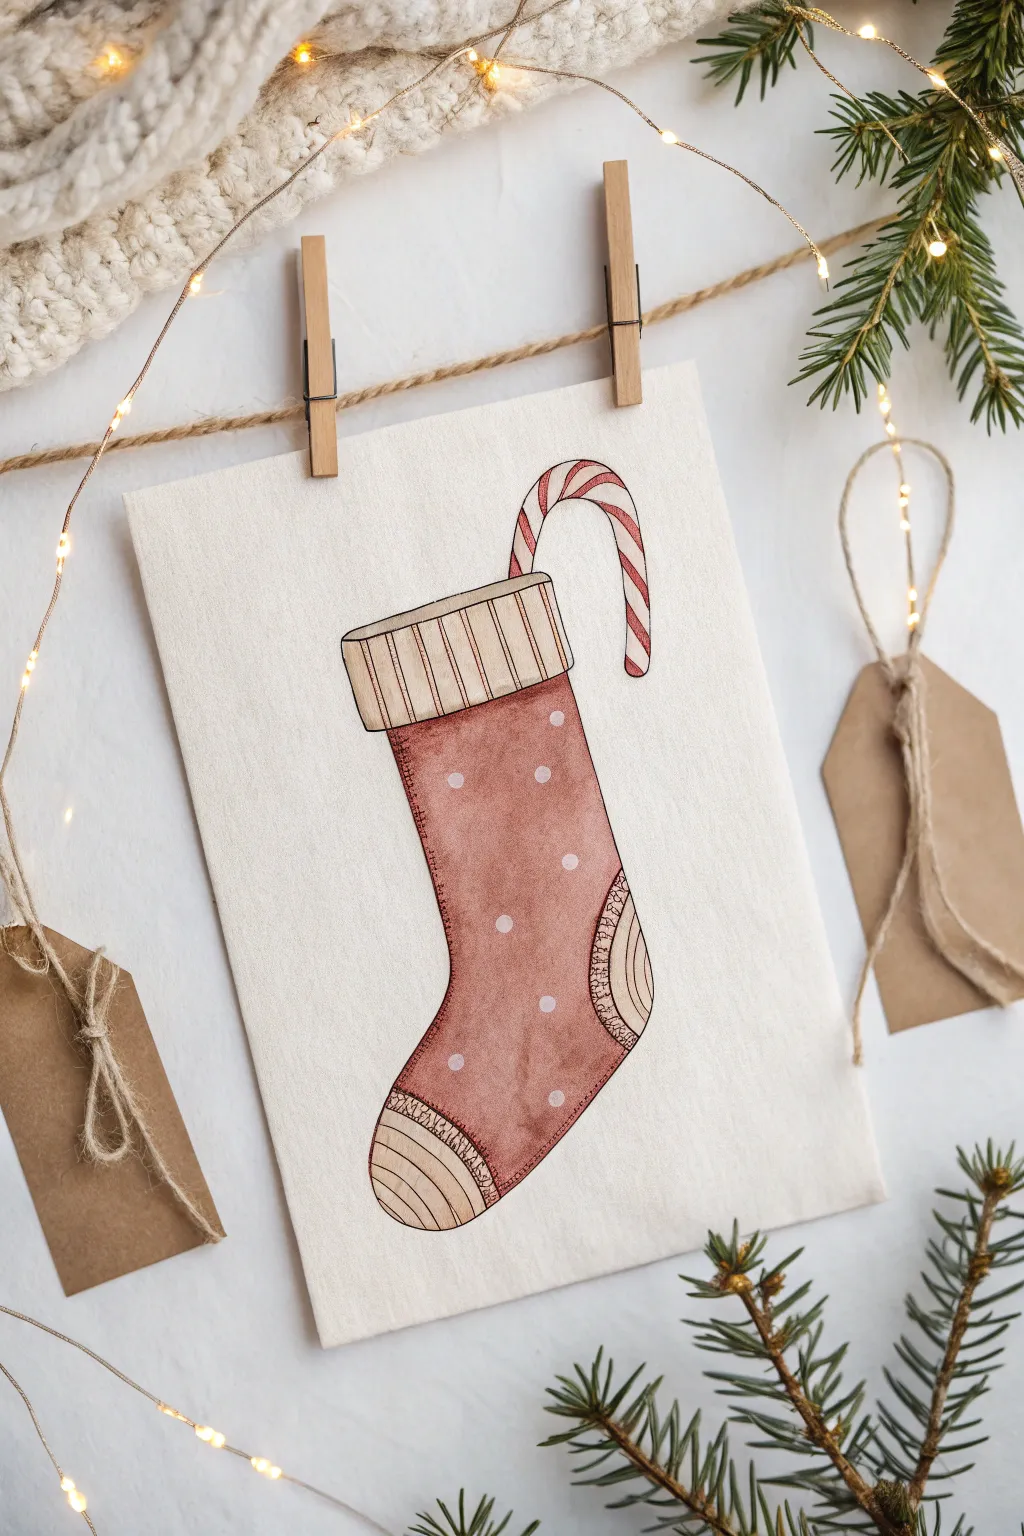
Capture the warmth of the season with this charming watercolor and ink illustration of a classic Christmas stocking. The soft washes and delicate linework create a nostalgic, handmade feel perfect for holiday cards or festive decor.
How-To Guide
Materials
- Cold press watercolor paper or textured cardstock (creamy white)
- Fine liner pen (black or dark sepia, waterproof)
- Watercolor paints (burnt sienna, alizarin crimson, yellow ochre)
- White gouache or white gel pen
- Round watercolor brush (size 4 or 6)
- Pencil and eraser
- Water jar and paper towels
Step 1: Sketching the Outline
-
Map the basic shape:
Start lightly with your pencil. Draw a vertical rectangle that tilts slightly to the right for the main body of the stocking. At the bottom, curve it gently to the left to form the foot shape. -
Add the cuff:
Top the main body with a wider, rectangular cuff shape. Give the top and bottom edges of this cuff a slight curve to suggest volume and roundness around the leg. -
Define the heel and toe:
Sketch semi-circles at the heel and toe areas to demarcate the reinforced patches often found on knitted socks. These will be colored differently later. -
Insert the candy cane:
Draw a candy cane peeking out from the top right of the cuff. Ensure the hook curves outward and downward, disappearing behind the stocking’s fabric. -
Refine with ink:
Trace over your pencil lines with a waterproof fine liner pen. Use confident, slightly loose strokes to maintain a hand-drawn charm rather than perfect mechanical lines.
Keep it loose
Don’t stress about coloring perfectly inside the lines. Slight overlaps or gaps between the ink and paint add character to the illustration.
Step 2: Adding Details & Texture
-
Ribbing the cuff:
Draw vertical lines inside the cuff area to mimic knitted ribbing. Space them somewhat evenly, but keep them organic. Don’t worry if they aren’t perfectly straight. -
Detailing the heel and toe:
Add curved contour lines inside the heel and toe patches. These should follow the rounded form of the sock to emphasize its 3D shape. -
Stitch work:
Along the inner edge where the heel and toe patches meet the main red fabric, draw tiny zig-zag or loop shapes to simulate stitching. -
Candy cane stripes:
Draw diagonal lines across the candy cane to create the classic peppermint swirl pattern. -
Erase pencil marks:
Once the ink is completely dry—give it a minute to be safe—gently erase all visible pencil sketches underneath.
Step 3: Watercolor Wash
-
Prepare the red mix:
Mix alizarin crimson with a touch of burnt sienna to get a warm, vintage red tone. Dilute it slightly with water so it isn’t too opaque. -
Paint the main body:
Fill in the main section of the stocking with your red mix. I like to let the color pool slightly in some areas to create natural watercolor texture. -
Lift or avoid dots:
For the polka dots, you have two choices: carefully paint around small circles as you go (negative painting) or paint the whole area red and add white later. Painting solid red is often easier for beginners. -
Paint the cuff, heel, and toe:
Mix a very dilute wash of yellow ochre and a tiny bit of brown to create a creamy beige. Paint the cuff, heel, and toe patches with this soft hue. -
Candy cane red:
Use a slightly more vibrant red (perhaps pure alizarin crimson) to carefully fill in the alternating stripes on the candy cane.
Make it a set
Draw three stockings in a row with different patterns—stripes, zig-zags, and plaid—to create a complete mantelpiece family portrait.
Step 4: Final Touches
-
Shadowing the ribbing:
Once the beige wash is dry, mix a slightly darker version of that tan color. Paint thin lines next to your ink lines on the cuff to add depth to the ribs. -
Adding the polka dots:
If you painted the stocking solid red, wait for it to dry completely. Then, use white gouache or a white gel pen to dot the fabric randomly. -
Brightening the cane:
If your paper isn’t bright white, you can use your white gouache to fill in the white stripes of the candy cane for extra pop. -
Optional texture:
For a final crafty look, you can gently splatter a tiny bit of diluted white paint over the red area to mimic fabric texture or faint snow.
Your adorable stocking illustration is now ready to hang on a card or frame for the holidays

PENCIL GUIDE
Understanding Pencil Grades from H to B
From first sketch to finished drawing — learn pencil grades, line control, and shading techniques.
Explore the Full Guide
Festive Wreath With Berries
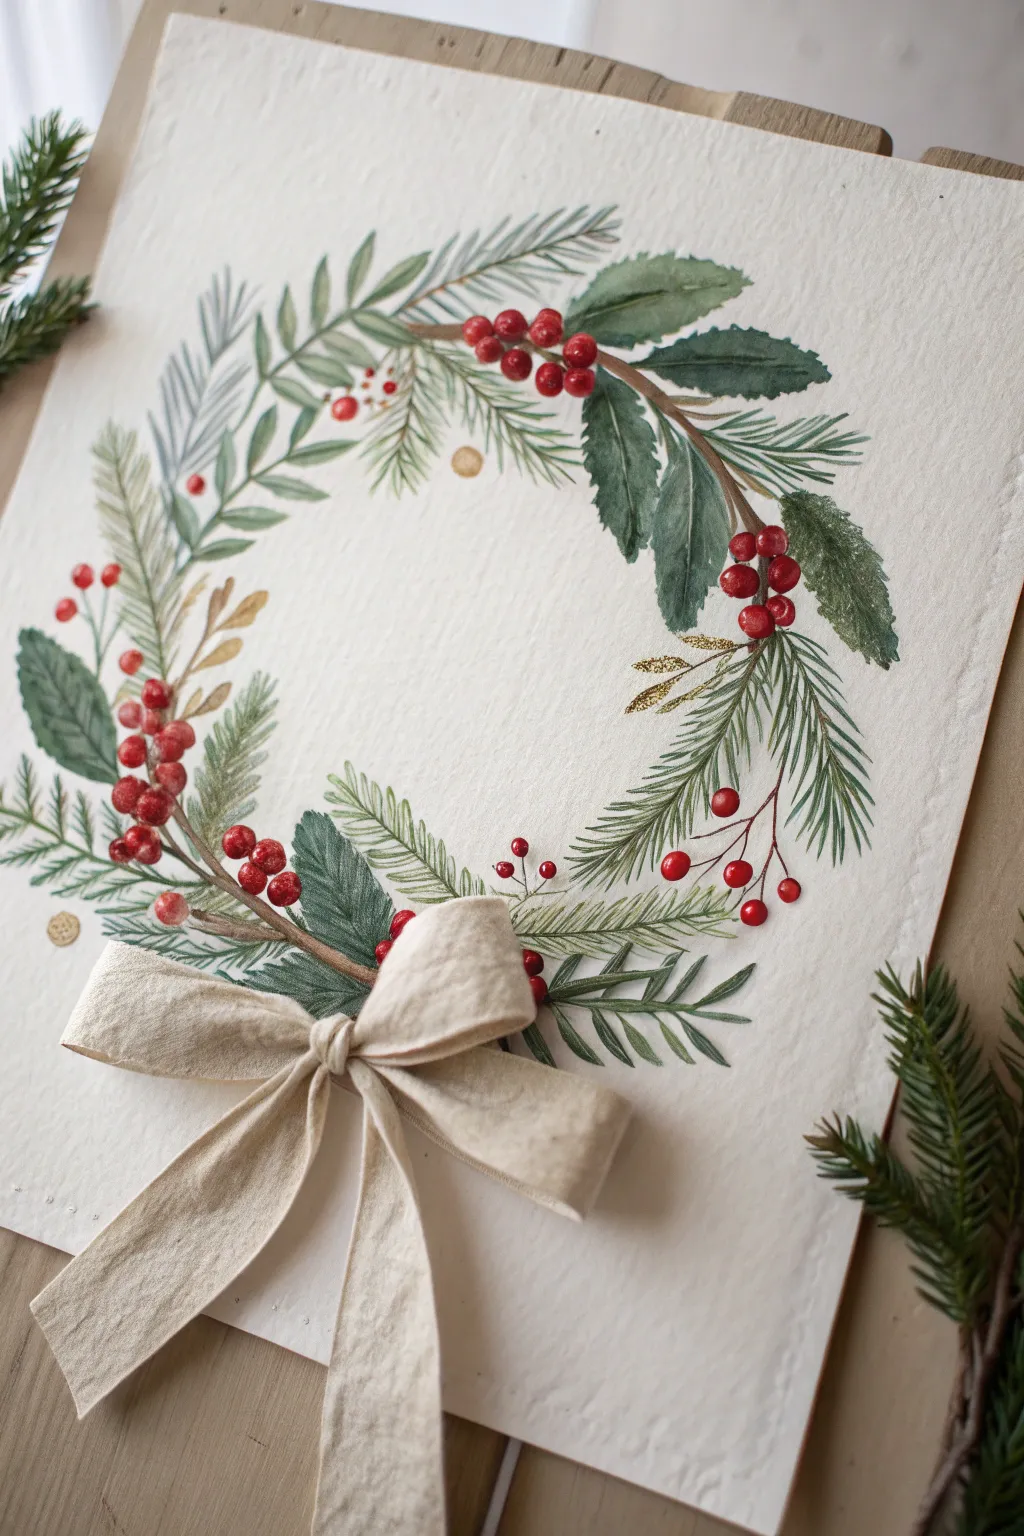
Capture the delicate beauty of the season with this mixed-media wreath project. Combining soft watercolor techniques with a tactile fabric bow creates a charming, dimensional piece perfect for holiday cards or framed decor.
Step-by-Step
Materials
- Cold press watercolor paper (heavyweight, textured)
- Watercolor paints (Sap Green, Hooker’s Green, Alizarin Crimson, Burnt Umber, Yellow Ochre, Gold)
- Round watercolor brushes (size 2, 4, and 6)
- Pencil (HB or lighter)
- Fine liner brush (size 0 or 00)
- Beige linen or cotton ribbon (1-inch width)
- Fabric glue or strong craft adhesive
- Paper towels and two water jars
Step 1: Sketching the Foundation
-
Plan the circle:
Begin by lightly tracing a circle on your watercolor paper using a round object like a bowl or plate as a guide. This will be the spine of your wreath. -
Map the foliage:
With a very light hand, sketch the rough placement of the main branches flowing in a clockwise or counter-clockwise direction. Mark small circles where the berry clusters will sit to reserve those whites.
Muddy colors?
If your greens are bleeding into the red berries and turning brown, ensure the green layer is bone dry before painting adjacent red elements. Patience prevents mud.
Step 2: Painting the Greenery
-
Base pine needles:
Load your size 4 brush with a watery Sap Green mixture. Starting from the branch spine, flick the brush outwards to create soft, airy pine needles. Keep these strokes loose and faint for the background layer. -
Add definition:
While the first layer is still slightly damp, mix Hooker’s Green with a touch of Burnt Umber for a darker shade. Add a second layer of pine needles using the size 2 brush to create depth and shadow. -
Paint holly leaves:
Using the size 6 brush and a rich green mix, paint the broad, scalloped shapes of holly leaves. Vary the pressure on your brush to get tapered points at the leaf edges. -
Detail the veins:
Wait for the holly leaves to dry completely, then use your fine liner brush with a dark, concentrated green to paint a thin central vein down each leaf. -
Introduce variation:
Mix a bit of Yellow Ochre into your green. Paint a few sprigs of leafy foliage interspersed among the pine to break up the texture and add warmth. -
Add gold accents:
For a festive touch, use metallic gold watercolor or gouache to paint delicate, fern-like sprigs tucking out from behind the main greenery. -
Paint the woody stems:
With a size 2 brush and Burnt Umber, connect the various foliage elements with thin, twisting branch lines. Allow these to peek through the greenery intermittently.
Make it sparkle
After the paint is dry, apply small dots of glitter glue to the center of the berries or along the gold sprigs for extra holiday shimmer.
Step 3: Adding the Berries
-
Base berry color:
Using Alizarin Crimson, paint the round berry shapes. Leave a tiny speck of white paper unpainted on the upper left of each berry to represent a highlight. -
Deepen the shadows:
Once the red base is dry, mix a tiny bit of green or brown into your red to darken it. Paint a crescent shape on the bottom right of each berry to give them a 3D spherical look. -
Connect the clusters:
Use the fine liner brush and brown paint to draw tiny stems connecting the berries to the main branch structure.
Step 4: Finishing Touches
-
Assess and fill:
Step back and look at the overall shape. Fill in any awkward gaps with faint, watery pine needles or small gold dots to balance the composition. -
Prepare the bow:
Take your beige linen ribbon and tie a neat bow. Trim the tails into a V-shape or at an angle, ensuring they are long enough to hang gracefully. -
Attach the bow:
Apply a dab of strong craft glue to the back of the knot on your fabric bow. Press it firmly onto the bottom center of the painted wreath, covering the area where your sketched circle ends met. -
Final adjustment:
Gently arrange the ribbon tails so they lay flat or have a natural curve, and let the glue dry completely before displaying.
Now you have a timeless piece of holiday art ready to gift or hang on your wall
Candy Cane With Shading
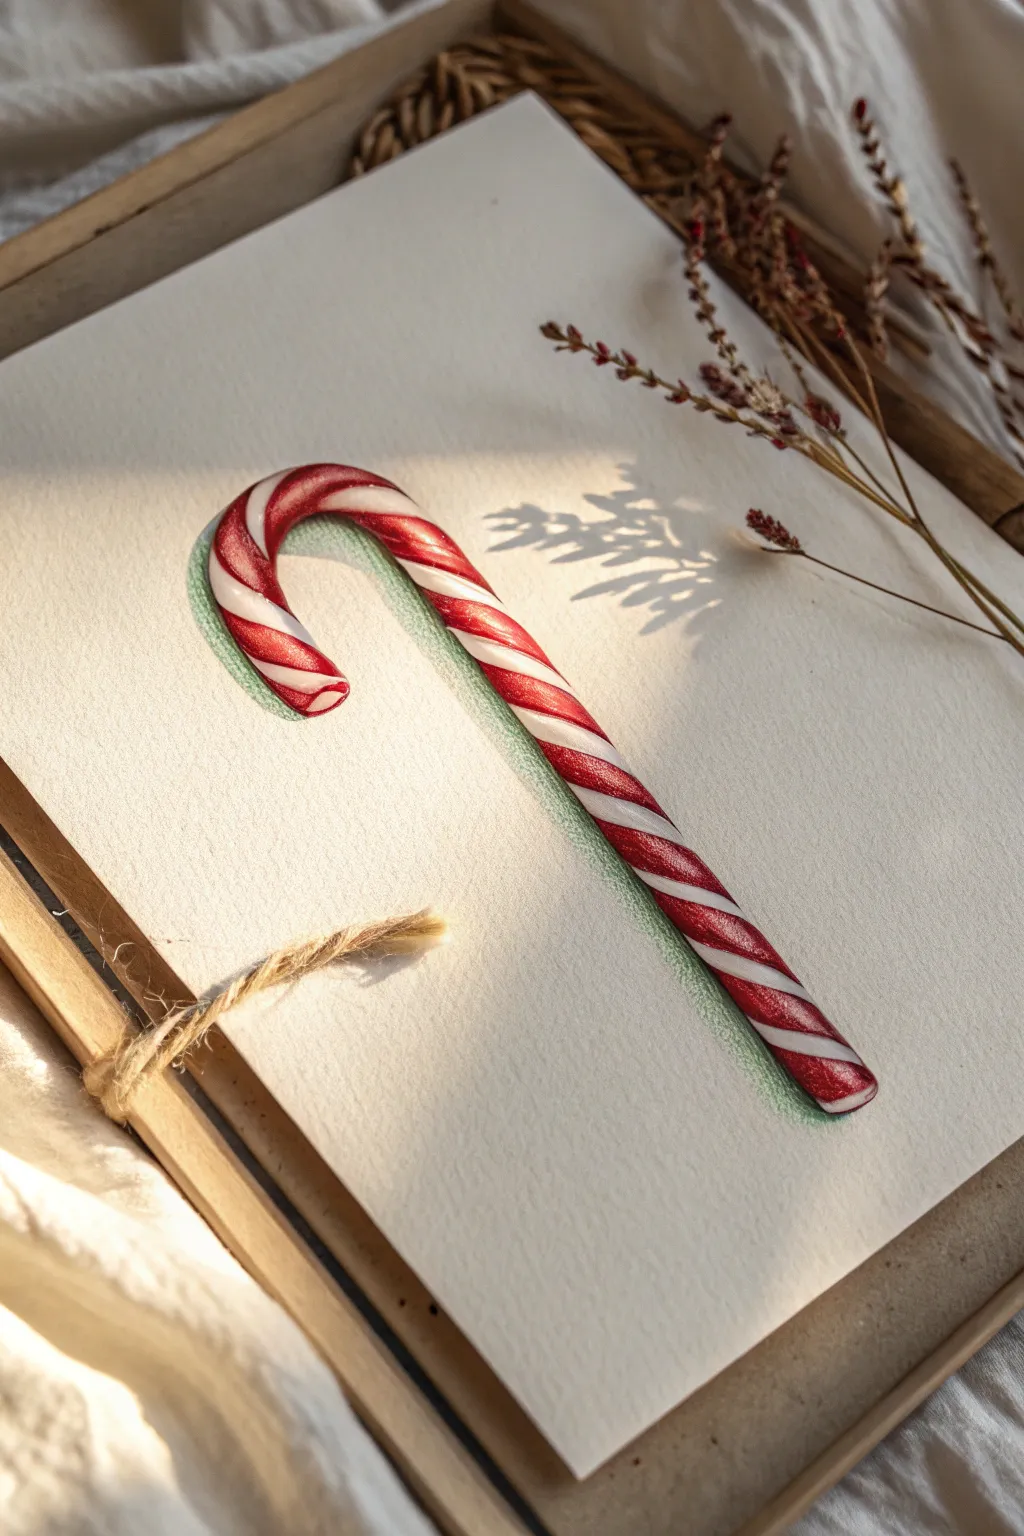
Master the art of illusion with this strikingly realistic candy cane drawing that seems to pop right off the paper. Using simple colored pencils and careful shading techniques, you’ll learn how to create dimension and texture that transforms a flat sketch into a festive 3D object.
Detailed Instructions
Materials
- High-quality textured art paper (watercolor or mixed media paper works best)
- Red colored pencil (wax or oil-based)
- White colored pencil or white gel pen
- Dark red or maroon colored pencil
- Cool grey colored pencil (light to medium tone)
- Blue-grey or teal-grey colored pencil (for shadow depth)
- Pencil sharpener
- Soft eraser
Step 1: Sketching the Outline
-
Draft the shape:
Begin by lightly sketching the classic hook shape of the candy cane. Keep your lines very faint so graphite doesn’t smudge into your colors later. -
Refine the curve:
Ensure the width of the cane remains consistent from the bottom straight edge all the way through the curve of the hook. -
Mark the stripes:
Sketch diagonal lines to indicate where the red stripes will go. vary the thickness, alternating between wide bands and thinner pinstripes for a classic look. -
Clean up lines:
Use a kneaded eraser to lift off excess graphite until only a ghost of the outline remains.
Fixing Smudged Reds
If red pigment bleeds into white areas, use a precision electric eraser or the sharp corner of a hard eraser to lift it, then redefine the edge with white pencil.
Step 2: Coloring the Red Stripes
-
Base layer red:
Fill in the red stripes with a medium pressure. Leave a thin, intentionally blank sliver on the upper left side of each stripe to act as the primary highlight. -
Deepen the edges:
Take your dark red or maroon pencil and shade the edges of the red stripes, particularly on the underside of the curve, to create roundness. -
Blend the mid-tones:
Go back over the transition between the dark edges and the bright red center with your primary red pencil to smooth out the gradient. -
Intensify the contrast:
Press harder with the dark red in the corners where the stripe curves away from the viewer to emphasize the cylindrical shape.
Level Up: Real Prop Lighting
Place a real candy cane on your paper under a lamp. Trace its actual shadow to get the most realistic shape and angle for your drawing.
Step 3: Coloring the White Sections
-
Preserve the white:
Leave the majority of the white stripe simply as the bare paper; this provides the brightest possible white value. -
Shadow the white:
Use a very light cool grey pencil to shade the edges of the white stripes, mirroring the shading you did on the red sections. -
Soften the blend:
Keep the center of the white stripes untouched. Use a light hand so the grey fades gently into the paper white.
Step 4: Creating the 3D Shadow
-
Map the shadow:
Observe where the light implies a shadow. Outline a shadow shape that runs parallel to the left and bottom side of the candy cane. -
Lay down base shadow:
Fill this shadow area with a light teal-grey or cool grey. I find using a slightly blue-toned grey makes the red pop more intensely. -
Darken the contact point:
Press harder with your grey pencil right next to the candy cane’s edge. The shadow should be darkest where the object touches the paper. -
Fade the edges:
Allow the shadow color to fade out slightly as it moves away from the cane, creating a soft, diffused look. -
Add texture to shadow:
Let the paper’s grain show through the shadow slightly; don’t burnish it completely smooth, as this mimics the surface texture.
Step 5: Highlights and Final Details
-
Establish highlights:
Use a white colored pencil to burnish the highlight areas you left blank on the red, making them look glossy. -
Add sharp reflections:
For an extra glassy look, use a white gel pen to add tiny, crisp dots or lines along the highest point of the curve. -
Refine the edges:
Go around the outer perimeter of the candy cane with your pencils one last time to ensure a crisp, clean edge against the paper.
Step back and admire how a few simple tricks of light and shadow have turned your paper into a festive treat


Snow Globe Mini Christmas Scene
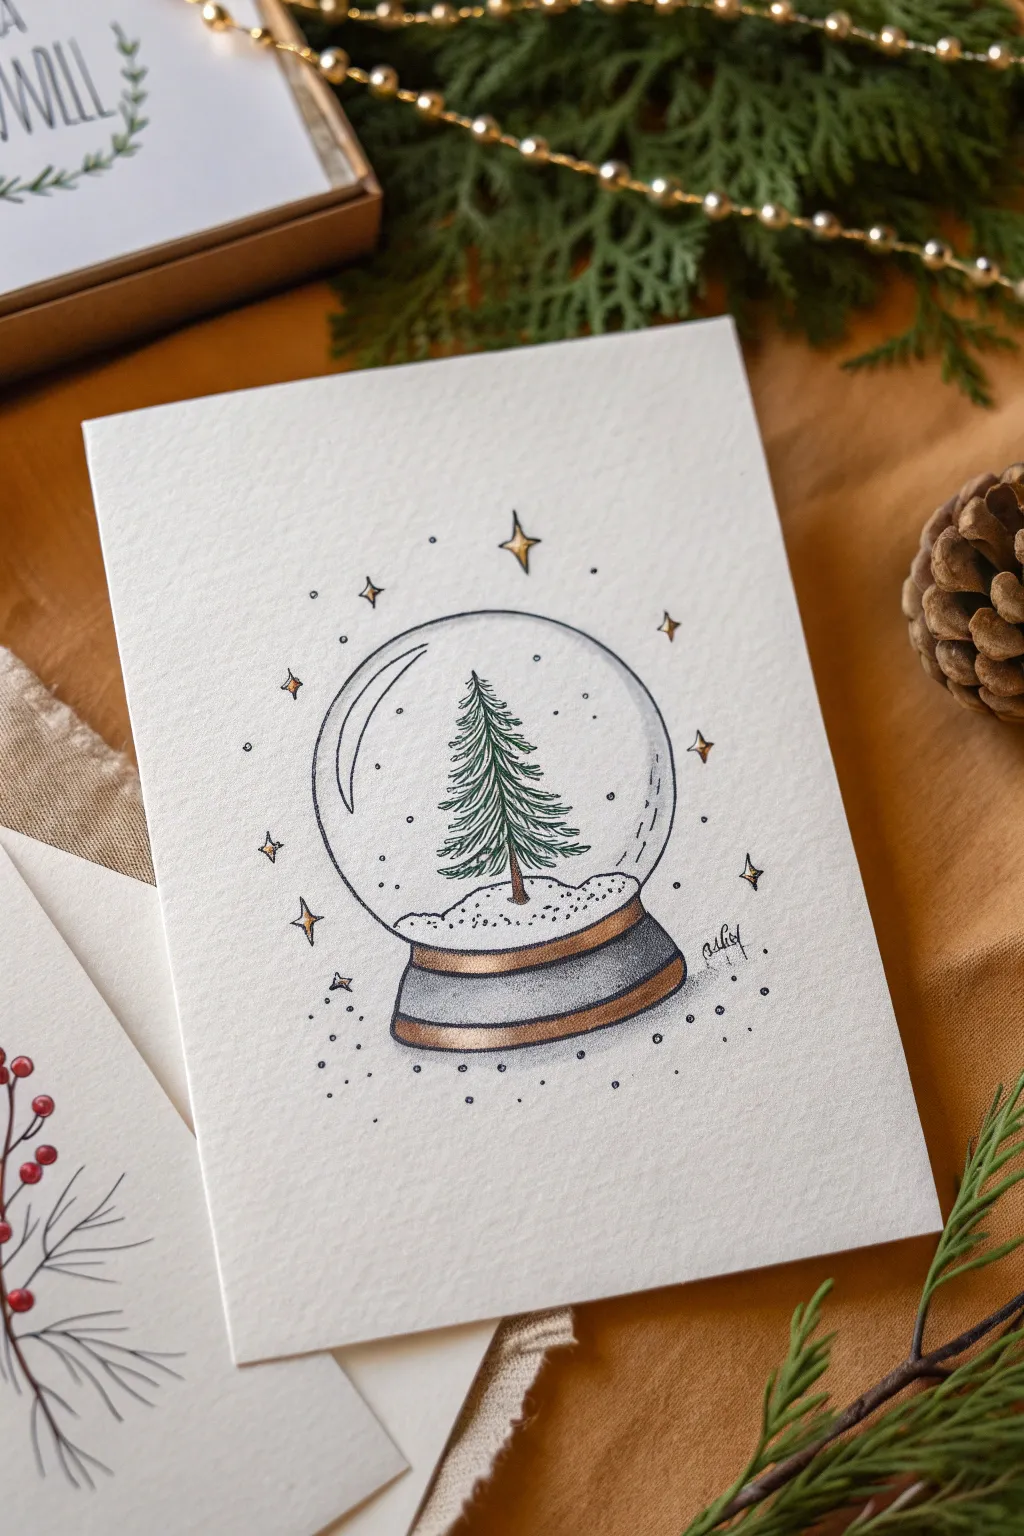
Capture the magic of a winter wonderland in miniature with this charming hand-drawn snow globe card. Using simple ink lines and touches of color, you’ll create a cozy, illustrative design that stands out beautifully against textured paper.
Step-by-Step Tutorial
Materials
- Textured cream or off-white cardstock (folded)
- Pencil (HB or H for light sketching)
- Eraser
- Fine liner pen (Black, 0.1mm and 0.3mm)
- Colored pencils (Forest Green, Dark Brown, gold/yellow ochre, light grey)
- White gel pen (optional, for snow highlights)
- Ruler (optional)
Step 1: Sketching the Structure
-
Draw the globe shape:
Begin by lightly sketching a perfect circle in the center of your card. If you struggle with freehand circles, trace a small cup or roll of tape to get that crisp, round shape. -
Add the base:
Sketch a curved rectangle directly underneath the circle to form the base. Make the bottom edge slightly wider and more curved than the top edge to give it dimension. -
Sketch the snow mound:
Inside the globe, near the bottom, draw a bumpy, uneven line to represent the pile of snow where the tree will stand. -
Outline the tree:
Draw a faint vertical line in the center of the snow mound as a guide for your tree trunk. Sketch a rough triangular shape around it to define the tree’s boundaries.
Wobbly Circles?
If you can’t get a smooth circle freehand, don’t sweat it. Trace the inside of a masking tape roll or use a compass with a light pencil touch before inking.
Step 2: Inking the Design
-
Ink the snow globe outline:
Using your 0.3mm fine liner, carefully trace over your pencil circle. Don’t worry if the line isn’t perfectly consistent; a little variation adds hand-drawn character. -
Define the base:
Ink the base structure. Add a double line at the top and bottom of the base to create ‘rims’ that we will color gold later. -
Draw the tree branches:
Switch to your finer 0.1mm pen. Starting from the top of the tree guide, make short, downward flicking strokes to create pine needles. Layer them densely near the center trunk and lighter toward the edges. -
Ink the snow and trunk:
Draw the trunk with two simple vertical lines. Then, ink the snow mound with a dotted, stippling texture rather than a solid line to make it look fluffy. -
Add glass reflections:
On the upper left and right sides of the globe’s interior, add two long, curved reflection lines parallel to the circle edge. This crucial step makes the object look like glass.
Step 3: Adding Detail & Color
-
Erase pencil marks:
Wait until the ink is completely dry, then gently erase all your initial pencil sketches. -
Color the tree:
Take your Forest Green colored pencil and shade the tree. Use firmer pressure near the center and under the branches for shadow, and lighter pressure at the tips. -
Fill the trunk:
Use a Dark Brown pencil to fill in the small trunk, pressing hard to get a rich tone. -
Gold accents:
Color the top and bottom rims of the base with your gold or yellow ochre pencil. The contrast between the grey pencil shading and gold gives a lovely metallic effect. -
Shade the base:
Use a light grey pencil to shade the main body of the base. Darken the edges to make it look rounded. -
Create the sparkle:
Using the gold pencil or a yellow fine liner, draw small four-pointed stars and diamonds floating around the outside of the globe. -
Add floating snow:
With your black fine liner, add tiny dots inside the globe for falling snow. I like to focus them near the bottom and sides rather than cluttering the tree. -
Final magic dust:
Add a few tiny dots around the exterior stars to create a magical aura, radiating outward from the globe.
Glossy Effect
Use a white gel pen to add a single bright white dot on top of the black reflection lines. It instantly makes the glass look shiny and realistic.
Now you have a cozy, custom-designed card ready to share warm winter wishes
Holiday Hand Lettering With Mini Icons
This charming project combines loose, bouncy calligraphy with a delightful scatter of winter-themed miniature doodles. The stark contrast of black ink on cream cardstock creates a modern, minimalist look that feels both festive and sophisticated.
How-To Guide
Materials
- High-quality cream or off-white cardstock (A5 size folded or flat)
- Pencil (HB or H)
- Kneaded eraser
- Fine-liner pen (0.1mm or 0.3mm)
- Brush pen (small to medium felt tip, black)
- Ruler
Step 1: Planning the Layout
-
Establish the center point:
Begin by finding the visual center of your card. Lightly sketch a vertical centerline and a horizontal centerline with your pencil and ruler to help balance the text. -
Draft the lettering guidelines:
Draw two horizontal baselines in the middle of the card for your text. Leave enough space between the top line (‘Merry’) and the bottom line (‘Christmas’) so the loops of the ‘y’ and the ‘h’ don’t collide. -
Sketch the ‘Merry’:
Using your pencil, lightly sketch the word ‘Merry’ in a cursive style. I prefer to exaggerate the downstroke of the ‘M’ and add a large, sweeping loop to the tail of the ‘y’. -
Sketch the ‘Christmas’:
Below ‘Merry’, pencil in ‘Christmas’ in a similar bouncy script. Allow the ‘C’ to wrap slightly underneath and ensure the ‘t’ crossbar is ready for a flourish later. -
Map out the icon placement:
Lightly sketch circles or rough shapes where you want your doodles to go. Aim for a mix of triangular tree shapes, circular ornaments, and small starbursts scattered evenly around the border, framing the text.
Keep it Loose
Don’t try to make the doodle icons identical. The charm of this style comes from the slight variations in the wonky trees and uneven stars.
Step 2: Inking the Lettering
-
Prepare your brush pen:
Switch to your black brush pen. Test the flow on a scrap piece of paper to ensure you can get thin upstrokes and thick downstrokes. -
Ink the word ‘Merry’:
Carefully trace over your pencil lines for ‘Merry’. Apply firm pressure on the downward strokes to create thickness, and lift pressure on the upward strokes for delicate hairlines. -
Ink the word ‘Christmas’:
Continue with ‘Christmas’, maintaining the same rhythm. Pay special attention to the ‘s’ and the ‘t’ crossbar, keeping the motion fluid. -
Refine the edges:
If any downstrokes look a bit shaky or uneven, carefully smooth them out with the tip of the pen to create a solid, bold look. -
Let the ink set:
Wait at least 5-10 minutes for the heavy brush ink to dry completely before your hand touches it for the next phase.
Add Sparkle
Once the black ink is dry, use a gold or silver gel pen to add accent dots or trace over the ornament hangers for a touch of holiday glimmer.
Step 3: Adding the Whimsical Icons
-
Switch pens:
Pick up your fine-liner pen (0.1mm or 0.3mm). This thinner line weight will create a nice contrast against the bold lettering. -
Draw the zig-zag trees:
Start drawing the evergreen trees. Use a loose, zig-zag motion starting from the top and getting wider at the base. Add a simple vertical line for the trunk. -
Add simple pine trees:
Draw the other style of tree, which looks like a vertical line with downward-slanting branches (like arrow fletching) on either side. -
Create the ornaments:
Draw small circles throughout the empty spaces. Add a tiny square and a loop at the top of each to signify the hanger, and color the circle in solid black, leaving a tiny white crescent for a highlight. -
Detail the snowflakes:
Draw asterisks (*) for simple snowflakes. For variety, add small dots at the end of each arm on some of them. -
Add botanical sprigs:
Sketch simple curved lines with small leaves or needles coming off them to represent holly or pine branches. -
Fill the gaps:
Look for empty white spaces and fill them with tiny singular dots or small solid stars to make the composition feel dense and festive.
Step 4: Finishing Touches
-
Erase pencil lines:
Once you are absolutely certain all ink is dry, gently run your kneaded eraser over the entire card to remove the graphite guidelines. -
Check for consistency:
Scan the drawing for any faint lines. Go over any doodle lines that look too thin or broken to ensure a crisp, finished appearance.
You now have a beautifully hand-lettered card ready to spread holiday cheer


Have a question or want to share your own experience? I'd love to hear from you in the comments below!