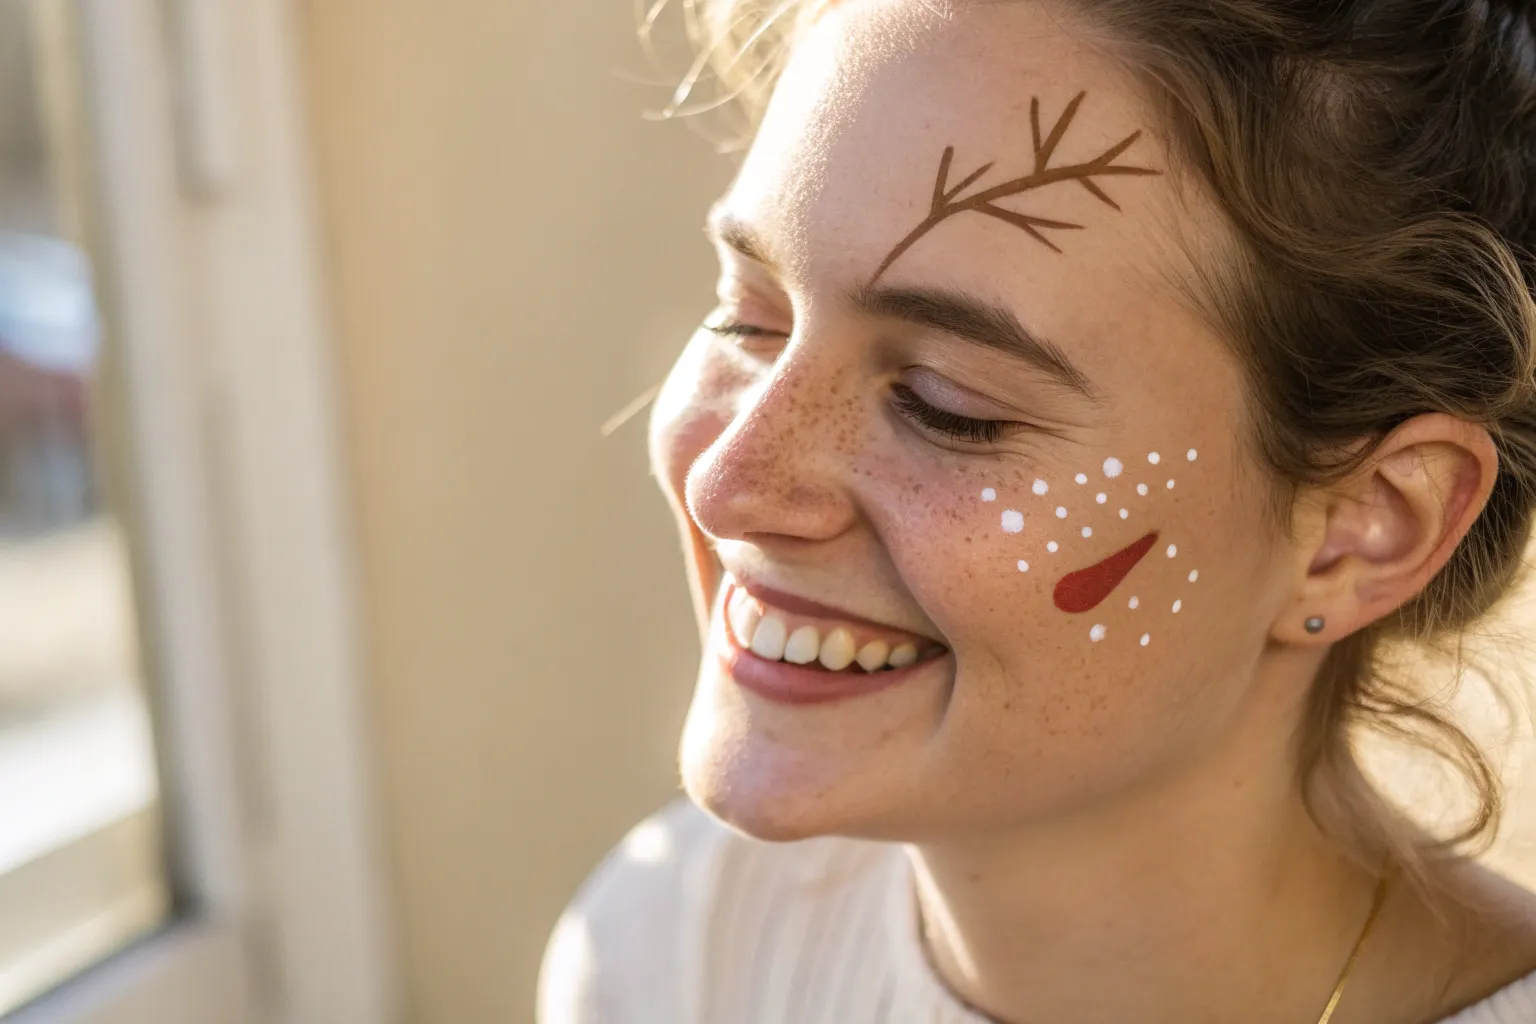
Christmas face paint is basically instant holiday magic—one brushstroke and you’re suddenly in the middle of a cozy winter story. I pulled together my favorite Christmas face paint ideas that range from quick cheek designs to full-face transformations, so you can pick what fits your time and skill level.
Snowman Cheek Art With Scarf
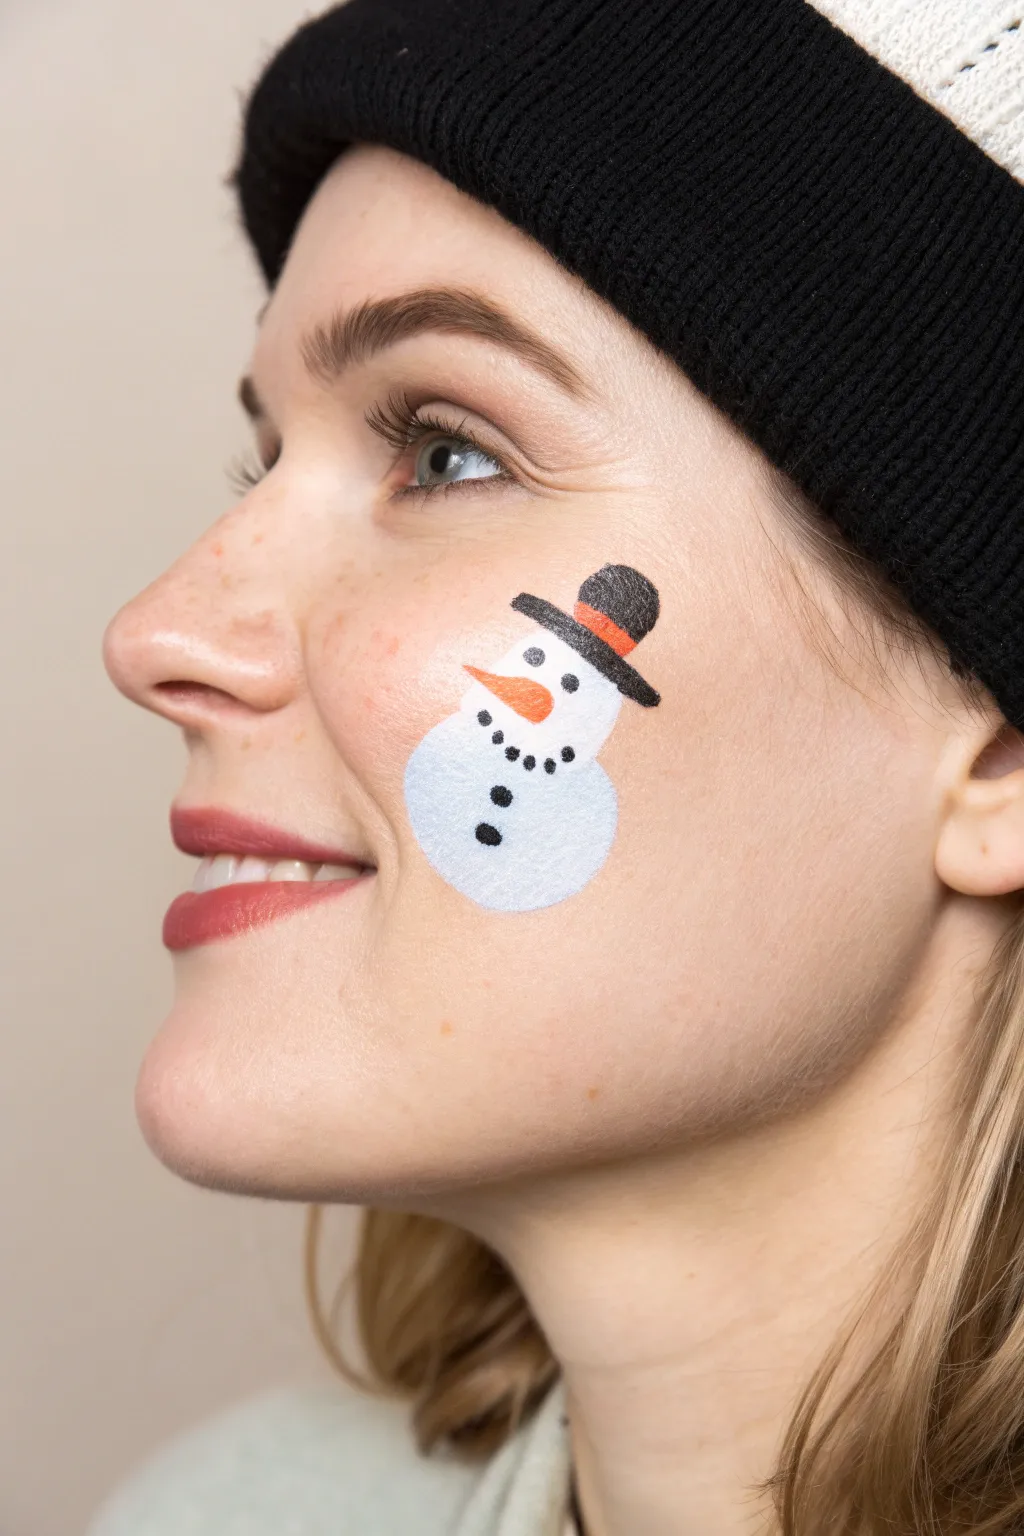
This charming, minimalist snowman face paint design sits perfectly on the apple of your cheek, adding a festive touch without a full-face mask. It features a classic two-ball snowman with a dapper top hat and carrot nose, perfect for holiday parties or winter school days.
Step-by-Step Tutorial
Materials
- White face paint
- Black face paint
- Orange face paint
- Red face paint (for hat band)
- Small round sponge or dauber
- Fine detail brush (size 1 or 2)
- Small round brush (size 2 or 3)
- Cup of water
- Paper towels
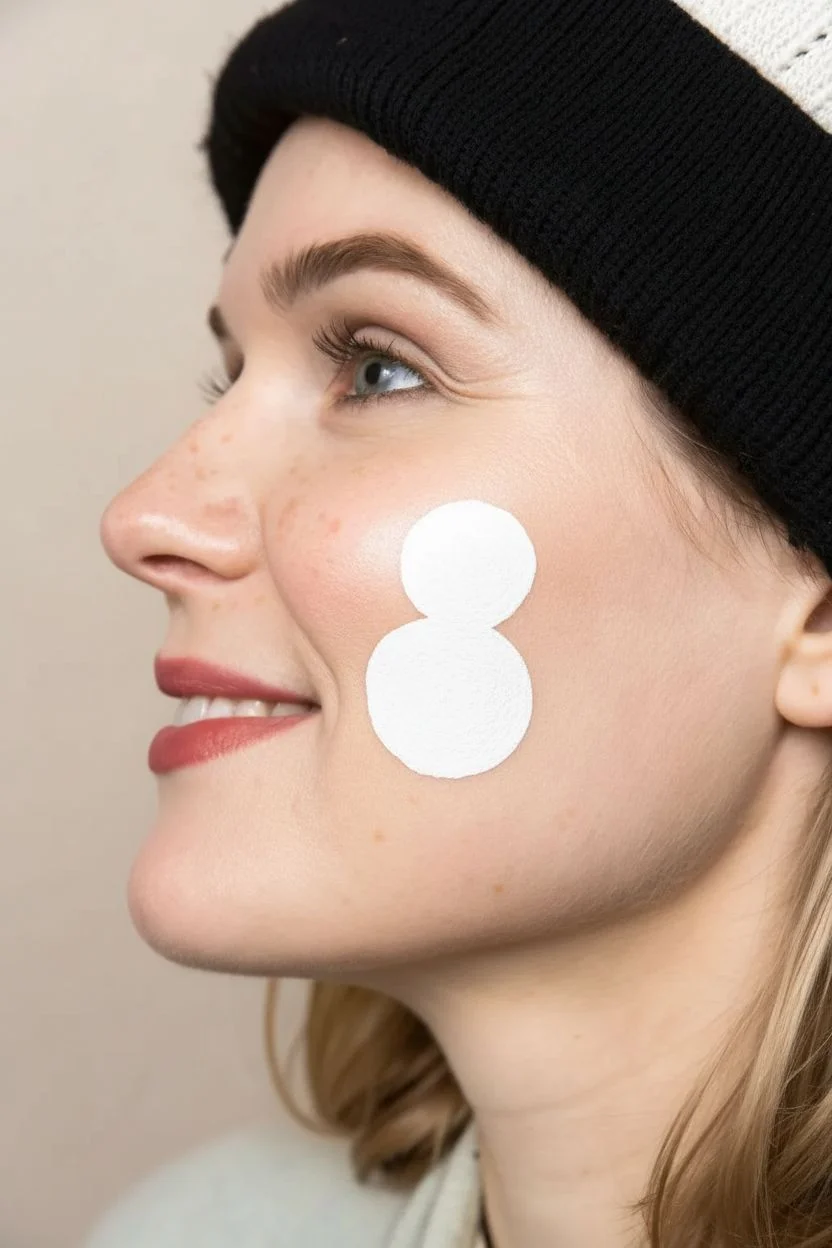
Step 1: The Snowman’s Body
-
Prep the cheek:
Ensure the skin on the cheek is clean and dry. If the subject is wearing makeup, you can paint directly over it, but clean skin usually holds water-based face paint best. -
Create the base:
Load a small round sponge or a dauber with white face paint. Make it creamy, not drippy, to get opaque coverage. -
Stamp the bottom snowball:
Gently press the sponge onto the lower part of the cheek to form a round circle. This will form the larger bottom section of the snowman. -
Add the head:
Reload your sponge lightly if needed. Stamp a slightly smaller circle directly on top of the first one, blending the connection point slightly so they look stacked but distinct. -
Smooth the edges:
Using a slightly damp small round brush, clean up the perimeter of your white circles to make them nice and neat.
Step 2: Adding Personality
-
Paint the hat brim:
Load your fine detail brush with black face paint. Draw a straight diagonal line across the top of the snowman’s head for the brim of the hat. -
Form the top hat:
Paint a square or rectangle shape sitting on top of the brim line you just created. Fill it in with solid black. -
Add the hat band:
Clean your fine brush thoroughly. Load it with red face paint carefully paint a thin stripe at the base of the hat’s crown, right above the brim. -
Paint the carrot nose:
Using the fine brush and orange paint, create a small triangle pointing outward from the center of the face. Give it a slight curve for character. -
Dot the eyes:
Switch back to black paint on your finest brush. Add two small, distinct dots above the nose for eyes.
Fixing Smudges
If black paint bleeds into the white, let it fully dry. Paint a fresh layer of thick white over the mistake, wait, then retry the black line.
Step 3: Final Details
-
Create the smile:
Using the very tip of your detail brush with black paint, create a dotted smile. Five or six tiny dots usually create the perfect happy expression. -
Add buttons:
Paint two or three slightly larger black dots down the center of the bottom white snowball to represent coal buttons. -
Highlight the nose:
This is a tiny step that helps a lot: add a microscopic spect of white to the top of the orange nose to make it look 3D. -
Shade the snow (optional):
For extra depth, you can take a very watery, translucent grey or light blue and run a thin line along the bottom right curve of the snowballs to suggest shadow. -
Final check:
Look for any smudges or uneven edges. Use a slightly damp Q-tip to clean up any stray marks on the skin around the design.
Make It Sparkle
Before the white paint dries completely, tap cosmetic-grade iridescent glitter onto the snowballs for a magical, frosty effect.
Enjoy showing off your cheerful, frosty new friend to everyone you meet


Candy Cane Stripe Swirl
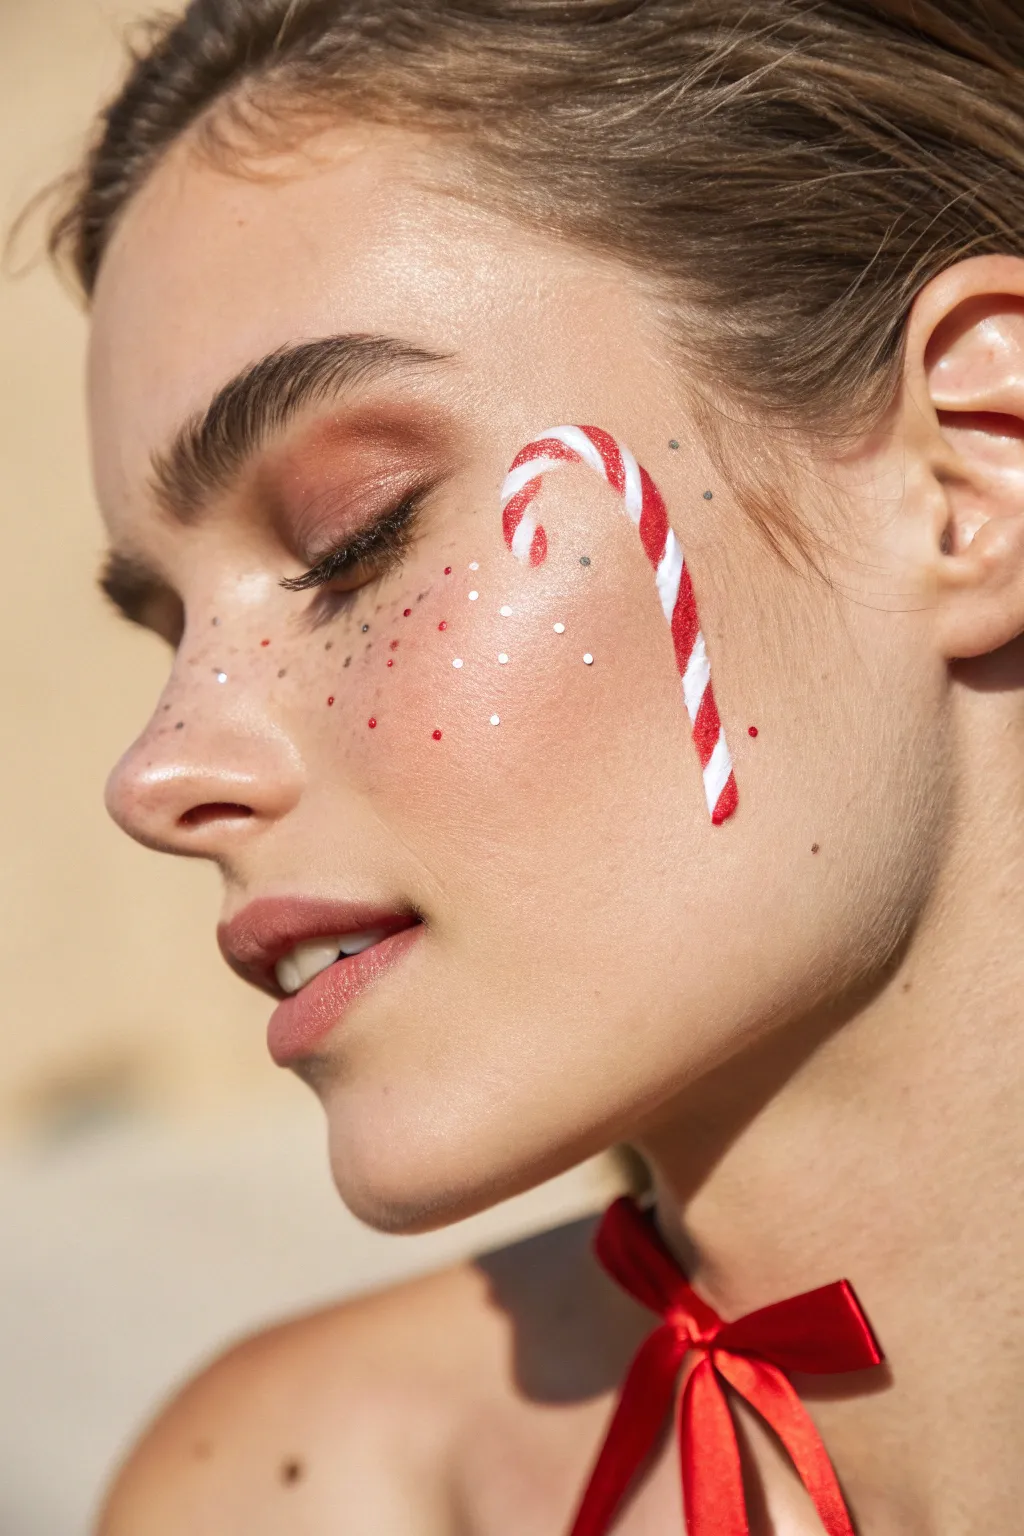
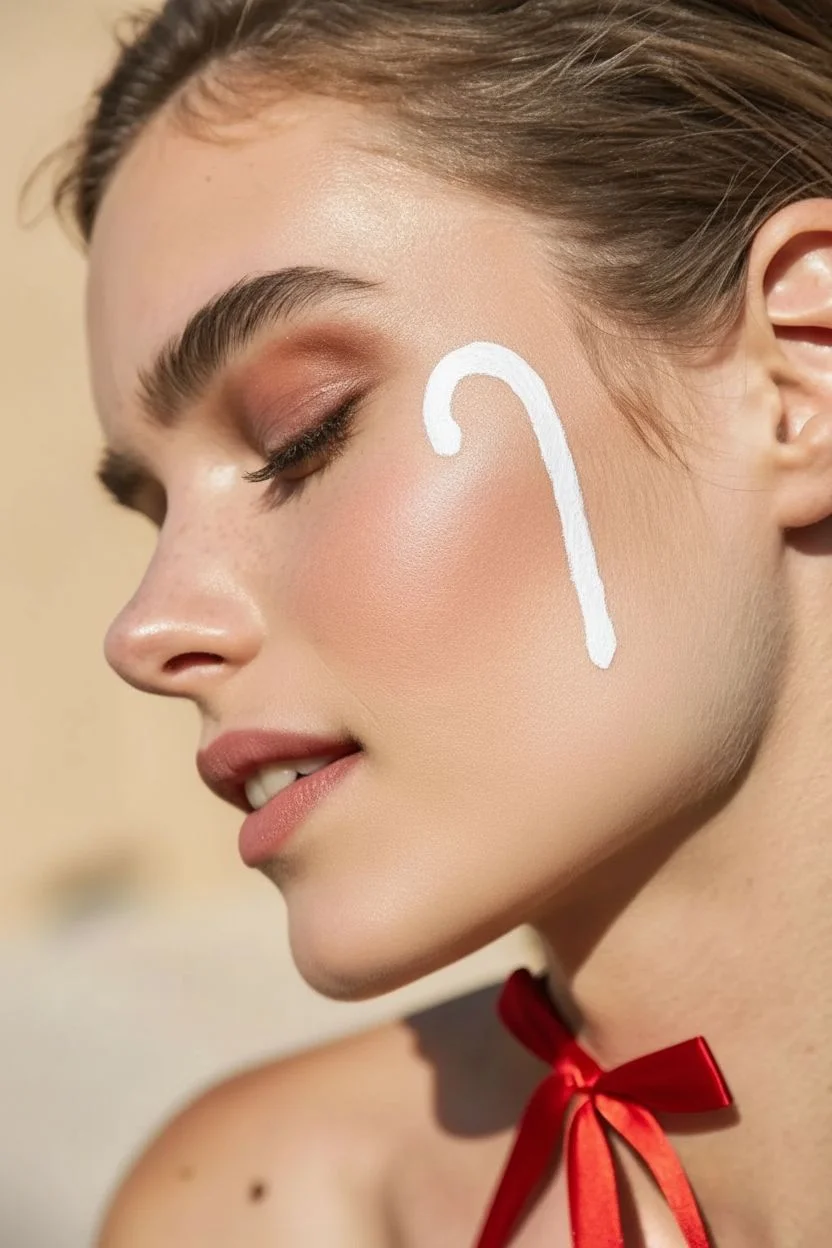
Transform your holiday makeup routine with this charmingly realistic candy cane design that curves elegantly along the cheekbone. This festive look combines classic red and white stripes with a delicate sprinkle of faux freckles for a whimsical, wintery touch.
Detailed Instructions
Materials
- White face paint (water-activated or cream)
- Bright red face paint
- Fine liner brush (size 0 or 00)
- Small flat brush or filbert brush
- Medium round brush
- Setting spray
- Loose cosmetic glitter (silver or iridescent)
- Red cosmetic glitter (optional)
- Spoolie brush or old toothbrush (for freckles)
- Warm brown eyeshadow (for shading)
Step 1: Base and Shape
-
Prep the canvas:
Begin with your usual foundation and concealer routine to create an even skin tone ensuring the cheek area is clean and dry before applying paint. -
Outline the cane:
Using a fine liner brush dipped in very diluted white paint or a nude eyeliner pencil, lightly sketch the shape of the candy cane. -
Positioning:
Start the hook near the temple, curve it over the cheekbone, and extend the straight stem down towards the jawline, keeping the width consistent. -
Fill the white base:
Take a medium round brush loaded with creamy white face paint and fill in the entire outline you just created. -
Smooth coverage:
Apply a second layer of white if needed to ensure it’s fully opaque and bright, smoothing out any brushstrokes. -
Let it set:
Allow the white base layer to dry completely for a minute so the red stripes won’t bleed into it later.
Fixing Smudges
If red bleeds into white, wait for it to dry fully. Then, tap pure white paint over the mistake with a small concealer brush to erase it.
Step 2: Stripes and Details
-
Map the stripes:
Visualize where your diagonal stripes will go; they should curve slightly around the form of the cane to give it a 3D effect rather than looking flat. -
Paint thick red stripes:
With a small flat brush and bright red paint, create the main diagonal stripes, pressing the brush down to get a clean edge. -
Check spacing:
Leave gaps of white between the red stripes that are roughly equal in width to the red stripes themselves. -
Refine the hook:
As you move up to the curved hook, adjust the angle of your stripes so they fan out slightly, following the turn of the cane. -
Add dimension:
I prefer to take a tiny bit of warm brown eyeshadow on a small fluffy brush and lightly dust it along one side of the cane to create a subtle shadow for volume.
Level Up The Look
Add a tiny dab of clear gloss over just the candy cane after sealing it to make it look like real, shiny hard candy.
Step 3: Sparkle and Finish
-
Create speckles:
Load a toothbrush or spoolie with watery white paint and gently flick the bristles to create tiny faux snow freckles across the nose and cheek. -
Red speckles:
Repeat the flicking motion with diluted red paint, concentrating these speckles closer to the candy cane itself. -
Apply glitter:
While the speckles are slightly tacky, press small flecks of silver or iridescent cosmetic glitter onto the cheek for a magical shimmer. -
Hand-place details:
Use the fine liner brush to add a few deliberate white dots or larger glitter flakes to act as highlights on the cheekbone. -
Set the look:
Close your eyes and mist the entire face with a setting spray to lock the face paint and glitter in place for all-day wear.
Enjoy showing off your sweet and festive holiday masterpiece


Christmas Tree Cheek With Ornament Dots
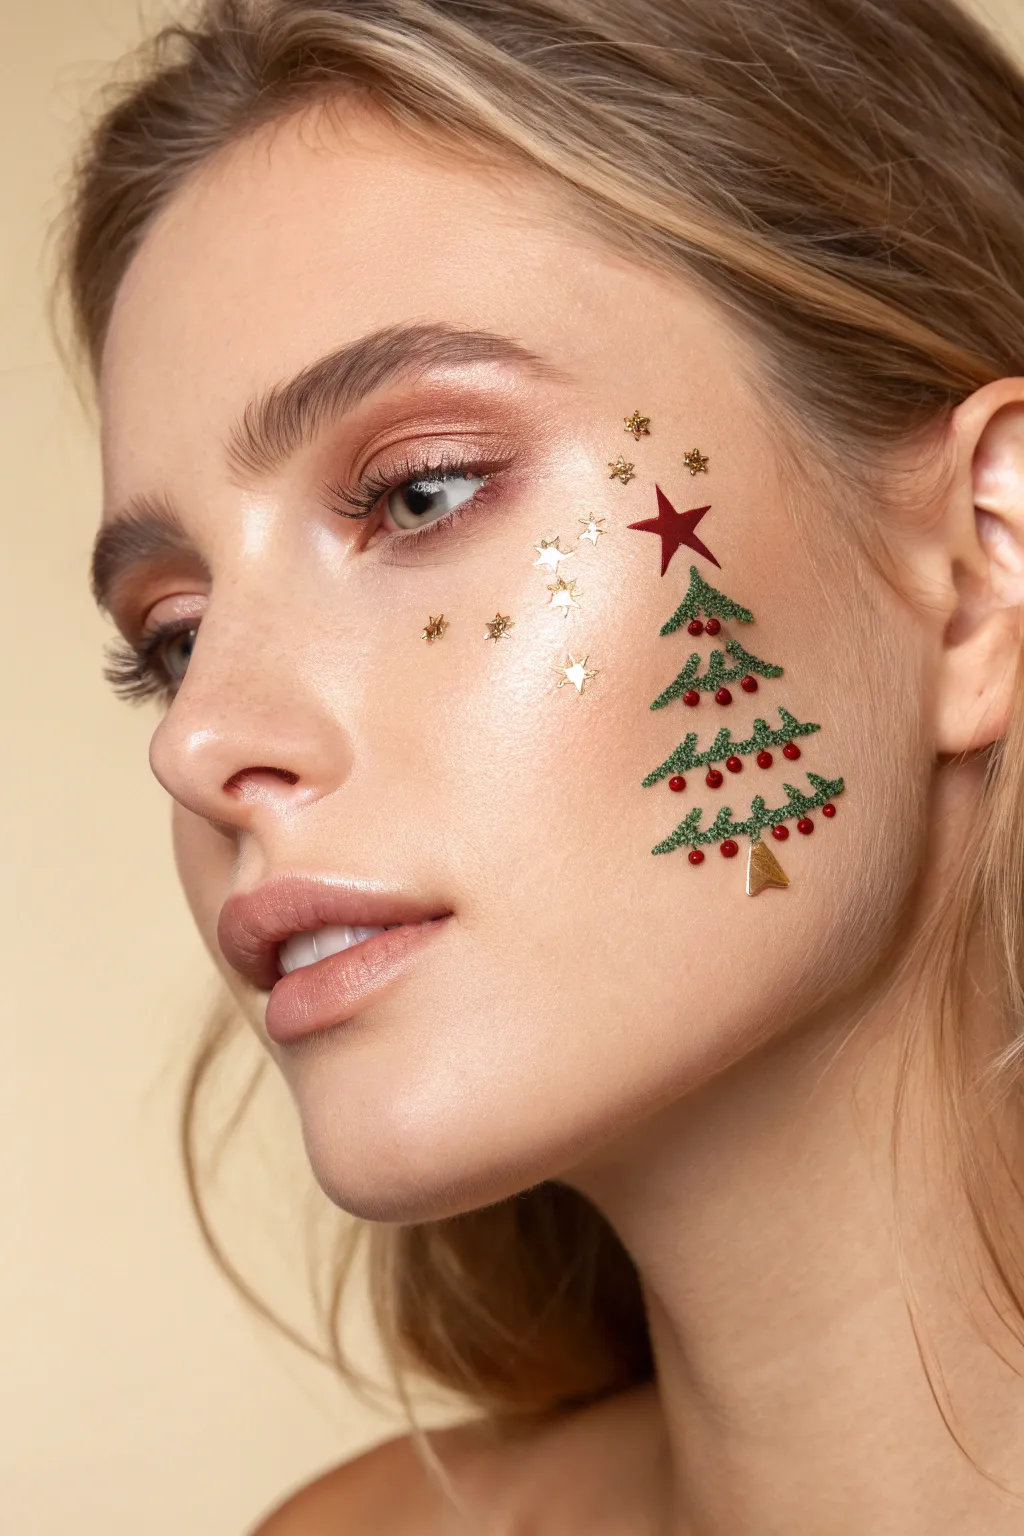
For an elegant take on festive face paint, this design features a delicately stylized Christmas tree adorned with crimson ornaments and surrounded by scattered gold stars. The look feels elevated rather than costume-like, making it perfect for holiday parties where you want just a touch of whimsy without full-face coverage.
Step-by-Step
Materials
- Face primer
- Light coverage foundation or tinted moisturizer
- Highlighter (liquid or powder)
- Small flat angled brush (for tree branches)
- Fine detail brush (for dots and stars)
- Green face paint or liquid eyeliner (forest green)
- Red face paint or liquid eyeliner (bright holly red)
- Gold metallic liquid liner or face paint (for trunk and stars)
- Small star stencils (optional)
- Gold cosmetic glitter (fine)
- Setting spray
Step 1: Base Preparation
-
Prime and Even Out:
Begin with a clean, moisturized canvas. Apply a light layer of primer followed by a sheer foundation or tinted moisturizer to even out your skin tone while keeping the texture looking like real skin. -
Highlight the Canvas:
Sweep a luminous highlighter across the top of your cheekbone, extending slightly towards the temple. Ideally, use a champagne or pearlescent shade to create a glowing backdrop for the artwork.
Smudge Control
If your red ornaments bleed into the green, the green base wasn’t dry enough. Let the tree layers set fully for at least 3-5 minutes before adding the dots.
Step 2: Painting the Tree
-
Map the Shape:
Visualize a triangular shape on the apple of your cheek. Using a very light touch with a pale eyeliner pencil, you can mark the top point and the bottom corners to guide your proportions. -
Create the Top Tier:
Load your small angled brush with forest green paint. Starting near the top point, press and drag the brush downwards and slightly outwards to create the first small jagged branch on the left. -
Mirror the Top Tier:
Repeat the motion on the right side, joining the two strokes at the top peak to form the triangle’s tip. The texture should look slightly rough, like pine needles, rather than a solid line. -
Build the Second Tier:
Move slightly down. Create a wider set of branches, starting the stroke slightly further out and angling it inward. Leave a tiny gap between tiers to keep the design airy. -
Third Tier Expansion:
Continue downwards with a third, wider layer. Press the angled brush firmly to get a nice textured edge on the bottom of the branches. -
Final Bottom Tier:
Paint the widest and final tier at the bottom of the tree structure. Ensure the ends flick up slightly for a perky, festive look. -
Add Texture (Optional):
If you want that flocked look from the photo, darker green stippling over wet paint or carefully pressing fine green glitter onto the wet branches works beautifully here. -
Paint the Trunk:
Using a fine detail brush and gold metallic paint, draw a small, uneven trapezoid or triangle shape at the very base of the tree for the trunk.
Make It 3D
Instead of painting the red dots, use eyelash glue to attach tiny red rhinestones or flat-back crystals for ornaments that actually catch the light.
Step 3: Ornaments and Accents
-
Place the Topper:
With a steady hand and red face paint, draw a five-pointed star at the very peak of your tree. I find it easiest to draw an inverted ‘V’ first, then cross the arms over. -
Add Red Ornaments:
Dip the back end of a brush or a dotting tool into your red paint. Gently press dots in a row across each tier of the green branches. -
Vary the Spacing:
Don’t make the dots perfectly uniform; vary the spacing slightly to mimic ornaments hanging on a real tree. -
Scatter Gold Stars:
Now for the magic. Using gold liquid liner or paint, draw tiny four-pointed and five-pointed stars scattering away from the tree towards your nose and eye. -
Vary Star Sizes:
Draw a mix of hollow star outlines and solid filled stars. Include extremely small dots of gold in between them to look like distant stardust. -
Inner Corner Sparkle:
Place a few small gold stars near the inner corner of your eye or on the bridge of the nose to tie the look together. -
Set the Look:
Once everything is completely dry, close your eyes and mist your face with a setting spray to ensure your festive art lasts all night.
Now you are ready to showcase your holiday spirit with this sophisticated and cheerful design


Wreath Around One Eye Mask
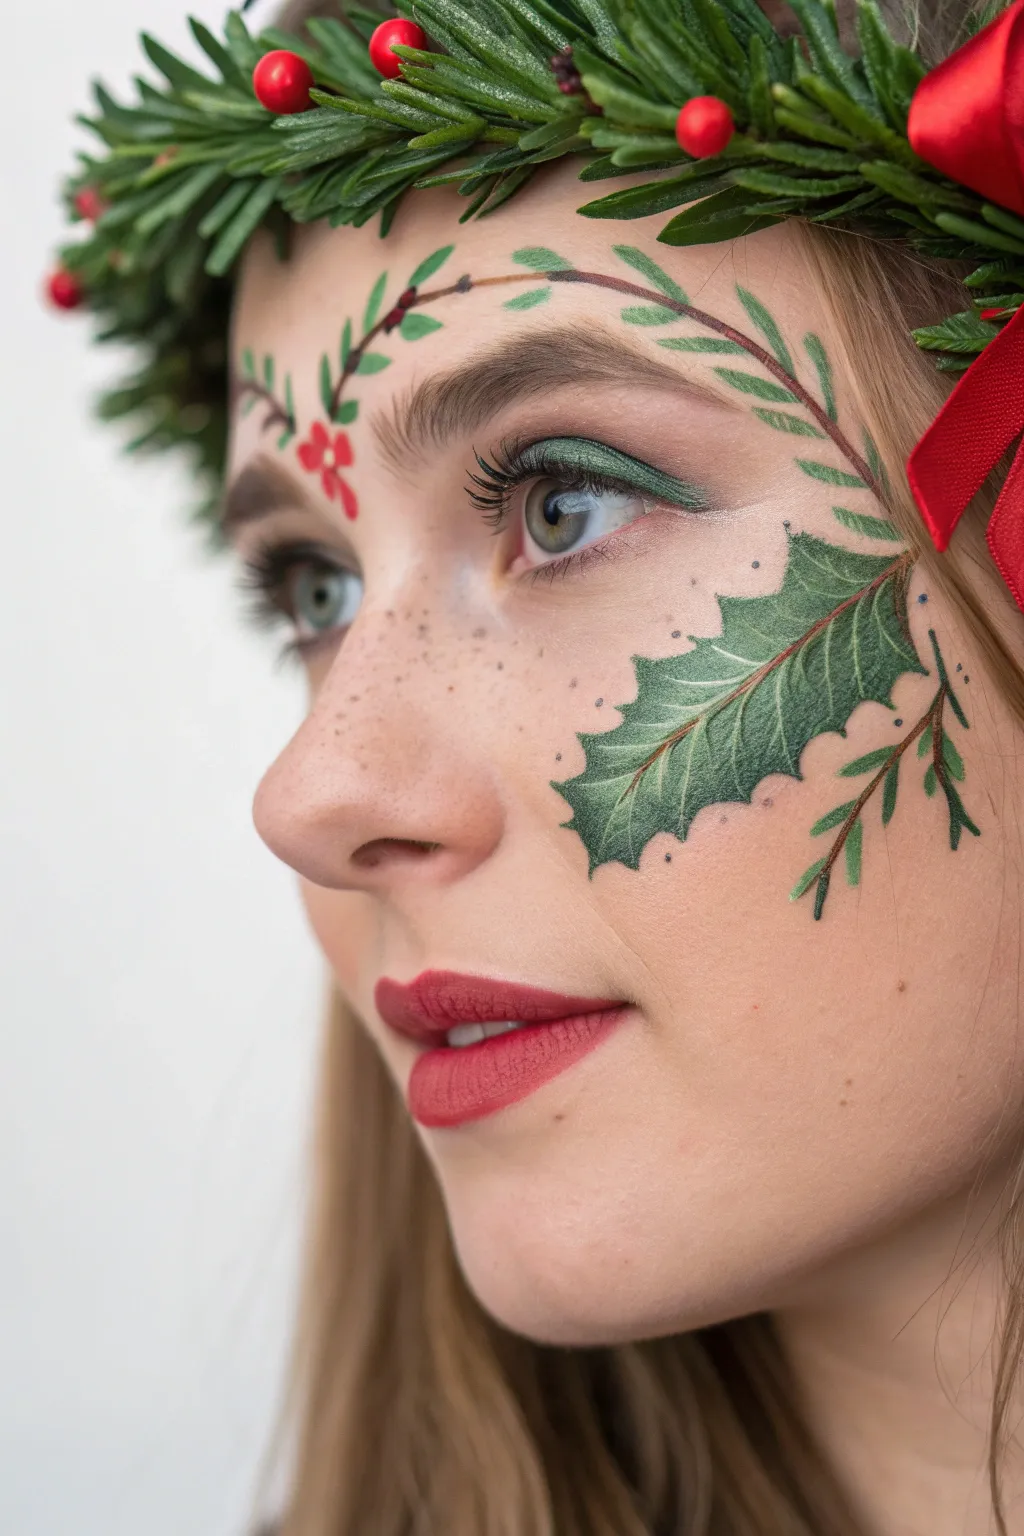

For an elegant alternative to a full face mask, this delicate wreath design combines realistic holly leaves with whimsical sprigs of pine and berries. It frames the eye beautifully while keeping the rest of the makeup fresh and natural with a classic red lip.
Step-by-Step Guide
Materials
- Matte foundation (skin tone match)
- Concealer
- Translucent setting powder
- Face paint palette (water-activated: dark green, light green, brown, red, white)
- Detail brushes (fine liner, small flat, angle brush)
- Green eyeshadow (shimmer or satin finish)
- Red lipstick (matte finish)
- Mascara
- Spoolie brush
- Setting spray
Step 1: Base Makeup
-
Prep the Canvas:
Begin with a clean, moisturized face. Apply a light layer of matte foundation to even out the skin tone, but keep the coverage natural so freckles can peek through if you have them. -
Conceal and Set:
Dab concealer under the eyes to brighten the area where the artwork will sit. Lightly dust translucent powder over the eyelids and cheeks to create a smooth, oil-free surface for the paint to grip. -
Eye Shadow Base:
Using a small flat brush, sweep a shimmering forest green eyeshadow across the upper eyelid, blending slightly into the crease. Keep the lower lash line clean for now. -
Brows and Lashes:
Brush brows upward with a clear gel or spoolie. Apply a coat of black mascara to top and bottom lashes to define the eyes without overpowering the paint work.
Paint Lifting?
If your brush lifts the layer of paint underneath, your brush is too wet or you are pressing too hard. Let the first layer dry completely, use barely damp bristles, and glide gently.
Step 2: Painting the Foliage
-
Outline the Holly Leaf:
Load a fine liner brush with dark green face paint. Starting at the outer corner of the eye, draw the distinctive spiky outline of a large holly leaf stretching down onto the cheekbone. -
Fill the Leaf:
Using a slightly wider brush, fill in the leaf shape with a medium green. While the paint is still damp, blend in a touch of lighter green towards the center to create dimension. -
Leaf Veining:
Once the base green is dry involved, switch back to your finest liner brush and a very pale green or white paint. Carefully draw the central vein and smaller branching veins on the holly leaf for a realistic texture. -
Branch Structure:
Mix a thin brown paint consistency. Draw a long, curving branch that arches from the temple, over the eyebrow, and extends towards the nose. Add a second smaller branch extending downward from the holly leaf. -
Pine Needles:
Using a fresh green shade, use short, quick strokes to paint pine needles along the brown branch lines. Vary the angle of the strokes to make the pine sprigs look fluffy and natural. -
Adding Fern Details:
On the forehead above the brow, paint small, fern-like leaves branching off the main stem. Use a lighter green here to contrast with the darker pine needles. -
Berry Placement:
Dip the end of a brush handle or use a dotters tool into bright red paint. Place three distinct dots in a cluster near the inner corner of the eyebrow to form holly berries. -
Berry Highlights:
Add a tiny speck of white paint to the top right of each red berry. This simple highlight step instantly makes them look round and glossy. -
Faux Freckles:
Dilute a small amount of brown paint with water. Dip a toothbrush or stiff brush into it and gently flick the bristles to splatter tiny speckles across the nose and cheeks for a whimsical, sun-kissed effect.
Step 3: Finishing Touches
-
Red Lip Application:
Apply a classic red matte lipstick. Use a lip brush for precise edges, ensuring the color balances the red berries on the forehead. -
Final Setting:
Mist the entire face with a setting spray to lock the design in place and prevent the water-based paints from cracking or smudging throughout the day. -
Accessorize:
Complete the look by adding a real or artificial greenery wreath crown to the hair, matching the painted tones on your face.
Sharper Lines
For the crispest points on your holly leaves, I like to twist the paintbrush into a needle-sharp point on the back of my hand before touching it to the skin.
This sophisticated holiday look creates a stunning seasonal statement without requiring a full face of coverage
BRUSH GUIDE
The Right Brush for Every Stroke
From clean lines to bold texture — master brush choice, stroke control, and essential techniques.
Explore the Full Guide
Icy Blue Frosted Eye Mask

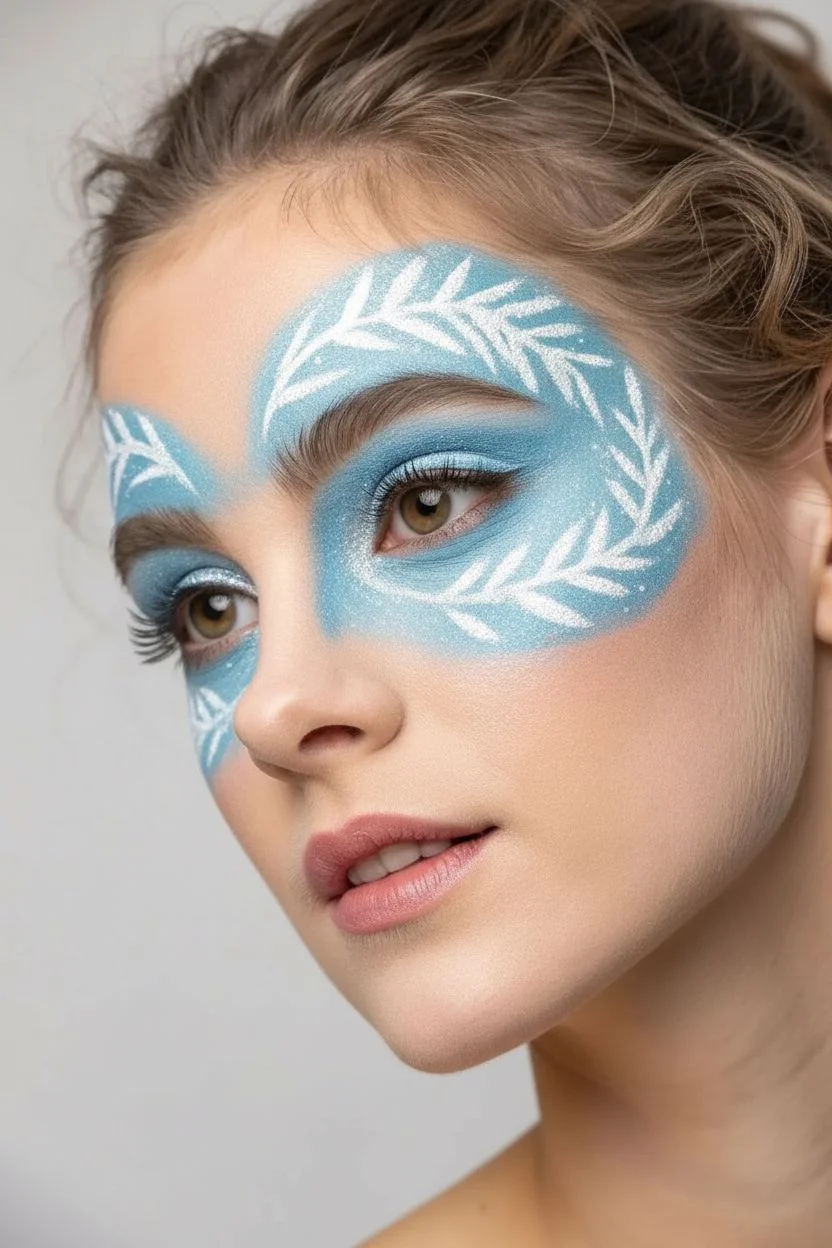
Transform into an ice queen with this ethereal frosted eye mask design that combines shimmering blues with crisp white snowflakes. The look captures the magic of winter with delicate linework and a soft, pearlescent finish that seems to glow on the skin.
Step-by-Step Tutorial
Materials
- Light blue metallic or shimmer face paint
- Teal or cyan matte face paint
- Strong white face paint (high pigmentation)
- Face painting sponge (high-density)
- Round brush (size 1 or 2 for fine lines)
- Round brush (size 4 for broader strokes)
- White or iridescent cosmetic glitter
- Small rhinestones or face gems (optional)
- Water spray bottle
- Setting spray
Step 1: Creating the Icy Base
-
Prep the sponge:
Dampen your high-density sponge slightly with water. You want it moist but not dripping to ensure the paint goes on creamy, not runny. -
Load the base colors:
Load one half of the sponge with the light blue shimmer paint and the other edge with a touch of the deeper teal matte paint to create a potential gradient. -
Map the mask shape:
Start sponging over the eyelids, extending outwards past the eyebrows. Gently tap the sponge to deposit color, creating a winged shape that swoops up towards the temples and forehead. -
Blend the bridge:
Bring the blue color across the bridge of the nose to connect both eyes. Keep the application lighter here to avoid looking too heavy. -
Fade the edges:
As you move toward the outer edges of the mask on the cheeks and forehead, use the clean side of your sponge to soften the blue paint, letting it fade naturally into the skin tone. -
Add shimmer:
While the blue paint is still slightly tacky, gently pat on some iridescent white glitter over the eyelids and the upper cheekbone area for that frosted ice effect.
Step 2: Painting the Frost Details
-
Load the liner brush:
Take your size 2 round brush and wet it thoroughly. Swirl it into your white face paint until you have an inky, smooth consistency perfect for linework. -
Paint the center snowflake:
Locate a spot just above the inner corner of the left eyebrow. Paint a simple starburst shape: start with a vertical line, cross it horizontally, and add diagonal lines in between. -
Detail the flake:
Add small ‘V’ shapes to the ends of the snowflake arms to make it look crystallized. Draw a long, elegant teardrop shape extending downward from the flake toward the nose bridge. -
Create fern patterns:
Above the left eyebrow, paint curved lines swooping upward. From these main stems, flick quick, short strokes outward to resemble fern leaves or frost patterns on a window. -
Mirror the design:
Move to the right temple area. Paint similar fern-like frost branches curving upwards and outwards, following the natural flow of the brow bone. -
Add floating branches:
On the outer cheekbone (lower right side), paint an upside-down white branch structure that looks like icicles or frost creeping downward. -
Refine with dots:
Using the very tip of your brush or a dotting tool, place clusters of small white dots of varying sizes around the ends of your frost branches and under the eye area to mimic falling snow.
Fixing Shaky Lines
If your white lines look thick or shaky, your brush might be too dry. Dip just the tip in water and rework the paint to an inky texture.
Step 3: Final Touches
-
Define the eyes:
Use a dry brush or cotton bud to gently smudge any blue paint that got too close to the waterline, ensuring the eyes look open and bright. -
Highlight the brow:
Take a clean brush with intense white paint and add tiny highlights right under the classic arch of the eyebrow to lift the expression. -
Set the look:
Close the eyes and mist a gentle layer of setting spray over the face to prevent the water-activated paint from smudging throughout the party.
Make It Sparkle
Apply self-adhesive rhinestones or use cosmetic glue to place gems at the center of the snowflakes and the tips of the frost branches.
This frosty look is sure to be a showstopper at your next holiday gathering
Gingerbread Cookie Face With Icing Details
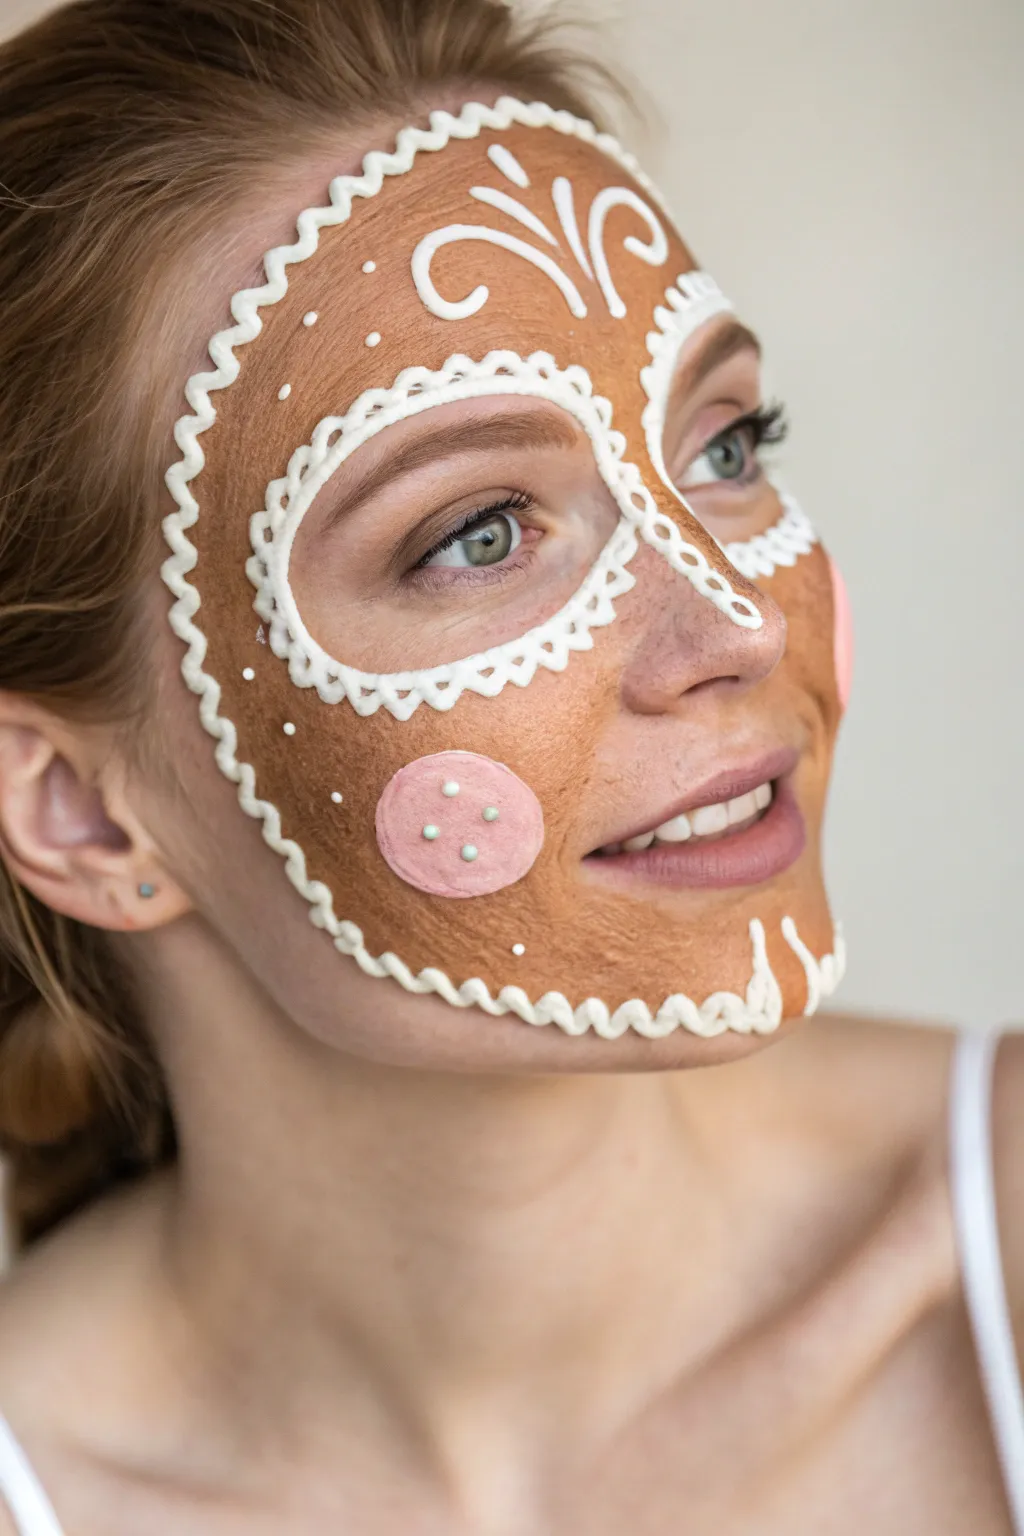
Transform yourself into a festive holiday treat with this realistic gingerbread cookie face paint design. The warm, toasted base combined with delicate white piping creates a surprisingly elegant yet whimsical look perfect for holiday parties.
How-To Guide
Materials
- Warm brown face paint (water-activated or cream)
- White face paint or liquid liner (high opacity)
- Pink face paint (soft pastel shade)
- Light green face paint (optional, for dots)
- Medium flat brush or sponge applicator
- Fine detail brush (liner or round #1)
- Small round brush (#3 or #4)
- Setting spray (optional)
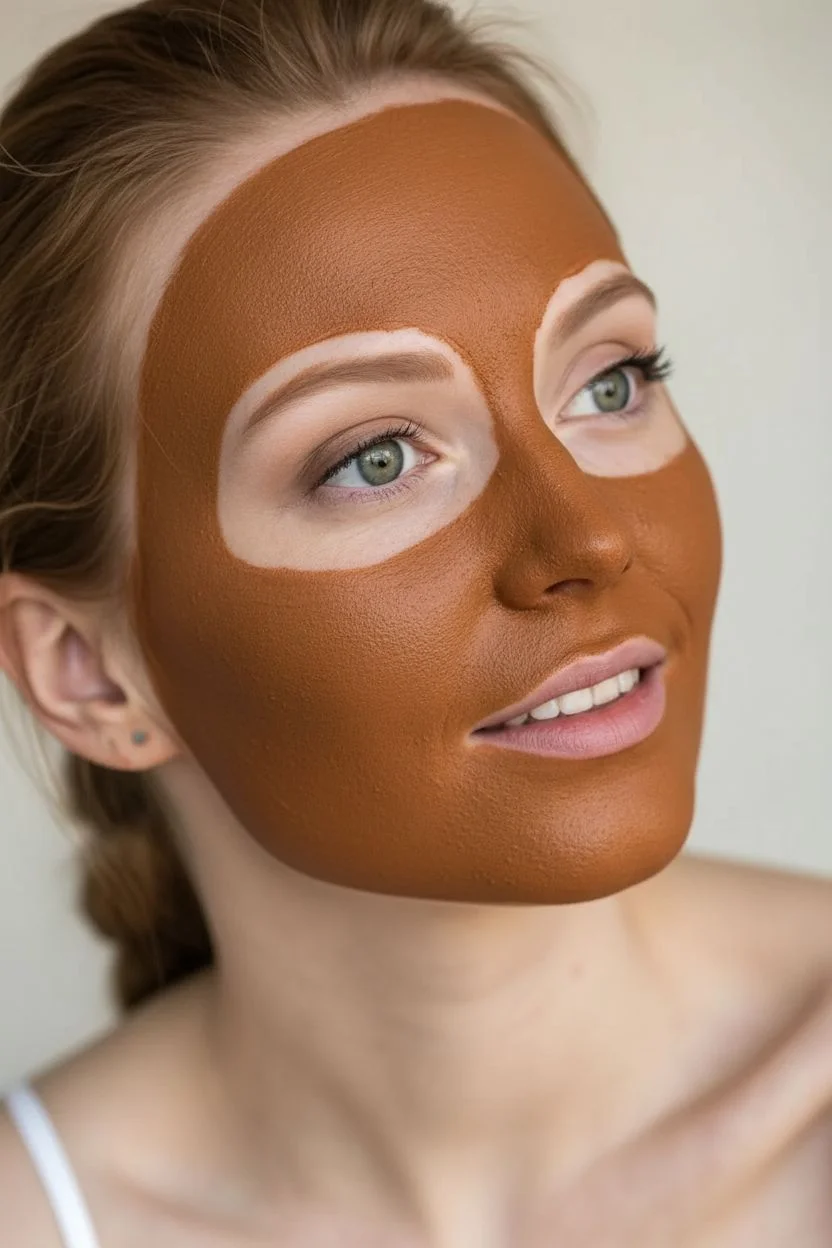
Step 1: The Cookie Base
-
Prep the canvas:
Start with a clean, dry face. Tie your hair back securely to prevent any stray strands from sticking to the paint as you work, especially near the hairline. -
Outline the shape:
Using a flat brush loaded with warm brown paint, lightly outline the mask shape. Curve it down from the center of the forehead, around the temples, under the cheekbones to the jawline, and across the chin. -
Fill in the base color:
With a sponge or the flat brush, fill in the entire area within your outline with the brown paint. Aim for an opaque, even coating that mimics the texture of baked dough. -
Create the eye openings:
Leave large, oval spaces around the eyes bare. This creates the classic ‘cutout’ look of a decorated cookie and keeps the makeup comfortable. -
Texture the dough:
If your base looks too flat, dab a slightly darker brown lightly over the cheeks and forehead with a textured sponge to simulate a baked surface.
Cracking Paint?
If the brown base cracks when you smile, your paint layer is too thick. Use a damp sponge to thin it out, or switch to a cream-based makeup for more flexibility.
Step 2: Icing Details
-
Start the center design:
Load a fine liner brush with creamy white paint. In the center of the forehead involving the start of the nose bridge, paint a decorative flourish or swirl. -
Outline the eyes:
Using the same fine brush, carefully outline the bare skin around your eyes with white paint. Keep this line thin and consistent. -
Pipe the scalloped eye border:
Around the thin eye outline, create a scalloped ‘lace’ pattern. Think of actual royal icing piping techniques—press down slightly and lift to create small loops. -
Connect the eye design:
Draw lines connecting the inner corners of the eye designs down the bridge of the nose, joining them into a decorative loop pattern. -
Border the face:
Create a continuous wavy line along the outer edge of the brown mask. This mimics the squiggly icing border often found on gingerbread men. -
Add dimension to the border:
For a 3D icing effect, I find going back over the high points of your white waves with a second coat really makes the ‘sugar’ pop.
Sugary Sparkle
While the white paint is still slightly wet, gently press cosmetic-grade iridescent white glitter onto the ‘icing’ lines for a realistic crystallized sugar texture.
Step 3: Sweet Decorations
-
Paint the cheeks:
Using a small round brush and pink paint, create a perfect circle on the apple of each painted cheek. These are your gumdrop buttons. -
Detail the gumdrops:
Once the pink is dry, use a dotting tool or the back of a brush to add four small dots (white or pale green) onto the pink circles to look like candy details. -
Add scattered sugar:
Dip your finest brush or a toothpick into white paint. Add tiny, random dots across the brown ‘dough’ areas to represent sprinkled sugar. -
Forehead flourishes:
Expand the forehead design with larger, decorative scrolls and teardrop shapes drifting upward toward the hairline. -
Define the nose:
Add a small white loop or line at the tip of the nose to connect the bridge design, completing the structured look of the mask. -
Final touches:
Check for any uneven edges in your white icing lines. Clean them up with a damp cotton bud or strengthen them with fresh white paint.
Now you are ready to bring some sweetness to your next holiday event with this classic cookie look

PENCIL GUIDE
Understanding Pencil Grades from H to B
From first sketch to finished drawing — learn pencil grades, line control, and shading techniques.
Explore the Full Guide
Mistletoe Kiss Mark With Greenery
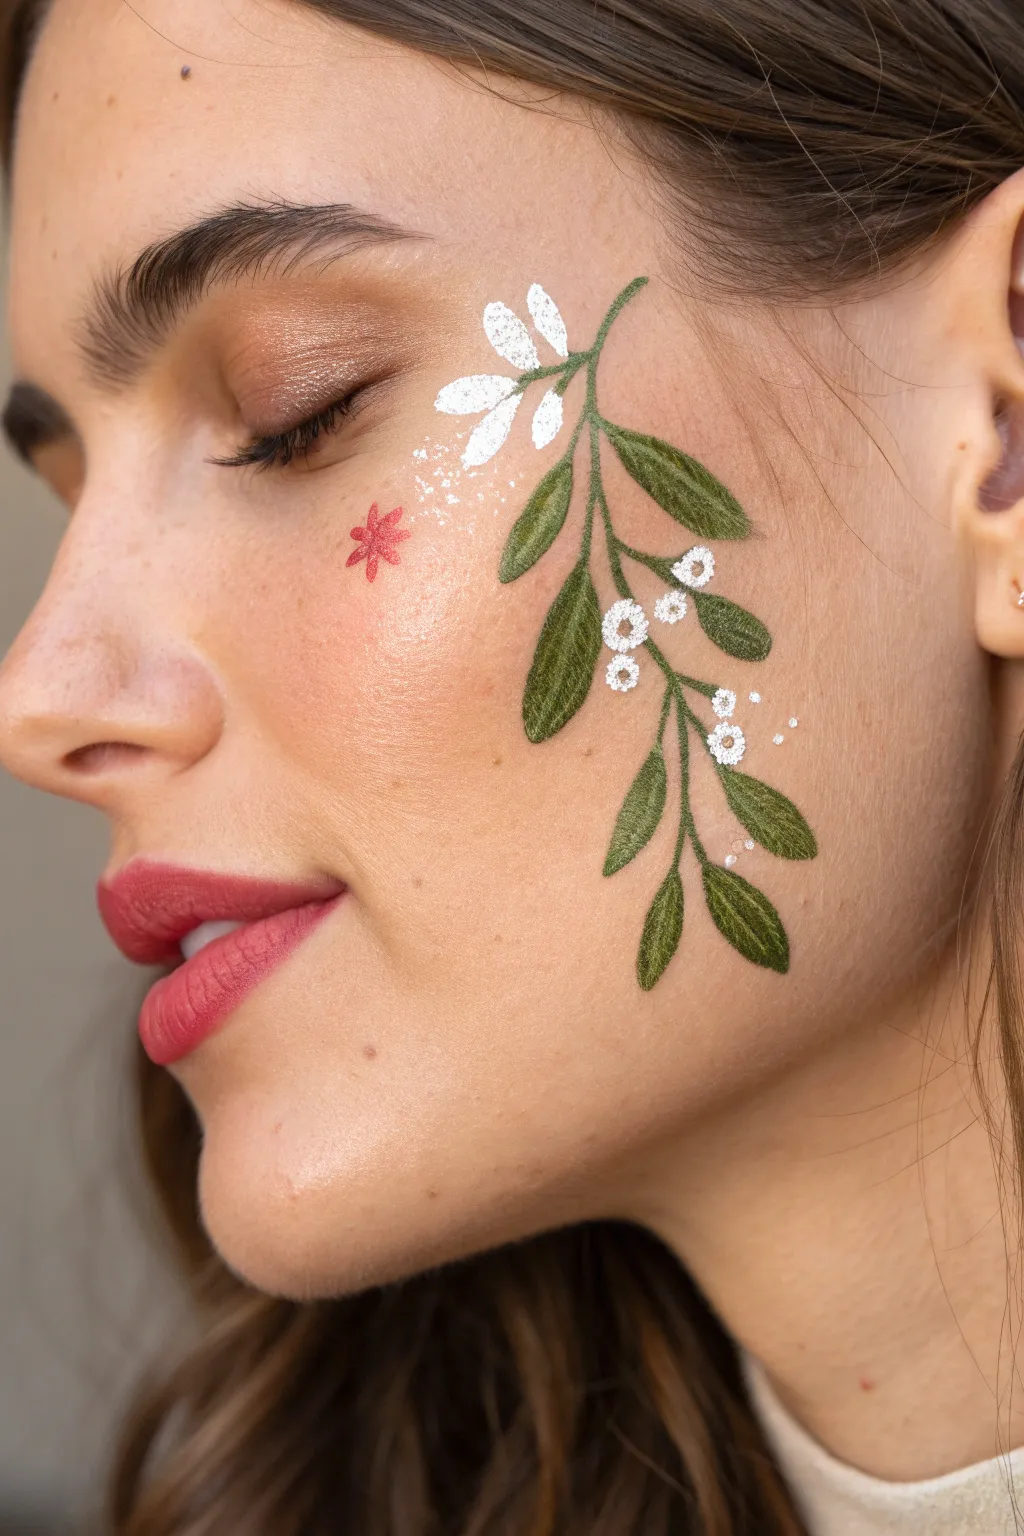
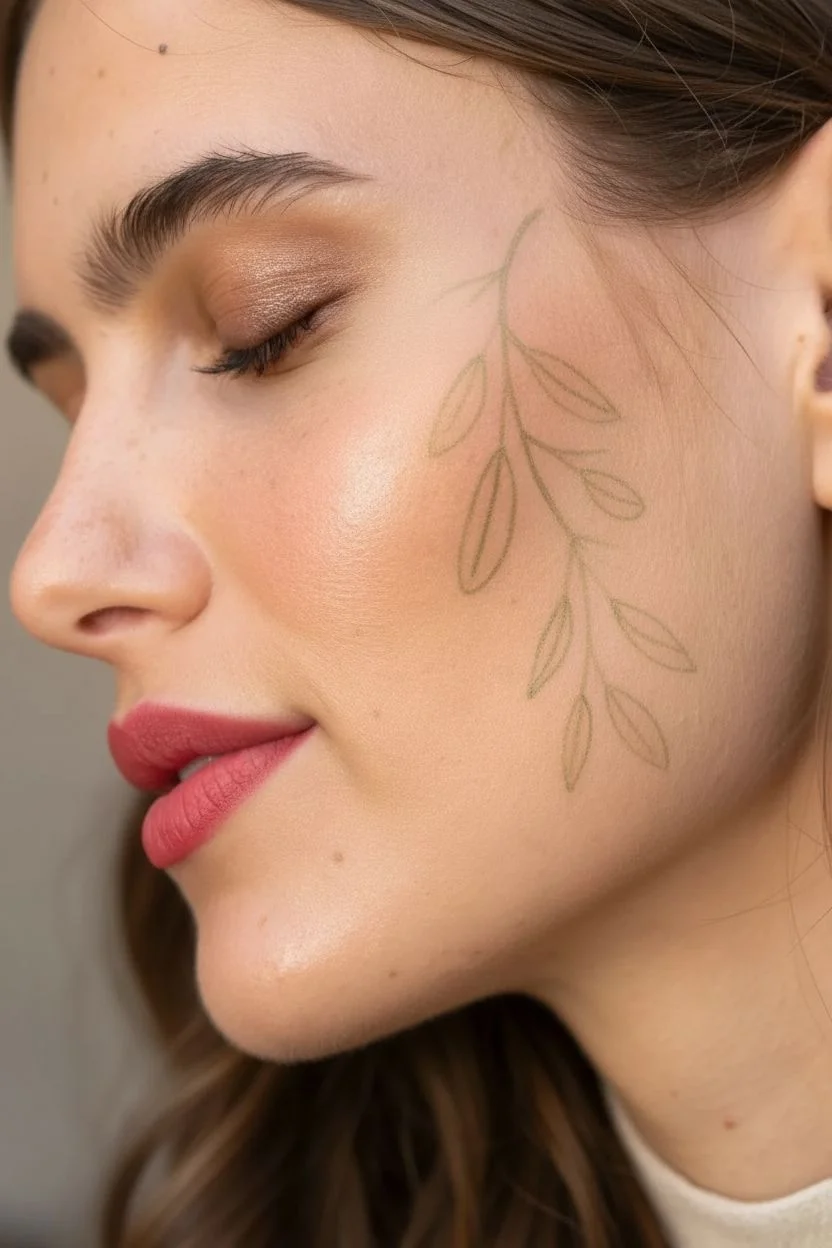
Transform your cheek into a canvas with this elegant, botanical face paint design that mimics the texture of hand-stitched embroidery. The combination of textured green leaves, delicate white blossoms, and a subtle red accent creates a sophisticated, festive look perfect for holiday gatherings.
Step-by-Step Tutorial
Materials
- Face paint palette (forest green, olive green, bright white, berry red)
- Fine liner brush (size 0 or 00)
- Small round brush (size 1)
- Detail brush for stippling
- Setting spray
- Small cup of water
- Paper towels
Step 1: Preparation and Base
-
Cleanse and prime:
Start with a clean, dry face. If you’re wearing foundation, ensure it’s set with a light powder so the paint adheres well without sliding. I like to spritz a tiny bit of setting spray before painting to create a barrier. -
Map the stem:
Using a fine liner brush and thinned-down olive green paint, lightly sketch the main curved stem. Start near the top of the cheekbone and curve it gently down towards the jawline, roughly following the contour of your cheek. -
Add gentle branching:
From this main line, sketch two or three smaller, shorter offshoot stems. Keep the lines very faint at this stage; they are just guides for where your leaves will sit.
Smudged Lines?
If your fine lines bleed, your paint is likely too watery. Blot the brush on a paper towel to remove excess moisture and reload with a creamier consistency.
Step 2: Creating the Leaves
-
Paint the base leaf shapes:
Load your small round brush with a mix of forest green and a touch of water. Press the brush down gently and lift while dragging to create teardrop-shaped leaves along the stems. aim for natural variation in size. -
Build the embroidery texture:
This is the key step for that stitched look. Once the base green is dry, take your fine liner brush with a slightly lighter olive green shade. Paint tiny, diagonal hatch marks across each leaf to mimic thread fibers. -
Add depth and shadow:
Reload the fine liner with the darkest forest green. Outline one side of each leaf thinly and add a central vein line to give dimension, reinforcing the idea of raised embroidery. -
Vary the greenery:
Near the top of the design, near the temple, paint a few leaves using white paint instead of green. Use the same hatching technique with a very pale grey or silver to give these white leaves texture, making them look like frosted or silver-threaded accents.
Step 3: Floral Details and Accents
-
Create white berry clusters:
Using the back end of a brush handle or a dotting tool dipped in bright white paint, place small clusters of dots along the stem. Group them in threes or fours to resemble mistletoe berries or tiny white flowers. -
Detail the berries:
Take your smallest detail brush and add tiny, irregular dots of white around the main berry clusters. This stippling effect creates a ‘pollen’ or ‘snow’ look that softens the design. -
Paint the red star accent:
Locate a spot slightly forward on the apple of the cheek, separate from the main branch. Using berry red paint and the fine liner, paint a small, simple six-pointed asterisk or star shape. This acts as a ‘kiss mark’ or a pop of contrasting color. -
Add whimsical speckles:
Dip a stiff brush or an old toothbrush into watery white paint. Flick the bristles gently with your finger to spray a very fine mist of white speckles around the top white leaves and the red star. This adds a magical, snowy atmosphere to the piece. -
Final highlights:
With your fine liner and pure white paint, add tiny highlight lines to the tips of the green leaves and the center of the red star to make them pop. -
Set the design:
Once everything is completely dry, mist the area lightly with a makeup setting spray to ensure your artwork lasts through the festivities.
Sparkle Upgrade
Before the white berry paint dries completely, tap a tiny amount of iridescent cosmetic glitter onto the centers for a festive shimmer that catches the light.
Enjoy wearing your sophisticated, artistic holiday look to your next seasonal celebration


Have a question or want to share your own experience? I'd love to hear from you in the comments below!