When I want a quick win in the studio, I reach for easy Christmas painting ideas that look festive fast and don’t require perfect drawing skills. These are the kinds of projects you can finish in one sitting and still feel proud enough to hang up or gift.
Classic Snowman With Simple Shapes
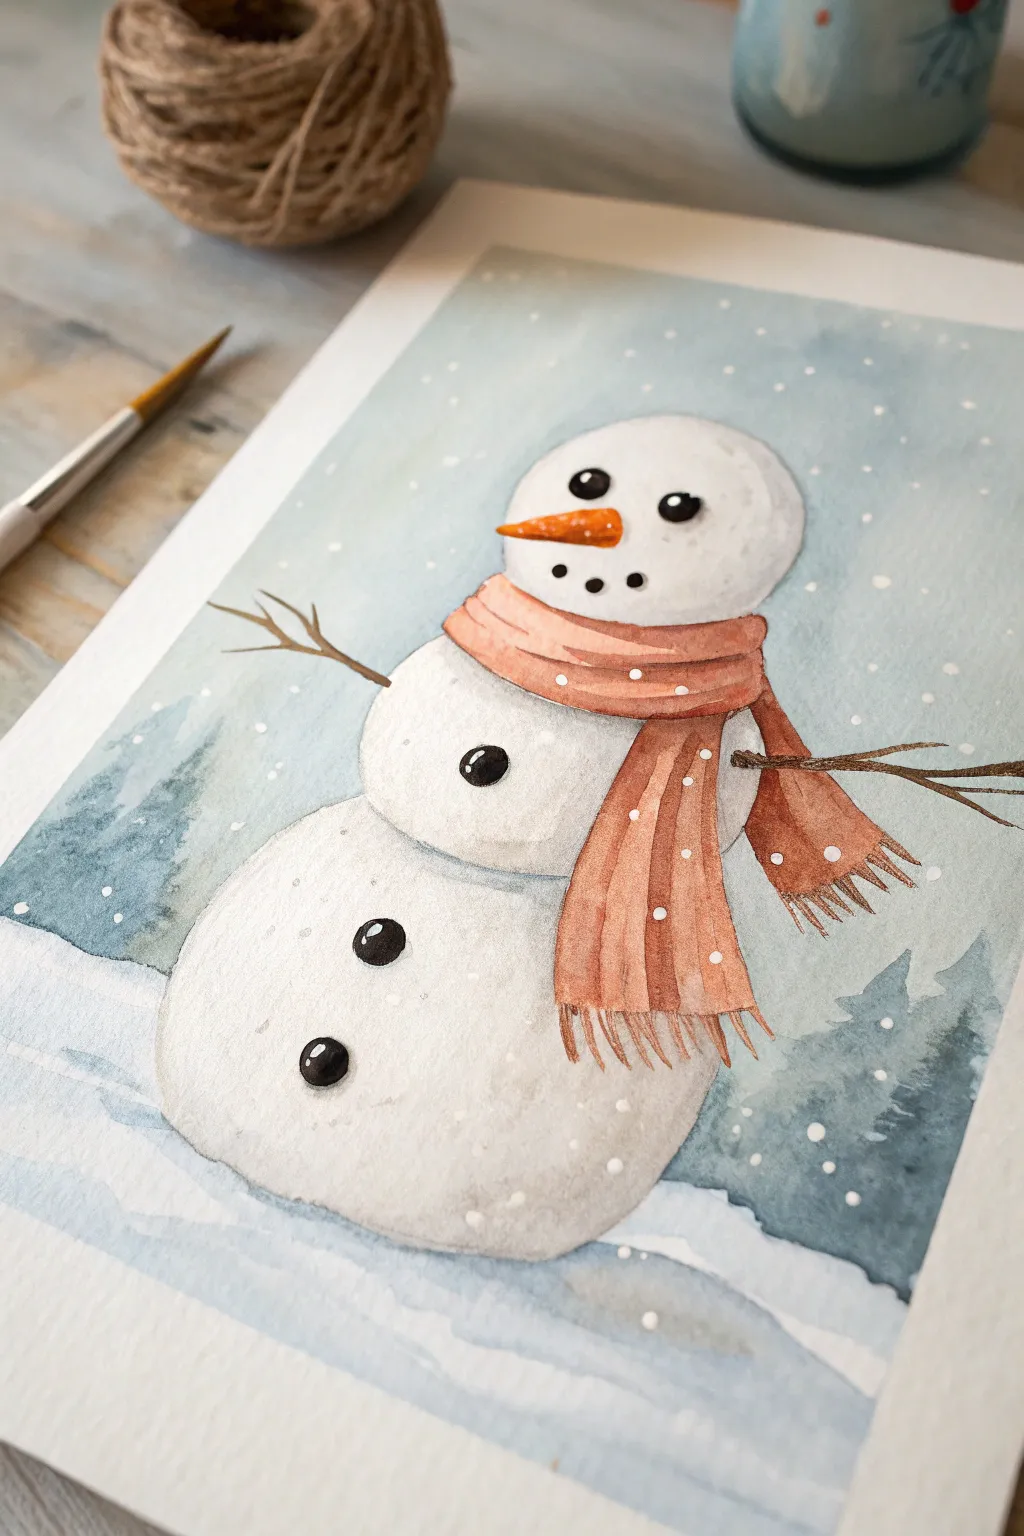
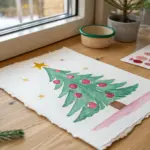
Capture the magic of winter with this charming watercolor illustration, featuring soft overlapping layers and crisp details. The gentle blue tones and warm scarf create a cozy, nostalgic holiday feeling that’s perfect for greeting cards or seasonal decor.
Detailed Instructions
Materials
- Cold press watercolor paper (300 gsm)
- Watercolor paints (Indigo, Burnt Sienna, Orange, Black)
- Round brushes (sizes 2, 4, and 8)
- White gouache or white gel pen
- Pencil and kneaded eraser
- Jar of water and paper towels
Step 1: Sketching and Initial Washes
-
Light Sketching:
Begin by lightly sketching three stacked circles for the snowman’s body, making the bottom one the largest and slightly flattened at the base. Add guidelines for the scarf around the neck area and mark the horizon line for the snowy ground. -
Wet-on-Wet Sky:
Wet the entire background area around the snowman with clean water using your largest brush. While the paper is glistening, drop in a diluted wash of Indigo or a cool blue-grey, letting the color fade as it reaches the bottom. -
Adding Texture:
While the background is still damp, dab in slightly darker blue pigment near the edges and bottom corners to suggest distant pine trees. Let the colors bleed naturally for a soft, out-of-focus look, then allow the paper to dry completely.
Muddy colors?
If the scarf bleeds into the snow body, you didn’t wait long enough! Let the white sections dry completely before painting adjacent colored areas.
Step 2: Painting the Snowman
-
First Body Layer:
Mix a very watery grey using a touch of Indigo and water. Paint the three snowballs, keeping the center of each circle almost white to create a rounded, 3D highlight effect. -
Shadow Definition:
While the snowballs are still damp, drop slightly darker grey paint along the bottom and right edges of each circle. This simple shading technique instantly gives the snowman weight and volume. -
Ground Shadows:
Paint gentle, horizontal blue-grey streaks under the snowman to anchor him to the ground. Soften the edges with a clean, damp brush so the shadow fades into the white snow. -
Drying Time:
Let the body and background layers dry fully before moving on. This prevents the scarf colors from bleeding into the crisp white snow.
Step 3: Accessories and Details
-
Scarf Base:
Using a size 4 brush, paint the scarf with a mix of Burnt Sienna and Orange. Lay down the color in distinct sections—the loop around the neck and the two hanging tails—leaving tiny white gaps between them to show the folds. -
Carrot Nose:
Paint a small, elongated triangle for the carrot nose using bright Orange. Once dry, add a tiny line of brown on the underside to give it dimension. -
Scarf Details:
Once the base orange wash is dry, use a slightly darker, less diluted mix of the same color to paint vertical stripes or texture lines on the scarf. Don’t forget to use the tip of your brush to flick out the fringe at the ends. -
Twig Arms:
Mix Burnt Sienna with a little Black to create a dark brown. Use your finest brush (size 2) to paint the stick arms, making the lines uneven and branching out at the ends for a natural look. -
Face and Buttons:
Using undefined Black paint, carefully dot in the eyes, the coal mouth smile, and the three buttons down the chest. Leave a tiny speck of white paper in the eyes for a sparkle, or add it later with gouache.
Add sparkle
Sprinkle a tiny pinch of iridescent watercolor medium or fine cosmetic glitter over the wet snow and sky sections for a magical, frosty shimmer.
Step 4: Final Touches
-
Falling Snow:
Dip your toothbrush or a stiff brush into white gouache. Flick the bristles to spatter tiny white dots across the painting. -
Snowy Highlights:
I like to take a fine brush with white gouache and add specific snowflakes on the scarf and hat area to show they are collecting snow. -
Final Contrast:
Assess your painting; if the background dried too light, you can carefully glaze another layer of blue around the snowman to make the white body pop.
Now you have a frosty friend ready to brighten up your winter days


Evergreen Tree Made From Layered Triangles
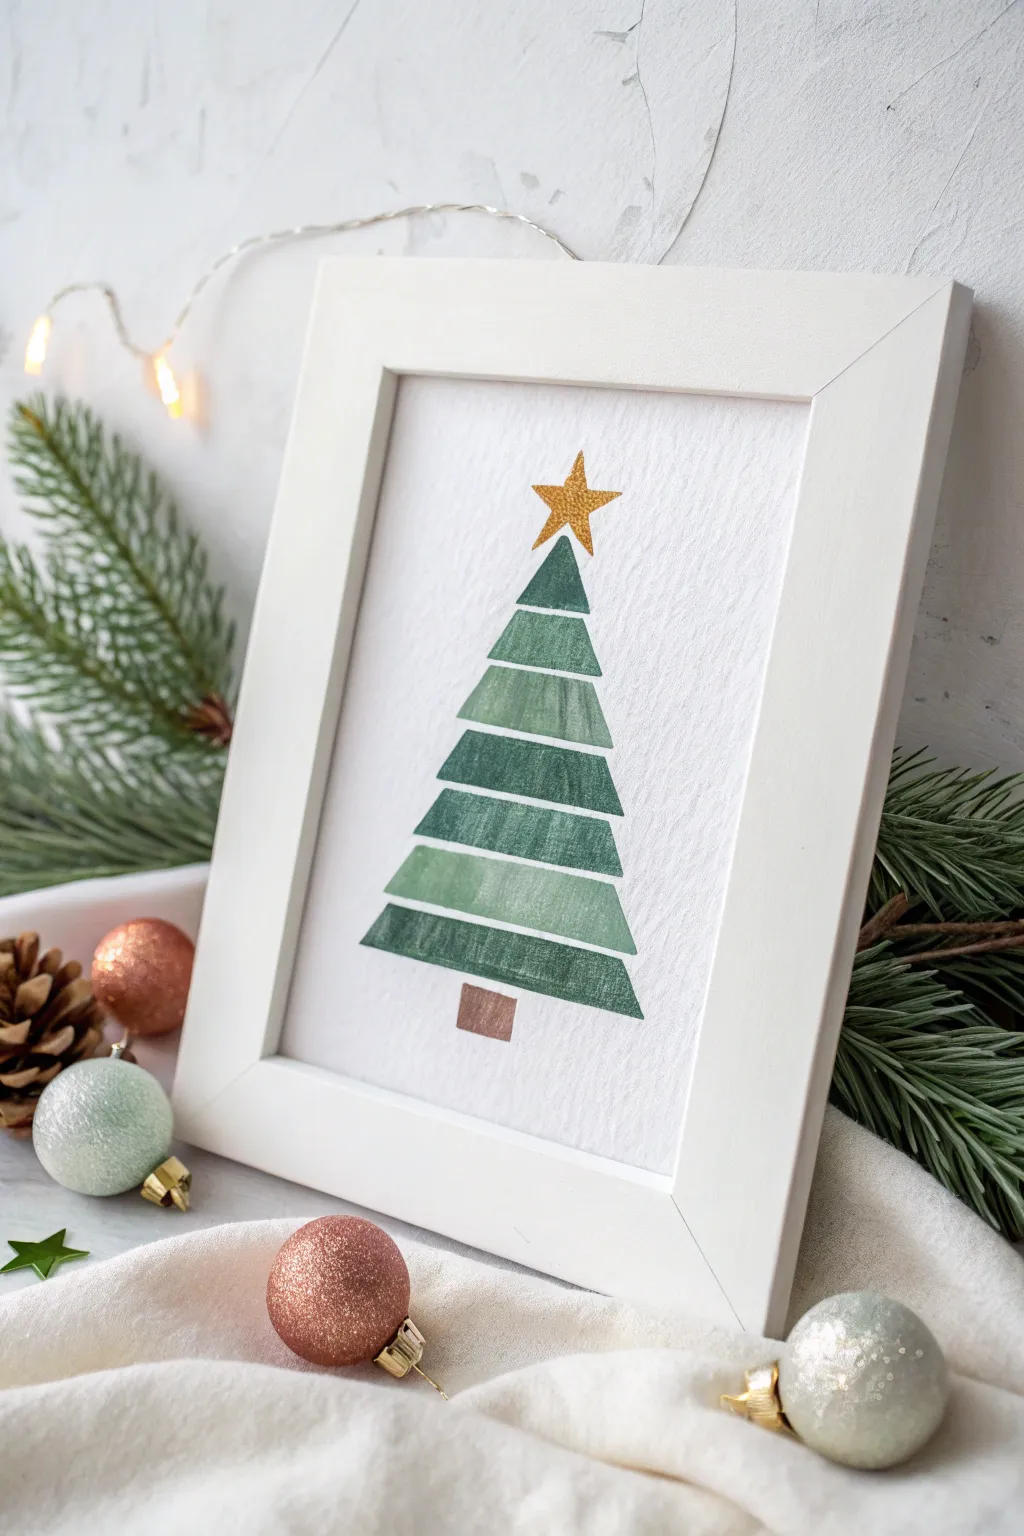
This minimalist Christmas tree project focuses on clean lines and varied green values to create a modern, geometric look. By stacking trapezoids of alternating shades, you achieve a sense of depth and style that looks professionally designed but is surprisingly simple to execute.
Step-by-Step
Materials
- Cold press watercolor paper (cut to 5×7 or 8×10)
- Watercolor paints (dark green, light green, brown)
- Small flat brush (size 4 or 6)
- Small round brush (size 2)
- Gold glitter paint or metallic marker
- Pencil
- Ruler
- Painter’s tape or washi tape
- White or light wood frame
Step 1: Drafting the Design
-
Establish the framework:
Begin by lightly marking a vertical centerline down the middle of your watercolor paper using a pencil and ruler. This will ensure your tree doesn’t lean to one side. -
Frame the triangle shape:
Draw a large, light triangle to define the outer boundaries of the tree. The top point should determine where your star sits, and the bottom line defines the widest branches. Make these lines very faint so they are easy to erase later. -
Divide into segments:
Starting from the top, use your ruler to mark horizontal lines across the main triangle, dividing the tree into roughly 6 to 7 tiers. I like to space these evenly, about 3/4 of an inch to 1 inch apart depending on your paper size. -
Create the gaps:
To get that separated, floating look, add a second horizontal line just slightly below each of your existing tier lines. This creates a tiny gap between each geometric segment. -
Refine the trapezoids:
Darken the specific shapes you will paint. The top shape will be a small triangle, and every shape below it will be a trapezoid (narrower at the top, wider at the bottom). Ensure the gaps between them are clear. -
Add the trunk and star:
Draw a simple rectangular trunk centered at the base. Finally, sketch a five-pointed star sitting precisely on the tip of the top triangle.
Crisp Edge Secret
For perfectly straight edges on your tiers, apply thin strips of washi tape along your pencil lines before painting. Peel it off gently while the paint is still slightly damp.
Step 2: Painting the Layers
-
Prepare your palette:
Mix two separate puddles of green watercolor paint. One should be a deep, saturated forest green, and the other a watery, lighter sage or pale green. You want a distinct contrast between them. -
Paint the top layer:
Using your flat brush, fill in the topmost triangle with the darker green mixture. Keep your edges crisp by using the edge of the flat brush against your pencil lines. -
Alternate the second tier:
Move directly to the trapezoid below the top triangle. Paint this section with your lighter green mix. Work carefully near the gap line to keep that white space clean. -
Continue the pattern:
Proceed down the tree, filling the third tier with the dark green, and the fourth with the light green. Continue this alternating pattern all the way to the bottom segment. -
Add texture:
While the paint is still slightly damp, you can drop a tiny bit of darker pigment into the corners of the shapes. This adds a subtle gradient effect that mimics the shadow of boughs. -
Paint the trunk:
Rinse your brush thoroughly and pick up a warm brown tone. Fill in the small rectangular trunk at the base. -
Allow to dry:
Let the green and brown sections dry completely. If you move to the star too soon, you risk smudging the green paint with your hand.
Make It Sparkle
While the green watercolor is still wet, sprinkle a tiny pinch of fine table salt onto the paint. Brush it off when dry for a subtle, frosty texture.
Step 3: Finishing Touches
-
Gild the star:
Using a small round brush and gold glitter paint (or a metallic marker for more control), carefully fill in the star shape at the top. -
Clean up outlines:
Once the paint is 100% bone dry to the touch, take a high-quality eraser and gently remove any visible pencil marks, especially in the white gaps between the tiers. -
Frame your work:
Place your finished painting into a simple white or light wood frame to complement the minimalist aesthetic.
Hang your newly framed tree on a gallery wall or place it on a mantel for a sophisticated festive touch


Candy Cane Stripes That Always Work
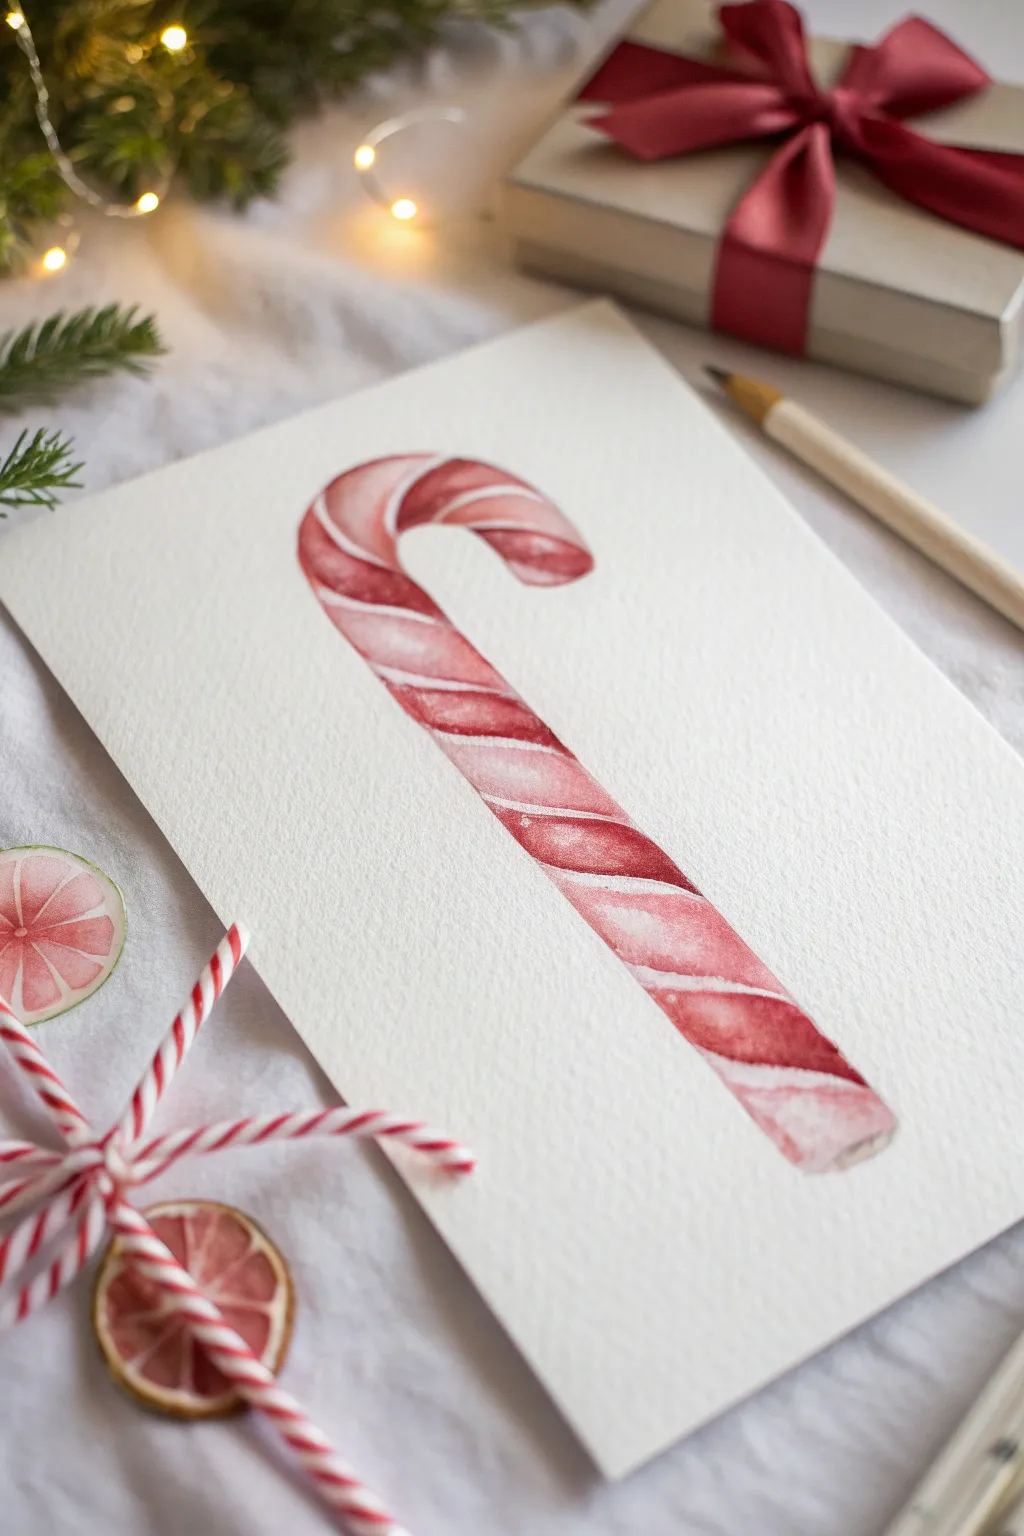
This project captures the nostalgic charm of a classic Christmas candy cane using simple watercolor techniques. The result is a soft, dimensional sweet treat on textured paper that looks good enough to eat but maintains an elegant, artistic feel.
How-To Guide
Materials
- Cold press watercolor paper (300 gsm recommended)
- H or HB pencil for light sketching
- Kneaded eraser
- Medium round watercolor brush (size 6 or 8)
- Small round detail brush (size 2 or 3)
- Red watercolor paint (Alizarin Crimson or Cadmium Red Deep)
- Clean water jar
- Paper towels
Step 1: Sketching the Shape
-
Outline the curve:
Begin by lightly sketching the outline of the candy cane. Draw two parallel curved lines that hook at the top, making sure the width stays consistent throughout the entire length. -
Define the ends:
Cap off the bottom and the top tip with slightly rounded, soft edges. Avoid sharp corners to keep that smooth, candy-like appearance. -
Mark the stripes:
Lightly draw diagonal lines across the body of the cane to mark where the red stripes will go. Vary the width slightly or keep them uniform depending on your preference, but ensure they follow the curve of the cane as they go around the hook. -
Clean up lines:
Go over your sketch with a kneaded eraser. Gently dab the paper to lift excess graphite so only a faint ghost image remains. You don’t want pencil lines showing clearly through the transparent watercolor.
Pro Tip: Lift for Shine
For an extra glossy look, use a stiff, damp brush to actively scrub and lift a thin white highlight line right down the center of the dry painting.
Step 2: Painting the Red Stripes
-
Mix your red:
Prepare a puddle of red paint on your palette. I like to mix a tiny touch of brown or darker red into Alizarin Crimson to get that vintage, deep holiday red rather than a bright fire engine color. -
First wash:
Using your medium brush, fill in every other section (the red stripes) with a light, diluted wash of your red mix. This establishes the base color without going too dark too fast. -
Add pigment while wet:
While that first wash is still damp, drop in more concentrated pigment along the edges of the cane. This technique, called ‘charging,’ creates natural-looking shadows and roundness. -
Create the highlight:
Lift out a small line of paint in the center of each red stripe using a clean, damp brush. This lighter center strip suggests the shiny, reflective surface of hard candy. -
Dry partially:
Let this layer dry until it is no longer distinctively glossy. The paper should feel cool to the touch but not soaked.
Level Up: Texture
Make it a “sugar-coated” candy cane! Sprinkle a pinch of clear embossing powder or fine glitter over the wet paint for a sparkly, sugared texture.
Step 3: Adding Dimension
-
Deepen the shadows:
With your smaller detail brush, apply a darker, more saturated red along the very bottom and right edges of the red stripes. This reinforces the cylindrical 3D shape. -
Soften the edges:
Immediately rinse your brush, dab it on a towel, and run the damp bristles along the inner edge of that dark line you just painted to blend it smoothly into the rest of the stripe. -
Shadow the white stripes:
The white stripes aren’t purely white; they need shadow too. Mix a very watery, pale grey or cool lavender. -
Paint white shadows:
Paint a thin crescent of this pale grey wash on the curved inner side of the hook and along one side of the straight section. Keep this subtle—it’s just a whisper of shadow. -
Refine the hook:
Pay special attention to the stripes on the curved hook. The perspective changes here, so ensure your darks and lights follow the rounded form of the bend. -
Final touches:
If any stripes look too flat, add one last glaze of deep red to the darkest corners once the paper is fully bone dry.
Now you have a sweet piece of holiday art ready to be framed or turned into a festive greeting card


Santa Hat On a Minimal Background
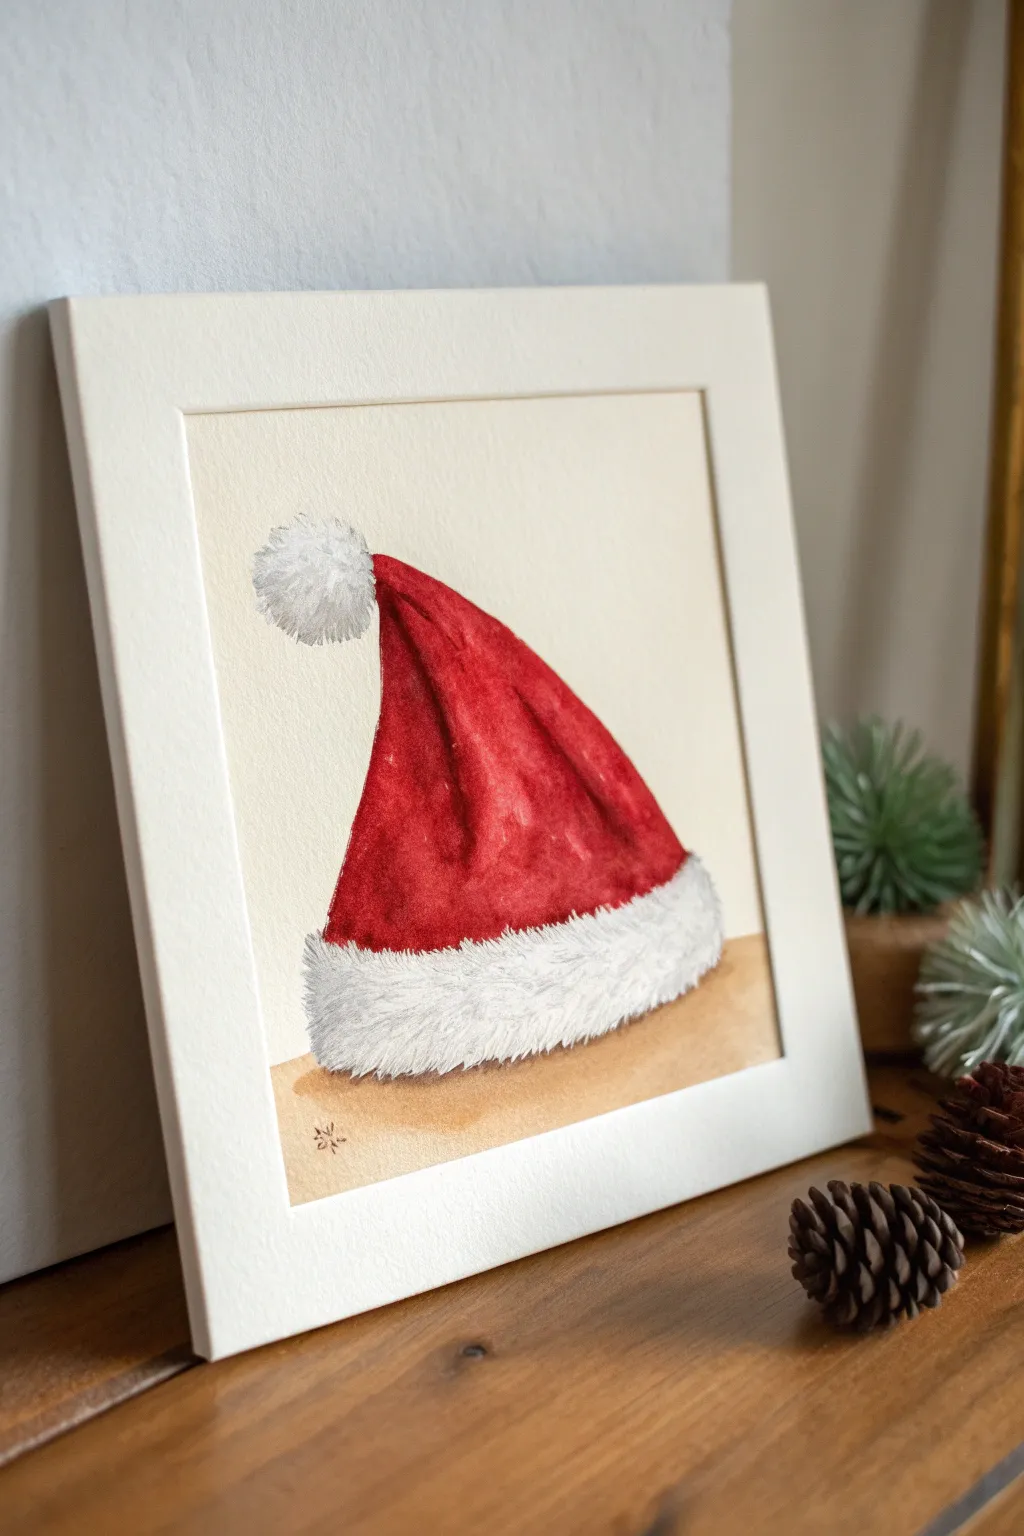
Capture the holiday spirit with this elegant and simple watercolor painting of a classic Santa hat. The soft, textured fur contrasts beautifully with the bold red fabric, all set on a warm, neutral background.
Step-by-Step Tutorial
Materials
- Cold-press watercolor paper (300 gsm)
- Watercolor paints (Alizarin Crimson, Cadmium Red, Burnt Umber, Yellow Ochre, Lamp Black or Payne’s Gray)
- Round watercolor brushes (Size 4, Size 8, and a small liner brush)
- Graphite pencil (HB or lighter) and eraser
- White gouache or white acrylic paint
- Masking fluid (optional)
- Clean water cups and paper towels
- Palette for mixing
Step 1: Sketching the Outline
-
Create the framework:
Begin by lightly sketching the general triangular shape of the hat on your watercolor paper. Keep the top point curved slightly to the left to denote a relaxed fold. -
Add the trim details:
Sketch a thick, curved band at the bottom for the fur trim. Instead of straight lines, use short, flicking pencil strokes to indicate a fluffy texture right from the start. -
Draw the pom-pom:
Draw a circular shape at the tip of the hat. Like the trim, use jagged, uneven lines to suggest the fuzzy texture of the ball.
Fur Fluff Pro-Tip
For realistic fur texture, ‘pull’ the paint outward using quick, flicking motions. Start the stroke inside the trim and lift the brush as you flick out to create tapered ends.
Step 2: Painting the Red Fabric
-
Prepare the red mix:
Mix a vibrant red using Cadmium Red with a touch of Alizarin Crimson to deepen it slightly. Ensure you have enough mixed to cover the main area without running out. -
Wet-on-dry foundation:
Apply the red paint to the main body of the hat using your Size 8 brush. Leave the highlighted ridge on the left side slightly lighter or even unpainted for a natural highlight. -
Create shadows while wet:
While the red paint is still damp, drop in a darker mix (add a tiny bit of Burnt Umber or a deeper red) into the folds, specifically along the right curve and the deep crease in the center. -
Define the form:
Use a damp, clean brush to soften any hard edges where the shadows meet the mid-tones, creating a smooth transition that makes the velvet look soft. -
Dry completely:
Let the red section dry entirely before moving on. This prevents the red from bleeding into your pristine white fur areas.
Level Up: Sparkles
Add a touch of glitter paint or iridescent medium to the white pom-pom and trim after the paint dries. It adds a festive shimmer that catches the light beautifully.
Step 3: Rendering the Fur Texture
-
Create a shadow grey:
Mix a very dilute wash of Payne’s Gray or a neutralized blue-grey. It should be barely visible on the paper. -
Paint the fur shadows:
Apply this pale grey to the bottom and right sides of the white trim and the pom-pom. This gives volume to the white shapes so they don’t look flat. -
Detail the texture:
Switch to your smaller brush or liner. Use a slightly darker grey mix to paint short, fine hair-like strokes within the shadow areas of the fur. -
Add highlights:
Once the grey is dry, use white gouache (or opaque white watercolor) to paint sharp, thin flicks of fur over the edges of the red hat and onto the background. This layering creates depth. -
Stipple the pom-pom:
Use a scruffy brush or a dry-brush technique with the white gouache to stipple the center of the pom-pom, enhancing its fluffiness.
Step 4: Background and Finishing Touches
-
Mix the background color:
Combine Yellow Ochre with a lot of water and a tiny dot of Burnt Umber to create a warm, creamy beige wash. -
Apply the ground shadow:
Paint a horizontal wash under the hat, letting it fade out as it moves upward. I personally like to keep this loose to contrast with the detailed hat. -
Darken the contact point:
Add a concentrated line of Burnt Umber right underneath the white trim where the hat sits on the surface to anchor the object. -
Sign and frame:
Once fully dry, erase any visible pencil lines. Add a small signature or a tiny snowflake doodle in the corner with a fine pen or thin brush.
Place your finished piece in a simple mat board frame to let the vibrant red pop against your holiday decor
BRUSH GUIDE
The Right Brush for Every Stroke
From clean lines to bold texture — master brush choice, stroke control, and essential techniques.
Explore the Full Guide
Reindeer Face Using Ovals and Antlers
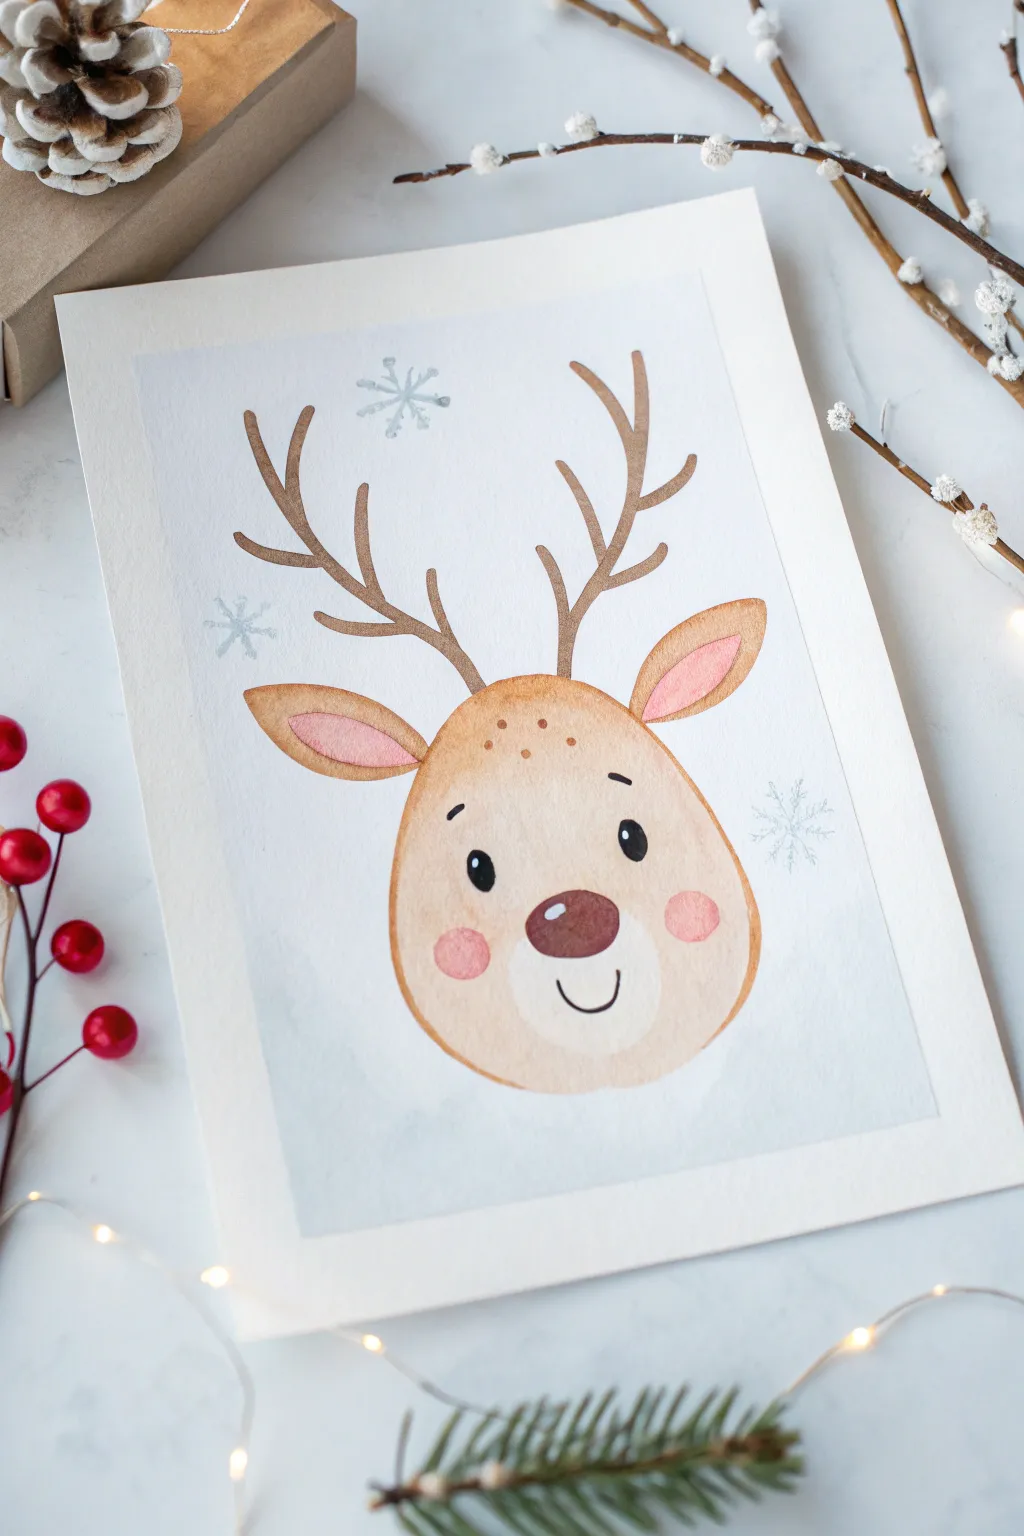
This charming project captures the sweetness of the holiday season with a simple, stylized reindeer face. Using basic oval shapes and soft watercolor washes, you’ll create a heartwarming piece of art perfect for cards or framed decor.
How-To Guide
Materials
- Cold press watercolor paper (A5 or 5×7 inches)
- Watercolor paints (Light brown, dark brown, pink, blue, black)
- Round watercolor brushes (Size 6 for washes, Size 2 for details)
- Pencil (HB or lighter)
- Kneadable eraser
- Painter’s tape or masking tape
- Clean water and paper towels
- White gouache or white gel pen (optional for snowflakes)
Step 1: Sketching the Base
-
Tape the edges:
Begin by taping down your watercolor paper to a board or table to create a clean white border and prevent buckling. Press the tape edges firmly. -
Draw the main oval:
Lightly sketch a large, wide egg shape in the center of the paper for the reindeer’s head. The bottom part should be slightly wider than the top. -
Add the ears:
Sketch two leaf-shaped ears extending from the upper sides of the head. Inside each ear, draw a smaller, matching shape for the inner ear. -
Place facial features:
Draw two small ovals for eyes, spaced somewhat widely apart. Below them, sketch a wider horizontal oval for the nose area, and add a small smile curve underneath. -
Sketch the antlers:
Draw branching antlers coming from the top of the head. Keep the lines simple, with a main branch and two or three smaller offshoots on each side. -
Design the snout:
Lightly mark a circle area around the mouth and nose. This area will remain lighter than the rest of the face later on.
Soft & Fuzzy Edges
To make the reindeer look furry, try the ‘wet-on-wet’ technique. Wet the face area with clean water first, then drop in your brown paint to let it bloom softly.
Step 2: Painting the Face
-
Base wash:
Mix a diluted light brown or tan color. Using your Size 6 brush, paint the entire head shape, carefully painting around the inner ears and the circular snout area you marked earlier. -
Fill the ears:
While the brown dries, use the same tan mix to paint the outer edges of the ears. -
Rosy cheeks and ears:
Mix a soft, pale pink. Paint the inner ear shapes. While you have pink on your brush, paint two soft circles on the cheeks. If the brown face is still slightly damp, the pink will blend softly; if dry, it will sit on top. -
Freckles:
Once the forehead area is dry, dab tiny dots of a slightly darker brown on the top of the head to create sweet little freckles. -
Painting the snout:
Use a very watered-down version of your tan mix (almost clear water) to paint the snout area, so it appears much lighter than the rest of the face.
Accidental Blobs?
If a pool of water forms or paint looks too dark, quickly touch the corner of a clean, dry paper towel to the spot to lift the excess liquid without scrubbing.
Step 3: Adding Details & Background
-
Darken the antlers:
Mix a medium brown shade, darker than the face color. Using the Size 2 brush, carefully fill in the antler shapes with steady strokes. -
Define the nose:
Use a rich, dark reddish-brown to paint the nose oval. Leave a tiny sliver of white unpainted at the top of the nose to look like a highlight. -
Eyes and mouth:
Using black paint or a very dark grey, carefully fill in the eye ovals. Use this same dark color to trace the small smile line. Add tiny white highlights to the eyes once dry if you painted them solid black. -
Background wash:
Prepare a very watery, pale blue wash. Gently paint the space surrounding the reindeer to create a snowy sky effect. Keep the edges irregular or soft for a dreamy look. -
Paint snowflakes:
Once the blue background is completely dry, use a slightly darker blue (or white gouache) and a fine brush to paint simple star-shaped snowflakes floating around the antlers. -
Final touches:
Add small accent eyebrows above the eyes with thin brown strokes to give the face more expression. -
Remove tape:
Wait until the paper is completely bone-dry. Peel the tape away slowly at a 45-degree angle to reveal your crisp white border.
Frame your joyful reindeer to bring a festive spirit to any corner of your home
Christmas Lights as Easy Dots and Lines
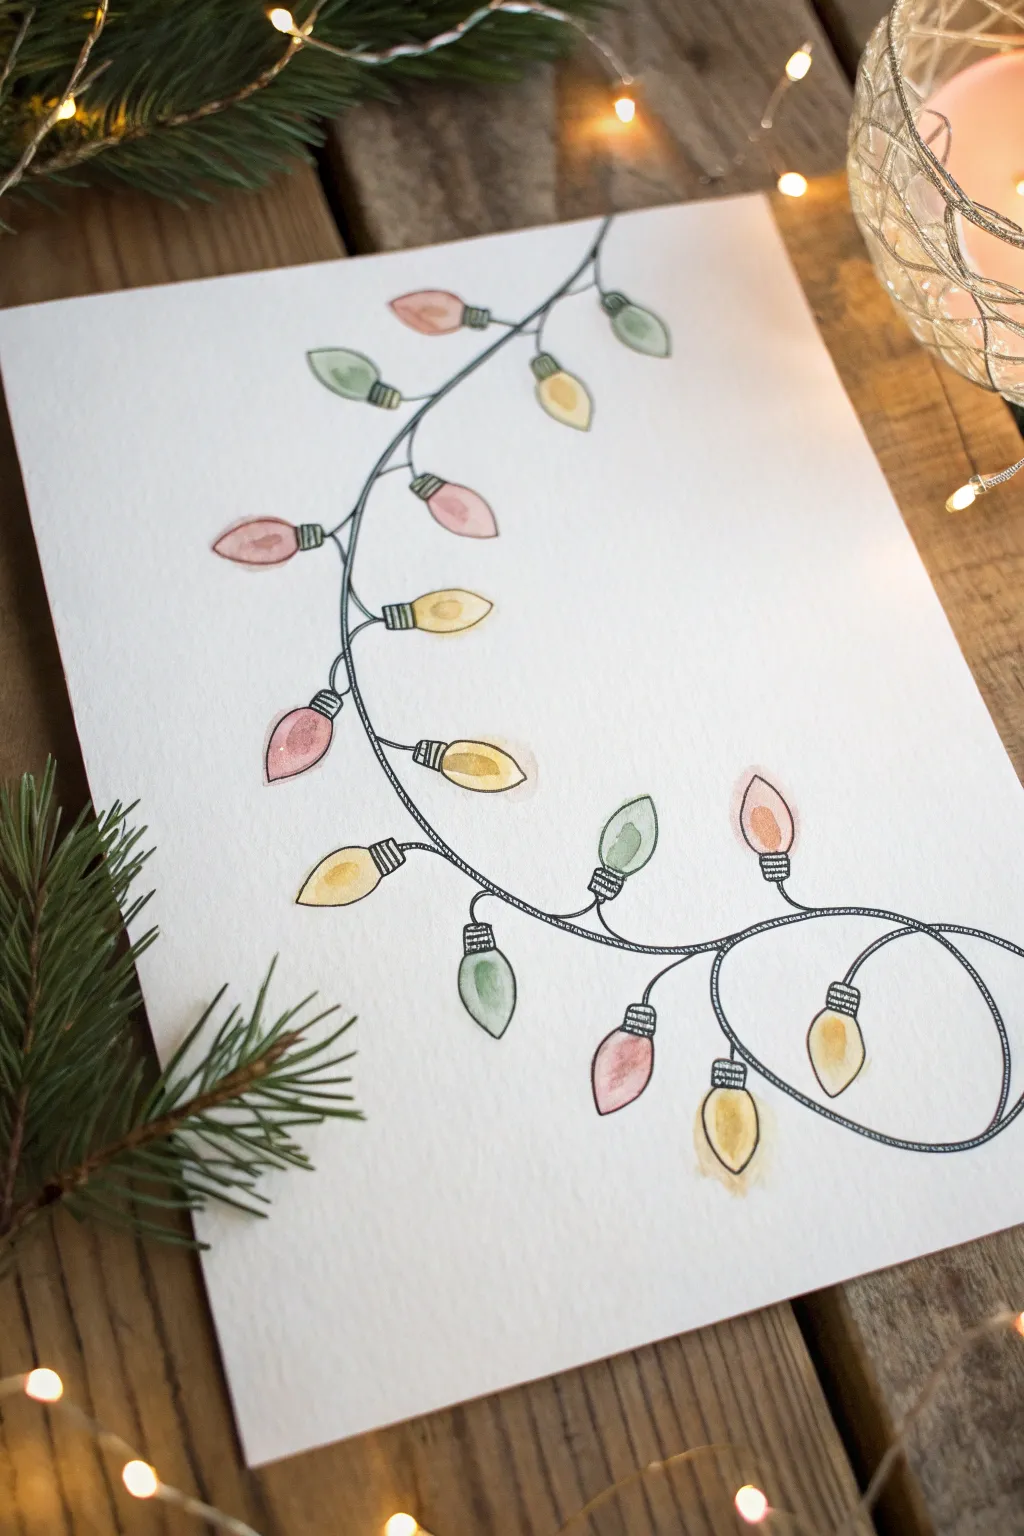
Capture the cozy glow of the holidays with this delicate watercolor illustration. This project combines simple ink line work with loose washes of color to create a festive light strand that looks beautiful on homemade cards.
Step-by-Step Guide
Materials
- Cold press watercolor paper (A5 or 5×7 inches)
- Fine liner pen (0.3mm or 0.5mm, waterproof black ink)
- Round watercolor brush (size 4 or 6)
- Watercolor paints (red/pink, yellow, green)
- Pencil (HB or H for light lines)
- Kneaded eraser
- Cup of water and paper towel
Step 1: Drawing the Structure
-
Sketch the path:
Begin by lightly sketching a sweeping curve with your pencil. Start from the top center and swoop down towards the bottom right, creating a gentle ‘C’ or ‘J’ shape. This will be the main wire for your light strand. -
Add bulb placements:
Along your pencil line, mark small, evenly spaced dashes where you want each light bulb to sit. Vary the angles slightly so some bulbs point inside the curve and some point outside for a natural, tangled look. -
Draft the bulb shapes:
Sketch the teardrop shape of the vintage light bulbs at each mark. Keep the pointed end facing away from the wire. -
Sketch the sockets:
Draw a small rectangle or cylinder connecting the base of the teardrop to the wire line. This represents the socket where the bulb screws in.
Loose Lines
Don’t try to draw the wire as a single stiff stroke. Use short, sketching strokes that overlap slightly. This makes the wire look flexible and twisted rather than rigid.
Step 2: Inking the Details
-
Trace the main wire:
Using your waterproof fine liner, trace over your main pencil line. Instead of one perfect line, try drawing two very close parallel lines that weave slightly, mimicking twisted electrical wire. -
Ink the sockets:
Outline the small rectangular sockets. Provide texture by drawing tiny horizontal lines or ridges across them, giving them that industrial screw-base look. -
Line the bulbs:
Trace your teardrop bulb shapes. Keep your hand relaxed; if the lines are slightly wobbly, it adds to the illustrative charm. -
Add characteristic coils:
At the bottom right where the strand ends, draw a loose loop or coil with the wire before letting it run off the page, suggesting the extra length of the light string. -
Clean up:
Once the ink is completely dry (give it a minute or two to prevent smudging), gently erase all visible pencil marks with your kneaded eraser.
Make it Sparkle
Once the watercolor is fully dry, use a white gel pen to add a sharp, bright dot or harsh ‘star’ shape on the highlight area of each bulb for extra shine.
Step 3: Adding the Color
-
Prepare your palette:
Mix three watery puddles of paint: a soft vintage red (or pink), a warm yellow-ochre, and a muted sage green. Keep the pigment load light; we want transparency. -
Paint the first color:
Dip your round brush into the red/pink wash. Randomly select about a third of the bulbs and fill them in. I like to leave a tiny sliver of white paper unpainted on one side of each bulb to represent a highlight. -
Apply the green:
Rinse your brush and switch to the sage green. Paint another scattering of bulbs, letting the color pool slightly at the bottom of the teardrop for a natural gradient. -
Finish with yellow:
Fill the remaining bulbs with yellow. This color naturally looks like glowing light, so it really brings the piece to life. -
Add a faint glow (optional):
If you want extra ambiance, take a very watered-down yellow and paint a loose, messy circle around the lit yellow bulbs, blending the edges into nothingness with clean water. -
Paint the sockets:
For the sockets, use a very diluted gray or simply let the black ink lines define them. If you prefer, a tiny touch of green wash over the wire and sockets ties it all together.
Now you have a charming strand of lights ready to brighten up your holiday greetings

PENCIL GUIDE
Understanding Pencil Grades from H to B
From first sketch to finished drawing — learn pencil grades, line control, and shading techniques.
Explore the Full Guide
Silent Night Sky With a Simple Moon
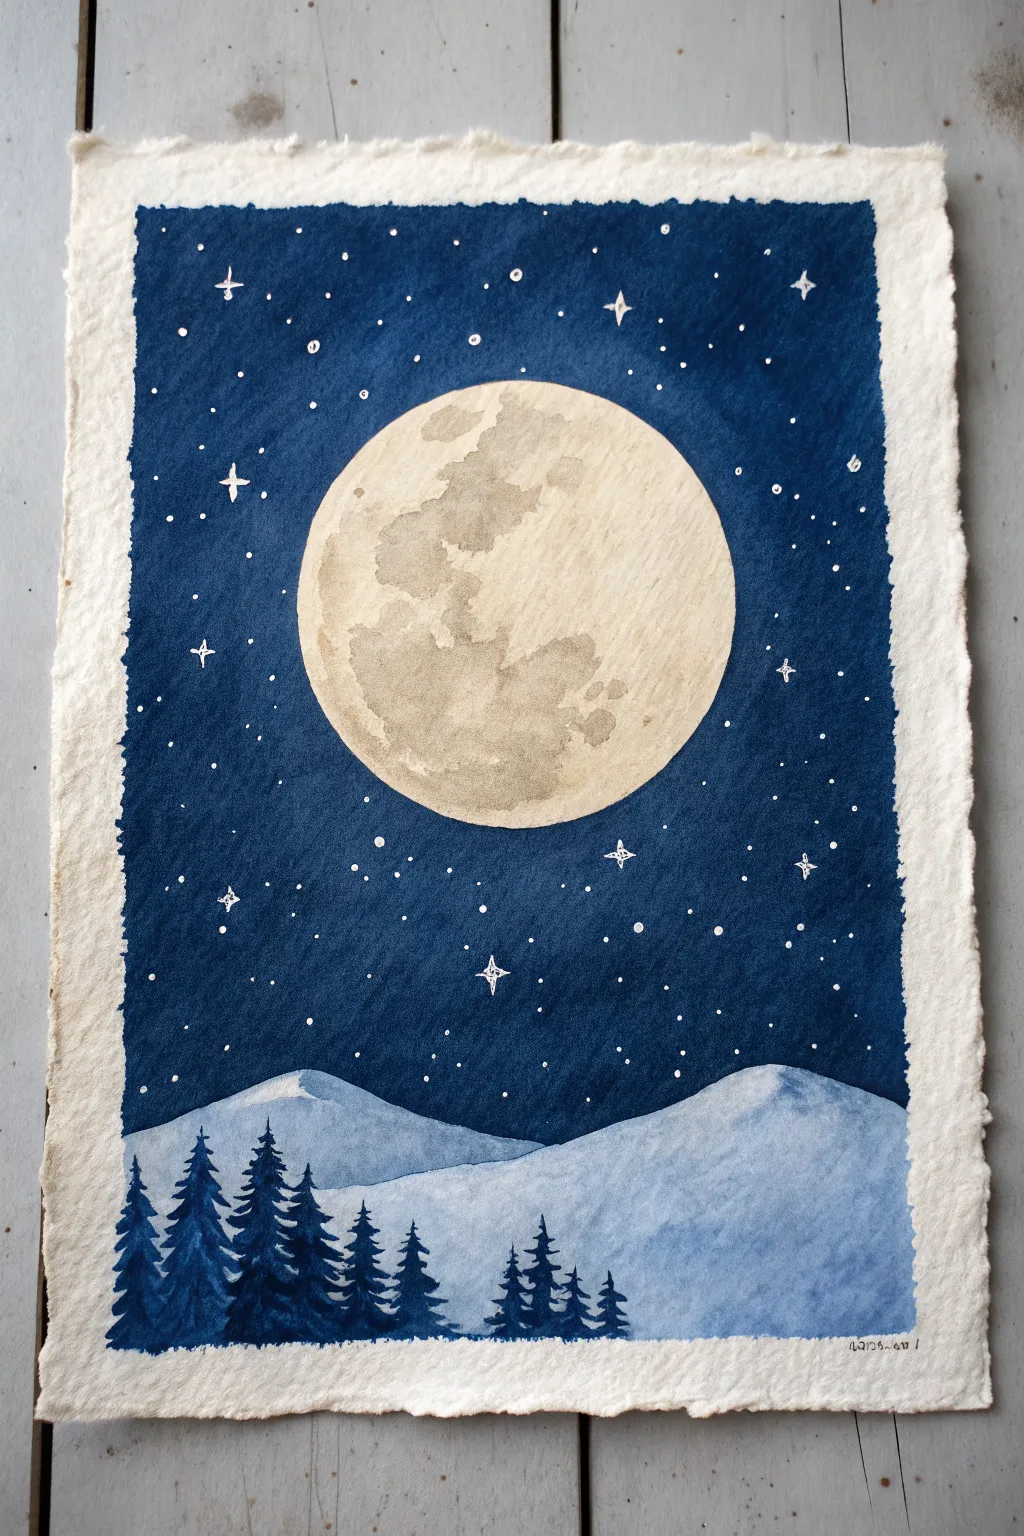
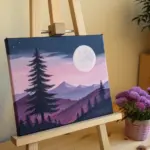
This serene watercolor painting captures the magic of a winter night with a bold, oversized moon glowing against a deep indigo sky. The contrast between the stark white, deckled-edge paper and the saturated blue creates a stunning, card-ready piece of art.
Step-by-Step Tutorial
Materials
- Cold press watercolor paper (deckled edge preferred)
- Masking tape
- Watercolor paints (Indigo, Prussian Blue, Payne’s Grey, Raw Umber)
- White Gouache or white gel pen
- Round brushes (sizes 2, 6, and 10)
- Pencil and circular object for tracing
- Jars of water
- Paper towels
Step 1: Planning and Sketching
-
Prepare the paper:
If your paper doesn’t have a natural deckled edge, you can carefully tear the edges against a ruler to create that rustic, torn look. Tape the paper down to your work surface, leaving about a half-inch border of white space around the edges to frame the scene. -
Outline the moon:
Place a circular object (like a masking tape roll or a glass rim) in the upper center of your paper. Trace it lightly with a pencil. This will be the focal point of your composition. -
Sketch the landscape:
Lightly draw two rolling hill shapes at the bottom third of the paper. Keep these lines faint as they will just be guides for your snowy mountains.
Uneven Sky?
If your large sky wash looks streaky, it likely dried too fast. Use a larger brush and pre-wet the paper slightly next time to help the pigment flow evenly.
Step 2: Painting the Sky and Moon
-
Mix the night sky color:
Create a deep, rich blue by mixing Indigo with a touch of Payne’s Grey. You want a very saturated, dark mixture for the night sky. -
Paint around the moon:
Using your size 6 brush, carefully paint the blue mixture around the pencil line of your moon. Be precise here to keep the moon perfectly round. -
Fill the sky:
Switch to your larger size 10 brush. Load it with the dark blue mix and fill in the rest of the sky area, stopping right at the line of your snowy mountains. The paint should appear solid and opaque. -
Let the sky dry:
Wait until the blue sky is completely bone dry. If you paint the moon too soon, the blue will bleed into it. -
Paint the moon base:
Dilute a tiny amount of Raw Umber or a warm grey with lots of water. Wash this pale color over the entire moon area. -
Add moon craters:
While the moon is still slightly damp, drop in slightly darker, uneven splotches of the grey-brown mix to create texture and craters. Concentrate these on the left side for a sense of dimension.
Make it Sparkle
For a magical winter effect, mix a tiny pinch of silver mica powder or iridescent medium into your white star paint. It catches the light beautifully.
Step 3: Creating the Snowy Landscape
-
Wash the mountains:
Mix a very diluted, pale blue wash using your sky color and lots of water. Paint the mountain shapes beneath the sky. -
Add snowy shadows:
Before the mountains dry completely, drop slightly darker blue pigment into the valleys and right sides of the hills to suggest shadows and form. Let this dry fully.
Step 4: Details: Trees and Stars
-
Mix the tree color:
Using your darkest blue (Indigo or Prussian Blue mixed with Payne’s Grey), create a thick, concentrated mixture. It should be much darker than the sky. -
Start the treelines:
With a size 2 brush, paint a vertical line for the trunk of your first tree. Start from the bottom edge and go up, but keep the trees below the horizon line of the mountains. -
Foliage technique:
Using the tip of the brush, make small dabbed strokes downward and outward from the trunk, getting wider as you move to the base. I like to keep these loose to mimic pine needles. -
Create a forest:
Repeat this process to create a cluster of trees on the left side and a smaller cluster on the right. Vary the heights to make them look natural. -
Add shining stars:
Once the sky is perfectly dry, use white gouache or a white gel pen to dot small stars throughout the blue area. -
Draw highlight stars:
Select 3 or 4 spots to draw larger, four-pointed stars (cross shapes) for extra sparkle. -
Final touches:
Carefully remove the tape to reveal the clean, deckled border.
Frame this peaceful winter scene or gift it as a handmade holiday card to someone special
Santa Sleigh Silhouette Over a Winter Moon
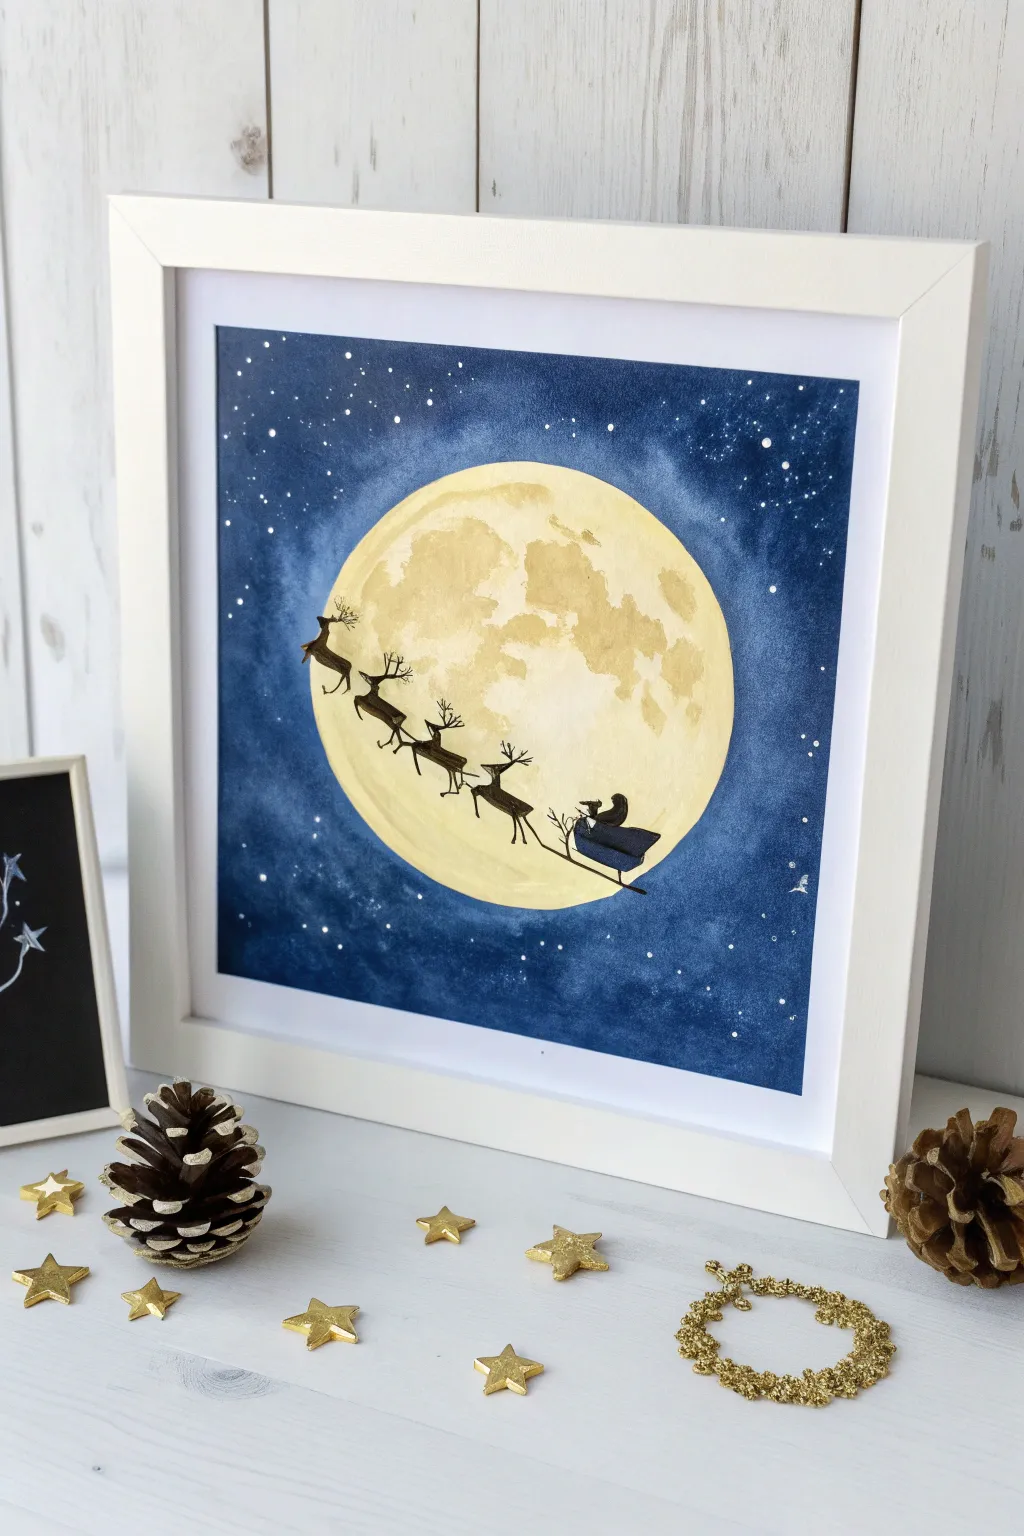
Capture the magic of Christmas Eve with this stunning watercolor and silhouette painting. By combining a bright, textured moon against a deep starry sky, you’ll create a striking backdrop for Santa’s iconic journey.
Step-by-Step
Materials
- Watercolor paper (cold press recommended for texture)
- Watercolor paints (Indigo, Payne’s Grey, Deep Blue, Yellow Ochre, Naples Yellow)
- White gouache or acrylic ink
- Fine liner pen (black) or black acrylic paint and very fine brush
- Round brushes (sizes 2, 6, and 12)
- Pencil and eraser
- Compass or a round object to trace
- Painter’s tape or masking fluid
- Palette for mixing
- Jar of clean water
Step 1: Planning and The Moon
-
Prepare the paper:
Begin by taping down your watercolor paper to a board or table on all four sides. This prevents the paper from buckling when it gets wet and creates a clean rectangular border. -
Outline the moon:
Use a compass or trace around a bowl to draw a large circle in the center of your paper. Keep your pencil lines very faint so they won’t show through the yellow paint later. -
Paint the moon base:
Using a size 6 brush, fill the circle with a wash of very pale yellow, like Naples Yellow or a watered-down Lemon Yellow. Keep it uneven and light. -
Add moon texture:
While the base is still slightly damp, drop in stronger patches of Yellow Ochre or Raw Sienna. Dab the pigment in specific areas to mimic craters and lunar maria (the dark spots on the moon). Let the water do the blending work naturally. -
Dry completely:
This step is crucial. Let the moon dry completely before moving on. I like to use a hairdryer on a low setting if I’m feeling impatient, but ensure it is bone dry. -
Mask the moon:
If you have liquid masking fluid, carefully paint over the entire dry moon to protect it. If not, you will simply need to paint carefully around the circle’s edge in the next phase.
Moon Texture Trick
While the yellow moon paint is wet, sprinkle a tiny pinch of table salt on it. Let it dry, then brush it off. This creates amazing crater-like textures.
Step 2: The Night Sky
-
Wet the background:
Using clean water and a large brush, wet the area outside the moon circle. This wet-on-wet technique allows the dark colors to blend smoothly. -
Apply the first layer:
Load a large brush with a mix of Indigo and Deep Blue. Start painting from the outer corners of the paper, working your way inward toward the moon. -
Deepen the cosmos:
While the paper is wet, drop in concentrated Payne’s Grey or Black in the corners to create a vignette effect. The sky should be lightest near the moon (creating a glow) and darkest at the edges. -
Create the glow:
Softly feather the blue paint as you get close to the moon’s edge. If you didn’t use masking fluid, be extremely careful here. A slightly lighter blue halo around the moon looks very realistic. -
Dry and remove mask:
Allow the background to dry completely. Once dry, gently rub off the masking fluid if you used it to reveal the bright moon beneath. -
Add stars:
Dip a toothbrush or a stiff brush into white gouache or acrylic ink. Tap or flick the brush over the painting to create a spray of stars. Focus more stars in the darker corners and fewer over the bright moon.
Add Some Magic
Mix a tiny amount of gold mica powder or metallic watercolor into the yellow moon paint for a subtle shimmer that catches the holiday lights.
Step 3: The Silhouette Detail
-
Draft the silhouette:
Lightly sketch the path of Santa’s sleigh diagonal across the moon. You only need a rough guideline for positioning the reindeer and sleigh. -
Paint the sleigh:
Using a very fine liner brush and black acrylic paint (or a waterproof ink pen), draw the sleigh shape first at the bottom right of the diagonal line. Keep it solid black. -
Add the reindeer:
Paint the reindeer moving upwards. Start with the bodies as simple oval shapes, then add the legs in motion. Notice how the legs stretch out to imply speed. -
Refine the antlers:
Switch to your thinnest brush or pen tip. Carefully draw the branching antlers on each reindeer. These tiny details are what make the silhouette readable. -
Connect the team:
Draw very thin lines connecting the reindeer to each other and back to the sleigh to represent the reins and harness. -
Final touches:
Add a few larger white dots by hand for prominent stars, or perhaps a tiny glint on the sleigh runner if you wish. Frame once fully dry.
Now you have a magical winter scene ready to be framed or gifted to someone special


Snowy Pine Branch With Two Easy Colors
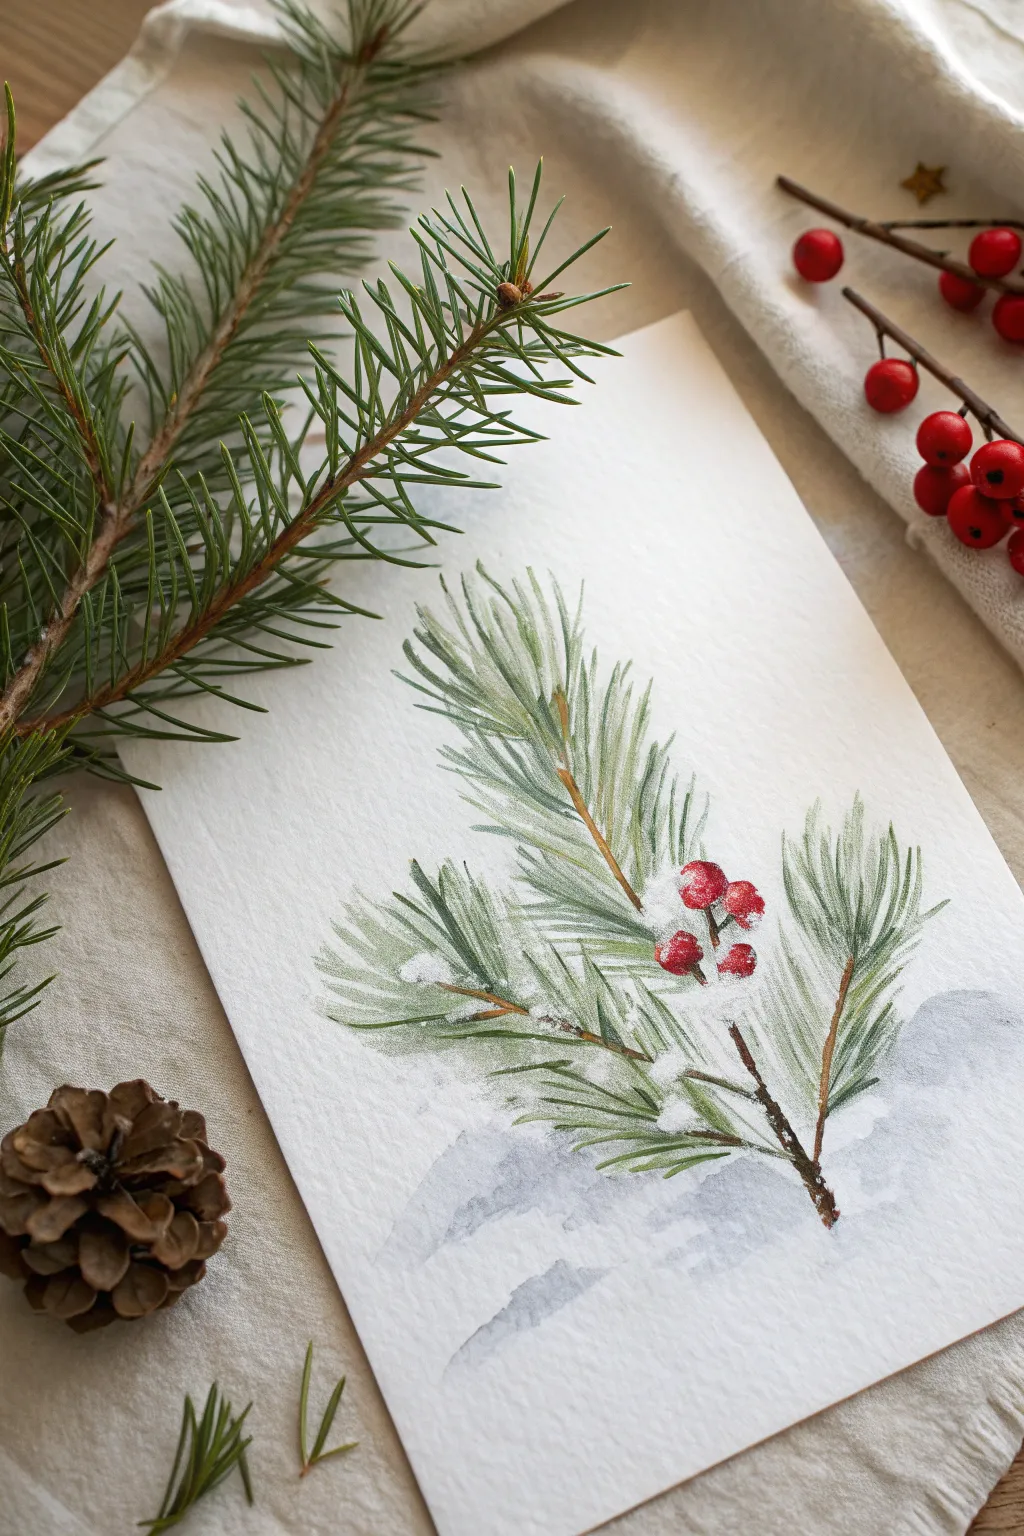
Capture the delicate frost of a winter morning with this simple yet elegant watercolor pine branch. Using a limited palette, you’ll learn to create soft shadows and crisp needles for a festive card or wall art.
Step-by-Step Guide
Materials
- Cold Press watercolor paper (300 gsm)
- Round watercolor brush (size 4 or 6)
- Small detail brush (size 0 or 1)
- Green watercolor paint (Sap Green or Olive Green mixed with a touch of blue)
- Red watercolor paint (Alizarin Crimson)
- Brown watercolor paint (Burnt Umber)
- Indigo or Paynes Gray for shadows
- Gouache or White acrylic paint for snow
- Pencil (HB)
- Two jars of water
- Paper towels
Step 1: Sketching and Shadows
-
Light Outline:
Begin by lightly sketching the main stem of the pine branch diagonally across your paper. Add faint lines indicating the general direction of the three main clusters of needles, but keep the pencil marks very subtle so they disappear later. -
Base Shadows:
Mix a very watery wash of Indigo or Paynes Gray. This will serve as the soft snowy shadow at the bottom of the compostion. -
Soft Wash:
Apply the grey wash loosely near the bottom where the branch ends, using irregular, jagged strokes to mimic the shape of drift snow. Let the edges fade out into clean water for a soft, dreamy look. -
Allow to Dry:
Let this shadow layer dry completely before moving on to the main branch to prevent the colors from bleeding into the background.
Needle Tip
For the crispest pine needles, always ensure your paint mixture is more pigment than water. If it’s too watery, the needles will look like indistinct blobs.
Step 2: Main Branch Structure
-
Painting the Stem:
Load your small detail brush with Burnt Umber. Paint the central stem using broken, textured strokes rather than a single solid line. -
Adding Texture:
While the brown is still slightly damp, drop in a tiny bit of darker brown or black in the nooks where the smaller branches split off to add depth. -
Needle Base Color:
Mix your Sap Green with a tiny touch of blue to get a cool, wintery forest green. Use your round brush (size 4 or 6) for this step. -
First Needle Layer:
Starting from the stem, flick your brush outward to create the needles. Use quick, confident strokes—press down at the base and lift up quickly at the tip to get a tapered point. -
Varying Density:
Group these needles in clusters. I find it helpful to leave some gaps between the clusters to keep the branch looking airy and not too heavy. -
Building Volume:
Once the first layer of green is dry, mix a slightly darker, more concentrated green. Paint a second layer of needles over the first, focusing on the areas closest to the brown stem to create volume.
Oops, too dark?
If your shadow layer looks too dark, quickly dab it with a clean paper towel while it’s still wet to lift the pigment and soften the look.
Step 3: Berries and Snow
-
Berry Placement:
Using your Alizarin Crimson, paint small, round clusters of berries near the junction of the branches. Keep them grouped in twos or threes. -
Berry Highlights:
Leave a tiny speck of white paper showing on the top left of each berry to represent a shine, or lift the color out with a dry brush while wet. -
Creating Snow:
Once the green and red layers are totally dry, squeeze out a bit of white gouache or acrylic paint. You want a thick, creamy consistency, not too watery. -
Snowy Clumps:
Dab the white paint onto the tops of the needle clusters and on top of the red berries. Think about where gravity would make snow settle naturally. -
Dry Brushing Frost:
Wipe most of the white paint off your brush until it’s nearly dry. Lightly drag the brush over the tips of the needles to create a frosty, dusted effect. -
Final White Splatters:
Dilute a small amount of white paint with water. Tap your brush handle against another brush over the painting to sprinkle tiny white dots across the image for falling snow.
Now you have a serene winter botanical illustration ready to frame or gift
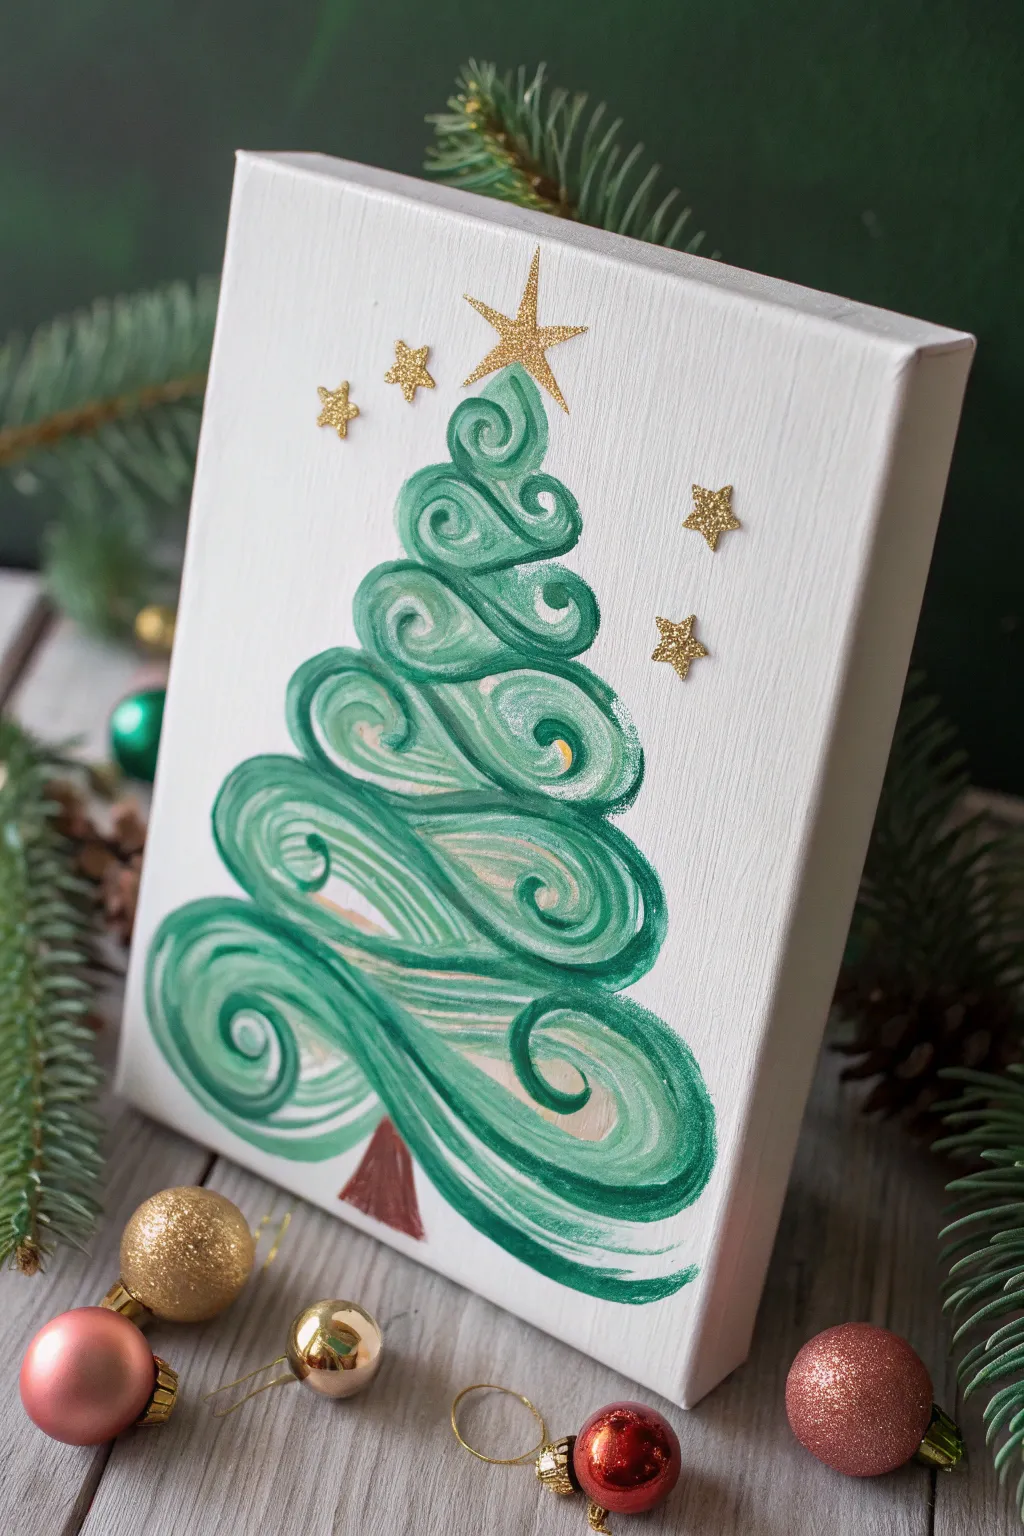
Abstract Christmas Tree Made From Swirly Brushstrokes

Capture the whimsy of the season with this elegantly simple abstract Christmas tree painting. Using fluid, swirling brushstrokes and a touch of gold sparkle, you’ll create a modern festive piece that looks far more complex than it actually is.
Detailed Instructions
Materials
- Small stretched canvas (rectangle or square)
- Acrylic paint (Deep Green, Light Green, White, Brown)
- Medium round brush (size 6 or 8)
- Small flat brush (for the trunk)
- Gold glitter cardstock or foam sheet
- Scissors
- Craft glue or hot glue gun
- Palette or paper plate
- Cup of water and paper towels
Step 1: Preparing the Palette
-
Base Prep:
Start with a clean, white stretched canvas; if your canvas isn’t primed, give it a quick coat of white acrylic paint and let it dry completely to ensure a smooth surface for your swirls. -
Load Your Brush:
Squeeze out your deep green, light green, and a touch of white paint onto your palette, keeping them somewhat separate but close enough to mix. -
Double Loading:
Dip your round brush into the deep green, then immediately dip the tip into the light green or white without rinsing; this ‘double loading’ technique creates those beautiful natural variegations in the strokes.
Brush control tip
For perfect spirals, use your whole arm to move the brush, not just your wrist. This creates fluid, confident curves rather than shaky, jagged lines.
Step 2: Painting the Tree Swirls
-
First Top Swirl:
Starting near the top center of the canvas, place your brush tip down and paint a small, tight clockwise spiral to form the very peak of the tree. -
Second Tier:
Just below the peak, paint a slightly larger swirl; start from the left, curve down and to the right, ending with a little curl upward. -
Continuing Down:
Reload your brush with multiple greens for every new stroke to keep the colors fresh and distinct. -
Widening the Shape:
Move down to the next tier, making the swirls wider than the ones above; think of painting a loose, lying-down ‘S’ shape that curls in on itself at the ends. -
Building Volume:
As you reach the middle of the tree, overlap your strokes slightly with the layer above to avoid large white gaps, ensuring the tree looks full. -
Adding Highlights:
If a section looks too dark, pick up a tiny bit of white on your dirty brush and add a quick, confident swoosh over the wet green to create a highlight. -
The Bottom Tier:
Create the widest branches at the bottom by making large, sweeping curves that extend almost to the edges of the canvas, curling the ends into distinct spirals. -
Smoothing Ends:
Check the ends of your swirls; if the paint looks thin or scratchy, dab a little extra paint on the tip of the swirl to make it round and opaque. -
Painting the Trunk:
Switch to your small flat brush and pick up the brown paint. -
Anchoring the Tree:
Paint a simple, small triangle or rectangle at the very bottom center of your green swirls to represent the trunk. -
Drying Time:
Allow the painting to dry completely; because the swirls might be thick with paint, give it at least 20-30 minutes.
Add dimension
Once the green paint is dry, use a thin liner brush with metallic gold paint to outline just the top edge of a few swirls for an extra pop of elegance.
Step 3: Adding the Sparkle
-
Cutting Stars:
While the paint dries, take your gold glitter cardstock and cut out one main star for the topper and three or four smaller stars for the background. -
Pre-arranging:
Lay the stars onto the dry canvas to play with the composition before gluing; I usually place the largest star right at the tip of the top swirl. -
Gluing the Topper:
Apply a small dot of glue to the back of the large star and press it firmly onto the top of the tree. -
Scattered Stars:
Glue the smaller stars around the upper empty space of the canvas to mimic a starry night sky. -
Final Inspection:
Check for any loose glitter or glue strings and gently brush them away once everything is set.
Display your shimmering swirled tree on a mantel or shelf to add a sophisticated handmade touch to your holiday decor


Have a question or want to share your own experience? I'd love to hear from you in the comments below!