Whenever I need instant holiday cheer, I reach for my brushes and start collecting Christmas painting ideas that feel cozy, bright, and totally doable. Below are my go-to subjects—starting with the classic Christmas icons and ending with a few artsy twists that still feel unmistakably Christmas.
Snowy Pines at Sunset
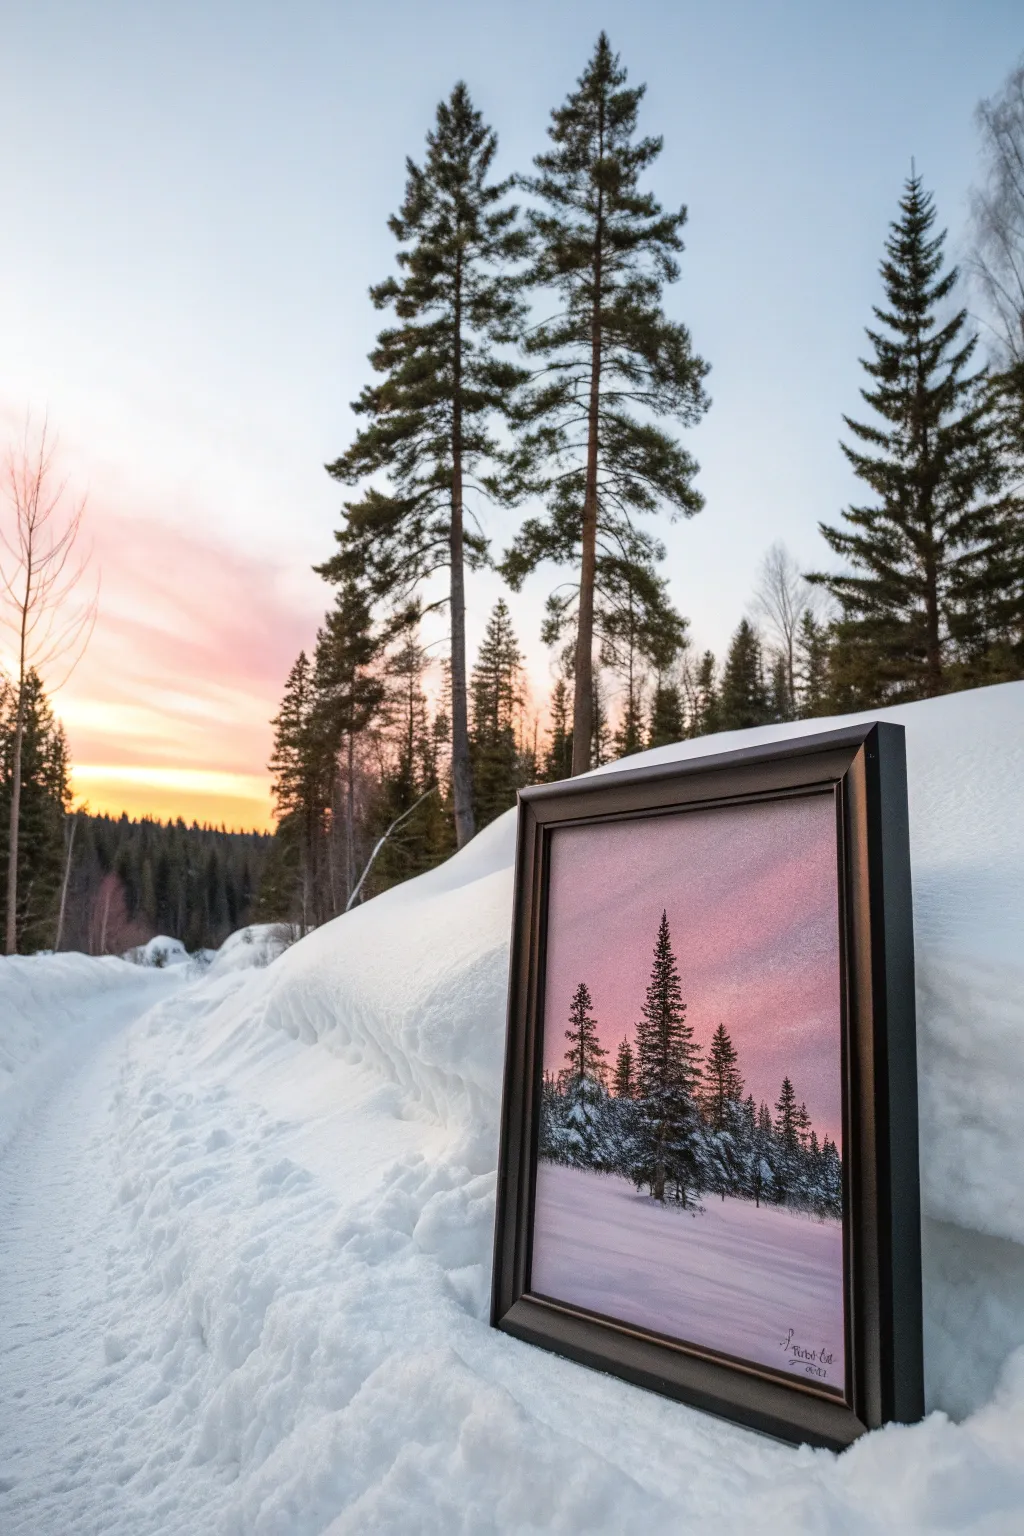
Capture the serene beauty of twilight in a snowy forest with this atmospheric acrylic painting. You’ll learn to blend soft pinks into purples for a gradient sky and layer dark, textured pines over a crisp white landscape.
Step-by-Step Tutorial
Materials
- Canvas panel (11×14 or similar)
- Acrylic paints: Titanium White, Mars Black, Magenta (or Alizarin Crimson), Dioxazine Purple, Ultramarine Blue, Cadmium Orange
- Flat shader brushes (1 inch, 1/2 inch)
- Fan brush or small flat brush (for trees)
- Small round detail brush
- Palette knife
- Cup of water and paper towels
- Easel or flat working surface
Step 1: Painting the Sunset Sky
-
Prepare the gradient palette:
Begin by squeezing out generous amounts of white, magenta, purple, and a touch of orange. You want to execute the sky while the paint is wet to get smooth blends, so have everything ready. -
Apply the horizon glow:
Mix white with a tiny dot of orange and magenta to barely tint it pink. Using your large flat brush, paint a horizontal strip across the canvas about one-third of the way up from the bottom. This band represents the brightest part of the sunset just behind the trees. -
Transition to mid-tones:
Without cleaning your brush, pick up more magenta and a touch of white. Paint horizontal strokes immediately above your pale horizon line, blending the two sections together where they meet. -
Deepen the upper sky:
Mix purple with a bit of magenta. Apply this to the top third of the canvas. Use long, sweeping horizontal strokes to pull this darker color down into the pink mid-tones, creating a seamless ombre effect from deep violet at the top to pale peach-pink at the horizon. I like to keep stroking horizontally until brush marks disappear. -
Let the sky cure:
Allow the background to dry completely. If the paint is still wet when you start the trees, the sharp dark colors will become muddy.
Step 2: Planting the Pines
-
Mix the tree color:
Instead of pure black, mix Mars Black with a little Dioxazine Purple or Green. This creates a rich, deep hue that feels more natural against the sunset. -
Mark the center tree:
Using the edge of a flat brush or a round brush, paint a thin, straight vertical line for the trunk of the tallest central tree. It should start below the horizon line and extend well into the pink sky. -
Build the tree structure:
Switch to a fan brush or use the corner of a flat brush. Start at the top of your trunk line. Tap gently with just the corner to create tiny top branches. -
Fill out the branches:
Work your way down the tree in a zigzag motion, tapping the brush horizontally. Press slightly harder as you go lower to make the branches wider and denser. -
Add companion trees:
Repeat this process for the surrounding trees. Vary their heights and widths; place some slightly behind others to create depth. Make the trees on the far edges slightly smaller or sparser to keep focus on the center. -
Anchor the trees:
Ensure the bottom of the trees connect solidly with the ground area. Simply extend the dark bristly texture slightly into the white area you left blank at the bottom.
Muddy Sky Fix
If your sky colors turn brown while blending, stop! Let the layer dry completely, then paint a fresh layer over it. Acrylics act like an eraser when you paint over them dry.
Step 3: Snow and Shadows
-
Base coat the snow:
Paint the bottom third of the canvas with Titanium White. While wet, brush slightly upward into the base of the trees to make them look like they are sitting in deep snow. -
Mix shadow color:
Create a wash of very light purple-blue. It should be mostly water or glazing medium with just a hint of pigment. -
Cast soft shadows:
Gently glide this shadow color horizontally across the snow, particularly at the base of the tree line. Smoothness is key here to replicate the soft texture of undisturbed snow. -
Highlight the branches:
Using a clean, small brush or palette knife with pure Titanium White, gently tap highlights onto the top edges of the dark tree branches. Don’t cover the whole tree; just enough to show snow resting on the boughs. -
Final touches:
Add a few extra bright white strokes in the foreground snow to suggest drifts or banks. Sign your name in the corner in a color that matches the trees.
Sparkle Finish
Once the painting is totally dry, mix a tiny bit of iridescent glitter medium into a clear gloss varnish and brush it over the snow areas for a magical, frosty shimmer.
Place your finished piece in a dark frame to make those pink sunset hues truly pop


Santa Sleigh Moon Silhouette
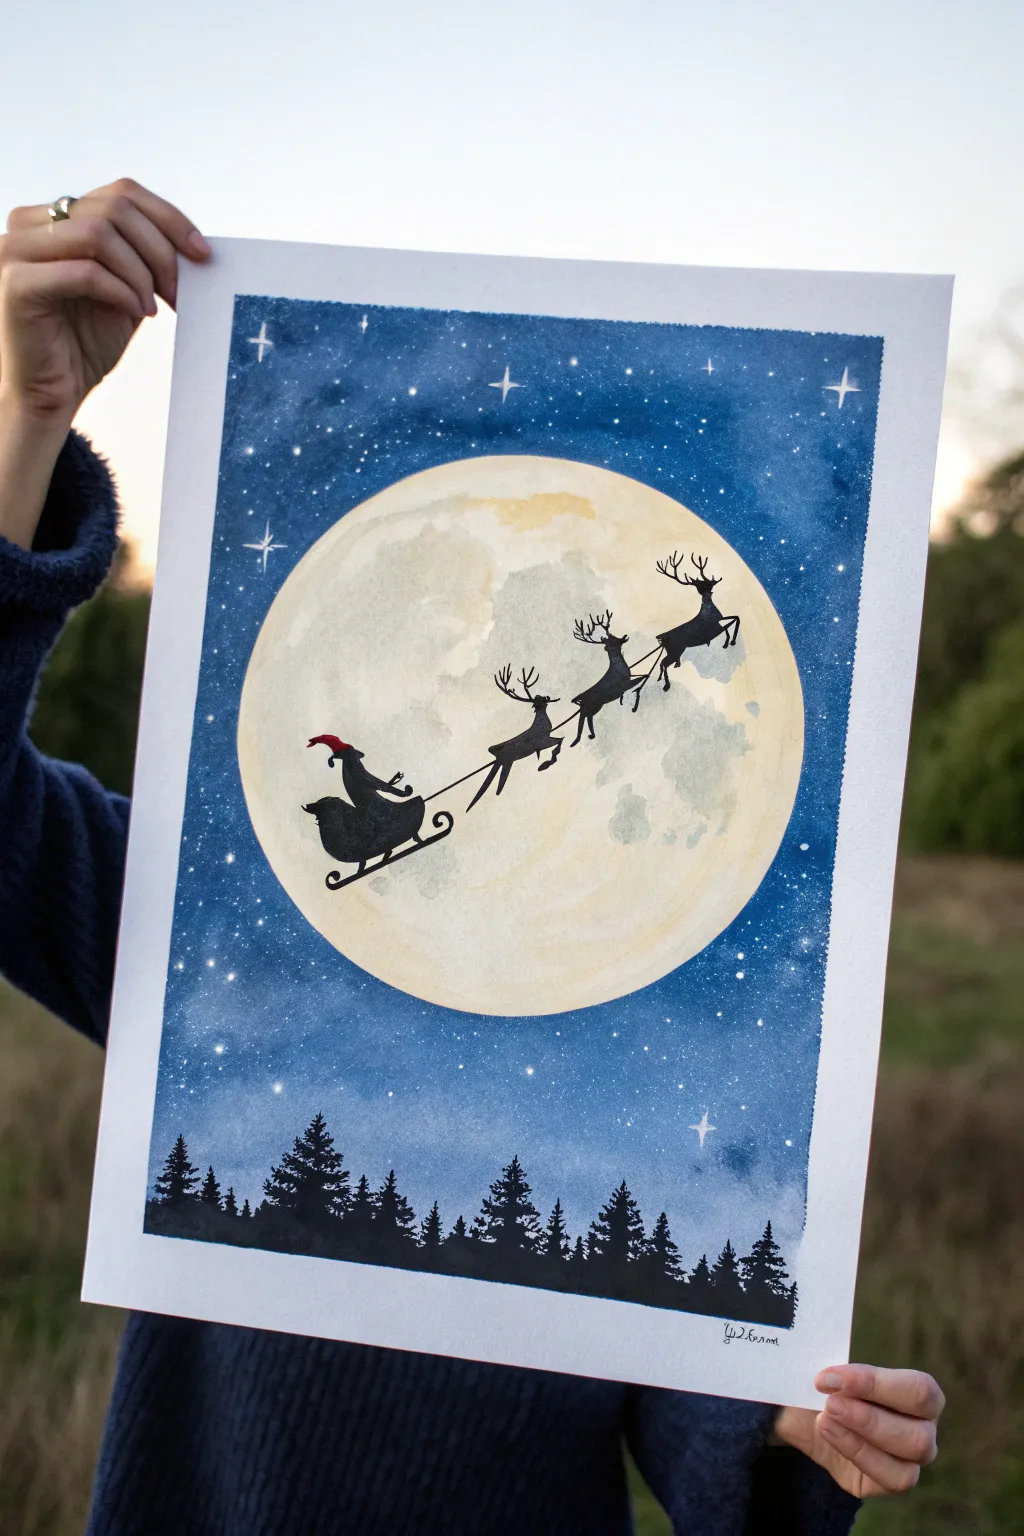
Capture the magic of Christmas Eve with this striking silhouette painting. By combining soft watercolor textures for the moon with crisp black details against a starry sky, you’ll create a dramatic scene that looks far more complex than it actually is.
How-To Guide
Materials
- High-quality watercolor paper (cold press, 300 gsm)
- Masking tape
- Large circular object (plate or bowl) or compass
- Watercolor paints (Indigo, Payne’s Gray, Prussian Blue, Yellow Ochre, Burnt Sienna)
- Black gouache or acrylic paint
- White gouache or white gel pen
- Pencil and eraser
- Round brushes (sizes 2, 6, and 10)
- Fine liner brush or detail brush
- Red paint or marker (tiny amount)
Step 1: Setting the Scene
-
Prepare the canvas:
Begin by taping down all four edges of your watercolor paper to a hard board using masking tape. This creates a clean white border and prevents the paper from buckling when wet. -
Map the moon:
Place your circular object or use a compass to draw a large circle in the center of the paper. Press very lightly with your pencil so the lines won’t show through the paint later. -
Outline the silhoettes:
Lightly sketch the path of the sleigh and reindeer diagonally across the moon. You don’t need perfect detail yet, just the general shapes and flowing movement. Also, mark a rough horizon line near the bottom for the trees.
Moon Texture Trick
Make the moon look realistic by lifting out pigment with a crumpled tissue while the paint is still wet. This creates soft cloud-like craters.
Step 2: Painting the Moon
-
Wet the circle:
Using clean water and a large round brush, wet only the inside of your moon circle. Be careful not to go over the pencil line into the sky area. -
Base glow:
Drop in a very watery mix of Yellow Ochre or a pale cream color. Let it bloom naturally on the wet paper for a soft, atmospheric glow. -
Add texture:
While the paper is still damp, dab in small touches of diluted Burnt Sienna or light gray to create the craters and shadows of the moon. Keep the edges soft and uneven. -
Dry completely:
This is crucial. Let the moon dry 100% before moving on. I like to use a hairdryer on a low setting to speed this up, ensuring the paper is bone dry to the touch.
Uneven Sky Color?
If your blue sky dries with weird lines (backruns), don’t panic. Gently re-wet the area with a damp brush and blend, or embrace it as cloud texture.
Step 3: The Night Sky
-
Wet the sky:
Once the moon is preserved and dry, wet the sky area around the circle with clean water. Work carefully right up to the moon’s edge without touching it. -
Deepen the blue:
Start dropping in your dark blues—Indigo and Prussian Blue. Make the color most intense at the top corners and edges, fading slightly lighter as you get closer to the moon to simulate its glow. -
Create stars:
While the sky paint is still wet, spritz a few tiny drops of clean water onto the blue to create blooming ‘star’ textures. Alternatively, wait until dry and splatter white gouache for sharper stars. -
Adding sparkle:
Use a white gel pen or a fine brush with white gouache to paint specific four-pointed stars in the darker areas of the sky for a magical twinkle.
Step 4: Silhouettes
-
Paint the forest:
Load your brush with solid black gouache or acrylic. Paint the treeline at the bottom, using vertical dabbing motions to create the jagged tops of pine trees. -
Vary tree heights:
Ensure your trees aren’t all the same height. Make some tall and sparse, others shorter and dense, to create a realistic forest profile. -
Outline the sleigh:
Switch to your smallest detail brush. Carefully paint the silhouette of the sleigh and Santa inside the moon area. Keep the edges crisp. -
Reindeer in flight:
Paint the reindeer shapes moving upwards. Focus on the legs—some extended, some bent—to convey the motion of galloping through the air. -
Connecting the team:
Use the very tip of your fine liner brush to draw thin lines connecting the reindeer to the sleigh and to each other. -
Final festive touch:
Once the black paint is dry, use a tiny dot of red paint or a marker to add Santa’s hat detail for a pop of color. -
The reveal:
Gently peel away the masking tape at a 45-degree angle to reveal your crisp white borders.
Frame your silhouette piece and enjoy the magical atmosphere it brings to your holiday decor


Friendly Snowman Portrait
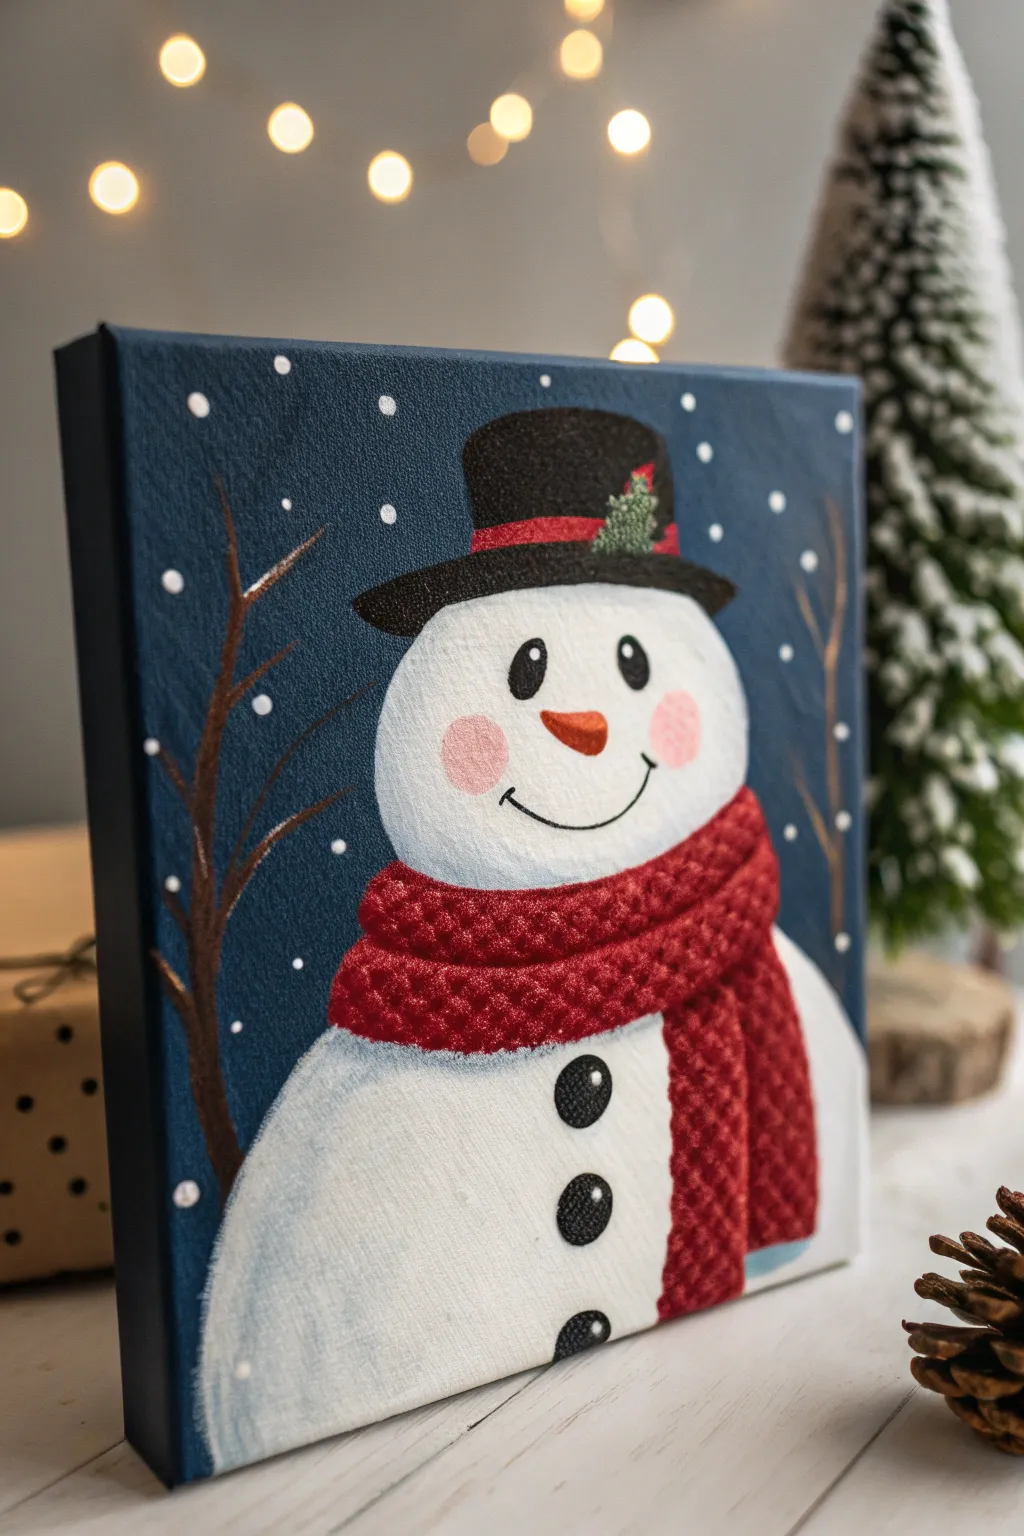
This charming snowman portrait captures the warmth of the season with his friendly smile and textured red scarf. Set against a deep, snowy night sky, this acrylic painting makes perfect holiday decor or a heartfelt handmade gift.
Detailed Instructions
Materials
- Square stretched canvas (8×8 or 10×10 inches)
- Acrylic paints: Titanium White, Mars Black, Navy Blue, Phthalo Blue, Cadmium Red, Burnt Umber, Cadmium Orange
- Flat brushes (large and medium)
- Round brushes (small and fine detail)
- Mixing palette
- Water cup and paper towels
- Pencil for sketching
- Tracing paper (optional)
Step 1: Setting the Scene
-
Prepare the Background:
Mix a deep, rich navy color using Navy Blue and a touch of Mars Black. Using your large flat brush, paint the entire canvas surface. Don’t forget to paint the sides of the canvas for a polished, gallery-wrapped look. -
Add Texture:
While the blue paint is still slightly wet, you can dab a clean, dry brush randomly across the surface to create subtle texture, or simply let it dry completely for a smooth night sky. -
Sketch the Snowman:
Once the background is fully dry, lightly sketch the snowman’s outline with a pencil. Draw a large oval for the head and a rounded shoulder shape for the body below. Add the rectangular shape for the top hat perched on his head.
Fixing Opacity Issues
Is the blue showing through the white paint? Don’t overload your brush to compensate. Instead, paint thin layers and let them dry fully between coats for a solid, bright white.
Step 2: Building the Snowman
-
Base Coat White:
Using a medium flat brush and Titanium White, fill in the snowman’s head and body. You will likely need two coats to ensure the dark blue background doesn’t show through. -
Paint the Hat:
Switch to Mars Black and fill in the hat shape. Use a steady hand to create a crisp brim line that slightly overlaps the snowman’s white head. Let this dry completely. -
Create Shadows:
Mix a very pale grey-blue using a tiny dot of your background blue into a lot of white. Paint a curved shadow on the left side of the snowman’s face and body to give him a 3D rounded appearance.
Level Up: Glitter Snow
Once the painting is totally dry, apply a layer of clear glitter glaze or Mod Podge mixed with iridescent glitter over the white areas of the snowman for a magical frosted effect.
Step 3: The Cozy Scarf
-
Outline the Scarf:
Sketch or paint the basic shape of the scarf wrapping around the neck and draping down the right side of the body. Paint the base layer with a solid coat of Cadmium Red. -
Add Knit Texture:
Mix a slightly darker red (add a touch of black or blue to your red). Using a small round brush, paint rows of tiny ‘V’ shapes or small dots across the scarf to mimic a knitted wool texture. I find working in horizontal rows helps keep the pattern consistent. -
Highlight the Weave:
Mix a lighter red (add a touch of white or orange). Add tiny highlights to the tops of your ‘V’ shapes or texture bumps to make the scarf look chunky and soft.
Step 4: Face and Details
-
Rosy Cheeks:
Mix a very watery, pale pink using red and white. Gently dab circular flushed cheeks onto the face while the white base is fully dry. You can smudge the edges with your finger to soften them. -
The Carrot Nose:
Paint a small, triangular carrot nose using Cadmium Orange. Add a tiny line of white on top for a highlight and a touch of brown on the bottom for shadow. -
Eyes and Mouth:
With your fine detail brush and Mars Black, paint two oval eyes and a curved line for the smile. Add small ‘tick’ marks at the ends of the smile for extra character. -
Hat Details:
Paint a red band across the hat. For the evergreen sprig, use a small brush to dab tiny dots of green (mix yellow and blue) in a triangular cluster, adding a few red dots for berries if desired. -
Buttons:
Paint three round black buttons down the center of the chest. Add four tiny white dots in the center of each to look like thread holes, and a small white highlight on the top edge of each button.
Step 5: Finishing Touches
-
Winter Branches:
Using thin Burnt Umber paint and a liner brush, paint delicate, spindly tree branches rising from the bottom left and right sides. Keep the lines shaky and organic. -
Falling Snow:
It’s time for snow! Dip the handle end of a paintbrush into Titanium White and dot snow all over the background. Vary the pressure to create different snowflake sizes. -
Hat Brim Snow:
Add a thin line of white specifically on the top of the hat brim and the very top of the hat to show where fresh snow has settled. -
Eye Sparkle:
Place a tiny white dot in the upper right corner of each black eye. This brings the character to life instantly.
Step back and admire your new frosty friend ready to brighten your home


Poinsettias and Pine Sprigs
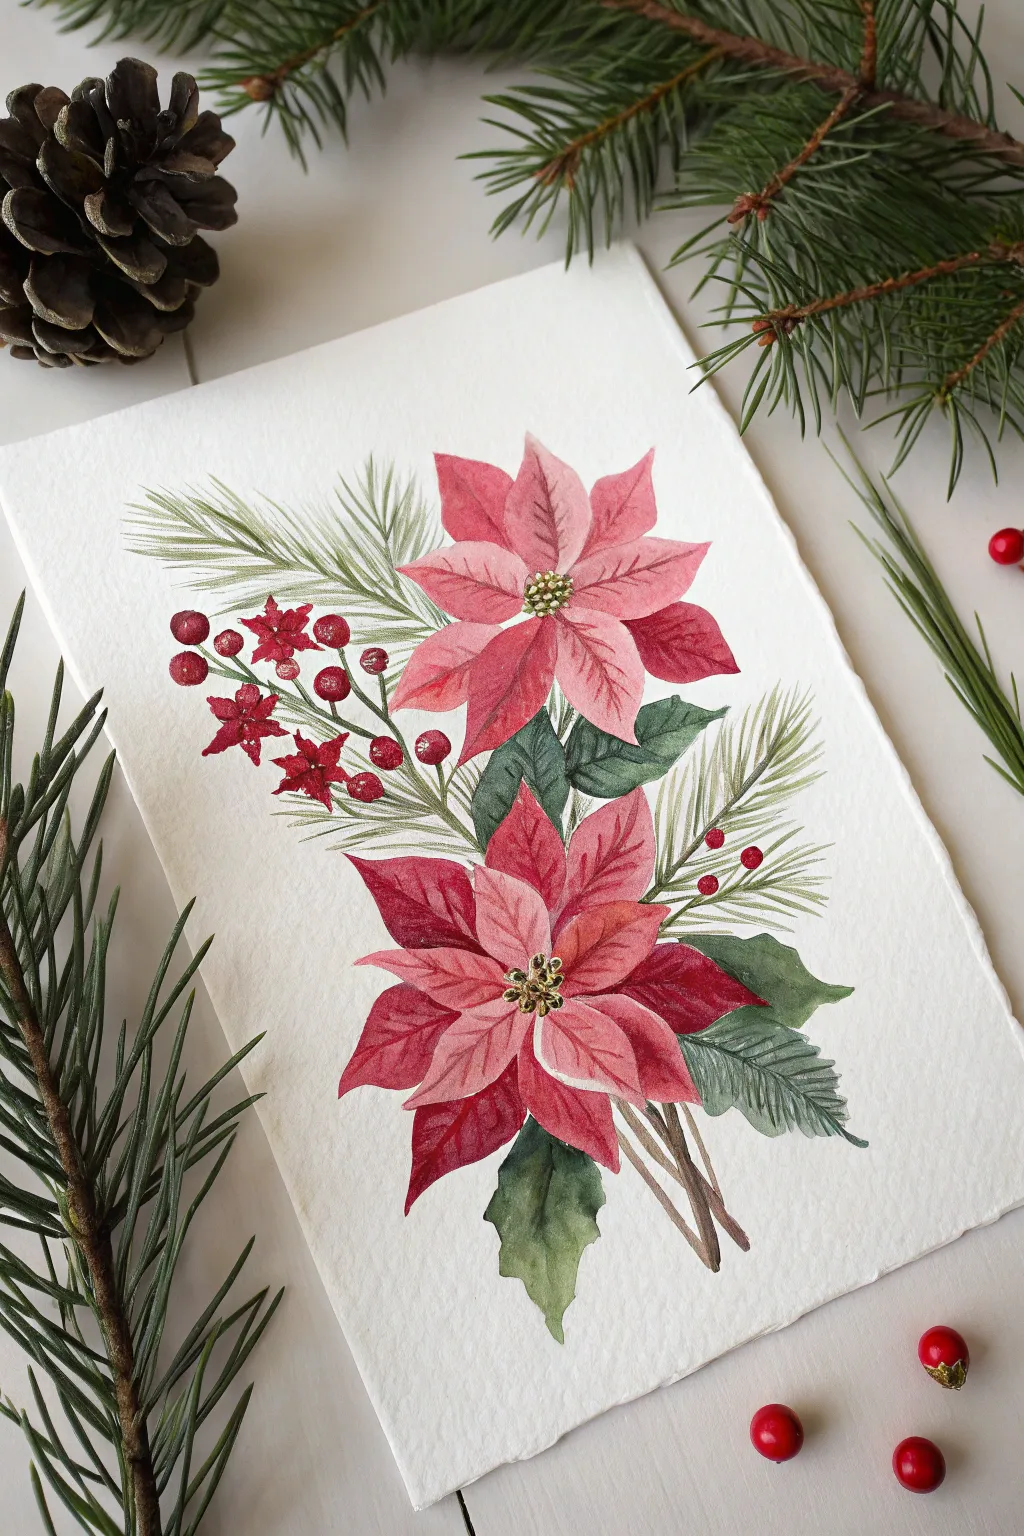
Capture the delicate beauty of the season with this elegant watercolor study featuring soft pink poinsettias nestled among pine sprigs. The textured paper and loose, watery layers give this piece a timeless, botanical illustration feel perfect for holiday cards.
How-To Guide
Materials
- Cold-press watercolor paper (300 gsm)
- Watercolor paints (Alizarin Crimson, Sap Green, Burnt Umber, Yellow Ochre, Opera Pink or Rose Madder)
- Round watercolor brushes (sizes 2, 6, and 8)
- Fine liner brush (size 0 or 00)
- Pencil (HB or 2H) and kneaded eraser
- Two jars of water
- Paper towels
- Gold gouache or metallic watercolor (optional)
Step 1: Sketching the Composition
-
Map out the flowers:
Begin by lightly sketching the two main poinsettia blooms. Place the top flower slightly to the right of center and the bottom flower lower and to the left. Draw the star-shaped centers first, then radiate the bracts (petals) outward in imperfect, leafy shapes. -
Add foliage guidelines:
Sketch long, sweeping curves extending from behind the flowers to indicate where the pine branches will flow. Add rough outlines for the broad green leaves tucked beneath the petals and a small cluster of berries on the left side. -
Refine and lighten:
Once your composition is set, use your kneaded eraser to lift most of the graphite, leaving only the faintest ghost of an outline so the pencil doesn’t show through the transparent paint.
Pro Tip: Edges
Leave hairline gaps of white paper between adjacent wet shapes (like petals) to prevent colors from merging into a single blob. This ‘white line’ technique defines forms without outlines.
Step 2: Painting the Poinsettias
-
First wash of petals:
Mix a watery wash of Opera Pink with a touch of Alizarin Crimson. Using your size 6 brush, paint the petals of the top flower. Leave tiny slivers of white paper between petals to define their edges naturally without harsh lines. -
Deepening the tones:
While the first layer is still slightly damp, drop a more concentrated red mix into the center of the petals and let it bleed outward. This creates a soft gradient that mimics the natural pigmentation of the bracts. -
Painting the lower bloom:
Repeat the process for the bottom poinsettia. This flower appears slightly darker, so use a higher ratio of Alizarin Crimson. I like to let the edges be a bit irregular to capture that papery texture poinsettias have. -
Adding petal veins:
Once the base layers are completely bone-dry, switch to a size 2 brush. Mix a semi-transparent darker red and carefully paint fine central veins on each petal, feathering them out slightly.
Step 3: Painting the Greenery
-
Base leaves:
Mix Sap Green with a touch of Burnt Umber to dull the color. Paint the broad leaves tucking under the red flowers. Use a wet-on-dry technique here to get crisp edges that contrast with the softer petals. -
Pine sprigs texture:
For the pine needles, use a thin liner brush or the tip of your size 2 brush. Load it with a watery green mix (Sap Green + a tiny bit of blue). Paint swift, flicking strokes outward from the stem lines you sketched earlier. -
Needle density:
Go back over the pine sprigs with a darker, thicker green mixture, adding a second layer of needles. This builds volume and makes the branches look fluffy rather than flat. -
Layering warmth:
Glaze a very pale yellow ochre wash over the pine needles in just a few spots once they are dry. This adds a hint of sunlight and warmth to the cool greens.
Level Up: Snow Effect
Load a toothbrush with opaque white gouache and gently flick it over the dried painting to create a subtle falling snow effect on your pine branches.
Step 4: Details & Berries
-
Berry clusters:
Paint the small round berries on the left sprig using a rich, concentrated red. Leave a tiny dot of white paper on the upper left of each berry to represent a highlight. -
Connecting stems:
Using a mix of Burnt Umber and a touch of red, paint the thin woody stems that connect the berries and the flowers. Keep these lines fine and slightly shaky for a natural look. -
Flower centers:
Paint the tiny cyathia (the true flowers in the center) with dots of Yellow Ochre and Green. If you have gold watercolor, adding small specks here gives a festive shimmer. -
Final shadows:
Mix a deep maroon-purple. Carefully paint into the deepest crevices where the petals meet the center and where leaves overlap. This final step adds the necessary contrast to make the image pop.
Allow your festive botanical study to dry completely before framing it or turning it into a beautiful handmade holiday card
BRUSH GUIDE
The Right Brush for Every Stroke
From clean lines to bold texture — master brush choice, stroke control, and essential techniques.
Explore the Full Guide
Candy Canes and Peppermint Pattern
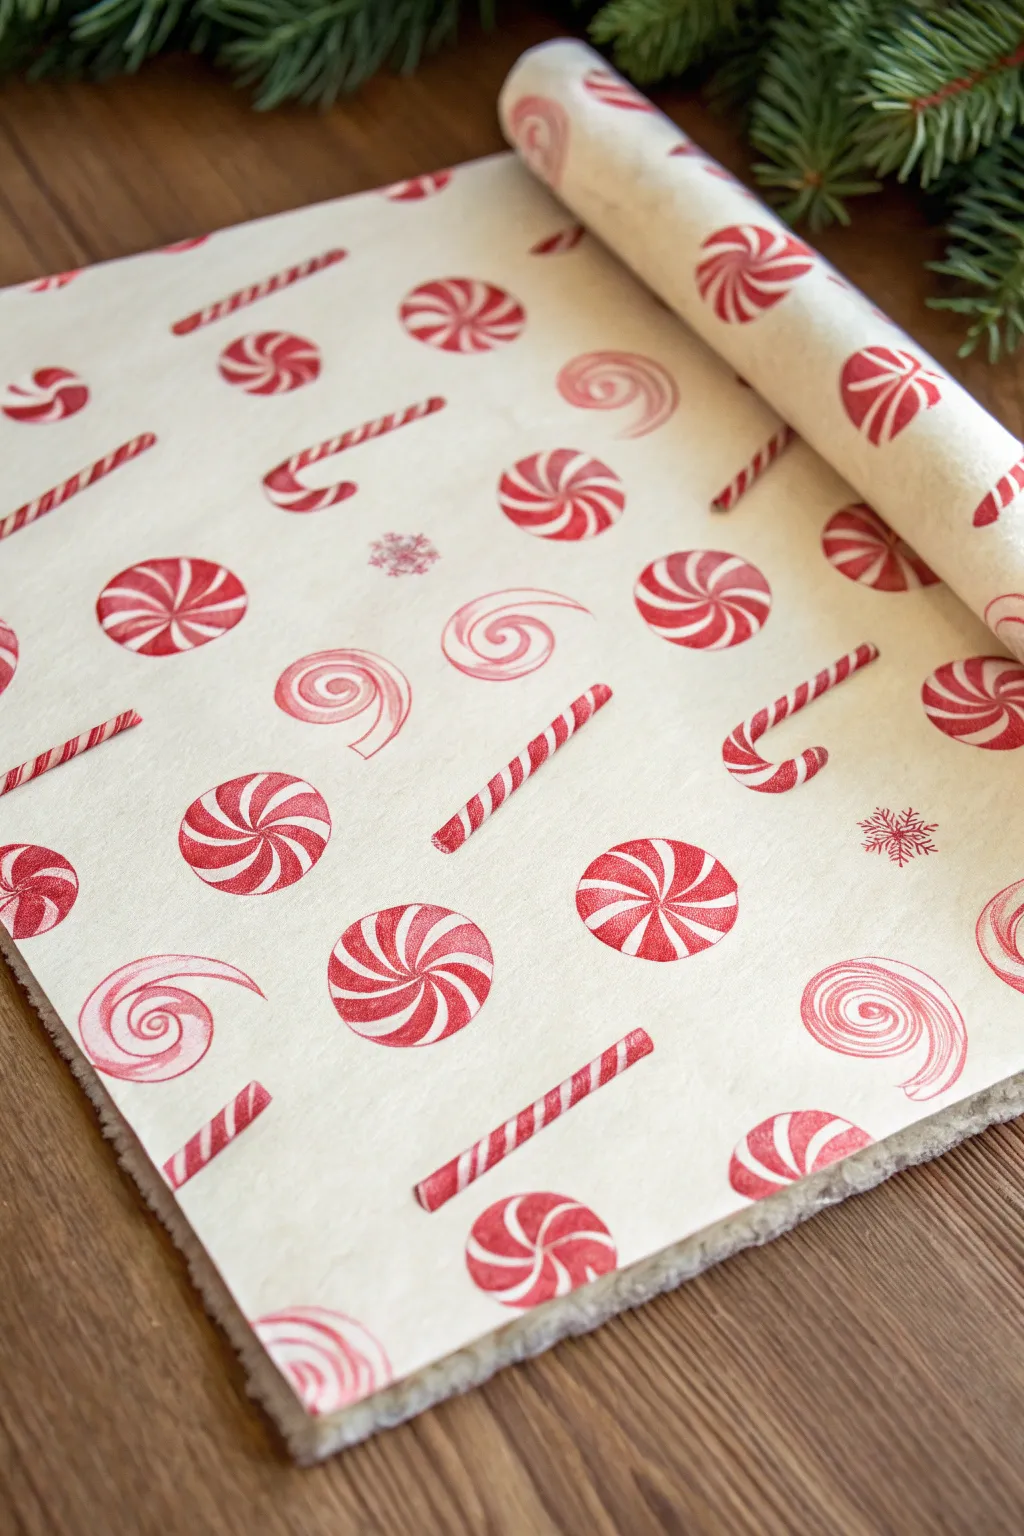
Capture the sweetness of the season with this delightful hand-painted pattern featuring classic peppermint candies and candy canes. The soft, parchment-like background makes the vibrant reds pop, creating a nostalgic and festive design perfect for wrapping paper or holiday cards.
Step-by-Step Guide
Materials
- Watercolor paper (cold press heavy weight)
- Red watercolor paint (Alizarin Crimson or Cadmium Red)
- White gouache (optional for highlights)
- Round brushes (sizes 2, 4, and 6)
- Pencil (HB or lighter)
- Eraser
- Ruler
- Mixing palette
- Water cups
- Paper towels
Step 1: Preparation & Layout
-
Prepare your canvas:
Start with a sheet of high-quality watercolor paper. If you want that warm, vintage look seen in the photo, apply a very light wash of yellow ochre or tea stain across the entire sheet and let it dry completely before beginning. -
Plan the spacing:
Visualize a loose grid on your paper to keep the elements balanced but not rigid. You want a scattered, organic feel. Lightly mark small dots with a pencil where your main elements—the large round swirled candies—will go. -
Sketch the main candies:
Using a light hand, draw circles of varying sizes for the round peppermint candies. Don’t worry about making them perfect circles; a little irregularity adds hand-painted charm. -
Add candy canes and sticks:
In the spaces between the circles, sketch diagonal straight lines for peppermint sticks and curved hooks for candy canes. Vary the orientation—some facing left, some right—to create movement in the pattern. -
Detail the swirls:
Inside your circles, lightly sketch the swirl guidelines. For the pinwheel candies, draw lines radiating from the center like wheel spokes. For the spiral candies, draw a singular line starting from the center and winding outward.
Brush Control Secret
Load your brush fully but wipe the tip once on a towel. This prevents a drop of water from rushing down and ruining your fine spiral lines.
Step 2: Painting the Elements
-
Mix your red:
Prepare a rich, saturated red on your palette. I like to have two puddles: one very concentrated for deep stripes and one slightly watered down for softer details. -
Paint the pinwheel candies:
Using a size 4 brush, paint every other wedge in your pinwheel sketches. Start from the outer edge and pull the stroke toward the center for a crisp point. -
Refine the pinwheel shape:
Ensure the white spaces between the red wedges act as the white stripes of the candy. Keep the edges neat but soft. -
Create the spiral candies:
Switch to a smaller size 2 brush for better control. Carefully paint the spiral line, varying the pressure to make the line thicker and thinner as it winds out, mimicking a rolled candy. -
Paint the candy canes:
For the candy canes and sticks, paint the red diagonal stripes. Leave consistent gaps of white paper between them. -
Add stripe variety:
To make them look realistic, alternate the thickness of the stripes on some candy canes—paint a thick red stripe followed by a very thin red line. -
Incorporate snowflakes:
If you have empty gaps in your composition, use your finest brush to paint delicate, tiny red snowflakes or stars. This acts as filler and adds texture.
Uneven Stripes?
If your white gaps are uneven, use opaque white gouache to tidy up the edges of the red stripes. It acts like a correction fluid for watercolor.
Step 3: Finishing Touches
-
Erase guidelines:
Once the paint is 100% bone dry, gently erase any visible pencil marks. Be careful not to scrub the paint. -
Add texture (optional):
For a textured look like the reference, dry brush a tiny bit of faint red texture over the white areas of the large spiral candies to suggest sugar or dimension. -
Review contrast:
Step back and look at your pattern. If some reds dried too light, go back over them with a second layer of concentrated paint to deepen the color. -
Flatten or roll:
The reference image shows the paper rolled. To achieve this effect for display, gently curl the paper around a rolling pin or tube to give it memory before photographing.
This charming pattern is now ready to be scanned for custom gift wrap or framed as seasonal decor
Minimalist Christmas Tree Marks
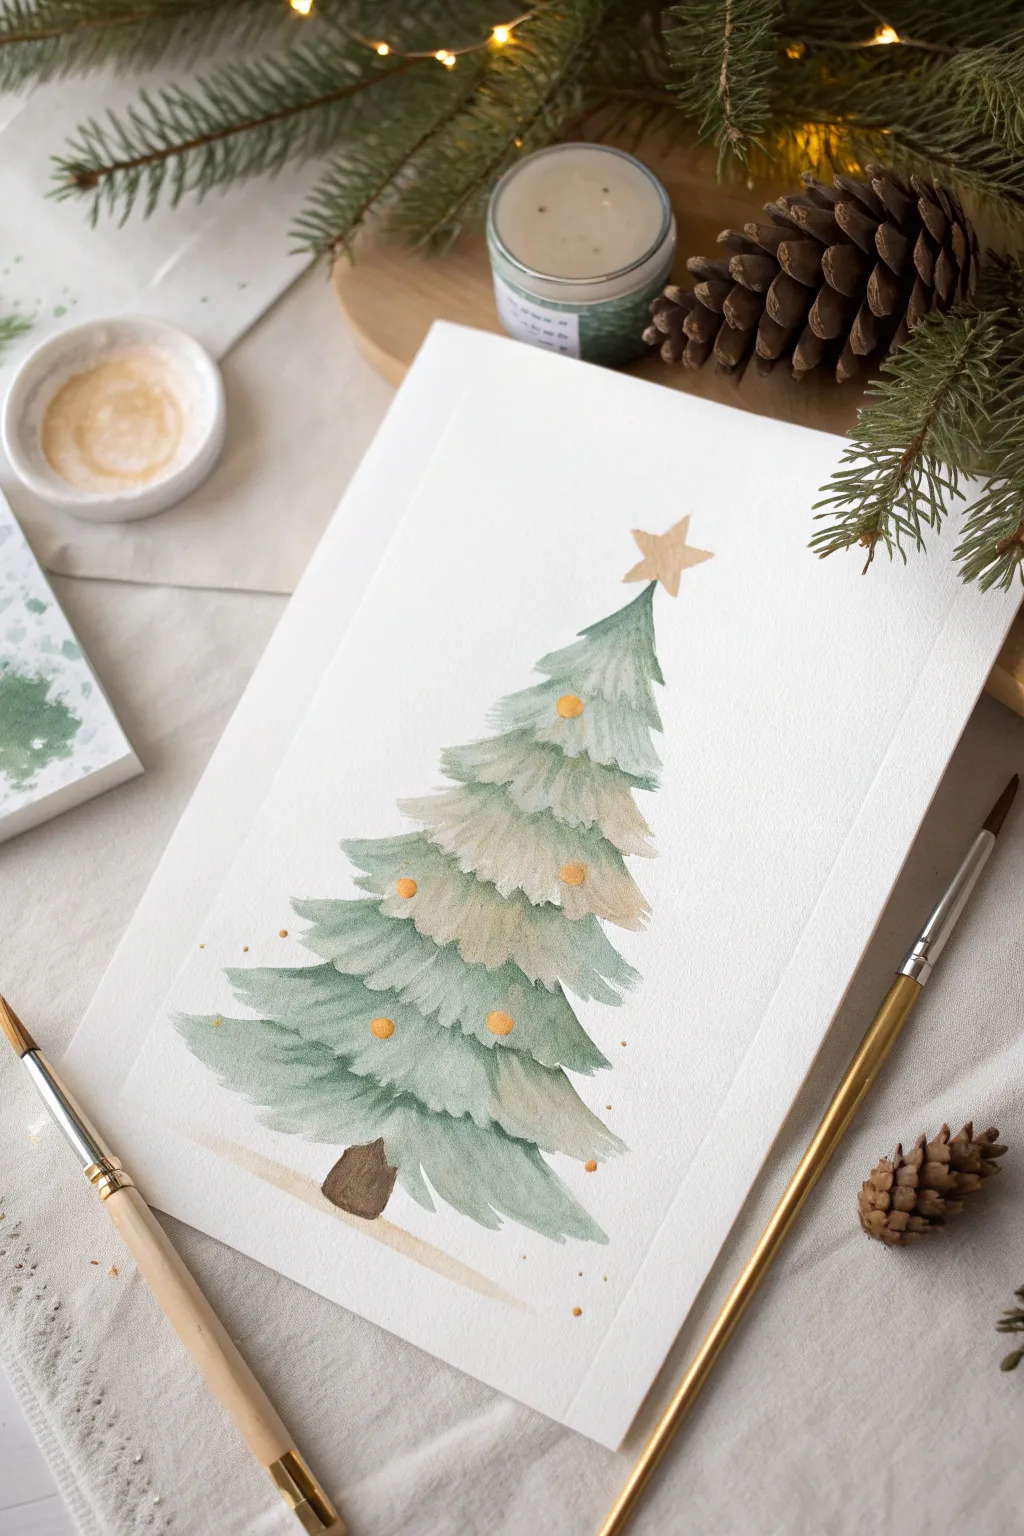
Capture the serene beauty of the festive season with this loose, illustrative watercolor tree. The soft blue-green needles layered with warm, sandy gold washes create a modern yet cozy holiday aesthetic perfect for homemade cards or wall art.
Step-by-Step Tutorial
Materials
- Cold press watercolor paper (300 gsm)
- Round watercolor brush (size 6 or 8)
- Fine detail brush (size 0 or 2)
- Watercolor paints (Sage Green, Payne’s Gray, Yellow Ochre, Burnt Umber)
- Metallic gold watercolor paint or gold ink
- Jar of clean water
- Paper towel
- Pencil (optional for light sketching)
Step 1: Planning the Structure
-
Light Sketching:
Begin by lightly marking the top point of your tree and the bottom center of the trunk with a pencil. This ensures your tree stays centered on the page without needing to draw the full outline. -
Prepare Your Palette:
Mix a watery ‘Sage Green’ by combining a basic green with a touch of Payne’s Gray or blue to cool it down. You want a muted, frosty tone rather than a bright spring green. -
Warm Tones:
Dilute some Yellow Ochre until it is very translucent. This will serve as the warm light filtering through the branches.
Wet-on-Wet Magic
Work quickly when adding the ochre to the green. The paper must be damp for the soft, blooming blend to happen naturally.
Step 2: Painting the Tree Layers
-
Top Boughs:
Start just below your top mark. Load your round brush with the cool green mix and paint downward, sweeping strokes that flick outward at the ends to mimic needles. Keep the very top narrow. -
Adding Warmth:
While the green is still slightly damp, rinse your brush and pick up the diluted Yellow Ochre. Drop this color into the center or tips of the green boughs, letting the colors bleed naturally together. -
Building Downward:
Let the top layer dry for a minute or two. Move down to the next tier of branches, widening the shape slightly. Use the tip of the brush to create jagged, textured edges that represent pine needles. -
Leaving White Space:
As you paint subsequent layers, be careful not to paint a solid block of color. Leave small gaps of white paper between some branches to suggest snow or light passing through the tree. -
Lower Branches:
For the bottom-most branches, add a tiny bit more blue or gray to your green mix to create visual weight and shadow. These strokes should be the widest and loosest. -
The Trunk:
Once the bottom greenery is dry, paint a small, sturdy stump at the base using Burnt Umber. Keep the edges slightly uneven for an organic look. -
Ground shadow:
Using a very watery mix of the Yellow Ochre or a pale brown, paint a thin, horizontal wash under the tree to ground it so it doesn’t look like it’s floating.
Step 3: Golden Details
-
The Star:
Once the green paint is completely dry to the touch, load your detail brush with gold paint or Yellow Ochre mixed with white. Paint a simple five-pointed star at the very peak. -
Ornaments:
Dab small, imperfect circles of gold or ochre onto the body of the tree. Vary the placement so they look like scattered baubles nestled in the greenery. -
Splatter Effect:
I like to load a brush with watery gold or ochre paint and tap it against another brush handle over the paper. This creates tiny speckles that look like magic dust or distant lights.
Add Sparkle
Use actual metallic watercolor gold paint for the star and ornaments. It catches the light beautifully when the painting is displayed.
Allow the entire piece to dry flat to ensure the delicate splatters settle perfectly into the paper texture

PENCIL GUIDE
Understanding Pencil Grades from H to B
From first sketch to finished drawing — learn pencil grades, line control, and shading techniques.
Explore the Full Guide
Christmas Cabin Under Starry Sky
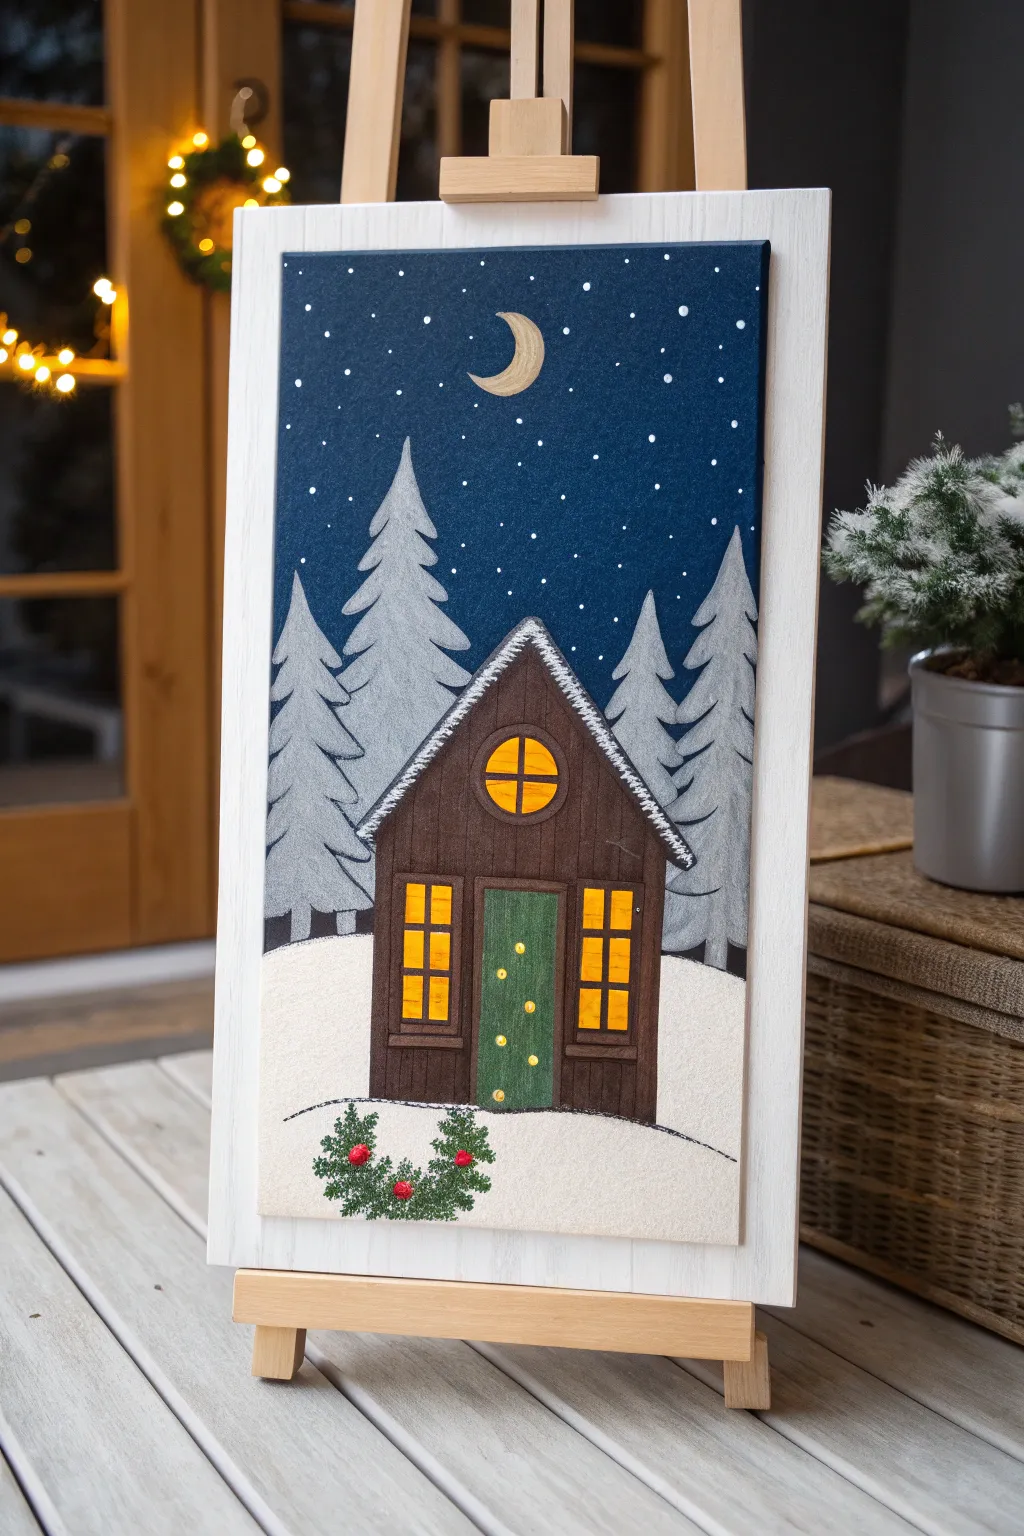
Capture the stillness of a silent winter night with this charming acrylic painting project. Featuring a rustic cabin nestled among snowy pines under a starry sky, this piece uses simple shapes and bold contrasts to create a heartwarming holiday decoration.
Step-by-Step
Materials
- Rectangular stretched canvas or canvas panel (approx. 10×20 inches recommended)
- Acrylic paints: Navy Blue, Titanium White, Burnt Umber (dark brown), Yellow Ochre (or bright yellow), Sap Green, Red
- Flat shader brushes (1-inch and 1/2-inch)
- Small round detail brush (size 1 or 2)
- Ruler and pencil
- Palette or paper plate
- Cup of water and paper towels
Step 1: Setting the Scene
-
Paint the background:
Begin by painting the top two-thirds of your canvas with a solid coat of Navy Blue acrylic paint. This will act as our night sky. Apply a second coat if needed for full opacity. -
Create the snowy ground:
For the bottom third, paint a gentle, rolling hill using Titanium White. Let the white paint overlap slightly with the dry blue sky to create a crisp horizon line. -
Splatter the stars:
Dip an old toothbrush or a stiff bristle brush into watered-down white paint. Use your thumb to flick the bristles, spraying tiny white specks across the blue section to create a field of distant stars.
Pro Tip: Sharp Lines
Use painter’s tape to mask off the edges of the cabin before painting the brown. This guarantees perfectly straight vertical walls and crisp roof angles.
Step 2: Building the Cabin
-
Sketch the outline:
Once the background is dry, use a pencil and ruler to lightly draw the outline of the cabin in the center. Start with a rectangle for the base and add a tall triangle on top for the roof. -
Fill the cabin shape:
Paint the entire cabin shape with Burnt Umber. Use vertical brush strokes on the main body to simulate wood planks, ensuring you keep the edges straight and tidy. -
Add the roof texture:
Mix a tiny amount of white into your brown paint to get a lighter shade. Use a small brush to dab this lighter color along the edges of the roof triangle, creating a frosted, snowy appearance. -
Paint the Windows:
Using Yellow Ochre or a bright yellow, paint two tall rectangular windows on the lower level and a circular window in the attic space. You may need two coats of yellow to make it pop against the dark brown. -
Add window frames:
With your smallest detail brush and dark brown paint (or black), carefully paint the grid lines (mullions) inside the yellow windows. -
Paint the front door:
Paint a rectangle between the two lower windows using Sap Green. Once dry, add a few tiny yellow dots to represent lights or decoration on the door.
Level Up: 3D Snow
Mix white paint with texture paste or even baking soda for the snow on the roof and ground. It adds real grit and dimension to the wintry parts.
Step 3: Adding Details
-
Create the pine trees:
Mix Titanium White with a very small drop of Navy Blue to create a pale, icy blue-grey. On either side of the cabin, paint simplified pine tree shapes. Start with a point at the top and brush downwards in flared, tiered strokes. -
Layer the trees:
Paint some trees slightly taller and others shorter to create depth. Ensure these grey trees stay ‘behind’ the cabin visually by stopping the paint where the cabin walls begin. -
Detail the roof:
Using pure Titanium White and a small brush, paint a jagged, snowy line along the very top edge of the roof triangle to show accumulated snow. -
Paint the moon:
In the upper center of the sky, paint a crescent moon shape. I like to use a mix of white and a tiny touch of yellow for a warm, glowing look. -
Add larger snowflakes:
Using the handle end of your paintbrush or a dotting tool, dip it in white paint and place distinct, larger dots around the sky to represent falling snow. -
Create the foreground bush:
At the very bottom left, just in front of the cabin, use a stippling motion (dabbing straight down) with your green paint to create a rough texture for a small bush or wreath. -
Decorate the bush:
Once the green is tacky or dry, dab three or four bright red dots onto the greenery for berries.
Step back and admire your serene winter scene, ready to bring a quiet warmth to your holiday display
Mini Christmas Village Series
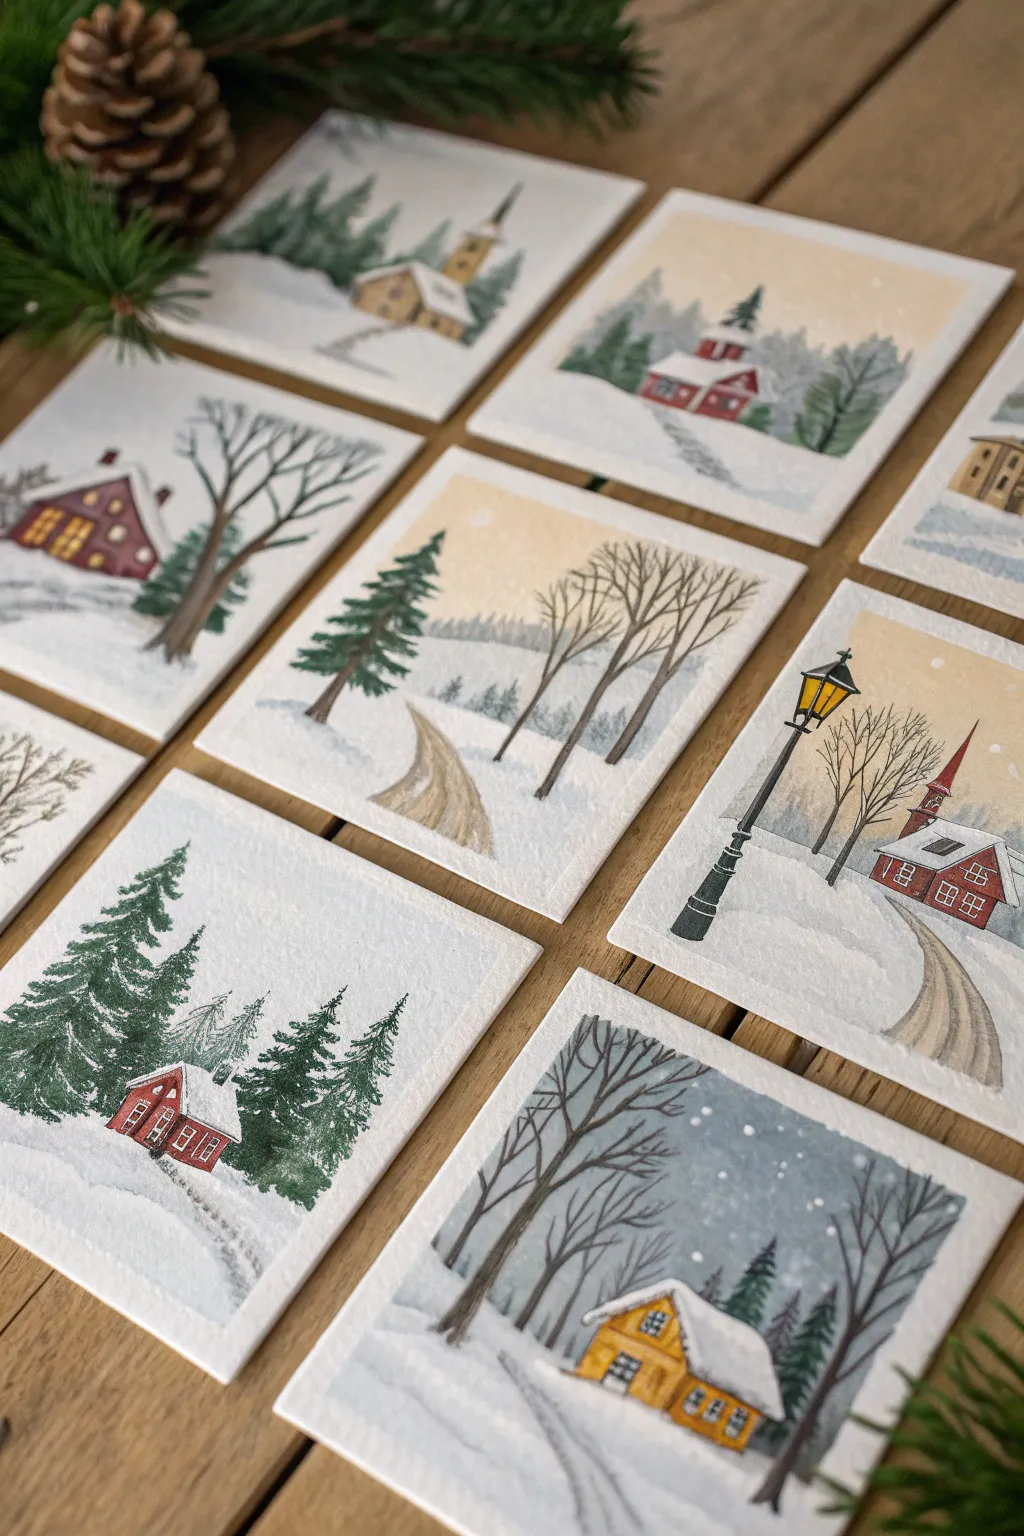
Create a charming set of miniature watercolor scenes that evoke the cozy stillness of a snowy village. Each small square tells a different part of the story, from a glowing streetlamp to secluded cabins tucked among pine trees.
Step-by-Step Tutorial
Materials
- Cold press watercolor paper (cut into 3×3 or 4×4 inch squares)
- Watercolor paints (Payne’s Grey, Burnt Sienna, Sap Green, Alizarin Crimson, Yellow Ochre, Ultramarine Blue)
- White gouache or white gel pen for snow details
- Small round brushes (size 0, 2, and 4)
- Graphite pencil (HB or H)
- Kneaded eraser
- Masking tape (optional, for clean edges)
- Palette for mixing
- Two jars of water
- Paper towels
Step 1: Planning and Preparation
-
Size and Scale:
Cut your watercolor paper into identical squares, roughly 3 to 4 inches each. Maintaining a uniform size is key to making these separate pieces feel like a cohesive ‘village’ set. -
Sketching the Scenes:
Lightly sketch a different simple scene on each square using an HB pencil. Aim for variety: draft one with a prominent church steeple, another with a close-up cabin, one featuring a winding path, and perhaps one focused on a streetlamp. -
Horizon Lines:
Keep your horizon lines low on the paper, leaving plenty of white space at the bottom to represent deep, untouched snow.
Step 2: Painting the Sky and Background
-
Soft Sky Washes:
For daytime scenes, wet the sky area with clean water and drop in a very dilute mix of Yellow Ochre or a pale grey-blue. Keep it transparent to suggest a cold, crisp winter atmosphere. -
Atmospheric Trees:
While the sky is slightly damp (but not soaking), paint faint, distant tree shapes along the horizon line using a watery mix of grey and green. Let these bleed slightly to create a soft, out-of-focus background effect. -
Drying Time:
Ensure the background layers are completely dry before moving forward. I like to work on all the squares simultaneously in this phase; by the time you finance the last sky, the first one is usually ready for the next step.
Batch Painting
Tape all your squares down to a single board. Painting them all at once ensures your color palette remains consistent across the whole series.
Step 3: Adding Structures and Focal Points
-
Base Colors for Buildings:
Paint the facades of the houses and church. Use Burnt Sienna or Yellow Ochre for wooden cabins, and Alizarin Crimson for classic red barns. Leave the roofs completely white to represent snow. -
Defining Windows:
Once the house walls are dry, use a size 0 brush with a dark brown or grey mix to outline windows. Add tiny dots of yellow inside the windows to create a warm, inviting glow. -
The Streetlamp Detail:
For the streetlamp scene, use a steady hand and black or concentrated Payne’s Grey to paint the post. Paint the glass enclosure yellow first, letting it dry before adding the dark metal cage lines over it.
Muddy Snow?
If your white snow areas get dirty, wait for everything to dry fully, then paint over the mistakes with opaque white gouache to reclaim the brightness.
Step 4: Foreground Elements and Texture
-
Pine Trees:
Using a size 2 brush and a rich Sap Green mixed with a touch of blue, paint the foreground pine trees. Use erratic, downward dabbing motions to mimic needles, leaving gaps of white paper on the branches for snow. -
Bare Deciduous Trees:
For leafless trees, mix a dark grey-brown. Start from the trunk and pull the brush upward, lifting pressure as you reach the tips to create delicate, spindly branches. -
Creating Paths:
Suggest paths leading to the doors by painting diluted brown or grey streaks in the white foreground. Follow the perspective lines, wider at the bottom and narrowing as they reach the building.
Step 5: Winter Accents
-
Deepening Shadows:
Mix a very watery purple-grey (Ultramarine Blue + a tiny bit of red). Glaze this shadow color under the roof eaves and on the snowy ground to the side of the trees to ground the objects. -
Roof Details:
If your roofs look too flat, add a very thin, broken line of light grey along the bottom edge or the peak to give the snow volume. -
Falling Snow:
Dip a brush or toothbrush into white gouache and gently tap it to splatter tiny snowflakes over the darker areas of the painting, like the trees and houses. -
Final Highlights:
Use a white gel pen or opaque gouache to add crisp highlights to the top of the lamp post or to clean up any muddy edges on the snowy roofs.
Arrange your finished miniatures together on a mantle or frame them individually for a gallery wall effect


Holiday Lettering With Holly

Embrace the elegance of simplicity with this holiday lettering project that pairs crisp, modern text with the organic beauty of winter foliage. This composition relies on the contrast between rustic handmade paper and vibrant, glossy holly leaves to create a sophisticated seasonal greeting.
Step-by-Step Guide
Materials
- Heavyweight cold-press watercolor paper or handmade cotton paper (with deckled edges)
- Black waterproof fine-liner pen (0.5mm or 0.8mm)
- Pencil (HB or 2H)
- Kneaded eraser
- Ruler
- Real or high-quality artificial holly branches
- Red berry sprays (artificial or real)
- Small gold star confetti or sequins
- Warm white LED fairy lights (copper wire style)
- White felt or textured fabric for the background
Step 1: Preparing the Centerpiece
-
Select your paper:
Choose a piece of high-quality paper for the card. Handmade cotton paper works best because of its beautiful, natural texture. If you’re using a standard sheet, carefully tear the edges against a ruler to create a faux-deckled look. -
Mark your guidelines:
Using a ruler and a very light touch with your pencil, mark the horizontal center of your paper. Draw two faint lines where your text will sit to ensure the lettering stays perfectly straight. -
Draft the letters:
Sketch out ‘MERRY CHRISTMAS’ in a simple, tall sans-serif style. Keep the spacing slightly loose between the letters to maintain that airy, modern feel shown in the photo. -
Refine the forms:
Go back over your pencil sketch to ensure the vertical lines of the letters are parallel. I find it helpful to focus on making the ‘M’ and ‘W’ shapes symmetrical. -
Ink the design:
Trace over your pencil lines with a black fine-liner pen. Use steady, deliberate strokes. Depending on the roughness of your paper, you may need to go over the lines twice to get a solid, dark black. -
Erase guidelines:
Wait at least 10 minutes for the ink to dry completely. Gently dab neatly with a kneaded eraser to lift the graphite without smudging the ink or damaging the paper fibers.
Step 2: Arranging the Composition
-
Set the stage:
Lay down your white textured fabric or felt on a flat surface. Smooth out any major wrinkles, but allow for some gentle undulation to mimic snow. -
Place the card:
Position your finished lettered card in the dead center of the fabric. This will be the anchor for everything else. -
Add the greenery:
Start placing holly branches around the perimeter of the card. Aim for an organic oval shape, leaving a bit of breathing room between the leaves and the paper edge. Alternate large leaves with smaller clusters. -
Inject color:
Tuck clusters of red berries into the greenery. Place them strategically at the corners and mid-points to guide the eye around the frame. -
Illuminate the scene:
Weave a delicate strand of copper-wire fairy lights through the foliage. Try to hide the wire under the leaves so only the small glowing bulbs are visible. -
Sprinkle the magic:
Scatter small gold star confetti around the card. Let them fall naturally; some should be closer to the paper, others further out, and a few can even overlap the greenery slightly. -
Final adjustments:
Step back and look at the composition from above. Nudge any leaves that are casting distracting shadows on the text and ensure the frame feels balanced before photographing or displaying.
Ink Bleeding Issues?
If your ink feathers on the porous handmade paper, spray the paper lightly with fixative first or switch to a thicker felt-tip marker creates cleaner lines.
Make It Sparkle
For extra dimension, carefully apply clear drying glue to the red berries and sprinkle fine glitter on them to make them look frosted or icy.
Once arranged, this beautiful setup serves as a perfect subject for your own holiday photography or a lovely foyer display
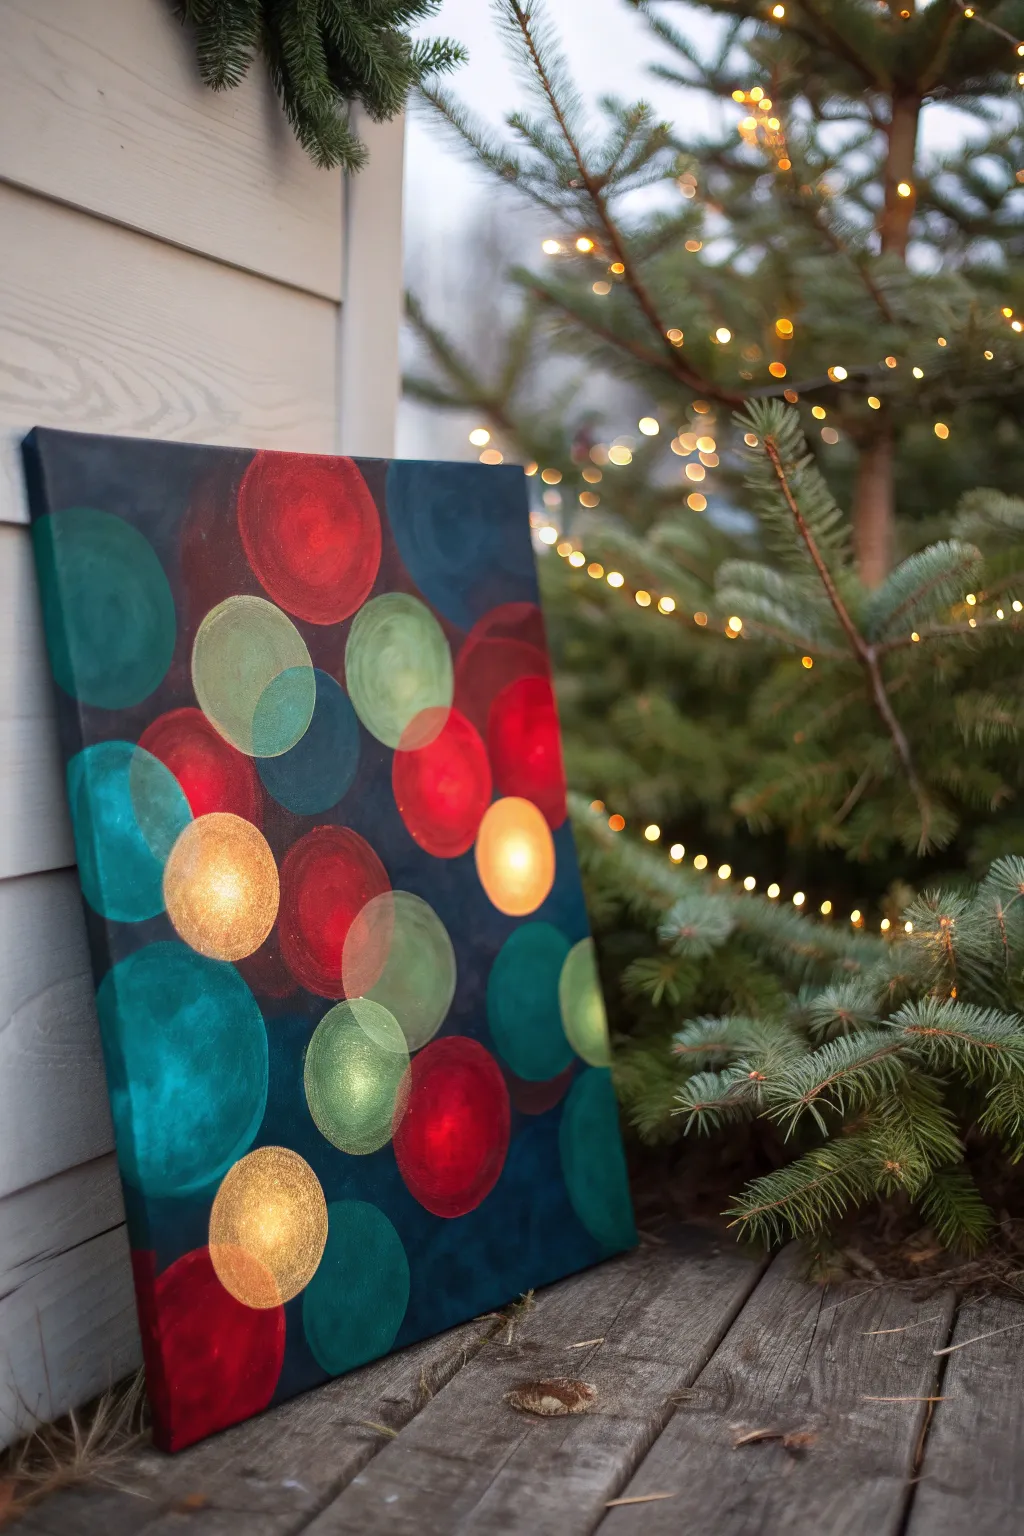
Abstract Christmas Lights Bokeh

Capture the magic of twinkling holiday lights with this simple yet stunning abstract painting technique. Using overlapping circles of jewel tones and gold on a dark background, you’ll create a cozy, glowing bokeh effect that looks professional but is surprisingly easy to achieve.
Detailed Instructions
Materials
- Stretched canvas (e.g., 16×20 inches)
- Acrylic paints: Phthalo Blue, Mars Black, Cadmium Red, Hooker’s Green, Titanium White, Metallic Gold, and Bright Yellow
- Circle stencils or household objects (cups, lids, tape rolls) in various sizes
- Sponge pouncers or round foam brushes (matching your circle sizes)
- Flat synthetic brush (1 inch)
- Palette or paper plate
- Paper towels
- Cup of water
Step 1: Setting the Scene
-
Mix the background color:
Start by creating a deep, moody base. Mix Phthalo Blue with a small amount of Mars Black to create a rich midnight blue. You want it dark enough to make the lights pop, but not completely pitch black. -
Paint the canvas:
Using your large flat brush, cover the entire canvas with your dark blue mixture. Ensure you paint the sides of the canvas as well for a polished, finished look. -
Create depth (optional):
While the background is still slightly wet, I like to blend in tiny hints of plain black or dark green in widely spacing patches to give the background subtle variation and depth. Let this layer dry completely before moving on.
Step 2: Building the Bokeh Layer
-
Prepare your ‘ghost’ colors:
For the background bokeh—the lights that look furthest away—you need muted, translucent colors. Mix your reds, greens, and blues with a significant amount of water or glazing medium to make them semi-transparent. -
Apply the first circles:
Dip a medium-sized sponge pouncer into your watered-down paint. Dab off excess paint on a paper towel until the intricate texture of the sponge shows. Gently press and twist the sponge onto the canvas to create soft, faint circles. -
Vary the sizes:
Using different sized pouncers or tracing circular objects, add more muted circles in blue, teal, and dull red. Let these overlap slightly. Because the paint is thin, the dark background will show through, creating that distant, out-of-focus look. -
Soften the edges:
If any circle edges look too hard or crisp, gently pat them with a clean, damp finger or a dry brush to blur the outline into the background.
Fixing Hard Edges
If your bokeh circles look too like rigid stickers, lightly glaze over their edges with a mix of water and your background blue color to push them back into the shadows.
Step 3: Adding the Mid-Ground Lights
-
Mix brighter opaque colors:
Now mix your standard Red, Green, and Turquoise paints. This time, don’t dilute them too much; you want these circles to stand out more than the first layer. -
Paint defined circles:
Using your stencils or circular objects as guides, paint solid circles over some of the empty spaces and partially overlapping the ghost circles. The overlap creates a beautiful transparency effect typical of bokeh photography. -
Create the illusion of transparency:
Where two circles overlap, you can mix the two colors together (e.g., where red meets blue, dab a little purple) to heighten the realistic optical effect. -
Let it dry:
Ensure this layer is dry to the touch before adding the final, brightest lights. This prevents mudding the vibrant colors.
Add Real Sparkle
Mix a pinch of fine gold glitter into your varnish or final glazing layer over the yellow ‘light’ circles for a true festive twinkle when the painting catches the light.
Step 4: Creating the Glow
-
Mix the glowing gold:
Combine Metallic Gold with a touch of Bright Yellow and a tiny dot of Titanium White. This will be your ‘light source’ color. -
Place focal points:
Choose 3-5 spots on your composition for the brightest lights. Use a stencil to paint these circles solidly with your gold mixture. -
Add the inner glow:
Once the gold circles are tacky but not fully dry, dab a spot of pure Titanium White right in the center of the gold circles. Use a dry soft brush to blend this white spot outward, fading it into the gold. -
Highlight other circles:
To make the red and green circles look like they are illuminated, add a subtle, lighter crescent shape or a soft lighter center to a few of them using a mix of the base color and white. -
Final dry brushing:
Taking a very dry brush with a tiny amount of white, you can ever-so-lightly glaze over a few edges where circles overlap to enhance the misty, illuminated feel. -
Seal the artwork:
Once the painting has cured (usually 24 hours), apply a gloss varnish. This deepens the dark background and makes the metallic gold shimmer beautifully under actual lights.
Now you have a festive, modern piece of art that captures the warmth of the season without being overly literal


Have a question or want to share your own experience? I'd love to hear from you in the comments below!