
When I need a quick hit of holiday creativity, I always come back to the Christmas tree—that simple triangle can turn into a hundred different artworks. These christmas tree art ideas are approachable, playful, and perfect for experimenting with texture, color, and cozy winter details.
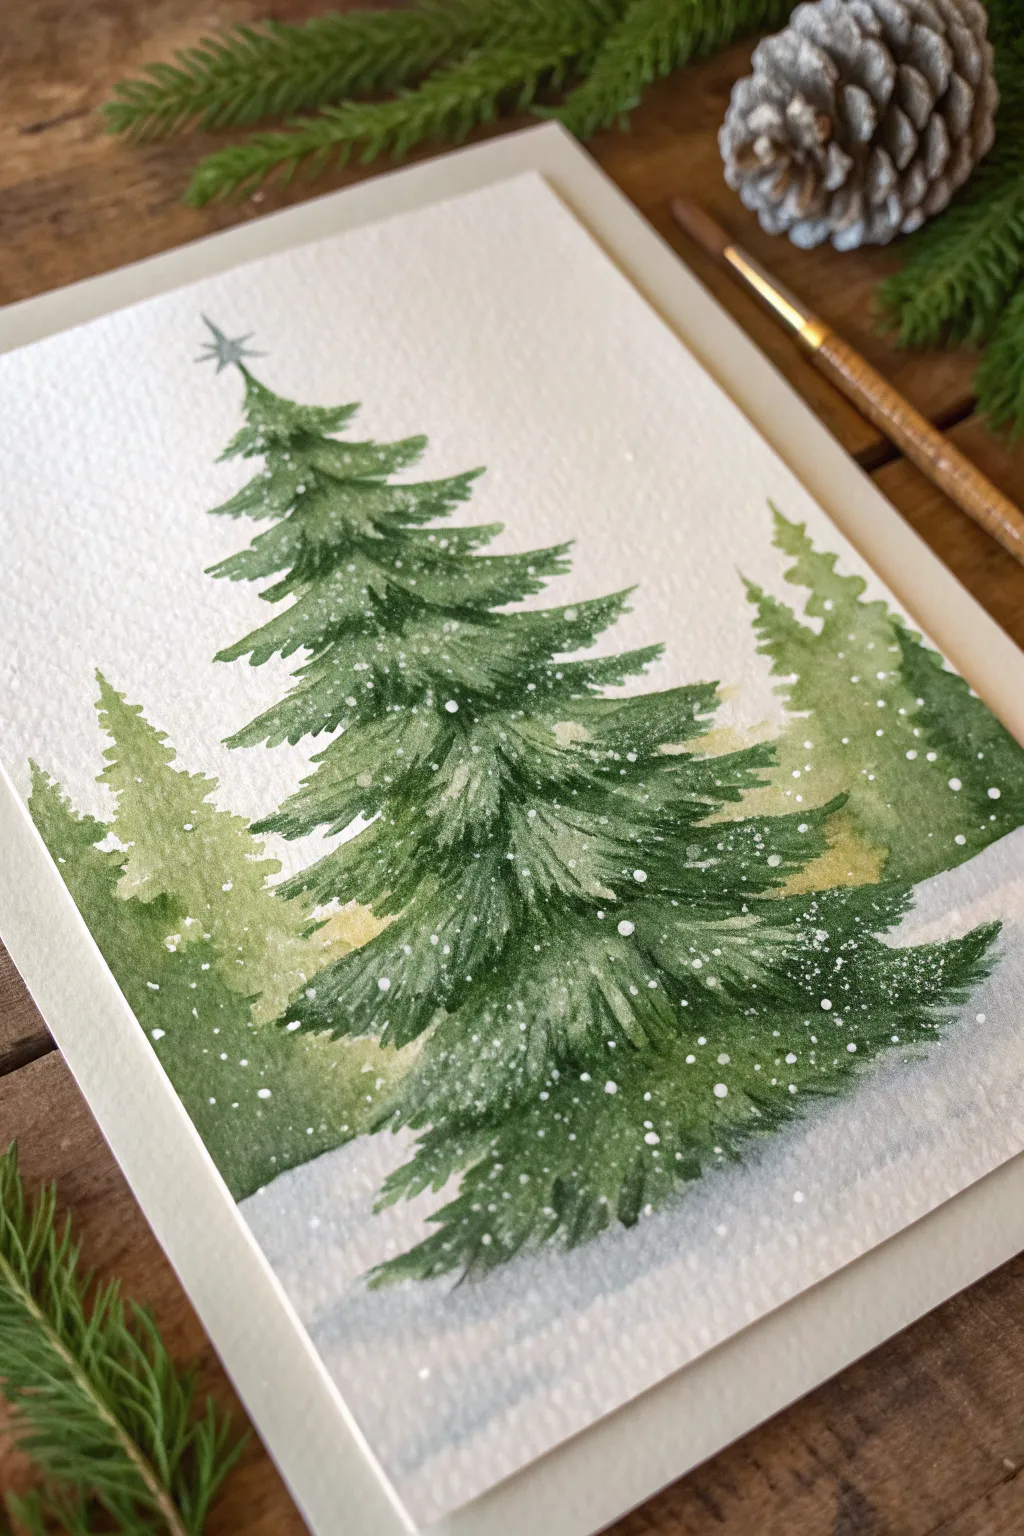
Classic Watercolor Evergreen Tree
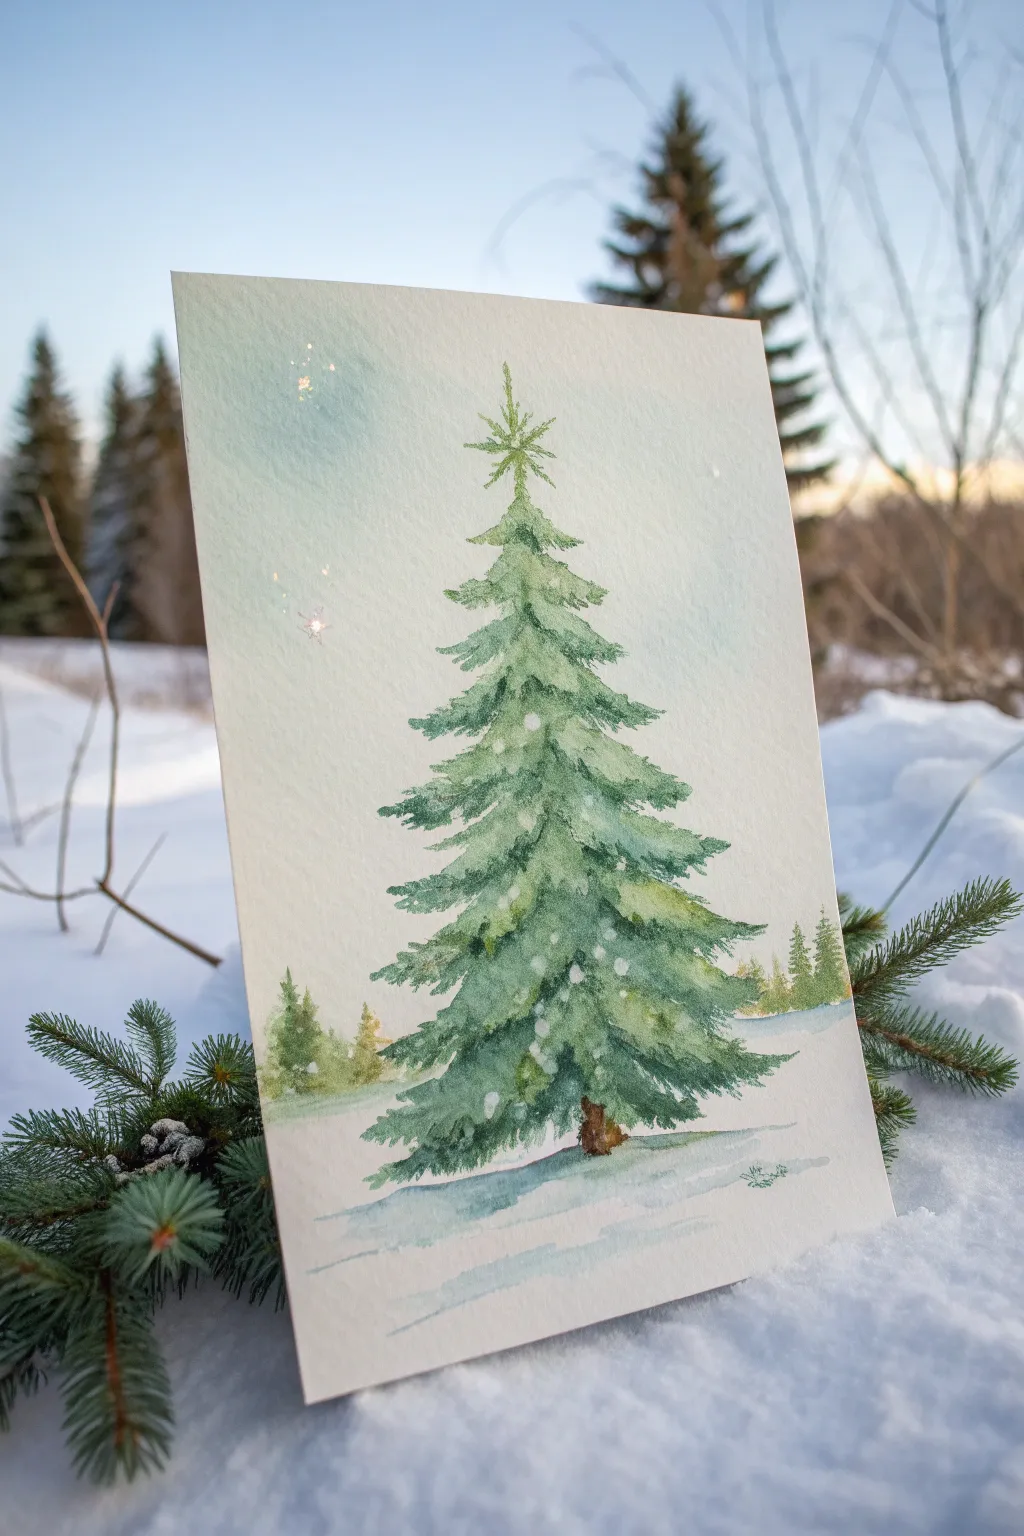
Capture the serene beauty of a snowy forest with this classic watercolor study. This project focuses on building layers of translucent evergreen tones to create a majestic tree that feels both grounded and ethereal.
How-To Guide
Materials
- Cold press watercolor paper (300 gsm)
- Watercolor paints: Sap Green, Hooker’s Green, Burnt Umber, Indigo, Cobalt Blue
- White gouache or white gel pen
- Round brushes (flats for washes): sizes 2, 6, and 10
- Two jars of water
- Paper towels
- Pencil (HB or lighter) and kneaded eraser
- Masking tape
Step 1: Setting the Scene
-
Prepare the paper:
Tape your watercolor paper down to a board on all four sides. This prevents buckling and creates a crisp white border if you paint to the edge, though for this centered composition, it mostly keeps the paper flat. -
Light sketch:
Using a very light hand, sketch a vertical line to mark the trunk’s center. Draw a loose triangle shape to guide the width of the tree, keeping the base wider than the top. Sketch a faint horizon line about a quarter of the way up from the bottom. -
Atmospheric sky:
Mix a very dilute wash of Cobalt Blue with plenty of water. Paint a soft, uneven wash in the upper left corner, fading it out as you move toward the center. This suggests a winter sky without overpowering the tree. -
Distant trees:
While the sky is drying, mix a pale, watery green. Paint tiny, simple tree shapes along the horizon line on either side of where your main tree will stand. Keep these blurry and indistinct to push them into the background.
Pro Tip: Lost and Found Edges
Don’t outline every branch. Let some green edges fade into the white paper and sharpen others. These “lost and found” edges make the tree look organic and voluminous rather than stiff.
Step 2: Building the Tree
-
First foliage layer:
Mix a light puddle of Sap Green. Starting at the very top point (the leader branch), use the tip of your size 6 brush to dab small markings. Use a dragging motion to create the look of needles. -
Branch structure:
Work your way down the center line, painting branches that swoop slightly downward and then curve up at the tips. Leave plenty of white paper showing between branches; this is crucial for the ‘snow’ effect later. -
Widening the base:
As you move down the tree, press harder on the brush to make wider marks. Allow the branches to fan out, following your initial triangle guide but keeping the edges jagged and natural. -
Deepening the color:
While the first layer is still slightly damp but not soaking, mix Hooker’s Green with a touch of Indigo for a shadow tone. Drop this darker color into the underside of the branches and near the trunk line. -
Mid-tone texture:
Once the initial layer is dry, mix a medium-strength green. I like to add a second layer of distinct pine needles over the dry shape to build density, focusing on the center of the tree mass. -
Trunk details:
Using the size 2 brush and Burnt Umber, paint the visible part of the trunk at the very bottom. You can also peek tiny bits of brown through the gaps in the branches higher up to suggest the sturdy interior wood.
Level Up: Salt Texture
While your green paint is still wet on the paper, sprinkle a pinch of table salt onto the branches. When dry and brushed off, it creates beautiful, icy snowflake textures in the pigment.
Step 3: Snow and Shadows
-
Grounding shadow:
Mix a cool shadow color using Cobalt Blue and a tiny touch of Burnt Umber. With a damp brush, paint a shadow under the tree, extending to the right to match the light source. -
Snowy ground:
Use diluted Cobalt Blue to add streaks horizontally across the foreground. This mimics the troughs and ridges of snow on the ground. -
Falling snow specs:
Load a small brush with slightly diluted white gouache. Tap the handle against another brush over the painting to spatter tiny white dots for falling snow. Focus some heavier spatters on the tree itself. -
Highlighting branches:
With a fine brush or white gel pen, add deliberate touches of white on the tops of the dried green branches. This creates the illusion of snow resting on the needles. -
Magic sparkle:
For the finishing touch shown in the inspiration, add a tiny star shape at the top of the tree using white gouache or a metallic gold watercolor if you have it. -
Final dry:
Let the piece dry completely before carefully peeling off the masking tape at a 45-degree angle.
Now you have a serene winter evergreen ready to be framed or sent as a holiday card


Acrylic Tree With Two-Tone Blending
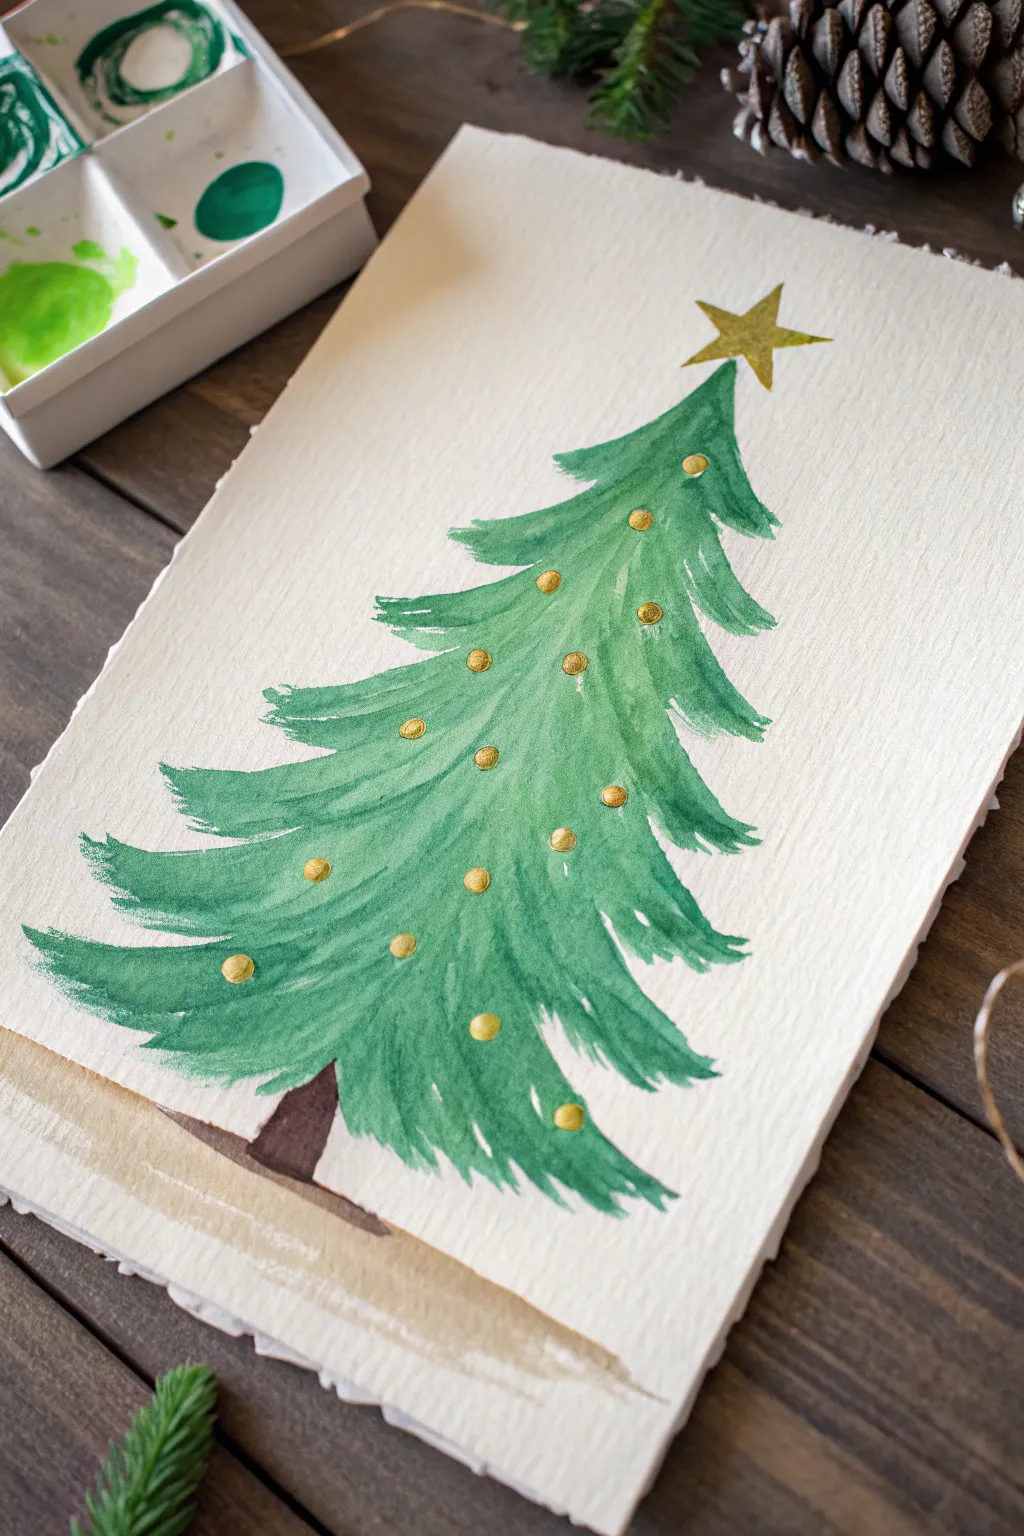
Capture the magic of the season with this elegant yet approachable tree painting that uses sweeping brushstrokes and simple two-tone blending. The textured deckle-edge paper adds a rustic charm, while golden accents provide the perfect festive shimmer.
Step-by-Step Tutorial
Materials
- Heavyweight watercolor or mixed media paper (deckle edge recommended)
- Acrylic paints (Forest Green, Leaf Green, Burnt Umber)
- Metallic Gold acrylic paint or paint pen
- Flat shader brush (size 6 or 8)
- Small round detail brush
- Palette for mixing
- Cup of water and paper towels
Step 1: Painting the Foliage
-
Prepare your palette:
Squeeze out your Forest Green and Leaf Green paints side-by-side on your palette. Don’t mix them yet; you want access to both distinct shades as well as a blended middle tone. -
Start at the top:
Load your flat brush with the darker Forest Green. Using the sharp edge of the brush, make a small, vertical triangle shape at the top center of your paper to form the tree’s peak. -
Create the first tier:
Immediately beneath the peak, paint sweeping strokes outward and downward. Imagine sketching a ‘skirt’ shape. Keep the strokes loose and feathered at the ends to mimic pine needles. -
Introduce the lighter green:
Without cleaning your brush fully, dip the corner into the lighter Leaf Green. Paint the next tier of branches below the first, letting the colors mix naturally on the paper for a streaky, organic look. -
Build the body and width:
Continue working your way down, widening the tree with each tier. Alternate between dipping into dark and light greens to create depth. The two-tone effect works best when you don’t over-blend. -
Shape the branches:
As you sweep the brush outward, flick your wrist slightly at the end of each stroke. This creates the jagged, feathery tips of the evergreen boughs. -
Add the bottom boughs:
For the final, widest layer, use mostly the darker green to ground the tree visually. Ensure the bottom edge is somewhat irregular rather than a straight line. -
Let the green dry:
Allow the main body of the tree to dry to the touch so your upcoming details don’t muddy the crisp green strokes.
Muddy colors?
If your greens are turning into a singular blob of color, wipe your brush clean more often. Reload with fresh paint every few strokes to keep the two tones distinct.
Step 2: Adding Trunk and Details
-
Paint the trunk:
Using the flat brush or a smaller round brush, paint a simple rectangle at the base using Burnt Umber. I like to keep this slightly sheer or watery so it doesn’t look too heavy. -
Add a ground shadow:
Wash your brush well. Take a tiny amount of diluted brown or beige paint and sweep a horizontal line under the tree to ground it, preventing it from looking like it’s floating. -
Paint the star:
Switch to your metallic gold paint. At the very top peak, paint a simple five-pointed star. Start with the top point, then the arms, maintaining distinct, sharp lines. -
Add baubles:
Using a small round brush or the back end of a paintbrush handle, dip into the gold paint. Dot circles randomly across the green boughs. -
Vary the placement:
Place some dots singly and others in loose pairs. Try to follow the curve of the sweeping branches to emphasize the tree’s volume. -
Check for shimmer:
If the gold paint dries a bit dull, add a second small dollop of paint right on top of the dried dots to increase the opacity and shine. -
Optional texture:
If your paper is smooth but you want the look in the photo, you can carefully tear the edges of the paper against a ruler to create a faux deckle edge.
Level Up: Snowfall
Once everything is completely dry, splatter diluted white acrylic paint over the entire piece using an old toothbrush for a magical snowy effect.
Once the gold accents have dried completely, your festive evergreen is ready to be framed or gifted as a beautiful holiday card


Q-Tip Ornament Dot Tree

This charming watercolor tree combines loose, expressive branches with perfectly round, colorful ornaments for a festive look. The contrasting textures of the wash-y greens and the opaque ornaments create a delightful balance that feels both handmade and polished.
Step-by-Step Guide
Materials
- Cold press watercolor paper (A4 or 9×12 inch)
- Watercolor paints (pan set or tubes)
- Round watercolor brush (size 6 or 8)
- Fine detail brush (size 0 or 2)
- Jar of clean water
- Paper towels
- Pencil (optional for sketching)
Step 1: Painting the Tree Structure
-
Mix your greens:
Start by mixing a natural pine green. Combine sap green with a touch of deep blue or cooler green to get that classic evergreen hue. Prepare a fairly watery puddle of this on your palette so the paint flows easily. -
Start at the top:
Using your medium round brush, begin at the very top point of the tree. Make a small, pointed stroke that flares out slightly downward to create the peak. -
Form the first tier:
Just below the peak, paint the first set of branches. Instead of painting individual needles, use the belly of the brush to create sweeping, downward motions that fan out to the left and right, leaving the edges uneven. -
Widen as you go:
This tree is built in roughly five clear tiers. As you move down to the second tier, make the branch span wider than the one above it. Allow the green wash to be uneven—some parts darker, some lighter—to suggest depth. -
Create texture:
For the edges of the branches, flick your brush tip outward slightly. This mimics the look of pine needles without needing to paint every single one. -
Layer the middle tiers:
Continue painting the third and fourth tiers, ensuring each is wider than the last. Keep your paint mixture wet enough that the strokes blend together softly within the main body of the tree. -
Finish the bottom branches:
For the final, widest tier at the bottom, curve the branches slightly upward at the tips. This gives the tree a happy, buoyant feel. -
Add the trunk:
Mix a dark brown using burnt umber and a tiny bit of black or blue. Paint a simple, sturdy rectangular stump at the base of the tree. Let the green and brown touch slightly if the paint is still wet; the bleed adds nice character. -
Let it dry completely:
This is crucial. The green background must be bone dry before you add the ornaments, otherwise, the colors will mud together.
Step 2: Decorating with Details
-
Paint the star:
Using a bright yellow-gold paint and your smaller detail brush, paint a five-pointed star at the very top peak. Fill it in solidly for a bold look. -
Select ornament colors:
Choose a palette of 4-5 distinct colors for your ornaments. The example uses muted tones like dusty pink, teal, mustard yellow, coral, and pale blue. -
Paint the large ornaments:
Using less water and more pigment (to keep them opaque), paint small circles scattered randomly across the tree branches. I find it helps to do all the pinks first, then switch to the next color. -
Add variation:
Make sure some ornaments are near the edges of the branches and others are tucked deeper into the green area. -
Include tiny fillers:
Once the main ornaments are placed, use your smallest brush to add tiny dots of very pale pink or white in the empty green spaces. These act as little twinkling lights or smaller baubles. -
Refine the star:
If your star looks a bit flat, you can add a tiny dab of darker orange in the center to give it dimension once the yellow base is dry. -
Evaluate the balance:
Take a step back. If a specific area looks too empty, add one more small colored dot to balance the composition.
Clean Edges Tech
For perfectly round ornaments, load your brush with creamy, opaque paint, touch the paper, and spin the brush handle in a circle between your fingers.
Bleeding Colors?
If ornament colors bleed into the green, the tree wasn’t dry enough. Let it dry fully, then paint the ornament again with thick, opaque paint to cover the error.
Once the ornaments are dry, your festive pine is ready to be framed or turned into a holiday card


Fork-Printed Pine Needle Tree
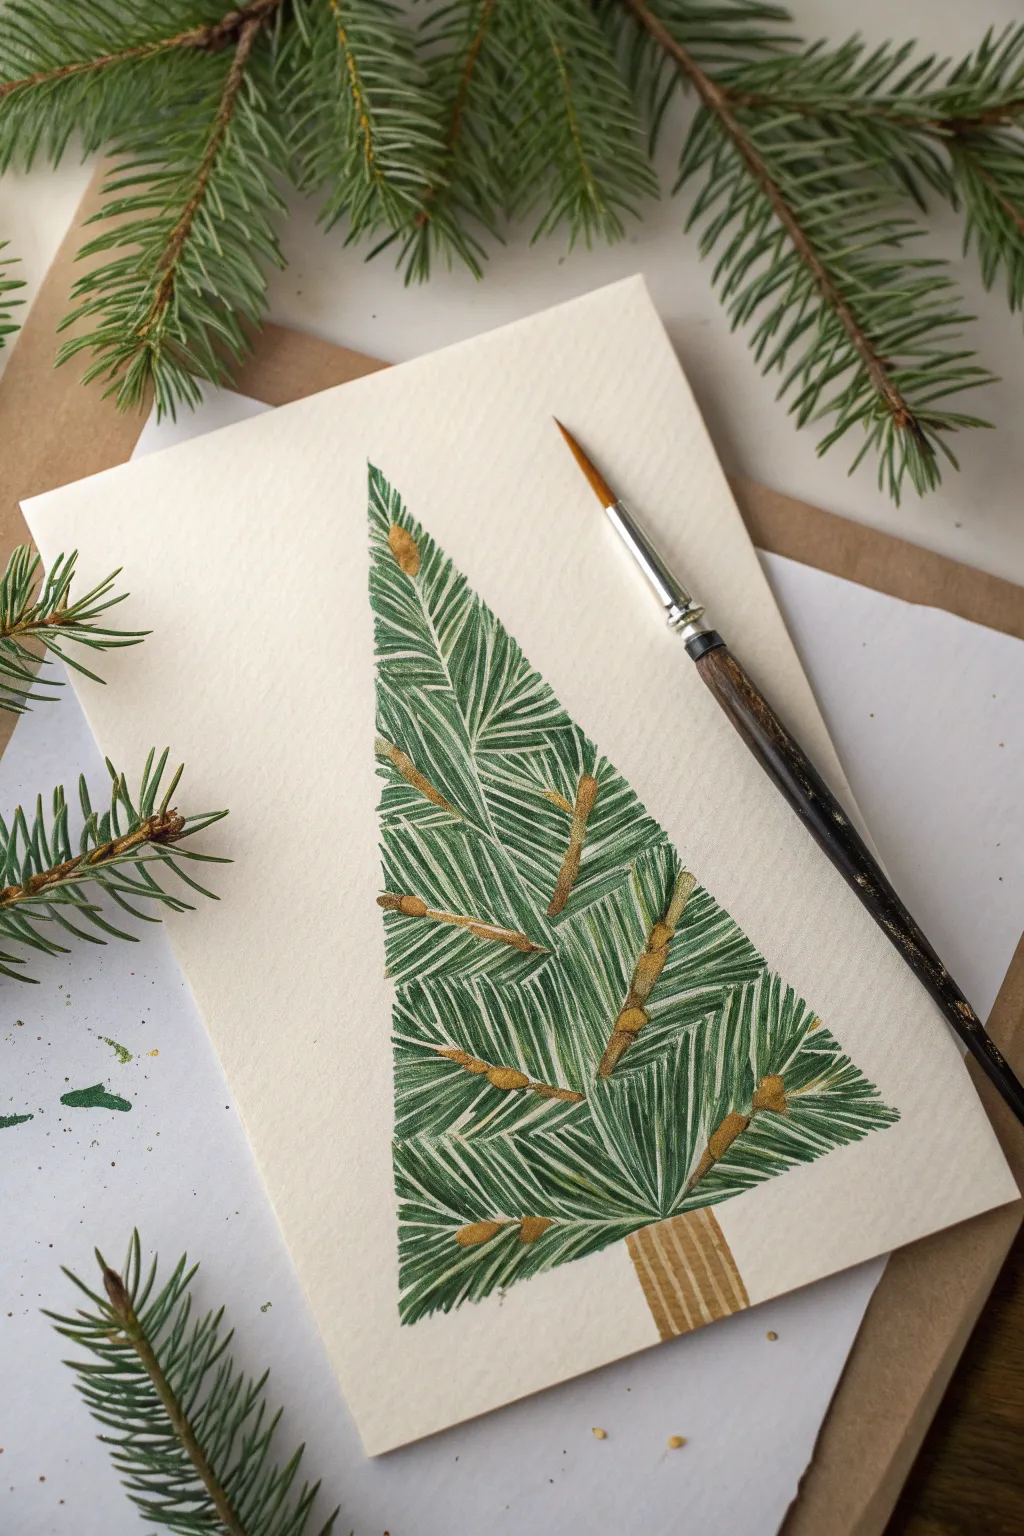
Create a charming, stylized holiday card featuring a Christmas tree composed of intricate, needle-like strokes. This watercolor project combines deep greens with festive gold accents for a naturally elegant look.
Step-by-Step
Materials
- Cold press watercolor paper (cut to card size)
- Small round watercolor brush (size 0 or 1)
- Fine liner brush (optional for details)
- Watercolor paints: Sap Green, Hooker’s Green, Burnt Umber
- Metallic gold watercolor or gouache paint
- Pencil and ruler
- Jar of water and paper towels
- Palette for mixing
Step 1: Planning the Shape
-
Outline the Triangle:
Begin by lightly sketching a tall, isosceles triangle in the center of your paper with a pencil. This will serve as the boundary for your tree. -
Mark the Sections:
Within this triangle, sketch faint, irregular diagonal lines to divide the tree into puzzle-piece shapes. These sections will define the direction of your pine needles later. -
Erase Heavy Lines:
Gently roll a kneaded eraser over your sketch until the lines are barely visible, just enough to guide you without showing through the paint.
Fixing paint bleeds
If green sections bleed into each other, you’re painting too fast! Let one section dry for 2 minutes before painting its neighbor to keep lines crisp.
Step 2: Painting the Greenery
-
Mix Your Greens:
Prepare a palette with two or three shades of green. Mixing Sap Green with a touch of Burnt Umber creates a lovely, realistic forest tone. -
Start the Needle Work:
Using your small round brush, begin filling one of your sketched sections. Paint fine, parallel lines close together to mimic pine needles. -
Vary the Direction:
Move to an adjacent section and change the angle of your strokes. If the first section had needles pointing left, make the next set point right or downward. -
Create Texture:
Continue filling the triangle section by section. The alternating directions of the strokes create a woven, textured effect that gives the tree depth. -
Mind the Gaps:
Leave extremely thin white gaps between the sections. This negative space acts as a visual separator, defining individual branches. -
Build Color Depth:
As you work, dip your brush into slightly different green mixes or use less water occasionally. This natural variation prevents the tree from looking flat. -
Refine the Edges:
When painting sections along the outer border, let the needle tips extend slightly past your pencil line for a natural, organic edge. -
Paint the Trunk:
Mix a diluted Burnt Umber. At the base of the triangle, paint a simple rectangle for the trunk, using vertical strokes to suggest bark texture. -
Allow to Dry:
Let the green layer dry completely. If the paper feels cool to the touch, it still contains moisture, so give it another few minutes.
Frosty finish
Mix white gouache with a tiny drop of blue and gently dry-brush over the green tips once dry to create a snowy, winter-morning frost effect.
Step 3: Adding Festive Details
-
Prepare the Gold:
Activate your metallic gold paint with a few drops of water until it reaches a creamy, opaque consistency. -
Add Pinecones:
Paint small, elongated ovals randomly throughout the tree structure. These represent small pinecones or golden buds resting on the branches. -
Connect the Details:
Using the very tip of your brush, draw thin gold lines connecting these buds to the center of the branch sections, anchoring them visually. -
Highlight the Trunk:
I like to add thin vertical stripes of gold over the brown trunk once it’s dry to tie the whole color scheme together. -
Final Polish:
Check your work for any large unintended gaps and fill them with a single green needle stroke if necessary.
Now you have a unique, hand-painted holiday card ready to share with someone special
BRUSH GUIDE
The Right Brush for Every Stroke
From clean lines to bold texture — master brush choice, stroke control, and essential techniques.
Explore the Full Guide
Painter’s Tape Resist Tree Silhouette
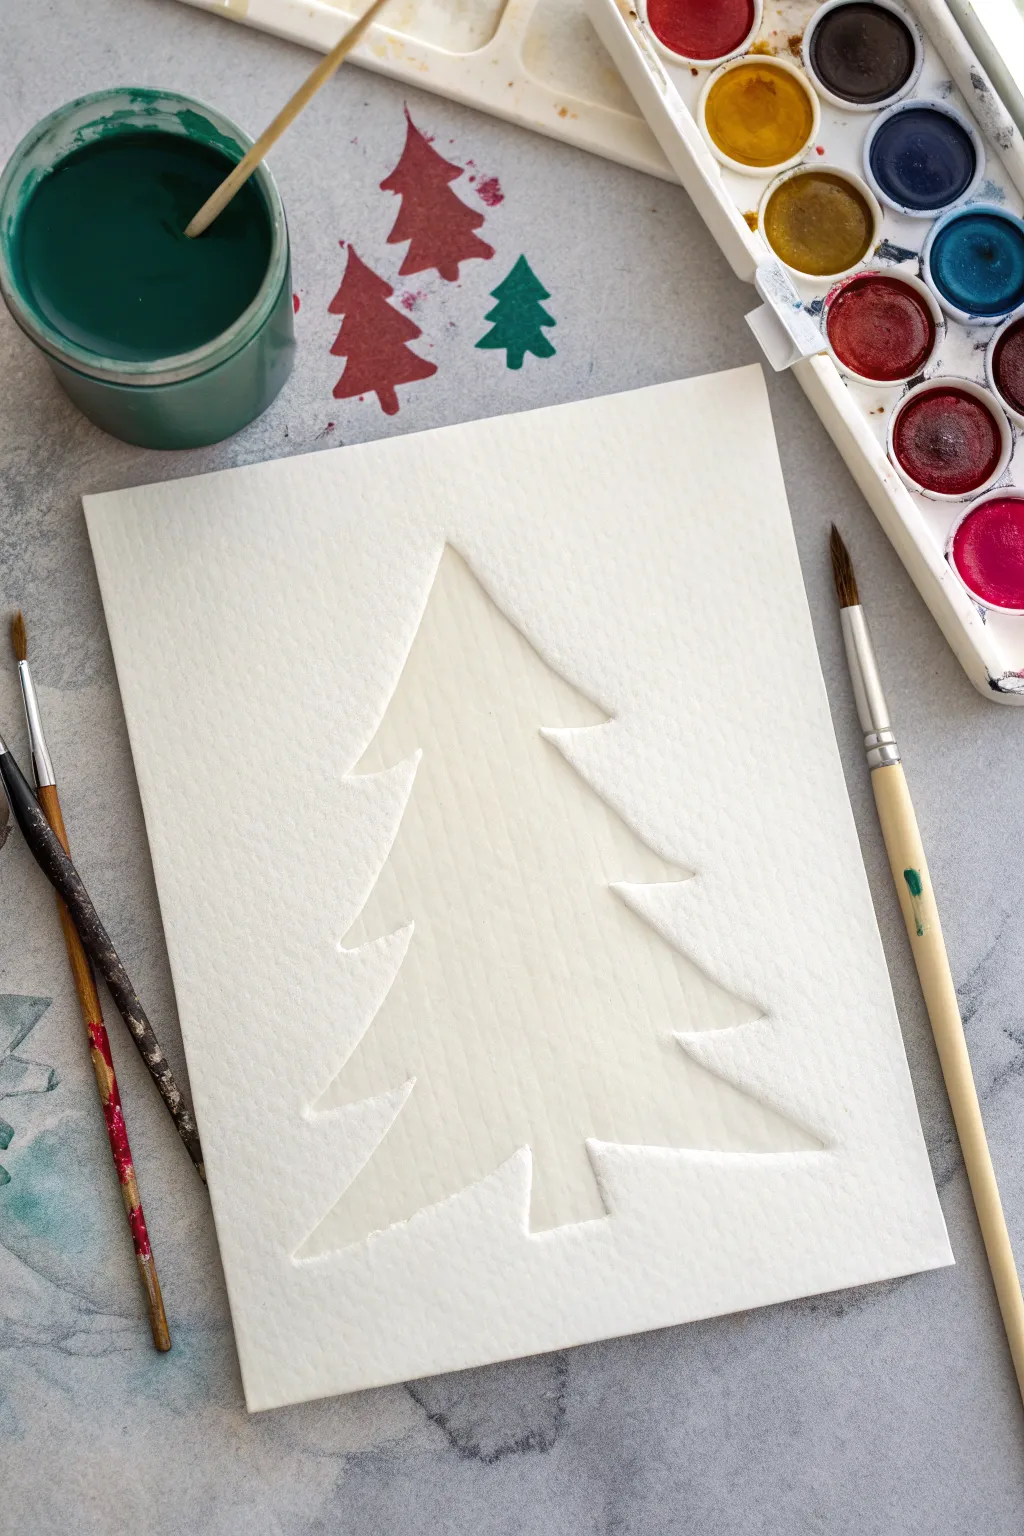
Create a stunningly simple holiday card using the magic of negative space and watercolor masking. This technique reveals a pristine white Christmas tree surrounded by soft watercolor textures, perfect for minimal and elegant greeting cards.
Step-by-Step Tutorial
Materials
- Heavyweight watercolor paper (300gsm/140lb or higher)
- Painter’s tape or masking tape
- Pencil
- Craft knife (X-Acto knife)
- Self-healing cutting mat
- Watercolor paints (various greens and reds)
- Round watercolor brushes (size 6 or 8)
- Jar of water
- Paper towels
Step 1: Preparing the Mask
-
Cover the paper:
Cut strips of painter’s tape and lay them horizontally across the center of your watercolor paper. Ensure the strips overlap slightly so there are no gaps between them where paint could seep through later. -
Sketch the tree:
Using a light pencil, draw a simple Christmas tree shape directly onto the painter’s tape. A symmetrical design with three distinct tiers usually works best for this silhouette style. -
Refine the lines:
Go over your sketch to make sure the points of the branches are sharp and the base is straight. This will be your cutting guide.
Tape Tip
Before applying tape to your paper, stick it to your jeans or shirt once first. This reduces the tackiness so it won’t tear your watercolor paper upon removal.
Step 2: Cutting and Refining
-
Cut the silhouette:
Place your paper on a self-healing cutting mat. Using a sharp craft knife, carefully trace along your pencil lines, cutting through the tape but trying not to slice deeply into the paper underneath. -
Remove the background tape:
This step requires a steady hand. Gently peel away the tape from the *outside* of the tree shape, leaving only the tree silhouette stuck to the paper. -
Seal the edges:
Run your fingernail or a bone folder firmly along the edges of the remaining tape tree. This burnishing step is crucial to prevent paint from bleeding under the mask and ruining your crisp lines.
Step 3: Painting the Background
-
Prepare the paint:
Activate your watercolor paints with a few drops of water. I like to mix a deep forest green and a vibrant crimson red on the palette to have them ready. -
Wet the paper:
Using a clean brush and clear water, lightly wet the paper area surrounding your tape tree. This wet-on-wet technique will help your colors blend softly. -
Apply the color:
Load your brush with paint and dab it onto the wet paper around the tape. Feel free to be loose here—splatters and uneven washes add to the charm. -
Create variation:
While the paper is still damp, drop in stronger pigment near the edges of the tape to create contrast, and let it fade out towards the edges of the paper. -
Add festive touches:
If you wish, paint small, simple tree shapes in red or green freehand in the background area or on scrap paper to test your colors. -
Let it dry completely:
Allow the paint to dry fully. If you peel the tape while the paper is damp, you risk tearing the surface or smudging the paint.
Sparkle Finish
Mix a tiny amount of iridescent medium or metallic gold paint into your background wash for a subtle, magical holiday shimmer.
Step 4: The Big Reveal
-
Lift the tape:
Once the paper is bone dry, slowly peel up the tape tree. Pull the tape back at a 45-degree angle, moving slowly to ensure a clean removal. -
Check the edges:
Inspect the revealed white tree. If there are any jagged edges where the paint bled slightly, you can gently scrape them away with your craft knife or cover them with opaque white gouache. -
Add final details:
For a bit of dimension, you can paint a very faint shadow along one side of the white tree using a watered-down grey or blue wash, or simply leave it stark white for a modern look.
Your elegant silhouette art is now ready to be framed or gifted as a handmade card
Paper Strip Layered Tree Collage
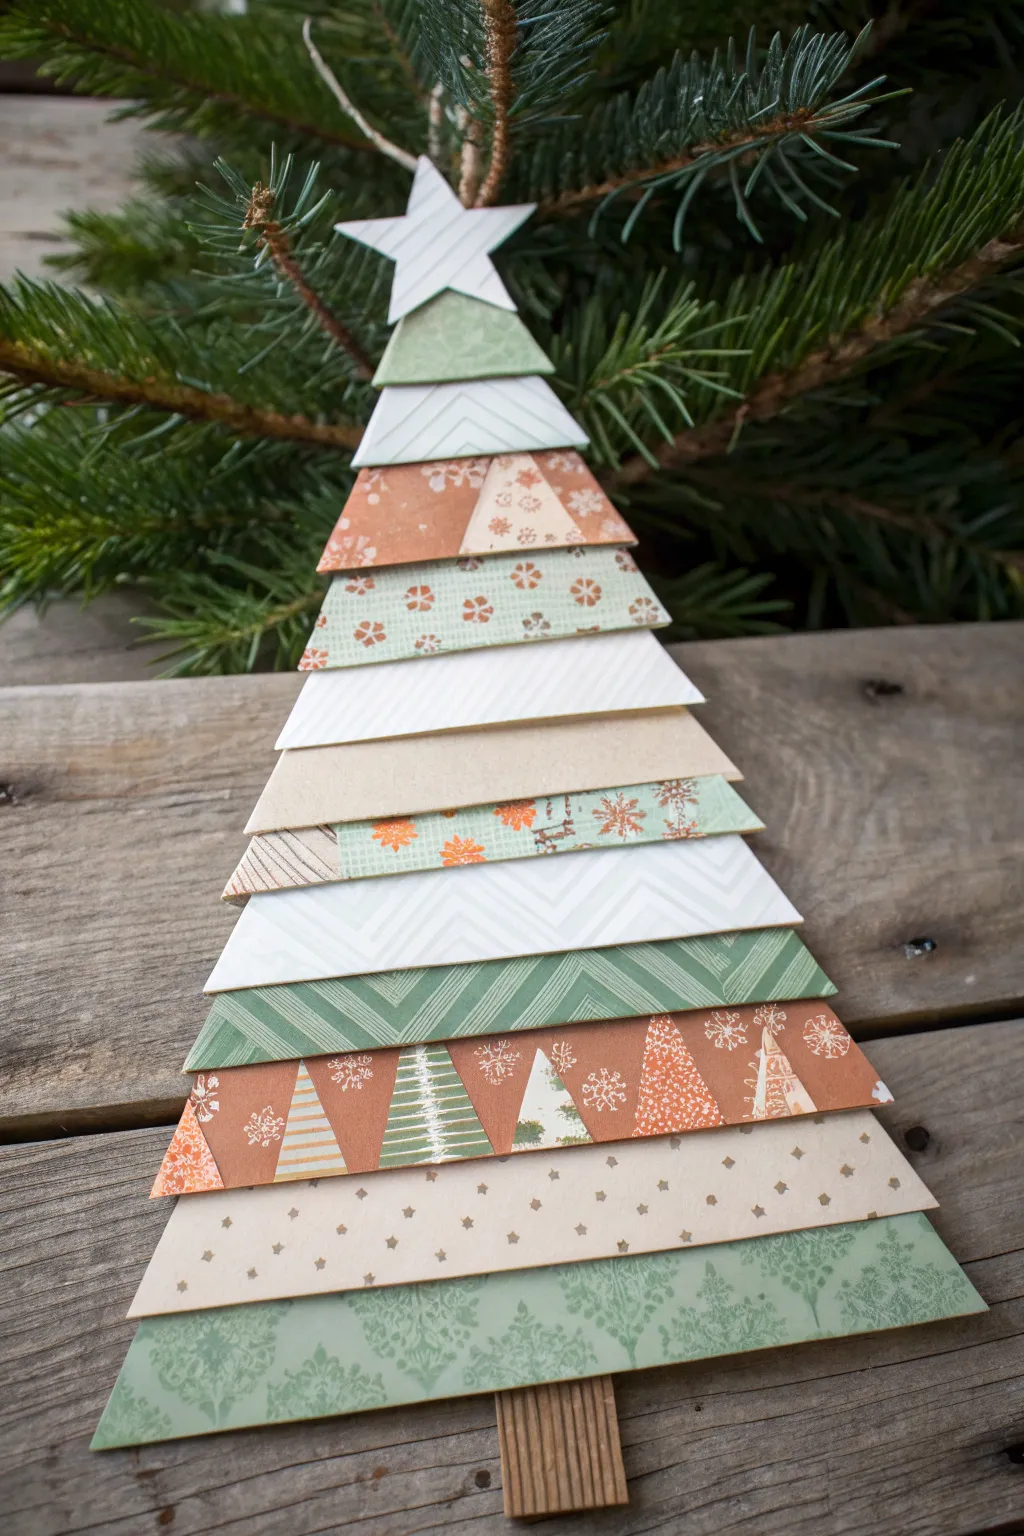
Transform leftover scraps of patterned scrapbook paper into this charmingly rustic layered tree ornament. By cutting and stacking papers of varying widths and prints, you create a surprisingly textured and dimensional piece that looks lovely hanging on a real evergreen.
How-To Guide
Materials
- Various sheets of patterned scrapbook paper (greens, creams, browns, mixed patterns)
- Small piece of corrugated cardboard (for the trunk)
- White or light-colored cardstock (for the star)
- Base cardstock sheet (optional, for stability)
- Paper trimmer or scissors
- Ruler
- Pencil
- Glue stick or craft glue
- Twine or string (for hanging)
- Hole punch (optional)
Step 1: Preparation & Cutting
-
Select your palette:
Gather a variety of patterned papers. Aim for a mix of geometric prints, solids, and holiday-themed motifs like snowflakes or trees. A limited color palette of sage greens, creams, and earthy browns keeps the look cohesive. -
Cut the base strips:
Create about 12 to 14 strips of paper. These don’t need to be perfectly uniform in height, but keeping them between 0.5 and 0.75 inches tall usually works best. -
Create the taper:
To form the tree shape, your bottom strip needs to be the widest (about 3-4 inches), and each subsequent strip moving upward needs to be slightly narrower. You can cut them as rectangles first. -
Angle the edges:
Trim the left and right sides of each paper strip at a slight angle to create trapezoid shapes. This helps the finalized tree look more integrated, rather than just a stack of rectangles. -
Prepare the trunk:
Cut a small rectangle from corrugated cardboard, roughly 1 inch tall and 0.75 inches wide. Position the corrugation vertically to mimic wood texture. -
Cut the star:
Using white cardstock or a very light patterned paper, cut out a simple five-point star shape. It should be sized proportionally to fit the very top of your tree.
Step 2: Assembly
-
Start the stack:
For easier handling, I find it helpful to glue the strips onto a triangular piece of scrap backing cardstock, though you can also glue them directly to one another if you overlap them significantly. -
Attach the bottom layer:
Glue your widest trapezoid strip at the very bottom of your backing (or start your chain here). Ensure the angled sides are pointing inward. -
Layer upwards:
Place the next widest strip directly above the first. Slight overlapping is good; it prevents gaps and adds physical dimension to the tree. -
Mix your patterns:
As you glue each subsequent layer, pay attention to the pattern order. Try to alternate between busy prints (like the orange snowflakes) and quieter textures (like the cream chevron) to keep the eye moving. -
Check the alignment:
Periodically pause to make sure your stack serves the overall triangular shape. The side edges should create a relatively straight diagonal line up to the peak. -
Finish the peak:
Continue gluing until you reach the smallest top strip. This piece should be quite narrow, serving as the point where the star will sit.
Gaps showing?
If you see white gaps between layers, cut a thin strip of matching paper and slip it behind the gap, gluing it in place from the back side.
Step 3: Final Details
-
Attach the trunk:
Flip the tree over. Glue the corrugated cardboard trunk to the back of the bottom-most paper strip, centering it so it peeks out visibly. -
Add the star:
Glue your cut-out star to the very top point of the tree. Let it overlap the top paper strip slightly to secure it well. -
Dry thoroughly:
Press the entire assembly flat, perhaps under a heavy book, for about 20 minutes to ensure all edges are sealed and the tree stays flat. -
Create a hanger:
Glue a loop of twine to the back of the star, or punch a tiny hole in the top point of the star to thread a string through.
Make it sparkle
Brush a tiny bit of glitter glue or Mod Podge mixed with fine glitter onto the edges of the white paper strips to mimic fresh snow.
Now you have a unique, handcrafted ornament ready to decorate your home

PENCIL GUIDE
Understanding Pencil Grades from H to B
From first sketch to finished drawing — learn pencil grades, line control, and shading techniques.
Explore the Full Guide
Woven Paper Christmas Tree
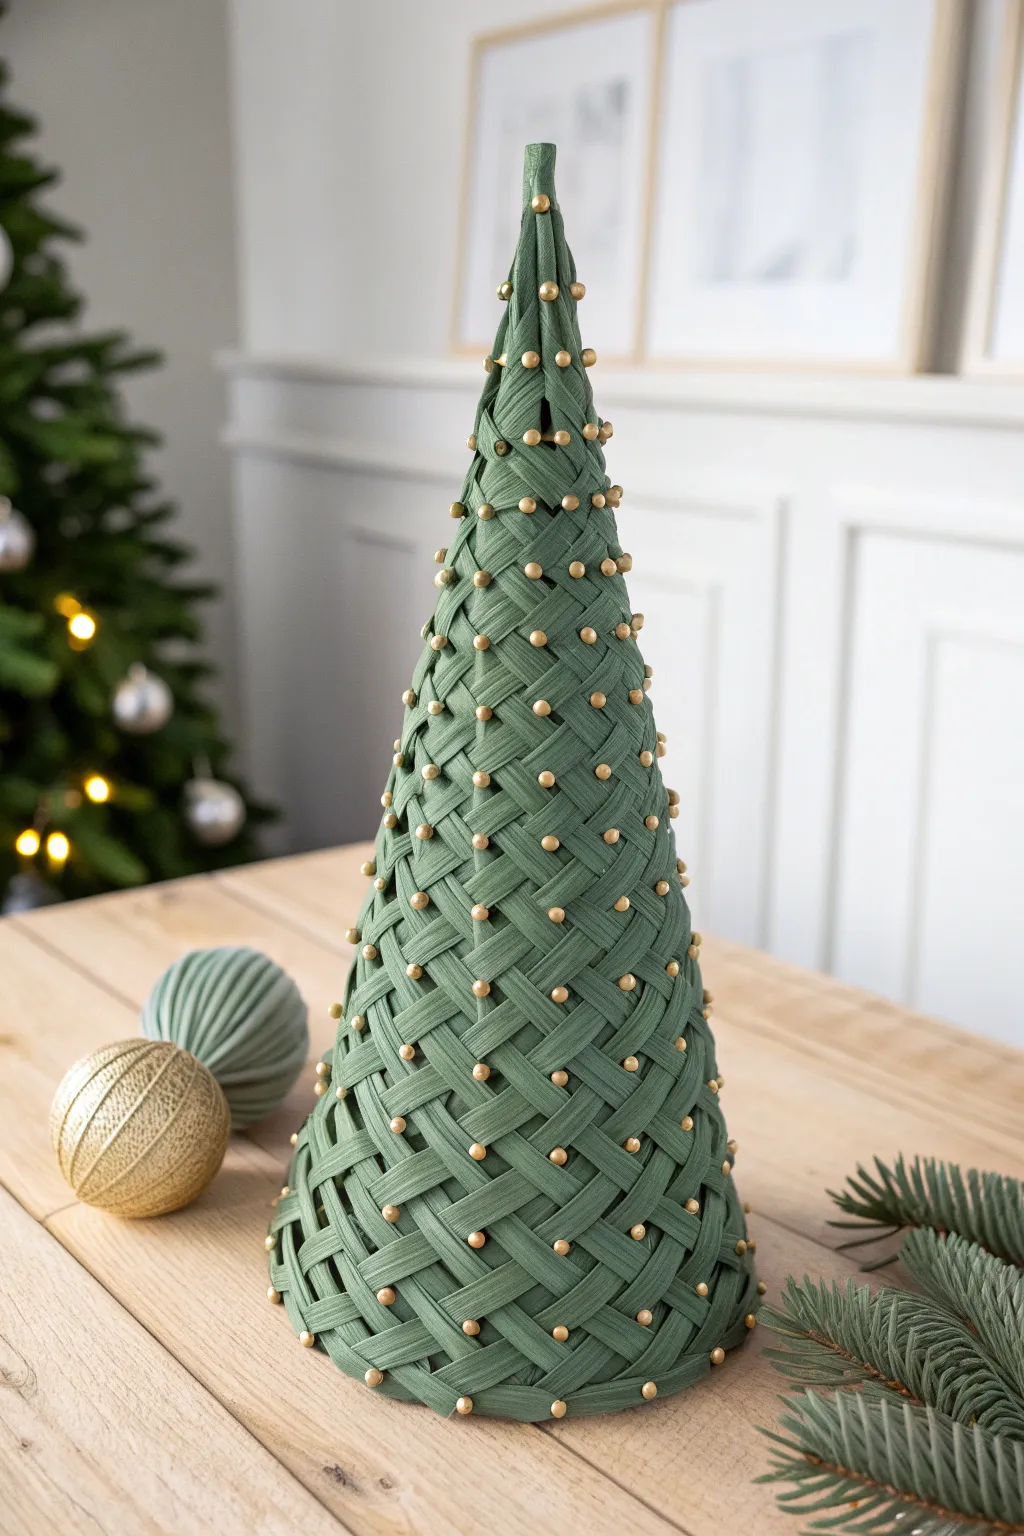
This sophisticated holiday project transforms simple paper strips into a stunning, texture-rich centerpiece. The intricate basket-weave pattern, accented with tiny gold beads, creates a timeless decoration that looks far more expensive than it costs to make.
Step-by-Step Tutorial
Materials
- Stiff green cardstock or textured art paper (forest green)
- Styrofoam or cardboard cone form (approx. 12-15 inches tall)
- Gold pearl-headed pins or small gold beads with craft glue
- Paper trimmer or scissors
- Ruler
- Double-sided tape or low-temp hot glue gun
- Pencil
Step 1: Preparing the Materials
-
Measure and Cut Strips:
Begin by cutting your green cardstock into long, even strips. For a tree of this scale, strips around 1/2 inch to 3/4 inch wide work best. You will need a significant number of strips, so cut more than you think you’ll need to avoid pausing later. -
Prepare the Cone Base:
If you are using a styrofoam cone, you might want to paint it a matching dark green first so no white shows through the weave. Let this base coat dry completely before proceeding. -
Anchor Vertical Strips:
Attach the ends of several paper strips to the very top point of the cone. Secure them firmly with hot glue or a pin. Let these strips drape vertically down the sides of the cone, spacing them evenly around the circumference like ribbons on a maypole.
Step 2: Weaving the Structure
-
Start the Diagonal Weave:
Take a new strip to use as a horizontal (or diagonal) weaver. Secure one end near the top of the cone, tucked under a vertical strip. -
Develop the Pattern:
Ideally for this conical shape, you aren’t doing a straight horizontal weave but rather two sets of diagonal strips opposing each other. Anchor a set of strips angling down to the right, and another set angling down to the left. -
Interlacing the Strips:
Weave the left-leaning strips over and under the right-leaning strips. This basket-weave creates the diamond pattern visible in the finished piece. Keep the tension snug against the cone form. -
Pinning as You Go:
I find it helpful to use temporary sewing pins to hold the strips in place while I adjust the weave. The cone shape makes paper want to slip, so pinning keeps your diamonds tight and uniform. -
Adding Length:
As you run out of length on a strip, simply glue a new strip to the end of the old one on the underside, hiding the seam within the weave. -
Securing the Bottom:
Once you reach the bottom of the cone, use a bead of hot glue or strong double-sided tape to secure all loose strip ends to the inner rim or bottom edge of the cone. -
Trimming Excess:
Trim any excess paper hanging off the bottom edge cleanly with scissors so the tree sits flat on a table.
Stay Sharp
Use a fresh blade on your paper trimmer. Fuzzy or torn edges on cardstock strips will cheapen the final look immediately.
Step 3: Detailed Embellishment
-
Selecting Intersection Points:
Identify the center of each woven diamond or the crossing points where strips overlap. This is where your gold accents will go. -
Inserting Gold Pins:
If you are using a styrofoam base, push a gold pearl-headed pin directly through the center of the overlapped paper strips and into the foam. This not only decorates the tree but permanently secures the weave. -
Gluing Bead Alternatives:
If you used a hollow cardboard cone or don’t have pins, use a tiny dot of tacky craft glue to attach a small gold bead at each intersection instead. -
Finishing the Top:
Wrap a final small piece of paper around the very tip of the cone to cover any messy starting points. You can secure this with a final gold pin on top for a neat finish. -
Final Adjustments:
Gently gently press down on any loose weaves and ensure all pins are pushed in to a uniform depth for a polished look.
Level Up: Ombre Effect
Use three shades of green paper, starting with the lightest at the top and transitioning to the darkest at the bottom for depth.
Place your woven tree on a mantel or side table and enjoy the handcrafted warmth it brings to your holiday decor
Tissue Paper Mosaic Tree Trio
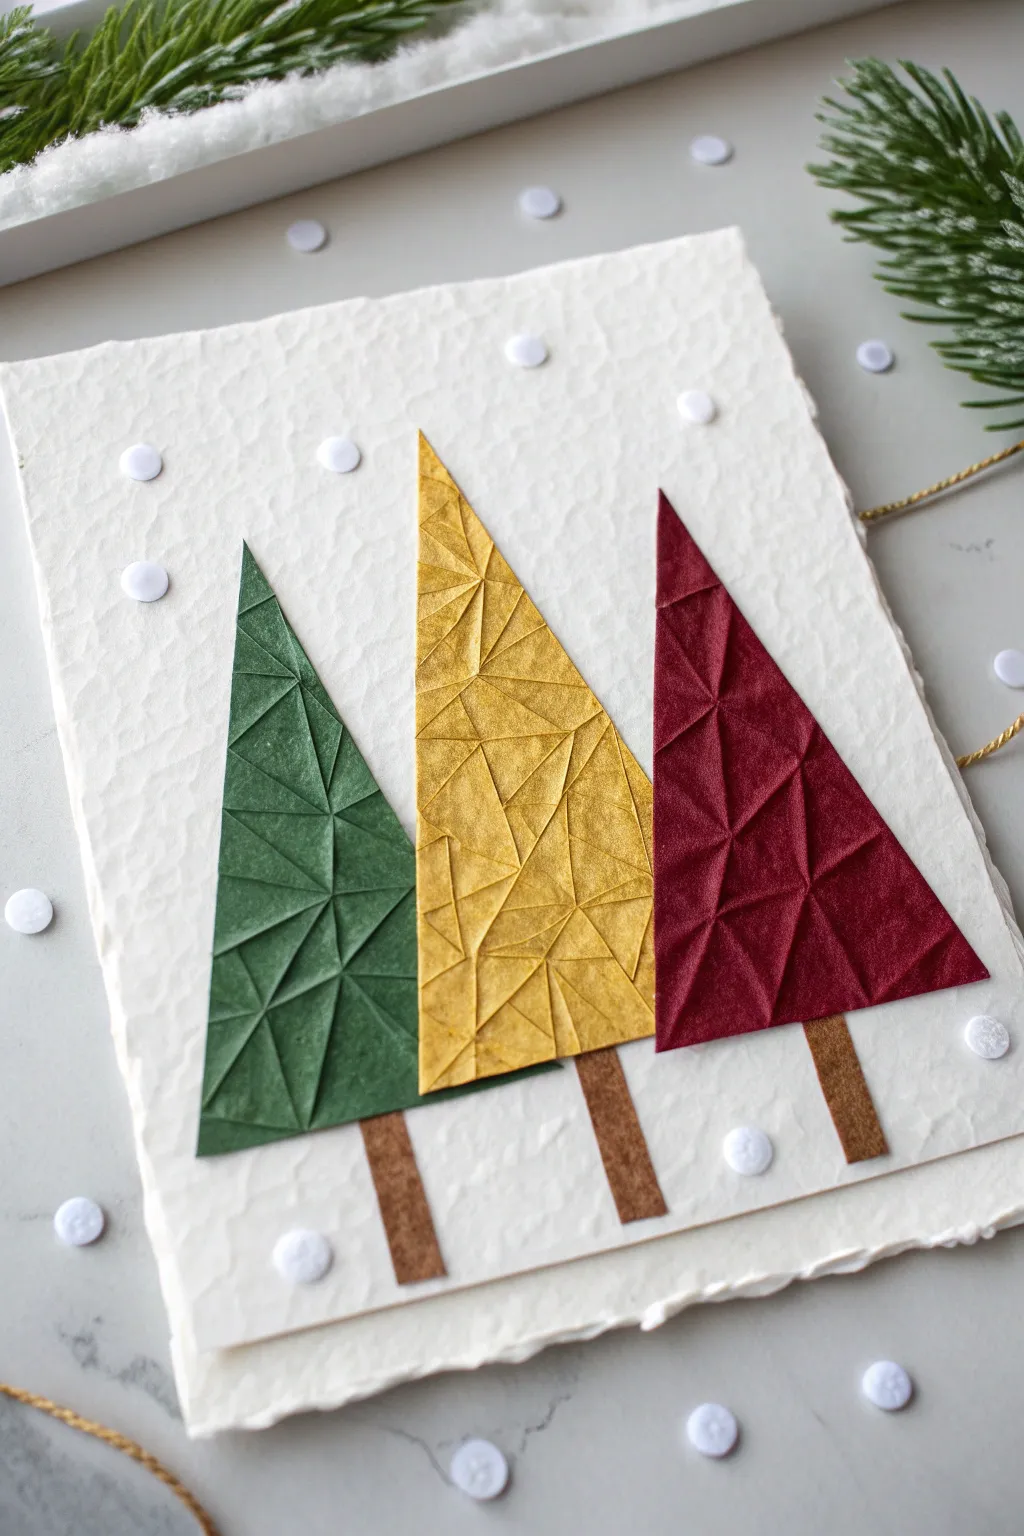
This elegant card combines rustic texture with modern geometric design, featuring three distinct Christmas trees that pop off the page. The unique “mosaic” effect is actually achieved through a clever folding and crumpling technique that mimics stained glass or facets.
Detailed Instructions
Materials
- Heavyweight textured cardstock (white or cream)
- Colored paper (deep green, mustard yellow, burgundy)
- Brown cardstock or kraft paper (for trunks)
- White hole punch or white sequins
- Glue stick or craft glue
- Scissors
- Ruler
- Pencil
- Bone folder (optional)
Step 1: Preparing the Base
-
Size the card:
Cut your heavyweight textured cardstock to your desired size. A standard 5×7 inch folded card works well for this design. If your paper has a raw or deckled edge, position it at the bottom for an artisanal look. -
Create the snow effect:
If you don’t have paper with a pre-existing heavy texture, you can create a subtle ‘snowy’ base layer. Tear a slightly smaller rectangle of textured watercolor paper and mount it centrally onto your main card base using foam tape for elevation.
Taming the Texture
If the crumpled paper refuses to lay flat during gluing, place a heavy book over the card for 15 minutes while the glue sets to bond the edges securely
Step 2: Creating the Trees
-
Draft the triangles:
On your colored papers (green, yellow, burgundy), use a ruler to draw three identical tall, narrow triangles. Aim for a height that fills about two-thirds of your card front. -
Cut the shapes:
Carefully cut out each triangle with sharp scissors to ensure clean, straight edges. -
Initial crumple:
Take the green triangle first. Gently crumple it into a loose ball in your hand. Don’t squeeze too tight, just enough to break the smooth surface fibers. -
Flatten and smooth:
Open the paper back up. Lay it flat on a hard surface and smooth it out with your fingers. -
Create distinct creases:
To get that geometric faceted look shown in the photo, fold corners of the paper inward randomly and press firmly, then unfold. Repeat this several times across the triangle’s surface to create sharp, intersecting valley and mountain folds. -
Repeat for all colors:
Perform the crumpling and creasing process on the yellow and burgundy triangles. I like to vary the fold patterns slightly so no two trees look exactly identical.
Gilded Edges
Lightly brush the raised creases of the trees with gold ink or metallic watercolor. This highlights the geometric folds and adds festive shimmer
Step 3: Assembly
-
Arrange the composition:
Place your three textured triangles onto the card base to determine spacing. The central yellow tree should sit slightly higher than the outer two to create visual balance. -
Glue the trees:
Apply a generous layer of glue to the back of each triangle. Press them firmly onto the textured cardstock. You may need to hold them down for a moment so the stiff, creased paper adheres completely. -
Add the trunks:
Cut three small, narrow rectangles from your brown cardstock. Lift the bottom edge of each tree slightly and slide the trunk underneath, gluing it in place. -
Punch the snow:
Use a standard hole punch on a scrap of white paper to create small confetti dots. -
Apply the snowfall:
Scatter the white dots randomly around the trees. Glue them down individually. Place a few overlapping the edges of the trees to make them feel integrated into the snowy scene.
Once the glue is fully dry, your handcrafted card is ready to share warm holiday wishes with a sophisticated touch


Cozy Window View Tree Scene
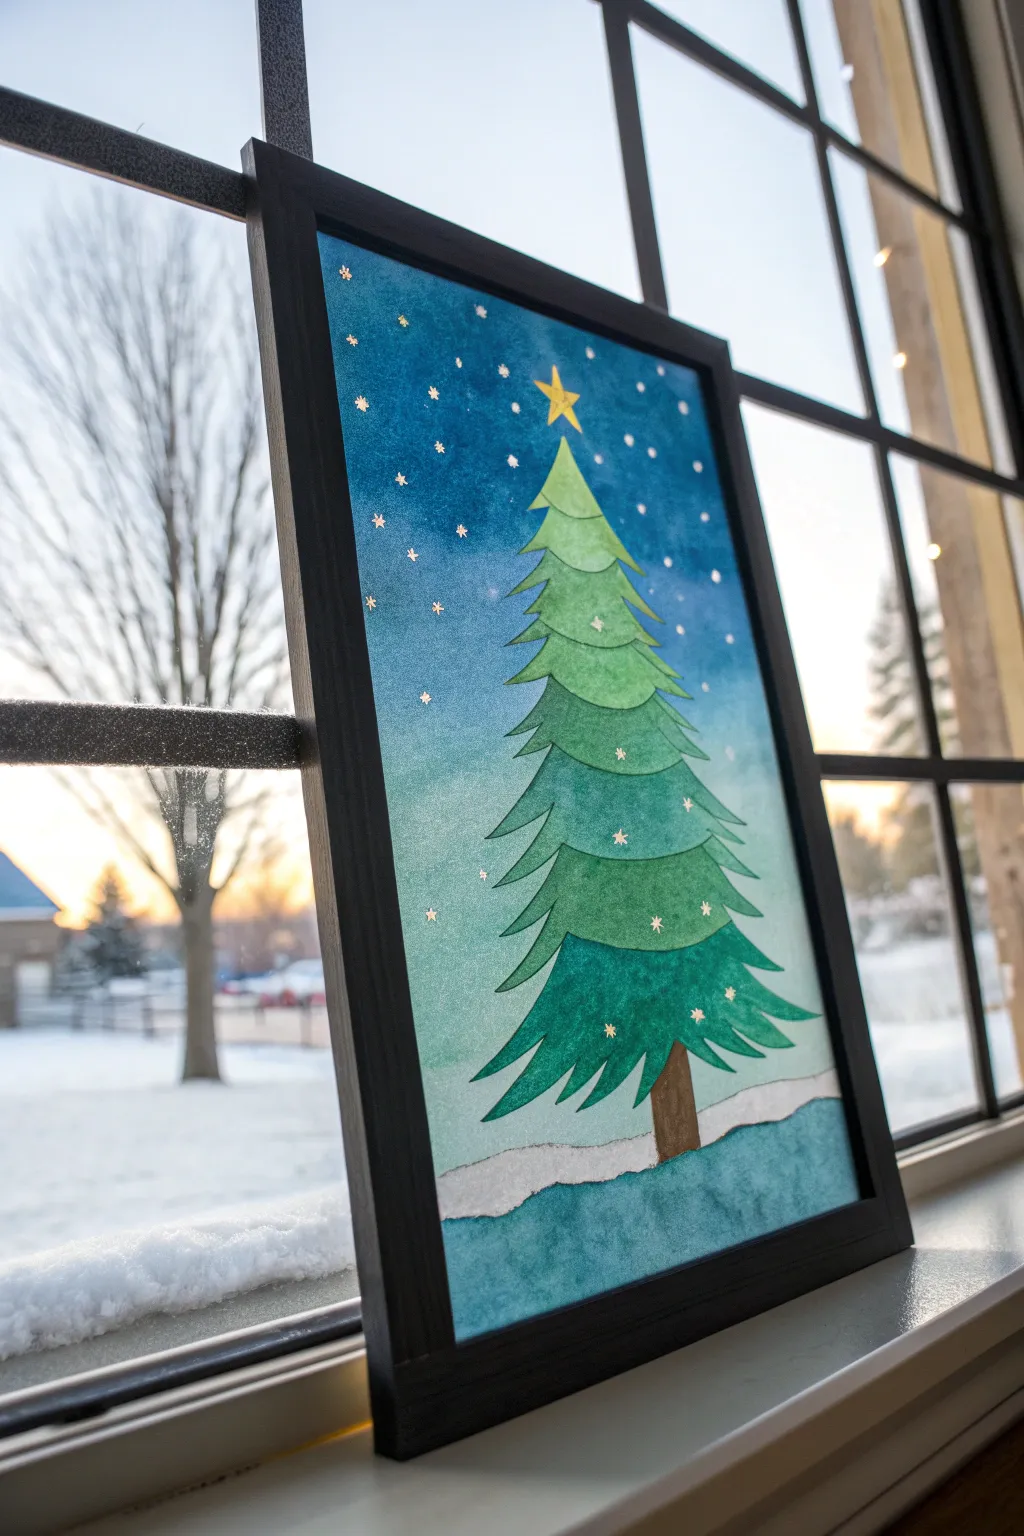
Capture the magic of a silent winter night with this layered, mixed-media painting that features a whimsical evergreen standing tall under a starry sky. Using simple watercolor washes and a touch of metallic shine, you’ll create a serene holiday scene perfect for framing.
How-To Guide
Materials
- Cold press watercolor paper (140 lb)
- Watercolor paints (phthalo blue, indigo, sap green, viridian, brown)
- Flat shader brush (1/2 inch) and round brush (size 6)
- Gold metallic paint or gold paint pen
- Pencil and eraser
- Masking tape
- Jar of clean water
- Paper towels
- Ruler
Step 1: Preparing and Sketching
-
Tape the edges:
Secure your watercolor paper to a sturdy board or your work surface using masking tape on all four sides. This creates a crisp white border and prevents the paper from buckling when wet. -
Sketch the horizon:
Lightly draw a wavy, uneven line near the bottom third of the paper to designate the snowy ground. Keep the line organic rather than perfectly straight. -
Outline the tree:
Lightly sketch a tall, thin triangle shape centered on the paper. Inside this guide, draw the distinct layers of the tree, using curved, scalloped lines that flare out slightly at the edges, stacking them like tiers on a cake.
Clean Lines Pro-Tip
To keep the white borders crisp, run a credit card or bone folder firmly over the edge of the masking tape before you start painting to seal it tight.
Step 2: Painting the Sky
-
Wet the sky area:
Using a clean brush and water, wet the entire sky area around your pencil sketch. Be careful not to get water inside the tree shape or below the horizon line. -
Apply the first wash:
Load your brush with a watery mix of phthalo blue. Start at the top of the paper and bring the color down, allowing it to fade slightly as it nears the horizon. -
Deepen the night colors:
While the paper is still damp, drop in concentrated indigo or darker blue at the very top corners. Let this bleed naturally downward to create a gradient effect, suggesting a deep night sky. -
Dry completely:
Let the sky layer dry completely before moving on. I prefer to wait about 15 minutes or use a hair dryer on a low setting.
Step 3: Painting the Tree
-
Base green layer:
Mix a light wash of sap green. Paint every other tier of the tree (starting from the top), skipping sections so wet paint doesn’t bleed into adjacent areas. -
Fill the gaps:
Once the first set of tiers is dry, paint the remaining sections with a slightly darker mix, perhaps adding a touch of viridian to vary the green tones. -
Add clear shadows:
Once the base greens are dry, mix a darker, more concentrated green. Paint a thin shadow line just under the scalloped bottom edge of each tier to give the tree dimension and make the layers pop. -
Paint the trunk:
Use a medium brown to fill in the small trunk rectangle at the base of the tree. Let it dry.
Level Up: Salt Texture
While the blue sky wash is still wet, sprinkle a pinch of table salt onto the paper. When it dries and you brush the salt off, it leaves beautiful frost-like textures.
Step 4: Ground and Details
-
Define the snow:
Take a very diluted wash of blue-grey and paint a wobbly line just below the horizon line you sketched earlier. This creates a shadow that suggests the thickness of the snow drift. -
Fill the foreground:
Paint the very bottom section of the ground (below the snow drift) with a textured wash of blue and teal, giving the impression of an icy foreground or shadowed snow. -
Add the stars:
Once the sky is bone dry, use your gold paint pen or a fine brush with metallic paint to dot small stars throughout the blue sky. Vary the sizes for a natural look. -
Paint the topper:
Draw and fill in a prominent five-pointed star at the very top of the tree using the same gold metallic pigment. -
Decorate the branches:
Add tiny gold asterisks or dots randomly across the green sections of the tree to represent ornaments or sparkling lights. -
Reveal the border:
Carefully peel away the masking tape at a 45-degree angle to reveal your clean white edges.
Place your finished piece in a simple black frame to contrast effectively with the cool winter colors
Chalk Pastel Glow Tree on Dark Paper

Capture the silent beauty of a snowy winter night with this striking chalk pastel project. Using dark paper as a dramatic backdrop makes the white frosty details of the evergreen pop with an ethereal glow.
Step-by-Step Guide
Materials
- Black construction paper or pastel paper (A4 size)
- Chalk pastels (dark green, light green, white, brown, yellow)
- Blending stump or cotton swabs
- Paper towel or soft cloth for cleaning fingers
- Workable fixative spray (optional)
Step 1: Setting the Structure
-
Initial sketch:
Begin by lightly tracing a vertical line down the center of your black paper with a white pastel pencil or the sharp edge of a white chalk stick. This will serve as the trunk guide to keep your tree straight. -
Marking the width:
Lightly dash a triangle shape over your center line to define how wide the bottom branches will be compared to the top. This sketch should be very faint so it disappears later. -
Base layer of green:
Take a dark green pastel and start drawing general branch shapes. Use short, downward-sweeping strokes starting from the center line and moving outward, following your triangle guide.
Step 2: Building the Branches
-
Layering lighter greens:
Switch to a lighter, more vibrant green. Apply this color over the dark green, focusing on the middle and tips of the branches, leaving the areas near the trunk darker for depth. -
Creating texture:
Instead of coloring in solid blocks, use rapid, flicking strokes. This mimics the texture of pine needles. I prefer to work from the top of the tree down to avoid smudging my previous work. -
Soft blending:
Use your finger or a blending stump to gently smudge the green layers together. You don’t want a smooth blur; just soften the distinct lines slightly to create a bushy base. -
Adding the trunk:
At the very bottom, draw a small, uneven stump using brown pastel. Add a tiny touch of black or dark green on one side to indicate shadow.
Smudged Skylight?
If you accidentally smear white dust across the black sky, use a kneadable eraser. Dab it repeatedly over the smear (don’t rub) to lift the dust without ruining the paper texture.
Step 3: Adding the Frost and Glow
-
First pass of snow:
Take a sharp edge of your white pastel. Draw distinct, heavy lines along the top ridges of each branch to represent settled snow. -
Feathering the frost:
Using a lighter touch with the white pastel, make small, quick flicks downward from your heavy snow lines into the green needles. This creates the look of frosted tips. -
Refining the shape:
Step back and look at your silhouette. Add extended white tips to the ends of the branches to make the tree look fuller and more organic against the black background. -
The glowing star:
At the very peak of the tree, draw a simple five-pointed star with white pastel. Press firmly to make it opaque. -
Adding warmth:
Lightly layer a small amount of yellow pastel over the white star. Smudge it gently outward with your fingertip to create a soft, glowing halo effect around the peak. -
Grounding shadow:
beneath the tree, use a dark grey or lightly applied white pastel to sketch rough horizontal strokes. Smudge them horizontally to create a snowy ground that fades into the darkness.
Sharper Needles
Pastel sticks can get blunt quickly. Break a stick in half to create a fresh, sharp edge. This “shat-tered” edge is perfect for drawing fine, crisp pine needles and tiny stars.
Step 4: Final Touches
-
Starry night sky:
To create the stars, engage the sharp corner of your white pastel. Press and twist gently in random spots across the black background to make crisp dots. -
Varying star sizes:
Make some dots tiny and faint, and others slightly larger and brighter to give the sky depth. -
Highlight check:
Do a final pass over the tree. If the green has swallowed up too much white, re-apply bright white strokes on the most prominent branches for high contrast. -
Clean up:
Use a clean paper towel to wipe away any accidental chalk dust smears on the black background, keeping the negative space purely dark. -
Protect the art:
If traditional chalk pastels were used, a light mist of workable fixative is recommended to prevent the dust from falling off over time.
Now you have a serene winter scene that captures the quiet magic of the season
Salt Watercolor Snowy Tree Texture
Capture the stillness of winter with this textured watercolor forest scene featuring a majestic pine sprinkled with snow. Using simple salt techniques and white gouache splatters, create a piece that feels frosty to the touch and perfectly festive.
Step-by-Step Tutorial
Materials
- Cold press watercolor paper (heavy texture is key)
- Watercolor paints (Sap Green, Hooker’s Green, Payne’s Grey, Yellow Ochre)
- White gouache or white acrylic ink
- Round watercolor brushes (Size 4 and Size 8)
- Table salt or sea salt
- Masking tape
- Water cups and paper towels
- Old toothbrush or stiff fan brush
Step 1: Setting the Scene
-
Paper preparation:
Begin by taping down all four sides of your cold press watercolor paper to a board or table. This prevents buckling when the paper gets wet and creates a clean white border later. -
Pencil sketch:
With an HB pencil, very lightly sketch a vertical line for the center trunk of your main tree. Add faint triangles to indicate where the two smaller background trees will sit on either side. -
Background wash:
Mix a very watery puddle of Yellow Ochre and a touch of Sap Green. Apply this loosely to the bottom third of the paper where the trees will sit, letting it fade into white as you move up. Let this dry completely.
Step 2: Background Trees
-
Mixing lighter greens:
Create a wash of Sap Green diluted with plenty of water. We want these trees to look further away, so they must be lighter and less detailed than the foreground tree. -
Painting the left shape:
Using the Size 8 brush, paint the silhouette of the smaller tree on the left. Use a dabbing motion to create jagged edges representing branches, keeping the shape loose and somewhat misty. -
Painting the right shape:
Repeat this process for the tree on the right side. While the paint is still wet, drop in a tiny bit of darker green at the base to add weight, then let these background trees dry completely.
Timing the Salt
If the salt doesn’t bloom, your paint was likely too dry. If it creates a muddy blob, it was too wet. Aim for a distinct sheen on the paper surface when you sprinkle.
Step 3: The Main Pine
-
Mixing deep greens:
Prepare a rich, concentrated mixture of Hooker’s Green and Payne’s Grey. You want a creamy consistency, not too watery, to get those sharp pine needle details. -
Starting the top:
Switch to your Size 4 brush. Starting just below where your star will be, use just the tip of the brush to flicker small strokes outward and downward, mimicking the top crown of the pine. -
Building emphasis:
Work your way down the center line, making the branches wider as you descend. Leave gaps of white paper between some branches—this negative space is crucial for looking like a real tree. -
Adding texture:
As you paint the lower, heavier branches, press the belly of the brush down to create thicker shapes, then flick the tip up at the ends. Overlap some branches over the dried background trees. -
Creating dimension:
While the green paint is still damp, drop concentrated Payne’s Grey into the center of the tree near the trunk area. This dark core creates instant 3D volume.
Make it Sparkle
Mix a tiny amount of iridescent medium or silver watercolor into your white gouache before splattering. Under warm holiday lights, the snow will genuinely twinkle.
Step 4: Snowy Textures
-
The salt technique:
While the heavy green branches are still glistening wet (timing is everything here), sprinkle a pinch of table salt onto the dense green areas. The salt will push the pigment away, creating crystalline frost textures. -
Waiting game:
Allow the painting to dry thoroughly. Do not touch the salt until the paper is bone dry, or you will smudge the effect. -
Reveal the frost:
Gently rub off the dried salt with your finger. You should see beautiful, star-like blooms in the texture of the branches. -
Adding shadows:
Mix a very watery grey-blue. Paint a soft, horizontal shadow on the ‘snow’ underneath the tree to ground it, blending the edges so they disappear into the white paper. -
The star:
With a fine detail brush and light grey paint, draw a simple star at the very apex of your main tree.
Step 5: Winter Storm Finish
-
Preparing the snow:
Squeeze out fresh white gouache and dilute it slightly with water until it is the consistency of milk. Acrylic ink works well here too. -
Splatter application:
Dip an old toothbrush or stiff brush into the white paint. Hold it over the painting and run your thumb across the bristles to flick tiny white specks across the entire scene. -
Final heavy bits:
I like to go back with a detail brush and tap a few larger dots of white directly onto the tips of the dark green branches to look like accumulated snow clumps.
Peel off your tape to reveal crisp edges and admire your serene winter forest
Button and Sequin Ornament Tree
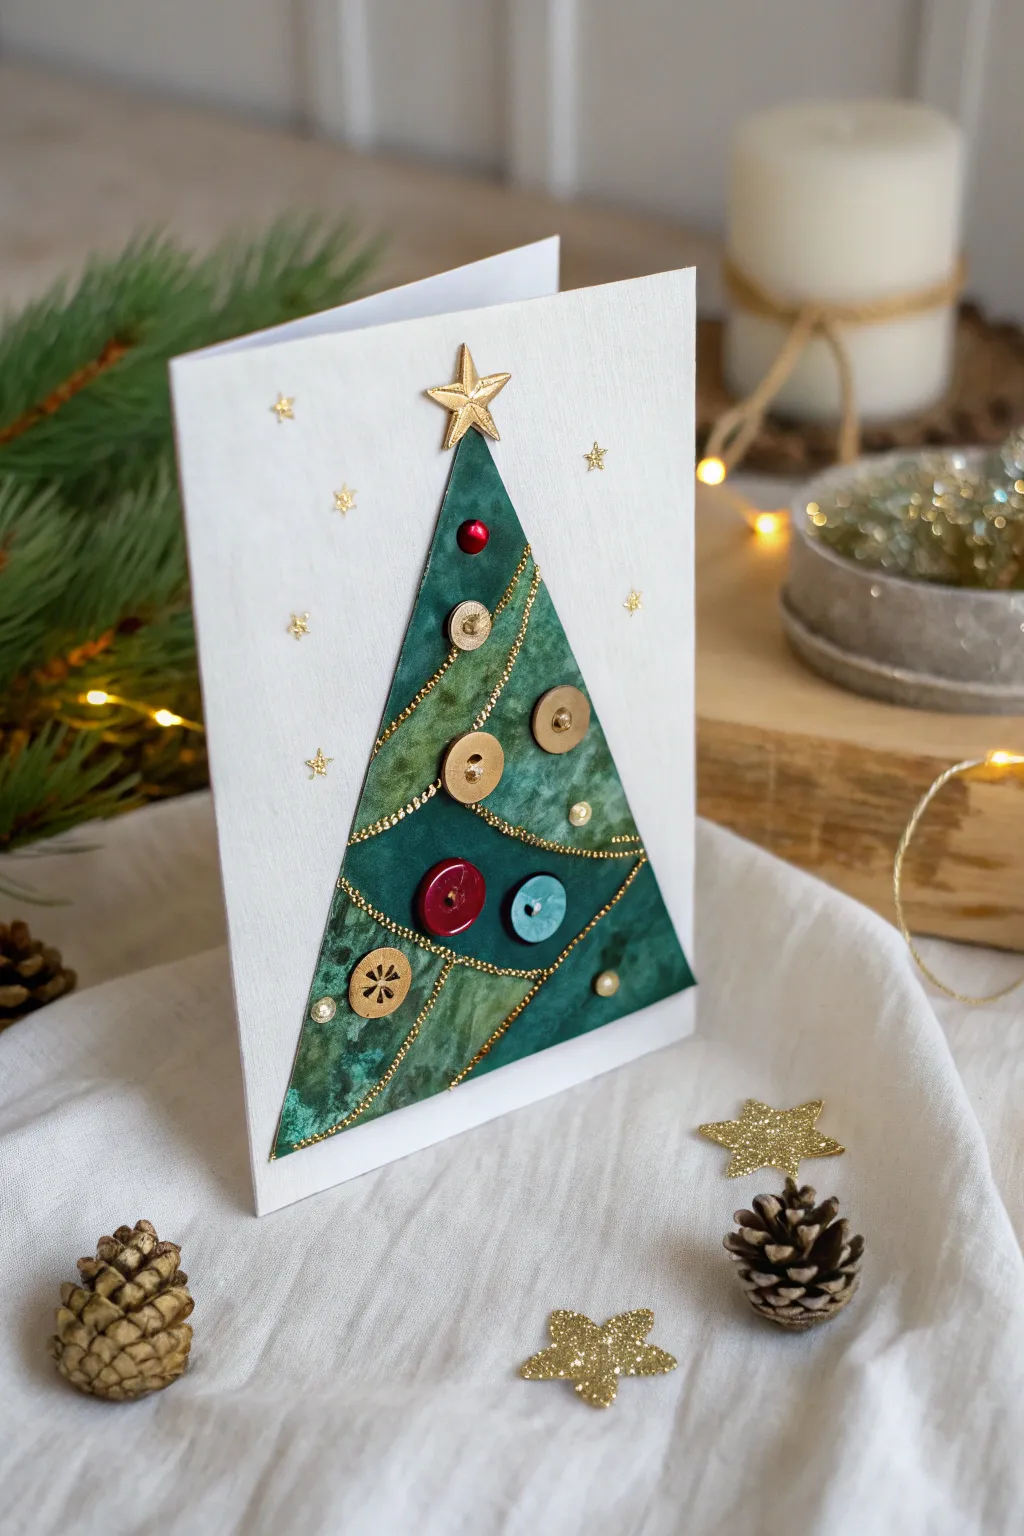
This elegant card combines rustic charm with festive sparkle, featuring a patchwork Christmas tree assembled from various shades of green paper. Accented with miniature gold chain garlands and an assortment of vintage-style buttons, it creates a tactile and sophisticated holiday greeting.
How-To Guide
Materials
- Blank white greeting card (folded)
- Scrapbook paper or cardstock (various shades of dark and marbled green)
- Gold craft chain or gold beaded string
- Assorted small buttons (red, gold, teal, brass)
- Gold star charm/topper
- Self-adhesive gold star stickers (tiny)
- Craft glue or hot glue gun (for heavier buttons)
- Scissors
- Ruler
- Pencil
Step 1: Planning and Cutting
-
Establish the tree shape:
Begin by lightly sketching a tall, narrow isosceles triangle onto a plain piece of scratch paper. This will serve as your main template to ensure the tree fits perfectly on your card front. -
Create the segments:
Divide your triangle template into four or five distinct horizontal sections. Draw slightly angled or wavy lines across the triangle rather than perfectly straight ones to give it that organic, patchwork look. -
Cut the template:
Cut out the main triangle from your scratch paper, then cut along the dividing lines you drew to create separate puzzle pieces. -
Trace onto green paper:
Select your various green papers. I like to use paper with a watercolor or marbled texture for depth. Trace each template segment onto a different shade of green paper. -
Snip the final shapes:
Carefully cut out your green paper shapes. Arrange them on your work surface to recreate the tree shape, mixing the shades to alternate light and dark segments.
Step 2: Assembling the Tree
-
Glue the base layer:
Starting from the bottom section, glue the paper segments directly onto the front of your white greeting card. Ensure the edges line up almost perfectly, leaving just a microscopic gap if you want to emphasize the segments. -
Measure the garland:
Take your gold craft chain or beaded string and drape it across the seams where the paper segments meet. Cut lengths specifically for each seam, allowing just a tiny bit of overhang to be trimmed later. -
Attach the gold details:
Apply a thin line of strong craft glue along the seams between the paper segments. Carefully press the gold chain into the glue. -
Secure the edges:
If your chain tends to fray, dab a tiny dot of glue at the very ends of the chain where they meet the edge of the tree to keep them secure.
Chain Reaction
If you don’t have metal chain, thick gold embroidery thread or twisted metallic twine creates a softer but equally festive garland effect.
Step 3: Adding Ornaments
-
Position the buttons:
Play with the arrangement of your buttons before gluing. Place larger buttons like the brass or red ones near the bottom and middle, and save tinier accents for the top. -
Glue the ornaments:
Once satisfied with the layout, glue each button firmly in place. Using a hot glue gun here can be helpful for heavier metal buttons to ensure they don’t slide. -
Add the topper:
Glue the metallic gold star at the very peak of the tree. If it has a loop (like a charm), you can snip the loop off with wire cutters or tuck it behind the paper point. -
Scatter the stars:
Place tiny self-adhesive gold star stickers randomly around the tree on the white background to mimic a night sky. -
Add final sparkle:
For extra detail, you can add tiny pearls or gems into empty spaces on the green paper, or even layer a small gem on top of a flat button. -
Let it set:
Allow the card to lie flat for at least an hour to ensure all thick glue drops and heavy embellishments are completely set.
Dimension Boost
Use thick foam mounting tape instead of glue for a few of the green paper segments. This raises parts of the tree for a cool 3D effect.
This beautiful keepsake card is now ready to be written in and sent to someone special
Pom-Pom Stamped Tree
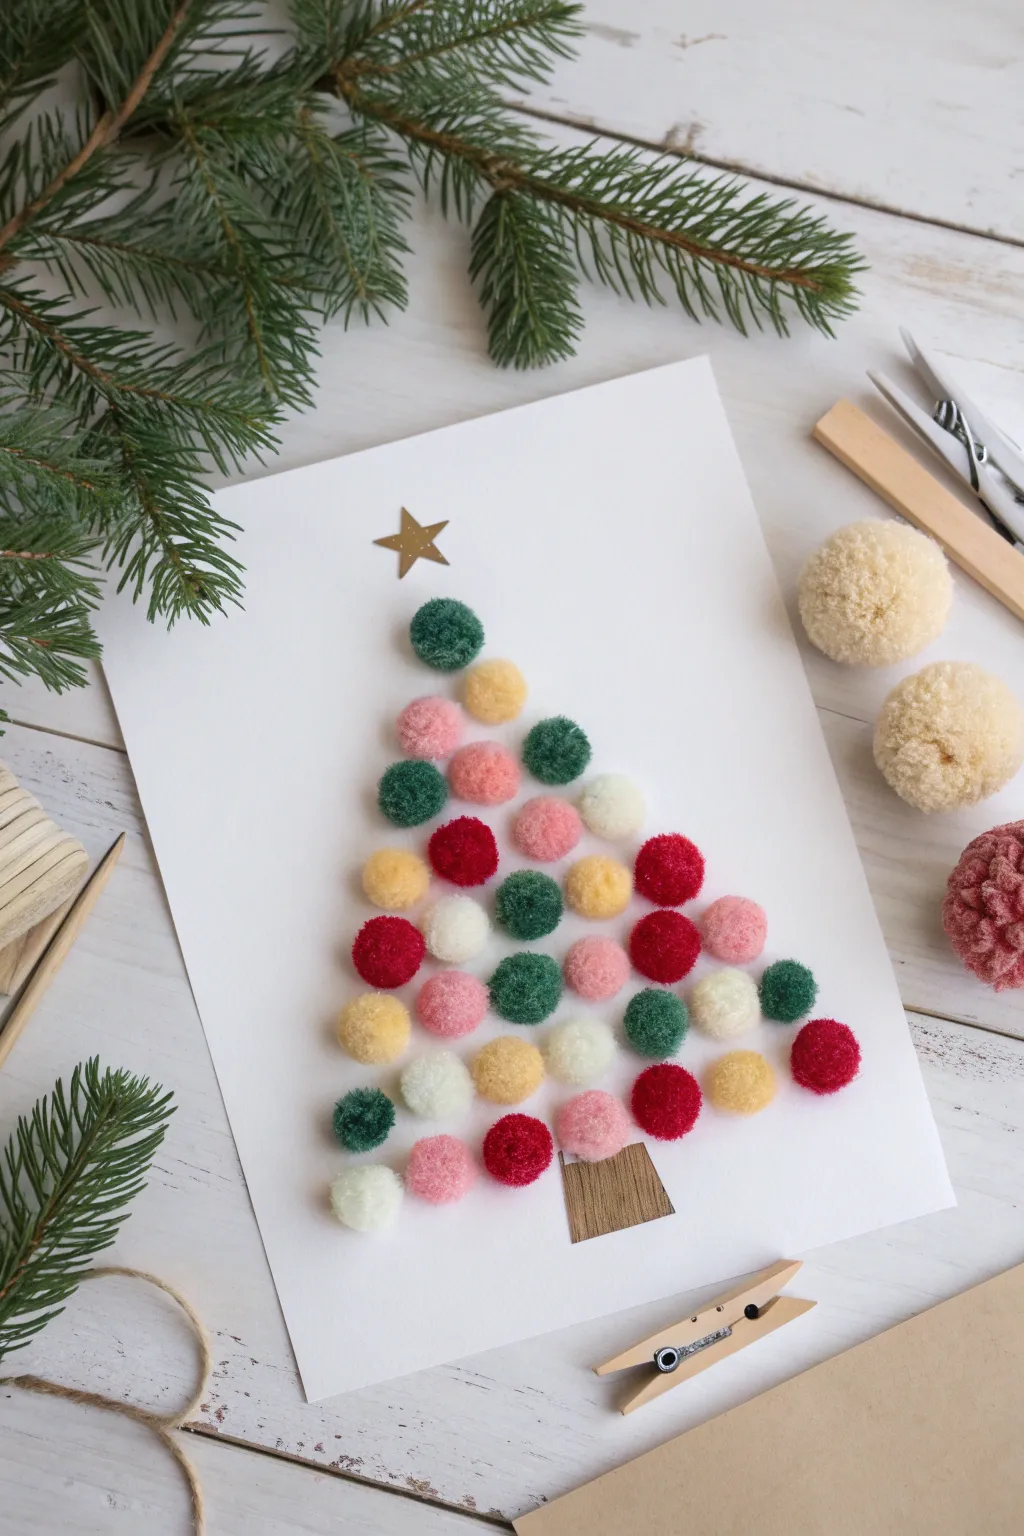
Create a cozy and tactile holiday greeting with this charming pom-pom Christmas tree card. Using soft, colorful pom-poms arranged in rows, you can build a festive design that pops right off the page.
Step-by-Step
Materials
- A4 thick watercolor paper or heavy white cardstock
- Assorted small pom-poms (approx. 1cm) in green, red, pink, cream, and mustard yellow
- Gold metallic paper or a gold star sticker
- Small piece of wood veneer or brown kraft cardboard
- Strong craft glue or a hot glue gun
- Pencil
- Ruler
- Scissors
Step 1: Preparation and Mapping
-
Prepare the card base:
Cut your white cardstock to your desired size. A standard 5×7 inch rectangle works beautifully for this design. -
Mark the center:
Using a ruler, lightly find the horizontal center of your card. Make a tiny pencil mark near the top where you want the star to sit and another near the bottom where the trunk will go. -
Sketch the guide:
Very lightly sketch a large triangle shape to guide your tree. This doesn’t need to be perfect, but it helps ensure your tree doesn’t lean to one side.
Step 2: Constructing the Tree
-
Select your palette:
Pour out your pom-poms and organize them by color. Having them visible makes it easier to create a balanced, randomized pattern like the one shown. -
Start at the top:
Apply a small dot of glue just below your top mark. I like to start with a single green pom-pom here to anchor the design. -
Begin the second row:
Place two pom-poms directly below the first one. Choose contrasting colors, such as cream and pink, to start building that varied look. -
Continue row by row:
Move to the third row, using three pom-poms. Ensure the colors are mixed well—try placing a dark green next to a light pink. -
Build the width:
For the fourth row, place four pom-poms. Keep the spacing tight so the white paper barely shows through between the fluff. -
Check the shape:
Pause to look at your triangle. The sides should be sloping outwards gently. Adjust the position of the outer pom-poms if the tree looks too skinny or too wide. -
Add the middle rows:
Continue adding rows, increasing the count by one pom-pom each time. For the fifth row, use five pom-poms, mixing in bold reds and mustard yellows. -
Create the lower section:
Proceed to the sixth and seventh rows. Make sure the bottom edge of the previous row nests slightly into the top curve of the new row for a dense look. -
Finish the foliage:
Complete the final bottom row. This should be your widest point. Ensure the line is relatively straight horizontally to give the tree a solid base.
Uneven Rows?
If your rows start looking wonky, use a ruler to lightly draw horizontal guide lines for each row before gluing. Erase lines after the glue dries.
Step 3: Details and Finishing Touches
-
Cut the trunk:
Cut a small trapezoid shape from the wood veneer or brown kraft cardboard. The top edge should be slightly narrower than the bottom. -
Attach the trunk:
Glue the trunk centered directly beneath the bottom row of pom-poms. Tuck the top edge slightly under the fluff of the pom-poms for a seamless transition. -
Prepare the star:
If you aren’t using a sticker, cut a simple five-point star from your gold metallic paper. -
Top the tree:
Adhere the gold star just above the very top pom-pom. Ensure one point of the star is aiming straight up. -
Clean up:
Gently pull away any wisps of hot glue or brush off loose fuzz from the card surface. -
Final press:
Once the glue is dry, gently press down on the pom-poms with your palm to ensure everything is securely attached and level.
Texture Boost
Mix different sizes of pom-poms or trim some slightly with scissors to create a more organic, textured surface that mimics real branches.
This soft, dimensional card is now ready to bring a touch of handmade warmth to someone’s holiday season
Bow-Tie Pasta Branch Relief Tree
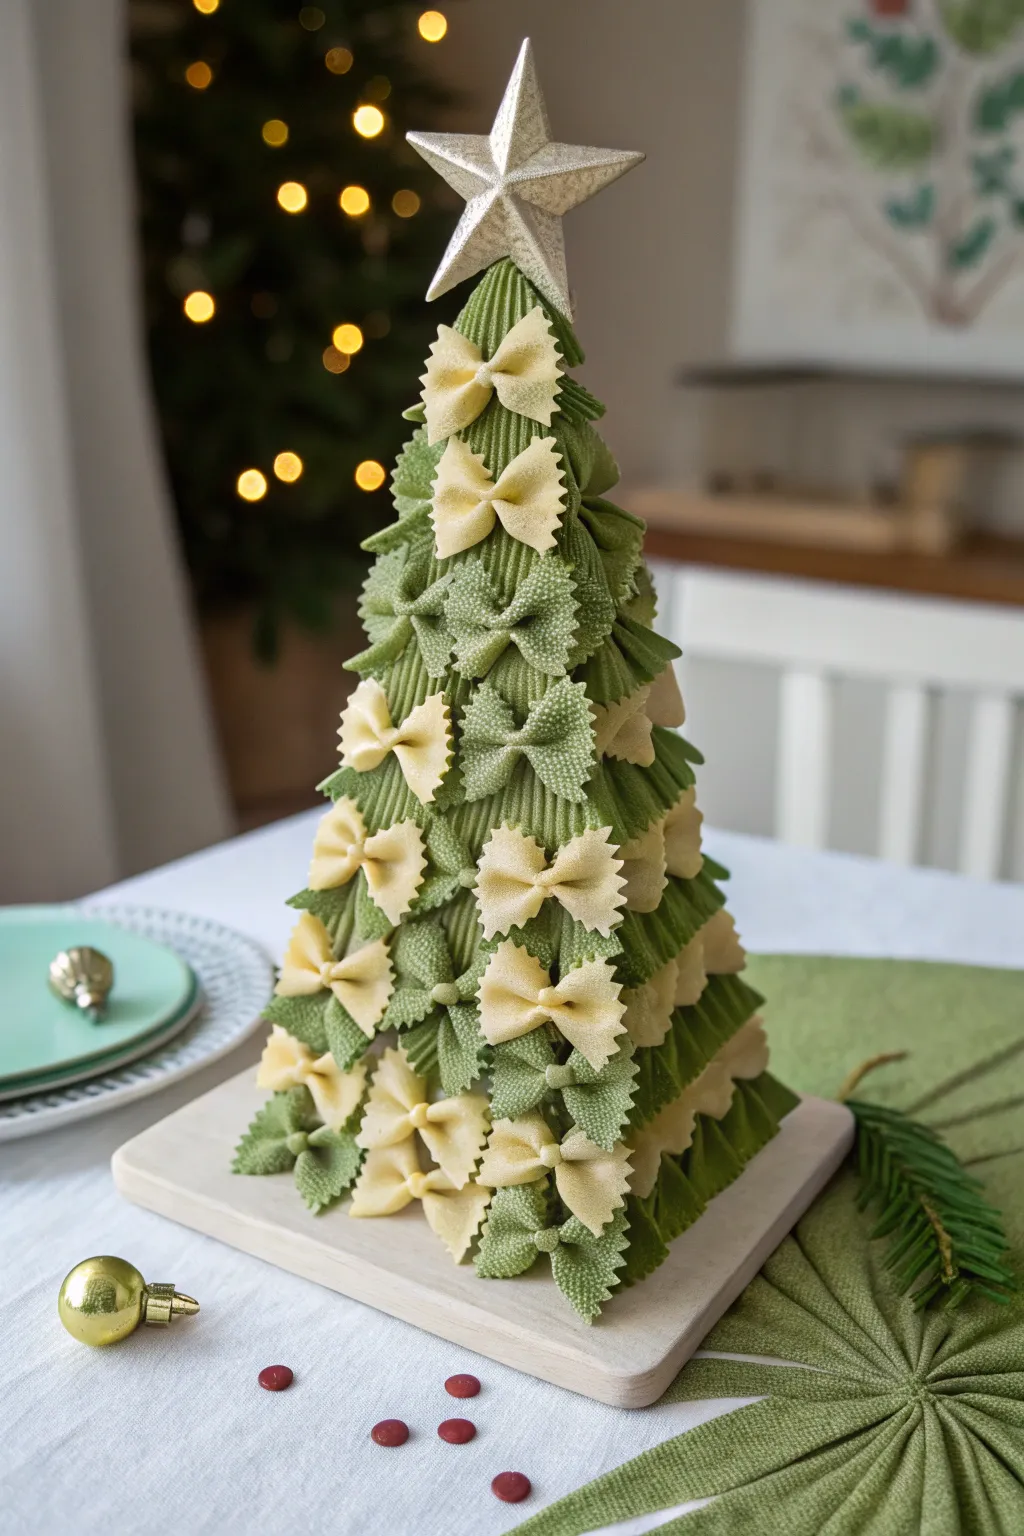
Bring a touch of whimsical Italian charm to your holiday table with this clever pasta Christmas tree. Using green and natural bow-tie pasta layered on a simple cone base, this project creates a striking relief texture that mimics pine boughs in the most delicious-looking way.
Step-by-Step Tutorial
Materials
- Styrofoam or cardboard cone (approx. 10-12 inches tall)
- Dried bow-tie (farfalle) pasta (standard size)
- Green acrylic paint (pine or forest green)
- Small paintbrush or spray paint
- Hot glue gun and plenty of glue sticks
- Large star ornament or topper (gold or silver)
- Rectangular wooden base or plank
- Newspaper or drop cloth for painting
Step 1: Preparing the ‘Foliage’
-
Sort the pasta:
Begin by separating your dried pasta into two groups. You will need about two-thirds of the pasta for the green ‘branches’ and one-third left in its natural yellow color for the accents. -
Paint the greens:
Lay out the larger group of pasta on a sheet of newspaper. Apply a coat of forest green acrylic paint. You can hand-paint them for a textured look or spray paint for speed. I find that spray paint gets into the nooks better. -
Dry and flip:
Allow the first side to dry completely, usually about 20 minutes. Flip the pasta pieces over and paint the undersides to ensure no raw pasta shows through on the final tree. -
Assess the coverage:
Check for any missed spots in the crimped centers of the bow ties and touch up with a small brush if necessary. Let everything cure fully before handling.
Step 2: Building the Structure
-
Prepare the base:
If your cone is Styrofoam, you might want to paint it a dark green first so white doesn’t peek through gaps. Once dry, limit the mess by gluing the bottom of the cone securely to the center of your wooden plank base. -
Start the bottom row:
Begin at the very bottom edge of the cone. Apply a dab of hot glue to the back center of a green pasta bow. -
Attach vertically:
Press the pasta onto the cone oriented vertically (standing up), so the ‘wings’ of the bow tie point up and down. This creates the hanging bough effect. Complete a full ring around the base using only green pasta. -
Start the second layer:
Start the next row slightly above the first, overlapping the pasta below like shingles on a roof. The bottom half of the new row should cover the top half of the previous row. -
Introduce the accents:
On this second row, substitute a natural (unpainted) pasta piece every 4th or 5th spot. The unpainted pasta acts as ‘garland’ or light accents climbing the tree.
Sticky Situation?
If hot glue melts the Styrofoam, switch to a low-temp glue gun or coat the Styrofoam in a layer of masking tape or school glue first to create a protective barrier.
Step 3: Layering to the Top
-
Continue the pattern:
Work your way up the cone, row by row. As the cone narrows, you will use fewer pasta pieces per ring. Try to stagger the placements so the vertical lines of the bows don’t create perfect columns. -
Increase accent frequency:
As you reach the middle section, feel free to add the unpainted pasta slightly more frequently or randomly to create a natural, organic distribution of color. -
Manage the spacing:
Ensure the pasta pieces are packed tightly together side-by-side. Gaps can disrupt the illusion of density. -
Tackle the peak:
When you reach the very top, the space will be tight. You may need to glue the final few pasta pieces at a steeper angle to cover the tip of the cone completely. -
Clear the webs:
Once the glue has set, inspect the tree for those pesky wispy strands of hot glue (spiderwebs) and pull them off gently.
Golden Glow
Rub a tiny amount of metallic gold wax or paint on the edges of the green pasta bows. This ‘gilded’ look catches the light beautifully and adds elegance.
Step 4: Finishing Touches
-
Attach the star:
Apply a generous amount of hot glue to the base of your star topper. Press it firmly onto the very tip of the cone, holding it in place for 30 seconds until the glue hardens. -
Secure the scene:
Double-check that the tree is stable on the wooden base. If it feels wobbly, add an extra ring of hot glue around where the cone meets the wood.
Place your pasta masterpiece on a mantel or dining table to enjoy a uniquely textured holiday decoration
Cardboard Tube Stamp Tree Pattern
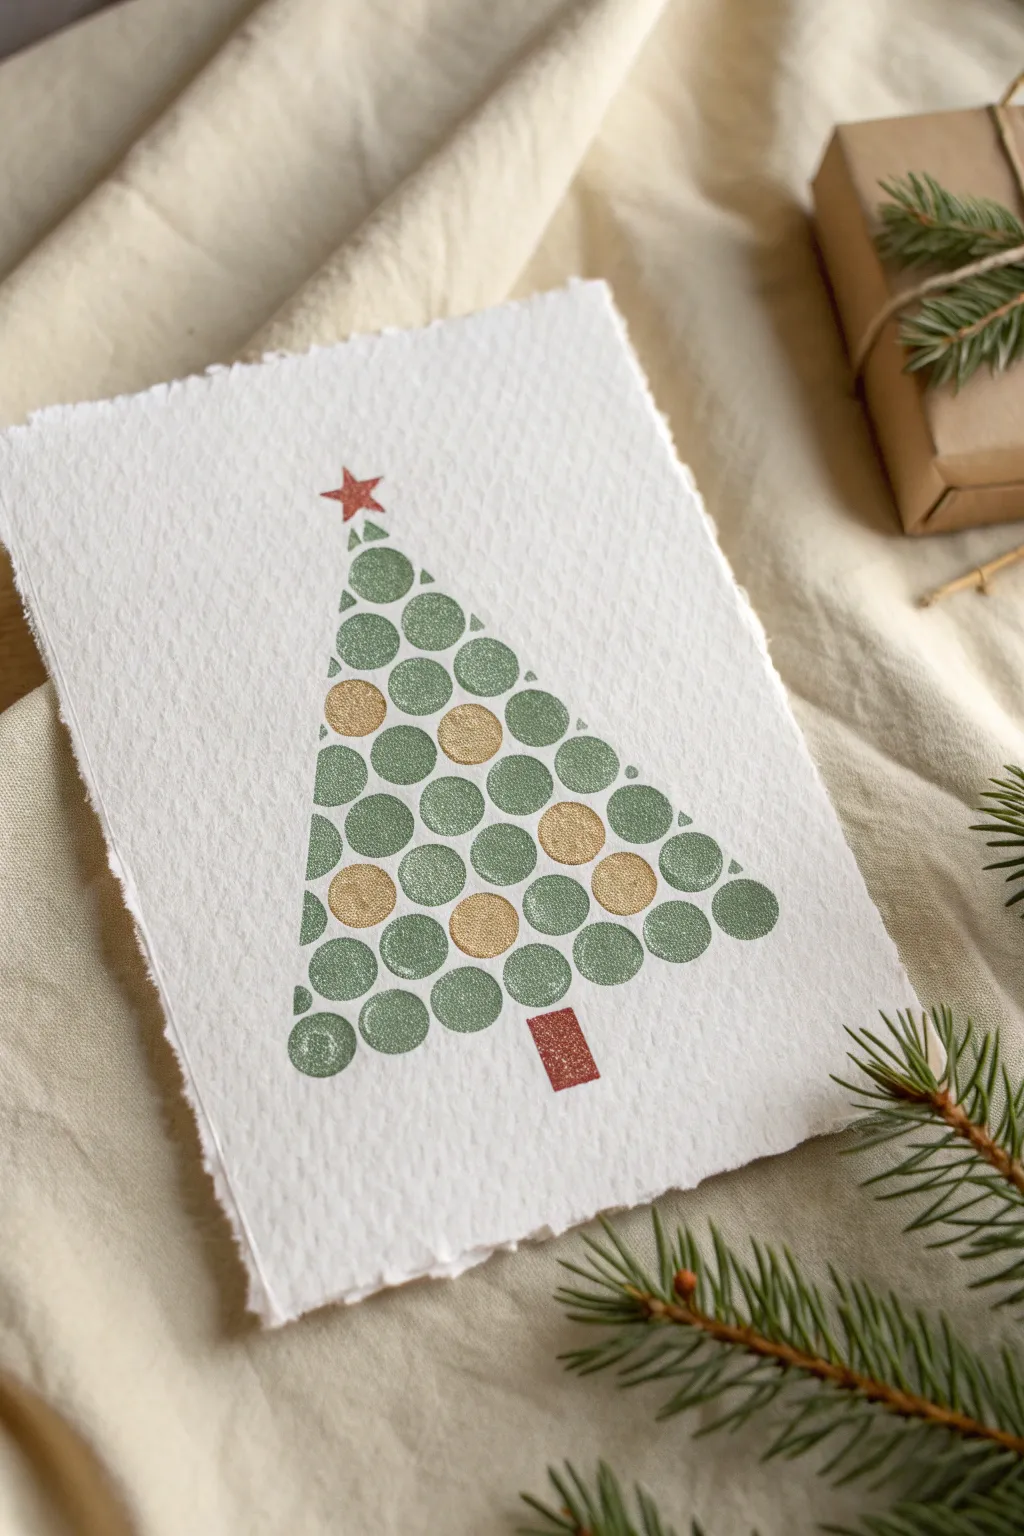
Embrace a minimalist aesthetic with this charming handmade holiday card, feautring a Christmas tree built from perfectly imperfect stamped circles. The combination of textured cotton paper, muted sage greens, and pop of gold creates a warm, vintage feel that’s surprisingly simple to achieve.
How-To Guide
Materials
- Heavyweight textured cotton watercolor paper (rough edge optional)
- Cardboard tube (paper towel or toilet paper roll)
- Sage green acrylic or gouache paint
- Metallic gold acrylic paint
- Burnt sienna or reddish-brown paint
- Red paint or star stamp
- Flat palette or dinner plate
- Small paintbrush (for touch-ups and trunk)
- Ruler and pencil (light graphite)
Step 1: Preparation
-
Shape the stamp:
Begin by gently squeezing your cardboard tube to ensure it forms a perfect circle, or leave it slightly oval if you prefer a more organic look. If the tube is too large, you can cut it open and roll it tighter, taping it secure to create a smaller diameter circle. -
Prepare the paper:
Tear your heavy watercolor paper to size. Tearing it against a ruler rather than cutting with scissors gives you those lovely, soft, decked edges seen in the original project. -
Map the triangle:
Using a ruler and a very light pencil touch, mark the top peak of your tree and the two bottom corners to form a tall, narrow triangle. This guide will help keep your stamping area defined so the tree doesn’t lean.
Uneven Circles?
If the cardboard tube gets soggy and loses shape, wrap a piece of masking tape around the rim to reinforce it and keep the circle crisp.
Step 2: Stamping the Foliage
-
Load the paint:
Squeeze a generous dollop of sage green paint onto your palette. Spread it out slightly so it’s a thin, even layer rather than a glou. -
Conduct a test stamp:
Dip the end of your cardboard tube into the green paint. Press it onto a scrap piece of paper first to ensure the rim is evenly coated and to gauge how much pressure you need. -
Start the bottom row:
Begin with the bottom layer of the tree. Stamp circles in a horizontal line, keeping them close enough to touch but not overlap excessively. Let the texture of the paper show through the paint. -
Build upwards:
Move to the next row up, positioning these circles in the ‘valleys’ between the circles below, creating a brick-layering pattern. Continue stamping rows, reducing the number of circles as you climb toward the peak. -
Fill the circles:
Once the outlines are stamped, use a brush to fill in the circles with the same sage green. Alternatively, you can stamp onto a ‘puddle’ of paint to get a solid fill instantly, though I find brushing it in gives more control over the opacity.
Step 3: Adding Details
-
Add gold accents:
While the green is drying, clean your tube stamp or use a second, smaller tube. Dip it into metallic gold paint. -
Place the ornaments:
Stamp a few gold circles randomly throughout the tree structure, replacing where a green circle would have been. This integrates the ‘ornaments’ directly into the tree’s geometry. -
Paint the trunk:
Using a small flat brush and reddish-brown paint, create a simple rectangle at the base of the tree. Keep the edges sharp to contrast with the round foliage. -
Top with a star:
At the very peak, add a small red star. You can use a pre-made rubber stamp for this, or hand-paint a simple five-point star using a fine-tip brush. -
Final dry:
Allow the entire card to dry completely flat for at least an hour. If the paper buckles from the moisture, place it under a heavy book once it is dry to the touch.
Add Sparkle
While the gold paint is still wet, lightly sprinkle a pinch of ultra-fine gold glitter over those specific circles for extra holiday shimmer.
Now you have a sophisticated, handcrafted card ready to share warm holiday wishes
String-Pull Abstract Tree Lights
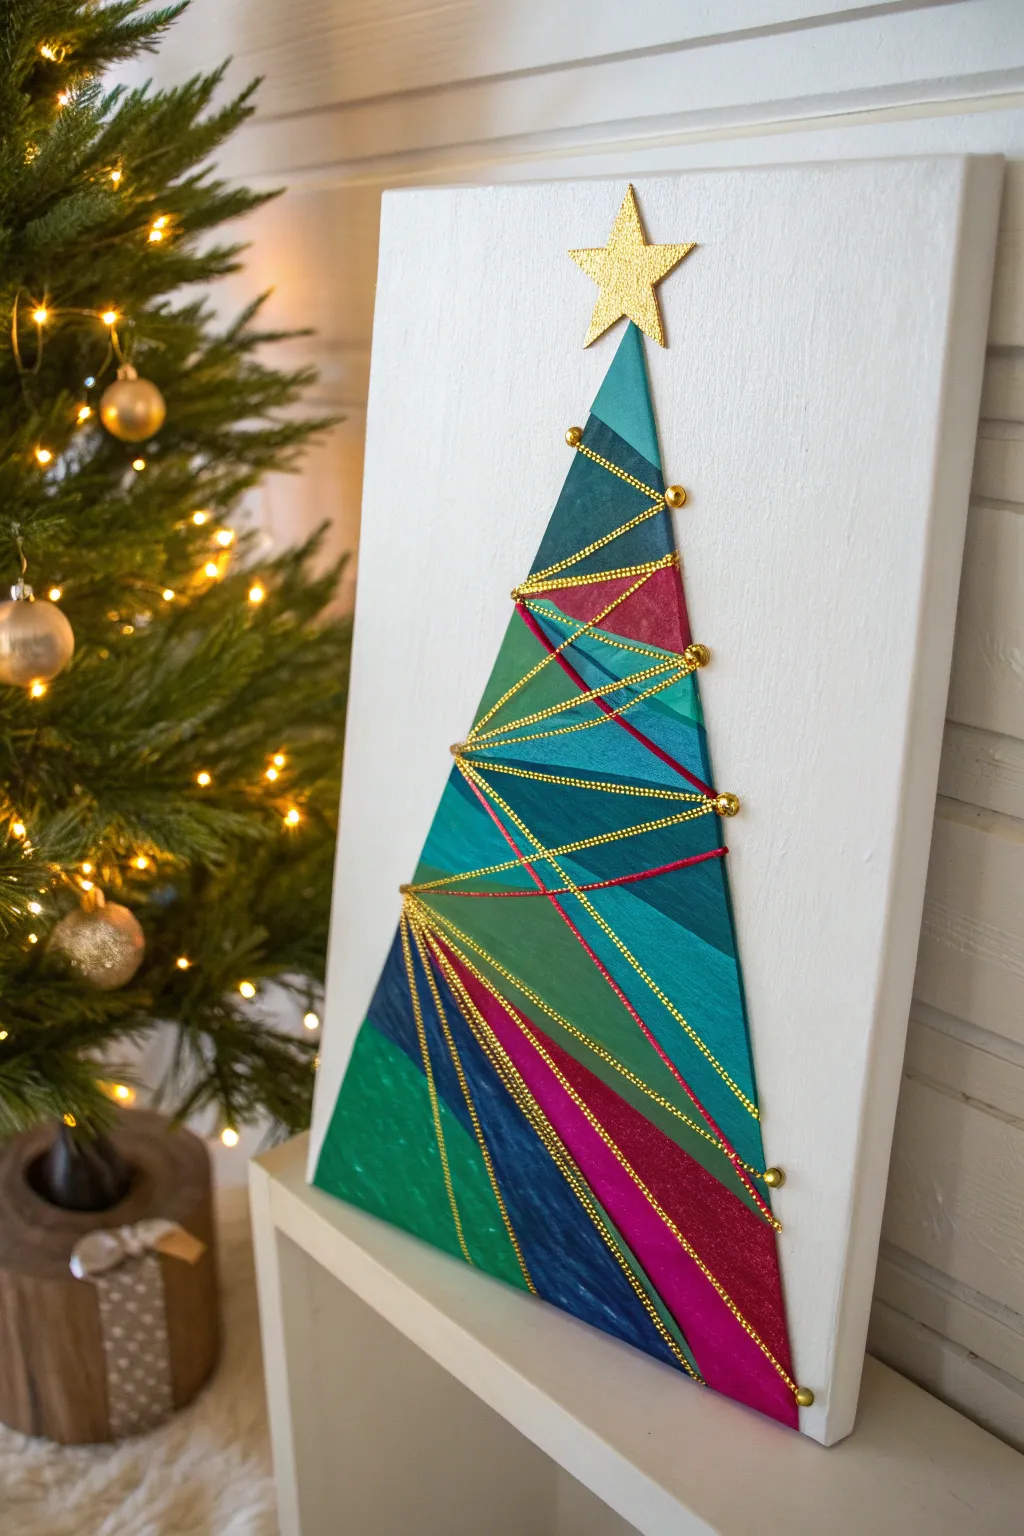
This modern, geometric Christmas tree combines bold color blocking with the texture of string art for a striking holiday decoration. The sharp lines and metallic accents create a sophisticated look that stands out against a crisp white background.
Detailed Instructions
Materials
- Rectangular stretched canvas (e.g., 16×20 inches)
- White acrylic paint (for background)
- Acrylic paints in deep jewel tones (emerald green, teal, navy blue, magenta/burgundy)
- Painter’s tape (various widths if available)
- Small flat paintbrush
- Gold beading string or thin gold chain
- Small brass upholstery tacks or round-head thumb tacks
- Gold glitter cardstock or wooden star cutout
- Hot glue gun and glue sticks
- Pencil and ruler
- Hammer (optional, for tacks)
Step 1: Preparing the Canvas
-
Prime the background:
Start by giving your canvas a fresh coat of white acrylic paint if it isn’t bright enough. Paint the edges as well for a finished look and let it dry completely. -
Map out the triangle:
Using a ruler and a light pencil, draw a large isosceles triangle centered on the canvas. the bottom base should be wide, tapering up to a point near the top third. -
Plan the geometric sections:
Inside your main tree triangle, lightly sketch random intersecting lines to create various geometric shards and polygons. These will become your color blocks.
Pro Tip: Crisper Lines
To prevent paint bleeding, paint a thin layer of white over the tape helper edge first. This seals the tape, so your colored paint sits perfectly on top.
Step 2: Painting the Design
-
Tape the first sections:
Apply painter’s tape along the pencil lines of a few non-adjacent shapes. Press the edges of the tape down firmly to prevent paint bleed. -
Paint the first colors:
Fill in the exposed shapes with your chosen jewel tones. I like to alternate between deep greens, teals, and the pop of magenta to keep the composition balanced. -
Remove tape and dry:
Carefully peel back the tape while the paint is still slightly tacky to get the crispest lines. Allow these sections to dry fully before moving on. -
Tape and paint remaining sections:
Once the first batch is dry, tape off the adjacent shapes. Paint these with contrasting colors so similar shades don’t touch too often, creating depth. -
Touch up edges:
After peeling the final tape and letting everything dry, use a small detail brush and the appropriate paint color to fix any small bleeds or uneven lines.
Level Up: Texture Boost
Mix a little modeling paste into your acrylic paint for the green sections to create raised, textured brushstrokes that mimic pine needles.
Step 3: Adding the String Art Elements
-
Mark tack positions:
Decide where you want your ‘garland’ to zigzag. Mark these spots along the edges of your tree and occasionally inside the larger color blocks. -
Insert the tacks:
Push the brass upholstery tacks into your marked spots. If the canvas wood frame is behind the spot, tap gently with a hammer; if it’s just canvas, support it from behind with a book while pushing. -
Secure the string start:
Tie one end of your gold beaded string or chain to the top-most tack hidden under where the star will go, or glue it to the back of the canvas. -
Weave the pattern:
Wind the gold string tightly around the tacks, zig-zagging back and forth across the tree. You can follow a specific pattern or keep it random and abstract. -
Secure the string end:
Once you reach the bottom, tie the string off securely around the final tack or hot glue the end in place.
Step 4: Final Details
-
Create the star:
Cut a simple five-point star shape out of gold glitter cardstock. Alternatively, paint a small wooden star cutout with gold metallic paint. -
Attach the topper:
Use a dab of hot glue to affix the star to the very peak of your painted tree, covering the top point of the triangle. -
Clean up:
Erase any visible pencil marks around the exterior of the tree carefully so you don’t smudge the white background.
Hang your new masterpiece near some fairy lights to let the gold string sparkle and shine
Minimal Line Tree With Metallic Accents

Capture the essence of the holidays with this strikingly simple design that balances crisp ink lines with touches of festive sparkle. This project is perfect for creating elegant, handmade Christmas cards that feel both modern and timeless.
Step-by-Step Tutorial
Materials
- High-quality white cardstock or watercolor paper (A5 size)
- Black fineliner pen (0.5mm or 0.8mm)
- Gold glitter glue pen or metallic gold marker
- Larger gold glitter star sticker or gold cardstock cutout
- Pencil and eraser
- Ruler
Step 1: Planning the Layout
-
Center alignment:
Begin by finding the vertical center of your cardstock. Lightly sketch a vertical line down the middle with your pencil to act as a guide for the tree’s trunk and symmetry. -
Define the height:
Mark a point about an inch from the top edge for the star, and another point about an inch from the bottom edge where the trunk will end. -
Triangle guide:
Lightly sketch a tall, narrow triangle connecting your top point to the approximate width of the base. This invisible boundary will keep your tree shape proportional as you draw the tiers.
Step 2: Drawing the Outline
-
Start the top tier:
Switch to your black fineliner. Starting just below your top mark, draw a small, curved triangle shape that flares out slightly at the bottom corners. -
Curve the bottom:
Connect the two bottom corners of this first tier with a gentle upward curve, rather than a straight line, to give the boughs a fuller appearance. -
Second tier width:
Start the second tier slightly inside the bottom corners of the first one. Draw lines angling outward that extend just past the width of the tier above. -
Continuing the stack:
Continue this pattern for four or five total tiers. Each new section should start from under the previous one and flare out wider. -
Drawing the trunk:
At the center of the widest bottom tier, draw a simple, small rectangular trunk. Keep the lines clean and unbound at the bottom or close it off depending on your preference. -
Erase guides:
Wait at least five minutes for the ink to fully set so you don’t smudge your work. Gently erase the pencil center line and triangle guide.
Wobbly Lines?
Don’t stress if your curves aren’t perfect. Small wavers in the ink line add to the hand-drawn charm. Just keep drawing confidently without lifting the pen mid-stroke.
Step 3: Adding the Accents
-
Top star application:
Apply a generous amount of gold glitter glue or stick a gold star embellishment at the very peak of your tree. It should be slightly larger than the other accents. -
Scattered placement:
Plan the placement of the smaller stars. Visualise a zig-zag or random pattern across the tiers so they don’t look too regimented. -
Drawing mini stars:
Using a gold gel pen or fine-tip metallic marker, draw small five-point stars on the white space of the tree tiers. -
Adding dimension:
If you are using glitter glue, carefully dab small dots or tiny drawn stars over your metallic marker base for extra texture and shine. -
Drying time:
Glitter glue can take a while to cure. Lay the artwork flat in a safe spot for at least an hour to ensure the stars harden without running.
Glitter Glue Tip
Tap the bottom of the glitter glue bottle on the table before squeezing. This removes air bubbles that cause the glue to ‘splurt’ out and ruin your fine details.
Now you have a stunning, minimalistic piece of holiday art ready to be framed or sent to a loved one


Have a question or want to share your own experience? I'd love to hear from you in the comments below!