If you’ve ever wanted your holiday table to feel extra personal, Christmas wine glass painting is such a satisfying little project. I’m sharing a mix of classic, crowd-pleasing designs and a few creative twists that still feel totally doable—even if you’re a beginner.
Santa Belt Wrap
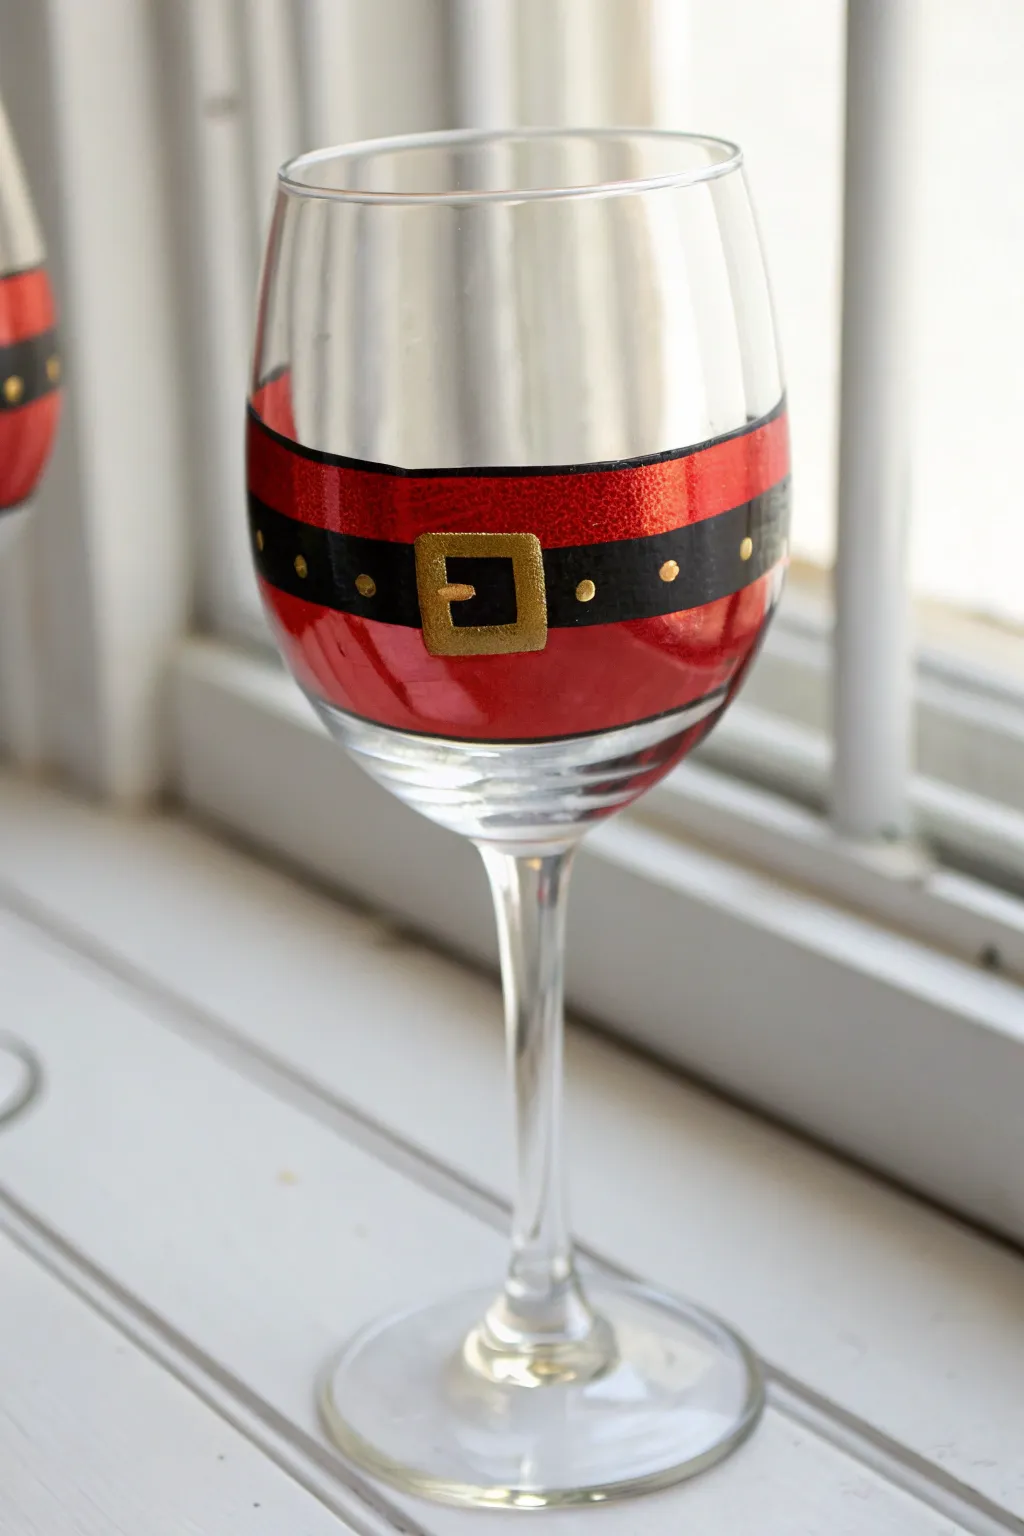

Bring the festive spirit straight to your dinner table with this charming Santa suit wine glass. It features a bold red coat wrapped around the bowl, cinched with a classic black belt and sparkling gold buckle.
Detailed Instructions
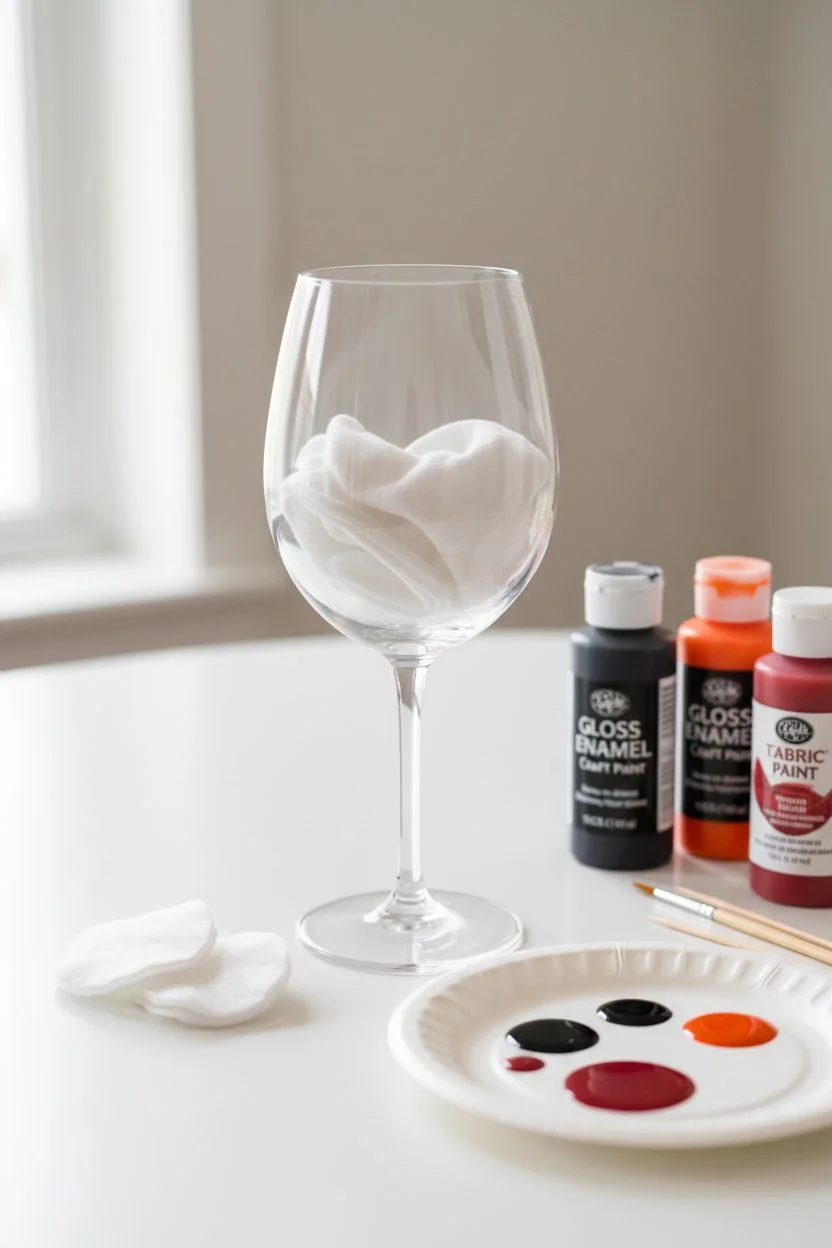
Materials
- Clear wine glass
- Rubbing alcohol
- Cotton pads
- Red enamel glass paint
- Black enamel glass paint
- Gold metallic enamel glass paint
- Flat shader brush (medium width)
- Small liner brush or detail brush
- Painter’s tape or masking tape
- Paper plate or palette
- Q-tips (for cleanup)
Step 1: Cleaning and Taping
-
Prep the surface:
Before adding any color, it’s crucial to remove oils and fingerprints. Wipe the entire outer surface of the wine glass bowl with rubbing alcohol and a cotton pad, holding the glass by the stem to keep it pristine. -
Define the top edge:
Apply a strip of painter’s tape horizontally around the upper part of the glass bowl. Make sure the tape is level all the way around, pressing down the edges firmly to prevent paint from seeping underneath. -
Define the bottom edge:
Apply a second strip of tape horizontally around the lower part of the bowl, just above where the bowl begins specifically tapering into the stem. -
Double check the gap:
Look at the exposed glass between your two tape lines. This area will become Santa’s coat, so ensure it looks balanced and even on all sides.
Clean Lines Pro-Tip
If you are freehanding the black belt and want extra stability, place the glass on a turntable or lazy Susan. Hold your brush steady in one spot and slowly rotate the glass.
Step 2: Painting the Coat
-
Apply the first red layer:
Using your flat shader brush, apply a coat of red enamel paint to the taped-off area. Use smooth, horizontal strokes to minimize brush marks. -
Let it dry:
Allow this first layer to dry according to the paint bottle’s instructions, usually about an hour. -
Second coat:
Apply a second layer of red paint for full opacity. The glass shouldn’t be see-through in this section anymore. -
Remove tape:
Carefully peel away the painter’s tape while the second coat is still slightly tacky—this often helps achieve a sharper line than waiting for it to fully cure. -
Clean up edges:
If any red paint bled under the tape, use a damp Q-tip or a toothpick to gently scrape or wipe it away for a crisp edge.
Step 3: Adding the Belt
-
Paint the belt line:
Load a clean flat brush with black enamel paint. Right in the center of your red band, paint a continuous horizontal stripe all the way around the glass. -
Refine the belt:
Go over the black line again if needed to ensure it is solid and opaque. I find steadying my hand against the table helps keep this line straight without needing more tape. -
Dry the black paint:
Give the black belt ample time to dry so you don’t accidentally smudge it while adding the next details.
Level Up: Texture
Before the gold buckle paint dries, sprinkle a tiny pinch of extra-fine gold glitter onto the wet paint. This adds a magical holiday sparkle that catches candlelight wonderfully.
Step 4: Buckle and Details
-
Outline the buckle:
Using a small liner brush and metallic gold paint, draw a square outline directly over the black belt in the center of the design. -
Thicken the buckle:
Go back over the square outline to thicken the lines, making the buckle look sturdy and substantial. -
Add the prong:
Paint a small, short gold line extending horizontally inward from the left side of the buckle frame to represent the belt prong. -
Paint the eyelets:
Dip the non-brush end (the handle tip) of a small paintbrush into the gold paint. Dot it onto the black belt to create evenly spaced gold circles on either side of the buckle.
Step 5: Finishing Up
-
Cure the paint:
Follow the manufacturer’s instructions for curing. This typically involves letting the glass air dry for 21 days or baking it in the oven to make the design dishwasher safe.
Once baked and cooled, your Santa glass is ready to be filled with your favorite holiday vintage


Candy Cane Stripes on Stem and Base
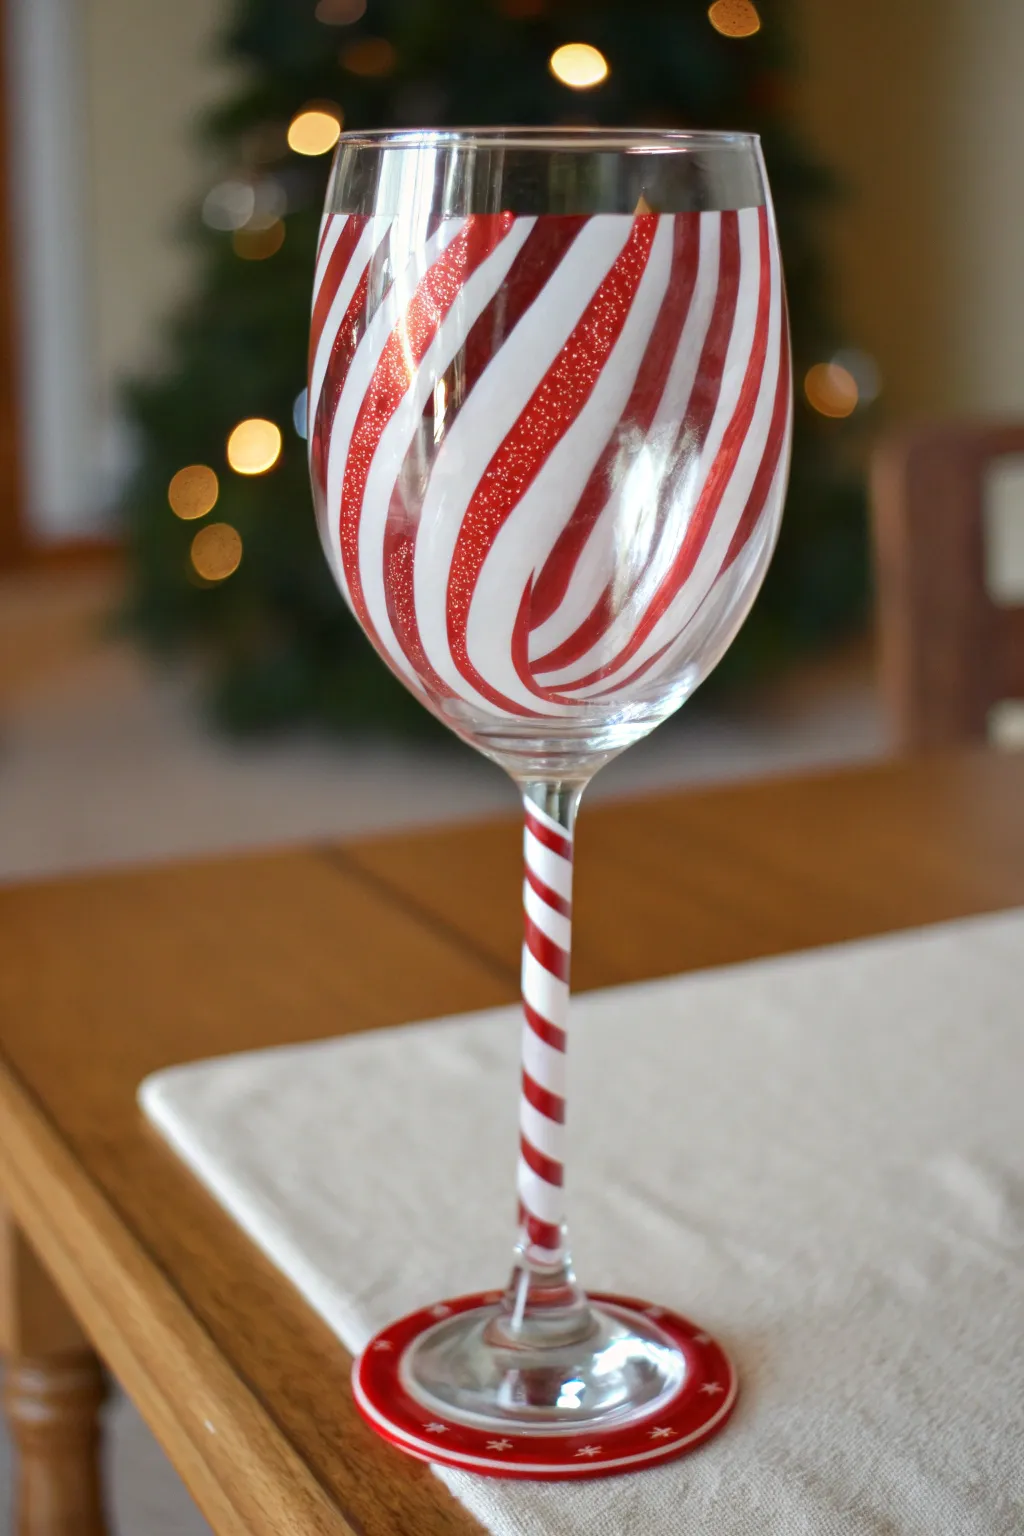
Capture the sweet nostalgia of Christmas candy with this dazzling wine glass design. Featuring glittering red swirls paired with classic white stripes, this project transforms plain glassware into a festive centerpiece perfect for holiday toasts.
How-To Guide
Materials
- Clear wine glass
- Rubbing alcohol
- Cotton pads
- Enamel craft paint (White)
- Enamel craft paint (Red)
- Fine red glitter
- Flat shader brush (medium width)
- Small round detail brush
- Painter’s tape or masking tape (1/4 inch width is ideal)
- Small plate or palette
- Oven (for curing)
Step 1: Preparation & Masking
-
Clean the surface:
Begin by thoroughly wiping down the entire exterior of the wine glass with rubbing alcohol and a cotton pad to remove any oils or fingerprints. -
Plan the bowl swirls:
Visualize a diagonal, swirling pattern starting from the base of the bowl and curving upward toward the rim. The stripes should start narrow at the bottom and widen slightly as the glass expands. -
Apply tape foundation:
Instead of freehand painting right away, use thin painter’s tape to mark out the spiral pattern on the bowl. Press the tape down firmly to create a seal against the glass, leaving gaps between the tape strips where your paint will go. -
Check spacing:
Ensure the spacing between tape lines is roughly even, though a little organic variation adds charm. The gaps should accommodate both a white stripe and a red stripe.
Step 2: Painting the Bowl
-
Paint the white swirls:
Using the flat shader brush, apply the white enamel paint in the gaps between the tape. Paint in smooth, sweeping strokes following the curve of the glass. -
Second coat for opacity:
Allow the first layer of white to dry to the touch (usually 15-20 minutes). Apply a second coat to ensure the white is opaque and bright. -
Remove tape:
Carefully peel off the painter’s tape while the second coat is still slightly tacky to keep crisp edges. -
Prepare the red paint:
Mix a small amount of fine red glitter directly into your red enamel paint on the palette, or have the glitter ready to sprinkle. -
Paint the red swirls:
Using the same brush (cleaned and dried), paint the red stripes into the negative space left by the tape. Follow the same swirling motion as the white stripes. -
Add the sparkle:
While the red paint is still wet, gently sprinkle more fine red glitter over the red stripes to achieve the sugary texture seen in the photo. Shake off excess lightly.
Uneven Stripes?
If your hand-painted red stripes look shaky next to the taped white ones, use a silver or gold paint pen to outline the boundary between them. It hides wobbles and adds bling.
Step 3: Stem & Base Details
-
Start the stem:
Switch to your small round detail brush. Starting at the top of the stem, paint alternating diagonal stripes of red and white down the length of the stem. -
Refine the candy cane look:
Keep these stripes tighter and more uniform than the bowl swirls to mimic a traditional candy cane stick. I find resting my pinky on the table helps steady my hand for these small lines. -
Paint the base rim:
Paint the outer rim of the glass base with a solid ring of red paint. -
Add base details:
Once the red rim is dry, use the very tip of your detail brush or a toothpick to add tiny white asterisk-shaped snowflakes or dots onto the red ring. -
Clean up edges:
Use a toothpick or a damp cotton swab to clean up any stray paint marks or uneven edges before the paint cures completely.
Frosted Effect
Mix a tiny drop of white paint with a glazing medium and lightly sponge it over the clear glass sections before painting stripes for a frosty, winter-window look.
Step 4: Curing
-
Dry time:
Allow the glass to air dry for at least 24 hours, or follow the specific instructions on your enamel paint bottle for air curing. -
Bake to set:
For dishwasher safety (top rack), place the glass in a cold oven. Set the temperature to 350°F (176°C) and bake for 30 minutes. Turn the oven off and let the glass cool down completely inside the oven.
Now you have a stunning, hand-painted glass ready to be filled with your favorite holiday vintage


Snowman Face With Scarf Details
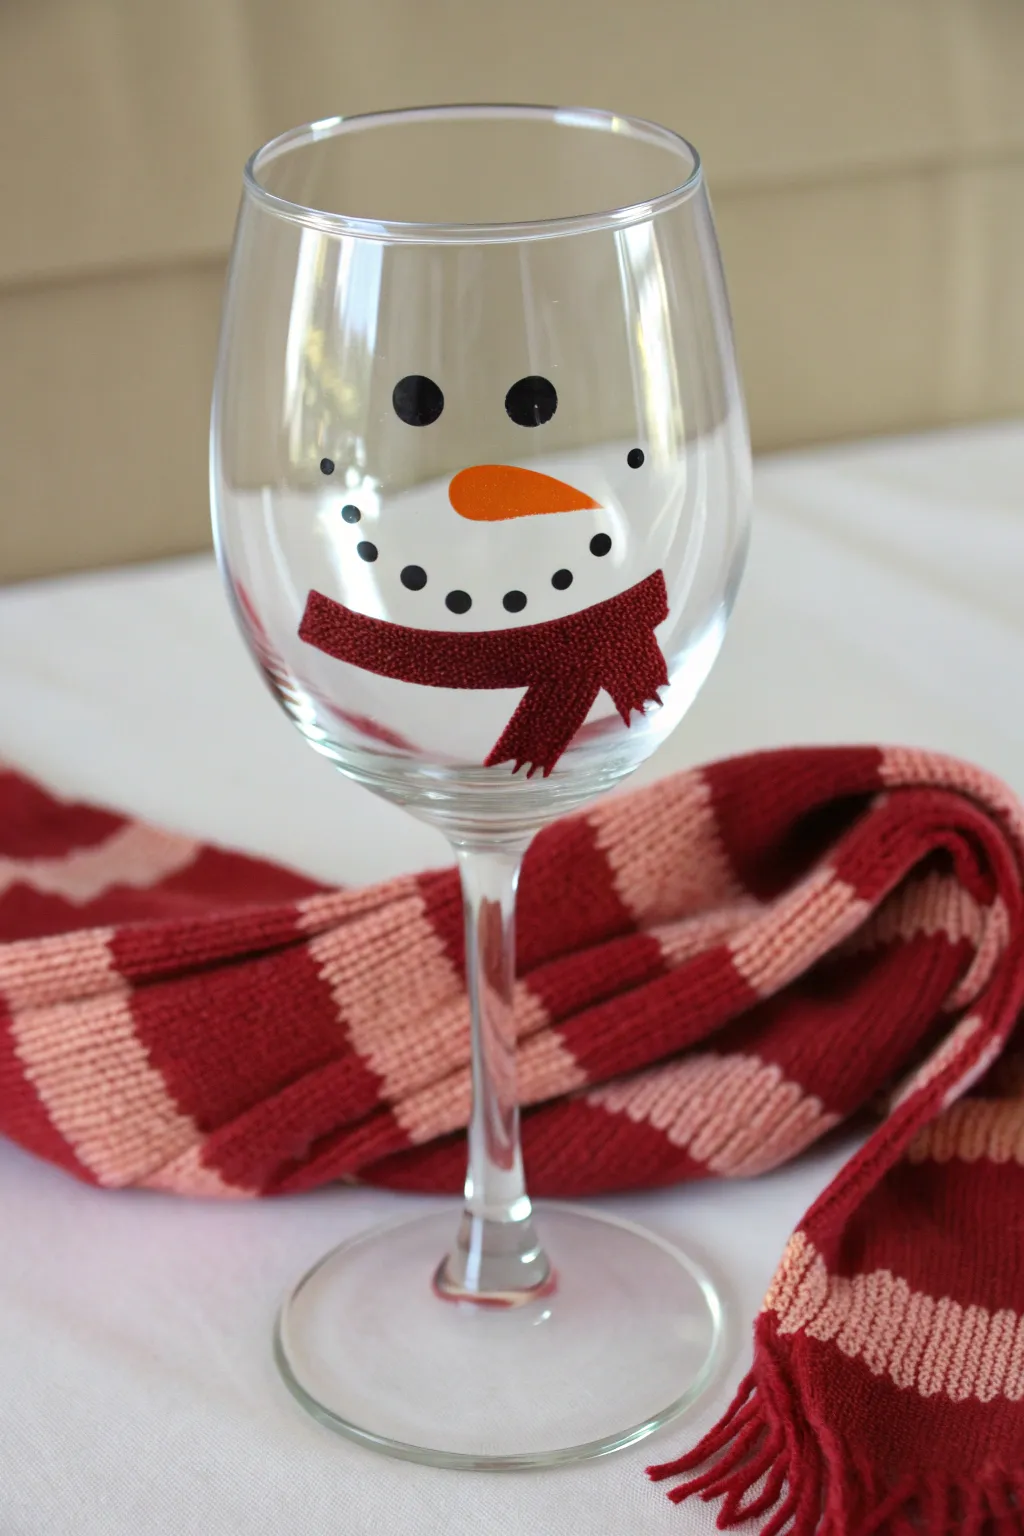
Transform plain stemware into a frosty friend with this charming snowman face design, featuring a cozy painted scarf that adds texture and warmth. The minimalist face paired with the detailed scarf detail creates a playful yet elegant holiday drinking vessel.
Detailed Instructions
Materials
- Clear wine glass
- Rubbing alcohol
- Cotton pads
- Gloss enamel craft paint (Black)
- Gloss enamel craft paint (Orange)
- Textured or dimensional fabric paint (Red/Burgundy)
- Small round paintbrush (size 2 or 3)
- Very fine liner brush (size 0 or 00)
- Toothpicks or dotting tool
- Paper palette or paper plate
- Q-tips (for cleanup)
Step 1: Preparation
-
Prepare the surface:
Before uncapping any paint, you need a pristine surface. Thoroughly wipe down the entire bowl of the wine glass with rubbing alcohol on a cotton pad to remove invisible oils or fingerprints. -
Dry completely:
Allow the alcohol to air dry completely for a minute or two. Even a tiny bit of moisture can prevent paint adhesion. -
Position the glass:
Situate the glass on a flat surface. You might want to place a crumpled towel inside the glass to help visualize the curve of the surface better while you work, though this is optional.
Step 2: Painting the Face
-
Paint the eyes:
Dip the handle end of a paintbrush or a large dotting tool into the black enamel paint. Press two confident dots onto the upper third of the glass bowl for the eyes. Space them about an inch apart. -
Add the nose foundation:
Using the small round brush and orange paint, create a sideways triangle shape just below and between the eyes. Start with a rounded base near the center and pull the brush out to a soft point on the right. -
Refine the nose shape:
Smooth out the orange triangle to look like a carrot. I like to make the tip slightly rounded rather than razor-sharp to keep the look whimsical. -
Create the smile dots:
For the mouth, you’ll need smaller dots than the eyes. Use a toothpick or a smaller dotting tool dipped in black paint. -
Arrange the smile:
Stamp a semi-circle of about five or six small black dots beneath the nose. Start with the center dot to establish placement, then work your way outward on each side to keep it symmetrical. -
Add rosy cheeks (optional):
While not strictly on the original, you can add two tiny faint dots at the corners of the smile if you want extra character, but the clean minimalist look works best.
Paint Drips?
If the eye dots start to drip due to gravity, wipe them off immediately. Use less paint on your tool and apply two thin coats rather than one thick glob.
Step 3: Adding the Scarf Detail
-
Outline the scarf:
Using the red dimensional or textured paint, draw a curved line horizontally below the smile. This represents the part of the scarf wrapped around the neck. -
Draw the tails:
From the right side of your horizontal line, draw two short vertical strips hanging down. Angle them slightly to mimic fabric draping naturally. -
Fill the shape:
Fill in the outline with the textured paint. Don’t smooth it out too much; the goal is to leave a little bulk so it looks like knit fabric. -
Create the texture:
While the paint is wet, take a clean toothpick and gently drag it through the red paint in tiny vertical parallel lines. This creates a ‘ribbed’ knit effect. -
Add the fringe:
At the very bottom of the scarf tails, use the fine liner brush or a toothpick to pull tiny wisps of paint outward, creating the look of fringed ends.
Fuzzy Scarf Texture
To mimic the fuzzy look of wool, lightly tap the wet scarf paint with a dry stipple brush or stiff sponge instead of smoothing it out.
Step 4: Finishing Up
-
Check for errors:
Look closely at your dots and lines. If you have any smudges, quickly wipe them away with a damp Q-tip before the paint sets. -
Initial drying:
Let the glass sit undisturbed for at least 1 hour. The dimensional paint on the scarf will take longer to dry than the flat enamel. -
Cure the paint:
Follow the instructions on your specific bottle of enamel paint. Most require air-drying for 21 days or baking in a cool oven (usually 350°F for 30 mins) to become dishwasher safe.
Now you have a festive piece of stemware ready for your favorite holiday vintage


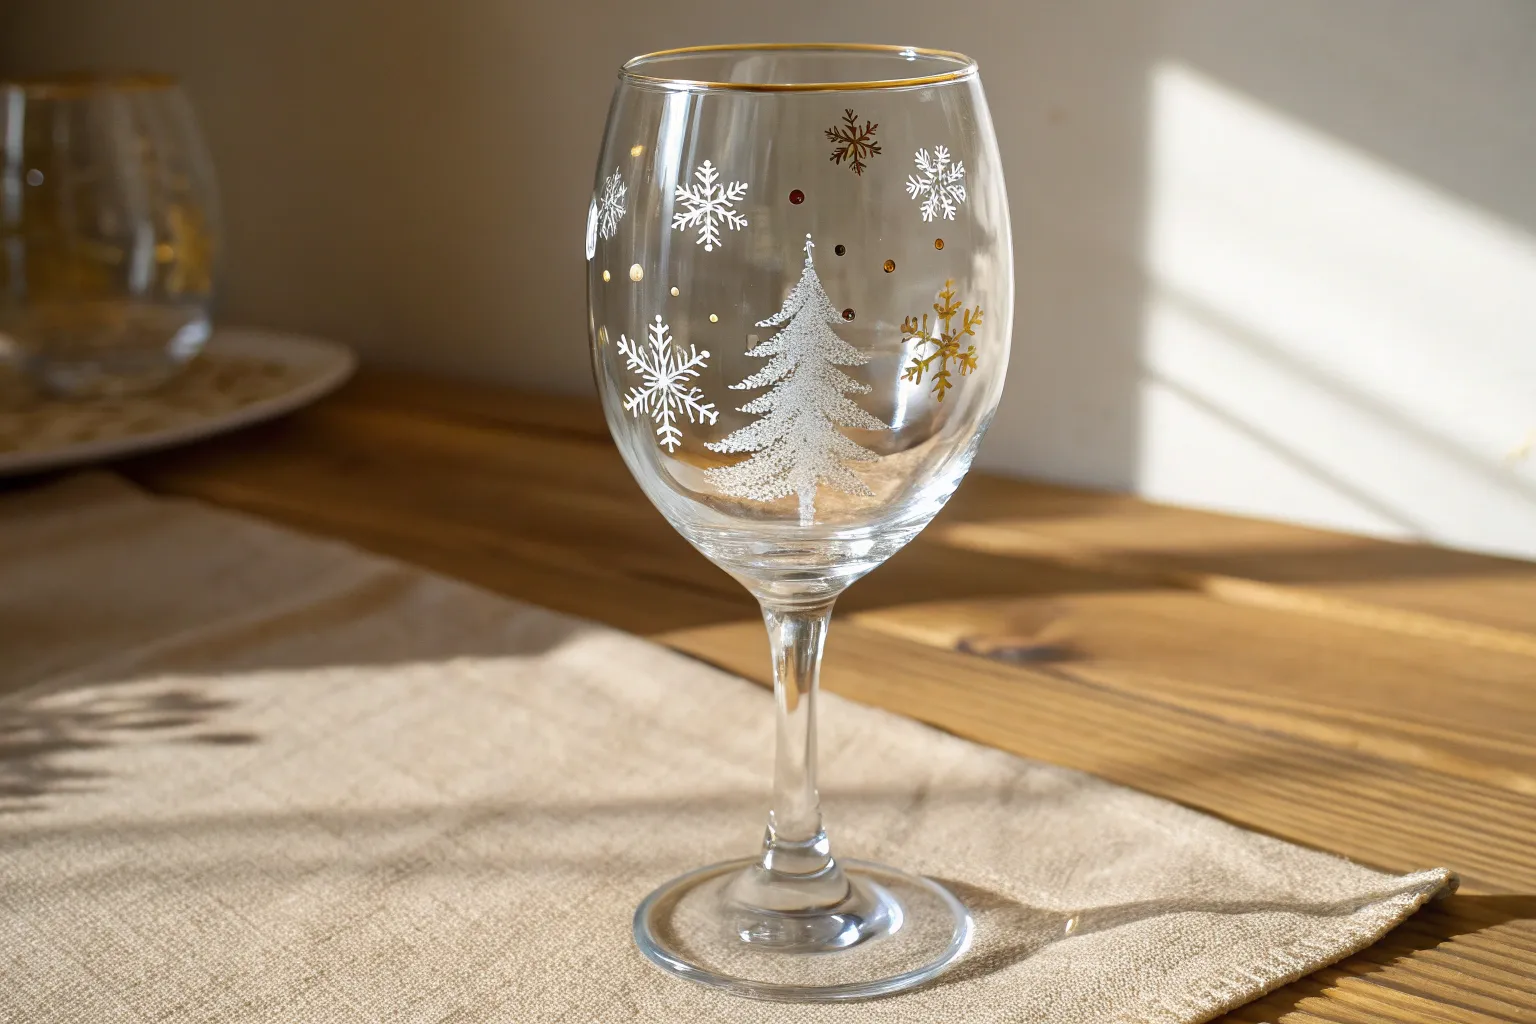
Delicate Snowflake Lace Border
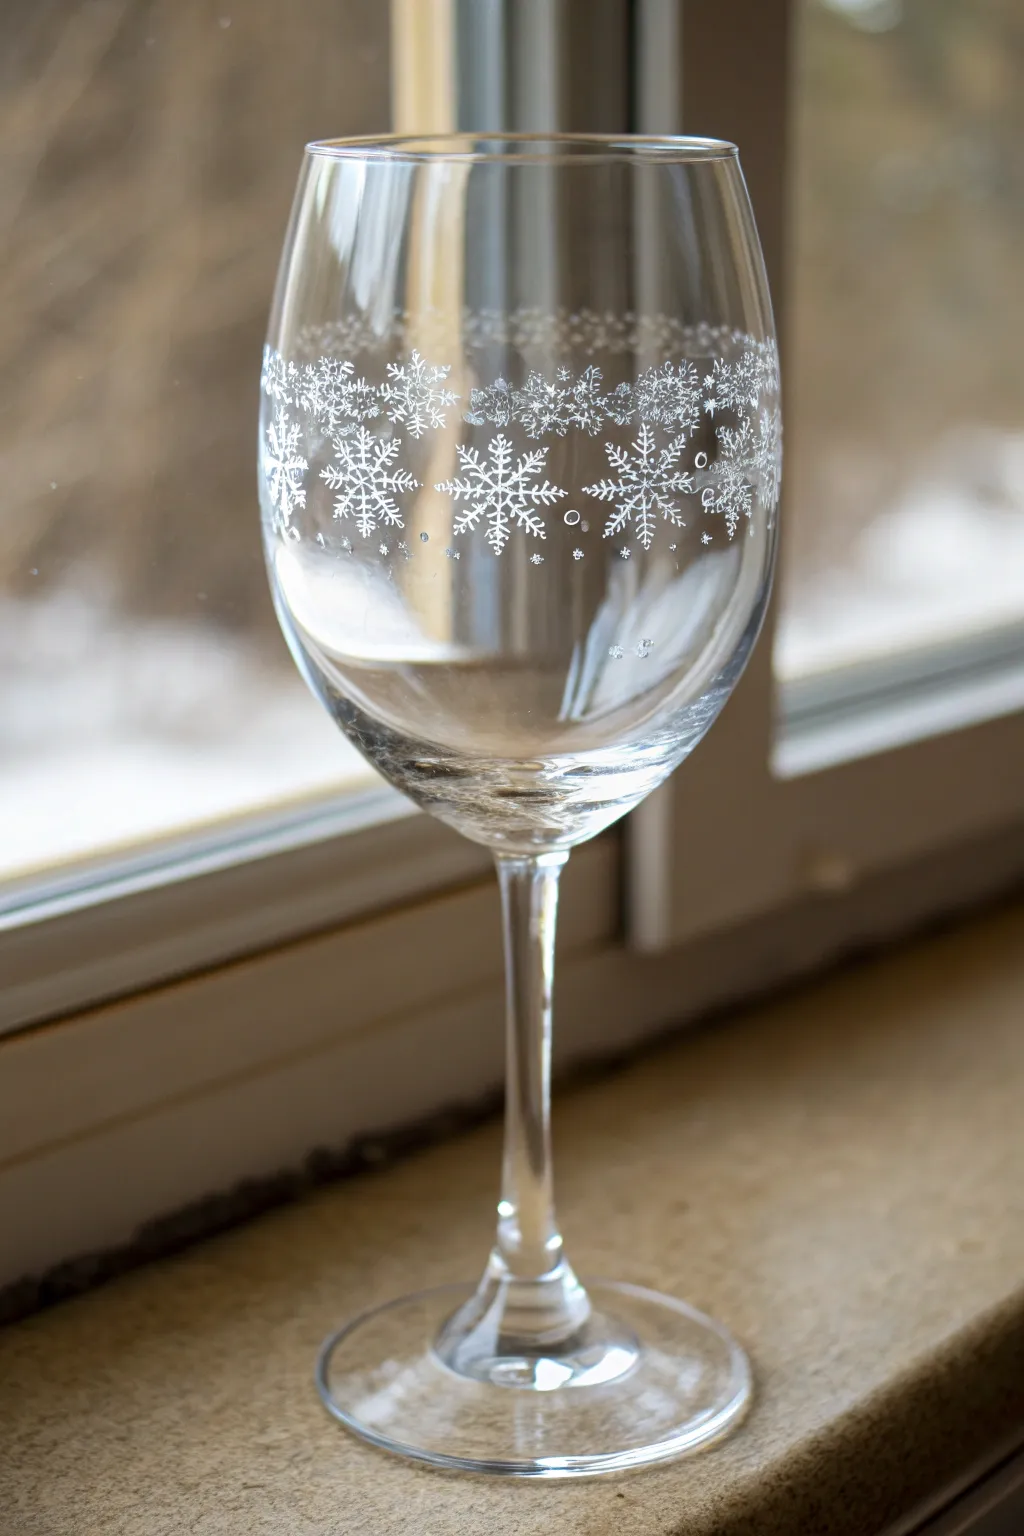
Transform plain stemware into a winter wonderland with this elegant, lacy snowflake design. The delicate white patterns mimic the gentle accumulation of frost on a windowpane, creating a sophisticated look perfect for holiday gatherings.
Step-by-Step
Materials
- Clear wine glass (thoroughly washed and dried)
- Rubbing alcohol
- Cotton pads or paper towels
- White enamel glass paint (gloss or frosted finish)
- Fine point detail brush (0 or 00 size)
- Small dotting tool or toothpick
- Paper plate or palette
- Cotton swabs (for cleanup)
- Painter’s tape or wash tape (optional)
- Oven (for curing, if required by paint)
Step 1: Preparation & Planning
-
Clean the surface:
Before you begin painting, it is crucial to remove any oils or fingerprints from the glass. Wipe the entire outer surface of the wine glass bowl with rubbing alcohol using a cotton pad. -
Determine placement:
Visually divide the glass bowl. You want the main band of snowflakes to sit just above the widest part of the glass, leaving plenty of clear space at the rim and the base. -
Set a guideline:
If you are worried about keeping your line straight, apply a strip of painter’s tape horizontally around the glass about an inch from the rim to act as an upper boundary, though freehand often looks more organic.
Pro Tip: Consistency Check
If your glass paint feels too thick or gloopy for fine lines, don’t add water. Use the specific thinner recommended by the paint brand to maintain adhesion.
Step 2: Painting the Main Snowflakes
-
Load your brush:
Squeeze a small amount of white enamel paint onto your palette. Dip your fine point brush in, ensuring the bristles are coated but not dripping. -
Start the first snowflake:
Choose a spot on your imaginary band and paint a simple vertical line about 3/4 of an inch long. This forms the central spine of your first flake. -
Create the cross:
Paint a horizontal line of the same length crossing through the center of the vertical line, creating a plus sign. -
Add diagonal rays:
Paint two diagonal lines intersecting the center, creating an eight-pointed star shape. Keep these lines thin and delicate. -
Add the details:
On each of the eight arms, paint tiny ‘V’ shapes facing outward to create the intricate, feathery look of a crystallized snowflake. I find short, quick, flicking motions work best here. -
Repeat around the glass:
Continue painting these large snowflakes around the circumference of the glass. Space them evenly, leaving about half an inch between the tips of adjacent flakes.
Step 3: Creating the Frost Effect
-
Switch tools:
Put down your brush and pick up your dotting tool or a toothpick. Dip the tip into the white paint. -
Fill the gaps:
Between each large snowflake, add a cluster of tiny dots. Vary the pressure to create different sized dots, simulating falling snow. -
Build the upper border:
Above the main band of snowflakes, create a dense ‘cloud’ of tiny dots and very small rudimentary asterisks. This creates that ‘frosted lace’ effect seen in the inspiration image. -
Fade upward:
As you move higher up the glass (closer to the rim), make the dots more sparse. This gradient effect makes the snow looks like it is gently settling. -
Add lower accents:
Add just a few stray dots below the main snowflake line to soften the bottom edge, preventing the design from looking too rigid. -
Clean up edges:
If any lines look too thick or a dot smudged, dip a cotton swab in rubbing alcohol and carefully wipe away the mistake while the paint is still wet.
Level Up: Silver Sparkle
While the white paint is wet, sprinkle a tiny pinch of ultra-fine iridescent glitter over the snowflakes for a magical, shimmering finish.
Step 4: Finishing Touches
-
Remove tape:
If you used a tape guideline, carefully peel it off now. Be extremely gentle to avoid smudging nearby wet paint. -
Dry thoroughly:
Let the glass sit undisturbed for at least 1 hour until the paint is dry to the touch, or follow the manufacturer’s specific drying instructions. -
Cure the paint:
To make the glass washable, cure the paint. This usually involves placing the glass in a cool oven, heating it to 350°F (175°C) for 30 minutes, and letting it cool down inside the oven.
Once baked and cooled, your custom frosted glassware is ready to be filled with your favorite holiday vintage
BRUSH GUIDE
The Right Brush for Every Stroke
From clean lines to bold texture — master brush choice, stroke control, and essential techniques.
Explore the Full Guide
Holly Leaves and Berry Garland
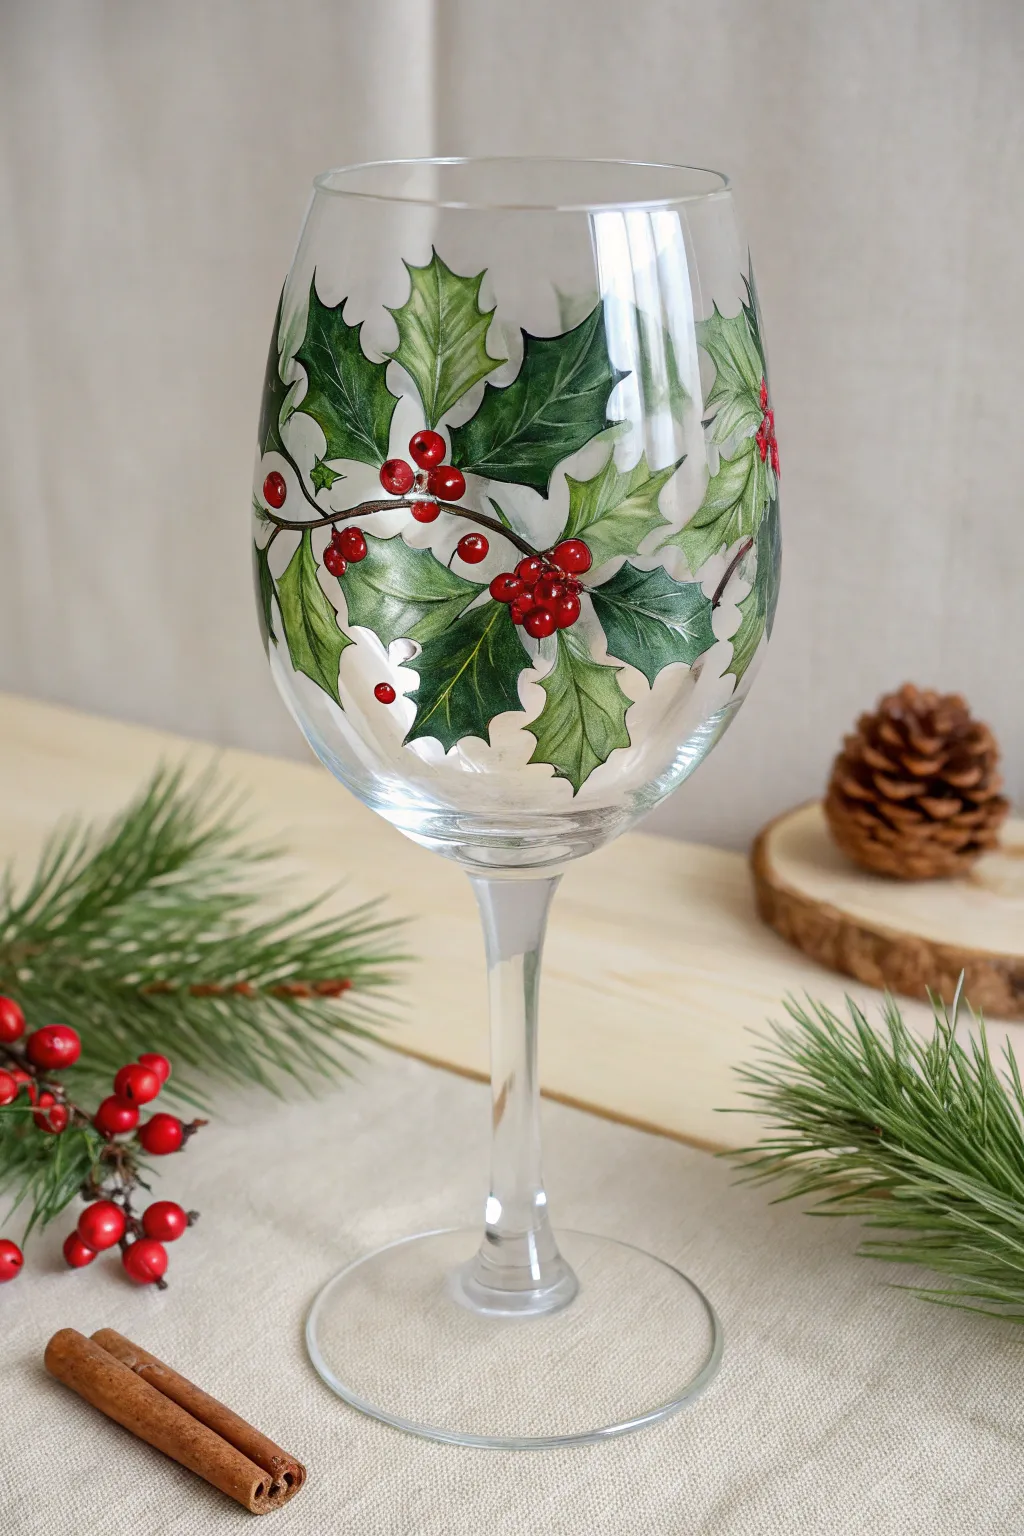
Transform plain glassware into elegant holiday decor with this classic holly leaf design. The translucent green washes and vibrant red berries create a festive garland effect that wraps beautifully around the bowl of the glass.
How-To Guide
Materials
- Clear white wine glass (washed with rubbing alcohol)
- Enamel glass paints (Pine Green, Leaf Green, Bright Red, White, Brown)
- Small round paintbrush (size 2 or 3)
- Fine liner brush (size 0 or 00)
- Rubbing alcohol
- Paper towels
- Paint palette or foil
Step 1: Planning the Vine
-
Clean surface:
Before you begin painting, thoroughly wipe down the outside of the glass bowl with rubbing alcohol to remove any oils or fingerprints. This ensures the paint adheres properly. -
Mix the vine color:
Mix a small amount of brown enamel paint with a tiny dot of black or dark green to create a deep, woody tone. -
Paint the main stem:
Using your fine liner brush, paint a thin, wandering line that wraps horizontally around the middle of the glass bowl. Keep the line slightly wavy to look natural, rather than perfectly straight. -
Add offshoots:
Paint small, short sprigs branching off from your main vine line. These will serve as anchor points for your leaf clusters and berries.
Paint Slipping?
If paint beads up or slides off the glass, the surface is likely oily. Clean the spot again with rubbing alcohol and let it dry completely before reapplying paint.
Step 2: Painting the Holly Leaves
-
Outline the shapes:
With the liner brush and Pine Green paint, gently outline the classic spiky holly leaf shapes attached to your vine. Group them in clusters of two or three. -
Base coat fill:
Switch to your small round brush. Mix a little thinner or water into your Leaf Green (depending on paint brand instructions) to create a semi-transparent wash. Fill in the leaf outlines. -
Create shading:
While the base coat is still slightly tacky, use the Pine Green to darken one half of each leaf, usually near the center vein. This adds instant dimension. -
Add veins:
Once the green layer is dry to the touch, use the liner brush and your darkest green color to paint a thin central line down each leaf, with tiny veins branching out to the spikes. -
Highlight tips:
I like to take a tiny bit of white paint mixed with pale green and gently dab it on the spiky tips of the leaves to make them look sharp and glossy.
Step 3: Adding Berries and Details
-
Paint berry clusters:
Using the back end of your paintbrush handle or a dotting tool, dip into Bright Red paint and press distinct round dots where the leaves meet the vine. -
Layering berries:
Group the berries in clusters of three to five, allowing some to slightly overlap others for a lush look. -
Individual berries:
Paint a few solitary red berries further along the vine or near leaf tips to balance the composition. -
Berry highlights:
Once the red paint is dry, use your finest brush to add a microscopic dot of white to the upper right curve of each berry. This reflection makes them look round and juicy. -
Final drying:
Allow the glass to dry for at least 24 hours before handling. -
Baking process:
To make the design dishwasher safe (check your specific paint instructions), place the cold glass into a cold oven. Set to 350°F (176°C) and bake for 30 minutes. Turn the oven off and let the glass cool completely inside before removing.
Snowy Effect
Sponge a light layer of frost medium or white enamel near the bottom of the leaves to create a sugar-frosted, snowy winter look.
Now you have a stunning piece of custom glassware ready to toast the holiday season
String of Holiday Lights Wrapped Around the Bowl
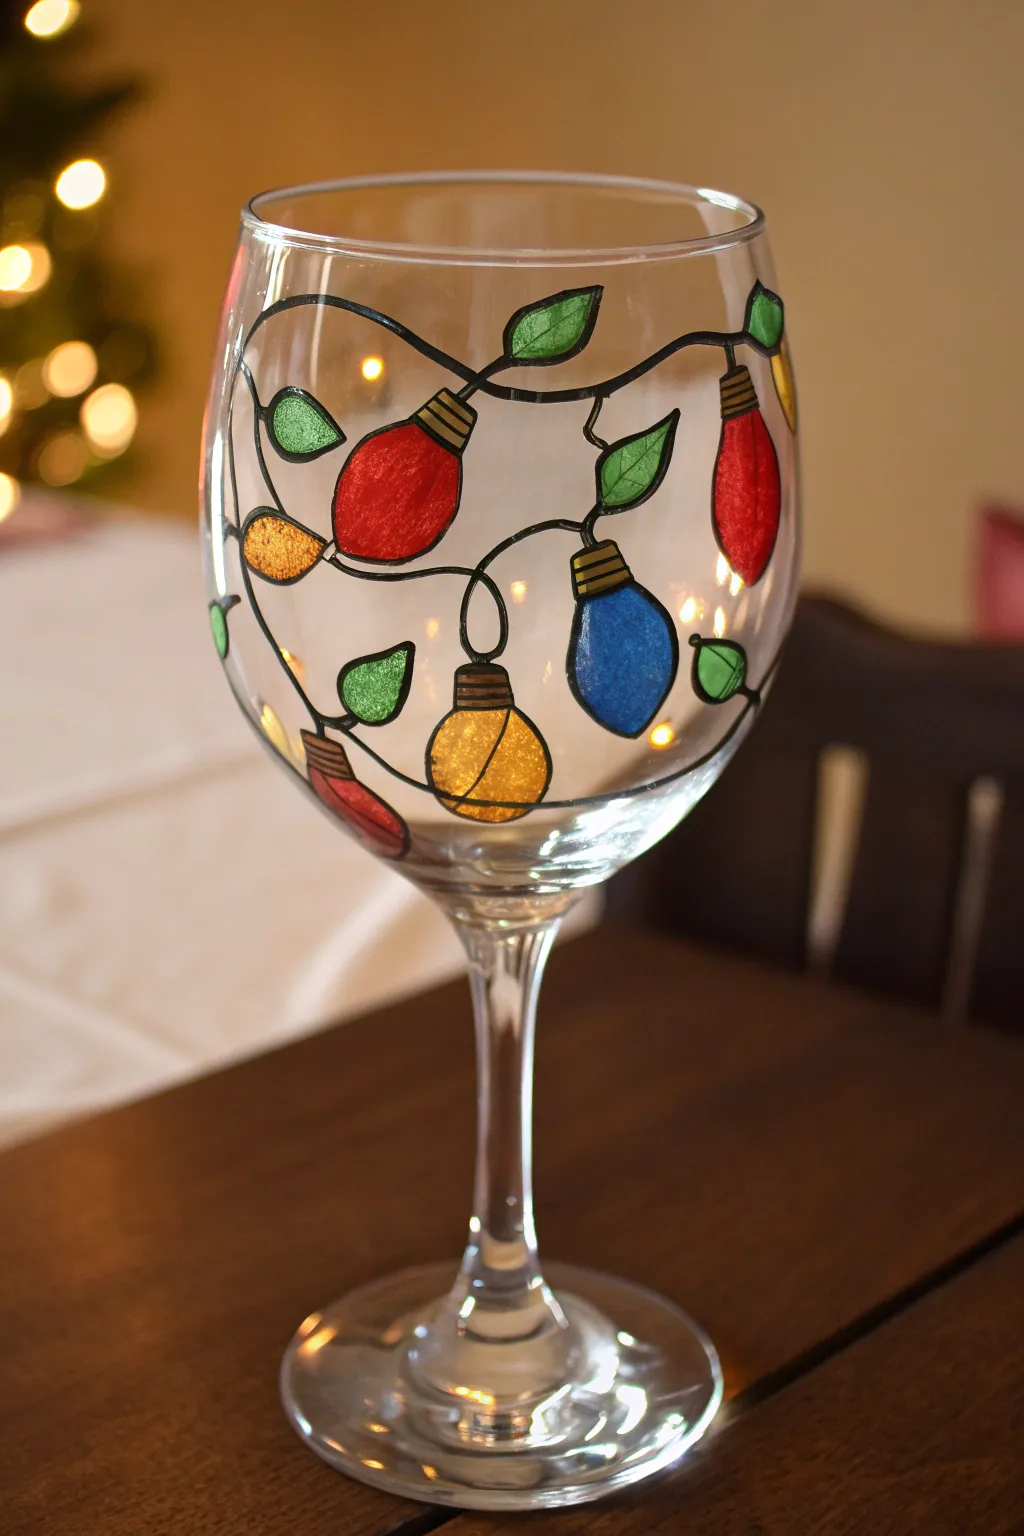
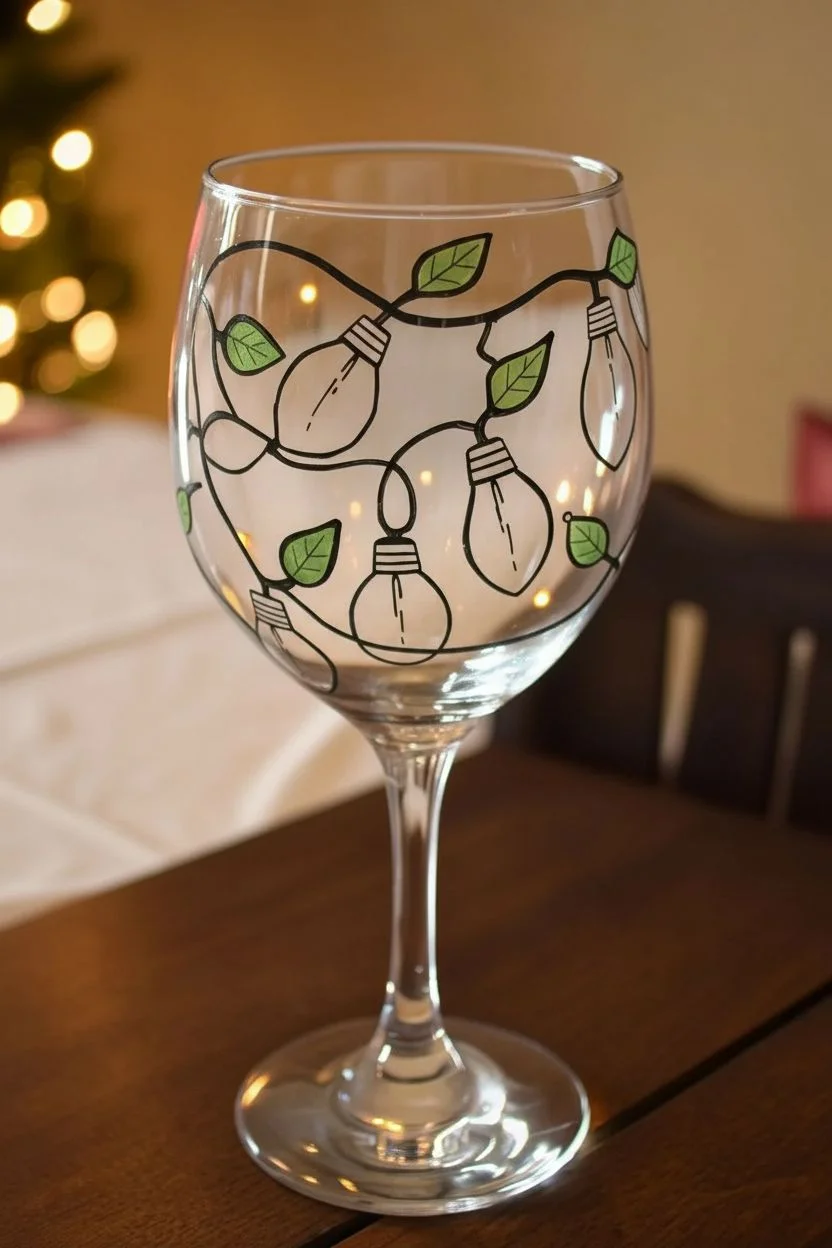
Transform a plain wine glass into a festive masterpiece with this vibrant string of lights design. The colorful bulbs and delicate green leaves create a playful, spiraling pattern that looks just like holiday lights wrapped around your drink.
Step-by-Step
Materials
- Clear stemmed wine glass
- Rubbing alcohol
- Cotton pads or paper towels
- Black glass liner paint (or oil-based paint pen)
- Glass paints (red, blue, yellow, green)
- Fine detail paintbrush (size 0 or 00)
- Paper plate or palette
- Q-tips (for cleanup)
- Oven (for curing, if paint requires)
Step 1: Preparation and Outline
-
Clean and Prep:
Begin by thoroughly cleaning the wine glass with rubbing alcohol and a cotton pad. This removes any oils or fingerprints that could prevent the paint from adhering properly. Handle the glass by the stem after this step. -
Plan the String Path:
Visualize a gently curving line that spirals around the bowl of the glass. You want it to look loose and natural, not a perfect coil. -
Draw the Main Wire:
Using your black glass liner or paint pen, draw the main string wire. Start near the top rim and create twisting loops that travel comfortably down toward the bottom of the bowl. -
Add Bulb Sockets:
Along the black wire, draw small rectangular or trapezoidal shapes hanging downwards. These will be the bases for your light bulbs. Space them out irregularly for a more organic look. -
Sketch the Bulbs:
Beneath each socket, draw a classic teardrop or large oval shape for the glass bulb. Vary the angles slightly so they don’t all hang perfectly vivid straight down. -
Add Leaf Details:
In the empty spaces along the wire between the bulbs, draw small, pointed oval leaf shapes attached directly to the main line. Add a tiny center line inside each leaf for a vein detail. -
Detail the Sockets:
Draw two or three tiny horizontal lines across each socket rectangle to mimic the screw threads on a real light bulb base. -
Let the Outline Dry:
Allow the black outline to dry completely. This is crucial—if you paint too soon, the black line will smear into your colors. I usually give this at least an hour.
Smooth Application
Don’t ‘brush’ the paint on like a wall. Instead, drop a bead of paint into the area and gently push it to the edges with your brush tip for a smooth, glossy finish.
Step 2: Adding Color
-
Fill the Red Bulbs:
Load your fine brush with red glass paint. Carefully fill in several of the bulb shapes, staying inside your black lines. Apply the paint somewhat thickly to get that rich, stained-glass effect. -
Paint the Blue Bulbs:
Rinse your brush well and switch to blue paint. Fill in another set of bulbs, trying to ensure you don’t place two blue ones right next to each other. -
Add Yellow and Green:
Continue the process with yellow paint for the glowing bulbs. Some bulbs can be green, or you can save the green exclusively for the leaves. -
Paint the Leaves:
Using a bright green glass paint, fill in the leaf shapes. If you want variety, you can mix a tiny dot of yellow into the green for a lighter shade on some leaves. -
Color the Sockets:
For the bulb sockets, use a metallic gold or a mix of yellow and brown paint. Carefully fill the tiny rectangular areas, avoiding the black thread lines you drew earlier. -
Check for Opacity:
Hold the glass up to the light. If the colors look too streaky or thin, wait for the first coat to be touch-dry and then gently dab on a second layer. -
Clean Up Edges:
If any paint went outside the lines, dip a Q-tip in rubbing alcohol and carefully wipe away the mistake before the paint fully cures.
Fixing Bubbles
If tiny air bubbles appear in your paint while wet, quickly pop them with a sewing pin or the very tip of a dry paintbrush to prevent cratering.
Step 3: Finishing Up
-
Final Cure:
Follow the instructions on your specific brand of glass paint for curing. Most require air drying for 21 days or baking in the oven (usually placing the glass in a cold oven, heating to 350°F, and baking for 30 minutes).
Enjoy your beautifully illuminated glass at your next holiday gathering

PENCIL GUIDE
Understanding Pencil Grades from H to B
From first sketch to finished drawing — learn pencil grades, line control, and shading techniques.
Explore the Full Guide
Mistletoe Cluster at the Rim
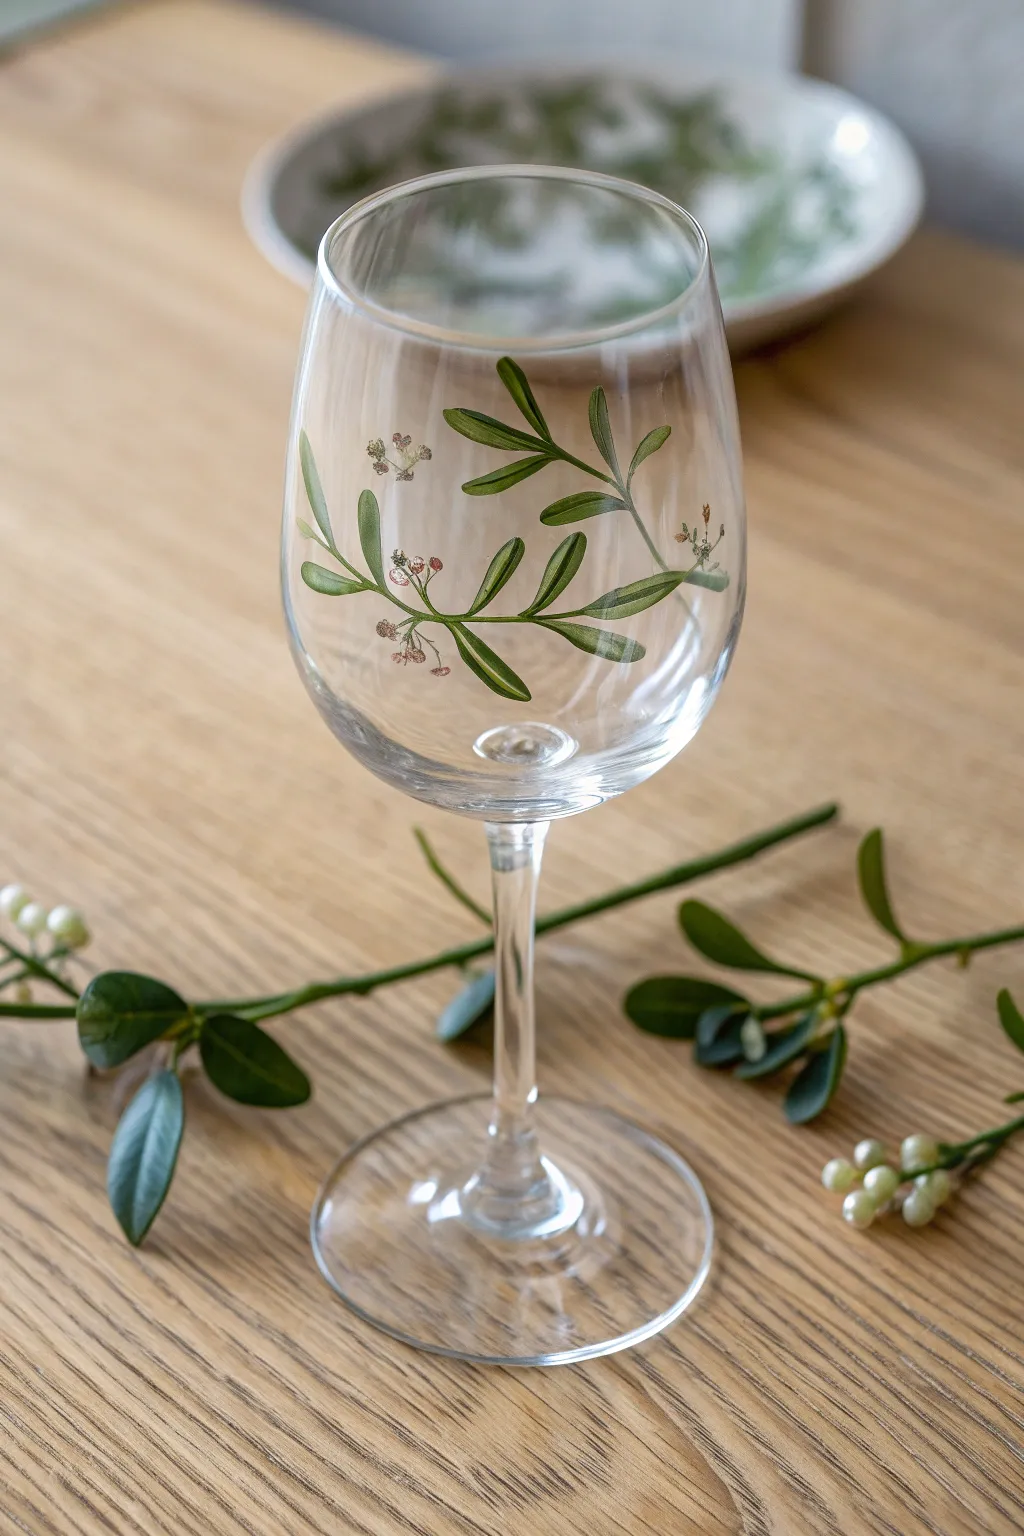
Bring a touch of sophisticated greenery to your holiday table with this delicate mistletoe wine glass. The design features slender, arching branches and subtle berries painted in translucent layers for a light, ethereal finish that mimics the real plant perfectly.
Detailed Instructions
Materials
- Clear wine glass with a rounded bowl
- Rubbing alcohol and cotton pads
- Enamel glass paints (Olive Green, darker Forest Green, Burnt Sienna or Reddish-Brown, White)
- Fine liner brush (size 0 or 00)
- Small round brush (size 1 or 2)
- Palette or small plate
- Paper towels
- Oven (for curing, if required by your paint brand)
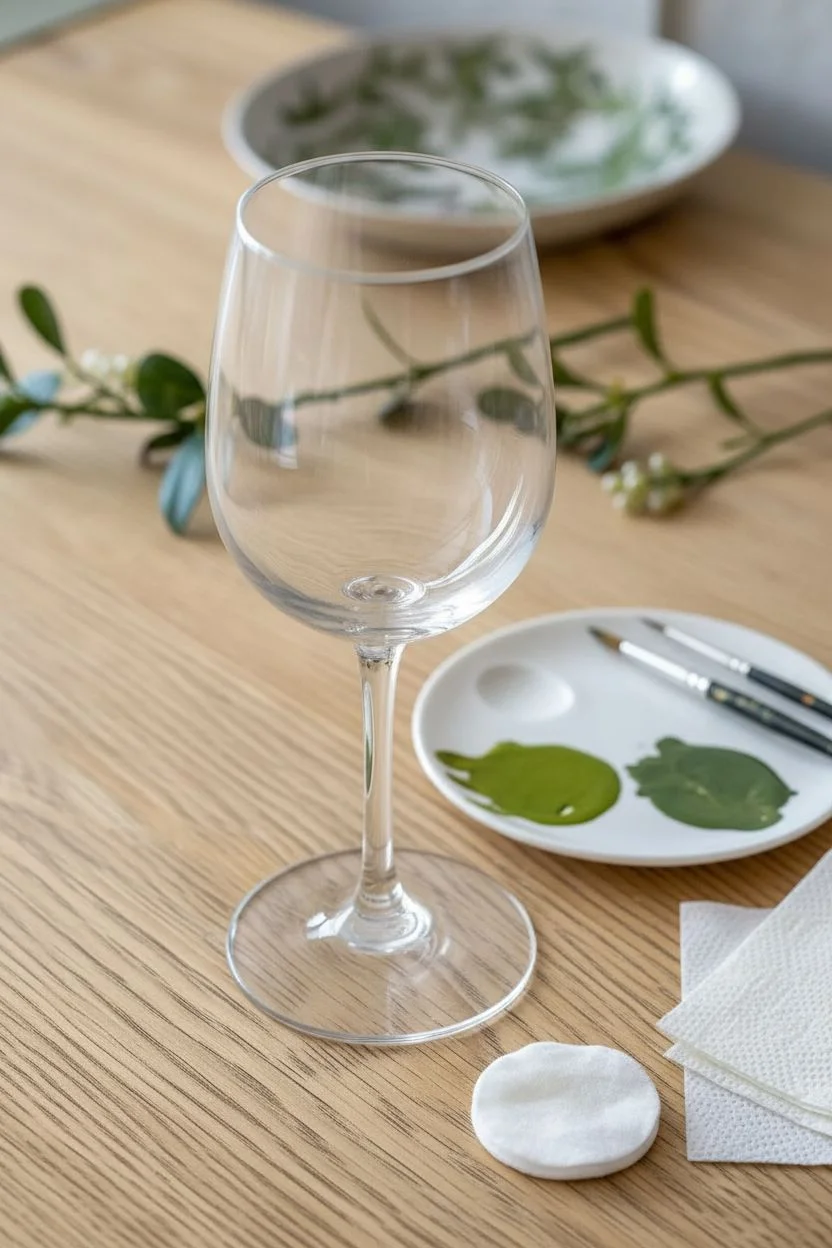
Step 1: Preparation and Planning
-
Clean the Surface:
Before painting, it is crucial to remove any oils or fingerprints from the glass. Thoroughly wipe down the entire outer surface of the wine glass bowl using a cotton pad soaked in rubbing alcohol. -
Dry Completely:
Let the alcohol evaporate completely. Avoid touching the area where you will be painting to keep it pristine for the paint to adhere properly. -
Mix Your Greens:
On your palette, prepare two shades of green. Squeeze out your Olive Green as a base. Then, mix a small amount of Olive Green with a tiny dot of Forest Green to create a slightly shadowed version for depth.
Uneven Coverage?
If your leaves look streaky, don’t overwork wet paint. Let the first coat dry completely, then apply a second thin layer for opacity.
Step 2: Painting the Greenery
-
Draft the Stem Lines:
Using the fine liner brush and the lighter Olive Green mixture, paint three to four thin, curved lines starting from the lower third of the bowl and arching upwards. -
Establish Flow:
Ensure these stem lines look organic by giving them a slight wiggle rather than making them perfectly straight. They should curve around the glass naturally. -
Start the Leaves:
Switch to your small round brush. Load it with the Olive Green paint. At the end of one stem branch, press the brush down gently and lift while pulling outward to create an elongated teardrop shape. -
Create Paired Leaves:
Mistletoe leaves often grow in pairs. Paint a second leaf opposite the first one, springing from the same point on the stem. Repeat this process down the length of your main branches. -
Add Variation:
Vary the size of the leaves slightly; make the ones near the tips of the branches smaller and young-looking, while the lower leaves can be broader. -
Layering Color:
While the first layer is still slightly wet, I like to take a tiny bit of the darker green mix on my liner brush and run a very thin line down the center of a few leaves to suggest a central vein. -
Fill in Gaps:
Step back and look at the composition. If there are large empty spaces, add a small, single sprig or a lone leaf to balance the design without overcrowding it. -
Allow Greenery to Set:
Let the green paint dry for about 15 to 20 minutes so it is tacky and stable before you add the berry details.
Stem Stability
Rest your painting hand’s pinky finger on the glass surface (away from wet paint) to stabilize your hand while drawing those fine stems.
Step 3: Detailing and Berries
-
Mix Berry Color:
Mix a small amount of White with a drop of Burnt Sienna or Reddish-Brown. You want a soft, muted pinkish-brown tone, not a bright Christmas red. -
Paint Berry Clusters:
Using the tip of your liner brush or a dotting tool, dab small clusters of three or four dots near the intersections where leaves meet the stems. -
Add Dimension to Berries:
Once the base berry color is down, add a microscopic dot of pure White to the top of each berry to simulate a highlight and make them look round. -
Connect the Berries:
Use your liner brush with the thinnest possible amount of brown paint to draw tiny stems connecting the berry clusters to the main green branch. -
Refine Edges:
Check your leaves for any messy edges. You can clean them up carefully with a damp cotton swab or a toothpick while the paint is still workable.
Step 4: Curing and Care
-
Air Dry First:
Allow the painted glass to air dry for at least 24 hours (or as recommended by your paint manufacturer) in a dust-free area. -
Bake to Set:
Place the glass in a cold oven. Turn the heat to 350°F (176°C) and bake for 30 minutes. Turn the oven off and let the glass cool down completely inside the oven to prevent cracking.
Once baked and cooled, your custom glassware is ready to be filled with your favorite vintage for a festive toast
Gnome Hat and Beard on the Glass Shape
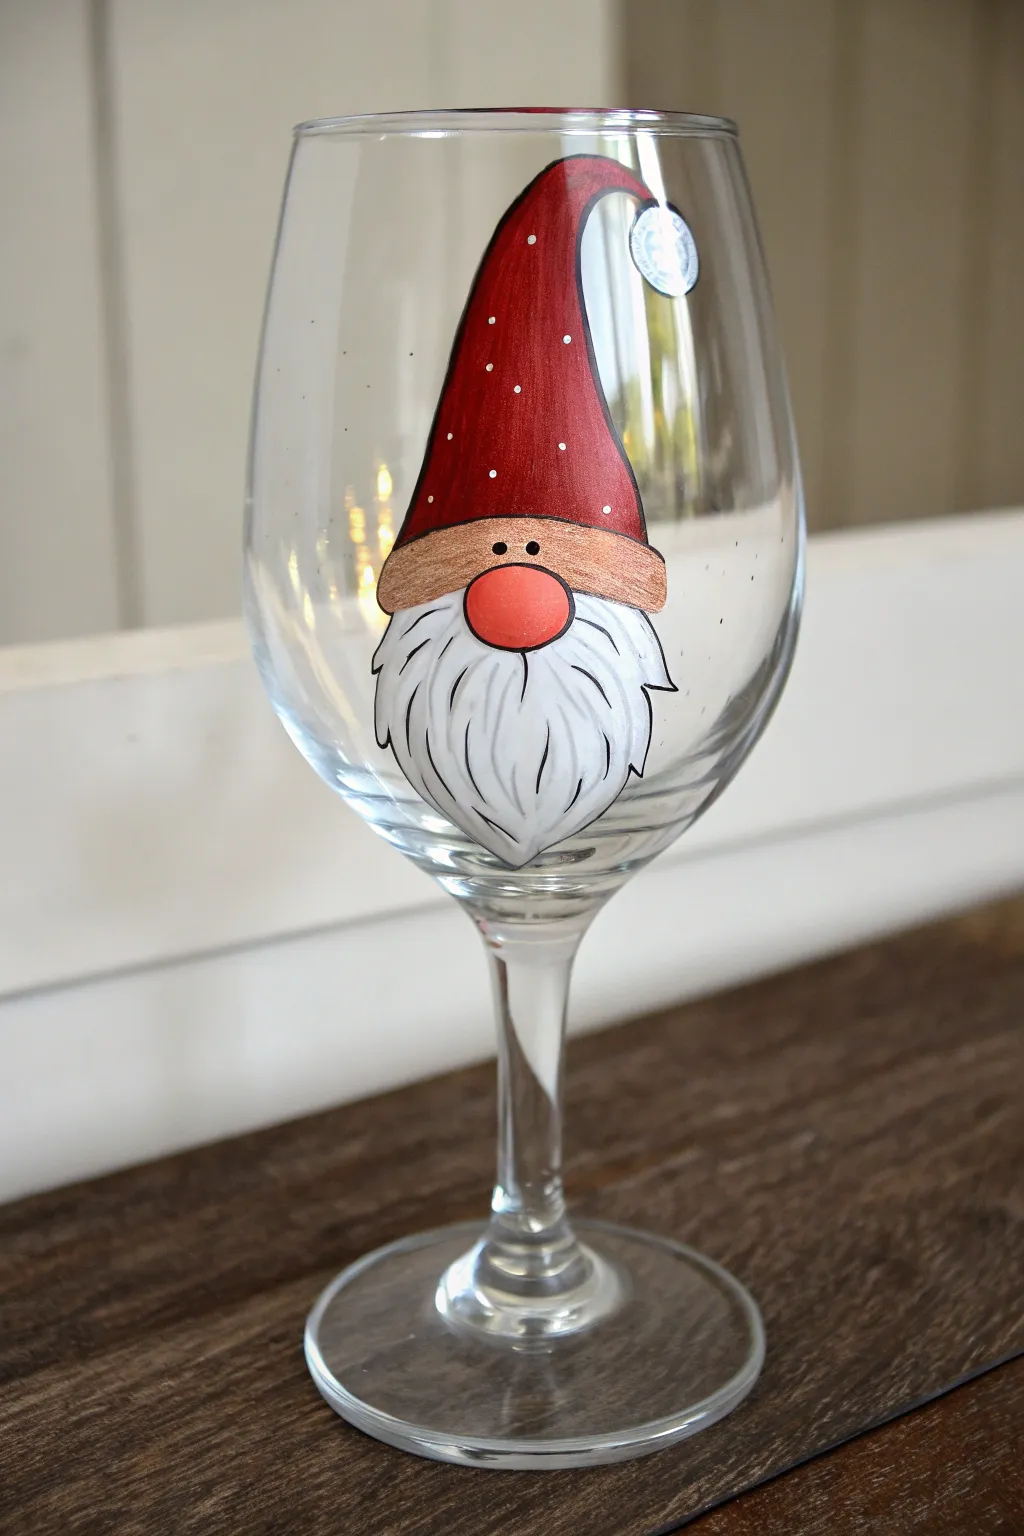

Transform a standard wine glass into a festive holiday character with this adorable painted gnome. Featuring a tall red hat, a peachy nose, and a fluffy white beard, this project uses the natural curve of the glass to bring the character to life.
Detailed Instructions
Materials
- Standard clear wine glass
- Rubbing alcohol and cotton pads
- Enamel glass paints (Red, White, Peach/Flesh tone, Black)
- Fine point detail brush (0 or 00 size)
- Small round brush (size 2 or 4)
- Fine tip black oil-based paint pen (optional but recommended for outlining)
- Oven for curing (optional)
Step 1: Preparation and Base Shapes
-
Clean the surface:
Before making a single mark, wipe the exterior of the wine glass thoroughly with rubbing alcohol on a cotton pad. This removes oils and fingerprints that prevent paint adhesion. -
Outline the nose:
Start by painting a medium-sized circle right in the center of the glass bowl using your peach or flesh-colored enamel paint. This central nose anchors the whole design. -
Sketch the hat shape:
Using a fine brush and slightly thinned red paint (or a red marker for a guide), draw a tall, curved triangle starting just above the nose area. Let the tip flop over to the right side for that classic gnome look. -
Fill the hat:
Fill in the hat outline with opaque red enamel paint. You may need two thin coats rather than one thick one to avoid drips on the curved glass. -
Create the brim:
Paint a gentle, curved band horizontally right above the nose, overlapping the bottom of the red hat slightly. I like to use a light brown or mixed beige for this to separate the hat from the face.
Step 2: Adding the Beard and Details
-
Outline the beard:
Using white paint, map out the beard shape starting from under the hat brim and flowing down around the nose, ending in a point near the stem of the glass. -
Fill the beard:
Fill in the entire beard area with white enamel paint. Apply this coat fairly smoothly, as we will add texture lines later. -
Add the pom-pom:
At the very tip of the flopped-over red hat, dab a clear circle of white paint to create the festive pom-pom ball. -
Let it dry completely:
This is crucial: allow the base colors to dry for at least an hour. The black outlining step requires a solid, dry surface. -
Outline the main shapes:
Using your fine detail brush and black paint (or a black oil-based paint pen), carefully trace the outer edges of the hat, the brim, the nose, and the beard. -
Detail the beard:
Draw wavy, vertical lines inside the white beard area to simulate hair texture. Start from under the nose and brim, sweeping downward toward the point. -
Add facial features:
Place two small black dots on the hat brim area, just above the nose, to create the eyes. This gives the illusion that the hat is pulled down low.
Paint Slipping?
If your paint feels slippery or separates on the glass, your first coat is likely too thick. Wipe it off and apply an ultra-thin ‘tacky’ layer first to establish a grip.
Step 3: Finishing Touches
-
Decorate the hat:
dip the end of your brush handle or a stylus into white paint and add small, random dots all over the red hat for a snowy texture. -
Detail the pom-pom:
Add a few tiny, curved black lines inside the white pom-pom circle to give it a fluffy, round appearance. -
Shadow the brim:
If you want extra depth, mix a tiny drop of brown into your white and add faint horizontal streaks on the brim to look like fabric texture. -
Cleanup lines:
Check your black outlines. If any lines look shaky, you can gently scratch away excess with a toothpick once the paint is tacky but not fully hard. -
Cure the glass:
Once fully dry (usually 24 hours), cure the glass according to your paint manufacturer’s instructions—usually by baking it in a cool oven that heats up gradually.
Steady Your Hand
For the crisp black outlines, roll up a small hand towel and place it inside the glass. This gives you something solid to grip and helps stabilize your hand while drawing.
Fill your new festive glass with a favorite holiday beverage and enjoy the cheer your little gnome brings to the table


Penguin in a Scarf and Earmuffs
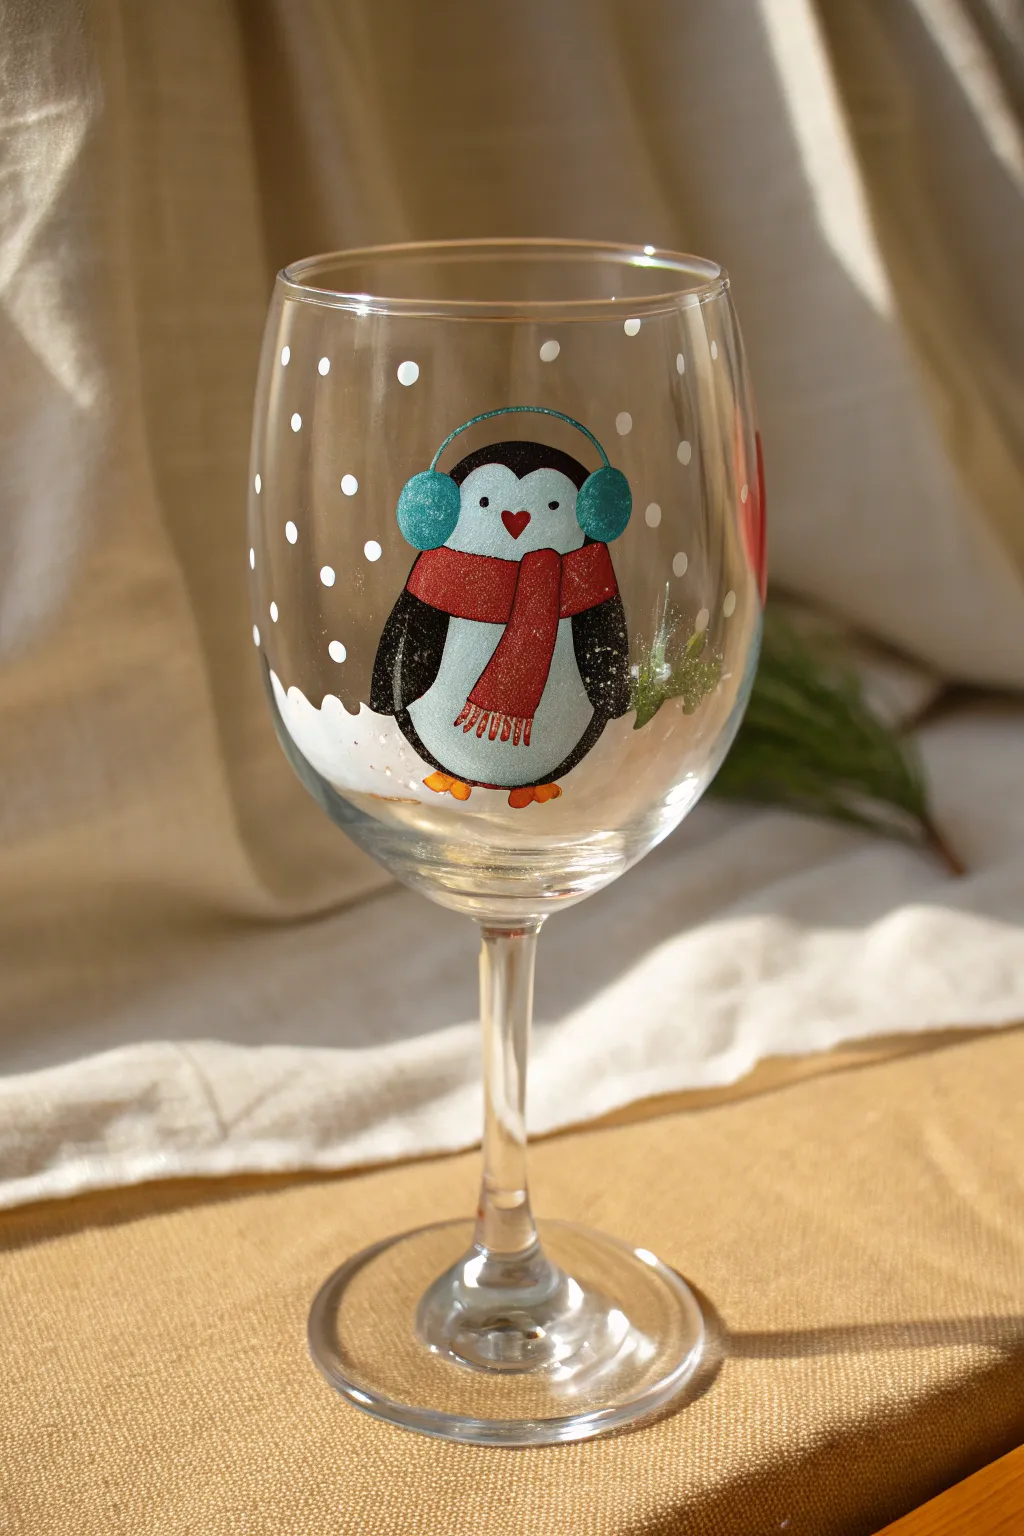
Transform a plain glass into a festive keepsake featuring an adorable penguin braving the snow. With sparkly snow details and a bright red scarf, this hand-painted design brings a cozy touch to your holiday table setting.
Step-by-Step
Materials
- Stemmed wine glass (cleaned with rubbing alcohol)
- Enamel glass paints in: Black, White, Red, Bright Blue/Teal, and Orange
- Crystal glitter paint or glass-safe glitter medium
- Fine detail brush (0 or 00 size)
- Small round brush (size 2 or 4)
- Rubbing alcohol
- Cotton pads
- Painting palette or foil
- Dotting tool or toothpick
Step 1: Setting the Scene
-
Prep the surface:
Before dipping your brush, wipe the entire glass surface with rubbing alcohol on a cotton pad to remove any oils or fingerprints that might prevent paint adhesion. -
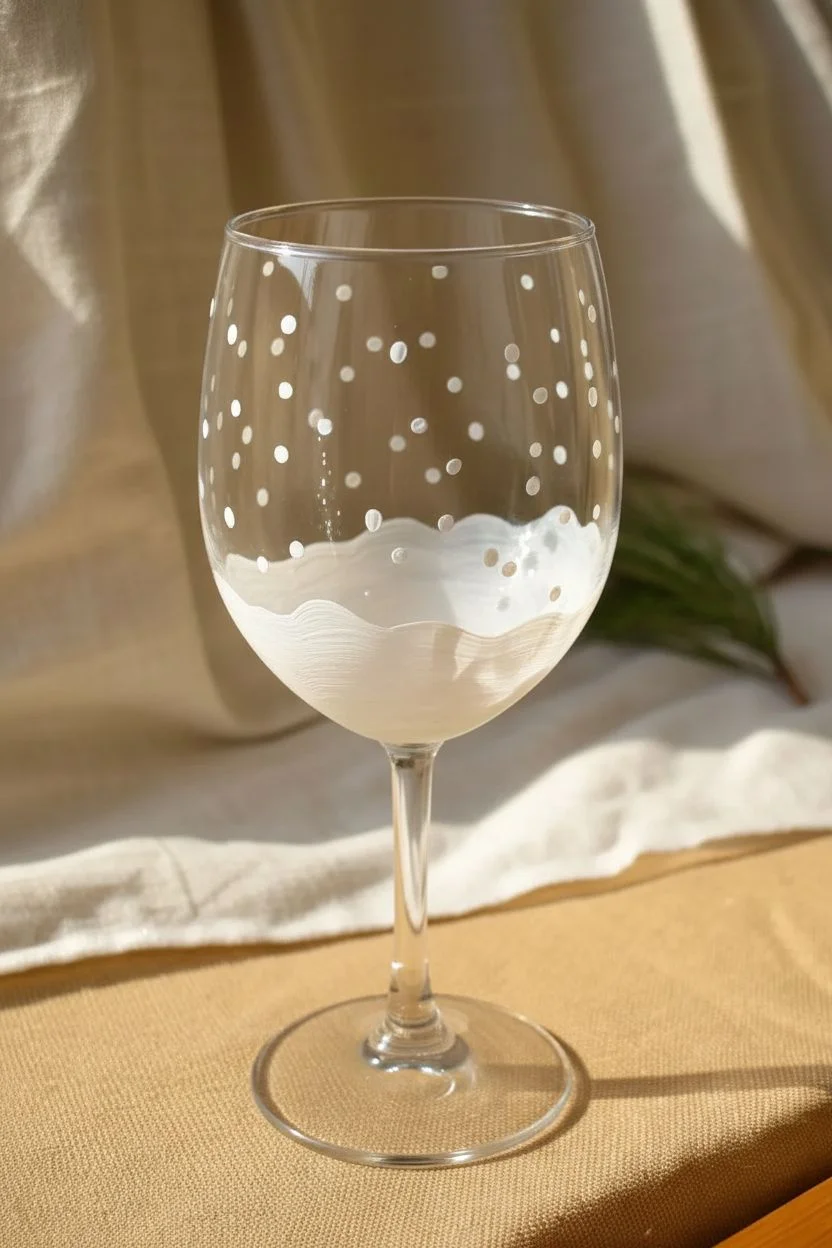
Paint the snow base:
Using your round brush and white enamel paint, create a wavy, irregular line near the bottom of the bowl of the glass. Fill in the area below the line completely to form a snowy ground for your penguin to stand on. -
Add falling snow:
Dip the handle end of a paintbrush or a dotting tool into white paint. Gently dot the upper part of the glass with random spots of varying sizes to simulate falling snowflakes.
Clean Lines
Keep a Q-tip dipped in rubbing alcohol nearby while painting. It works like a magic eraser for any smudges or wobbly edges before the paint dries.
Step 2: Creating the Penguin
-
Outline the body:
With black paint and a fine detail brush, outline a large oval shape standing on the snow. Keep the shape slightly wider at the bottom for a cute, chubby look. -
Fill the body:
Fill in the black oval completely. Don’t worry about the tummy yet; we will layer white on top once the black is dry, or you can leave a negative space oval if you have a very steady hand. -
Add the tummy:
Once the black layer is touch-dry (or if you left space), paint a smaller, inner oval using white paint mixed with a tiny dot of blue for a cool, icy undertone. This creates the penguin’s belly and face canvas. -
Add texture:
While the paint is wet, you can lightly stipple the white area to give it a feathery texture, or keep it smooth for a cartoon style. -
Paint the feet:
Using bright orange paint, add two small, half-oval shapes at the bottom of the penguin’s body for feet.
Step 3: Accessories and Details
-
Starting the scarf:
With red paint, draw a curved band across the penguin’s neck area. I find it helps to let the ends drape down slightly on the right side to show weight and movement. -
Scarf fringe:
Use your finest brush to flick tiny lines at the bottom of the scarf drape to create the look of fringe. -
Adding earmuffs:
Mix a teal or bright blue paint. Paint two round circles on either side of the penguin’s head area. Connect them over the top of the black head with a very thin blue arch. -
The face:
Using the very tip of your detail brush or a toothpick, add two tiny black dots for eyes. Paint a small red heart or inverted triangle between the eyes for a sweet beak. -
Glitter accents:
Once the main colors are dry, carefully brush a layer of crystal glitter paint over the blue earmuffs and the white belly area to give it a frosty shimmer. -
Finishing the scarf:
Add highlight lines to the red scarf with a lighter red or white mixture to define the folds. -
Final cure:
Follow the instructions on your specific paint bottle for curing—most require either 21 days of air drying or baking in a cool oven brought up to temperature.
Correcting See-Through Paint
If your white paint looks streaky or translucent over the glass, let the first coat dry completely (about 1 hour) before adding a second coat for full opacity.
Allow your new penguin friend to cure fully before hand washing and displaying with your favorite winter beverage
Cozy Sweater Pattern Bands
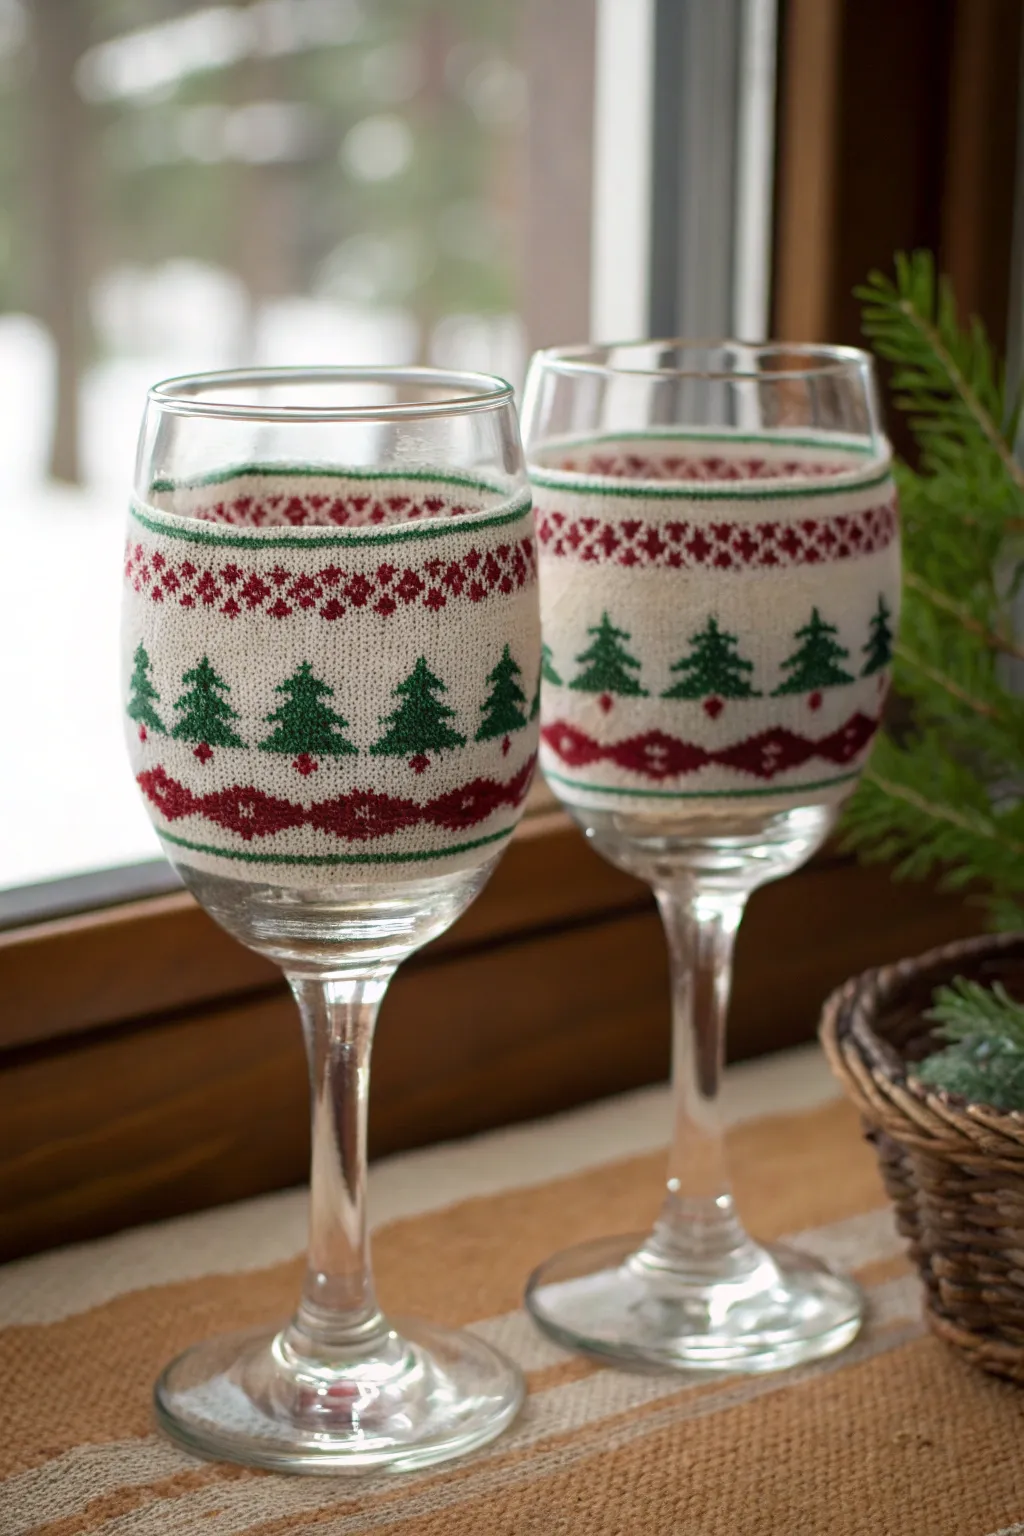
Transform ordinary glassware into cozy, winter-ready masterpieces without picking up a single knitting needle. This project uses clever painting techniques to mimic the texture and pattern of a classic Fair Isle sweater directly onto the glass.
How-To Guide
Materials
- Wine glasses (clear, stemmed)
- Rubbing alcohol
- Cotton pads
- Enamel craft paint (White, Dark Green, Deep Red)
- Fine detail paintbrush (00 or 000 size)
- Small flat shader brush
- Painter’s tape or stencil tape
- Graph paper (optional)
- Pencil (optional)
- Toothpicks
- Oven (for curing)
Step 1: Preparation & Base Layer
-
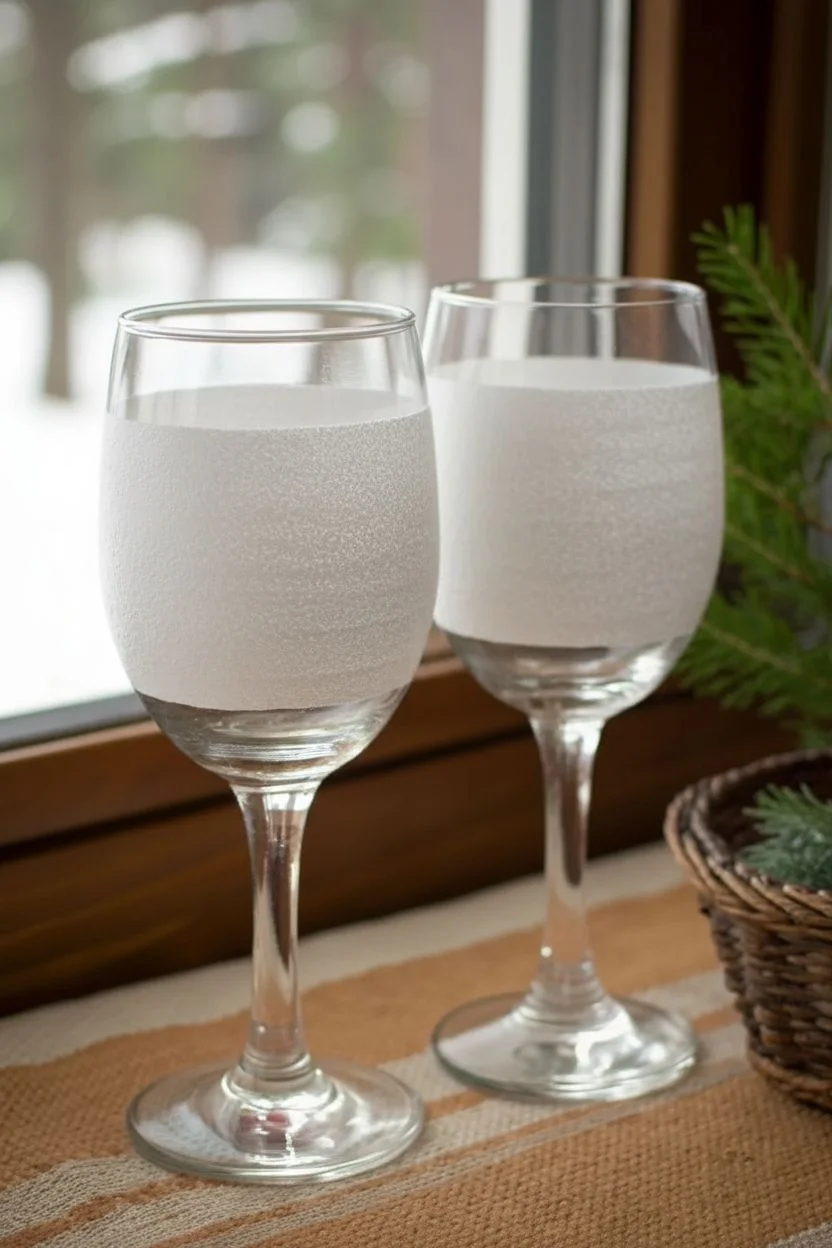
Clean surface:
Begin by thoroughly wiping down the outside of your wine glasses with rubbing alcohol and a cotton pad. This removes oils and fingerprints that could prevent the paint from adhering properly. -
Define the band:
Apply two horizontal strips of painter’s tape around the bowl of the glass. Position one strip about an inch below the rim and the second strip about two inches further down to create a crisp window for your sweater pattern. -
Apply base color:
Using the flat shader brush, apply a coat of white enamel paint between the tape lines. Use vertical strokes to mimic the direction of knit stitches. -
Second coat:
Allow the first layer to dry to the touch (usually 15-20 minutes). Then, apply a second coat of white to ensure full opacity so the background looks like solid fabric. -
Texture creation:
While the second coat is still slightly tacky, I like to gently dab it with a dry, stiff brush or a textured sponge. This creates a subtle stippled effect that resembles the fuzziness of yarn. -
Remove tape:
Carefully peel away the painter’s tape while the paint is still slightly wet to prevent chipping the edges. Let the white band dry completely for at least one hour before painting designs on top.
Stitch Effect Pro Tip
Paint your designs using tiny ‘V’ shapes or small dots instead of solid lines. This pixelated technique tricks the eye into seeing a knitted texture rather than flat paint.
Step 2: Designing the Fair Isle Pattern
-
Create borders:
Load your fine detail brush with dark green paint. Carefully paint a thin, continuous line along the very top and very bottom edges of your white band to frame the design. -
Paint the trees:
Find the center of your band. Using green paint, create a small triangle shape for the top of a tree. Below the triangle, paint small horizontal dashes that get wider as you go down, mimicking the look of boughs. -
Complete the forest:
Continue painting identical trees around the circumference of the glass, spacing them evenly. Leave about half an inch of white space between each tree. -
Add red accents:
Switch to your deep red paint. Add a tiny dot or square at the very base of each green tree to serve as the trunk. -
Top geometric band:
About a half-inch below the top green rim, paint a row of small red ‘X’ shapes or diamonds. These mimic the cross-stitch or pixelated look of a knitted pattern. -
Bottom geometric band:
Repeat the geometric pattern near the bottom edge. Paint small red diamonds connecting horizontally to create an argyle-inspired strip beneath the trees. -
Detailing the knit:
This step makes it look realistic: Use a toothpick dipped in wet paint to gently scratch tiny vertical lines into your colored shapes before they dry. This reveals the white base underneath and looks like individual yarn stitches.
Smudge Correction
If you make a mistake on the white base, wait for the error to dry partially, then gently scrape it off with a toothpick. Wiping wet paint often smears and ruins the base.
Step 3: Finishing Touches
-
Refine edges:
Check the upper and lower rims of your painted band. If they look uneven, use a clean toothpick to gently scrape away excess paint for a sharp line. -
Drying time:
Allow the glasses to air dry for at least 21 days for a full cure, or follow the baking instructions on your specific enamel paint bottle. -
Baking method:
If baking, place the glasses in a *cold* oven. Set the temperature to 350°F (175°C) and bake for 30 minutes. Turn the oven off and let the glasses cool down completely inside the oven before removing them.
Now pour your favorite vintage and enjoy the cozy charm of your new glassware
Peek-a-Boo Snowflake on the Bottom Base
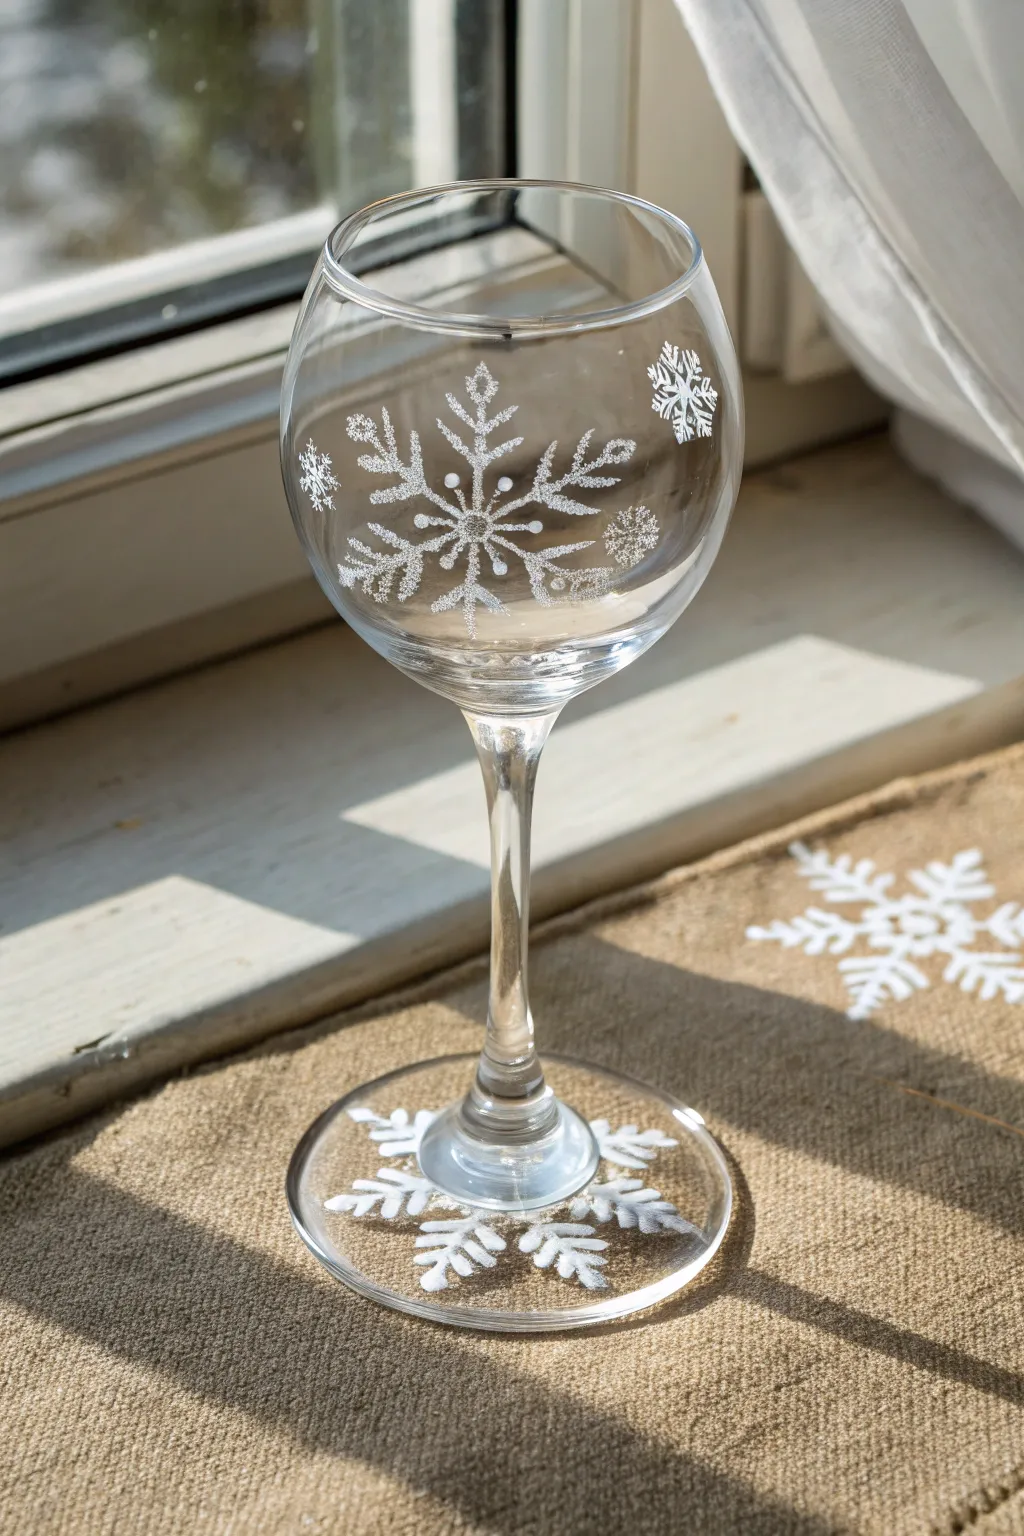
Surprise your holiday guests with this double-sided delight, featuring delicate frost snowflakes on the bowl and a hidden treasure underneath. The snowflake on the base looks beautiful when resting on the table and reveals a clever detail every time someone takes a sip.
Step-by-Step Tutorial
Materials
- Clear stemmed wine glass
- Rubbing alcohol
- Cotton rounds or paper towels
- White enamel craft paint (glass-appropriate)
- Frost or glitter medium (top coat or mix-in)
- Fine liner brush (size 0 or 00)
- Small flat brush
- Dotting tool or toothpick
- Paper plate or palette
- Oven for curing (optional, depending on paint)
Step 1: Preparation
-
Clean the Surface:
Before you begin, wipe down the entire wine glass with rubbing alcohol on a cotton round to remove any oils or fingerprints. This ensures your beautiful snowflakes adhere properly. -
Plan Your Spacing:
Visualize where your main snowflake will go on the bowl. You want it centered on the curve but not right at the rim where lips will touch.
Use a Guide
Print a snowflake clip-art image, cut it out, and tape it inside the glass bowl. You can simply trace the lines from the outside for a perfect shape.
Step 2: The Main Snowflake
-
Paint the Center Star:
Using your fine liner brush loaded with white enamel paint, create a simple six-point star in the center of the glass bowl. Start with a vertical line, then an ‘X’ crossing through its center. -
Add Inner Details:
Near the intersection of your six lines, paint tiny V-shapes pointing outward on each arm. This creates the intricate crystal look immediately. -
Extend the Arms:
Lengthen the main six lines if needed, keeping them fine and delicate. A light hand is key here—don’t press too hard on the brush. -
Create Outer Branches:
Towards the end of each arm, paint larger V-shapes branching out. Think of these like the feathers on an arrow. -
Add the Frost Effect:
Once the basic white structure is tacky but not fully dry, lightly dab a bit of glitter or frost medium over the lines to give it that icy texture. -
Dotting Details:
Dip your dotting tool or toothpick into white paint and add small dots at the very tips of the snowflake arms and in the negative spaces between the arms.
Step 3: Surrounding Elements
-
Paint Smaller Flakes:
Scattered around the main snowflake, paint two or three smaller, simpler starbursts. Vary their designs slightly so no two are identical. -
Paint the Mini-Crystals:
Fill in empty spaces with tiny asterisks or simple dots to simulate falling snow.
Add Metallic Flair
Mix a tiny drop of silver metallic paint into your white enamel. It adds a sophisticated dimension that sparkles beautifully in candlelight.
Step 4: The Peek-a-Boo Base
-
Flip the Glass:
Carefully turn the glass upside down and rest it on its rim. You are going to paint on the underside of the base. -
Create the Base Snowflake:
Paint a large six-point star that spans the width of the base, centered around the stem attachment. The stem will be the center of this snowflake. -
Thicken the Lines:
Since the base is thicker glass, make these lines slightly bolder than the ones on the bowl so they show up clearly through the glass. -
Add Decorative Ferns:
Paint fern-like branches coming off the main six arms. I find that painting ‘leaves’ on both sides of each arm fills the space nicely. -
Final Cleanup:
Check the rim of the glass to ensure no paint strayed into the drinking area. Wipe away any mistakes with a damp cotton swab before the paint sets. -
Curing:
Follow your specific paint brand’s instructions for curing. This usually involves air drying for 21 days or baking the glass in a cool oven that heats up to 350°F for 30 minutes.
Now you have a stunning winter glass that looks just as magical sitting on the table as it does when raised for a toast


Have a question or want to share your own experience? I'd love to hear from you in the comments below!