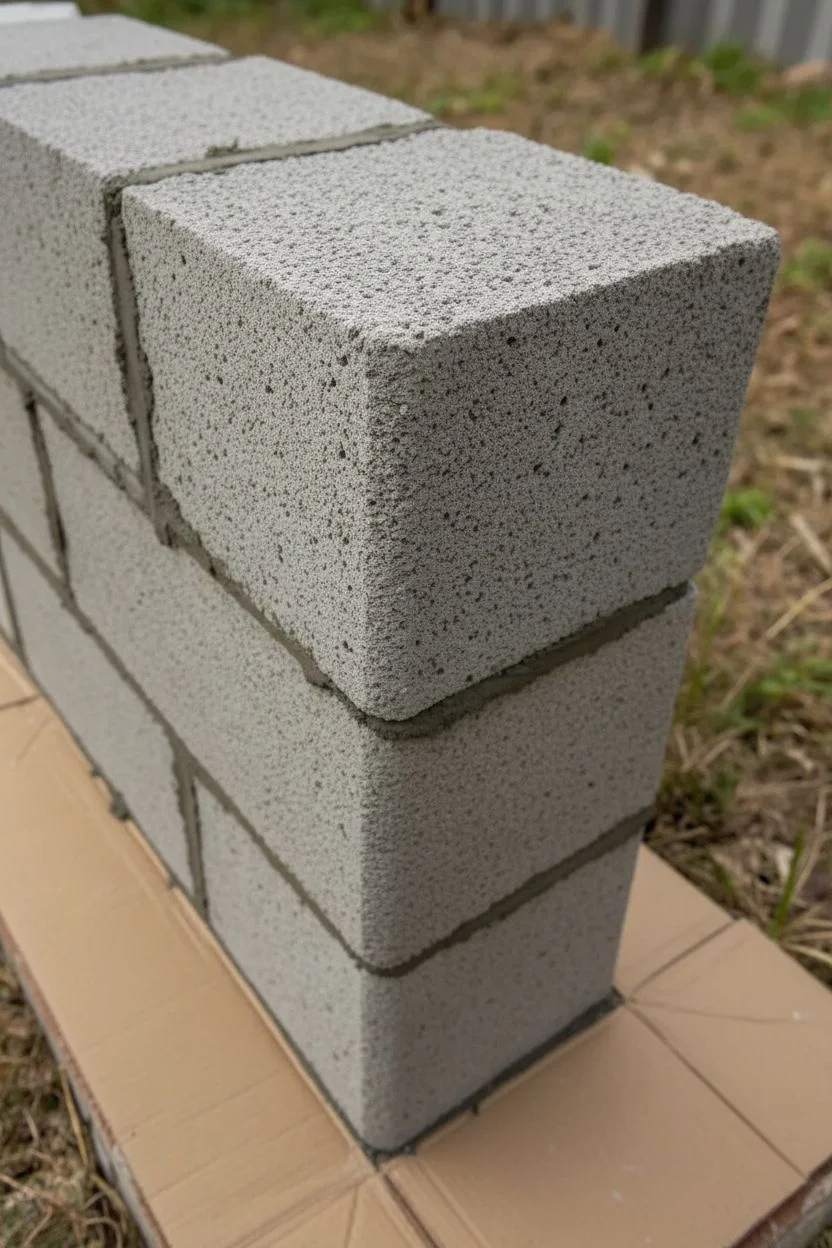
If you’ve got a stack of plain gray cinder blocks sitting around (or a whole cinder block wall staring you down), paint is the fastest way to make them feel intentional and stylish. Here are my favorite cinder block paint ideas—starting with the classics everyone loves and drifting into the artsy, unexpected stuff that turns blocks into real features.
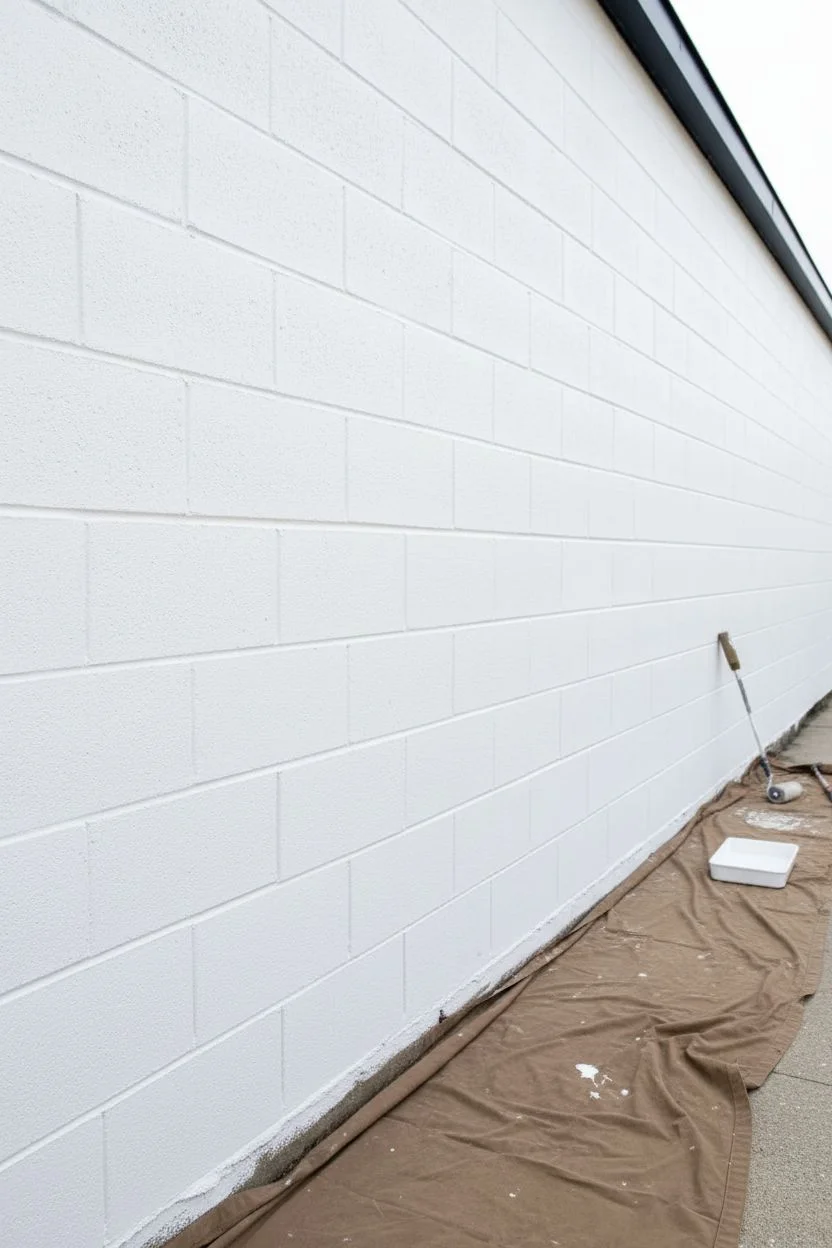
Crisp Solid-Color Makeover for a Cinder Block Wall
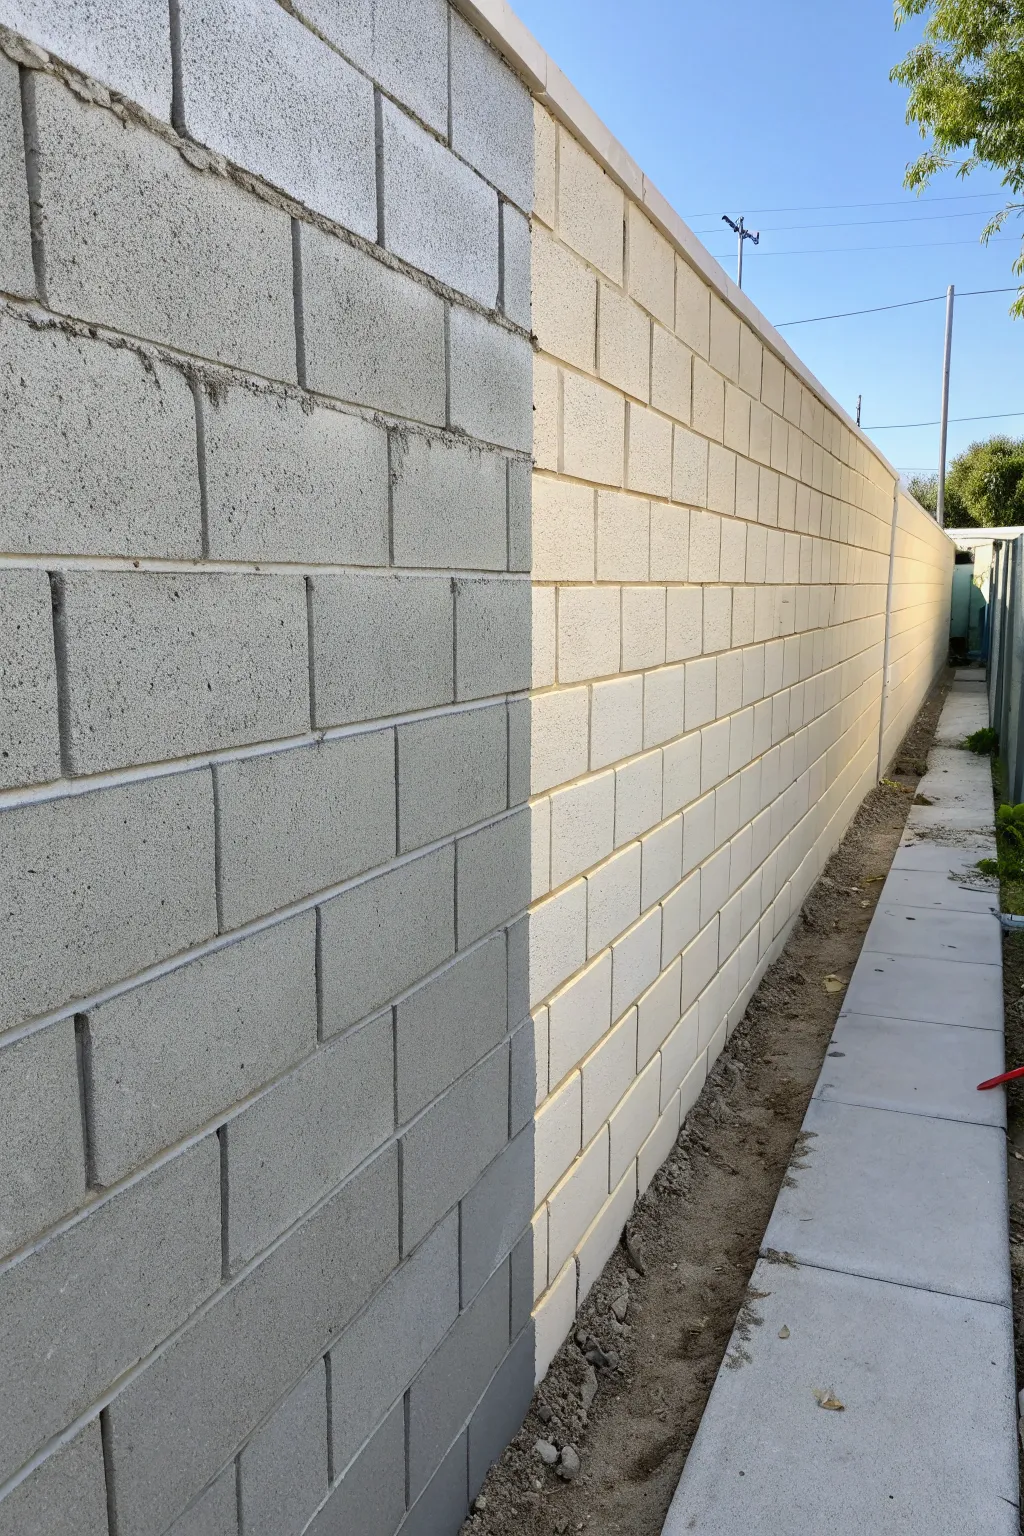
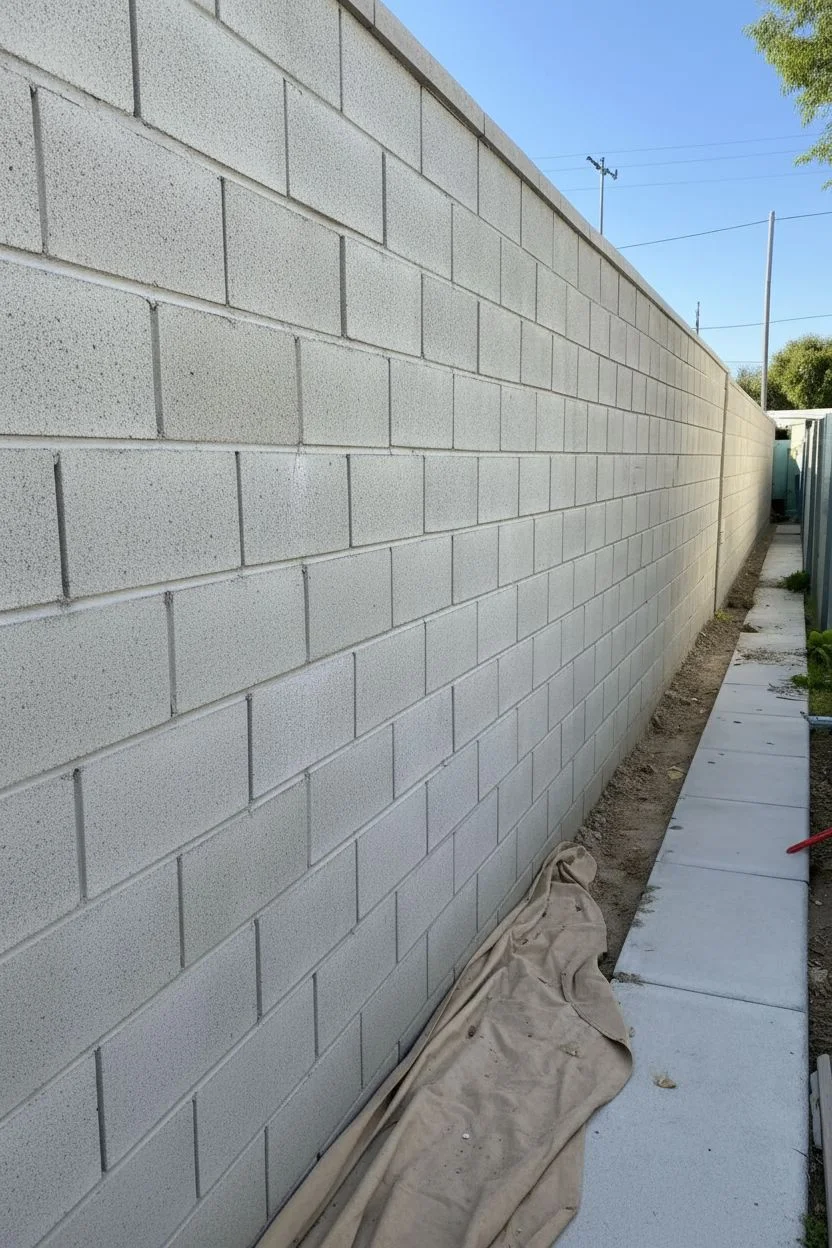
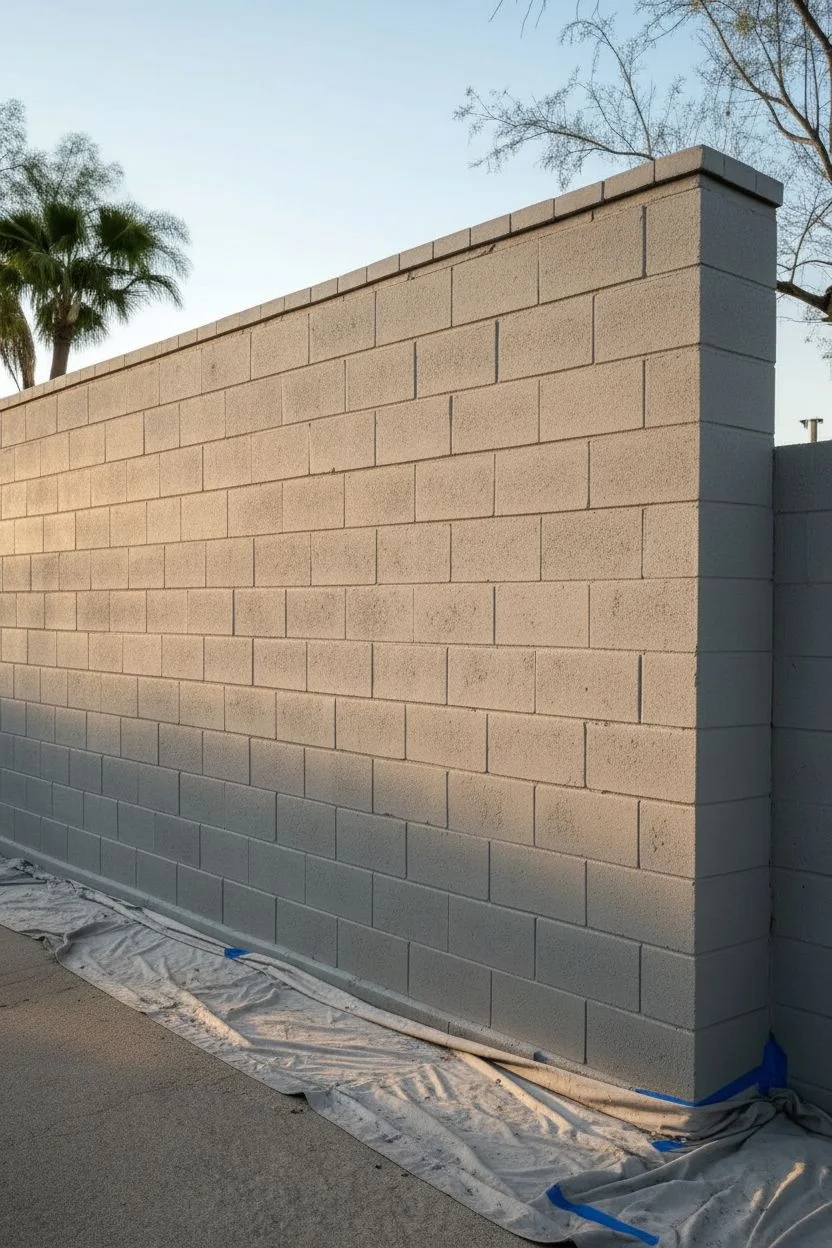
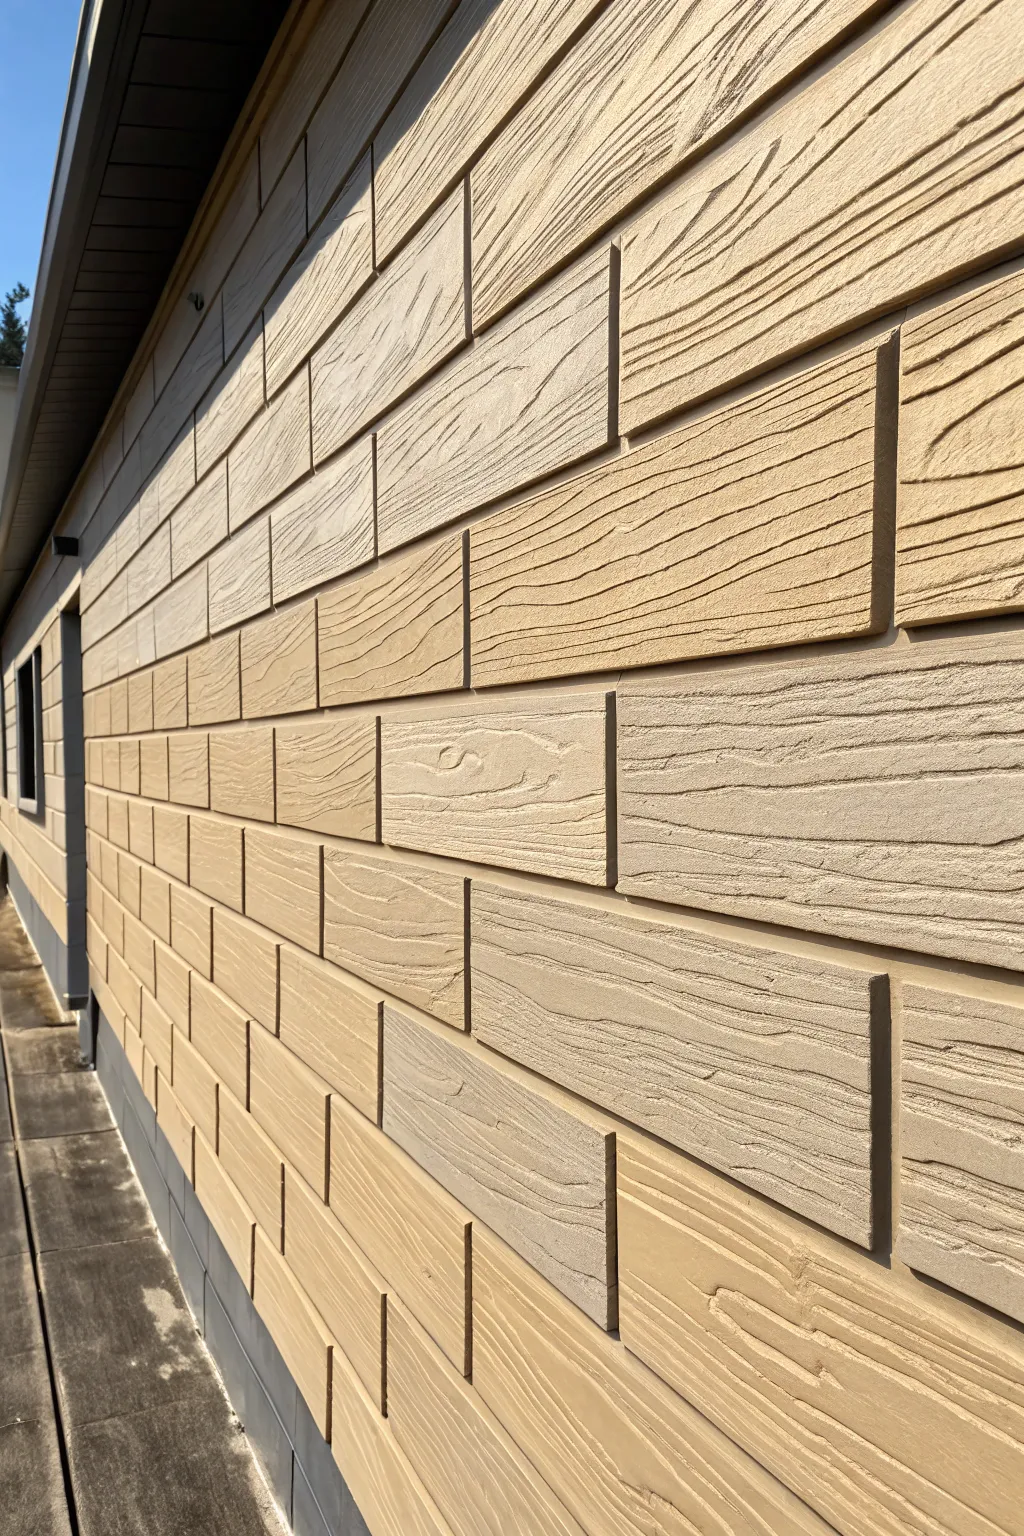
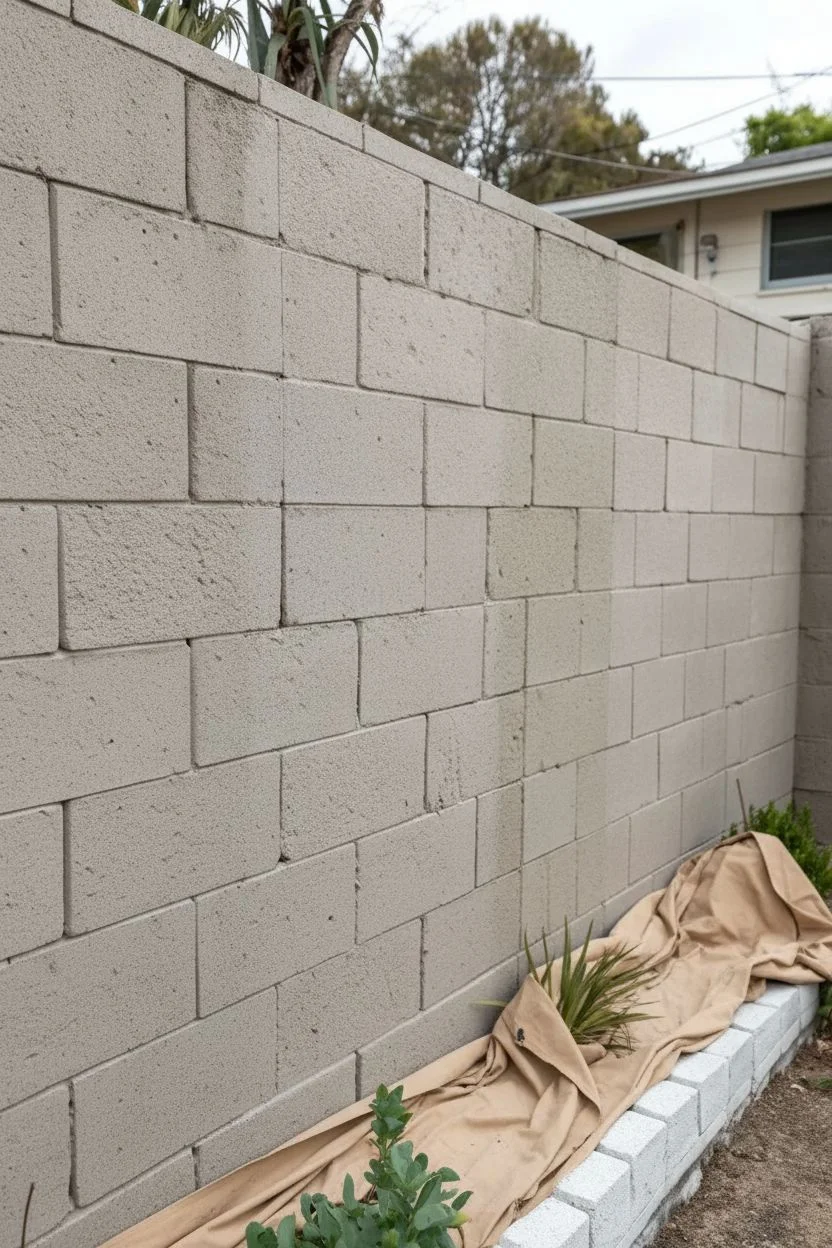
Transform a drab grey cinder block wall into a clean, warm feature that brightens up your outdoor space. This project demonstrates how a coat of warm cream paint can instantly modernize masonry while maintaining its classic texture.
How-To Guide
Materials
- High-quality masonry primer
- Exterior acrylic latex masonry paint (cream/off-white color)
- Stiff-bristle scrub brush
- Pressure washer (optional but recommended)
- TSP (Trisodium Phosphate) or heavy-duty outdoor cleaner
- High-nap roller (3/4 inch to 1 inch nap)
- Roller frame and extension pole
- Large paint tray
- Angled sash brush (2-1/2 inch) for cutting in
- Painter’s tape
- Drop cloths or cardboard
- Bucket for cleaning
Step 1: Preparation & Cleaning
-
Clear the perimeter:
Before anything touches the wall, remove any plants, rocks, or debris sitting directly against the base. If you have a concrete walkway like in the photo, sweep it thoroughly to prevent dust from blowing onto wet paint later. -
Scrub the blocks:
Mix TSP or a heavy-duty outdoor cleaner with water in a bucket. Using a stiff-bristle brush, scrub the wall vigorously to remove dirt, moss, efflorescence (white chalky powder), and loose mortar. -
Rinse thoroughly:
Use a garden hose with a high-pressure nozzle or a pressure washer to rinse off all the cleaning solution. Start from the top and work your way down so dirty water doesn’t streak clean areas. -
Allow extensive drying time:
This is crucial: let the wall dry completely. Cinder blocks range in porosity, so give it at least 24 to 48 hours of dry weather. Painting damp concrete will trap moisture and cause peeling later. -
Protect the ground:
Lay down drop cloths or heavy cardboard along the base of the wall to protect the dirt or concrete path. I prefer canvas cloths as plastic can be slippery outdoors.
Step 2: Priming the Surface
-
Inspect the mortar joints:
Check for deep cracks or missing mortar. Fill any significant gaps with concrete filler or caulk designed for masonry to ensure a uniform surface. -
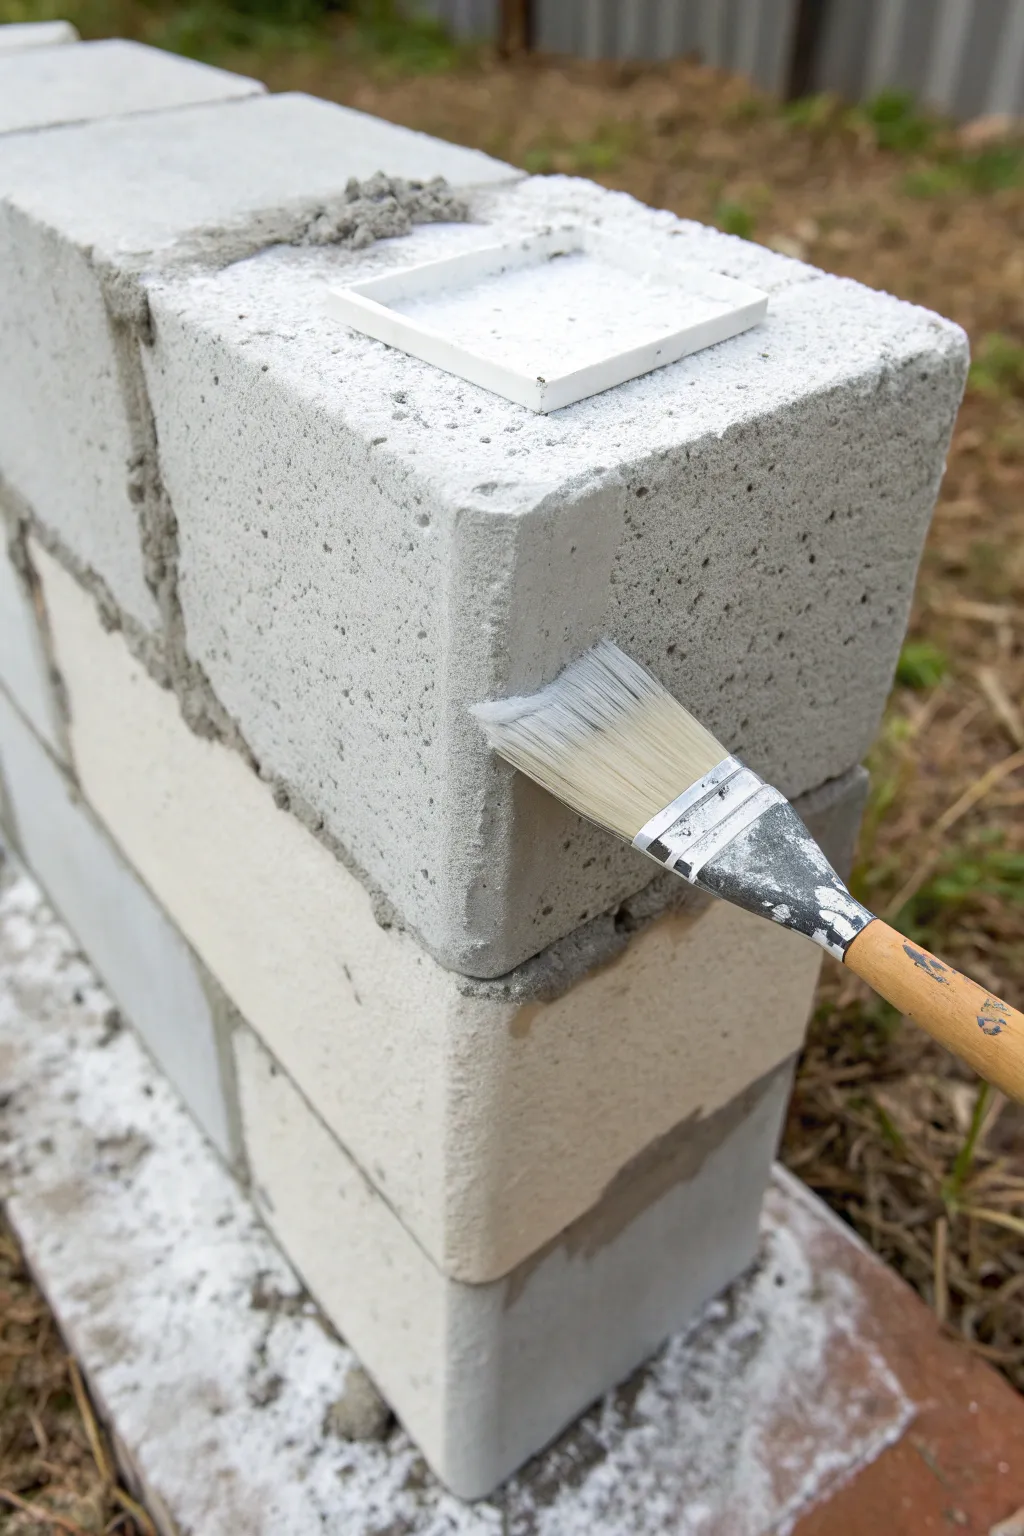
Cut in the edges:
Use your angled sash brush to apply masonry primer along the top cap of the wall, the bottom edge near the ground, and any vertical ends. Work the primer well into the porous texture. -
Load a high-nap roller:
Pour your masonry primer into the tray. Load a 3/4-inch or 1-inch nap roller generously. You need a thick nap to reach into the crevices of rough block. -
Apply the primer coat:
Roll the primer onto the wall using vertical strokes. Don’t stretch the paint too thin; the block will drink it up. Apply enough to fill the pores but watch for drips. -
Let the primer cure:
Check the manufacturer’s instructions for drying time. Masonry primer often dries quickly to the touch but needs time to bond properly before the topcoat.
Sticky Situation?
If the roller is sliding instead of rolling, the surface might be too slick or your paint is too thin. Switch to a thicker nap roller or rough up previously painted surfaces with sandpaper.
Step 3: Painting the Finish Coat
-
Prepare the paint:
Stir your exterior masonry paint thoroughly. If you are using multiple cans for a long wall, mix them together in a 5-gallon bucket (boxing) to ensure color consistency from start to finish. -
Cut in the topcoat:
Just like with the primer, use your brush to paint the perimeter edges with your finish color first. Pay special attention to the deep groove mortar lines if the roller misses them. -
Roll the first coat:
Saturate your roller and begin applying the paint. Work in small sections, perhaps 4 feet wide at a time, moving from a wet edge to a dry area to avoid lap marks. -
Check for pinholes:
Cinder blocks are notorious for pinholes where air escapes or paint doesn’t penetrate. Inspect closely and dab these spots with your brush or re-roll immediately while wet. -
Dry and reassess:
Allow the first coat to dry completely, usually 4-6 hours depending on humidity. Stand back and look for uneven spots or gray bleed-through. -
Apply second coat:
Apply a second coat for full coverage and durability. This coat will go on faster and smoother than the first since the pores are now sealed. -
Clean up immediately:
Remove painter’s tape while the final coat is still slightly tacky to prevent peeling. Fold up drop cloths carefully to avoid spilling dried paint flakes onto your clean walkway.
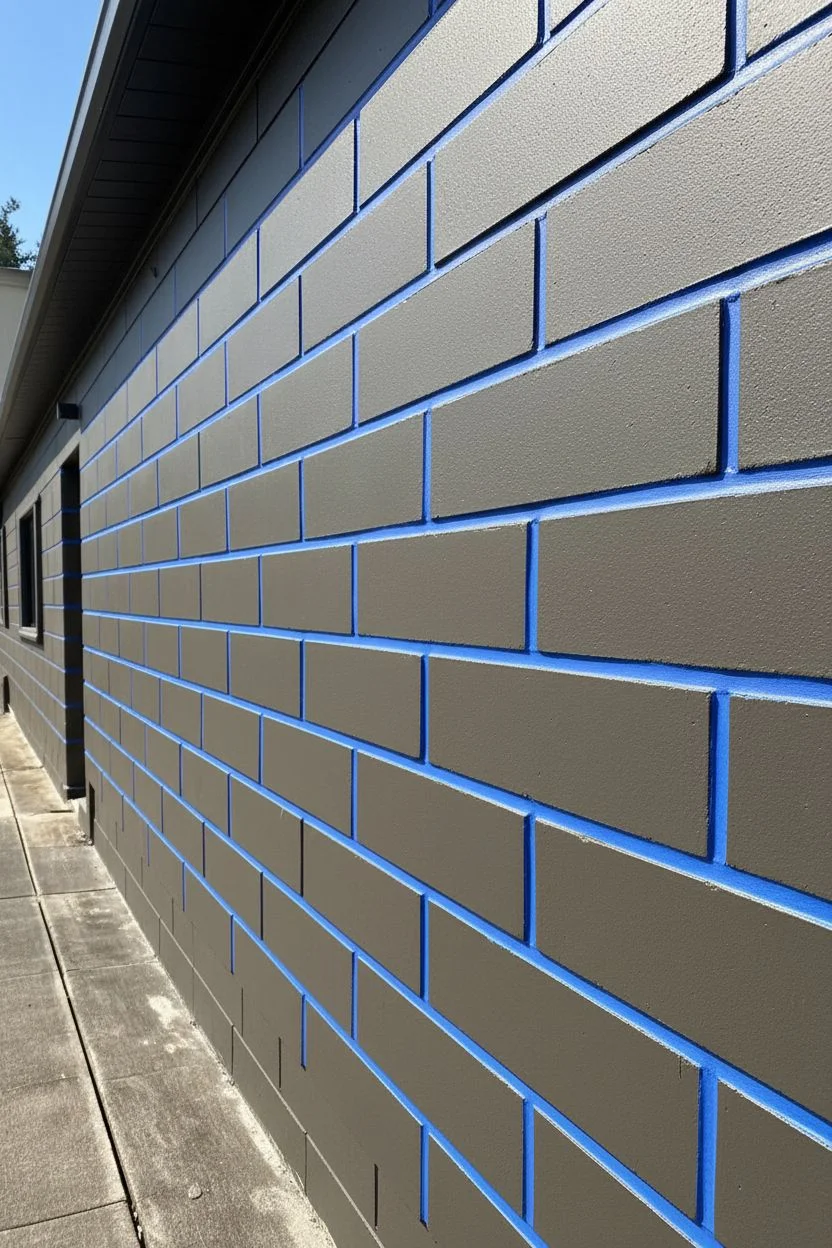
Add a Design Twist
Use a contrasting charcoal spray paint and a geometric stencil on just a few blocks to create a random, modern accent pattern over the cream base.
Enjoy the clean, expansive look of your freshly painted wall which now serves as a perfect neutral backdrop for your garden


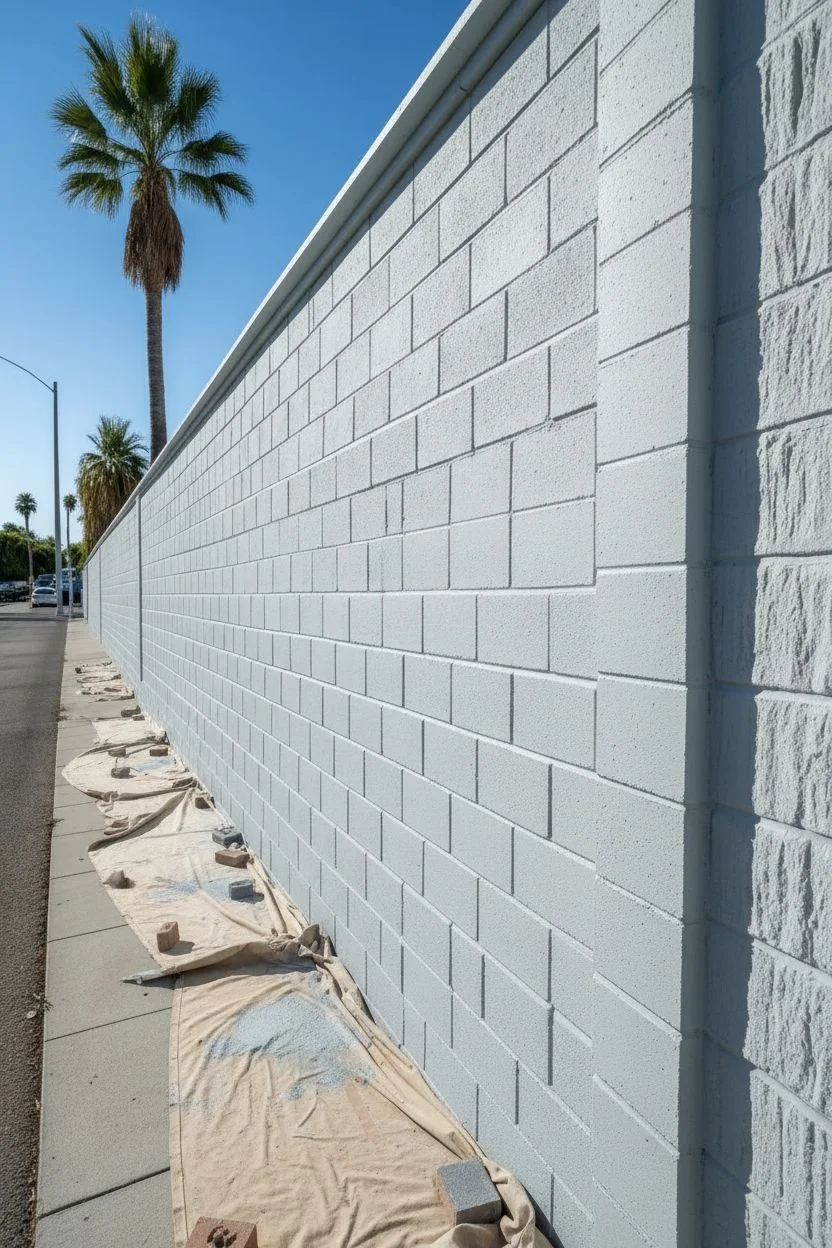
Soft Whitewash Look on Painted Cinder Blocks
Transform raw, industrial grey cinder blocks into a soft, airy feature with this simple whitewashing technique. The result is a weathered, semi-transparent finish that brightens the space while keeping the natural texture of the stone visible.
Step-by-Step
Materials
- White latex exterior paint (flat or eggshell finish)
- Water for dilution
- Clean mixing bucket
- Stir stick
- 2-inch synthetic bristle paint brush (flat edge)
- Small plastic tray or lid (for resting tools)
- Drop cloth or cardboard
- Stiff bristle scrub brush (for prep)
Step 1: Preparation and Mixing
-
Clean surface:
Before touching a brush to the wall, use a stiff bristle brush to knock away any loose dirt, moss, or crumbling mortar from the cinder blocks. The surface needs to be dry and relatively clean for the wash to adhere properly. -
Protect the ground:
Lay down your drop cloth or cardboard along the base of the wall to catch drips, as the watery consistency of whitewash makes splatter much more likely than with standard paint. -
Create the wash:
Pour a small amount of white latex paint into your mixing bucket. You don’t need much to start. -
Dilute the paint:
Add water to the paint in a 1:1 ratio. I usually start with equal parts water and paint, but you can adjust this later. -
Stir thoroughly:
Mix the solution vigorously with your stir stick until the consistency is smooth and uniform, resembling thin milk rather than heavy cream. -
Test the consistency:
Find a scrap block or an inconspicuous spot on the wall to test your mix. If it’s too opaque, add a splash more water; if it’s too runny, add a dollop of paint.
Pro Tip: Wet the Wall
Slightly mist the concrete with a spray bottle or hose before painting. Damp blocks absorb the wash more slowly, giving you longer to work the paint.
Step 2: Applying the Whitewash
-
Load the brush:
Dip your 2-inch brush into the mixture, letting the excess drip off slightly before moving to the wall. -
Start at the mortar:
Begin by working the brush into the mortar joints first. The rough texture here soaks up liquid quickly, so get good coverage in the crevices. -
Brush the face:
Move to the flat face of the cinder block. Apply the wash with horizontal strokes, following the direction of the block. -
Work in sections:
Paint one or two blocks at a time. This prevents the wash from drying too quickly and creating harsh lap lines where wet paint meets dry. -
Feather the edges:
As you brush, gently feather out the edges of your strokes to blend the wash seamlessly across the surface. -
Watch for drips:
Keep an eye on the vertical surfaces for running drips. Because the paint is thin, you’ll need to catch these with your brush and smooth them out immediately. -
Check coverage:
Step back occasionally to check the look. You want the grey of the concrete to peek through slightly, not disappear completely.
Troubleshooting: Too Blotchy?
If the finish looks uneven or blotchy after drying, use a damp rag to wipe away excess paint from darker areas while applying the next coat.
Step 3: Finishing Up
-
Evaluate the opacity:
Once the first coat is dry to the touch (which happens fast on porous concrete), decide if you want it whiter. -
Second coat (optional):
If you prefer a brighter, more solid white look, apply a second thin coat using the same technique. -
Clean tools:
Rinse your brush and bucket thoroughly with water while the paint is still wet to prevent hardening in the bristles. -
Final dry:
Allow the entire wall to cure fully according to the drying time listed on your original paint can.
Now step back and enjoy the fresh, coastal vibe your new wall brings to the garden


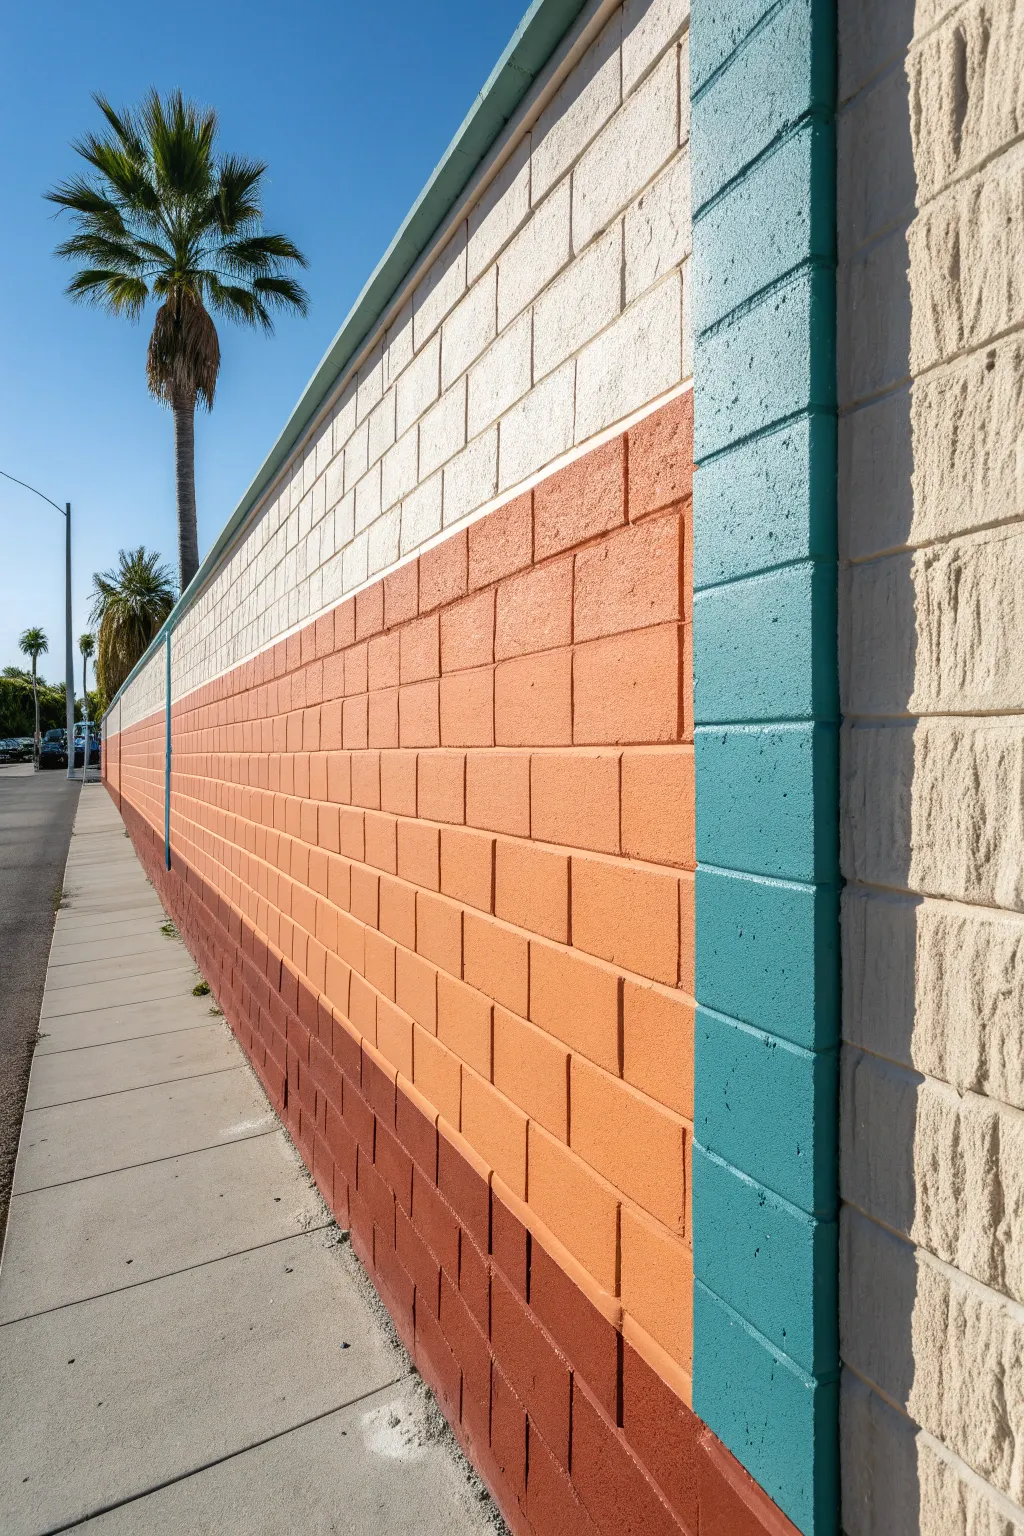
Two-Tone Color Blocking Across a Cinder Block Fence
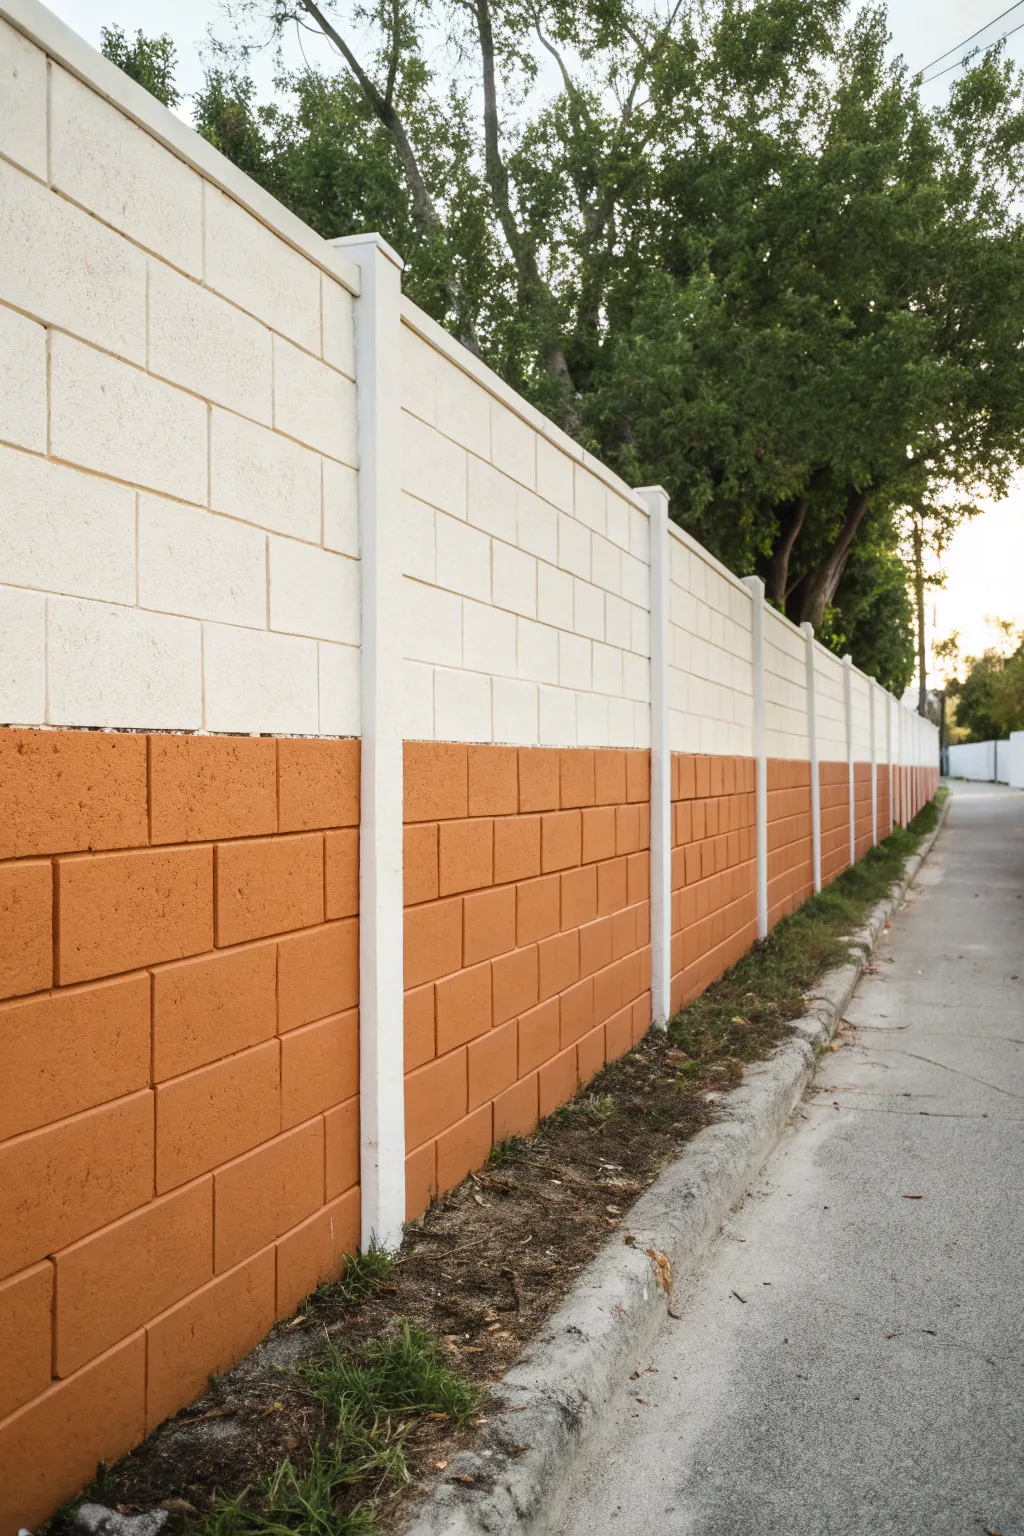
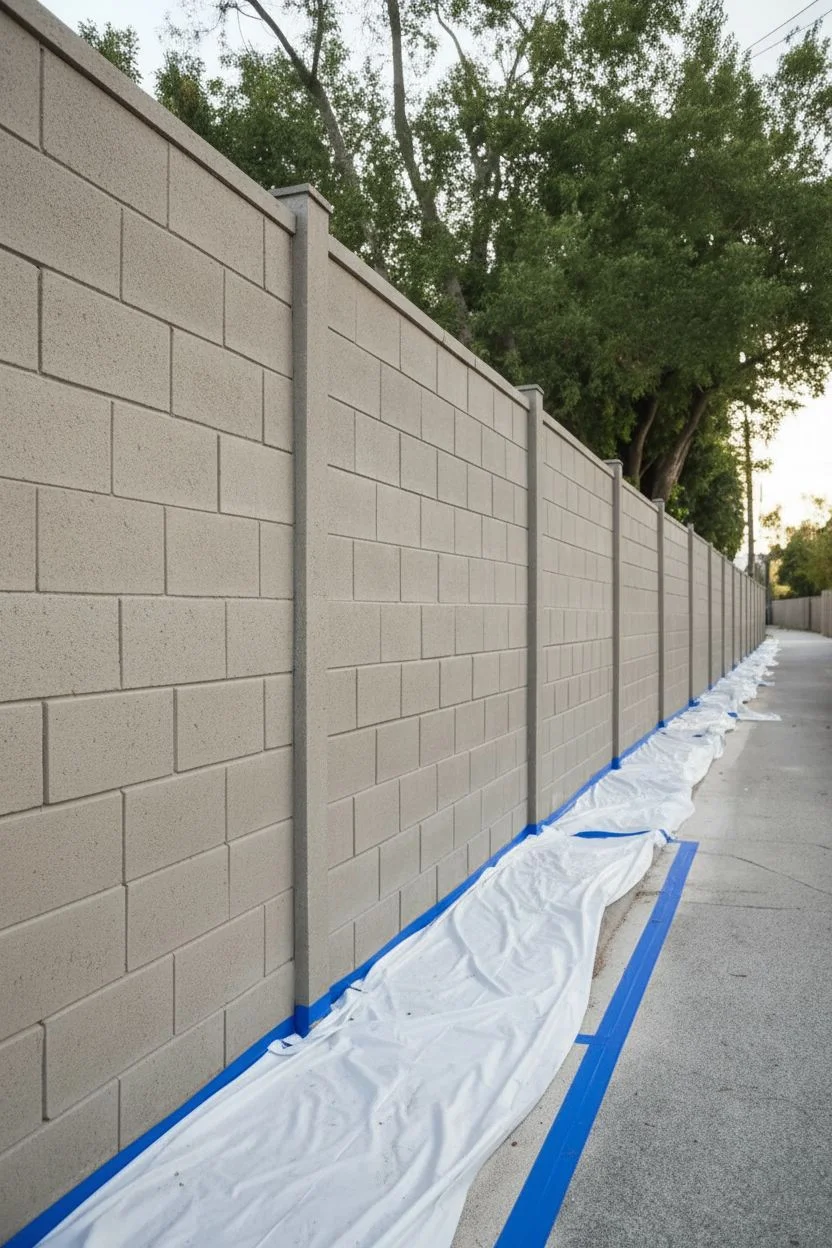
Transform a drab grey cinder block wall into a striking architectural feature with this clean two-tone design. By pairing a warm terracotta lower section with a crisp cream upper, you create a grounded, lengthened look that completely refreshes your outdoor space.
Step-by-Step Guide
Materials
- High-quality masonry primer
- Exterior masonry paint (Cream/Off-White)
- Exterior masonry paint (Terracotta/Burnt Orange)
- Stiff bristle scrub brush
- Pressure washer (optional but recommended)
- 3/4-inch nap roller covers (for rough surfaces)
- Standard 9-inch roller frame and extension pole
- 4-inch mini roller (for detailed areas)
- 2-inch angled sash brush
- Painter’s tape (wide width)
- Drop cloths or plastic sheeting
- Paint tray and liners
Step 1: Preparation & Cleaning
-
Clear vegetation:
Begin by pulling back any grass, weeds, or soil from the base of the wall. Dig a shallow trench, about 2-3 inches deep, along the bottom edge so you can paint below the soil line later. -
Scrub the surface:
Use a stiff bristle brush to remove loose dirt, moss, or efflorescence (white salty deposits). If the wall is old, check for crumbling mortar and patch it beforehand. -
Wash thoroughly:
Wash the entire fence with water. I find a pressure washer makes this much faster, but a hose and aggressive scrubbing work too. Let the masonry dry completely for at least 24-48 hours. -
Protect the area:
Lay down drop cloths along the base of the wall to catch splatter. If you have an adjacent sidewalk like in the photo, tape the edge where the concrete meets the wall.
Bleeding Lines?
If paint bleeds under the tape due to deep mortar joints, wait for it to fully dry. Then, re-tape the line slightly lower or higher and touch up with the correcting color using a small artist’s brush.
Step 2: Priming & Base Coat
-
Apply masonry primer:
Roll on a coat of high-quality masonry primer over the entire wall. Cinder blocks are thirsty and porous; the primer ensures your topcoat adheres properly and lasts longer. -
Cut in edges:
While the primer dries, use your angled brush to ‘cut in’ the corners, the top cap of the wall, and around the vertical posts if they are present. -
Paint the upper section first:
Start with your lighter color (cream). Using a thick nap roller, paint the top half of the wall, extending the paint about 6 inches lower than where you want your transition line to be. -
Ensure full coverage:
Work the roller in multiple directions to force paint into the porous block texture. Two coats are usually necessary for that solid, opaque finish. -
Paint vertical posts:
If your fence has vertical columns or posts like the example, paint them the same light cream color now. Use the 4-inch mini roller for better control on these narrower surfaces.
Step 3: Creating the Color Block
-
Measure the transition line:
Decide on the height of your two-tone split. In the example, the split happens exactly at a horizontal mortar joint line, which makes taping much easier. -
Tape the line:
Apply a strip of wide painter’s tape along the horizontal mortar line you chose. Press the tape firmly into the grout to prevent bleed-under. -
Seal the tape edge:
Lightly brush a small amount of the *cream* paint over the bottom edge of the tape. This seals any gaps; if paint bleeds, it will be the cream color and won’t show. -
Apply the darker color:
Open your terracotta paint. Use your roller to apply the color to the bottom section of the wall, rolling right up to—and slightly over—the tape line. -
Watch the posts:
Be careful around the vertical posts. You want the orange color to stop precisely where the block meets the post. Use an angled brush here for a sharp vertical line. -
Second coat:
Let the first coat of terracotta dry according to the can instructions, then apply a second coat for richness and durability. -
Remove tape:
Pull the tape off while the second coat is still slightly tacky (not soaking wet, but not fully cured). Pull at a 45-degree angle for the sharpest line.
Pro Tip: Long-Lasting Finish
Use elastomeric masonry paint. It is much thicker than standard exterior latex, bridging small hairline cracks and expanding with the wall in heat to prevent peeling.
Step 4: Finishing Touches
-
Touch up irregularities:
inspect the wall for any missed pinholes in the cinder blocks. Dab a little paint into these deep pores with a brush if needed. -
Clean up the base:
Once the bottom paint is dry, you can push the soil back into the trench you dug earlier, creating a seamless look where the wall rises from the ground.
Enjoy the fresh, structured look your new color-blocked fence brings to the entire yard


Classic Painted Stripes That Follow Cinder Block Lines
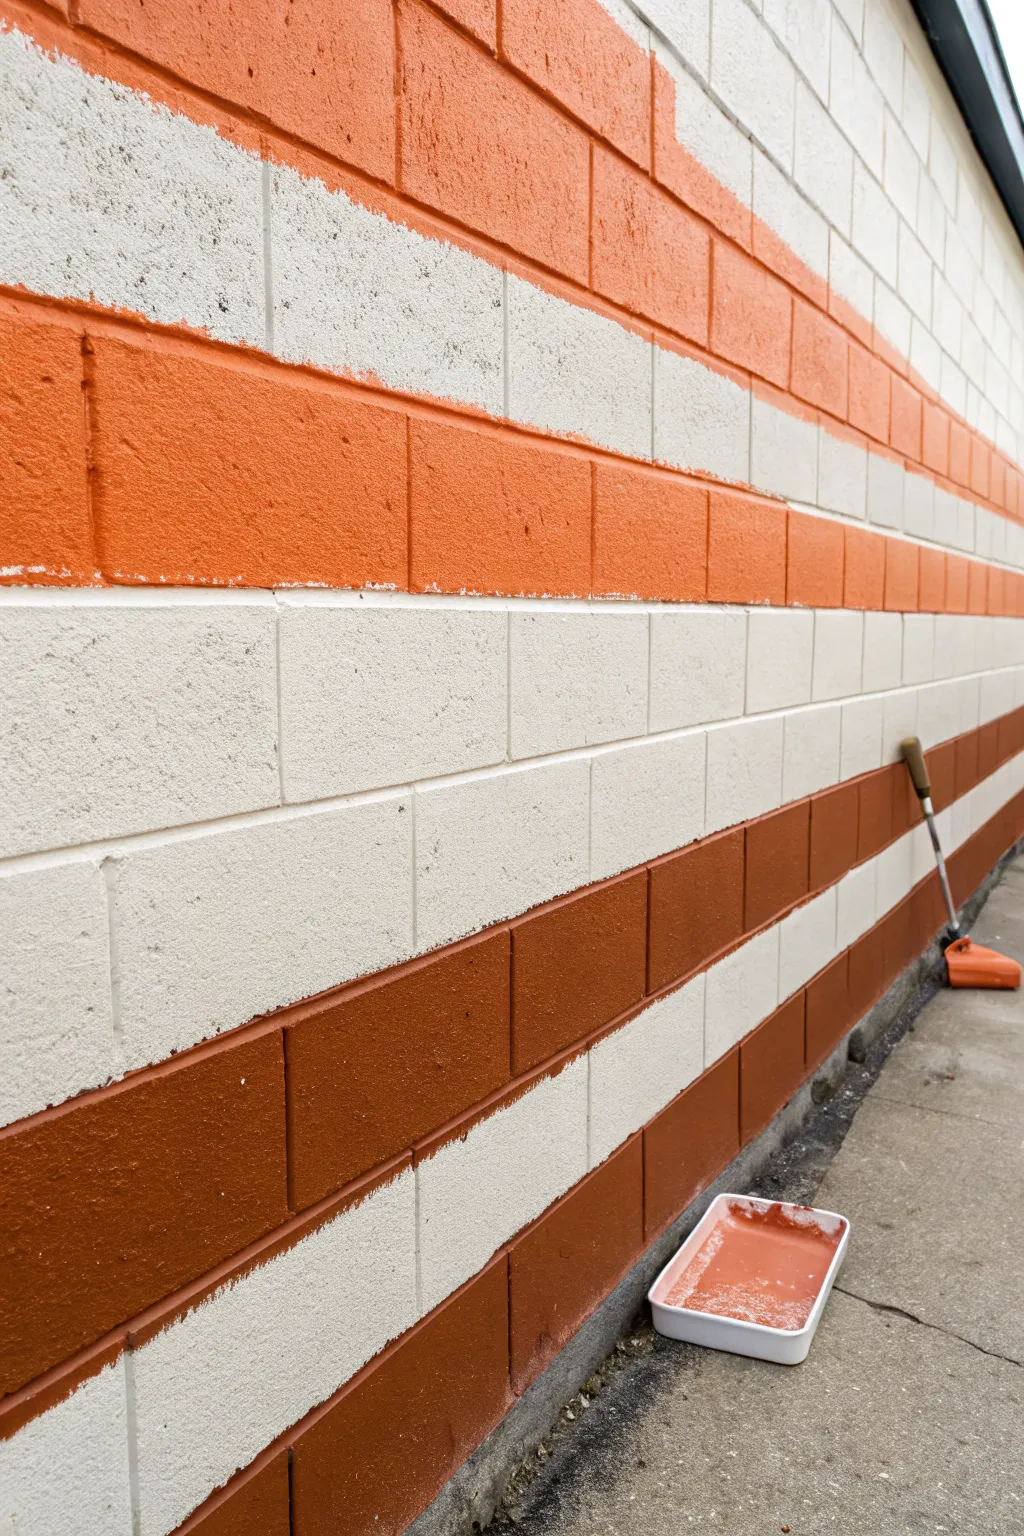
Transform a plain, industrial cinder block wall into a vibrant statement piece by painting classic horizontal stripes that follow the masonry lines. This project uses three distinct colors—bright white, bold orange, and deep terracotta—to create a warm, retro-inspired aesthetic that adds instant character to exterior or interior spaces.
Step-by-Step Tutorial
Materials
- External masonry paint (White)
- External masonry paint (Bright Orange/Tangerine)
- External masonry paint (Dark Terracotta/Burnt Sienna)
- Stiff-bristle nylon paintbrush (2-3 inch)
- Mini paint roller and tray (for large areas)
- Large paint roller and extension pole (optional)
- Wire brush or stiff broom
- Pressure washer (optional)
- Painter’s tape (optional but recommended for beginners)
- Canvas drop cloth
- Soap and water for cleaning
Step 1: Preparation
-
Assess the surface:
Begin by inspecting your cinder block wall for significant cracks or damage. Small hairline cracks can often be filled with paint, but larger issues might need masonry filler before you start. -
Clean the blocks:
Use a wire brush or a stiff broom to vigorously sweep the entire wall. You need to remove loose dirt, moss, cobwebs, and efflorescence (white salty deposits) so the paint adheres properly. -
Wash thoroughly:
Wash the wall down with soapy water and a scrub brush. If you are working on an exterior wall, I find using a pressure washer on a low setting speeds this up significantly. Let the wall dry completely for at least 24 hours. -
Protect the area:
Lay down a heavy canvas drop cloth along the base of the wall. Masonry paint can be drippy and difficult to clean off concrete sidewalks or flooring once dried.
Step 2: Painting the Base
-
Plan your pattern:
Decide on your stripe sequence. In the project shown, the pattern creates bands of color two blocks high, separated by bands of white blocks. Using the mortar lines as your guide eliminates the need for complex measuring. -
Apply the base coat:
Paint the entire wall (or the specific sections intended to be white) with your white masonry paint. Use a thick nap roller (3/4 inch or higher) to get paint into the porous texture of the blocks. -
Work into crevices:
Follow up with a brush to jam paint into the deep mortar joints and pinholes that the roller missed. This ensures a solid, opaque background. -
Dry time is key:
Allow this white base coat to dry fully according to the can’s instructions, usually 4-6 hours, before attempting to add colored stripes.
Textured Surface Trick
When painting rough blocks, wiggle your brush in small circles rather than just stroking back and forth. This circular motion forces paint into deep pores.
Step 3: Adding the Color Stripes
-
Select the orange row:
Identify the rows intended for the bright orange stripe. Pour a small amount of orange masonry paint into your tray. A smaller tray is easier to move along with you as you work horizontally. -
Cut in the edges:
Using a 2-3 inch stiff-bristle brush, carefully paint the top and bottom edges of the blocks along the mortar line. Since cinder blocks have a rough texture, painter’s tape often leaks, so a steady hand cutting in manually is often more effective. -
Fill the center:
Once the edges are defined, use a mini roller or larger brush to fill in the face of the block with the orange paint. -
Cover the vertical joints:
Don’t forget the vertical mortar joints between the blocks in your colored row. Dab the brush heavily here to ensure the orange paint covers the white base completely in these recessed areas. -
Begin the terracotta stripe:
Move down to the bottom section (leaving white rows in between) and repeat the process with the dark terracotta/burnt sienna paint. Start by cutting in the top horizontal mortar line. -
Define the bottom edge:
Paint carefully along the very bottom where the wall meets the ground. If you are worried about the floor, slide a piece of cardboard against the wall as a moving shield while you paint. -
Fill the dark blocks:
Fill in the rest of the terracotta blocks, ensuring consistent coverage. Masonry paint is thick, so watch out for drips pooling in the texture of the blocks. -
Check for holidays:
Stand back and look at the wall from different angles. Cinder blocks are notorious for “holidays”—little missed spots where the pore was too deep for the first pass. Dab extra paint into these spots. -
Apply second coats:
Depending on the quality of your paint, the orange and terracotta might need a second coat to achieve full opacity and vibrancy. -
Clean up:
Wash your brushes immediately with water (if using water-based masonry paint) and remove the drop cloth carefully.
Graphic Pop
For a sharper, more modern look, paint the mortar lines a contrasting dark grey instead of letting them blend in with the block color.
Enjoy the fresh, structured look your new colorful wall brings to the space
BRUSH GUIDE
The Right Brush for Every Stroke
From clean lines to bold texture — master brush choice, stroke control, and essential techniques.
Explore the Full Guide
Simple Stencil Pattern Repeated on Cinder Blocks
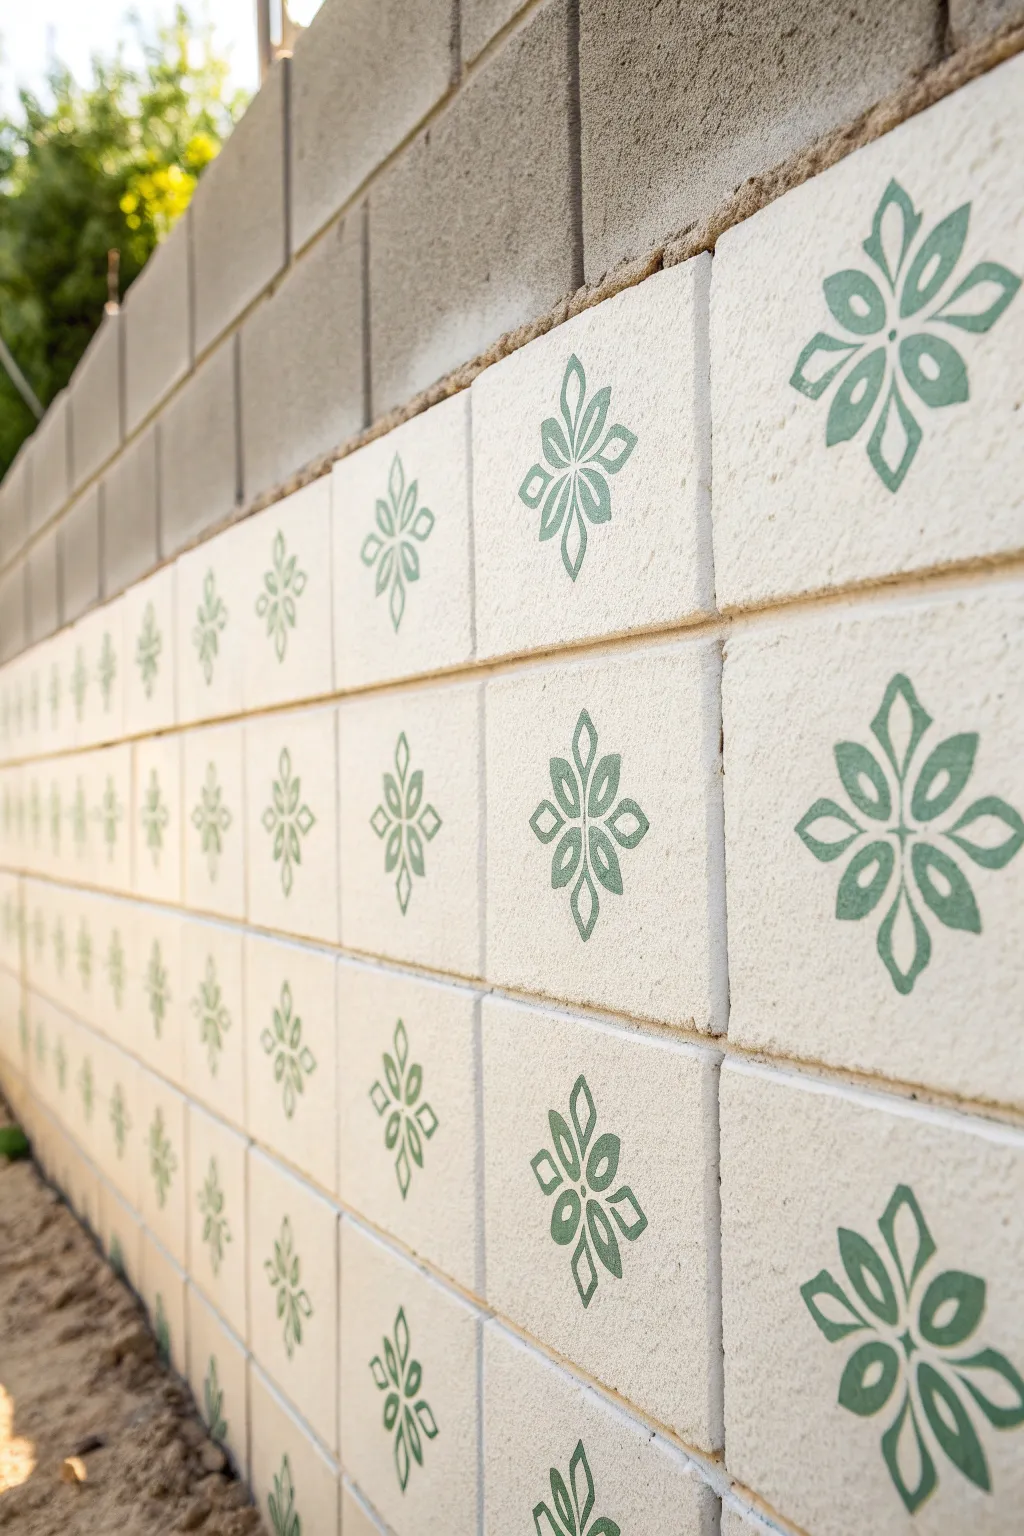
Transform a plain, industrial cinder block fence into a charming garden feature with this simple stencil technique. By applying a warm white base and a repeating geometric flower motif in sage green, you create the look of custom decorative tiles for a fraction of the cost.
Step-by-Step
Materials
- Exterior masonry primer
- Exterior masonry paint (cream/off-white)
- Exterior masonry paint (sage green)
- Large geometric floral stencil (approx. 8×8 inches)
- Stencil brush or high-density foam roller
- Large paint roller and tray
- Painter’s tape
- Wire brush
- Power washer or hose
- Paper towels
- Spray adhesive (optional)
Step 1: Preparation and Base Coat
-
Clean the Surface:
Begin by thoroughly cleaning the cinder block wall. Use a wire brush to scrub away any loose mortar, dirt, or moss that might prevent paint adhesion. -
Wash Down:
Rinse the entire wall with a power washer or a hose with a high-pressure nozzle. Allow the masonry to dry completely for at least 24 hours before you start painting. -
Prime the Blocks:
Apply a coat of exterior masonry primer using a thick-nap roller. Cinder blocks are very porous and will soak up a lot of paint, so this step is crucial for an even finish. -
Dry the Primer:
Let the primer dry according to the manufacturer’s instructions, usually about 2-4 hours depending on the humidity. -
Apply Base Color:
Roll on your cream or off-white exterior masonry paint. You want a solid, opaque background, so don’t be afraid to load up the roller. -
Second Coat:
Once the first coat is dry, apply a second coat of the base color to ensure no grey block shows through. Let this cure fully, preferably overnight, to provide a stable surface for stenciling.
Bleed Prevention
Masonry is bumpy! Use very little paint on your brush (the “dry brush” method) to prevent leaks. It’s better to do two light coats than one heavy tailored coat.
Step 2: Stenciling the Pattern
-
Prepare the Stencil:
Spray the back of your floral stencil with a light mist of repositionable spray adhesive. Let it get tacky for a moment before placing it. -
Position the First Block:
Center the stencil on the first cinder block. I find it easiest to start at a top corners and work my way down and across. -
Secure with Tape:
Use small pieces of painter’s tape on the corners of the stencil to hold it firmly in place against the textured surface. -
Load the Brush:
Dip your stencil brush or small foam roller into the sage green paint. Offload almost all the paint onto a paper towel until the brush feels nearly dry. -
Apply the Pattern:
Dab the paint over the stencil using an up-and-down pouncing motion. DO NOT brush side-to-side, as this pushes paint under the edges and blurs the design. -
Check Coverage:
Lift a corner carefully to check your color density. Apply a second pass if you want a deeper green, but keep the layers thin to prevent bleeding. -
Remove and Repeat:
Peel the stencil off immediately while the paint is still wet. Move to the next block, aligning the design in the center of the rectangle. -
Clean the Stencil:
Every 3-4 blocks, wipe down the back of the stencil with a damp cloth to remove built-up paint that might smudge your clean wall. -
Complete the Grid:
Continue the process across the entire wall. Don’t worry if the texture makes the edges slightly imperfect; it adds to the hand-painted, rustic tile look. -
Touch Ups:
Once the green paint is dry, use a small artist’s brush and your base cream color to clean up any significant bleeds or smudges.
Distressed Finish
For an aged, old-world look, lightly sand the green floral patterns with 120-grit sandpaper after they dry to reveal bits of the cream base underneath.
Enjoy the new custom-tiled look of your garden wall
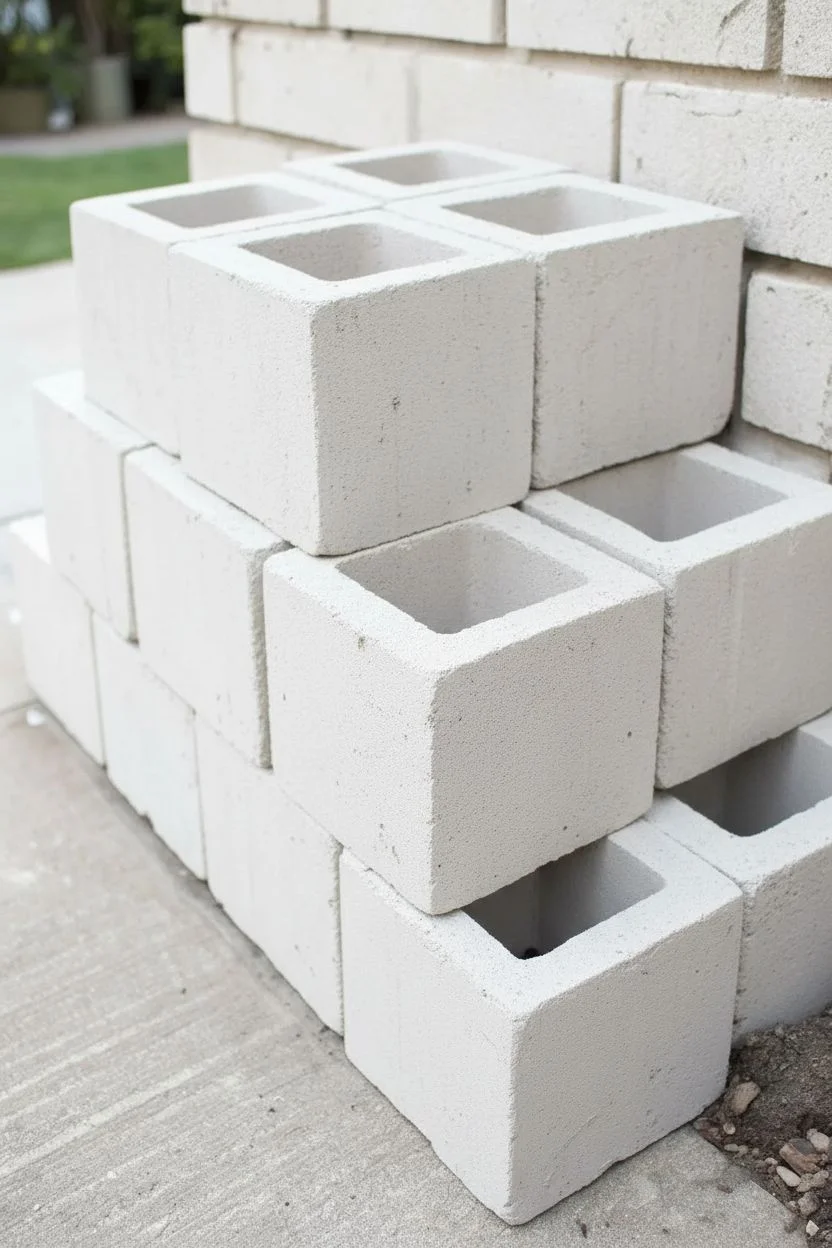
Bright Pop-Color Cinder Block Planters
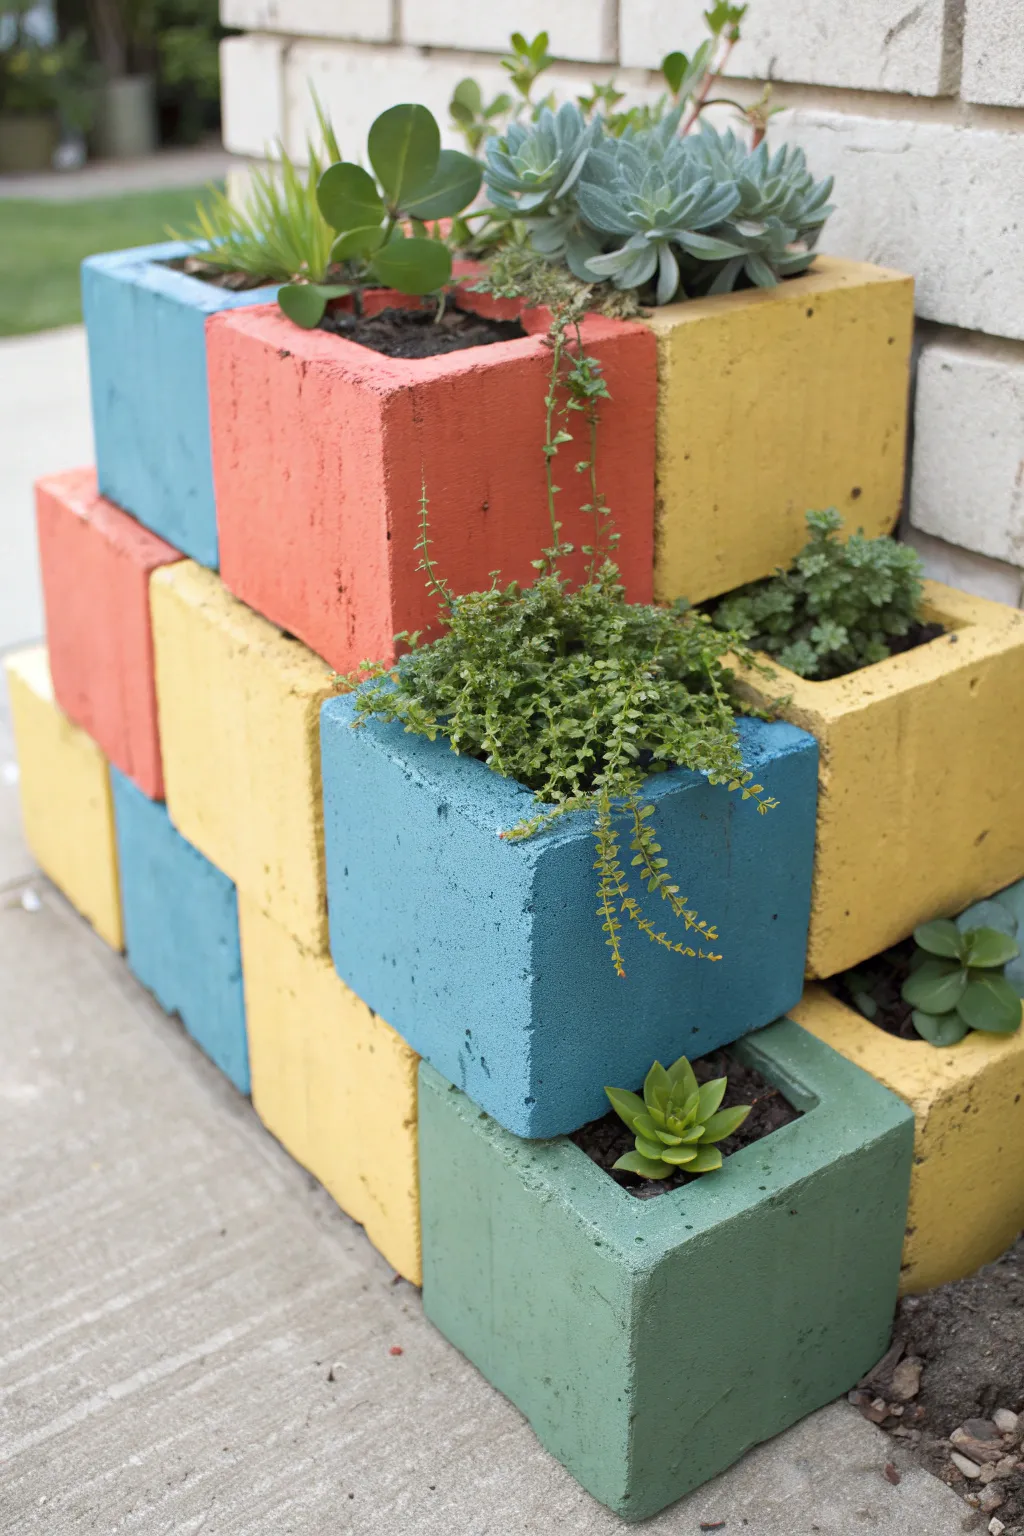
Transform drab industrial concrete into a vibrant, Mondrian-inspired vertical garden with this cheerful project. By stacking painted half-blocks in an asymmetrical pattern, you can create a striking architectural planter that adds a modern pop of color to any patio or entryway.
Step-by-Step Tutorial
Materials
- Half-size concrete cinder blocks (roughly 8 inch cubes)
- Exterior masonry paint or high-quality acrylic outdoor paint
- Paint primer (specifically for masonry/concrete)
- Paintbrushes (2-3 inch synthetic bristles)
- Liquid construction adhesive (landscape block adhesive)
- Caulk gun
- Potting soil (cactus/succulent mix recommended)
- Small pea gravel or landscape fabric
- Assorted plants (succulents, sedum, creeping jenny)
- Scrub brush and water
- Drop cloth or cardboard
Step 1: Prep and Prime
-
Clean the blocks:
Begin by thoroughly scrubbing your cinder blocks with a stiff brush and water to remove dust, loose grit, and debris. Any loose particles will prevent the paint from adhering properly. -
Dry completely:
Let the blocks sit in the sun until they are bone dry. Concrete is porous and holds moisture, so rushing this step can cause paint to bubble later. -
Apply primer:
Coat the exterior surfaces and the top rim of each block with a high-quality masonry primer. This seals the pores and ensures your colors stay bright rather than soaking into the gray concrete.
Step 2: Painting
-
Select your palette:
Choose a color scheme. The project shown uses a playful primary palette: bright coral-red, sunshine yellow, sky blue, and a muted sage green. -
First coat:
Apply your first coat of exterior paint. Use long, even strokes to get into the nooks and crannies of the concrete texture. Don’t worry if it looks a bit streaky initially. -
Dry and repeat:
Allow the first coat to dry according to the paint can’s instructions. Apply a second, and possibly third, coat until the color is opaque and vibrant. -
Paint inside rims:
Don’t forget to paint about two inches down into the inside of the block’s hollow center. This ensures that once the soil settles, you still see color, not gray concrete.
Block Prep Secret
Use a wire brush to knock off any large concrete burrs or sharp edges before priming. This makes painting much smoother and prevents snagging your brush.
Step 3: Assembly and Planting
-
Plan your layout:
Before gluing, dry-stack your blocks to test the arrangement. Aim for variation in height, creating ledges and nooks. I like to balance the colors so no two identical shades are touching directly. -
Prepare the base:
Ensure the ground where the planter will live is level. If placing on dirt, you may want to put down a layer of gravel first for stability. -
Glue the base layer:
Apply construction adhesive to the sides of the bottom blocks where they touch each other to create a solid foundation. -
Stack upwards:
Apply adhesive to the top rims of the lower blocks and place the next tier on top. Press firmly to bond them. -
Let adhesive cure:
Wait 24 hours for the construction adhesive to fully cure before adding the weight of soil and water. -
Create drainage protection:
If your blocks are sitting on a solid surface like concrete, cut small squares of landscape fabric to line the bottom of the holes, or add a layer of gravel, to keep soil from washing out underneath. -
Add soil:
Fill the hollow cavities with potting mix. Since concrete can get hot and dry out quickly, a cactus or succulent mix is usually best. -
Plant:
Tuck your plants into the soil. Use trailing plants like ‘Creeping Jenny’ or ‘String of Pearls’ near the edges to soften the harsh geometric lines of the blocks. -
Final clean up:
Brush off any stray soil from the painted rims and give the plants a gentle watering to settle them in.
Variations
Try stenciling geometric patterns or house numbers onto the flat sides of the blocks for a custom address marker that doubles as a planter.
Step back and admire your colorful, modern garden sculpture that brings life to even the smallest corner

PENCIL GUIDE
Understanding Pencil Grades from H to B
From first sketch to finished drawing — learn pencil grades, line control, and shading techniques.
Explore the Full Guide
Matte Black-and-White Geometric Cinder Block Planter Wall
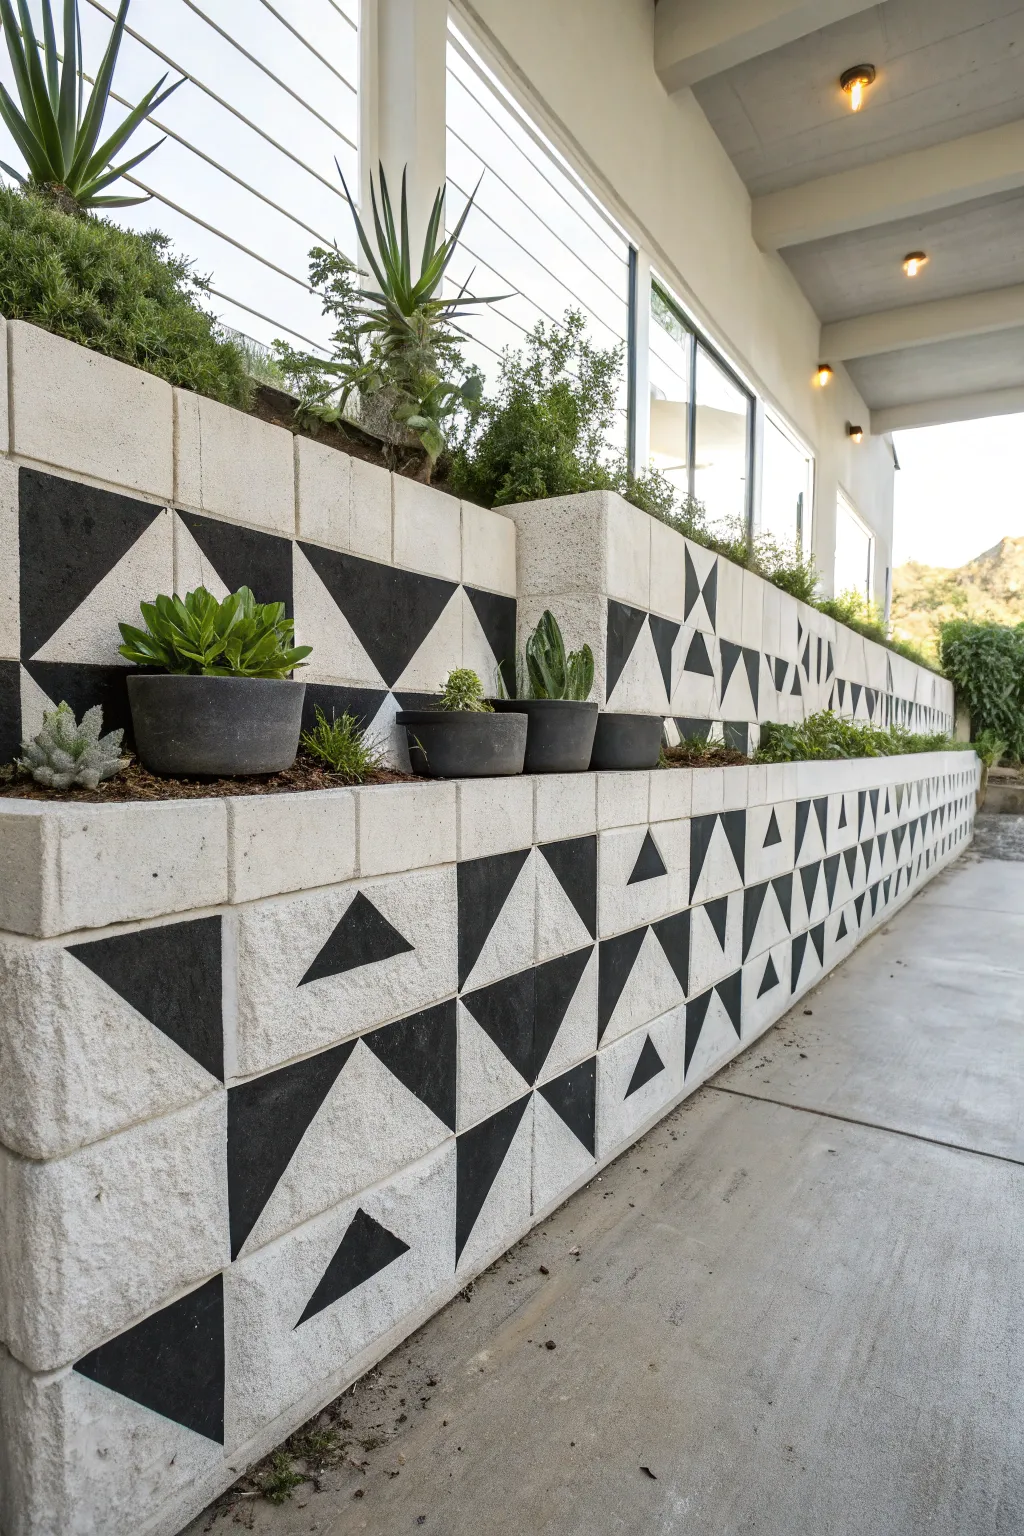
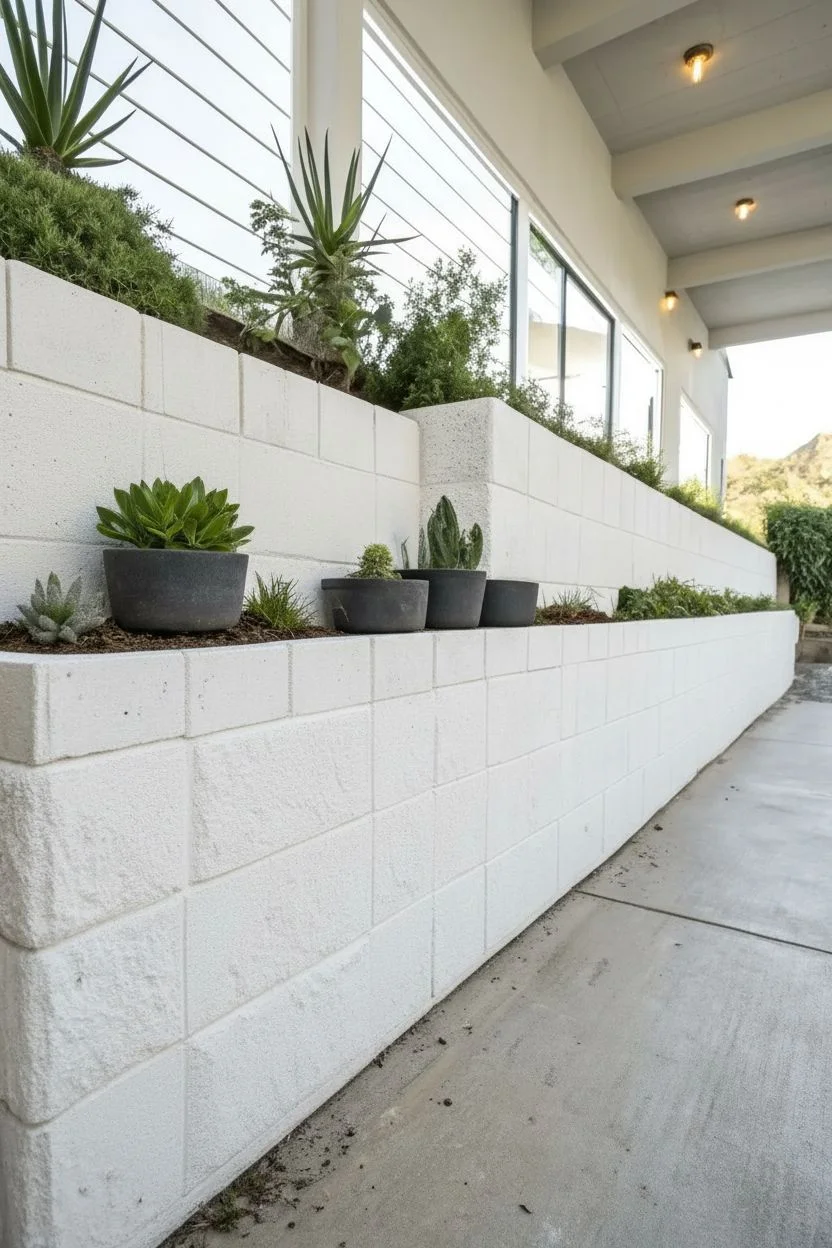
Transform a standard retaining wall into a striking architectural feature with this high-contrast geometric design. By utilizing the natural shape of cinder blocks and a crisp matte black paint, you can create a sophisticated pattern that feels both modern and timeless.
Step-by-Step Guide
Materials
- Concrete cinder blocks (standard 8x8x16 size)
- Exterior masonry primer (white or gray based)
- Exterior masonry paint (matte black)
- Exterior masonry paint (matte white or off-white)
- Painter’s tape (1.5 or 2 inch width)
- Stiff-bristled scrub brush
- Pressure washer (optional)
- Small roller with thick nap (3/8 or 1/2 inch) for textured surfaces
- Angled sash brush (2 inch)
- Heavy-duty drop cloths
- Ruler or straight edge
- Pencil or chalk
Step 1: Preparation & Base Coat
-
Clean the Surface:
Begin by thoroughly cleaning your cinder blocks. If they are already installed, scrub them vigorously with a stiff-bristled brush and water to remove dirt, moss, and loose debris. For older walls, a pressure washer on a low setting is highly effective here. -
Allow to Dry:
Let the concrete dry completely. Applying paint to damp concrete will trap moisture and cause bubbling later, so I usually wait a full 24 hours after washing just to be safe. -
Prime the Blocks:
Apply a coat of high-quality exterior masonry primer. This seals the porous concrete and ensures your topcoat adheres properly. Use a thick-nap roller to get into all the nooks and crannies of the block face. -
Apply Base Color:
Once the primer is dry, roll on two coats of your matte white or off-white masonry paint. This will serve as the background for your geometric design. Allow adequate drying time between coats according to the manufacturer’s instructions.
Seal the Deal
Textured concrete is tricky. Run a credit card or putty knife firmly over the edge of your painter’s tape to force it into the block’s deep grooves before painting.
Step 2: Creating the Pattern
-
Plan the Layout:
Observe the pattern in the reference image. It uses diagonal splits to create triangles. Decide which blocks will be fully black, fully white, or split diagnally to create the ‘arrows’ and larger triangle motifs. -
Mark Diagonals:
For blocks that will be split into black and white triangles, use a ruler and pencil to lightly mark a diagonal line from one corner of the block face to the opposite corner. -
Tape the Lines:
Apply high-quality painter’s tape along your pencil marks. Press the extensive firmly along the edge to prevent paint bleed. **Crucial Tip:** Place the tape on the side of the line that will remain *white*. -
Seal the Tape Edge:
To get a razor-sharp line on textured concrete, brush a very light layer of your *base* white paint over the edge of the tape first. This seals any gaps; if paint bleeds under, it will be white-on-white and invisible.
Glow Up
Add solar-powered puck lights inside the hollow cores of a few blocks, or install up-lighting at the base to make the geometric shadows pop at night.
Step 3: Painting the Design
-
Paint the Black Sections:
Using a smaller roller or stiff brush, apply the matte black masonry paint to the designated triangular areas and full black blocks. -
Work in Sections:
Don’t rush to do the whole wall at once. Work in small sections so you can manage the wet edge and ensure consistent coverage without brush marks drying too quickly. -
Apply Second Coat:
The black paint needs to be opaque to pop against the white. Apply a second coat of black once the first is dry to the touch. -
Remove Tape Carefully:
Remove the painter’s tape while the final coat of black paint is still slightly tacky, pulling it away from the painted edge at a 45-degree angle. This prevents the dried paint skin from peeling up with the tape. -
Touch Up:
inspect your lines. If any bleed-through occurred on the rough texture, use a small artist’s brush and your white base paint to tidy up the geometric edges.
Enjoy the dramatic transformation of your outdoor space with your new custom-painted planter feature
Ombre Gradient Up a Painted Cinder Block Wall
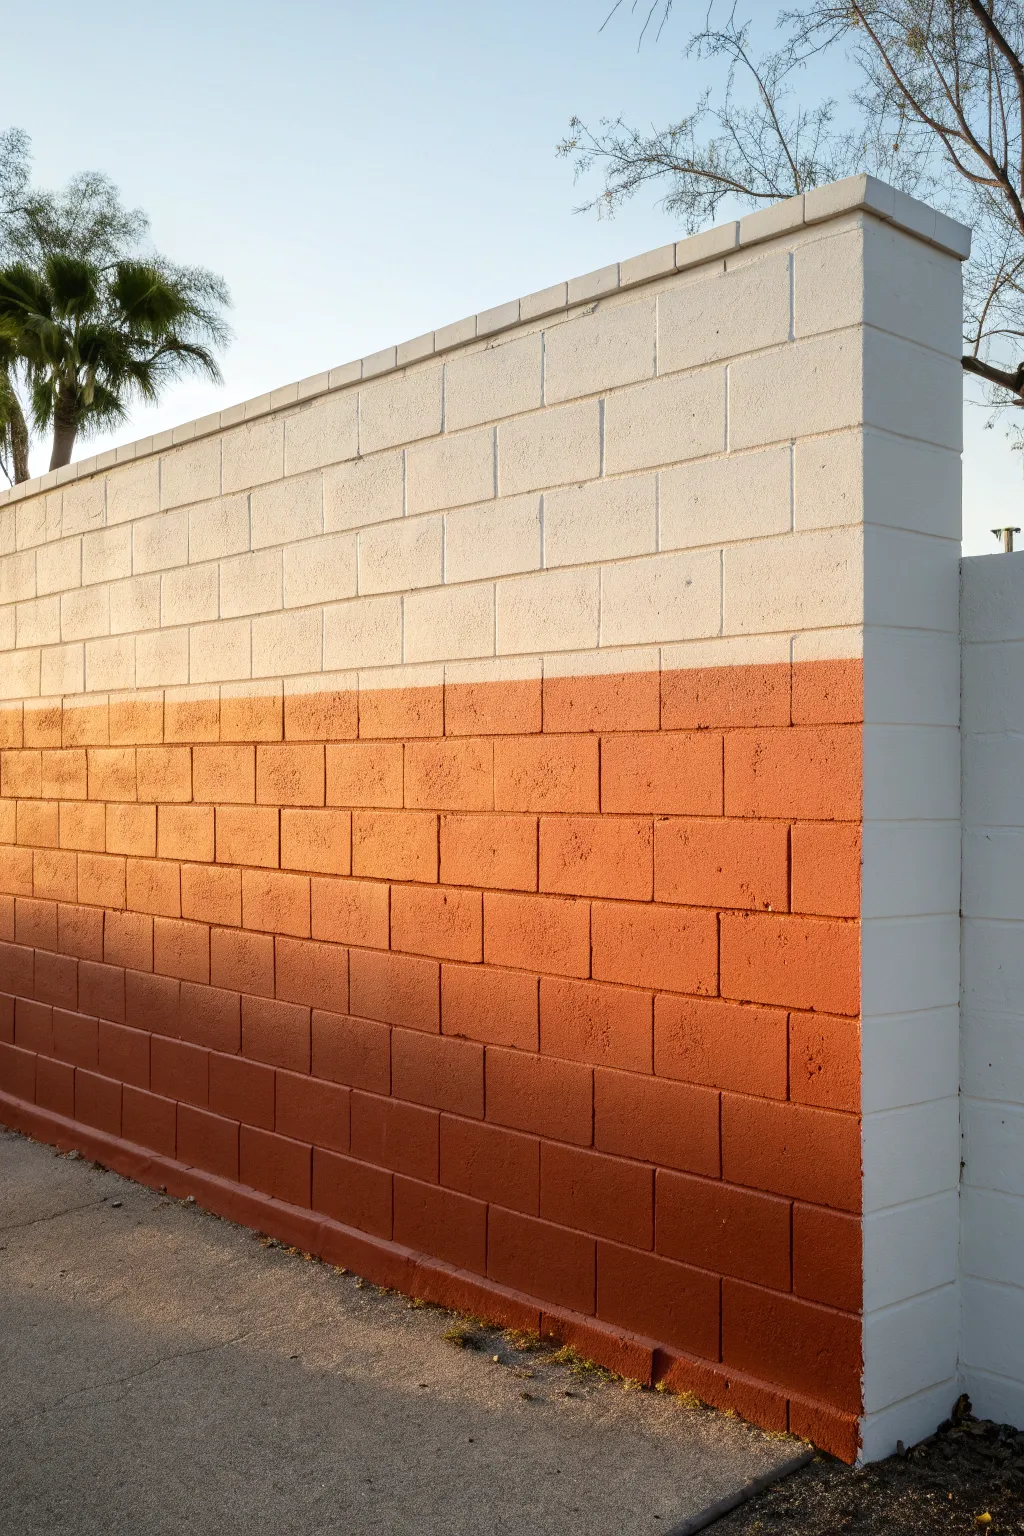
Transform a plain masonry barrier into a stunning architectural feature with this two-tone ombre effect. The gradient shift from deep rust to crisp white mimics the warmth of a desert sunset, adding height and visual interest to your outdoor space.
Detailed Instructions
Materials
- Exterior masonry primer (white)
- Exterior masonry paint (White)
- Exterior masonry paint (Terra Cotta or Rust Orange)
- Pressure washer or stiff scrub brush
- TSP substitute or concrete cleaner
- Paint roller frame with extension pole
- 3/4-inch nap roller covers (for rough surfaces)
- Wide paintbrush (4-inch)
- Paint tray and liners
- Painters tape
- Drop cloths
- Empty bucket for mixing (optional)
- Sprayer (optional, for base coat)
Step 1: Cleaning and Prep
-
Scrub the surface:
Before painting, the cinder blocks must be completely free of dirt, moss, and loose debris. Use a pressure washer for the best results, or vigorously scrub with a stiff brush and concrete cleaner. -
Let it dry completely:
Masonry absorbs a lot of water. Allow the wall to dry for at least 24 to 48 hours to ensure no moisture is trapped inside the blocks, which can cause paint to peel later. -
Protect the perimeter:
Lay down heavy-duty drop cloths along the base of the wall to protect your sidewalk or garden soil from drips. Tape off any adjacent walls or columns you don’t want painted.
Uneven Color Fix
If the transition looks messy, don’t overwork wet paint. Let it dry completely, then dry-brush a 50/50 mix of your two colors over the uneven line to smooth it out.
Step 2: Base Coat Application
-
Prime the wall:
Apply a high-quality masonry primer to the entire surface. This seals the porous concrete and ensures your final colors pop. A sprayer makes quick work of this, but a thick nap roller works too. -
Apply the white top section:
Start by painting the top half of the wall with your exterior white masonry paint. Use a 3/4-inch nap roller to get deep into the crevices of the block. -
Extend the white lower:
Bring the white paint down slightly lower than where you want the transition line to be. In this design, the transition happens just below the halfway mark. -
Dry between coats:
Masonry paint is thick. Follow the manufacturer’s instructions for drying time before adding a second coat of white if needed for full opacity.
Add Geometric Flair
Instead of a soft fade, create distinct color blocks! Use painter’s tape to paint specific individual blocks in slightly different shades of orange for a pixelated transition.
Step 3: Creating the Ombre Effect
-
Define the transition line:
Identify the specific horizontal grout line where you want the sharp color change to begin. In the image, this is about 5 courses of blocks down from the top. -
Paint the dark base:
Starting from the bottom of the wall, apply the terra cotta or rust-colored paint. Work your way upward, ensuring solid coverage on the lower blocks. -
Create the soft fade:
This is the trickiest part. When you reach the transition area (the middle section), use a technique called ‘dry brushing’ or a very lightly loaded roller. -
Feather the edge:
While the paint is still wet, gently roll or brush the terra cotta color upward into the white section, using less and less pressure as you go up. -
Blend the mid-tones:
For a smoother look, you can mix a small amount of the white and rust paint in a separate bucket to create a mid-tone. Apply this strictly to the transition line to bridge the gap between dark and light. -
Refine the lines:
Unlike a smooth gradient, cinder blocks have distinct horizontal divisions. I prefer to let the color fade naturally but keep the horizontal grout lines somewhat crisp to emphasize the block structure. -
Check from a distance:
Step back about 10 feet to view the gradient. Up close it might look messy, but from a distance, the fade should look cohesive. -
Touch up lightly:
If the orange line feels too harsh, lightly brush some white paint downward over the top edge of the orange to soften it.
Step 4: Final Details
-
Paint the returns:
Don’t forget the short sides (ends) of the wall if they are exposed. Match the gradient height carefully so it wraps around the corner seamlessly. -
Clean up the base:
Once the wall is tacky-dry, carefully remove the drop cloths. If any paint bled onto the concrete floor, scrub it immediately with a wet rag. -
Inspect grout lines:
Masonry blocks have deep pores. Walk the wall and use a small brush to dab paint into any pinholes or deep grout crevices that the roller missed.
This simple gradient technique turns a functional wall into a warm, modern backdrop perfect for your patio


Faux Brick Pattern Painted Directly on Cinder Blocks
Transform a plain, utilitarian cinder block wall into a warm, inviting brick structure with this trompe-l’œil painting technique. By carefully layering shades of terracotta, brown, and charcoal, you can achieve a realistic textured look that adds instant curb appeal without the cost of masonry.
Step-by-Step Tutorial
Materials
- High-quality exterior primer (grey tinted)
- Exterior masonry paint (base brick color: terracotta/orange)
- Exterior masonry paint (accent colors: dark brown, tan, cream)
- Exterior masonry paint (mortar color: light grey or cream)
- Exterior masonry paint (accent band: charcoal or black)
- Painter’s tape (various widths: 1/4 inch or 3/8 inch commonly used for mortar lines)
- Large roller and tray (for base coats)
- Sea sponge or specialized faux finish sponge
- Small angled sash brush
- 4-foot level or laser level
- Chalk line
- Pencil
- Small stencil brush or old toothbrush (for speckling involved in texture)
Step 1: Preparation and Base Coat
-
Clean the Surface:
Begin by thoroughly power washing the cinder block wall to remove any dirt, mildew, or efflorescence. Allow the masonry to dry completely for at least 24 hours before applying any paint. -
Prime the Blocks:
Apply a coat of quality exterior masonry primer. Since your mortar lines will likely be grey, using a grey-tinted primer here can save time later, acting as the base color for the ‘mortar’ between your faux bricks. -
Base Mortar Color:
Once primed, roll on two coats of your chosen mortar color (light grey or cream). Ensure full coverage, as this will be the grid lines revealed when you peel off the tape later.
Step 2: Creating the Grid
-
Measure Your Bricks:
Determine the size of your faux bricks. Standard modular bricks are roughly 2 ¼ inches high by 8 inches long. Mark these measurements vertically up the wall corner providing the spacing guide. -
Mark Horizontal Lines:
Using a laser level or a long 4-foot level, draw horizontal pencil lines across the wall at your determined height intervals. -
Tape Horizontal Joints:
Run long strips of your narrow painter’s tape (1/4 to 3/8 inch works best) along these horizontal pencil lines. Press the edges down firmly to prevent bleed-under. -
Mark Vertical Joints:
Mark the vertical spacing for your bricks, staggering them on every other row (running bond pattern). A standard offset aligns the center of one brick with the vertical joint of the row above. -
Tape Vertical Joints:
Place small vertical pieces of tape between the horizontal lines at your marked intervals. I find it helpful to cut a small rigid spacer from cardboard to keep the vertical gaps consistent without measuring every single one.
Natural Variation Tip
Real brick isn’t uniform. Intentionally paint a few individual ‘bricks’ entirely in a slightly darker or lighter shade before sponging to break up the visual repetition.
Step 3: Painting the Brick Effect
-
Mix Your Palette:
Pour your main terracotta/orange color into a tray. Have your accent colors (browns, tans) ready on a separate palette or paper plate for easy blending. -
Apply Base Brick Tone:
Roll or brush the main terracotta color over the entire taped area. Don’t worry if it looks flat at this stage; texture comes next. -
Stipple for Texture:
While the base coat is still tacky, dip a sea sponge into the darker brown accent paint. Dab off excess on cardboard, then lightly pounce the sponge over random bricks to create color variation. -
Add Dimension:
Repeat the sponging process with a lighter tan color on different bricks, or even on the same ones, to simulate the natural clay variations found in real masonry. -
Define the Accent Band:
If recreating the dark lower band shown in the image, measure a section near the bottom (usually 3-4 brick courses high). Paint this section with your charcoal or black masonry paint. -
Texturize the Dark Band:
Sponge a little bit of grey or lighter black onto the charcoal band to ensure it looks like dark stone or brick, rather than flat black paint. -
Splatter Effect:
For a hyper-realistic finish, dip an old toothbrush into thinned black or dark brown paint and flick tiny speckles onto the wall. This mimics the pitting and imperfections of real fired clay.
Bleed-Through Blues
If paint bleeds under the tape, don’t panic. Once dry, just re-paint the mortar line with a small artist brush. Rough edges actually make it look more like real mortar.
Step 4: The Big Reveal
-
Remove the Tape:
Wait until the paint is dry to the touch but not fully cured (usually about 1-2 hours). Slowly peel back the tape at a 45-degree angle to reveal your crisp mortar lines underneath. -
Touch Up:
Inspect the ‘mortar’ lines. If any brick paint bled under the tape, use a small artist’s brush and your original grey mortar paint to tidy up the edges. -
Seal the Work (Optional):
If your wall is exposed to harsh weather, applying a clear matte masonry sealer can help protect your faux finish from fading and water damage.
Step back and admire how a simple paint job has given your wall the weight and history of traditional brickwork
Faux Wood Plank Illusion Over a Cinder Block Surface
Transform a plain, industrial cinder block wall into a warm, inviting facade with this clever faux wood technique. By layering textured paint and meticulously etching grain patterns, you can create the surprisingly realistic illusion of individual timber siding planks.
Detailed Instructions
Materials
- Exterior masonry primer
- Base coat exterior latex paint (dark brown/charcoal)
- Thick-body textured coating or stucco patch compound
- Top coat exterior acrylic latex paint (warm beige/tan)
- Painter’s tape (various widths)
- 4-inch putty knife
- Wire brush
- Wood graining tool (or stiff bristle brush)
- Laser level or chalk line
- Long straightedge or level
- Paint roller (medium nap)
- Angle sash brush
Step 1: Preparation & Base Layout
-
Clean and Prime:
Begin by thoroughly cleaning the cinder block surface with a wire brush to remove loose debris, followed by a pressure wash if necessary. Once fully dry, roll on a heavy coat of high-quality masonry primer to seal the porous blocks. -
Apply the Shadow Coat:
Paint the entire wall with your dark base color (dark brown or charcoal). This layer is crucial because it will peek through the gaps later to create the deep shadow lines between your faux ‘planks’. -
Mark Hiking Lines:
Using a laser level or chalk line, mark horizontal guide lines up the wall. Space them according to your desired plank width—about 6 to 8 inches usually looks realistic for exterior siding. -
Tape the Gaps:
Apply strips of painter’s tape along your horizontal guide lines. These taped areas will preserve the dark base coat and become the shadowed seams between boards once removed. -
Create Vertical Joints:
To simulate staggered siding, add short vertical pieces of tape randomly within the horizontal rows. Avoid lining these vertical joints up perfectly; a staggered ‘brick’ pattern looks more like authentic carpentry.
Pro Texture Tip
Vary the pressure on your graining tool for each ‘plank.’ Heavy pressure creates bold knots, while light dragging mimics straight grain lumber.
Step 2: Creating the Texture
-
Mix the Texture Medium:
Mix your beige top coat paint with a thick-body texture additive or use a tintable stucco patch compound. You want a consistency like thick peanut butter that will hold ridges. -
Apply the Coat:
Working in sections of about 3-4 ‘planks’ at a time, trowel the thick mixture onto the wall over the tape. Apply it roughly 1/8 to 1/4 inch thick to build localized volume. -
Define the Grain:
While the compound is wet, drag a wood graining tool or stiff brush horizontally across the surface. Wiggle the tool slightly as you pull to create organic knots and waves characteristic of natural timber. -
Add Deep Etching:
For extra realism, use the corner of your putty knife to carve deeper fissures or cracks into a few random planks. I like to do this sparingly so the wall doesn’t look too distressed. -
Working Upward:
Continue this process, moving up the wall section by section. Ensure you don’t coat too far ahead, or the texture material will dry before you can stamp the grain pattern.
Step 3: Finishing Touches
-
Partial Dry:
Allow the texture to set up until it is firm to the touch but not fully cured—usually about 30 to 45 minutes depending on humidity. -
Remove the Tape:
Carefully peel away the tape while the compound is still slightly pliable. Pull the tape at a sharp angle to cut clean lines through the thick texture, revealing the dark ‘gaps’ underneath. -
Soften Edges:
If pulling the tape created jagged spikes of compound along the edges, gently knock them down with a soft brush or your finger before the material hardens completely. -
Full Cure:
Let the wall dry for at least 24 to 48 hours. The thick texture needs more time than standard paint to cure all the way through. -
Dry Brushing:
Once fully hard, lightly dry-brush a lighter cream or darker mocha shade over the raised texture ridges. This highlights the grain pattern and adds dimension to the flat color. -
Seal the Work:
Finish by rolling on a clear, matte exterior masonry sealer. This protects your faux finish from rain and UV fading while unifying the sheen.
Sticky Tape Trouble?
If the tape tears during removal, the texture compound dried too hard. Next time, pull tape sooner or score the edge gently with a utility knife first.
Step back and admire how a flat concrete surface now has the structural depth and warmth of natural wood siding
Stonewash Texture for a Backyard Cinder Block Retaining Wall
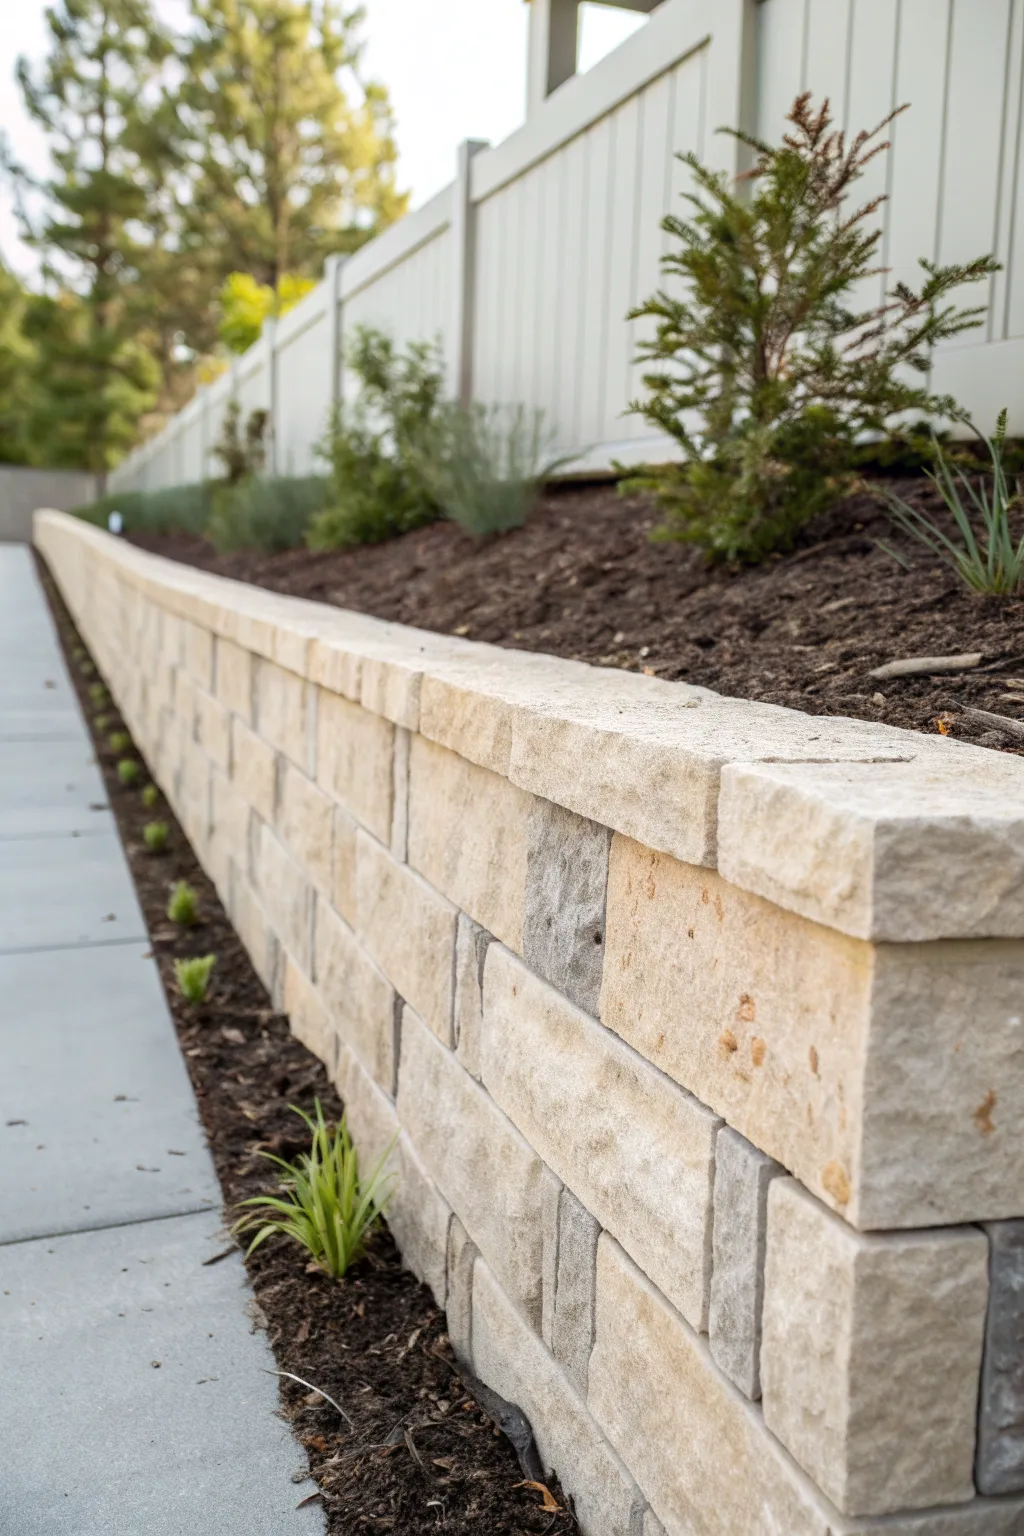
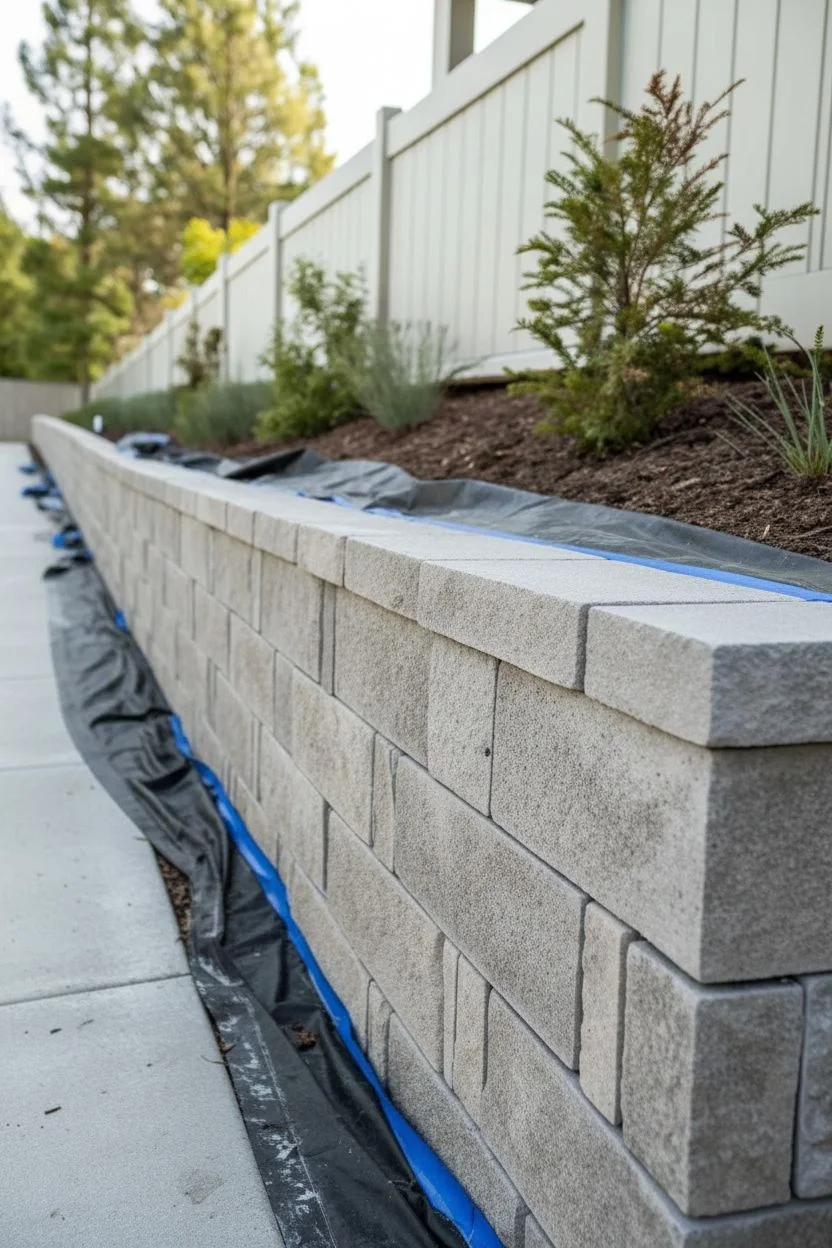
Transform standard gray cinder blocks into a high-end, textured stone wall that rivals expensive masonry. By layering paints and using natural sea sponges, you’ll create a realistic split-face stone effect that adds depth and curb appeal to any retaining wall.
Step-by-Step Guide
Materials
- Concrete primer (exterior grade)
- Exterior latex paint (base coat, sandstone/cream color)
- Exterior latex paint (secondary color, light gray)
- Exterior latex paint (accent color, darker taupe/brown)
- Joint compound or stucco patch (optional for texture)
- Wide masonry brush
- Natural sea sponges
- Small detail brush
- Painter’s tape
- Drop cloths
- Matte masonry sealer
Step 1: Cleaning and Prep
-
Clean the blocks:
Thoroughly pressure wash the cinder blocks to remove all dirt, moss, and loose debris. Let the wall dry completely for at least 24 hours before starting any work. -
Tape off edges:
Apply painter’s tape to protect adjacent walkways or siding, and lay down drop cloths to catch drips on the soil or grass. -
Prime the surface:
Roll or brush on a high-quality exterior concrete primer. This ensures your faux finish adheres correctly and lasts through weather changes.
Step 2: Creating the Base Texture
-
Mix base color:
Pour your sandstone or cream-colored base paint into a tray. I sometimes stir in a small amount of sand or a texture additive to mimic the rough feel of real stone. -
Apply base coat:
Using a wide masonry brush, apply a heavy coat of the base color. Don’t smooth it out perfectly; stippling—jabbing the brush tips against the block—creates better texture. -
Add dimension:
While the base coat is still slightly tacky, dab on small irregular patches of joint compound or stucco patch if you want a true split-face relief, then paint over them once dry. -
Dry time:
Allow this base layer to cure fully according to the paint manufacturer’s instructions, usually 4-6 hours.
Natural Variation Tip
Rotate your sponge frequently as you work. Keeping the sponge in the same position creates a repetitive ‘stamp’ pattern that ruins the natural stone illusion.
Step 3: Adding Stone Variation
-
Prepare sponge colors:
Pour small amounts of your light gray and taupe paints onto paper plates. Dampen your sea sponge and wring it out well so it’s moist but not dripping. -
Sponge on gray tones:
Dip the sponge lightly into the gray paint and dab off excess on cardboard. Lightly press the sponge randomly across various blocks to simulate natural mineral deposits. -
Create individual ‘stones’:
To make the wall look like separate stones rather than one slab, tape off random rectangular sections or use a straight edge to isolate specific blocks while sponging different densities of color. -
Apply taupe accents:
Using a fresh corner of the sponge, add the darker taupe color sparingly. Focus these darker spots near the edges or bottom of individual ‘blocks’ to suggest shadow and weight. -
Blend the layers:
If the sponge marks look too harsh, lightly dry-brush over them with a tiny bit of the original base color to soften the transition.
Color Blending Fix
If a color spot is too intense, immediately dab it with a clean, wet rag to lift some pigment. This works best while the paint is still wet.
Step 4: Highlighting and Sealing
-
Detail the edges:
Use a small detail brush with a slightly lighter cream shade to highlight the top edges and corners of your faux stones. This trick mimics the way light hits chipped stone. -
Simulate grout lines:
If your cinder blocks have recessed joints, paint them a dark gray or deep brown to create the illusion of deep shadows between the ‘stones’. -
Inspect from a distance:
Step back about 10 feet to check the overall balance. Add more sponging where the pattern looks too uniform or repetitive. -
Final cure:
Let all paint layers dry completely for 24 hours to ensure the texture is set hard. -
Seal the wall:
Apply a clear, non-yellowing matte masonry sealer. This protects your artwork from rain and UV fading while maintaining the natural, non-glossy look of stone.
Enjoy the elegant look of your new faux stone wall without the heavy lifting of real masonry
Botanical Leaf Silhouettes on Painted Cinder Blocks
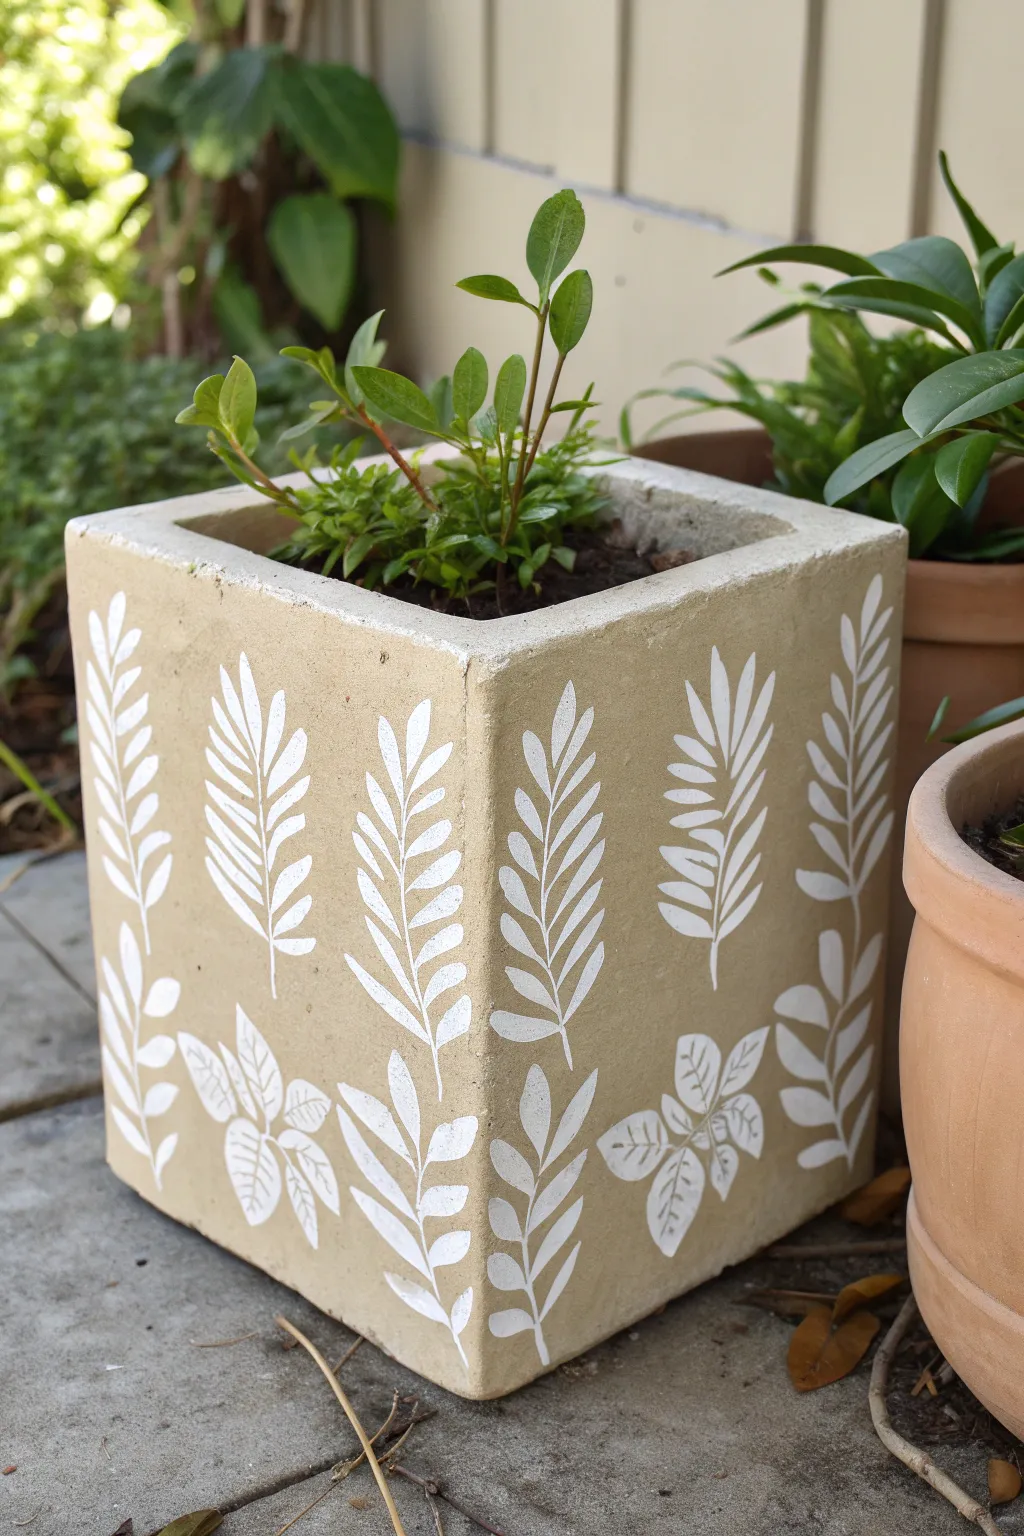
Transform a plain concrete block into an elegant garden accent with this simple silhouette technique. The warm beige base paired with crisp white botanical forms creates a sophisticated, nature-inspired look perfect for any patio.
Detailed Instructions
Materials
- Square concrete planter or cinder block
- Outdoor acrylic craft paint (Beige/Tan)
- Outdoor acrylic craft paint (White)
- Wide flat paintbrush (2-inch)
- Fine detail paintbrush (round size 2 or 4)
- Small flat shader brush (size 6 or 8)
- Leaf stencils (optional)
- Pencil or white chalk
- Paper plate or palette
- Clear matte outdoor sealer spray
Step 1: Base Preparation
-
Clean surface:
Begin by scrubbing your concrete block thoroughly with a stiff brush and water to remove any dirt or loose debris. Let it dry completely in the sun before painting, as trapped moisture can cause paint to peel later. -
Apply base coat:
Using your wide flat brush, apply a generous layer of the beige outdoor acrylic paint to the entire exterior surface. -
Work into texture:
Dab the brush into the porous holes of the concrete to ensure full coverage. The rough texture will soak up paint, so I find a pouncing motion works better than smooth strokes here. -
Second coat:
Allow the first layer to dry for about an hour. Apply a second coat of beige to achieve a solid, opaque finish that hides the gray concrete underneath. -
Full dry:
Let the base coat cure for at least 2-3 hours or overnight to ensure a hard surface for the detail work.
Crisp Lines Secret
Use a stencil brush with very little paint (dry brush technique) if using stencils. This prevents paint from bleeding under the edges on the rough concrete surface.
Step 2: Designing the Pattern
-
Sketch placement:
Using a pencil or a piece of white chalk, lightly sketch vertical lines where your main fern stems will go. Aim for a mix of heights to keep the design dynamic. -
Outline leaves:
Draw simple leaf shapes stemming from your vertical lines. For the ferns, make small angled dashes; for the bottom clusters, sketch broader oval shapes. -
Plan spacing:
Step back and look at your sketched composition. Ensure there is enough negative space between the leaves so the design doesn’t look cluttered.
Step 3: Painting the Botanicals
-
Paint stems:
Dip your fine detail brush into the white paint. Carefully trace over your vertical stem lines first, starting from the bottom and flicking upward for a tapered look. -
Create fern leaves:
Switch to the small flat shader brush for the leaves. Load it with white paint and press it down gently at an angle to create the leaf shape in one stroke. -
Repeat pattern:
Continue this press-and-lift motion up the stem. As you reach the top of the fern, use just the corner or side of the brush to make the leaves smaller. -
Paint broad leaves:
For the clustered leaves at the bottom, use the round brush to outline the leaf shape first, then fill in the center with smooth strokes. -
Add veins:
Once the broad white leaves are semi-dry, use a very fine brush with a tiny amount of the beige base color to paint thin veins inside the white leaves for added detail. -
Refine edges:
Go back over any rough edges with your detail brush. If the concrete texture made the lines bumpy, add a second thin layer of white to crispen the silhouette. -
Erase guidelines:
If any chalk or pencil marks are still visible, gently wipe them away with a damp cloth or cotton swab once the paint is fully dry.
Fixing Mistakes
Did a leaf come out messy? Don’t panic. Let the white paint dry completely, then simply paint over the mistake with your beige base color and try again.
Step 4: Finishing Touches
-
Seal project:
Take the planter to a well-ventilated area. Apply two light coats of clear matte outdoor sealer spray to protect the paint from rain and UV fading. -
Final cure:
Let the sealer dry for 24 hours before filling the planter with soil and your favorite greenery.
Enjoy the calm, natural vibe your new planter brings to your garden space
Tile-Inspired Squares That Turn Cinder Blocks Into a Feature
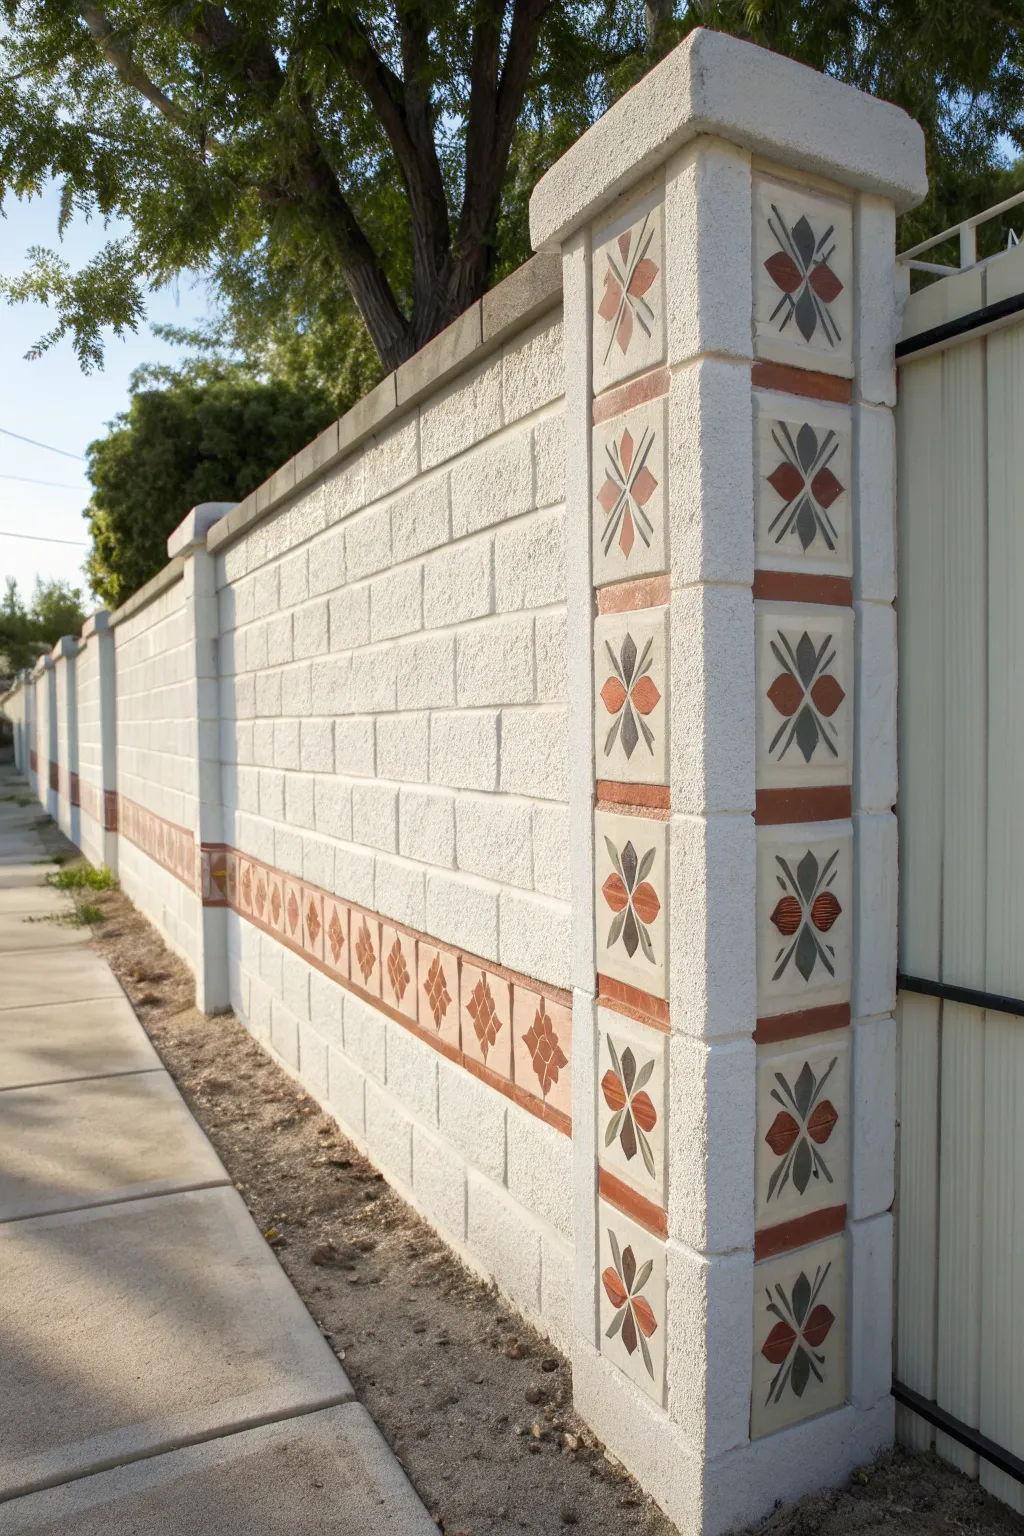
Transform a plain, industrial cinder block fence into a Mediterranean-inspired masterpiece by painting faux tiles directly onto the concrete. This project uses the natural grid of the blocks to frame elegant floral motifs, creating a high-end look without the cost of actual masonry work.
How-To Guide
Materials
- Exterior masonry primer (white)
- Exterior latex paint (base white or off-white)
- Stencil plastic or heavy cardstock
- Cutting mat and X-Acto knife
- Painter’s tape (1-inch width)
- Small foam roller
- Angle sash brush (2-inch)
- Detail brushes (flat and round)
- Acrylic exterior paints (terracotta orange, deep charcoal grey)
- Measuring tape
- Pencil
- Clear exterior masonry sealer (matte finish)
Step 1: Preparation & Base Coat
-
Clean surface:
Begin by thoroughly pressure washing the cinder block wall to remove dirt, moss, and loose debris. Allow the wall to dry completely, ideally for 24-48 hours, to ensure proper paint adhesion. -
Prime the surface:
Apply a generous coat of exterior masonry primer using a thick-nap roller. Work the primer into the pores of the concrete blocks, ensuring full coverage to prevent the finish coats from soaking in unevenly. -
Apply base color:
Once primed, roll on two coats of your white or off-white exterior latex paint. This creates the ‘grout’ color and the background for your faux tiles. -
Plan the layout:
Identify which blocks will feature the designs. In the inspiration image, the vertical columns use square blocks for individual tiles, while the horizontal wall features a running bond pattern where a specific row is highlighted.
Clean Lines Pro-Tip
Use spray adhesive on the back of your stencil rather than just tape. It holds the intricate inner bridges flat against the rough concrete, preventing fuzzy paint edges.
Step 2: Creating the Tile Grid
-
Mask horizontal bands:
For the decorative horizontal stripe, use painter’s tape to mask off the top and bottom edges of the chosen row of blocks. This defines the borders where your terracotta trim will go. -
Paint the borders:
Using the terracotta paint and a sash brush, paint the narrow horizontal bands above and below your designated tile row. This mimics the look of brick coping or trim tiles. -
Add vertical definition:
On the vertical columns, paint thin horizontal terracotta lines between every square block to simulate spacing between decorative tiles.
Step 3: Stenciling the Motifs
-
Design the stencil:
Draft a four-petal floral design on paper that fits within the face of your cinder blocks (roughly 6×6 or 8×8 inches depending on your block size). The design should have four main petals meeting at a center point, with four smaller spear-shaped leaves between them. -
Cut the stencil:
Transfer your design to stencil plastic. Carefully cut out the petal shapes using an X-Acto knife on a cutting mat. I find it helpful to keep bridges of plastic connecting the pieces to keep the stencil floppy-free. -
Position the stencil:
Secure the stencil to the center of the first block using painter’s tape. Ensure it is centered both vertically and horizontally within the block face. -
Stipple the main petals:
Load a stencil brush or small sponge with the terracotta paint. Offload most of the paint onto a paper towel until the brush is almost dry, then stipple the color into the four main rounded petals. -
Stipple the accent leaves:
Using a fresh sponge or brush, repeat the process with the charcoal grey paint for the four spear-shaped leaves that sit diagonally between the orange petals. -
Remove and repeat:
Carefully peel back the stencil while the paint is still wet to avoid pulling up dried edges. Wipe the back of the stencil clean, move to the next block, and repeat the process.
Level Up: Aged Effect
Mix a tiny amount of glazing medium with dark brown paint. Lightly wash it over the white ’tiles’ before sealing to create an antiqued, old-world patina.
Step 4: Detailing & Sealing
-
Hand-paint connections:
Once the main shapes are stenciled, use a fine liner brush and the charcoal paint to extend thin lines from the grey leaves toward the center, if your design requires connecting stems. -
Refine edges:
Inspect your tiles for any bleed-under. Use a small flat brush with your white base color to tidy up the edges of the petals and leaves for a crisp, tile-like appearance. -
Add sheen (Optional):
To make the ’tiles’ look like glazed ceramic, apply a high-gloss clear coat strictly over the painted design area, leaving the ‘grout’ lines matte. -
Final seal:
Apply a full coat of clear exterior masonry sealer over the entire wall. This protects your artwork from UV fading and weather damage, ensuring the faux finish lasts for years.
This faux-tile technique offers all the charm of Spanish architecture with just a weekend of painting effort and creativity
Checkerboard Grid That Embraces the Cinder Block Pattern
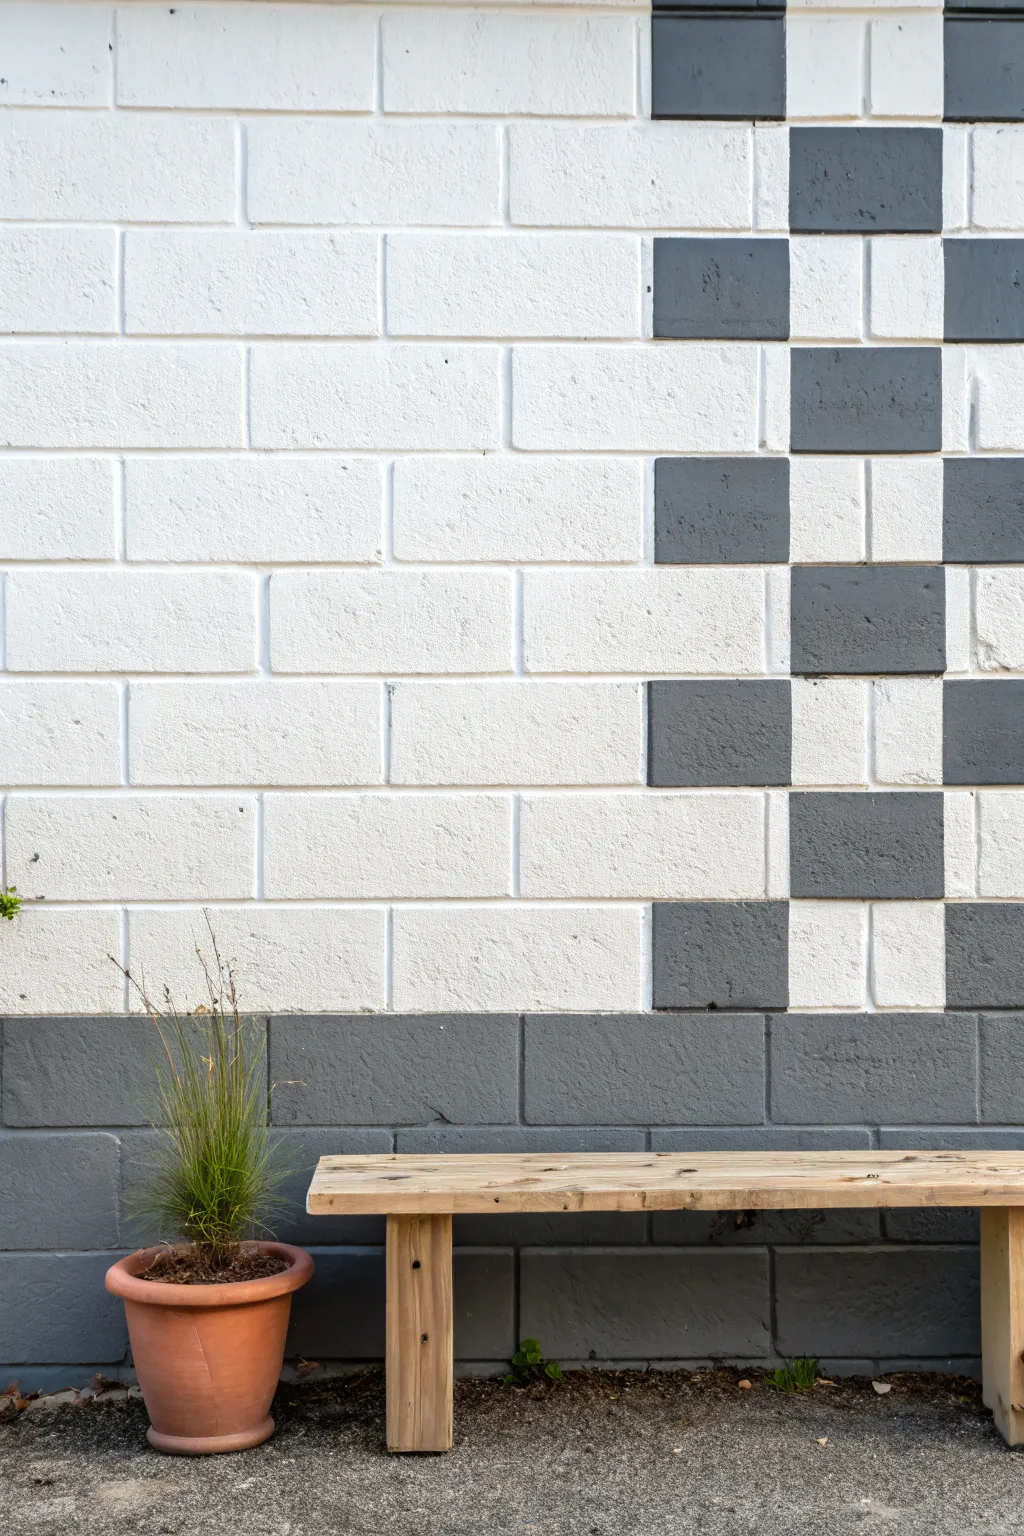
Transform a plain cinder block wall into a modern, geometric feature by playing with its inherent grid. This checkerboard pattern uses the existing mortar lines as a guide, creating a high-contrast look that feels both structured and artistic.
Step-by-Step Tutorial
Materials
- Exterior masonry paint (white)
- Exterior masonry paint (dark gray)
- Stiff-bristle scrubbing brush
- TSP (Trisodium Phosphate) cleaner
- Pressure washer (optional)
- Painter’s tape (1-inch width)
- Paint roller with thick nap (3/4 inch or higher)
- Extension pole for roller
- Angled sash brush (2.5 inch)
- Small artist brush or detail brush
- Drop cloths
- Tape measure
- Pencil or chalk
Step 1: Preparation & Cleaning
-
Clear the area:
Remove any furniture, plants, or debris from near the wall. Lay down drop cloths to protect the ground from drips and spills. -
Scrub the blocks:
Mix TSP cleaner with water according to package instructions. Use a stiff-bristle brush to rigorously scrub the cinder blocks, focusing on removing dirt, moss, or efflorescence. -
Rinse thoroughly:
Wash off all cleaning residue with a hose or pressure washer. Allow the wall to dry completely, ideally for 24 hours, as moisture trapped in the blocks can cause paint to peel later. -
Inspect mortar lines:
Check the mortar joints for any cracks or holes. Patch them with masonry caulk or mortar repair if necessary, letting it cure before painting.
Bleeding Edges?
If paint seeps into the porous block outside your lines, don’t wipe it! Let it dry completely, then touch it up with the base color. Wiping wet masonry paint just smudges it further into the texture.
Step 2: Painting the Base Coat
-
Cut in the edges:
Using your angled sash brush and the white masonry paint, cut in the edges along the top, sides, and around any fixtures. I like to work in sections to keep a wet edge. -
Roll the white base:
Load a thick-nap roller with white paint. The textured surface of cinder blocks requires a lot of paint, so don’t be shy with loading the roller. -
Work into the texture:
Roll vertically and then horizontally (back-rolling) to push the paint into all the pores and pinholes of the concrete blocks. -
Apply a second coat:
Once the first coat is dry to the touch (usually 2-4 hours), apply a second coat of white paint to ensure solid, opaque coverage without gray bleed-through.
Step 3: Creating the Design
-
Mark the datum line:
Decide where you want the solid gray foundation to end. Measure up from the ground and mark a level horizontal line across the wall with a pencil. -
Paint the bottom section:
Using the dark gray paint, fill in the entire bottom section below your marked line. Use the brush for the top edge to keep it neat, then roll the rest. -
Map the checkerboard:
Above the solid gray section, identify the columns of half-blocks (the alternating squares creates by the bond pattern). Use a small piece of tape to mark which specific blocks will be painted gray. -
Outline the squares:
For the checkerboard squares, use your angled brush to carefully outline the perimeter of the chosen blocks. Stay strictly within the face of the block, not painting onto the mortar joints. -
Fill the squares:
Fill in the centers of your outlined squares with gray paint. A mini-roller works well here for speed, or just continue with the brush for precision. -
Add floating accents:
Select a random assortment of blocks further up the wall to paint gray, breaking the strict pattern for a more modern, deconstructed look.
Level Up: Ombre Effect
Instead of a single dark gray, mix three shades of gray. Paint the bottom rows the darkest shade, the middle checkerboard a medium gray, and the highest floating blocks the lightest silver tone.
Step 4: Finishing Touches
-
Clean the lines:
Inspect your gray squares. If any paint strayed onto the white mortar, use a small artist brush and white paint to sharpen the edges. -
Check for holidays:
Look for “holidays” (missed spots) where the gray paint didn’t fully cover the texture. Dab extra paint into these crevices using a stippling motion with your brush. -
Final dry:
Remove any temporary marking tape and let the wall cure fully according to the paint manufacturer’s recommendation before placing furniture back against it.
Step back and admire how a simple two-tone application has turned a functional wall into a striking architectural statement
Sunset-to-Night Gradient Galaxy Painted on Cinder Blocks
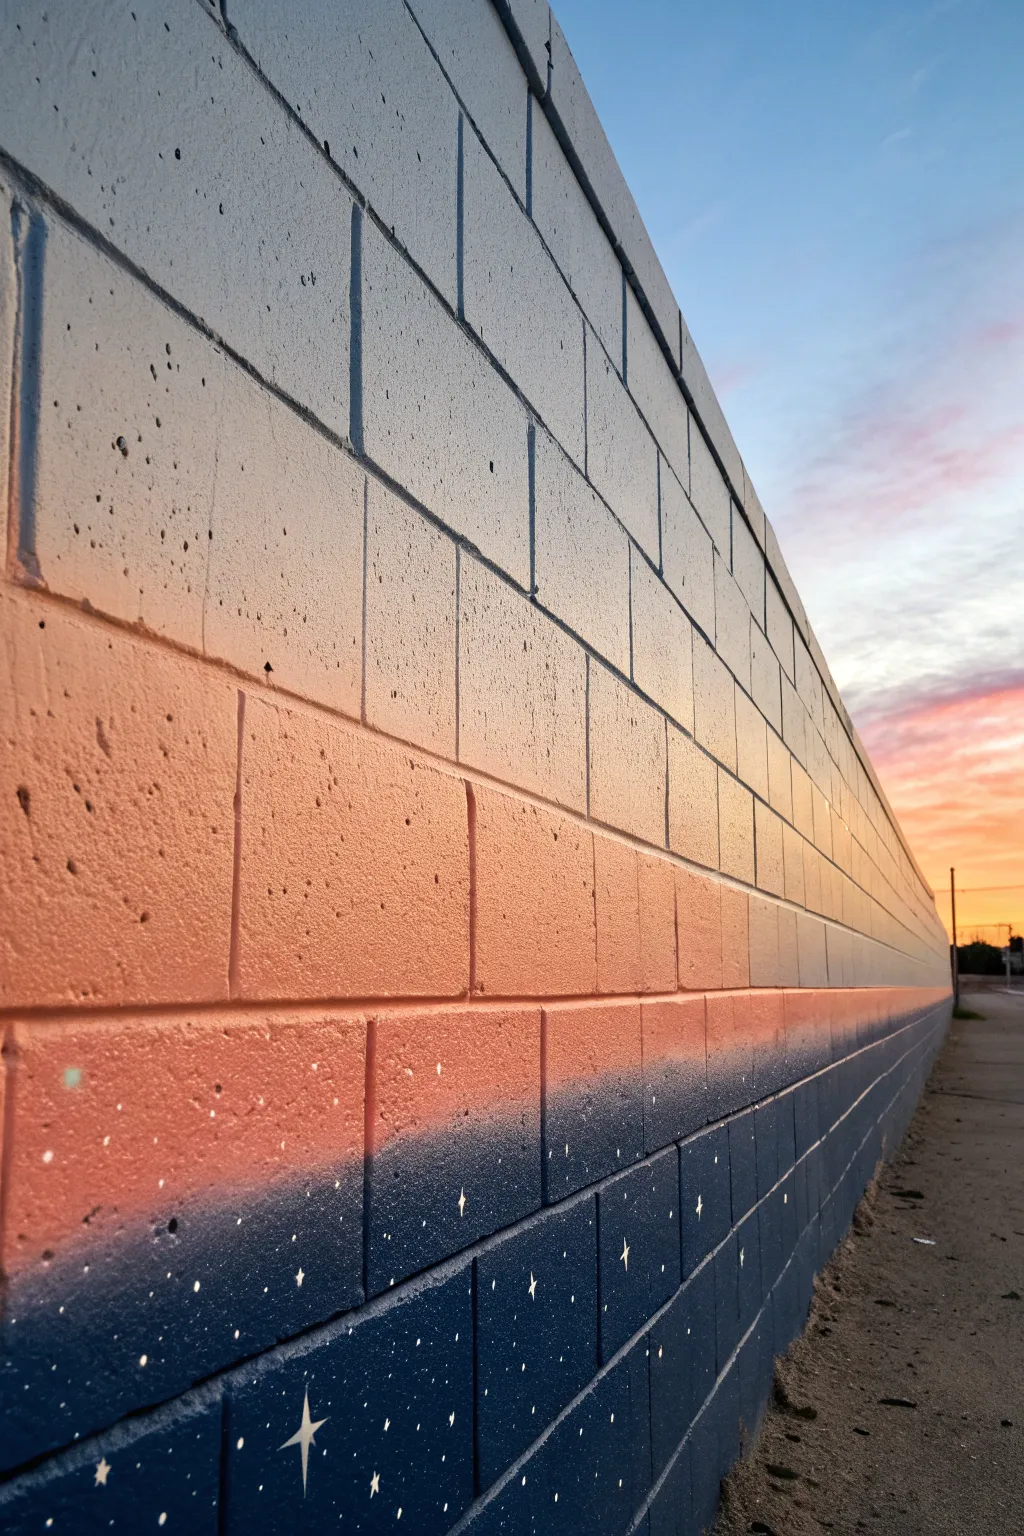
Transform a plain exterior wall into a breathtaking vista with this sunset-to-night gradient. This project uses the natural texture of cinder blocks to add depth to a soft galaxy design, blending warm horizons into a starry deep blue base.
Step-by-Step Guide
Materials
- TSP substitute or concrete cleaner
- Scrub brush and hose
- Adhesive painter’s tape
- Exterior masonry primer (white)
- Exterior acrylic latex paint (Pale Sky Blue)
- Exterior acrylic latex paint (Peach or Soft Orange)
- Exterior acrylic latex paint (Deep Navy Blue)
- Large paint roller and tray
- 2-inch angled sash brush
- Small detail brush (for stars)
- Spray bottle with water (optional, for blending)
- Drop cloths
Step 1: Preparation & Priming
-
Clean the surface:
Before painting, scrub the cinder block wall thoroughly with a TSP substitute and a stiff brush to remove dirt, moss, or grime. Rinse well with a hose and let it dry completely for at least 24 hours. -
Protect the area:
Lay down heavy-duty drop cloths along the base of the wall to protect the ground from drips and spills. Use painter’s tape to mask off any adjacent trim or areas you don’t want painted. -
Apply primer:
Roll on a coat of high-quality exterior masonry primer. Use the brush to cut in the mortar joints first to ensure full coverage, as cinder blocks are very porous and thirsty.
Wet-on-Wet Blending
Work in sections of about 4 feet wide at a time so your paint stays wet for blending. If the cinder block dries too fast, a mist of water is essential.
Step 2: Creating the Gradient
-
Start with the sky:
Begin at the top section of the wall. Apply the Pale Sky Blue paint using a roller, covering roughly the top third of your intended canvas area. -
Apply the sunset band:
Paint the middle section with your Peach or Soft Orange color. Don’t worry about a perfect line where it meets the blue yet; just get the color on the blocks. -
Paint the night base:
Apply the Deep Navy Blue to the bottom third of the wall, extending all the way to the ground. This dark base helps ground the mural visually. -
Blend the upper horizon:
While the paint is still tacky, use a brush to blend the transition between the Pale Sky Blue and the Peach. You can lightly mist the area with water to help the acrylics merge more smoothly. -
Blend the lower horizon:
Repeat the blending process where the Peach meets the Navy Blue. I find that using a dry brush technique here creates a nice haziness that mimics the atmosphere at dusk. -
Softening the transitions:
Stand back a few feet to check your gradient. If the lines look too harsh, stipple a little of the lighter color over the darker edge to break up the solid line.
Step 3: Adding the Galaxy Details
-
Mix the star paint:
Pour a small amount of white primer or very light blue paint onto a paper plate. You want this paint slightly thinner than usual for crisp dots. -
Create main stars:
Using your smallest detail brush, hand-paint a few larger, four-pointed stars (diamond shapes with elongated points) randomly across the dark navy section. -
Add medium stars:
Dot in medium-sized circles of varied spacing. Concentrate most of them in the darkest blue area, becoming more sparse as you move up into the orange section. -
Create the milky way dust:
Dip an old toothbrush or stiff bristle brush into the white paint. Run your thumb across the bristles to flick a fine mist of tiny speckles over the navy blue area. -
Add highlight accents:
Put a tiny dot of pure white in the center of your largest four-pointed stars to make them look like they are glowing. -
Final inspection:
Step back and check the balance of your stars. If the spray pattern looks too uniform, come back in and add a few manual dots to break up the pattern. -
Clean up:
Once the artwork is dry, carefully peel away the painter’s tape and fold up your drop cloths.
Glow in the Dark
Mix phosphorescent pigment powder into clear exterior sealer and paint over the white stars. By day they look normal, but at night the wall will come alive.
Now you have a stunning, celestial backdrop that brings color to your outdoor space day and night
Patchwork “One Block at a Time” Color Story on Painted Cinder Blocks

Transform a plain exterior wall into a statement piece with this color-blocked patchwork design using varied earth tones and greens. The vertical stripes of alternating colors create a rhythmic, modern aesthetic that feels both organized and organic.
How-To Guide
Materials
- Exterior masonry paint (White, Cream/Light Beige, Peach/Light Terracotta, Deep Terracotta/Rust, Sage Green, Deep Forest Green)
- Mild detergent or masonry cleaner
- Stiff bristle scrub brush
- Pressure washer (optional)
- Paint rollers (4-inch size for blocks)
- Angled sash brush (2-inch)
- Painter’s tape (exterior grade)
- Drop cloths
- Paint tray and liners
- Chalk line or level (optional)
Step 1: Preparation
-
Clean the Surface:
Begin by thoroughly cleaning the cinder block wall. Use a stiff bristle brush and a mixture of mild detergent and water to scrub away any dirt, moss, or efflorescence. If the wall is particularly grimy, a pressure washer on a low setting can save time. -
Rinse and Dry:
Rinse the wall completely with clean water to remove all soap residue. Allow the masonry to dry fully for at least 24 to 48 hours; trapping moisture behind paint can cause peeling later. -
Protect Surroundings:
Lay down drop cloths along the base of the wall to protect the soil or pavement. If there are plants nearby, gently tie them back or cover them loosely to shield them from paint splatters.
Clean Lines on Bumpiness
Cinder blocks are bumpy! After applying tape, run a thin bead of clear caulk along the tape edge. This seals the bumpy gaps so paint won’t bleed under.
Step 2: Planning the Layout
-
Analyze the Pattern:
Notice the specific rhythm in the image: vertical distinct columns of color. The first column is white (top) and peach (bottom). The second is beige (top) and rust (bottom). The third matches the first but with sage green at bottom, and the fourth is dark green (top/bottom). -
Mark Vertical Zones:
Using a piece of chalk or pencil, lightly mark the vertical boundaries between your columns. The design relies on the natural vertical grout lines of the cinder blocks, so follow these existing seams. -
Determine Horizontal Splits:
Decide where the color change will happen within each column. In the inspiration image, the colors shift roughly halfway down, but slightly staggered. Mark these horizontal transition lines lightly on the blocks.
Step 3: Painting the Lighter Tones
-
Tape Vertical Edges:
Apply exterior painter’s tape along the vertical grout line separating your first column (white/peach) from the second (beige/rust). This ensures a crisp line where the colors meet. -
Apply White Base:
Using a 4-inch roller, apply the white paint to the top section of the first column. Use a generous amount of paint to get into the porous texture of the block. -
Cut in Edges:
Use the angled sash brush to push paint into the deep grout lines and corners that the roller might stick over. I find this helps seal the block better against moisture. -
Paint the Second Top Section:
Move to the second column’s top section and apply the beige/light taupe color. Be careful not to cross your taped line into the white section. -
Continue the Top Row:
Repeat this process for the remaining upper sections (white again for the third column, dark green for the fourth), taping off sections as needed or painting non-adjacent columns first to let them dry.
Paint Soaking In Too Fast?
If the blocks are drinking up your expensive paint, apply a dedicated masonry primer first. This seals the pores and creates a uniform surface for the topcoat.
Step 4: Adding the Deep Accents
-
Paint the Peach Section:
Once the top white section is dry to the touch, apply the peach/light terracotta paint to the bottom half of the first column. Use your brush to create a clean horizontal line where it meets the white block. -
Apply Rust Tone:
Paint the bottom section of the second column with the deep rust color. Ensure full coverage in the grout lines, as dark colors can show missed spots more easily. -
Add Green Variations:
For the third column, paint the bottom section in sage green. For the distinct fourth column, paint the entire vertical strip in the deep forest green, ensuring it is heavily saturated. -
Detail Work:
Inspect the grout lines. The image shows the grout painted the same color as the varying blocks (not left gray). Go back with a small brush and dab paint into any deep pits or holes in the mortar. -
Second Coat:
Masonry is thirsty. Apply a second coat to all colored sections to ensure the colors are vibrant and opaque, especially the lighter peach and beige tones. -
Remove Tape:
Carefully peel away any painter’s tape while the final coat is still slightly tacky to prevent pulling up dried paint chips. -
Touch Up:
Use a small artist’s brush for any minor bleeds or spots where the rough texture of the block made the tape lift. Crisp lines are key to this geometric look.
Step back and admire how this simple blocking technique completely revitalizes the garden boundary
Trompe-l’Oeil Shadows for a 3D Painted Cinder Block Illusion
Transform a plain cinder block wall into a vibrant architectural feature with this bold color-blocking technique that mimics the warm hues of a desert sunset. By combining deep terracotta, coral, and cream with a striking teal accent, you’ll create a modern, structured look that instantly upgrades your outdoor space.
Detailed Instructions
Materials
- Exterior masonry primer
- Exterior masonry paint (Deep Terracotta/Rust)
- Exterior masonry paint (Coral/Salmon Orange)
- Exterior masonry paint (Off-White/Cream)
- Exterior masonry paint (Teal/Turquoise)
- Painters tape (2-inch width)
- Wire brush or stiff scrub brush
- Pressure washer (optional but recommended)
- High-nap roller covers (3/4 inch to 1 inch for rough surfaces)
- Roller frame and extension pole
- Angled sash brush (2.5 inch)
- Drop cloths
- Chalk line or laser level
Step 1: Preparation
-
Clean the Surface:
Begin by thoroughly cleaning the cinder block wall. Use a wire brush to remove any loose debris, dirt, or efflorescence (white salty deposits). If possible, pressure wash the entire surface to ensure the best adhesion, then let the wall dry completely for at least 24 hours. -
Protect Surrounding Areas:
Lay down drop cloths along the base of the wall to protect the sidewalk or ground. Ensure the cloths are weighted down or taped to prevent shifting. -
Prime the Masonry:
Apply a high-quality exterior masonry primer to the entire wall. Use a high-nap roller to work the primer deep into the porous texture of the blocks. I find that taking extra time here to fill the nooks ensures the topcoat looks much smoother later on. Allow the primer to dry according to the manufacturer’s instructions.
Step 2: Mapping the Design
-
Establish the Horizontal Lines:
Determine the height of your color bands. In the reference image, the bottom terracotta band covers about 4-5 courses of block, the middle coral band covers another 4-5 courses, and the top is cream. Use the mortar lines as your natural guide, but snap a chalk line if your rows aren’t perfectly level to ensure a straight visual break. -
Mark the Vertical Accent:
Identify the vertical column or pilaster you want to highlight. Mark this section off to be painted separately from the horizontal stripes.
Uneven Lines?
On rough cinch block, tape often fails. Instead, use a ‘dry brush’ technique or a small artist’s brush to hand-paint the transition line within the mortar groove for the sharpest look.
Step 3: Painting the Horizontal Bands
-
Paint the Top Cream Section:
Start at the top to avoid drips on finished lower sections. Apply the Off-White/Cream paint using a clean high-nap roller. Cover the top section extending down to your first transition line. -
Cut in the Top Edge:
Use your angled sash brush to carefully cut in along the very top edge of the wall and any corners. -
Apply the Middle Coral Band:
Once the cream paint is dry to the touch, move to the middle section. Apply the Coral/Salmon Orange paint. When meeting the cream section, cut in carefully with a brush first for a sharp line, or tape off the dried cream paint if you prefer extra security. -
Detail the Mortar Joints:
Masonry paint can bridge gaps, but deep mortar joints often need extra attention. Use the tip of your brush to dab paint into any deep recesses in the coral section that the roller missed. -
Paint the Bottom Terracotta Band:
Finally, apply the Deep Terracotta/Rust paint to the bottom section. This dark color creates a visual anchor for the wall. Roll the paint on thick, ensuring even coverage down to the sidewalk or ground line. -
Refine the Edges:
Use the angled brush to sharpen the line where the terracotta meets the coral. A steady hand following the masonry joint usually yields the best result, as tape can sometimes bleed on rough brick.
Pro Tip: Paint Absorption
Cinder blocks are thirsty! Plan to use 20-30% more paint than the can suggests for standard walls, or apply a second coat of primer to seal the pores first.
Step 4: The Vertical Accent
-
Tape Off the Column:
To get the crisp separation seen in the photo, apply painter’s tape vertically along the edge where the flat wall meets the protruding column. Press the tape firmly into the mortar joints. -
Apply Teal Paint:
Paint the vertical column with the Teal/Turquoise paint. Use a smaller roller or a brush for better control, especially if the column face is narrow. -
Remove Tape:
Pull the tape off while the teal paint is still slightly tacky to prevent peeling the dry film. Pull at a 45-degree angle away from the painted edge.
Step 5: Finishing Touches
-
Inspect for Holidays:
Walk the length of the wall and look for ‘holidays’ (missed spots), especially in the rough texture of the cinder blocks. Touch up these areas with a small brush. -
Clean Up:
Remove all drop cloths and dispose of masking materials. Wash your brushes and rollers immediately.
Step back and admire how a simple palette of colors has completely redefined the structure of your outdoor wall


Have a question or want to share your own experience? I'd love to hear from you in the comments below!