
Circle paintings are my favorite little worlds—everything feels focused, cozy, and doable. Here are 20 circle painting ideas you can try on a round canvas or inside a taped circular border, starting with the classics and ending with some fun curveballs.
Sunset Gradient With a Tree Silhouette
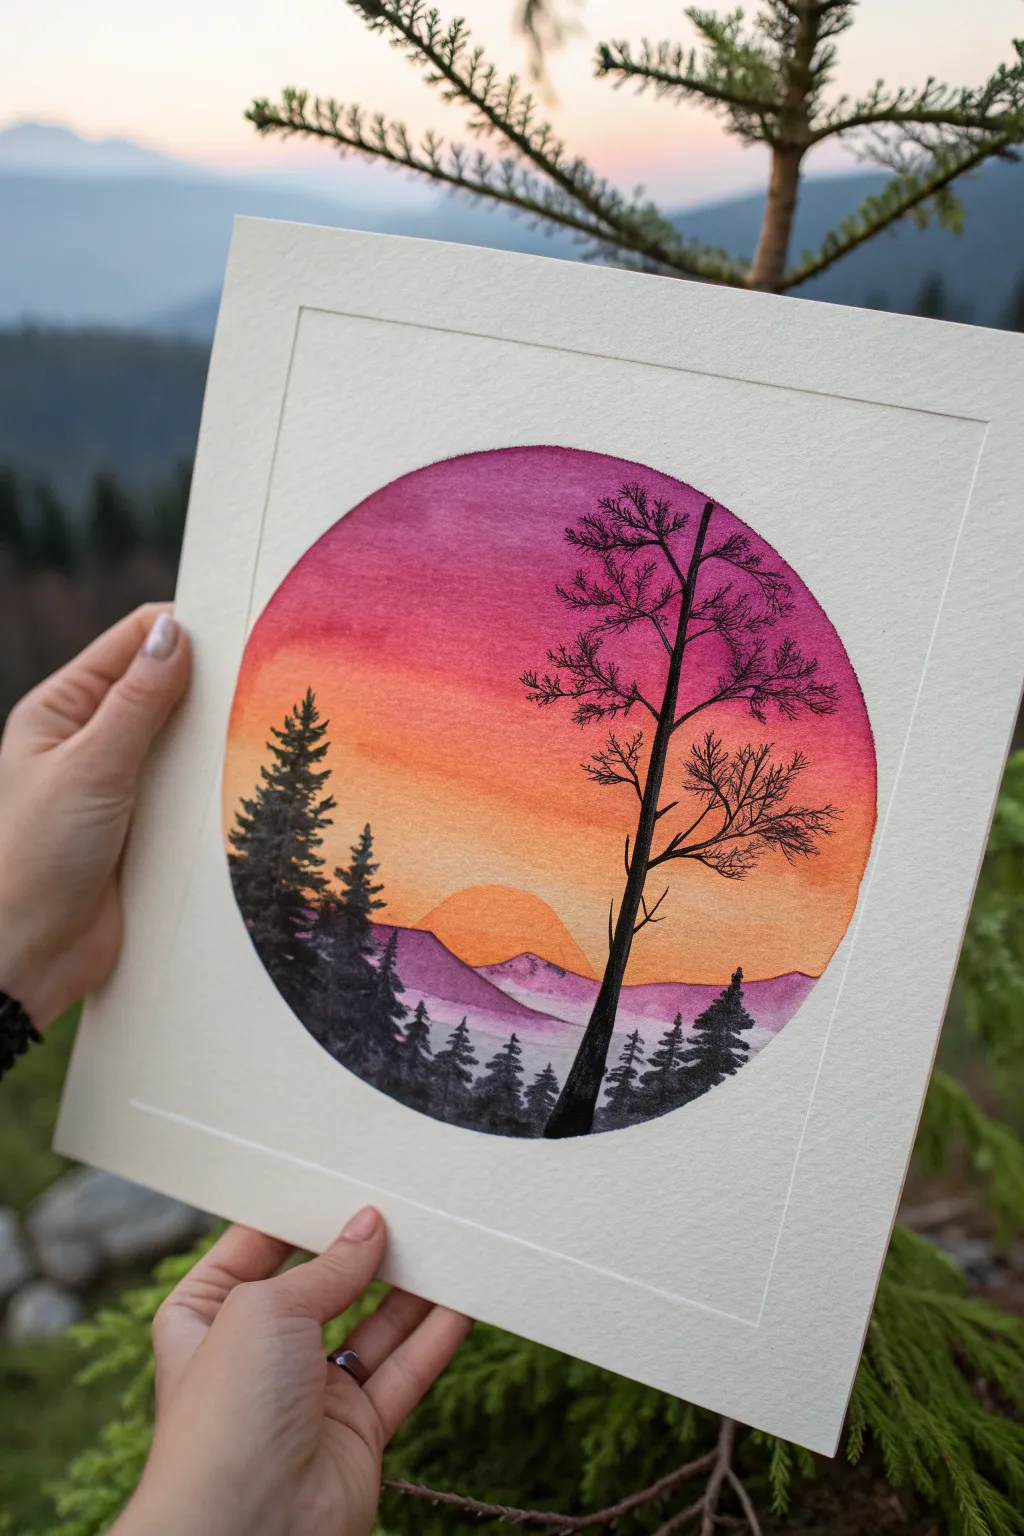
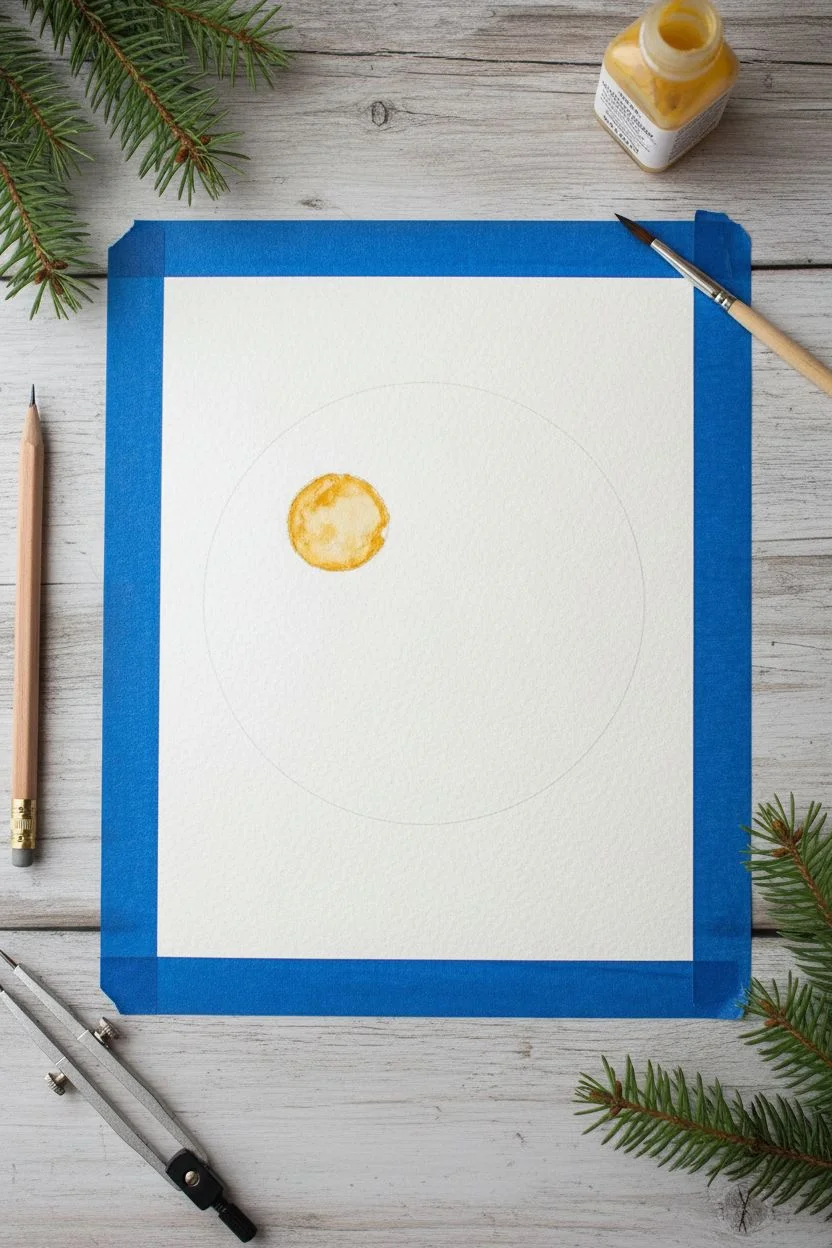
This project captures the serene beauty of a mountain sunset within a perfectly crisp circle, blending vibrant watercolor gradients with stark black silhouettes. It is a fantastic exercise in mastering wet-on-wet blending and precise negative space management.
Step-by-Step Tutorial
Materials
- Cold press watercolor paper (300 gsm)
- Painter’s tape or masking tape
- Compass or round object to trace
- Pencil and eraser
- Watercolor paints (Magenta, Red, Orange, Yellow, Purple)
- Black ink or high-pigment black gouache
- Round watercolor brushes (sizes 6, 2, and 00)
- Jar of clean water
- Paper towels
- White gel pen (optional)
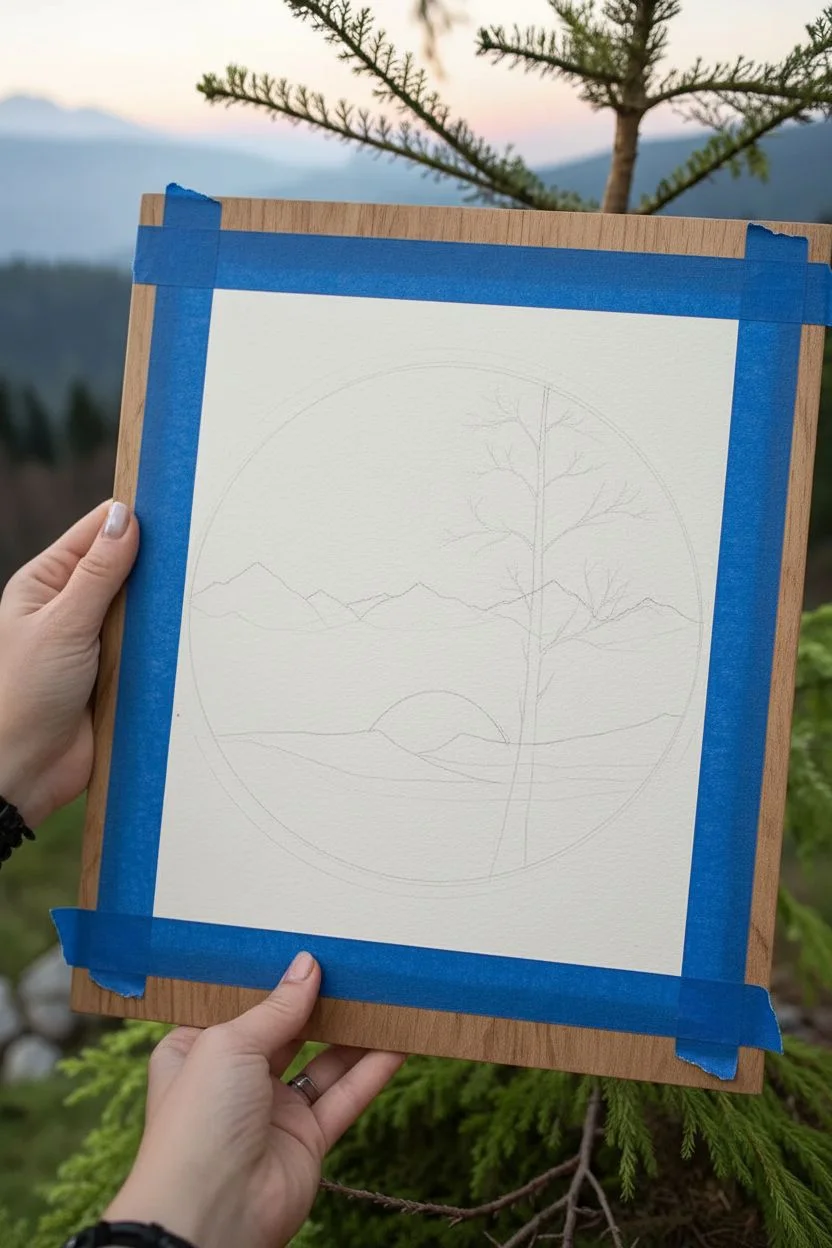
Step 1: Preparation & Sketching
-
Define the boundary:
Begin by taping down your watercolor paper to a board to prevent buckling. Use a compass or trace a circular object (like a bowl or large lid) centered on the paper to create your main circular frame. -
Sketch the horizon:
Lightly sketch the horizon line about one-third of the way up from the bottom of the circle. Draw the jagged outlines of a distant mountain range. -
Place the sun:
Draw a semicircle rising from behind the mountains to represent the sun. Keep your pencil lines very faint so they don’t show through the final paint layers. -
Outline the main tree:
Sketch a guiding line for the large, bare tree on the right side. You don’t need to draw every twig yet, just the main trunk line and major branch directions.
Clean Edges Pro-Tip
Apply masking fluid around the outer perimeter of your circle before painting. This guarantees a razor-sharp edge without worrying about painting ‘outside the lines’ while blending.
Step 2: The Sunset Gradient
-
Wet the sky area:
Using a clean brush and water, wet the entire sky area inside the circle, stopping strictly at the mountain line and carefully painting around the sun shape. The paper should be glistening but not forming puddles. -
Apply the top color:
Load a size 6 brush with a rich magenta or deep purple mix. Apply this to the very top arc of the circle, letting the wet paper help diffuse the pigment downwards. -
Blend into warm tones:
Rinse your brush slightly and pick up a bright red-orange. Apply this below the magenta, allowing the colors to touch and bleed together naturally. -
Finish the gradient:
Transition into a pure yellow near the horizon line above the mountains. Ensure the transition from orange to yellow is smooth by using horizontal brush strokes. -
Paint the sun:
Clean your brush thoroughly. Paint the sun shape using a pale, watered-down yellow or orange, ensuring it stays distinct from the surrounding sky. Let the entire sky layer dry completely.
Gradient Troubleshooting
If you get ‘cauliflower’ blooms in your sky, it means you added water to drying paint. Don’t touch it! Wait for it to dry fully, then you can try to glaze over it to smooth it out.
Step 3: The Middle Ground
-
Paint the mountains:
Mix a diluted purple wash. Paint the mountain range, making it slightly darker at the peaks and letting it fade out near the bottom where mist might settle. -
Add depth:
While the mountains are still slightly damp, drop in a tiny bit of darker purple at the very bottom edge of the mountains to create a sense of shadowing.
Step 4: Silhouettes & Details
-
Start the pine trees:
Once the background is bone dry, switch to black ink or gouache and a size 2 brush. Start painting the pine trees on the left side. Use a tapping motion to create the texture of pine needles. -
Fill the foreground:
Paint the solid black ground at the very bottom of the circle, connecting the bases of your trees. This anchors the whole composition. -
Paint the main trunk:
Using the same black pigment, carefully paint the trunk of the large tree on the right. Make the base wider and taper it as it reaches toward the top of the circle. -
Detail the branches:
Switch to your smallest detail brush (size 00). Paint fine branches extending from the main trunk. I find that holding the brush loosely towards the end of the handle helps create more natural, shaky organic lines. -
Add delicate twigs:
Add the tiniest twigs at the ends of the branches. Ensure these lines are very fine and delicate to contrast with the bold pine trees. -
Add mist (optional):
If desired, you can use a very diluted white gouache or gel pen to add subtle horizontal streaks across the base of the mountains for a misty effect. -
Final touches:
Erase any visible pencil marks around the outside of the circle border to leave a clean, sharp edge.
Now you have a stunning landscape caught in a perfect circle, ready to frame or gift


Moonlit Night Sky With Pine Silhouettes
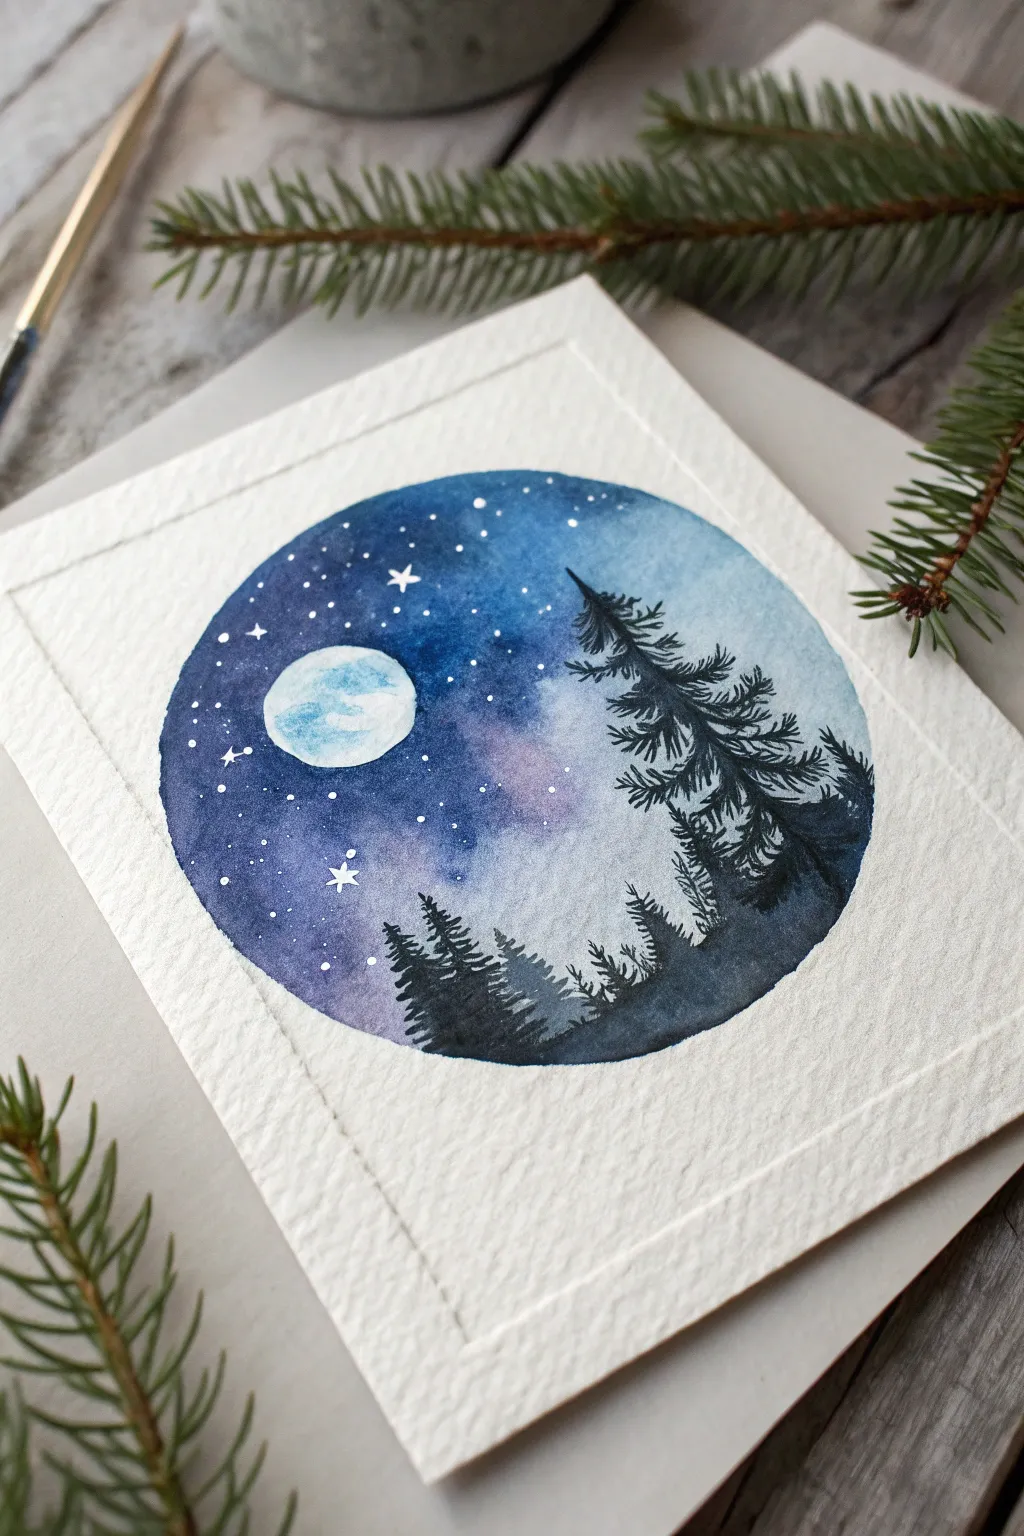
This enchanting watercolor piece captures the serene beauty of a moonlit forest within a crisp circular frame. The deep indigo sky, dotted with glistening stars, contrasts beautifully against the silhouetted pines, perfect for a cozy winter evening project.
Detailed Instructions
Materials
- Cold press watercolor paper (300gsm)
- Pencil and compass (or circular object to trace)
- Masking tape or artist tape
- Watercolor paints (Indigo, Prussian Blue, Payne’s Gray, Ultramarine, Violet)
- White opacity medium (e.g., white gouache, Dr. Ph. Martin’s Bleed Proof White, or a white gel pen)
- Round watercolor brushes (size 6 or 8 for wash, size 0 or 2 for details)
- Clean water jars
- Palette for mixing
- Paper towels
Step 1: Preparation and Sketching
-
Secure the paper:
Begin by taping down the edges of your watercolor paper to a hard board or table. This prevents buckling when the paper gets wet. -
Draw the boundary:
Using a compass or by tracing a circular plate, lightly draw a perfect circle in the center of your paper. Keep the pencil lines faint so they don’t show through the final wash. -
Mask the moon:
Sketch a small circle for the full moon on the left side. Carefully fill this moon shape with masking fluid if you have it, or simply be very mindful to paint around it in the next steps.
Bleeding Edges?
If paint bleeds outside your pencil circle, don’t panic. Wait for it to dry, then paint a thick border of opaque white gouache around the circle’s exterior to clean up the edge line.
Step 2: Painting the Night Sky
-
Wet-on-wet base:
Brush clean water across the entire inside of the large circle, avoiding the moon area. The paper should be glistening but not forming puddles. -
Applying the darks:
Load your larger brush with a strong mix of Indigo and Prussian Blue. Drop this pigment into the upper left area and around the outer edges of the circle, letting it bloom into the wet paper. -
Adding atmospheric color:
While the surface is still wet, introduce a touch of violet or a lighter Ultramarine near the center and lower right. This creates a soft, glowing nebula effect that contrasts with the deep night. -
Softening the moon glow:
Clean your brush and slightly dampen it. Gently lift a tiny bit of pigment from the area immediately surrounding your moon to create a subtle halo effect. -
Paint the moon:
Once the surrounding sky is damp but not soaking, paint the moon using a very dilute wash of pale blue. Leave a few white slivers of unpainted paper on the moon’s surface for texture. -
First drying phase:
Allow this background layer to dry completely. The paper must be bone-dry before you add the sharp details of the trees.
Step 3: Stars and Silhouettes
-
Splatter the stars:
Load a wet brush or toothbrush with white gouache. Tap it over the painting to create a spray of distant stars. I find covering the bottom area with a paper scrap keeps the ‘ground’ clean. -
Detailing larger stars:
Use a white gel pen or a fine brush with gouache to manually draw a few distinct four-pointed stars and larger dots in the darker upper section of the sky. -
Start the pine trees:
Switch to your smallest brush and load it with concentrated Payne’s Gray or a black watercolor mix. Start painting the tip of the largest tree on the right side. -
Building tree branches:
Use a tapping motion to create the jagged, downward-sloping branches of the pine. The texture should look rough and organic, getting wider as you move down the trunk. -
Creating the forest line:
Paint smaller, simpler tree tops towards the bottom center and left. These should look further away, so make them shorter and less detailed. -
Filling the foreground:
Paint a solid, dark hilly mass at the very bottom of the circle to connect all the tree trunks. This grounds the composition. -
Final touches:
Add a few tiny stray branches sticking out from the main tree trunks for realism. Let the black paint dry completely. -
Reveal:
If you used masking tape, peel it away gently at an angle to reveal your crisp edges and framed artwork.
Add Dimension
Mix a tiny amount of salt into the wet sky wash before it dries. The salt absorbs pigment, creating unique crystalline textures that look like distant galaxies or frost.
Frame your mini masterpiece or turn it into a beautiful handmade holiday card to share with someone special


Mountain Peak and Lake Reflection Inside a Circle
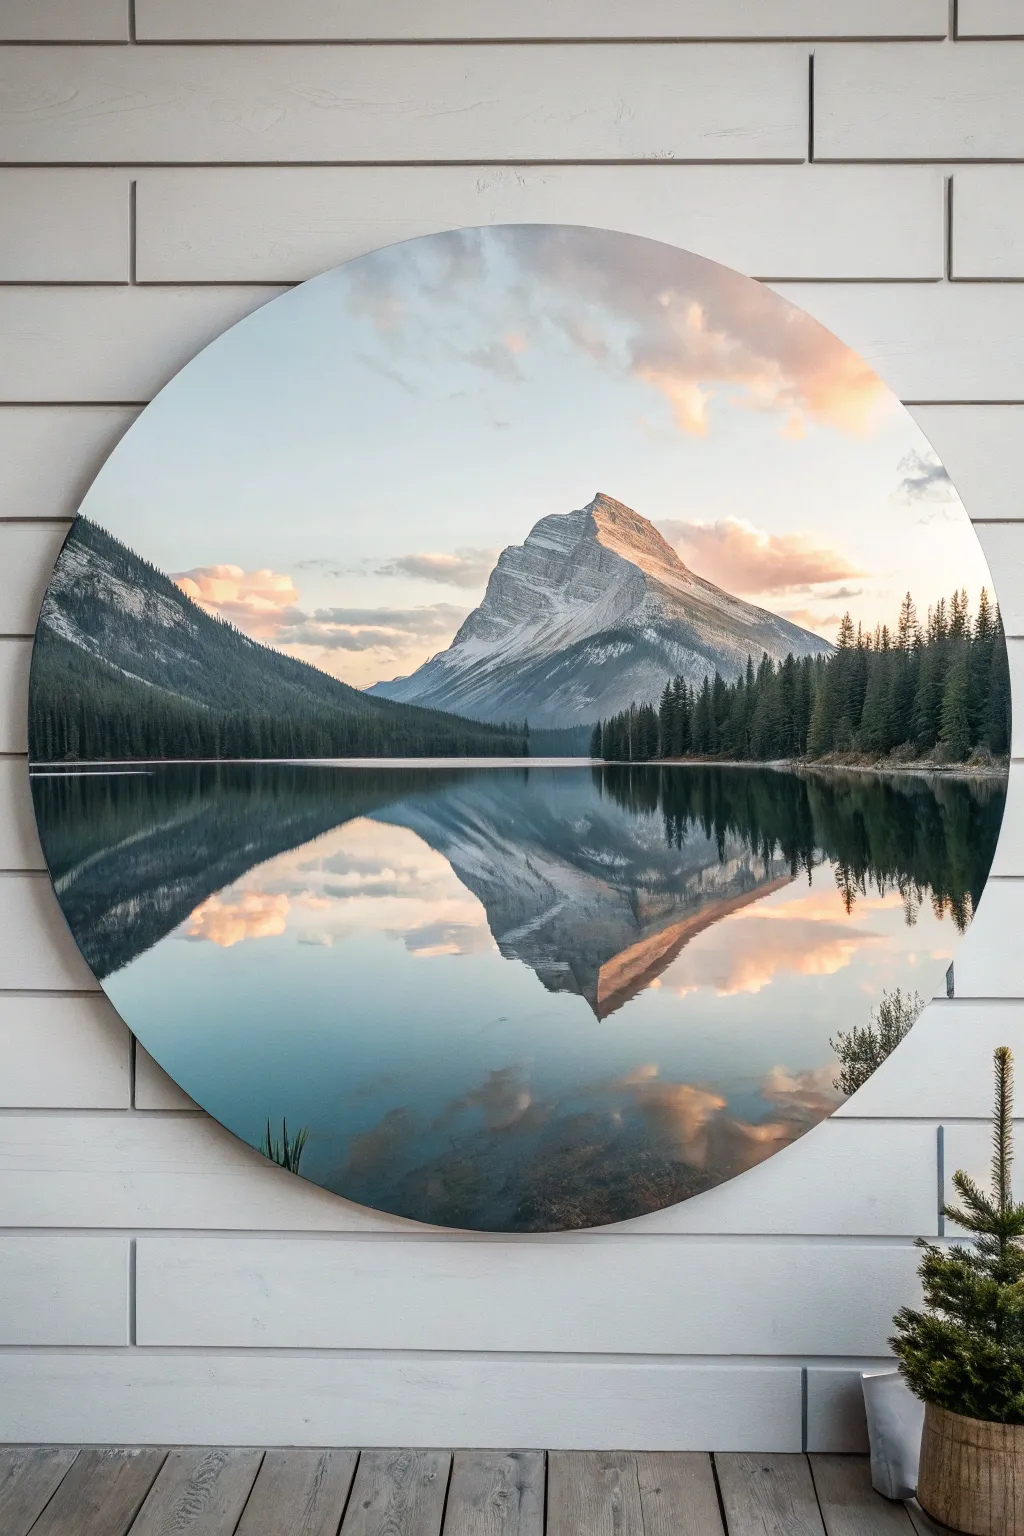
Capture the serene beauty of a mountain peak reflected in a still lake with this breathtaking circular painting project. The unique round format enhances the feeling of looking through a portal into a peaceful, natural world.
Step-by-Step Guide
Materials
- Round wooden panel or circular canvas (24-36 inch diameter)
- Gesso primer
- Acrylic paints (Titanium White, Phthalo Blue, Mars Black, Burnt Umber, Alizarin Crimson, Cadmium Yellow, Payne’s Grey)
- Set of brushes: 2-inch flat brush, various filbert brushes, fine liner brush
- Mixing palette
- Water container and paper towels
- Masking tape or painter’s tape
- Ruler or straight edge
- Soft blending brush or mop brush
Step 1: Preparation & Sky
-
Prime the surface:
Begin by applying two coats of gesso to your round panel, sanding lightly between coats for a smooth finish. This ensures your paint glides on effortlessly and the colors remain vibrant. -
Establish the horizon:
Measure exactly halfway down the circle and lightly draw a horizontal line with a pencil. Place a strip of masking tape directly above this line to protect the sky area while you work on the water later, or work freehand if you prefer soft edges. -
Paint the gradient sky:
Mix a pale, icy blue using Titanium White and a tiny touch of Phthalo Blue. Start painting at the top of the circle, gradually adding more white as you move downward toward the horizon. -
Add warmth:
While the blue is still wet, blend in small amounts of Titanium White mixed with a speck of Alizarin Crimson and Cadmium Yellow near the horizon line to create a soft, peachy sunset glow. -
Paint soft clouds:
Using a filbert brush, dab in cloud shapes with a mix of white and a touch of the peach tone. Soften the bottom edges of the clouds with a clean, dry mop brush to make them look fluffy and distant.
Pro Tip: Palette Knife Magic
Use a palette knife for the mountain snow. Dragging it lightly over the dry base coat allows paint to break naturally, creating realistic rock textures effortlessly.
Step 2: The Mountain
-
Block in the mountain shape:
Sketch the triangular peak of the mountain slightly off-center to the right. Use a mix of Payne’s Grey and White to fill in the silhouette, keeping the edges rough to mimic rock. -
Define the light source:
Identify that the light is coming from the right. Mix a highlight color using White with a hint of warmth (yellow/red). Apply this to the right-facing slopes of the mountain using a palette knife or flat brush for a textured, rocky look. -
Add shadows:
Deepen your grey mix with a little blue and painted the shadowed, left-facing slopes. I like to let the paint break slightly here to suggest rugged terrain and snow patches. -
Paint the distant hills:
On the left side, paint the rolling hills that recede into the distance. Use a darker, bluer grey than the mountain to show atmospheric perspective, but keep it lighter than the foreground trees.
Troubleshooting: Muddy Reflections
If your water reflections look muddy, wait for the paint to dry completely. Then, apply a thin glaze of blue or grey over the area to unify the tones without losing the shapes underneath.
Step 3: The Reflection
-
Mirror the sky:
Remove the masking tape if you used it. Recreate the sky gradient in the bottom half of the circle, mirroring the colors—peach near the horizon, fading into soft blue at the bottom edge. -
Reflect the mountain:
Paint the inverted mountain shape in the water. Use slightly darker and more muted tones than the actual mountain. Soften the edges horizontally with a dry brush to create the illusion of a watery surface. -
Add water ripples:
While the reflection paint is wet, gently drag a clean, dry brush horizontally across the reflection to blur it slightly. Add very thin horizontal lines of white to suggest surface tension.
Step 4: Foreground & Details
-
Paint the tree line:
Mix a dark green using Phthalo Blue, Cadmium Yellow, and a touch of Mars Black. Using a fan brush or flat brush turned sideways, tap in vertical vertical lines along the horizon to create a dense forest of pine trees. -
Vary tree heights:
Ensure the trees vary in height for a natural look. Make the trees on the right side taller and more detailed, as they are visually closer. -
Reflect the trees:
Paint the reflection of the trees into the water directly below them. Pull the paint downwards vertically, then gently brush across horizontally to shatter the reflection slightly. -
Enhance contrast:
Darken the waterline with a thin line of almost-black paint to separate the land from the water clearly. -
Final highlights:
Add final touches of bright peach or pink to the cloud reflections and the enlightened side of the mountain peak to make the lighting pop.
Hang your finished masterpiece and enjoy the calming view of your personal mountain getaway


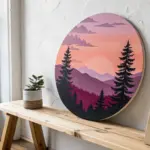
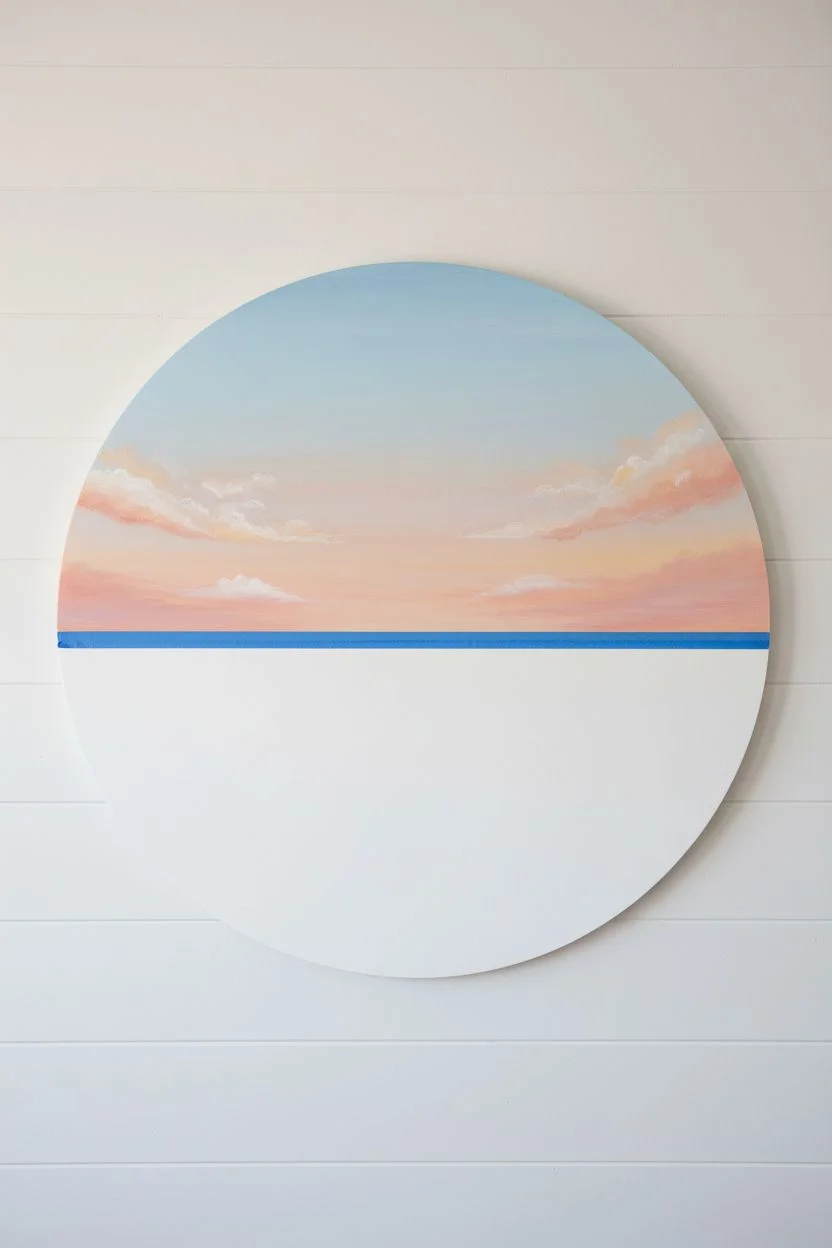
Layered Rolling Hills With Soft Color Bands
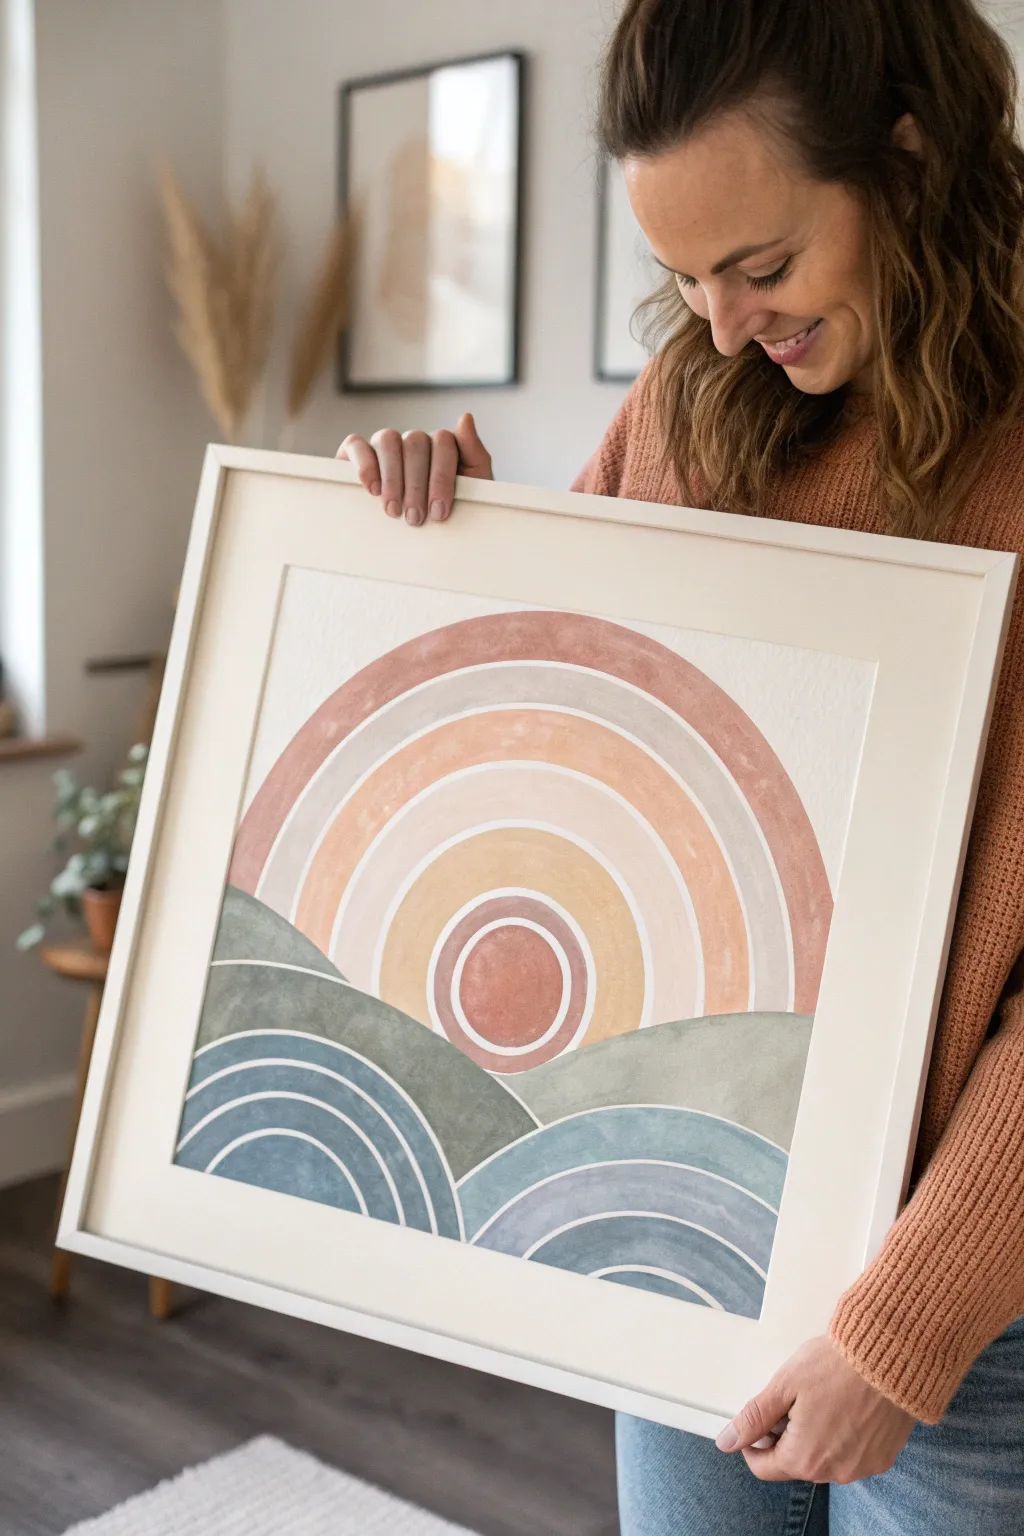
This striking geometric landscape combines the simplicity of circles with the warmth of a muted, earthy palette to create a modern sunrise scene. By layering broad, rolling arches, you’ll build a composition that feels both structured and soothing.
Step-by-Step
Materials
- High-quality watercolor paper or mixed media paper (square format, approx. 12×12 inches)
- Pencil and large eraser
- Compass or round objects for tracing (bowls, plates of various sizes)
- Ruler
- Painter’s tape or masking fluid (optional but helpful for clean lines)
- Gouache or acrylic paints (Terra cotta, pale peach, mustard yellow, sage green, deep dusty blue, light blue-grey)
- White gel pen (medium thickness) or white acrylic paint with a fine liner brush
- Flat shader brushes (medium and small sizes)
- Palette for mixing
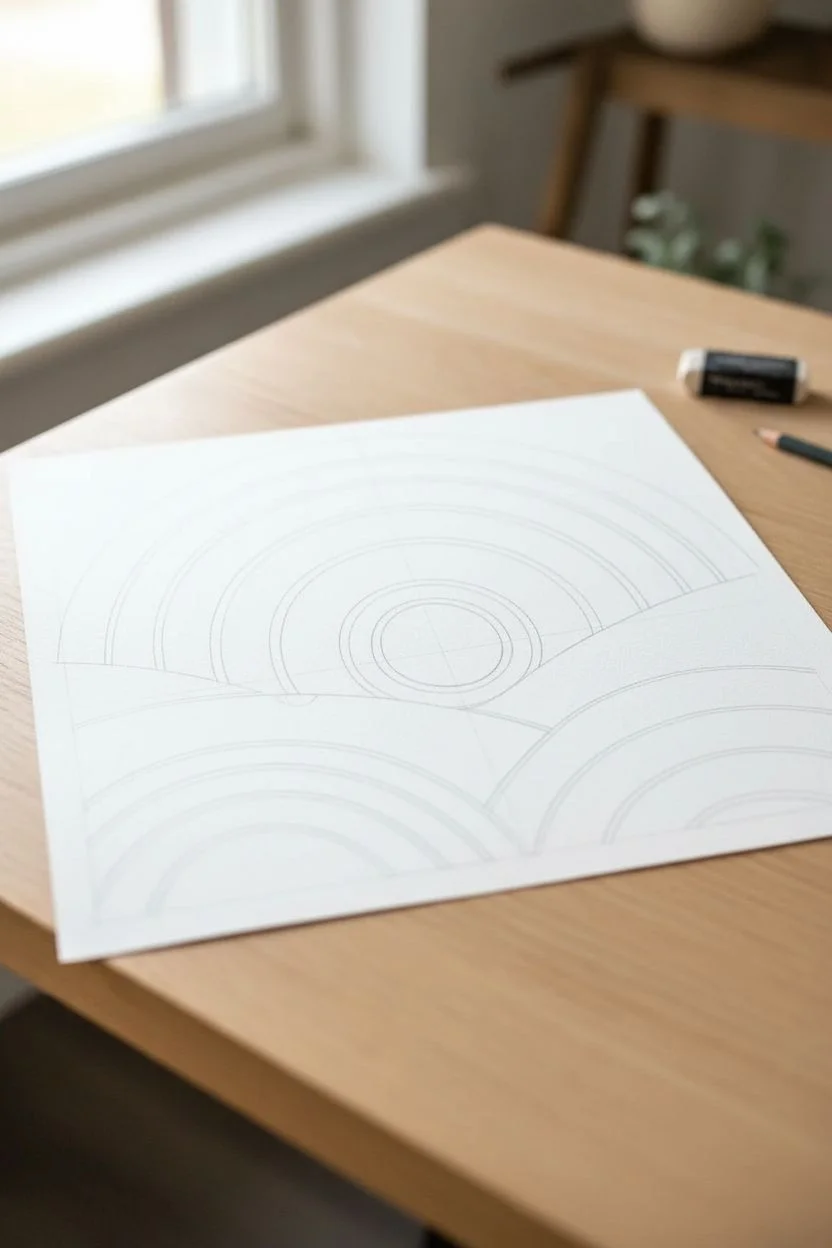
Step 1: Planning the Geometry
-
Establish the horizon:
Begin by lightly drawing a horizontal line across your paper about one-third of the way up from the bottom. This doesn’t need to be perfectly straight, but it anchors your hills. -
Draft the central sun:
Use a compass to draw a small circle in the very center, just sitting on or slightly above your horizon line. Draw three more concentric circles expanding outward from this point to create the sun’s bands. -
Map the large rainbow arch:
Anchor your compass at the same center point, but extend it much further out. Draw large semi-circles that form the giant rainbow shape encompassing the sun. You’ll want about four or five distinct bands within this large arch. -
Sketch the rolling hills:
In the bottom left and bottom right corners, use your compass or trace the edge of a bowl to create semi-circular mounds. These should look like hills rising up to meet the horizon line. Add internal concentric lines within these hills to mirror the banded style of the sun. -
Refine the overlaps:
Decide which shapes are in front. In this design, the green hills sit clearly in front of the large background rainbow but behind the foreground blue waves. Erase any pencil lines that cross into shapes that should be ‘on top’ to keep your painting guide clean.
Step 2: Painting the Sunrise
-
Mix your palette:
Prepare your gouache or acrylics. You are aiming for a matte, earthy look. Mix a dusty terracotta, a soft cream-peach, a muted mustard, and a sage green. I find that pre-mixing all my colors helps ensure the palette feels cohesive before I even start painting. -
Paint the central sun:
Start with the small inner circle of the sun, filling it with your terracotta shade. Leave a deliberate thin gap of white paper between this circle and the next ring if you have a steady hand, or paint solid and add white lines later. -
Fill the sun rays:
Moving outward from the center, paint the rings in a gradient: deep peach, then fading to a lighter cream or soft yellow. Use a flat brush to get crisp edges on the curves. -
Block in the large arch:
For the massive rainbow arch, alternate your warm tones. Use the terracotta for the outermost band to frame the piece, and fill the inner bands with lighter peach and taupe tones. Keep your paint consistency creamy and opaque to avoid streakiness.
Steady Hands
Struggling with smooth curves? Rotate your paper, not your hand. Pulling the brush toward you in a natural arc is much easier than pushing it away or twisting your wrist.
Step 3: Painting the Landscape
-
Paint the middle ground hills:
Using your sage green, fill in the rolling hills that sit directly beneath the sun. These shapes act as a bridge between the warm sky and cool foreground. -
Add the foreground waves:
For the bottom-most semi-circles (the blue hills), switch to your cool tones. Effect a gradient by painting the outer bands a deep dusty blue and the inner bands a lighter blue-grey or lavender-grey. -
Let it dry completely:
Walk away and let the artwork dry fully. Gouache can smudge if unmatched, so patience is key here.
Texture Twist
Mix a tiny bit of baking soda into your acrylic paint for a grainy, terracotta-like texture that makes the hills feel more organic and earthy.
Step 4: Defining the Details
-
Add separation lines:
This is the step that makes the geometry pop. Using a white gel pen or a very fine liner brush with white acrylic, carefully trace the white separation lines between every colored band. -
Clean up edges:
Go over the white lines a second time if needed to make them opaque and consistent in thickness. The contrast between the matte colors and the crisp white lines creates that modern print look. -
Erase guide lines:
Once the white ink is 100% dry, gently erase any visible pencil marks from your initial sketch. -
Frame it:
Place your finished piece in a square frame with a mount to replicate the professional look in the photo.
Hang your geometric landscape in a bright room and enjoy the calm, structured beauty you’ve created
BRUSH GUIDE
The Right Brush for Every Stroke
From clean lines to bold texture — master brush choice, stroke control, and essential techniques.
Explore the Full Guide
Single Wildflower in a Loose Watercolor Wash Circle
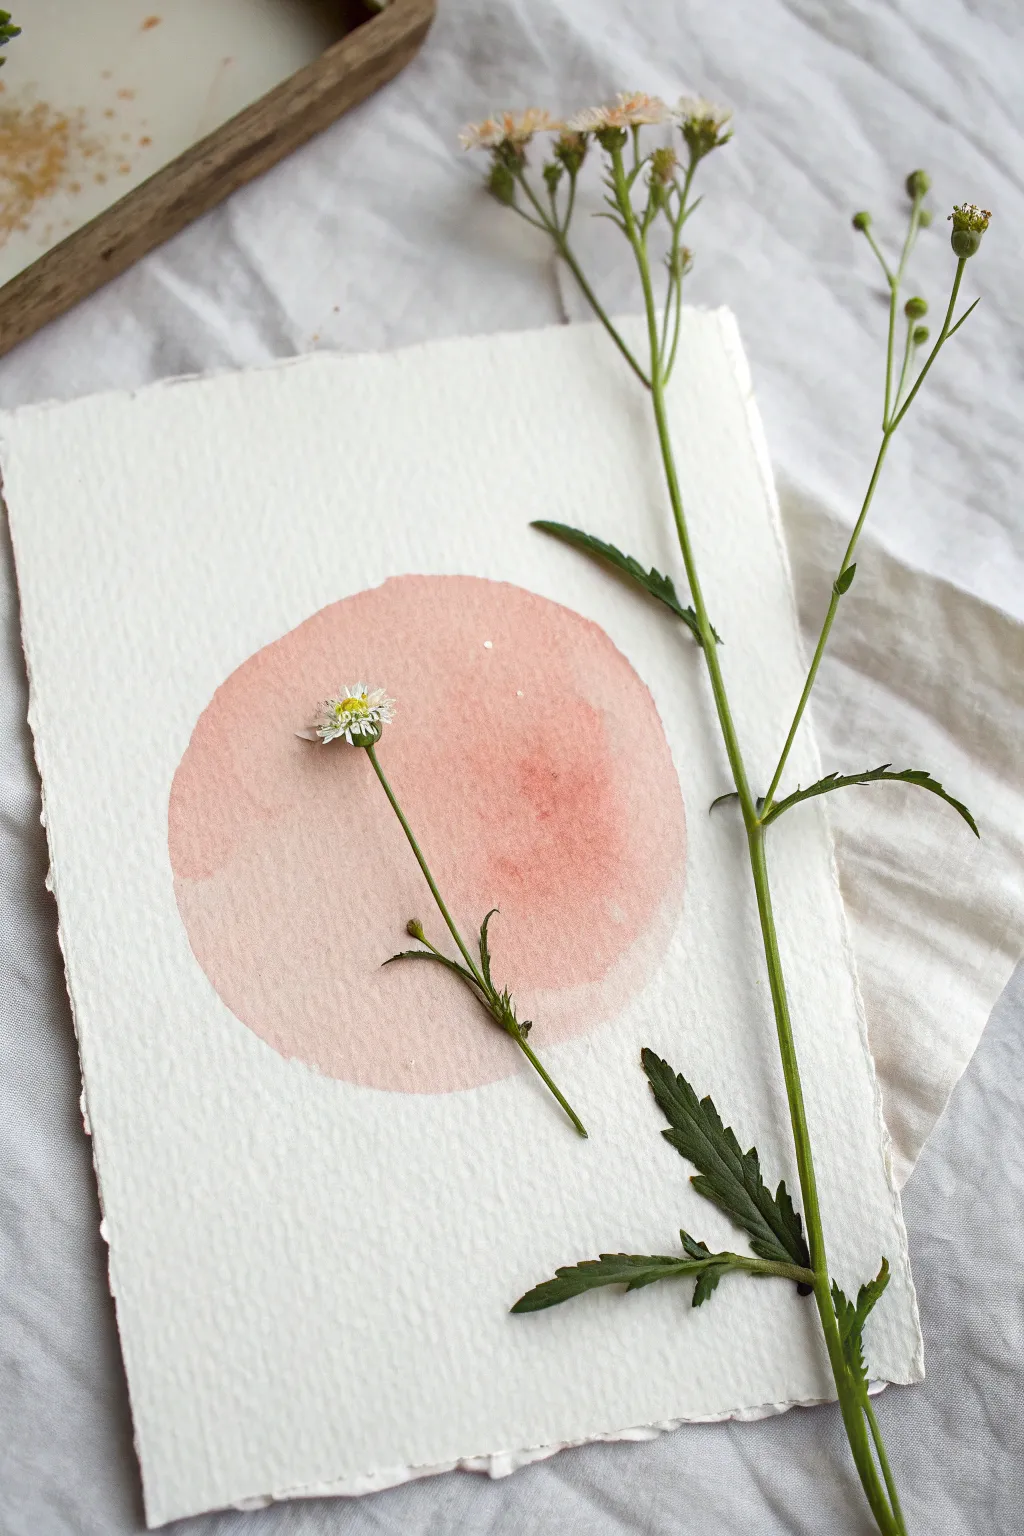
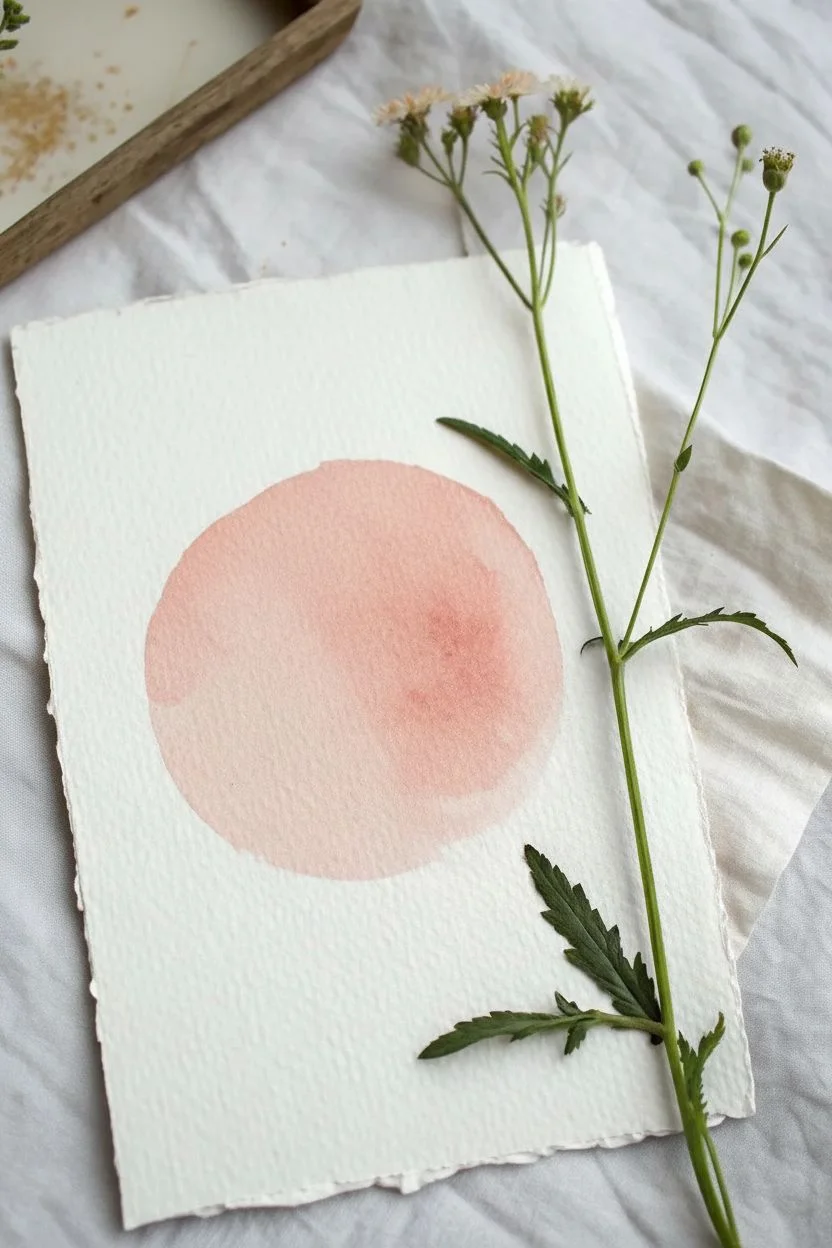
Embrace the beauty of negative space and natural textures with this minimalist project. Combining a loose watercolor wash with a delicate pressed bloom creates a piece that feels both organic and modern.
Step-by-Step Guide
Materials
- Cold press watercolor paper (preferably with deckled edges)
- Watercolor paint (terracotta, peach, or burnt sienna)
- Large round watercolor brush (size 10 or 12)
- Small pressed wildflower (daisy family or similar)
- PVA glue or matte medium
- Small synthetic brush for gluing
- Clean water jar
- Paper towels
- Tweezers
- Weight (heavy book) for pressing
Step 1: Preparation
-
Select your paper:
Choose a high-quality watercolor paper. For this specific look, paper with rough, torn, or deckled edges adds significantly to the rustic charm. -
Prepare the botanical:
If you haven’t already, press your small wildflower. Place a fresh bloom between parchment paper inside a heavy book for at least 3-5 days until it is completely flat and dry. -
Mix your color:
In your palette, mix a watery wash of terracotta. I like to combine a bit of Burnt Sienna with a touch of rose or Alizarin Crimson to get that warm, earthy pink tone seen in the example.
Clean Edges Trick
Work efficiently! If you paint too slowly, the edges will dry before you fill the center, creating unwanted hard lines. Keep the paint flowing wet-into-wet.
Step 2: Painting the Wash
-
Load the brush:
Fully saturate your large round brush with the paint mixture. You want the brush specifically wet enough to hold a lot of pigment but not dripping uncontrollably. -
Paint the first arc:
Start near the top of where you want your circle to be. With a confident, sweeping motion, paint a curved line downwards to form one side of the circle. -
Complete the shape:
Reload your brush slightly if needed and paint the opposing curve to close the circle. Don’t worry about making it geometrically perfect; the wobbly, hand-painted edge is part of the aesthetic. -
Fill the center:
Quickly fill in the middle of the circle with more wash while the edges are still wet. This helps create a relatively even tone without harsh internal lines. -
Create texture (bloom):
To achieve the subtle ‘bloom’ texture seen in the reference, drop a tiny amount of clean water or a slightly more saturated pigment into the wet wash and let it spread naturally. -
Let it dry completely:
Allow the paper to dry flat. Do not use a heat gun, as this might warp the paper too much. Wait until the paper is cool to the touch.
Step 3: Adding the Botanical
-
Position the flower:
Using tweezers, gently pick up your dried pressed flower. Place it onto the dry painted circle to test positioning. Aim for an off-center placement for a more dynamic composition. -
Prepare the adhesive:
Pour a small dot of clear-drying PVA glue or matte medium onto a scrap piece of paper. -
Apply glue:
Flip the flower over carefully. Using a small synthetic brush or a toothpick, dab tiny amounts of glue onto the back of the flower head and the main points of the stem. -
Secure the flower:
Flip the flower back over and gently press it onto the painted circle in your chosen spot. Use the tweezers to make minor adjustments before the glue sets. -
Press down:
Place a small sheet of wax paper over the artwork and gently lay a light book on top for about 30 minutes to ensure the flower adheres completely flat.
Try Gold Leaf
Add a touch of luxury by applying tiny flecks of gold leaf to the flower petals or the edge of the circle after the paint has fully dried.
This simple yet elegant piece is now ready to be framed or gifted to a fellow nature lover
Starry Galaxy Wash With Splatter Inside a Masked Circle
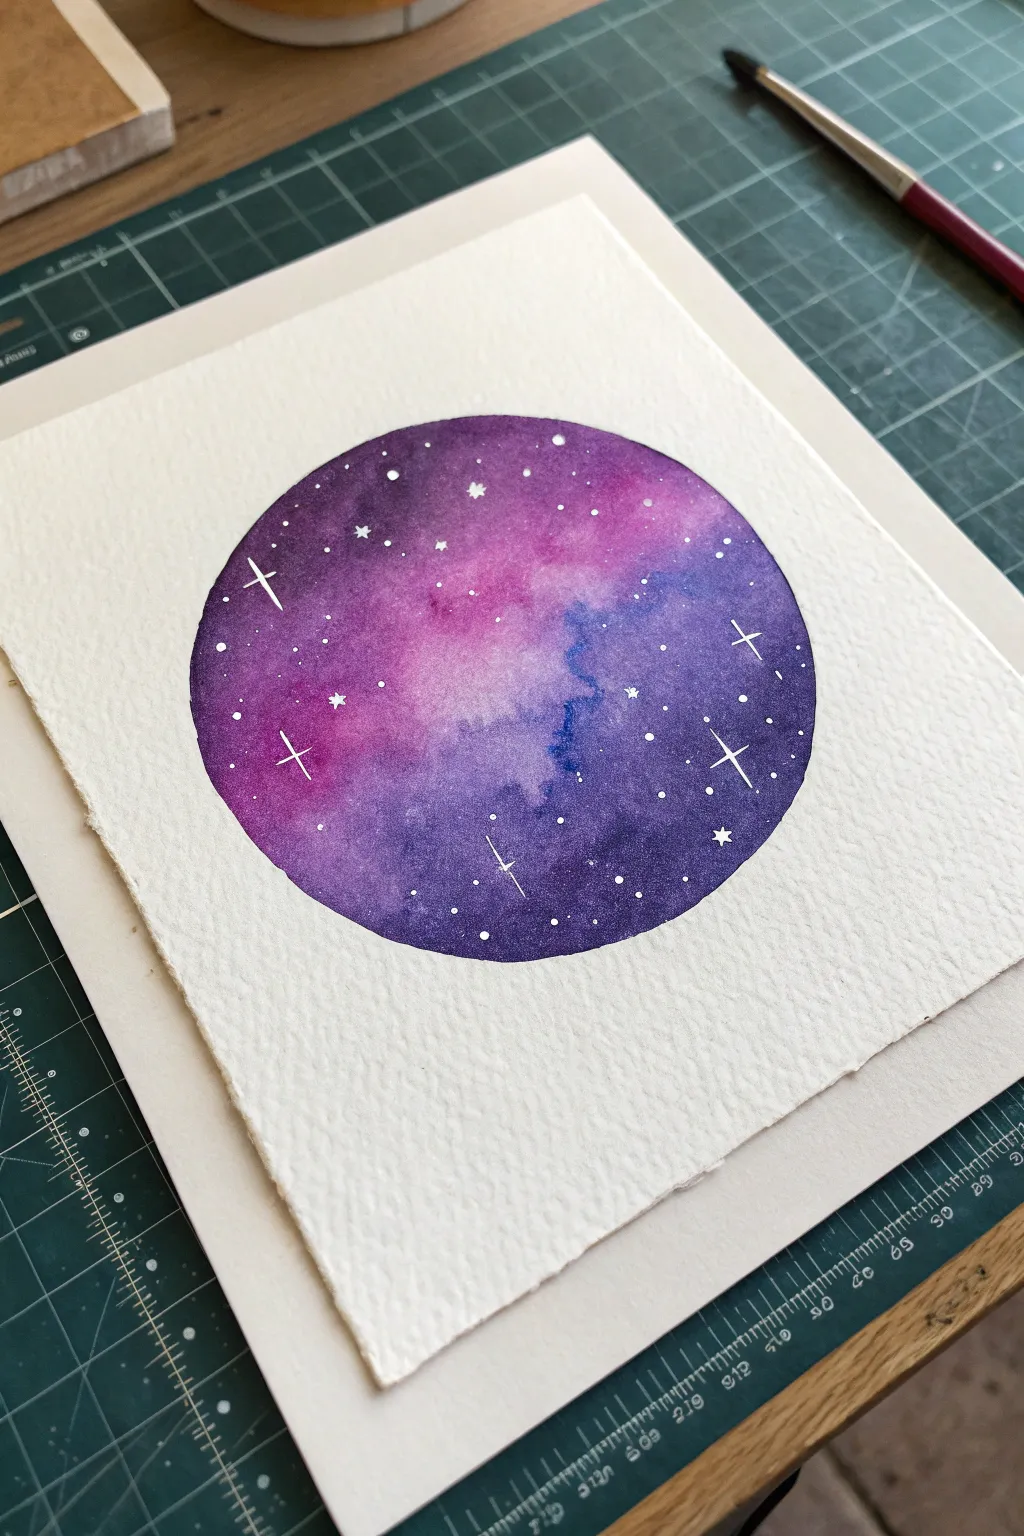
Capture the magic of the cosmos within a perfect circle using vibrant watercolor washes and simple masking tricks. This project combines deep violets, indigos, and bright pinks to create a mesmerizing galaxy effect dotted with twinkling stars.
Detailed Instructions
Materials
- Cold press watercolor paper (300 gsm)
- Masking tape or large circle template
- Pencil
- Watercolor paints (Indigo, Purple, Magenta/Rose, Ultramarine Blue)
- Round watercolor brushes (sizes 6 and 2)
- White gouache or white gel pen
- Clean water jar
- Paper towels
- Mixing palette
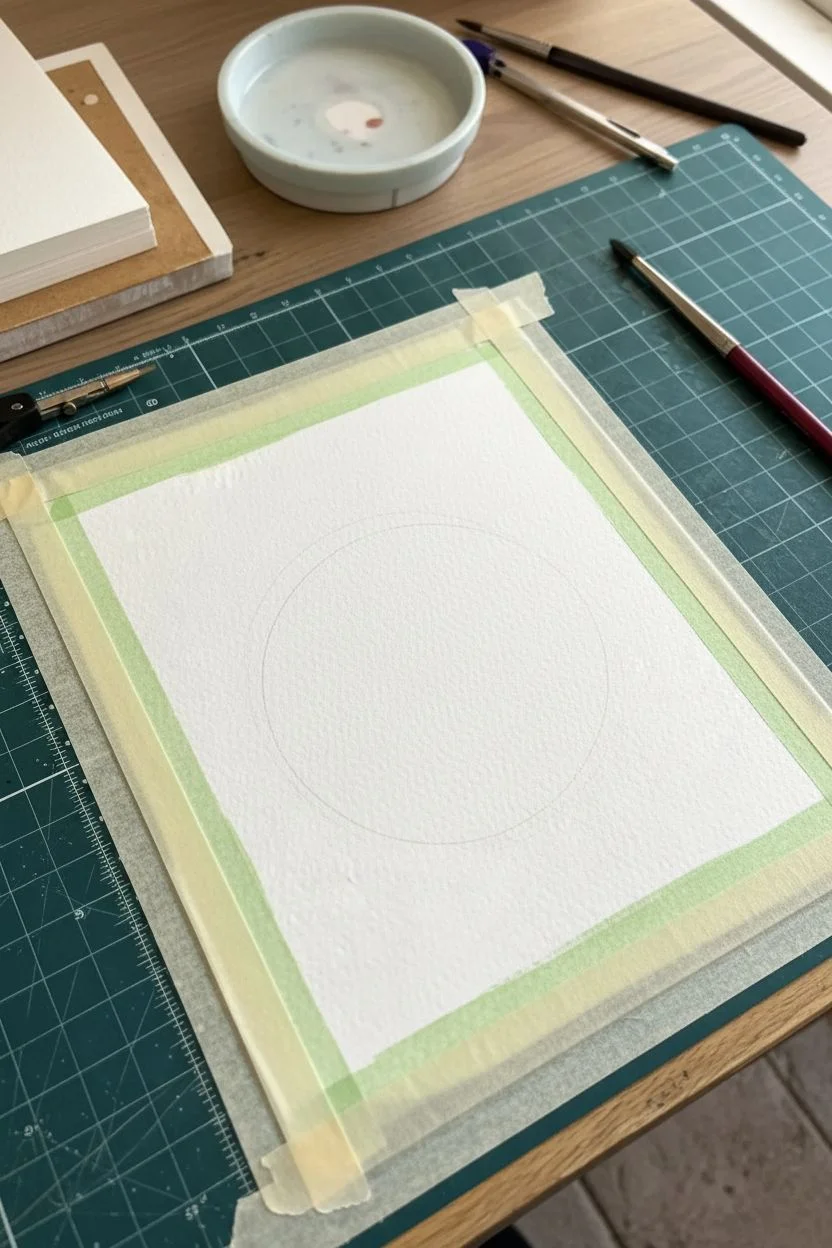
Step 1: Preparation and Masking
-
Trace the boundary:
Begin by lightly tracing a circle onto your watercolor paper using a circular object (like a bowl or large tape roll) or a compass. Keep the pencil line very faint so it doesn’t show through lighter paint sections later. -
Secure the paper:
Tape down all four edges of your watercolor paper to your work surface. This prevents the paper from buckling when we add heavy water washes in the next steps. -
Prepare the mask (Optional):
For a razor-sharp edge like the example, carefully apply masking fluid to the area *outside* the circle, or cut a circular hole in a piece of low-tack masking film and place it over your paper. If you feel steady, you can simply paint carefully up to the pencil line without masking.
Uneven Watermark Edges?
If you get hard lines inside your galaxy where you wanted smoothness, your paper dried too fast. Next time, work quicker or use 100% cotton paper which stays wet longer.
Step 2: Creating the Galaxy Wash
-
Prepare your colors:
Pre-mix puddles of your galaxy colors on the palette: a deep indigo or violet, a bright magenta or rose, and an ultramarine blue. Having these ready is crucial for working wet-in-wet. -
Wet the circle:
Using your larger round brush and clean water, apply an even coat of water inside the circle. The paper should glisten but not have standing puddles. -
Drop in the lightest color:
Start by dropping the magenta or rose color into the center-left area of the wet circle. Let the pigment bloom and spread naturally into the wet paper. -
Add mid-tones:
Introduce ultramarine blue or a lighter purple around the edges of the pink section. Allow the colors to touch and bleed into each other, creating soft transitions. -
Deepen the edges:
While the paper is still wet, taking care to work quickly, paint the outer rim of the circle with your darkest indigo or deep violet. This frames the glowing center. -
Blend and tilt:
If the transitions look too harsh, clean your brush, dampen it slightly, and gently nudge the colors together. You can also physically tilt your board to help the paints flow. -
Enhance texture:
While the wash is damp (but losing its shine), drop in tiny amounts of clean water or concentrated dark pigment in random spots. This creates ‘cauliflower’ blooms that look like distant nebulae clouds. -
Let it dry completely:
This is the hardest part—wait for the paint to face bone dry. The paper must be cool to the touch and flat before moving on.
Step 3: Adding the Stars
-
Prepare the white:
Squeeze out a small amount of white gouache. It needs to be the consistency of heavy cream—opaque enough to cover the dark paint but fluid enough to flow. -
Paint the major stars:
Using your smallest detail brush (size 0 or 2), paint small four-pointed star shapes. Start with a vertical line, cross it with a horizontal line, and drag the tips out to fine points. -
Add placement variety:
Scatter a few medium-sized solid dots near your four-pointed stars. Vary the sizes to create depth; some stars should look closer than others. -
Creating the star cluster:
Load a stiff brush or an old toothbrush with slightly watered-down white gouache. Hold it over the painting and tap the handle against another brush to splatter creates a mist of tiny distant stars. -
Refine the details:
Use a white gel pen for the tiniest, sharpest pinpoints of light if the gouache feels too thick for the smallest details. -
Final check:
Step back and look at the composition. If a certain area feels empty, add a small cross-star or a few dots to balance the galaxy.
Cover Your Surroundings
Before splattering white paint for stars, cover the white paper outside your circle with scrap practice paper or paper towels to keep the borders pristine.
Peel away your tape to reveal a perfect portal into deep space

PENCIL GUIDE
Understanding Pencil Grades from H to B
From first sketch to finished drawing — learn pencil grades, line control, and shading techniques.
Explore the Full Guide
Aurora Arc That Follows the Top Curve
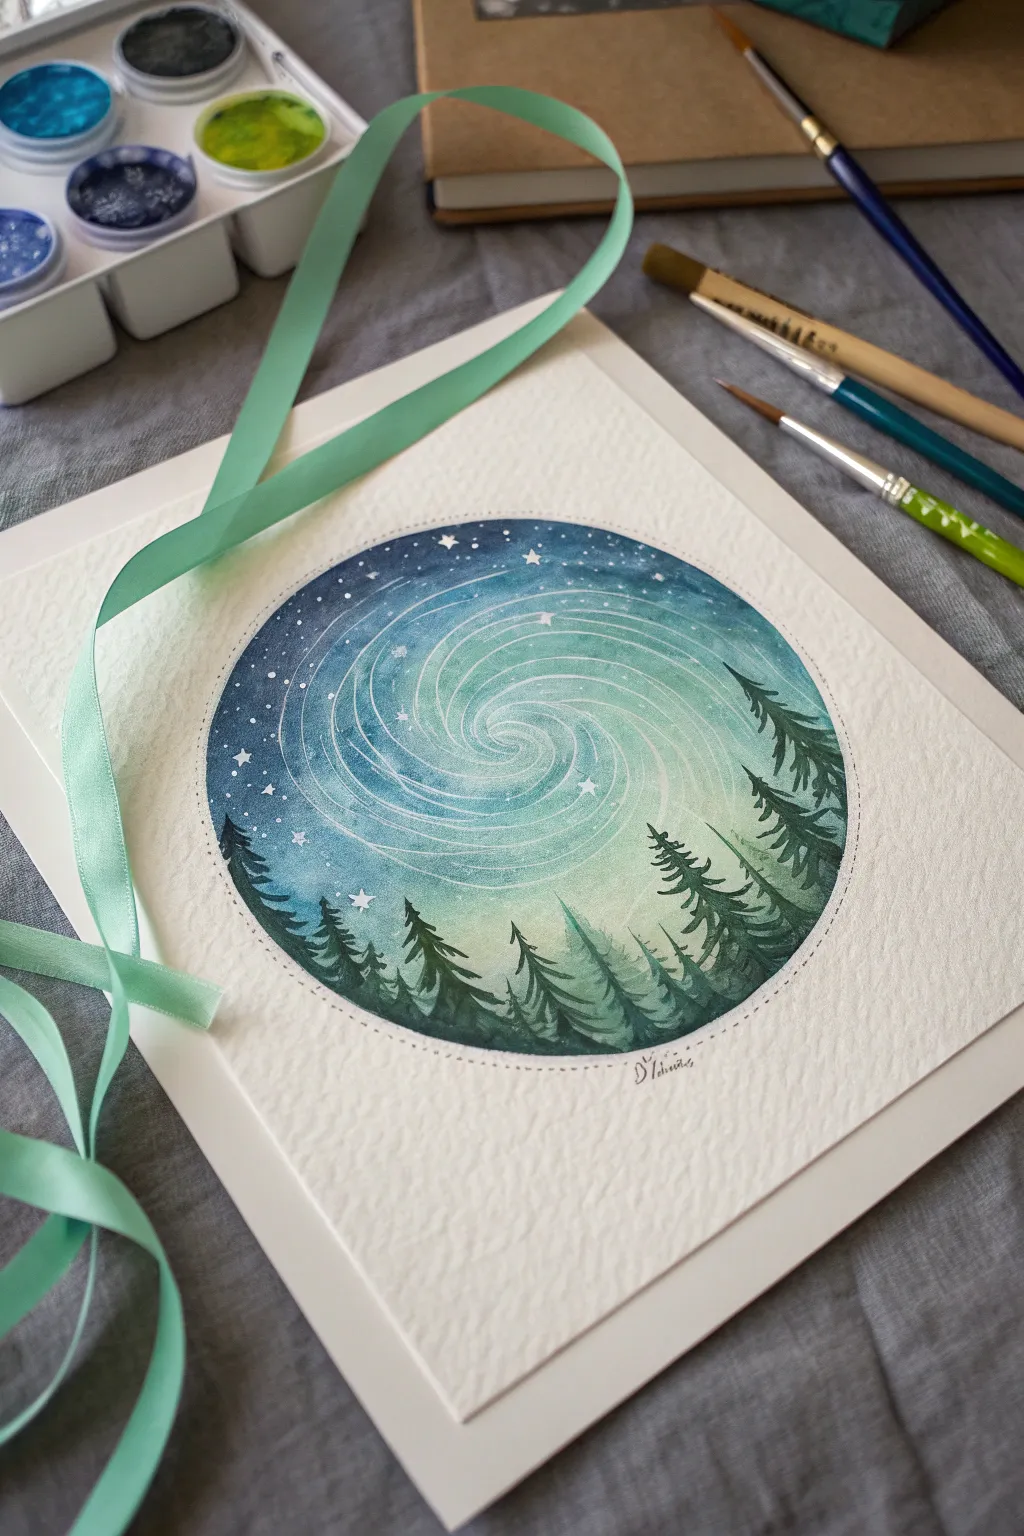
Capture the magic of a swirling, starry night tucked perfectly into a circle. This watercolor project uses wet-on-wet techniques to create a luminous spiral sky above a silhouette of evergreen trees.
Step-by-Step Guide
Materials
- Cold press watercolor paper (textured)
- Watercolor paints (Indigo, Phthalo Blue, Emerald Green, Lemon Yellow)
- White gouache or white gel pen
- Compass or circular object for tracing
- Pencil and eraser
- Round watercolor brushes (size 6 or 8 for washes, size 0 or 1 for details)
- Painter’s tape or masking fluid (optional)
- Clean water and paper towels
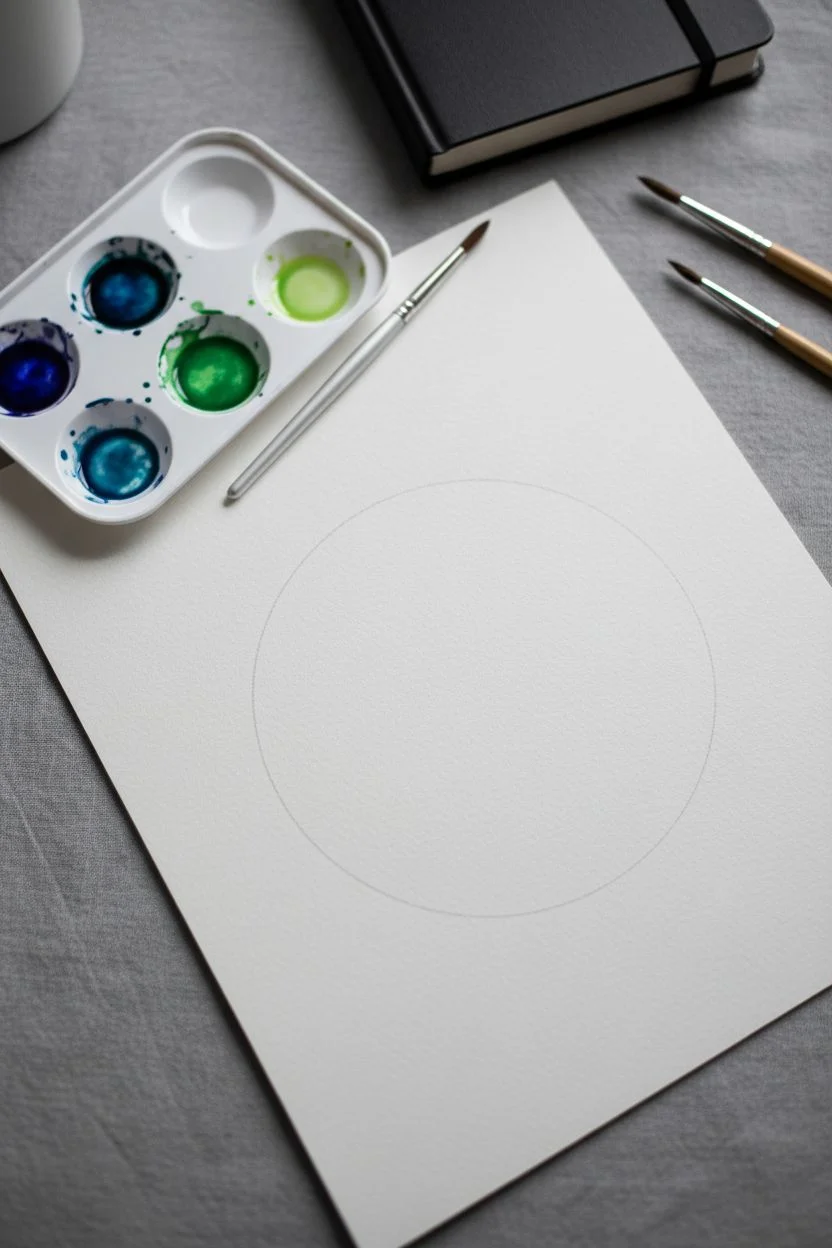
Step 1: Setting the Scene
-
Draw the boundary:
Begin by lightly tracing a perfect circle onto your watercolor paper using a compass or a heavy bowl. Keep your pencil lines faint so they disappear under the paint later. -
Prepare your palette:
Pre-mix three puddles of paint: a deep Indigo mixed with Phthalo Blue for the outer edges, an Emerald Green for the mid-tones, and a very pale, watery Yellow-Green for the center.
Step 2: Painting the Sky Spiral
-
Wet the paper:
Using your larger round brush and clean water, thoroughly wet the entire inside of the circle. The paper should have a visible sheen but no standing puddles of water. -
Add the center glow:
Start by dropping your palest yellow-green mix into the very center of the circle. Let the pigment bloom outward naturally. -
Introduce the mid-tones:
Paint a ring of emerald green around the yellow center. While the paper is wet, gently blend it slightly inwards, but leave the very center distinctive. -
Darken the edges:
Drop the dark indigo-blue mix around the outer perimeter of the circle. Use your brush to guide this dark color inwards in a spiral motion, creating the effect of a vortex. -
Create the spiral texture:
Clean and dry your brush slightly (a ‘thirsty’ brush). Gently lift specific curved lines of paint out of the wet surface to emphasize the spiral movement, revealing the lighter layers underneath. -
Let it dry completely:
This is crucial—wait until the paper is bone dry and flat before proceeding. Use a hairdryer on a low setting if you need to speed things up.
Bleeding Edges?
If paint escapes the circle, don’t wipe it while wet! Wait for it to dry completely, then gently lift the mistake with a stiff, damp brush, acting like an eraser.
Step 3: The Forest Silhouette
-
Draft the treeline:
Once the sky is dry, you can very lightly sketch the placement of your trees along the bottom arc, varying their heights for visual interest. -
Start the background trees:
Mix a watery version of your Indigo/Green combination. Paint faint, simple tree shapes in the distance to create atmospheric perspective. -
Paint the foreground trees:
Load your smaller detail brush with a thick, saturated mix of Indigo and Emerald Green (very little water). Paint the main tree shapes, using a stippling motion for the branches. -
Define the branches:
Start at the top of each tree with a fine line, then zigzag your brush downwards, getting wider at the base to create the classic fir tree shape. -
Anchor the bottom:
Fill in the very bottom curve of the circle with solid dark green-black to ground the forest and hide any unfinished trunks.
Metallic Magic
Swap the white gouache for metallic silver or gold watercolor when painting the stars. It adds a subtle shimmer that changes beautifully as the light hits the paper.
Step 4: Starry details
-
Paint the spiral stars:
Dip your smallest brush into white gouache. Follow the spiral lines you lifted earlier, painting tiny dots and small four-pointed stars to accentuate the curve. -
Add random stars:
Scatter a few more tiny white dots in the darker blue sections of the sky to balance the composition. -
Optional texture:
If you want a dotted border like the example, use a fine-tip pen or your smallest brush to dab tiny dots along the pencil line circumference.
Now you have a serene little world captured in a circle, ready to be framed or gifted
Desert Sun With Cactus Silhouette and Sandy Texture
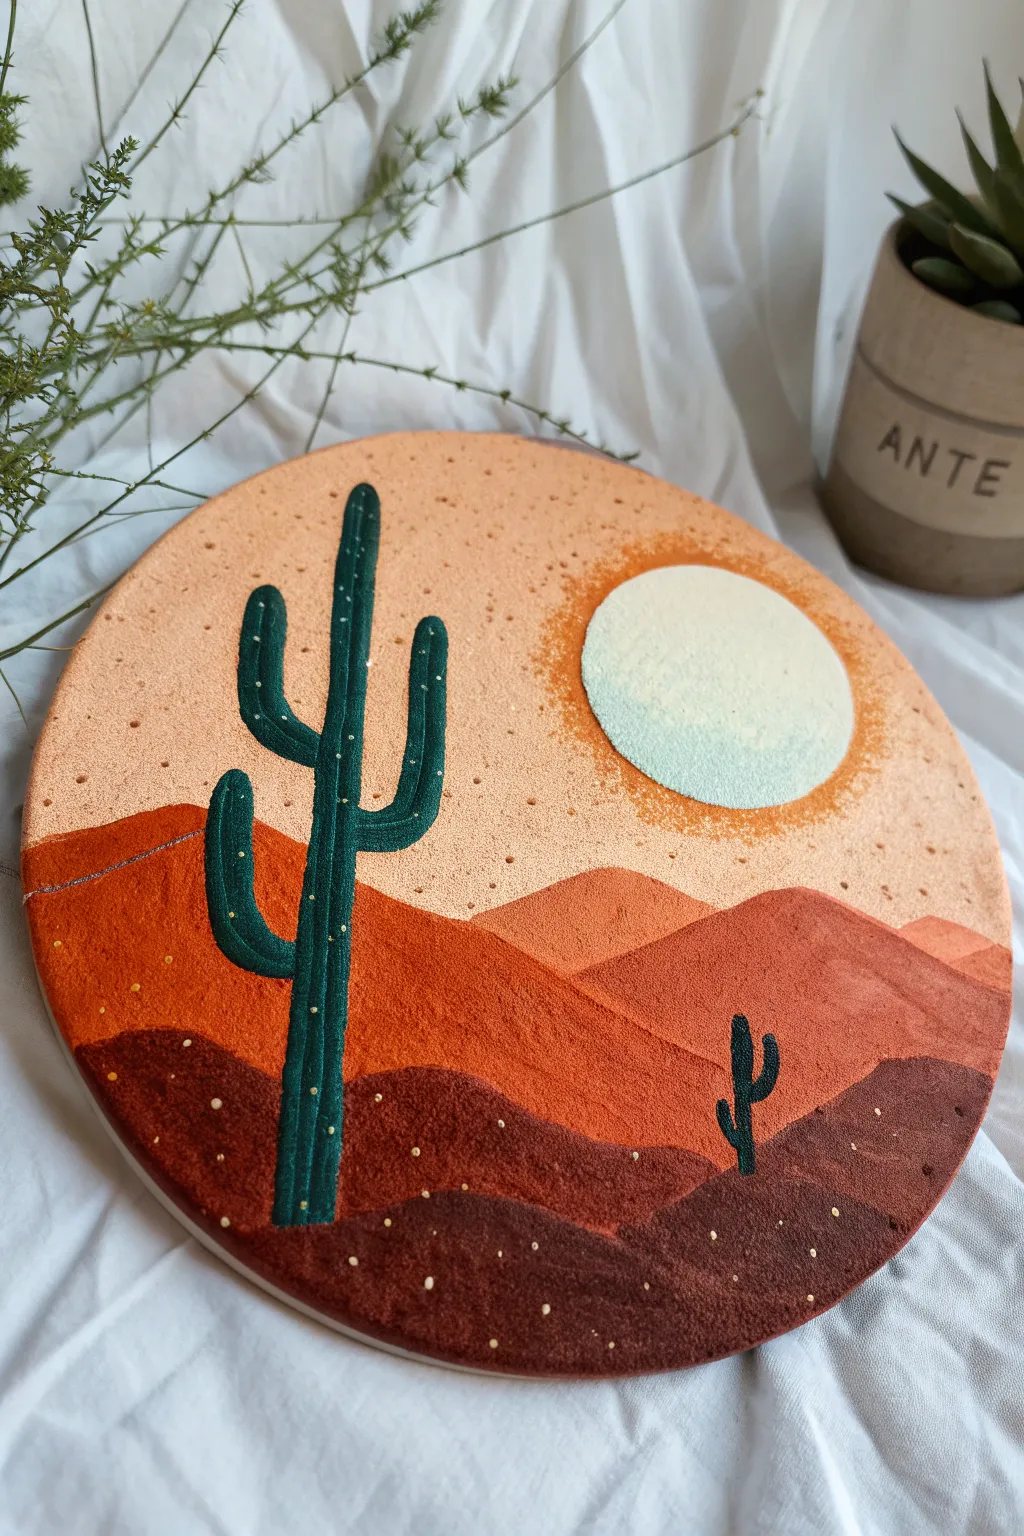
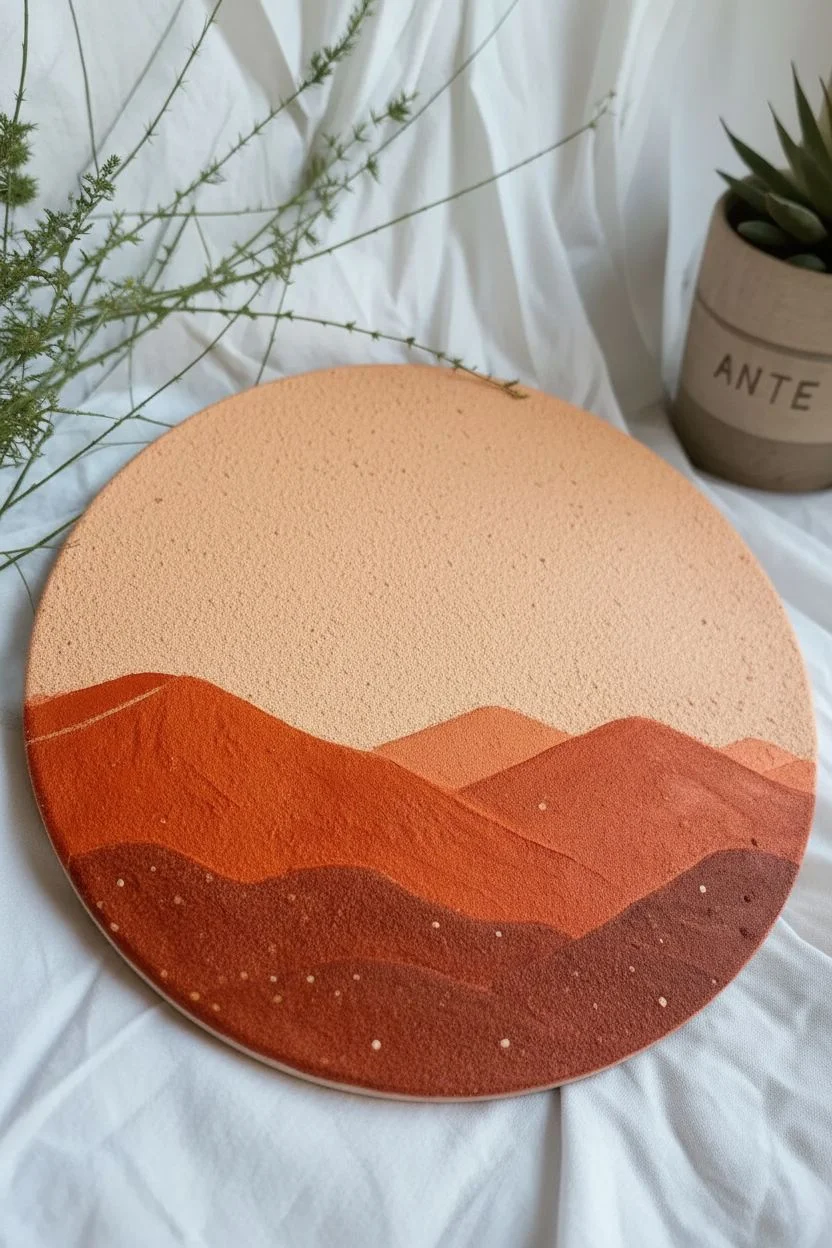
Capture the warmth of a desert sunset with this wonderfully tactile circle painting. Using a textured medium creates a sandy, grainy finish that brings the dunes and sun to life, while crisp cactus silhouettes add a touch of graphic drama.
Step-by-Step
Materials
- Round canvas or wooden circle panel (approx. 8-10 inches)
- Acrylic paints (dark brown, rust orange, light peach, white, deep green)
- Texture medium (sand texture gel, fine sand, or baking soda)
- Painter’s tape or masking tape
- Flat shader brushes (medium and small)
- Fine liner brush
- Palette knife
- Round sponge applicator or stencil brush
- Gold paint pen or small dotting tool
Step 1: Creating the Textured Base
-
Mix your texture:
Before painting, prepare your textured acrylics. Mix a texture medium (like sand gel or even baking soda) into your acrylic paints on your palette. You want a grainy, spreadable consistency that isn’t too runny. Do this for your brown, rust, and peach colors. -
Sketch the horizon:
Lightly sketch the rolling hills of the sand dunes with a pencil. Start with the foreground hills at the bottom and work your way up to the horizon line, creating layers of depth. -
Block in the sky:
Start at the top with your lightest peach color. Using a palette knife or a flat brush, apply the paint thickly to create that rough, stucco-like texture. Cover the entire sky area above your highest dune line.
Step 2: Layering the Dunes
-
Paint the farthest dunes:
Mix a slightly darker orange-peach shade. Paint the dune layer closest to the horizon line. Ensure the texture remains consistent by dabbing rather than just stroking the paint. -
Work into the mid-ground:
Move down to the next section of hills. Use a vibrant rust orange for these middle dunes. Paint right up to the line of the previous layer, letting the texture overlap slightly to avoid smooth gaps. -
Deepen the foreground:
For the bottom-most hills, mix a deep, reddish-brown. Apply this dark color to the foreground, creating a strong contrast that anchors the composition. Let this base layer dry completely—it may take longer than standard acrylics due to the texture.
Fixing bumpy lines
If the textured surface makes painting straight cactus lines hard, dilute your green paint slightly with water to help it flow into the crevices better.
Step 3: The Sun & Atmosphere
-
Position the sun:
Once the sky is dry, place a circular object (like a small lid) or use a compass to lightly mark the sun’s position on the right side. -
Paint the sun:
Fill in the circle with a very pale, almost white yellow mixed with texture. I like to use a round sponge here to dab the paint on, keeping the circle edges crisp but the surface rough. -
Add the sun’s glow:
To create the hazy ring around the sun, dry brush a little bit of darker orange or gold paint around the perimeter of the sun circle. Dab gently to blend it into the peach sky.
Make it 3D
Glue actual sand or fine crafting glitter onto the wet paint of the bottom dunes for an ultra-realistic, touchable sandy finish.
Step 4: Cactus Details
-
Outline the main cactus:
With a small round brush and deep green paint (no texture medium needed for this part, as you want smooth lines over the rough background), paint the main saguaro cactus on the left. Start with the vertical trunk. -
Add cactus arms:
Paint the arms of the cactus, curving them upwards. Make sure the green is opaque; you might need two coats to cover the textured background completely. -
Paint the distant cactus:
Using a smaller brush, paint the tiny silhouette of a second cactus on the lower right dune. Keep it simple to show distance.
Step 5: Final Touches
-
Highlight the cactus:
Mix a slightly lighter green or teal. Painted vertical highlight lines on the sunny side of the cactus arms and trunk to give them dimension. -
Add prickles:
Using a very fine liner brush or a white gel pen, add tiny vertical rows of dots along the cactus ribs to represent spines. -
Texture speckles:
To enhance the sandy look, dip an old toothbrush or stiff brush into watered-down brown paint and flick tiny speckles across the sky and dunes. -
Gold accents:
For a bit of magic, use a gold paint pen or dotting tool to add random tiny gold dots in the dark foreground sand, mimicking glittering minerals.
Hang your desert round on a wall that catches the afternoon light to really highlight those textures


City Skyline at Dusk Hugging the Bottom Rim
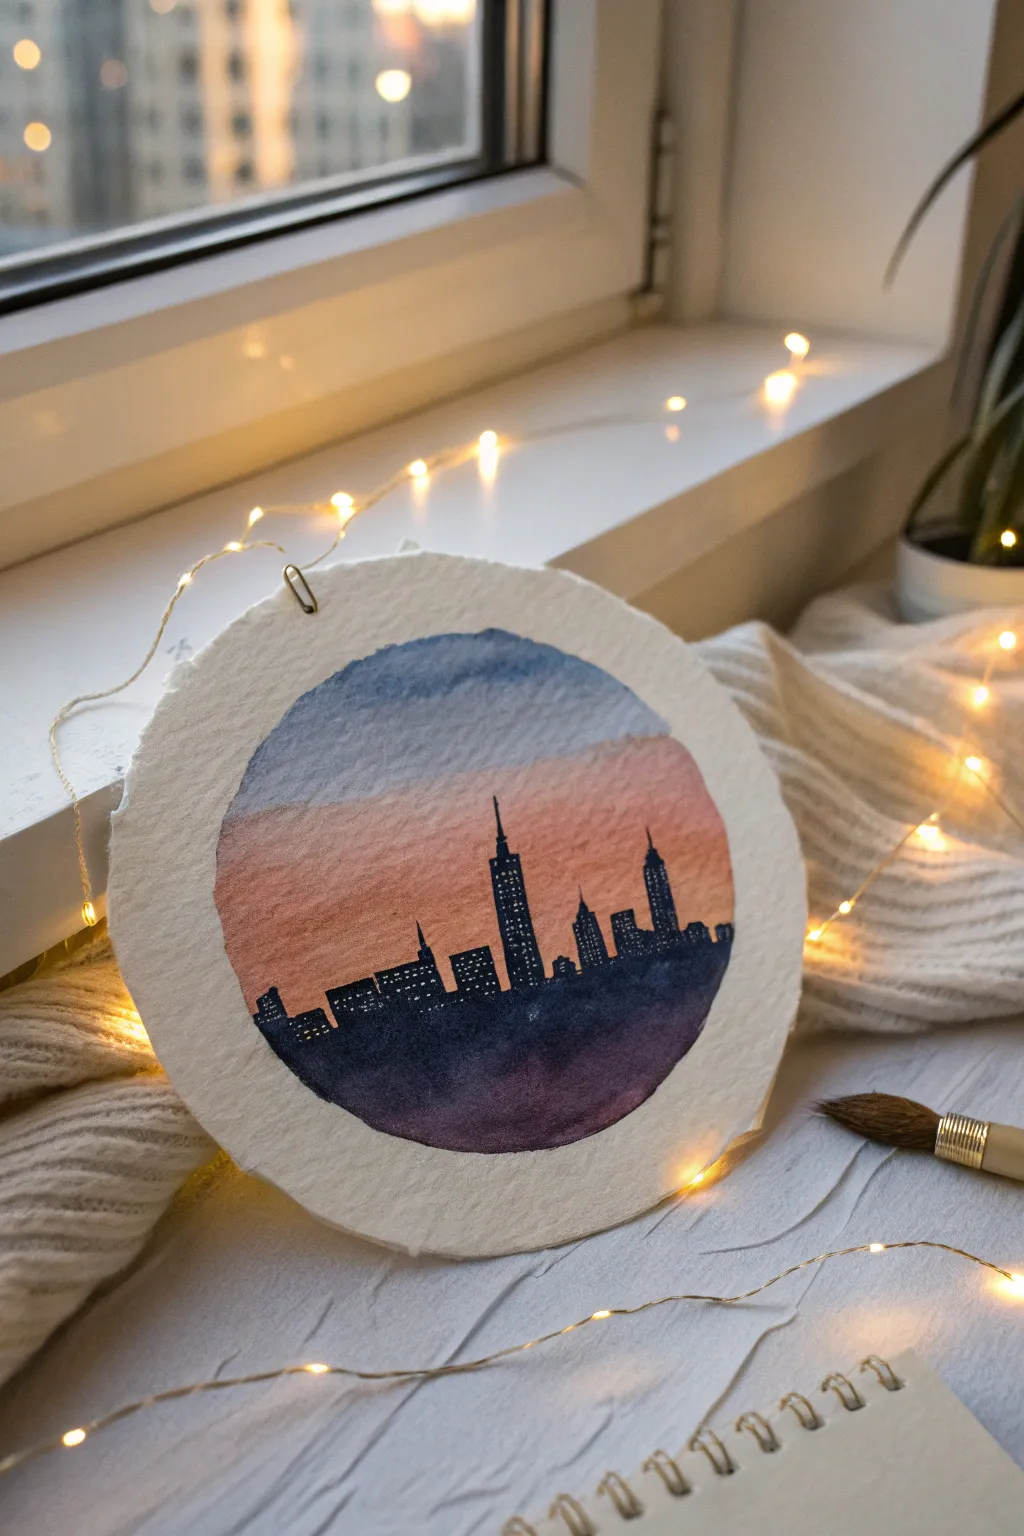
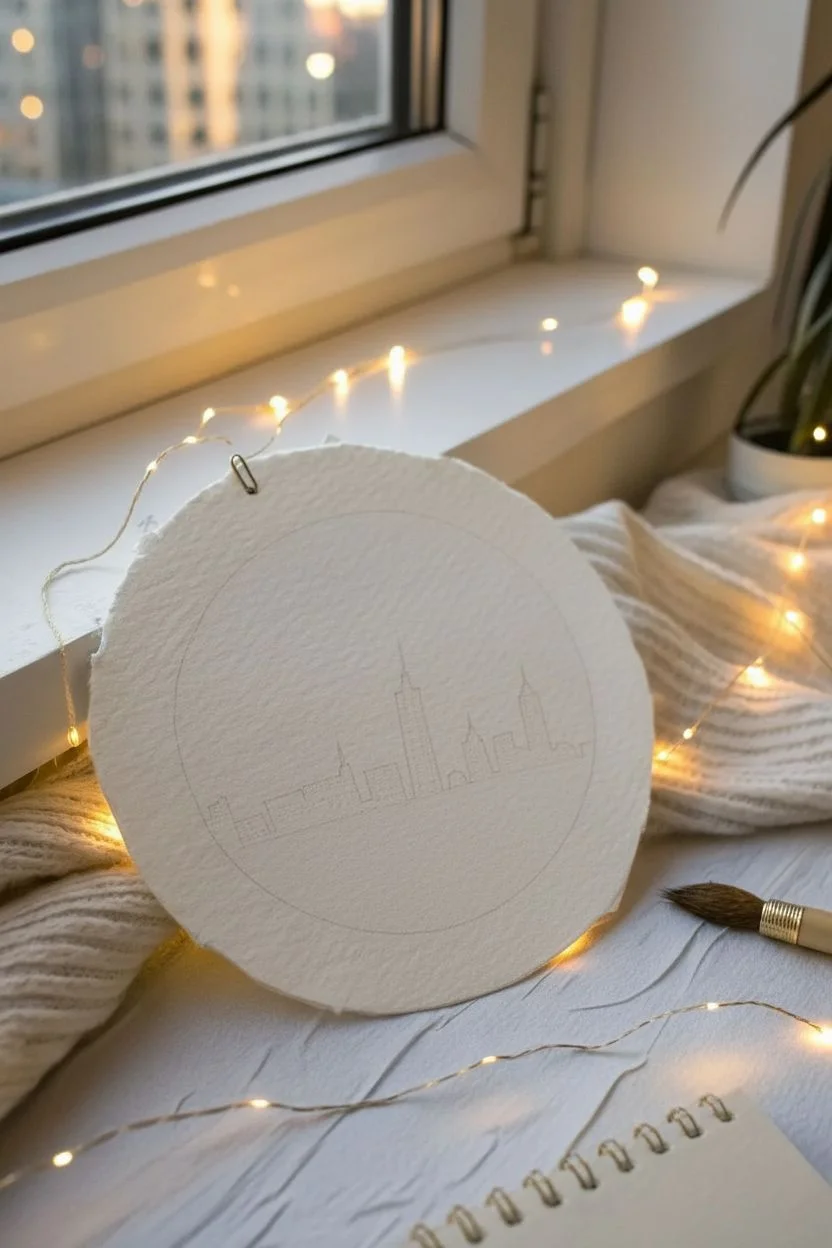
Capture the magic of the city at sunset with this moody, atmospheric watercolor circle. The silhouette of skyscrapers hugs the bottom rim, grounded by a rich, dark foreground that contrasts beautifully with a soft, blended sky.
How-To Guide
Materials
- Circular deckle-edged watercolor paper (heavyweight, approx. 300gsm)
- Watercolor paints (Indigo, Paynes Gray, Alizarin Crimson, Cadmium Orange, Ultramarine Blue)
- White gel pen or gouache
- Synthetic round brushes (size 6 for washes, size 0 or 2 for details)
- Pencil for light sketching
- Clean water and paper towels
- Masking tape (optional, to secure the paper)
Step 1: Setting the Scene
-
Prepare your paper:
Start with a distinctively round sheet of watercolor paper. The rough, deckle edge adds a lovely tactile quality to the finished piece, so avoid taping down the very edges if possible. -
Sketch the horizon:
Using a very hard pencil (like an H or 2H), draw a faint horizontal line across the lower third of the circle to mark where your city will sit. -
Outline major buildings:
Sketch the rough shapes of the tallest skyscrapers. You don’t need architectural precision here; focus on varying the heights and shapes—some pointed like the Empire State Building, some blocky and flat.
Edge Control
Leave a tiny, uneven border of unpainted white paper around the circumference. This ‘breathing room’ highlights the beautiful texture of the deckle edge.
Step 2: Painting the Sky Gradient
-
Wet the sky area:
With your larger round brush and clean water, gently wet the entire area above your city sketch. The paper should be glisten but not have puddles. -
Apply the twilight blue:
Drop a wash of Ultramarine Blue mixed with a touch of Indigo into the very top curve of the circle. Let gravity pull the pigment down slightly. -
Transition to warmth:
Rinse your brush and pick up Alizarin Crimson. Blend this into the bottom edge of the blue while it’s still wet to create a soft purple transition zone. -
Add the sunset glow:
Load your brush with Cadmium Orange and paint the area just above the city horizon. Allow this to bleed upward into the crimson for a seamless gradient. -
Dry completely:
Let this layer dry fully. The paper must be bone dry before you add the crisp silhouette, or the sharp lines will bleed into the sky.
Step 3: Creating the Silhouette
-
Mix a deep dark:
Create a rich, near-black color. I prefer mixing Indigo and Alizarin Crimson for a dark purple-black rather than using straight black paint, as it has more depth. -
Outline the buildings:
Switch to your fine detail brush (size 0 or 2). Carefully trace the outlines of your sketched buildings against the dried sunset background. -
Fill the shapes:
Fill in the building shapes completely with your dark mixture. Ensure the paint is opaque enough to cover the orange background. -
Anchor the bottom:
Paint the entire bottom semi-circle below the skyline with the same dark mixture, ensuring the ‘ground’ area is solid and heavy. -
Add foreground wash:
While the bottom black area is still wet, drop in a slightly more diluted purple or crimson wash near the very bottom edge to create subtle variation in the shadows.
Starry Night
Flick tiny specks of white gouache into the upper blue section of the sky to create faint stars appearing as the sun sets.
Step 4: Illuminating the City
-
Wait for dryness:
This is crucial: allow the dark silhouette layer to dry completely. If it’s even slightly damp, your lights will turn gray. -
Add window lights:
Using a fine white gel pen or a tiny brush with white gouache, dot small windows onto the skyscrapers. -
Vary the patterns:
Don’t make them uniform grids. Cluster some lights together, leave some floors dark, and create vertical lines on taller towers to mimic reality. -
Final touches:
Add a tiny antenna line to the tallest building using your finest brush and the dark paint mixture if the original silhouette got lost. -
Flatten if needed:
Once fully dry, if the paper has buckled, place it under a heavy book overnight to flatten the circle perfectly.
Your moody urban skyline is now ready to display on a small easel or mounted in a floating frame
Koi Pond Top View With Ripples and Lily Pads
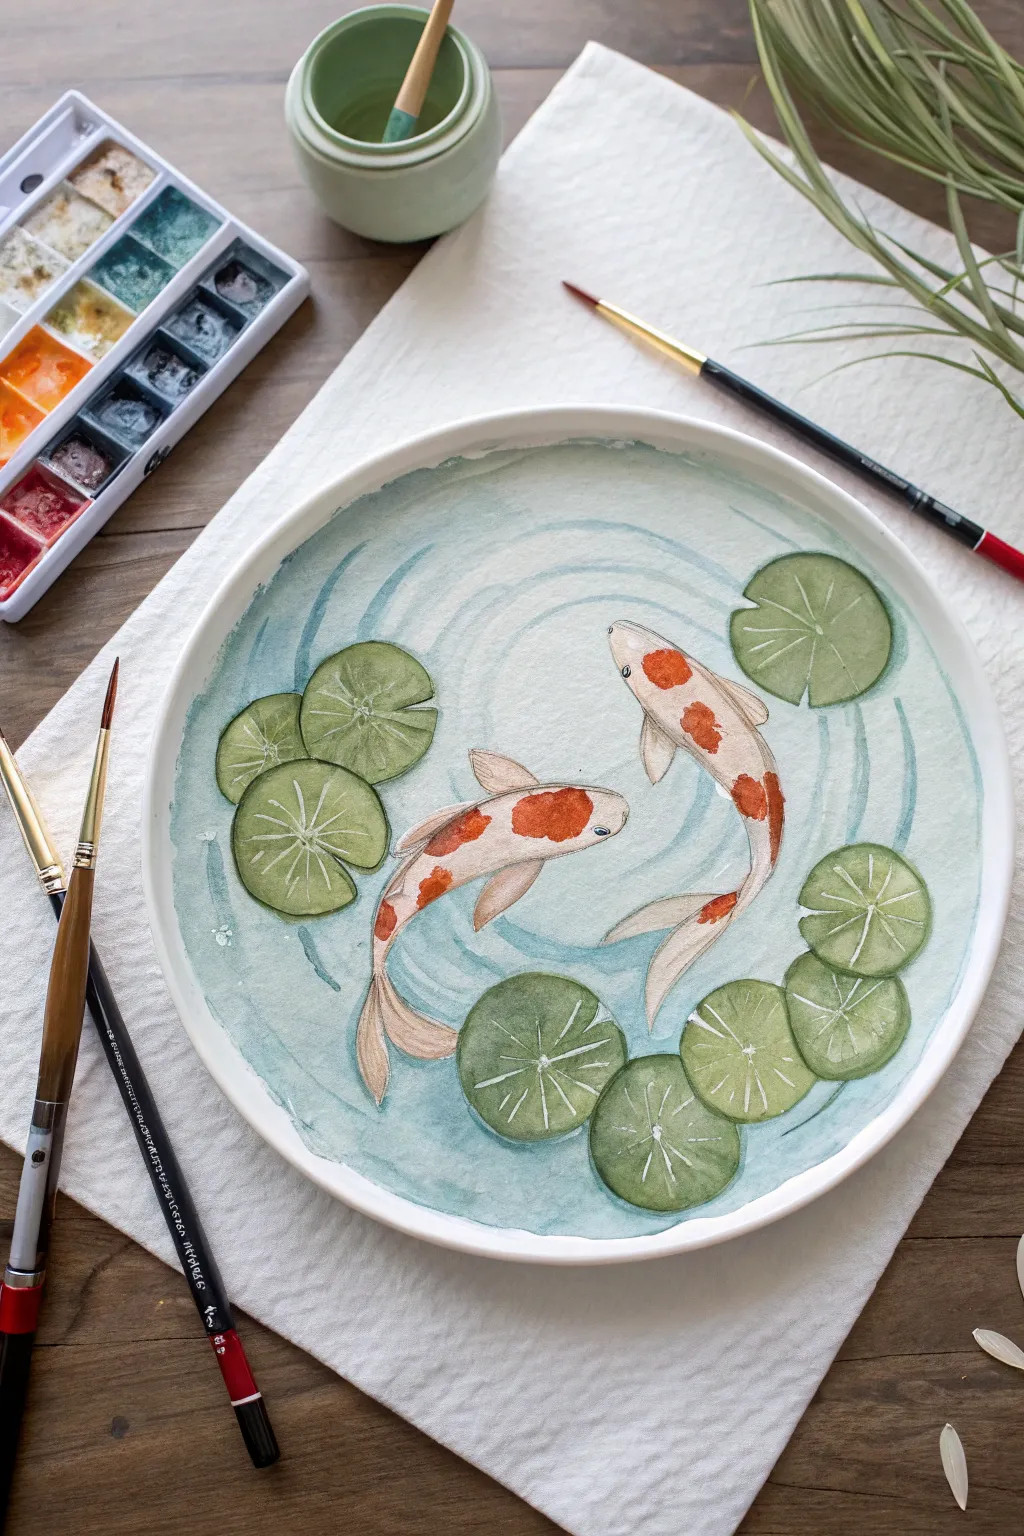
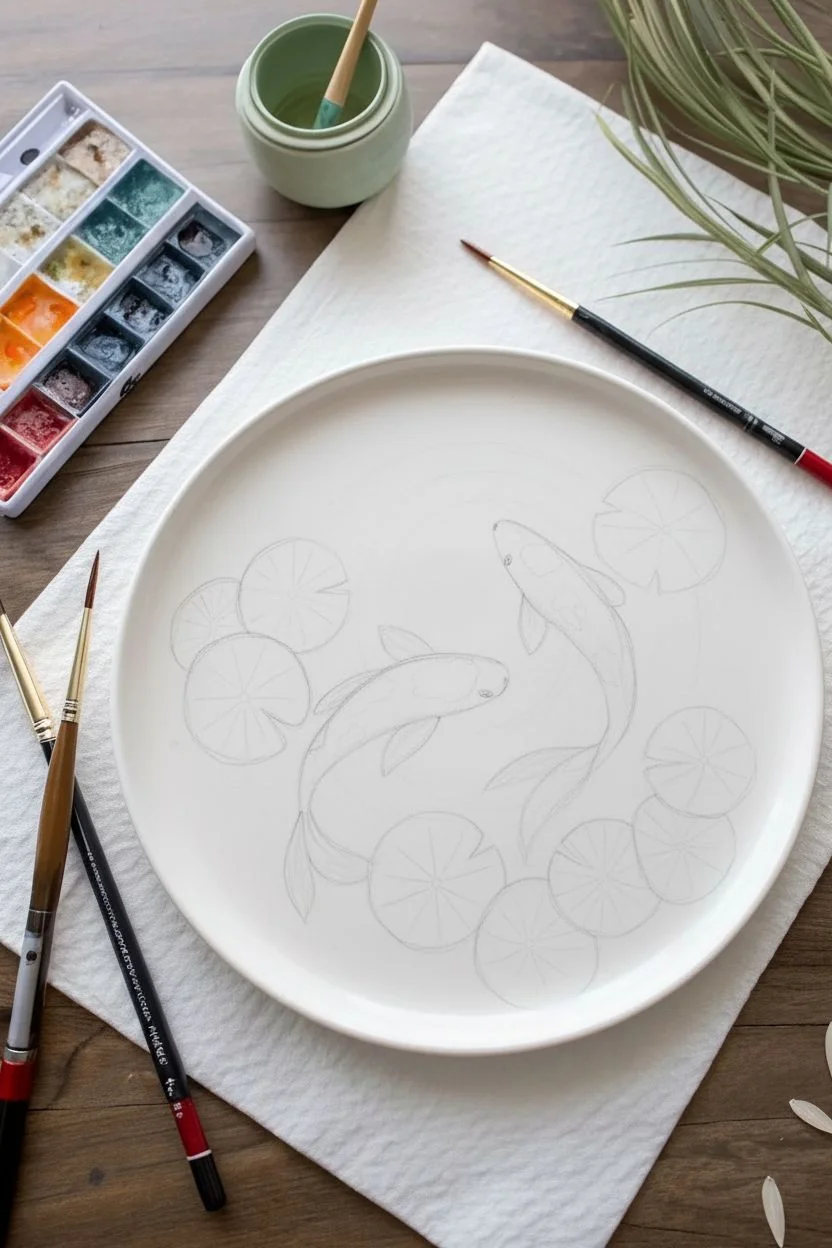
Transform a simple ceramic dish or round watercolor block into a tranquil pond scene with this delicate koi painting. The combination of watery ripples, vibrant orange koi, and floating lily pads creates a peaceful, meditative piece of art.
Step-by-Step
Materials
- Round ceramic watercolor palette or a heavy-weight round watercolor paper block
- Watercolor paints (Cerulean Blue, Turquoise, Sap Green, Cadmium Orange, Burnt Sienna, White Gouache)
- Round watercolor brushes (Size 2 for details, Size 6 for washes)
- Pencil (HB or lighter)
- Kneaded eraser
- Jar of clean water
- Paper towel
Step 1: Planning the Pond
-
Lightly sketch the composition:
Begin by lightly sketching the outline of two koi fish swimming in a circular motion, almost like a yin-yang symbol. Add several circles of varying sizes scattered around the edges to represent the lily pads. -
Refine the lily pads:
For each lily pad circle, draw a small pie-slice wedge removed from one side. Then, draw faint lines radiating from the center like wheel spokes to indicate the veins. -
Detail the fish:
Refine the fish shapes, adding fins, tails, and the dorsal fin. Keep the pencil lines barely visible so they won’t show through the transparent watercolor later.
Step 2: Painting the Water
-
Prepare the water color:
Mix a very dilute wash of Cerulean Blue with a touch of Turquoise. You want this to be extremely pale and watery. -
Apply the base wash:
Using your larger size 6 brush, paint the entire background, carefully painting around the fish and the lily pads. Keep the edges wet to avoid hard lines forming where you don’t want them. -
Create the ripples:
While the base wash is still slightly damp but not soaking, use a slightly more concentrated blue mixture to paint curved lines rippling outward from the fish and lily pads. Follow the circular shape of the dish. -
Deepen the shadows:
Once the first layer is dry, add deeper blue shadows directly under the lily pads and along one side of the ripples to give the water clarity and depth.
Muddy Waters?
If your blue water paint bleeds into your orange fish, stop immediately. Dab the mistake with a clean paper towel and let it dry completely before attempting to fix the edge with opaque white gouache.
Step 3: Bringing the Koi to Life
-
Base coat for the fish:
Mix a creamy, pale beige using a tiny bit of Orange and plenty of water. Paint the bodies of the fish, leaving the fins slightly more transparent. -
Add the iconic spots:
While the body is still slightly damp, drop in concentrated Cadmium Orange or Red-Orange onto the head and back to create soft, blooming spots. This wet-on-wet technique creates natural-looking markings. -
Define the fins:
Use a mix of dilute Burnt Sienna to outline the delicate rays of the tail and side fins. Keep your brush strokes very light and feathery here. -
Add facial details:
With your smallest brush (size 0 or 2), paint the eyes using black or dark grey, leaving a tiny speck of white paper for the highlight. -
Highlight the scales:
I like to use a tiny bit of white gouache or a white gel pen to add subtle highlights on the fish’s back and nose to make them look wet and glistening.
Pro Tip: Bloom Control
For the koi spots, the paper dampness is key. If it’s too wet, the orange will take over. If too dry, it won’t blend. Test the dampness on a scrap piece of paper first to get the perfect soft edge.
Step 4: Finishing the Greenery
-
Paint the lily pads:
Mix a fresh Sap Green. Paint the lily pads with a flat wash. Vary the shade slightly between pads—some yellowish-green, some cooler green—for variety. -
Add vein details:
Once the green wash is bone dry, use a fine brush with white gouache or a very pale green mixture to paint the radiating veins you sketched earlier. -
Shadow the pads:
Add a thin line of darker green on the side of each lily pad opposite your light source to give them a slight 3D thickness. -
Final ripples check:
Examine the water one last time. If the ripples faded too much significantly drying, glaze a final, very transparent layer of blue curves to reinforce the movement of the water.
Allow your beautiful ceramic pond to dry completely overnight before displaying it flat on a table or hanging it on a wall
Underwater Reef Scene With Light Rays in a Circle
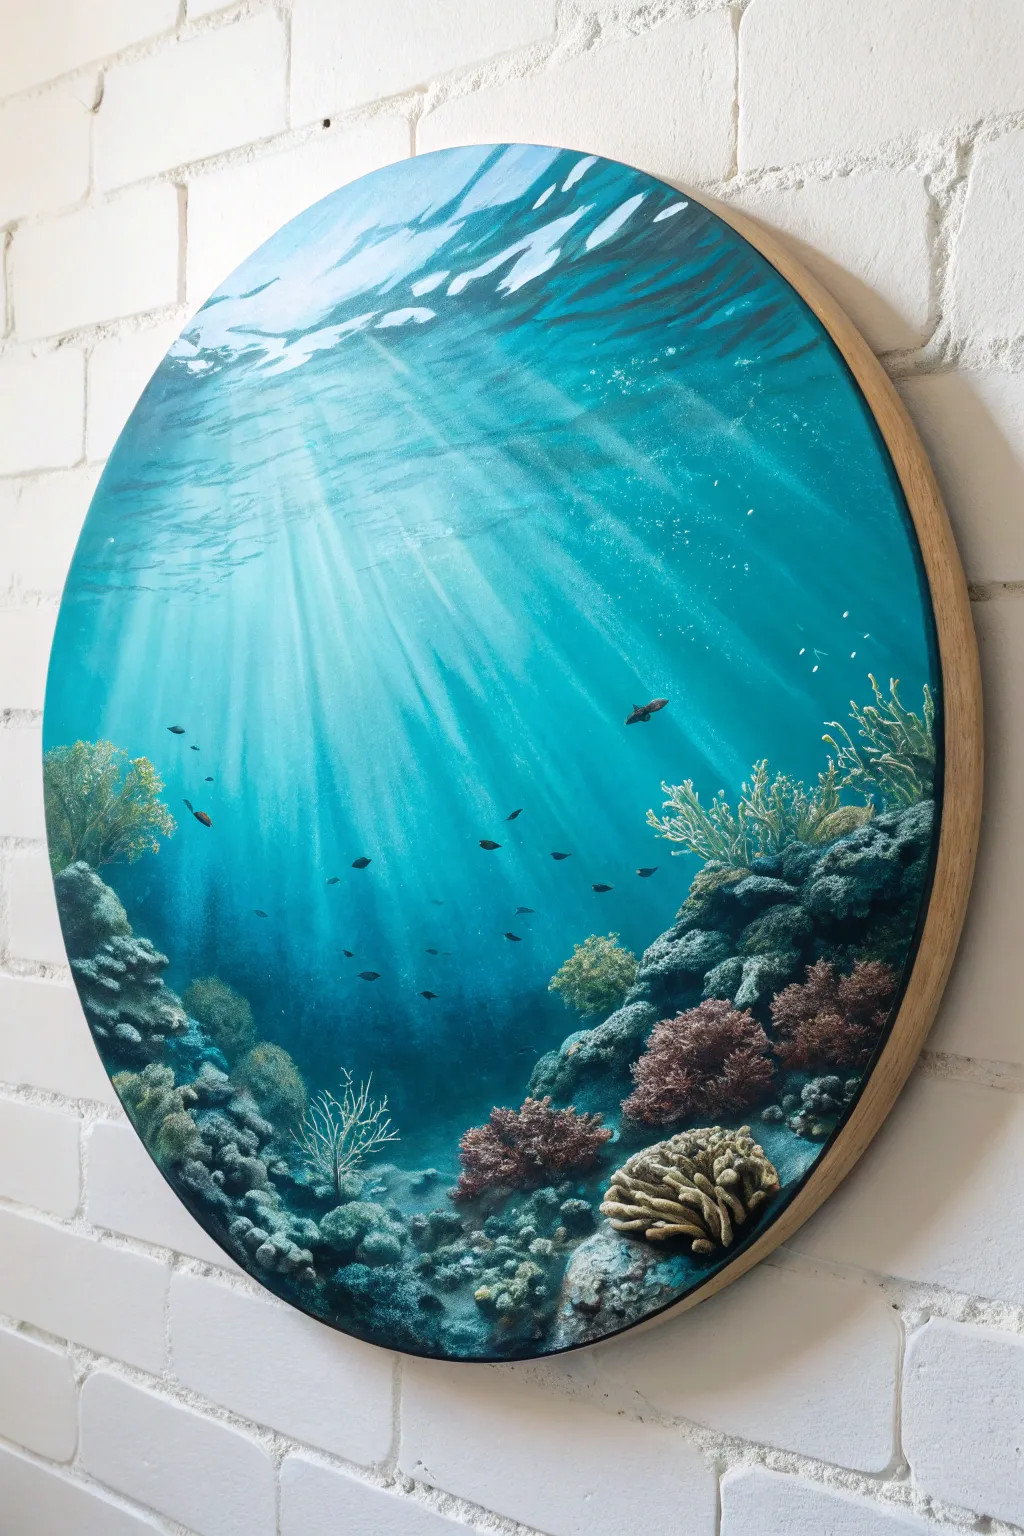
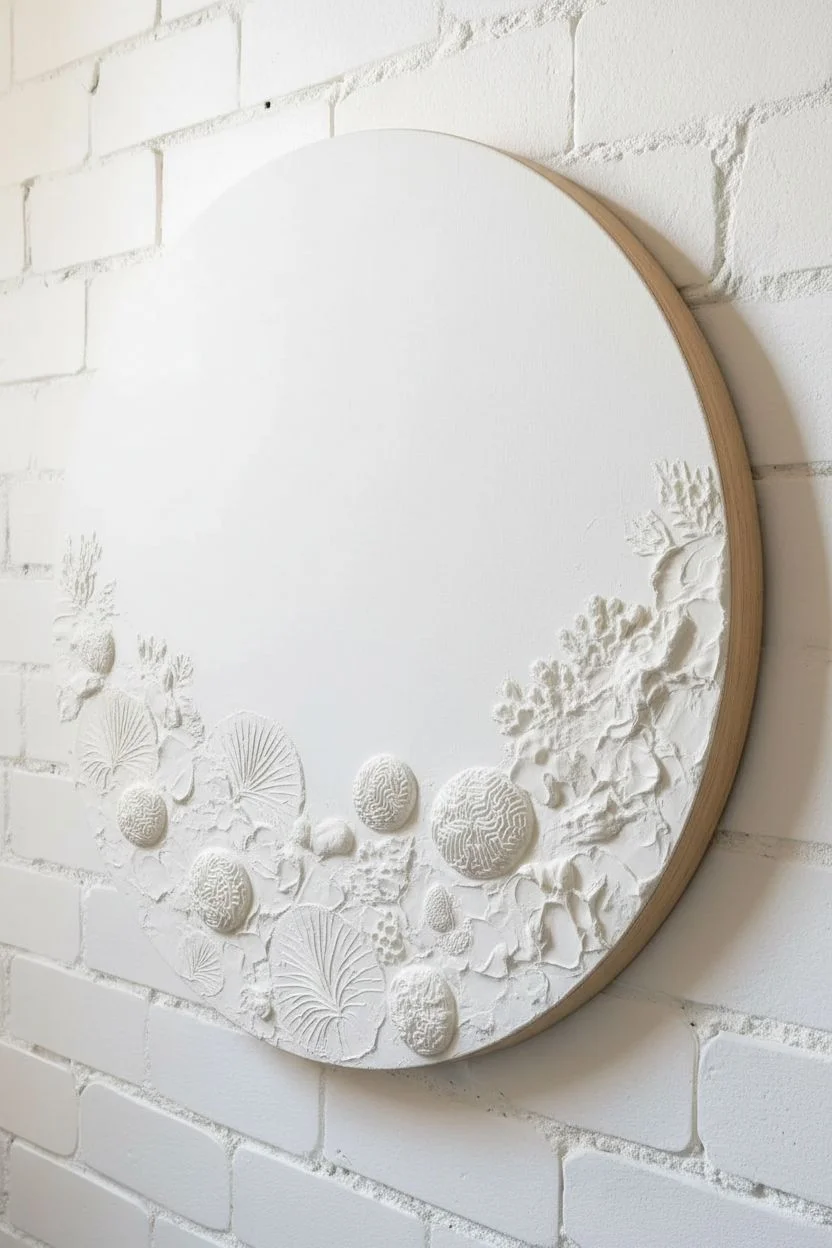
Dive into this immersive circular painting where shafts of light pierce the deep ocean blue to reveal a textured coral reef. Using layers of acrylics and modeling paste, you will build a 3D seascape that feels like looking through the porthole of a submarine.
Step-by-Step Guide
Materials
- Round wood panel or stretched round canvas (approx. 16-20 inches)
- Acrylic heavy body paints (Phthalo Blue, Turquoise, Titanium White, Black, Burnt Umber, Yellow Ochre)
- Acrylic modeling paste or heavy texture gel
- Palette knives (various shapes)
- Large flat wash brush (2 inch)
- Medium filbert brush
- Small round detail brush (size 0 or 1)
- Glazing medium
- Spray bottle with water
- Masking tape (optional for horizon line)
Step 1: Creating the Textured Reef
-
Map out the reef:
Begin by lightly sketching a jagged, organic horizon line about 1/4 of the way up from the bottom of your circle. This will define where your coral reef sits. -
Apply modeling paste:
Scoop generous amounts of modeling paste onto the bottom section using a palette knife. Don’t smooth it out; you want to create clumps and ridges. -
Sculpt coral textures:
While the paste is wet, use the tip of the knife or even a crumpled piece of foil to stamp textures into the blobs. Create some fan shapes for soft corals and rounded mounds for brain coral. -
Let it cure:
This step requires patience. Allow the texture paste to dry completely, preferably overnight, until it is hard to the touch.
Uneven Gradients?
If your blue gradient looks choppy, mist the canvas lightly with your water spray bottle while blending. Acrylics blend much smoother when kept slightly damp.
Step 2: Painting the Deep Blue
-
Base gradient:
Mix Phthalo Blue with a touch of Black for the deepest ocean depths. Paint the area just above your textured reef, blending upwards. -
Mid-water transition:
Gradually mix in Turquoise and a little Titanium White as you move up the canvas. Use a large flat brush and horizontal strokes to blend the deep blue into a lighter teal. -
Surface brightness:
At the very top of the circle, use almost pure White mixed with a tiny drop of Turquoise to represent the bright surface water. Keep your blend smooth. -
Painting the surface ripples:
Using pure White and a smaller brush, paint jagged, horizontal zig-zag lines at the very top edge to mimic the water’s surface from below.
Pro Texture Tip
Don’t have modeling paste? Mix baking soda into white acrylic paint until it forms a thick, gritty paste. It creates excellent rocky textures for reefs on a budget.
Step 3: Adding the Light Rays
-
Prepare the glaze:
Mix a large amount of Glazing Medium with a small amount of Titanium White. The mixture should be translucent, not opaque. -
Drafting the rays:
Using a flat brush angled diagonally, pull streaks of the glaze from the top bright area down towards the reef. Vary the width and angle slightly for realism. -
Softening the edges:
Before the glaze dries, gently run a dry, clean brush along the edges of your rays to fade them into the surrounding blue water. -
Layering light to create depth:
Once the first layer is dry, add a second, narrower layer of brighter white glaze inside the main rays to intensify the light source. -
Add ocean particles:
Load a toothbrush with watered-down white paint and flick fine speckles across the blue water area to create suspended particles and bubbles.
Step 4: Bringing the Reef to Life
-
Base coat the texture:
Paint the entire dried texture area with a dark mix of Blue and Burnt Umber. Ensure you get into every nook and cranny. -
Dry brushing heavy texture:
Dip a dry brush into a lighter grey-blue or dull green. Wipe most of the paint off on a paper towel, then lightly drag it over the raised texture to highlight the coral shapes. -
Adding coral colors:
I like to mix subtle pinks and ochres here. Using the dry brush technique again, dab these colors onto specific ‘coral’ clumps to differentiate species. -
Highlighting the tips:
Use a detail brush with very light cream or white to tap the very tips of the corals that would be catching the light from above. -
Planting sea fans:
With a fine liner brush and thinned light paint, draw delicate, branching sea fan structures rising from the rocks.
Step 5: Final Details
-
Painting fish silhouettes:
Using dark blue-black paint, add small fish shapes. Paint them smaller and simpler in the distance, and slightly larger with more defined fins in the foreground. -
Adding schools:
Group tiny dots or dashes together in the mid-water section to represent distant schools of baitfish swimming in the current. -
Varnish and seal:
Once fully dry, apply a gloss varnish. This will deepen the colors and give the water a wet, glass-like appearance.
Hang your finished circular seascape and enjoy the tranquil view of your own private underwater world
Four Seasons Series Using the Same Circular Layout
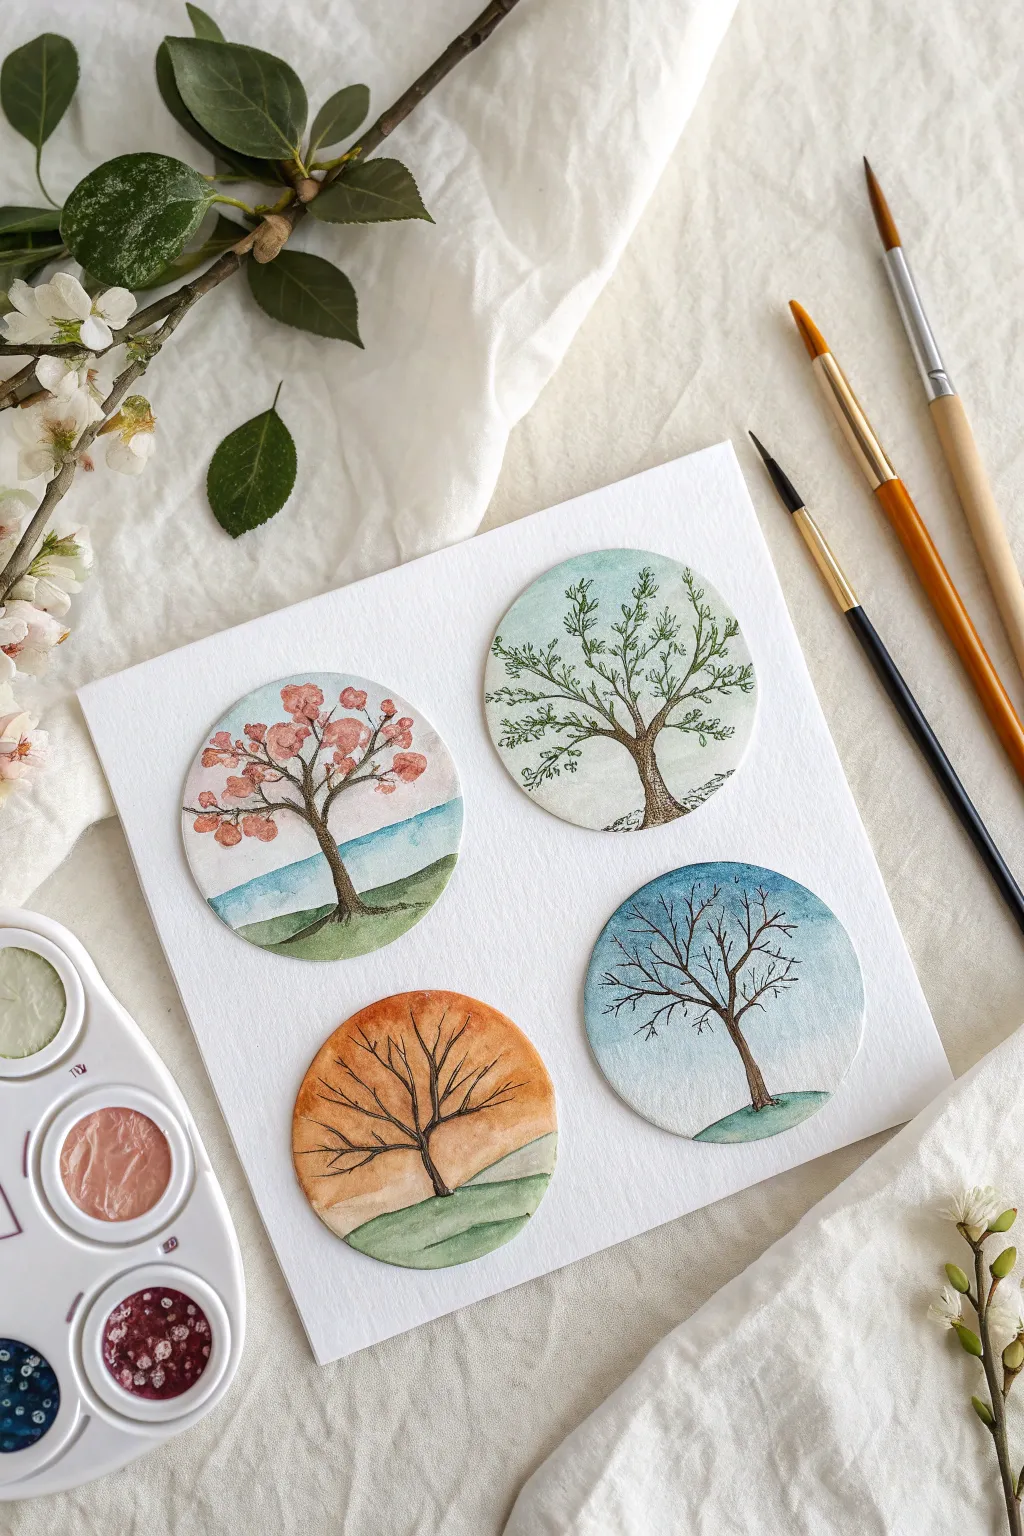
Capture the passing of time with this delicate watercolor series featuring a single tree transformation through spring, summer, autumn, and winter. Set within uniform circles, these miniature landscapes create a cohesive and charming visual story.
Step-by-Step
Materials
- Cold press watercolor paper (approx. 140lb/300gsm)
- Watercolor paints (pan set shown: greens, warm browns, reddish-pink, blue, yellow-ochre)
- Round watercolor brushes (sizes 2, 4, and 0 for details)
- Compass or a circular object to trace (approx. 2-3 inches diameter)
- Pencil (HB or H)
- Kneadable eraser
- Clean water and paper towels
- Micron pen or fine liner (optional for tree outlines)
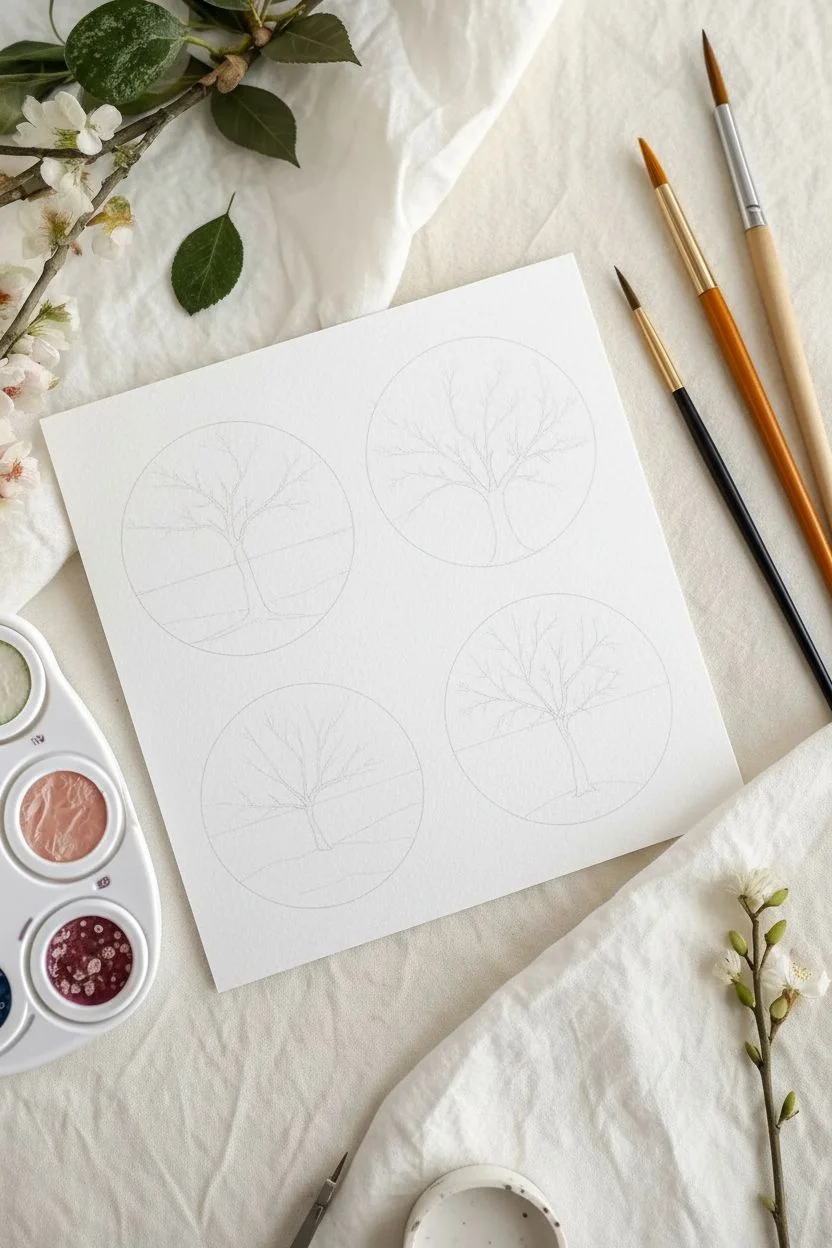
Step 1: Planning the Composition
-
Outline the layout:
Begin by lightly tracing four circles of equal size on your watercolor paper using a compass or a round object. Arrange them in a 2×2 grid, leaving plenty of white space between them. -
Sketch the trees:
Inside each circle, lightly sketch a tree skeleton. Try to keep the trunk and main branch structure fairly consistent across all four to show it’s the ‘same’ tree, but vary the foliage slightly based on the season. -
Add horizon lines:
Draw faint horizon lines. Notice how the perspective shifts slightly in the reference image; some have lower horizons for a vast sky, while others are hilly. Keep pencil marks very light so they don’t show through the paint.
Bleeding edges?
If your paint bleeds outside the pencil circle, don’t panic. Gently lift the wet pigment with a clean, damp brush or wait for it to dry and use opaque white gouache to touch up the edges.
Step 2: Spring (Top Left)
-
Paint the sky and ground:
Wet the sky area of the first circle and drop in a very pale blue wash. For the ground, use a fresh spring green mixed with a little yellow. -
Create the blossoms:
Once the sky is dry, mix a soft pinkish-red. Dab small, irregular clusters of ‘blossoms’ onto the branches. Keep them loose and airy. -
Define the trunk:
Using a fine brush (size 0 or 2), paint the trunk with a medium brown. Ensure the branches connect naturally to the pink clusters.
Step 3: Summer (Top Right)
-
Establish the summer atmosphere:
Wash the sky with a slightly cooler, minty teal. Keep the ground area unpainted or very white for a high-contrast look, or add a subtle textured ground. -
Fill the canopy:
Mix a vibrant leafy green. Instead of painting solid leaves, use the tip of your brush to tap tiny dashes and dots along the branches, simulating full summer foliage. -
Strengthen the structure:
Paint the trunk with a darker, textured brown. I find that adding tiny horizontal lines on the trunk gives it a nice bark-like texture.
Add metallic accents
For a magical touch, use metallic gold watercolor paint for the sun in the summer circle or for the bare branches in the winter scene to make them shimmer.
Step 4: Autumn (Bottom Left)
-
Set the mood:
This circle needs warmth. Paint a gradient sky starting with orange at the top fading to pale yellow near the horizon. -
Paint the fading grass:
For the ground, use a muted sage green, perhaps mixing in a tiny bit of burnt sienna to dull the brightness. -
Bare branches:
Since the leaves have fallen, focus on the intricate branch structure. Paint the skeleton of the tree clearly in dark brown, extending the fine twigs outward.
Step 5: Winter (Bottom Right)
-
Create a cold sky:
Use a cool blue (like cerulean or cobalt) for the sky, perhaps darkening the top edge slightly to suggest a winter chill. -
The snowy hill:
Paint the hill in a pale blue-green, leaving the top ridge lighter to suggest snow resting on the ground. -
Final details:
Paint the bare winter tree with sharp, distinct branches. You can make the brown slightly cooler by mixing in a touch of blue. -
Refine the edges:
If you want crisp circles, carefully go around the outer edge of each painting with your finest brush to neaten the perimeter, or erase any stray pencil marks once fully dry.
Display your seasonal quartet in a square frame to celebrate nature’s cycle all year round
Abstract Color Wheel Bloom With Blended Petals
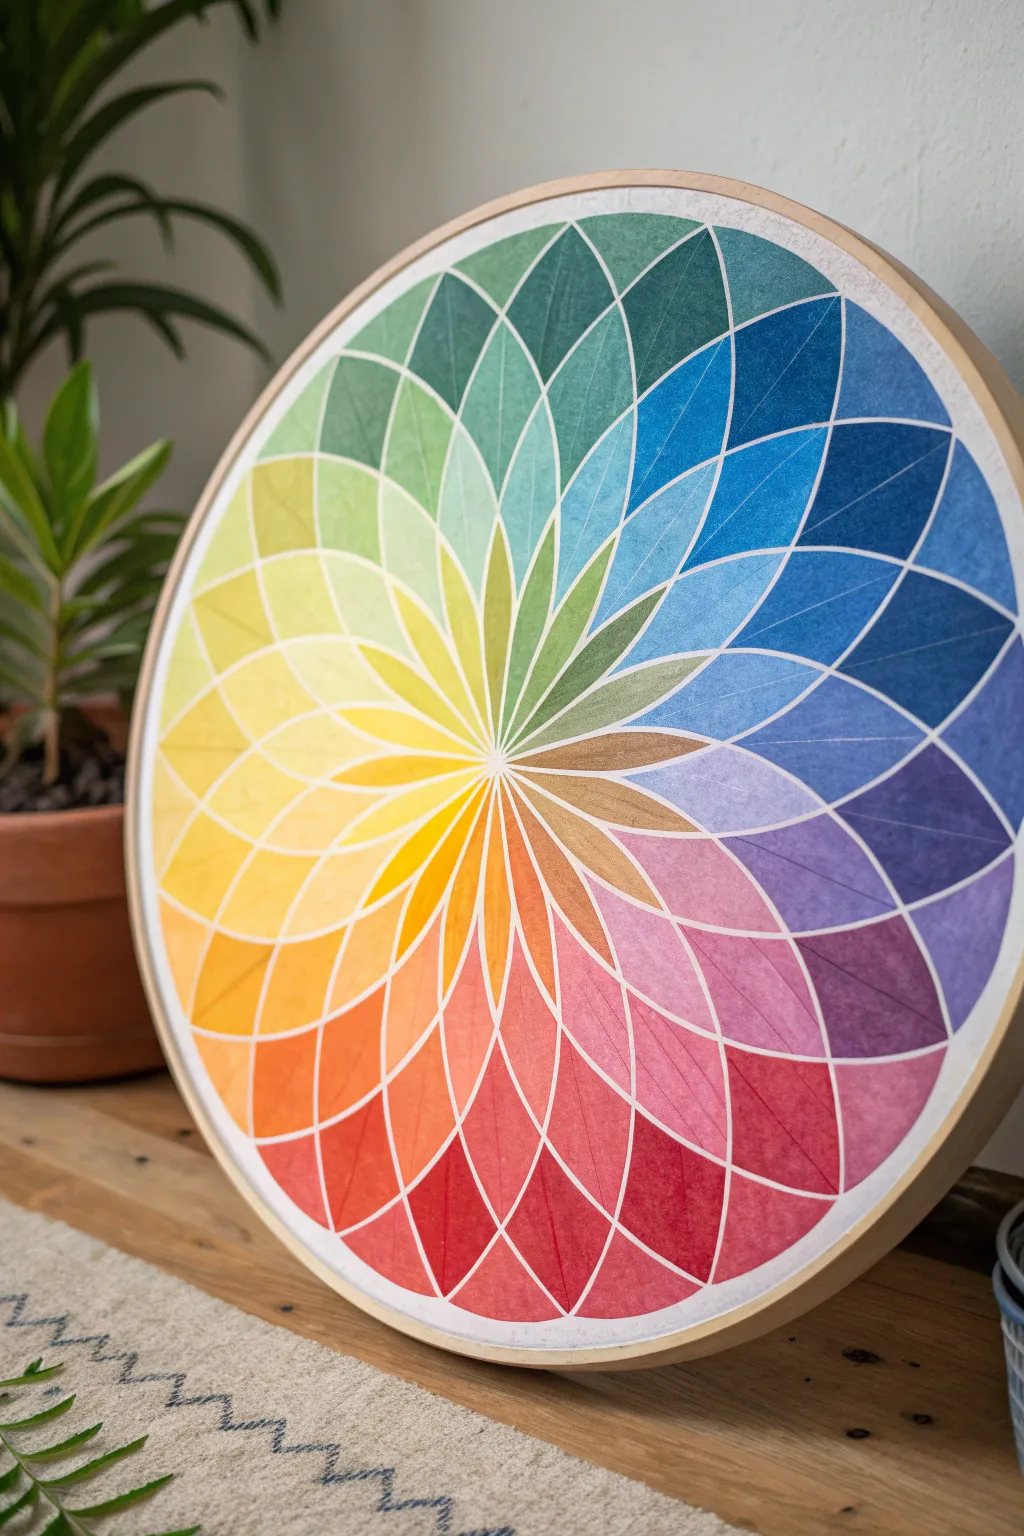
This stunning circular artwork transforms a standard color wheel into a blooming geometric flower. By meticulously blending overlapping watercolor layers, you’ll create a vibrant, mesmerizing mandala that celebrates the full spectrum of light.
How-To Guide
Materials
- Round wooden art panel or watercolor paper stretched in an embroidery hoop (approx. 12-16 inches)
- Watercolor paints (high-quality tube watercolors recommended for vibrancy)
- Compass with a pencil holder
- Protractor
- HB Pencil
- Fine liner brush and medium round watercolor brush
- Masking fluid (optional but helpful)
- Painter’s tape
- Mixing palette with multiple wells
- Clean water
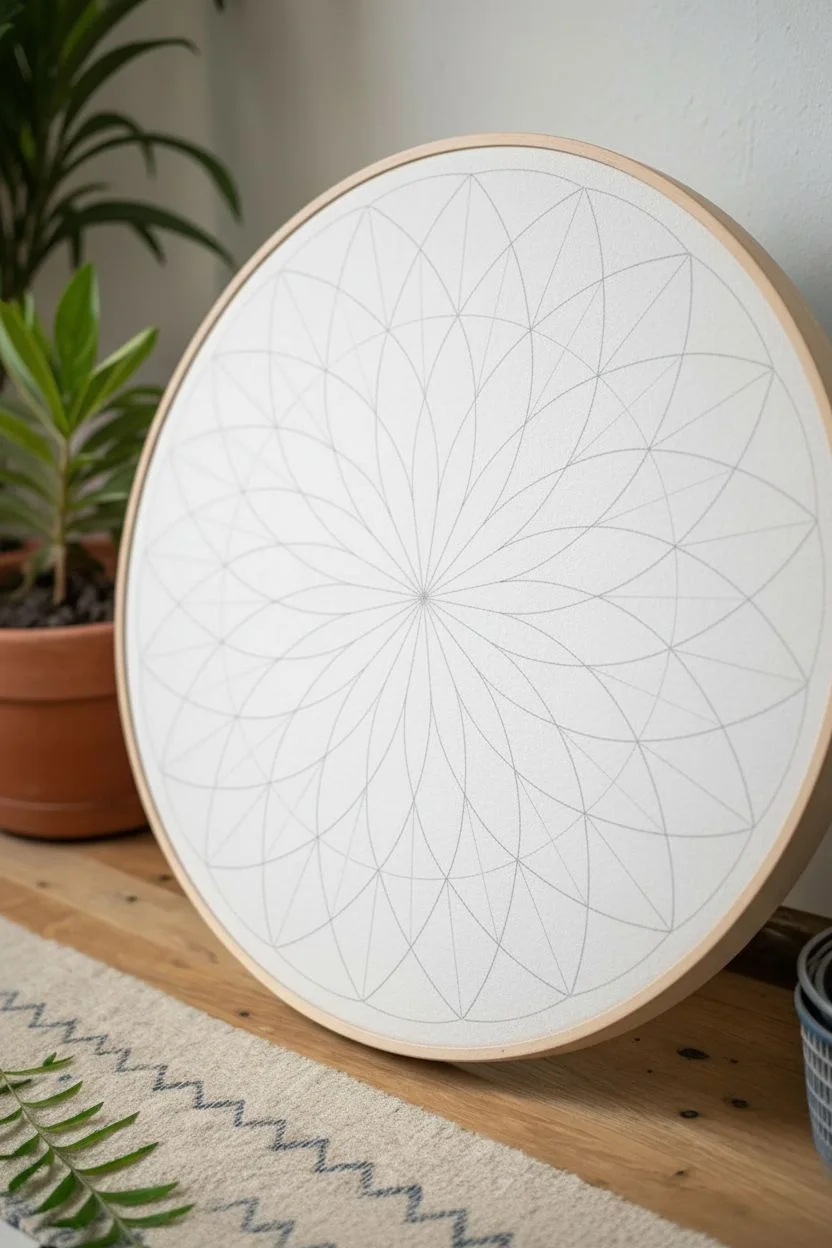
Step 1: Planning the Geometry
-
Find the center:
Begin by measuring the precise center of your circular canvas or paper. Mark this spot lightly with a pencil, as every single line will radiate from or relate to this central point. -
Draw the main axis lines:
Using a ruler, draw a vertical line and a horizontal line through the center to divide the circle into four equal quadrants. Keep your pencil pressure very light so the graphite doesn’t smudge later. -
Divide into segments:
Use your protractor to mark every 15 degrees around the circle’s edge. Draw straight lines connecting these marks through the center point, creating a pie-chart appearance with 24 equal triangular slices. -
Mark petal lengths:
Decide on the number of petal rings you want. Place compass marks along one of the spoke lines at even intervals (e.g., 2 inches, 4 inches, and 6 inches from the center) to define where each tier of petals will end. -
Construct the petal curves:
This is the trickiest part: Adjust your compass to span the width of two segments. Place the needle point on the intersection of a spoke and a ring marker, then swing an arc to connect the spoke lines. Repeat this symmetrically to create the pointed ‘vesica piscis’ or almond shape for each petal. -
Refine the grid:
Continue creating these curved petal shapes for every segment, radiating outward. When finished, you should have a complex, interlocking flower grid. Use a kneaded eraser to gently lift excess graphite, leaving just a faint guide.
Bleeding Lines?
If paint bleeds across your grid lines, stop immediately. Let the area dry completely, then gently lift the mistake with a damp, clean brush or cover it with opaque white gouache later.
Step 2: Applying the Color Spectrum
-
Prepare your palette:
Squeeze out your primary colors (red, blue, yellow) and secondary colors. Arrange them in a circle on your palette to mimic the color wheel transitions you’ll be painting. -
Paint the center star:
Start with the innermost ring of small petals. Pick a starting color (like yellow) and paint one petal. Move clockwise, mixing a tiny amount of the next color (orange) into your brush for the next petal. Continue this gradual shift around the center until the spectrum is complete. -
Establish the gradient technique:
For the larger outer petals, you want a ‘stained glass’ look. Wet the paper inside a petal shape with clean water first. Drop in your saturated color at the distinct tip of the petal and let it diffuse softly toward the center. -
Work in non-adjacent sections:
To prevent wet paint from bleeding across lines, skip every other petal as you work. Let the first set dry completely before painting the neighbors. I find this patience really pays off in crisp edges. -
Layering the middle ring:
As you move to the middle ring of petals, observe how the colors interact. If a blue petal overlaps a yellow area from the ring below, define that overlap with a customized green mix to simulate transparency. -
Deepening the outer rim:
The outermost petals should have the deepest, most saturated values to frame the piece. Use less water and more pigment here. Ensure the blue section is opposite the orange, and purple is opposite yellow, maintaining color wheel accuracy. -
Contrast lines:
Once the painting is 100% dry, you have a choice. You can leave the natural white gaps between petals (if you were careful with spacing), or use a fine white gel pen or white gouache to re-draw the grid lines for a crisp, geometric pop.
Step 3: Finishing Touches
-
Clean up edges:
If you used an embroidery hoop with paper, carefully trim any excess paper from the back or glue it down to the inner rim for a tidy finish. -
Seal the artwork:
Since watercolor is reactivated by moisture, spray the finished piece with a UV-resistant archival fixative. Do this in a well-ventilated area using light, even coats.
Transparency Trick
For a true overlay effect, glaze the second layer. Let the first petal dry fully, then paint the overlapping petal with a diluted, watery wash so the bottom color shows through.
Hang your radiant mandala in a bright spot and enjoy the harmonious splash of color it brings to your room


Have a question or want to share your own experience? I'd love to hear from you in the comments below!