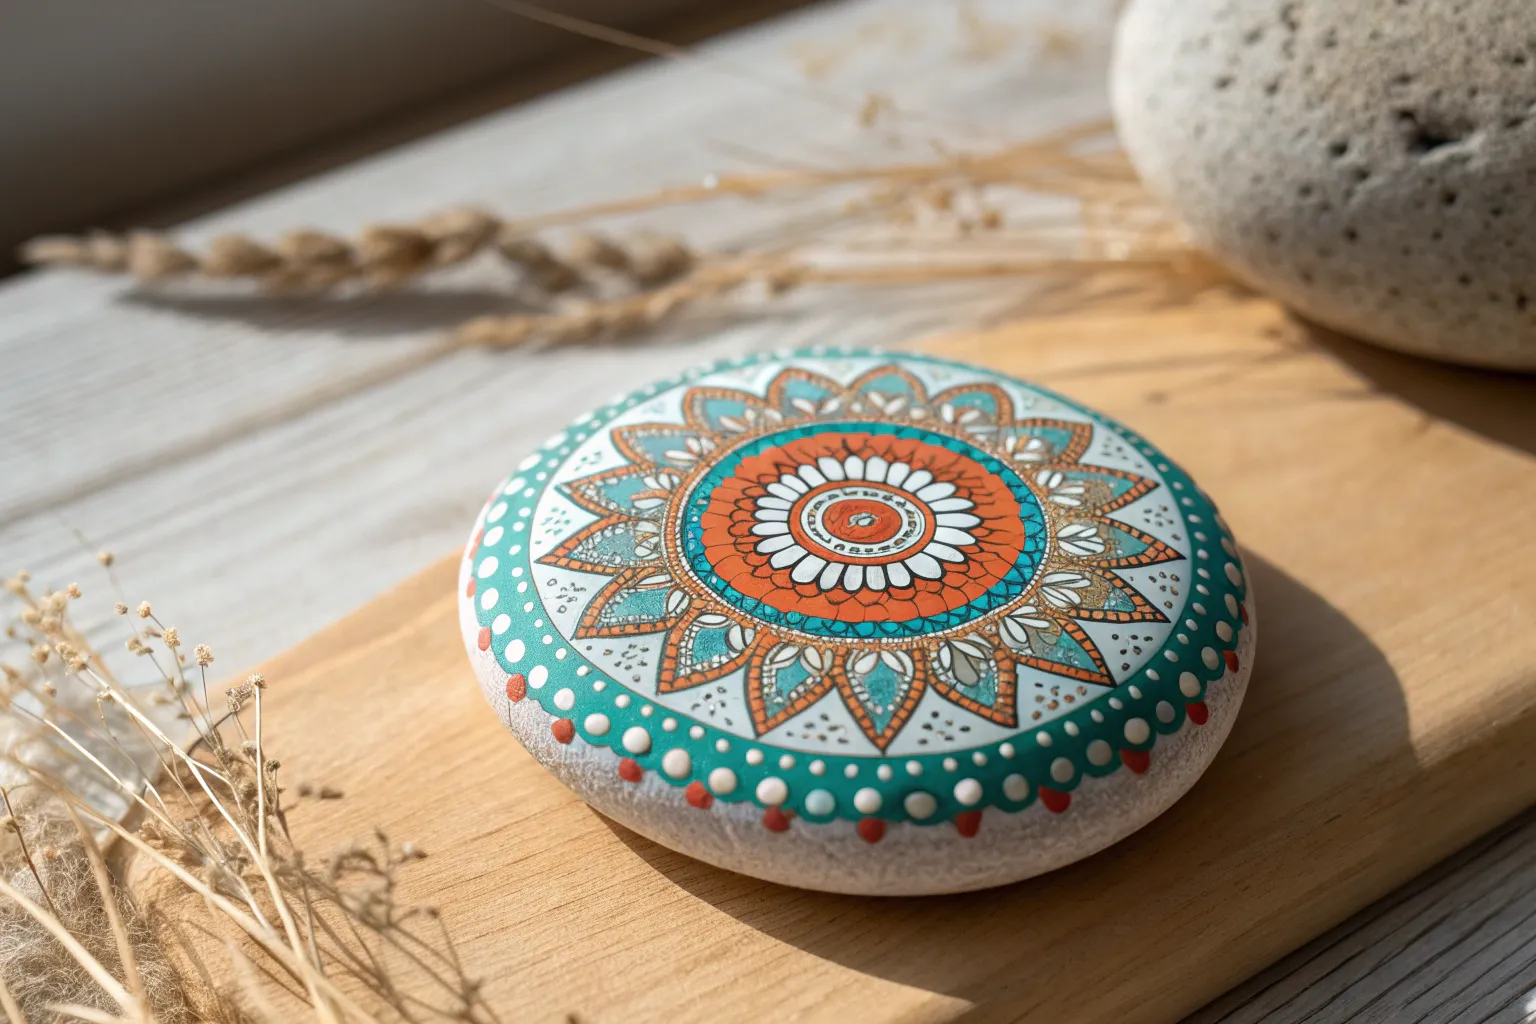
Whenever I pick up a perfectly round stone, it already feels like a tiny painting with its own built-in frame. These circle rock painting ideas lean into that shape on purpose—so the curve of the rock becomes part of the design, not just the background.
Dot Mandala Rings
This elegant rock painting features a stunning radial design reminiscent of delicate lace or a blooming flower. With a striking contrast between the matte black background and metallic gold, peach, and cream dots, it is a perfect centerpiece for meditation or decor.
Detailed Instructions
Materials
- Smooth, round river rock (approx. 3-4 inches diameter)
- Black acrylic paint (matte finish)
- Acrylic paints: Metallic Gold, Cream/Off-White, Light Peach/Salmon
- Dotting tools (set of graduating sizes)
- Flat paintbrush (for base coat)
- Clear acrylic sealer (matte or gloss)
- Small palette or ceramic tile
- Paper towels and water cup
Step 1: Preparation & Base
-
Clean surface:
Begin by washing your stone with warm soapy water to remove any dirt or oils. Let it dry completely. -
Base coat:
Apply a smooth, even coat of black acrylic paint over the entire top surface of the rock. You might need two coats for full opacity; let the first dry before applying the second. -
Centering:
Find the approximate center of the rock. Using your largest dotting tool, place a single large Cream dot right in the middle.
Paint Consistency
For perfectly round dots, your paint should be the consistency of heavy cream. If it forms ‘peaks’ when you lift the tool, mix in a tiny drop of pouring medium.
Step 2: The Inner Mandala Rings
-
First ring:
Switch to a medium-small tool. Dip into the Light Peach paint and create a tight ring of dots immediately surrounding the central Cream dot. -
Second ring:
Using a slightly larger tool, create a second ring of Light Peach dots. Place each new dot in the ‘valley’ between two dots of the previous ring for a nested look. -
Third ring:
Change to the Cream paint. Create a third ring of dots, slightly larger than the last, continuing the expanding radial pattern. -
Fourth ring:
For the final inner ring, use the Light Peach paint again with a medium-sized tool. Ensure these dots are spaced evenly, as they will guide the larger outer petals.
Step 3: Creating the Golden Petals
-
Adding gold anchors:
Using a large dotting tool, place a large Metallic Gold dot above every other dot in your last peach ring. Leave some space between them for the details. -
Rough petal shape:
While the gold paint is still wet, use a toothpick or a fine needle tool to drag the top center of the dot outward, creating a teardrop or petal shape pointing away from the center. -
Walking the dots:
Create the lace frame around the gold petals. Dip a small tool in Cream paint. Place a small dot at the base of a gold petal, then ‘walk’ smaller and smaller dots up one side to the tip without re-dipping. -
Completing the frame:
Repeat the walking dots technique on the other side of the same gold petal so they meet at the tip. Do this for every gold petal on the rock. -
Inner petal texture:
Once the large gold teardrops are dry, take a very fine tool and add tiny dots of Cream or a lighter gold tone inside the gold shape to add texture.
Try a New Palette
Swap the palette for a ‘frozen’ theme using silver instead of gold, and varying shades of blue instead of peach for an icy winter mandala look.
Step 4: Outer Details & Finishing
-
Negative space fillers:
Look at the V-shaped spaces between the bottom of your gold petals. Place a medium Light Peach dot in these gaps. -
Outer borders:
Use your smallest tool to place tiny Cream dots around the outer edge of the mandala, filling any remaining black space and framing the design. -
Cleanup:
Check for any uneven dots or splashes. You can carefully scrape them away with a damp toothpick while wet, or touch up with black paint once dry. -
Sealing:
Allow the rock to dry for at least 24 hours. I prefer to apply a spray varnish to protect the dots from chipping without smearing the paint.
Enjoy the calming process of placing each dot as your beautiful stone mandala comes to life.


Concentric Color Band Gradient
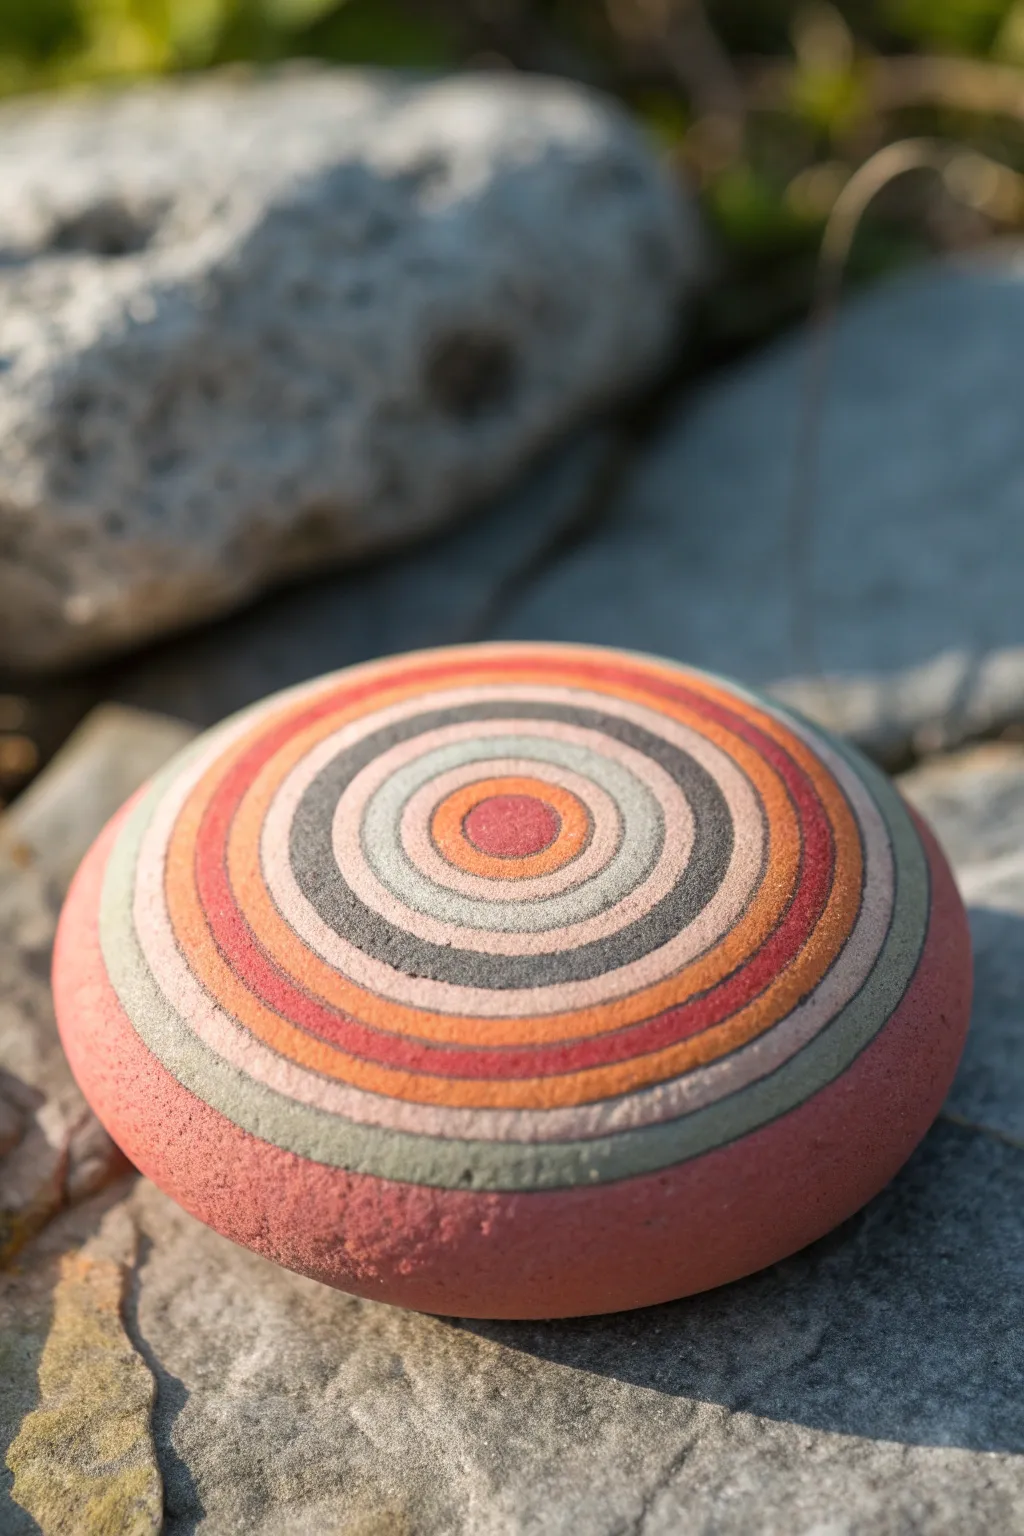
This serene rock painting project transforms a simple stone into a mesmerizing bullseye of warm earth tones. By layering precise bands of color from the center outward, you create a satisfying gradient that feels both modern and primal.
How-To Guide
Materials
- Smooth, round river rock (flat is best)
- Acrylic paints (terracotta, brick red, burnt orange, slate gray, cream, sage green)
- Set of fine detail brushes (sizes 00, 0, and 1)
- Small flat brush (size 2 or 4)
- Compass or circle stencil (optional but helpful)
- White pencil or chalk pencil
- Palette for mixing
- Water cup and paper towels
- Matte spray sealer
Step 1: Preparation & Base
-
Select your stone:
Choose a rock that is as naturally round and smooth as possible. Wash it thoroughly with soap and water to remove any dirt or oils, then let it dry completely. -
Prime the surface:
Mix a muted terracotta or brick red shade to act as your base. Using your flat brush, coat the entire top surface of the rock, extending down the sides. -
Second coat:
Once the first layer is dry to the touch, apply a second coat to ensure solid opacity. This creates a uniform background that will peek through later as the outermost ring. -
Find the center:
Visualize the absolute center of your stone. Make a tiny, faint mark with your white pencil to guide your concentric circles.
Steady Hands Pro-Tip
Rest your painting wrist on the table and rotate the rock with your other hand. The rock moves, not the brush. This creates much smoother curves than trying to move your arm.
Step 2: Drafting the Design
-
Sketch the center point:
Draw a small circle around your center mark, about the size of a pencil eraser. This will be your ‘bullseye’ target. -
Map out the rings:
Lightly sketch concentric rings radiating outward from the center. You don’t need to be mathematically perfect, but try to keep spacing relatively consistent. If you struggle with freehand, use a circle stencil or a compass. -
Review spacing:
Step back and look at your sketched lines. Aim for roughly 10 to 12 distinct bands to match the reference image.
Wobbly Lines?
Don’t panic! Let the mistake dry completely. Paint over the wobble with the adjacent color to ‘push’ the line back into shape. Acrylic covers itself easily.
Step 3: Painting the Bands
-
Paint the bullseye:
Start right in the middle. Mix a deep, muted red and fill in that central circle using your smallest detail brush. -
First inner ring:
Mix a burnt orange color. Carefully paint the band immediately surrounding the center dot. Keep your hand steady and rotate the rock as you paint to maintain a consistent curve. -
Contrast layer:
For the next ring, switch to a lighter cream or very pale beige. This high-contrast band helps separate the darker center from the mid-tones. -
Add cool tones:
Introduce a slate gray or dark charcoal band next. This cool tone breaks up the warmth and adds visual depth to the gradient. -
Texture technique:
I like to use a slightly drier brush for these bands. Instead of a thick globs of paint, use just enough pigment to cover the stone’s texture, giving it that natural, matte look seen in the photo. -
Mid-ring variation:
Continue working outward, alternating between your muted oranges, brick reds, and creams. Refer to the photo: notice how thin bands of dark gray are sandwiched between wider bands of light gray or cream. -
Clean up edges:
As you paint each new ring, use the flat edge of your small brush to refine the boundary of the previous ring. If a line gets wobbly, wait for it to dry and correct it with the neighboring color. -
The transition zone:
As you move past the halfway point, introduce a sage green or muted olive band. This earthy green bridges the gap between the warm reds and cool grays. -
Outer definition:
Paint a thin, sharp band of dark red or burgundy near the outer edge. This acts as a frame for the inner design. -
Final outer bands:
Finish the perimeter with wider bands of light gray and sage green, blending softly into the base coat you applied at the very beginning.
Step 4: Finishing Touches
-
Check for gaps:
Inspect the rock closely. If any underlying rock color is showing through unintended gaps between rings, touch them up with a 00 brush. -
Erase guidelines:
If any white pencil marks are still visible, gently wipe them away with a damp Q-tip, being careful not to disturb the paint. -
Seal the work:
To preserve that stony, matte texture, finish with a matte spray sealer. Gloss would make it look like plastic, so stick to matte for this organic style.
Place your finished mandala stone in a garden or on a desk for a calming focal point.


Galaxy Orb Night Sky
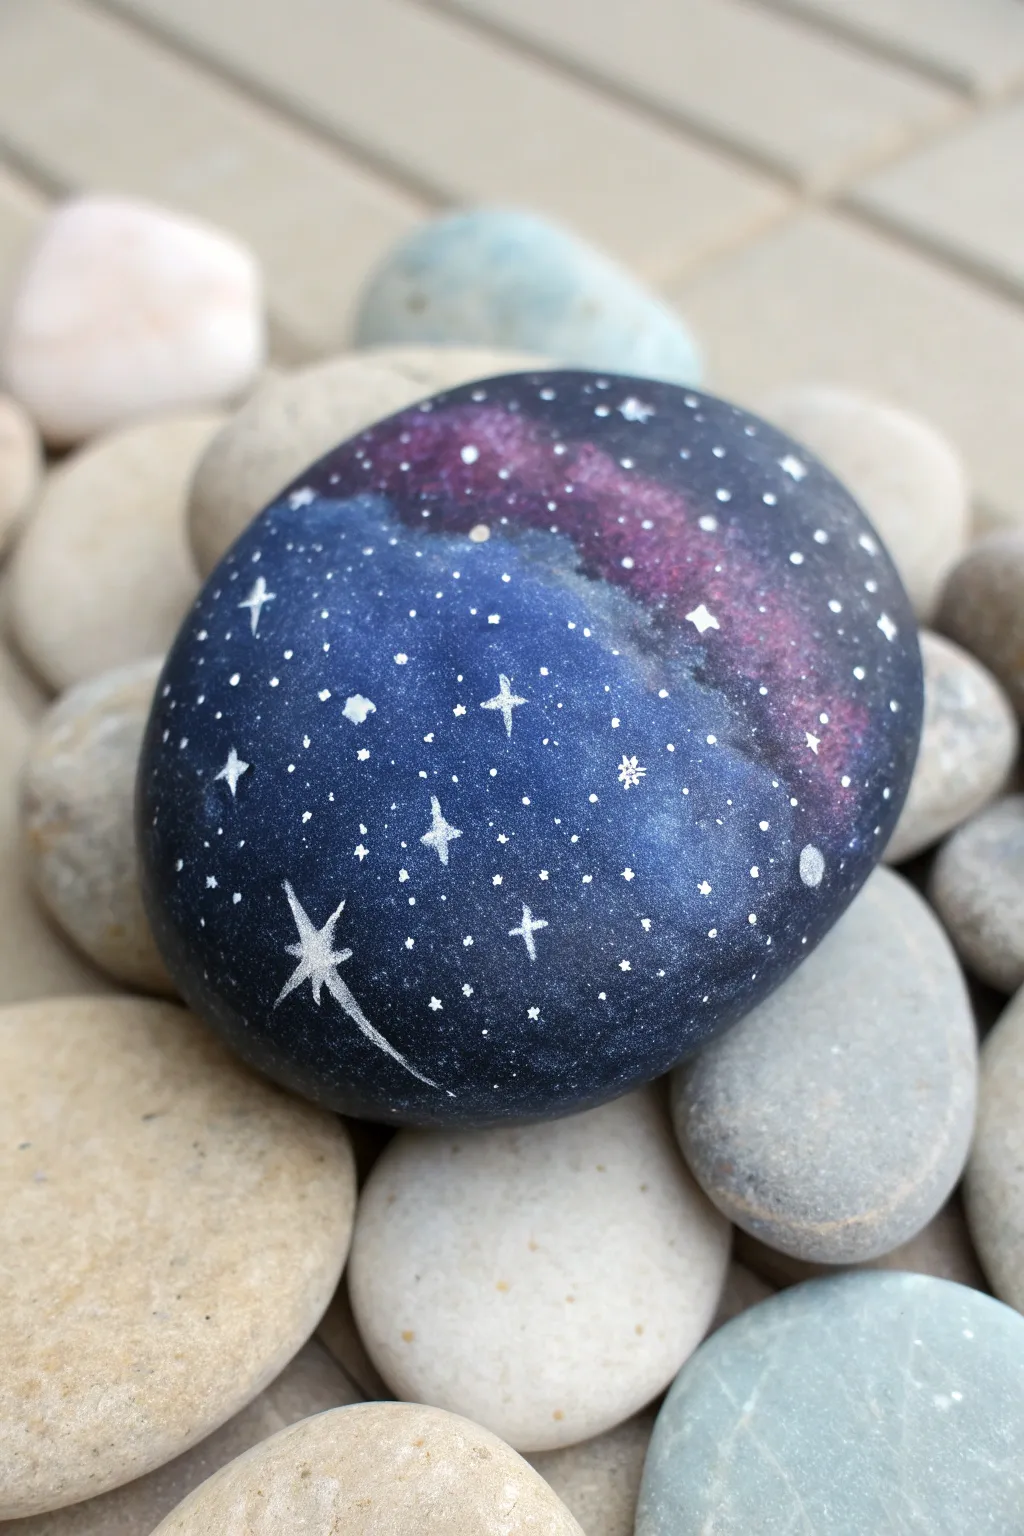
Transform an ordinary river stone into a handheld piece of the universe with this dreamy galaxy painting. The deep blues and vibrant purples blend seamlessly to create a nebula effect, topped with delicate stars that seem to twinkle in your palm.
Step-by-Step Tutorial
Materials
- Smooth oval river rock (approx. 3-4 inches wide)
- Acrylic paints: Black, Midnight Blue, Ultramarine Blue, Magenta/Purple, White
- Paintbrushes: Flat shader brush, small sponge dabber (or cosmetic sponge), fine liner brush (size 0 or 00)
- Old toothbrush (optional for splattering)
- Palette or small plate
- Water cup and paper towels
- Gloss varnish or clear sealant spray
Step 1: Setting the Scene
-
Clean the Canvas:
Begin by washing your stone thoroughly with soap and water to remove any dirt or oils. Let it dry completely before starting to ensure the paint adheres properly. -
Base Coat:
Paint the entire top surface of the rock with a solid layer of black acrylic paint. I like to carry the black slightly down the sides so no bare stone shows from the top view. -
Second Coat:
Allow the first layer to dry (usually 10-15 minutes), then apply a second coat of black if needed to get a completely opaque, dark background.
Cloudy Colors?
If your nebula looks muddy, wait for the paint to dry fully before adding the next color layer. Wet-on-wet blending can turn gray if overworked.
Step 2: Creating the Nebula
-
Primary Blue Layer:
Pour a small amount of midnight blue paint onto your palette. Using a small sponge dabber or the corner of a cosmetic sponge, gently dab the paint across the majority of the rock, leaving the edges dark black to create depth. -
Blending Transition:
While the midnight blue is still slightly tacky, dab some ultramarine blue into the center area, blending it softly outward into the darker blue. -
Adding the Nebula Cloud:
Load a clean part of your sponge with magenta or purple paint. Dab a diagonal band across the upper third of the rock, creating a soft, cloudy streak. Use a light touch so the texture looks airy. -
Highlighting the Cloud:
Mix a tiny speck of white into your magenta to create a lighter lilac color. Dab this sparingly into the very center of your purple band to make the nebula glow. -
Softening Edges:
If any edges look too harsh, go back with a sponge lightly loaded with black or dark blue and tap around the perimeter of your nebula to soften the transition. -
Full Dry:
Let this colorful cloud layer dry completely. This is crucial; if the base is wet, your stars will turn muddy instead of crisp white.
Add Dimension
Mix a tiny bit of metallic silver paint into your white star mixture. Under direct light, this will make your galaxy genuinely shimmer and twinkle.
Step 3: Adding the Stars
-
Splatter Technique:
Dilute a small drop of white acrylic paint with water until it’s the consistency of ink. Dip an old toothbrush (or a stiff brush) into it. -
Creating Distance:
Run your thumb over the bristles to flick tiny specks of white paint onto the rock. This creates the thousands of distant, tiny stars. Aim for random distribution. -
Manual Stars:
Using your finest liner brush or a toothpick, dip into undiluted white paint and dot individual stars around the deep blue sections. Vary the pressure to create different sizes. -
Painting the Shooting Star:
Locate an open space in the lower blue area. Using the fine liner brush, paint a four-pointed star shape. Then, drag a thin, curved tail downwards and to the right, lifting your brush at the end to taper the line. -
Adding Major Stars:
Paint 3-4 other larger, four-pointed ‘cross’ stars scattered around the galaxy. Keep the lines thin and delicate. -
Highlighting Detail:
Add a tiny, secondary dot of bright white in the center of your shooting star and larger cross stars to make them pop.
Step 4: Finishing Touches
-
Final Cleanup:
Check the edges of your design. If you accidentally smudged white paint on the unpainted back of the rock, wipe it off now with a damp cloth. -
Sealing:
Once the paint is bone dry (give it at least an hour), apply a coat of gloss varnish or spray sealant. The gloss finish mimics the wet look of the river rock and deepens the galaxy colors significantly.
You now have a miniature universe captured on stone, ready to brighten a desk or garden path


Moon Surface and Craters
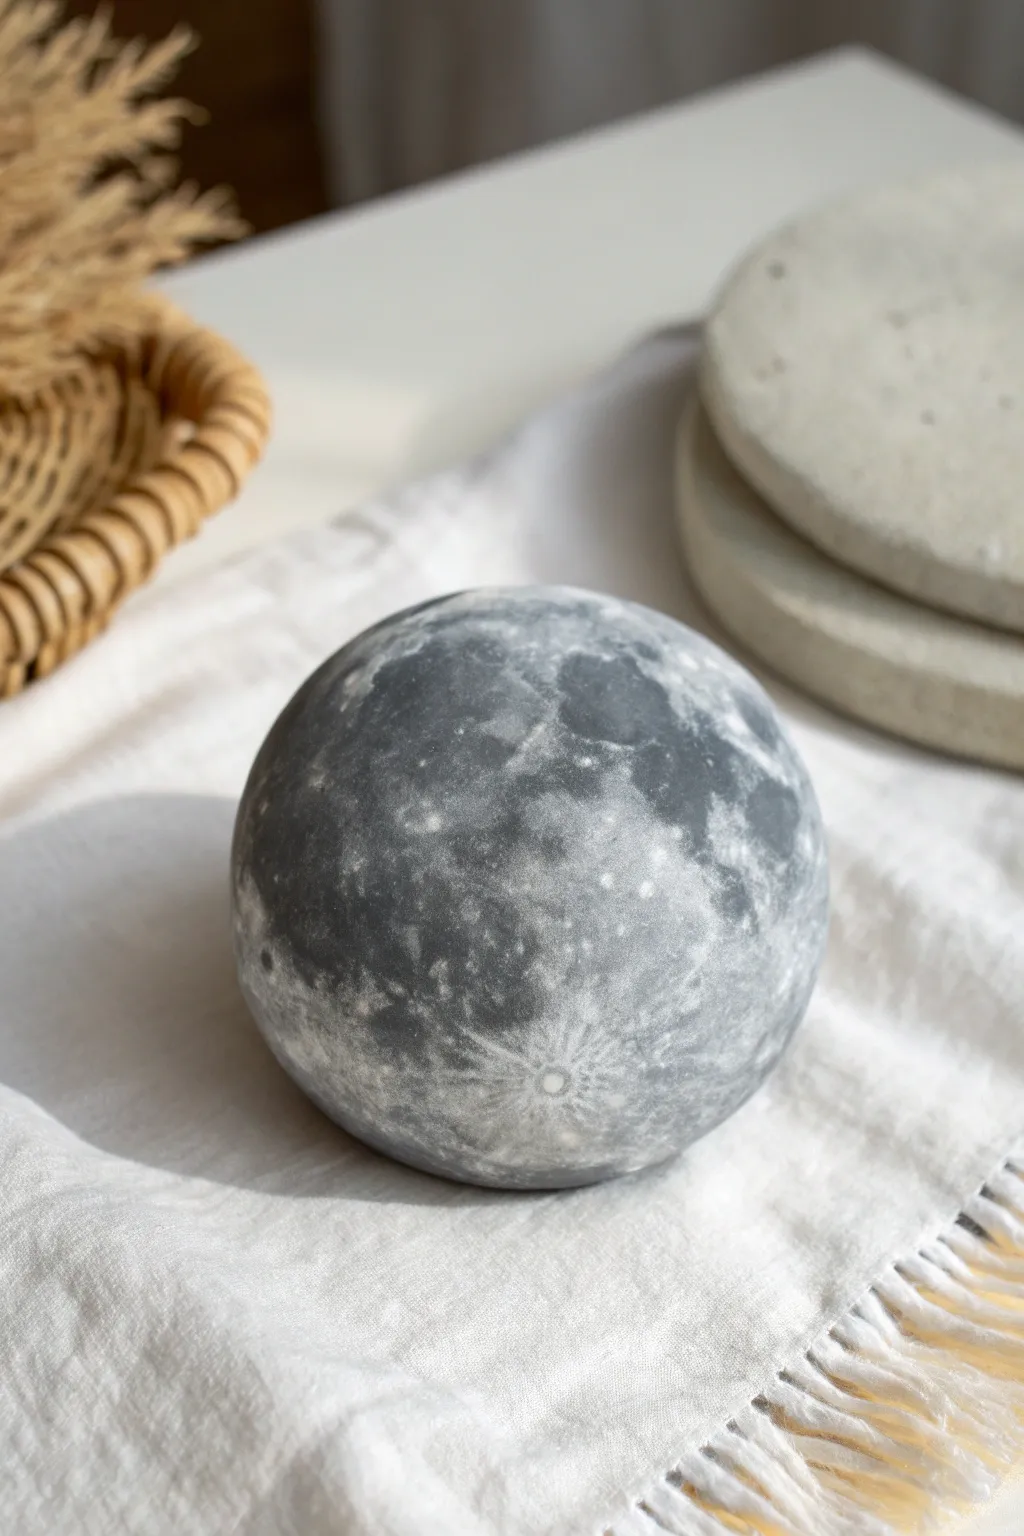
Transform a simple round stone into a stunning, scientifically inspired replica of the moon. This project uses layers of grey, white, and subtle textures to achieve realistic crater depth and lunar mare shading.
Step-by-Step
Materials
- Perfectly round, smooth river rock
- Gesso surface primer (white or clear)
- Acrylic paints: Black, Titanium White, Paynes Grey, Slate Grey
- Assorted brushes (small flat brush, fine liner brush, and a stenciling brush)
- Natural sea sponge
- Old toothbrush
- Fine-grit sandpaper
- Matte finish sealant spray
Step 1: Preparation and Base
-
Stone Selection:
Begin by finding the roundest stone possible. A spherical shape is key to selling the illusion of a miniature moon. -
Surface Prep:
Wash the stone thoroughly with soap and water to remove oils and dirt. Let it dry completely in the sun. -
Priming:
Apply a coat of Gesso to the entire surface. This gives the acrylics something to grip onto and ensures the grey tones appear true to color. -
Smoothing:
Once the Gesso is dry, lightly sand the surface with fine-grit sandpaper if there are any significant ridges or brushstrokes. -
Base Coat Application:
Mix a mid-tone grey using Slate Grey and a touch of Titanium White. Paint the entire stone with this neutral base and allow it to dry thoroughly.
Step 2: Mapping the Lunar Maria
-
Mixing Shadow Tones:
Create a darker, charcoal grey shade by mixing Paynes Grey with a small amount of Black. This will be used for the ‘maria’—the dark plains of the moon. -
Reference Study:
Look at the reference photo or a moon map. Notice the large, irregular dark patches that dominate the surface. -
Sponging the Maria:
Dampen a natural sea sponge and dip it into the charcoal grey mix. Blot off excess paint on a paper towel. -
Applying Large Shades:
Gently dab the sponge onto the stone to create the dark lunar plains. Focus on creating organic, uneven shapes rather than perfect circles. -
Softening Edges:
While the paint is still slightly tacky, use a clean, dry brush to gently feather the edges of the dark patches so they blend naturally into the lighter base.
Muddy colors?
If greys are blending into a single blob, you are working too wet-on-wet. Let the base layers dry completely before sponging on the darker maria or lighter highlights.
Step 3: Crater Texturing and Highlights
-
Creating Texture:
Mix a lighter grey, almost white. Using a fairly dry stencil brush, stipple this color over the lighter areas of the moon to suggest dusty, rocky terrain. -
Tycho Crater Base:
Locate the prominent ‘Tycho’ crater (the bright impact point with rays). Paint a small, solid white circle near the bottom center of your composition. -
Painting the Rays:
Dilute your white paint slightly with water. Using a fine liner brush, flick thin, radiating lines outward from the Tycho crater to simulate the ejecta rays. -
Adding Smaller Craters:
Switch back to your mid-tone grey. Paint tiny dots and small ‘c’ shapes scattered across the surface to represent smaller impact sites. -
Highlighting Rims:
With pure Titanium White on a detail brush, add tiny crescents to the top-left edge of your smaller craters to simulate light hitting the raised rims. -
Splatter Effect:
For a micro-texture, dip an old toothbrush into diluted white paint. Run your thumb across the bristles to flick a fine mist of specks onto the stone. -
Final Adjustments:
Step back and assess the contrast. If the dark areas faded too much during drying, glaze over them again with a very thin wash of Paynes Grey. -
Sealing:
Once fully cured (wait at least 24 hours), spray the entire rock with a matte sealant to protect the paint without adding an unrealistic glossy shine.
Glow in the Dark
Mix phosphorescent medium with your white paint for the crater rays. By day, it’s a realistic moon; by night, the craters will softly glow on your shelf.
Now you have a piece of the night sky you can hold in the palm of your hand
BRUSH GUIDE
The Right Brush for Every Stroke
From clean lines to bold texture — master brush choice, stroke control, and essential techniques.
Explore the Full Guide
Lunar Phase Circle Rock Set
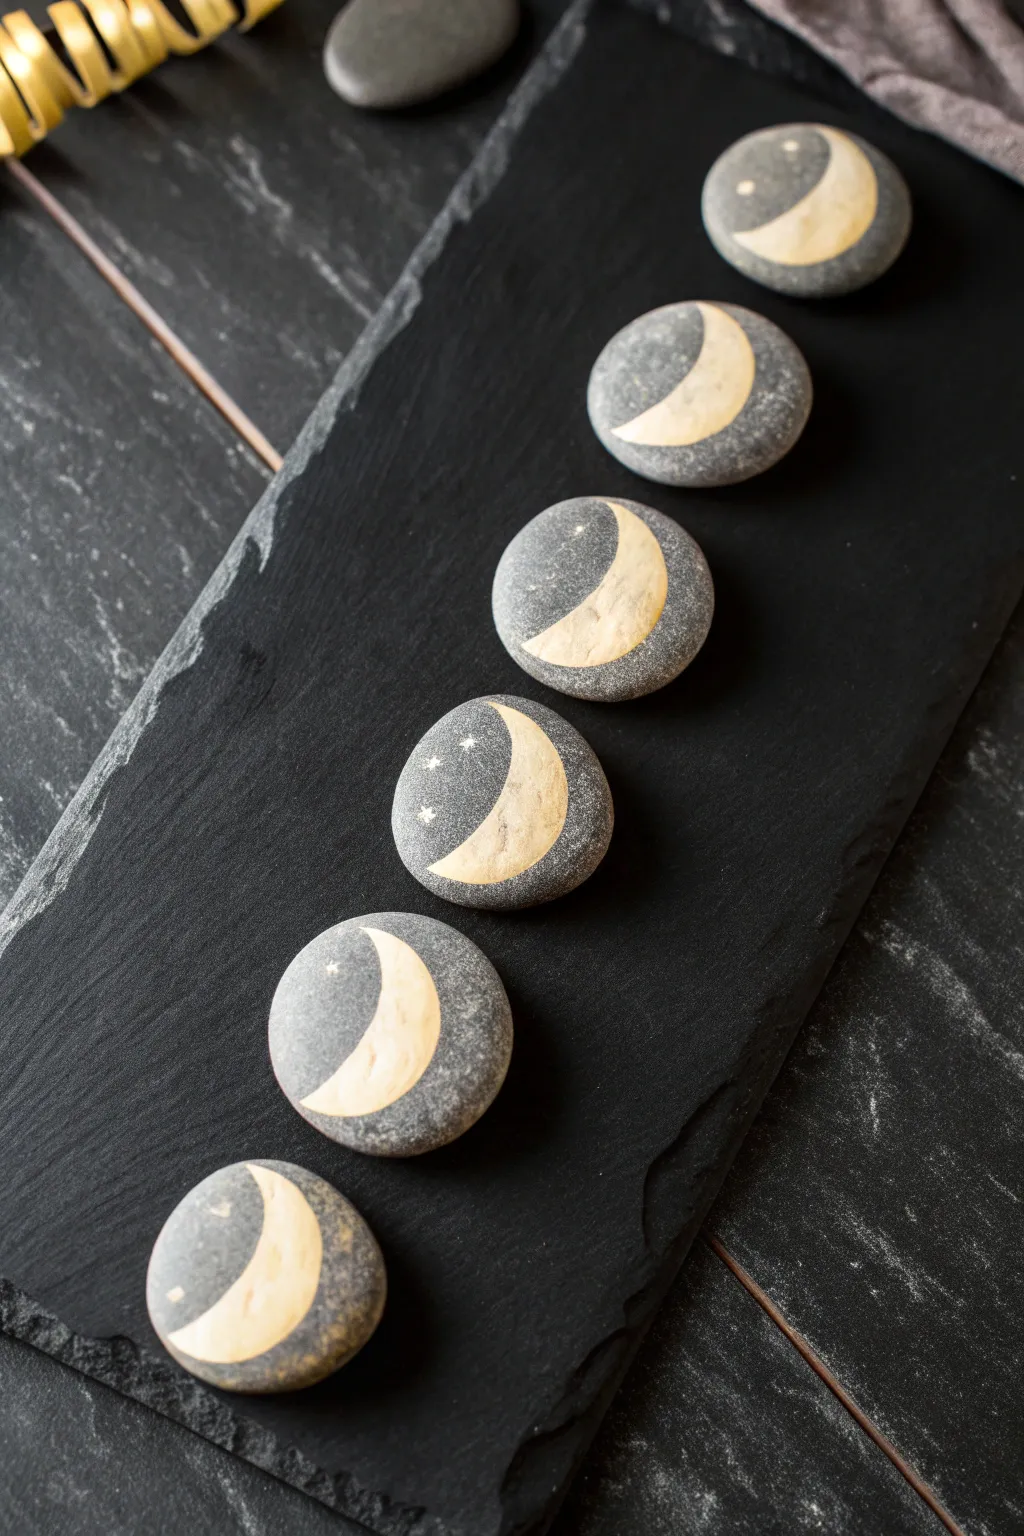
Capture the magic of the night sky with these elegantly simple lunar stones. Using natural grey river rocks as your canvas, you’ll paint glowing golden crescents that look stunning arranged on a slate board or scattered through a garden.
Step-by-Step Tutorial
Materials
- 6 smooth, round grey river stones (approx. 2-3 inches)
- Metallic gold acrylic paint
- Fine detail paintbrush (size 0 or 00)
- Small flat paintbrush (size 2-4)
- White pencil or chalk pencil for sketching
- Matte finish spray sealer (optional)
- Cup of water
- Paper towels
Step 1: Preparing the Canvas
-
Clean the stones:
Begin by thoroughly washing your river stones with warm soapy water to remove any dirt or oily residue. Scrub them gently with a brush if needed. -
Dry completely:
Let the stones dry completely in the sun or use a hairdryer to speed up the process. The surface must be bone dry for the paint to adhere properly. -
Plan the alignment:
Line up your six stones in a row to determine the best face for each one. Look for the smoothest, flattest side to be your painting surface.
Metallic Shine Tip
If your gold paint looks dull, paint a base layer of ochre or yellow acrylic first. This gives the metallic topcoat a solid foundation to really pop.
Step 2: Sketching the Moons
-
Mark the outer circle:
Using a white pencil or chalk pencil, lightly sketch the outer curve of the moon on each stone. Try to follow the natural curve of the stone’s edge for a harmonious look. -
Define the inner curve:
Sketch the inner curve to create a crescent shape. Vary the thickness on different stones if you want to represent different stages of the waxing or waning moon, or keep them uniform like the example. -
Refine the points:
Sharpen the tips of your crescent moon sketch. The points should taper off gently into the grey of the stone rather than ending efficiently. -
Check for symmetry:
Step back and look at all six stones together. Adjust your sketches now before facing them with paint to ensure the sizes look cohesive.
Constellation Upgrade
Research real constellations like Cassiopeia or the Big Dipper and paint them accurately on the dark side of the stone using tiny dots and thin connecting lines.
Step 3: Painting the Gold
-
Shake the paint:
Shake your metallic gold acrylic paint vigorously. Metallic pigments often settle at the bottom, and you need them well-mixed for that solid sheen. -
Outline the shape:
Dip your fine detail brush into the gold paint. I personally find it helpful to slightly thin the paint with a tiny drop of water for smoother lines. Carefully trace over your pencil outlines. -
Fill the center:
Switch to your small flat brush to fill in the body of the crescent. Apply the paint in smooth, even strokes, following the curve of the moon. -
Let the first coat dry:
Allow the first layer of gold to dry completely. Metallic paints can be semi-transparent, so you will likely see streaks at this stage. -
Apply a second coat:
Paint a second layer of gold over the crescent. This builds up the opacity and gives the finished piece a rich, solid luster. -
Clean up edges:
Use the fine detail brush again to neaten up any wobbly edges or to sharpen the tips of the crescent moons.
Step 4: Adding Galaxy Details
-
Map out stars:
On a few selected stones, visualize where you want tiny stars to sit within the dark, unpainted space of the rock. -
Paint tiny crosses:
Using the very tip of your detail brush, paint miniature ‘plus’ signs (+) in gold to represent twinkling stars. Keep them delicate. -
Add dot accents:
Dip the handle end of your paintbrush or a toothpick into the gold paint. Gently dot the stone near the crescent to add distant stars or stardust effects. -
Let everything cure:
Allow the stones to sit undisturbed for at least an hour until the paint is fully cured and hard to the touch. -
Erase guidelines:
If any white pencil marks are still visible around the gold paint, gently wipe them away with a damp Q-tip or a soft eraser. -
Seal the artwork:
To protect your work, especially if these will be outdoors, impart a light coat of matte spray sealer. Hold the can 12 inches away to avoid clouding the metallic shine.
Arrange your celestial collection on a mantle or tray to bring a little piece of the cosmos into your home
Sunset Ocean Portal

Capture the serene beauty of a coastal sunset on a smooth canvas provided by nature. This project features a seamless gradient sky melting into a tranquil teal ocean, creating a miniature window to the sea right in the palm of your hand.
Step-by-Step Guide
Materials
- Smooth, oval-shaped river rock
- Gesso or white acrylic primer
- Acrylic paints (Titanium White, Light Blue/Cyan, Baby Pink, Orange, Burnt Sienna, Teal/Turquoise, Black)
- Flat shader brushes (small and medium)
- Fine liner brush or detail brush
- Water cup and paper towels
- Palette or paper plate
- Matte or glossy sealant spray/varnish
Step 1: Preparation and Base Layer
-
Clean the Stone:
Begin by washing your rock with warm, soapy water to remove any dirt or oils that might prevent the paint from adhering properly. Pat it dry completely. -
Apply Primer:
Paint a solid coat of white gesso or white acrylic paint over the entire top surface of the rock. This creates a bright base that will make your sunset colors pop. -
Create the Horizon Line:
Once dry, lightly visualize or sketch a horizontal line across the middle of the rock. This will separate your sky from the ocean.
Smooth Blends
To get that seamless sunset gradient, use a slightly damp brush. If the paint dries too fast, a drop of acrylic retarder helps keep it workable longer.
Step 2: Painting the Sunset Sky
-
Top Sky Layer:
Starting at the very top of the rock, paint a curve of very pale blue mixed with plenty of white. -
Transition to Pink:
While the blue is still slightly wet, introduce a soft baby pink just below it. Use back-and-forth horizontal strokes to blend the edges where the two colors meet. -
Adding Warmth:
Below the pink, paint a band of bright orange. Clean your brush often to keep the colors muddying, but work quickly enough to blend the transition into the pink layer. -
Deepening the Horizon:
Right above your horizon line, mix a tiny bit of Burnt Sienna or red into your orange to create a darker, richer sunset hue. This adds depth to the lowest part of the sky.
Step 3: Painting the Ocean
-
Ocean Base Color:
Fill the bottom half of the rock with a rich teal or turquoise paint. Carefully cut in a crisp, straight line against the sunset sky. -
Adding Ocean Depth:
While the teal is wet, darken the right and left edges slightly with a tiny drop of blue or black mixed into the teal, keeping the center lighter.
Metallic Magic
Mix a tiny amount of metallic gold paint into the sun’s reflection on the water for a mesmerizing shimmer that catches the light.
Step 4: Details and Finish
-
Paint the Sun:
Using a small detail brush or the end of a paintbrush handle, place a small, solid white dot just above the horizon line in the left-center area. -
Create the Reflection:
Directly below the sun, paint horizontal dashes of pale yellow or watered-down white on the water. Make them wider near the horizon and narrower as you move down the rock. -
Add Texture to Water:
With an extremely fine liner brush and thin white paint, add delicate, sparse horizontal lines across the water to suggest gentle waves. -
Paint the Land Mass:
On the right side of the horizon, paint a small, irregular shape using dark brown or black to represent a distant island or shoreline. -
Detail the Trees:
Use a stippling motion (tiny dots) with the tip of your smallest brush along the top of the land mass to simulate the silhouette of tiny pine trees. -
Final Coat:
Allow the rock to dry overnight to ensure all thick paint layers are set. Finish with a spray sealant to protect your miniature masterpiece.
Now you have a permanent piece of paradise to keep at your desk or gift to a friend

PENCIL GUIDE
Understanding Pencil Grades from H to B
From first sketch to finished drawing — learn pencil grades, line control, and shading techniques.
Explore the Full Guide
Mountain Landscape in a Circle Frame
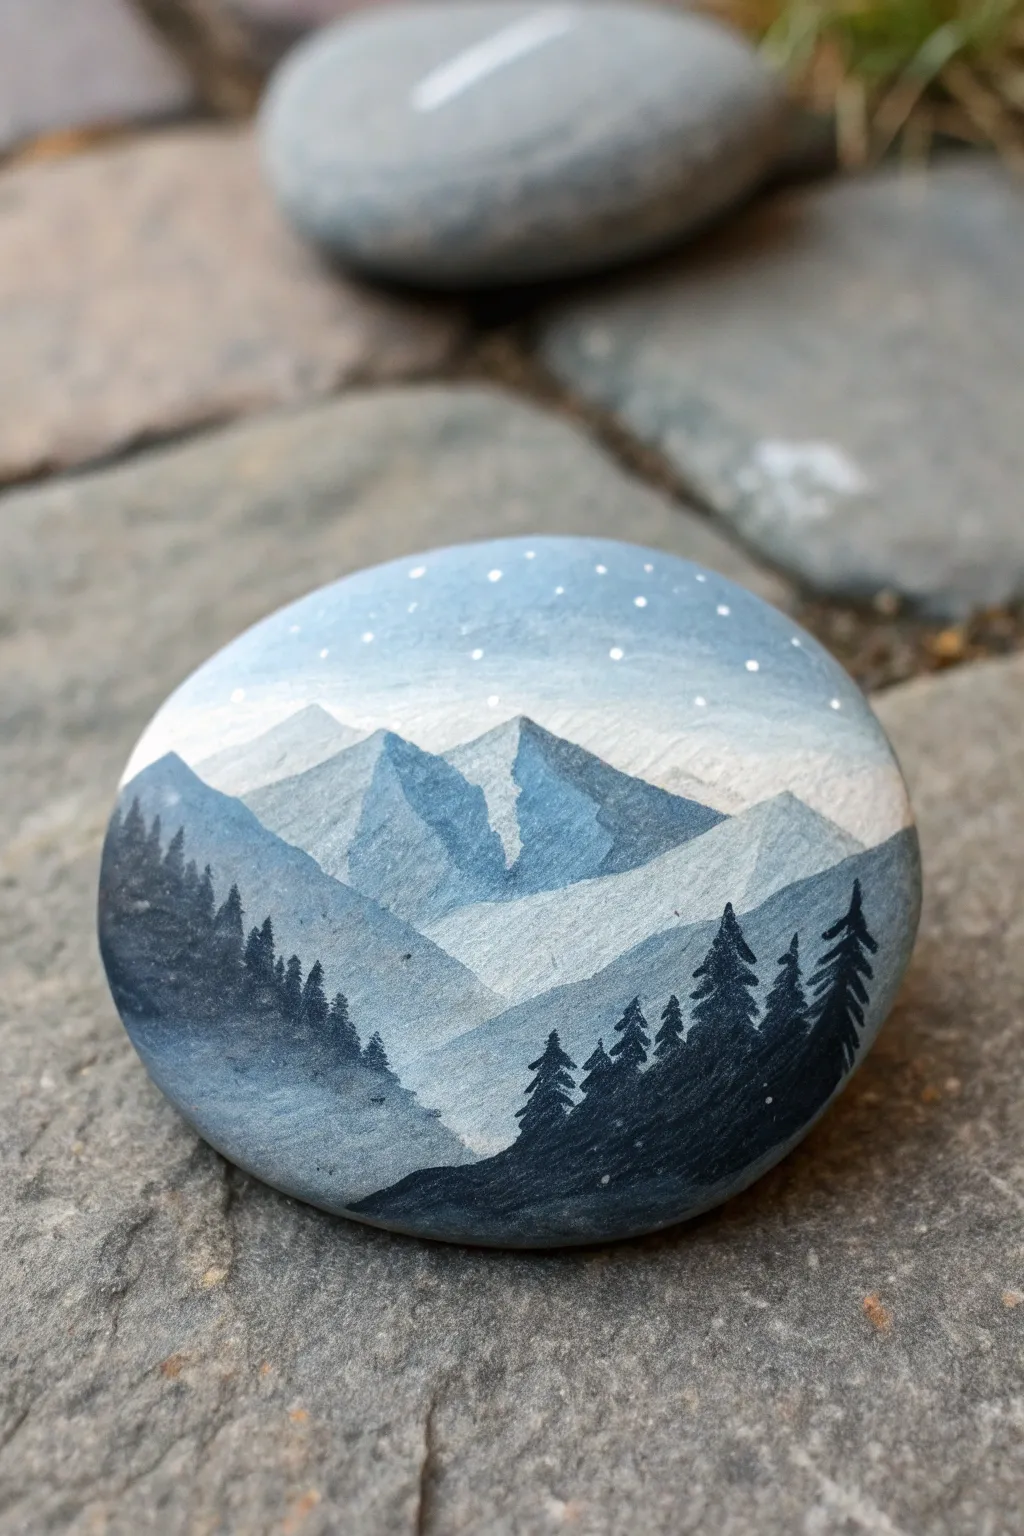
Capture the serene beauty of a high-altitude night on a simple river stone. This project layers shades of blue and white to create convincing atmospheric depth, finished with crisp silhouette trees against a starry sky.
Detailed Instructions
Materials
- Smooth, rounded river rock (approx. 3-4 inches wide)
- Acrylic paints: Titanium White, Ultramarine Blue, Phthalo Blue, Lamp Black
- Flat shader brushes (small and medium)
- Fine liner brush (size 00 or 000)
- Palette for mixing
- Cup of water and paper towels
- Matte or satin clear sealant spray
Step 1: Setting the Sky
-
Prep the surface:
Begin by scrubbing your rock with warm soapy water to remove any dirt or oils. Let it dry completely before starting to ensure the paint adheres properly. -
Base gradient:
Mix a very light blue shade using mostly Titanium White with a tiny dot of Phthalo Blue. Paint the top third of the rock with this color, blending it slightly lighter as you move closer to where the mountains will be. -
Soften the horizon:
While the sky paint is still slightly damp, mix a bit more white into your blend and sweep it horizontally across the bottom edge of the sky area. This creates a hazy, atmospheric glow.
Muddy Mountains?
If your mountain layers are blending into one big blob, ensure each layer is 100% dry before painting the next one in front of it.
Step 2: Layering the Mountains
-
First mountain range:
Mix a light gray-blue shade. Using a small flat brush, paint the outline of the furthest mountain peaks directly below the sky. Keep the edges triangular but slightly rugged. -
Fill the peaks:
Fill in the shape of these distant mountains, blending the color downward. I like to let the paint fade out slightly at the bottom to mimic mist rising from the valley. -
Snow caps:
Once the distant mountains are dry to the touch, use a small brush with pure white paint to add snow to the right-side slopes of the peaks. Use a dry-brush technique—wiping most paint off the brush first—to give the snow a textured, wind-swept look. -
Mid-ground range:
Create a slightly darker medium blue shade. Paint a second range of mountains below the first one, allowing the peaks to overlap the distant range slightly. This creates instant depth. -
Adding dimension:
Paint the left side of these mid-ground peaks slightly darker than the right side to establish a light source direction. -
Lower slopes:
Mix a slate blue color (add a tiny touch of black to your blue). Paint sloping hills in the middle foreground that sweep downward from left to right. -
Mist layering:
Use a translucent wash of watered-down white paint over the valleys between the mountain ranges. This separates the layers and enhances the foggy morning effect.
Step 3: Foreground and Details
-
Darkest silhouettes:
Mix your darkest shade: black with a touch of dark blue. Using this color, paint a sloping hill shape at the very bottom right of the rock, curving upward slightly. -
Tree trunks:
Switch to your finest detail liner brush. Dip it into the black-blue mix and paint thin vertical lines rising from the dark hill. Vary the heights to make the forest look natural. -
Defining the pines:
Starting at the top of a tree line, use tiny horizontal dabs to create branches. Keep the top narrow and widen the branches as you move down the trunk. -
Left side trees:
Repeat this process on the lower left side, painting smaller trees that appear to be further back on the slate-blue hill. Make these slightly lighter (dark grey-blue) than the foreground trees to push them into the distance. -
Starry sky:
Dip the tip of a toothpick or the handle end of a small brush into pure white paint. Gently dot the sky area to create stars. Group a few together and leave open spaces for a realistic constellation look.
Level Up: Northern Lights
Instead of a plain blue sky, blend teal and purple swirls in the background before adding stars for an aurora borealis effect.
Step 4: Finishing Touches
-
Quality check:
Step back and look at your rock. If the snow on the mountains looks too bright, glaze over it with a very watery blue wash to settle it into the scene. -
Seal the work:
Allow the rock to dry overnight to ensure all thick paint layers are cured. Spray with a matte or satin sealant to protect the artwork from scratching or fading.
Place your finished mountain stone on a desk or shelf to bring a breath of fresh alpine air into your daily space
Wildflower Wreath Around the Edge
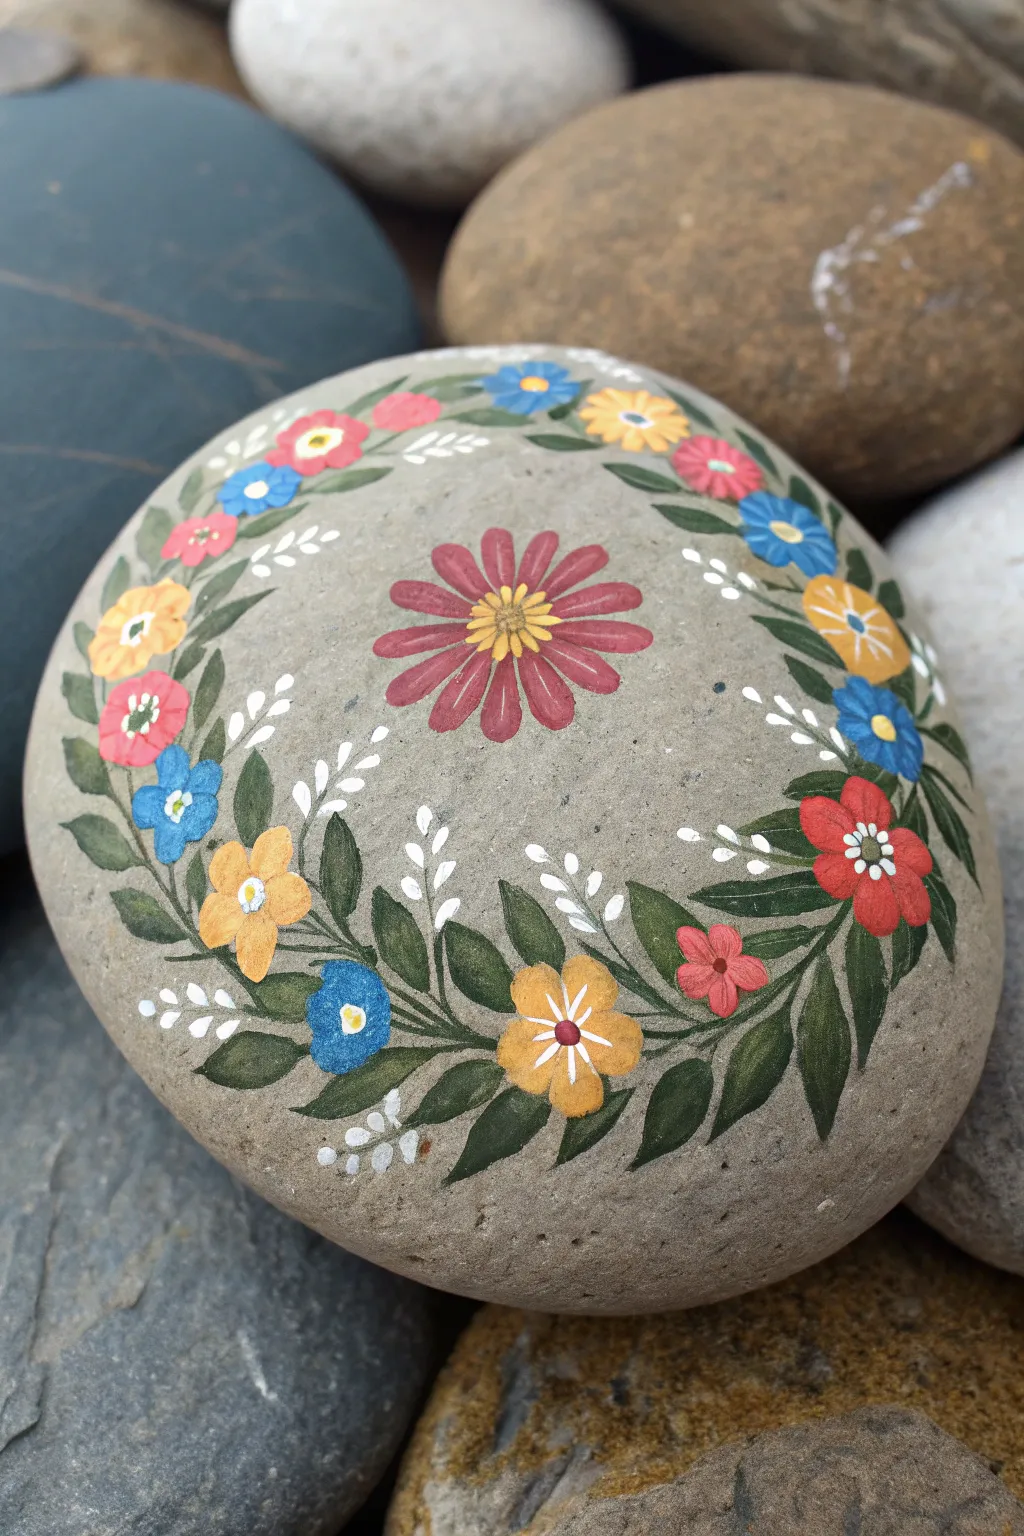
This charming design features a central ruby-red daisy encircled by a vibrant garland of miniature wildflowers and leafy greens. The natural grey of the stone works perfectly as a neutral canvas, giving the piece a rustic, garden-fresh appeal.
Step-by-Step
Materials
- Smooth, round river rock (approx. 3-4 inches wide)
- Acrylic paints: Deep red, ochre yellow, sky blue, forest green, titanium white, and black
- Fine detail brushes (sizes 0, 00, and 1)
- Small dotting tool or toothpick
- Palette or small plate for mixing
- Matte or satin sealant spray
Step 1: Painting the Centerpiece
-
Clean the canvas:
Start by scrubbing your river rock with soapy water and drying it completely to ensure all dust and oils are removed, which helps the paint adhere better. -
Center flower base:
Using a size 1 brush loaded with deep red paint, create the central flower. Paint elongated, teardrop-shaped petals radiating outward from the absolute center of the stone. -
Layering the center:
Paint about 10-12 petals for a full look. Once the red is dry, painting a small circle of ochre yellow right in the middle. -
Adding detail to the center:
With your thinnest brush (00), add very fine red lines radiating from the yellow center into the red petals for texture. Then, use white to paint tiny star-burst lines inside the yellow center.
Brush Technique
For sharp leaf tips, press down at the base of the leaf and lift the brush upward quickly as you drag it out. This creates a natural taper.
Step 2: Forming the Leafy Wreath
-
Map the greenery:
Mix a tiny bit of black into your forest green to create a deep shade. Using a liner brush, paint a loose, imaginary circle around the central flower to guide where your leaves will go. -
Paint main leaves:
Paint pairs of pointed, almond-shaped leaves along this circular path. Vary the angles so they look wind-blown or natural rather than perfectly geometric. -
Add leaf veins:
Once the dark green base is dry, mix a lighter green (green + yellow). Use your finest brush to paint a thin central vein line down the middle of each leaf. -
Fill the gaps:
I like to scan the wreath for any large empty spaces between the main leaves and add smaller, single leaves or tiny stems in those spots.
Add a Bee
Make the garden come alive by painting a tiny bumblebee resting on one of the yellow or red petals in the wreath.
Step 3: Adding the Wildflowers
-
Placement strategy:
Plan to place about 6-8 main flowers evenly around the wreath. Alternate your colors: yellow, blue, and red. -
Paint simple blooms:
For the yellow and blue flowers, paint 5 rounded petals. For the side-facing flowers (like the small red ones), paint just 3 petals in a fan shape. -
Flower centers:
Use a dotting tool or the back of your brush to place a white dot in the center of the blue and red flowers, and a white or light yellow dot in the yellow ones. -
Tiny details:
Add minuscule white lines radiating from the centers of the blue flowers to give them depth. -
White sprigs:
Using titanium white and a very light touch, paint delicate fern-like sprigs or clusters of three tiny dots filling the spaces between the colorful flowers.
Step 4: Finishing Touches
-
Clean up:
Inspect your edges. If any paint went outside the wreath line where you don’t want it, you can scratch it off gently with a toothpick if it’s already dry, or wipe it with a damp Q-tip. -
Seal the stone:
Allow the stone to cure for 24 hours. Finish with a matte or satin spray varnish to protect the artwork without making it too glossy and artificial-looking.
Place this lovely stone on a desk or in a garden pot to enjoy a bloom that lasts all year round


Classic Ladybug Circle Rock

Transform a smooth, rounded stone into a charming garden companion with this vibrant ladybug design. The glossy finish gives the bright crimson shell and deep black spots a polished, professional look that will shine among your plants.
Step-by-Step Tutorial
Materials
- Smooth, oval-shaped river rock
- Red acrylic paint (bright scarlet or crimson)
- Black acrylic paint
- White acrylic paint
- Flat paintbrush (medium size)
- Small round paintbrush or detail brush
- Dotting tool (or the handle end of a paintbrush)
- Clear gloss sealant (spray or brush-on)
- Pencil (optional)
Step 1: Preparation and Base Coat
-
Clean your canvas:
Begin by thoroughly washing your rock with soap and water to remove any dirt or oils. Let it dry completely in the sun or with a paper towel, as moisture will prevent the paint from adhering properly. -
Apply the red base:
Using your flat paintbrush, coat the entire top surface of the rock with bright red acrylic paint. You want a vibrant, solid color, so don’t be afraid to be generous. -
Layer for opacity:
Acrylic paints, especially reds, can sometimes be translucent. Once the first coat is dry to the touch, apply a second coat to ensure a rich, opaque finish where no stone color shows through. -
Dry thoroughly:
Set the rock aside and allow the red base to dry completely. This is crucial because painting black over wet red will result in a muddy mess.
Step 2: Adding Details
-
Outline the head:
Visualize a curved line at the front, slightly narrower end of your rock. Using a pencil lightly or going straight in with a small brush and black paint, mark off the semi-circle that will become the ladybug’s face. -
Fill the face:
Paint the marked head section entirely black. Use smooth strokes to get a crisp edge against the red body. -
Draw the center line:
Switch to your detail brush or a very fine liner brush. Starting from the center of the black neck, paint a thin black line straight down the middle of the red body to the tail, separating the wings. -
Thicken the line:
Go back over your center line slightly to give it a bit more weight, tapering it gently as you reach the back of the stone. -
Create the spots:
Dip a dotting tool or the wooden handle end of a paintbrush into your black paint. Press firmly onto the red wings to create varied circles. I like to scatter them somewhat randomly rather than making perfect rows. -
Vary spot sizes:
For a natural look, make some spots slightly larger by swirling the tool in a small circle, and keep others as simple stamps. Don’t forget to add a few partial spots near the edges of the rock. -
Let the black dry:
Wait for the black paint to fully set. The spots will be thicker than the base coat, so give them a little extra drying time.
Paint Smearing?
If the red paint lifts when you apply the black, the base layer wasn’t fully dry. Let it sit longer or use a hairdryer on low heat to speed up the process.
Step 3: Finishing Touches
-
Paint the eyes:
Dip a smaller dotting tool or a toothpick into white paint. Place two small dots onto the black head area to create the eyes. -
Add pupils:
Once the white dots are dry, use a very fine point (like a toothpick tip) with a tiny amount of black paint to add minuscule pupils to the center of the white eyes. -
Final dry:
Allow the entire rock to dry for several hours or overnight. Ensure absolutely no paint is tacky before moving to the next step. -
Apply sealant:
To achieve that high-gloss, wet look seen in the photo, apply a layer of clear gloss sealant. This seals the rock against weather and makes the colors pop beautifully.
Color Pop
Apply a coat of white paint underneath the red base layer. This acts as a primer and makes the red appear much brighter and more neon.
Place your shiny new beetle in a flower pot or give it as a cheerful handmade gift
Citrus Slice Cross-Section
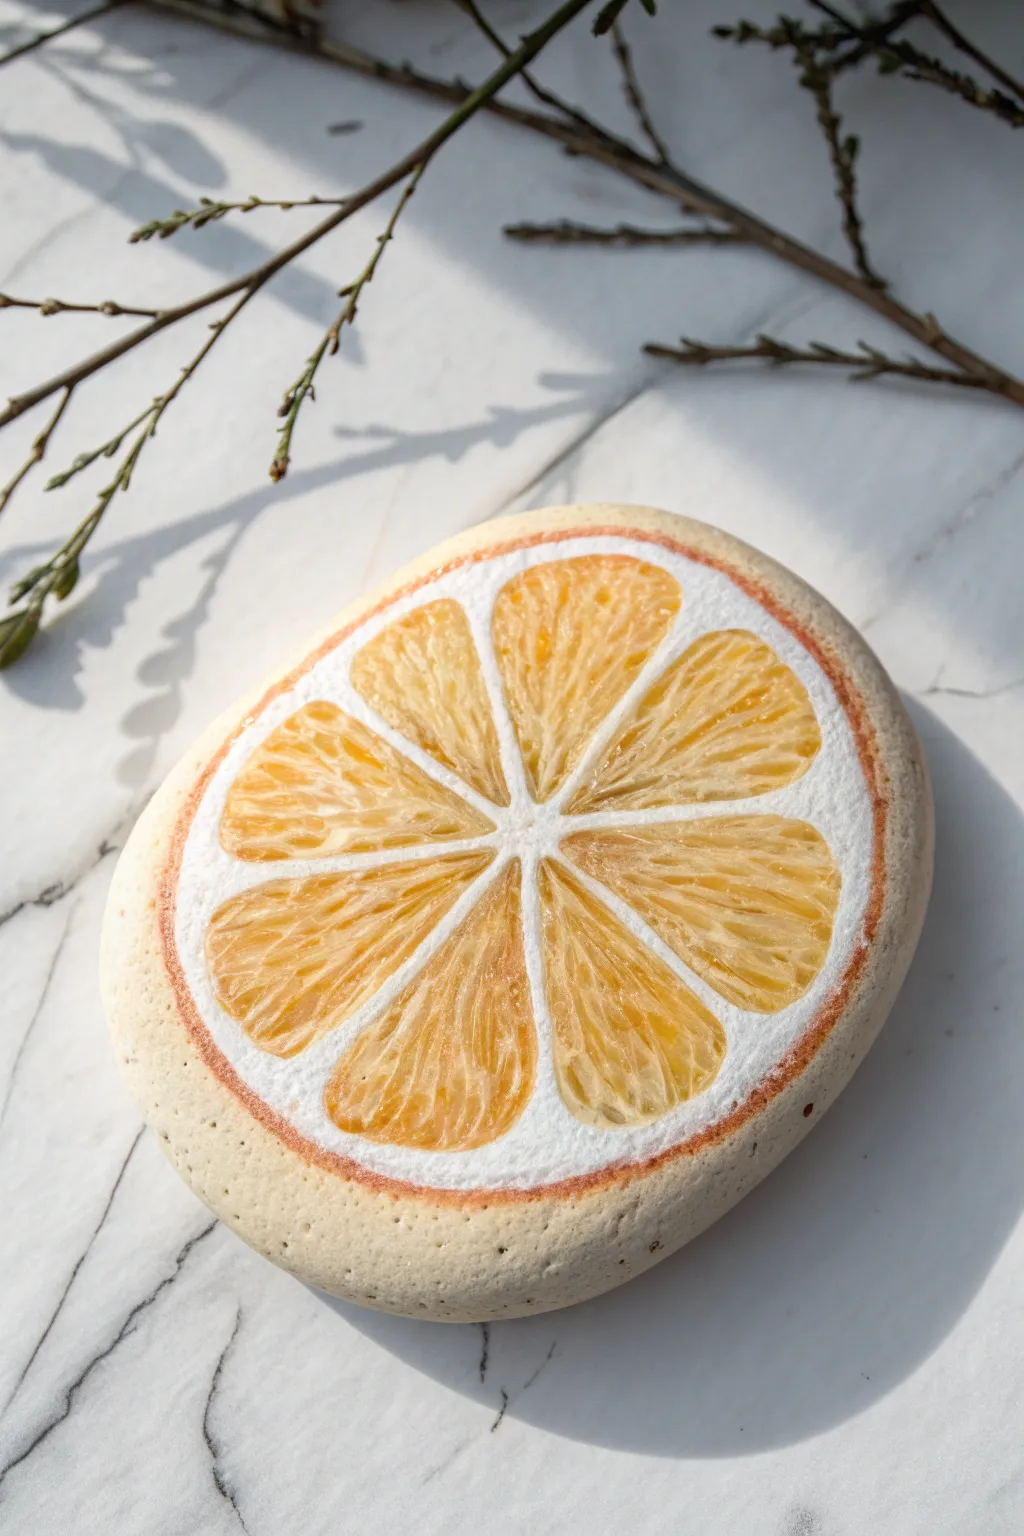
Transform a simple smooth stone into a juicy, hyper-realistic citrus slice that looks good enough to squeeze. This project focuses on layering translucent glazes to capture the delicate, fibrous texture of fruit pulp.
Step-by-Step
Materials
- Smooth, flat oval river rock (cleaned and dried)
- Acrylic paints (white, titanium white, lemon yellow, cadmium orange, burnt sienna, yellow ochre)
- Gesso (optional but recommended)
- Fine detail brushes (sizes 0, 00, and 1)
- Small flat brush
- Glazing medium or water (for thinning)
- Palette or small plate
- Paper towels
- Matte or satin varnish
Step 1: Base Preparation
-
Prime the Surface:
Begin by cleaning your rock thoroughly to remove any dust or oils. Apply a thin coat of white gesso or titanium white acrylic paint over the top surface. This creates a bright foundation that will make your citrus colors pop. -
Sketch the Segments:
Once the white base is completely dry, lightly sketch the citrus design with a pencil. Draw a small central point, then radiate lines outward to create wedge shapes. Aim for 8-10 segments, rounding off the outer corners of each wedge so they don’t touch the very edge of the rock—leave a border for the rind. -
Block in the Pith:
Using titanium white, paint the areas between your pencil lines. This includes the center star, the dividing membranes, and the thick outer ring. This ‘pith’ area should remain stark white for high contrast.
Uneven Coverage?
If your white pith looks streaky after painting the fruit segments, go back with a liner brush and carefully re-outline the white membranes with fresh titanium white to crisp up the edges.
Step 2: Creating the Pulp
-
First Yellow Glaze:
Mix a small amount of lemon yellow with glazing medium or a little water to make it translucent. Fill in each fruit segment. You want the white background to shine through this initial layer. -
Adding Orange Depth:
While the yellow is still slightly tacky or just dry, mix a wash of cadmium orange. Apply this to the outer edges of each segment and near the center point, leaving the middle of the segment yellower to suggest volume. -
Texture Guidelines:
Using your finest brush (size 00) and a mix of orange and yellow ochre, start painting tiny, thin lines radiating from the center of the fruit outward. These lines mimic the juice sacs inside the pulp. -
Building Fibers:
Deepen the color of your liner brush with a touch of burnt sienna. Paint very short, broken lines within the segments, focusing on the ‘shadow’ areas where one segment meets the white membrane. -
Highlighting the Sacs:
Clean your brush thoroughly. I like to take pure titanium white, thinned slightly, and paint extremely fine highlights on top of your orange fibers. These should look like little sparkles or glistening juice pockets.
Juicy Level Up
Use ‘Glossy Accents’ or UV resin specifically just on the orange segments. This creates a raised, 3D wet look that contrasts beautifully with the matte white pith.
Step 3: The Rind & Details
-
The Inner Rind Edge:
Mix a soft peach color using white and a tiny dot of orange. Paint a very thin, consistent line right where the white pith meets your colored fruit segments. This softens the transition. -
Painting the Peel:
On the very outer edge of the white pith area, paint a ring of cadmium orange mixed with a little burnt sienna. This represents the actual skin of the orange. -
Stippling Texture:
To give the peel a realistic skin texture, gently stipple (dot) the outer orange ring with a darker shade of orange-brown. This mimics the porous surface of citrus skin. -
Adding Pith Pores:
Dilute a tiny amount of grey or light brown paint until it’s barely visible. Add minuscule dots randomly onto the white pith area to simulate the spongy texture. -
Final Glaze:
Once all layers are bone dry, mix a very watery yellow glaze and brush it quickly over the entire fruit center (avoiding the white pith). This unifies the highlights and shadows.
Step 4: Finishing Touches
-
Clean Up Edges:
If any paint smudged onto the side of the rock where you want the natural stone showing, wipe it away with a damp cloth or paint over it with a color that matches your rock. -
Varnishing:
Apply a coat of satin or matte varnish to protect your work. A gloss varnish can also work on the fruit segments specifically to make them look wet and juicy.
Now you have a refreshing piece of art that looks fresh from the produce aisle
Watermelon Round Slice
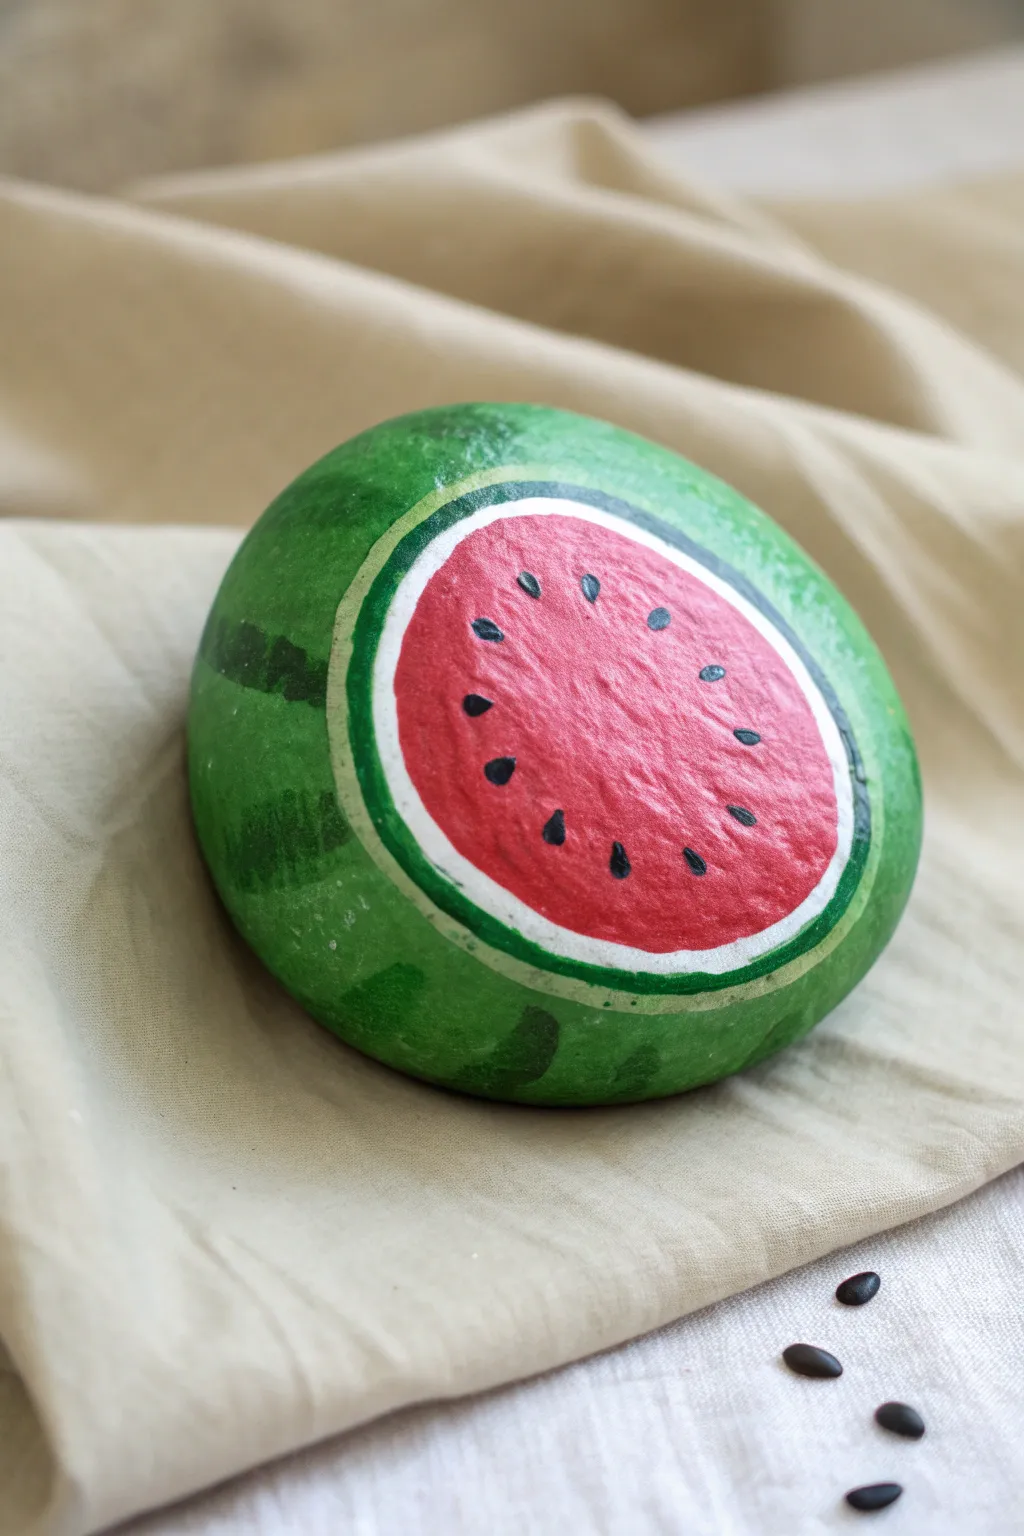
Transform a simple round stone into a juicy, convincing watermelon slice with just a few colors and a steady hand. This project uses the natural curve of the rock to mimic the fruit’s spherical shape, creating a delightful 3D trompe-l’œil effect.
Detailed Instructions
Materials
- Smooth, round river rock (approx. palm-sized)
- Acrylic paints (bright red, white, sap green, dark forest green, black)
- Flat paintbrush (medium size)
- Small round detail brush
- Pencil
- Matte or satin sealant/varnish
- Palette or small dish for mixing
- Paper towels and water cup
Step 1: Prepping the Canvas
-
Clean the surface:
Before you begin, scrub your rock thoroughly with soap and water to remove any dirt or oils. Let it dry completely, as moisture trapped inside can ruin the paint later. -
Sketch the circle:
Using a pencil, lightly draw a large circle on the top face of the rock. This will be the exposed pink flesh of the watermelon. -
Sketch the inner rind:
Draw a slightly larger circle around the first one, leaving about a 1/4 inch gap between them. This gap will become the white inner rind.
Oops! Uneven Circles?
If your painted circles look wobbly, don’t stress. Wait for the paint to dry fully, then use the adjacent color to cut back in and corrective-shape the messy edge.
Step 2: Painting the Fruit Flesh
-
Base coat the red:
Fill in the smallest inner circle with bright red acrylic paint. You will likely need two coats to get a solid, opaque color that hides the grey of the stone. -
Texture the red:
While the second coat of red is still slightly tacky, I like to stipple it gently with a dry brush or a bit of sponge to give it that realistic grainy fruit texture. -
Paint the white rind:
Using your medium flat brush, paint the ring between the red center and your outer pencil line with white paint. -
Blend the transition:
Let the white dry slightly, then carefully touch up the edge where the red meets the white. It doesn’t need to be perfectly sharp; a slightly soft line looks more natural.
Step 3: Creating the Outer Rind
-
Green base coat:
Paint the entire remainder of the rock—everything outside the white ring—with your sap green (the lighter green shade). Don’t forget the bottom if you want it fully covered. -
Define the rim:
Carefully run a line of this lighter green right up against the white ring. A steady hand is key here to keep the circle relatively round. -
Stripe planning:
Once the light green base is dry, visualize or lightly sketch wavy stripes radiating from the center ‘slice’ down the sides of the rock. -
Painting the stripes:
Load your brush with dark forest green. Paint irregular, wavy stripes over the light green background. Vary the width of the lines so they look organic. -
Add stripe details:
Feather the edges of the dark stripes slightly so they blend naturally into the lighter green, rather than looking like stiff bars.
Take It Further
Try painting a bite mark! Use white paint to create a scalloped ‘bitten’ edge cutting into the red circle, then outline it with a thin bit of the green rind.
Step 4: Details & Sealing
-
Seed placement:
Switch to your smallest detail brush and black paint. Imagine a circle inside the red area and paint small teardrop shapes along this imaginary ring. -
Seed variety:
Add a few more seeds closer to the center, pointing them generally inward. Don’t make them too uniform; randomness adds realism. -
Highlight the seeds:
For a pro touch, add a tiny, microscopic dot of white paint to the top of each black seed to make them look wet and shiny. -
Final drying:
Allow the entire rock to dry for at least an hour or two to ensure no moisture is trapped under the sealer. -
Seal the deal:
Apply a coat of matte or satin varnish. This protects the paint from chipping and gives the ‘fruit’ a nice sheen without being overwhelmingly glossy.
Place your finished rock in the garden or use it as a summery paperweight to brighten up your desk
Emoji-Style Face Circle Rocks


Transform smooth river rocks into a charming cast of characters with minimal effort and maximum personality. This set features muted, earthy tones and simple black line work to create a clean, modern aesthetic perfect for mood trackers or playful decor.
How-To Guide
Materials
- Smooth, rounded river stones (approx. 2-3 inches wide)
- Acrylic paints (muted pink, burnt orange, cream/beige, teal, terracotta, plain white)
- Black acrylic paint marker (fine tip) or fine liner brush
- Flat paintbrush (medium size)
- Matte finish sealant spray or varnish
- Palette or paper plate for mixing
- Water cup and paper towels
Step 1: Preparing the Base
-
Clean your canvas:
Begin by washing your stones thoroughly with warm soapy water to remove any dirt or oils. Let them dry completely, as moisture will prevent the paint from adhering properly. -
Choose your palette:
Select muted, earthy acrylic colors to match the sophisticated look of the original image. You’ll want a spectrum that includes a soft pink, a warm orange, a neutral beige, a dusty teal/green, a deep terracotta, and an off-white. -
Mix custom shades:
If your paints are too bright straight from the tube, tone them down by mixing in a tiny dot of brown or grey. This helps achieve that natural, organic vibe rather than a plastic toy look. -
Apply the base coat:
Paint the entire top surface of each rock with your chosen base colors. Use a flat brush for smooth coverage. -
Layer for opacity:
Let the first coat dry fully. I usually find that lighter colors like the cream and pink need a second or even third coat to be completely opaque and hide the natural rock color underneath. -
Smooth it out:
Check for any ridges or brushstrokes while the paint is wet and smooth them out gently. Allow the final base coat to dry completely—it must be bone dry before you add the faces.
Step 2: Drawing the Expressions
-
Plan the expressions:
Decide which face goes on which color. The image features a stoic face (pink), a love-struck face (orange), a big grin (beige), a side-smirk (teal), a sleeping face (terracotta), and a worried/shocked face (white). -
Start with the eyes:
Using a fine-tip black paint marker, draw the eyes first. Keep them simple: distinct oval dots for the stoic and smiling faces, and heart shapes for the orange ‘love’ face. -
Creating closed eyes:
For the sleeping and worried faces, draw curved lines. Downward curves create a peaceful sleeping look, while short, slanted lines create a worried expression. -
Add the mouths:
Draw the mouths using confident, smooth strokes. A straight line for stoic, huge U-shapes for happy, and a squiggly line for the worried rock. -
Refining the ‘Love’ face:
For the orange rock with heart eyes, ensure the smile is slightly smaller and curved upward gently to balance the large eyes. -
Detailing the ‘Smirk’:
On the teal rock, draw the smile slightly askew, curving up more on one side than the other, to give it a mischievous personality. -
Drying the ink:
Allow the black marker or paint to dry completely. If you move to the next step too soon, the black ink might smear.
Marker Tip
If your paint marker skips over the rock’s texture, press the tip on a scrap paper to get the ink flowing again before returning to the stone.
Step 3: Final Touches
-
Seal the deal:
Take your stones to a well-ventilated area and apply a thin layer of matte spray sealant. A matte finish preserves the natural stone look better than a glossy one. -
Let it cure:
Let the sealer dry uninterrupted according to the manufacturer’s instructions to ensure your expressions stay permanent.
Mix & Match Personalities
Turn this into a game by painting different eyes and mouths on separate stones, letting kids mix and match them to create new funny faces.
Now you have a set of emotive stones ready to brighten up your desk or garden path
Cute Animal Face on a Round Stone
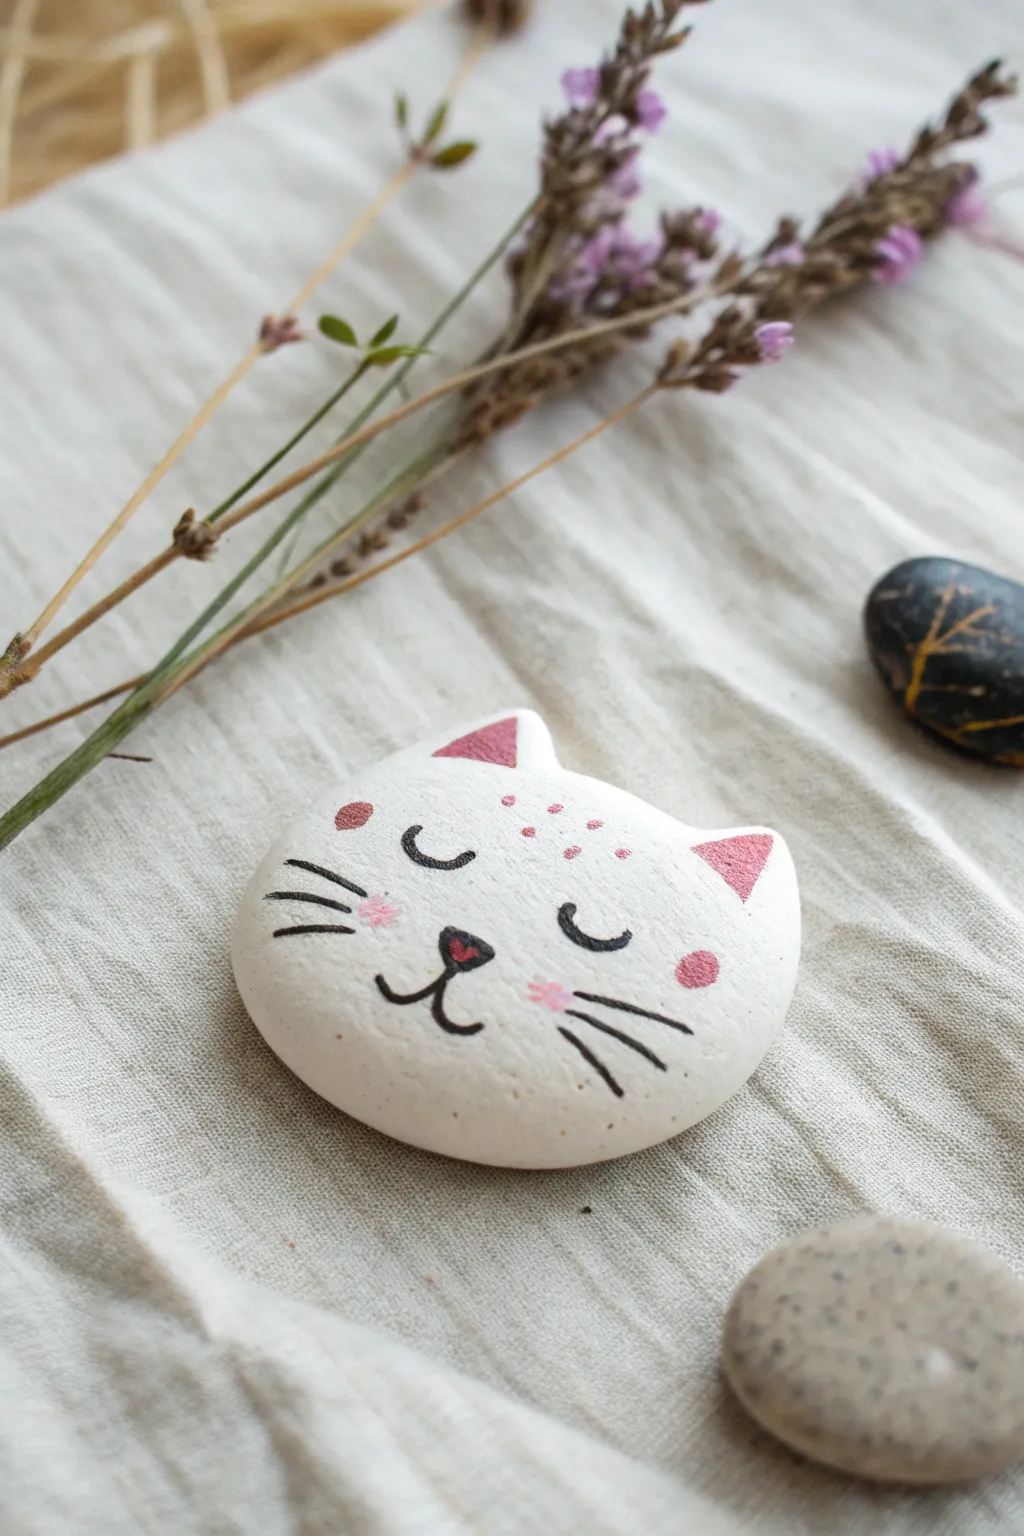
Transform a simple round stone into a serene sleeping kitty with this minimalist design. The soft white background and delicate pink accents create a calming decorative piece that fits perfectly on a desk or shelf.
Step-by-Step Guide
Materials
- Smooth, round river stone (about palm-sized)
- White acrylic paint (matte finish)
- Pink acrylic paint (soft pastel shade)
- Black acrylic paint or extra-fine Posca paint pen
- Wide flat paintbrush
- Fine detail paintbrush (size 0 or 00)
- Small dotting tool or toothpick
- Matte spray varnish or sealant
Step 1: Preparing the Base
-
Clean the stone:
Wash your stone thoroughly with warm soapy water to remove any dirt or oils, then let it dry completely. -
Apply the base coat:
Using the wide flat brush, paint the entire top surface of the rock with white acrylic paint. -
Build opacity:
Allow the first layer to dry fully, then apply a second or third coat until the natural rock color is completely hidden and you have a smooth, opaque white surface. -
Let it cure:
Set the stone aside until the white base is bone dry to the touch to prevent smudging in later steps.
Step 2: Designing the Ears
-
Plan ear placement:
Visualize two triangles near the top edge of your stone. These will be the cat’s ears. -
Paint the pink triangles:
Load a small brush with pink paint and carefully paint two small, soft triangles near the top curve of the rock. Keep the bottom edge of the triangles slightly curved to mimic the ear shape. -
Refine the edges:
Ensure the pink triangles are symmetrical. I find it helps to look at the stone from a distance to check the balance.
Use a Paint Pen
If you struggle with brush control for fine lines like whiskers and eyes, swap the detailed brush for an extra-fine acrylic paint marker or permanent ink pen.
Step 3: Adding Facial Features
-
Draw the sleeping eyes:
Using black paint and a fine detail brush (or a black paint pen for easier control), draw two downward-curving semicircles in the center of the face for closed eyelids. -
Add eyelashes:
Don’t add lashes just yet—this specific design keeps the eyes clean and simple, just a thick line for the lid. -
Create the nose:
Paint a very small, inverted triangle centered below the eyes using black paint. Round the corners slightly for a softer look. -
Add a touch of love:
Once the black nose is dry, carefully dab a tiny speck of pink paint or a small red heart right in the center of the black nose triangle. -
Draw the mouth:
From the bottom tip of the nose, draw a short vertical line down, then curve it outward to the left and right to create a ‘3’ shape on its side, forming the classic cat smile.
Add 3D Ears
Before painting, shape tiny triangles out of air-dry clay and glue them to the top of the rock to give your cat actual protruding ears to paint pink.
Step 4: Decorative Details
-
Paint the whiskers:
Using your finest brush or pen, draw three whiskers on each cheek. Start near the nose and flick the brush outward so the lines taper off nicely. -
Add cheek blushes:
Dip your finger or a round brush into the pink paint, blot off the excess, and gently dab a round spot on the right cheek for a rosy glow. -
Add floral cheek detail:
On the left cheek, instead of a solid circle, paint a tiny pink flower shape using five small dots clustered together. -
Dot the forehead:
Using a dotting tool or toothpick dipped in pink paint, add a freckle pattern between the ears. Create a small arch of dots over the eyes. -
Accent marks:
Add one larger pink dot or heart shape near the left eye for asymmetry.
Step 5: Fining Touches
-
Dry completely:
Allow all the detailed paint work to dry for at least an hour. -
Seal the artwork:
Spray the stone with a matte varnish. Do this in light, even coats to avoid making the ink or paint run.
Now you have a quiet little companion to keep on your desk
Sea Turtle Shell Pattern
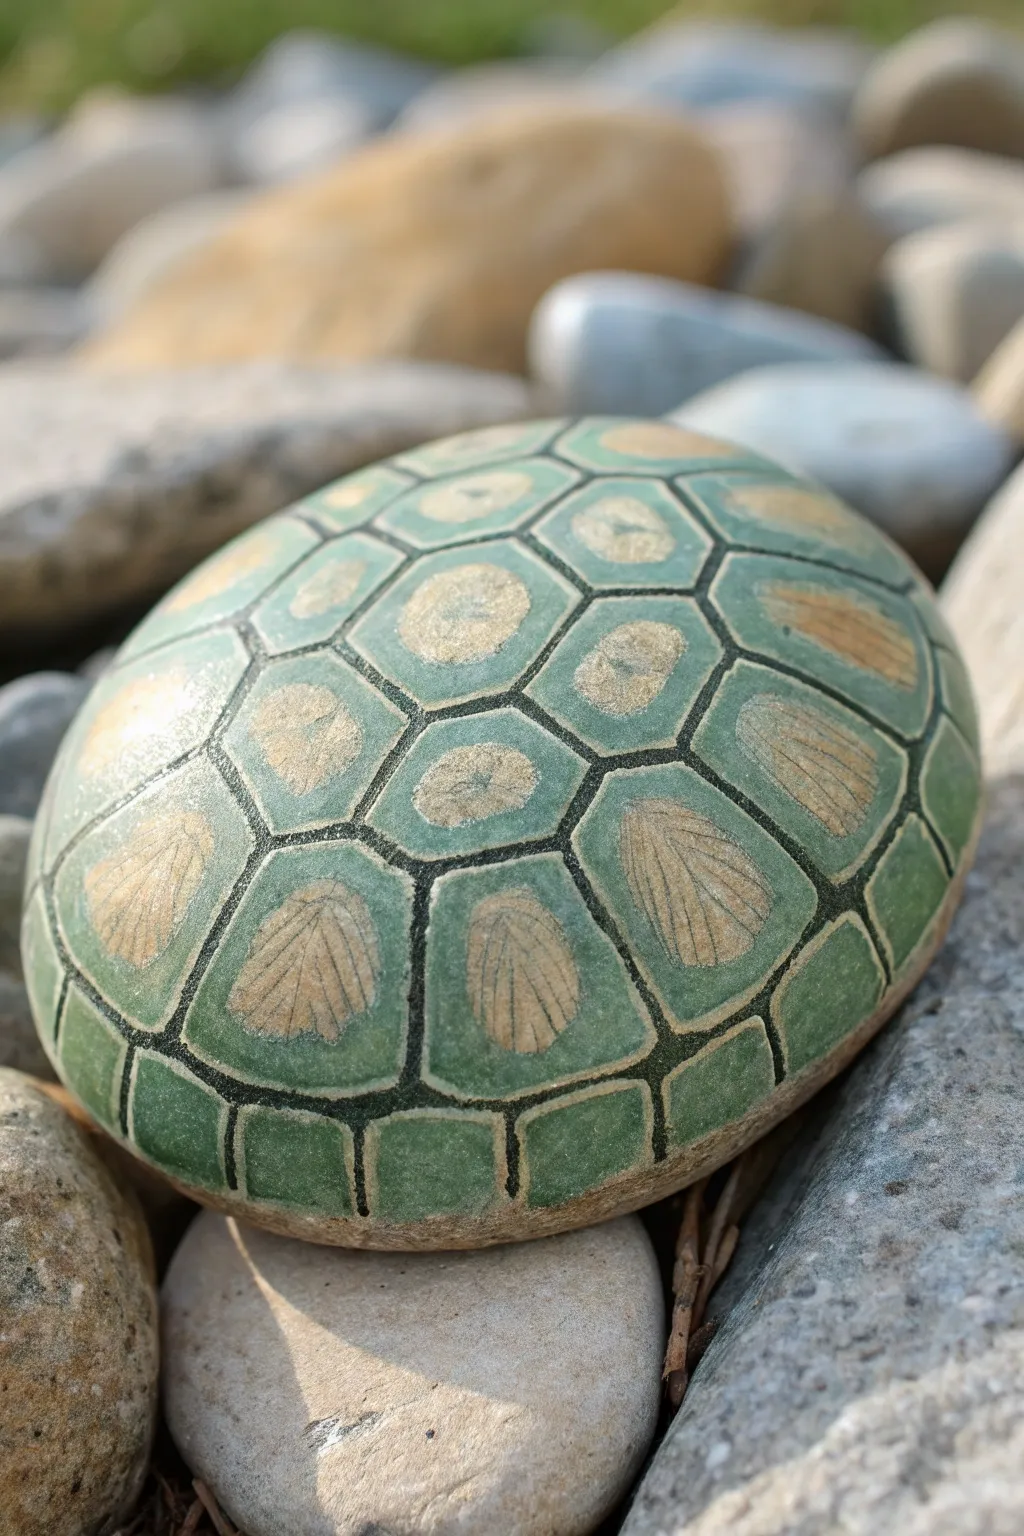
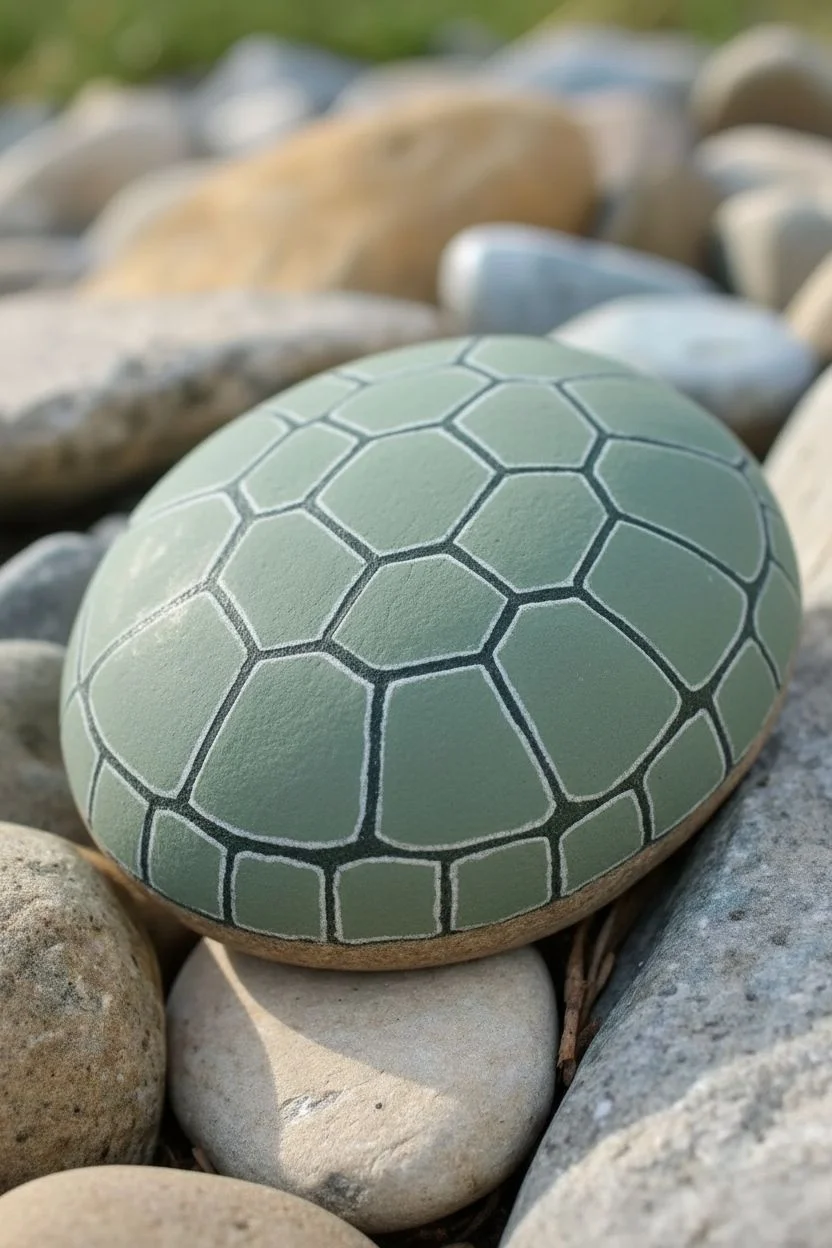
Transform an ordinary oval stone into a mesmerizing sea turtle shell with this detailed painting technique. The natural texture of the rock combined with muted greens and golds creates a faux-finish that looks startlingly realistic nestled in a garden bed.
Detailed Instructions
Materials
- Smooth, oval-shaped river rock (palm-sized or larger)
- Acrylic paints: Sage green, forest green, warm beige, golden tan, dark brown, and black
- Fine liner brush (size 0 or 00)
- Small flat shader brush
- Medium round brush
- Pencil / white chalk pencil
- Matte or satin spray varnish
- Water cup and paper towels
Step 1: Base Coat & Layout
-
Clean surface:
Begin by scrubbing your rock with soap and water to remove any dirt or oily residue, then let it dry drastically. A clean surface ensures the paint adheres properly. -
Apply base color:
Mix a muted sage green with a tiny drop of brown to -
Draft the center scutes:
Once the base is dry, use a pencil or white chalk pencil to lightly sketch the pattern. Start with a row of 3-4 hexagonal shapes down the exact center spine of the rock. -
Add side scutes:
Draw larger, irregular pentagons or hexagons flanking both sides of your center row. These should curve naturally with the shape of the stone. -
Finish the border:
Sketch a ring of smaller, rectangular shapes along the very bottom edge of the rock to represent the marginal scutes.
Step 2: Adding Depth & Texture
-
Paint interior shapes:
Using a slightly darker forest green, carefully paint the inside of each drawn shape, leaving a very thin gap of the original sage base showing between them. -
Mix leaf texture color:
Create a warm, sandy beige color. It should be semi-transparent, so you might want to water down your acrylic slightly or use a glazing medium. -
Center details:
In the central row of hexagons, dab this sandy beige color into the middle, keeping the edges darker green. Use a stippling motion for a pitted texture. -
Paint shell grooves:
For the side scutes, paint fine, fan-like lines using the beige mix. Start from the center-facing edge and pull outward, mimicking the ridges of a real shell. -
Highlight ridges:
Mix a lighter golden tan. Go over the beige fan lines you just made, but keep these strokes thinner and shorter to create a highlight effect on the ‘ridges’ of the shell pattern. -
Soften the edges:
If your beige lines look too harsh, I like to take a damp, clean brush and lightly feather the outer edges to blend them back into the green.
Natural Texture
Don’t aim for perfect symmetry. Real turtle shells have irregularities. Varying the size and angle of the side scutes makes the final piece look much more organic.
Step 3: Defining the Grid
-
Prepare the liner:
Mix black with dark brown to create a soft, natural charcoal tone. Load a fine liner brush with this mix, ensuring the paint flows like ink (add water if needed). -
Outline the scutes:
Trace over the pencil lines between all your green shapes. Keep the line consistent in thickness, acting as the ‘grout’ between the shell plates. -
Refine intersections:
Where your grid lines meet (the corners of the hexagons), thicken the line ever so slightly to round off the corners, giving it a more organic look. -
Add rim detail:
Extend the dark lines down between the small rectangular border shapes at the bottom, letting them fade out as they wrap under the rock.
Make It a Family
Paint 3-4 rocks of different sizes using slightly different shades of green (olive, brownish-green, bright lime) to create a whole family of garden turtles.
Step 4: Finishing Touches
-
Central highlight:
Add a very faint, dry-brushed highlight of white or pale yellow to the very top center of the rock to make the shell look domed and shiny. -
Final cure:
Allow the rock to dry overnight to ensure all thick layers of paint are fully set. -
Seal the work:
Spray with a satin or matte varnish. A satin finish works best here to mimic the slight sheen of a real turtle shell without looking like plastic.
Place your finished shell among low-lying ground cover plants for a delightful garden surprise
Baseball Stitching on a Circle Rock
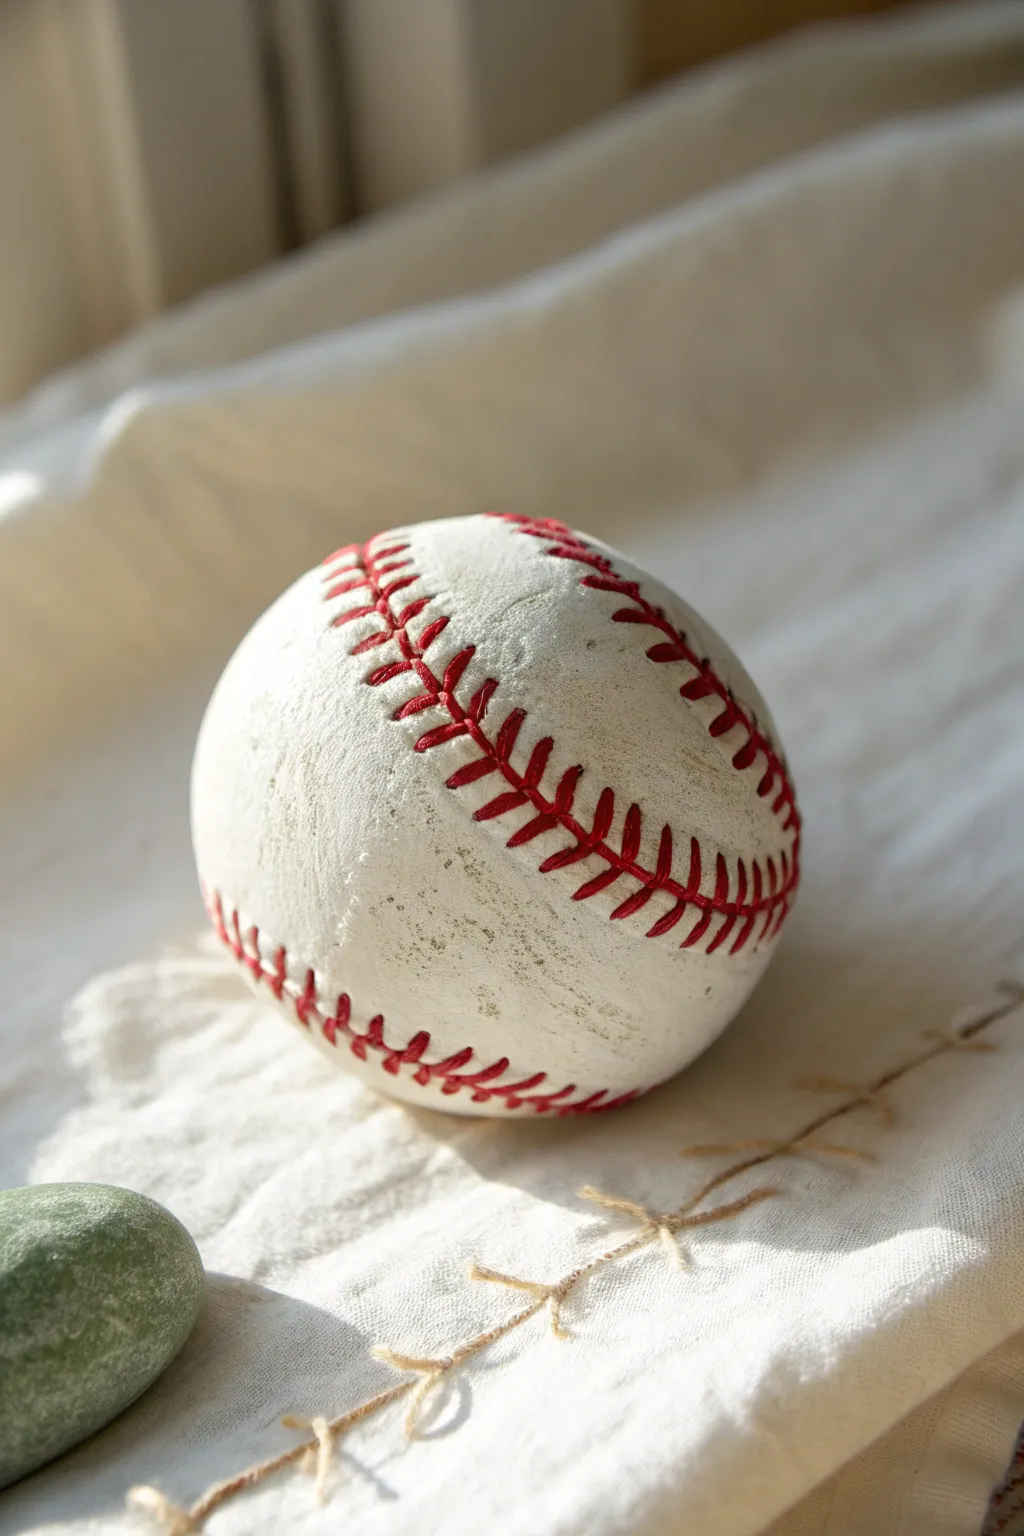
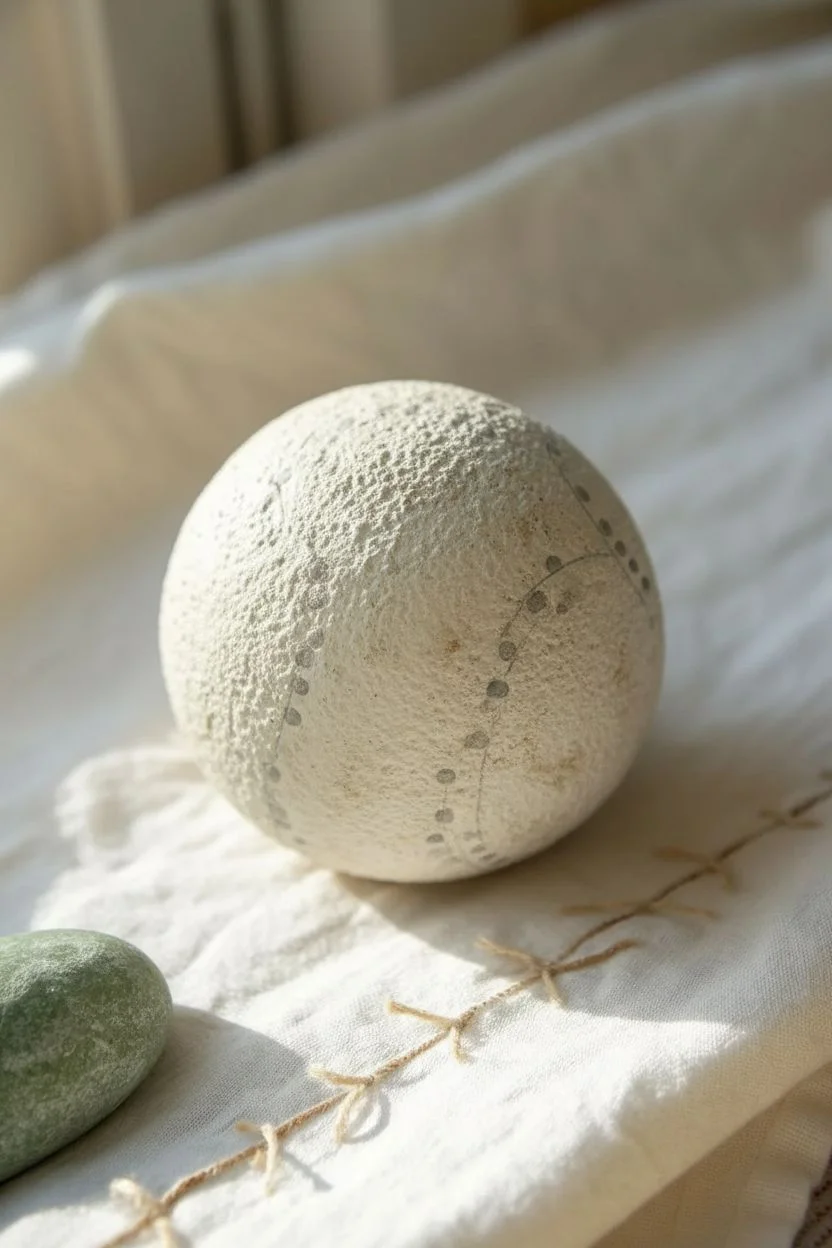
Transform a simple round stone into a game-day essential with this incredibly realistic baseball rock painting. By layering subtle textures and mastering the iconic red stitching, you’ll create a piece of decor that looks ready to be thrown across the diamond.
Step-by-Step
Materials
- Smooth, round river rock
- White acrylic paint (matte)
- Titanium White heavy body acrylic paint
- Cream or off-white acrylic paint
- Raw Umber or light grey acrylic paint (for weathering)
- Bright red acrylic paint (heavy body preferred)
- Small flat brush
- Fine liner brush (size 0 or 00)
- Sea sponge or old toothbrush
- Pencil
- Matte spray varnish
Step 1: Preparing the Base
-
Prime the Surface:
Scrub your rock clean and let it dry completely. Apply a base coat of standard white acrylic paint over the entire visible surface. Let this dry, then apply a second coat to ensure no grey stone shows through. -
Build the Leather Texture:
To mimic the thick hide of a baseball, mix your Titanium White heavy body paint with a tiny drop of cream. Dab this onto the rock using a sponge rather than brushing it on. This stippling motion creates a subtle, bumpy texture. -
Add Subtle Weathering:
Actual baseballs are rarely pristine white. While the texture layer is still slightly tacky, lightly dab a very dry sponge dipped in a whisper of Raw Umber or grey onto random spots. Smudge it immediately with your finger to create scuffs and dirt marks.
Uneven Seams?
If your stitched lines look wobbly, don’t panic. Real baseballs distort as they are hit. Emphasize the ‘error’ with extra browning to make it look like a scuff mark.
Step 2: Drafting the Seams
-
Pencil the Guidelines:
Look at a real baseball or a reference photo to understand the distinct hourglass curve of the seams. Lightly sketch two parallel curving lines across the rock face with a pencil. These will guide your stitching. -
Mark Stitch Holes:
Along the outside of your two parallel lines, make small pencil ticks spaced evenly apart. I find that spacing them about 1/4 inch apart works best for an average-sized rock. -
Pre-Shadow the Holes:
Using your liner brush and watered-down grey paint, make tiny dots where you marked the stitch holes. This adds depth underneath the red thread you are about to paint.
Level Up: Signed Ball
Use a super-fine blue Sharpie or ink pen to add a replica autograph of a famous player on the smooth white section between the seams.
Step 3: Stitching the Details
-
Paint the V-Shaped Threads:
Load your fine liner brush with heavy body red paint. Start by painting the diagonal threads. Connect a hole on the left line to a slightly lower hole on the right line, then paint the opposing diagonal to form a ‘V’ shape. -
Build Dimension:
Red paint can be translucent, so you will likely need a second pass. Carefully retrace your red V-shapes to make the color bold and opaque. Using heavy body paint helps build a physical ridge for texture. -
Add Highlight Accents:
Mix a tiny bit of white into your red paint to make a light pink. Touche just the very crest of each red stitch with this lighter color. This tiny highlight makes the thread look round and glossy. -
Create Shadows:
Dilute a bit of dark grey or brown paint until it’s like watercolor. Carefully paint a thin shadow line right underneath each red stitch. This floats the stitching off the ‘leather’ surface.
Step 4: Final Touches
-
Enhance Scuffs:
Return to your weathering colors. If the ball looks too clean, use an old toothbrush to lightly spatter a few microscopic specks of watered-down brown paint for a dirty, game-used look. -
Smooth the Surface:
If you used heavy body paint for the leather, inspect the rock for any unnatural spikes of paint and gently knock them down with a fine-grit sandpaper if needed, being careful not to ruin the coat. -
Seal the Work:
Finish with a matte spray varnish. Gloss would make it look like plastic, so matte gives you that authentic dry leather finish.
Place your finished rock on a shelf or desk for a sporty accent that looks surprisingly soft to the touch
Yin-Yang Koi in a Perfect Circle
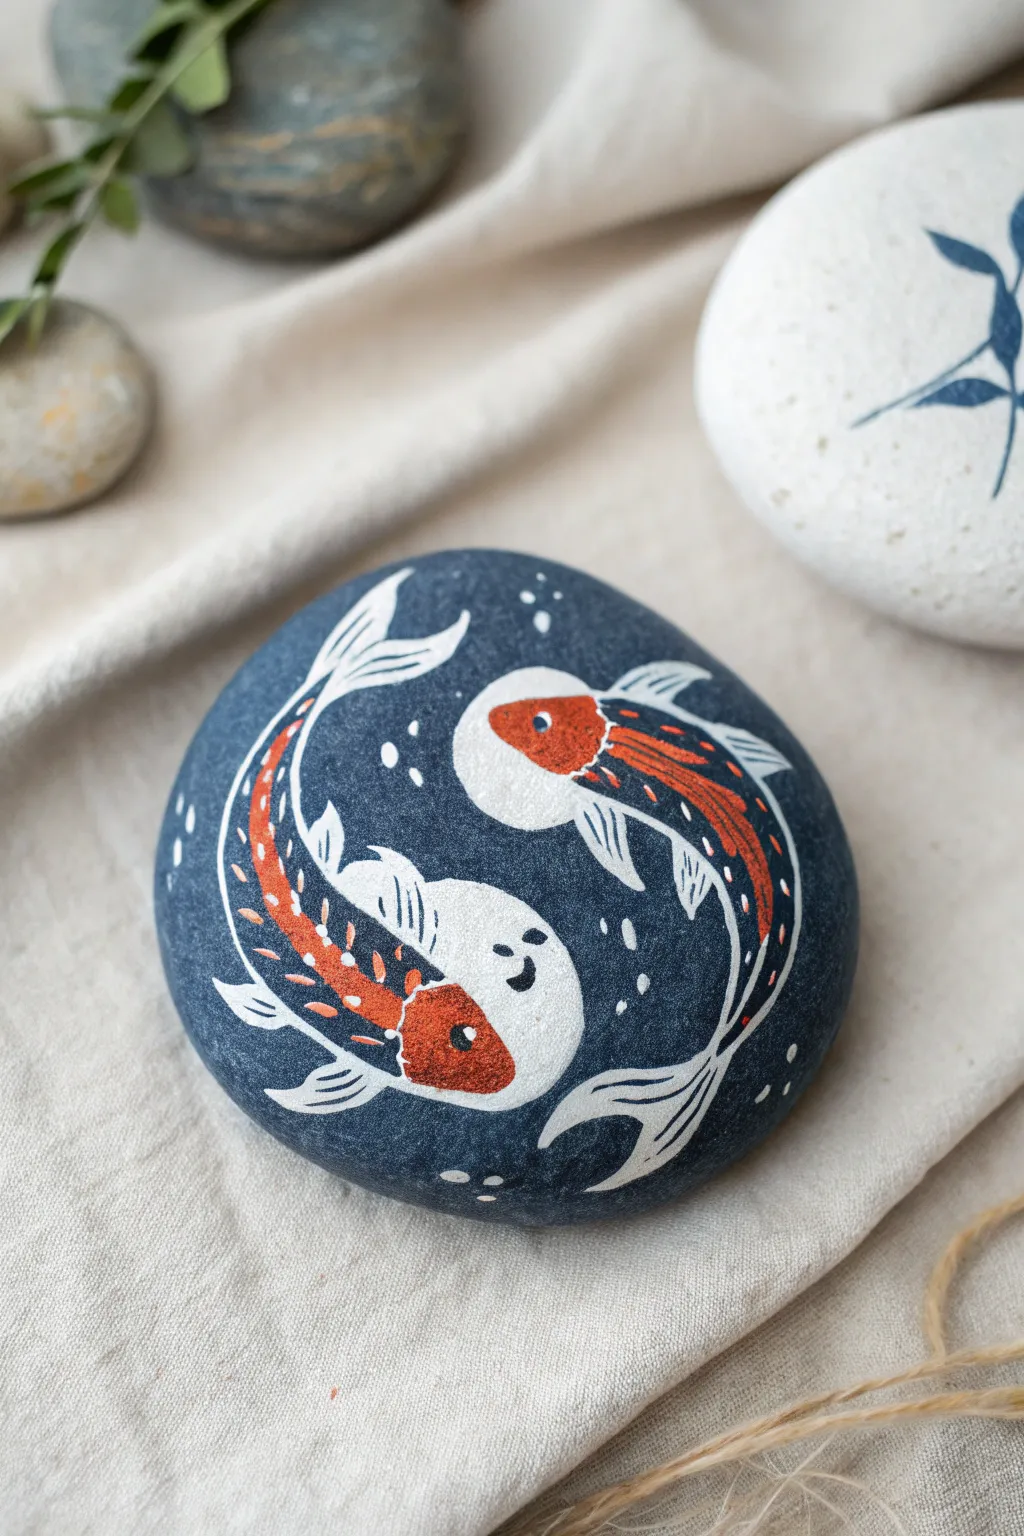
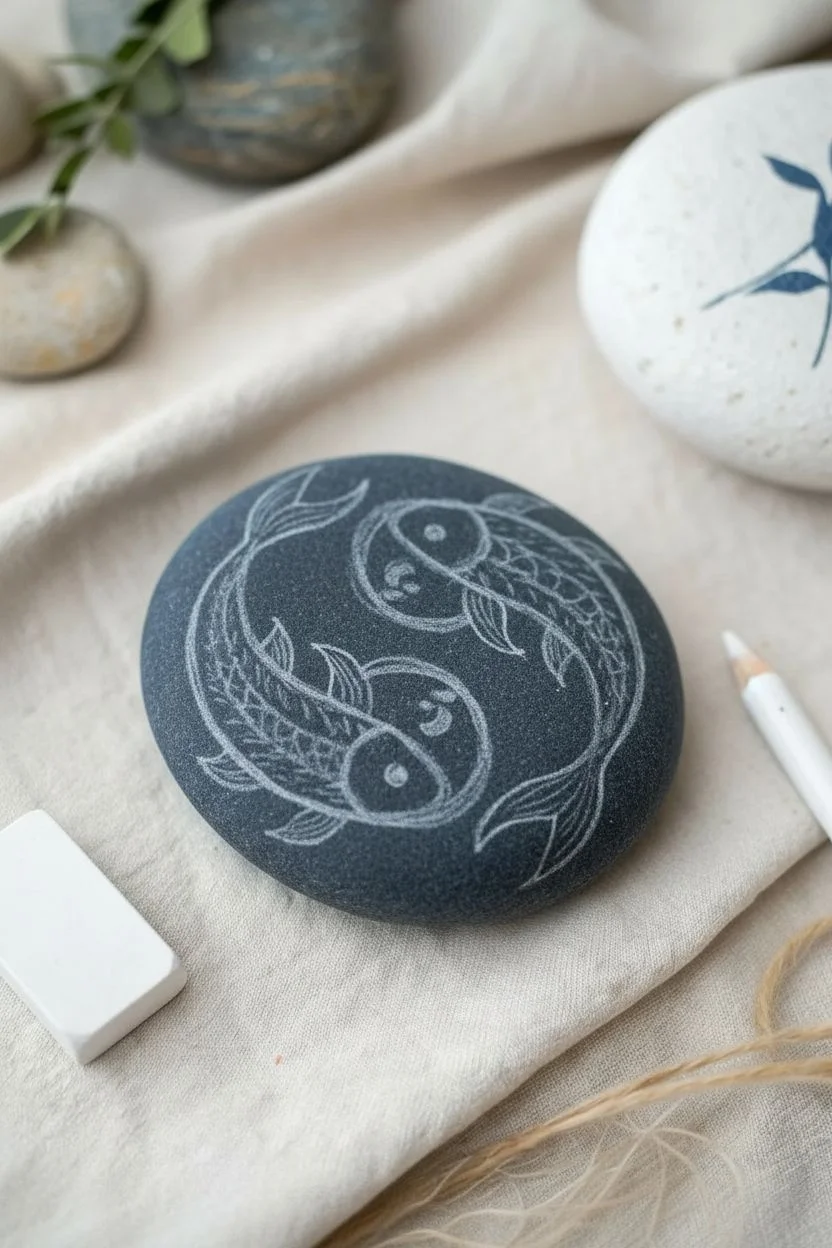
Capture the serene balance of nature with this painted river stone featuring two koi swimming in an endless loop. The natural dark blue-grey background contrasts beautifully with the bright orange and crisp white details, creating a calming, symbolic art piece.
How-To Guide
Materials
- Smooth, round river stone (dark grey or blue-grey base)
- Acrylic paints (Titanium White, Crimson Red, Cadmium Orange/Vermilion, Black, Dark Navy/Payne’s Grey)
- Fine detail brushes (size 0, 00, and 1)
- Flat shader brush (small)
- Pencil (white charcoal or chalk pencil recommended)
- Palette or mixing plate
- Cup of water and paper towels
- Matte or satin spray varnish (optional)
Step 1: Preparation and Base
-
Clean the surface:
Wash your stone thoroughly with soap and water to remove any dirt or oils. Let it dry completely. If your stone isn’t naturally dark, apply a base coat of dark navy or charcoal grey acrylic paint over the entire surface and let dry. -
Sketch the layout:
Using a white charcoal pencil or chalk pencil, lightly sketch two curved teardrop shapes swirling around each other. This forms the classic Yin-Yang structure. Mark where the heads and tails will flow to ensure symmetry.
Pro Tip: Brushing
For the crispest fine lines on the fins, thin your white acrylic paint slightly with a drop of water. Ink-consistency paint flows off the liner brush much smoother than thick tube paint.
Step 2: Painting the Koi Bodies
-
Block in white areas:
Start by painting the head and the very tips of the tail white. Depending on your paint opacity, you may need two thin coats here to get a solid, bright white against the dark background. Allow time to dry between coats. -
Define the spine color:
Mix a vibrant orange using vermilion or clear orange. Paint the main body section of each fish, extending from behind the head down towards the tail, leaving the belly area unpainted or dark if you prefer the negative space look shown in the reference. -
Add texture to the orange:
While the orange is drying, mix a slightly darker, reddish-orange tone. Carefully stipple or streak this darker color onto the orange sections to suggest scales and depth, rather than a flat block of color.
Step 3: Drawing Fine Details
-
Outline the fish:
Switch to your finest 00 brush and titanium white paint. Carefully outline the entire shape of both fish. The line should be delicate but crisp. -
Paint the dorsal fins:
Draw the dorsal fin along the back of the orange section using white lines. Create a spiky, flowing texture by using quick, short strokes that angle backward. -
Add pectoral and tail fins:
Paint the large, sweeping tail fins and the side pectoral fins in white. Use long, flowing lines to mimic movement in water. Leave small gaps of the dark rock showing through the fins to define the individual rays. -
Detail the scales:
Using your finest brush, paint tiny white dashes or small ‘v’ shapes along the orange part of the body. This mimics the highlight on the scales and adds lovely texture.
Level Up: Metallic Pop
Swap the standard orange paint for a metallic copper or gold acrylic. The shimmer will make the koi look even more magical when the light hits the rock.
Step 4: Face and Finishing Touches
-
Paint the eyes:
Dip the handle end of a small brush into black paint to make a perfect dot for the eye on the white head area. Once dry, add a microscopic spec of white for the reflection highlight. -
Add facial details:
Paint a tiny curved black line for the mouth and perhaps a small gill line near the head. Keep these marks minimal to maintain the cute, stylized aesthetic. -
Create bubbles:
Using the tip of your brush or a dotting tool, place small white dots of varying sizes in the empty dark spaces around the fish. Cluster them slightly near the tails to suggest movement. -
Clean up edges:
If any lines became too thick or messy, use the dark background color (dark navy or grey) to carefully cut back into the design and sharpen the edges. -
Seal the rock:
Once the paint is fully cured (give it at least an hour), spray the stone with a matte or satin varnish. This protects the artwork from chipping and deepens the contrast.
Place your finished stone on a desk or in a garden pot to enjoy a moment of zen every time you see it
Stained Glass Segment Mosaic
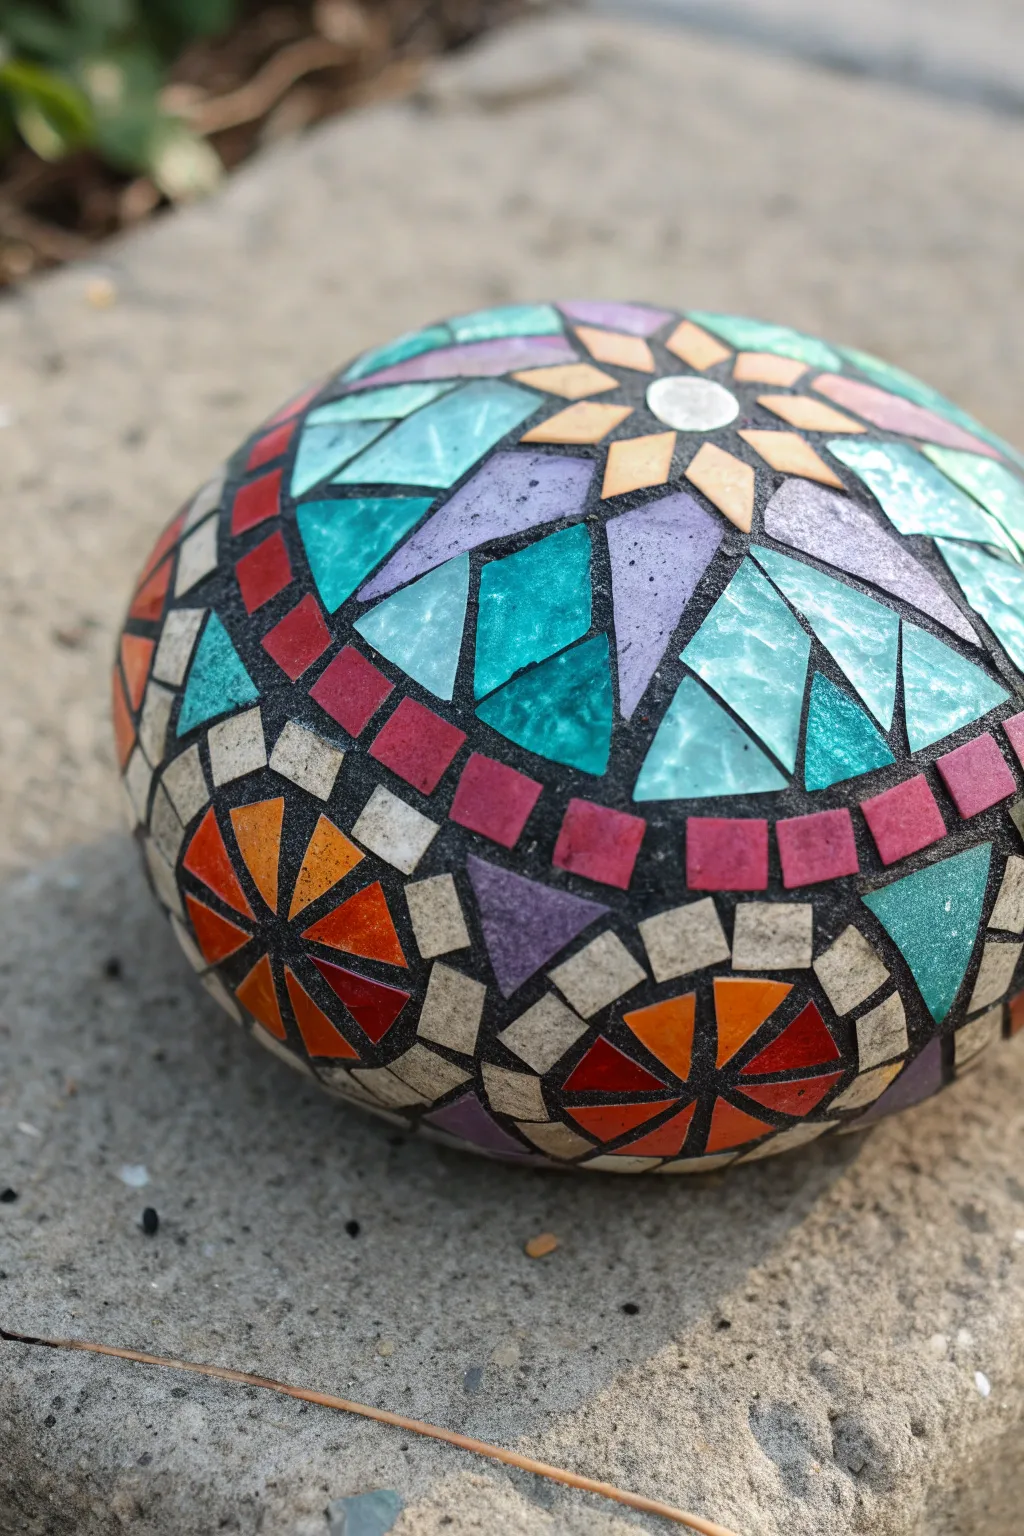
Transform a simple round river rock into a mesmerizing piece of art that mimics the luminosity of a cathedral window. This project uses glass tiles and dark grout to create geometric mandalas that sparkle in the sunlight.
Step-by-Step Tutorial
Materials
- Smooth, round river rock (approx. 4-6 inches)
- Stained glass cutting sheets (opaque and iridescent varieties)
- Wheeled glass nippers
- Mosaic adhesive (Weldbond or similar outdoor-rated glue)
- Black sanded grout
- Mixing cup and stir stick
- Sponge and soft rags
- Safety glasses
- Pencil specifically for glass or permanent marker
- Latex or nitrile gloves
Step 1: Design and Preparation
-
Clean the substrate:
Begin by scrubbing your rock thoroughly with soap and water to remove any dirt or moss. Let it dry completely in the sun, as trapped moisture will affect adhesion later. -
Map out the center:
Find the highest point or ‘crown’ of the stone. Mark a small circle here to serve as your centerpiece; this ensures your symmetry radiates outward correctly. -
Sketch the primary star:
Draw an eight-pointed star or flower shape radiating from that center circle. It doesn’t need to be perfect, as the glass pieces will define the final edges.
Clean Cuts Pro-Tip
For sharper geometric points, score the glass surface lightly with a scoring tool before using your nippers. This helps direct the break exactly where you want it.
Step 2: Cutting and Placing Glass
-
Create the center bead:
Nip a small, round piece of white or mirror glass for the very center. Apply a dab of adhesive to the back and press it firmly onto your center mark. -
Cut the inner petals:
Using your wheeled nippers, cut cream or pale yellow glass into small diamond or kite shapes. I find it helpful to hold the nippers perpendicular to the glass for cleaner cuts. -
Place the inner ring:
Glue these diamonds around the center bead, leaving a small gap (about 1/16th of an inch) between each piece to allow room for the grout later. -
Cut the larger star points:
Select a contrasting color, like a textured pale purple, and nip larger triangular wedges. These will form the main body of your geometric star. -
Fill the negative space:
Between the purple star points, cut and place teal or turquoise triangles. This creates the ‘stained glass’ effect where colors interlock. -
Create a separating border:
Nip small, uniform squares of deep red or maroon glass. Arrange these in a tight ring surrounding your central star design to define the section.
Level Up: Mirror Magic
Incorporate small pieces of mirror glass into the center star or outer border. These will catch the sunlight and create dazzling reflections around your garden.
Step 3: Completing the Pattern
-
Add secondary motifs:
On the lower slopes of the rock, create smaller semi-circle or fan shapes using orange and red triangular shards. These look like rising suns or half-flowers. -
Background fill:
Cut irregular shaped pieces of cream or white glass (tesserae) to fill in the background areas around your fans and star. Keep the grout gaps consistent. -
Final drying time:
Once all glass pieces are placed, let the adhesive cure for at least 24 hours. The glue must be completely clear and hard before you introduce moisture from the grout.
Step 4: Grouting and Finishing
-
Mix the grout:
Put on your dust mask and gloves. Mix the black sanded grout with water until it reaches the consistency of peanut butter or thick brownie batter. -
Apply the grout:
Slather the grout over the entire stone, pressing it deeply into all the crevices. Don’t be afraid to cover the glass completely; you want to ensure no gaps are missed. -
Initial wipe down:
Wait about 10-15 minutes for the grout to set slightly. Using a damp (not soaking wet) sponge, gently wipe away the excess grout from the tops of the glass tiles. -
Shape the edges:
Pay special attention to the bottom edge of the mosaic. Use your gloved finger to smooth the grout line where the glass ends and the bare rock begins. -
Final polish:
After the grout has dried for another hour and a haze has formed, take a dry, soft cloth and buff the glass pieces until they shine brilliantly against the dark black grout.
Place your finished stone in a garden bed or sunny windowsill to enjoy the full effect of the light playing off the colors
Op Art Spiral Illusion

Transform a simple stone into a mesmerizing optical illusion that seems to twist and move before your eyes. This monochrome design relies on precise spacing and high contrast to create a swirling depth effect that looks complicated but is surprisingly achievable.
How-To Guide
Materials
- Smooth, round river stone (flattened shape works best)
- White acrylic paint (high opacity)
- Black acrylic paint
- Pencil
- Finetip black permanent marker or paint pen (0.5mm)
- Fine detail paintbrush (size 0 or 00)
- Flat shader brush
- Matte or sealant spray
Step 1: Base Preparation
-
Clean the surface:
Begin by thoroughly washing your stone with warm soapy water to remove any dirt or oils. Let it dry completely before starting, as moisture can trap bubbles under your paint. -
Apply base coats:
Using a flat shader brush, cover the entire top surface of the rock with white acrylic paint. You want a very solid foundation, so I recommend applying 2-3 thin coats rather than one thick one, allowing full drying time between layers. -
Find the center:
Once the white base is bone dry, locate the approximate center of the rock. Mark a tiny dot with your pencil to serve as the anchor for your spiral.
Wobbly Lines?
If your hand shakes while painting curves, rest your pinky finger on the dry part of the rock for stability. Breathing out while making the stroke helps too.
Step 2: Drafting the Design
-
Start the spiral:
Using a light pencil touch, draw a small, tight spiral starting from your center dot. It should look like a snail shell, looping around itself two or three times before expanding. -
Draw radiating lines:
From the outer edge of your central spiral, sketch curved lines flowing outward toward the edge of the rock. Imagine these as curved sun rays that have been twisted. -
Create the segments:
Continue adding these curved lines all around the spiral. The key is to keep the spacing relatively even, though the segments will naturally widen as they reach the rock’s edge. -
Review the flow:
Step back and look at your pencil sketch. The lines should all curve in the same direction to create that sense of motion. Erase and adjust any lines that look stiff or straight.
Step 3: Painting the Contrast
-
Outline the center:
Switch to your fine liner or black paint pen. Carefully trace the very center spiral first to establish your focal point. -
Outline the arms:
Ideally, continue tracing the pencil lines outward with the pen to create clear boundaries for your painting. This acts as a barrier to stop the black paint from bleeding into the white sections. -
Identify pattern sections:
To avoid confusion, lightly mark a small ‘x’ with your pencil inside every other segment. This ensures you don’t accidentally paint two black stripes next to each other. -
Fill the center first:
Using your smallest detail brush and black acrylic paint, fill in the tightest parts of the spiral near the center. Paint pens work great here if your brush feels too clumsy for the tiny gaps. -
Paint the widening arms:
Move outward to the larger segments. Switch to a slightly larger brush if needed, filling in the marked sections with black paint. -
Smooth the edges:
As you paint the black sections, carefully drag your brush along the curve to ensure a smooth, sharp line against the white. This high contrast is crucial for the illusion. -
Extend to the sides:
Carry the black stripes over the curvature of the stone and down the sides. This makes the object look like a continuous 3D form rather than just a painted top surface.
Color Pop
Try replacing the white sections with a neon gradient or metallic gold. The black spiral will still create the illusion, but with a vibrant twist.
Step 4: Refining and Sealing
-
Touch up the white:
Once the black paint is dry, inspect your white segments. If you smudged any black, use a clean brush and white paint to tidy up the lines. -
Sharpen the spiral:
Go back to the very center with your finest tool. Ensure the start of the spiral is crisp; a muddy center can ruin the spinning effect. -
Let it cure:
Allow the rock to dry overnight to ensure all layers of paint are hardened. -
Seal the work:
Apply a clear sealant. A matte spray keeps the focus on the pattern without glare, while a glossy finish can make the black look deeper and richer.
Place this stone on a desk or shelf and watch how it draws the eye immediately to its center


Have a question or want to share your own experience? I'd love to hear from you in the comments below!