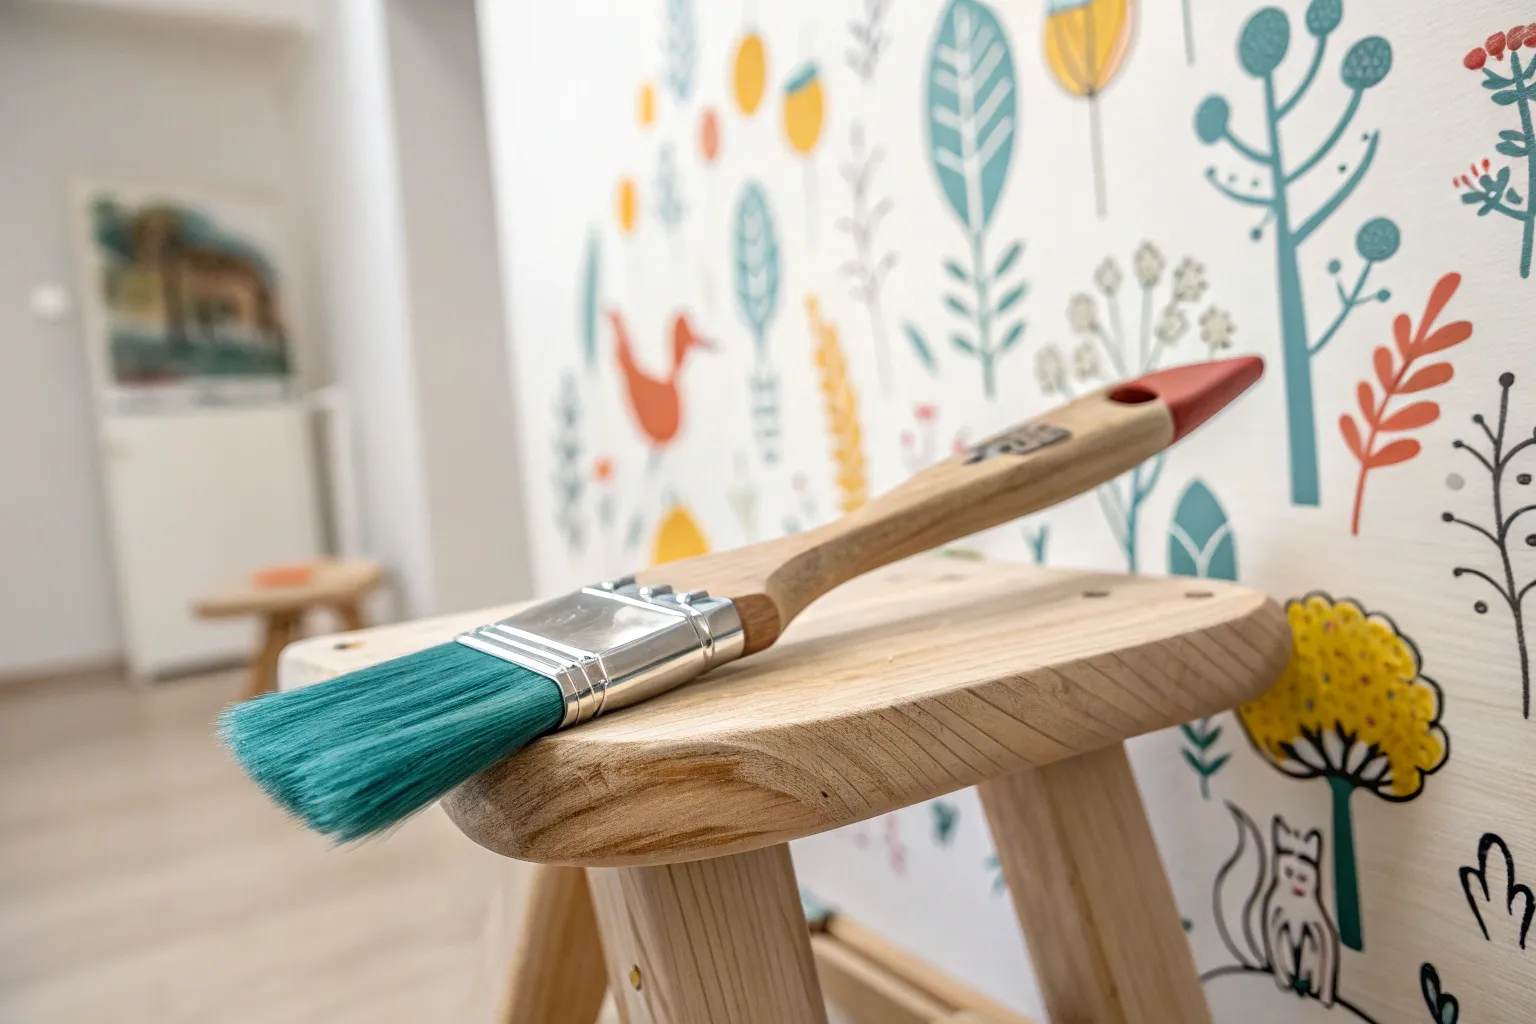
When you paint a classroom on purpose (not just “pick a color and hope”), the whole room starts teaching alongside you. Here are my favorite classroom paint ideas that create learning zones, spark curiosity, and make the space feel like a place kids want to be.
Color-Blocked Activity Zones
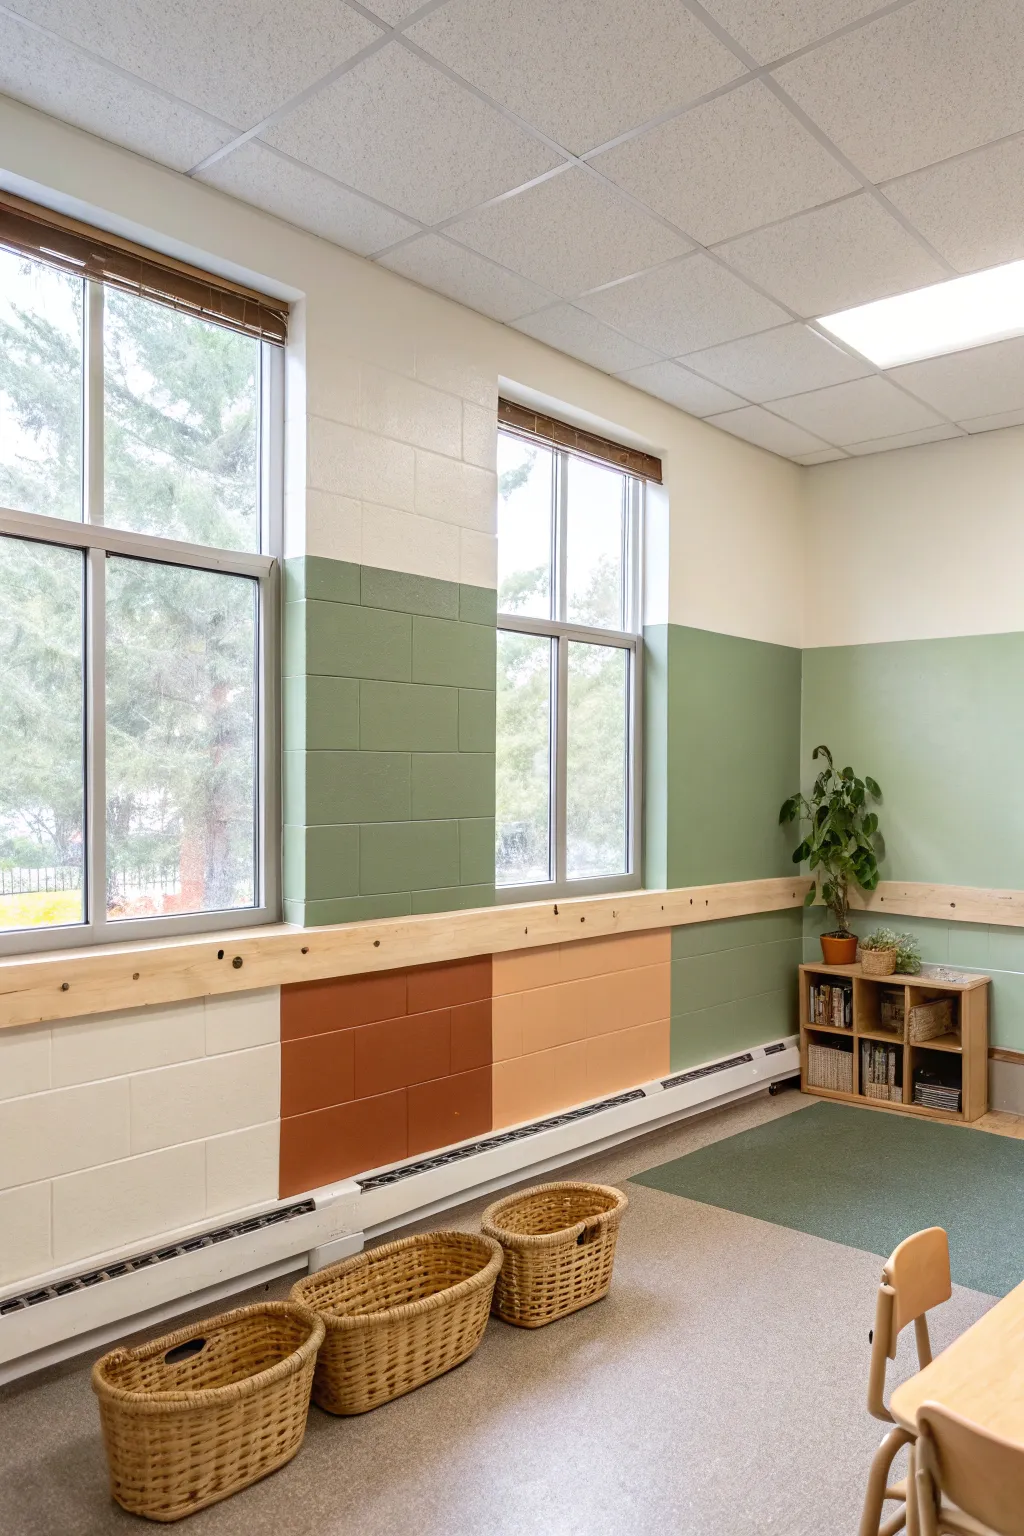
Transform a standard cinder block classroom wall into an engaging focal point using a crisp, color-blocked design. This tutorial guides you through creating defined zones using a soothing palette of cream, terracotta, peach, and sage green aimed at brightening the learning environment.
Detailed Instructions
Materials
- Interior latex primer
- Satin finish interior latex paint (Cream/Off-White)
- Satin finish interior latex paint (Terracotta/Rust)
- Satin finish interior latex paint (Peach/Apricot)
- Satin finish interior latex paint (Sage/Moss Green)
- Painters tape (multi-surface)
- TSP substitute cleaner and rags
- Drop cloths
- Medium nap roller (3/8″ to 1/2″)
- Small angled sash brush (2.5″)
- Paint tray and liners
- Measuring tape
- Pencil or chalk
- Laser level (optional but helpful)
Step 1: Preparation and Cleaning
-
Protect the area:
Begin by removing all furniture, baskets, and rugs from the wall area. Lay down heavy-duty drop cloths to protect the flooring from potential drips. -
Clean the surface:
Cinder blocks can hold dust in their pores. Wash the entire wall thoroughly using a TSP substitute and a rag or scrub brush to remove any grime, oils, or loose debris. -
Rinse and dry:
Wipe the wall down with plain water to remove cleaner residue and allow the masonry to dry completely before applying any primer, usually overnight. -
Tape off trim:
Apply painter’s tape carefully along the edges of the wooden chair rail trim, window casings, and baseboard heating units to ensure clean lines.
Bleeding Lines?
If paint seeps into the porous block texture under the tape, wait for it to dry, then use a small artist brush and the original background color to carefully touch up the rough edge.
Step 2: Mapping the Design
-
Measure the zones:
Decide on the width of your vertical color blocks. In this design, the blocks are determined by the natural vertical grout lines of the cinder blocks, usually every 16 inches. -
Mark vertical divisions:
Use a pencil to lightly mark where one color will end and the next begins. Following existing grout lines makes this incredibly easy and ensures straight verticals without a level. -
Establish the horizon line:
The wooden trim acts as the natural horizon line here. If you don’t have trim, you would need to use a laser level to tape a horizontal line across the room at chair-rail height.
Step 3: Painting the Base Colors
-
Prime the wall:
Apply a coat of high-quality bonding primer. Cinder block is thirsty, so this step is crucial for even color absorption later. -
Paint the upper wall:
Start with the upper section above the trim. Use a roller to apply the sage green paint, cutting in around the windows and ceiling with your angled sash brush. -
Apply second coat:
Allow the green paint to dry according to the can’s instructions, then apply a second coat for full, opaque coverage. -
Start the lower section:
For the lower color blocks, paint the lightest color first (the cream section). Paint slightly past your pencil max line to ensure no gaps appear later.
Choosing Finish
Avoid flat or matte paint for classrooms. A satin or semi-gloss finish is much more durable and easier to wipe down when little hands leave smudges on the wall.
Step 4: Creating the Color Blocks
-
Tape vertical lines:
Once the cream paint is fully cured (give it at least 24 hours), tape a vertical line down the grout line where the terracotta section begins. Press the tape firmly into the grout recesses. -
Seal the tape edge:
To get a crisp line on textured block, I like to brush a tiny amount of the base color (cream) over the tape edge first. This seals any gaps so the next color won’t bleed under. -
Apply terracotta paint:
Paint the terracotta onto the designated square block area. Use a brush to work paint into the deep mortar joints and a small roller for the face of the blocks. -
Apply peach paint:
Repeat the taping and painting process for the peach section next to the terracotta. You may need to wait for the terracotta to dry before taping that specific boundary. -
Detail work:
Use a small artist’s brush to touch up any mortar joints that the roller might have missed, ensuring solid color saturation in the grooves. -
Remove tape:
Peel off the painter’s tape while the final coat is still slightly tacky to prevent pulling up dried paint skins. -
Clean up:
Remove the tape from the window frames and wooden trim, fold up your drop cloths, and return the baskets and reading materials to their new zones.
This vibrant new wall will energize the space and create inviting corners for reading and activities


One Calm Reading Corner Accent Wall
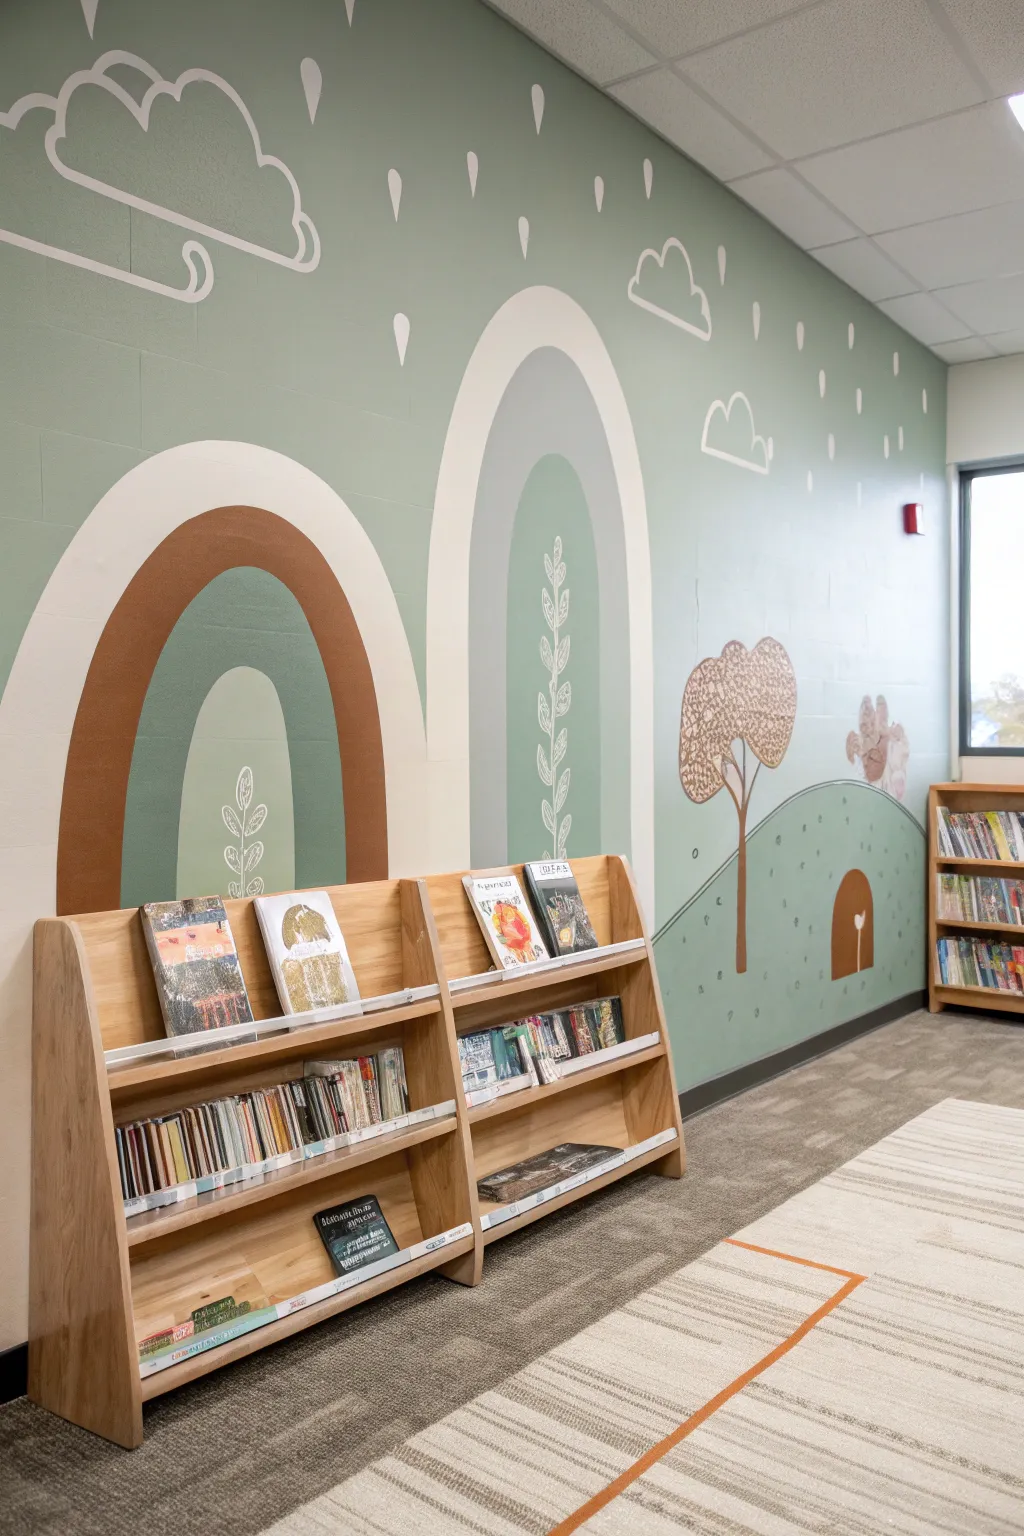
Transform a plain classroom corner into a soothing sanctuary with this muted, nature-inspired mural. Featuring soft arches, gentle rain, and rolling hills in a palette of sage, cream, and terracotta, this design brings calm to any reading nook.
Step-by-Step
Materials
- Interior latex paint (Sage Green, Cream/Off-White, Muted Terracotta, Light Grey)
- White paint pen or small detail brush
- Painter’s tape
- Pencil and eraser
- String and thumb tack (for creating compass)
- Level
- Small angled paintbrush (1.5 – 2 inch)
- Medium roller and tray
- Drop cloth
- Ladder or step stool
Step 1: Preparation & Base
-
Prepare the workspace:
Clear the wall completely, moving bookshelves aside. Lay down your drop cloth to protect the flooring or carpet and wipe the wall down with a damp cloth to remove dust. -
Apply the background color:
Roll on two coats of your main background color—in this case, the soothing Sage Green. Allow the first coat to dry completely for about 2-4 hours before applying the second to ensure full, even coverage.
Wobbly Arches?
If your hand isn’t steady on curves, use flexible painter’s tape designed for curves, or clean up wobbly edges later with a small artist’s brush and your background wall color.
Step 2: Designing the Arches
-
Mark the center points:
Decide where your two main arches will stand. Mark the center point of each arch at the height where the curve will begin. -
Create a string compass:
Tie a piece of string to a pencil. Pin the other end of the string to your center mark using a thumb tack. The length of the string will determine the radius of your outer arch. -
Draft the outer curves:
Keeping the string taut, lightly draw the large semi-circle for the top of the arch. Shorten the string to create the inner bands and draw those concentric semi-circles inside the first one. -
Extend the lines downward:
Use a level and a long straight edge (or a ruler) to draw straight vertical lines from the ends of your semi-circles down to the floor or baseboard.
Make it Magnetic
Paint the lower hill section with clear magnetic primer before applying the color coat. This turns the ‘ground’ into an interactive space for magnetic poetry or letters.
Step 3: Drafting the Landscape
-
Sketch the hills:
To the right of the arches, lightly sketch a rolling hill shape that creates a horizon line. Add a second, smaller hill shape slightly behind or to the side for depth. -
Outline the trees:
Draw simple, lolly-pop style tree outlines. Keep the trunks thin and the canopies rounded or cloud-like. Don’t worry about perfect symmetry; organic shapes look best here.
Step 4: Painting the Shapes
-
Cut in the large arch:
Using your small angled brush, carefully paint the outline of the large left arch using the Muted Terracotta. Fill in the shape, keeping your hand steady on the curved edges. -
Paint the inner arch layers:
Switch to your Cream paint for the outer band of the second arch, and Light Grey for the inner sections. I find it helps to do the edges first and then fill the centers. -
Fill in the hills:
Paint the rolling hills in a slightly different shade of green (or a mix of your Sage and Grey) to distinguish them from the background wall. -
Paint the trees:
Use the Muted Terracotta for the tree trunk and the Cream or Light Grey for the tree canopies. You may need two coats here to cover the green background fully.
Step 5: Adding Details
-
Draw the clouds:
Once the main paint is dry, use a white paint pen or a very fine brush with white paint to freehand simple outline-style clouds near the ceiling. -
Add rain drops:
Paint small, tear-drop shapes falling from the clouds. Space them irregularly for a whimsical feel rather than a rigid pattern. -
Create botanical doodles:
Inside the arches, draw simple white vine or leaf patterns climbing up from the bottom center. Keep the lines thin and delicate. -
Detail the trees:
Add texture to the tree canopies by drawing small circles or stippling with your paint pen to mimic leaves. -
Final touches:
Erase any visible pencil marks. If you sketched a small mouse hole or critter door on the hill, paint that in now with a dark brown or terracotta color for a cute hidden detail.
Step back and admire how this peaceful scene changes the entire energy of the room


Painted Arch “Meeting Spot” Backdrop
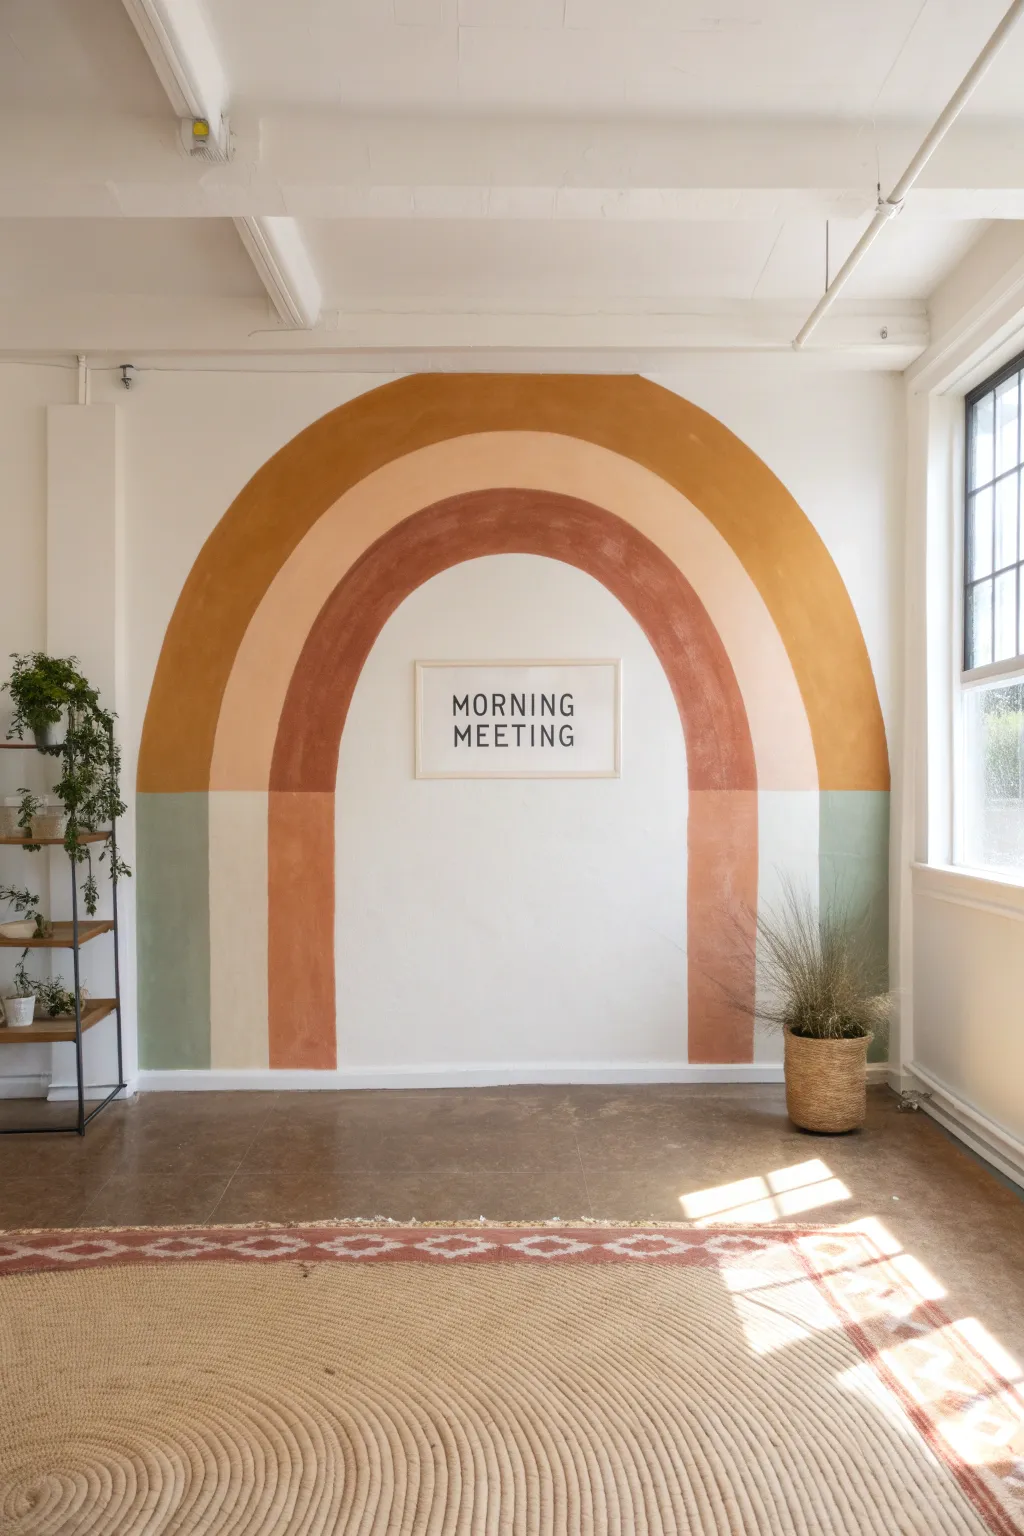
Transform a blank classroom wall into a warm, inviting focal point with this earthy, concentric arch mural. The simple geometry combined with terracotta and sage tones creates a calming backdrop perfect for grounding your morning meeting space.
How-To Guide
Materials
- Interior house paint (sample pots): mustard yellow/ochre, terracotta/rust, muted sage green
- High-quality painter’s tape (1-inch width)
- Pencil and eraser
- String
- Thumbtacks or a small nail
- Tape measure or yardstick
- Small roller kit (4-inch rollers)
- Small angled sash brush (1.5 or 2 inch)
- Drop cloth
- Level (optional)
- Framed print or sign for the center
Step 1: Planning and Mapping
-
Prepare the workspace:
Clear the wall area completely and lay down a drop cloth to protect the floor from any potential drips. -
Determine the center:
Measure the width of your wall section to find the exact horizontal center point for your arch. Mark this spot lightly with a pencil at the height where you want the arches to begin curving (usually about 4-5 feet from the floor). -
Create a compass tool:
Tie a piece of string to a pencil. Determine the radius of your smallest (inner) arch loop, then tie a loop at the other end of the string to match that length. -
Draw the inner arch:
Pin or tape the string’s loop anchor point to your center mark on the wall. Keeping the string taut, swing the pencil up and over to draw your first semi-circle. -
Draw the outer arches:
Extend the string length by about 6-8 inches for the middle arch and draw another semi-circle from the same center point. extend it another 6-8 inches for the final, largest arch. -
Mark the vertical lines:
Use a level or a long straight edge to draw straight vertical lines extending down from the ends of each semi-circle to the floor (or baseboard). -
Add horizontal divisions:
To recreate the color-blocking effect shown in the inspiration photo, measure up from the floor to about hip-height. Lightly draw a horizontal line across the legs of the arches.
Wobbly Arches?
If your curved lines aren’t perfect, use a tiny artist’s paintbrush and the background wall color to ‘eraser’ mistakes and crisp up the edge.
Step 2: Painting the Design
-
Outline the edges:
Using your small angled brush, carefully ‘cut in’ the curved edges of the outermost arch with your ochre/yellow paint. A steady hand is key here, as tape is hard to use on curves. -
Fill the outer arch:
Once the outline is crisp, use the small roller to fill in the rest of the top arch section with the ochre paint. Stop when you reach the horizontal line you marked on the legs. -
Paint the middle arch:
Repeat the process with the terracotta/rust paint for the middle arch. Carefully cut in the edges first, then roll the interior, stopping again at the horizontal divider line. -
Paint the inner arch sections:
For the smallest arch, paint the top curved section and the legs all the way down in the same terracotta color, as the inner arch doesn’t switch colors at the horizontal line in this design. -
Apply the bottom blocks:
Switch to the sage green paint. Use painter’s tape to mark a crisp horizontal line where the top colors end. Paint the bottom sections of the outer legs green. -
Paint the middle leg bottom:
For the legs of the middle arch, paint the bottom section a creamy off-white or light beige to create contrast between the rust and green sections. -
Double check coverage:
Allow the first coat to dry sufficiently according to the paint can instructions. If the texture of the wall is showing through or the color looks streaky, apply a second coat. -
Clean up edges:
I like to keep a small artist’s brush handy for this part—dip it in your original wall color to touch up any wobbles on the outside edges of your arches. -
Mount the sign:
Once the paint is fully cured (give it at least 24 hours), center your ‘Morning Meeting’ sign inside the negative space of the smallest arch and hang it securely.
Pro Tip: String Stretch
Use non-stretchy twine or wire for your compass. Regular yarn stretches when pulled taut, leading to oval or uneven arches rather than perfect circles.
Step back and enjoy the calming, structured atmosphere this simple mural brings to your daily gathering space


Simple Rainbow Gradient Wall Band
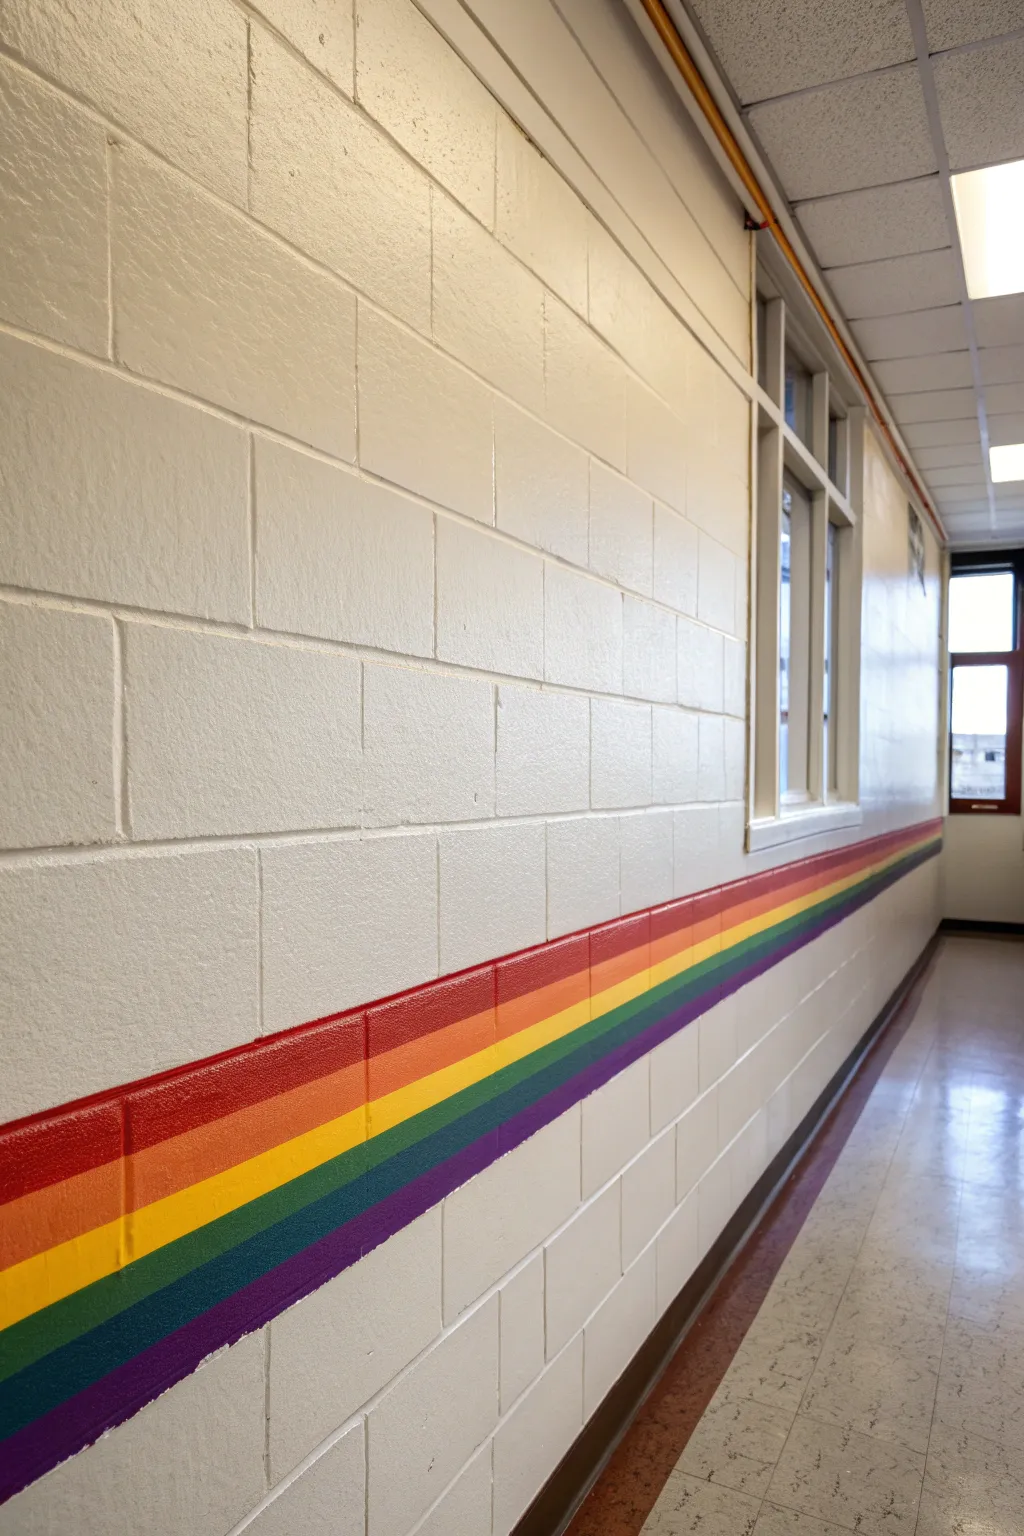
Bring a burst of energy to your classroom hallway with this simple yet impactful rainbow gradient band. By following the natural grid of cinder block walls, this project creates clean, vibrant lines that brighten the space without requiring complex murals.
Detailed Instructions
Materials
- Semi-gloss latex wall paint (Red, Orange, Yellow, Green, Blue, Purple)
- White primer (optional, for dark walls)
- Painter’s tape (1-inch width)
- Small angled sash brush (1.5 to 2 inch)
- Small foam roller (4-inch) and tray
- Measuring tape
- Level (4-foot works best)
- Pencil
- Damp rag for cleanup
- Drop cloth
Step 1: Preparation and Marking
-
Clean the surface:
Before anything else, wipe down the cinder block wall with a damp rag and mild detergent to remove dust, handprints, and grime. Let it dry completely. -
Determine the height:
Decide where you want your rainbow band to sit. In the image, the top edge aligns with a mortar line about waist-height, making it perfect for younger students. -
Measure the total width:
Measure the vertical space you intend to paint. Simple division is key here; if you have six colors, you want the total height to be divisible by six for equal stripes. -
Mark the guidelines:
Using your pencil and level, lightly mark horizontal lines across the length of the wall to separate each color band. Don’t rely solely on the mortar lines, as masonry isn’t always perfectly level. -
Tape the boundaries:
Apply painter’s tape along the very top and very bottom edges of your planned rainbow area to protect the existing white wall paint.
Bleed-Through Blues
Cinder blocks are bumpy! If paint bleeds under the tape, wait for it to dry, then use a tiny artist brush and the adjacent color to neatly ‘erase’ the mistake.
Step 2: Taping the Stripes
-
Strategy for taping:
You cannot tape every line at once because the tape has width. You’ll need to paint alternating stripes first. Tape off the area for the finish ‘Red’, ‘Yellow’, and ‘Blue’ bands (or simply stripes 1, 3, and 5). -
Seal the tape edges:
Press the tape firmly into the texture of the cinder blocks. For extra crisp lines on this uneven surface, run a thin bead of the distinct base wall color along the tape edge to seal it.
Step 3: Painting the Primary Stripes
-
Paint the red stripe:
Using the angled sash brush, cut in the edges of your top stripe (Red). Fill in the center with the small foam roller for a smooth finish. -
Paint the yellow stripe:
Move down to your third marked section. Apply the yellow paint, ensuring you work the paint into the heavy texture of the concrete block pores. -
Paint the blue stripe:
Apply the blue paint to the fifth section. I find two thin coats are always better than one thick one to prevent drips on vertical masonry. -
Remove tape while wet:
Carefully peel back the tape while the paint is still slightly tacky. This prevents the dried latex from pulling away with the adhesive. -
Allow to dry:
Let these three stripes dry completely, preferably overnight, before moving to the next phase.
Pro Tip: Sheen Matters
Use Semi-Gloss or Satin paint for hallways. Flat paint holds onto backpack scuffs and handprints, while glossier finishes are much easier to wipe clean.
Step 4: Painting the Secondary Stripes
-
Tape the remaining sections:
Once the first stripes are cured, apply tape delicately over the edge of the dried red, yellow, and blue paint to expose the empty bands. -
Paint the orange stripe:
Fill in the space between the red and yellow with your orange paint, being careful not to overload the brush near the tape. -
Paint the green stripe:
Apply green paint in the band between yellow and blue. Use the brush to dab paint into deep mortar joints if the roller misses them. -
Paint the purple stripe:
Finish with the bottom violet/purple stripe. Check for any drips running down onto the baseboard or floor. -
Final reveal:
Slowly remove the final strips of tape to reveal your sharp, interlocking rainbow gradient. -
Touch-ups:
Use a small artist’s brush to fix any areas where the textured block caused paint bleed, using the appropriate color to clean up the line.
This vibrant addition transforms a utilitarian hallway into a welcoming path for students and staff alike
BRUSH GUIDE
The Right Brush for Every Stroke
From clean lines to bold texture — master brush choice, stroke control, and essential techniques.
Explore the Full Guide
Tree of Knowledge Mural
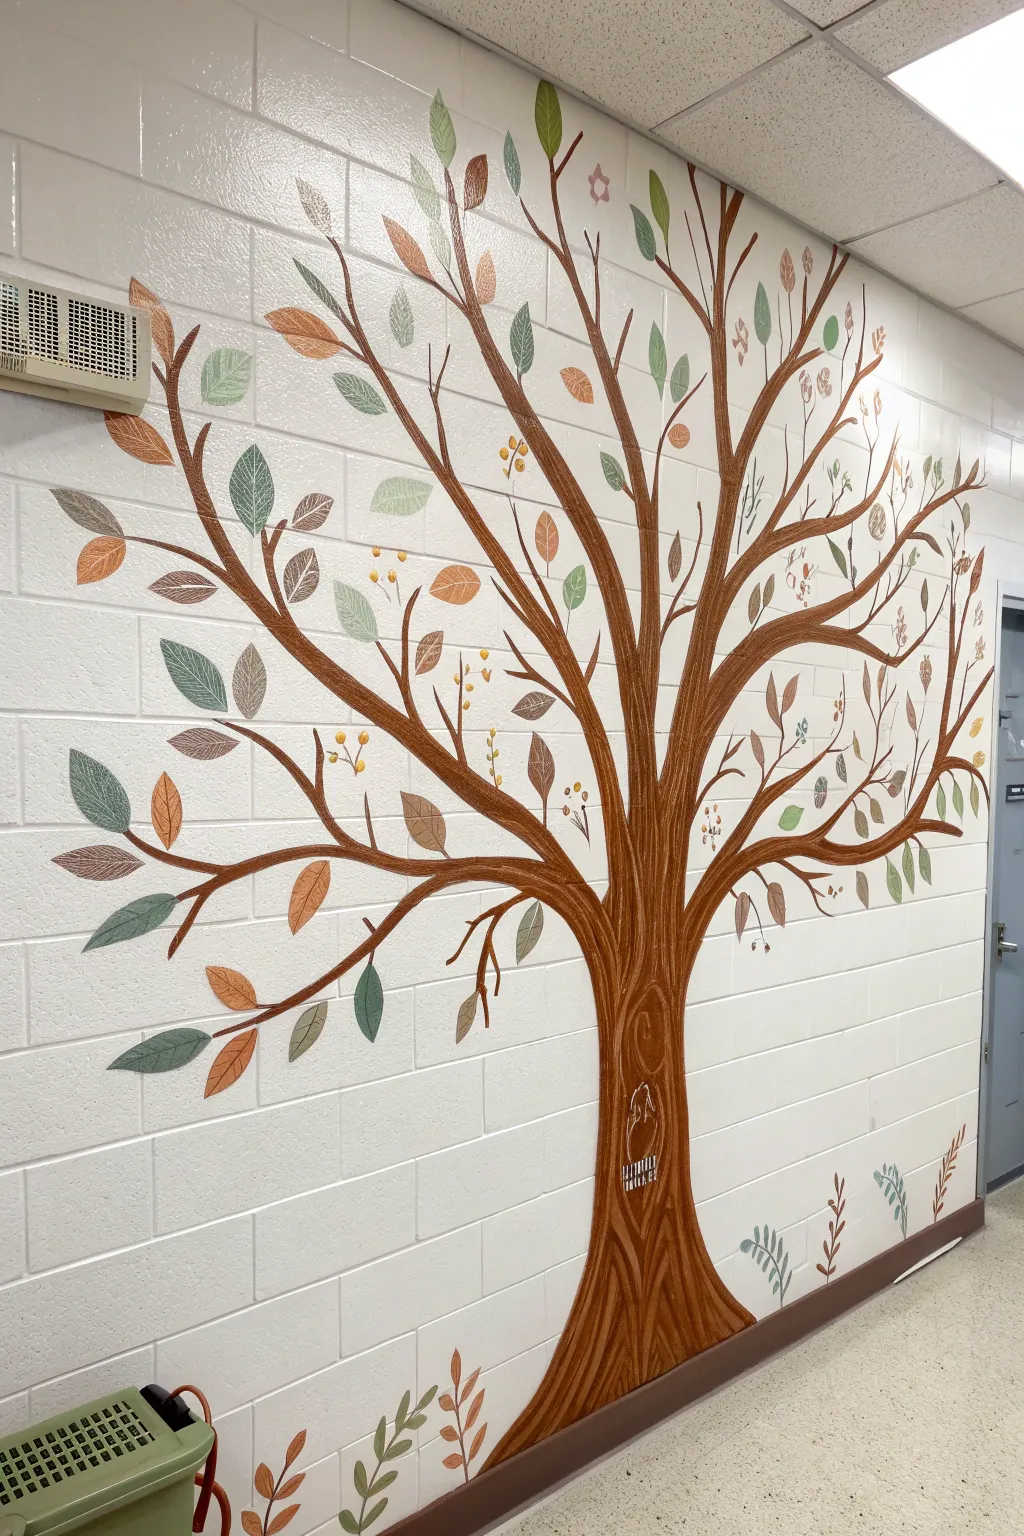
Transform a blank cinder block wall into an inspiring focal point with this stylized tree mural that symbolizes growth and knowledge. The design features a sturdy trunk with flowing wood grain lines and a diverse canopy of leaves in muted, earthy tones.
Step-by-Step Tutorial
Materials
- Latex wall paint (Dark Warm Brown)
- Latex wall paint (Medium Tan/Caramel)
- Acrylic paints (Sage Green, Olive Green, Burnt Orange, Mustard Yellow, Cream)
- Wide painter’s tape
- Chalk or pencil (for sketching)
- Projector (optional but recommended)
- 2-inch angled sash brush (for blocking in trunk)
- Round detail brushes (sizes 4 and 8)
- Liner brush (for fine veins)
- Clean rags
- Step stool or ladder
Step 1: Planning and Sketching
-
Prepare the surface:
Ensure the cinder block wall is clean and dust-free. If the wall is currently glossy, give it a quick scuff sand or apply a primer so your mural paint adheres properly. -
Map out the trunk:
Using a piece of chalk, lightly sketch the main silhouette of the tree trunk. Start wide at the base, letting the roots flare out along the baseboard, and taper upward toward the ceiling. -
Define the main branches:
Extend 5-7 large branches from the top of the trunk. Let them reach outward in organic curves, ensuring they spread nicely across the designated wall space. -
Outline the canopy:
Sketch smaller offshoot branches and indicate general areas where leaf clusters will go. You don’t need to draw every individual leaf yet, just mark their general flow.
Step 2: Painting the Structure
-
Block in the trunk base color:
Dip your 2-inch angled brush into the Medium Tan paint. Fill in the entire trunk and the main thick branches. Don’t worry about perfect opacity; the texture of the block will add character. -
Extend the branches:
Switch to a smaller round brush (size 8) to paint the thinner branches extending from the main ones. Use a loose hand to keep them looking natural rather than stiff. -
Add the wood grain texture:
Once the tan base is dry to the touch, load a round brush with the Dark Warm Brown paint. Paint long, flowing vertical lines down the trunk to simulate bark texture. -
Create knots and swirls:
While adding the grain lines, occasionally curve your strokes into oval shapes or ‘eyes’ to mimic natural knots in the wood. This gives the tree its unique personality. -
Detail the branch connections:
Where branches split from the trunk, paint darker V-shapes in the crooks to add depth. Follow the contours of the branches with your grain lines.
Rough Surface Troubleshooting
Cinder blocks soak up paint! Do not thin your paint with water. Use a ‘stippling’ or dabbing motion to get paint into the deep pores of the blocks.
Step 3: Adding the Foliage
-
Paint the large leaves:
Start with your largest leaf shapes using the Oliver Green and Burnt Orange paints. I like to scatter these randomly first to establish balance across the wall. -
Layer in medium leaves:
Fill in the gaps with medium-sized leaves in Sage Green and Mustard Yellow. Vary the direction they point—some up, some down, some sideways. -
Add delicate filler leaves:
Use the Cream paint and a smaller brush to add tiny sprigs or clusters of berries near the tips of the smallest branches. -
Paint ground foliage:
Don’t forget the base! Add simple fern-like sprigs and leaves growing up from the floor molding to ground the tree in its environment. -
Detail the leaf veins:
Using a liner brush and Cream or Dark Brown paint (depending on loop contrast), add a central vein and delicate side veins to the larger leaves. -
Add whimsical elements:
Paint a small hollow or ‘door’ at the base of the trunk or hidden symbols within the grain if desired, like the small grid pattern near the base in the example.
Pro Tip: Color Harmony
Limit your palette to 4-5 core colors. Mix them together slightly (e.g., add a touch of brown to your green) to ensure all tones feel cohesive.
Step back and admire how this organic design completely softens the industrial feel of the room
Music Staff Wall for a Music Corner
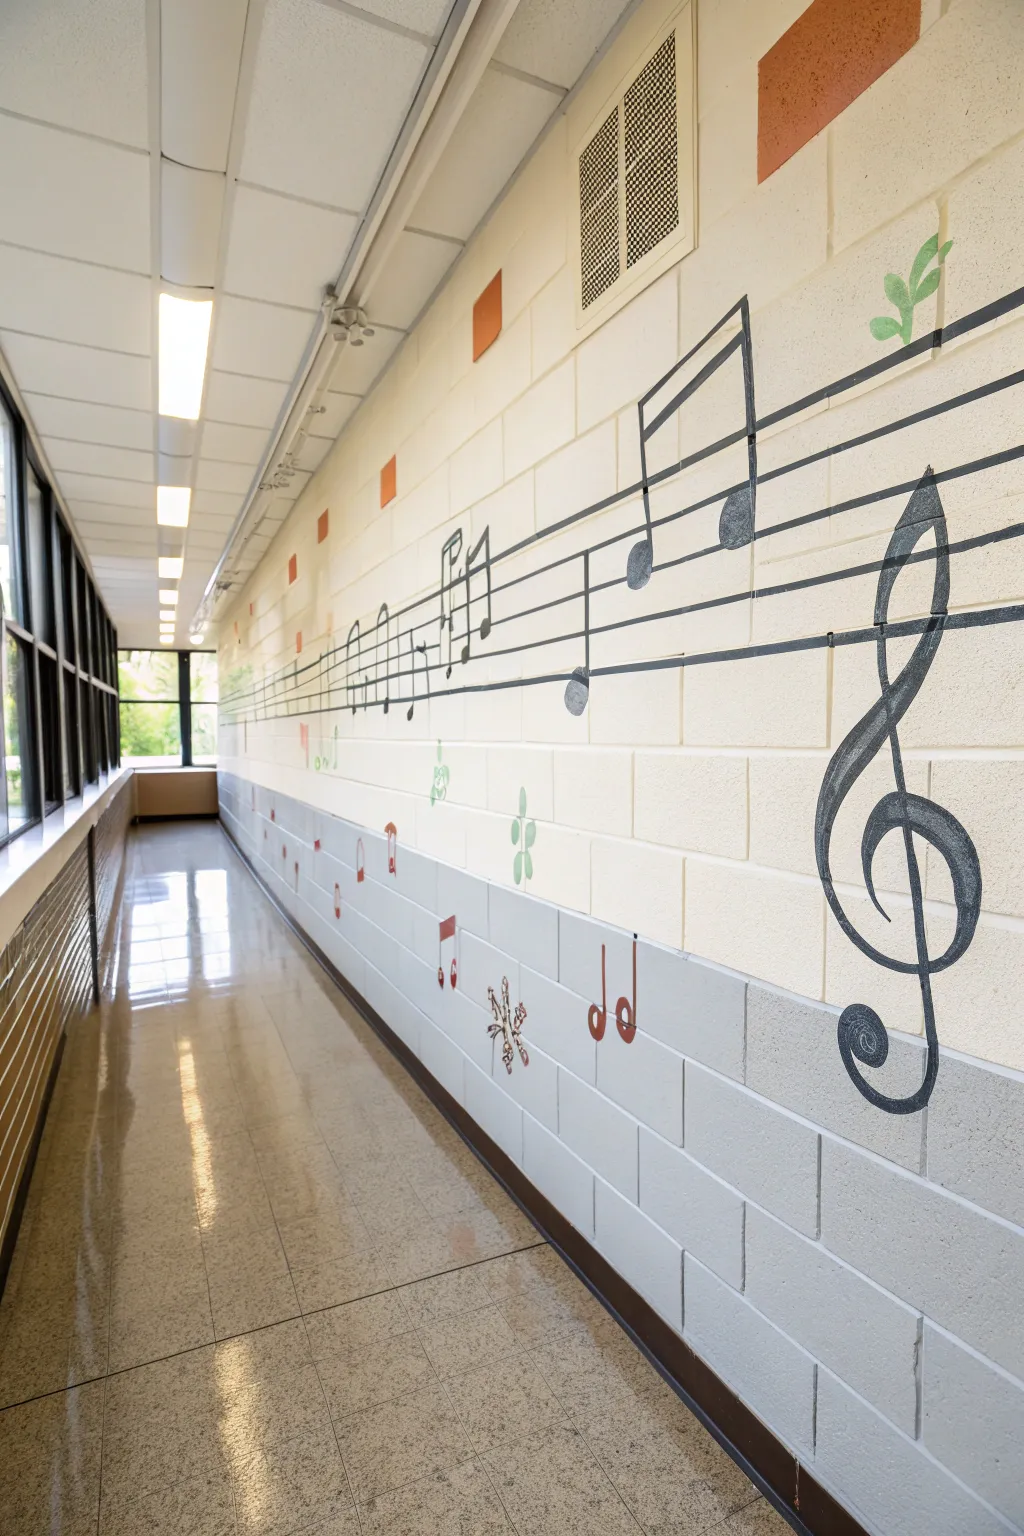
Transform a plain cinder block wall into a grand scale piece of sheet music that brightens up any corridor or music room. This mural features bold black staff lines and oversized musical notation, creating a playful yet educational environment.
Step-by-Step
Materials
- Drop cloths and painter’s tape
- Degreaser or TSP cleaner and sponges
- White or light beige latex wall paint (eggshell finish)
- Grey latex wall paint (satin or semi-gloss finish)
- Black acrylic paint or latex paint (flat or matte finish)
- Red acrylic paint
- Green acrylic paint
- Long level (4-foot or laser level)
- Chalk line reel or stretched string
- Pencil and eraser
- Assorted paintbrushes (1-inch flat, medium round, fine liner)
- Small foam roller and tray
- Artist’s painter’s tape (low tack)
Step 1: Preparation and Base Coat
-
Clean the surface:
Begin by thoroughly cleaning the cinder block wall with a degreaser or TSP solution to remove any grime, oils, or dust, which is crucial for paint adhesion. Rinse with clean water and let it dry completely. -
Mask the floor:
Lay down drop cloths along the base of the wall and secure them with painter’s tape to protect the flooring from drips and splatters. -
Establish the horizon line:
Measure up from the floor to about one-third of the wall’s height (typically chair-rail height). Use a laser level or a 4-foot level to draw a straight horizontal pencil line across the entire length of the wall. -
Paint the lower section:
Apply the grey paint to the area below your pencil line using a roller. Since cinder blocks involve deep grout lines, use a brush first to cut in the edges and press paint into the mortar joints before rolling the faces. -
Paint the upper section:
Once the grey line is clean, paint the upper two-thirds of the wall with the cream or light beige color. I find two coats are often necessary here to get a solid, opaque background that makes the black notes pop.
Step 2: Drafting the Staff
-
Mark staff spacing:
Determine the height of your music staff. Measure five equidistant points vertically for your lines. A spacing of 4 to 6 inches between lines usually works well for a wall of this scale. -
Snap the lines:
This step is much easier with a partner. Hold a chalk line (or a long straightedge with a pencil) at your marked heights and snap or draw five long, horizontal parallel lines across the upper cream section of the wall. -
Tape the staff lines:
Apply painter’s tape above and below each chalk line to create a stencil for your staff lines. Press the tape edges down firmly, especially into the recessed mortar joints of the cinder blocks, to prevent bleeding. -
Paint the staff lines:
Fill in the space between the tape strips with black paint. Use a stiff brush to dab paint into the textured grout lines rather than just brushing over them. -
Reveal the staff:
While the black play is still slightly tacky, carefully peel away the painter’s tape at a 45-degree angle to reveal crisp, straight staff lines.
Bleed-Through Blues
Use a ‘sealing’ technique on textured block. After taping lines, paint over the tape edge with the BACKGROUND color first. This seals gaps so black paint can’t creep under.
Step 3: Adding Musical Elements
-
Sketch the treble clef:
Choose a prominent spot on the right side of your wall for the large treble clef. Lightly sketch the shape with a pencil, ensuring the swirl centers on the second line from the bottom (the G line). -
Draw the notes:
Sketch various music notes (eighth notes, quarter notes) along the staff. Vary their positions to create a sense of rhythm. Add a few floating notes in the grey section below for a whimsical touch. -
Paint the black notes:
Using a medium round brush and black paint, carefully fill in your treble clef and the note heads on the staff. For the stems, a flat brush works great to get straight edges. -
Add colored accents:
To bring life to the mural, paint a few specific notes in color. Use red for lower notes or accents in the grey area, and green for occasional decorative elements or leaves sprouting from the staff. -
Detail the accents:
For the green leaf shapes, use a liner brush to add small veins or stems, giving them a slightly organic feel against the rigid staff lines. -
Touch up edges:
Inspect your lines and notes. Use a small brush with the background wall color (cream or grey) to clean up any smudges or uneven edges around the notes.
Pro Tip: Custom Stencils
Cut a simple cardboard stencil for the oval note heads. This ensures every note is the exact same size and shape, speeding up the process significantly.
Step back and admire how your new musical mural sets a harmonious tone for the entire hallway

PENCIL GUIDE
Understanding Pencil Grades from H to B
From first sketch to finished drawing — learn pencil grades, line control, and shading techniques.
Explore the Full Guide
World Map “Where We’re Learning” Mural
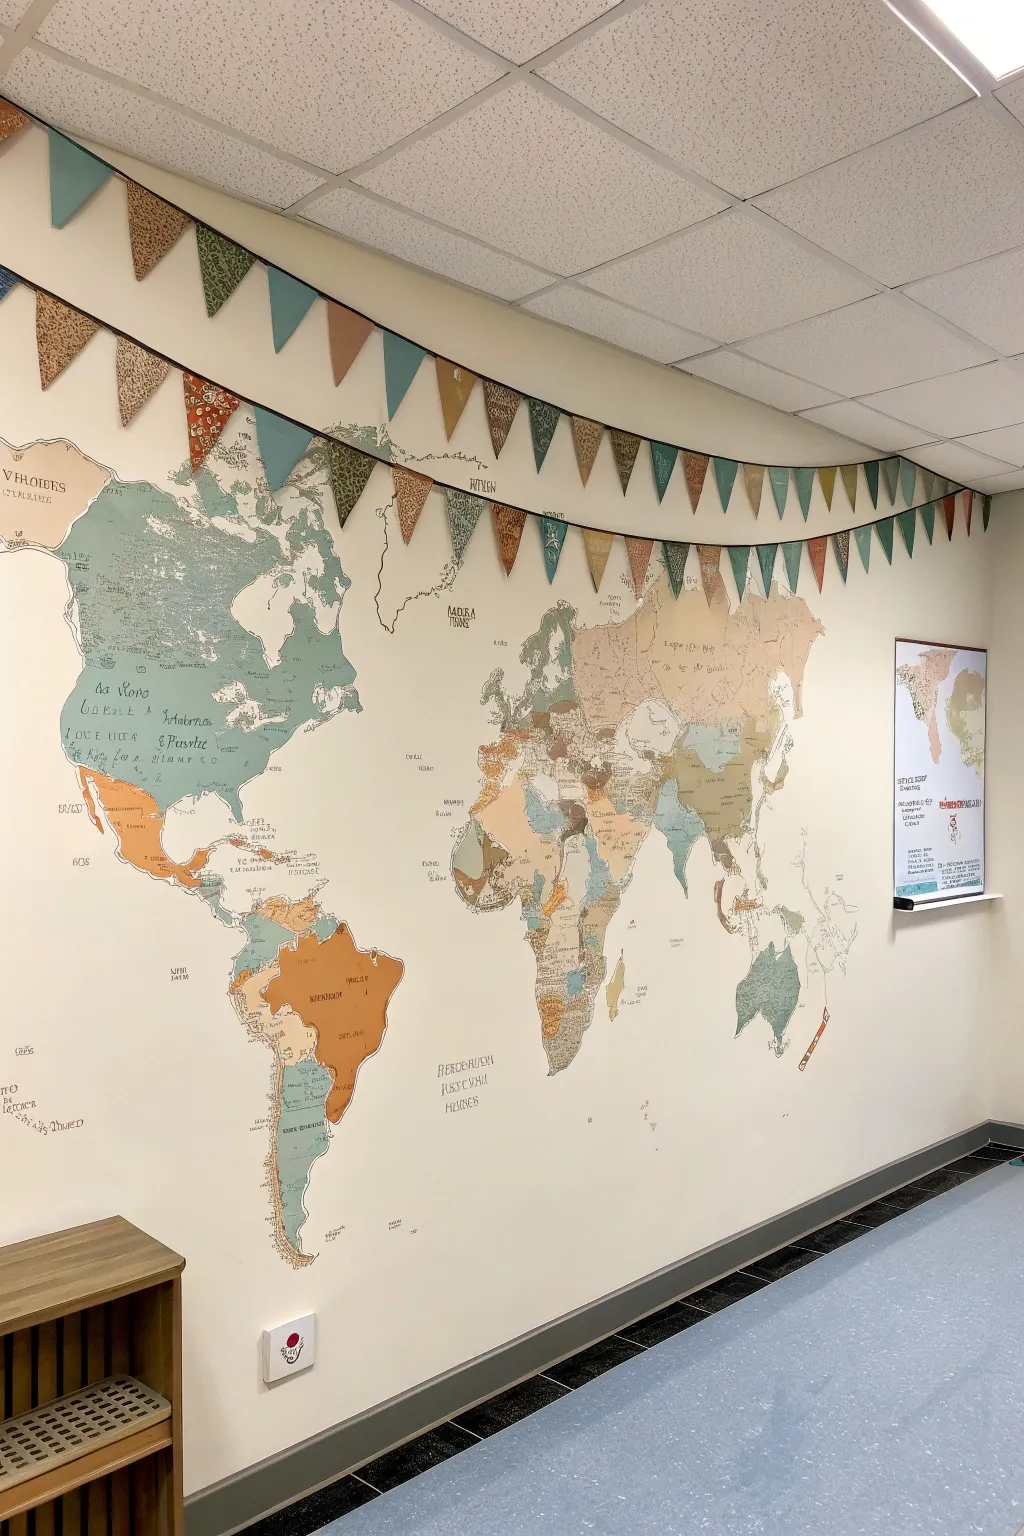
Transform a blank classroom wall into an expansive, interactive geography lesson with this muted, vintage-style world map mural. This project uses soft earth tones and distressed textures to create an inviting, permanent learning station rather than a bright, distracting decoration.
Step-by-Step Tutorial
Materials
- Overhead projector or digital projector
- Digital high-resolution world map image (outline style)
- Pencil
- Eraser
- Painter’s tape
- Interior latex wall paint (eggshell or satin finish): Cream/off-white base
- Acrylic craft paints: Sage green, terracotta orange, muted mustard, slate blue, warm brown
- Small foam rollers
- Assortment of artist brushes: 1-inch flat, #4 round, #0 detail
- Paint tray
- Paper towels
- Fabric scraps (cotton prints in matching colors)
- Jute twine
- Hot glue gun or sewing machine
Step 1: Preparing the Canvas
-
Prep the Wall:
Clean the wall surface thoroughly with a damp cloth to remove dust and oils. If the wall has a loud existing color, prime it first with a neutral cream or off-white base color to serve as the ‘ocean’ and background. -
Set Up the Projector:
Position your digital projector on a cart or table facing the wall. Load your high-resolution map outline. Adjust the distance until the map spans the full width of your desired mural area, ensuring the continents are level. -
Trace the Continents:
Lightly trace the projected outlines of the continents onto the wall using a pencil. Don’t worry about capturing every tiny island perfectly; focus on the major landmass shapes and coastlines. -
Trace Internal Borders:
While the projector is still on, trace the internal country borders. Use a slightly lighter touch here, as these lines will guide your painting zones but shouldn’t be too visible later. -
Double-Check Lines:
Turn off the projector and step back. Inspect your pencil work for any gaps or confusing overlapping areas. Clean up stray marks with a good eraser so your paint application will be neat.
Step 2: Painting the World
-
Mix Your Palette:
Prepare your acrylic paints. Aim for a muted, ‘antique map’ palette rather than primary colors. Mix a little white into your greens and blues to soften them, creating that distinctive chalkboard-friendly look. -
Outline Borders:
Using a #4 round brush and the specific color chosen for a country, paint a thin outline just inside your pencil markings. This creates a barrier that helps prevent you from coloring outside the lines later. -
Fill Larger Areas:
For large countries like the US, Brazil, or China, use a small 1-inch flat brush or even a mini foam roller to fill in the color. Apply thin, even layers. I find two thin coats cover better than one thick, gloppy one. -
Detail Work:
Switch to your smallest #0 detail brush to maneuver around tricky coastlines, islands, and narrow borders. Keep a wet paper towel handy to quickly wipe up any slips before the paint dries. -
Create Texture:
Once the base coats are dry, dry-brush a tiny amount of warm brown or darker green over the landmasses. This adds a weathered, vintage depth so the map doesn’t look like a flat sticker. -
Add Text and Labels:
Using a very fine brush and diluted dark brown or charcoal paint (avoid stark black), carefully letter the names of oceans, continents, and key countries. You can project the text again if you aren’t confident in your freehand lettering.
Smudged Pencil Lines?
If pencil graphite smears into your light paint colors, lightly dab the area with a kneaded eraser. For stubborn smudges, seal the line with a tiny bit of matte medium before painting over it.
Step 3: Drafting the Bunting
-
Cut Fabric Triangles:
Cut your fabric scraps into uniform triangles. For the scale shown, triangles about 6 inches wide and 8 inches tall work well. You’ll need enough to span the extensive width of your mural. -
Arrange the Pattern:
Lay your triangles out on the floor first. Shuffle the prints and solids to ensure a balanced distribution of color and pattern that complements the painted map below. -
Attach to Twine:
Measure a length of jute twine slightly longer than your wall width. Attach the triangles to the twine using a line of hot glue along the top edge of the fabric, folding over a small hem to encase the string. -
Initial Hanging:
Secure the ends of the bunting to the top corners of the wall using small nails or command hooks. Allow the banner to drape naturally in a gentle curve. -
Create the Swag:
To get the double-draped look seen in the photo, lift the center point of the twine and hook it onto a nail or hook placed higher up, near the ceiling line. Adjust until the swags are even.
Interactive Upgrade
Paint the entire map area with clear chalkboard topcoat. This transforms your beautiful mural into an interactive surface where you can draw temporary travel lines or label capitals with chalk.
Now you have a stunning, educational backdrop ready to inspire global curiosity in your students
Painted STEM Gear and Circuit Accent
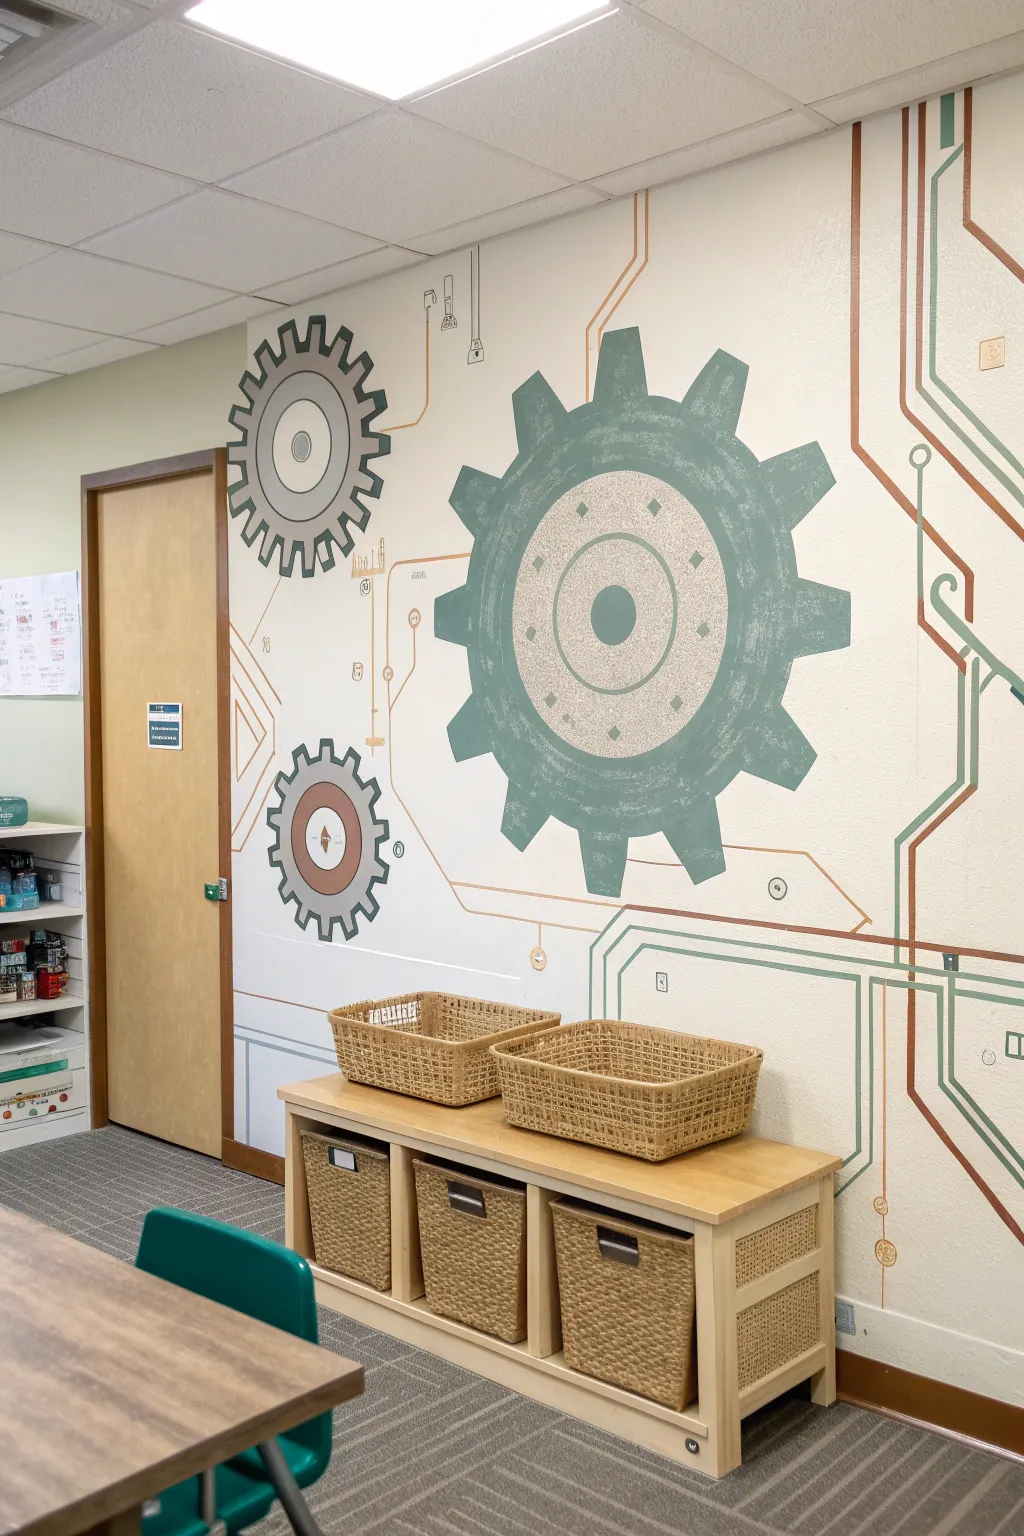
Transform a plain classroom wall into an engaging hub of innovation with this large-scale STEM mural. Featuring oversized mechanical gears connected by intricate circuit-style pathways, this design uses stencils and crisp taping techniques to achieve a professional, graphic look.
Step-by-Step Guide
Materials
- Latex interior wall paint (base color: Cream/Off-white)
- Latex accent paints (Teal/Sage Green, Charcoal Grey, Terra Cotta/Rust, Light Grey)
- Large cardboard or poster board (for making stencils)
- Projector (optional but highly recommended)
- Pencil and eraser
- Painter’s tape (various widths: 1 inch and thin 1/4 inch crafting tape)
- High-density foam rollers (4-inch size)
- Small angled sash brush
- Detail artist brushes
- X-Acto knife or sharp scissors
- Measuring tape and level
- Drop cloths
Step 1: Planning & Base Coat
-
Prep the canvas:
Begin by clearing the wall area and patching any holes or imperfections. Lay down drop cloths to protect the carpet. -
Apply the background:
Roll on two coats of your creamy off-white base color. Let this dry completely—I usually recommend waiting at least 24 hours before applying tape to ensure it doesn’t peel up the fresh paint.
Step 2: Drafting the Design
-
Create gear templates:
Decide on the size of your three main gears. Use a projector to cast gear images onto large poster board and trace them, or use a string-and-pencil compass to draw perfect circles. Cut out these templates. -
Position the gears:
Tape your cardboard gear templates to the wall to visualize the layout. Arranging the largest gear off-center usually creates the most dynamic composition. -
Trace the outlines:
Lightly trace around your templates with a pencil. For the inner details of the large green gear, use a ruler to mark the center point and draw the concentric circles. -
Map the circuitry:
Using a long level and a pencil, draw the straight lines for the ‘wires’ creating the circuit board effect. Connect these lines to the gears and let them run vertically to the floor and ceiling.
Bleed-Proof Lines
If your wall has heavy texture (like orange peel), tape alone won’t work. After taping, apply a thin layer of clear matte medium or the base wall color to seal the edge before adding color.
Step 3: Painting the Gears
-
Tape the large gear:
Carefully apply painter’s tape around the exterior jagged teeth of the large central gear. Press the tape edges down firmly to prevent bleed. -
Paint the main gear body:
Using a small foam roller, fill in the large gear with your Sage Green or Teal paint. Apply two thin coats rather than one thick one for a smoother finish. -
Add inner details:
Once the green is dry, use a circle stencil or steady hand to paint the inner light grey ring. I like to add small diamond or circle shapes in the ring using a different stencil for extra texture. -
Paint secondary gears:
Move to the smaller gears on the left. Paint the top one in Charcoal Grey and the lower one in a mix of Charcoal and Terra Cotta. Use a fine brush to keep the gear teeth sharp.
Interactive Elements
Paint the center of the lowest gear with magnetic primer and top coat. This allows students to attach real magnets or circuit components directly to the mural!
Step 4: Creating the Circuits
-
Tape the circuit lines:
This is where the 1/4 inch painter’s tape is essential. Apply tape along both sides of your pencil lines to create the thin wiring paths. -
Varied line thickness:
For the thicker ‘pipes’ or main power lines, use standard 1-inch tape to create wider gaps. Add small circles at corners or intersections to mimic soldering points. -
Seal the tape edges:
Lightly brush a tiny amount of the base wall color over the tape edges. This seals the tape and ensures your colored lines will be razor-sharp. -
Fill the lines:
Paint the circuit lines using your Terra Cotta and Green accent colors. Use a small brush to get into the corners without going over the tape.
Step 5: Finishing Touches
-
Remove tape:
The most satisfying part: slowly peel back all the tape while the paint is slightly tacky but mostly dry. -
Touch up:
Inspect your edges. Use a tiny artist brush and the base cream color to erase any small smudges or bleeds. -
Add dimension:
Optional: Mix a slightly darker shade of your gear colors and paint thin shadow lines on one side of the gear teeth to make them look 3D. -
Install storage:
Once the wall is fully cured, place your low shelving unit in front to complete the functional learning zone.
Step back and admire your industrial masterpiece, ready to inspire the next generation of engineers.


Indoor Meadow Nature Mural
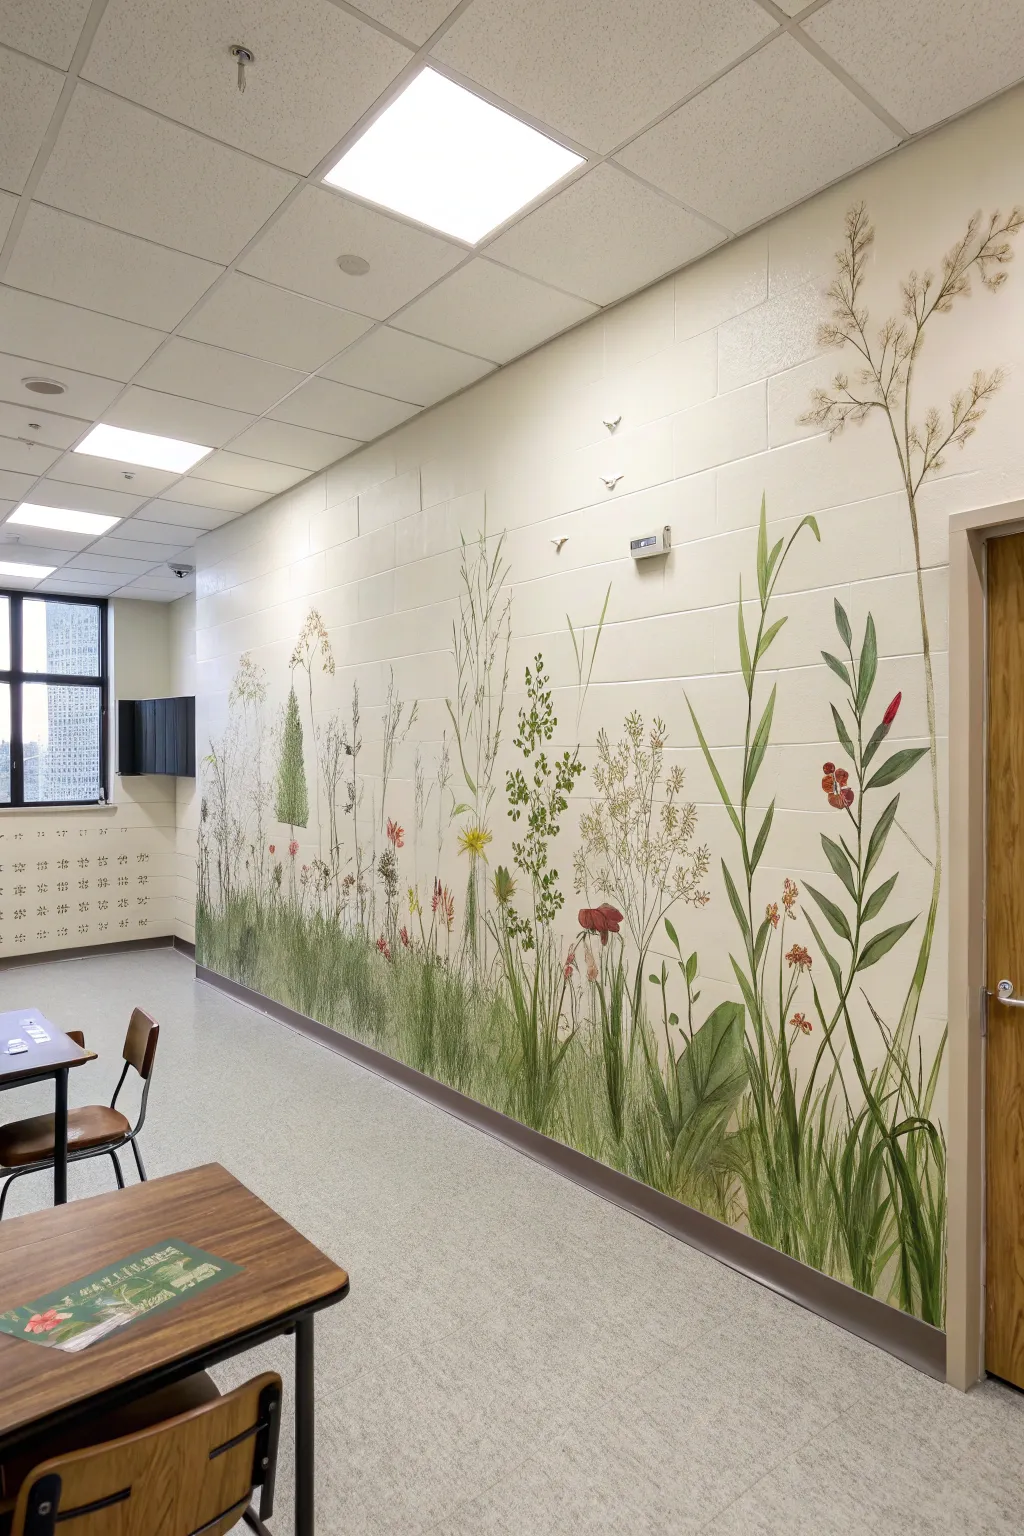
Transform a plain classroom wall into a serene, botanical field study that brings the outdoors in. This mural focuses on creating depth through layered grasses and delicate wildflowers, using the existing wall color as a bright, airy background.
Step-by-Step
Materials
- Latex interior wall paint (off-white base)
- Acrylic paints (various greens, browns, reds, yellows)
- Painter’s tape
- Drop cloths
- Assorted brushes (broad flat brushes, medium angle brushes, liner brushes)
- Chalk or pastel pencil for sketching
- Mixing cups or a large palette
- Step ladder
- Reference images of local flora
Step 1: Preparation and Background
-
Prepare the space:
Clear the area of furniture and lay down drop cloths to protect the flooring. Tape off the baseboards and any adjoining walls or door frames with painter’s tape. -
Assess the base wall:
If your wall isn’t already a clean, warm white or cream, apply a fresh coat of interior latex paint. This mural relies on negative space, so the background color is crucial for that airy, scientific-illustration look. -
Sketch the composition:
Using a light-colored chalk or pastel pencil, lightly sketch the placement of your tallest plants first. Mark vertical lines where the prominent reeds and flower stalks will go, varying heights to create a natural rhythm.
Natural Flow Tip
Avoid crossing stems perfectly. In nature, plants grow toward light, so have your lines curve slightly outward as they rise rather than standing stick-straight.
Step 2: Layer 1: The Tallest Flora
-
Mix base greens:
Prepare three shades of green acrylic paint: a dark olive, a vibrant fern green, and a muted sage. Keep them slightly watered down for better flow. -
Paint structural stems:
Starting with the tallest elements, use a medium angle brush to pull long, confident strokes upward. Focus on the tall reeds on the right side and the airy grass heads in the center. -
Add high details:
Switch to a liner brush to add the delicate, feathery tops of the tall brown grasses. Use a stippling motion with a mix of brown and ochre paint to simulate seeds and textures.
Add Hidden Life
Hide small painted insects like ladybugs, bees, or butterflies among the leaves for students to discover during quiet moments.
Step 3: Layer 2: The Mid-Ground
-
Create leafy volume:
I like to use a wider flat brush here to paint the broad, leafy plants like the prominent ones on the right. Twist the brush as you stroke upwards to create tapering leaf shapes. -
Introduce color:
Paint the wildflower stems and leaves, then add pops of color. Use deep reds and muted pinks for the small blossoms on the right, and bright yellow for the dandelion-like flowers in the center. -
Paint the ‘Cloud’ plants:
For the hazy, white/grey plants (like Queen Anne’s Lace or baby’s breath), use a dry brush technique. lightly distract a round brush with pale grey-white paint and dab gently in clusters.
Step 4: Layer 3: Grassy Base and Depth
-
Establish the dense bottom:
Near the floor, the vegetation needs to look thick. Use the dark olive green and a large brush to create a dense, chaotic layer of short vertical strokes in the bottom 12 inches. -
Layer lighter grasses:
While the dark layer is tacky, layer lighter greens over it. Use quick, upward flicking motions to mimic individual blades of grass overlapping each other. -
Add thin connectors:
Use your finest liner brush with watered-down paint to draw very thin connecting stems and stray grass blades that break away from the main clumps, adding realism.
Step 5: Final Details
-
Refine flowers:
Go back to your colored flowers and add highlights. A tiny dot of white or pale yellow in the center of the red blooms brings them to life. -
Clean up edges:
Step back and check for balance. If the bottom looks too heavy, paint a few tall, thin transparent stems rising out. If the top looks empty, add faint ‘ghost’ grasses with very watered-down beige paint. -
Remove tape:
Slowly peel off the painter’s tape while the paint is still slightly rubbery to prevent peeling, revealing a crisp bottom edge. -
Protect the work:
Since this is a high-traffic classroom, apply a clear, matte water-based varnish over the painted areas once fully dry to protect against scuffs and fading.
This peaceful botanical wall will provide a calming backdrop for learning for years to come
Geometric Triangle Feature Wall
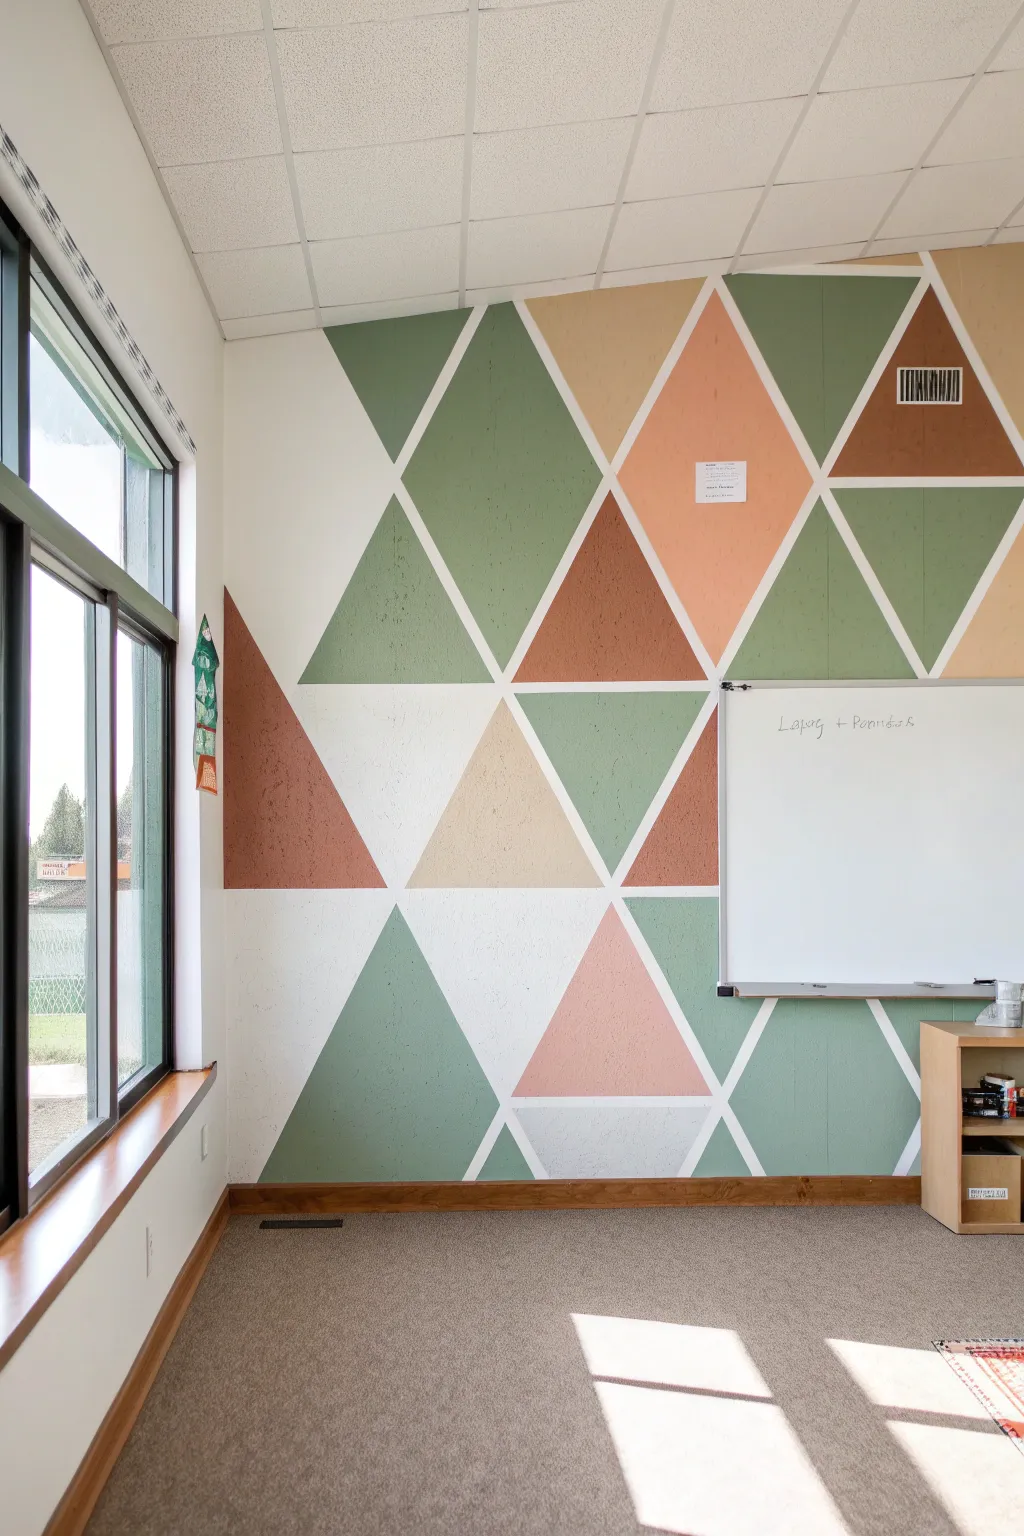
Transform a plain classroom wall into a stunning focal point with this large-scale geometric mural. Featuring earthy tones of sage, terra cotta, and beige separated by crisp white lines, this project brings modern warmth and structure to any learning space.
Step-by-Step Tutorial
Materials
- Interior latex paint (Eggshell or Satin finish) in 5-6 earthy colors (sage green, forest green, terra cotta, peach, beige, grey)
- Painter’s tape (1-inch width for thick lines as shown)
- High-quality angled sash brush
- Small foam rollers (4-inch size) and a tray
- Base wall paint (white or off-white) for sealing tape
- Measuring tape
- Pencil
- Drop cloths
- Ladder or step stool
- Level or laser level (optional but helpful)
Step 1: Preparation & Planning
-
Prep the Surface:
Start by cleaning the wall thoroughly to remove dust and oils. If the wall isn’t already white, paint the entire surface with your chosen white base color, as this will become the ‘grout’ lines between your triangles later on. -
Map the Design:
Sketch a rough plan on paper first to balance your colors. Looking at the photo, the pattern relies on large equilateral or isosceles triangles. You don’t need to be perfect, but having a general color map saves time during the painting phase. -
Mark Key Points:
Using a pencil and tape measure, mark the vertices of your triangles on the wall. A good rule of thumb is to measure equal distances along the ceiling line and baseboard to create a consistent grid foundation.
Bleed-Through Blues?
If paint bleeds under the tape, wait for it to dry completely. Re-tape along the original line and paint over the mistake with the background color (white) to erase the jagged edge.
Step 2: Taping the Grid
-
Apply the Diagonal Tape:
Connect your pencil marks with painter’s tape to form the triangle shapes. Work in long, continuous strips from floor to ceiling where possible to keep lines straight. Press the tape down firmly. -
Seal the Tape Edges:
This is the secret to crisp lines: Paint over the edge of the tape with your *base wall color* (white). This seals any gaps; if paint bleeds underneath, it will just be white on white, keeping your future colors sharp. -
Double-Check Positioning:
Stand back and look at your taped grid. Ensure the angles look pleasing and that the tape is on the ‘outside’ of the shapes you intend to paint, preserving the white space between them.
Add Textural Depth
Make a ‘sensory wall’ by painting a few triangles with chalk paint or magnetic primer before adding the color, giving students an interactive space to draw or attach magnets.
Step 3: Painting the Triangles
-
Color Blocking Strategy:
Consult your sketch and mark each taped-off triangle with a tiny dot of the color intended for that spot. This prevents accidental mix-ups once you have multiple paint cans open. -
Cut In Borders:
Starting with your first color, use the angled sash brush to carefully paint along the taped edges of the triangle. I find this gives better control than jamming a roller into the corners. -
Roll the Centers:
Use a small 4-inch foam roller to fill in the rest of the triangle. The foam provides a smooth finish without heavy texture. Apply a generous coat but avoid drips. -
Repeat for All Colors:
Work through your chosen palette one color at a time. Rinse your brush and swap roller covers between colors, or wrapping them in plastic if you need to do a second coat later. -
Apply Second Coat:
Once the first coat is dry to the touch (usually 1-2 hours), check for patchiness. Apply a second coat to ensure rich, opaque color coverage, especially for darker earth tones.
Step 4: The Reveal
-
Remove Tape While Slightly Tack:
For the cleanest lines, peel the tape off while the final coat of paint is still slightly tacky—not soaking wet, but not fully cured either. Pull the tape slowly at a 45-degree angle away from the painted area. -
Touch Up:
Inspect your lines. If any paint managed to bleed through, use a tiny artist’s brush and your white base paint to carefully correct the edges. -
Clean Up Edges:
Reinstall any vent covers or outlet plates you removed, and admire how the white lines make your geometric colors pop against the wall.
Step back and enjoy the vibrant, modern energy this geometric feature brings to the room
Paint-Drip Border for an Art Area
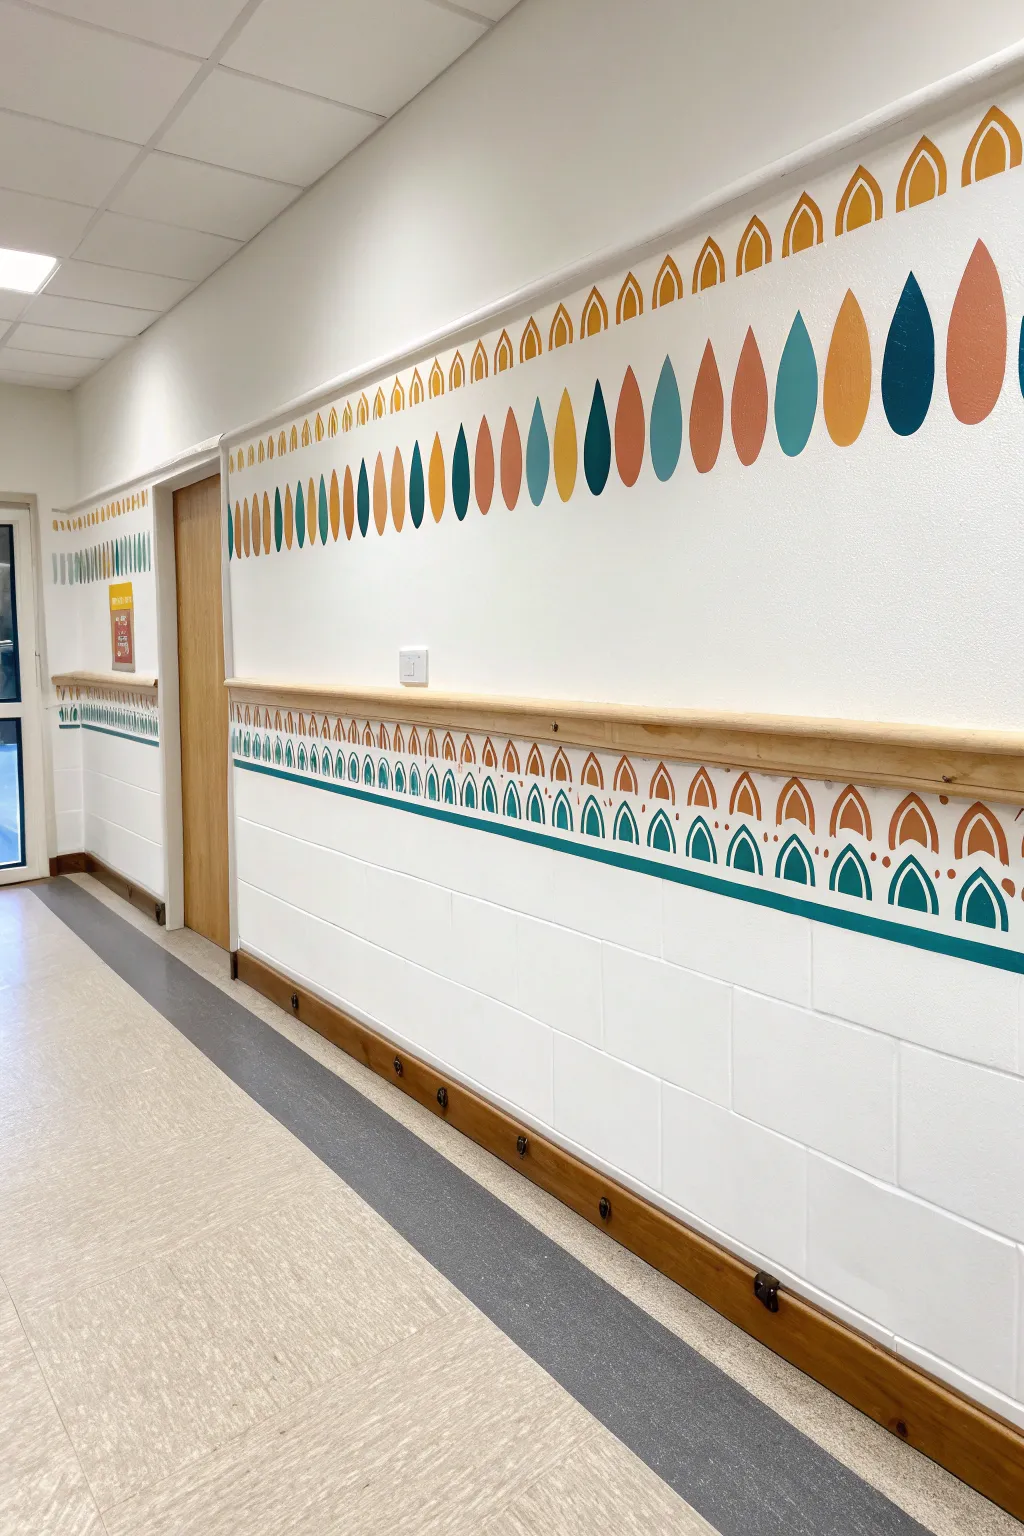
Transform a plain corridor into a vibrant walkway with this structured yet playful teardrop design. Using repeating geometric shapes in a warm, earthy palette creates a sense of rhythm and movement that draws the eye down the hall.
Step-by-Step
Materials
- Matte interior wall paint (white base)
- Sample pots of latex paint (teal, mustard yellow, terra cotta, burnt orange)
- Painter’s tape (1-inch width)
- Cardstock or stencil acetate
- Pencil
- Small foam roller
- Assorted angled artist brushes (1-inch and 1/2-inch)
- Laser level or chalk line
- Measuring tape
- Drop cloth
Step 1: Wall Prep & Layout
-
Clean and mask:
Begin by wiping down the wall surface with a damp cloth to remove dust. Apply painter’s tape along the ceiling line, door frames, and the top edge of any wooden chair rails or baseboards to protect them. -
Establish the baseline:
Decide where your main row of large teardrops will sit. Use a laser level or a chalk line to mark a perfectly straight horizontal guideline roughly 12-18 inches below the ceiling. This invisible line will be the reference for the bottom of the largest shapes. -
Create the stencils:
You will need three sizes of ‘teardrop’ shapes. Draw a large one (approx. 8 inches tall), a medium one (approx. 4 inches), and a small one (approx. 2 inches) on cardstock or heavy acetate. Cut them out carefully with scissors or a craft knife.
Uneven Edges?
If paint bleeds under your stencil or tape, wait for it to dry completely. Then, use a small artist’s brush and your white base wall paint to carefully ‘erase’ the mistakes.
Step 2: Painting the Upper Border
-
Trace the top row:
Starting just below the ceiling or crown molding, lightly trace the smallest teardrop stencil repeatedly. Since the image shows negative space shapes here (outlines), space them evenly, leaving about an inch between each. -
Paint the golden arches:
Using a small angled brush and mustard yellow paint, carefully paint the outline of these small top shapes. Instead of filling them in, paint a thick line around your traced mark to create an open arch effect. -
Add the main teardrops:
Moving down to your main guideline established earlier, begin tracing the large teardrop stencil. To replicate the pattern shown, stagger the sizes: trace a large drop, then a medium one, then large again. -
Randomize the spacing:
Notice how the image has a dense ‘forest’ of drops. Don’t just do one single line; create a second, slightly lower row where the shapes nests between the upper ones, overlapping slightly in height but not touching. -
Assign colors:
Before painting, plan your color distribution. Mark each traced shape with a tiny dot of the intended color (teal, terra cotta, yellow) to ensure a balanced, random mix without clustering too much of one hue. -
Fill the shapes:
Use your angled brushes to fill in these shapes solidly. Paint the edges first for a crisp line, then fill the center. Two coats might be necessary for the darker teal and terra cotta shades to ensure full opacity.
Step 3: Creating the Lower Dado Rail Detail
-
Mark the lower zone:
If your wall has a chair rail, this design sits just below it. If not, measure about 36 inches from the floor and snap a chalk line. Apply a strip of painter’s tape horizontally about 4 inches below the rail to define the bottom of the teal band. -
Trace the repetitive pattern:
In the space between the chair rail and your tape, trace two rows of the small teardrop stencil. The top row should point up, and the bottom row should point up as well, aligned directly under the spaces of the top row. -
Paint the teal band:
Paint the solid horizontal band at the bottom of this section using teal paint and a small roller or brush. Ensure the top edge is crisp and straight. -
Detail the arches:
Using terra cotta and mustard yellow, paint the outlines of the small teardrop rows you traced. Like the ceiling border, these are open arches, not filled shapes. -
Add accent dots:
For a finishing touch, dip the end of a paintbrush handle or a small dowel into terra cotta paint and dot it between the arches for extra detail. -
Dry and peel:
Wait until the paint is tacky but not fully cured—usually about an hour—to carefully peel off all painter’s tape at a 45-degree angle. This prevents the dried paint from ripping.
Level Up The Look
Add a dimensional effect by painting a very thin, lighter shade of each color on just the left side of every teardrop to create a subtle highlight or ‘shine’ mark.
Enjoy the rhythmic, colorful energy this simple geometric border adds to your hallway
Doorway Painted as a Storybook Portal
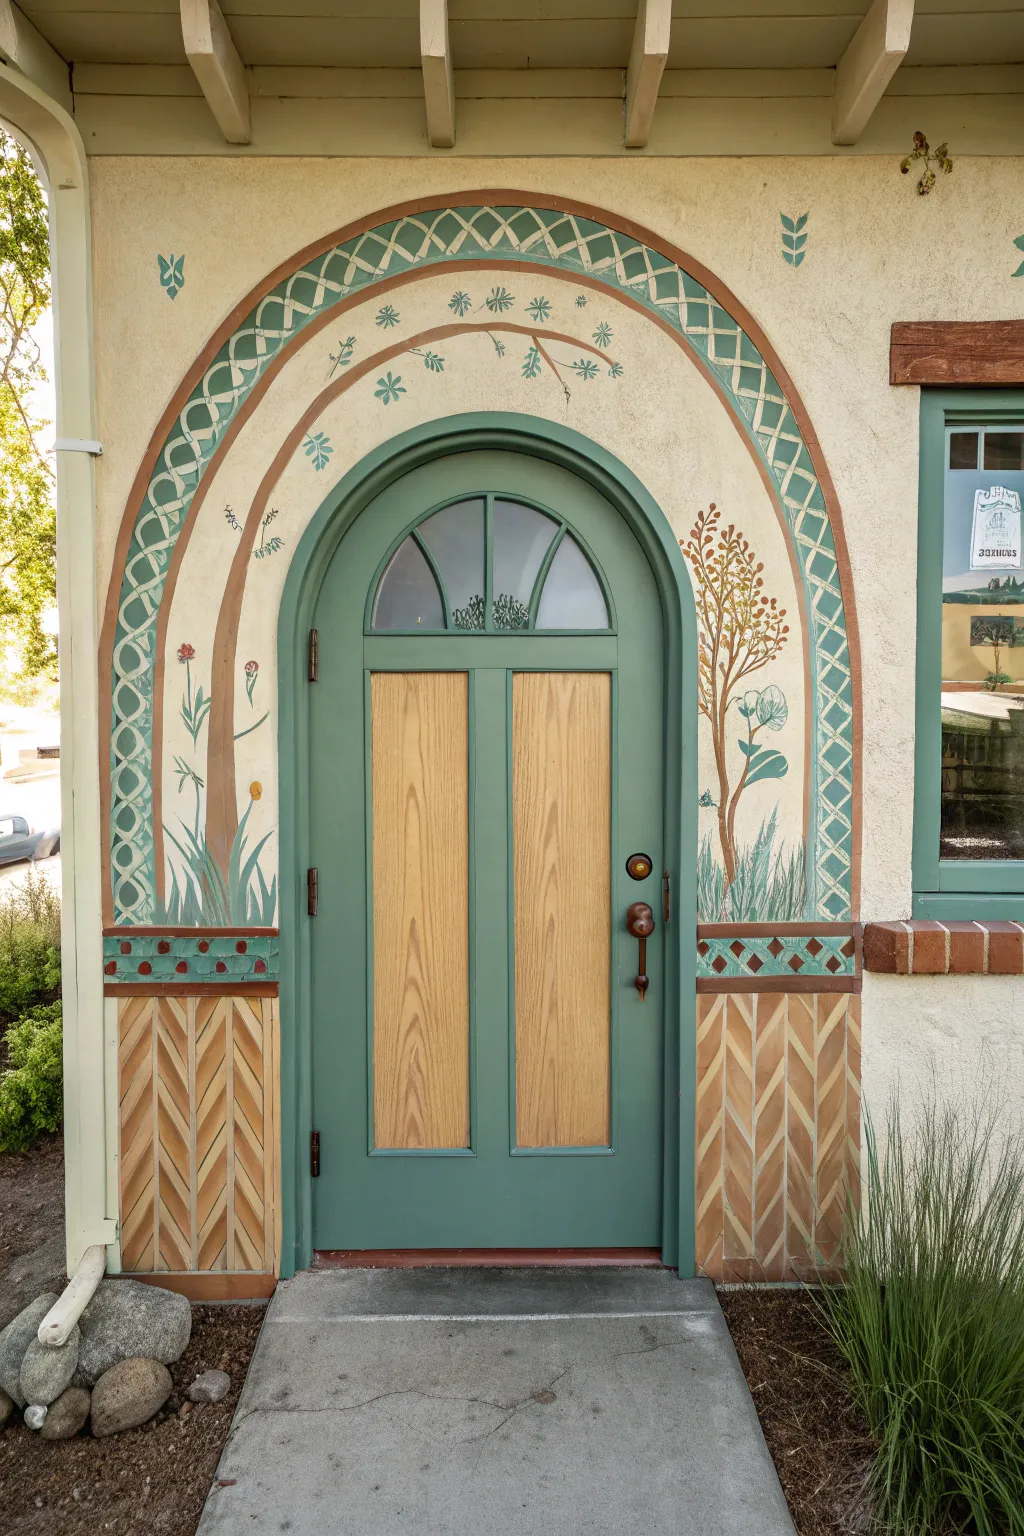
Transform a standard classroom doorway into an enchanting portal to learning with this detailed mural project. By layering geometric patterns with organic botanical elements, you’ll create a welcoming Art Nouveau-inspired entrance that sparks imagination before students even step inside.
Detailed Instructions
Materials
- Exterior or interior latex paint (Cream/Beige base coat)
- Acrylic paints (Forest Green, Sage Green, Terracotta, Brown, White)
- Painter’s tape (various widths: 1-inch and 1/4-inch)
- Assorted paintbrushes (1-inch flat, round sizes 4, 6, and 8, fine liner brush)
- Chalk or pencil for sketching
- Measuring tape and ruler
- Bubble level
- Stencil material (optional for leaves)
- Large sponge or rag (for texture)
Step 1: Base and Structure
-
Prepare the surface:
Begin by cleaning the wall surface around the door frame thoroughly to remove dust and oils. If the existing paint is glossy, give it a light sanding to help the new paint adhere better. -
Apply the base coat:
Paint the entire wall area surrounding the door with a warm cream or beige latex paint. This neutral background mimics the look of aged plaster and makes the subsequent colors pop. -
Outline the arch:
Using a pencil, a string, and a anchor point at the center of the door frame, lightly sketch a large semi-circle arch above the door. Draw a second, larger arch about 8-10 inches outside the first to create the border for your lattice design.
Bleeding Lines?
If paint bleeds under your lattice tape, wait for it to dry completely. Then use a small artist’s brush and the original background color (terracotta) to carefully touch up and straighten the lines.
Step 2: Geometric Lattice Work
-
Create the outer rim color:
Fill in the space between your two pencil arch lines with a Terracotta or warm brown paint. I like to keep this layer fairly flat and solid as it acts as the background for the lattice. -
Tape the lattice pattern:
Once the terracotta band is fully dry, use 1/4-inch painter’s tape to create the crisscross lattice pattern. Lay strips diagonally in one direction, then cross them in the opposite direction to form diamonds. -
Paint the lattice overlay:
Paint over the taped area with a Sage Green acrylic paint. Use a pouncing motion with your brush to prevent paint from bleeding under the tape edges. -
Reveal the design:
Carefully peel away the tape while the paint is still slightly tacky to reveal the terracotta diamond pattern beneath the sage green lattice.
Add Dimension
Mix a tiny drop of black into your green paint to create a shadow shade. Paint a thin line along the bottom edge of every lattice strip to make the ‘wood’ lattice look 3D and woven.
Step 3: Lower Wall Detailing
-
Mark the chevron section:
Below the door handle height (wainscoting level), measure two rectangular sections on either side of the door. Use vertical strips of 1-inch painter’s tape to create columns. -
Sketch the chevrons:
Lightly draw zig-zag patterns within the vertical columns. This doesn’t need to be mathematically perfect; a hand-drawn look adds charm. -
Paint the chevrons:
Using a small flat brush and alternating between brown and tan paints, fill in the chevron stripes. A slightly watered-down paint can create a nice wood-stain effect here. -
Add the decorative border:
Paint a horizontal band separating the chevron area from the upper mural. Use the Sage Green and add small Terracotta dots or diamonds inside this band for detail.
Step 4: Botanical Embellishments
-
Sketch the trees:
On the cream wall space between the door frame and the lattice arch, sketch thin, winding tree trunks on both sides using chalk. -
Paint the trunks:
Use a round brush and brown paint to fill in the tree trunks. Vary the pressure to make the branches tapering and natural-looking. -
Add foliage details:
Switch to a smaller round brush. Dip into Sage Green and dab small leaf shapes along the branches. Add smaller clusters of dots in Terracotta to represent berries or buds. -
Paint the stylized flowers:
On the right side, paint larger, stylized floral shapes. Create a circle with light blue or white wash, then outline petals with a fine liner brush in dark green. -
Fill the bottom with grass:
At the base of the trees (just above the horizontal border), use a fan brush or an old frayed brush with green paint to flick upward, creating the look of tall grasses. -
Stencil decorative accents:
In the open space above the door arch, use a small stencil or freehand small geometric flower bursts in Sage Green to fill the negative space without crowding it. -
Final touches:
Step back and check for balance. If the design feels too light, add a second coat to the main tree trunks or outline the lattice arch with a thin line of brown paint for definition.
Your classroom entrance is now a magical gateway that invites curiosity and wonder every morning


Have a question or want to share your own experience? I'd love to hear from you in the comments below!