A plain clay vase is basically a blank canvas with curves, texture, and tons of personality. Here are my favorite clay vase painting ideas—starting with the classics you’ll want to save immediately, then moving into the fun, unexpected stuff.
Two-Tone Dip for Modern Minimalism
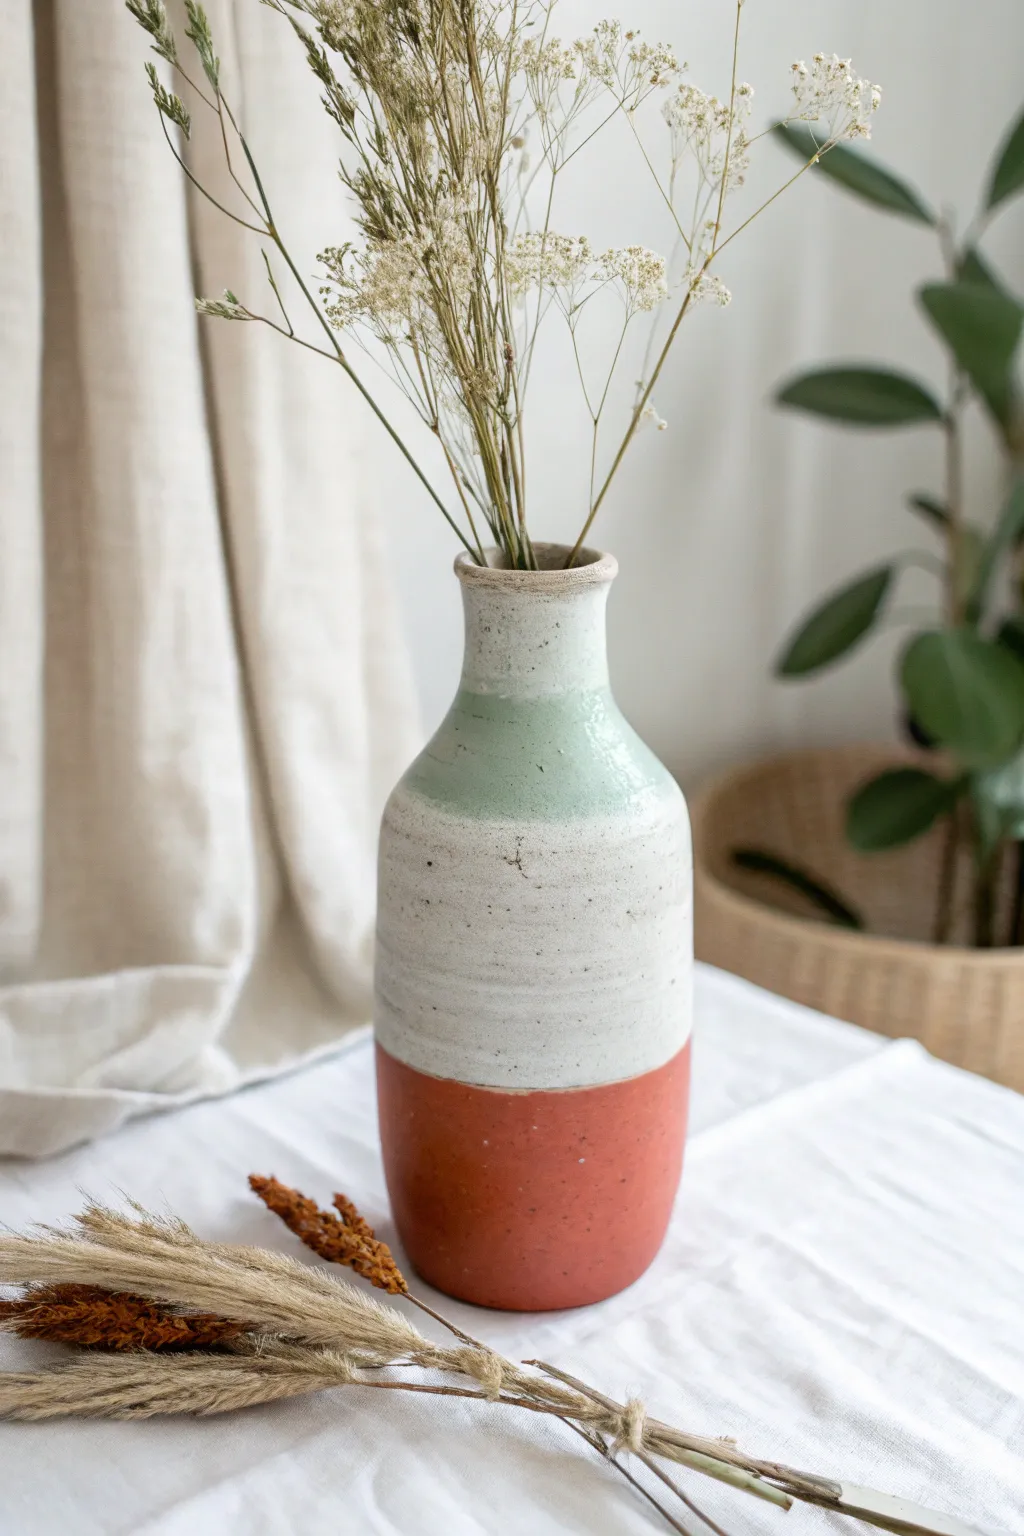
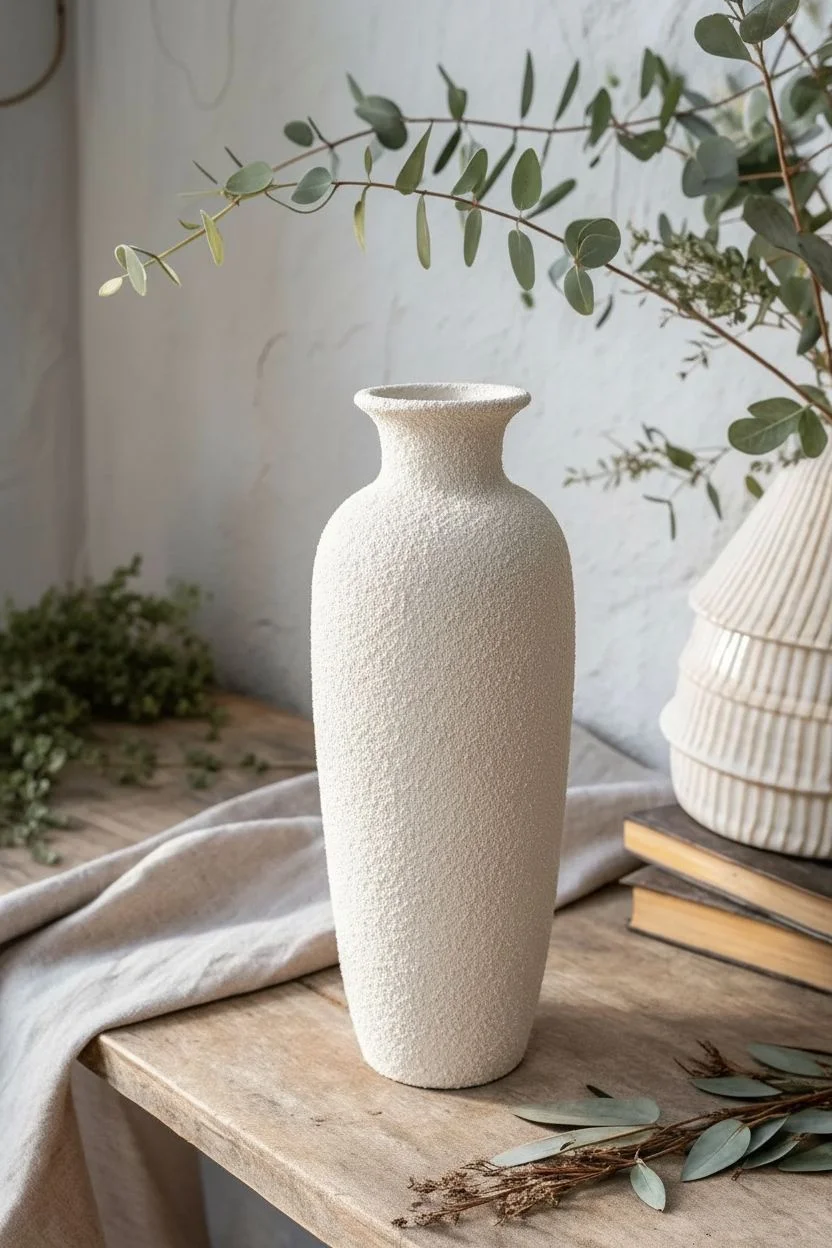
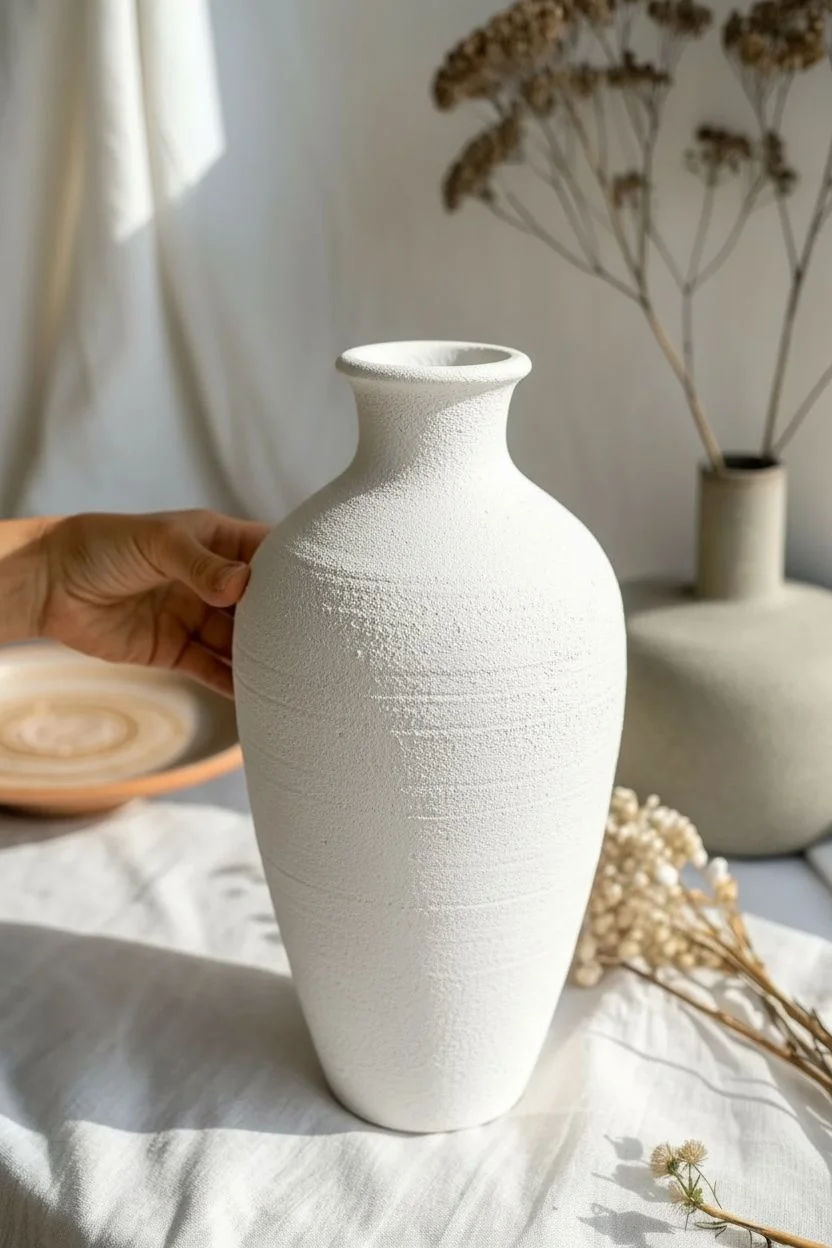
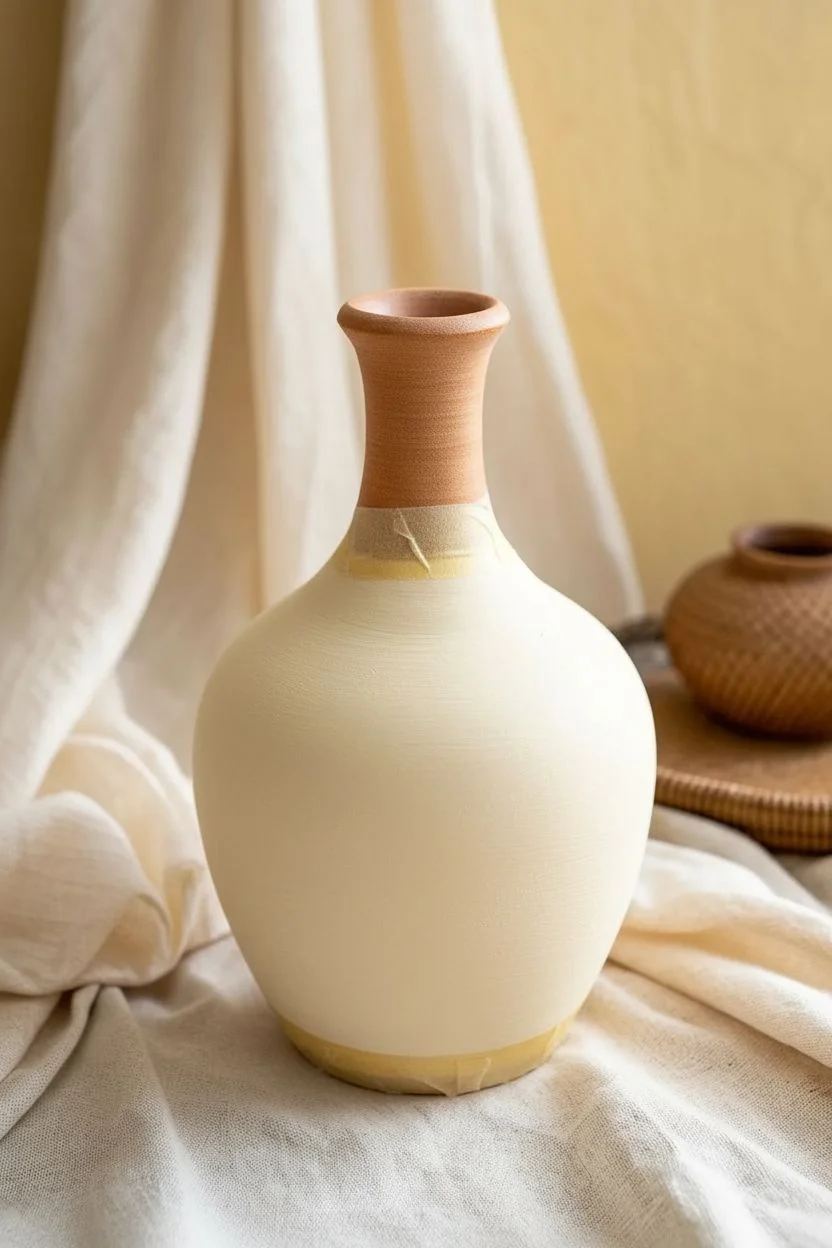
Embrace the effortless charm of Scandinavian design with this beautiful tri-tone dipped vase project. By combining raw terracotta with soft bands of speckled white and sage, you’ll create a centerpiece that feels both earthy and refreshingly modern.
How-To Guide
Materials
- Bisque-fired ceramic vase (bottleneck shape)
- Masking tape or painter’s tape
- Satin finish white ceramic glaze (with speckles if possible)
- Pale sage green ceramic glaze
- Deep terracotta or rust-orange ceramic glaze
- Medium flat brush
- Small detail brush
- Clear matte sealant spray (optional)
- Old newspaper or drop cloth
Step 1: Base Preparation
-
Clean the surface:
Begin by wiping down your bisque vase with a slightly damp cloth to remove any kiln dust or oils from your hands. This ensures the glaze adheres perfectly. -
Dry completely:
Let the vase sit for about ten minutes to ensure absolutely no moisture remains on the surface before you start masking. -
Mark the bottom section:
Decide how high you want your bold terracotta base to go. In the reference, it takes up roughly the bottom third. Apply a strip of masking tape horizontally around the vase at this line. -
Check the seal:
Run your thumbnail firmly along the edge of the tape to prevent paint from bleeding underneath. A tight seal is crucial for that crisp line.
Step 2: Applying the Earthy Base
-
Start painting the terracotta:
Dip your flat brush into the terracotta or rust-coloured glaze. Apply it to the bottom section below your tape line, using smooth, horizontal strokes. -
Build coverage:
For a rich, opaque look like the original, you’ll likely need two or three coats. Allow the paint to become touch-dry between each layer. -
Remove tape carefully:
While the final coat is still slightly tacky—not fully dry—gently peel away the masking tape at a 45-degree angle to reveal a sharp edge. Let this section cure completely.
Bleeding Lines?
If paint seeps under the tape, wait for it to dry completely. Then, gently scrape the excess away with a craft knife or use a small brush with the base color to tidy the edge.
Step 3: The Middle Layer
-
Mask the middle section:
Once the base is dry, apply a new line of tape right over the top edge of your terracotta paint to protect it. Then, place a second piece of tape further up the neck of the vase, marking where the white section ends and the green begins. -
Paint the white band:
Using a clean flat brush, apply your speckled white glaze to the middle section. If you can’t find pre-speckled glaze, I like to flick a tiny bit of diluted grey paint onto the wet white layer with an old toothbrush for texture. -
Layer for opacity:
Apply 2-3 coats of white until the raw clay underneath is fully hidden. Keep your strokes even to avoid ridges. -
Peel and reveal:
Remove both pieces of tape carefully. You should now have a terracotta bottom and a white middle section.
Natural Texture
To mimic the stonewashed look in the photo, sponge the paint on lightly instead of brushing. This creates a more organic, porous texture rather than a solid plastic finish.
Step 4: The Sage Top & Finish
-
Define the top boundary:
Apply a final strip of tape over the top edge of your white section to protect it while you work on the neck. -
Apply the sage green:
Paint the remaining top section of the vase, including the rim, with your pale sage green glaze. This usually requires a slightly smaller brush to navigate the curve of the neck neatly. -
Refine the rim:
Use a small detail brush to ensure the paint goes just over the lip of the vase for a professional finish. -
Remove final tape:
Peel off the last piece of masking tape. If you have any small bleeds or uneven lines, touch them up now with a tiny detail brush and the appropriate color. -
Let it cure:
Allow the vase to dry undisturbed for at least 24 hours. -
Seal the deal:
If you used acrylic paints masquerading as glazes, finish with a clear matte sealant spray to protect your work. If using real ceramic glazes, fire the piece according to manufacturer instructions.
Now you have a stunning, artisanal-style vase ready to display your favorite dried botanicals


Crisp Stripes With Clean Tape Lines
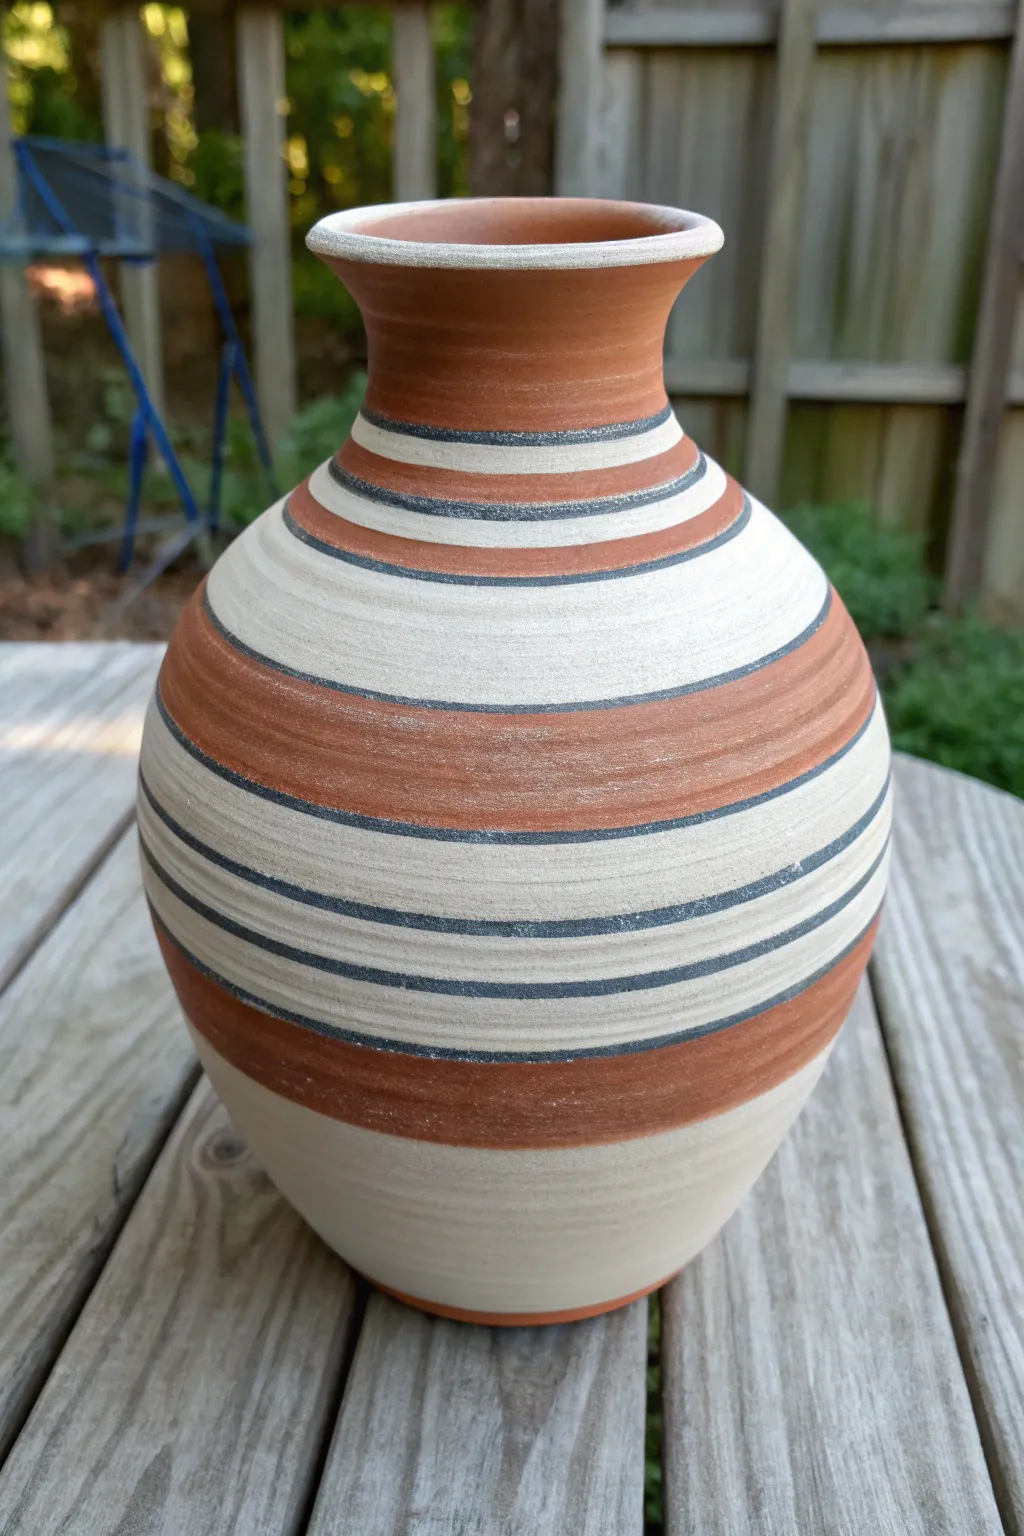
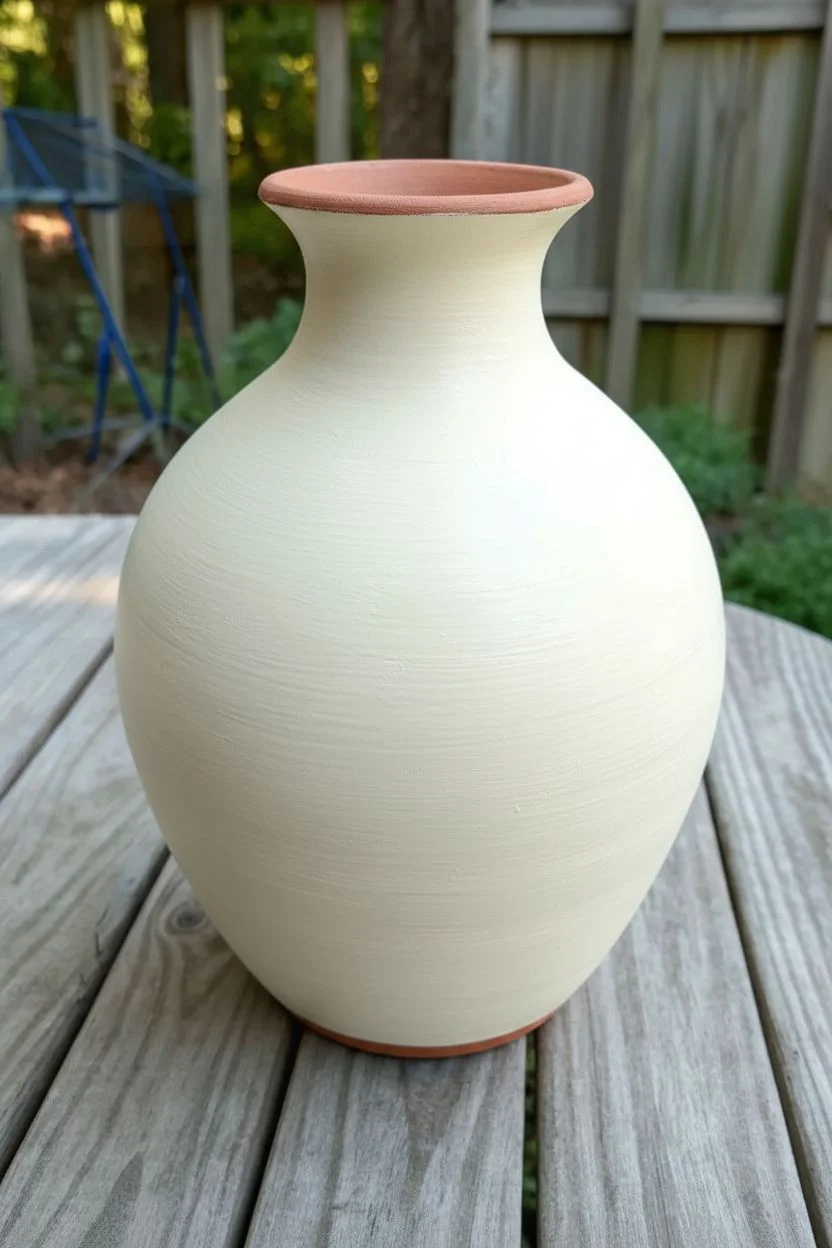
This tutorial guides you through creating a striking, modern vase featuring crisp horizontal bands of cream, terracotta, and slate blue. Using a tape-resist method, you’ll achieve perfectly straight lines that contrast beautifully with the organic texture of the clay surface.
Detailed Instructions
Materials
- Bisque-fired ceramic vase (cleaned and dust-free)
- Painter’s tape (various widths: 1/4 inch, 1/2 inch, and 1 inch)
- Acrylic paints or ceramic glazes (Cream/Off-White, Terra Cotta/Rust, Slate Blue/Dark Grey)
- Flat paintbrushes (medium and small)
- Sponge or damp cloth
- Palette or paper plate
- Sealant (matte acrylic sealer or clear glaze)
Step 1: Preparation & Base Coat
-
Clean the Surface:
Begin by wiping down your ceramic vase with a damp sponge to remove any dust or oils. This ensures your paint adheres properly and smoothly. -
Apply the Cream Base:
Using a medium flat brush, apply a coat of the cream or off-white paint to the entire middle section of the vase where the majority of the lighter bands will be. You don’t need to paint the very top or bottom if those will be solidly colored, but painting a large central area gives you a good canvas. -
Layering for Opacity:
Let the first coat dry completely to the touch. Apply a second or even third coat until you have a solid, opaque cream finish without streakiness. -
Full Dry Time:
Allow the base coat to dry thoroughly. This is crucial—if the paint is even slightly tacky, the tape in the next phase will peel it off. I like to wait at least an hour or use a hairdryer on a cool setting to speed things up.
Step 2: Taping the Pattern
-
Marking the Center:
Visualize the central cream band. Apply a strip of painters tape horizontally around the vase to protect what will remain the cream color. Press the edges down firmly with your fingernail. -
Creating Thin White Lines:
Apply thinner strips of tape (1/4 inch) above and below your main central band. These taped areas will remain white/cream when you reveal the final project. -
Spacing the Pattern:
Look at the negative space between your tape lines. These exposed gaps are where your colors will go. Ensure the gaps correspond to where you want your terracotta and slate blue stripes to be. -
Seal the Tape Edges:
To get ultra-crisp lines, lightly brush a very thin layer of your cream base paint *over* the edges of the tape. This seals the gap; if any paint bleeds under, it will be the base color, making it invisible.
Burnishing the Tape
For the crispest possible lines on textured clay, run the back of a spoon over the tape edges after applying. This ‘burnishing’ presses the adhesive deep into the clay’s tiny textures.
Step 3: Adding Color
-
Painting the Terracotta:
Load a clean brush with the terracotta or rust-colored paint. Fill in the wide bands near the shoulder and the bottom of the vase. -
Detailed Rust Stripes:
Carefully paint the thinner rust stripes located just above and below the central white section. Take your time to ensure even coverage. -
Painting the Slate Lines:
Using a smaller flat brush and the slate blue/dark grey paint, fill in the very thin gaps intended for the dark accents. These thin pinstripes provide the high contrast. -
Review and Touch Up:
Check for opacity. If the dark paint looks transparent or streaky, allow it to dry slightly and add a second coat for a bold, solid look. -
Color the Neck and Base:
Paint the neck and the very bottom rim of the vase. In the example, the neck is a solid terracotta color which frames the piece nicely.
Paint Bleeding Under?
If paint seeps under the tape, let it dry completely. Then, gently scrape the excess mistake away with a craft knife or toothpick before touching up with the base color.
Step 4: Finishing Touches
-
Remove Tape While Damp:
Do not wait for the paint to fully cure. When the top coat is dry to the touch but not hardened, carefully peel back the tape at a 45-degree angle. This prevents the paint from cracking along the edge. -
Fixing Bleeds:
If any paint bled under the tape despite your efforts, use a tiny detailed brush and your cream paint to carefully tidy up the lines. -
Sealing the Work:
Once the entire vase is bone dry (wait 24 hours to be safe), apply a matte clear sealant. This protects the finish and unifies the sheen of the different paint colors. -
Interior Glaze (Optional):
If you used acrylics and plan to hold real flowers, coat the *inside* with a waterproof sealant or simply place a glass jar inside the vase to hold the water.
Place your newly stripe-painted vase on a sunlit table or shelf to enjoy the interplay of geometric lines and earthy tones


Playful Polka Dots That Wrap Around the Curve
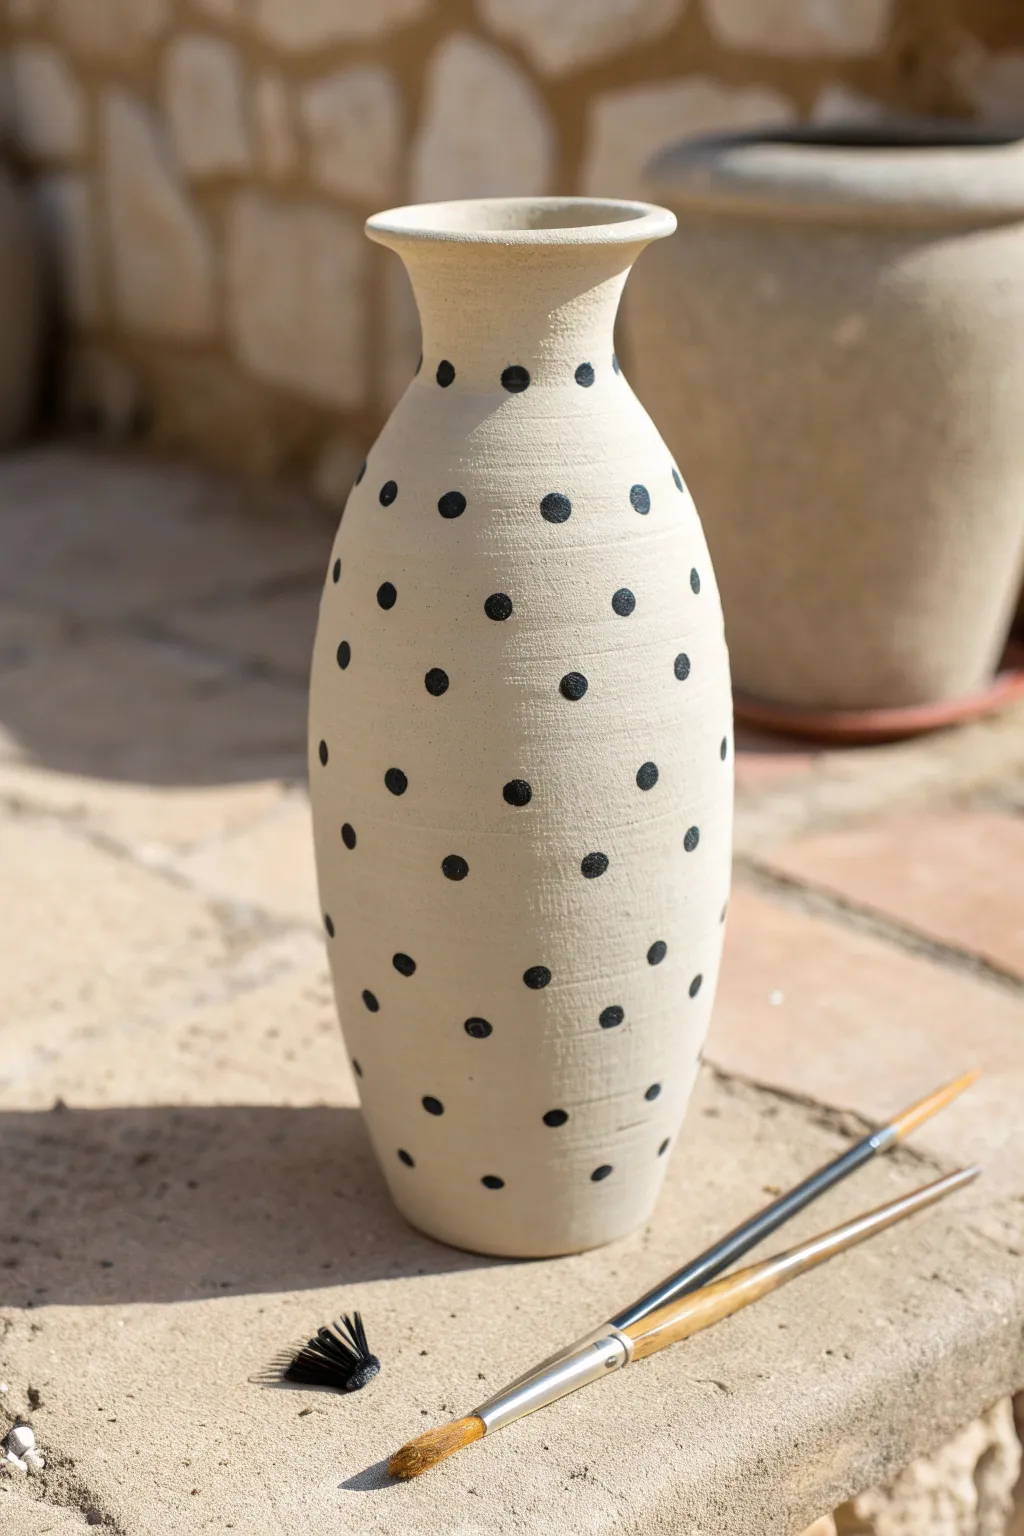
This project celebrates simplicity by transforming raw, unglazed clay into a playful statement piece. The rhythmic pattern of black dots wraps endlessly around the bottle neck curve, creating a modern look that feels both organic and structured.
Step-by-Step Tutorial
Materials
- Bisque-fired ceramic vase or raw clay vase (bottle shape)
- Black acrylic paint or matte ceramic underglaze
- Small round paintbrush (size 2 or 4)
- Pencil (optional)
- Clean water jar
- Paper towel
- Matte spray sealant (optional, for acrylics)
- Clear glaze (optional, for underglaze)
Step 1: Preparation
-
Clean surface:
Begin by wiping down your ceramic vase with a slightly damp sponge or cloth to remove any kiln dust or debris. -
Inspect the texture:
Run your hand over the surface to ensure it is smooth; if there are any sharp burrs of clay, gently sand them down now. -
Let it dry:
Ensure the surface is completely bone dry before applying any paint, as moisture can affect adhesion. -
Prepare paint:
Squeeze a small amount of black paint onto your palette. If it feels too think, add a tiny drop of water to improve flow, but keep it opaque.
Step 2: Planning the Pattern
-
Visualizing the grid:
Look at the vase and imagine a diagonal grid wrapping around it. -
Marking anchor points:
I like to use a pencil to very lightly mark where my first row of dots will go near the top neck to establish spacing. -
Checking intervals:
Ensure your pencil marks appear roughly equidistant from each other horizontally. -
Offset planning:
Mark the next row down, placing these points exactly in the middle gap between the two dots above them.
Stamp It Instead
Make a consistent dot stamp by dipping the eraser end of a new pencil into the paint. Press straight down onto the clay for uniform circles every time.
Step 3: Painting the Dots
-
Loading the brush:
Dip your round brush into the black paint, ensuring the tip is saturated but not dripping. -
The first dot:
Start at the neck. Press the brush tip gently against the clay and twirl it slightly to create a perfect circle. -
Working the top row:
Continue painting the dots around the neck collar, following your pencil guides or freehanding if you feel confident. -
Starting the second row:
Move to the row below. Paint your dot in the ‘window’ created by the two dots above it to create the alternating effect. -
Consistency check:
Try to keep the pressure consistent for every dot so they remain roughly the same size. -
Navigating the curve:
As the vase widens, you may need to ever-so-slightly increase the space between dots to maintain the diagonal flow. -
Painting the belly:
Continue the pattern down the widest part of the vase, being careful not to smudge wet paint with your stabilizing hand. -
Tapering down:
Follow the curve as the vase narrows again near the bottom, letting the pattern naturally wrap out of sight. -
Touch-ups:
Once the main pattern is done, look for any dots that need a second coat of black to be fully opaque.
Color Pop
Before adding the black dots, paint the entire vase a soft pastel color like sage green or blush pink to create a more vibrant, high-contrast background.
Step 4: Finalizing
-
Drying time:
Let the vase sit undisturbed for at least an hour to ensure the thickest parts of the paint are dry. -
Erase guidelines:
If you used pencil marks that are still visible, gently erase them now, being careful not to rub the paint. -
Sealing (Optional):
If you used acrylics and want protection, spray a light coat of matte fixative over the surface.
Place your finished vase in a sunny spot to admire the clean contrast of the pattern against the raw texture


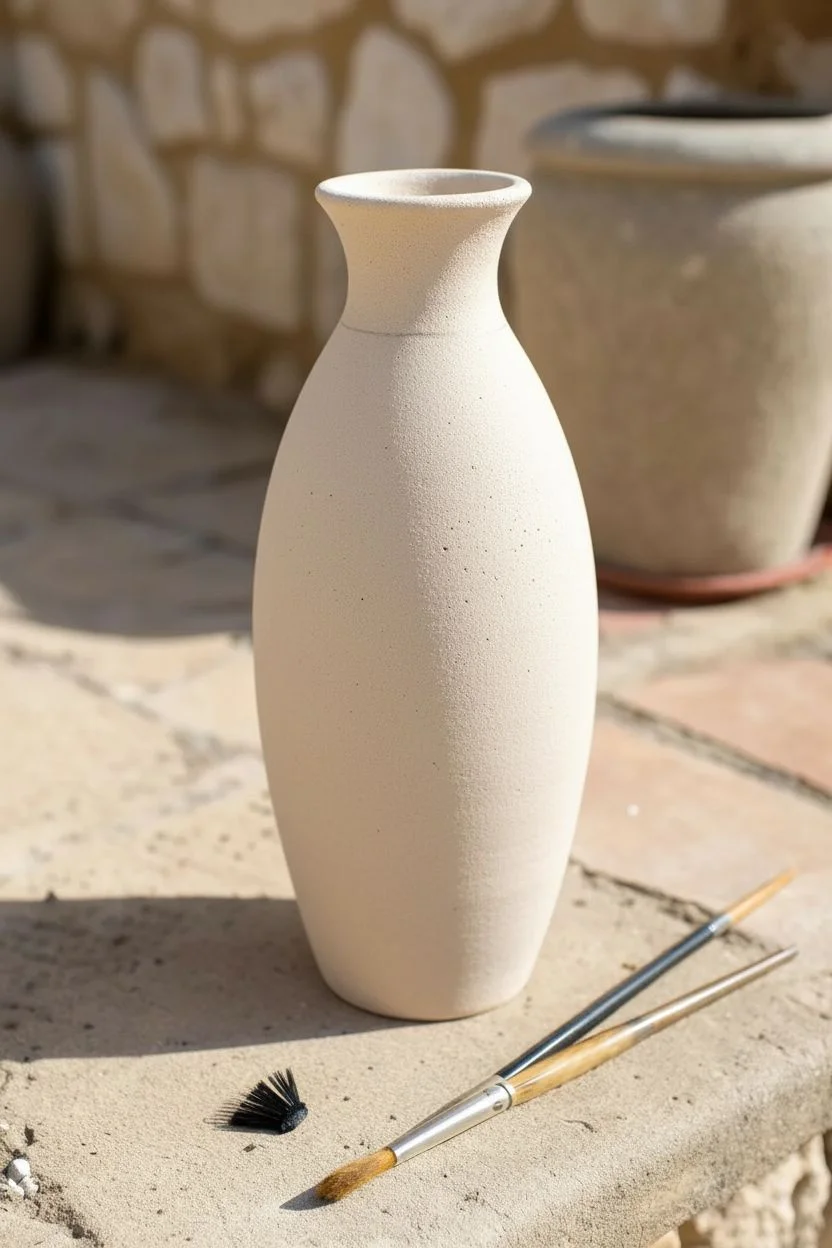
Simple Wildflowers for an Instant Cottage Feel
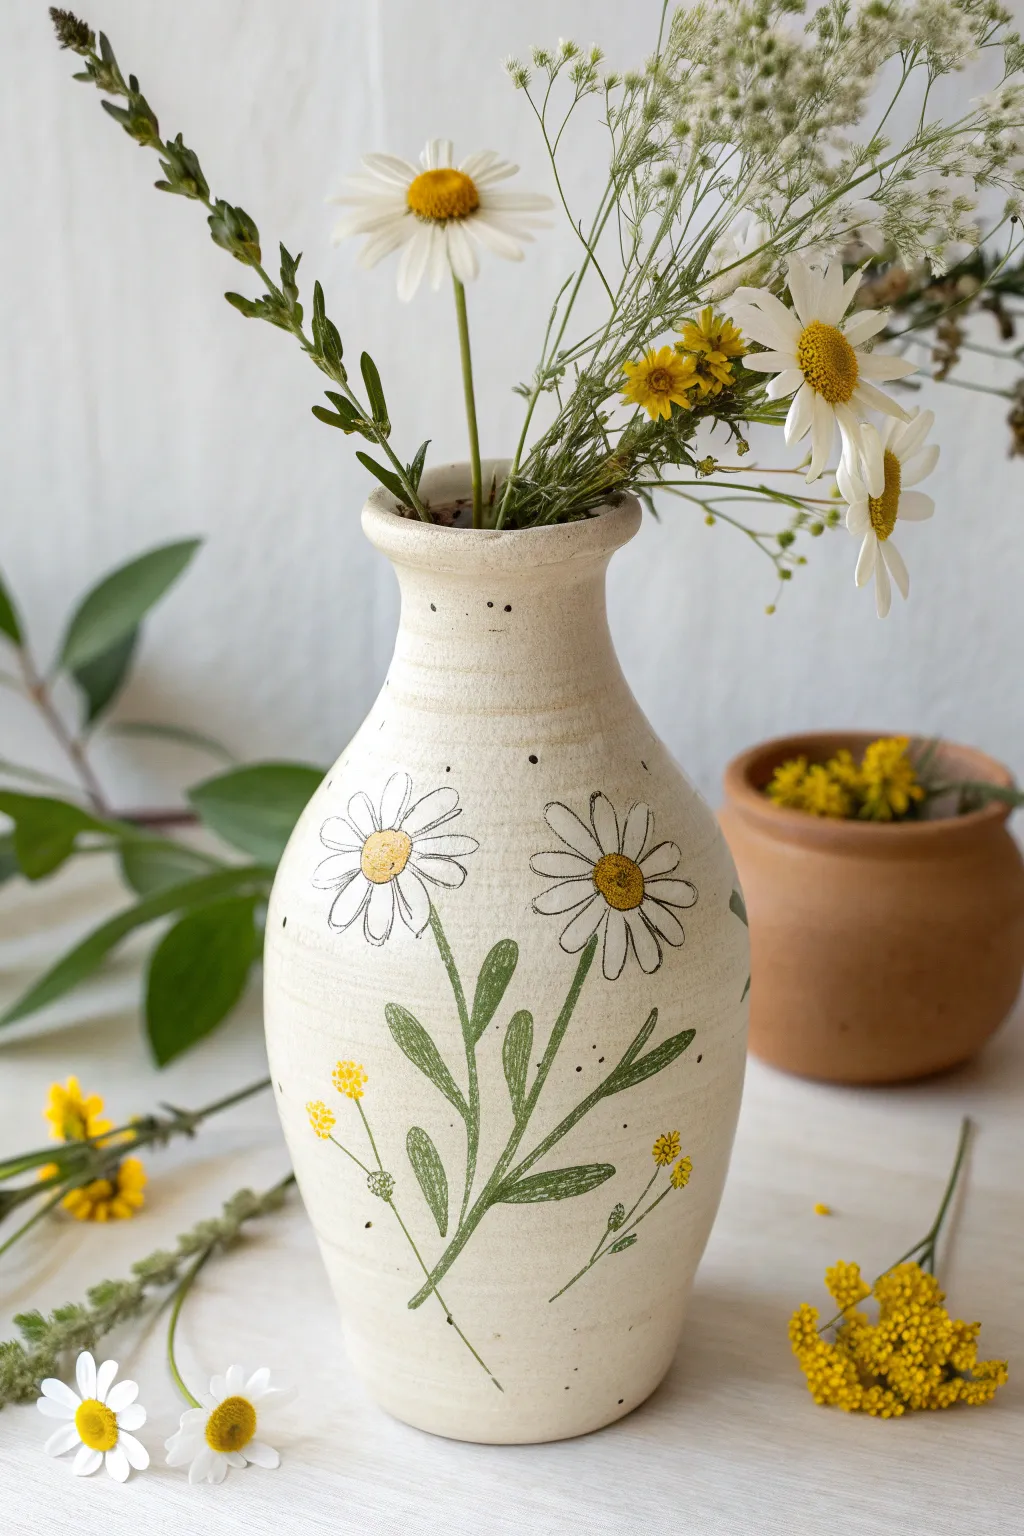
Capture the charm of a sun-drenched meadow with this lovely ceramic painting project. The design uses loose, sketch-like strokes and soft colors to create an effortless cottage-core aesthetic that transforms plain pottery into a warm centerpiece.
Step-by-Step
Materials
- Bisque ceramic vase or a matte glazed cream vase
- Ceramic paints or acrylic paints (if not firing)
- Fine liner brush (size 0 or 00)
- Small round brush (size 2)
- Black fine-point paint pen or liner brush
- Pencil and eraser
- Clear matte sealant spray (optional, for acrylics)
- Colors: Mustard yellow, sage green, olive green, cream/white
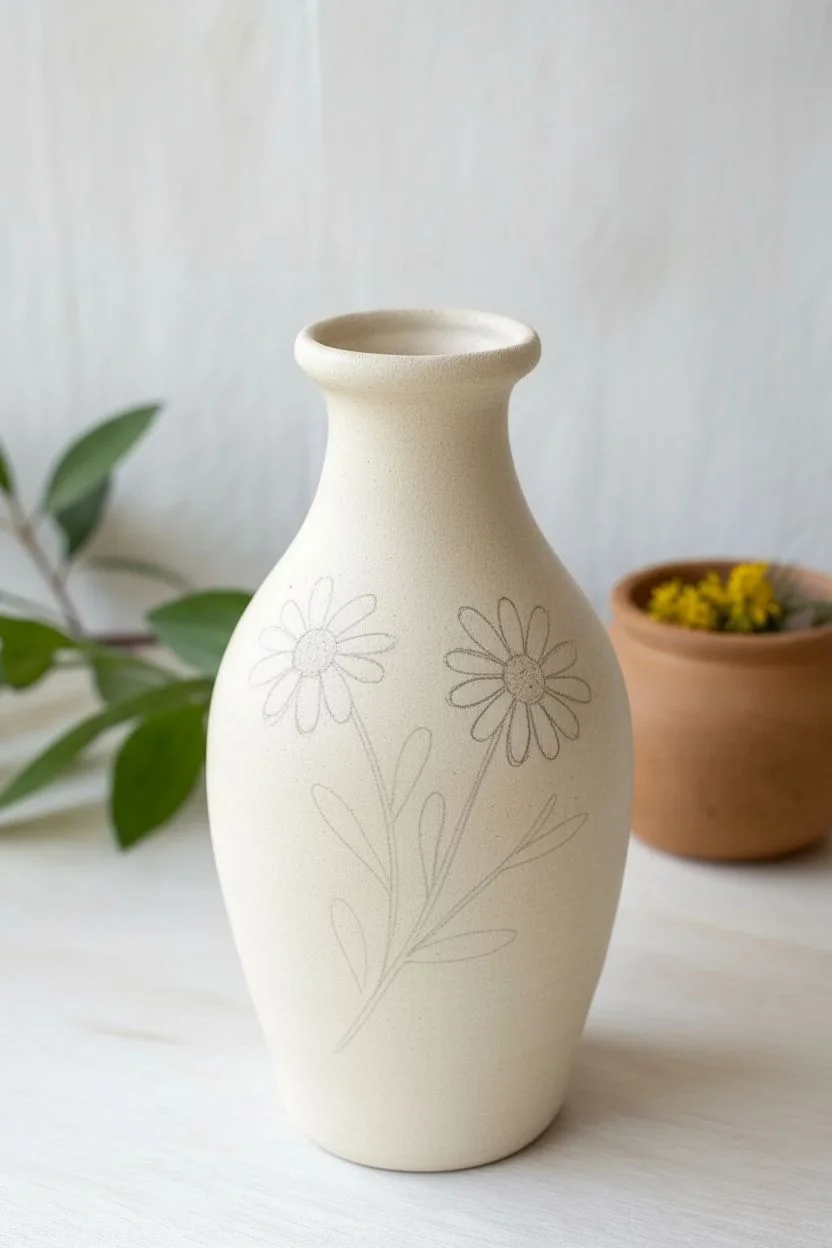
Step 1: Planning the Layout
-
Clean surface:
Ensure your vase is completely clean and dry. Wipe it down with a slightly damp cloth to remove any dust or oils that might prevent the paint from adhering properly. -
Sketch placement:
Using a pencil very lightly, mark where you want the center of your main daisy flowers to be. Aim to place them slightly off-center from each other for a natural, organic look rather than a rigid pattern. -
Draw floral outlines:
Lightly sketch the petals of the two large daisies. Keep the lines faint; you just need a guide. Add the long, flowing stems curving upward from the bottom of the vase.
Step 2: Painting the Daisies
-
Petal base:
Mix a very tiny amount of grey into your white paint to create an off-white shade that stands out against the cream vase. Use your round brush to fill in the daisy petals. -
Petal opacity:
Depending on your paint quality, you may need a second coat on the petals once the first is dry. The goal is a solid, clean shape. -
Flower centers:
Dip your round brush into the mustard yellow paint. Dab a generous circle in the center of your daisies. Tap the brush tip gently to create a slightly textured, stippled effect acting as pollen. -
Center detailing:
Once the yellow centers are tacky but not fully dry, take a clean, dry brush or a toothpick and gently stipple the very edges to soften the transition.
Keep it fluid
Add a drop of water to your black paint for the outlines. Inky paint flows smoother than thick paint, preventing jagged lines.
Step 3: Adding Greenery
-
Painting stems:
Load your liner brush with olive green paint mixed with a touch of water to help it flow. Painting from the bottom up, follow your pencil lines to create thin, elegant stems for the daisies. -
Adding leaves:
Switch to the sage green or a lighter mix of the olive. Paint elongated, oval-shaped leaves attaching to the main stems. Keep the stroke swift—press down for width and lift up for a pointed tip. -
Leaf details:
I like to vary the green shades slightly here. Add a few smaller, darker leaves near the base or overlapping the lighter ones to create depth. -
Filler flowers:
Paint thin, branching stems extending outward using the fine liner brush. Add tiny clusters of yellow dots at the tips to represent small wildflowers or goldenrod.
Make it yours
Try swapping the yellow centers for a soft lavender or peach tone to match your specific room decor while keeping the same rustic style.
Step 4: The Illustrative Outline
-
Defining petals:
This is the most crucial step for the style. Using a black fine-point paint pen or a liner brush with black paint, carefully trace the outline of your white daisy petals. -
Loose style:
Don’t try to be perfect. Let the black lines break occasionally or overlap slightly. This sketch-like quality gives the vase its hand-drawn charm. -
Center details:
Add tiny black dots or small ‘c’ curves inside the yellow flower centers to simulate texture and depth. -
Leaf veins:
Draw simple central veins on your green leaves using the black liner. A single line down the middle usually suffices for this simple style. -
Speckling:
Dilute a bit of black or dark brown paint with water. Load a stiff brush (like a toothbrush or old paintbrush) and run your thumb across the bristles to flick tiny speckles across the vase. -
Finishing touches:
Add a few random black dots around the flowers to balance the speckling and fill any large empty voids.
Step 5: Protection
-
Drying time:
Let the vase sit undisturbed for at least 24 hours to ensure all layers, especially the thick yellow centers, are fully cured. -
Sealing:
If you used acrylics without firing, take the vase to a well-ventilated area and apply a clear matte sealant spray to protect your artwork from chipping.
Fill your new vase with fresh greens or dried blooms and enjoy the cozy atmosphere it creates
BRUSH GUIDE
The Right Brush for Every Stroke
From clean lines to bold texture — master brush choice, stroke control, and essential techniques.
Explore the Full Guide
Ombre Gradient From Rim to Base

For the “Ombre Gradient” project, we are capturing the warmth of earthy terracotta fading into a soft, sandy cream. This tutorial focuses on achieving that seamless, organic transition and specific stone-like texture that makes the piece feel aged and authentic.
Step-by-Step Guide
Materials
- Tall ceramic or glass vase (primed white)
- Baking soda or plaster powder (for texture)
- Acrylic paint: Burnt Sienna (terracotta)
- Acrylic paint: Unbleached Titanium or Cream
- Acrylic paint: Raw Umber (optional for darkening base)
- Foam brushes or dense makeup sponges
- Mixing palette or paper plate
- Matte spray sealant
Step 1: Preparation & Base Texture
-
Clean the Surface:
Begin by thoroughly wiping down your vase to remove any dust or oils. If you are using a slick glass vase, give it a quick sanding with fine-grit sandpaper to help the paint adhere. -
Create the Textured Mixture:
To mimic the stoneware look in the photo, mix your cream-colored acrylic paint with baking soda. Aim for a ratio of about 2 parts paint to 1 part baking soda. It should feel fluffy and paste-like. -
Apply the Base Coat:
Cover the entire vase with this textured cream mixture using a foam brush. Use dabbing motions rather than long strokes to build up that stone-like stippled surface. -
Let it Cure:
Allow this base layer to dry completely. Since it’s thicker than standard paint, I like to give it at least an hour or two until it’s hard to the touch.
Uneven Blending?
If the paint dries too fast while blending, keep a misting spray bottle of water nearby. One light spritz softens the acrylic, making it easy to work the gradient again.
Step 2: Creating the Ombre Gradient
-
Mix the Terracotta Shade:
Prepare your Burnt Sienna paint. Mix a small amount of baking soda into this color as well, so the texture remains consistent across the gradient. -
Paint the Bottom Section:
Apply the terracotta mixture to the bottom third of the vase. Don’t worry about a neat upper edge yet; just get good coverage around the base. -
Create a Mid-Tone:
On your palette, mix a transition shade by combining equal parts of your Terracotta mix and your Cream mix. -
Apply the Transition Zone:
Paint a band of this mid-tone color right above the dark terracotta section. Overlap the two colors slightly while the paint is still wet. -
Blend Upwards:
Using a clean sponge or dry foam brush, gently dab at the line where the mid-tone meets the original cream base coat. Use a vertical, tapping motion to blur the hard line. -
Blend Downwards:
Repeat the dabbing process where the mid-tone meets the dark terracotta base. The goal is to make the bands of color disappearance into each other. -
Feather the Edges:
To achieve the specific rough, flame-like transition seen in the photo, take a mostly dry brush with a tiny bit of terracotta paint and ‘drag’ it upwards slightly into the cream section in random peaks. -
Check the Rim:
The photo shows a lovely detail on the rim. Use a small brush to paint the very top edge with the terracotta color to frame the piece.
Level Up: Speckled Clay
Use an old toothbrush to flick tiny droplets of brown paint onto the cream upper section before sealing. This mimics the look of iron flecks found in real fired ceramic.
Step 3: Finishing Touches
-
Adding Depth (Optional):
If your base looks too flat, verify the bottom is dark enough. You can mix a tiny drop of Raw Umber into the burnt sienna and dab it just around the very bottom edge for visual weight. -
Dry Brushing:
Once the gradient is dry, take a clean, dry brush with a tiny amount of cream paint. Lightly whisk it over the transition area to soften any spots that look too harsh. -
Final Drying:
Let the entire project dry overnight. The baking soda mixture can be fragile when wet, so patience is key here. -
Seal the Texture:
Protect your work with a clear matte spray sealant. Do not use gloss, as it will ruin the faux-stone effect. Spray 2-3 light coats.
Enjoy styling your new faux-ceramic vase with some dried eucalyptus or branches
Geometric Color Blocks for a Clean, Artsy Look
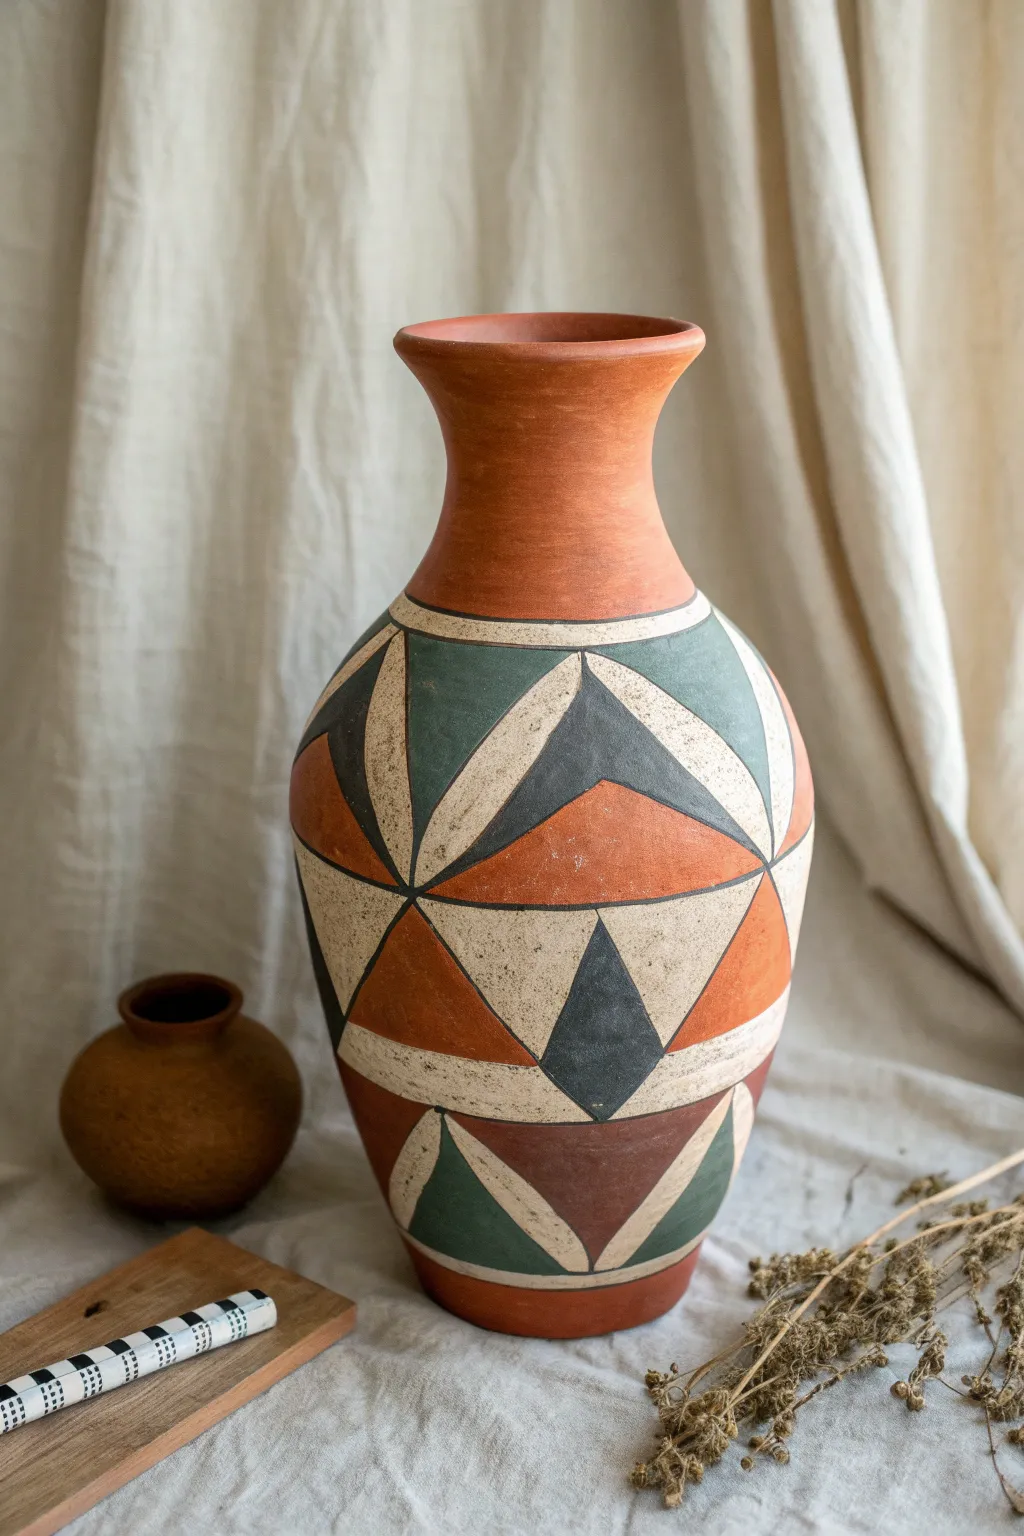
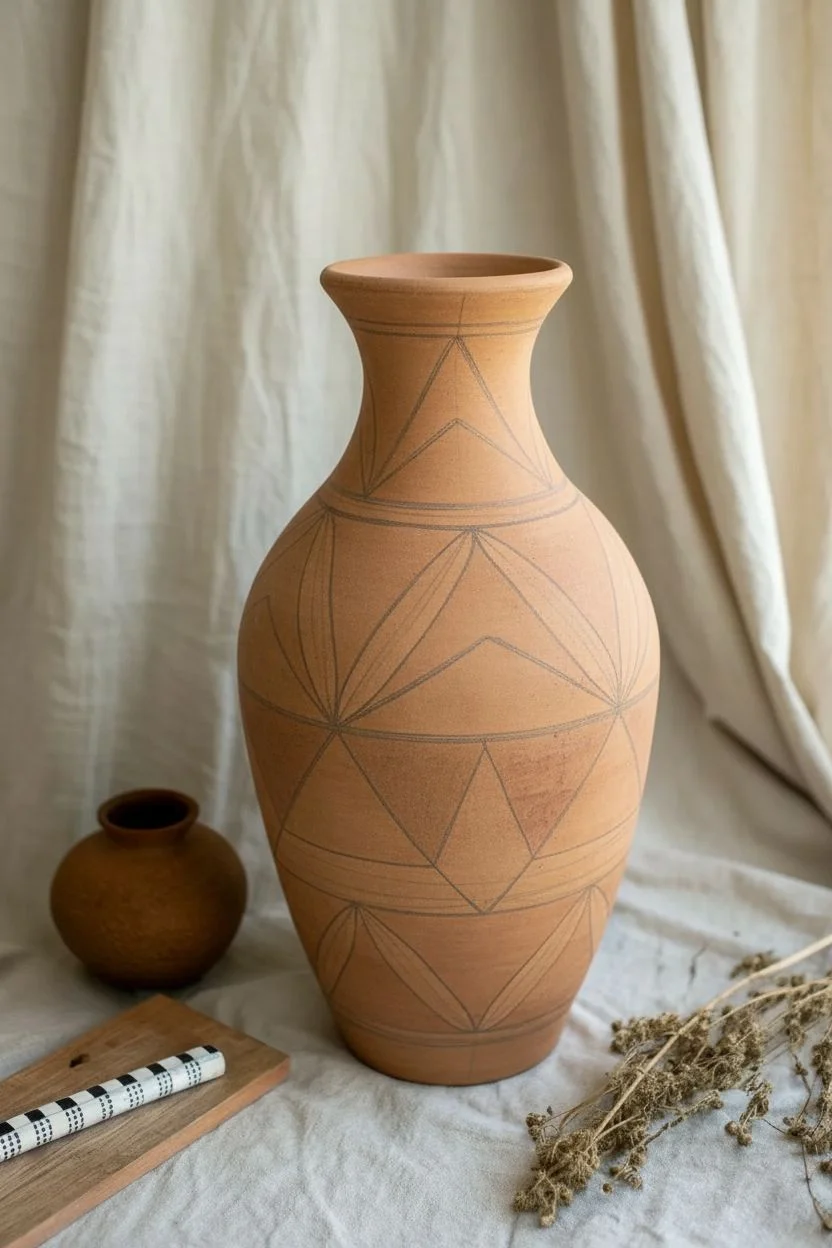
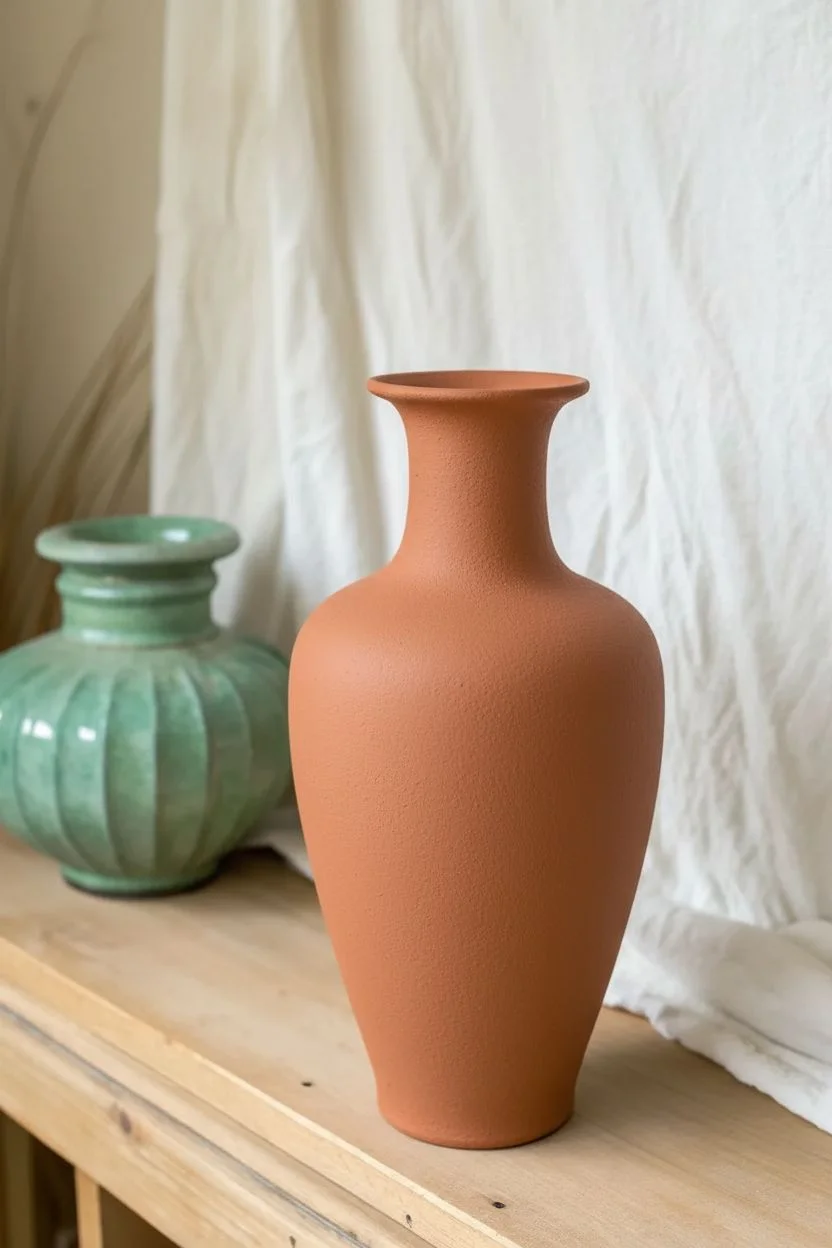
Transform a simple terracotta vessel into a striking piece of decor using bold geometric shapes and an earthy color palette. This project combines the raw, warm texture of varying clay tones with clean lines for a sophisticated, museum-worthy finish.
Detailed Instructions
Materials
- Tall terracotta vase (smooth finish)
- Pencil and eraser
- Flexible measuring tape
- High-quality acrylic paints (Cream, Muted Dark Green, Charcoal Black, Terracotta Orange)
- Flat shader brushes (sizes 6 and 10)
- Small round detail brush (size 0 or 1)
- Painter’s tape (optional, for masking)
- Matte spray varnish
- Paper plate or palette
- Cup of water and paper towels
Step 1: Planning and Sketching
-
Prepare the surface:
Ensure your terracotta vase is clean and completely dry. If it’s a raw clay pot, wipe it down with a slightly damp cloth to remove any kiln dust that might interfere with paint adhesion. -
Define the boundaries:
Decide where the main geometric pattern will sit. In the example, the neck remains bare clay. Use a pencil and a flexible measuring tape to lightly draw a horizontal ring around the base of the neck and another ring near the bottom. -
Establish the grid:
To get symmetrical triangles, measure the circumference of the vase at its widest point. Divide this number by how many vertical ‘sections’ you want (usually 6 or 8 works well). Mark these vertical intervals lightly with pencil. -
Sketch the triangles:
Connect your marks to form a lattice of large triangles and diamonds. Don’t worry about perfection; hand-drawn geometry adds to the artisanal charm. Sketch intersecting diagonal lines to create the smaller triangles inside the larger shapes.
Step 2: Painting the Color Blocks
-
Select your palette:
Pour out small amounts of cream, muted dark green, charcoal black, and terracotta orange onto your palette. If you don’t have a terracotta paint that matches the vase, mix a little orange, brown, and white until it blends seamlessly with the raw clay. -
Start with the darkest tones:
Using a flat shader brush, fill in specific triangular sections with the charcoal black. Focus on creating a balanced distribution; for instance, paint the central diamond shapes dark to anchor the design. -
Apply the green accents:
Switch to your muted green paint. Fill in the large triangles adjacent to the black sections. Use the flat edge of your brush to get crisp lines against the pencil marks. -
Add warmth:
Paint the remaining designated sections with the terracotta orange paint. This creates a beautiful illusion where some parts look like painted clay and others look like raw clay, even if you are painting over the whole surface. -
Fill the light sections:
Use the cream or off-white paint for the remaining shapes. This high-contrast color will make the earthy tones pop. You might need two coats here to fully cover the underlying terracotta color of the vase. -
Clean up edges:
Once the color blocks are tacky but not fully dry, use a slightly damp brush to gently tidy any major smudges, but keep in mind we will be adding defining lines next. -
Dry completely:
Let the vase sit for at least an hour until the paint is completely dry to the touch. This prevents smearing during the detailing phase.
Pro Tip: Line Stability
Rest your pinky finger on the dry surface of the vase while painting the thin outline lines. This stabilizes your hand and acts as a pivot point for smoother strokes.
Step 3: Detailing and Finishing
-
Mix the liner color:
Prepare a fluid mixture of your cream paint. Add a tiny drop of water to improve the flow; it should be the consistency of heavy cream. -
Outline the shapes:
Using your smallest round detail brush, carefully paint thin lines over the boundaries where your color blocks meet. This ‘grout line’ effect unifies the design and hides any uneven edges between colors. -
Line the top and bottom:
Paint the horizontal rings you sketched earlier at the neck and base using the same cream color to frame the entire pattern. -
Let it cure:
Allow the vase to dry overnight to ensure the paint has fully bonded to the porous clay surface. -
Seal the work:
Take the vase outdoors or to a well-ventilated area. Apply a light coat of matte spray varnish. This protects the paint from chipping and gives the vase a uniform, professional finish without making it too shiny.
Level Up: Sgraffito Style
Instead of painting the white divider lines, paint the whole section solid first. Before it dries, use a carving tool to scratch lines through the paint to reveal the clay below.
Place your new geometric vase on a linen cloth or wooden table to highlight its beautiful earthy aesthetic

PENCIL GUIDE
Understanding Pencil Grades from H to B
From first sketch to finished drawing — learn pencil grades, line control, and shading techniques.
Explore the Full Guide
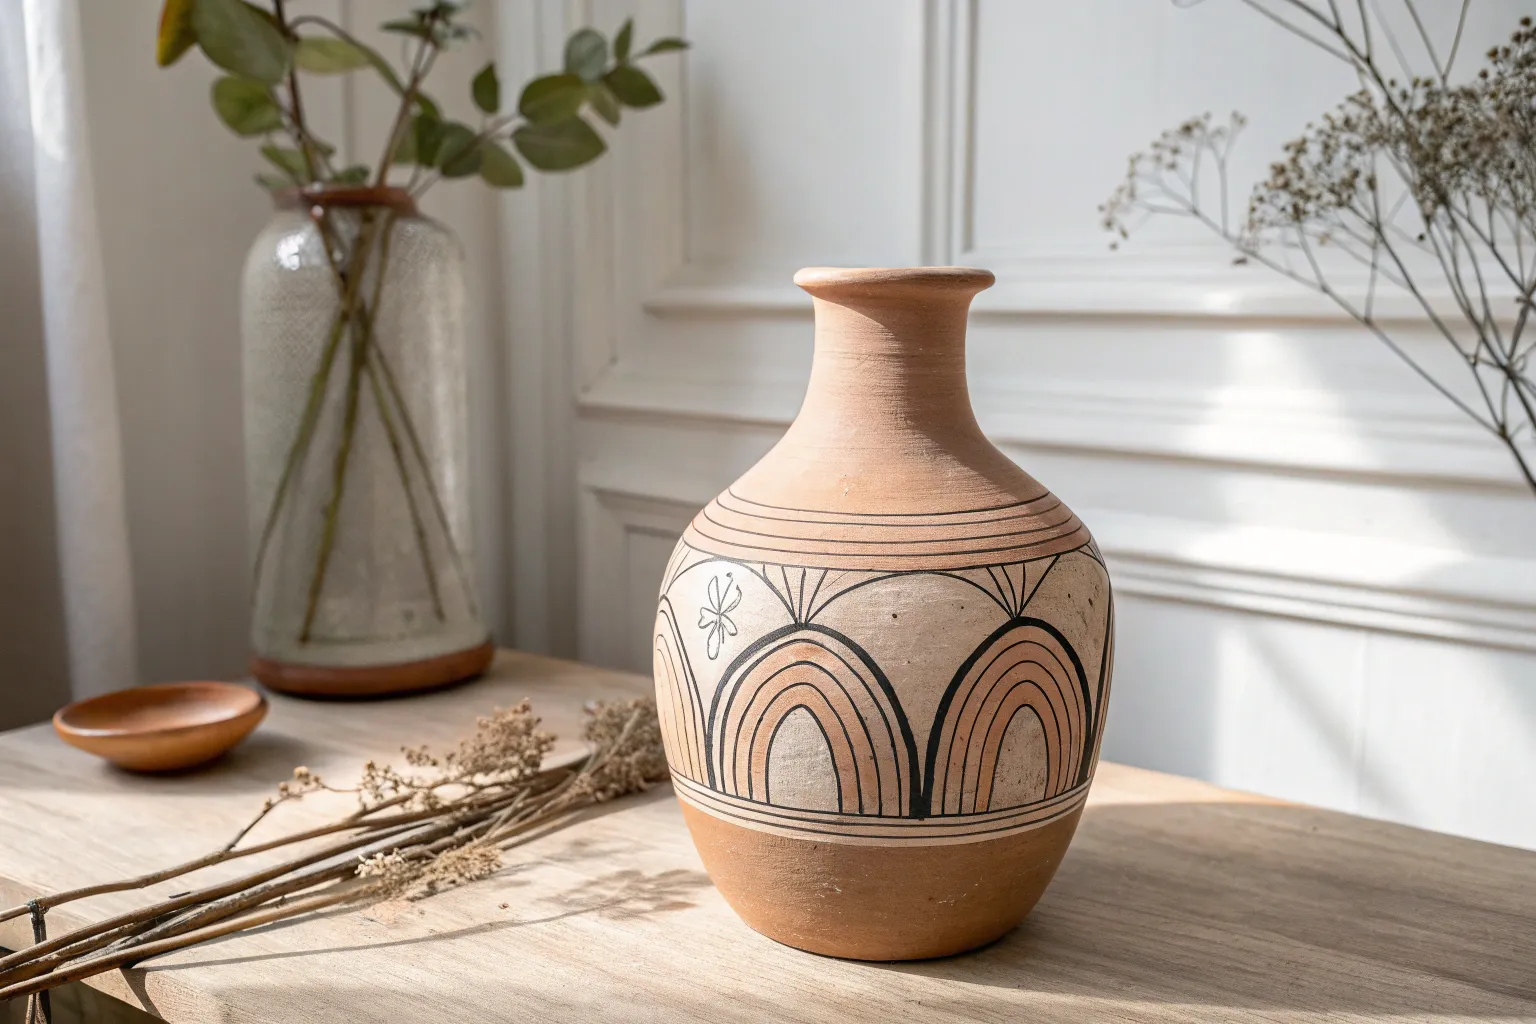
Boho Folk Patterns in Warm Earth Tones
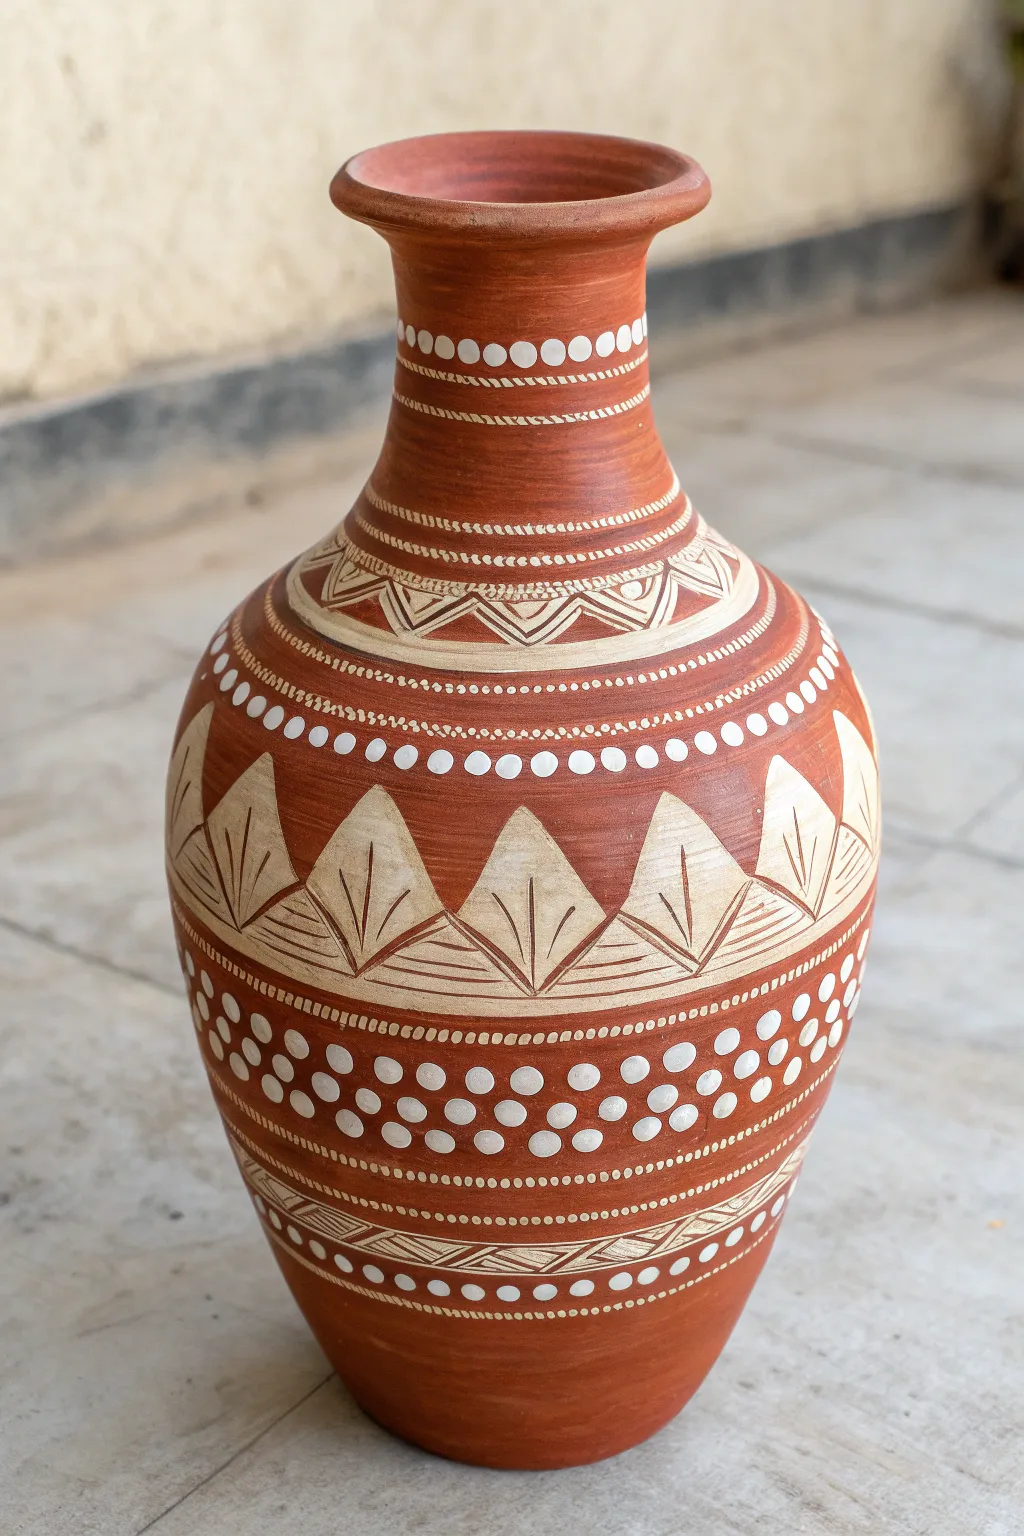
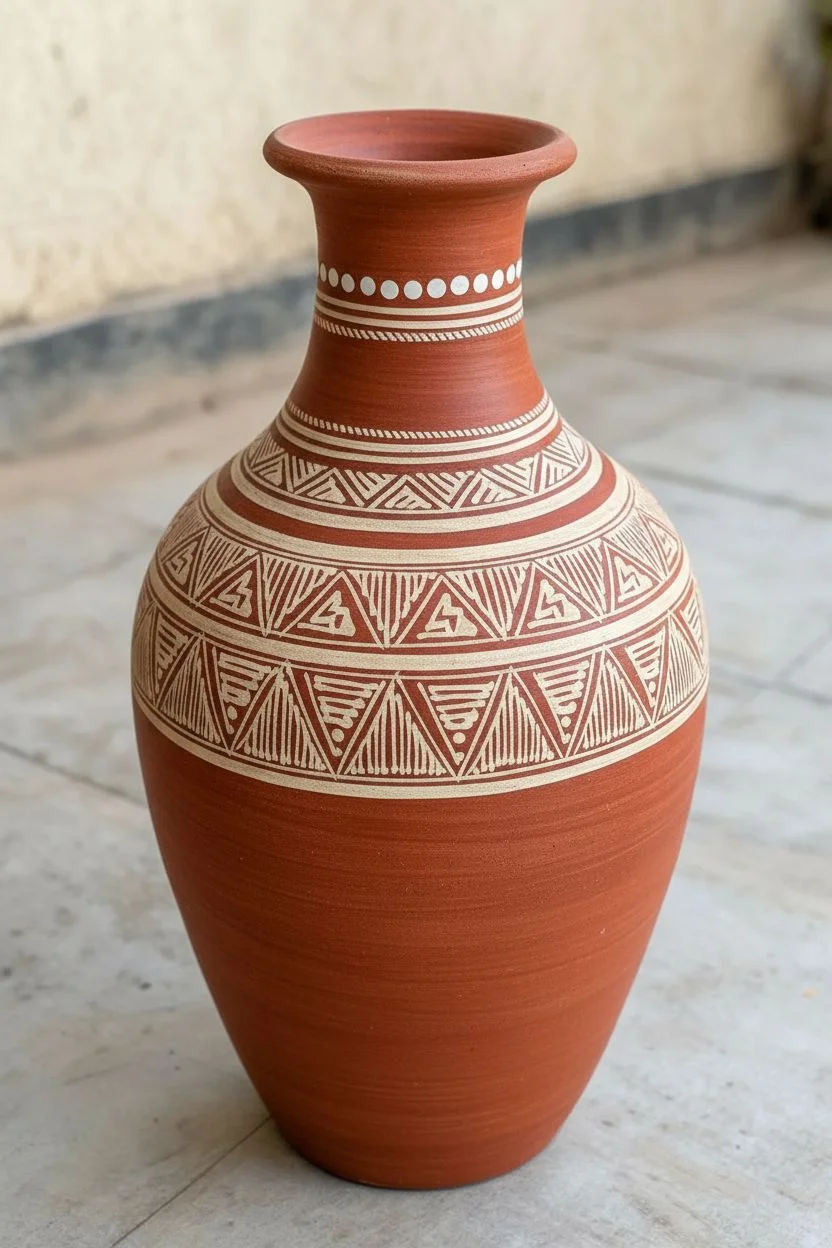
Transform a plain clay pot into a stunning piece of folk art using simple white lines and geometric motifs. This project combines the warmth of natural terracotta with crisp, intricate detailing for a timeless bohemian look.
Step-by-Step Guide
Materials
- Terracotta vase (clean and dry)
- White acrylic paint (high pigment/fluid body works best)
- Fine detail brushes (size 0, 00, or liner brush)
- Dotting tools (various sizes) or ends of paintbrushes
- Pencil for sketching (optional)
- Palette or small plate
- Paper towel
- Water cup
- Matte spray varnish (optional)
Step 1: Preparation & Neck Design
-
Clean surface:
Ensure your terracotta vase is free of dust and completely dry. If the surface is too rough, give it a very light sand with fine-grit sandpaper. -
Start the top ring:
Dip a medium-sized dotting tool into white acrylic paint. Create a ring of evenly spaced dots around the base of the vase’s neck. -
Add horizontal bands:
Using a liner brush, paint two parallel thin lines just below your first row of dots. These lines frame the neck patterns. -
Detail the neck:
Between painting sections, I find it helpful to rotate the vase on a lazy susan. Add a wavy line or small diagonal dashes between two more parallel lines further down the neck. -
Transition pattern:
Where the neck widens into the shoulder, paint a band of zig-zags or triangles pointing upward. Fill the interior of these triangles with smaller nested triangles or lines.
Uneven Dots?
If your dots look like jagged peaks, your paint is too thick. Dip your tool in a tiny drop of water to thin the acrylic slightly before dotting perpendicular to the surface.
Step 2: Painting the Body Motifs
-
Define the shoulder:
Paint two bold, parallel white lines around the widest part of the shoulder. Between these lines, use a small dotting tool to add a continuous row of tiny dots. -
Create the upper border:
Below the shoulder band, create a row of larger, prominent dots. Use a larger dotting tool or the back of a large brush handle for these. -
Outline the main triangles:
Sketching lightly with a pencil first can help spacing here. Paint large, equilateral triangles around the main body of the vase. The base of the triangles should rest on a lower imaginary line. -
Fill the leaves:
Inside each large triangle, paint a central vertical line. Add diagonal veins branching out from this center line to create a stylized leaf look. -
Texture the background:
In the negative space between the large triangles (the upside-down V shapes), add texture with hatching lines or small chevrons to add depth. -
Separate sections:
Paint a double horizontal line beneath the entire triangle motif to close off the main decorative section.
Steady Hand Trick
For crisper lines on a curved surface, anchor your pinky finger on a dry part of the vase while you paint. This stabilizes your hand and acts as a pivot point.
Step 3: Lower Detailing & Finishing
-
Add the dot field:
Below the main band, create a ‘field’ of polka dots. Start with a row of medium dots, then a row of larger dots below it. Stagger them like bricks for a balanced pattern. -
Refine the dot spacing:
Keep your dotting tool vertical when pressing down to ensure perfectly round circles. Add two or three rows total, varying the size slightly to create visual interest. -
Lower geometric band:
Paint two more parallel lines below the dot field. Inside this new channel, add a simple zig-zag or cross-hatch pattern. -
Final border:
Finish the design near the bottom of the vase with a final row of small, neat dots. -
Touch ups:
Inspect your lines. If any paint looks transparent, carefully go over it with a second coat once the first is dry for bright, opaque white. -
Seal:
Once fully cured (wait at least 24 hours), spray lightly with a matte varnish to protect the design without making the terracotta too shiny.
Place your newly decorated vase on a shelf or fill it with dried flowers to enjoy the handcrafted charm
Blue-and-White Porcelain-Inspired Florals
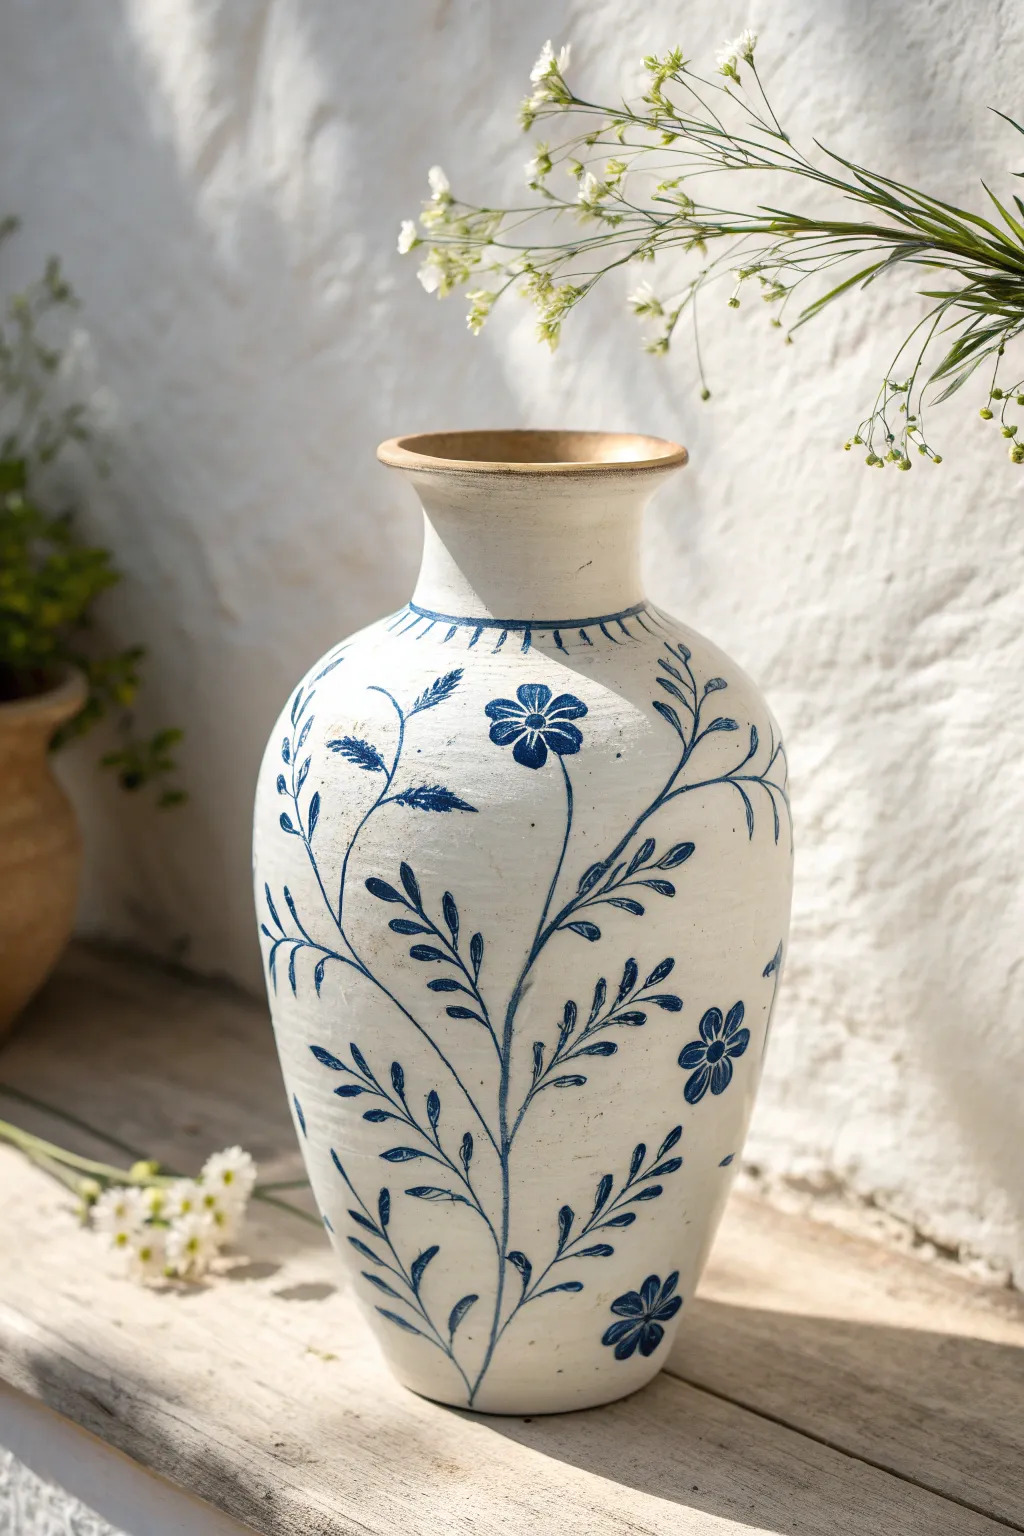

Capture the timeless elegance of classic blue-and-white porcelain with a rustic twist on a standard terracotta vase. This project uses a matte white base and deep indigo botanicals to create a piece that feels both heirloom-quality and refreshingly handmade.
Step-by-Step Tutorial
Materials
- Terracotta or ceramic vase (biskware)
- White chalk paint or matte acrylic paint
- Deep indigo/navy blue acrylic paint
- Flat brush (1 inch)
- Round detail brushes (size 0 and 2)
- Pencil
- Matte spray sealer or varnish
- Water cup and paper towels
Step 1: Base Preparation
-
Clean the Surface:
Wipe down your vase with a damp cloth to remove any dust or oils. Let it dry completely to ensure the paint adheres properly. -
Mask the Rim:
If you want to keep the natural clay lip seen in the photo, apply painter’s tape around the top rim, or simply be very careful when painting near the top. -
Apply the Base Coat:
Using a flat brush, apply a coat of white chalk paint over the entire body of the vase. Chalk paint works beautifully here because it mimics the texture of unglazed ceramic. -
Build Opacity:
Allow the first coat to dry for about 20 minutes. Apply a second coat to ensure solid coverage, hiding the original clay color completely. Let this dry specifically for at least an hour before sketching.
Brushwork Pro-Tip
Practice your leaf strokes on paper first. Pressing harder widens the stroke; lifting creates the point. This variation gives the design its organic flow.
Step 2: Sketching the Design
-
Identify Key Florals:
Look at the composition: there is one central flower near the top shoulder and several stems reaching upward from the bottom. -
Light Guide Lines:
With a pencil, very lightly sketch the main curved stems moving up the vase. These should be flowing and organic, not straight lines. -
Sketch the Focal Flower:
Draw a simple five-petal flower on the upper shoulder of the vase. Keep the petals rounded and open. -
Add Leaf Placement:
Mark small dashes along the stems where your leaves will go. Vary the direction so some point up and some curve outward. -
Plan the Neck Detail:
Sketch a light ring around the base of the neck, adding small tick marks for the decorative collar pattern.
Shaky Lines?
If your long stem lines look shaky, use your pinky finger as a stabilizer against the vase while you paint or work in shorter, connecting segments.
Step 3: Painting the Blue Motifs
-
Prepare the Blue:
Thin your indigo acrylic paint slightly with a drop of water. Ink-like consistency helps create smooth, long lines. -
Paint main stems:
Using a size 2 round brush, paint the long, central stems over your pencil lines. Start from the bottom and lift pressure as you reach the top of the line for a tapered effect. -
Paint the leaves:
Switch to a smaller brush if needed. For the leaves, press the belly of the brush down to create the width and then lift up quickly to make a sharp point. This ‘press and lift’ technique creates that classic folk-art leaf shape. -
Detail the Focal Flower:
Fill in the petals of your main flower with solid blue. Leave a tiny white dot in the center, or paint a small blue circle with radiating lines. -
Add Secondary Florals:
Paint smaller, simpler flower heads low on the vase using three or four quick brushstrokes for petals. -
Texture the Leaves:
For some leaves, rather than filling them in solid, paint them with quick, feathery strokes to mimic the texture seen in the reference image. -
The Neck Pattern:
Paint a thin blue ring around the base of the neck. Add small perpendicular dashes (like eyelashes) pointing downwards to create the collar detail. -
Review and Touch Up:
Step back and look at the vase. Add tiny stray leaves or dots to fill any large empty white spaces, balancing the composition. -
Refine Edges:
I like to go back with a tiny bit of white paint to clean up any blue lines that got too thick or messy.
Step 4: Finishing
-
Remove Tape:
If you taped the rim, peel it off carefully now. -
Seal the Work:
Once the blue paint is bone dry (give it a few hours), spray the entire vase with a matte clear sealer to protect the artwork without adding high shine.
Place your finished vase near a window where the light can highlight the delicate contrast of the blue botanicals against the white clay


Loose Abstract Brushstrokes for a Modern Statement Vase
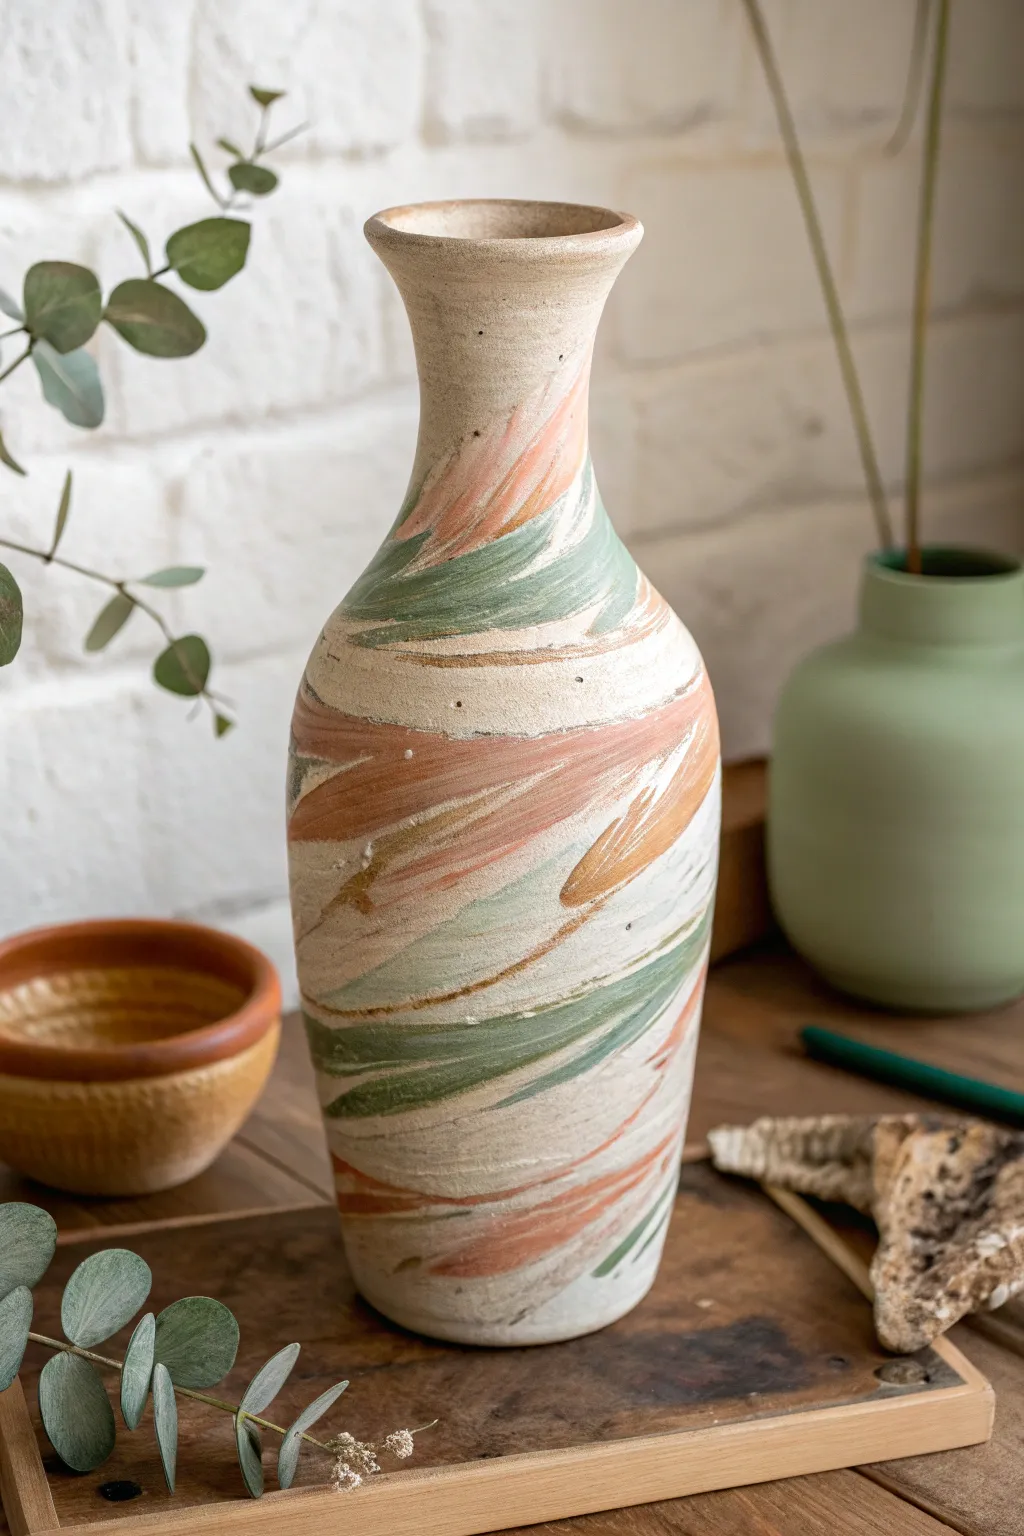
Transform a plain bisque vase into a statement piece with moving, organic energy using a loose brushstroke technique. This project mimics the look of marbled clay or windswept landscapes, combining muted earthy tones like terra cotta, sage green, and cream for a modern, textured finish.
Detailed Instructions
Materials
- Bisque or matte-glazed ceramic vase (tall, curvy shape works best)
- Acrylic paints: Terra Cotta/Burnt Sienna, Sage Green, Warm Cream/Off-White
- Texturing medium or baking soda (optional, for added grit)
- Wide, flat synthetic brush (approx. 1 inch)
- Medium round brush
- Palette or paper plate
- Water cup and paper towels
- Matte spray sealant
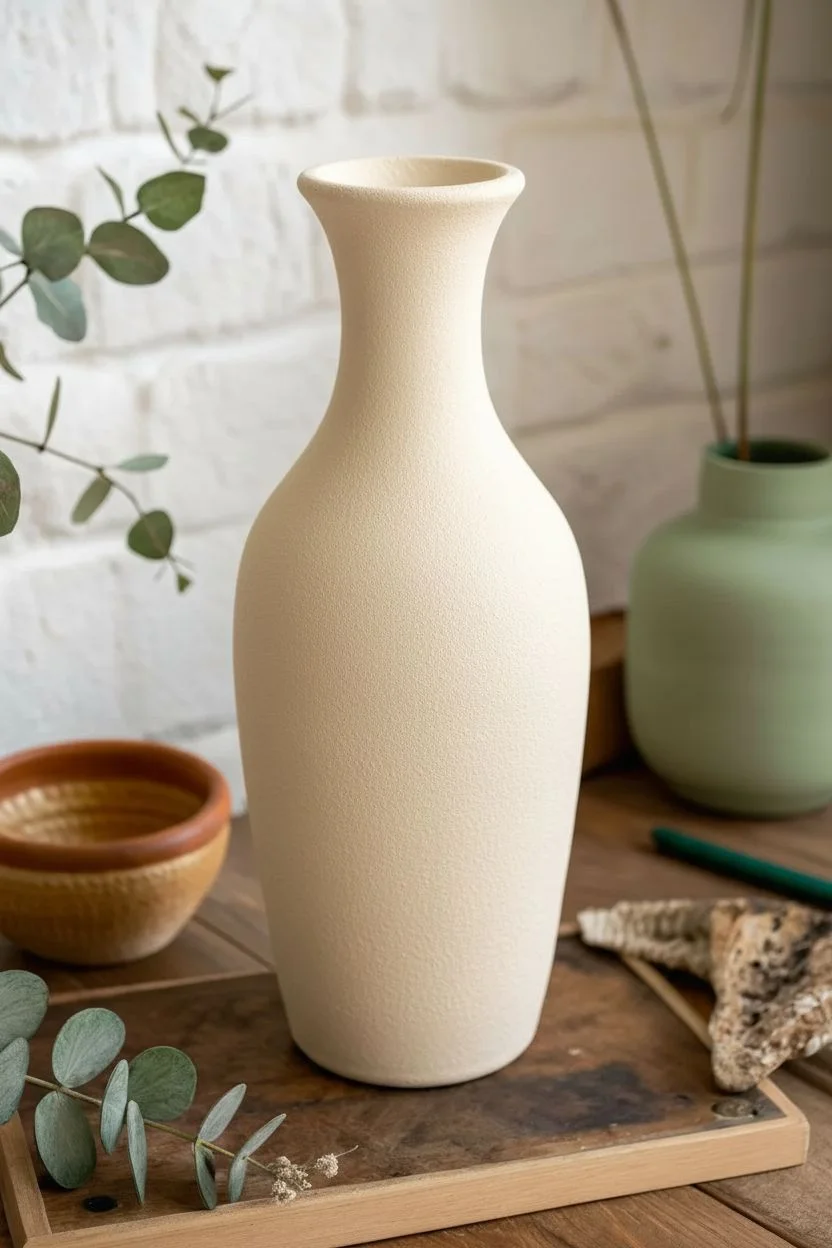
Step 1: Base Preparation
-
Clean surface:
Begin by wiping down your vase with a damp cloth to remove any dust or oils. Let it dry completely so the paint adheres properly to the porous surface. -
Mix base color:
Create a warm, neutral base by mixing your Cream paint with a tiny dot of Terra Cotta. You want an off-white that feels stony and organic rather than stark white. -
Add texture (optional):
If your vase is very smooth and you want that gritty, raw pottery look shown in the photo, mix a teaspoon of baking soda into your base paint color. -
Apply base coat:
Cover the entire exterior of the vase with your base mixture using the wide flat brush. Don’t worry about perfect smoothness; a little texture adds character. -
Dry time:
Allow this base layer to dry fully. It should feel chalky to the touch before you proceed to the decorative strokes.
Oops! Muddy Colors?
If strokes look brown or muddy where they overlap, let the first color dry completely before applying the second. This keeps the hues distinct and crisp.
Step 2: Creating the Abstract Flow
-
Prepare palette:
Squeeze out generous amounts of Terra Cotta, Sage Green, and Cream onto your palette. Keep them separate but close enough to pull from quickly. -
Load the brush:
Here is the key technique: dip your medium round brush into the Sage Green, but don’t mix it fully. Pick up a little Cream on the tip as well to create natural blending on the pottery. -
First directional strokes:
Starting from the middle of the vase, drag your brush diagonally upward. Apply varying pressure—press down at the start and lift off at the end to create a tapered ‘leaf’ shape. -
Follow the curve:
Continue adding green strokes, allowing them to wrap around the curvature of the vase. Imagine the wind blowing around the form; all strokes should generally follow a similar diagonal flow. -
Switch colors:
Rinse your brush lightly (doesn’t need to be perfect) and switch to the Terra Cotta color. Load the brush with paint, keeping the consistency relatively thick. -
Interweave strokes:
Paint Terra Cotta strokes in the gaps between the green ones. Overlap them slightly in places to create depth, mimicking layers of sedimentary rock. -
Layering cream:
Reload with plain Cream paint. Add strokes specifically over areas where the green and orange meet to soften the transition and add brightness. -
Dry brushing details:
Wipe most of the paint off your brush. Lightly drag the dry brush over the existing colors to create scratchy, weathered textures that reveal the underlayers. -
Check the balance:
Step back and look at the vase from a distance. If one area looks too heavy with green or orange, balance it out with a few light strokes of Cream or the opposing color. -
Add speckles (optional):
To mimic raw clay speckling, flick a stiff toothbrush loaded with watered-down brown paint lightly over the surface.
Step 3: Finishing Touches
-
Final dry:
Let the decorative layer dry completely, preferably overnight, to ensure the thickest parts of the paint are set. -
Seal the work:
In a well-ventilated area, spray the vase with a matte sealant. This protects the paint from chipping while maintaining that non-glossy, earthenware aesthetic.
Level Up: Gold Leaf
Once the paint is dry, apply thin streaks of gold leaf adhesive along the edges of a few strokes. Add foil for a touch of luxe ‘kintsugi’ style shimmer.
Place your newly painted vase on a sunny sill or wooden table to enjoy the warm, organic vibe you’ve created
Botanical Leaf Silhouettes Using Simple Shapes
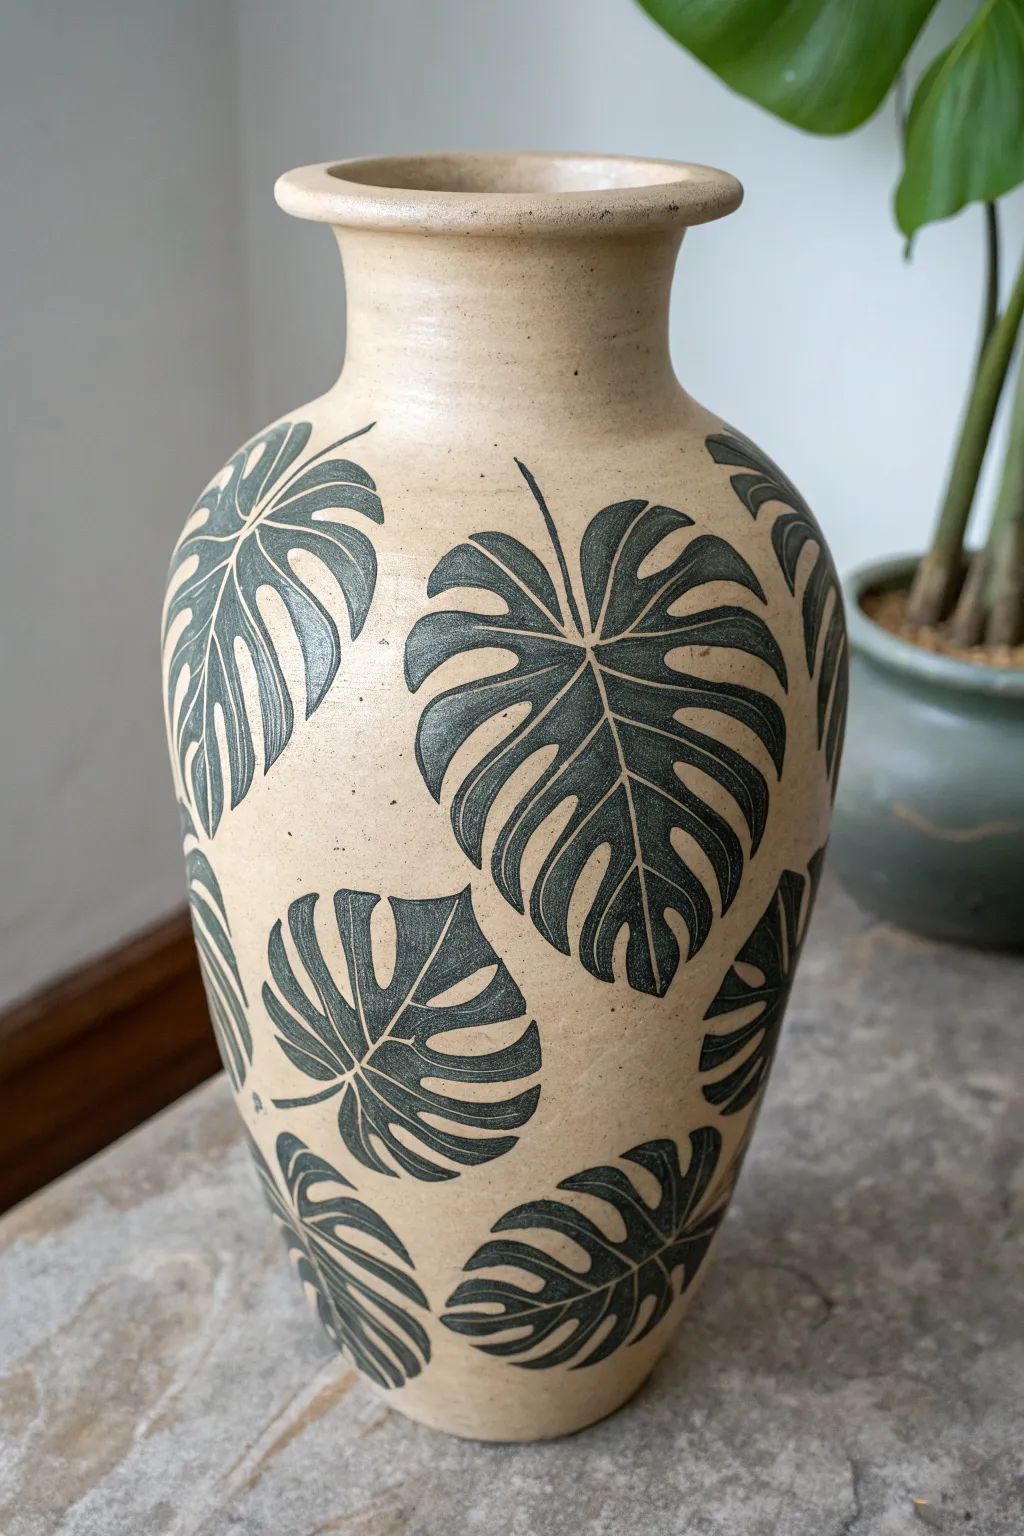
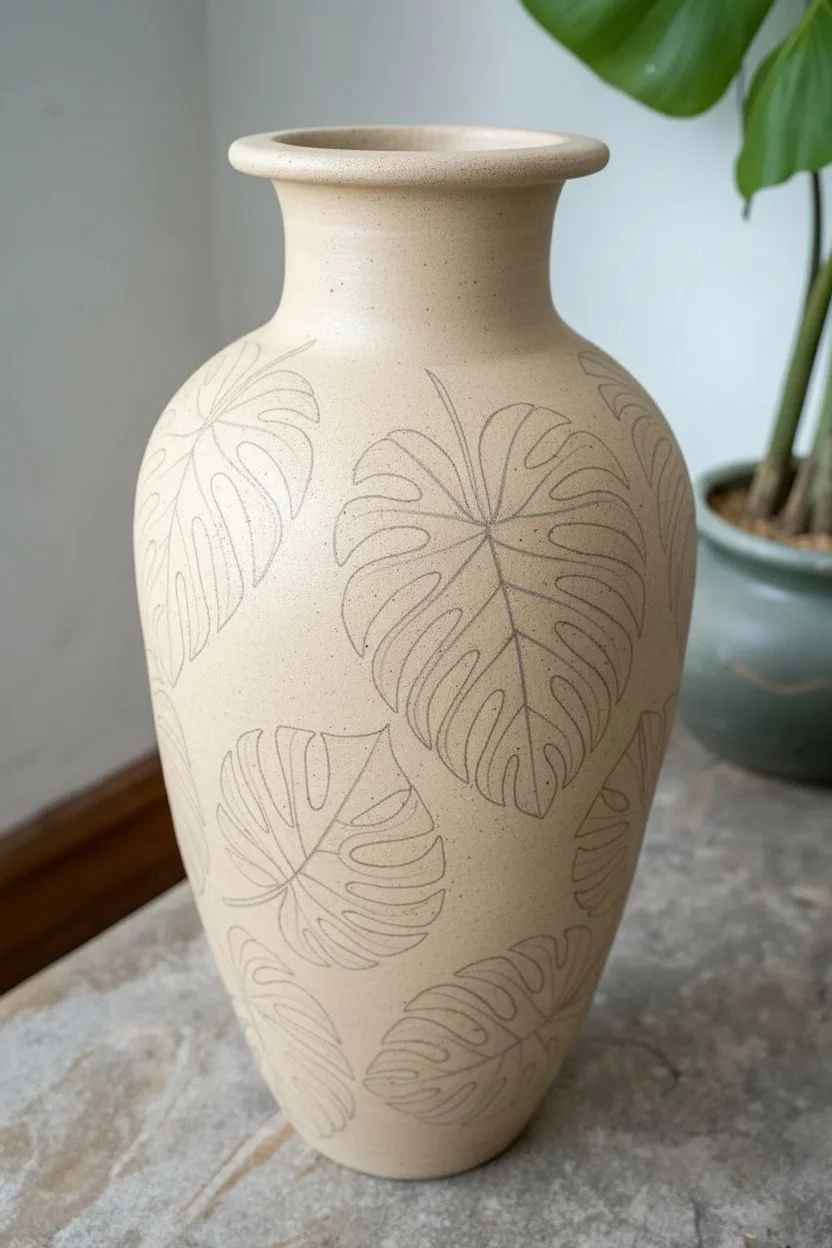
Capture the organic elegance of houseplants with this stylized leaf motif on a neutral clay vase. The contrast between the sandy, speckled base and the deep forest green silhouettes creates a striking, modern botanical look perfect for any shelf.
How-To Guide
Materials
- Bisque-fired ceramic vase (smooth stoneware or tan clay body)
- Underglaze (Dark Forest Green or Black)
- Small fine-liner brush (size 0 or 00)
- Medium round brush (size 4 or 6)
- Pencil (HB or lighter)
- Tracing paper (optional)
- Clear matte glaze
- Damp sponge
- Water container
Step 1: Preparation and Planning
-
Clean the Surface:
Begin by wiping down your bisque-fired vase with a slightly damp sponge. This removes any kiln dust or oils from handling that might repel the underglaze. -
Sketch the Monstera Shape:
Using a light pencil, lightly sketch the outline of a Monstera leaf directly onto the vase. Start with a central vein line, then draw a heart-shaped perimeter. Don’t worry about perfection; organic shapes look better. -
Add Fenestrations:
Draw the characteristic splits (fenestrations) of the leaf. Create deep V-shaped notches extending from the edge of the leaf toward the center vein, leaving bridges of clay in between. -
Establish Placement:
Repeat this sketching process around the vase. Vary the orientation—some leaves pointing up, some angled sideways, and others near the bottom pointing down. I like to leave about an inch or two of negative space between each leaf so the design breathes.
Step 2: Painting the Silhouettes
-
Outline the Leaves:
Load your fine-liner brush with the dark green underglaze. Carefully trace over your pencil outlines, maintaining a steady hand to keep the edges crisp. -
Define the Central Vein:
Paint a thin line down the center of the leaf. From this center line, paint delicate veins extending outward into each leaf section. These unpainted lines will remain the color of the clay body. -
Negative Space Veining:
Instead of painting the veins, remember you are painting the *leaf* around the veins. Leave a hair-thin gap of unpainted clay where the veins should be. This sgraffito-like effect is easier achieved by painting sections rather than scratching away later. -
Fill the Sections:
Switch to your medium round brush. Fill in the leaf sections between your outlined edges and the reserved vein lines. Apply the underglaze somewhat thickly to ensure opacity. -
Second Coat Application:
Once the first layer is touch-dry (it will look chalky), apply a second coat of green to the leaves. This prevents streakiness and ensures a solid, dark silhouette after firing. -
Refining Edges:
Go back with your fine-liner brush to sharpen any leaf tips or curve edges that look wobble. The beauty of this design relies on the sharp contrast between the painted leaf and the raw clay.
Fixing Wobbly Lines
If you paint over a vein line, wait for it to dry completely. Then, gently scratch the underglaze away with a needle tool or toothpick to reveal the clay again.
Step 3: Finishing and Glazing
-
Clean Up Smudges:
Check the unpainted clay areas. If any green specs landed where they shouldn’t be, gently scrape them off with a craft knife or wipe with a barely damp sponge corner. -
Let Underglaze Dry:
Allow the vase to dry completely for several hours, or preferably overnight, to ensure the moisture has evaporated from the clay. -
Bisque Fire (Optional):
If your studio practice allows, do a shallow bisque fire to set the underglaze. If not, proceed carefully to glazing. -
Apply Clear Glaze:
Dip or brush a clear matte glaze over the entire vase. A matte finish is crucial here to mimic the natural texture of the reference image; a glossy glaze would distract from the earthy vibe. -
Final Fire:
Fire the vase in the kiln according to the temperature requirements of your specific clay and glaze combination.
Textured Twist
Use a speckled buff clay body instead of plain white. The iron speckles will show through the clear glaze and enhance the natural, botanical aesthetic of the piece.
Place your finished vase near a window where the natural light can highlight the matte texture and deep green tones
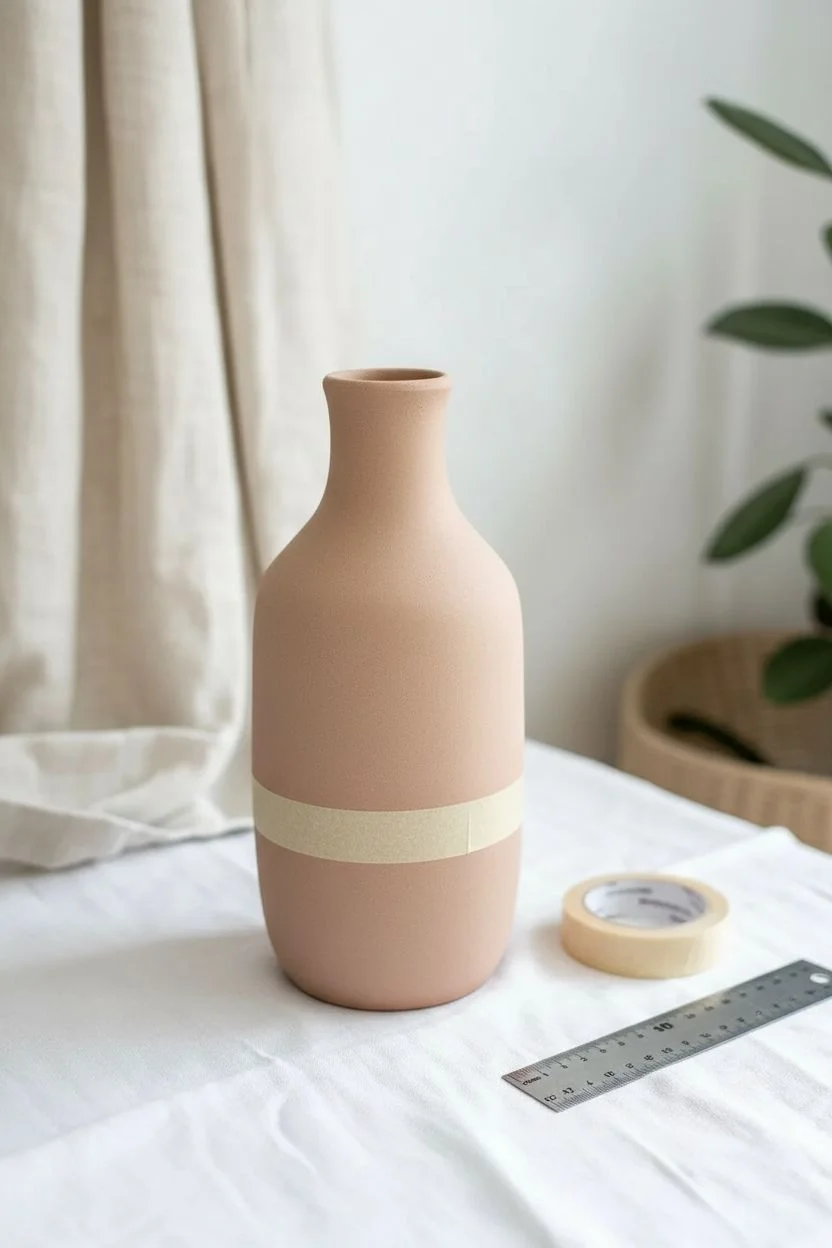
Terracotta Whitewash With Soft Distressed Edges

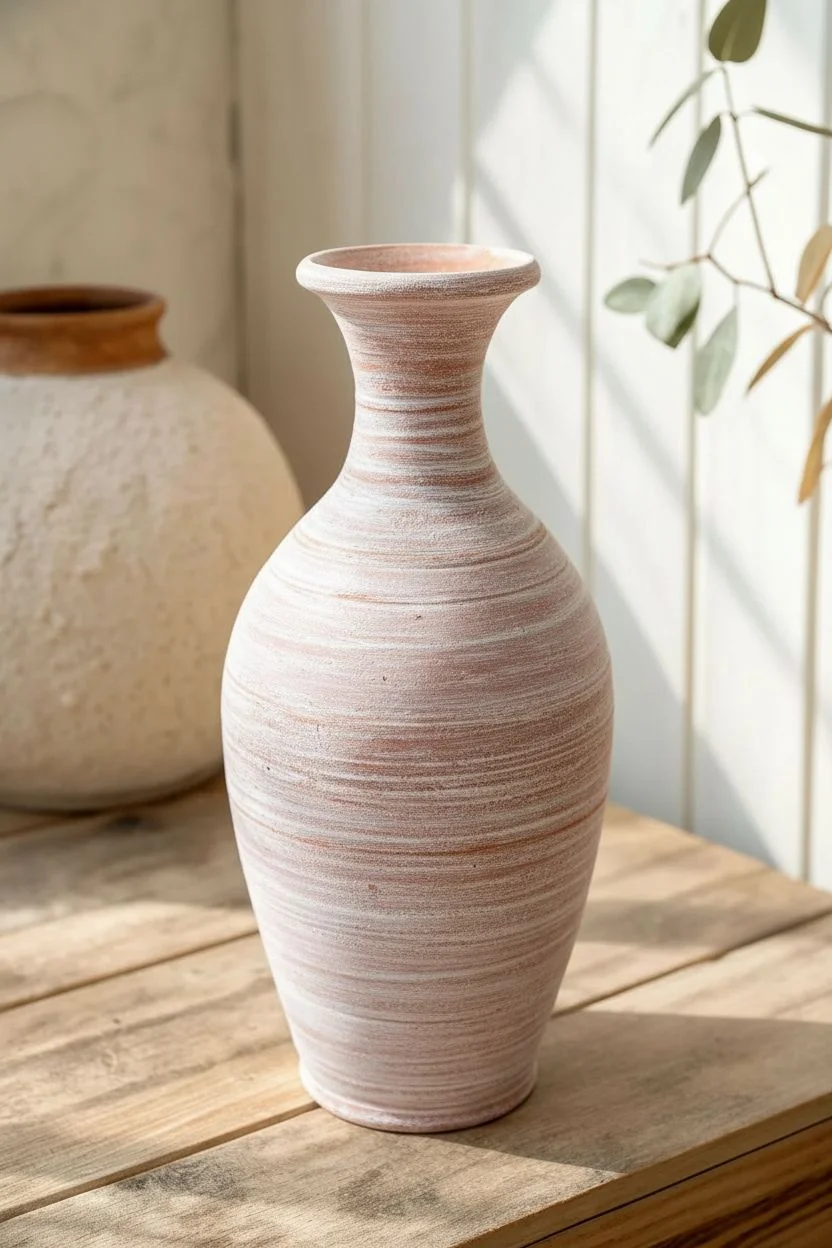
Transform a plain terracotta vase into an aged, sun-bleached beauty using a simple whitewash technique and strategic distressing. This project creates a stunning pottery barn-inspired look with beautiful textured layers that let the natural clay warmth peek through.
Detailed Instructions
Materials
- Unfinished terracotta vase (tall neck shape)
- White or cream chalk paint
- Water
- Small mixing bowl or cup
- 2-inch chip brush or rough bristle brush
- Paper towels or lint-free rags
- Medium-grit sandpaper (120-150 grit)
- Fine-grit sandpaper (220 grit)
- Clear matte sealer spray (optional)
- Drop cloth
Step 1: Preparation & First Coat
-
Clean surface:
Begin by wiping down your terracotta vase with a slightly damp cloth to remove any dust or oils, ensuring the paint adheres properly to the porous surface. -
Mix whitewash:
In your mixing bowl, combine the white chalk paint with water. I usually aim for a 50/50 ratio, creating a consistency similar to skim milk that is fluid but still pigmented. -
Apply base wash:
Dip your chip brush into the mixture and apply it liberally over the entire vase, working in horizontal strokes around the circumference to mimic wheel-turned pottery lines. -
Wipe back:
Immediately use a crumpled paper towel to gently blot and wipe away portions of the wet paint, leaving a very thin, translucent veil of white over the orange clay. -
Dry completely:
Let this initial wash dry fully, which should only take about 15 to 20 minutes since the terracotta absorbs the moisture so quickly.
Too Much White?
If you accidentally covered too much terracotta, use a damp sanding sponge instead of dry sandpaper. This removes paint faster and ‘smears’ the clay dust for a dirtier, older look.
Step 2: Layering Texture
-
Create thick mixture:
Pour a small amount of undiluted chalk paint onto a palette or shallow dish; you want this paint to be full-bodied for texture. -
Dry brush technique:
Load just the very tips of your chip brush with the undiluted paint and offload the excess onto a paper towel until the brush feels almost dry. -
Highlight the neck:
Focusing on the neck of the vase, drag the brush horizontally across the existing ridges. This catches the high points and emphasizes the form. -
Build the body:
Move down to the main body of the vase and apply thicker bands of white paint, leaving irregular gaps where the base layer shows through. -
Add heavy bands:
Create distinct horizontal stripes of heavier white paint around the widest part of the vase and near the base, allowing the brush bristles to leave visible, scratchy texture marks. -
Feather the edges:
Use a clean, dry rag to gently feather the edges of these thicker painted bands while they are still tacky to prevent harsh stop-and-start lines. -
Dry thoroughly:
Allow these heavier layers to cure for at least an hour. Chalk paint dries fast, but thicker applications need more time to harden before sanding.
Add Ancient Texture
Mix a teaspoon of baking soda into your thick paint layer. This creates a gritty, stone-like surface that looks incredibly realistic once distressed and sanded back.
Step 3: Distressing & Finishing
-
Initial sanding:
Take your medium-grit sandpaper and firmly sand horizontal bands around the vase, pressing harder in areas where you want the raw terracotta to reappear strongly. -
Expose the clay:
Sand aggressively around the rim, the shoulder where the neck meets the body, and the bottom third to reveal rich bands of orange clay, mimicking natural wear. -
Refine the texture:
Switch to fine-grit sandpaper to smooth out the transition areas between the thick paint and the exposed clay, creating that soft, dusty look seen in the photo. -
Create micro-scratches:
Drag the sandpaper horizontally around the entire piece one last time to create tiny, uniform scratch marks that unify the ‘turned’ look of the pottery. -
Dust off:
Wipe the vase down with a dry cloth to remove the loose paint dust; don’t use a wet cloth here or you might reactivate the wash. -
Optional seal:
If you plan to use this outdoors or near moisture, apply a light mist of matte clear sealer. I prefer to leave it unsealed for a more authentic, chalky texture.
Place your newly aged vase in a sunlit spot where the light can catch the beautiful texture you created
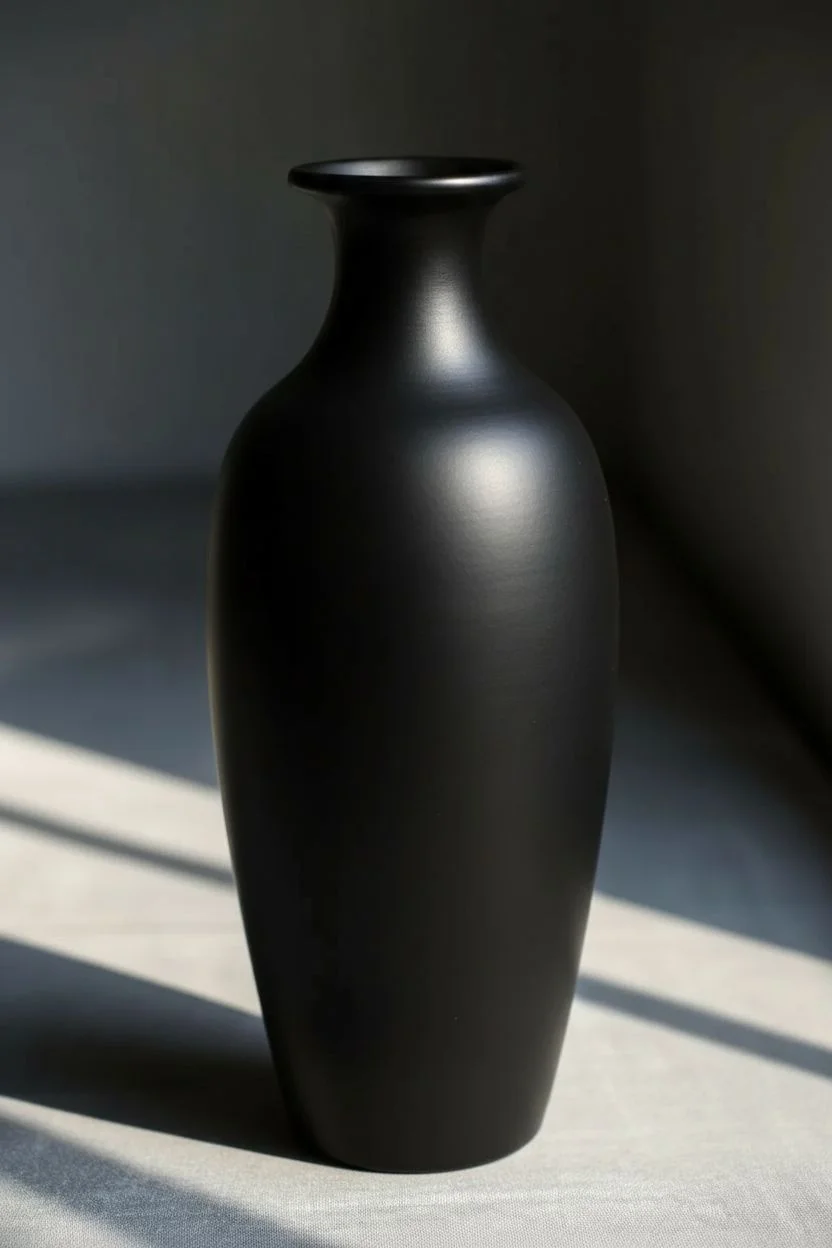
Chalky Matte Layers in Calm Neutral Tones
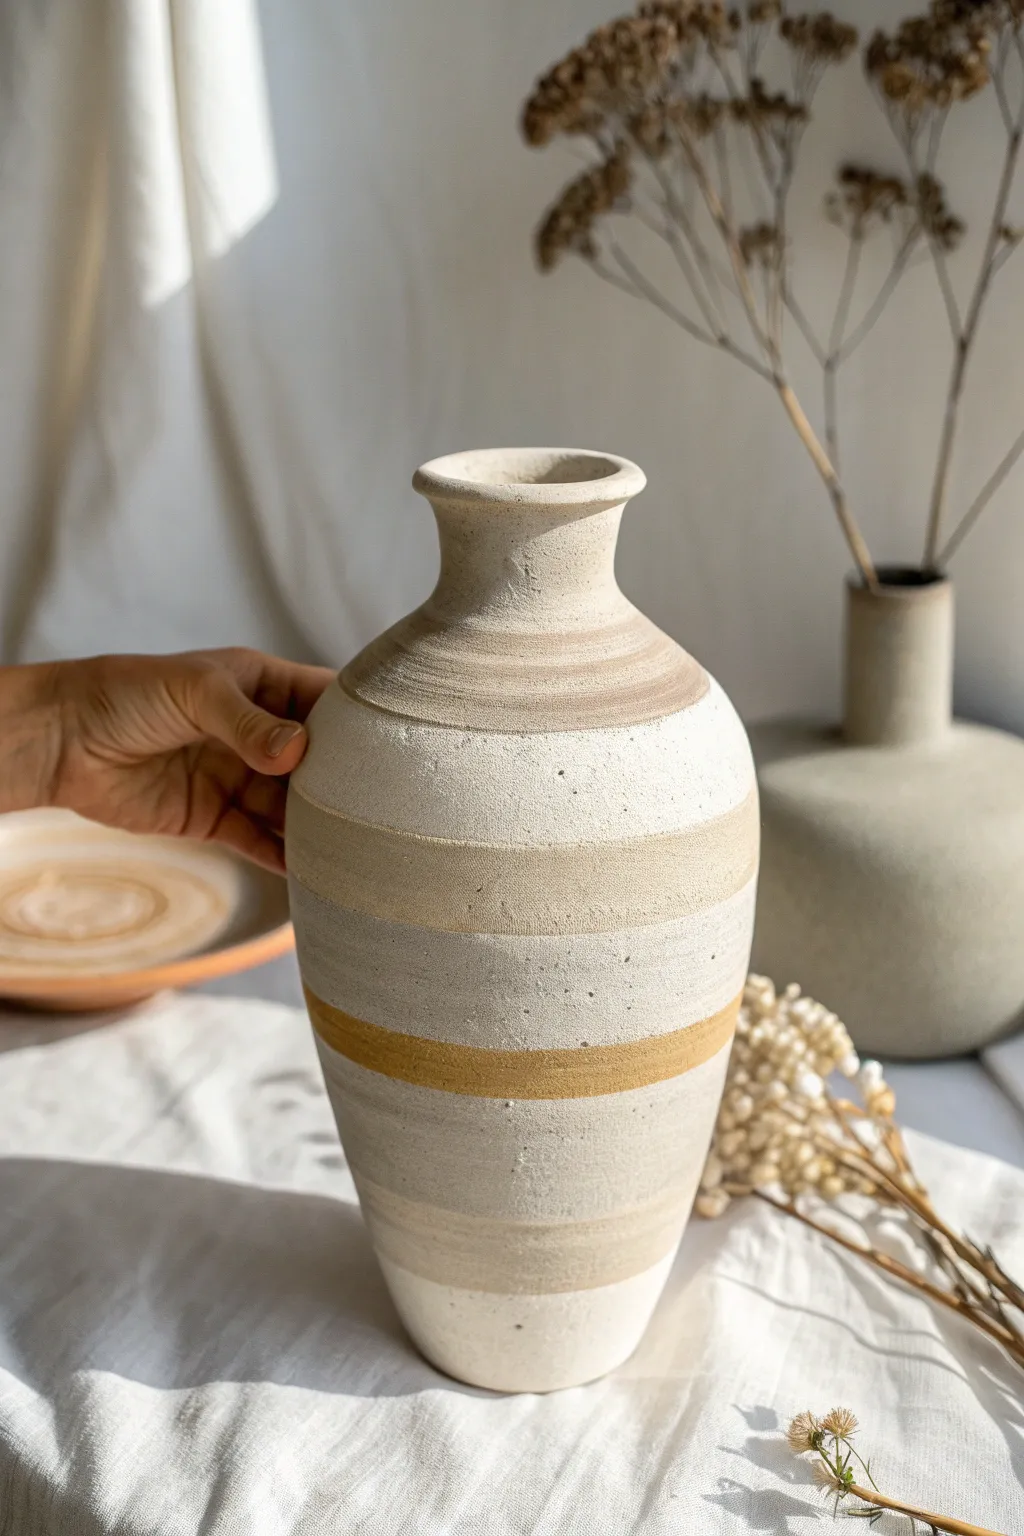
Transform a plain ceramic vase into a piece of modern stoneware art using chalky paints in calming neutral tones. The layered, horizontal banding creates a soothing rhythm that mimics the organic feel of wheel-thrown pottery.
Step-by-Step
Materials
- Plain ceramic or terracotta vase (matte finish preferred)
- Chalk-finish paints (White, Cream, Beige, Warm Ochre/Mustard, Light Grey)
- Plaster of Paris or baking soda (optional, for texture)
- Flat synthetic paintbrushes (medium and small)
- Painter’s tape (optional)
- Mixing palette or paper plate
- Fine-grit sandpaper (220 grit)
- Matte clear sealant spray
Step 1: Base Preparation
-
Clean surface:
Begin by thoroughly wiping down your vase with a damp cloth to remove any dust or oils. If the vase has a glossy glaze, lightly sand the entire surface with fine-grit sandpaper to give the paint something to grip. -
Mix base color:
Pour a generous amount of white chalk paint onto your palette. To achieve that authentic, stony texture seen in the photo, mix in a teaspoon of Plaster of Paris or baking soda until the consistency resembles thick heavy cream. -
Apply base coat:
Paint the entire vase with your textured white mixture. Use long, horizontal brushstrokes around the circumference rather than vertical ones; this establishes the ‘thrown pottery’ look right from the start. -
Dry thoroughly:
Let this base layer dry completely. Chalk paint dries relatively fast, but since we added texture, give it at least 30-45 minutes.
Step 2: Layering the Stripes
-
Plan your bands:
Visualize where your stripes will go. The beauty of this design lies in the varying widths—some bands are thick and bold, while others are mere accents. -
Mix the grey tones:
Create a soft ‘greige’ color by mixing your light grey paint with a touch of beige. This will be the widest, central band on the vase. -
Paint the central band:
Using a medium flat brush, paint the broad grey section around the middle of the vase. Don’t worry about perfect straight lines; a slightly wobbly, hand-painted edge adds to the organic charm. -
Add the ochre accent:
Switch to your warm ochre or mustard paint. Apply a thinner band just below the grey section. This pop of warmth breaks up the cool neutrals. -
Create the upper beige band:
Mix a light sandstone color using beige and a tiny drop of white. Paint a medium-width band on the shoulder of the vase, just below the neck. -
Detail the neck:
Paint the very neck and rim of the vase. You can use the original white base color or a very subtle off-white to differentiate it slightly from the body. -
Feather the edges:
While the paint is still slightly tacky, take a dry, clean brush and very gently feather the boundaries between the colors if you want a softer transition, or leave them crisp for a graphic look.
Natural Texture
Don’t over-blend your paint. Leaving visible horizontal brushstrokes creates ridges that mimic the turning lines found on wheel-thrown clay pots.
Step 3: Adding Texture & Finishing
-
Apply the bottom section:
For the bottom third of the vase, mix a variation of the grey stripe—perhaps slightly lighter or darker—and paint horizontal bands down to the base. -
Create ‘speckles’:
I like to add faux ceramic speckles here. Dip an old toothbrush into slightly watered-down dark grey or brown paint. Run your thumb across the bristles to flick tiny unpredictable dots onto the vase surface. -
Distress gently:
Once all paint layers are bone dry, take your fine-grit sandpaper and very lightly sand over the raised areas and ridges. This reveals hints of the layers underneath and creates a weathered, matte feel. -
Dust off:
Wipe away any sanding dust with a dry, soft cloth or a tack cloth. -
Seal the work:
Protective, non-yellowing matte spray sealant is crucial here. Apply two light coats to seal the chalk paint without adding unwanted shine.
Shaky Lines?
If freehand painting feels too risky, place the vase on a lazy susan. Hold your brush steady in one spot and slowly rotate the turntable to get even bands.
Now step back and admire how simple paint layers have given your vase the sophisticated look of handmade stoneware
Faux Patina for an Aged, Collected Look
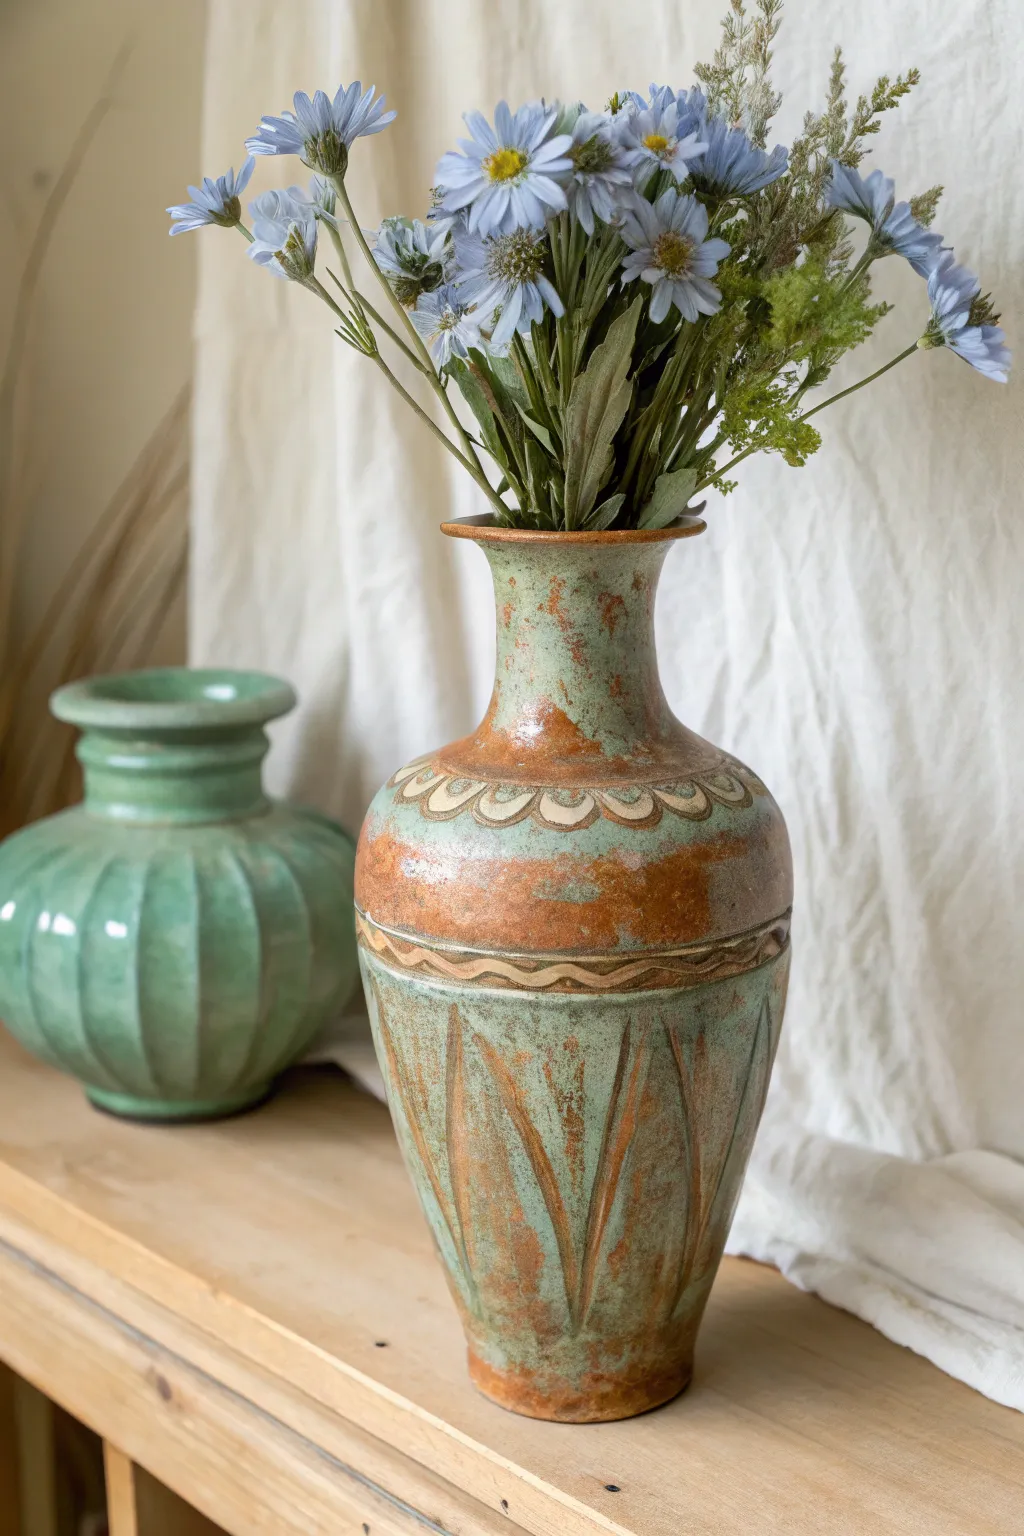
Transform a plain vase into an artifact that looks like it was dug out of an ancient ruin with this rich, textured faux finish. The interplay between the rusty base tones and the vibrant verdigris green creates a convincing illusion of time-worn pottery.
How-To Guide
Materials
- Plain ceramic or terracotta vase (with basic shape)
- Sandpaper (medium grit)
- Primer (spray or brush-on)
- Acrylic paints: Burnt Sienna, Raw Umber, Terracotta
- Acrylic paints: Turquoise, Sage Green, Antique White
- Pencil
- Small round carving tool (optional) or fine detail brush
- Sea sponge or coarse texture sponge
- Clean cotton rag
- Matte finish sealer
Step 1: Preparation & Base Coat
-
Prep the surface:
Begin by lightly sanding your vase to rough up the glossy surface if it’s glazed, or simply wipe down a terracotta pot to remove dust. This ensures your paint adheres for the long haul. -
Prime the vase:
Apply a coat of primer over the entire exterior. Let this dry completely before moving on. -
Mix the rust, base color:
In your palette, mix Burnt Sienna with a touch of Terracotta and Raw Umber. You want a deep, warm, rusty brown color that simulates aged iron or unglazed clay. I usually aim for a slightly uneven mix here for more dimension. -
Apply the rusty layer:
Paint the entire vase with your rust mixture. Don’t worry about being too perfect; texture is good here. Apply two coats if necessary for solid coverage.
Layering Secret
Apply a layer of wax or petroleum jelly over the rust base coat on high points before painting the green. The green won’t stick there, creating perfect peeling paint effects.
Step 2: Sculpting the Design
-
Sketch the geometry:
Once the base coat is bone dry, use a pencil to lightly sketch your design. Draw a band around the shoulder with scallop shapes, a wavy line below that, and long, vertical leaf-like shapes rising from the bottom. -
Carve or darken outlines:
If your vase is clay or bisque, you can gently carve these lines with a tool. If not, simulate the effect by painting over your pencil lines with a thin brush and dark Raw Umber to create a ‘groove’ shadow. -
Highlight the scallops:
Inside the scallop band on the shoulder, paint the half-circles with a diluted Antique White or light cream color to make them stand out against the rust background.
Too Much Green?
If you covered too much of the rust color, dip a rag in rubbing alcohol and gently rub the green layer. It removes acrylic paint cleanly, exposing the base coat underneath.
Step 3: The Verdigris Technique
-
Mix the patina color:
Combine Turquoise with a little Sage Green and a drop of water. The paint should be fluid but not runny. -
Sponge on the green:
Dip a sea sponge into the green mix and dab off the excess on a paper towel. Lightly pounce the sponge over the vase, focusing heavily on the neck and the spaces between your designs. -
Distress the green:
While the green paint is still tacky, use a damp cotton rag to wipe areas back. You want to reveal that rusty base coat underneath, especially on raised areas and edges where natural wear would occur. -
Detail the lower section:
On the bottom section with the vertical leaf shapes, apply the green paint between the leaves, but leave the inside of the leaf shapes mostly rusty brown. -
Refine the leaf shapes:
Use a dry brush with a tiny amount of green to lightly streak the inside of the rusty leaf shapes, tying the color palette together without covering the base entirely. -
Add mineral deposits:
Mix a very watery wash of Antique White. Flick or dab tiny amounts onto the greenest areas to simulate mineral buildup.
Step 4: Finishing Touches
-
Enhance the etched lines:
Go back with a fine liner brush and reinforce the ‘carved’ lines (the wavy line and leaf outlines) with a dark brown or black wash to deepen the contrast. -
Final dry brushing:
With a dry, stiff brush and a tiny bit of Burnt Sienna, hit the lip of the vase and the very bottom rim to unify the aged look. -
Seal the work:
Once you are happy with the level of distressing, seal the vase with a matte spray varnish. Avoid gloss, as it ruins the antique clay effect.
Place your newly aged vase on a shelf with dried flowers to enjoy that timeless, collected atmosphere
Mandala Dot Painting Around the Neck and Rim
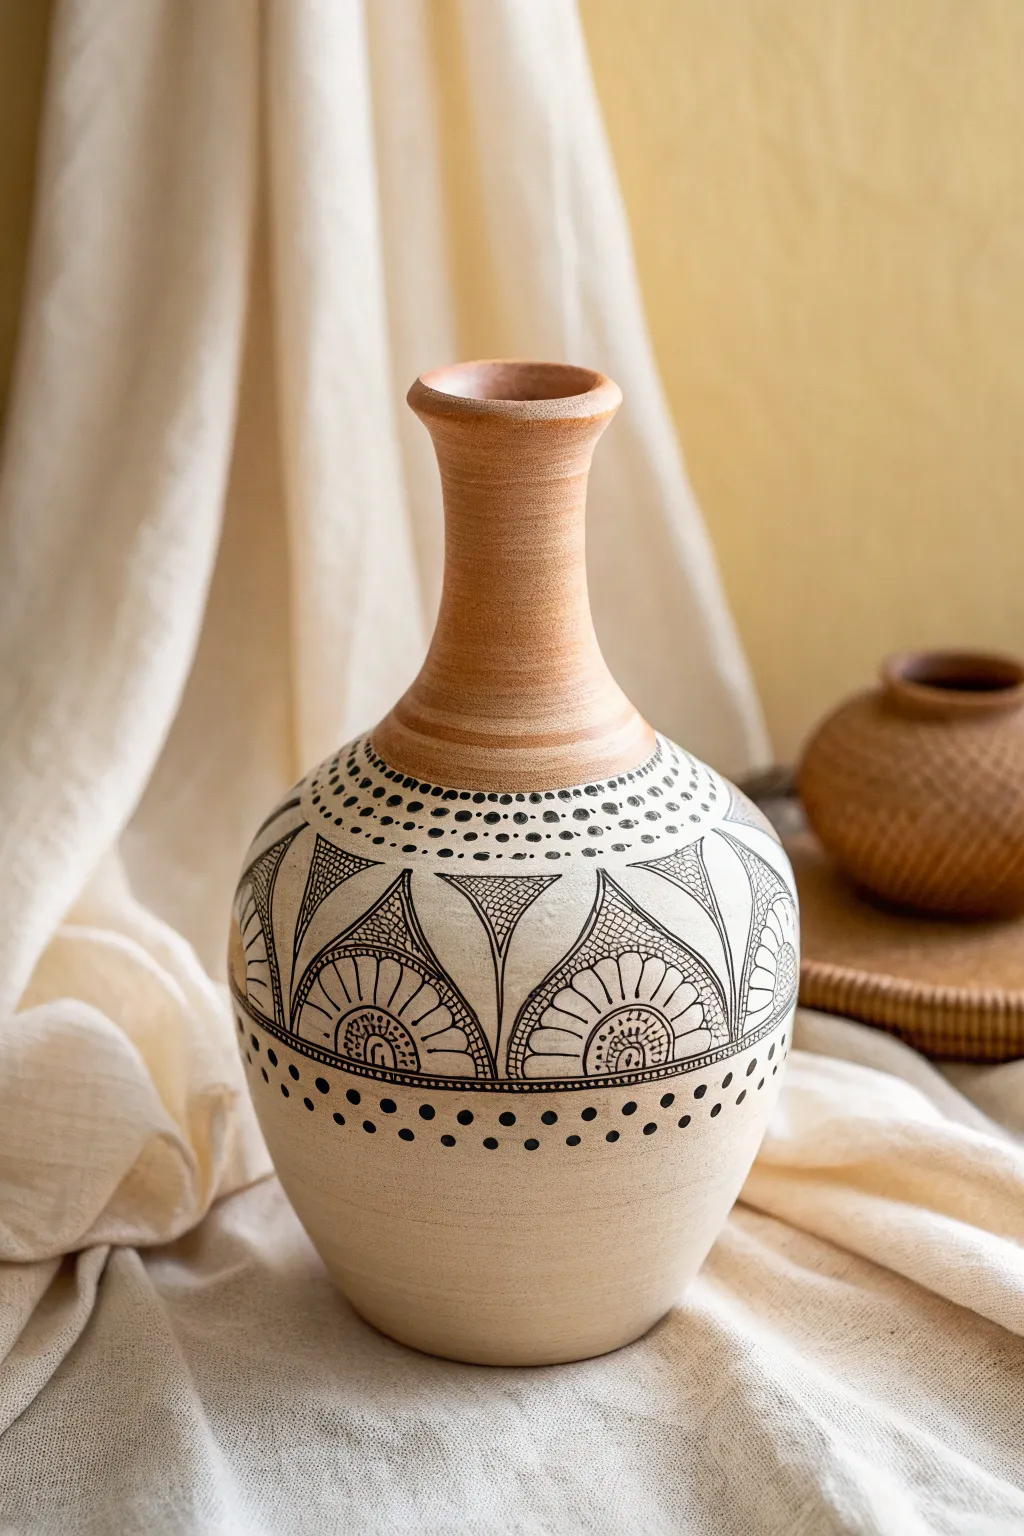
Transform a plain terracotta vase into a stunning bohemian centerpiece using simple geometric patterns and high-contrast linework. This project combines raw clay textures with precise cream blocking and intricate black ink details for a modern, global-inspired look.
Step-by-Step Tutorial
Materials
- Terracotta vase (bottle-neck shape preferred)
- Cream or off-white acrylic paint
- Flat shader brush (size 10 or 12)
- Black fine-point paint pen (0.7mm or 1mm tip)
- Black medium-point paint pen (2mm tip)
- Pencil and eraser
- Painter’s tape or masking tape
- Matte spray sealer
Step 1: Base Preparation
-
Clean surface:
Begin by wiping down your terracotta vase with a damp cloth to remove any dust or oils, ensuring a clean surface for the paint to adhere to. -
Define the painted area:
Decide where your cream section will start and stop. This design keeps the neck and the very bottom natural. Use painter’s tape to mark off the neck line (just below the curve) and the bottom line (about 2 inches from the base). -
Apply base color:
Load your flat brush with cream acrylic paint. Apply the paint in the large center section between your tape lines. You’ll likely need 2-3 coats for solid, opaque coverage, letting each coat dry completely in between. -
Remove tape:
Once the final coat is tacky but not fully dry, gently peel away the painter’s tape to reveal crisp, clean lines against the raw terracotta.
Uneven Lines?
If your paint pen skips or the line looks shaky, don’t panic. Wait for it to dry, then carefully scratch off the mistake with an exacto knife or touch it up with a tiny dot of cream paint.
Step 2: Mapping the Design
-
Draft horizontal guides:
Lightly trace horizontal pencil lines around the circumference of the cream section. You need a top bands for dots, a large central band for the triangles, and a lower band for the bottom dots. -
Sketch the triangles:
In the main central band, lightly sketch a row of upside-down triangles. The points should extend downward. Leave distinct V-shaped gaps between them. -
Add semi-circles:
Inside each V-shaped gap (between the inverted triangles), sketch a semi-circle arch resting on your lower horizontal guide line.
Step 3: Inking the Pattern
-
Outline main shapes:
Using your medium-point black paint pen, carefully trace over your pencil lines for the large triangles and semi-circles. Keep your hand steady and rotate the vase as you pull the pen. -
Create the top dot border:
Near the top edge of the cream paint, use the medium pen to create three rows of dots. The top and bottom rows should be small dots, while the middle row can feature slightly larger, more spaced-out dots. -
Fill triangles with hatching:
Switch to your fine-point pen. Inside each inverted triangle, draw a smaller internal triangle. Fill the space between the inner and outer triangle with tight cross-hatching or a mesh pattern. -
Detail the semi-circles:
Inside the semi-circle arches, draw a smaller concentric arch. Connect the two arch lines with straight radiating lines to create a ‘petal’ or ‘sunburst’ effect. -
Add intricate centers:
At the very bottom center of those semi-circles, draw a tiny half-circle filled with small dots or scales for extra detail. -
Thicken the baseline:
Go back over the main horizontal line running underneath your geometric shapes. I like to double-line this to create a bold, weighty foundation for the pattern. -
Add the bottom dot border:
Below main design band, use the medium pen to add two rows of staggered dots. Make the top row slightly larger and the bottom row smaller to taper the design off visually.
Add Texture
Before painting the cream base, mix a teaspoon of baking soda into your acrylic paint. This creates a grainy, ceramic-like texture that makes the piece look like high-end pottery.
Step 4: Finishing Touches
-
Erase guidelines:
Wait at least 20 minutes to ensure the paint pen ink is fully cured. Gently erase any visible pencil marks with a soft white eraser. -
Seal the artwork:
To protect your geometric lines from scratching, take the vase to a well-ventilated area and apply a light coat of clear matte spray sealer over the entire piece.
Place your finished vase on a wooden tray or linen cloth to highlight its earthy, handmade charm
Galaxy Speckles for a Night-Sky Clay Vase
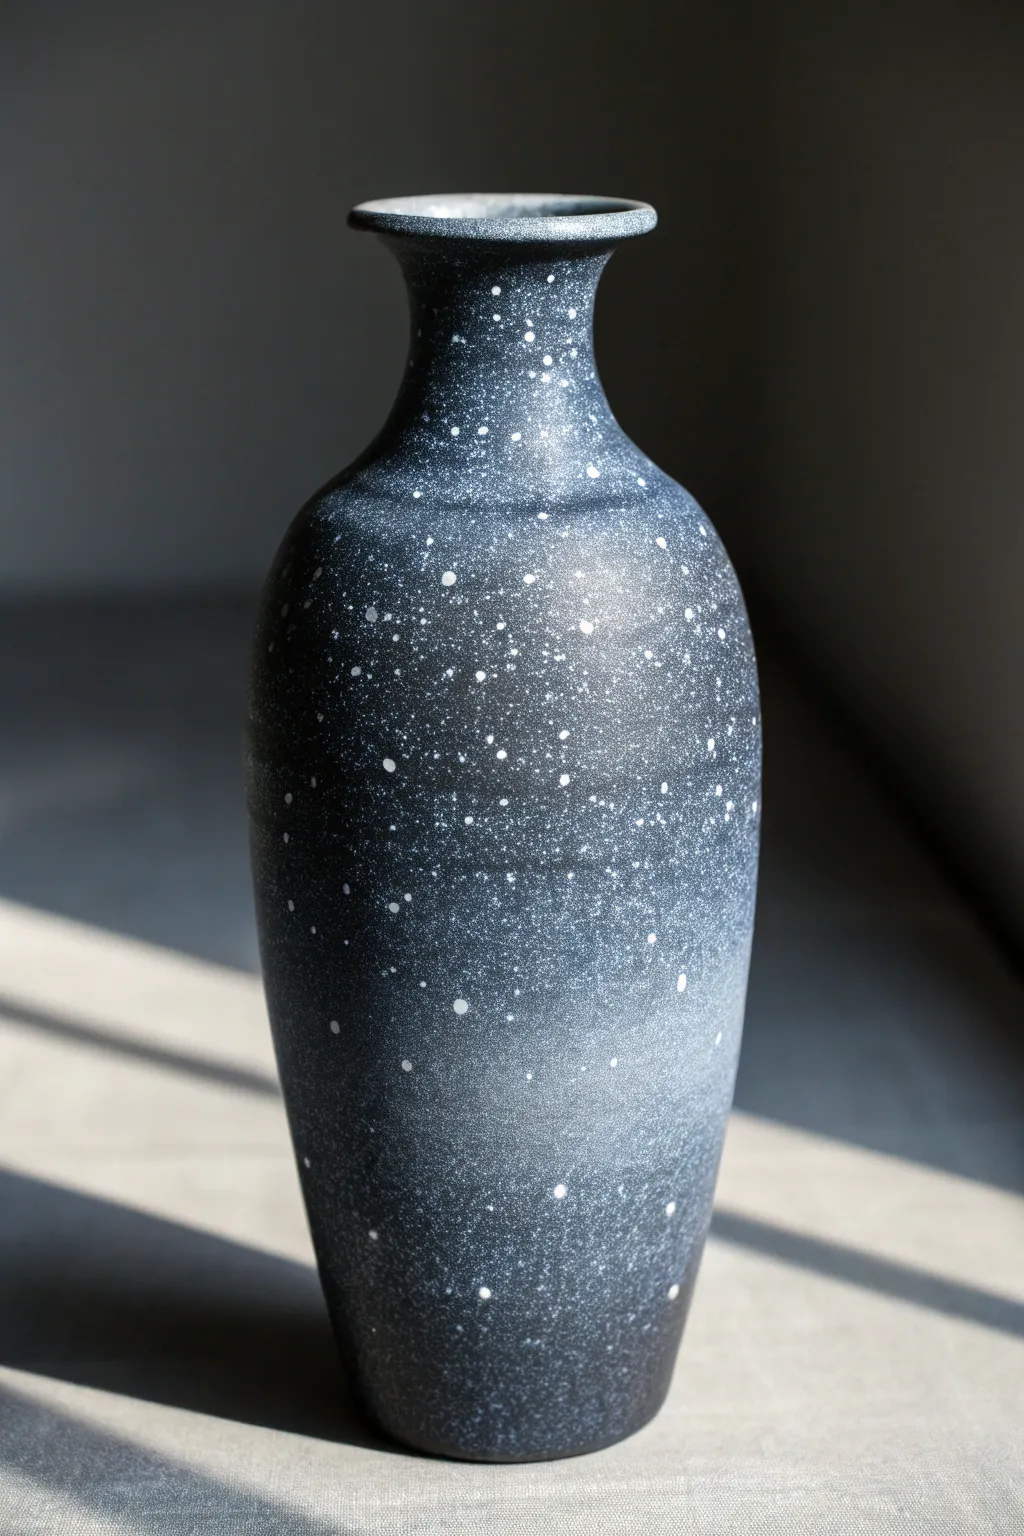
Transform a plain ceramic form into a piece of the night sky with this mesmerizing galaxy speckle finish. By layering gradients of deep space hues and flicking bright stars across the surface, you’ll achieve an atmospheric depth that looks professional yet is surprisingly simple to execute.
Step-by-Step
Materials
- Bisque-fired clay vase (smooth surface preferred)
- Black acrylic paint or matte black spray paint
- Dark navy blue acrylic paint
- Charcoal grey acrylic paint
- Titanium white acrylic paint
- Sea sponge or cosmetic wedge sponge
- Stiff-bristled toothbrush (dedicated for crafting)
- Small soft paintbrush
- Matte spray varnish or sealant
- Palette or paper plate
- Water container
- Newspaper or drop cloth (essential for splatter)
Step 1: Setting the Deep Space Base
-
Prepare the surface:
Wipe down your clay vase with a slightly damp cloth to remove any kiln dust or oils. Let it dry completely for a few minutes to ensure the paint adheres properly. -
Apply the base coat:
Cover the entire vase with a solid layer of black paint. If you are using acrylics, use a soft brush to get an even coat. For a smoother finish without brushstrokes, I prefer using matte black spray paint outdoors. -
Check for coverage:
Inspect the vase for any missed spots, especially near the rim and base. Apply a second coat if the clay color is peeking through, then let this base layer dry completely—at least 30 minutes.
Blob Control
If the toothbrush flicks a massive blob of white paint, don’t wipe it! Wait for it to dry completely, then paint over just that dot with black. Re-spritz that spot.
Step 2: Creating Atmospheric Nebulas
-
Prepare the gradient colors:
Squeeze a small amount of dark navy blue and charcoal grey onto your palette. You want these colors to be subtle transitions from the black, not stark contrasts. -
Load the sponge:
Dampen your sea sponge or cosmetic wedge slightly, wring it out well, and dip it into the charcoal grey. Blot most of the paint off onto a paper towel until the sponge is almost dry. -
Sponge on the first layer:
Gently dab the grey sponge onto the middle section of the vase. Keep the pressure light to create a cloudy, uneven texture rather than a solid block of color. -
Add blue depth:
Using a clean section of the sponge (or a new wedge), pick up the dark navy blue. Blot it, then sponge it over parts of the black and parts of the grey, blending the edges softly. -
Refine the fade:
Focus the lighter grey and blue tones towards the center or ‘bulge’ of the vase while keeping the neck and very bottom darker black. This enhances the 3D form. -
Create a highlights zone:
Mix a tiny drop of white into your grey to create a lighter slate color. Very sparingly sponge this into the center of your nebula clouds to create a glow effect. -
Let the atmosphere dry:
Allow these sponge layers to dry fully. If the transitions look too harsh, you can lightly sponge a bit of black back over the edges to soften them.
Level Up: Metallic Orbit
For extra dimension, try mixing a tiny bit of metallic silver or pearlescent medium into your white star mixture for a shimmer that catches the sunlight.
Step 3: The Starfield Sputter
-
Set up a splatter zone:
This step is messy. Ensure your work area is covered with plenty of newspaper, and move any other objects out of the splatter range. -
Mix the star paint:
On your palette, mix titanium white paint with a few drops of water. You are looking for a consistency similar to heavy cream or melted ice cream—fluid enough to fly, but thick enough to stay opaque. -
Load the toothbrush:
Dip the bristles of your stiff toothbrush into the thinned white paint. Tap off any large dripping globs. -
Test your technique:
Hold the toothbrush bristles facing down over a piece of scrap paper. Run your thumb firmly across the bristles to flick the paint. Adjust your water ratio if the dots are too big or too faint. -
Spray the distant stars:
Hold the brush about 10-12 inches away from the vase. Rapidly flick the bristles to create a fine mist of tiny white dots. Rotate the vase to cover all sides evenly. -
Create cluster density:
Move the brush closer (about 6 inches) to specific areas where you sponged the lighter nebula colors. Flick again to create a denser concentration of stars in the loose ‘clouds’ of the galaxy. -
Add major stars manually:
Dip the handle end of a small paintbrush or a toothpick into un-thinned white paint. Gently dot a few larger, distinct stars onto the vase to break up the uniformity of the spray. -
Clean the rim:
If significant splatter landed on the inside rim where you don’t want it, use a damp cloth to wipe it clean before the paint sets.
Step 4: Finishing and Sealing
-
Dry properly:
Let the white speckles dry completely. Since some dots might be thicker, give this at least an hour. -
Seal the artwork:
Take the vase to a well-ventilated area and apply a clear matte spray sealant. This protects the acrylics from scratching and gives the galaxy a unified, finished sheen.
Place your new celestial vessel near a window and watch how the light plays across your personal piece of the universe
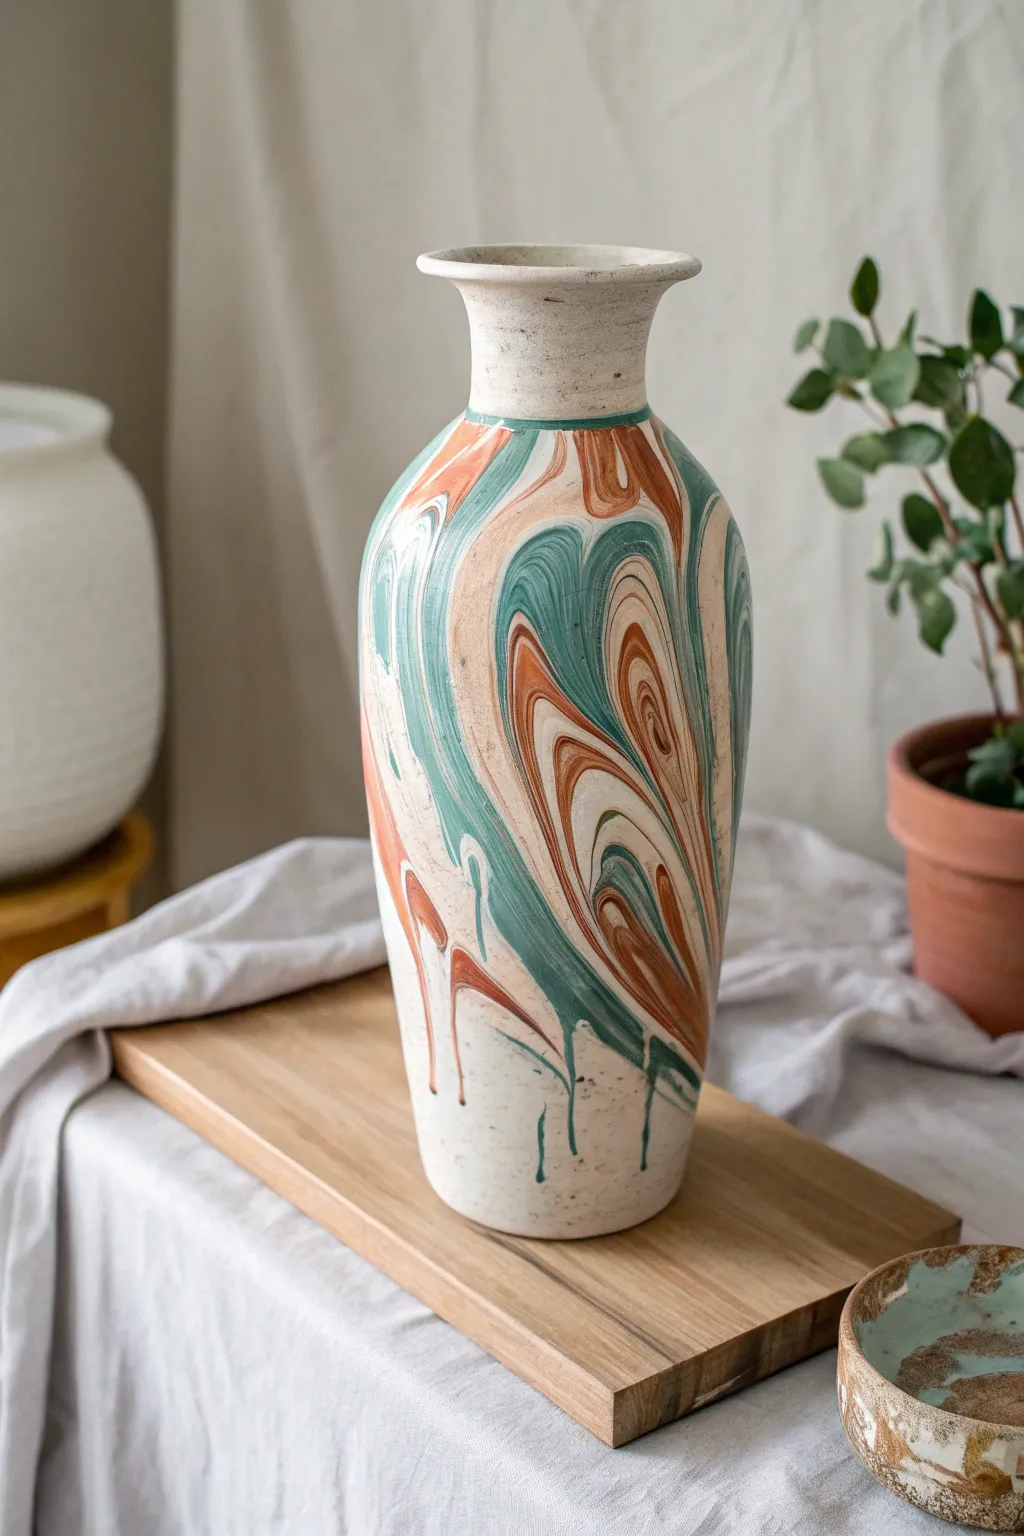
Marbled Swirl With a Controlled Paint Pour

Capture the fluid elegance of agate stones and ocean waves with this mesmerizing controlled pour technique. By carefully layering teal and terracotta acrylics, you’ll transform a plain ceramic vessel into a piece of fluid art that feels both modern and earthy.
Detailed Instructions
Materials
- Tall bisque or matte glazed ceramic vase (white or cream base)
- Acrylic pouring medium
- Acrylic paints: Teal/Aqua, Terracotta/Burnt Orange, White, Beige
- Plastic cups (one for each color, one for the dirty pour)
- Craft sticks for stirring
- Painter’s tape
- Large drip tray or cardboard box
- Raised support (can or jar to hold vase up)
- Clear acrylic sealer spray (satin finish)
Step 1: Preparation & Mixing
-
Clean surface:
Begin by wiping down your vase with a damp cloth to remove any dust or oils, ensuring the paint adheres properly. -
Tape the neck:
Since we want the top neck of the vase to remain unpainted and speckled like the original image, wrap painter’s tape tightly around the neck where the curve begins to widen. -
Set up the station:
Place your raised support (like an old coffee can) inside your drip tray. Balance the vase upside down if painting the bottom, or upright if pouring from the top—for this specific look, standing it upright is best so the drips flow naturally downward. -
Mix pouring medium:
In separate cups, mix your acrylic paints with the pouring medium. Follow the bottle instructions, but a 1:1 ratio is standard. You want a consistency like warm honey—fluid enough to run, but thick enough to hold color separation. -
Check consistency:
Lift your stirring stick; the paint should flow off in a continuous stream without breaking. If it’s too thick, add a tiny drop of water.
Cell Creation Tip
Want more separation between colors? Add 1-2 drops of silicone oil to your paint cups before layering them. This creates distinct ‘cells’ or circles within the swirls.
Step 2: The ‘Dirty Pour’ Technique
-
Layer the cup:
Take a clean, empty cup. Pour a small amount of white into the bottom. Gently layer the other colors on top—teal next, then a splash of terracotta, then beige. Do not stir. -
building layers:
Repeat the layering process until the cup is about half full. Pour gently down the side of the cup to prevent the colors from muddling together too much. -
The initial pour:
Hold the cup just below the taped line on the vase. Tilting the vase slightly, begin pouring the paint slowly in a controlled stream onto the shoulder of the vase. -
Creating the swirl:
As you pour, rotate the vase slowly. Wiggle your wrist slightly while pouring to create the wavy, agate-like striations seen in the reference photo. -
Directing flow:
Let gravity do the work. The paint will naturally slide down the sides. If you see a large gap, add a small direct pour of teal or terracotta to fill it. -
Managing drips:
Allow the paint to run all the way down. The reference image shows uneven drips near the bottom; stop pouring before the vase is fully coated if you want that exposed clay look at the base. -
Touch-ups:
Use a craft stick to catch any drips that look like they might run off the bottom edge completely, or to gently guide a swirl that isn’t moving fast enough.
Speckle Effect
If your base vase isn’t naturally speckled, flick a toothbrush loaded with diluted brown paint onto the dry, unpainted clay areas for that faux-stoneware finish.
Step 3: Finishing Touches
-
Remove tape:
Carefully peel off the painter’s tape while the paint is still wet. This prevents the paint from peeling up with the tape later. -
Clean the edge:
I find that a damp Q-tip works perfectly here to clean up the line where the paint meets the exposed clay, ensuring a crisp transition. -
Initial dry:
Let the vase sit undisturbed for at least 24 hours. Acrylic pours are thick and take longer to dry than standard painting. -
Check hardness:
Touch an inconspicuous area near the bottom. If it’s tacky, give it another 12 hours. -
Seal the work:
Once fully cured, take the vase not a well-ventilated area and spray it with a satin acrylic sealer. This protects the finish and unifies the sheen.
Now step back and admire the unique geology you’ve created right on your tabletop
Raised 3D Clay Lines Painted for Textural Pop
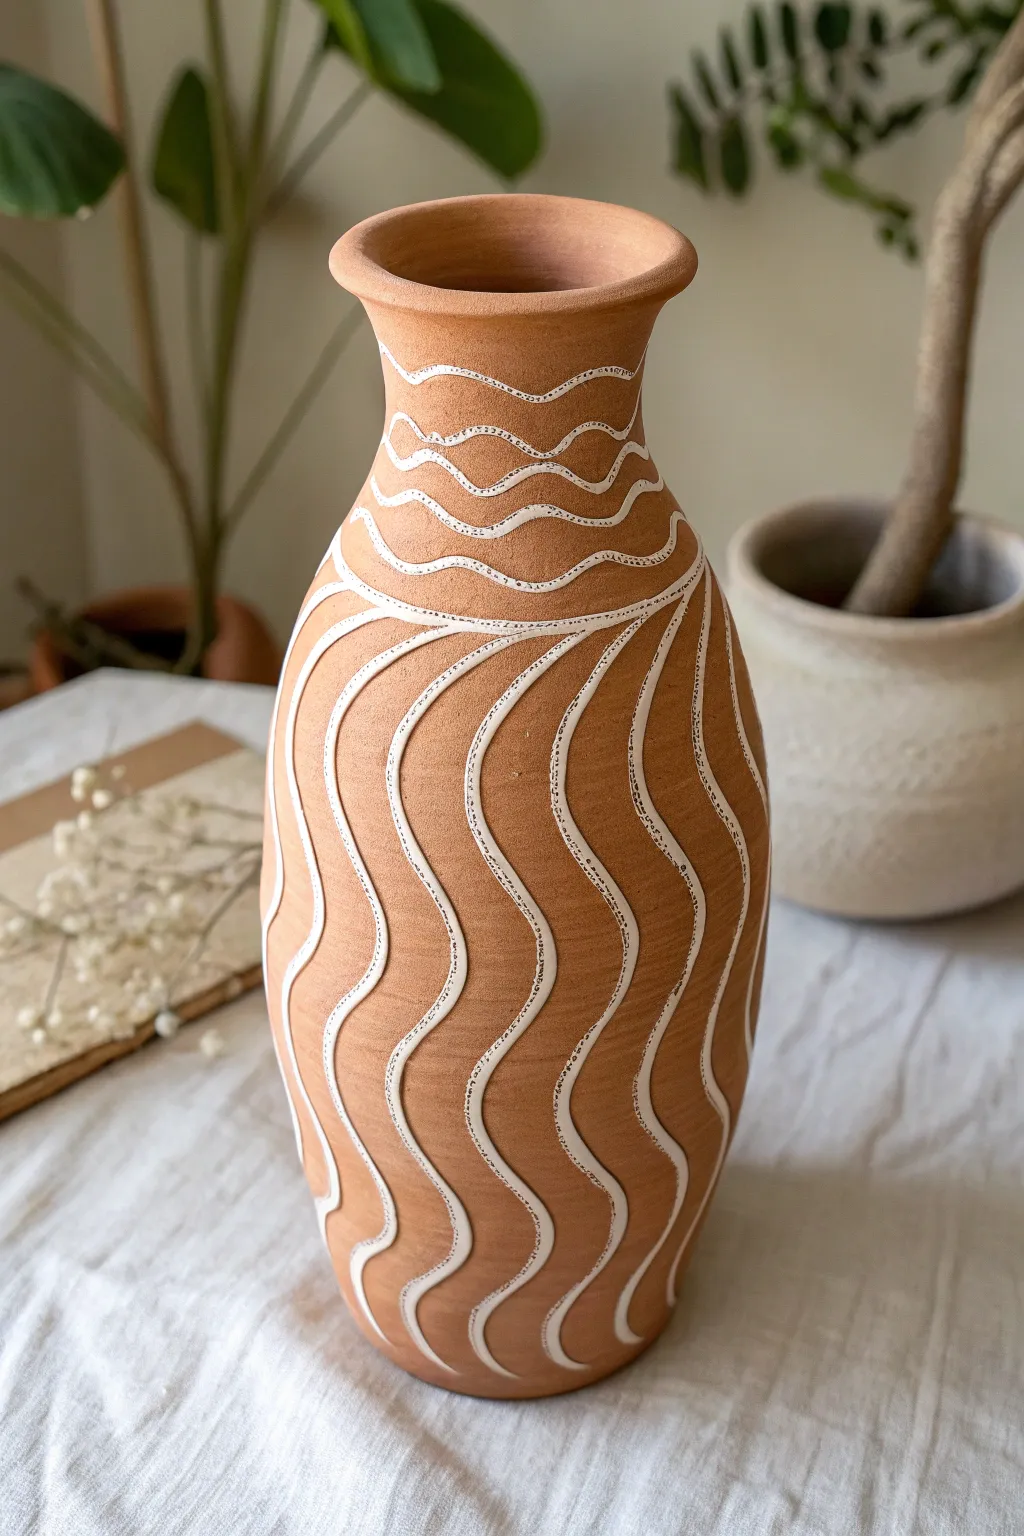
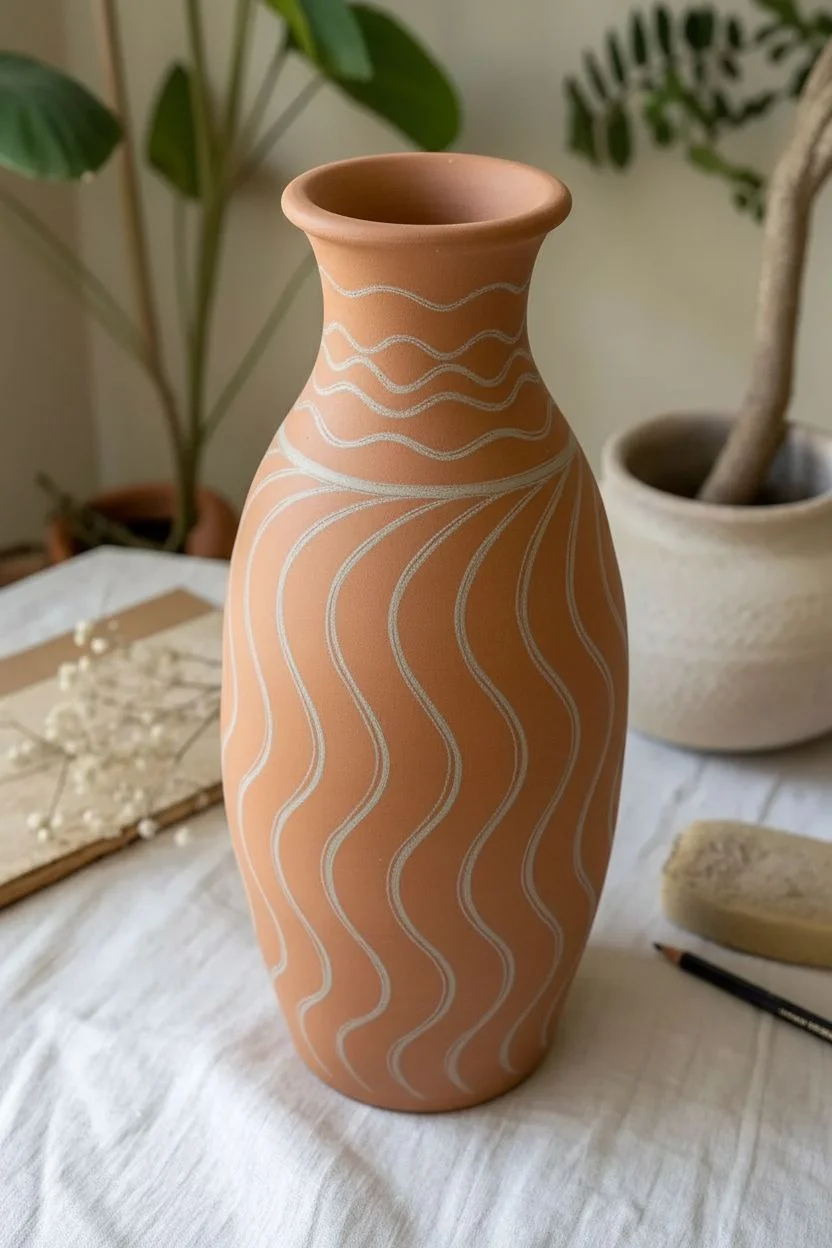
Elegance meets texture in this stunning project that transforms a simple terracotta vase into a tactile work of art. Using a technique called slip trailing (or a clever faux-piping alternative), you will create raised, rhythmic white lines that dance across the warm clay surface.
How-To Guide
Materials
- Bisque-fired terracotta vase (clean and dust-free)
- White ceramic slip (thick consistency) OR white dimensional fabric paint (for a no-fire option)
- Slip trailer bottle with fine tip nozzle OR fine-tip piping bag
- Pencil
- Damp sponge
- Q-tips or small clean-up tool
- Clear matte sealant spray (if using non-fired materials)
Step 1: Preparation & Planning
-
Clean surface:
Begin by wiping down your terracotta vase with a slightly damp sponge. This removes any dust that might prevent your design from adhering properly. -
Plan the neck design:
Using a pencil, lightly sketch horizontal wavy lines around the neck of the vase. You don’t need to be perfect here; these are just guide rails. -
Plan the body design:
Sketch long, vertical S-curves flowing from the shoulder down to the base. Space them somewhat evenly, creating a rhythmic, rippled effect. -
Prepare the medium:
Fill your slip trailer bottle with thick white slip. If you are doing a non-fired version, prepare your dimensional puffy paint or relief paste. -
Test the flow:
Squeeze a test line onto a scrap piece of paper or cardboard. You want a steady, even flow without air bubbles, similar to icing a cake.
Steady Hands
Rest your elbow on the table and use your pinky finger against the vase itself as a stabilizer while you pipe the long vertical lines.
Step 2: Piping the Texture
-
Start at the neck:
Beginning at the top rim, gently squeeze the bottle to trace your first horizontal wavy line. Keep your hand steady and move at a consistent speed. -
Maintain pressure:
Continue adding the horizontal waves down the neck. The key is consistent pressure on the bottle to ensure the line width stays uniform. -
Create the visual break:
At the shoulder of the vase (where the neck meets the body), pipe a distinct double line or a slightly thicker border to separate the two patterns. -
Begin the body curves:
Start piping the vertical curves. I find it easiest to start at the top of a line and pull the bottle downward towards my body. -
Work in sections:
Rotate the vase carefully as you complete each vertical line. Be mindful not to smudge the wet lines you’ve already completed on the other side. -
Check line quality:
Look closely at your lines. They should be raised and rounded. If a line looks flat, you can carefully pipe a second layer over it while wet, though doing it in one pass is better.
Step 3: Refining & Finishing
-
Clean up mistakes:
If a line goes rogue, use a damp Q-tip or a small clay tool to wipe it away immediately. Let the spot dry for a second before re-piping. -
Initial drying:
Allow the vase to sit undisturbed. If using real clay slip, let it dry to bone dry state. If using dimensional paint, wait at least 24 hours. -
Smoothing (Clay method only):
Once the slip is bone dry, you can very gently rub high spots with a fine fingertip to knock down any sharp peaks, but be careful not to break the delicate lines. -
Firing (Clay method only):
Fire the vase in a kiln according to the clay and slip specifications. Usually, a low-fire bisque is sufficient for terracotta. -
Sealing (Paint method only):
If you used dimensional paint, take the vase outside and spray a light coat of clear matte sealant to protect the design and unify the sheen.
Clogged Nozzle?
If the flow stops, don’t squeeze harder or it might explode. Use a thin sewing needle or wire to clear the tip blockage, then resume.
Place your finished vase near a window where the natural light can cast shadows on the raised lines, emphasizing the beautiful texture you created


Have a question or want to share your own experience? I'd love to hear from you in the comments below!