A clear phone case is basically a tiny, glossy canvas that lets your phone color shine through as part of the design. I love how reverse painting on clear plastic gives you crisp, protected artwork that still feels light and minimal.
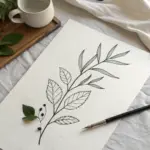
Tiny Daisies Scattered Pattern
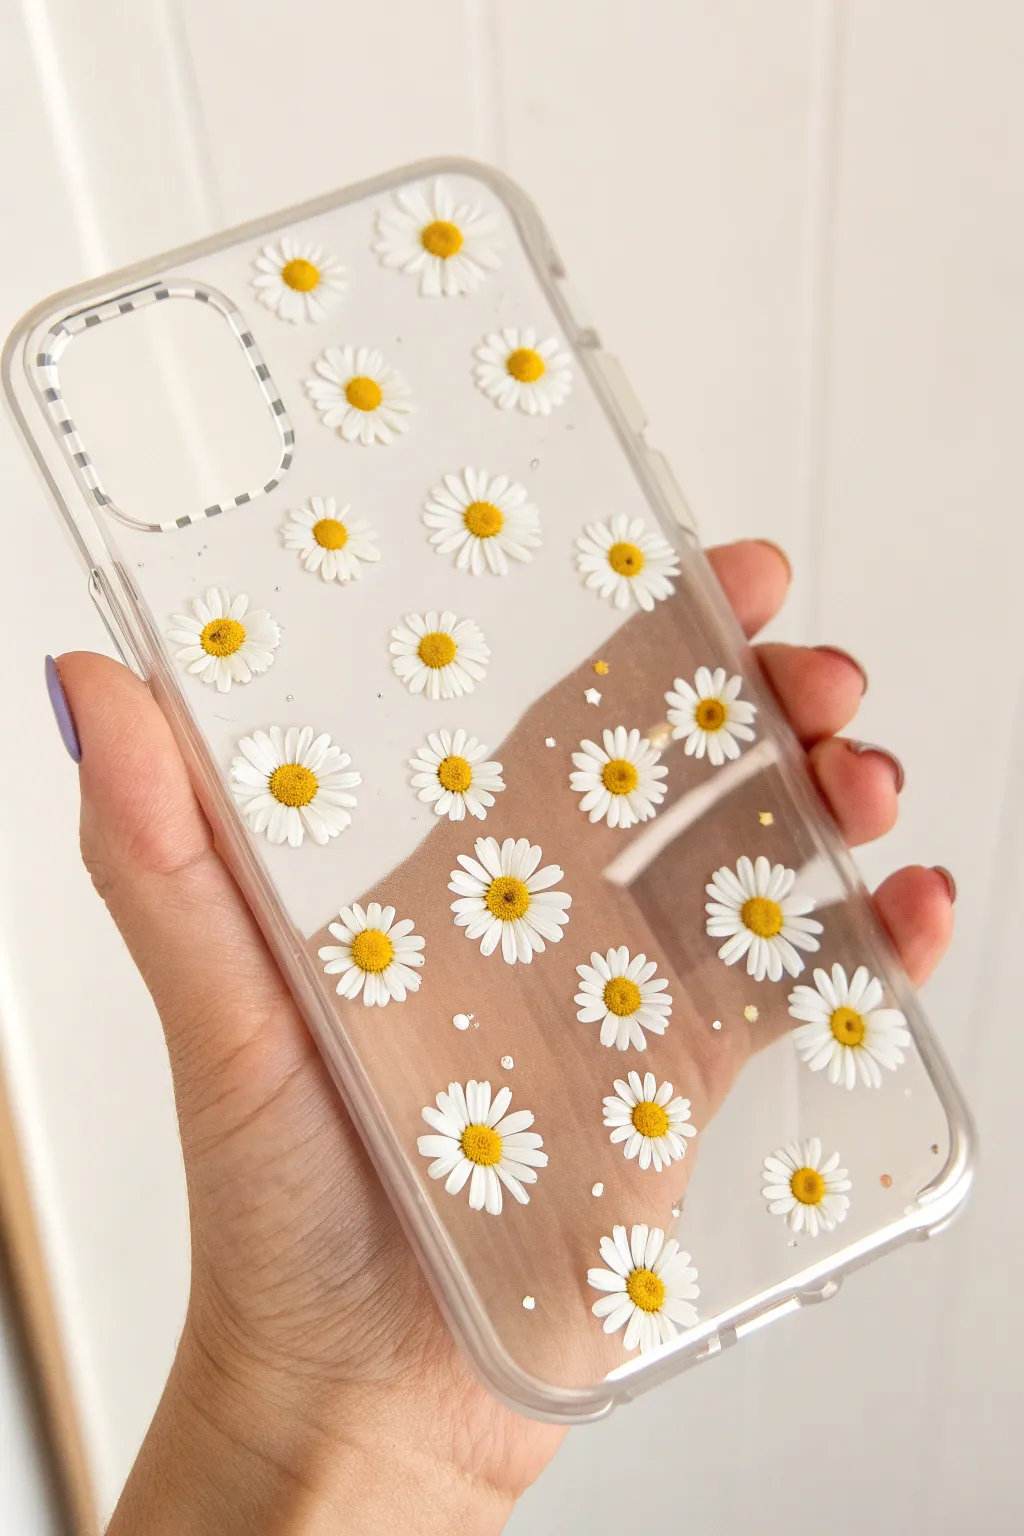
Transform a plain clear phone case into a blooming cottagecore accessory with this delicate scattered daisy pattern. The tiny white petals and bright yellow centers create a fresh, airy look that lets your phone’s original color peek through.
How-To Guide
Materials
- Clear, hard plastic phone case
- White acrylic paint (high opacity)
- Yellow ochre or golden yellow acrylic paint
- Fine tip detail brush (size 0 or 00)
- Dotting tool or toothpick
- Rubbing alcohol and cotton pad
- Clear resin or spray-on clear sealant (glossy finish)
- Palette or small dish
Step 1: Preparation & Planning
-
Clean the surface:
Before you begin, wipe down the exterior of your clear case thoroughly with rubbing alcohol on a cotton pad. This removes any finger oils or dust that could prevent the paint from adhering properly. -
Visualize the layout:
Hold the case up to your phone to see where the logo or camera bump sits. You’ll want to plan your flower placement so you don’t paint directly over the Apple logo if you prefer it visible, though covering it is fine too.
Step 2: Painting the Petals
-
Load your brush:
Squeeze a small amount of white acrylic paint onto your palette. You want a heavy-body paint if possible, so it covers well in one coat. Dip your fine detail brush in, ensuring the tip is sharp and not overloaded. -
Paint the first flower center reference:
Instead of painting the yellow center first, I like to visualize a tiny invisible dot where the center will be. This helps guide your petal placement. -
Create the first petal:
Press the tip of your brush down gently and pull it slightly outward to create a small, teardrop or oval shape. These daisies have slender, distinct petals, so keep your strokes thin. -
Complete the circle:
Continue painting petals around your imaginary center point. Aim for about 12-15 thin petals per flower for a realistic daisy look, leaving a small empty space in the middle. -
Scatter the blooms:
Repeat this process across the case. Vary the rotation of the flowers slightly so they don’t look like a uniform grid. Place some near the edges appearing to fall off the side for a natural effect. -
Check for opacity:
Once your white petals are dry (acrylics dry fast, usually within 10-15 minutes), check if they are solid white. If they look streaky or transparent, carefully apply a second coat over the existing petals.
Fixing Mistakes
Smudged a petal? Don’t wipe it while wet! Let the mistake dry completely, then gently scratch it off with a wooden toothpick or fingernail without damaging the plastic case underneath.
Step 3: Adding the Centers
-
Prepare the yellow paint:
Clean your brush or switch to a dotting tool. Use a sunny yellow ochre shade rather than a neon yellow for a more natural, wildflower aesthetic. -
Dot the centers:
Dip your tool into the yellow paint and gently press a dot into the center of each white flower ring. The dot should be large enough to touch the base of the petals. -
Add texture detail:
For extra realism, take a clean toothpick and gently stipple tiny texture dots into the wet yellow paint, or add a microscopic dot of darker orange on one side of the yellow center to create shadow. -
Let it cure:
Allow the paint to fully dry for at least one hour. It must be completely hard to the touch before sealing.
Add Some Sparkle
Before your final sealant layer dries, sprinkle a pinch of ultra-fine iridescent glitter over the spaces between the flowers to give the case a magical, morning-dew shimmer.
Step 4: Sealing the Artwork
-
Choosing a sealant:
Acrylic paint on plastic is prone to scratching, so sealing is mandatory. A thin layer of UV resin is most durable, but a clear gloss spray sealant works for a simpler finish. -
Applying resin (Option A):
If using resin, pour a small amount over the back of the case and spread it to the edges with a silicone brush or stick. Ensure it covers all painted areas evenly. -
Curing resin:
Place the case under a UV lamp for 2-3 minutes or in direct bright sunlight until the finish is hard and tack-free. -
Applying spray (Option B):
If using spray sealant, take the case to a well-ventilated area. Hold the can 8-10 inches away and apply two thin, even coats, letting them dry completely in between. -
Final dry time:
Let the case sit undisturbed for 24 hours to ensure the chemical bond is strong before snapping it onto your phone.
Enjoy your lovely new floral accessory that brings a touch of spring to your everyday tech


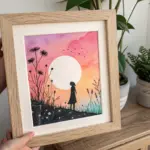
Simple Wildflower Bouquet Corner
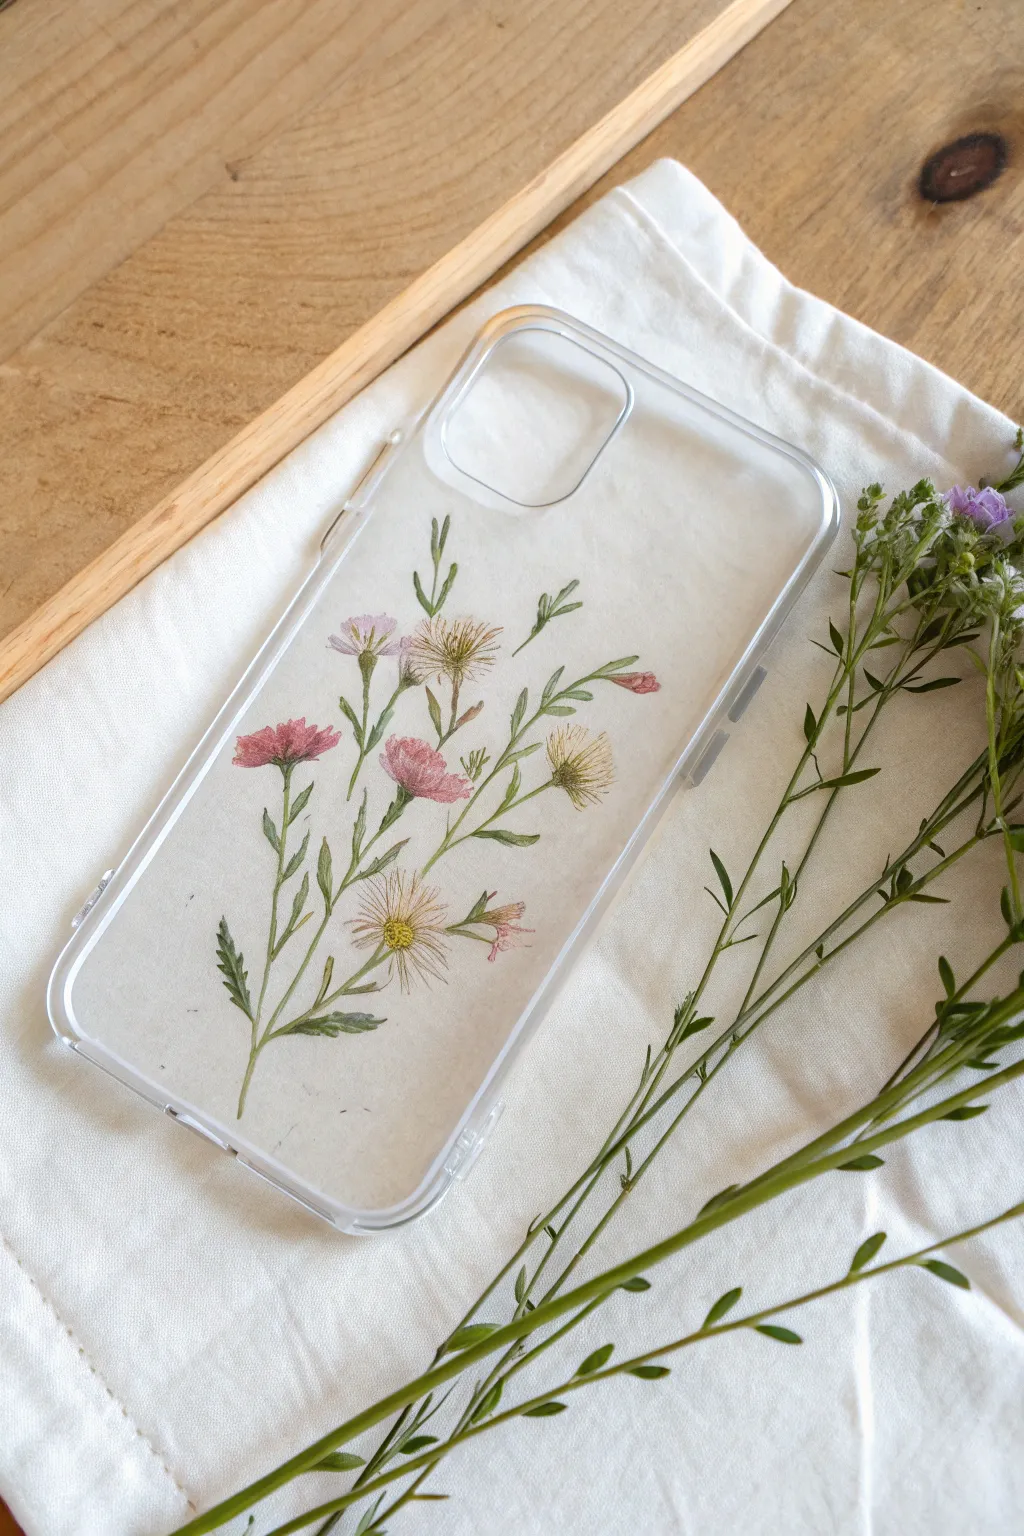
Capture the delicate beauty of a meadow with this elegant phone case project. Instead of painting directly on plastic, you’ll create a removable watercolor cardstock insert that features fine stems and blushing blooms, giving your device a soft, botanical touch.
Step-by-Step
Materials
- Clear transparent phone case (compatible with your specific phone model)
- Heavyweight watercolor paper or mixed media cardstock
- Pencil
- Scissors or craft knife
- Fine liner pens (sepia or dark green, 0.05mm and 0.1mm)
- Watercolor paints (shades of sap green, olive, blush pink, mauve, warm yellow)
- Small round detail brushes (size 0 and 2)
- Mixing palette
- Paper towels
Step 1: Preparation & Drawing
-
Trace the template:
Place your phone case face down on the watercolor paper. Use a pencil to lightly trace the outer shape of the case, ensuring you also trace the camera hole cutout accurately. -
Cut the shape:
Carefully cut out the paper shape. I find it helpful to cut slightly inside the pencil line so the paper fits easily inside the case walls without buckling. -
Test the fit:
Slip the blank paper cutout into your clear case and snap it onto your phone. Check for any edges that need trimming, especially around the camera lens, then remove it for painting. -
Sketch the composition:
With the paper flat, lightly sketch a central stem structure. Aim for a diagonal composition that flows from the bottom left toward the top right, leaving some negative space around the edges.
Keep it sheer
Add more water to your paint than usual. Translucent, watery layers look more delicate and ‘wildflower-like’ than thick opaque paint.
Step 2: Painting the Greenery
-
Mix your greens:
Prepare two shades of green on your palette: a lighter yellow-green for new growth and a deeper olive for the main stems. -
Paint main stems:
Using your size 0 brush, paint the primary stems with the olive mix. intricate, thin lines are key here, so use the very tip of the brush and barely touch the paper. -
Add leaves:
While the stems are damp, add small, slender leaves using the lighter green. Press the brush belly down slightly and lift up to create a tapered point. -
Vary direction:
Ensure the leaves and small offshoot stems point in different directions—some reaching up, some delicately drooping—to mimic the natural chaos of wildflowers.
Step 3: Adding the Blooms
-
Paint base pinks:
Dilute a blush pink so it is very watery. Paint small, organic blotches where you want the larger flower heads to sit. They don’t need to be perfect circles; rough edges are better. -
Add darker buds:
Mix a slightly more saturated mauve or dark pink. Add tiny dots or tear-drop shapes near the tops of thinner stems to represent unbloomed buds. -
Create texture:
Once the pink base is semi-dry, use a slightly drier brush to dab darker pink center lines or petals on the main flowers to give them dimension. -
Golden centers:
Drop a tiny speck of warm yellow or ochre into the center of the open flowers. Let the yellow bleed slightly into the pink for a soft, watercolor look. -
Dry completely:
Allow the painting to dry fully. If you rush this part, the fine liner step will bleed into the damp fibrous paper.
Wrinkled paper?
If the watercolor warps your paper insert, place it under a heavy book overnight once it is completely dry to flatten it before casing.
Step 4: Fine Details & Assembly
-
Outline with ink:
Using a 0.05mm sepia or dark green pen, loosely outline parts of the leaves and stems. Don’t trace every line perfectly; broken, sketchy lines add artistic character. -
Detail the petals:
Add very fine strokes to the flower petals, radiating from the yellow centers outward. This defines the individual petals within the watercolor wash. -
Add textures:
Use the pen to add tiny spikes or fuzz to the centers of the flowers (like thistles or asters) to give them that distinct wildflower appearance. -
Final check:
Erase any visible pencil marks from your initial sketch, being careful not to smudge the ink. -
Install:
Place the artwork facing out inside your clear case and snap your phone in. The phone holds the paper in place, protecting your miniature painting.
Enjoy carrying a little piece of the garden with you wherever you go


Lavender Sprigs in Clean Rows
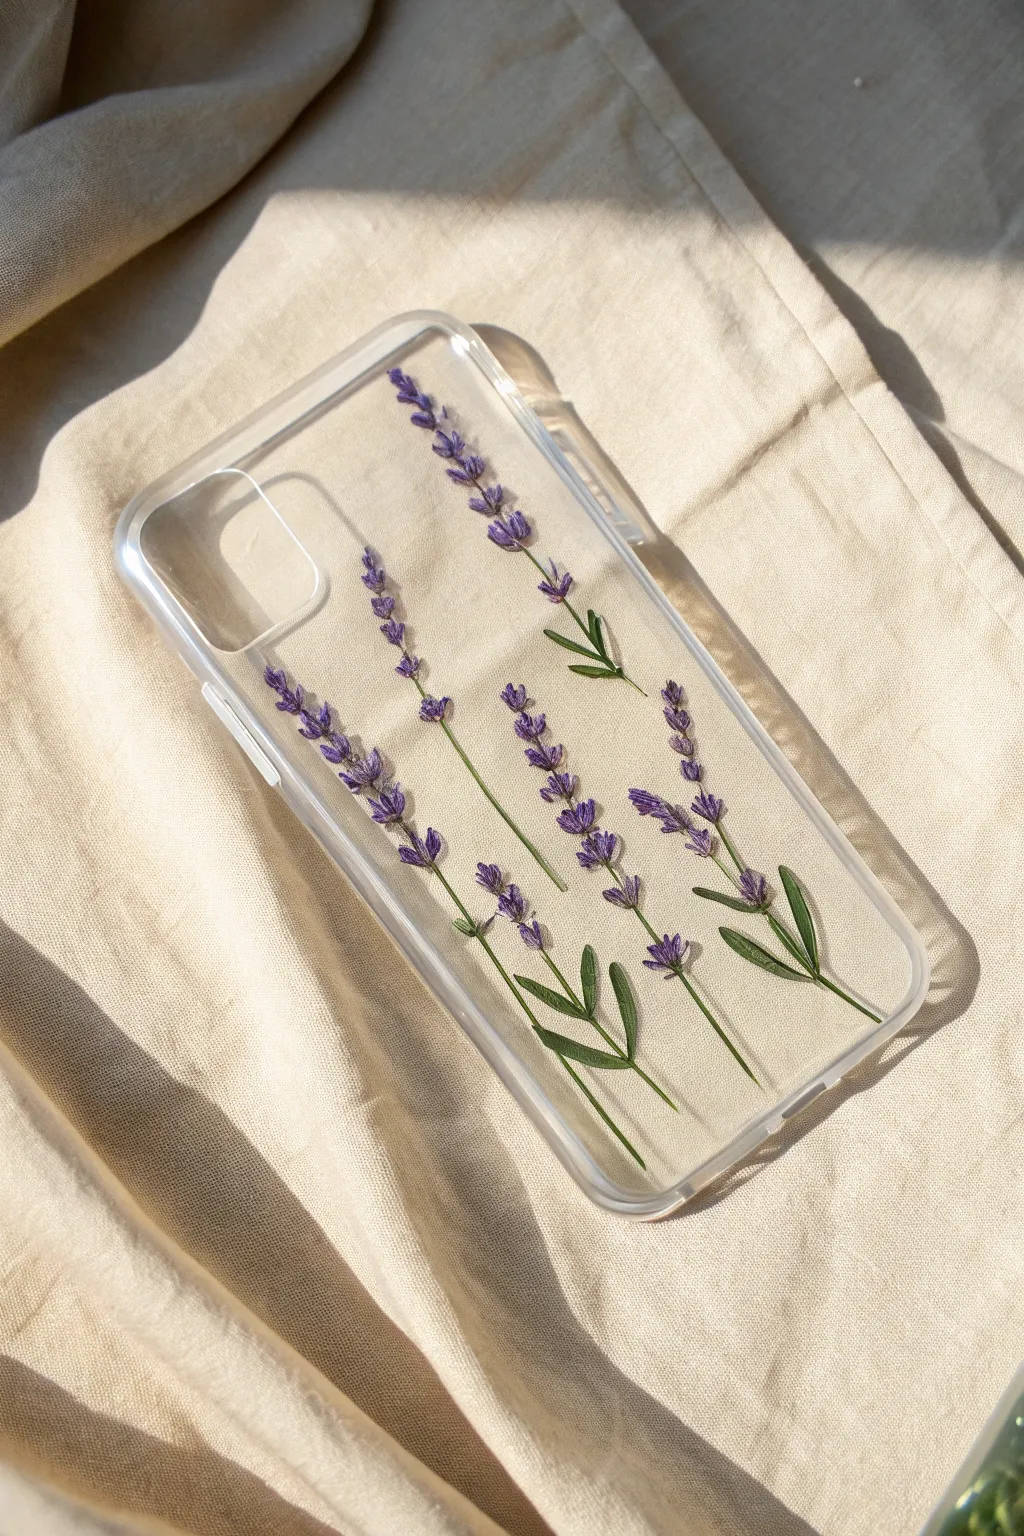
Bring the calming beauty of a summer garden to your everyday tech with this delicate lavender phone case. By embedding real pressed flowers into resin, you create a timeless botanical accessory that looks like a miniature herbarium.
How-To Guide
Materials
- Clear hard-shell phone case
- Dried, pressed lavender sprigs
- Two-part clear casting resin (epoxy)
- Small mixing cups and wooden stir sticks
- Tweezers
- Disposable gloves
- Scissors
Step 1: Preparation
-
Clean the surface:
Before you begin, wipe down the back of your clear phone case with rubbing alcohol. This removes oils or fingerprints that could cloud your resin finish. -
Assess your flowers:
Lay out your pressed lavender sprigs on a clean paper towel. Check that they are completely flat and dry; any moisture trapped inside will eventually rot and turn brown. -
Dry styling:
Place the case face down on your work surface. Arrange the dry lavender sprigs on top of it to finalize your composition. The goal is five distinct vertical stems, varying slightly in height. -
Trim the stems:
Using small scissors, trim the lavender stems so they fit perfectly within the flat back panel of the case. Ensure no leaves or petals hang over the curved edges or the camera hole.
Flatness is Key
If your lavender is too bulky, sandwich it between wax paper and heavy books for another week. Flat flowers prevent bumps in the final resin surface.
Step 2: Applying the First Layer
-
Mix the resin:
Put on your gloves and mix a small amount of two-part resin according to the package instructions. Stir slowly to minimize bubbles. -
Pour the base coat:
Pour a very thin layer of resin onto the center of the case back. Use your stir stick to spread it evenly toward the edges, creating a sticky base for the flowers. -
Pop bubbles:
Wait a minute or two for air bubbles to rise, then gently breathe on the surface (the CO2 helps pop them) or use a lighter held at a distance.
Add Subtle Sparkle
Mix a tiny pinch of iridescent fine glitter or crushed gold leaf into the final resin pour for a magical, shimmering finish.
Step 3: Embedding the Botanicals
-
Place the first sprig:
Using tweezers, carefully pick up your first lavender stem. I like to start with the central sprig to establish the spacing. -
Press down gently:
Lay the sprig into the wet resin. Tap it gently with the end of your tweezers to ensure the entire flower is making contact with the resin. -
Position remaining sprigs:
Place the other four sprigs, two on either side of the center. Aim for a ‘clean row’ aesthetic by keeping the stems relatively parallel. -
Adjust the leaves:
Use a toothpick to gently nudge any tiny leaves so they lie flat. If a leaf is sticking up, it will poke through the final surface. -
Initial cure:
Let this layer set for a few hours until it reaches a ‘tacky’ gel state. This prevents the flowers from floating up when you pour the final coat.
Step 4: Sealing the Artwork
-
Mix the second batch:
Mix a second small batch of clear resin. This layer needs to be just thick enough to fully submerge the lavender buds. -
Pour the top coat:
Slowly pour the resin directly over the flowers. Start in the middle and carefully push the liquid outward to the edges. -
Edge maintenance:
Be extremely careful near the camera opening and side edges. Use a toothpick to guide resin precisely to the rim without letting it drip over the sides. -
Final bubble check:
Check closely around the intricate texture of the lavender buds, as air likes to get trapped there. Pop any stubborn bubbles immediately. -
Dust cover:
Cover the case with a clean box or plastic container to protect it from dust while it cures. -
Complete cure:
Allow the case to cure completely for 24 to 48 hours in a warm, dry room before putting it on your phone.
Enjoy carrying a piece of nature with you wherever you go


Sunflower Half-Bloom on the Edge
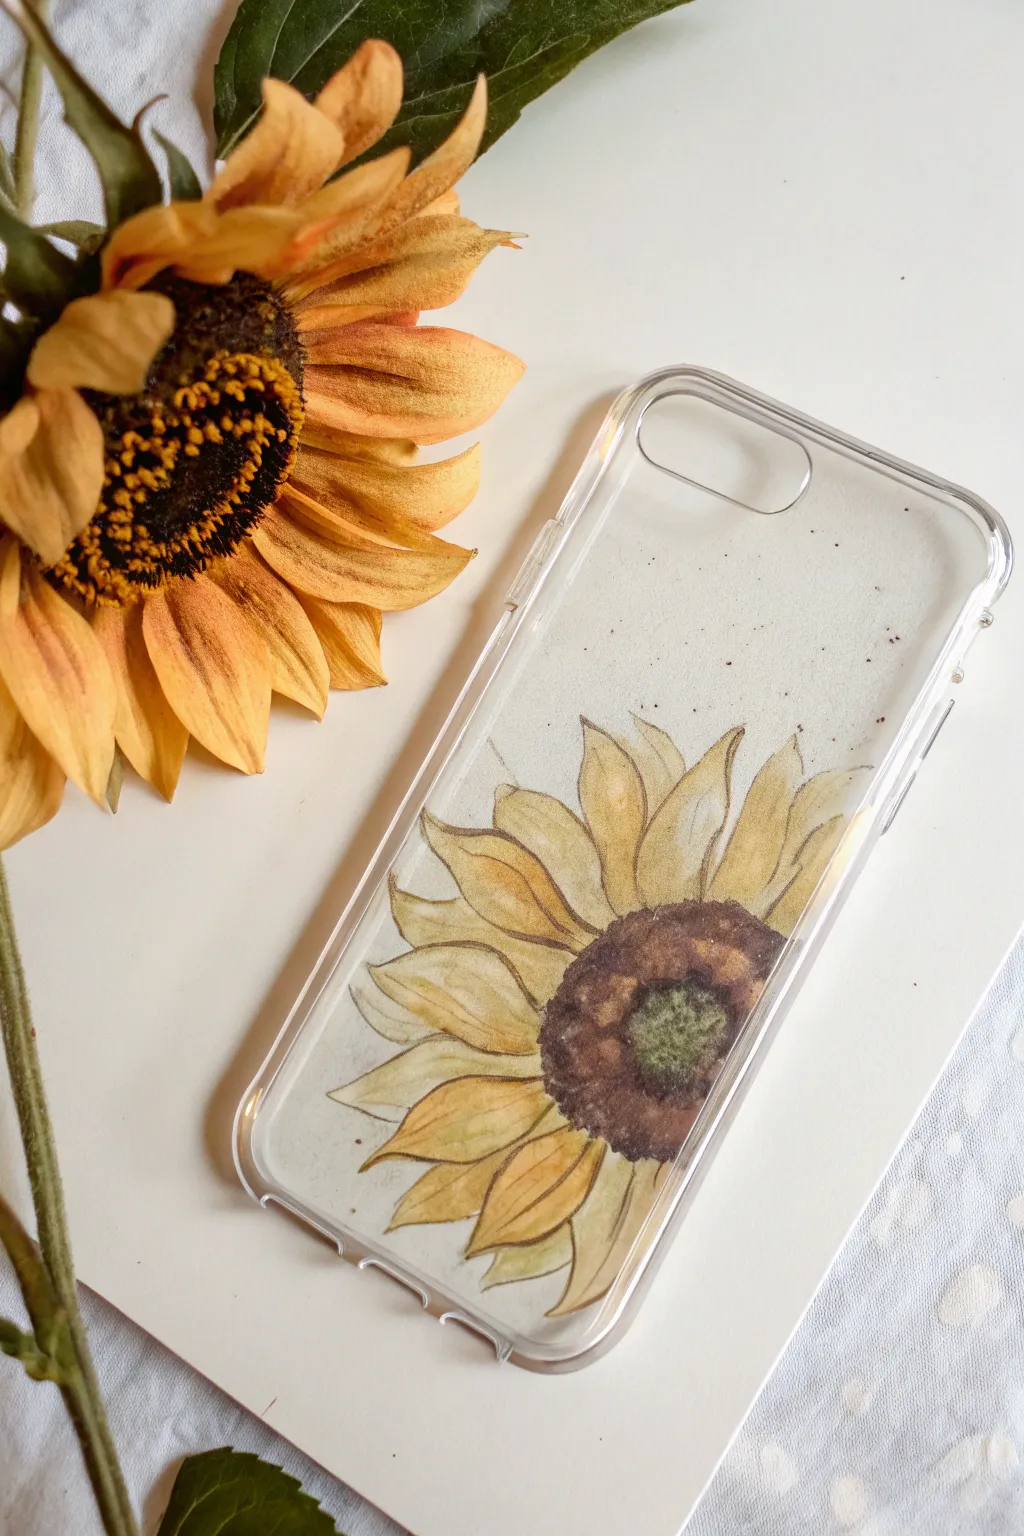
Capture the warmth of a late summer day with this delicate, hand-painted sunflower insert. Because the design is painted on watercolor paper and placed inside the clear case, you can swap it out whenever the seasons change without damaging your phone case.
Detailed Instructions
Materials
- High-quality watercolor paper (cold press creates nice texture)
- Clear phone case
- Pencil and eraser
- Watercolor paints (Yellow Ochre, Burnt Sienna, Lemon Yellow, Sap Green, Burnt Umber)
- Small round brushes (sizes 0 and 2)
- Scissors or a craft knife
- Fine-liner pen (brown or sepia, archival ink)
- Cup of water and paper towels
Step 1: Preparing the Canvas
-
Trace the Shape:
Place your clear phone case face-down onto your watercolor paper. Using a pencil, lightly trace around the outside edge of the case. Don’t forget to trace the camera hole opening as well, which will help you position your flower composition later. -
Cut the Template:
Carefully cut out the paper shape you just traced. You will likely need to trim it down slightly further—about 1-2 millimeters on all sides—so it fits snugly inside the case rather than sitting on the rim. Test the fit often until it lies completely flat inside the plastic shell. -
Sketch the Composition:
Lightly sketch a large half-circle shape near the bottom right edge of the paper template. This will be the brown center of your sunflower. Sketch radiating petals extending outward and upward, ensuring some of them go off the edge of the paper for a natural, cropped look.
Prevent Smudging
If you used a water-soluble marker for outlines, seal the paper with a light mist of matte spray fixative before putting it in the case to prevent humidity transfer.
Step 2: Painting the Petals
-
Base Layer:
Mix a watery wash of Lemon Yellow and paint the entire surface of each petal. Keep this layer very light and transparent to let the paper’s texture show through. I like to let this dry completely before moving on so the colors don’t muddy. -
Building Warmth:
Load a size 2 brush with Yellow Ochre. While the paper is dry, paint streaks starting from the base of the petal (nearest the center) and flicking outward towards the tip. This creates depth and simulates the natural grooves of the flower. -
Shadow Accents:
Mix a tiny amount of Burnt Sienna into your yellow. Paint thin lines along the bottom edges of the petals where they overlap with one another. This separation makes the flower look three-dimensional rather than flat. -
Softening Edges:
Dip a clean brush in water and gently run it along the hard edges of your darker yellow strokes. This ‘bleed’ technique softens the lines, giving that classic dreamy watercolor effect.
Add Some sparkle
Once the watercolor is dry, add tiny touches of metallic gold paint to the center of the sunflower or the edges of the petals for a subtle shimmer in sunlight.
Step 3: The Center & Details
-
Center Base:
Paint the half-circle center with a wash of Burnt Umber. Keep the center-most point slightly lighter or leave a small patch of green (Sap Green mixed with brown) to represent the florets that haven’t opened yet. -
Adding Texture:
Once the brown base is damp but not soaking wet, dot concentrated dark brown or black paint around the outer rim of the center circle. Let these dots bleed slightly into the lighter center for a fuzzy, organic texture. -
Defining Outlines:
Wait for the paint to be bone dry. Using a very fine sepia or brown pen (or a size 0 brush with concentrated paint), loosely outline the petals. Avoid a continuous rigid line; keep your hand shaky and broken to mimic the fragile edges of dried petals. -
Final Splatters:
Load a brush with watered-down brown paint. Hold it over the paper and tap the handle against another brush to create tiny speckles across the white space. This fills the void and adds an artistic, sketchbook vibe. -
Assembly:
Ensure the artwork is 100% dry to prevent any mold or sticking. Place the paper painting-side down into the clear case, then snap your phone in to hold it securely in place.
Now you have a custom piece of botanical art you can carry with you everywhere you go
BRUSH GUIDE
The Right Brush for Every Stroke
From clean lines to bold texture — master brush choice, stroke control, and essential techniques.
Explore the Full Guide
Minimal Butterflies Floating
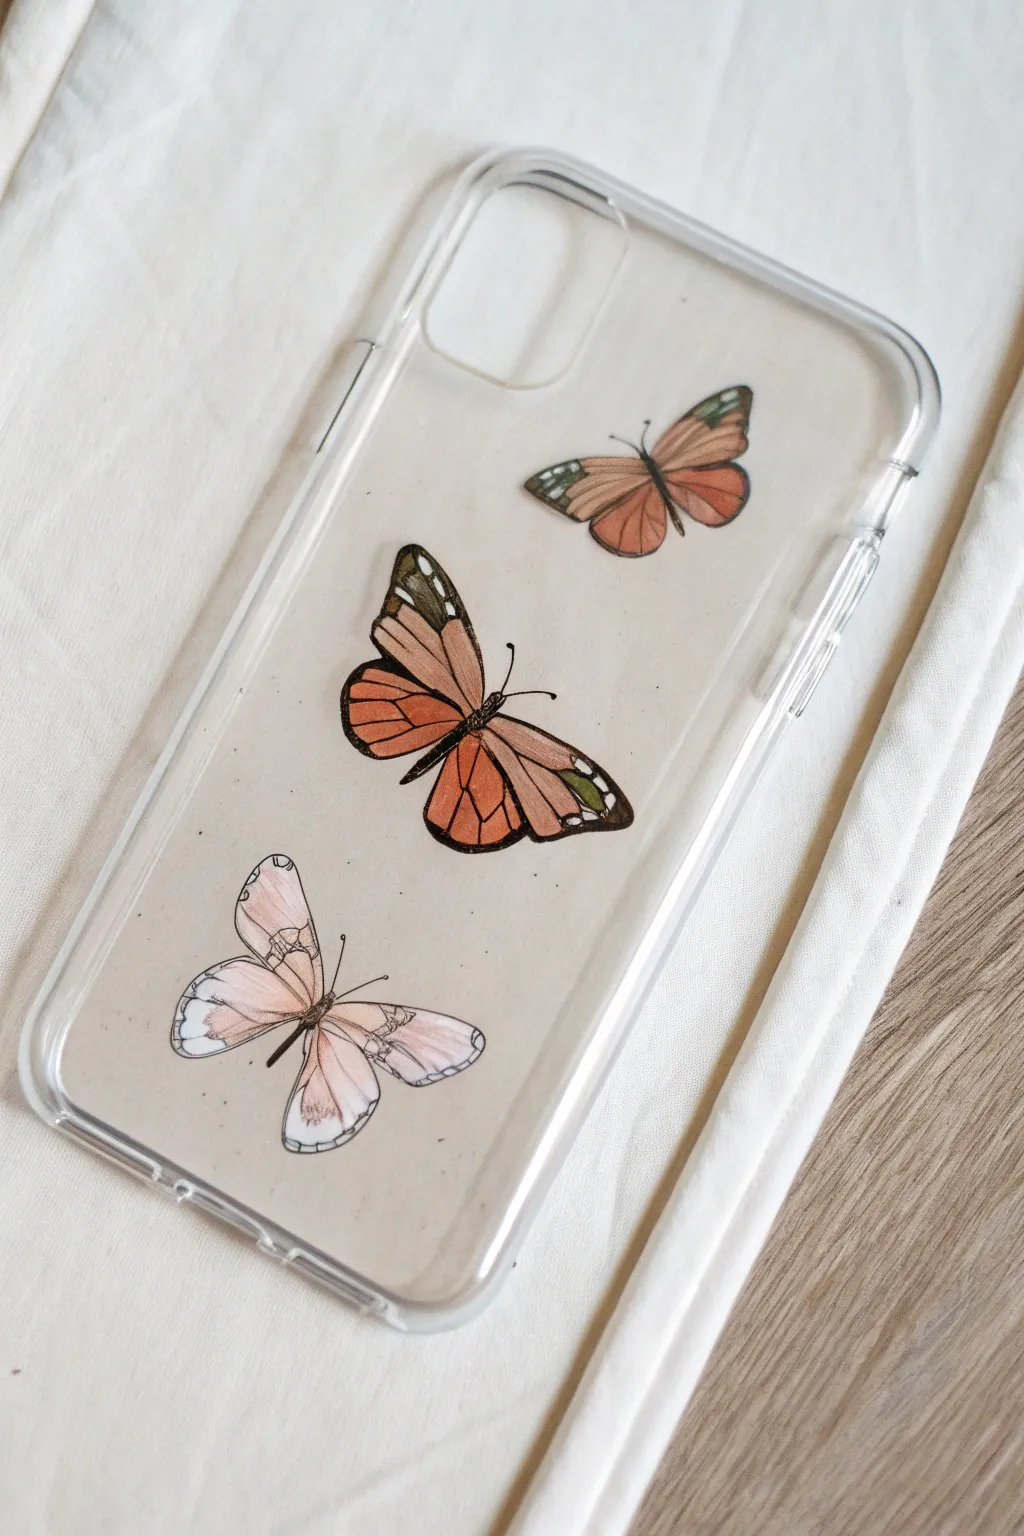
Transform your clear case with this delicate, nature-inspired butterfly trio. By painting on a paper insert rather than the plastic itself, you achieve a soft, textured look that can be swapped out whenever your mood changes.
Step-by-Step
Materials
- Clear phone case
- Thick sketching paper or mixed media paper (light beige or cream)
- Pencil and eraser
- Fine liner pen (black, waterproof, 0.1mm or 0.3mm)
- Colored pencils (muted orange, terracotta, peach, white, olive green)
- Scissors or craft knife
- White gel pen (optional for highlights)
Step 1: Preparation & Template
-
Trace your template:
Remove your phone from its case. Place the clear case face down on your sheet of beige sketching paper. -
Outline the shape:
Using a pencil, lightly trace roughly around the outside of the case. This gives you a general size guide, but you’ll need to trim it down later to fit the *inside*. -
Mark the camera hole:
Don’t forget to trace the camera opening at the top corner so you know exactly where to avoid placing your illustrations.
Smudge Prevention
If your hand smudges the pencil drawings while you work, place a scrap piece of paper under your drawing hand to protect the artwork.
Step 2: Sketching the Butterflies
-
Position the first butterfly:
Start with the topmost butterfly, placing it to the right of the camera hole. Sketch a small, angled oval body and two triangular wings sweeping backward. -
Add the central butterfly:
Draw the largest butterfly in the middle. It should be flying diagonally upward. Create distinct forewings and hindwings, keeping the edges slightly scalloped for realism. -
Place the bottom butterfly:
Sketch the final butterfly near the bottom left. This one should look like it’s landing, with wings spread open wider. Keep your pencil lines very faint here. -
Refine the wing patterns:
Lightly draw the vein structures inside the wings. For the top two, mark out the darker tip areas where the color will be most intense.
Level Up: Pressed Flowers
For a mixed-media 3D effect, glue tiny real pressed flowers or fern leaves between the drawn butterflies before placing the insert into the case.
Step 3: Inking
-
Outline the forms:
Take your fine liner pen and carefully go over your pencil lines. Use a slightly broken or sketchy line quality rather than a solid thick bold line; this keeps it looking delicate. -
Fill the dark details:
Color in the bodies of the butterflies with the black pen. Also, darken the outer edges of the top two butterflies’ wings, leaving small spots open for white details later. -
Draw the antennae:
Add thin, curving antennae to each head. I find quick, confident flicks of the wrist produce much smoother curves than trying to draw them slowly. -
Erase pencil marks:
Wait at least five minutes for the ink to fully dry, then gently erase all visible pencil sketches to clean up the drawing.
Step 4: Adding Color
-
Base layer for the top butterflies:
Using a muted orange colored pencil, lightly shade the wings of the top and middle butterflies. Press harder near the body and fade out as you reach the edges. -
Deepen the tones:
Layer a terracotta or reddish-brown pencil over the orange areas to add depth. Focus on the veins and the areas closest to the black wing tips. -
Add subtle contrast:
Use a touch of olive green on the tips of the wings for the top two butterflies to mimic the specific species coloring seen in the reference. -
Color the bottom butterfly:
Switch to a pale peach or light pink pencil for the bottom butterfly. Keep this one much lighter and airier than the others. -
Highlights:
Take a white charcoal pencil or white gel pen and add tiny dots to the black wing tips. Fill in the lower sections of the bottom butterfly’s wings with white to make them pop against the beige paper.
Step 5: Assembly
-
Cut out the insert:
Cut along your initial traced outline. It is best to cut slightly inside your line so the paper fits easily into the case without buckling. -
Cut the camera hole:
Carefully use a craft knife or sharp scissors to cut out the camera opening. -
Final fit:
Place the artwork inside the clear case, pressing it flat. Snap your phone in to secure the paper in place.
Now you have a custom phone aesthetic that captures the gentle beauty of nature.
Soft Clouds and Tiny Stars
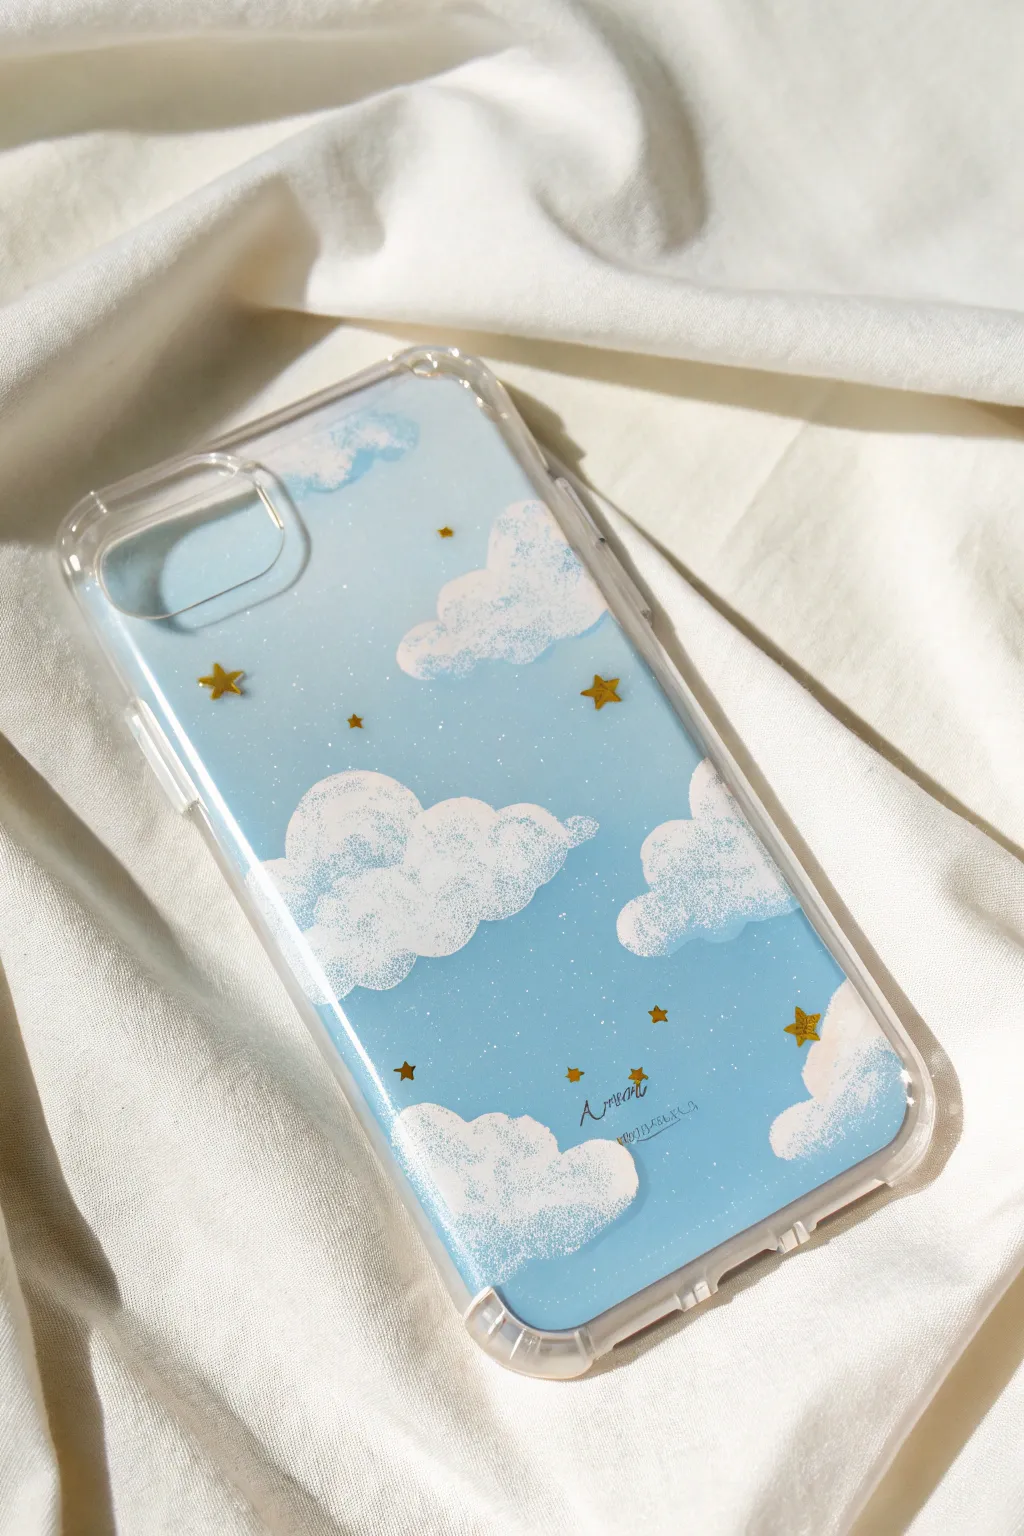
Transform a plain clear case into a serene skyscape with fluffy white clouds and scattered golden stars. This design uses layered painting techniques to give the clouds a soft, textured depth against a shimmery blue background.
Detailed Instructions
Materials
- Clear plastic phone case
- Acrylic paint (sky blue, white)
- Small gold star confetti or metallic gold paint
- Fine glitter (iridescent or silver)
- Small paintbrush (flat and detail)
- Sponge dabber or small piece of makeup sponge
- Clear sealant or resin (optional)
- Rubbing alcohol
- Cotton pads
Step 1: Preparation and Cloud Forming
-
Clean surface:
Begin by removing any dust or oils from inside the phone case using a cotton pad soaked in rubbing alcohol. This ensures your paint adheres perfectly to the smooth plastic surface. -
Plan placement:
Decide where you want your largest cloud formations to sit. I like to keep the center relatively open for the phone’s logo and place bigger clouds near the bottom corners and sides. -
Sponge texture:
Take a small sponge dabber or a torn piece of makeup sponge and dip it lightly into white acrylic paint. Dab off most of the excess paint onto a paper towel until the sponge is almost dry. -
Dab first layer:
Gently press the sponge onto the *inside* of the case to create the first layer of clouds. Use a light, tapping motion to create fluffy, uneven edges rather than solid blobs. -
Build opacity:
Let the first white layer dry for about 5 minutes. Go back over the centers of the clouds with more white paint, dabbing slightly heavier this time to make the middles opaque while keeping the edges semi-transparent and misty. -
Refine edges:
Use a very small, dry detail brush to gently feather the edges of the white paint while it’s still tacky if any spots look too harsh or circular.
Step 2: Adding the Stars
-
star placement:
While the white clouds are fully drying, select your gold star confetti pieces. Arranging them dry on the outside of the case first can help you visualize the final look. -
Adhere stars:
Apply a tiny dot of clear drying glue or a dab of wet clear nail polish on the inside of the case where you want each star. Press the gold stars face-down into the adhesive (since you’ll view them from the outside). -
Tiny distant stars:
Using the tip of a toothpick or a dotting tool dipped in gold metallic paint, add tiny specks between the larger confetti stars to create the illusion of distant constellations. -
Sparkle dust:
Mix a pinch of fine iridescent or silver glitter into a small amount of clear medium or watered-down white glue. Brush a very thin, patchy layer of this over the empty spaces between clouds.
Sponge Technique
For the fluffiest clouds, tear your makeup sponge rather than cutting it. The ragged, uneven surface creates a much more natural, organic cloud texture than a flat cut wedge.
Step 3: The Blue Sky Background
-
Mix blue tone:
Prepare your sky blue acrylic paint. If you want a softer look, mix in a little white. Ensure you have enough mixed paint to cover the entire back of the case in one go for even color. -
Paint around (optional):
If you want the clouds to really pop, you can carefully paint the blue around the edges of the white clouds first with a small brush, blending slightly over the misty edges. -
Full coverage:
Once the clouds and stars are 100% dry, paint the entire inside of the case with the blue paint. Paint right over the back of the dried white clouds and stars. -
Check opacity:
Hold the case up to a light source. If you see streaks or light shining through the blue, let it dry for 20 minutes and apply a second coat of blue. -
Clean edges:
Before the final coat dries completely, use a cotton swab or toothpick to clean up any paint that might have smudged onto the camera rim or the side bumpers of the case. -
Seal (Optional):
For extra durability, effectively sealing your work from scratches by the phone itself, brush on a layer of varnish or Mod Podge over the fully dried blue paint.
Add a Moon Phase
Instead of just stars, use gold foil or metallic paint to add a crescent moon hidden among the clouds for a magical nighttime aesthetic.
Now snap your phone in and enjoy your own pocket-sized piece of the heavens

PENCIL GUIDE
Understanding Pencil Grades from H to B
From first sketch to finished drawing — learn pencil grades, line control, and shading techniques.
Explore the Full Guide
Cherry Pair With Simple Highlights

Transform a plain phone case into a juicy statement piece with this vibrant cherry design. The bold red fruit paired with crisp white highlights creates a playful, retro-inspired look that really pops against the transparency of the case.
Step-by-Step Guide
Materials
- Clear, hard plastic phone case
- Red acrylic paint (opaque)
- Deep green acrylic paint
- White acrylic paint or white paint pen (fine tip)
- Rubbing alcohol and cotton pad
- Small round paintbrush (size 2 or 3)
- Fine liner brush (size 0 or 00)
- Clear acrylic sealer or resin (optional)
Step 1: Preparation
-
Clean surface:
Before you start painting, it is crucial to remove any oils or fingerprints from the case. Wipe the entire exterior surface down thoroughly with a cotton pad soaked in rubbing alcohol and let it air dry completely. -
Plan placement:
Decide where you want your main cherry pair to sit. The center is a classic choice, but slightly off-center works well too. You can use a dry-erase marker to lightly sketch the outline on the *inside* of the case to act as a guide without marking your painting surface.
Paint Peeling?
If acrylics won’t stick, lightly sand the area with fine-grit sandpaper first. The rougher texture gives the paint something to grab onto without ruining the clear look.
Step 2: Painting the Cherries
-
Base circles:
Load your small round brush with bright red paint. Paint two circles, roughly the size of a dime or nickel depending on your case size. Place one slightly higher than the other to give them a natural hang. -
Refine shape:
Cherries aren’t perfectly round spheres. While the paint is wet, flatten the tops slightly where the stems will connect, giving them that characteristic heart-like dip. -
Second coat:
Acrylic paint can be streaky on smooth plastic. Allow the first red layer to dry until touch-dry, then apply a second coat to ensure solid, opaque color coverage. -
Mini bonus:
Paint a tiny, single cherry shape near the bottom corner for an extra cute detail. This should be much smaller than your main pair, perhaps just a simple red smudge or small circle.
Step 3: Stems and Leaves
-
Stem roots:
Switch to your fine liner brush and the green paint. Starting from the slight dip in the top of each red cherry, paint a thin line moving upwards. These lines should angle toward each other to meet at a central point. -
Connecting point:
Bring the two stems together at the top, slightly thickening the line where they join to mimic the natural knot. -
Leaf shape:
From the junction point of the stems, paint a single, elongated oval shape extending out to the left for the leaf. It should taper to a point at the end. -
Leaf fill:
Fill in the leaf shape with your green paint. If the green is too translucent, let it dry and apply a second layer, just like you did for the red fruit. -
Tiny stem:
Don’t forget the mini cherry! Add a very short, curved green line near the small red spot you painted earlier.
Add Sparkle
Mix a tiny amount of glitter into your red paint for the second coat, or sprinkle fine iridescent glitter over the cherries while the sealer is still wet.
Step 4: Highlights and Details
-
Drying check:
Ensure all red and green paint is completely bone dry. Use a hairdryer on a cool setting if you need to speed this up, as painting over wet layers will muddy the colors. -
Fruit highlights:
Using a very fine brush or a white paint pen, draw a small, curved line (like a smile) near the top left of each large cherry. This creates that shiny, dimensional look. -
Stem accent:
Add a tiny speck of white where the stem meets the fruit on each cherry to define the connection point. -
Leaf vein:
Carefully draw a thin white line down the center of the green leaf. -
Background vein details:
For extra texture, you can add tiny, feathery V-shapes branching off the central leaf vein, though a single line often looks cleaner. -
Mini cherry face:
For the tiny cherry at the bottom, add a small curved white line to give it a matching highlight, or turn it into a tiny smiley face for a whimsical touch.
Step 5: Sealing
-
Seal surface:
Acrylic paint can scratch off smooth plastic easily. Once your design is fully cured (give it a few hours), apply a layer of clear varnish or brush-on sealer over the painted areas to protect your artwork.
Pop your phone back in and enjoy your custom, fruit-themed accessory
Cute Strawberries With Leaf Caps
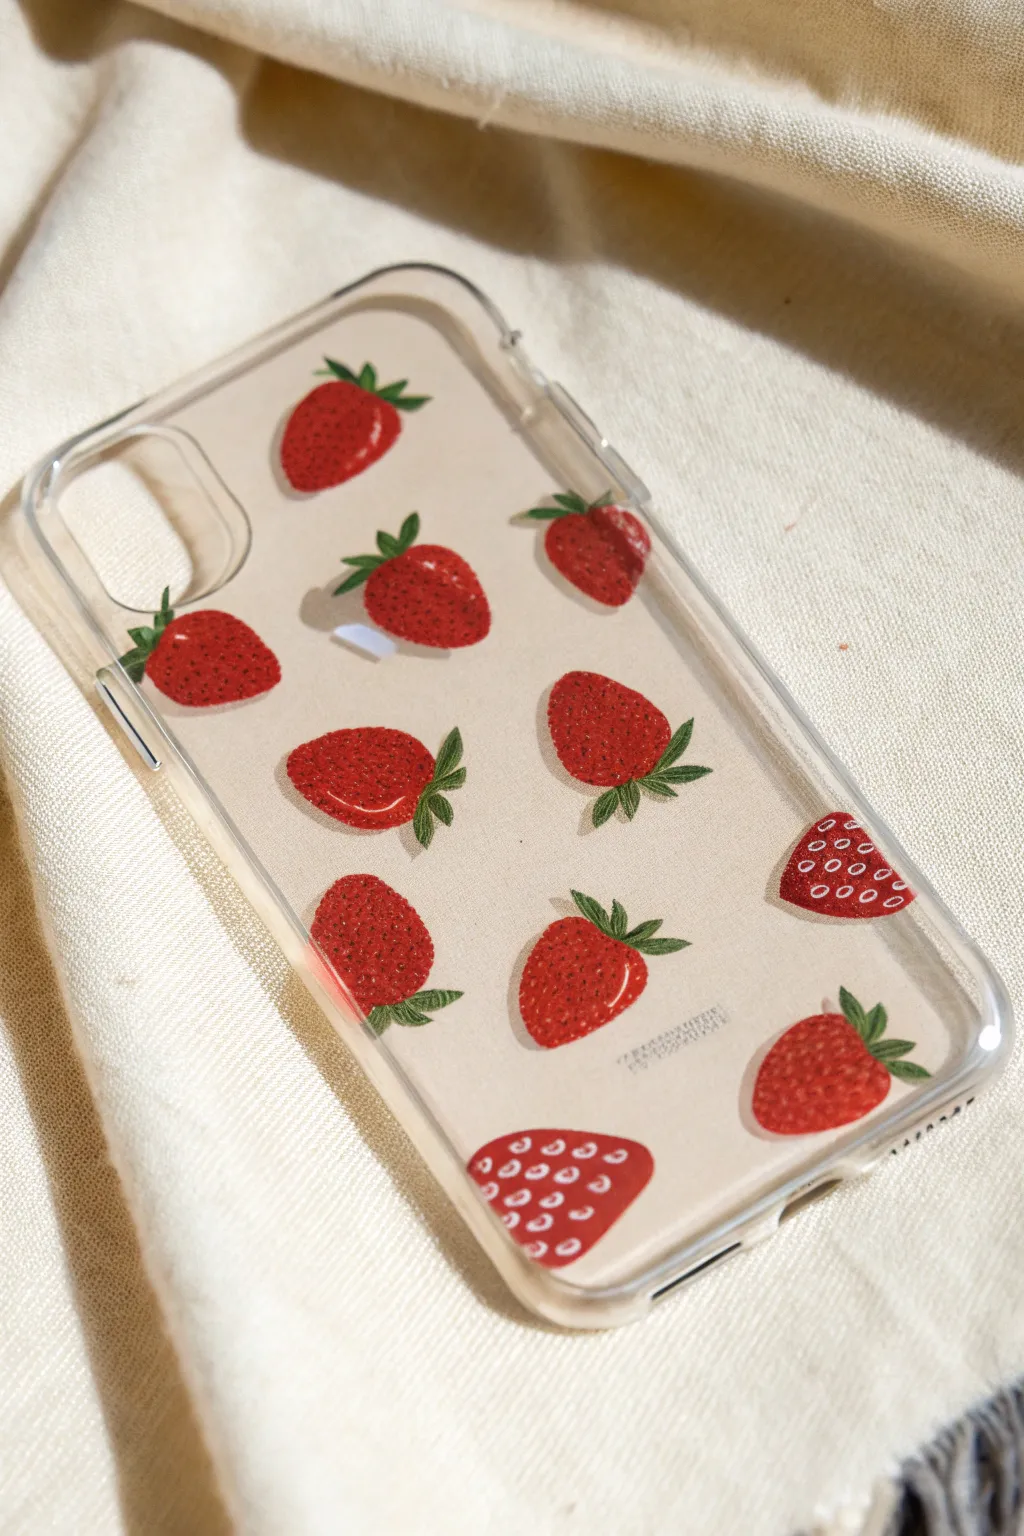
Transform a plain clear case into a summer-ready accessory with this charming pattern of hand-painted strawberries. The design features a playful mix of whole strawberries and small slices, creating a light and breezy aesthetic.
Step-by-Step Tutorial
Materials
- Clear, hard plastic phone case
- Rubbing alcohol and paper towel
- Red acrylic paint (bright scarlet or crimson)
- White acrylic paint
- Dark green acrylic paint
- Small round detail brush (size 0 or 1)
- Fine liner brush (size 00 or 000)
- Small palette or mixing dish
- Clear sealant (spray varnish or resin)
Step 1: Preparation
-
Clean surface:
Before you begin painting, it’s crucial to remove any oils or fingerprints from the case. Wipe the exterior surface thoroughly with rubbing alcohol and a paper towel. -
Dry completely:
Let the alcohol evaporate completely so the plastic is dry and ready to accept the paint.
Paint on the Inside
For ultimate durability, paint the design on the *inside* of the clear case. This way, the plastic itself acts as a shield for your art.
Step 2: Painting the Fruit
-
Mix base red:
Squeeze out your bright red paint onto the palette. If it feels too transparent, you can mix in a tiny dot of white to increase opacity without turning it pink. -
Paint strawberry shapes:
Using the small round brush, paint heart-like shapes with rounded bottoms scattered randomly across the case. Keep them roughly uniform in size, about the size of a dime. -
Add strawberry slices:
To add variety like in the photo, paint a few semi-circles or triangular wedges near the edges. This makes the pattern look like it continues off the case. -
Let the base dry:
Allow the red shapes to dry completely. Acrylics on plastic can be slippery, so patience here prevents smudging. -
Second coat:
If the red looks streaky or translucent, apply a second thin layer of red paint directly over the first and let it dry again. -
Mix leaf green:
Prepare your dark green paint. You want a nice contrast against the red, so a forest or sap green works best. -
Paint the caps:
Using the fine liner brush, paint small, star-like bursts of leaves at the top of each whole strawberry. Use short, flicking motions to create pointy leaf tips. -
Vary the leaves:
I like to change the angle of the leaves slightly on each berry so they don’t look like identical stamps.
Step 3: Details & Sealing
-
Prepare the details:
Squeeze out a fresh dollop of white paint. You’ll need a very steady hand for the seeds. -
Add white seeds:
Using the very tip of your finest brush (or even a toothpick), tap tiny white dots onto the red bodies of the strawberries. -
Detail the slices:
For the sliced berry shapes, paint a thin white rim along the inside edge and a small white core in the center. -
Add highlights:
Paint a faint, thin curved white line on the top left shoulder of a few strawberries to give them a glossy, rounded look. -
Wait for full cure:
Let the entire design dry for at least 24 hours. The paint needs to be fully cured before sealing. -
Apply sealant:
Take the case to a well-ventilated area and spray a thin, even coat of clear varnish over the back. This protects the acrylic from scratching off during daily use.
Glittery Finish
Mix a pinch of fine loose glitter into your red paint or final sealant layer to give the strawberries a subtle, sugary sparkle.
Pop your phone back in and enjoy your freshly picked, custom-designed accessory


Smiley Face Doodles and Hearts
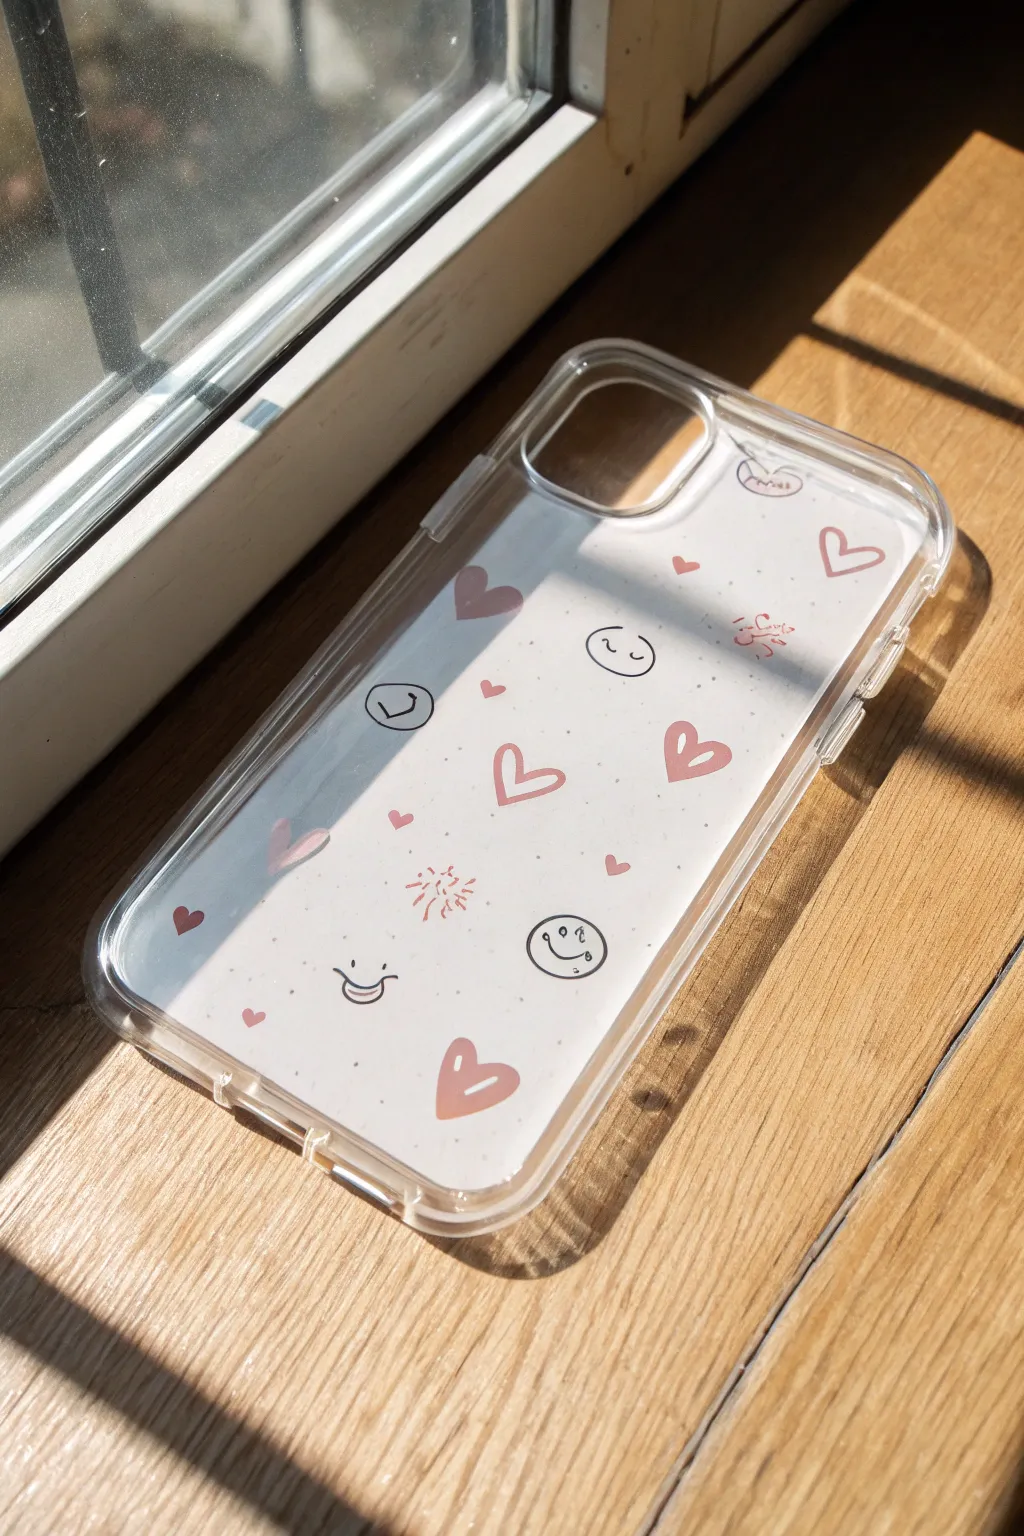
Transform a plain clear flexible case into a cute, custom accessory with this simple paper insert technique. The design features scattered pink hearts and playful smiley faces, creating a sweet, hand-drawn aesthetic that sits safely inside your phone case.
Detailed Instructions
Materials
- Clear phone case
- White cardstock or heavy drawing paper
- Pencil
- Scissors and X-ACTO knife
- Pink brush pen or marker (soft pastel shade)
- Black fine-liner pen (0.3mm or 0.5mm)
- Cutting mat
Step 1: Creating the Template
-
Trace your phone:
Place your clear phone case face down on a piece of white cardstock or heavy drawing paper. -
Outline the shape:
Use a pencil to lightly trace around the outside perimeter of the phone case. This gives you a starting shape that is slightly larger than the inside dimensions. -
Mark the camera hole:
While the case is still in place, trace the camera opening carefully. This is the most crucial part for alignment. -
Cut out the insert:
Using scissors, cut out the main shape. You will need to trim slightly inside your pencil lines—about 2-3mm—so the paper fits snugly inside the case rather than matching the outer dimensions. -
Refine the fit:
Place your paper cutout inside the clear case to test the fit. Trim any edges that buckle or don’t lie flat. Once it fits perfectly, remove it for decorating. -
Cut the camera window:
Place the paper on a cutting mat. Use an X-ACTO knife to carefully cut out the camera hole you traced earlier.
Step 2: Designing the Pattern
-
Draft the layout:
Using your pencil very lightly, sketch out where you want your main elements to go. Draw a few hearts and circle faces scattered randomly to ensure a balanced composition. -
Draw the smiley faces:
Take your black fine-liner pen and ink the smiley faces. Draw simple circles with two small dots for eyes and a curved line for a smile. Vary the expressions slightly—perhaps one has a winking eye or a wider grin. -
Add filled hearts:
Using your pink brush pen or marker, draw solid hearts in various sizes. Angle them differently so they look like they are floating or tumbling. -
Draw outline hearts:
Switch back to the pink marker to draw open, outline-style hearts. These add visual variety and keep the design feeling light. -
Include tiny details:
Fill in the gaps with tiny solid hearts or small dots. I find that groups of three faint dots or tiny speckles help the background look less empty. -
Sketch doodle accents:
In the remaining negative spaces, add small doodles like a little flower burst or squiggles using the pink marker. -
Erase pencil lines:
Wait for all ink to be completely dry to avoid smudging. Then, gently erase any visible pencil marks from your initial sketch.
Tip: Reversible Art
Draw a completely different design on the back of the cardstock. Whenever you want a new look, just flip the paper insert over for instant variety.
Step 3: Assembly
-
Insert the design:
Clean the inside of your clear phone case to remove dust or fingerprints. -
Place the paper:
Drop your decorated cardstock into the case with the drawing facing out (towards the back of the case). -
Secure the phone:
Snap your phone into the case. The phone itself will hold the paper insert securely in place against the clear back.
Level Up: Glitter Pop
Add tiny dabs of clear glitter glue or metallic silver pen to the center of the hearts for a design that catches the sunlight.
Enjoy your customized case that brings a smile every time you pick up your phone
Single-Line Face in Black and White

Capture the essence of modern abstract art with this elegant phone case design. Using just a single continuous black line, you’ll create a striking facial profile that floats beautifully on the clear background of your case.
Step-by-Step Tutorial
Materials
- Clear plastic phone case (compatible with your specific phone model)
- Black oil-based paint marker (fine or extra-fine tip)
- Rubbing alcohol or glass cleaner
- Cotton pads or lint-free cloth
- Printed template of a single-line face drawing (sized to fit your case)
- Washi tape or masking tape
- Scissors
- Clear acrylic sealant spray (optional but recommended)
Step 1: Preparing the Case and Design
-
Clean surface:
Before you start, thoroughly clean the *inside* and *outside* of your clear phone case using rubbing alcohol and a lint-free cloth. This removes fingerprints and oils that could prevent the paint from adhering properly. -
Source your artwork:
Find a single-line face drawing you love. You can sketch your own or find a digital download online. Ensure the lines are simple and distinct. -
Resize the template:
Resize your chosen image on a computer or phone so it fits perfectly within the dimensions of your phone case. Pay attention to the camera hole cutout so the design doesn’t get chopped off awkwardly. -
Print and cut:
Print the resized image on standard paper. Cut around the design, leaving a small border so it’s easier to handle. -
Position the template:
Place the paper template inside the phone case, with the design facing outward (so you can see it through the back). Tape it securely in place using washi tape so it doesn’t shift while you work.
Step 2: Tracing the Design
-
Prime the marker:
Shake your black oil-based paint marker well. I always zest the tip on a scrap piece of paper first to ensure the ink is flowing smoothly but not puddling. -
Plan your start point:
Look at the design and decide where to begin. For single-line art, starting at the neck or the top of the forehead usually offers the smooth flow. -
Begin tracing:
Carefully trace the black lines of your template directly onto the *outside* of the phone case. Use a steady hand and try to keep the pen pressure consistent for an even line width. -
Maintain flow:
Try to lift the pen as little as possible. The beauty of this style is the continuous, fluid look, so move your whole arm rather than just your wrist to avoid shaky jitters. -
Handle curves:
When you reach the curves of the lips or nose, slow down slightly. Allow the ink to deposit fully so the curves look intentional and bold. -
Tracing the eyelashes:
For the eyelashes, use very light, quick flicks of the marker nib. These should be delicate compared to the bolder main profile line. -
Add a signature:
If your original design has a small artist signature or if you want to sign your work, add it now in a discreet spot near the bottom. -
Check for gaps:
Lift the case up to a light source (without removing the template yet) to check for any thin spots in the black line. gently go over any areas that look transparent.
Reverse Method
Draw on the *inside* of the case for scratch-proof art! You must mirror-image your template first before printing so the face looks correct from the outside.
Step 3: Finishing Touches
-
Remove template:
Once you are satisfied with the tracing, carefully peel off the tape and remove the paper template from the inside of the case. -
Clean up edges:
If you made any small mistakes or smudges, use a cotton swab dipped in a tiny bit of rubbing alcohol to gently erase them. Do this quickly before the paint fully cures. -
Initial drying:
Let the case sit undisturbed for at least 1-2 hours. Oil-based markers need time to set completely on non-porous plastic surfaces. -
Seal the design:
To make your case durable for daily use, take it outside and apply a thin, even coat of clear acrylic sealant spray over the painted side. This prevents the lines from scratching off in your pocket. -
Final cure:
Allow the sealant to dry for the full time recommended on the can (usually 24 hours) before putting the case onto your phone.
Color Pop
Once the black outline is totally dry, paint abstract blobs of pastel colors (like blush pink or sage green) behind the face on the inside of the case.
Now you have a chic, custom accessory that looks like a high-end boutique find
Abstract Color Blobs With Outlines
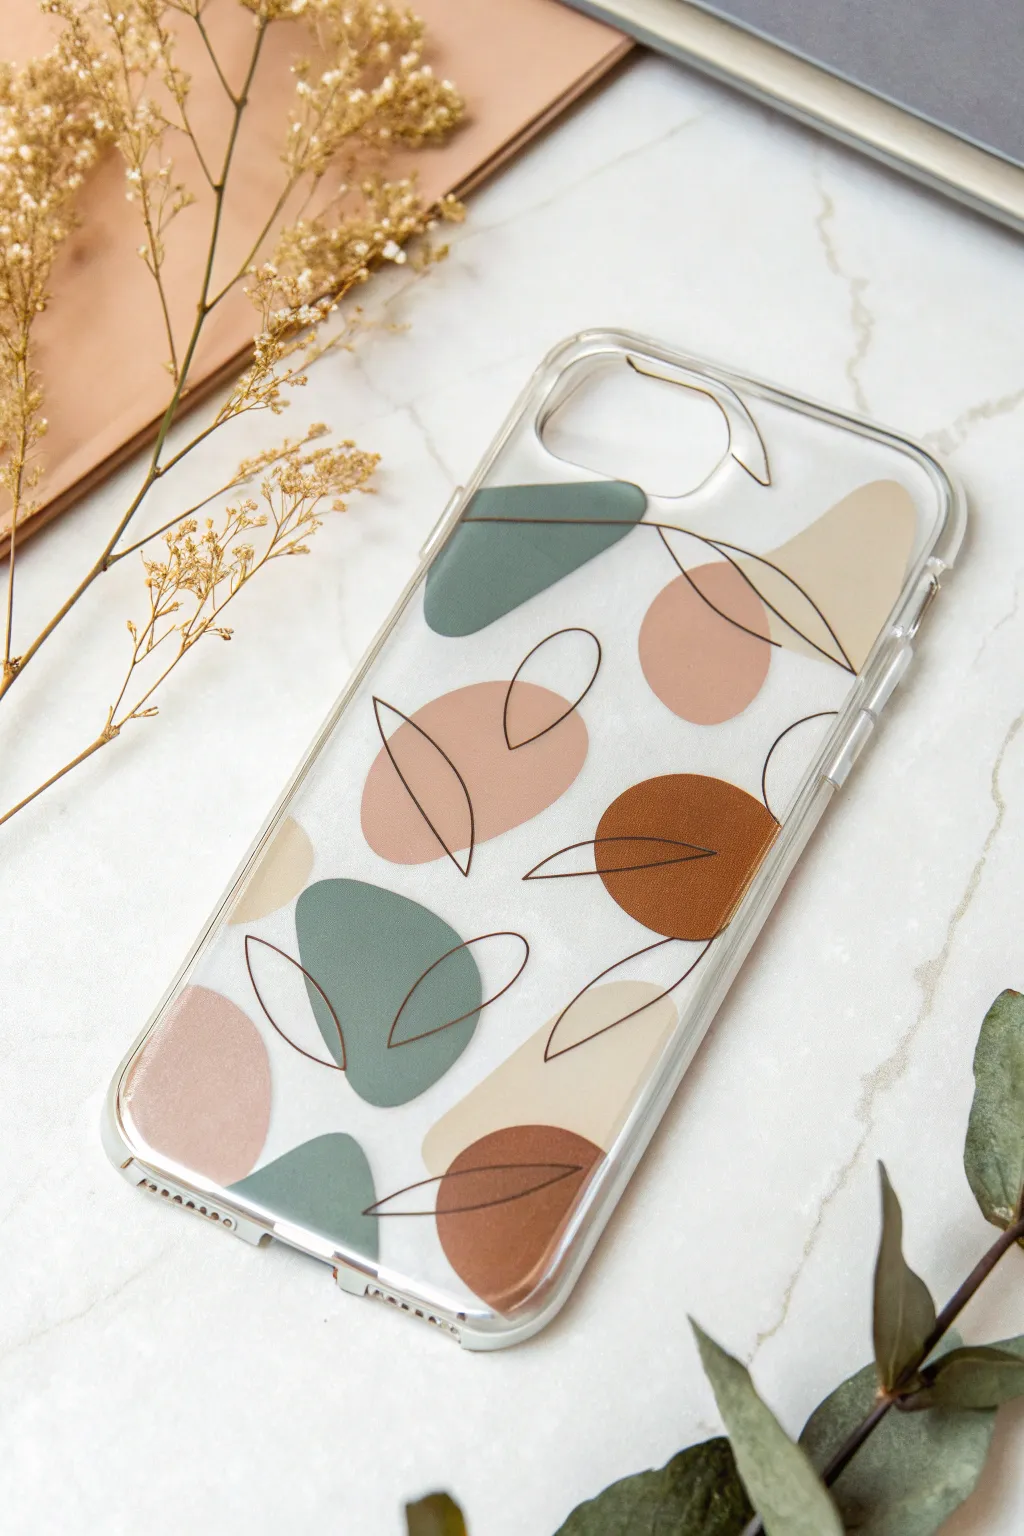
Transform a plain clear case into a modern art piece featuring earthy abstract shapes and delicate botanical line work. This design combines muted greens, terra cotta, and beige tones with fine black lines for an aesthetic that is both organic and structured.
Step-by-Step Guide
Materials
- Clear phone case (hard shell preferred)
- Acrylic paints (Sage Green, Terra Cotta/Rust, Beige/Sand, White)
- Black oil-based paint pen (fine tip) or permanent marker
- Small flat synthetic brush
- Small round detail brush
- Rubbing alcohol and cotton pads
- Palette or paper plate
- Clear aesthetic sealant spray or resin (optional)
Step 1: Preparation & Planning
-
Clean the surface:
Before you apply any paint, use rubbing alcohol on a cotton pad to wipe down the inside of the phone case. This removes oils and fingerprints that could prevent the paint from sticking. -
Plan your layout:
Since you will be painting on the *inside* of the case to protect the design, remember that your image will be reversed when viewed from the outside. You might want to sketch your blob placement on a piece of paper first to visualize the balance.
Step 2: Painting the Line Work
-
Start with the lines:
Surprisingly, for this reverse-painting technique, we start with the foreground details. Take your fine-tip black paint pen. -
Draw the leaves:
Draw simple, minimal leaf shapes directly onto the plastic interior. Think of simple marquise shapes or ‘eye’ shapes. -
Create overlapping stems:
Connect your leaf shapes with thin, sweeping stems. Don’t worry if the lines intersect where the color blobs will eventually go; this adds to the abstract look. -
Let the ink cure:
Allow the black lines to dry completely. If you’re using a paint pen, give it at least 15-20 minutes so the acrylic paint applied later doesn’t smear the black ink.
Oops! Smudged Lines?
If acrylic paint smears your black lines, the ink wasn’t dry. Use a Q-tip with water to gently wipe away the wet paint, let the ink dry longer, and seek again.
Step 3: Adding the Color Blobs
-
Mix your palette:
Squeeze out your acrylics. You want a harmonious, earthy palette: a muted sage green, a warm terra cotta rust, and a soft beige. If your colors are too bright, mix in a tiny dot of black or brown to desaturate them. -
Paint the first blob color:
I usually start with the darkest color, which is the rust or terra cotta here. Using your small flat brush, paint organic, rounded shapes over some of your line drawings. -
Ensure opacity:
Don’t be afraid to paint right over the dried black lines. Because the lines are on the glass-side first, they will show through clearly on the finished product. -
Add the sage green:
Clean your brush and switch to the sage green. Paint irregular kidney-bean or oval shapes in the empty spaces, creating a nice balance with the warmer tones. -
Fill with beige:
Finally, add the beige or sand-colored shapes. These lighter tones help frame the darker colors. Try to place them near the edges or corners for a framing effect. -
Check for transparency:
Hold the case up to the light. If the paint looks streaky or translucent, let the first coat dry and apply a second coat to make the colors solid and opaque. -
Refine the edges:
If you want crisp edges on your blobs, gently tidy them up with your brush, but remember that a slightly imperfect, hand-painted edge is part of the charm.
Pro Tip: Layering Depth
Mix your acrylics with a tiny bit of white gesso. This increases opacity quickly so you don’t need five coats of paint to block out the light.
Step 4: Finishing and Sealing
-
Let it cure fully:
Allow the acrylic paint to dry completely. This might take an hour or two depending on how thick your layers were. -
Optional protection:
Since the paint is on the inside, it is protected from scratches from the outside world, but your phone itself can scratch the paint. I recommend adding a thin layer of clear varnish or even a piece of paper cut to size to sit between the phone and the paint. -
Clean the exterior:
Wipe the outside of the case one last time to remove any smudges from handling it during the painting process. -
The reveal:
Flip the case over to see your finished design. The black lines should look crisp sitting ‘on top’ of the abstract color blobs. -
Install the phone:
carefully snap your phone into the case. The background color of your phone will peek through the clear spaces, becoming the fourth color in your palette.
Now you have a custom, gallery-worthy accessory that adds an artistic touch to your daily tech
Checkerboard Corner Pop
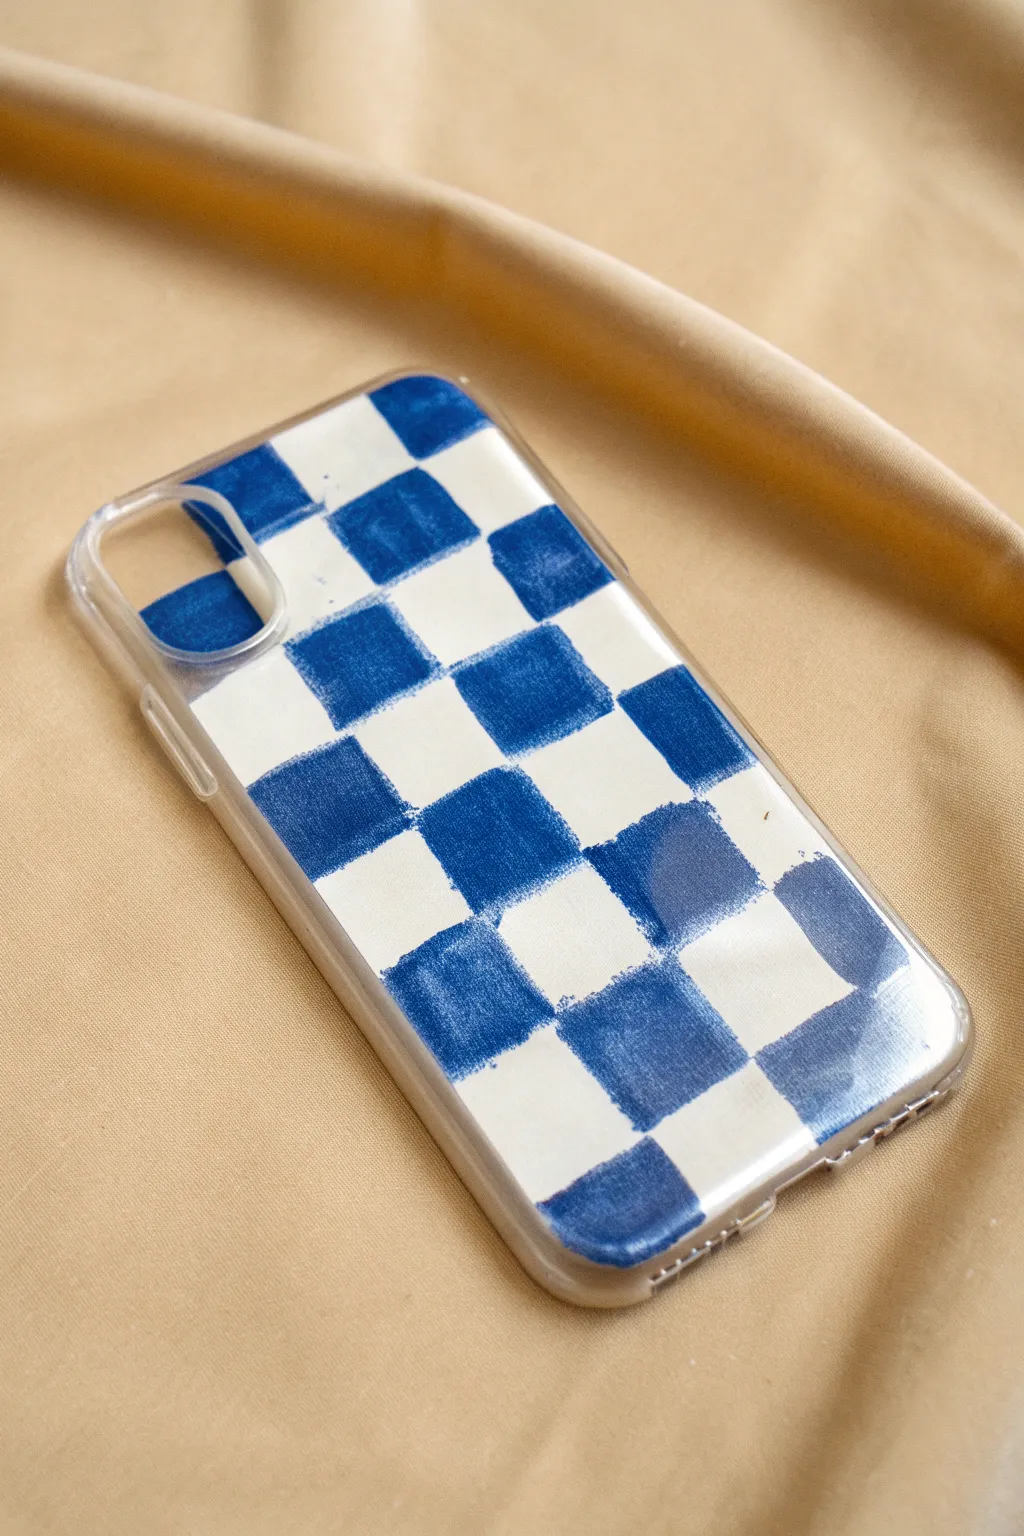
Transform a plain clear phone case into a trendy statement piece with this simple blue and white checkerboard design. By painting on the inside of the case, you create a smooth, glossy finish that won’t scratch off during daily use.
Step-by-Step
Materials
- clear phone case
- acrylic paint (royal blue)
- acrylic paint (titanium white)
- square shader brush (small to medium)
- rubbing alcohol
- cotton rounds or paper towels
- hairdryer (optional, for faster drying)
- fine tip marker (optional)
Step 1: Preparation
-
Clean the Surface:
Begin by thoroughly cleaning the inside of your clear phone case. Moisten a cotton round with rubbing alcohol and wipe down the interior surface to remove any oils, dust, or fingerprints. -
Dry Completely:
Allow the alcohol to evaporate completely. A clean, dry surface is crucial for the acrylic paint to adhere properly without peeling later. -
Visualize the Grid:
Before painting, visualize how you want your grid to sit. The design in the image uses a warped, slightly imperfect checkerboard style rather than a mathematically perfect grid, which adds to its charm.
Use Washi Tape
Struggling with straight lines? Use thin washi tape to grid out your design on the outside of the case as a guide, then paint on the inside following the lines.
Step 2: Painting the Blue Checks
-
Load the Brush:
Squeeze a small amount of royal blue acrylic paint onto your palette. Load your square shader brush, ensuring the bristles are evenly coated but not dripping. -
Start the Corners:
Begin by painting your first blue square near the top camera cutout. Press the flat edge of the brush down to create a crisp straight line, then pull to fill the shape. -
Create the Pattern:
Paint the remaining blue squares in a checkerboard formation. Leave empty visual spaces roughly the same size as your painted squares where the white blocks will eventually go. -
Embrace Imperfection:
Don’t worry if your squares aren’t perfectly identical or if the edges are slightly organic. This hand-painted look gives the case its artistic, textured aesthetic. -
Check Density:
Hold the case up to a light source to check for transparency. If the blue looks too thin or streaky, let it dry partially and apply a second coat for opacity. -
Dry the Blue Layer:
Allow the blue squares to dry completely. This is critical; if the blue is wet when you add white, it will smear into a light blue mess. You can use a hairdryer on a cool setting to speed this up.
Add Metallic Flair
Mix a tiny amount of silver or gold metallic medium into your blue paint for a subtle shimmer that catches the light when the phone moves.
Step 3: Filling with White
-
Apply White Paint:
Once the blue is bone-dry to the touch, load a clean brush with titanium white acrylic paint. -
Fill the Gaps:
Paint the white squares into the empty spaces you left earlier. It is okay if the white paint slightly overlaps the edges of the dried blue squares; since you are viewing this from the outside, the first layer (blue) will remain sharp. -
Cover the Back:
For a solid, opaque look, I like to paint a full layer of white over the entire back of the design once the individual white squares are dry. This acts as a backing layer and makes colors pop. -
Final Dry:
Set the case aside in a safe, dust-free area to cure. Acrylics on plastic can take a few hours to truly harden.
Step 4: Finishing Touches
-
Clean Edges:
Inspect the sides and camera hole of the case. If any paint smudged onto the rim or outside, use a toothpick or a damp cotton swab to gently scrape or wipe it away. -
Insert Phone:
Once the paint is fully cured and no longer tacky, gently snap your phone into the case. The phone itself will protect the paint from scratching against other objects.
Now you have a custom, durable accessory that shows off your artistic side
Wavy Color Bands That Stay See-Through
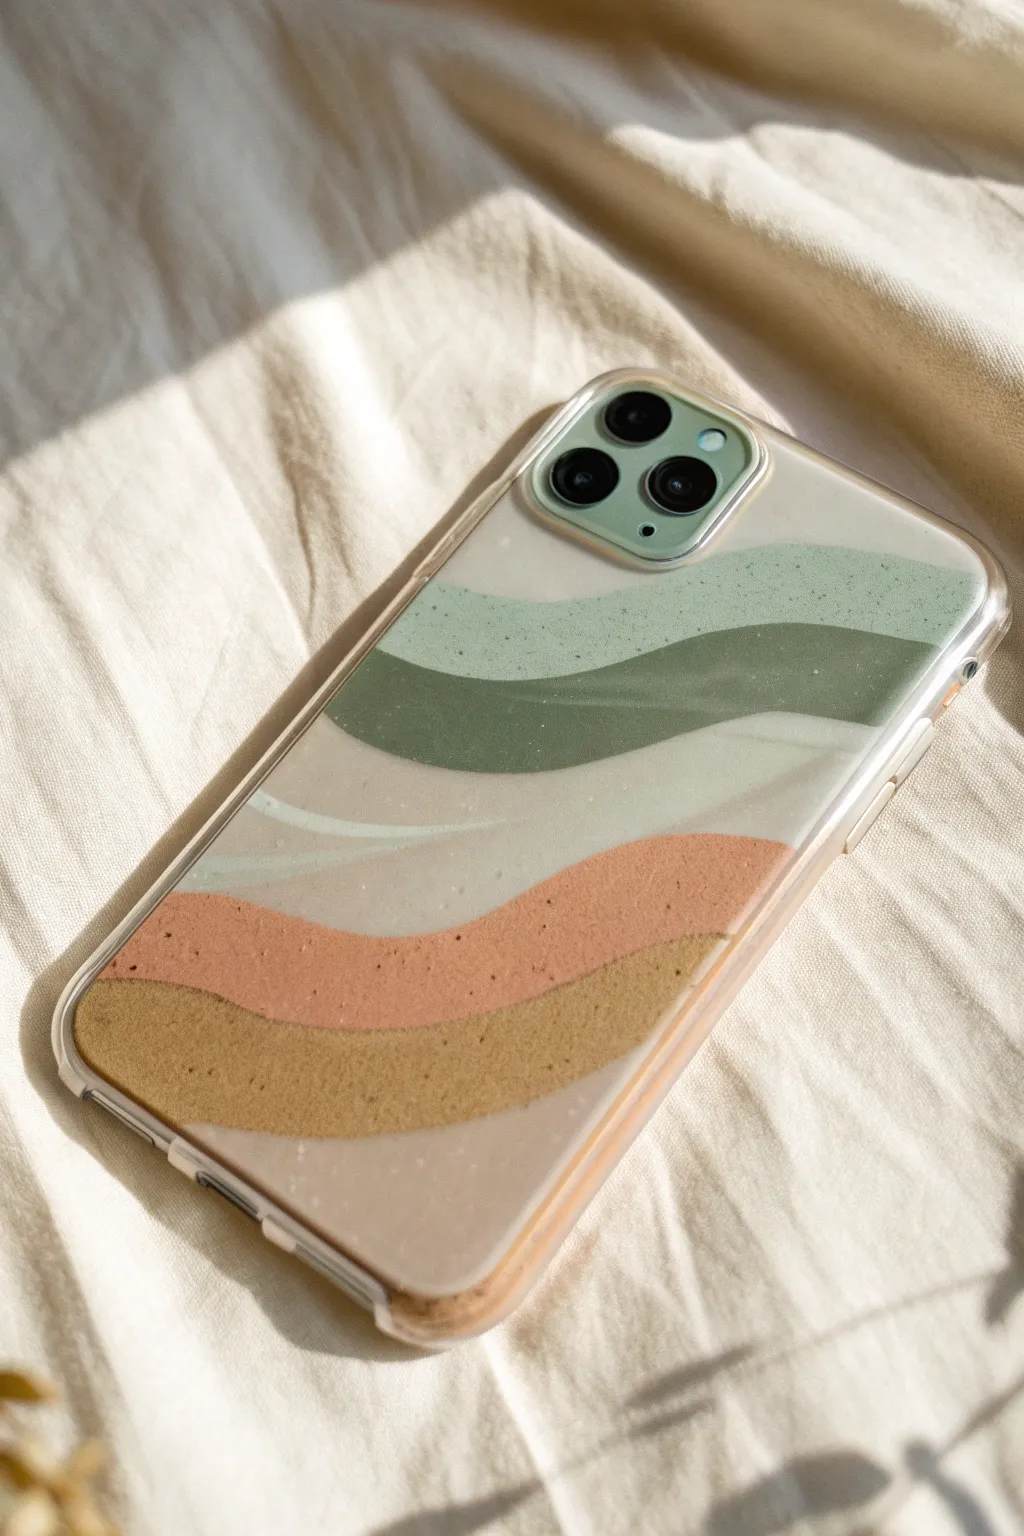
Transform a plain clear case into an aesthetic accessory with these soothing, earthy waves. By painting on the inside of the case, you preserve the glossy finish on the outside while creating depth with layered, organic shapes.
Step-by-Step Guide
Materials
- Clear phone case (hard plastic or TPU)
- Matte acrylic paints (Sage green, olive green, cream, terracotta/peach, mustard yellow)
- Medium flat synthetic brush
- Small round detail brush
- Rubbing alcohol
- Cotton pads or paper towel
- Palette or paper plate
- Clear matte varnish or Mod Podge (optional)
Step 1: Preparation
-
Clean the Surface:
Before you start, it is crucial to remove any factory oils or fingerprints from the case. Wipe the *inside* of the phone case thoroughly with rubbing alcohol and a cotton pad. -
Dry Completely:
Let the alcohol evaporate completely. The surface must be bone dry for the paint to adhere properly. -
Plan Your Composition:
Look at the back of your phone through the case to visualize where the camera bump sits. You’ll be painting in reverse, so the layer you paint first will be the one seen ‘on top’ from the outside.
Step 2: Painting the Waves
-
Mix the Sage Green:
Prepare your lightest green shade on the palette. If your paint is too fluid, let it sit for a minute to thicken slightly, which helps with opacity. -
First Green Wave:
Using the flat brush, paint a swooping, organic band near the camera opening. Paint straight onto the *inside* of the case. Don’t worry about texture on the back; the front will look smooth through the plastic. -
Add the Olive Tone:
While the first band is drying, mix your darker olive green. Paint a second wave directly below the sage one, following the same organic curve but varying the thickness. -
Create Negative Space:
Leave a wide clear gap below the green sections. This negative space allows your phone’s color to peek through later, or we can fill it with a neutral tone. -
The Cream Layer:
Mix a soft cream or off-white. Fill the gap between the greens and where your bottom colors will go. I like to apply this layer a bit thinner to create a semi-translucent effect. -
Terracotta Swoop:
Switch to your terracotta or peach shade. Paint a bold, rising wave near the bottom third of the case. Use the round brush to refined edge where it meets the cream section. -
Mustard Base:
Fill the very bottom of the case with the mustard yellow tone, curving it upwards to meet the terracotta band.
Paint Peeling Off?
Plastic is slippery! If paint won’t stick, lightly sand the INSIDE of the case with fine-grit sandpaper to give it ‘tooth’ before cleaning and painting.
Step 3: Refining and Sealing
-
Check for Opacity:
Flip the case over to view it from the front. If the colors look streaky or too sheer, wait for the first coat to dry fully and apply a second coat to those specific areas. -
Clean Edges:
If any paint went over the sides or into the camera hole, use a damp cotton swab or a toothpick to gently scrape it away while it’s still tacky. -
Dry Thoroughly:
Let the case sit undisturbed for at least 2-3 hours. Acrylics on plastic take longer to cure than on paper. -
Optional Speckling:
For that stone-like texture seen in the photo, dip an old toothbrush in diluted black or dark brown paint and gently flick tiny specks over the dried paint. -
Seal the Design:
To prevent scratching from your phone itself, apply a thin layer of varnish or Mod Podge over the fully dried paint on the inside. -
Final Cure:
Allow the sealant to cure overnight before snapping your phone into the case.
Check Your Perspective
Rembember you are painting in reverse layer order. Details you want visible ‘on top’ must be painted first against the plastic, background colors last.
Enjoy your custom, earthy accessory that looks professionally made.
Reverse-Painted Gradient Sunset
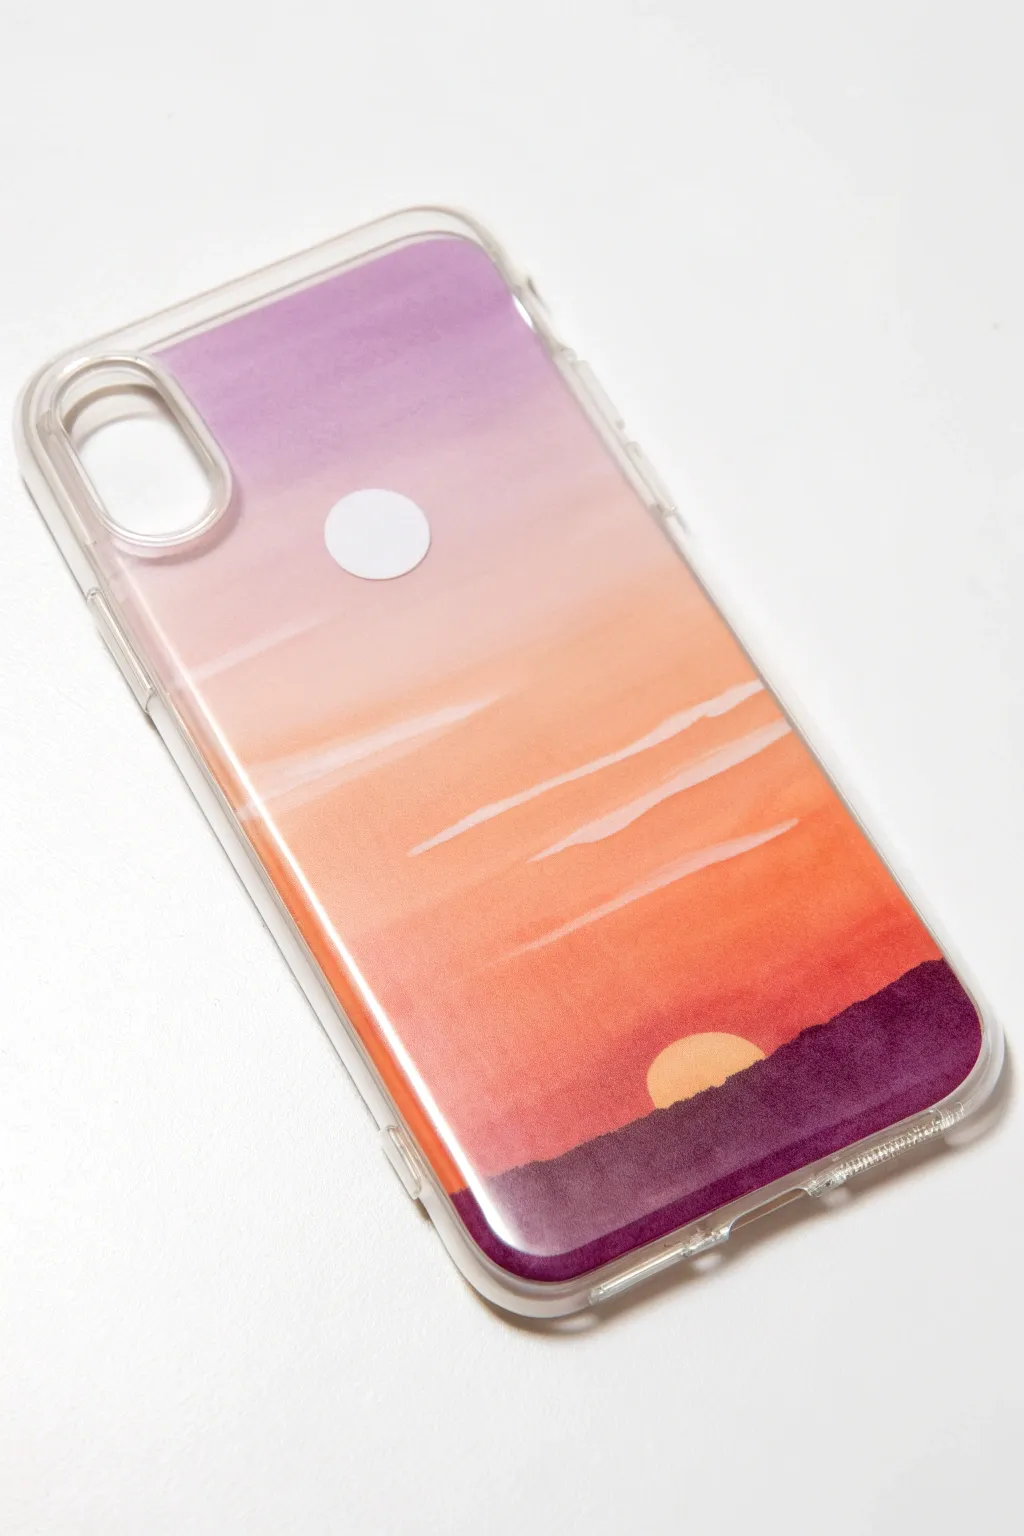
Capture the serenity of dusk right on your phone with this reverse-painted gradient sunset case. By painting on the inside of a clear case, you achieve a flawless glossy finish that protects your artwork from scratches.
Step-by-Step Tutorial
Materials
- Clear plastic phone case (hard shell or soft TPU)
- Acrylic paints (purple, orange, yellow, white, deep maroon/black)
- Rubbing alcohol and cotton pads
- Soft synthetic paintbrushes (flat and fine liner)
- Painter’s tape or masking tape (optional)
- Palette or paper plate
- Water cup and paper towels
Step 1: Preparation
-
Clean and Prep:
Begin by removing your phone from the case. Thoroughly clean the *inside* of the case with rubbing alcohol and a cotton pad. This removes oils and fingerprints that could prevent the paint from adhering properly. -
Dry Completely:
Allow the alcohol to dry completely. Avoid touching the inside surface with your bare fingers after cleaning. -
Masking (Optional):
If you are worried about paint getting on the clear sides or camera rim, you can carefully apply painter’s tape to the exterior edges, though careful brushwork usually suffices.
Step 2: Painting the Sunset Layers
-
Understand Reverse Layers:
Remember, you are painting in reverse. The first layer you put down will be the top layer visible from the outside. Details like the sun and clouds need to happen first. -
Paint the Sun:
Mix a warm, pale yellow. Using a small brush, paint a semi-circle near the bottom third of the case for the setting sun. Let this dry completely so it doesn’t smear into the other colors. -
Add Whispy Clouds:
Mix a very pale orange or off-white. Using a fine liner brush, paint thin, streaky horizontal lines across the middle area to represent clouds. Keep them translucent and organic. -
Wait for Details:
Ensure the sun and cloud details are dry to the touch before proceeding to the background gradient.
Layer Logic
Check your progress by flipping the case over regularly. Since you’re working backwards, the “front” view is the only way to see if your blending is smooth.
Step 3: Creating the Gradient
-
Mix Your Gradient Colors:
Prepare three main colors on your palette: a soft lavender-purple for the top, a warm peach/orange for the middle, and a vibrant reddish-orange for the horizon. -
Apply the Top Color:
Start at the top of the case (near the camera hole) with the lavender paint. Brush horizontally, covering the top third. -
Apply the Middle Color:
Paint the peach/orange color in the middle section. While the paint is still wet, gently blend the seam where it meets the lavender using light, horizontal strokes. -
Apply the Horizon Color:
Paint the bottom section (around the sun) with the reddish-orange. Carefully paint *over* the dried sun and cloud details—since we are painting in reverse, the sun will still show through. -
Blend the Transitions:
Work quickly to blend the red-orange into the peach section directly above it. A slightly damp brush can help smooth out the transition so it looks like a soft sky. -
Let the Sky Dry:
Allow this first coat of gradient to dry. It might look streaky or translucent right now; that is normal. -
Second Coat (Opaque Layer):
Once dry, apply a second coat of the same gradient colors over the back. This makes the colors solid and opaque so your dark phone doesn’t show through.
Starry Night Twist
Before painting the gradient, use a toothbrush to flick tiny specks of white paint onto the clear case for a magical starry effect over your sunset.
Step 4: Final Details
-
Paint the Landscape Silhouette:
Mix a deep maroon or purple-black color. Paint a jagged, organic line across the very bottom edge, covering the bottom of the sun slightly, to create distant hills or ground. -
Fill the Landscape:
Fill in the rest of the bottom area with this dark color until you reach the bottom edge of the case. -
Dry and Seal:
Let the entire painting dry for at least 24 hours. The paint remains on the inside, protected by the phone itself, but you can add a layer of clear varnish or mod podge over the paint for extra durability against friction with the phone back.
Pop your phone back in and enjoy your custom sunset view every time you make a call
Glitter Confetti Dots Under Paint
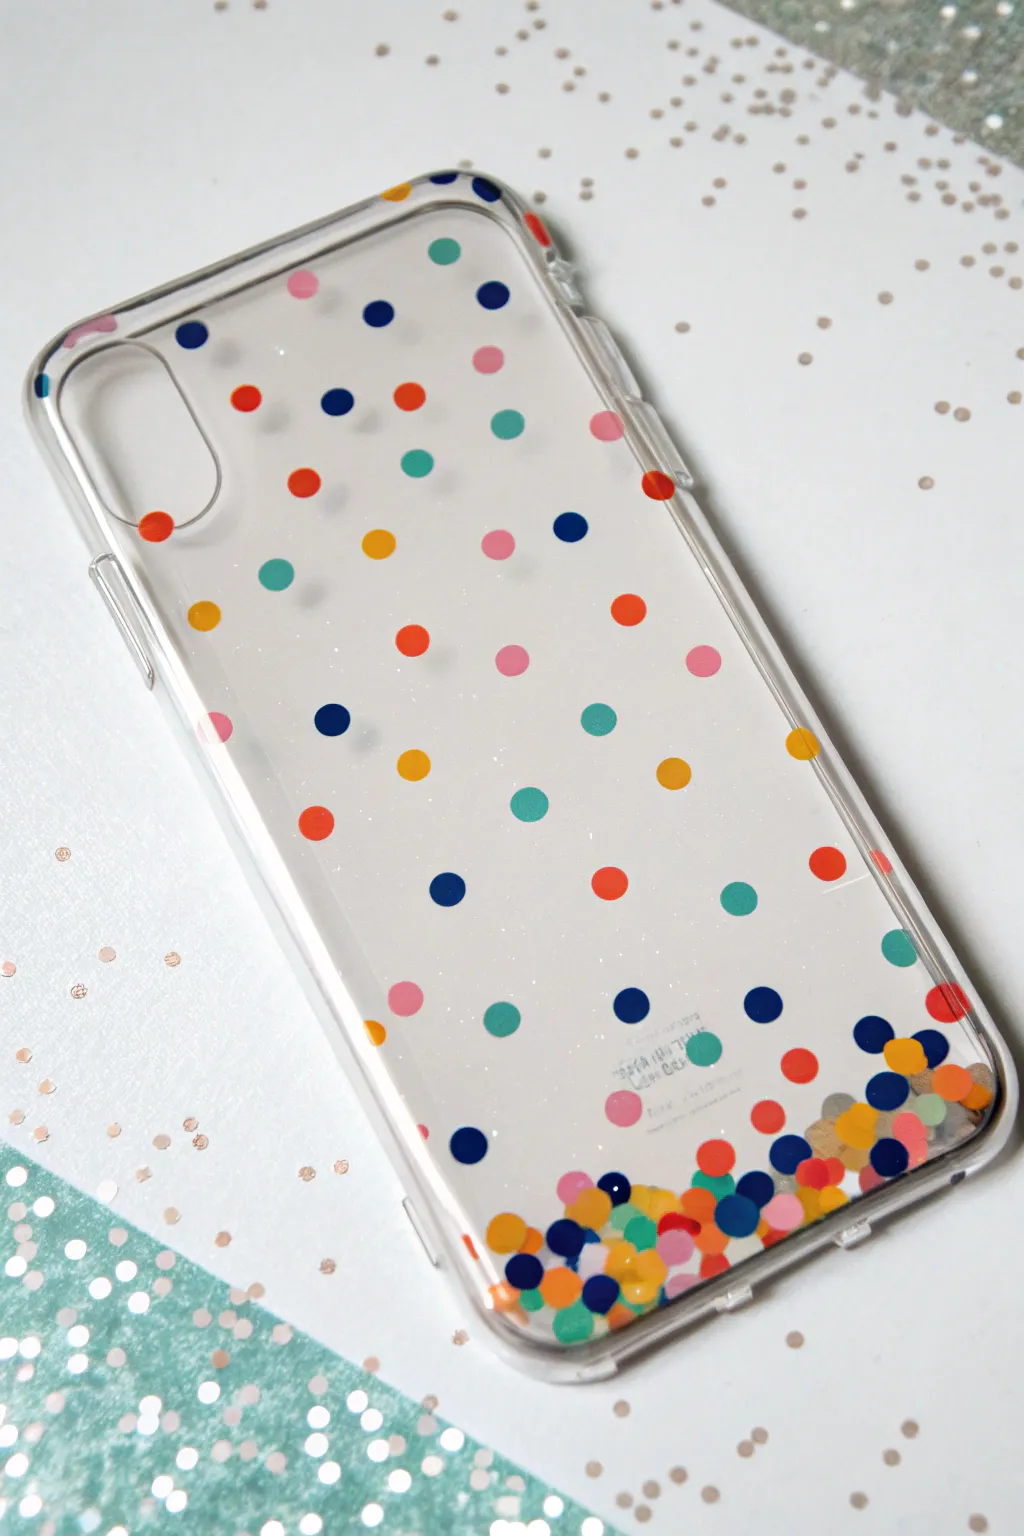
Transform a plain clear case into a party-ready accessory with this vibrant confetti design. By layering colorful dots and sealing them beneath a protective coat, you create a playful, falling snow effect that looks professional and won’t scratch off.
Step-by-Step
Materials
- Clear hard plastic phone case
- Multi-colored circular confetti (matte finish preferred)
- Mod Podge or clear craft glue (glossy finish)
- Small flat paintbrush
- Tweezers
- Clear spray sealant or resin (optional for extra durability)
- Rubbing alcohol
- Cotton pad
Step 1: Preparation & Planning
-
Clean the Surface:
Remove any existing dust or fingerprints from the *inside* of your clear phone case. Wipe the interior surface thoroughly with rubbing alcohol on a cotton pad and let it air dry completely. -
Sort Your Confetti:
Pour out your confetti mix onto a clean surface. Separate the dots by color—typically blue, orange, yellow, pink, and teal—so you can easily grab the exact shade you need without fumbling later. -
Plan the Layout:
Visualize the gradient effect before gluing. You want a heavy concentration of dots at the very bottom of the case that gradually thins out as it moves upward, becoming sparse scattered polka dots near the top.
Step 2: Applying the Confetti
-
Base Layer of Glue:
Using your small flat brush, apply a thin, even layer of Mod Podge or clear craft glue to the bottom one-inch section of the inside of the case. Don’t let it dry yet. -
Create the dense bottom:
While the glue is wet, sprinkle a generous amount of confetti into that bottom corner. Use your fingers or tweezers to nudge them into a dense pile, overlapping them slightly to create that ‘pile of fun’ look. -
Moving Upward:
Apply small dots of glue randomly above the dense bottom section. Pick up individual confetti pieces with tweezers and place them onto these glue spots. -
Spacing the Dots:
As you move higher up the case, increase the distance between the dots. Place them irregularly to avoid rigid grid patterns; you want it to look like they are floating or falling naturally. -
Color Balance:
Step back occasionally to check the color distribution. Ensure you don’t have a cluster of just blue dots in one area; keep the mix vibrant and varied across the entire surface. -
Securing the edges:
Pay special attention to dots near the camera hole and the side buttons. Press these down firmly to ensure they don’t lift up and snag on your phone later. -
Initial Drying:
Let the first layer of glue dry completely. The dots should be stiff and not slide around when touched. This usually takes about 20-30 minutes depending on your glue thickness.
Use a hole punch
Can’t find the perfect confetti colors? Make your own custom mix using colored cardstock or stiff construction paper and a standard office hole punch.
Step 3: Sealing and Finishing
-
The Sealing Coat:
Pour a small amount of Mod Podge inside the case. With a clean brush, gently spread a generous layer over the entire back interior, fully covering every single confetti dot. -
Smooth it Out:
Work quickly to smooth out any brush strokes. The goal is a uniform, milky layer that will dry clear. This ’embeds’ the confetti so the paper edges won’t peel up when you insert your phone. -
Check for Air Bubbles:
Inspect the wet glue for trapped air bubbles, especially around the overlapped confetti at the bottom. Pop them gently with a pin or the tip of your tweezers. -
Long Dry Time:
Place the case right-side up in a dust-free area. Allow it to cure for at least 24 hours. The glue must be 100% hard and dry, or it will stick to the back of your phone. -
Final Cleanup:
Once dry, check the exterior of the case. If any glue smudged on the outside or the camera rim, wipe it away with a damp cloth or a little rubbing alcohol. -
The Fit Test:
Gently insert your phone into the case. If it feels too tight due to the added thickness, you might need to gently sand down high spots, but usually a thin coat fits perfectly.
Upgrade the sparkle
Mix a tiny pinch of ultra-fine holographic glitter into your final sealing layer associated with the glue to give the background a subtle, shimmering ‘galaxy’ effect.
Now your phone is wrapped in a permanent celebration that looks store-bought but is uniquely yours


Have a question or want to share your own experience? I'd love to hear from you in the comments below!