
I love how no-carve pumpkins let you chase big, artsy ideas without the messy scooping or sharp tools. Here are my favorite clever ways to transform a pumpkin using paint, paper, and a few fun add-ons.
Painted Jack-o’-Lantern Faces
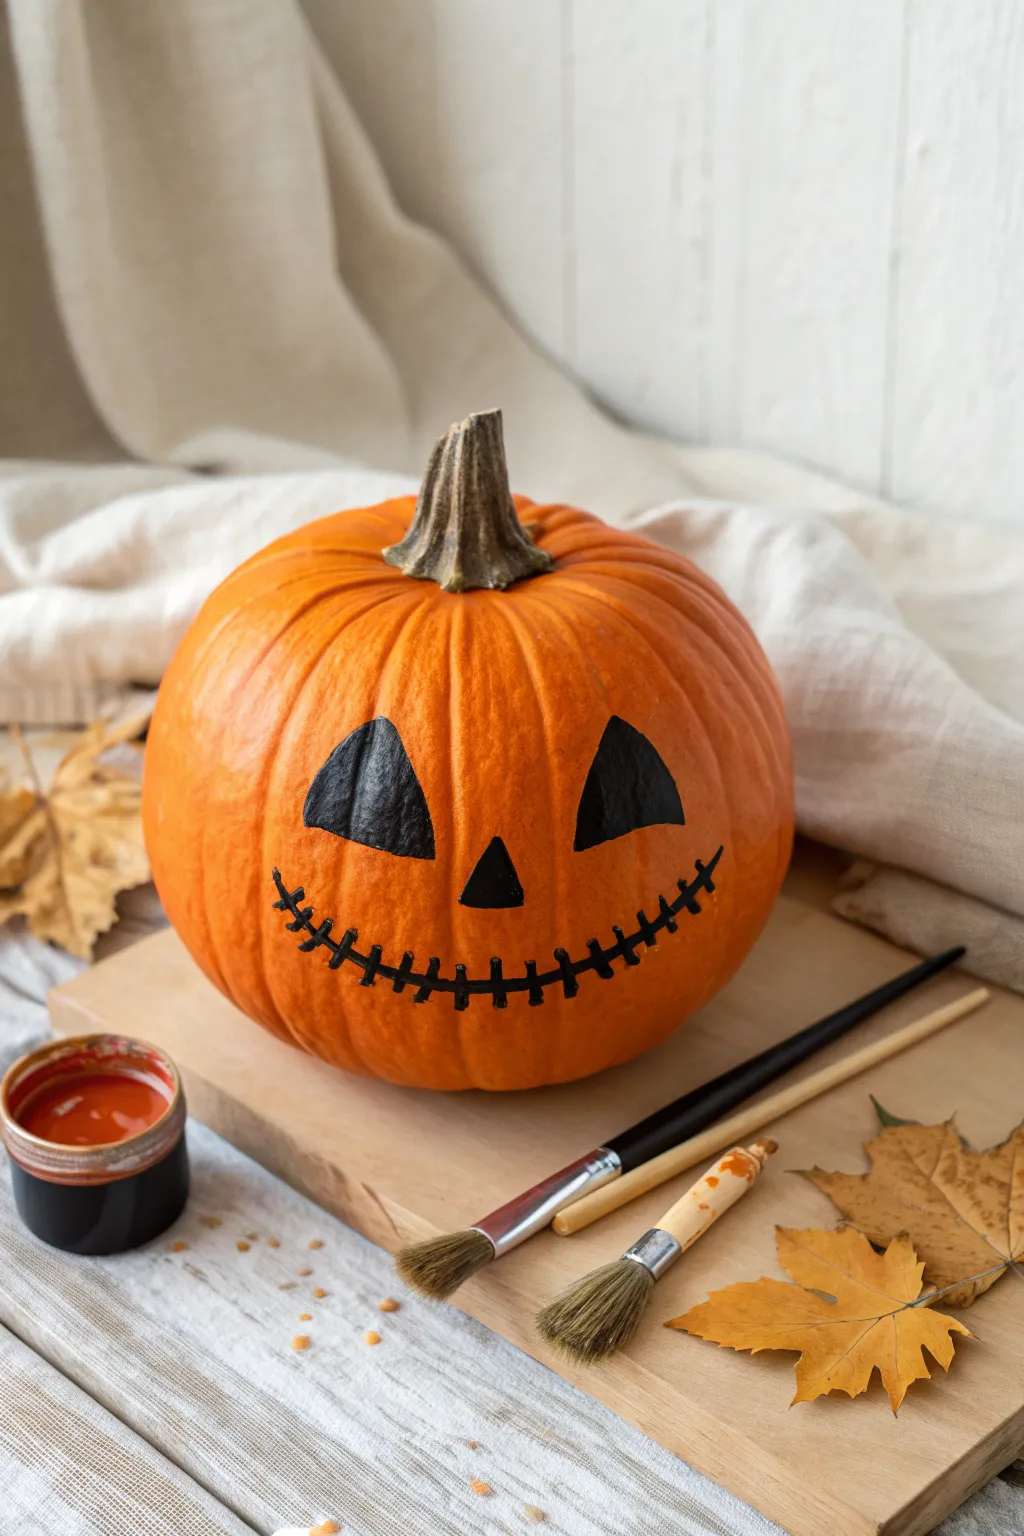
For the classic Halloween look without the messy pumpkin guts, try painting on a spooky jack-o’-lantern face. This stitched, ragdoll-style grin adds just the right amount of creepy character to your doorstep display.
Step-by-Step Tutorial
Materials
- Medium-sized orange pumpkin
- Black acrylic craft paint
- Flat shader brush (medium width)
- Small round detail brush
- Pencil or dry-erase marker
- Paper towels
- Cup of water
- Damp cloth (for corrections)
Step 1: Cleaning & Prep
-
Surface Cleaning:
Begin by wiping down the entire surface of your pumpkin with a damp cloth or paper towel. -
Drying:
Ensure the pumpkin skin is completely dry before applying any paint, as moisture will cause the acrylic to flake off later. -
Positioning:
Set the pumpkin on a stable surface and locate the smoothest side to serve as the ‘face’ canvas.
Step 2: Drafting the Design
-
Sketching the Eyes:
Using a pencil or a light touch with a dry-erase marker, lightly sketch two large triangles for the eyes about a third of the way down the pumpkin. -
Defining the Shape:
I like to slightly curve the outer vertical edge of each eye triangle to give it a softer, more organic look rather than perfectly rigid geometry. -
Placing the Nose:
Draw a much smaller triangle directly in the center, slightly below the eyes, for the nose. -
Mapping the Mouth:
Sketch a long, wide, upward-curving line for the smile, ensuring it stretches past the width of the eyes on both sides.
Paint Slipping?
If the acrylic paint beads up on the pumpkin skin, the surface might be too waxy. Lightly buff the painting area with fine-grit sandpaper so the paint adheres better.
Step 3: Painting the Features
-
Filling the Eyes:
Dip your flat shader brush into the black acrylic paint and carefully outline the left eye triangle. -
Solid Coverage:
Fill in the rest of the left eye shape, using long, smooth strokes to minimize brush texture. -
Repeating on the Right:
Move to the right eye and repeat the process, outlining first and then filling in clearly. -
Painting the Nose:
Switch to your smaller detail brush or use the corner of the flat brush to fill in the small nose triangle. -
First Coat Drying:
Let these filled shapes dry for about 10-15 minutes. If the orange shows through, apply a second coat for opaque black coverage.
Seal the Deal
To make your design weather-resistant for outdoor display, spray the finished face with a coat of clear matte acrylic sealer once the black paint is fully dry.
Step 4: Creating the Stitched Mouth
-
Drawing the Smile Line:
Load your small round detail brush with black paint. Trace over your sketched mouth line with a steady hand to create the main smile. -
Thickening the Line:
Go over the main smile line one more time to make it bold enough to stand out from a distance. -
Adding Center Stitches:
Starting at the center of the mouth, paint short, vertical hatch marks across the main line. -
Working Outward:
Continue painting vertical hatch marks radiating outward toward the cheeks, keeping the spacing somewhat irregular for a stitched effect. -
Finishing the Edges:
Add a small ‘X’ shape or a final cross-hatch at the very tips of the smile to cap off the design. -
Final Cleanup:
Once dry, gently wipe away any visible pencil or marker lines with a damp cloth.
Place your newly painted pumpkin on the porch for a festive decoration that lasts longer than a carved one


Bold Black Silhouette Pumpkins
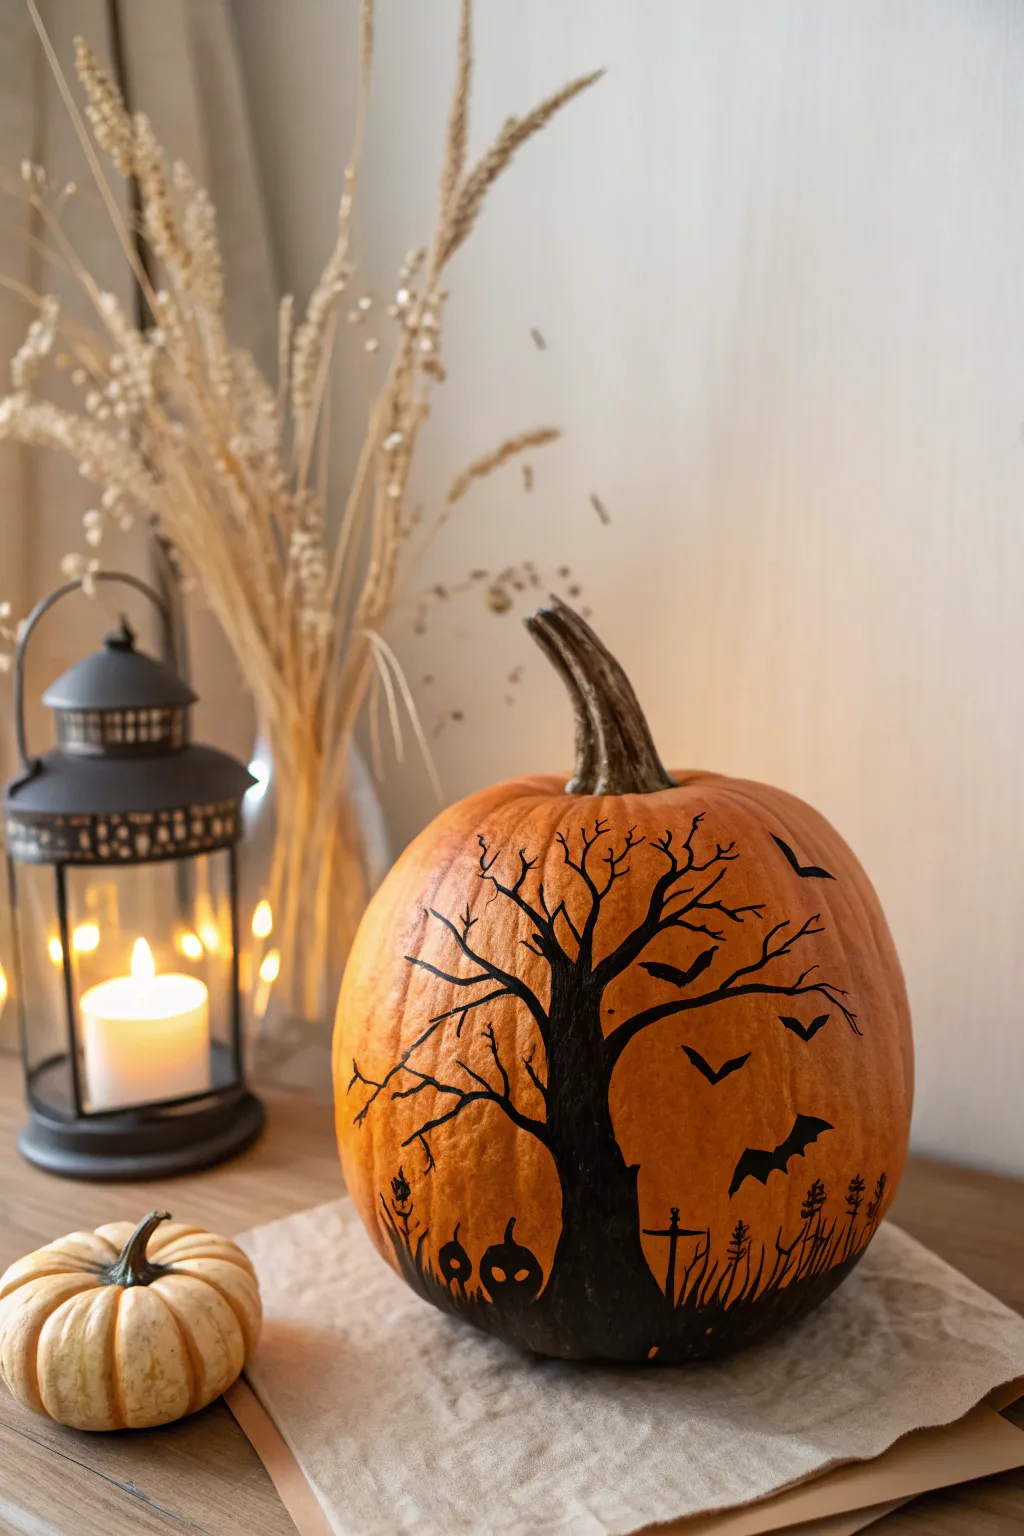
Transform a classic orange pumpkin into a haunting landscape without ever picking up a carving knife. This striking design uses high-contrast black paint to create a shadowy graveyard scene complete with a gnarled tree and flying bats.
Step-by-Step
Materials
- Medium-sized orange pumpkin (real or artificial)
- Black acrylic craft paint
- Fine point round paintbrush (size 0 or 1)
- Medium flat paintbrush (size 6 or 8)
- Pencil or disappearing fabric marker
- Damp paper towel
- Matte or satin clear sealant spray (optional)
Step 1: Preparation & Planning
-
Clean surface:
Wipe down your pumpkin with a damp paper towel to remove any dirt or dust. A clean surface ensures the paint adheres properly and doesn’t flake off later. -
Dry completely:
Let the pumpkin air dry for at least 15 minutes. Acrylic paint doesn’t like moisture, so a bone-dry surface is key. -
Sketch the horizon:
Using a pencil, lightly sketch a low, uneven horizon line near the bottom quarter of the pumpkin. This doesn’t need to be straight; a little waviness looks like natural ground. -
Outline the tree:
Sketch the main trunk of the tree slightly off-center. Draw the trunk thick at the bottom where it meets the ground and taper it as it goes up. -
Add branches:
Lightly draw the main branches extending outward and upward. Aim for jagged, crooked angles to make the tree look spooky and old.
Step 2: Painting the Base Elements
-
Fill the ground:
Using your medium flat brush and black acrylic paint, fill in the area below your horizon line. Paint solid black all around the base to ground the design. -
Paint the trunk:
Still using the medium brush, paint the main trunk of the tree. Apply the paint thick enough to be opaque; you don’t want the orange showing through the center. -
Switch brushes:
Change to your fine point round brush for better control as you move into the details. -
Detail the branches:
Paint the main branches you sketched, carefully following your lines. At the ends of the branches, use the very tip of the brush to flicker out into tiny, delicate twigs. -
Add texture:
I like to vary the pressure on the brush here—press harder for thicker branch sections and lift up for whispy ends.
Paint Slipping?
If acrylic paint beads up on a waxy pumpkin skin, try lightly buffing the surface with fine-grit sandpaper or a scouring pad first to give it ‘tooth’.
Step 3: Adding Spooky Details
-
Create the fence:
Along the horizon line, paint thin vertical lines with your fine brush to represent an old fence or tall grass. -
Paint tombstones:
Add small, simple shapes like crosses or rounded stones near the base of the tree. Keep these small so they look like they are in the distance. -
Add grass blades:
Use quick, short upward strokes along the bottom black area to create the look of overgrown grass covering the graves. -
Add bats:
In the open orange space to the right of the tree, paint simple ‘V’ shapes for distant bats. For closer bats, make the wings slightly more curved and scalloped. -
Include subtle ghosts:
If you want extra detail, paint tiny rounded shapes with small eyes near the ground to suggest lurking spirits or jack-o’-lanterns. -
Fix mistakes:
If you smudge any paint, quickly wipe it with a damp cotton swab or wait for it to dry and scrape it off gently with a fingernail. -
Seal:
Once the paint is fully dry (give it at least an hour), you can spray a light coat of matte sealant to protect your artwork from the elements.
Glow Up
Use glow-in-the-dark paint over the black bat silhouettes or for the eyes of the ground spirits to make the design pop when the lights go out.
Place your masterpiece next to a lantern or candle to cast real shadows alongside your painted ones


Easy Stripes and Polka Dots
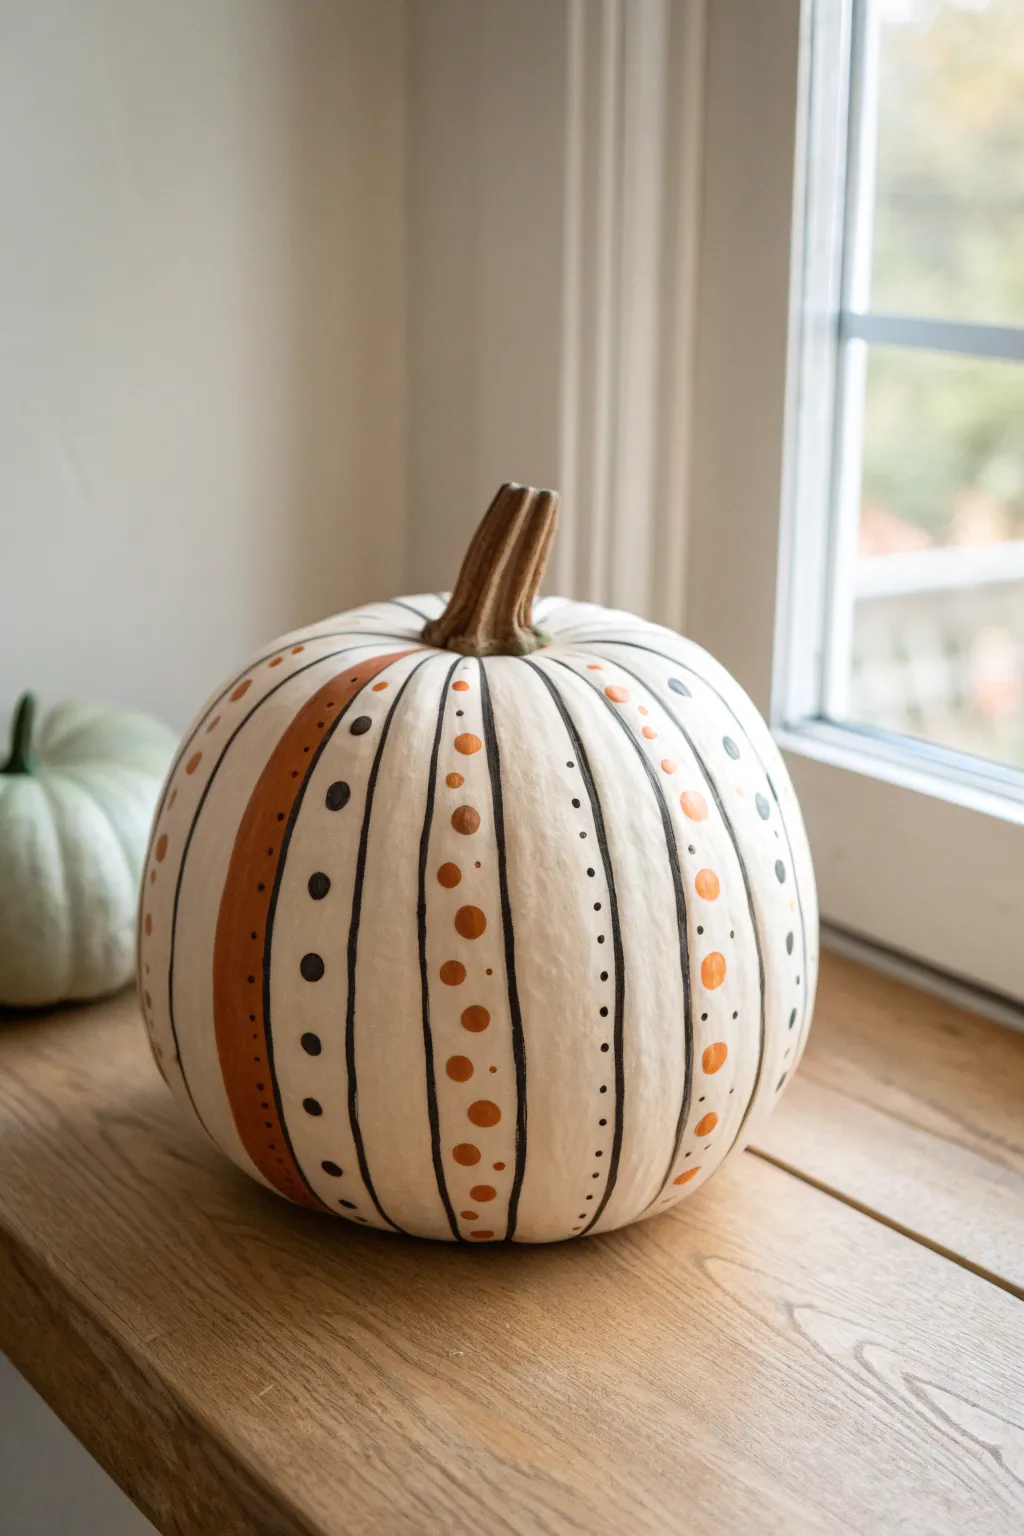
Transform a simple white pumpkin into a piece of modern fall decor with this clean and accessible project. By combining distinct vertical lines with playful polka dots, you’ll create a sophisticated look that fits perfectly on a windowsill or mantel.
Step-by-Step Tutorial
Materials
- Medium-sized white pumpkin (real or faux)
- Black acrylic paint pen (medium tip)
- Burnt orange acrylic paint
- Light taupe or beige acrylic paint
- Small round paintbrush (size 2 or 4)
- Pencil
- Paper towel
- Clear matte sealer (optional)
Step 1: Preparation & Planning
-
Clean surface:
Begin by wiping down your pumpkin with a damp cloth to remove any dirt or oils. If using a real pumpkin, make sure it is completely dry before starting. -
Identify ribs:
Examine the natural vertical grooves (ribs) of your pumpkin. These will serve as your natural guide for the stripes. You don’t need to measure; just follow nature’s lines. -
Sketch the layout:
Lightly trace down the center of each groove with a pencil. Decide which sections will get a solid black line, which will get paint, and which will receive dots.
Uneven Lines?
If your hand shakes while drawing long lines, rest your pinky finger against the pumpkin surface as an anchor. It creates stability as you pull the pen down.
Step 2: Creating the Lines
-
Draw primary black lines:
Take your black paint pen and carefully draw thin vertical lines following the deepest part of every other groove. Start from the base of the stem and pull the pen steadily down to the bottom. -
Add secondary lines:
In the alternating sections (the ones without the first black line), draw two more black lines that frame the center of that raised rib section. -
Check consistency:
Rotate the pumpkin to ensure your lines are relatively even in thickness. Don’t worry about perfection; a little wobble adds hand-painted charm.
Step 3: Painting the Colors
-
Fill the thick stripes:
Choose one or two specific sections to fill completely with color. Dip your brush into the burnt orange paint and carefully fill the space between two of your black border lines. -
Apply second coat:
Allow the first layer of orange to dry for about 10 minutes. If the white pumpkin skin is showing through, apply a second thin coat for opacity. -
Clean the brush:
Thoroughly rinse your brush and dry it well on a paper towel before switching colors.
Pro Tip: Perfect Circles
For consistent polka dots without a stencil, use Q-tips dipped in paint for medium dots, and the flat head of a nail or pin for tiny dots.
Step 4: Adding the Dots
-
Create large dots:
Using the handle end (the non-brush end) of your paintbrush, dip it into the burnt orange paint. Press this onto the white sections centered between black lines to create uniform large dots. -
Create medium dots:
Wipe the handle clean and switch to the light taupe paint. Add slightly smaller dots in alternating columns around the pumpkin. -
Add tiny black details:
Take your black paint pen again. In the remaining empty white columns, place the tip gently against the surface to create a vertical row of tiny, precise black micro-dots. -
Vary the dot pattern:
Look closely at the design; some columns should have large orange dots, while others feature tiny black ones alongside the larger colored dots. Mixing these scales creates visual interest.
Step 5: Finishing Touches
-
Inspect the stem:
If your stem looks dull, you can dry-brush a tiny amount of light brown paint over it to enhance the texture, though leaving it natural often works best. -
Touch up edges:
check the edges of your solid orange stripe. If paint bled over the black lines, re-trace that section of the black line with your paint pen once the color is 100% dry. -
Let it cure:
Allow the entire pumpkin to sit undisturbed for at least an hour to ensure the thickest dots of paint are hardened. -
Seal the work:
If this pumpkin is going outside, lightly mist it with a clear matte sealer to protect your design from moisture.
Enjoy displaying your chic, hand-painted creation alongside your other fall decorations


Soft Ombre Color Blend
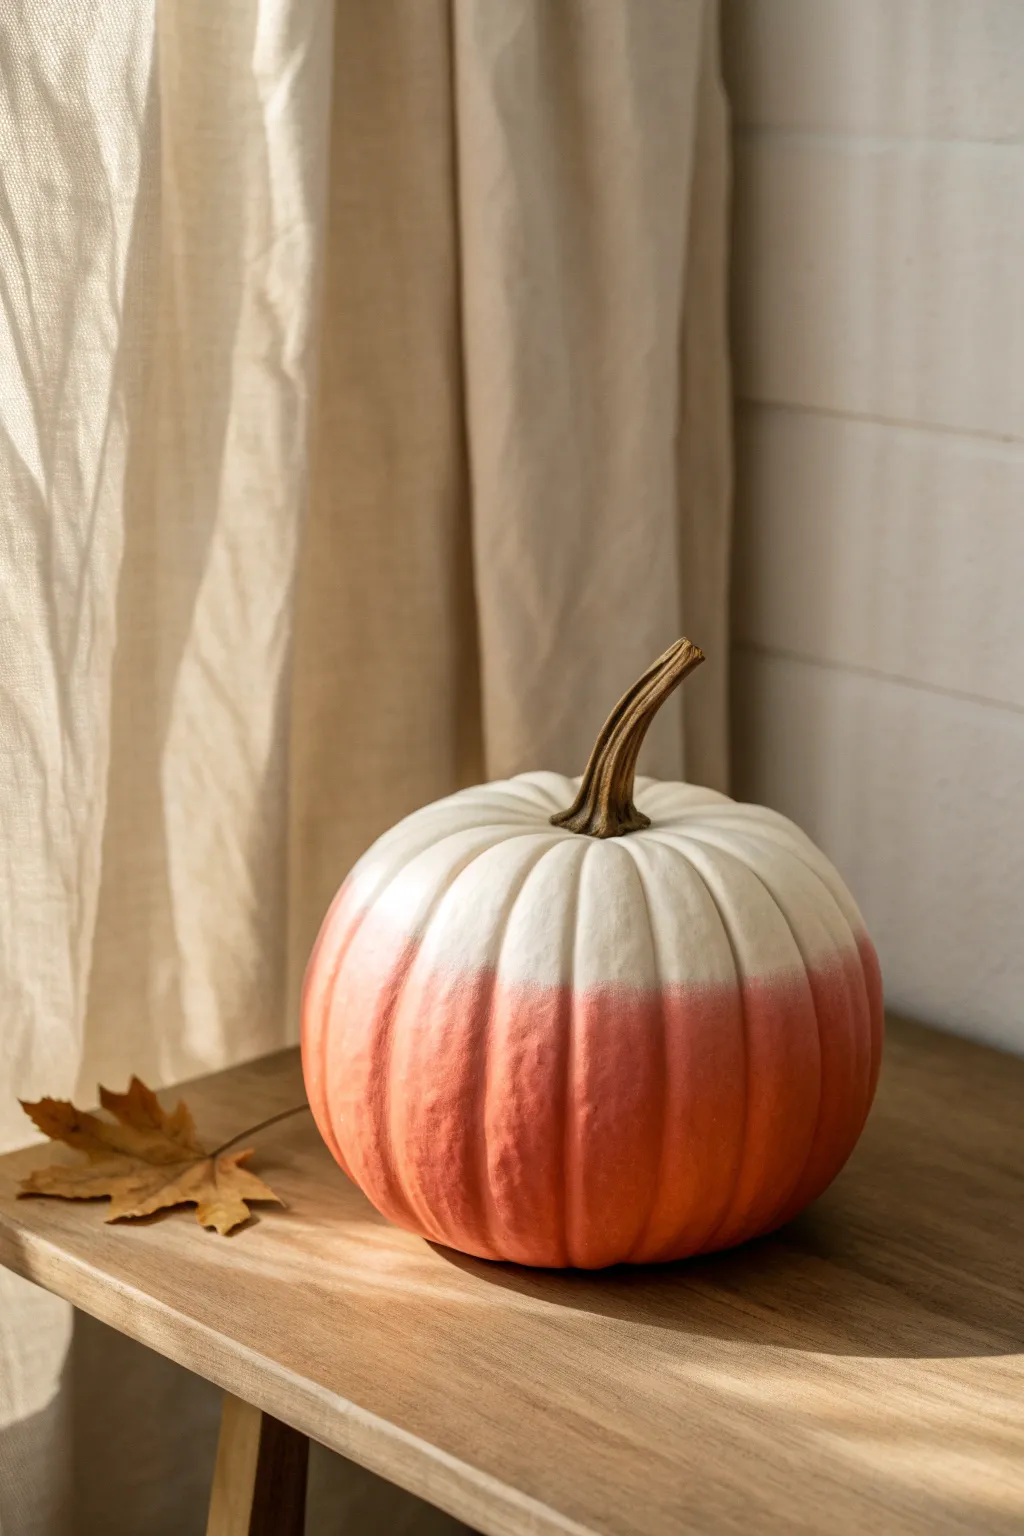
Capture the soft glow of golden hour with this elegant two-tone pumpkin design. The seamless blend from creamy white to warm coral creates a sophisticated, modern look perfect for minimal autumn decor.
Detailed Instructions
Materials
- Medium-sized pumpkin (white or cream preferred)
- White or cream matte acrylic paint
- Coral or peach matte acrylic paint
- Foam sponge brush
- Medium flat paintbrush
- Makeup sponge or soft blending sponge
- Paper towels
- Painter’s tape (optional, for stem)
Step 1: Preparation
-
Clean surface:
Begin by thoroughly wiping down your pumpkin with a damp cloth to remove any dirt or oils that might prevent paint adhesion. Let it dry completely. -
Protect the stem:
If you want to keep the natural stem color, carefully wrap a small piece of painter’s tape around the base of the stem where it meets the pumpkin skin. -
Select your workspace:
Set up in a well-lit area and put down some protective paper or newspaper, as sponging can sometimes create tiny splatters.
Pro Tip: Sponge Textures
Use a cosmetic wedge sponge for the smoothest blend. Unlike kitchen sponges, the tight pores create an airbrushed look without leaving obvious texture marks.
Step 2: Base Application
-
Apply top color:
Using your foam brush, paint the top half of the pumpkin with the cream or white acrylic paint. It doesn’t need to be perfect at the bottom edge yet. -
Extend the white:
Bring the white paint down slightly past the equator of the pumpkin, feathering out the strokes as you go lower so the paint layer is thinner near the middle. -
Apply bottom color:
While the top is still slightly tacky but not wet, use a clean bush to apply the coral paint to the bottom third of the pumpkin. -
Work upwards:
Paint the coral color upwards towards the middle, stopping just before you hit the solid white section, leaving a small gap of unpainted or thinly painted skin between the two colors. -
Initial drying:
Let this first coat dry for about 10-15 minutes. A second coat is usually needed for full opacity, especially on darker pumpkins.
Step 3: Creating the Ombre
-
Refresh paints:
Put a fresh dab of white and a fresh dab of coral on your palette or paper plate. You need the paint wet for blending. -
Apply wet layers:
Apply a fresh, thin layer of white near the middle line, and immediately apply a fresh layer of coral right below it so they touch. -
Start sponging:
Take your makeup sponge or soft blending sponge. Dampen it slightly—I find a bone-dry sponge absorbs too much paint—and dab it right over the line where the colors meet. -
Blur the line:
Using a rapid up-and-down tapping motion, move the sponge along the horizon line of the pumpkin to blur the hard edge. -
Adjust the gradient:
If the orange looks too strong, dip the sponge lightly in white and tap it downwards. If the white is taking over, dip in coral and tap upwards. -
Check the ribs:
Pay special attention to the deep grooves of the pumpkin; poke the corner of the sponge into these crevices to ensure the gradient looks continuous, not stripey. -
Final smooth:
Do one last pass around the circumference with a light hand to ensure the transition is soft and misty rather than blocky.
Troubleshooting: M muddy Colors
If the middle section turns muddy or gray, stop blending. Let it dry completely, then re-apply fresh white and coral strips and blend again quickly while wet.
Step 4: Finishing Touches
-
Remove tape:
Once the paint is dry to the touch, carefully peel away the painter’s tape from the stem. -
Touch up stem:
If any paint got on the stem, you can gently scrape it off with a fingernail or use a small brush with brown paint to correct it. -
Seal (Optional):
For longevity, spray a light coat of matte clear sealer over the pumpkin, though leaving it unsealed keeps that lovely chalky finish visible in the photo.
Place your finished pumpkin near a window to let the natural light highlight your smooth color transition
BRUSH GUIDE
The Right Brush for Every Stroke
From clean lines to bold texture — master brush choice, stroke control, and essential techniques.
Explore the Full Guide
Gem and Pearl Constellations
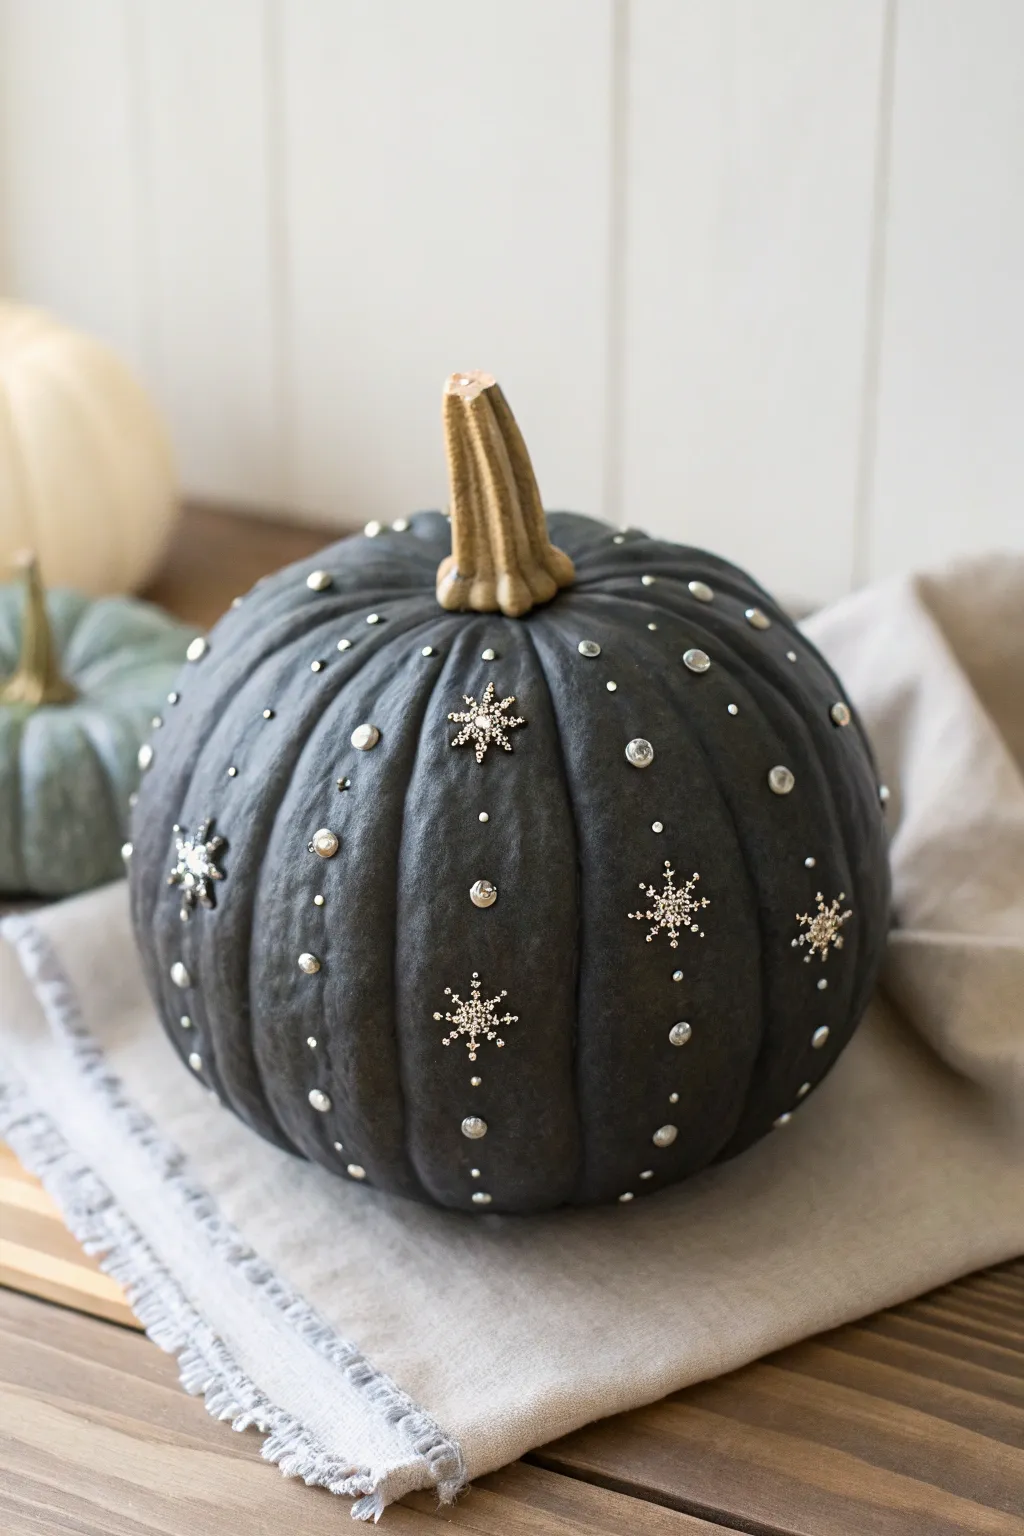
Transform a simple pumpkin into a sophisticated celestial centerpiece using a dark, moody base and sparkling embellishments. The combination of matte charcoal paint with silver snowflakes and gems creates a stunning contrast that feels both festive and elegant.
Detailed Instructions
Materials
- Medium-sized pumpkin (real or faux)
- Matte charcoal or soft black acrylic paint
- Wide foam brush or flat paintbrush
- Silver snowflake charms or flat-back embellishments
- Assorted silver rhinestones, studs, or flat-back pearls (various sizes)
- Strong craft glue (e.g., E6000) or hot glue gun with glue sticks
- Tweezers
- Paper plate or palette
- Protective drop cloth or newspaper
Step 1: Preparation & Base Coat
-
Clean the surface:
Before creating your masterpiece, ensure the pumpkin is completely clean. Wipe it down with a damp cloth to remove dirt or oils and let it dry thoroughly. -
Protect your workspace:
Lay down newspaper or a drop cloth on your table to catch any paint drips. -
Apply the first coat:
Squeeze a generous amount of matte charcoal paint onto your palette. Using a foam brush, apply a smooth, even layer over the entire pumpkin, stopping at the base of the stem. -
Let it dry:
Allow the first coat to dry completely. This usually takes about 20-30 minutes, but check that it’s dry to the touch before proceeding. -
Apply the second coat:
For that deep, opaque look shown in the darker areas, apply a second coat of paint. This ensures full coverage and a rich, velvety finish. -
Preserve the stem:
Keep the stem natural. If you accidentally get paint on it, wiping it off immediately with a damp paper towel usually does the trick.
Adhesive Tip
For slick faux pumpkins, lightly scuff the surface with sandpaper where you plan to glue heavier gems. This helps the adhesive grip better.
Step 2: Creating the Constellation Design
-
Plan your snowflake placement:
Before gluing, lay out your silver snowflake charms on the table to plan their distribution. You want them spaced somewhat randomly but balanced around the pumpkin’s ribs. -
Attach the main stars:
Apply a small dot of strong craft glue to the back of a snowflake charm. Press it firmly onto the center of a pumpkin rib. I find holding it for 10 seconds helps it set securely. -
Distribute the snowflakes:
Continue attaching snowflakes around the pumpkin, placing some higher and some lower to create movement. Avoid placing them in perfectly straight horizontal lines. -
Select your accent gems:
Sort your rhinestones or studs by size. You’ll want a mix of tiny dots and medium-sized gems to create the effect of distant stars. -
Add vertical gem lines:
Using tweezers for precision, pick up a medium-sized gem, dip the back in glue, and place it vertically aligned above or below a snowflake. -
Create scattered constellations:
Fill in the empty spaces on adjacent ribs with smaller rhinestones. Scatter them singly or in loose pairs to look like a natural starry sky. -
Detail the ribs:
Place tiny studs or pearls along the natural ridges of the pumpkin to highlight its shape without overpowering the main design. -
Check for balance:
Step back and look at the pumpkin from all angles. If a spot looks too empty, add a small cluster of the tiniest rhinestones. -
Final drying time:
Allow the glue to cure completely according to the manufacturer’s instructions before moving your celestial creation.
Gilded Stem
Elevate the look by brushing a layer of metallic gold leaf or gold paint onto the pumpkin stem for a luxurious finish that complements the silver stars.
Place your finished pumpkin on a soft linen cloth to complete the cozy winter vignette
Botanical Pressed Leaf Pumpkin
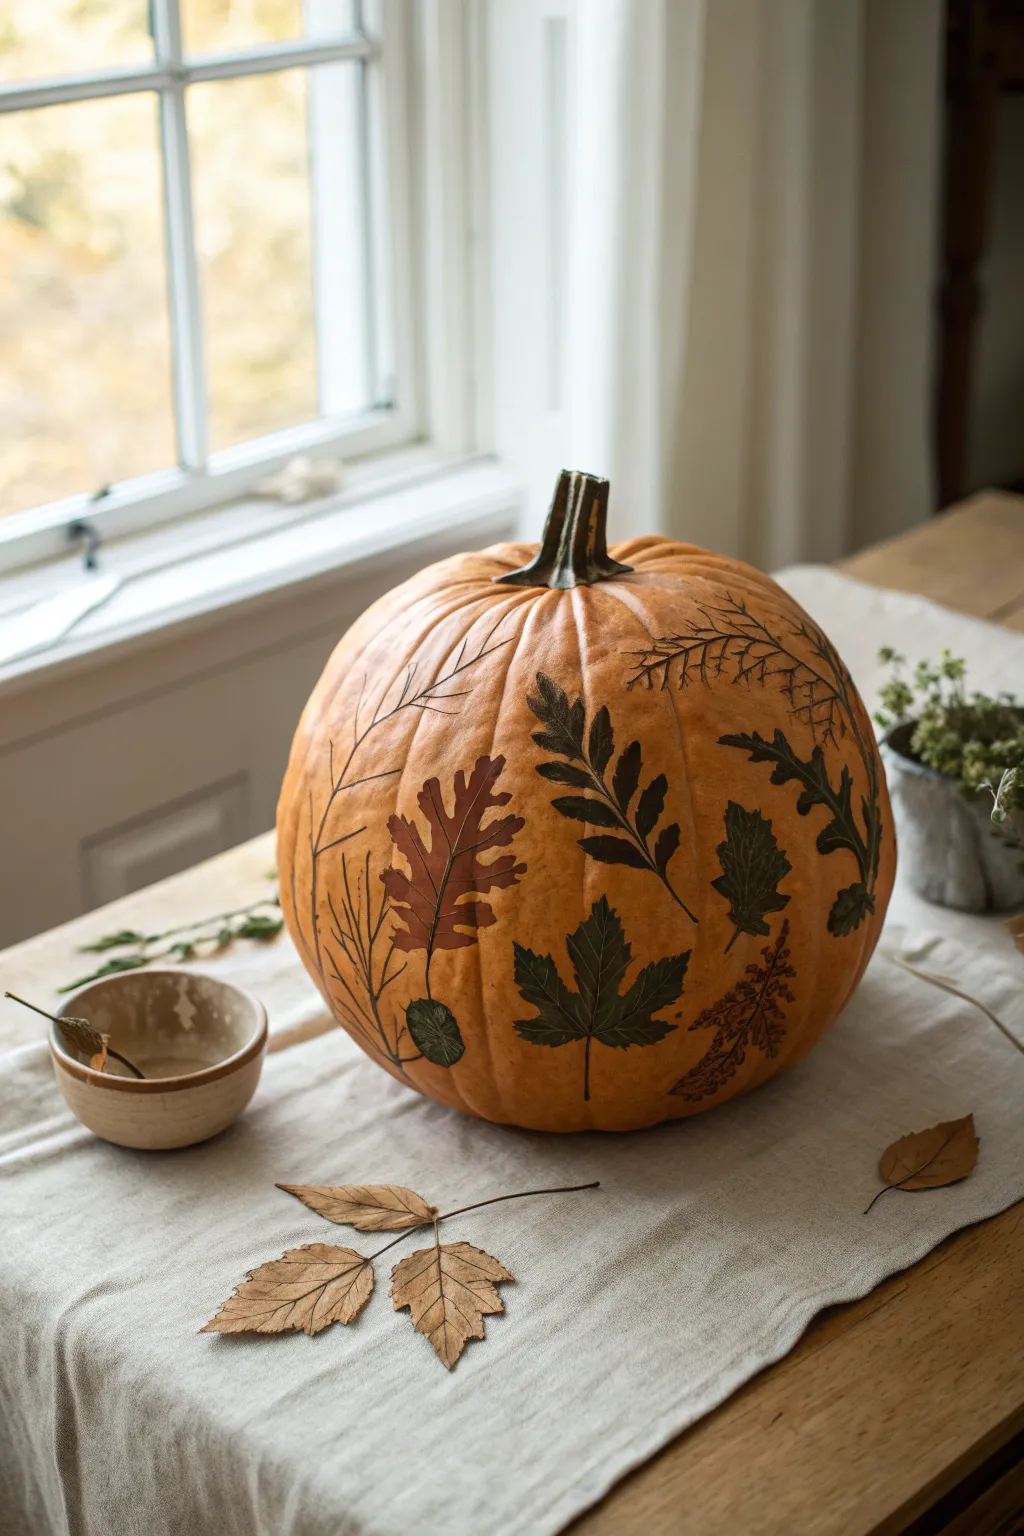
Transform a plain gourd into a sophisticated autumn centerpiece by showcasing the delicate structures of nature against a bright orange canvas. This no-carve technique uses decoupage to adhere real preserved leaves directly onto the pumpkin’s surface for an elegant, earthy look.
How-To Guide
Materials
- Medium-sized orange pumpkin (real or faux)
- Assorted pressed leaves (fern, maple, oak, etc.)
- Mod Podge (Matte finish)
- Foam brush or soft bristle brush
- Tweezers
- Paper towels
- Heavy books (for pressing leaves beforehand)
- Wax paper
- Clear acrylic sealer spray (optional)
Step 1: Preparation
-
Select and Clean or Your Pumpkin:
Choose a pumpkin with a smooth surface and minimal deep ribbing, as this makes adhering flat leaves much easier. Wash the surface thoroughly with mild soapy water and dry it completely. -
Gather and Press Leaves:
Collect a variety of leaves from your yard or purchase a dried botanical pack. If using fresh leaves, place them between sheets of wax paper inside a heavy book for at least a week until they are completely flat and dry. I prefer selecting thinner leaves like ferns because they conform better to the pumpkin’s curve. -
Plan Your Composition:
Before gluing anything, lay your pressed leaves out on a table to simulate the pumpkin’s surface. Experiment with different arrangements, mixing sizes and shapes—fern fronds look great vertical, while maple leaves work well as focal points.
Flatten Those Fronds
Thick veins on leaves can be trouble. Use a rolling pin to gently flatten dried leaves further before gluing to help them lie flush.
Step 2: Adhering the Botanicals
-
Apply Initial Glue Layer:
Squeeze a small amount of matte Mod Podge onto a plate or bowl. Using your foam brush, apply a thin, even layer of adhesive to the back of your first leaf. -
Position the Leaf:
Place the leaf onto the pumpkin’s surface. Start with larger leaves first to establish your main design elements. -
Smooth it Out:
Gently press the leaf down, starting from the center and working your way out to the edges. Use your fingers to carefully smooth out any air bubbles, being gentle so you don’t crack the dry leaf. -
Secure the Edges:
Pay special attention to the tips and stems. If a stem is thick and won’t stick, hold it in place with your finger for a minute or use a tiny piece of painter’s tape to hold it while it dries. -
Seal the First Leaf:
Immediately brush a thin layer of Mod Podge over the top of the leaf to seal it. Extend the glue slightly past the leaf edges onto the pumpkin skin to ensure a good seal. -
Work in Sections:
Continue adding leaves one by one. I like to rotate the pumpkin as I work to ensure the design looks balanced from all angles. -
Layering Elements:
For a more organic look, slightly overlap some leaves. Ensure the bottom leaf is somewhat dry before placing another one on top of it to prevent shifting. -
Clean Up Excess Glue:
If you have large globs of Mod Podge on the pumpkin skin, wipe them away gently with a damp paper towel before they dry completely to keep the finish neat.
Stubborn Stems?
If stiff stems keep popping up despite the glue, use a small piece of clear plastic wrap pulled tight over the wet glue to hold it down until dry.
Step 3: Finishing Touches
-
Review and Repair:
Once all leaves are applied, check for any lifting edges. Use a toothpick dipped in glue to re-adhere any stubborn points. -
Final Sealing Coat:
Apply a final coat of Mod Podge over the entire pumpkin surface, not just the leaves. This unifies the texture and gives the whole project a consistent matte finish. -
Let it Cure:
Allow the pumpkin to dry completely in a safe place for at least 24 hours. The glue will turn from white to clear as it dries. -
Optional Spray Sealant:
If you plan to display your pumpkin on a porch where it might encounter moisture, spray it with a clear acrylic sealer for extra protection.
Step 4: Styling
-
Create a Vignette:
Arrange loose dried leaves around the base of your pumpkin on a linen runner to echo the design on the pumpkin itself.
Enjoy the timeless, natural elegance of your botanical pumpkin all season long

PENCIL GUIDE
Understanding Pencil Grades from H to B
From first sketch to finished drawing — learn pencil grades, line control, and shading techniques.
Explore the Full Guide
Little Pumpkin Place Cards
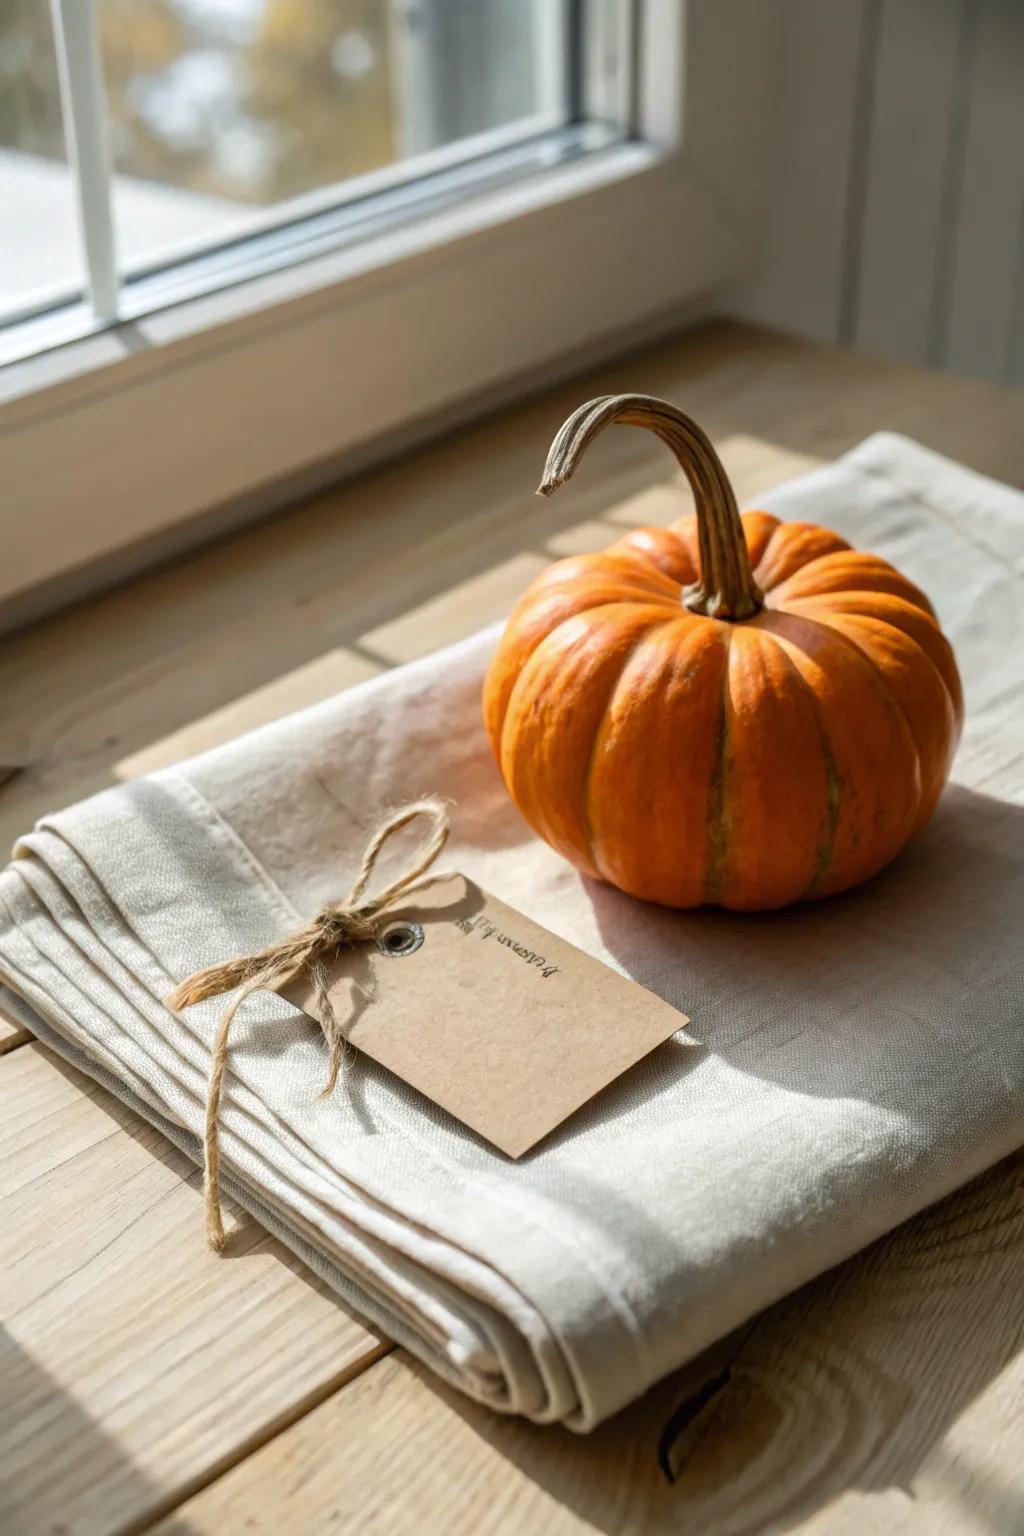
Bring a touch of organic warmth to your autumn table setting with these effortless pumpkin place cards. The combination of natural linen, kraft paper, and vibrant miniature gourds creates a cozy, minimalist aesthetic perfect for Thanksgiving gatherings.
Step-by-Step Guide
Materials
- Miniature orange pumpkins (like ‘Jack Be Little’)
- Rectangular kraft paper tags with pre-punched holes
- Jute twine or hemp cord
- Fine-point black calligraphy pen or marker
- Pencil (optional)
- Scissors
- Linen napkins (for styling)
Step 1: Preparing the Twine
-
Measure the twine:
Start by unspooling a length of natural jute twine. You will want a piece that is roughly 10 inches long to allow plenty of room for tying a secure bow without struggling with short ends. -
Cut to size:
Using sharp scissors, snip the twine cleanly. If the juice is fraying excessively at the cut point, you can dampen your fingers slightly and twist the end to binding it back together temporarily. -
Double check the length:
Loop the piece of twine loosely around your fingers to ensure it feels manageable working with distinct knots requires a bit of slack.
Step 2: Creating the Name Tag
-
Select your tag:
Choose a rectangular kraft paper tag. The one in the project has a reinforced eyelet, which adds a nice industrial touch, but a simple punched hole works just fine too. -
Draft the name:
If you aren’t confident in your freehand lettering, lightly sketch the guest’s name onto the tag using a pencil. Aim for a flowing, handwritten script to match the rustic vibe. -
Ink the letters:
Trace over your pencil lines with a fine-point black pen. I find that a slightly messy, rapid cursive style looks more authentic than perfect calligraphy for this specific look. -
Let the ink set:
Allow the ink to dry completely for a minute or two to prevent smudging against the rough texture of the kraft paper. -
Erase guidelines:
Once the ink is totally dry, gently erase any visible pencil marks underneath the text.
Smudge Stopper
Kraft paper is absorbent and can make ink bleed. Test your pen on a scrap piece first. Felt tip pens often feather; a ballpoint or gel pen usually yields crisper lines.
Step 3: Assembling the Place Card
-
Thread the tag:
Take your cut piece of jute twine and feed one end through the hole or eyelet of your prepared name tag. -
Center the twine:
Pull the twine through until the tag sits roughly in the middle of the string. -
Tie a preliminary knot:
Create a simple overhand knot just above the hole of the tag to secure it in place on the string. This prevents it from sliding around too much later. -
Create the bow:
Tie the two loose ends of the twine into a simple shoelace bow. You want the loops to be somewhat floppy and relaxed rather than tight and rigid. -
Adjust the aesthetics:
Tug gently on the loops to even them out, but don’t worry about perfect symmetry. The charm lies in the slightly askew, handmade appearance. -
Trim the tails:
Use your scissors to trim the trailing ends of the bow. One tail can be slightly longer than the other for a natural look.
Gilded Touch
Brush a tiny amount of gold leaf or metallic paint onto the very tip of the pumpkin stem to add a subtle hint of glamour to the rustic setting.
Step 4: Final Presentation
-
Prepare the linen:
Fold a natural linen napkin neatly into a rectangle or square. The fabric texture contrasts beautifully with the smooth pumpkin skin. -
Position the elements:
Place the folded napkin at the center of the place setting. Set your miniature pumpkin directly on top. -
Add the tag:
Simply lay the finished tag and twine bow on the napkin next to the pumpkin. There is no need to tie it onto the stem; laying it beside the gourd creates a laid-back, inviting feel.
Now you have a charming, personalized autumn placeholder that guests can take home as a favor


Have a question or want to share your own experience? I'd love to hear from you in the comments below!