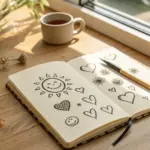
When you’re drawing conflict, you’re really drawing invisible stuff—tension, misunderstanding, power, and pressure. Here are my favorite conflict drawing ideas that read instantly, even in simple sketches.
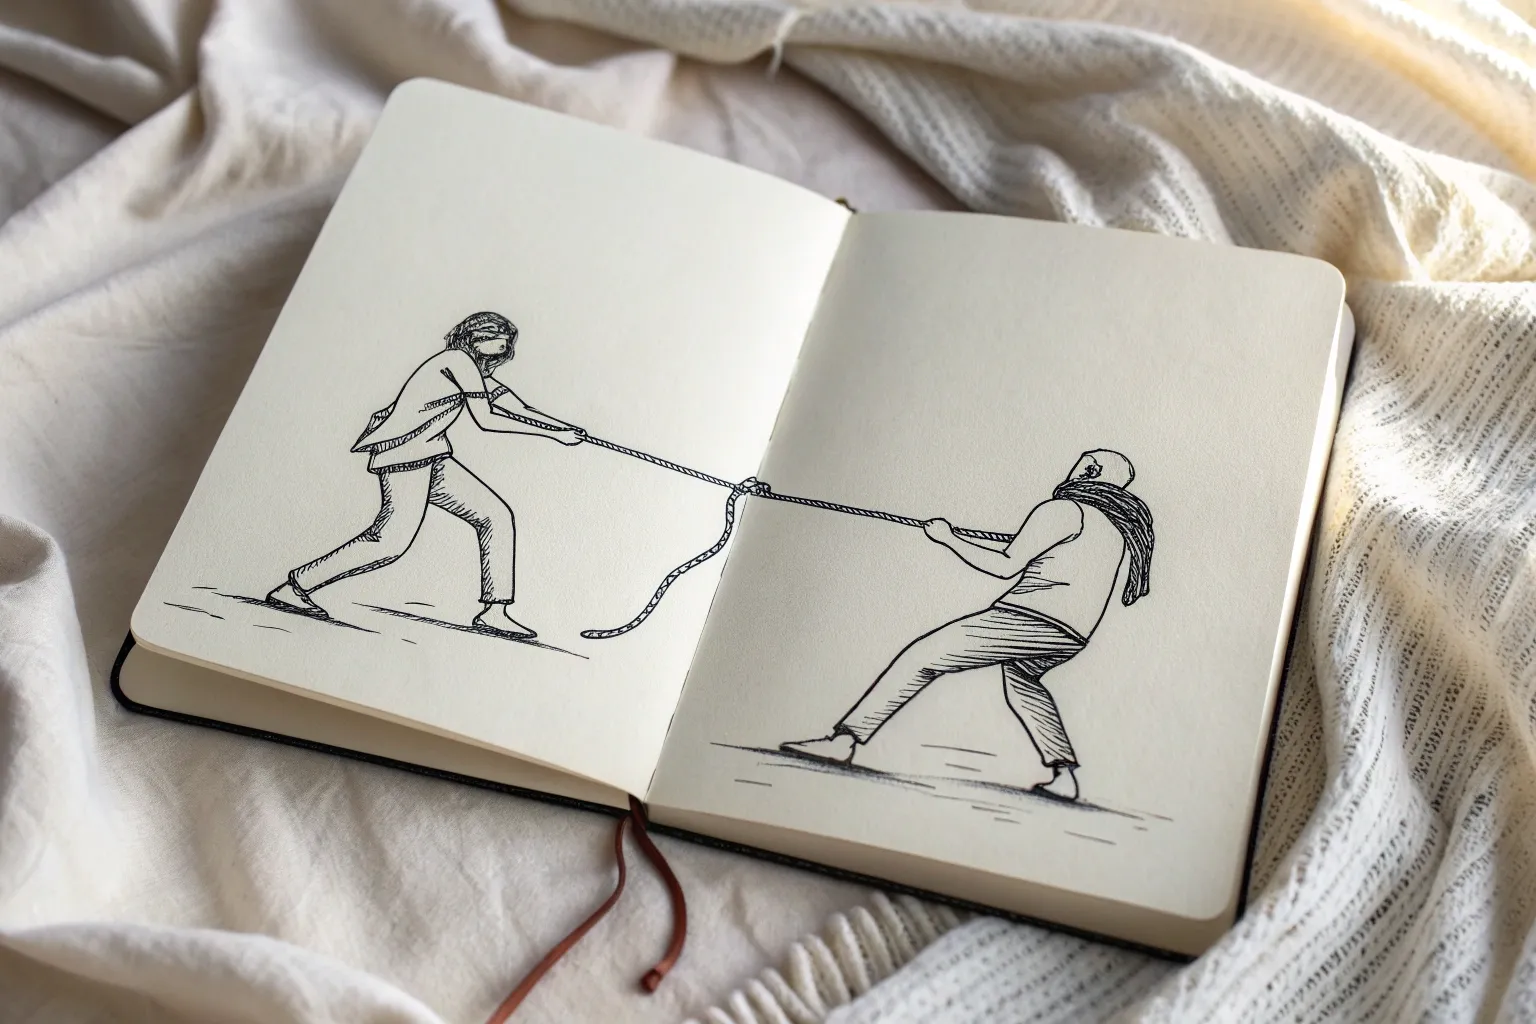
Classic Tug-of-War Power Struggle
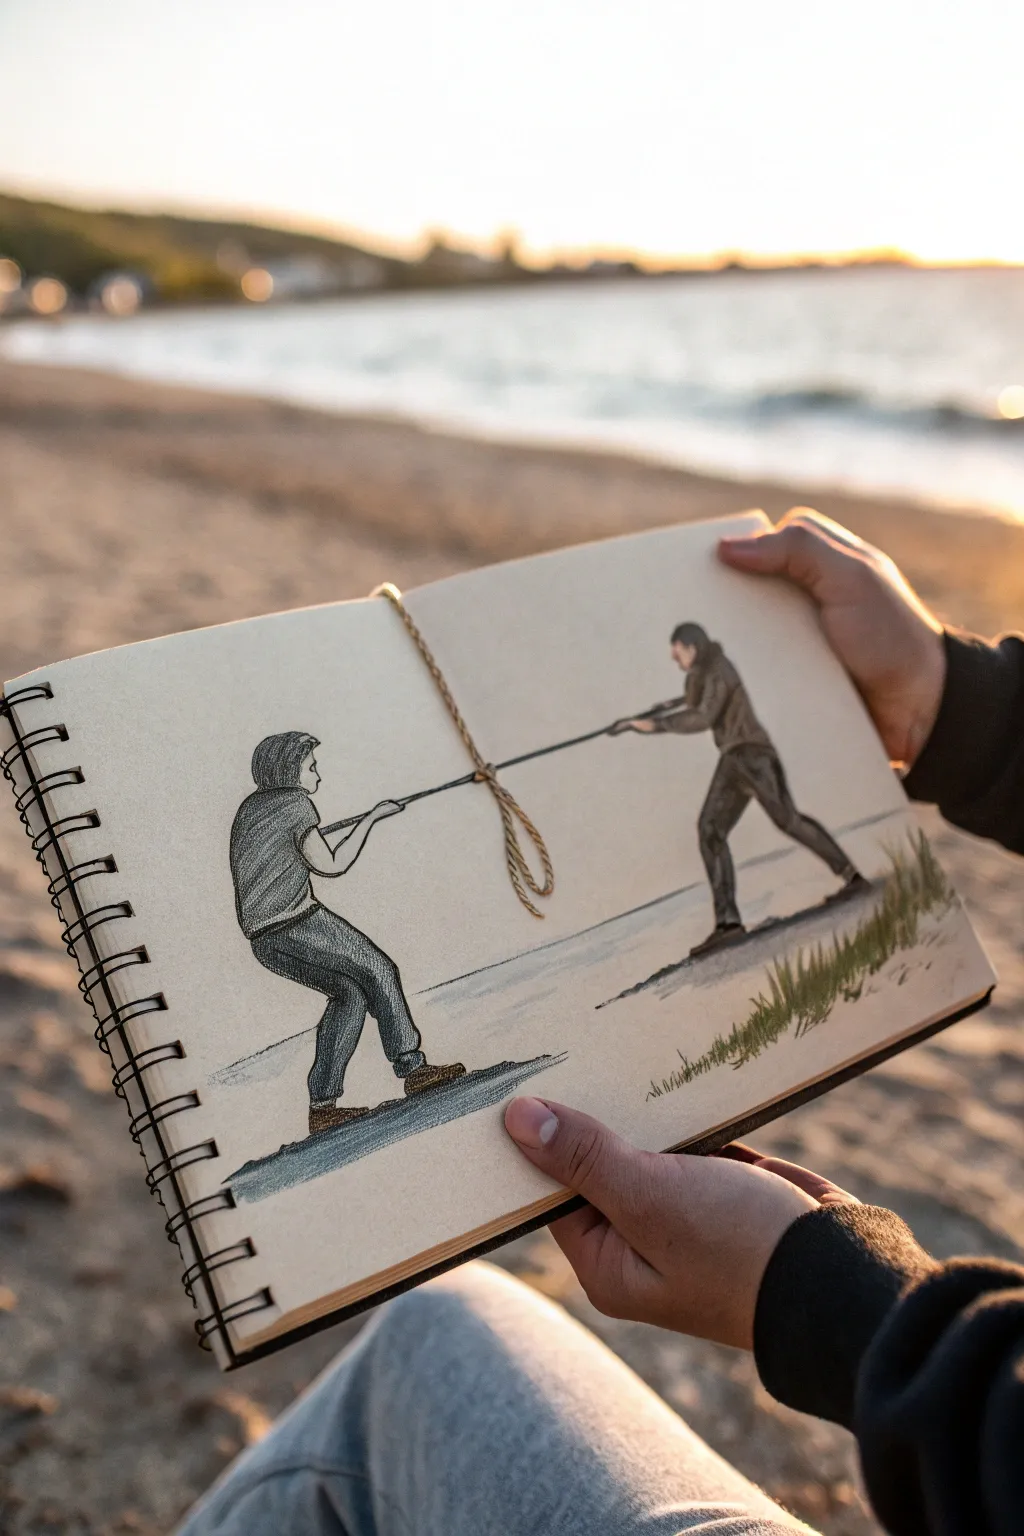
This clever conceptual drawing brings a sketchbook’s physical features to life by turning the built-in bookmark string into a tug-of-war rope. The result is a striking interplay between 2D sketching and 3D reality on tan-toned paper.
How-To Guide
Materials
- Spiral-bound sketchbook with tan/toned paper and an attached ribbon marker/string
- Graphite pencils (HB, 2B, 4B)
- Black charcoal pencil or dark graphite (6B+)
- White charcoal pencil or white gel pen
- Kneaded eraser
- Blending stump (tortillon)
- Ruler (optional)
Step 1: Planning and Composition
-
Position the string:
Open your sketchbook to a fresh spread. Pull the bookmark string taut across the page to see where it naturally falls. It needs to cross the middle area where the figures’ hands will be. -
Mark the grip points:
While holding the string taut, make faint tick marks on the paper exactly where the string sits. These marks will determine the height of the hands for both figures to ensure the illusion works. -
Rough figure placement:
Lightly sketch two stick figures on opposite sides of the page using an HB pencil. The figure on the left should be leaning back, digging their heels in, while the figure on the right mirrors this tension, leaning away from the center.
Tension Trick
Make the figures lean back at extreme angles (45 degrees or lower). The more impossible the balance seems without the rope, the more realistic the tension will feel.
Step 2: Drafting the Figures
-
Flesh out the forms:
Build upon your stick figures by adding volume to the bodies. Focus on the posture of struggle—bent knees, arched backs, and arms fully extended toward the center. -
Refine the hands:
Draw the hands clenched around the imaginary line connecting to your string marks. The knuckles should be tight and facing upward or sideways depending on the grip style you prefer. -
Clothing details:
Sketch casually wrinkled clothing, like jeans and t-shirts. Add stress folds in the fabric around the joints (knees, elbows) and waist to emphasize the physical exertion. -
Grounding the scene:
Sketch faint, scribbly patches of ground beneath their feet. Since they are digging in, show a bit of displaced earth or shadow directly behind their heels.
String Doesn’t Line Up?
Don’t erase the whole drawing. Just adjust the angle of the forearms and redraw the hands slightly higher or lower to meet the natural resting point of the string.
Step 3: Shading and Definition
-
Darken the outlines:
Switch to a 2B or 4B pencil to firm up the main outlines. I usually press a bit harder on the underside of the limbs to suggest weight and shadow. -
Fill in the values:
Use the side of your pencil lead to shade the clothing and pants. Keep the strokes directional—following the curve of the leg or arm—to enhance the 3D form. -
Deep characteristic shadows:
Use the black charcoal pencil or a soft 6B graphite to add the darkest accents: the deep folds in the jeans, the hair, and the cast shadows on the ground. -
Blend for smoothness:
Take your blending stump and gently soften the graphite shading on the clothes, smoothing out the pencil strokes to create a more solid fabric texture.
Step 4: Integration and Highlights
-
Create the rope illusion:
Draw a faint line connecting the string’s actual path to the hands if the string isn’t currently in place. Shade the ‘rope’ entering and exiting their fists to match the thickness of the real string. -
Draw the knot shadow:
Look at where the knotted loop of the string hangs. Draw a cast shadow on the paper directly beneath where the loop will rest to make it look like it’s floating just above the page. -
Add highlights:
Use a white charcoal pencil to add highlights to the top edges of the shoulders, heads, and knees. This ‘rim lighting’ separates the figures from the tan background. -
Grass textures:
Add some quick, upward strokes near the feet using both dark graphite and white charcoal to suggest tufts of grass, consistent with the beachy or outdoor vibe. -
Final check:
Place the string back into position. Adjust the drawing of the hands slightly if needed so the real string looks like it is passing right through their grip.
Once you’ve aligned the string, snap a photo to capture the perfect illusion of dimension and conflict


Stick Figure Argument With Pointing Hands
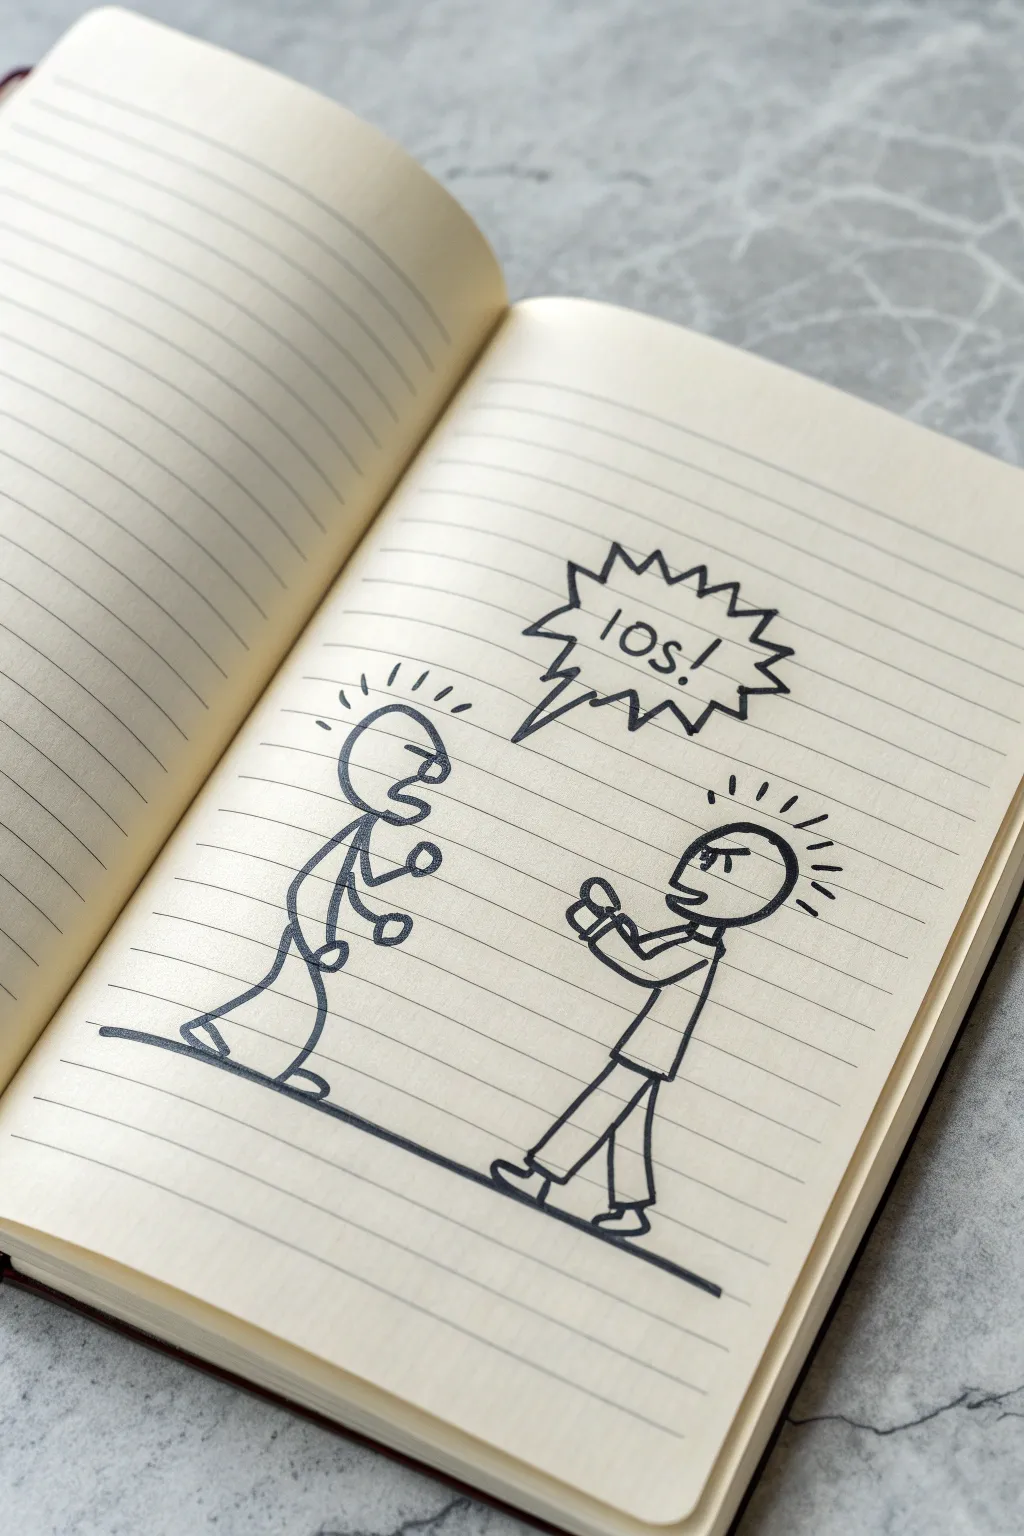
Capture the raw energy of an argument with this deceptively simple ink sketch on lined paper. By using exaggerated postures and bold speech bubbles, you’ll learn how to turn basic stick figures into expressive characters full of emotion.
Step-by-Step Guide
Materials
- Lined notebook or journal
- Black ink pen (fine liner or gel pen)
- Pencil (optional, for sketching)
- Eraser
Step 1: Setting the Stage
-
Establish the ground line:
Begin by drawing a thick, dark horizontal line across one of the notebook’s ruled lines. This serves as the floor where your characters will stand, grounding the scene. -
Position the figures:
Visualize where your two characters will stand. Leave a gap in the center for the tension to build, placing the left figure slightly closer to the margin and the right figure mirrored on the opposite side.
Step 2: Drawing the Left Figure
-
Head and jaw:
Draw an oval for the head, but leave the front open. Instead of closing it, draw a wide, open V-shape for a shouting jaw, making the top lip slightly overlap the bottom. -
Aggressive posture:
Sketch a curved spine leaning forward. The body line should arch toward the opponent, indicating aggression and engagement in the argument. -
Adding arms and fists:
Draw the arms bent sharply at the elbows. Place simple circular ‘fists’ in front of the chest, suggesting they are ready to fight or emphasizing a point. -
Legs and stance:
Draw the legs wide apart for stability. The front foot can be lifted slightly or flat, while the back leg anchors the body. Add simple oval shapes for feet. -
Facial details:
Add a pair of glasses using two connected circles and a temple arm. Draw a small, angry eyebrow line angled down toward the nose area to emphasize the shouting expression.
Ink Smearing?
If your pen smears on notebook paper, place a scrap piece of paper under your drawing hand. This acts as a shield, protecting your fresh ink lines while you work across the page.
Step 3: Drawing the Right Figure
-
Head outline:
Draw a smooth oval for the second figure’s head. Unlike the first figure, keep this outline complete for now, or leave a small gap for the mouth. -
Torso and attire:
Draw a rectangular shape for the torso to suggest a shirt or jacket. I find that giving one character slightly more ‘clothing’ detail adds a nice visual contrast. -
Defensive arms:
Sketch the arms raised. The hands should be drawn as simple mittens or ovals, posed as if gesturing wildly or defending against the other’s words. -
Legs in motion:
Draw the legs as rectangular pant legs rather than single lines. Position them in a walking or stepping-back motion to make the figure look dynamic. -
Expression:
Draw a jagged mouth line or an open shout. Add thick, angled eyebrows to show frustration or anger.
Level Up
Add color to emphasize emotions: use a red pencil to lightly shade inside the speech bubble or around the characters’ heads to represent rising anger and heat.
Step 4: speech and Emphasis
-
Draft the speech:
In the space between their heads slightly closer to the right figure, write the text ’10s!’ (or your chosen exclamation) in simple, capital letters. -
Create the jagged bubble:
Draw a sharp, jagged outline around the text. Make the spikes irregular to convey volume and harshness. -
Direct the tail:
Draw the tail of the speech bubble as a lightning-bolt shape pointing clearly toward the speaker’s mouth. -
Radiating lines:
Add short, straight lines radiating from the back of the left figure’s head and around the right figure’s head. These ‘stress lines’ visually represent shouting and high emotion. -
Final inking:
Go over your lines with the black pen, thickening the floor line and the speech bubble outline slightly to make them pop.
You now have a dynamic little scene that perfectly visualizes a heated moment

Tangled Speech Bubbles Communication Knot
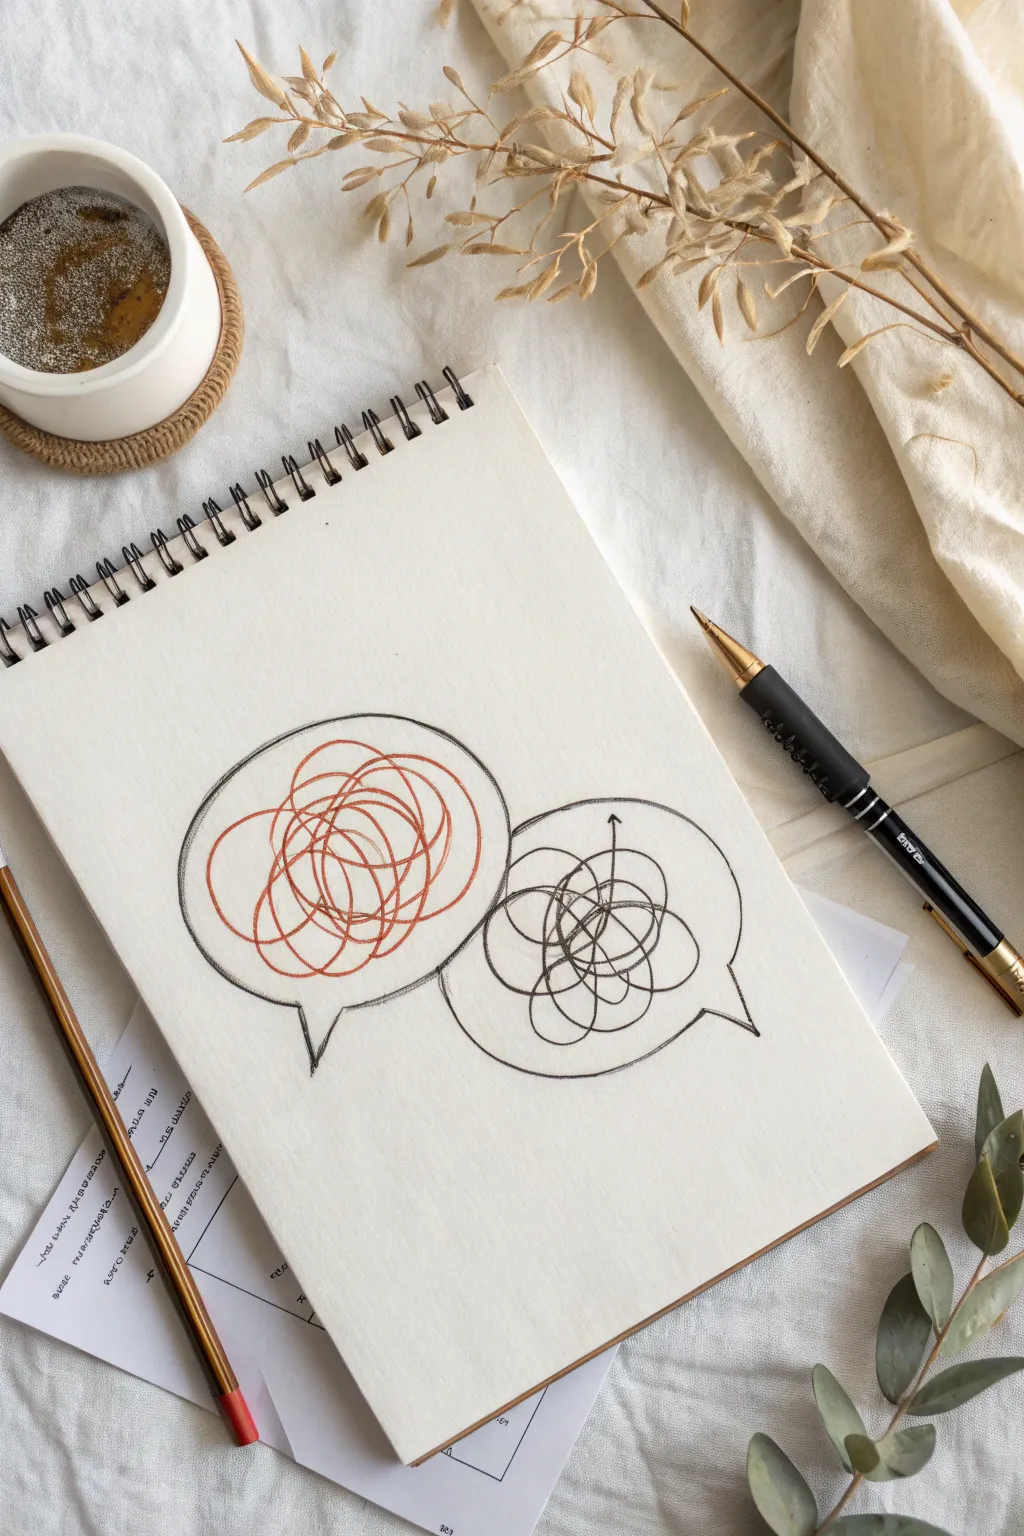
Visualizing the complex nature of conflict and resolution, this minimalist sketch uses symbolism to represent tangled thoughts. Two intersecting speech bubbles contrast a messy, chaotic knot with a path toward clarity, creating a powerful metaphor for effective communication.
Step-by-Step Guide
Materials
- Spiral-bound sketchbook (heavyweight paper preferred)
- Black fine liner pen (0.5mm or 0.8mm)
- Terracotta or rust-orange colored pencil
- Grey or graphite colored pencil
- Pencil (for initial sketching)
- Eraser
- Compass or circle template (optional for perfect circles)
Step 1: Setting the Structure
-
Positioning the bubbles:
Visualize the center of your sketchbook page. You’ll need space for two overlapping dialogue bubbles. Start by lightly sketching a circle on the left side, roughly 2-3 inches in diameter. -
Adding the second circle:
Sketch a second circle to the right, slightly lower than the first one. Ensure they overlap slightly in the middle, creating a connection between the two speakers. -
Drawing the tails:
Add the speech bubble ‘tails’ or pointers. For the left bubble, draw a small triangular point aiming downward and slightly left. For the right bubble, draw the point aiming downward and to the right. -
Refining the outline:
Once satisfied with the placement, go over your pencil lines with the black fine liner pen. Use a confident, continuous stroke for the cleanest look, but don’t worry if it looks slightly hand-drawn—that adds character. -
Handling the overlap:
Where the bubbles overlap, you have a choice. I prefer to keep the outlines of both visible to show transparency, or you can stop the line of the back bubble where it meets the front one. -
Erasing guides:
Wait a moment for the ink to dry completely to avoid smudging, then gently erase all underlying pencil marks to leave a clean black outline.
Step 2: Creating the Chaos
-
Starting the conflict knot:
Focus on the left bubble first. Take your terracotta or rust-orange colored pencil. Start in the center and begin drawing a continuous, looping line. -
Building density:
Keep your hand loose. Create loops of varying sizes—some tight and small, others large and sweeping. The goal is to make it look tangled and frustrating without filling the entire bubble solid. -
Adding pressure variation:
As you scribble, vary your pressure. Press harder in some tight corners of the knot to create focal points of ‘tension’ and lighter on the outer loops. -
Drafting the resolution path:
Move to the right bubble. Switch to your grey or graphite pencil. Before scribbling, visualize a singular path that starts in a tangle but eventually finds a way out. -
Drawing the grey tangle:
Draw a similar tangled knot in the center of the right bubble using the grey pencil. Keep it slightly looser than the red one to suggest it is unraveling. -
Defining the exit arrow:
Identify a line from your grey tangle that can extend upward. Draw this line curving out of the mess and moving straightforwardly toward the top of the bubble. -
Inking the arrow:
Switch back to your black fine liner. Carefully trace just the specific path of the arrow within the grey chaos. Start from inside the knot and trace the line moving upward, ending with an arrowhead. -
Emphasizing the solution:
Trace a few of the loops connected to that arrow with the black pen as well, making the ‘path of logic’ distinct from the grey background noise. -
Final touches:
Review the drawing. If the red knot feels too light, add a second layer of scribbles to increase the intensity and contrast against the calming grey and black of the resolution side.
Fixing Smudges
If you accidentally smudge the ink while erasing pencil lines, turn it into a shadow or create a slightly thicker line weight on that side of the bubble to hide the mistake naturally.
Add Watercolor
Instead of colored pencils, use a light wash of watercolor for the scribbles. Use wet-on-dry technique for crisp lines, or wet-on-wet for a diffused, emotional effect.
You have now captured a meaningful representation of conflict resolution suitable for journaling or therapy homework

Clenched Fist as Raw Conflict Symbol
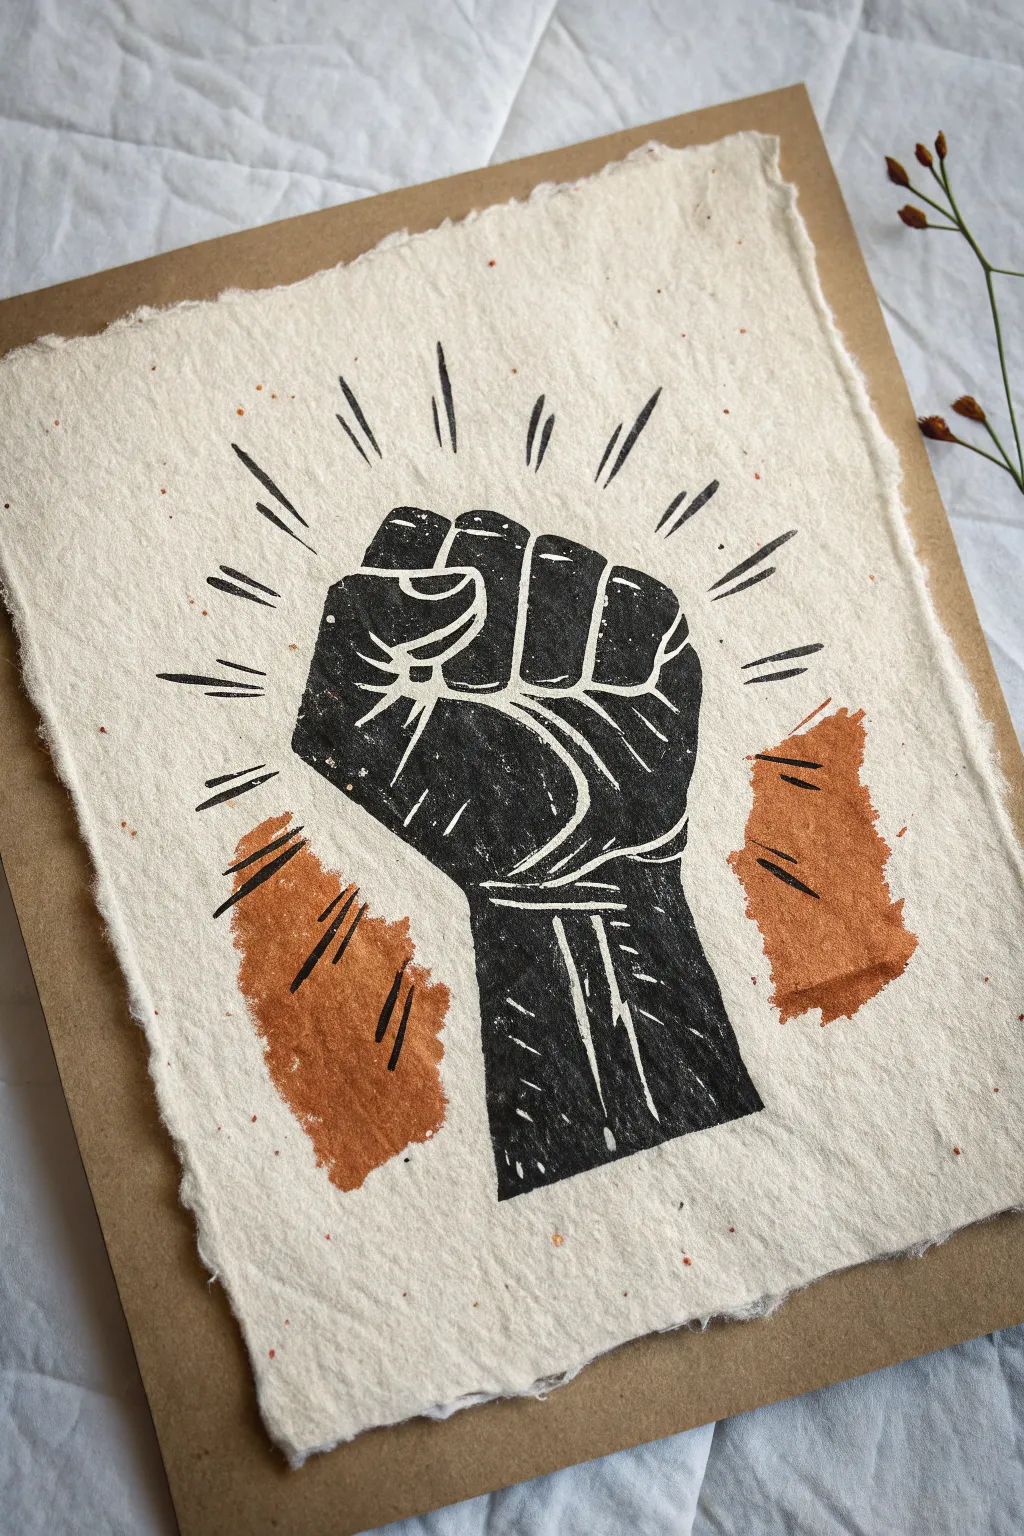
Create a powerful symbol of strength and unity with this striking linocut print project. Using rustic handmade paper and bold block printing ink, you’ll craft a textured, expressive piece that balances raw energy with clean graphic lines.
How-To Guide
Materials
- Soft-cut lino block (min 4×6 inches)
- Linocut carving tools (V-gouge and U-gouge)
- Black block printing ink (water-based or oil-based)
- Terracotta or burnt orange acrylic paint or ink
- Handmade paper with deckle edge (heavyweight)
- Brayer (roller)
- Pencil and tracing paper
- Glass pane or acrylic sheet (for inking)
- Small paintbrush or sponge
- Baren or wooden spoon
Step 1: Design and Transfer
-
Sketch the fist contour:
Begin by sketching the outline of a clenched fist on tracing paper. Focus on the blocky shapes of the knuckles and the thumb wrapping across the fingers. -
Add high-contrast details:
Refine your sketch by marking where the shadows will be. Since this is a relief print, remember that you are carving away the white areas and leaving the black areas untouched. Shade in the shadowed parts of your drawing to visualize the final positive space. -
Include radiating lines:
Draw short, sharp lines radiating outward from the top of the fist to suggest motion or power. Keep them loose and varied in length. -
Transfer to the block:
Flip your tracing paper drawing face down onto the lino block. Rub the back firmly with a pencil or spoon to transfer the graphite image onto the surface. The image on the block should be a mirror image of your final print.
Step 2: Carving the Block
-
Outline fine details:
Using a small V-gouge, carefully carve along the outlines of your drawing. Carve the white lines that define the fingers, the creases in the palm, and the highlights on the wrist. -
Carve the radiating lines:
Use the V-gouge to cut the radiating lines. Start the cut near the fist and flick the tool outward to taper the line naturally. -
Clear large negative spaces:
Switch to a wider U-gouge to clear away the large background areas around the fist. You don’t need to make this perfectly smooth; some texture in the ‘white’ space adds character, though for this specific look, we want the background mostly clear. -
Refine the inner textures:
Go back in with your smallest tool to add tiny scratch marks inside the black areas of the fist, like on the forearm or shadow side. These small chatter marks simulate a distressed, vintage texture. -
Clean the block:
Brush away any loose linoleum crumbs. You can wipe the block gently with a slightly damp cloth to ensure no debris gets stuck in the ink later.
Clean Lines Pro-Tip
Warm your lino block slightly with a hair dryer or on a radiator before carving. It softens the material, making it much easier to cut smooth curves without slipping.
Step 3: Adding the Background Color
-
Prepare the accent color:
Mix a small amount of terracotta or burnt orange paint. You want a consistency that isn’t too watery, so it sits on the textured paper without soaking through immediately. -
Paint the background swashes:
Identify where the fist will be placed on your handmade paper. Paint two rough, organic patches of color on the lower left and right areas where the wrist will eventually sit. Keep the edges ragged and dry-brushed for a raw look. -
Let it dry completely:
Allow the painted swashes to dry fully. If the paper is damp when you print the black ink, the lines might bleed.
Level Up: Gold Leaf
Add a touch of precious detail by applying adhesive to the radiating ‘shine’ lines and laying down gold leaf instead of just black ink.
Step 4: Printing the Image
-
Charge the roller:
Squeeze a small line of black block printing ink onto your glass pane. Roll the brayer back and forth and lift it occasionally to create an even, velvety layer of ink on the roller. Listen for a sticky ‘hissing’ sound. -
Ink the block:
Roll the ink onto your carved block. Apply it in multiple thin layers, rolling in different directions to ensure solid coverage on the raised areas without flooding the carved crevices. -
Position the paper:
Carefully align your handmade paper over the inked block. I prefer to lower the paper onto the block rather than stamping the block onto the paper, as it gives me more control over placement. -
Press and burnish:
Once the paper is down, use a baren or the back of a wooden spoon to rub the back of the paper in small circles. Apply firm, even pressure over the entire design, paying special attention to the edges. -
Check for transfer:
Holding one corner down firmly so it doesn’t shift, carefully peek under another corner to see if the black is transferring solidly. If not, lay it back down and rub that area some more. -
The reveal:
Slowly peel the paper off the block from one corner to reveal your print. The combination of the deep black ink and the rustic paper texture creates a striking effect. -
Final drying:
Place the finished print on a drying rack or flat surface. Oil-based inks can take a few days to cure fully, while water-based inks will dry much faster.
Now you have a bold statement piece ready to frame or gift to an activist friend

PENCIL GUIDE
Understanding Pencil Grades from H to B
From first sketch to finished drawing — learn pencil grades, line control, and shading techniques.
Explore the Full Guide
Opposing Arrows Head-On Force Diagram
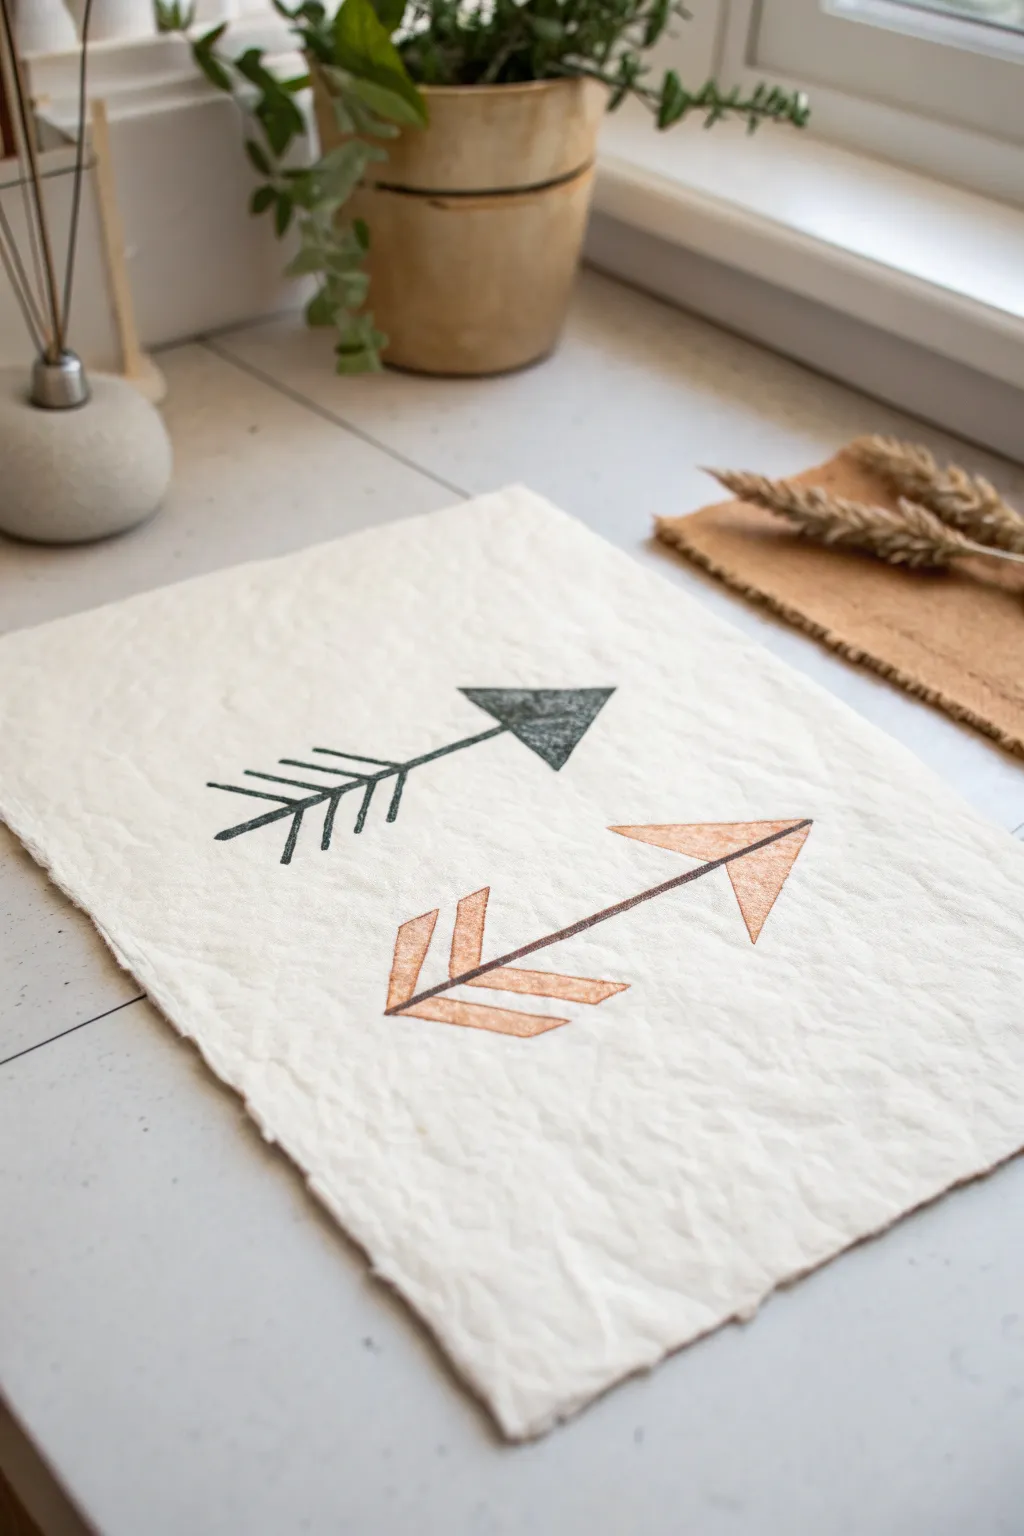
Create a striking symbol of opposition using the timeless art of lino block printing on handmade paper. This project combines rustic textures with modern geometric design, resulting in a minimalist piece perfect for wall art or stationary.
How-To Guide
Materials
- Soft-cut linoleum block (approx. 4×6 inches)
- Linoleum cutter tool with V-gouge and U-gouge blades
- Pencil and ruler
- Tracing paper (optional)
- Block printing ink (black or dark charcoal)
- Block printing ink (rust orange or terracotta)
- Brayer (rubber roller)
- Glass or acrylic sheet (for rolling ink)
- Heavily textured handmade paper or cold-press watercolor paper
- Baren or a clean wooden spoon
Step 1: Designing and Carving
-
Draft your design:
Begin by sketching two arrows on a piece of scrap paper to determine your sizing. Aim for a simple, geometric style where the arrowheads are triangles and the fletching (feathers) are simple lines or angled blocks. -
Transfer to block:
Draw your arrows directly onto the linoleum block using a pencil and ruler. Orientation doesn’t strictly matter for symmetrical arrows, but remember that block printing creates a mirror image, so if you have a specific left/right preference, draw it in reverse. -
Outline with small gouge:
Fit your cutter with a fine V-shaped blade. Carefully carve along the pencil lines of your first arrow. You want to carve *away* the negative space, leaving the arrow shape raised. Start by outlining the shape precisely. -
Clear negative space:
Switch to a wider U-shaped blade to clear away the unneeded linoleum around your first arrow design. You don’t need to carve the whole block away yet, just create a clear zone around the shape. -
Carve the second arrow:
Repeat the outlining and clearing process for the second arrow. If you printed them on the same block, you now need to make a choice: carve them on separate blocks for easier two-color printing, or carefully cut the linoleum block in half to separate the two stamps. -
Separate the stamps:
I prefer to use a craft knife to slice the linoleum block into two separate pieces. This makes inking in two different colors much cleaner and prevents accidental color mixing.
Pro Tip: Getting Texture
Don’t aim for a solid, opaque black. Let the ‘noise’ happen! The tiny white speckles where the ink misses the deepest paper crevices create that vintage, worn aesthetic.
Step 2: Printing the Arrows
-
Prepare the paper:
Lay your textured handmade paper on a flat, clean surface. The rough texture is part of the charm, so don’t try to flatten it out too much. -
Ink the first color:
Squeeze a small amount of the dark charcoal ink onto your glass palette. Roll the brayer back and forth and up and down until the ink sounds ‘sticky’ and has a velvety texture. -
Apply ink to block:
Roll the inked brayer over the first arrow stamp (the one intended for the top position). Ensure the raised surface is evenly coated but not gloopy, as excess ink can slide into the carved grooves. -
Print the top arrow:
Position the stamp over the upper half of your paper, pointing to the right. Press down firmly. Use a baren or the back of a wooden spoon to rub the back of the stamp in small circles to transfer the ink fully. -
Lift and clean:
Peel the stamp off carefully to reveal the print. Wipe any excess ink off your brayer and palette if you only have one roller, or prepare a fresh setup for the next color. -
Ink the second color:
Prepare the rust or terracotta ink on the palette. You want a warm, earthy tone to contrast with the dark charcoal. Ensure the brayer picks up a thin, even layer. -
Position the second arrow:
Take the second arrow stamp and ink it thoroughly. Hover it over the bottom half of the paper, ensuring it is centered relative to the top arrow but pointing in the opposite direction (left). -
Print the bottom arrow:
Press the stamp down firmly. Because handmade paper has deep valleys, apply extra pressure with your spoon/baren to ensure the ink reaches the lower textures of the paper surface. -
Reveal the final print:
Lift the second stamp to check your alignment. The imperfect, slightly distressed edges caused by the paper texture add to the authentic handmade look. -
Dry completely:
Oil-based block printing inks take longer to dry than acrylics. Place your print in a safe, dust-free area for at least 24 hours, or until the ink is completely smudge-proof to the touch.
Level Up: Deckled Edges
To mimic the paper shown, rip your paper against a heavy straight edge or ruler. Dip a brush in water and run it along the tear line first to soften the fibers for a feathery edge.
Enjoy the satisfying contrast of your new rustic arrow print
Broken Bridge Between Reaching Hands
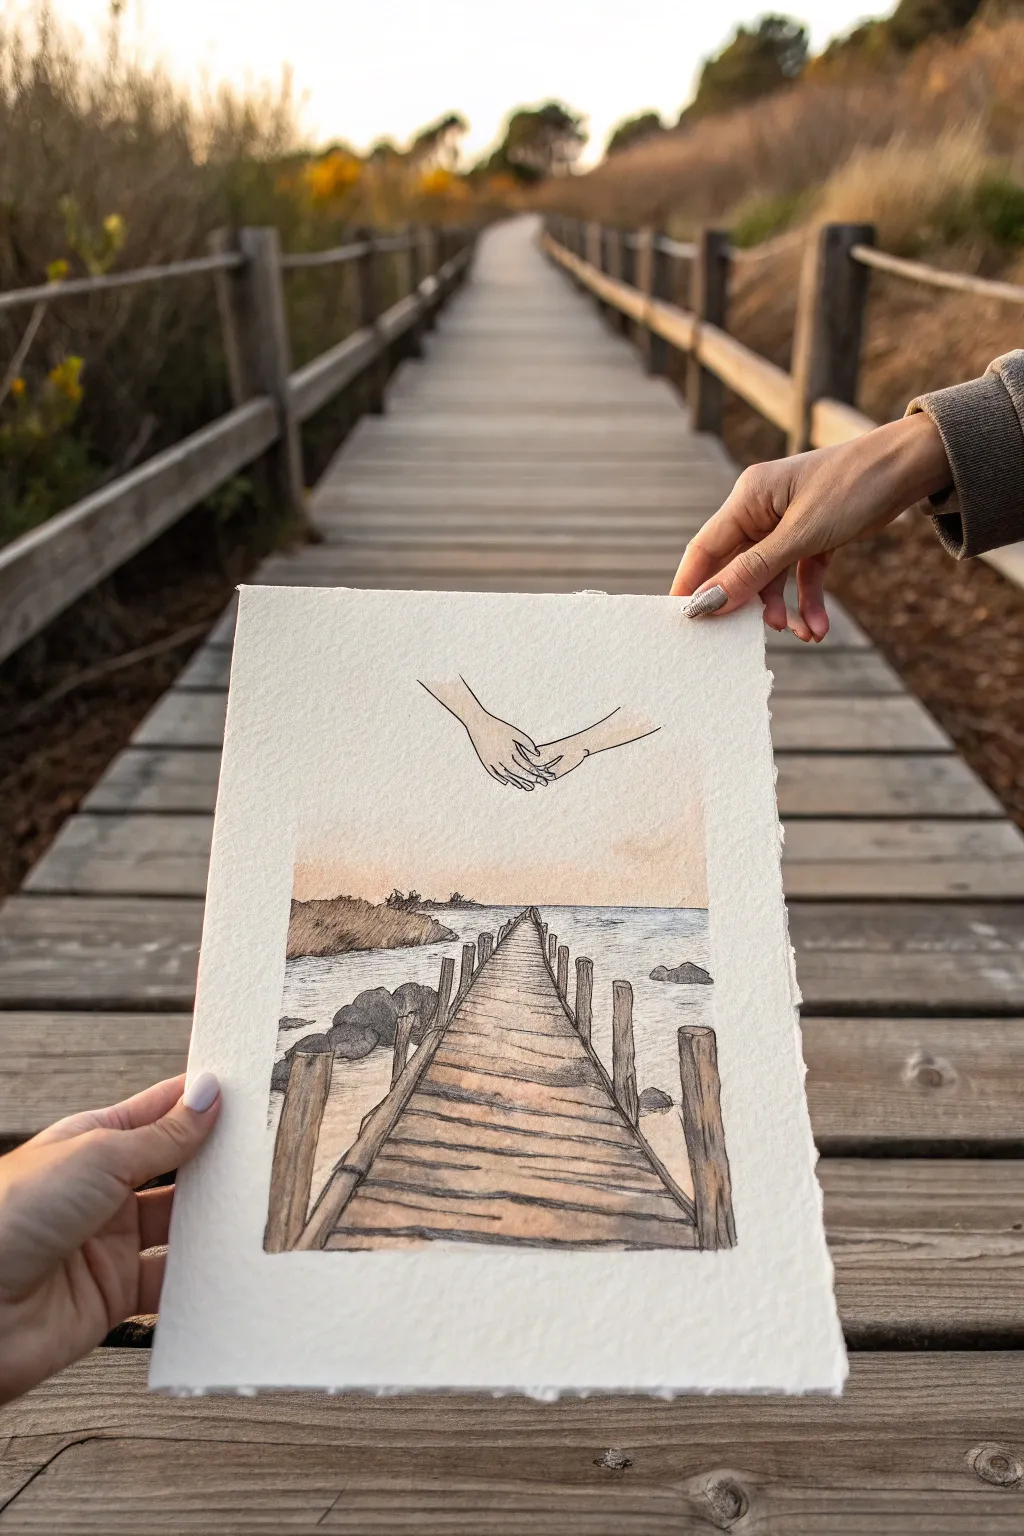
This evocative mixed-media piece combines delicate ink line-work with soft watercolor washes to depict a poignant moment of connection. The illustration features a weathered wooden pier stretching toward the horizon beneath two hands reaching out in the open sky.
Step-by-Step
Materials
- Cold press watercolor paper (300 gsm)
- HB pencil for sketching
- Kneaded eraser
- Waterproof fine liner pens (0.1mm and 0.5mm)
- Watercolor paint set (Ultramarine Blue, Burnt Sienna, Yellow Ochre, Alizarin Crimson)
- Round watercolor brushes (Size 4 and Size 8)
- Clean water container
- Paper towels
- Painter’s tape or drawing board
Step 1: Sketching the Composition
-
Establish the horizon:
Begin by lightly drawing a horizontal line across the middle of your paper. This will separate the sea from the sky and serve as the vanishing point for your perspective. -
Outline the pier:
Draw two diagonal lines starting wide at the bottom of the page and converging toward a single point on your horizon line. This creates the illusion of depth for the wooden walkway. -
Add structural details:
Sketch vertical posts along the sides of your pier lines. Make the posts in the foreground taller and thicker, gradually making them smaller as they recede into the distance. -
Texture the wood:
Lightly indicate horizontal planks across the pier’s surface. Don’t make them perfect; slightly uneven lines suggest aged, weathered wood. -
Position the hands:
In the upper third of the paper (the sky area), sketch two hands reaching toward each other. Start with basic geometric shapes for the palms and then refine the fingers. Ensure there is a tiny gap between them to create tension. -
Sketch environmental elements:
Draw rough outlines for rocks on either side of the pier in the water and a distant landmass on the horizon line.
Step 2: Inking the Foundation
-
Line the hands:
Using your 0.1mm fine liner, carefully trace the pencil lines of the hands. Keep the lines continuous and smooth. You want these to feel delicate compared to the rustic pier below. -
Ink the pier structure:
Switch to a 0.5mm pen for the pier’s main outlines and posts. The thicker line weight adds stability to the foreground elements. -
Detail the wood grain:
With the 0.1mm pen, add wood grain texture to the planks and posts. Use broken, wavy lines rather than straight rulers to emphasize the organic texture of drift-wood. -
Erase pencil marks:
Once the ink is completely dry—I usually give it at least 15 minutes to be safe—gently remove all underlying graphite with your kneaded eraser.
Pro Tip: Perspective Check
To fix your perspective, ensure the horizontal lines of the wooden planks get closer together as they move toward the horizon. This compression is key to depth.
Step 3: Watercolor Washes
-
Paint the sky:
Mix a very dilute wash of Yellow Ochre and a touch of Alizarin Crimson. With a wet size 8 brush, apply this wash to the lower part of the sky area, fading it out to white as you move upward toward the hands. -
Base layer for the pier:
Mix Burnt Sienna with plenty of water. Paint the entire surface of the wooden planks and posts. Keep the color varied—lighter in some spots, darker in others—to mimic natural weathering. -
Define the water:
Use a light wash of Ultramarine Blue for the water. Paint around the rocks and the pier. Keep the edges near the horizon softer by using a slightly wetter brush. -
Paint rocks and land:
Mix Ultramarine Blue with Burnt Sienna to create a dark, muted grey. Fill in the rocks and the distant landmass. You can dab the wet paint with a paper towel to create a rocky texture. -
Deepen the wood shadows:
Once the first wood layer is dry, mix a concentrated Burnt Sienna (less water). Use a size 4 brush to paint the sides of the posts and the gaps between the planks to add dimension. -
Add skin tones:
Mix a very faint wash of watered-down Burnt Sienna or a dedicated flesh tone. Gently apply a sheer layer to the hands, keeping it extremely subtle so the ink drawing remains the focus.
Troubleshooting: Smudged Ink
If your fineliner bleeds when you add watercolor, the ink wasn’t waterproof. Stop immediately, let it dry fully, then lightly seal the ink with a spray fixative before continuing.
Allow the paper to dry completely flat before removing any tape to reveal your finished scene
BRUSH GUIDE
The Right Brush for Every Stroke
From clean lines to bold texture — master brush choice, stroke control, and essential techniques.
Explore the Full Guide
Split Heart Pulled in Two Directions
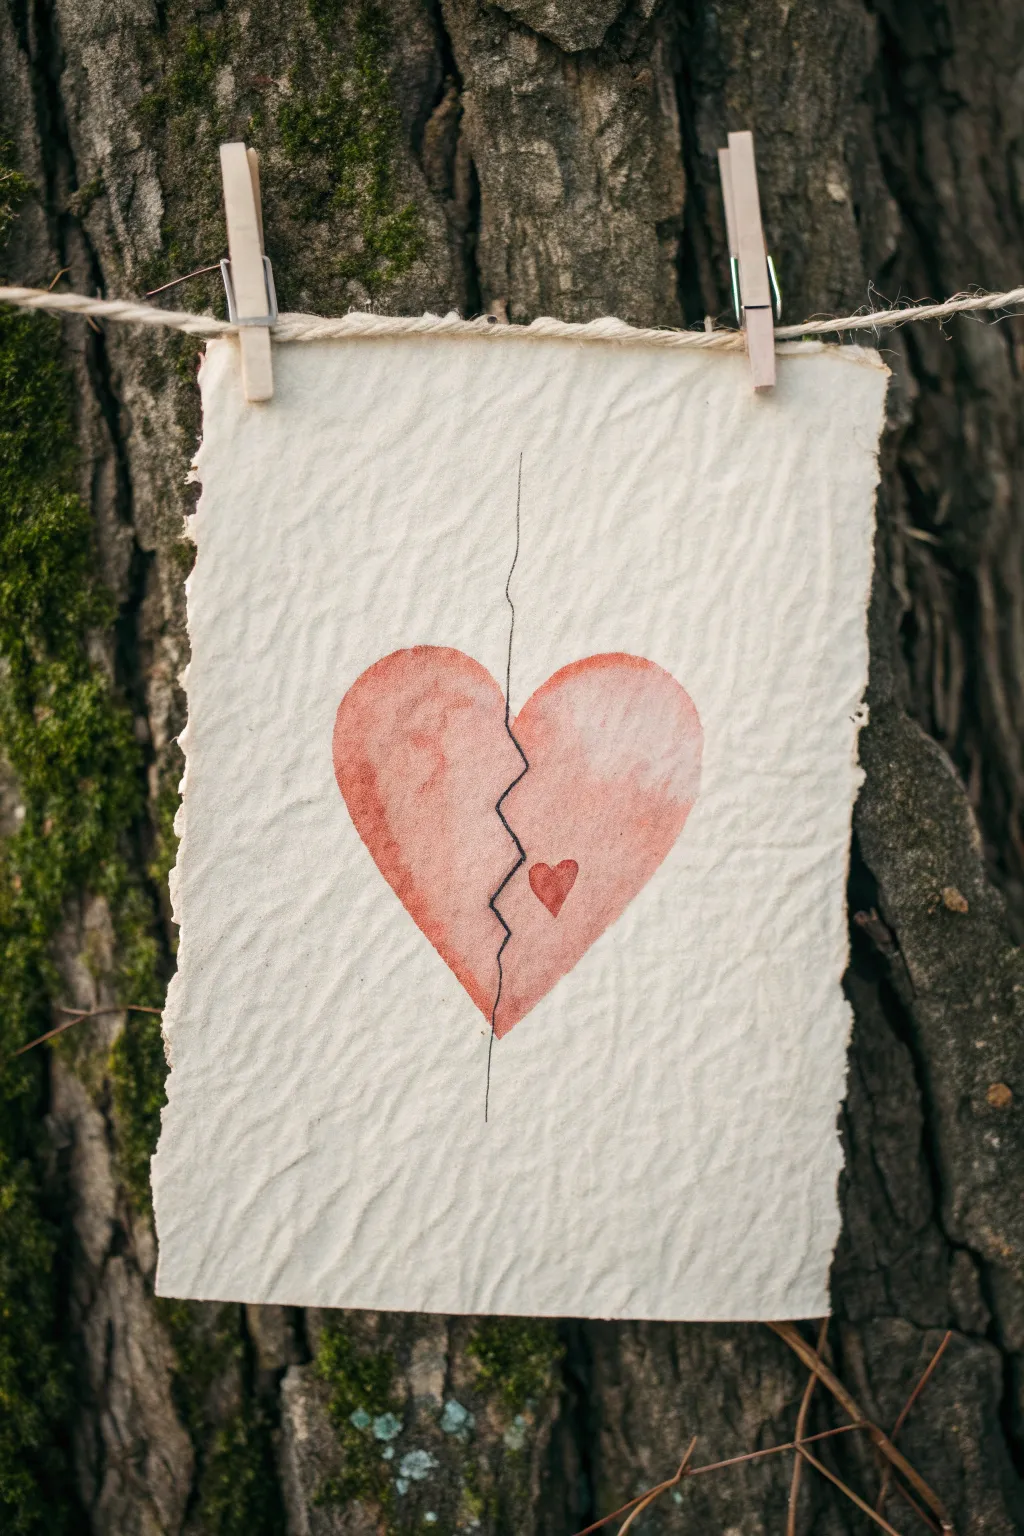
Capture the delicate tension of conflict with this symbolic watercolor piece. Using textured paper and soft washes, you will create a fractured, yet mending, heart visualization that speaks volumes.
Step-by-Step Tutorial
Materials
- Heavyweight textured handmade paper (deckled edge)
- Watercolor paints (Alizarin Crimson, Cadmium Red, burnt sienna)
- Small round watercolor brush (size 4 or 6)
- Fine liner brush or black fine-tip pen
- Pencil (HB)
- Clean water jar
- Paper towels
- Jute twine and small wooden clothespins (for display)
Step 1: Preparation & Sketching
-
Paper selection:
Begin by selecting a piece of heavy, handmade paper. The rough texture and irregular ‘deckled’ edges are crucial for replicating the organic look of the original image. -
Light outline:
Using an HB pencil, very faintly sketch the outline of a large heart in the center of the paper. Keep your touch incredibly light so the graphite doesn’t show through the translucent paint later. -
Marking the split:
Draw a jagged, vertical line down the center of the heart. Instead of a straight cut, create a zig-zag pattern near the middle to represent a fracture. -
Adding the seed:
Sketch a tiny, secondary heart shape nestled within the right half of the larger heart, just beside the jagged crack line.
Step 2: Painting the Base Layers
-
Mixing the red:
Mix a watery wash of red watercolor. I find that blending Alizarin Crimson with a touch of Burnt Sienna gives that slightly muted, earthy red tone seen in the reference. -
First wash – Left side:
Load your round brush with the watery mix and fill in the left half of the heart. Work quickly to keep a wet edge, allowing the color to pool slightly at the edges for texture. -
First wash – Right side:
Paint the right half of the heart with the same wash, being careful not to paint over the tiny heart sketch or cross the center fracture line. -
Creating texture:
While the paint is still damp, dab a few spots with a clean, slightly thirsty brush to lift pigment, or add a drop of darker red to create the mottled, uneven appearance. -
Drying time:
Allow this initial layer to dry completely. The paper must be bone dry before you add the precise line work to prevent bleeding.
Uneven Wash?
If your watercolor dries with hard ‘bloom’ lines, lightly wet the area with clean water and lift the excess pigment with a tissue to soften it.
Step 3: Detailing & Definition
-
Painting the small heart:
Mix a more concentrated, saturated red—less water, more pigment. Carefully paint the tiny heart using the tip of your brush for a solid, opaque look. -
The fracture line:
Switch to a fine liner brush with black watercolor (or a fine-tip pen if you prefer control). Draw a thin, vertical line starting well above the heart and descending through the fracture. -
Following the crack:
Trace the jagged gap between the two heart halves precisely with your thin black line, continuing straight down past the bottom point of the heart. -
Softening edges:
If the main heart outline looks too sharp, you can take a damp, clean brush and very gently soften the outer perimeter to settle the paint into the paper’s texture.
Paper Aging
Dip the edges of your paper in strong tea and let dry before painting to enhance the vintage, weathered aesthetic.
Step 4: Display
-
Stringing the line:
Cut a length of jute twine. The rustic quality of the twine matches the handmade paper perfectly. -
Hanging:
Use two small wooden clothespins to attach the top corners of your dry painting to the twine. -
Final check:
Adjust the clips so the paper hangs straight, ready to be photographed against a natural background like tree bark or wood.
Hang your artwork in a place where the light catches the texture of the paper
Endless Cycle Wheel Chase Scene
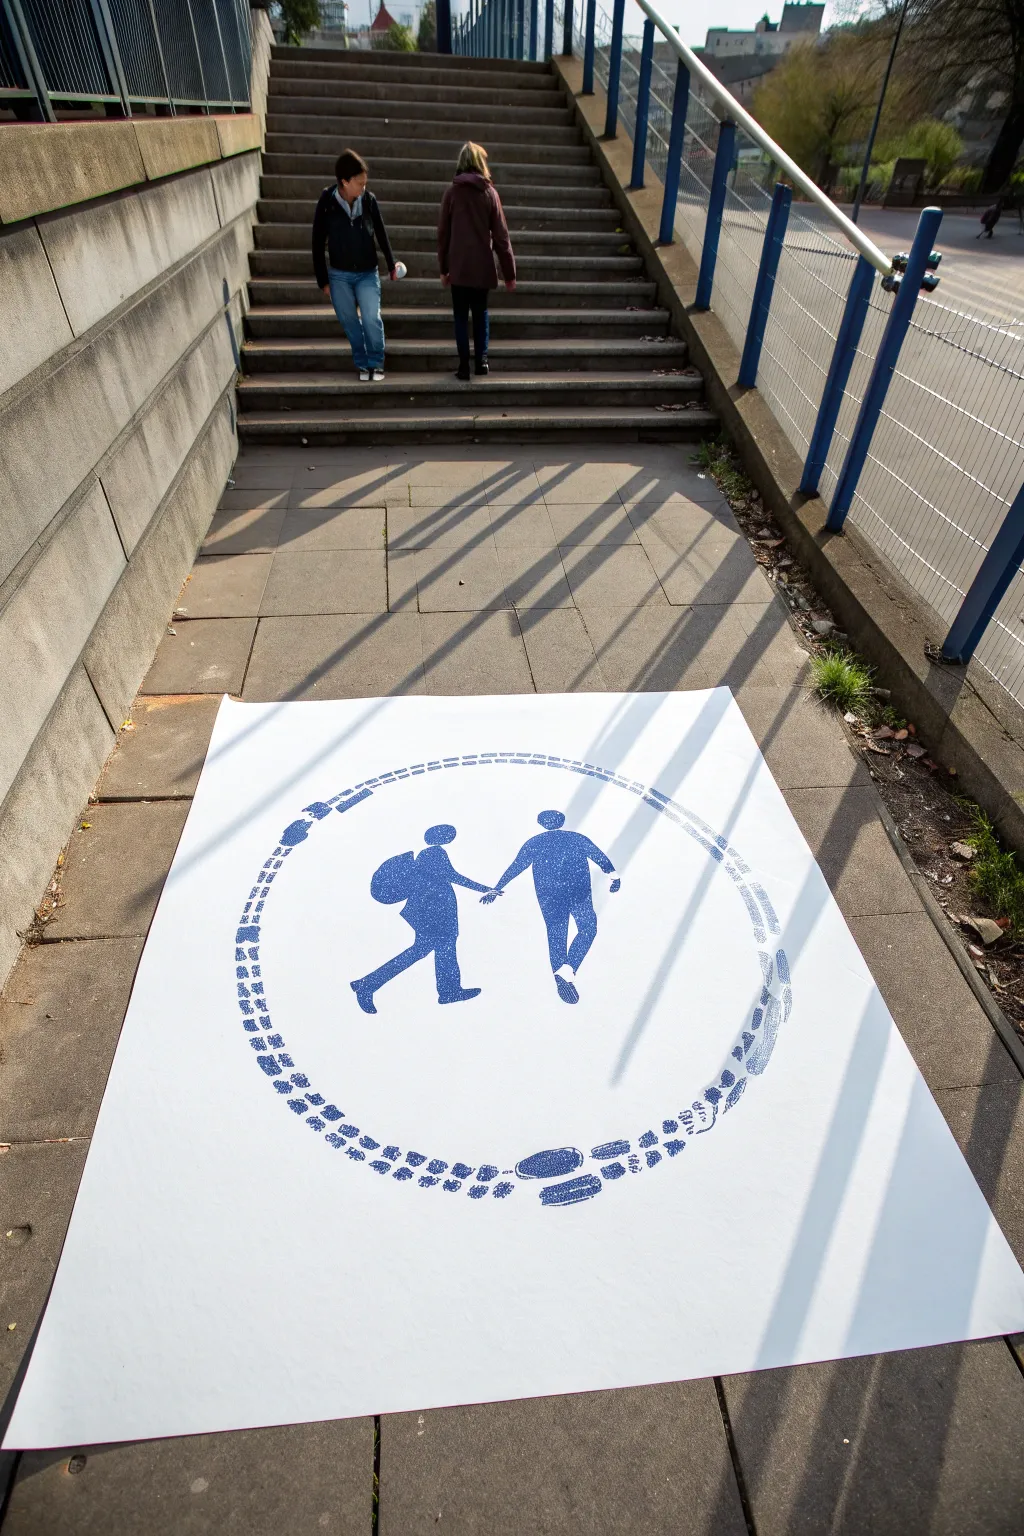
This captivating large-scale drawing uses simple relief rubbing and stenciling techniques to create a poignant narrative of connection. By combining tire tread textures with silhouetted figures, you’ll create a striking blue monochrome piece that invites viewers to ponder the cycles of movement and togetherness.
How-To Guide
Materials
- Large roll of heavy-duty white paper (at least 36 inches wide)
- Blue block printing ink or heavy body acrylic paint
- Foam brayer or roller
- Large shallow tray for ink
- Masking tape or painter’s tape
- Scrap cardboard or stiff paper for stencils
- Craft knife and cutting mat
- Bicycle tire or old shoe sole (for texture)
- Pencil and eraser
- Large compass or string and chalk
Step 1: Preparation and Layout
-
Prepare the canvas:
Cut a large square from your paper roll, measuring roughly 4×4 feet. Lay it flat on a clean, hard surface and tape down the corners to prevent shifting while you work. -
Find the center:
Lightly mark the center of the paper with a pencil. This will serve as the anchor point for your entire composition. -
Draw the boundary circle:
Create a makeshift compass using a piece of non-stretchy string tied to a pencil. Anchor one end at the center mark and lightly sketch a large circle about 3 feet in diameter. -
Draft the inner figures:
In the center of the circle, lightly sketch the outlines of two walking figures holding hands. Keep the shapes simple and blocky, focusing on the silhouette rather than internal details. -
Refine the silhouettes:
Clean up your pencil lines for the figures, ensuring the connection point of their hands is clear and the legs suggest motion. One figure can have a backpack shape for added narrative.
Clean Edges Trick
When stenciling the figures, spray the back of your cardstock with a light mist of repositionable spray adhesive. This prevents the ink from bleeding under the edges for sharp silhouettes.
Step 2: Creating the Stencils
-
Cut the figure stencil:
Transfer your figure drawing onto a piece of stiff cardstock or acetate. Carefully cut out the positive shape of the figures using a craft knife, leaving you with the negative space as a stencil. -
Create the tread pattern:
Find a texture source like an old bicycle tire or the sole of a chunky sneaker. If using a tire, cut a 6-inch section to use as a stamp. -
Test prints:
Squeeze some blue block printing ink onto your tray and roll it out with the brayer until it sounds tacky. Inking your texture source lightly, do a few test presses on scrap paper to gauge the pressure needed.
Narrative Twist
Change the footprints in the outer circle to match the story. Use dog paws, bare feet, or boot prints to alteration the meaning of who is encircling the central characters.
Step 3: Printing and Texture
-
Stencil the central figures:
Place your figure stencil securely over the center of your large paper. Use tape to hold it in place if necessary. -
Apply texture to figures:
Instead of filling the stencil with solid color, use a textured sponge or crumpled paper dipped in blue ink. Dab repeatedly inside the stencil to create a mottled, grainy blue fill that mimics asphalt or grit. -
Reveal the couple:
Carefully lift the stencil straight up to avoid smudging. Allow this central motif to dry completely before moving on to the outer ring so your hand doesn’t smear it. -
Begin the tread circle:
Apply ink to your tire fragment or shoe sole. Starting at the top of your penciled circle guide, press the object down firmly to make your first impression. -
Complete the loop:
Work your way around the circle, re-inking for every impression. Rotate the angle of the stamp slightly as you go to follow the curve of the circle. -
Vary the texture:
I like to vary the pressure slightly as I go around—some prints can be dark and heavy, while others can be lighter and more faded to suggest wear and movement. -
Add secondary tracks:
If desired, use a smaller texture tool (like a bottle cap or different shoe sole) to add a second, thinner line of tracks just inside or outside the main tire tread circle for complexity.
Step 4: Finishing Touches
-
Clean up guides:
Once the ink is fully dry (wait at least an hour), gently erase any visible pencil marks from your initial circle and figure sketches. -
Assess contrast:
Step back and look at the drawing. If the central figures look too pale against the white paper, you can carefully re-stencil a second layer of texture to darken the blue. -
Trimming:
If surface edges got messy, trim the paper borders with a long ruler and knife for a crisp, clean white margin.
Installation is the final step; place your fresh artwork on a sidewalk or patio to photograph it in its natural, urban context


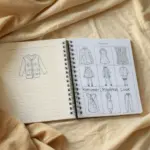
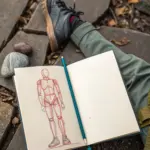
Puppet Strings Tangled Control Battle
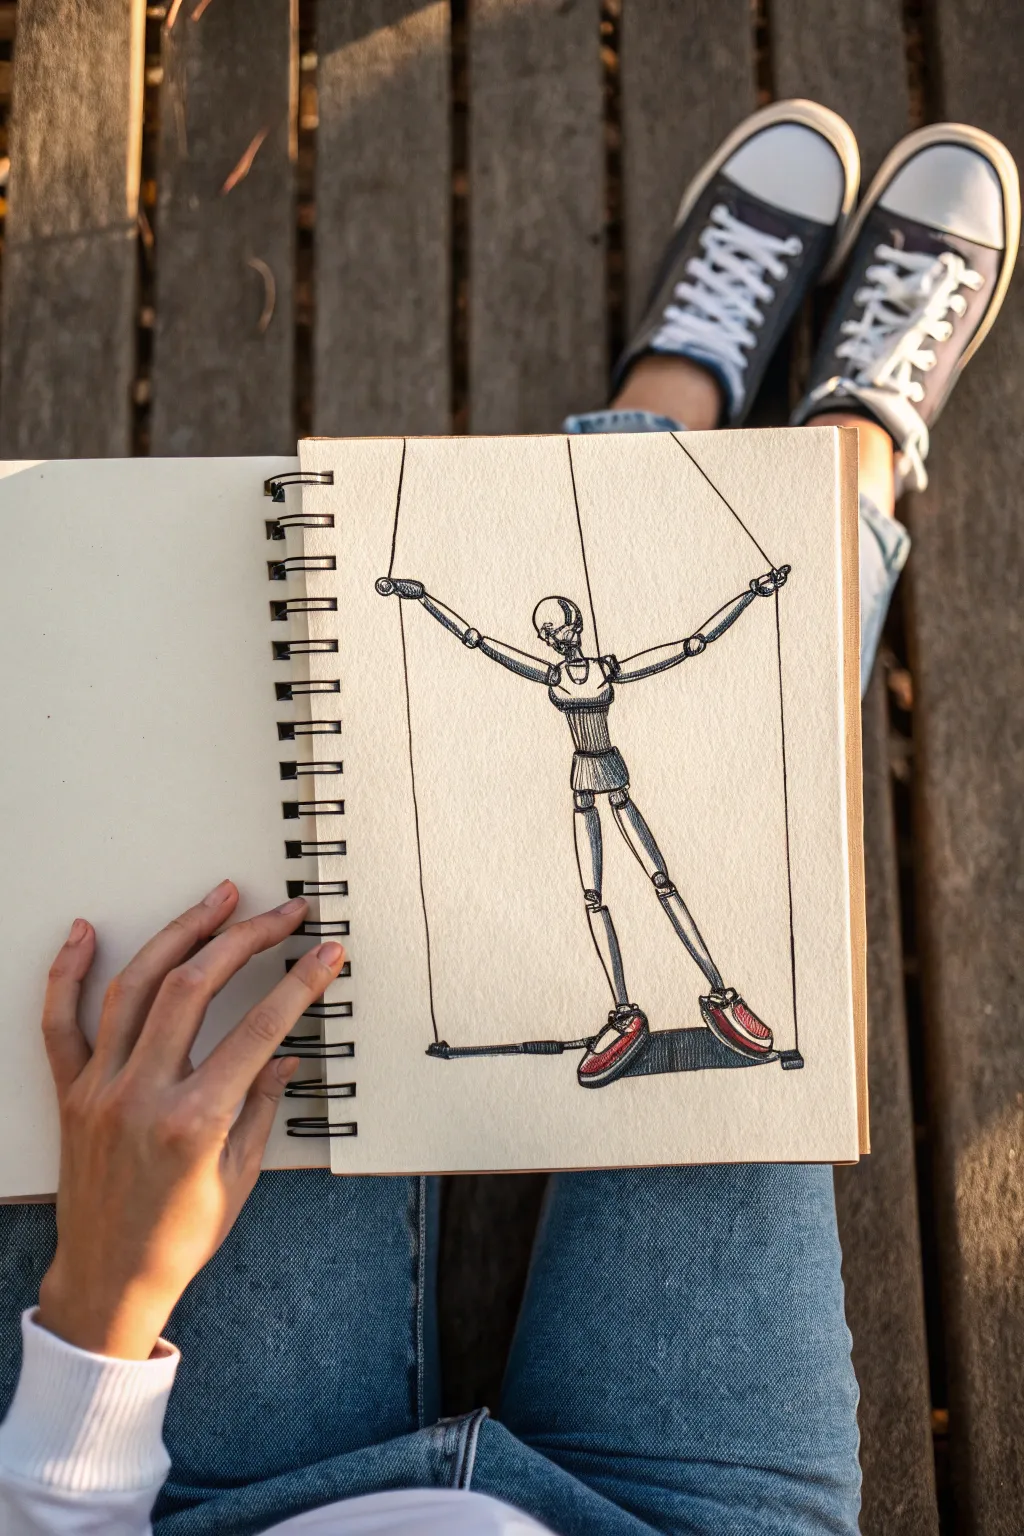
This striking sketchbook concept illustrates the tension of control through a wooden mannequin puppet bound by strings. The drawing combines precise ink linework with subtle, disciplined hatching and a splash of red for visual impact.
Step-by-Step Tutorial
Materials
- Sketchbook proper (plain or mixed media paper, heavy weight preferred)
- H pencil (for initial layout)
- HB pencil
- Kneadable eraser
- Fine liner pens (sizes 0.1, 0.3, and 0.5)
- Red marker or colored pencil
- Ruler
Step 1: Constructing the Frame
-
Establish the pose:
Begin lightly with your H pencil to map out the basic stick figure of the mannequin. Focus on the gesture first: arms outstretched in a ‘T’ pose and legs spread wide as if taking a prominent, heavy step. The torso should be slightly tilted. -
Flesh out the forms:
Turn those stick lines into geometric 3D shapes. Draw cylinders for the upper arms, forearms, thighs, and calves. Use spheres for the joints at the shoulders, elbows, and knees. Keep the head a smooth, egg-like oval. -
Define the torso segments:
Structure the chest area as a rounded block and the waist as a separate, smaller cylinder below it. The hips should look like a modified triangular block, connecting the torso to the legs. -
Sketch the accessories:
Add the distinguishing details: small loops or hooks at the wrists and ankles for the strings. Draw sneakers on the feet instead of standard wooden feet to add a modern, personal touch to the puppet.
Uneven Strings?
If your ruler slips and a string line looks crooked, turn it into a ‘slack’ string. Draw a slight curve or wave in it to imply that specific limb has lost tension.
Step 2: Inking the Puppet
-
Outline the main body:
Switch to a 0.5 fine liner. Carefully trace your pencil construction lines, defining the outer edges of the wooden limbs. Don’t close every shape perfectly; leaving small gaps where joints meet can make the figure look more articulated. -
Detail the joints:
Use a finer 0.3 pen to draw the internal mechanics of the joints—the small circles inside the knees and elbows that suggest rotation points. -
Draw the shoes:
Ink the sneakers with the 0.3 pen. Draw the sole, the toe cap, and the laces area. Keep the lines clean but slightly organic to differentiate the fabric/rubber texture from the hard wood of the body. -
Add the control bar:
Near the feet, draw a heavy horizontal bar that seems to be weighing the figure down or acting as a platform. Use the 0.5 pen for a bold outline here to give it visual weight. -
Connect the strings:
Using a ruler and a 0.1 pen, draw straight lines extending from the wrists, head, and ankles all the way up off the page. These lines must be perfectly straight to represent tension.
Highlighting Volume
When hatching the cylindrical limbs, slightly curve your hatching strokes to follow the form of the cylinder. This stresses the 3D volume more than straight lines.
Step 3: Adding Depth and Color
-
Begin hatching:
With the 0.1 fine liner, start adding vertical hatching lines on the mannequin’s body. Focus on the sides of the cylinders to create roundness. Keep your strokes consistent and parallel. -
Deepen the shadows:
Go over the darkest areas—under the arms, beneath the chest block, and the inner thighs—with cross-hatching (lines going in the opposite direction). This builds contrast and makes the figure pop. -
Texture the wood:
Add very subtle, sparse lines on the ‘lit’ sides of the wooden limbs to suggest grain texture without overcrowding the drawing. -
Shadow the ground platform:
Fill the horizontal bar or shadow beneath the feet with dense, tight cross-hatching using the 0.3 pen. This anchors the figure to the ground. -
Apply the accent color:
Take your red marker or colored pencil and carefully fill in the canvas parts of the sneakers. Leave the toe caps and soles white for high contrast. -
Final clean-up:
Wait at least five minutes for the ink to fully cure. Here I prefer to gently test a small corner first before erasing the underlying pencil lines with a kneadable eraser to reveal the crisp ink work.
Close your sketchbook knowing you’ve captured a complex metaphor with simple, powerful lines
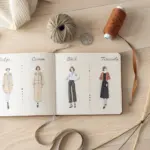
Two Colors Fighting on Wet Paper
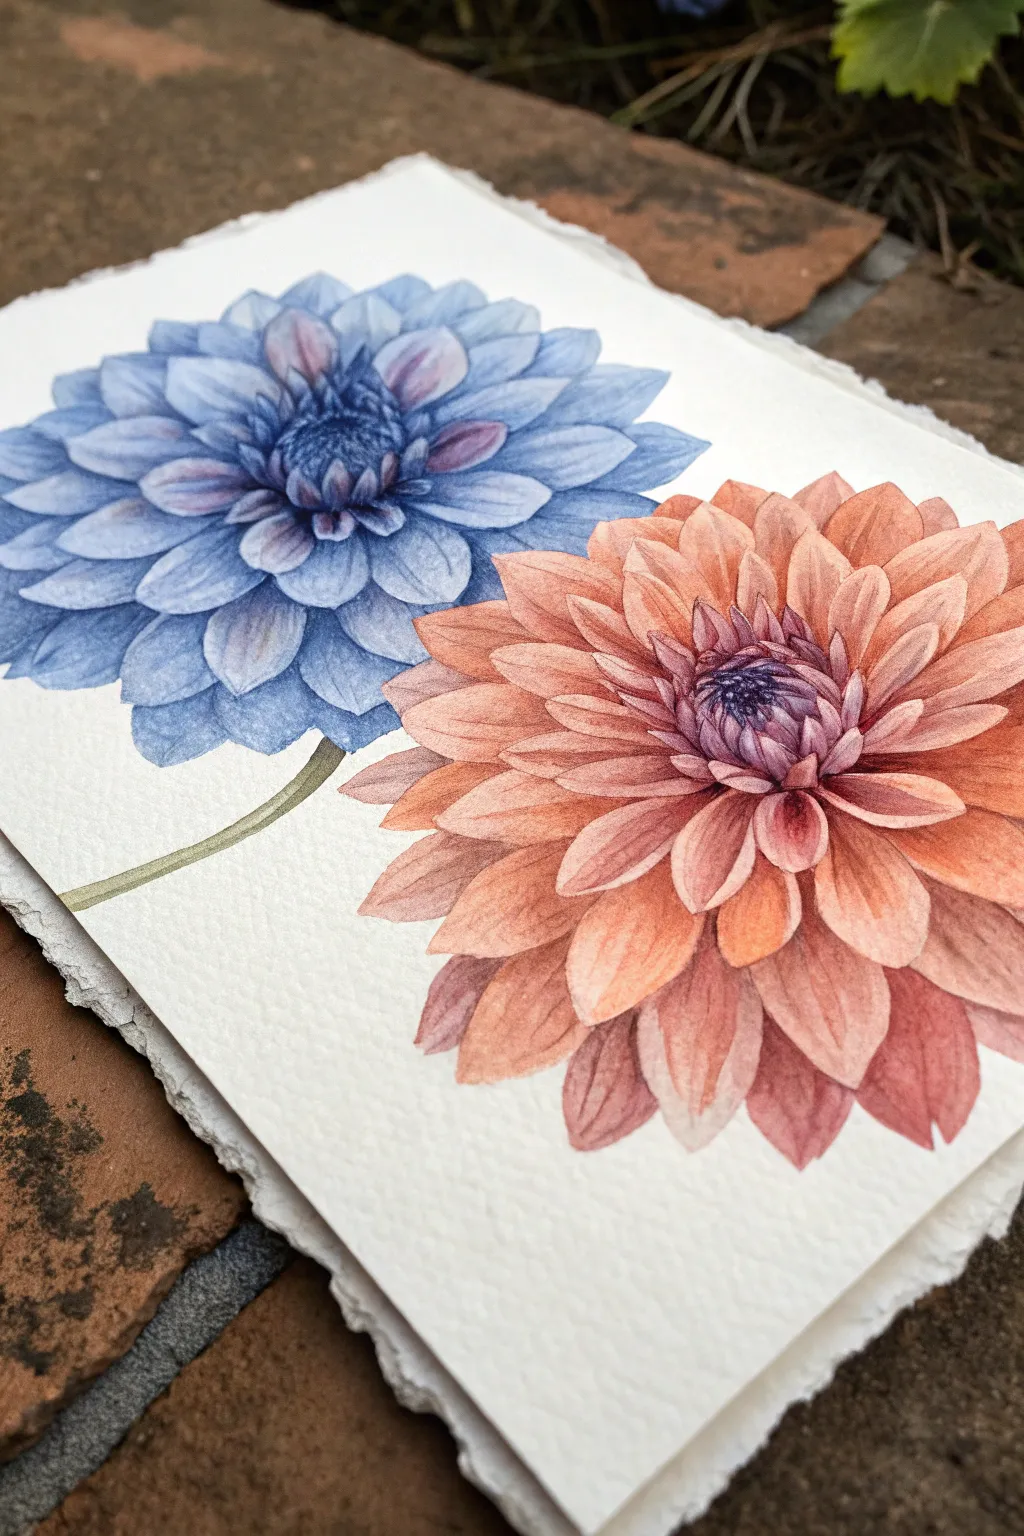
Capture the tension between cool serenity and warm energy with this dual dahlia study. Using precise watercolor glazing on textured deckle-edge paper, you will paint two distinct flowers that seem to lean into one another in vivid contrast.
How-To Guide
Materials
- Heavyweight cold press watercolor paper (deckle edge optional)
- Watercolor paints: Indanthrone Blue, Ultramarine, Quinacridone Rose, Cadmium Orange, Burnt Sienna
- Round brushes: sizes 6, 2, and 0 for details
- Pencil (HB or H) and kneaded eraser
- Two jars of water
- Paper towels or cotton rag
- Masking fluid (optional)
Step 1: Planning and Sketching
-
Composition:
Begin by lightly marking the centers of your two flowers. Place the blue dahlia slightly higher on the left and the orange dahlia lower on the right, ensuring their petals will nearly touch or overlap in the center. -
Petal structure:
Sketch the inner cluster of tight petals first for both flowers. These centers should be detailed and distinct. -
Expansion:
Work outward, drawing the larger, fully opened petals. Pay close attention to the way the petals curve and stack; dahlia petals are often pointed and slightly curled at the edges. -
Refining the sketch:
Lighten your pencil lines with a kneaded eraser until they are barely visible. Heavy graphite can dirty the translucent watercolor layers.
Step 2: Painting the Blue Dahlia
-
Base washes:
Mix a watery wash of Indanthrone Blue and Ultramarine. Paint every other petal on the outer ring to prevent them from bleeding into each other, using the wet-on-dry technique for crisp edges. -
Filling the gaps:
Once the first set of petals is completely dry, paint the remaining petals in the same light blue wash. -
Building depth:
Mix a slightly more concentrated blue-violet by adding a touch of Quinacridone Rose. Apply this to the base of each petal where it meets the center, softening the edge with a damp brush to create a gradient. -
The center:
Paint the tight inner petals with a darker, more saturated mix of blue and purple. Leave tiny slivers of white paper between these small petals to define them. -
Veining details:
Switch to your size 0 brush. Use a highly concentrated blue mix to paint hair-thin veins on the petals, following the contour of the shape.
Keep Edges Sharp
Patience is key for dahlia petals. If you paint adjacent petals while wet, they merge into a blob. Wait for total dryness or use a hair dryer.
Step 3: Painting the Orange Dahlia
-
Warm base layers:
Create a palette of peach using Cadmium Orange and a lot of water. Just like the blue flower, paint alternating petals on the outer rings first. -
Adding vibration:
While the petal wash is still damp, drop a tiny amount of Quinacridone Rose into the tips of a few petals. This creates a subtle ‘conflict’ of color within the flower itself. -
Inner shadows:
Mix Burnt Sienna with a touch of purple to create a warm shadow color. Apply this to the deep overlapping areas of the petals to create separation. -
The purple heart:
The center of this orange dahlia has a purple tint, linking it to the blue flower. Paint the center tight petals with a muted purple mix, blending it out into the orange surrounding petals. -
Leaf stem:
Paint a thin, curving stem for the blue flower using a mix of sap green and a touch of the orange mix to harmonize the palette.
Muddy Centers?
If the flower center looks like a dark blob, lift some pigment out with a clean, damp brush while wet, or use white gouache for highlights later.
Step 4: Final Definition
-
Deepening contrast:
Look at the area where the petals overlap deeply. Glaze a final dark layer in the deepest crevices to make the petals pop forward. -
Texture check:
If the petals look too flat, dry brush a little texture near the tips using a damp brush with very little paint.
Now you have a stunning study of botanical contrast ready to be framed
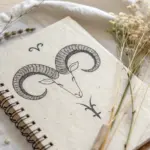
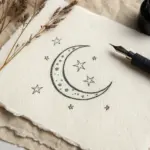
Jagged Shapes Colliding in Abstract Space
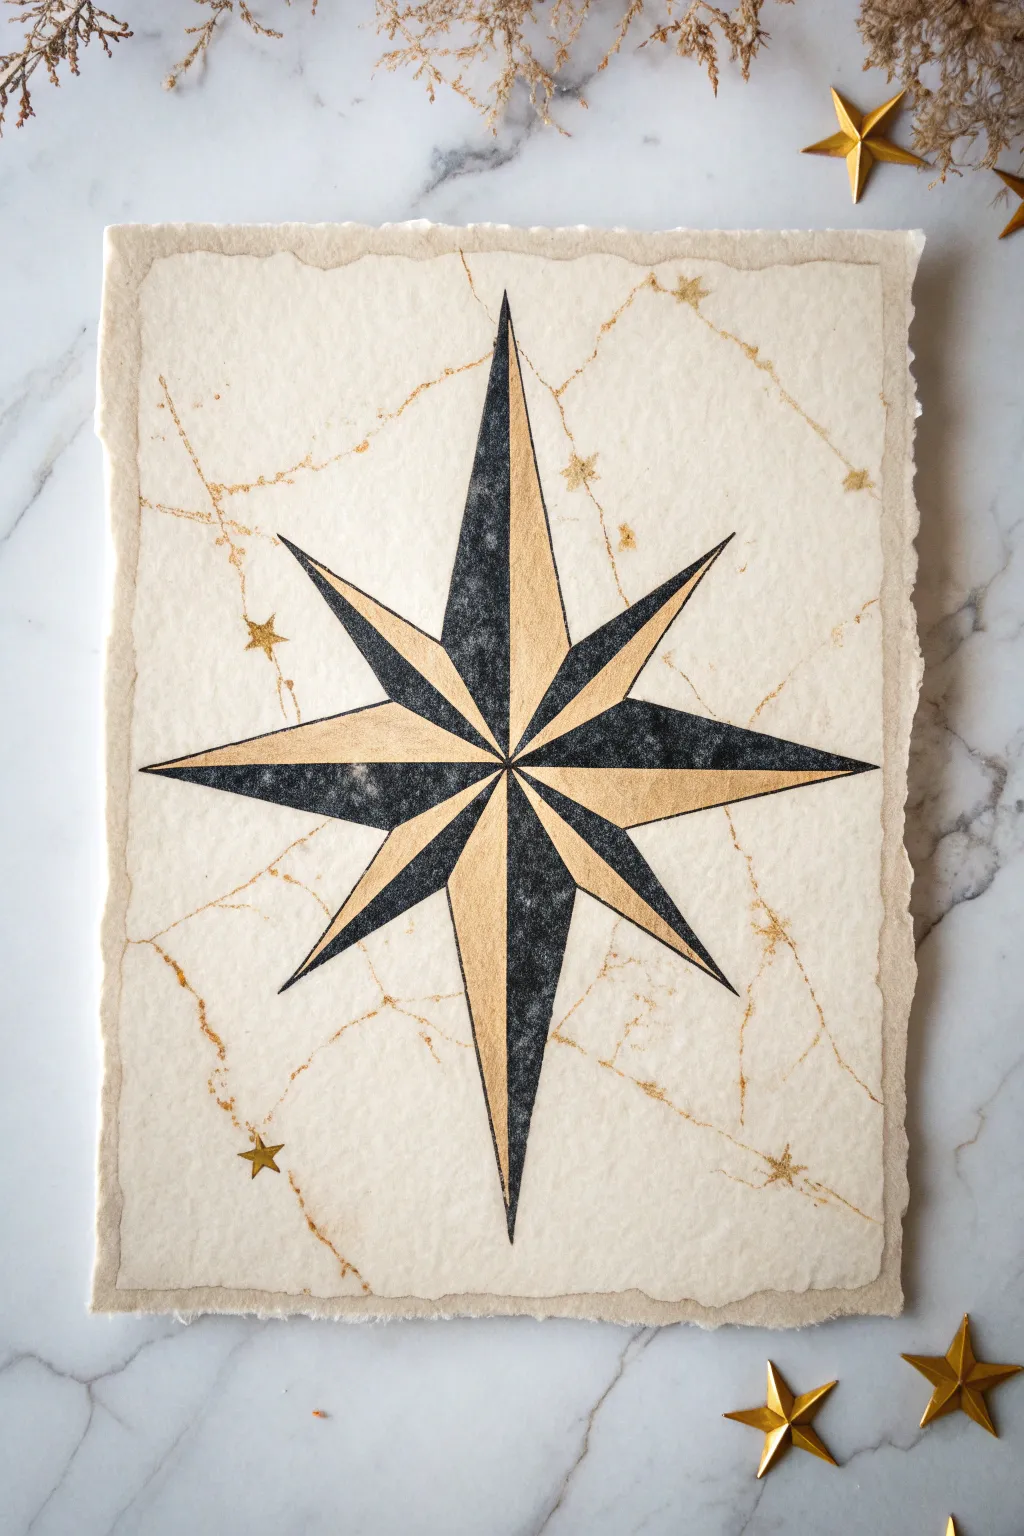
This project captures the sharp, opposing geometry of a compass rose using bold charcoal blacks and shimmering gold hues. The result is a striking, jagged starburst set against a textured, antique-style background that feels both celestial and grounded.
Step-by-Step
Materials
- Heavyweight textured paper (watercolor or handmade cotton rag)
- Ruler
- Pencil (HB or 2H)
- Eraser
- Gold metallic paint or gold leaf pen
- Black ink, charcoal pencil, or very dark grey paint
- Fine liner brush (if using paint)
- Small round brush
- Tea or diluted coffee (for antiquing)
- Paper towels
Step 1: Preparing the Antique Base
-
Deckle the edges:
If your paper implies a clean cut, you can tear the edges gently against a ruler to create a rough, handmade ‘deckled’ look. This adds instant character. -
Create the marble effect:
Before drawing the star, create the background texture. Lightly crumple a piece of plastic wrap or use a scrunched paper towel dipped in diluted gold paint. -
Apply the veins:
Dab and gently drag this scrunched tool across the paper to create fine, wandering golden veins that mimic marble or cracked stone. -
Splatter details:
Load a small brush with the gold mixture and tap it against your finger to flick tiny droplets onto the paper. Let this layer dry completely before proceeding.
Use Tape for Sharp Points
For razor-sharp lines on your star rays, apply low-tack painter’s tape along the edge of the section you are painting. Peel it off while the paint is still damp.
Step 2: Drafting the Geometry
-
Find the center:
Use your ruler to lightly mark the absolute center of your paper page. This single point is crucial for the star’s symmetry. -
Draw the main axis:
Draw a vertical line and a horizontal line crossing at the center point. Make the vertical line much longer than the horizontal one for that elongated ‘North-South’ look. -
Mark the diagonals:
Draw two diagonal lines through the center, forming an ‘X’. These should be shorter than both the vertical and horizontal main lines. -
Connect the points:
Connect the tips of your lines back to the center stem structure to form the diamond shapes of the star points. You should now have an eight-pointed star outline. -
Bisect the points:
Draw straight lines from the center point out to the very tip of each star ray. This splits every ray into two symmetrical halves.
Step 3: Applying Contrast
-
Plan the shading:
To get the 3D effect, you need alternating colors. Lightly mark every other half-ray with a small dot so you know which ones will be black and which will be gold. -
Apply the black:
Using your black ink or charcoal, fill in the segments you marked. If using charcoal, press firmly for a dense, matte black texture that contrasts with the shine. -
Crisp up edges:
Be incredibly careful near the center point. Use a ruler as a barrier if painting, or a very sharp point if drawing, to keep those converging lines distinct. -
Paint the gold:
Fill the remaining segments with your gold metallic paint. I like to apply two thin coats here to ensure the shimmer is solid and opaque. -
Refine the outline:
Once the main colors are dry, use a very fine black liner or pencil to re-trace the outer perimeter of the star to give it a sharp, defined edge.
Level Up: Coffee Staining
Brush weak tea or coffee over the paper *before* adding gold veins. Let it pool slightly at the edges for an ancient parchment look that creates deeper contrast.
Step 4: Celestial Embellishments
-
Add satellite stars:
Identify 3-4 open spaces in the background ‘marble’ texture. Sketch tiny four-pointed or five-pointed stars. -
Gold leaf the details:
Paint these small stars with your gold medium. They don’t need to be perfectly symmetrical; a little irregularity looks more handmade. -
Connect the constellations:
Look for the gold veins you painted in the first phase. Use specific veins to ‘connect’ your little stars, enhancing the map-like feeling.
Now you have a stunning piece of geometric art that feels like an artifact from an explorer’s map
Have a question or want to share your own experience? I'd love to hear from you in the comments below!