
A plain jar turns into instant kitchen charm with the right cookie jar painting idea, and you don’t need fancy skills to make it look special. Here are my favorite designs—starting with the classics everyone loves, then sliding into the more playful, unexpected looks.
Classic Gingham Kitchen Cookie Jar
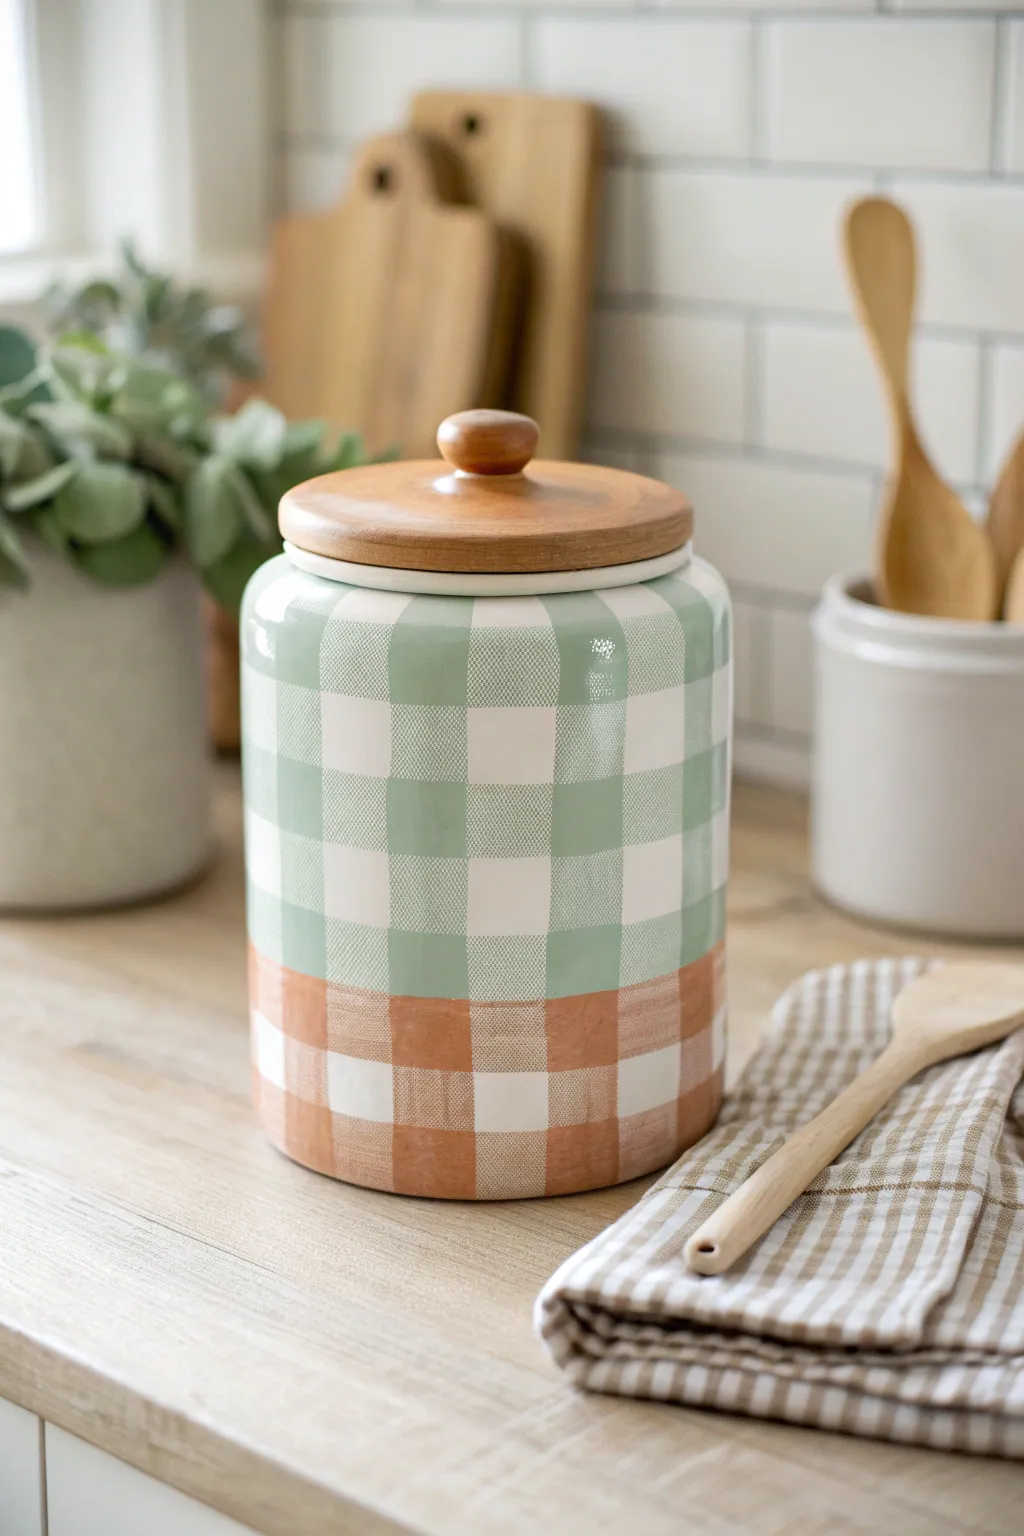
Bring a touch of cozy cottage charm to your countertop with this dual-tone gingham cookie jar. By combining soft sage green and warm terracotta checks, you’ll transform a plain ceramic canister into a custom piece that looks effortlessly vintage.
Detailed Instructions
Materials
- Plain white ceramic canister with wooden lid
- Rubbing alcohol
- Adhesive stencil tape or painter’s tape (1/2 inch width)
- Gloss enamel paint (Sage Green)
- Gloss enamel paint (Terracotta/Warm Peach)
- Gloss enamel paint (White)
- Glazing medium (for ceramics/glass)
- Small flat shader brushes
- Detail liner brush
- Palette or small mixing cups
- Paper towels
- Oven (for curing, if paint requires)
Step 1: Preparation & Base Grid
-
Clean surface:
Begin by wiping the entire exterior of your white ceramic jar with rubbing alcohol and a paper towel. This removes any oils or fingerprints that could prevent the paint fro adhering properly. -
Define the color split:
Decide where you want the color change to happen. On this jar, the bottom third is terracotta. Place a horizontal strip of tape around the circumference at this dividing line to keep your sections distinct. -
Tape vertical stripes:
Apply vertical strips of tape from the top rim down to the bottom edge, spacing them evenly. To get perfect squares, the space between tape strips should match the width of the tape itself. -
Tape horizontal stripes:
Layer horizontal strips of tape around the jar, maintaining that same spacing to create a grid of open white squares. -
Seal edges:
Press down firmly on all tape edges with your thumbnail or a credit card edge. This is crucial for crisp lines and prevents paint bleed.
Bleeding Lines?
If paint bleeds, use a toothpick to gently scrape away excess paint while it’s still semi-wet. For dry mistakes, a cotton swab dipped in rubbing alcohol works like an eraser on ceramic.
Step 2: Mixing & Painting the Medium Tone
-
Mix the glaze:
Mix your sage green enamel paint with a small amount of glazing medium (about 2:1 ratio). The glaze makes the paint slightly translucent, mimicking the woven look of fabric. -
Paint top vertical checks:
Using a flat brush, paint the open squares in the upper section (above your dividing line) with the sage mixture. Apply thin, even coats. -
Mix terracotta glaze:
Clean your brush and prepare the terracotta mixture, again combining the enamel paint with a little glazing medium. -
Paint bottom vertical checks:
Fill in the open squares on the bottom third of the jar with the terracotta glaze mixture. -
Partial peel:
Carefully remove *only* the horizontal tape strips while the paint is tacky, but leave the vertical strips in place for now. Let this layer dry completely.
Level Up: Faux Texture
Before the paint fully dries, drag a dry, stiff-bristled brush lightly across the squares. This creates subtle streaks, making the paint look more like actual woven linen fibers.
Step 3: Creating the Darker Intersections
-
Re-tape horizontally:
Once the first layer is fully dry, apply new horizontal tape strips exactly where the previous ones were. This exposes the intersecting squares that need to be darker. -
Mix darker shades:
Now, use your paints without the glazing medium, or mix in a tiny drop of a darker shade (like dark green or burnt orange) to create a more saturated version of your colors. -
Paint intersections:
Identify the squares where vertical and horizontal painted stripes would ‘overlap.’ Paint these squares with the saturated, darker paint relative to their section (dark sage on top, dark terracotta on bottom). -
Remove all tape:
Gently peel away all remaining tape. You should now see a pattern of white squares, light glazed squares, and dark saturated squares.
Step 4: Refining & Curing
-
Touch ups:
Dip a fine liner brush into white paint or rubbing alcohol to carefully clean up any edges where paint might have bled under the tape. -
Add texture:
For a true fabric look, I sometimes dry brush faint white lines horizontally and vertically across the painted squares to simulate thread texture, though keeping it solid looks crisp and modern. -
Rim painting:
If the rim looks messy, paint a thin, solid line of sage green around the very top lip of the jar for a finished appearance. -
Cure the paint:
Follow the curing instructions on your specific enamel paint bottle. Many require air drying for 21 days or baking in a cool oven (usually 350°F for 30 minutes) to become dishwasher safe.
Fill your new jar with your favorite treats and enjoy the sweet vintage style on your counter

Painted Cookie Assortment Pattern
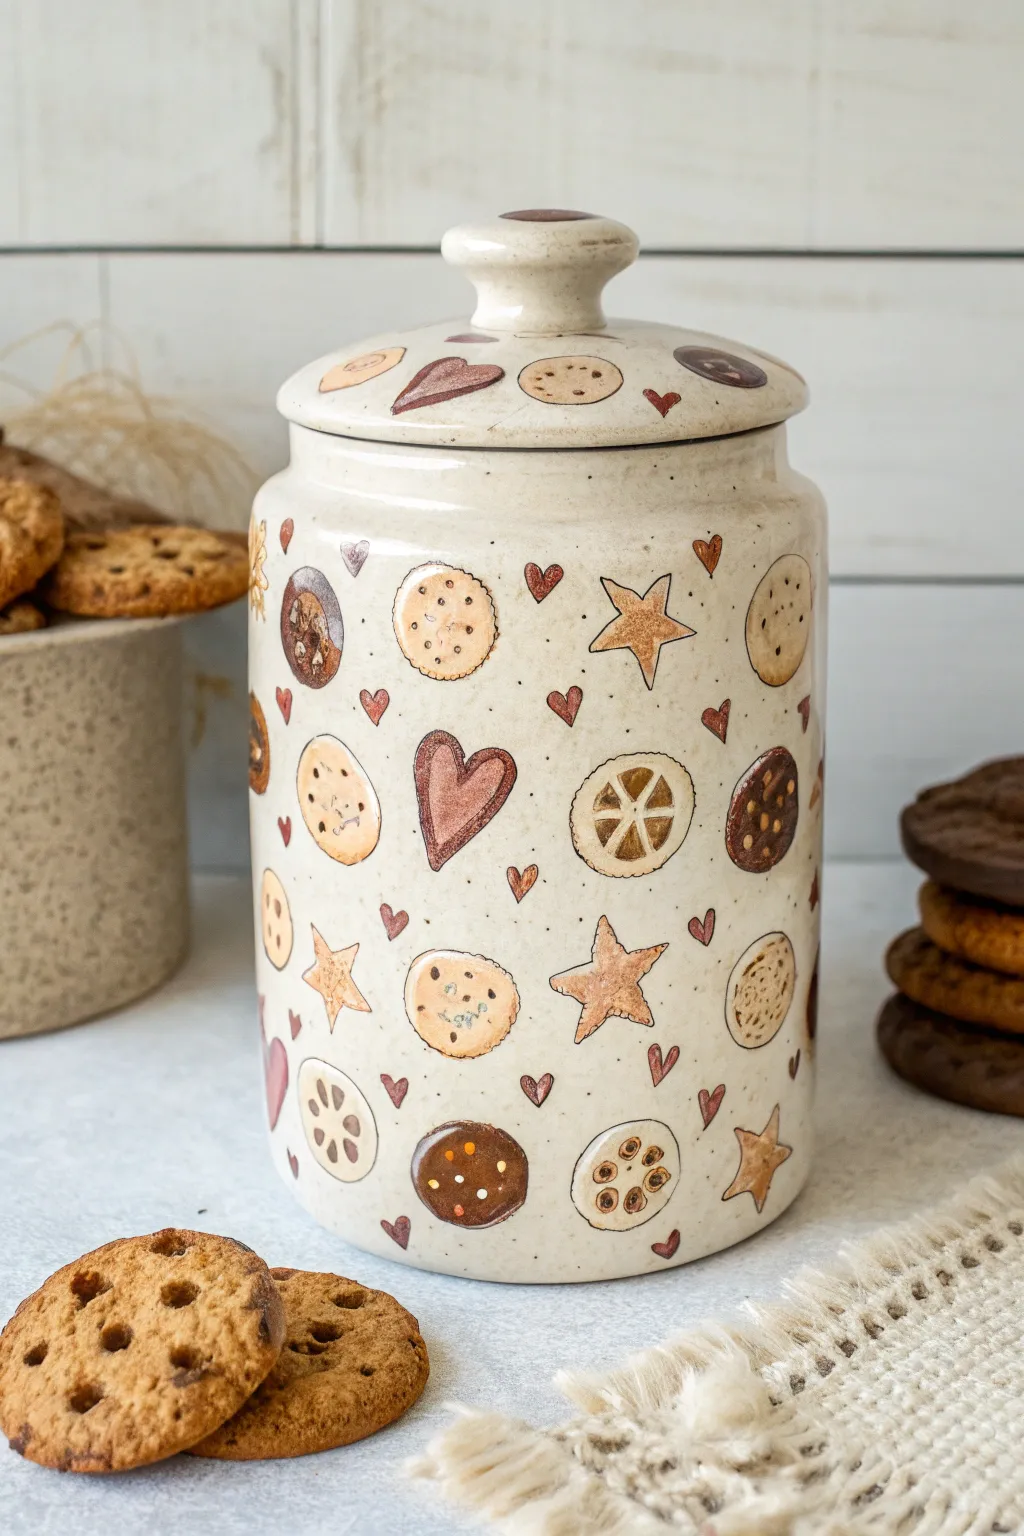
Transform a plain ceramic jar into a delightful display featuring a medley of hand-painted treats. This rustic pattern combines whimsical hearts, classic chocolate chips, and sugar-dusted stars for a cozy, bakery-inspired finish.
Detailed Instructions
Materials
- Plain ceramic cookie jar (white or off-white)
- Pebeo Porcelaine 150 paints (or similar bake-able ceramic paints)
- Colors: Warm beige, burnt sienna, dark brown, cream/off-white, terracotta
- Fine liner brushes (size 0 and 00)
- Small round brush (size 2)
- Graphite transfer paper (optional)
- Pencil and eraser
- Rubbing alcohol
- Cotton pads
Step 1: Preparation & Planning
-
Clean the Surface:
Before beginning any painting, thoroughly wipe down the entire exterior of your ceramic jar and lid with rubbing alcohol and a cotton pad. This removes invisible oils and dirt that prevent paint adhesion. -
Draft Your Sketch:
Sketch out various cookie shapes on a piece of paper first to finalize your assortment. Aim for a mix: heart-shaped cookies, star cutouts, classic round biscuits, and chocolate chip mounds. -
Transfer the Design:
Lightly draw your pattern directly onto the jar using a soft pencil. Alternatively, if you aren’t confident freehanding, tape your paper sketch over graphite transfer paper and trace the outlines onto the ceramic. -
Space the Elements:
Ensure you scatter small floating hearts between the larger cookie shapes to fill negative space evenly. Don’t forget to extend the pattern onto the lid for a cohesive look.
Pro Tip: Rustic Texture
Use a nearly dry brush for the cookie surfaces. This ‘dry brushing’ technique leaves subtle streaks that mimic the floury, uneven surface of real homemade biscuits.
Step 2: Base Colors
-
Mix the Dough Color:
Create a ‘baked dough’ base color by mixing warm beige with a tiny drop of burnt sienna. You want a light, golden-tan hue that looks like perfectly baked shortbread. -
Paint the Base Shapes:
Using your size 2 round brush, fill in the main bodies of the cookies with your dough mixture. Keep the paint application slightly uneven or thin in spots to mimic the texture of a real baked good. -
Paint the Chocolate Elements:
Switch to a dark brown paint. Fill in any full chocolate cookies, like the round dark ones shown in the pattern. Also, use this color for large chocolate chunks or heart centers. -
Add Decorative Hearts:
Using a terracotta or reddish-brown shade, paint the small filler hearts scattered around the jar. Also use this color for any jam-filled heart cookies.
Level Up: Glossy Jam
After baking and cooling the jar, add a drop of clear gloss varnish or resin specifically over the ‘jam’ centers of the heart cookies for a realistic, sticky shine.
Step 3: Detailing & Texturing
-
Outline the Shapes:
Once the base layers are dry to the touch, use a very fine liner brush (size 00) and a darker brown (thinned slightly with water if needed) to loosely outline each cookie. A shaky, organic line looks better here than a perfect one. -
Add Texture Dots:
Stipple tiny dots of dark brown or burnt sienna onto the light ‘dough’ cookies. This simple technique instantly creates the look of porous, baked texture. -
Detail the Star Cookies:
For the star shapes, create dimension by painting faint lines radiating from the center to the points, giving them a faceted, 3D appearance. -
Create Linzer Cookie Details:
For the round cookies with central cutouts (like the wheel shapes), carefully outline the inner segments with your fine liner brush to define the pattern. -
Paint Chocolate Chips:
Add small, irregular blobs of dark brown onto the round cookies to represent chocolate chips. Variation in size makes them look more realistic.
Step 4: Finishing Touches
-
Add Highlights:
Using a tiny dot of cream or white paint, add a small reflection on the chocolate chips or the dark chocolate cookies to make them look glossy and appetizing. -
Clean Up:
If you made any stray marks or smudges, use a damp cotton swab or a toothpick to gently scrape away the error before the paint cures. -
Dry Time:
Let the jar sit undisturbed for at least 24 hours to allow the paint to fully dry and set on the surface. -
Bake to Set:
Place the jar in a cool oven, then turn it to 300°F (150°C). Once the temperature is reached, bake for 35 minutes. Turn the oven off and let the jar cool completely inside before removing.
Fill your newly finished masterpiece with your favorite snacks and display it proudly on the counter


Farmhouse Stripes and Wheat Stems
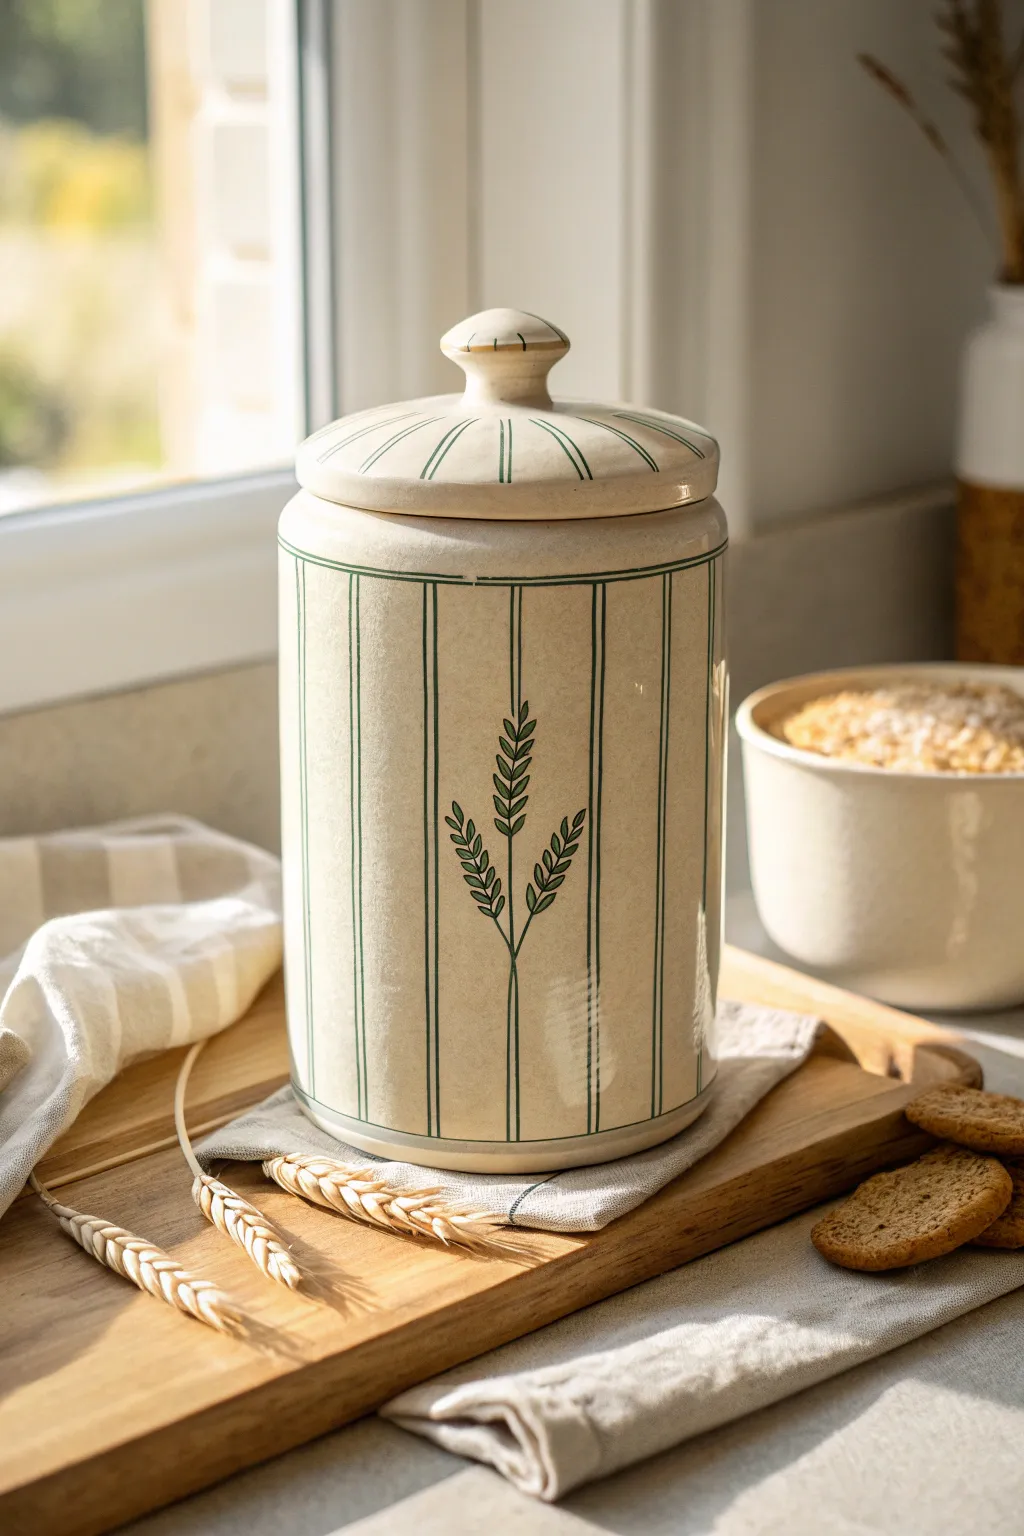
Bring the warmth of a farmhouse kitchen into your home with this elegantly simple painted cookie jar project. The creamy beige base, accented with crisp racing green stripes and a delicate wheat motif, creates a timeless piece perfect for storing your favorite oat biscuits.
Step-by-Step Tutorial
Materials
- Cylindrical ceramic cookie jar with lid (cleaned and dried)
- Multi-surface acrylic paint or ceramic paint (Cream/Beige)
- Multi-surface acrylic paint or ceramic paint (Hunter Green or Forest Green)
- Wide flat synthetic brush (for base coat)
- Fine liner brush (size 0 or 00)
- Flat shader brush (small size)
- Masking tape or painter’s tape (1/4 inch width is ideal)
- Pencil
- Ruler or flexible measuring tape
- Gloss or satin clear sealant (food-safe if painting the interior, though exterior-only is recommended)
- Palette or small dish
- Paper towels and water cup
Step 1: Base Preparation
-
Clean the surface:
Begin by thoroughly washing your ceramic jar with warm soapy water to remove any grease or dust. Dry it completely with a lint-free towel. -
Apply the base coat:
Using the wide flat brush, apply a smooth, even coat of the cream or beige paint over the entire exterior of the jar and lid. Use long horizontal strokes to minimize brush marks. -
Add a second layer:
Allow the first coat to dry to the touch (usually 20-30 minutes). I find applying a second coat adds a lovely depth and opacity that mimics real stoneware. Let this dry fully for at least an hour.
Wobbly Stripes?
If freehand stripes are proving difficult, use thin masking tape to create guides. Paint between the tape for crisp lines, but remove it while the paint is still slightly wet to avoid peeling.
Step 2: Defining the Lines
-
Mark vertical guides:
Using a flexible measuring tape and a pencil, lightly mark small dots around the top and bottom circumference of the jar where you want your vertical stripes to be. Spacing them about 1.5 to 2 inches apart works well. -
Connect the dots:
Gently rest your ruler against the jar’s curve and lightly sketch faint pencil lines connecting your top and bottom marks. These will guide your painting. -
Paint vertical stripes:
Load your fine liner brush with the Hunter Green paint. Carefully paint over your pencil lines, starting from the top and pulling the brush down in smooth, steady strokes. Don’t worry if they aren’t perfectly straight; a little wobble adds hand-painted charm. -
Add horizontal bands:
Paint a horizontal green band around the very top rim of the jar body and another near the bottom edge. Using a banding wheel or finding a way to rotate the jar while keeping your hand steady can help here. -
Detail the lid:
For the lid, paint thin green lines radiating from the central knob down to the rim, matching the approximate spacing of the body stripes. Paint a small ring or accent on the knob itself for continuity.
Step 3: The Wheat Motif
-
Sketch the stems:
Choose a prominent vertical stripe on the front of the jar to serve as the ‘center’ for your wheat design. Lightly pencil in a central stem rising up along the stripe, with two shorter stems branching off to the left and right. -
Paint the leaves:
Using the Hunter Green paint and your fine liner brush, paint small V-shapes or teardrops along the top portion of each stem to create the wheat grains. Start at the tip of the stem and work your way down. -
Refine the shape:
Slightly angle the grains outward as you go down the stalk. The central stalk should be the tallest, with the side stalks curving gently away. -
Connect the design:
Ensure the base of your wheat stems connects seamlessly into the vertical pinstripe, making it look as though the design grows naturally from the line work.
Add Texture
Before the beige base coat dries, dab it lightly with a dry sponge or crumpled plastic wrap. This subtle texture mimics the look of authentic, speckled stoneware pottery.
Step 4: Finishing Up
-
Clean up details:
Once the green paint is dry, use a clean, damp brush or a cotton swab to gently tidy up any smudges or uneven edges on your stripes. -
Cure the paint:
Follow the manufacturer’s instructions for curing your specific paint. Some require air drying for 21 days, while others can be baked in a home oven for durability. -
Seal the piece:
Apply a coat of gloss or satin clear sealant over the painted exterior to protect your artwork from chipping and fading. This also gives it that glossy ceramic finish.
Enjoy displaying your beautiful new farmhouse jar on your counter, ready to serve up sweet treats


Blue-and-White Floral Cookie Jar
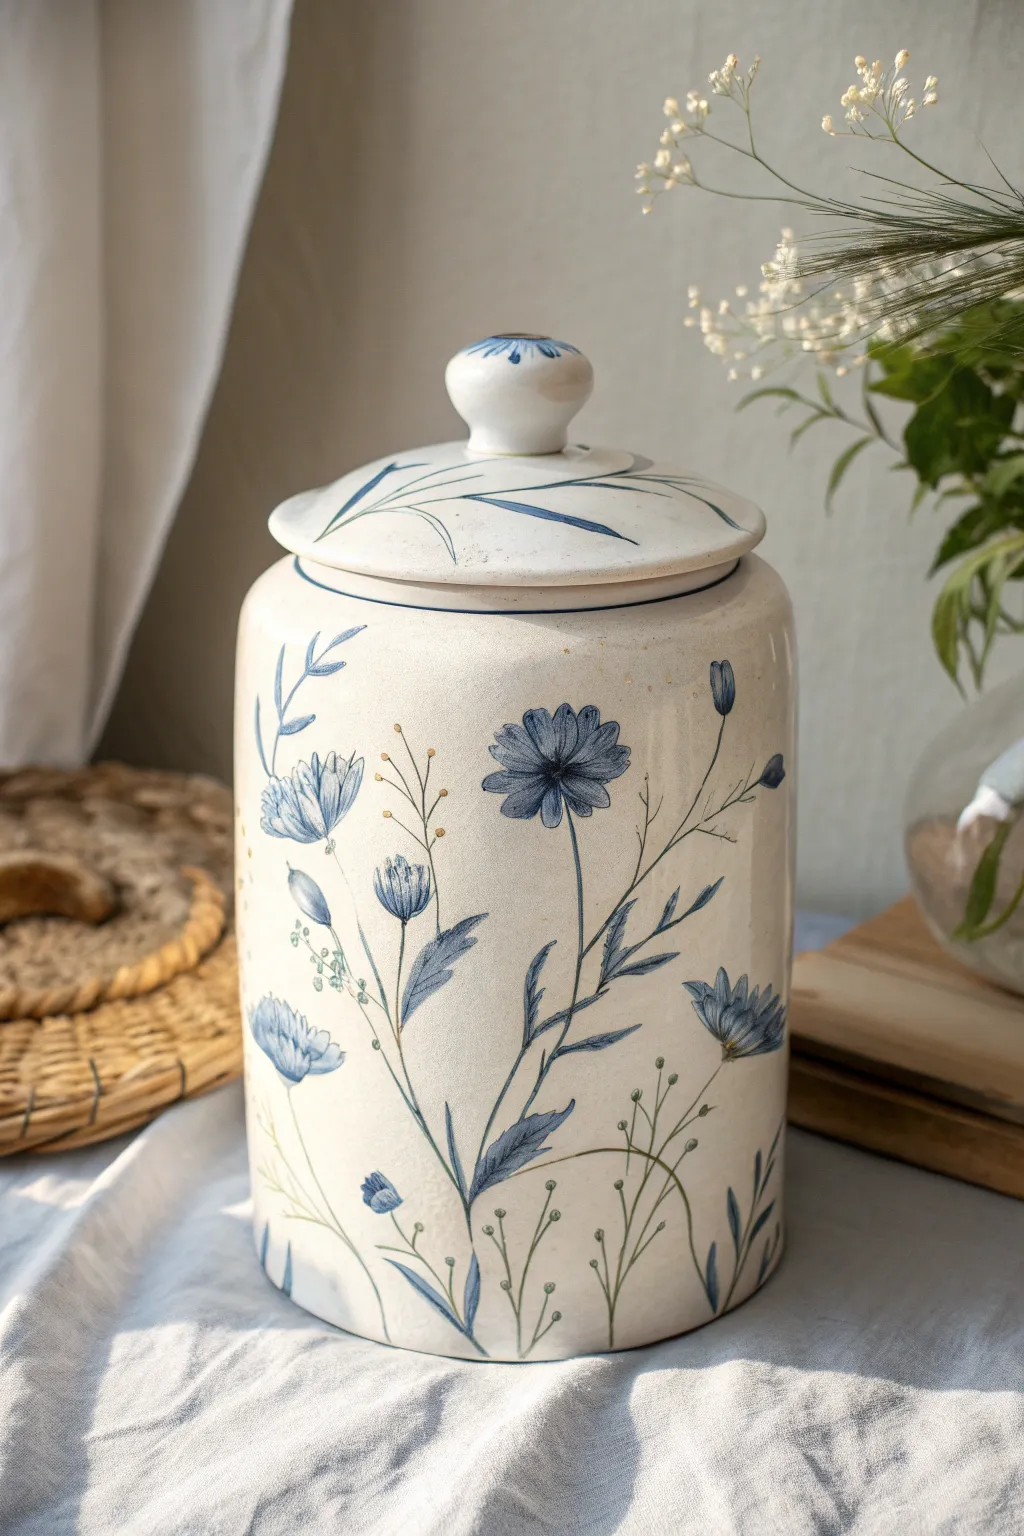
Transform a plain ceramic jar into a piece of country-cottage decor with this elegant blue-and-white floral design. The look mimics vintage hand-painted pottery, featuring sweeping wildflower stems and soft blue petals against a creamy glazed base.
Detailed Instructions
Materials
- Large ceramic cookie jar with lid (bisque or prepainted cream)
- Porcelain paints or multi-surface acrylics (Navy Blue, Cornflower Blue, Sage Green, Olive Green, Cream/Off-White)
- Clear gloss ceramic sealant or glaze (food-safe if painting the interior)
- Round brushes (sizes 2, 4, and 6)
- Fine liner brush (size 00 or 0)
- Pencil for sketching
- Palette
- Water set
Step 1: Preparation and Base Coat
-
Clean surface:
Begin by thoroughly washing your ceramic jar with soap and water to remove any grease or dust. Wipe it down with rubbing alcohol to ensure the cleanest possible surface for paint adhesion. -
Apply base color:
If your jar isn’t already a vintage cream color, mix a touch of warm yellow or brown into white paint to create an antique cream tone. Sponge or brush this all over the jar and lid. -
Apply second coat:
Let the first layer dry completely, then apply a second coat to ensure opacity. A smooth, opaque background is crucial for mimicking the look of glazed stoneware. -
Sketch the composition:
Using a pencil, very lightly map out the flow of your main stems. I like to start from the bottom and sweep upwards in curved, organic lines to create movement.
Step 2: Painting the Foliage
-
Mix green tones:
On your palette, create a dusty sage color by mixing Olive Green with a tiny bit of white and blue. You want the greens to feel muted, not neon. -
Paint main stems:
Using a liner brush and your sage mix, trace over your pencil lines. Keep your hand loose and vary the pressure—press harder for the base of the stem and lift off as you reach the tip for a tapered effect. -
Add secondary branches:
Extending from the main stems, paint thinner, branching lines that will eventually hold the flower heads. Allow these to cross over each other slightly for a natural, tangled look. -
Paint leaves:
Switch to a size 2 round brush. Paint elongated, narrow leaves along the stems. Use a ‘press and lift’ motion: touch the tip to the jar, press the belly of the brush down to widen the leaf, and lift again to form a point. -
Add darker accents:
While the green is still slightly tacky, mix a darker Olive Green. Add tiny strokes at the base of the leaves and stems to create depth and shadow.
Wobbly Lines?
If your stems look shaky, don’t worry. Dip a Q-tip in rubbing alcohol or water (depending on paint base) and gently wipe away the mistake before it dries.
Step 3: Creating the Blooms
-
Paint main flower centers:
Identify where your largest blooms will go (like the large daisy-shaped one). Paint a small, dark navy center dot as a guide. -
Paint petals:
Load a size 4 round brush with diluted Cornflower Blue. Starting from the center dot, pull strokes outward. For the side-facing flowers (like the tulip-shaped ones), paint three to four upward strokes that cup together. -
Layer petal colors:
Once the base blue is dry, mix a darker Navy Blue. Use a smaller brush to add thin streaks from the center of the petals outward. This creates the texture and veining seen in wildflowers. -
Detail the flower centers:
Go back to the centers of your open flowers. Stipple (dot) dark blue and a tiny bit of yellow or ochre in the middle to create a textured pollen area. -
Add buds:
At the tips of the thinnest stems, paint small teardrop shapes in blue. encase the bottom of these ‘buds’ with a small stroke of green where they meet the stem. -
Create tiny filler flowers:
Using your finest liner brush or even a toothpick, dot tiny clusters of circles on the ends of the wispiest stems to represent baby’s breath or seeds.
Crackled Finish
For a truly antique look, apply a crackle medium over your base cream coat before painting your flowers. It mimics aged pottery glaze perfectly.
Step 4: Lid and Finishing Touches
-
Decorate the lid:
Don’t forget the lid! Paint 3-4 long, sweeping leaves that curve over the dome shape. Mimic the style of the jar’s foliage. -
Paint the knob:
Add a simple blue accent to the very top knob, perhaps a small flower or a ring of blue petals radiating from the center. -
Rim detail:
Using a steady hand and a liner brush, paint a very thin navy blue line around the rim of the jar and the edge of the lid to frame the artwork. -
Dry and cure:
Allow the paint to cure fully according to the bottle instructions (usually 24 hours). If using bake-on ceramic paints, bake the jar in the oven as directed to set the design permanently. -
Seal:
Finish with a coat of clear gloss glaze or sealant to give it that high-shine ceramic look and protect your beautiful brushwork.
Now fill your jar with treats and enjoy the timeless charm of your hand-painted creation
BRUSH GUIDE
The Right Brush for Every Stroke
From clean lines to bold texture — master brush choice, stroke control, and essential techniques.
Explore the Full Guide
Lemon Grove Cookie Jar
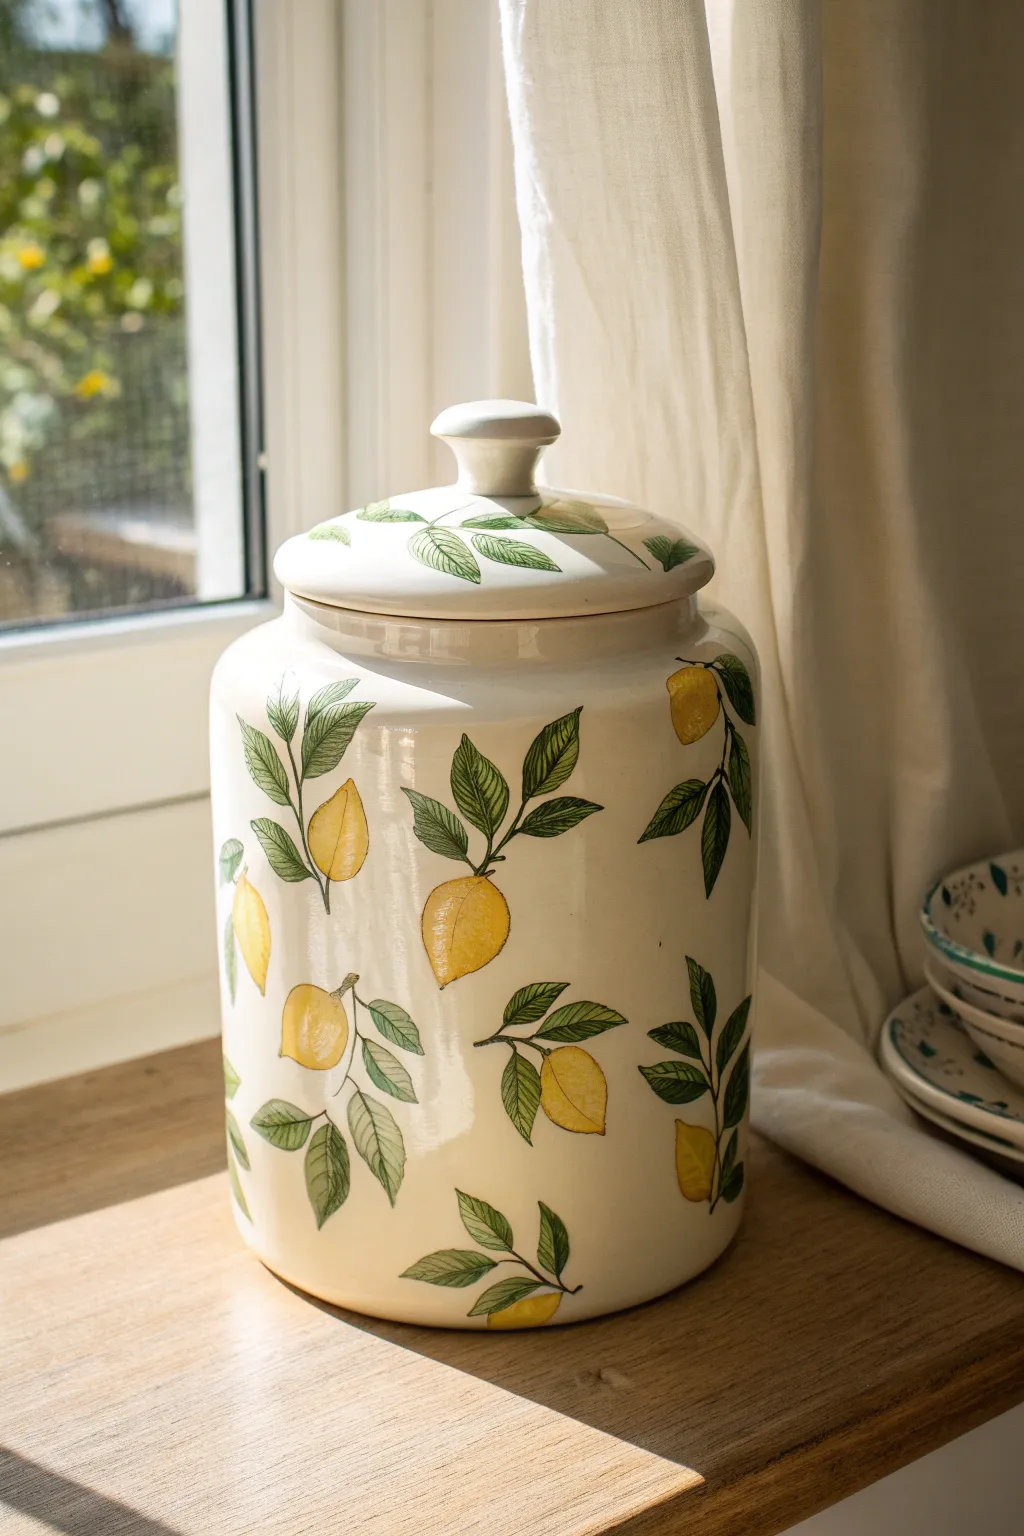
Bring a touch of Mediterranean sunshine into your kitchen with this botanical-inspired cookie jar. The design features scattered lemons and lush green leaves painted in a loose, illustrative style that feels both vintage and fresh.
Step-by-Step Guide
Materials
- Plain white ceramic cookie jar with lid
- Ceramic or enamel paints (Buttercup Yellow, Ocher, various Greens, Black)
- Rubbing alcohol and cotton pads
- Fine liner brush (size 0 or 00)
- Round brush (size 2 or 4)
- Pale glazing medium (optional)
- Clear high-gloss ceramic sealer (spray or brush-on)
- Palette for mixing
- Pencil for sketching
- Oven (if using bake-to-set paints)
Step 1: Preparation & Base Layout
-
Clean the surface:
Before painting, wipe the entire exterior of the cookie jar and the lid with rubbing alcohol. This removes any finger oils or dust that might prevent the paint from adhering properly. -
Plan the placement:
Visualize a scattered pattern where no two lemons are perfectly aligned. You want a natural, falling-leaf look. Lightly sketch the oval shapes of the lemons directly onto the ceramic using a pencil; don’t worry about erasing, as the graphite will likely bake off or be covered. -
Sketch the stems and leaves:
Add thin lines stemming from the top of each lemon oval. Draw two to three leaves per lemon, ensuring the leaves vary in direction—some pointing up, some drooping down—to create movement.
Fixing Smudges
Made a mistake with the black liner? Use a damp cotton swab or a toothpick to gently scrape away the error before it dries. Don’t wipe with a cloth or you’ll smear it.
Step 2: Painting the Fruit & Foliage
-
Base coat the lemons:
Using your round brush, fill in the lemon shapes with Buttercup Yellow. The coverage doesn’t need to be perfectly opaque; a little transparency actually creates a nice watercolor effect. -
Add dimension to the fruit:
While the yellow is still slightly tacky, mix a tiny dot of Ocher into your yellow. Paint a curved shadow along the bottom edge of each lemon to give them a rounded, 3D appearance. -
Paint the leaves:
Switch to a clean round brush and fill in your leaf sketches with a medium green. Use a single stroke from the stem to the leaf tip for the smoothest shape. -
Vary the greenery:
For visual interest, mix a breakdown of lighter and darker greens. Paint a few leaves with a darker forest green and others with a brighter leaf green so the grove looks lush and natural. -
Lid details:
Don’t forget the lid! Replicate smaller versions of the leaves and perhaps the top of a lemon peeking out around the rim of the lid, keeping the handle knob plain white for contrast.
Vintage Patina
For an antique look, mix a tiny drop of brown paint into your clear glaze or sealer. This creates a subtle ‘tea-stained’ finish that makes the jar look aged.
Step 3: Fine Lines & Finishing
-
Outline the lemons:
Once the color layers are dry to the touch, load your fine liner brush with slightly watered-down black paint. Carefully outline the lemons with a thin, shaky line—imperfect lines add to the illustrative charm. -
Detail the leaves:
Outline each leaf with the fine liner. Draw a central vein down the middle of each leaf and add tiny diagonal veins branching off. -
Connect the stems:
Trace over your pencil stem lines with black, connecting the fruit to the main branch structure. I find adding a tiny black dot at the bottom of the lemon creates a realistic blossom end. -
Add texture:
Using the very tip of your liner brush, add tiny stippling dots or short hatching lines on the shadowed side of the lemons to suggest the textured rind. -
Dry and cure:
Allow the paint to dry completely, usually for 24 hours. If using bake-to-set ceramic paints, place the jar in a cool oven, heat to the manufacturer’s specified temperature, and bake. -
Seal the artwork:
Once cooled (or fully cured), apply a clear high-gloss ceramic sealer. This protects your design from chipping and gives it that professional glazed ceramic look.
Now you have a charming, hand-painted piece of decor ready to be filled with your favorite treats
Sprinkles and Confetti Dots
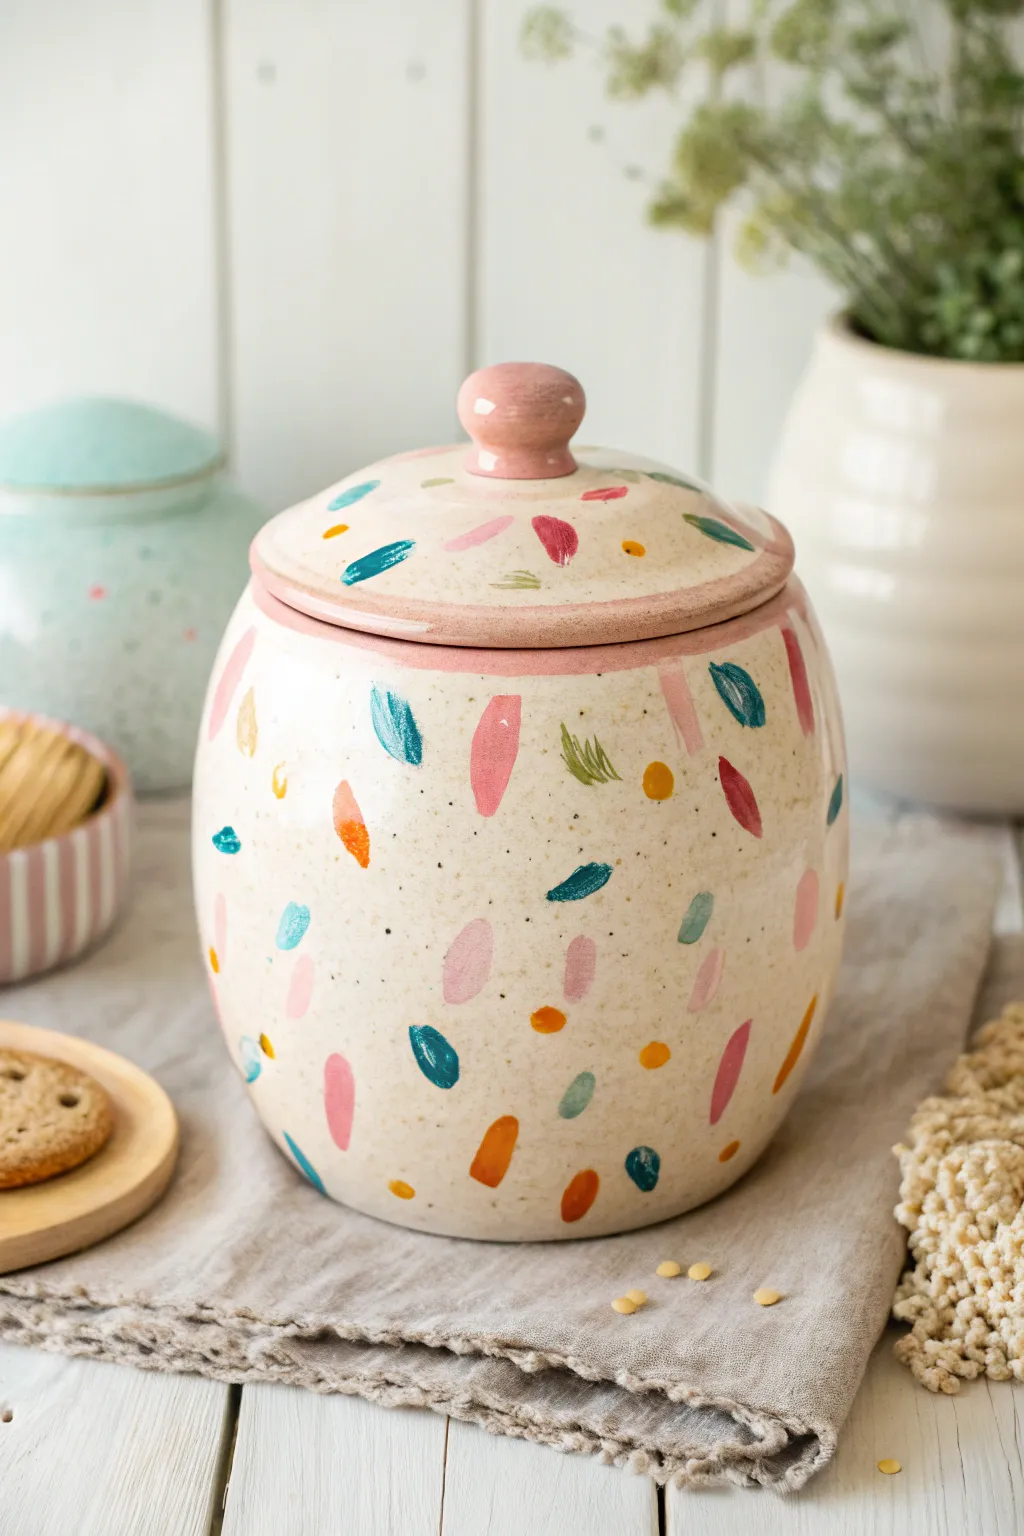
Transform a plain ceramic jar into a delightful kitchen centerpiece with this loose, painterly confetti design. The soft cream base speckled with flecks provides a warm, handmade pottery feel, while the energetic dashes of color add a playful modern twist.
Step-by-Step Guide
Materials
- Cylindrical ceramic cookie jar with lid
- Ceramic paint or multi-surface acrylics (Cream, Soft Pink, Teal, Golden Yellow, Orange, darker Teal)
- Medium flat brush (approx. 1/2 inch) for base coating
- Small round brush (size 2 or 4) for confetti dashes
- Old toothbrush or stiff bristle brush
- Palette or paper plate
- Water cup and paper towels
- Gloss varnish or clear ceramic sealant
Step 1: Creating the Rustic Base
-
Clean the Surface:
Begin by thoroughly wiping down your ceramic jar with rubbing alcohol or soapy water to remove any oils or dust. Let it dry completely. -
Mix the Base Color:
Squeeze out your cream colored paint. If it looks too stark, mix in just a tiny drop of brown or beige to warm it up, aiming for an oatmeal or natural clay tone. -
Apply the First Coat:
Using the medium flat brush, apply an even coat of the cream paint over the entire exterior of the jar and the lid. Don’t paint the knob yet. -
Layer for Opacity:
Allow the first coat to dry until it’s no longer tacky. Apply a second or third coat as needed until you have a solid, opaque background. -
Splatter Effect:
Dilute a small amount of black or dark brown paint with water until it’s inky. Dip an old toothbrush into this mixture. -
Flicking the Flecks:
Hold the toothbrush near the jar and run your thumb across the bristles to flick tiny specks onto the cream surface. Go lightly—you want a subtle speckled pottery look, not a mess. -
Dry Completely:
Let the base and speckles dry fully before moving on to the colorful details. This prevents smearing.
Step 2: Painting the Confetti and Details
-
Paint the Accents:
Using your soft pink paint and a small brush, carefully paint the round knob on the lid. You may need two coats for a smooth finish. -
Define the Rim:
With the same pink shade, paint a thin, consistent band around the bottom edge of the lid where it meets the jar. This frames the design beautifully. -
Practice Your Stroke:
On a piece of scrap paper, practice making the ‘confetti’ shape. Press the belly of a round brush down and lift up quickly to create a tapered, oval-like dash. -
Start with Pink Dashes:
Load your round brush with pink paint. Scatter these larger dashes randomly around the jar and lid. Keep them oriented vertically or slightly diagonally, but vary the angles slightly for a natural look. -
Add Teal Accents:
Switch to your teal paint. Add new dashes in empty spaces, occasionally placing one near a pink dash but not touching it. Vary the size slightly—some can be smaller dots. -
Incorporate Warmth:
Clean your brush and pick up the golden yellow. Add small round dots and short dashes to fill in gaps. I like to keep these smaller than the main strokes. -
Add Depth with Orange:
Use the orange paint to add a few vibrant strokes. These should be sparse compared to the other colors to act as pop accents. -
Layering Textures:
Once the main strokes are dry, take a very fine brush with a slightly darker shade of teal or green. Add tiny, scratchy lines or smaller dashes inside or near a few of the existing shapes to create a painterly texture. -
Sealing the Work:
Allow the paint to cure for at least 24 hours. Apply a coat of gloss varnish or clear sealant to protect your design and give it that shiny, fired-ceramic finish.
Uneven Coverage?
If acrylic paint streaks on the smooth ceramic, try dabbing it on with a sponge pouncer instead of brushing for the base coat.
Pro Tip: Baking
Check your paint label! Many ceramic paints become dishwasher safe if you bake the finished piece in a home oven.
Fill your new artisan-style jar with your favorite treats and enjoy the pop of color on your counter

PENCIL GUIDE
Understanding Pencil Grades from H to B
From first sketch to finished drawing — learn pencil grades, line control, and shading techniques.
Explore the Full Guide
Ombre Dip-Dye Cookie Jar
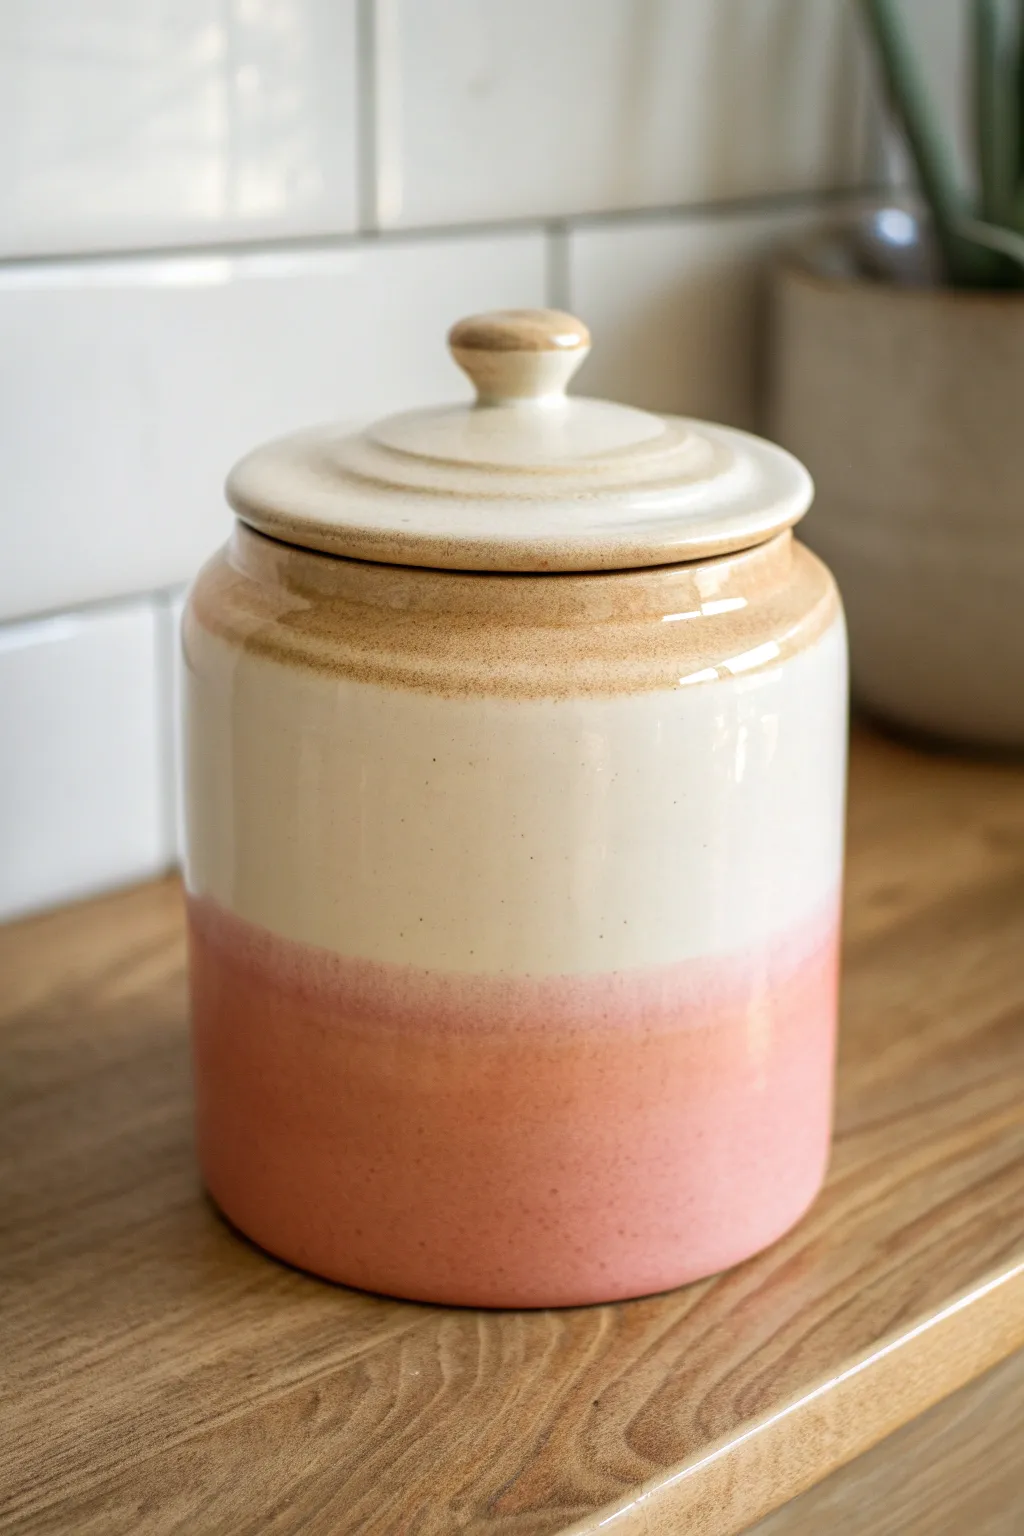
Transform a plain ceramic jar into a trendy, artisanal piece with this soft ombre technique. By layering spray paints and glazes, you can mimic the high-end look of dip-dyed pottery without needing a kiln.
Detailed Instructions
Materials
- Plain white ceramic cookie jar with lid
- Sandpaper (medium grit and fine grit)
- Spray primer (white or bonding)
- Dusty pink or terracotta spray paint (matte or satin finish)
- Cream or off-white spray paint (gloss finish)
- Light brown acrylic paint
- Glazing medium
- Small sponge or sea sponge
- Soft paintbrush
- Clear gloss protective sealant spray
- Painter’s tape
- Drop cloth or cardboard
Step 1: Preparation
-
Clean the surface:
Begin by thoroughly washing your cookie jar with warm soapy water to remove any grease or oils. Dry it completely with a lint-free cloth. -
Sand for adhesion:
Lightly scuff the entire exterior surface of the jar and lid using medium-grit sandpaper. This creates a ‘tooth’ for the paint to grab onto, which is especially important if your jar is already glazed. -
Protect the inside:
Use painter’s tape and paper to mask off the inside of the jar and the underside of the lid. You want to keep the food-safe interior surface free of paint. -
Apply primer:
Place the jar upside down on your drop cloth. Apply a thin, even coat of bonding primer to the entire exterior. I like to do two light coats rather than one heavy one to prevent drips. Let this dry fully according to the can’s instructions.
Mist Control
When creating the ombre fade, start spraying into the air away from the jar, then sweep across. Starting the spray directly on the jar can cause splatter spots.
Step 2: Creating the Base and Ombre
-
Base coat application:
Spray the entire jar with your cream or off-white gloss paint. This will be the main color of the body. Apply several thin coats until you have solid coverage, letting it dry between layers. -
Position for the gradient:
Once the base is dry to the touch, flip the jar upside down again. This angle makes it much easier to control the paint spray for the bottom section. -
Apply the pink tone:
Using your dusty pink or terracotta spray paint, spray the bottom third of the jar (which is currently facing up). Aim directly at the bottom to get solid coverage there. -
Create the fade:
To achieve the ombre fade, pull the spray can further away from the object (about 12-15 inches). Lightly mist the area where the pink meets the cream. Don’t aim directly at the jar here; aim slightly into the air so only the finest mist settles on the transition line. -
Refine the transition:
If the line looks too harsh, you can lightly mist a tiny bit of cream paint downward from the top to soften the blend. Let the jar dry completely for at least 24 hours.
Step 3: Adding the Faux-Glaze Details
-
Mix the glaze color:
Mix a small amount of light brown acrylic paint with a glazing medium. You want a translucent, runny consistency that mimics melted ceramic glaze. -
Paint the rim:
Using a soft brush, apply this brown mixture to the rim of the jar opening and the outer edge of the lid. It doesn’t need to be perfect; slight variations add to the handmade look. -
Sponge the texture:
While the brown paint is still wet, dab it gently with a damp sea sponge. This removes brush strokes and creates that speckled, organic texture often seen on stoneware. -
Detail the lid handle:
Apply the same brown glaze mixture to the knob of the lid. Wipe away a little bit of the paint with a paper towel so the cream color peeks through on the high points. -
Simulate the drip:
For the band just below the rim (where the lid sits), paint a slightly thicker line of the brown glaze. I prefer to blur the bottom edge of this line with a clean, damp brush to make it look like the glaze melted slightly in the firing process.
Speckled Stone Effect
Flick a toothbrush dipped in diluted brown paint over the cream section before sealing. The tiny splatters look exactly like authentic speckled stoneware clay.
Step 4: Finishing Touches
-
Final drying time:
Allow all your acrylic details to dry completely. This usually takes about an hour, but check your paint bottle to be sure. -
Seal the project:
Spray the entire jar and lid with a clear gloss sealant. This unifies the finish, making the matte pink look more like glazed ceramic, and protects your paint job from chips. -
Remove masking:
Carefully peel away the painter’s tape from the interior. If any paint seeped under, you can gently scrape it away with a craft knife or fingernail.
Place your newly transformed jar on the counter and fill it with your favorite treats for a stylish kitchen update
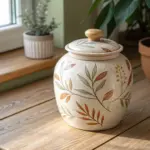
Minimal Line-Drawn Cookie Sketches
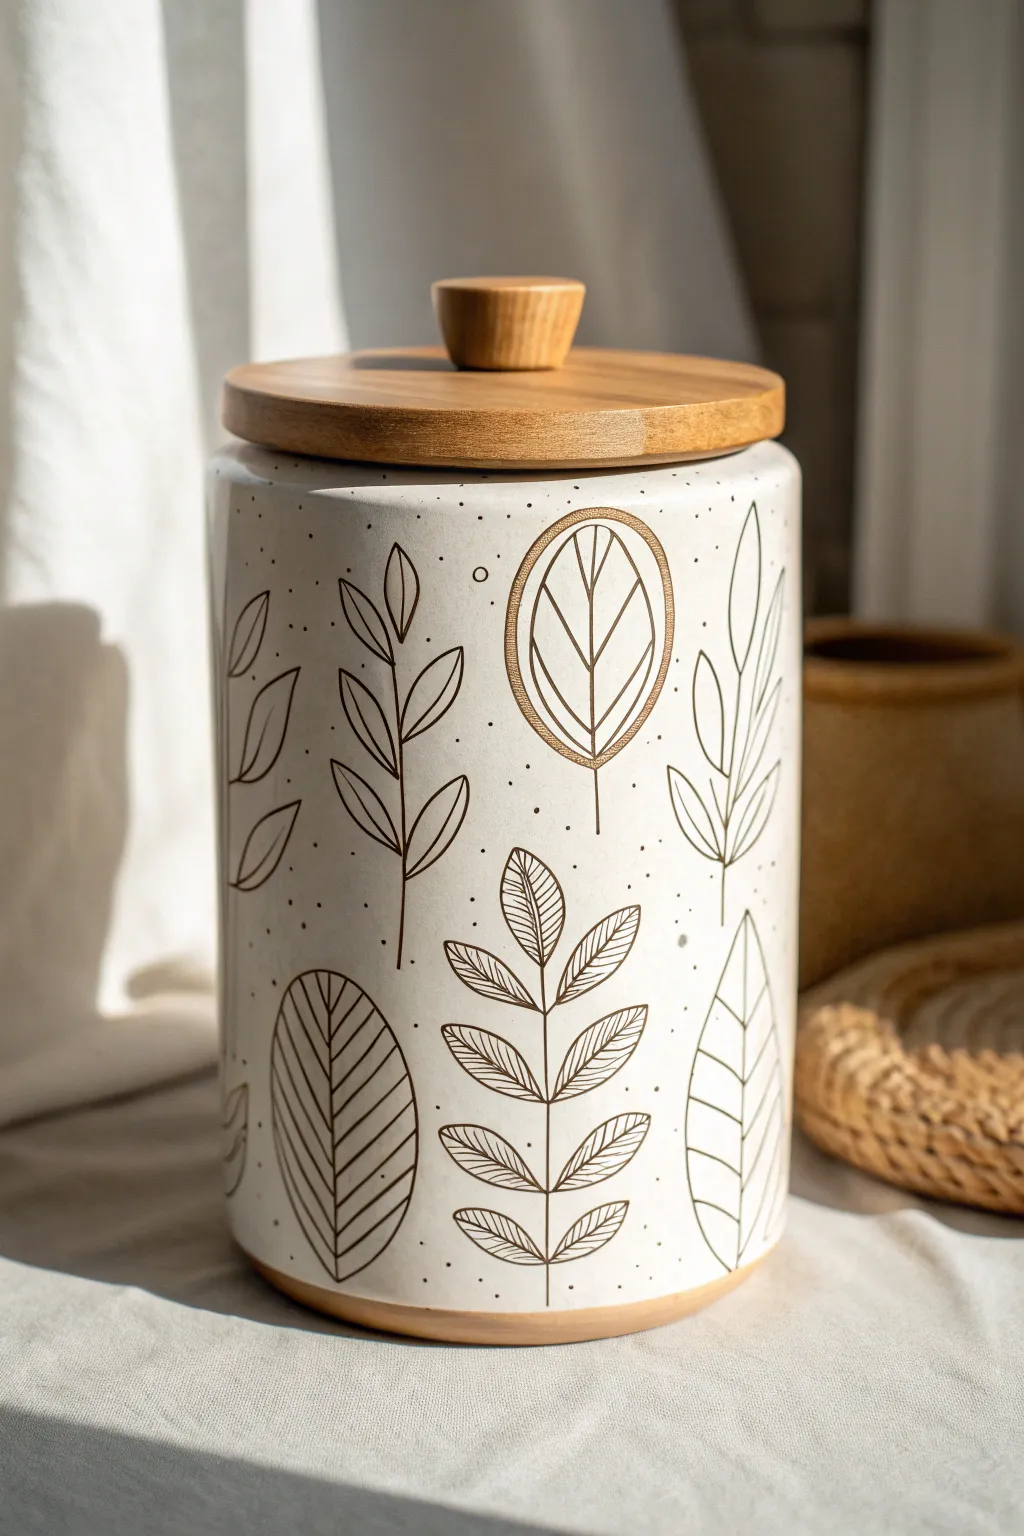
Transform a plain ceramic jar into a piece of modern kitchen decor with this delicate line-art project. The design features elegant, minimalist brown foliage sketches on a creamy, speckled background, achieving an organic and sophisticated look.
Step-by-Step Tutorial
Materials
- White or cream ceramic jar with a wooden lid
- Medium-grit sandpaper
- Rubbing alcohol and lint-free cloth
- Multi-surface acrylic paint (Cream or Off-White)
- Wide flat synthetic brush
- Acrylic paint marker (Fine tip, Bronze or Burnt Umber)
- Brown acrylic paint (thinned) or watered-down brown ink
- Old toothbrush
- Water-based polyurethane sealer (Matte or Satin finish)
- Pencil and eraser
Step 1: Base Preparation
-
Prepare the surface:
Begin by lightly sanding the entire exterior of your ceramic jar to create a bit of tooth for the paint to adhere to. -
Clean thoroughly:
Wipe the jar down with rubbing alcohol on a lint-free cloth to remove all dust, oils, and fingerprints. -
Apply base coat:
Using your wide flat brush, apply a smooth coat of cream or off-white multi-surface acrylic paint. Use long, even strokes to minimize brush marks. -
Apply second coat:
Allow the first layer to dry completely (check the bottle for drying times), then apply a second coat for full opacity. I find that cross-hatching the second layer helps hide any streaks. -
Create the speckled effect:
Dip an old toothbrush into thinned brown paint or watered-down ink. Run your thumb over the bristles to flick tiny speckles onto the dry cream base. Rotate the jar to ensure even, random coverage and let this dry fully.
Wobbly Lines?
If your hand shakes while drawing long stems, try moving your whole arm from the shoulder rather than just your wrist. This creates smoother, more confident lines.
Step 2: Line Art Design
-
Draft the stems:
Using a pencil very lightly, sketch the main vertical lines where your plant stems will go. Vary the heights and spacing to keep the composition dynamic. -
Sketch leaf shapes:
Lightly outline different leaf styles. Try mixing oval shapes, elongated pointed leaves, and smaller, fuller foliage to mimic the variety seen in the example. -
Trace stems with marker:
Take your bronze or burnt umber paint marker and carefully trace over your pencil lines for the main stems first. Keep your hand steady but relaxed. -
Outline the leaves:
Go over the leaf outlines. For the oval leaves, draw a double outline or a thick rim to give them more visual weight compared to the thinner stems. -
Add internal details:
Draw the veins inside the leaves. For the larger oval leaves, draw a central line and simple angled veins. For the fern-like leaves, add small hatched lines. -
Fill small accents:
If your design includes solid shapes, use the marker to gently fill in small sections or add tiny dots around the leaves to integrate the design with the speckled background. -
Clean up:
Once the marker ink is absolutely dry, gently erase any visible pencil marks. Be careful not to scrub too hard over the paint.
Mix Up The Foliage
Instead of just leaves, try drawing simple line-art wildflowers or wheat stalks in the same bronze color for a more meadow-inspired cottagecore look.
Step 3: Finishing Touches
-
Seal the artwork:
Protect your design by applying a thin layer of water-based polyurethane sealer. A matte finish looks best for this earthy style. -
Detail the rim:
If the bottom of your jar has an exposed clay rim, use a small brush to tidy up the edge where the cream paint meets the raw clay for a crisp finish. -
Final cure:
Let the jar cure for at least 24 to 48 hours before handling excessively or placing it in your kitchen.
Now your kitchen counter has a touch of handmade elegance ready to store your favorite treats


Stencil Tile Pattern Cookie Jar
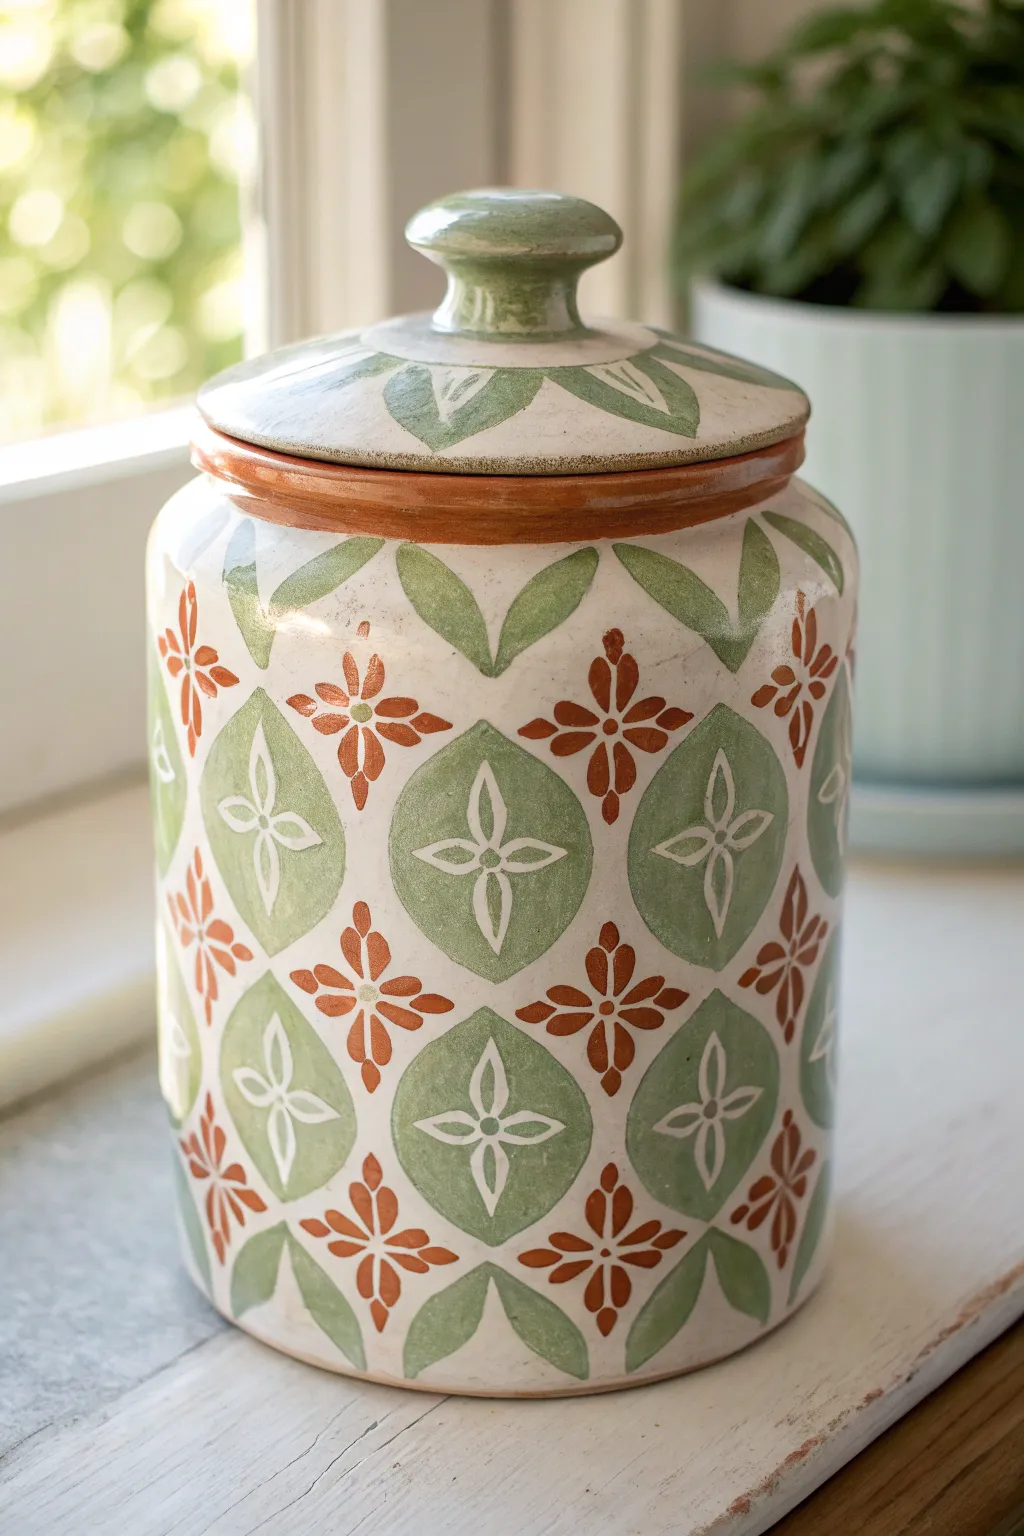
Transform a plain ceramic jar into an artisanal showpiece with this clever stenciling and hand-painting technique. The result resembles high-end Portuguese tiles, featuring earthy sage greens and warm rust tones on a creamy base.
Step-by-Step
Materials
- Plain white or cream ceramic cookie jar with lid
- Ceramic or multi-surface acrylic paints (Sage Green, Rust/Terracotta, Cream/Off-White)
- Small flat shader brush (size ~4-6)
- Fine liner brush (size 0 or 1)
- Flexible stencil sheet (for the oval shape)
- Painter’s tape
- Pencil
- Clear spray sealant (gloss or satin finish)
- Paper plate or palette
- Paper towels
Step 1: Preparation & Base Layout
-
Clean the surface:
Wipe down your ceramic jar thoroughly with rubbing alcohol or soapy water to remove any oils or fingerprints. Let it dry completely. -
Create the oval stencil:
If you don’t have a pre-made stencil, draw a pointed oval shape (like an almond) onto a flexible plastic sheet or cardstock and cut it out. This will be the main ’tile’ shape for the green sections. -
Mark the grid:
Lightly mark a grid around the jar using a pencil. You want alternating rows where the ovals will sit. Measure the circumference to ensure your spacing is even so the pattern meets neatly at the back.
Step 2: Painting the Green Ovals
-
Stencil placement:
Position your oval stencil on the first marked spot. Secure it gently with painter’s tape if needed to keep it steady on the curved surface. -
Apply sage green:
Load your flat brush with Sage Green paint. Dab off excess paint on a paper towel to prevent bleeding under the stencil edges. -
Stipple the color:
Gently stipple or brush the green paint inside the stencil. I prefer stippling near the edges for a crisp line. -
Repeat the pattern:
Lift the stencil carefully and move to the next position. Continue until all the green ovals are painted in their alternating grid pattern. Let this layer dry to the touch. -
Add lid details:
While the jar body dries, paint freehand pointed oval leaves radiating from the center of the lid using the same Sage Green.
Clean Lines Hack
If your stencil slips on the curved surface, lightly spray the back of your stencil with repositionable spray adhesive. It holds tight but peels off without residue.
Step 3: Adding the Floral Motifs
-
Paint the rust flowers:
In the open cream spaces between the green ovals, paint a simple four-petaled flower shape using the Rust/Terracotta paint and a small round brush. These should look like four teardrops meeting in the center. -
Add vertical dividers:
Between the main pattern rows, connect the rust flowers vertically with small diamond or teardrop shapes to create a continuous lattice feel. -
Detail the green ovals:
Using a fine liner brush and Cream/Off-White paint, hand-paint a delicate four-petaled flower outline inside each dried green oval. This gives it that intricate etched look. -
Paint the rim:
Using the flat brush, paint a solid band of Rust/Terracotta around the neck of the jar where the lid sits.
Antique Finish
After the final seal, rub a dark wax or diluted brown paint into the crevices and wipe it back immediately to make the jar look like vintage earthenware.
Step 4: Finishing Touches
-
Refine edges:
Check for any uneven edges. You can tidy up the green ovals with a bit of the cream base color if you need to correct the shape. -
Add texture marks:
For an aged, hand-thrown pottery look, dry brush a tiny amount of watered-down brown paint very lightly over the white floral details inside the green ovals. -
Seal the work:
Once all paint is fully cured (check your paint bottle instructions, usually 24 hours), spray the entire jar and lid with a clear gloss or satin sealant to protect your design from chipping.
Fill your beautiful new jar with homemade treats and display it proudly on your counter
Gingerbread Scene Holiday Cookie Jar
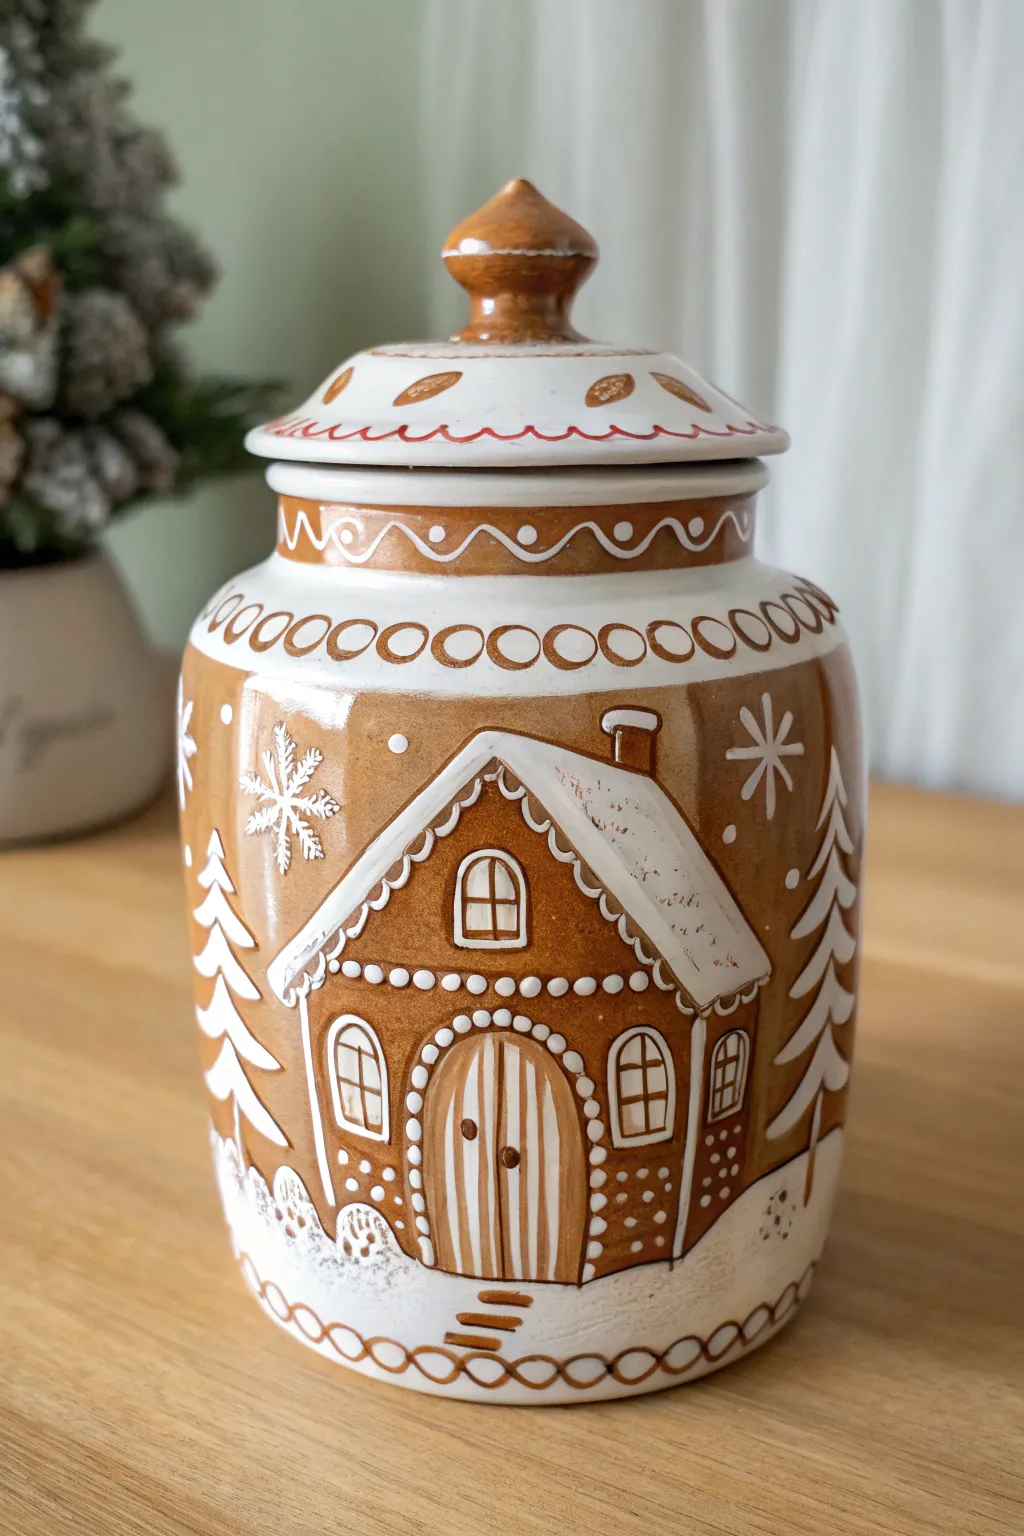
Transform a plain ceramic jar into a delightful holiday centerpiece with this gingerbread-inspired design. The warm brown tones and intricate white “icing” details create a cozy, whimsical look that is perfect for storing your favorite Christmas treats.
Step-by-Step
Materials
- Large ceramic cookie jar with lid (white or cream base)
- Ceramic or multi-surface acrylic paints: Gingerbread brown, Warm white, Red-brown
- Set of paintbrushes: 1-inch flat brush, small round brush, fine liner brush
- Pencil for sketching
- Rubbing alcohol
- Cotton pads
- Palette or paper plate
- Clear acrylic sealer spray (gloss or satin finish)
Step 1: Preparation & Base Coat
-
Clean surface:
Begin by wiping down your ceramic jar thoroughly with rubbing alcohol on a cotton pad. This removes any oils or dust that might prevent the paint from sticking properly. -
Block out the design:
Using a light pencil, sketch two large rectangular areas on opposite sides of the jar for the house structures, leaving the curved neck and bottom rim unpainted for now. This helps you visualize where the gingerbread color needs to go. -
Paint the background:
Mix your gingerbread brown paint with a tiny drop of red-brown to get that baked cookie warmth. Use the 1-inch flat brush to paint the main body of the jar, carefully painting around the bottom snow area and the upper rim. -
Add lid details:
Paint the knob of the lid with the same gingerbread mixture. Paint small leaf-like shapes on the slope of the lid using the same color, spacing them evenly apart. -
Apply second coat:
Ceramic often needs two coats for opacity. Once the first layer is dry to the touch, apply a second coat of brown to ensure a rich, solid color without streaks.
Fixing Wobbly Lines
If your white lines look shaky, wait for them to dry completely. Then, use a damp toothpick to gently scrape away the excess paint and neaten the edges.
Step 2: Painting the House Elements
-
Outline the house:
With the gingerbread base dry, create the house silhouette. Paint a darker brown outline for the roof and walls, or simply leave the base color as is and prepare to add white details on top. -
Paint the roof:
Use a flat brush and warm white paint to create the snowy roof. Following the A-frame shape, dab the paint on somewhat thickly to mimic the texture of heavy royal icing. -
Add windows and door:
Switch to a small round brush. Paint arched outlines for the front door and rectangular outlines for the windows using white paint. Fill in the window panes with white, leaving thin brown lines for the mullions. -
Door details:
For the door, paint vertical stripes in white to suggest wood planks. Add two small brown dots for the door handles once the white is dry. -
Chimney addition:
Paint a small rectangle emerging from the right side of the roof for the chimney. Add a cap of white ‘snow’ on top of it.
Puffy Icing Trick
Mix a tiny amount of baking soda into your white acrylic paint. This thickens the texture, making your painted ‘icing’ look raised and realistic.
Step 3: Icing Details & Decoration
-
Pipe the scallops:
Using your fine liner brush, paint a scalloped design (series of connected ‘u’ shapes) along the roofline of the house to look like decorative piping. -
Add roof dots:
Underneath the scalloped roofline, dot small pearls of white paint. I find distinct, round dots really sell the ‘icing’ effect better than flat strokes. -
Create the trees:
On either side of the house, paint stylized pine trees using the white paint. Start with a vertical line for the trunk, then add swooping, downward-curved lines for branches. -
Snowflakes and stars:
Fill the empty brown space above the house with snowflakes. Paint a simple cross, then add an ‘X’ over it, and add tiny v-shapes at the tips of the lines. -
Neck decoration:
Paint a wavy white line around the neck of the jar (the brown section just below the lid). Add a dot of white inside each curve and above each peak. -
Top border rings:
Just below the neck, where the jar starts to widen, paint a row of brown rings or circles all the way around the circumference. -
Lid borders:
Paint a thin, wavy red-brown line around the rim of the lid. If you have a steady hand, add tiny dots inside the waves. -
Snowy base:
Paint the very bottom of the jar with white to create a ground of snow. Stipple the top edge of this white area to make it look fluffy and soft where it meets the brown background.
Step 4: Finishing
-
Cure the paint:
Allow the jar to dry for at least 24 hours. If your paint requires oven baking to cure (check the bottle label), follow those instructions now. -
Seal:
Once fully cured and cool, take the jar outside and spray it with a clear acrylic sealer to protect your handwork from chips and scratches.
Now you have a charming, hand-painted piece to hold your holiday sweets all season long
Pet Biscuit Cookie Jar With Paw Prints
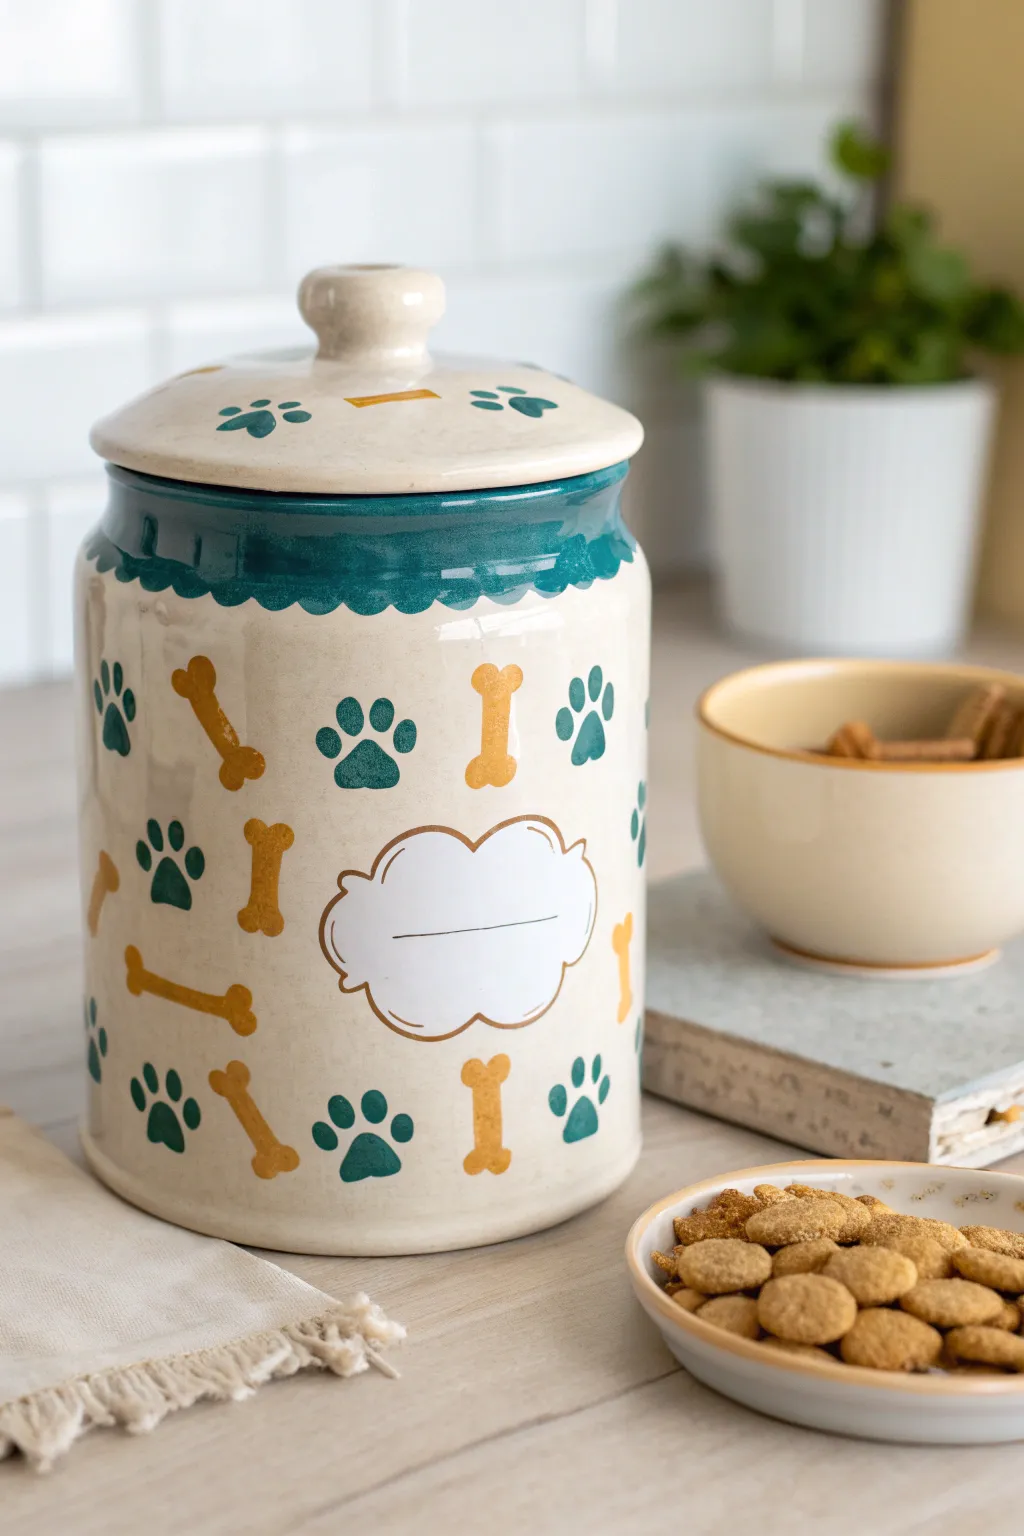
Transform a plain ceramic jar into a charming storage spot for your furry friend’s favorite snacks. This design features a classic cream base adorned with playful teal paw prints and golden bones, finished with a personalized label area.
Step-by-Step Guide
Materials
- Plain ceramic cookie jar with lid
- Ceramic or multi-surface acrylic paints (Cream/Beige, Teal/Dark Green, Mustard Yellow/Gold, White)
- Medium flat brush
- Small round detail brush (size 2 or 3)
- Fine liner brush (size 0 or 00)
- Pencil for sketching
- Painter’s tape or stencil tape
- Rubbing alcohol and cotton pads
- Clear sealant spray (food-safe for exterior use)
Step 1: Preparation & Base Coat
-
Clean the surface:
Wipe down the entire exterior of your cookie jar with rubbing alcohol on a cotton pad. This removes oils and dust, ensuring your paint adheres perfectly to the ceramic surface. -
Apply the base color:
Using a medium flat brush, apply a coat of cream or beige paint over the entire jar and lid. If your jar is already a nice cream ceramic, you can skip this, but painting it gives a uniform canvas. -
Layer for opacity:
Allow the first coat to dry completely for about an hour. If the original jar color shows through, apply a second coat of the cream paint and let it dry fully before moving on.
Step 2: Designing the Pattern
-
Sketch the label area:
Decide on the placement for your central label. Lightly sketch a cloud-like or scalloped shape in the center of the jar using a pencil. This will be the reserve space for the name tag. -
Mark pattern placement:
Lightly mark small ‘X’s or dots around the rest of the jar where you want your bones and paw prints to go. aim for a random, tossed pattern, alternating between the two motifs to keep it balanced. -
Paint the label background:
Fill in your sketched label shape with white paint. You might need two coats to make it bright and opaque against the cream background. Let this dry completely. -
Outline the label:
Once the white is dry, use your fine liner brush and the mustard yellow/gold paint to carefully outline the cloud shape. For a decorative touch, add a second, thinner outline just inside the first one.
Wobbly Lines?
If painting the scalloped rim freehand is difficult, trace a round object like a coin or bottle cap repeatedly around the jar with a pencil to create a perfect guide before painting.
Step 3: Painting the Motifs
-
Paint the bones:
Using the small round brush and mustard yellow paint, fill in the bone shapes at your marked spots. Paint a straight line with two small hearts or bumps at each end to create the classic bone shape. -
Add the paw prints:
Switch to the teal/dark green paint. For each paw print, paint a larger, rounded triangle or bean shape for the main pad, and three to four smaller oval dots above it for the toes. -
Decorate the lid:
Repeat the bone and paw print pattern on the top of the lid. Scale them down slightly if needed to fit the smaller surface area, keeping the spacing airy and light. -
Create the scalloped rim:
On the main body of the jar, just below the neck, sketch a scalloped or wavy line around the circumference. Use painter’s tape above this line to get a crisp top edge if helpful. -
Fill the rim border:
Paint the area between the jar opening and your scalloped line with the teal paint. I find using a flat brush helps get a smooth, even coverage here. Carefully remove any tape while the paint is still slightly wet. -
Detail the border:
Once the teal border is dry, use the fine liner brush to add a thin teal outline just below the scalloped edge to give it a finished look.
Make it 3D
For a tactile finish, use puffy paint for the paw pads or the gold bones. It adds a fun texture that makes the jar feel more like a custom ceramic piece.
Step 4: Finishing Touches
-
Personalize the label:
Return to the white label area. Using a very steady hand and the fine liner brush (or a gold paint pen if you prefer), draw a straight horizontal line across the center for writing a pet’s name later. -
Clean up mistakes:
Inspect your work. If any paint smudged, use a damp Q-tip or a small brush with the cream base color to tidy up the edges of your designs. -
Seal the project:
Allow the jar to cure for at least 24 hours. Then, apply a clear, food-safe sealant spray to the exterior only. This protects your artwork from scratches and moisture.
Now your furry friend has a stylish stash for their treats that looks great on any countertop


Have a question or want to share your own experience? I'd love to hear from you in the comments below!