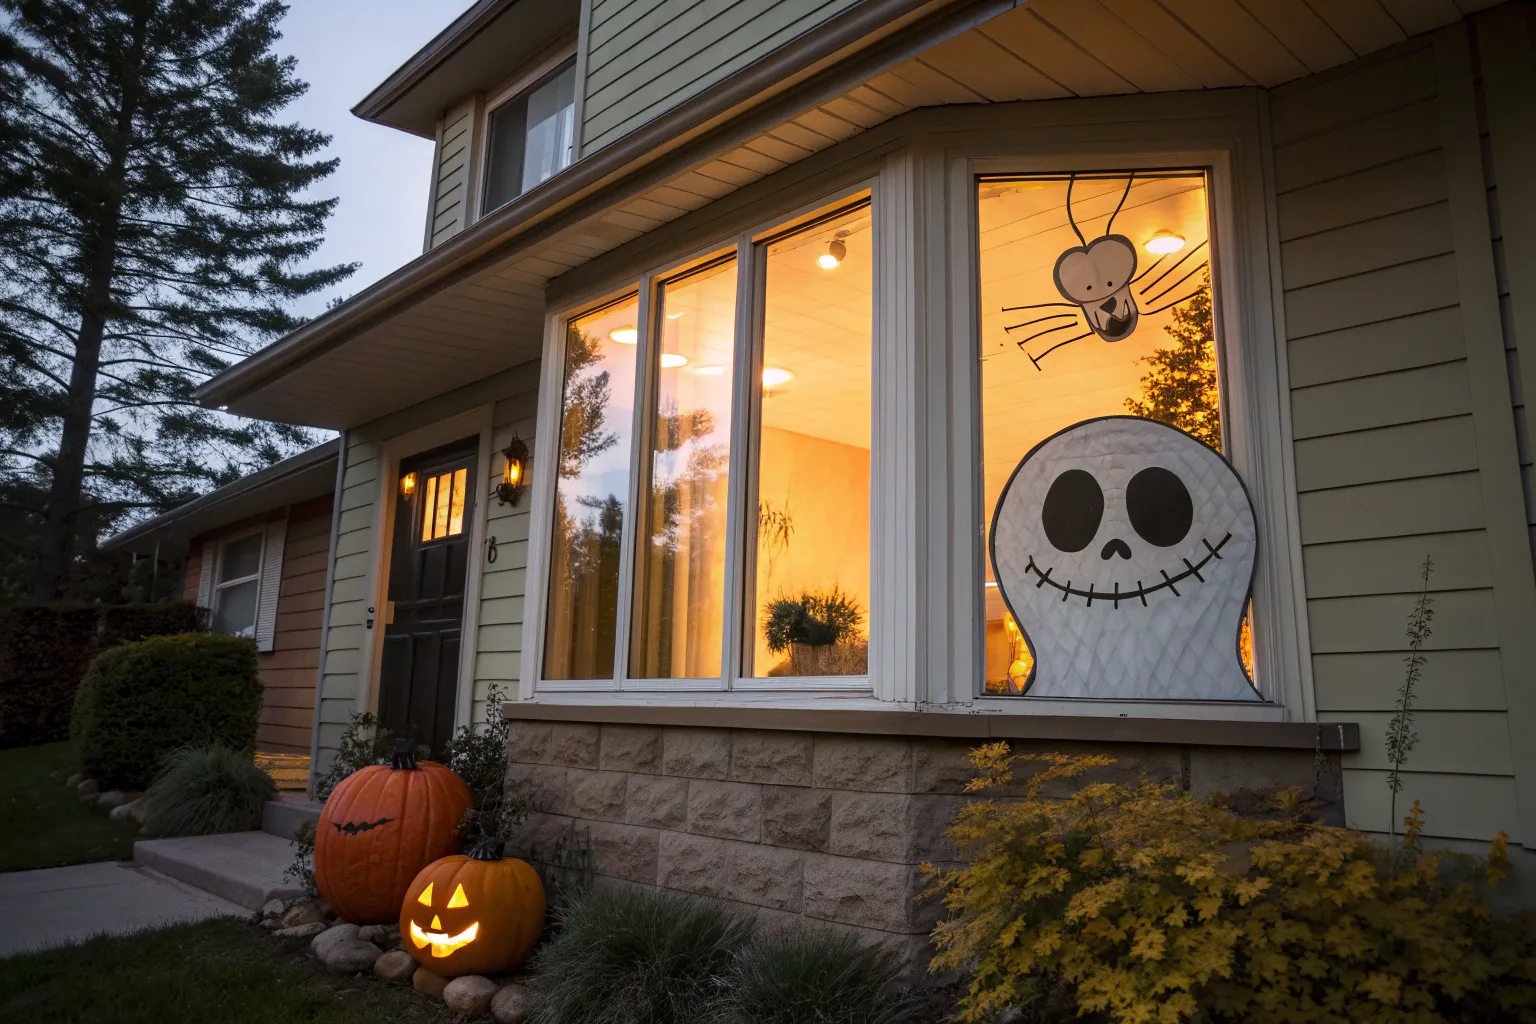
If you want instant Halloween window painting magic without hauling out a ton of décor, painting right on the glass is my favorite studio-to-home trick. These cool Halloween window painting ideas range from classic crowd-pleasers to artsy, unexpected designs that look amazing from the street.
Floating White Ghost Trio
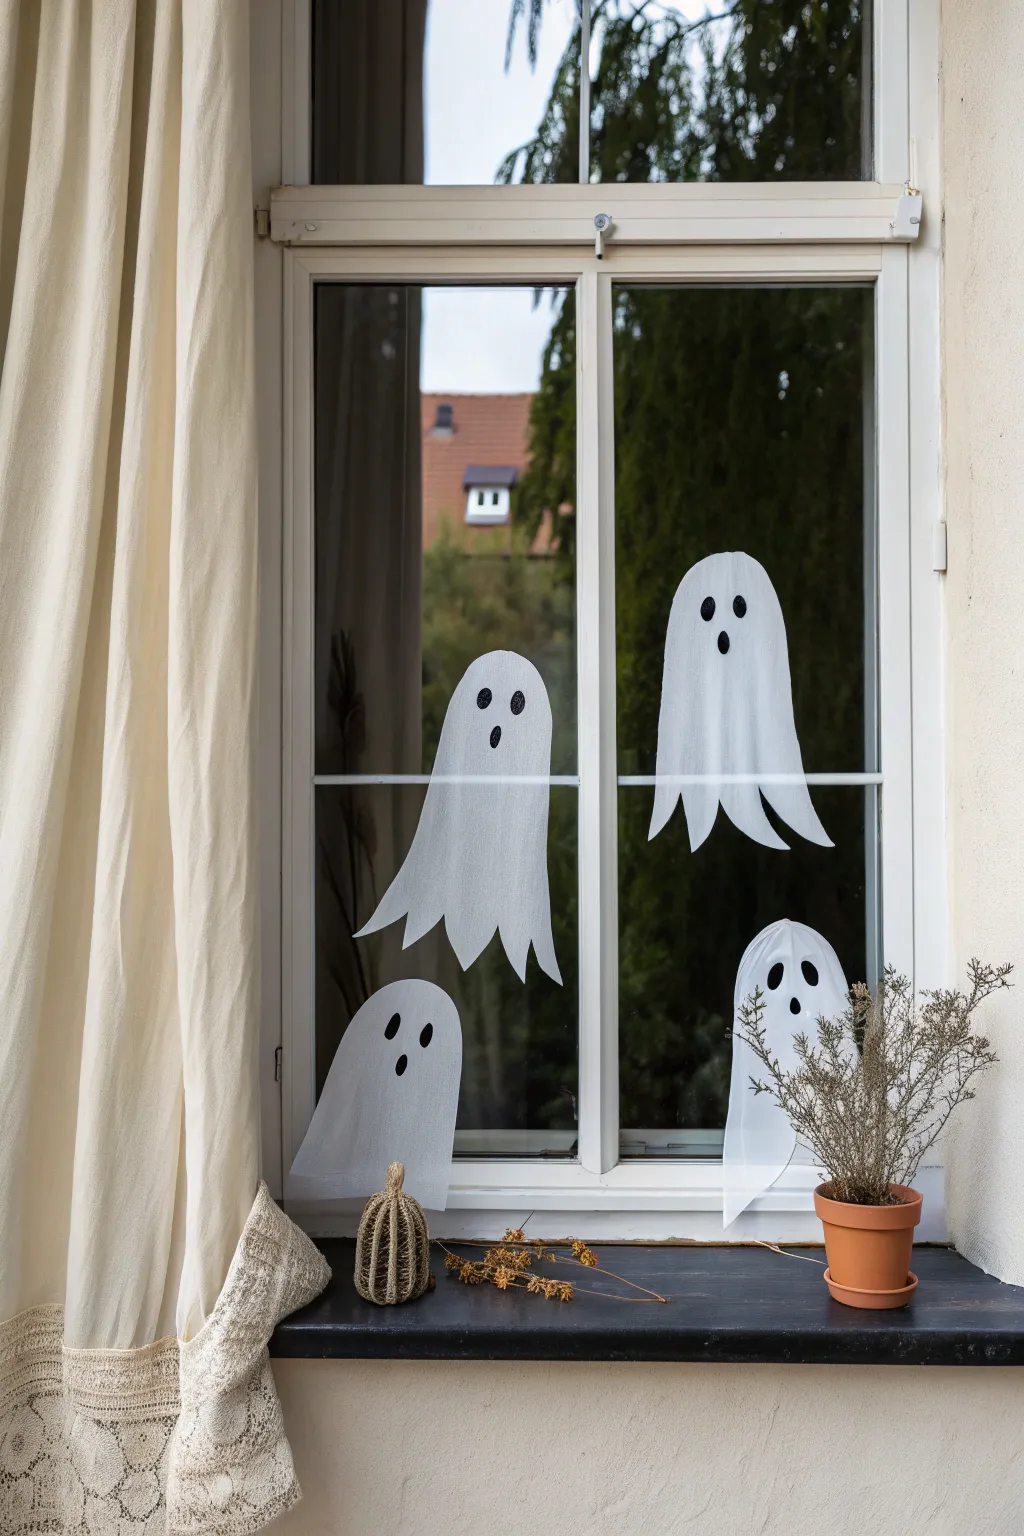
These spectral visitors create a hauntingly elegant silhouette against your window pane, filtering the outside light through their translucent bodies. It’s a surprisingly simple craft that swaps messy paints for the texture of parchment paper to achieve that perfect ethereal glow.
Step-by-Step
Materials
- White parchment paper or baking paper
- Black construction paper or cardstock
- Scissors
- Pencil
- Glue stick or double-sided tape
- Clear tape or adhesive putty (for mounting)
- Ghost template (optional)
Step 1: Shaping the Specters
-
Prepare your workspace:
Clear a flat surface and unroll a length of white parchment paper. You may need to weigh down the corners with small objects like mugs or books to keep it from curling back up while you work. -
Draft the outline:
Using a pencil, lightly sketch a classic ghost shape onto the parchment. Aim for a rounded, dome-like head that widens slightly as it goes down. Don’t press too hard, as parchment can tear easily. -
Create the flowing hem:
At the bottom of your sketch, draw a jagged, uneven hemline. Create wavy points and curves to mimic a tattered sheet blowing in the wind rather than a straight line. -
Vary sizes:
Repeat the sketching process to create three or four ghosts of different heights and widths. I like to make one tall ‘leader’ ghost and a couple of shorter companions to create a dynamic grouping. -
Cut out the bodies:
Carefully cut along your pencil lines with sharp scissors. Parchment paper is slippery, so take your time, especially around the wavy bottom edges to keep the curves smooth.
Sticky Situation?
If the black construction paper features keep peeling off the waxy parchment, try using double-sided tape or tiny dots of white craft glue instead of a standard glue stick.
Step 2: Adding Personality
-
Select black paper:
Grab your sheet of black construction paper or cardstock. This opaque material will provide a stark, high-contrast look against the translucent white bodies. -
Sketch the eyes:
Draw oval or teardrop shapes for the eyes. Experiment with different sizes—large, vertical ovals look spookier, while smaller, round dots look cuter. -
Sketch the mouths:
Draw mouth shapes for your ghosts. A simple vertical oval creates a classic ‘moaning’ expression. You can leave one or two mouthless for a more mysterious vibe. -
Cut facial features:
Cut out all the black eye and mouth pieces. Keep them organized in small piles so you don’t lose the tiny paper bits. -
Arrangement test:
Place the black shapes onto your parchment ghosts without gluing them yet. Move them around to find the best expression for each character. -
Secure the faces:
Apply a small amount of glue stick to the back of the black eyes and mouths. Press them firmly onto the parchment paper bodies. Since parchment has a waxy coating, hold them down for a few seconds to ensure they adhere.
Pro Tip: Texture Talk
Crumple the parchment paper into a tight ball and then smooth it back out before cutting. This creates a wrinkled, ancient fabric texture that catches light beautifully.
Step 3: Window Installation
-
Clean the glass:
Wipe down the inside of your window thoroughly with glass cleaner. Dust or grease will make it harder for the ghosts to stick and stay up. -
Plan the composition:
Hold your ghosts up to the window to decide on placement. Stagger them at different heights—some ‘floating’ high and others hovering near the windowsill. -
Apply adhesive:
Roll small loops of clear scotch tape or use small dots of adhesive putty. Place these on the back of each ghost, hiding them behind the opaque black eyes or near the edges where they are less visible. -
Mount the ghosts:
Press the ghosts onto the window pane. Smooth them down gently from the center outwards to minimize shadows from the tape. -
Overlap for depth:
If you have multiple ghosts, try slightly overlapping one behind another. The translucency of the parchment allows the silhouette of the rear ghost to show through, adding a cool layered effect.
Now you have a spooky, glowing display that looks great from both inside and outside the house


Corner Spiderweb Frame
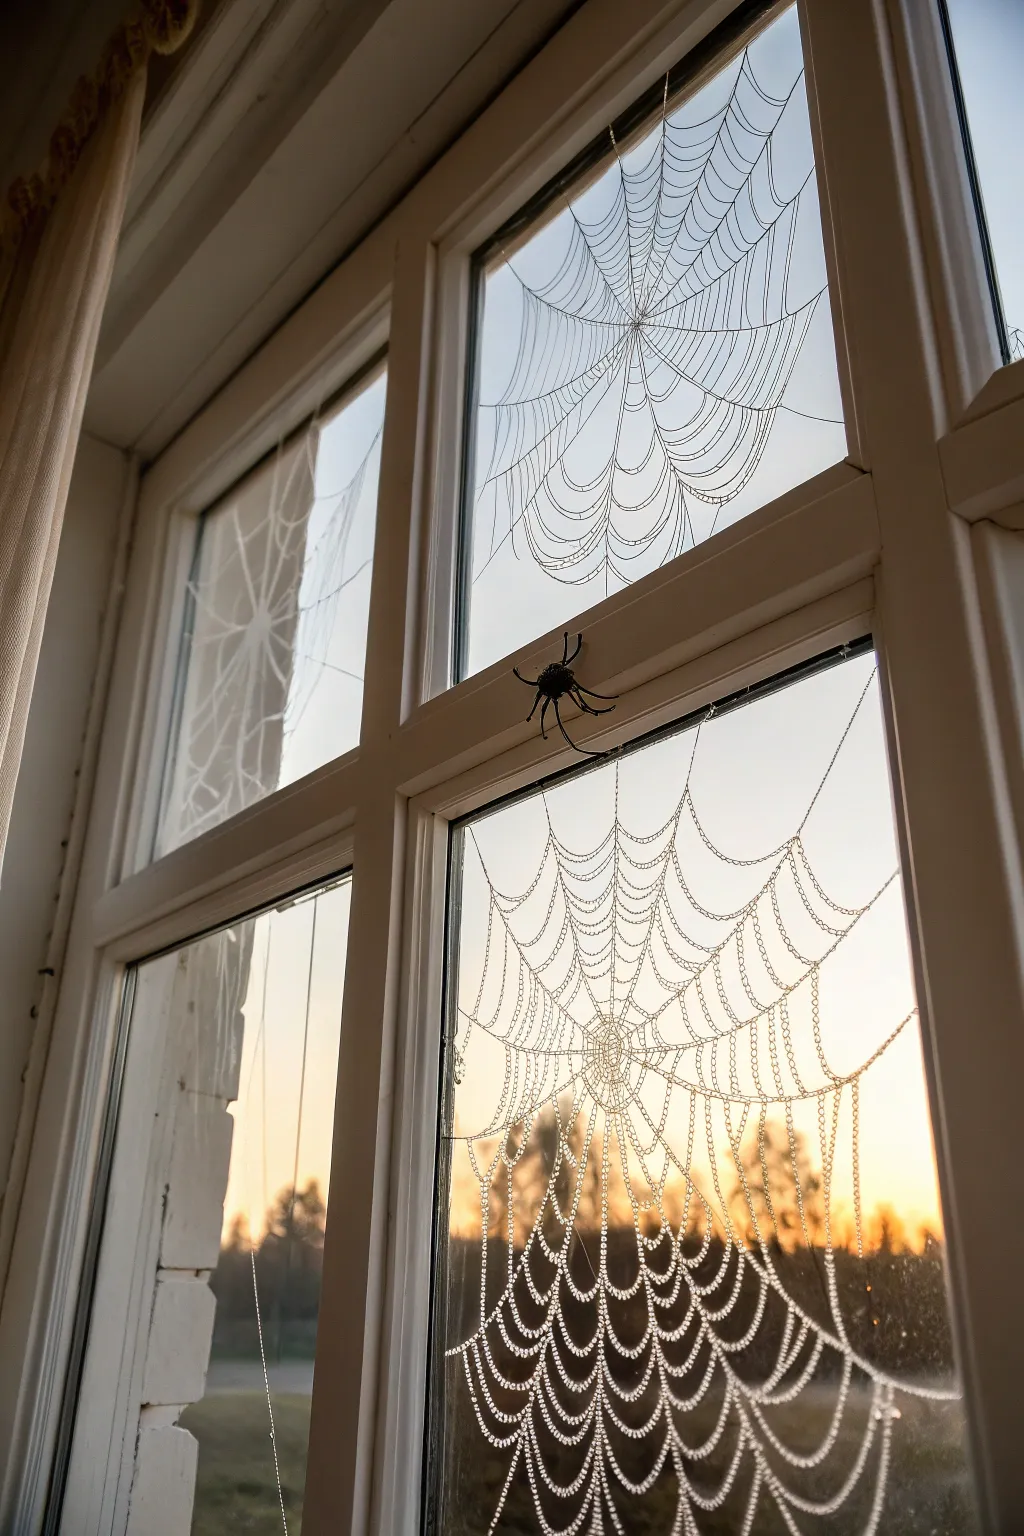
Transform your window panes into an eerie, abandoned cottage scene with this intricate spiderweb design that mimics the look of morning frost and dew. The white linework catches the light beautifully against a sunset or dark evening sky, while a realistic spider adds the perfect creepy-crawly finish.
Step-by-Step Tutorial
Materials
- White liquid chalk marker (fine and medium tip)
- White acrylic paint (optional, for opacity)
- Fine detail paintbrush (size 0 or 1)
- Glass cleaner and microfiber cloth
- Realistic plastic spider prop
- Adhesive putty or strong double-sided tape
- Reference photo of a spiderweb
- Dry erase marker (faint color like light grey)
Step 1: Preparation and Planning
-
Clean surface:
Thoroughly clean your window panes with glass cleaner and a microfiber cloth. Any dust or grease will prevent the chalk marker from adhering smoothly and can cause skips in your lines. -
Mark the center:
Decide where the center of your web will be. In the upper pane, this project places the center point near the top middle edge, while the bottom pane features a web anchored lower down. You can use a faint dry erase marker to place a small dot as your anchor point. -
Draft structural lines:
Using your faint dry erase marker or very light pressure with the chalk marker, draw the ‘spokes’ of the web radiating outward from your center point. These lines should extend all the way to the edges of the window frame.
Shake It Up
Shake your liquid chalk marker vigorously every 5 minutes. The pigments settle quickly, and frequent shaking ensures your white lines stay opaque and don’t turn watery.
Step 2: Painting the Web Structure
-
Solidify the spokes:
Go over your structural radial lines with the medium-tip white liquid chalk marker. Make these lines firm and relatively straight, as they bear the tension of the web. -
Start the spiral:
Begin near the center point and start connecting the spokes with curved lines. These are the sticky capture threads. I find it easiest to work in a spiral motion outward, but you can also do concentric circles. -
Create the drape:
Ensure each connecting line dips slightly in the middle, creating a ‘U’ shape between the spokes. This scalloped effect is crucial for a realistic, gravity-affected look. -
Vary the spacing:
Keep the lines tighter and closer together near the center of the web. As you move outward toward the window frame, let the spacing between the spiral rows get gradually wider. -
Anchor the edges:
When you reach the window frame, continue your lines until they physically touch the wood or vinyl. This makes the web look like it is truly attached to the architecture.
Step 3: Adding the ‘Dew Drop’ Details
-
Switch tools:
For the intricate beaded look, switch to a fine-tip chalk marker or a fine detail brush dipped in white acrylic paint. -
Add clear beads:
Along the curved horizontal threads, gently dab small dots or ‘beads’ of paint. These represent dew drops clinging to the silk. -
Focus on intersections:
Place slightly larger dots where the spiral threads cross over the radial spoke lines. This emphasizes the structure and adds dimension. -
Create hanging drips:
On the bottom-most curves of the web loops, add a few elongated tear-drop shapes hanging down to simulate heavy moisture gathering at the lowest points. -
Vary dot density:
Don’t make the pattern too uniform. Cluster some dots closely together and leave other sections purely as lines to keep it organic.
Uneven Flow?
If the marker stops writing on the vertical glass, press the tip down on a horizontal piece of scrap paper to re-saturate the nib, then return to the window immediately.
Step 4: Finishing Touches
-
Repeat on other panes:
Move to the adjacent window pane. For a corner effect, simply draw partial webs that look like they are continuing from the main pane, or start a fresh web in a different quadrant. -
Clean up errors:
If you made any smudges or shaky lines, use a damp cotton swab to wipe them away precisely. Chalk marker is very forgiving while wet. -
Prepare the spider:
Take your realistic plastic spider and apply a small amount of adhesive putty or strong double-sided tape to its underside. -
Mount the spider:
Press the spider firmly onto the window frame (the sash bar), positioning it so its legs overlap slightly onto the glass near the web. This gives the illusion it is guarding its creation. -
Final inspection:
Step back and view the window from a distance. If any lines look too faint against the light, go over them a second time to increase opacity.
Enjoy the spooktacular view through your new frosty webs every time you look outside


Big BOO Lettering With Web Details
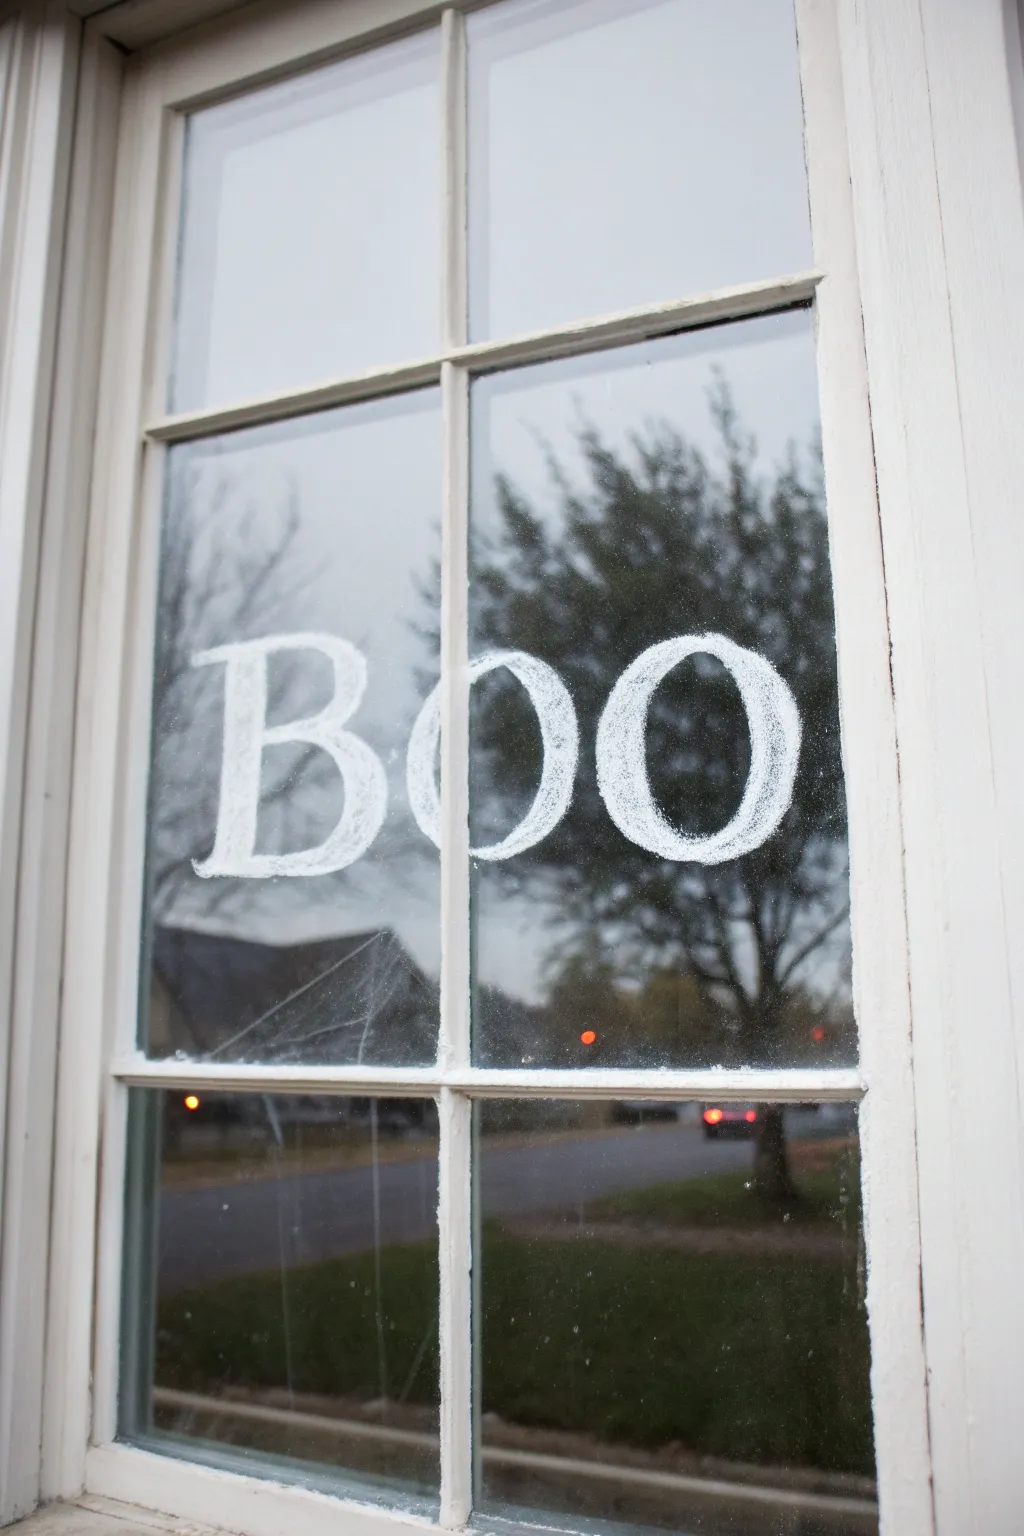
Transform your view into a ghostly greeting with this simple yet striking window art project. Using window-safe markers or paint, you’ll create large, textured lettering that stands out beautifully against the autumn evening light, complete with subtle, spooky spiderweb accents.
Step-by-Step Guide
Materials
- White liquid chalk marker (jumbo tip recommended)
- White window paint or acrylic craft paint (alternative to marker)
- Wide flat paintbrush (if using paint)
- Glass cleaner
- Lint-free cloth or paper towels
- Painter’s tape or masking tape
- Toothpick or skewer (for web detailing)
- Ruler or measuring tape
Step 1: Preparation
-
Clean the surface:
Start by thoroughly cleaning the window pane inside and out. Any dust or grease will prevent the chalk marker or paint from adhering smoothly, so give it a good wipe with glass cleaner and a lint-free cloth. -
Dry completely:
Ensure the glass is perfectly dry before you begin. Moisture can cause the marker ink to run or become diluted, ruining that crisp white look we’re aiming for. -
Plan your spacing:
Look at your window grid. The word “BOO” fits perfectly across a standard two-pane width if you split the middle ‘O’ across the mullion, or fits vertically. Decide where you want the letters to sit to maximize visibility. -
Mark guidelines:
Use small pieces of painter’s tape to mark the top and bottom height of your letters. This ensures your text stays straight and doesn’t drift upward or downward as you work.
Chalky Texture Trick
Don’t aim for solid white coverage. Let the marker run slightly dry or use a stiff distinct brush to leave visible streaks. This creates the spooky, aged texture shown in the image.
Step 2: Lettering
-
Prime the marker:
If using a liquid chalk marker, shake it vigorously and press the tip down on a piece of scrap paper until the white ink flows fully into the nib. -
Outline the ‘B’:
Start with the ‘B’ on the left side. Draw the vertical spine first, then create the two curved loops. Don’t worry about filling it in yet; focus on getting a nice, serif-style shape. -
Thicken the strokes:
Go back over your outline to thicken the lines. The vertical parts of the letter should be thicker than the horizontal curves to mimic traditional typography. -
Fill in the ‘B’:
Use a scribbling motion to fill in the letter. A slightly messy, textured fill actually looks better here—it gives it a ghostly, chalk-like appearance rather than a perfect solid block. -
Draw the first ‘O’:
Move to the next pane (or space) for the first ‘O’. Draw a large oval. Keep the height consistent with your ‘B’. -
Add serif details:
If you look closely at the ‘B’, it has small feet or ‘serifs’ at the top and bottom of the main stem. Add these little flares to give the font a classic, storybook feel. -
Create the second ‘O’:
Complete the word with the final ‘O’. I like to step back outside for a moment here to check the spacing from the street view, but you can just check from inside. -
Build texture:
Once the first layer is dry (it takes just a minute), go back and add scribble strokes in random directions. This builds opacity and creates that brushy, hand-painted look seen in the photo.
Step 3: Details & Cleanup
-
Add subtle webs:
In the corners of the window pane near the letters, lightly sketch faint spiderweb lines. Use a very light touch or a dryer marker tip so they look gossamer and translucent. -
Scratch in details:
For extra realism, take a toothpick or skewer and gently scratch through the web paint while it’s still tacky. This subtractive method creates very fine, realistic strands. -
Clean up edges:
If any paint went outside your intended lines or onto the wooden frame, use a damp Q-tip or a wet corner of a cloth to wipe it away immediately for a sharp edge. -
Remove tape:
Peel off your painter’s tape guides carefully. -
Final inspection:
Check your work from the outside. If the letters look too transparent against the dark evening sky, apply one more quick layer of scribbles to the center of each stroke.
Dainty Drips?
If your marker is too runny and drips down the glass, dab it quickly with a sponge. You can turn a drip into a spooky design element, but fast action prevents a mess.
Now your window is ready to cast a delightfully eerie spell on passersby all season long


Bat Swarm Across the Top Pane
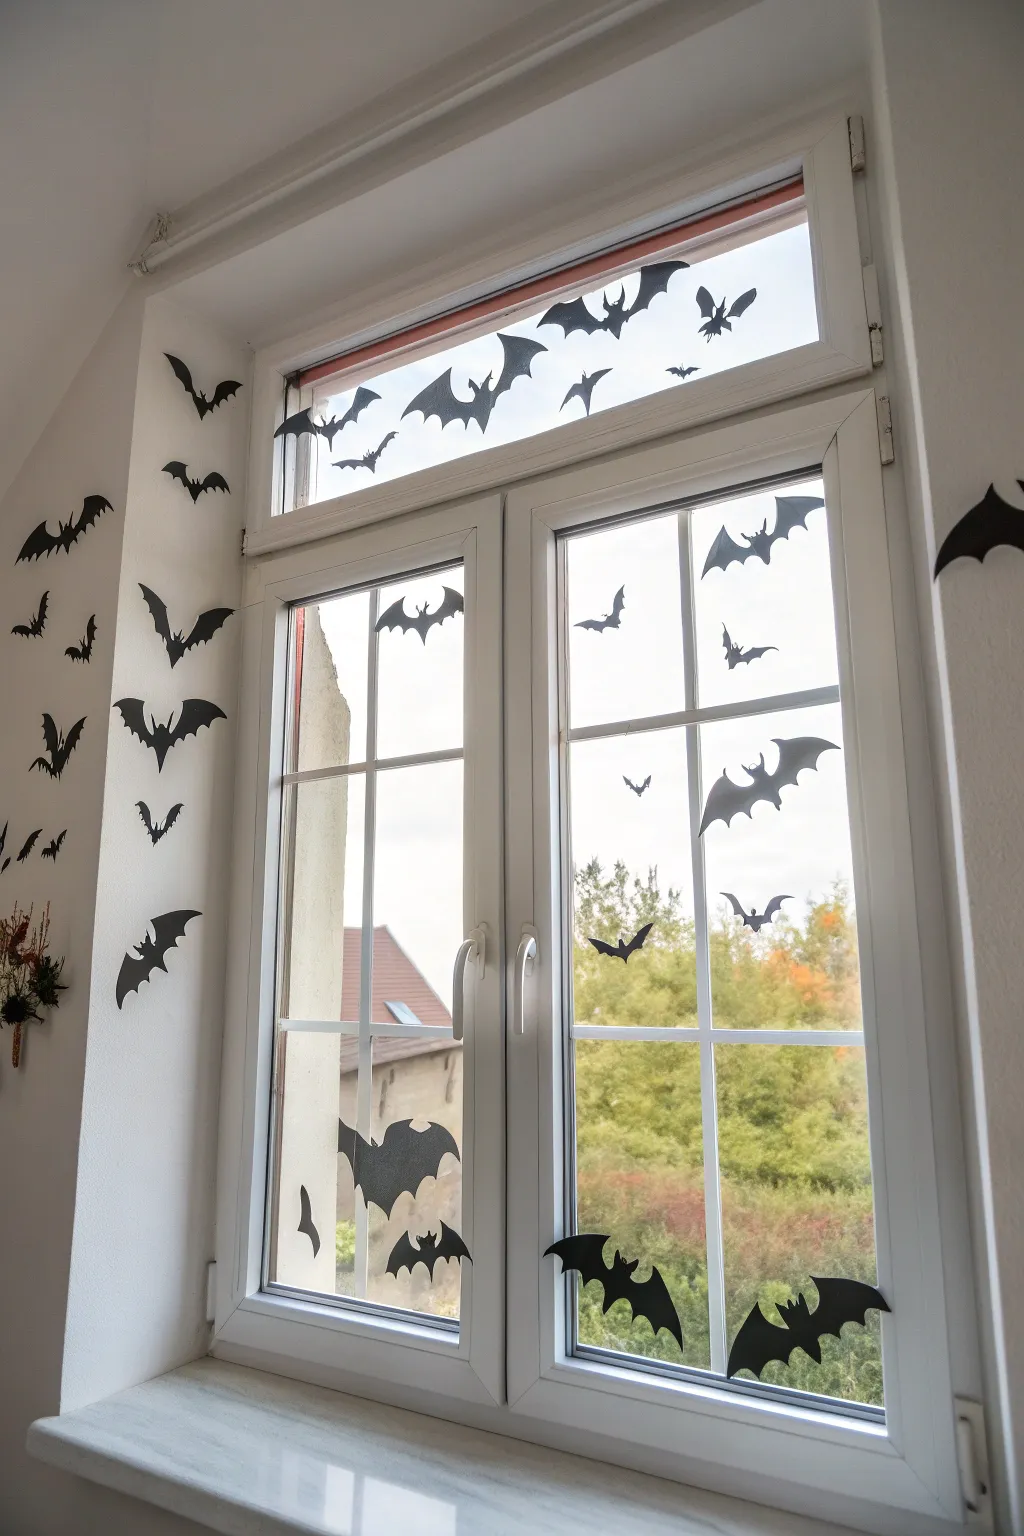
Transform an ordinary window into a spooky cavern exit with this dramatic flock of paper bats. By arranging silhouette cutouts in a sweeping motion across the glass and onto the wall, you create a sense of movement and depth that feels eerily alive.
How-To Guide
Materials
- Black construction paper or cardstock (heavy weight serves best)
- Pencil for tracing
- Scissors (standard and fine-point for details)
- Double-sided tape or painter’s tape
- Bat templates (printed in various sizes)
- Bone folder (optional, for crisp folds)
Step 1: Planning and Preparation
-
Source Your Shapes:
Begin by finding or drawing bat silhouettes in at least three or four different sizes. You want a mix of large ‘leader’ bats and smaller ones to create perspective. -
Trace the Flock:
Lay your black cardstock flat and trace your templates efficiently to minimize waste. I like to fit the wings close together like a puzzle to get the most out of each sheet. -
Consider Wing Variations:
For a more natural look, use a few different wing positions—some spread wide and gliding, others with wings angled up as if mid-flap.
Step 2: Creating the Bats
-
Cut the Basic Shapes:
Use your standard scissors to cut out the general outline of the larger bats. Smooth, long cuts produce better edges than choppy, short snips. -
Refine the Details:
Switch to smaller, fine-point scissors to navigate the tricky curves around the bat ears and the scalloped edges of the wings. -
Add Dimension:
To make the bats look like they are flying rather than just stickers, fold them gently down the center of the body. This lifts the wings away from the surface slightly. -
Crease the Wings:
For the largest bats, you can add slight secondary creases where the wing ‘fingers’ would be. This extra geometry catches the light beautifully. -
Prep the Adhesives:
Cut small strips of double-sided tape or roll small loops of painter’s tape. Place the adhesive only along the central spine regarding the fold you just made.
Tape Troubles?
If bats fall off cold glass, try cleaning the window with rubbing alcohol first. Blue painter’s tape is safer for painted walls than standard tape.
Step 3: Installation
-
Start at the Source:
Choose a focal point where the swarm originates. In this design, the top transom window acts as the main exit point. -
Cluster the Top:
stick a dense grouping of bats in the upper window pane. Overlap a few slightly or place them close together to simulate a crowded tunnel exit. -
Create the Flow:
Begin placing bats on the lower window panes. Arrange them in a diagonal or curved imaginary line to suggest a flight path, rather than scattering them randomly. -
Vary the Sizes:
Place larger bats closer to eye level and smaller bats further away or high up. This trick creates a forced perspective that adds depth to the window. -
Breach the Frame:
Don’t let the window frame stop you. Stick several bats directly onto the white PVC frame and the surrounding wall to show the swarm breaking containment. -
Directionality Check:
Step back and look at the whole composition. Ensure all bats generally face the same direction of travel, though a few stragglers can be turning. -
Fill the Gaps:
Identify any hollow spots in your stream of bats. Cutting tiny, distant-looking bats is a great way to fill these voids without cluttering the view. -
Secure the Wings (Optional):
If a specific bat is drooping too much, add a tiny dot of adhesive to the tip of one wing to anchor its angle while keeping the 3D effect.
Glow Up
Use glow-in-the-dark paint on the eyes or wing tips of the bats. They will charge in the daylight and create a ghostly swarm effect at night.
Step back and admire how a simple paper cutout project can add such dynamic energy to your Halloween decor
BRUSH GUIDE
The Right Brush for Every Stroke
From clean lines to bold texture — master brush choice, stroke control, and essential techniques.
Explore the Full Guide
Graveyard Horizon Across Multiple Panes
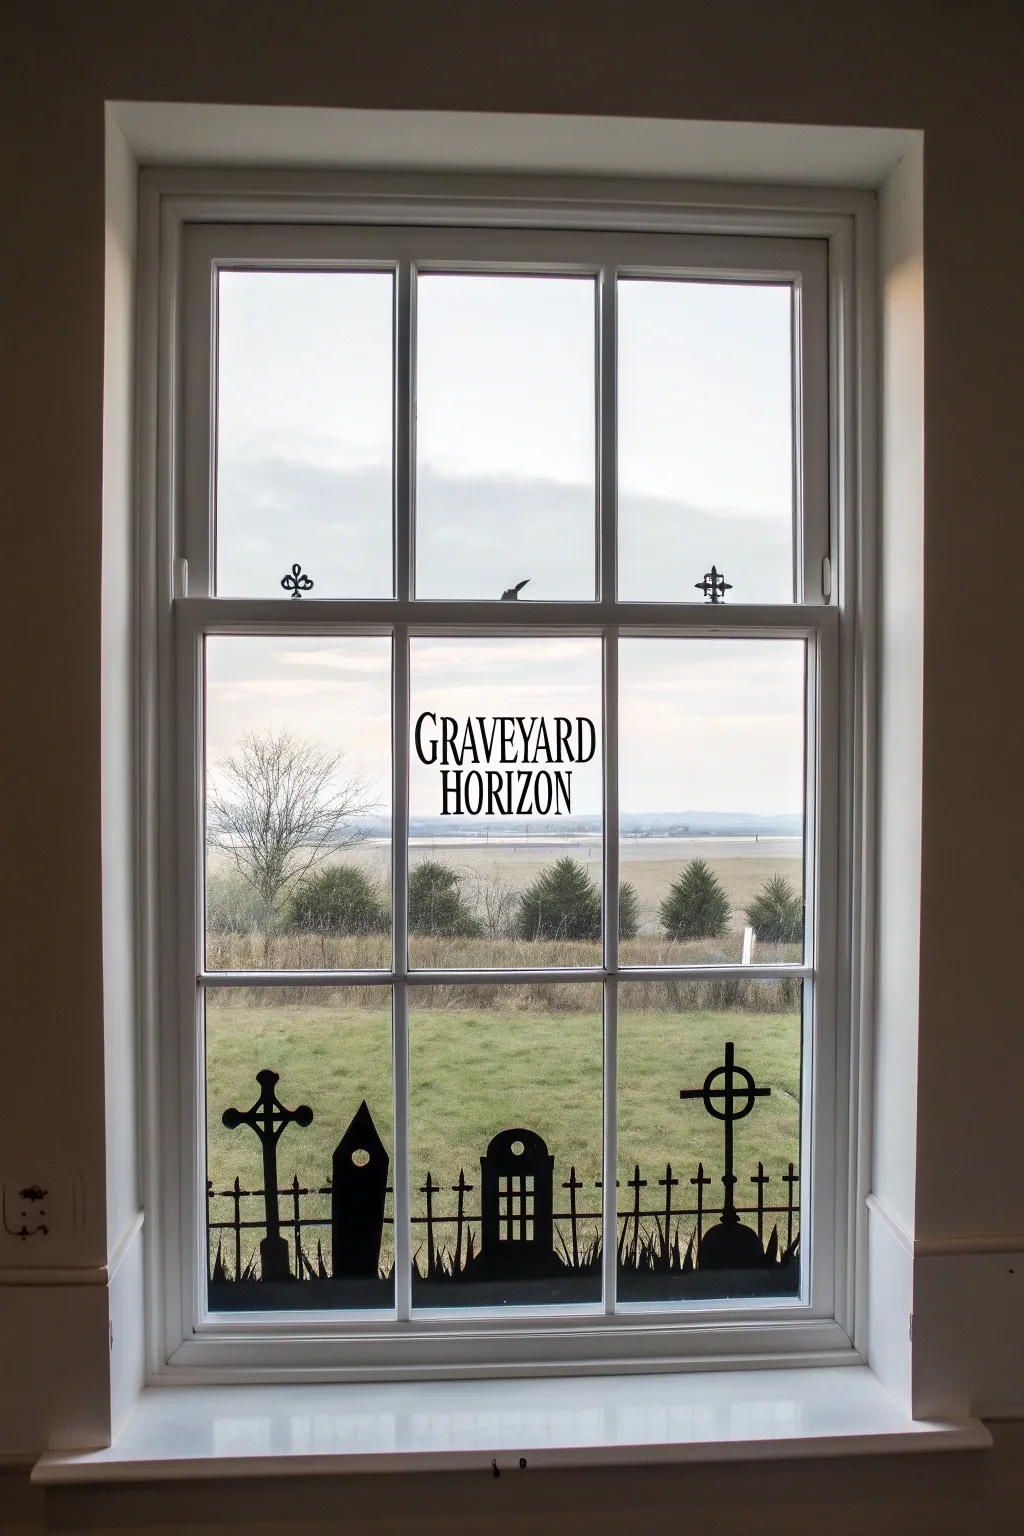
Transform a standard multi-pane window into a spooky vista with this high-contrast silhouette design. By utilizing the natural grid of the window sash, you can create a perfectly framed graveyard scene that looks professional yet is surprisingly simple to execute with precision.
How-To Guide
Materials
- Black acrylic craft paint or temporary window paint
- Self-adhesive black vinyl sheets (matte finish preferred)
- Electronic cutting machine (Cricut/Silhouette) or X-Acto knife with cutting mat
- Transfer tape (for vinyl application)
- Small flat artist brush
- Fine detail brush
- Rubbing alcohol
- Lint-free cloth
- Printed templates (text and silhouettes)
- Painter’s tape or masking tape
- Glass cleaner
Step 1: Preparation & Cleaning
-
Surface Prep:
Begin by thoroughly cleaning the window glass inside and out. Any fingerprints or dust will prevent the vinyl or paint from adhering properly. -
Degreasing:
Wipe the specific areas where you will apply the designs with rubbing alcohol on a lint-free cloth. I always do this two times just to be safe, as window films and paint can peel easily if oils remain.
Step 2: Creating the Digital Designs
-
Design the Graveyard Strip:
If using a cutting machine, design a continuous graveyard scene that spans the width of your lower three panes. Include elements like a classic cross, a tombstone, a crypt, and a wrought-iron fence. -
Size the Text:
Measure the center pane precisely. Create your ‘GRAVEYARD HORIZON’ text in a haunted serif font, ensuring it is centered and sized to leave about 2 inches of breathing room on either side. -
Cut the Elements:
Feed your matte black vinyl into the cutting machine. Cut the graveyard scene in segments if your machine width is limited, and cut the text block separately.
Bubbles in the Vinyl?
If you trap an air bubble under a large tombstone shape, prevent wrinkles by pricking the center with a fine needle and pressing the air out through the hole.
Step 3: Applying the Vinyl
-
Weeding:
Carefully remove the excess vinyl from your backing sheet, leaving only the black design elements. Don’t forget the tiny negative spaces inside letters like ‘A’, ‘R’, ‘O’, and ‘D’. -
Transfer Tape Application:
Apply transfer tape over the weeded vinyl designs and burnish firmly with a scraper tool or credit card to ensure the vinyl lifts off the backing paper. -
Positioning the Text:
Start with the center pane. Use a ruler to find the exact middle point. Hover the transfer tape over the glass until perfectly aligned, then press the center first, smoothing outward to avoid bubbles. -
Installing the Graveyard Scene:
Apply the bottom silhouette design across the lower three panes. Since the window mullions (bars) interrupt the glass, you can either cut the vinyl to fit inside each pane or apply it and slice the gaps with a razor blade afterward for a seamless look. -
Peeling the Tape:
Slowly peel back the transfer tape at a sharp 45-degree angle. If the vinyl lifts with the tape, lay it back down and burnish again.
Pro Tip: Backlighting
Place small, battery-operated LED tea lights on the interior sill behind the tombstones at night. This creates an eerie uplighting effect visible from the street.
Step 4: Hand-Painted Details
-
Adding Height:
Sometimes vinyl doesn’t stick well to textured window glazing or putty. Use your small flat brush and black acrylic paint to extend the bottoms of the tombstones all the way down to the sill if there’s a gap. -
Painting the Grass:
With a fine detail brush, hand-paint small blades of grass extending upward from the bottom vinyl edge. This softens the transition and makes the silhouette look more organic. -
Upper Sash Accents:
For the small decorative finials on the upper sash bar (the horizontal divider), it is often easier to paint these freehand than to use vinyl. Sketch small fleur-de-lis or cross shapes lightly with a dry-erase marker first. -
Filling the Accents:
Fill in your sketched sash accents with black paint. Keep the paint relatively thick to ensure opacity against the bright outdoor light.
Step 5: Finishing Touches
-
Cleanup:
Check for any stray paint smudges or vinyl adhesive residue on the clear glass. Use a cotton swab dipped in glass cleaner to tidy up the edges. -
Final Polish:
Gently buff the surrounding glass with a fresh microfiber cloth to remove fingerprints left during the installation process.
Step back and admire how this striking silhouette frames the outside world with a touch of gothic elegance
Witch and Cauldron Silhouette Scene
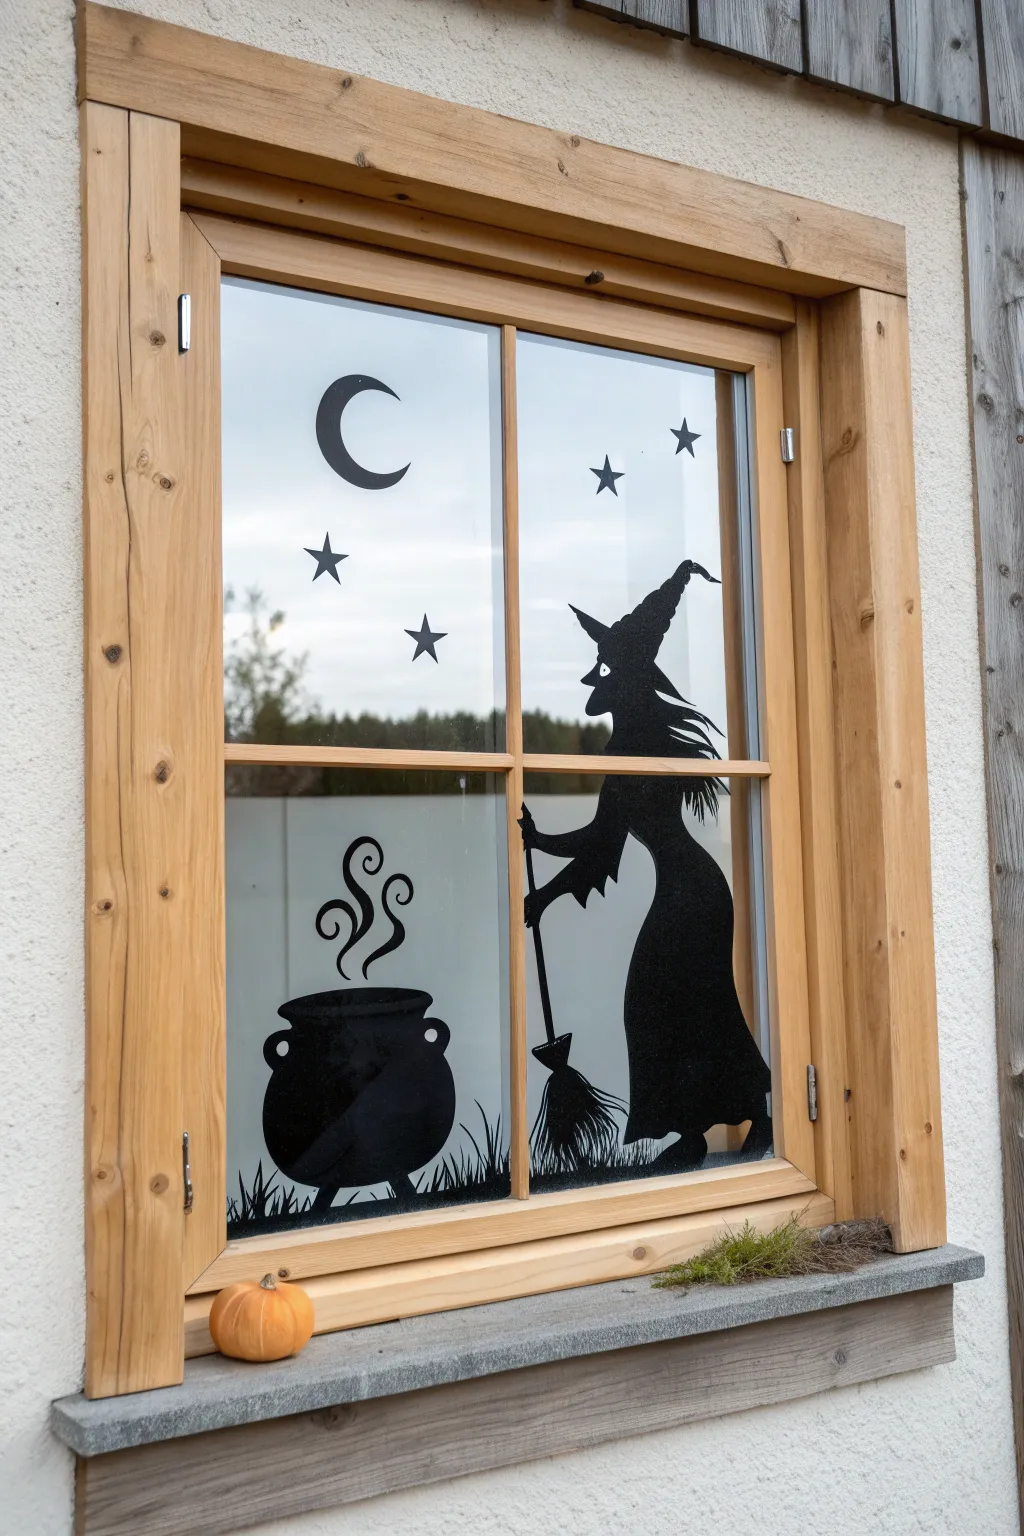
Transform a standard four-pane window into a spooky storybook scene with this striking high-contrast silhouette. The bold black shapes against the daylight create a dramatic effect that looks professionally printed but is easily achieved with simple materials.
Detailed Instructions
Materials
- Black adhesive vinyl sheets (matte or glossy)
- Transfer tape (optional but helpful)
- Scissors or a precision craft knife (X-Acto)
- Self-healing cutting mat
- Pencil and paper (for sketching)
- Window cleaner and microfiber cloth
- Squeegee or credit card
- Painter’s tape
Step 1: Preparation and Design
-
Clean the surface:
Start by thoroughly cleaning your window panes with glass cleaner and a microfiber cloth. Dust or grease will prevent the vinyl from sticking largely, so ensure the glass is completely dry and streak-free. -
Measure the panes:
Measure the individual window panes carefully. This project spans across four distinct sections, so you need to know exactly where the wooden dividers (muntins) will break up your image. -
Sketch the layout:
On a large piece of paper, sketch out your full scene to scale. Draw the crescent moon and stars for the top panes, and the witch, broom, and cauldron for the bottom panes. -
Plan the split:
Mark on your sketch where the window dividers fall. Notice how the witch’s body spans the vertical divider—her hat and broom are on the right, but her hand reaches into the left pane for the broom handle.
Sticky Situation?
If a large vinyl piece sticks to itself, spray a tiny mist of water on the adhesive side. It lets you reposition the vinyl on the glass before it dries and sticks permanently.
Step 2: Cutting the Shapes
-
Draft onto vinyl:
Flip your paper sketch over and trace the shapes onto the white paper backing of your black vinyl. Remember to draw the image in reverse on the backing so it faces the correct way when applied. -
Cut the moon and stars:
Using your scissors, cut out the crescent moon and the several four-to-five-point stars. These are simple shapes and good for warming up. -
Cut the cauldron:
Cut out the cauldron shape for the bottom left pane. Don’t forget the circular handles on the sides and the distinct rim at the top. -
Cut the steam swirls:
I find using a precision craft knife works best here for the delicate swirls of steam rising from the cauldron. Go slowly to keep the curves smooth. -
Cut the witch silhouette:
Cut the witch figure. Pay special attention to the jagged texture of her hair and the point of her hat. Separate the figure where the window divider will be usually right through the broom handle or arm. -
Create the grass:
Cut strips of ‘grass’ with jagged, uneven spikes. You’ll need enough length to run along the bottom of both lower panes to ground the scene.
Step 3: Application
-
Apply the moon:
Peel the backing off the crescent moon and place it in the upper left pane. Start from the center and smooth outwards to avoid bubbles. -
Place the stars:
Scatter the star decals across both top panes. Vary their angles slightly to make the night sky look more dynamic. -
Position the cauldron:
Apply the cauldron to the bottom left pane. Ensure it is leveled properly so it doesn’t look like it’s tipping over. -
Add the steam:
Carefully place the steam swirls above the cauldron. Use the tip of your craft knife to position the thin vinyl lines before pressing them down firmly. -
Apply the witch’s body:
Adhere the main body of the witch in the bottom right pane. Align her closely with the window frame so the silhouette feels substantial. -
Connect the broom:
Apply the broom handle and the witch’s hand in the corresponding spot on the left pane, ensuring the lines visually ‘connect’ across the wooden divider. -
Ground the scene:
Apply the grass strips along the very bottom edge of the glass on both lower panes. This hides any gaps and makes the scene look complete. -
Smooth out bubbles:
Run a squeegee or a sturdy credit card over all the vinyl pieces to push out any trapped air bubbles and ensure a strong bond.
Magical Glow
Add battery-operated orange or purple fairy lights on the interior window sill. At night, this backlights the black vinyl, making the silhouette visible from outside.
Step back outside and admire how your spooky storybook scene comes to life against the daylight

PENCIL GUIDE
Understanding Pencil Grades from H to B
From first sketch to finished drawing — learn pencil grades, line control, and shading techniques.
Explore the Full Guide
Candy Corn and Star Confetti Fillers
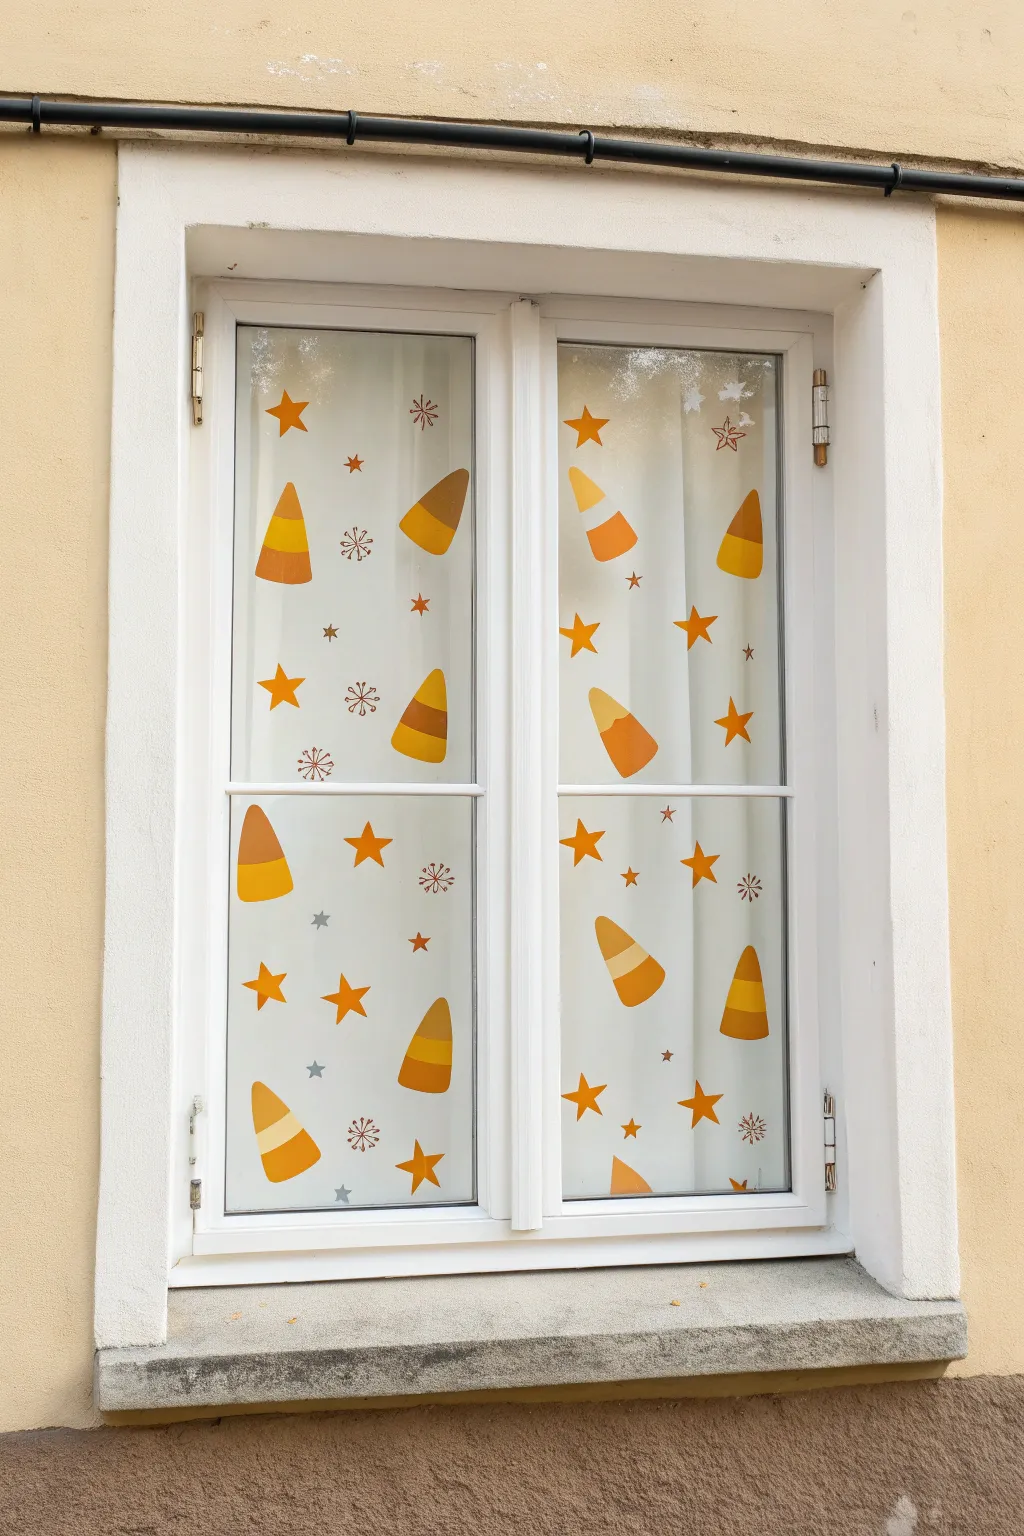
Transform your plain glass into a festive Halloween display with this charmingly simple candy corn and star motif. The translucent quality of the paint allows light to filter through, creating a warm, glowing effect that looks delightful from both inside and out.
Step-by-Step Tutorial
Materials
- Glass cleaner and microfiber cloth
- Acrylic craft paint (opaque white, bright orange, warm yellow)
- Painter’s tape or stencil film (optional, for crisp lines)
- Small flat shader brush (approx. 1/2 inch)
- Round detail brush (size 2 or 3)
- Paper plate or palette
- Pencil and paper (for sketching placement)
Step 1: Preparation & Planning
-
Clean surface:
Start by thoroughly cleaning your window glass with glass cleaner and a lint-free microfiber cloth. Any dust or grease will prevent the paint from sticking properly. -
Sketch layout:
Since this design relies on a random ‘confetti’ look, take a moment to lightly sketch a rough plan on paper first. Aim for a balanced distribution where no two identical shapes are right next to each other. -
Set up palette:
Squeeze out quarter-sized dollops of your white, orange, and yellow acrylic paints onto your palette. I usually keep a damp paper towel nearby for quick brush cleaning.
Fixing Mistakes
Mess up a shape? Don’t panic. Let acrylic paint dry completely on glass, then it scrapes off cleanly with a razor blade or craft knife.
Step 2: Painting Candy Corn
-
Base shape:
Using your flat shader brush, paint a rounded triangle shape. Start with the widest bottom section using yellow paint. -
Middle section:
While the yellow is still slightly wet (but not soaking), rinse your brush and pick up the bright orange. Paint the middle band of the candy corn, slightly overlapping the yellow to blend the transition just a tiny bit. -
White tip:
Finally, clean the brush and apply the white paint to the top triangular tip. The rounded corners give it that classic candy look rather than a sharp geometric triangle. -
Rotate orientations:
Continue painting candy corn shapes across the window. Make sure to rotate them—some pointing up, some down, some diagonal. This creates the illusion that they are tumbling through the air. -
Second coat:
Acrylic on glass can sometimes look streaky. Once the first layer is dry to the touch (usually 15 minutes), go back and gently dab a second coat on any areas that look too transparent.
Make It Glow
Mix a drop of dish soap into your acrylic paint. This helps it stick to slick glass better and makes removal easier when the holiday is over.
Step 3: Adding Stars & Confetti
-
Large stars:
Switch to your round detail brush. Dip it in the orange paint and create classic five-pointed stars. Start by painting a ‘V’ shape, then add the arms, filling in the center. -
Filling gaps:
Place these larger orange stars in the empty spaces between your candy corns, keeping the spacing somewhat irregular to maintain that scattered feel. -
Mini stars:
Use the very tip of your detail brush to add smaller, four-pointed star shapes scattered throughout the design. Imagine these as distant twinkles. -
Snowflake confetti:
Mix a tiny bit of brown or dark orange into your main orange color to get a slightly distinct hue. Paint small, asterisk-style shapes (a central point with thin lines radiating out) to act as ‘confetti’ fillers. -
Tiny dots:
Dip the non-brush end (the handle) of your paintbrush into the paint and dot it onto the glass to create perfect, tiny circles. Scattering these around the larger shapes ties the whole ‘confetti’ look together.
Step 4: Finishing Touches
-
Cleanup edges:
If any paint edges look messy or stray drips occurred, use a damp cotton swab or the edge of a credit card to gently scrape away the excess paint once it’s dry. -
Final inspection:
Step back about five feet to view the whole window. Check if there are any large empty voids that need an extra star or dot to balance the composition.
Enjoy the cozy autumn atmosphere your hand-painted window brings to the room
Faux Stained Glass Spooky Motifs
Transform an ordinary window into a glowing, translucent mosaic of Halloween spirit using simple tissue paper. This project mimics the warm, fragmented look of stained glass while adding spooky silhouettes that come alive when backlit by indoor lights or the sun.
Detailed Instructions
Materials
- Tissue paper sheets (orange, yellow, cream/white)
- Black construction paper or cardstock
- Scissors and/or hobby knife
- Liquid starch or watered-down white glue (Mod Podge works too)
- Foam brush or wide paintbrush
- Pencil
- Ruler
- Masking tape or painter’s tape
- Glass cleaner and paper towels
Step 1: Preparation & Cutting
-
Clean surface:
Begin by thoroughly cleaning the window pane you intend to decorate. Use glass cleaner and paper towels to remove any dust, grime, or fingerprints, ensuring a smooth surface for adhesion. -
Measure panes:
Measure the dimensions of each individual glass square in your window sash. You want your tissue paper pieces to fit precisely within the frame, so accuracy here is key. -
Cut tissue:
Using your measurements, cut rectangular pieces of orange, yellow, and cream tissue paper. I find it helpful to cut a few more than I think I’ll need just in case of tearing. -
Plan layout:
Lay out your tissue rectangles on a flat surface (like a table) in the same grid pattern as your window to visualize the color distribution. Aim for a balanced mix of light and dark oranges alongside the yellows and creams.
Wrinkle Warrior
Don’t fret over wrinkles in the tissue paper! As the liquid starch dries, it tightens the paper, smoothing out minor bubbles automatically.
Step 2: Creating the Silhouettes
-
Sketch stars:
On your black construction paper, sketch out a variety of five-pointed stars. Vary the sizes significantly—some should be tiny pinpricks, while others can be bold focal points. -
Sketch icons:
Draw a skull and crossbones motif for one of the larger panes. Keep the shapes simple and graphic so they are easy to cut out. -
Cut shapes:
carefully cut out all your black paper stars, the skull, and the crossed bones. For intricate areas like the skull’s eyes or nose, a hobby knife on a cutting mat offers better precision than scissors. -
Draw on tissue:
For a few select panes (like the cream ones), use a thin black marker or pen to draw decorative elements directly onto the tissue paper, such as tiny star clusters or radiating ‘sunburst’ lines on an orange piece.
Double Sided Display
Sandwich the black cutouts between two layers of tissue paper. This makes the silhouettes look equally crisp and bold from both inside and outside.
Step 3: Assembly & Adhesion
-
Apply adhesive:
Pour a small amount of liquid starch or watered-down glue into a container. Using a foam brush, paint a thin, even layer directly onto the top corner of the first glass pane. -
Place tissue:
Gently press the corresponding tissue paper rectangle onto the wet glass. Start from the top and smooth it downwards to minimize wrinkles, though a few crinkles add to the authentic glass texture. -
Seal tissue:
Once the tissue is positioned, brush another thin layer of your starch or glue mixture over the top of the paper to seal it. Be gentle to avoid tearing the wet tissue. -
Attach stars:
While the top coat is still wet, press your black paper stars onto the tissue. Use your brush to dab a little more adhesive over them to secure them in place. -
Create star outlines:
For a unique look seen in the reference, create ‘hollow’ stars by cutting star shapes out of the tissue paper itself before adhering, or by drawing outlines with a black marker after the tissue is dry. -
Position the skull:
Adhere the cream tissue paper for the skull pane first. Then, place the skull and crossbones cutouts onto the wet surface, sealing them with a final top coat of adhesive. -
Intermission:
Allow the first few panes to dry slightly before moving to adjacent ones. This prevents the wet papers from shifting if you accidentally bump the frame. -
Complete the grid:
Continue the process for the remaining panes, alternating colors according to your planned layout. Remember to vary the placement of stars—some centered, some clustered in corners. -
Final touches:
Once all panes are covered and drying, check for any peeling corners. dab a tiny bit of extra glue under any loose edges and press them down firmly. -
Clean up:
Use a damp cloth to carefully wipe any excess glue from the wooden or vinyl window frames, leaving a crisp edge around your new faux stained glass.
Enjoy the warm, festive glow your new window brings to the room every time the sun hits it


Glowing Silhouette Trick Using Indoor Light
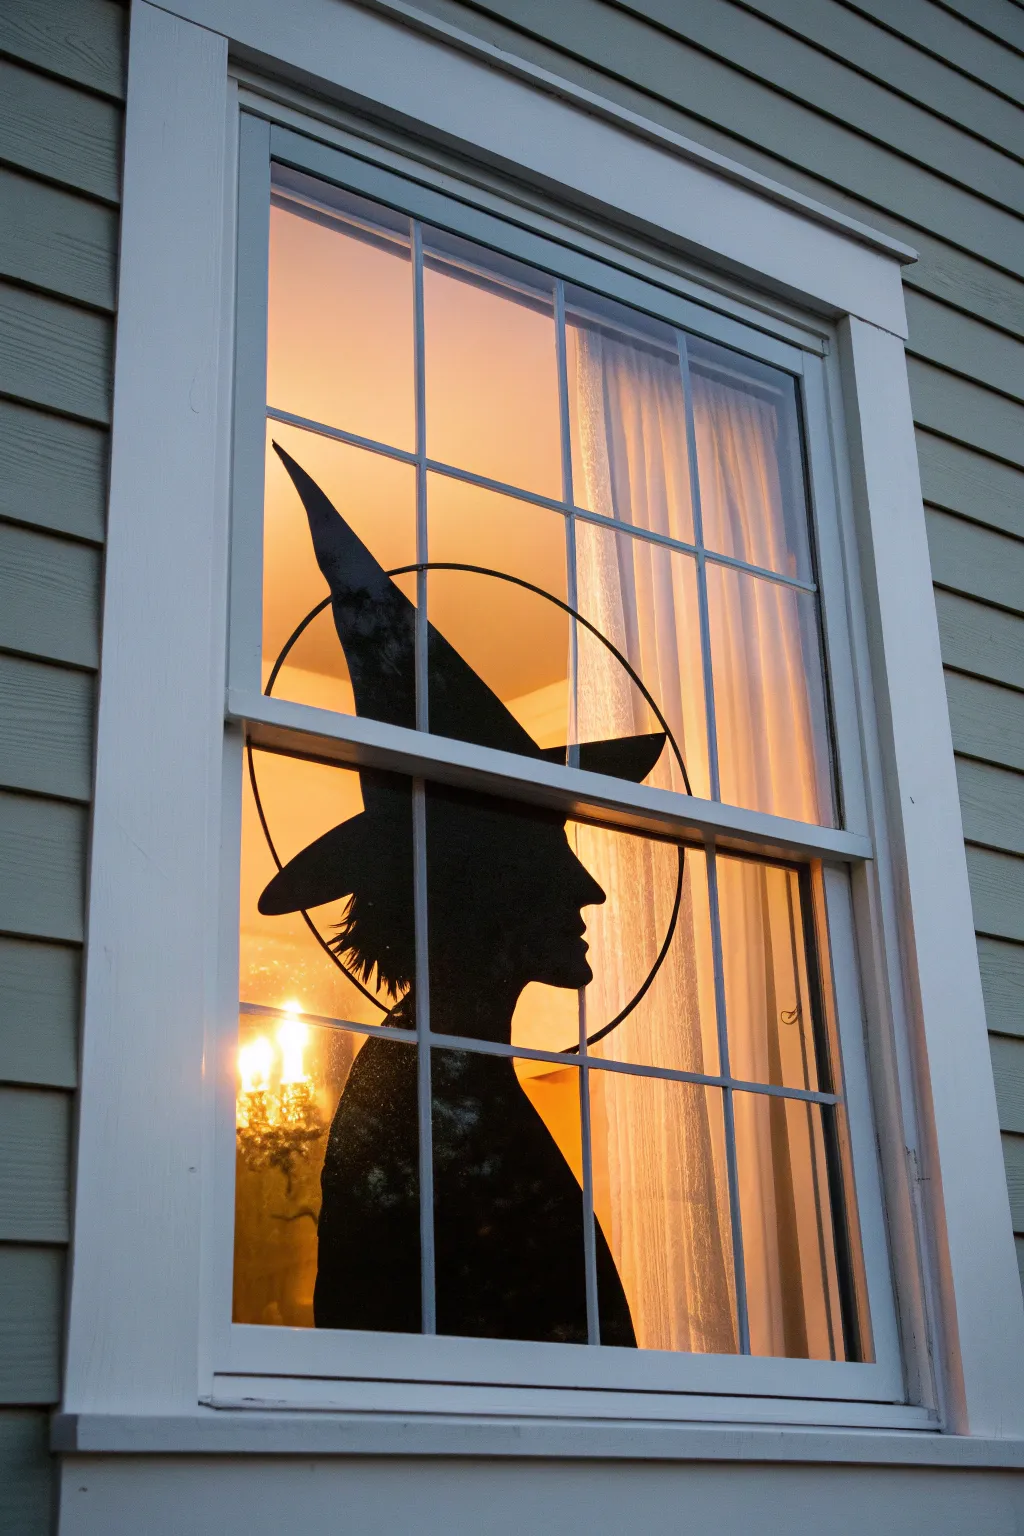
Harness the power of your interior lighting to create a dramatic Halloween display that glows from within. By painting a crisp, black silhouette directly on your window glass, you transform a standard pane into a spooky shadow puppet show that captivates neighbors passing by.
Step-by-Step Guide
Materials
- Black acrylic craft paint or window-safe tempera paint
- Liquid dish soap (if using acrylics, for easier removal)
- Wide painter’s tape or masking tape
- Black dry-erase marker or grease pencil
- Assorted paintbrushes (1-inch flat brush and a small round detail brush)
- Printed witch profile template (scaled to your window size)
- Scissors
Step 1: Planning and Outlining
-
Clean the surface:
Start with a crystal-clean canvas. Thoroughly wash the inside of your window pane with glass cleaner and a lint-free cloth to remove any dust or fingerprints that might prevent the paint from sticking smoothly. -
Prepare your template:
Find a profile image of a witch—or draw one yourself—featuring a pointy hat, crooked nose, and chin. Enlarge and print this image across several sheets of paper if necessary to fill the desired window pane. -
Assemble the paper pattern:
Cut out the paper silhouette carefully. If it spans multiple pages, tape them together securely so the image is one cohesive shape. -
Position the template:
Tape the paper silhouette to the *outside* of the window facing in. This allows you to trace the lines from the inside without the paper getting in the way of your paint. -
Trace the design:
Using a black dry-erase marker or grease pencil on the inside glass, carefully trace the outline visible through the window. Don’t worry if the line is shaky; paint will cover it. -
Refine the details:
Step back and check your outline. Ensure the hat brim is straight and the facial features are distinct. Wipe away and redraw any sections that look disproportionate.
Step 2: Painting the Silhouette
-
Mix your paint:
Squeeze a generous amount of black acrylic paint onto a palette. I like to mix in a few drops of dish soap here—it doesn’t change the look, but it makes scraping the paint off in November much easier. -
Outline the edge:
Dip your small round brush into the paint and engage in the critical ‘cutting in’ phase. Paint a steady, solid line right along the inside edge of your traced marker outline. -
Sharpen the points:
Pay special attention to the tip of the hat, the nose, and any jagged hair details. These sharp points are what make the silhouette readable from the street. -
Fill the center:
Switch to your larger flat brush. begin filling in the large areas of the silhouette. Use horizontal strokes to minimize streaks. -
Check for gaps:
Hold up a light source or piece of white paper behind your work to see if light is bleeding through the black paint. The goal is complete opacity. -
Apply a second coat:
Once the first layer is dry to the touch (usually 15-20 minutes), apply a second coat of black paint. Two thin coats are always better than one thick, gloopy one. -
Add the circle element (Optional):
The example image features a circular ring element around the witch. To replicate this, use a large bowl or makeshift compass to trace a circle that intersects the hat and neck, then paint it with a steady hand. -
Clean up edges:
If you painted outside the lines, wait for it to dry completely, then use a razor blade or craft knife to gently scrape away the mistake for a crisp edge. -
Remove the template:
Go outside and remove the paper template from the exterior glass. Clean off any tape residue left on the outside pane.
Paint Choice
Use ‘window paint markers’ for the outline if you have shaky hands, then fill with brush-on paint. It offers more control for details like hair.
Step 3: Setting the Scene
-
Arrange backlighting:
The magic of this project relies on contrast. Close any sheer curtains behind the painting or hang a thin white sheet to act as a diffuser. -
Position the light:
Place a warm-toned lamp or orange light bulb directly behind the window shade or curtain. This creates that glowing sunset effect that makes the black silhouette pop.
Streaky Shadows?
If light shines through your black paint, dab the paint on with a sponge brush instead of stroking it. This deposits more pigment for opacity.
Flip the switch on your backlight and head outside to admire your spooky creation glowing in the night.


Have a question or want to share your own experience? I'd love to hear from you in the comments below!