
Whenever I’m stuck or just craving something satisfying to draw, I come back to heart shapes—they’re classic, but they can get wildly creative with just a few tweaks. Here are my favorite cool heart drawing ideas to play with in your sketchbook, starting simple and sliding into the weird, dreamy stuff.
Rose-Vine Heart Frame
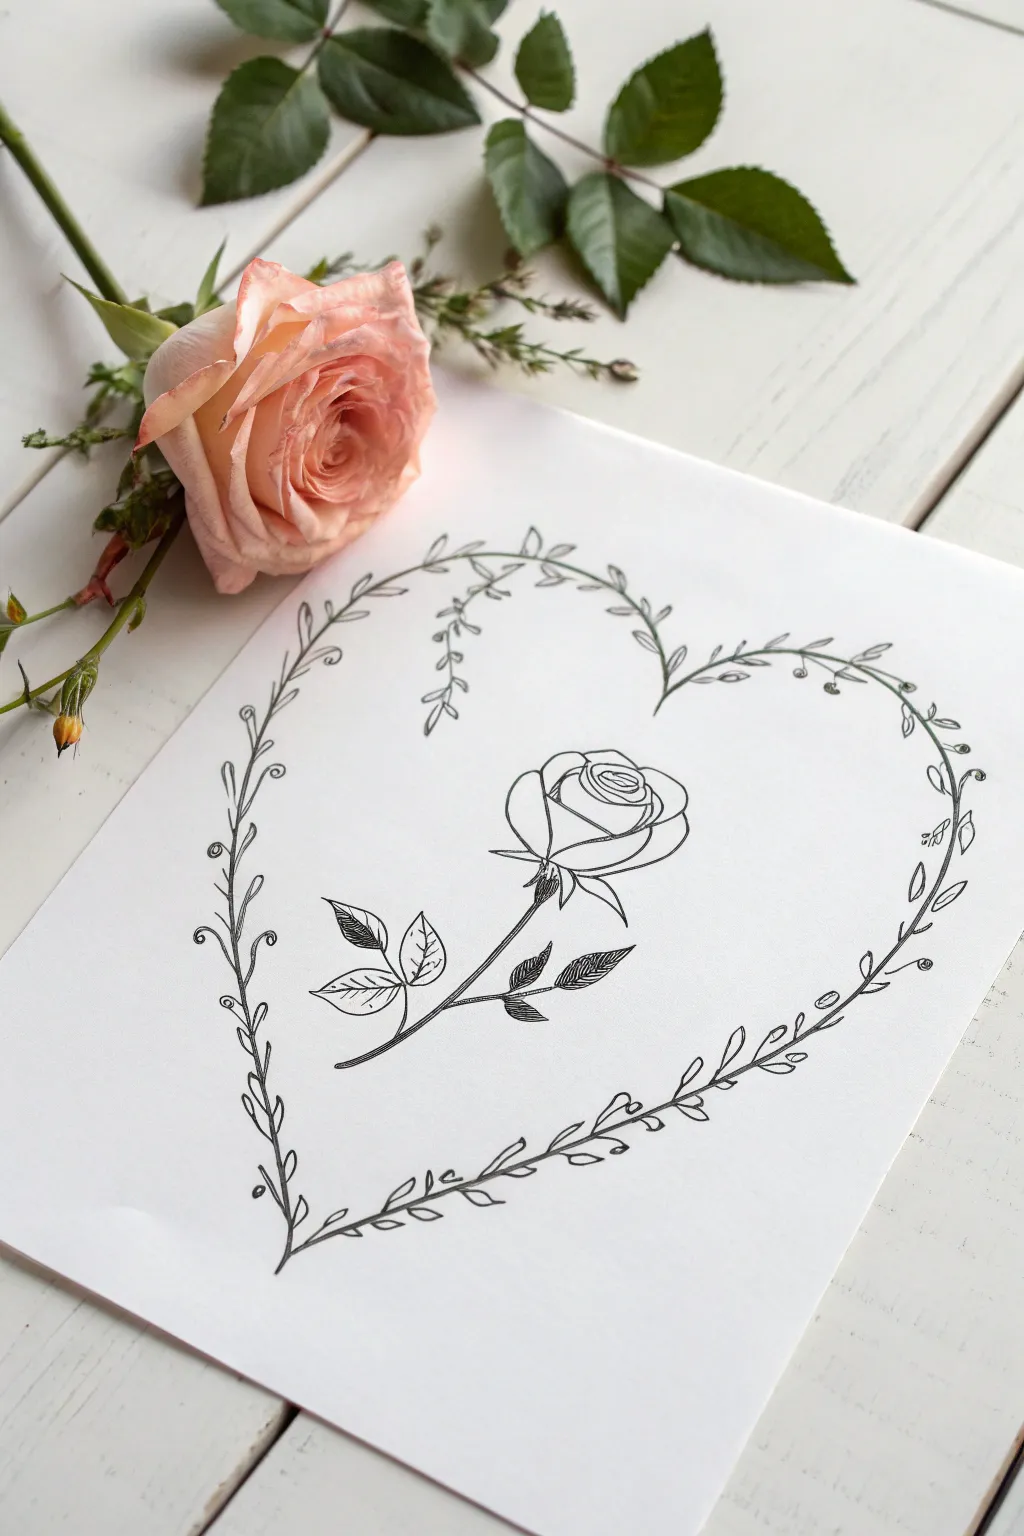
Capture the timeless romance of a rose garden with this delicate pen illustration. This project combines a structured vine frame with a detailed central bloom, creating a minimalist yet striking piece perfect for greeting cards or framed art.
Step-by-Step Tutorial
Materials
- High-quality white drawing paper or cardstock (A4 or letter size)
- HB pencil
- Soft white eraser
- Fine liner pen (0.1mm or 0.3mm nib, black)
- Ruler (optional)
- Tracing paper (optional for symmetry)
Step 1: Drafting the Structure
-
Outline the Heart:
Start by lightly sketching a large heart shape in the center of your paper using your HB pencil. Keep your lines very faint, as these will serve merely as a guide for the vines later and will be erased. -
Mark the Vine Path:
Along your pencil heart line, sketch a second, intertwined line that weaves back and forth across the main shape. This helps visualize where the main stems of the vine will twist and turn. -
Position the Central Rose:
In the middle of the heart, sketch a rough circle to mark the rose’s head. Draw a slightly curved line extending downwards and to the left for the stem, ensuring it doesn’t touch the heart frame.
Uneven Heart Shape?
If you struggle drawing symmetry, fold a piece of scratch paper in half, cut a half-heart, and unfold it. Use this as a stencil to trace your initial pencil guideline.
Step 2: Drawing the Central Rose
-
Create the Rose Center:
Switch to your fine liner pen. Start at the center of your rose circle and draw a tight spiral that flares out slightly, creating the tightly packed inner petals. -
Add Surround Petals:
Draw larger, curved shapes embracing the center spiral. Make these lines slightly wobbly or organic rather than perfect arcs to mimic soft petal edges. -
Form the Rose Bowl:
Draw a U-shaped curve beneath your petals to form the base of the flower head. Connect the outer petals to this base with simple, sweeping lines. -
Detail the Sepals:
Directly under the flower head, draw three or four small, leaf-like spikes (sepals) that point downwards and curl slightly, transitioning into the stem. -
Stem and Thorns:
Ink the main stem line you sketched earlier. Add one or two small, sharp triangles along the stem to represent thorns. -
Add Rose Leaves:
Draw two compound leaves branching off the lower stem. Each should have three leaflets with jagged, serrated edges. Draw a central vein down the middle of each leaflet. -
Shading the Rose:
Using very light, short strokes (hatching), add shading to the base of the petals and on one side of the leaves to give the flower depth and dimension.
Step 3: Inking the Vine Frame
-
Ink the Main Stems:
Moving to the heart frame, ink the main vine stems. I find it helpful to break the line occasionally rather than drawing one continuous stroke, as this looks more natural. -
Draw the Leaves:
Start adding small, almond-shaped leaves along the vine. Alternate their direction so they point outwards and inwards. Group them in pairs or singles. -
Add Decorative Buds:
Interperse the leaves with tiny circles or teardrop shapes on short stems to represent small flower buds or berries. -
Include Hanging Tendrils:
Near the top curves of the heart, draw a few delicate, wavy lines hanging downwards into the white space. Add tiny leaves to these for a whimsical weeping vine effect. -
Check Balance:
Step back and look at your frame. If certain areas look sparse, add a few extra leaves or specific curly tendrils to fill the gaps.
Vary Line Weight
Press slightly harder on the downstrokes of the leaves and lighter on the tips. This variation in line thickness makes the drawing feel dynamic and professional.
Step 4: Finishing Touches
-
Erase Pencil Guides:
Wait at least 5-10 minutes for the ink to dry completely. Gently erase all visible pencil marks, being careful not to smudge the ink or crinkle the paper. -
Refine Details:
Go back in with your pen to thicken any main lines that look too thin, especially on the underside of the vines, to create a subtle shadow effect.
Now you have a beautifully framed botanical illustration ready to be gifted or displayed


Continuous One-Line Heart Doodle

Capture the essence of casual romance with this simple yet expressive continuous line heart doodle. Its charm lies in the imperfect, sketchy quality that suggests a fleeting moment of inspiration rather than rigid precision.
Step-by-Step Guide
Materials
- Sketchbook with cream or off-white paper
- Standard HB or 2B graphite pencil
- Flat work surface
Step 1: Setting the Foundation
-
Position your hand:
Rest your hand comfortably on the lower portion of the open sketchbook page. You’ll want a loose grip on your pencil, holding it slightly further back than you would for writing to allow for more fluid movement. -
Visualize the shape:
Before touching the paper, hover your pencil tip over the center of the page. Imagine the heart shape sitting there, tilting slightly to the left for that casual, candid look. -
Start at the dip:
Place your pencil tip at the top center dip of the heart. This will be your starting and ending anchor point. -
Draw the left arch:
In a smooth motion, curve the line upward and to the left to create the first rounded lobe of the heart. -
Descend the left side:
Bring the line sweeping down the left side. Don’t worry about making it perfectly straight; a slight wobble adds character. -
Form the point:
Curve sharply at the bottom to form the pointed tip of the heart. Instead of lifting the pencil, keep the pressure consistent as you turn the corner.
Stiff line syndrome?
If your heart looks too rigid, try drawing from your shoulder rather than just your wrist. This creates smoother, more confident curves.
Step 2: Completing the Loop
-
Ascend the right side:
Draw the line upward to form the right side of the heart. This side can be slightly wider or narrower than the left to enhance the hand-drawn aesthetic. -
Create the right arch:
Curve over the top of the right lobe, aiming to meet your original starting point at the center dip. -
The crossover overlap:
Here is the crucial stylistic detail: do not stop exactly where you started. Instead, let the line cross over your starting point slightly. -
Second pass initiation:
Continue the motion without lifting the pencil. We are going to re-trace the shape loosely to give it that sketchy, energetic vibe. -
Retrace the left lobe:
Follow your original line up and over the left arch again. Allow the new line to drift slightly inside or outside the first one—imperfection is the goal. -
Sketch the bottom tip again:
Bring the second line down to the bottom point. You might want to press just a tiny bit harder here to accentuate the sharpness of the point. -
Finish the right side:
Sweep back up the right side for the final time. The lines can crisscross or run parallel; let the momentum of your hand decide. -
The final tail:
As you reach the center dip again, let the line trail off naturally into the interior of the heart or just slightly past the intersection. -
Lift and assess:
Lift your pencil. Look at the flow of the lines. The drawing should feel airy and unforced.
Variation Ideas
Try varying your pencil pressure—push harder on the downstrokes and lighter on the upstrokes for effortless calligraphy-style dimension.
Now you have a charming, rustic sketch that perfectly fills the page with minimal effort


Checkerboard Heart Pattern
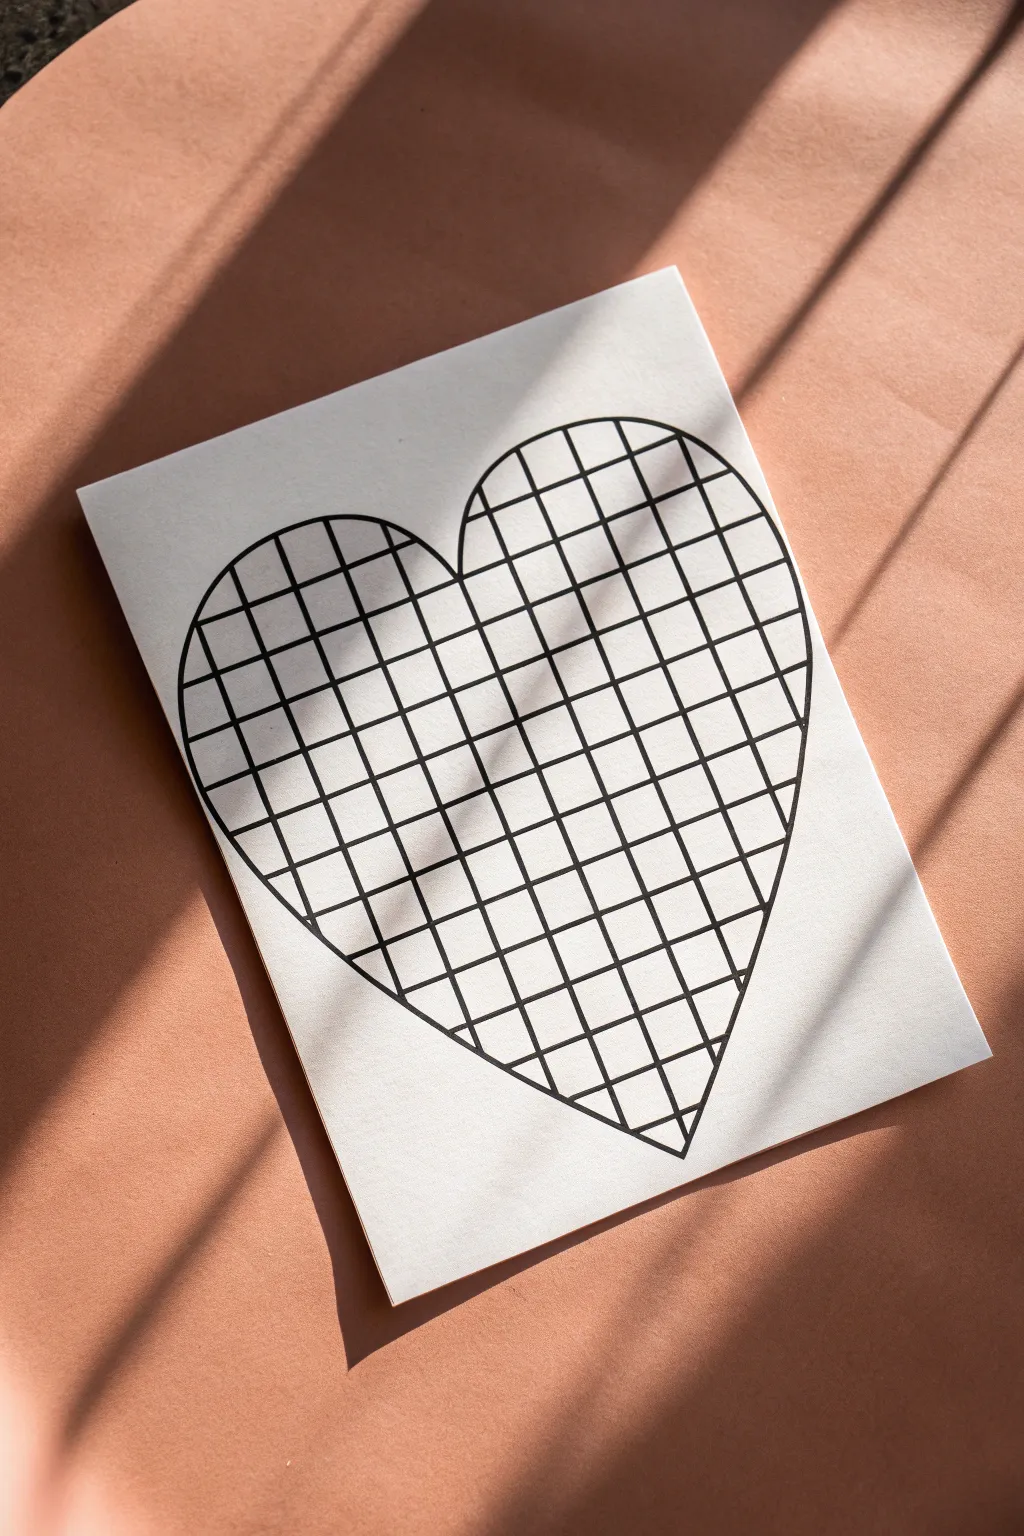
This minimalist project combines the classic heart shape with a satisfyingly structured grid pattern for a modern, architectural look. The crisp black lines against white paper create a bold contrast that is perfect for card making or simple wall art.
Detailed Instructions
Materials
- Heavyweight white drawing paper or cardstock
- Pencil (HB or H for light lines)
- Eraser
- Black fine-liner pen (0.5mm or 0.8mm)
- Ruler (preferably clear plastic)
- Heart template or stencil (optional)
Step 1: Drafting the Shapes
-
Draw the heart outline:
Start by drawing a large, symmetrical heart in the center of your paper using a pencil. Press very lightly so the graphite won’t be visible later. If you aren’t confident freehanding, trace a template or fold a scrap piece of paper to cut a perfect heart stencil first. -
Set your grid angle:
Decide on the angle of your grid. The example uses a diagonal orientation. Place your ruler across the heart at roughly a 45-degree angle to establish your first guideline. -
Mark grid spacing:
Before drawing lines, map out your spacing. Use the ruler to make small tick marks along the top edge of your heart outline, spacing them evenly (about 1-1.5 cm apart depending on how dense you want the grid). -
Draw the first set of lines:
Using your ruler and the tick marks as a guide, draw parallel diagonal lines across the entire heart using your pencil. Extend these lines fully from one edge of the heart outline to the other. -
Create the cross-hatch:
Rotate your ruler 90 degrees to create the perpendicular lines. It helps to use the corner of a piece of paper or a set square against your first line to ensure a perfect right angle. -
Finish the pencil grid:
Draw the second set of diagonal lines across the heart, maintaining the same spacing as the first set. You should now see a uniform grid of diamond or square shapes filling your heart.
Clean Lines Pro-Tip
Tape a penny to the underside of your ruler. This lifts the straight edge slightly off the paper, preventing ink from bleeding under the ruler and causing smudges.
Step 2: Inking and Refining
-
Select your pen:
Choose a black fine-liner. A slightly thicker nib, like an 0.8mm, works well for the main outline, while an 0.5mm is great for the internal grid, though a single thickness works fine too. -
Trace the heart outline:
Carefully trace over your main heart shape pencil line with the black pen. Try to do each curve in one smooth, continuous motion to avoid shaky intersections. -
Ink the first grid direction:
Place your ruler back over your pencil grid lines. Run your pen along the ruler edge to ink the first set of diagonal lines. Be careful to stop exactly at the heart’s outline—don’t cross over the border. -
Lift the ruler carefully:
I usually lift the ruler straight up rather than sliding it after drawing ink lines to prevent smearing wet ink across the white paper. -
Ink the second grid direction:
Rotate the ruler and ink the perpendicular set of lines, completing the grid pattern. Again, verify that your ink is dry before placing the ruler down over fresh lines. -
Let the ink cure:
Wait at least 5 to 10 minutes for the ink to dry completely. This is crucial because erasing over wet ink will ruin the crispness of your lines. -
Erase pencil marks:
Gently run a large eraser over the entire design to remove the underlying graphite structure. Hold the paper taut with your other hand so it doesn’t crinkle while you erase. -
Check for gaps:
inspect the edges where the grid lines meet the heart outline. If any lines fall short, carefully connect them to the border with your fine-liner.
Level Up: Optical Illusion
Make the heart look 3D by gently curving your grid lines outward instead of using a ruler. This creates a spherical ‘bulging’ effect like the heart is inflated.
Now you have a striking geometric heart ready to be framed or gifted to someone special


Heart Planet With Rings and Stars
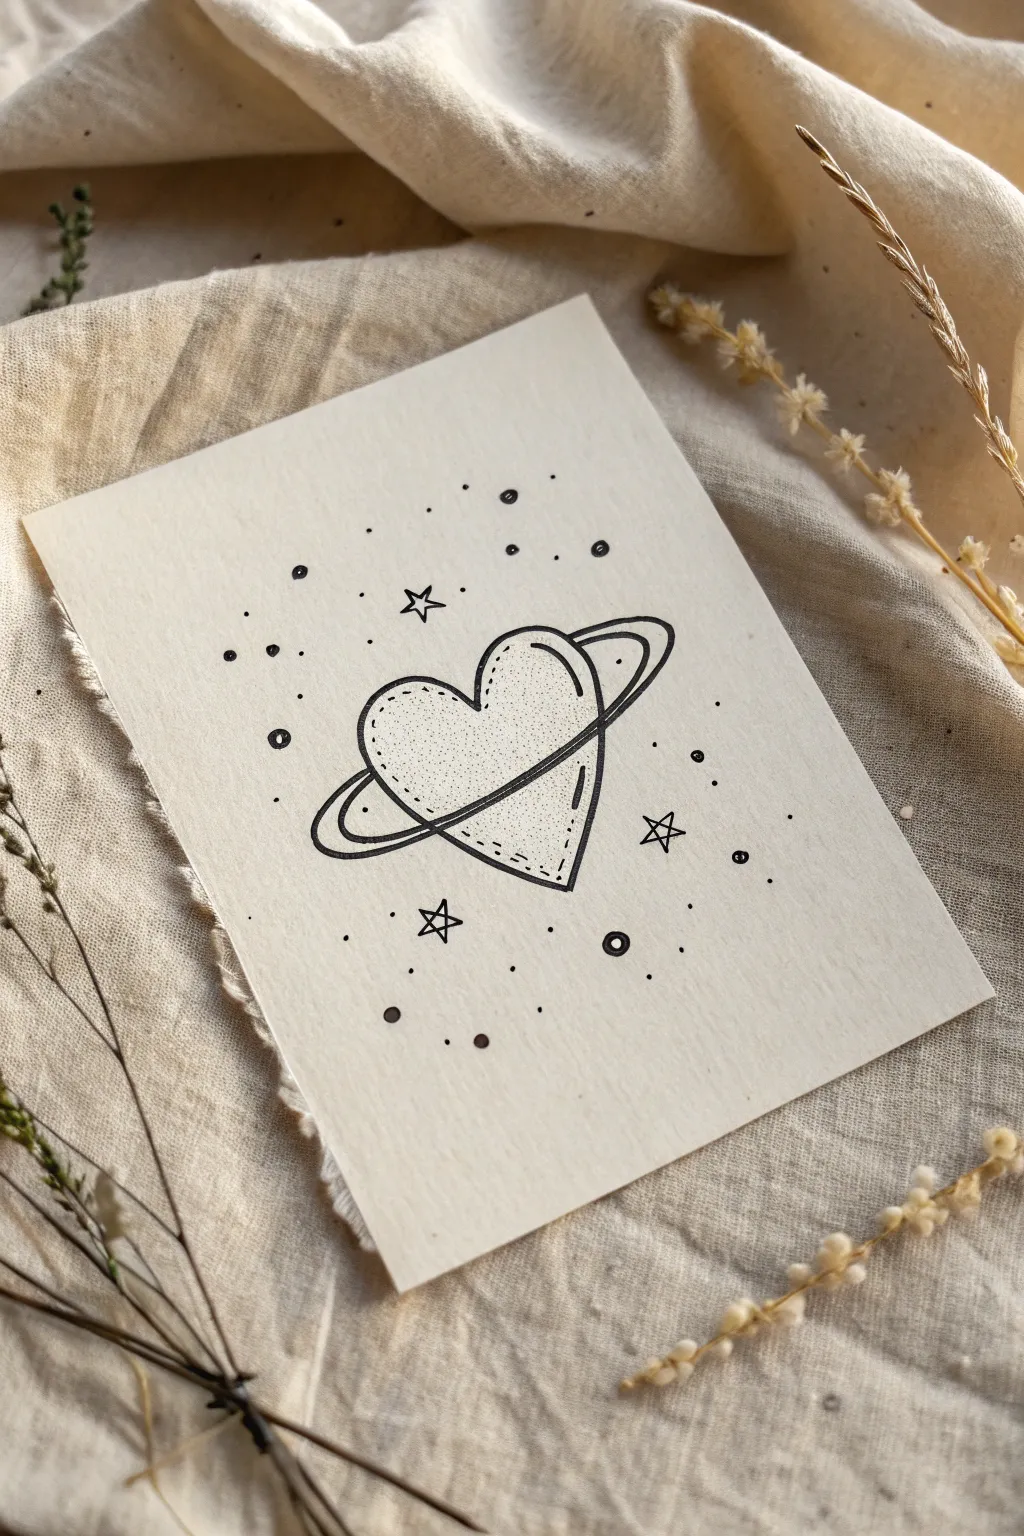
Transform a simple heart shape into a celestial beauty with this charming planet-inspired drawing. Done in crisp black fineliner on textured paper, this stippled illustration features playful planetary rings and a galaxy of surrounding stars.
Detailed Instructions
Materials
- Cream or off-white cardstock (textured or mixed media paper preferred)
- Pencil (HB or 2H for light sketching)
- Eraser (kneaded eraser works best)
- Black fineliner pens (0.1mm for details, 0.3mm or 0.5mm for main lines)
- Ruler (optional, if you want precise stars)
Step 1: Sketching the Base
-
Center the heart:
Start by lightly sketching a standard heart shape in the center of your paper using your pencil. Keep it fairly symmetrical, but a little organic tilt adds character. -
Add the belt:
Visualize an oval ring circling the heart. Sketch the front part of the ring curving across the middle of the heart, starting from the lower-left and arching up to the upper-right. -
Complete the orbit:
Draw the back part of the ring emerging from behind the heart. It should look like it’s wrapping around the back, completing the orbital path. -
Define the ring thickness:
Add a second parallel line to your ring sketch to give it thickness. The ring should be wider at the sides and taper slightly where it crosses the heart. -
Plan the galaxy:
Lightly mark positions for three main 5-pointed stars around the heart. I usually place one top-left, one bottom-left, and one bottom-right for balance. -
Scatter the dust:
Mark tiny circles and dots randomly around the main subject to map out where your cosmic dust and smaller distant planets will go.
Wobbly Rungs?
If your ring ellipses look shaky, try rotating the paper as you draw the curve. Your hand creates smoother pivots when drawing away from your body in a natural arc.
Step 2: Inking the Lines
-
Outline the heart:
Switch to your 0.3mm or 0.5mm fineliner. Carefully trace the outer edge of the heart. Be sure to stop your line where the ring passes in front of the heart so you don’t draw through it. -
Trace the rings:
Ink the planetary rings with smooth, confident strokes. The line that crosses the face of the heart should be unbroken, reinforcing that it is in the foreground. -
Draw the stars:
Outline your 5-pointed stars. They don’t need to be geometrically perfect; a hand-drawn look fits the aesthetic. -
Erase pencil marks:
Allow the ink to dry completely to avoid smudging. Then, gently use your kneaded eraser to lift all the graphite sketch lines.
Step 3: Adding Texture and Detail
-
Inner stitching:
Using a thinner 0.1mm pen, draw a dashed ‘stitch’ line just inside the perimeter of the heart. This subtle detail gives it a dimensional, patch-like feel. -
Highlight line:
Add a short, curved line on the upper right lobe of the heart and a smaller one on the bottom right to suggest a smooth, reflective surface. -
Start stippling:
With the 0.1mm pen, begin adding dots (stippling) inside the heart. Concentrate the dots heavily at the bottom tip and along the left edge to create shadow. -
Fade the gradient:
As you move toward the center and top right of the heart, space the dots further apart. This creates a gradient effect that makes the heart look rounded. -
Ring details:
Add a single thin line running through the middle of the planetary ring’s width to give it extra definition.
Make It Pop
Use a white gel pen to add tiny highlights on top of the black inked areas, or add a wash of watercolor inside the heart for a splash of galaxy purple or blue.
Step 4: Cosmic Atmosphere
-
Design unique planets:
Ink the small circles you sketched earlier. Fill some in completely black, and for others, leave a tiny white dot in the center to look like a crater or shine. -
Star details:
Inside your 5-pointed stars, draw a smaller star shape or simple lines connecting the corners to the center to add geometric interest. -
Micro-stars:
Fill the empty space with tiny dots of various sizes. Group them slightly near the main stars to create miniature constellations. -
Final check:
Step back and look at the balance. If a spot feels too empty, add a small hollow circle or a single black dot to even out the composition.
Now you have a celestial doodle perfect for a greeting card or a bullet journal cover page


Have a question or want to share your own experience? I'd love to hear from you in the comments below!