If you’ve got a plain pair of shoes and a little creative itch, you’re sitting on a perfect tiny canvas. Here are my favorite cool shoe painting ideas—from classic, beginner-friendly looks to the kind of wearable art that makes people stop and stare.
Classic Tie-Dye Swirls
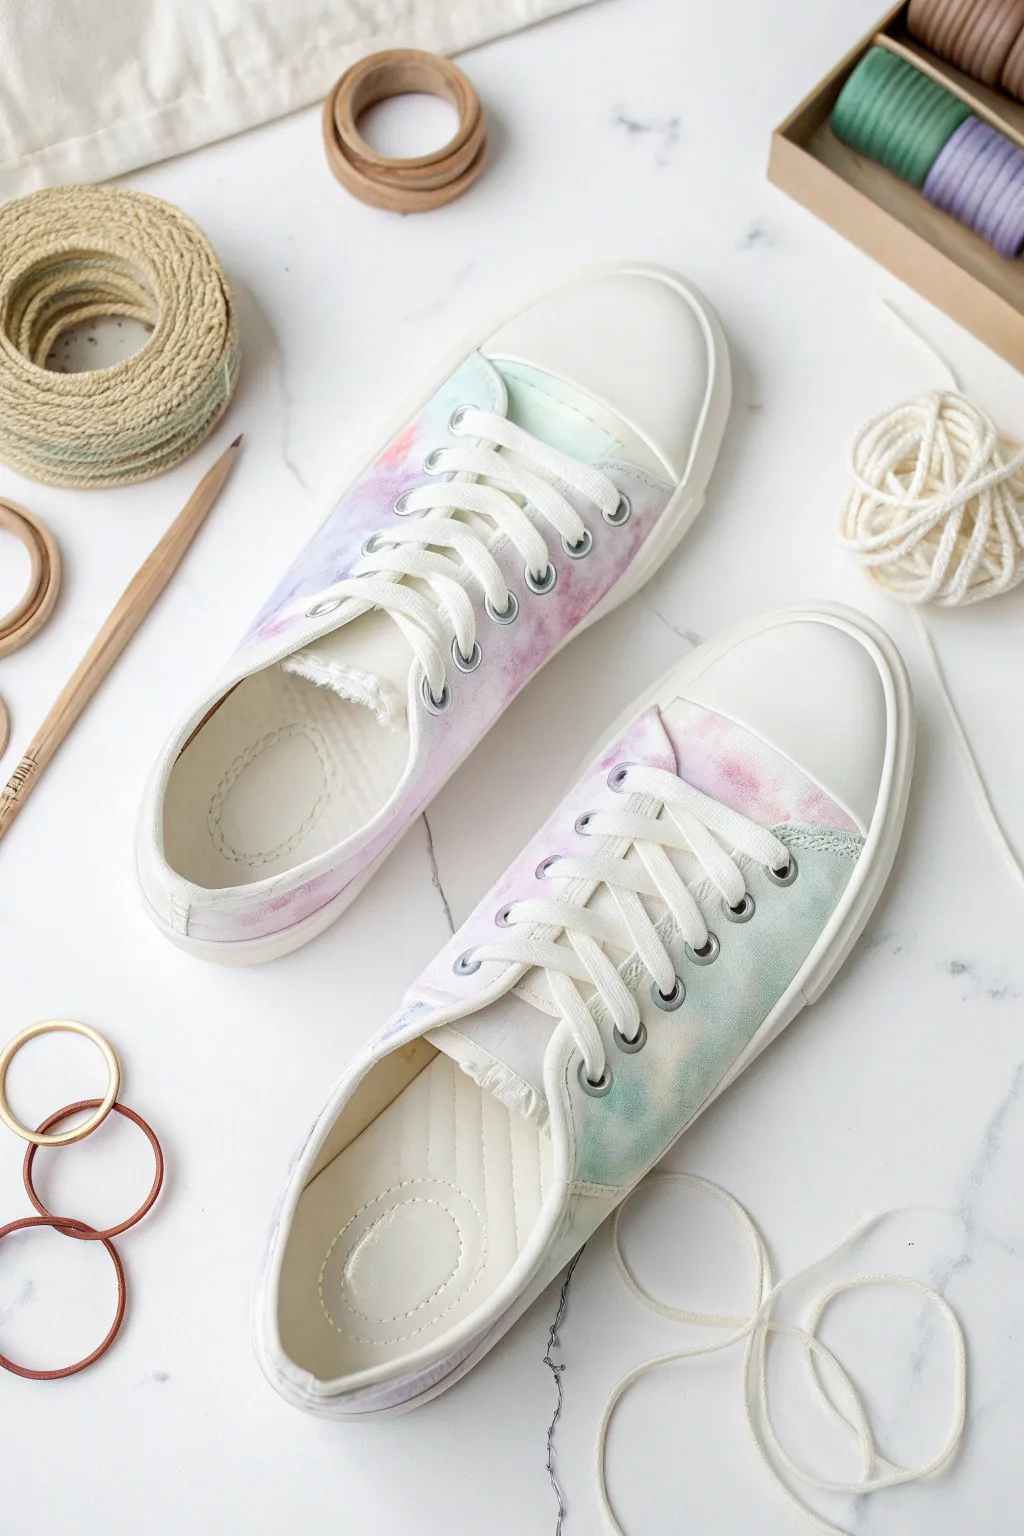
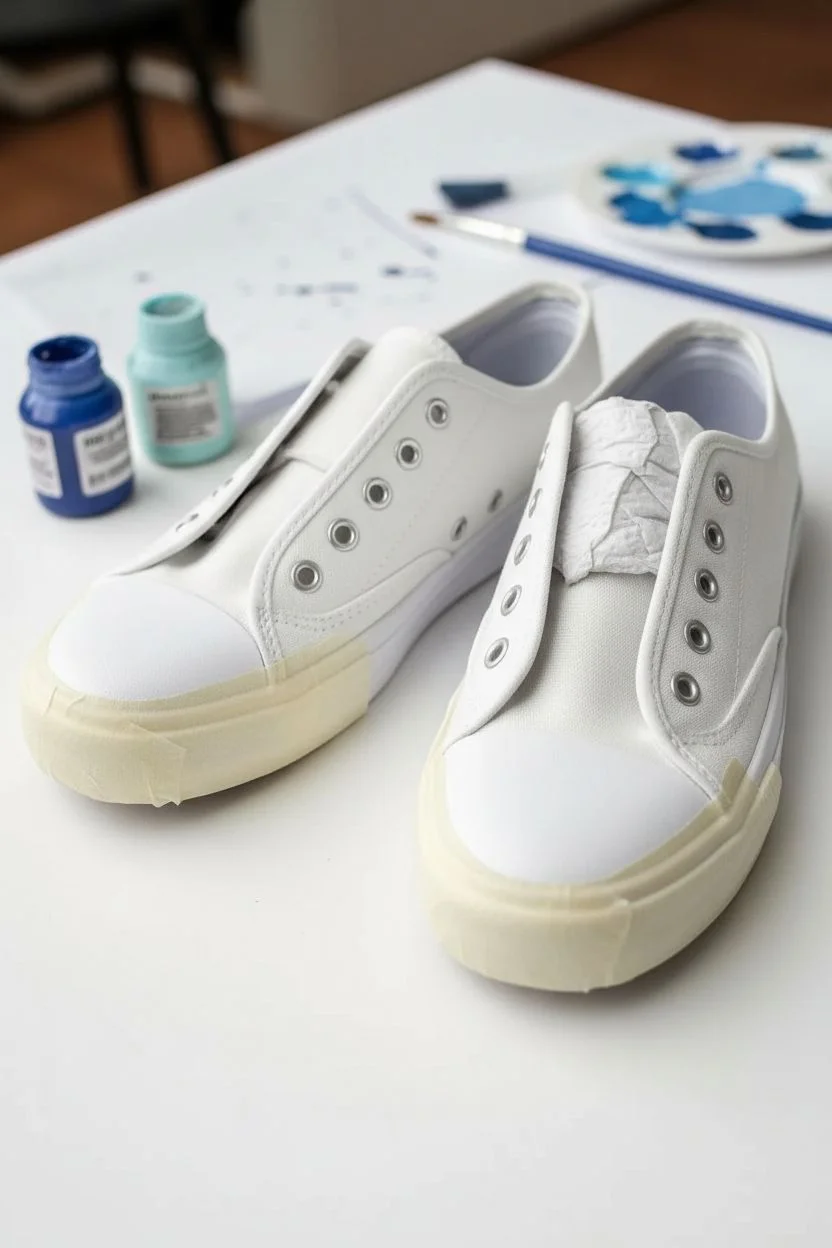
Transform plain white canvas sneakers into a dreamy, watercolor masterpiece with this soft tie-dye technique. The gentle blend of mint, lavender, and blush pink creates an ethereal look that is subtle enough for everyday wear yet full of artistic character.
How-To Guide
Materials
- White canvas sneakers
- Fabric medium or rubbing alcohol (91% or higher)
- Fabric paint or permanent markers (mint green, lavender, soft pink)
- Small spray bottle or misting bottle
- Painters tape or masking tape
- Small sponge brushes or soft paintbrushes
- Plastic drop cloth or garbage bag
- Paper towels
- Waterproofing spray (optional)
Step 1: Setting the Stage
-
Remove Laces:
Begin by completely unlacing both shoes. Set the laces aside to keep them crisp white, or purchase a second pair to dye later if you prefer a monochromatic look. -
Protect the Soles:
Carefully apply painter’s tape to the rubber soles and the toe caps. Press the edges down firmly with your fingernail to prevent any dye from bleeding onto the rubber parts. -
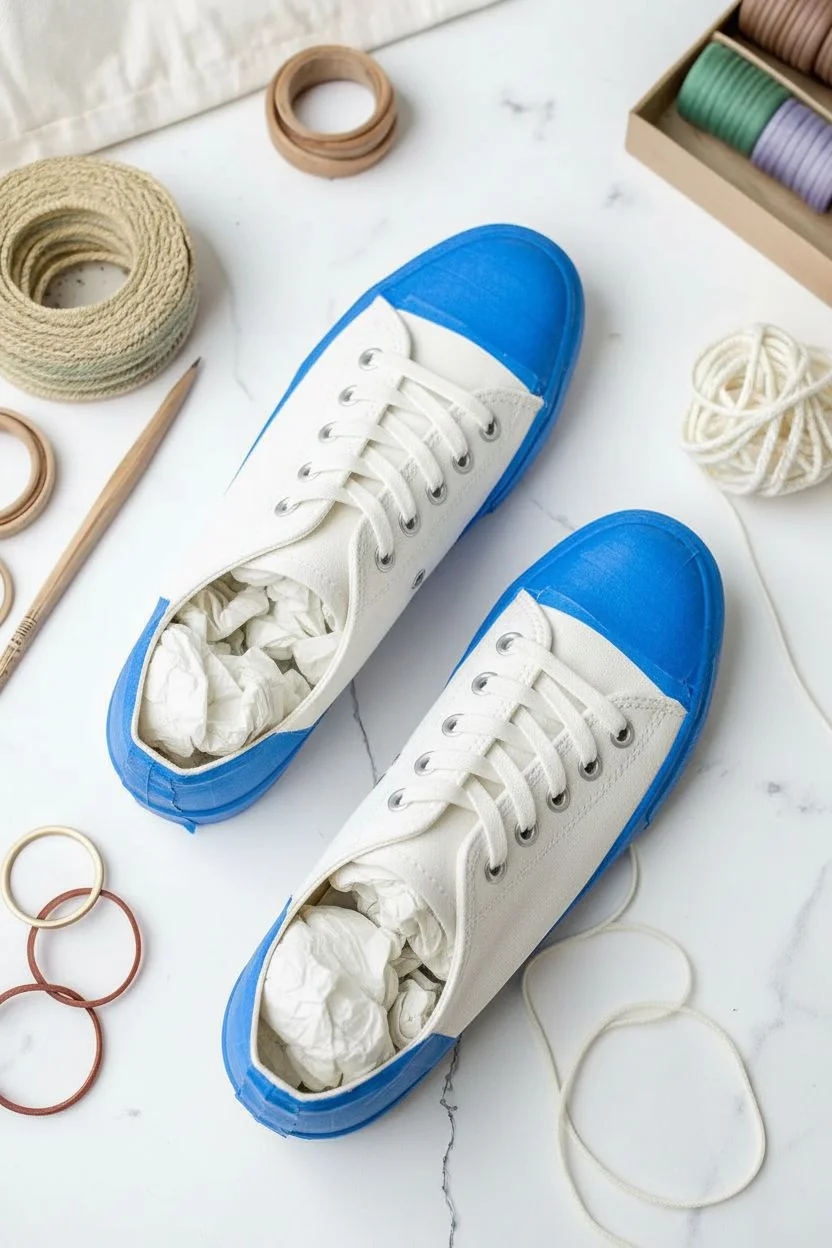
Stuff the Shoes:
Stuff the insides of the shoes tightly with paper towels or old rags. This helps the shoe hold its shape while you work and absorbs any excess liquid that might seep through.
Step 2: Applying Color
-
Prepare Your Colors:
If using fabric paint, dilute it slightly with water or fabric medium until it has a milky consistency. If using permanent markers, simply have your selected pastels uncapped and ready. -
Dampen the Canvas:
Lightly mist the canvas surface with clear water using your spray bottle. The fabric should be damp to the touch but not soaking wet; this helps the colors bleed and blend naturally. -
Zone the Mint:
Start near the toe area or heel. Apply your mint green color in irregular patches. I like to dab the paint gently with a sponge for a cloudy effect rather than brushing it on. -
Add Lavender Accents:
Move to the middle section of the shoe. Apply the lavender color, allowing the edges to touch and slightly overlap with the mint green while it’s still damp. -
Introduce Blush Pink:
Fill in the remaining white spaces with the soft pink shade. Focus on creating organic shapes rather than straight lines to enhance the tie-dye aesthetic.
Bleed Control
Start with lighter colors first. You can always darken a pale section, but it is much harder to lighten a spot that got too much dark pigment.
Step 3: Creating the Blend
-
The Magic Mist:
If using permanent markers, spray the colored areas generously with rubbing alcohol now to make the ink run. If using diluted paint, give a very light mist of water to encourage further bleeding between colors. -
Blot and Blur:
Take a clean, dry paper towel and gently blot the surface where colors meet. This removes hard lines and creates that signature soft, dreamy transition between the hues. -
Check the Tongue:
Don’t forget to pull the tongue out and apply the same color pattern there, ensuring no stark white canvas is visible around the eyelets. -
Let it Dry:
Allow the shoes to air dry completely in a well-ventilated area. Avoid direct sunlight, which might fade the pastel pigments too quickly.
Texture Twist
Sprinkle coarse salt over the wet dye while it dries. The salt absorbs pigment unevenly, creating a cool speckled, galaxy-like texture on the canvas.
Step 4: Finishing Touches
-
Remove Tape:
Once fully dry, slowly peel off the painter’s tape from the rubber soles. If any color leaked through, use a cotton swab dipped in rubbing alcohol or nail polish remover to wipe it clean immediately. -
Heat Set:
To make the design permanent, toss the shoes in a dryer on high heat for about 15 minutes (put them in a pillowcase first) or use a hairdryer on the hottest setting for several minutes per shoe. -
Seal the Deal:
Spray the canvas with a waterproofing spray or fabric protector. This will help repel dirt and keep your pastel colors looking fresh longer. -
Re-Lace:
Thread your crisp white laces back through the eyelets. The contrast between the bright white laces and the soft pastel canvas really makes the colors pop.
Now you are ready to step out in your one-of-a-kind pastel creations


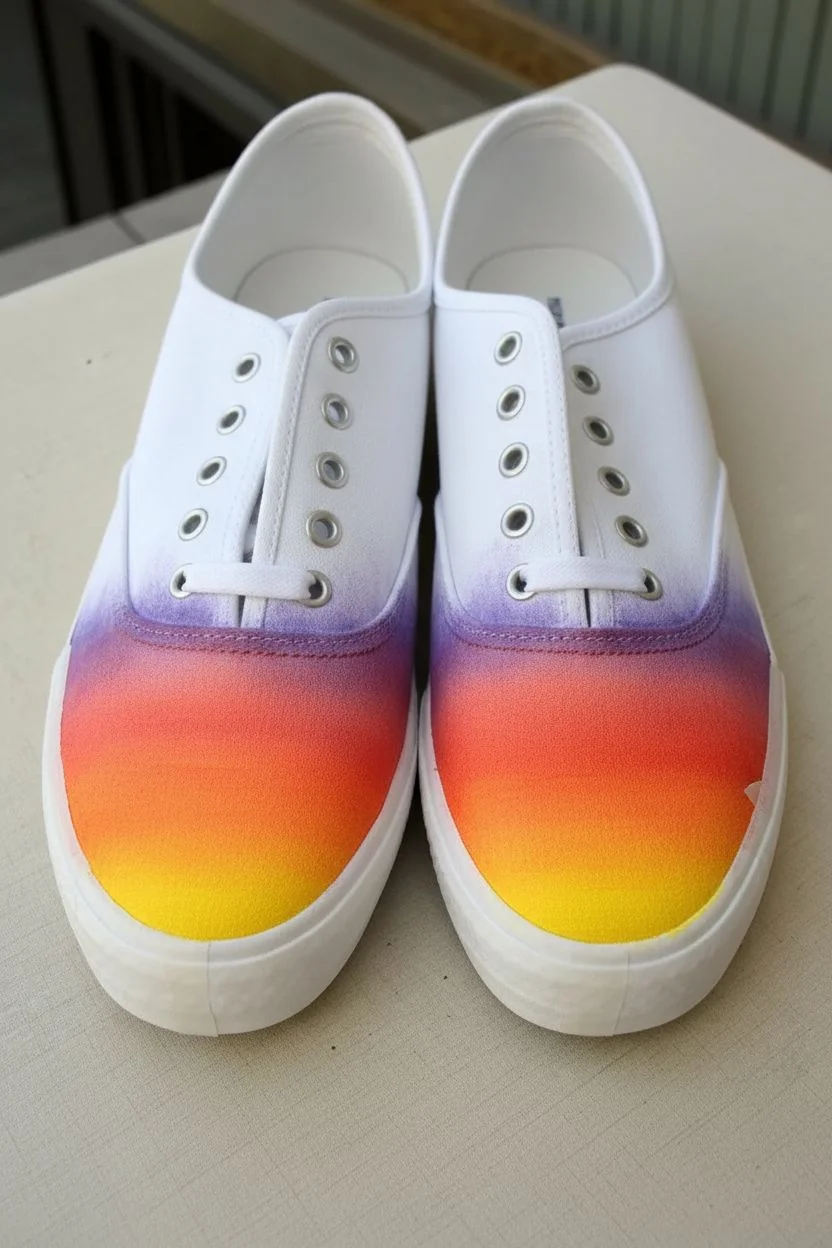
Smooth Ombre Fade Base
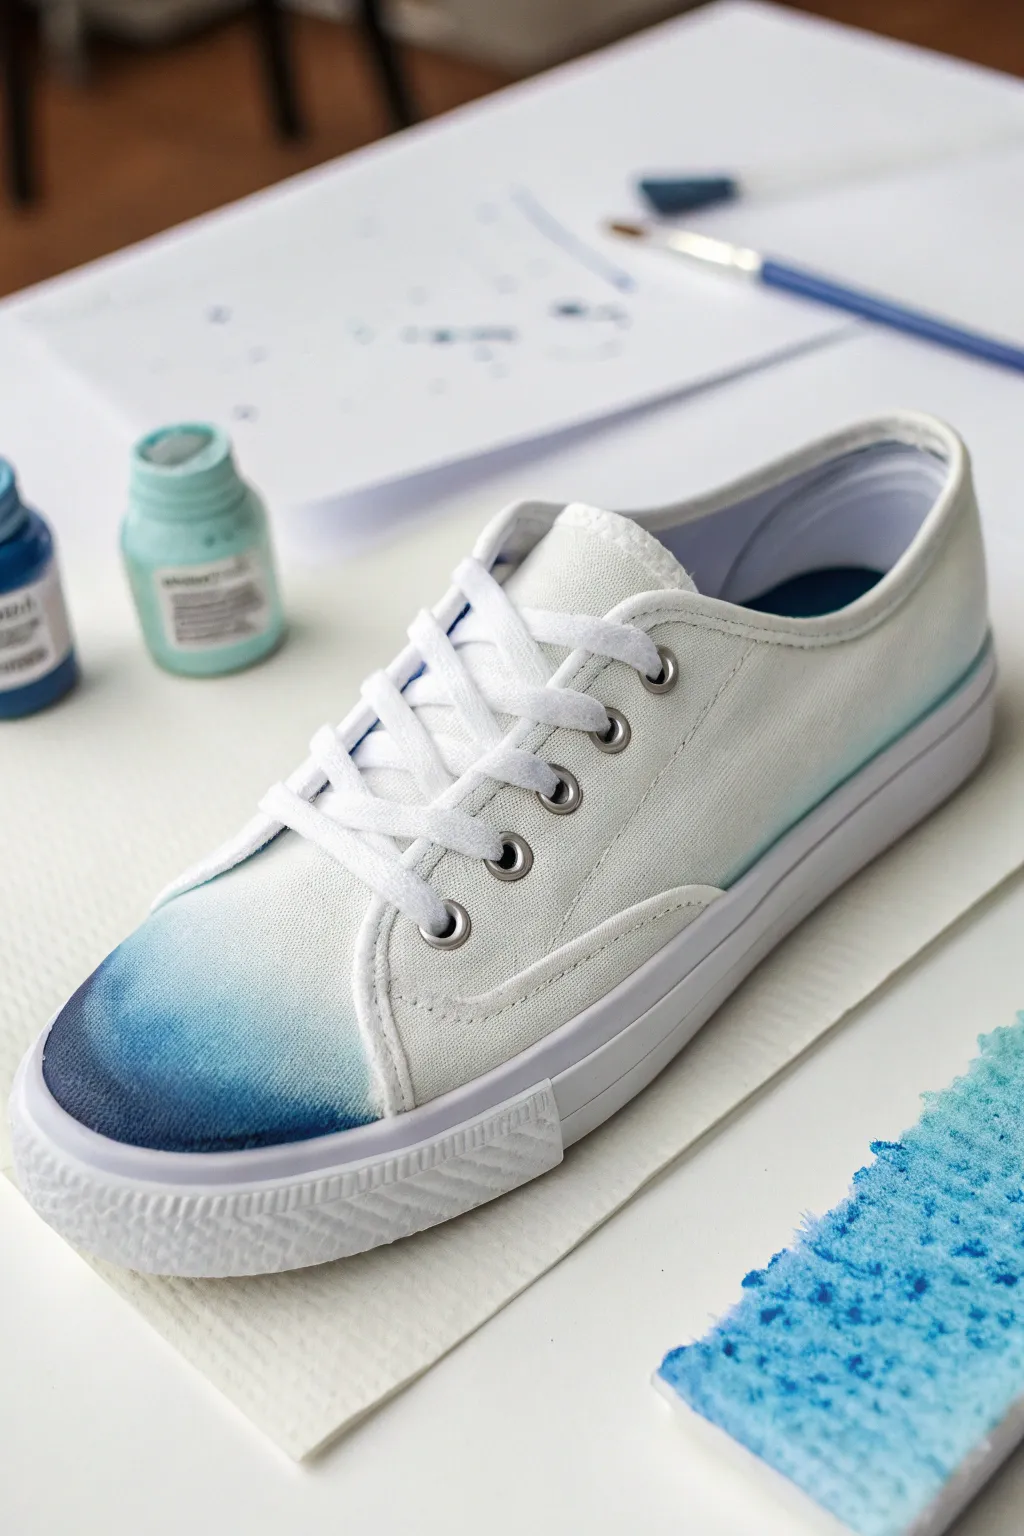
Give your classic white kicks a fresh, oceanic update with this seamless ombre fade technique. This project creates a stunning dye-like effect that transitions from a deep indigo toe to the shoe’s natural white canvas.
Detailed Instructions
Materials
- White canvas sneakers
- Fabric paint or acrylic paint mixed with textile medium
- Colors: Deep Indigo, Cerulean Blue, White
- Medium-sized flat paintbrush
- Small painting sponge or kitchen sponge piece
- Masking tape
- Water cup
- Palette or small mixing dish
- Paper towels
Step 1: Preparation and Protection
-
Prepare the shoes:
Start by removing the shoelaces completely from both sneakers. This prevents accidental staining and gives you a clear canvas to work on. -
Stuff the toes:
Pack the toe area of each shoe tightly with paper towels or newspaper. This creates a firm surface to paint against and helps the canvas keep its shape while wet. -
Mask the soles:
Carefully apply masking tape along the rubber sole edge where it meets the canvas. Run your fingernail along the tape edge to ensure a tight seal so no paint bleeds onto the rubber.
Step 2: Paint Mixing
-
Create the dark shade:
On your palette, pour out a small amount of your Deep Indigo paint. If using standard acrylics, mix it with fabric medium according to the bottle’s ratio (usually 1:1). -
Create the mid-tone:
In a separate spot, mix equal parts of Deep Indigo and Cerulean Blue to create a bridge color. -
Create the lightest tint:
Mix a large amount of white paint with just a drop of Cerulean Blue and plenty of water or medium. You want a very watery, sheer ‘glaze’ consistency for the fading edge.
Wet-on-Wet is Key
For a buttery smooth gradient, always work while the paint is wet. If it starts to dry, mist the canvas lightly with a spray bottle of water to reactivate the blending.
Step 3: Applying the Ombre
-
Wet the canvas:
Use a clean brush and plain water to lightly dampen the toe area of the shoe. Do not soak it; just make the fabric receptive to the paint. -
Apply the darkest tip:
Load your sponge with the Deep Indigo mix. Dab it heavily onto the very tip of the toe cap, extending back about one inch. Saturate the fabric well here. -
Add the mid-tone:
Pick up the mid-tone blue mix with the sponge. Dab this just behind the dark indigo section, slightly overlapping the first color while it’s still wet. -
Start the blend:
Use a clean, damp brush to gently scrub the boundary between the dark indigo and the mid-tone blue. The water will help the pigments merge seamlessly. -
Apply the lightest fade:
Dip your brush into the watery light blue mix. Apply this starting at the edge of the mid-tone and brushing backward toward the laces. -
Feather the edge:
Clean your brush and leave it barely damp. Starting from the unpainted white canvas, brush lightly toward the light blue paint. This feathers the edge so there is no hard line where the paint stops. -
Deepen the contrast:
I like to go back while the toe is still damp and add one more concentrated layer of Deep Indigo right at the rubber edge for maximum depth. -
Repeat on second shoe:
Follow the same steps for the other sneaker, placing them side-by-side occasionally to ensure the fade lengths match.
Galaxy Upgrade
Once the blue fade is dry, gently flick a stiff toothbrush loaded with white paint over the dark blue toe area to create a starry night galaxy effect.
Step 4: Finishing Details
-
Dry thoroughly:
Allow the paint to air dry completely for at least 24 hours. The colors may lighten slightly as they dry. -
Remove tape:
Once dry, carefully peel away the masking tape from the rubber soles. If any paint seeped through, wipe it immediately with a damp cloth or a dab of rubbing alcohol. -
Heat set the paint:
Most fabric paints require heat setting. Use a hairdryer on high heat for 3-5 minutes over the painted area, or toss them in a dryer if the manufacturer instructions allow. -
Re-lace:
Lace your sneakers back up with clean white laces to make the blue pop.
Step out in style with your customized, perfectly blended gradient sneakers


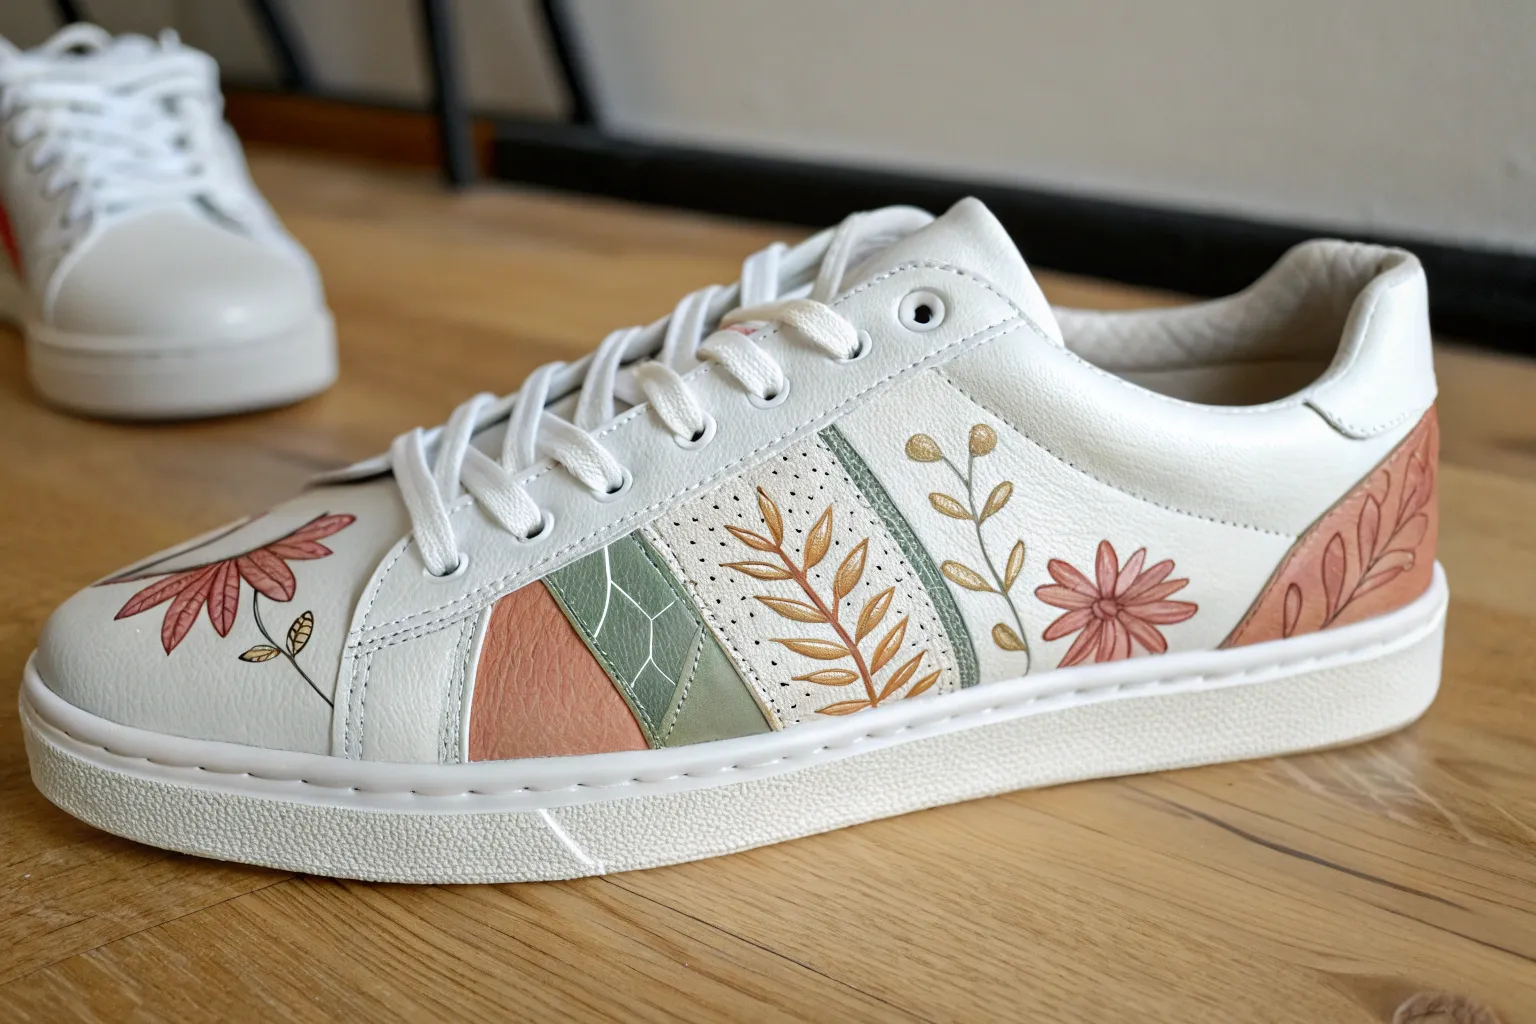
Wildflower Wrap-Around Border
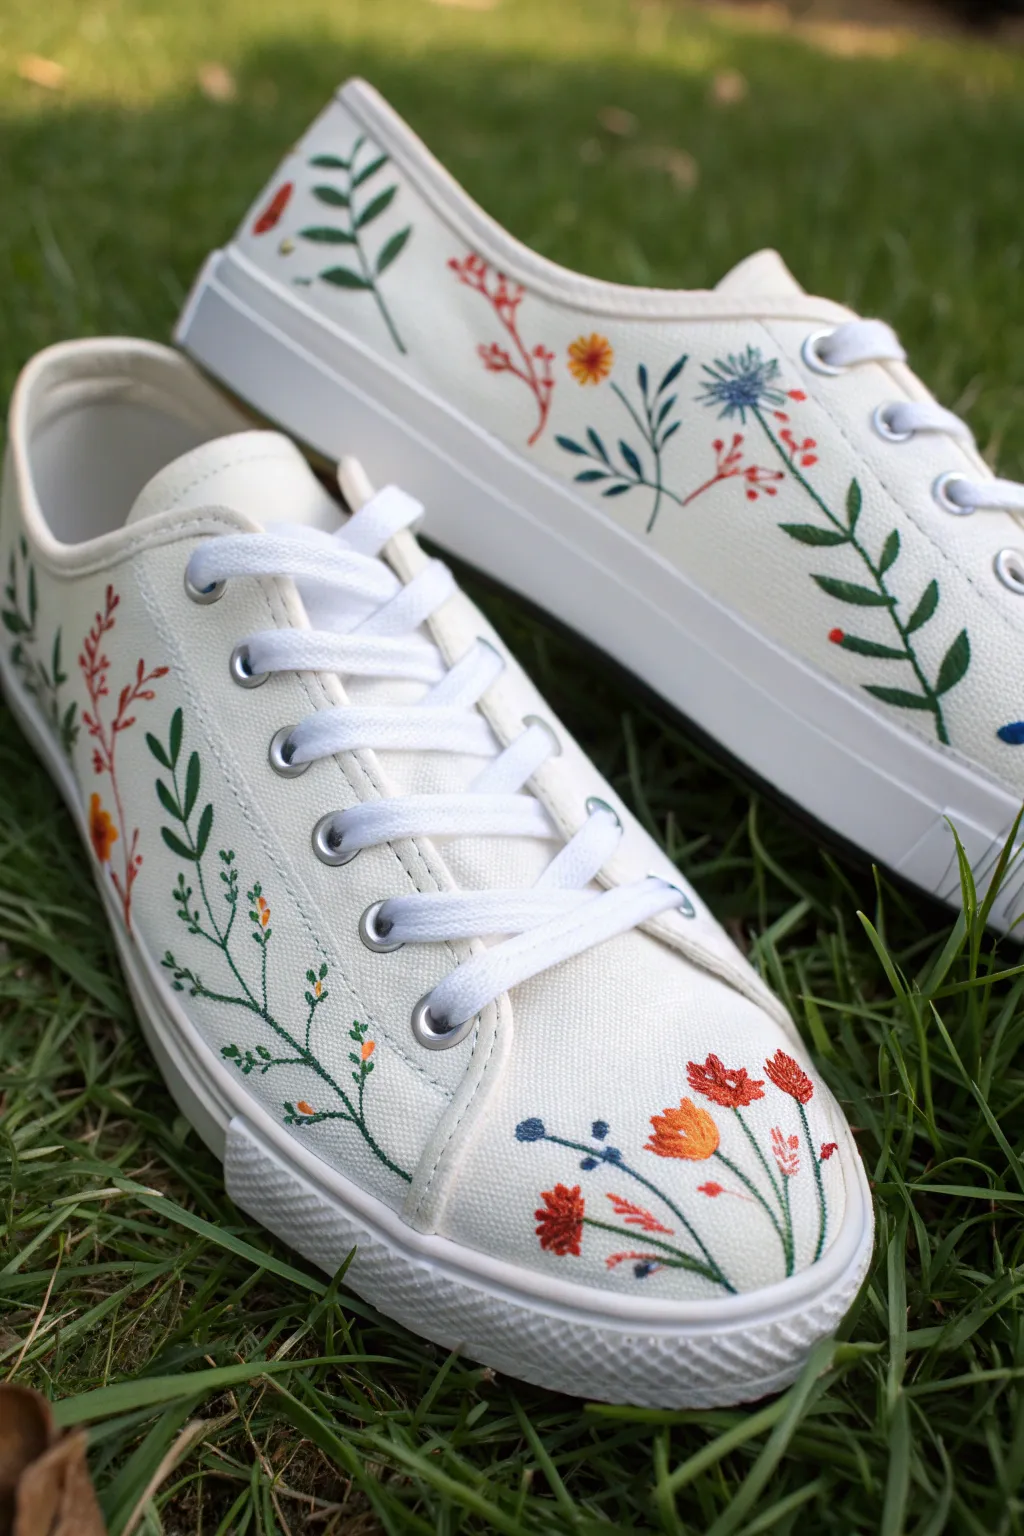
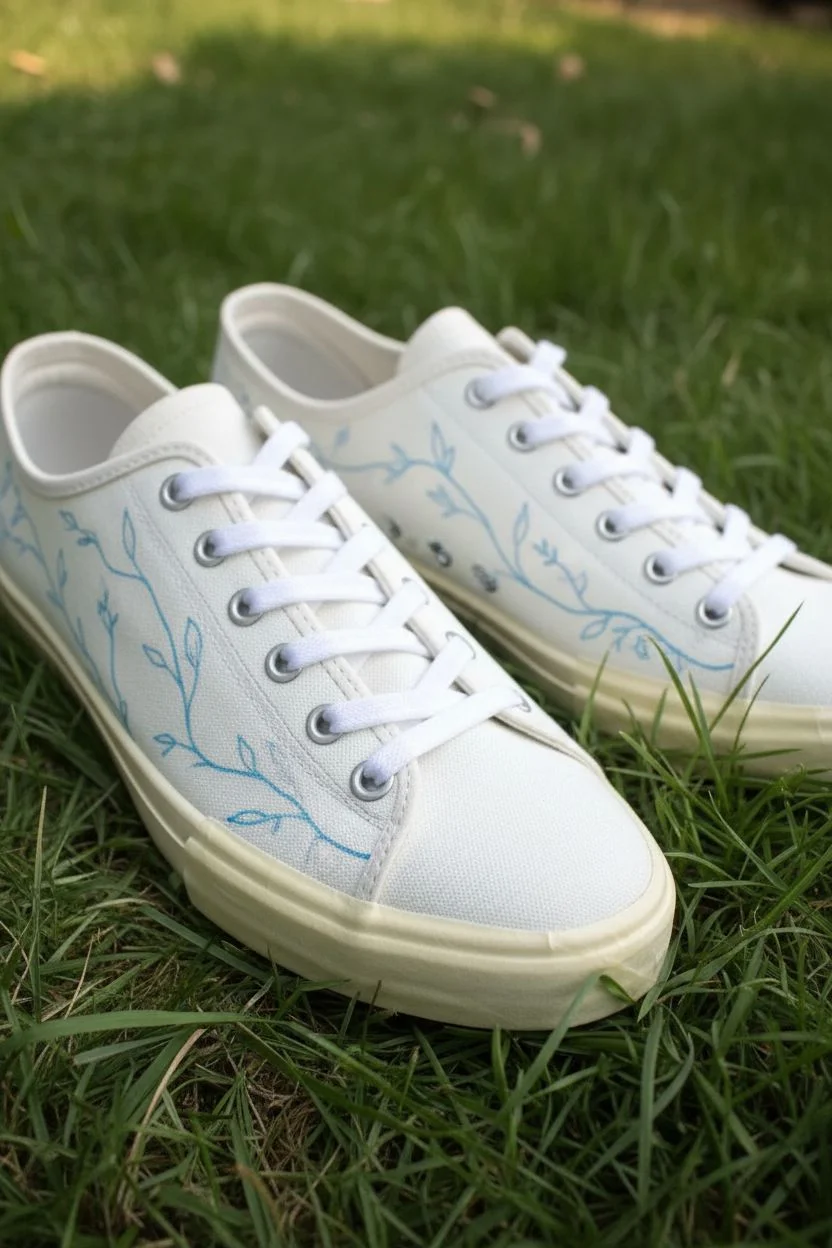
Transform plain white canvas sneakers into a blooming garden with this delicate wildflower design that cleverly mimics the look of hand embroidery. Using fine brushwork and layered strokes, you’ll create a charming wrap-around border of stems, leaves, and petals that looks stitched right onto the fabric.
Step-by-Step Guide
Materials
- White canvas sneakers (clean and dry)
- Acrylic fabric craft paints (dark green, fern green, rust orange, mustard yellow, deep blue, crimson red)
- Fabric painting medium (if using regular acrylics)
- Round detail brushes (sizes 0, 00, and 1)
- Water-erasable fabric marking pen or soft pencil
- Palette or small plastic lid
- Paper towels
- Masking tape (optional for protecting soles)
- Acrylic sealer spray (matte finish)
Step 1: Preparation & Sketching
-
Prepare the canvas:
Begin by removing the shoelaces completely to give yourself an unobstructed workspace. If your shoes are new, give them a quick wipe with a damp cloth to remove any factory sizing, then let them dry fully. -
Protect the soles:
If you’re worried about accidental smudges, apply a strip of masking tape along the rubber sole where it meets the fabric. This gives you a crisp edge to work against without fear of staining the rubber. -
Plan the main stems:
Using your air-erasable pen or a very light pencil touch, sketch the primary flowing lines for your stems. Start near the toe cap and draw meandering lines that wrap around the sides towards the heel. Keep the lines loose and organic, avoiding stiff straight shapes.
Faux-Thread Texture
To enhance the embroidery illusion, use slightly thicker paint than usual. The raised texture of the paint strokes physically mimics the height of embroidery floss on the canvas.
Step 2: Painting the Greenery
-
Mix your greens:
On your palette, mix a small amount of fabric medium with your dark green paint. This ensures the paint flexes with the shoe while walking. -
Paint the main stems:
Load a size 1 or 0 brush with the dark green mixture. Carefully trace over your sketched stem lines. Use light pressure; you want thin, delicate lines that resemble thread, not thick marker strokes. -
Add basic leaves:
Switching to a size 0 brush, paint small, teardrop-shaped leaves coming off the main stems. Alternate the placement—left, then right—as you move up the stem. -
Vary the foliage:
To create depth, mix a lighter ‘fern green’ shade. Add a second variety of leaves, perhaps longer and thinner ‘grassy’ strokes, interspersed between your darker leaves. This variation makes the garden feel wilder. -
Create the fern texture:
For the fern-like elements seen on the side, paint a central spine first. Then, using short, quick flicks of the brush, add tiny leaflets extending from the spine. I find that pulling the brush away from the stem creates the sharpest points.
Step 3: Adding the Blooms
-
Paint the rust-colored buds:
Mix a rust orange color. Using the tip of your smallest brush (size 00), dab small, elongated oval shapes at the ends of some stems. These mimic tight flower buds. -
Create the ‘stitched’ flowers:
For the larger orange and red flowers near the toe, don’t paint a solid blob. Instead, build the flower using short, parallel dashes. This ‘hatching’ technique replicates the look of satin stitch embroidery. -
Add mustard yellow accents:
Using the mustard yellow, add small circular clusters or distinct individual dots to represent pollen or small wildflowers like billy buttons. -
Detail the blue thistles:
Take your deep blue paint and create fan-shaped flowers. Start from a central point and flick outward in a radial pattern. Once the blue dries slightly, you can add a tiny dot of white or light blue at the base for contrast. -
Layering for volume:
Go back over your larger flowers with a slightly lighter shade of their base color (e.g., light orange on top of rust). Add just a few strokes on top to create a highlighted, 3D effect suitable for the faux-embroidery look. -
Tiny twig details:
Using a very diluted brown or dark red, add extremely fine, short lines branching off the main stems to fill any large empty white spaces. These act as filler sprigs.
Make It 3D
After sealing, create a mixed-media masterpiece by actually stitching over a few select flower centers with real embroidery floss and a sharp needle for genuine texture.
Step 4: Finishing Touches
-
Clean up guidelines:
Once the paint is completely dry to the touch (usually 1-2 hours), use a damp Q-tip or a hairdryer (if using heat-erasable pens) to remove any visible sketch lines. -
Heat set the design:
If your fabric paint requires heat setting, use a hair dryer on high heat for a few minutes or carefully iron the shoes with a cloth barrier between the iron and the paint. -
Seal the artwork:
Take the shoes outside and spray them with a matte acrylic sealer. Apply two light coats rather than one heavy one to prevent dripping. This protects your hard work from dirt and water. -
Re-lace and wear:
Remove the masking tape from the soles and lace your sneakers back up once the sealer has cured for 24 hours.
Step into your new floral artwork and enjoy the custom bloom wherever you walk


Bold Sunflower Toe Caps
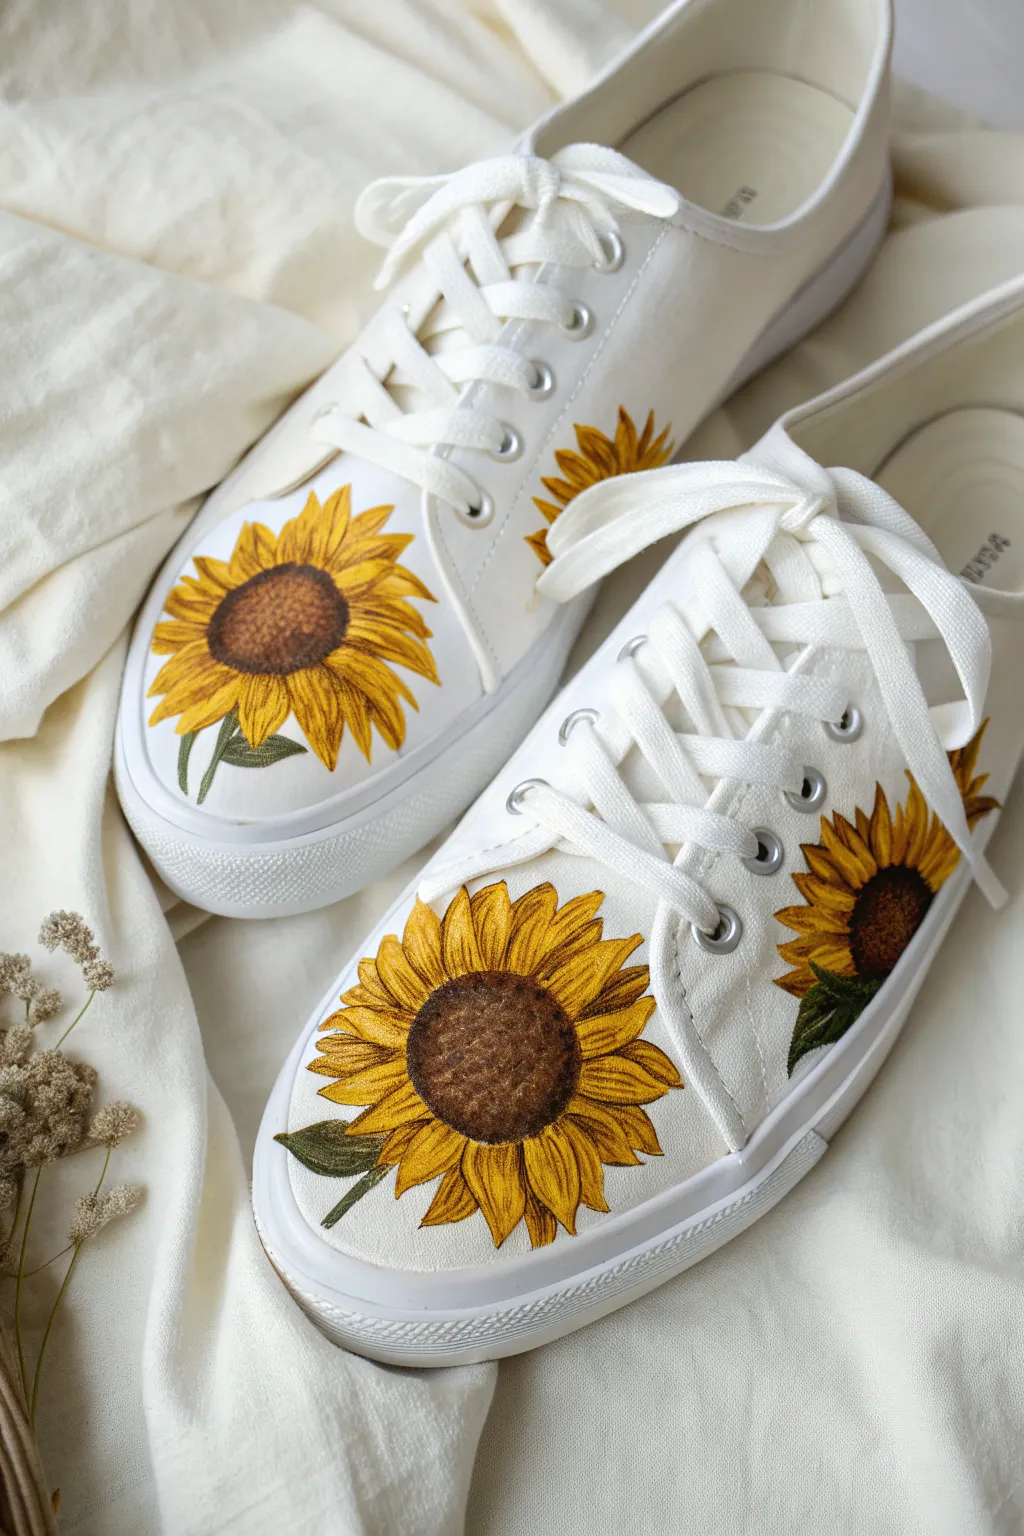
Transform plain white canvas sneakers into a walking field of gold with these detailed sunflower illustrations. The design focuses on placement, utilizing the natural curve of the toe cap to frame large, vibrant blooms that wrap around the sides.
Step-by-Step Tutorial
Materials
- White canvas sneakers (clean)
- Fabric paint or high-quality acrylic paint mixed with textile medium
- Paint colors: Golden yellow, deep ochre, burnt sienna, dark brown, leaf green, olive green, white
- Small flat shader brush (size 2 or 4)
- Fine liner brush (size 0 or 00)
- Pencil or air-erasable fabric marker
- Heat gun or hairdryer (optional)
- Painter’s tape
- Water cup and palette
- Acrylic sealer spray (matte or satin finishing)
Step 1: Preparation & Sketching
-
Prep the Surface:
Remove the laces from your sneakers to prevent accidental paint splatters and to reach the tongue area easily. Stuff the toes tightly with paper towels or plastic bags; this creates a firm, resistant surface to paint against rather than a sagging fabric. -
Define the Canvas:
Use painter’s tape to mask off the rubber soles completely. Press the tape edge down firmly with your fingernail to ensure no paint bleeds onto the rubber foxing. -
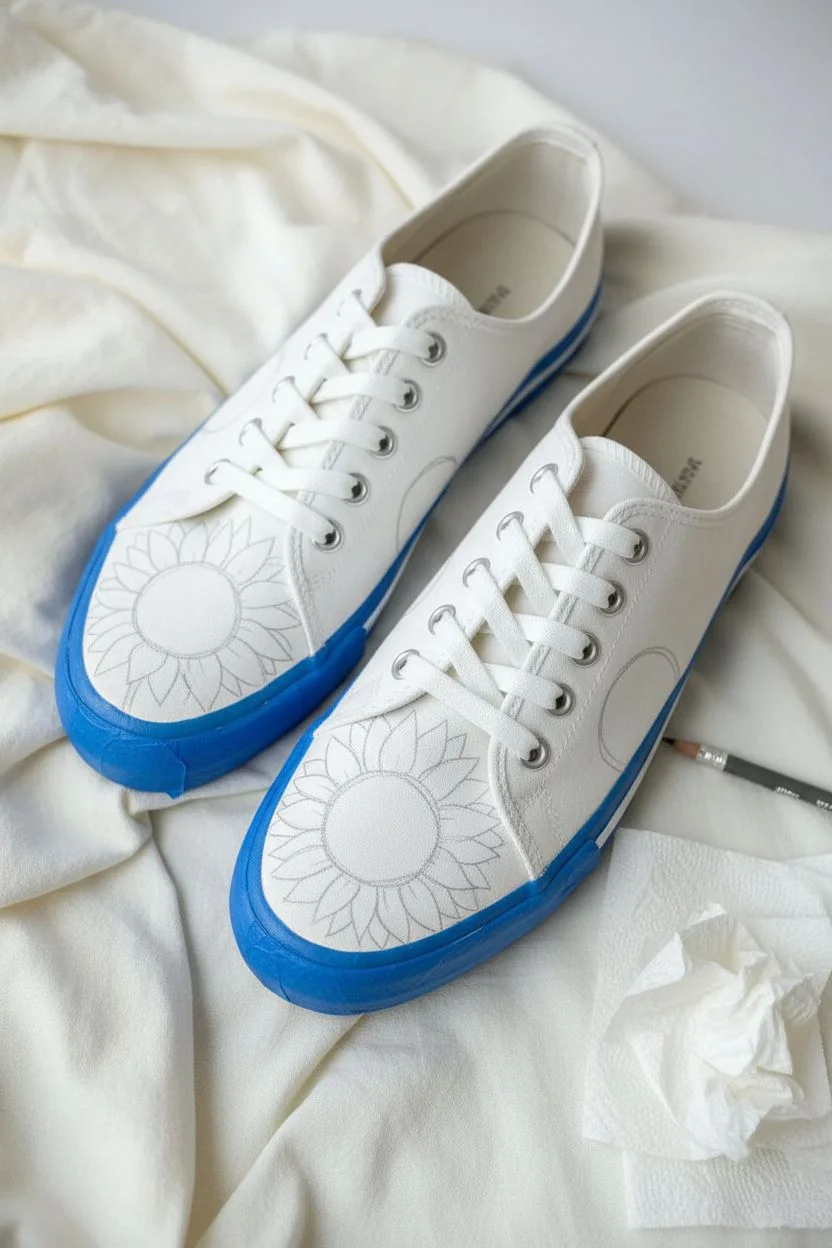
Map the Centers:
Using a pencil or air-erasable marker, sketch large circles for the sunflower centers. Place the main bloom directly on the center of the toe cap, slightly off-center for a natural look. Add a second partial circle on the side panel of the shoe. -
Draft the Petals:
Sketch the petal shapes radiating outward. Keep them slightly irregular—some overlapping, some twisting at the tips—rather than perfect uniform loops. This natural variation is key to the realistic look shown in the image.
Fixing Stiff Fabric
If the painted areas feel too stiff or crunchy after drying, the paint layer was likely too thick. Next time, mix in more fabric medium to keep the canvas flexible.
Step 2: Blocking Colors
-
Base Coat White:
I like to paint a thin layer of white paint inside your sketched flower outlines first. This primes the canvas and ensures your yellows will pop brightly rather than looking dull against the fabric weave. -
Underpainting the Petals:
Mix a medium golden yellow with a touch of fabric medium. Fill in all the petal shapes with a flat brush. Don’t worry about shading yet; just get a solid, opaque layer of color down. -
Fuzzy Centers:
For the seed heaads, dab a dark brown mixed with a little burnt sienna into the center circles. Use a stippling motion (rapid up-and-down tapping) with an old or stiff brush to create a textured, fuzzy appearance.
Pro Tip: Texture Trick
Use a toothbrush to flick tiny specks of lighter brown onto the dark center seeds. It mimics pollen and adds incredible realism instantly.
Step 3: Detailing & Depth
-
Deepen the Centers:
While the center is still slightly tacky, stipple in darker brown or black just around the outer rim of the seed head circle. Add a lighter, tawny brown highlight in the very center to create a domed 3D effect. -
Petal Shadows:
Mix a warm ochre or light orange tone. Using your small flat brush, paint streaks at the base of each petal (where it meets the center) and along the overlapping edges of petals that are ‘behind’ others. -
Petal Highlights:
Clean your brush thoroughly. Mix bright yellow with a tiny bit of white. Add highlights to the tips and raised ridges of the petals to catch the light. -
Defining Lines:
Switch to your fine liner brush. With a thinned-down burnt sienna, paint very delicate vein lines down the center of select petals to add texture.
Step 4: Leaves & Finishing Touches
-
Base Greenery:
Paint the small leaves peeking out from under the blooms using olive green. One or two jagged leaves near the bottom of the toe cap anchor the design beautifully. -
Leaf Texture:
Add depth to the leaves by painting one half slightly darker than the other, and use your liner brush to add a thin central vein in a lighter green. -
Clean Up:
Once the paint is dry to the touch, check for any white background spots you might want to tidy up. If you made mistakes outside the lines, you can carefully paint over them with white to blend back into the canvas. -
Heat Set:
If your fabric medium requires it, use a hairdryer or iron (with a cloth between) to heat set the paint properly. This ensures the design stays put during wear. -
Seal and Lace:
Spray the painted areas with a light coat of acrylic sealer for extra weather protection. Once fully cured (check your sealer’s instructions), re-lace the shoes with crisp white laces.
Step out in style knowing your custom floral footwear is truly one of a kind
BRUSH GUIDE
The Right Brush for Every Stroke
From clean lines to bold texture — master brush choice, stroke control, and essential techniques.
Explore the Full Guide
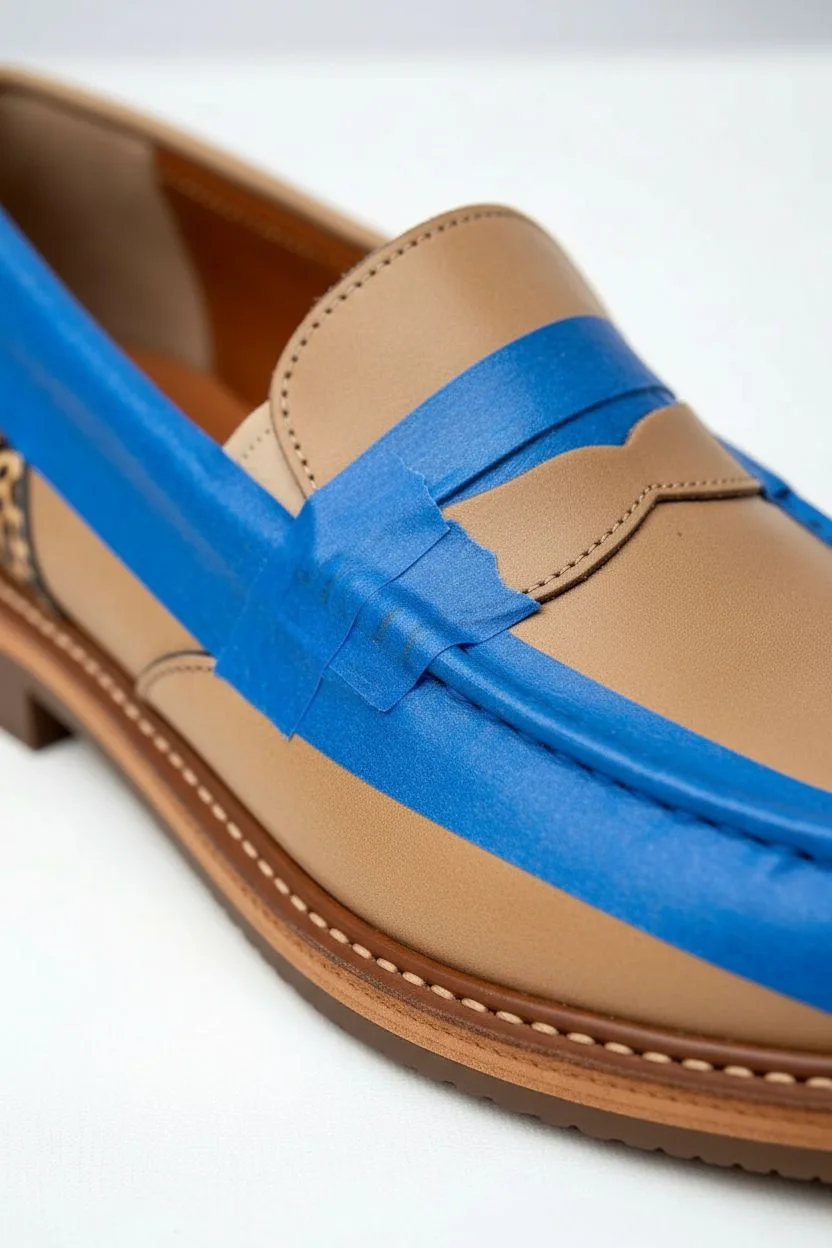
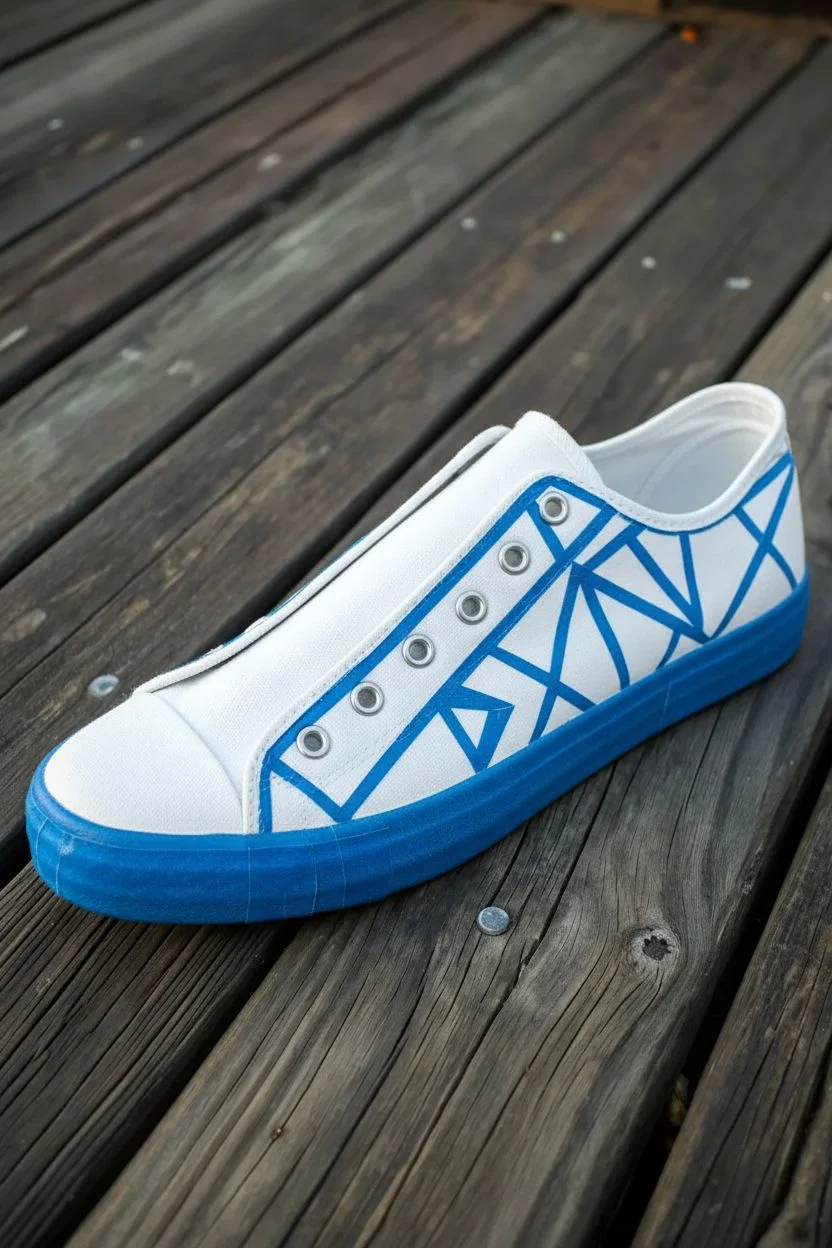
Simple Geometric Color Blocks
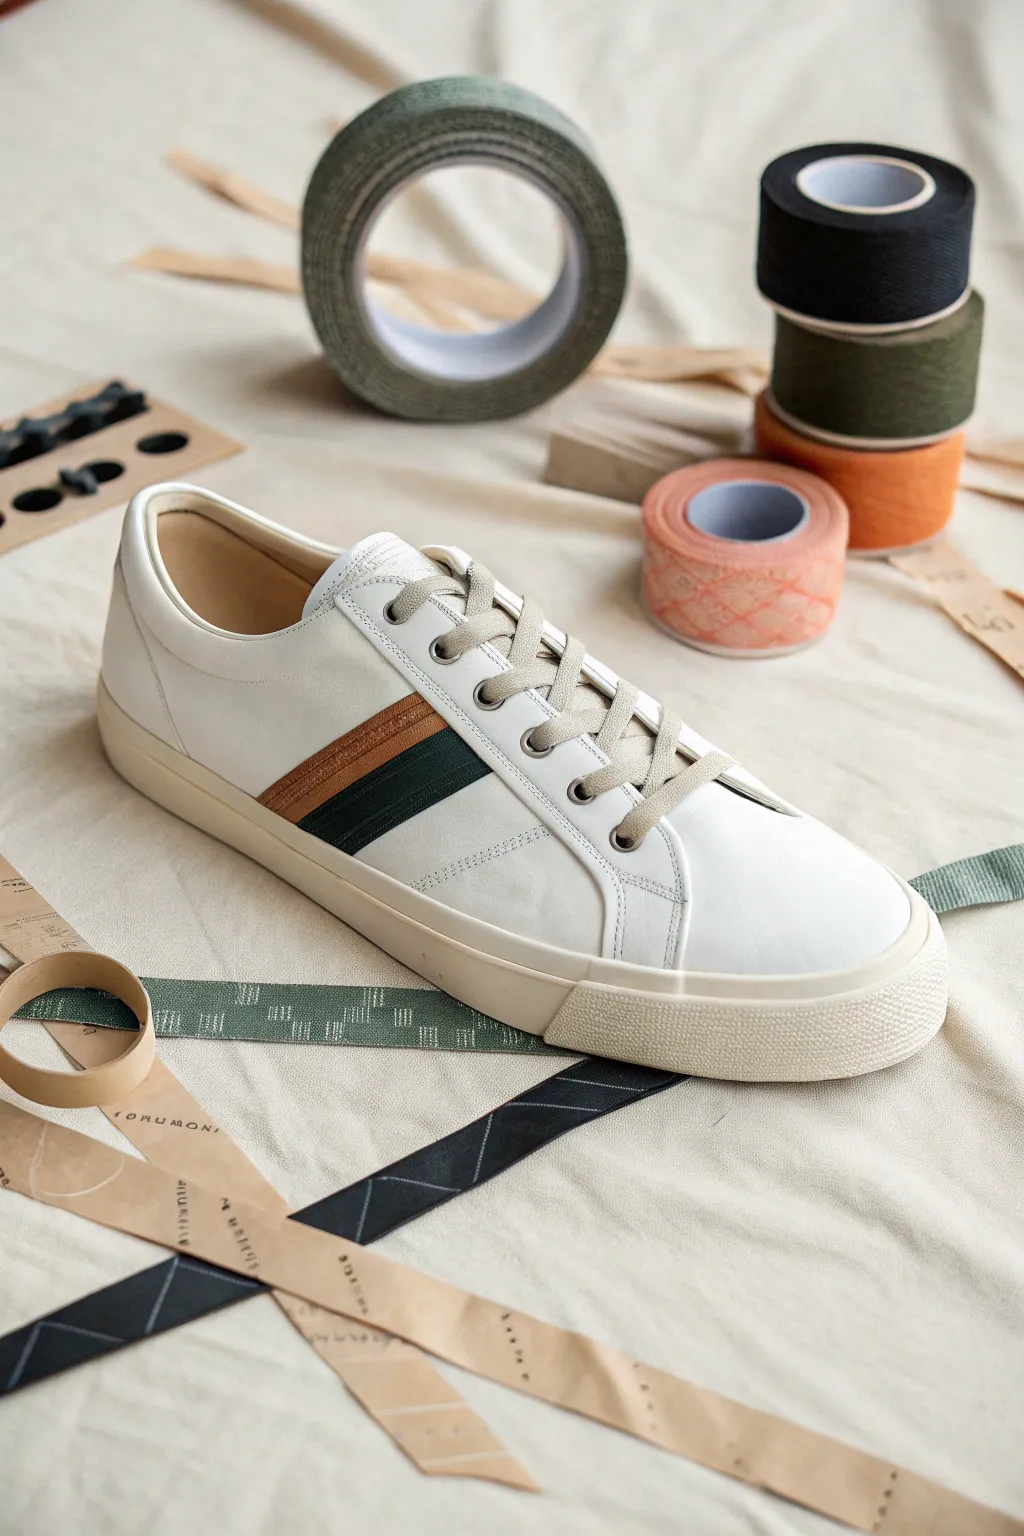
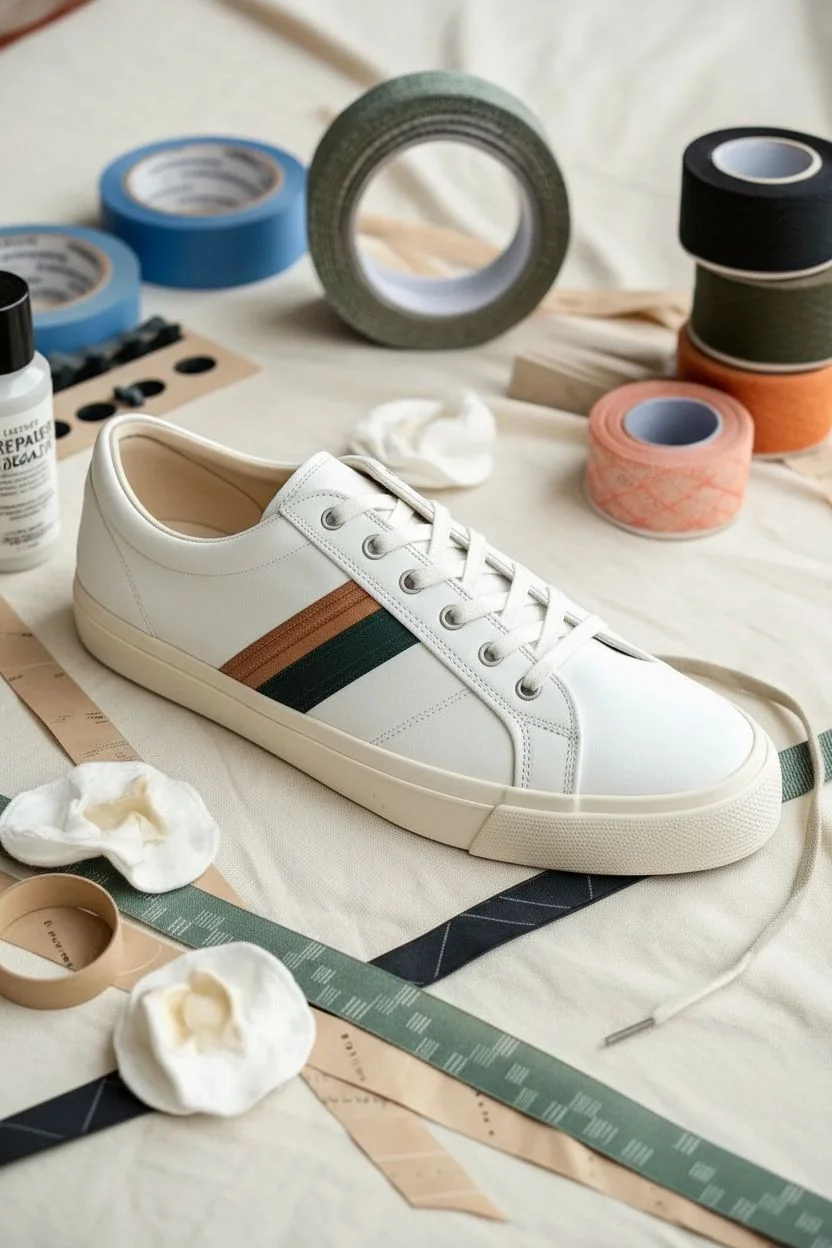
Transform a plain pair of white leather sneakers into a high-end designer lookalike with this incredibly simple geometric upgrade. By using high-quality leather paints and precise taping, you’ll create a crisp, dual-tone diagonal stripe design that looks factory-made.
Step-by-Step Guide
Materials
- White leather sneakers (clean and dry)
- Leather preparer and degalazer
- Cotton rounds or balls
- Blue painter’s tape or dedicated masking tape
- Leather paint (Tan/Cognac shade)
- Leather paint (Forest Green shade)
- Flat shader brush (size 6 or 8)
- Detail brush (size 0 or 1)
- Matte or satin acrylic finisher
- Hairdryer (optional)
Step 1: Preparation
-
Remove laces:
Take the laces off both shoes completely to give yourself unobstructed access to the side panels where you will be painting. -
Clean the surface:
Using a cotton round soaked in leather preparer and degalazer, vigorously scrub the area on the side of the shoe where the stripes will go. This removes the factory finish so the paint adheres properly. -
Dry the leather:
Allow the leather to dry completely for about 5-10 minutes. The surface should feel slightly tacky or matte compared to the rest of the shoe. -
Plan the geometry:
Visualize two parallel diagonal lines running from the bottom sole edge upward toward the laces. The angle should be roughly 45 degrees relative to the sole.
Bleeding Lines?
If paint bleeds under tape, wait for it to dry. Use a Q-tip dipped in deglazer to gently wipe away the excess, or paint over the error with white shoe paint.
Step 2: Taping the Design
-
Place the first tape line:
Apply a strip of masking tape diagonally across the side panel. This will demarcate the upper edge of the top (tan) stripe. Press the edge down firmly with your fingernail. -
Create the middle gap:
Place a second piece of tape parallel to the first, leaving a gap about 1/2 inch wide. This gap will become your tan stripe. -
Mask the separation:
Place a third piece of tape right next to the second one to create a tiny separation line between the two colored stripes, or simply butt the green stripe directly against the tan one if you prefer no gap. -
Define the lower stripe:
Place the final piece of tape below the prospective green area, leaving another 1/2 inch gap for the green paint. Ensure all tape edges are sealed tight to prevent bleeding. -
Protect the sole:
Apply tape along the rubber midsole where the leather meets the rubber to ensure you don’t accidentally paint on the sole.
Seal the Tape
Before painting color, paint a thin layer of the shoe’s base color (white) over the tape edges. This seals the tape so any bleed is invisible.
Step 3: Painting
-
Paint the Tan Stripe:
Shake your Cognac/Tan leather paint well. Using the flat shader brush, apply a thin, even coat to the upper open stripe area. -
Feather the edges:
Brush away from the tape edges slightly to avoid pushing paint underneath the tape. Let this first layer dry for 10-15 minutes. -
Paint the Green Stripe:
While the tan layer dries, use a clean brush to apply the Forest Green paint to the lower stripe area. Keep this layer thin. -
Build opacity:
Once dry to the touch, apply a second and third coat to both colors until the finish is solid and opaque. I usually find three thin coats is perfect for leather paint. -
Remove tape:
This is the satisfying part. Before the final coat is 100% rock hard (but dry to the touch), slowly peel back the tape at a sharp angle to reveal your crisp lines. -
Touch ups:
If any paint bled under the tape, use a toothpick or the tiny detail brush with a little white paint to correct the edges carefully.
Step 4: Finishing
-
Apply finisher:
Once the paint has cured for at least 24 hours, apply a thin layer of matte or satin acrylic finisher over the painted stripes to seal them against scuffs and water. -
Re-lace:
Lace your sneakers back up. For an extra custom touch, you could use laces that match the tan stripe.
Enjoy walking around in your custom kicks knowing you created that clean, professional design yourself
Black-and-White Doodle Lines
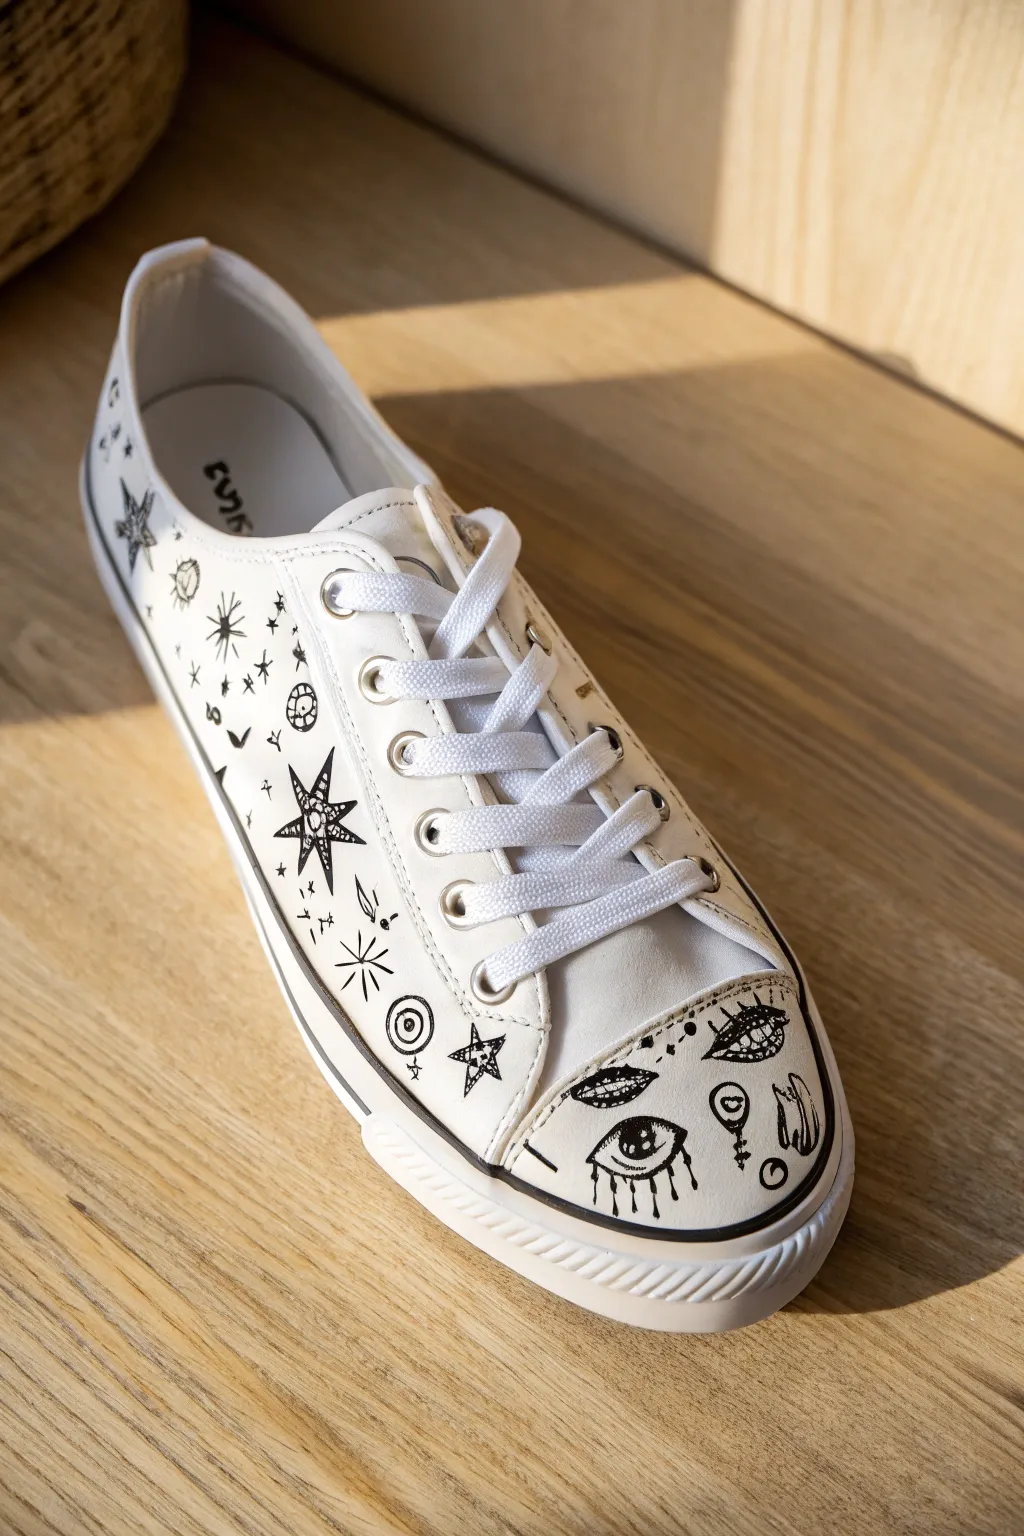
Transform a plain pair of white shoes into a celestial statement piece with nothing but a steady hand and a good marker. This project uses high-contrast black ink to create dreamy, mystical doodles ranging from weeping eyes to scattered stars.
Detailed Instructions
Materials
- White canvas sneakers (low-top style)
- Fine-point fabric marker (black)
- Ultra-fine tip permanent marker (black)
- Pencil (HB or lighter)
- Eraser (white polymer recommended)
- Waterproofing spray or fabric sealant
- Paper towels or stuffing paper
Step 1: Preparation & Planning
-
Clean and prep:
Before anything else, ensure your shoes are clean and dry. If they are brand new, give them a quick wipe to remove any factory dust. Remove the laces to give yourself an unobstructed canvas to work on. -
Support the shape:
Stuff the toe box of the shoe tightly with paper towels or newspaper. This provides a firm surface to draw against, preventing the canvas from collapsing under your pen pressure. -
Observe the canvas:
Notice the distinct sections of the shoe: the toe cap (often rubber), the side panels, and the heel strip. This design focuses heavily on the rubber toe cap and the side canvas panels.
Smudge Control
If ink bleeds on the rubber toe, quickly dip a cotton swab in rubbing alcohol to wipe it away before it sets completely.
Step 2: Sketching the Layout
-
Light pencil draft:
Using a light hand, sketch your main motifs onto the canvas with a pencil. Don’t worry about the tiny details yet; just map out where the bigger elements will go to ensure balanced spacing. -
Placement strategy:
For the side panel shown in the image, plan for a large, detailed starburst near the center and a swirling circular motif near the sole. Leave plenty of ‘white space’ between items. -
Mapping the toe cap:
On the rubber toe cap, lightly mark positions for three distinct eye designs. I like to stagger them—one lower left, one upper right—to create movement.
Glow Up
Use glow-in-the-dark fabric paint to highlight the stars or the pupils of the eyes for a hidden surprise at night.
Step 3: Inking the Side Panels
-
Start with the focal star:
Using the fine-point fabric marker, draw the central five-pointed star. Thicken the outline, then fill the interior with small dots or stippling to create texture without making it solid black. -
Add secondary stars:
Around the main star, draw smaller four-pointed stars and simple asterisks. Vary the sizes to make it look like a constellation. -
Draw the sunburst:
Near the bottom edge, draw a symbol resembling a sun or eye with radiating lines. Keep the lines crisp and separated. -
Fill the gaps:
Look for empty spaces and fill them with tiny doodles: crescent moons, small dots, tiny lightning bolts, or leafy sprigs. These ‘filler’ elements tie the larger drawings together. -
Refine the lines:
Go over your main lines a second time if needed to ensure the black is deep and opaque.
Step 4: Detailing the Toe Cap
-
Switch markers:
For the rubber toe cap, switch to your ultra-fine permanent marker (like a standard Sharpie). Fabric markers can sometimes smear on non-porous rubber. -
The weeping eye:
Draw the lower eye first. Make the pupil perfectly round and dark, then add heavy lashes. Below the eye, draw vertical lines ending in droplets to represent tears. -
The detailed eye:
Draw the upper eye with more complex shading. Use cross-hatching inside the iris and detailed, curved lashes on the lid. -
Adding symbols:
In the spaces between the eyes, add smaller mystic symbols like a keyhole, a gender symbol, or abstract swirls. -
Let it set:
Be very careful not to touch the rubber toe cap for at least 15 minutes, as ink sits on top of this surface longer than it does on fabric.
Step 5: Finishing Touches
-
Erase guidelines:
Once you are absolutely certain all ink is dry (I usually wait an hour just to be safe), gently erase any visible pencil marks. -
Seal the deal:
Spray the canvas areas with a waterproofing spray or clear fabric sealant. This protects your art from puddles and dirt. -
Re-lace:
Put your shoelaces back in. Opt for crisp white laces to keep the look monochromatic and clean.
Lace up your new custom kicks and enjoy walking in your own personal galaxy

PENCIL GUIDE
Understanding Pencil Grades from H to B
From first sketch to finished drawing — learn pencil grades, line control, and shading techniques.
Explore the Full Guide
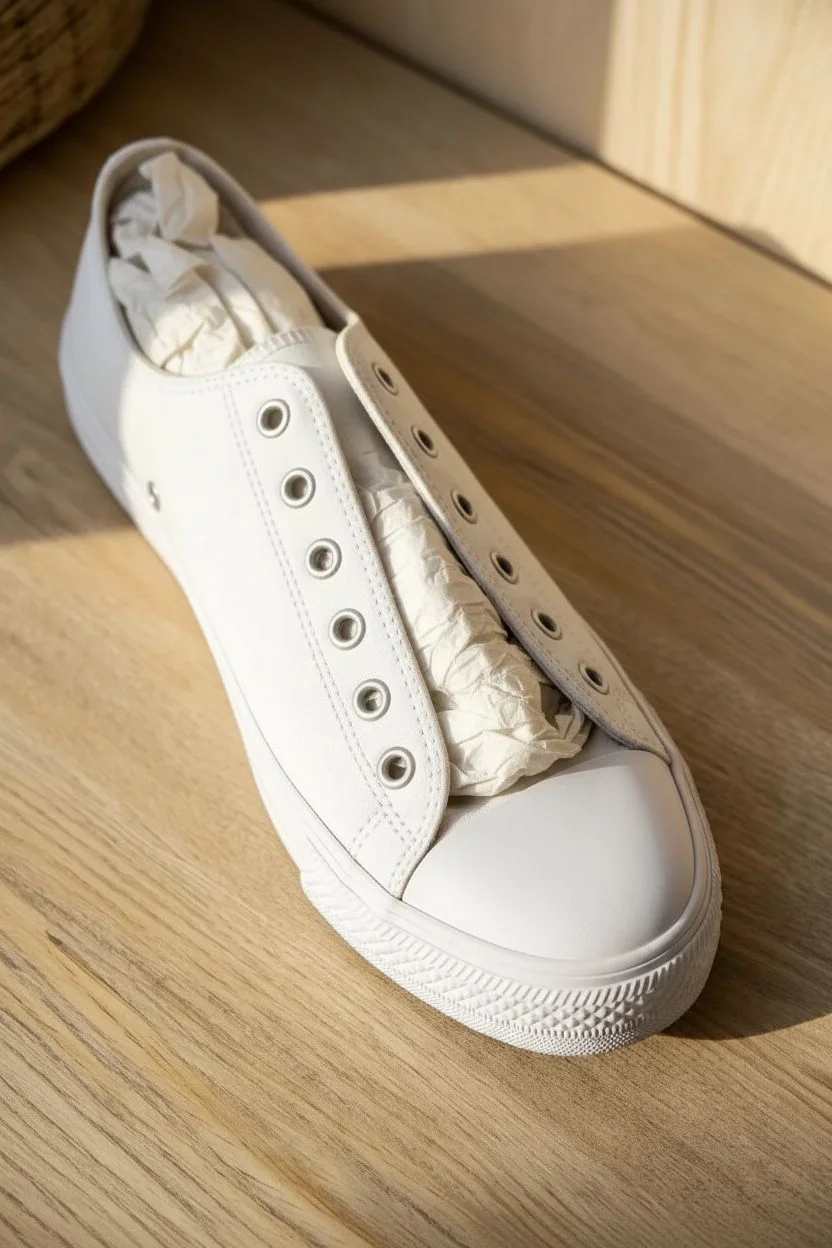
Minimal Monochrome Pattern Repeat

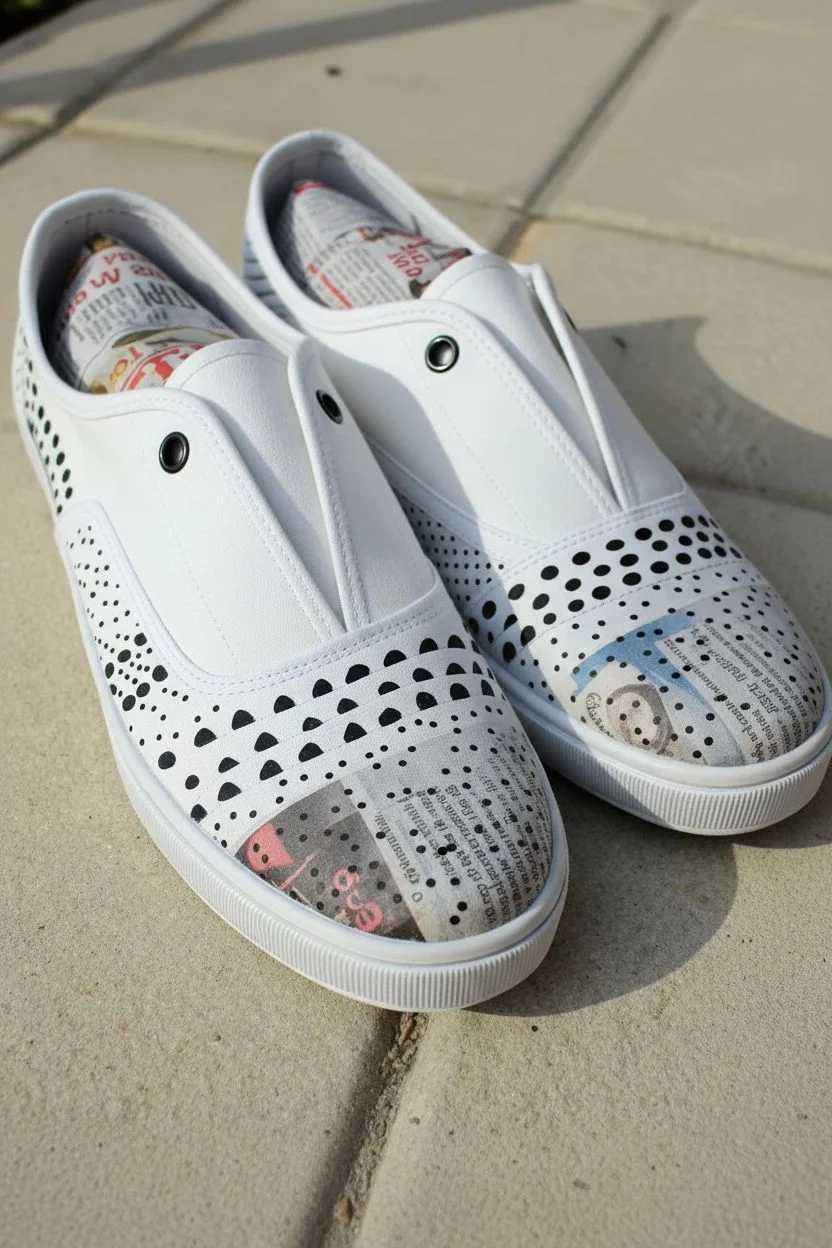
Transform plain white canvas shoes into a statement piece with nothing more than black paint and a steady hand. This design explores the beauty of negative space, using varied dot sizes and semi-circles to create a dynamic, textural look that feels modern and playful.
Step-by-Step Guide
Materials
- White canvas sneakers (plimsoll style recommended)
- Black fabric paint or multi-surface acrylic paint
- Fabric painting medium (if using standard acrylics)
- Fine detail paintbrush (size 0 or 00)
- Small round paintbrush (size 2)
- Pencil for sketching (optional but helpful)
- Masking tape
- Palette or small dish
- Water cup and paper towels
Step 1: Preparation and Planning
-
Clean the slate:
Before you begin, ensure your shoes are clean and free of dust. If they are brand new, give them a quick wipe with a damp cloth to remove any factory sizing, then let them air dry completely. -
Remove hardware:
Unlace the shoes completely. This gives you unfettered access to the tongue and eyelet areas, ensuring your pattern can flow uninterrupted across the shoe’s surface. -
Stuff the shoes:
Pack the toes of the sneakers tightly with old newspaper or rags. This creates a solid, firm surface to paint on, which is much easier than trying to paint against a collapsing, flexible fabric. -
Plan the zones:
Observe the stitching lines on your specific shoe. For this design, we are treating the toe box and the side panels as distinct zones. If you’re nervous about freehanding, you can lightly sketch faint guidelines with a pencil to mark where the larger shapes will go.
Pro Tip: Tool Hack
Don’t have a tiny brush? Use the non-brush end of a paintbrush, a toothpick, or even a nail art dotting tool dipped in paint to create perfectly round dots every time.
Step 2: Painting the Base Patterns
-
Mix your medium:
If you are using regular acrylic paint, mix it with fabric medium according to the bottle’s instructions (usually a 1:1 or 2:1 ratio). This ensures the paint flexes with the shoe and doesn’t crack as you walk. -
Start the semi-circles:
Begin at the base of the laces, near the transition to the toe box. Using your small round brush, paint a row of solid black semi-circles (or ‘D’ shapes) facing upwards. I like to keep these roughly 1/4 inch wide. -
Build the second row:
Paint a second row of semi-circles below the first, staggering them slightly so they sit in the gaps of the row above, creating a scale-like effect. -
Add floating shapes:
Below your rows of semi-circles, paint a scattered row of small, solid triangles or rounded triangles. These act as a transition shape between the heavy semi-circles and the delicate dots coming next. -
Establish the heel pattern:
Move to the back heel area or side panels. Replicate the semi-circle motif here if desired, or switch to larger full circles. The reference image uses larger black polka dots on the side panels that are densely packed but not touching.
Step 3: Detailing with Dots
-
Switch to the fine brush:
Pick up your size 0 or 00 detail brush. We are now moving into the stippling phase to create the gradation effect. -
Dense stippling:
Immediately below your semi-circles and triangles on the toe box, begin painting small, dense dots. Keep them close together but distinct. -
Fade out the pattern:
As you move closer to the rubber toe cap, space the dots further apart. This creates a gradient effect, fading from the heavy black shapes near the laces to white space at the tip of the shoe. -
Vary the dot size:
To make the pattern feel organic, don’t try to make every dot perfect. Intentional irregularity adds charm. Mix tiny pin-prick dots with slightly larger specks. -
Fill the gaps:
Look at the side panels again. Fill the spaces between your larger circles with tiny stippled dots. This connects the design elements and adds texture to the white space. -
Address the tongue:
Don’t forget the tongue of the shoe. Paint a few simple stripes or a continuation of the semi-circle pattern near the top edge so it peeks out interestingly from behind the laces.
Level Up: Color Pop
While the monochrome look is chic, try swapping the black paint for navy blue or neon pink for a totally different vibe, or paint the semi-circles in metallic gold.
Step 4: Finishing Touches
-
Clean up edges:
If any paint strayed onto the rubber soles, use a wet Q-tip or a damp cloth to wipe it away immediately before it sets. -
Let it cure:
Allow the paint to dry completely. Fabric paint often requires 24 hours to cure fully. Check your specific paint bottle for instructions on heat setting—some require a quick blast with a hair dryer or an iron (with a protective cloth) to become permanent. -
Re-lace:
Once the shoes are fully dry and cured, remove the stuffing and re-lace your sneakers. Crisp white laces look best to maintain that high-contrast monochrome vibe.
Step out in your new custom kicks and enjoy the minimalist flair you’ve added to your wardrobe
Animal Print Spots and Stripes
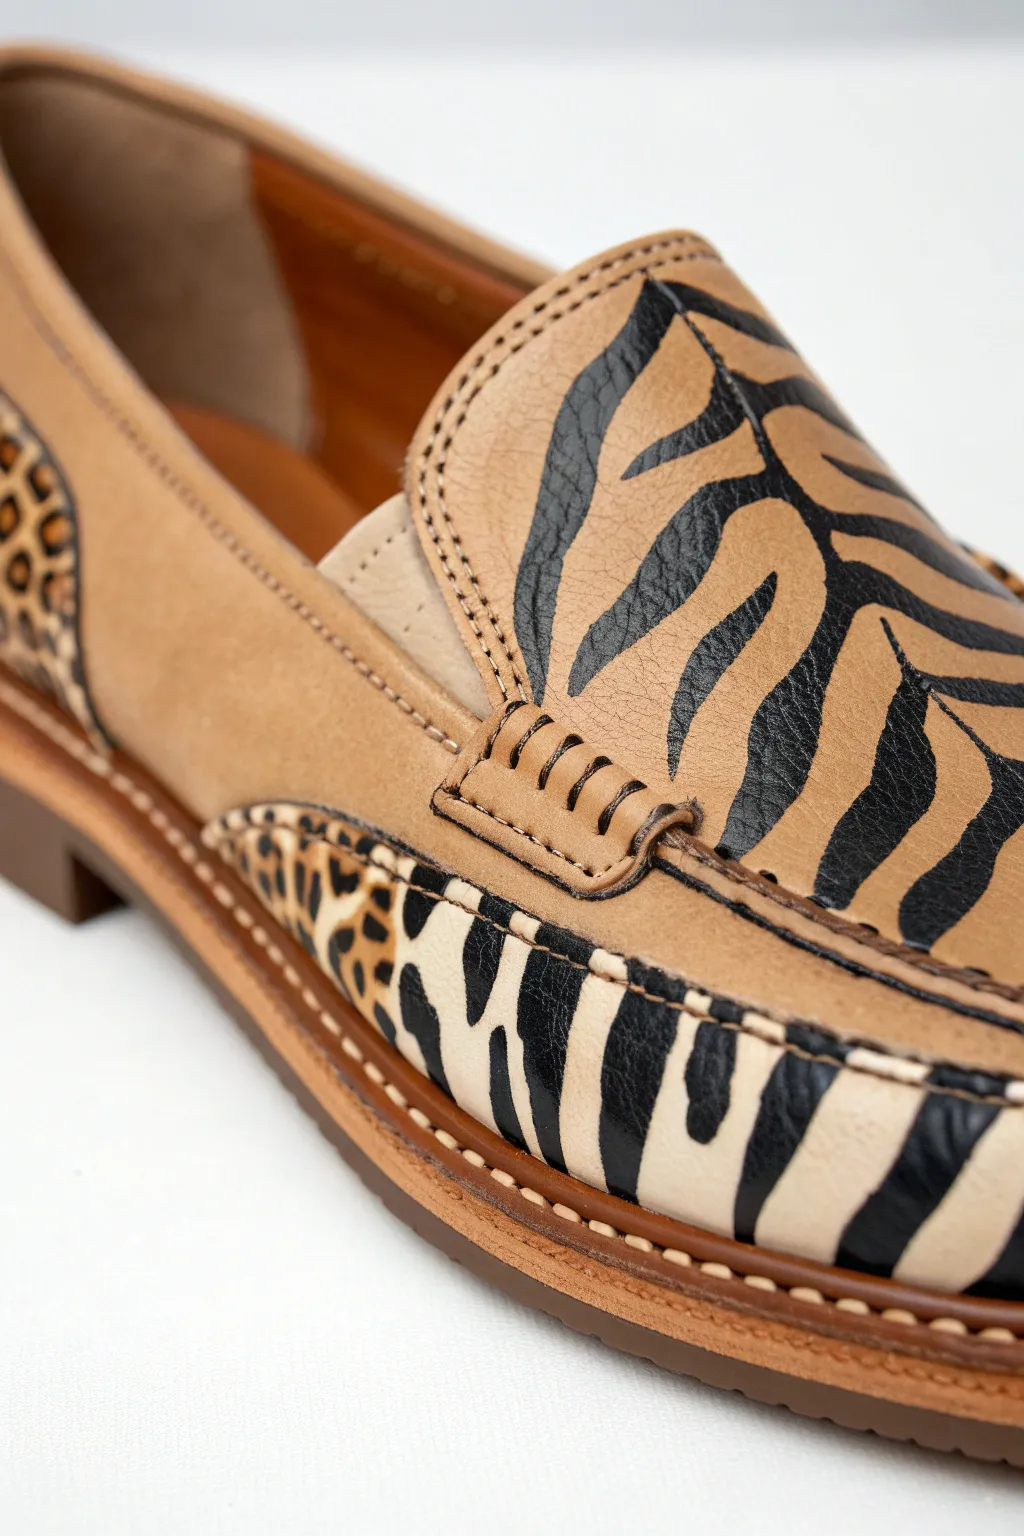
Transform a simple pair of beige leather loafers into a bold fashion statement by hand-painting classic animal print motifs directly onto the leather. This project combines sleek zebra stripes and spotted details for a custom, high-end look without the designer price tag.
Detailed Instructions
Materials
- Beige or tan leather loafers
- Angelus leather preparer and deglazer (or acetone)
- Cotton pads or balls
- Angelus acrylic leather paint (Black)
- Angelus acrylic leather paint (Cream or Off-White – optional for highlight)
- Fine detail paintbrush (size 0 or 00)
- Small flat shader brush
- Painter’s tape or masking tape
- Acrylic leather finisher (Matte or Satin)
- Hair dryer or heat gun (optional)
Step 1: Preparation
-
Clean the leather:
Before painting, you absolutely must remove the factory finish. Dampen a cotton pad with leather preparer and deglazer. Rub the specific areas you plan to paint—the top vamp and the side apron—until the leather loses its sheen and feels slightly tacky. This ensures the paint adheres permanently. -
Mask the edges:
Use painter’s tape to meticulously mask off the areas you want to keep plain beige. Pay close attention to the stitching lines and the ‘penny keeper’ strap across the top; press the tape down firmly with your fingernail to prevent any paint bleed.
Step 2: Painting the Zebra Vamp
-
Map the stripes:
Using your fine detail brush and a tiny amount of black paint diluted slightly with water, lightly sketch the outline of your zebra stripes on the top front panel. Reference a photo of real zebra skin to get the organic, branching V-shapes correct. -
Fill the black stripes:
Switch to undiluted black leather paint. Carefully fill in your sketched outlines. Use smooth, confident strokes that taper off at the ends to mimic hair growth patterns. Keep the paint layer thin to avoid cracking. -
Refine the edges:
Go back over the edges of your black stripes with the smallest brush. Make the edges slightly jagged or feathered rather than perfectly smooth lines; this texture creates a more realistic animal fur effect. -
Dry and repeat:
Allow the first coat of black to dry for about 15-20 minutes. If the black looks streaky or translucent, apply a second thin coat to make it opaque and bold.
Fixing Paint Cracks
If paint cracks after drying, you likely applied it too thick. Sand the crack gently with high-grit sandpaper, then re-apply a very thin layer mixed with a fabric medium.
Step 3: Detailing the Apron
-
Design the side pattern:
For the lower stitched section (the apron), create a pattern that transitions or contrasts. In the example, notice how the stripes are thicker and more block-like. Sketch these shapes loosely first. -
Paint the blocky stripes:
Paint these lower markings using vertical, chopping strokes. Unlike the flowing v-shapes on top, these should look more like interrupted vertical bars. -
Add subtle spotting:
On the very back heel area or near the stitching, add small C-shaped spots or irregular dots to introduce a leopard print element if desired, blending the two animal themes. -
Clean up errors:
If I accidentally get a stray dot of black paint on the unpainted beige leather, I quickly wipe it away with a damp Q-tip before it dries. If it has dried, use a tiny bit of deglazer to gently lift it.
Add Texture
For a 3D effect, mix a tiny pinch of puff additive into your paint. Use a heat gun to activate it slightly, creating raised ‘hairs’ on your zebra stripes.
Step 4: Finishing Touches
-
Let it cure:
Once all painting is complete, let the shoes sit undisturbed for at least 24 hours. This curing time allows the acrylic polymers to bond fully with the leather fibers. -
Apply the sealer:
Pour a small amount of matte or satin finisher into a cap. Using a clean flat brush, apply a thin, even layer over the painted areas. This protects the design from scuffs and water damage. -
Remove tape:
Carefully peel away your masking tape. Pull the tape away from the paint line at a 45-degree angle to ensure a crisp edge. -
Condition the unpainted leather:
Since the deglazer can be drying, apply a neutral leather conditioner to the unpainted parts of the shoe to restore moisture and shine.
Walk confidently in your new custom loafers, knowing your footwear is truly one of a kind


Galaxy Night Sky With Stars
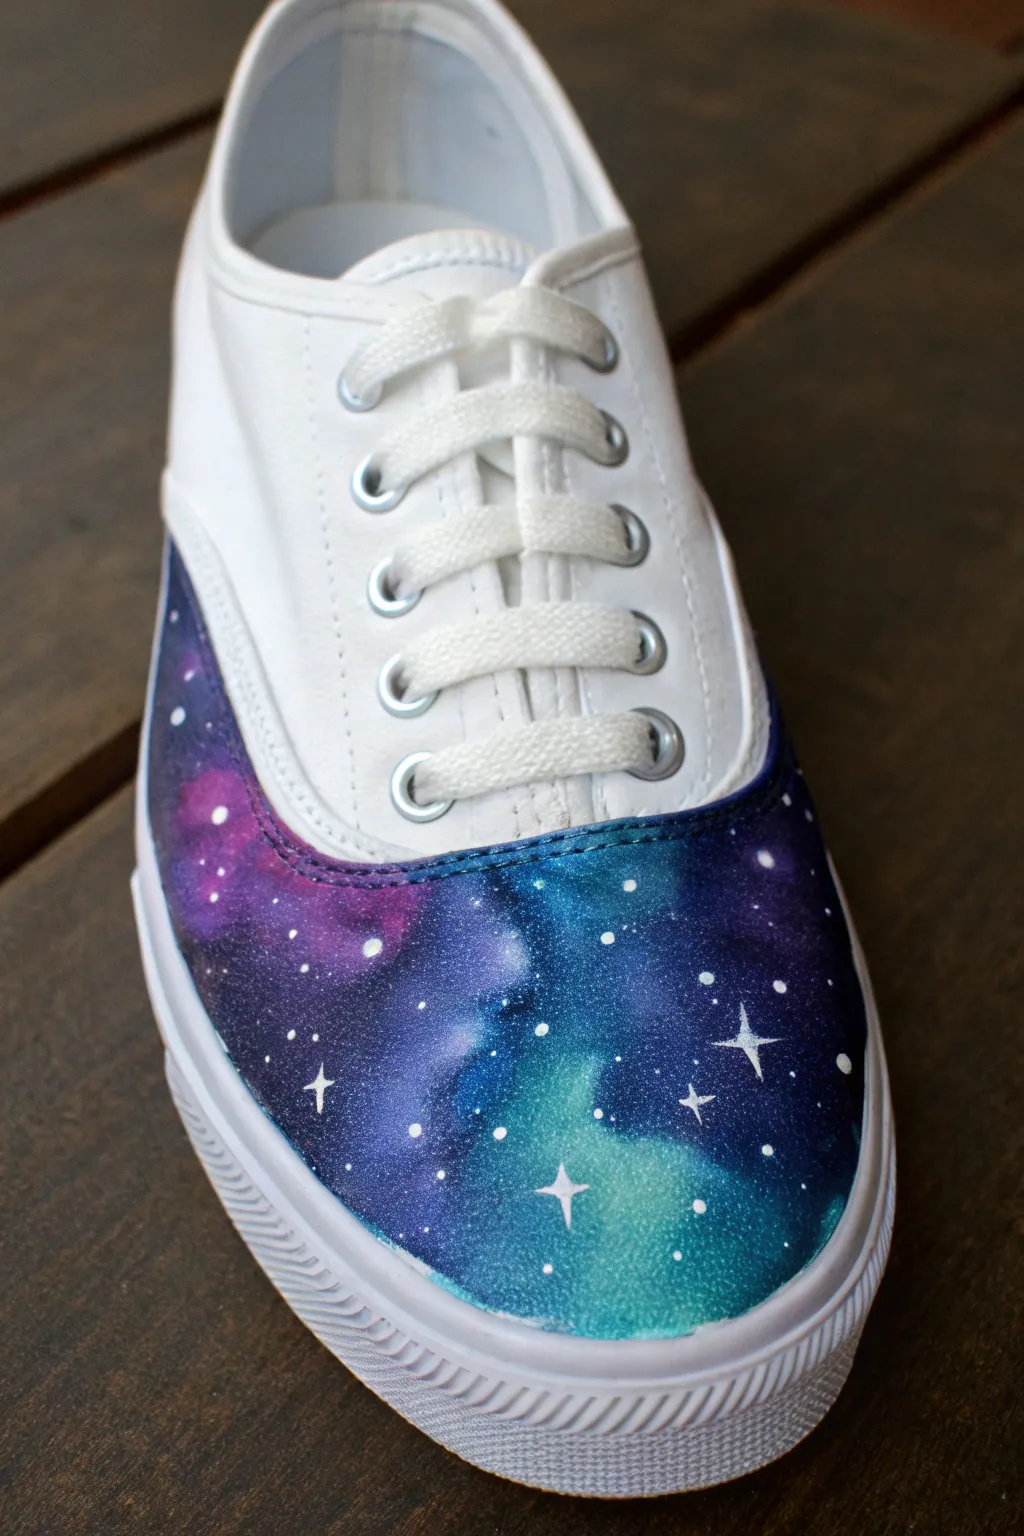
Transform plain white canvas sneakers into a wearable piece of the cosmos with this stunning galaxy painting project. The deep nebula blues and purples blend seamlessly together, highlighted by delicate white stars for an ethereal, out-of-this-world look.
Step-by-Step
Materials
- White canvas sneakers
- Fabric paint (Black, Navy Blue, Purple, Teal/Turquoise, White)
- Fabric painting medium (if using acrylics)
- Masking tape or painter’s tape
- Sponges (makeup wedges work best)
- Small flat paint brushes
- Fine detail liner brush (size 0 or 00)
- Old toothbrush
- Water cup and paper towels
- Acrylic sealer spray (matte or satin finish)
Step 1: Preparation
-
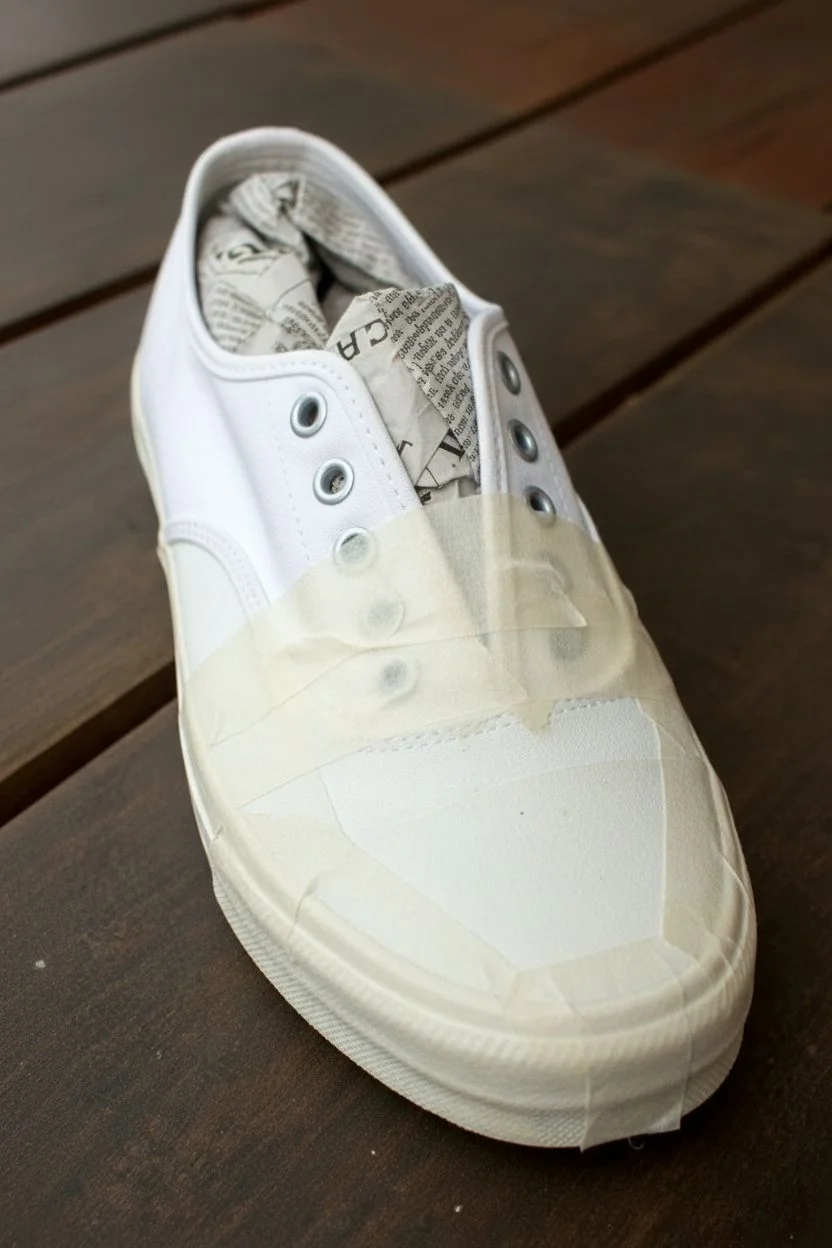
Prepare the canvas:
Remove the laces from your sneakers to prevent accidental staining and allow full access to the tongue and eyelets. If the shoes are new, give them a quick wipe with a clean, damp cloth to remove any sizing or dust. -
Masking time:
Carefully apply masking tape to the rubber soles and the foxing (the rubber strip connecting the sole to the canvas). Firmly press down the edges of the tape to ensure no paint bleeds onto the white rubber parts. -
Stuff the toes:
Stuff the toe box of the shoe tightly with newspaper or plastic bags. This creates a firm surface for painting and prevents the fabric from buckling while you work.
Sponge Tactics
Use makeup wedges! Tear off the smooth factory edge to create a rough, textured surface. This creates a much more organic, cloud-like blend than a smooth sponge.
Step 2: Creating the Nebula
-
Start with the darks:
Pour a small amount of black and navy blue fabric paint onto your palette. Using a small piece of sponge, dab the dark colors onto the outer edges of the toe cap and side panels. -
Leave negative space:
Don’t cover the entire area with the dark colors. Leave the center sections of the toe box and side panels white or very lightly covered, as this is where your brighter colors will glow. -
Add deep purple:
While the dark base is still slightly tacky, sponge in your deep purple paint next to the navy blue areas. Blend the edges by overlapping the sponging slightly, creating a smooth transition rather than a hard line. -
Brighten with teal:
Take a clean sponge edge and dip it into the teal or turquoise paint. Dab this into the center ‘negative space’ areas you left earlier. Work the color outwards into the purple and blue, blending softly. -
Layering for depth:
I like to go back and reinforce the dark edges with a second layer of black if needed. The contrast between the deepest blacks and the bright teal is what makes the galaxy pop. -
Softening the blend:
If the transition between colors looks too harsh, use a barely damp sponge with a tiny amount of white paint mixed with teal to soften the center highlights, creating a glowing nebula effect. -
Drying check:
Allow this base layer to dry completely before moving on to the stars. The paint should be dry to the touch so the white stars sit crisply on top without muddying.
Muddy Colors?
If your colors turn brown or gray while blending, you likely overworked the wet paint. Let the layers dry completely between colors, then glaze the next color on top.
Step 3: Starry Details
-
Detailed stars:
Using your finest detail brush and pure white paint, hand-paint a few larger, four-pointed stars. Draw a simple cross shape, then elongate the center point to create a sparkle effect. -
Dot placement:
With the same detail brush or the tip of a toothpick, place specific medium-sized dots around your larger stars. Grouping them slightly helps mimic natural constellations. -
The toothbrush method:
Dip an old toothbrush into white paint that has been slightly thinned with water. Test it on a paper towel first by running your thumb across the bristles to flick the paint. -
Creating the starfield:
Gently flick the toothbrush bristles over the painted areas of the shoe to create a spray of fine, mist-like stars. Do this sparingly at first; you can always add more. -
Cleanup:
Carefully peel away the masking tape while the paint is dry but not fully cured to avoid peeling any paint off the canvas. Use a damp Q-tip to wipe away any stray spots on the rubber.
Step 4: Finishing Up
-
Final drying:
Let the shoes sit for at least 24 hours to ensure the paint is fully cured deep into the canvas fibers. -
Heat setting:
If your fabric paint requires it, heat set the design with a hair dryer on high heat for a few minutes, keeping the dryer moving constantly. -
Sealing the deal:
Spray the painted areas with a light coat of acrylic sealer. This protects your artwork from dirt and water, keeping those colors vibrant for longer. -
Re-lace:
Once the sealer is dry, re-lace your sneakers. White laces provide a crisp contrast, but black laces can also look sleek against the dark galaxy background.
Wear your new celestial creations with pride, knowing you have the whole universe at your feet
Ocean Wave Side Panels
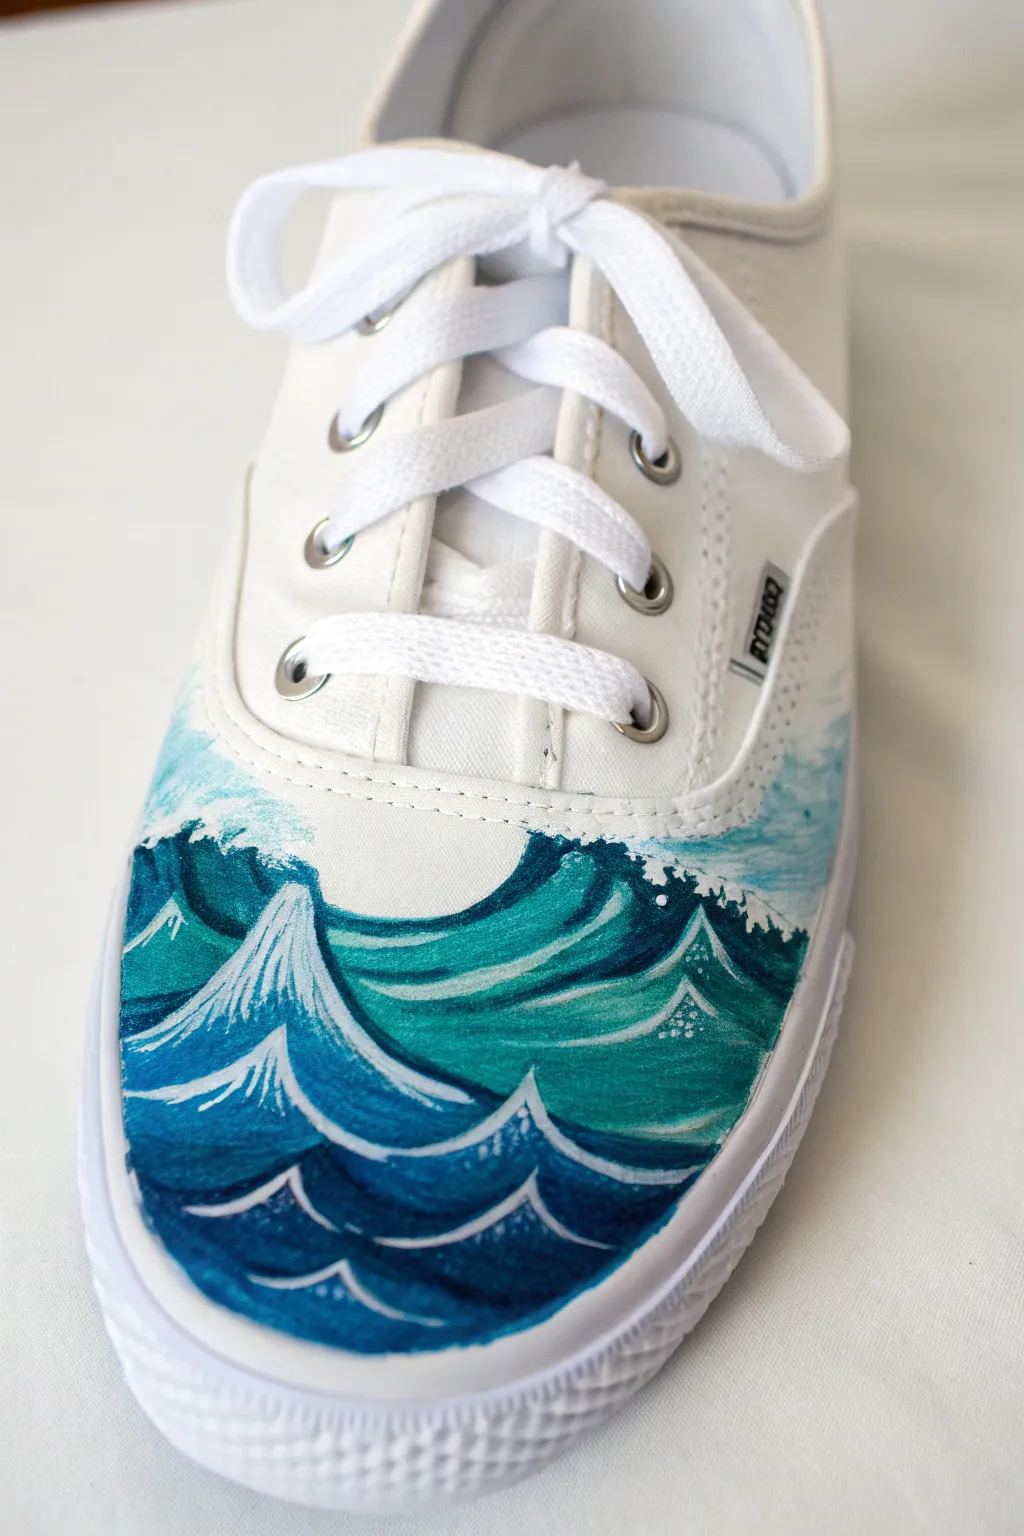

Transform a plain pair of white canvas sneakers into a piece of wearable art with this dynamic ocean wave design. Using a blend of deep blues, teals, and crisp white lines, you’ll create a stylized seascape right on the toe cap.
Step-by-Step Guide
Materials
- White canvas sneakers
- Fabric medium
- Acrylic paints (Phthalo Blue, Teal/Turquoise, Navy Blue, Titanium White)
- Painter’s tape or masking tape
- Fine liner brush (size 0 or 00)
- Small flat brush (size 2 or 4)
- Water cup and palette
- Hairdryer (optional, for speed drying)
- Acrylic sealer or waterproofing spray
Step 1: Preparation & Base shapes
-
Prep the shoe:
Remove the laces to keep them clean and provide unobstructed access to the tongue and eyelets. Stuff the toe of the shoe tightly with newspaper or plastic bags to create a firm, smooth surface for painting. -
Mask the sole:
Determine how far you want the paint to go. Place a strip of painter’s tape along the rubber foxing tape (the rubber sidewall) where it meets the canvas to ensure crisp lines and prevent smudges on the sole. -
Mix your medium:
Mix your acrylic paints with fabric medium according to the bottle instructions (usually a 1:1 or 2:1 ratio). This crucial step prevents the dried paint from cracking when you walk. -
Block the horizon:
Using your flat brush and a mix of white with a tiny drop of teal, paint a very faint, washed-out horizon line near the top of the toe box. Blend this downwards into a slightly darker teal to create an atmospheric background.
Fixing stiff paint
If the dried paint feels too hard or plastic-like, you likely used too little fabric medium. Gently flex the fabric, but next time, increase the medium ratio to keep it soft.
Step 2: Painting the Deep Ocean
-
Outline the main swell:
Switch to your teal paint. Draw the swooping, curved top edge of your primary waves across the middle of the toe box. Make these lines undulating and organic rather than perfect zig-zags. -
Fill the mid-tones:
Using the teal color, fill in the body of the waves you just outlined. Don’t worry about shading yet; just get a solid, opaque layer of color down. Let this dry completely before moving to the next color. -
Establish the foreground:
Mix a dark navy blue (or Phthalo Blue with a touch of black). Paint the bottom section of the toe cap with this deep swirling colour. Create upward-curving peaks that look like they are about to crash. -
Layer the blues:
I like to add depth by painting a mid-toned blue strip between the dark navy bottom and the teal middle. Ensure the edges of these color zones curve together naturally. -
Add texture strokes:
While the paint is dry, take a slightly lighter shade of your teal and blue. Dry-brush faint, horizontal streaks within the wave bodies to mimic the movement of water.
Step 3: Detailing the Foam
-
Start the white caps:
Load your fine liner brush with pure Titanium White. Carefully outline the very top edges of your teal and navy wave shapes. Vary the line thickness: thicker at the peak, thinner as it slides down. -
Create the inner frothing:
Paint triangular ‘webbing’ or curved V-shapes inside the large dark blue waves. These white lines should follow the contour of the wave, looking like surface foam dragging on the water. -
Add splashes:
At the crest of the highest waves, use the tip of your brush to dot tiny clusters of white. This stippling effect mimics the spray of foam breaking off the wave lip. -
Refine the background:
Go back to your faded horizon area. Add very faint, watered-down scribbles of white to suggest distant, choppy water without drawing too much attention away from the foreground. -
Clean up edges:
Check the edges near the stitching and the rubber sole. If any paint bled or looks uneven, use white paint or a clean brush with water to tidy up the perimeter. -
Seal the deal:
Allow the shoes to dry for at least 24 hours. Once fully cured, apply a coat of acrylic sealer or water-repellent spray to protect your artwork from puddles and dirt.
Pro Tip: Gradients
For smoother transitions between the teal and blue sections, mix the two colors on your palette while wet and apply to the boundary line before they dry.
Now you are ready to step out in style with your customized ocean kicks
Sunset Silhouettes Across the Pair
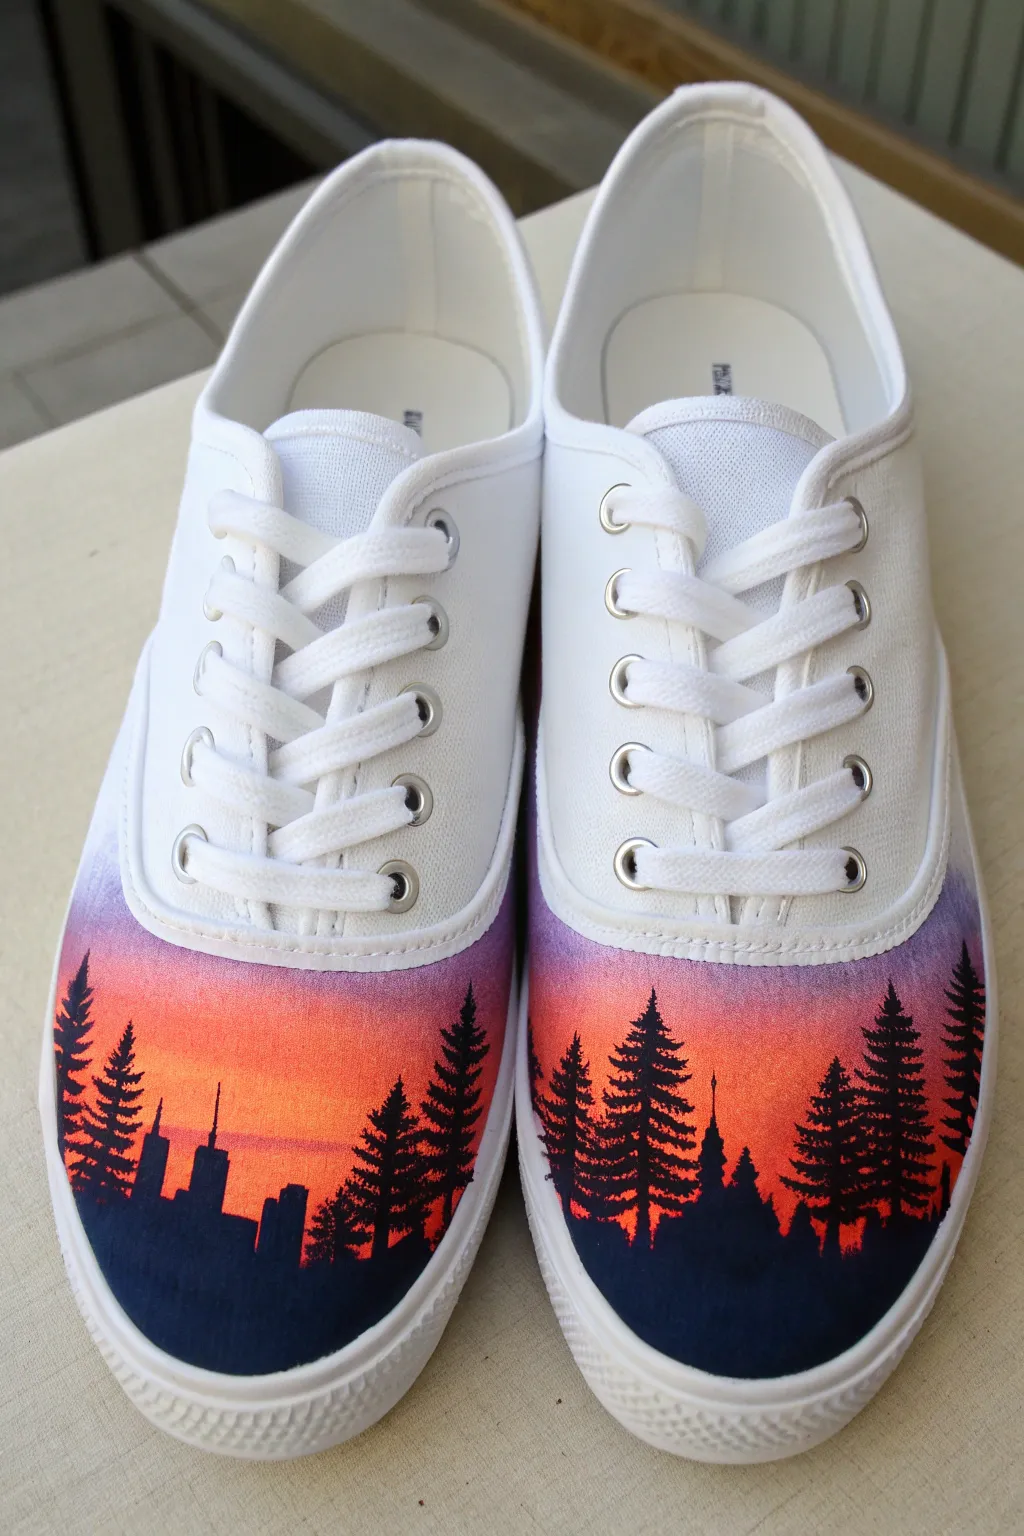
Transform a plain pair of white canvas sneakers into a wearable masterpiece featuring a vibrant gradient sunset and striking black silhouettes. This design splits a scene across both shoes, combining a city skyline on one side with a serene pine forest on the other.
Step-by-Step
Materials
- White canvas sneakers
- Fabric medium or textile medium
- Acrylic paints (Titanium White, Golden Yellow, Cadmium Orange, Magenta/Purple, Carbon Black)
- Masking tape
- Small flat shader brushes
- Fine liner brush (size 0 or 00)
- Water cup
- Paper towels
- Palette or paper plate
- Acrylic finisher/sealer spray
Step 1: Preparation & Gradient Base
-
Prepare the canvas:
Remove the laces from the shoes to prevent accidental staining and set them aside. Use masking tape to carefully cover the rubber soles along the bottom edge where the canvas meets the rubber. Press the tape down firmly to ensure no paint bleeds under. -
Mix the fabric medium:
Before starting, mix your acrylic paints with the fabric medium according to the bottle’s instructions (usually a 1:1 or 2:1 ratio). This ensures the paint remains flexible on the shoe and won’t crack when you walk. -
White base coat:
Paint a thin layer of white mixed with fabric medium over the toe area where the design will go. This primes the canvas and will make your sunset colors pop much brighter. -
Map the horizon:
Mentally divide the toe cap area. The bottom quarter will be black silhouette, and the upper three-quarters will be the sunset gradient. You don’t need to draw a line, just keep this spacing in mind. -
Apply the purple band:
Using a flat brush, apply a band of violet or deep purple paint at the very top of the toe box, fading it slightly as you move downward. -
Blend the orange mid-tone:
Clean your brush and pick up your orange paint. Apply a band of orange just below the purple, overlapping the wet edges slightly. -
Create the transition:
While both paints are still wet, use the brush to gently blend the purple and orange where they meet, creating a dusty rose transition color. -
Add the yellow horizon:
Apply bright yellow paint at the bottom of the gradient area (closest to the rubber toe cap). Blend this upward into the orange section to create a glowing horizon effect. -
Smooth the gradient:
I like to take a clean, slightly damp brush and run it across the entire gradient again very lightly to smooth out any harsh lines between the colors. Let this base layer dry completely.
Pro Tip: Better Blending
Keep a small mister bottle of water nearby. One tiny spritz on the canvas before applying the gradient keeps the acrylics wet longer, allowing for a seamless, airbrushed look.
Step 2: Painting the Silhouettes
-
Outline the skyline:
Switch to your fine liner brush and black paint. On the left shoe, outline the rectangular shapes of city buildings along the bottom edge. Vary the heights to make it look like a realistic skyline. -
Fill the buildings:
Fill in the building outlines with solid black paint. Make sure the bottom edge meets the rubber sole cleanly. -
Add city details:
Use the very tip of your liner brush to add thin antennas or spires to the tops of a few buildings for extra definition. -
Start the forest:
On the right shoe (and the edges of the left), paint vertical lines to represent the trunks of pine trees. Stagger them so some are tall and some shorter. -
Paint pine branches:
Using a stippling or dabbing motion with the liner brush, add branches to the tree trunks. Start narrow at the top and get wider as you go down, creating a triangular shape. -
Add temple silhouette:
On the right shoe, amidst the trees, carefully outline the curved roof shapes of a temple or pagoda structure to match the photo’s theme. Fill it in with black. -
Connect the ground:
Ensure all your trees and buildings are connected at the bottom by painting a solid black strip along the seam where the canvas meets the sole tape. -
Refine edges:
Check your silhouettes against the sunset background. If the black looks patchy, wait for it to dry and add a second coat for solid opacity.
Level Up: Starry Night
Once the sunset is dry but before painting trees, use a toothbrush to flick tiny specks of white paint onto the purple section creates a subtle starry sky effect.
Step 3: Finishing Touches
-
Remove tape:
Once the paint is fully dry to the touch, slowly peel off the masking tape from the soles. -
Clean up:
If any paint bled onto the rubber, use a Q-tip dipped in rubbing alcohol or nail polish remover to wipe it away immediately. -
Seal the artwork:
Spray the painted area with an acrylic finisher or water-resistant spray. This protects your hard work from dirt and rain when you wear them out.
Now lace up your custom kicks and enjoy the sunset wherever you walk
Graffiti-Inspired Street Graphics
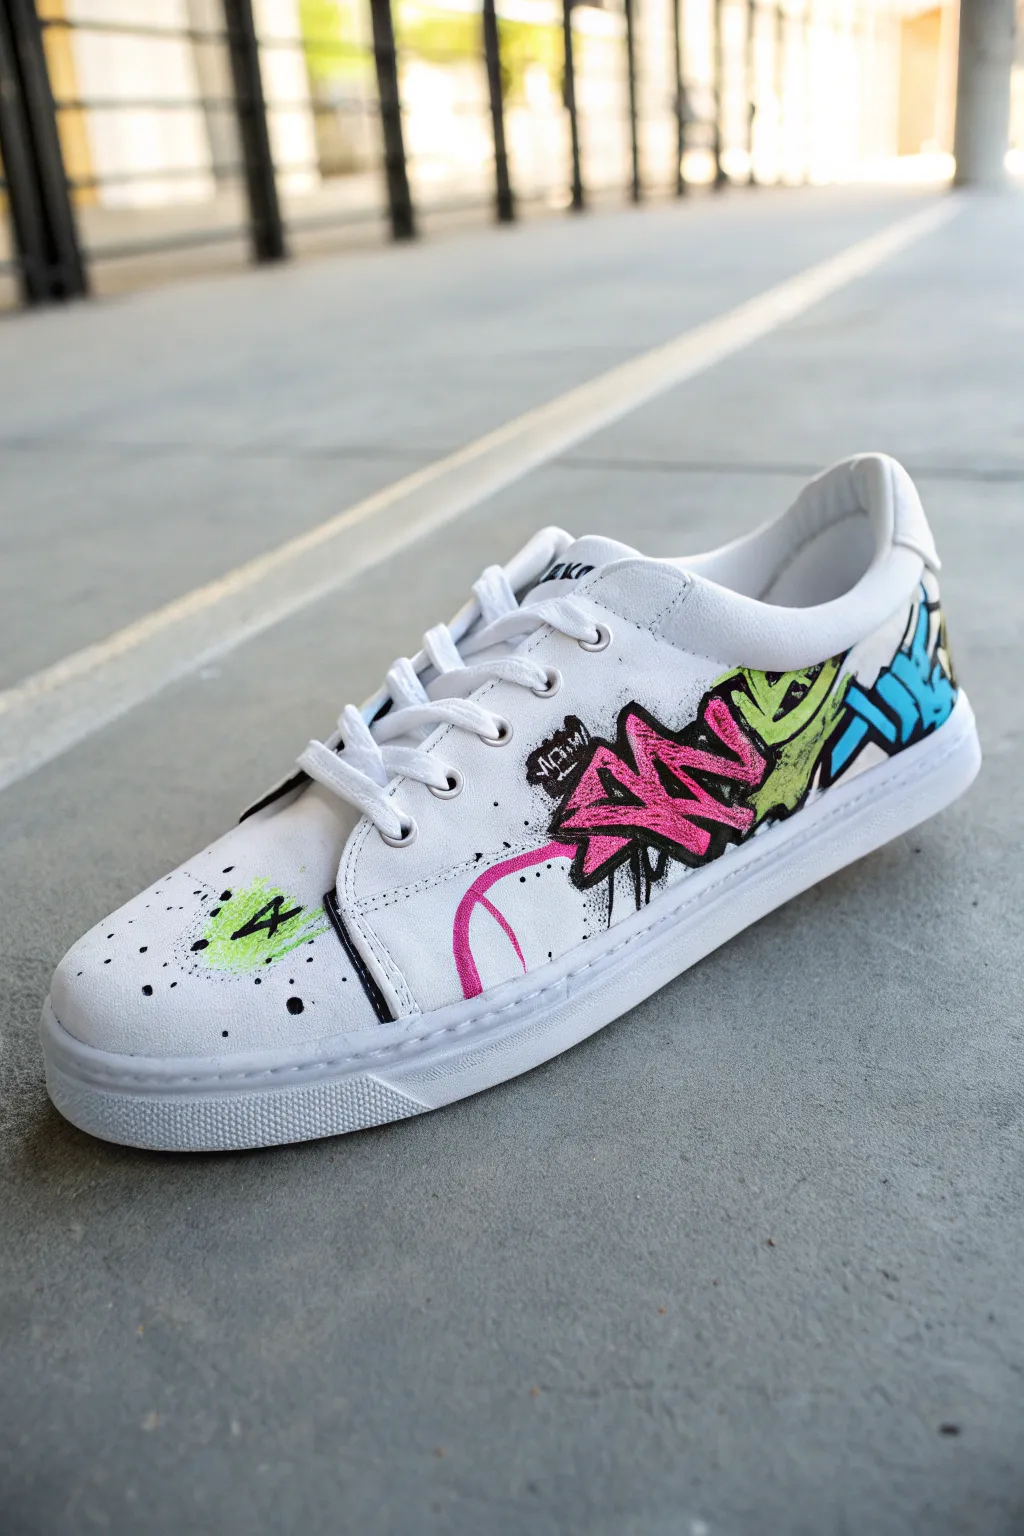
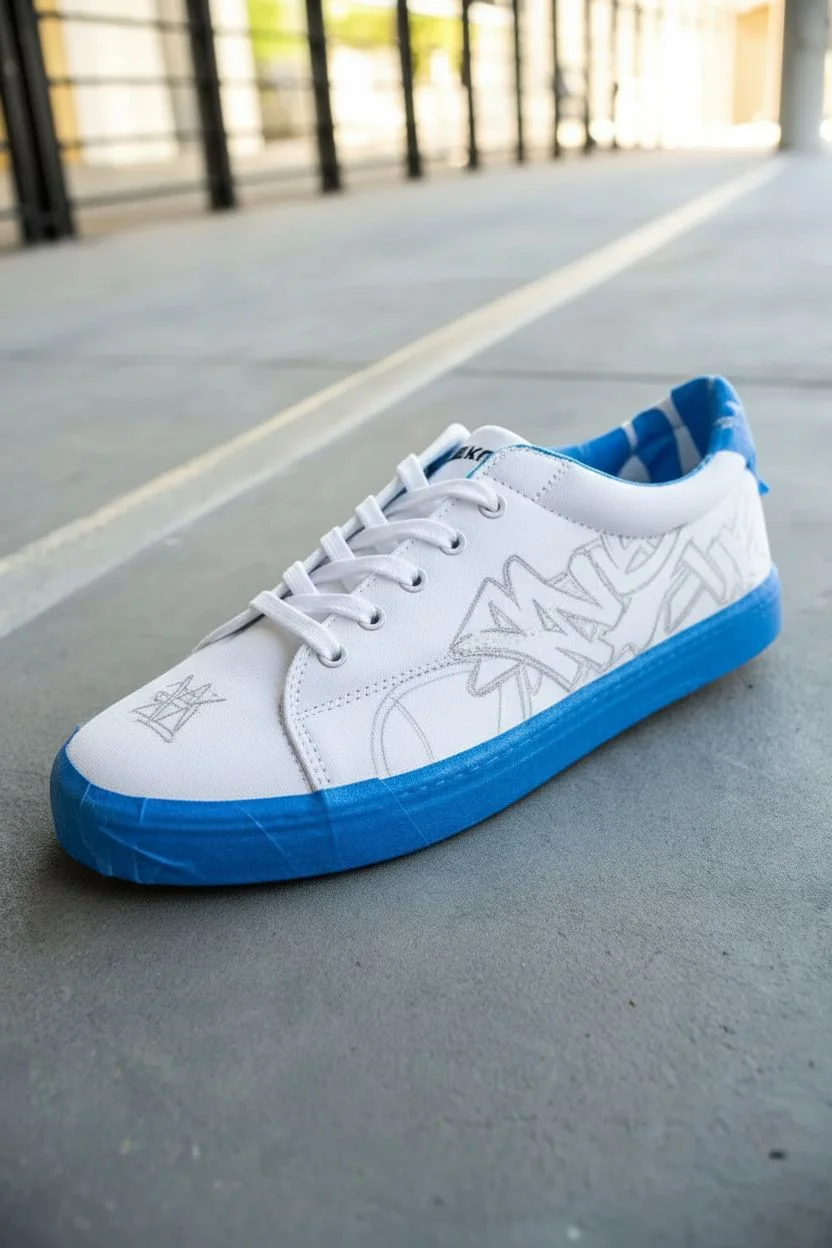
Transform a plain white sneaker into a statement piece with this vibrant graffiti-inspired customization. Using a combination of bold, jagged lettering and splatter effects, this project captures the raw energy of street art in a wearable format.
Detailed Instructions
Materials
- White leather or canvas sneakers
- Angelus leather prep and deglazer (or acetone)
- Cotton rounds
- Masking tape
- Paint markers (Posca or Angelus) in Hot Pink, Neon Green, Cyan Blue, Black, and White
- Fine detail paintbrush (size 0 or 00)
- Acrylic leather paint (optional, for base layers)
- Old toothbrush (for splatter effect)
- Matte acrylic finisher/sealer
- Heat gun or hairdryer
Step 1: Prep Work
-
Clean the Surface:
Before adding any color, the shoe needs to be stripped of its factory finish. Use cotton rounds soaked in leather prep and deglazer to firmly rub the areas where you plan to paint. This ensures the paint bonds permanently. -
Masking Off:
Use masking tape to cover the rubber soles and the inner lining. This keeps your lines crisp and protects the parts of the shoe you want to remain pristine white. -
Sketching the Layout:
Using a very light pencil touch, sketch out your graffiti lettering on the side panel. Aim for jagged, interconnected shapes that mimic wildstyle tags. Don’t worry about perfection; street art thrives on flow.
Clean Lines
If your black outline bleeds or looks shaky, wait for it to fully dry. Then, use a fine brush with white paint to clean up the edges and sharpen the graphic.
Step 2: Applying Color
-
Base Color: Pink:
Start with your hot pink paint marker. Fill in the center section of your graffiti lettering. You want a somewhat textured, sketchy fill rather than a solid block of color to mimic the texture of spray paint on a wall. -
Base Color: Green:
Move to the right/upper section of the graffiti cluster and fill in the shapes with neon green. Overlap slightly with the pink areas to create a sense of depth. -
Base Color: Blue:
Finish the main color blocks by filling the rear heel section of the graffiti with cyan blue. Let these base colors dry completely before moving to the next step. -
Toe Box Detail:
On the toe of the shoe, create a small, concentrated burst of neon green. Use a dry-brush technique or light marker strokes to make it look like a scuff or a spray mark.
Step 3: Outlining and Details
-
Primary Outlines:
This is where the image comes to life. Use a fine-point black paint marker to outline all your colored shapes. Keep the lines varied in thickness—heavy on one side, thin on the other—to simulate a shadow effect. -
Adding the drips:
Add small drip lines coming off the bottom of the pink letters. Street art often features these ‘drips’ to suggest wet spray paint. -
Inner details:
Inside the pink and green blocks, add quick, scratchy black lines. This cross-hatching adds grit and texture, preventing the color from looking too cartoonish. -
Highlighting:
I like to take a white paint pen and add tiny highlights on the upper corners of the letters. It gives the graffiti a ‘bubble’ effect and makes it pop off the white leather.
Level Up: Gloss Pop
Use a high-gloss finisher only on the graffiti letters while keeping the rest of the shoe matte. This mimics the look of fresh wet enamel paint.
Step 4: Splatter Effects
-
Toe Splatter:
Dip an old toothbrush into black leather paint. Hold it near the green mark on the toe box and run your thumb across the bristles to flick tiny specks of paint onto the shoe. -
Side Splatter:
Repeat the splatter technique lightly around the main graffiti graphic. Focus the black specks near the ‘explosion’ points of the letters to create dynamic energy. -
Symbol Work:
Paint a small, rough ‘4’ or similar abstract symbol over the green toe mark in black to tie the front design to the side artwork.
Step 5: Finishing Up
-
Drying:
Allow the paint to cure for at least 24 hours. You can speed this up carefully with a heat gun, but patience is best for durability. -
Sealing:
Apply a thin layer of matte acrylic finisher over the painted areas using a soft brush. This protects against scuffs and water damage. -
Lacing Up:
Remove the masking tape and re-lace the shoes. Using crisp white laces keeps the focus on your new artwork.
Wear your new street-style art with pride and watch heads turn as you walk by
Personalized Name or Initial Monogram
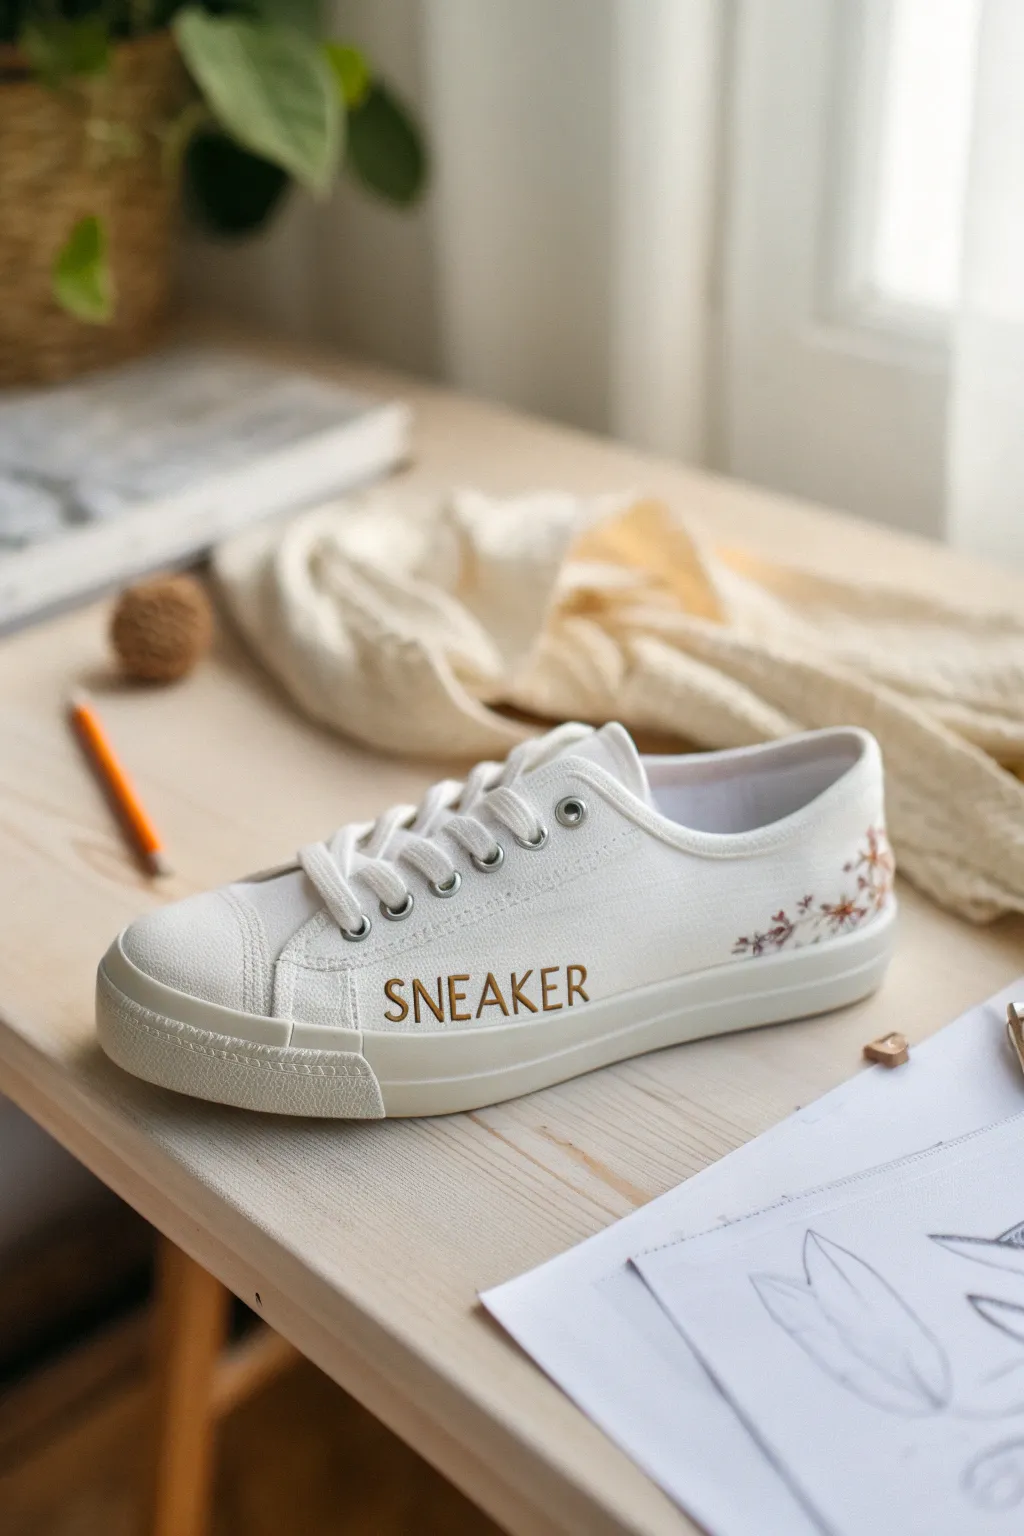
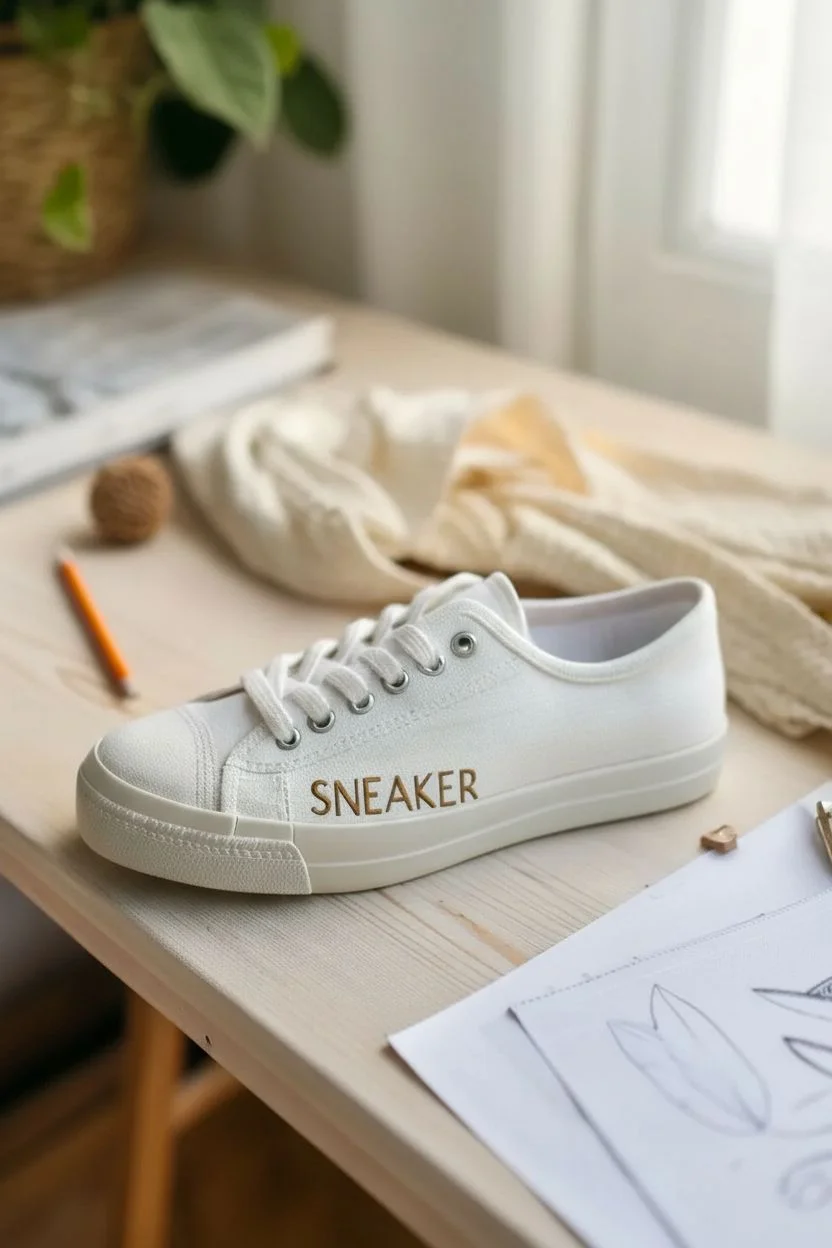
Transform a plain pair of white canvas sneakers into a personalized statement piece with elegant golden lettering and delicate floral accents. This project combines crisp typography with soft botanical details for a look that is both modern and romantic.
Step-by-Step Guide
Materials
- White canvas sneakers (low-top)
- Gold metallic fabric paint or acrylic paint mixed with fabric medium
- Fine detail paintbrush (size 0 or 00)
- Small flat shader brush
- Adhesive stencil film or stencil vinyl (optional but recommended)
- Craft knife or cutting machine
- Soft graphite pencil
- Masking tape
- Iron or hairdryer (for heat setting)
- Acrylic paints in muted earth tones (brown, rust, soft pink)
- Water cup and palette
Step 1: Preparation & Lettering
-
Prepare the canvas:
Start by removing the laces from your sneakers to give yourself a clear workspace. If the shoes are new, give them a quick wipe with a clean, dry cloth to remove any surface dust. -
Plan your text placement:
Decide on the word or name you want to feature. In the photo, ‘SNEAKER’ is placed centrally on the side panel. Use a soft pencil to very lightly sketch a straight baseline for your letters. -
Create a stencil:
For the crispest results, I recommend cutting a stencil. Print your chosen word in a classic serif font to the desired size. Place a piece of adhesive stencil film over the printout and carefully trace and cut out the letters using a craft knife. -
Apply the stencil:
Peel the backing off your stencil and adhere it firmly to the canvas, aligning the bottom of the letters with your pencil baseline. Press down all the edges, especially the tiny bridges inside letters like ‘A’ or ‘R’, to prevent paint bleed. -
Paint the letters first coat:
Dip your small flat brush into the gold metallic fabric paint. Dab off excess paint—you want a ‘dry brush’ effect to avoid bleeding. Apply the paint over the stencil using an up-and-down pouncing or stippling motion rather than dragging the brush. -
Apply second coat:
Let the first coat dry for about 15-20 minutes. Apply a second layer of gold paint to ensure a rich, opaque metallic finish. The gold should shine brightly against the white canvas. -
Reveal the text:
Wait until the paint is tacky but not fully dry before carefully peeling away the stencil. This helps keep the edges sharp. Use a craft knife to lift out the small inner pieces of the letters. -
Touch up edges:
Since canvas has texture, you might have tiny imperfections. Use your size 0 detail brush and a tiny bit of white paint (or gold, depending on the error) to clean up any fuzzy edges.
Step 2: Floral Accents & Finishing
-
Sketch the floral placement:
Move to the heel area of the shoe. Lightly sketch a small, curving vine shape that wraps slightly around the back. Keep the design wispy and organic. -
Paint the stems:
Mix a diluted brown acrylic paint. Using the very tip of your detail brush, paint thin, delicate lines over your pencil sketch to create the main stems of your floral spray. -
Add leaves:
Dip the detail brush into a rust or muted orange color. Press the belly of the brush down gently and lift up quickly to create small, teardrop-shaped leaves along the stems. -
Paint small blossoms:
Using a soft pink or a lighter shade of the rust color, add tiny dots or three-petal shapes at the ends of the stems to represent small buds or flowers. -
Add metallic highlights:
To tie the design together, add extremely small dots of your gold metallic paint into the centers of the flowers or randomly along the vine for a little sparkle. -
Heat set the design:
Once the paint is completely dry (wait at least 24 hours), heat set the paint to make it permanent. You can use a hairdryer on high heat for several minutes, or carefully iron the painted areas with a pressing cloth between the iron and the shoe. -
Re-lace and wear:
Lace your sneakers back up. For a cohesive look, you could even replace standard laces with ones that match your text color, though crisp white keeps the focus on your artwork.
Bleeding Edges?
If paint bleeds under the stencil, don’t panic. Wait for it to dry, then use white acrylic paint and a tiny brush to ‘erase’ the mistake by painting over the bleed.
Leather Luxe
Swap the white canvas for leather sneakers. Use leather preparer and leather paints for a project that looks professionally manufactured.
Now step out in style with your completely unique, custom-lettered kicks that are sure to start conversations
Retro Stencil Layers and Texture
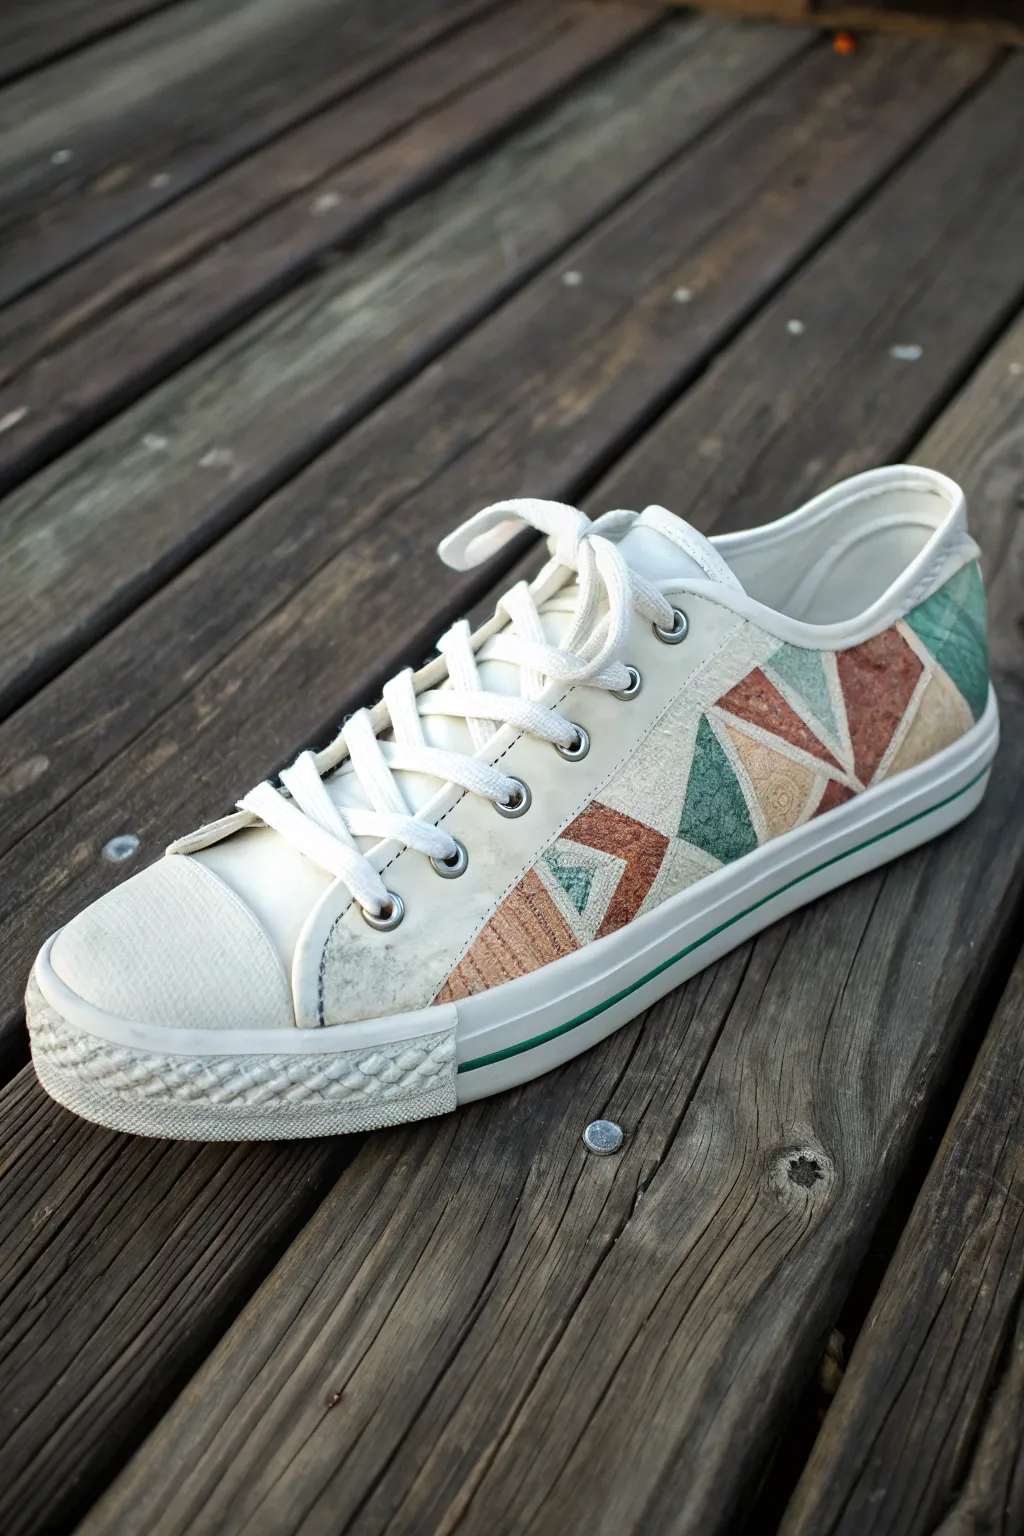
Transform a standard pair of white canvas sneakers into a retro masterpiece featuring textured, earthy triangles. This project combines stencil work with clever texturing techniques to give your shoes a dimensional, stone-and-cork aesthetic that feels both vintage and modern.
Detailed Instructions
Materials
- White canvas low-top sneakers
- Painter’s tape or stencil film
- Fabric medium
- Acrylic paints (teal, rust red, light beige, dark brown, cream)
- Hobby knife (X-Acto)
- Small sea sponge or stippling brush
- Fine grit sandpaper
- Matt sealant or finisher
- Modeling paste (flexible) or puffy paint
- Small flat paintbrush
- Toothpick or sculpting tool
Step 1: Preparation & Base Layout
-
Clean the Canvas:
Begin by removing the laces from your sneakers. Wipe down the canvas surface with a damp cloth to remove any dust or manufacturing residue, ensuring a clean bond for your paint. -
Protect the Soles:
Carefully apply painter’s tape along the rubber sole edge where it meets the canvas. This stops paint from bleeding onto the white rubber foxing during the messy texturing phase. -
Design the Triangles:
Using thin strips of painter’s tape or a custom-cut stencil film, tape off a geometric pattern of interlocking triangles on the side panel of the shoe. Make sure the tape edges are pressed down firmly to prevent leaks.
Step 2: Creating the Textures
-
Mix the Cork Texture:
For the beige and tan sections, mix a small amount of flexible modeling paste with beige acrylic paint. Add a tiny pinch of sand or use a stiff stippling brush to create a rough, cork-like surface inside these specific triangles. -
Apply the Stone Texture:
For the darker triangles (rust and brown), mix your paint with fabric medium. Apply this layer thickly, then dab it with a coarse sea sponge while wet to create a pitted, stone-like appearance. -
Create the Verdigris Effect:
For the teal triangles, paint a base layer of dark green. While it’s tacky, sponge on a lighter teal mixed with a bit of white to simulate an aged copper or patina loop. -
Remove Tape Carefully:
Before the texture paste fully hardens but after it has set slightly, peel away the tape strips. This ensures clean, sharp lines between your geometric shapes. -
Refine Edges:
If any texture bled under the tape, use a damp toothpick or a clean, small brush to gently scrape or wipe away the excess for crisp definition.
Cracked Texture?
If your texture paste cracks too much after drying, mix a drop of fabric medium or liquid latex into the paste next time to add elasticity for movement.
Step 3: Toe Cap & Bumper Detail
-
Prepare the Bumper:
The image shows a unique textured rubber bumper. To replicate this, apply a thin layer of white puffy paint or flexible modeling paste over the existing rubber texturing on the toe bumper. -
Sculpt the Woven Pattern:
While the paste on the bumper is wet, use a sculpting tool or the side of a toothpick to press diagonal hash marks into it, mimicking a woven rope texture. Let this cure completely according to package instructions. -
Paint the Stripe:
Using a very fine detail brush and dark green or teal paint, carefully paint the thin racing stripe along the rubber midsole to match your geometric design.
Metallic Pop
Add thin gold or copper leafing lines between the triangles instead of leaving empty canvas for a high-end, Art Deco inspire finish.
Step 4: Finishing Touches
-
Distress the Design:
Once all paint and texture is bone dry, lightly scuff the geometric shapes with fine-grit sandpaper. This knocks back the brightness and enhances the retro, worn-in look. -
Antique the Surface:
Mix a wash of 90% water and 10% brown paint. Brush this quickly over the textured triangles and immediately wipe it off with a paper towel. The dark pigment will settle into the texture crevices, highlighting the faux cork and stone effects. -
Seal the Deal:
Apply a flexible matte fabric sealant or finisher over the painted areas. This is crucial to prevent the textured paste from cracking as the shoe flexes during walking. -
Re-lace and Wear:
Remove the remaining tape from the soles, double-check that your sealant is dry to the touch, and re-lace your sneakers.
Step out in style knowing your custom kicks are truly one of a kind
Tattoo-Style Linework on Leather
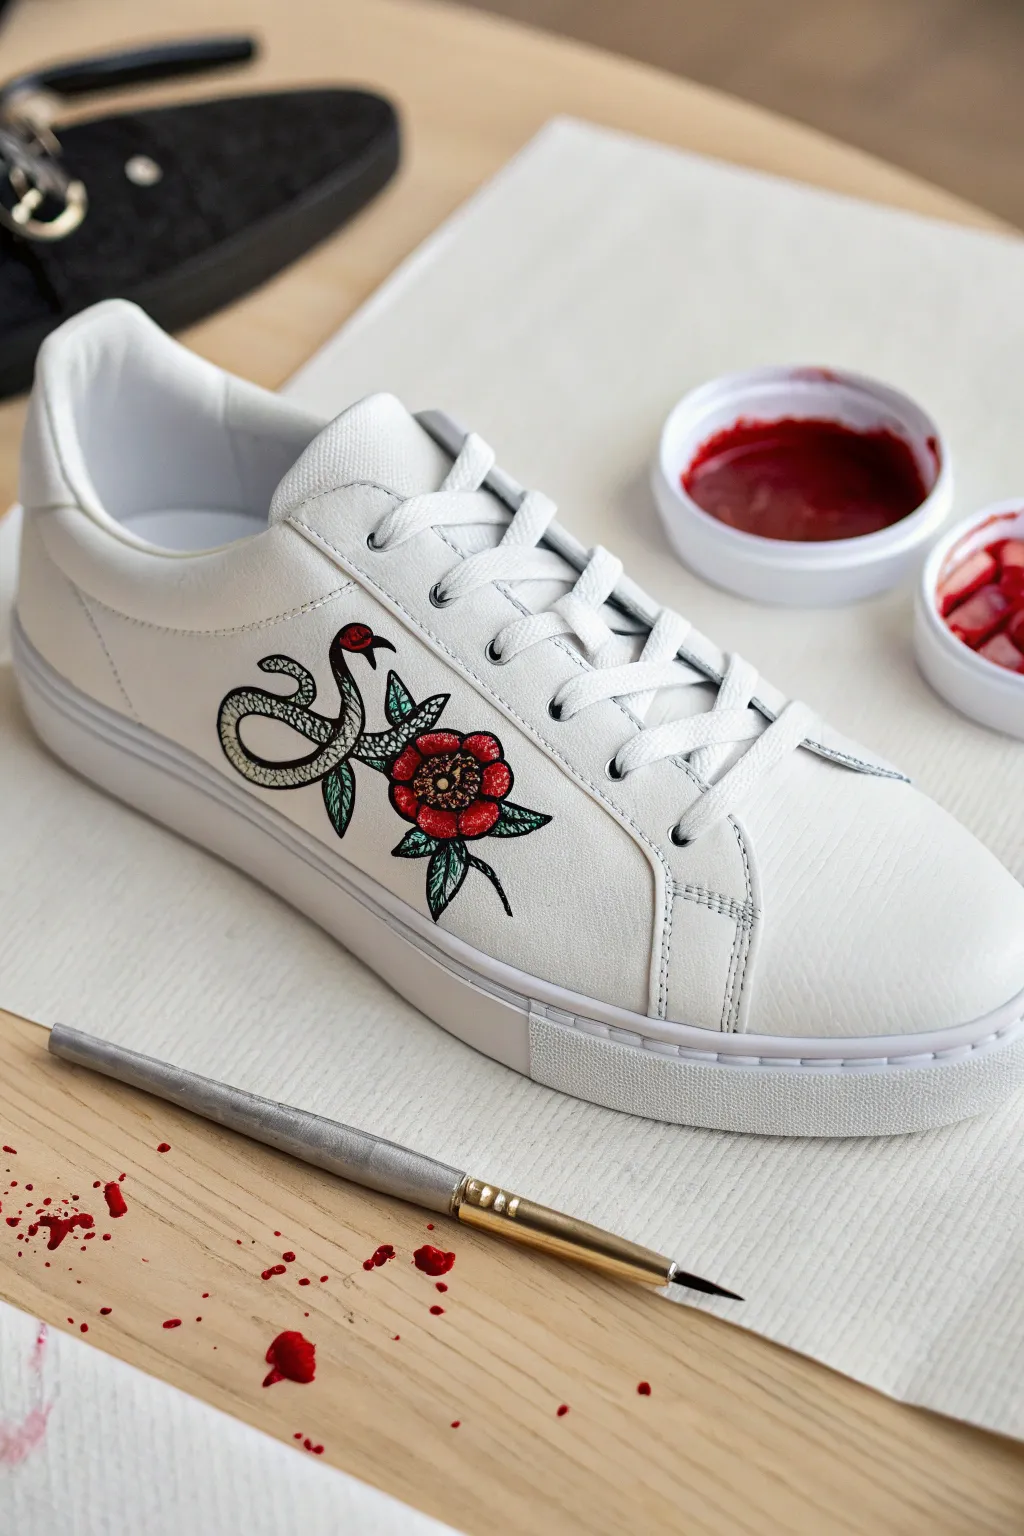
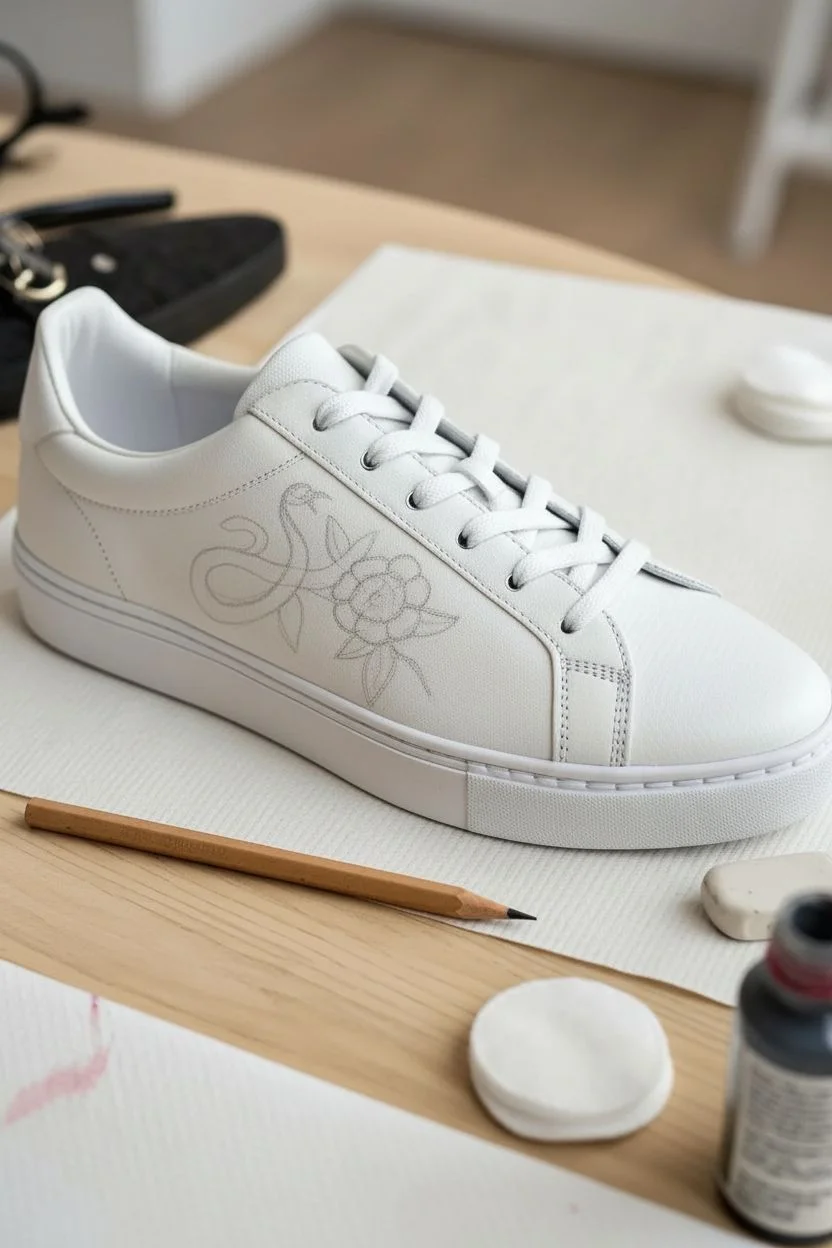
Transform a plain pair of white leather sneakers into a high-end streetwear staple with this classic tattoo-inspired design. The sharp black linework mixed with vibrant red florals creates a look that rivals luxury designer shoes.
Step-by-Step
Materials
- White leather sneakers
- Leather preparer or rubbing alcohol
- Cotton pads
- Angelus leather paint (Black, Red, Green, White)
- Fine liner brush (Script or size 00)
- Small flat shader brush
- Pencil for sketching
- Heat gun or hairdryer
- Matte or satin acrylic finisher
- Masking tape (optional)
Step 1: Preparation & Sketching
-
Surface Prep:
Before painting, you absolutely must remove the factory finish. Apply leather preparer or acetone to a cotton pad and scrub the side area of the shoe where you plan to paint until the leather feels slightly tacky and loses its shine. -
Drafting the Design:
Using a pencil, lightly sketch your design directly onto the leather. Drawing a curving ‘S’ shape for the snake first helps establish the flow, then add the flower head near the center of the snake’s body. -
Refining the Sketch:
Flesh out the snake’s body around your guide line, ensuring the width is consistent. Add the small details now: the leaves poking out from the flower and the snake’s head shape.
Fixing thick paint
If your black lines look chunky or raised, your paint is too thick. Dilute it slightly with water or a flow improver until it has the consistency of skim milk for sharp lines.
Step 2: Painting the Base
-
Base Coating:
Since we are painting on white leather, we can go straight to color, but mixing a tiny drop of white into your red paint can help it be more opaque. Use a small flat brush to fill in the flower petals with a deep red. -
Painting the Leaves:
Mix a muted green tone for the leaves. I prefer slightly desaturated greens for tattoo styles rather than bright neon. Fill in the leaf shapes carefully. -
The Snake’s Body:
For the snake, decide if you want it filled or just outlined. In this design, the snake remains mostly white/pale grey with heavy shading. If you want a slight tint, apply a very watery wash of grey now. -
Drying Time:
Let these base layers dry completely. Use a heat gun on a low setting or a hairdryer to speed this up, keeping it moving so you don’t burn the paint.
Pro Tip: Anchor Point
Keep your pinky finger resting on a clean part of the shoe while you paint. This ‘anchor’ stabilizes your hand, making those long, curving linework strokes much smoother.
Step 3: Linework & Details
-
Starting the Outline:
This is the most critical step. Load your fine liner brush with black leather paint. Ensure the paint flows well—add a tiny drop of water if it’s too thick. Start outlining the flower petals with smooth, confident strokes. -
Outlining the Snake:
Trace the outer edges of the snake using the same fine liner. Keeping your wrist resting on a stable surface helps minimize shake. -
Adding Scales:
For the texture on the snake, paint a diamond pattern along the back. You don’t need to draw every individual scale; suggesting the texture with hatching often looks more artistic. -
Stippling & Shading:
Use tiny dots (stippling) or very small hatch marks in black to create shadows where the snake passes under flower petals or twists around itself. -
Flower Center Details:
Add the center of the flower using small black dots for the stamen, perhaps adding a touch of gold or yellow if you have it, though black works perfectly for a monotone tattoo look.
Step 4: Finishing
-
Cleanup:
If any lines went astray, dip a clean brush or toothpick in a little acetone and gently scrape or wipe away the mistake before it cures fully. -
Sealing the Work:
Once the paint has dried for at least 24 hours, apply a thin layer of matte acrylic finisher over the artwork. This protects the paint from scratches and water damage. -
Optional Second Coat:
For extra durability, apply a second coat of finisher after the first one is dry to the touch.
Lace up your new custom kicks and enjoy the sophisticated edge they add to your outfit
Comic Book Pop Art Halftones

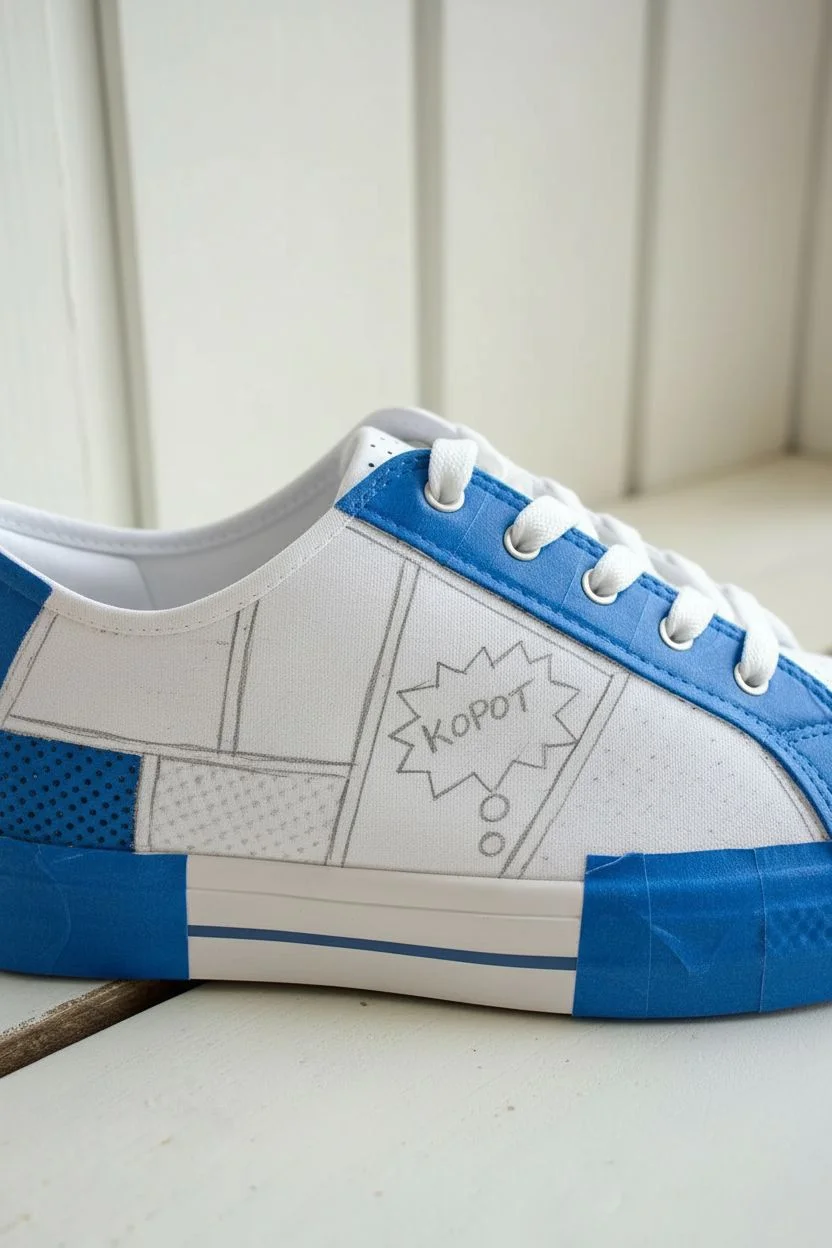
Transform plain white sneakers into a walking comic book with this vibrant Pop Art makeover. Featuring bold black outlines, primary colors, and those classic Ben-Day dots, this project pays homage to the Lichtenstein era of art.
Step-by-Step Tutorial
Materials
- White leather or canvas sneakers
- Angelus leather paint (Red, Blue, Yellow, White, Black)
- Painter’s tape or masking tape
- Pencils and eraser
- Fine detail paintbrushes (Size 0 and 00)
- Small flat paintbrush
- Rubbing alcohol
- Cotton rounds
- Dotting tool or toothpick
- Matte finish or sealant (optional)
Step 1: Preparation and Planning
-
Prep the Surface:
Before painting, use cotton rounds soaked in rubbing alcohol to wipe down the leather areas of the shoe. This removes the factory finish and ensures the paint adheres properly. -
Tape Off Zones:
If you want to keep the sole or the lace eyelet area pristine white, like in the photo, apply painter’s tape carefully along the edges. -
Sketch the Grid:
Using a pencil, lightly sketch large geometric blocks onto the side of the shoe. Think in terms of comic panels—squares, rectangles, and triangles work best. -
Add Elements:
Sketch a ‘speech bubble’ shape inside one of your panels. Inside, write a short, punchy comic word like ‘POP!’, ‘POW!’, or ‘HOOP’ as seen here.
Step 2: Color Blocking
-
Paint the Red Block:
Start with your bright red paint. Fill in one large rectangular section completely. Use a flat brush for the center and switch to a detail brush near the pencil lines. -
Apply the Yellow Base:
Paint the panel that contains your speech bubble with a solid coat of yellow. This high-contrast color makes the bubble pop. -
Fill the Blue Section:
Choose another segment for your primary blue. Apply the paint smoothly, ensuring you don’t leave brush strokes. -
Paint the White Areas:
Even though the shoe is white, paint the dedicated ‘white’ panels with actual white paint. This ensures the texture matches the other painted sections. -
Second Coats:
Allow the first layer to dry for about 15-20 minutes. Apply a second coat to all colored blocks to get that solid, opaque comic book look. -
Create the Speech Bubble:
Using your smallest brush, carefully paint the jagged speech bubble shape white against the yellow background. Add the small trailing circles leading down.
Clean Lines Hack
For the straightest panel dividers, use thin strips of electrical tape or masking tape as a guide. Paint your black lines between them, let dry, and peel for a crisp edge.
Step 3: Details and Halftones
-
Outline the Grid:
This is the crucial step. Take your black paint and a size 0 brush to paint thick, bold lines over your original pencil grid marks. This separates the color blocks. -
Outline the Bubble:
Using a very steady hand, outline the speech bubble and the text inside with thin black lines. -
Add Dots to White:
Dip a dotting tool or the back of a paintbrush into black paint. In the white panel, press down to create a grid of evenly spaced black polka dots. -
Add Dots to Colors:
If you want texture on colored sections, use a slightly darker shade of the base color to add dots/circles (like dark blue dots on light blue paint), or use a fine mesh stencil. -
Final Cleanup:
Look for any shaky lines. Use a tiny bit of the base color to ‘erase’ any black paint that went astray. -
Seal the Work:
Once fully dry (roughly 24 hours), apply a clear acrylic finisher to protect your artwork from scuffs and weather.
Wobbly Dots?
If your hand-painted dots look uneven, dip the flat end of a drill bit or a specialized nail art dotting tool into the paint. Stamp straight down and lift straight up.
Lace up your new kicks and enjoy showing off your wearable art piece to the world
Stained Glass Outlines and Color Fills
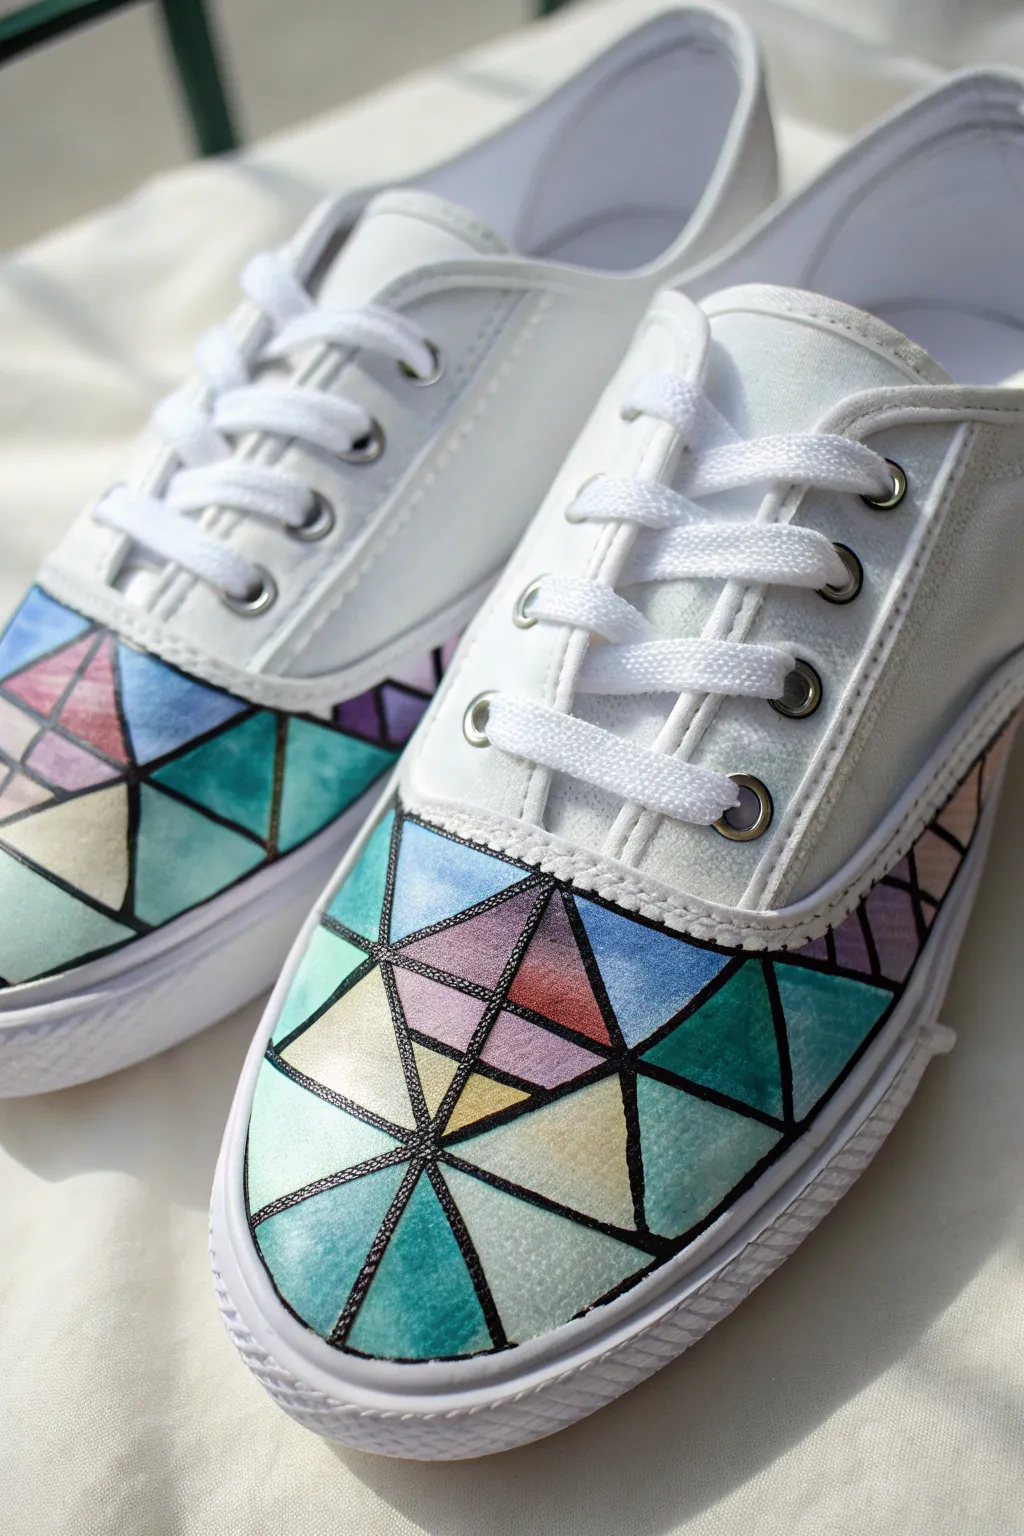
Transform plain white canvas sneakers into walkable art with this vibrant stained glass effect. By using sharp geometric lines and watercolor-style blending, you create a sophisticated, faceted look that mimics light passing through glass.
How-To Guide
Materials
- White canvas sneakers (Vans or Converse style)
- Black fabric marker (fine or medium tip)
- Fabric medium
- Acrylic paints (teal, violet, sky blue, magenta, pale yellow, white)
- Small round brushes (size 0 and 2)
- Masking tape or painters tape
- Pencil
- Water cup and palette
- Hairdryer (optional, to speed up drying)
- Acrylic sealer spray (matte or satin finish)
Step 1: Creating the Grid
-
Prep the surface:
Start by removing the shoelaces completely. Stuff the toe box of each shoe tightly with newspaper or plastic bags to create a firm, smooth surface for drawing. -
Protect the sole:
Apply masking tape carefully along the rubber sole where it meets the canvas. This ensures your lines won’t stray onto the rubber bumper. -
Draft the center point:
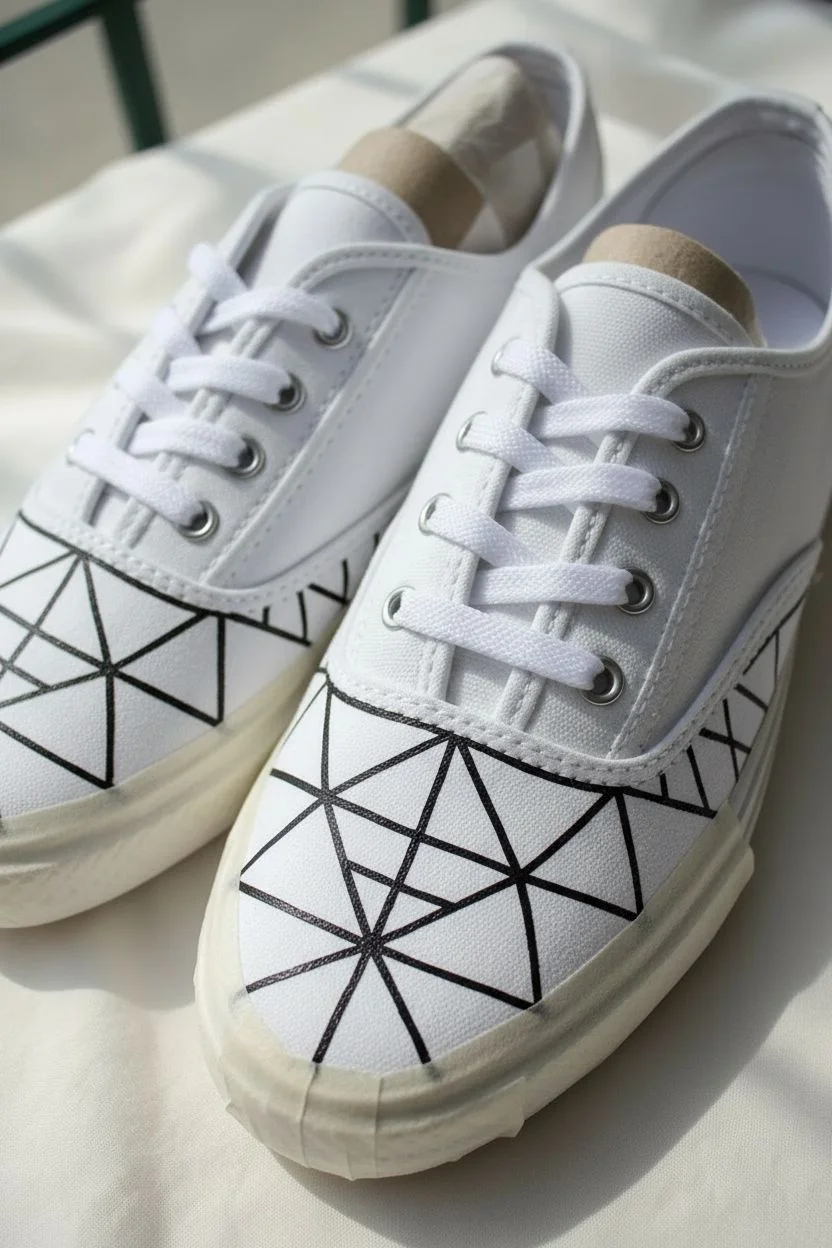
With a pencil, lightly mark a focal point near the center of the toe cap. This doesn’t need to be perfectly centered, as asymmetrical designs often look more dynamic. -
Draw radiating lines:
Sketch straight lines radiating outward from your focal point to the edges of the stitched toe area found on this style of shoe. -
Connect the web:
Connect these radiating spokes with intersecting lines to create triangles of various sizes. Aim for a mix of larger and smaller shapes to keep the pattern interesting. -
Ink the outlines:
Once you are happy with the pencil sketch, trace over every line with your black fabric marker. Go slowly to ensure the lines are crisp and uniform in thickness.
Bleeding Lines?
If your marker bleeds into the canvas grain, apply a very thin layer of clear acrylic medium or white paint to the canvas first. Let it dry completely before drawing your black lines.
Step 2: Applying Color
-
Mix your base medium:
On your palette, mix your acrylic paints with fabric medium according to the bottle instructions (usually 1:1 or 2:1). This keeps the paint flexible so it won’t crack when you walk. -
Create a watercolor consistency:
Add just a tiny drop of water to your paint mixtures. You want the paint to be slightly translucent to achieve that stained-glass transparency look, rather than fully opaque blocks of color. -
Start with cool tones:
Begin filling in scattered triangles with your teal and sky blue shades. I find it helpful to paint non-adjacent sections first to prevent wet colors from bleeding into each other. -
Add warmth:
Fill in remaining sections with magenta, violet, and pale yellow. Try to balance the colors so no single hue dominates one area. -
Create gradients:
For a true glass effect, add a touch of white or a lighter version of the color to the center of a few larger triangles, blending it outward while wet. This mimics light catching the center of a pane. -
Let it dry completely:
Allow the paint to air dry for at least 2 hours, or speed this up with a hairdryer on a low heat setting.
Step 3: Finishing Touches
-
Re-trace lines:
Painting often dulls the original black outlines. Go back over all the black lines with your fabric marker to make the ‘lead’ of the stained glass pop again. -
Clean up edges:
If any color bled under the tape or onto the stitching, you can carefully touch it up with a bit of opaque white acrylic paint. -
Heat set the design:
Once the shoes are fully dry (give it 24 hours if possible), toss them in the dryer on high heat for 15 minutes or use a blow dryer to set the fabric medium permanently. -
Seal for durability:
Take the shoes outside and spray a thin, even coat of acrylic sealer over the painted area to protect against dirt and water. -
Draft the sides (optional):
If you are feeling ambitious, extend the geometric pattern slightly towards the heel on the side panels, following the same radiating logic used on the toe. -
Re-lace:
Remove the masking tape from the soles and lace the shoes back up with crisp white laces to complete the look.
Pro Tip: Ombré Effect
Load two colors on your brush at once (e.g., teal and white) to paint instant gradients inside each triangle. This creates depth much faster than blending on the shoe.
Enjoy walking around in your custom-designed footwear that captures the light with every step
Split-Pair Story Mural
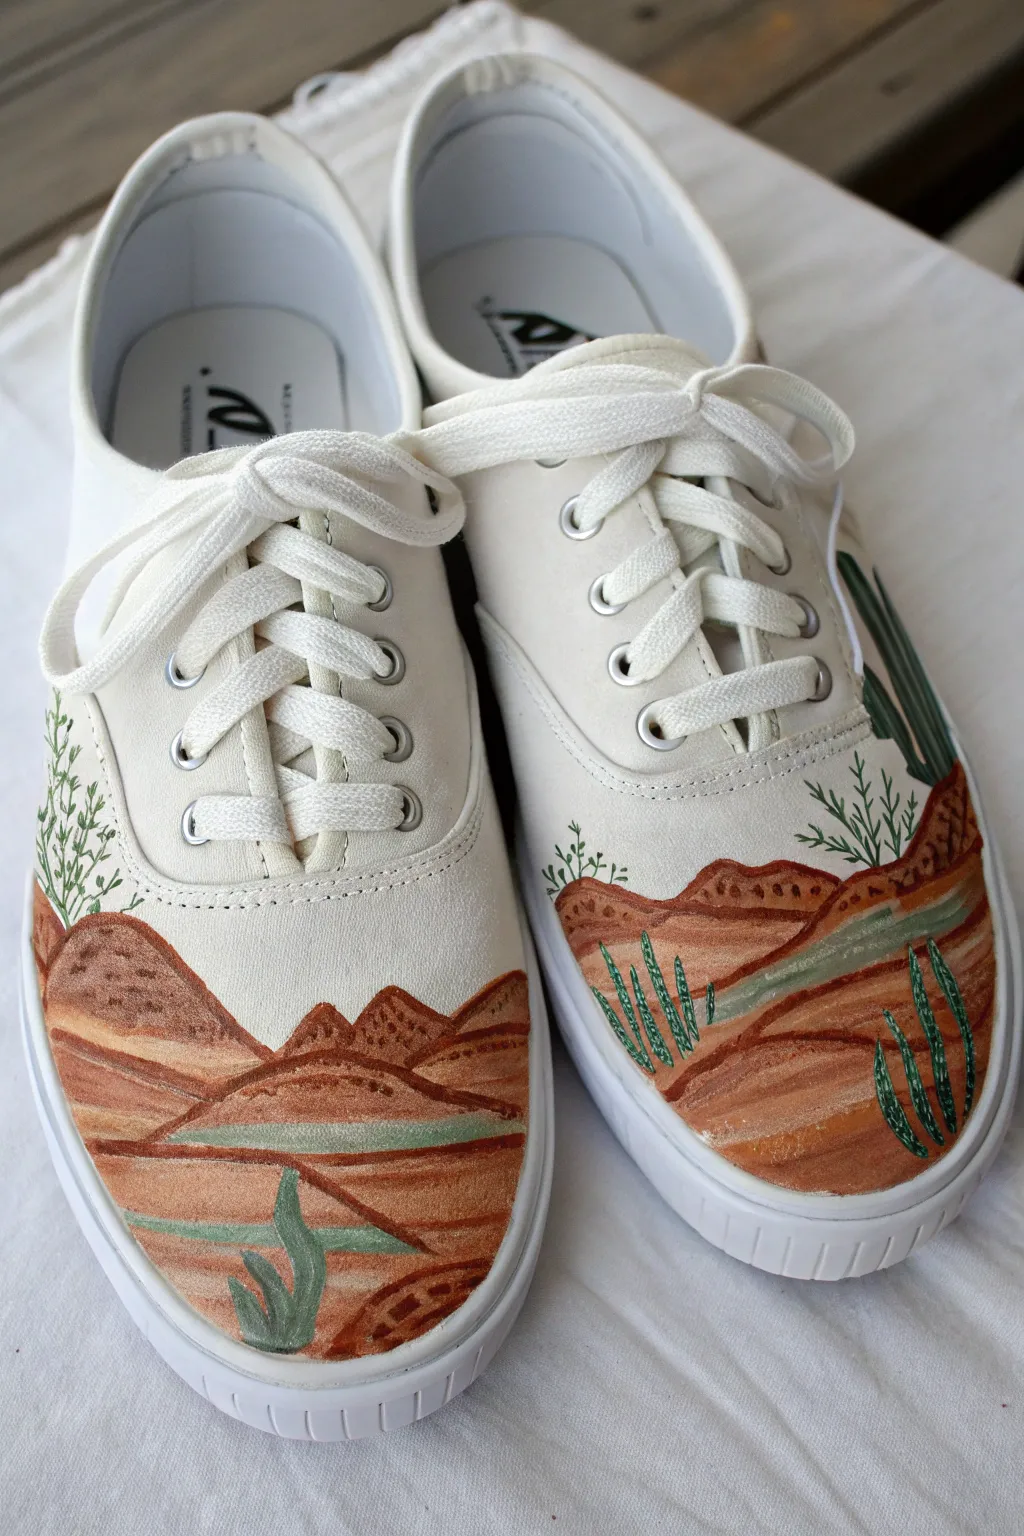
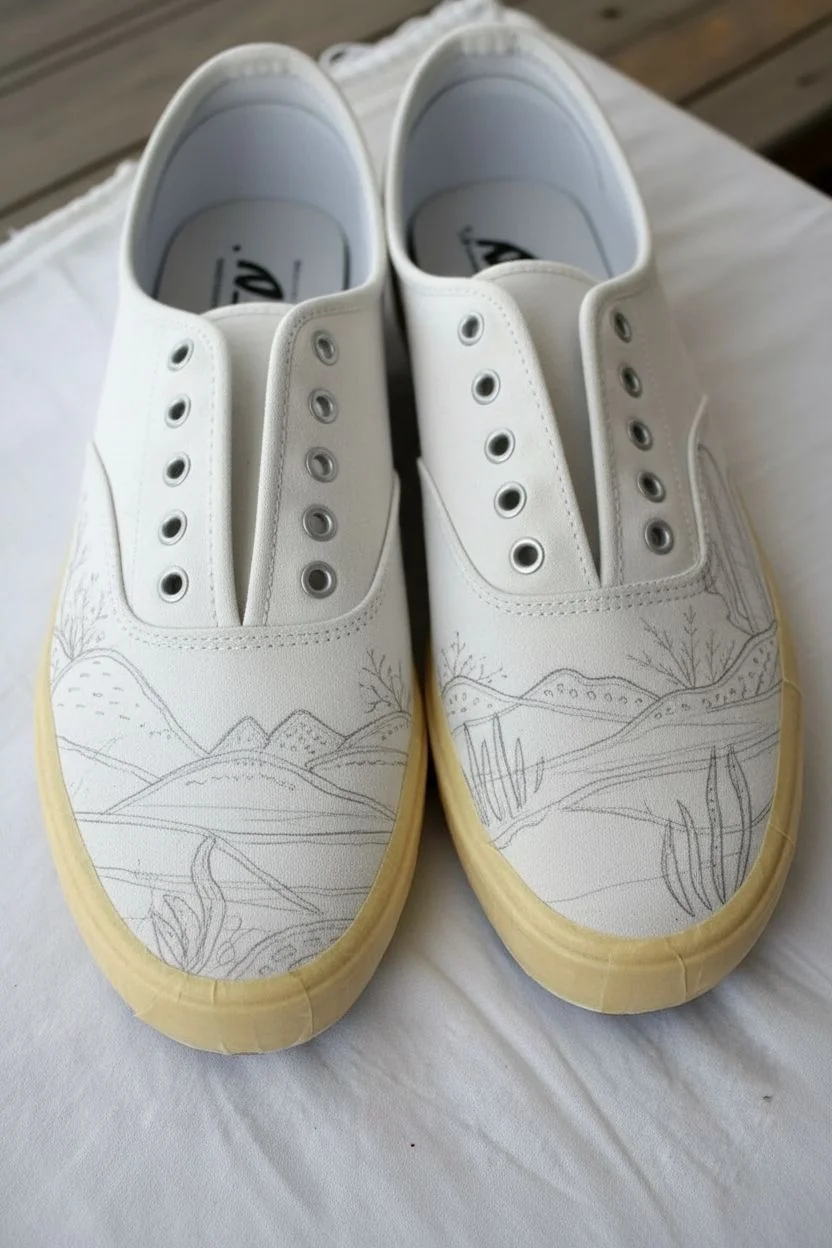
Transform a plain pair of white kicks into a sprawling Southwestern landscape that stretches across both feet. This split-pair design uses warm terracotta tones and saguaro accents to create a seamless desert horizon when your feet are side-by-side.
Step-by-Step Guide
Materials
- White canvas sneakers (Vans Authentic or similar style)
- Acrylic leather/fabric paints (Terracotta, Dark Brown, Tan, Sage Green, Dark Green, White)
- Fabric painting medium (mixed with acrylics if not using specific fabric paint)
- Set of small synthetic brushes (00 detail liner, round #2, small flat shader)
- Pencil or disappearing fabric marker
- Masking tape
- Water cup and palette
- Hairdryer (optional for speeding up drying)
Step 1: Prep & Sketching
-
Prepare the canvas:
Remove the shoelaces completely from both sneakers. Use masking tape to cover the rubber soles along the edge of the canvas to protect them from stray brushstrokes. -
Align the horizon:
Place the shoes side-by-side on a flat surface, touching each other. This is crucial for the split-pair effect. -
Draft the landscape lines:
Using a pencil very lightly, sketch the undulating lines of the rock formations. Make sure the lines flow from the left shoe onto the right shoe so the hills connect visually. -
Add vegetation details:
Sketch small shapes for the cacti and bushes. Place a large cactus rising on the right side and smaller scrub brush details on the left toe box for balance.
Keep it fluid
Mix a specialized fabric medium into your acrylics (usually 1:1) to prevent the paint from cracking when the shoe bends during walking.
Step 2: Painting the Landscape
-
Mix the base colors:
Prepare a gradient of warm earth tones on your palette: a deep rust brown, a medium terracotta, and a light sandy beige. -
Block in the background hills:
Start with the furthest hills near the eyelets. Paint these shapes with your lightest tan color, keeping the paint fairly thin so it soaks into the canvas weave. -
Paint the mid-ground rocks:
Move downwards to the next layer of rocks. Fill these shapes with the medium terracotta shade. I like to keep my brush strokes horizontal here to mimic sedimentary rock layers. -
Define the foreground:
Use the darkest brown mixed with a touch of rust for the closest rock formations near the toe tips. -
Create rock texture:
Once the base layers are dry to the touch, mix a slightly darker version of your terracotta. Use a small round brush to add small dots and dashed lines along the tops of the hills to suggest rough texture. -
Add lighter strata:
Mix a pale, off-white sand color. Pain thin, horizontal stripes across the reddish rocks to create that classic striated canyon look.
Step 3: Vegetation & Details
-
Paint the cacti base:
Using a medium sage green, fill in the cactus shapes and the leafy bushes. Let this layer dry completely. -
Add plant shadows:
With a thin liner brush and dark green paint, add a shadow line to one side of each cactus arm to give them dimension. -
Detail the branches:
For the scrub bushes on the left shoe, paint tiny, delicate branches extending upward using the very tip of your detail brush. -
Add sunlight highlights:
Mix a tiny amount of white into your sage green. Add a thin highlight line on the opposite side of the cacti from your shadows. -
Create spines and texture:
Using the liner brush and off-white paint, add tiny dots or dashes on the cacti to represent needles. -
Final foliage touches:
Dab tiny dots of green at the ends of your branch lines to simulate small leaves or desert blooms.
Clean lines only
If you smudge paint onto the white canvas sky area, don’t wipe it! Let it dry, then paint over the mistake with opaque white fabric paint.
Step 4: Finishing
-
Heat set the paint:
Allow the shoes to dry for at least 24 hours. If your paint instructions require it, use a hairdryer on high heat or an iron (with a cloth barrier) to set the design. -
Remove tape and re-lace:
Peel off the masking tape from the soles. Re-lace the sneakers with fresh white laces to keep the look crisp.
Now you are ready to walk your own path with these custom desert scenes
Trompe L’Oeil Texture Illusions
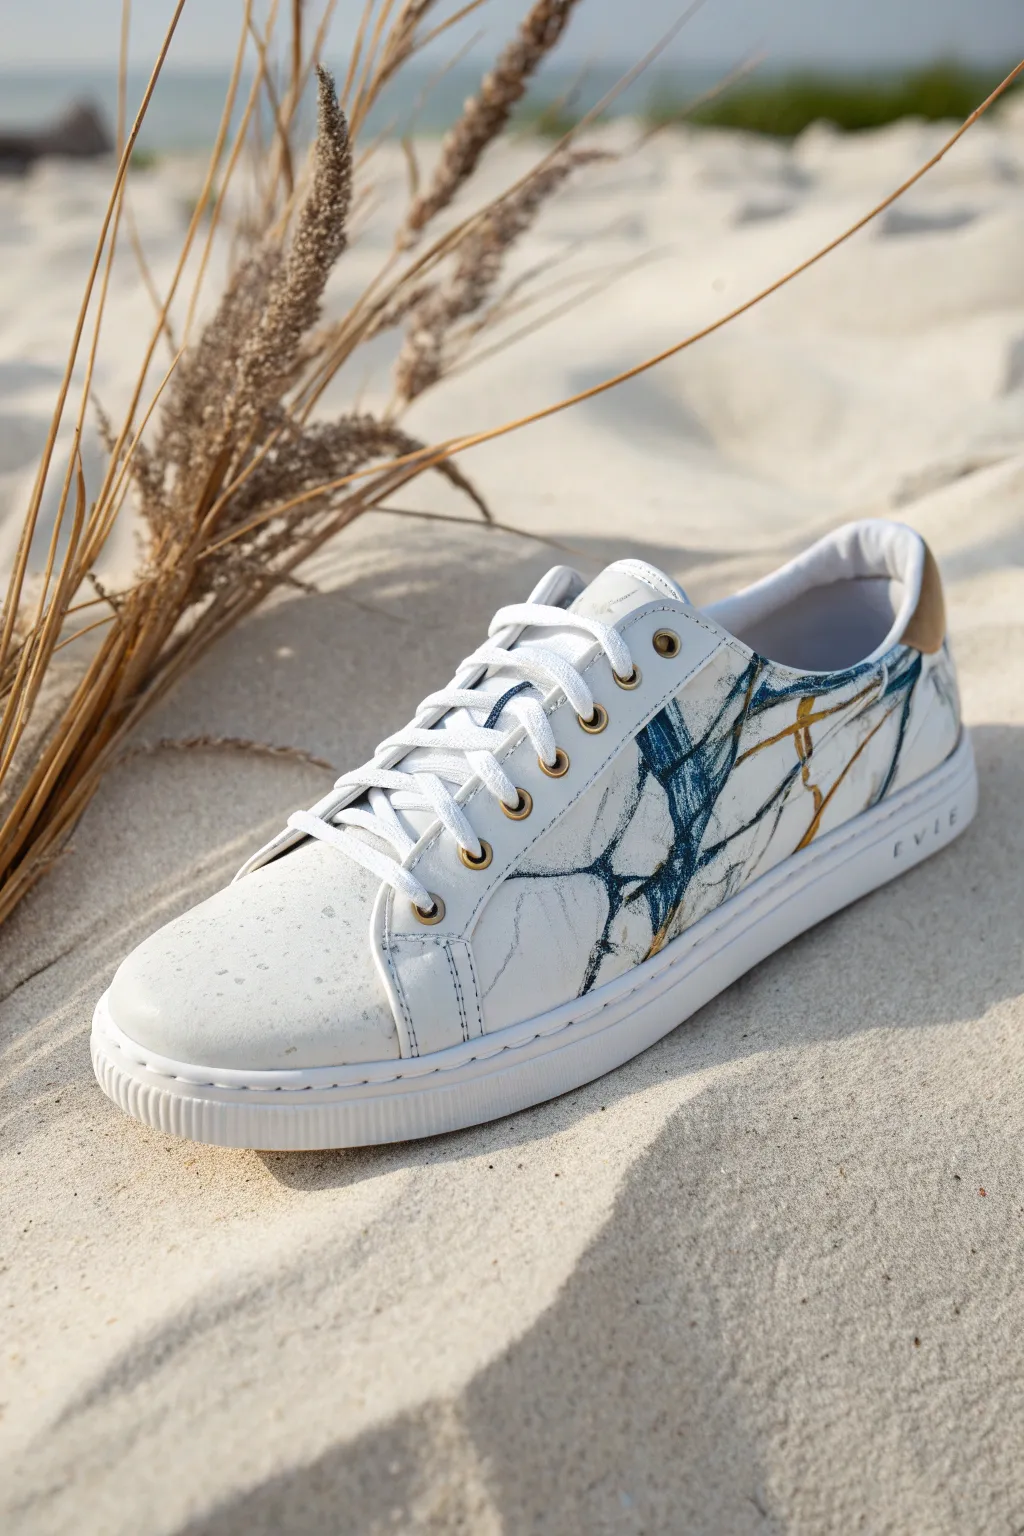
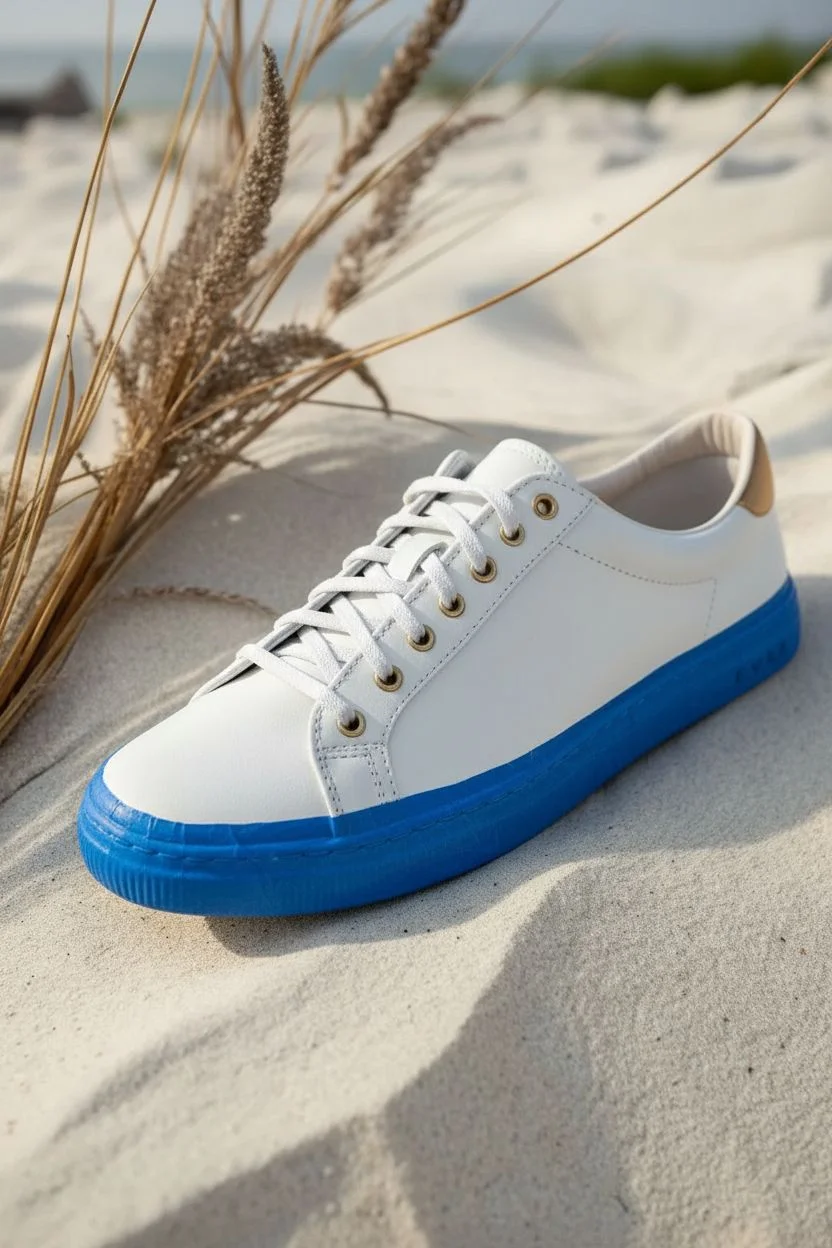
Elevate plain white leather sneakers into high-end art with this sophisticated marble illusion. By manipulating fluid acrylics and metallic accents, you’ll create realistic stone veining that looks impossibly expensive.
How-To Guide
Materials
- White leather sneakers (clean and dry)
- Leather preparer and deglazer (or acetone)
- Cotton pads
- Angelus leather paints (White, Navy Blue, Grey)
- Floating medium or fabric medium
- Gold metallic leather paint
- Fine detail liner brush (00 or 000)
- Small round brush
- Feather or plastic wrap (for texturing)
- Matte acrylic finisher
Step 1: Preparation
-
Remove Factory Glaze:
Before laying down any color, dampen a cotton pad with leather preparer or acetone. Scrub the areas of the shoe you intend to paint quite vigorously until the leather feels tacky rather than smooth; this ensures the paint adheres permanently. -
Mask Off Soles:
Use painter’s tape to carefully cover the rubber soles and the interior lining. This marble technique can get a little messy, and clean edges differentiate professional work from amateur attempts. -
Base Coat:
Apply a thin, even layer of white leather paint mixed with a tiny drop of grey to create a realistic ‘stone’ base. The off-white tone adds depth compared to the stark factory white. Let this dry completely for 15 minutes.
Step 2: Creating the Veining
-
Mix Your Flow:
On your palette, mix your navy blue paint with a significant amount of floating medium (about a 50/50 ratio). This makes the paint translucent and fluid, which is crucial for the watery look of marble veins. -
Lay the Primary Lines:
Using a small round brush, paint shaky, organic lines across the side panel of the shoe. Avoid straight lines; think about how lightning forks or tree roots spread. -
Soften the Edges:
Immediately after painting a blue line, use a barely damp clean brush to feather the edges outward. This creates the ‘ghost’ vein effect where the mineral deposit seems to fade into the white stone. -
Add Texture Details:
Here I like to use a crumpled bit of plastic wrap or a real feather dipped lightly in the diluted blue mix. Dab it randomly around your main veins to create natural mottling and imperfections found in real rock. -
Deepen the Contrast:
Go back in with your fine liner brush and undiluted navy blue paint. Trace through the very center of your widest, softest veins to create a sharp, distinct crack. This contrast between the soft wash and the sharp line sells the illusion. -
Connect the Gaps:
Draw tiny, hairline fractures branching off the main veins. Let these fade out into nothingness rather than ending abruptly.
Clean Up Slips
Did a vein get too messy or dark? Don’t panic. Let it dry, then paint over the mistake with your base white color. Paint acts like an eraser here.
Step 3: The Gold Fracture
-
Identify Accent Areas:
Select two or three spots where the blue veins intersect or run parallel. These will become your Kintsugi-inspired gold fracture points. -
Apply Metallic Paint:
Using your finest liner brush, paint thin, jagged streaks of gold metallic paint alongside or weaving through the blue veins. Keep the gold application sparse; less is more effective here. -
Sharpen Gold Edges:
If the gold looks too soft, you can outline it partially with a microscopic amount of dark grey to make the metal pop off the ‘stone’ background.
Level Up: Crackle
Apply a layer of crackle medium before the top veins. As it dries, it physically splits the paint, creating actual texture that feels like real stone.
Step 4: Finishing Up
-
Splatter Effect:
For a final touch of realism, load a toothbrush with diluted grey paint and flick incredible fine speckles over the entire painted area. This mimics the grit found in natural marble. -
Dry Completely:
Allow the design to dry for at least 24 hours. Leather paint needs to cure, not just dry to the touch. -
Seal the Deal:
Apply a matte acrylic finisher over the painted areas using a soft sponge brush. Keep layers thin to avoid white streaks. This protects against scuffs and ensures your faux stone finish lasts.
Step back and admire your custom kicks that look heavy as stone but walk light as air


Have a question or want to share your own experience? I'd love to hear from you in the comments below!