
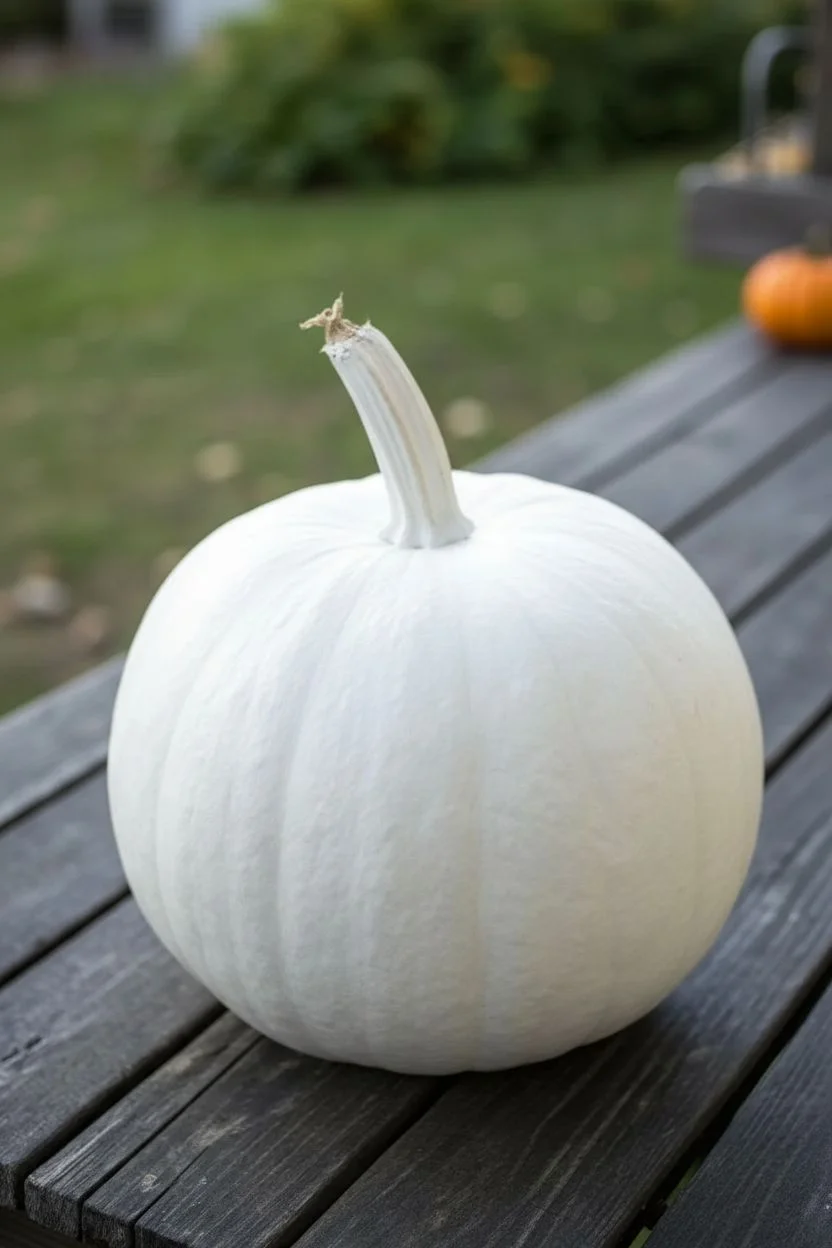
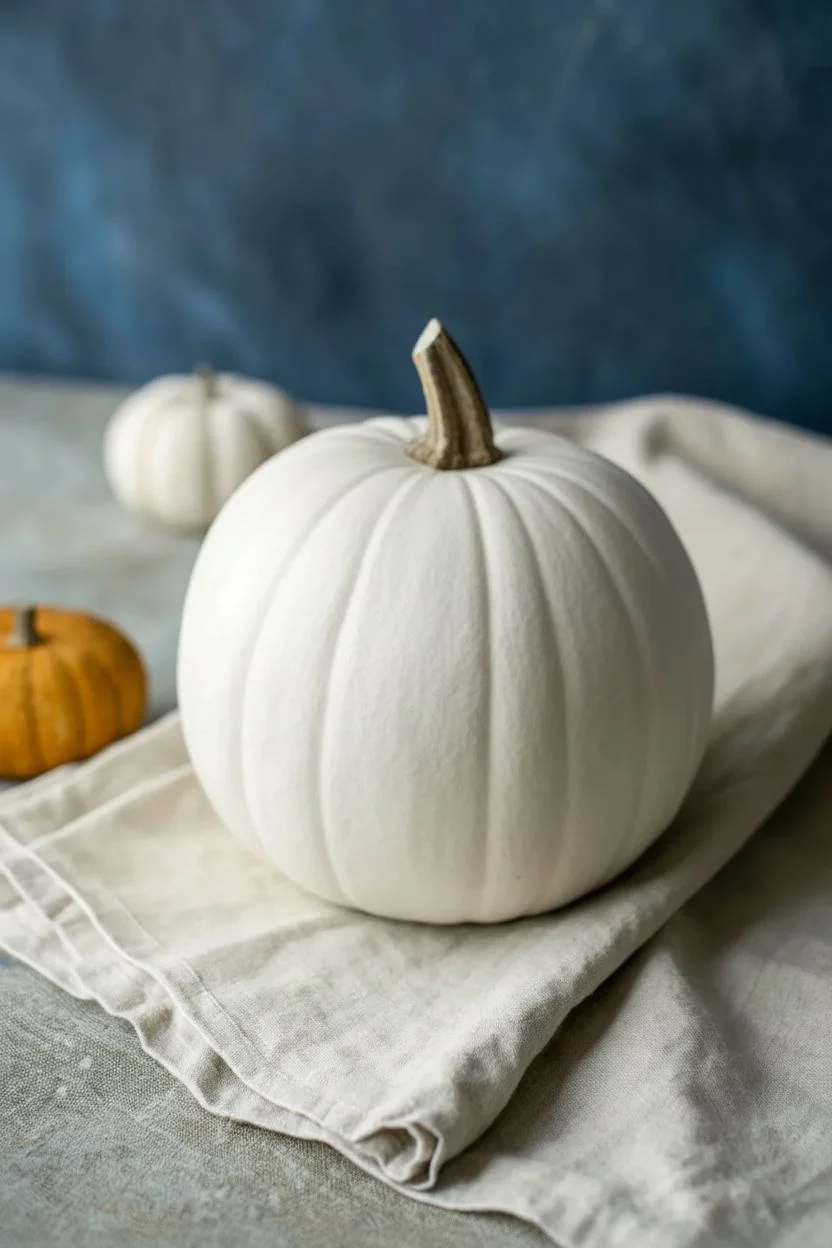
A white pumpkin is basically the dream canvas: clean, bright, and ready for bold contrast. If you want fall decor that looks modern, spooky, or artsy without carving mess, these cool white pumpkin painting ideas will hit the spot.
Classic Black Jack-O’-Lantern Face on a White Pumpkin
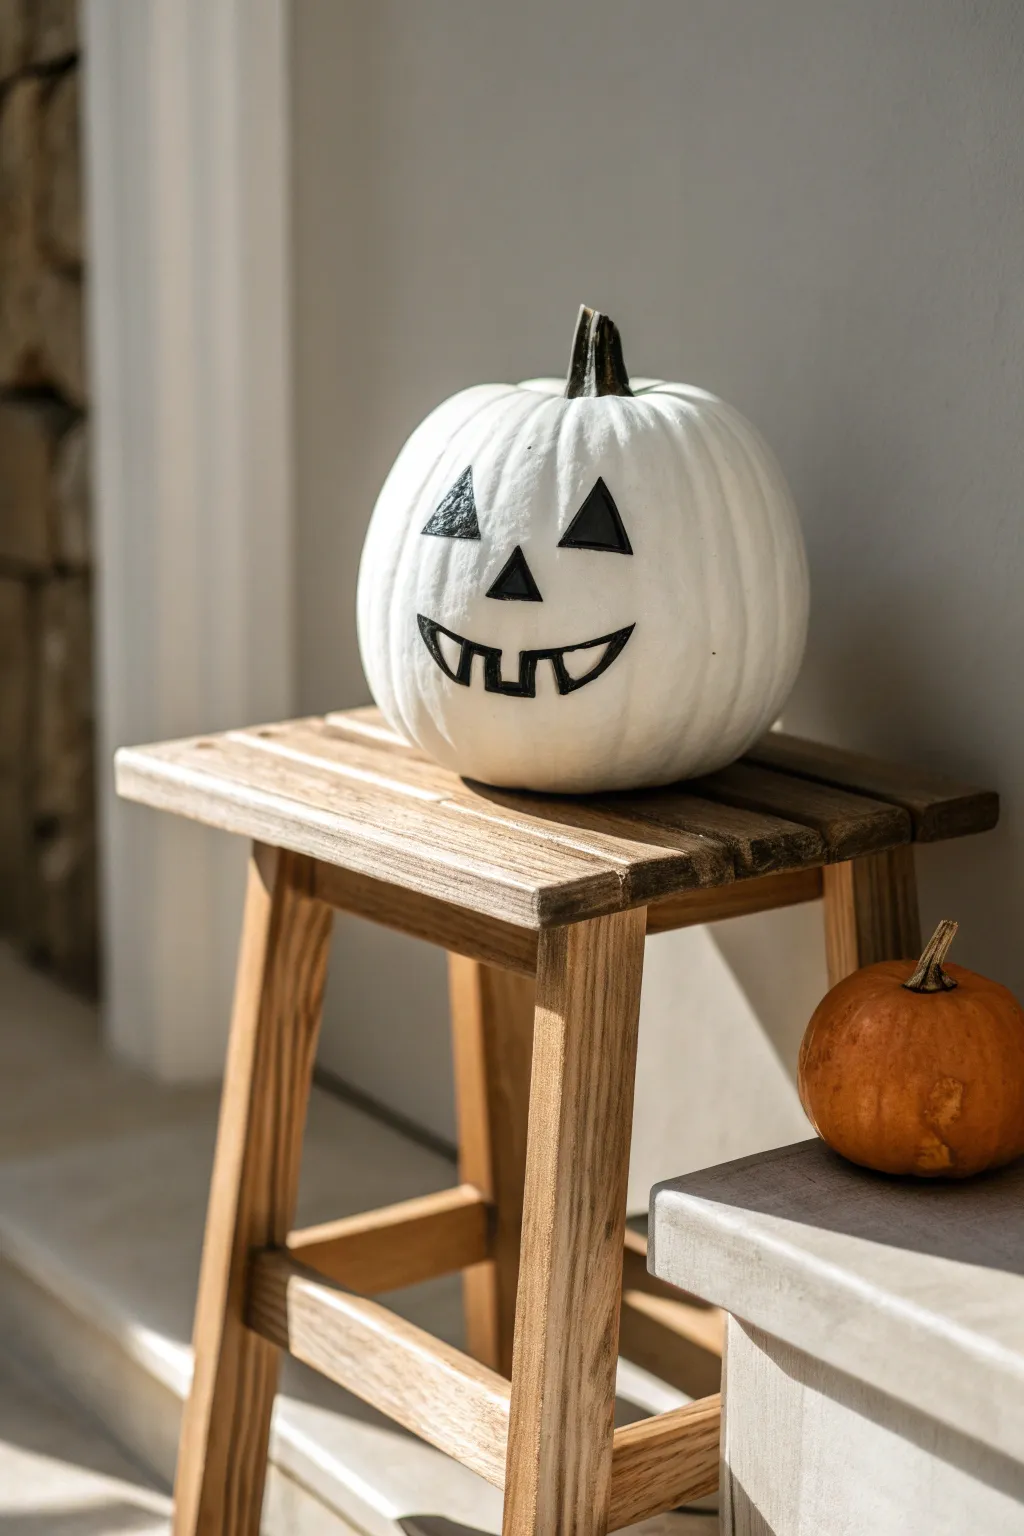
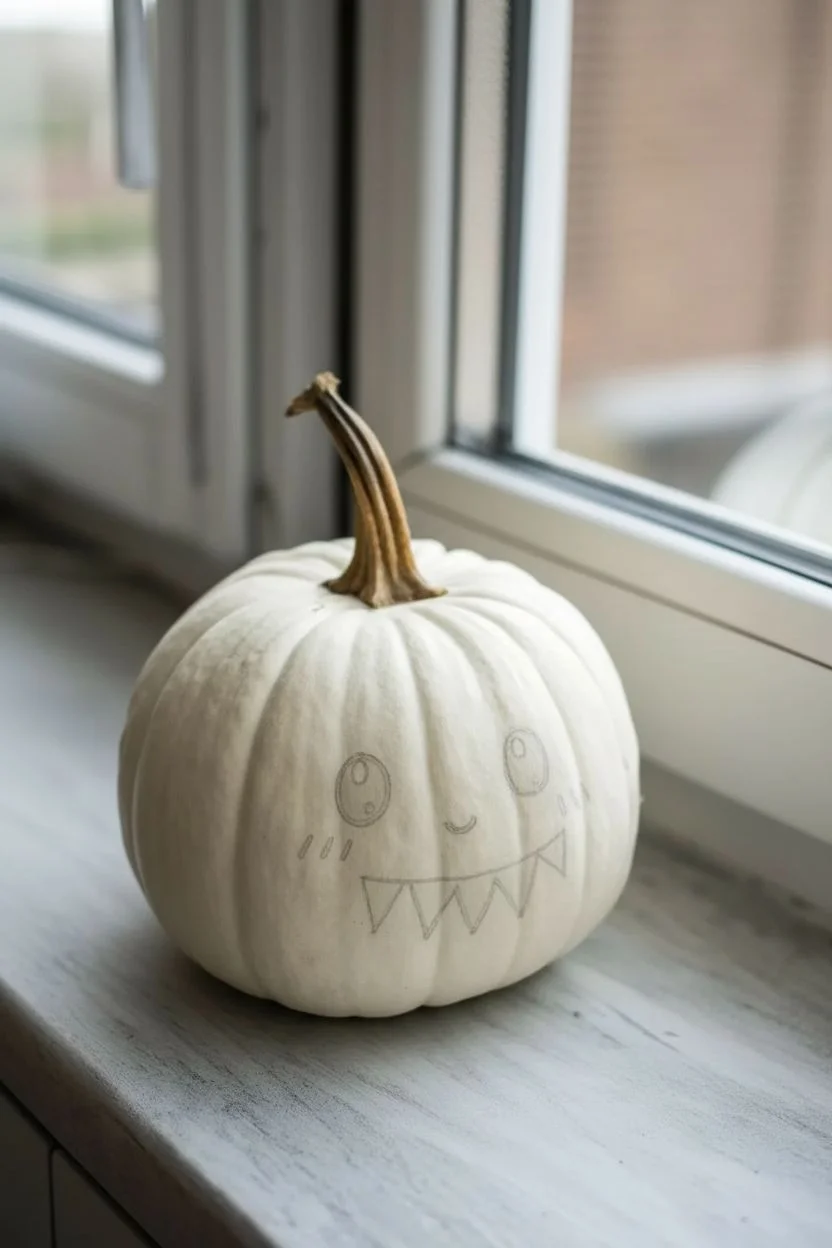
Embrace a minimalist Halloween aesthetic with this crisp, high-contrast pumpkin design. Using a natural white pumpkin as your canvas allows the classic jack-o’-lantern features to pop with a modern, graphic appeal.
Step-by-Step
Materials
- Medium-sized white pumpkin (real or faux)
- Black semi-gloss acrylic paint
- Fine-grit sandpaper (optional)
- Pencil for sketching
- Small flat paint brush (size 4 or 6)
- Fine detail brush (size 0 or 1)
- Damp cloth or paper towel
- Palette or paper plate
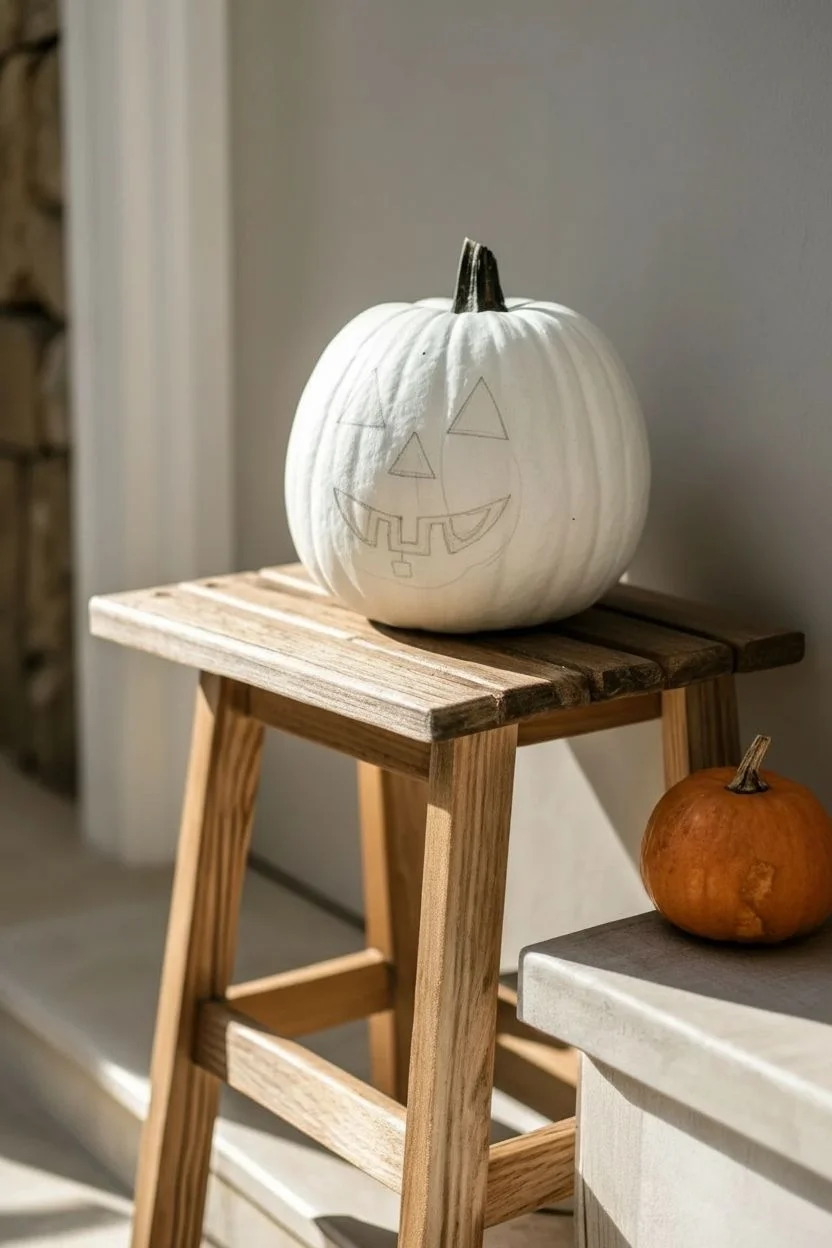
Step 1: Preparation and Sketching
-
Clean the Surface:
Begin by wiping down your white pumpkin with a damp cloth to remove any dirt or garden residue. If you are using a faux pumpkin, a quick dusting will suffice. -
Smooth Imperfections:
Inspect the surface where you plan to paint the face. If there are rough bumps that might interfere with your lines, gently sand them down with fine-grit sandpaper, then wipe away the dust. -
Identify the Best Side:
Rotate the pumpkin to find its most flattering angle. Look for a relatively flat area that sits upright, as this will make painting the geometric shapes much easier. -
Sketch the Eyes:
Using a pencil, lightly draw two triangles for the eyes about a third of the way down from the stem. Keep the lines faint so they are easy to cover later. -
Add the Nose:
Draw a smaller triangle directly between and slightly below the eyes to serve as the nose. -
Outline the Smile:
Sketch a wide, curved smile below the nose. I like to start with the top line of the mouth, curving it gently upwards at the ends. -
Detail the Mouth:
Draw the bottom curve of the mouth, connecting it to the corners of the top line. Inside the mouth shape, sketch two square teeth—one hanging down from the top and one poking up from the bottom.
Uneven Lines?
If your brushstrokes feel shaky, try resting your pinky finger on the pumpkin surface while you paint to stabilize your hand
Step 2: Painting the Features
-
Outline the Shapes:
Dip your fine detail brush into the black acrylic paint. carefully outline the triangle eyes and nose, using the tip of the brush to keep the edges sharp. -
Fill the Eyes and Nose:
Switch to your small flat brush to fill in the centers of the eyes and nose. Apply the paint in smooth strokes to avoid ridges. -
Check Coverage:
If the white skin shows through the black paint, let the first coat dry for about 10 minutes and apply a second coat for solid opacity. -
Outline the Smile:
Returning to the fine detail brush, trace the outer perimeter of the smile. Keep your hand steady to ensure a smooth curve. -
Define the Teeth:
Paint the outline of the two square teeth inside the mouth. Do not fill them in yet; getting the outline crisp is key here. -
Fill the Mouth Void:
Paint the space inside the mouth black, being very careful to paint *around* the two square teeth, leaving them white. This negative space creates the toothy grin. -
Border the Mouth:
To match the reference image style, paint a distinct black outline around the entire mouth shape, slightly thicker than your fill lines, to give it a cartoon-like border. -
Final Touch-Ups:
Inspect all edges for wobbles. Use the detail brush with a tiny amount of paint to straighten any lines or sharpen the points of the triangles. -
Clean Up Smudges:
If you made any mistakes, use a damp Q-tip to wipe away wet paint, or wait for it to dry and touch it up with white paint.
Make it Shine
Once fully dry, apply a coat of clear gloss spray sealant. This protects the paint outdoors and gives the face a professionally finished wet look
Place your creation on a simple wooden stool or warm step to complete that charming autumn vignette


Minimalist Ghost Face With Simple Eyes and Mouth

For a minimalist Halloween decoration that balances spooky and sweet, this ghost-face painted white pumpkin is an ideal project. It features bold, contrasting features on a pristine white base, creating a charming character that fits perfectly into neutral autumn decor.
How-To Guide
Materials
- Medium-sized pumpkin (real or faux)
- White acrylic craft paint (matte finish)
- Black acrylic craft paint
- Large flat paintbrush or sponge brush
- Small round detail brush (size 1 or 2)
- Medium round brush (size 4 or 6)
- Pencil
- Paper plate or palette
- Cup of water
- Paper towels
- Clear matte sealer spray (optional)
Step 1: Preparation & Base Coat
-
Clean the surface:
Begin by wiping down your pumpkin with a damp cloth to remove any dirt or residue. If using a real pumpkin, ensure it is completely dry before proceeding. -
Protect the stem:
If you want to keep the natural look of the stem, carefully wrap it with painter’s tape. I find this quick step saves a lot of time on touch-ups later. -
Apply the first white coat:
Using your large flat brush or sponge brush, apply an even coat of white acrylic paint. Work in sections from the top down, following the vertical ribs of the pumpkin. -
Allow to dry:
Let the first coat dry completely, which usually takes about 20-30 minutes. The pumpkin should feel dry to the touch, not tacky. -
Apply subsequent coats:
Apply a second and possibly third coat of white paint to achieve full opacity. You want a solid, bright white finish where no orange or base color shows through. -
Invert for coverage:
Once the sides are dry, carefully turn the pumpkin over to paint the very bottom, ensuring complete coverage of the visible surface.
Fixing Wobbly Lines
If your hand shakes while painting the smile, clean the edge immediately with a damp Q-tip. If the paint dries, correct the line’s shape using white paint.
Step 2: Drafting the Face
-
Visualize placement:
Before drawing, look at your pumpkin’s shape. Choose a relatively smooth side or a wide section between ribs to serve as the ‘face’ area. -
Sketch the eye ovals:
Lightly sketch two tall, vertical ovals for the eyes using a pencil. Position them fairly wide apart to give the face that cute, innocent look. -
Outline the nose:
Draw a small, soft triangle or teardrop shape right in the center, slightly below the eyes. -
Sketch the smile:
Draw a simple, shallow curve for the mouth below the nose. Keep the line thin and slightly upturned at the ends. -
Mark the highlights:
Inside the top-left area of each eye oval, draw a small circle. This will remain white to create the ‘sparkle’ in the eyes.
Glow-in-the-Dark Twist
Mix a clear glow medium or phosphorescent paint into your white base coat. By day it looks classic, but at night the ghost face glows eerily green!
Step 3: Painting the Features
-
Outline the eyes:
Load your medium round brush with black acrylic paint. carefully outline the oval shapes of the eyes, moving slowly to keep steady edges. -
Fill the eyes:
Fill in the black ovals, being extremely careful to paint around the small circle highlights you sketched earlier. The white base coat should show through these circles. -
Refine the highlights:
If you accidentally paint over a highlight, don’t worry. Just let the black dry, then use your smallest brush to add a dot of white paint back on top. -
Paint the nose:
Switch to your small detail brush. Fill in the small nose shape with solid black paint. -
Paint the mouth:
Using the very tip of your detail brush, trace the smile line. Keep the pressure light to ensure the line stays delicate and doesn’t get too thick. -
Touch up edges:
Inspect your black lines. If any edges look ragged, use a clean damp brush to gently tidy them up or apply a tiny bit of white paint to correct mistakes once dry. -
Seal the project:
Once the face is fully dry (give it an hour to be safe), you can lightly spray the pumpkin with a clear matte sealer to protect the paint from scratching.
Place your adorable ghost pumpkin among some autumn leaves and enjoy the festive spirit you’ve created


Bold Spiderweb Lines for High-Contrast Drama
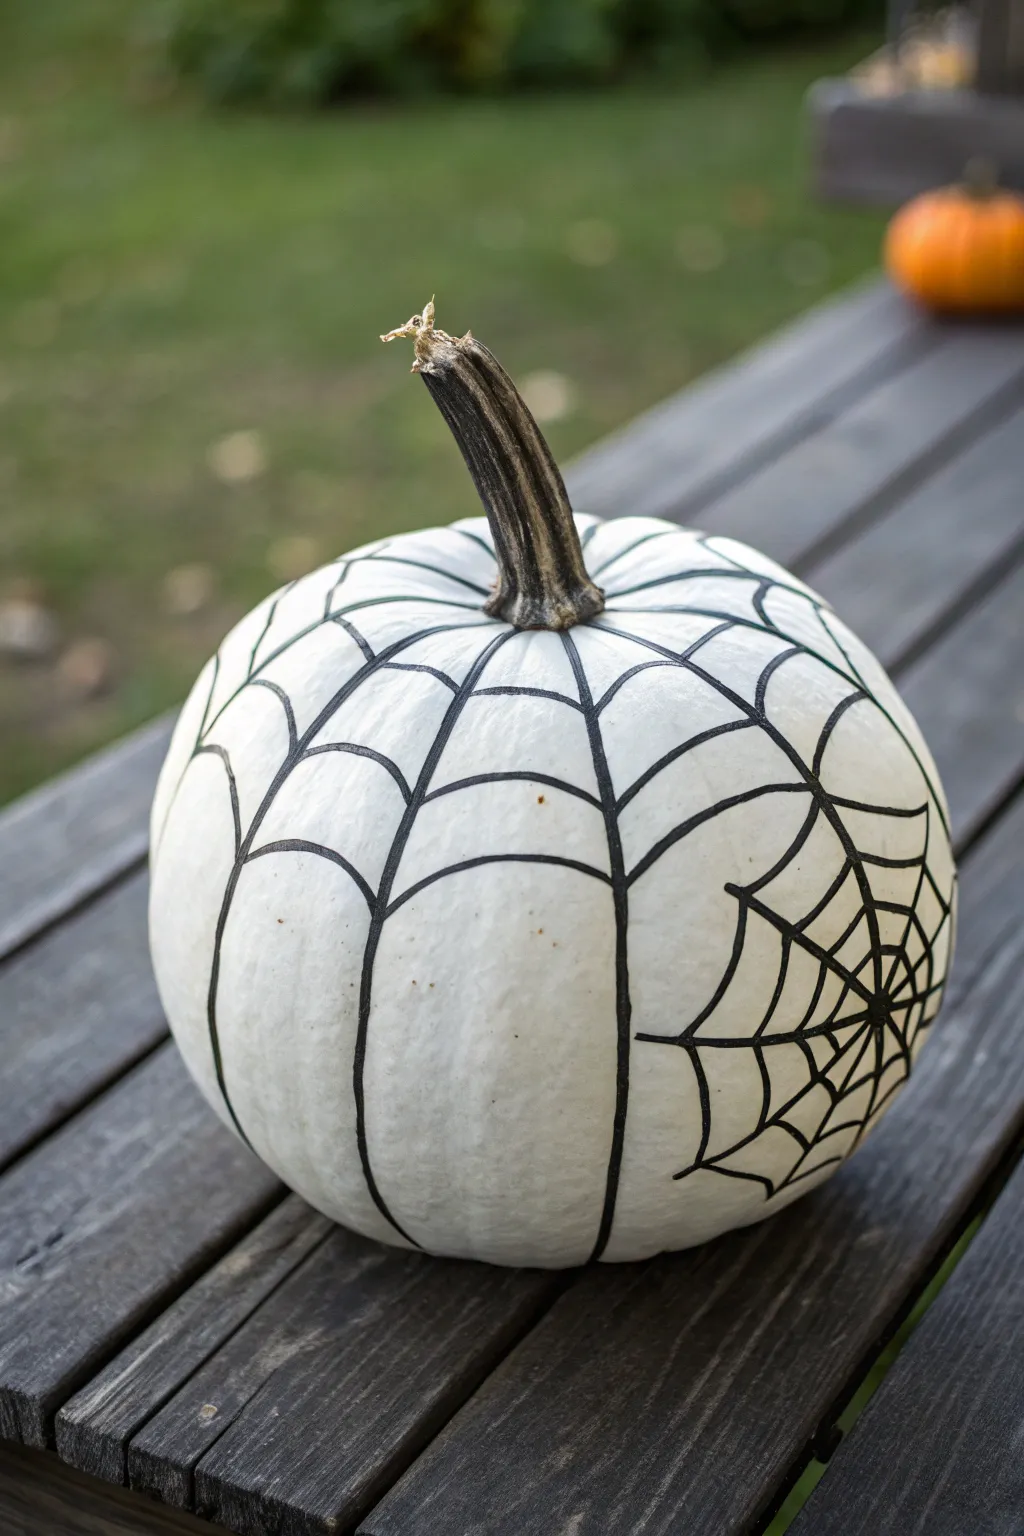
Embrace the spooky elegance of black and white with this strikingly simple spiderweb design. By utilizing the natural ridges of the pumpkin, you can create a bold, high-contrast look that stands out on any porch.
Step-by-Step
Materials
- Medium-sized pumpkin
- White acrylic paint (matte or satin)
- Black acrylic paint or a broad black paint marker
- Medium foam brush
- Fine-point round brush (size 2 or 4)
- Pencil
- Damp cloth
- Clear sealant spray (optional)
Step 1: Preparation & Base Coat
-
Clean surface:
Begin by wiping down your pumpkin with a damp cloth to remove any dirt or field dust. Dry it completely with a towel. -
Remove stem debris:
Gently brush off any loose dirt or flaky bits from the stem itself, but leave the texture intact for character. -
First coat of white:
Using your foam brush, apply an even coat of white acrylic paint over the entire pumpkin surface, avoiding the stem. -
Let it dry:
Wait for the first coat to dry fully to the touch, usually about 20-30 minutes. -
Second coat:
Apply a second coat of white paint to ensure opacity, covering any orange streaks that might be showing through. -
Full cure:
Allow the pumpkin to sit for at least an hour until the white base is completely dry and hard.
Steady Hand Trick
Rest your pinky finger against the dry surface of the pumpkin while painting lines. This anchors your hand and gives you much cleaner, smoother strokes.
Step 2: Drawing the Web Structure
-
Map the main lines:
Lightly sketch vertical lines with a pencil, following the natural indented ridges of the pumpkin from the stem down to the base. -
Paint vertical spokes:
Using black paint and a round brush (or a broad paint marker), trace over your pencil lines to create the main ‘spokes’ of the web. -
Thicken the lines:
Go back over your vertical lines to ensure they are bold and consistent in width, tapering slightly as they reach the bottom. -
Start the webbing:
Begin near the top stem. Paint curved, U-shaped horizontal lines connecting each vertical spoke to its neighbor. -
Continue downward:
Move down the pumpkin, painting concentric rows of these scalloped connecting lines, spacing them wider apart as you go lower. -
Dry the main web:
Give the black paint a few minutes to set so you don’t smudge it while working on the side detail.
Make It 3D
Glue a plastic spider onto the side web focal point. For extra creepiness, trail a bit of black yarn from the spider to the stem.
Step 3: Adding the Side Detail
-
Choose a focal point:
Pick a smooth spot on the side of the pumpkin to be the center of a secondary, smaller web. -
Paint the center point:
Mark a small black dot as your anchor point. -
Radiate outward:
Draw straight lines radiating out from that center dot like a starburst, connecting them into the previous vertical lines where possible. -
Connect the side web:
Add small, tight scalloped lines between these new spokes, creating a dense web pattern that expands outward. -
Refine intersections:
Check where lines meet and thicken the intersections slightly to make the web look strong and organic. -
Final touches:
Look for any thin spots in the black paint and touch them up for maximum contrast.
Place your high-contrast creation on a dark surface to really make that white pop


Matte Black Bat Silhouettes Scattered Across the Surface
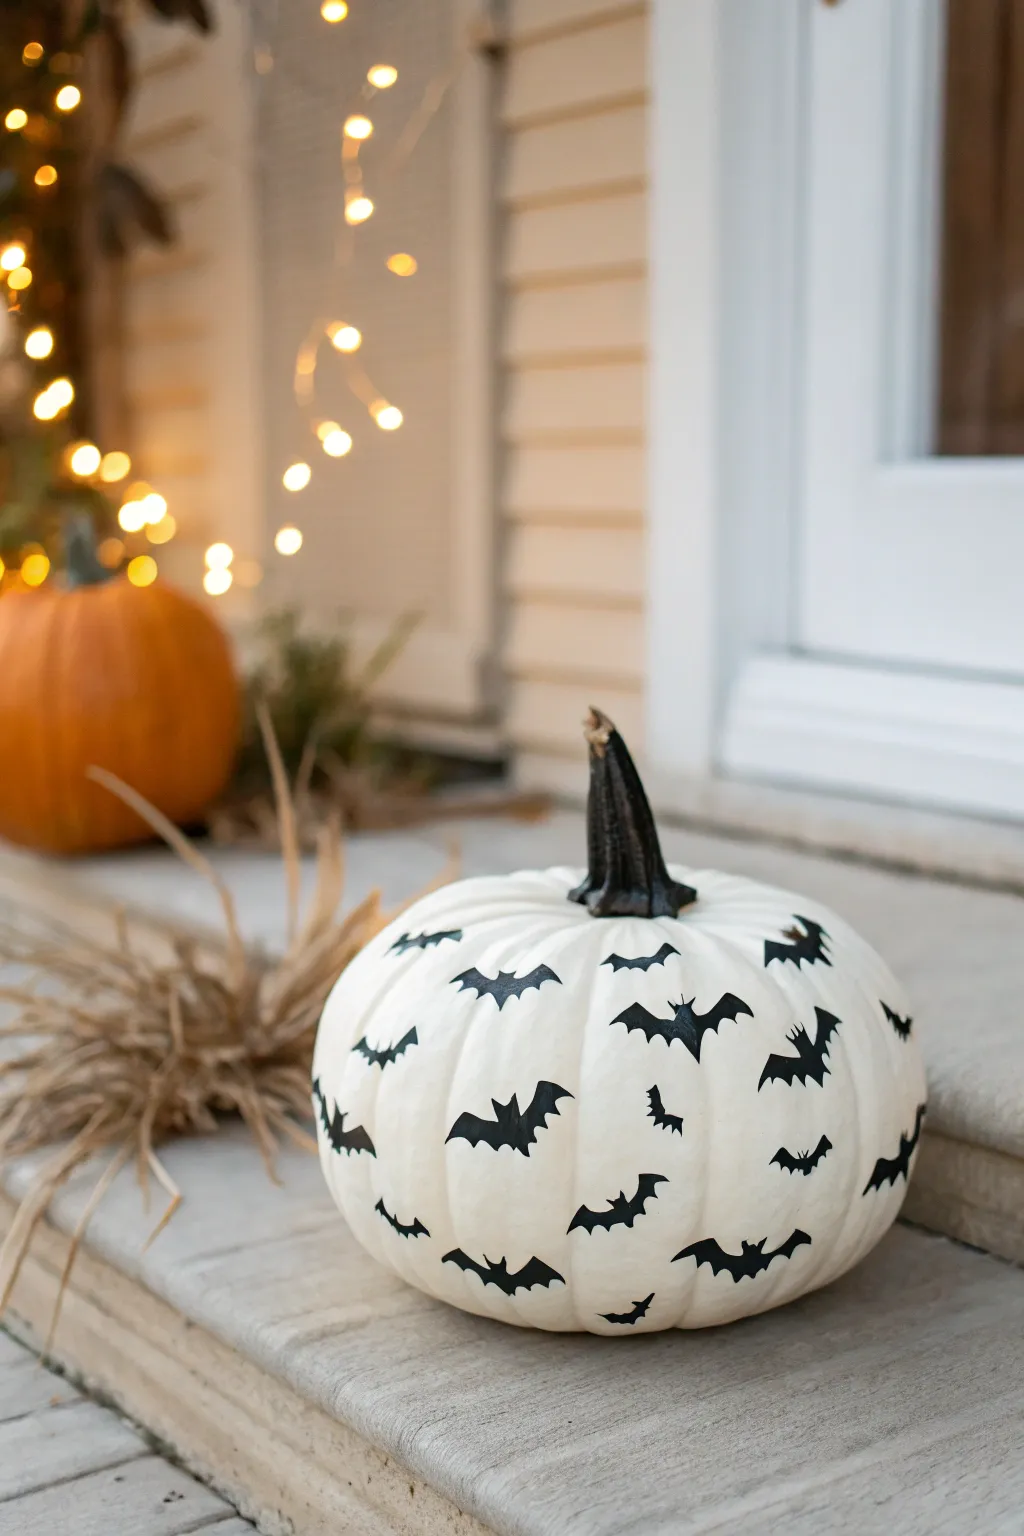
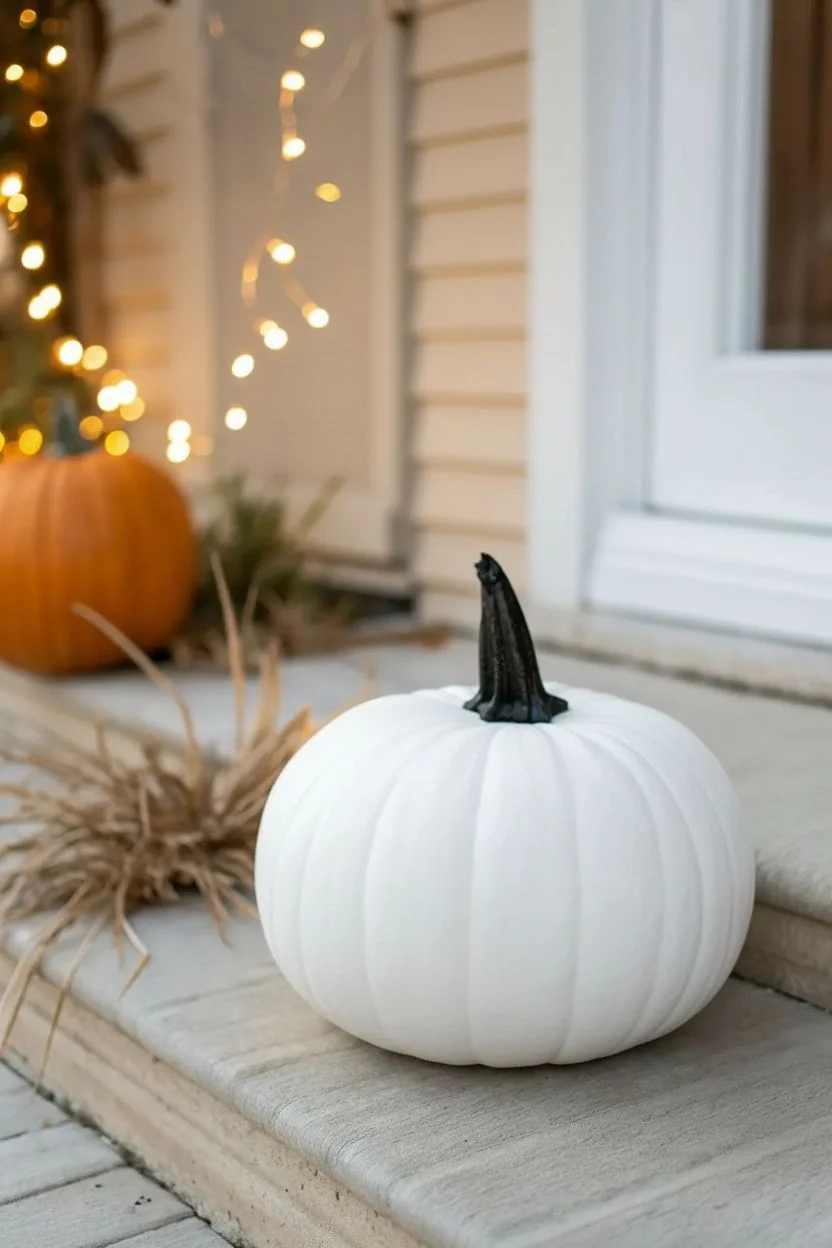
Achieve a minimalist yet spooky look with this high-contrast pumpkin project. By combining a matte white base with scattered black bat silhouettes, you create a finished piece that feels modern and playful without being overly scary.
Step-by-Step Tutorial
Materials
- Medium-sized pumpkin (real or faux)
- White matte acrylic paint or chalk paint
- Black matte acrylic paint
- Black adhesive vinyl (matte finish) OR black cardstock and Mod Podge
- Cricut machine or scissors
- Bat stencil or printable template
- Medium flat paintbrush
- Small detail paintbrush
- Painter’s tape (optional, for stem)
- Clear matte sealer spray
Step 1: Preparing the Canvas
-
Clean surface:
Begin by thoroughly wiping down your pumpkin with a damp cloth to remove any dirt or oils. If you are using a real pumpkin, ensure it is completely dry before painting. -
Protect the stem:
Since the stem will be painted a different color, you can wrap a bit of painter’s tape around the very base of the stem where it meets the pumpkin skin to keep your lines crisp. -
Apply base coat:
Using a medium flat brush, apply a coat of white matte acrylic or chalk paint over the entire body of the pumpkin. Don’t worry if the orange shows through slightly on the first pass. -
Layer for opacity:
Let the first coat dry completely, usually about 20-30 minutes. Apply a second and possibly third coat until the finish is solid, opaque, and stark white. -
Paint the stem:
Once the white body is dry, remove the tape protecting the stem. Use a smaller flast brush to paint the entire stem with the matte black acrylic paint. I like to use two coats here to ensure the natural beige of the stem is fully concealed.
Bat Movement
To mimic the chaotic flight of real bats, vary the angles significantly. Start with a dense cluster near the bottom and space them out more as you go up.
Step 2: Creating the Bats
-
Choose your method:
You have two main options for the bats: painting them by hand using a stencil, or cutting them out of black material. For the crispest lines similar to the photo, cutting them from adhesive vinyl or cardstock is recommended. -
Cut the shapes:
If using a cutting machine (like a Cricut), load a simple bat silhouette file and cut about 20-30 bats from matte black vinyl. Varies the sizes slightly (between 1 to 2 inches) generally looks best. -
Manual cutting option:
If you don’t have a cutting machine, print a bat template onto paper, cut it out, trace it onto your black vinyl or cardstock, and carefully cut out the shapes with sharp scissors. -
Weeding:
For vinyl users, remove the excess vinyl from the backing sheet, leaving only the bat stickers ready for transfer.
Rough Texture Help
If the pumpkin skin is too bumpy for vinyl to STICK, use a hairdryer on low heat. Warm the vinyl after applying it, then press it into the texture.
Step 3: Assembly and Finishing
-
Plan placement:
Before sticking anything down, mentally map out where the bats will go. The goal is a random, scattered pattern. Avoid placing them in straight lines or perfectly symmetrical rows. -
Apply first bat:
Peel the backing off your first bat vinyl sticker and place it centrally on the front of the pumpkin. Press down firmly from the center outward to smooth out bubbles. -
Fill the surface:
Continue applying bats around the pumpkin. Rotate the angle of some bats—have some flying ‘up’ and others banking left or right—to create a sense of movement. -
Handle the curves:
Pumpkins are bumpy. When placing a sticker over a deep aesthetic groove (rib), press the vinyl deep into the crease with your fingernail or a burnishing tool so it adheres to the surface rather than bridging the gap. -
Alternative: Decoupage:
If you used cardstock instead of vinyl, brush a small amount of Mod Podge on the back of each cutout, press it to the pumpkin, and then brush a thin layer over the top to seal it. -
Touch ups:
Check the edges of your white paint near the stem. If any black stem paint dripped, use a small detail brush with white paint to clean up the transition line. -
Seal the work:
To make your pumpkin weather-resistant for the porch, take it outside and apply a light mist of clear matte sealer spray over the entire piece.
Place your creation on the doorstep to greet visitors with a classic Halloween vibe
BRUSH GUIDE
The Right Brush for Every Stroke
From clean lines to bold texture — master brush choice, stroke control, and essential techniques.
Explore the Full Guide
Dripping Spooky Typography Like a Mini Pumpkin Sign

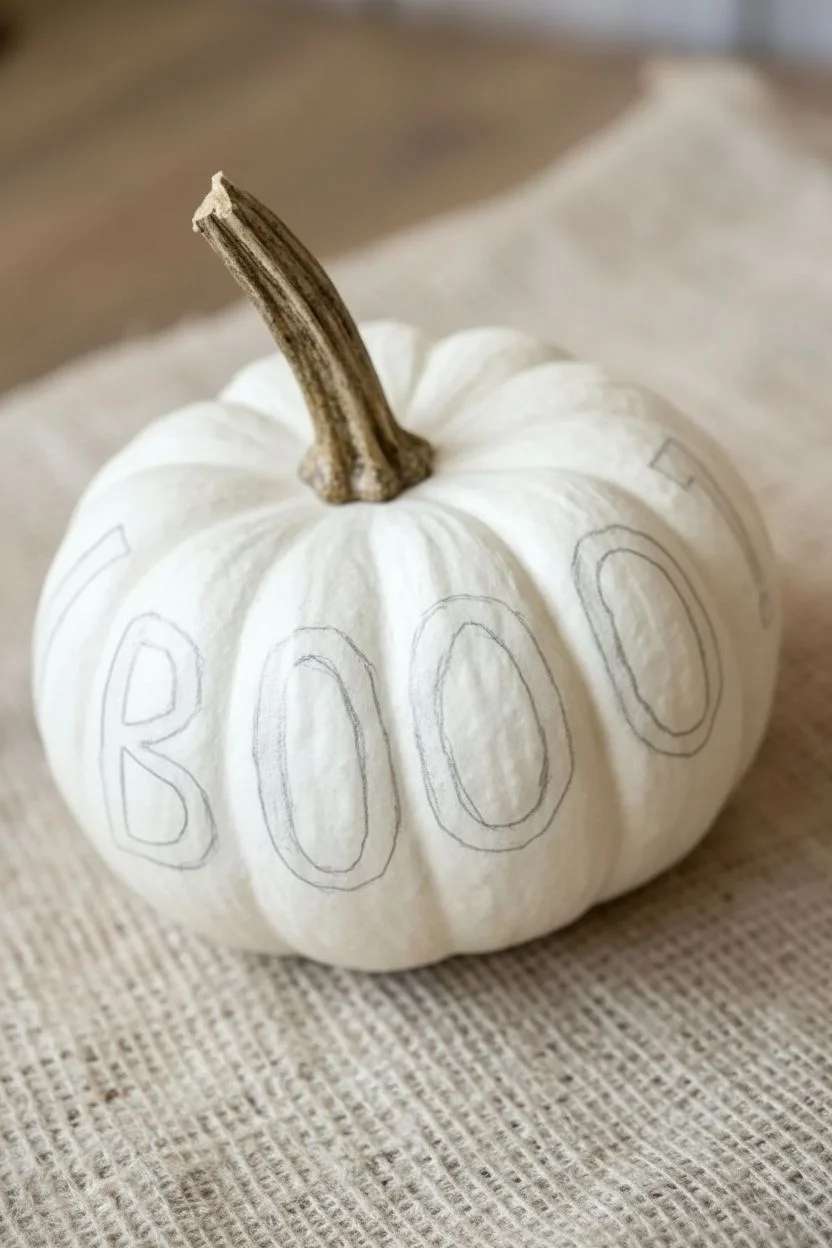
Turn a simple white mini pumpkin into a typographic statement piece with this high-contrast design. The dripping letter effect adds a spooky, freshly-inked vibe that requires zero carving skills but delivers maximum Halloween style.
Step-by-Step
Materials
- Small white pumpkin (real or faux)
- Black acrylic paint
- Small round paintbrush (size 2 or 4)
- Fine liner brush (size 0 or 00)
- Pencil for sketching
- Paper plate or palette
- Cup of water
- Paper towels
- Clear matte sealer spray (optional)
Step 1: Planning the Typography
-
Clean surface:
Begin by wiping down your pumpkin with a slightly damp paper towel to remove any dust or dirt. If you are using a real pumpkin, ensure it is completely dry before proceeding. -
Choose your word:
Decide on a short word that fits comfortably around the circumference. ‘BOO!’ or ‘BOOO!’ works perfectly because the round letters mimic the pumpkin’s shape. -
Sketch the letters:
Lightly sketch your letters onto the pumpkin using a pencil. Aim for thick, blocky shapes but don’t worry about perfect straight lines; a hand-drawn look adds character. -
Follow the ribs:
Try to position the center of each letter slightly over the ribs (the indented lines) of the pumpkin to give the text dimension as it wraps around the curve.
Pro Tip: Stabilization
Keep the pumpkin steady by placing it inside a roll of painter’s tape or a small bowl while you paint. This prevents it from rolling away while you tackle the detailed lettering.
Step 2: Painting the Letters
-
Load the brush:
Squeeze a small amount of black acrylic paint onto your palette. Load your small round brush, ensuring the bristles are coated but not dripping. -
Outline first:
Carefully trace the pencil outline of your first letter. I find it helpful to anchor my pinky finger on the pumpkin for stability while tracing the curves. -
Fill in the shape:
Fill in the center of the letter with solid black coverage. You may need two coats if your paint is thin, but let the first coat dry to the touch before adding the second. -
Repeat for all letters:
Continue outlining and filling in the remaining letters, rotating the pumpkin as you go. Be careful not to smudge the wet paint of the previous letters.
Level Up: Glossy Finish
Make the ‘ink’ look permanently wet and fresh by brushing a coat of high-gloss varnish or clear nail polish over ONLY the black painted letters once they are dry.
Step 3: Adding the Dripping Effect
-
Switch brushes:
Once the main letters are painted, switch to your fine liner brush for the detailed work. -
Create drip lines:
At the bottom of each letter, paint thin, wavy lines extending downward. Vary the lengths—some short, some long—to make the dripping look natural. -
Add tear drops:
At the end of some of your drip lines, paint a small solid teardrop shape. This simulates gravity pulling the heavy ‘ink’ down. -
Thicken connections:
Where the drip line meets the bottom of the letter, slightly thicken the connection point. It should look like the paint is pooling before it runs down.
Step 4: Splatter and Finish
-
Add splatter dots:
Using the tip of your liner brush, add tiny random dots around the letters. Focus these primarily near the top and bottom of the text to simulate ink splatter. -
Check consistency:
Step back and look at the pumpkin from a distance. If any black areas look streaky, touch them up now with a final light coat of paint. -
Dry completely:
Allow the pumpkin to sit undisturbed for at least an hour to ensure the thickest parts of the paint are fully cured. -
Seal the deal:
If you plan to display this pumpkin outdoors or want to protect the finish, lightly mist it with a clear matte sealer spray.
Place your typographic pumpkin on a stack of books or a mantle for a chic and spooky accent piece
Black-and-White Buffalo Plaid Wrap Around the Ribs
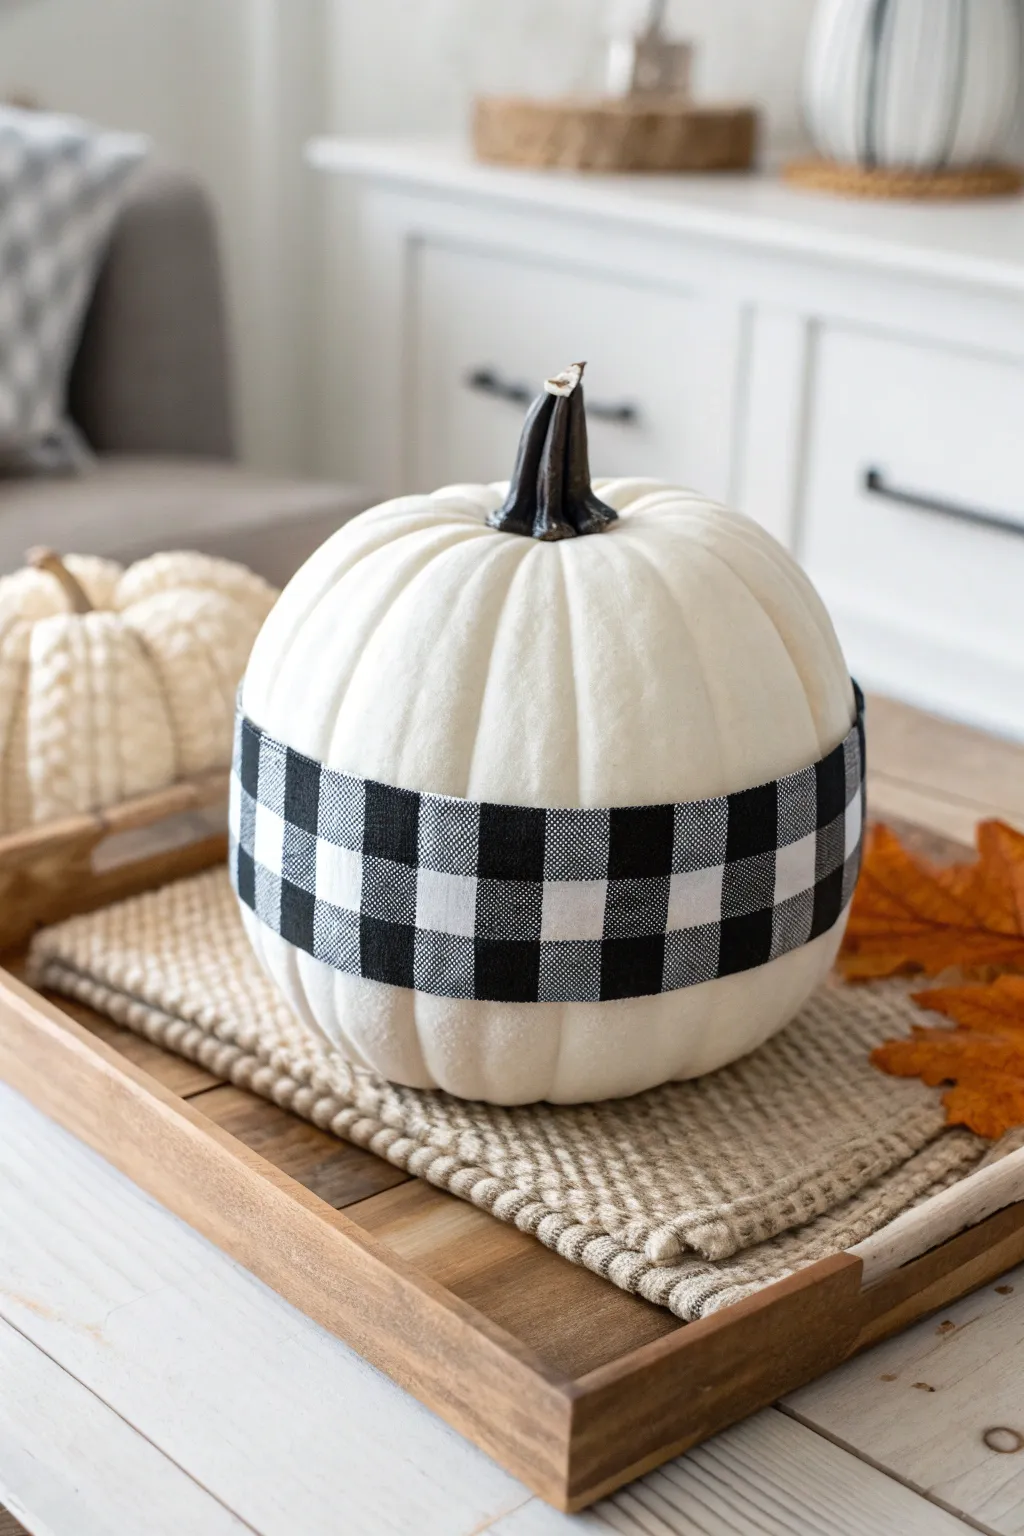
This chic and modern pumpkin design features a crisp band of hand-painted buffalo plaid wrapping around its center. The stark contrast of black and white check against the creamy pumpkin skin creates a cozy farmhouse look perfect for autumn decor.
Step-by-Step Guide
Materials
- Medium-sized white craft pumpkin (faux)
- Black acrylic craft paint
- Dark grey acrylic craft paint
- Light grey acrylic craft paint
- Painters tape (1-inch width)
- Flat shader paintbrush (small to medium)
- Pencil
- Ruler or measuring tape
- Matte sealer spray (optional)
Step 1: Preparation & Mapping
-
Clean surface:
Begin by wiping down your faux pumpkin with a damp cloth to remove any dust or oils that might prevent the paint from sticking well. Let it dry completely. -
Stem painting:
If your pumpkin doesn’t already have a black stem, carefully paint the stem with black acrylic paint. You may need two coats for full coverage; precise edges near the pumpkin top really help the finished look. -
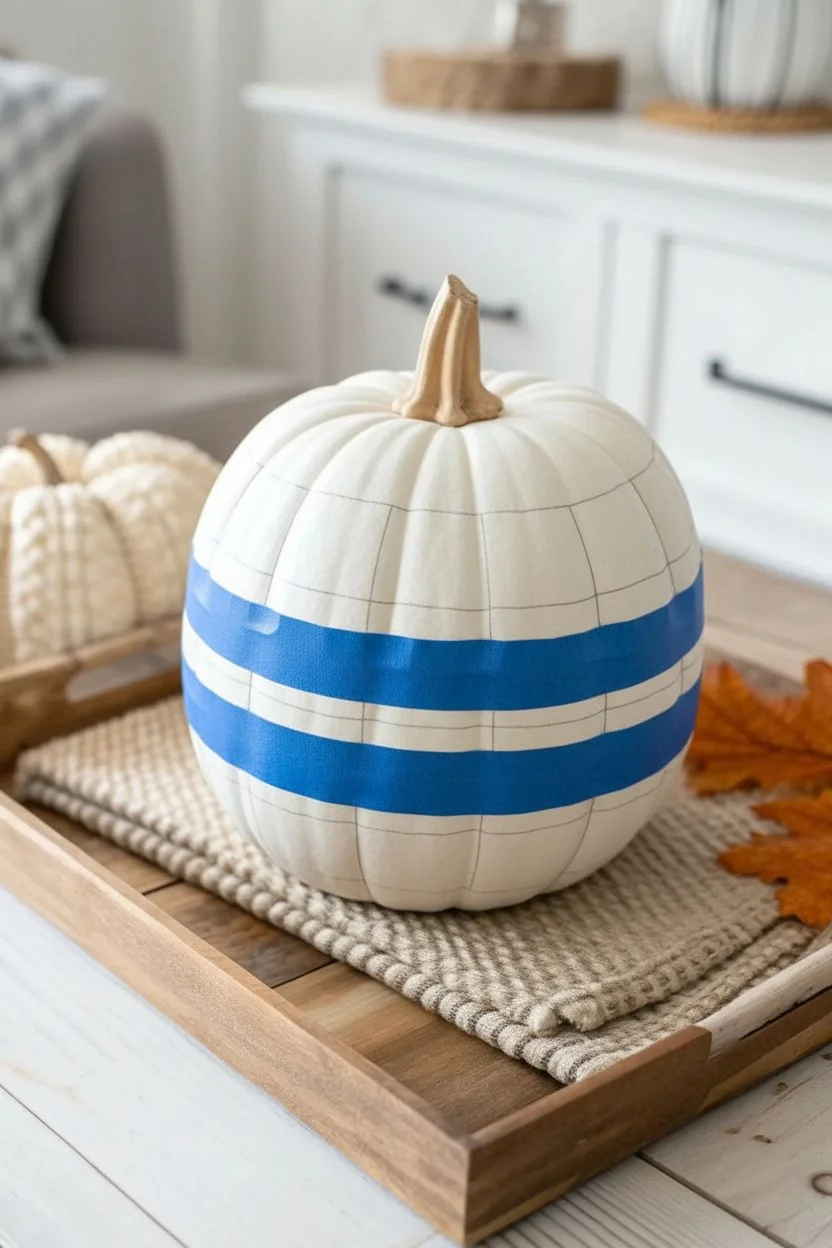
Measure the band:
Decide on the width of your plaid band. I find that centering the band around the pumpkin’s widest point works best. Using a ruler, mark a top line and a bottom line lightly with a pencil all the way around the circumference. -
Tape the borders:
Apply painters tape along your pencil lines to create a clean top and bottom border for your painting area. Press the tape edges down firmly so paint won’t bleed underneath.
Uneven Lines?
If the pumpkin’s ribs make straight lines difficult, use flexible washi tape instead of standard painter’s tape to hug the curves better.
Step 2: Painting the Grid Base
-
Sketch the grid:
Inside your taped area, lightly sketch a grid of squares using your pencil. Aim for squares that are roughly 1 inch by 1 inch. Don’t worry if they warp slightly over the pumpkin’s ribs; that adds character. -
Paint vertical stripes:
Start by identifying every other vertical column of squares. Fill these columns in completely with your light grey paint. This establishes the lighter intersections of the plaid pattern. Let this dry for about 15 minutes. -
Paint horizontal stripes:
Now, identify every other horizontal row. Where these rows intersect with the empty (white) vertical columns, paint those squares light grey as well. Essentially, you are painting the ‘crossing’ paths of the plaid in the lightest shade first.
Cozy Texture
Mix a small amount of baking soda into your paint before applying. This creates a grainy, fabric-like texture that mimics real wool flannel.
Step 3: Adding Depth & Contrast
-
Intersections:
The magic of buffalo plaid happens at the intersections. Identify the squares where a vertical grey stripe crosses a horizontal grey stripe. Paint these specific squares with your dark grey paint. -
Key dark squares:
Looking at your reference or pattern logic, identify the remaining ’empty’ squares that haven’t been painted yet (they should alternate with the grey squares). These will become your solid black squares. -
Painting black:
Fill in those identified squares with black acrylic paint. Use a flat brush to keep the edges as straight and sharp as possible. -
Refining the pattern:
Step back and look at the pattern. You should see white squares, light grey squares, dark grey squares (where stripes would overlap), and solid black squares. Retouch any edges where colors meet.
Step 4: Finishing Touches
-
Texture simulation:
To give it a fabric-like appearance, you can use a very dry brush with a tiny amount of white paint to lightly drag across the black squares, simulating the woven texture of fabric. -
Remove tape:
Once the paint is tacky but not fully hardened, carefully peel away the top and bottom blue painter’s tape. Pull at a 45-degree angle away from the paint to ensure a crisp line. -
Touch up lines:
Using a fine liner brush and white paint (or the pumpkin’s base color), tidy up any spots where paint might have bled under the tape. -
Sealing:
If you plan to place this pumpkin on a porch or high-traffic area, apply a light coat of matte sealer spray over the painted band to protect your work from scuffs.
Place your stylishly tailored pumpkin on a wooden tray or your mantel to enjoy the cozy texture throughout the season

PENCIL GUIDE
Understanding Pencil Grades from H to B
From first sketch to finished drawing — learn pencil grades, line control, and shading techniques.
Explore the Full Guide
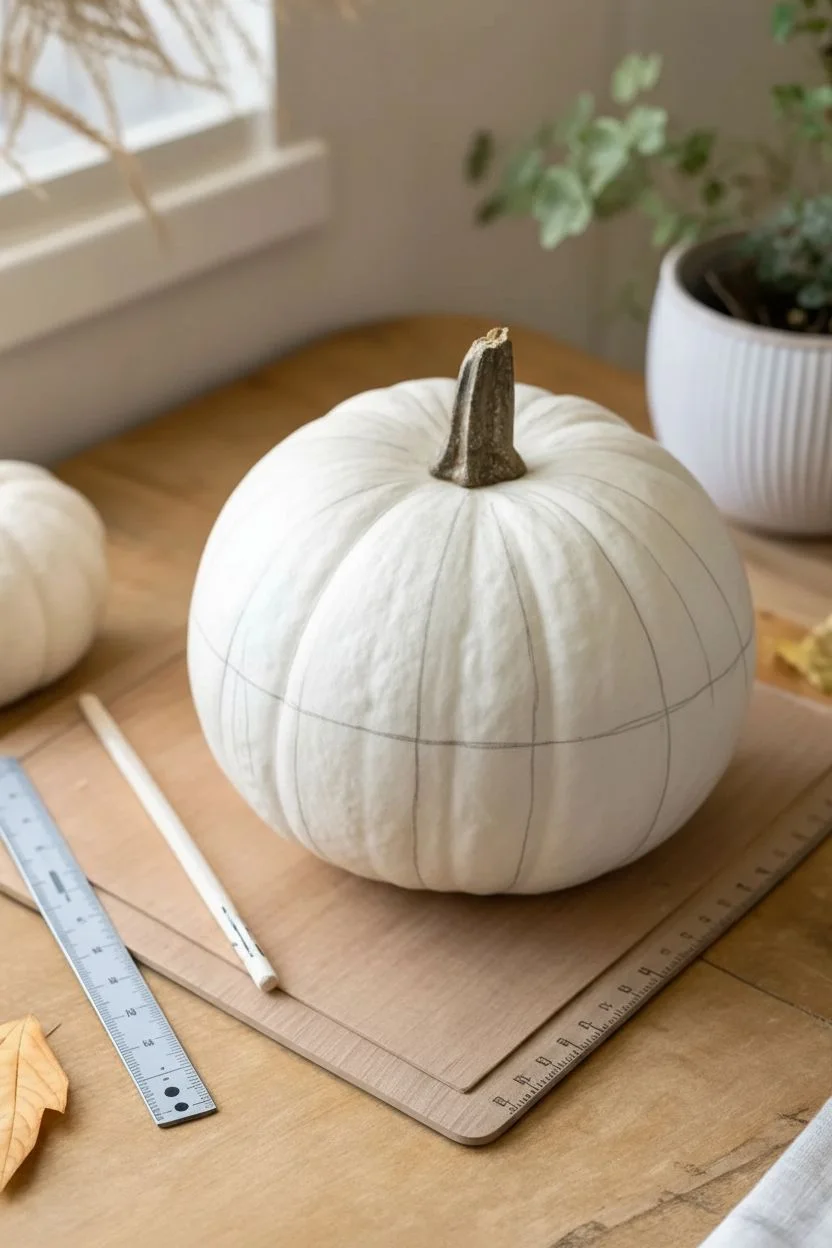
Geometric Triangles and Color Blocks for a Modern Look
Give your fall decor a minimalist, modern twist with this striking geometric painted pumpkin. By using the pumpkin’s natural shape as a guide, you can create a high-contrast design that feels both organic and structured.
Step-by-Step
Materials
- White pumpkin (real or faux)
- Black acrylic craft paint
- Fine liner paintbrush
- Medium flat paintbrush
- Pencil
- Paper plate or palette
- Cup of water
- Paper towels
- Ruler or soft measuring tape (optional)
Step 1: Preparation and Planning
-
Clean surface:
If using a real pumpkin, wash it thoroughly with mild soapy water and dry it completely. For a faux pumpkin, give it a quick wipe with a damp cloth to remove any manufacturing dust. -
Initial mapping:
Look closely at your pumpkin to identify its natural ribs and valleys. You will be using the recessed valleys (the grooves) as the map for your vertical lines. -
Mark the center:
Using a pencil, lightly mark a horizontal line around the equator of the pumpkin. This doesn’t have to be perfectly straight; following the organic curve looks best.
Clean Lines Hack
If you struggle with freehand straight lines, use thin washi tape or painter’s tape to mask off the triangle shapes before painting the centers.
Step 2: Painting the Structure
-
Load your liner brush:
Squeeze a small amount of black acrylic paint onto your palette. Thin the paint slightly with a drop of water if it feels too thick; you want an inky consistency that flows smoothly. -
Paint vertical lines:
Starting from the base of the stem, paint a thin black line down following each natural groove all the way to the bottom center of the pumpkin. -
Steady your hand:
I usually rest my pinky finger against the pumpkin surface while painting these lines to keep my hand steady for a cleaner stroke. -
Check consistency:
Ensure all the vertical lines are roughly the same thickness. Go back over any lines that look too faint or broken to solidify the black color. -
Let lines dry:
Allow the vertical lines to dry completely before moving on to avoid smudging your work. This usually takes about 10-15 minutes.
Add Metallic Pop
For a glamorous twist on this modern look, paint the pumpkin stem in gold or copper leaf to contrast with the matte black and white design.
Step 3: Adding the Geometric Details
-
Outline the triangles:
At the midline you marked earlier, draw outlines for triangles. The vertical line you painted should act as the center altitude of the triangle pointing downward, or the meeting point between two connected shapes. -
Create the flag shape:
Specifically for this design, draw a sideways triangle or ‘pennant’ shape bridging the space between two vertical lines. The flat side of the triangle sits against one vertical line, and the point touches the next vertical line. -
Alternate directions:
You can alternate the direction of these triangular blocks or keep them uniform. In the reference, they create a sharp, jagged band around the middle. -
Fill the shapes:
Switch to your medium flat brush. Carefully fill in the triangle outlines with solid black paint. -
Refine edges:
Use the fine liner brush again to sharpen the corners and edges of your filled triangles, ensuring crisp points where the shapes meet the vertical lines. -
Add a second coat:
Blocks of black paint often dry a bit streaky. Apply a second coat to the filled triangles once the first layer is dry for a solid, opaque look. -
Touch up:
Inspect the pumpkin for any stray white spots within your design or shaky edges and correct them with a tiny bit of paint. -
Final dry:
Let the entire pumpkin sit undisturbed for at least an hour to ensure the thickest parts of the paint are fully cured.
Now you have a striking centerpiece that perfectly balances spooky vibes with chic modern aesthetics
Herringbone Pattern That Feels Chic and Timeless
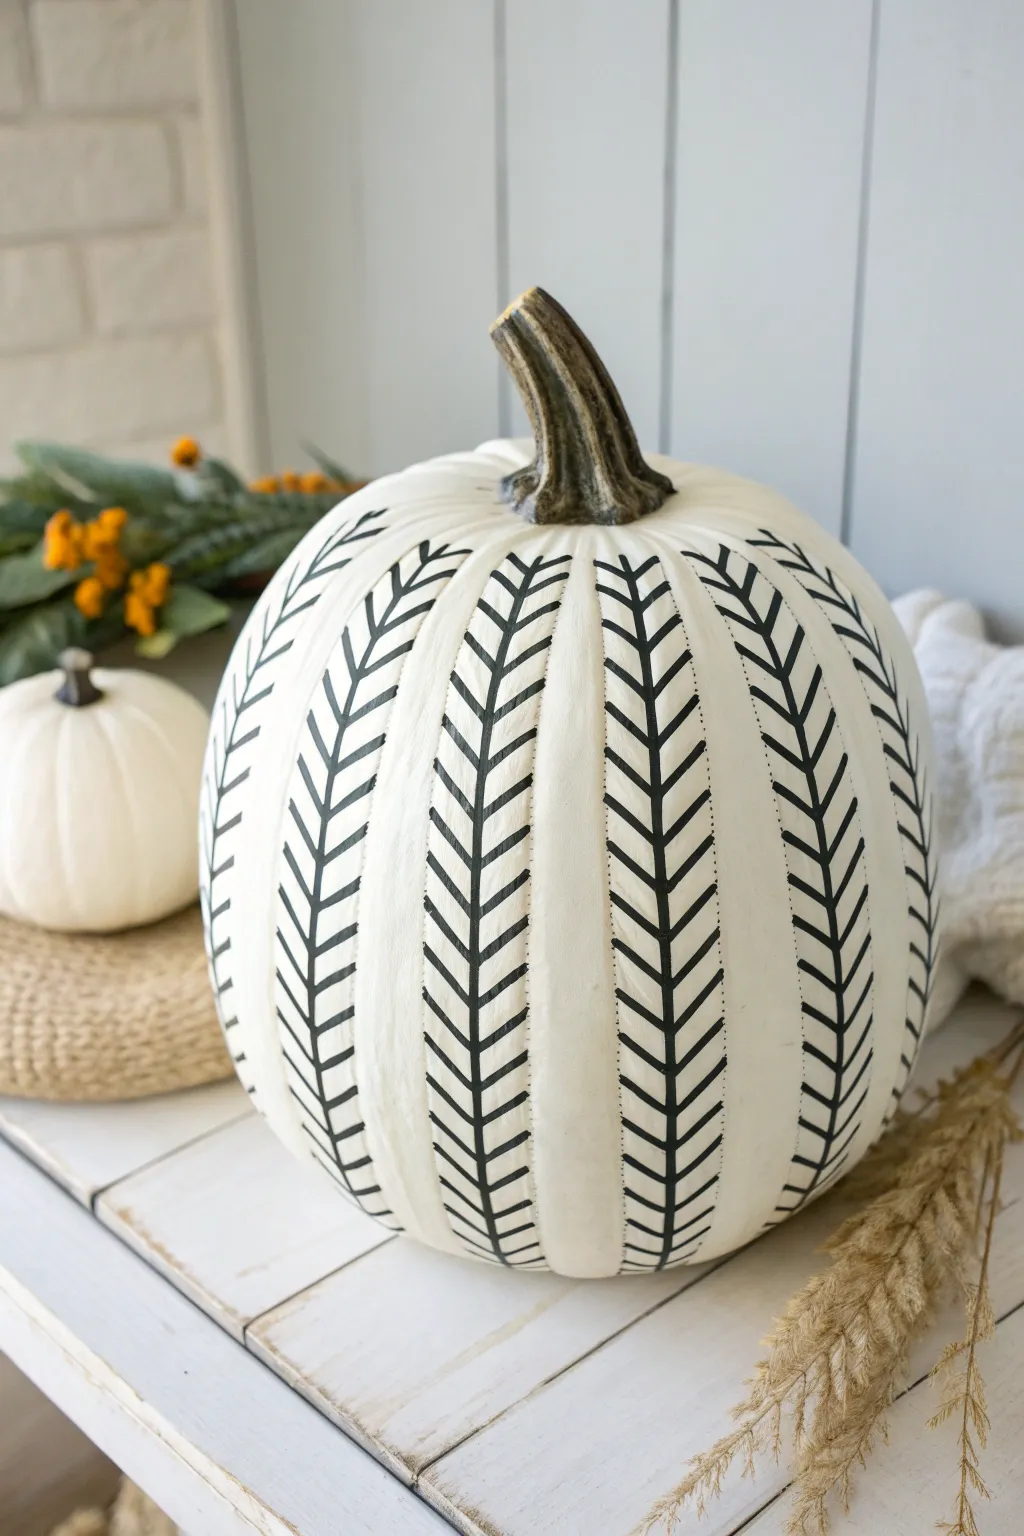
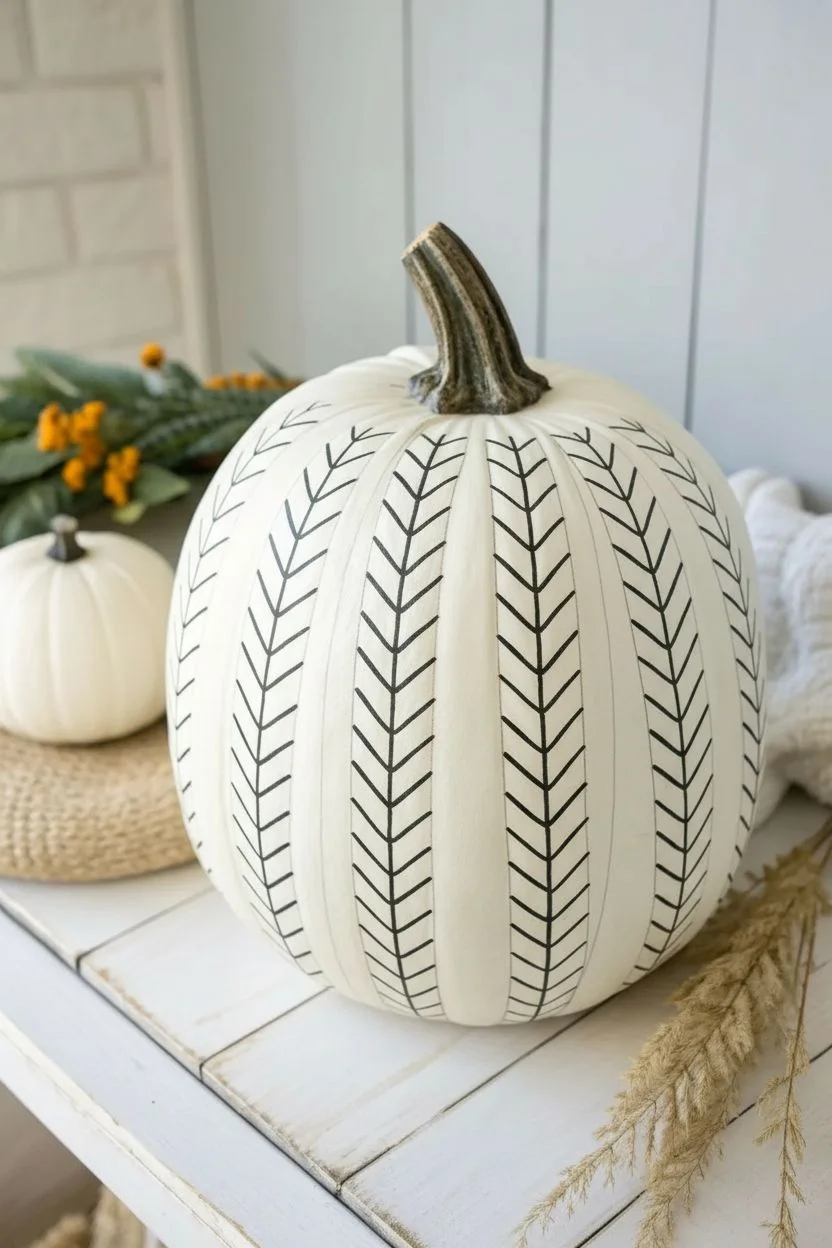
Elevate your autumn decor with this sophisticated black and white design that mimics a classic textile weave. The stark contrast of the black precision lines against the creamy white pumpkin creates a modern, farmhouse-chic centerpiece perfect for any table setting.
Step-by-Step Guide
Materials
- Faux white pumpkin (medium to large size)
- Black sharpie oil-based paint pen (fine point)
- Black sharpie oil-based paint pen (medium point for filling)
- Pencil (H or HB)
- White eraser
- Flexible sewing tape measure
- Damp cloth
- Matte clear spray sealant (optional)
- Brown acrylic paint (optional for stem touch-ups)
Step 1: Preparation & Planning
-
Clean the Surface:
Begin by wiping down your faux pumpkin with a damp cloth to remove any dust, oils, or manufacturing residue. If you are using a real pumpkin, ensure it is completely dry and scrubbed clean. -
Identify the Ribs:
Observe the natural (or molded) ribs of the pumpkin. The vertical indentations will serve as the natural dividers for your pattern, so you won’t need to draw vertical grid lines. -
Sketch a Guide Line:
Using your flexible tape measure, find the vertical center of one of the pumpkin’s raised ribs. Lightly sketch a faint pencil line down this center ridge from the stem to the base; this will act as the ‘spine’ for your herringbone V-shapes.
Smudge Control
Work from top to bottom. If you’re right-handed, rotate the pumpkin counter-clockwise as you work so your hand rests on unpainted areas.
Step 2: Drawing the Pattern
-
Start at the Top:
Begin near the stem on your first selected rib. Using the fine-point paint pen, draw a small diagonal line slanting downward from your center pencil line to the left edge of the rib. -
Mirror the Stroke:
Immediately draw a corresponding diagonal line from the same center point slanting downward to the right edge of the rib, creating an inverted ‘V’ shape. -
Establish Spacing:
Move your pen tip about 1/4 inch down the center line. Start your next ‘V’ here, keeping the angle parallel to your first set of lines. -
Continue Down the Rib:
Repeat this V-formation all the way down to the base of the pumpkin. I find it helps to rotate the pumpkin slightly as you work down the curve to keep your hand position comfortable. -
Skip a Section:
Move past the indentation to the next raised rib. Skip every other rib initially to prevent your hand from smudging wet ink on adjacent sections. -
Repeat the Pattern:
Recreate the center pencil guide and the column of V-shapes on all the odd-numbered ribs first. -
Fill the Gaps:
Once the first set of ribs is dry to the touch, go back and fill in the even-numbered ribs with the same pattern.
Color Switch
Try a metallic gold or copper paint pen instead of black for a warmer, glam look that glows beautifully under candle light.
Step 3: Refining & Finishing
-
Thicken the Lines:
For a bolder look closer to the reference image, go back over your lines with the medium-point pen, or simply double-stroke with the fine point to add a slight variation in weight. -
Connect the Spines:
Draw a unified vertical line straight down the center of your Vs, connecting all the points. This creates the ‘spine’ of the fern-like or feather look. -
Check the Edges:
Examine where the diagonal lines end. They should stop naturally where the pumpkin rib curves inward, avoiding the deep creases. -
Stem Touch-Ups:
If your faux pumpkin stem looks too plasticky, dry brush a little brown acrylic paint over it to give it a realistic, weathered texture that compliments the chic body. -
Erase Guides:
Wait at least 30 minutes for the oil pen to cure completely. Gently erase any visible pencil marks with a white eraser. -
Seal (Optional):
If this pumpkin will sit on a porch, mist it lightly with a matte clear spray sealant to protect the design from moisture.
Place your stylish new gourd alongside some dried wheat or eucalyptus greenery to complete the modern seasonal vignette


Delicate Black Botanical Line Art for a Clean Aesthetic
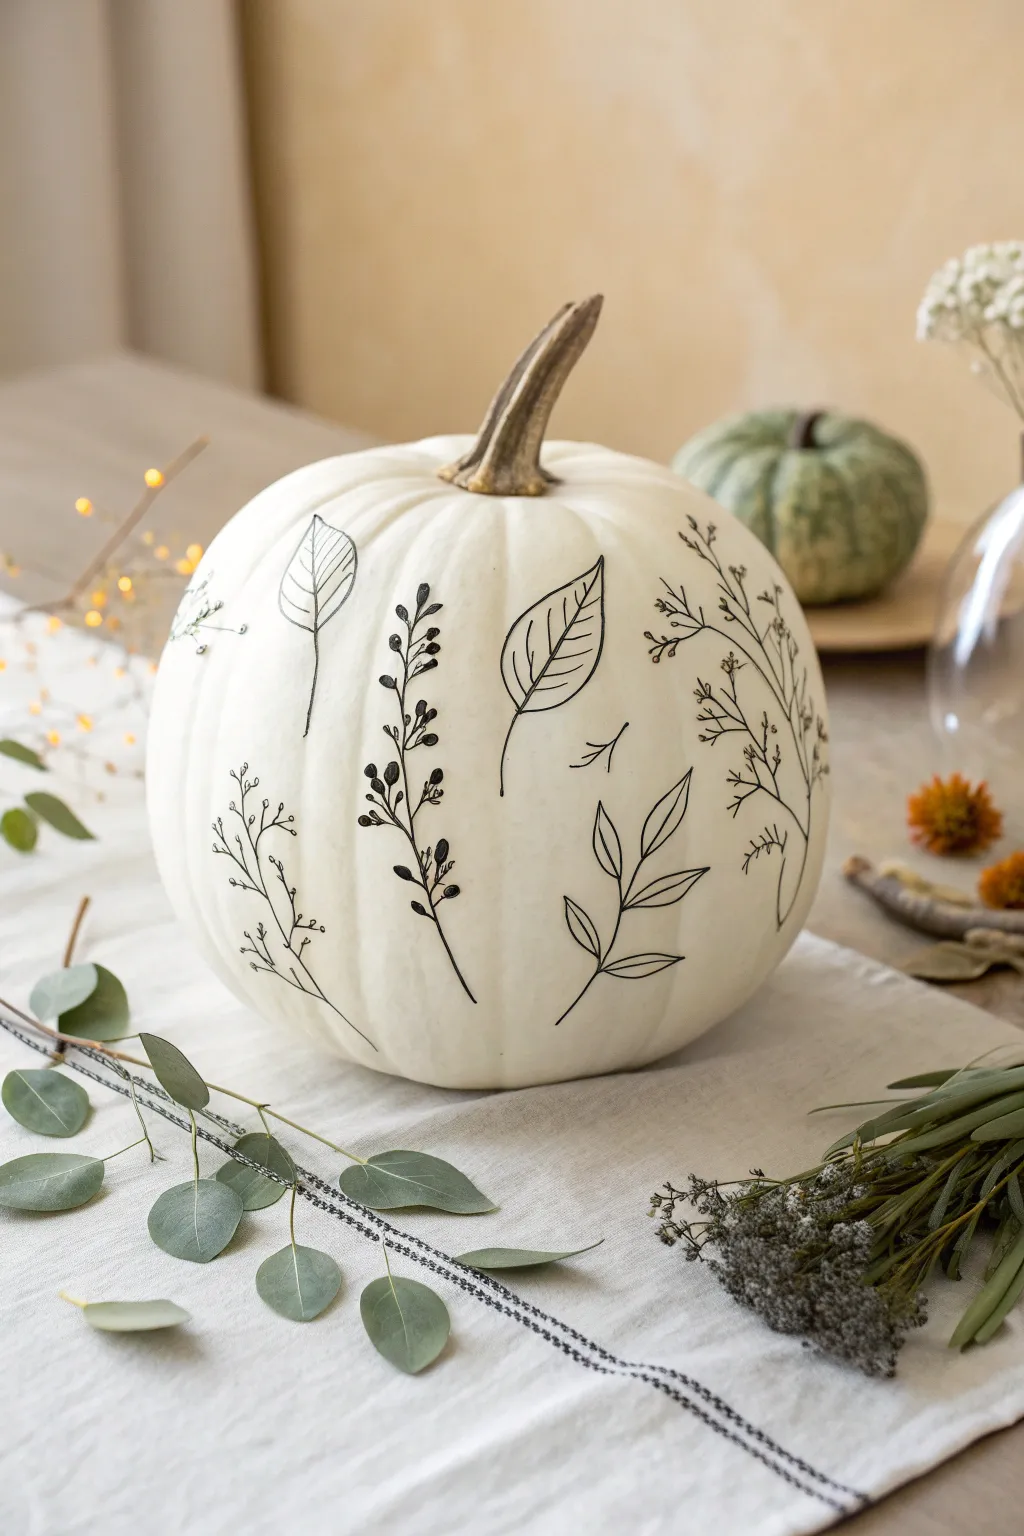
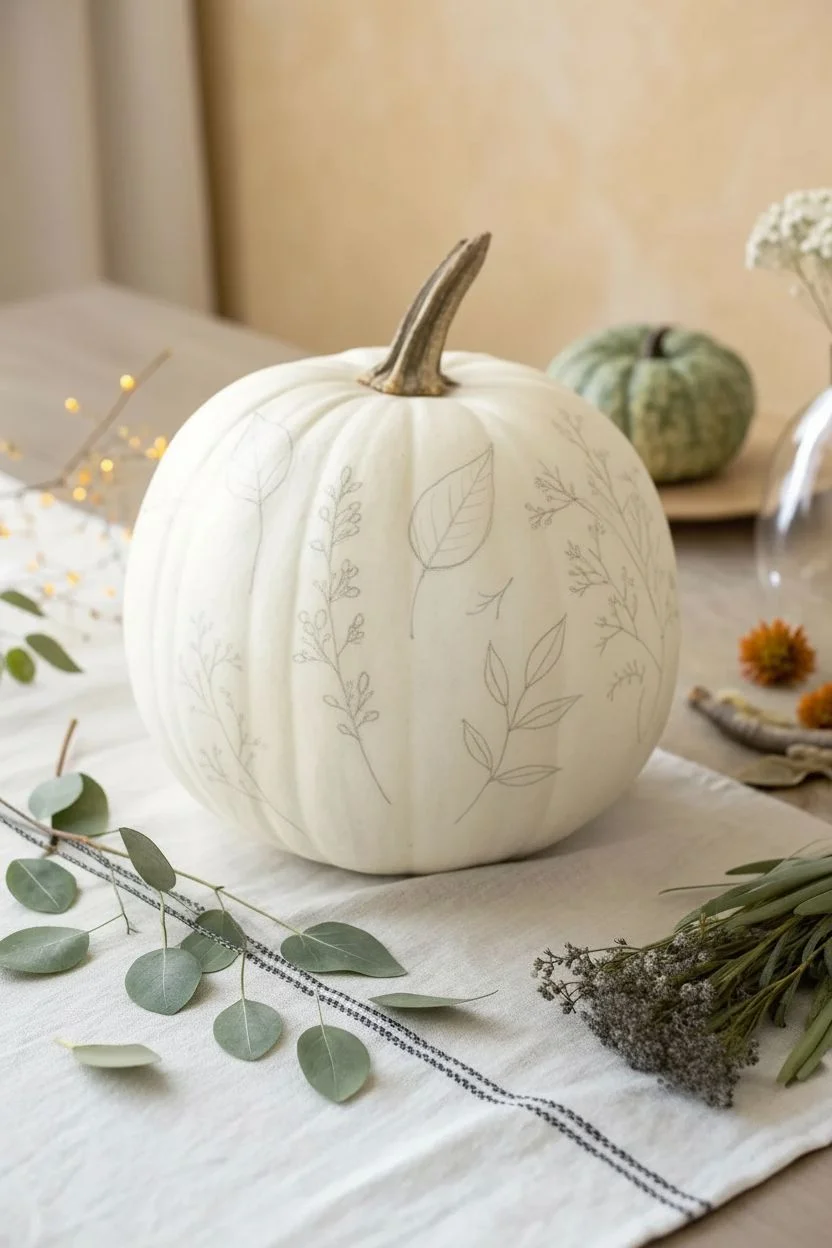
Embrace simplicity with this elegant project that transforms a plain white pumpkin into a canvas for delicate botanical illustrations. The contrast of fine black ink against the creamy pumpkin skin creates a modern, sophisticated look perfect for a neutral autumn display.
How-To Guide
Materials
- Medium-sized white pumpkin (real or faux)
- Fine-point black permanent marker or paint pen (0.5mm or 0.7mm)
- Pencil and eraser
- Rubbing alcohol
- Cotton rounds
- Clear matte sealant spray (optional)
- Reference images of leaves and twigs
Step 1: Preparation & Planning
-
Clean the surface:
Before laying down any ink, wipe the entire surface of your pumpkin with rubbing alcohol on a cotton round to remove oils, dirt, or waxy residues that might repel the marker. -
Dry thoroughly:
Let the pumpkin air dry completely for about 10 minutes to ensure a pristine surface. -
Sketch loosely:
Using a light hand, sketch the basic placement of your botanical elements with a pencil. Don’t worry about perfect details yet; just map out where the stems will curve to ensure balanced spacing around the pumpkin. -
Vary the heights:
When planning your layout, make sure to stagger the height of your stems. Some should start lower near the base, while others can float higher up, mimicking the organic randomness of nature.
Ink Flow Tip
Test your marker on the bottom of the pumpkin first. Pumpkin skin can be slippery, and you want to ensure the ink adheres well without beading up.
Step 2: Drawing the Stems
-
Start the main lines:
Take your fine-point black marker or paint pen. Begin by tracing the main central vein or stem of your first botanical sprig. Use a confident, sweeping motion to prevent shaky lines. -
Anchor the designs:
I find it helpful to draw the stems following the natural vertical ribs of the pumpkin occasionally, as this helps guide the eye and accentuates the pumpkin’s shape. -
Add branching off-shoots:
From the main stem, draw smaller, thinner lines branching outward. Keep these branches asymmetrical—nature rarely produces perfectly mirrored limbs.
Level Up: Gold Accents
After the black ink dries, trace a shadow line on the right side of the leaves using a metallic gold paint pen for a subtle, glimmering highlight.
Step 3: Adding Details
-
Draw simple leaves:
On one of your stems, draw simple, open leaf shapes like elm or beech leaves. Outline them clearly but leave the interior empty for a light, airy feel. -
Create berry sprigs:
For contrast, devote a different stem to berries. Draw small, solidified black circles clustering along the branch tips to add visual weight and texture. -
Sketch fern-like fronds:
In the spaces between larger leaves, draw delicate, needle-like foliage or feathery fern patterns. Use quick, short flicks of the pen to keep these lines extremely thin. -
Detail the veins:
Go back to your larger open leaves and draw a single line down the center, adding tiny diagonal veins. Keep these internal lines thinner than the outline if possible. -
Rotate and assess:
Spin the pumpkin slowly to look for large empty gaps. Add small floating seeds, tiny singular leaves, or short twigs to fill these voids without overcrowding the design.
Step 4: Finishing Touches
-
Clean up sketches:
Once the ink is completely dry—give it a good 20 minutes to be safe—gently erase any visible pencil marks. Be careful not to scrub too hard over the ink. -
Seal the artwork:
If you plan to keep this pumpkin on a porch or for several years (if faux), spray a light coat of matte clear sealant over the drawing to prevent smudging or fading. -
Style your display:
Place your finished pumpkin on a textured linen cloth and pair it with fresh eucalyptus or dried herbs to complement the natural aesthetic.
Step back and admire how a few simple lines can transform a basic gourd into a piece of modern art
Celestial Moons and Stars in Metallic Accents on White

Transform a plain white pumpkin into a dreamy, astral centerpiece with just a few metallic touches. This elegant design combines shimmering gold stars and a detailed crescent moon for a sophisticated take on Halloween decor that looks beautiful all season long.
Step-by-Step Guide
Materials
- White craft pumpkin (or a real white pumpkin, cleaned)
- Gold metallic paint marker (fine point)
- Gold metallic paint marker (medium point)
- Pencil (H or HB for light lines)
- Soft eraser
- Paper towels
- Gloss varnish or clear sealer spray (optional)
- Reference image of stars/moons
Step 1: Preparation & Planning
-
Surface Prep:
Begin by thoroughly cleaning the surface of your pumpkin. Whether it’s real or faux, wipe it down with a damp cloth to remove dust or oils, as these can stop the marker ink from adhering properly. -
Dry Completely:
Allow the pumpkin to dry completely before you start sketching. Any moisture can cause your marker ink to bleed or run. -
Reference Check:
Take a moment to look at the positioning of the celestial elements in the example. Notice how the large moon anchors the design on the lower half, while stars scatter upwards toward the stem.
Step 2: Drafting the Design
-
Sketch the Moon:
Using a pencil with a very light hand, draw the crescent moon shape first. Place it slightly off-center on the lower curve of the pumpkin. Sketch the outer curve first, then the inner curve to create the crescent. -
Add Moon Details:
Inside the crescent shape, lightly sketch the decorative swirls and dots. Don’t press hard; you just need faint guidelines to follow with your marker later. -
Plotting Stars:
Mark the locations for your larger stars. I like to randomize their placement to look like a natural night sky, mixing larger 8-point stars with smaller 4-point stars. -
Tiny Star Fillers:
In the empty spaces between the larger stars, lightly mark tiny dots or small diamond shapes. These will act as distant stars to fill out the composition.
Clean Lines Secret
Rest your pinky finger on the pumpkin surface while drawing to stabilize your hand. This acts as an anchor and prevents unsteady lines on the curved surface.
Step 3: Applying the Gold
-
Prime the Markers:
Shake your gold paint markers well. Press the tip down on a scrap piece of paper or paper towel until the ink flows smoothly and consistently. -
Outline the Moon:
Using the medium point marker, carefully trace the outer and inner curves of your crescent moon. Work slowly to keep the lines clean and smooth. -
Detailing the Moon:
Switch to your fine point marker for the intricate internal work. Draw the swirls inside the moon, starting from the center and curving outward to the tips. -
Drawing Large Stars:
With the fine point marker, draw the largest stars. Create a cross first, then add smaller diagonal lines intersecting the center to create a radiant starburst effect. -
Mid-Size Stars:
Draw simple 5-point open stars or solid 4-point diamond stars scattered around the upper half of the pumpkin. -
Micro Details:
Use the very tip of the fine marker to add tiny dots and small specks of gold dust around the larger elements. This adds texture and magic to the scene.
Ink Not Flowing?
If the marker skips on the waxy pumpkin skin, lightly buff the area with a dry paper towel or very fine sandpaper to give the surface a bit of ‘tooth’ for grip.
Step 4: Finishing Touches
-
Let Ink Set:
Allow the gold ink to dry for at least 15-20 minutes. It needs to be fully cured before you touch it or attempt to erase anything. -
Clean Up Guidelines:
Once the gold is completely dry, gently erase any visible pencil marks. Be very careful rubbing over the painted areas to avoid smudging the metallic finish. -
Second Coat (Optional):
Inspect your gold lines. If they look a bit translucent, go over the thickest parts of the moon outline one more time for a richer, opaque gold look. -
Sealing:
If you plan to place this pumpkin outside, spray a light coat of clear gloss sealer over the entire pumpkin to protect the design from moisture.
Place your shimmering celestial pumpkin on a mantle or table runner to bring a touch of starlight into your home
Gold Geometric Lines Over a White Pumpkin Base

Elevate a simple white pumpkin into a piece of modern art with this geometric gold line design. The crisp contrast between the matte white base and the shimmering metallic lines creates a sophisticated look that fits perfectly in contemporary fall decor.
Step-by-Step Tutorial
Materials
- White craft pumpkin (or real white pumpkin, cleaned and dried)
- White acrylic paint (matte or satin finish)
- Gold paint pen (fine tip) or gold leaf pen
- Liquid gold gilding paint (optional, for stem)
- Small paintbrush
- Ruler or straight edge (flexible sewing tape works well on curves)
- Pencil
- Clear matte sealant spray
Step 1: Base Preparation
-
Clean surface:
Begin by wiping down your pumpkin with a damp cloth to remove any dust or oils. If using a real pumpkin, wash it with a mild soap solution and dry completely. -
Apply base coat:
Even if your pumpkin is already white, applying a fresh coat of white acrylic paint creates a uniform, professional canvas. Use a wide flat brush for smooth coverage. -
Let it cure:
Allow the white base coat to dry fully. This usually takes about an hour, but check your paint bottle for specifics. -
Inspect coverage:
Check for any streaks. If the original color is showing through, apply a second thin coat of white paint and let it dry again.
Wobbly Lines?
If your hand shakes or a line goes crooked, don’t wipe it! Let the gold dry completely, then touch it up with a small brush and white paint to ‘erase’ the mistake.
Step 2: Drawing the Geometry
-
Plan your points:
Visualize the geometric pattern before you start. The design relies on triangles and intersecting lines. Start by marking a few faint pencil dots randomly around the pumpkin’s surface. -
Connect the dots:
Using a flexible ruler or just freehanding for an organic look, lightly sketch straight lines connecting your pencil dots to form various sized triangles. -
Extend lines:
Extend some lines all the way around the curve of the pumpkin, crossing over natural ridges. Don’t worry about perfection; the lines should follow the form. -
Check density:
Step back and look at the pattern. Add more intersecting lines if some areas look too empty, aiming for a balanced ‘web’ effect.
Step 3: Applying Gold Accents
-
Prime the pen:
Shake your gold paint pen well and press the nib down on a scrap piece of paper until the metallic ink flows smoothly. -
Trace the lines:
Carefully trace over your pencil sketches with the gold pen. Use steady, even pressure to keep the line width consistent. -
Handle curves:
When crossing the pumpkin’s vertical ribs, slow down. The pen might skip on the bumps, so you may need to go over those indentations twice. -
Clean up intersections:
At the points where multiple lines meet (the vertices), dab the pen slightly to ensure a sharp, clean join. -
Let ink dry:
Wait 10-15 minutes for the gold ink to set completely so you don’t accidentally smudge it with your hand. -
Erase guidelines:
Once the gold is fully dry, gently erase any visible pencil marks that peek out from underneath the gold lines.
Make It Sparkle
For extra dimension, apply a thin line of craft glue over select gold segments and sprinkle fine gold glitter on top before shaking off the excess.
Step 4: Finishing Touches
-
Gild the stem:
For a cohesive look, brush liquid gold gilding or use your paint pen to color the very base of the stem where it meets the pumpkin. -
Initial seal:
Hold a clear matte sealant spray about 12 inches away and apply a very light mist to set the artwork. -
Protect the finish:
After the first mist dries, apply a slightly heavier coat of sealant to protect the pumpkin from scratches and moisture during display.
Place your gilded masterpiece on a mantle or tablescape to enjoy the modern flair it brings to the season
Paint-Splatter Art for an Abstract Gallery Feel
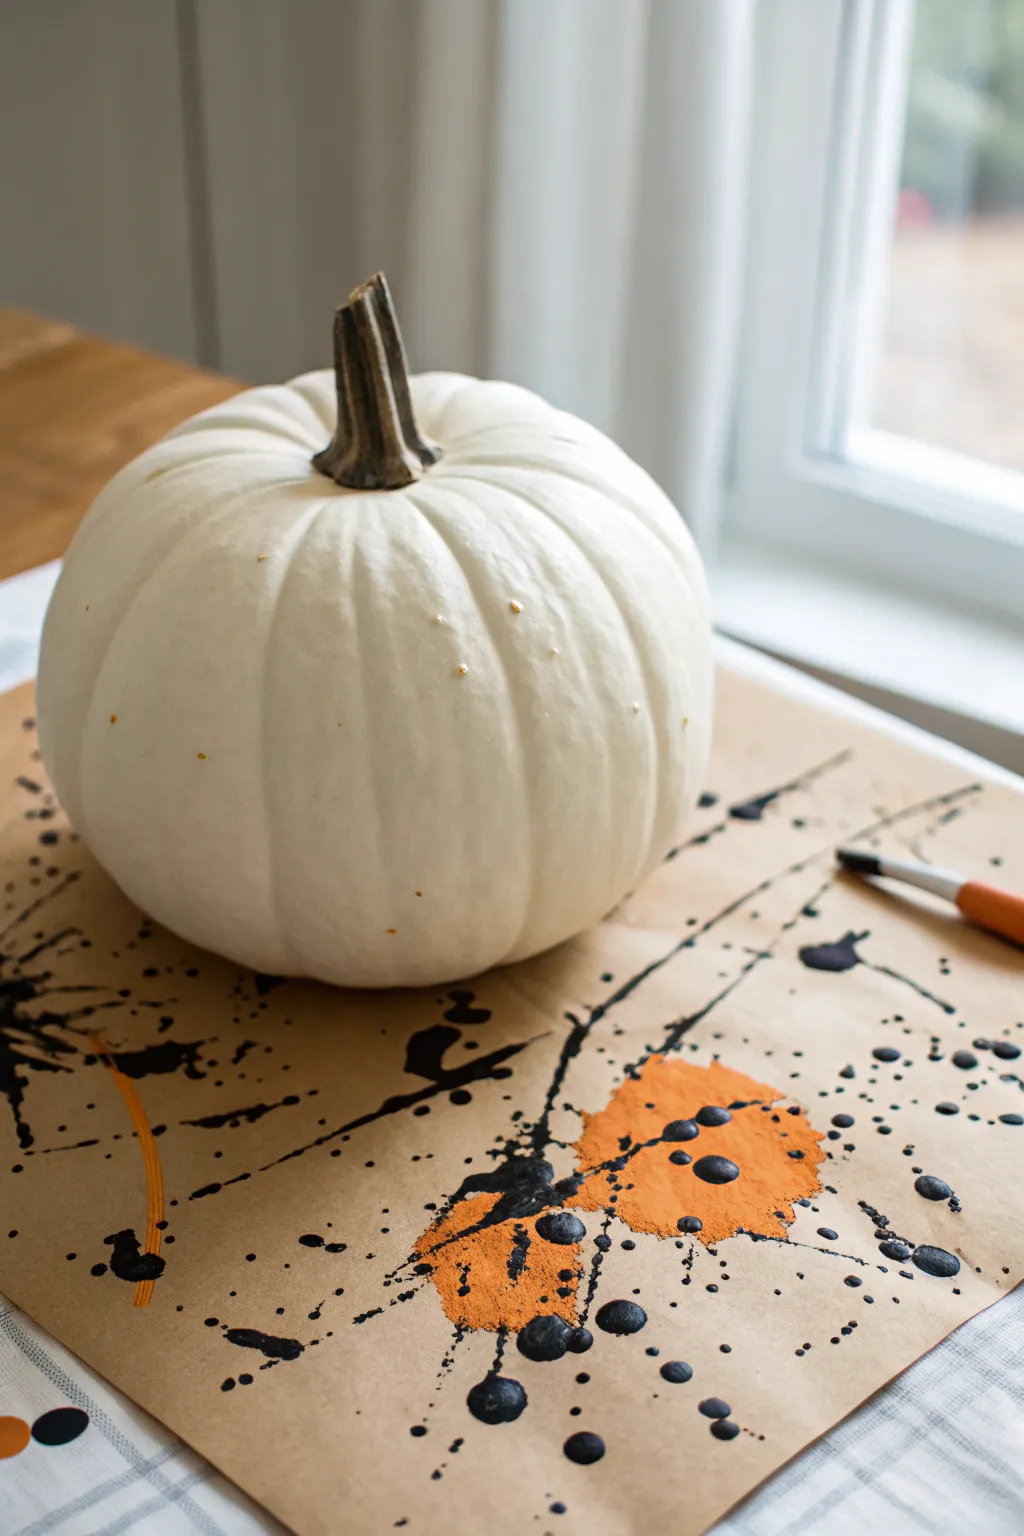
Embrace the chaos of abstract expressionism with this high-energy, low-stress pumpkin project. Instead of painting the pumpkin directly, you’ll use it as a centerpiece while creating a dynamic splash-art frame on kraft paper beneath it, giving your autumn display a modern gallery vibe.
Step-by-Step Guide
Materials
- Medium-sized white pumpkin (real or faux)
- Large sheet of heavy brown kraft paper or butcher paper
- Black acrylic paint
- Bright orange acrylic paint
- Small to medium round paintbrush
- Cup of water for rinsing
- Paper towels
- Drop cloth or old newspapers (to protect your table underneath)
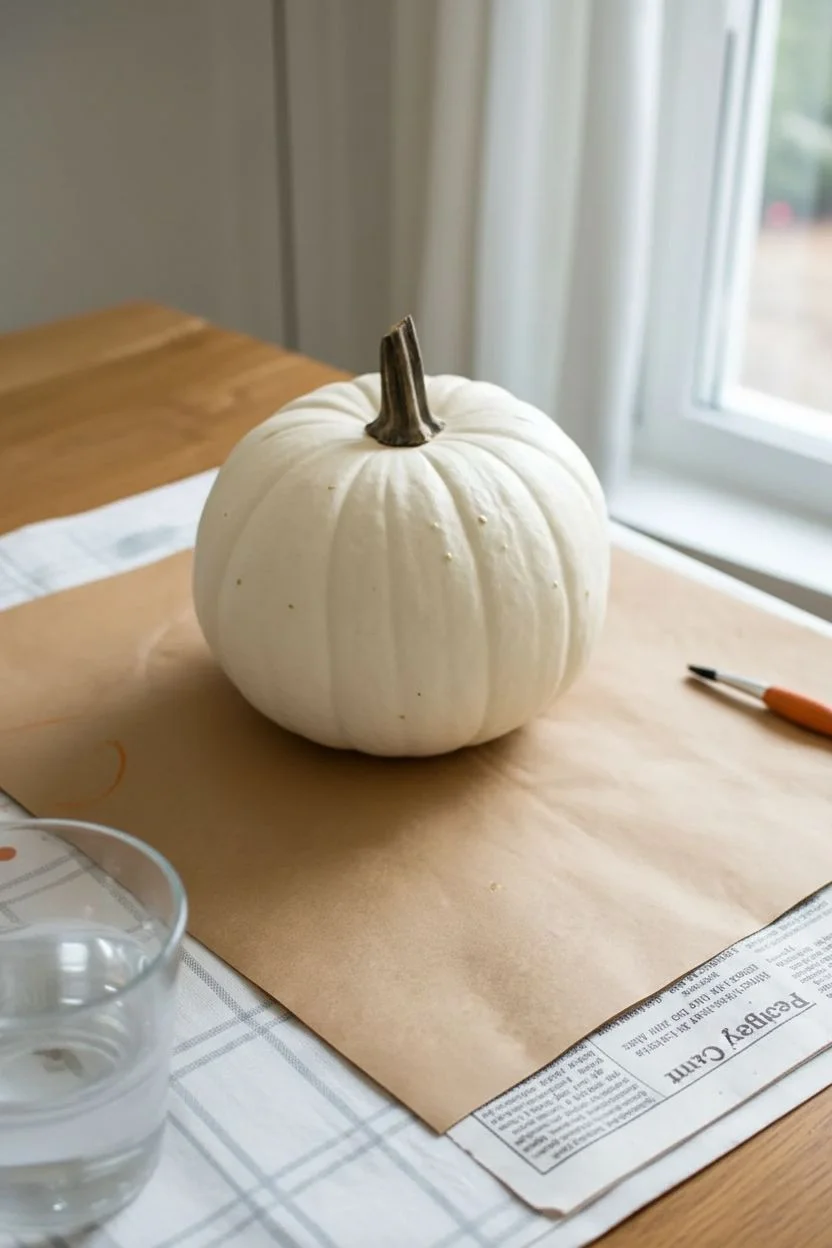
Step 1: Setting the Stage
-
Prepare your workspace:
Lay down a protective drop cloth or old newspapers on your table first. This project gets messy by design, so you want to ensure your furniture is safe from flying acrylics. -
Lay the kraft paper:
Cut a large square or rectangle of heavy brown kraft paper. It should be significantly larger than your pumpkin, extending at least 6-8 inches out on all sides to frame the artwork. -
Clean the pumpkin:
Wipe down your white pumpkin with a damp cloth to remove any dirt or dust. A clean surface ensures a striking contrast against the rustic paper, even if we aren’t painting the pumpkin itself heavily. -
Position the pumpkin:
Place your white pumpkin directly in the center of the kraft paper. This will act as a ‘mask’ for the negative space in your design.
Splatter Control
If paint is landing everywhere but the paper, your paint is too thick. Add water drop by drop until it flicks easily off the bristles.
Step 2: Creating the Paint Splatters
-
Prepare the black paint:
Squeeze a generous amount of black acrylic paint onto a palette or paper plate. Add a few drops of water to thin it slightly; you want a consistency closer to heavy cream so it flings easily. -
Load the brush:
Dip your round paintbrush into the thinned black paint, ensuring the bristles are fully saturated but not dripping uncontrollably. -
The flicking technique:
Hold the brush over the paper and tap the handle firmly against your other hand or a finger. This creates controlled sprays of small droplets. -
The whipping technique:
For those longer, dramatic lines shown in the image, use a quick whipping motion with your wrist to fling paint across the paper. Aim near the base of the pumpkin so lines radiate outward. -
Repeat around the perimeter:
Move around the pumpkin, adding black splatters from different angles. It doesn’t need to be symmetrical—irregularity adds to the charm. -
Create the orange focal point:
Clean your brush thoroughly. Squeeze out bright orange paint. Locate a spot on the paper where you want a pop of color, similar to the large blotch in the photo. -
Apply the orange splash:
Paint a rough, organic shape in orange directly on the paper. I find dabbing the brush rather than stroking creates a more ‘splattered’ texture. -
Layering wet-on-wet:
While the orange patch is still wet, dip your brush back into the black paint (slightly thicker this time) and drip a few large droplets directly onto the orange area for contrast. -
Add gentle speckles to the pumpkin:
Using a very small amount of gold or orange paint on a toothbrush or stiff brush, lightly flick a tiny bit of mist onto the pumpkin skin itself. This connects the object to the background. -
Review and refine:
Step back and look at the composition. If there are large empty spaces on the paper, add a few more aggressive black flicks to balance the look. -
Let it dry completely:
Allow the paper (and any stray drops on the pumpkin) to dry undisturbed for at least an hour. The thick blobs of paint will take longer to set.
Pro Tip
Use varied arm speeds when flicking paint. Fast flicks create long, thin lines; slow, heavy taps create rounder, fuller droplets.
Once dry, this modern art display brings a sophisticated yet edgy autumn atmosphere to any window ledge or table
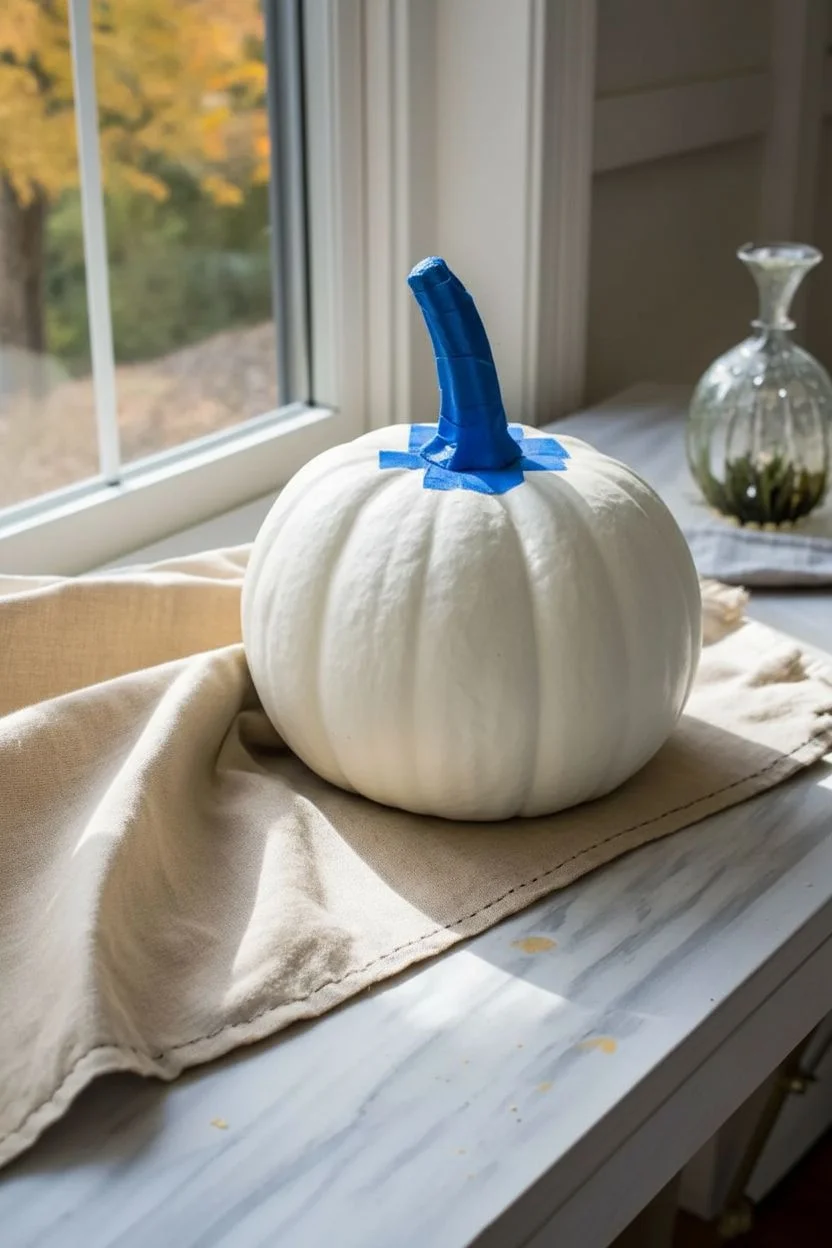
Black Paint Pour Drips Over a White Pumpkin for Edge
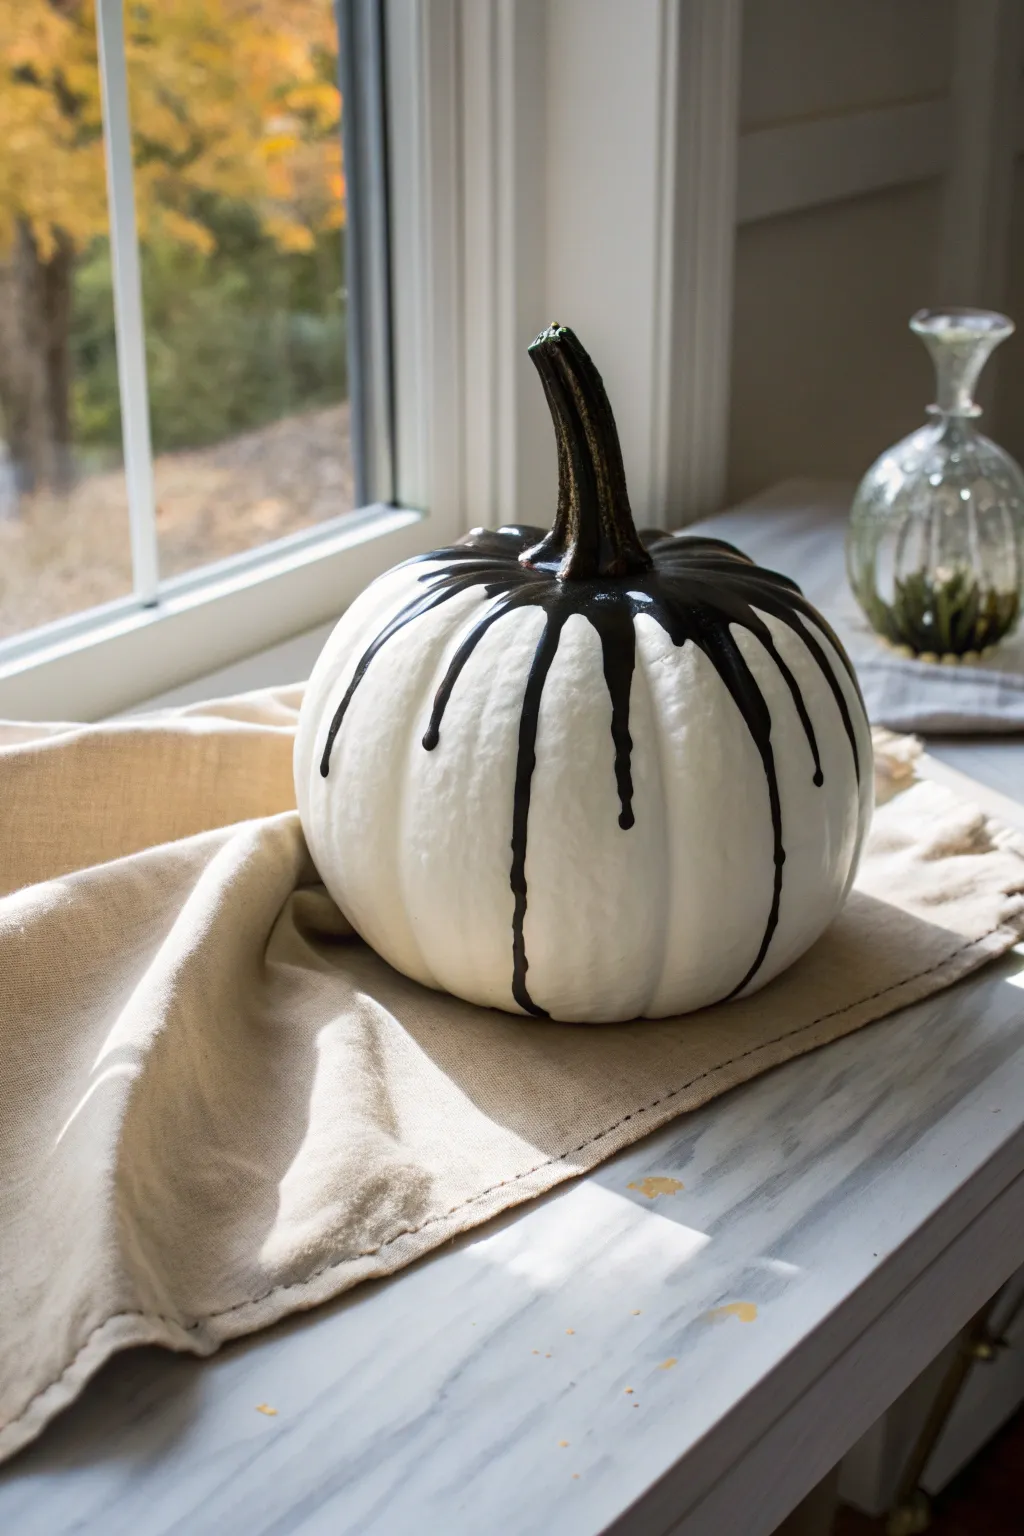
Embrace a modern, slightly eerie aesthetic with this high-contrast pumpkin project that creates striking visual drama with minimal effort. The stark black drips cascading down a pristine white base evoke a gothic elegance perfect for stylish Halloween decor.
Step-by-Step Tutorial
Materials
- Medium-sized faux pumpkin (white)
- High-gloss black acrylic paint (fluid or pouring medium)
- Small squeeze bottle or plastic spoon
- Painter’s tape or masking tape
- Drop cloth or old newspaper
- Disposable cup
- Water based sealer (optional)
- Damp paper towels
Step 1: Preparation
-
Clean surface:
Begin by wiping down your white faux pumpkin with a damp paper towel to remove any dust or manufacturing residue. -
Dry thoroughly:
Ensure the surface is completely dry before proceeding, as moisture will prevent the paint from adhering properly. -
Protect stem:
Carefully wrap the entire stem with painter’s tape if you want to keep the natural look, though painting over it creates the seamless look shown in the example. -
Setup workspace:
Place your drop cloth or newspaper on a flat work surface. This project involves dripping paint, so cover a wider area than you think you need.
Step 2: Creating the Drips
-
Prepare paint:
Pour your high-gloss black acrylic paint into a disposable cup. If the paint is too thick, thin it slightly with a few drops of pouring medium or water until it creates a fluid, honey-like consistency. -
Initial pour:
Starting at the very base of the stem, slowly pour a small puddle of paint directly onto the top center of the pumpkin. -
Guide the flow:
Using a small spoon or the tip of a squeeze bottle, gently push the paint puddle outward toward the ridges of the pumpkin. -
Create the first drip:
Identify a natural groove in the pumpkin’s shape and nudge a bit more paint over the edge so it begins to travel downward. -
Vary the lengths:
Rotate the pumpkin and continue nudging paint over the edges. Use slightly more paint for long drips and less for shorter, staggered drips. -
Control speed:
If a drip is moving too fast for your liking, lay the pumpkin on its side briefly to slow gravity’s pull until the paint thickens slightly. -
Coat the stem:
While the drips are settling, use a brush or the remaining paint to fully coat the stem black, blending it seamlessly into the top paint puddle. -
Check consistency:
Watch for any drips that are pooling too much at the bottom; wipe them away gently if they reach the table surface to keep the lines clean.
Pro Tip: Gravity Control
Use a hairdryer on a low, cool setting to gently push the paint drips down faster or directionalize them if they are moving too slowly.
Step 3: Finishing Touches
-
Initial dry:
Allow the pumpkin to sit undisturbed for at least 2-3 hours. The thick drips will take much longer to dry than a standard coat of paint. -
Touch ups:
Inspect the black coverage near the stem. If the white shows through as the paint settles, dab a little extra black paint into the gaps. -
Full cure:
Let the project cure overnight in a dust-free area to ensure the thickest parts of the drip are hardened completely. -
Seal (optional):
For extra durability, especially if placing outdoors, apply a gloss clear coat spray over the entire pumpkin once fully dry. -
Display:
Remove any protective tape and arrange your pumpkin near a window where natural light can highlight the glossy contrast of the drips.
Level Up: Metallic Twist
Before the black paint dries, sprinkle fine gold or silver glitter onto the wet drips for a glamorous, shimmering effect.
Place your striking new centerpiece on a linen runner and enjoy the dramatic flair it adds to your room
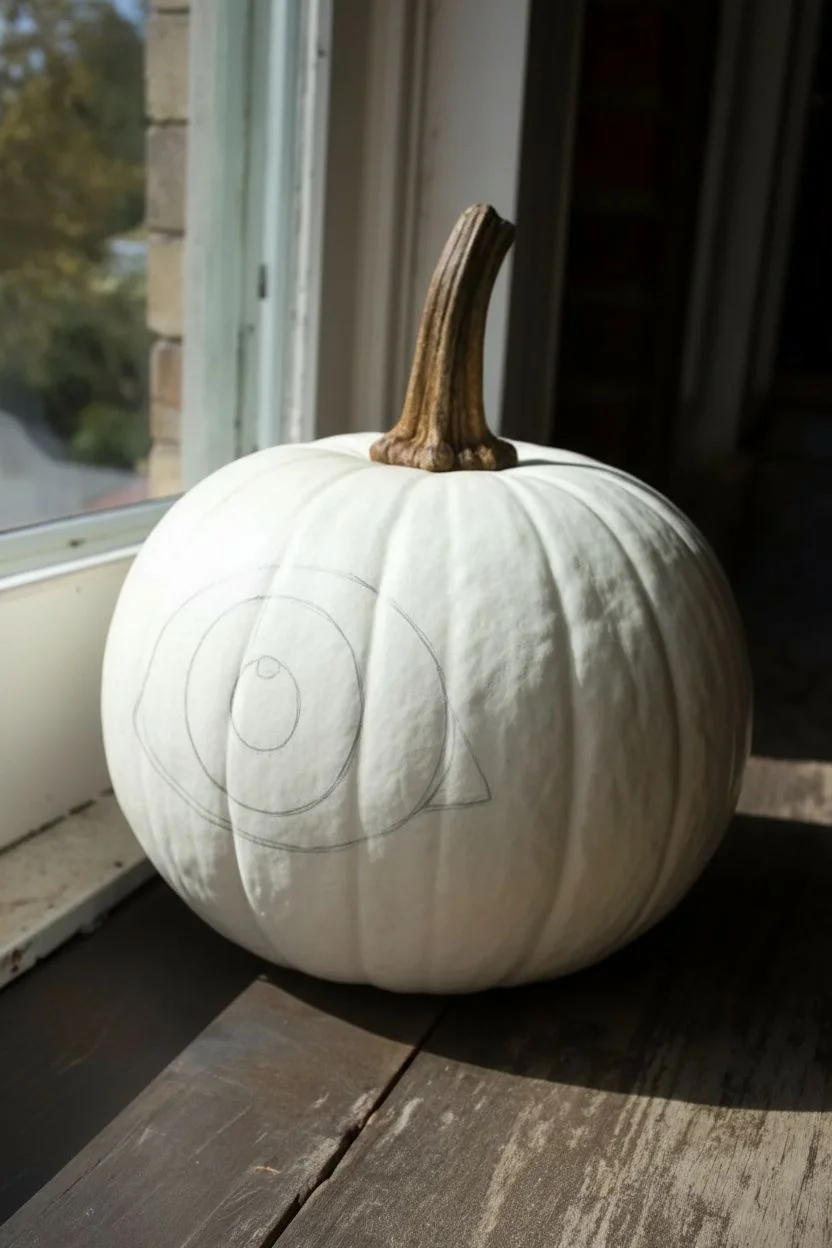
No-Carve Eyeball Design That Pops on a White Pumpkin
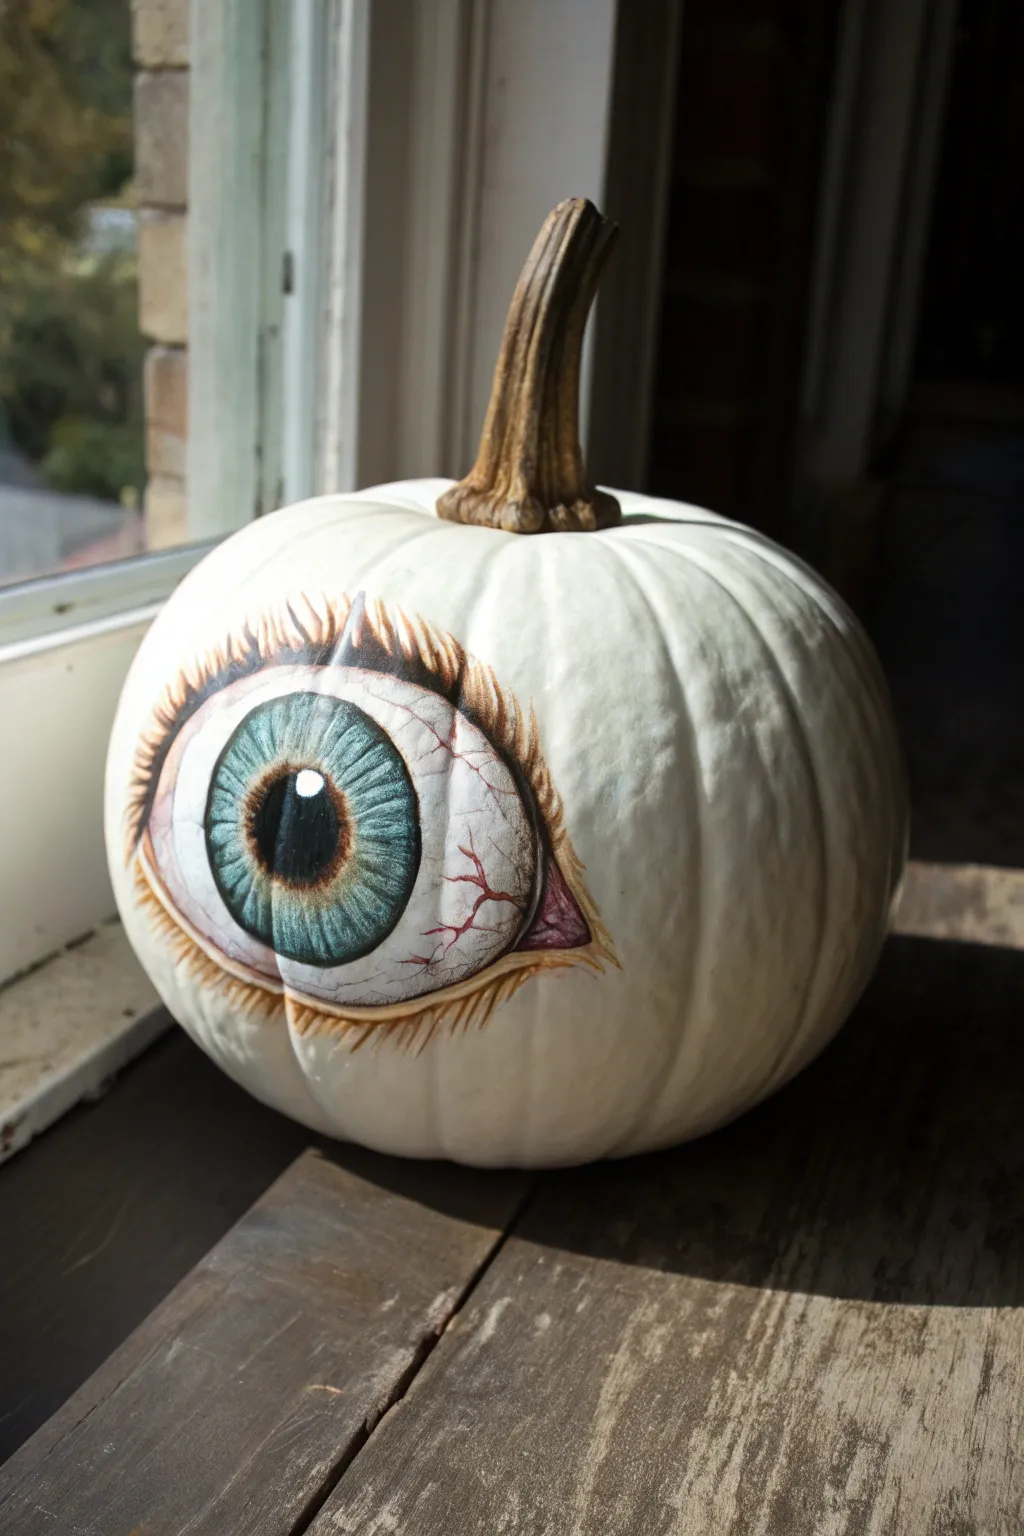
Transform a simple white pumpkin into an eerie, realistic eyeball that seems to follow you around the room. This no-carve design uses painting techniques to create depth and texture, resulting in a striking decoration without any of the mess of scooping out guts.
How-To Guide
Materials
- Medium-sized white pumpkin (specifically a ‘Casper’ or ‘Lumina’ variety)
- Pencil for sketching
- Acrylic craft paints (Titanium White, Phthalo Blue, Burnt Umber, Hooker’s Green, Crimson Red, Black)
- Fine detail brushes (sizes 0 and 00)
- Small flat brush (size 2 or 4)
- Round brush (size 4)
- Cup of water
- Palette or paper plate
- Paper towels
- Clear matte acrylic sealer spray
Step 1: Preparation and Sketching
-
Clean surface:
Begin by wiping down your pumpkin with a damp cloth to remove any dirt or garden residue. Dry it completely with a paper towel ensures the paint adheres properly to the waxy skin. -
Outline the eye shape:
Using a light pencil, sketch a large almond shape on the flattest side of the pumpkin. The vertical ridges of the pumpkin create natural contours, so try to center the pupil over a ridge or valley depending on the look you want. -
Sketch the iris:
Draw a perfect circle inside the almond shape for the iris. The top and bottom of this circle should be slightly cut off by the upper and lower eyelids to avoid a shocked expression. -
Mark the pupil and glint:
Draw a smaller circle in the absolute center for the pupil. Then, sketch a tiny square or rectangle overlapping the pupil and iris—this will be the ‘glint’ or reflection that brings the eye to life.
Step 2: Painting the Iris
-
Base coat the iris:
Mix a small amount of Phthalo Blue with a touch of Hooker’s Green and Titanium White. Use your round brush to fill in the entire iris area, painting around the pupil and the reflection highlight. -
Add radial texture:
While the base is still slightly tacky, mix a darker teal using less white. Use a fine detail brush to flick lines starting from the pupil edge outward toward the rim of the iris, simulating muscle fibers. -
Highlight the iris:
Mix a very light blue-white. Paint short, fine strokes originating from the pupil outward, layering them over the darker strokes to create dimension. I like to concentrate these lighter strokes near the center. -
Fill the pupil:
Use pure Black paint to fill in the center pupil circle. Be very careful to keep the edges crisp and verify you leave that little rectangular highlight completely unpainted for now. -
Add the glint:
Once the black pupil is dry, fill in the reflection highlight with pure Titanium White. This single step instantly transforms the painting from flat to realistic. -
Darken the limbal ring:
Outline the outer edge of the iris with a very dark blue or black mix. Feather this edges slightly inward so it isn’t a harsh cartoon line, but rather a soft blurry border.
Placement is Key
Utilize the pumpkin’s natural anatomy! Paint the eye directly over a ‘rib’ bump to make the eyeball physically bulge out for a 3D effect.
Step 3: Defining the Sclera and Eyelids
-
Whiten the eye:
Paint the ‘white’ of the eye (sclera) with Titanium White inside your almond shape. It might need two coats to cover the pumpkin’s natural skin tone fully. -
Add shading:
Mix a very watery wash of grey (white with a drop of black). Glaze the corners of the eyeball and underneath the upper eyelid to make the eye look spherical rather than flat. -
Paint veins:
Thin down Crimson Red paint with water until it’s ink-like. Using your finest liner brush (00), paint wiggly, jagged lines creeping in from the corners of the eye toward the iris. -
Define the tear duct:
At the inner corner of the eye, paint a small fleshy triangle using a mix of Crimson Red and White (pink). Add a tiny dot of white highlight to make it look wet.
Paint Not Sticking?
If the pumpkin skin is too waxy and repels paint, lightly buff the area with fine-grit sandpaper or a scouring pad before you start sketching.
Step 4: Lashes and Finishing Details
-
Underline the lids:
Mix Burnt Umber with a little water. Paint a thin line along the bottom of the upper lid and the top of the lower lid to create the ‘waterline’ where lashes grow. -
Paint the lashes:
Using Burnt Umber and your liner brush, create the lashes. Start with the brush pressing down at the lid line and flick upward and outward quickly to get a tapered point. -
Vary lash direction:
Change the angle of your lashes as you move across the eye. They should fan out. Make the lower lashes shorter and more sparse than the upper lashes. -
Add a shadow mask:
To integrate the eye onto the pumpkin, take a very diluted brown wash and paint a faint shadow underneath the lower lashes directly on the pumpkin skin. -
Seal the work:
Once the paint is bone dry (give it at least an hour), spray the entire painted area with a clear matte acrylic sealer. This protects the paint from cracking as the pumpkin ages.
Now you have a brilliantly creepy centerpiece that stares down your Halloween guests
Cute Monster Faces Using a White Pumpkin as the Base

Transform a simple white pumpkin into an adorable little monster with nothing more than a few paint markers. This minimalist design features glossy anime-style eyes and a playful toothy grin that strikes the perfect balance between spooky and sweet.
Step-by-Step Tutorial
Materials
- Small white pumpkin (real or faux)
- Black acrylic paint marker (fine point)
- Black acrylic paint marker (medium point)
- Orange or bronze metallic paint marker
- White acrylic paint pen (extra fine point)
- Pencil with eraser
- Paper towel or rag
- Matte spray sealer (optional)
Step 1: Planning the Face
-
Clean surface:
Before starting, wipe down your pumpkin with a slightly damp cloth to remove any dust or dirt that might interfere with the paint adhesion. Dry it completely. -
Locate the center:
Find the ‘best side’ of your pumpkin—the smoothest area without major blemishes or deep ridges that might distort your drawing. -
Sketch the eye placement:
Using a light pencil touch, sketch two oval shapes for the eyes. Place them fairly wide apart to achieve that cute, ‘kawaii’ look. -
Draft the mouth:
Lightly draw a curved line below the eyes for the top of the mouth. Sketch five downward-pointing triangles hanging from this line to form the fangs. -
Add details:
Mark the spots for the tiny nose curve and the three whisker dashes on each cheek.
Placement Pro Tip
Draw the face features lower on the pumpkin rather than centered vertically. A lower face creates a cuter, more innocent looking character.
Step 2: Painting the Features
-
Outline the eyes:
Take your medium-point black paint marker and carefully trace the oval outlines of the eyes you sketched. -
Fill the eyes:
Fill in the ovals completely with black ink. If the white pumpkin skin shows through, let the first layer dry for a minute and add a second coat for solid coverage. -
Create the nose:
Switch to your fine-point black marker. Draw a tiny, shallow ‘u’ shape right in the center between the eyes for the nose. -
Draw the whiskers:
Using the same fine-point marker, add three quick, angled dashes on the left cheek and three on the right cheek. -
Outline the mouth:
Trace the main horizontal curve of the mouth with the fine-point black pen. -
Define the teeth:
Carefully outline the five triangular teeth hanging from the mouth line. Ensure the tips of the triangles are sharp and clean.
Level Up: Accessories
Glue on a miniature witch hat or a tiny fabric bow near the stem to give your friendly monster even more personality.
Step 3: Color and Highlights
-
Color the teeth:
Take your orange or bronze metallic marker. Carefully fill inside the triangular outlines of the teeth. -
Layering color:
I usually find that metallic markers need a second pass to look truly vibrant, so apply another layer of orange once the first is dry. -
Add large highlights:
Once the black eye paint is 100% dry, take your white paint pen. Add a medium-sized circle in the upper right corner of the left eye, and the upper left corner of the right eye. -
Add small highlights:
Place a much smaller white dot diagonally opposite the large highlight in each eye. This creates that sparkling, lively expression. -
Correction time:
If you smudged any lines, use a tiny bit of white paint to cover the mistake, acting like correction fluid. -
Clean up sketch lines:
Gently erase any visible pencil marks that weren’t covered by paint, being careful not to rub off your fresh artwork. -
Seal (optional):
If you want to keep this pumpkin for next year (provided it’s faux), give it a light coat of matte spray sealer.
Now you have a charming little pumpkin friend to brighten up your windowsill for the season
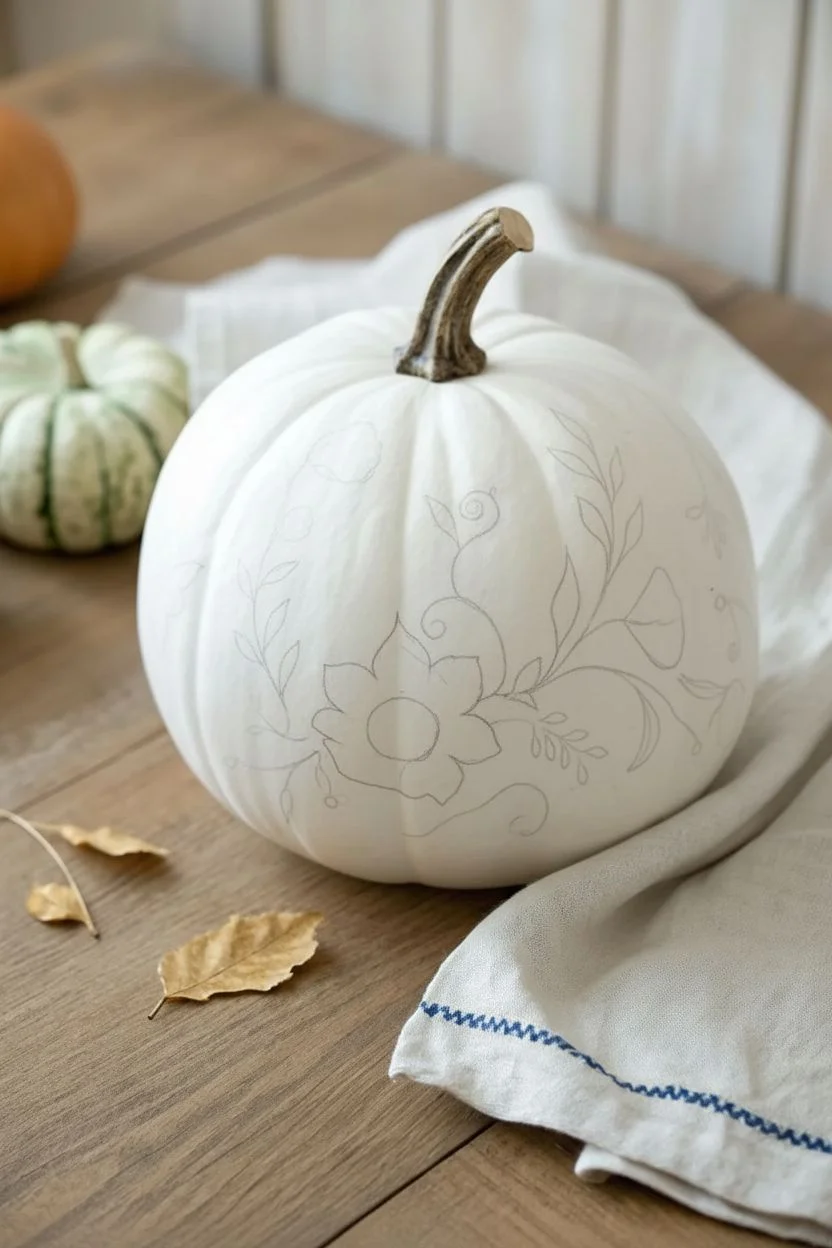
Blue-and-White Porcelain-Inspired Florals on a White Pumpkin
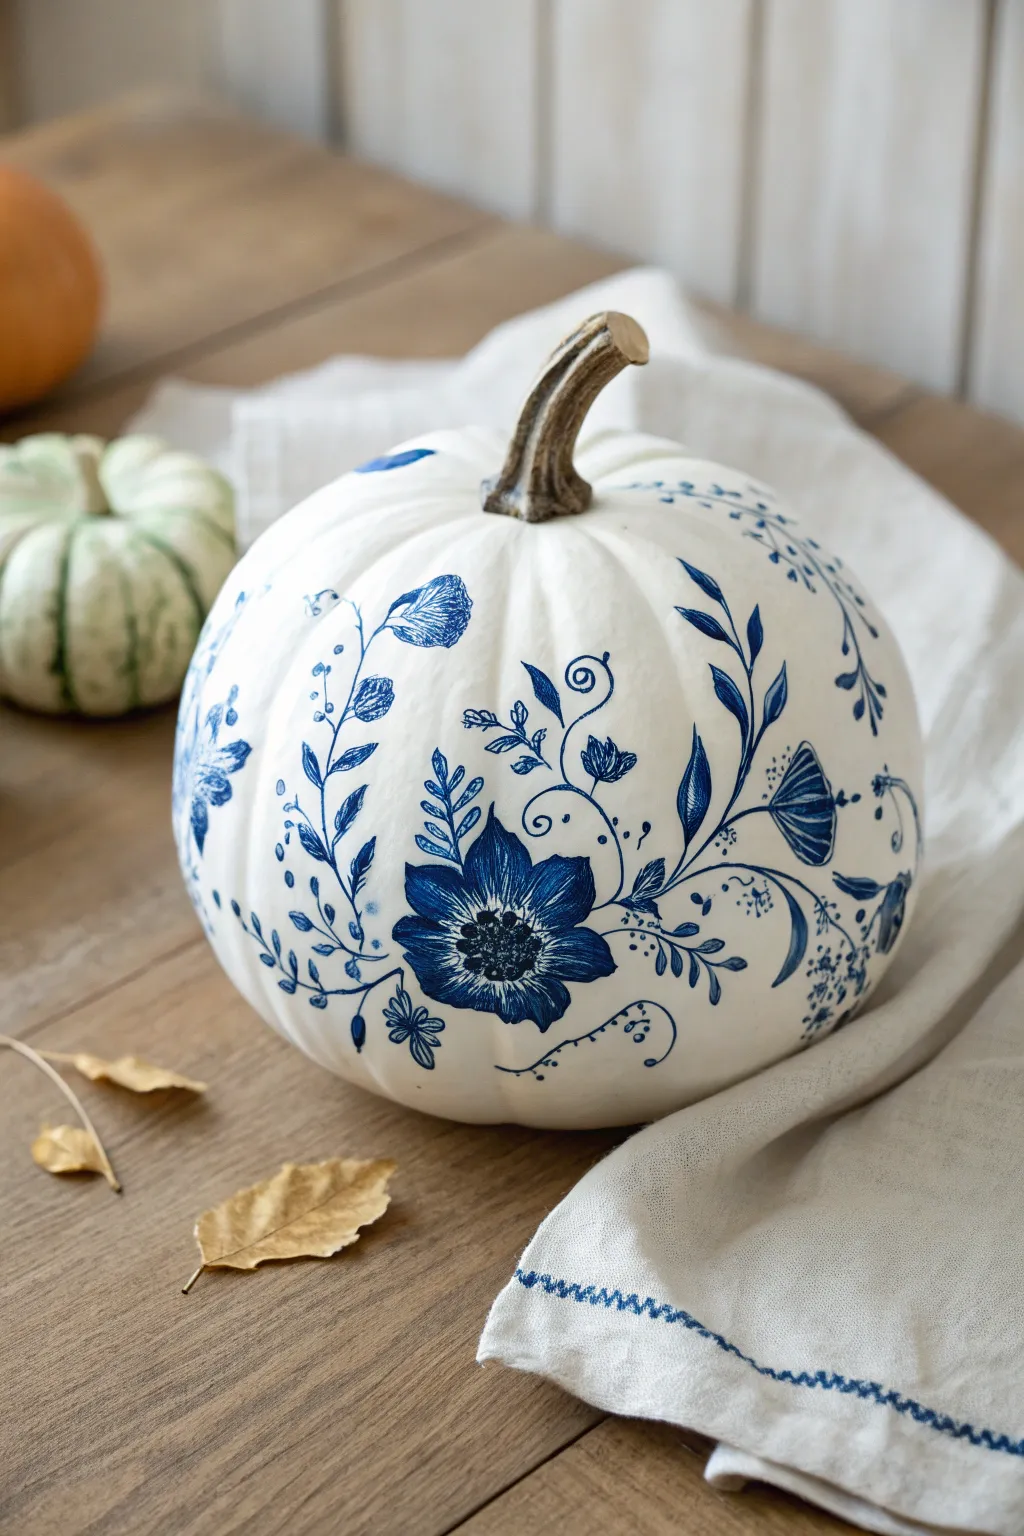
Transform a simple white pumpkin into an elegant piece of fall decor that mimics the timeless beauty of blue-and-white porcelain. This project uses fine lines and careful shading to create a stunning, sophisticated floral motif that looks hand-painted on ceramic.
Detailed Instructions
Materials
- Medium-sized white pumpkin (real or faux)
- Alcohol ink markers (Navy Blue and Royal Blue)
- Fine-point permanent marker (Navy Blue)
- White acrylic paint (optional, for base)
- Matte spray sealer or fixative
- Pencil and eraser
- Cotton swabs
- Rubbing alcohol
- Tissues or paper towels
Step 1: Preparation and Planning
-
Clean surface:
Begin by wiping down your pumpkin with a damp cloth to remove any dust or dirt. If using a real pumpkin, ensure it is completely dry. For faux pumpkins, a quick wipe with rubbing alcohol helps remove any manufacturing oils. -
Prime (optional):
If your pumpkin isn’t a bright, clean white, or if it has discolorations, apply a thin coat of white acrylic paint. This provides a uniform canvas that makes the blue ink pop, just like real porcelain. -
Sketch basic layout:
Lightly sketch the main stems of your floral design using a pencil. Instead of drawing every petal, just mark the ‘S’ curves for the vines and simple circles where the main focal flowers will sit.
Use Flowing Lines
When drawing stems, move your whole arm, not just your wrist. This creates smoother, more elegant curves essential for the chinoiserie look.
Step 2: Drawing the Focal Flowers
-
Outline the center:
Start with the large, open flower near the bottom center. Using the fine-point navy marker, draw the stippled center by making small dots in a dense circular cluster. -
Draft the petals:
Draw five or six large, slightly pointed petals radiating from the center. Keep the lines delicate. It’s okay if they aren’t perfectly symmetrical; organic shapes look more natural. -
Fill with color:
Take your darker alcohol ink marker and fill in the petals. I like to leave tiny slivers of white space near the edges or in the middle of the petal to create a highlight effect. -
Add texture:
Once the initial ink is dry, use the fine-point pen to add thin lines inside the petals, radiating from the center outward. This mimics the fine brushstrokes seen on antique china. -
Create secondary blooms:
Move to the upper left and right quadrants. Sketch smaller, semi-closed tulip shapes or bell flowers. Outline them first with the fine tip, then fill them in with the lighter royal blue marker for subtle variety.
Step 3: Vines and Foliage
-
Connect the stems:
Using the fine-point marker, trace over your pencil stem lines. Vary the pressure—press harder on the downstrokes and lighter on the upstrokes to create a calligraphy-like variance in line thickness. -
Add main leaves:
Draw elongated, lance-shaped leaves along the main stems. Alternate them left and right. Fill them in solidly with the navy marker, or use a hatching technique for a lighter look. -
Incorporate ferns:
In the negative spaces between large flowers, add delicate fern-like fronds. Draw a central spine and add tiny, quick dashes on either side for the leaves. -
Draw whimsical spirals:
Add curling tendrils coming off the main vines. These should be very fine lines that spiral tightly at the ends, adding movement and a whimsical touch to the composition. -
Cluster small buds:
At the ends of some smaller branches, draw clusters of three or four tiny dots or circles to represent berries or unopened buds.
Ink Bleeding?
If the ink bleeds into the pumpkin’s pores, switch to paint markers or use a clear matte sealer as a base coat before you start drawing.
Step 4: Refining and Sealing
-
Check balance:
Step back and look at the pumpkin from a distance. If one side looks too empty, add a floating leaf or a small sprig of berries to balance the visual weight. -
Clean up errors:
To fix any smudges or sharpen an edge, dip a cotton swab in a tiny amount of rubbing alcohol and gently erase the unwanted ink. Be careful not to let the alcohol drip. -
Enhance shading:
Go back over the darkest areas, such as the center of the main flower and the base of the leaves, with a second layer of the navy marker to deepen the contrast. -
Erase pencil marks:
Wait at least 15 minutes to ensure all ink is completely bone dry. Then, gently erase any visible pencil guidelines. -
Seal the artwork:
In a well-ventilated area, spray the pumpkin with a clear matte fixative. This prevents the ink from fading and protects the surface from moisture if you display it outdoors.
Place your beautiful creation on a mantle or dining table to enjoy a touch of classic elegance this autumn
Negative Space Mandala Patterns That Use the White Pumpkin Glow

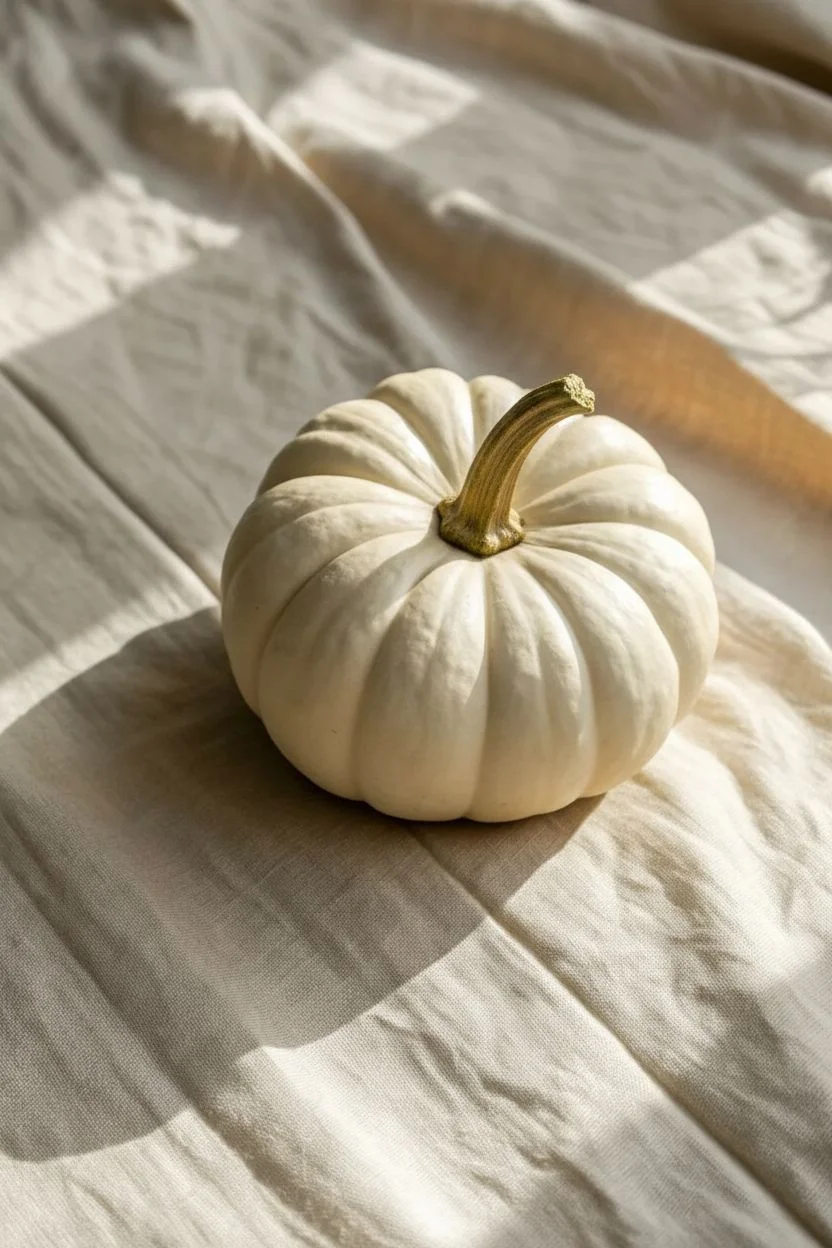
Embrace the beauty of negative space by turning a simple white pumpkin into an elegant centerpiece featuring a stunning metallic gold stem. This project keeps the pumpkin’s natural creamy skin as the star, using subtle enhancements to create a sophisticated autumn look.
Step-by-Step
Materials
- Small white pumpkin (real or faux)
- Metallic gold acrylic paint
- Small flat shader brush (size 4 or 6)
- Fine detail brush (size 0 or 1)
- Damp cloth or paper towel
- Rubbing alcohol
- Cotton pads
- Matte sealer spray (optional)
- Painters tape (optional)
Step 1: Preparation
-
Clean surface:
Begin by thoroughly cleaning the surface of your white pumpkin. If it’s real, mix a little water with a drop of dish soap to remove dirt. -
Degrease:
Once dry, wipe the entire pumpkin, especially the stem area, with a cotton pad soaked in rubbing alcohol. This removes natural oils and ensures the paint adheres perfectly to the stem. -
Dry completely:
Allow the pumpkin to air dry completely for at least 15 minutes before applying any paint. Trapped moisture can cause peeling later. -
Protect the skin:
If you are worried about unsteady hands, apply small pieces of painter’s tape around the very base of the stem to protect the white skin, though I find free-handing it gives a more organic edge.
Paint Viscosity Tip
If your gold paint is too thin/runny, mix in a tiny drop of yellow ochre acrylic. It boosts opacity without ruining the metallic shine.
Step 2: Painting the Stem
-
Base coat application:
Load your flat shader brush with metallic gold paint. Start at the top of the stem and paint downwards with smooth strokes. -
Cover the ridges:
Work the paint into the nooks and crannies of the stem’s texture. Pumpkin stems are often quite knobby, so ensure you don’t leave any brown or green showing through. -
Refine the base:
As you approach the base where the stem meets the pumpkin body, switch to your fine detail brush. -
Create the edge:
Carefully trace the natural line where the stem connects to the pumpkin. It doesn’t need to be a perfect circle; following the organic, bumpy line looks most natural. -
First coat drying:
Let this first layer dry for about 20-30 minutes. Metallic paints can sometimes be semi-transparent, so patience is key here. -
Second coat:
Apply a second coat of gold paint using the same technique. This layer will provide that rich, opaque luster that makes the stem pop. -
Check angles:
Rotate the pumpkin to view the stem from all sides. Touch up any missed spots on the underside of the stem ridges.
Step 3: Finishing Touches
-
Clean edges:
If any gold paint accidentally grazed the white skin, quickly wipe it away with a damp Q-tip or a wet brush before it cures. -
Optional texture:
For added dimension, you can dry-brush a tiny amount of a lighter gold or bronze on the raised ridges of the stem to highlight the texture. -
Buff the pumpkin:
Take a soft, dry cloth and gently buff the white skin of the pumpkin (avoiding the wet stem) to enhance its natural satin sheen. -
Sealing (Optional):
If this pumpkin will be handled frequently, brush a clear matte varnish over just the gold stem to prevent chipping. -
Final cure:
Allow the project to dry undisturbed for a full hour before styling it. -
Styling prep:
To mimic the reference image, find a textured beige or cream fabric. Wrinkle it intentionally to create shadows that complement the pumpkin’s curves.
Glitter Upgrade
While the paint is wet, dust ultra-fine gold glitter onto the stem for extra sparkle. Shake off excess once fully dry for a magical finish.
Enjoy the sophisticated simplicity of your new decor piece as it catches the autumn light


Have a question or want to share your own experience? I'd love to hear from you in the comments below!