Painting as a couple is basically my favorite kind of creative teamwork: you get the fun of making something together, plus a keepsake that feels like the two of you. Here are my go-to couple painting ideas—starting with the classics everyone loves and drifting into more playful, unexpected twists.
Split-Gradient Sunset Diptych
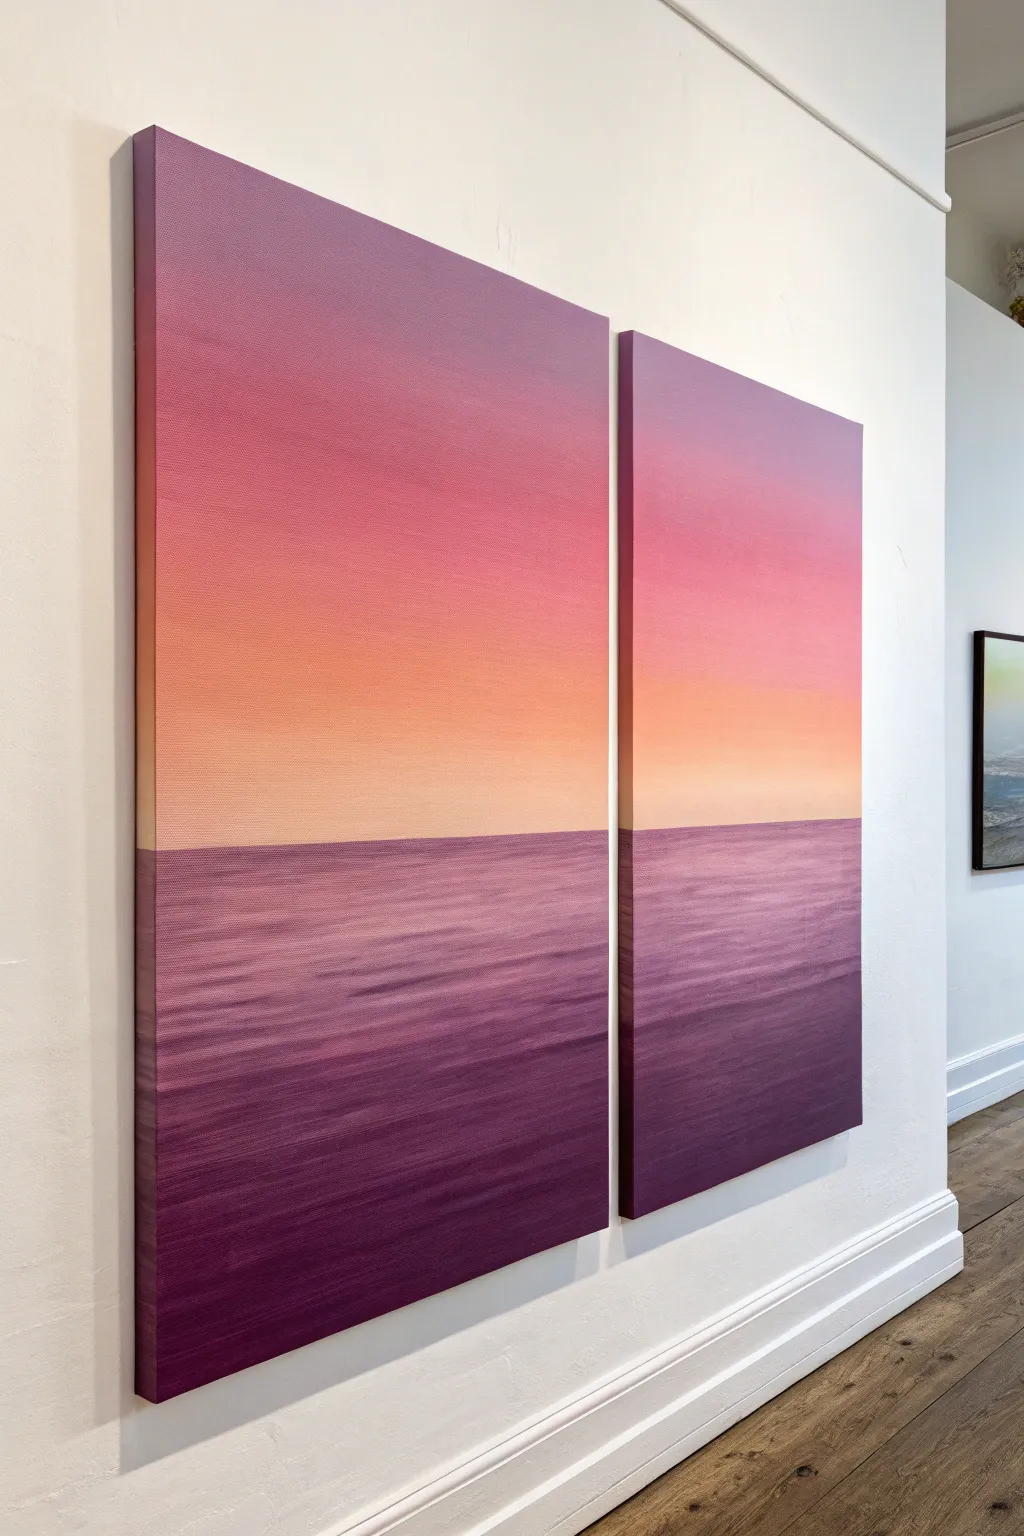
This elegant two-piece painting captures the serene transition of a sunset sky meeting the sea, creating a stunning focal point for any room. Through careful blending and a harmonious color palette, you’ll create a seamless horizon that spans across two separate canvases.
How-To Guide
Materials
- Two gallery-wrapped canvases (rectangular, identical size, e.g., 20×30 inches)
- Heavy body acrylic paints (Titanium White, Cadmium Yellow Medium, Cadmium Red or Magenta, Quinacridone Violet, Ultramarine Blue, Mars Black)
- Large flat wash brush (2-3 inches wide)
- Medium flat brush (1 inch)
- Palette knife (for mixing)
- Spray bottle with water (misting)
- Masking tape or painter’s tape
- Large palette or disposable plates
- Easel or flat work surface
- Rags or paper towels
Step 1: Preparation & Sky Base
-
Align the canvases:
Place your two canvases side-by-side on your easel or work surface. Ensure they are touching or have a very small, consistent gap (about 1/4 inch) so you can paint the gradient across both simultaneously. This ensures the horizon and colors match perfectly. -
Mark the horizon:
Decide where your horizon line will sit. In the reference image, it’s slightly below the center line. Use a ruler and a pencil to draw a faint straight line across both canvases. Apply a strip of masking tape directly below this line to protect the water area while you paint the sky. -
Mix your sky gradients:
Prepare large piles of your sky colors on the palette. You’ll need a deep violet-magenta for the top, transitioning into a medium pink, then a warm peach, and finally a pale yellow-white near the horizon. -
Paint the top sky section:
Using your large flat brush, apply the deep violet-magenta mixture to the top third of both canvases. Bringing the color down the sides of the canvas (gallery wrapping) creates a professional finish. -
Apply the mid-tones:
Clean your brush, then apply the medium pink band below the violet used previously. While the paints are still wet, use horizontal strokes to blend the border between the violet and pink until the line disappears. -
Paint the horizon glow:
Apply the peach and pale yellow mixture right above the tape line. Work quickly to ensure the paint remains wet enough for blending. I like to keep a misting bottle handy to keep the acrylics open longer for smoother transitions. -
Final sky blend:
With a clean, slightly damp large brush, run long, continuous horizontal strokes across the entire sky area from top to bottom and back up. This unifies the gradient. Let the sky dry completely before removing the tape.
Pro Mixing Tip
Add a tiny drop of retarder medium to your acrylics. This slows drying time significantly, giving you extra minutes to achieve that buttery, seamless gradient in the sky without panic.
Step 2: Painting the Sea
-
Tape the sky:
Once the sky is fully dry to the touch, apply a new strip of masking tape directly *above* the horizon line, covering the very bottom edge of your painted sky. This ensures a razor-sharp horizon. -
Mix the water tones:
Mix a deep purple (similar to the top of the sky but slightly darker/bluer) and a lighter lavender-mauve. The water mirrors the sky but tends to be darker and more textured. -
Block in the water base:
Start at the very bottom of the canvases with your darkest purple mix. Paint upwards, gradually introducing the lighter lavender tones as you approach the horizon tape. -
Create wave texture:
Switch to a medium flat brush. Unlike the smooth sky, the water needs texture. Use horizontal sweeping motions, allowing streaks of darker purple to remain visible amidst the lighter areas. -
Add reflection highlights:
Near the center (where the sun would be reflecting), dry-brush some subtle pink and peach horizontal streaks on top of the purple water. Keep these strokes very flat and level. -
Refine the surface:
Continue layering thin, horizontal strokes across both canvases. Ensure the colors flow visually from the left canvas to the right canvas so they look like one continuous sea. -
Paint the edges:
Don’t forget to extend the water colors and horizon line around the sides of the canvases. This step is crucial for the diptych effect when viewed from an angle.
Level It Up
Add a third smaller panel in the middle or offset the hanging heights slightly for a modern triptych look, adjusting your horizon line accordingly.
Step 3: Finishing Touches
-
Reveal the horizon:
Gently peel away the masking tape from the sky. You should be left with a crisp, perfect line separating the water from the sunset. -
Soften the edge (optional):
If the horizon line looks too sharp or artificial, take a small brush with a tiny amount of pale color and lightly glaze over the seam in a few spots to create atmospheric perspective. -
Final inspection:
Step back and look at the canvases separated by a few inches. Check that the gradient and brushstrokes align logically across the gap. -
Varnish:
Once the painting has cured (usually 24-48 hours), apply a satin or gloss varnish to deepen the colors and protect the surface from dust and UV light.
Hang your masterpieces with a small gap between them to enjoy the visual rhythm of your serene seascape


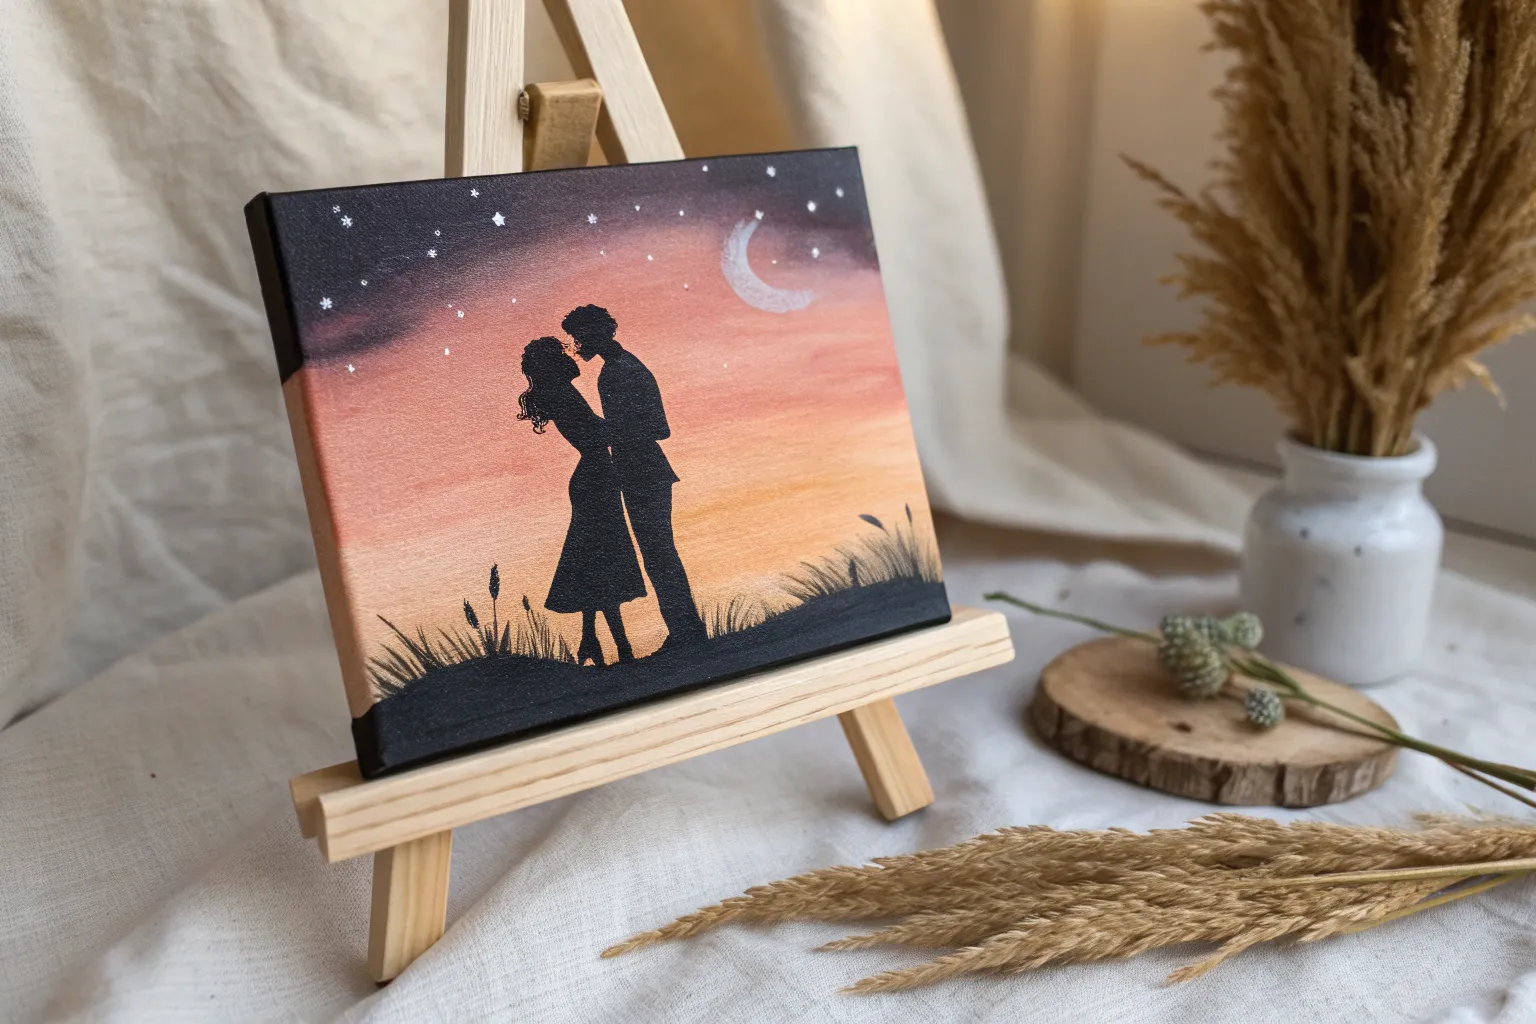
Moonlit Couple Silhouette
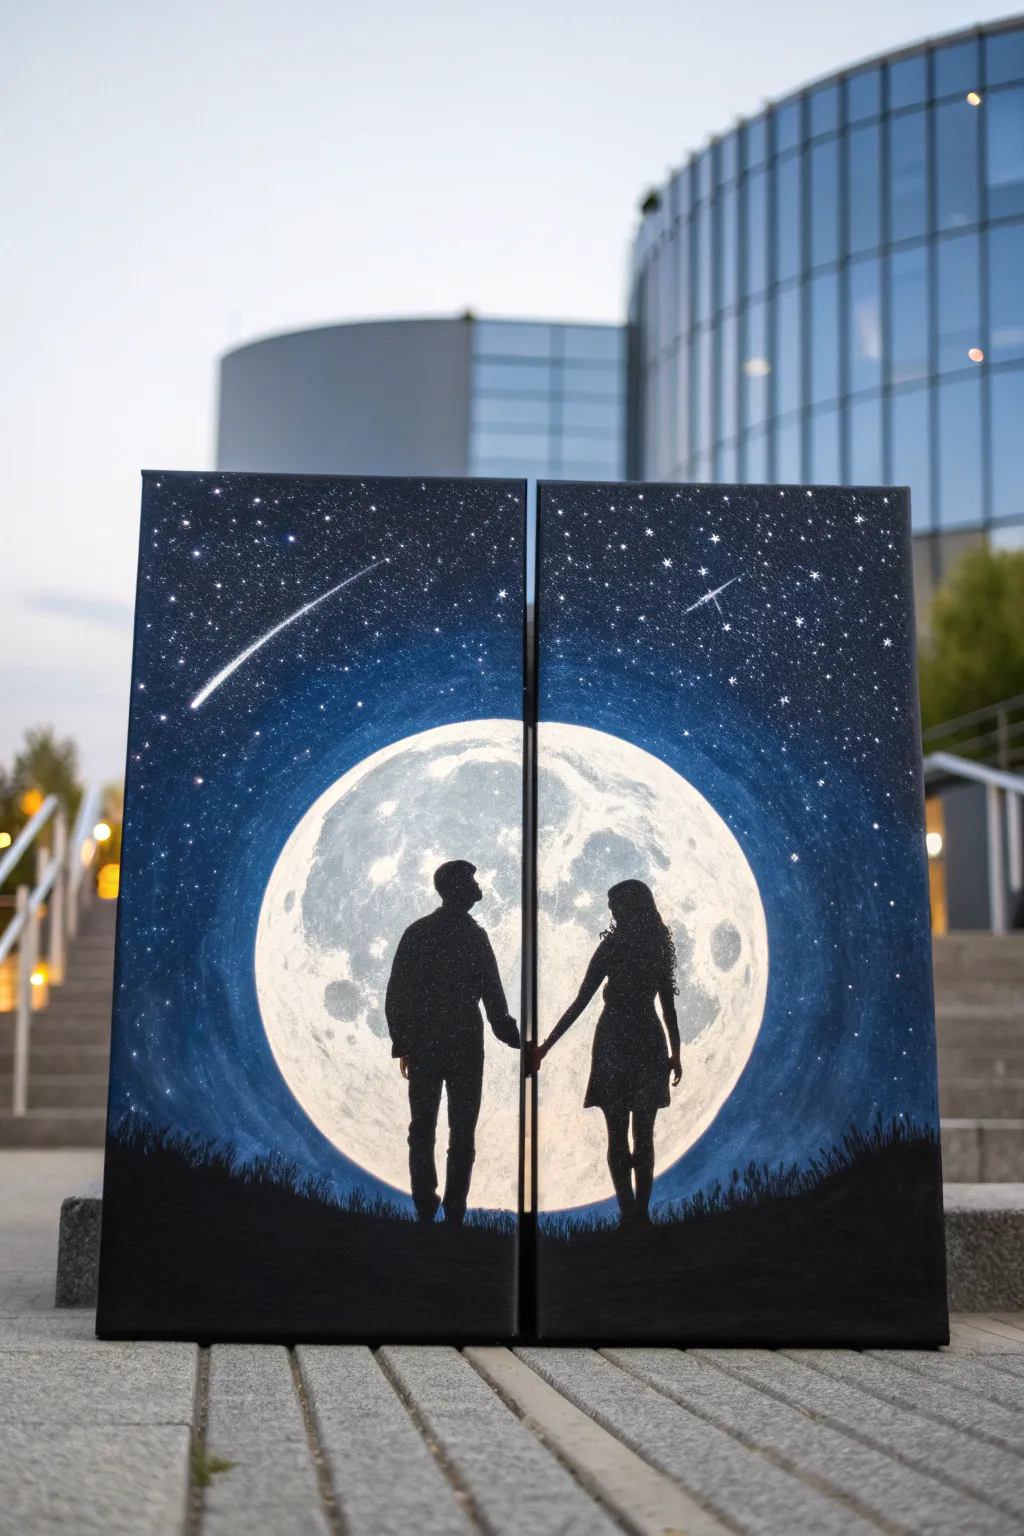
Celebrate your bond with this stunning split-canvas painting that features two silhouettes united by a glowing full moon. The dramatic contrast between the deep starry sky and the romantic figures creates a captivating centerpiece for any shared space.
Step-by-Step
Materials
- Two rectangular stretched canvases (same size)
- Acrylic paints: Black, Titanium White, Phthalo Blue, Ultramarine Blue
- Large flat brush or sponge brush
- Medium round brush
- Small liner brush or toothbrush
- Circular stencil (plate, lid, or contact paper)
- Pencil
- Palette for mixing
- Water cup and paper towels
Step 1: Setting the Scene
-
Prepare the Canvases:
Push your two canvases together side-by-side so they touch. Treat them as a single large surface for the initial sketching phase to ensure the image flows seamlessly across the gap. -
Define the Moon:
Place your circular object (like a dinner plate or large lid) centered directly over the seam where the canvases meet. Ideally, the center of the moon should sit right on the crack. Lightly trace the circle with a pencil. -
Sketch the Horizon:
Draw a gentle, uneven line near the bottom of both canvases to represent the grassy hill. Make sure the hill’s slope matches up on both sides. -
Outline the Couple:
Sketch the silhouette of a person on each canvas. Position them inside the moon circle so their dark shapes stand out against the light background, with their hands meeting exactly at the center gap.
Edge Alignment
Use painter’s tape to bind the backs of the canvases together while painting the moon. This stops them from shifting and keeps your circle perfectly aligned.
Step 2: Painting the Sky and Moon
-
Base Coat the Moon:
Separate the canvases slightly. Paint the entire moon circle with Titanium White. Don’t worry about texture yet; just get a solid, opaque white base down. -
Create the Glow:
While the white is still wet, mix a tiny drop of Phthalo Blue with white to create a very pale ice blue. Blend this around the outer edges of the moon to soften the transition into the sky. -
Texture the Moon:
Using a dry brush or a crumpled paper towel, dab faint grey and pale blue spots onto the white moon to mimic craters. Keep these subtle; you want a glowing effect, not a polka-dot look. -
Start the Cosmo Background:
Mix Ultramarine Blue with a touch of Black for a deep navy. Paint the area immediately surrounding the moon, blending outward. -
Darken the Edges:
As you move toward the top and corners of the canvas, add more black to your blue mix. The corners should be nearly pure black to create a vignette effect that draws the eye to the center. -
Blend the Sky:
Use a clean, slightly damp large brush to smooth out the transition between the bright glow around the moon and the deep dark corners. Work quickly before the acrylic dries.
Add Personal Details
Customize the silhouettes to match the real couple! Add a specific hairstyle, a baseball cap, glasses, or even a small silhouette of a pet sitting at their feet.
Step 3: Stars and Details
-
Add the Stars:
Dilute some white paint with water until it’s inky. Dip a toothbrush or stiff brush into it, then flick the bristles with your thumb to spray tiny stars across the dark blue sections. -
Paint the Shooting Star:
On the left canvas, use a liner brush with pure white to drag a thin, diagonal line. Press down at the start (the head) and lift off as you drag (the tail) to create a fading streak. -
Highlight Major Stars:
Pick a few speckles to emphasize. Use your smallest brush to make a few cross-shaped twinkles for visual interest.
Step 4: The Silhouettes
-
Paint the Ground:
Use pure Black paint to fill in the hill area at the bottom. Use a rough blotting motion along the top edge of the hill to simulate the texture of grass blades. -
Fill the Figures:
Carefully fill in your pencil sketches of the couple with solid black. Use a small round brush for the bodies and a liner brush for fine details like fingers and hair. -
Refine the Edges:
I find it helpful to go back over the silhouette edges one last time to ensure they are crisp against the bright moon. Sharp edges are key to the silhouette effect. -
Connect the Hands:
Place the canvases back together to check the hands. Ensure the fingertips extend right to the edge of the canvas wrap so they look like they are touching when hung. -
Paint the Sides:
Don’t forget to extend your sky, ground, and moon colors onto the sides (gallery wrap) of the canvases for a polished, professional finish.
Hang your masterpieces about an inch apart to let the negative space enhance the connection between the figures


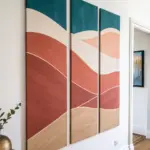
Two Trees Forming a Heart Canopy
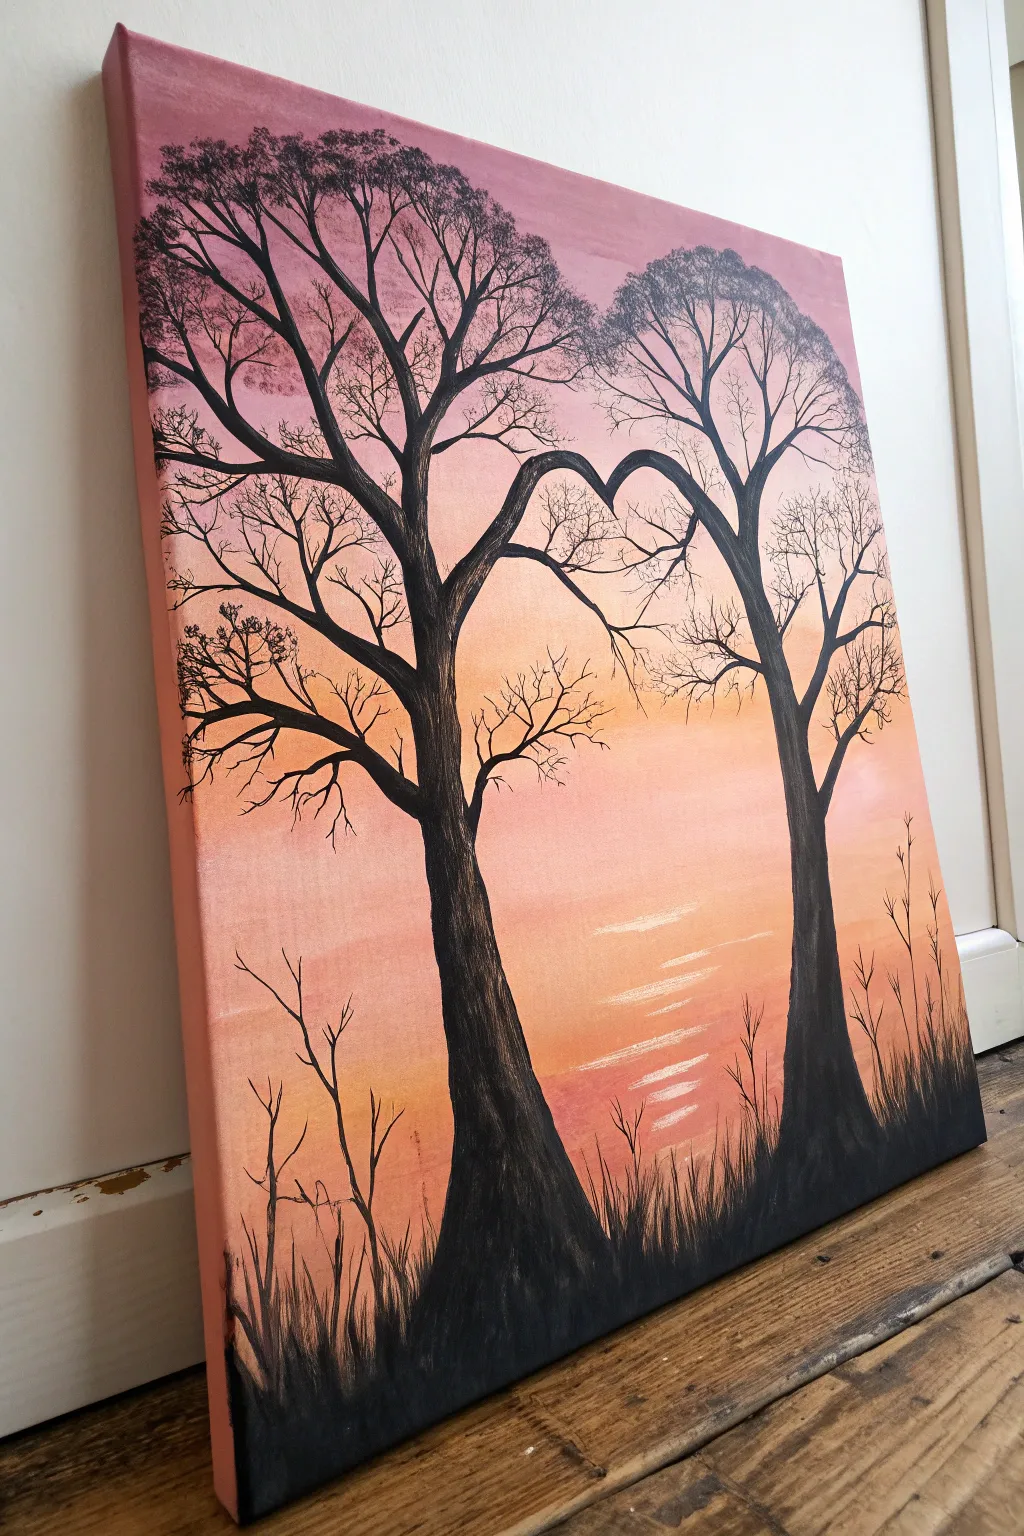
Capture the warmth of love with this romantic silhouette painting, featuring two majestic trees curving together against a vibrant sunset sky. The blending of soft pinks and oranges creates a dreamy backdrop for the bold, graphic tree shapes.
Step-by-Step
Materials
- Stretched canvas (e.g., 16×20 inches)
- Acrylic paints: Titanium White, Bright Orange, Deep Pink/Magenta, Mars Black
- Large flat brush (1-2 inch) for background blending
- Medium round brush
- Fine liner brush or rigger brush
- Palette
- Cup of water
- Paper towels
- Pencil (optional)
Step 1: Creating the Sunset Gradient
-
Prepare the Sky Colors:
Squeeze out generous amounts of pink, orange, and white paint onto your palette. You will need enough to cover the entire canvas without stopping to mix more. -
Start with the Top Sky:
Using a large flat brush, apply a band of deep pink mixed with a tiny bit of black or purple (if available) across the very top edge of the canvas. This creates a vignette effect. -
Transition to Pink:
Immediately below the dark band, paint a wide strip of pure pink. While the paint is still wet, use horizontal strokes to blend the edge where it meets the darker color above. -
Blend into Orange:
Clean your brush slightly, then pick up bright orange. Apply this in the middle section of the canvas. Work quickly to blend the orange upward into the wet pink paint using long, smooth left-to-right strokes. -
Lighten the Horizon:
Mix orange with a significant amount of white to create a soft peach tone. Apply this to the lower third of the canvas, blending it seamlessly into the bolder orange above. -
Paint the Reflection:
In the bottom center, where the ‘sun’ would be reflecting on water or mist, paint a few horizontal streaks of almost pure white mixed with a touch of peach. Keep these loose and slightly broken. -
Dry Completely:
Allow the background to dry fully before proceeding. This step is crucial so your black silhouettes remain crisp and don’t smudge into the sky colors.
Pro Tip: Flow is Key
For the finest twigs, water down your black paint until it feels like ink. This helps the paint flow off the liner brush smoothly for long, unbroken lines without skipping.
Step 2: Painting the Tree Silhouettes
-
Sketch the Heart Shape:
Lightly use a pencil to mark the position of the two tree trunks and, most importantly, the negative space of the heart in the center. This guide ensures the branches meet exactly where you want them. -
Block in the Trunks:
Moisten your medium round brush and load it with black paint. Paint the two main trunks, starting wide at the base and tapering slightly as they go up. They should lean just a little towards the outer edges. -
Create the Heart Arch:
Extend the two main inner branches from each trunk, curving them inward until they touch. Thickening these branches slightly where they meet emphasizes the heart shape. -
Add Secondary Branches:
Switch to a smaller brush. Paint several major branches extending upward and outward from the main trunks. Keep your hand loose to create natural, organic curves rather than straight lines. -
Detail with Twigs:
Using your finest liner brush and slightly watered-down black paint (ink consistency), add delicate twigs to the ends of the branches. I find that rolling the brush slightly as you pull creates very natural-looking tips. -
Form the Foliage:
To create the illusion of leaves at the very top, use an old, scruffy brush or a sponge dabbed in black paint. Lightly stipple texture at the top of the canopy and along the outer upper edges. -
Ground the Scene:
Paint a solid black uneven line across the bottom of the canvas to establish the ground. Paint over the bottom of the trunks so they look rooted rather than floating. -
Add Grass Texture:
Using the liner brush, flick upward quickly from the ground line to create varied heights of grass blades. Vary the pressure to make some thick and some thin. -
Paint Foreground Saplings:
Add visual interest to the lower corners by painting a few thin, bare saplings or tall weeds on the left and right sides, reaching up into the orange sky. -
Final Touches:
Step back and check the balance of the silhouette. If the heart shape needs definition, carefully add small twigs to outline the negative space more clearly.
Troubleshooting: Harsh Blends
If your sky gradient looks streak, the paint dried too fast. Mist the canvas lightly with water or use a slow-drying medium to keep the acrylics wet and workable longer.
Hang your finished piece where the warm colors can brighten up the room


Hidden Message Night Scene With Glow Layers
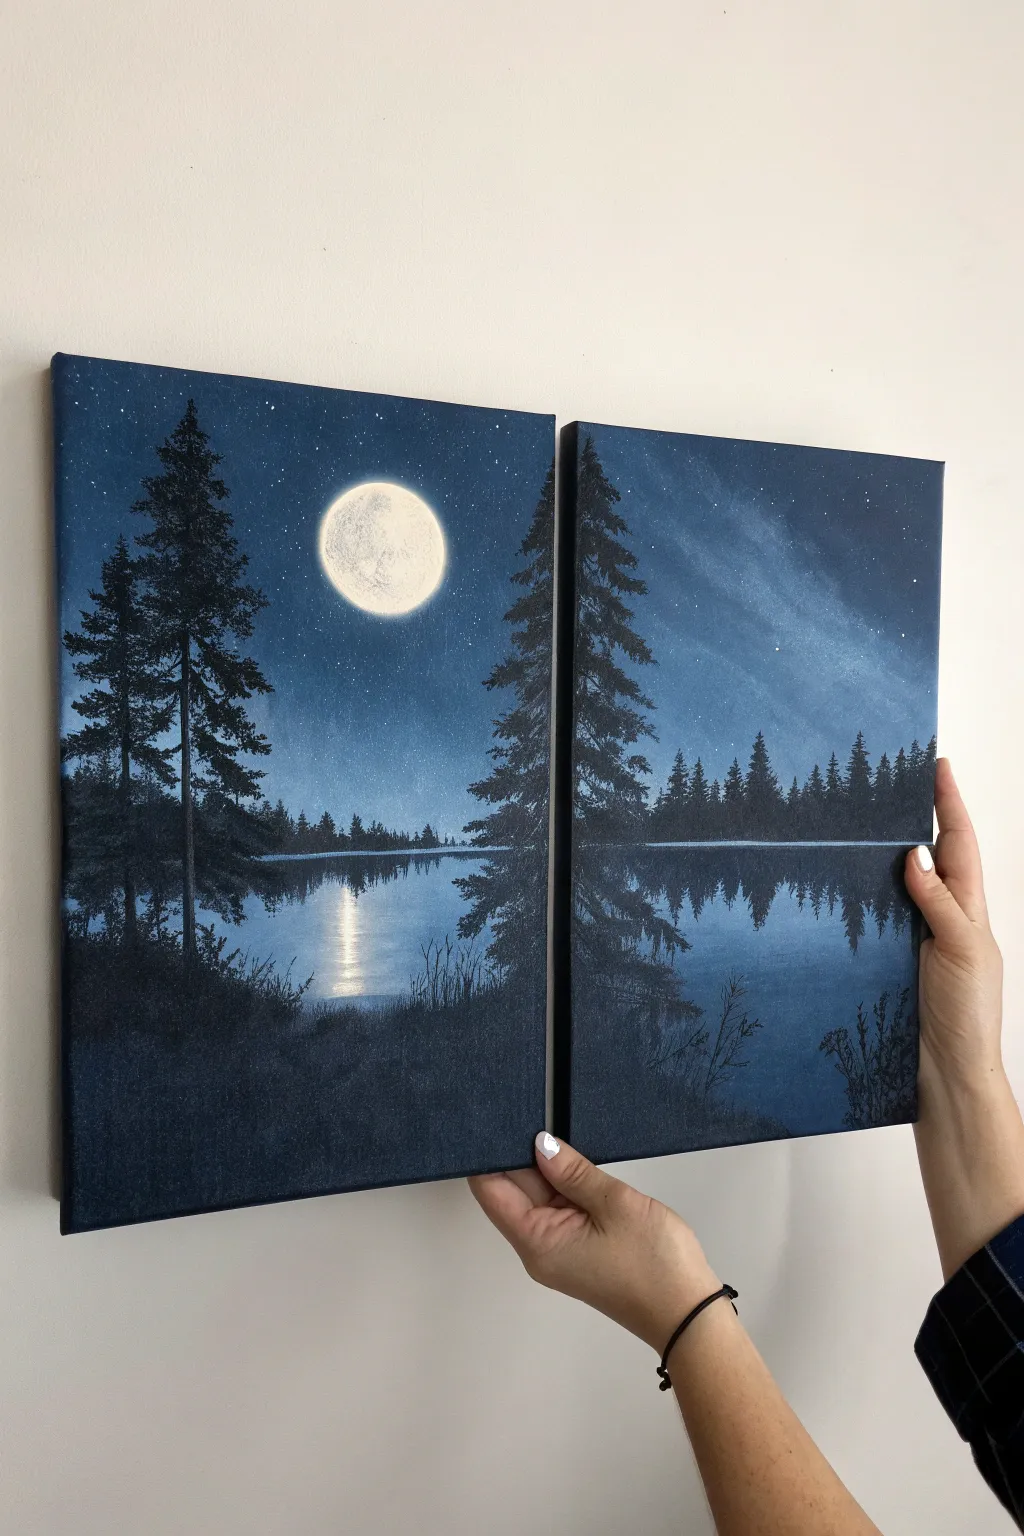
This stunning two-panel nightscape creates a cohesive, romantic scene perfect for a couple’s painting night or a solo project. Using a limited palette of deep blues and blacks, you’ll capture the serene glow of a full moon reflecting over a quiet lake.
How-To Guide
Materials
- Two stretched canvases (e.g., 10×12 or similar rect sizes)
- Acrylic paints: Phthalo Blue, Mars Black, Titanium White
- Large flat brush (1 inch)
- Medium filbert brush
- Small flat brush (shader)
- Small liner brush or rigger brush
- Old toothbrush (for stars)
- Palette
- Water cup and paper towels
Step 1: The Midnight Sky
-
Prepare the Gradient:
Place both canvases side-by-side on your workspace so they touch. You want to paint across both simultaneously to ensure the sky blends perfectly. -
Base Layer:
Mix a dark midnight blue using Phthalo Blue and a touch of Black. Apply this to the top corners and edges of both canvases, stroking inwards. -
Blending Down:
Gradually add more Blue and a tiny bit of White to your mixture as you work your way down the canvas. The sky should be lightest near the center-left where the moon will sit. -
Creating the Glow:
On the left canvas, scrub a circle of lighter blue-white into the wet paint where you plan to place the moon. Soften the edges so it looks like a hazy glow rather than a sticker. -
Milky Way Texture:
On the right canvas, use a dry brush with a very small amount of white and pale blue to create a diagonal, cloudy streak for the milky way effect. Keep this subtle.
Step 2: The Moon and Stars
-
Painting the Moon:
Once the sky is tacky or dry, use a filbert brush with Titanium White to paint the solid circle of the moon on the left canvas, right in the center of your glow. -
Adding Craters:
While the white is still wet, mix a faint grey and dab it gently onto the moon’s surface to create texture and craters. Don’t overblend; let the texture sit. -
Starry Night:
Dilute some white paint with water until it’s inky. Dip an old toothbrush into it and flick the bristles with your thumb to spray tiny stars across the top half of both canvases. -
Bright Stars:
Use your liner brush to dot a few specific, brighter stars in the sky to add variety to the splatter pattern.
Star Splatter Mess
If your stars turn into big blobs, wait for them to dry completely, then paint over the mistake with your dark sky color. Re-splatter carefully with less water on the brush.
Step 3: Water and Reflections
-
Horizon Line:
Determine your horizon line about one-third up from the bottom. Use a piece of tape or a ruler to ensure it is straight across both canvases. -
Water Base:
Paint the water area with horizontal strokes, mirroring the sky colors but slightly darker. Darker blue at the bottom corners, lighter blue in the center. -
Moonlight Reflection:
On the left canvas directly under the moon, use horizontal zig-zag strokes of white to create the shimmering reflection path on the water. -
Distant Trees:
Mix a dark grey-blue (not fully black yet) and paint small, vertical jagged shapes along the horizon line for the distant tree line. Let this dry completely.
Glow in the Dark
For a magical hidden surprise, mix phosphorescent (glow-in-the-dark) medium with your white paint for the moon and the reflection highlights.
Step 4: Foreground Silhouettes
-
Tree Placement:
Switch to pure Mars Black. Identify where your large foreground pine trees will go—one framing the left edge and one splitting the middle (half on each canvas). -
Painting Pine Trunks:
Draw straight vertical lines for the trunks of your main trees using the small flat brush. -
Adding Pine Branches:
Using the corner of a flat brush or a fan brush, tap in the pine branches sticking out from the trunk. Start narrow at the top and get wider near the bottom. -
Foreground Grass:
Fill in the bottom inch or two of both canvases with solid black for the ground. Use upward flicking motions with a liner brush to create tall grasses. -
Water Reflections:
For the distant trees, dry-brush a faint, blurry vertical reflection downwards into the water. Keep these reflections indistinct and softer than the real trees.
Hang your panels slightly apart to let the negative space connect the scene and enjoy your peaceful nightscape


Have a question or want to share your own experience? I'd love to hear from you in the comments below!