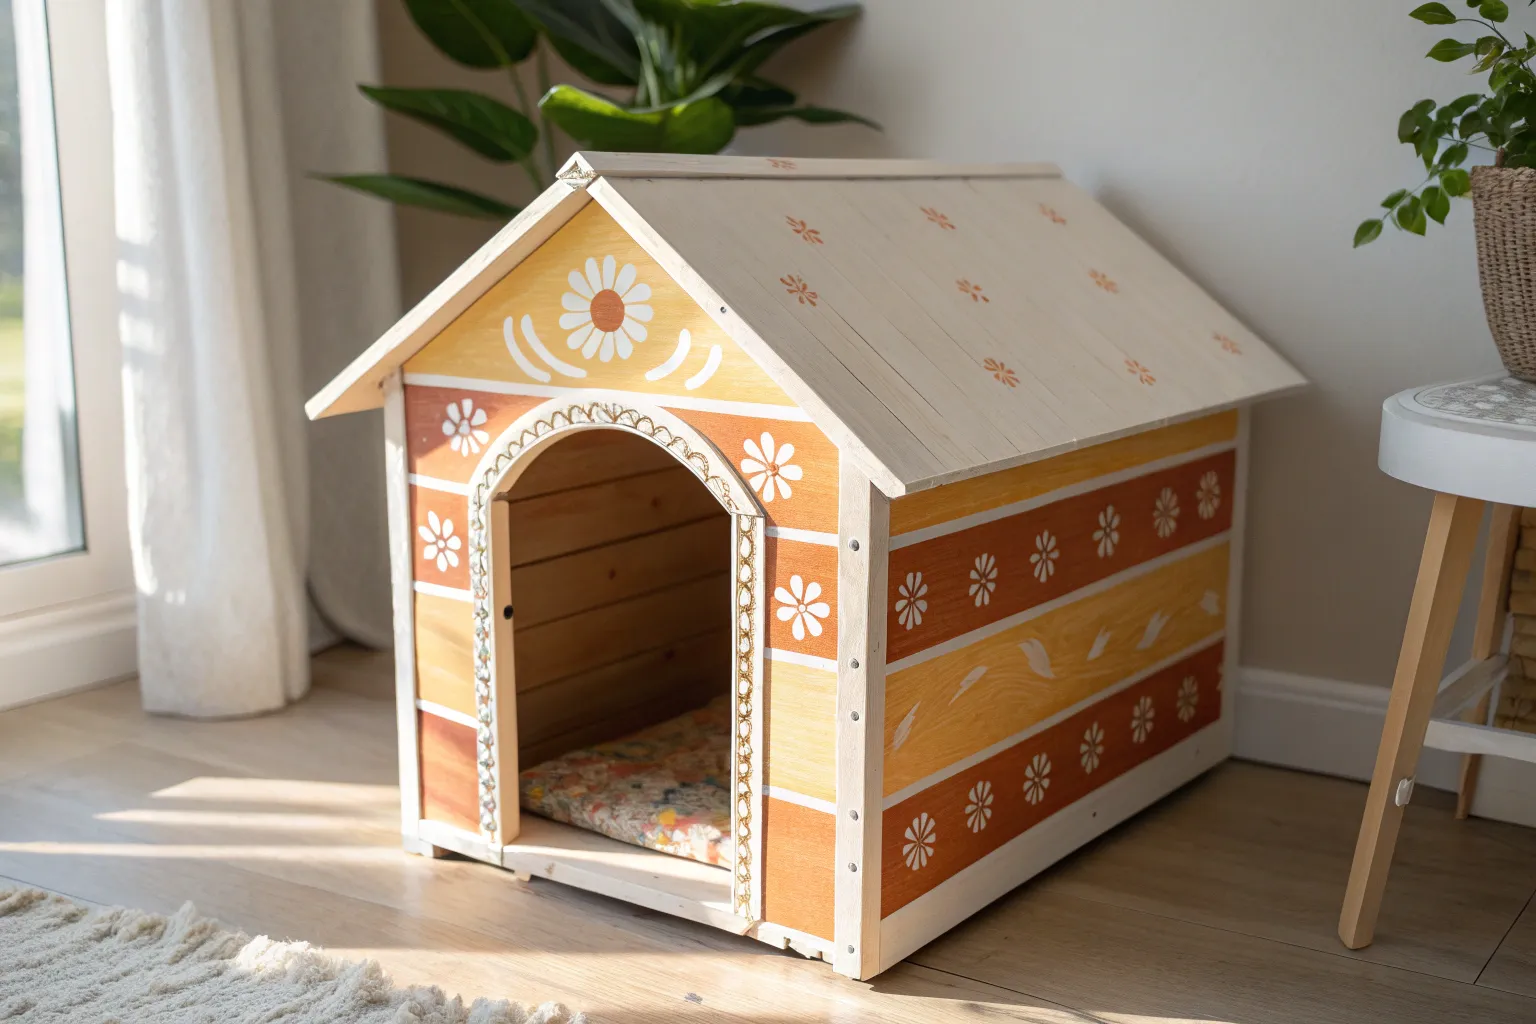
When I paint a dog house, I treat it like a tiny canvas that just happens to have a wagging critic inside. These creative dog house paint ideas go from classic, homey charm to artsy statement looks you can pull off with steady lines and a playful palette.
Classic Cottage Dog House With Crisp Trim
Transform a standard wooden dog house into a charming backyard retreat with this classic cottage-inspired paint scheme. The crisp white trim against soft beige siding creates a warm, inviting look that mimics traditional home exteriors.
Detailed Instructions
Materials
- Wooden dog house (pre-built or DIY kit)
- Exterior-grade acrylic latex paint (soft beige/taupe)
- Exterior-grade acrylic latex paint (bright white)
- Exterior-grade acrylic latex paint (dark charcoal or slate grey for roof)
- Painting tape (1-inch width)
- Angled sash brush (2-inch)
- Mini foam roller and tray
- Small artist brush (for tight corners)
- Sandpaper (120 and 220 grit)
- Wood filler (if repairing an older house)
- Tack cloth
- Decorative wooden plaque (optional)
Step 1: Preparation
-
Surface Cleaning:
Begin by thoroughly cleaning the exterior of the dog house. If it’s a new kit, wipe away any sawdust. For an older house, scrub off dirt and debris with mild soapy water and let it dry completely. -
Sanding and Smoothing:
Lightly sand all surfaces with 120-grit sandpaper to rough up the existing finish or raw wood, which helps the paint adhere. Follow up with 220-grit for a smooth touch, paying special attention to the trim edges. -
Dust Removal:
Use a tack cloth or a damp rag to remove every speck of sanding dust. Painting over dust will create a gritty texture that detracts from the clean cottage look. -
Patching Imperfections:
Inspect the siding for any knot holes or cracks. Fill these with exterior wood filler, let it dry according to the package instructions, and sand flush for a seamless finish.
Tape Like a Pro
Run a putty knife over the edge of your painter’s tape after applying it. This creates a tight seal that prevents paint bleed, ensuring your trim lines stay razor-sharp.
Step 2: Painting the Body
-
Taping the Trim:
Apply painter’s tape carefully along the edges of the white trim pieces—around the door frame, the vertical corner posts, and the roofline fascia. Press the tape edges down firmly to prevent bleed-through. -
First Coat of Beige:
Stir your soft beige exterior paint well. Using a mini foam roller, apply the first coat to the horizontal siding panels. The roller helps achieve a smooth finish quickly on the flat areas. -
Detailing the Grooves:
While the paint is wet, use your angled sash brush to work the paint into the horizontal grooves between the siding boards. Ensure no raw wood is peeking through the gaps. -
Second Coat Application:
Allow the first coat to dry for at least 4 hours. Apply a second coat of beige to ensure rich, opaque coverage, smoothing out any roller marks with long, light strokes.
Nameplate Upgrade
Use a stencil to paint your pup’s name on the small plaque in the same charcoal grey used for the roof. It ties the whole color scheme together perfectly.
Step 3: Crisp White Trim
-
Removing the Tape:
Once the beige paint is fully dry, carefully peel off the painter’s tape. Now, tape off the freshly painted beige siding right up against the trim to protect your work. -
Framing the Entrance:
Start painting the arched door frame with your bright white exterior paint. The curved shape requires a steady hand, so I often switch to a smaller brush here for better control. -
Corner Posts and Fascia:
Move on to the vertical corner posts and the roof fascia boards. Apply two thin coats rather than one thick one to avoid drips, letting the paint dry between layers. -
Painting the Plaque:
If your house has a decorative plaque above the door, paint the background white to match the trim. You can later add a name or design with a fine-tip marker or contrasting paint.
Step 4: Roof and Final Touches
-
Roof Base Coat:
For the roof, use a dark charcoal or slate grey paint to mimic asphalt shingles. Use a wider brush to cover the surface area efficiently. -
Creating Texture:
If your roof is flat wood but you want the shingle look, you can dab a dry sponge into slightly lighter grey paint and stipple it over the dark grey base to create a textured, granular appearance. -
Cleaning Up Edges:
Remove all remaining tape. Inspect the lines where the white trim meets the beige siding. Use a small artist brush to touch up any spots where the paint might have bled or missed. -
Sealing (Optional):
Although exterior paint is durable, adding a coat of clear matte exterior polyurethane can provide extra protection against rain and sun fading. -
Styling the Scene:
Once fully cured (give it 24-48 hours), place the house in your garden. Adding a small dried flower wreath nearby or tall grasses complements the natural cottage aesthetic beautifully.
Your furry friend now has a stylish, classic home that looks great in any backyard setting


Coastal Stripe Dog House in Breezy Blues
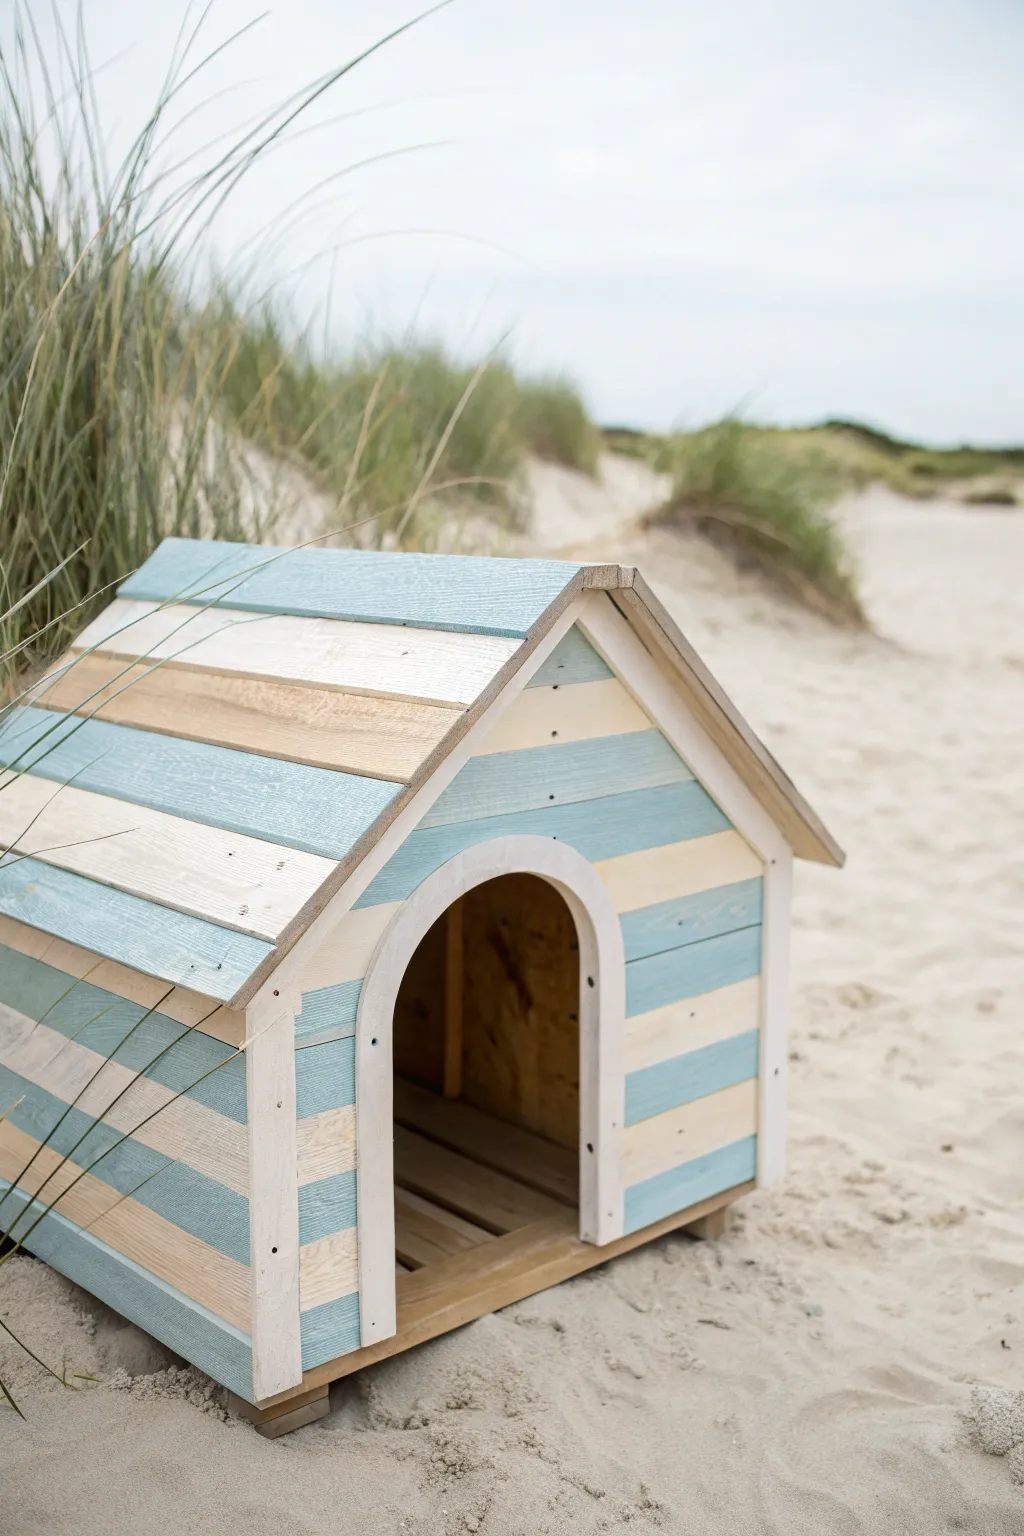
Bring the relaxing vibes of the seaside to your pup’s backyard retreat with this charming coastal makeover. By alternating soft blue, creamy white, and natural wood tones, you’ll create a weathered, beach-shack look that feels effortlessly stylish.
Step-by-Step Tutorial
Materials
- Wooden dog house (assembled)
- Sandpaper (120 and 220 grit)
- Painter’s tape (1-inch width)
- Exterior wood primer
- Exterior latex paint (Soft Sea Blue)
- Exterior latex paint (Warm Cream or Off-White)
- Exterior wood stain (Light Oak or Driftwood)
- Paintbrushes (2-inch sash brush and 1-inch detail brush)
- Measuring tape
- Pencil
- Clear matte exterior sealer (polyurethane)
- Drop cloth
Step 1: Preparation & Planning
-
Clean surface:
Begin by thoroughly cleaning the exterior of the dog house to remove any dirt, dust, or oils that might prevent the paint from sticking. -
Initial sand:
Sand the entire exterior with 120-grit sandpaper to smooth out rough patches and open the wood grain. -
Wipe down:
Use a damp cloth to wipe away all sanding dust and let the wood dry completely before moving forward. -
Measure the stripes:
Decide on the width of your horizontal stripes; for this look, roughly 3-4 inches works perfectly. Measure from the roofline down and mark faint pencil lines across the front and sides. -
Remove hardware:
If your dog house has any metal feet or nameplates, remove them or tape them off securely to keep them paint-free.
Tape Bleed Fix
Paint bled under the tape? Don’t panic. Once dry, use a small flat-edged brush with the base color to create a crisp line over the mistake.
Step 2: Painting the Base & Stripes
-
Apply the stain:
Identify which stripes you want to remain ‘natural.’ Apply the light oak wood stain to these specific areas using a rag or brush, as well as the interior floor if visible. -
Let stain cure:
Allow the stain to dry fully according to the manufacturer’s instructions, usually overnight, to prevent bleeding into the paint. -
Tape the first set:
Apply painter’s tape along the pencil lines to mask off the stained areas and the future ‘blue’ stripes. You are isolating the areas that will be painted cream first. -
Paint cream stripes:
Apply the Warm Cream exterior paint to the exposed striped areas. I prefer two thin coats here for better durability than one thick gloppy one. -
Trim detail:
While the cream paint is out, paint the arched doorway trim and the front vertical corner trim pieces solid cream to frame the structure. -
Remove and re-tape:
Once the cream paint is dry to the touch, carefully peel off the tape. Let it cure for at least 4 hours, then apply new tape over the cream and stained stripes to isolate the areas for the blue paint. -
Paint blue stripes:
Fill in the remaining areas with Soft Sea Blue paint. Don’t forget that the roof slats follow this same pattern, so paint those blue stripes now too.
Nautical Upgrade
Attach a small wooden anchor or a personalized driftwood nameplate above the archway using marine-grade adhesive for extra coastal flair.
Step 3: Finishing Touches
-
Reveal the pattern:
Gently remove all painter’s tape to reveal your alternating pattern of blue, cream, and natural wood. -
Touch ups:
Use a small artist’s brush to fix any paint bleeds or uneven lines where the stripes meet. -
Distressing (optional):
For that true weathered beach look, lightly sand the painted edges with 220-grit sandpaper to let a bit of the wood peek through. -
Roof ridge:
Ensure the very top ridge of the roof is sealed or painted solid to prevent water from seeping into end grains. -
Seal the deal:
Apply two coats of clear matte exterior sealer over the entire house, including the stained wood, to protect it from rain and UV rays. -
Ventilation check:
Make sure no paint has sealed the ventilation gaps shut; run a putty knife through the gaps between roof slats if necessary. -
Final dry:
Let the project cure in a dry, well-ventilated garage or shed for at least 24 to 48 hours before moving it to its permanent spot.
Your pup now has the perfect seaside sanctuary to enjoy lazy afternoons in the shade


Barn-Red Dog House With a Painted Door Detail
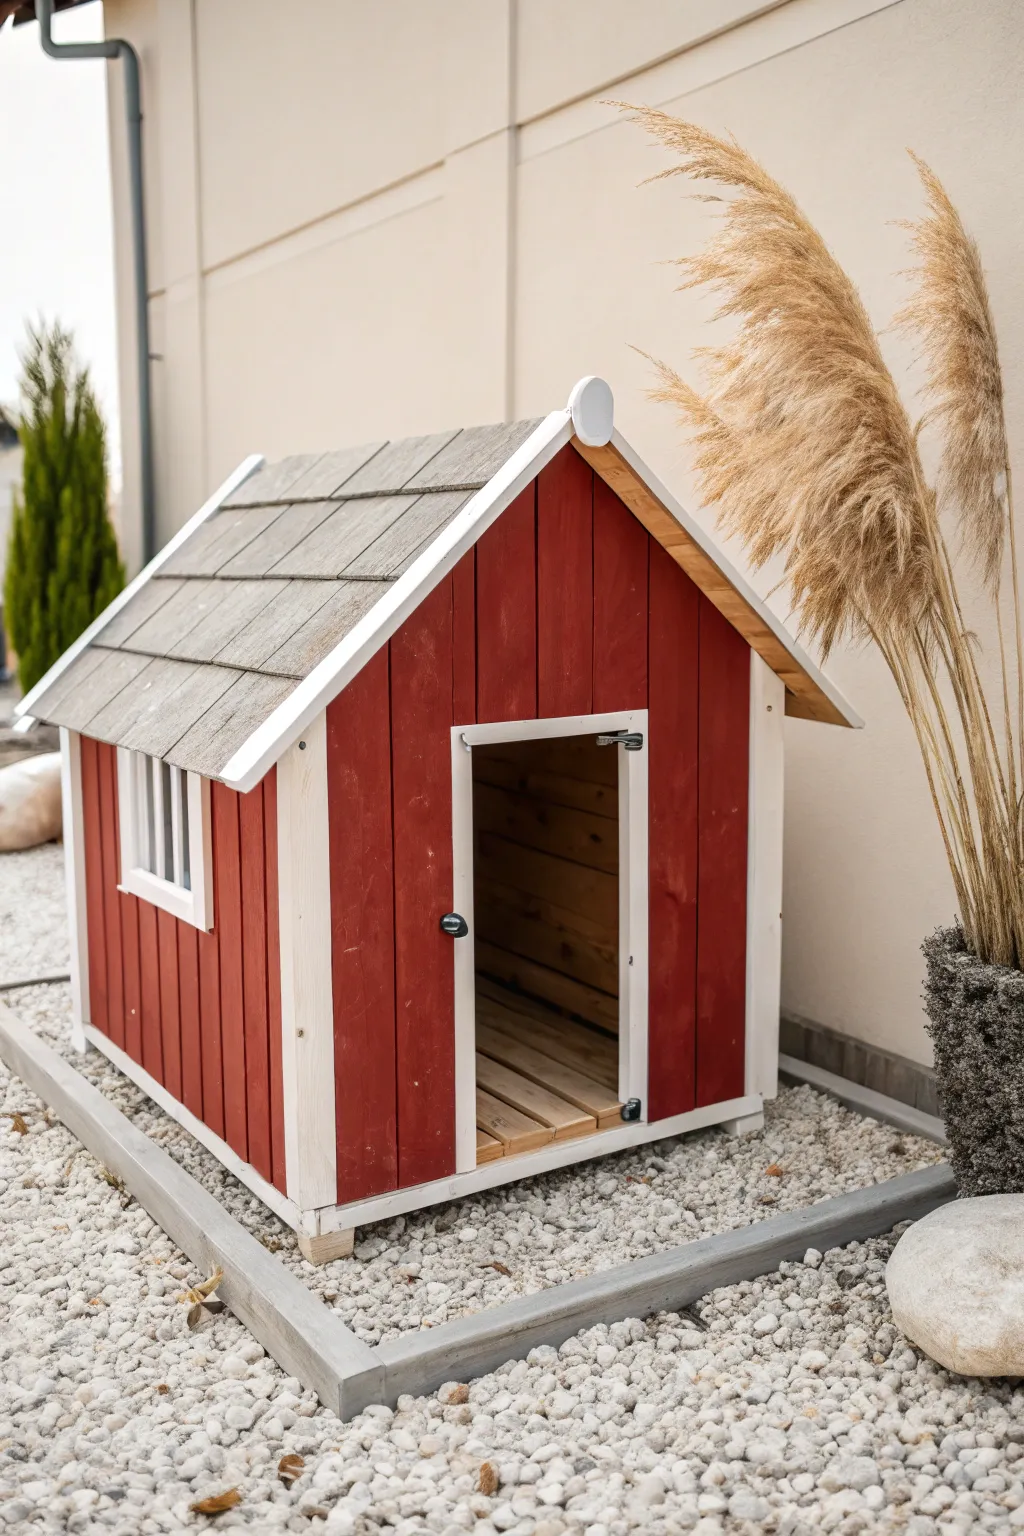
Transform a basic wooden dog house into a charming miniature barn that pops against any backyard landscape. This project features classic red vertical siding, crisp white trim, and a faux-shingle roof effect that brings a touch of countryside character to your pet’s home.
Step-by-Step
Materials
- Unfinished wooden dog house (or existing one to refinish)
- Barn red exterior paint (semi-gloss or satin)
- Bright white exterior paint (semi-gloss)
- Grey wood stain or diluted grey paint
- Sandpaper (120 and 220 grit)
- Painter’s tape (1-inch width)
- Medium paintbrush (2-inch)
- Small angled sash brush
- Detail brush
- Drop cloth
- Small roller (optional for roof)
- Screwdriver (to remove hardware)
- Wood filler (if repairing an old house)
Step 1: Preparation & Base Work
-
Remove Hardware:
Before dipping any brushes, unscrew and remove any metal hardware like latches, hinges, or decorative bolts. Store them safely in a baggie so they don’t get lost or painted over. -
Clean surface:
If you are upcycling an old house, wash it down thoroughly to remove dirt and mildew. For new wood, wipe it with a tack cloth to remove sawdust. -
Sand the wood:
Give the entire structure a good sanding with 120-grit sandpaper to rough up the surface for better paint adhesion. Follow up with 220-grit for a smoother finish on the trim areas. -
Fill gaps:
Inspect the wood for major cracks or knot holes. Apply wood filler where needed, let it dry completely, and sand it flush with the surface.
Uneven Edges?
If paint bleeds under the tape, let it dry fully. Then, create a sharp edge by scraping gently with a razor blade or using a tiny artist’s brush to correct the line with the background color.
Step 2: Painting the Siding
-
Tape the trim:
Apply painter’s tape carefully along the edges of the door frame, windows, and corner posts to protect them while you paint the red siding. -
First coat of red:
Using your 2-inch brush, apply the first coat of barn red paint to the main vertical siding panels. Work in the direction of the wood grain to ensure the paint penetrates the grooves. -
Dry time:
Let the first coat dry for at least 4 hours, or according to your paint can’s instructions. It might look a bit streaky, but don’t worry. -
Second coat of red:
Apply a second coat of red for a rich, opaque color. I like to be generous with the paint here to ensure full coverage against the weather. -
Remove tape:
Carefully peel off the painter’s tape while the second coat is still slightly tacky to get the cleanest lines.
Step 3: Detailing the Trim
-
Outline the trim:
Once the red is fully dry, use the small angled sash brush to carefully cut in the white paint on the corner posts, window frames, and door detailing. -
Fill in the white:
Paint the faces of the trim with the bright white paint. You may need two to three thin coats to cover the raw wood completely without drips. -
Paint the finial:
Don’t forget the decorative finial or cap at the peak of the roof gable—paint this white to match the trim. -
Add window details:
If your dog house has faux window muntins (the grid bars), use a very small detail brush to paint these white.
Add a Name Plate
Personalize the entrance by hanging a small, painted wooden bone or slate chalkboard above the door frame with your pup’s name in white hand-lettering.
Step 4: Roof & Finishing Touches
-
Stain the roof:
For the roof shingles, use a grey wood stain or highly diluted grey paint. Apply it with a brush, wiping off excess with a rag to let the wood grain show through for a weathered look. -
Reattach hardware:
Once everything has cured for at least 24 hours, screw the latches and hinges back into place. The black hardware provides a nice contrast to the red. -
Touch-ups:
Do a final walk-around. Use a tiny brush to touch up any spots where red met white or where you missed a crevice. -
Floor treatment:
If the interior floor is visible through the door, consider applying a clear weather-sealant to the raw wood floorboards to protect them from muddy paws.
Your furry friend now has a stylish, weather-resistant home that looks charming in any season


Faux Log Cabin Dog House With Wood-Grain Lines
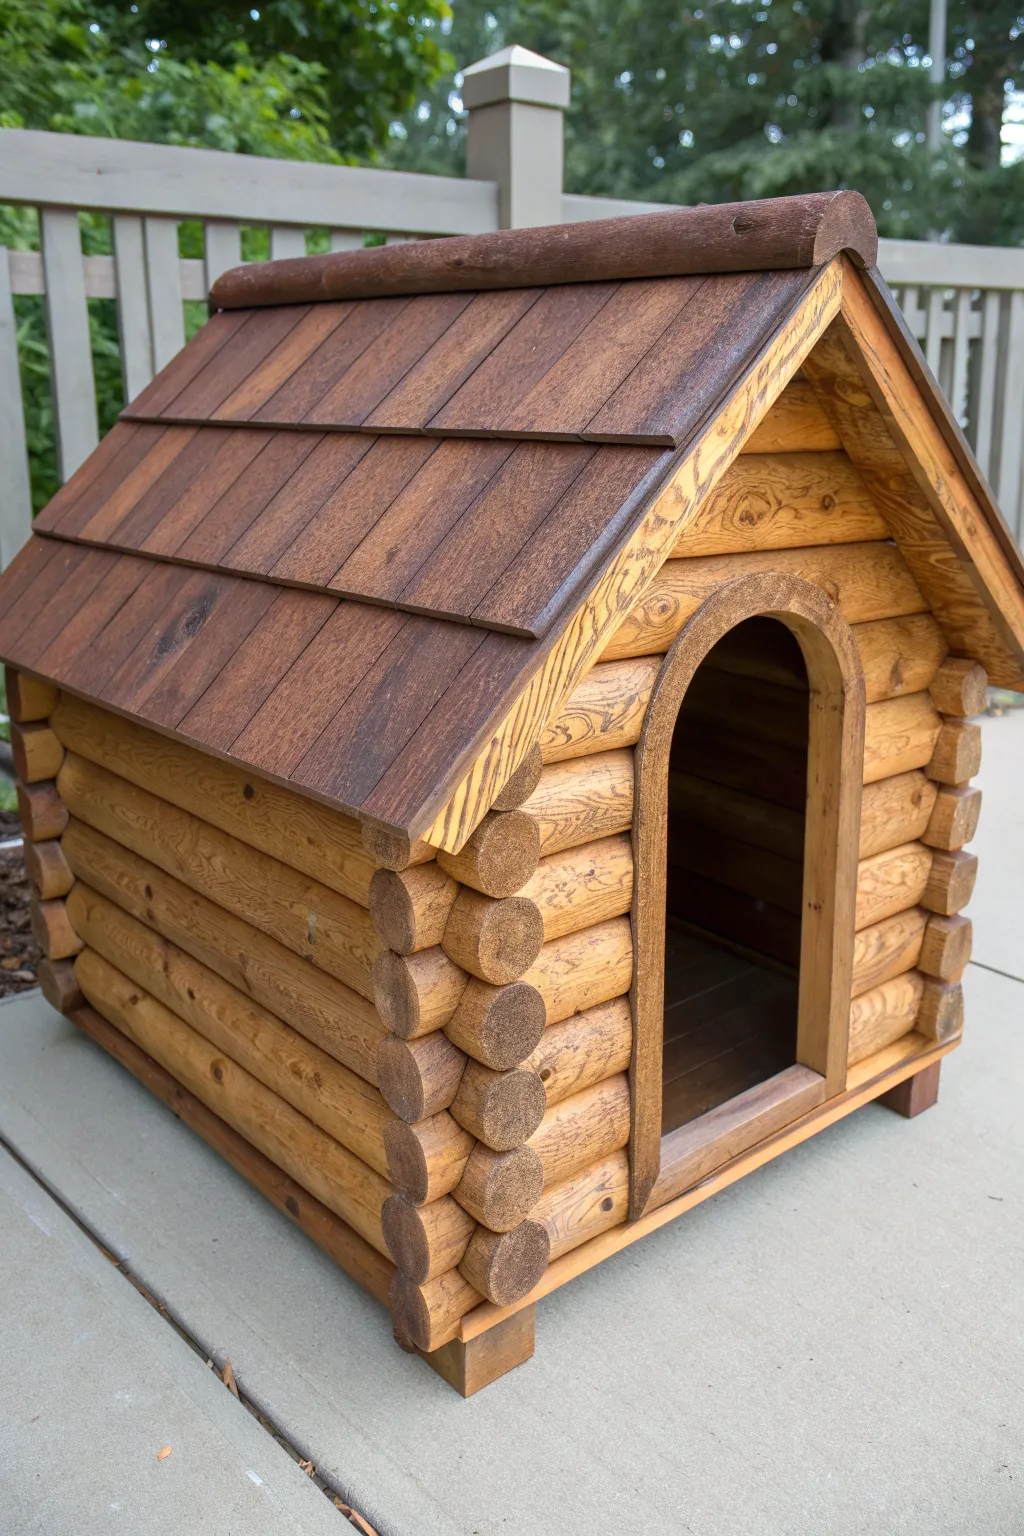
Transform a plain wooden dog house into a rustic retreat that looks like it belongs deep in the mountains. This project uses clever painting and staining techniques to turn flat surfaces or basic half-rounds into convincing, textured logs complete with realistic knotty grain.
Step-by-Step Tutorial
Materials
- Unfinished wooden dog house (or plywood for building one)
- Half-round molding (for faux logs)
- Wood stain (dark walnut or espresso)
- Wood stain (golden oak or pecan)
- Wood stain (red mahogany for roof)
- Spar urethane or outdoor sealer
- Assorted paintbrushes (foam and bristle)
- Wood glue and finish nails
- Rectangle roofing shingles (thin wood slats)
- Grain rocker tool (optional)
- Fine grit sandpaper
Step 1: Building the Log Siding
-
Prep the surface:
Begin with a clean, sanded base structure. Whether you are building from scratch or refinishing a store-bought house, ensure the exterior walls are smooth and free of old paint. -
Measure and cut half-rounds:
Measure the length of the side walls. Cut your half-round molding strips to fit these horizontal lengths exactly. -
Create the corner joints:
To mimic the interlocking look of a real cabin, you’ll need shorter ‘log ends.’ Cut small pieces of half-round (about 2-3 inches long) to serve as the perpendicular log ends that stick out at the corners. -
Attach the siding:
Glue and nail the long half-round strips horizontally up the sides of the house. Leave a gap between the ends of the long strips at the corners to accommodate the perpendicular log ends you cut earlier. -
Install corner details:
Place the short ‘log end’ pieces vertically between the alternating rows of the long logs at the corners. This creates that classic Lincoln Log zipper effect. -
Frame the doorway:
Cut a flat piece of wood into an arch shape to frame the door. Glue this over the ends of the half-rounds where they meet the door opening to create a clean, finished entry.
Insider Grain Tip
If you aren’t confident painting grain by hand, use a “grain rocker” tool. Drag it through wet dark gel stain over a dry light base coat for instant texture.
Step 2: Creating the Wood Grain
-
Apply the base coat:
Stain all the ‘log’ siding with your lighter stain color, like golden oak. Apply it generously to soak into the wood, then wipe away excess. -
Draw the grain lines:
Dip a fine-tip brush into the darker walnut stain. Hand-paint swirling grain lines and mock knots onto the dried lighter stain. -
Enhance the knots:
For the circular log ends at the corners, dab the darker stain heavily in the center and paint concentric rings outward to simulate growth rings. -
Detail the door frame:
Stain the arched door frame with a medium tone. I like to drag a dry bristle brush with dark stain vertically down it to mimic rough-sawn lumber texture.
Fixing Blotchy Stain
If the pine wood absorbs stain unevenly, apply a pre-stain wood conditioner first. This helps the wood take the color uniformly for a professional look.
Step 3: Roofing and Finishing
-
Prepare roof slats:
Cut thin wooden rectangular slats for the shingles. Sand the edges slightly to remove splinters. -
Stain the shingles first:
Stain these slats with the red mahogany color before attaching them. This ensures no bare wood shows if they shrink or shift later. -
Install the first row:
Starting at the bottom edge of the roof, glue and nail your first row of shingles. -
Layer the shingles:
Apply the next row, overlapping the first by about half an inch. Continue moving upward toward the peak. -
Cap the ridge:
Use a piece of rounded molding or two joined wood strips to cover the very top peak where the shingle sides meet. -
Seal the project:
Once all stain is fully dry (give it 24 hours), apply three coats of outdoor spar urethane. This is crucial for protecting the finish from rain and sun.
Your pup now has the coziest cabin on the block, ready for backyard camping adventures
BRUSH GUIDE
The Right Brush for Every Stroke
From clean lines to bold texture — master brush choice, stroke control, and essential techniques.
Explore the Full Guide
Shingle-Style Roof Illusion on a Dog House
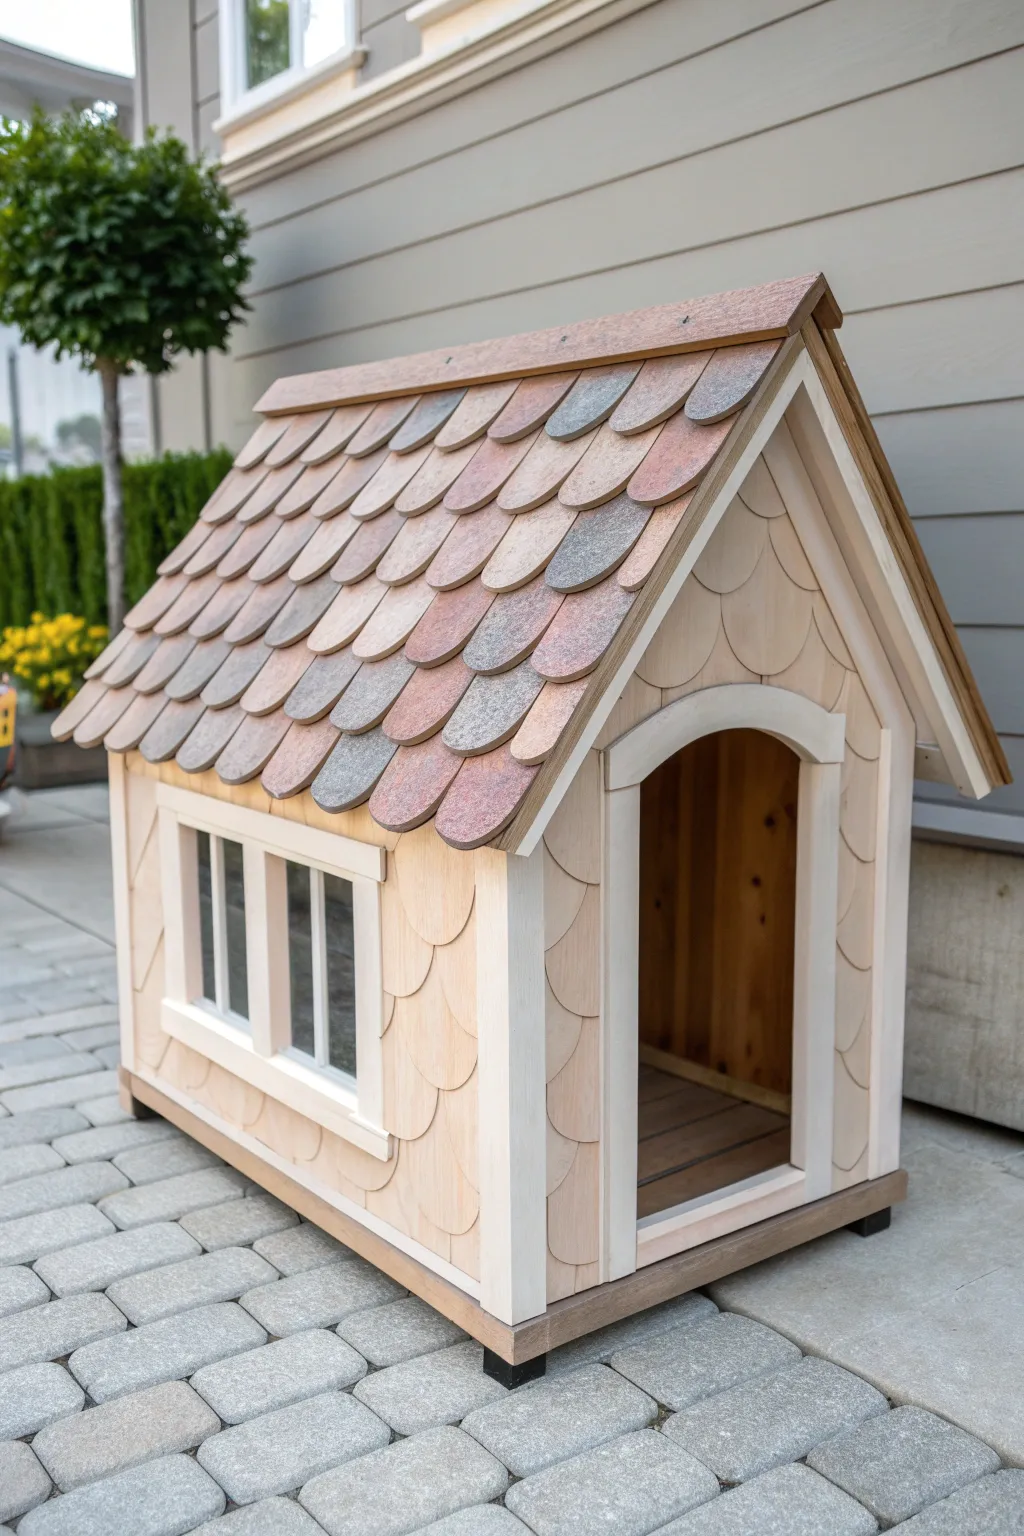
Transform a plain wooden structure into a storybook cottage with this highly textured, shingle-style project. By layering scalloped wood pieces and using a variegated stain technique, you’ll create a charming, weather-resistant retreat that looks like it belongs in a fairy tale.
Step-by-Step
Materials
- Plywood dog house shell (pre-built or assembled)
- Cedar or pine shakes (scalloped/fish-scale profile)
- Rounded roof shingles (cedar or composite)
- Exterior wood glue
- Brad nailer with 1-inch brad nails
- Exterior wood stain (Light Oak, Red Mahogany, Dark Walnut)
- Exterior paint (Cream/Off-White for trim)
- Paintbrushes (2-inch sash brush)
- Rags or staining sponges
- Sandpaper (120 and 220 grit)
- Clear outdoor sealant (polyurethane or spar varnish)
Step 1: Prepping the Base Structure
-
Sand the surfaces:
Before attaching any decorative elements, ensure your basic dog house shell is smooth. Give the entire plywood exterior a quick pass with 120-grit sandpaper to remove rough splinters. -
Mark your guidelines:
To keep your shingles straight later, use a pencil and a long ruler to draw horizontal level lines across the roof and the side walls. Space them according to the height of your specific shingles.
Pro Tip: Weathering
To make the roof look naturally aged instantly, lightly sand the edges of the dark-stained shingles before sealing. This reveals raw wood at the tips for a ‘worn’ effect.
Step 2: Creating the Fish-Scale Siding
-
Sort your wall shingles:
For the walls, you are using the light-colored, scalloped wood pieces often called ‘fish scales.’ Sort them to ensure you have consistent widths. -
Install the bottom row:
Start at the very bottom edge of the side walls. Apply a dab of exterior wood glue to the back of a shingle and secure it with a brad nail. Continue this across the entire bottom row. -
Layer the second row:
Start the next row up, overlapping the first row by about half an inch. Offset the seams so the center of the top shingle aligns with the gap between the two below it. -
Navigate corners and trim:
When you reach the window or door frames, you will need to cut the shingles to fit. A jigsaw or coping saw works well here. Only apply these wall shingles to the main body panels, not the trim. -
Sand the wall shingles:
Once all wall shingles are nailed and glued, lightly sand the faces with 220-grit paper to prepare them for a very light stain or sealant.
Troubleshooting: Gaps
If you have gaps between shingles near the roof peak, don’t force them. Cut narrow slivers of shingle to fill the void, gluing them in place before adding the ridge cap.
Step 3: Constructing the Variegated Roof
-
Pre-stain the roof tiles:
This is crucial for the multicolor look. Divide your rounded roof tiles into three or four piles. Stain one pile Light Oak, one Red Mahogany, one Dark Walnut, and leave one raw or very light. -
Let tiles dry:
Allow the stained tiles to dry completely according to the manufacturer’s instructions before handling them. This prevents smearing colors during installation. -
Install the starter strip:
Nail a flat strip of wood along the bottom edge of the roofline to kick the first row of shingles out at the correct angle. -
Lay the first roof row:
Begin attaching the roof tiles at the bottom eave. Mix the colors randomly as you go—place a red one, then a dark one, then a light one—to create that organic, aged texture. -
Continue upward:
Work your way up the roof slope, row by row. Ensure each new row overlaps the nails of the row beneath it so no fasteners are visible. -
Cap the ridge:
Once you reach the peak, install a wooden ridge cap or two long boards joined in a V-shape to seal the top seam where the two roof sides meet.
Step 4: Detailed Trim and Finish
-
Paint the trim components:
While the main house is drying, paint your window frames, door arch, and corner posts with the Cream exterior paint. I find two coats usually give the best solid coverage. -
Install the trim:
Frame the doorway with your painted arched trim and attach the window frames over the siding cutout. Use finish nails and set them slightly below the surface. -
Fill nail holes:
Use a dab of wood filler on the trim nail holes. Once dry, touch up with a tiny bit of cream paint to make them invisible. -
Apply clear coat:
To protect all that beautiful wood from rain and sun, brush on two coats of high-quality exterior spar varnish or polyurethane over the entire house, including the roof. -
Add the base:
Finally, attach the dark painted base trim or feet to keep the wood siding off the damp ground, which helps prevent rot.
Step back and admire the cozy, textured masterpiece your pup now calls home
Modern Color-Block Dog House in Two Tones
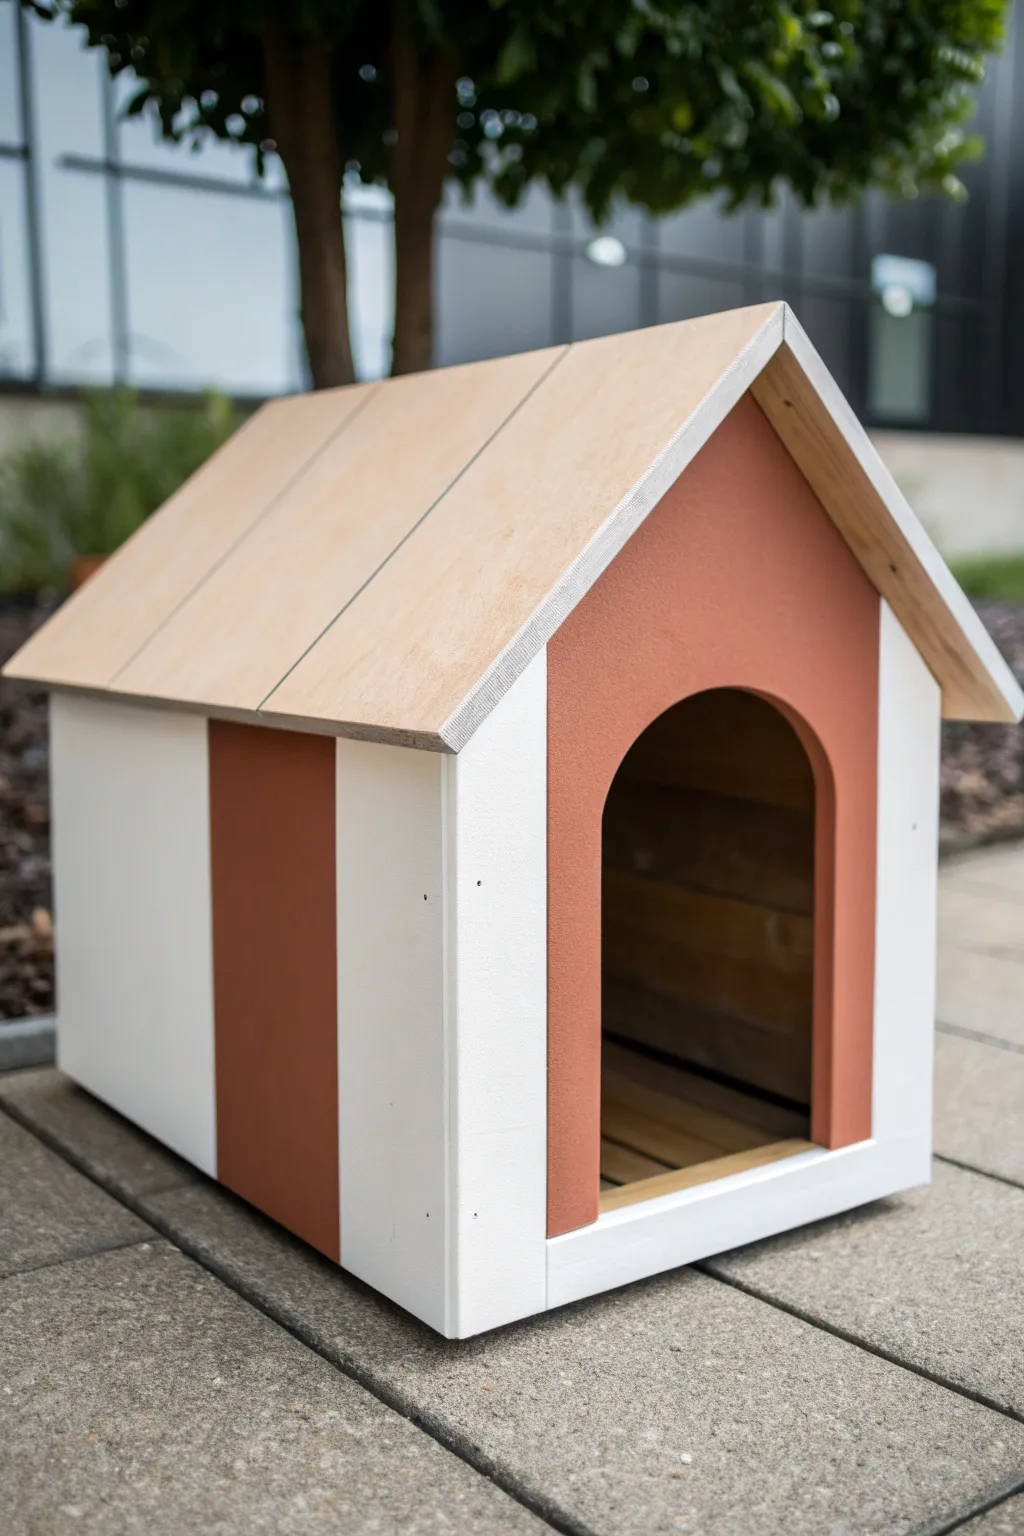
Transform a plain wooden dog house into a modern architectural statement with this stylish color-block design. The warm terracotta tones paired with crisp white lines create a clean, contemporary look that fits perfectly in any modern backyard.
How-To Guide
Materials
- Wooden dog house (assembled or kit)
- Sandpaper (120 and 220 grit)
- Painter’s tape (high quality, 1-inch width)
- Exterior primer (white)
- Exterior paint: Warm Teracotta / Burnt Orange
- Exterior paint: Bright White
- Clear exterior wood sealer (matte or satin)
- Paint rollers (mini foam rollers work best)
- Angled sash brush (2-inch)
- Drop cloth
- Tack cloth
- Pencil
- Measuring tape
Step 1: Preparation & Priming
-
Surface Prep:
Begin by sanding the entire exterior of the dog house with 120-grit sandpaper to remove any rough splinters or existing finish. Follow up with 220-grit for a smooth surface. -
Clean Up:
Wipe down every surface with a tack cloth to remove all sawdust. Any dust left behind will prevent your crisp lines from sticking properly. -
Protect the Roof:
If you want to keep the natural wood look for the roof as shown in the photo, cover the entire roof area with painter’s tape or plastic sheeting to protect it from stray drips. -
Prime the Body:
Apply a coat of exterior primer to the main body of the house. I find that a mini foam roller gives the smoothest finish here. -
Dry and Inspect:
Let the primer dry completely according to the can’s instructions. If the wood grain still shows through heavily, apply a second coat.
Tape Sealing Trick
To get perfect lines on textured wood, run a damp cloth over the tape edge before painting. This activates the tape’s gel barrier for an ultra-tight seal.
Step 2: Painting the Base
-
Apply White Base:
Paint the entire body of the house (sides, front, and back) with your Bright White exterior paint. -
Second Coat:
Allow the first coat to dry, then apply a second coat of white for full, opaque coverage. -
Drafting the Design:
Once the white paint is fully cured (give it at least 24 hours), use a measuring tape to find the vertical center of the side panel. -
Marking Lines:
Mark a vertical line down the side panel where the terracotta stripe will go. In the image, this stripe is roughly 6-8 inches wide.
Step 3: Adding the Color Block
-
Tape the Shapes:
Apply painter’s tape firmly along your pencil lines on the side panel. For the front, tape off the white border area, leaving the arched center and surrounding panel exposed. -
Seal the Tape:
Press the tape edges down firmly with a credit card or putty knife. A pro trick is to paint a thin layer of the *white* base paint over the tape edge first to seal it against bleeding. -
Paint the Front:
Using the angled brush, carefully paint the front face (around the door) with the Terracotta paint. Go slow around the arch curve. -
Paint the Side Stripe:
Fill in the vertical stripe area on the side panel with the Terracotta paint using a small roller. -
Second Color Coat:
Apply a second coat of Terracotta to ensure the color is rich and solid. -
The Reveal:
Remove the painter’s tape while the final coat is still slightly tacky (not soaking wet, but not fully dry) to ensure a razor-sharp edge.
Level Up: Name Plate
Add a customized modern touch by attaching matte black house numbers or painted wooden letters above the archway to spell out your pup’s name.
Step 4: Finishing Touches
-
Roof Treatment:
Remove the protective covering from the roof. Lightly sand the plywood roof if needed to clean it up. -
Seal the Roof:
Apply two coats of clear exterior wood sealer to the roof to protect it from rain while maintaining that pale, natural wood aesthetic. -
Interior Detail:
Stain or seal the visible interior floor planks with a clear coat to protect them from muddy paws. -
Final Cure:
Let the entire project cure for at least 48 hours in a dry, ventilated area before moving it outdoors.
Your pup now has the trendiest spot in the neighborhood to relax

PENCIL GUIDE
Understanding Pencil Grades from H to B
From first sketch to finished drawing — learn pencil grades, line control, and shading techniques.
Explore the Full Guide
Bold Striped Dog House With a Playful Palette
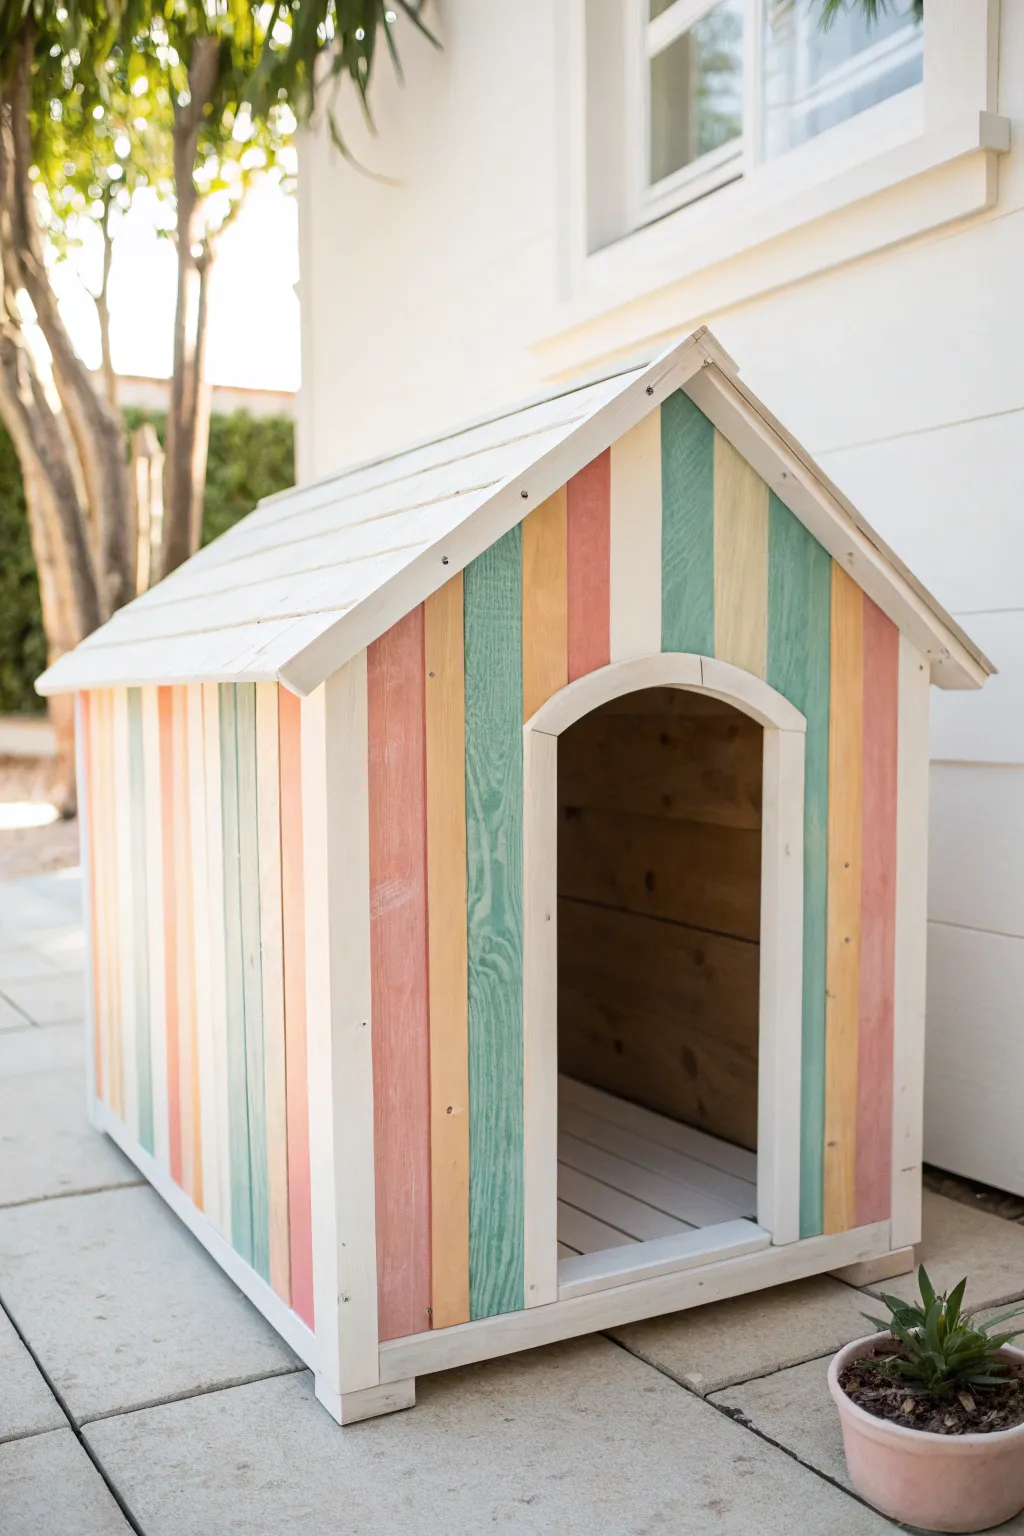
Give your furry friend a beach-inspired retreat with this vibrant, candy-striped dog house transformation. By using vertical planks as a guide for alternating pastel colors, you’ll create a structured yet whimsical look that brightens up any patio.
Step-by-Step
Materials
- Raw wooden dog house with vertical plank siding (or existing house stripped of paint)
- Sandpaper (120 and 220 grit)
- Painter’s tape (1-inch or wider)
- White outdoor primer
- Outdoor wood paint in creamy white (base)
- Outdoor wood paint in pastel blue-green (teal)
- Outdoor wood paint in pastel pink (salmon)
- Outdoor wood paint in pastel yellow (ochre)
- Small roller brush (4-inch)
- Angled sash brush (1.5-inch)
- Drop cloth
- Screwdriver (if disassembling trim)
Step 1: Preparation & Priming
-
Prepare the workspace:
Lay down a drop cloth in a well-ventilated outdoor area or garage to protect your patio surface from drips. -
Sand the surfaces:
Give the entire dog house a thorough sanding with 120-grit sandpaper to remove rough spots, especially if working with raw wood. Follow up with 220-grit for a smooth finish that accepts paint readily. -
Clean the wood:
Wipe down the entire structure with a damp cloth or tack cloth to remove all sawdust. Any lingering dust will ruin your smooth striped finish. -
Protect the interior:
If you want to keep the interior wood natural as seen in the photo, tape off the inside edge of the doorway carefully. -
Prime the exterior:
Apply a coat of high-quality outdoor wood primer to the roof, trim, and all siding planks. This step is crucial for ensuring your pastel colors pop and last against the elements. -
Let it cure:
Allow the primer to dry completely according to the manufacturer’s instructions before moving on to the color.
Step 2: Painting the Base & Trim
-
Paint the white stripes first:
Identify which vertical planks will be your creamy white stripes. Using your angled brush, paint these specific planks first, along with the roof and all trim pieces (corner boards, door frame, and base molding). -
Coat the trim:
Apply a second coat of creamy white to the doorway arch and the roof fascia. I find this helps define the shape of the house clearly before adding the busy pattern. -
Paint the roof slats:
Use the small roller to paint the roof slats white. Ensure you get into the horizontal grooves between the slats with the edge of a brush for full coverage.
Tape Trick
Press the edge of your painter’s tape down firmly using a credit card or putty knife. This creates a perfect seal and prevents the colored paint from bleeding under the tape onto the white stripes.
Step 3: Creating the Colorful Stripes
-
Isolate the first color group:
Once the white paint is fully dry (give it at least 4 hours), use painter’s tape to mask off the edges of the white planks you just painted. This ensures crisp lines for your colored stripes. -
Apply the teal stripes:
Select your pastel teal paint. Color in every third plank (or following your specific pattern) using the angled sash brush. Work carefully along the vertical grooves to avoid bleeding onto neighboring planks. -
Apply the pink stripes:
Using a fresh brush (or a thoroughly cleaned one), paint the pastel pink/salmon stripes. Focus on smooth, long vertical strokes to mimic the wood grain direction. -
Apply the yellow stripes:
Fill in the remaining designated planks with your pastel yellow paint. At this stage, the house will look messy with tape everywhere, but trust the process. -
Second coat for vibrancy:
Pastel colors can sometimes be sheer. Apply a second coat to all colored stripes once the first coat is dry to touch. -
Remove the tape:
The most satisfying part: carefully peel off the painter’s tape while the paint is still slightly tacky (not wet, but not fully cured) to prevent peeling.
Personalize It
Add a wooden bone-shaped sign with your dog’s name above the arched doorway. Paint it in one of the accent colors—like the teal or pink—to tie the whole design together.
Step 4: Distressing & Finishing
-
Touch up edges:
Inspect the vertical grooves where the colors meet. If any paint bled, use a small artist’s brush and the base white color to clean up the lines. -
Optional distressing:
To achieve the beachy, weathered look in the photo, lightly dry-brush a tiny amount of white paint over the colored planks, or lightly sand distinct spots to let the wood grain peek through. -
Install the floor:
If your dog house came with a separate floor, slide the painted white floor panel inside now. -
Final inspection:
Check the roof and trim one last time for any missed spots or uneven coverage.
Now your pup has the most stylish spot in the yard to lounge away those sunny afternoons
Gingham Pattern Dog House for Cozy Charm
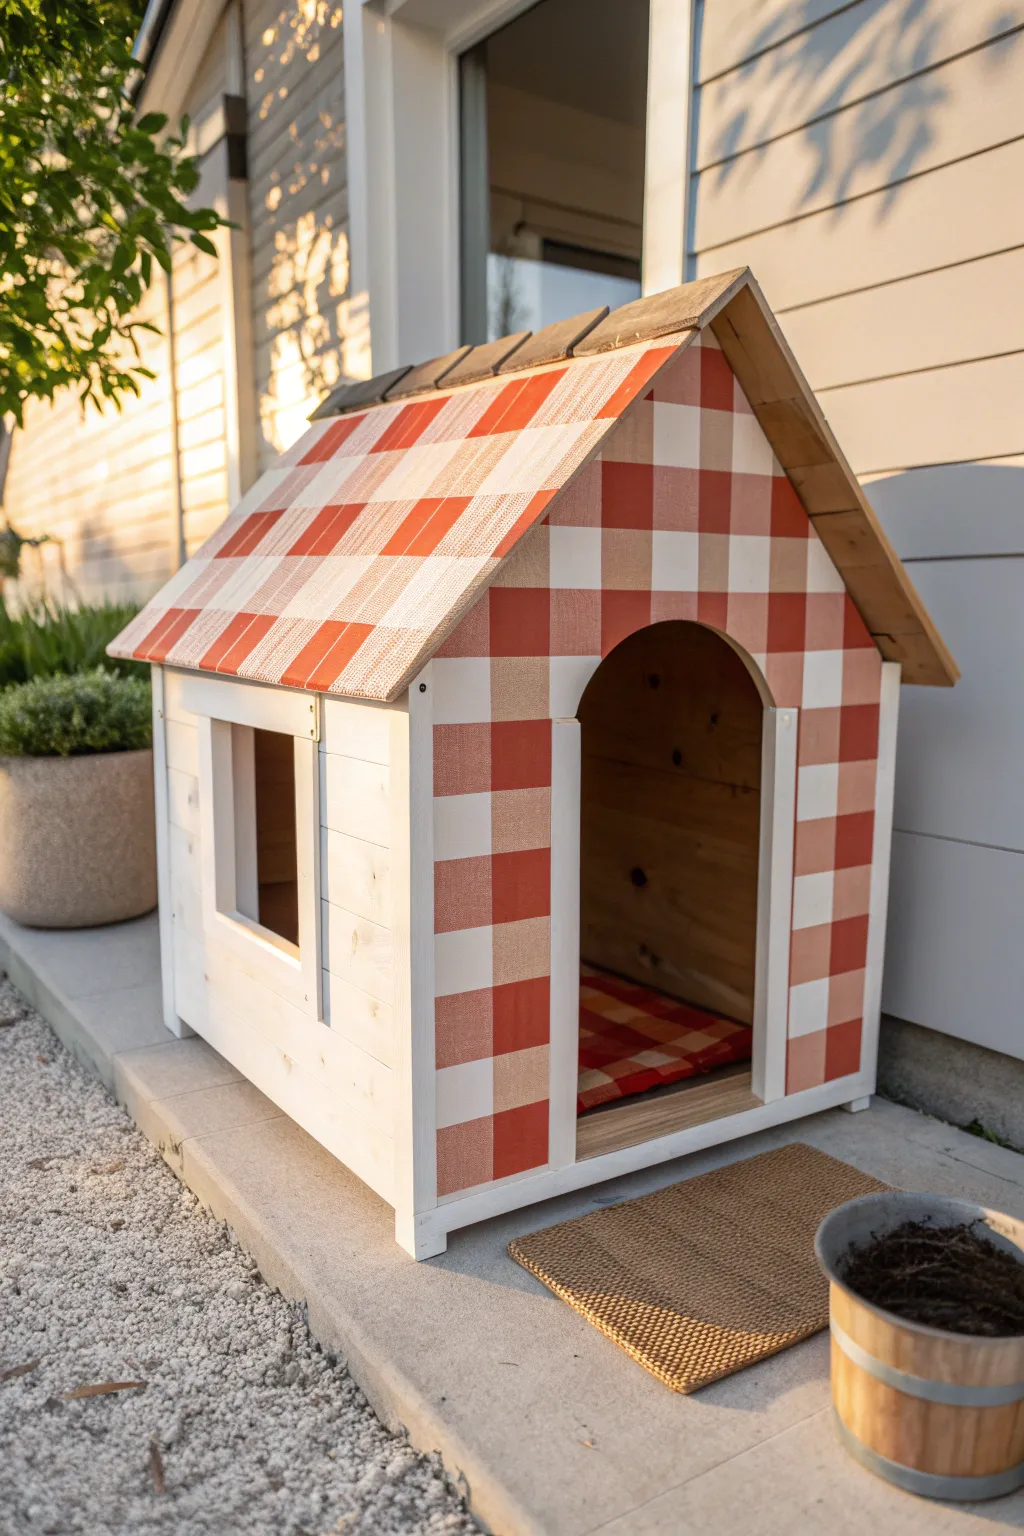
Transform a basic wooden dog house into a charming backyard focal point with this cozy gingham paint technique. The warm red and cream checkered pattern evokes the feeling of a classic picnic basket, giving your pup a stylish and inviting retreat.
Step-by-Step Tutorial
Materials
- Wooden dog house (pre-built or kit)
- Exterior primer
- Exterior paint: Cream/Off-White (Base)
- Exterior paint: Warm Red (Accent)
- Wide painter’s tape (1.5 or 2 inch width)
- Measuring tape and pencil
- Small foam roller
- Angled sash brush
- Clear matte exterior sealer
- Mixing texturing medium (optional for fabric look)
Step 1: Preparation & Base Coat
-
Clean and sand:
Begin by ensuring the wood surface is clean and dry. If the house is older, give it a light sanding to remove rough spots. Wipe away all dust with a damp cloth or tack cloth. -
Apply primer:
Coat the entire exterior, including the roof shingles and trim, with a high-quality exterior primer. This step is crucial for longevity, especially if the house will be exposed to the elements. -
Paint the solid sections:
Using your sash brush and roller, paint the side walls (the non-gingham areas) and the trip in your chosen base color. For the look in the image, keep the planks a solid, clean white or cream. -
Paint the patterned areas base:
Paint the front facade and the roof entirely in the Cream/Off-White base color. This lighter color needs to be the background for the gingham pattern. Apply two coats if necessary for full opacity and let it dry completely—ideally overnight.
Tape Sealing Trick
Before painting your stripes, brush a thin layer of the *base* color (cream) over the tape edges. This seals the tape and ensures crisp lines.
Step 2: Creating the Gingham Grid
-
Plan your spacing:
Measure the width of your painter’s tape; this will dictate the size of your checks. Mark subtle tick marks along the roofline and the front facade to guide your tape placement. -
Tape vertical stripes:
Apply strips of painter’s tape vertically from the roof peak down to the base. Use a spacer piece of tape to ensure the gap between strips is exactly the same width as the tape itself. -
Mix the mid-tone color:
Gingham relies on transparency. Create a ‘mid-tone’ peach/light red by mixing your Warm Red paint with a substantial amount of the Cream base (roughly 50/50 mix). Alternatively, use a glaze medium with the red paint to create transparency. -
Paint vertical stripes:
Using the foam roller, apply your mid-tone mix over the exposed vertical areas. Use a light hand to avoid bleeding under the tape. Let this dry to the touch, then gently remove the tape. -
Allow to cure:
It is critical that the vertical stripes are fully dry before proceeding. I usually wait at least 4 hours here to prevent peeling fresh paint in the next step.
Textured Fabric Effect
For a ‘linen’ look, lightly drag a dry bristle brush through the wet paint on the mid-tone stripes. This mimics the weave of actual fabric.
Step 3: Completing the Pattern
-
Tape horizontal stripes:
Now apply tape horizontally across the roof and face, perpendicular to your first set of stripes. Again, use a spacer piece of tape to maintain perfect grid spacing. -
Paint horizontal mid-tones:
Roll your mid-tone mix over the exposed horizontal rows. This creates the intersecting grid look essential for the pattern. -
Identify the ‘dark’ squares:
Keep the horizontal tape in place! You will now see areas where the new horizontal paint crosses the previous vertical stripes. These specific squares need to be the darkest color. -
Fill the accent squares:
Using a small brush or a precise roller, fill in ONLY those intersecting squares with your full-strength Warm Red paint. This creates the depth that mimics woven fabric. -
Reveal the pattern:
Once the paint is tacky but not fully dry, slowly peel off the horizontal tape at a 45-degree angle. You should now see the classic check pattern with three distinct tones: white base, mid-tone mix, and dark red intersection. -
Touch-ups:
Use a small artist’s brush to tidy up any bleed-through or uneven edges with the appropriate color.
Step 4: Finishing Touches
-
Seal the interior:
While focusing on the exterior, don’t forget to seal the interior wood with a clear, non-toxic sealer to protect it from moisture and muddy paws. -
Apply exterior topcoat:
Once the gingham pattern has cured for 24 hours, apply two coats of clear matte exterior sealer over the entire house to protect your hard work from sun and rain. -
Style the entrance:
Add a cozy cushion inside and perhaps a small welcome mat outside to complete the welcoming look seen in the photo.
Your pup now has the cutest cottage on the block, perfect for sunny afternoon naps


Polka Dot Dog House With Subtle Paw Prints
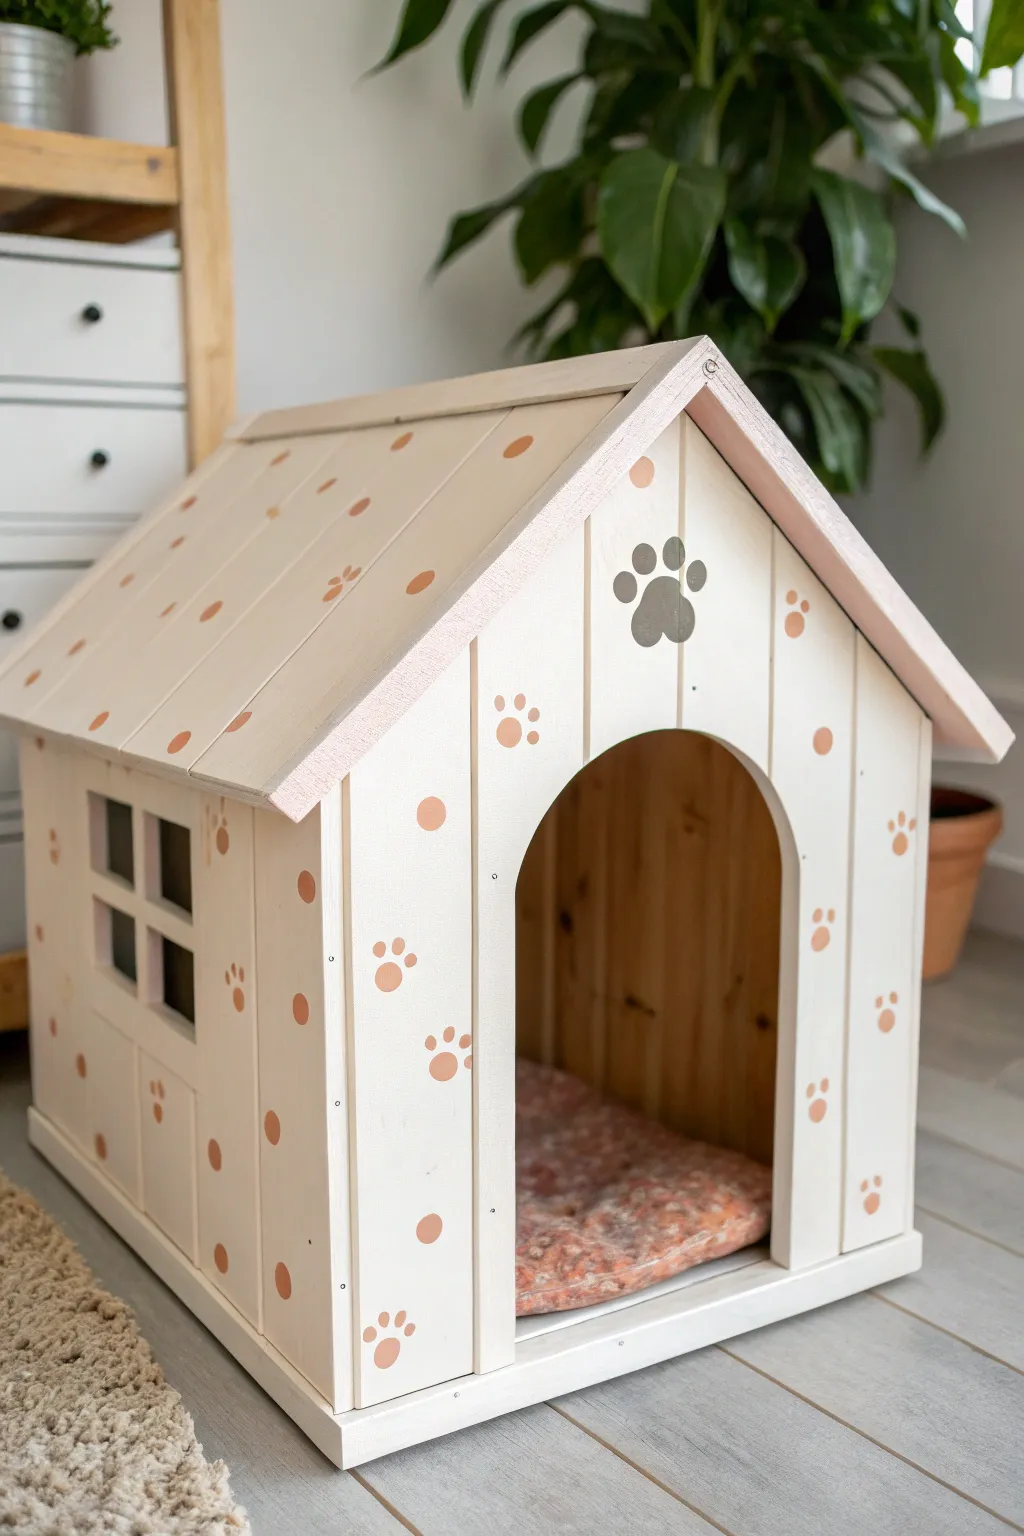
Transform a plain wooden dog house into a charming sanctuary with a soft, neutral palette and playful accents. This project combines creamy white siding with delightful salmon-pink polka dots and paw prints for a look that is both cozy and stylish.
Step-by-Step
Materials
- Wooden dog house (pre-built or DIY kit)
- Sandpaper (120 and 220 grit)
- Tack cloth
- Exterior primer (white)
- Exterior latex paint (Creamy White/Off-White)
- Exterior latex paint (Salmon/Muted Pink)
- Exterior latex paint (Dark Grey/Taupe) for the main paw print
- 2-inch angled sash brush
- 1-inch flat brush
- Round foam sponge pouncers (small and medium sizes)
- Small detail brush (size 2 or 4)
- Painter’s tape
- Pencil
- Paw print stencil (optional)
- Clear outdoor sealant (polyurethane base)
Step 1: Preparation & Base Coat
-
Sand the surface:
Begin by sanding the entire exterior of the dog house with 120-grit sandpaper to remove any rough splinters or existing finish. Follow up with 220-grit for a smooth painting surface. -
Clean the wood:
Wipe down every nook and cranny with a tack cloth to remove sawdust. A clean surface is crucial for paint adhesion. -
Apply primer:
Coat the entire exterior, including the roof and trim, with a high-quality exterior primer. Let this dry completely according to the manufacturer’s instructions. -
Paint the main body:
Using the 2-inch sash brush, apply the creamy white exterior paint to the walls and roof slats. Brush in the direction of the wood grain for a seamless finish. -
Apply a second coat:
Once the first coat is dry to the touch, apply a second coat of the creamy white paint to ensure full opacity and weather resistance. -
Paint the trim:
Carefully paint the front-facing roof trim (the fascia) with the salmon pink paint using the 1-inch flat brush. You might want to use painter’s tape along the roof edge to keep lines crisp.
Pro Tip: Perfect Circles
Twist your foam pouncer slightly as you lift it off the wood surface. This helps break the suction and prevents the paint from pulling up and creating ragged edges on your dots.
Step 2: Adding the Pattern
-
Plan the polka dots:
Before painting, visualize the placement of your dots. I like to lightly mark scattered spots with a pencil on the walls and roof to ensure a balanced, random distribution. -
Apply the dots:
Dip a medium-sized round foam pouncer into the salmon pink paint. Dab excess paint onto a paper plate, then press firmly onto your marked spots on the walls to create perfect circles. -
Paint roof dots:
Repeat the sponge pouncing process on the roof slats using the same pink shade. Space them slightly further apart than the wall dots for a decorative touch. -
Create small paw prints:
Using a smaller pouncer or the tip of your detail brush, add three small dots above selected wall polka dots to turn them into paw prints. Keep the distinct ‘toes’ close to the main pad. -
Detail the feature paw:
Locate the center point above the arched doorway. Using a large stencil or freehanding with a pencil, outline a prominent paw print. -
Fill the feature paw:
Use the dark grey or taupe paint and your detail brush to carefully fill in the large paw print above the door. Apply two coats if necessary for a solid, bold look.
Step 3: Finishing Touches
-
Touch up edges:
Inspect the window frames and corners. Use a small brush to touch up any white paint that may have been smudged during the detailed work. -
Paint window muntins:
If your dog house has a window pane grid, carefully paint these strips with the dark grey or maintain the cream color depending on your preference. -
Seal the project:
Once all paint is fully cured (usually 24 hours), apply a clear outdoor sealant over the entire house. This protects your hard work from rain and UV rays. -
Add comfort:
Place a cozy, weather-resistant cushion inside the house to make the new space inviting for your pup.
Troubleshooting: Bleeding
If paint bleeds under your stencil or tape, let it dry completely. Then, use a small artist’s brush and the base wall color to carefully paint over the mistake and sharpen the line.
Your furry friend now has a custom home that looks just as good as it feels to nap in
Painted Windows and Shutters on a Dog House
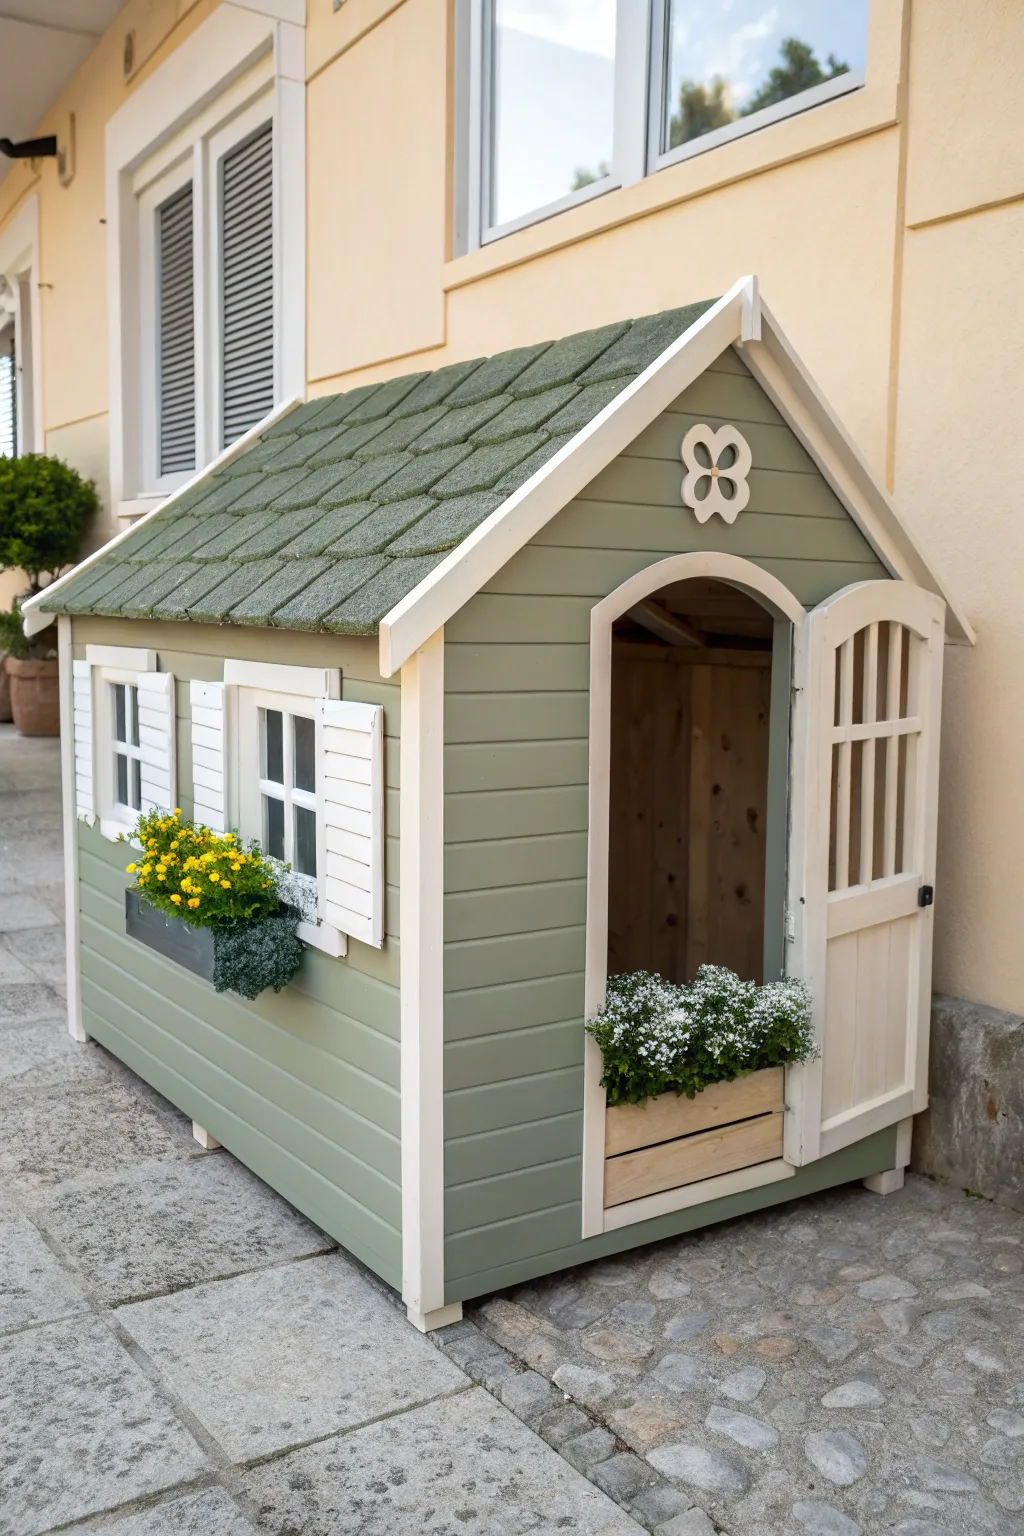
Transform a plain wooden dog house into an adorable backyard cottage with this detailed painting guide. By adding crisp white shutters and window trims against a sage green siding, you create a cozy, inviting look that mimics a real countryside home.
Detailed Instructions
Materials
- Wooden dog house with window cutouts
- Medium-grit sandpaper (120-150 grit)
- Exterior wood primer
- Exterior paint: Sage Green (satin or semi-gloss)
- Exterior paint: Bright White (semi-gloss)
- Painter’s tape (1-inch and 2-inch)
- Small foam roller and tray
- 1.5-inch angled sash brush
- Small detail brush
- Wood filler (if needed)
- Clean tack cloths
Step 1: Preparation & Base Coat
-
Disassemble hardware:
Before dipping your brush, remove any metal hardware, hinges, or existing flower boxes. This ensures you can paint every nook and cranny without obstacle. -
Sand the surfaces:
Give the entire window area and shutters a thorough sanding with medium-grit sandpaper. You want to scuff up the surface to help the paint adhere, especially if the wood is pre-finished. -
Clean the dust:
Wipe down all surfaces with a tack cloth to remove every speck of sawdust. Painting over dust will ruin your smooth finish. -
Apply primer:
Coat the window trims, muntins (the grid bars inside the window), and shutters with a high-quality exterior wood primer. Let this dry completely according to the can’s instructions.
Step 2: Painting the Siding
-
Mask the trim:
Use painter’s tape to mask off the edges of the window trim and shutters where they meet the main house siding. This protects your crisp white areas later. -
Cut in the green:
Using your angled sash brush, carefully paint the Sage Green paint along the taped edges and into the grooves of the siding panels around the window area. -
Roll the flat areas:
Use the small foam roller to apply the green paint to the flat siding surfaces for a smooth, brush-mark-free finish. I find two thin coats work better than one thick one here. -
Remove tape and dry:
Peel off the painter’s tape while the second coat is still slightly tacky to prevent peeling, then let the green paint cure fully.
Bleeding Lines?
If paint seeps under your tape, let it dry completely. Then, lightly scrape the excess with a razor blade or touch up with a small artist brush and the base color.
Step 3: Detailed Window Work
-
Mask the siding:
Once the green is dry, reverse your taping. Apply tape onto the green siding right up against the window trim and shutters. -
Paint the muntins:
Start with the hardest part: the grid bars inside the window. Use the small detail brush and Bright White paint to carefully coat these thin strips. -
Paint the frames:
Switch to your angled sash brush to paint the main window frames white. Work from the top down to catch any drips. -
Coat the shutters:
Paint the shutter slats carefully. Ensure you get white paint into the angled louvers without letting it pool in the corners. -
Second coat of white:
White paint over wood often needs a second pass. Apply a final coat to the muntins, frames, and shutters for a solid, opaque brightness. -
Clean up edges:
Remove the tape. If any green bled onto the white or vice versa, use a tiny artist’s brush for touch-ups once everything is dry. -
Reattach flower boxes:
Once the paint is fully cured (give it 24 hours), reattach your flower boxes under the windows. Filling them with bright yellow flowers like marigolds really pops against the sage and white.
Pro Sealing Tip
To prevent tape bleed, paint a thin layer of the base color (green) over the tape edge first. This seals the gap so your white paint line stays razor sharp.
Your pup now has the most stylish home on the block with these beautifully finished windows
Personalized Name Sign for a Dog House Front
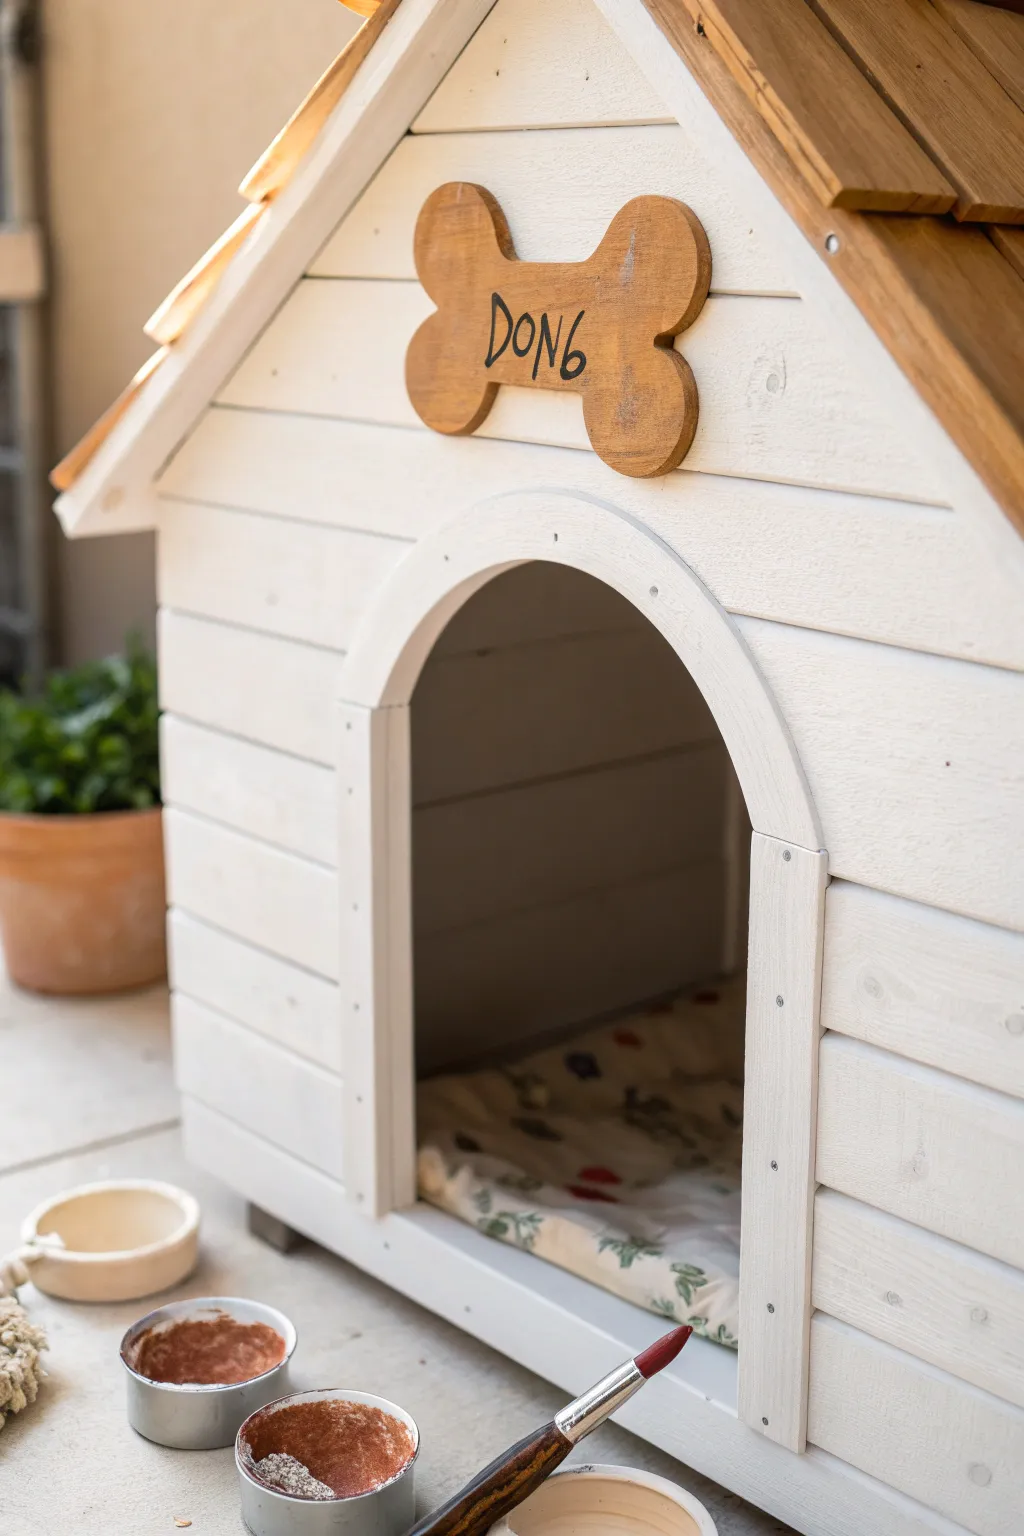
Give your pup’s palace a custom touch with this charming bone-shaped nameplate. The rustic wood finish combined with simple hand-lettering creates a timeless, personalized focal point for any dog house front.
Step-by-Step Tutorial
Materials
- Unfinished wooden bone cutout (approx. 8-10 inches wide)
- Medium-grit sandpaper
- Pencil
- Honey or warm oak wood stain
- Clean rag or foam brush for staining
- Black permanent marker or black acrylic paint driven
- Fine-point paintbrush (if using acrylic paint)
- Clear outdoor sealant spray (matte or satin)
- Wood glue or small exterior screws
Step 1: Preparation and Staining
-
Prepare the surface:
Start by lightly sanding your wooden bone cutout with medium-grit sandpaper. Focus on smoothing out any rough edges or splinters along the curves to ensure a professional finish. -
Clean the dust:
Wipe the wood down thoroughly with a clean, dry cloth to remove all sanding dust. This is crucial for an even stain application. -
Apply the stain:
Dip a rag or foam brush into your honey or warm oak wood stain. Apply it generously to the front and sides of the bone cutout, following the direction of the wood grain. -
Wipe excess stain:
Let the stain sit for about 2-3 minutes to penetrate the wood fibers. Then, use a clean rag to wipe away any excess liquid, leaving a rich, semi-transparent color. -
Let it dry:
Set the stained wood aside in a well-ventilated area. Allow it to dry completely according to the manufacturer’s instructions, usually at least 4-6 hours.
Step 2: Lettering the Name
-
Sketch the name:
Once the stain is dry to the touch, use a pencil to lightly sketch your dog’s name in the center of the bone. Aim for a loose, handwritten style rather than perfect block letters. -
Check spacing:
Step back and look at your pencil marks to ensure the name is centered and legible. Adjust the spacing now before making permanent marks. -
Trace the letters:
Carefully trace over your pencil lines using a fat black permanent marker or a fine paintbrush dipped in black acrylic paint. I personally find a marker easier for beginners to control on stained wood. -
Thicken the strokes:
Go back over each letter to thicken the lines slightly. Adding a little extra weight to the downstrokes can give the lettering a purposeful, calligraphic look. -
Dry the lettering:
Allow the paint or marker ink to dry completely. If you used acrylic paint, give it at least an hour; marker ink usually dries within minutes.
Stain Depth Tip
Want a darker, more weathered look? Apply a second coat of stain after the first one dries, but wipe it off quickly to avoid hiding the wood grain.
Step 3: Finishing and Mounting
-
Seal the wood:
Take the sign outside and spray it with a clear outdoor sealant. Apply two light coats, letting them dry in between, to protect the wood from rain and sun. -
Determine placement:
Hold the finished sign up to the dog house, centering it directly above the arched doorway. Use a pencil to mark where it looks best. -
Apply adhesive:
Apply a generous amount of strong exterior wood glue to the back of the bone sign. -
Secure the sign:
Press the sign firmly onto the dog house siding at your marked spot. You may need to use painter’s tape to hold it in place while the glue sets. -
Optional reinforcement:
For extra durability, you can drive two small finish nails through the sign into the house wall, though strong glue is often sufficient for lightweight wood.
Make It 3D
Instead of painting the name, buy small wooden craft letters, paint them black, and glue them onto the bone for a cool raised effect.
Now your furry friend has a home that is officially their own with this custom entryway sign
Sunny Ombre Dog House From Base to Roof
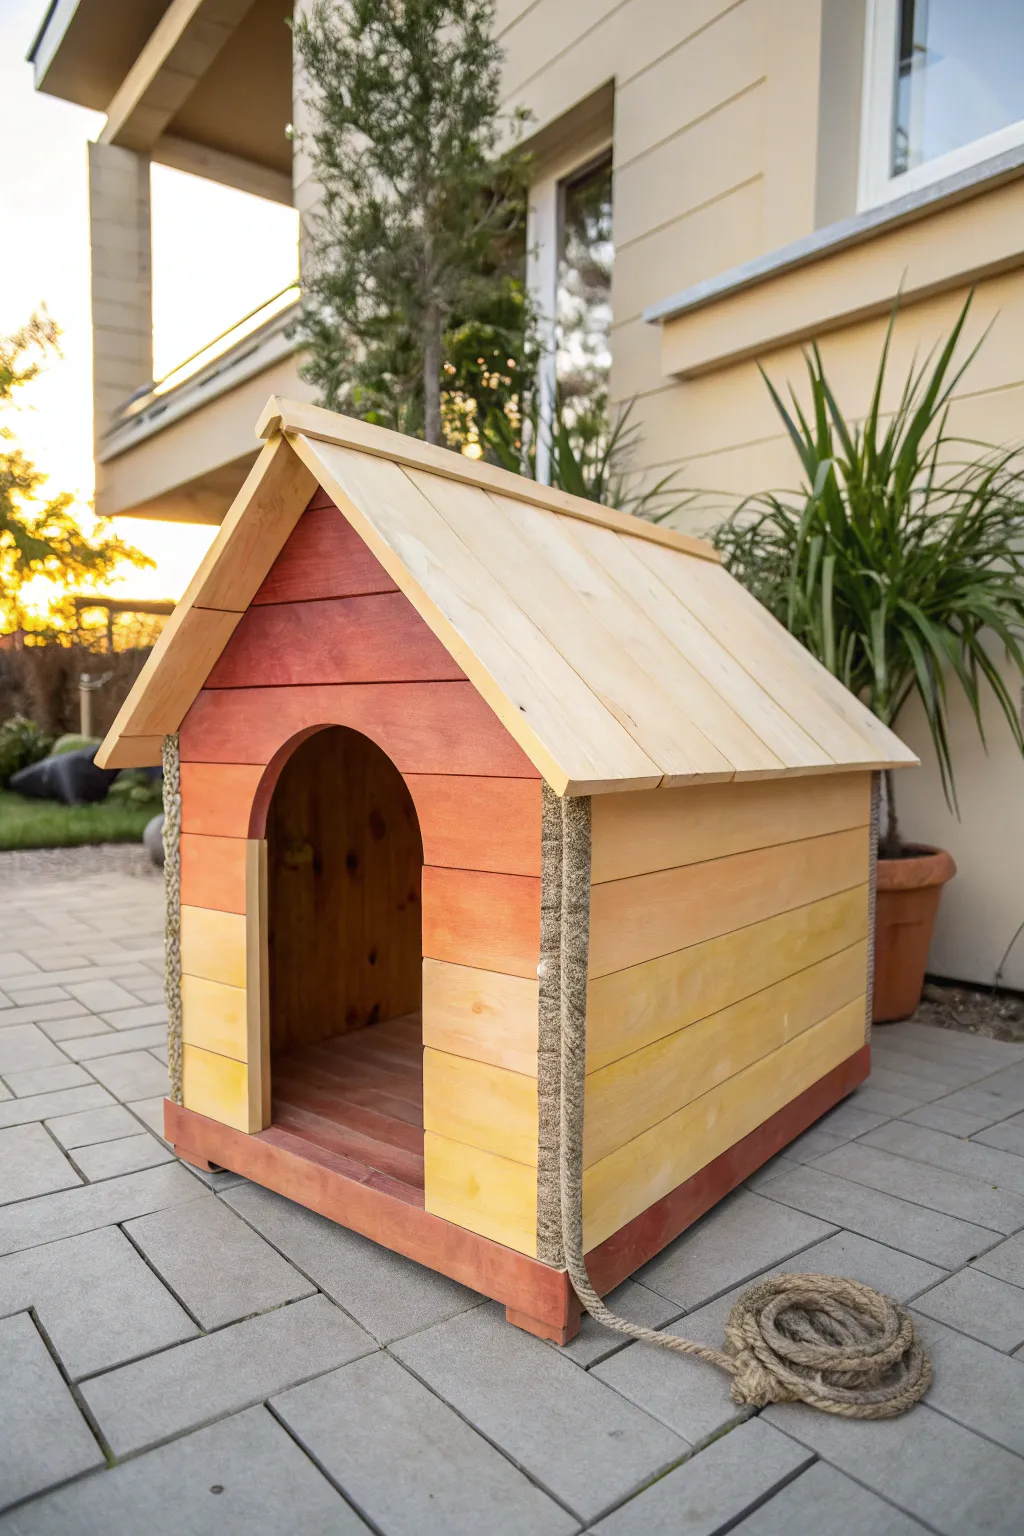
Transform a plain wooden dog house into a glowing backyard centerpiece with this warm, sunset-inspired gradient. By blending deep reds into soft yellows, you create a cozy, welcoming effect that mimics the evening sky.
How-To Guide
Materials
- Unfinished wooden dog house
- Sandpaper (120 and 220 grit)
- Painter’s tape
- Exterior wood primer
- Exterior latex paint: Deep Red or Terracotta
- Exterior latex paint: Bright Orange
- Exterior latex paint: Sunshine Yellow
- Reddish-brown wood stain (for base trim)
- Clean rags or staining sponge
- Wide paintbrushes (2-3 inches)
- Mixing cups or trays
- Spray bottle with water (optional)
- Thick jute or sisal rope (approx. 1-1.5 inch diameter)
- Construction adhesive or heavy-duty wood glue
- Scissors or utility knife
- Clear exterior polyurethane sealer
Step 1: Preparation & Base Work
-
Sand the surface:
Begin by sanding the entire exterior of the dog house with 120-grit sandpaper to remove any rough splinters or existing finish. Follow up with 220-grit for a smooth painting surface. -
Clean the wood:
Wipe down the entire structure with a damp cloth to remove sanding dust. Allow the wood to dry completely before applying any paint. -
Protect the roof:
Since the roof will remain natural wood, carefully mask off the roof edges where they meet the walls using painter’s tape. -
Prime the walls:
Apply a coat of exterior wood primer to the front, back, and side walls. This ensures the bright sunset colors will pop and adhere properly. -
Stain the base trim:
Using a rag or sponge, apply the reddish-brown wood stain to the very bottom trim pieces of the house. I find wiping off excess stain quickly keeps the wood grain visible.
Uneven Blending?
If your gradient looks blocky instead of smooth, try using a dry brush technique. Offload most paint from your brush and lightly feather the boundary line.
Step 2: Creating the Ombre Gradient
-
Apply the top color:
Start painting the top third of the walls with your deep red or terracotta paint. Use horizontal strokes and don’t worry about a perfect straight line at the bottom edge. -
Apply the middle color:
Paint the middle section with bright orange, slightly overlapping the wet edge of the red paint above. -
Blend the upper transition:
While both paints are still wet, use a clean, slightly damp brush to blur the line where red meets orange. Work back and forth horizontally until the transition looks soft. -
Apply the bottom color:
Paint the bottom third of the walls with sunshine yellow, bringing it right up to the wet orange section. -
Blend the lower transition:
Blend the orange and yellow sections using the same technique as before. If the paint is drying too fast, a light mist from a spray bottle can help re-wet the surface for better blending. -
Repeat for opacity:
Once the first gradient layer is fully dry, assess the coverage. You will likely need a second pass of all three colors and blending steps to get rich, solid color. -
Paint the arch interior:
Don’t forget the inside edge of the door arch. Paint this area to match the height of the exterior gradient stripes so the design flows seamlessly inward.
Step 3: Finishing Touches
-
Seal the roof:
Remove the painter’s tape from the roof. Apply two coats of clear exterior polyurethane to the natural roof slats to protect them from rain and sun. -
Seal the painted walls:
Once the ombre paint is cured (wait at least 24 hours), apply a coat of clear sealer over the painted sections for added durability. -
Measure the rope trim:
Measure the length of the vertical corners on the front of the dog house. Cut two pieces of thick jute rope to match this height. -
Attach the rope:
Apply a generous bead of construction adhesive along the front corner seams. Press the rope firmly into the glue, holding it in place for a minute or taping it down until the adhesive sets. -
Add the handle:
If desired, attach a longer piece of rope near the base or leave the excess length of the corner rope specifically to act as a pull-handle for moving the house easily.
Add a Solar Light
Install a small solar-powered lantern above the door arch. It highlights your paint job at night and makes the house easier for your pup to find.
Your furry friend now has a stylish, custom home that brings a warm glow to the patio all day long
Folk Floral Dog House With Hand-Painted Blooms
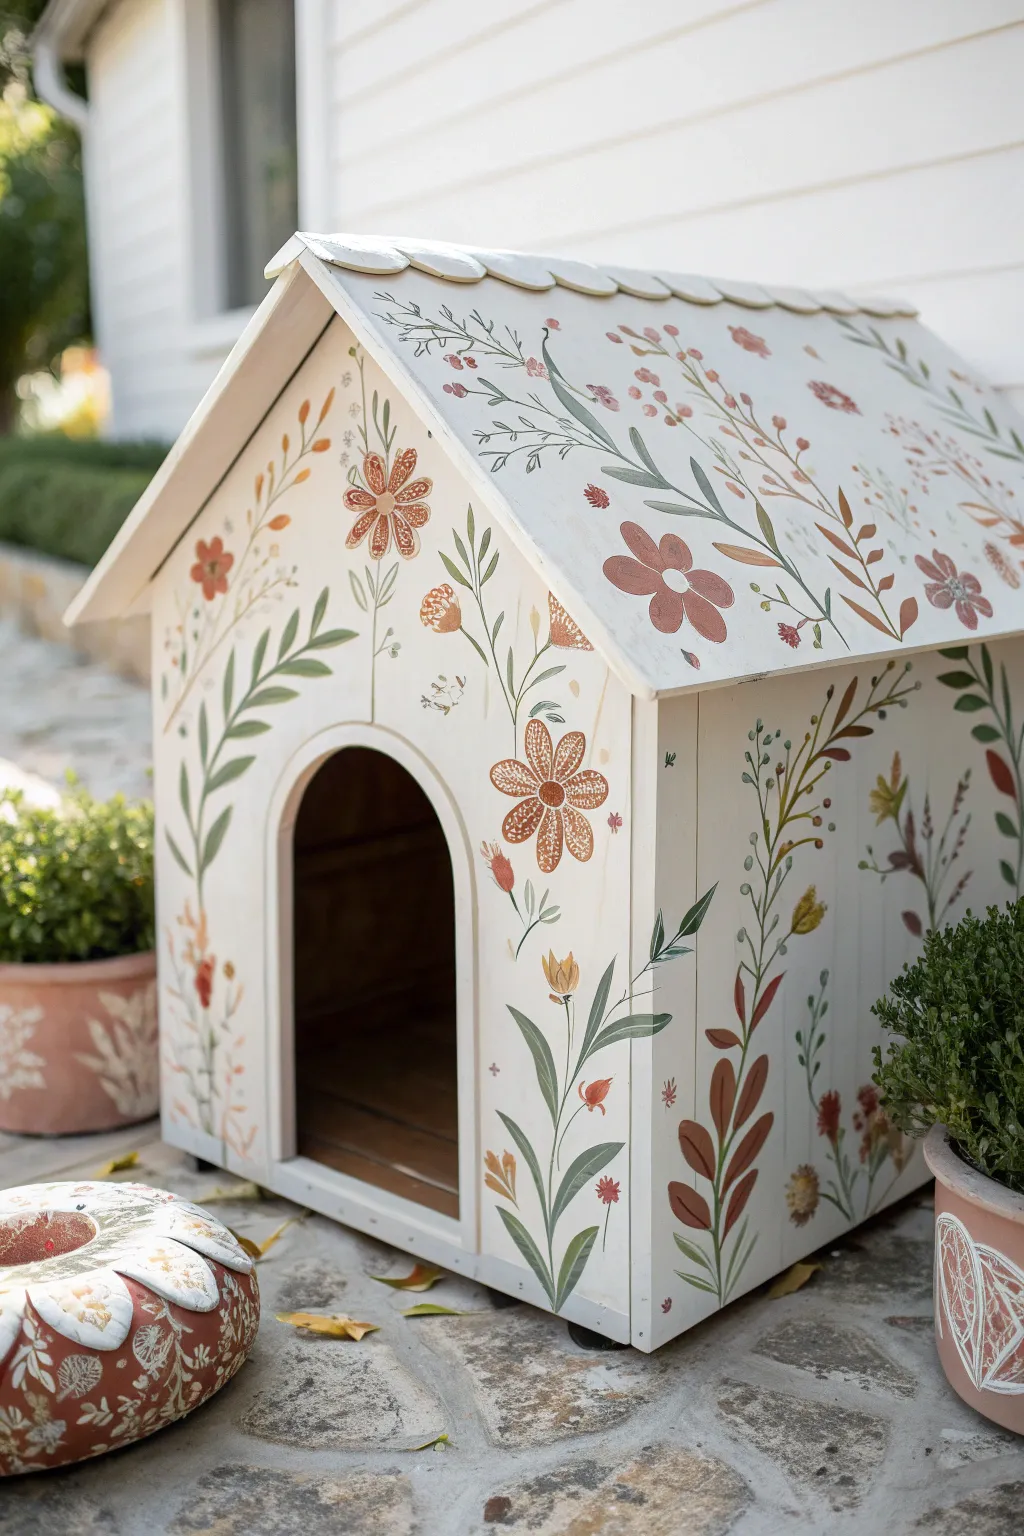
Transform a plain wooden dog house into a charming garden cottage with this hand-painted folk floral design. Featuring muted earth tones, delicate vines, and stylized blooms, this project creates a cozy, artistic sanctuary that blends beautifully with outdoor decor.
Detailed Instructions
Materials
- Wooden dog house (pre-built)
- Sandpaper (120 and 220 grit)
- Primer (exterior grade, white)
- Exterior latex paint (creamy off-white base)
- Acrylic craft paints (outdoor/multi-surface)
- Colors: Terracotta, sage green, mustard yellow, burnt Sienna, deep olive
- Assorted paintbrushes (vines, filbert, round sizes 2-6)
- Graphite transfer paper (optional)
- Pencil
- Clear outdoor sealer (matte or satin finish)
- Painter’s tape
Step 1: Preparation & Base Coat
-
Sand the Surface:
Begin by sanding the entire exterior of the dog house with 120-grit sandpaper to smooth out any rough wood grain or splinters. Follow up with 220-grit for a polished finish. -
Wipe Clean:
Use a tack cloth or slightly damp rag to remove all sanding dust. The surface needs to be completely clean for the primer to adhere properly. -
Prime the Wood:
Apply a coat of high-quality exterior primer to the entire house, including the roof. Let this dry completely according to the can’s instructions. -
Apply the Base Layer:
Paint the entire structure with your creamy off-white exterior paint. I usually apply two thin coats rather than one thick one to prevent drips, allowing full drying time between layers.
Uneven Petals?
Don’t stress about perfect symmetry. Folk art thrives on slight imperfections. If a flower looks too lopsided, turn it into a side-profile bud by painting a green calyx over the uneven side.
Step 2: Painting the Foliage
-
Plan Your Vines:
Using a pencil, lightly sketch the main curved stems of your plants. Start from the bottom edges and corners, drawing sweeping lines that grow upward toward the roofline. -
Paint the Stems:
Mix a deep olive green with a touch of sage. Using a liner brush or a size 2 round brush, trace over your pencil lines to create the main stems, tapering them slightly at the ends. -
Add Large Leaves:
Switch to a filbert brush or a size 6 round brush. Using sage green, paint elongated, almond-shaped leaves branching off the main stems. Press down at the base of the leaf and lift as you pull outward to create a point. -
Layer in Detail:
Once the large leaves are dry, use a darker green to add a central vein line to each leaf for a bit of dimension. -
Create Vertical Grasses:
Near the base of the house, paint thin, vertical sprigs and smaller vine clusters to fill negative space and ground the design.
Practice First
Before painting directly on the house, practice your leaf strokes on a piece of cardboard. Mastering the ‘press-and-lift’ motion with your round brush is key to getting those tapered leaf shapes.
Step 3: Adding the Blooms
-
Paint Large Feature Flowers:
Select a few focal points for larger blooms. Using terracotta or burnt Sienna, paint simple five-petal daisy shapes. Keep them somewhat flat and stylized to maintain the folk art look. -
Add Dotted Patterns:
Dip the handle end of a paintbrush into creamy white or light yellow paint. Dot patterns onto the petals of your dried terracotta flowers to add texture and intricate detail. -
Paint Secondary Florals:
Using mustard yellow and softer reds, paint smaller tulip-shaped buds and circular posies scattered among the vines. -
Roof Garden:
Don’t forget the roof panels. Extend your vine pattern onto the roof, aiming for a lighter, airier distribution of flowers compared to the walls. -
Small Filler Florals:
Fill any remaining gaps with tiny clusters of dots or small three-petal buds in contrasting colors to make the design feel lush and abundant.
Step 4: Finishing Touches
-
Clean Up Lines:
Step back and check your work. If any background color needs touching up, use your small brush and the off-white base paint to tidy up edges. -
First Sealer Coat:
Once the artwork is fully cured (give it at least 24 hours), apply a clear outdoor sealer. Use long, even strokes to avoid clouding. -
Final Seal:
Apply a second coat of sealer to ensure the dog house can withstand rain and sun, paying extra attention to the roof area.
Now your pup has a stylish retreat that looks as good in the garden as your favorite flowers
Mountain Mural Dog House With a Painted Horizon
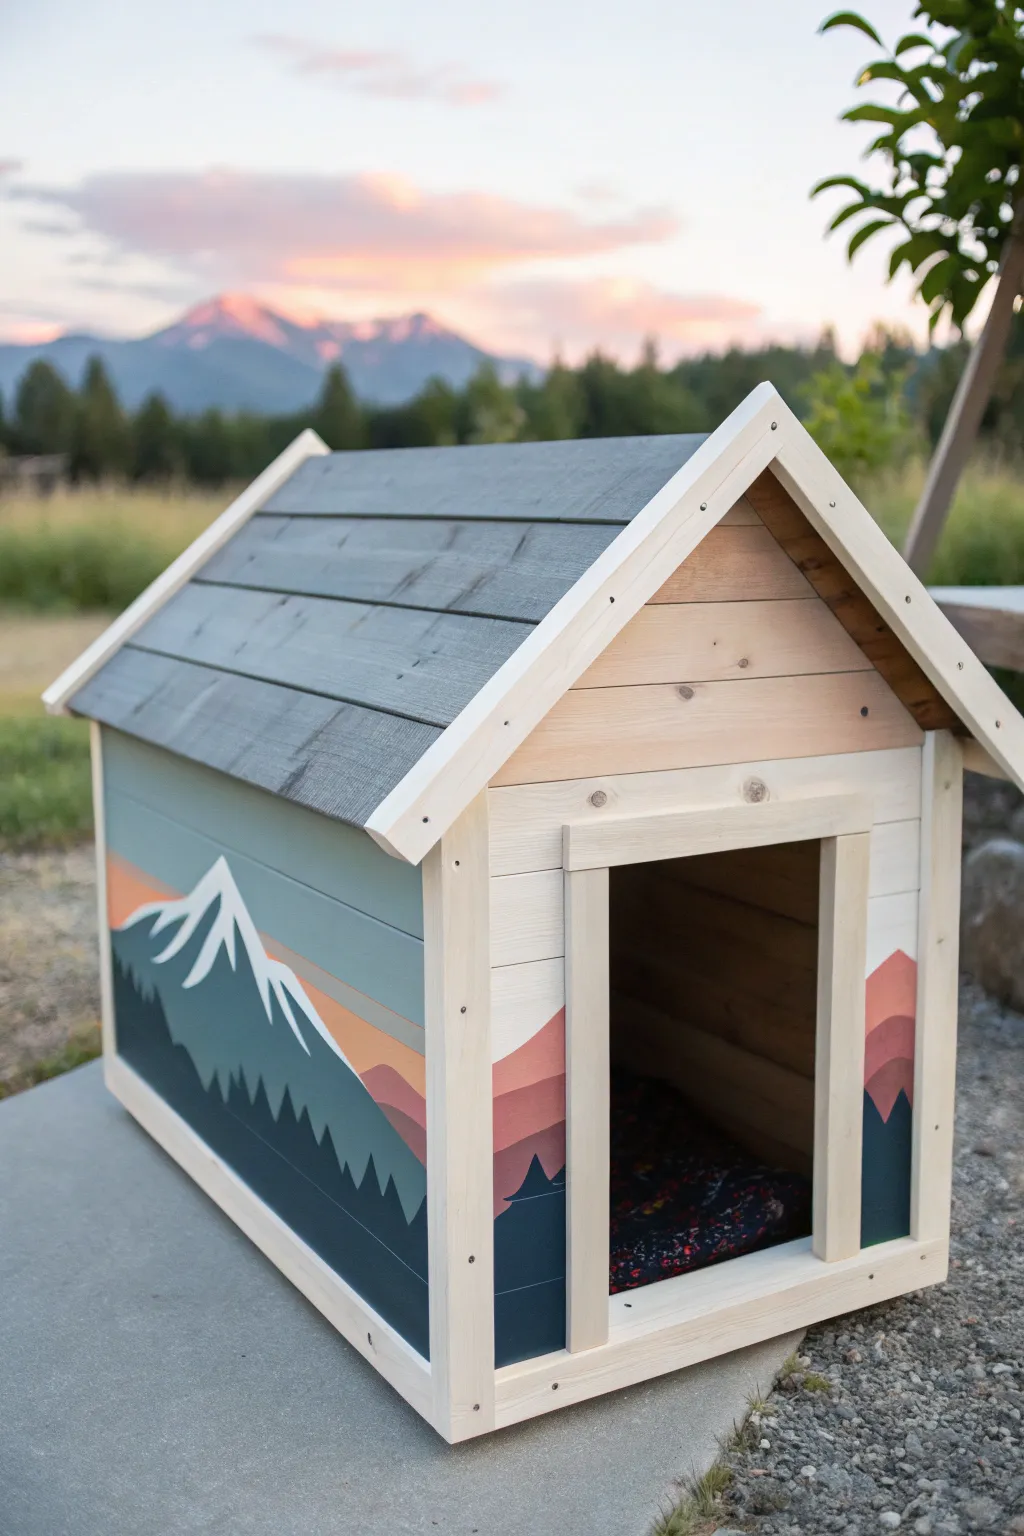
Transform a plain wooden dog house into a stunning landscape feature with this mountain mural project that mirrors the great outdoors. Using a palette of slate greys, forest greens, and warm sunset hues, you’ll create a cozy, artistic haven that looks beautiful in any backyard setting.
Step-by-Step Tutorial
Materials
- Unfinished wooden dog house
- Sandpaper (120 and 220 grit)
- Painter’s tape (various widths)
- Exterior primer
- Exterior acrylic latex paint (Slate Blue/Grey for roof)
- Exterior acrylic latex paint (White/Cream for peaks)
- Exterior acrylic latex paint (Dark Forest Green for trees)
- Exterior acrylic latex paint (Muted Blue-Grey for mountain body)
- Exterior acrylic latex paint (Coral/Salmon for sunset)
- Various paintbrushes (2-inch flat, 1-inch angled, detail shader)
- Pencil
- Clear exterior matte sealant
Step 1: Preparation & Base Coat
-
Sand the surface:
Begin by smoothing the entire exterior of the dog house with 120-grit sandpaper to remove rough splinters, followed by 220-grit for a smooth painting surface. Wipe away all dust with a tack cloth or damp rag. -
Protect the trim:
Carefully apply painter’s tape to all the vertical trim pieces, the roof fascia, and the door frame. The goal is to keep these natural wood for a nice contrast, so verify the edges are sealed tight. -
Prime the panels:
Apply a coat of exterior primer to the main side panels and the front face of the house. Don’t worry about the roof yet; focus on creating a blank canvas for your mural. -
Paint the background sky:
Once primed, paint the upper portion of the walls with a muted blue-grey. On the side panel, this will serve as your sky and distant mountain base. Bring this color about halfway down the wall.
Bleeding Lines?
If paint bleeds under the tape onto the natural wood, wait for it to fully dry, then gently scrape it away with a razor blade or sand it off with a folded piece of 220-grit sandpaper.
Step 2: Painting the Roof
-
Tape off the roof line:
Ensure the trim fascia is taped off securely. You want clean lines where the shingles meet the wood trim. -
Apply the roof color:
Using the slate grey paint, coat the roof slats entirely. Brush with the grain of the wood to let the texture show through slightly while ensuring full coverage. -
Second coat:
After the first coat dries (usually 2-4 hours), apply a second coat to the roof for durability against the elements.
Step 3: Creating the Mural
-
Sketch the mountain outline:
Lightly sketch a large, jagged mountain peak on the side panel using a pencil. Let the slope continue around to the front panel for a seamless 3D effect. -
Fill the mountain body:
Paint the main body of the mountain using a slightly darker shade of blue-grey than your sky, or mix a little forest green into your sky color for depth. Follow your pencil lines carefully. -
Add snow caps:
Using the white or cream paint and an angled brush, paint the ‘snow’ on the top peaks. Use a jagged, downward stroke to mimic snow resting on rock crevices. -
Paint the sunset layer:
Below the main mountain range but above the bottom edge, paint a band of coral or salmon color. I find curving this line slightly mimics rolling foothills. -
Sketch the treeline:
Near the bottom of the panels, pencil in a row of pine trees. Vary their heights—some tall, some short—to make the forest look natural. -
Fill in the forest:
Use the dark forest green and a detail brush to fill in the tree silhouettes. Keep the edges sharp and pointy to represent pine needles. -
Add foreground depth:
Paint a second, lower layer of trees in an even darker shade (mix a drop of black into your green) at the very bottom edge to create perspective.
Pro Tip
When painting the snow caps, don’t reload your brush constantly. A ‘dry brush’ technique creates a scratchy texture that looks more like real snow on rock than a solid blob of white paint.
Step 4: Finishing Touches
-
Remove the tape:
Carefully peel off the painter’s tape from the trim while the paint is still slightly tacky to prevent peeling dry paint. -
Touch up edges:
Inspect where the mural meets the natural wood trim. Use a small detail brush to clean up any bleed-through or missed spots. -
Seal the artwork:
Apply two coats of clear exterior matte sealant over the entire house, including the unpainted wood trim. This protects the wood from moisture and keeps your mural colors vibrant. -
Add bedding:
Once fully cured (wait at least 48 hours), place a cozy blanket or weatherproof cushion inside to make it ready for your furry friend.
Your pup now has a mountain lodge that rivals the beauty of the landscape behind it
Mini-Me Dog House That Matches Your Home Exterior
This charming, high-end dog house features a sophisticated olive green hue accented by crisp white trim, perfectly mimicking the style of a contemporary home. The true showstopper is the natural cedar shake roof, adding textural warmth that elevates the entire structure into a backyard focal point.
How-To Guide
Materials
- Dog house kit (or lumber: 2×4 framing, plywood sheeting, clapboard siding)
- Cedar shake shingles
- Exterior semi-gloss paint (Olive Green)
- Exterior semi-gloss paint (Bright White)
- Framing nailer or hammer and nails
- Wood glue
- Paint rollers and angled brushes
- Jigsaw (for cutting the arch and window)
- Measuring tape and speed square
- Caulk and caulking gun
- Sandpaper (120 and 220 grit)
- Plexiglass (optional, for window)
- Stain or sealant for roof base
Step 1: Planning and Base Construction
-
Scale and dimensions:
Begin by measuring your dog to ensure the planned structure allows them to stand and turn around comfortably. Sketch your design, modeling the profile after a classic gabled roof house but incorporating extended eaves for shade. -
Building the platform:
Construct a rectangular base frame using pressure-treated 2x4s to lift the house off the ground, preventing moisture damage. Cover this frame with a sheet of ¾-inch exterior-grade plywood for a solid interior floor. -
Wall framing:
Cut four wall panels from plywood sheeting. For the front and back panels, cut the tops at a 45-degree angle to create the peaks for the roof. Attach vertical 2×2 supports at the interior corners to screw the panels together securely.
Step 2: Adding Character
-
Cutting the craftsman arch:
On the front panel, trace a generous doorway with a flat bottom and a gently arched top. Use a jigsaw to carefully cut out this shape, moving slowly to ensure a smooth curve. -
Creating the window:
On one side panel, mark out a rectangular opening for a window to provide airflow and a view. Cut this out with the jigsaw, then frame the opening with small strips of trim to create a finished ledge and casing. -
Siding application:
Apply horizontal clapboard siding over the exterior plywood walls. Start from the bottom and work your way up, ensuring each piece overlaps the one below it slightly for water runoff. Trim the edges flush with the corners.
Match the Main House
Bring a photo of your home’s exterior to the hardware store for color matching. Using the exact same paint code for the siding creates a true ‘mini-me’ effect.
Step 3: Roofing and Trim
-
Roof substrate:
Attach two large rectangular pieces of plywood for the roof, ensuring they overhang the walls by several inches on all sides. Secure these directly into the angled tops of the front and back wall panels. -
Shingling preparation:
Lay a strip of roofing felt or starter shingles along the bottom edge of the roof plywood. This provides the necessary weatherproofing layer before the decorative wood goes on. -
Installing cedar shakes:
Nail the cedar shakes in overlapping rows, starting at the bottom eave and working upward toward the peak. I find it helpful to vary the width of the shakes slightly to give it that authentic, handmade texture. -
Capping the ridge:
Once you reach the top, cover the exposed seam where the roof panels meet with a wooden ridge cap or overlapping shakes to ensure the peak is watertight. -
Applying the trim:
Measure and cut 1×3 trim boards to frame the corners, the sloping roofline (fascia), and the base. Create a custom arched trim piece for the door by tracing the cutout piece on a wider board and cutting a matching frame.
Solar Porch Light
Install a small solar-powered lantern above the arched doorway. It mimics a porch light and adds a cute, functional safety feature for nighttime potty breaks.
Step 4: Painting and Finishing
-
Caulking gaps:
Run a bead of exterior-grade caulk along all seams where the trim meets the siding and around the window frame. Smooth it down with a wet finger and let it cure completely. -
Priming everything:
Apply a coat of high-quality exterior primer to the siding and the trim. The cedar roof can remain unpainted to age naturally to a silver-gray, or be sealed with a clear coat. -
Painting the siding:
Using a small roller, apply two coats of the olive green semi-gloss exterior paint to the siding sections. Use a brush to get into the grooves of the clapboards to ensure full coverage. -
Crisp white details:
With an angled sash brush, carefully paint the corner trim, roof fascia, baseboards, window casing, and door arch with the bright white paint. Take your time here to keep the lines sharp against the green. -
Final touches:
If desired, install a piece of plexiglass on the inside of the window opening, or leave it open for better ventilation. Place the finished house on a level surface, preferably on gravel or pavers.
Your pup now has a stylish retreat that complements your home perfectly
Chalkboard-Style Dog House Panel for Doodles
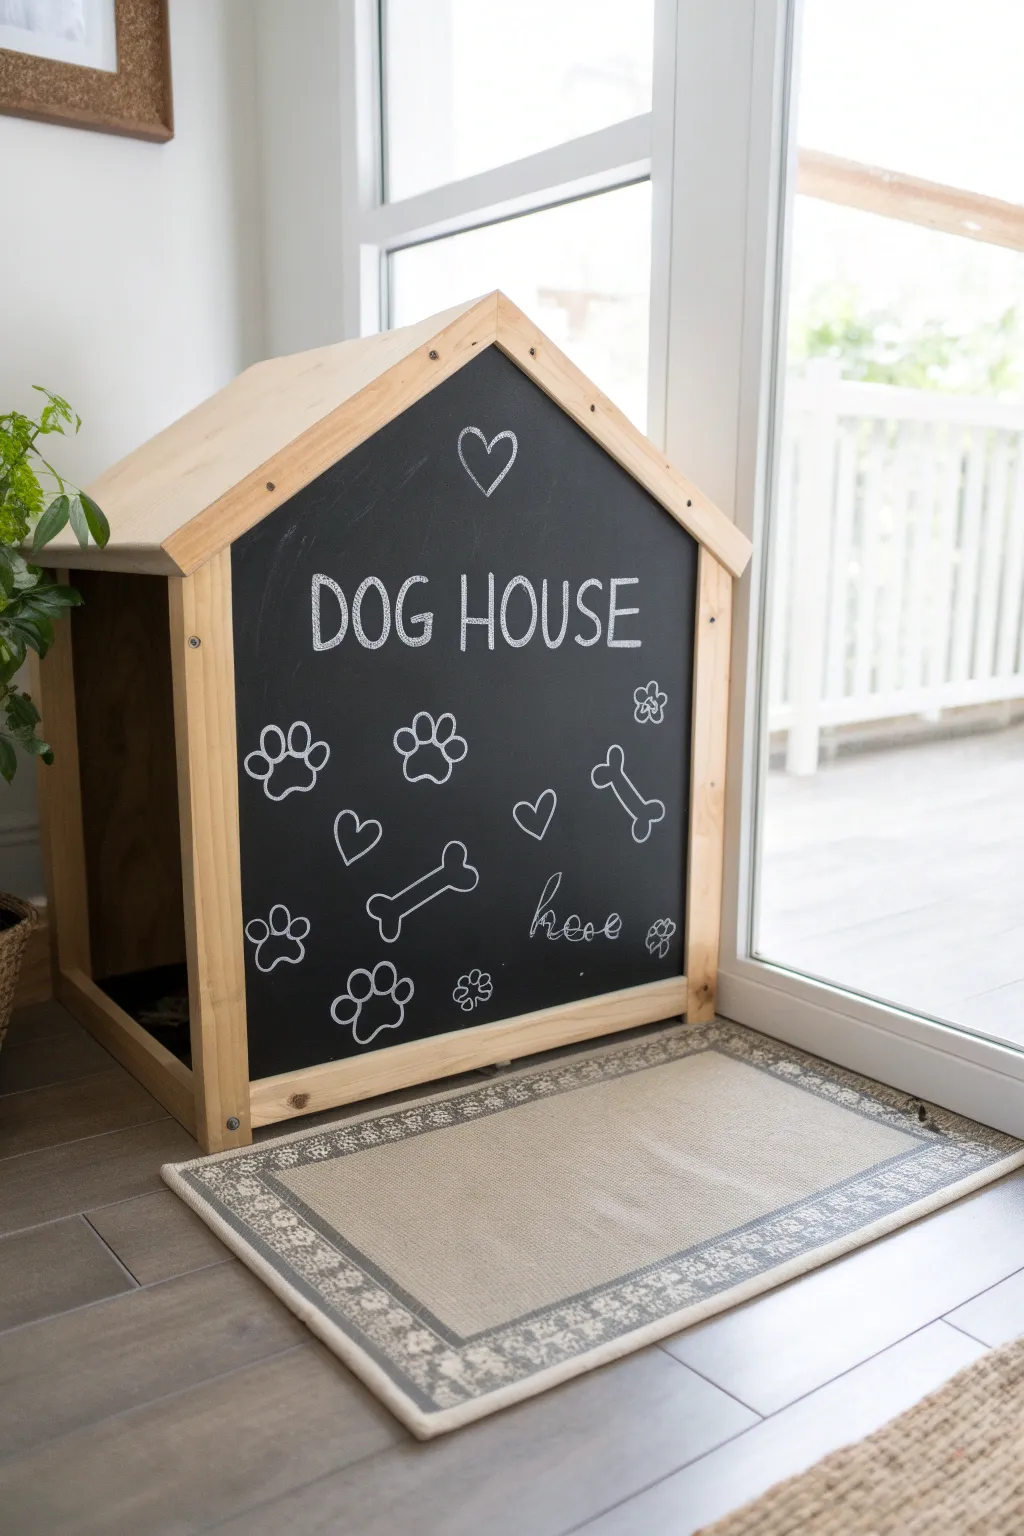
Transform a standard wooden dog crate into an ever-changing canvas with this clever chalkboard front panel. This charming project combines natural wood framing with a sleek black surface, perfect for doodling your pup’s name or seasonal art.
Detailed Instructions
Materials
- Plywood sheet (sized to fit your dog house front)
- 1×2 inch pine lumber (for framing)
- Black chalkboard paint
- Primer suitable for wood
- Foam paint rollers
- Paint tray
- Standard white chalk
- Wood glue
- Brad nailer or finishing nails
- Painter’s tape
- Sandpaper (medium and fine grit)
- Jigsaw (if cutting the house shape yourself)
- Damp rag
Step 1: Preparing the Panel
-
Cut the Panel to Shape:
Measure the front opening of your dog house structure exactly. Using a jigsaw, cut your plywood sheet into a pentagon shape to match the A-frame roofline of the house. -
Sand the Surface:
Since chalkboard paint requires a very smooth base to write on effectively, sand the face of the plywood thoroughly. Start with medium grit to remove imperfections and finish with fine grit for a glass-like feel. -
Clean Before Painting:
Wipe down the entire board with a damp rag or tack cloth. Any remaining sawdust will create bumps in your chalkboard finish, so be meticulous here. -
Applying Primer:
Roll on a coat of primer to seal the wood. This prevents the chalkboard paint from soaking in unevenly and ensures a durable finish. -
Painting the Chalkboard:
Once the primer is dry, apply your first coat of black chalkboard paint using a foam roller for the smoothest possible texture. I prefer foam over nap rollers because it minimizes texture. -
Second Coat Logic:
Let the first coat dry according to the can’s instructions (usually 2-4 hours), then apply a second coat. Paint in the opposite direction (horizontally vs vertically) to ensure full, solid coverage.
Uneven Wood Grain?
If plywood grain shows through the paint, apply a skim coat of wood filler over the entire face before priming to get a perfectly smooth writing surface.
Step 2: Framing the Art
-
Measuring the Trim:
While the paint cures, measure the edges of your plywood panel. Cut your 1×2 pine lumber to create a frame that sits flush with the panel edges. You’ll need mitered cuts at the roof peak for a clean joint. -
Natural Finish Prep:
Leave the pine trim unpainted for that modern, Scandinavian contrast seen in the photo. Give the wood a light sanding to remove rough spots or stamps. -
Attaching the Frame:
Attach the pine trim to the front face of the plywood using wood glue and a few brad nails. The frame should border the black chalkboard area perfectly. -
Conditioning the Chalkboard:
This is a crucial step most people miss. Take a piece of chalk and rub the side of it over the entire painted surface, then wipe it off with a dry cloth. This ‘seasons’ the board so your first drawing doesn’t leave a ghost image forever.
Sharpen Your Chalk
Use a pencil sharpener on your standard stick of chalk. A sharp point allows for the crisp lettering and detailed paw prints seen in the photo.
Step 3: Creating the Chalk Art
-
Drafting the Text:
Lightly sketch your design with a pencil first if you’re nervous. Position the words ‘DOG HOUSE’ in the upper center, using tall, narrow capital letters. -
Drawing the Title:
Go over your pencil guide with firm pressure using standard white chalk. Keep the lines slightly sketchy for a rustic, hand-drawn look rather than perfect typography. -
Adding Paw Prints:
Draw three to four paw prints scattered around the lower left and center. Start with a rounded triangle for the main pad and add four oval toes above it. -
Bones and Hearts:
Balance the composition by adding outlines of dog bones on the right side. Intersperse small hearts and simple outlined flowers or clovers to fill empty negative space without overcrowding. -
Script Accent:
Near the bottom right, add a small cursive word like ‘love’ or ‘here’ (as shown in the reference) to contrast with the block lettering above. -
Final Clean Up:
Use a slightly damp Q-tip to sharpen any smudged lines or clean up chalk dust that strayed too far, giving your artwork a crisp finish.
Now you have a stylish, interactive feature that makes your furry friend’s home a focal point of the room
Night Sky Dog House With Stars and Constellations
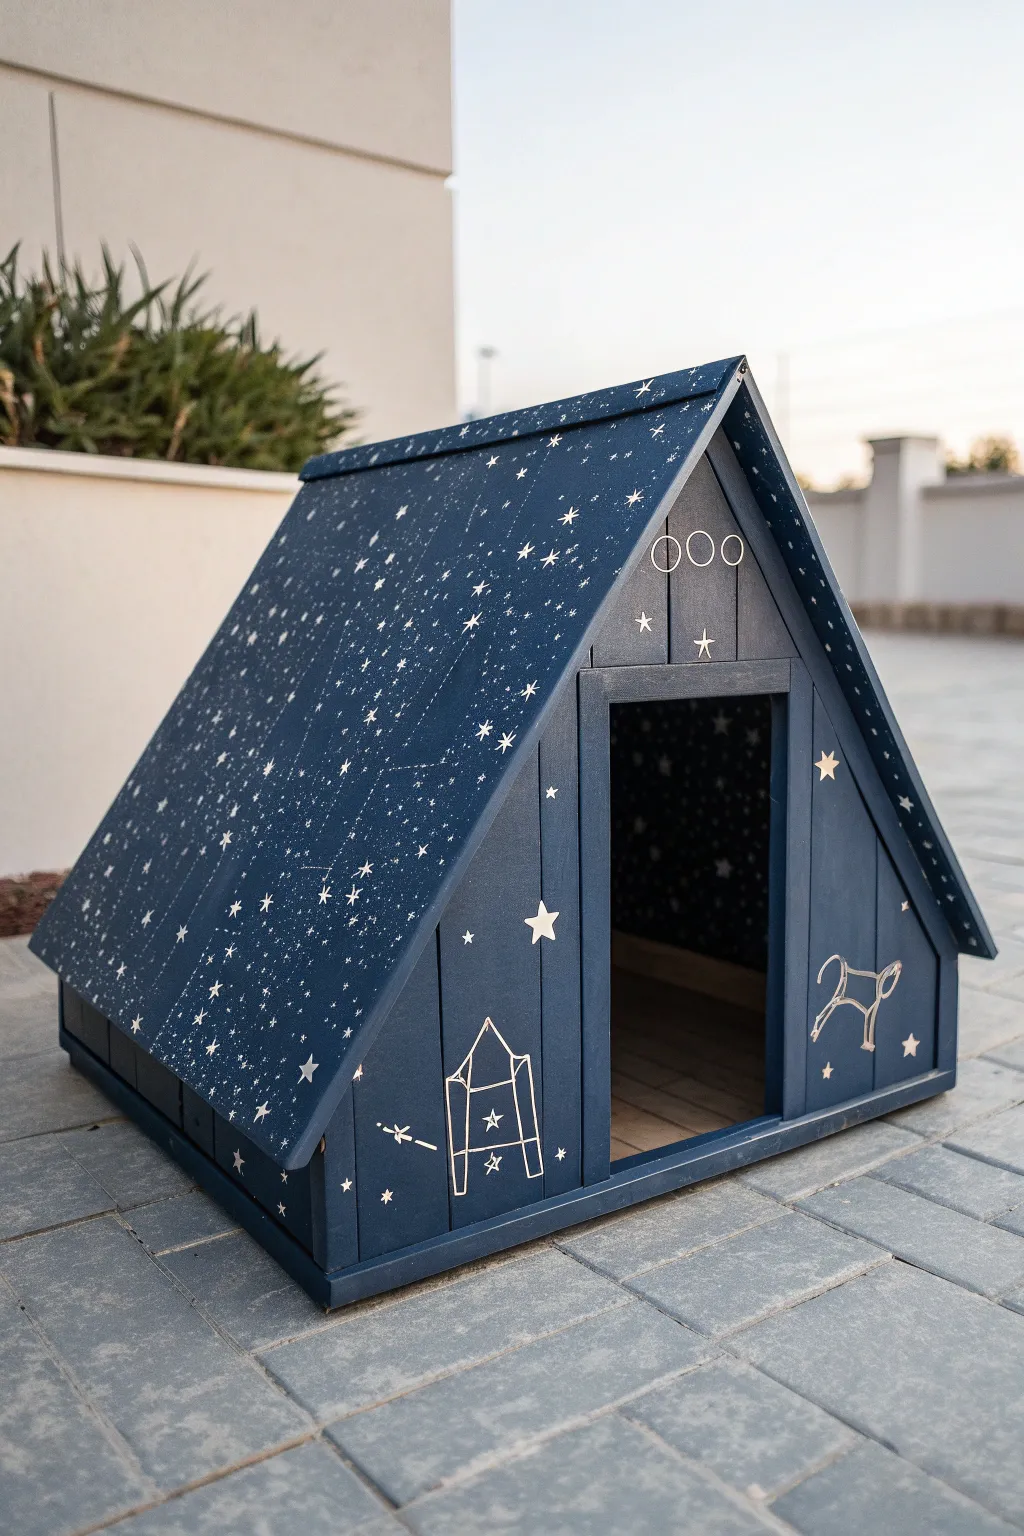
Transform a simple wooden structure into a celestial retreat with this dreamy night sky design. Featuring a deep navy base swirled with hundreds of stars, constellations, and whimsical space-themed illustrations, this project turns a basic pet shelter into an out-of-this-world focal point.
Step-by-Step
Materials
- Wooden dog house (assembled or kit)
- Sandpaper (120 and 220 grit)
- Exterior primer
- Deep navy blue exterior paint
- Metallic silver or white outdoor acrylic paint
- Small fine-tipped paintbrushes (00 and 1 size)
- Old toothbrush or stiff bristle brush
- Painters tape
- Chalk or white watercolor pencil
- Cardboard or drop cloth
- Clear outdoor sealer (polyurethane)
Step 1: Preparation & Base Coat
-
Sand the surfaces:
Begin by giving the entire dog house a good sanding with 120-grit paper to remove any rough splinters or old finishes. Follow up with 220-grit for a smooth painting surface, then wipe away all dust with a tack cloth or damp rag. -
Prime the wood:
Apply a coat of high-quality exterior primer to the entire structure, including the interior walls if you plan to paint them. Let this dry completely according to the manufacturer’s instructions. -
Paint the midnight base:
Apply your deep navy blue exterior paint. Use long, even strokes to cover the roof, sides, and front face. Don’t forget the interior walls—painting them creates a cozy, immersive cave. -
Apply a second coat:
Once the first layer is dry, add a second coat of navy blue. This ensures a rich, opaque background that will make your stars pop. Allow this to cure fully, preferably overnight.
Step 2: Creating the Galaxy
-
Splatter the Milky Way:
Dip an old toothbrush or stiff bristle brush into thinned white or silver paint. Run your thumb over the bristles to flick tiny specks of paint onto the roof. Focus the density in a diagonal band to mimic the Milky Way. -
Vary the spray density:
Move closer for denser clusters of stars and stand back for a lighter dusting. I like to practice on a piece of cardboard first to get the consistency right before tackling the roof. -
Hand-paint larger stars:
Using a fine-tipped brush, paint individual four-pointed and five-pointed stars scattered across the heavy splatter areas. Vary their sizes to create depth and visual interest. -
Connect the dots:
Look for natural clusters in your splatter or painted stars and use very thin lines to connect them, creating subtle, invented constellations on the roof panels.
Oops! Paint Blobs?
If a splatter gets too big, don’t wipe it! Let it dry, then turn it into a larger planet or a shooting star by painting a tail.
Step 3: Illustrations & Details
-
Sketch the designs:
On the front panels, lightly sketch your main designs using a piece of chalk or a white watercolor pencil. Draw a simple rocket ship on one side and a dog silhouette constellation on the other. -
Outline the rocket:
Using your finest brush and metallic silver or cream paint, carefully trace over your rocket sketch. Keep the lines relatively thin and geometric for a blueprint aesthetic. -
Paint the dog constellation:
On the opposite side, paint the outline of the dog. Add small stars at the ‘joints’ or corners of the drawing to emphasize the constellation style. -
Add geometric details:
Above the door frame, paint simple geometric symbols, like the three circles shown in the reference, or perhaps the pet’s name in a thin, sans-serif font. -
Detail the interior:
If you painted the inside navy, reach in and add a few large, hand-painted stars on the back wall so they are visible through the doorway. -
Clean up sketches:
Once the detail paint is fully dry, effectively wipe away any visible chalk or pencil guidelines with a slightly damp cloth.
Glow Up
Mix glow-in-the-dark powder into your white paint for the stars so the house illuminates softly at night.
Step 4: Finishing Touches
-
Seal the artwork:
Protect your hard work from the elements by applying two coats of clear, outdoor-rated polyurethane sealer. Satin or matte finish works best to keep the non-reflective ‘night sky’ look. -
Final inspection:
Check for any drips in the clear coat and brush them out immediately. Let the house cure in a dry, ventilated area for at least 48 hours before letting your pup move in.
Your pup now has a galactic gateway to dream of chasing comets in their sleep
Trompe L’Oeil Brick Dog House for Wow-Factor Texture
Transform a basic wooden dog house into a stately mini-manor with a clever trompe l’oeil paint technique. This project uses taping and layering to mimic the texture and depth of real red bricks without the heavy masonry work.
Step-by-Step Guide
Materials
- Wooden dog house (assembled)
- Sandpaper (120-grit)
- Dark grey exterior house paint (mortar color)
- Terracotta or brick-red exterior paint
- Dark brown or black acrylic paint (for shading)
- Painter’s tape (1/4 inch width)
- Sea sponge or coarse texture roller
- Small artist brush
- Clear exterior sealant (matte finish)
- Grey wood stain (optional for trim)
- Rags
Step 1: Preparation and Base Coat
-
Prepare the surface:
Start by giving the exterior of the dog house a quick sanding with 120-grit paper to remove any splinters or glossy finishes that might repel paint. Wipe it down with a damp rag to remove dust. -
Prime the surface:
If your wood is raw, apply a coat of exterior primer. If it’s already finished, you can skip straight to the base color. -
Apply the mortar color:
Paint the entire body of the house with your dark grey exterior paint. This will be the color of the ‘grout’ lines between your bricks, so ensure solid coverage. Let this dry completely, ideally overnight.
Step 2: Creating the Brick Pattern
-
Tape horizontal lines:
Using 1/4 inch painter’s tape, create long horizontal lines across the walls. Space them about 2.5 to 3 inches apart to mimic standard brick height. Use a level or ruler to keep them straight. -
Tape vertical lines:
Add vertical pieces of tape between the horizontal lines to create individual bricks. Remember to stagger these vertical lines on alternating rows—like real bricklaying—so the joints don’t line up perfectly. -
Seal the tape edges:
Lightly brush a very thin layer of your grey base coat over the tape edges. This clever trick seals the tape and prevents the red brick paint from bleeding underneath, ensuring crisp grout lines later.
Tape Trouble?
If paint bleeds under the tape, don’t panic. Wait for it to dry, then use a small flat brush and your original grey mortar paint to tidy up the lines
Step 3: Painting the Brick Texture
-
Sponge on the first brick layer:
Dip a sea sponge into your terracotta or brick-red paint, blotting off excess on a paper towel. Dab the paint onto the taped areas. Don’t aim for solid coverage; letting some grey peek through adds realistic texture. -
Add dimension with shading:
While the red paint is still slightly tacky, mix a tiny drop of dark brown or black into your red paint. Lightly sponge this darker shade randomly onto the bricks to create a weathered, kiln-fired look. -
Dry and touch up:
Allow the sponged paint to dry to the touch. If some areas look too flat, I like to go back with a slightly lighter orange-red mix on the center of a few bricks to make them pop.
Level Up: 3D Texture
Mix a handful of fine sand or sawdust into your red paint before sponging. This adds gritty, realistic texture that feels like real brick when touched
Step 4: The Big Reveal and Finishing Touches
-
Remove the tape:
Carefully peel off all the painter’s tape. Pull the tape at a 45-degree angle while the paint is dry but not fully cured—this usually prevents chipping. -
Softening the edges:
If the grout lines look too stark and perfect, take a small artist brush with a tiny bit of the brick color and lightly feather some edges to make it look more aged and natural. -
Treat the trim:
Paint or stain the doorway trim, corner posts, and roof fascia. A weathered grey wood stain complements the orange brick tones beautifully, as seen in the photo. -
Protect the roof:
If your roof is wood shingles like the image, ensure they are sealed. If painting them, use a dark grey or slate color to contrast with the warm brick body. -
Shade the interior:
Paint the visible interior walls a dark color if you want the house to look cozy and deep, or simply seal the natural wood. -
Apply final sealant:
Once everything is fully dry (give it 24 hours), apply two coats of clear matte exterior sealant. This protects your artwork from rain and UV rays.
Your pup now has the most stylish residence on the block, combining rustic charm with artistic flair


Have a question or want to share your own experience? I'd love to hear from you in the comments below!