
A painted crib can turn a plain nursery into something that feels totally custom, even if you started with a hand-me-down. Here are my favorite crib painting ideas—from classic, cozy colors to artsy finishes that make the whole room feel intentional.
Classic Crisp White Refresh

Transform a tired or dark wooden crib into a bright, airy focal point with this crisp white makeover. This project creates a clean, factory-smooth finish that instantly modernizes any nursery while maintaining a warm, inviting feel.
Step-by-Step Guide
Materials
- Solid wood crib
- Medium-grit sandpaper (120-150 grit)
- Fine-grit sandpaper (220 grit)
- Tack cloths
- High-quality water-based primer (zero-VOC recommended)
- Baby-safe white furniture paint (satin or semi-gloss)
- Small foam roller
- 2-inch synthetic angled brush
- Drop cloths
- Painter’s tape
- Screwdriver or Allen wrench (for disassembly)
- Mild degreaser or TSP substitute
Step 1: Preparation and Cleaning
-
Disassemble the crib:
Begin by taking the crib apart as much as possible using your screwdriver or Allen wrench. Painting individual flat pieces is far easier than fighting gravity on a fully assembled structure, ensuring you don’t miss hidden nooks. -
Label hardware:
Place all screws, bolts, and washers into labeled sandwich bags. Tape these bags securely to a part of the crib that won’t get painted, like the metal mattress spring base, so nothing gets lost. -
Clean surfaces thoroughly:
Wipe down every inch of the crib frame with a mild degreaser or TSP substitute. This removes oils, handprints, and old furniture polish that could prevent the new paint from adhering properly. -
Scuff sand the wood:
Using the medium-grit sandpaper, gently sand all surfaces. You aren’t trying to strip the old finish completely; you just want to knock off the shine and create a ‘tooth’ for the primer to grab onto. -
Remove sanding dust:
Vacuum up the bulk of the dust, then wipe every spindle and rail with a tacky cloth. This step is crucial for achieving that smooth, professional finish.
Sticky Situation?
If the paint feels tacky days later, humidity is likely the culprit. Move the pieces to an air-conditioned room or set up a gentle fan to circulate dry air and speed up the curing process.
Step 2: Priming for Adhesion
-
Tape off restricted areas:
Use painter’s tape to cover any metal latch mechanisms or areas where screws need to be reinserted later. Paint build-up in screw holes can make reassembly significantly harder. -
Apply primer to spindles:
Start with your angled brush to work primer into the corners and crevices of the spindles. I generally like to do the tricky detailed areas first so I can smooth the flat areas later. -
Roll flat surfaces:
Switch to the small foam roller for the top rails and flat panels. Apply a thin, even coat of primer. Don’t worry if the old wood color shows through slightly; the goal is adhesion, not complete coverage yet. -
Lightly sand the primer:
Once the primer is fully dry (check the can for times), lightly run your massive fine-grit sandpaper over the surfaces to smooth out any brush strokes or raised grain. Wipe clean with a fresh tack cloth.
Step 3: Painting the Crisp White Finish
-
Apply the first coat on spindles:
Just like with priming, use your brush to tackle the spindles first. Apply the baby-safe white paint in long, smooth vertical strokes, watching carefully for drips that might gather at the bottom of the slats. -
Roll the main frame:
Use a fresh foam roller to coat the flat rails and legs. Roll lightly to avoid creating air bubbles in the paint finish. Keeping a ‘wet edge’ helps prevent lap marks from forming. -
Allow extensive drying time:
Let this first coat dry completely. It is better to wait a little longer than necessary than to ruin the finish by rushing. Overnight drying is often best for furniture. -
Sand between coats:
Very gently buff the painted surface with the fine-grit sandpaper. This feels counterintuitive, but it knocks down tiny imperfections and results in a factory-smooth feel. -
Apply final coats:
Repeat the painting process for a second and potentially third coat, depending on coverage. White paint over dark wood often needs three thin coats rather than two thick ones. -
Inspect for drips:
About 10-15 minutes after applying the final coat, do a quick visual check for any gravity-induced drips on the vertical slats and brush them out gently while the paint is still tacky. -
Cure the paint:
Before reassembly, let the crib pieces sit in a well-ventilated area for at least 3-5 days. Paint dries quickly but ‘cures’ (hardens) slowly; you don’t want the hardware to dig into soft paint. -
Reassemble carefully:
Once fully cured, remove the tape and reassemble the crib. Hand-tighten screws initially to avoid cracking the new finish around the joinery.
Level Up: Distress It
For a farmhouse vibe, use fine grit sandpaper to gently sand the edges and corners after the white paint dries, revealing a hint of the wood underneath before sealing.
Step back and admire how a simple coat of white paint has completely refreshed the room with a clean, peaceful atmosphere


Two-Tone Rails and Slats
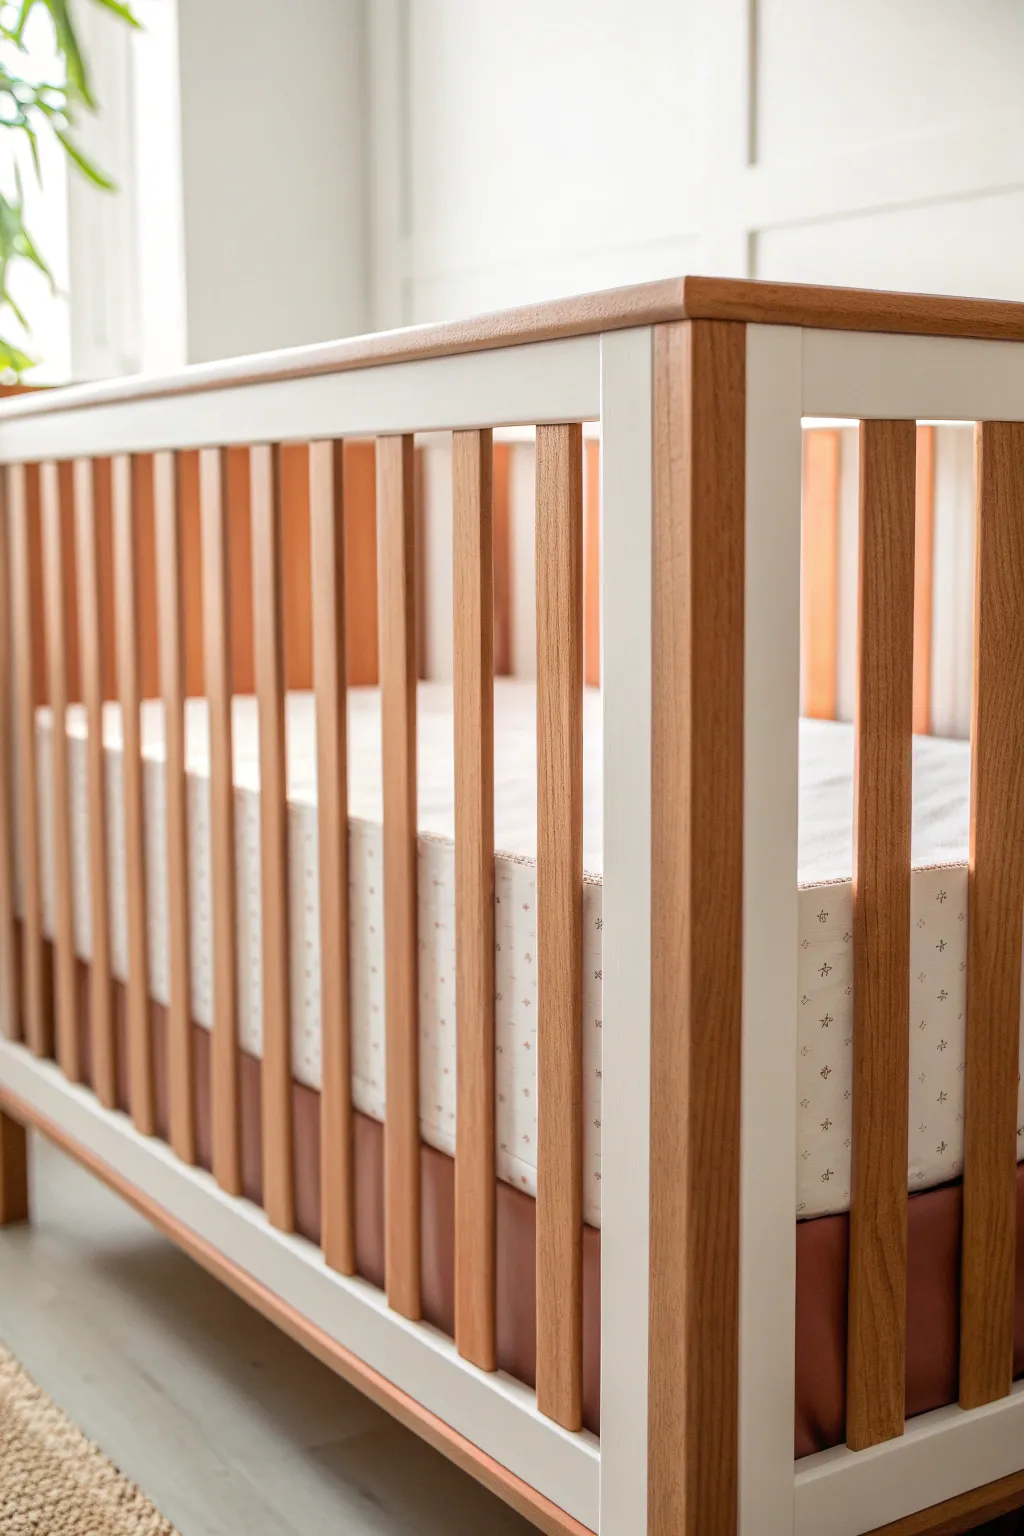
This project transforms a standard crib into a high-end, boutique-style piece by combining crisp white rails with the warmth of natural wood tones. The contrast between the painted horizontal sleekness and the organic vertical slats creates a timeless, gender-neutral focal point for any nursery.
How-To Guide
Materials
- Unfinished wooden crib or existing crib to refinish
- Medium-grit sandpaper (120-150 grit)
- Fine-grit sandpaper (220 grit)
- Liquid deglosser (if painting over old finish)
- Painter’s tape (high quality)
- White furniture paint (satin or semi-gloss, non-toxic, distinct ‘baby safe’ rating)
- Water-based polyurethane (matte or satin finish)
- Gel stain in a warm Pecan or Oak shade
- Clean lint-free rags
- Foam brushes
- 2-inch angled synthetic bristle brush
- Drop cloth
- Tack cloth
- Screwdriver or Allen wrench (for disassembly)
Step 1: Preparation & Disassembly
-
Break it down:
Begin by fully disassembling the crib. It is infinitely easier to achieve clean lines on the slats if the crib sides are separated from the mattress support and headboards. Keep all hardware in a labeled bag so nothing gets lost. -
Assess the surface:
If you are starting with a pre-finished crib, wipe down all surfaces with a liquid deglosser. This removes surface oils and helps the new finish adhere without aggressive stripping. -
Initial sand:
Lightly sand all pieces with medium-grit sandpaper. If the crib was previously painted or varnished, you’ll need to sand the slats down to raw wood if you plan to stain them like the example; otherwise, scuff them thoroughly to receive a faux-wood paint technique. -
Clean up dust:
Vacuum up the sanding dust using a brush attachment. Follow up by wiping every nook and cranny with a tack cloth to ensure a perfectly smooth base.
Clean Lines Secret
Before painting white, seal your tape edge with a tiny bit of clear matte medium or polyurethane. This fills gaps so paint can’t bleed under.
Step 2: Staining the Slats & Accents
-
Tape off the white zones:
Decide which parts stay wood-toned. In our inspiration, this includes the vertical slats, the top cap rail, and the corner uprights. Use painter’s tape to meticulously mask off the horizontal bottom rail and the horizontal sub-rail that holds the slats, as these will be white. -
Apply the warm tone:
Using a lint-free rag or foam brush, apply the gel stain to the slats and top rail. I prefer gel stain here because it doesn’t drip as easily on vertical surfaces. Work in small sections, rubbing it deep into the grain. -
Wipe away excess:
Wait about 2-3 minutes, then wipe off the excess stain with a clean rag. The goal is a natural glow, not a dark, opaque finish. Ensure you get into the corners where the slats meet the rail. -
Dry and repeat:
Let the stain dry completely according to the manufacturer’s timeframe. If the color feels too light, apply a second coat using the same wipe-on, wipe-off method.
Step 3: Painting the Frame White
-
Reverse tape:
Once the stain is 100% dry (give it a full 24 hours to be safe), remove the old tape. Now, carefully tape over the newly stained wood areas where they meet the parts destined for white paint. Press the tape edges down firmly to prevent bleed. -
Prime (if needed):
If your white paint doesn’t have a built-in primer, apply a thin coat of stain-blocking primer to the horizontal rails. This stops wood tannins from bleeding through the white later. -
First white coat:
Using your angled synthetic brush, apply the first coat of white furniture paint to the horizontal bottom rails and the frame structure. Use long, smooth strokes to minimize brush marks. -
Sand between coats:
After the first coat is dry to the touch, very lightly run fine-grit sandpaper over the white areas. This knocks down any raised grain or brush ridges. -
Full coverage:
Apply a second and perhaps third coat of white paint until the finish is solid and opaque. Thin, multiple layers always cure harder than one thick gloppy one.
Natural Wood Look
Can’t strip the old paint from the slats? Use a ‘retique it’ kit or a wood-grain tool with glaze over a tan base coat to fake the wood look.
Step 4: Sealing & Assembly
-
Remove tape promptly:
Peel off the painter’s tape while the final coat of white paint is still slightly tacky. This helps ensure a crisp line without pulling up dried paint chips. -
Protective clear coat:
To protect that baby-safe surface, brush a water-based polyurethane over the entire piece—both the stained wood and the painted white sections. A matte or satin finish looks most modern and hides teething marks better than high gloss. -
Final cure:
Let the crib parts cure in a well-ventilated area for several days before reassembling. Paint needs time to harden completely so it won’t stick or dent during assembly. -
Reassembly:
Put the crib back together using your saved hardware. Tighten all bolts securely and verify structural stability before placing the mattress inside.
With your fresh two-tone design complete, you have created a stunning, custom piece of furniture ready to anchor the nursery design.


Muted Sage Green Calm

Bring a sense of serene nature into your nursery by transforming a standard wooden crib with a coat of soft, muted sage green. This project balances modern color trends with traditional spindle details for a peaceful, gender-neutral centerpiece.
Step-by-Step Tutorial
Materials
- Wooden crib (unfinished or previously finished)
- Sanding sponges (medium and fine grit)
- Tack cloth
- Painter’s tape
- High-quality stain-blocking primer
- Muted sage green furniture paint (satin or semi-gloss finish)
- 2-inch angled synthetic sash brush
- Small round artist brush (for spindle crevices)
- Drop cloth
- Mild degreaser or TSP substitute
- Polycrylic topcoat or furniture wax (optional)
Step 1: Preparation
-
Disassemble the crib:
Before you begin, take the crib apart completely. It is much easier to paint individual rails and panels lying flat or propped up than to navigate a fully assembled piece. Keep all hardware in a labeled bag so nothing gets lost. -
Clean thoroughly:
Wipe down every surface with a mild degreaser or TSP substitute to remove oils, fingerprints, and dust. This step is critical for ensuring your paint adheres properly, especially if the crib is second-hand. -
Sand the surfaces:
Using a medium-grit sanding sponge, scuff sand the entire crib. Spindles can be tricky, so wrap the flexible sponge around the curves to get into the details. You don’t need to strip it to bare wood, just remove the glossy sheen. -
Remove dust:
Vacuum up the sanding dust, then wipe everything down with a tack cloth. Even tiny specks of dust will show up in your final finish, so be thorough here. -
Tape off hardware areas:
Use painter’s tape to cover any metal inserts, screw holes, or mattress spring supports that shouldn’t be painted. Press the tape edges down firmly to prevent bleed-through.
Step 2: Priming
-
Apply the primer:
Brush on a coat of high-quality, stain-blocking primer. This is essential to prevent wood tannins or old stains from bleeding through your beautiful sage green later. Use long, even strokes along the grain. -
Check for drips:
While priming the vertical spindles, watch closely for drips pooling at the bottom crevices. Catch them early with your brush before they dry into hard bumps. -
Light sanding:
Once the primer is fully dry (check the can for specific times), lightly run a fine-grit sanding sponge over the surfaces to knock down any raised grain or brush marks. Wipe away the dust with a tack cloth again.
Spindle Savior
For tricky spindles, wear an old sock or a dedicated painting glove over your hand. Dip it lightly in paint and wrap your hand around the spindle to coat it evenly in seconds.
Step 3: Painting
-
Start with the spindles:
Begin applying your sage green paint to the spindles first. It’s the most tedious part, and doing it first prevents you from messing up the flat rails later. I find a small round brush helps get full coverage in the detailed turnings. -
Paint the top and bottom rails:
Switch to your 2-inch angled sash brush and paint the horizontal rails. Work in sections, brushing the paint into the wet edge of the previous section to avoid lap marks. -
Paint the headboard and footboard:
Apply paint to the larger flat panels of the headboard and footboard. Use long, continuous strokes from one end to the other for a smooth, professional finish. -
Let the first coat cure:
Allow the first coat to dry completely according to the manufacturer’s instructions. Do not rush this step; painting over tacky paint will pull it up and ruin the texture. -
Sand between coats:
Very lightly sand the surface with fine-grit sandpaper. This creates a stronger bond for the next layer and ensures a buttery smooth finish for baby’s hands. -
Apply the second coat:
Repeat the painting process for a second coat to achieve full opacity and depth of color. The sage green should look rich and even now. -
Inspect and touch up:
Once dry, inspect the crib from different angles in good lighting. Look for any holidays (missed spots) or thin areas, especially around the spindle turnings, and touch them up carefully.
Two-Tone Twist
Consider leaving the top rail natural wood or staining it a warm oak tone for a modern two-tone look. Just tape off the rail heavily before priming and painting the rest.
Step 4: Finishing Touches
-
Optional topcoat:
If you used a chalk-style paint, you must seal it with a clear furniture wax or polycrylic. If you used a self-sealing furniture enamel, this step is optional but can add extra durability. -
Cure time:
Allow the final finish to cure for several days before reassembling. Paint may feel dry to the touch quickly, but it takes time to harden fully enough to withstand safe use. -
Reassemble:
Carefully remove the painter’s tape and reassemble the crib. Tighten all bolts securely and ensure the structure is stable before adding the mattress.
Enjoy the calming atmosphere this refreshed piece brings to your little one’s new room


Dusty Blue Traditional Twist
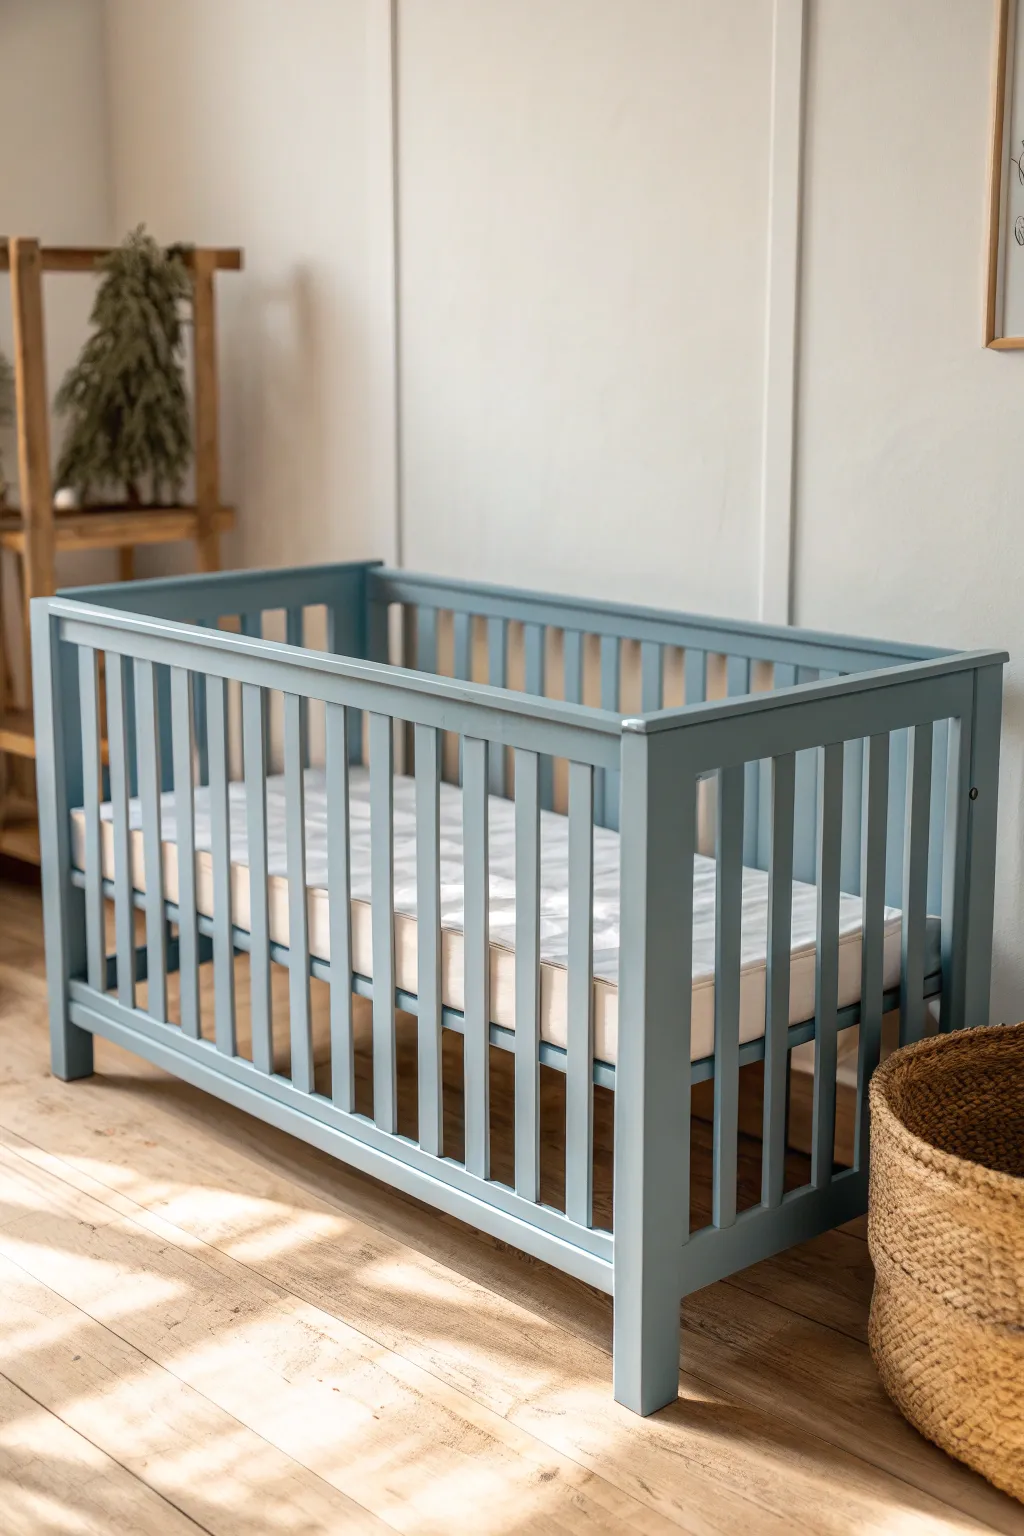
Transform a standard wooden crib into a soothing, sophisticated focal point with this muted blue finish. The result is a soft, matte look that bridges the gap between classic nursery style and modern color trends.
Step-by-Step
Materials
- Unfinished or previously finished wooden crib
- Sanding block (medium grit, 120-150)
- Sanding sponge (fine grit, 220)
- Tack cloths
- Painter’s tape
- Stain-blocking primer (water-based)
- Dusty blue mineral or chalk-style nursery-safe paint
- Small synthetic angled sash brush (1.5 to 2 inch)
- High-density foam roller (4-inch)
- Clear matte protective topcoat (non-toxic, water-based)
- Drop cloth
- Screwdriver or Allen wrench (for disassembly)
Step 1: Preparation & Sanding
-
Setup and Safety:
Begin by moving the crib to a well-ventilated area, preferably outdoors or a garage with good airflow. Lay down a large drop cloth to protect your flooring. -
Disassembly:
Take the crib apart as much as possible using your screwdriver or Allen wrench. Remove the mattress support spring and any hardware, placing screws in a labeled bag so they don’t get lost. -
Initial Cleaning:
Wipe down all wooden surfaces with a damp cloth and a mild degreasing cleaner to remove oils, fingerprints, or old polish. -
Scuff Sanding:
Using a medium-grit sanding block (around 120-150 grit), thoroughly sand all surfaces. You don’t need to strip the wood bare, but you must roughen any existing glossy finish to ensure the primer adheres. -
Detail Sanding:
Switch to a sanding sponge to get into the tricky curves and corners of the slats. Sponges bend easily around the dowels without flattening them. -
Dust Removal:
Vacuum up the bulk of the sanding dust, then wipe every piece down with a tack cloth to capture even the finest particles.
Pro Tip: Drip Patrol
Keep a bright flashlight handy while painting the vertical slats. Shine it at different angles to catch hidden drips running down the sides before they dry.
Step 2: Priming & Painting
-
Applying Primer:
Apply a coat of stain-blocking primer using a brush for the corners and a small foam roller for the flat rails. This prevents wood tannins from bleeding through your blue paint later. -
Inspect and Sand Primer:
Once the primer is fully dry, lightly run a fine-grit sanding sponge over it to knock down any raised grain or brush strokes. Wipe away dust with a fresh tack cloth. -
Painting the Slats:
Open your dusty blue paint and stir well. Start painting the vertical slats first using your angled sash brush. Work in sections of 3-4 slats at a time to maintain a wet edge. -
Rolling Flat Surfaces:
For the wider top and bottom rails, switch to the high-density foam roller. This tool is my favorite for achieving that factory-smooth finish without visible brush marks. -
Touching Up:
Check for drips, especially where the slats meet the bottom rail. Smooth them out immediately with your brush before the paint begins to tack up. -
Drying Time:
Allow the first coat to dry according to the manufacturer’s instructions, usually 2-4 hours depending on humidity. -
Second Coat Application:
Apply a second coat of blue paint exactly as you did the first. Two thin coats are always better than one thick one for durability. -
Final Inspection:
Look closely at the finish in good lighting. If the coverage looks uneven or patchy, a light third coat may be necessary for this specific dusty blue tone.
Level Up: Color Blocking
For a modern twist, tape off the bottom 4 inches of the crib legs and leave them natural wood or paint them a contrasting gold for a ‘dipped’ effect.
Step 3: Sealing & Assembly
-
Topcoat Application:
To protect against teething and wear, apply a non-toxic, clear matte topcoat. Use a fresh foam roller for the flats and a clean brush for the slats. -
The Cure Period:
Let the crib pieces cure for at least 48 hours (or longer if recommended by your paint brand) before reassembling. Paint may feel dry to the touch but needs time to harden fully. -
Reassembly:
Once fully cured, reassemble the crib using the hardware you saved. Tighten all bolts securely and re-insert the mattress support.
Now you have a beautifully updated crib ready to anchor your nursery design
BRUSH GUIDE
The Right Brush for Every Stroke
From clean lines to bold texture — master brush choice, stroke control, and essential techniques.
Explore the Full Guide
Blush or Soft Peach Pastel
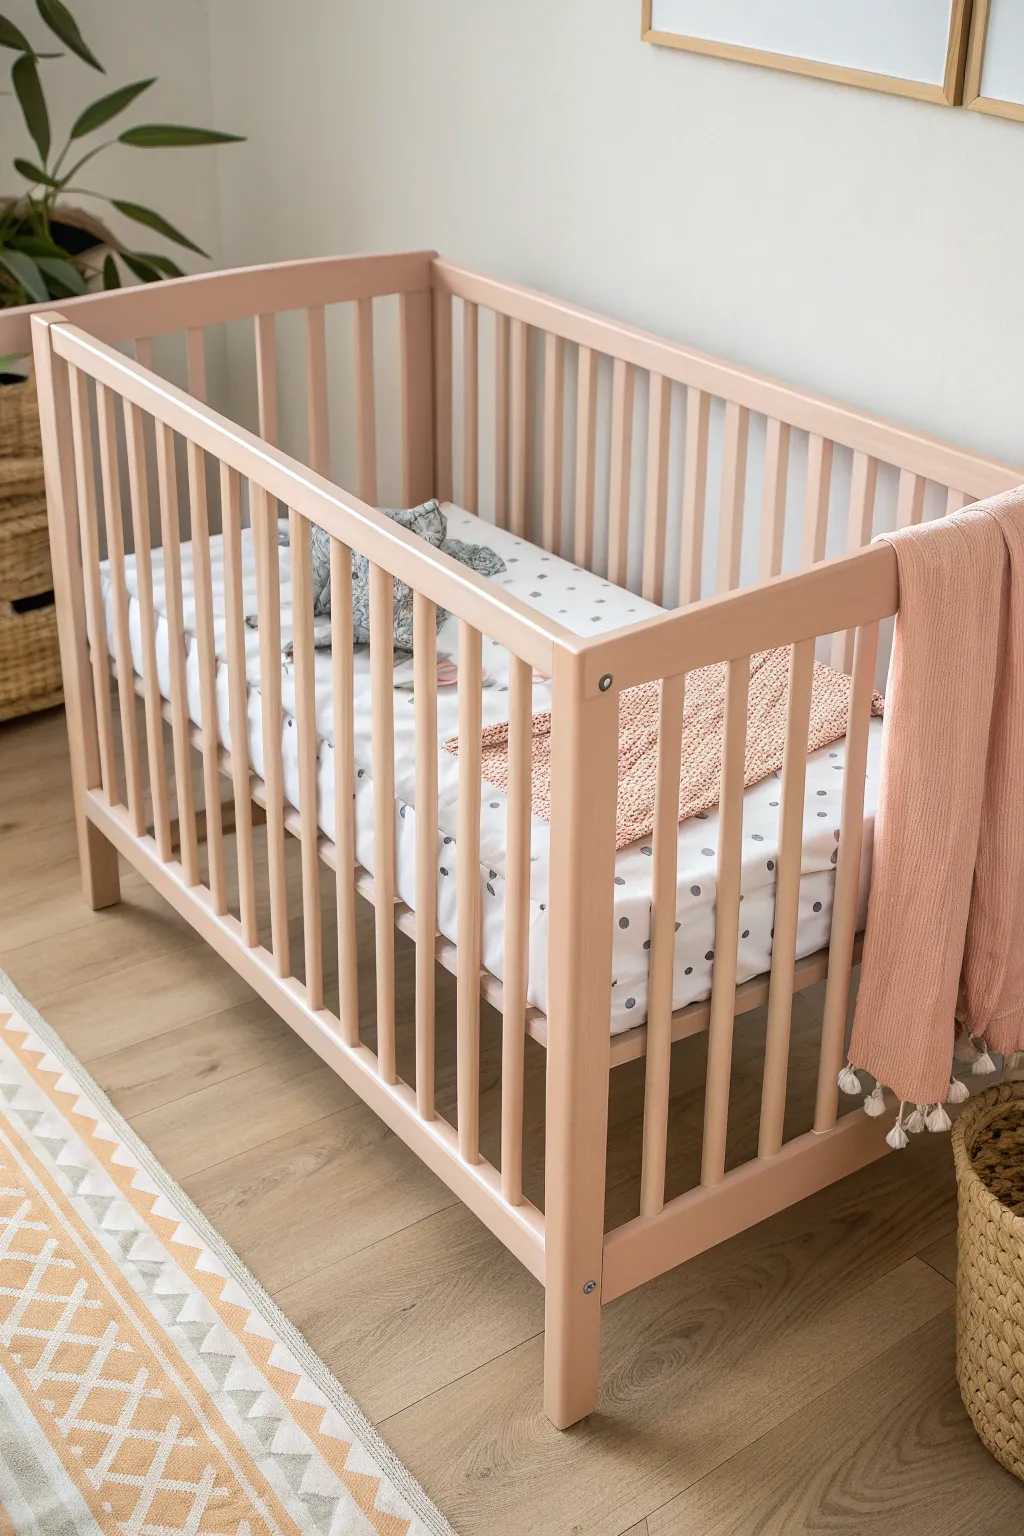
Transform a plain wooden crib into a soft statement piece with this gentle blush-peach finish. The result is a warm, matte pastel that feels modern yet timeless, perfect for adding a subtle pop of color to a neutral nursery.
How-To Guide
Materials
- Wooden crib (unfinished or previously finished)
- Non-toxic, baby-safe furniture paint (Blush/Soft Peach)
- Water-based primer (zero VOC)
- Sanding block (medium grit)
- Sanding sponge (fine grit)
- Tack cloth
- Drop cloth
- Painter’s tape
- High-quality synthetic angled brush (2-inch)
- Small foam roller
- Small artist’s brush
- Mild degreaser or soapy water
Step 1: Preparation
-
Set up your workspace:
Move the crib to a well-ventilated area, ideally a garage or outdoors on a nice day. Lay down a drop cloth to protect your floor from dust and drips. -
Clean surfaces thoroughly:
Before you even think about sanding, wipe the entire crib (focusing on rails and corners) with a mild degreaser or warm soapy water to remove oils and grime. Let it dry completely. -
Rough up the finish:
Using a medium-grit sanding block, scuff sand every surface of the crib. You aren’t trying to strip it to bare wood, just removing the shine to give the primer something to grip. -
Remove sanding dust:
Wipe away the bulk of the dust with a dry cloth, then go over the entire piece with a tack cloth to pick up the finest particles. This step is crucial for a smooth feel later. -
Mask hardware:
If you can’t disassemble the crib completely, use painter’s tape to carefully cover any metal bolts, screws, or mattress support hooks you don’t want painted.
Step 2: Priming
-
Apply the first primer coat:
Using your foam roller for flat slats and the angled brush for corners, apply a thin, even coat of zero-VOC primer. Don’t worry if the wood grain shows through; coverage isn’t the goal yet. -
Wait for curing:
Allow the primer to dry according to the manufacturer’s instructions, usually at least 2-4 hours. It shouldn’t feel tacky to the touch. -
Light sanding:
Take your fine-grit sanding sponge and very gently glide it over the primed surfaces. This knocks down any raised wood grain or brush ridge. -
Clean again:
One more quick pass with the tack cloth ensures your paint surface is perfectly debris-free.
Sticky Spindles?
If the spindles stick to your brush, you’re overloading paint. Work in very thin layers. If drying is too slow due to humidity, set up a fan (aimed away from the wet paint) to circulate air.
Step 3: Painting
-
Start with the spindles:
Dip your angled brush into the blush paint. Work on the vertical spindles first, painting the sides and tricky corners where they meet the rails. Keep layers thin to avoid drips. -
Roll flat surfaces:
Use the foam roller on the wider top rails and flat ends of the crib. This helps achieve that factory-smooth finish without visible brushstrokes. -
Inspect for drips:
About 10 minutes after applying, I like to do a quick visual check for paint runs, especially under the top rail, and smooth them out gently with a dry brush. -
Dry and repeat:
Let the first coat dry for roughly 4-6 hours. If the peach looks streaky, don’t panic—pastels often need multiple coats. -
Second coat application:
Apply the second coat just like the first. This is where the color depth really builds up. -
Touch up details:
Use a small artist’s brush to get any missed spots inside corners or around hardware holes without overloading them with paint. -
Optional third coat:
If you still see transparency or want a richer color, adhere to drying times and add a very light third coat. -
Final cure:
Let the crib cure for at least 3-4 days (or up to a week) before placing the mattress back in. This ensures the paint hardens fully and won’t chip.
Two-Tone Style
For a modern twist, leave the round vertical spindles natural wood and only paint the top rails and frame in peach. Just tape off the spindle ends perfectly before priming.
Enjoy the peaceful atmosphere your newly refreshed crib brings to the nursery space
Charcoal or Matte Black Statement

Give any nursery a sophisticated anchor point with this bold charcoal-black crib makeover. The matte finish offers a modern, high-end look that transforms standard wood furniture into a timeless statement piece.
Detailed Instructions
Materials
- Wooden crib (unfinished or previously finished)
- Non-toxic, low-VOC furniture paint (Matte Black or Charcoal)
- High-quality water-based primer
- Medium-grit sandpaper (120-150 grit)
- Fine-grit sandpaper (220 grit)
- Tack cloths
- Degreaser or mild soap solution
- Synthetic angular sash brush (1.5 – 2 inch)
- Mini foam rollers (4-inch)
- Drop cloths
- Blue painter’s tape
- Screwdriver or allen wrench (for disassembly)
Step 1: Preparation & Disassembly
-
Clear and prepare workspace:
Lay down drop cloths in a well-ventilated area, ideally a garage or a room with open windows, to catch any sanding dust and paint drips. -
Disassemble the crib:
Using your screwdriver or wrench, carefully take the crib apart. It is much easier to paint individual rails when they are laying flat rather than upright as an assembled unit. -
Label hardware:
Place all screws, bolts, and small hardware into a labeled zip-top bag so reassembly later is stress-free. -
Clean surfaces thoroughly:
Wipe down every inch of the wood with a degreaser or mild soap solution to remove oils, old polish, or fingerprints that could repel paint.
Use a Drying Rack
To paint spindles efficiently, lean pieces against a wall or drying rack. Just place cardboard underneath to prevent slipping and protect your floors.
Step 2: Sanding & Priming
-
Initial light scuffing:
Using the medium-grit sandpaper, gently scuff all surfaces. You aren’t trying to strip it to bare wood, just creating enough ‘tooth’ for the primer to grip. -
Remove sanding dust:
Vacuum the pieces and then wipe them firmly with a tack cloth to ensure absolutely no dust remains in the crevices. -
Protect hardware points:
Use painter’s tape to cover any metal thread inserts or bolt holes. Paint buildup here makes reassembly a nightmare later. -
Apply primer:
Brush or roll on a coat of high-quality water-based primer. A grey-tinted primer works wonders here to help that black topcoat cover faster. -
Sand the primer:
Once the primer is fully dry, lightly sand it with 220-grit paper to smooth out any brush strokes, then wipe with a tack cloth again.
Add a Wax Guard
For extra durability against teething marks, tackle a final coat of clear, non-toxic furniture wax over the railing tops once the paint is fully cured.
Step 3: Painting the Finish
-
Cut in the corners:
Use your angled sash brush to paint inside corners, detailed edges, and the tricky spots where the spindles meet the rails. -
Roll the spindles:
Using a mini foam roller, apply paint to the vertical spindles. This helps avoid the drippy texture brushes sometimes leave on round surfaces. -
Paint flat surfaces:
Roll the top rails and wider panels for a smooth, matte finish. I prefer doing long, single passes to keep the texture uniform. -
Dry and assess:
Let the first coat dry completely according to the paint can’s instructions—usually 2 to 4 hours. -
Apply second coat:
Apply a second coat using the same method: brush corners first, then roll large areas. This deepens the black color and ensures full coverage. -
Check for holidays:
Inspect the pieces under bright light to find any ‘holidays’ (missed spots) or light areas and touch them u carefully. -
Cure time:
This is crucial: Let the paint cure for at least 3-5 days before reassembly. Paint may feel dry to the touch quickly, but it needs time to harden fully.
Step 4: Reassembly
-
Remove tape:
Peel off all painter’s tape from the bolt holes and hardware inserts. -
Reassemble carefully:
Put the crib back together using the hardware you saved. Be gentle when tightening screws to avoid cracking the new finish. -
Final wipe down:
Give the crib one last gentle wipe with a dry microfiber cloth to remove any dust from the assembly process.
Enjoy the sleek ambiance this sophisticated black crib brings to your nursery design

PENCIL GUIDE
Understanding Pencil Grades from H to B
From first sketch to finished drawing — learn pencil grades, line control, and shading techniques.
Explore the Full Guide
Deep Navy With Metallic Accents
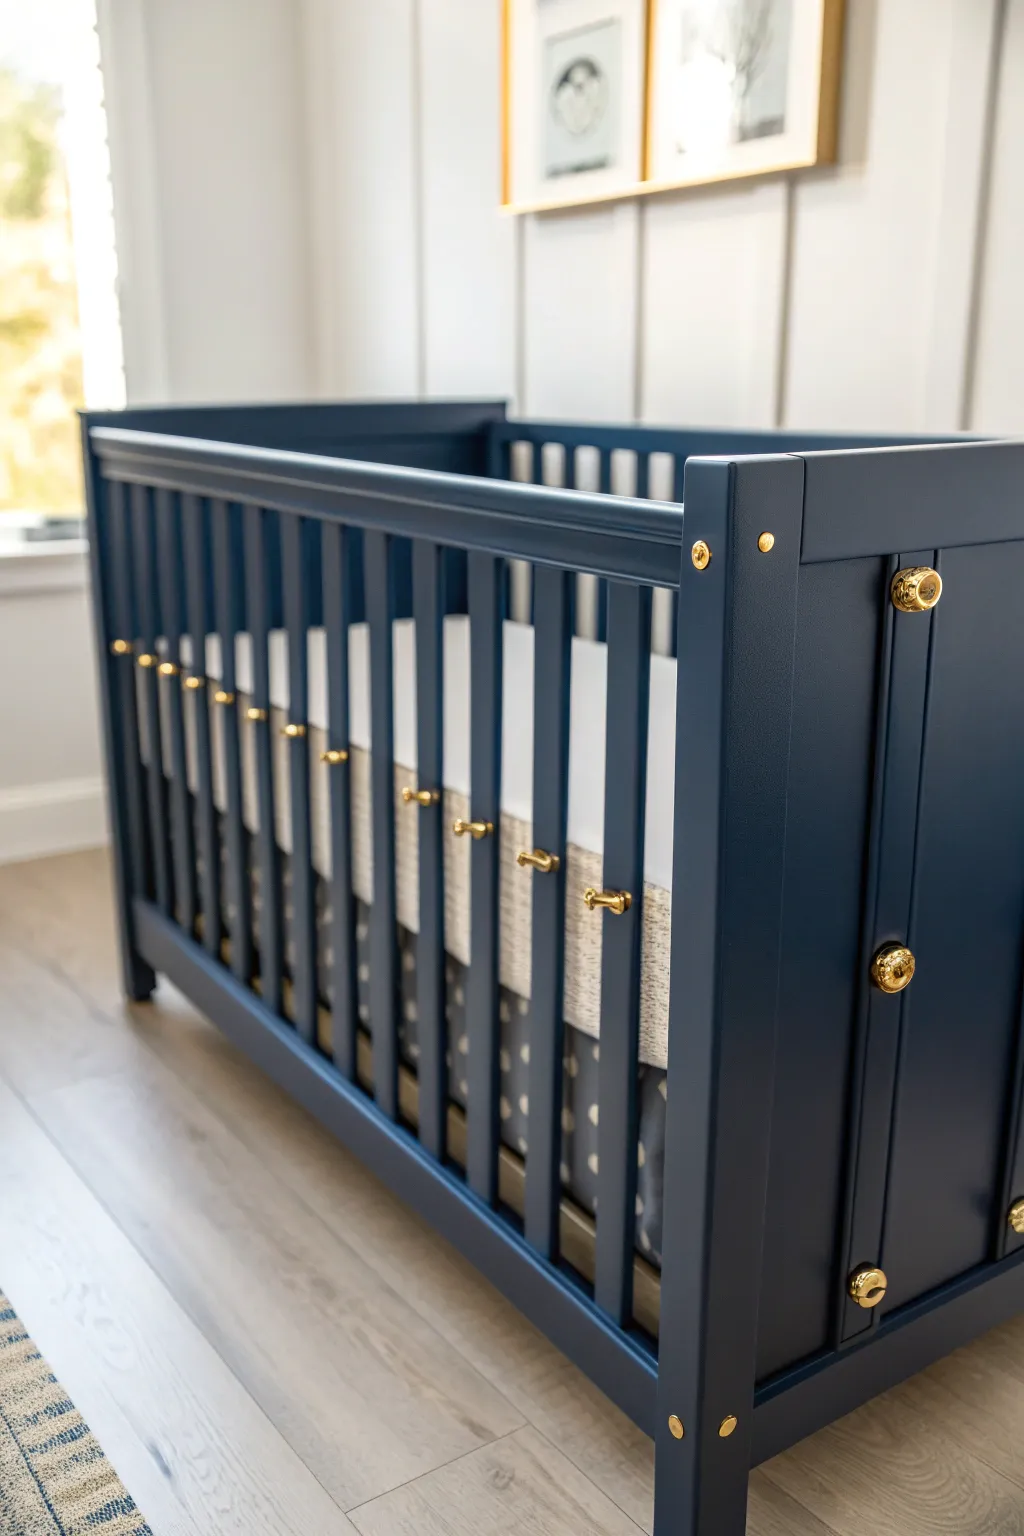
Transform a standard wooden crib into a sophisticated centerpiece for your nursery with a rich, deep navy finish and elegant metallic hardware accents. This project combines modern bold color with classic, almost military-style brass details for a look that feels both timeless and luxurious.
How-To Guide
Materials
- Wooden crib (unfinished or previously painted)
- Sandpaper (120 and 220 grit)
- Tack cloth
- Painter’s tape
- High-quality interior primer (stain-blocking)
- Deep navy semi-gloss or satin enamel paint
- Small foam roller and tray
- Angled sash brush (2 inch)
- Gold or brass decorative hardware (small latches, screw caps, or decorative upholstery tacks)
- Larger decorative brass knobs (2-4 for the ends)
- Drill with small bits
- Gold spray paint (optional, to match mismatched hardware)
- Clear protective topcoat (child-safe, water-based polyurethane)
- Screwdriver
- Drop cloth
Step 1: Preparation & Priming
-
Disassemble the crib:
Before you start, take the crib apart as much as possible. Removing the mattress support and separating the four sides makes painting the slats significantly easier and prevents drips effectively. -
Clean and sand surfaces:
Wipe down all wooden surfaces with a damp cloth to remove dust. Once dry, scuff sand everything with 120-grit sandpaper to remove any old glossy finish, helping the new paint adhere better. -
Remove dust:
Vacuum up the sanding dust, then wipe the entire frame down with a tack cloth. This step is crucial because any leftover dust will create a bumpy finish on your sleek navy paint. -
Apply primer:
Using a foam roller for flat areas and a brush for corners, apply a coat of high-quality stain-blocking primer. I like to use a grey-tinted primer if possible, as it helps the dark blue coverage later on. -
Sand the primer:
Once the primer is fully dry, lightly sand it with 220-grit sandpaper to smooth out any brush strokes or texture. Wipe away the dust again with a tack cloth.
Hardware Pro Tip
Use a template made from stiff cardstock to mark your drill holes on the slats. This ensures every piece of gold hardware is at the exact same height without measuring 20 times.
Step 2: Painting the Navy Base
-
Paint the slats first:
Start by painting the vertical slats using your angled sash brush or a small roller. Work in sections, brushing with the grain, and watch carefully for drips pooling in the corners where slats meet the rails. -
Paint the frame rails:
Move onto the top and bottom horizontal rails. Use long, smooth strokes to ensure an even finish. A foam roller works wonders here for a factory-smooth look. -
Paint the end panels:
Paint the solid end panels last. If they have recessed details, use the brush to get into the grooves first, then smooth over flat areas with the roller. -
Let dry and recoat:
Allow the first coat to cure according to the can’s instructions—usually 4 to 6 hours. Apply a second coat to ensure deep, opaque coverage without any streaks. -
Apply topcoat:
For durability against teething and cleaning, apply two coats of a water-based, child-safe clear polyurethane. Let this cure fully for at least 24 hours before handling.
Step 3: Adding the Gilded Details
-
Prep the hardware:
If your chosen hardware pieces aren’t the same shade of gold, stick them into a piece of cardboard and give them a quick coat of metallic gold spray paint so they match perfectly. -
Mark hardware placement:
Decide where you want your decorative accents. For the look in the image, measure precisely halfway up the vertical slats and mark a small dot for the decorative latches or screws. -
Drill pilot holes:
Using a drill bit slightly smaller than your hardware screws, carefully drill pilot holes at your marked spots. This prevents the wood slats from splitting when you add the decor. -
Install slat hardware:
Screw in the small gold latches or decorative studs onto the vertical slats. Hand-tighten these carefully to avoid stripping the wood. -
Attach end panel knobs:
Drill holes on the sturdy vertical posts of the end panels and attach the larger decorative brass knobs. These serve as statement pieces that tie the whole look together. -
Reassemble:
Put the crib back together carefully. Touch up any screw heads or accidentally scratched areas with a tiny artist’s brush and a dab of navy paint.
Level Up The Look
For an even more regal appearance, paint the inside of of the end panels in a lighter, contrasting shade like cream or dove grey to highlight the dark navy frame.
Your custom crib will now be the stunning focal point of a sophisticated and cozy nursery
Soft Ombre Fade
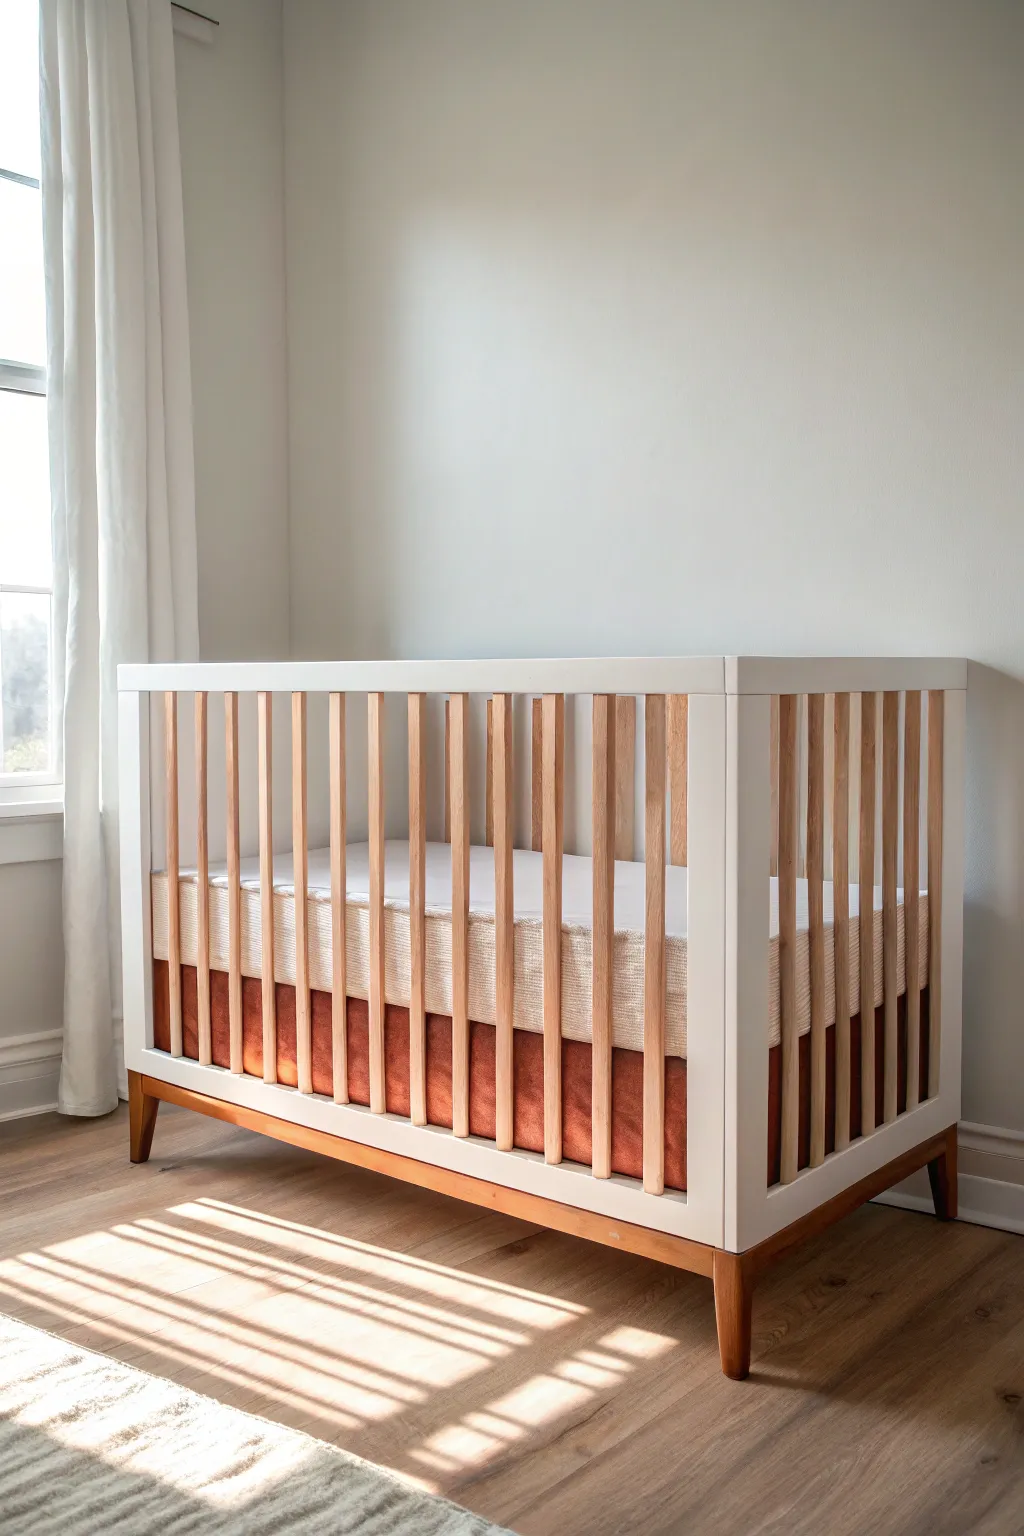
Transform a standard crib into a modern statement piece by combining crisp white framing with the warmth of natural wood tones. This project achieves a subtle, sophisticated two-tone look that mimics a soft ombre effect through the interplay of painted surfaces and exposed wood grain.
Step-by-Step
Materials
- Unfinished wooden crib or existing crib (to be sanded)
- Medium and fine grit sandpaper (120 and 220 grit)
- Painter’s tape (high quality)
- Primer (stain-blocking)
- White furniture paint (satin or semi-gloss finish)
- Clear protective topcoat (water-based polycrylic)
- Natural wood stain (light oak or natural tone)
- Foam roller and tray
- Small angled sash brush
- Tack cloth
- Drop cloths
Step 1: Preparation & Sanding
-
Disassemble the crib:
Begin by taking the crib apart completely. It is much easier to achieve clean lines and thorough coverage when working with individual panels and rails rather than the assembled unit. -
Clean all surfaces:
Wipe down every piece with a damp cloth and mild cleaner to remove dust, grime, or oils. Let the wood dry completely before moving to the next step. -
Sand the finish:
Using 120-grit sandpaper, thoroughly sand every surface. If you are starting with a pre-painted crib, you need to scuff it up well. For the spindles and legs where you want exposed wood, sand down to the raw grain. -
Smooth the surface:
Switch to 220-grit sandpaper for a second pass. This ensures a buttery smooth base for both the stain and the paint. Wipe away all dust with a tack cloth.
Step 2: Staining the Accents
-
Select your wood areas:
Identify exactly which parts will remain natural wood. In this design, it’s the vertical spindles and the angled bottom legs. This creates that visual ‘fade’ contrasted against the solid frame. -
Apply the stain:
Using a clean rag or foam brush, apply the natural wood stain to the spindles and legs. Work in the direction of the grain to avoid streaks. -
Wipe excess stain:
After letting the stain penetrate for a few minutes (check your can’s instructions), wipe off any excess with a clean lint-free cloth. This prevents a tacky finish. -
Seal the wood:
Once dry, apply a coat of clear water-based polycrylic to the stained areas. This protects the wood and prevents the stain from bleeding into your white paint later.
Bleeding Lines?
If paint bleeds under the tape, use a razor blade to gently scrape it off the finished wood. Alternatively, use a tiny artist brush to touch up the line with stain.
Step 3: Painting the Frame
-
Tape off the wood:
This is the most critical step for crisp lines. Carefully wrap painter’s tape around the top and bottom of every single spindle where it meets the horizontal rails. Press the edges down firmly. -
Protect the legs:
Similarly, apply tape to the wooden legs where they join the main crib body. Take your time here; good preparation makes the painting phase a breeze. -
Prime the frame:
Apply a coat of stain-blocking primer to the horizontal top and bottom rails and the solid side panels. I prefer a foam roller here for the smoothest application. -
Sand the primer:
Once the primer is fully dry, lightly sand it with 220-grit paper to remove any brush marks or nubs. Wipe clean again with a tack cloth. -
First coat of white:
Apply your first coat of white furniture paint. Use the small angled brush to get into corners and edges first, then smooth out the flat surfaces with the foam roller. -
Second coat of white:
Allow the first coat to dry completely according to the manufacturer’s times. Apply a second coat for full, opaque coverage. Lighter colors almost always need two or three thin coats rather than one thick one.
Color Wash Upgrade
Instead of stark white, mix 1 part paint to 4 parts water for the frame. This creates a whitewash effect that lets some grain show, softening the transition.
Step 4: Finishing Touches
-
Remove tape immediately:
While the final coat of paint is still slightly tacky (not soaking wet, but not fully cured), carefully peel off the painter’s tape at a 45-degree angle. This helps prevent the paint from peeling up with the tape. -
Touch-ups:
Inspect your lines. If any paint bled onto the stained wood, gently scrape it away with a fingernail or use a tiny bit of sandpaper. If stain bled onto paint, use a small artist’s brush to cover it with white. -
Final seal:
Apply a final clear topcoat over the painted white sections for added durability against bumps and teething marks. Let the crib cure for several days before reassembling.
Enjoy the peaceful, airy atmosphere this beautifully updated crib brings to the nursery.


Dip-Painted Legs or Spindle Tips
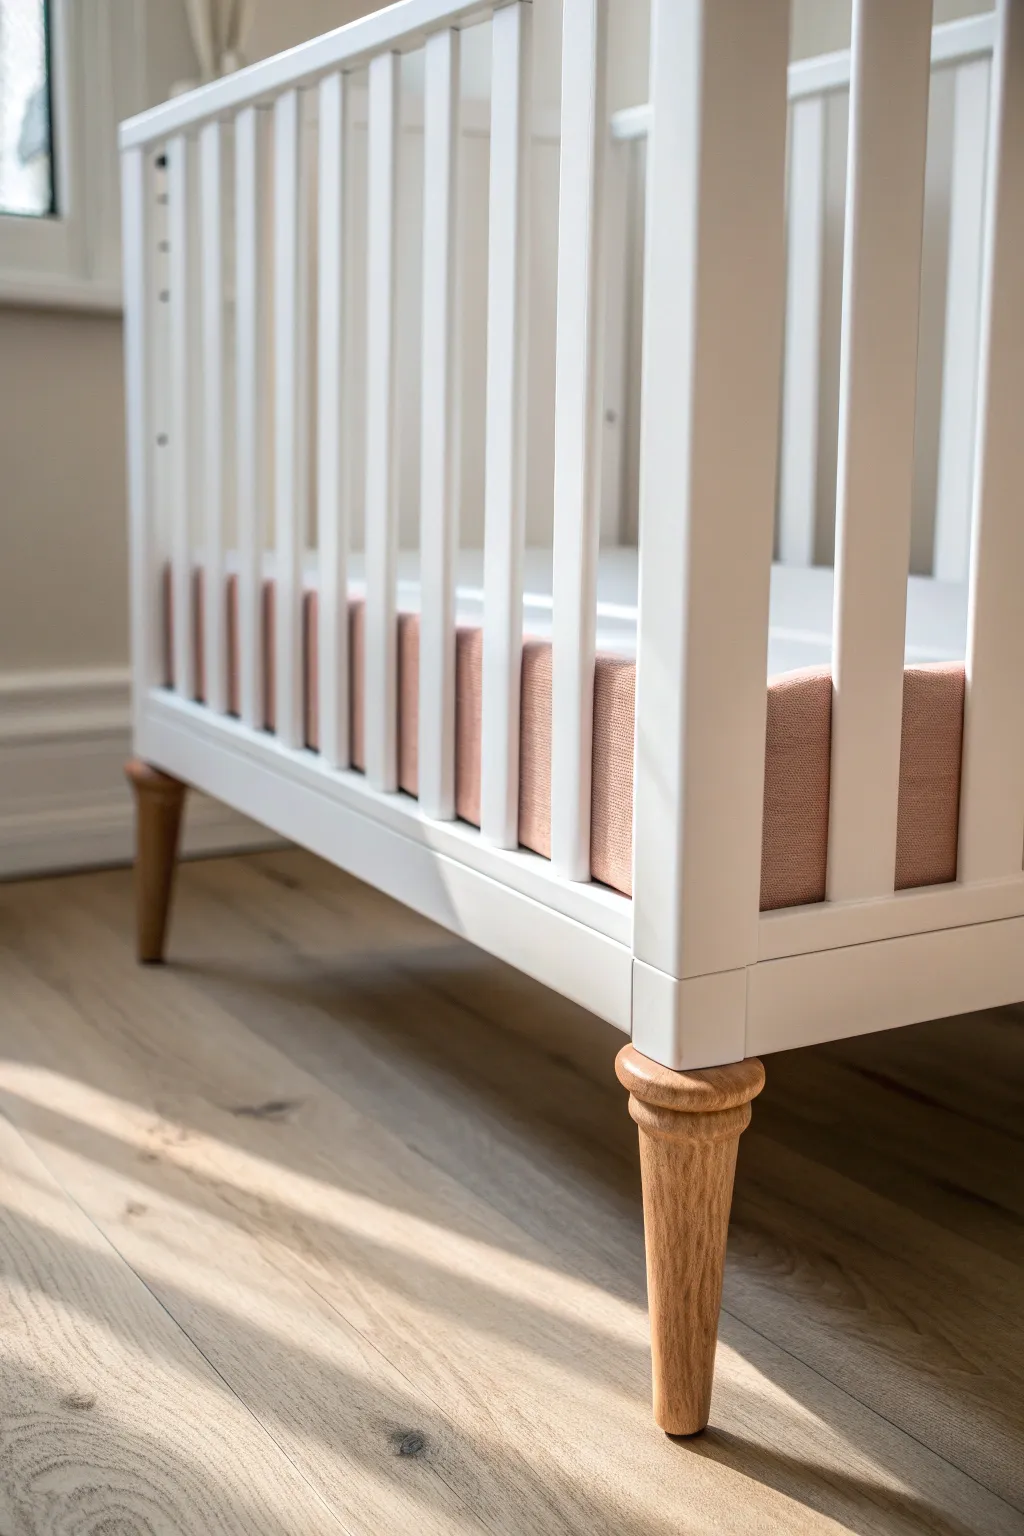
Give your nursery a modern, airy feel by combining crisp white paint with the warmth of natural wood. This project mimics the popular ‘dipped’ look by keeping the beautiful turned legs of a crib unpainted while refreshing the rest of the frame for a high-contrast, custom finish.
Step-by-Step
Materials
- Wooden crib (unfinished or previously painted)
- Medium-grit sandpaper (120-150 grit)
- Fine-grit sandpaper (220 grit)
- Tack cloth
- Painter’s tape (high-quality, delicate surface)
- Plastic drop cloth
- Primer suitable for furniture (water-based recommended)
- White furniture paint (satin or semi-gloss finish)
- Clear matte or satin polycrylic sealer
- Small foam roller
- High-quality angled sash brush
- Screwdriver or Allen wrench (for disassembly)
Step 1: Preparation & Disassembly
-
Disassemble the crib:
Begin by taking the crib apart completely. It is much easier to achieve a professional finish on the spindles and corners when the pieces are laying flat rather than assembled. -
Identify the leg transition:
Examine the legs to decide exactly where the white paint will stop and the natural wood will begin. On the crib shown, this transition happens naturally where the square post meets the turned, rounded leg foot. -
Clean the surfaces:
Wipe down every piece with a damp cloth and a mild degreaser to remove oils, dust, or fingerprints that might interfere with paint adhesion. -
Tape off the legs:
Carefully wrap painter’s tape around the top of the turned leg section. Press the edge of the tape firmly down with your fingernail or a credit card to seal it tight against the wood, preventing any paint bleed. -
Protect the rest of the leg:
Use additional tape and plastic or paper to completely cover the bottom portion of the legs that will remain natural wood. You don’t want accidental splatters on this area.
Seal the Tape Edge
Before painting white, brush a tiny amount of clear sealer over the tape edge. This fills any microscopic gaps so no white paint can sneak under, ensuring a razor-sharp line.
Step 2: Sanding & Priming
-
Sand the main frame:
Scuff sand all the parts that will be painted white using medium-grit sandpaper. You aren’t trying to strip it bare, just creating a rough surface for the primer to grip. -
Sand the legs (optional):
If the wooden legs have an old, orange-tinted varnish, I like to sand them down to raw wood using steps of medium then fine grit sandpaper for a lighter, more modern natural tone. -
Remove dust:
Thoroughly wipe away all sanding dust with a tack cloth. Any leftover dust will create a bumpy texture in your final paint job. -
Apply primer:
Apply a coat of primer to all the parts intended to be white. Use a brush to get into the crevices of the spindles and a small foam roller for the flat rails to ensure a smooth finish. -
Check for drips:
While priming, keep a close eye on the vertical spindles where drips love to form. smooth them out immediately with your brush.
Step 3: Painting & Sealing
-
Light sanding:
Once the primer is fully dry, lightly run fine-grit sandpaper over the surfaces to knock down any raised grain or fuzz. Wipe clean with a tack cloth again. -
First coat of paint:
Apply your first coat of white furniture paint. Focus on thin, even layers rather than one thick coat, using long strokes with your brush on the spindles. -
Second coat of paint:
Allow the first coat to dry according to the can’s instructions, then apply a second coat for full opacity. A third coat might be necessary depending on the quality of your paint. -
Remove the tape:
This is the crucial moment—carefully peel away the painter’s tape while the final coat of paint is still slightly tacky (not wet, but not fully cured). Pull the tape away from the painted edge at a 45-degree angle to get a crisp line. -
Seal the legs:
If you sanded the legs down to raw wood earlier, apply 2-3 coats of clear polycrylic sealer to protect them. This keeps the wood looking natural but makes it wipeable. -
Seal the painted frame (optional):
For extra durability against teething marks and daily wear, apply a topcoat of clear polycrylic over the white painted sections. -
Reassemble:
Wait at least 24-48 hours for the paint to cure and harden sufficiently before reassembling the crib to avoid denting the fresh finish.
Sticky Spindles?
If painted spindles feel tacky, humidity is likely too high. Move the pieces to a climate-controlled room and let them cure for a full week before use.
Once reassembled, you’ll have a stunning bespoke piece that feels both classic and perfectly on-trend
Tiny Polka Dots on the Crib Ends
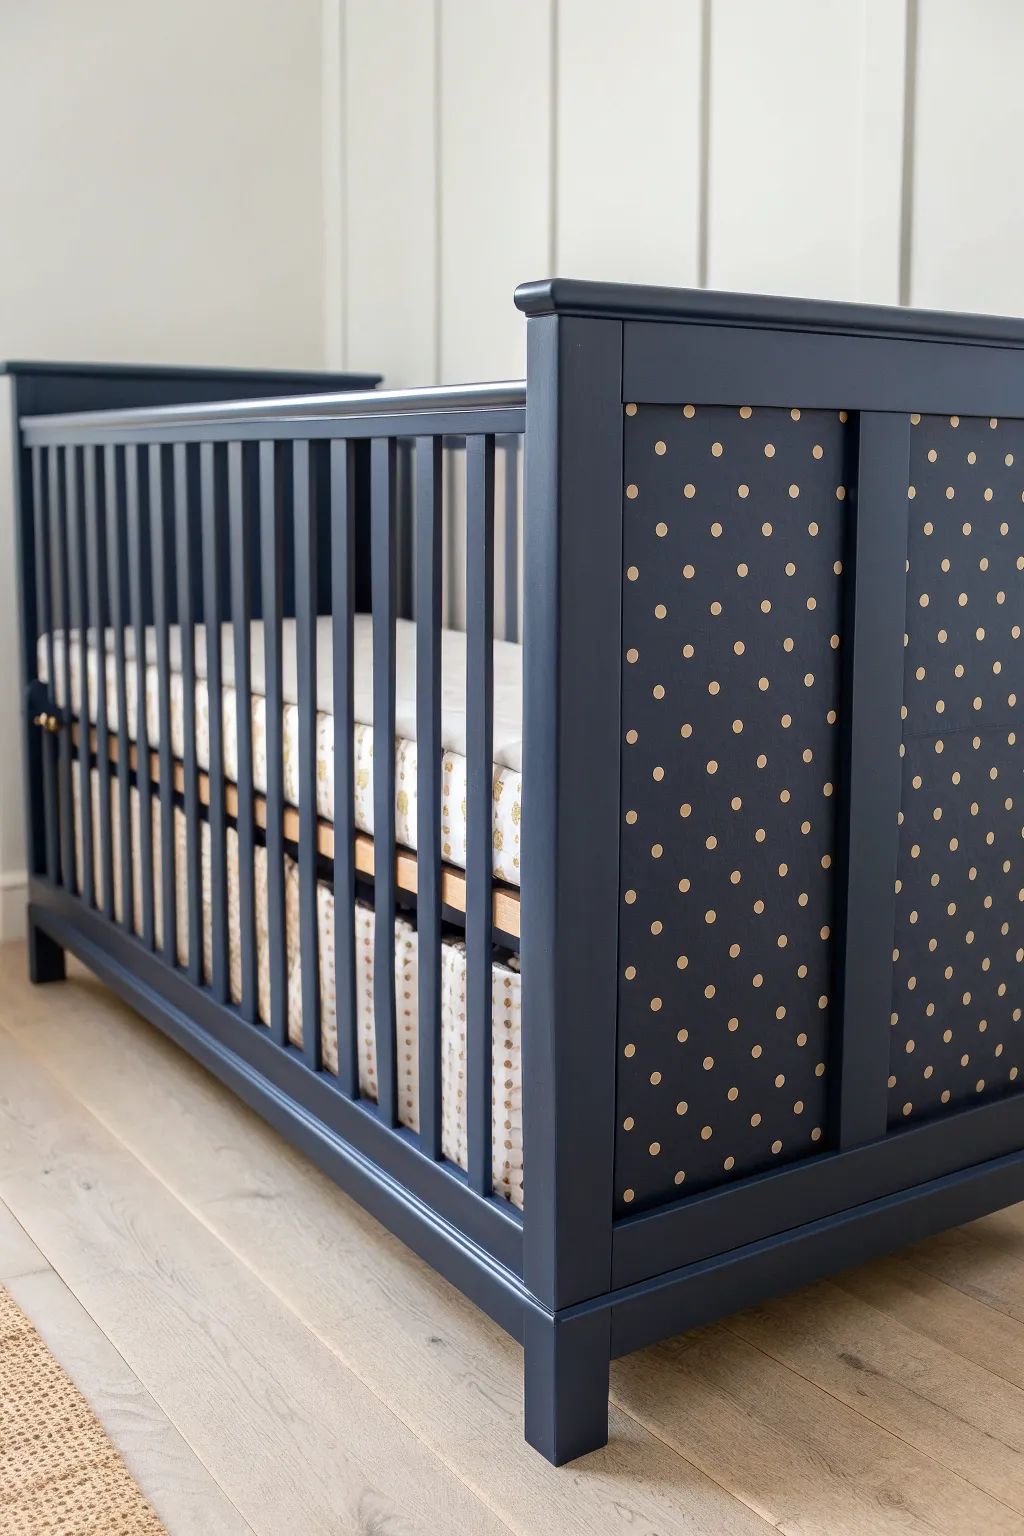
Transform a standard crib into a charming focal point by combining a deep, moody navy finish with playful, uniform polka dots. This project updates plain end panels with a pattern that feels both classic and whimsical, perfect for a modern nursery.
How-To Guide
Materials
- Wooden crib (with solid end panels)
- Sandpaper (120 and 220 grit)
- Tack cloth
- Painter’s tape
- High-quality bonding primer (safe for baby furniture)
- Navy blue furniture paint (satin or semi-gloss, baby-safe/low-VOC)
- Gold or metallic paint (non-toxic)
- Small foam pouncer or round stencil sponge (sized to desired dot width)
- Small paintbrush (for touch-ups)
- Measuring tape or ruler
- Chalk or light pencil
- Clear protective topcoat (optional, baby-safe)
- Drop cloths
Step 1: Prep and Prime
-
Safety check:
Before starting, ensure your crib meets current safety standards. If you are repainting an older crib, check for lead paint using a test kit. -
Disassemble the crib:
Take the crib apart as much as possible. Working on flat panels lying horizontally is infinitely easier than painting vertical surfaces, especially for the dots later. -
Clean surfaces:
Wipe down every piece with a mild degreaser or soapy water to remove oils and dirt. Let it dry completely. -
Sand the finish:
Lightly scuff the existing finish with 120-grit sandpaper. You don’t need to strip it to bare wood, just create enough ‘tooth’ for the new paint to grab onto. -
Remove dust:
Wipe away sanding dust thoroughly using a tack cloth so your finish remains smooth. -
Apply primer:
Brush or roll on a coat of high-quality bonding primer. This ensures your navy paint sticks and provides true color coverage. Let this cure according to the can’s instructions.
Step 2: The Navy Base
-
First coat of navy:
Apply your navy blue furniture paint. Use a high-quality synthetic brush for corners and spindles, and a small foam roller for the flat panels to avoid brush strokes. -
Sand between coats:
Once dry, lightly sand with 220-grit sandpaper to knock down any bumps. Wipe with a tack cloth again. -
Second coat:
Apply a second coat of navy paint for a rich, opaque finish. Depending on the brand, you might need a third thin coat for full depth. -
Full cure time:
Allow the base color to dry completely—ideally overnight—before attempting the pattern work.
Uneven Circles?
If sponge pouncers are leaving messy edges, switch to circle stencil vinyl stickers. Stick them on, paint the gold inside the void, and peel immediately while wet for sharp lines.
Step 3: Polka Dot Pattern
-
Create a grid guide:
On the solid end panels, use a measuring tape and chalk to meaningfuly mark a grid. Decide on your spacing—2 to 3 inches apart usually looks best for this scale. -
Offset the rows:
For the classic staggered look shown in the image, mark your second row of dots so they sit halfway between the dots of the row above, creating a diamond pattern rather than a square grid. -
Practice your pounce:
Dip your round foam pouncer into the gold paint. Practice on a piece of cardboard first. I find that offloading a tiny bit of paint onto a paper towel prevents globs and bleeding edges. -
Apply the dots:
Press the foam pouncer straight down onto your chalk marks with gentle, even pressure. Twist slightly as you lift straight up to keep the circle crisp. -
Repeat the process:
Work your way across the panel, reloading the sponge frequently but lightly. Take breaks to step back and ensure your spacing looks visually correct. -
Touch up edges:
If any gold paint bled, wait for it to fully dry, then use a tiny artist’s brush and your navy paint to carefully clean up the circle’s edge. -
Clean off chalk:
Once the gold dots are fully dry (give them plenty of time), gently wipe away any visible chalk guidelines with a slightly damp cloth.
Go Geometric
Swap the round sponge for a triangular makeup sponge or a square stamp to create a modern geometric pattern while keeping the same staggered layout.
Step 4: Sealing and Assembly
-
Apply topcoat:
For extra durability against teething and wear, apply a clear, water-based, non-toxic polycrylic topcoat over the panels and rails. -
Reassemble:
Wait until the paint has cured hard (often 24-48 hours minimum) before reassembling the crib to prevent the parts from sticking together.
Now you have a custom piece of nursery furniture that balances elegant color with playful pattern
Tape-Edge Geometric Crib Ends
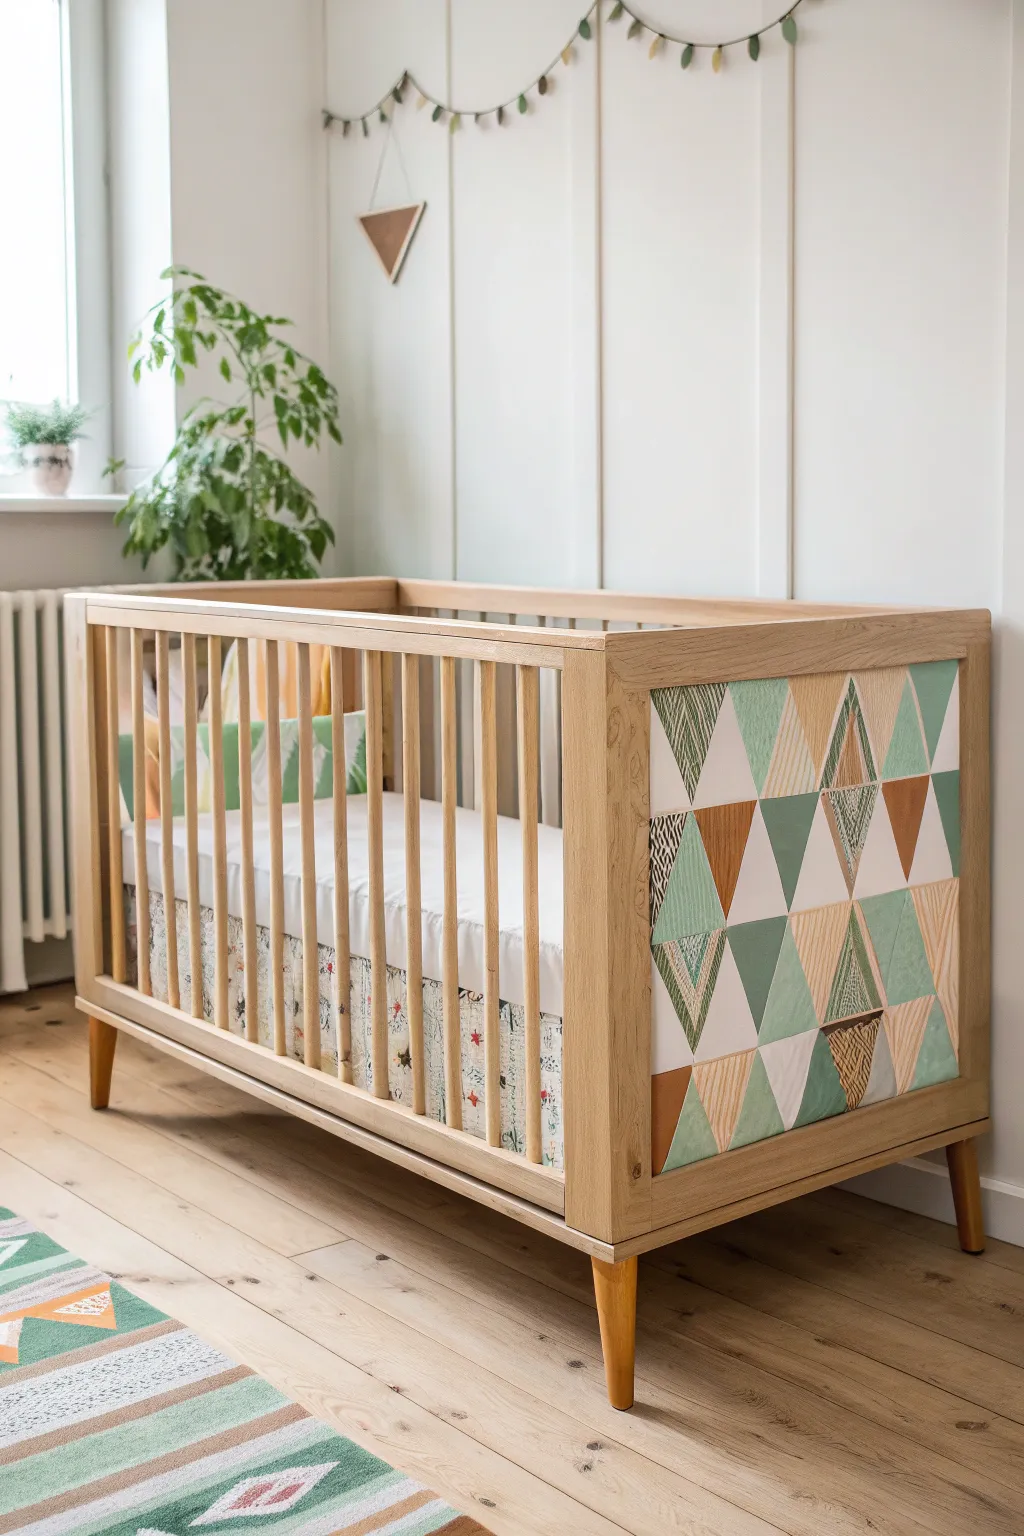
Transform a plain wooden crib into a modern nursery centerpiece with this geometric end panel design. Using simple painter’s tape and a palette of earthy greens and neutrals, you will create a structured yet whimsical pattern that adds just the right amount of artistic flair.
Detailed Instructions
Materials
- Crib with solid wood end panels (unfinished or sanded)
- Painter’s tape (various widths, 0.5 inch and 1 inch)
- Acrylic craft paints (sage green, mint, forest green, tan, chocolate brown, white)
- Small flat paintbrushes
- Fine-grit sandpaper (220 grit)
- Clear protective topcoat (child-safe/non-toxic)
- Ruler or straight edge
- Pencil
- Damp cloth
- Drop cloth
Step 1: Preparation
-
Prepare the workspace:
Move the crib to a well-ventilated area and place a drop cloth underneath to catch any drips or dust. -
Clean surface:
Wipe down the end panel of the crib with a damp cloth to remove any dust or oils. -
Sand the panel:
Lightly sand the area you intend to paint using 220-grit sandpaper. This helps the paint adhere better to the wood grain. -
Wipe away dust:
Use a tack cloth or a clean, damp rag to thoroughly remove all sanding dust. Let the wood dry completely. -
Tape the border:
Apply painter’s tape around the inner frame of the panel to protect the wood edges that you want to remain unpainted.
Step 2: Drafting the Design
-
Mark vertical guides:
Using a ruler, lightly mark vertical lines periodically across the panel width to help keep your triangles upright. -
Tape the first set of diagonals:
Run strips of painter’s tape diagonally across the panel in one direction. Space them unevenly if you want varied triangle sizes, or measure essentially equal distances for a uniform look. -
Tape intersecting diagonals:
Apply tape diagonally in the opposite direction, crossing over the first set. This creates the foundational grid of triangles and diamonds. -
Seal the tape edges:
Run a credit card or your thumbnail firmly along the edges of all tape. This is crucial to prevent paint from bleeding under the lines.
Clean Lines Pro-Tip
Before applying your colored paints, brush a thin layer of clear matte medium or white paint over the tape edges. This seals the gap and guarantees razor-sharp geometric lines.
Step 3: Painting the Pattern
-
Plan your palette:
Squeeze your paint colors onto a palette. I find it helpful to mix a little white into the greens to create softer tonal variations before starting. -
Paint first color group:
Select non-adjacent triangles and paint them with your darkest green shade. Use a small flat brush and stroke away from the tape edge inward. -
Apply lighter tones:
Fill a different set of scattered triangles with the mint and sage green shades, ensuring you leave plenty of blank spaces for other colors. -
Add accent colors:
Paint remaining triangles with tan and chocolate brown. Leave some triangles unpainted if you want the natural wood grain to be part of the pattern. -
Create patterned details:
For the patterned triangles shown in the inspiration, use a tiny detailing brush to paint small lines or distinct strokes inside a few specific triangles after their base coat is dry. -
Second coat:
Once the paint is dry to the touch, apply a second coat to any colors that look streaky or transparent.
Level Up: Texture
Instead of painting patterns, use small cuts of fabric or textured wallpaper inside a few triangles. Apply them carefully with strong decoupage glue for a mixed-media effect.
Step 4: Finishing
-
Remove tape:
Carefully peel off the painter’s tape while the paint is still slightly tacky. Pull at a 45-degree angle to ensure clean, crisp lines. -
Touch up:
Inspect the lines. If any paint bled firmly, use a tiny brush with the background wall color or carefully scrape it away with a craft knife. -
Apply sealer:
Once the paint is fully cured (check manufacturer instructions), apply a thin layer of child-safe, non-toxic clear coat to protect your artwork from scratches. -
Final cure:
Allow the crib to dry completely in a well-ventilated room for at least 24 to 48 hours before placing a mattress or bedding inside.
Now you have a custom, boutique-style crib that serves as a beautiful focal point for the nursery
Chalky Distressed Vintage Finish
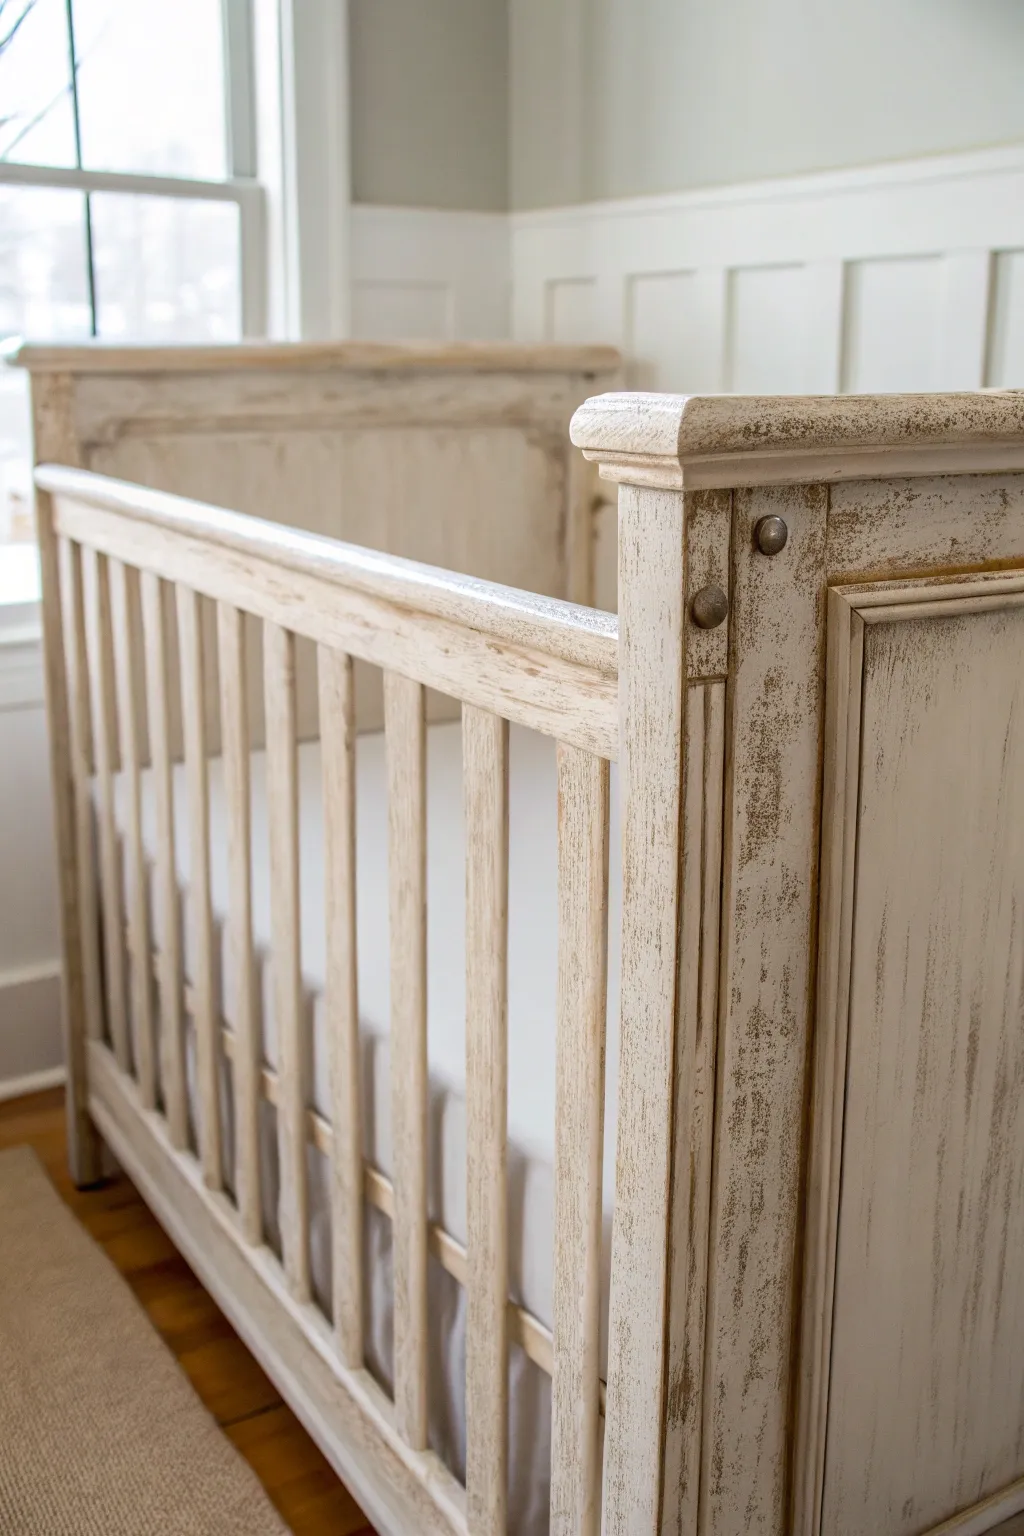
Achieve a beautifully aged, heirloom quality with this chalk-style finish that brings out the natural character of wood grain. By layering cream paint over dark wood and strategically sanding it back, you create a soft, distressed look perfect for a cozy nursery.
Step-by-Step
Materials
- Wooden crib (with dark stain or pre-stained dark)
- Medium-grit sandpaper (120-grit)
- Fine-grit sandpaper (220-grit)
- Tack cloth or microfiber rags
- Chalk-style paint in a warm cream or antique white
- High-quality synthetic bristle brush (2-inch)
- Small artist brush for crevices
- Clear finishing wax (furniture wax)
- Dark antique wax (optional, for deeper grooves)
- Wax brush or lint-free cotton cloth
- Drop cloths
- Painter’s tape
Step 1: Preparation
-
Clean the Surface:
Before anything else, wipe down the entire crib thoroughly to remove any oils, dust, or sticky residue that might resist the paint. -
Protect Hardware:
If you can’t disassemble the crib, use painter’s tape to carefully cover any metal bolts or hardware you don’t want painted. -
Scuff Sanding:
Lightly sand the existing finish with 120-grit sandpaper. You aren’t trying to strip it bare, just giving the surface enough ‘tooth’ for the chalk paint to grip. This is especially important for glossy cribs. -
Wipe Down:
Remove all sanding dust with a tack cloth. Any leftover dust will create bumps in your final finish, so be thorough here.
Paint Stripping Off?
If paint peels off in sheets while sanding, it didn’t bond well. Sand that spot down to wood, clean thoroughly, and re-paint. Ensure the base is scuffed enough next time.
Step 2: Painting & Distressing
-
First Coat:
Apply your first coat of warm cream chalk paint. Brush in the direction of the wood grain. Don’t worry about perfect coverage yet; a little streakiness adds to the vintage charm later. -
Spindles and Slats:
Approach the vertical slats systematically. I like to paint the ‘insides’ of the slats first, then the front and back faces, to ensure no missed spots. -
Dry Time:
Let this first coat dry completely, usually about 1-2 hours depending on humidity, before moving on. -
Second Coat:
Apply a second coat for richer opacity. While the paint is still wet, pay attention to drip marks on the spindles and smooth them out with your brush. -
Full Cure:
Allow the paint to dry fully, preferably overnight. The paint needs to be hard enough to withstand the sanding step without peeling off in chunks. -
Strategic Distressing:
Take your 220-grit sandpaper and target localized areas where wear would naturally occur: corners, raised edges of the trim, and the tops of rails. -
Heavy Distressing:
For the look in the photo, apply firmer pressure on the vertical corners of the posts and the horizontal ridges to reveal the dark wood base underneath. -
Spindle Detail:
Lightly run the sandpaper up and down a few random spindles to break the uniform white color, mimicking years of use. -
Clean Up Dust:
Using a fresh tack cloth, wipe away all the fine powder created by the distressing process.
Step 3: Sealing & Antiquing
-
Apply Clear Wax:
Load a wax brush with clear furniture wax. working in sections, massage the wax into the porous chalk paint using a circular motion. -
Buffing:
After applying the wax, use a clean, lint-free cloth to wipe off the excess. Buff it gently to create a soft, satin sheen rather than a sticky surface. -
Dark Wax Accents:
To deepen the rustic look, mix a tiny amount of dark antique wax with clear wax. Apply this narrowly into the deep crevices of the molding or corners. -
Blending Back:
If the dark wax looks too heavy, wipe over it immediately with a cloth dipped in clear wax; the clear wax acts like an eraser for the dark wax. -
Final Buff:
Once you are happy with the finish, give the entire crib one last buffing with a clean cotton rag to ensure a smooth, durable surface safe for baby. -
Cure Time:
Let the wax cure for at least 20-30 days before using the crib. The wax needs to harden completely to be safe and durable.
Add Subtle Age
Use a specialized ‘crackle medium’ between paint layers on the flat panels. As the top coat creates fine cracks, the dark base will show through for texture.
Once the wax has fully cured, your custom vintage-style crib is ready to become the centerpiece of the nursery
Hand-Painted Night Sky Crib

Transform a plain crib into a celestial dreamscape with this elegant hand-painted project. Featuring a deep midnight blue base and shimmering gold moons and stars, this creates an enchanting focal point for any nursery.
How-To Guide
Materials
- Wooden crib (unfinished or previously painted)
- Sandpaper (120-grit and 220-grit)
- Tack cloth
- Painter’s tape
- Primer (stain-blocking)
- Navy blue furniture paint (chalk or milk paint works well)
- Metallic gold acrylic paint
- Assorted brushes (foam roller, medium flat brush, fine liner brush)
- Pencil and eraser
- Cardstock or stencil paper
- X-Acto knife
- Poly-acrylic topcoat (matte or satin finish)
Step 1: Preparation & Base Coat
-
Assess the surface:
If your crib has an existing glossy finish, you will need to scuff it up thoroughly. If it is raw wood, a light sanding to smooth out any rough spots is sufficient. -
Sand the crib:
Using 120-grit sandpaper, go over the entire surface of the crib, paying special attention to the flat panels on the ends where the artwork will go. Wipe away all dust with a tack cloth. -
Protect hardware:
Remove any screws or bolts if possible, or cover them carefully with painter’s tape to keep them clean. -
Apply primer:
Roll or brush on a high-quality stain-blocking primer. This ensures your dark blue color adheres well and looks true to tone. Let this dry completely according to the can’s instructions. -
Sand the primer:
Once dry, do a very quick, light pass with 220-grit sandpaper to knock down any texture, creating a buttery smooth surface for your paint. -
Paint the first coat:
Apply your navy blue furniture paint. Use a small foam roller for the large flat panels to avoid brush strokes, and a medium brush for the spindles. Let it dry. -
Apply the second coat:
Apply a second coat of navy blue to ensure full, opaque coverage. This depth of color is crucial for the night sky effect.
Step 2: Creating the Celestial Designs
-
Plan your layout:
While the paint sets, sketch out a few moon shapes (crescents of varying thickness) and starbursts on paper to decide on your favorite silhouettes. -
Make stencils:
To ensure uniform moon shapes, draw your crescents on cardstock and carefully cut them out. You can freehand the stars, but stencils help for the larger moons. -
Transfer the design:
Lightly trace your moon stencils onto the flat end panels using a pencil. Arrange them randomly but evenly; I like to keep them facing different directions for visual interest. -
Paint the moons:
Using a flat brush and metallic gold paint, fill in the crescent shapes. You may need two thin layers of gold to make it pop against the dark blue. -
Add texture detail:
Once the base gold creates a solid shape, use a slightly drier brush to add wispy lines inside the curve of the moon, mimicking a textured or engraved look. -
Draft the suns and stars:
Lightly pencil in locations for your starbursts and tiny stars. Place them in the empty spaces between the moons to balance the composition. -
Paint the fine details:
Switch to your fine liner brush. Paint the thin rays of the suns and the small four-point stars. A steady hand is key here, but slight imperfections add charm. -
Add constellations:
Connect a few tiny dots or small stars with very fine lines to suggest constellations or shooting stars scattered throughout the design.
Gold Pop Pro-Tip
For the brightest gold stars, paint the shapes in white first as a primer, let dry, and then layer the metallic gold on top. It makes the shimmer much more intense.
Step 3: Sealing & Protection
-
Check for mistakes:
Look over your work. If any gold lines went astray, touch them up with a tiny bit of the navy blue paint. -
Apply the topcoat:
To protect your artwork from scratches and wear, apply a clear poly-acrylic topcoat. Water-based formulas are best as they won’t yellow over time. -
Let it cure:
Allow the crib to cure fully before placing a mattress inside. Consult your paint can, as curing takes longer than drying.
Wobbly Lines?
If your hand lacks stability for the long star rays, use a ruler or straight edge. Hold it slightly off the surface to guide your brush without smearing the paint.
Once the topcoat has fully cured, your custom starry night crib is ready to lull your little one to sleep


Have a question or want to share your own experience? I'd love to hear from you in the comments below!