In my studio, I think of crown molding as the room’s picture frame—it can quietly polish everything or totally change the vibe. Here are my favorite crown molding color ideas (from classic to artsy) to help you tweak height, mood, and style with just paint.
Classic Bright White Crown Molding
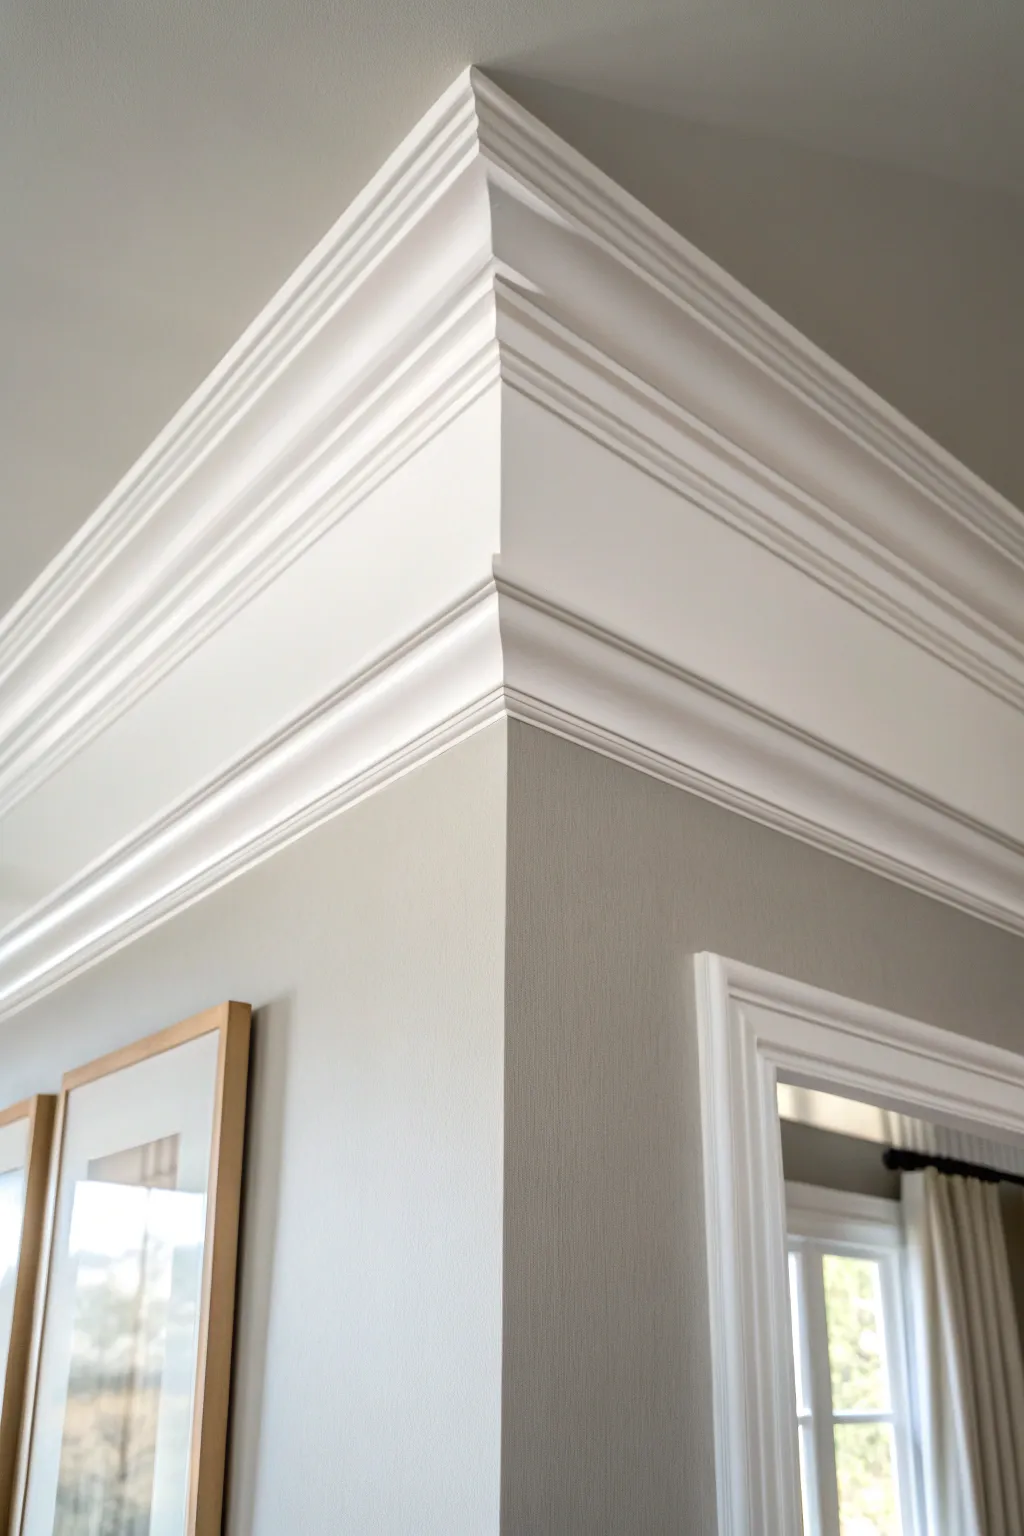
This project transforms a standard room corner into a stately focal point using a multi-piece crown molding build-up. By combining a baseboard inverted at the ceiling line with a traditional crown profile and an additional trim strip, you achieve a thick, substantial look that mimics historic millwork without the custom price tag.
Step-by-Step Guide
Materials
- High-density foam or wood crown molding (main profile, approx. 4-5 inches)
- Flat baseboard molding (approx. 3-4 inches wide)
- Small cove or shoe molding (optional for bottom detail)
- Miter saw with a sharp finishing blade
- Coping saw
- Brad nailer with 2-inch brad nails
- Stud finder
- Construction adhesive (Liquid Nails or similar)
- Wood glue
- Paintable latex caulk
- Caulk gun
- Wood filler or spackling compound
- Fine-grit sandpaper (220 grit)
- Painter’s tape
- Primer
- Semi-gloss bright white interior trim paint
- Angled sash brush (2.5 inch)
- Step ladder
- Measuring tape
- Pencil
Step 1: Planning and Preparation
-
Measure the room:
Measure the perimeter of your room at least twice to ensure accuracy. Add about 10-15% extra material to account for miter cuts and potential mistakes. -
Locate studs and joists:
Use a stud finder to mark the location of wall studs and ceiling joists along the installation path. Mark these clearly with a pencil or pieces of painter’s tape so you know exactly where to aim your nails later. -
Plan the build-up:
Identify the stack shown in the image: a flat baseboard piece mounted upside down against the wall first, followed by the main crown profile bridging the gap between that flat piece and the ceiling.
Gaping Miters?
If your outside corner has a slight gap due to uneven walls, run the round shaft of a screwdriver over the wood fibers at the joint to compress them together, then fill and sand.
Step 2: Installing the Base Layer
-
Cut the backer board:
Cut your flat baseboard stock to length for your first wall. Since this piece sits flat against the wall, simple butt joints work in corners if you overlap them, but mitering the outside corners (like the one shown in the photo) is crucial. -
Install the backer board:
Position the flat board on the wall. For this specific heavy look, you might drop it down about into the ceiling 3-4 inches. Use a level to ensure it is perfectly straight, then nail it into the studs. I find using a little construction adhesive here helps keep things solid. -
Address the outside corner:
For the outside corner shown in the photo, cut the flat board at a 45-degree angle. Glue the joint and nail it securely, ensuring the corner is tight and sharp.
Step 3: Installing the Main Crown
-
Set up the saw:
Crown molding is tricky because it sits at an angle. Set your miter saw to the spring angle of your molding (usually 38 or 45 degrees) or use the ‘upside down and backwards’ cutting method. -
Measure the run:
Measure from the corner to the next endpoint on the flat backer board you just installed, not the wall itself, as the crown sits on top of it. -
Cut the outside corner:
For the prominent corner in the image, cut two pieces of the main crown profile at opposing 45-degree angles. Test fit them dry to ensure the design profile matches up perfectly at the point. -
Cope inside corners:
For inside corners (where walls meet inward), cut one piece square and butt it into the corner. Cut the second piece at a 45-degree angle, then use a coping saw to cut away the back material along the profile line so it fits snugly over the first piece. -
Fasten the molding:
Apply wood glue to the corner joints. Nail the molding through the bottom edge into the flat backer board and through the top edge into the ceiling joists or top plate.
Pro Tip: The Jig Trick
Make a small jig of your crown molding fence settings on a scrap board. Mark exactly where the molding sits on the saw bed to ensure consistent cutting angles every time.
Step 4: Finishing and Painting
-
Fill nail holes:
Go over every inch of the molding and fill all nail holes with wood filler or sphackle. Overfill slightly to account for shrinkage. -
Sand smooth:
Once the filler is dry, sand it flush with 220-grit sandpaper. Also lightly sand any rough wood grain on the molding surface. -
Caulk the seams:
Run a bead of paintable latex caulk along the top edge (ceiling), the bottom edge (wall), and inside the corner joints. Smooth it with a wet finger or a damp rag for a seamless transition. -
Prime the wood:
If your molding wasn’t pre-primed, apply a high-quality primer to seal the wood and ensure even paint coverage. -
Cut in the edges:
Using your angled sash brush, carefully paint the edges where the molding meets the wall and ceiling. Take your time near the peach wall color to avoid messy overlaps. -
Apply the finish coat:
Paint the entire molding stack with semi-gloss bright white paint. Apply long, smooth strokes to minimize brush marks. Two thin coats are better than one thick one.
Step back and admire how this architectural detail instantly raises the visual height and elegance of your room


Soft Warm White for Cozy Glow
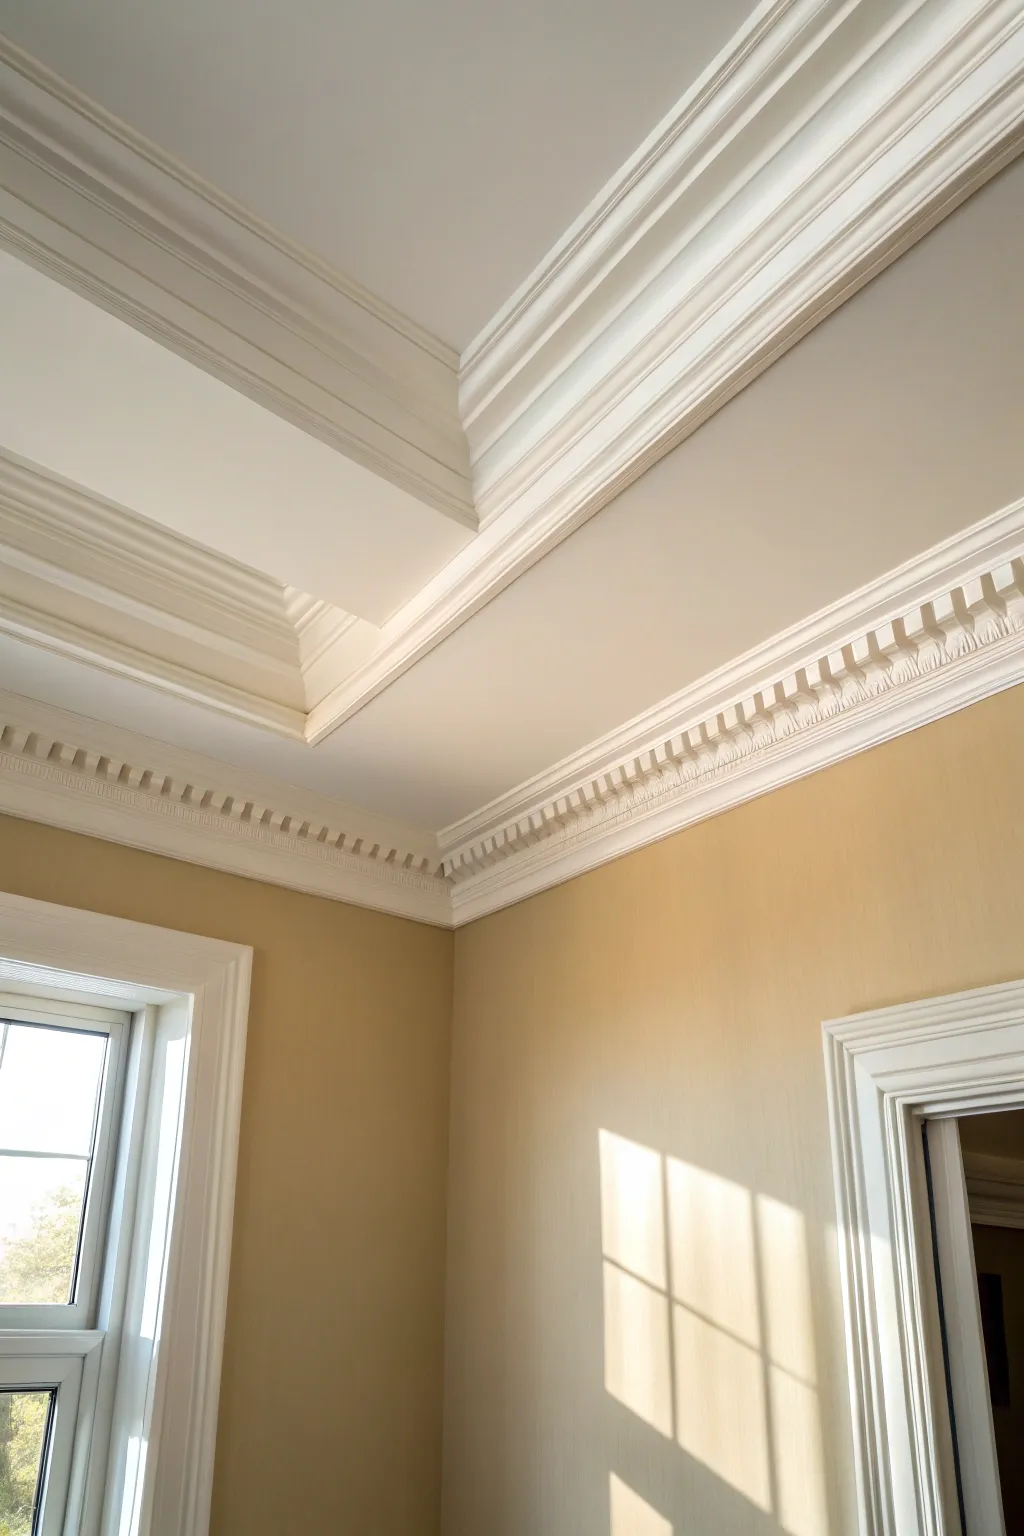
Recreate the sophisticated charm of this warm, glowy interior with a detailed painting tutorial. You will capture the interplay of light and shadow on intricate crown molding and the soft, buttery warmth of the walls.
Step-by-Step
Materials
- Canvas or primed panel (12×16 inches or larger)
- Acrylic paints: Titanium White, Unbleached Titanium, Yellow Ochre, Burnt Umber, Raw Sienna
- Synthetic brushes: 1-inch flat, #6 filbert, #2 round, fine liner
- Palette knife for mixing
- Water container and paper towels
- Ruler or T-square (optional for straight lines)
- Slow-drying medium (optional)
Step 1: Laying the Architecture
-
Sketch the Perspective:
Start with a light pencil sketch to establish the corner of the room. Draw the vertical corner line first, then use two-point perspective to angle the ceiling lines and door frames outward. Pay close attention to the stepped tiers of the tray ceiling. -
Details the Moldings:
Rough in the shapes of the crown molding. Don’t worry about every tiny dentil yet, just block in the main horizontal bands that wrap around the ceiling and the window frames. -
Block in Base Wall Color:
Mix a large amount of Yellow Ochre with Unbleached Titanium and a touch of Titanium White. Apply this warm beige tone to the wall sections using the 1-inch flat brush, keeping the strokes smooth. -
Paint the Ceiling Base:
For the flat ceiling planes, mix Titanium White with a tiny speck of Raw Sienna to create an off-white that isn’t too cold. Paint the main ceiling area and the vertical steps between the molding layers.
Uneven Lines?
If your molding lines look wobbly, use a ruler or piece of tape as a guide for your brush. A ‘mahl stick’ (or just resting your hand on a dry stick) also stabilizes shaking.
Step 2: Sculpting Volume with Light
-
Shadowing the Corners:
Mix a shadow tone using your wall color plus a small amount of Burnt Umber. Glaze this into the main vertical corner and the top edges of the walls where they meet the ceiling, softening the transition with a dry filbert brush. -
Defining the Molding Layers:
Use the #6 filbert and a mix of White and light grey (mix White + touch of Umber) to paint the recessed areas of the crown molding. This establishes the ‘steps’ in the plasterwork before we add fine details. -
Adding the Dentil Detail:
With your #2 round brush and a slightly darker shadow mix (Umber + Ochre), paint small, rhythmic vertical dashes along the lower band of the crown molding to suggest the dentil pattern. Keep them evenly spaced but not perfectly rigid. -
Highlighting the Trim:
Load the #2 round brush with pure Titanium White. Paint the top edges of each molding tier where the light hits. This sharp contrast against the shadow stripes makes the trim pop.
Step 3: Capturing the Sunlight
-
Creating the Sun Patch:
On the right-hand wall, outline the shape of the window reflection. Mix a bright, high-key color using Titanium White and a very small amount of Yellow Ochre. It should be significantly lighter than the wall color. -
Painting the Light Glow:
Fill in the sun patch with this bright mix. Soften the edges slightly so it looks like light hitting a surface, rather than a painted white square. -
Adding Window Pane Shadows:
Mix a transparent glaze of Burnt Umber and medium. Use the fine liner brush to paint the thin, crisp cross-bars within the sun patch. These are the shadows cast by the window muntins. -
Refining the Window Frame:
Move to the actual window on the left. Paint the casing with your white trim color, but darken the side facing away from the light source to give it 3D depth. -
Painting the Glass:
For the window glass, brush in a very pale, cool blue-grey (White + speck of Umber + Blue if you have it, or just cool grey). Keep it high-key to suggest intense outdoor light flooding in.
Level Up: Texture
Mix a little modeling paste into your white paint for the final highlights on the molding. This physical texture creates real shadows on the canvas.
Step 4: Final Polish
-
Deepening Recesses:
I like to go back with the liner brush and a dark umber mix to reinforce the darkest crevices in the molding—specifically right under the heavy top tier. This deepens the relief. -
Adjusting Wall Values:
Check the walls for flatness. If they look too uniform, glaze a bit more warmth (Raw Sienna) near the sun patch to show the light bouncing off the beige paint. -
Doorway Details:
If you included the doorway on the right, paint the dark interior void with Burnt Umber and a touch of black. This dark vertical anchors the composition against all the light tones. -
Final White Highlights:
Use your smallest brush to add pure white specular highlights on the sharpest corners of the woodwork facing the window.
Step back and admire how the painted light transforms a simple architectural study into a warm, inviting space


Creamy Off-White for Vintage Charm
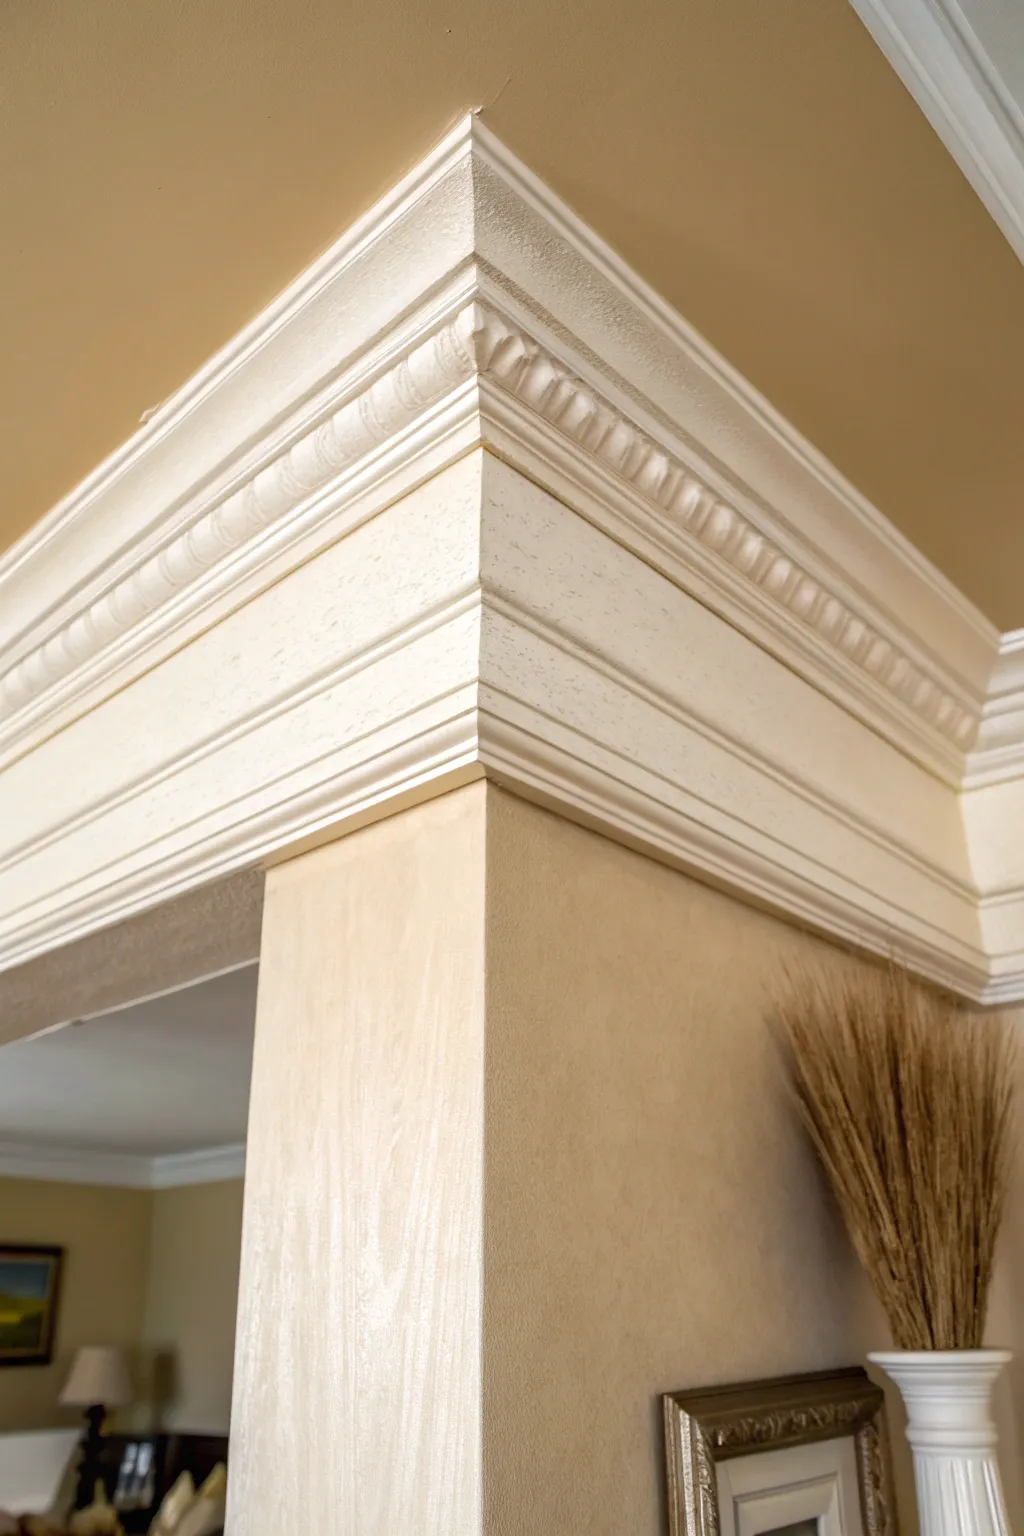
Recreate this elegant, multi-layered architectural detail that adds depth and vintage charm to any room. This project combines a classic dentil-style crown with a flat frieze board to create a substantial, built-up look finished in a creamy off-white.
Step-by-Step Guide
Materials
- Pre-primed crown molding with dentil or egg-and-dart detail
- 1×6 flat MDF or wood board (for the frieze)
- Small cove molding or trim piece (optional cap)
- Miter saw (compound sliding preferred)
- Coping saw
- Pneumatic finish nailer with 2-inch and 1.5-inch nails
- Stud finder
- Construction adhesive
- Wood filler
- Paintable caulk and caulk gun
- Fine-grit sandpaper (220 grit)
- Creamy off-white semi-gloss paint
- 2-inch angled sash brush
- Painter’s tape
- Measuring tape
- Pencil
Step 1: Planning and Preparation
-
Measure the run:
Begin by carefully measuring the length of the walls and the external corner of the column where the molding will wrap. It helps to draw a quick sketch to visualize the cuts. -
Locate studs:
Use a stud finder to mark the framing locations along the wall and the corner of the column. Mark these lightly with a pencil just below where the molding will sit. -
Establish the baseline:
Determine how far down from the ceiling your stack will extend. Mark a level horizontal line around the room representing the bottom edge of the flat frieze board.
Closing the Gaps
If your mitered corners have slight gaps due to uneven walls, rub the shank of a screwdriver over the sharp miter point to burnish the wood fibers together.
Step 2: Installing the Base Layers
-
Cut the frieze board:
Cut your 1×6 flat board to length. For the outside corners of the column, you will need to cut 45-degree miters. I find cutting these slightly long and testing the fit first saves material. -
Install the frieze:
Apply a bead of construction adhesive to the back of the board. Position the board along your level line and nail it into the studs using 2-inch finish nails. -
Secure the corners:
At the external corner, apply wood glue to the mitered edges of the frieze board. Nail through the joint from both sides to lock the corner tight. -
Fill initial nail holes:
Quickly dab wood filler over the nail heads on this flat layer now, as the upper molding might make them harder to reach later.
Add a Bottom Cap
To make the assembly look even more substantial, add a tiny decorative cove molding or shoe molding at the very bottom of the frieze board.
Step 3: Adding the Crown
-
Measure the crown projection:
Place a scrap piece of crown against a framing square to determine exactly how far it projects from the wall and drops from the ceiling. -
Mark the crown position:
Using your measurements, mark a guide line on the installed frieze board or ceiling indicating where the bottom edge of the crown molding should rest. -
Cut the outside corners:
Set your miter saw to the spring angle of your molding. Cut the outside miter joints for the column wrap carefully, ensuring the pattern (like the dentil detail) aligns nicely at the corner. -
Test fit the crown:
Dry fit the corner pieces around the column. Even small gaps can be noticeable here, so adjust your miter angle slightly if the wall corner isn’t a perfect 90 degrees. -
Install the crown:
Nail the crown molding into place, aiming for the ceiling joists and wall studs. Be careful not to nail through the intricate detailed sections where filling holes is difficult. -
Cope inside corners:
For any inside corners where the molding hits walls, cope the joint rather than mitering. Cut a 45-degree bevel, then use a coping saw to cut along the profile line to fit snugly against the adjacent piece.
Step 4: Finishing Touches
-
Caulk the seams:
Run a thin bead of paintable caulk along the top edge against the ceiling and the bottom edge where the crown meets the frieze board. Smooth it with a wet finger. -
Fill and sand:
Fill all remaining nail holes with wood filler. Once dry, sand the filler smooth with fine-grit sandpaper, wiping away any dust with a tack cloth. -
Prime the surface:
If your wood wasn’t pre-primed, apply a high-quality primer. Pay special attention to covering any wood filler spots to ensure an even final sheen. -
Paint the detailed areas:
Using a high-quality sash brush, paint the intricate dentil or egg-and-dart details first. Use a dabbing motion to get paint into crevices without pooling. -
Apply the final coat:
Brush the creamy off-white semi-gloss paint in long, smooth strokes along the length of the molding. I like to keep a wet edge to avoid lap marks.
Step back and admire how this layered architectural feature completely transforms the character of your space


Match Crown Molding to the Ceiling
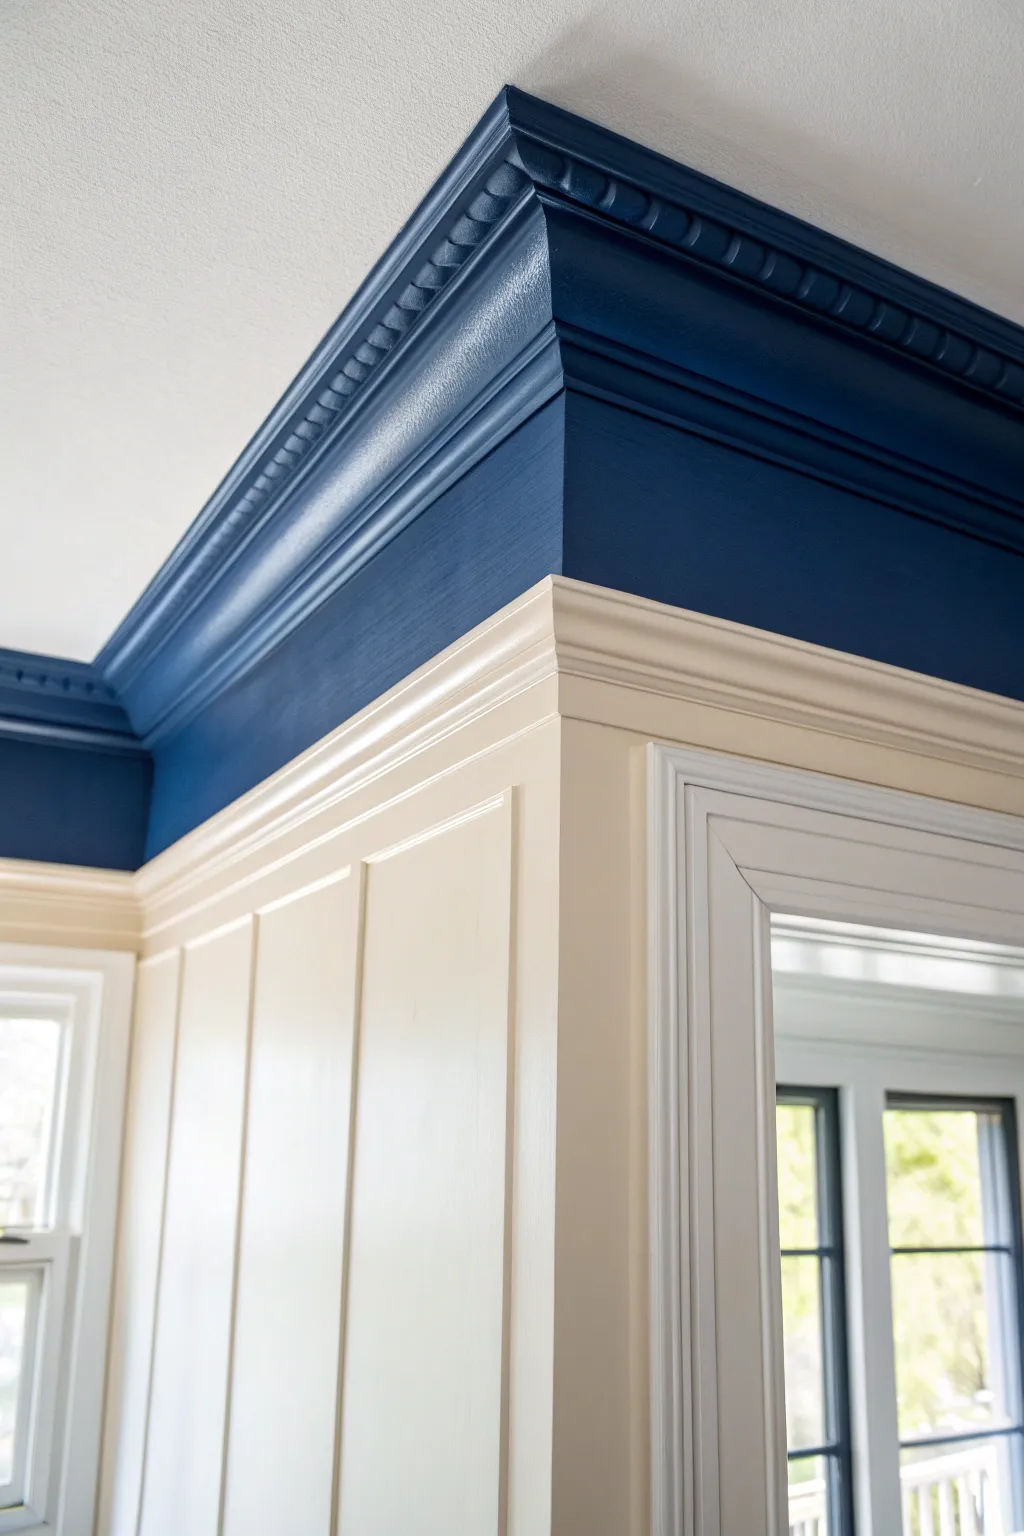
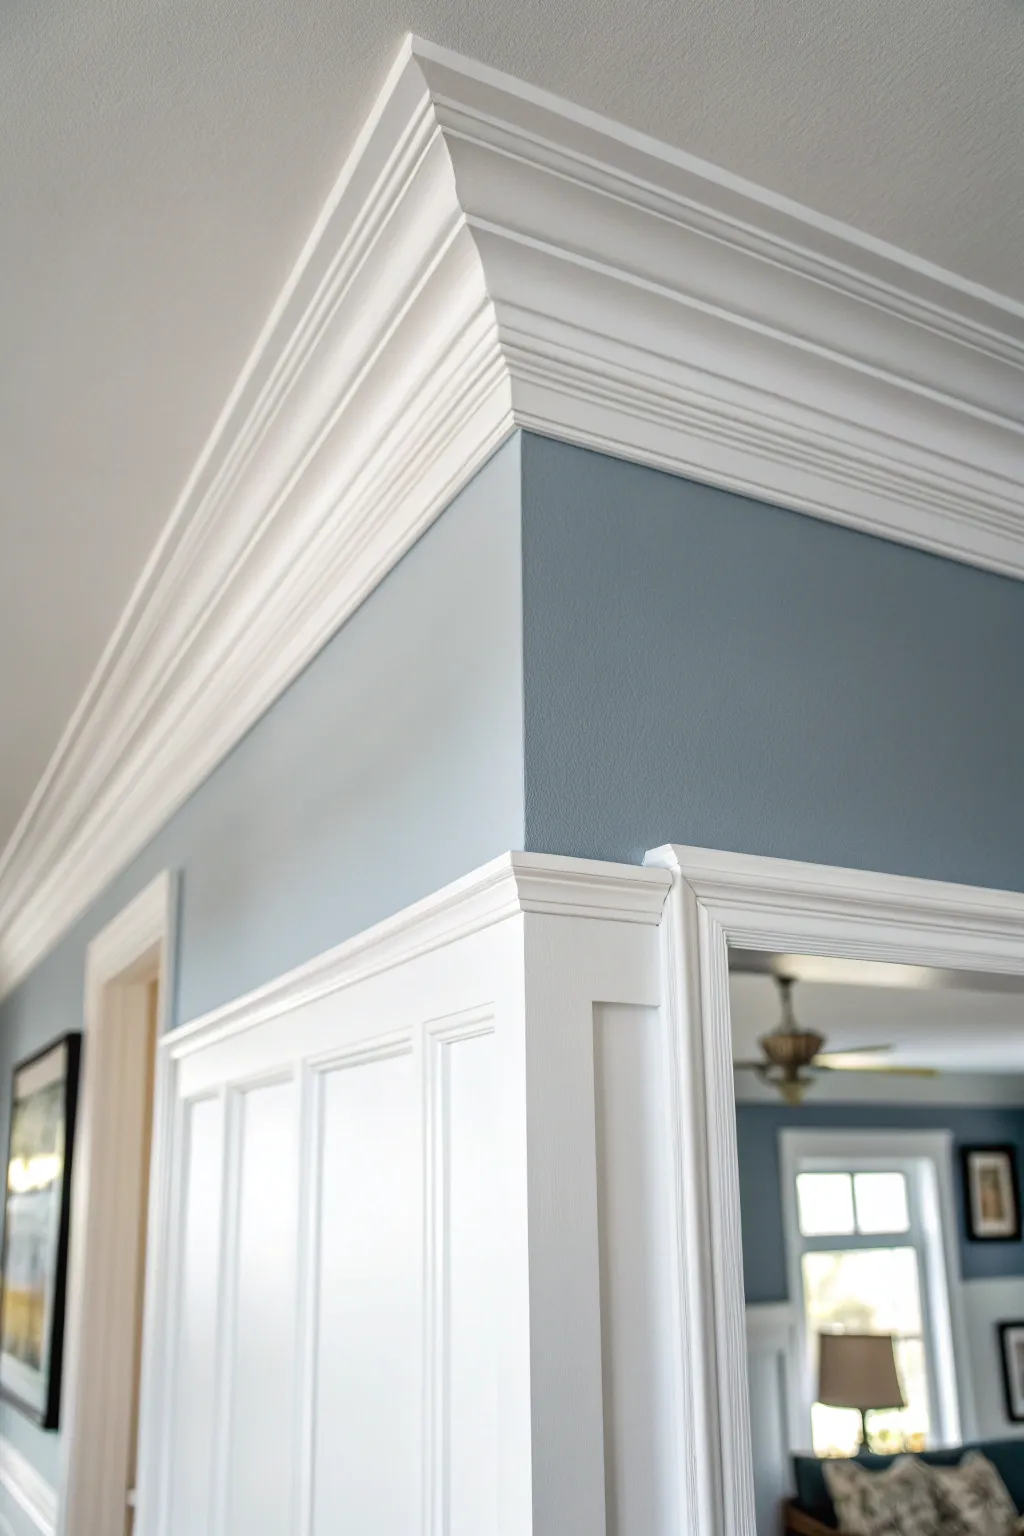
Transform a standard room into a statement space by painting the crown molding a deep, rich navy blue that contrasts beautifully against crisp white ceilings and cream wainscoting. This bold millwork approach bridges the gap between classic paneling and modern color design.
Step-by-Step
Materials
- High-quality painter’s tape (blue or green)
- Deep navy blue interior paint (semi-gloss or satin finish)
- Cream/Off-white interior paint (satin finish for walls)
- Angled sash brush (2.5 inch)
- Small artist brush or detail brush
- Drop cloths
- Sanding sponge (fine grit)
- Tack cloth
- Screwdriver (if removing hardware)
- Step ladder
Step 1: Preparation
-
Protect the area:
Begin by laying down drop cloths to protect your floors and furniture. Move smaller items out of the room to give yourself ample space to maneuver the ladder. -
Clean surfaces:
Wipe down the existing crown molding, the wall paneling below it, and the ceiling edge with a damp cloth to remove dust and cobwebs. -
Light sanding:
Use a fine-grit sanding sponge to gently scuff the surface of the molding and the upper wall section. This helps the new paint adhere better, especially if the old finish was glossy. -
Remove dust:
Wipe away all sanding residue with a tack cloth. Start with a clean surface for the smoothest finish. -
Tape the ceiling:
Carefully apply painter’s tape to the ceiling, right where it meets the top edge of the crown molding. Press the tape edge down firmly with a putty knife or your fingernail to prevent bleed-through. -
Tape the lower divide:
Apply a line of tape along the top edge of the paneling/wainscoting where it will meet the dark blue upper wall section.
Clean Lines Secret
Before painting the navy, seal the tape edge with a tiny bit of the *ceiling white* paint first. This blocks gaps so the navy line is razor-sharp.
Step 2: Painting the Dark Upper Section
-
Cut in the edges:
Dip your angled sash brush into the navy paint roughly one inch. Carefully paint along the taped ceiling line and the taped paneling line. -
Paint the crown molding:
Working in 2-3 foot sections, paint the face of the crown molding. Use long, smooth strokes to minimize brush marks. -
Detail the grooves:
Use the tip of your brush to get paint into the decorative dental molding or intricate curves. Don’t let paint pool in these crevices. -
Paint the upper wall strip:
Continue painting the navy color down the small strip of wall between the crown molding and the top of the wainscoting cap. This creates the cohesive ‘extended molding’ look. -
Feather the edges:
As you move to a new section, always stroke back into the wet edge of the previous section to blend the finish seamlessly. -
Apply second coat:
Allow the first coat to dry completely according to the can’s instructions. A dark color like this almost always needs a second coat for full opacity and richness. -
Remove tape (Upper):
While the second coat is still slightly tacky (or right after it dries), slowly peel the tape off the ceiling at a 45-degree angle.
Sheen Selection
Use a satin or semi-gloss finish for the molding. It reflects light to show off the curves and is much easier to wipe clean than matte paint.
Step 3: Refining the Lower Paneling
-
Tape the navy edge:
Once the navy paint has cured completely (wait at least 24 hours), run a strip of delicate-surface painter’s tape along the bottom edge of the navy paint to protect your work. -
Paint the moulding cap:
Using the cream/off-white paint, carefully paint the top cap of the wainscoting. This creates the sharp contrast line shown in the image. -
Paint the panels:
Paint the vertical battens and flat panel sections of the wall below. Watch for drips at the corners of the panel squares. -
Window casing touch-up:
If your window trim meets the paneling, ensure the cream color continues seamlessly onto the window casing for a built-in look. -
Final inspection:
Remove the final tape strip gently. I find using a small artist brush is perfect here to fix any tiny spots where the navy might have bled onto the cream, or vice versa.
Enjoy the dramatic elegance your new color-blocked molding adds to the room
BRUSH GUIDE
The Right Brush for Every Stroke
From clean lines to bold texture — master brush choice, stroke control, and essential techniques.
Explore the Full Guide
Color-Drenched Crown Molding With Walls
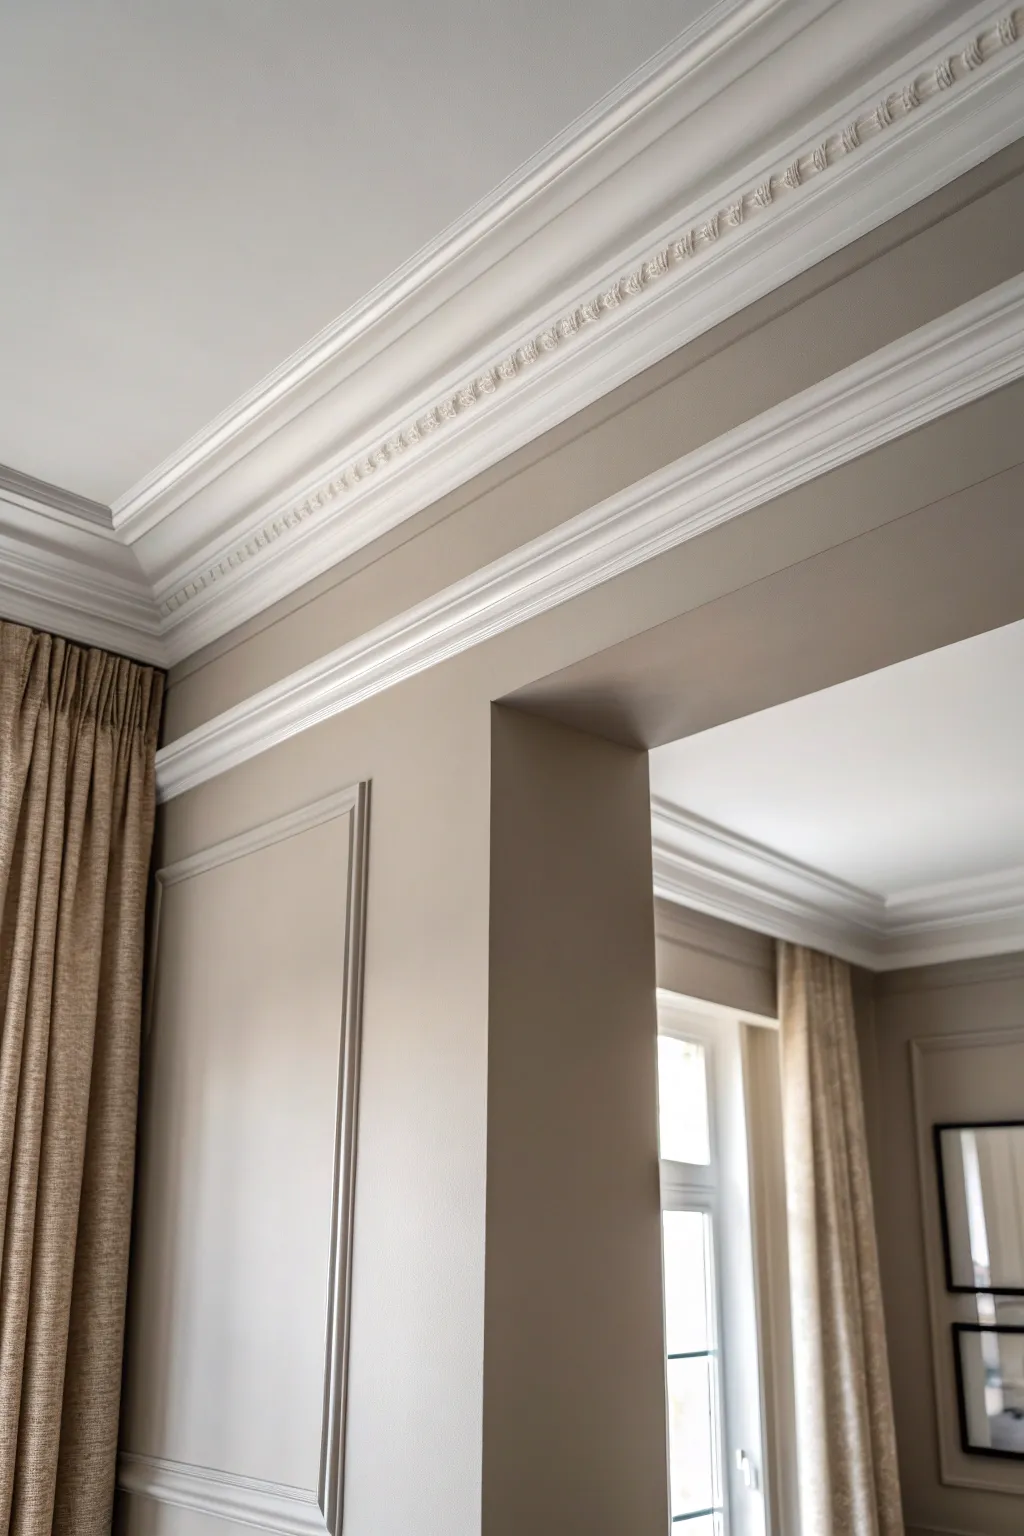
Achieve a timeless, high-end interior look by pairing rich taupe walls with intricate, bright white crown molding. This two-tone approach highlights architectural details while maintaining a warm, cohesive atmosphere.
Step-by-Step Tutorial
Materials
- High-quality latex interior paint (Satin or Eggshell for walls, Taupe color)
- High-quality latex interior paint (Semi-gloss for trim, White/Off-White color)
- Painter’s tape (delicate surface)
- Angled sash brush (2.5 inch)
- Roller frame and microfiber roller covers (3/8 inch nap)
- Paint tray and liners
- Drop cloths
- Sanding sponge (fine grit)
- Spackle or wood filler
- Caulk and caulk gun
- Ladder
Step 1: Preparation & Surface repair
-
Clear and protect:
Move furniture away from the walls and cover the floors completely with drop cloths to protect against splatters. -
Inspect the molding:
Check the crown molding and wall trim for any nail holes, gaps, or separation from the wall. This is critical for that seamless, high-end look. -
Fill imperfections:
Use spackle or wood filler to fill any nail holes. For gaps between the molding and the wall or ceiling, apply a thin bead of caulk and smooth it with a damp finger. -
Sand for adhesion:
Once the filler is dry, lightly sand the walls and the wood trim with a fine-grit sanding sponge. This knocks down bumps and helps the new paint stick. -
Clean dust:
Wipe down all surfaces with a damp cloth or tack cloth to remove sanding dust. Painting over dust results in a gritty texture.
Step 2: Painting the Crown Molding
-
Cut in the ceiling line:
Using your angled sash brush and the semi-gloss white paint, carefully cut in the top edge of the crown molding where it meets the ceiling. -
Paint the detail work:
Apply paint to the intricate carved details of the crown molding. I find dabbing the brush slightly helps get paint into the recessed crevices without dripping. -
Smooth the strokes:
Immediately smooth out the paint on the molding with long, horizontal brush strokes to minimize brush marks. -
Paint lower trim:
Paint any picture frame molding or baseboards with the same semi-gloss white, ensuring clear, crisp edges. -
Allow to dry:
Let the trim paint dry completely according to the can’s instructions—usually at least 4 hours—before taping.
Uneven Lines?
If paint bled under the tape, wait for it to fully dry. Then, use a small artist’s brush and the original trim color to carefully touch up the line for a crisp finish.
Step 3: Painting the Walls
-
Tape the trim:
Once the white trim paint is fully cured, apply delicate surface painter’s tape along the bottom edge of the crown molding and the edges of any wall paneling. -
Seal the tape edge:
Run a fingernail or putty knife firmly along the tape edge to prevent paint bleed. -
Cut in the walls:
Use the angled brush and your taupe wall paint to cut in around the taped trim, corners, and ceiling line. -
Roll the walls:
Pour the taupe paint into a tray. Load your roller and apply the paint to the large wall sections in a ‘W’ or ‘M’ pattern for even coverage. -
Back-roll:
Go over the wet paint with the roller (without adding new paint) from ceiling to floor to smooth out the texture. -
Apply second coat:
After the first coat is dry to the touch, repeat the cutting and rolling process for a rich, solid color. -
Remove tape:
Carefully peel off the painter’s tape while the wall paint is still slightly tacky to ensure a razor-sharp line.
Add Dimension
For extra depth, choose a wall color just one shade darker than your main taupe for the space inside the picture frame molding panels.
Step back and admire how the crisp molding pops against the warm walls, creating an elegant architectural statement
Crown Molding One Shade Lighter Than Walls
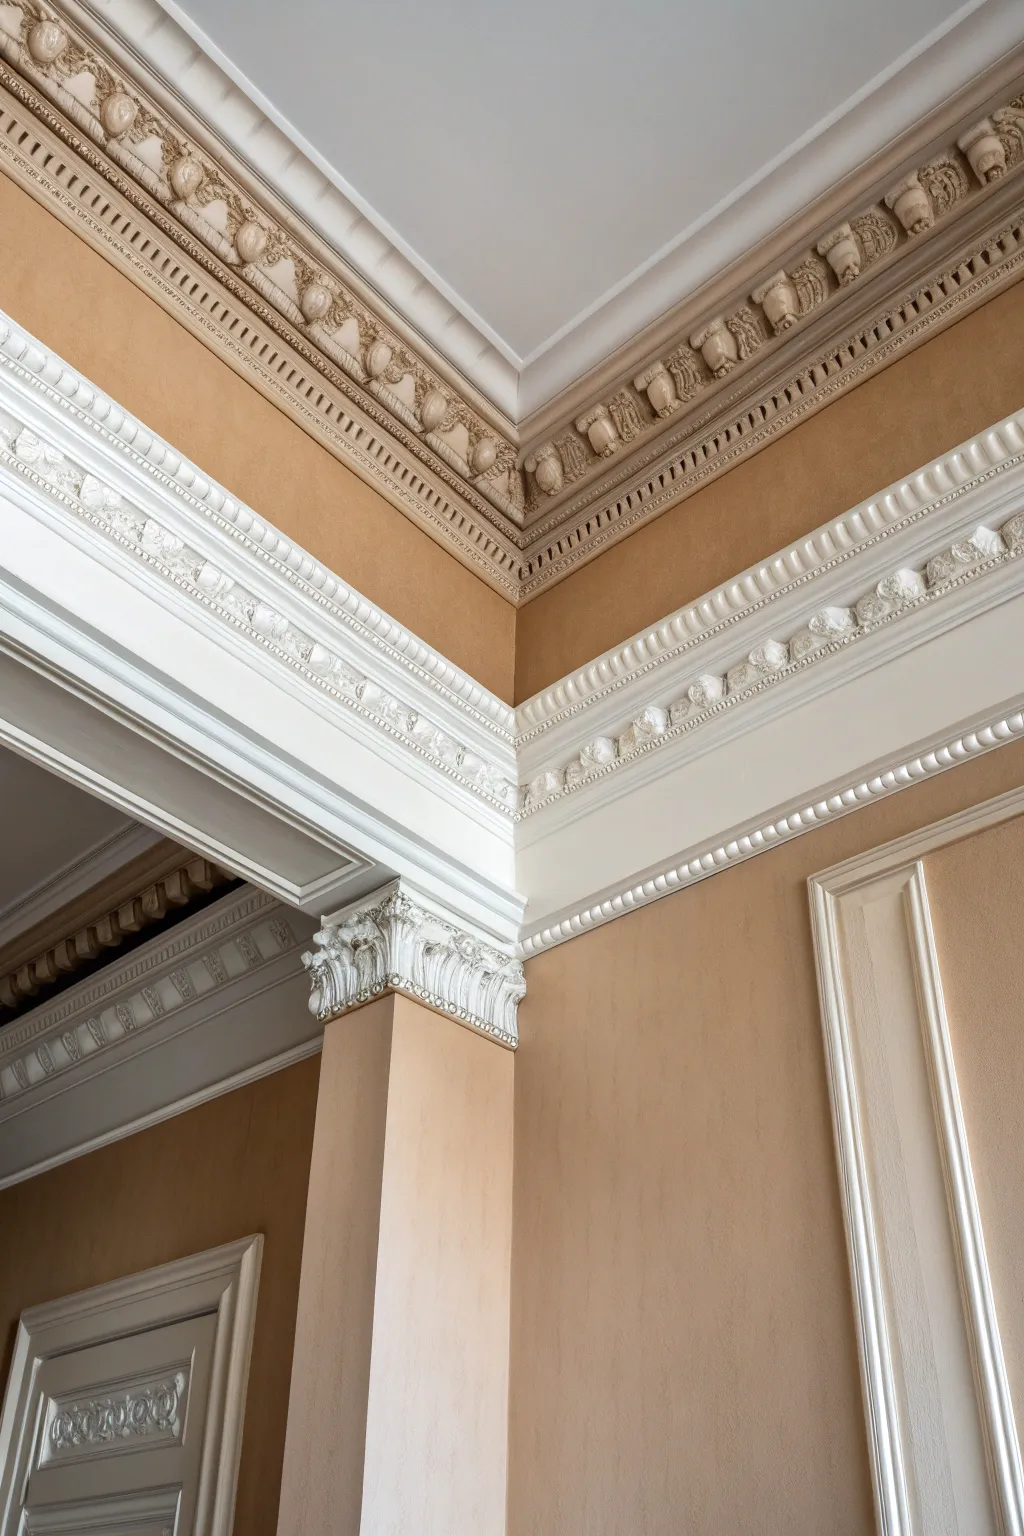
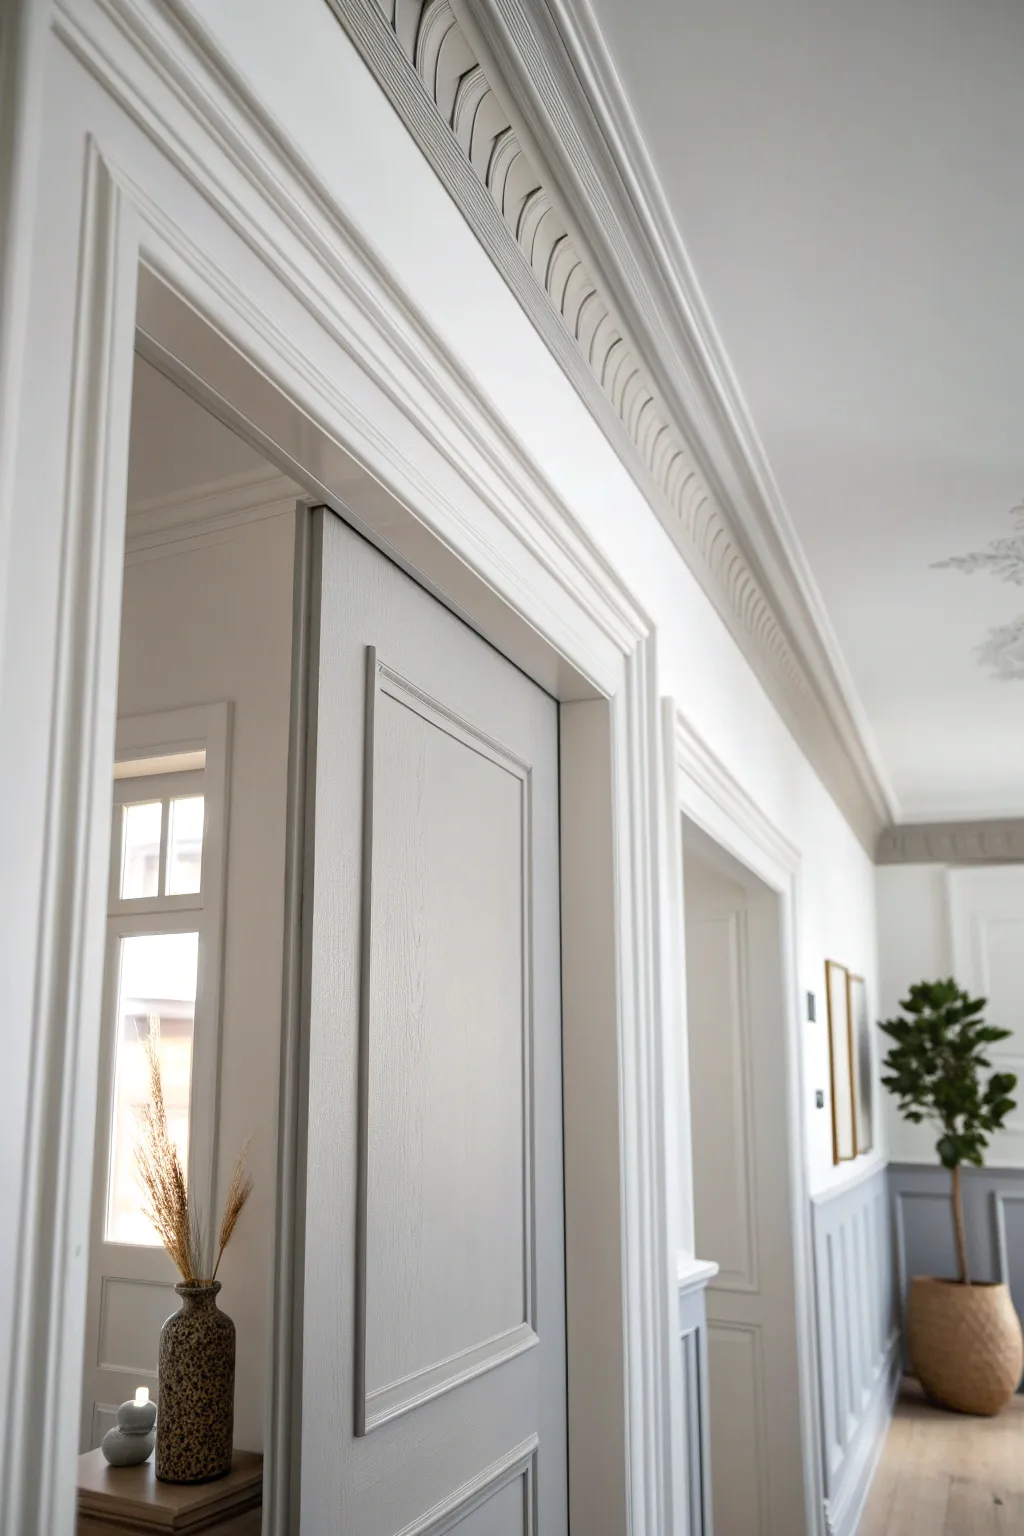
Recreate the sophisticated look of this architectural corner by layering warm tan walls with creamy, slightly lighter decorative molding for a soft, cohesive transition. This tutorial guides you through installing multi-piece molding and achieving that perfect monochromatic shift where the trim gently lifts from the wall color.
How-To Guide
Materials
- Warm tan satin latex paint (wall color)
- Cream or off-white semi-gloss latex paint (trim color)
- Glazing liquid (optional for depth)
- Pre-primed crown molding (dentil or egg-and-dart pattern)
- Baseboard or flat stock trim (for layering)
- Corbels or decorative cap elements
- Miter saw
- Pin nailer or finish nailer
- Paintable latex caulk & caulk gun
- Wood filler
- Synthentic angled sash brush (2.5 inch)
- Fine-grit sandpaper (220 grit)
- Painter’s tape
- Drop cloths
Step 1: Wall Preparation & Base Coat
-
Prep the surface:
Begin by cleaning the walls and ceiling corners thoroughly to remove dust and cobwebs. Patch any holes with spackling paste and sand flush once dry to ensure a smooth foundation for your molding. -
Apply the wall color:
Cut in the edges using your warm tan satin paint. Since the molding will cover the very top of the wall, you don’t need a razor-sharp line at the ceiling, but ensure consistent coverage where the molding bottom will sit. -
Roll the walls:
Roll the main wall surfaces with the tan paint. Apply two coats for rich, uniform color depth, allowing 4 hours of drying time between applications.
Gap Troubles?
If corner gaps are too wide for caulk, slip a thin shim behind the molding to push it out, or glue a sliver of wood into the gap before sanding and filling.
Step 2: Molding Installation
-
Measure and cut main crown:
Measure your room’s perimeter. Set your miter saw to the spring angle of your chosen crown molding (usually 38 or 45 degrees) and cut your inside and outside corners. Coping inside corners typically yields a tighter fit than mitering. -
Install the sub-layer:
To achieve the stacked grandeur seen in the image, first install a flat piece of baseboard or stock lumber slightly below where the main crown will sit. This adds visual weight and height to the assembly. -
Attach the main crown:
Nail the primary decorative crown molding into place, overlapping the top edge of your sub-layer flat stock. Ensure you hit the wall studs and ceiling joists for a secure hold. -
Add decorative capitals:
If recreating the column effect shown, install the capital or decorative corbel at the top of your vertical pilaster trim. Center it perfectly under the main crown assembly before nailing. -
Fill and seamless:
Fill all nail holes with wood filler. Apply a bead of paintable latex caulk along the top edge (ceiling ceiling) and bottom edge (meeting the wall), as well as any joints between molding pieces. Smooth with a damp finger.
Step 3: Painting & Tonal Finish
-
Sand the trim:
Once the filler layout is dry, lightly scuff the molding surfaces with 220-grit sandpaper to remove any raised grain or excess filler. Wipe away all dust with a tack cloth. -
Tape for protection:
Apply painter’s tape to the wall immediately below the molding and the ceiling immediately above it to protect your freshly painted surfaces. -
Mix the custom shade:
For that ‘one shade lighter’ look, I often mix a small amount of the wall color into the white trim paint (about a 1:10 ratio) to create a custom cream that harmonizes perfectly with the room. -
Paint the detailed areas:
Dip your angled sash brush and dab paint into the deep crevices of the dentil or egg-and-dart patterns first. Avoid overloading the brush to prevent drips pooling in the details. -
Stroke the smooth sections:
With long, horizontal strokes, paint the smooth, curved profiles of the molding. Feather out any brush marks to ensure a glass-smooth finish. -
Apply a second coat:
Allow the first coat to dry completely (check can instructions), then apply a second coat for full opacity and sheen uniformity. -
Optional glazing:
To highlight the intricate carvings as shown in the photo, mix a translucent glaze. Brush it over the ornate sections and immediately wipe off the high spots with a rag, leaving darker pigment only in the recesses. -
Remove tape:
Score the edge of the tape with a utility knife before pulling it away while the paint is still slightly tacky. This prevents the tape from pulling up chunks of your new dried paint.
Pro Tip: The Cheater Block
Cut a small 6-inch section of your molding assembly first. Use this ‘cheater block’ to test the height and fit around the room specifically to mark stud locations before long installs.
Step back and admire how the subtle color shift draws the eye upward, celebrating the architecture without overwhelming the space

PENCIL GUIDE
Understanding Pencil Grades from H to B
From first sketch to finished drawing — learn pencil grades, line control, and shading techniques.
Explore the Full Guide
Crown Molding One Shade Darker Than Walls
Transform a plain corner into a sophisticated architectural feature by installing layered wainscoting and substantial baseboards. This project creates a timeless, high-end look that adds depth and character to any room through the clever use of molding profiles.
Detailed Instructions
Materials
- Pre-primed MDF or wood baseboard (5-inch or taller)
- Chair rail molding with a deep profile
- Panel molding or 1×4 trim boards (for vertical stiles)
- Compound miter saw
- Pneumatic brad nailer with 18-gauge finish nails
- Construction adhesive (optional but recommended for uneven walls)
- Wood filler
- Paintable caulk and caulk gun
- Fine-grit sandpaper (220-grit)
- Interior semi-gloss or satin paint (white or off-white)
- Wall paint (greige or taupe)
- Painter’s tape
- Level and measuring tape
- Stud finder
Step 1: Preparation and Layout
-
Assess the space:
Begin by removing any existing baseboards along the walls you intend to upgrade, using a utility knife to score the caulk line first to prevent peeling the drywall paper. -
Determine height:
Decide on the height of your wainscoting. A general rule of thumb is one-third up the wall, often around 32 to 36 inches including the chair rail cap. -
Mark level lines:
Use a level or laser level to snap a horizontal chalk line around the room at the height where the top of your chair rail will sit. This ensures visual continuity even if the floor dips. -
Locate studs:
I always take a moment here to mark stud locations with a pencil just above where the molding will go, ensuring the nails hit solid wood for a secure hold.
Closing Excessive Gaps
If a wavy wall leaves a large gap behind the trim, don’t just fill it with caulk. Insert a thin wood shim or backer rod into the gap first, then caulk over it for a crack-proof seal.
Step 2: Installing the Basework
-
Cut baseboards to length:
Measure the wall lengths for your baseboards. Set your miter saw to 45 degrees for outside corners and use a coping saw for inside corners if you want a tighter joint, though mitering works fine for paint-grade trim. -
Install the baseboard:
Nail the baseboard into place using the stud marks as a guide. If walls are bowed, apply a bead of construction adhesive to the back to help it grab the drywall. -
Install the stile backing (optional):
If you are using flat panels, now is the time to apply 1/4-inch plywood or MDF sheets to the wall between the baseboard and your upper line. If using the existing drywall as the ‘panel,’ skip to the chair rail.
Return at Door Frames
When chair rail meets a door casing that is thinner than the rail itself, miter the end of the chair rail at 45 degrees back toward the wall to create a clean, finished ‘return’.
Step 3: Chair Rail and Vertical Elements
-
Cut the chair rail:
Measure and cut your chair rail molding, paying special attention to the outside corners where the miter cuts will be most visible. -
Secure the top rail:
Install the chair rail so the top edge aligns perfectly with your level line. Use longer nails here if necessary to penetrate through drywall into the studs. -
Measure vertical stiles:
If adding vertical separation (stiles), measure the distance between the top of the baseboard and the bottom of the chair rail. -
Install vertical pieces:
Cut your 1×4 or panel molding strips to fit snugly between the horizontal rails. Space them evenly along the wall, usually 24 to 36 inches apart depending on room scale.
Step 4: Finishing Touches
-
Fill the holes:
Go over every nail hole with wood filler. Overfill slightly, as the filler shrinks when it dries, and then sand strictly flush once hardened. -
Caulk the seams:
Apply a thin bead of paintable caulk to all seams where wood meets wood or wood meets wall. Smooth it with a wet finger for a seamless transition. -
Sand for smoothness:
Give all wood surfaces a light sanding with 220-grit paper to remove any raised grain or filler ridges. -
Prime raw edges:
If you made any cuts that exposed raw MDF or wood, spot-prime those areas to prevent the final paint from soaking in unevenly. -
Paint the trim:
Apply two coats of semi-gloss or satin paint to the wainscoting and baseboards. I prefer using a high-quality angled sash brush for the sharp edges and a small foam roller for the flat sections to minimize brush strokes. -
Paint the upper wall:
Once the trim is fully dry and taped off (or cut in carefully), paint the upper wall in your contrasting taupe or greige shade to make the fresh woodwork pop.
Step back and enjoy the structured, polished atmosphere your new molding brings to the space
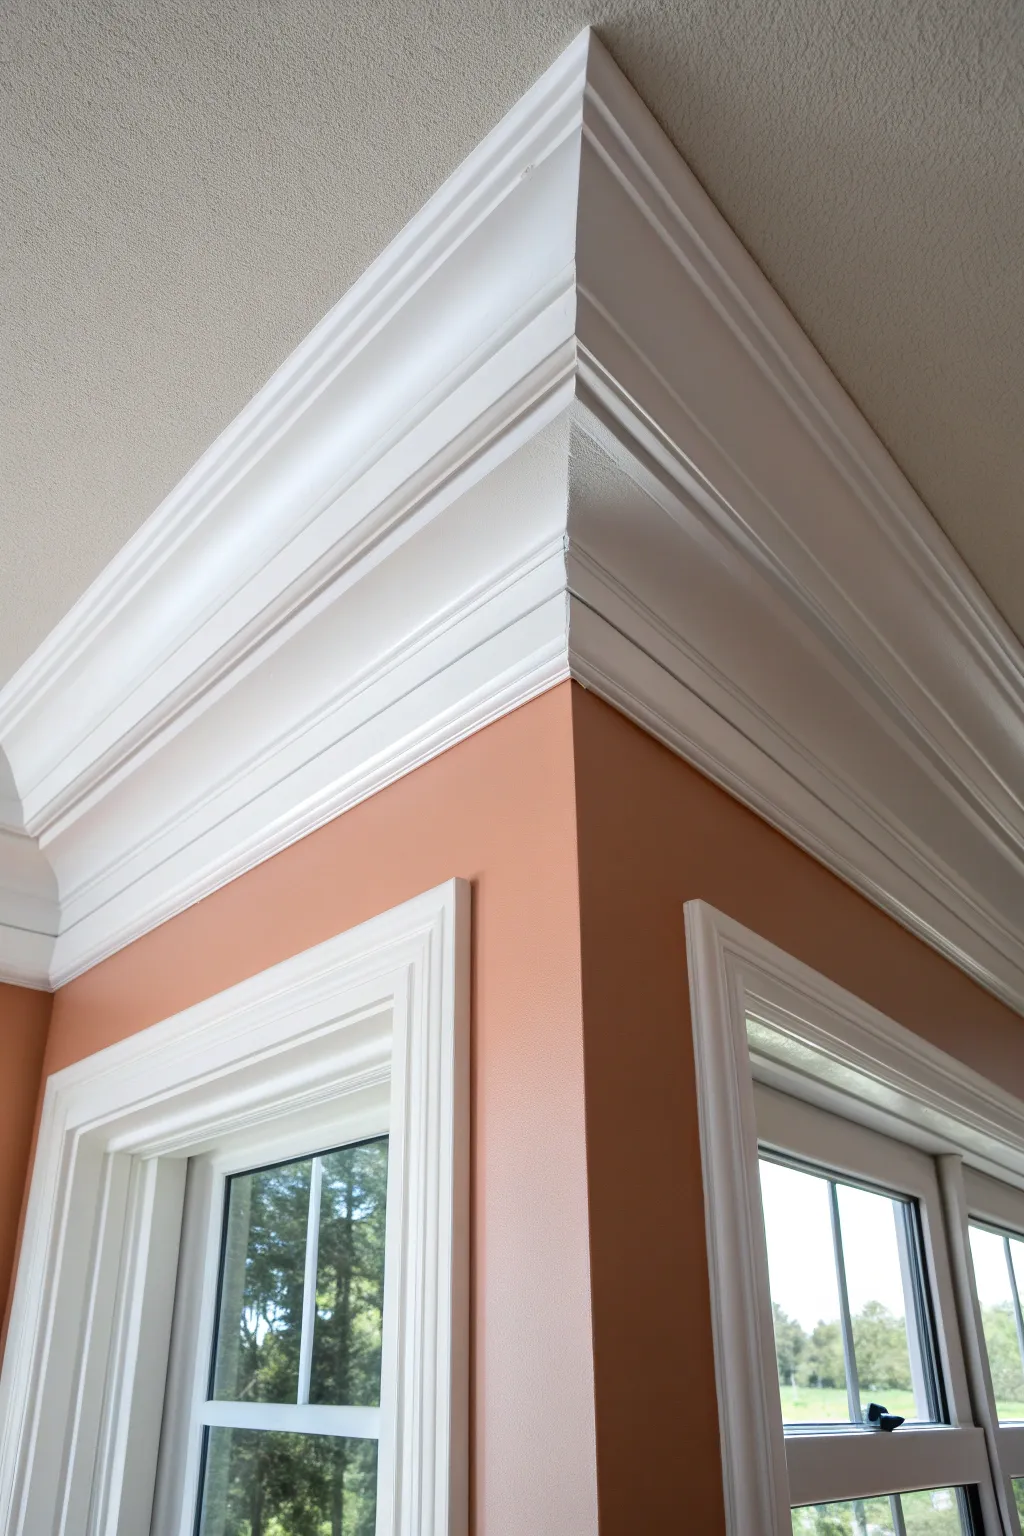
White Crown Molding With Greige Walls
Transform a standard room corner into a stately architectural feature by combining two separate molding profiles for a custom, built-up look. The crisp white contrast against warm greige walls adds immediate height and sophistication to your space.
Step-by-Step
Materials
- Baseboard molding (flat profile, approx. 4-5 inches)
- Traditional crown molding (ogee or cove profile)
- Miter saw (10-inch or larger)
- Coping saw
- 18-gauge brad nailer
- 2-inch brad nails
- Stud finder
- Construction adhesive
- Caulk gun and paintable acrylic latex caulk
- Wood filler
- Fine-grit sandpaper (220-grit)
- Painter’s tape
- Semi-gloss white trim paint
- Greige wall paint (for touch-ups)
- 2-inch angled sash brush
- Ladder
Step 1: Planning and Base Layer
-
Analyze the wall:
Begin by using a stud finder to locate and mark the ceiling joists and wall studs near the ceiling line. Mark these lightly with a pencil so you know exactly where your nails will hold firmly. -
Measure the run:
Measure the length of the walls at the ceiling level precisely. It is often wise to measure twice to ensure you don’t cut your material too short. -
Install the flat stock:
Cut your flat baseboard molding to length. This piece acts as the bottom ‘frieze’ board. Place it against the wall, but leave a small gap (about 1/8 inch) from the ceiling to allow the crown to sit properly over it if needed. -
Secure the base:
Apply a wavy line of construction adhesive to the back of the flat board. Press it onto the wall and secure it into the studs using your brad nailer, spacing nails every 16 inches.
Closing the Gaps
If your corner joint has a small gap even after coping, don’t panic. Rub the round shaft of a screwdriver over the wood fibers near the gap to burnish them together, then fill the remaining space with caulk.
Step 2: Cutting and Installing the Crown
-
Set the miter saw:
To cut the traditional crown molding that sits on top, you need to cut it ‘upside down and backwards’ on the miter saw. Place the molding against the fence exactly as it would sit against the wall and ceiling. -
Cut the first inside corner:
Cut one end of your first piece of crown molding square (90 degrees) to butt into the corner if it’s the first piece, or cut a 45-degree inside miter if you plan to cope the next piece. -
Cope the joint:
For the adjoining piece at the corner, cut a 45-degree inside bevel. Then, use a coping saw to carefully cut away the wood along the profile edge of the miter. This back-cutting allows the piece to fit snugly over the first installed piece. -
Dry fit the corner:
Hold the coped piece up to check the fit against the first installed piece. Fine-tune the edge with sandpaper or a file if the joint isn’t perfectly tight. -
Install the crown layer:
Position the crown molding so it overlaps the top edge of the flat baseboard you installed earlier. The bottom detail of the crown should rest on the face of the flat board. -
Nail it home:
Nail the crown molding into the ceiling joists and into the studs (through the flat board). I like to angle the nails slightly to create a mechanical lock.
Step 3: Refining and Painting
-
Fill the nail holes:
Use a small amount of wood filler to cover every nail head. Overfill slightly, as the filler will shrink when it dries. -
Sand smooth:
Once the filler is dry, sand the spots flush with 220-grit sandpaper. Vacuum away any dust from the molding and the walls. -
Caulk the seams:
Run a thin bead of paintable caulk along the top edge where the molding meets the ceiling, and the bottom edge where it meets the flat board. Don’t forget the vertical corner joint. -
Smooth the caulk:
Dip your finger in water and run it along the bead of caulk to create a smooth, seamless transition. Keep a rag handy to wipe off excess immediately. -
Tape off boundaries:
Apply painter’s tape to the greige wall just below the molding and to the ceiling just above it to ensure crisp lines. -
Apply the first coat:
Using an angled sash brush, apply a coat of semi-gloss white paint. Work in long, smooth strokes to minimize brush marks. -
Apply the final coat:
After the first coat dries completely, apply a second coat for a distinct, solid white finish that pops against the wall color. -
Remove tape:
Carefully peel away the painter’s tape while the paint is still slightly tacky to prevent peeling dry paint.
Use a ‘Stop Block’
Screw a wood block onto your miter saw fence at the exact position where the crown molding rests. This ensures every piece assumes the exact same angle, making your corner cuts align perfectly every time.
Step back and admire how this layered architectural detail completely changes the character of your room


Cool White Crown Molding With Blue-Gray Walls
Transform a plain room corner into a stately architectural feature by combining crisp white crown molding with soothing blue-gray walls. This project adds vertical interest and a touch of classic refinement that frames your space beautifully.
Step-by-Step Guide
Materials
- Primed MDF or wood crown molding (4-5 inch profile)
- Primed 1×4 trim board (for wainscoting cap)
- Panel molding trim (for wainscoting detail)
- Compound miter saw
- Coping saw
- Brad nailer with 2-inch brad nails
- Stud finder
- Digital angle finder (optional but helpful)
- Caulk gun and paintable latex caulk
- Wood filler
- Fine-grit sandpaper (220-grit)
- Painter’s tape
- Latex paint (Cool White, Semi-Gloss)
- Latex paint (Blue-Gray, Eggshell or Satin)
- Angled sash brush (2.5 inch)
- Paint roller and tray
Step 1: Preparation & Wall Painting
-
Clear and Prep:
Remove any existing trim you plan to replace and clear the room of furniture. Use a stud finder to locate and mark all wall studs and ceiling joists with a pencil near the ceiling line where they will be covered by molding. -
Paint the Upper Walls:
Before installing any trim, paint the upper portion of the walls with your chosen blue-gray color. Roll the paint all the way to the ceiling and slightly below where your wainscoting cap will sit to ensure full coverage without needing careful cut-ins later. -
Paint the Ceiling:
If your ceiling needs a refresh, do it now. A flat white ceiling paint offers the best contrast against the satin or semi-gloss finish you’ll use for the crown molding.
Clean Corner Cut
When coping usually tricky profiles, rub the cut edge with the side of a pencil lead. The dark graphite highlights high spots preventing a tight fit, showing exactly where to file down.
Step 2: Installing the Wainscoting Cap & Door Trim
-
Install Door Casing:
If replacing door trim, cut and install your vertical casing legs first, followed by the header piece. Secure them into the rough opening studs using your brad nailer. -
Set the Wainscoting Height:
Determine the height for your wainscoting or paneling. Snap a level chalk line around the room at this height to guide your installation of the top cap. -
Install the Top Cap:
Cut your 1×4 trim board to length for the walls. Place it horizontally along your chalk line, creating the shelf-like top of your paneling. Nail it securely into the studs. -
Add Decorative Molding:
To mimic the look in the photo, add a small piece of cove or bed molding directly underneath the 1×4 cap. This softens the transition and adds a shadow line.
Step 3: Crown Molding Installation
-
Measure the Perimeter:
Measure each wall section at the ceiling level precisely. Measure twice to ensure accuracy, as corners are rarely perfectly square. -
Cut the First Piece:
Cut your first length of crown molding with square 90-degree cuts on both ends. Install this piece on the wall opposite the main entry door so you look straight at it. -
Cope the Inside Corners:
For the adjacent pieces, cut the end that meets the first piece at a 45-degree inside bevel. I find it helpful to trace the profile edge with a pencil to make it easier to see. -
Use the Coping Saw:
Use a coping saw to cut along the profile line you just created, back-cutting slightly to remove more material from the back than the front. This ensures a tight fit against the face of the first board. -
Test Fit and Install:
Test the fit of your coped joint. Ideally, it should snap snugly over the profile of the installed piece. Once happy, nail the molding into the studs and ceiling joists. -
Handle Outside Corners:
For the outside corner shown in the image, measure to the exact corner point. Set your miter saw to 45 degrees (or the exact bisected angle if you measured it) and cut the mating pieces to wrap around the corner. -
Secure Outside Corners:
Apply a little wood glue to the mitered faces of the outside corner pieces before nailing them. You can use cross-nails through the joint itself to hold it tight while the glue dries.
Raise the Bar
Install hidden LED strip lighting behind the top edge of the crown molding. Leave a small 1-inch gap from the ceiling to create a soft, modern uplight glow.
Step 4: Finishing Touches
-
Fill Nail Holes:
Fill all nail holes in the crown molding, door casing, and wainscoting cap with wood filler. Leave it slightly proud of the surface to account for shrinkage. -
Sand Smooth:
Once dry, sand the filler flush with 220-grit sandpaper. Run your hand over the surface to ensure it feels perfectly smooth. -
Caulk the Gaps:
Apply a thin bead of paintable latex caulk along the ceiling line, the wall line, and inside all corner joints. Smooth it with a wet finger or a damp rag for a seamless look. -
Prime Bare Wood:
If you used unprimed wood or have exposed filler, spot prime those areas to ensure the topcoat adheres evenly. -
Apply Finish Paint:
Using your angled sash brush, carefully paint the crown molding with semi-gloss cool white paint. Long, steady strokes help minimize brush marks. -
Paint Wainscoting/Trim:
Paint the door casing and wainscoting cap to match the crown molding. Do two light coats rather than one heavy one for the most professional, durable finish.
Step back and admire how the crisp white lines now perfectly frame the calm blue tones of your newly transformed room
Soft Gray Crown Molding for Gentle Contrast
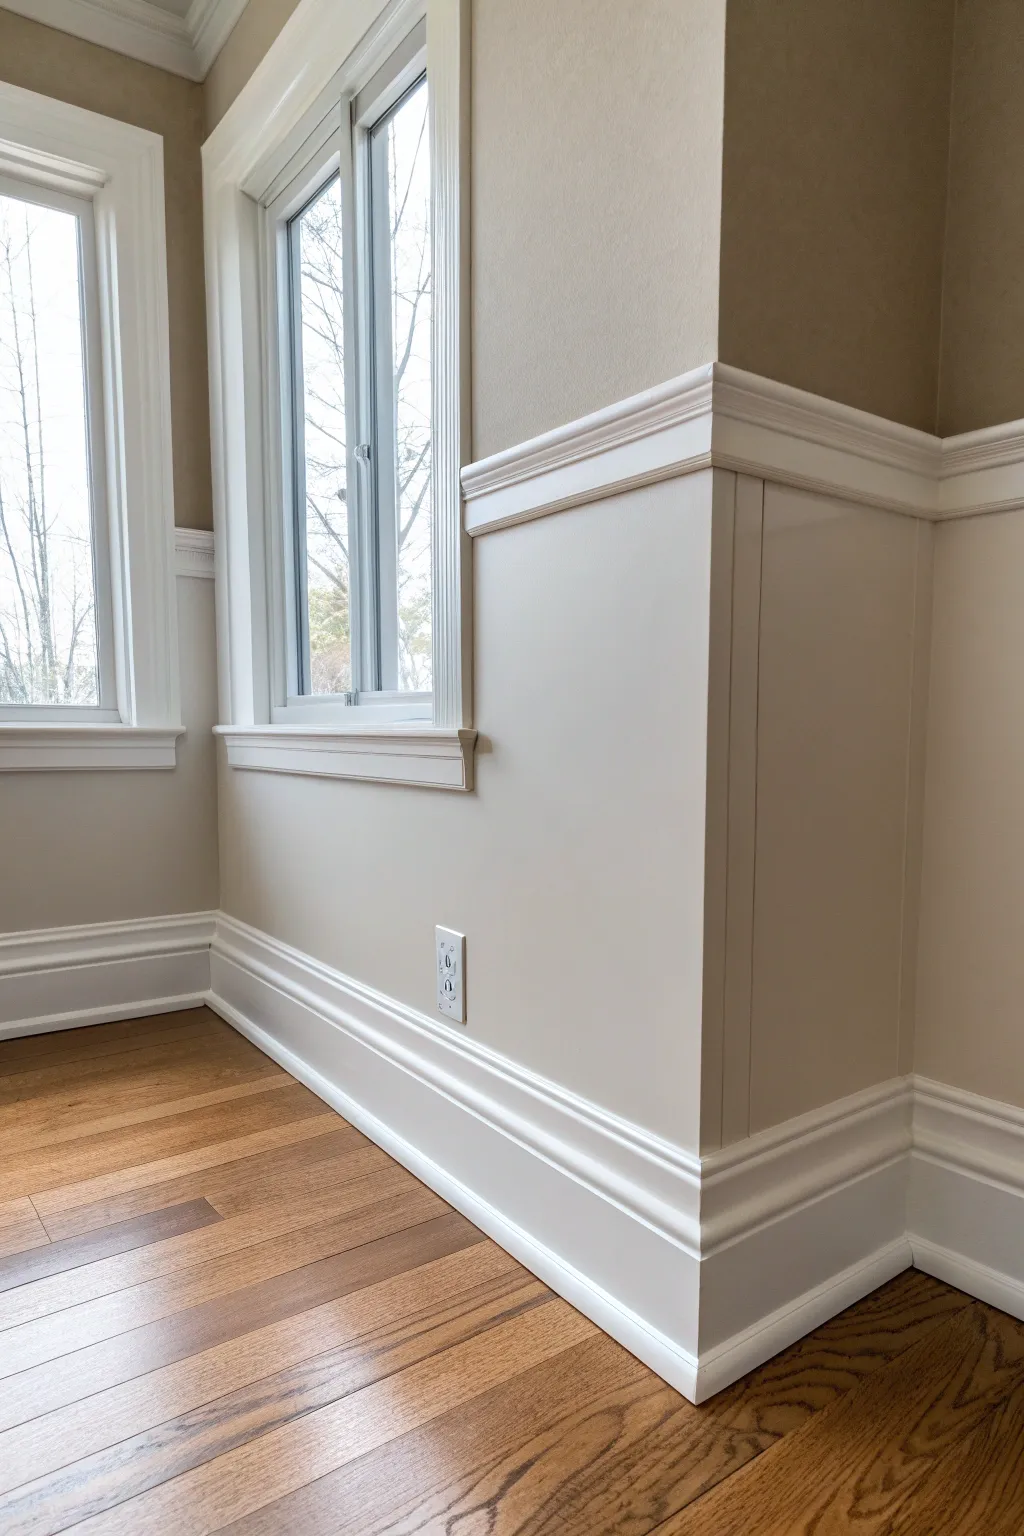
Elevate your hallway or living space by installing elegant crown molding and coordinating wainscoting painted in a soft, soothing gray. This architectural upgrade adds immediate character and a sense of verticality to any standard room.
How-To Guide
Materials
- Primed crown molding (5-7 inch width)
- Primed wainscoting panels or chair rail/baseboard combo
- Miter saw
- Coping saw
- Brad nailer and 18-gauge brad nails
- Stud finder
- Caulk gun and paintable latex caulk
- Wood filler
- Fine-grit sandpaper (220-grit)
- Painter’s tape
- Interior semi-gloss paint (Soft Gray)
- Interior eggshell or matte paint (White/Cream for walls)
- Angled sash brush (2.5 inch)
- Drop cloths
- Ladder
Step 1: Preparation & Planning
-
Measure and Map:
Begin by measuring the total perimeter of your room at ceiling height. Create a rough sketch of the walls, noting inside and outside corners. Purchase 10-15% extra material to account for cutting errors. -
Locate Studs:
Use a stud finder to mark the joist locations along the ceiling and stud locations on the wall. Mark these spots clearly with a pencil or a piece of painter’s tape regarding where you will nail later. -
Pre-Paint Molding:
Before cutting, set up a painting station. Apply your first coat of Soft Gray semi-gloss paint to the molding lengths. I find it much easier to get a smooth base coat down while the wood is on saw horses rather than on a ladder.
Step 2: Installation
-
Cut the First Piece:
Start with the longest wall. Cut the first piece of crown molding with square (90-degree) cuts on both ends to fit flush against the walls. -
Install First Section:
Position the first piece against the wall and ceiling. Use your brad nailer to secure the molding into the studs and joists you marked earlier. Ensure it sits tight against both surfaces. -
Cut the Second Piece:
For the adjacent wall (an inside corner), you will need to cope the joint. Cut the end of the second piece at a 45-degree angle on your miter saw, revealing the profile of the molding. -
Cope the Joint:
Run a pencil along the profile edge created by the bevel cut to make it visible. Use a coping saw to carefully back-cut along this profile line, removing the wood behind the face. -
Test Fit and Refine:
Test the fit of your coped piece against the installed piece. If there are gaps, use a file or sandpaper to fine-tune the cut until it locks almost seamlessly into the first piece. -
Nail in Place:
Once the fit is tight, nail the second piece into the wall studs and ceiling joists. Continue this measure-cope-install pattern around the room.
Master the Cope
When coping, angle your saw back more than 90 degrees. Removing more wood from the back ensures only the front edge touches, making a tighter visible joint.
Step 3: Wainscoting & Finishing
-
Install Paneling:
If you are adding the wainscoting shown in the lower section, measure up from the floor (commonly 32-36 inches) and snap a level line. Install your baseboards and chair rail, then fit the vertical battens or panels in between. -
Fill Nail Holes:
Go around the room and fill all nail holes in the crown molding and wainscoting with wood filler. Overfill slightly as it shrinks when drying. -
Sand Smooth:
Once the filler is dry, sand the spots flat with 220-grit sandpaper. Also lightly sand any joints that might not be perfectly flush. -
Caulk the Gaps:
Run a bead of paintable latex caulk along the top edge (ceiling) and bottom edge (wall) of the crown molding, as well as in the corners. Smooth the bead with a wet finger or damp rag.
Closing Gaps
If a corner joint has a small gap due to uneven walls, don’t panic. Use the shaft of a screwdriver to rub the wood fibers of the two pieces together, blurring the line.
Step 4: Painting
-
Protect Surfaces:
Tape off the ceiling and the wall directly adjacent to the molding. Place drop cloths over the flooring. -
Final Coat Application:
Apply the final coat of Soft Gray semi-gloss paint. Use an angled sash brush for precision. Long, smooth strokes will help minimize brush marks. -
Address lower walls:
Paint the wainscoting in the same gray tone to ground the space, while painting the wall section between the crown and chair rail in a crisp white or cream matte finish. -
Remove Tape:
Carefully peel away the painter’s tape while the paint is still slightly tacky to ensure a crisp line without peeling up dried paint.
Step back and admire how the new molding draws the eye upward and finishes the room with timeless elegance
Charcoal Crown Molding for Modern Edge
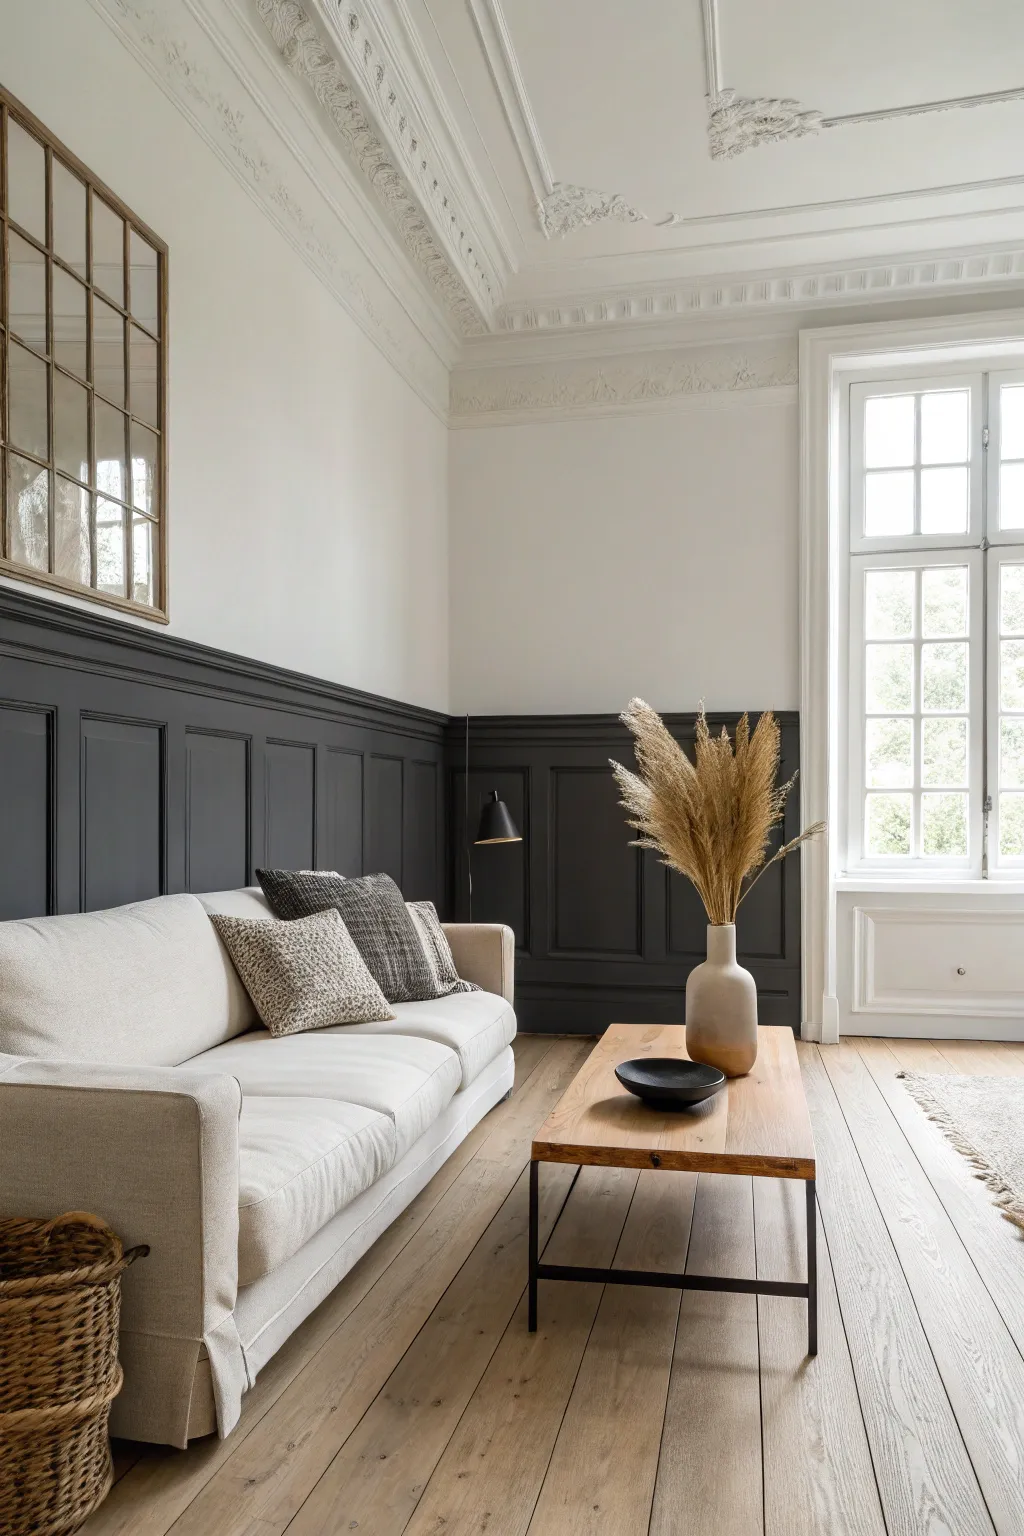
Contrast is king in this stunning room transformation, where deep charcoal wainscoting grounds the space while letting the ornate white crown molding sing above. This project focuses on establishing that perfect division of space, creating a bold architectural statement that feels both historic and thoroughly modern.
Step-by-Step Tutorial
Materials
- High-quality painter’s tape (frog tape recommended)
- Deep charcoal interior paint (satin or eggshell finish)
- Crisp white interior paint (flat or eggshell)
- Bright white trim paint (semi-gloss)
- Spackle or wood filler
- Medium-grit sandpaper (120-150 grit)
- Fine-grit sandpaper (220 grit)
- Caulk and caulk gun
- Angled sash brush (2.5 inch)
- Trim roller (4 inch) with smooth nap
- Standard roller and extension pole
- Drop cloths
- Mild detergent and sponge
- Primer (if changing drastic colors)
Step 1: Preparation & Wall Repair
-
Assess and clean:
Start by clearing the furniture away from the walls. Wipe down all surfaces—wainscoting, upper walls, and that beautiful crown molding—with a mild detergent solution to remove dust and oils. -
Fill imperfections:
Inspect the wainscoting panels and the chair rail for any dings or nail holes. Apply spackle or wood filler, pressing it firmly into the voids and leaving it slightly mounded to account for shrinkage. -
Sand for smoothness:
Once the filler is dry, sand the repairs flush with medium-grit paper. I find giving the entire wainscoting a light scuff-sand helps the new dark paint adhere better to previous glossy finishes. -
Caulk the gaps:
Run a bead of paintable caulk along the seams where the paneling meets the wall, and where the crown molding meets the ceiling. Smoothing this with a damp finger now prevents unsightly gaps later.
Step 2: Painting the Upper Features
-
Tackle the crown molding first:
Using your angled sash brush and semi-gloss bright white paint, carefully coat the ornate crown molding. Work in sections, dabbing slightly into deep crevices to avoid paint pooling. -
Cut in the upper walls:
With the crisp white wall paint, cut in the line where the ceiling meets the wall (or just below the crown molding). Don’t worry about being messy near the wainscoting yet; gravity works in our favor here. -
Roll the upper walls:
Use a standard roller to apply the white paint to the upper wall sections. Apply two coats for a solid, opaque finish that allows the ceiling details to pop.
Clean Corner Tip
When painting recessed panel corners, dabbing the brush tip loads too much paint. Instead, pull the brush away from the corner to drag paint out and prevent drips.
Step 3: The Dark Transformation
-
Tape the transition:
This is the most critical step. Once the upper white wall is fully dry (wait 24 hours if possible), run a line of high-quality painter’s tape exactly along the top edge of the chair rail. -
Seal the tape edge:
To ensure a razor-sharp line, brush a tiny amount of the *white* paint over the edge of the tape. This seals the gap; if any paint bleeds under, it matches the wall, creating a perfect barrier for the charcoal. -
Cut in the charcoal:
Open your deep charcoal paint. Use the sash brush to cut in along the baseboards, corners, and inside the recessed squares of the paneling where a roller won’t reach. -
Roll the flat surfaces:
Use a 4-inch trim roller to apply the charcoal to the flat stiles, rails, and center panels. The small roller gives you better control than a large one on this type of woodwork. -
Watch for drips:
Paneling loves to catch drips in corners. Keep a dry brush handy to smoothing out any accumulation in the recessed corners of the molding before they tack up. -
Apply the second coat:
Dark colors can be patchy. Apply a second coat after the recommended drying time, following the same process of brushing corners first, then rolling flats. -
Paint the baseboards:
Extend the charcoal color down to the baseboards to create a cohesive, floor-to-chair-rail block of color. This adds visual height to the lower section. -
The reveal:
While the final coat of charcoal is still slightly tacky (not wet, but not fully cured), slowly peel back the painter’s tape at a 45-degree angle to reveal your crisp line.
Level Up: Matte Finish
For an ultra-modern, velvety look, use a dead-flat matte finish for the charcoal section. It absorbs light beautifully but choose a washable brand for durability.
Step back and admire how this high-contrast design instantly elevates the architectural feel of your room
Black Crown Molding for Graphic Framing
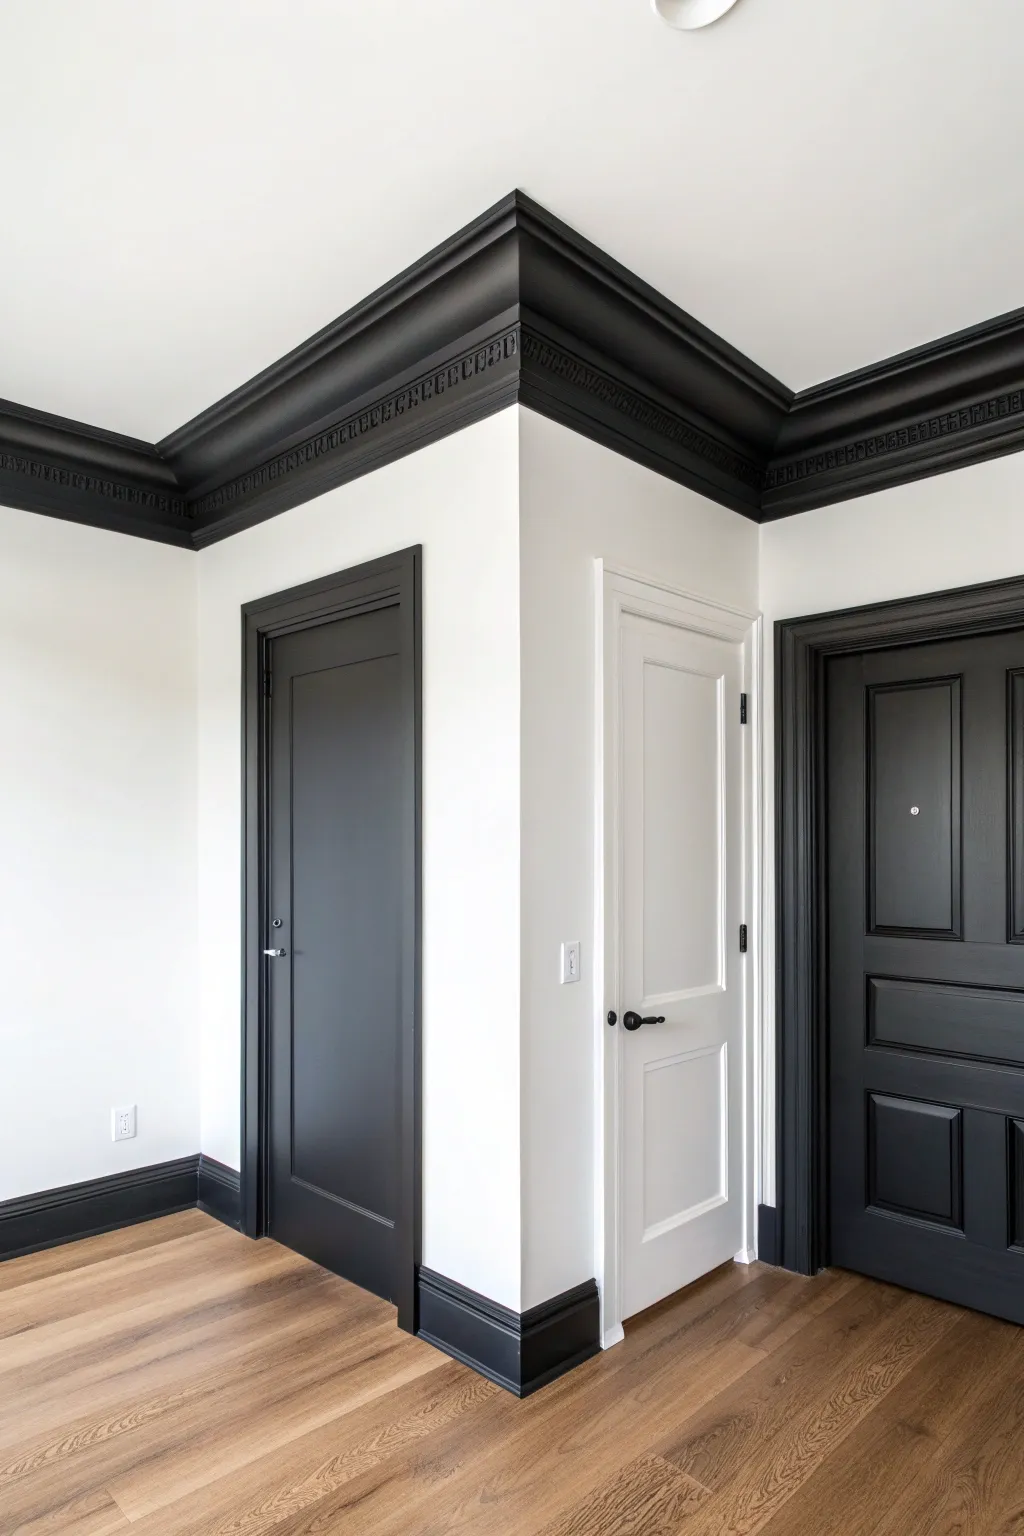
Achieve a bold, high-contrast aesthetic by framing clean white walls with striking black molding and joinery. This project creates a crisp, architectural look that defines the room’s geometry and adds immediate sophistication to any space.
Detailed Instructions
Materials
- High-quality semi-gloss or satin black interior paint (latex or acrylic-alkyd based)
- Wide crown molding (detailed profile)
- Tall baseboards (simple profile)
- Painter’s caulk
- Caulk gun
- Wood filler or spackling compound
- Fine-grit sandpaper (220 grit)
- Tack cloth
- High-quality angled sash brush (2-2.5 inch)
- Mini foam roller or velour roller for doors
- Painter’s tape (delicate surface recommended)
- Drop cloths
- Ladder
Step 1: Preparation & Surface Work
-
Assess and clean:
Begin by cleaning all existing trim, baseboards, and door surfaces thoroughly with a degreaser or mild soap solution to remove oils and dust that could repel paint. -
Sand for adhesion:
Lightly scuff-sand the crown molding, baseboards, and door casings with 220-grit sandpaper. You aren’t trying to remove all the old finish, just creating ‘tooth’ for the new black paint to grip. -
Fill imperfections:
Inspect the molding for nail holes or gaps. Fill these with wood filler or spackling. Once dry, sand these spots flush with the surrounding surface. -
Caulk the seams:
Run a thin bead of painter’s caulk along the top edge of the baseboards and both edges of the crown molding where they meet the wall and ceiling. Smooth it with a wet finger for a seamless transition. -
Tape carefully:
Apply painter’s tape to the walls and ceiling right up against the molding edges. Since we are using black paint, obtaining a razor-sharp line is critical, so press the tape edge down firmly.
Bleeding Lines?
If you struggle with blurry lines, paint over the tape edge with your WALL color first to seal it. Then apply the black; the black will sit perfectly on top.
Step 2: Painting the Crown & Baseboards
-
Cut in the edges:
Using an angled sash brush, carefully paint the top and bottom edges of the crown molding first. This ensures you get paint into the detailed crevices of the profile without overloading the brush. -
Fill the center:
Brush the paint across the main body of the molding. Use long, smooth strokes to minimize brush marks. I like to work in three-foot sections, maintaining a wet edge as I move along the room. -
Paint the baseboards:
Repeat the cutting-in and filling process for the baseboards. Ensure you check for drips that might pool near the floor, as black paint shows texture variations vividly. -
Apply a second coat:
Let the first coat dry completely according to the can’s instructions. Apply a second coat to ensure a deep, opaque black finish without any light spots showing through.
Step 3: Painting the Doors
-
Prep the doors:
Decide which doors will be black and which white. For the black doors, remove hardware or tape it off meticulously. -
Paint panel details first:
Use a brush to paint the recessed molding and corners of the door panels first. Smooth out any pooling in the corners immediately. -
Roll the flat surfaces:
Switch to a mini roller for the flat panels, stiles, and rails. This provides a smoother, factory-like finish compared to brushing large areas. -
Layering the finish:
Apply two to three thin coats rather than one thick one. Black paint can be tricky with coverage, so patience here prevents sagging and uneven sheen.
Sheen Strategy
For black trim, Satin or Semi-Gloss finishes are best. Matte black marks too easily, while High Gloss highlights every tiny surface perfection.
Step 4: Finishing Touches
-
Remove tape:
Pull the painter’s tape off while the final coat is still slightly tacky, pulling at a 45-degree angle away from the painted edge to keep the line crisp. -
Touch up walls:
If any black paint bled onto the white walls, wait for it to dry fully, then use a small artist’s brush and your white wall paint to correct the line. -
Reinstall hardware:
Once the doors are fully cured (give it at least 24 hours), reinstall your door knobs and hardware to complete the high-contrast look.
Step back and admire how the dark framework instantly sharpens the architectural lines of your room
Deep Navy Crown Molding for Sophisticated Drama
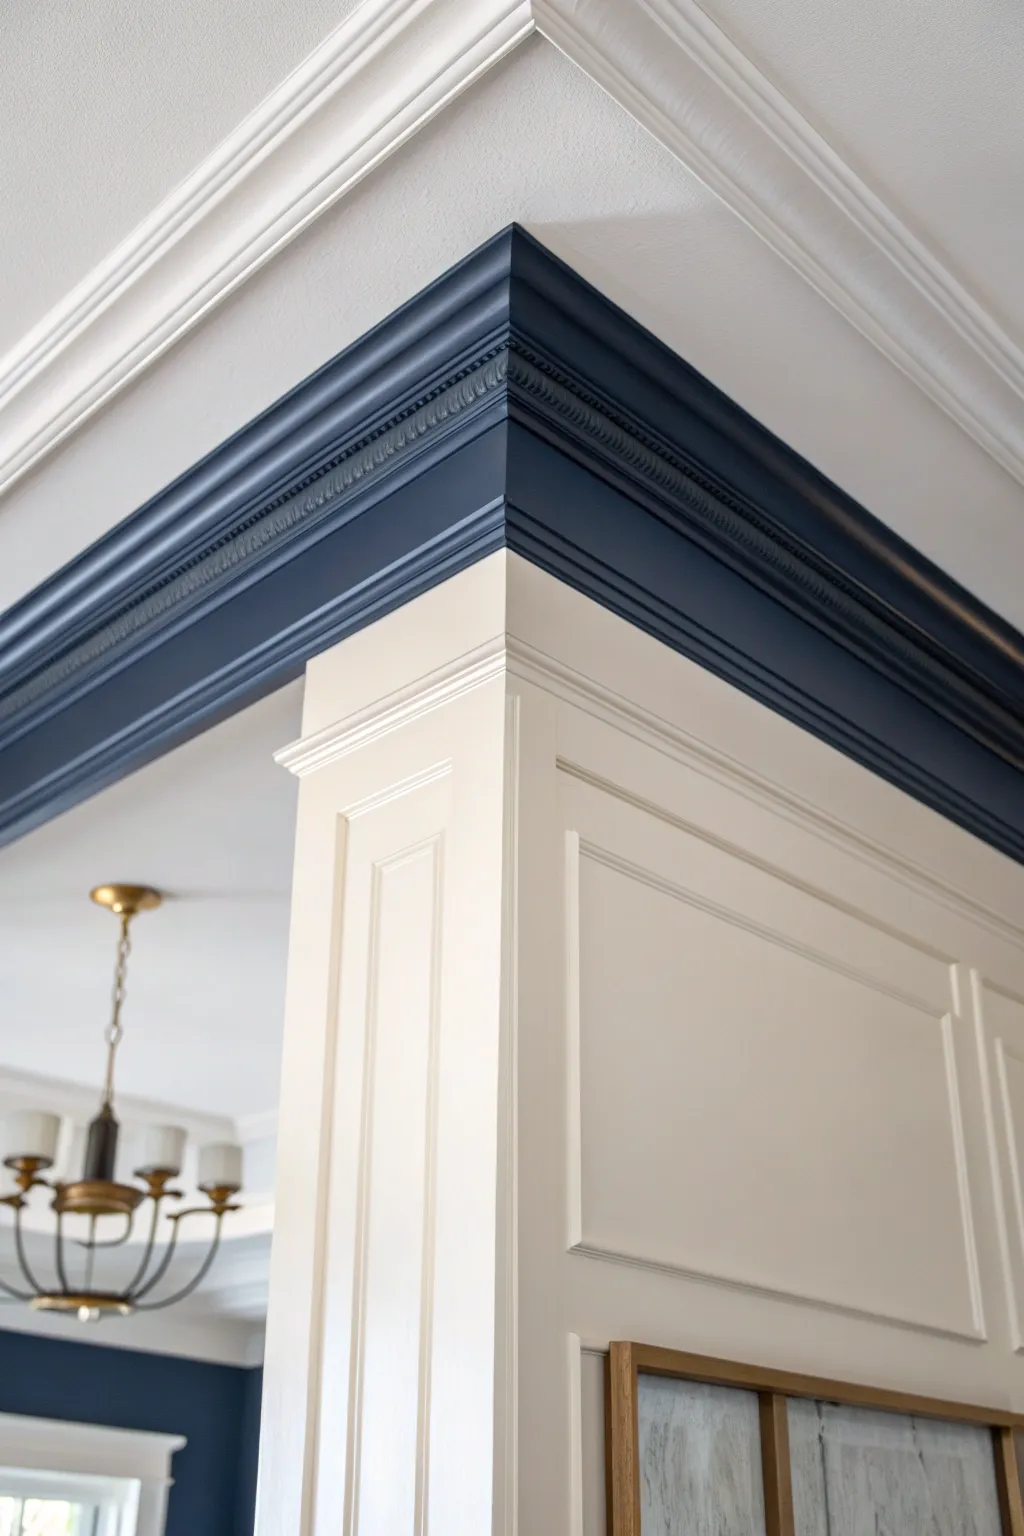
Transform ordinary architectural details into a stunning focal point with this bold, sophisticated navy crown molding project. The deep blue hue adds dramatic contrast against crisp white paneling, highlighting the intricate contours of the molding for a high-end, custom look.
Step-by-Step Tutorial
Materials
- High-quality interior satin or semi-gloss paint (Deep Navy Blue)
- Interior semi-gloss paint (Creamy White)
- Painter’s tape (sharp lines)
- Angled sash brush (2.5 inch)
- Small artist brush or detail brush
- Fine-grit sandpaper (220-grit)
- Tack cloth
- Drop cloths
- Screwdriver (to remove hardware if necessary)
- Mild detergent and sponge
- Wood filler (if repairing nail holes)
- Caulk and caulk gun
Step 1: Preparation & Cleaning
-
Clear the area:
Begin by removing any nearby furniture or wall hangings. Lay down drop cloths to protect your flooring from potential drips or splatters, ensuring they are flush against the base of the column or wall. -
Clean surface:
Thoroughly clean the molding and wood paneling with a mild detergent and water solution to remove dust, grease, and grime. Let it dry completely. -
Repair imperfections:
Inspect the wood for nail holes or dents. Fill these with wood filler, allow it to dry, and sand them flush. If there are gaps where the molding meets the wall or ceiling, apply a thin bead of caulk and smooth it with a wet finger. -
Sand for adhesion:
Lightly scuff-sand all painted surfaces with 220-grit sandpaper. This deglosses the previous finish and helps the new paint adhere properly. -
Remove dust:
Wipe away all sanding dust using a tack cloth. Any remaining dust can ruin the smoothness of your final finish.
Tape Bleed Fix
If paint bleeds under tape, let it dry completely. Then place a piece of tape over the bleed and gently scrape it away with a putty knife, or carefully touch up with an artist brush.
Step 2: Painting the Paneling (Cream)
-
Cut in edges:
Using your angled sash brush and the creamy white paint, carefully cut in around the edges of the lower paneling where it meets the wall or future blue molding areas. -
Paint the panels:
Apply the creamy white paint to the main panel faces and stiles. Use long, smooth strokes in the direction of the wood grain to minimize brush marks. -
Second coat:
Allow the first coat to dry according to the manufacturer’s instructions. Apply a second coat for full, opaque coverage and a rich finish.
Step 3: Painting the Crown Molding (Navy)
-
Tape carefully:
Once the cream paint is fully cured (give it at least 24 hours), apply painter’s tape along the bottom edge of the crown molding to protect your fresh cream paint. Press the tape edge firmly to prevent bleed-through. -
Tape the ceiling:
Apply tape to the ceiling or upper white molding right where it meets the ornate wood you plan to paint navy. -
First navy coat:
Load your angled sash brush with the deep navy paint. Start painting the broad sections of the molding. I like to work in small sections to keep a wet edge. -
Detail work:
As you encounter the intricate dentil or rope detailing in the molding, use the paint tip of your sash brush to gently dab paint into crevices. Do not overload the brush to avoid drips getting stuck in the details. -
Check for drips:
Periodically step back and inspect the grooves for pooling paint. Smooth these out immediately with a mostly dry brush. -
Second navy coat:
After the first coat is dry, apply a second coat of navy. Dark colors often require two or even three thin coats to achieve true depth and hide the lighter color underneath. -
Touch-ups:
If there are tiny recesses in the ornate pattern that the sash brush missed, use a small artist’s brush to carefully fill them in.
Gilded Edge
For an extra layer of luxury, run a very thin line of gold leaf paint or metallic wax along the very bottom edge of the navy molding where it meets the cream panel.
Step 4: Finishing Touches
-
Remove tape:
Ideally, remove the painter’s tape while the final coat is still slightly tacky. Pull the tape slowly at a 45-degree angle away from the painted edge to ensure a razor-sharp line. -
Inspect lines:
Check the transition line between the navy and cream. If there is minor bleeding, use a small artist brush and the appropriate color to touch up the line freehand. -
Clean chandelier:
Since you were working near the ceiling, give your light fixture a quick dust or wipe down to ensure the whole vignette looks sparkling and fresh.
Step back and admire how this striking splash of navy transforms the entire character of your room
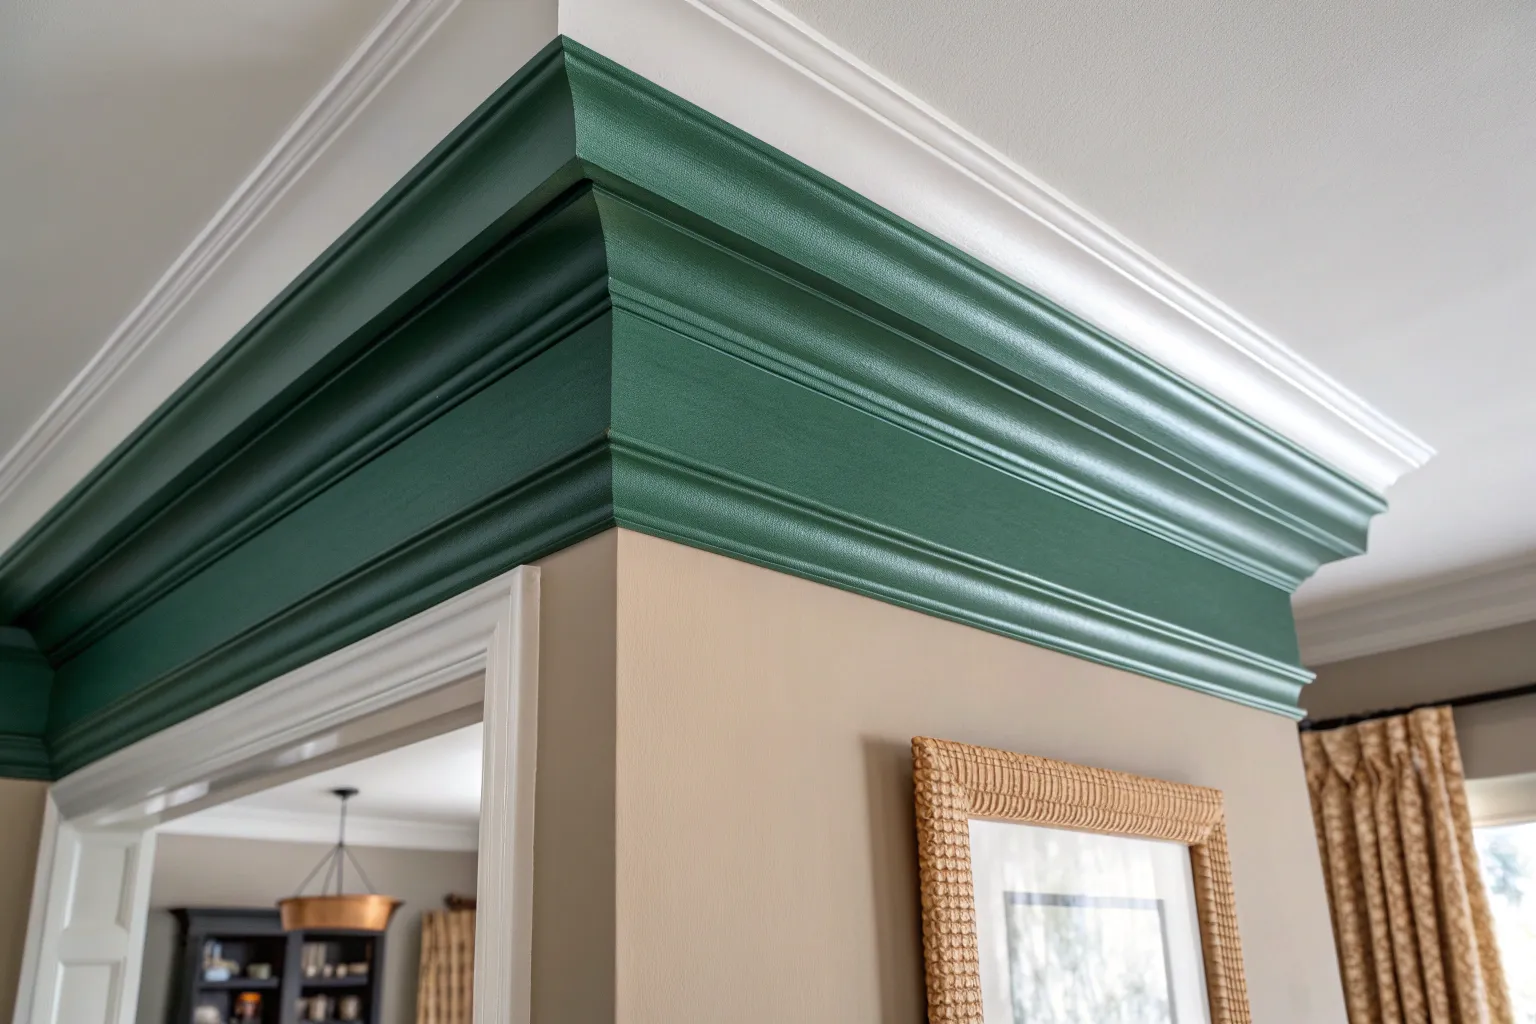
Forest Green Crown Molding for Moody Depth
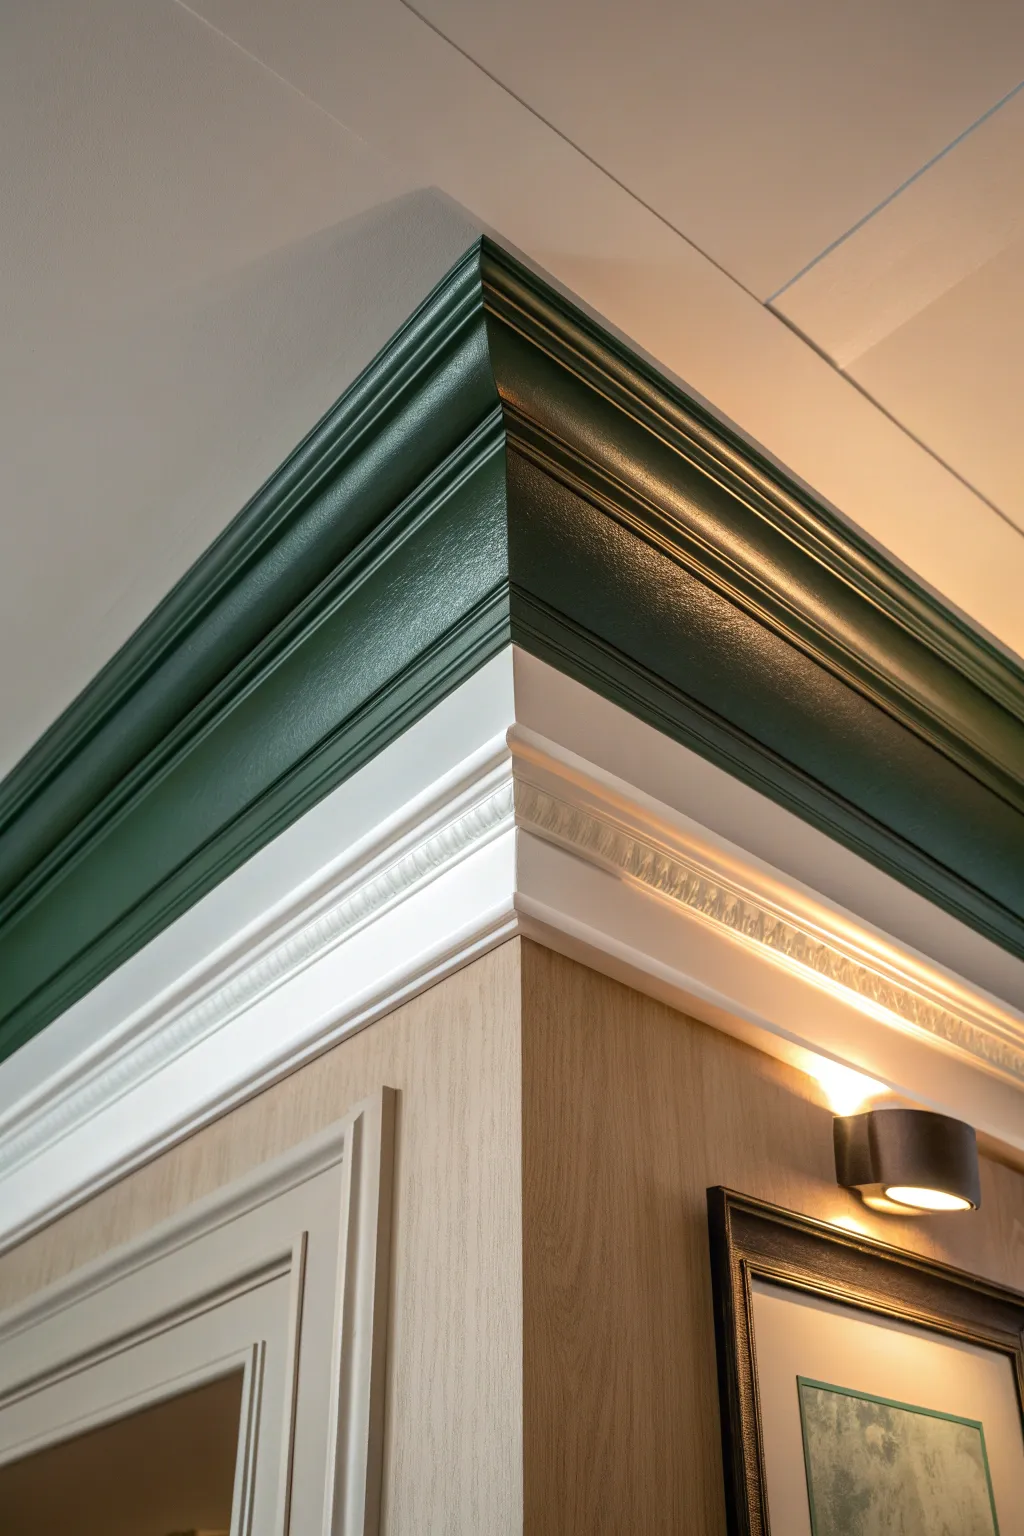
This project creates a striking architectural statement by layering two distinct molding profiles to add visual height and drama. By painting the upper tier a deep, glossy forest green and contrasting it with a crisp white lower trim, you achieve a moody, sophisticated finish perfect for elevating any room.
Step-by-Step Guide
Materials
- Large profile crown molding (top tier)
- Smaller decorative trim molding (lower tier)
- Forest green paint (semi-gloss or high-gloss)
- Bright white trim paint (semi-gloss)
- Wood filler or spackle
- Caulk and caulk gun
- Painter’s tape (delicate surface)
- Angled sash brush (2-inch)
- Small artist brush for touch-ups
- Sandpaper (220-grit)
- Drop cloths
- Miter saw (if installing new molding)
- Brad nailer (if installing new molding)
Step 1: Preparation and Prime
-
Assess the surface:
Begin by inspecting your current molding setup. If you are installing new molding, ensure your miter cuts are tight. If you are painting existing molding, clean the surfaces thoroughly with a degreaser to remove dust and oils. -
Fill imperfections:
Use wood filler to cover any nail holes or gaps in the corner joints. Press the filler in firmly and leave it slightly proud of the surface to allow for shrinkage. -
Sand smooth:
Once the filler is completely dry, sand the filled areas with 220-grit sandpaper until they are perfectly flush with the molding profile. Wipe away all dust with a tack cloth. -
Caulk the seams:
Run a thin bead of paintable caulk along the top edge where the molding meets the ceiling and the bottom edge where it meets the wall. Use a wet finger to smooth the bead immediately for a seamless transition.
Step 2: Painting the Lower Tier
-
Protect the wall:
Since the wall features a textured wallpaper, carefully apply delicate surface painter’s tape along the bottom edge of the lower white trim to protect the wall covering. -
Paint the white trim:
Apply your bright white semi-gloss paint to the lower tier molding. Use long, even strokes to minimize brush marks. -
Detail work:
If your lower molding has intricate details like the one shown, use a smaller brush to ensure paint gets into the crevices without pooling, which can obscure the design. -
Apply second coat:
Allow the first coat to dry according to the manufacturer’s instructions, then apply a second coat for solid, opaque coverage.
Bleeding Lines?
If paint bleeds under the tape, let it dry completely. Then, use a stiff, damp brush or a razor blade to gently scrape away the excess, or carefully touch up with the base color.
Step 3: Painting the Upper Tier
-
Tape the separation:
Once the white paint is fully cured—I generally wait at least 24 hours to be safe—apply painter’s tape to the very top edge of the white molding to protect it from the green paint. -
Tape the ceiling:
Apply a strip of tape to the ceiling right against the top edge of the upper molding to ensure a crisp line. -
Cut in the edges:
Dip your angled sash brush into the deep forest green paint. Carefully cut in along the top (ceiling) and bottom (white molding) edges first. -
Fill the profile:
Paint the main body of the upper molding. Forest green is a dark pigment, so don’t rework the paint too much as it dries or it may streak. -
Check for drips:
Inspect the curves and grooves of the molding profile immediately for any drips or runs and smooth them out with the brush tip. -
Apply second coat:
Dark colors often require two or even three coats for true depth. Apply subsequent coats once the previous one is dry to the touch.
Clean Edges Pro Tip
Before applying the forest green, brush a thin layer of the base white paint over the tape edge. This seals the tape and ensures any bleed is white-on-white, leaving a perfect green line.
Step 4: Finishing Touches
-
Remove tape:
Peel off the painter’s tape while the final coat of paint is still slightly tacky. Pull the tape away from the painted edge at a 45-degree angle to prevent peeling. -
Touch up lines:
Use a small artist brush to fix any tiny areas where the green might have bled onto the white or vice versa. -
Polish texturing:
If the green paint looks uneven in sheen after drying, lightly buff it with a soft cloth to unify the gloss finish. -
Final inspection:
Stand back and check the corner joints and ceiling lines. If you see slight gaps against the ceiling, a tiny amount of artist’s white paint can sharpen that line.
Now step back and enjoy the dramatic, custom look your precision painting has brought to the room
Dusty Pastel Crown Molding for a Soft Pop
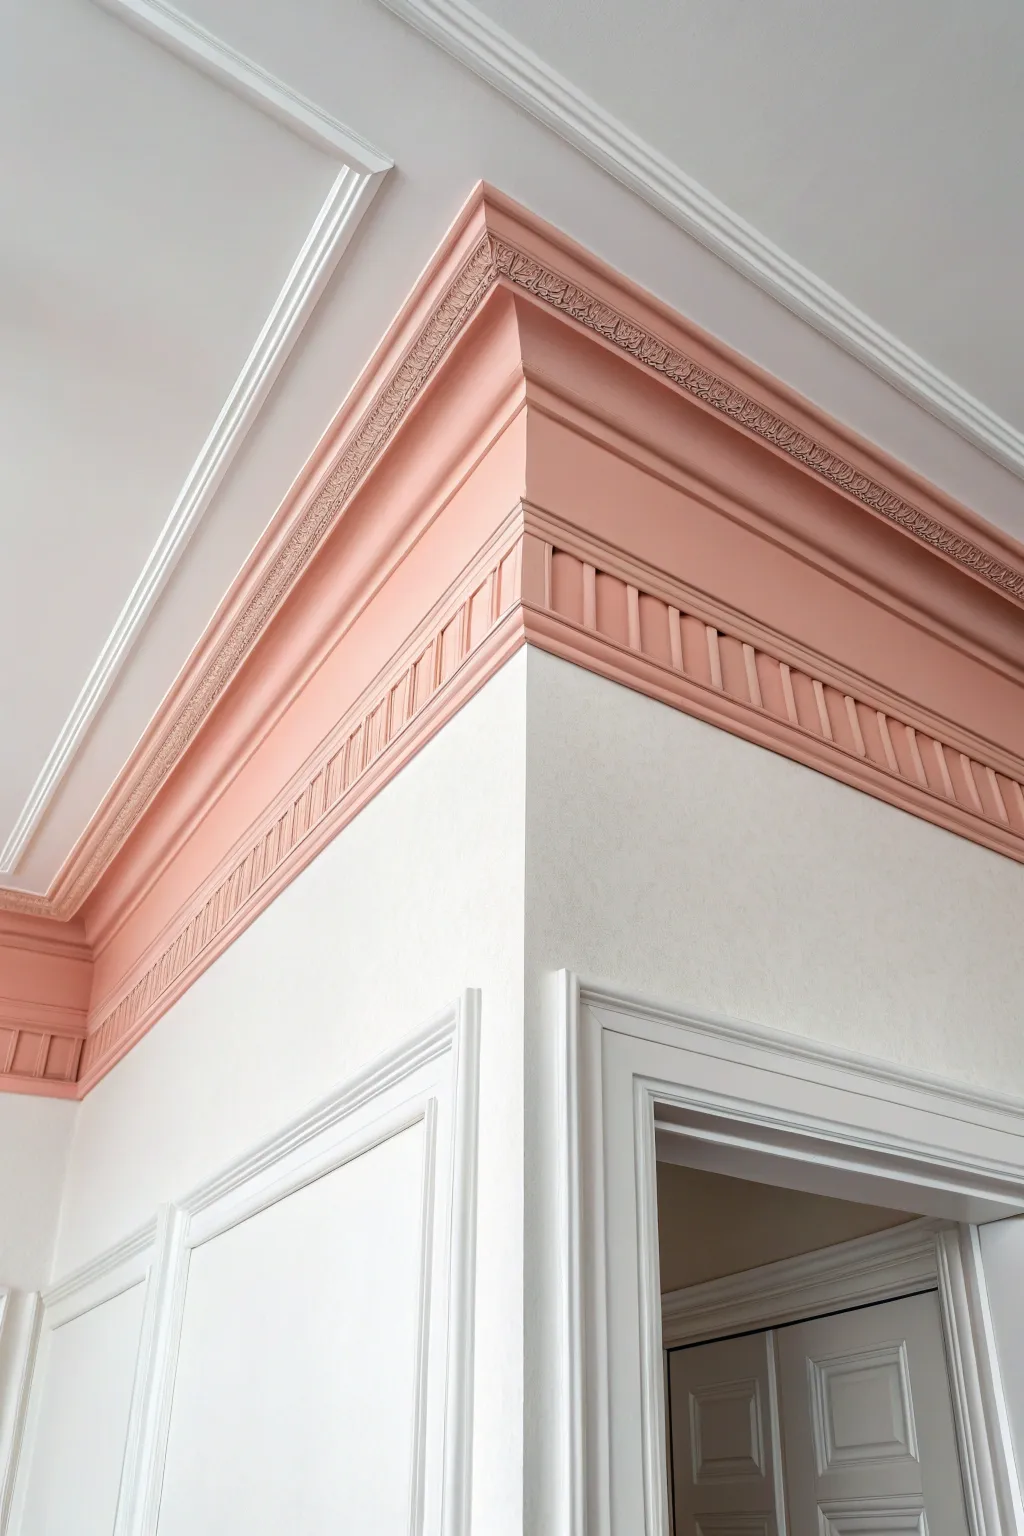
Transform ordinary white walls into a statement feature by highlighting architectural details with a soft, sophisticated pop of color. This dusty pink crown molding adds instant warmth and elegance, drawing the eye upward and emphasizing the height of the room.
How-To Guide
Materials
- High-quality painter’s tape (1.5 or 2 inch)
- Interior semi-gloss or satin paint (dusty salmon/pink shade)
- Interior flat or eggshell paint (bright white for ceiling/walls)
- Angled sash brush (2.5 inch)
- Small artist brush (for detail work)
- Drop cloths
- Sanding sponge (220 grit)
- Tack cloth
- Screwdriver (implied for removing outlet covers if needed, though not shown)
- Ladder
Step 1: Preparation
-
Clear the area:
Move furniture away from the walls and lay down drop cloths to protect your flooring from any potential drips or splatters. -
Inspect the molding:
Check the crown molding for any existing nail holes, gaps, or cracks. Fill these imperfections with wood filler or caulk if necessary, smoothing them out with a finger or damp rag. -
Sand the surface:
Lightly scuff the surface of the crown molding with a 220-grit sanding sponge. This helps the new paint adhere better, especially if the previous finish was glossy. -
Clean dust away:
Wipe down the entire length of the molding with a tack cloth to remove every bit of sanding dust. A dusty surface will ruin your smooth finish. -
Tape the ceiling:
Apply painter’s tape along the ceiling line right where it meets the top edge of the crown molding. Press the tape edge down firmly with a putty knife or credit card to prevent bleed-through. -
Tape the wall:
Repeat the taping process along the bottom edge of the molding where it meets the wall. I always take extra time here to ensure the line is perfectly straight.
Tape Sealing Trick
Don’t skip painting the tape edge with the *base* wall color first. It fills voids under the tape so the accent color can’t bleed through.
Step 2: Painting the Base Layer
-
Seal the tape:
Paint a very thin line of your *white* wall/ceiling color over the edge of the tape. This trick seals the tape edge so that if any paint bleeds underneath, it matches the wall, creating a razor-sharp line later. -
Let the seal dry:
Allow this sealing layer to dry completely according to the manufacturer’s instructions before opening your pink paint.
Drips in Detail Work?
If paint pools in the ornate crevices, keep a dry brush handy to soak up excess liquid immediately, preserving the sharp relief of the molding.
Step 3: Applying Color
-
Cut in the edges:
Dip your angled sash brush into the dusty pink paint. Carefully paint along the top and bottom edges of the molding first, overlapping slightly onto the tape. -
paint the profile:
Fill in the center sections of the molding. For areas with vertical detailing or dentils (like the lower section in the image), use a dabbing motion to get paint into the crevices. -
Smooth the strokes:
Once a section is covered, run the brush lightly over it in long, horizontal strokes to smooth out any brush marks or drips before moving to the next section. -
Check for pooling:
Inspect the detailed crevices—like the floral motif at the top—to ensure paint hasn’t pooled there, which would obscure the design. -
Apply second coat:
After the first coat is fully dry, apply a second coat for rich, opaque coverage. The pink tone often needs two layers to truly pop against white.
Step 4: Finishing Up
-
Remove tape while damp:
I prefer to peel the painter’s tape off slowly while the second coat is still slightly tacky. Pull the tape away from the painted edge at a 45-degree angle. -
Wait for full cure:
Let the paint cure fully for at least 24 hours before trying to clean or touch it. -
Touch up details:
If you notice any tiny spots where white shows through in deep carvings, use a small artist brush to carefully dab in a little pink paint. -
Clean up edges:
If any pink paint bled onto the white wall despite your taping, use your small artist brush and white paint to tidy up the line once everything is dry.
Enjoy the elegant contrast your new dusty pink molding brings to the room
Two-Tone Crown Molding for Tray Ceilings
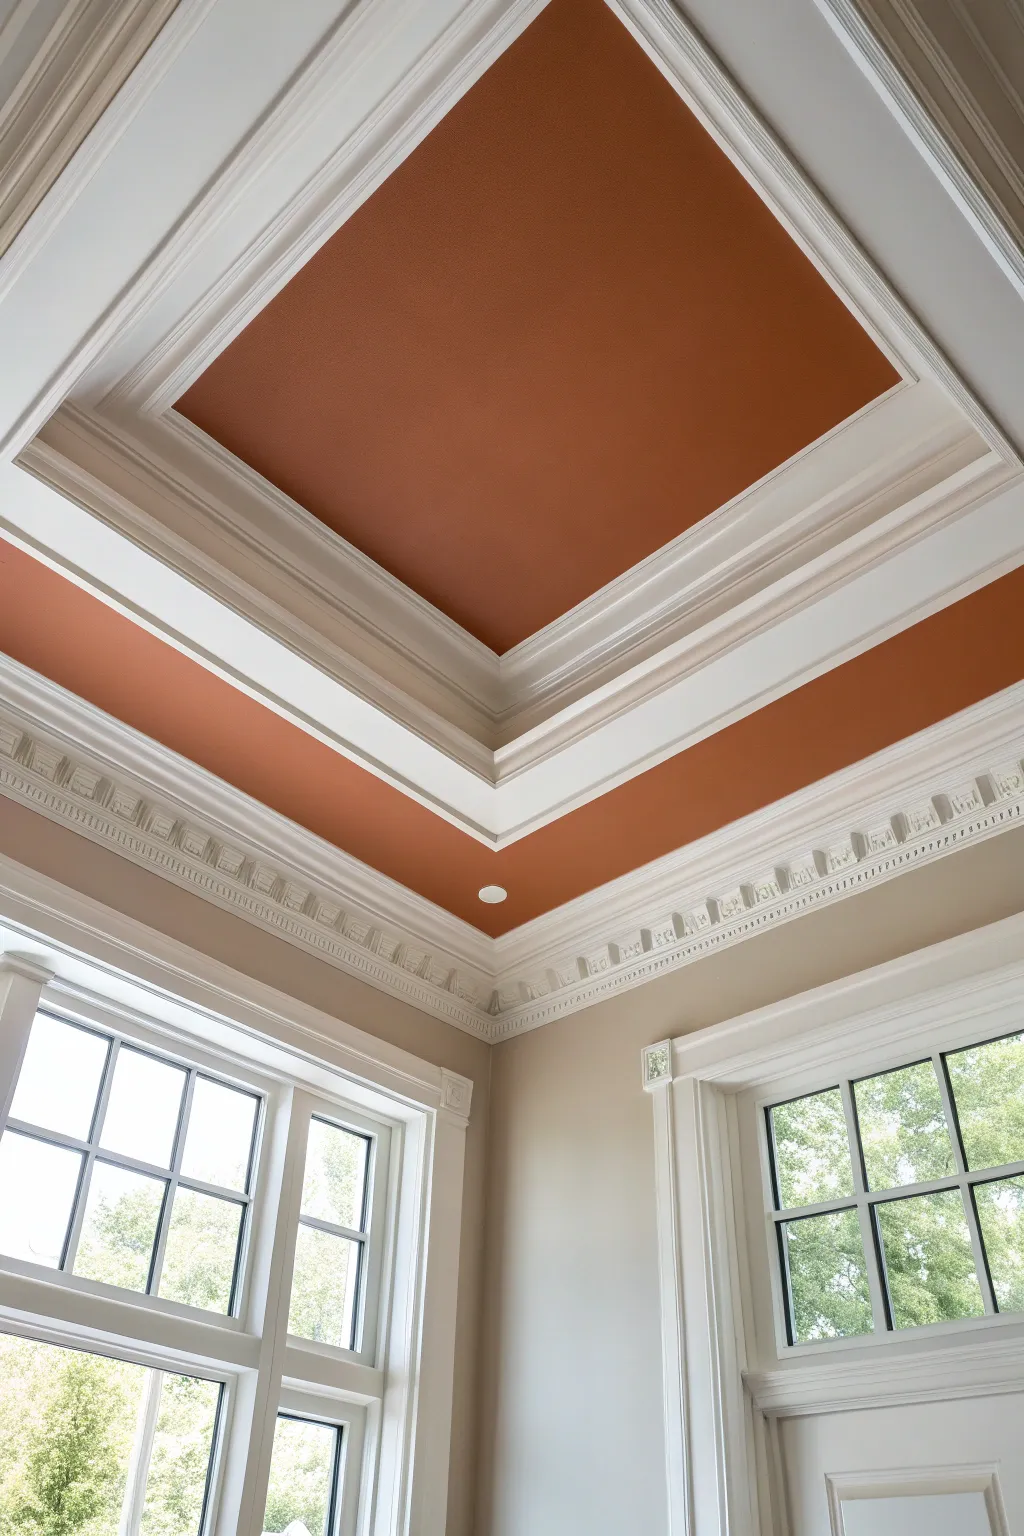
This project transforms a standard room into a stately retreat by highlighting the architectural depth of a tray ceiling with a bold color contrast. The interplay between the crisp white molding and the warm, russet-toned recesses creates a sophisticated, multi-dimensional canopy overhead.
Step-by-Step Guide
Materials
- High-quality interior latex paint (Russet/Terracotta color, flat or eggshell finish)
- Contrasting trim paint (Bright White, semi-gloss finish)
- Neutral wall paint (Beige/Greige, matte finish)
- Painter’s tape (multiple widths: 1-inch and 2-inch)
- Angled sash brush (2.5 inch)
- Roller frame and extension pole
- Microfiber roller covers (3/8 inch nap for smooth finish)
- Canvas drop cloths
- Ladder or scaffolding
- Sanding sponge (fine grit)
- Spackling paste and putty knife
- Caulk and caulk gun
Step 1: Preparation and Surface Repair
-
Protect the room:
Clear the room of furniture or move it to the center. Lay down heavy canvas drop cloths to cover the entire floor, especially under the areas where you will be working overhead. -
Inspect the molding:
Examine the intricate dentil crown molding and the flat molding strips for any cracks or gaps. Use a caulk gun to fill gaps along the edges where the molding meets the drywall. -
Fill nail holes:
If there are any visible nail holes or imperfections in the drywall or wood trim, fill them with spackling paste. Allow it to dry completely. -
Sand for smoothness:
Gently sand the patched areas with a fine-grit sanding sponge. Wipe away all dust with a tack cloth or damp rag to ensure the paint adheres properly. -
Tape off the walls:
Apply painter’s tape along the bottom edge of the lower crown molding to protect your wall color. Press the tape edges down firmly with a putty knife to prevent bleed-through.
Bleeding Lines?
If paint bleeds under tape, let it dry fully. Apply a tiny bit of the base color to seal the gap, then repaint the line with the contrast color.
Step 2: Painting the Trim and Molding
-
Cut in the white trim:
Using the angled sash brush and your bright white semi-gloss paint, carefully paint the intricate details of the dentil molding. Work the bristles into the small crevices of the dentil blocks. -
Paint the flat molding:
Continue with the brush to paint the flat steps of the tray ceiling and the vertical risers. I find it helpful to engage the ‘wet edge’ technique here, moving consistently to avoid lap marks. -
Apply a second coat:
Once the first coat of white is dry, assess coverage. Semi-gloss often requires a second coat to look truly solid and luminous. Apply the second coat and let it cure fully.
Step 3: Applying the Russet Accent Color
-
Tape the molding edges:
This is critical: Apply fresh painter’s tape along the *interior* edges of the white molding you just painted. This protects your crisp white lines from the incoming bold color. -
Cut in the accent color:
Open your russet/terracotta paint. With a clean angled brush, cut in a 3-inch band of color along the taped edges of the horizontal ceiling plane and the angled side recess. -
Roll the angled recess:
Use a small roller or a mini-roller to fill in the angled or vertical section of the tray ceiling (the lower band of color). Ensure the color is even and smooth. -
Roll the center square:
Switch to a standard roller on an extension pole. Paint the large central square of the ceiling with the russet color. Roll in a ‘W’ pattern to distribute paint, then smooth it out with long, parallel strokes. -
Check for holidays:
Inspect the ceiling from different angles to spot any missed patches, known as ‘holidays.’ Touch these up while the paint is still workable. -
Apply the final coat:
Allow the first coat of the russet color to dry according to the can’s instructions. Apply a second coat to ensure the color is deep, rich, and opaque.
Clean Edges Instantly
Before painting your accent color, brush a light layer of the base (white) paint over the tape edge to ‘seal’ it for a razor-sharp line.
Step 4: Finishing Touches
-
Remove tape carefully:
While the final coat is still slightly tacky (not fully cured), slowly peel back the painter’s tape at a 45-degree angle. This prevents the dried paint film from ripping. -
Inspect edges:
Look closely at the transition lines between the white molding and the russet ceiling. If any color bled through, use a tiny artist’s brush and white paint to clean up the line. -
Paint the walls:
Finally, paint the walls below the crown molding in your neutral beige tone. Cut in carefully against the bottom of the crown molding and roll the rest of the wall surfaces.
Step back and admire how the warm ceiling hue instantly elevates the height and elegance of the room
Highlight Crown Molding Details With Two Colors
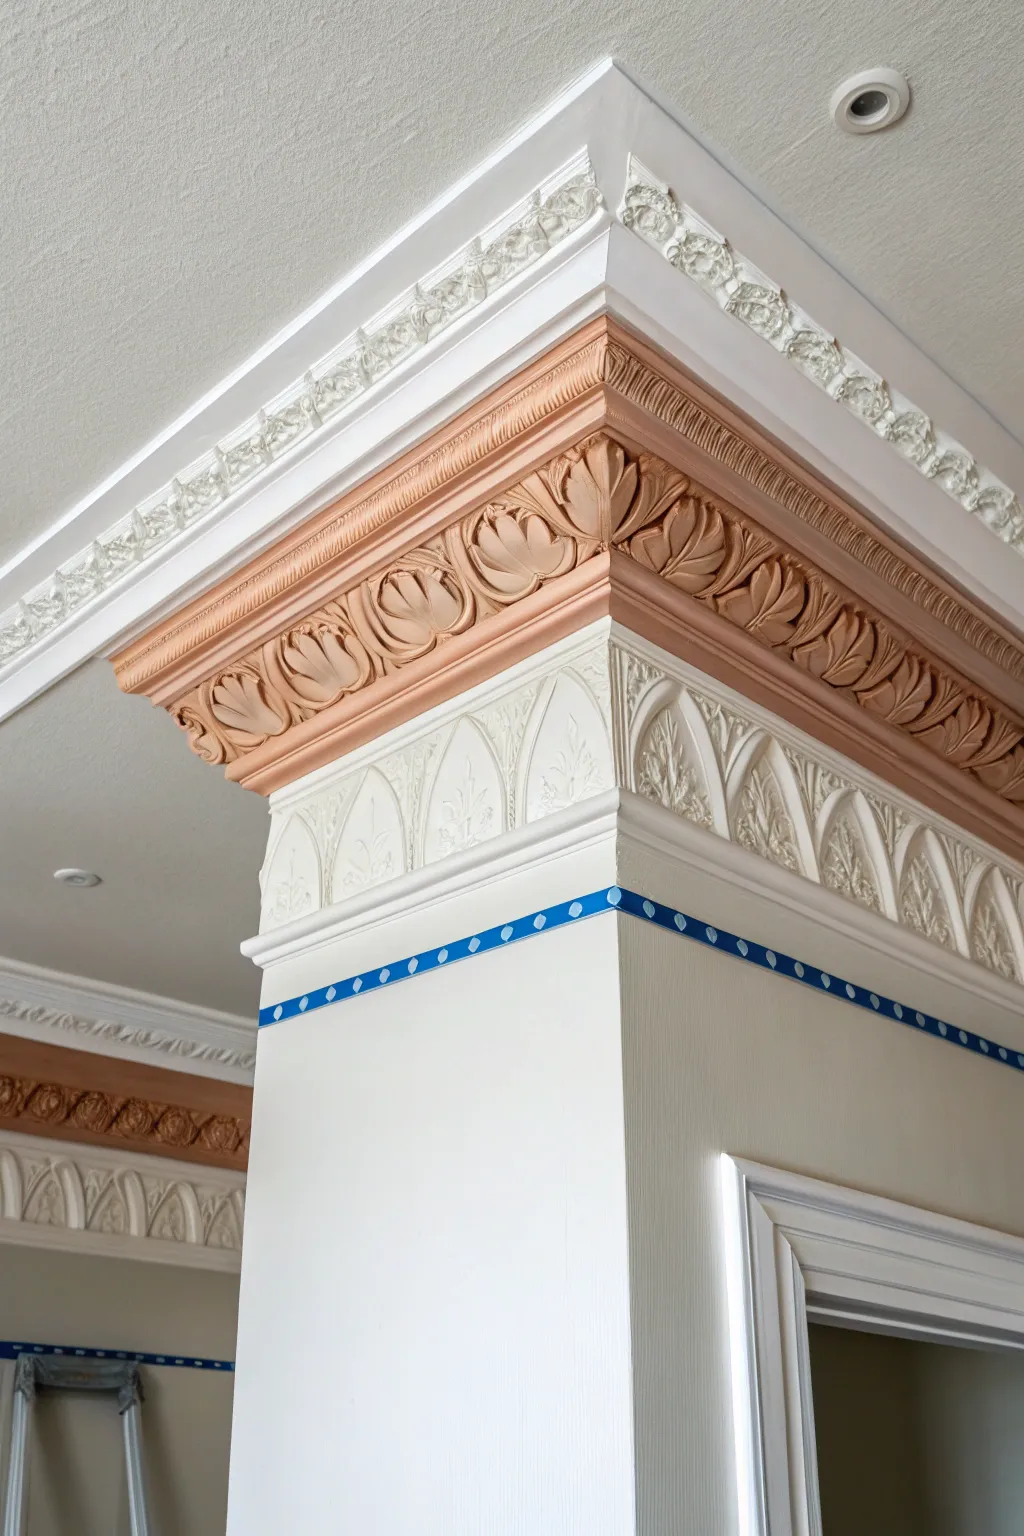
Elevate ordinary molding into a stunning architectural feature by painting key details in a contrasting hue. This project layers creamy white with a warm terracotta tone to emphasize the intricate leaf leaf patterns, transforming a standard column into a focal point.
Detailed Instructions
Materials
- High-quality interior latex paint (creamy white)
- Interior latex paint (terracotta/dusty rose)
- 1.5-inch angled sash brush
- Small artist brushes (round and flat framing)
- High-adhesion painter’s tape (blue)
- Damp painter’s rag
- Step ladder
- Fine-grit sanding sponge
- Caulk and caulk gun (if filling gaps)
Step 1: Preparation & Base Coat
-
Clean the surface:
Before dipping any brush, ensure the molding is free of dust. A quick wipe with a damp rag or a tack cloth removes debris that could ruin your smooth finish. -
Inspect and fill:
Look for nail holes or gaps where the molding meets the ceiling. Fill these with paintable caulk or spackle and let them dry completely, then sand lightly with a fine-grit sponge for a perfect substrate. -
Mask the perimeter:
Apply painter’s tape just below the molding on the wall and just above it on the ceiling. This protects your surrounding surfaces from stray bristles. -
Apply the base color:
Using the 1.5-inch angled sash brush, paint the entire molding assembly with your creamy white base color. This acts as your canvas. -
Ensure full coverage:
Work the bristles into the deep crevices of the leaves and arches. It’s crucial that the white coat covers everything, as missed spots will be harder to fix later. -
Apply a second coat:
Once the first coat is dry to the touch, apply a second layer of white. This ensures a rich, solid background that isn’t translucent.
Step 2: Applying the Accent Color
-
Select the accent zone:
Identify the specific band of molding you want to highlight. In this look, it’s the central band featuring the heavy acanthus leaf texture. -
Load the artist brush:
Dip a small, flat artist brush into the terracotta paint. Don’t overload it; control is more important than speed here. -
Paint the prominent leaves:
Carefully paint the raised leaf surfaces. I find it easiest to start at the center of each leaf and brush outward toward the edges. -
Define the edges:
Use a smaller round brush to cut into the deep recesses between the leaves. You want the color to recede into the shadows while keeping the very top and bottom ridges white if desired. -
Cut in the horizontal lines:
Steady your hand against the wall or ladder and paint the straight horizontal rails that border the leaf pattern. Keep a clean, damp rag handy to immediately wipe off any slips onto the white sections. -
Check for holidays:
Inspect the accent area from different angles (especially from below). Touch up any spots where the white base coat is still peeking through the terracotta unexpectedly.
Brush Control Secret
Rest your pinky finger against a dry part of the molding while painting intricate details. It acts as a stabilizer, preventing your hand from shaking during precise work.
Step 3: Finishing Touches
-
Create the decorative stripe:
To mimic the blue patterned line shown in the inspiration photo, measure a few inches down from the main molding. Apply a strip of painters tape. -
Apply the pattern tape:
If recreating the diamond pattern, use a specialty stenciling tape or carefully cut diamond shapes out of a solid strip of blue tape applied to the wall. -
Paint the stripe detail:
Lightly dab your accent paint (terracotta or a darker blue if matching the tape look) over the stencil area. Use a dry-brush technique to prevent bleed-under. -
Remove tape:
While the paint is still slightly tacky, slowly peel away your masking tape at a 45-degree angle. This prevents the dried paint film from ripping. -
Final inspection:
Step down from the ladder and view the work from the floor. Correct any tiny imperfections with a fine artist brush.
Paint Bleeding Fix
If accent color bleeds onto the white, wait for it to fully dry. Then, use a small flat brush with the white base color to carefully “cut” back over the mistake.
With the tape removed and the paint dry, your molding now boasts a custom, high-end look that highlights architectural character.
High-Gloss Crown Molding to Catch Light
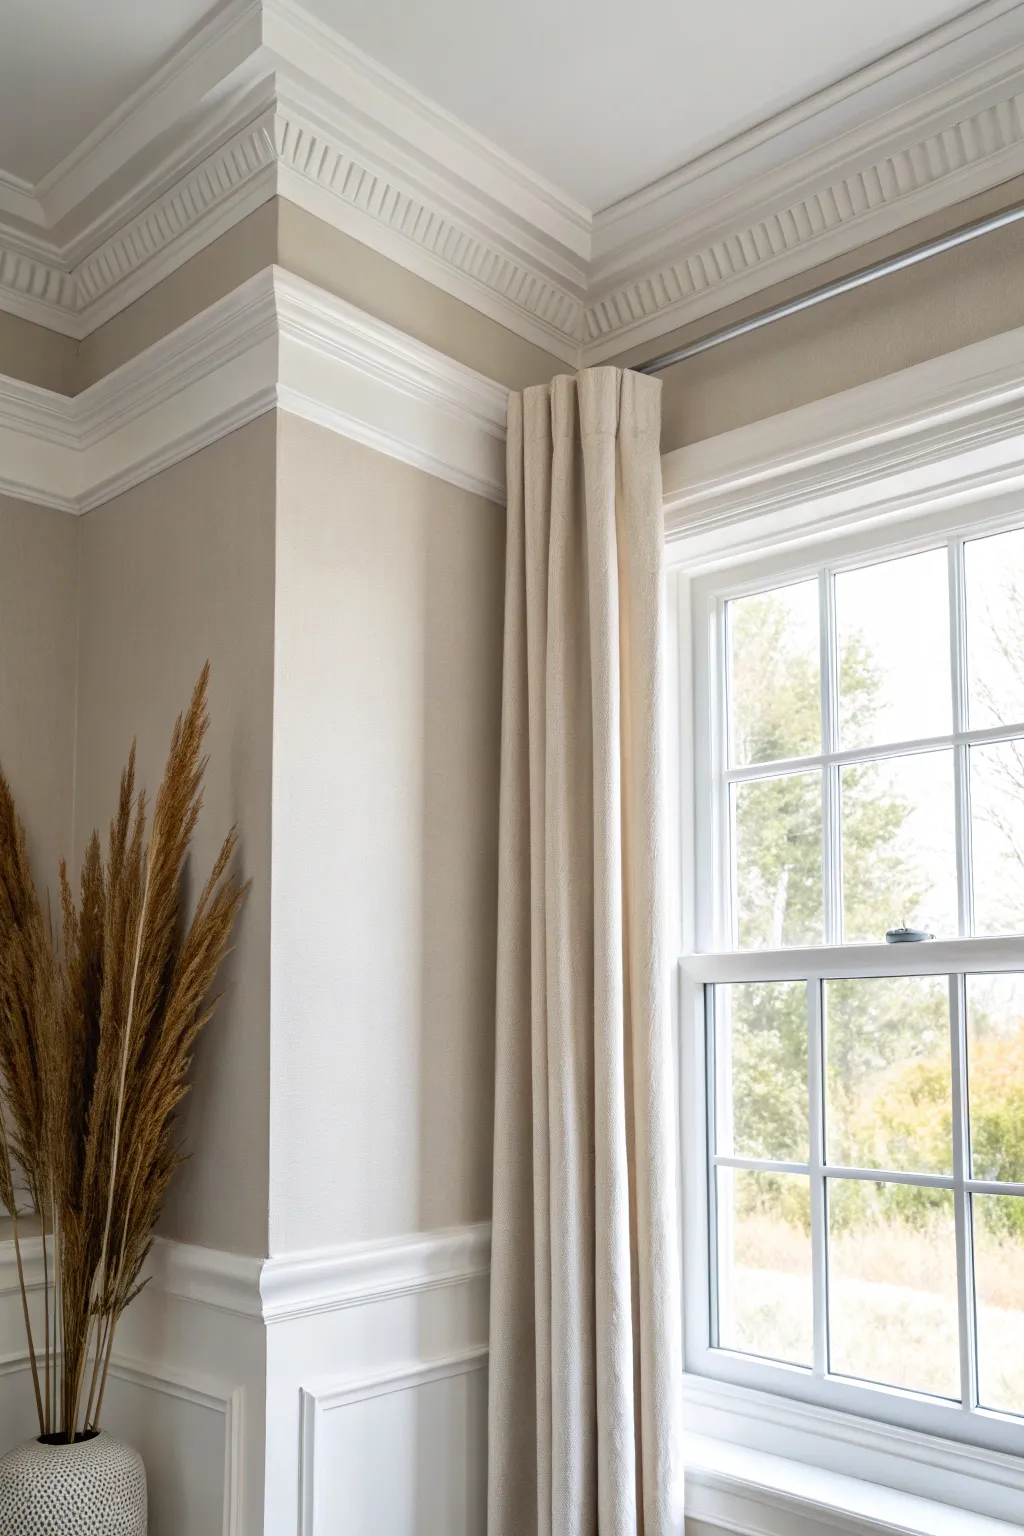
Recreate this serene corner scene by focusing on crisp architectural lines and soft, neutral tones. This tutorial guides you through illustrating elaborate crown molding and wainscoting, emphasizing the play of light on high-gloss trim surfaces.
Step-by-Step Guide
Materials
- Heavyweight watercolor paper or mixed media board
- Pencil (HB and 2H for light drafting)
- Ruler or T-square
- Fine liner pens (0.1, 0.3, 0.5 mm in warm grey and black)
- Watercolor paints (Sepia, Yellow Ochre, Burnt Umber, Payne’s Grey, Titanium White)
- Small round brushes (size 0, 2, 4)
- White gouache or white gel pen
- Masking fluid (optional)
Step 1: Structural Layout
-
Draft the corner perspective:
Begin by establishing the vertical corner line of the wall about one-third of the way from the left. Use your ruler to draw the ceiling line and floor lines, ensuring they vanish correctly to imply a 3D space. -
Block in the molding layers:
At the top, sketch the intricate crown molding. Break it down into stacked geometric shapes: a flat vertical fascia, a concave curve, and the dental molding (the small rectangular blocks) detail. -
Outline the window and wainscoting:
Draw the window frame on the right side, carefully measuring the grid for the panes. Below the main wall area, sketch the wainscoting and chair rail, aligning it with the window sill level. -
Position the decor elements:
Lightly sketch the columnar shape of the curtains hanging straight down. In the left corner, outline the vase and the tall, feathery shape of the pampas grass.
Uneven Wash Lines?
If your wall wash dries with hard edges, re-wet the area with clean water and clear brush to soften lines. For large walls, use a wet-on-wet technique.
Step 2: Inking and Definition
-
Refine the dental molding:
Using a 0.1mm pen, carefully ink the small ‘teeth’ of the dental molding. Keep the lines very crisp to suggest rigid wood carving. -
Ink the structural lines:
Go over the main wall corners, window frames, and wainscoting panels with a 0.3mm pen. I find using a warm grey pen here instead of black keeps the look airy and sophisticated. -
Detail the soft textures:
For the curtains, use loose, vertical strokes to suggest folds. Sketch the pampas grass with feathery, upward flicking motions to capture their fluffiness.
Step 3: Base Color Application
-
Wash the walls:
Mix a very dilute wash of Yellow Ochre and a touch of Sepia to create a warm beige. Apply this to the wall sections, keeping it flat and even. -
Paint the window view:
For the outdoor scene through the window, wash in soft greens and yellows. Keep this blurry and indistinct to mimic the depth of field shown in the reference. -
Initial curtain tone:
Apply a creamy off-white wash to the curtains. While wet, drop in a slightly darker beige into the shadow folds to create instant volume.
Pro Tip: Perspective Check
Use a single vanishing point slightly off-page to the left. All horizontal lines on the left wall should angle slightly toward it for realism.
Step 4: Shadows and Depth
-
Deepen the corner shadows:
Mix a cool grey (Payne’s Grey + water). Glaze this into the inner corner of the walls and directly under the crown molding to recede those areas. -
Define the molding relief:
Using a size 2 brush, paint thin shadows under each ‘tooth’ of the dental molding and along the bottom edges of the horizontal trim lines. This is crucial for the 3D effect. -
Shade the wainscoting:
Add shadows inside the recessed panels of the lower wall. Remember that the light is coming from the window, so shadows should fall to the left of raised edges. -
Render the dried grass:
Use Burnt Umber and Sepia with a dry-brush technique to tap in the texture of the pampas grass plumes, layering darks over lights.
Step 5: Highlights and Finishing
-
Enhance the high-gloss effect:
The key to the ‘high-gloss’ look is sharp contrast. Use opaque white gouache to paint thin, crisp highlight lines along the sharpest edges of the crown molding and window frame. -
Brighten the window muntins:
Run a pure white line along the top and right edges of the window bars (muntins) where the light hits most directly. -
Curtain highlights:
Add subtle white highlights to the crests of the curtain folds to emphasize the fabric’s sheen. -
Final vase texture:
Stipple small dots on the vase to replicate its textured surface, ensuring the lit side remains lighter.
Step back and admire how the crisp highlights bring your architectural illustration to life
Metallic-Tinted Crown Molding for Subtle Shine
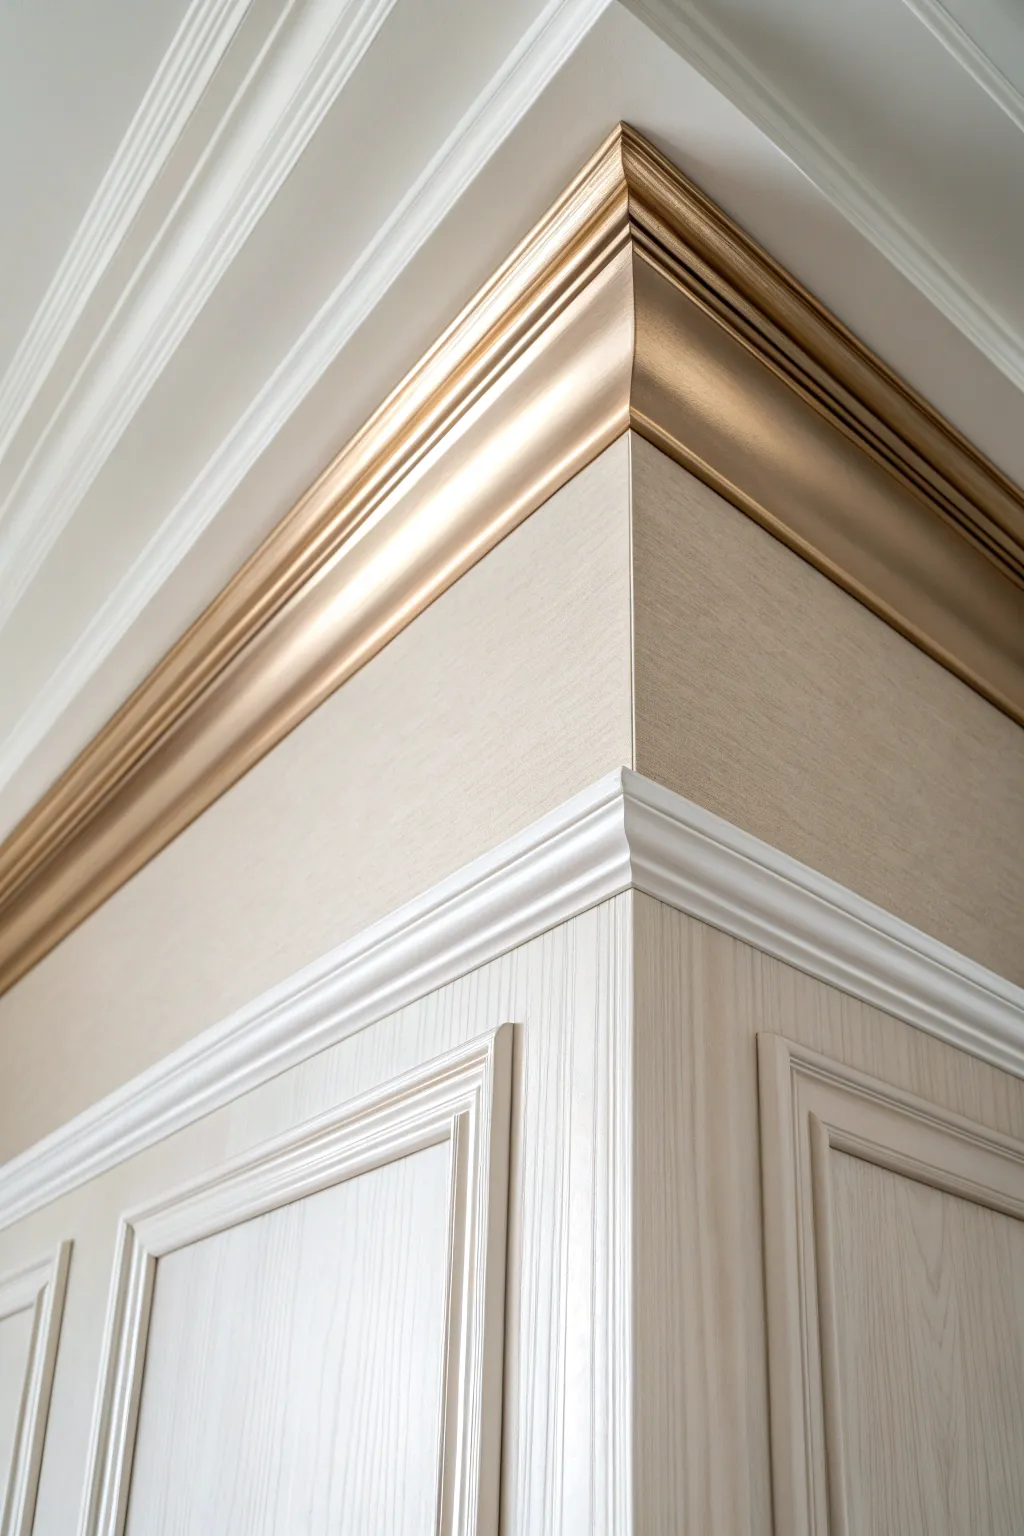
This project transforms standard room corners into a high-end architectural statement by layering custom paneling with striking metallic crown molding. The result is a warm, opulent focal point that blends classic cabinetry details with a modern touch of glamour.
Step-by-Step
Materials
- Large profile crown molding (wood or polyurethane)
- Chair rail decorative trim
- Pre-primed cabinet grade plywood or MDF panels
- Panel molding trim pieces
- Metallic champagne gold spray paint or metallic furniture paint
- Satin finish creamy beige wall paint
- White semi-gloss trim paint
- High-grit sandpaper (220-320 grit)
- Construction adhesive
- Pin nailer or finish nails
- Wood filler
- Caulk
- Painter’s tape
- Level and miter saw
Step 1: Preparation & Lower Structure
-
Assess the Base:
Begin by ensuring the existing wall corner is clean and smooth. If you are building this onto existing cabinetry, ensure the surface is deglossed and sanded. -
Cut the Panels:
Measure and cut your cabinet-grade plywood or MDF panels to fit the lower wall section. Miter the edges at 45 degrees where the two panels meet at the corner for a seamless joint. -
Install Main Panels:
Apply construction adhesive to the back of your panels and secure them to the wall or cabinet base using a pin nailer. Check often with a level to ensure vertical alignment. -
Add Panel Molding:
Measure out inset rectangles on your panels to create the shaker-style aesthetic. Cut your panel molding trim with precise 45-degree miters. -
Secure the Frame:
Glue and pin nail the panel molding pieces into place on the main panels, maintaining an even border distance from the edges.
Uneven Paint?
Metallic paint shows imperfections easily. Ensure the molding is perfectly smooth before painting, and use a spray can trigger grip for even application.
Step 2: Painting & Texturing
-
Fill and Sand:
Fill all nail holes and miter seams with wood filler. Once dry, sand everything smooth with high-grit sandpaper, wiping away dust with a tack cloth. -
Prime the Surface:
Apply a high-quality primer to the entire lower structure to ensure an even absorption of the topcoat. -
Paint Lower Cabinetry:
Paint the panels and trim in a soft, creamy beige satin finish. I find that using a sprayer here gives the most professional, brush-stroke-free finish. -
Create the Frieze Texture:
For the flat wall section above the white chair rail but below the gold crown, apply a textured beige wallpaper or use a linen-effect painting technique to add subtle depth. -
Install the Chair Rail:
Cut and install a white chair rail molding to separate the lower cabinetry from the textured frieze section above. Paint this white to contrast slightly with the beige.
Step 3: The Metallic Crown
-
Prep the Crown Molding:
Before installation, lay your large crown molding strips on a flat surface. This is crucial for getting that flawless metallic finish without painting overhead. -
Apply Metallic Base:
Spray or brush your metallic champagne gold paint onto the molding. Several thin coats are better than one thick coat to avoid drips and maintain the wood grain detail. -
Let it Cure:
Allow the metallic paint to fully cure according to the manufacturer’s instructions. Handling it too soon can leave fingerprints on the metallic sheen. -
Measure and Miter:
Carefully measure your ceiling perimeter. Cut the metallic molding with a miter saw, using a ‘coping’ technique for inside corners if the walls aren’t perfectly square. -
Install the Crown:
Mount the gold molding at the top of the frieze section. Use adhesive and minimal nails, placing nails in discreet crevices to avoid ruining the metallic finish. -
Touch Up:
Using a tiny artist’s brush, touch up any nail holes or filled seams in the crown molding with a small amount of liquid gold leaf or the same metallic paint. -
Final White Trim:
Install the final bright white ceiling trim just above or abutting the gold crown to create a crisp transition to the ceiling color.
Level Up: Glazing
Apply a very subtle warm brown glaze into the deep crevices of the gold molding and wipe away the excess. This mimics antique gold leafing.
Step 4: Final Details
-
Caulk Lines:
Run a thin bead of paintable caulk along the edges where the white trim meets the ceiling and where the lower panels meet the wall. -
Clean and Buff:
Gently wipe down the metallic molding with a dry microfiber cloth to maximize its shine and remove any installation dust.
Step back and admire how the light catches the metallic curve of your new architectural feature
Color-Blocked Crown Molding to Define Zones
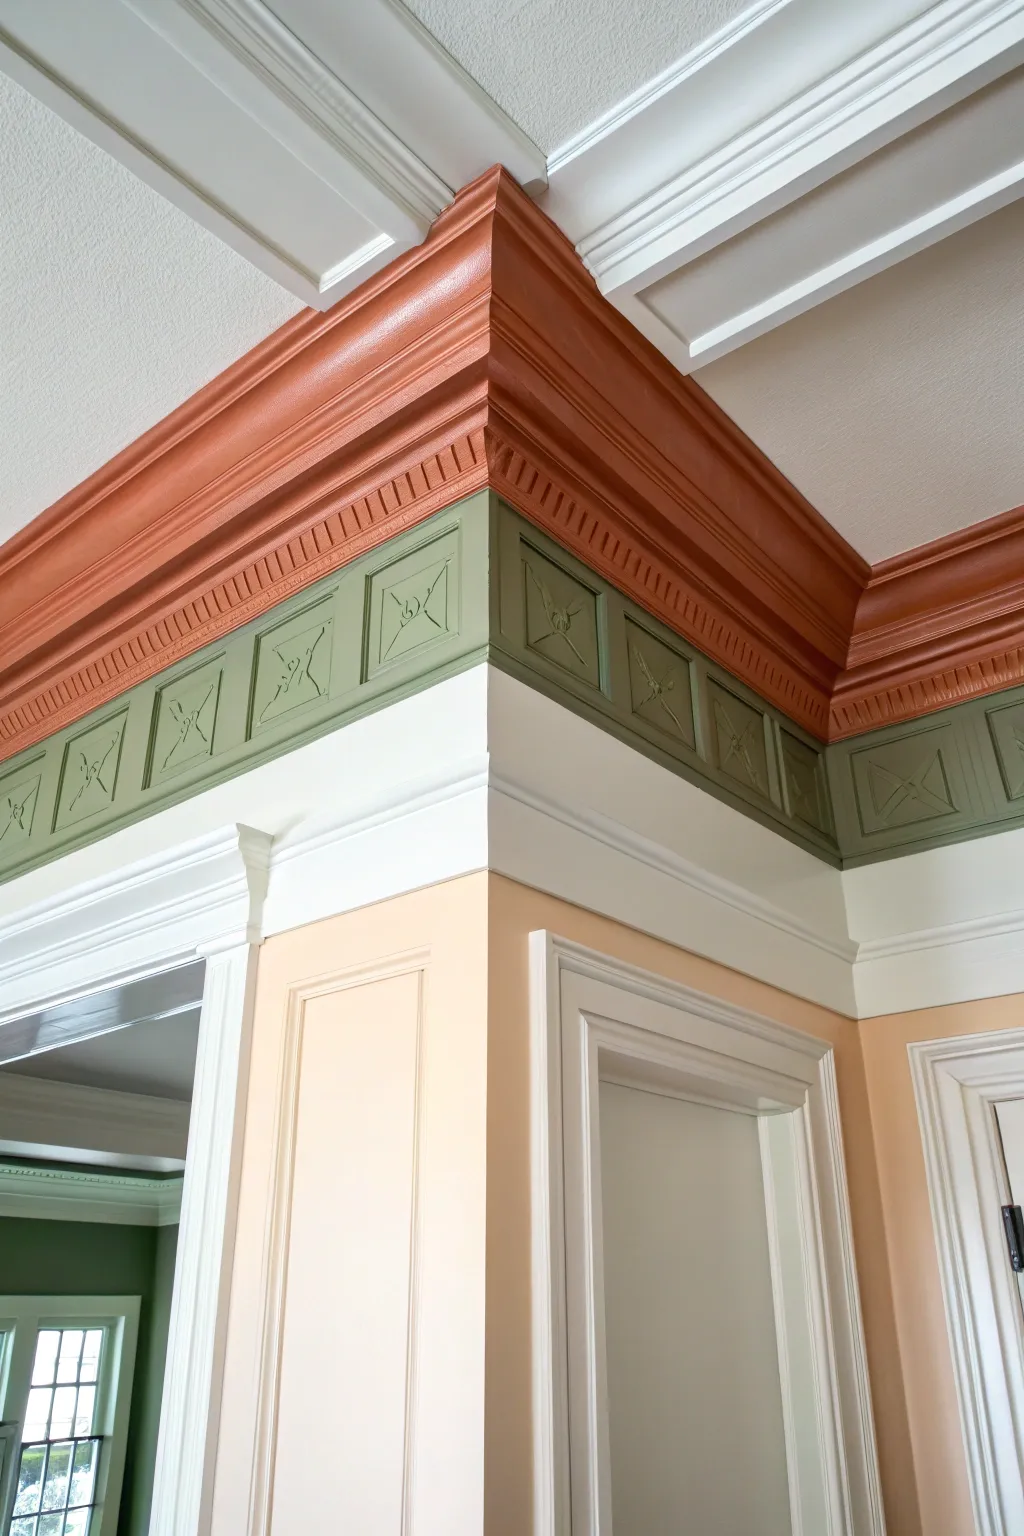
This project transforms standard room transitions into high-impact architectural features by using distinct bands of color on layered molding. The result is a sophisticated, historical look that draws the eye upward and defines the space with bold terracotta and sage tones.
Step-by-Step Tutorial
Materials
- High-quality interior satin or semi-gloss latex paint (Terracotta/Brick Red)
- High-quality interior satin or semi-gloss latex paint (Sage/Olive Green)
- High-quality interior satin or semi-gloss latex paint (Creamy White)
- Peachy-beige wall paint (matte or eggshell)
- Painter’s tape (multi-surface and delicate surface)
- Angled sash brush (2-2.5 inch)
- Small artist brush or fitch brush for details
- Sandpaper (220 grit) and tack cloth
- Drop cloths
- Ladder
- Caulk and caulking gun (if needed for gaps)
Step 1: Preparation and Base Layers
-
Clean and protect:
Begin by removing any dust or cobwebs from your existing molding with a damp cloth or vacuum attachment. Lay down drop cloths to protect your floors and furniture below the work area. -
Assess the surface:
Check the molding for existing glossy paint. If the surface is very shiny, give it a quick scuff-sand with 220-grit sandpaper to help the new paint adhere, then wipe away the dust with a tack cloth. -
Caulk any gaps:
Inspect the joints where the molding meets the ceiling and where the different trim pieces meet each other. Fill any visible cracks with paintable caulk and smooth it with a wet finger. -
Taping the ceiling:
Apply painter’s tape to the ceiling right along the edge where the top crown molding touches it. Press the edge of the tape down firmly with a putty knife or fingernail to prevent bleed-through. -
Paint the white transition:
Start by painting the white band of molding that sits below the detailed frieze and above the wall color. Use your creamy white paint and an angled sash brush. Extend the paint slightly onto the wall area if you haven’t painted the walls yet, just to ensure coverage.
Step 2: Applying the Feature Colors
-
Tape the white band:
Once the white paint is fully dry (wait at least 4-6 hours, or overnight for best results), apply delicate surface tape along the top edge of the white molding where it meets the decorative square panel section. -
Paint the green frieze:
I like to use a smaller angled brush for this section. Paint the decorative band featuring the square motifs in the sage green color. Work the bristles into the recessed squares and the ‘X’ patterns to ensure full coverage. -
Check for pools:
Keep a close eye on the corners of the relief squares; paint tends to pool there. Gently brush out any heavy drips before they start to tack up. -
Cut in the upper line:
Paint the flat lip just above the green squares with the sage green paint as well. You don’t need tape here if you have a steady hand, as the next color will overlap the top edge of this green section. -
Tape for the crown:
Allow the green section to dry completely. Then, carefully tape off the top horizontal edge of the green frieze to protect it from the red paint. -
Apply the terracotta crown:
Using the angled sash brush, paint the large, upper cove molding in the terracotta red color. Start from the ceiling line ensuring a crisp edge against your ceiling tape, and work your way down to the taped green line. -
Detail the dentils:
For the small ‘teeth’ or dentil molding at the bottom of the crown, switch to a small artist brush or turn your sash brush vertically. Dab paint into the deep crevices between the dentils to avoid leaving white holidays.
Bleed-Through Rescue
If paint bleeds under tape, let it dry fully. Re-tape the ‘victim’ color, seal the tape with a tiny bit of clear matte medium or the base color, then paint the top color again.
Step 3: Finishing Touches
-
Remove tape carefully:
While the final coat of paint is still slightly tacky (but not wet), slowly peel away the painter’s tape at a 45-degree angle. This prevents the dried paint film from peeling up with the tape. -
Touch up lines:
Inspect your color transitions. If any paint bled under the tape, use a tiny artist brush and the appropriate color to sharpen the lines. -
Paint the lower wall:
Finally, paint the wall sections below the white molding in your soft peachy-beige. Cut in carefully against the bottom edge of the white trim for a clean finish.
Add Antique Depth
To highlight the relief details in the green squares or red dentils, apply a translucent dark glaze over the dried paint and wipe it off the high points with a rag.
Step back and admire how the distinct bands of color visually heighten the ceiling and add rigid structure to the room architecture
Striped or Stenciled Crown Molding Accents
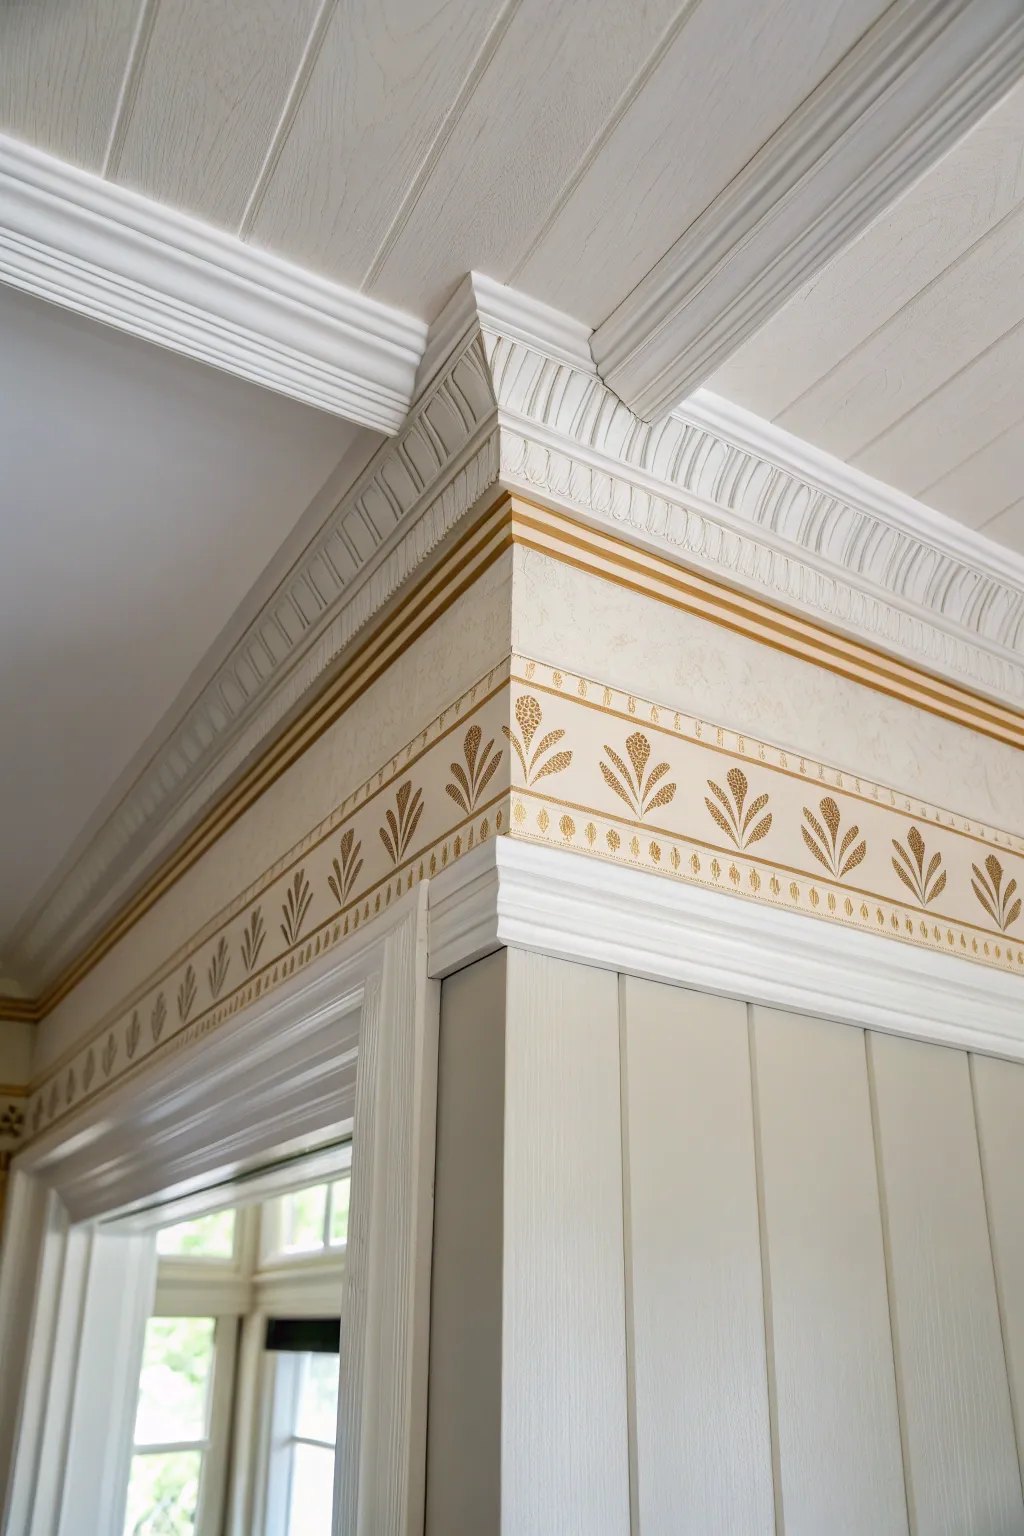
Elevate standard white molding by adding a sophisticated “frieze” layer just below the crown. This project combines crisp gold striping and a delicate botanical stencil to create the illusion of custom, high-end plasterwork or wallpaper borders.
Step-by-Step Guide
Materials
- High-quality painter’s tape (various widths)
- Metallic gold paint (rich gold tone)
- Cream or off-white latex wall paint (base color)
- Botanical leaf stencil (border style)
- Stencil brush or high-density foam roller
- Small angled sash brush
- Fine liner brush
- Level and pencil
- Paper towels
- Spray adhesive (repositionable)
Step 1: Preparation and Base Coat
-
Clean the surface:
Before picking up a brush, ensure the wall space between your crown molding and the lower trim (or where the border will end) is perfectly clean. Dust and grease can prevent the tape from sealing properly later. -
Apply the base color:
Paint the area below the crown molding with your cream or off-white base color. Two coats are usually necessary for a seamless, solid finish. Let this cure for at least 24 hours to prevent tape damage. -
Measure the stripe placement:
Using a ruler, measure down about 1 inch from the bottom edge of the crown molding. Mark this spot lightly with a pencil at several intervals along the wall. -
Tape the upper stripe:
Run a continuous line of painter’s tape just below your pencil marks. I like to use a laser level here to ensure the line stays perfectly horizontal, even if the ceiling height varies slightly. -
Create the stripe width:
Place a second line of tape parallel to the crown molding, leaving about a 1/4-inch to 1/2-inch gap between the molding and the tape. This gap will become your crisp gold stripe.
Seal for Sharpness
For zero bleed on textured walls, paint over the stencil edge with the *base wall color* first. Let it dry, then apply the gold. This seals the gaps.
Step 2: Painting the Gold Accents
-
Seal the tape edges:
Lightly brush a tiny amount of your base cream paint over the tape edges of your stripe area. This seals the tape and prevents the metallic gold from bleeding underneath. -
Paint the gold stripe:
Once the seal is dry, use a small angled brush to apply the metallic gold paint into the stripe gap. Metallic paints can be translucent, so plan for two or three thin coats rather than one thick one. -
Remove tape:
Carefully peel back the tape while the final coat of gold is still slightly tacky. Pull at a 45-degree angle away from the painted line. -
Define the lower border:
Measure the height of your stencil plus about 1/2 inch for negative space. Apply a line of tape below the gold stripe to define the bottom edge where your stenciled frieze will stop. -
Add detail lines:
Using a fine liner brush and a steady hand (or a straight edge guide), paint a very thin gold pinstripe along the bottom and top edges of where the stencil pattern will sit, framing the frieze area.
Step 3: Stenciling the Pattern
-
Prepare the stencil:
Spray the back of your botanical stencil with a light mist of repositionable spray adhesive. Let it get tacky for a minute before pressing it onto the wall. -
Position the first repeat:
Align the top of the stencil parallel to your upper gold stripe. Start in the least conspicuous corner of the room so any pattern mismatch at the end is hidden. -
Load the stencil brush:
Dip just the tip of your stencil brush into the metallic gold paint. Offload almost all the paint onto a paper towel until the brush feels dry. This ‘dry brush’ technique is crucial for crisp edges. -
Apply the paint:
Use a light swirling or stippling motion to apply the gold paint through the stencil openings. Build up the color gradually rather than trying to get full opacity immediately. -
Move and repeat:
Carefully peel the stencil off and reposition it for the next section. Most stencils have registration marks to help you align the pattern perfectly with the previous impression. -
Finish corners:
When you reach a corner, bend the flexible stencil into the corner and use your hand to hold it tight while you stipple the design into the crease. -
Touch ups:
After the stenciling is complete and dry, use a tiny artist’s brush and your base cream color to clean up any small bleeds or smudges.
Metallic Glaze Finish
Mix a drop of pearl glazing liquid into your cream base coat for the background. This gives a subtle shimmer that complements the gold leaf nicely.
Step back and admire how this elegant border adds distinct architectural character to your ceiling line
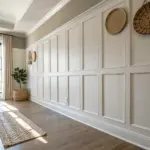


Have a question or want to share your own experience? I'd love to hear from you in the comments below!