If you’re craving something sweet and low-pressure to paint, cute ducks are basically the perfect subject. I love how a few simple shapes and soft colors can instantly turn into a little character that feels warm, cozy, and full of personality.
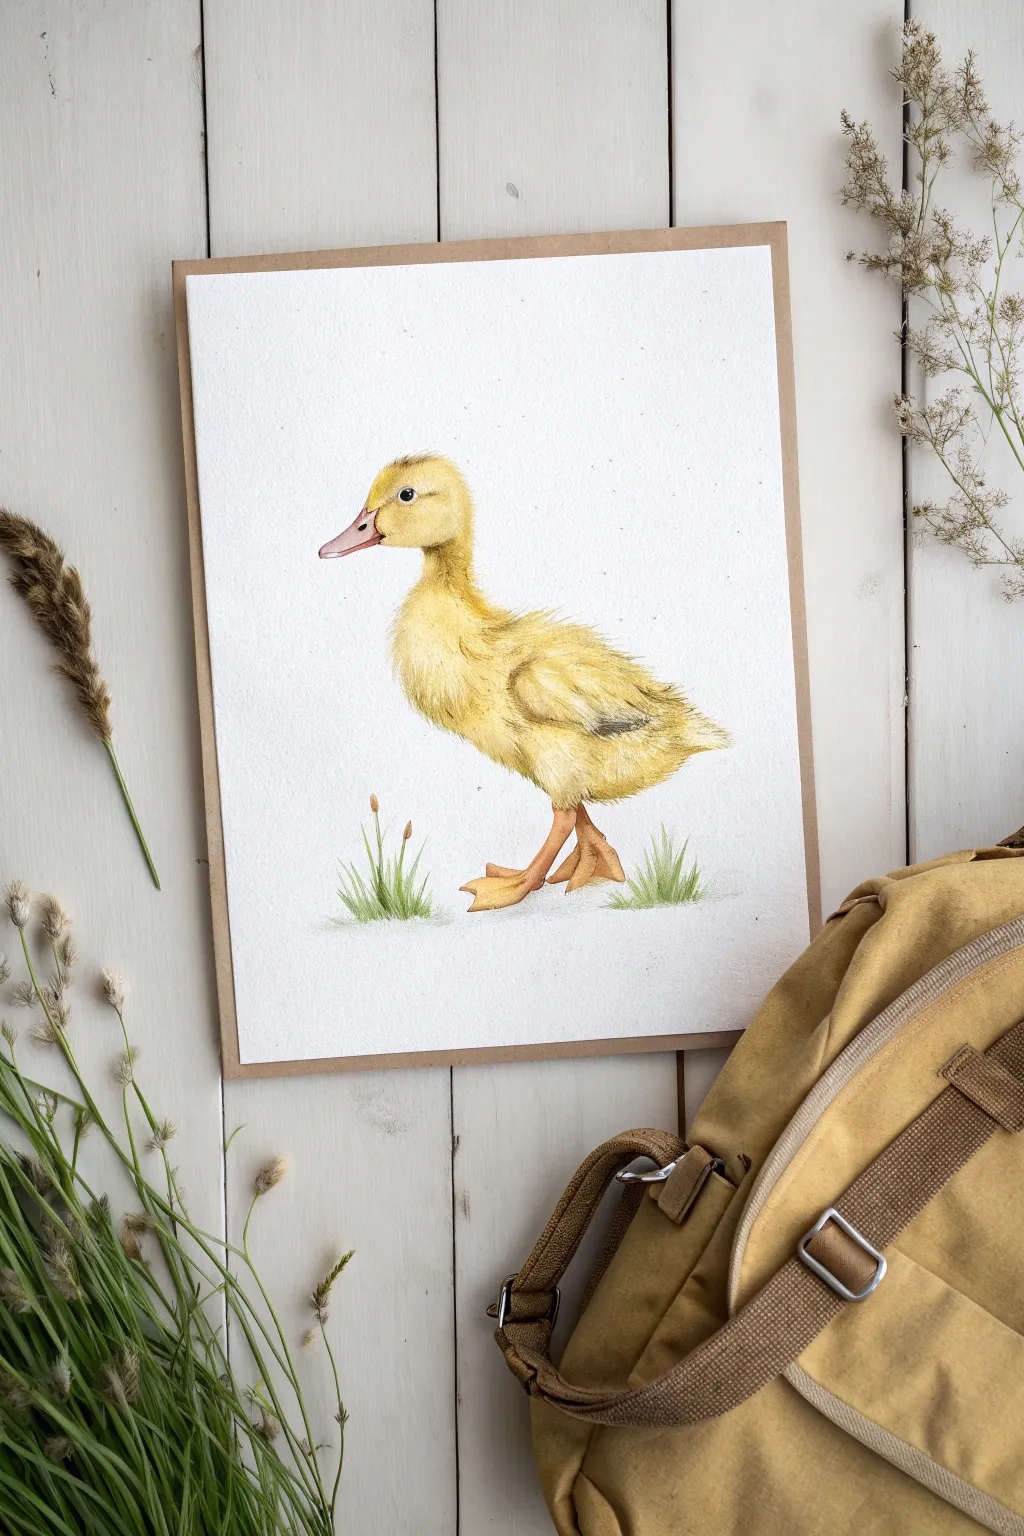
Classic Duckling Profile in Soft Pastels
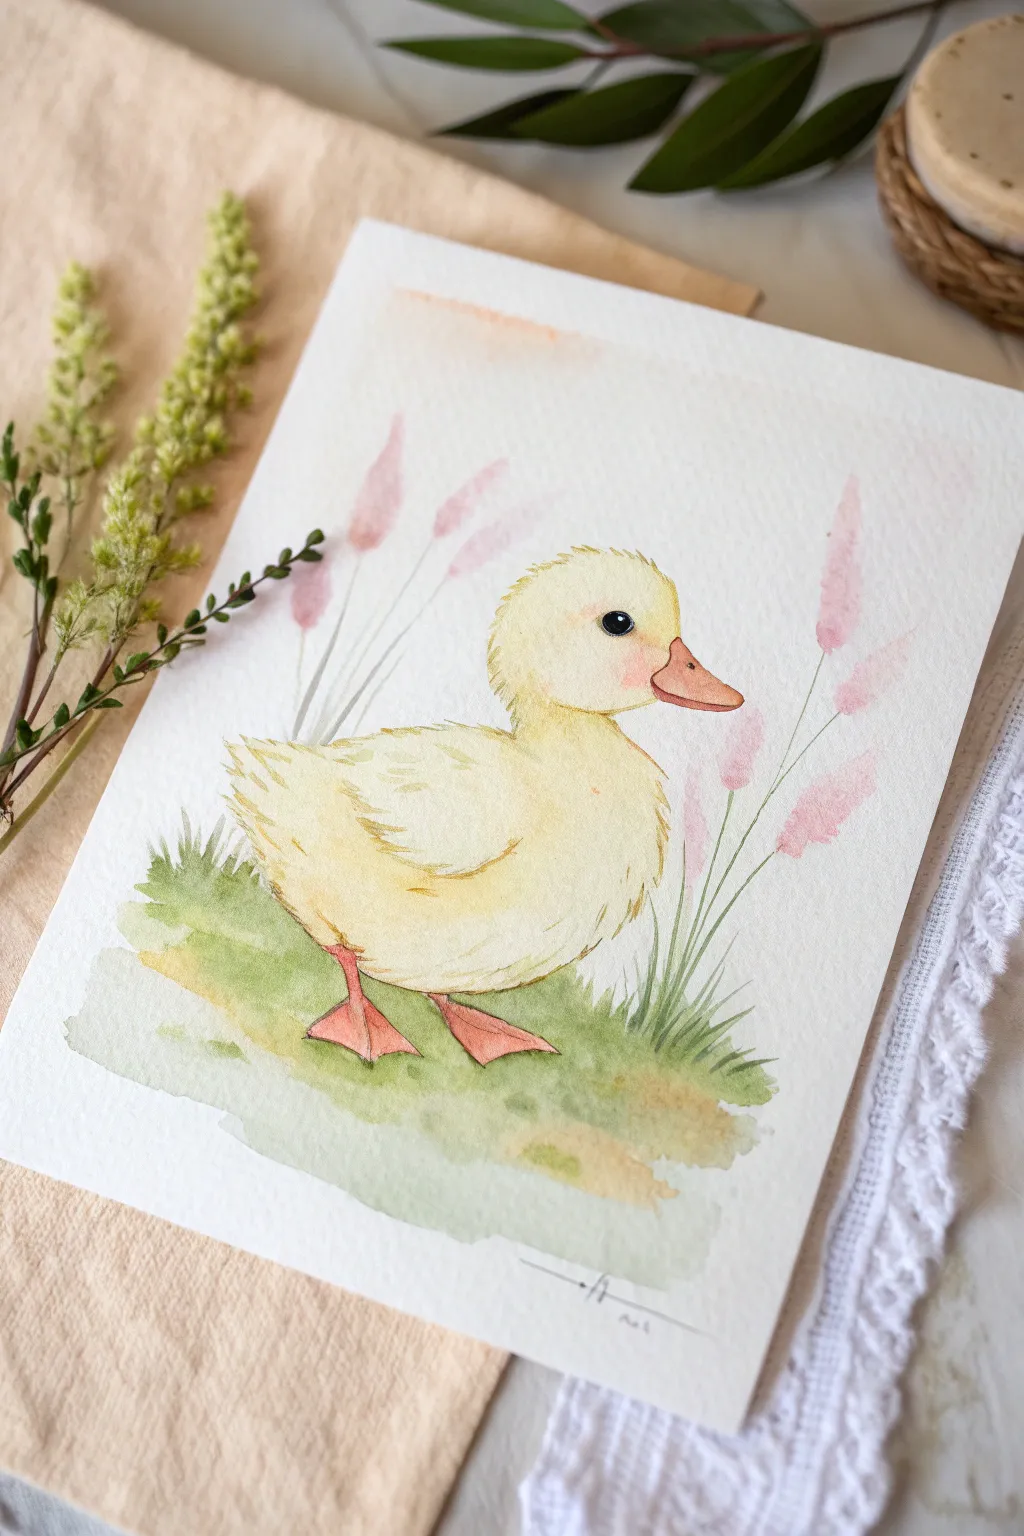
Capture the sweetness of spring with this delicate watercolor tutorial featuring a fluffy yellow duckling among tall pink reeds. Using soft washes and fine details, you will create a heartwarming piece perfect for a nursery or spring decor.
Step-by-Step Tutorial
Materials
- Cold press watercolor paper (300 gsm)
- H or HB pencil for sketching
- Kneaded eraser
- Watercolor paints: Lemon Yellow, Yellow Ochre, Burnt Sienna, Sap Green, Alizarin Crimson, Lamp Black
- Round watercolor brushes: Size 6 (for washes) and Size 0 or 00 (for details)
- Clean water
- Paper towels
- Masking tape (optional)
Step 1: Sketching the Shape
-
Outline the head and body:
Start with a light pencil sketch. Draw a rounded circle for the head and a larger, slightly elongated oval for the body. Connect them with a gentle curve to form the neck. -
Add facial features:
Sketch a triangular beak shape pointing to the right. Place a small circle for the eye slightly above the center line of the head. -
Detail the wing and feet:
Draw the wing shape tucked against the side of the body, curving upward slightly at the tail. Sketch two webbed feet planted firmly on the ground. -
Place the background elements:
Lightly draw vertical lines for the reeds behind the duckling and jagged lines at the bottom to indicate where the grass patch will be. Use your kneaded eraser to lighten the sketch until it is barely visible.
Muddy colors?
If your yellow looks dirty, clean your water jar immediately. Yellow is very sensitive to contamination; use two jars, one for rinsing and one for clean water mixing.
Step 2: Base Washes
-
Paint the first yellow wash:
Mix a very watery Lemon Yellow. With your size 6 brush, apply this pale wash over the entire duckling’s body, avoiding the beak and eye area. Keep the edges soft and uneven to suggest fluffiness. -
Foundational greenery:
While the yellow dries, mix a light, watery Sap Green. Paint the grass patch beneath the duckling using loose, jagged strokes. Let some colors bleed slightly for a natural look. -
Background reeds:
Mix a very pale pink using Alizarin Crimson and plenty of water. Paint the fluffy tops of the reeds in the background. Use a thin line of diluted green for the stems.
Step 3: Building Form and Texture
-
Deepen the yellow tones:
Once the first layer is dry, mix Lemon Yellow with a tiny touch of Yellow Ochre. Apply this to the bottom of the belly, under the neck, and under the wing to create shadow and volume. -
Paint the beak and feet:
Mix a soft orange using Yellow Ochre and a dot of Alizarin Crimson. Paint the beak and the legs. Let this layer dry completely. -
Refining the beak:
Use a slightly more concentrated version of your orange mix to add a shadow line along the bottom of the beak and a small dot for the nostril. -
Adding texture to the feathers:
Switch to your size 0 brush. Using a mix of Yellow Ochre and a hint of Burnt Sienna, paint tiny, short, flicking strokes along the outline of the head and chest to mimic downy feathers. -
Wing definition:
Use the same ochre mix to define the layered feathers on the wing. Keep your strokes loose and curved to follow the wing’s shape.
Add sparkle
For a magical nursery look, mix a tiny amount of iridescent medium into the pink reed paint or splatter small dots of white gouache around the scene for ‘pollen’.
Step 4: Final Details
-
Paint the eye:
Carefully paint the eye using Lamp Black creating a solid dark circle. Leave a tiny speck of white paper unpainted for the highlight, which gives the duckling life. -
Cheek flush:
I like to add a very watery, transparent glaze of Alizarin Crimson to the duckling’s cheek area for a rosy, cute effect. -
Enhance the grass:
Mix a stronger Sap Green with a touch of Burnt Sienna. Paint individual blades of grass in the foreground using quick upward flicks with your small brush. -
Ground shadows:
Add a wash of brownish-green directly under the feet to ground the duckling so it doesn’t look like it’s floating. -
Reed details:
Add a few more defined pink strokes to the reed heads to give them texture, keeping the background soft compared to the crisp duckling.
Allow your painting to dry flat completely before framing your adorable new artwork


Rubber Ducky in a Simple Bubble Bath Scene
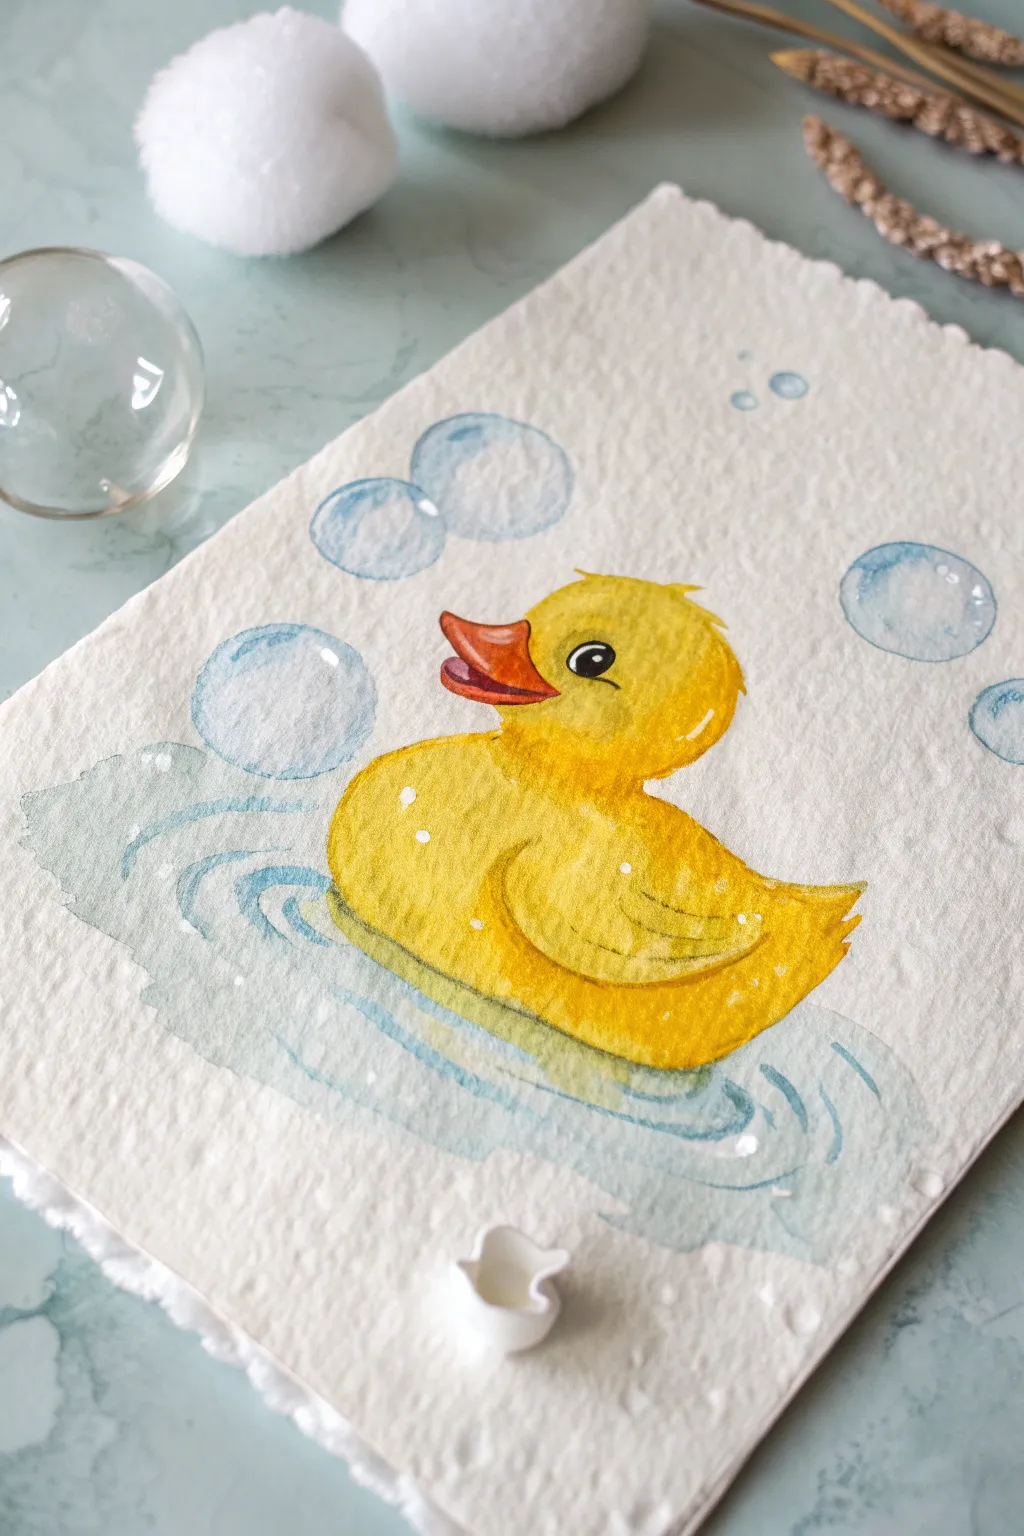
Capture the classic joy of bath time with this delightful watercolor painting of a yellow rubber ducky floating amongst gentle bubbles. Using simple washes and careful layering, you’ll create a piece full of splashy personality and soft, translucent textures.
Step-by-Step Tutorial
Materials
- Cold-press watercolor paper (300 gsm or heavier, preferably with deckled edges)
- Watercolor paints (Cadmium Yellow, Yellow Ochre, Cadmium Orange, Cerulean Blue, Payne’s Gray)
- White gouache or white gel pen
- Round brushes (sizes 2, 4, and 8)
- HB pencil and kneaded eraser
- Two jars of water
- Paper towels
Step 1: Sketching and Initial Washes
-
Outline the ducky:
Begin with a light pencil sketch on your watercolor paper. Draw a large oval for the body and a circle for the head, connecting them with a curved neck. Add a distinctive triangular beak and a curved wing on the side. -
Add floating elements:
Sketch varying sizes of circles around the duck to represent bubbles. Beneath the duck, lightly draw rippling oval shapes to indicate the water movement. Keep your pencil pressure very light so the graphite doesn’t show through later. -
First yellow layer:
Mix a watery wash of Cadmium Yellow. Using your size 8 brush, fill in the entire body of the duck, leaving the eye area and beak white for now. Let the paint pool slightly at the bottom of the duck for natural shading. -
Painting the beak:
While the body dries, mix a light orange using Cadmium Orange watered down. Carefully paint the beak area. If the yellow body is still wet near the beak, wait a moment to avoid bleeding colors. -
Water base layer:
Prepare a very dilute mixture of Cerulean Blue. Paint the water area around the base of the duck using horizontal, wavy strokes. Don’t fill the entire space solid; leave some white paper peeking through to suggest sparkling reflections.
Step 2: Building Form and Depth
-
Deepening the yellow:
Once the first layer is completely dry, mix a slightly stronger Cadmium Yellow with a touch of Yellow Ochre. Apply this to the bottom of the duck and under the wing to create rounded volume. -
Defining the wing:
Use a size 4 brush to paint the wing shape with a more saturated yellow mixture. Add a few curved strokes inside the wing feathers to give them definition. -
Detailing the beak:
Mix a stronger orange, perhaps with a tiny touch of red. Paint the inside of the mouth and the underside of the beak to give it a 3D structural look. Leave a tiny highlight on the upper beak if possible. -
Painting the eye:
With a steady hand and a size 2 brush (or a fine liner), paint the eye using Payne’s Gray or black. Leave a small white circle unpainted for the ‘catchlight’ reflection, which brings the character to life. -
Adding shadows:
Mix a little purple or light brown into your yellow to create a shadow tone. Glaze this gently under the chin and along the waterline of the duck to ground it in the scene.
Muddy Colors?
If your yellow shadows look greenish, ensure your blue water layer is 100% dry before painting near the duck’s base. Also, use a discrete shadow mix (purple/yellow) rather than layering blue over yellow.
Step 3: Bubbles and Final Touches
-
Painting bubbles:
For the bubbles, use a clean brush with very diluted blue paint. Outline one side of each bubble circle, softening the edge with clear water so it fades into the center. Do not fill the bubble completely. -
Bubble highlights:
Add a few darker blue accents on the bottom curves of the bubbles to suggest weight. I like to drop a tiny hint of yellow into the wet bubble paint occasionally to reflect the duck. -
Water ripples:
Strengthen the water ripples with a more saturated blue. Paint concentric curved lines radiating from the duck, varying the line thickness to create movement. -
Adding sparkle:
Once everything is bone dry, use white gouache or a gel pen to add sharp highlights. Place three dots on the duck’s body, a glint on the beak, and highlights on the top curve of each bubble. -
Splatter texture:
Load a brush with watery white gouache and tap it against another brush handle over the paper to create tiny white droplets, mimicking sea spray or bath foam.
Make It Pop
Try adding a subtle iridescent medium to your bubble mixture. When the light catches the painting, the bubbles will have a genuine pearlescent shimmer just like real soap.
Allow the final highlights to dry completely before displaying your cheerful rubber ducky masterpiece


Minimal Color-Block Background With a Tiny Duck
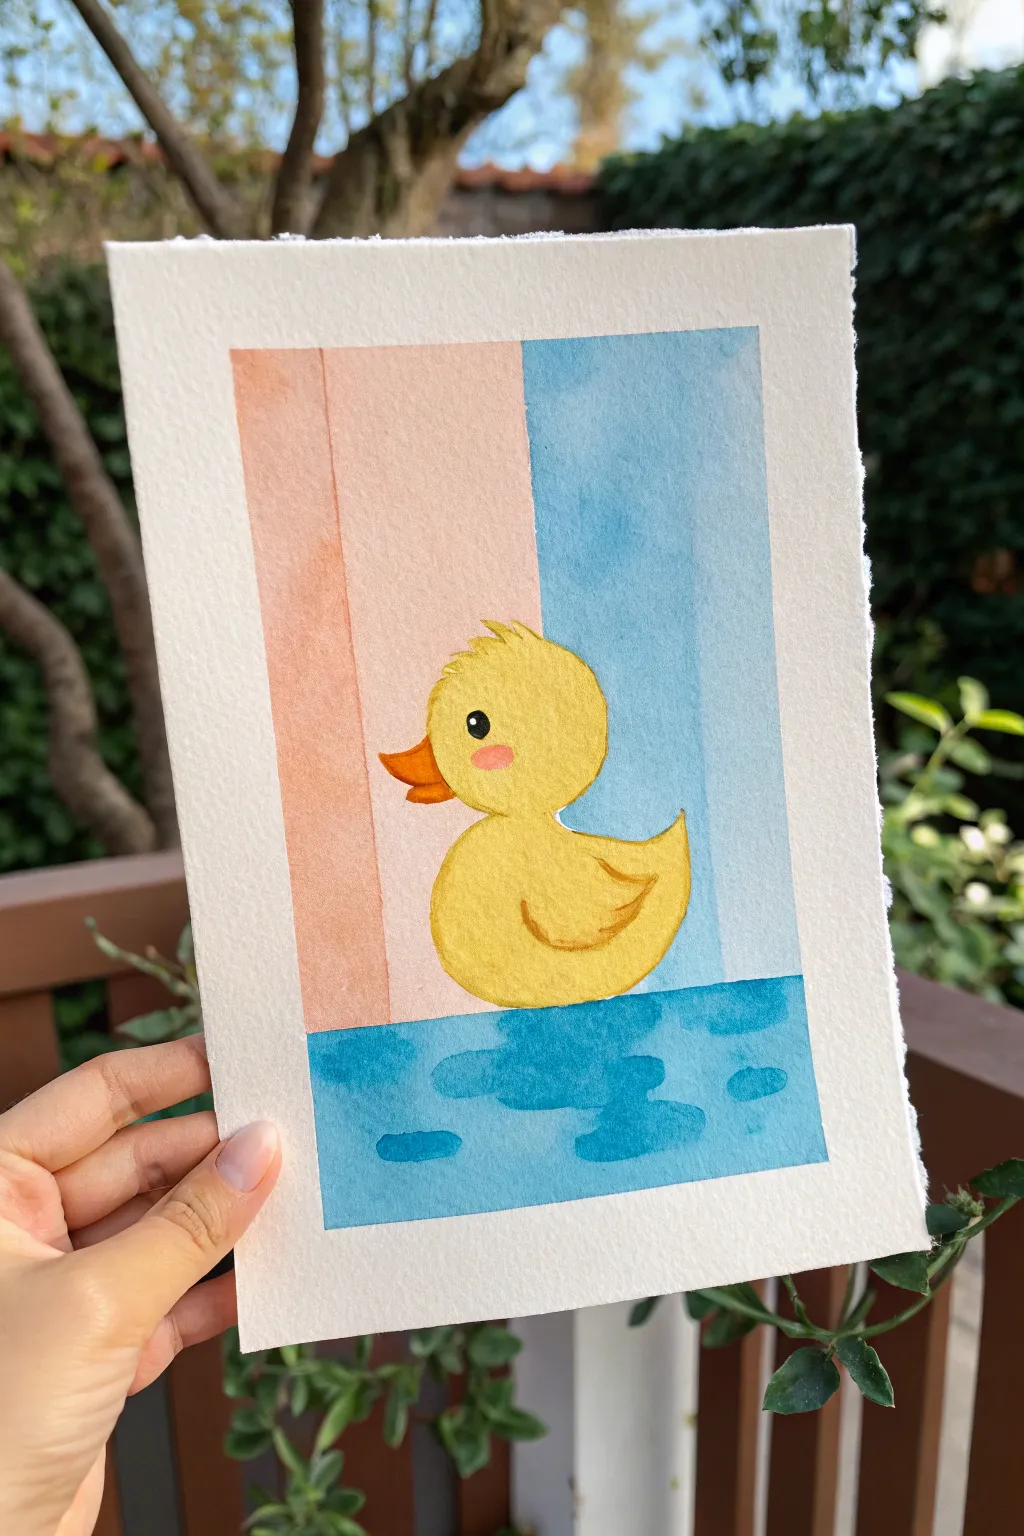
Embrace the playful simplicity of color blocking with this charming watercolor piece featuring a classic yellow rubber duck. The clean vertical stripes in soft pastels create a modern, minimal backdrop that lets the bright little character shine.
Step-by-Step
Materials
- Cold press watercolor paper (approx. 5×7 inches)
- Masking tape or painter’s tape
- Watercolor paints (Yellow, Orange, Peach/Light Pink, Cerulean Blue)
- Round watercolor brushes (sizes 4 and 6)
- Fine liner brush or size 0 brush
- Pencil and eraser
- Jars of clean water
- Palette for mixing
- Paper towels
Step 1: Sketching and Preparation
-
Tape the paper:
Begin by taping down all four edges of your watercolor paper to a sturdy board or table. This creates a clean white border and prevents the paper from buckling when wet. -
Outline the rectangle:
Use a ruler to lightly draw the main rectangular boundary of the painting inside your taped area, leaving about an inch of white space from the tape. -
Draw the duck:
Sketch a simple circle for the head and a larger oval for the body. Connect them with curved lines for the neck. Add a small triangular shape for the tail and a curved beak. -
Add background lines:
Draw a horizontal line across the bottom third to create the water level. Then, draw two vertical lines dividing the upper section into three equal vertical stripes. -
Refine the sketch:
Lightly erase your sketch until it’s barely visible. Refine the duck’s shape by giving it little tufts of feathers on top of the head.
Clean Lines
For crisp stripes, let each section dry fully before starting the next. If you struggle with steady hands, use washi tape to mask off the stripe edges.
Step 2: Painting the Background
-
First stripe wash:
Mix a watery peach or light salmon color. Paint the left-most vertical stripe, being very careful to paint around the duck’s beak and head. Let this layer dry completely. -
Middle stripe wash:
Prepare a very pale pink wash. Paint the middle vertical stripe behind the duck. Ensure the first stripe is dry so the colors don’t bleed into each other. -
Right stripe wash:
Mix a light cerulean blue with plenty of water. Fill in the right-most vertical stripe. Maintain a clean edge against the middle stripe. -
Paint the water base:
Using a slightly stronger mix of cerulean blue, paint the entire bottom horizontal section for the water. Paint carefully around the bottom of the duck. -
Add water ripples:
While the blue water base is still slightly damp, mix a more saturated blue. Drop in small, horizontal oval shapes beneath the duck to suggest ripples and depth.
Step 3: Bringing the Duck to Life
-
Base yellow layer:
Load your size 6 brush with bright lemon yellow paint. Fill in the entire body of the duck, keeping the wash even and consistent. -
Paint the beak:
Mix a vibrant orange and fill in the beak area. I like to add a tiny touch of red to the orange to make it pop against the yellow. -
Adding shadows:
Once the yellow base is dry, mix a slightly darker, warmer yellow (or add a tiny dot of orange to your yellow). Paint a curved shadow along the bottom of the belly and under the neck. -
Define the wing:
Using the same shadow color and a smaller brush, paint a curved ‘U’ shape on the body to indicate a small wing. -
Paint the cheek:
Dilute a tiny bit of red or pink paint heavily with water. Dab a soft, circular blush spot on the duck’s cheek. -
The eye detail:
Using your smallest brush (size 0) and black paint (or highly concentrated dark blue/brown), paint a small solid circle for the eye. Leave a tiny speck of white paper for the highlight. -
Final outlines:
For a stylized look, use a very fine brush with a slightly darker yellow-brown mix to outline the tuft of hair and the curve of the tail.
Muddy Colors?
If the yellow body looks greenish near the blue water, your blue layer wasn’t dry enough. Wait for the water to be bone-dry before painting the duck.
Peel off the tape gently to reveal your crisp, clean borders and enjoy your adorable duckling art


Sleepy Duck Tucked Into a Cozy Nest
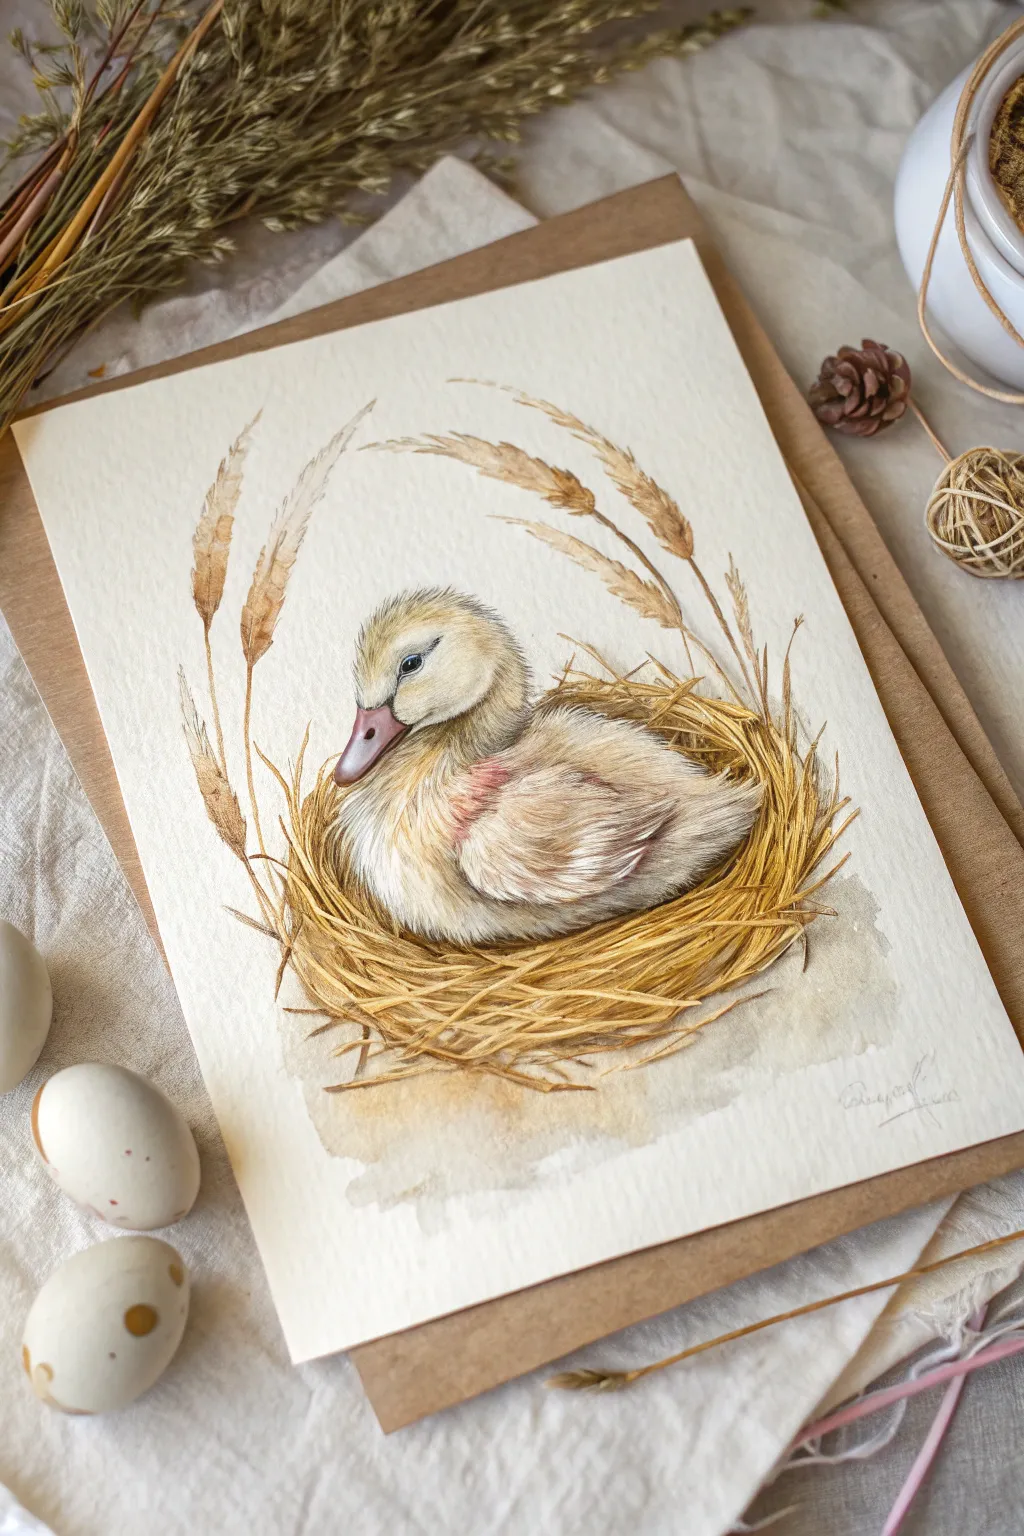
Capture the tender moment of a sleepy duckling nestled in dry grass with this delicate watercolor tutorial. You’ll layer soft washes to create fluffy down feathers and build up crisp details for a realistic woven nest effect.
Detailed Instructions
Materials
- Cold press watercolor paper (300 gsm)
- Watercolor paints (Yellow Ochre, Burnt Sienna, Raw Umber, Sepia, Payne’s Grey, Alizarin Crimson)
- White gouache or white gel pen
- Round brushes (sizes 2, 4, and 00 for details)
- HB pencil for sketching
- Kneadable eraser
- Mixing palette
- Two jars of water
- Paper towels
Step 1: Planning and Sketching
-
Light Outline:
Begin with a very faint pencil sketch. Draw an oval shape for the duckling’s body and a smaller circle for the head tucked slightly down. Sketch the curve of the bill. -
Form the Nest:
Lightly draw the surrounding nest. Instead of drawing every individual straw, just indicate the main circular flow and direction of the grass blades wrapping around the bird. -
Adding Height:
Sketch three or four tall, wheat-like stalks rising up on the left and curving gently over the duckling to frame the composition. Keep your pencil lines minimal so they don’t show through the paint.
Step 2: Base Layers
-
First Head Wash:
Mix a very watery wash of Yellow Ochre with a tiny touch of Burnt Sienna. Apply this to the duckling’s head, leaving the area around the eye and part of the cheek white for highlights. -
Body Base:
While the head is damp, continue the wash down the neck and onto the back. Drop in a hint of diluted Alizarin Crimson on the shoulder area to suggest warmth under the feathers. -
Nest Foundation:
Mix a larger puddle of Yellow Ochre and Raw Umber. Using a size 4 brush, paint loose, sweeping strokes underneath the duckling to establish the bulk of the nest. Don’t worry about individual strands yet; focus on the shadow shape where the bird sits. -
Tall Grass Wash:
Paint the tall stalks with a pale mix of Burnt Sienna. Let the paint fade out near the tips for a soft, airy look.
Muddy colors?
If your straw colors look muddy, you’re likely overworking wet paint. Let the base yellow layer dry completely before adding the darker brown textural lines on top.
Step 3: Developing Form
-
Shadows on the Duckling:
Once the first layer is dry, mix a soft greyish-brown using Burnt Sienna and a touch of Payne’s Grey. Glaze this gently under the wing, beneath the chin, and along the bottom of the belly to create roundness. -
Painting the Bill:
Use a mix of Alizarin Crimson and a tiny bit of Grey for the bill. Paint the top half darker and leave a lighter area near the tip. Add a darker nostril detail while the paint is still slightly damp for a soft edge. -
Building Nest Texture:
Switch to a size 2 brush. Load it with a thicker mix of Raw Umber and Yellow Ochre. Paint distinct, curving lines over the dry base of the nest to simulate individual pieces of straw. -
Deepening Shadows:
Mix Sepia with a little purple or dark blue creates a rich shadow tone. Apply this deeply in the crevices of the nest, directly underneath the duckling, to anchor it firmly in the space.
Add Magic
Splatter tiny droplets of gold watercolor or watered-down white gouache around the wheat stalks to give the piece a magical, dusty atmosphere.
Step 4: Refining Details
-
Feather Texture:
Using your smallest brush (size 00) and a fairly dry mix of Sepia, make tiny, flicking strokes on the duckling’s head and wing. Follow the direction of feather growth to simulate fluffy down. -
The Eye:
Paint the eye with a dark mix of Sepia and Payne’s Grey. Leave a tiny speck of white paper for the catchlight, or add it later with white gouache. Outline the eye rim gently. -
Defining Straws:
Go back to the nest with a dark brown mix. Define the edges of select pieces of grass in the foreground to bring them forward. Vary the line thickness to make the nest look organic. -
Wheat Accents:
Add texture to the tall stalks by stippling small dots and dashes of Burnt Sienna along the seed heads. Keep the strokes loose. -
Final Highlights:
Use white gouache on your smallest brush to add crisp highlights to individual pieces of straw in the nest and a few tiny strokes on the duckling’s wing to make the feathers pop. -
Grounding Shadows:
Add a very faint wash of watery grey/brown beneath the nest itself on the paper to cast a slight shadow, grounding the entire composition so it doesn’t feel like it’s floating.
Step back and admire the gentle warmth of your little resting duckling
BRUSH GUIDE
The Right Brush for Every Stroke
From clean lines to bold texture — master brush choice, stroke control, and essential techniques.
Explore the Full Guide
Two Ducklings Cuddling Cheek to Cheek
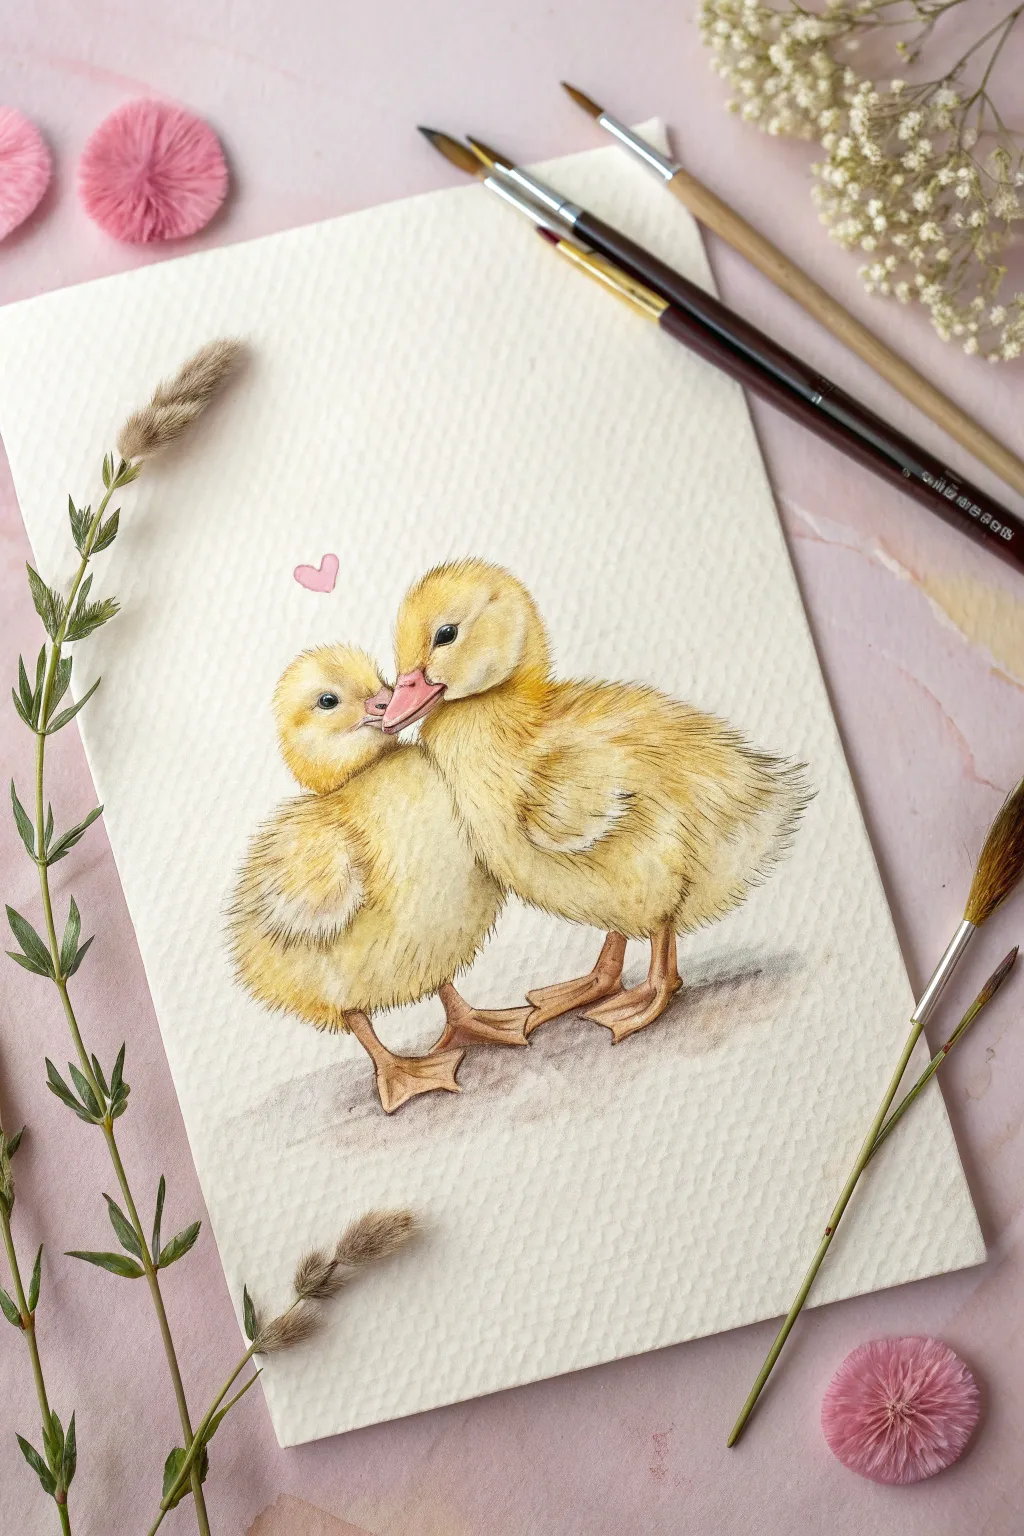
Capture the tender moment of two fluffy yellow ducklings sharing a sweet nudge in this heartwarming watercolor painting. The textured paper enhances the softness of their downy feathers, making them look touchably real.
Step-by-Step Tutorial
Materials
- Cold press watercolor paper (300 gsm)
- Watercolor paints (Cadmium Yellow, Yellow Ochre, Burnt Sienna, Burnt Umber, Alizarin Crimson)
- Round watercolor brushes (Size 2, 4, and 00 for details)
- HB Pencil
- Kneaded eraser
- Clean water jar
- Paper towels
- Masking fluid (optional)
Step 1: Sketch and Base Washes
-
Outline the shapes:
Start with a light HB pencil sketch. Draw two intersecting oval shapes for the bodies and two smaller circles for the heads. Position them so the duckling on the left is slightly tucked behind the right one, with their beaks nearly touching. -
Refine the features:
Define the bills, eyes, and feet. Keep your pencil lines extremely faint, especially around the fluffy edges of the ducklings, as graphite can dirty the yellow paint later. Gently lift excess graphite with a kneaded eraser. -
First yellow wash:
Mix a watery wash of Cadmium Yellow. Applying wet-on-dry, fill in the entire shape of both ducklings, avoiding the eyes and bills. This initial layer should be pale and luminous to serve as the base light. -
Adding warmth:
While the first layer is still slightly damp, drop in small touches of Yellow Ochre on the shadowed sides—under the chins, beneath the wings, and where the two bodies meet.
Feather Tip
Don’t overwork the yellow washes. Yellow can easily become muddy if mixed with too many dark colors. Keep your brush clean and let layers dry fully.
Step 2: Building Fluff and Form
-
Painting the bills:
Mix a soft pink using a tiny amount of Alizarin Crimson and water. Paint the bills carefully. For the darker bill on the right, add a touch of Burnt Sienna to the mix. -
Developing the texture:
Once the base yellow is completely dry, switch to a size 2 brush. Mix a slightly thicker blend of Yellow Ochre and a dot of Burnt Sienna. Use short, flicking brushstrokes to mimic downy feathers. -
Directional fluff:
Pay attention to the direction of the feathers. They should radiate outward from the center of the chest and curve around the wings. Keep these strokes loose and separate to maintain the airy feel. -
Deepening shadows:
Create a darker shadow mix with Burnt Sienna and a hint of Burnt Umber. Glaze this into the crevices where the wings tuck against the body and the deep shadow between the two ducklings to separate their forms. -
Detailing the feet:
Use a mix of Orange and Burnt Sienna for the legs and webbed feet. Paint them flat first, then add darker ridges along the toes once the first layer dries.
Step 3: Fine Details and Finishing Touches
-
The eyes:
Using your smallest brush (00) and a thick mix of Burnt Umber and Indigo (or black), carefully paint the eyes. Leave a tiny speck of white paper unpainted for the highlight, or add it back later with white gouache. -
Refining the face:
Add tiny, precise feather strokes around the eyes and beak using a slightly darker yellow mix. This frames the face and gives the ducklings their expressive character. -
Grounding shadow:
Mix a watery, neutral grey-purple using the leftovers of your shadow mix and a touch of blue. Paint a soft, diffuse shadow on the ground beneath their feet so they don’t look like they are floating. -
Final feather texture:
I like to take a nearly dry brush with a bit of Burnt Sienna and lightly scumble over the wing areas. This dry-brush technique catches the tooth of the paper and emphasizes the fuzzy texture. -
The heart:
Paint a small, simple heart floating just above their heads using a clean pink mix. Keep it delicate to match the sweetness of the scene.
Level Up: Background Bloom
Instead of a plain background, try a very wet-on-wet pale pink wash around the edges of the paper to create a dreamy, romantic vignetting effect.
Now you have a charming pair of ducklings ready to brighten up any room
Ducky With a Little Bowtie
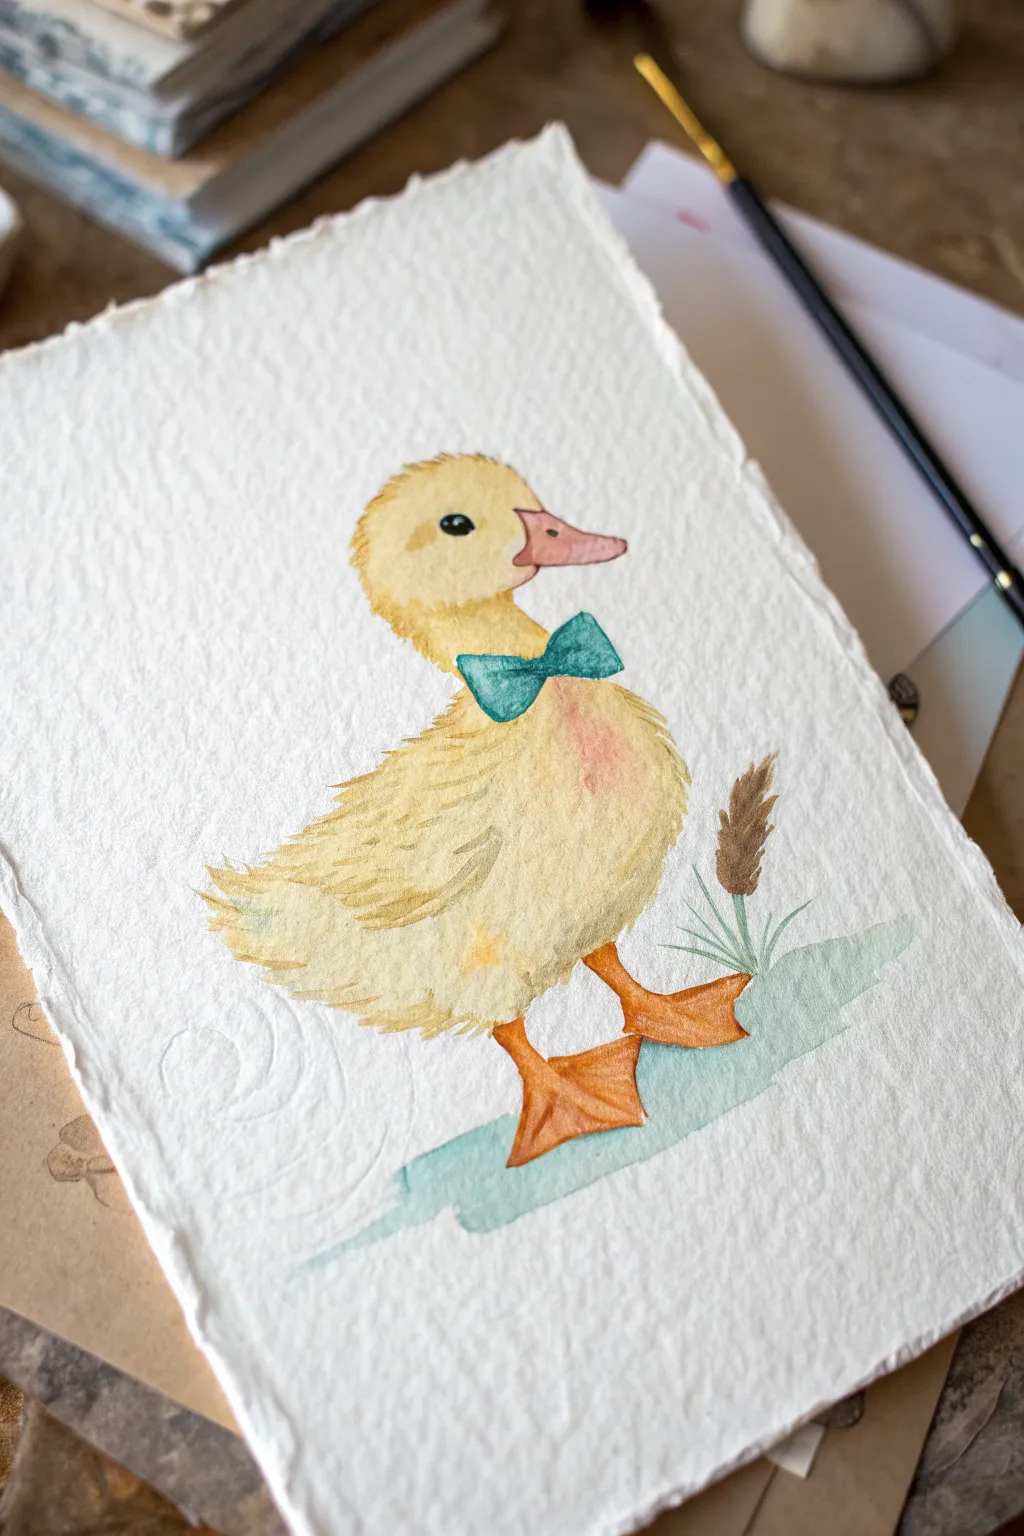
This whimsical watercolor piece features a charming yellow duckling sporting a teal bowtie, painted on textured, deckle-edged paper for an organic feel. The soft washes and loose brushstrokes create a gentle, inviting character perfect for a nursery or greeting card.
How-To Guide
Materials
- Cold press watercolor paper (deckle edge recommended)
- Watercolor paints (Yellow Ochre, Lemon Yellow, Teal/Turquoise, Burnt Sienna, Payne’s Gray, Orange)
- Round watercolor brushes (Size 4 and Size 8)
- Pencil (HB or 2H)
- Kneaded eraser
- Clean water jar
- Paper towels
Step 1: Sketching the Shape
-
Outline the head:
Start by lightly sketching a slightly flattened circle for the head in the upper center of your paper. -
Add the body:
Draw an oval shape below the head for the body, angling it slightly to create a puffed-chest posture. -
Connect and refine:
Connect the head and body with a curved neck line. Sketch a small triangular tail at the back and outline the beak sticking out from the face. -
Detail the accessories:
Draw a small bowtie shape right at the neck junction. Sketch two large, webbed feet at the bottom, making sure they look grounded. -
Lighten the lines:
Use your kneaded eraser to roll over the sketch, lifting up most of the graphite so only faint guidelines remain.
Muddy Colors?
Wait for the yellow body to be 100% bone dry before painting the teal bowtie. If the yellow is damp, the teal will bleed into it, turning the neck green.
Step 2: First Washes
-
Base yellow layer:
Mix a watery wash of Lemon Yellow and Yellow Ochre. Using the larger brush, paint the entire head and body, leaving the beak, eye, and bowtie white. -
Feather texture:
While the yellow paint is still damp, dab in slightly more concentrated Yellow Ochre near the bottom of the belly and under the neck to suggest shadow and fluff. -
Painting the beak:
Mix a soft pinkish-orange using a tiny bit of red and yellow. Paint the beak carefully, leaving a tiny highlight if possible. -
The feet:
Using a vibrant Orange mixed with a touch of Burnt Sienna, paint the webbed feet. I like to let the color pool slightly at the tips of the toes for variation.
Sophisticated Edge
Mount your finished painting on a piece of kraft paper or dark cardstock slightly larger than your artwork to highlight the beautiful deckle edges.
Step 3: Adding Character & Detail
-
The bowtie pop:
Load your smaller brush with a rich Teal or Turquoise. Paint the bowtie carefully, keeping the edges crisp against the yellow feathers. -
Defining the eye:
Once the face is completely dry, use a dark mix (Payne’s Gray or thick black) to paint the small round eye, leaving a tiny speck of white paper for the catchlight. -
Wing indication:
Mix a slightly darker, brownish-yellow. Use the tip of your brush to paint curved, sweeping strokes on the side of the body to suggest a folded wing. -
Building depth:
Add a few dry-brush strokes of pale brown or grey around the tail feathers and chest to give the duckling a scruffy, soft texture. -
Beak details:
Add a tiny nostril line on the beak using a darker pink-brown mix.
Step 4: Setting the Scene
-
Ground shadow:
Dilute your Teal paint significantly with water. Paint a loose, horizontal wash under the feet to ground the figure. -
Painting the reed:
Use Burnt Sienna to paint a small, fuzzy cattail shape to the right of the duck. -
Stem and grass:
With a diluted green or teal mix, paint a thin stem for the reed and a few quick, upward flicks of grass blades intersecting the ground shadow. -
Final touches:
Assess the painting. If the bowtie needs more definition, add a second layer of teal to the center knot for dimension.
Allow the paper to dry completely flat before framing your dapper little friend.

PENCIL GUIDE
Understanding Pencil Grades from H to B
From first sketch to finished drawing — learn pencil grades, line control, and shading techniques.
Explore the Full Guide
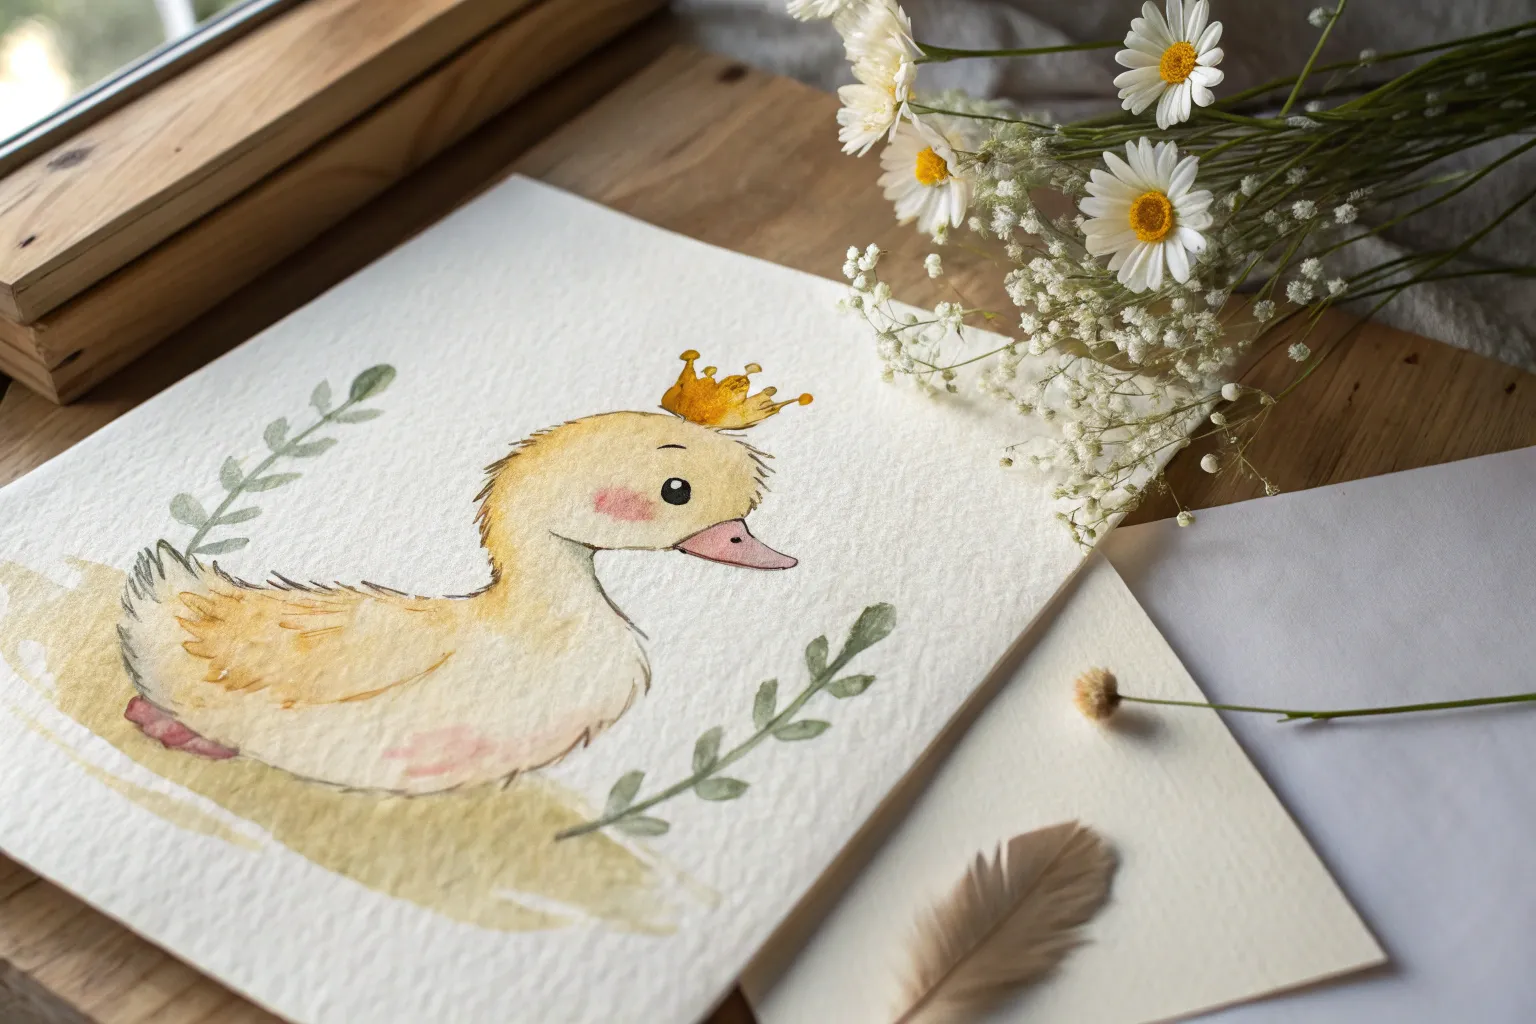
Flower Crown Duck in a Whimsical Garden
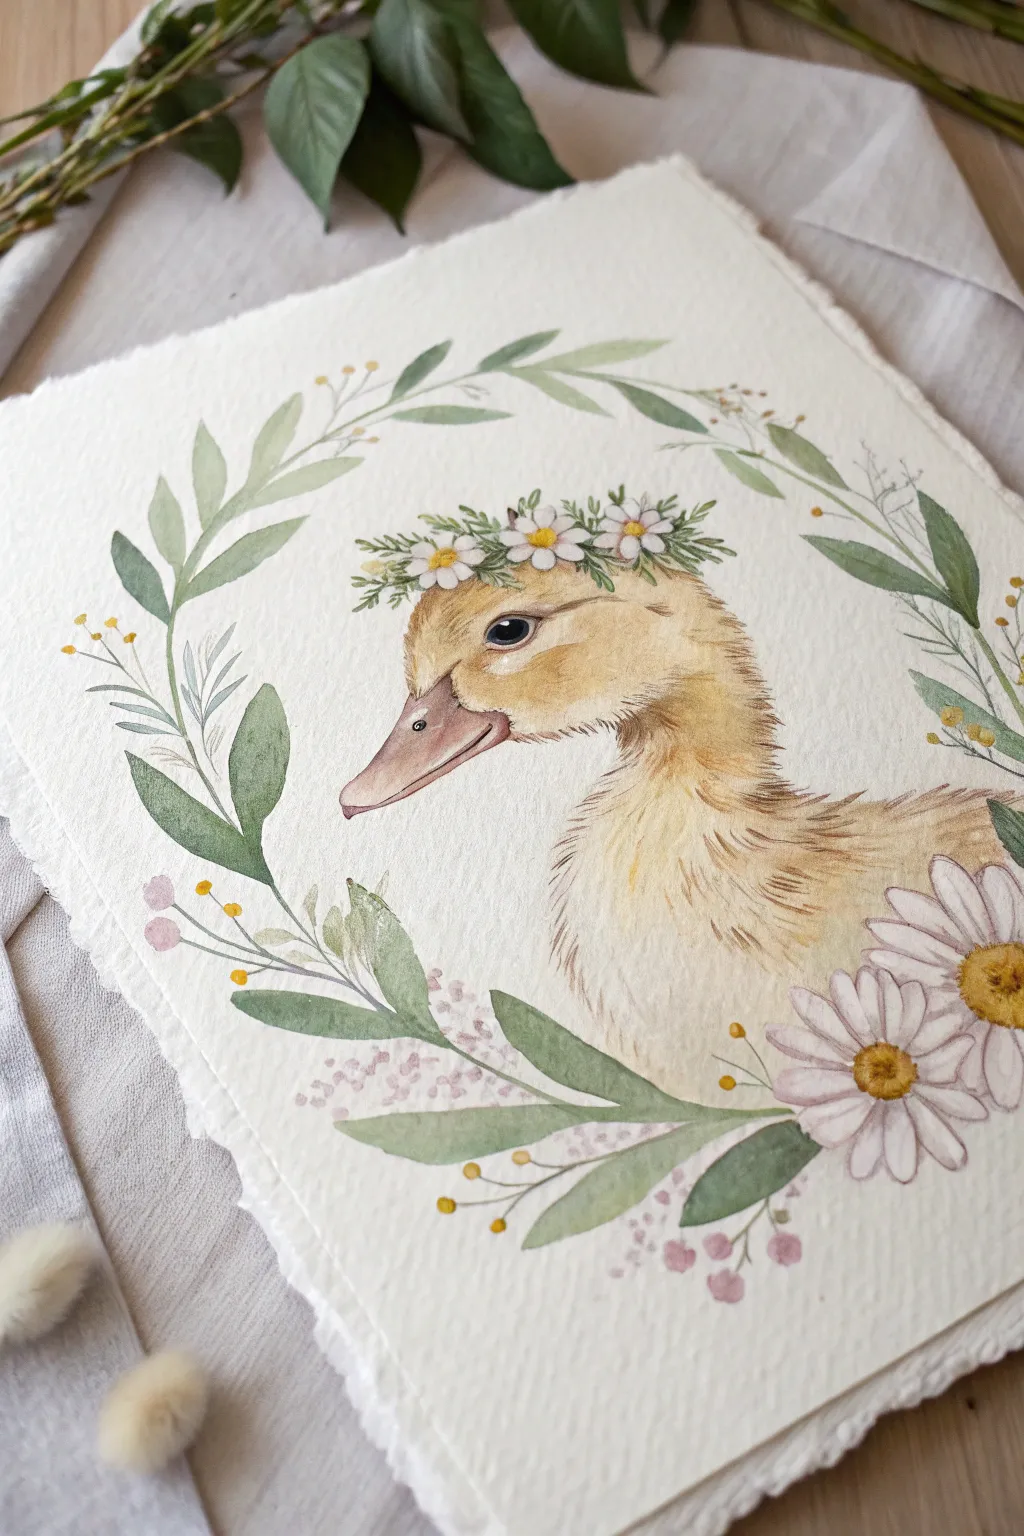
Capture the sweetness of spring with this delicate watercolor portrait of a duckling wearing a daisy crown. Framed by a loose, leafy wreath on deckled paper, this piece combines soft wet-on-wet techniques with precise floral details for a truly charming result.
Step-by-Step Tutorial
Materials
- Cold-press watercolor paper (300 gsm or heavier), preferably with deckled edges
- Watercolor paints (Yellow Ochre, Burnt Sienna, Sap Green, Paynes Grey, Alizarin Crimson)
- White gouache for highlights
- Round brushes: sizes 2, 6, and a finer 0 for details
- HB pencil for sketching
- Kneaded eraser
- Two jars of water
- Paper towels
Step 1: Sketching the Composition
-
Positioning the subject:
Begin by lightly sketching the duckling’s head and neck in the center-right of your paper. Leave plenty of breathing room around the edges for the wreath. -
Refining the features:
Refine the beak shape and the eye placement. The eye should be slightly almond-shaped with a small highlight circle reserved inside. -
Adding floral elements:
Sketch a simple crown of small five-petaled daisies sitting just above the duckling’s brow line. Then, draw two sweeping curves creating an oval open wreath shape around the duck, adding loose leaves and stems along these curves.
Muddiness Fix
If your yellow feathers look dirty, you likely mixed the brown shadow color while the yellow was too wet. Let it dry completely, then glaze pure yellow over the top to bring back vibrancy.
Step 2: Painting the Duckling
-
Initial wash:
Mix a very watery wash of Yellow Ochre with a tiny touch of Burnt Sienna. Apply this to the entire head and neck area, avoiding the beak, eye, and flower crown. -
Building depth:
While the first layer is still slightly damp, drop in a slightly more saturated mix of the same color under the chin and at the back of the neck to suggest shadow. -
Feather texture:
Once the base is dry, use your size 2 brush with a drier mix of Burnt Sienna to paint short, flicking strokes in the direction of feather growth. Focus these around the neck and cheeks. -
Painting the beak:
Mix Alizarin Crimson with a touch of Paynes Grey for a muted pinkish-purple. Paint the beak, leaving the nostril and the line where the beak opens darker. -
Eye details:
Paint the eye using a strong mix of Paynes Grey or black. Be careful to paint around the tiny white highlight circle you sketched earlier to keep the eye looking lively.
Step 3: Floral Crown & Wreath
-
Leaf base layers:
Using Sap Green thinned with water, paint the leaves of the wreath and the crown. Vary the pressure on your brush to create tapered leaf shapes. -
Flower centers:
Drop small dots of Yellow Ochre into the centers of the daisies on the crown and the larger daisies in the bottom right corner. -
Shadows on petals:
Use a very watered-down grey or violet to paint shadow lines on the white petals deeply separating them from one another so they don’t disappear into the off-white paper. -
Additional foliage:
Mix a blue-green shade and add thin stems and smaller, fern-like sprigs to fill gaps in the wreath, creating a wild, garden feel. -
Pink accents:
Add small clusters of pink berries or buds along the bottom curve of the wreath using diluted Alizarin Crimson to balance the composition.
Add Gold Leaf
Apply tiny touches of liquid gold leaf to the centers of the daisies or the tips of the leaves in the wreath for a shimmering, magical finish.
Step 4: Final Details
-
Facial definition:
Using your smallest brush (size 0), add fine dark lines near the beak and eye to sharpen the expression. -
White gouache highlights:
I like to use a tiny bit of white gouache to add final crisp highlights to the tip of the beak and to brighten the daisy petals if they got muddy. -
Softening edges:
If any feather strokes look too harsh, take a clean, slightly damp brush and gently rub the edge to soften it back into the underlayer.
Now you have a gentle, nature-inspired artwork perfect for a nursery or spring display
Duck With an Umbrella on a Rainy Day
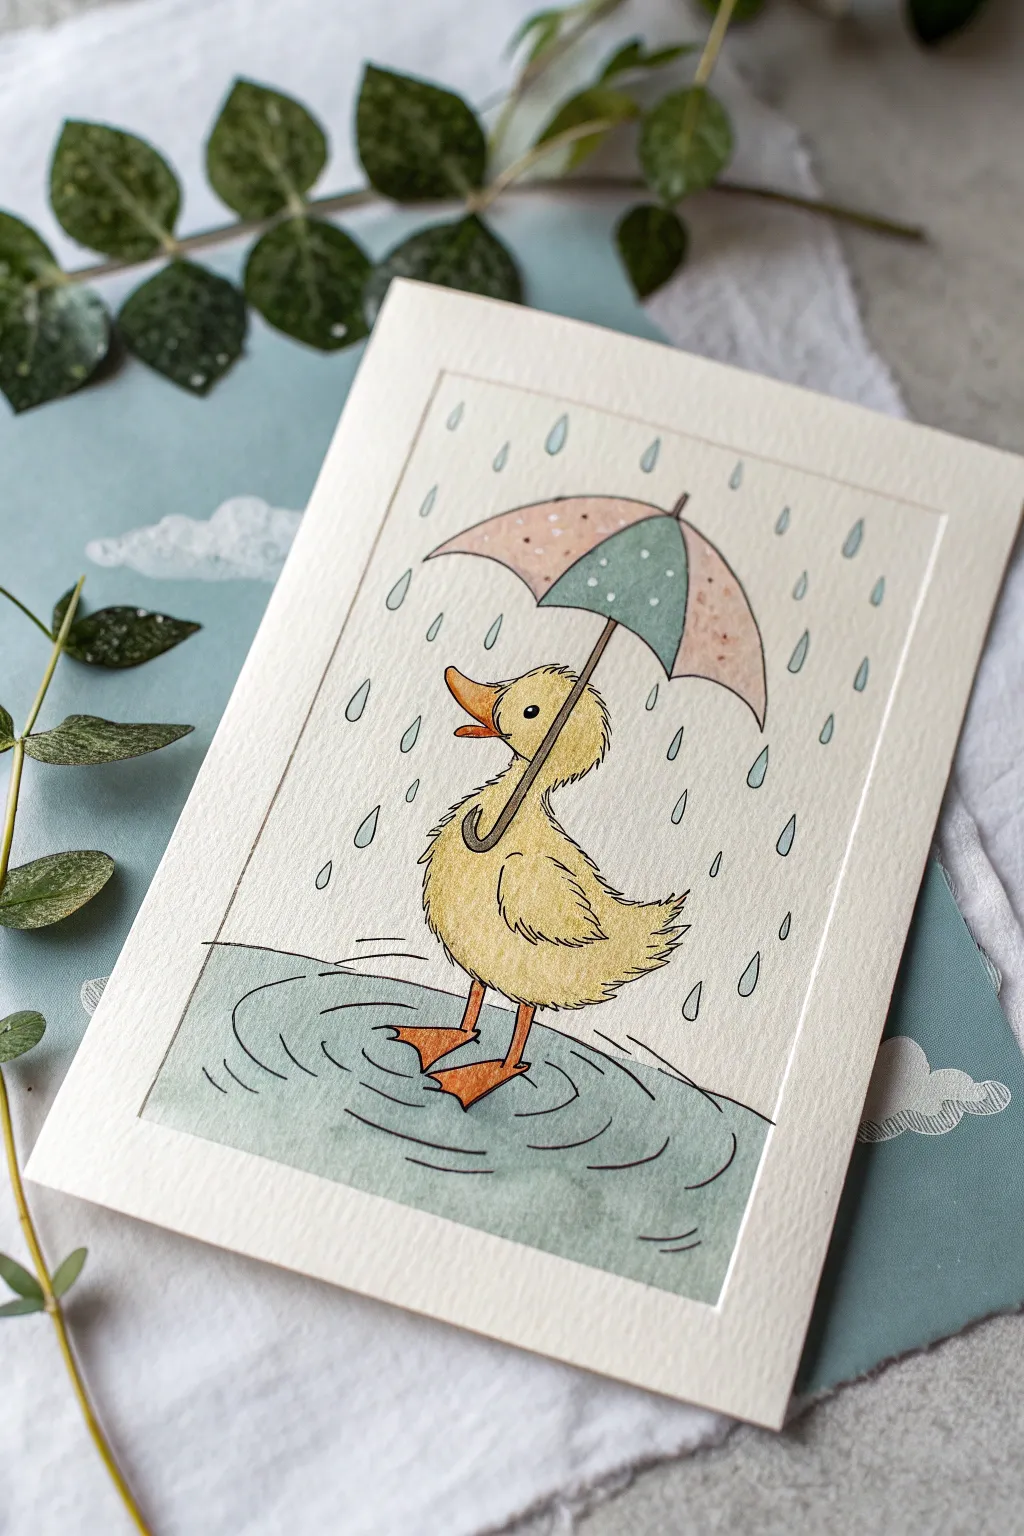
Capture the cozy feeling of a rainy day with this charming watercolor and ink illustration. Featuring a fuzzy yellow duckling sheltered under a patterned umbrella, this project blends precise line work with soft, blended washes.
How-To Guide
Materials
- Cold press watercolor paper (A5 size recommended)
- Waterproof fine liner pen (black, 0.3mm or 0.5mm)
- Set of watercolor paints (pan or tube)
- Round watercolor brushes (size 4 and size 0 for details)
- Pencil (HB) and eraser
- Ruler
- Two jars of water
- Paper towel
Step 1: Sketching the Framework
-
Define the borders:
Begin by using your ruler to draw a crisp rectangular border about 1 inch from the edge of your paper. This frames the scene and gives the finished piece a polished, card-like appearance. -
Position the duck:
Lightly sketch the basic shapes of the duck in the center of the frame. Start with a circle for the head and an oval for the body, keeping the lines faint so they can be erased later. -
Add the umbrella:
Draw the umbrella canopy arching over the duck’s head. Ensure the handle shaft comes down at an angle, held by the duck’s wing, creating a dynamic pose. -
Refine the details:
Flesh out the sketch by adding the beak, eye, and wings. Draw the puddle shape around the webbed feet and sketch small teardrop shapes falling vertically for the rain.
Feathery Texture Tip
When painting the yellow body, try ‘wet-on-dry’ for the edges to keep the feathery outline crisp, then soften the color inward with water.
Step 2: Inking the Outline
-
Trace the main lines:
Using your waterproof fine liner, carefully go over your pencil lines. For the duck’s body, use short, broken strokes rather than a solid line to mimic fluff and feathers. -
Detail the water features:
Ink the rain droplets and the ripples in the puddle. Keep the ripple lines fluid and broken to suggest movement in the water. -
Erase pencil marks:
Wait until the ink is completely dry to prevent smudging. I usually give it at least 5 minutes before gently erasing all the visible pencil guidelines.
Make It 3D
Use foam adhesive tape to mount your finished painting onto a slightly larger piece of colored cardstock for a subtle shadowbox effect.
Step 3: Applying Watercolor Washes
-
Paint the duckling:
Mix a bright, sunny yellow with plenty of water. Apply this wash to the duck’s body, leaving the beak and feet dry for now. Drop a tiny touch of light orange on the wing/chest area while wet for shadow. -
Color the beak and feet:
Use a vibrant orange for the beak and feet. These areas are small, so switch to your smaller brush to stay neatly inside the lines. -
Fill the umbrella panels:
Paint the umbrella in alternating colors. A soft pink and a muted teal work beautifully together. For the pink sections, you can lift out tiny spots of color with a dry brush or add white gouache later for a polka-dot effect. -
Create the puddle:
Mix a diluted teal or grey-blue wash. Apply this freely to the puddle area, letting the color vary slightly in intensity to create depth. -
Tint the rain droplets:
Using a very pale blue wash, carefully fill in the falling raindrops. Keep this subtle so it doesn’t overpower the main subject.
Step 4: Final Touches
-
Add texture to the umbrella:
Once the umbrella paint is dry, use a white gel pen or opaque white paint to add small decorative dots to the teal sections. -
Deepen the shadows:
Mix a slightly darker yellow-brown shade. Glaze this gently under the wing, under the chin, and where the feet meet the water to ground the figure. -
Enhance the eye:
If your black outline got covered by paint, re-darken the eye with your pen, leaving a tiny white speck for the catchlight to bring the character to life.
Now you have a sweet illustrative piece perfect for framing or sending as a cheerful greeting card


Puddle-Splashing Duck With Little Water Drops
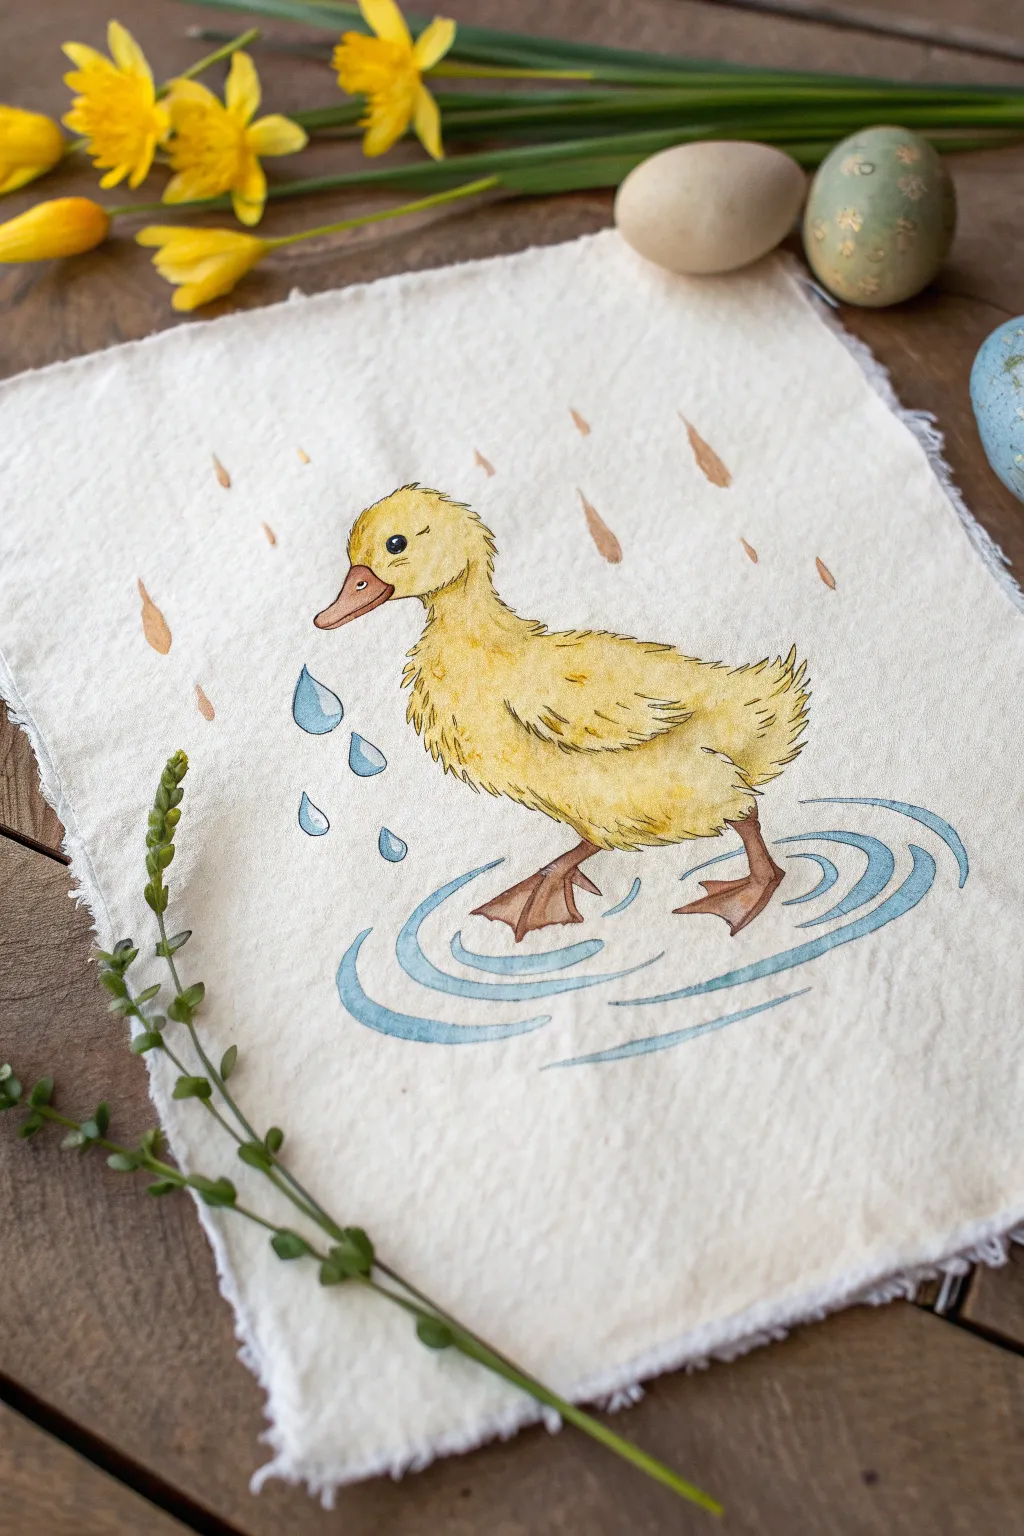
This charming project captures the joy of a spring shower with a fluffy yellow duckling splashing in a blue puddle. Painted directly onto a piece of raw-edged cotton fabric, the texture adds a lovely, rustic feel to the delicate watercolor details.
Step-by-Step Tutorial
Materials
- Heavyweight cotton or linen fabric scraps
- Fabric stiffener or gesso (clear)
- Watercolor paints (Yellow Ochre, Lemon Yellow, Burnt Sienna, Payne’s Grey, Cerulean Blue)
- Small round brushes (size 2 and 4)
- Fine liner brush (size 00)
- Pencil (HB or lighter)
- Mixing palette
- Paper towels
- Water jar
- Scissors
Step 1: Preparing the Canvas
-
Cut the fabric:
Cut a rectangular piece of your cotton or linen fabric, leaving about an inch of extra space around your intended image borders. -
Fray the edges:
Gently pull loose threads from all four sides of the fabric to create a soft, frayed fringe about a quarter-inch deep. This gives the piece its distinct, rustic charm. -
Prime the surface:
Since fabric is very absorbent, apply a thin layer of clear gesso or fabric medium to the painting area. Let this dry completely to prevent your paint from bleeding uncontrollably.
Step 2: Sketching the Duckling
-
Outline the body:
Using a light hand, sketch a large oval for the body and a smaller circle for the head above it. Connect them with a gentle curve for the neck. -
Add features:
Draw the beak pointing slightly downward and a small round eye high on the head. Sketch the feet stance, placing one foot forward and one back to suggest walking motion. -
Define the fluff:
Go over your smooth outlines with short, jagged pencil strokes to indicate feathers, especially on the chest, tail, and back of the head. -
Sketch the water:
Lightly draw concentric oval rings around the feet to mark where the ripples will be painted later.
Bleeding Control
If paint spreads too fast on the fabric, your brush is too wet. Blot it on a paper towel before touching the fabric, and use a ‘dry brush’ technique for details.
Step 3: Painting the Duckling
-
Base yellow wash:
Mix a watery Lemon Yellow and apply it to the entire duck body, leaving the beak and feet unpainted. Keep the edges soft and feathery. -
Add shadows:
While the yellow is still slightly damp, drop in a mix of Yellow Ochre or a tiny touch of brown near the wing, under the belly, and the back of the neck to create volume. -
Detail the feathers:
Using your size 2 brush and a more concentrated Yellow Ochre, paint short, flicking strokes to mimic the texture of wet downy feathers. -
Paint the beak:
Fill in the beak with a soft Burnt Sienna. Add a tiny dabs of darker brown for the nostril and the line separating the upper and lower beak. -
Paint the feet:
Use a darker brown mix for the legs and webbed feet. Ensure the feet look firmly planted by darkening the bottom edges slightly. -
Define the eye:
With your smallest brush and Payne’s Grey (or black), carefully paint the eye, leaving a tiny speck of white paper/fabric unpainted for the highlight.
Pro Tip: Fabric Choice
Use a tightly woven fabric like calico or muslin. Loose weaves make it hard to paint fine details like the eye and beak accurately.
Step 4: Environment Details
-
Create the ripples:
Dilute Cerulean Blue with plenty of water. Paint the curved lines of the ripples around the feet, varying the thickness to show movement. -
Adding splashing drops:
Paint two or three tear-drop shapes near the duck’s chest using the same blue mix. Outline one side slightly darker to give them dimension. -
Falling rain:
Mix a very watery, warm brown or beige. Paint simple tear-drop shapes falling from the top of the fabric towards the duck to simulate rain. -
Final outlines:
I like to take a fine liner brush with a very light brown mix and gently outline the feathery edges of the duck to make it pop against the fabric background.
Once dry, display your adorable duckling art flat on a table or frame it in a shadow box to preserve the beautiful fabric texture
Tranquil Duck Floating on Simple Ripple Swirls
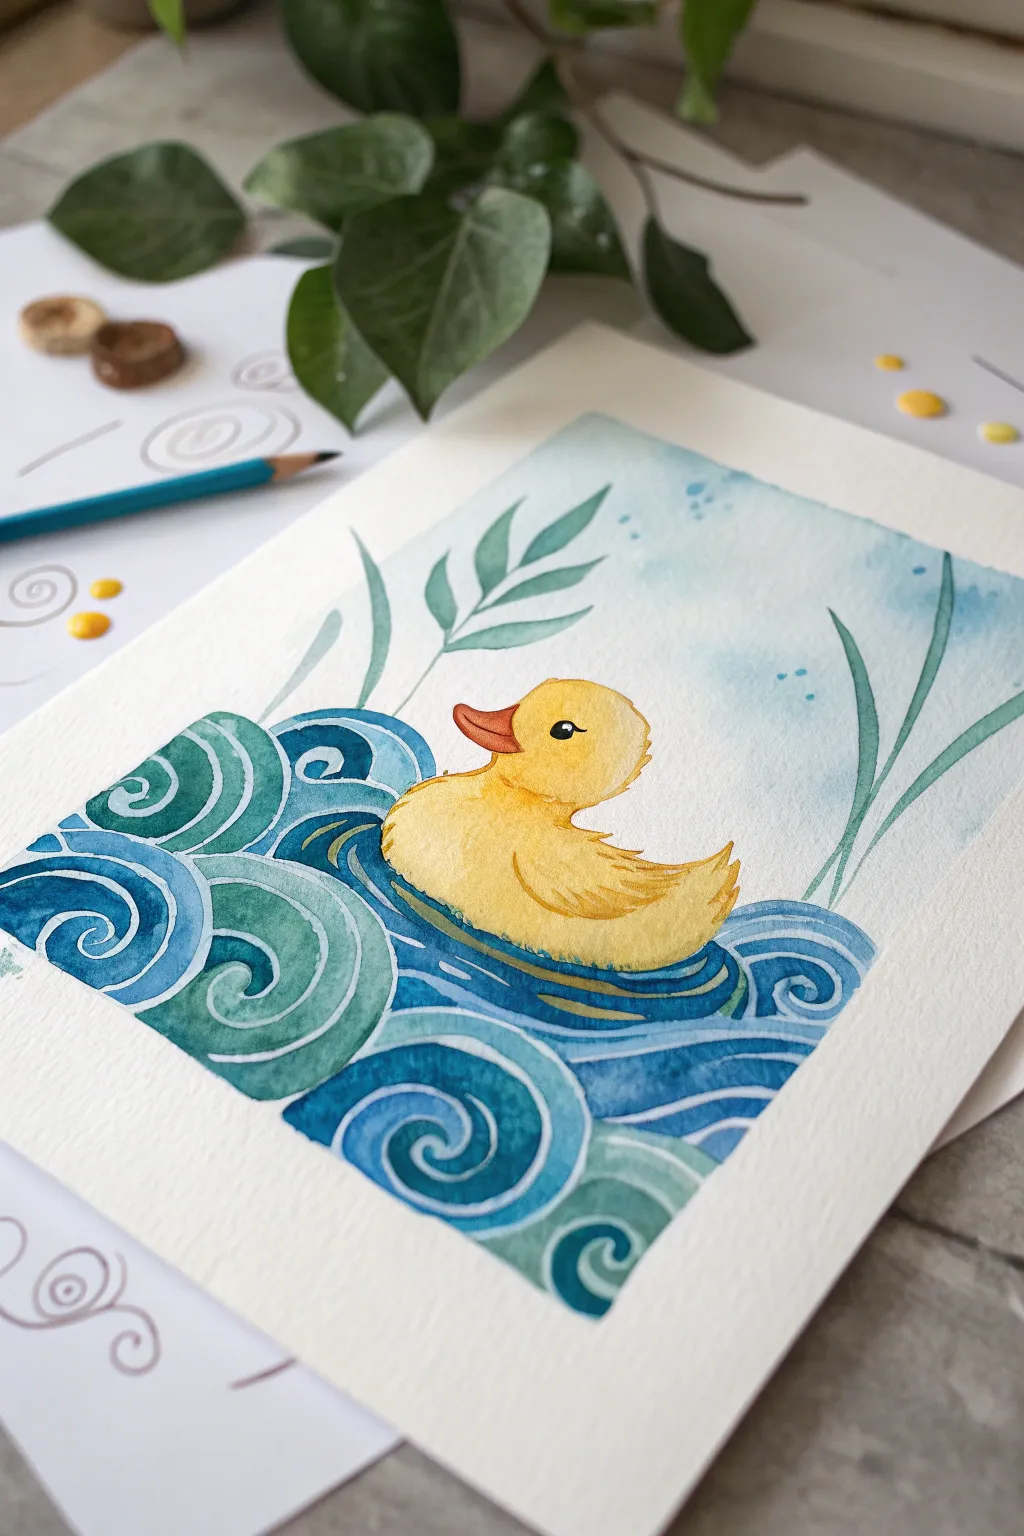
Capture the serene charm of a little yellow duck bobbing on stylized waves with this cheerful watercolor project. The unique combination of a soft, traditional subject with bold, pattern-like water ripples creates a delightful illustration perfect for a nursery or greeting card.
Step-by-Step Guide
Materials
- Cold press watercolor paper (300 gsm)
- Watercolor paints (Cadmium Yellow, Yellow Ochre, Phthalo Blue, turquoise/teal mix, Sap Green)
- Round watercolor brushes (size 4 for details, size 8 or 10 for washes)
- Pencil (HB or H for light sketching)
- Eraser
- Two jars of water
- Paper towels
- Masking tape
Step 1: Sketching the Composition
-
Tape down your paper:
Begin by taping the edges of your watercolor paper to a board with masking tape. This creates a crisp white border and prevents the paper from buckling when wet. -
Position the duck:
Lightly sketch the outline of the duckling in the center of the page. Use simple shapes: a circle for the head and an oval for the body, connecting them with a curved neck. -
Map out the waves:
Instead of realistic water, draw bold, swirling spiral shapes around the base of the duck. Extend these spirals outward to form a rectangular block of water beneath the subject. -
Add floating reeds:
Sketch a few tall, simple leaves or reeds rising from behind the water on the left and right sides. Keep them slender and slightly curved for movement.
Uneven Water Lines?
If your white gaps between waves look messy, wait for the paint to dry fully. Then, use a white gel pen or white gouache to redefine and sharpen those dividing lines.
Step 2: Painting the Duckling
-
Base yellow wash:
Load your brush with a clean, bright Cadmium Yellow. Paint the entire body of the duck, leaving just a tiny spec of white paper for the eye highlight if you’re comfortable, though we can add it later with gouache. -
Adding shadows:
While the yellow is still slightly damp, introduce a touch of Yellow Ochre or a slightly darker orange-gold mix to the bottom of the duck and under the neck. This gives the little bird form and volume. -
Feather details:
Once the base layer is dry, use a smaller brush with a more concentrated yellow-orange mix to flick in small wing details and tail feathers. -
Beak and eye:
Paint the beak with a bright orange. Once dry, paint the eye solid black, ensuring you leave that tiny white catchlight sparkle.
Step 3: Creating the Swirling Water
-
Choose your palette:
Prepare two main pools of color: a deep ocean blue and a softer teal or turquoise. This variation adds visual interest to the stylized waves. -
Paint the first spirals:
Start with the spirals closest to the duck. Fill in the swirl shapes, alternating between your blue and teal mixtures. I find it helpful to rotate the paper slightly as I paint the curves. -
Leave white gaps:
Crucially, leave a thin channel of dry white paper between each swirl section. This negative space acts as the outline and defines the stylized ‘pattern’ look of the water. -
Fill the water block:
Continue working outward, filling in the remaining wave shapes. Keep your edges crisp to maintain that graphic illustration style. -
Deepen the contact points:
Add a slightly darker blue right where the duck meets the water to ground the figure so it looks like it is truly floating.
Make it Sparkle
Add a touch of iridescent mediium to your blue paint mix. When the light hits the finished painting, the water swirls will shimmer like a real sunlit pond.
Step 4: Background and Finishing Touches
-
Wash the sky:
Wet the sky area above the water with clean water first. Drop in a very watered-down, pale blue wash, letting it fade out irregularly before it hits the paper edges. -
Greenery accents:
Paint the reeds with Sap Green. Vary the pressure on your brush to make the leaves taper elegantly at the tips. -
Splatter texture:
Load a brush with watery blue paint and gently tap it against another brush handle to create soft splatters in the sky area. -
Final check:
Allow everything to dry completely. Erase any visible pencil lines in the white gaps between the waves for a polished look. -
Reveal:
Gently peel away the masking tape at a 45-degree angle to reveal your clean white border.
You now have a charming piece of storybook-style art ready to frame or gift
Fluffy Texture Duck Using Dry Brush Strokes
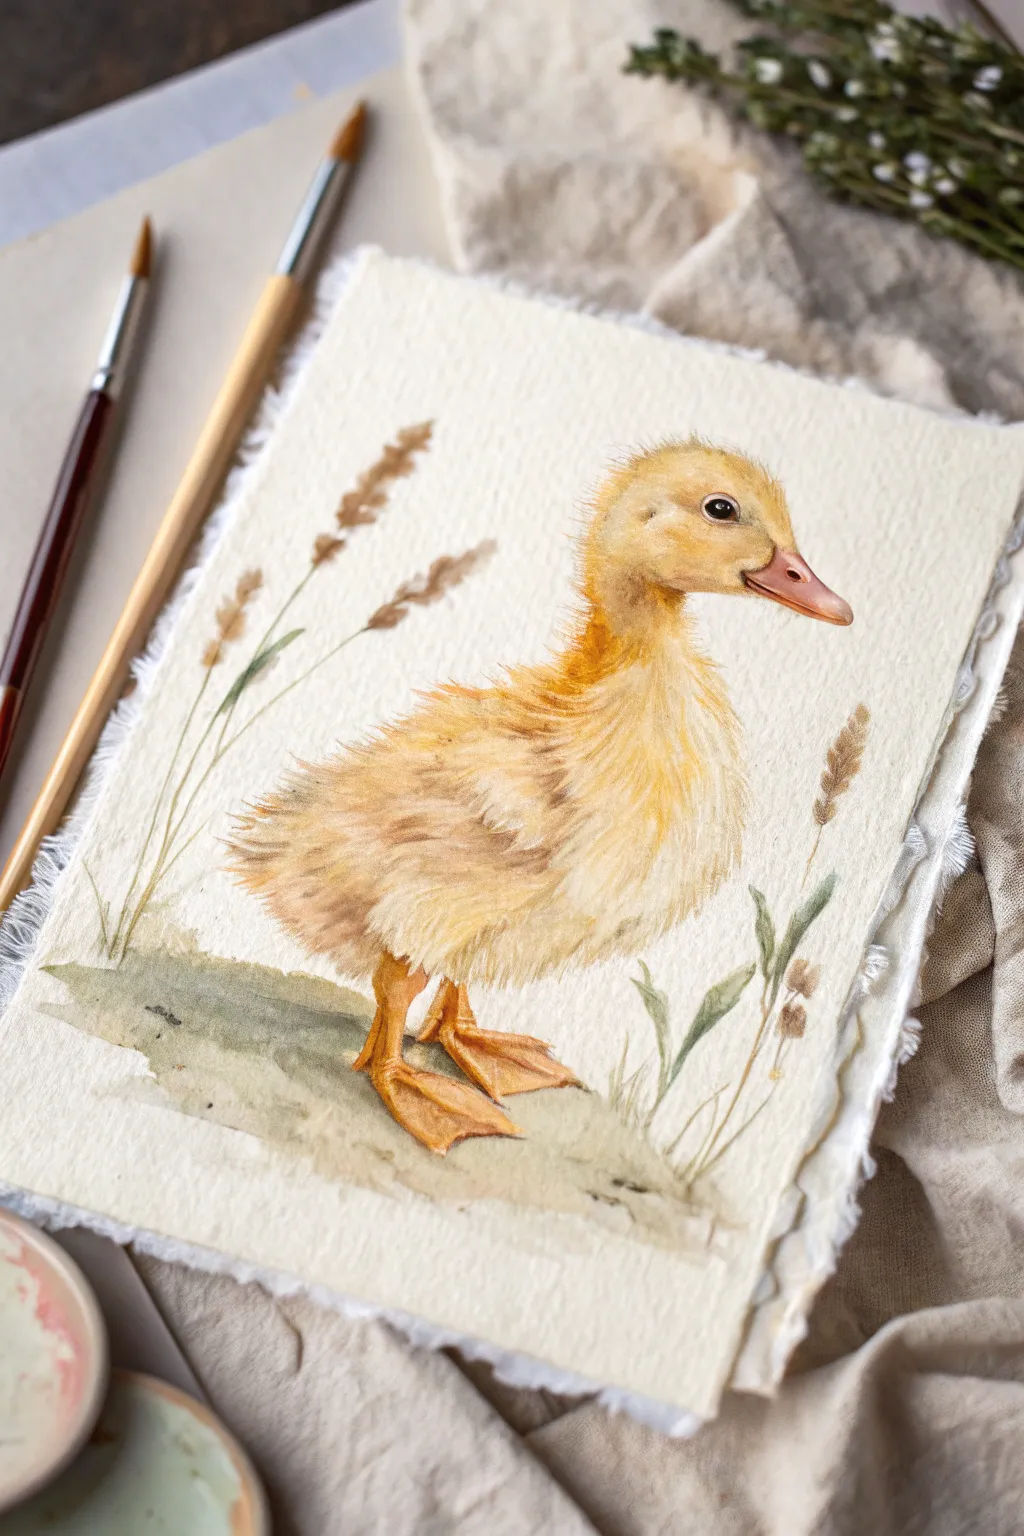
Capture the irresistible softness of a young duckling with this detailed watercolor tutorial. By combining wet-on-wet washes for the base with precise dry brush strokes for the feathers, you will create a realistic, fluffy texture that looks touchable.
Step-by-Step
Materials
- Heavyweight watercolor paper (300gsm cold press recommended)
- Watercolor paints (Yellow Ochre, Burnt Sienna, Raw Umber, Paynes Grey, Sap Green)
- Round brushes (sizes 2, 4, and 8)
- Fine liner brush (size 00 or 0)
- Two jars of water
- Paper towel or rag
- Pencil (HB) and kneaded eraser
Step 1: Sketching and Base Layers
-
Light Outline:
Begin with a very faint pencil sketch of the duckling’s form. Focus on the oval shape of the body and the smaller, rounded head. Mark the position of the beak, eye, and feet lightly, avoiding heavy graphite lines that might show through the yellow paint. -
First Wash:
Mix a watery wash of Yellow Ochre. Using a size 8 round brush, wet the area of the duckling’s head and body with clean water first, then drop in the yellow pigment. Let the color bloom naturally, keeping the edges soft but leaving the beak and eye area white for now. -
Building Warmth:
While the first layer is still slightly damp, introduce a touch of Burnt Sienna to the shadows under the neck, the back of the head, and the underside of the belly. This establishes volume early on. -
Painting the Beak and Feet:
Mix a diluted orange using Yellow Ochre and a tiny dot of Red or Burnt Sienna. Paint the beak and legs with a flat wash. Once dry, add a second layer of the same mix to the shadowed sides of the toes and the underside of the beak to create dimension. -
Grounding the Subject:
Mix a muted green-grey using Sap Green and a touch of Umber or Paynes Grey. With a damp brush, paint a loose, horizontal patch of ground beneath the feet. Let the edges fade out into the white paper so the ground doesn’t look like a solid block.
Step 2: Creating Fluffy Texture
-
Preparing the Brush:
Now for the texture. Load a size 4 brush with a thicker mix of Yellow Ochre and Burnt Sienna. Blot the brush on a paper towel until it is almost dry—this is crucial for the dry brush technique. -
Feather Direction:
Start applying short, flickering strokes following the growth direction of the down. I find it helps to start at the neck and work outwards. The dry brush will skip over the tooth of the paper, creating that fuzzy, broken look naturally. -
Deepening Shadows:
Switch to a slightly darker mix of Raw Umber and Burnt Sienna. Apply more concentrated dry brush strokes in the shadowed areas: under the wing, beneath the chin, and along the lower belly. Keep the strokes short and varied in length. -
Detailing the Face:
Use a size 2 brush for the facial features. Paint short, tiny strokes radiating outward from the eye to make the face look soft. Be careful not to outline the head with a solid line; instead, use tiny outward flicks to simulate fluff breaking the silhouette. -
The Eye:
Paint the eye using a dark mix of Paynes Grey and Burnt Umber (avoid pure black for a more natural look). Leave a tiny speck of white paper for the highlight, or add it back later with gouache. Outline the eye rim gently to make it pop.
Dry Brush Success
If your paint is pooling or creating hard lines, your brush is too wet. Blot it thoroughly on a towel until it leaves only a faint, scratchy mark when tested on scrap paper.
Step 3: Final Details and Surroundings
-
Defining the Wing:
The wing feathers are slightly more structured than the body down. Use groups of longer, sweeping strokes with a mix of Raw Umber to suggest the beginnings of wing feathers tucked against the side. -
Texturing the Legs:
Add creases and texture to the legs and webbed feet using a fine liner brush and a mix of Burnt Sienna. Paint the webbing lines and the small claws at the tips of the toes. -
Background Grasses:
Mix a watery Sap Green with a bit of Brown. Paint a few tall, slender blades of grass rising from the ground wash. Keep them loose and transparent to ensure they don’t distract from the duckling. -
Seed Heads:
Dab small spots of brown at the tips of the grass stems to create seed heads. You can spatter a tiny bit of clean water into these brown spots while wet to create a blooming texture. -
Final Highlights:
If you lost any brightness, mix a little opaque white gouache with lemon yellow and use the liner brush to add a few final ‘lit’ hairs on the top of the head and the curve of the chest where the light hits.
Deckle Edge Effect
For a rustic look like the photo, tear your watercolor paper alongside a ruler instead of cutting it with scissors. This creates a soft, fibrous ‘deckle’ edge.
Step back and admire how a few simple techniques have transformed simple washes into a lively, fluffy little bird.
Duck With a Little Backpack on an Adventure
Capture the charm of a fluffy duckling taking its first steps with this delicate watercolor tutorial. The soft washes of yellow and fine detail work create a gentle, realistic texture that brings this little adventurer to life.
Detailed Instructions
Materials
- Cold press watercolor paper (300 gsm)
- Pencil (HB or 2H)
- Kneaded eraser
- Watercolors: Lemon Yellow, Cadmium Yellow, Yellow Ochre, Burnt Sienna, Payne’s Grey, Sap Green
- Round brushes: sizes 6, 2, and 00 (for details)
- Clean water jar
- Paper towels
- Brown kraft cardstock (for mounting)
Step 1: Sketching the Shape
-
Outline the head and body:
Start with a light pencil sketch. Draw a small circle for the head and a larger oval beneath it for the body, angling the oval slightly upward to suggest a walking posture. -
Connect the forms:
Connect the head to the body with two curved lines for the neck. Keep the lines loose to imply fluffiness rather than a smooth seal-like skin. -
Add features and feet:
Sketch the beak pointing left, the eye placement, and the small wing shape tucked against the side. Draw the legs and webbed feet, positioning one foot slightly forward to show movement. -
Refine the outline:
Use your kneaded eraser to lighten the graphite lines until they are barely visible. This prevents the pencil from muddying the transparent yellow paint later.
Step 2: Applying Base Colors
-
Initial wash:
Wet the duckling’s body area with clean water (wet-on-wet technique). Drop in a very dilute wash of Lemon Yellow, letting it flow naturally but avoiding the eye and beak. -
Building warmth:
While the paper is still damp, dab some Cadmium Yellow into the shadowed areas: under the chin, beneath the wing, and along the bottom of the belly. -
Beak and feet base:
Paint the beak with a light wash of watery Burnt Sienna mixed with a touch of pink or red. Use a mix of Yellow Ochre and Orange for the flat base color of the feet. -
Let it dry completely:
Ensure the paper is bone dry before moving to texture work. If it’s cool to the touch, it still needs more time.
Feathery Texture Tip
Don’t outline the whole duck! Leave edges broken and use short, directional brush strokes at the perimeter to mimic soft down feathers rather than a hard shell.
Step 3: Creating Texture and Depth
-
Layering feathers:
Switch to your size 2 brush. Using short, flicking strokes with a mix of Yellow Ochre and Cadmium Yellow, start building the texture of downy feathers. Follow the curve of the body. -
Wing definition:
Darken the area under the wing with a thicker mix of Yellow Ochre to make the wing pop out. Add subtle feather flicks on top of the wing itself. -
Facial details:
Paint the eye using extremely concentrated Payne’s Grey or black, leaving a tiny speck of white paper for the highlight. This spark of life is crucial. -
Beak refinement:
Add a darker line of Burnt Sienna along the opening of the beak and a tiny nostril dot. Glaze a darker shadow on the underside of the beak. -
Shadows and grey tones:
I like to mix a tiny bit of Payne’s Grey into Yellow Ochre to create a desaturated shadow color. Apply this sparingly under the tail feathers and deep in the neck folds.
Level Up: Seasonal Twist
Paint a tiny accessory on the duckling, like a red rain boot or a miniature backpack, to match the adventure theme more literally.
Step 4: Final Details
-
Detailing the feet:
Use a size 00 brush with Burnt Sienna to outline the webbed feet and add wrinkles to the ankles. Deepen the color where the feet touch the ground. -
Adding the grass:
Mix Sap Green with a touch of Yellow. Using quick, upward flicking motions, paint tufts of grass around the feet. Vary the height and angle for realism. -
Grounding shadow:
Dilute a cool grey or purple very heavily. Paint a soft, diffuse shadow directly under the duckling and the grass to ground the figure so it doesn’t look like it’s floating. -
Final fluff check:
Use your smallest brush to add tiny, stray ‘hairs’ or fluff on the back of the head and tail using a dry-brush technique. -
Mount the artwork:
Once fully dry, trim the watercolor paper slightly smaller than your brown kraft cardstock. Center it and glue it down to create a rustic frame effect.
Now you have a sweet little companion ready to brighten up any room or serve as a charming greeting card
Night-Sky Duck With Tiny Stars and Moon Glow
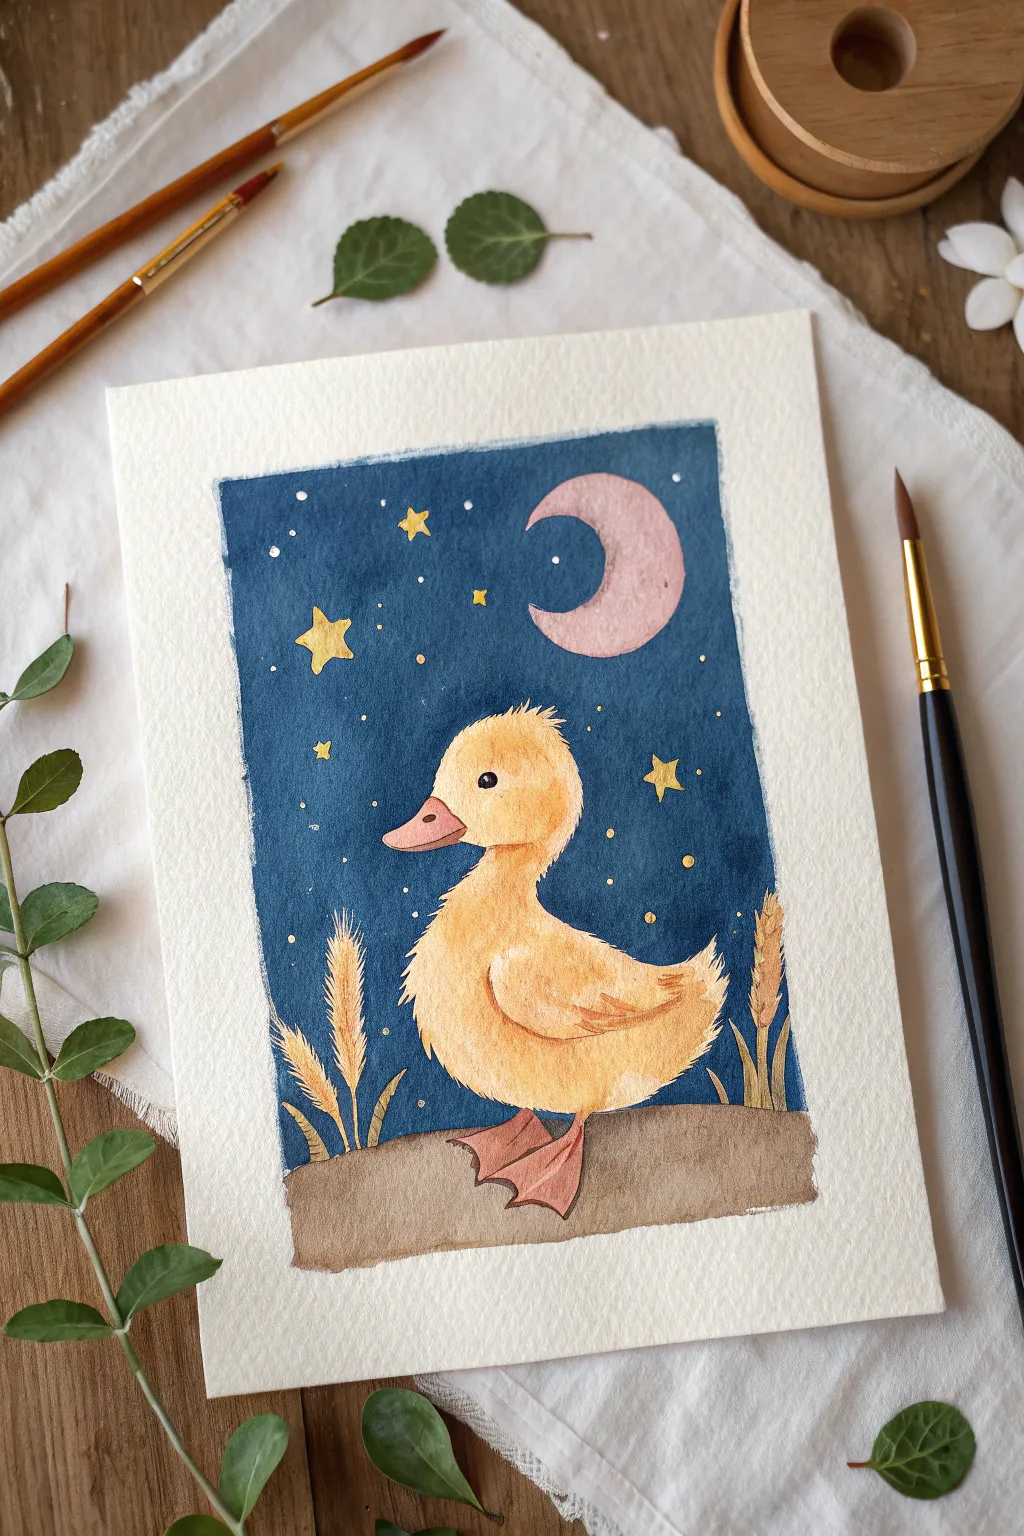
Capture the magic of a peaceful evening with this adorable watercolor illustration featuring a fluffy duckling beneath a starry sky. The deep indigo background makes the yellow duckling pop, creating a cozy and enchanting scene perfect for a nursery or greeting card.
Step-by-Step Guide
Materials
- Cold press watercolor paper (300 gsm)
- Watercolor paints (Indigo, Hansa Yellow, Yellow Ochre, Burnt Sienna, Burnt Umber, Potter’s Pink or Light Red)
- Gouache paint (White and Gold/Yellow)
- Round watercolor brushes (sizes 2, 6, and 8)
- Small flat brush (optional, for edges)
- Pencil (HB) and kneadable eraser
- Masking tape
- jar of water and paper towels
Step 1: Preparation and Sketching
-
Tape the Edges:
Secure your watercolor paper to a board or table using masking tape on all four sides. This creates a crisp, clean border and helps prevent the paper from buckling when wet. -
Sketch the Outline:
Using an HB pencil, lightly sketch the oval shape for the duck’s body and a smaller circle for the head. Connect them with a curved neck. -
Add Details:
Refine the shape by adding a slightly upturned bill, webbed feet, and a small wing. Sketch the ground line near the bottom and place a crescent moon in the upper right corner. -
Lighten the Lines:
Roll your kneadable eraser gently over the entire sketch. You want the graphite lines to be barely visible so they don’t dirty the yellow paint later.
Fuzzy Edges Pro-Tip
To make the duck look extra fluffy, dry-brush the edges. Use a slightly damp brush with thick pigment and lightly drag it outward from the duck’s outline.
Step 2: Painting the Background
-
Outline in Water:
With clean water and a size 6 brush, wet the sky area, carefully painting *around* the duck, the moon, and the stars if you drew them large enough (otherwise paint over the star spots and add them later). -
Apply Indigo Wash:
Load your brush with a rich, dark Indigo. Drop the color into the wet sky area. Use the tip of the brush to carefully cut in around the duck’s fuzzy head contour. -
Even Out the Sky:
Continue filling the sky down to the horizon line. If the paint looks uneven, that’s okay—it adds texture to the night sky. Let this layer dry completely before moving on.
Step 3: Painting the Duckling
-
Base Yellow Layer:
Mix a bright Hansa Yellow with plenty of water. Paint the entire head and body of the duckling with a size 6 brush. -
Add Shadow and Warmth:
While the yellow is still slightly damp, drop a mix of Yellow Ochre and a tiny touch of Burnt Sienna into the bottom of the belly and under the wing to create roundness. -
Texture the Feathers:
Once the base layer is dry, use a size 2 brush with a slightly thicker Yellow Ochre mix to paint tiny, short strokes along the edges and on the chest to mimic fluffy down feathers. -
The Bill and Feet:
Mix a soft pinkish-orange using Potter’s Pink and a touch of Yellow. Paint the bill and the webbed feet. I usually add a slightly darker line on the bill for the nostril while it’s wet.
Fixing Sky Bleeds
If blue paint bleeds into your yellow duck, don’t panic! Blot it immediately with a clean paper towel, let it dry, then gently lift the stain with a damp stiff brush.
Step 4: Ground and Details
-
Paint the Ground:
Use a wash of Burnt Umber or a soft brown for the ground beneath the duck. Keep the top edge slightly uneven to look like dirt or soil. -
Add Wheat Stalks:
Using a mix of Yellow Ochre and Burnt Umber, paint simple wheat stalks rising from the ground on the left and right sides. Use the tip of the size 2 brush to dab the seed heads. -
Moon and Stars:
Paint the crescent moon with a very pale, watered-down pink. For the stars, use opaque yellow gouache or a gold watercolor to paint small star shapes and dots. -
The Eye:
Using a very dark mix of Burnt Umber and Indigo (or black), carefully paint the small round eye. Leave a tiny speck of white paper for the highlight, or add it back later with white gouache. -
Final Highlights:
Use white gouache on a size 2 brush to add tiny dots in the sky for distant stars and to highlight the edges of the wheat stalks. -
Peel the Tape:
Wait until the painting is 100% dry. Slowly peel the masking tape away at a 45-degree angle to reveal your clean, crisp borders.
Now you have a serene little masterpiece ready to frame or gift


Have a question or want to share your own experience? I'd love to hear from you in the comments below!