Whenever you’re craving cute easy drawings that actually turn out adorable, I stick to step by step builds that start with the simplest shapes. Grab a pencil and let me show you a bunch of kawaii-style ideas you can sketch in quick, confidence-boosting stages.
Kawaii Cat Face
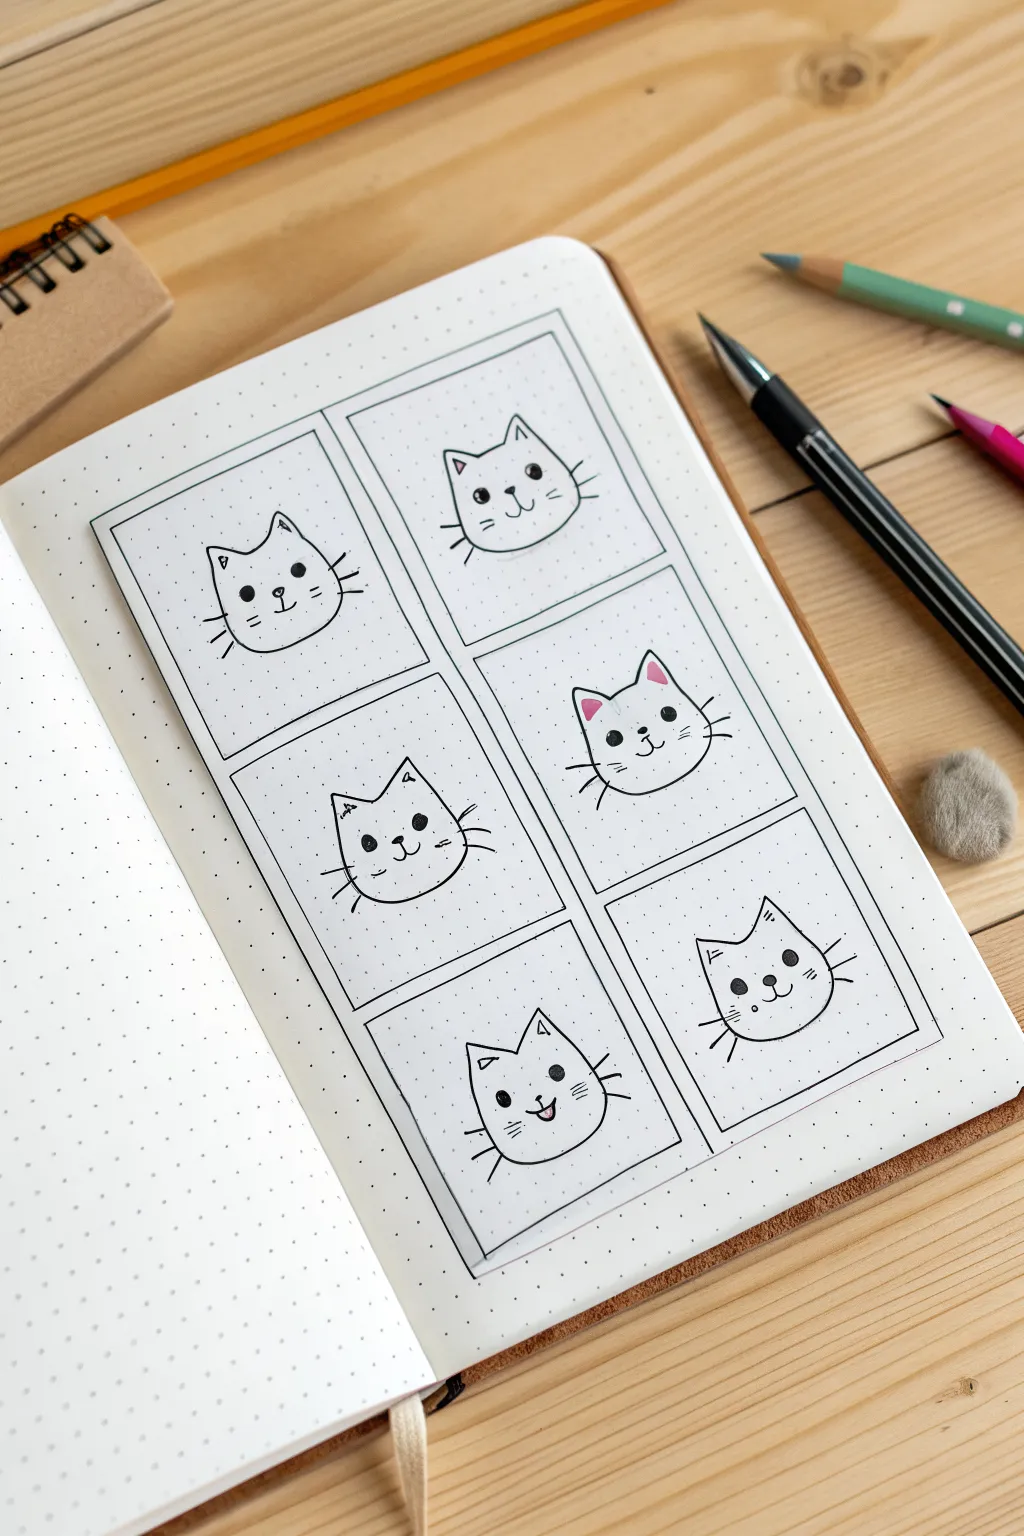
Capture a variety of moods with this fun grid of kawaii cat expressions drawn on dotted journal paper. This simple project uses a repetitive layout to explore subtle changes in emotion, creating a charming study of feline feelings.
Step-by-Step Tutorial
Materials
- Dotted bullet journal or grid paper
- Black fineliner (0.3mm or 0.5mm)
- Ruler
- Pencil
- Eraser
- Pink colored pencil or marker
Step 1: Setting the Stage
-
Map out the grid:
Start by counting your dots to determine the size of your frames. A 2×3 layout works beautifully here. Using your pencil and ruler, lightly sketch six identical rectangles, leaving a bit of breathing room between each one. -
Ink the frames:
Once you are satisfied with the spacing, trace over your pencil lines with the black fineliner. You can add a second, thinner line just inside the first to create a ‘double frame’ effect for extra polish.
Uneven Eyes?
If your eyes look lopsided, practice sketching a light horizontal line across the face first. Use the grid dots as anchors to ensure both eyes sit on the exact same ‘level’ before inking.
Step 2: Drafting the Cats
-
Sketch the base shape:
In the center of the first box, lightly pencil a wide, soft ‘U’ shape for the cat’s face. Keep the bottom curve gentle rather than pointed. -
Add the ears:
Draw two triangular ears on top of the head. Connect them with a slightly curved line for the top of the skull. -
Repeat the process:
Go through the remaining five boxes and replicate this same head shape. Aim for consistency, but don’t worry if they aren’t photocopies of each other—handmade charm is key. -
Ink the outlines:
Go over the main outline of all six cat heads with your pen. Don’t ink the facial features yet; we want to keep the insides blank to customize them later.
Pattern Play
Instead of leaving the cats white, turn them into different breeds. Add stripes for a tabby, patches for a calico, or color the ears and nose tips dark for a Siamese look.
Step 3: Adding Personality
-
Placement guide:
You can use the dots on the paper to help align the eyes and noses so they sit at the same height across the grid. -
Draw the Classic Cat:
For the first face, draw two solid black circles for eyes. Add a tiny inverted triangle for the nose and a ‘3’ shape turned on its side for the mouth. -
Add whiskers:
Give the first cat three short, straight whiskers on each cheek. Quick, confident flicks of the pen work best here. -
Create the Happy Cat:
In the next box, draw the same eyes and nose, but make the mouth a closed smile. You can make the eyes slightly larger or add tiny highlights (white dots) if your pen allows. -
Draw the Curious Cat:
For the third variation, try tilting the head slightly or changing the eye spacing. A small, simple smirk gives a different vibe. -
Design the Blushing Cat:
In the fourth box, draw the standard face but leave room on the cheeks. This is the one we will color later. -
Create the Playful Cat:
For the fifth box, draw the mouth open slightly, perhaps showing a tiny tongue. This adds an energetic feel to the collection. -
Finish the set:
Complete the final box with another variation—perhaps looking sideways or winking, keeping the whiskers consistent with the others.
Step 4: Final Touches
-
Erase pencil marks:
Wait until the ink is completely dry to avoid smudging. Gently erase all the underlying pencil sketches and frame guides. -
Add color accents:
Grab your pink pencil. On one of the cats (like the fourth one), gently color the inside of the ears. -
Highlight the cheeks:
Using the same pink pencil, add soft, circular blush marks to the cheeks of the colored cat to make it stand out as the ‘featured’ expression.
Now you have a delightful gallery of expressions ready to brighten up your bullet journal page

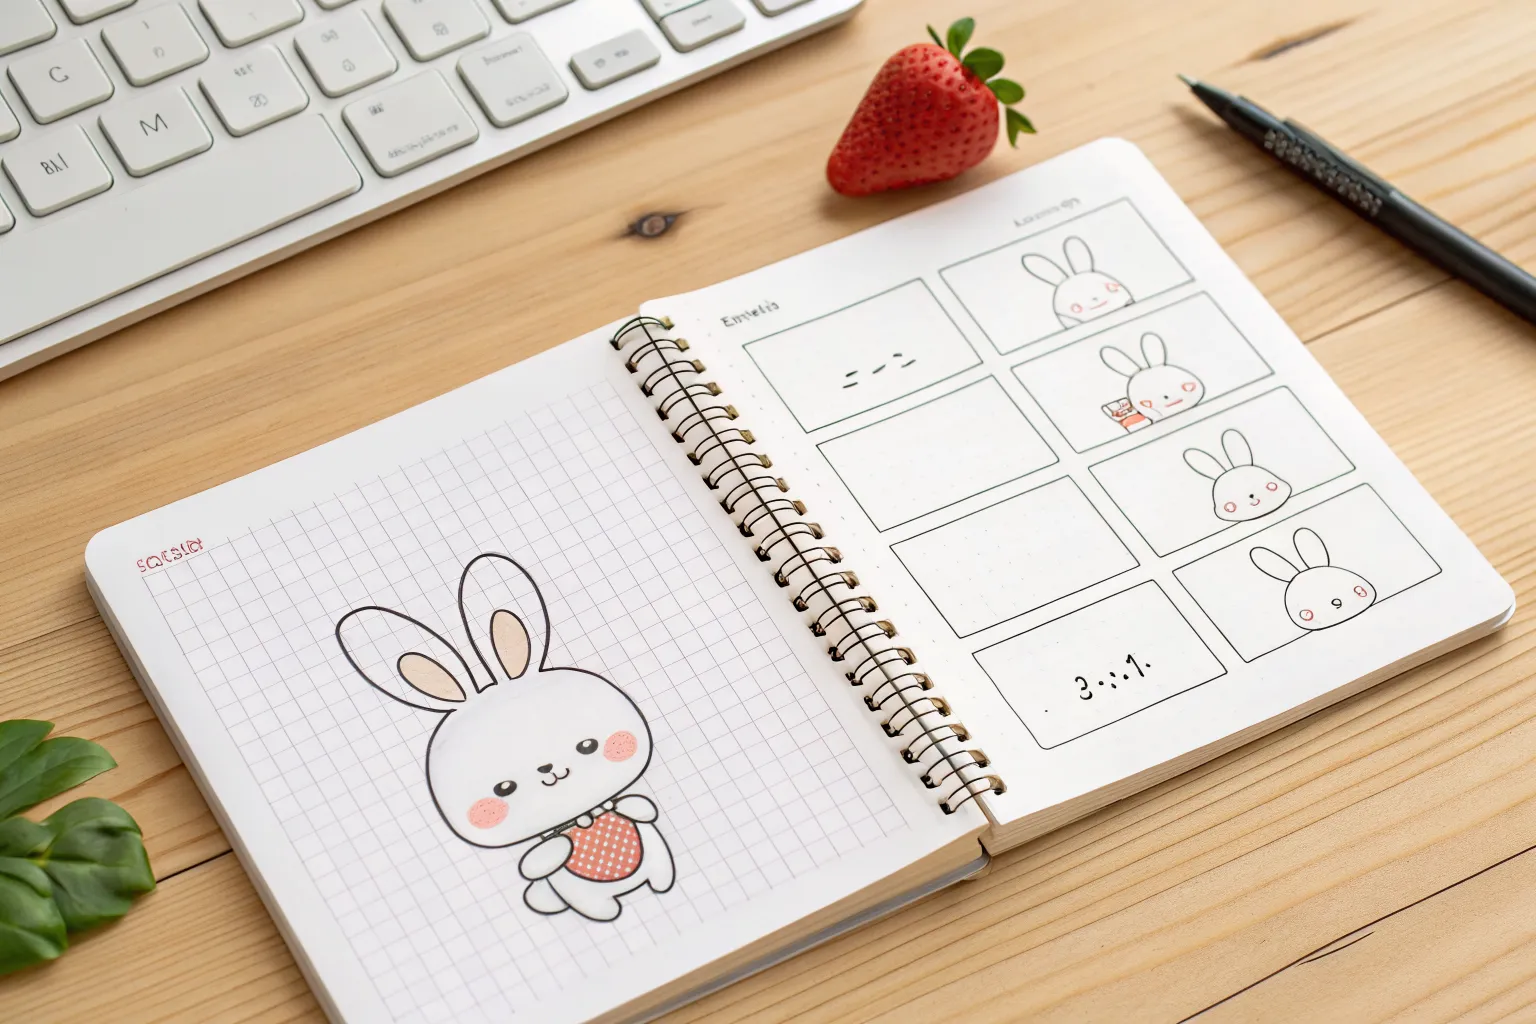
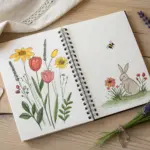
Chubby Bunny Sitting
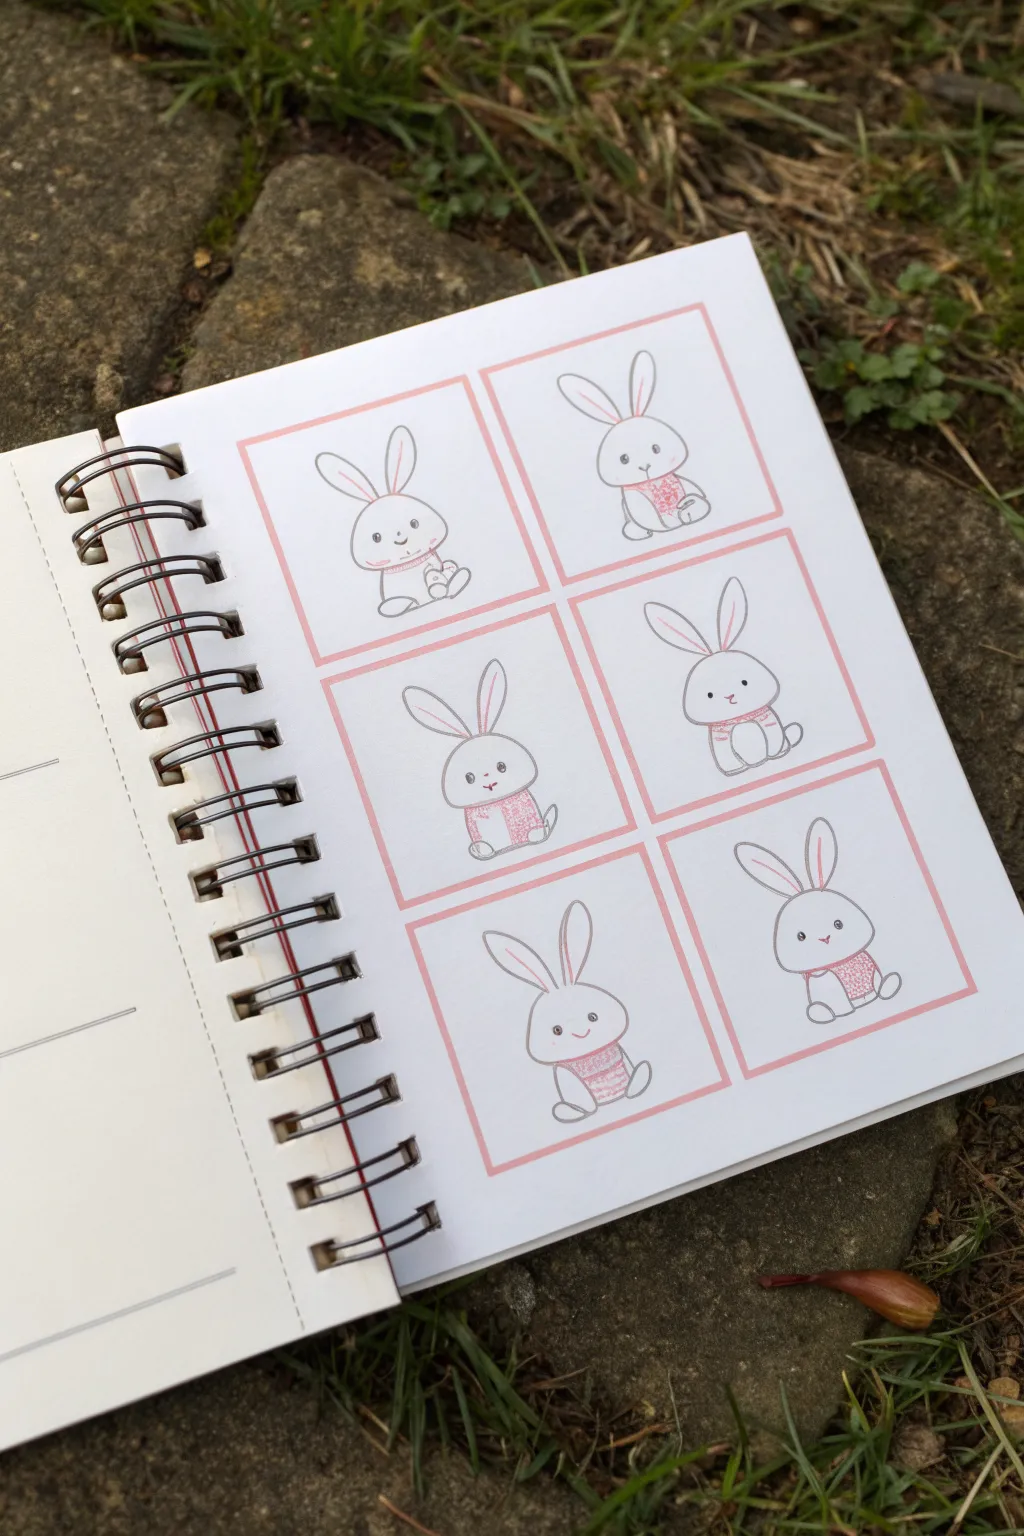
Capture the sweetness of spring with this minimal line drawing of a chubby bunny sitting peacefully. Using simple shapes and a touch of textured pattern, you’ll create a charming character perfect for filling your sketchbook or planner.
Step-by-Step
Materials
- Fine-liner pen (black or dark grey, 0.3mm or 0.5mm)
- Pink colored pencil or fine-point marker
- Pencil (HB for sketching)
- Eraser
- Sketchbook or smooth drawing paper
Step 1: Building the Form
-
Head shape:
Begin by lightly sketching a wide, slightly flattened oval for the bunny’s head. Keep the bottom curve fuller to give it chubby cheeks. -
Body outline:
Directly beneath the head, draw a smaller, rounded shape for the body. It should look like a little gumdrop or bean shape sitting on the ground. -
Adding ears:
Sketch two long, rounded ears extending from the top of the head. Position them slightly apart, tilting outward just a bit for a relaxed look. -
Inner ear detail:
Inside each ear shape, draw a smaller, parallel curve to define the inner ear. This line shouldn’t close completely at the bottom.
Wobbly Lines?
If your circles aren’t perfect, rotate the paper as you draw curves. Pulling the pen toward your body usually creates smoother arcs than pushing away.
Step 2: Features and Details
-
Face placement:
Draw two small dots for eyes, spaced wide apart on the lower half of the face. Place a tiny, rounded triangle nose right between them. -
Mouth and cheeks:
From the nose, draw two small opposing curves (like a widening ‘w’) for the mouth. Add light oval shapes on the cheeks if desired for placement. -
Tummy line:
Draw a curved horizontal line across the bunny’s body, roughly a third of the way down from the neck. This separates the head/neck area from the ‘shirt’ section. -
Paws and feet:
Add two small oval shapes near the tummy line for front paws. At the bottom of the body, draw larger ovals pointing outward for the back feet. -
Tail fluff:
If viewing the bunny slightly from the side, add a small puffy cloud shape near the bottom rear for a tail.
Pattern Play
Instead of cross-hatching the shirt, try tiny polka dots or horizontal stripes to give each bunny in your grid a unique personality.
Step 3: Inking and Patterning
-
Refining lines:
Take your fine-liner pen and carefully trace over your pencil lines. I like to keep the wrist loose here to ensure the curves stay smooth. -
Clean up:
Once the ink is completely dry, thoroughly erase all the underlying pencil sketches so only the clean line art remains. -
Coloring the shirt:
Using your pink pencil or marker, fill in the area of the body below the neck line. This creates the bunny’s little sweater. -
Adding texture:
To mimic the textured look in the reference, draw tiny, dense diagonal cross-hatching or stippling over the pink area with a slightly darker pink or red fine liner. -
Framing:
Draw a simple square frame around your finished bunny using the pink tool. This helps the drawing feel complete, like a sticker or a stamp. -
Final touches:
Add tiny pink accent strokes to the inner ears or cheeks for a little extra warmth and personality.
Now you have an adorable grid of bunnies ready to brighten up your bullet journal layout

Simple Panda With Big Eyes
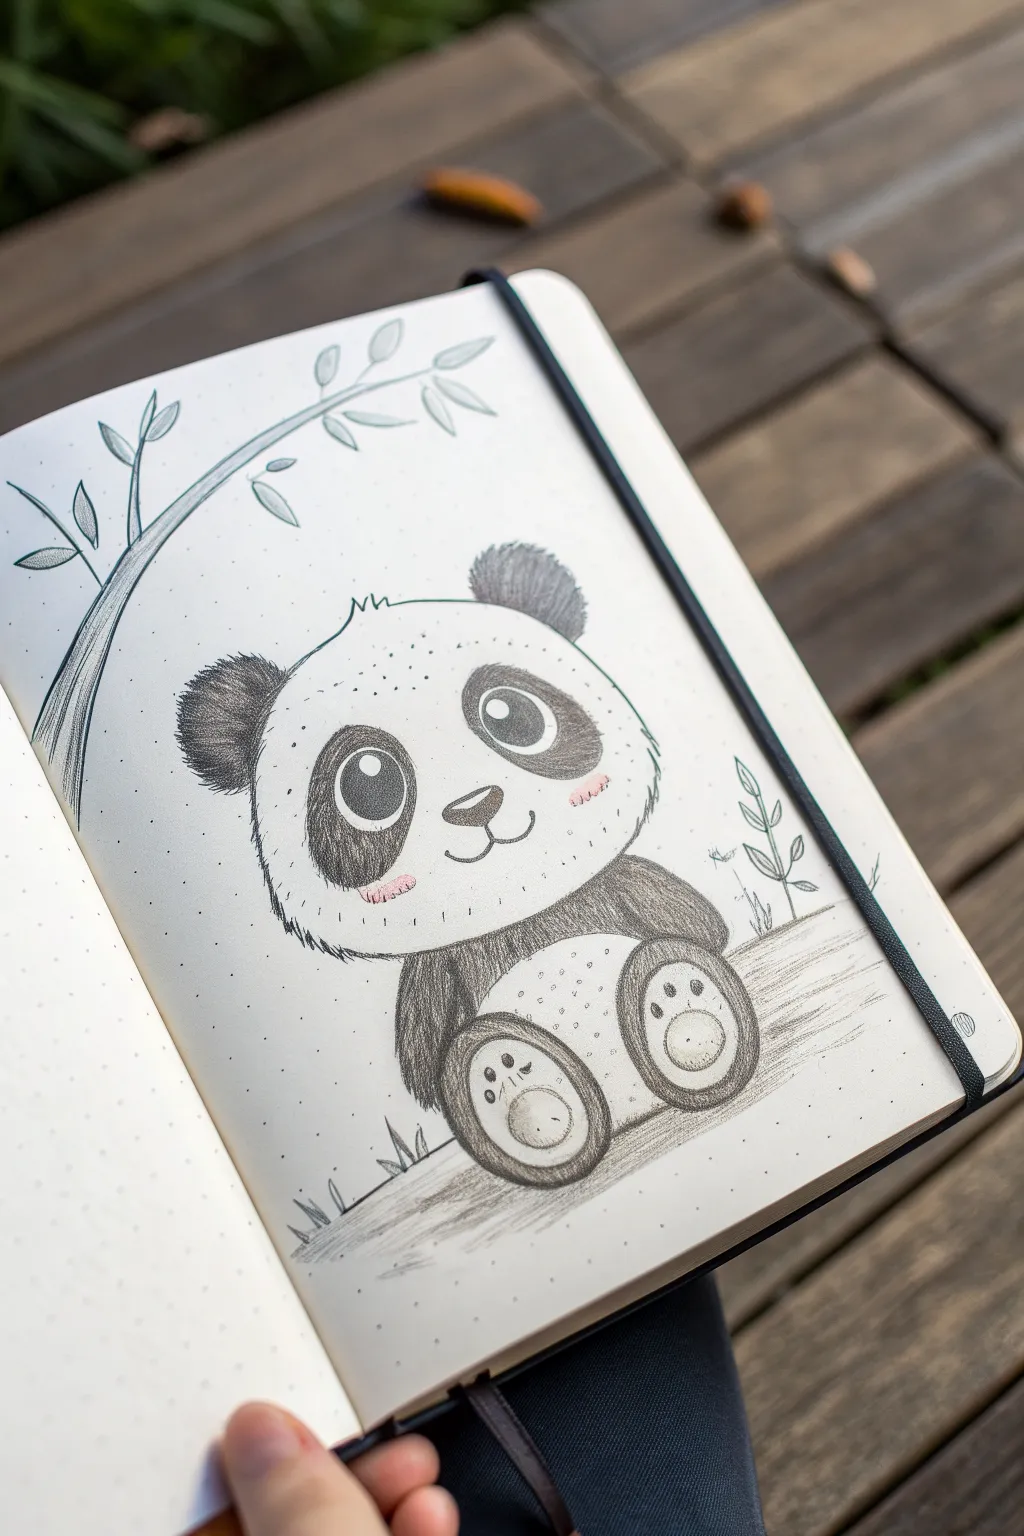
Capture the sweetness of a baby panda with this adorable sketch featuring oversized eyes and soft, fuzzy textures. This easy-to-follow drawing uses simple graphite techniques on dot grid paper to create a charming character perfect for your journal.
How-To Guide
Materials
- Dot grid notebook or sketchbook paper
- HB or 2B pencil for sketching
- 4B or 6B pencil for dark shading
- Pink colored pencil or pastel
- Eraser (kneaded eraser preferred)
- Blending stump (optional)
Step 1: Basic Shapes
-
Head outline:
Start by drawing a large, slightly flattened oval for the panda’s head. The bottom should be wider than the top to give it that cute, chubby look. Keep your lines light so they can be adjusted later. -
Body shape:
Directly underneath the head, sketch a smaller, rounded shape for the body. It should look a bit like a beanbag chair that the head is resting on, slightly narrower than the head width. -
Legs and paws:
Add two oval shapes at the bottom of the body for the rear feet, angling them slightly outward. Then, draw two curved lines coming from the side of the body to form the front arms resting on its belly.
Highlight Hack
Make the eyes shine! If you accidentally shaded over the white eye spots, dab them with a white gel pen or opaque white gouache to bring back the brightness.
Step 2: Facial Features
-
Eye placement:
Draw two large, tilted oval patches inside the head. These are the black fur patches around the eyes. They should angle downwards toward the nose. -
Adding the eyes:
Inside the dark patches, draw two large circles for the actual eyes. Inside those circles, add a smaller circle near the top left for the highlight, leaving it pure white. -
Nose and mouth:
Place a small, rounded triangle between the eyes for the nose. From the bottom of the nose, draw a small anchor shape or a ‘w’ to create a happy, smiling mouth. -
Ear shapes:
Sketch two rounded semi-circles on top of the head for the ears. Make sure they are spaced widely apart.
Make it a Scene
Extend the bamboo branch across the page or draw a second panda rolling around next to this one for a playful sketchbook spread.
Step 3: Shading and Texture
-
Darkening the eyes:
Using your darker pencil (4B or 6B), fill in the pupils, carefully avoiding the white highlight circles. Then, shade the fur patches around the eyes, using small, dense strokes to simulate fur. -
Furry ears:
Fill in the ears with dark graphite. Instead of a solid block of color, use short, quick strokes along the edges to create a fluffy, fuzzy texture. -
Body fur:
Shade the arms and the outer edges of the body legs dark grey. I find that scumbling (small circular motions) works great here to keep the texture soft rather than harsh. -
Detailing the feet:
Define the footpads on the rear paws. Draw a large oval pad in the center and three smaller toe beans above it. Leave the pads lighter than the surrounding fur or lightly shade them. -
Texturing the head:
Go over the initial head outline. Instead of a solid line, break it up into tiny, jagged strokes to make the panda look soft and hairy, especially on the cheeks.
Step 4: Atmosphere and Finishing Touches
-
Rosy cheeks:
Take your pink pencil and gently color two oval patches just below the eyes on the cheeks. Add a few small hatch marks over the pink for extra texture. -
Grounding shadow:
Add some horizontal scribbles underneath the panda to create the ground. This anchors your drawing so the panda doesn’t look like it’s floating. -
Bamboo branch:
Starting from the left edge of the paper, draw a long, curved double-line arching over the panda. Add segments to the branch to make it look like bamboo. -
Adding leaves:
Draw simple, pointed oval shapes dangling from the bamboo stem. Vary their sizes and angles to make the branch look natural. -
Grass tufts:
Add a few small spikes of grass peaking up from the ground line near the panda’s feet. -
Final clean up:
Erase any remaining stray sketch lines. If you want more contrast, go back over the darkest areas (eyes and ears) one last time to make them pop.
Now you have a delightfully fuzzy friend to brighten up your notebook page

Tiny Teddy Bear
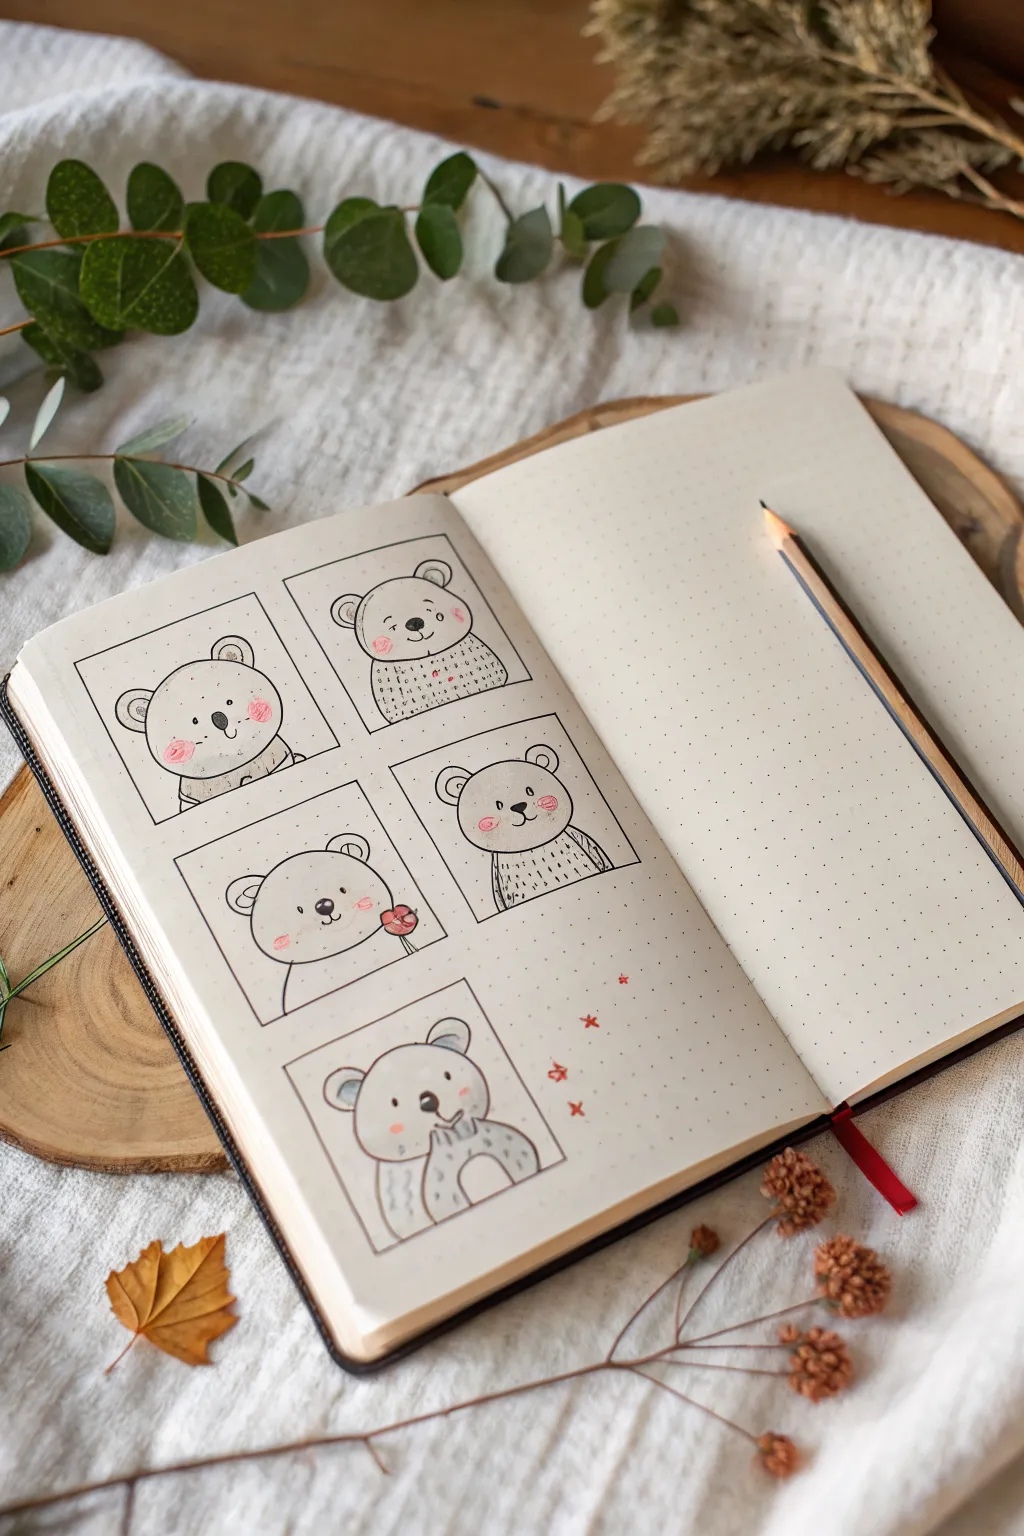
This darling journal spread features a series of five expressive teddy bears, each framed in its own neat little box. It’s a perfect way to practice character consistency while adding a touch of sweetness to your bullet journal or sketchbook.
Step-by-Step Guide
Materials
- Dotted grid journal or sketchbook
- Fine liner pen (black, 0.3mm or 0.5mm)
- Pencil (HB)
- Ruler
- Eraser
- Pink colored pencil or mildliner
- Red fine liner or gel pen (optional for small details)
Step 1: Setting the Grid
-
Map out the layout:
Start by lightly sketching the layout of your five boxes using a pencil and ruler. Create two rows: two boxes on the top row and two on the middle row. Center a single box on the bottom row to create a balanced composition. -
Define the frames:
Make each square approximately 1.5 to 2 inches (about 4-5 cm) wide. Using the dot grid as a guide ensures your lines are perfectly straight and the boxes are uniform in size. -
Ink the borders:
Once you are happy with the arrangement, trace over your pencil squares with a black fine liner. Don’t worry if the lines aren’t machine-perfect; a little wobble adds hand-drawn charm.
Step 2: Drawing the Base Bears
-
Top left bear outline:
In the first box, lightly pencil a circle for the head near the top center. Add two smaller semi-circles on top for ears. Sketch a curved line below the head for the sweater collar. -
Top right bear outline:
For the second bear, draw the head circle again. This time, add a simple textured sweater body directly underneath, making it slightly rounded like a cozy mound. -
Middle row bears:
Repeat the head shape for the next two boxes. For the bear on the left, position the head slightly lower to make room for a flower later. For the bear on the right, sketch a furry body texture using small dashed lines. -
Bottom bear outline:
For the final centered bear, draw the head and then add two arms coming up towards the mouth, as if the bear is giggling or hiding a smile.
Grid Trick
Count the dots on your page before drawing the first line. Divide that number by two to find the exact center of the page for perfect alignment.
Step 3: Adding Faces and Details
-
Inking the heads:
Go over your pencil outlines with the black fine liner. When drawing the ears, add a smaller semi-circle inside each one to create depth. -
Bear 1 features:
In the first box, draw two tiny dots for eyes and a small oval nose. Draw a straight vertical line down from the nose to a simple curved mouth. -
Bear 2 texture:
For the top right bear, add little ‘v’ shapes or dashes across the sweater area to mimic a knitted texture. Give this bear a side-glancing expression by placing the eye dots slightly to the right. -
Bear 3 prop:
On the middle-left variation, draw a simple flower shape near the cheek. Add a stem extending downwards. Ensure the bear’s mouth curves up near the flower. -
Bear 4 fuzz:
I like to use broken lines for the body of the middle-right bear to make it look extra fluffy. Give this one wide-set eyes for an innocent look. -
Bear 5 pose:
For the bottom bear, carefully ink the paws covering the mouth area. Add small curved lines on the paws to suggest fingers or tufts of fur.
Oops! Wobbly Line?
If a square border gets crooked, don’t restart. Go over the line again loosely 2-3 times to create a deliberate ‘sketchy’ frame style intentionally.
Step 4: Finishing Touches
-
Blushing cheeks:
Take your pink colored pencil and gently gently rub small circles on the cheeks of every bear. This brings them to life instantly. -
Nose highlights:
If you filled in the noses with solid black, you can use a white gel pen to add a tiny shine dot, or simply leave a tiny speck of white paper showing when you ink them. -
Clean up:
Wait for the ink to be completely dry, then erase all remaining pencil guidelines. This crisp contrast makes the drawings pop. -
Decorative elements:
Finally, add a few tiny decorative stars or ‘x’ marks in red ink floating in the empty space to the right of the bottom bear to balance the page visual weight.
Now you have a grid of adorable bears ready to brighten up your week
BRUSH GUIDE
The Right Brush for Every Stroke
From clean lines to bold texture — master brush choice, stroke control, and essential techniques.
Explore the Full Guide
Cute Fox With a Fluffy Tail
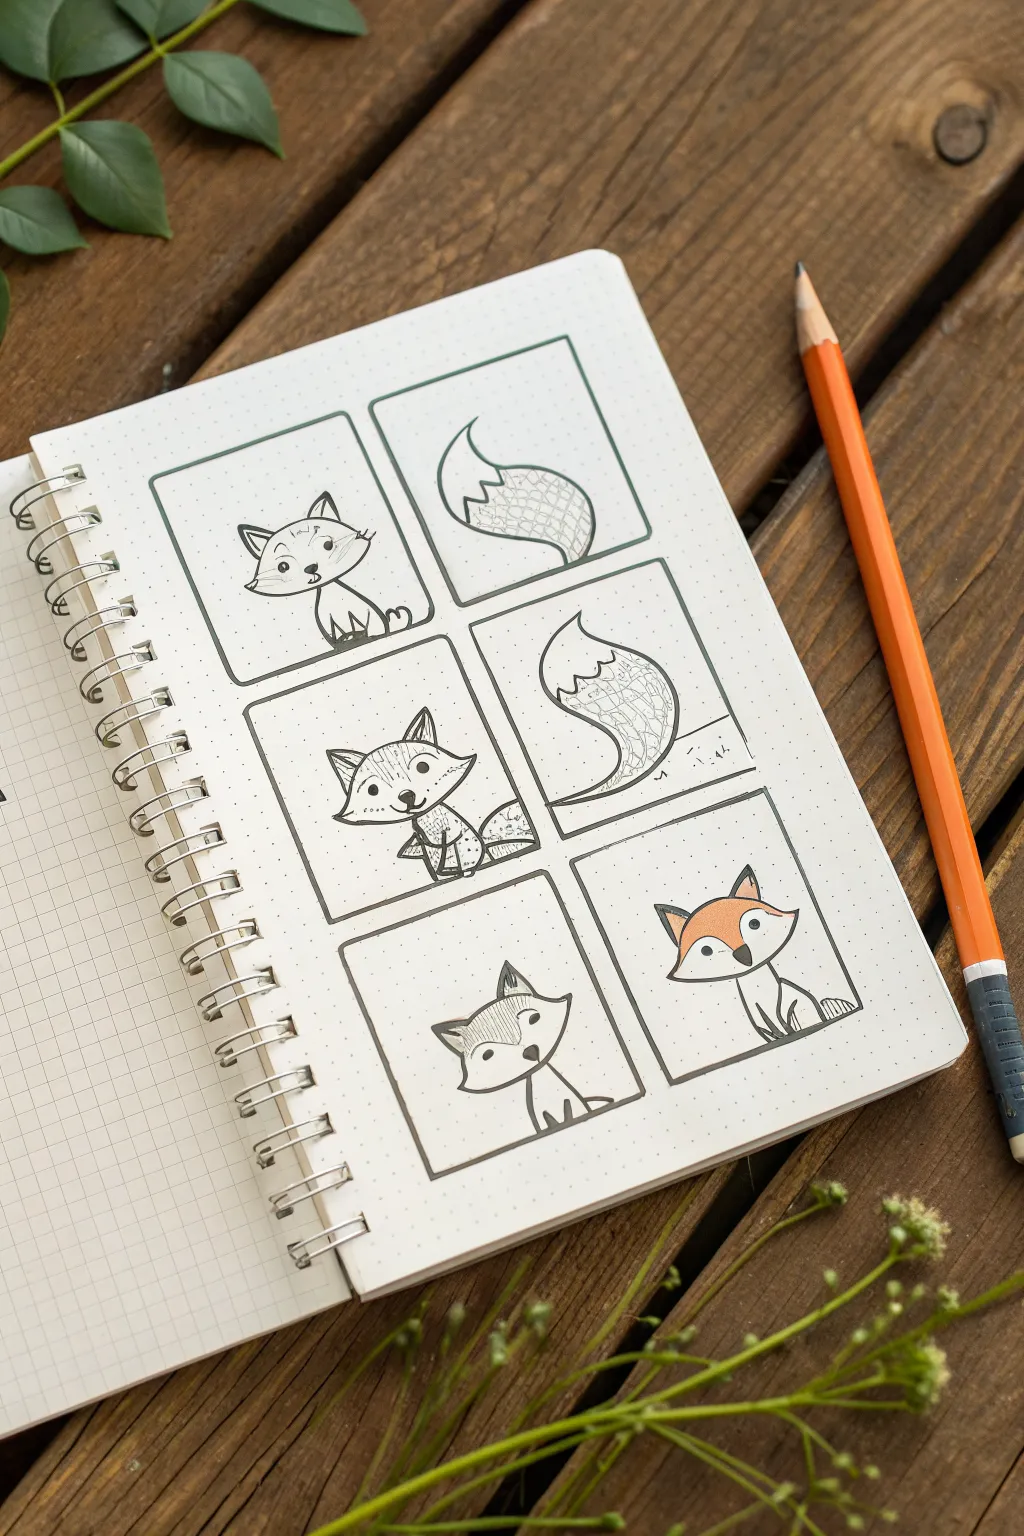
This adorable fox drawing is broken down into six bite-sized panels, making it incredibly approachable for beginners. Using a dot grid notebook helps keep your proportions neat as you build this cute character from simple shapes to a colorful finish.
Step-by-Step
Materials
- Dot grid notebook or graph paper
- Fine liner pen (black, roughly 0.3mm or 0.5mm)
- Pencil (for initial sketching)
- Eraser
- Orange colored pencil or marker
- Ruler (optional)
Step 1: Setting Up the Grid
-
Draft the frame:
Start by drawing six equal-sized rectangles on your page, arranged in two columns of three. Using the dots on your paper as a guide will help ensure they are all the same size. -
Refine the lines:
Go over your rectangle borders with your black fine liner pen to create clear, defined panels for each step of the drawing.
Step 2: Drawing the Head
-
Outline the head shape:
In the top-left panel, draw a wide, slightly flattened oval shape that tapers to points on the left and right for the cheeks. -
Add ears and features:
Draw two triangles on top for ears. Inside the face, add two small circles for eyes and a tiny triangular nose. -
Define the body:
Sketch a simple curved line coming down from the head to form a small, seated body, adding tiny paws at the bottom. -
Ink the first panel:
Trace over your pencil lines with the fine liner, adding details like whiskers and inner ear triangles. I find drawing the eyes solid black makes it instantly cuter.
Grid Notebook Magic
Count the dots! If your first box is 8 dots wide by 8 dots high, use that exact count for every subsequent box to get perfect uniformity without a ruler.
Step 3: Creating the Tail
-
Sketch the tail shape:
In the top-right panel, draw a large, curved teardrop shape. It should look like a giant comma or leaf. -
Add texture details:
Divide the tail tip with a zigzag line. Fill the main part of the tail with a faint cross-hatching pattern to suggest fluffy fur texture. -
Ink the tail:
Go over the outline with your pen. Don’t worry if the cross-hatching is imperfect; that adds hand-drawn charm.
Make It Yours
Try changing the expression in the final panel. A winking eye or a sticking-out tongue adds tons of personality to your finished character.
Step 4: Middle Row Variations
-
Draw the stylized fox:
In the middle-left panel, combine the head and body concepts but try a slightly more angular style. Draw the fur on the cheeks as sharp zigzag points. -
Add cross-hatching shading:
Use vertical hatching lines on the forehead and the body to create a textured, illustrative look different from the first fox. -
Focus on tail variation:
In the middle-right panel, draw just the tail again, but curve it differently—perhaps curling upward more dramatically. Use looser, scribbly lines for the internal texture here.
Step 5: Final Fox Sketches
-
Profile view sketch:
In the bottom-left panel, draw the fox’s head turned slightly to the side. The nose should point toward the right edge of the frame. -
Complete the minimal body:
Add a very simple line for the back and a small curve for the leg. Keep this version minimal and clean. -
Draw the final fox:
In the bottom-right panel, draw the full fox again: head, ears, body, and tail all together. This is your ‘masterpiece’ version. -
Add color:
Take your orange pencil and color the top half of the face (the mask area) and the main body of the fox in the final panel. Leave the snout, chest, and tail tip white for contrast. -
Final touches:
Erase any remaining pencil marks across all six panels to leave the ink crisp and clean.
Now you have a charming step-by-step reference sheet right in your sketchbook
Round Frog With Blush Cheeks
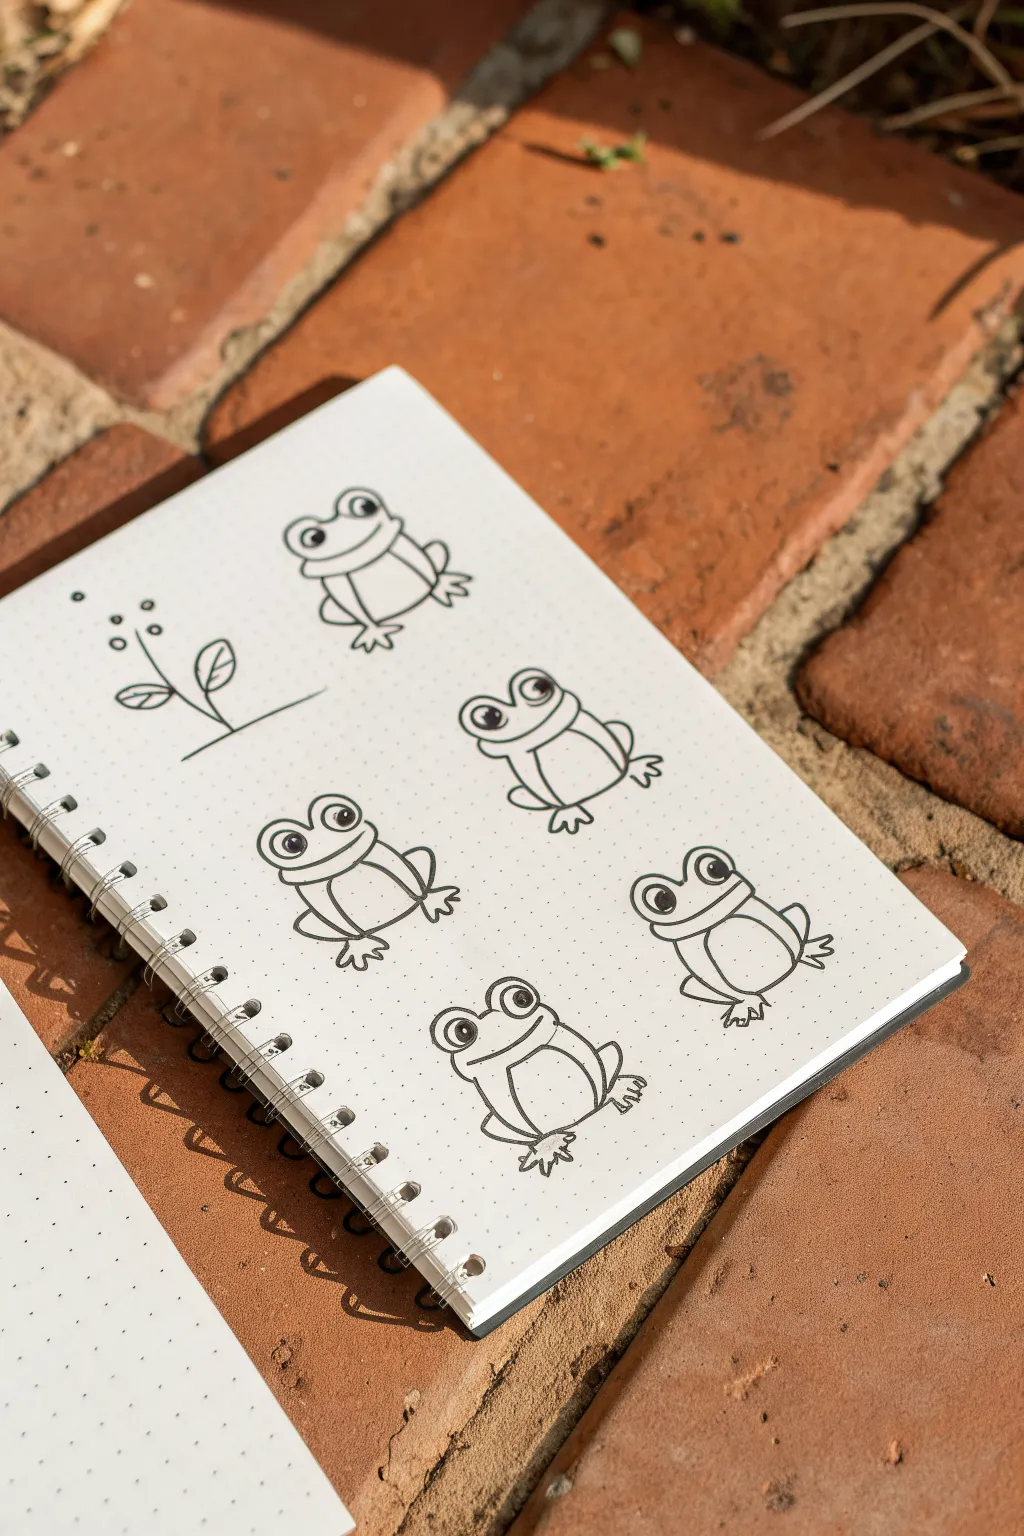
Capture the charm of amphibian friends with these simple, cartoon-style frog doodles. Using a dotted notebook helps guide your proportions, resulting in adorably consistent characters with wide-set eyes and happy expressions.
How-To Guide
Materials
- Dotted grid notebook or journal
- Fine liner pen (0.3mm or 0.5mm, black)
- Pencil (for sketching)
- Eraser
Step 1: Drawing the Head and Eyes
-
Map out the eyes:
Start by drawing two medium-sized circles near the top of wherein you want your frog to sit. Leave a small gap between them, roughly half the width of one eye. -
Add the pupils:
Inside each eye circle, draw a smaller circle toward the bottom-right or bottom-left to indicate the gaze direction. Fill in these smaller circles with your black pen, leaving a tiny white dot for a highlight if you want extra sparkle. -
Create the head shape:
Draw a curved line connecting the bottom outer edges of the two eye circles. This line should dip slightly in the middle, creating a wide, shallow ‘U’ shape that forms the top of the frog’s mouth area. -
Draw the lower face:
From the outer edge of each eye, draw a curved line extending downward and slightly outward to form the cheeks. Connect these at the bottom with a gentle curve to complete the head shape.
Uneven Circles?
If your circles are lopsided, don’t worry. Frogs are organic shapes! Use the grid dots as guide points: mark the top, bottom, left, and right of the circle first, then connect them.
Step 2: Body and Limbs
-
Form the body:
Draw a rounded, squat U-shape starting from the lower cheeks of the head. This forms the main belly and back of the frog. -
Define the belly:
Inside the body outline, draw a smaller, similar curve to define the frog’s lighter belly patch. It should look like a bib or apron shape. -
Add the back legs:
On either side of the body, draw a large, curved ‘C’ shape (and a backward ‘C’ on the right) that starts near the mid-body and curves down towards the ground. These represent the powerful folded legs. -
Sketch the feet:
At the base of those ‘C’ curves, draw the webbed feet. Use three small, pointed triangles or zig-zags for toes. -
Draw the front arms:
Draw two simple lines extending down from the neck area, resting against the belly. End these with smaller three-toed hands, similar to the feet but slightly simpler.
Expression Trick
Change the frog’s mood instantly by altering the pupils. Drawing them looking up makes the frog look innocent; drawing them looking inward (cross-eyed) makes it look silly.
Step 3: Finishing Touches
-
Add facial details:
Draw a wide smile right between the eyes and the chin. I find a simple curved line works best here. -
Blush marks:
Add small oval shapes or simple slanted lines just under the eyes on the cheeks to give the frog a blushing effect. -
Ink the lines:
Go over your pencil sketch with your fine liner pen. Keep your hand steady and confident for smooth lines. -
Erase guidelines:
Once the ink is completely dry—give it a good minute—gently erase any remaining pencil marks to clean up the drawing. -
Optional plant doodle:
To accompany your frogs, draw a simple vertical line with small circles at the top for berries and leaf shapes branching off the sides.
Fill a whole page with these little jumpers to create your own whimsical pond scene

PENCIL GUIDE
Understanding Pencil Grades from H to B
From first sketch to finished drawing — learn pencil grades, line control, and shading techniques.
Explore the Full Guide
Easy Daisy Flower
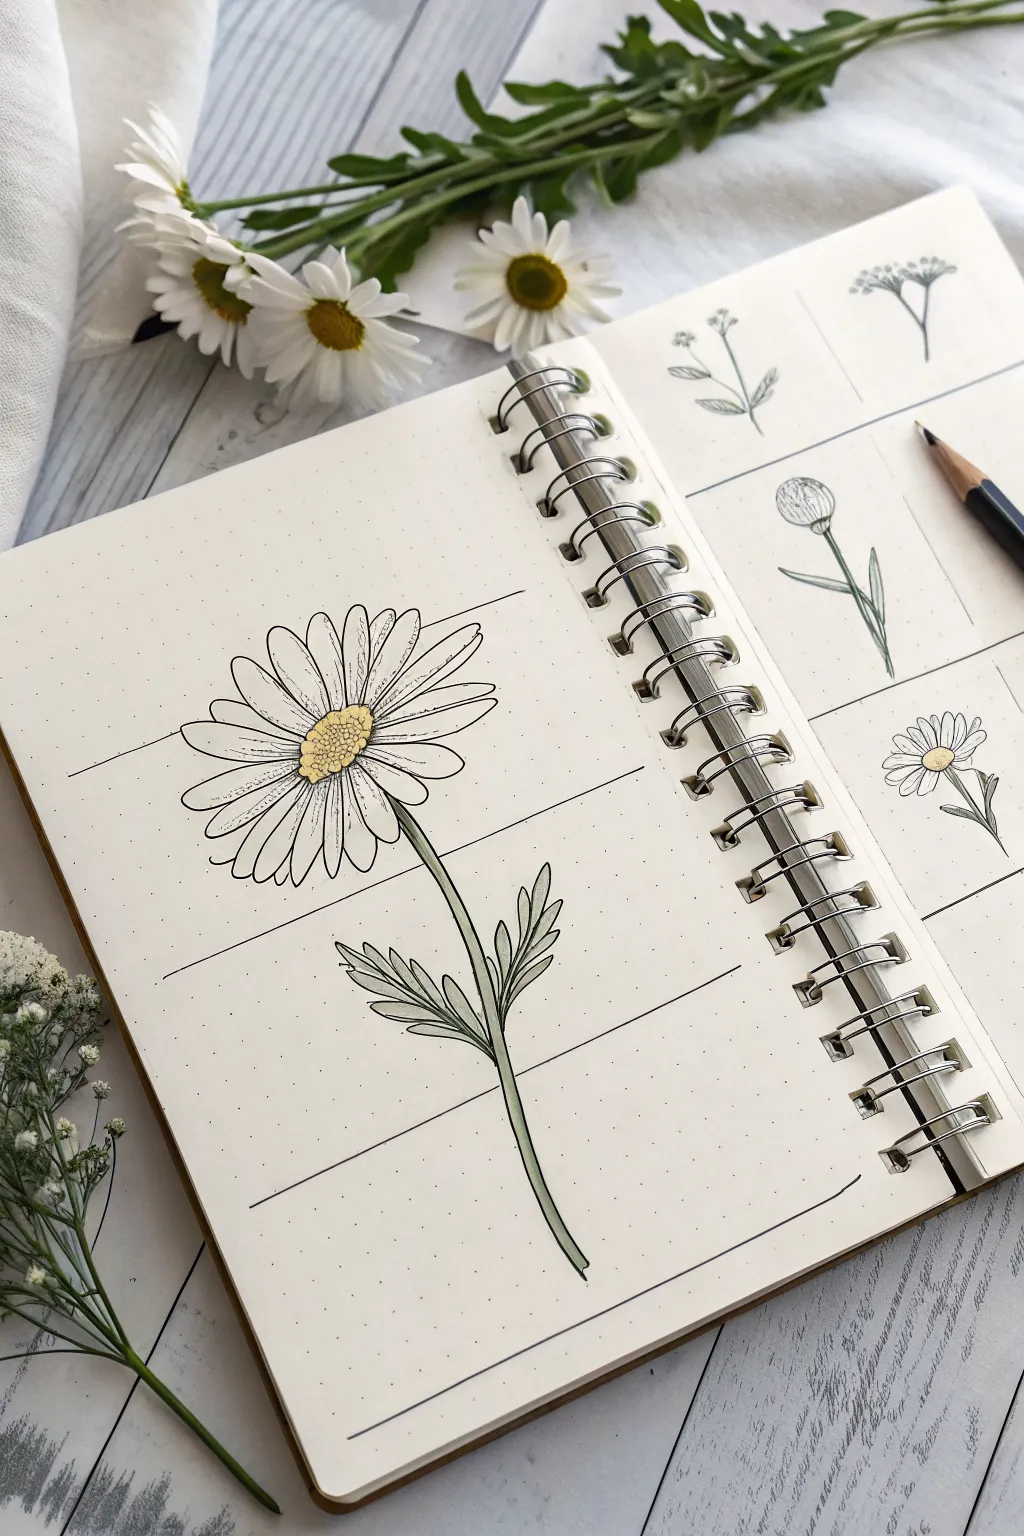
Brighten up your bullet journal with this lovely, detailed daisy illustration. It features clean linework and soft pops of color, making for a cheerful page spread that looks professional but is surprisingly simple to sketch.
Step-by-Step Guide
Materials
- Dotted grid notebook
- Fine liner pen (0.3mm or 0.5mm, black)
- Pencil (HB)
- Eraser
- Colored pencils or light markers (Yellow, Sage Green)
- Ruler or straight edge
Step 1: Setting the Structure
-
Map out the grid:
Start by drawing four light horizontal guidelines across your page using your ruler. Space them evenly, roughly an inch apart, to help you visualize the height and proportion of your flower. -
Place the center:
In the gap between the top two lines, sketch a flattened oval shape. This will be the flower’s center disk. Don’t press too hard with your pencil, as this is just a guide. -
Draw the stem guideline:
From the bottom of your oval, draw a gently curved line extending downward through the remaining horizontal guides. Add a slight bend to the right near the bottom to give the flower a natural, organic posture.
Step 2: Petals and Leaves
-
Sketch the primary petals:
Around the central oval, lightly sketch long, narrow petal shapes. Start with the ones at the top and bottom (12 and 6 o’clock positions), then add the sides (3 and 9 o’clock) to establish symmetry. -
Fill in the gaps:
Add more petals between your primary ones. vary their angles slightly so they don’t look too stiff. Some petals can appear ‘behind’ others by stopping their lines where they intersect with the foreground petals. -
Refine the petal tips:
Go over your petal outlines and give the tips slight notches or subtle curves rather than perfect points, as real daisy petals are often a bit irregular. -
Outline the stem:
Thicken your stem guideline by drawing a second line parallel to it. Keep the stem slender, widening it just a tiny fraction where it meets the flower head. -
Add leaf foundations:
About halfway down the stem, sketch two lines branching outward—one to the left and one to the right. These will become the central spines of your leaves. -
Shape the serrated leaves:
Draw the leaf outlines around those spines. Daisy leaves are somewhat jagged or lobed, so use short, connected curves to create that classic ‘toothed’ edge rather than a smooth oval.
Layering Petals
Draw front petals first! Sketch full shapes for closest petals, then tuck partial shapes behind them for gaps. Avoid perfect spacing for a natural look.
Step 3: Inking and Details
-
Ink the flower center:
Switch to your fine liner. Instead of a solid line for the center oval, use tiny, tight stippling dots or very small circles to mimic the texture of pollen. Keep the dots denser at the bottom right for a shadow effect. -
Ink the petals:
Trace your petal sketches with confident, smooth strokes. Add a central vein line to a few petals—just a quick flick from the center outward—to add dimension without cluttering the drawing. -
Ink stem and leaves:
Carefully trace the stem and leaf outlines. For the leaves, draw a central vein line, and I like to add tiny side veins corresponding to the lobes of the leaf for extra realism. -
Clean up the sketch:
Once the ink is completely dry—give it a full minute so it doesn’t smear—gently erase all your pencil guidelines and the horizontal grid lines.
Wobbly Lines?
Don’t stress straight lines. Nature is imperfect. If a petal line wobbles, just thicken that segment slightly to hide the shake. It adds character!
Step 4: Adding Color
-
Color the disk:
Using a yellow colored pencil, gently fill in the center disk. Apply a bit more pressure on the lower right side to deepen the color and enhance the 3D effect of the stippling. -
Tint the stem:
Take your sage green pencil and color sharply along one side of the stem (the shadowed side) and then fade gently toward the other side to make the stem look round. -
Leaf details:
Color the leaves with the same green. I recommend leaving tiny slivers of white paper showing along the top edges of the leaves to act as natural highlights. -
Final touches:
Review your drawing. If the petals feel too flat, add very faint gray lines or stippling near the center where the petals meet the disk to suggest depth.
You now have a beautifully detailed botanical sketch ready to decorate your journal spreads
Smiling Cactus in a Pot
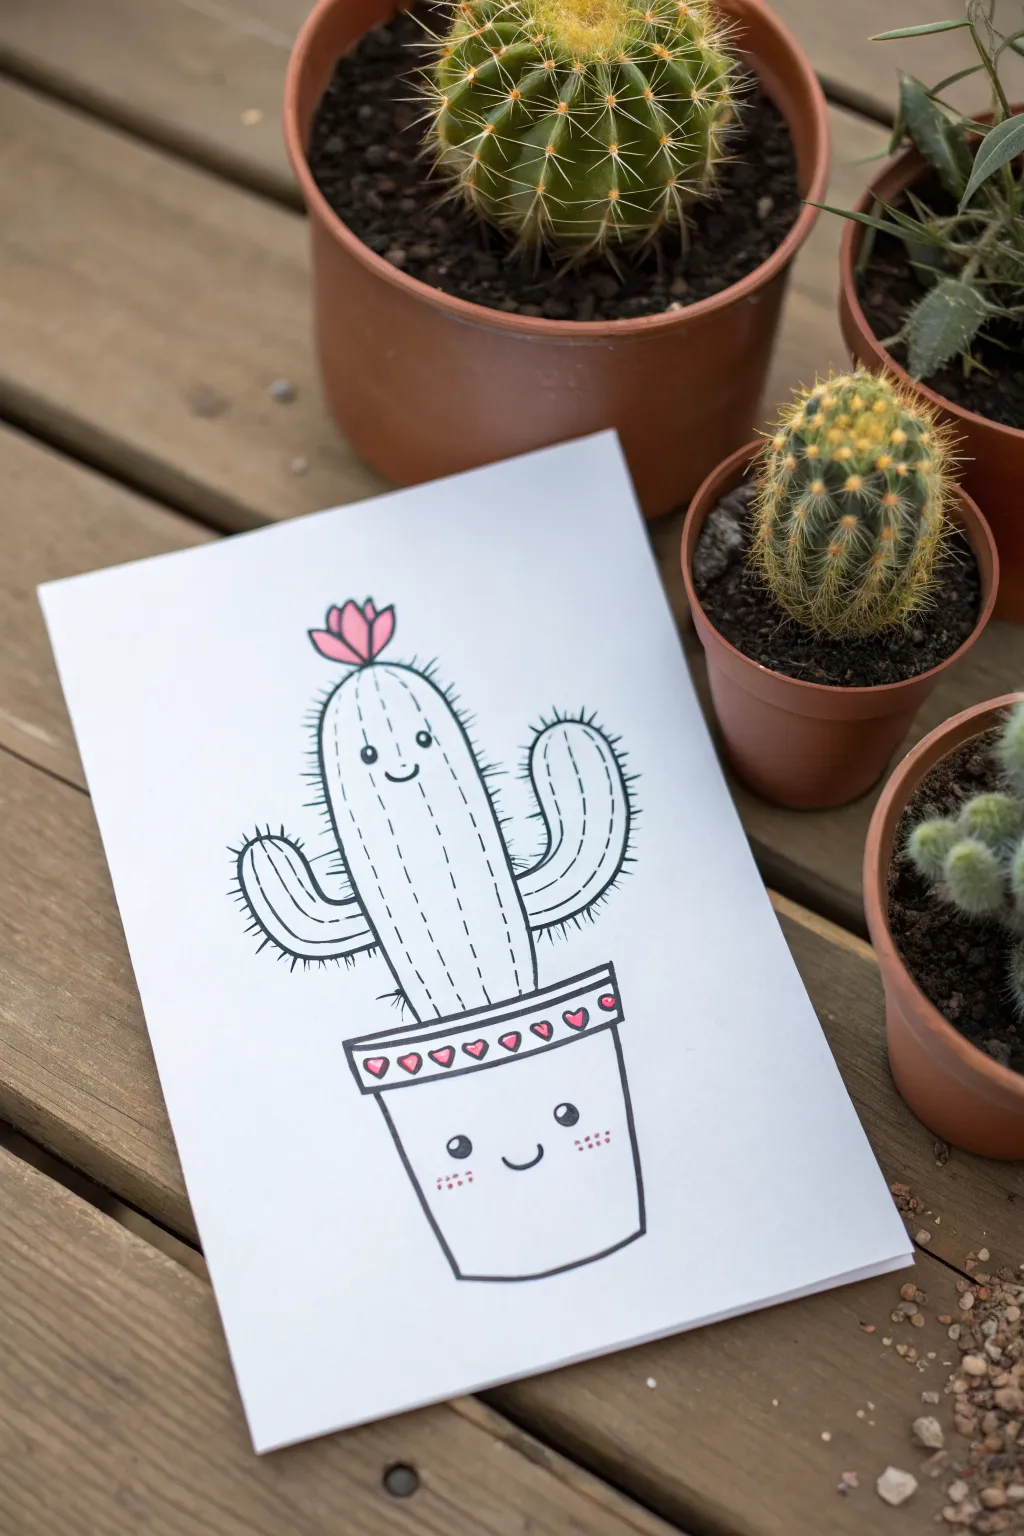
Brighten up your sketchbook with this adorable potted cactus that’s bursting with personality. Using simple lines and minimal color, this cheerful illustration is perfect for beginners looking to practice cute character art.
Detailed Instructions
Materials
- White drawing paper or cardstock
- Pencil (HB or 2B)
- Eraser
- Black fine liner pen (0.5mm or 0.8mm)
- Pink marker or colored pencil
Step 1: Drafting the Shapes
-
Start with the pot:
Begin near the bottom of your page by drawing a simple bucket shape for the pot. Keep the top line open for now, and make the bottom edge slightly curved to give it dimension. -
Add the rim:
Draw a thin, horizontal rectangle directly on top of your bucket shape. This creates the rim of the flower pot. It should be slightly wider than the base of the pot. -
Draw the main cactus body:
Sketch a tall, rounded cylinder shape rising from the center of the pot. Make sure the top is completely rounded like a dome. -
Sketch the arms:
Add two curved arms on either side of the main body. For a dynamic look, draw the left arm curving upward shortly, and the right arm extending a bit further out before curving up.
Step 2: Adding Details and Inking
-
Ink the main outlines:
Using your black fine liner, carefully trace over your pencil outlines for the cactus body, arms, and pot. Keep your hand steady for clean, bold lines. -
Add vertical texture lines:
Inside the main cactus body and the arms, draw dashed vertical lines. These lines follow the curve of the cactus to show its ribbed texture. -
Draw the spines:
Along the outer edges of the cactus and arms, add small, short strokes sticking outward. I like to keep these fairly sparse so it doesn’t look too cluttered. -
Decorate the pot rim:
Draw a row of tiny hearts inside the rectangular rim of the pot. Space them out evenly from left to right. -
Create the flower:
At the very top of the cactus head, draw a small, three-petaled flower shape. It should look like a little crown sitting on top.
Steady Hands
If your hand feels shaky drawing the long vertical lines, try “ghosting” the motion first—hover your pen over the paper and practice the movement before touching down.
Step 3: The Cute Faces
-
Draw the cactus face:
In the upper third of the cactus body, draw two small black dots for eyes and a tiny ‘u’ shape between them for a smile. -
Draw the pot face:
Give the pot a matching personality. Draw two larger black circles for eyes on the front of the pot, spaced widely apart. -
Finish the pot smile:
Add a simple curved smile between the pot’s eyes. It helps to place this slightly lower than the eyes for that extra cute factor. -
Add blush details:
Using a thinner pen or small dots, add freckle-like blush marks under the eyes of the pot face.
Make it a Party
Draw a whole family of cacti! Try different shapes—some round and short, others tall and thin—and give them different facial expressions or accessories like glasses.
Step 4: Color and Cleanup
-
Erase pencil marks:
Wait a moment for the ink to dry completely, then gently erase all your initial pencil sketches to reveal the clean drawing. -
Color the flower:
Take your pink marker and carefully fill in the petals of the flower on top of the cactus. -
Color the hearts and cheeks:
Use the same pink color to fill in the tiny hearts on the rim. You can also add very subtle pink dots to the cheeks on the pot face for warmth.
Now you have a charming little desert friend to keep you company on your desk


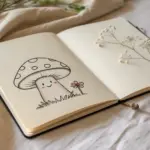
Cozy Mushroom Buddy
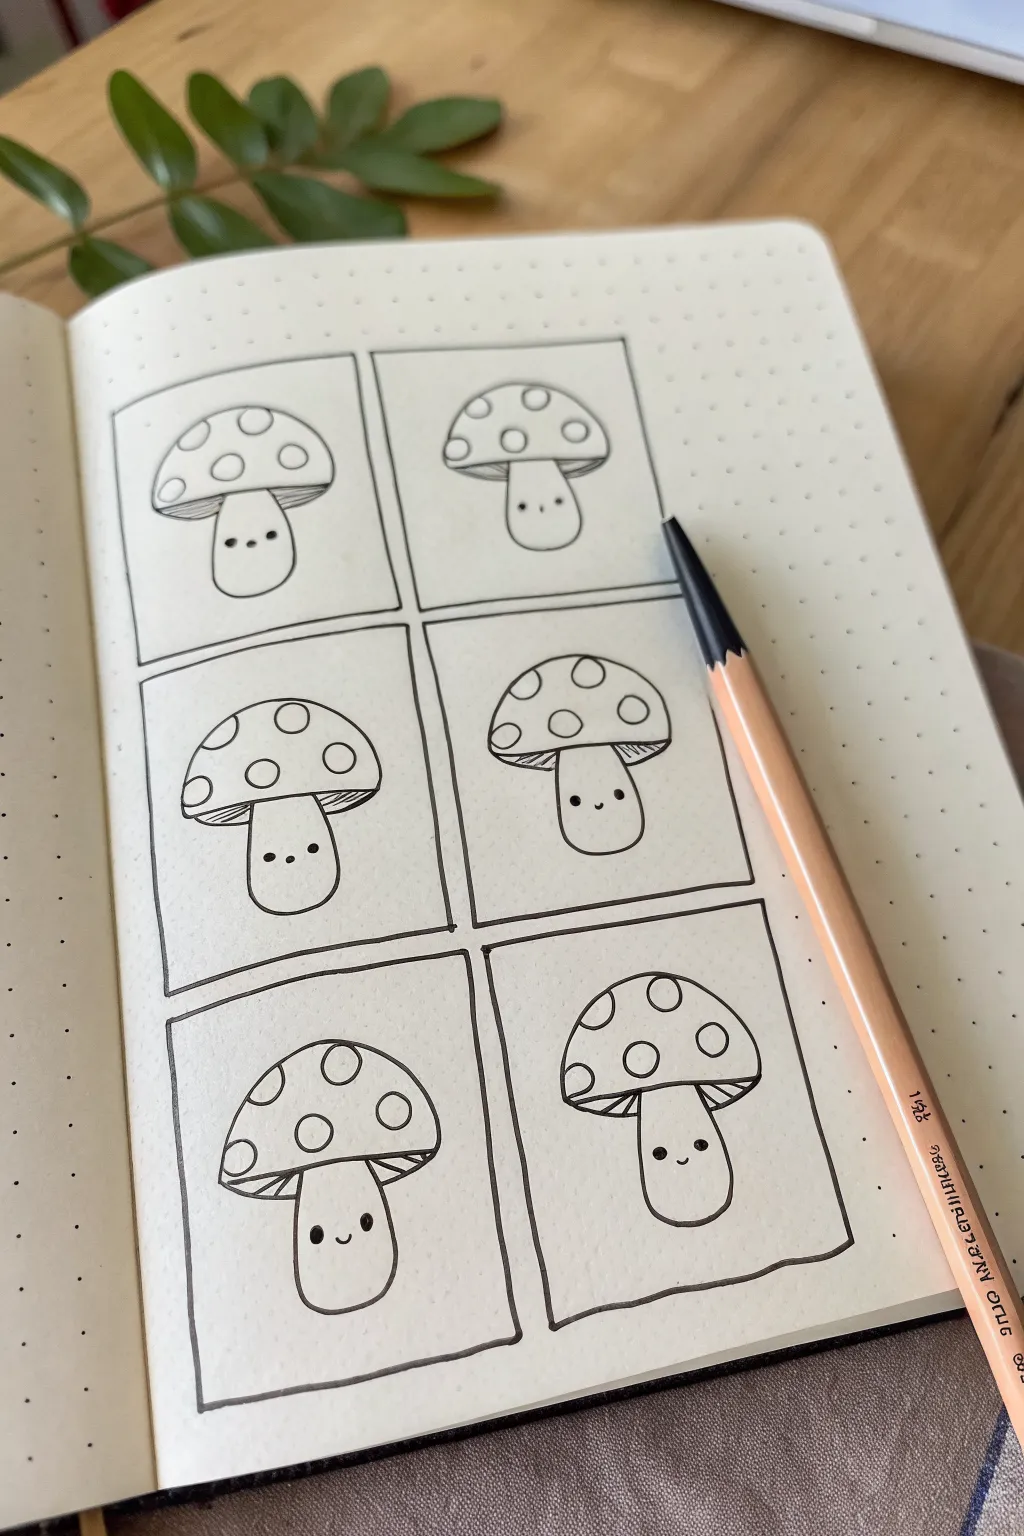
Capture the charm of autumn with these delightful, expressive mushroom doodles perfect for your bullet journal. This grid layout explores six subtle variations of a friendly fungi character, teaching you how to build personality with simple lines.
How-To Guide
Materials
- Dotted bullet journal or grid paper
- Fine liner pen (black, 0.3mm or 0.5mm)
- Pencil (HB or similar)
- Eraser
- Ruler (optional, but helpful for the grid)
Step 1: Setting the Stage
-
Draft the grid:
Start by defining your layout. Using a pencil and your journal’s dot grid as a guide, lightly sketch a 2×3 grid of rectangles. Each box should be roughly equal in size, perhaps 6×8 dots if using standard spacing. -
Ink the frames:
Once you are satisfied with the spacing, trace over your rectangle borders with your black fine liner. Don’t worry about using a ruler here; a slightly wobbly, hand-drawn line adds to the cozy, organic feel of the spread. -
Erase guidelines:
Wait a moment for the ink to dry completely, then gently erase your pencil grid lines so you have six clean frames ready to be filled.
Smudged Ink?
If you smudge a line, transform it! Turn a stray mark into a falling leaf, a tiny fly, or add extra grass blades at the base to cover the mistake.
Step 2: Drawing the Base Shapes
-
Cap placement:
In the upper third of the first box, draw a semi-circle or dome shape for the mushroom cap. Leave plenty of room underneath for the stem. -
Closing the cap:
Connect the bottom edges of your dome with a slightly curved horizontal line to close the shape. This creates the rim of the mushroom cap. -
Adding the stem:
Draw a ‘U’ shape extending downward from the center of the cap’s rim. Make the stem chubby and rounded at the bottom for maximum cuteness. -
Repeat the basics:
Repeat this cap-and-stem process for the remaining five boxes. You can vary the width of the caps or the length of the stems slightly to give each one a unique silhouette.
Step 3: Adding Personality & Details
-
Draw the spots:
On the top domes, draw several circles of varying sizes. Let some ‘fall off’ the edge by drawing only half-circles where the cap silhouette curves. -
Create the gills:
For the mushrooms where you want to show the underside (like the middle left one), add a second curved line just under the cap rim. Fill this narrow space with tiny vertical hash marks to represent gills. -
Ink the outlines:
Go over your pencil sketches with the fine liner. Use a steady hand, but remember that organic shapes look better when they aren’t perfect. -
Add faces:
This is the most crucial part! Place two tiny dots for eyes low on the stem. Add a tiny smile right between them, or experiment with keeping just the eyes for a minimalist look. -
Face variations:
Play with the expressions across the grid. Try wideset eyes, eyes closer together, or putting the face slightly higher up. Small shifts change the character entirely. -
Clean up:
Once all ink work is thoroughly dry, do a final pass with your eraser to remove any remaining graphite sketch lines from inside the mushrooms.
Color Pop
Use mildliners or colored pencils to color just the caps in varying shades of red, orange, and brown, leaving the stems white for contrast.
Now you have a page full of friendly little characters ready to brighten up your journal planning
Cloud With a Mini Rainbow
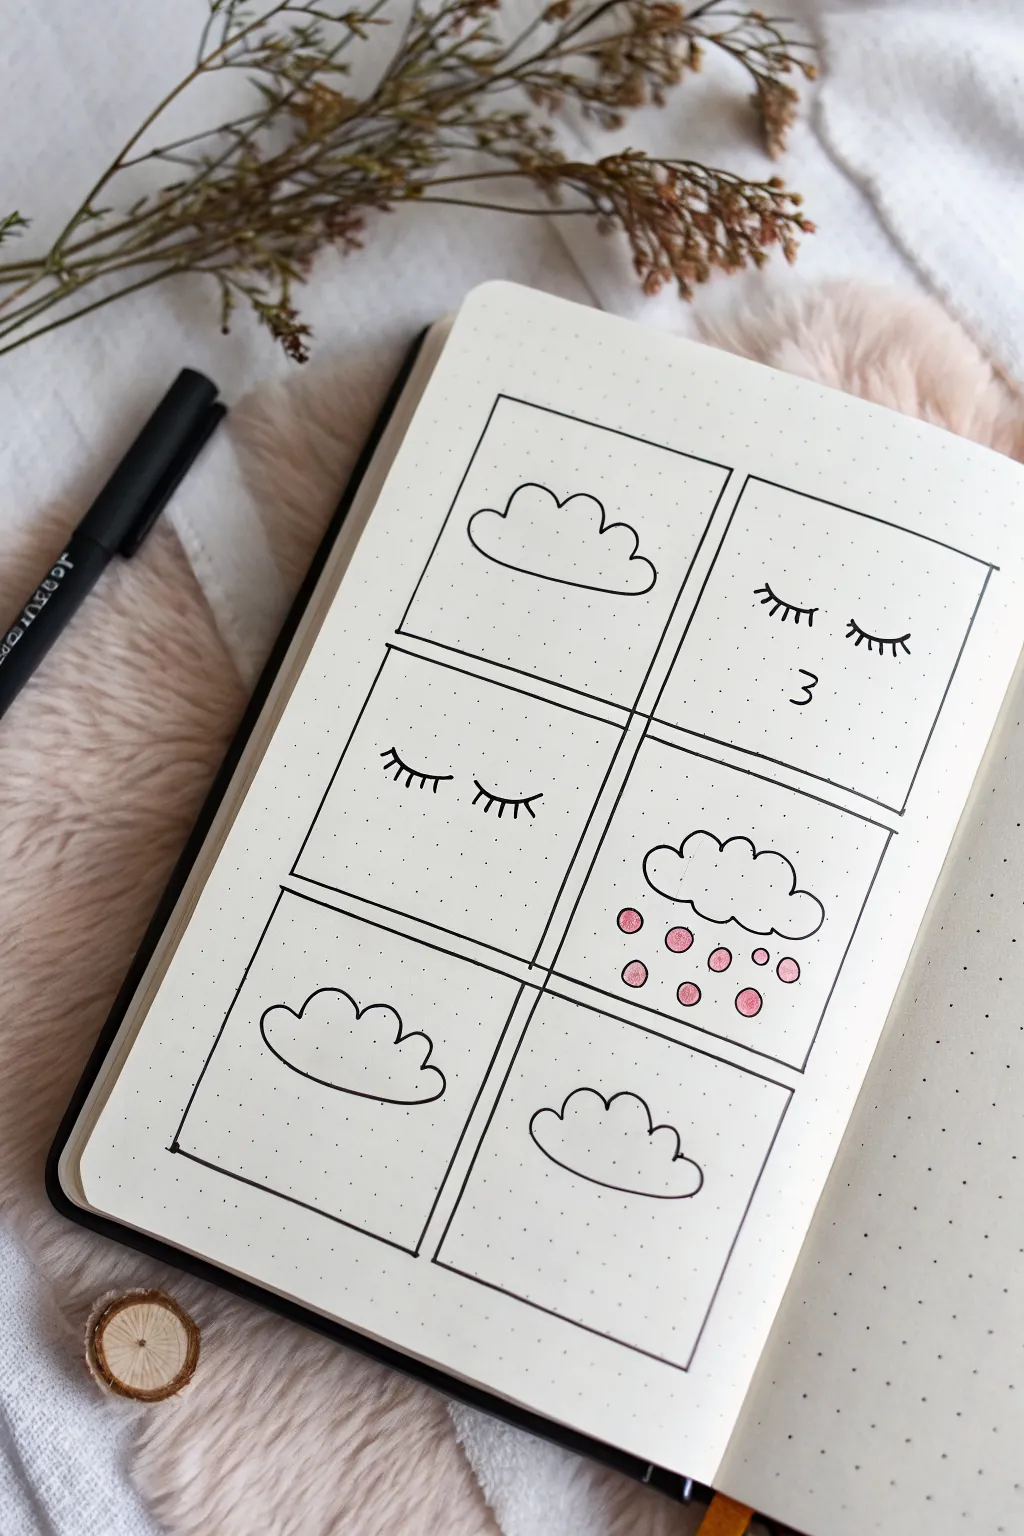
This charming bullet journal spread features a series of six simple square panels, each containing a cute, minimalist doodle related to weather or moods. The designs range from fluffy clouds and rain showers to sleepy eyes, all drawn with clean black lines and subtle dot accents on dot grid paper.
Detailed Instructions
Materials
- Dot grid notebook or journal
- Fine liner pen (black, 0.3mm or 0.5mm)
- Ruler
- Pencil
- Eraser
- Pink marker or colored pencil
Step 1: Setting the Grid
-
Measure the layout:
Start by deciding on the size of your squares. Count the dots in your notebook to ensure even spacing. A 6×6 or 8×8 dot square usually works well for these mini-doodles. -
Pencil guidelines:
Lightly sketch out two columns of three squares each using a pencil and ruler. Leave a row or two of dots between the squares to keep the layout breathable. -
Ink the frames:
Once you are happy with the positioning, trace over your pencil lines with your black fine liner. Use the ruler to keep your lines crisp and straight. -
Erase guidelines:
Wait a moment for the ink to dry completely to avoid smudging, then gently erase the pencil marks.
Uneven Humps?
If your cloud bumps look uneven, lightly pencil three circles where you want the bumps to be first, then outline just the tops of the circles.
Step 2: Drawing the Top Row
-
First cloud outline:
In the top-left box, draw a fluffy cloud. Start with a flat straight line at the bottom, then create the upper shape using three or four curved humps connected together. -
Sleepy eyes:
Move to the top-right box. Locate the center and draw two small downward curves for eyelids. Add three or four tiny lashes to each lid. -
Kissing face detail:
Just below the sleeping eyes in the same box, draw a small number ‘3’ shape on its side or upright to represent a cute puckered mouth or nose.
Grid Trick
Count grid dots before drawing your frames! For a standard A5 journal, leaving 2 dots between boxes usually creates perfect spacing.
Step 3: Drawing the Middle Row
-
Winking lashes:
In the middle-left box, draw another pair of closed eyes. This time, make the curves slightly wider and add longer, more pronounced eyelashes fanning out. -
Rain cloud:
For the middle-right box, draw another cloud shape. Unlike the first one, make the entire perimeter bumpy with curves, omitting the flat bottom line. -
Adding rain:
beneath the cloud, draw small circles scattered downward to mimic raindrops. Vary the placement slightly so it doesn’t look too rigid. -
Coloring the rain:
Take your pink marker and carefully fill in the raindrop circles. I think a soft pastel pink adds a lovely unexpected warmth here, different from the usual blue.
Step 4: Drawing the Bottom Row
-
Floating cloud:
In the bottom-left box, draw a third cloud. Give this one a flatter bottom but round off the corners slightly more than the first one for variety. -
Final cloud:
In the last box on the bottom right, draw one more simple cloud. Keep the line weight consistent with the frames for a unified look. -
Final clean up:
Check the whole spread for any stray pencil marks or uneven ink spots and touch up or erase as needed.
Now you have a serene and minimalist art spread nicely framed in your journal
Cute Sun and Moon Pair
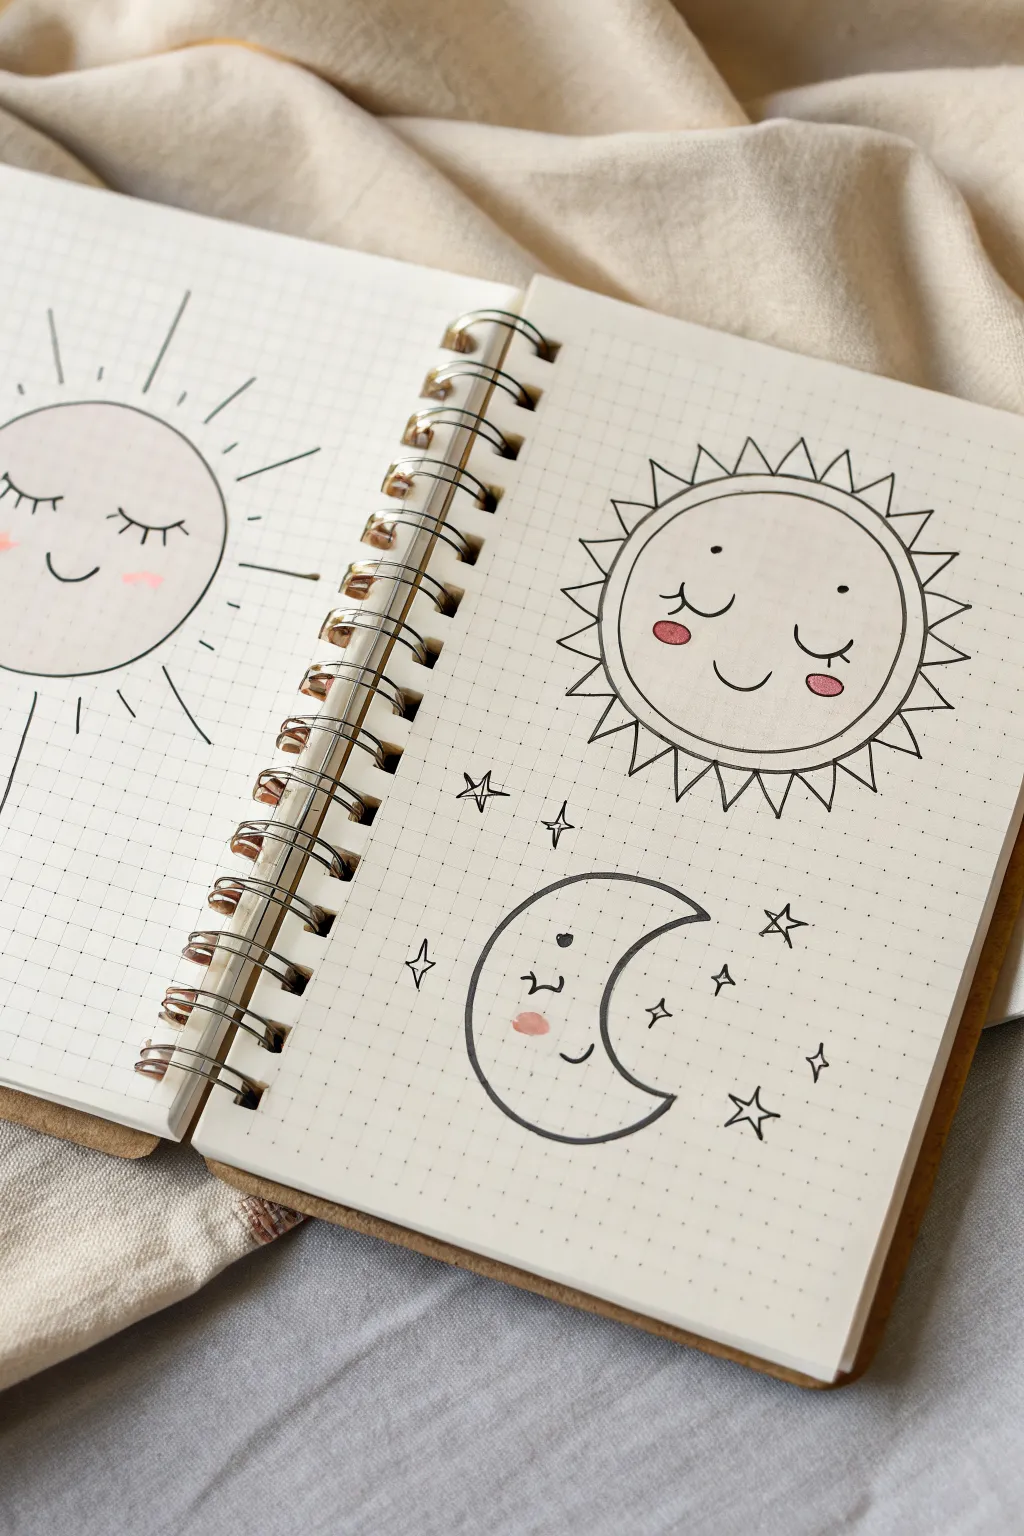
Brighten your bullet journal with this adorable sun and moon duo, perfect for tracking weather or simply adding a touch of whimsy. The clean lines and cheerful expressions make this beginner-friendly sketch a delightful addition to any page spread.
Step-by-Step
Materials
- Dot grid notebook or sketchbook
- Fine liner pen (0.3mm or 0.5mm)
- Pencil (HB or similar)
- Eraser
- Circle maker (compass or stencil)
- Pink mildliner or colored pencil
Step 1: Planning the Layout
-
Establish the positions:
Visualize where you want your celestial pair to sit on the page. I typically place the sun in the upper half and the moon in the lower half, slightly offset to the left for a balanced composition. -
Draft the sun’s circle:
Using a pencil and a circle stencil (or freehand if you’re feeling confident), lightly draw a perfect circle for the sun’s face. Keep the pressure light so it’s easy to erase later. -
Outline the moon:
Below and to the left of your sun draft, sketch a crescent C-shape for the moon. Make sure the inner curve is smooth and the points are gently tapered but not too sharp.
Wobbly Circles?
If you struggle with freehand circles, trace a small coin, a washi tape roll, or the bottom of a glue stick foundation.
Step 2: Drawing the Sun
-
Inking the face shape:
Trace over your pencil circle with your fine liner pen. Use a steady hand to create a clean, continuous line. -
Add the rays:
Draw small triangles all around the sun’s circumference. Aim for them to be roughly the same size, pointing outward like the teeth of a gear. It helps to draw top, bottom, left, and right first, then fill in the gaps. -
Draw the second layer of rays:
Now, draw a second, larger V-shape between each of the smaller triangles. These should be strictly linear—just two lines meeting at a shap point—to create a burst effect behind the first layer. -
Add the eyes:
Place two small dots wide apart on the sun’s face. Below each dot, draw a small, upward-curving lash to make the eyes look like they are happily closed or blinking. -
Create the smile:
Right in the center between the eyes, draw a simple, small U-shape for a sweet little smile. -
Add rosy cheeks:
Using your pink marker or colored pencil, draw two small ovals directly underneath the eyes for blushing cheeks.
Step 3: Drawing the Moon
-
Ink the crescent:
Go over your pencil sketch of the moon with the fine liner. If you want a thicker line weight here, you can retrace it slightly to make the moon feel solid. -
Draw the sleeping eye:
Near the center of the crescent shape, draw a small, downward-curving arch with three tiny straight lashes poking out from the top. -
Add the mouth:
Just below the eye, draw a tiny curve near the inner edge of the crescent to give the moon a peaceful smile. -
Include a cheek highlight:
Dab a single spot of pink just under the eye to match the sun’s style.
Make it Shine
Use a metallic gold gel pen to outline the stars or fill in the sun’s rays for a sparkling finish that catches the light.
Step 4: Final Details
-
Scatter the stars:
Around the empty spaces, draw simple four-pointed stars. Draw a cross, but curve the lines inward toward the center point to make them sparkle. -
Add twinkle details:
Fill in smaller gaps with tiny diamond shapes or simple dots to create a magical, starry sky effect. -
Clean up:
Wait until the ink is completely dry—give it a full minute just to be safe—and then gently erase all remaining pencil marks to leave a crisp, clean drawing.
Now you have a charming celestial pair ready to guide you through your journaling adventure
Sparkly Star Doodles
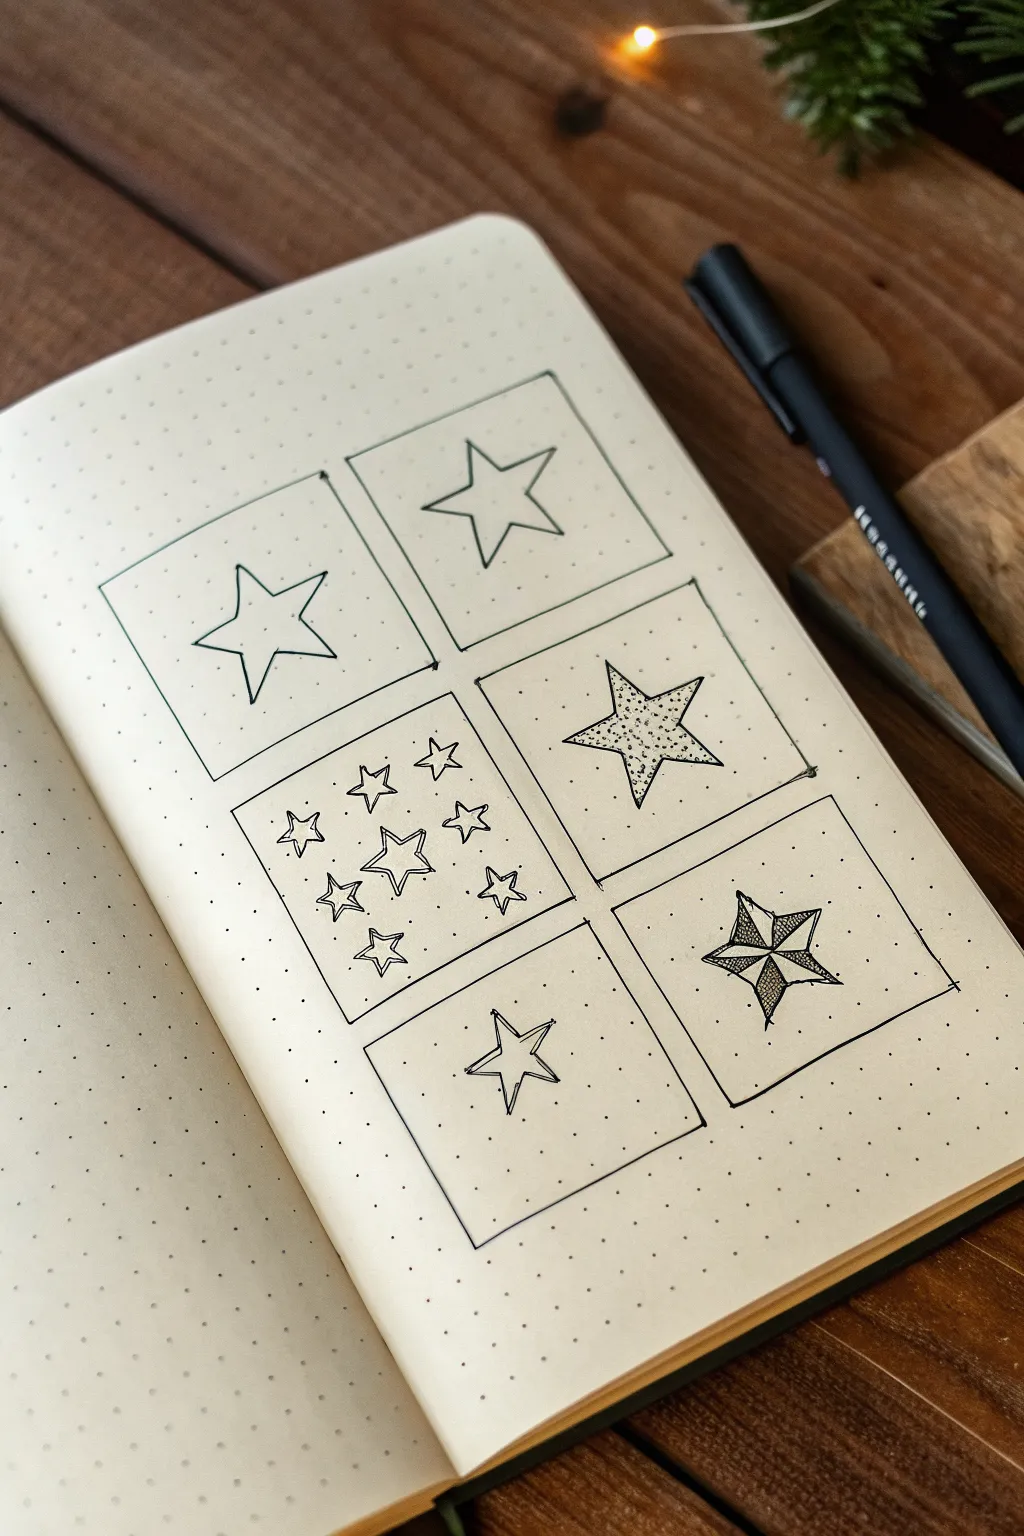
Transform a simple bullet journal page into a constellation of creativity with these six distinct star variations. From classic five-point outlines to stippled textures and nautical designs, this minimalist spread explores fun ways to doodle celestial shapes using just a pen.
Detailed Instructions
Materials
- Dotted bullet journal or grid paper
- Fine liner pen (black, 0.3mm or 0.5mm)
- Ruler
- Pencil (HB or lighter)
- Eraser
Step 1: Setting Up the Grid
-
Plan the Layout:
Visualize a 2×3 grid on your page. Count the dots carefully to ensure each square will be the same size. A width of roughly 8-10 grid squares works perfectly for these doodles. -
Draft the Frames:
Using your pencil and ruler, lightly sketch six identical squares. Leave a small gap of about 2-3 grid spaces between each square to let the designs breathe. -
Ink the Borders:
Once you are happy with the spacing, trace over your pencil lines with your black fine liner. Keep the pressure even for a crisp, clean border. Let the ink dry completely before erasing any stray pencil marks.
Grid Tricks
Count your dots twice! Finding the exact center of your page first helps ensure your 2×3 grid sits perfectly symmetrical on the paper.
Step 2: Drawing the Classic Stars
-
The Simple Outline (Top Left):
In the first box, draw a standard five-point star. Start by making an inverted ‘V’ shape, then cross upward to the left, straight across to the right, and down to connect. Keep the lines sleek and unshaded. -
The Double Outline (Top Right):
In the second box, draw another five-point star similar to the first one. Now, carefully draw a second, slightly smaller star inside it, keeping the distance between the lines consistent. -
Adding Dimension (Bottom Middle):
In the bottom middle box, draw a standard star outline first. From the inner corner of each V-shape valley, draw a short straight line connecting to the center point of the star to create a faceted, 3D effect.
Step 3: Adding Texture and Detail
-
The Stippled Star (Middle Right):
Draw a large five-point star outline. Instead of coloring it in solidly, use the tip to tap tiny dots inside the shape. Concentrate the dots near the center and make them sparse near the tips for a fading gradient effect. -
The Nautical Star (Bottom Right):
Draw a star, then draw lines from every outer point and every inner valley to the center. You should have 10 triangular sections. Shade in every other triangle section black to create a high-contrast nautical look.
Cosmic Colors
Instead of black ink, use metallic silver or gold gel pens on black paper. The stippled star looks especially brilliant in metallic ink.
Step 4: The Star Cluster
-
Draft the Cluster (Middle Left):
In the remaining box, lightly sketch a central star surrounded by six or seven smaller stars of varying sizes. -
Varying Line Styles:
Ink the central star with a double outline for emphasis. For the surrounding smaller stars, use single outlines. -
Finishing Touches:
Fill the empty negative space between the stars with tiny single dots to make the cluster look dense and magical. Erase all remaining pencil sketches gently to finish the spread.
Now you have a reference page of dazzling doodle styles ready to decorate your next journal entry
Heart Envelope Note

This charming grid of sketches breaks down the simple joy of drawing a cute love letter, frame by frame. You’ll create a sequential storyboard that transforms a basic envelope into a heart-filled message, perfect for cardmaking or journaling.
How-To Guide
Materials
- White cardstock or heavy drawing paper (A4 or Letter size)
- Black fine-liner pen (0.3mm or 0.5mm)
- Pencil and eraser for initial sketching
- Ruler
- Pink colored pencil or marker
Step 1: Setting the Stage
-
Prepare the grid:
Start by drawing six evenly spaced squares on your paper using a ruler and pencil. Arrange them in two columns of three rows to match the reference layout. -
Ink the frames:
Once you are satisfied with the spacing, trace over your pencil squares with the black fine-liner to create crisp, permanent borders. -
Number the sequence:
In the top-left corner of each square, write small numbers from 1 to 6. Notice that the reference numbers (1, 3, 3, 6, 6, 8) seem a bit random or perhaps represent dates, but for clarity, you can simply label them chronologically or mimic the quirky numbering shown in the photo.
Wobbly Lines?
If your squares aren’t perfectly straight, don’t worry. A slightly hand-drawn look adds to the doodle aesthetic. Just keep your pen pressure consistent.
Step 2: Drawing the Sequence: Top Row
-
Frame 1 outline:
In the first box, draw a simple rectangle slightly tilted to the left. This forms the body of the envelope. -
Frame 1 details:
Add a triangular flap coming down from the top edge. Draw two simple black dots for eyes and a small ‘o’ mouth right on the flap’s point to make a cute face. -
Frame 2 outline:
Moving to the top right box, draw the same tilted rectangle envelope shape again. -
Frame 2 details:
Draw the envelope flap again, but this time, skip the face. Instead, draw a small, solid heart right in the center where the seal would be. -
Coloring Frame 2:
Use your pink marker or pencil to color in that tiny heart seal.
Make It Personal
Swap the hearts for tiny stars or flower doodles in the last two frames to change the theme from love to celebration or friendship.
Step 3: Drawing the Sequence: Middle Row
-
Frame 3 base:
In the middle left box, draw the envelope outline again, keeping that consistent tilt. -
Frame 3 expression:
On the flap this time, draw two small curved lines for smiling eyes and a tiny smile underneath. -
Frame 4 base:
For the middle right box, draw your standard envelope rectangle. -
Frame 4 heart:
Draw an open heart outline on the flap (don’t fill it in yet) and add subtle inner outlines to the envelope edges to give it a bit of depth. -
Frame 4 color:
Gently shade the inside of the heart outline with a very light touch of pink.
Step 4: Drawing the Sequence: Bottom Row
-
Frame 5 transition:
In the bottom left box, we switch focus. Instead of the envelope, draw a medium-sized heart floating in the center of the square. -
Frame 5 coloring:
Color this heart a solid, soft pink, just like the seal in the second frame. -
Frame 6 conclusion:
For the final box on the bottom right, draw another heart, perhaps slightly larger or angled differently than the previous one. -
Frame 6 coloring:
Fill this final heart with the same pink hue to tie the whole visual story together. -
Final touches:
Wait for all ink to be completely dry, then gently erase any remaining pencil guidelines from your initial grid setup.
Now you have a sweet, hand-drawn story ready to be gifted or framed on your desk
Smiling Donut With Sprinkles

This tutorial guides you through sketching a charming little donut with a friendly face, nestled inside a neat square frame. It’s a perfect beginner exercise that combines simple geometric shapes with cute character design.
Detailed Instructions
Materials
- Spiral-bound sketchbook or drawing paper
- Fine liner pens (black, sizes 01 and 03)
- Pencil (HB or 2B)
- Eraser
- Ruler
- Colored pencils (pink, tan/light brown)
- Colorless blender pencil (optional)
Step 1: Setting the Stage
-
Create the framework:
Start by using your ruler and pencil to draw a simple square box on your page. This frame helps contain the drawing and gives it a finished, sticker-like appearance. -
Ink the frame:
Go over your pencil square with a 03 fine liner pen to create a crisp border, then gently erase the pencil guidelines once the ink is dry.
Donut Stability
Draw faint crosshairs (a vertical and horizontal line) through the center of your square first. This helps you center the donut hole perfectly.
Step 2: Drawing the Donut Shape
-
Sketch the outer circle:
Lightly sketch a circle in the center of your box. It doesn’t need to be perfectly round; a slightly organic shape makes the pastry look more realistic and softer. -
Add the inner hole:
Draw a smaller circle right in the middle of the first one. This creates the classic donut ring shape. -
Create the 3D effect:
To give the donut some thickness, draw a curved line slightly below the bottom edge of the outer circle, following its curve. Connect the ends to the main circle to show the side of the pastry. -
Define the frosting line:
Draw a wavy, undulating line inside the donut shape. This line should weave between the outer and inner circles, creating the look of icing dripped over the top.
Make It a Set
Draw 3 more squares and fill them with different pastry friends: a cupcake, a macaron, and a croissant, all with matching animated faces.
Step 3: Adding Details & Ink
-
Sketch the face:
In the center of the frosting area, draw two tiny dots for eyes and a small, curved smile right between them. Keep the features low on the ‘face’ for maximum cuteness. -
Add sprinkles:
Scatter small ovals and tiny circles randomly across the frosting area. Avoid the face, but fill the rest of the space evenly. -
Refine with ink:
Switch to your 01 fine liner. Carefully trace over your pencil lines. Use confident, smooth strokes for the circles and wavy frosting line. -
Erase pencil marks:
Wait a moment for the ink to set completely to avoid smudging, then erase all the underlying pencil sketches cleanly.
Step 4: Coloring
-
Base the pastry:
Take a light tan or beige pencil and color the bottom 3D rim of the donut. Keep the pressure light to mimic golden-brown dough. -
Color the frosting:
Use a pink pencil to color the frosting area. Outline the edges first, then fill in the middle with soft, circular strokes to avoid harsh directional lines. -
Layering the pink:
I like to go back over the pink area a second time, pressing slightly harder near the bottom of the frosting waves to create a subtle shadow and dimension. -
Highlight the eyes:
If your markers or pens covered the eyes, re-darken them with your black fine liner to make them pop against the pink background. -
Color the sprinkles:
You can leave the sprinkles white (negative space) or use different colored pencils to make them rainbow. For this specific look, leaving them uncolored or very pale works well. -
Final touch:
Add two small pink ovals on the cheeks, slightly darker than the frosting color, to give the donut a blushing, happy expression.
Now you have a sweet little character ready to brighten up your notebook page
Boba-Style Drink Character

These charming line art doodles showcase six different variations of bubble tea drinks neatly arranged in a grid. The minimalist style, capturing everything from classic boba to fruity infusions, makes this a perfect beginner-friendly project for your bullet journal.
Step-by-Step Guide
Materials
- Dot grid notebook or journal (A5 size recommended)
- Fine liner pen (black, 0.3mm or 0.5mm)
- Pencil (HB or mechanical)
- Ruler
- Eraser
Step 1: Planning the Layout
-
Map the grid:
Using your pencil and ruler, lightly sketch a large rectangle that fills most of the page. Inside this, create a 2×3 grid structure to form six equal vertical rectangles. -
Define the frames:
Once the pencil spacing looks even, ink over the grid lines with your fine liner to create six distinct ‘ polaroid-style’ frames. Leave a small gap between the inner frames if you prefer the look of separate cards.
Uneven Circles?
Draw the boba pearls lightly in pencil first. It’s distinctively harder to draw perfect circles in ink immediately. Irregular shapes actually look more organic and tasty.
Step 2: Drawing the Base Cups
-
Sketch the lids:
In the upper third of each frame, draw a flattened oval or a straight horizontal line with slight curves at the ends to represent the cup lid. -
Add the rims:
Draw a parallel line just above the lid line and connect the sides to create the rim of the cup. This small detail adds dimension. -
Outline the cups:
From the corners of the lid, draw two lines tapering slightly inward as they go down, stopping before the bottom of the frame. Connect them with a curved line at the bottom. -
Insert straws:
Draw two vertical parallel lines coming out from the center of each lid. Angle a few of them slightly for variety. Top each straw with a small oval or angled line to show the opening.
Add a Splash of Color
Use mild highlighters or watercolor pencils to tint the liquid area. Leave the boba black or white for contrast, but color the ‘tea’ pale beige, brown, or pink.
Step 3: Adding Fillings and Details
-
Create the classic boba (Top Right):
In the top right cup, draw a cluster of small circles at the bottom. Fill them in solidly with black ink, leaving a tiny white dot in each for a highlight. -
Draw the creamy swirl (Top Left):
For the top left cup, draw a wavy line halfway up the cup to suggest a creamy topping or foam. Add a few small bubbles floating above the main liquid line. -
Sketch fruit chunks (Middle Left):
In the middle left panel, draw irregular shapes at the bottom that look like fruit slices. I like to add a curved line halfway up the cup to show the ice level. -
Add floating pearls (Middle Right):
For the middle right cup, draw small circles scattered from the bottom to the middle. Unlike the classic boba, keep these circles open (unfilled) to represent a different flavor like popping boba. -
Fill the bottom heavy cup (Bottom Left):
In the bottom left cup, draw a dense layer of dark circles at the very bottom, stacking them tightly. Add a horizontal line just above them to show the liquid level. -
Create the mixed drink (Bottom Right):
In the final cup, mix dark filled circles with open circles. Draw a distinct ‘liquid line’ near the top of the cup to make it look full.
Step 4: Final Touches
-
Ink the outlines:
Go over all your pencil sketches with the fine liner. Use confident, steady strokes for the long lines of the cups and straws. -
Refine the details:
Check that all boba pearls are clearly defined. If any look too faint, thicken their outlines slightly. -
Erase guidelines:
Wait until the ink is completely dry—give it a good few minutes—then gently erase all underlying pencil marks to reveal a clean, crisp page.
You now have a delightful menu of bubble tea variations ready to decorate your journal spreads
Avocado With a Happy Pit
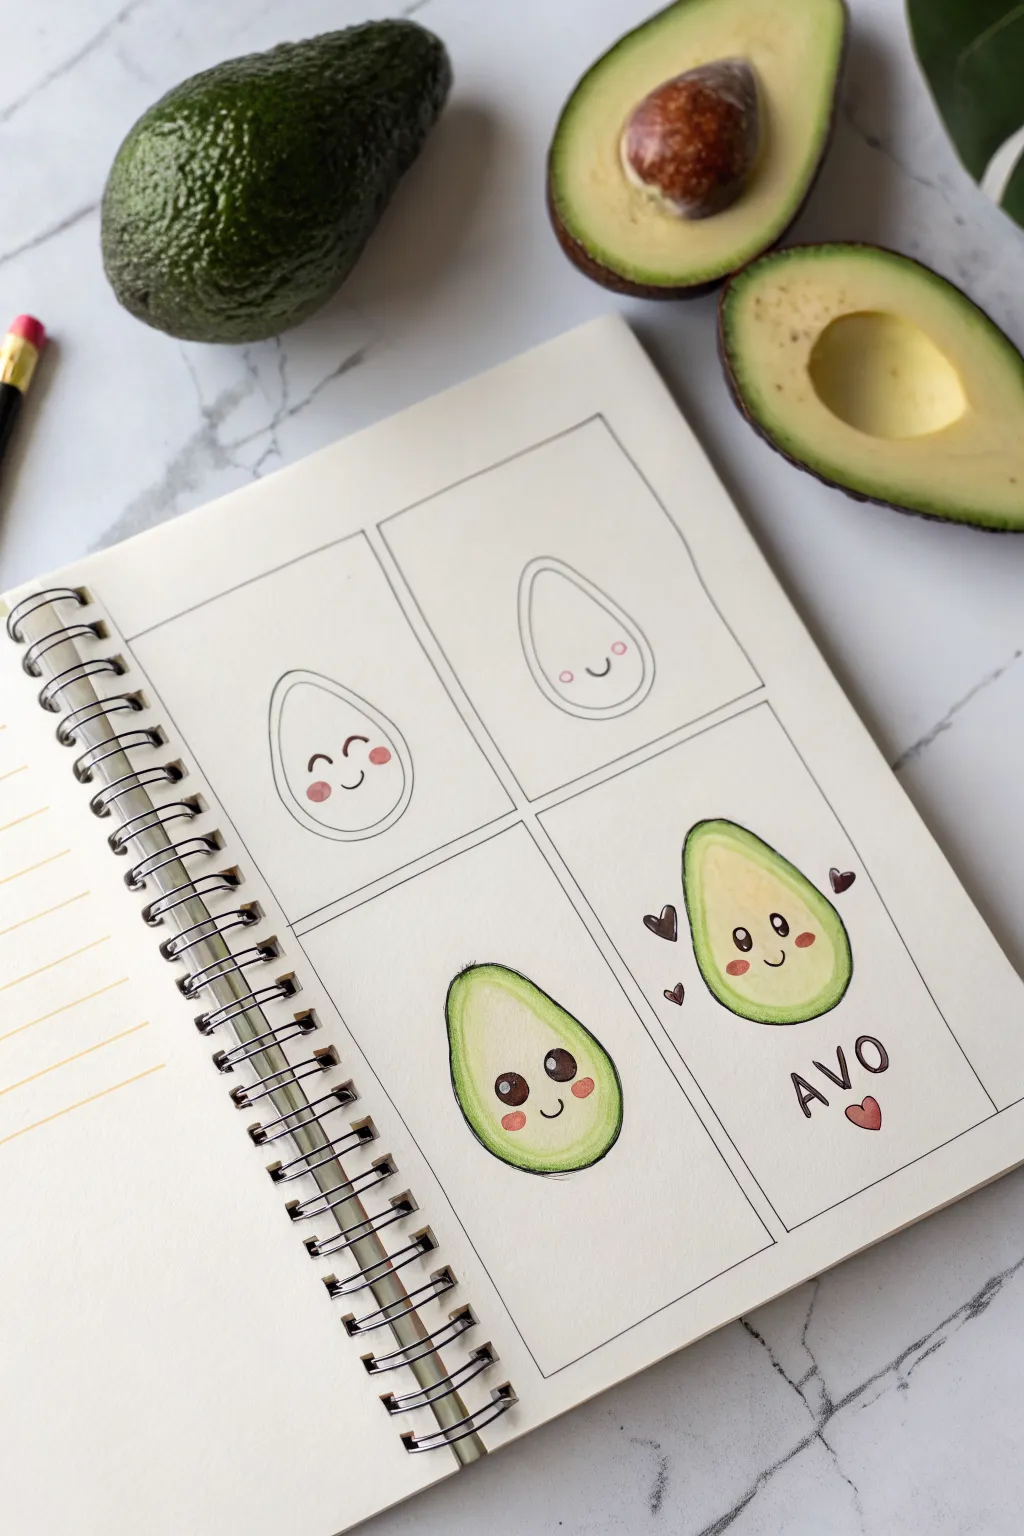
Brighten your sketchbook with this adorable, multi-panel drawing of a cheerful avocado friend. You’ll move from simple line art to a fully colored and expressive character that practically waves hello from the page.
Detailed Instructions
Materials
- Sketchbook or drawing paper
- Pencil
- Eraser
- Fine liner pen (black or dark brown)
- Colored pencils or markers (light green, dark green, pink, brown)
- Ruler
Step 1: Setting the Stage
-
Draw the grid:
Start by dividing your page into four equal rectangles using a ruler and pencil. This creates a comic-strip style layout that shows the progression of your drawing. -
Sketch the first avocado shape:
In the top-left box, lightly sketch a teardrop or pear shape. Inside that, draw a slightly smaller oval near the bottom center to represent the pit. -
Add the first face:
Give the pit a personality by drawing two small curved lines for eyes, a tiny U-shape smile, and circular cheeks. Add small eyebrows above the eyes for a happy expression. -
Outline the second panel:
Move to the top-right box. I like to draw the same avocado outline again here, but this time, leave the inner oval blank for a moment to focus on just the shape.
Step 2: Adding Details and Line Art
-
Create the pit-less version:
In the top-right panel you just started, draw a smaller outline inside the main shape to show where the pit would sit, resembling an empty avocado half. Add a tiny face directly onto the flesh area if you want an alternative cute look. -
Sketch the third panel:
In the bottom-left box, repeat the avocado shape with the pit inside. This time, draw larger, solid oval eyes with tiny white highlights to make them look shiny. -
Sketch the final panel:
In the bottom-right box, draw your most detailed avocado yet. Give it big, expressive eyes, a happy mouth, and add little floating hearts around it. Write ‘AVO’ underneath in bubbly letters. -
Ink the outlines:
Using a fine liner pen, carefully trace over your pencil lines in all four panels. Use a steady hand for the long curves of the avocado skin. -
Clean up sketch lines:
Once the ink is completely dry—wait a minute or two to prevent smudging—erase all the underlying pencil marks to reveal crisp, clean drawings.
Uneven Shapes?
If your avocado shape feels lopsided, lightly sketch a vertical centerline first. Draw the left curve, then mirror it on the right for better symmetry.
Step 3: Bringing it to Life with Color
-
Color the skin:
Start coloring the bottom-left avocado. Use a dark green pencil for the outermost edge of the avocado to represent the thick skin. -
Shade the flesh:
Fill the inside flesh area with a light, creamy green. As you get closer to the center pit, fade the green into a very pale yellow or cream color to mimic a real avocado’s gradient. -
Color the first pit:
Take a brown pencil and color the pit in the bottom-left panel. Apply more pressure at the bottom edge for shading, making it look round and 3D. -
Add blush:
Use a pink pencil or marker to color two small circles on the cheeks for a rosy look. -
Color the final panel:
Repeat the coloring process for the bottom-right drawing. Dark green skin, gradient light green flesh, and rosy cheeks. -
Color the extras:
Fill in the floating hearts with a deep red or burgundy. If you wrote ‘AVO’, color the heart inside the letter ‘O’ pink or red as well. -
Final touches:
Using a white gel pen or very light pencil, add a tiny highlight on the top left of the pit and the eyes to make them sparkle.
Smooth Blending
For a creamy texture, color in small circles rather than straight lines. Layer yellow over the light green near the center to soften the transition.
Now you have a whole page of happy avocados ready to brighten up your day
Planet Cat Mashup

Create a charming set of four planetary vignettes using simple lines and geometric shapes. This minimalist space-themed spread is perfect for filling a journal page with cosmic wonder without needing advanced artistic skills.
Step-by-Step Tutorial
Materials
- Spiral-bound sketchbook or drawing paper
- Fine-point black pen (0.5mm or 0.3mm)
- Pencil for sketching
- Eraser
- Ruler
Step 1: Setting the Framework
-
Draw layout boxes:
Begin by using your ruler to lightly sketch four vertical rectangles on your page. Arrange them in a 2×2 grid or a single row, depending on your paper size, leaving a small gap between each frame. -
Define the borders:
Once you are happy with the placement, go over the pencil lines with your black pen to create crisp, permanent frames for your artwork.
Wobbly Circles?
Don’t stress about perfect circles! If yours looks lopsided, add a few extra craters or ‘atmosphere lines’ to that side. The irregularity makes it look more organic.
Step 2: Panel 1: The Ringed Giant
-
Sketch the main planet:
In the top left rectangle, draw a medium-sized circle near the top center. It doesn’t need to be perfectly round; a hand-drawn look adds character. -
Add texture stripes:
Draw three or four slightly curved horizontal lines across the surface of the circle to mimic atmospheric bands. -
Ground with a horizon:
Near the bottom of the frame, draw a wavy horizon line. Below this line, fill the space with parallel horizontal lines to create a stylized ground texture. -
Insert a tiny moon:
Draw a small circle resting on the horizon line and add a few small ‘u’ shapes inside it to suggest craters. -
Sprinkle in stars:
Fill the empty space around the main planet with small stars—use simple five-point shapes and tiny dots for distant starlight.
Step 3: Panel 2: Falling Stars
-
Draw the lower planet:
In the top right rectangle, place a circle in the lower third of the frame. Draw horizontal lines across it, curving them slightly downward to emphasize the sphere’s roundness. -
Add a rocky corner:
In the very bottom left corner, draw a jagged, uneven line to suggest a rocky terrain in the foreground. -
Create large stars:
Draw three large, distinctive stars in the upper open space. Give them long, sharp points for a classic cartoon twinkle effect. -
Add varied star sizes:
Scatter smaller five-point stars and simple dots throughout the scene to balance the composition.
Add Pop of Color
Use watercolor pencils to lightly shade just the planets, leaving the background white, or fill the background with black ink to make the planets pop.
Step 4: Panel 3: The Cratered Moon
-
Center the sphere:
In the bottom left rectangle, draw a large circle right in the center. This will be the main focal point of this panel. -
Add crater details:
Fill the inside of the circle with various small circles and ovals. For some, add a tiny crescent shape inside the edge to give the craters depth. -
Detail the background:
Keep the background minimal here, adding just four small dots in the corners of the frame to signify space.
Step 5: Panel 4: The Swirling Gas Planet
-
Draw the outline:
In the final bottom right rectangle, draw another large central circle. -
Create the swirl:
Starting from the center of the planet, draw a continuous spiral line that loops outward until it nearly touches the circle’s edge. I find it helps to keep your wrist loose for a smoother curve. -
Add orbiting elements:
Draw a tiny circle on one of the outer spiral lines to represent a storm or a satellite feature. -
Finalize ink work:
Go over all your pencil sketches with the fine-point pen. Ensure your lines are confident and solid. -
Clean up:
Wait a moment for the ink to dry completely, then gently erase all remaining pencil guidelines to reveal your crisp, clean artwork.
You now have a delightful gallery of hand-drawn celestial bodies ready to decorate your journal


Have a question or want to share your own experience? I'd love to hear from you in the comments below!