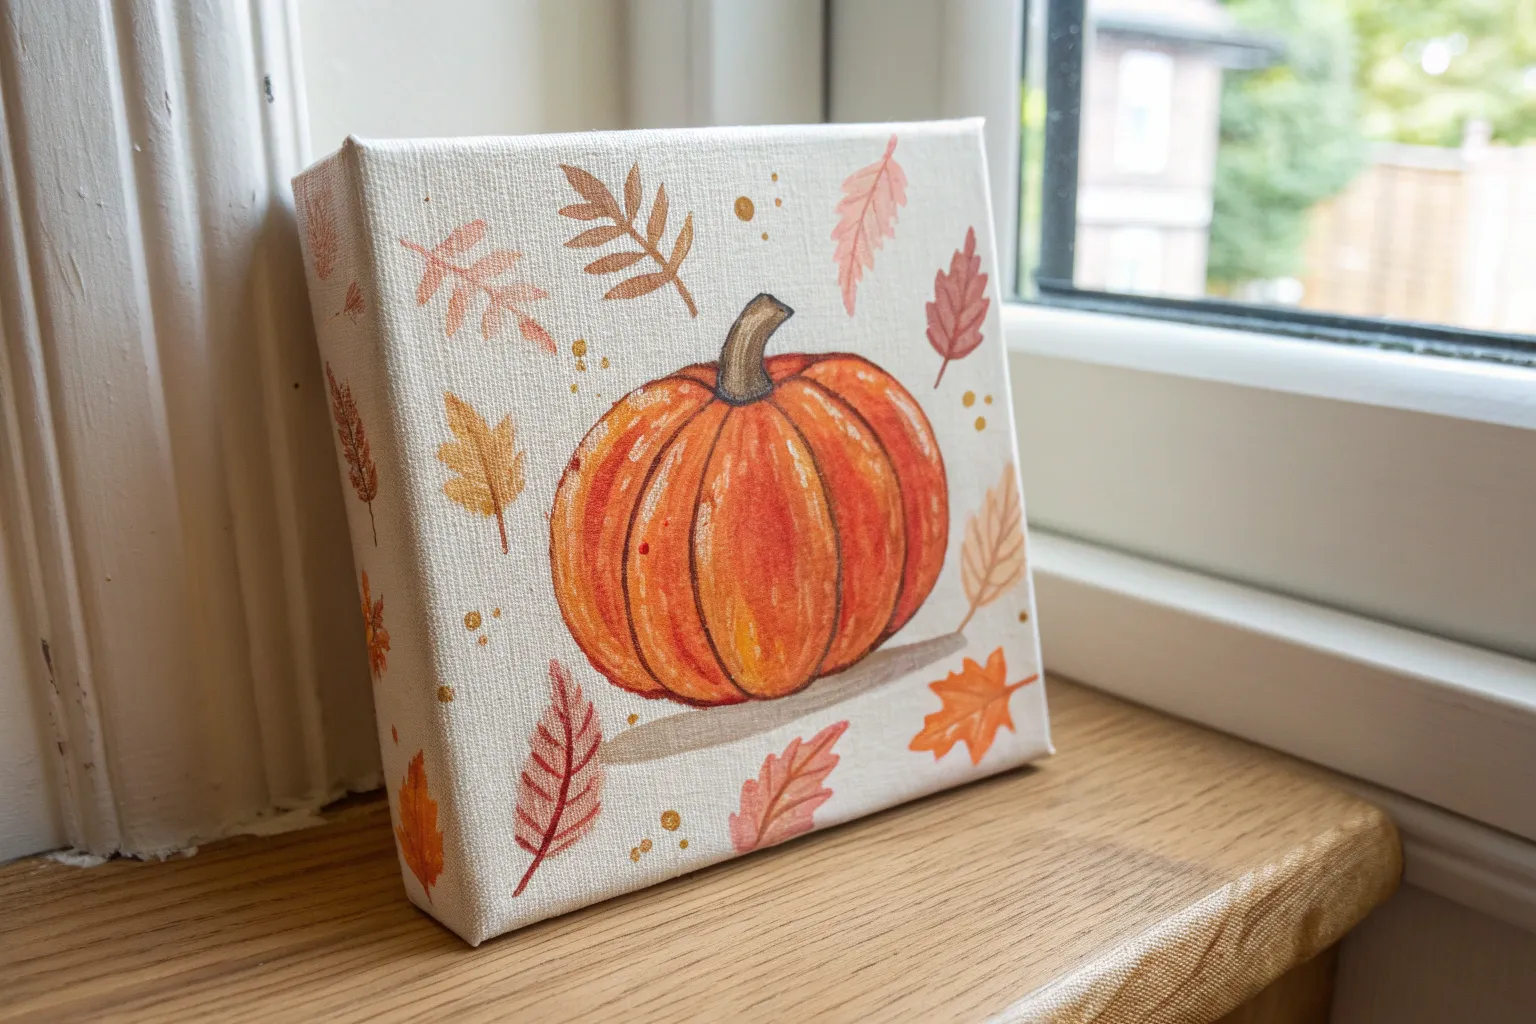
I’m always chasing that cozy fall feeling in paint—warm colors, sweet little details, and scenes that look like they belong on a storybook page. Here are my favorite cute fall painting ideas that are beginner-friendly but still feel special enough to pin, gift, or hang up all season long.
Whimsical Pumpkin Patch With Chunky Shapes

Capture the cozy essence of autumn with this warm and inviting watercolor pumpkin illustration. Using simple shapes and organic textures, you’ll create a charming piece of art perfect for seasonal greeting cards or framed decor.
Detailed Instructions
Materials
- Cold press watercolor paper (deckle edge optional)
- Watercolor paints (burnt orange, yellow ochre, sap green, burnt umber)
- Round watercolor brush (size 6 or 8)
- Fine detail brush (size 0 or 2)
- Pencil and kneaded eraser
- Clean water and paper towel
Step 1: Sketching the Guidelines
-
Rough Outline:
Begin by lightly sketching a wide oval shape in the center of your paper. This doesn’t need to be perfect; organic vegetable shapes are rarely symmetrical. -
Defining Segments:
Draw curved lines radiating from the top center point down to the bottom, creating the classic ribbed pumpkin segments. Make the frontmost segment the widest and the side segments slightly narrower to create depth. -
Adding the Stem:
Sketch a thick, slightly twisted stem emerging from the top center dip. Keep the lines slightly jagged to suggest a woody texture. -
Botanical Details:
Lightly pencil in a few leaves at the base and a sprig of foliage extending from the top left, just behind the pumpkin.
Muddy Colors?
If your orange looks dull, you may have overworked it while wet. Let layers dry completely before glazing new colors on top to keep them crisp.
Step 2: Painting the Pumpkin
-
First Wash:
Mix a watery wash of yellow ochre and apply it loosely to the entire pumpkin body, avoiding the stem. This underlying glow will add warmth to your final orange tones. -
Let it Dry:
Allow this initial layer to dry completely. If you work too soon, your segments might bleed into one big puddle. -
Building Color:
Load your brush with a vibrant burnt orange. Paint the individual segments one by one, leaving a tiny sliver of unpainted space (or the pale yellow underlayer) between them to act as a highlight. -
Wet-on-Wet Shading:
While the orange paint is still damp, drop a touch of darker reddish-brown or concentrated orange at the bottom curve of each segment and near the stem divot. Let the pigment bloom naturally to create volume. -
Softening Edges:
If a line looks too harsh, rinse your brush and run clean, damp bristles along the edge to soften the transition.
Deckled Edge Idea
If you don’t have deckled paper, create a faux vintage look by carefully tearing the edges of your finished painting against a ruler.
Step 3: Stem and Foliage
-
Painting the Stem:
Mix burnt umber with a tiny touch of green. Paint the stem using vertical strokes that follow the twist of the wood. Use the tip of your brush to drag a little color down into the top of the pumpkin segments for a seamless connection. -
Base Leaves:
Using a muted sap green, paint small, simple leaf shapes at the base of the pumpkin. Keep the paint varied—some parts watery, some more pigmented—to give the leaves texture. -
Upper Sprig:
For the wheat-like sprig at the top left, use a pale mixture of yellow ochre and brown. Paint a thin stem and simple, teardrop-shaped leaves or kernels. -
Final Details:
Once everything is bone dry, use your fine detail brush to add very thin, broken lines to the stem for bark texture and emphasize the deepest shadows between the pumpkin ridges. -
Splatter Effect:
I like to finish by flicking a tiny amount of diluted brown or gold paint onto the paper for that rustic, imperfect charm.
Step back and admire your charming harvest creation, ready to be gifted or displayed


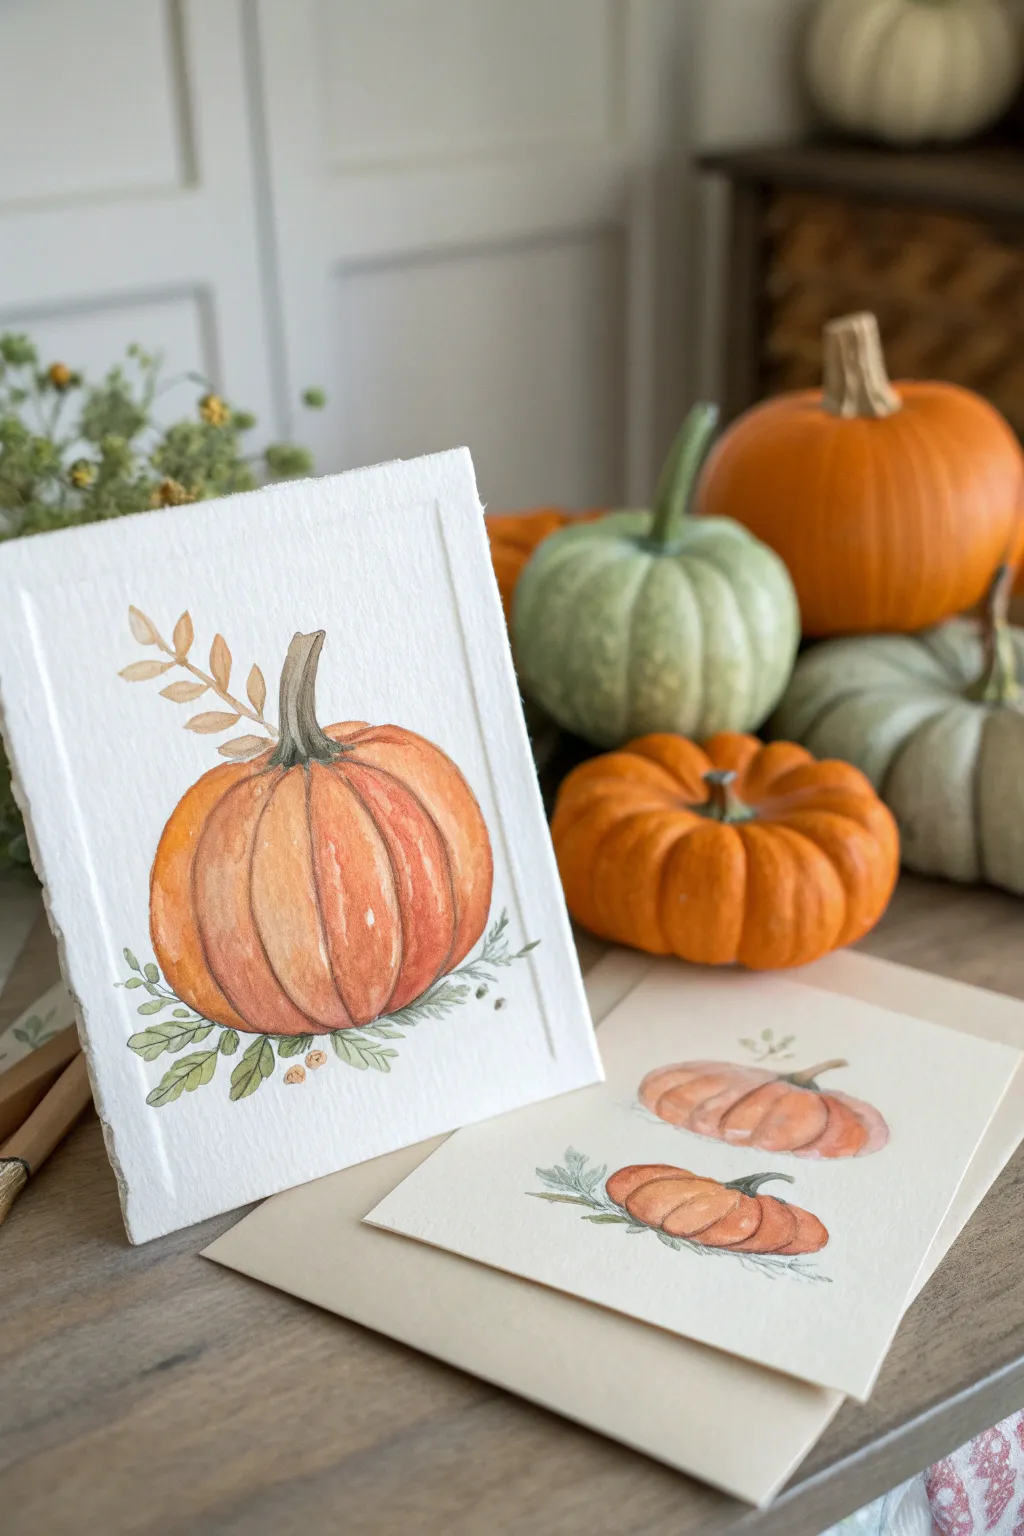
Easy Watercolor Pumpkin With Soft Shading
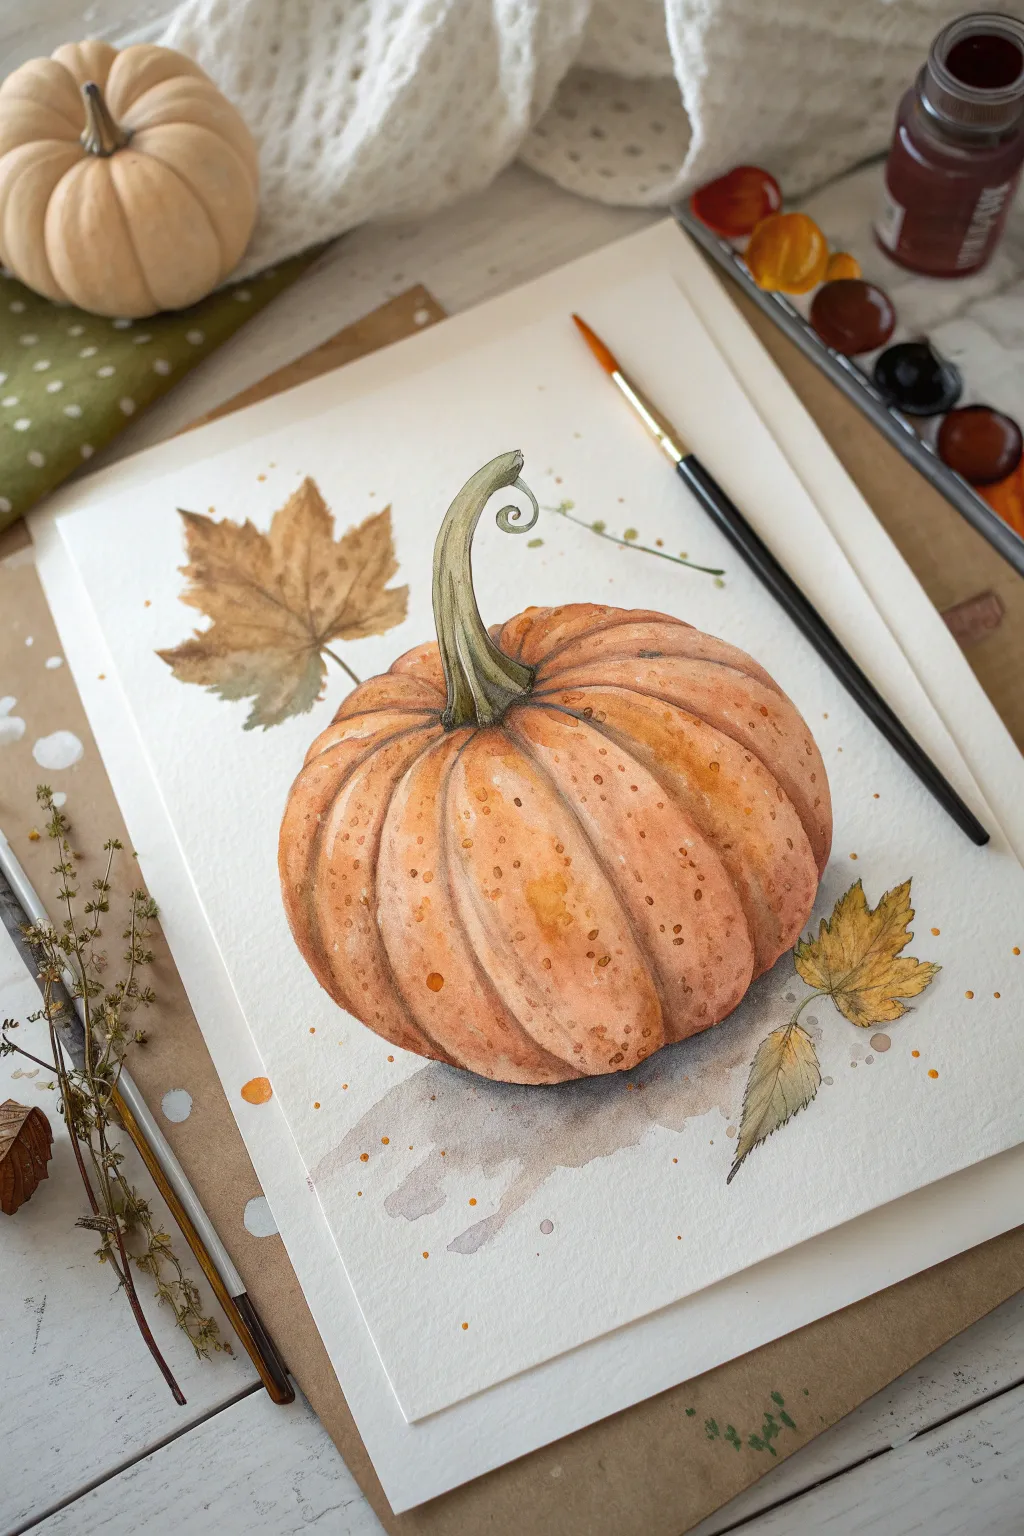
Capture the essence of autumn with this gentle watercolor study, featuring a plump, ribbed pumpkin and delicate dried leaves. The soft shading and subtle speckling create a cozy, realistic texture that brings the vegetable to life on paper.
Step-by-Step Tutorial
Materials
- Cold press watercolor paper (140lb/300gsm)
- Watercolor paints (Burnt Sienna, Yellow Ochre, Sap Green, Burnt Umber, Alizarin Crimson)
- Round watercolor brushes (Size 4 and Size 8)
- Pencil (HB or 2H) for sketching
- Kneaded eraser
- Two jars of water
- Paper towels
- Mixing palette
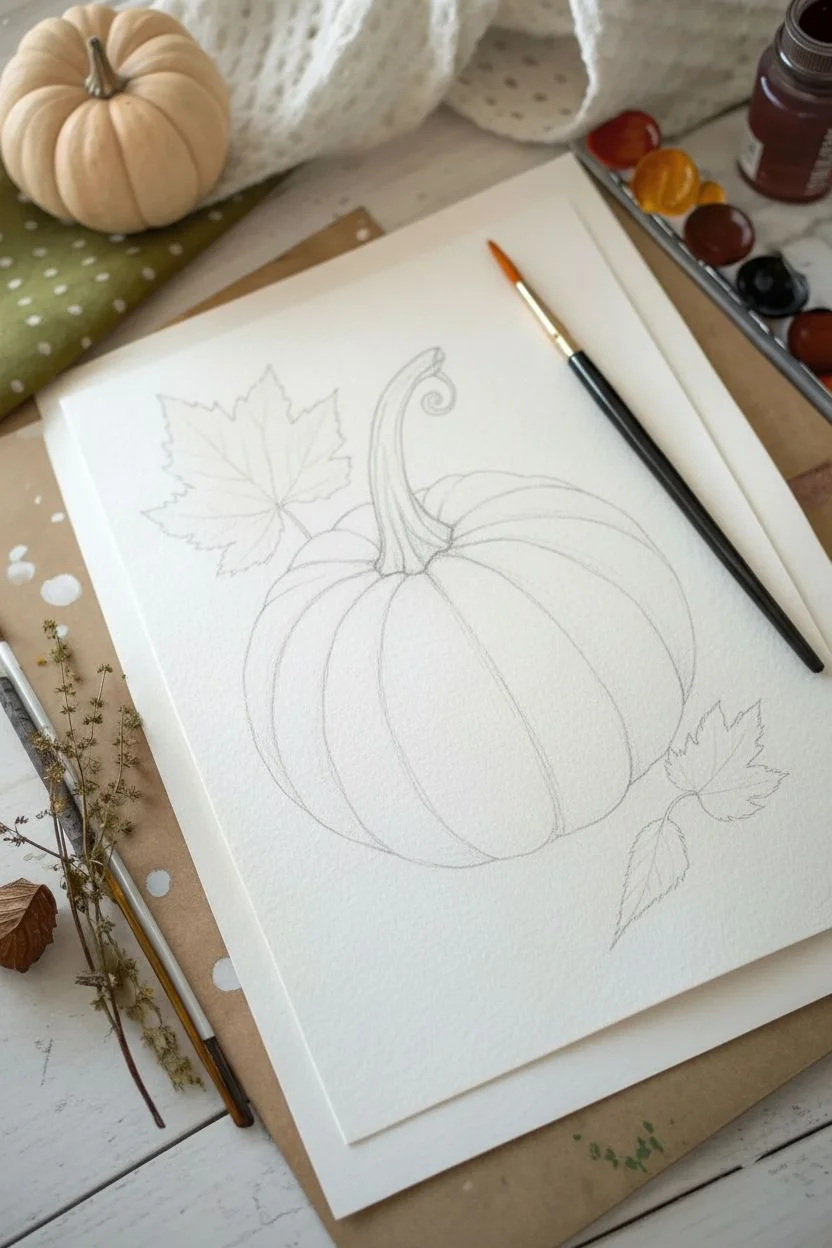
Step 1: Sketching the Composition
-
Outline the pumpkin shape:
Begin by lightly sketching a flattened oval shape in the center of your paper. Don’t make it a perfect circle; let it be slightly wider than it is tall to capture that heavy pumpkin feel. -
Define the ribs:
Draw curved lines radiating from the center indentation where the stem will sit, curving down to the bottom. I like to vary the width of these segments to make the pumpkin look organic and natural rather than perfectly symmetrical. -
Add the stem and leaves:
Sketch a thick, twisted stem emerging from the center divot, curling slightly at the top with a playful tendril. Add a large maple-style leaf on the left side and a smaller, crinkled leaf near the bottom right. -
Gentle erasing:
Roll your kneaded eraser over the entire sketch to lift the heavy graphite. You want ghost lines that possess just enough visibility to guide your paint without showing through later.
Keep the Highlights
Don’t overwork the center of each pumpkin rib. Leaving the paper white or very pale in the middle creates a natural shine that makes the pumpkin look round and plump.
Step 2: Painting the Pumpkin Base
-
Mix your base orange:
Create a warm, muted orange mix using Yellow Ochre and a touch of Burnt Sienna. You want a color that feels like a harvest vegetable, not a bright traffic cone. -
First wash on the ribs:
Using your size 8 brush, paint one segment (rib) of the pumpkin with clean water, then drop in your orange mix. Leave a thin sliver of white paper between each segment to act as a highlight and separate the ribs. -
Build volume with shading:
While the paint is still damp, drop a slightly darker mix (add a tiny bit of Burnt Umber or Alizarin Crimson to your orange) into the bottom curves and the crevices where the ribs meet. This gives the pumpkin its roundness. -
Work segment by segment:
Continue painting each rib, skipping every other one to let them dry slightly before painting the neighbors. This prevents the wet paint from bleeding together into one big blob.
Step 3: Adding Details and Texture
-
Deepen the shadows:
Once the first layer is dry, mix a deeper terracotta color. Use your size 4 brush to gently glaze over the shadows between the ribs and the underside of the pumpkin to enhance the 3D effect. -
Paint the stem:
Mix Sap Green with a little Burnt Umber for an earthy olive tone. Paint the stem, using darker strokes along the grooves of the twist and leaving tiny highlights for texture. -
Create the speckled texture:
Load a brush with a watery brown-orange mix and tap the handle against your finger to splatter tiny droplets across the pumpkin’s surface. This mimics natural imperfections. -
Add the curling tendril:
With the very tip of your smallest brush and the green mixture, paint a delicate, thin line curling off the top of the stem.
Muddy Colors?
If your orange looks dull, you may have added too much blue or black to darken it. Use a touch of red or brown (like Burnt Umber) to deepen the orange while keeping it warm.
Step 4: Leaves and Final Touches
-
Wash for the large leaf:
Wet the large leaf shape on the left. Drop in a mix of Yellow Ochre and dirty green, letting the colors bleed together loosely. -
Define leaf edges:
While the leaf is still damp, touch the edges with a concentrated brown to create a crisp, dried rim effect. -
Paint the small dry leaf:
For the bottom right leaf, use a drier brush with Burnt Sienna and yellow. Keep the edges ragged and sharp to suggest crispness. -
Ground the subject:
Mix a very watery grey-purple shadow color. Paint a loose, uneven wash directly underneath the pumpkin to ground it physically on the page. -
Final speckles:
Add a final round of subtle splatters, this time using a slightly darker brown paint, focusing on the shadow areas and the background near the leaves for artistic flair.
Allow your painting to dry completely before erasing any remaining pencil marks to reveal your crisp autumn masterpiece


Fall Leaves Garland Border Around a Simple Center
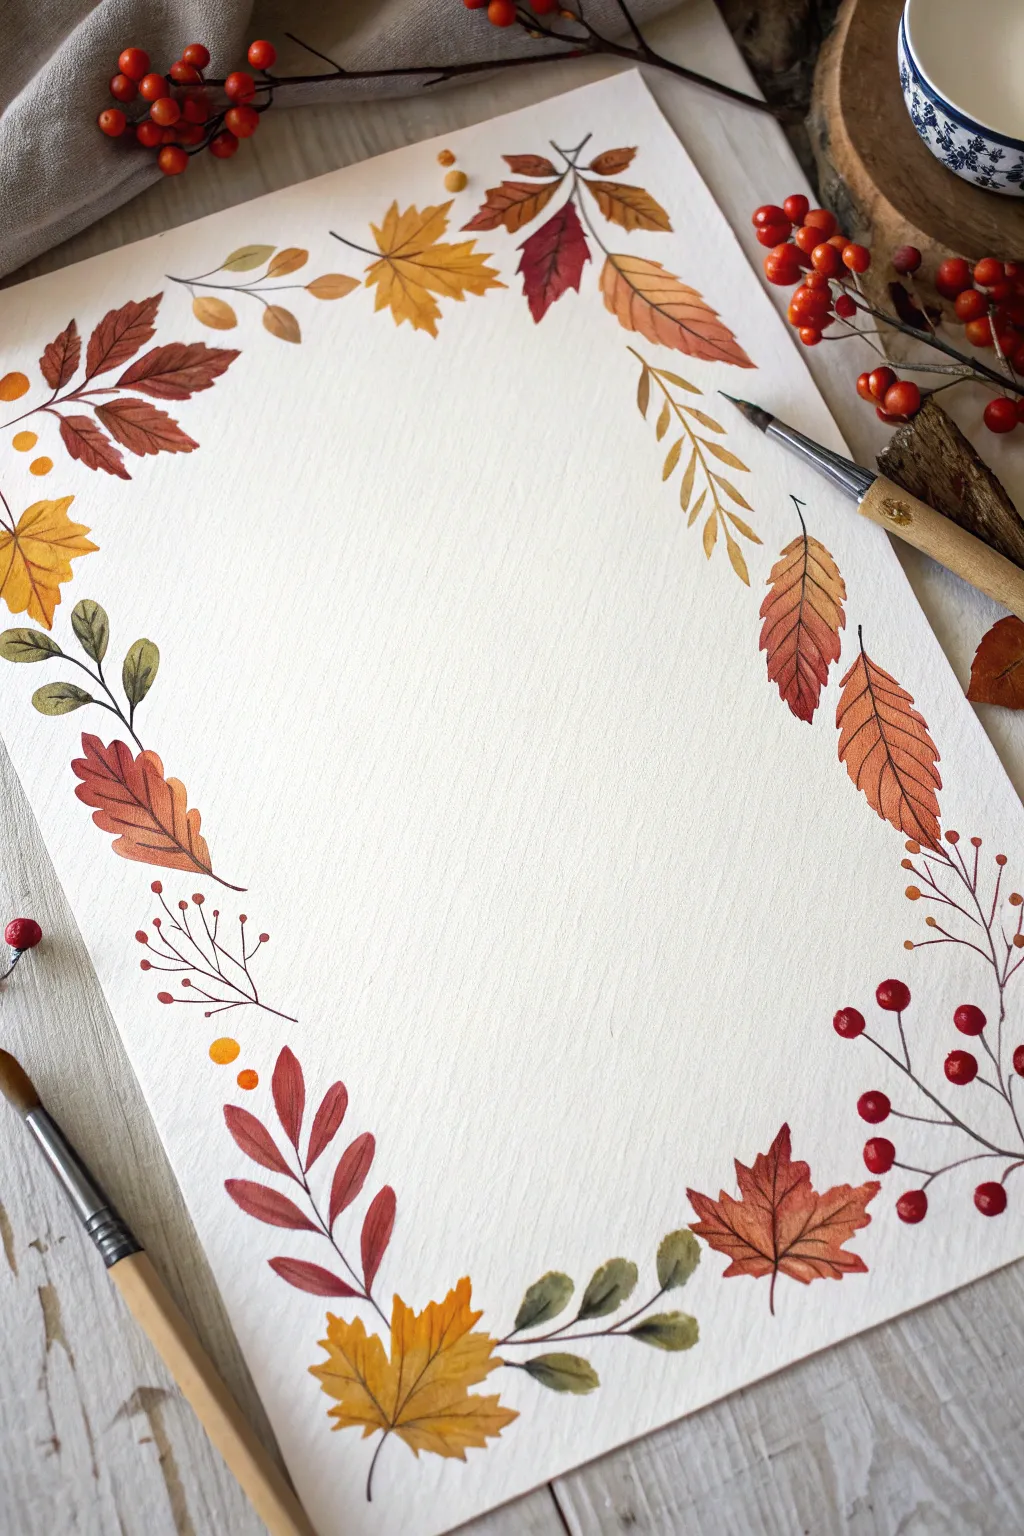
Brighten up your stationery with this delicate, nature-inspired border that perfectly captures the golden warmth of autumn. Using a mix of wet-on-dry techniques and fine detailing, you’ll create a frame of dancing leaves and berries that leaves plenty of room for your own poetry or calligraphy.
How-To Guide
Materials
- Cold press watercolor paper (A4 or letter size)
- Watercolor paints (burnt sienna, yellow ochre, sap green, crimson red, burnt umber)
- Round watercolor brushes (size 4 for leaves, size 0 or 1 for stems)
- Pencil (HB)
- Kneaded eraser
- Jar of clean water
- Paper towels
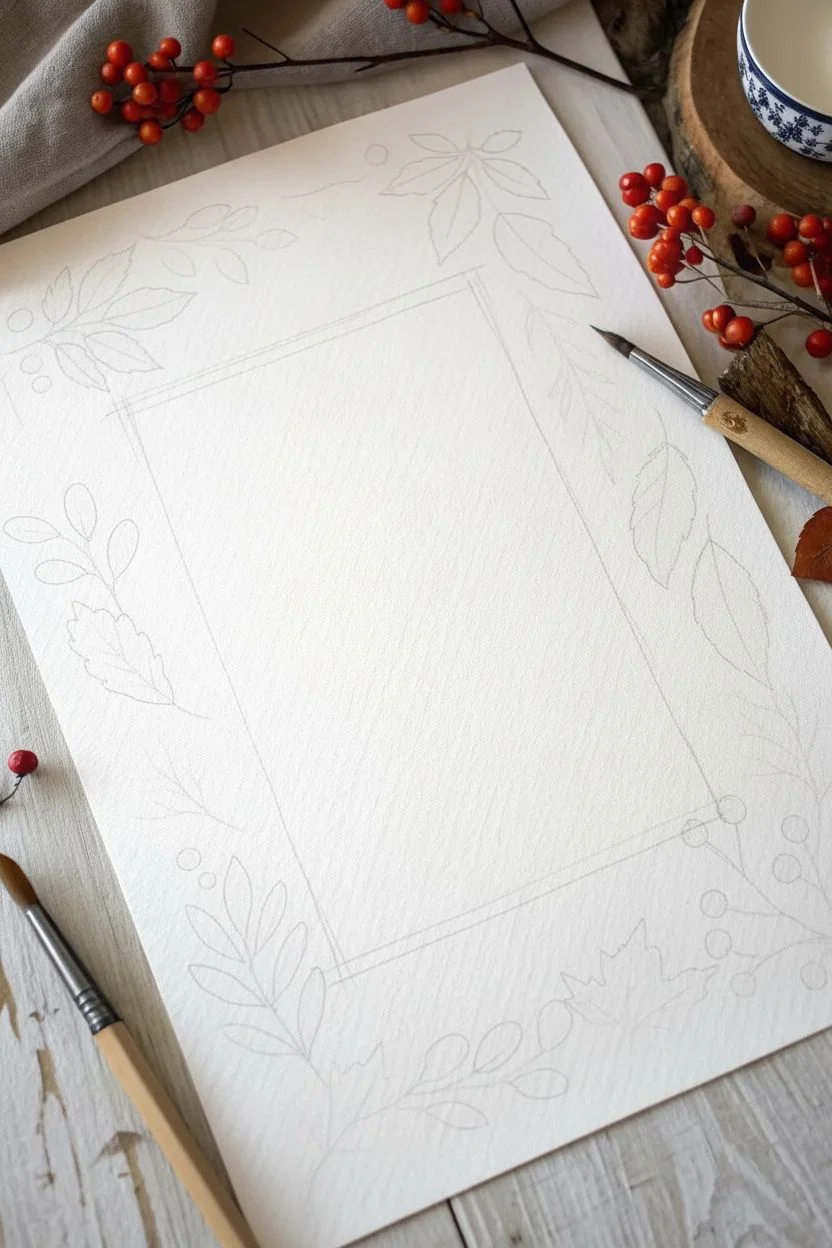
Step 1: Sketching the Layout
-
Establish the frame:
Begin by lightly tracing a large rectangle in the center of your paper using your pencil. This negative space will remain white, so keep your pencil lines incredibly faint; draw them just dark enough to see. -
Map out leaf clusters:
Without drawing details, sketch loose ovals and teardrop shapes along the perimeter of your rectangle to plan where the main leaves will sit. Alternate the direction of these shapes so the border feels organic and flowing. -
Add connecting elements:
Draw faint, curving lines connecting your leaf shapes. These will become the vines and stems. In current gaps, sketch tiny circles for berries or thin lines for twig accents.
Step 2: Painting the Foliage
-
Maple leaf base:
Start with the prominent maple leaves in the corners. Mix yellow ochre with a touch of burnt sienna. Paint the broad, pointed lobes, keeping the paint wetter near the center and pulling it outward to sharp points. -
Adding color variation:
While the maple leaves are still slightly damp, drop a tiny bit of orange or red into the tips of the lobes. Let the colors bleed naturally for that turning-leaf effect. -
Elongated beech leaves:
For the long, oval leaves (like beech or birch), mix burnt sienna and a hint of red. Paint these with single, confident strokes, pressing the belly of the brush down and lifting up at the end to create a tapered point. -
Green accents:
Using a muted sap green (I like to mix in a tiny bit of brown to dull it), paint the small, rounded pairs of leaves on the left and bottom edges. These anchor the warmer tones with cool contrast. -
Ferns and filler:
Switch to a lighter yellow-brown mix. Paint the fern-like sprigs on the right side using quick, repetitive dashes stemming from a central line.
Wet-on-Wet Magic
For realistic gradients, wet the leaf shape with clear water first. Touch yellow to the center and red to the edges; let them merge without over-brushing.
Step 3: Details and Stems
-
Painting the stems:
Switch to your size 0 or 1 detail brush. deeply load it with dark brown (burnt umber). Carefully trace over your pencil stem lines, connecting the floating leaves to the main vine structure. -
Adding veins:
Once your base leaves are completely dry, paint thin central veins and side veins using a slightly darker version of the leaf’s base color. Keep these lines extremely fine. -
Berry clusters:
For the circular berries on the bottom right and left, use a concentrated crimson red. Paint small circles, leaving a tiny speck of white paper showing on each one to represent a highlight. -
Twig accents:
Add the bare twig structures seen on the bottom left and right sides. Use a shaky hand intentionally here to make the twigs look natural and woody, ending them with tiny red buds. -
Final touches:
Erase any remaining pencil marks gently. If the composition feels unbalanced, add small floating yellow dots or single pine needles to fill empty white pockets.
Troubleshooting: Hard Edges
If you get unwanted hard lines inside a leaf, your paint dried too fast. Soften the edge with a clean, slightly damp brush before it fully sets.
Once dry, your elegant autumnal border is ready to frame a favorite quote or serve as beautiful stationery


Q-Tip Dot Fall Tree With Candy-Color Leaves
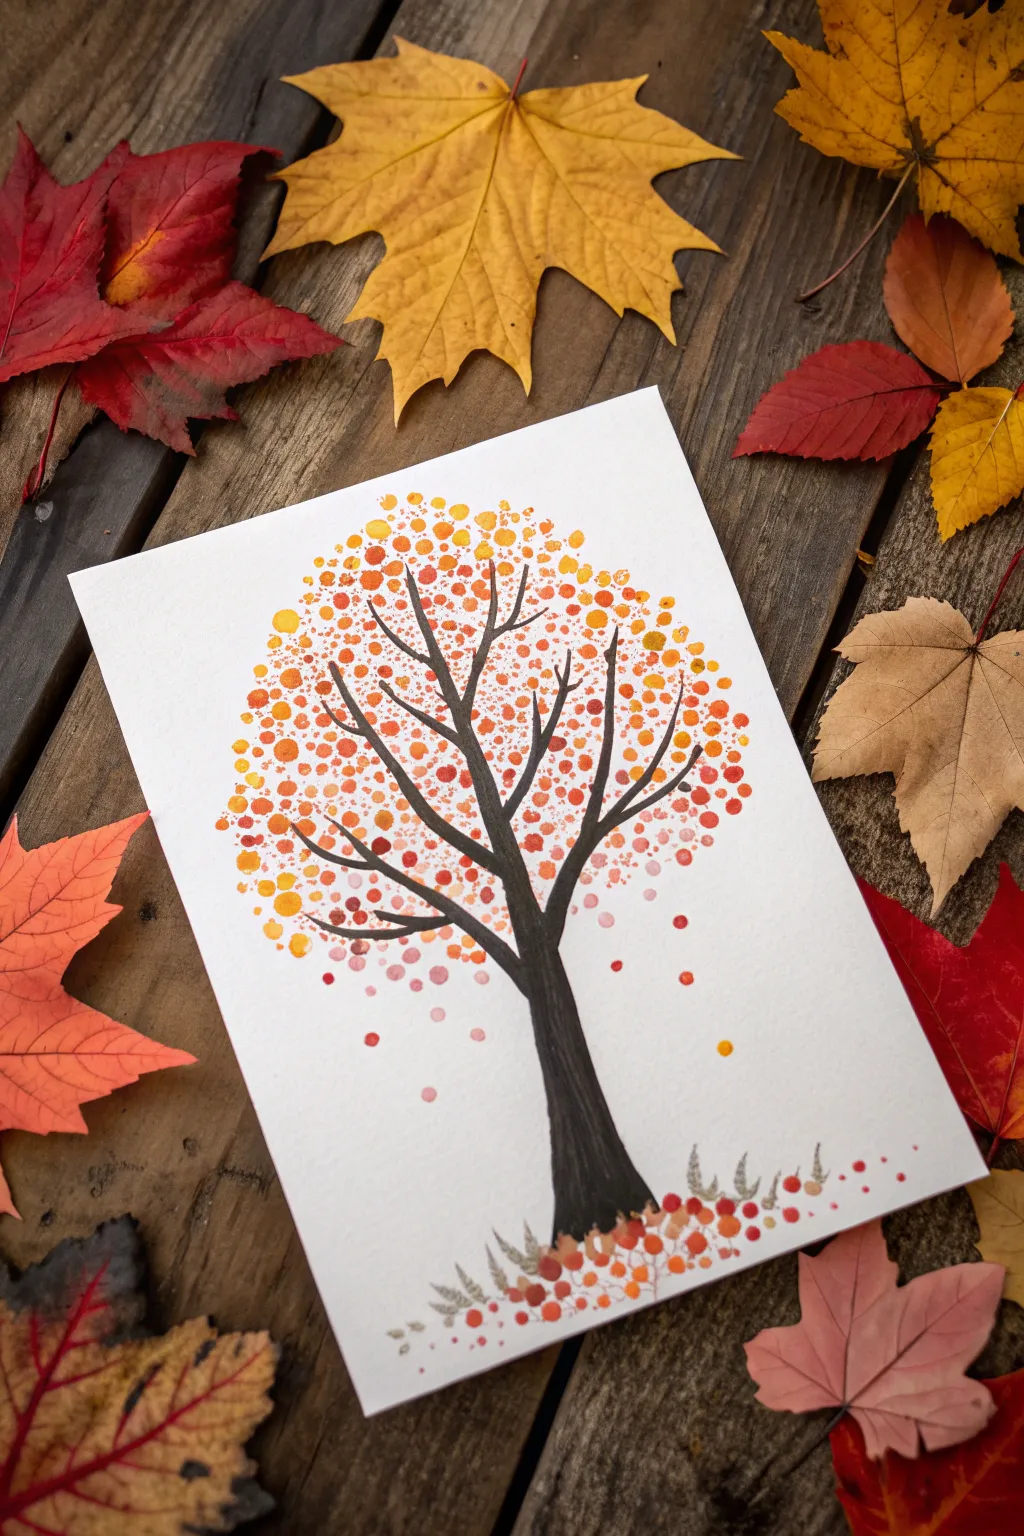
Capture the essence of autumn with this simple yet striking pointillism technique that mimics falling leaves. Using common cotton swabs, you’ll build up layers of vibrant fall colors to create a textured, canopy-filled tree.
Step-by-Step Tutorial
Materials
- White cardstock or heavy watercolor paper
- Acrylic craft paints (burnt orange, golden yellow, bright red, deep brown)
- Black fine-liner pen or thin round paintbrush
- Cotton swabs (Q-tips)
- Small palette or paper plate
- Paper towels
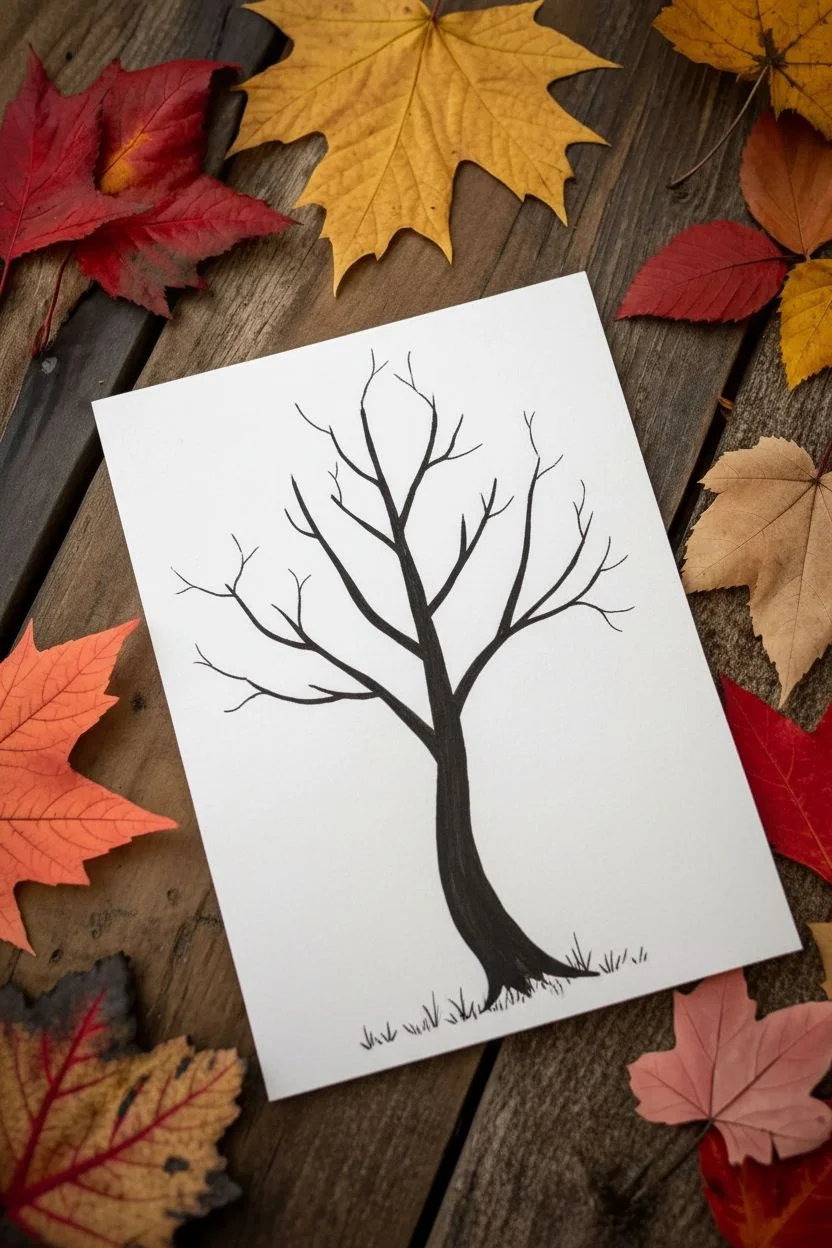
Step 1: Painting the Skeleton
-
Draw the trunk:
Start near the bottom center of your paper. Using black acrylic paint and a fine brush (or a thick black marker), draw a sleek, curving trunk that tapers slightly as it goes up. -
Extend the main branches:
From the top of the trunk, paint three to four main branches extending outward. Keep them relatively thick at the base and let them reach high into the page. -
Add secondary twigs:
Switch to a very fine brush or pen to add delicate Y-shaped twigs branching off the main limbs. These provide the structure that will peek through your leaves later. -
Create the base:
At the very bottom of the trunk, flair the roots out slightly to ground the tree. You can add tiny, quick upward strokes to suggest blades of grass along the baseline.
Step 2: Building the Canopy
-
Prepare your palette:
Squeeze dime-sized amounts of yellow, orange, and red paint onto your palette. Ensure they aren’t touching yet so you can control your mixing. -
Start with yellow:
Dip a fresh Q-tip into the yellow paint. Begin stamping dots around the outer edges of the branches, creating the general round shape of the tree’s crown. -
Fill the gaps:
Continue adding yellow dots towards the center of the tree, leaving plenty of white space between them for other colors. -
Layer the orange:
Using a new Q-tip, dip into the orange paint. Stamp these dots in the empty spaces between the yellow dots, concentrating slightly more near the middle of the tree for depth. -
Add red accents:
Take a third Q-tip for the red paint. Add these dots sparingly compared to the yellow and orange, using them to create contrast and vibrancy throughout the canopy. -
Create falling leaves:
Stamp a few random dots floating in the air below the branches as if they are drifting down in the breeze. -
Ground the tree:
Add a cluster of mixed-color dots (red, orange, yellow) along the bottom of the page near the roots to mimic a pile of fallen leaves. -
Mix a transition shade:
Dip a used yellow Q-tip into a tiny bit of red to create a custom peach-orange shade. Add a few of these unique colored dots to blend the harsh differences between the primary colors.
Clean Dabbing
Keep your dots perfectly round by reloading the Q-tip frequently. If the cotton gets too fuzzy or saturated, switch to a fresh one immediately.
Step 3: Final Details
-
Check density:
Step back and look at your tree. If any areas look too sparse or too uniform, add a few more dots to break up the pattern. -
Add texture to the grass:
Use a pen or very fine brush with diluted grey or black paint to add tiny fern-like details or grass blades peeking out from the leaf pile at the bottom. -
Let it dry completely:
Allow the paint to fully set for about 20 minutes before handling, as the thick dots can take a moment to dry.
Fall Breeze Effect
Make the wind visible by clustering your falling leaf dots to one side (left or right) rather than scattering them straight down.
This vibrant tree makes a wonderful seasonal decoration or a personalized card for autumn greetings
BRUSH GUIDE
The Right Brush for Every Stroke
From clean lines to bold texture — master brush choice, stroke control, and essential techniques.
Explore the Full Guide
Little Gnome Holding a Pumpkin
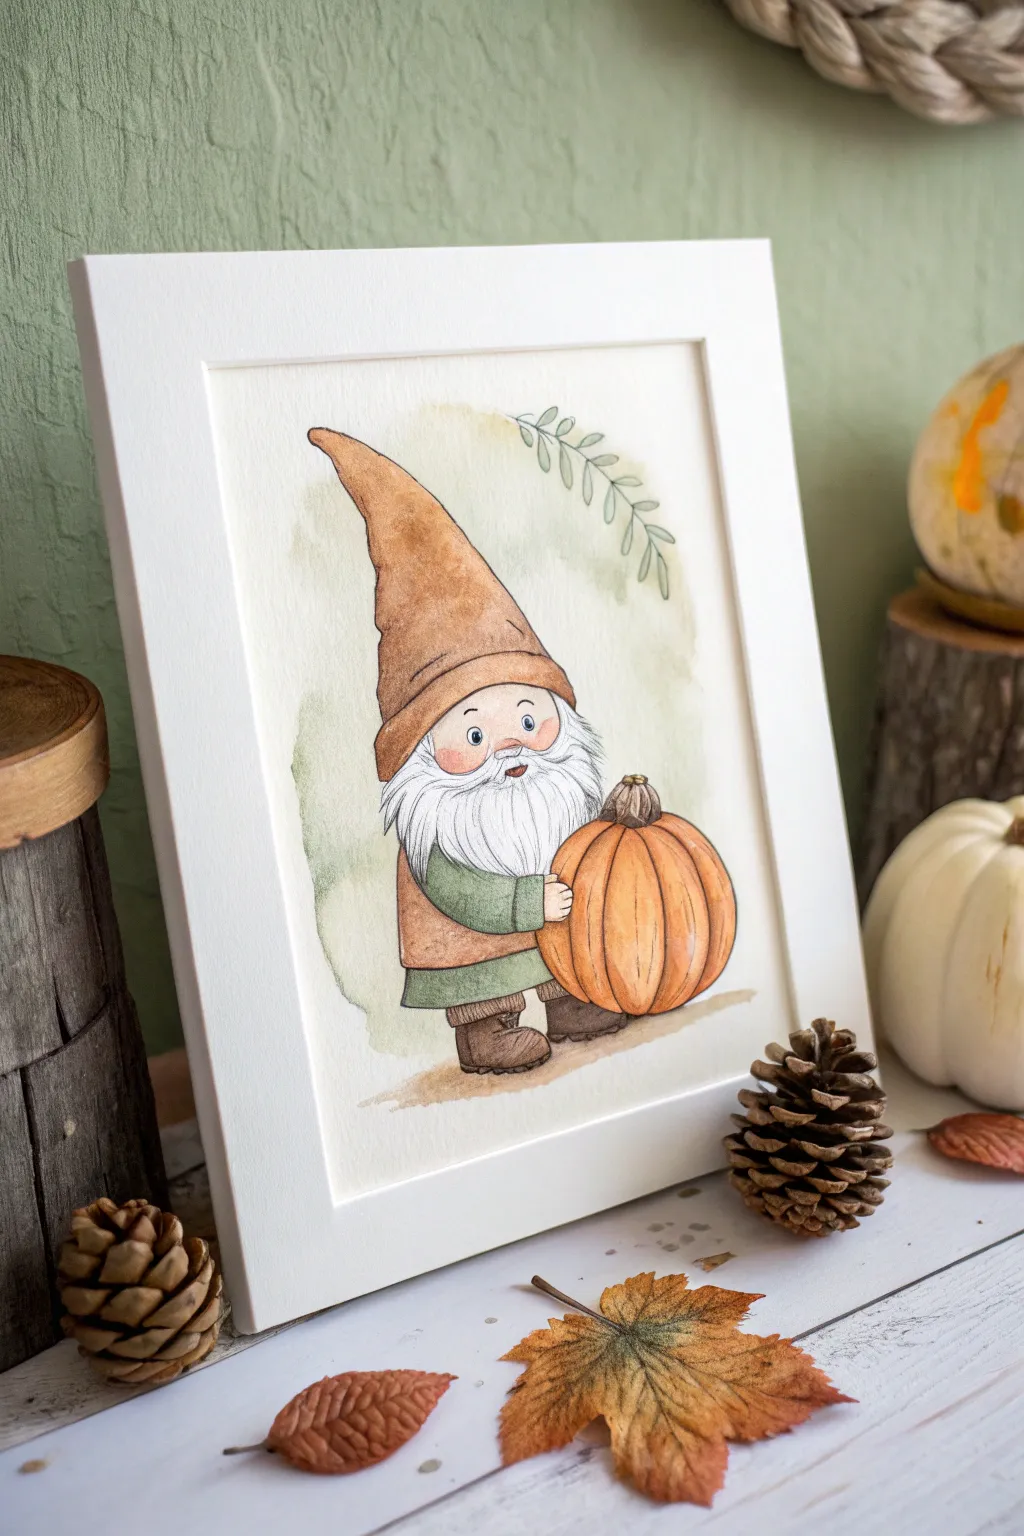
This charming illustration features a friendly gnome in a tall brown hat holding a bright orange pumpkin against a soft, sage-green wash. The gentle watercolor textures and crisp fine-liner details give it a cozy, storybook quality perfect for autumn décor.
Step-by-Step
Materials
- Hot press watercolor paper (8×10 or 9×12)
- Set of watercolors (burnt sienna, yellow ochre, sap green, cadmium orange, lamp black, cadmium red)
- Pencil (HB or 2H)
- Kneaded eraser
- Fine liner pens (0.1mm and 0.3mm in dark brown or black)
- Round watercolor brushes (Size 2, 4, and 8)
- White gouache or white gel pen
- Jars of water
- Paper towels
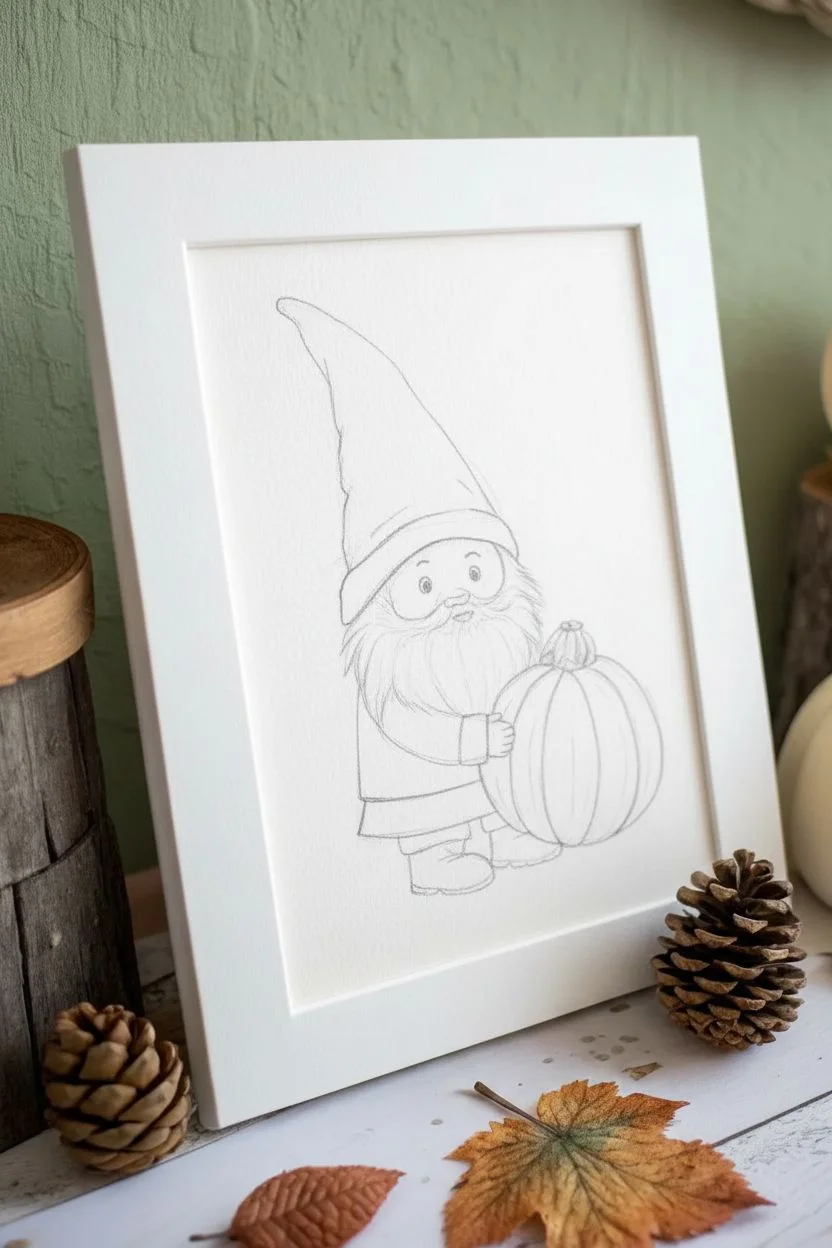
Step 1: Sketching the Character
-
Outline the head and hat:
Start with a light pencil sketch. Draw a large, slightly curved triangle for the hat, letting the tip droop backward for character. At the base of the hat, draw a curved brim that acts as the top of the gnome’s face. -
Draw the face and beard:
Below the hat brim, sketch a small oval for the face, adding a round nose and two small eyes. Sketch the beard flowing outward from under the nose and sides of the face, ending in pointed tufts. -
Add the body and arms:
Draw the gnome’s tunic as a simple rectangle slightly wider at the bottom. Sketch two arms coming from the sides, bending forward to hold the pumpkin. -
Position the pumpkin:
Draw a large, slightly flattened circle resting in the gnome’s hands. Add vertical curved lines to indicate the pumpkin’s ribs and a sturdy stem on top. -
Sketch the boots:
Finish the figure by drawing two sturdy boots at the bottom, pointing slightly outward for stability.
Muddy colors?
If your pumpkin orange looks dull, ensure the green tunic paint was 100% dry before starting the pumpkin nearby. Clean your water jar frequently to keep bright colors popping.
Step 2: Painting the Base Colors
-
Paint the face:
Mix a very dilute wash of burnt sienna and white (or just dilute burnt sienna heavily) for a skin tone. Apply it to the face area, adding a touch more red to the cheeks and nose while still wet for a rosy glow. -
Color the hat:
Use a mix of yellow ochre and burnt sienna for the hat. Apply a wash over the entire hat shape, dropping in slightly darker brown near the brim and folds for shadow. Let this dry completely. -
Wash the tunic:
Mix a muted green using sap green and a touch of brown. Paint the tunic body, keeping the color fairly transparent. -
Paint the pumpkin:
Use a vibrant cadmium orange for the pumpkin. Paint each segment individually, leaving tiny slivers of white paper between the ribs to create natural highlights and dimension. -
Add boot color:
Paint the boots with a dark brown mix (burnt umber or burnt sienna with a touch of black). Leave the ‘soles’ slightly lighter if you wish.
Make it festive
Try painting faint patterns on the gnome’s hat while the first wash is still damp. Polka dots or tiny stars lifted out with a thirsty brush add a magical touch.
Step 3: Adding Details and Shadows
-
Deepen the pumpkin shadows:
Once the first orange layer is dry, mix a slightly darker orange-red. Glaze this color along the bottom of the pumpkin and the edges of the ribs to create roundness. -
Paint the leaves:
Using a size 2 brush and watery sap green, paint the delicate sprig of leaves floating above the gnome’s head. Keep these very loose and transparent. -
Shadow the beard:
Mix a very pale grey-blue wash. Apply minimal strokes under the mustache and between beard sections to suggest depth without making the beard look dirty. -
Background wash:
Wet the background area around the gnome with clean water. Drop in very dilute sage green and ochre, letting it bleed softly outwards but fading to white before the page edge. -
Paint the ground:
Add a wash of light brown under the boots to ground the character, simulating dirt or dried leaves.
Step 4: Inking and Finishing
-
Inking the outline:
Once the paint is bone dry—I usually test this with the back of my hand—use a 0.1mm pen to outline the entire figure. Use broken lines for the beard to keep it looking fluffy. -
Define the face:
Carefully ink the eyes, leaving a tiny white dot for the highlight (or add it later with white gel pen). Outline the nose and smile. -
Texture the fabric:
Add tiny hatching lines on the hat and tunic with the pen to suggest fabric texture and deeper shadows. -
Final highlights:
Use a white gel pen or gouache to add crisp highlights to the pumpkin’s shoulder and the top of the nose for extra shine.
Frame your charming gnome in a simple white frame to let the warm autumn colors truly shine
Friendly Scarecrow and Crow Besties
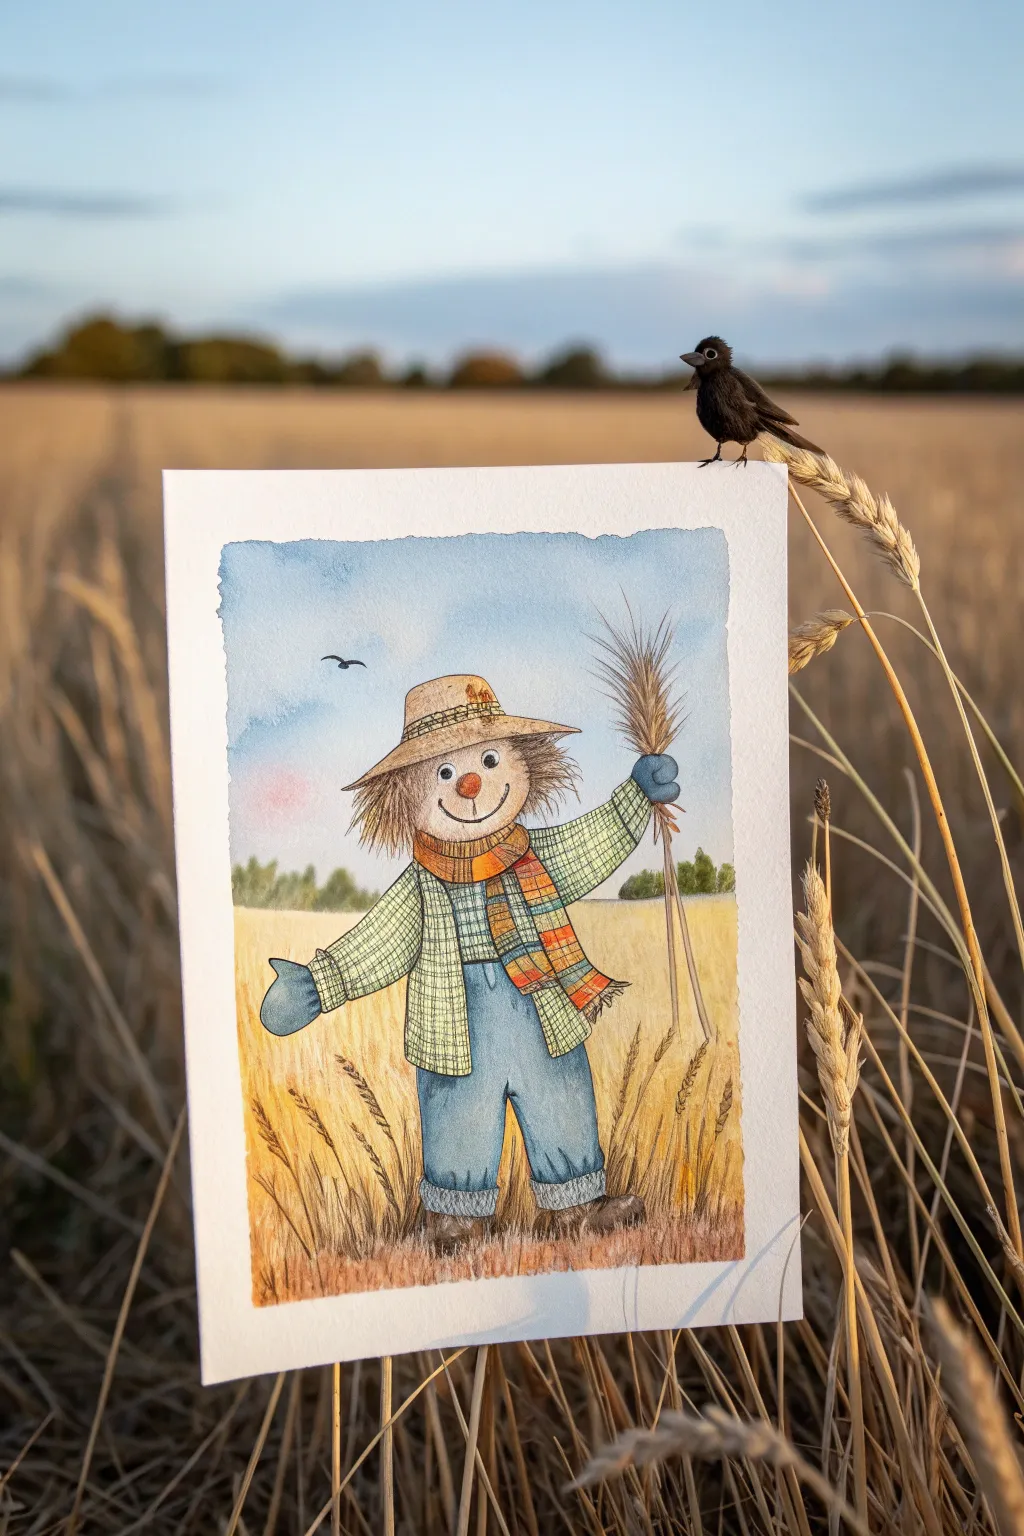
Capture the golden warmth of autumn with this charming watercolor illustration of a friendly scarecrow greeting the harvest. This project combines loose wet-on-wet background washes with detailed ink work, perfect for creating a cozy seasonal greeting card.
How-To Guide
Materials
- Cold press watercolor paper (300 gsm)
- Watercolor paints (Cerulean Blue, Burnt Sienna, Yellow Ochre, Cadmium Orange, Sap Green, Payne’s Gray)
- Fine liner pen (waterproof, brown or sepia, 0.1mm and 0.3mm)
- Round watercolor brushes (size 2, 6, and 10)
- Pencil (HB) and kneaded eraser
- Masking fluid (optional)
- White gel pen
- Paper towels and two water jars
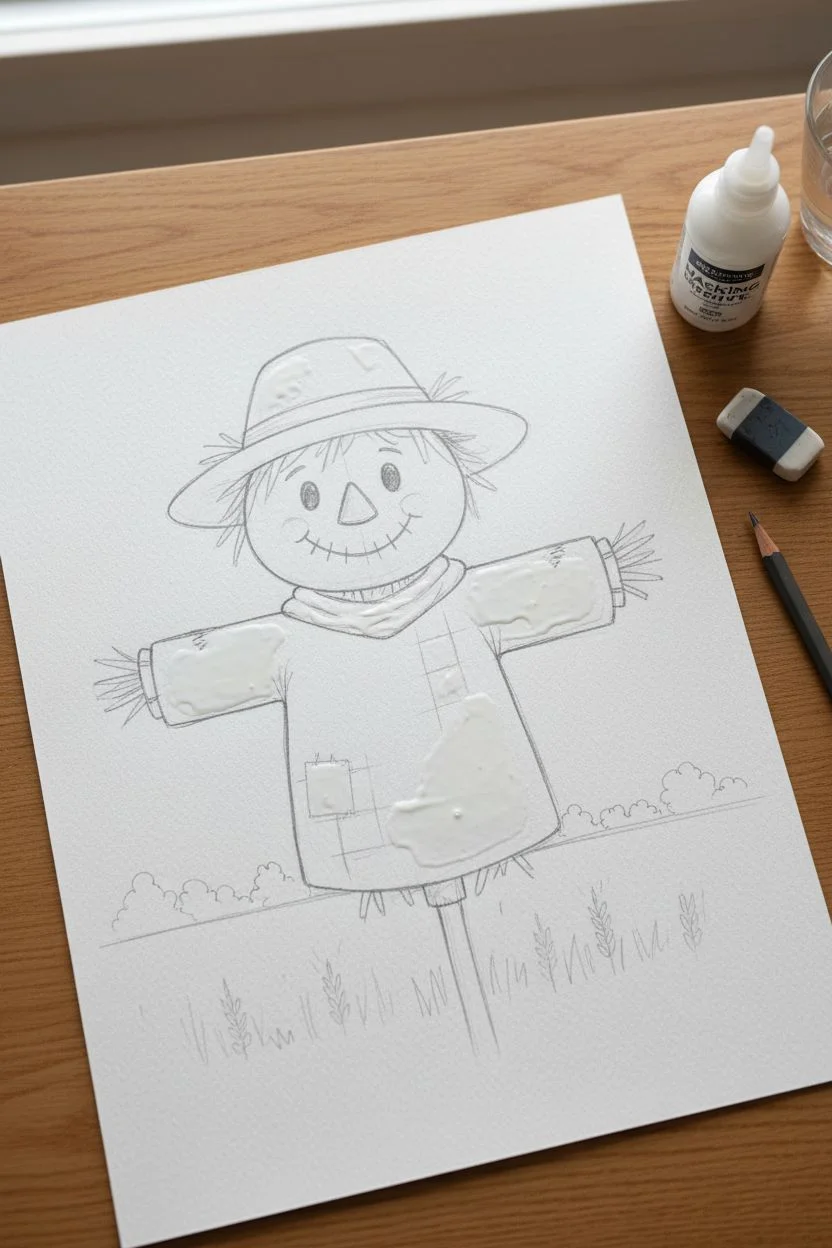
Step 1: Sketching and Masking
-
Light Outline:
Begin by lightly sketching the scarecrow’s basic shapes in the center of your paper. Use a large oval for the head, a wider brim for the hat, rectangles for the torso and legs, and simple lines for the arms extended outward. -
Add Details:
Refine your sketch by adding the straw hair sticking out from the hat, the scarf wrapped loosely around the neck, and the checkered pattern lines on the shirt. Don’t forget the friendly smile and the triangular nose. -
Background Elements:
Sketch a horizon line about one-third up the page. Below this line, draw vertical directional lines to indicate the wheat stalks. Above the horizon, lightly mark where the distant treeline sits. -
Masking (Optional):
If you want crisp edges, apply masking fluid over the scarecrow shape and let it dry completely. This allows you to paint the sky freely without worrying about the main subject.
Step 2: Painting the Atmosphere
-
Sky Wash:
Wet the sky area with clean water using your size 10 brush. Drop in a dilute wash of Cerulean Blue, starting stronger at the top and fading to almost white near the horizon. -
Rosy Glow:
While the sky is still slightly damp, touch a tiny amount of diluted pink or light Cadmium Red into the left side of the horizon to suggest a soft sunrise or sunset glow. -
Distant Trees:
Once the sky is dry, mix Sap Green with a touch of Payne’s Gray. Paint the distant treeline along the horizon using a size 6 brush with an uneven, bumpy top edge to simulate foliage. -
Golden Field Base:
Paint the bottom third of the paper with a wash of Yellow Ochre. While wet, drop in streaks of Burnt Sienna to create depth and suggest dense crops.
Texturizing Tip
For the wheat field, try the ‘dry brush’ technique. Load your brush with paint, blot it on a towel, and lightly drag it upward to create scratchy texture.
Step 3: Bringing the Scarecrow to Life
-
Character Base Layers:
Remove the masking fluid if used. Paint the scarecrow’s face with a very pale wash of diluted Burnt Sienna. Paint the hat and straw hair with Yellow Ochre. -
Clothing Colors:
Paint the shirt with a light wash of green. For the overalls, use a faded blue mix (Cerulean with a touch of gray) to look like worn denim. -
Scarf Stripes:
Using your size 2 brush, paint the stripes on the scarf with alternating Cadmium Orange and Burnt Sienna. Let the colors tough slightly for a soft, woven look. -
Checkered Shirt Detail:
Once the green shirt layer is bone dry, use a slightly darker green mix to paint faint vertical and horizontal grid lines to create the plaid texture. -
Denim Shading:
Add shadows to the overalls where the legs meet the boots and under the shirt hem using a slightly more concentrated blue-gray mix.
Muddy Colors?
If your watercolors look muddy, ensure each layer is completely dry before glazing a new color over it, or simplify your color mixing palette.
Step 4: Ink and Texture
-
Outlining:
Using a 0.3mm brown waterproof pen, outline the main shapes of the scarecrow. Keep the lines somewhat broken and sketch-like rather than solid and continuous to maintain a rustic feel. -
Straw Texture:
Switch to a 0.1mm pen to add fine, flicking lines to the hair, the broom in his hand, and the cuffs of the pants perfectly mimicking loose straw. -
Facial Features:
Ink the eyes as solid black dots with the pen, and draw the stitched smile. Paint the nose with a bright pop of orange. -
Foreground Wheat:
Use a rigger brush or size 2 brush with Burnt Sienna to paint distinct, taller wheat stalks in the immediate foreground, overlapping the scarecrow’s boots slightly. -
Final Highlights:
Use a white gel pen to add a small sparkle in the eyes and gentle highlights on the top of the hat brim and the shoulders of the shirt.
Enjoy the gentle rustic charm your new scarecrow friend brings to your collection

PENCIL GUIDE
Understanding Pencil Grades from H to B
From first sketch to finished drawing — learn pencil grades, line control, and shading techniques.
Explore the Full Guide
Vintage Truck Hauling Pumpkins
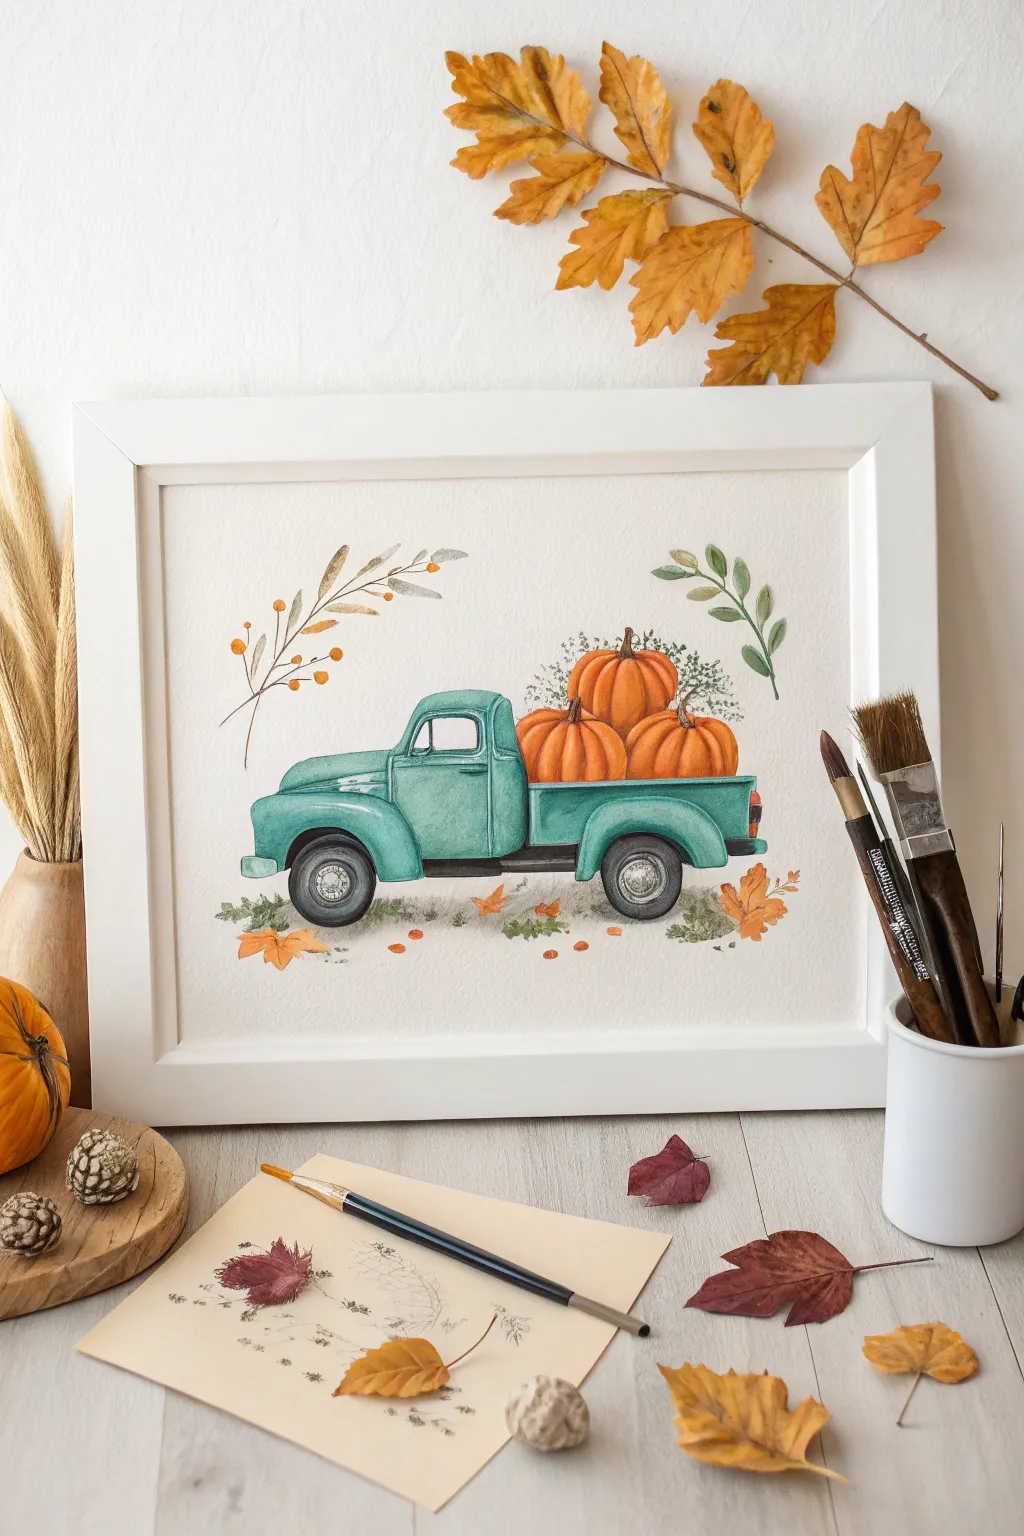
Capture the essence of an autumn harvest with this charming watercolor illustration of a classic teal pickup truck overloaded with bright orange pumpkins. This project combines structured drawing with loose, organic watercolor techniques for a cozy, nostalgic piece of seasonal art.
Step-by-Step Tutorial
Materials
- Cold press watercolor paper (140lb/300gsm)
- Watercolor paint set (essential colors: teal/turquoise, burnt sienna, orange, sap green, payne’s gray)
- Round watercolor brushes (sizes 2, 6, and 8)
- 005 or 01 waterproof pigment fineliner (brown or black) – optional
- HB pencil and kneaded eraser
- Palette for mixing
- Two jars of water
- Paper towels
- Masking tape
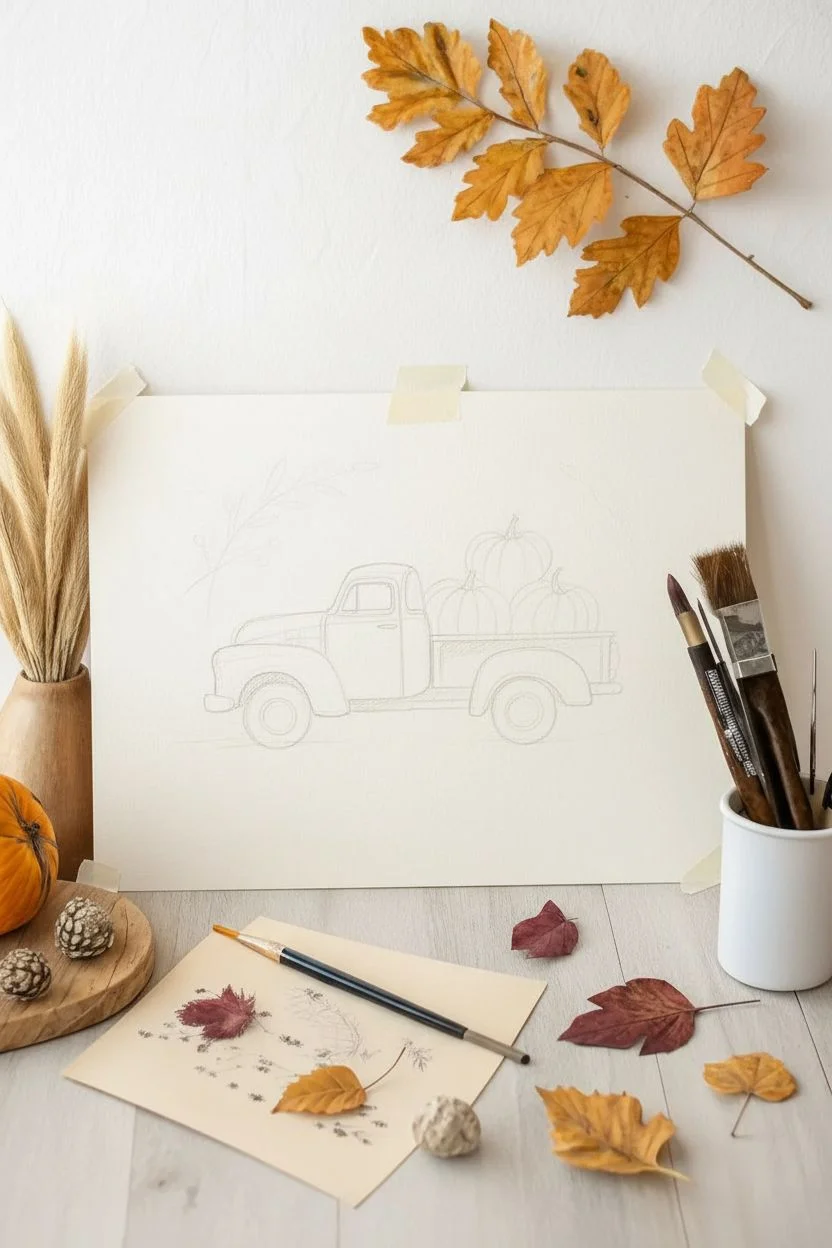
Step 1: Drafting the Design
-
Sketch the truck body:
Begin with a light HB pencil sketch. Draw a long rectangle for the truck bed and a taller, rounded square shape for the cab. Don’t press too hard; you want these lines to be barely visible later. -
Add wheel wells and fenders:
Sketch the prominent, curved fenders over where the wheels will go. The front fender should be large and rounded, swooping down towards the bumper. -
Define the details:
Add the window, the side door line, and the front grill area. Draw two circles for the tires, leaving a small gap between the tire and the fender. -
Load the produce:
Sketch three large pumpkin shapes in the truck bed. Start with the central, largest pumpkin, then tuck two slightly smaller ones on either side to create depth. -
Frame with foliage:
Lightly trace a few stems and leaves floating above the truck bed and near the wheels to suggest an autumn breeze, but keep these very faint for now.
Muddy colors?
If your teal truck looks dirty next to the orange pumpkins, wait for the teal to dry completely before starting the pumpkins. Orange and blue are opposites and create brown when mixed wet-on-wet.
Step 2: Painting the Truck
-
Mix the vintage teal:
Combine a turquoise or teal paint with a tiny touch of burnt sienna or gray to desaturate it. You want a color that looks aged, not neon. -
Base wash:
Using a size 6 brush, apply a light, watery wash of your teal mix to the entire body of the truck, avoiding the window, wheels, and bumper. -
Deepen the shadows:
While the first layer is still slightly damp, drop in more concentrated teal paint along the bottom edges of the fenders, under the door handle, and beneath the window frame to create volume. -
Define the running board:
Use a darker mix (add a bit of Payne’s Gray to your teal) to paint the running board connecting the front and back fenders, as well as the dark shadow inside the wheel wells. -
Window details:
Paint the side mirror and the interior of the cab visible through the window. I usually use a very watery grey-blue interpretation here so it doesn’t distract from the pumpkins.
Farmhouse Style
Add a rustic touch by using a dry brush technique with white cquache on the truck’s fenders to mimic scratched paint or a weathered finish.
Step 3: Harvest Colors
-
Pumpkin base layers:
Mix a vibrant orange. Paint the pumpkins one by one, leaving a tiny sliver of dry paper between them so the colors don’t bleed into a single blob. -
Adding ribbed texture:
Once the orange is tacky but not soaked, use a smaller brush with a reddish-orange mix to paint curved vertical lines, mimicking the ribs of the pumpkin. -
Stems and greenery:
Use a dark brown for the pumpkin stems. Then, mix a muted sap green for the leaves poking out from the pile, using quick, dabbing strokes. -
Painting the tires:
Switch to a dark grey (Payne’s Gray is perfect) for the tires. Leave a small white highlight in the center for the hubcaps, painting metallic grey details around it.
Step 4: Atmospheric Details
-
Floating foliage:
Using a size 2 brush and a mix of olive green and burnt orange, paint the delicate branches and falling leaves you sketched earlier floating around the truck. -
Grounding the truck:
Mix a watery grey-brown. Paint a loose, horizontal shadow directly under the tires and the truck body so it doesn’t look like it’s floating in mid-air. -
Scattered leaves:
Paint a few loose maple leaf shapes on the ground near the tires using varied shades of orange and ochre. -
Final ink touches:
If you want a sharper illustration style, use a fine waterproof pen to loosely outline the truck door, the fenders, and the pumpkin ribs once the paint is bone dry. -
Highlights:
If you lost your highlights, use a tiny amount of white gouache or a white gel pen to add shine to the chrome bumper, hubcaps, and the curve of the pumpkins.
Frame your finished piece in a simple white or wood frame to let those autumn colors truly shine
Simple Mushroom Cluster in Autumn Grass
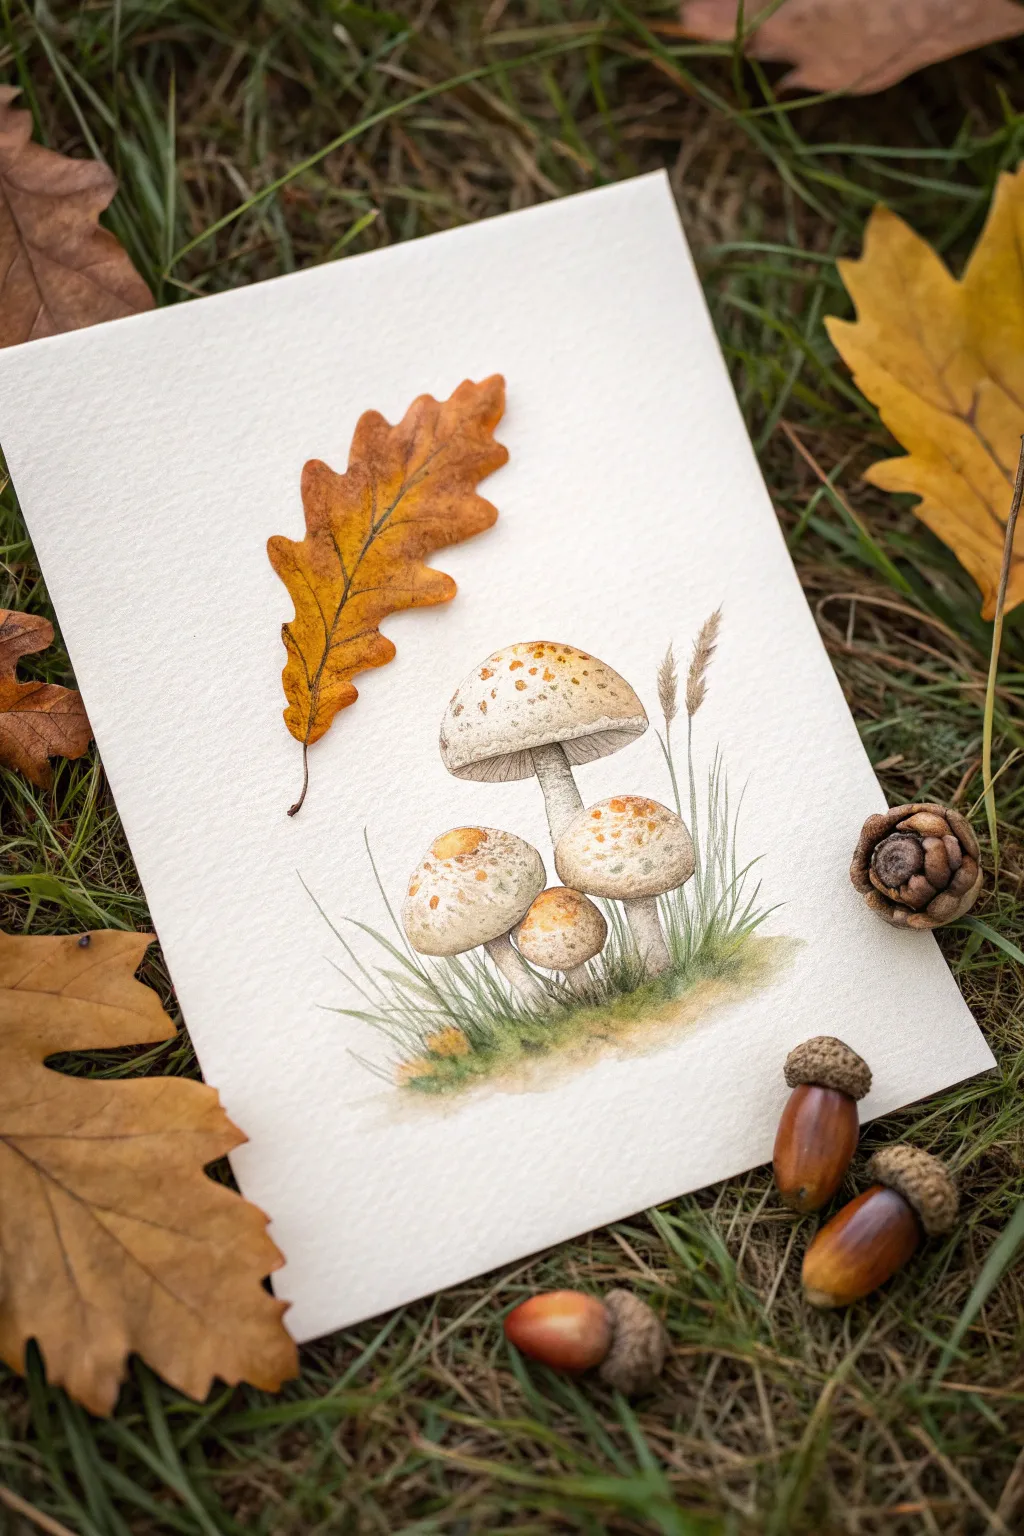
Capture the quiet beauty of the forest floor with this delicate watercolor study featuring a medley of speckled mushrooms and a crisp oak leaf. The soft, earthy palette and fine details make this a perfect project for blending botanical realism with whimsical autumn charm.
How-To Guide
Materials
- Hot press watercolor paper (approx. 5×7 inches)
- Watercolor paints (Yellow Ochre, Burnt Sienna, Raw Umber, Sap Green, Payne’s Gray)
- Synthetic round brushes (Size 4 for washes, Size 0 or 00 for details)
- HB pencil for sketching
- Kneaded eraser
- Two jars of water
- Paper towels
- Real oak leaf (optional, for reference)
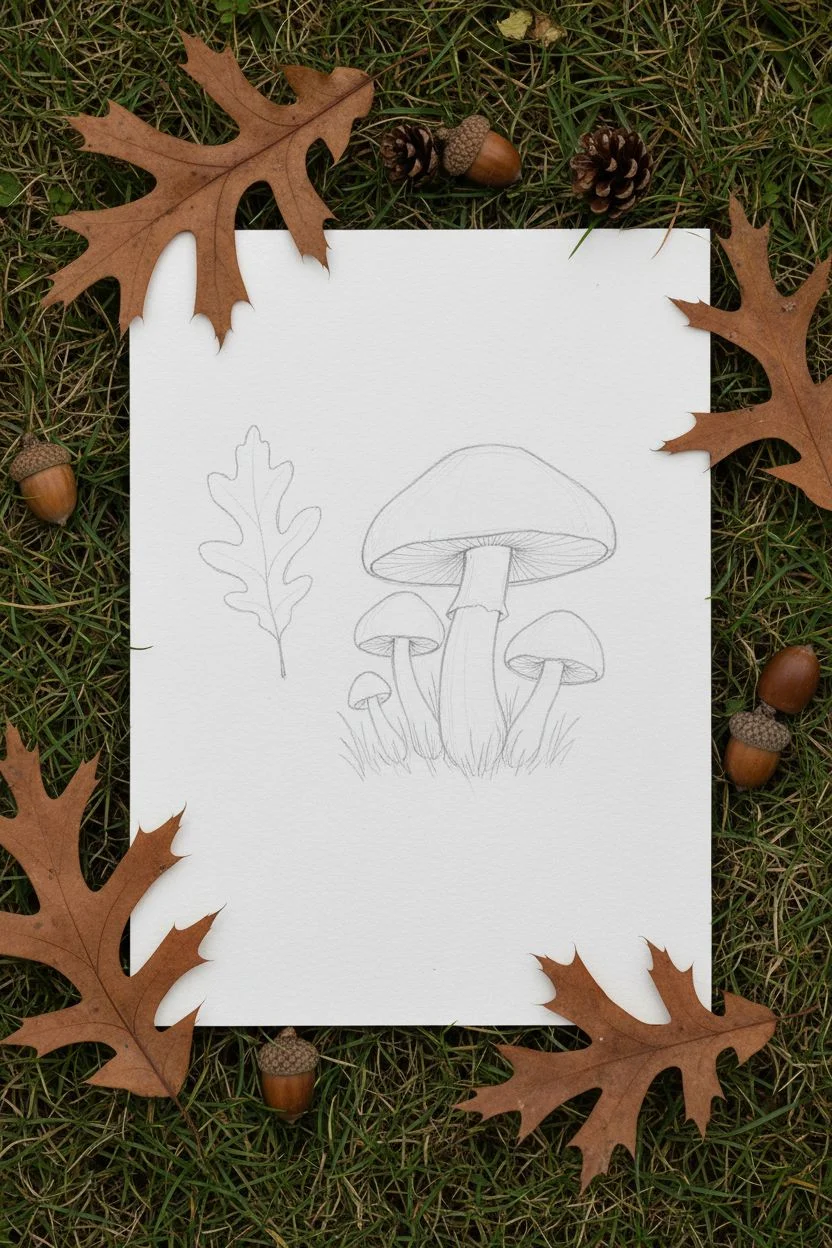
Step 1: Sketching the Composition
-
Outline the caps:
Begin by lightly sketching the shapes of the mushroom caps using your HB pencil. Place the largest mushroom slightly off-center to the right, sitting highest, and then arrange the three smaller caps below it to form a cozy cluster. -
Add stems and grass:
Draw the stems relatively thick, broadening slightly at the base where they meet the ground. Sketch faint vertical lines around the bases to indicate where the grass blades will eventually go, grounded in a small tuft. -
Positon the leaf:
To the left of the largest mushroom cap, sketch a single oak leaf floating vertically. Focus on the lobed edges and the central vein, ensuring it looks like it’s gently falling rather than stiffly placed. -
Refine and erase:
Go over your sketch to ensure the proportions feel natural. Before painting, use your kneaded eraser to gently lift the graphite until the lines are barely visible, preventing the pencil from smudging into your wet paint later.
Natural Texture
For the mushroom spots, vary the pressure of your brush. Press harder for larger spots and barely touch the paper for tiny flecks.
Step 2: Painting the Mushrooms
-
Base wash for caps:
Mix a very dilute wash of Yellow Ochre with a tiny touch of Raw Umber. Apply this pale cream color to the mushroom caps, leaving plenty of white paper showing through for highlights, especially on the tops. -
Add speckling:
While the base wash is still slightly damp, take a slightly more concentrated mix of Burnt Sienna on your size 0 brush. Tap in small irregular spots and scales on the caps, letting them bleed slightly for a natural, organic texture. -
Shadowing the stems:
Paint the stems with a watery grey-brown mix. I like to keep the center of the stems lighter to suggest roundness, adding darker pigment only along the sides and right under the cap where the shadow falls. -
Defining the gills:
Once the underside of the large cap is dry, paint fine, radiating lines using a pale grey-brown mix to suggest the gills. Keep these lines very delicate and closely spaced. -
Deepening the spots:
Return to the caps once they are fully dry. Add a second layer of smaller, darker orange-brown dots (Burnt Sienna) to create depth and dimension in the textured skin of the mushroom.
Step 3: Painting the Leaf
-
Leaf base layer:
Mix a vibrant Golden Yellow or Yellow Ochre and paint the entire oak leaf shape. While it’s wet, drop in touches of Burnt Sienna near the edges and the tip to simulate the turning colors of autumn. -
Vein details:
Allow the leaf to dry completely. switch to your smallest detail brush and a mix of Burnt Sienna and Raw Umber to paint the central vein and the smaller branching veins with thin, crisp lines. -
Adding texture:
Stipple tiny dots or faint washes of brown on the leaf surface to mimic natural blemishes and age spots found on fallen foliage.
Muddy Greens?
If your grass looks too bright or artificial, mix a tiny dot of red into your green paint. This neutralizes the hue for a realistic dried-grass look.
Step 4: Grounding and Details
-
Grass base:
Mix Sap Green with a little Raw Umber for an earthy, muted green. Using upward flickering strokes, paint the grass blades growing around the base of the mushroom stems. -
Adding tall grasses:
To the right of the mushrooms, paint a few taller, thinner stalks that extend upward. Add small feathery strokes at the tips to suggest seed heads, using a brownish-grey tone. -
Ground shadows:
Add a soft wash of greenish-brown along the bottom area where the stems meet the grass. This grounds the subject so the mushrooms don’t look like they are floating in empty space. -
Final dry grass details:
Intersperse the green grass with strokes of Yellow Ochre to represent dry, dead grass blades, enhancing the autumnal feel of the scene. -
Final assessment:
Step back and check the contrast. If the mushrooms look too pale, subtly darken the shadows under the caps with a transparent glaze of diluted Payne’s Gray.
Now you have a charming woodland snapshot preserved in watercolor to celebrate the season


Woodland Hedgehog With an Acorn Snack
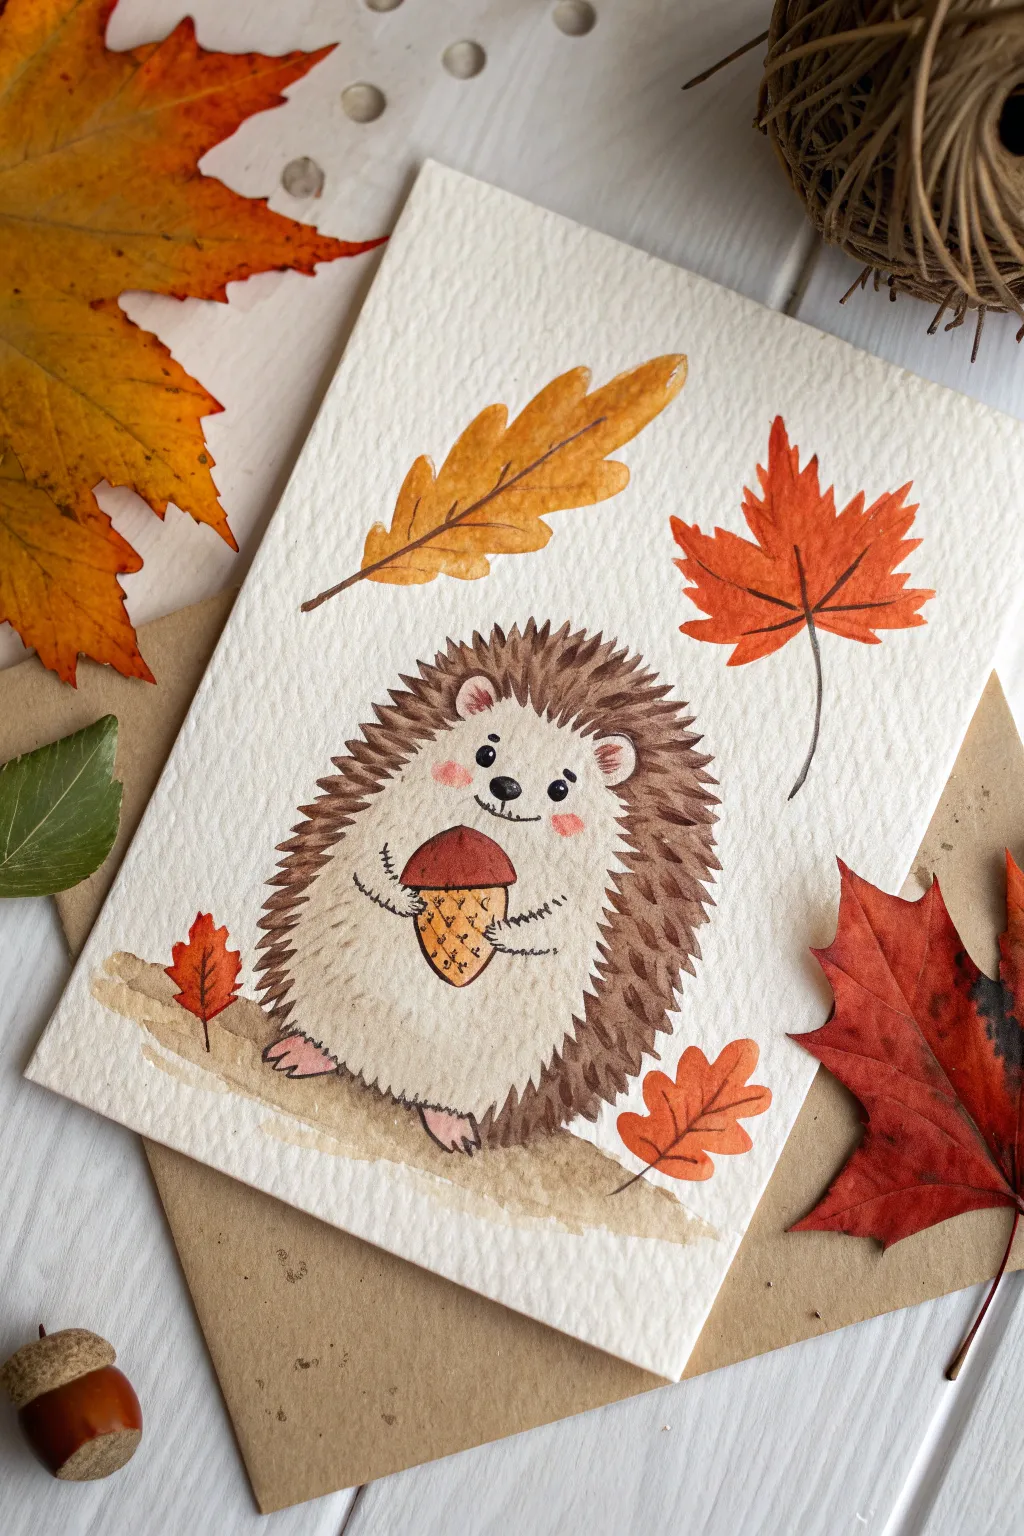
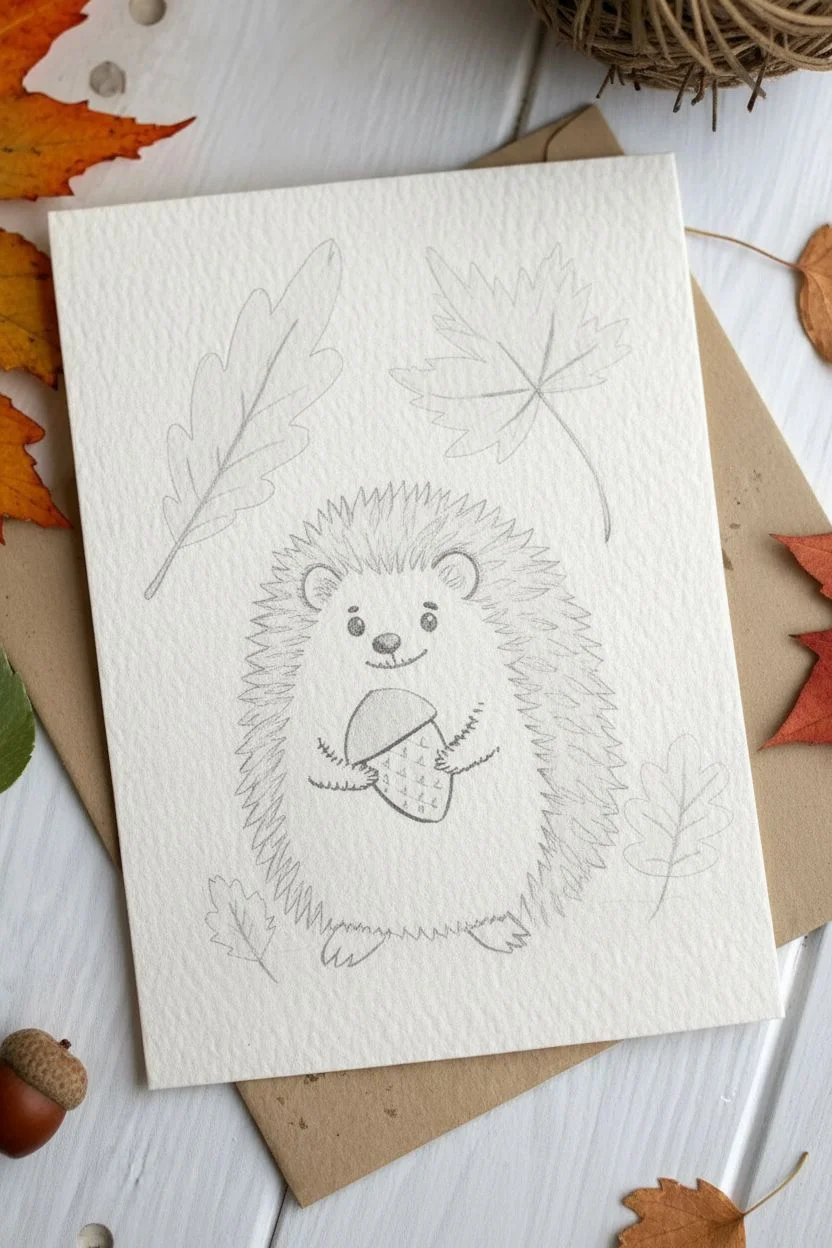
This adorable watercolor painting captures the cozy spirit of autumn with a smiling hedgehog proudly holding its acorn prize. The warm, earthy tones and textured paper create a charming, handmade look perfect for seasonal greeting cards.
Step-by-Step Guide
Materials
- Cold press watercolor paper (approx. 5×7 inches)
- Watercolor paints (browns, ochres, reds, oranges, black)
- Round watercolor brushes (sizes 2 and 4)
- Fine liner brush (size 0 or 00) or Micron pen (0.1mm)
- Pencil and eraser for sketching
- Jar of water
- Paper towels
- Flat craft envelope (kraft paper color)
Step 1: Sketching the Outline
-
Map out the shapes:
Start with a light pencil sketch. Draw a large, slightly squat oval shape for the hedgehog’s body in the center of your paper. -
Add facial features:
Within the upper half of the oval, sketch a wide, U-shaped curve to define the face area, separating it from where the prickles will go. Add two small circles for eyes, a rounded nose, and a gentle smile. -
Sketch the acorn:
Draw an acorn being held in the center of the body. Simple shapes work best here: an oval for the nut and a little cap on top. -
Add limbs and ears:
Sketch two small, rounded ears at the top of the face curve. Add tiny paws holding the acorn and two small feet peeking out at the bottom. -
Place the leaves:
Lightly draw the outlines of three autumn leaves floating around the hedgehog and two smaller ones near the ground line.
Control Your Water
To get those crisp spikes, blot your brush on a paper towel before painting. Too much water will make the fur look blobby instead of sharp.
Step 2: Painting the Hedgehog
-
Paint the face base:
Mix a very dilute, pale beige watercolor wash. Fill in the face area, body, and paws, keeping the paint quite wet but not puddling. -
Add rosy cheeks:
While the face wash is still slightly damp, dab a tiny amount of diluted pink or coral paint onto the cheek area to create a soft blush bloom. -
Base coat for prickles:
Mix a light brown shade and paint the outer ring of the hedgehog’s body (the prickle area). Use short, outward strokes to mimic a spiky texture along the edge. -
Deepen the fur texture:
Once the first layer is dry, use a darker brown paint. With a size 2 brush, paint individual spike strokes over the brown area, layering them to create density and depth. -
Detail the ears and feet:
Fill in the inner ears and the feet with a slightly pinkish-brown tone to distinguish them from the main body color.
Bleeding Colors?
If the brown spikes bleed into the face, you didn’t let the face layer dry enough. Wait for it to be bone-dry, or use a hairdryer to speed it up.
Step 3: Painting the Acorn and Leaves
-
Color the acorn nut:
Paint the bottom half of the acorn with a golden ochre or light brown. -
Paint the acorn cap:
Use a reddish-brown or rust color for the acorn cap. I like to let this dry briefly before adding a tiny grid pattern for texture using the tip of your brush. -
Paint the floating leaves:
Fill in your leaf sketches with vibrant fall colors. Use burnt orange for the maple leaves and a golden yellow-ochre for the oak leaf. -
Add the ground shadow:
Mix a watery, neutral beige or light brown. Swipe a loose, horizontal wash under the hedgehog’s feet to ground the character so it isn’t floating in space. -
Paint the small ground leaves:
Add the two tiny leaves resting on the ground wash using deep orange or red.
Step 4: Final Details
-
Define the face:
Using a very fine brush with black paint (or a waterproof ink pen), carefully fill in the eyes, nose, and the smiling mouth line. Add tiny white highlights to the eyes if possible. -
Add leaf veins:
Once the leaves are completely 100% dry, use a thin brush with dark brown paint to draw the central stems and delicate veins on each leaf. -
Detail the paws:
Use your fine liner to add tiny scratch marks or fingers to the paws holding the acorn to give them definition. -
Enhance the prickles:
Do one final pass on the hedgehog’s spikes with your darkest brown, adding sharp, distinct points around the perimeter for a crisp silhouette.
Once dry, you can mount your painting onto the kraft envelope or frame it as a sweet seasonal decoration
Acorns and Oak Leaves Pattern Repeat
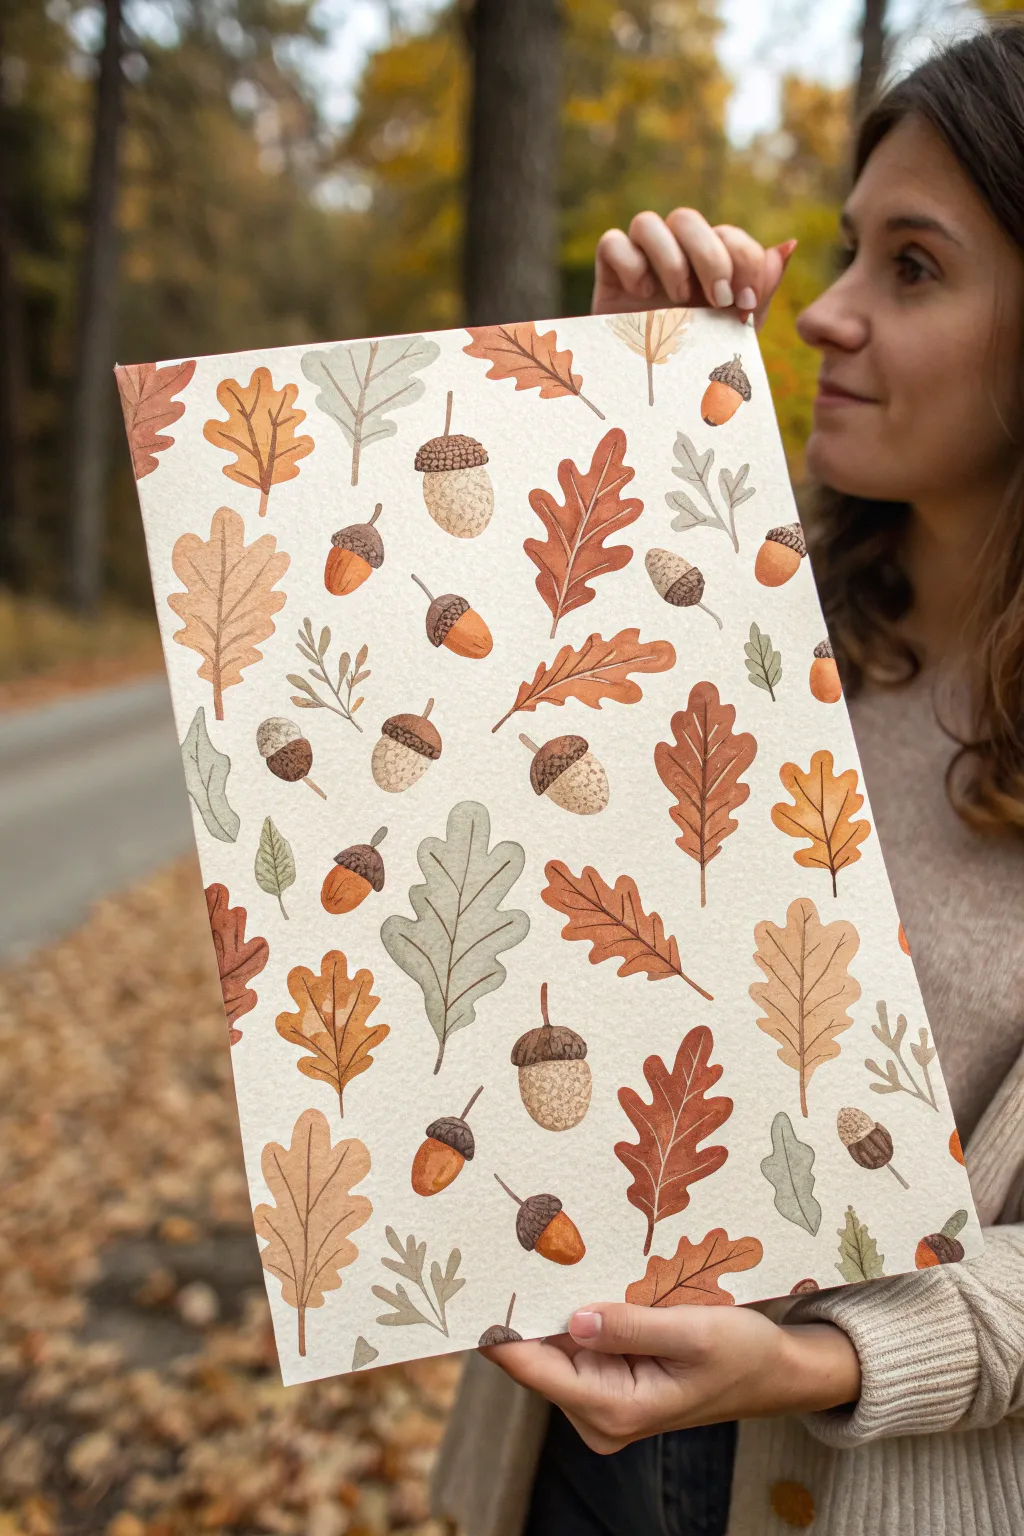
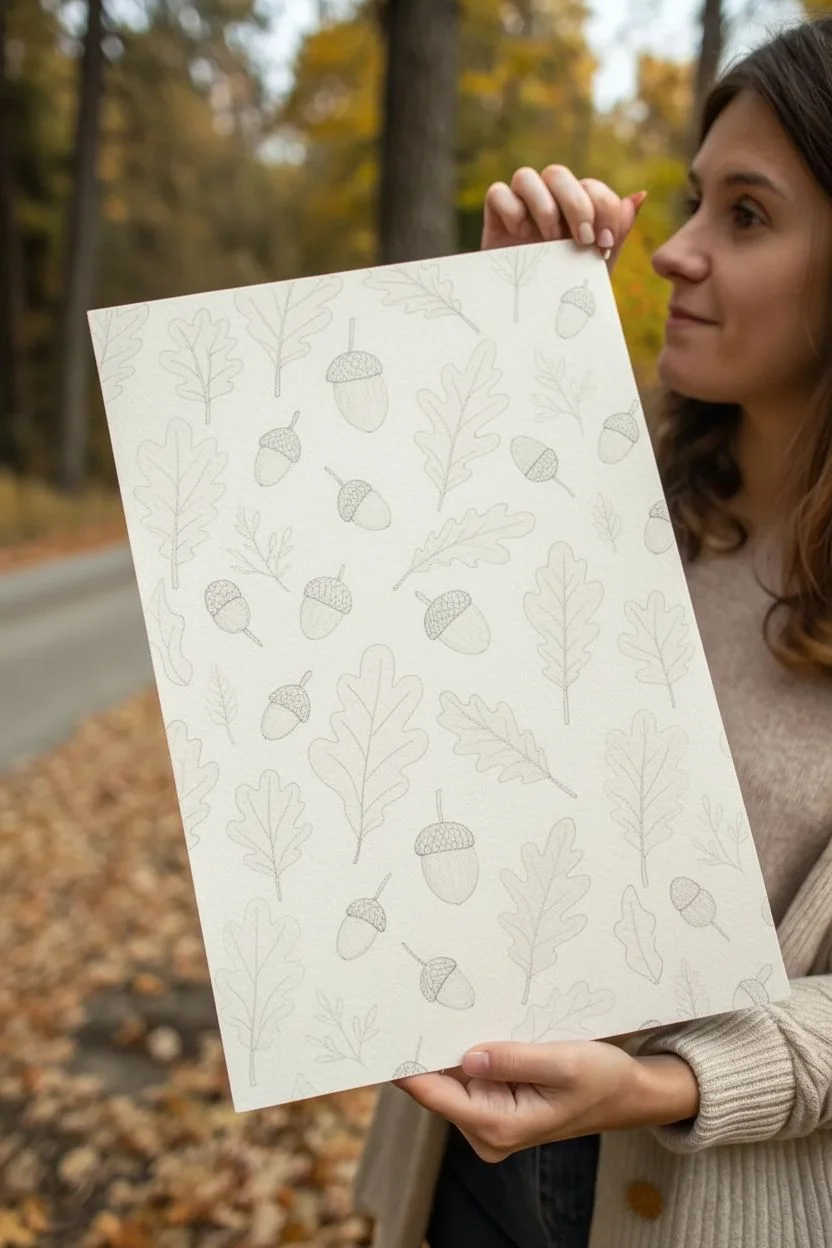
Capture the essence of an autumn forest floor with this charming pattern painting featuring stylized acorns and oak leaves. Using soft, muted earthy tones like rust, sage, and ochre, you will create a cozy, rhythmic design perfect for seasonal decor.
How-To Guide
Materials
- Heavyweight watercolor paper or mixed media board (12×18 inch or similar)
- Watercolor paints or fluid acrylics
- Paintbrushes: size 6 round for leaves, size 2 round for details
- Pencil (HB or H)
- Kneaded eraser
- Palette for mixing
- Jar of clean water
- Paper towels
- Optional: masking fluid
Step 1: Planning and Sketching
-
Analyze the Color Palette:
Before sketching, mix your primary colors on your palette. You will need four main shades: a warm rust-red, a golden ochre yellow, a soft sage green, and a sandy beige for the lighter leaves. For the acorns, mix a dark chocolate brown and a light tan. -
Establish a Grid (Optional):
If you want a very structured repeat pattern, you can lightly draw a pencil grid on your paper. However, for the organic look shown in the image, a freehand approach works best. Just visualize diagonal lines to help stagger your elements. -
Sketch the Key Elements:
Start by lightly sketching the larger oak leaves. Draw a variety of leaf shapes—some lobed and curvy, others more jagged. Rotate them in different directions so they tumble across the page rather than standing straight up. -
Fill in the Gaps:
In the spaces between the large leaves, sketch your acorns. Vary their angles; have some pointing up, some down, and some sideways. Add small sprigs of filler leaves or stems to balance out any large empty white spaces. -
Refine the Sketch:
Go over your pencil lines with a kneaded eraser, rolling it gently over the paper to lift up dark graphite. You want the lines to be barely visible guides so they don’t show through the finished paint.
Step 2: Painting the Foliage
-
Start with the Lighter Leaves:
Using your size 6 brush, load it with the sandy beige or pale oat color. Paint the shapes of the lighter oak leaves. Keep the color wash relatively flat, but allow small pools of water to create natural texture as they dry. -
Paint the Rust Elements:
Switch to your rust-red mix. Identify the leaves that will be this bold color and fill them in carefully. I like to paint the stem and the main vein line first, then pull the color out toward the leaf edges. -
Add Golden Tones:
Using the ochre yellow, paint the remaining large oak leaves. If you want variety, you can drop a tiny bit of the rust color into the wet yellow paint near the stem for a subtle gradient effect. -
Incorporate the Greens:
Use the sage green mix for the smaller filler leaves and sprigs. These cool tones balance the warmth of the red and yellow. Paint these delicately with the tip of your brush. -
Let the Base Layer Dry:
Allow all the leaf shapes to dry completely. If the paper feels cool to the touch, it is still wet. Wait until it is room temperature before moving to the next step to prevent bleeding.
Wet-on-Wet Magic
For a softer, more organic look, drop a tiny bit of clear water onto a leaf just before painting. The pigment will bloom outward, creating beautiful, unpredictable edges.
Step 3: Painting Acorns and Details
-
Paint the Acorn Bodies:
For the smooth bottom part of the acorns, use a medium brown or warm tan. Paint a smooth, curved shape. Leave a tiny sliver of white paper on the side of each nut to act as a highlight, giving it volume. -
Add the Acorn Caps:
Once the bodies are semi-dry, paint the textured caps using a darker chocolate brown. Ensure the cap slightly overlaps the top of the nut body. -
Create Cap Texture:
While the dark brown caps are damp (not soaking wet), use the very tip of your size 2 brush to dot in darker pigment or lift out tiny specks of pigment with a dry brush. This simulates the rough, bumpy texture of an acorn cap. -
Detail the Veins:
Return to your dried leaves. Using a slightly darker version of each leaf’s base color (e.g., dark rust on the rust leaves), paint thin central veins and branching side veins. Keep these lines fine and delicate. -
Final Stems:
Use a thin brown mix to connect any floating acorns to a tiny stem if they look too detached. Check the whole composition for balance. -
Erase and Assess:
Once the painting is 100% bone dry (give it time!), gently erase any remaining visible pencil marks. Step back and admire your pattern.
Uneven Spacing?
If you end up with a large empty gap, fail it with a tiny ‘floating’ acorn or a single small green leaf. These small elements act as perfect confetti to fix spacing errors.
Hang your finished piece in a wooden frame or lean it on a shelf to bring the crisp feeling of autumn air into your home
Cozy Cabin in a Colorful Autumn Woods
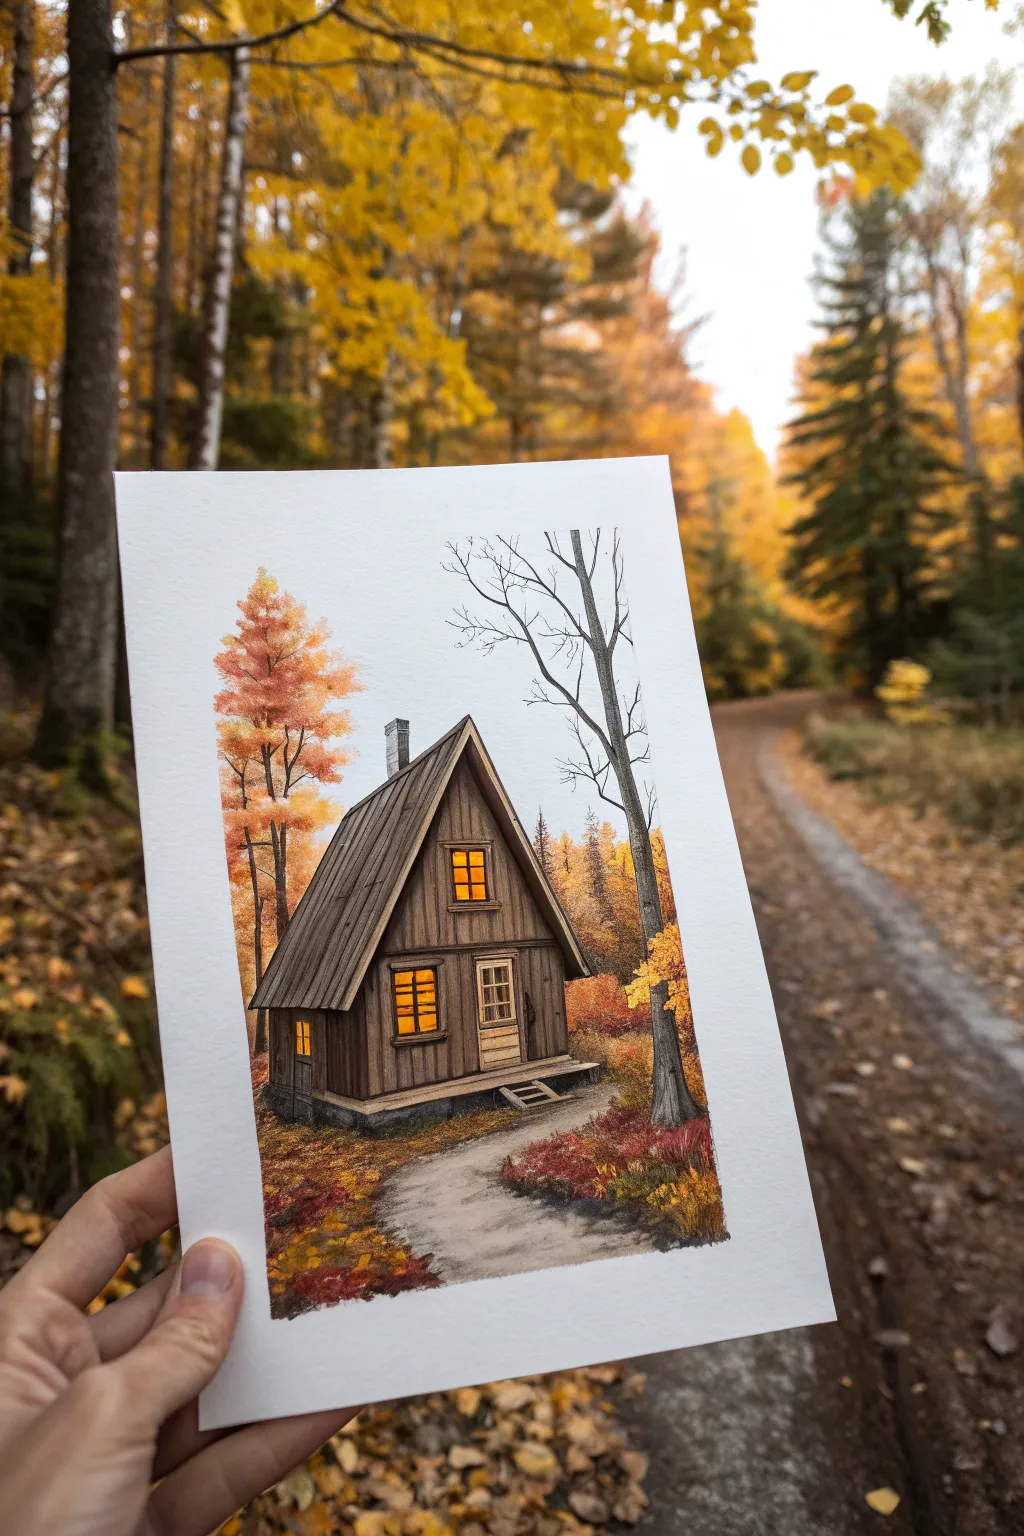
Capture the essence of a serene woodland escape with this charming mixed-media illustration featuring an A-frame cabin nestled among vibrant fall foliage. The warm glowing windows and crisp details create an inviting scene that feels like a cozy hug on a crisp October day.
Step-by-Step Tutorial
Materials
- Heavyweight cold-press watercolor paper (300gsm)
- Pencil (HB or 2H)
- Kneaded eraser
- Watercolor paints (Burnt Sienna, Yellow Ochre, Alizarin Crimson, Sepia, Indigo, Cadmium Yellow)
- Small round brushes (size 0, 2, and 4)
- Fine liner pens (black or dark brown, 0.1mm and 0.3mm)
- Colored pencils (various earth tones and warm yellows)
- White gel pen or gouache
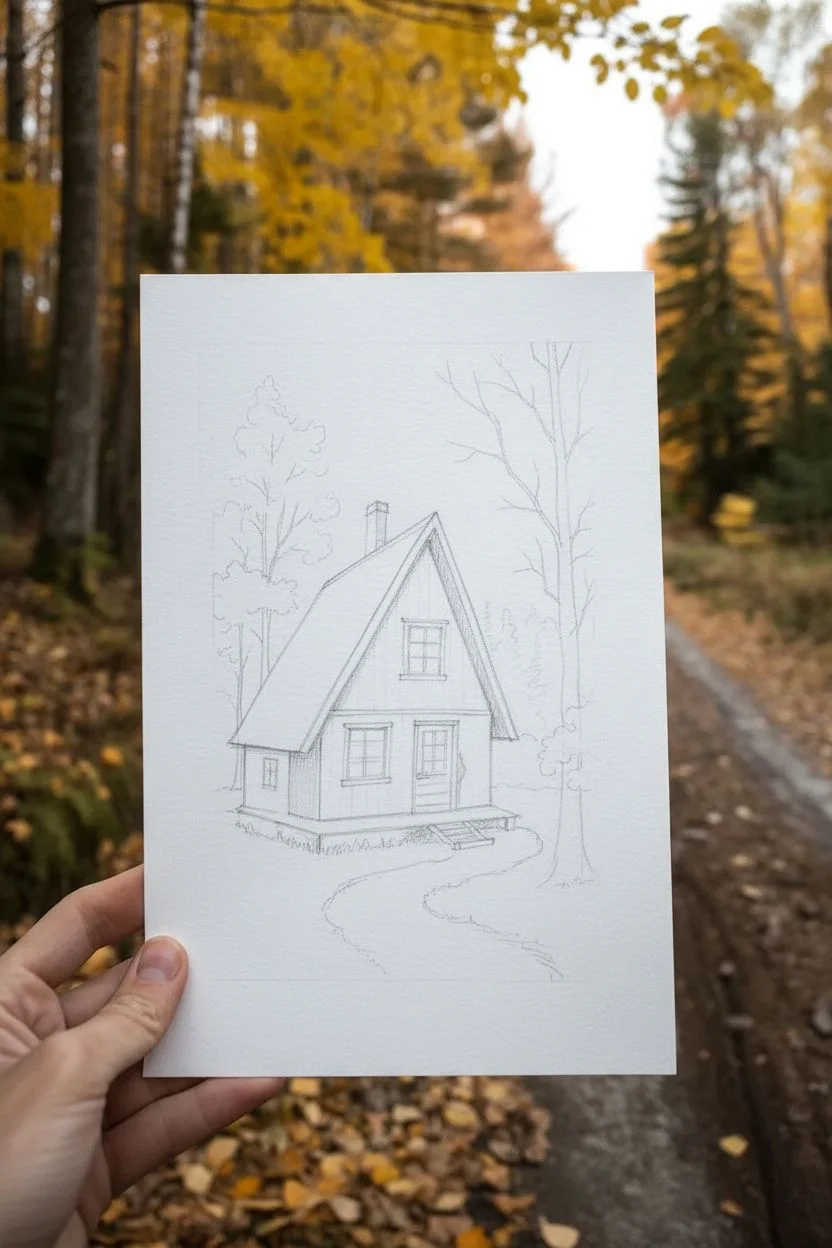
Step 1: Sketching the Scene
-
Map out the horizon:
Begin by lightly drawing a horizon line about a third of the way up from the bottom of your paper to ground your scene. -
Draft the cabin structure:
Sketch the main A-frame shape slightly off-center. Draw a steep triangle for the roof, then add the rectangular base walls visible underneath. -
Add architectural details:
Lightly pencil in a small chimney, the front porch steps, and the placement of the windows and front door. -
Place the trees:
Sketch the skeletal structure of the bare trees on the right and the fuller, leafy tree on the left, keeping lines loose and organic.
Keep it Fresh
Leave tiny slivers of white paper unpainted between the window mullions and the glowing yellow glass. This prevents bleeding and makes the light look brighter.
Step 2: Establishing Color
-
Paint the sky:
Apply a very pale, watered-down wash of light blue or cool grey to the sky area, fading it out as you get closer to the horizon. -
Warm up the windows:
Using intense Cadmium Yellow mixed with a touch of Orange, paint the window panes to create that signature warm, glowing interior light. -
Base coat for the cabin:
Paint the wooden siding with a wash of Sepia or diluted Burnt Umber. Keep this layer fairly light; we will build darkness later. -
Create the roof texture:
Use a cooler, darker grey-brown mix for the roof. While wet, drop in hints of purple or blue near the peak to suggest shadowing. -
Foliage foundation:
Dab Yellow Ochre and Burnt Sienna onto the left tree and the forest floor to create a base of fallen leaves.
Step 3: Building Depth and Detail
-
Define the cabin planks:
Once the base layer is completely dry, use a fine brush (size 0) with a darker brown mix to paint thin vertical lines on the siding. -
Add tree bark texture:
Paint the trunk on the right with a mix of Indigo and Sepia. Use a ‘dry brush’ technique to leave some paper tooth visible for texture. -
Layer the autumn leaves:
Stipple brighter oranges and reds over the dried yellow base of the left tree. Leave some gaps to let the lighter colors shine through. -
Ground the cabin:
Paint the shadow underneath the porch and steps using a dark, cool grey to firmly plant the structure on the ground. -
Define the pathway:
Paint a winding path leading from the foreground to the door using a pale, dirty wash of grey-brown, keeping the edges soft.
Make it Yours
Change the season by swapping the orange leaves for bare branches and adding white gouache ‘snow’ to the roof and ground for a winter cabin vibe.
Step 4: Ink and Final Touches
-
Outline comfortably:
Take your 0.1mm pen and begin outlining the cabin structure. Don’t worry about perfectly straight lines; shaky lines add rustic character. -
Detail the branches:
Use the pen to draw the fine, spindly twigs on the bare tree to the right, tapering your strokes at the ends. -
Enhance the wood grain:
Add small knots and wood grain textures to the cabin walls with your pen, particularly around the window frames. -
Boost color vibrance:
I like to come in with colored pencils now to add saturation. gently color over the foliage and the glowing windows to make them pop. -
Add foreground texture:
Use stippling with your pen or colored pencils in the foreground grass to simulate scattered fallen leaves and rough terrain. -
Final highlights:
Use a white gel pen to add tiny reflections on the window panes and to separate the roof edge from the dark background trees.
Now you have a tranquil autumn scene that perfectly preserves the magic of the season
Fall Wreath With Berries and a Tiny Bow
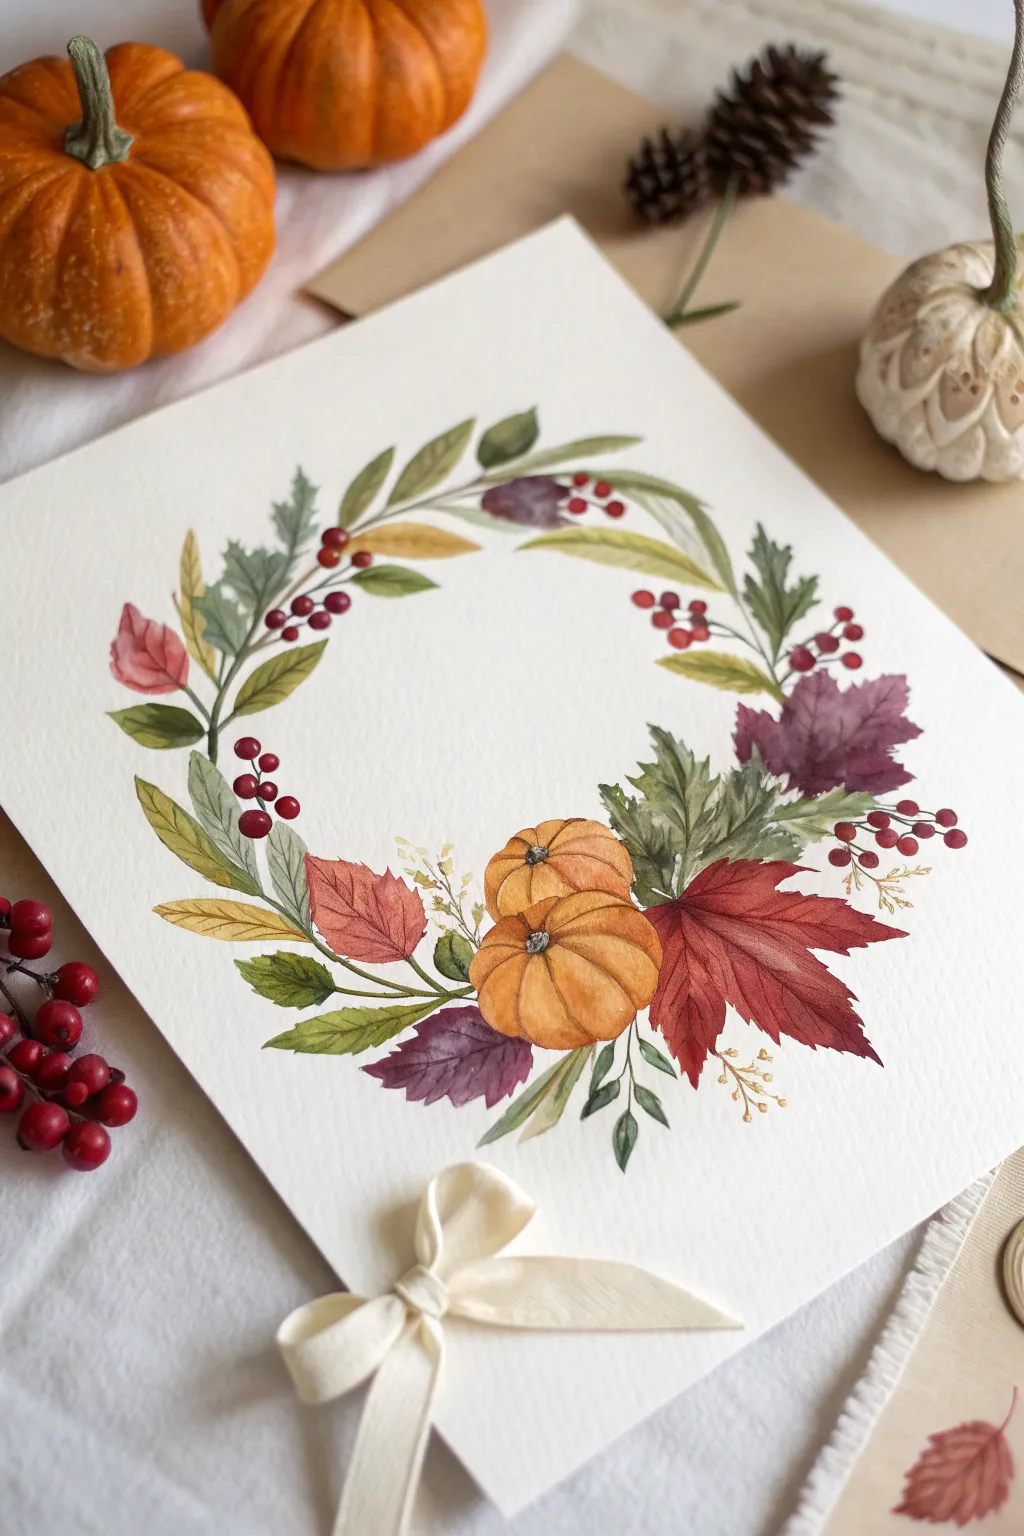
Celebrate the changing seasons with this delicate watercolor tutorial featuring a charming wreath of pumpkins, turning leaves, and bright berries. The composition balances warm oranges and deep burgundies with fresh greens, all tied together with a sweet cream-colored ribbon for a polished finish.
Step-by-Step
Materials
- Cold-press watercolor paper (300 gsm)
- Watercolor paints (burnt sienna, sap green, alizarin crimson, yellow ochre, indigo)
- Round watercolor brushes (size 2, 6, and 8)
- Pencil (HB or H)
- Kneaded eraser
- Cream satin ribbon (1/2 inch width)
- Glue dot or craft glue
- Two jars of water
- Paper towels
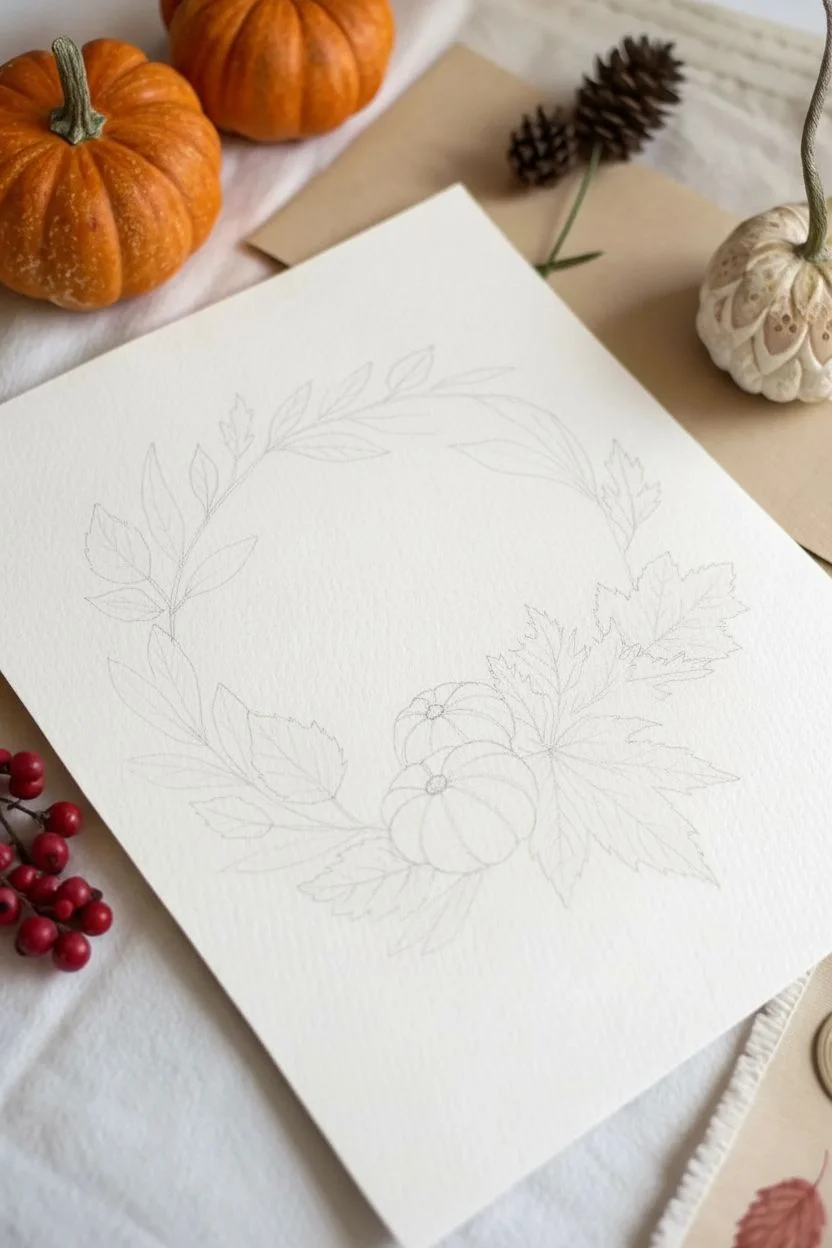
Step 1: Sketching the Composition
-
Draw the circle guide:
Begin by lightly sketching a large circle in the center of your paper to serve as your wreath’s spine. Use a bowl or compass if you need a perfect shape, but keep your pencil lines extremely faint so they disappear under the paint. -
Place the pumpkins:
Sketch two overlapping pumpkins in the bottom right quadrant of your circle. Make the front pumpkin slightly lower and tilted forward, with segments visible, while the back pumpkin peeks out from behind. -
Outline main foliage:
Draw the outline of the large red maple leaf extending from the right of the pumpkins. Then, add outlines for 3-4 larger leaves on the opposite side to balance the weight. -
Fill in the gaps:
Lightly pencil in sprigs of berries, fern fronds, and smaller filler leaves along the circle line. Leave the bottom center slightly open where the ribbon will eventually go.
Muddy Colors?
If your leaves look muddy, let layers dry completely before painting adjacent shapes. Wet paint touching wet paint will bleed and lose definition.
Step 2: Painting the Elements
-
Base layer for pumpkins:
Mix yellow ochre with a touch of burnt sienna. Paint the segments of the pumpkins using a wet-on-dry technique, leaving tiny slivers of white paper between the segments to define their shape. -
Adding pumpkin depth:
While the base is still slightly damp, drop in concentrated burnt sienna at the bottom curves and near the stems to create roundness and shadow. -
Painting the maple leaf:
Use alizarin crimson mixed with a bit of burnt sienna for the large maple leaf. Paint this loosely, allowing the color to fade slightly at the tips for a natural look. -
Greenery base tones:
Mix sap green with a little indigo for a cool, deep green. Paint the fern-like leaves and the darker foliage at the top of the wreath, using the tip of your size 6 brush for sharp points. -
Autumnal leaves:
Paint the remaining leaves using varying mixes. Use pure ochre for some, and a watery mix of crimson and purple for others. I find that varying the water-to-paint ratio here helps create that translucent, drying-leaf effect. -
Berry details:
Switch to your size 2 brush. Mix a vibrant red using alizarin crimson and a touch of orange. paint small round berries in clusters, leaving a tiny pinprick of white paper on each for a highlight. -
Adding stems:
Use a thin, dark brown mix (burnt sienna plus indigo) to connect all your leaves and berries to the main circular spine. Keep these lines very fine and organic.
Add Sparkle
For a magical touch, use metallic gold watercolor paint for the tiny filler sprigs or veins on the pumpkin to catch the light.
Step 3: Layering and Refining
-
Leaf texture:
Once the large leaves are completely dry, paint delicate veins using a slightly darker version of their base color and your smallest brush. -
Pumpkin definition:
Strengthen the shadows between the pumpkin ridges with a glaze of burnt sienna. Add small, dark stems using a grey-brown mix. -
Golden accents:
Mix a very watery yellow ochre or metallic gold paint if you have it. Paint tiny, delicate sprigs of filler weeds sticking out from the main arrangement to add whimsy. -
Final foliage check:
Assess the balance of the wreath. If it looks sparse in areas, add a few more small green leaves or berry clusters to fill the gaps.
Step 4: Finishing Touches
-
Erasing guides:
Wait until the painting is bone dry—touch it with the back of your hand to check for coldness. Gently erase any visible pencil lines with the kneaded eraser. -
Preparing the ribbon:
Cut a 6-inch piece of cream ribbon. Tie it into a small, neat bow, trimming the tails at an angle so they hang nicely. -
Attaching the bow:
Apply a glue dot or a small dab of craft glue to the back of the bow’s knot. Press it firmly onto the bottom center of the paper, visually anchoring the wreath.
Now you have a piece of artwork that captures the cozy spirit of autumn ready to frame or gift
Enchanted Night Sky With Swirly Clouds and Stars
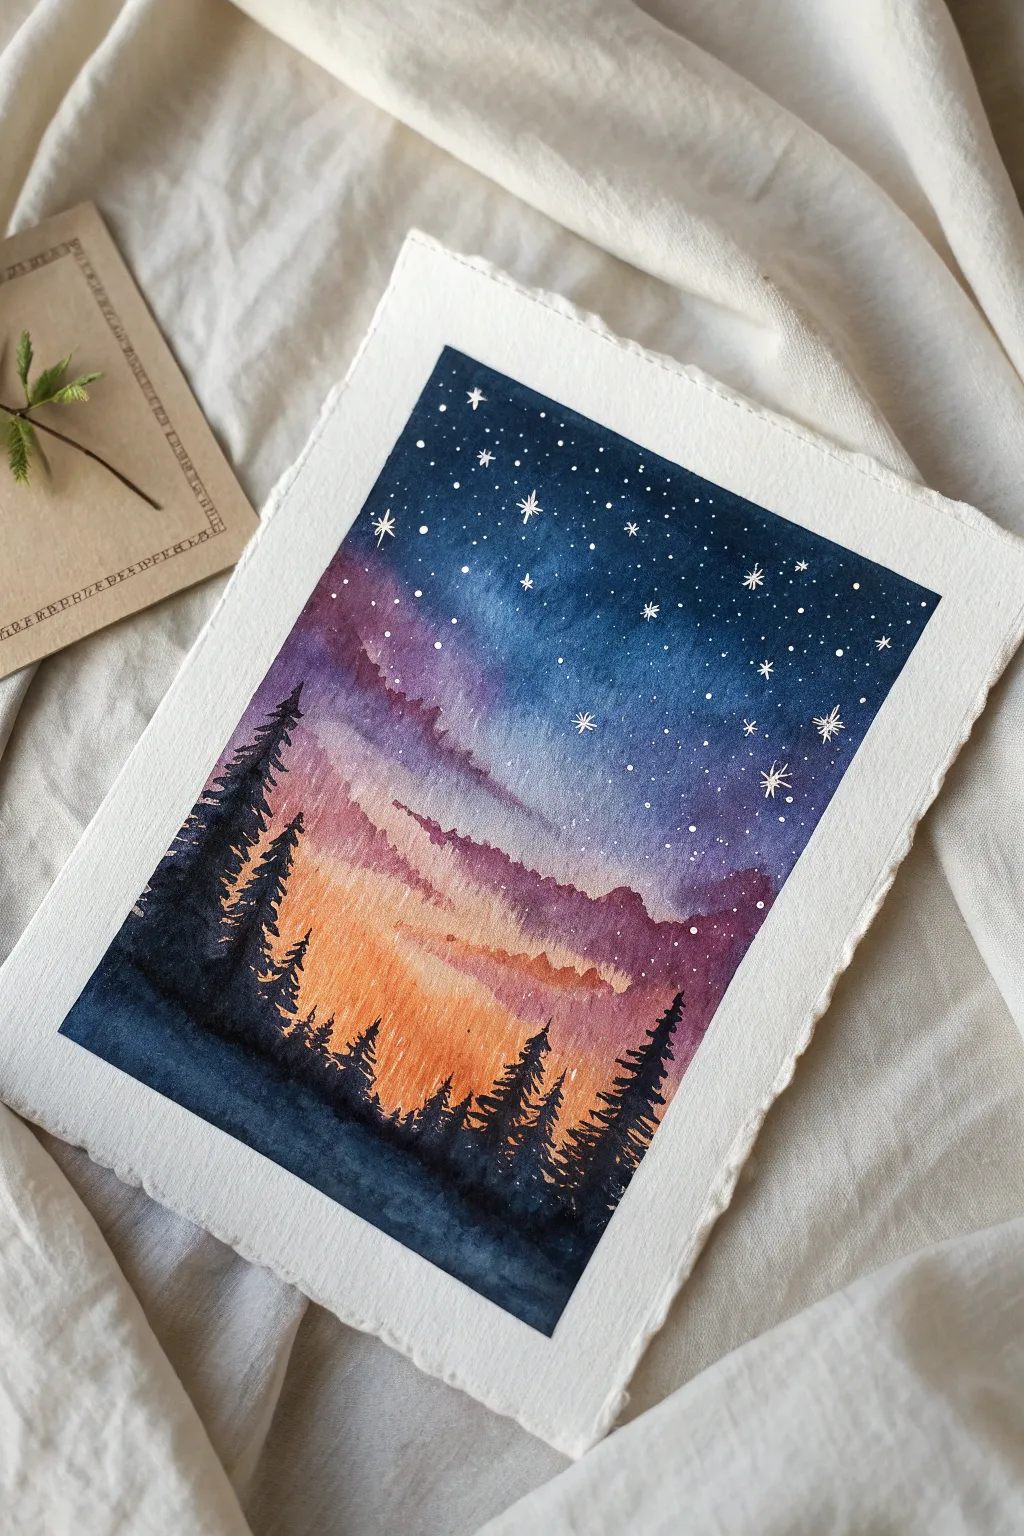
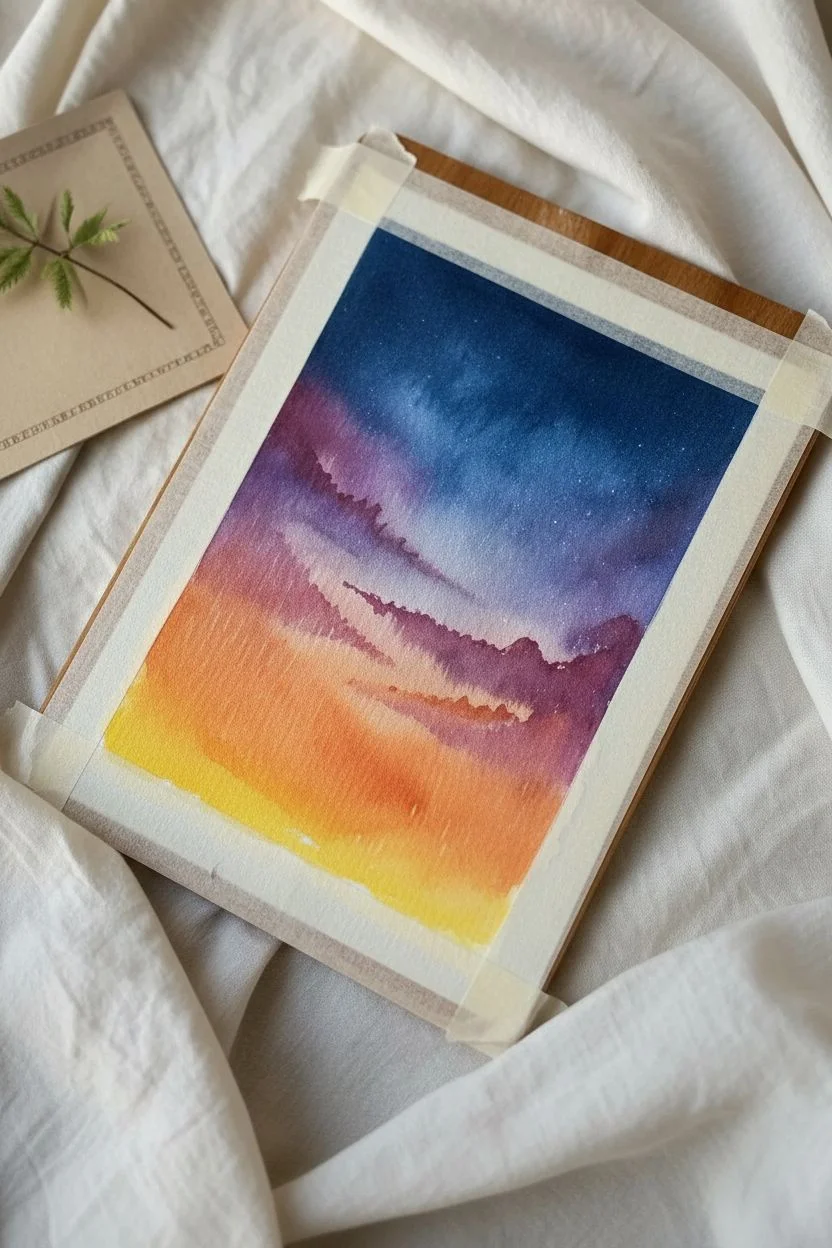
Capture the magical transition from a fiery sunset to a deep, starry night with this dreamy watercolor project. You’ll create a seamless gradient sky that glows behind silhouetted pine trees on beautiful deckled-edge paper.
Step-by-Step Tutorial
Materials
- Cold press watercolor paper (deckled edge preferably)
- Watercolor paints (Indigo, Purple/Violet, Magenta, Cadmium Orange, Lemon Yellow)
- White opacity gouache or white gel pen
- Painter’s tape or masking tape
- Large flat wash brush (approx. 1 inch)
- Medium round brush (size 6 or 8)
- Small detail brush (size 0 or 2)
- Two jars of water (one for clean, one for dirty)
- Paper towels
- Board or hard surface to tape paper down
Step 1: Setting the Sky
-
Prepare your canvas:
Begin by taping your watercolor paper securely to a hard backboard. Since this piece uses a lot of water, taping all four sides tightly ensures the paper doesn’t buckle while drying. -
Pre-wet the paper:
Using your large flat brush and clean water, apply an even coat of water across the entire upper 2/3 of the paper. You want a glistening sheen, but no puddles, to help the colors blend effortlessly. -
Apply the sunset glow:
Starting near the bottom third, paint a horizontal band of Lemon Yellow. While it’s still wet, blend Cadmium Orange directly above it, letting the colors bleed together naturally. -
Introduce the purples:
Moving upward, mix a vibrant Magenta or reddish-purple and paint a strip above the orange. Carefully graze the brush where the orange and purple meet to create a soft, peachy transition rather than a hard line. -
Deepen the night sky:
For the top section, load your brush with a rich Indigo or Prussian Blue. Paint the top edge and work your way down into the purple, adding more pigment to the corners to create a vignette effect. -
Refine the blend:
Clean your brush, dampen it slightly, and gently run it horizontally across the transition zones if any harsh lines remain. Let gravity do some of the work by tilting your board slightly. -
Add cloud texture:
While the purple and blue sections are still damp, dab in a slightly more concentrated purple mix with a round brush to suggest soft, drifting clouds. Allow the sky to dry completely before moving on.
Step 2: The Silhouetted Forest
-
Mix the darkest shade:
Create a near-black color by mixing your Indigo with a touch of Burnt Umber or a tiny bit of Black. You want this to be very opaque, so use less water than you did for the sky. -
Paint the tree line base:
Using the medium round brush, paint an uneven, wavy horizon line near the bottom of the glowing yellow section. This establishes the ground where your trees will stand. -
Start the tall pines:
Switch to your smaller detail brush. Draw a thin vertical line up from the base to mark the trunk of your first tree. Make sure to vary the heights—some should reach into the purple sky, others stay in the orange. -
Add pine branches:
Starting from the top of your trunk line, use a stippling or tapping motion to create branches. Keep the top branches very narrow and widen the tree as you move down, forming a triangular shape. -
Fill in the forest:
Continue painting trees across the horizon. I like to cluster them, overlapping some trees to create density, while leaving small gaps of orange light peaking through the lower branches. -
Darken the foreground:
Once the trees are placed, go back over the bottom foreground area with your darkest mix to ensure it feels solid and heavy, grounding the composition.
Tip: Paper Texture
For that authentic, vintage look, tear your watercolor paper against a ruler before starting, or buy pre-cut deckle-edge paper. The ragged edge adds rustic charm.
Step 3: Starlight Details
-
Prepare the stars:
Ensure the sky layer is bone dry. Take your white gouache (consistency of heavy cream) or a white gel pen. If using gouache, load a small detail brush. -
Create the major stars:
Paint a few larger, eight-pointed stars scattered in the dark blue upper section. Draw a simple cross, then add a smaller ‘X’ through the center. -
Add distant stardust:
Dot the tip of your brush or pen to create tiny pinpricks of light. Concentrate them in the darker blue areas, getting sparser as you move down into the purple clouds. -
The final reveal:
Wait for all paint to dry completely. Carefully peel away the masking tape at a 45-degree angle to reveal the clean border against the deckled edge.
Level Up: Galaxy Dust
Load a toothbrush with diluted white gouache and flick the bristles with your thumb over the dark blue section. This creates a realistic, dense cluster of distant stars.
Now you have a serene little window into a magical forest evening to display on your desk
Smiling Ghosts Floating Through a Pumpkin Patch
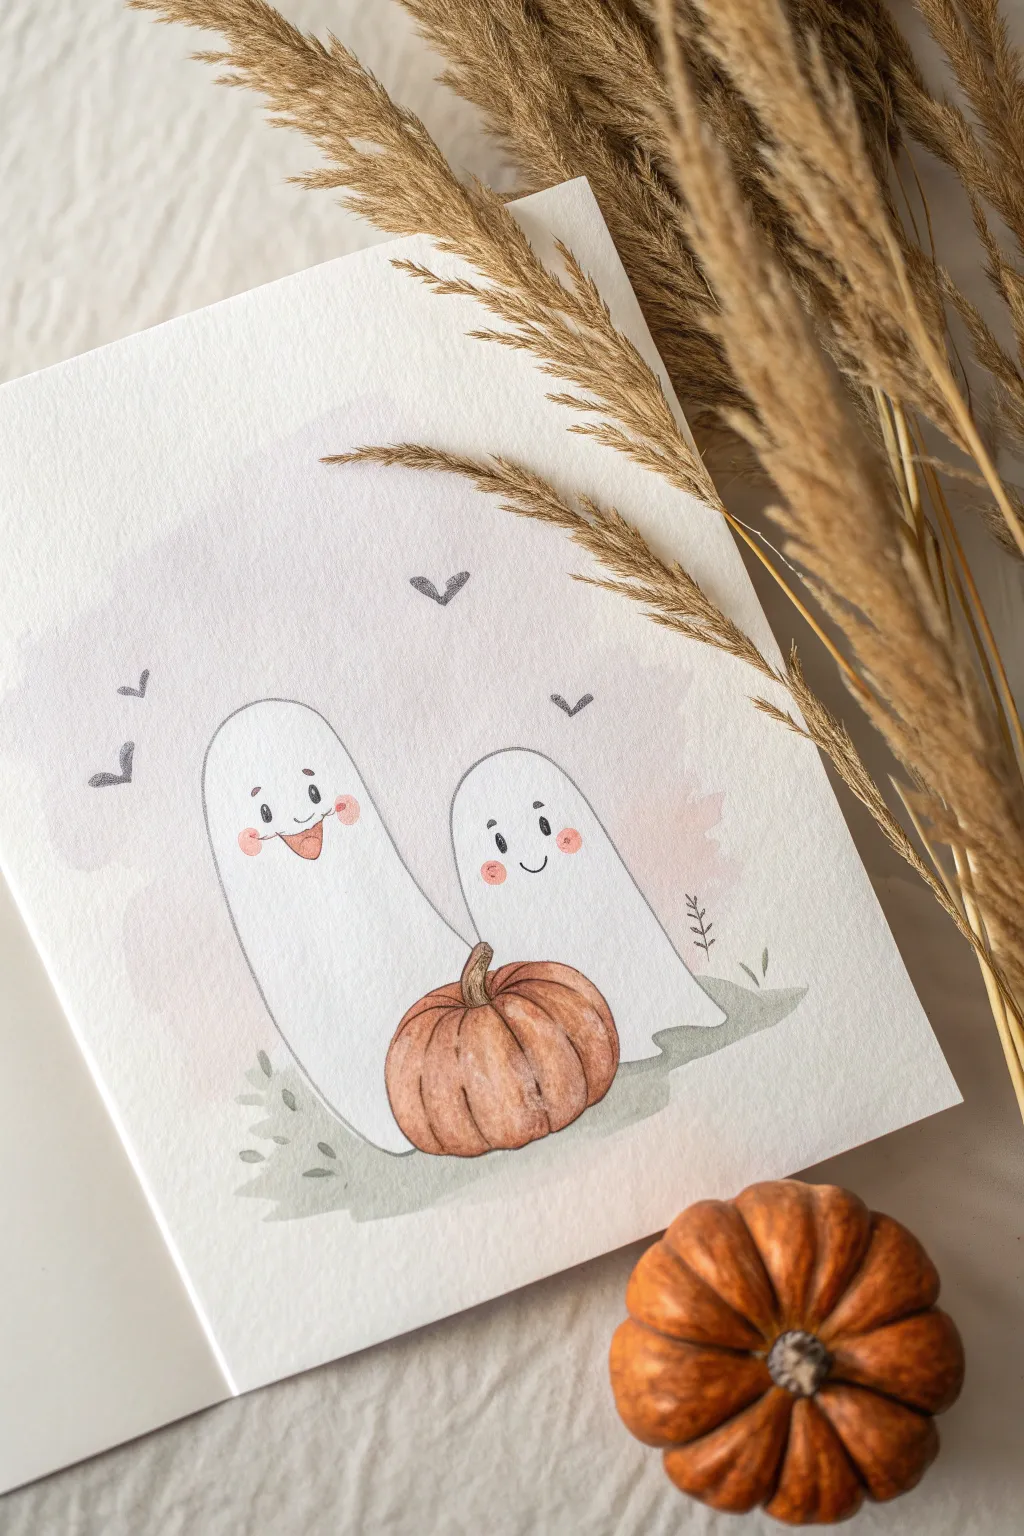
Capture the whimsical spirit of autumn with this watercolor illustration of two friendly ghosts and their prized pumpkin. This gentle scene combines soft wet-on-wet background washes with crisp character details for a heartwarming seasonal display.
Detailed Instructions
Materials
- Cold press watercolor paper (300 gsm)
- Watercolor paints (Payne’s Grey, Burnt Sienna, Orange, Sap Green, Light Pink)
- Round watercolor brushes (size 6 for washes, size 2 for details)
- Fine liner pen (black or dark grey, size 0.1 or 0.3)
- Pencil (HB or H)
- Kneaded eraser
- Clean water and paper towels
Step 1: Sketching the Scene
-
Outline the pumpkin base:
Begin by lightly sketching the large pumpkin near the bottom center of your page. Draw a wide, flattened oval shape, then divide it into curved sections (ribs) that radiate from the top stem area. -
Draw the ghost shapes:
Sketch two elongated, rounded mounds rising from behind the pumpkin. Make the left ghost slightly taller and leaning inward, while the right ghost is a bit shorter and rounder. Ensure their bottom edges disappear naturally behind the pumpkin or ground line. -
Add facial features:
Map out the faces lightly. The left ghost gets a big, open-mouthed smile and oval eyes. The right ghost gets a sweet, simple curved smile and smaller round eyes. -
Detail the surroundings:
Sketch the pumpkin stem twisting slightly to the left. Add a wavy ground line beneath everything and mark spots for a few small leaves or grass blades. Finally, draw four small ‘V’ shapes in the sky for distant birds or bats. -
Lighten the lines:
Gently roll your kneaded eraser over the entire sketch. You want the graphite lines to be barely visible—just enough to guide your painting without showing through the translucent watercolor.
Bleeding Lines?
If your ink bleeds when you draw over the paint, the paper isn’t dry enough. Wait longer or use a hairdryer on low heat. Ensure your pen is waterproof if adding paint after.
Step 2: Applying Watercolor Layers
-
Paint the background wash:
Mix a very dilute, watery wash of Payne’s Grey with a tiny touch of pink. Wet the area around the ghosts (avoiding their bodies) and drop this color in loosely to create a soft, cloudy atmosphere. Let the edges fade out naturally. -
Base coat the pumpkin:
While the background dries, mix a warm orange. Paint the pumpkin sections, leaving tiny slivers of white paper between the ribs to act as highlights. This helps define the roundness. -
Deepen the pumpkin shadows:
While the orange is still slightly damp, drop in a mix of Burnt Sienna and orange at the bottom of the pumpkin and in the creases between the ribs to create volume. -
Paint the stem and ground:
Use a brown mix for the stem, keeping the top lighter. For the ground patches, use a desaturated Sap Green or a grey-green mix to paint irregular patches of grass beneath the figures. -
Add the cheeky blush:
Using a clean, damp brush, pick up a tiny amount of diluted pink or light red. Gently dab circular rosy cheeks onto both ghosts. Soften the edges with a clean wet brush if they look too harsh. -
Fill the open mouth:
For the taller ghost, paint the inside of the mouth with a darker grey or brown, leaving a small curve unpainted for the tongue, which you can fill with a soft pink.
Sparkle Upgrade
Once dry, use a white gel pen to add stronger highlights to the pumpkin’s curve and emphatic sparkles in the ghosts’ eyes for extra cuteness.
Step 3: Inking and Finishing Touches
-
Outline the ghosts:
Once the paint is completely bone-dry, use your fine liner to trace the outlines of the ghosts. Don’t press too hard; a slightly broken or variable line adds character. -
Define the pumpkin:
Ink the pumpkin ribs with thin, sketchy lines. Add short, quick vertical strokes on the pumpkin skin to suggest texture and roughness. -
Draw the faces:
Ink the eyes and mouths carefully. Fill in the pupils solid black but leave a tiny white speck in the eyes for a ‘sparkle’ of life. -
Add movement to the sky:
Ink the flying silhouettes in the background. Vary the angle of the wings to make them look like they are fluttering. -
Detail the foreground:
Add tiny ink details to the ground patches, drawing little sprigs of grass or leafy textures over the green wash. -
Final shading touches:
Review your work. If the ghosts look too flat, I sometimes add a very faint, watery grey shadow along one side of their bodies to give them dimension.
Now you have a charming duo ready to haunt your home with happiness
Black Cat on a Pile of Autumn Leaves
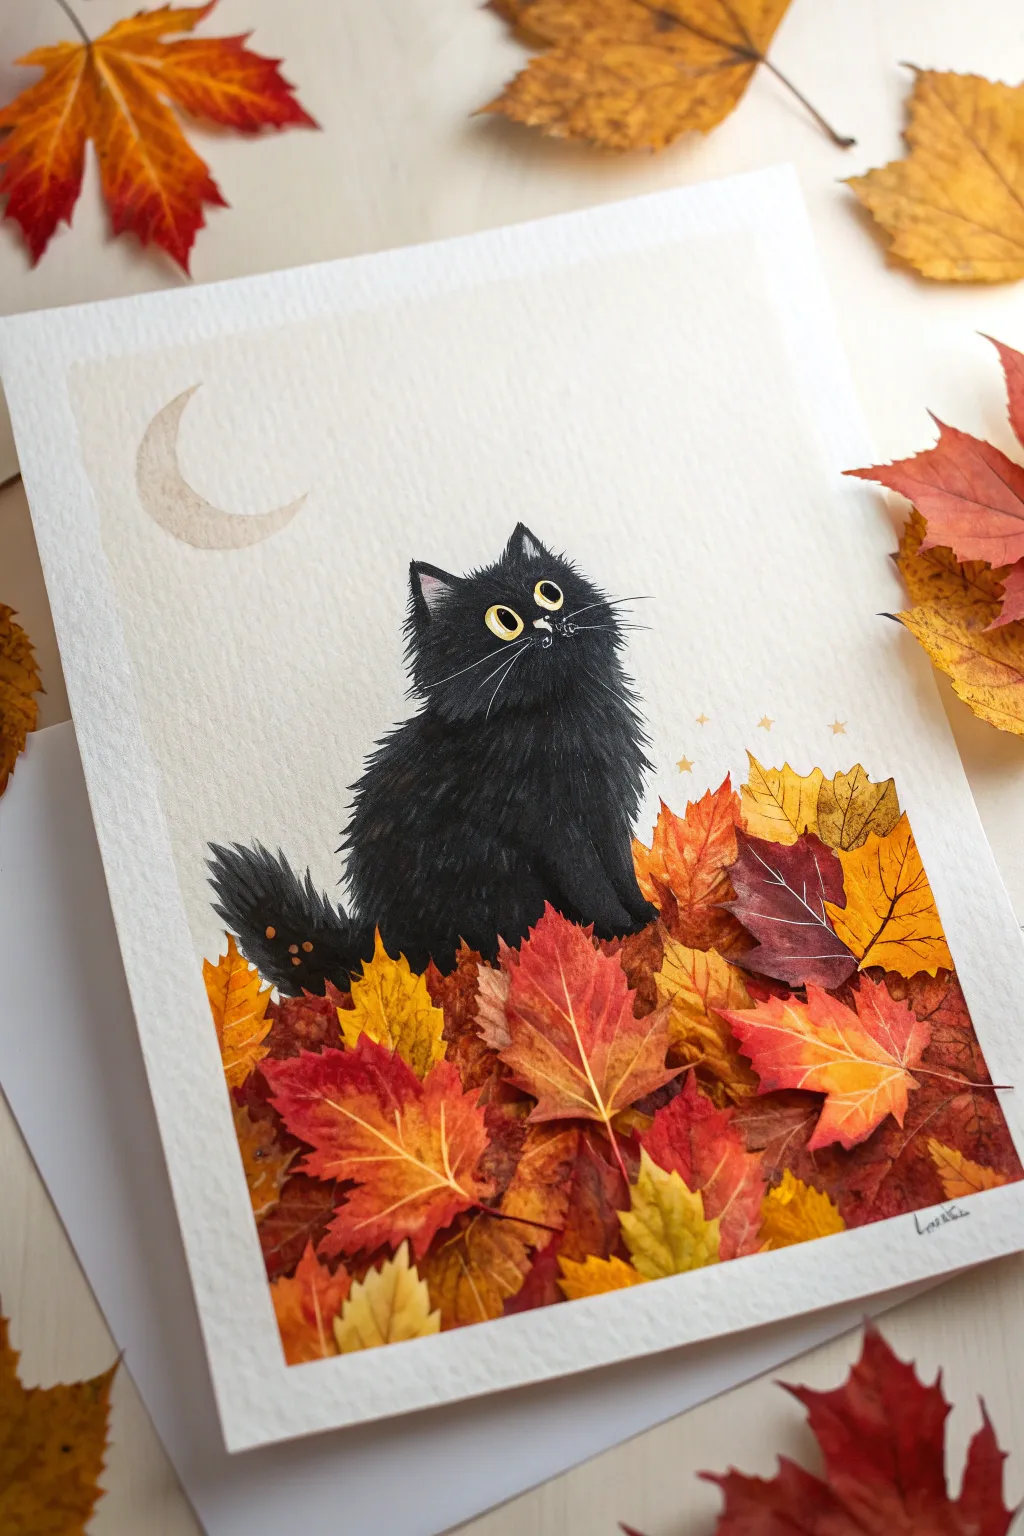
Capture the cozy spirit of fall with this charming illustration of a black cat nestled among vibrant foliage. Using a blend of watercolor and gouache, you’ll create a textured, heartwarming scene perfect for seasonal decor or greeting cards.
Step-by-Step Guide
Materials
- Cold press watercolor paper (300 gsm)
- Watercolor paints (Yellow Ochre, Burnt Sienna, Alizarin Crimson, Sap Green)
- Black gouache or acrylic paint
- White gel pen or fine liner
- Assorted brushes (large wash brush, medium round size 6, fine detail size 0 or 1)
- Pencil and kneaded eraser
- Masking tape
- Paper towels
- Cup of water
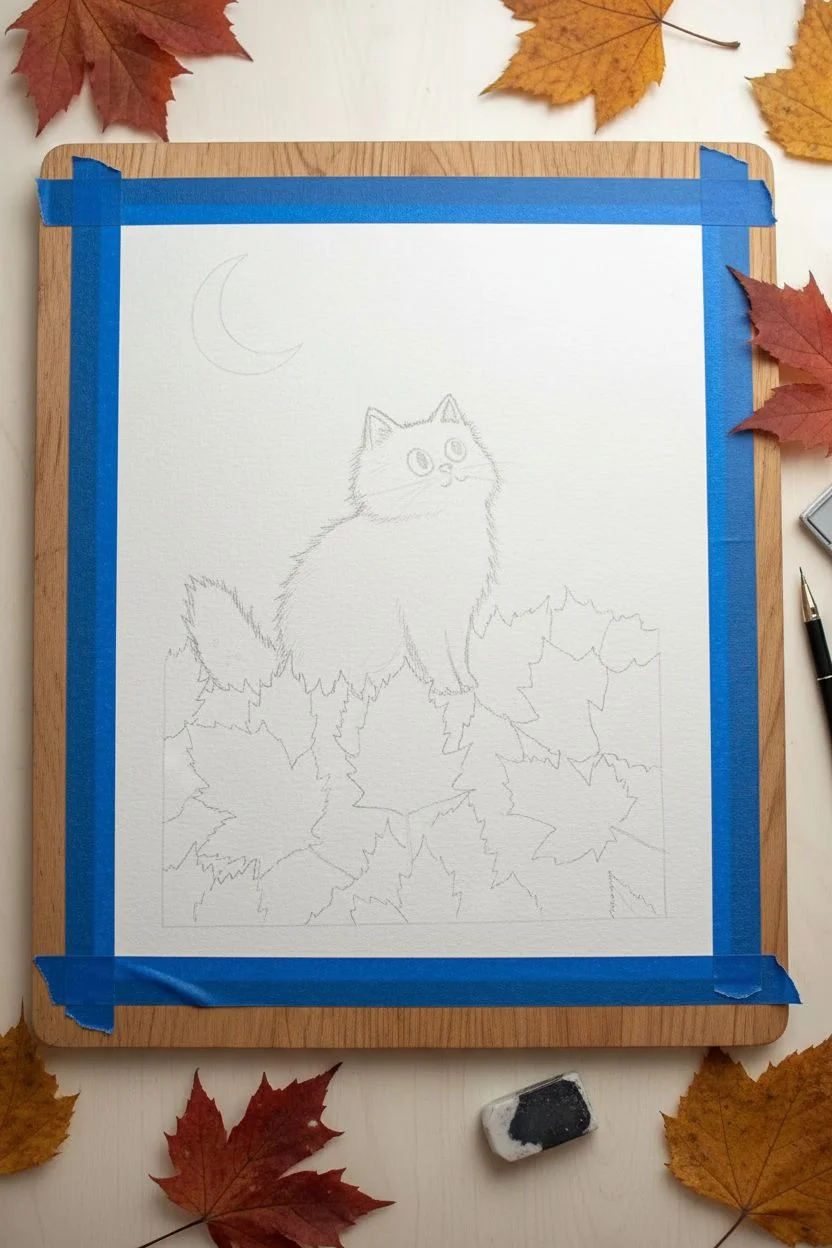
Step 1: Preparation & Sketching
-
Prepare the workspace:
Begin by taping down the edges of your watercolor paper to a sturdy board. This prevents the paper from buckling when wet and ensures you get that crisp, clean border at the end. -
Sketch the composition:
Lightly sketch the outline of the cat in the center-bottom of the page. It should be a simple, slightly fluffy pear shape. Don’t worry about fur details yet. -
Add background elements:
Draw the crescent moon in the upper left corner. Then, lightly map out the pile of leaves surrounding the base of the cat, creating a mound shape without drawing every single individual leaf.
Fixing Muddy Leaves
If your autumn leaves turn into a brown blob, let the paper dry completely. Then, glaze over the top with a pure, bright yellow or orange to bring back vibrancy without disturbing the paint underneath.
Step 2: Painting the Background
-
Initial wash:
Mix a very watery, pale beige or cream color using Yellow Ochre and plenty of water. Apply a flat wash over the entire sky area, carefully painting around the moon and the cat. -
Paint the moon:
Once the sky is damp (not soaking), paint the moon with a slightly darker dilution of the beige mix to give it subtle texture, or leave it the white of the paper for contrast. -
Let it dry:
Wait until the background is completely bone dry before moving on to the next step to prevent colors from bleeding into the sky.
Level Up: Metallic Pop
Use metallic gold watercolor or ink for the crescent moon and the veins on the leaves. It will catch the light beautifully and add a magical quality to the finished illustration.
Step 3: Creating the Leaf Pile
-
Base layer for leaves:
Start painting the leaves at the bottom. Use a mix of reds, oranges, and yellows. The key here is variety—paint loose leaf shapes, letting the wet colors touch and bleed into each other slightly for a natural look. -
Layering depth:
While the first layer is drying, mix a darker brown-red using Burnt Sienna and Alizarin Crimson. Paint smaller leaf shapes behind and between the brighter ones to create the illusion of a deep pile. -
Adding definition:
Once the leaf layers are dry, use your smaller round brush to paint crisp outlines or veins on the most prominent leaves using a saturated orange or red-brown mix. -
Integration:
Ensure the leaves closest to the cat slightly overlap the bottom of your sketch line so the cat looks settled *in* the pile, not floating above it.
Step 4: Painting the Cat
-
Blocking in the black:
Switch to black gouache (or acrylic) for the cat. Gouache is opaque and matte, which looks fantastic here. Paint the entire silhouette of the cat solid black. -
Creating texture:
While painting the edges of the silhouette, use short, flicking brushstrokes outward to simulate fluffy fur, especially on the cheeks, chest, and tail. -
Drying time:
Allow the black paint to dry completely. Gouache dries relatively fast, but if it’s still cool to the touch, wait a bit longer.
Step 5: Final Details
-
The eyes:
Paint two large, round yellow circles for the eyes. I find gouache is perfect for this because it can cover the black layer underneath. Add thin vertical black pupils once the yellow is dry. -
Whiskers and nose:
Using a white gel pen or a very fine brush with white gouache, draw delicate whiskers radiating from the face. Add a tiny nose and mouth detail. -
Fur highlights:
Add subtle grey or white strokes on the chest or tail to suggest volume and lighting on the black fur. -
Magical touches:
If desired, add tiny gold or yellow stars around the cat using the tip of your detail brush. -
Reveal:
carefully peel away the masking tape to reveal your clean edges.
Frame your cozy creation or gift it to a cat-loving friend to celebrate the season
Mini Fall Painting Sampler Grid of Tiny Icons
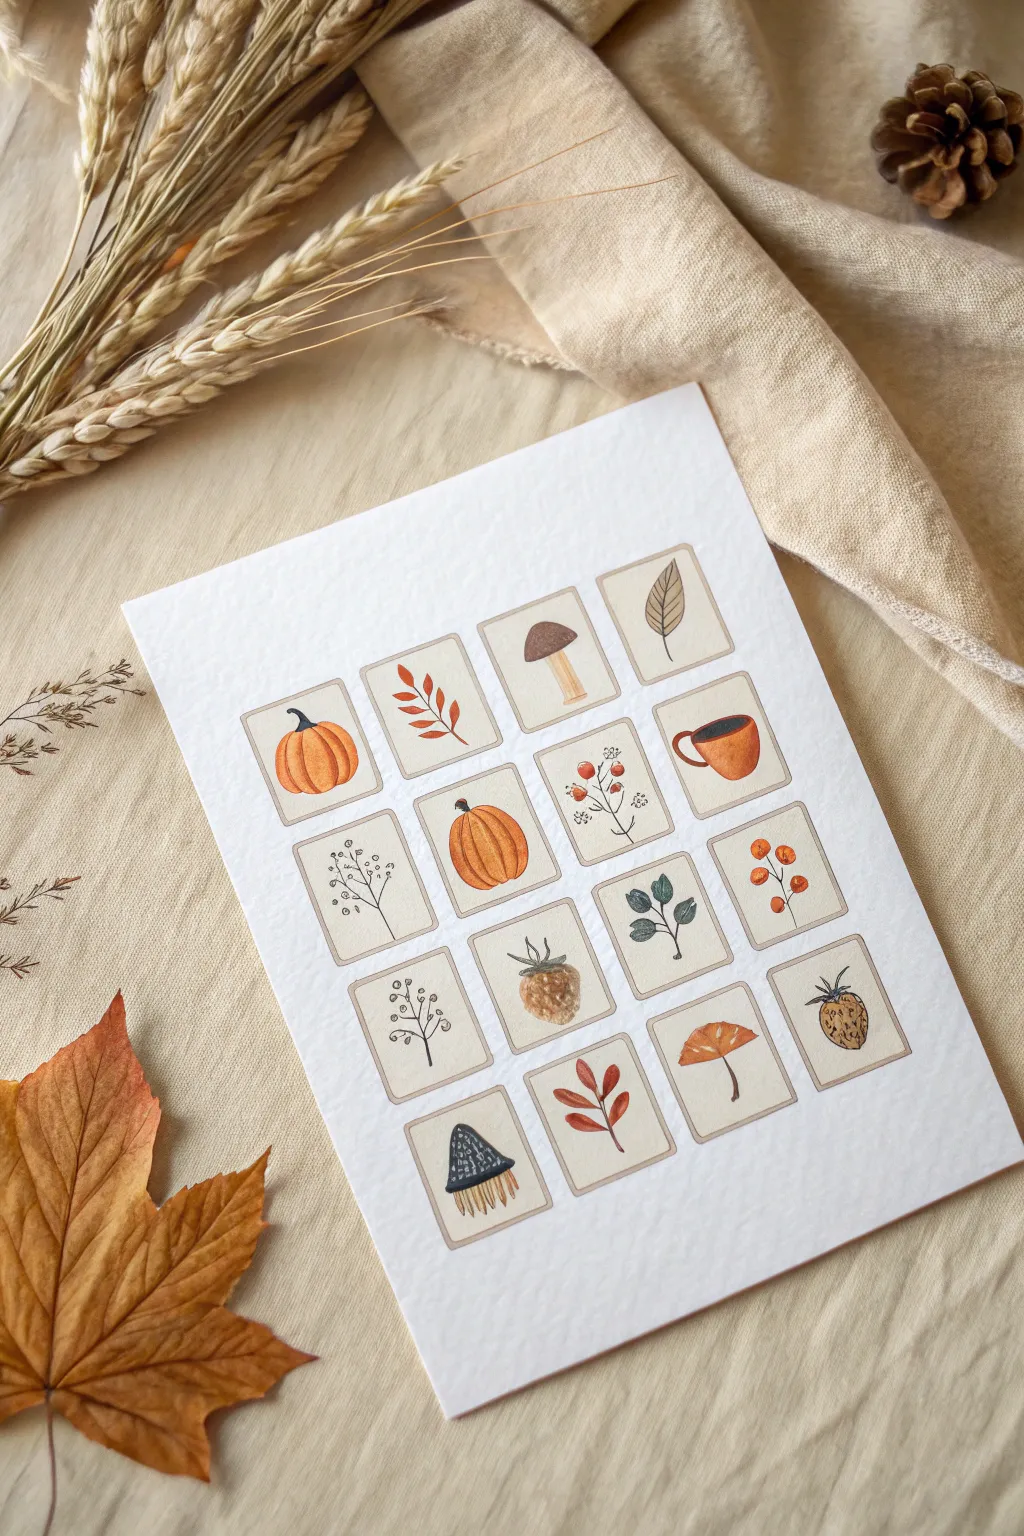
Celebrate the season by painting a charming collection of tiny fall treasures, from plump pumpkins to cozy mugs, arranged in a neat sampler grid. This project captures the essence of autumn in bite-sized illustrations that come together to form a beautiful, poster-like composition.
How-To Guide
Materials
- Cold press watercolor paper (A4 or 8×10 size)
- Pencil (HB or H)
- Fine-tip waterproof pen (black or sepia, 0.1 or 0.3mm size)
- Ruler
- Watercolor paints (burnt sienna, yellow ochre, sap green, alizarin crimson, burnt umber)
- Small round watercolor brushes (sizes 0, 2, and 4)
- Jar of water
- Paper towels
- Kneaded eraser
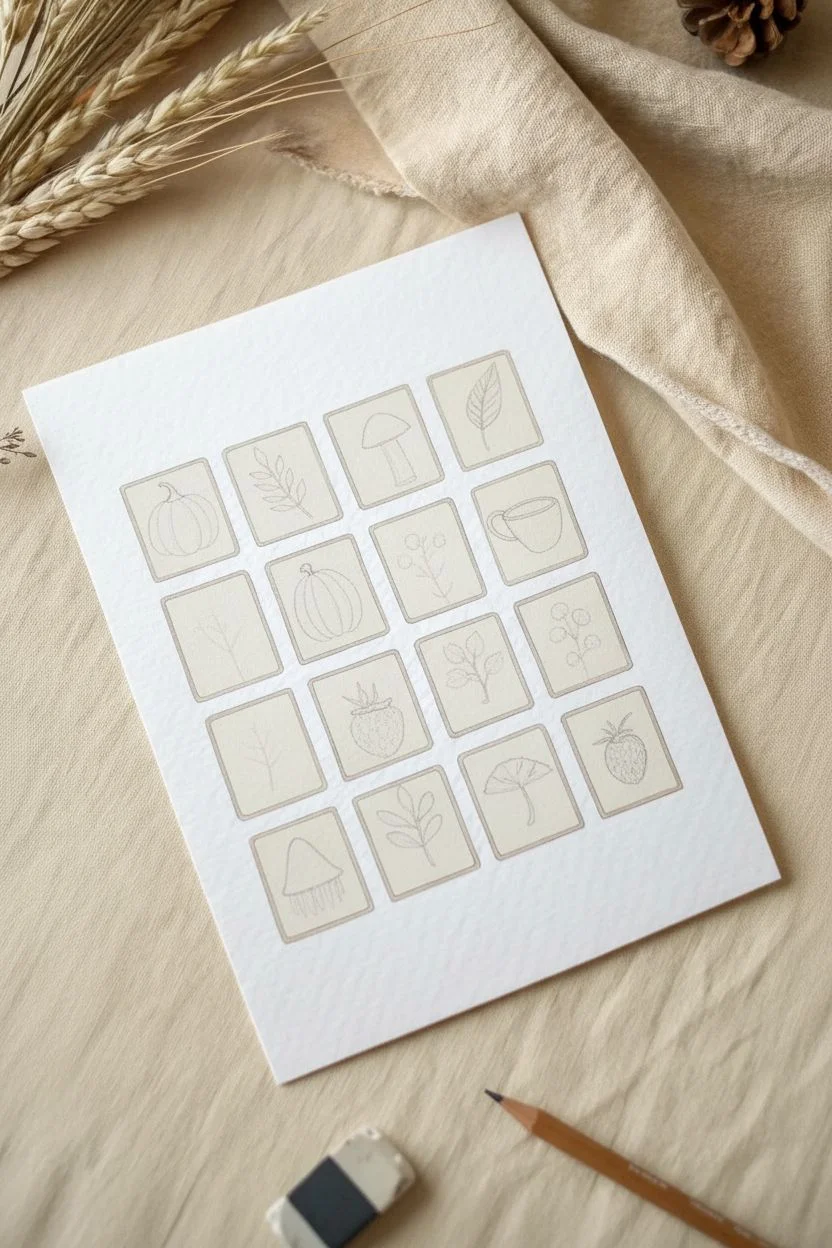
Step 1: Drafting the Grid
-
Measure the layout:
Begin by finding the center of your paper to ensure symmetry. Using your ruler and pencil, lightly map out a grid of 16 small rectangles (4 columns by 4 rows). A size of about 1.5 inches by 2 inches for each rectangle works well, but adjust based on your paper size. -
Add spacing:
Leave a comfortable gap between each rectangle—roughly a quarter of an inch—so the illustrations don’t feel crowded. -
Sketch the frames:
Go over your measured lines with a slightly darker pencil stroke to define the boxes, rounding the corners ever so slightly if you prefer a softer, vintage playing card look. -
Outline the icons:
Inside each box, lightly sketch a different fall motif. Follow the reference image: places pumpkins in the first and second columns, a mug in the top right, mushrooms scattered throughout, and various sprigs of leaves and berries in the remaining spaces.
Step 2: Inking and Definition
-
Trace the boxes:
Using a very fine waterproof pen (sepia ink adds a lovely vintage warmth), trace the rectangular frames. Keep your hand loose; perfect straight lines aren’t necessary and slight wobbles add character. -
Ink the botanical details:
Carefully ink the stems, leaf veins, and outlines of your sketches. For the delicate berry sprigs, use thin, broken lines to suggest fragility. -
Erase pencil guides:
Wait until the ink is completely dry to prevent smudging, then gently use a kneaded eraser to lift away all pencil marks, leaving a clean slate for painting.
Vintage Paper Effect
To make the ‘cards’ pop, paint a thin shadow line along the bottom and right edge of each rectangle using diluted gray paint.
Step 3: Watercolor Wash & Detail
-
Paint the pumpkins:
Mix a vibrant orange using burnt sienna and a touch of yellow ochre. Paint the segments of the pumpkins, leaving slivers of white paper between the ridges to create natural highlights and dimension. -
Color the foliage:
For the leaves, vary your greens. Mix sap green with a little burnt umber for a dried-leaf look, and use pure burnt sienna for the reddish-brown autumn leaves. -
Fill the mug:
Paint the mug in the top right corner with a warm terracotta or burnt orange. Darkness the inside oval to suggest coffee or hot cocoa. -
Paint the mushrooms:
Use diluted burnt umber for mushroom caps. For the whimsical blue mushroom at the bottom, use a touch of indigo or payne’s gray, adding dots if desired. -
Wash the backgrounds:
Create a very watery, pale beige wash (lots of water with a tiny drop of brown). Carefully paint inside each rectangle box, going around your illustrations. This tints the ‘cards’ to look like aged paper. -
Add deep contrast:
Once the first layers are dry, come back with a smaller brush and more concentrated paint to add shadows under the mushroom caps and on the shaded sides of the pumpkins. -
Final textures:
Use your smallest brush (size 0) simply damp with dark brown paint to add tiny dots on the strawberries or veins on the larger leaves for final texture.
Make it a Gift
Scan your finished painting and print it onto sticker paper to create your own custom sheet of autumn planner stickers.
Now you have a cozy gallery of fall favorites ready to frame or display on a seasonal mood board


Have a question or want to share your own experience? I'd love to hear from you in the comments below!