Cute pottery painting is my favorite kind of project because it’s low-pressure and instantly cheerful—like turning everyday dishes into little mood-boosters. If you’ve got a plain mug or bowl staring at you, these cute pottery painting ideas will help you dress it up with charm in a way that still feels totally doable.
Tiny Hearts All Over
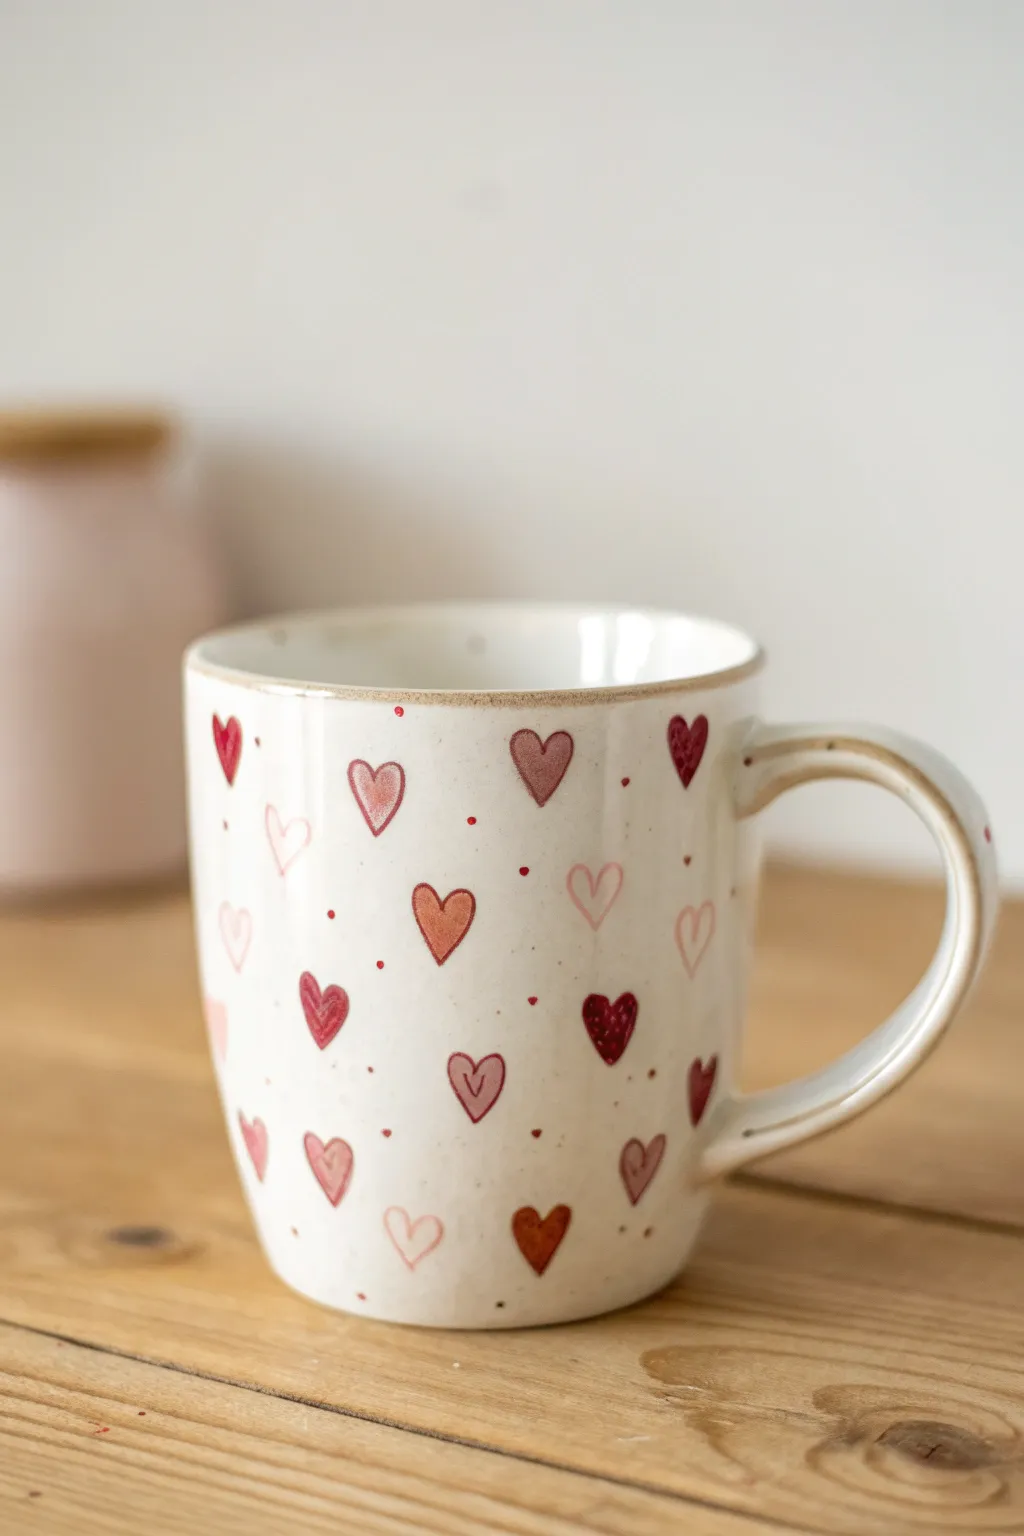
This charming project turns a simple ceramic mug into a heartwarming keepsake covered in varied, tiny hearts. The scattered pattern and mix of pink and berry hues give it a whimsical, hand-drawn feel that’s perfect for Valentine’s Day or just brightening your morning coffee.
Detailed Instructions
Materials
- Bisque ceramic mug (smooth surface)
- Underglaze paints: light pink, medium rose, deep maroon, and rust red
- Fine liner brush (size 0 or 00)
- Small round brush (size 2)
- Clear transparent dipping glaze
- Sponge
- Water cup
- Pencil (optional)
Step 1: Prep & Planning
-
Clean the surface:
Before painting, wipe down your bisque mug with a slightly damp sponge to remove any dust or oils from your hands, ensuring the paint adheres properly. -
Plan your placement:
Visualize a random, confetti-like distribution for the hearts. You want them to look scattered, not aligned in strict rows. If you’re nervous about freehanding, you can lightly sketch the heart positions with a pencil; the graphite will burn off in the kiln.
Brush Control Secret
Load your brush with paint but dab it once on a paper towel before touching the mug. This prevents blobs and gives you sharper points on the bottom of your hearts.
Step 2: Painting the Hearts
-
Start with light pink:
Dip your small round brush into the lightest pink underglaze. Paint small hearts randomly around the mug, leaving plenty of empty space between them for other colors. -
Outline technique:
For a stylized look, try painting the outline of the heart first with two simple swoops that meet at the bottom point, then fill in the center gently. -
Add medium rose tones:
Switch to your medium rose color. Paint a similar number of hearts in the empty spaces. Rotate the mug as you work to ensure even coverage around the curved surface. -
Introduce deep maroon:
Using the deep maroon shade, add darker accent hearts. These provide beautiful contrast against the lighter creamy background. -
Mix in rust red:
Finally, add the rust red hearts. Don’t worry if some hearts are slightly different sizes or shapes; that variation adds to the charm. -
Check for consistency:
Look at the mug from a distance. If you spot any large bald patches, fill them in with a heart in whichever color feels least represented in that area. -
Apply second coats:
Most underglazes require 2-3 coats for solid opacity. Let the first layer dry to the touch, then carefully go over each heart again with its respective color.
Switch It Up
Instead of red and pink, try this design with monochrome blues or a rainbow palette for a totally different vibe while keeping the same sweet pattern.
Step 3: Adding Details
-
Create open hearts:
For visual texture, leave a few hearts as just outlines rather than filling them in completely solid. Use your finest liner brush for these delicate shapes. -
Inner details:
Take a contrasting color—like dark maroon on a light pink heart—and paint a tiny ‘V’ or smaller heart inside a few of the larger solid hearts. -
The dot technique:
Using the very tip of your fine brush or a dotting tool, place tiny dots of red and maroon in the negative spaces between the hearts. -
Don’t overdo the dots:
Keep the dots sparse and random. They should act like confetti, adding movement to the design without making it look cluttered.
Step 4: Finishing Touches
-
Rim the edge:
Dip your fine liner brush in a diluted wash of the rust or brown underglaze. Carefully run the belly of the brush along the rim of the mug to create a subtle, organic border. -
Detail the handle:
Consider adding a simple stripe or a few tiny hearts running down the spine of the handle to tie the design together. -
Dry completely:
Allow the underglaze to dry completely. The surface should look chalky and matte when it’s ready for the next step. -
Glaze application:
Apply a clear transparent glaze over the entire piece. If you are at a studio, this is usually done by dipping the mug into a glaze bucket for a smooth, even beat. -
Final wipe:
Wipe the foot (bottom) of the mug clean with a sponge to prevent it from sticking to the kiln shelf during firing.
Now your adorable mug is ready for the kiln and will soon be your favorite vessel for warm drinks


Sweet Polka Dot Sprinkle
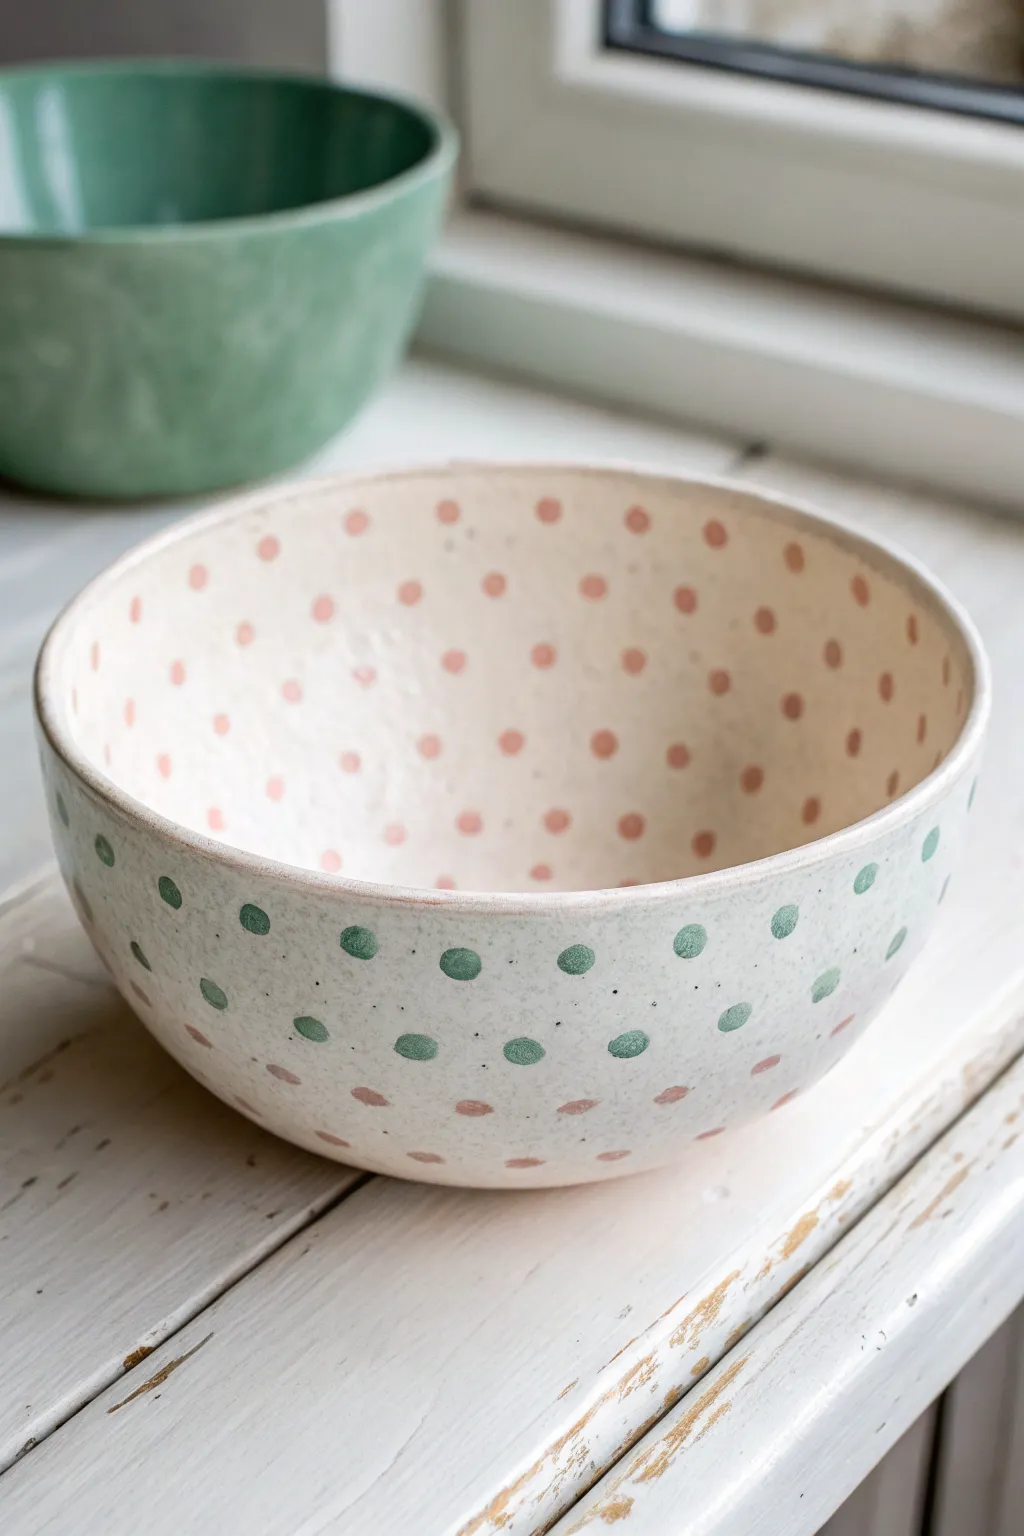
This charming bowl project combines a soft, milky white base with playful polka dots in earthy pink and sage green. The design features a hidden surprise, with warm pink dots speckling the interior, while the exterior showcases a sweet dual-tone pattern.
Step-by-Step Tutorial
Materials
- Bisque ceramic bowl (ready to paint)
- Creamy white underglaze (speckled or plain)
- Sage green underglaze
- Terracotta pink underglaze
- Wide soft fan brush (for base coats)
- Round sponge dabber or small round brush (size 4 or 6)
- Damp sponge for cleaning
- Clear dipping glaze (for post-painting firing)
- Palette or small dish for paints
Step 1: Base Preparation
-
Clean the Bisque:
Start by wiping down your bisque bowl with a clean, slightly damp sponge to remove any dust or kiln residue. This ensures the glaze adheres perfectly to the surface. -
Interior Base Coat:
Load your wide fan brush with the creamy white underglaze. Apply a smooth, even layer to the entire inside of the bowl, starting from the center and working your way up to the rim. -
Exterior Base Coat:
Flip the bowl over (carefully supporting it) and apply the same creamy white underglaze to the outside. Brush in long, horizontal strokes to minimize visible brush marks. -
Second Layer:
Once the first coat is dry to the touch (it will look chalky), apply a second coat to both the inside and outside. I find that three thin coats usually provide the best opaque coverage, so verify your specific glaze instructions. -
Rim Smoothing:
Check the rim of the bowl. If globs of glaze have gathered there, gently smooth them out with your finger or a slightly damp brush to ensure a clean edge.
Uneven Dots?
If your hand-painted circles look wobbly, use the eraser end of a pencil as a stamp. Dip it in underglaze and press for perfect, uniform circles every time.
Step 2: Interior Dotting
-
Load the Pink:
Pour a small amount of the terracotta pink underglaze onto your palette. If using a brush, load it fully; if using a sponge dabber, tap it into the paint until coated but not dripping. -
Start from the Center:
Begin placing your pink dots inside the bowl, starting at the very bottom center. Press gently to create round, uniform circles. -
Work Upwards:
Create concentric circles of dots moving up the walls of the bowl. Offset the dots in each new row so they sit in the gaps of the row below (like bricks), rather than stacking them directly on top of each other. -
Check Consistency:
As you reach the rim, ensure your spacing remains consistent. Don’t worry if the dots aren’t perfectly identical; that handmade inconsistency adds charm.
Step 3: Exterior Pattern
-
Switch to Green:
Clean your brush or dabber thoroughly, or switch to a fresh tool. Load up the sage green underglaze. -
Top Exterior Row:
Starting near the rim on the outside of the bowl, paint your first horizontal row of green dots. Keep them spaced about half an inch apart. -
Second Green Row:
Paint a second row of green dots below the first, staggering them in the windows of the first row. -
Transition to Pink:
Switch back to the terracotta pink color. Begin painting rows of pink dots below the green ones, continuing the staggered brick pattern down toward the base of the foot. -
Fade Out:
Paint the final row of pink dots near the very bottom. You can make these slightly smaller if space is tight near the foot of the bowl. -
Speckling (Optional):
If you want that extra speckly clay look seen in the photo but are using plain white glaze, you can flick a toothbrush with thinned black or brown underglaze very lightly over the piece.
Pro Tip: Layer Density
For the dots to stand out boldly against the cream background, dab them twice. One coat might be too translucent after firing; a second dab adds richness.
Step 4: Finishing
-
Final Inspection:
Look over your work for any accidental smears or drops of glaze where they shouldn’t be. Gently scrape them away with a craft knife or wipe with a damp Q-tip. -
Drying Time:
Let the piece dry completely overnight. The underglaze should feel bone dry before you take it to be glazed and fired. -
Clear Glaze & Fire:
Dip the entire bowl in a clear dipping glaze. This will seal your design and make it food-safe after it goes through the kiln firing process.
Once fired, this delightful speckled bowl will be ready for your morning cereal or a cozy soup


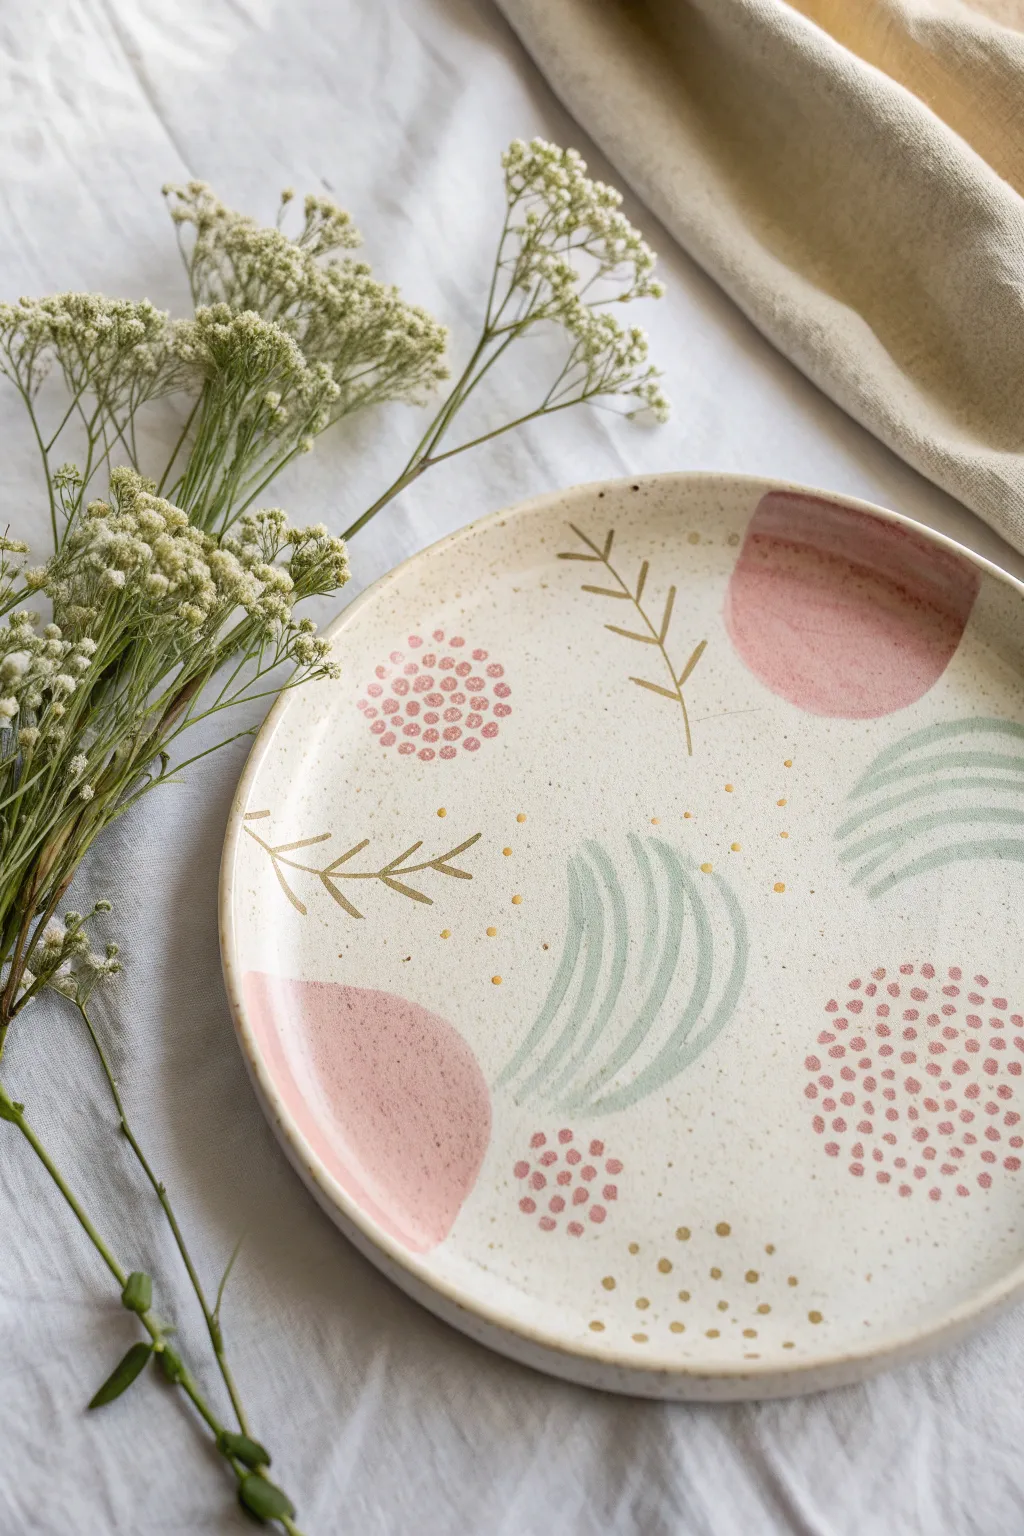
Simple Pastel Stripes
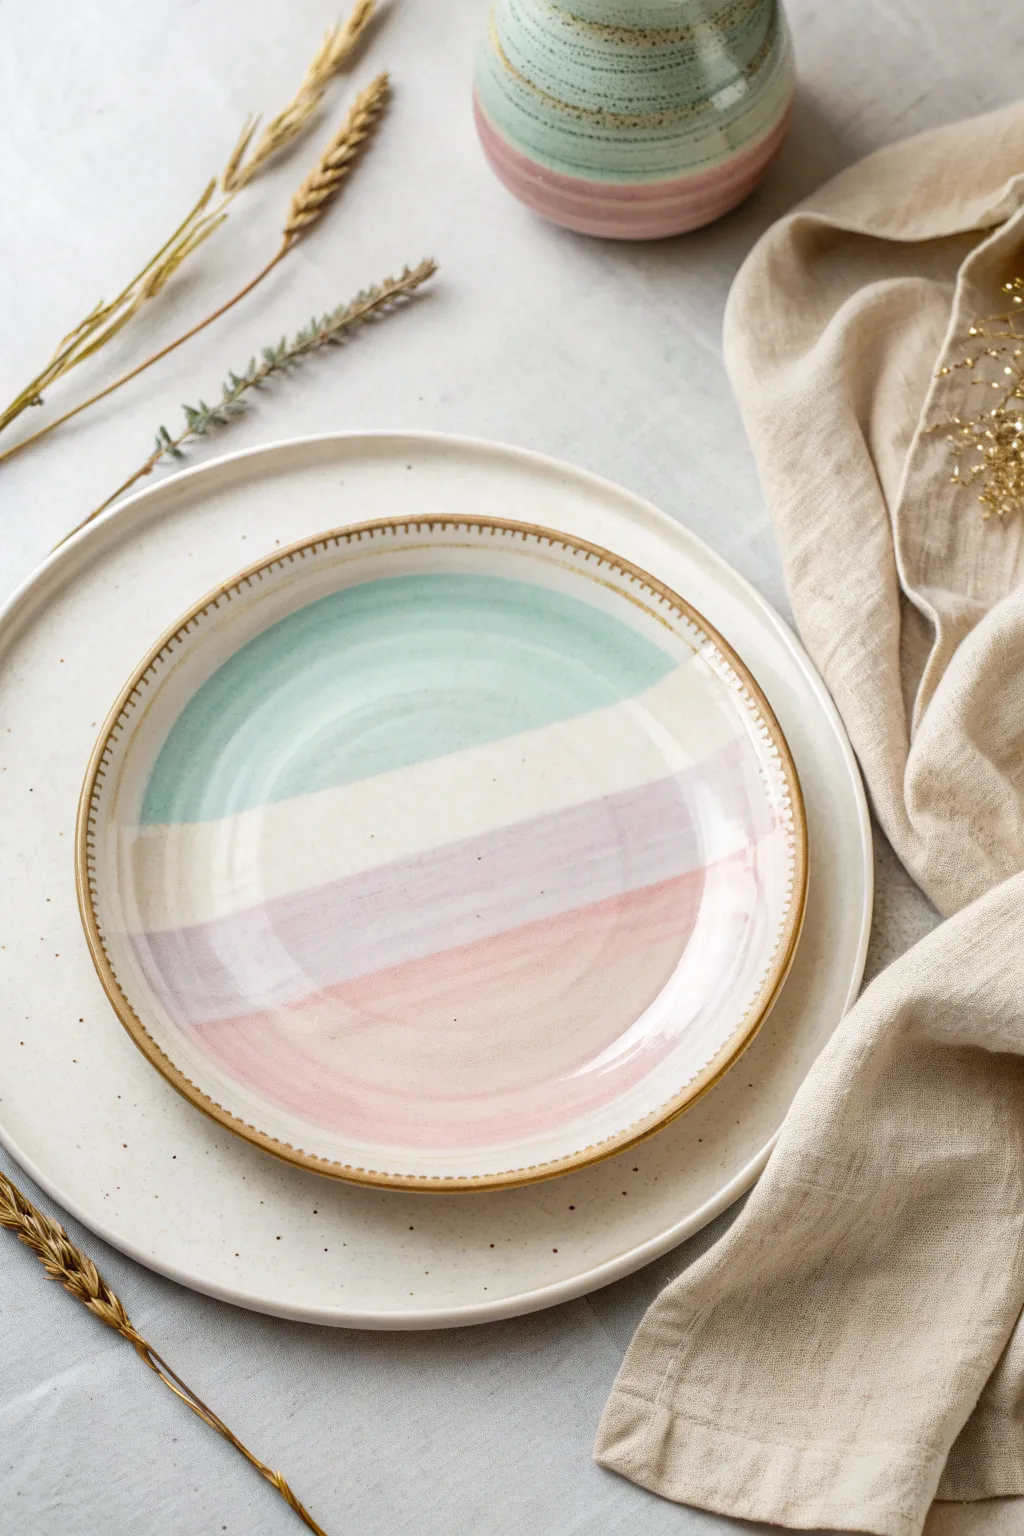
Transform a plain ceramic bisque plate into a dreamy, coastal-inspired piece with just a few soft hues. This design uses gentle, sweeping curves and a rustic rim to create a look that is both modern and wonderfully handmade.
Step-by-Step Guide
Materials
- Small round ceramic bisque plate (salad or dessert size)
- Underglaze paints: Muted teal/mint, pale lavender, soft coral pink, and honey brown
- Wide, flat synthetic paintbrush (about 1 inch width)
- Fine liner brush (size 0 or 00)
- Sponge and water bowl
- Clear dipping glaze
- Kiln (or access to a studio firing service)
Step 1: Preparation & Base Coat
-
Clean the bisque:
Begin by wiping down your ceramic bisque plate with a slightly damp sponge. This is crucial for removing any ceramic dust that might resist the glaze. -
Mix your base tone:
If your bisque isn’t already a warm white, you may want to apply a very watered-down wash of cream underglaze. However, for a natural look like the photo, leaving the raw creamy bisque color exposed as the ‘white’ stripe works perfectly.
Uneven Stripes?
Don’t panic if your curves aren’t perfect! Gently scratch away excess dry paint with a toothpick or wooden skewer to refine the edges before firing.
Step 2: Painting the Pastel Waves
-
Load the wide brush:
Dip your wide, flat brush into the muted teal or mint underglaze. Ensure the brush is fully loaded but not dripping. -
Apply the top curve:
Place your brush near the top third of the plate. In one smooth, confident motion, sweep the brush across the surface creating a slight downward curve. Don’t worry about perfectly straight edges; a slightly organic wave looks more natural. -
Second coat for opacity:
Let that first teal swipe dry until it loses its sheen (usually just a minute or two). Apply a second coat directly over the first to ensure the color is solid and consistent. -
Plan the negative space:
Leave a gap of about an inch or two below the teal stripe. This unpainted area will serve as your cream-colored stripe. -
Paint the middle stripe:
Using the pale lavender underglaze and a clean wide brush, paint a second curved swathe below the gap. Mimic the curve of the first stripe so they look like gentle waves flowing together. -
Layering the lavender:
Just like the teal, apply a second coat of lavender once the first is dry to touch. Underglazes often fire lighter than they look when wet, so good coverage helps. -
Add the bottom stripe:
For the bottom section, switch to your soft coral pink. Fill in the remaining crescent shape at the bottom of the plate, following the curve established by the lavender band above it. -
Final opacity check:
Apply your second or third coat of pink. I find that pink pigments can sometimes be a bit translucent, so a third thin layer ensures that lovely blush tone really pops after firing.
Step 3: Detailing the Rim
-
Prepare the brown glaze:
Squeeze out a small amount of honey brown underglaze on your palette. Add a tiny drop of water to improve the flow for fine detail work. -
Paint the rim edge:
Using your fine liner brush, carefully paint a thin line along the very top edge of the plate’s rim. Use the physical edge of the plate as a guide to keep your hand steady. -
Create the hatch marks:
Starting at the top, make tiny, short vertical dashes perpendicular to the rim line you just painted. These should be spaced evenly, resembling stitching or the teeth of a comb. -
Work in small sections:
Rotate the plate as you go, painting about an inch of hatch marks at a time. This prevents you from smudging wet paint with your hand. -
Soften the look:
If the brown marks look too harsh or dark, you can gently dab them with a nearly-dry sponge once set to give them a weathered, vintage appearance.
Level Up: Speckled Clay
For a rustic, pottery-studio look, flick a stiff toothbrush loaded with watered-down brown paint over the finished design to add speckles before glazing.
Step 4: Finishing & Firing
-
Clean up imperfections:
Check the back of the plate for any stray smudge marks from your fingers and wipe them away with a damp sponge. -
Clear glaze application:
Once the underglaze is bone dry (give it at least 20 minutes), the piece needs to be dipped in clear glaze. If you are at a studio, they usually handle this step for you. -
Firing:
Fire the piece in the kiln according to the clay and glaze specifications (typically Cone 06 or 04 for earthenware). This final step will make the plate food-safe and shiny.
Once fired, you will have a serene, custom piece perfect for morning toast or display


Dainty Daisy Ring

Transform a simple ceramic bowl into a sweet cottagecore centerpiece with this delicate floral design. Using a dusty pink base and crisp white petals, you’ll create a charming ring of daisies that feels both vintage and fresh.
Step-by-Step Tutorial
Materials
- Bisque ceramic bowl (shallow, pasta-bowl style)
- Dusty pink underglaze
- Bright white underglaze
- Golden yellow underglaze
- Forest green underglaze
- Dark blue underglaze
- Fan brush (for base coat)
- Small round brush (size 2 or 4)
- Fine liner brush (size 0 or 00)
- Pencil
- Clear dipping glaze
Step 1: Base Coat Application
-
Clean the bisque:
Start by wiping down your ceramic bowl with a slightly damp sponge to remove any kiln dust. This ensures the glaze adheres smoothly without pinholes. -
Apply the background color:
Using a fan brush, apply a coat of dusty pink underglaze to the entire inside of the bowl. Make your strokes long and even to minimize texture. -
Build opacity:
Allow the first layer to dry until it’s chalky to the touch. Apply a second and third coat of the pink, alternating the direction of your brushstrokes each time for solid, opaque coverage. -
Dry completely:
Let the pink base dry completely before moving on to the detailed work. If it’s damp, your pencil lines might carve into the clay surface.
Loose Lines Look Best
Don’t try to make your outlines steady. The charm of this design comes from the jittery, sketched quality of the black lines. Hold the brush further back on the handle to encourage a looser stroke.
Step 2: Painting the Daisies
-
Plan positions:
Lightly visualize where your flowers will sit. Aim for about 6-8 daisies spaced evenly around the slanted inner rim of the bowl. -
Paint the centers:
Using your small round brush loaded with golden yellow, paint circular centers for each daisy. They don’t need to be perfect circles; slight organic irregularities look more natural. -
Add the first petals:
Switch to bright white underglaze. Press the belly of your round brush down near the yellow center and pull outward to create a petal shape. Paint four petals in a ‘plus’ sign shape first to establish symmetry. -
Fill in petals:
Fill in the gaps between your four main petals with one or two more petals each. I find it helpful to reload the brush frequently to keep the white crisp against the pink background. -
Second coat for petals:
White underglaze can be translucent. Once the first layer of petals is dry, carefully dab a second layer of white on top to make them pop. -
Outline the flowers:
With a fine liner brush and black or very dark grey underglaze (diluted slightly with water for flow), outline each petal and the center. Keep the lines incredibly thin and shaky for a sketched look.
Step 3: Adding Greenery
-
Paint stems:
Using the liner brush and forest green, paint thin, curving stems connecting the flowers or flowing freely between them. Vary the direction of the curves for movement. -
Add leaves:
Paint small, simple leaf shapes attached to the stems. A simple ‘press and lift’ motion with a round brush creates a perfect small leaf. -
Outline leaves:
Just as you did with the flowers, use your fine liner and dark underglaze to loosely outline the leaves and stems. This comic-book style outlining defines the dainty shapes.
Add a hidden bumblebee
Hide a tiny painted bee resting on one of the petals or flying in the center of the bowl. Use the same yellow and black from your palette for a fun surprise when you finish your meal.
Step 4: Final Details
-
Add the rim detail:
Dip the tip or handle end of a paintbrush into dark blue underglaze. Dot small points along the very top edge of the rim. -
Create spacing groups:
For the specific look in the photo, group the dots closely together in some areas and leave wider spaces in others, rather than perfectly spacing them like a ruler. -
Clean up:
Check the underside of the bowl for any accidental pink smudges and wipe them away with a clean sponge. -
Glaze and fire:
Once all underglazes are bone dry, dip the piece in clear glaze and fire according to your clay body’s instructions.
Your finished bowl will be a lovely addition to any breakfast table, perfect for holding yogurt or fruit
BRUSH GUIDE
The Right Brush for Every Stroke
From clean lines to bold texture — master brush choice, stroke control, and essential techniques.
Explore the Full Guide
Cherry Pair Motif

Embrace a cozy cottagecore aesthetic with this charming ceramic mug design featuring a classic cherry duo. The speckled cream background gives it a rustic, handmade feel, while the vibrant red fruit adds a perfect pop of color.
Detailed Instructions
Materials
- Bisque ceramic mug (straight-sided)
- Cream or off-white underglaze (speckled variety preferred)
- Bright red underglaze
- Deep green underglaze
- Brown or dark stem underglaze
- Fan brush (for base coats)
- Small round brush (size 2 or 4)
- Fine liner brush (size 00 or 0)
- Clear dipping glaze
- Old toothbrush (if creating speckles manually)
- Pencil
Step 1: Base Preparation
-
Clean the Bisque:
Wipe down your bisque mug with a damp sponge to remove any dust. This ensures the underglaze adheres properly to the surface. -
Apply Base Color:
Using a soft fan brush, apply three even coats of your cream or off-white underglaze to the entire outside of the mug. Allow each coat to dry until it’s chalky and matte before applying the next. -
Add Speckles (Optional):
If your base glaze isn’t pre-speckled, dip an old toothbrush into a watered-down brown underglaze. Run your thumb over the bristles to flick tiny specks onto the mug’s surface. Let this dry completely.
Step 2: Painting the Cherries
-
Sketch the Outline:
Lightly sketch the cherry placement with a pencil. Draw two circles near the bottom half of the mug, slightly overlapping or touching. Remember, the pencil lead will burn off in the kiln, so don’t worry about mistakes. -
First Coat of Red:
With a small round brush, fill in the cherry shapes with bright red underglaze. Make the edges smooth and rounded. -
Layering Color:
Apply a second and third coat of red, ensuring full coverage so the cream background doesn’t show through. Let layers dry in between. -
Adding Highlights:
To give the cherries a juicy, 3D look, add a small curved line of white underglaze or simply leave a tiny unpainted negative space near the top right of each fruit. Soften the edge if using white paint.
Uneven Coverage?
If your red cherries look streaky after drying, dab the paint on in a stippling motion for the final coat rather than dragging the brush. This deposits more pigment.
Step 3: Stems and Leaves
-
Drawing the Stems:
Switch to your fine liner brush. Load it with green or brown underglaze and paint two thin lines curving upwards from the cherries to meet at a central point. -
Forming the Connection:
At the meeting point of the stems, paint a small nub where they would attach to a branch. -
Leaf Outline:
Sketch two leaf shapes extending from the stem junction. One can point upwards providing balance, while the other drifts to the side. -
Filling the Leaves:
Use the small round brush and deep green underglaze to fill in the leaves. Apply 2-3 coats for solid opacity. -
Adding Textures:
Once the green is dry, maintain a very steady hand and use the liner brush with a slightly darker green or diluted black to paint a central vein down each leaf for definition.
Make it a Set
Paint a matching saucer with a ring of smaller, single cherries around the rim to create a delightful breakfast set perfect for display.
Step 4: Finishing Touches
-
Rim Detail:
Dip a sponge or brush very lightly into a brown oxide or underglaze. Gently run it along the very edge of the rim to create a rustic, defined lip. -
Final Inspection:
Check for any unwanted smudges or pinholes in the glaze. You can gently scratch away stray marks with a wooden skewer or clean them up with a damp brush. -
Clear Glazing:
Once the artwork is bone dry, dip the entire mug into a clear transparent glaze. -
Firing:
Fire the mug in the kiln according to the clay and glaze temperature specifications (usually Cone 06 or Cone 6).
Enjoy sipping your morning coffee from this adorably handcrafted piece of fruit art
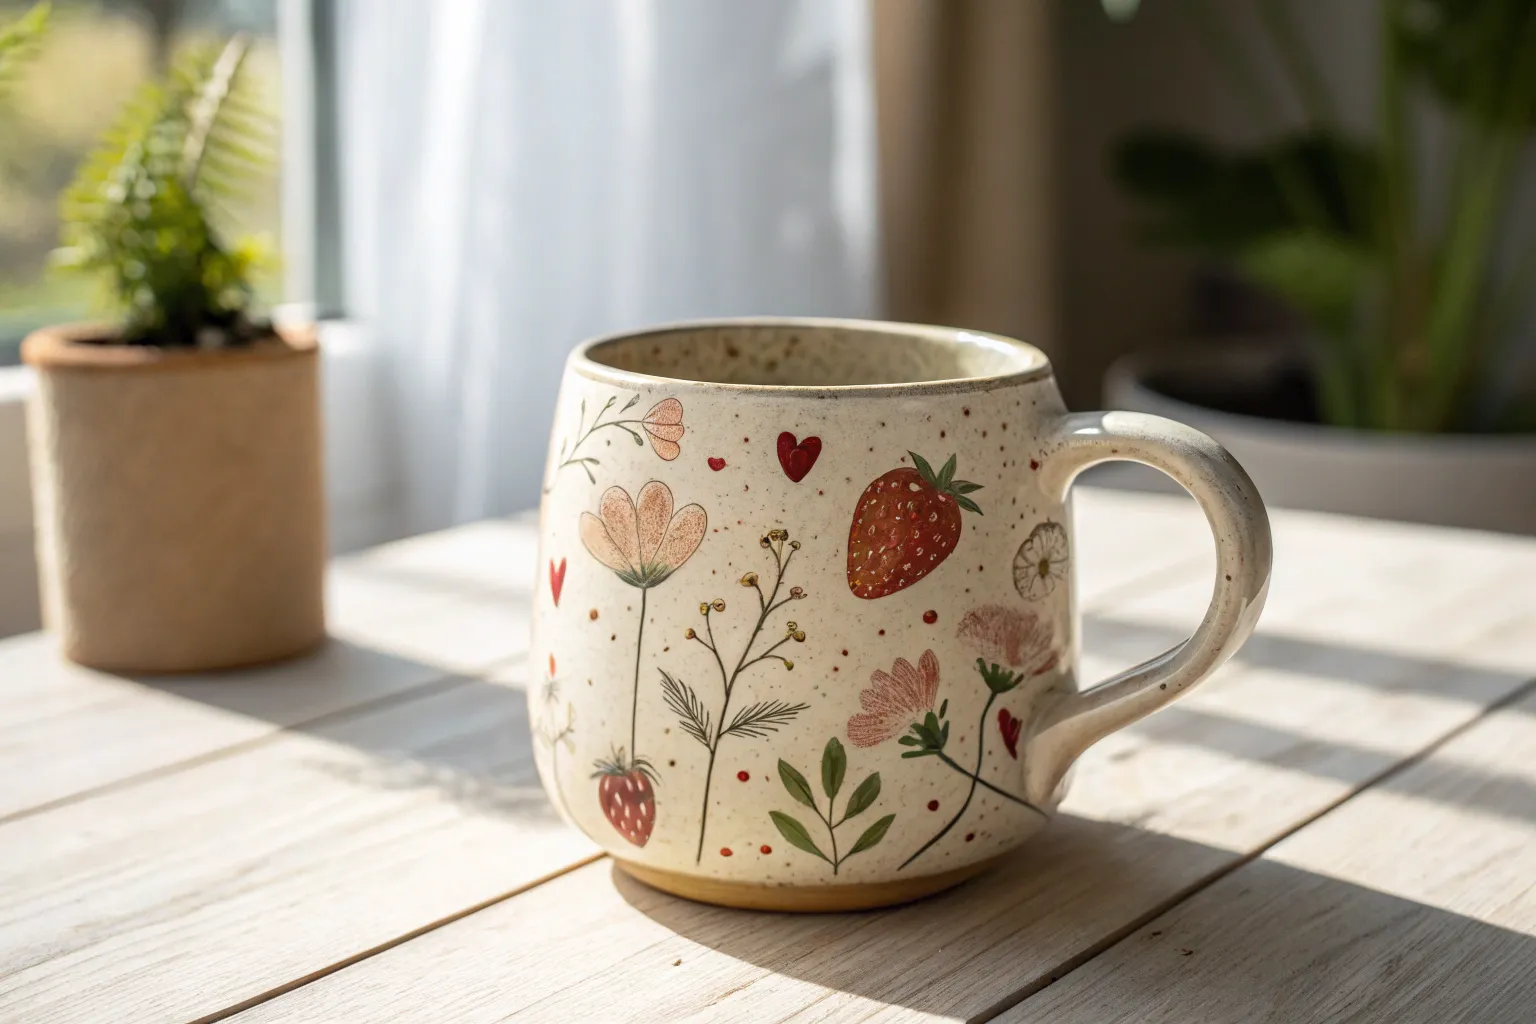
Strawberry Patch Mug
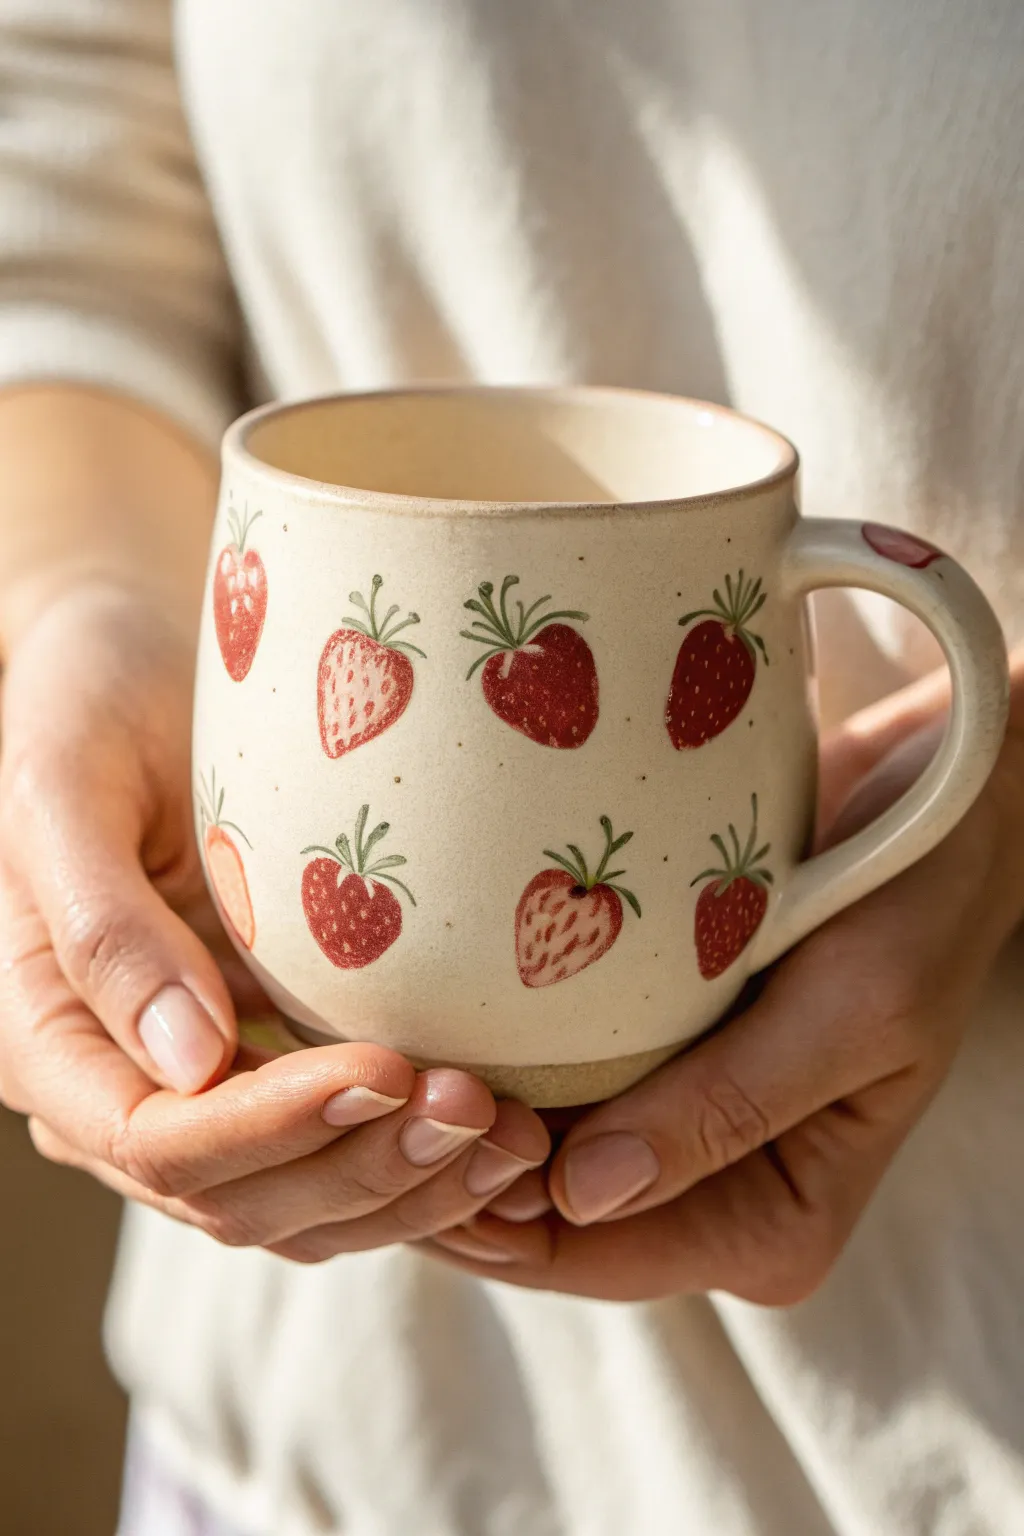
Bring the sweetness of summer into your kitchen with this delightful hand-painted mug featuring a repetitive strawberry motif. The design balances bold red berries with softer, washed-out ones on a speckled cream background for a cozy, rustic feel.
Step-by-Step Tutorial
Materials
- Bisque ceramic mug (rounded shape preferred)
- Underglaze (Cream/Oatmeal)
- Underglaze (Deep Red)
- Underglaze (Light Pink or watered down Red)
- Underglaze (Sage Green)
- Underglaze (Dark Green)
- Speckled glaze (optional, or use a splatter technique)
- Fan brush (for base coat)
- Small round brush (size 2 or 4)
- Fine liner brush (size 0 or 00)
- Clear dipping glaze
- Sponge and water
Step 1: Base Preparation
-
Clean the bisque:
Wipe down the entire mug with a damp sponge to remove any dust or oils from handling. This ensures the glaze adheres properly. -
Apply base color:
Using a fan brush, apply three even coats of a cream or oatmeal underglaze to the entire exterior of the mug. Allow each coat to dry until it’s chalky to the touch before applying the next. -
Add speckles (optional):
If your base glaze isn’t pre-speckled, load a stiff brush with brown underglaze and flick the bristles to create tiny speckles across the surface. Let this dry completely.
Step 2: Painting the Strawberries
-
Plan your placement:
Visualize a grid pattern. You’ll want two or three rows of strawberries, alternating the placement like bricks in a wall. You can lightly sketch the outlines with a pencil; the graphite will burn off in the kiln. -
Paint the solid berries:
Load your small round brush with the deep red underglaze. Paint inverted triangle shapes with rounded corners for the berries. Fill them in solidly, using 2-3 coats for rich opacity. -
Paint the lighter berries:
Alternating with the dark red ones, paint the lighter berries. Use your light pink underglaze, or water down your red slightly for a translucent, watercolor effect. These only need 1-2 coats. -
Add texture to light berries:
While I’m working on the pink berries, I like to take a slightly darker red on a fine brush and add small dashes or dots to simulate seeds, giving them a bit more definition. -
Add seeds to dark berries:
Once the dark red berries are dry, use a fine liner brush with a pale cream or yellow underglaze to dot small seeds onto the surface.
Natural Shape Tip
Don’t make the strawberries perfect triangles. Strawberries are lumpy in nature! Keep the shapes slightly organic and varied for a charming, hand-painted look.
Step 3: Stems and Details
-
Paint the leafy caps:
Using a liner brush and sage green underglaze, paint the leafy tops (calyx) on each berry. Use 3-5 small, quick strokes flicking upward from the top of the berry. -
Add stem definition:
For extra depth, take a tiny amount of dark green on the very tip of your liner brush. Add a thin line down the center of the main stem on a few berries to create shadow. -
Rim detail:
If you want the rim to have that exposed clay look shown in the photo, wipe a very thin line of glaze off the lip with a damp sponge, or paint a thin line of brown oxide wash along the rim. -
Handle accent:
Don’t forget the handle. Paint a single small strawberry or a few green leaves near the top join of the handle for a sweet surprise detail.
Smudged Paint?
If you accidentally smudge red onto the cream background, wait for it to dry completely, then gently scratch the mistake off with a craft knife or needle tool.
Step 4: Finishing
-
Final drying:
Let the mug sit for at least a few hours, or overnight, to ensure all moisture has evaporated from the underglaze layers. -
Clear glaze application:
Dip the entire mug into a clear dipping glaze. Ensure you hold it by the foot or use glazing tongs to get an even coat. -
Foot cleanup:
Wipe the bottom foot of the mug completely clean of glaze with a wet sponge to prevent it from sticking to the kiln shelf. -
Fire the piece:
Fire the mug in the kiln according to the clay and glaze specifications (usually Cone 5 or 6 for stoneware).
Now you have a charming custom mug ready for your morning coffee or tea

PENCIL GUIDE
Understanding Pencil Grades from H to B
From first sketch to finished drawing — learn pencil grades, line control, and shading techniques.
Explore the Full Guide
Lemons With Tiny Leaves
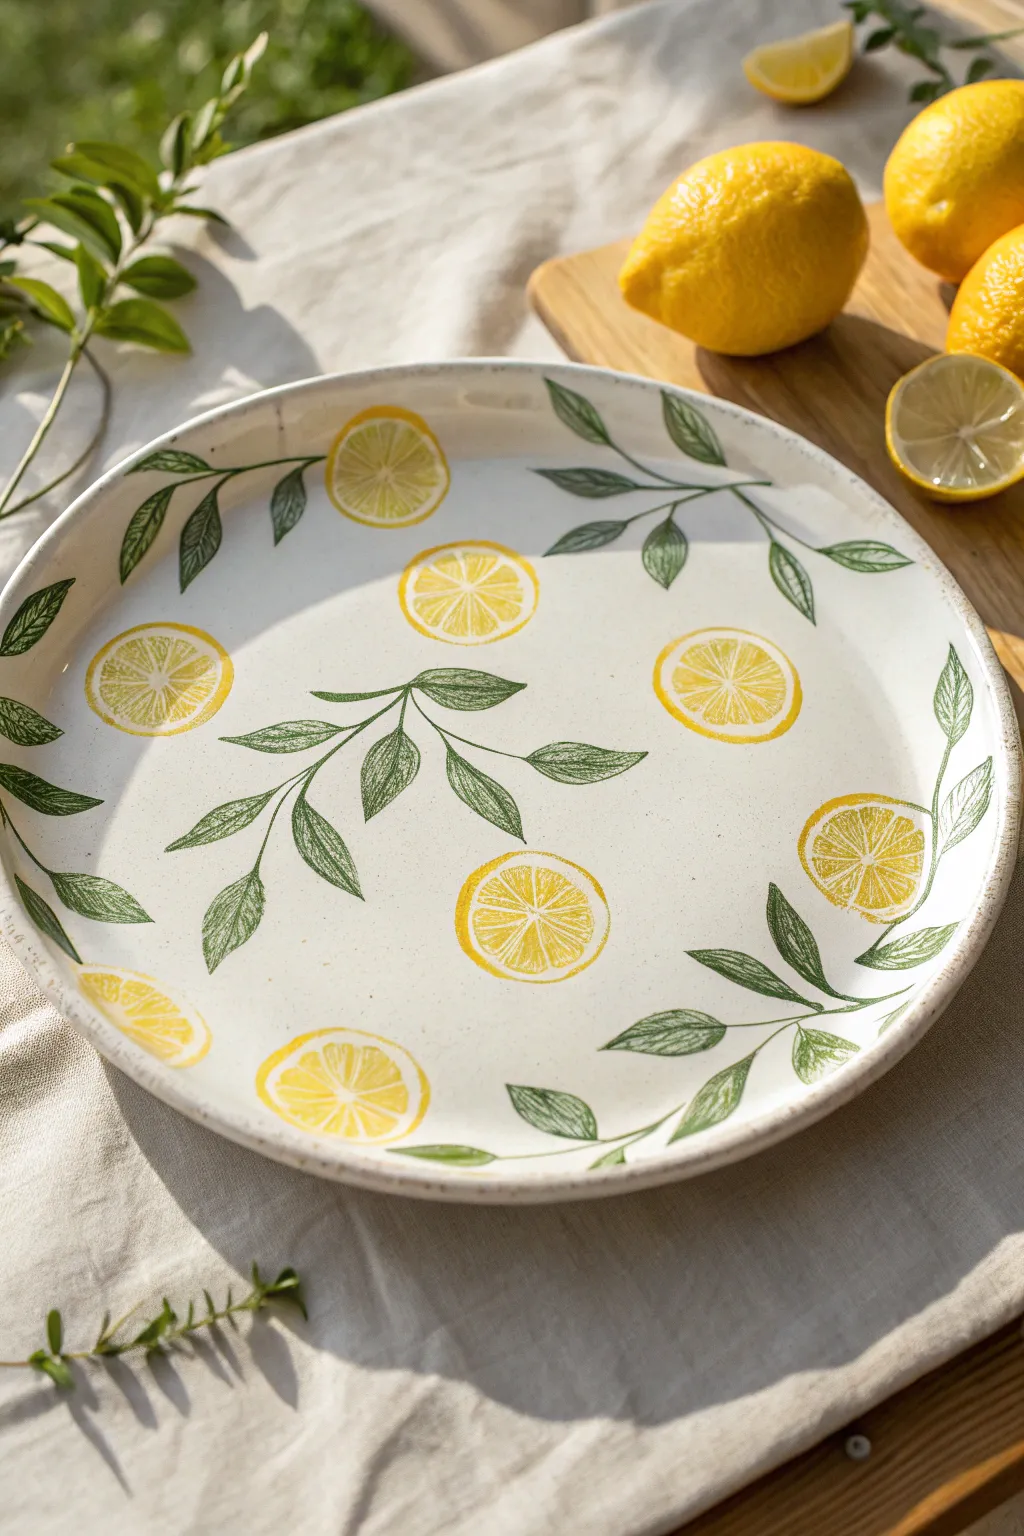
Brighten up your table setting with this cheerful lemon-patterned plate that feels like summertime in Italy. The design features translucent yellow lemon slices scattered among delicate, hand-sketched green leaves on a creamy white background.
Detailed Instructions
Materials
- Bisque-fired ceramic dinner plate (coupe style preferred)
- Underglaze paints: bright lemon yellow, dark vivid green
- Small round paintbrush (size 2 or 4)
- Fine liner brush (size 0 or 00)
- Pencil (standard HB)
- Sponge
- Water cup
- Clear dipping glaze
Step 1: Preparation & Layout
-
Clean the bisque:
Wipe down your bisque plate with a damp sponge. This removes any dust that could prevent the glaze from adhering properly to the clay surface. -
Plan your placement:
Using a pencil, lightly sketch where your lemon slices will go. Aim for a random, organic scatter pattern. Some should be fully on the plate, while others can look like they are ‘cropped’ by the rim. -
Sketch the leaves:
Draw winding vines connecting the open spaces. Add pairs of leaves along the stems, varying their angles to create movement. Don’t worry about heavy pencil lines; they will burn off in the kiln.
Fixing Wobbly Lines
If a stem line gets too thick or shaky, wait for it to dry instantly. Then, use a toothpick or a stiff, damp brush to gently scratch away the excess paint and refine the edge.
Step 2: Painting the Lemons
-
Outline the rind:
Load your small round brush with bright yellow underglaze. Paint a thin circle for the outer rind of each lemon slice. For the ‘cropped’ lemons, just paint the visible arc. -
Create the segments:
Inside each yellow circle, paint triangular wedges to form the fruit segments. Leave small gaps of unpainted white space between the wedges to represent the pith. -
Texturize the fruit:
Instead of filling the wedges with solid color, use a slightly dry brush to stipple or dab the yellow paint inside the segments. This mimics the juicy texture of citrus pulp. -
Second coat (optional):
If your yellow looks too faint, apply a second layer to the rind only. I like to keep the inner fruit segments slightly translucent for a watercolor effect.
Step 3: Adding the Foilage
-
Outline the stems:
Switch to your fine liner brush and the dark green underglaze. carefully trace over your pencil lines for the main stems, keeping the pressure light for a delicate line. -
Outline the leaves:
Trace the outline of each leaf shape attached to the stems. Make sure the points of the leaves are sharp and defined. -
Add leaf veins:
Draw a central vein down the middle of each leaf outline. Use very light pressure here to keep the line thinner than the outline. -
Detail the texture:
Add tiny, diagonal hatching lines inside the leaves. These should angle from the center vein outward, mimicking the texture of a real lemon leaf. -
Vary the density:
Don’t feel the need to fill every leaf perfectly even. Some scratching can be closer together to create darker areas, while wider spacing creates highlights.
Add Dimension
Mix a tiny dot of orange into your yellow underglaze. Use this slightly warmer shade to add a small shadow to just one side of each lemon rind for a rounded, 3D effect.
Step 4: Finishing Touches
-
Check for smudges:
Look over the white background areas. If you accidentally smudged any green or yellow, gently scrape it away with a craft knife or a clean, stiff brush. -
Sign your work:
Don’t forget to flip the plate over and sign your name or date the bottom with the fine liner brush. -
Let it dry completely:
Allow the underglaze to dry until it is chalky and cool to the touch. This usually takes about 20 minutes. -
Glaze and fire:
Dip the entire plate into a clear transparent glaze. Fire the piece in the kiln according to the clay and glaze specifications (usually Cone 06 or 6).
Once fired, you will have a durable, dishwasher-safe piece of art perfect for serving summer salads
Mini Wildflower Meadow
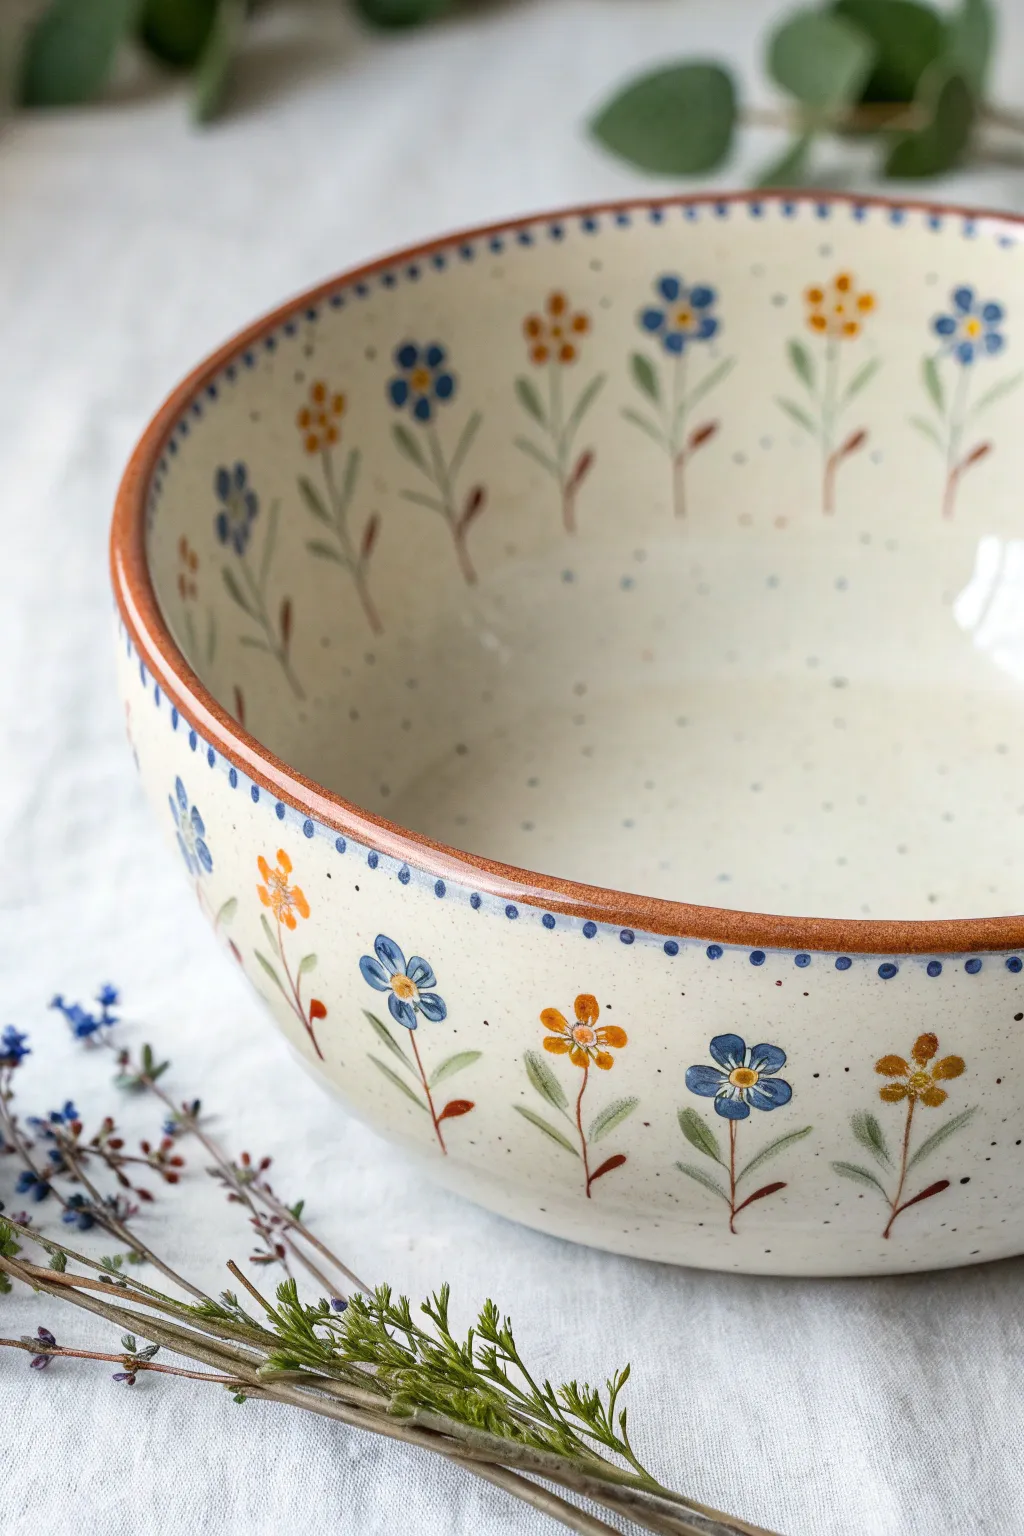
Bring the gentle charm of a summer field to your table with this lovely speckled ceramic bowl. The repeating pattern of blue forget-me-nots and golden buttercups creates a rhythmic, vintage-inspired design that looks beautiful from every angle.
Step-by-Step Tutorial
Materials
- Bisque ceramic bowl (wide, shallow soup or pasta bowl)
- Underglaze pencil (light brown or grey)
- Underglazes: Cornflower Blue, Mustard Yellow/Ochre, Sage Green, Dark Brown
- Round watercolor brushes (size 2 and size 6)
- Fine liner brush (size 0 or 00)
- Sponge
- Clear dipping glaze
- Kiln access
Step 1: Preparation & Planning
-
Clean the bisque:
Begin by wiping down your bisque bowl with a damp sponge. This removes any dust that might prevent the glaze from adhering properly. -
Mark your spacing:
Visualizing the bowl as a clock face, use your underglaze pencil to make faint tick marks around the outside rim to space your flowers evenly. Aim for about 1.5 to 2 inches between each stem. -
Sketch the stems:
Lightly sketch vertical lines extending up from the base of the bowl at each tick mark. Vary the heights slightly for a natural look, but keep them roughly uniform.
Natural Speckle Hack
If you struggle with the ‘flick’ technique for speckles, use a ‘Speckled Buff’ clay instead of white clay. The clay itself will create lovely iron spots when fired.
Step 2: Painting the Exterior
-
Paint the flower centers:
Using the size 2 brush and Mustard Yellow, dab small circles at the top of alternating stems. I like to keep these centers slightly irregular rather than perfect dots. -
Add blue petals:
On the stems without yellow centers, painting five small teardrop shapes using Cornflower Blue to create the forget-me-not blossoms. Leave a tiny empty space in the very center. -
Add yellow petals:
On the stems with existing yellow centers, paint five Mustard Yellow petals around them. These will be your buttercups or small wildflowers. -
Complete the blue centers:
Once the blue petals are dry to the touch, add a tiny dot of white or very pale yellow in the center of each blue flower. -
Paint the stems and leaves:
Switch to your Sage Green and the fine liner brush. Trace over your pencil stem lines. Add two simple leaves near the base of each stem, sweeping outward like open arms. -
Add details:
With the Dark Brown underglaze and your finest brush, add tiny stamens or center details to the flowers and a very thin line defining the bottom of the stem.
Level Up: Bee Friends
Add a tiny bumblebee buzzing between two of the flowers! Use yellow for the body, black stripes, and very watery light blue for translucent wings.
Step 3: Painting the Interior
-
Mirror the pattern:
Repeat the exact same flower spacing and painting process on the inside of the bowl. Ensure the internal flowers align with the external ones for a cohesive look. -
Create the speckles:
Dilute a small amount of Dark Brown underglaze with water. Load an old toothbrush or stiff brush and flick the bristles to create a fine mist of speckles across the entire interior surface.
Step 4: Finishing Touches
-
Rim detail:
Using a steady hand and a size 6 brush loaded with Dark Brown (or a rust color), paint a solid band along the top rim of the bowl. -
Dotted border:
Just under the rim on the outside, use the back end of a small paintbrush dipped in Cornflower Blue to stamp a row of evenly spaced dots. -
Glaze and fire:
Once all underglaze is completely dry, dip the entire bowl in clear transparent glaze. Wipe the foot clean and fire in the kiln according to your clay’s specifications.
Now you have a charming, meadow-inspired bowl perfect for your morning cereal or a warm soup


Cute Gingham Checks
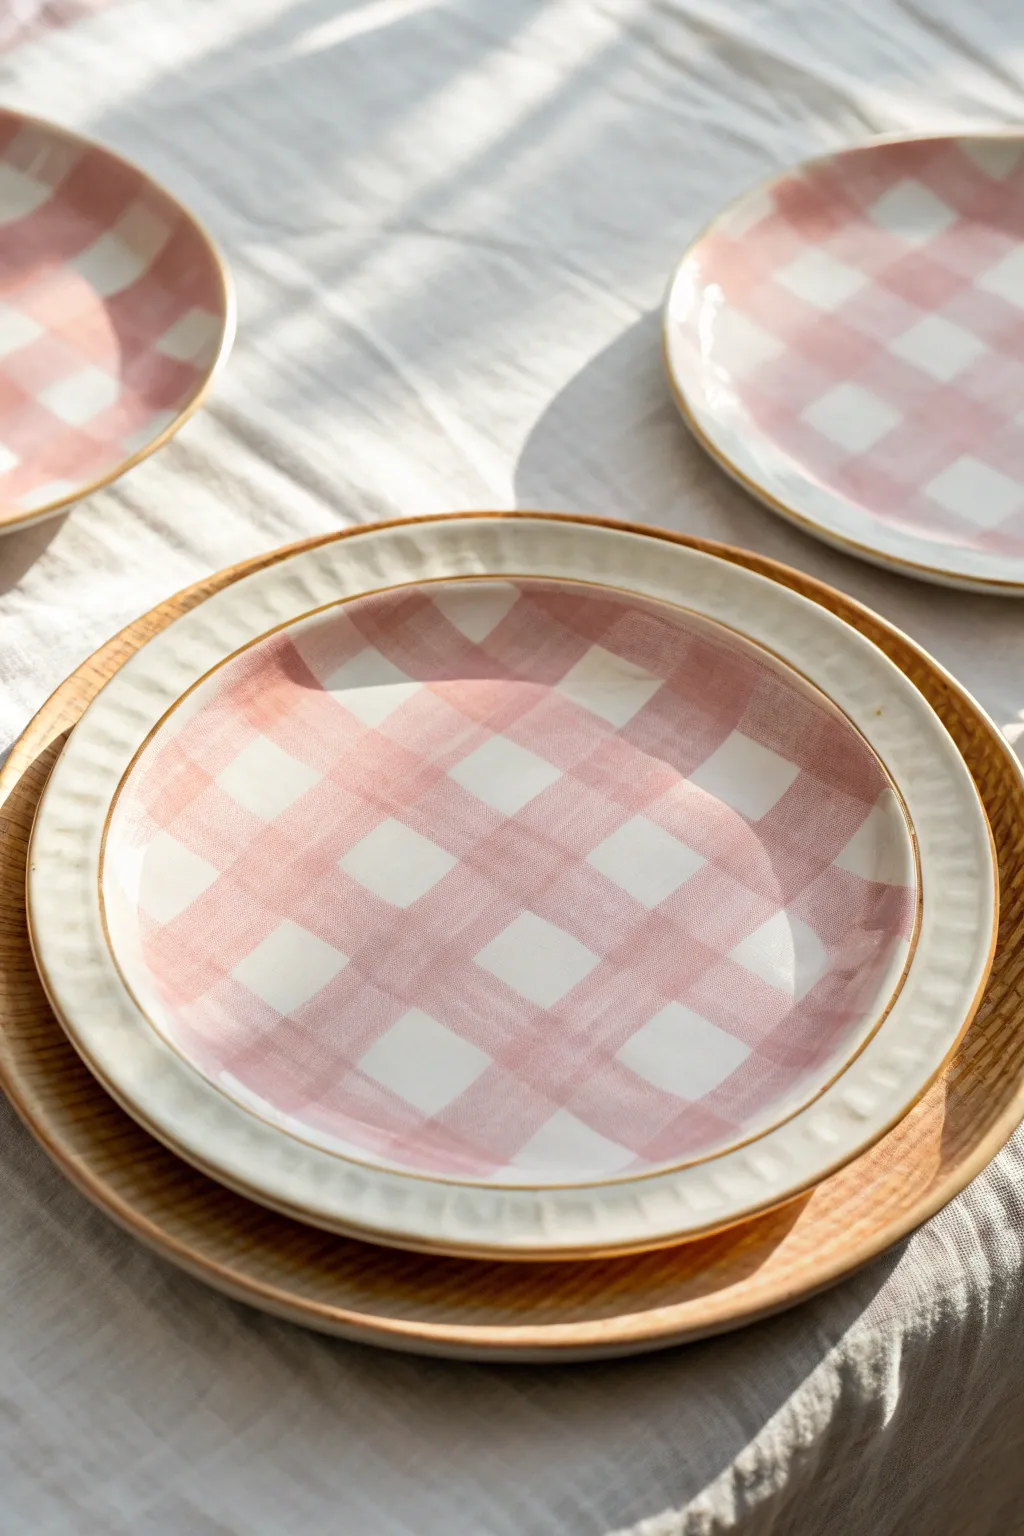
Embrace the cottagecore aesthetic with this charming pink gingham plate design that brings warmth to any table setting. The hand-painted checks create a lovely watercolor effect, proving that straight lines don’t need to be perfect to be beautiful.
How-To Guide
Materials
- Bisque ceramic salad plate with a rim
- Light pink underglaze
- Darker rose pink underglaze (optional, for mixing)
- Clear dipping glaze
- Flat shader brush (approx. 3/4 inch wide)
- Ruler or straight edge
- Pencil (standard #2)
- Small round brush (for touch-ups)
- Bowl of water
- Damp sponge
Step 1: Preparation & Planning
-
Wipe it down:
Begin by gently wiping your bisque plate with a damp sponge. This removes any ceramic dust that could prevent the glaze from adhering properly to the surface. -
Find the center:
Using your pencil and ruler, lightly mark the center point of the plate. Don’t worry about the pencil marks; they will burn off completely in the kiln firing process. -
Map the grid:
Lightly draw a grid of evenly spaced vertical and horizontal lines across the entire face of the plate using your ruler. I like to space mine about 1 inch apart to create nice, chunky checks.
Grid Master Trick
Use masking tape instead of pencil lines to block out stripes! It keeps lines crisp and speeds up painting, but peel it off while the glaze is slightly damp to avoid chipping.
Step 2: Painting the Base Stripes
-
Prepare your wash:
Dilute your light pink underglaze slightly with water. You want a consistency that is translucent, almost like watercolor, rather than opaque paint. -
First vertical stripe:
Load your flat shader brush with the diluted pink wash. Start painting your first vertical stripe, skipping every other column in your pencil grid. -
Complete vertical columns:
Continue painting vertical stripes across the plate, maintaining that ‘every other one’ rhythm. Keep your brush strokes loose; the visible texture adds to the handmade charm. -
Let it dry:
Allow these vertical stripes to dry completely. The surface should look matte and feel dry to the touch before you proceed to cross them.
Step 3: Creating the Check Pattern
-
First horizontal stripe:
Using the same diluted pink wash, paint your first horizontal stripe across the plate, perpendicular to your first set. Follow your pencil grid carefully. -
Observe the overlap:
Notice as you paint over the vertical stripes, darker squares naturally form where the two layers of glaze intersect. This is the magic of the gingham effect! -
Finish the grid:
Paint the remaining horizontal stripes, skipping every other row just like before. Ensure you are maintaining consistent pressure to keep the wash even. -
Assess the transparency:
Check your ‘dark’ squares. If the overlap isn’t creating enough contrast, you can go back over just those intersection squares with a second light coat of wash. -
Rim detail:
For a polished look, run a thin line of the undiluted pink glaze around the very edge or rim of the plate using a steady hand and a small round brush.
Mix & Match Palette
Try a mismatched set! Paint each plate in a different pastel hue—sage green, soft lilac, or butter yellow—to create a stunning spring picnic collection.
Step 4: Finishing & Firing
-
Dry thoroughly:
Let the entire plate dry for at least 20 minutes. The underglaze must be totally moisture-free before glazing. -
Clear glaze application:
Dip the plate into clear dipping glaze using tongs. Ensure an even coat covers the entire piece, sealing in your design. -
Clean the foot:
Wipe the foot (bottom ring) of the plate clean with a sponge so it doesn’t stick to the kiln shelf during firing. -
Fire it up:
Fire the plate in the kiln according to the specific temperature guidelines for your chosen clay and glaze—usually cone 06 or cone 6.
Once fired, these delightful plates are ready to turn your next breakfast into a cozy, stylish occasion
Cozy Mushroom Cluster
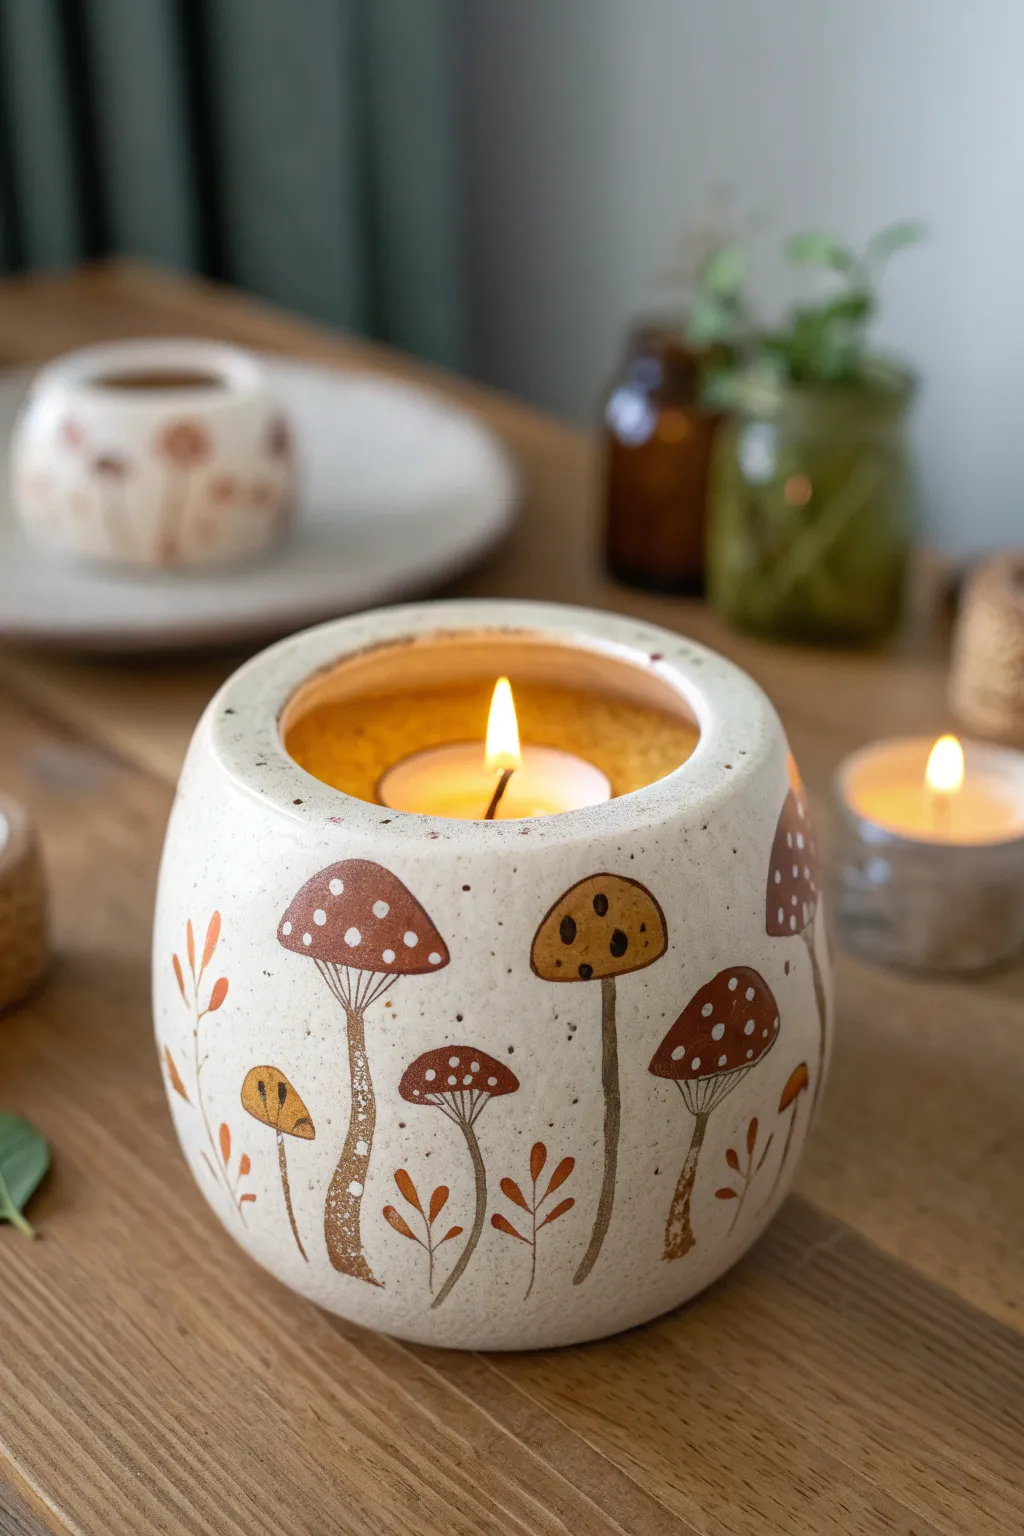
Bring the charm of a forest floor into your home with this adorable mushroom-themed ceramic candle holder. Featuring a variety of whimsical fungi in warm autumn tones, this project transforms a simple bisque sphere into a cozy centerpiece perfect for tea lights.
Step-by-Step Tutorial
Materials
- Bisque ceramic sphere candle holder (white earthenware)
- Underglaze paints: Warm brown, dark chocolate brown, ochre/mustard yellow, terracotta orange
- Underglaze pencil (light brown or grey)
- Speckled glaze (clear or translucent cream with speckles)
- Small round detail brushes (sizes 0 and 2)
- Flat shader brush (size 4)
- Sponge
- Water cup and palette
- Clear dipping glaze (if not using speckled glaze)
Step 1: Preparation & Sketching
-
Clean the bisque:
Begin by wiping down your bisque ware with a slightly damp sponge. This removes any dust that could prevent the glaze from adhering properly. -
Plan the composition:
Visualize where your mushroom clusters will go. You want them evenly spaced around the belly of the pot, varying in height to create a natural, organic look. -
Sketch the outlines:
Using a light underglaze pencil, lightly sketch the mushroom shapes directly onto the pottery. Draw simple caps—some rounded like buttons, others wide and flat—and varying stem thicknesses. Add small leaf sprigs between the fungi.
Step 2: Painting the Mushrooms
-
Base coat the caps:
Start painting the mushroom caps. Use the warm brown for the larger, classic toadstool shapes. Apply smooth, even strokes to fill the outline. -
Add variety with ochre:
For the smaller or flatter mushrooms, switch to your ochre or mustard yellow underglaze. Mixing up the colors prevents the design from looking too uniform. -
Paint the terracotta accents:
Use the terracotta orange for the tiny leaf sprigs and perhaps a few smaller mushroom caps to add warmth to the palette. -
Apply a second coat:
Once the first layer is dry to the touch, apply a second coat to all colored areas to ensure the final fired color is solid and opaque. -
Paint the stems:
Using a diluted wash of the light brown or a cream underglaze, paint the stems. You want these to be slightly translucent to look delicate. I like to keep the brush slightly drier here for texture.
Fixing Smudges
If you accidentally smear a mushroom cap, wait for it to fully dry. Then, gently scratch the mistake off with a toothpick or a stiff brush before retouching.
Step 3: Detailing & Texture
-
Add cap spots:
Dip the handle end of a paintbrush into white or cream underglaze. Dot it onto the dry brown mushroom caps to create the classic ‘fly agaric’ spots. -
Create texture on yellow caps:
For the ochre mushrooms, use your smallest brush and dark brown paint to add tiny dots or porous textures, giving them a different species look. -
Outline the stems:
With a size 0 brush and dark chocolate brown underglaze, very delicately outline the stems. Add small, broken lines inside the stem for fibrous texture. -
Detail the gills:
On the taller mushrooms where the underside of the cap is visible, use the dark brown to paint fine, straight lines radiating from the stem to the cap edge to represent gills. -
Refine the foliage:
Go back to your terracotta leaf sprigs and add a thin central vein with your dark brown detail brush to sharpen the look.
Glow Up
Paint the inside of the holder with a gold luster or bright yellow underglaze. When the candle is lit, it will cast a warm, customized glow.
Step 4: Glazing & Finishing
-
Inside preparation:
If you want the inside to have a color, paint the interior with a solid coat of ochre or leave it plain depending on your preference. -
Speckled application:
If using a bottled speckled glaze that serves as a clear coat, apply it over the entire piece now (2-3 coats usually). Ensure you don’t smear your underglaze designs. -
Alternative clear dipping:
If you painted your design on bare bisque and want the speckled look shown in the photo, dip the entire piece in a clear glaze mixed with iron speckles. -
Check the foot:
Wipe the bottom of the candle holder clean with a sponge to ensure no glaze is left there, which would fuse it to the kiln shelf. -
Final dry:
Let the piece dry completely before firing. Any moisture left in the clay can cause issues during the kiln cycle.
Once fired, pop in a tealight and enjoy the warm, autumnal atmosphere your new creation brings to the room
Smiley Stars and Moons

Brighten up your morning coffee routine with this cheerful, celestial-themed mug featuring happy suns, sleepy moons, and scattered stars. The speckled cream background gives it a warm, vintage pottery feel while the rust and mustard yellow tones keep it earthy and grounded.
Detailed Instructions
Materials
- Bisque ceramic mug (approx. 12-14 oz)
- Speckled cream or oatmeal stoneware glaze
- Underglaze in mustard yellow
- Underglaze in rust/terracotta brown
- Fine detail liner brush (size 0 or 00)
- Small round brush (size 2 or 4)
- Pencil for sketching
- Clear dipping glaze (if not using a glossy stoneware glaze)
Step 1: Planning and Base Coat
-
Clean your canvas:
Start by wiping down your bisque mug with a damp sponge. This removes any dust that might prevent the glaze from adhering properly. -
Plan your pattern:
Using a pencil, lightly sketch your layout directly onto the bisque. Draw circle outlines for the suns, crescent shapes for the moons, and scatter a mix of large and small stars in the empty spaces. Don’t press too hard; the pencil lead will burn off in the kiln. -
Apply the background:
Carefully paint around your sketched designs with the speckled cream glaze. You’ll need 2-3 coats for full opacity, letting each coat dry until it loses its sheen before applying the next. Avoid painting inside your sketched shapes for now.
Step 2: Painting the Sun and Moon
-
Fill the suns:
Load your round brush with mustard yellow underglaze. Fill in the circular sun shapes with 3 solid coats to ensure the yellow pops against the background. -
Outline the suns:
Once the yellow is dry to the touch, use your fine liner brush and the rust-colored underglaze to paint a thin outline around the yellow circle. I like to keep a steady hand here by resting my pinky on the table. -
Add sun faces:
With the liner brush and rust color, add the facial features: two small vertical ovals for eyes and a wide, U-shaped smile. Add small perpendicular lines at the ends of the smile for distinct cheeks. -
Paint the moons:
For the crescent moons, paint the interior shape with the mustard yellow. Just like the suns, apply 3 coats for solid coverage. -
Detail the moons:
Outline the crescent shape with the rust color. Then, draw a simple happy face—two vertical dashes for eyes and a simple curve for the mouth—floating near the crescent, rather than inside it.
Steady Hands
For the crispest lines on the curved surface, place the mug on a banding wheel. Rotate the wheel slowly while moving your brush to keep lines smooth.
Step 3: Creating the Stars
-
Draw open stars:
Using the liner brush and rust underglaze, paint the outlines of large, five-pointed stars. These are ‘open’ stars, meaning you won’t fill them in, letting the raw bisque or background show through. -
Paint solid stars:
Fill a few medium-sized star shapes completely with the rust color for variety. -
Add tiny accents:
Sprinkle in tiny, solid rust-colored asterisk stars or dots to fill any awkward negative spaces between the larger elements. -
Rim the edges:
Dip your brush in the rust color and run it along the rim of the mug to create a finished border. Do the same along the very bottom edge where the wall meets the base.
Color Pop
Make the stars sparkle by adding a tiny dot of white glaze to the center of the rust-colored stars or the eyes of the smiley faces.
Step 4: A Surprise Inside
-
Decorate the interior:
Don’t forget the inside! Paint a single open star outline near the inner rim with the rust color. You can also paint the interior walls with the speckled cream glaze. -
Refine the speckles:
If your background glaze doesn’t have built-in speckles, you can create them now. Dip a toothbrush into watered-down brown glaze and gently flick it over the mug for that splatter effect. -
Final clear glaze:
If you used underglazes on raw bisque without a glossy background glaze, dip the entire mug in a clear dipping glaze. If you used a stoneware glaze for the cream background, you can likely skip this step depending on the product instructions. -
Fire it up:
Let the mug dry completely for at least 24 hours before firing it in the kiln according to your glaze’s cone specifications.
Now you have a cozy mug that greets you with a smile every single sip
Happy Rainbow Ombre
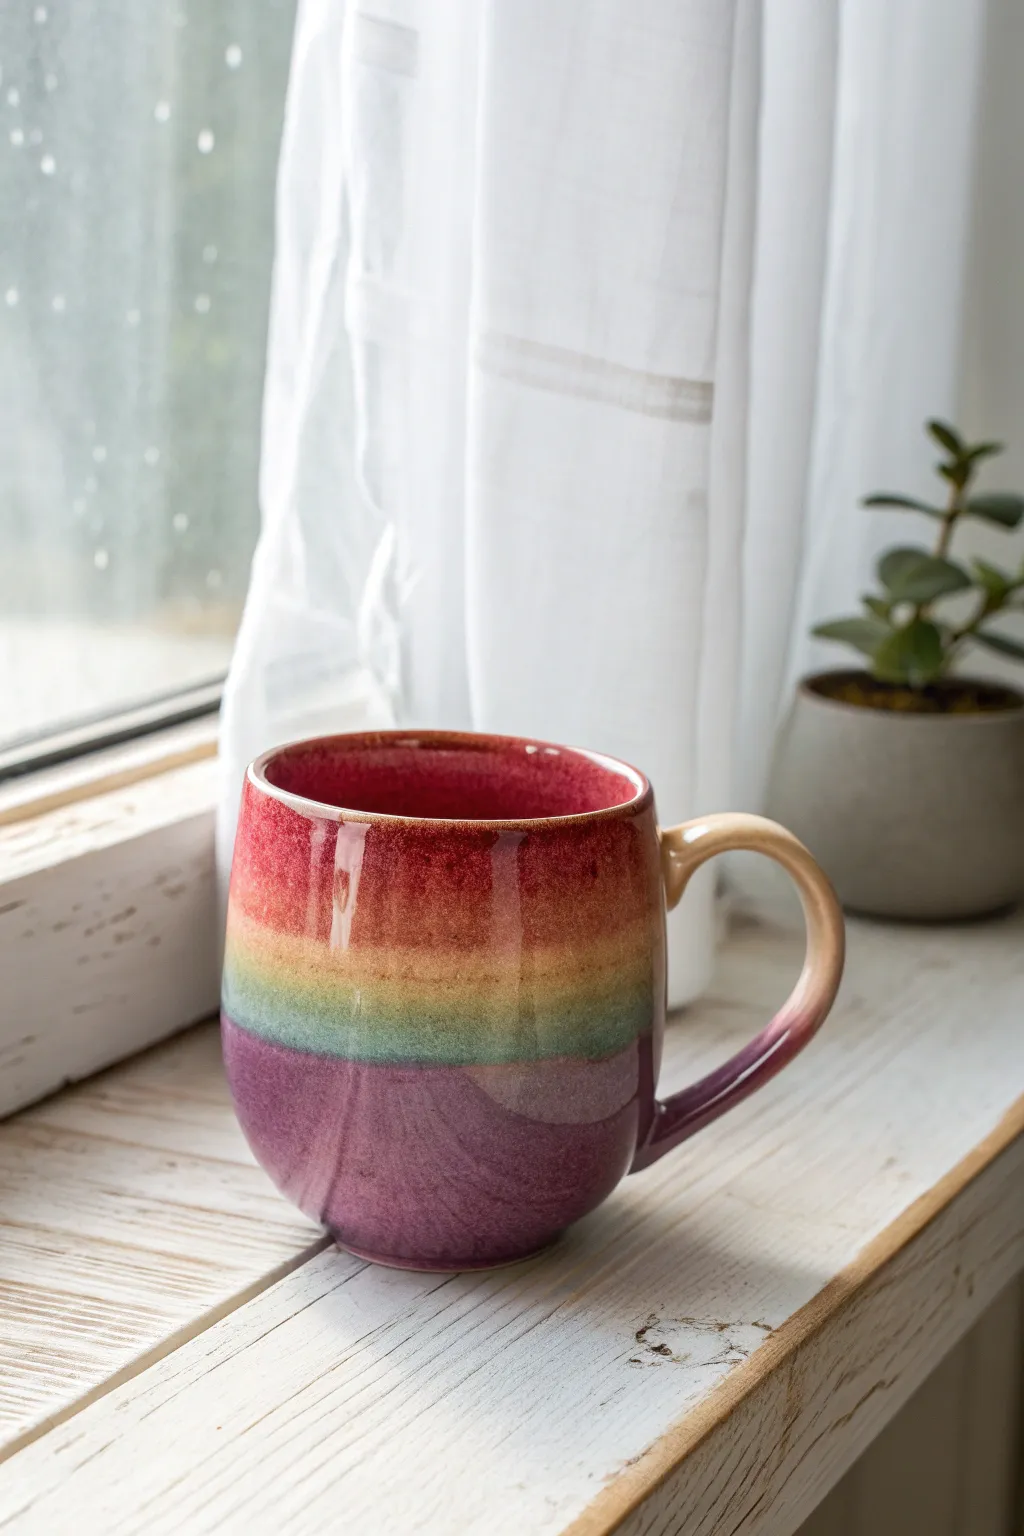
Brighten your morning coffee routine with this vibrant, mood-lifting rainbow mug featuring a seamless ombre gradient. The transition from warm berry reds to cool purples creates a stunning watercolor effect that looks professionally glazed.
Step-by-Step Tutorial
Materials
- Bisque fired ceramic mug
- Ceramic glazes (Red, Orange, Yellow, Teal/Green, Purple)
- Fan brush or wide soft synthetic brush
- Small round brush (for handle)
- Sponge
- Water cup
- Palette or tile for mixing
Step 1: Preparation
-
Clean surface:
Wipe down your bisque mug with a damp sponge to remove any dust or oils that might prevent the glaze from adhering properly.
Muddy colors?
Avoid over-mixing complementary colors (like purple and yellow) directly. Use a transition color like red or blue in between to keep the gradient vibrant and clean.
Step 2: Applying the Gradient
-
Start at the top:
Load your fan brush with the red glaze. Paint a horizontal band around the very top rim of the mug, extending down about an inch. -
Blend downward:
Before the red dries completely, dip your brush into the orange glaze. Paint a band directly below the red, slightly overlapping the two colors. -
Soften the transition:
Use a clean, slightly damp brush to gently feather the area where red meets orange, creating a soft blur rather than a hard line. -
Add warmth:
Continuing the pattern, apply a band of yellow glaze below the orange. Blend the orange down into the yellow while the glaze is still workable. -
Introduce cool tones:
Apply a thin strip of teal or light green glaze below the yellow. Just like before, gently blend the yellow down into this green layer to avoid a harsh stripe. -
Anchor with purple:
Paint the remaining bottom section of the mug with your purple glaze. Blend the green edge into the purple to finish the main body gradient. -
Handle detail:
Using a smaller round brush, paint the handle. Start with beige or yellow at the top curve and blend into purple near the bottom to mirror the mug’s body. -
Interior color:
I prefer to paint the inside a solid color to contrast the busy exterior. Apply three coats of the red glaze to the interior for a bold surprise.
Drip Effect
For a more artistic look, load your brush heavily with the top color and press it against the rim, allowing tiny controlled drips to run down through the other layers.
Step 3: Finishing Touches
-
Second coat:
Once the first layer is dry to the touch, repeat the gradient application process. A second coat ensures the colors are rich and opaque after firing. -
Third coat (Optional):
For extra depth, add a third coat, particularly focusing on the purple base to ensure it fires to a deep, dark hue. -
Dry thoroughly:
Allow the mug to dry completely. The glaze will look chalky and matte at this stage, which is normal. -
Clear glaze:
Dip the entire mug into a clear dipping glaze if your colored glazes aren’t glossy on their own. If using ‘underglaze’, this step is mandatory. -
Check the foot:
Wipe the bottom foot of the mug clean with a wet sponge. Any glaze left here will fuse the mug to the kiln shelf during firing. -
Final wipe:
Use a damp sponge to clean up the rim if any drips occurred during the dipping process, keeping the lip smooth. -
Review:
Inspect the surface for any pinholes or missed spots. Dab a tiny bit of glaze on these areas to patch them before firing. -
Fire:
Have the piece fired in a kiln according to the specific temperature instructions on your glaze bottles (usually Cone 06 or Cone 6).
Enjoy your new favorite mug and the beautiful way the colors meld together after firing
Bumblebee and Blossom Combo
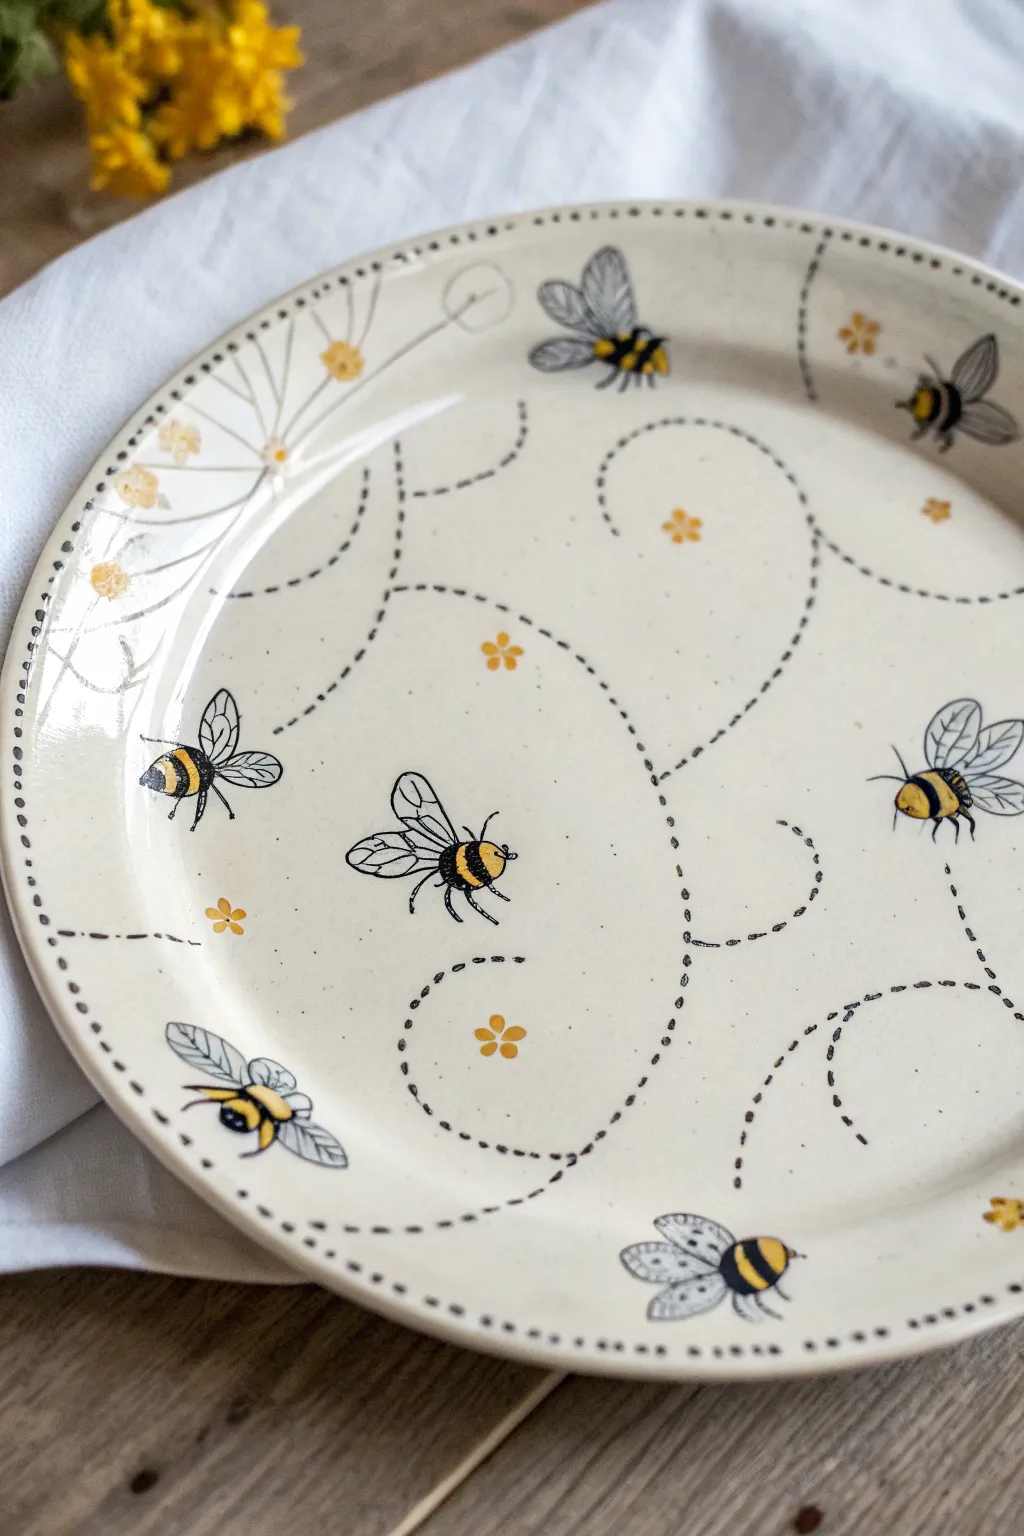
Capture the whimsical movement of a summer garden with this charming pottery project. By combining delicate dotted trails with bold, illustrative bees, you’ll create a lively scene that feels lighter than air.
How-To Guide
Materials
- Bisque ceramic plate (salad or dinner size)
- Ceramic glaze paints (black, bright yellow, pale cream/off-white)
- Fine liner brush (size 0 or 00)
- Small round brush (size 2)
- Detail writer bottle (optional but helpful for dots)
- Pencil (for sketching)
- Sponge and water
- Clear dipping glaze
Step 1: Preparation and Planning
-
Clean surface:
Begin by wiping down your bisque plate with a damp sponge. This removes any dust that might resist the glaze and ensures a smooth painting surface. -
Sketch the flow:
Lightly sketch your design directly onto the plate using a lead pencil. Focus on drawing large, looping curves that will become the flight paths; don’t worry about perfection, as the pencil marks will burn off in the kiln. -
Position the bees:
Mark small oval shapes where you want your bees to land. Try to vary their orientation—some flying left, some right, and some buzzing near the rim—to keep the composition dynamic.
Uneven Dots?
If your brush dots are inconsistent, try using the wrong end of a brush or a toothpick dipped in paint. Stamp it straight down for perfect circles every time.
Step 2: Painting the Motifs
-
Base coat the bodies:
Using a size 2 round brush, fill in the bee bodies with bright yellow glaze. Apply two to three coats, letting each dry briefly in between, to ensure the yellow pops against the cream background. -
Outline the bees:
Once the yellow is dry to the touch, switch to your fine liner brush and black glaze. outline the yellow oval, then draw the head, antennae, and legs. Keep your hand loose for that illustrative look. -
Add the stripes:
Paint the characteristic black stripes across the yellow body. You don’t need straight lines; slightly curved or jagged strokes add texture and fuzziness to the bees. -
Create the wings:
With the very tip of your liner brush and watered-down black glaze (or a grey wash), draw the tear-drop shaped wings. Add tiny veins inside the wings for extra detail. -
Add flower accents:
Dip the handle end of a brush into yellow glaze to stamp small five-petaled flowers scattered around the empty spaces. This creates uniform, cute blossoms without intricate painting.
Add a buzz
Use a pale blue wash (mostly water, tiny drop of blue) inside the wings before adding the black veins to give them a transparent, glassy effect.
Step 3: The Flight Trails
-
Load the liner:
For the trails, you need a steady stream of paint. Load your liner brush heavily with black glaze, or fill a detail writer bottle if you have one handy. -
Follow the loops:
Trace over your initial pencil loops with small, rapid dashes or dots. I find it easier to rotate the plate as I work, rather than twisting my wrist into uncomfortable angles. -
Connect the trail:
Ensure the dotted lines connect visually to the tail end of the bees, showing where they have just flown from. -
Rim details:
Add a dotted border around the rim of the plate to frame the artwork. Space these dots slightly closer together than the flight trails for a distinct border effect. -
Sprig details:
On the left side, paint a few delicate stems and leaves using thin black lines, adding yellow dots at the tips to mimic wildflowers swinging in the breeze.
Step 4: Finishing Touches
-
Check opacity:
Look closely at your black lines. If any look transparent or grey, carefully go over them with a second coat of black to ensure a crisp finish after firing. -
Clean up:
Use a damp brush or a toothpick to gently scrape away any stray drips or smudges on the unpainted areas. -
Glaze and fire:
Once completely dry, hand the piece over to the studio staff to be dipped in clear glaze and fired in the kiln.
Enjoy your snack on this buzzy plate that captures the joy of summer
Clouds With Blushy Cheeks
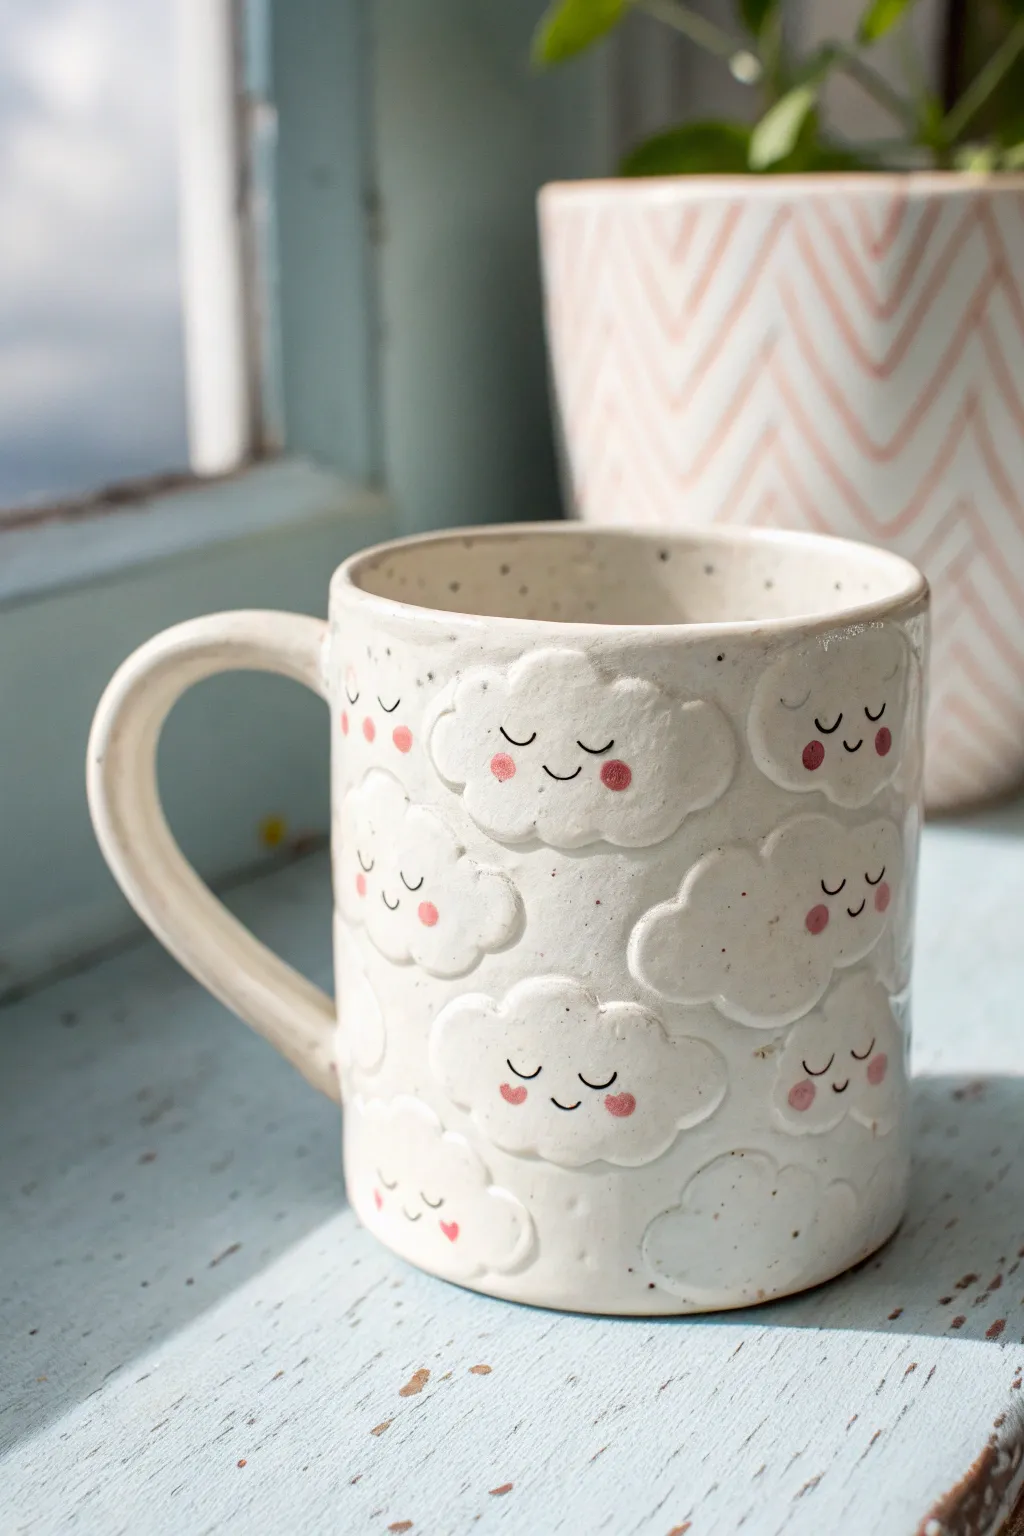
This whimsical mug features fluffy, raised clouds with sweet expressions that float across a speckled cream surface. The tactile 3D elements combined with blushing cheeks make it an impossibly cute addition to your morning coffee routine.
Step-by-Step Tutorial
Materials
- Bisque mug (smooth, cylindrical shape preferred)
- Pottery clay (matching the bisque body)
- Slip (liquid clay)
- Scoring tool or needle tool
- Soft ribs (silicone or rubber)
- Small sponges
- Underglaze pencil or fine liner brush (Black)
- Underglaze (Pink)
- Speckled Cream/White glaze (food safe)
- Small round paintbrush
- Clear matte or glossy glaze (optional, depending on speckled glaze finish)
- Kiln
Step 1: Sculpting the Clouds
-
Prepare your clay:
Roll out a small slab of fresh soft clay to about 1/4 inch thickness. Ensure it is the same clay body type as your mug if you are handbuilding, or compatible moist clay if attaching to leather-hard ware. -
Cut cloud shapes:
Using a needle tool, cut out organic, bubbly cloud shapes. Make them vary slightly in size, but keep them roughly oval and fluffy-looking. -
Smooth the edges:
Dip your finger in a tiny bit of water or slip and run it along the cut edges of each cloud to round them off. You want them to look soft and puffy, not sharp. -
Score the attachment points:
Hold a cloud up to the mug to decide placement. Use your scoring tool to scratch rough hatch marks onto the back of the cloud and the corresponding spot on the mug. -
Apply slip:
Dab a generous amount of slip onto both scored areas. This acts as the glue that bonds the added clay to the mug body. -
Attach and press:
Firmly press the cloud onto the mug. Wiggle it slightly to lock the scored grooves together, ensuring no air bubbles are trapped behind it. -
Seal the seams:
Use a small modeling tool or the back of a paintbrush to gently blend the very edges of the cloud onto the mug surface to ensure a permanent bond. -
Clean up:
Take a damp sponge and wipe around the base of the clouds to remove any excess slip that squished out. Repeat this process until the mug is covered in floating clouds. -
First firing:
Allow the mug to dry completely (bone dry). Fire it to bisque temperature in the kiln so it is ready for glazing.
Placement Pro-Tip
Make sure your cloud placement doesn’t interfere with the handle or the rim where your lips will touch. Keep the top 1/2 inch clear for comfortable sipping.
Step 2: Painting & Glazing
-
Draw the faces:
On the bisque-fired clouds, use a black underglaze pencil or a very fine liner brush with black underglaze to draw the expressions. Create two small ‘U’ shapes for closed sleeping eyes and a tiny smile in the center. -
Add the blush:
Dip a small round brush into pink underglaze. Dab two distinct circles on either side of the smile to create the rosy cheeks. -
Wax resist (optional):
If you want the clouds to remain raw or matte while the background is glossy, carefully apply wax resist over the cloud shapes now. Otherwise, proceed to glazing the whole piece. -
Apply the main glaze:
Dip or brush your Speckled Cream glaze over the entire mug. I find that dipping usually provides the most even coverage for texture like this. -
Check the coverage:
Ensure the glaze has settled nicely around the raised edges of the clouds but isn’t so thick that it obscures the sculpted details. -
Clean the bottom:
Wipe the foot of the mug with a wet sponge to remove any glaze preventing it from sticking to the kiln shelf. -
Final fire:
Load the mug into the kiln for the final glaze firing according to the temperature requirements of your specific glaze/clay combo.
Level Up: Sky Texture
Before attaching clouds, lightly sponge a sky-blue underglaze onto the mug body. When glazed over with sheer white, it creates a subtle atmospheric depth.
Once cooled, your mug is ready to bring a sky-high level of cheer to your beverage breaks
Cute Cat Face Bowl
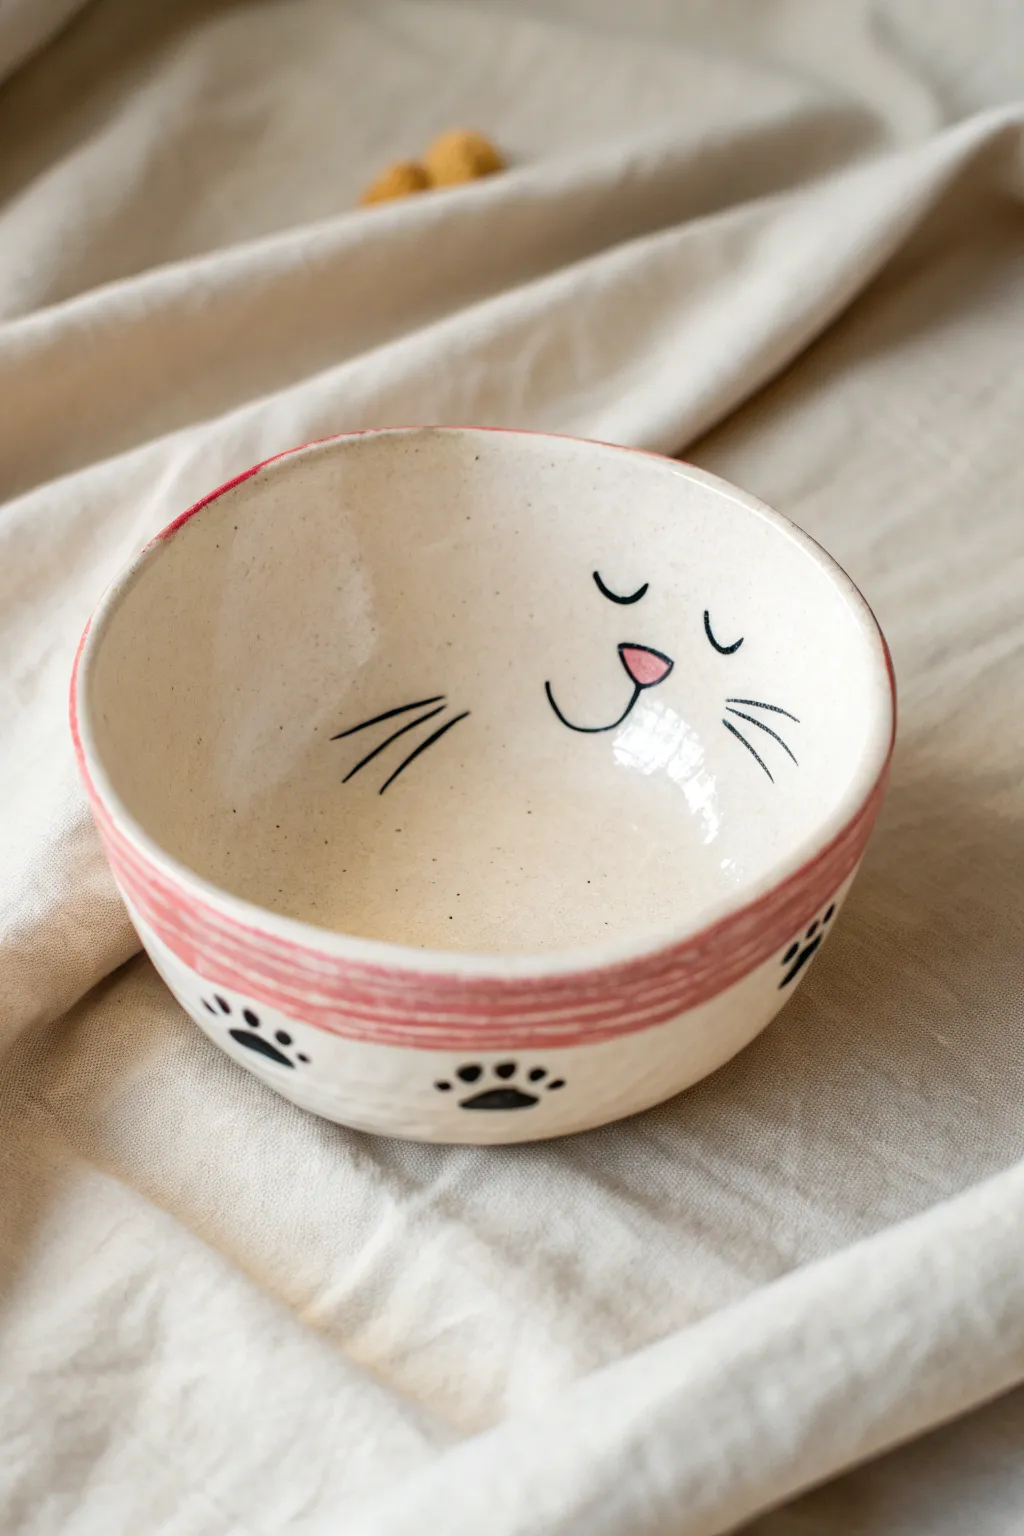
This charming ceramic bowl features a serene sleeping cat face painted directly onto the interior, creating a sweet surprise as you finish your meal. The outside is adorned with rustic pink stripes and adorable paw prints, making it cozy from every angle.
Step-by-Step
Materials
- Bisque bowl (cereal or soup size)
- Underglaze (Black, Light Pink, Cream/Off-White)
- Clear glaze
- Small round detail brush (size 0 or 1)
- Medium round brush
- Soft fan brush (for glaze)
- Sponge
- Water cup
- Pencil (optional)
Step 1: Base Preparation
-
Clean the Bisque:
Before painting, wipe down your bisque bowl with a slightly damp sponge. This removes any dust that might prevent the glaze from adhering properly. -
Apply the Base Coat:
Using a soft brush, apply a creamy off-white underglaze to the entire interior and exterior of the bowl. Aim for 2-3 coats, letting each layer dry until matte before adding the next. This gives that speckled, natural look if you use a speckled clay base or a speckled glaze like the one in the photo.
Brush Control Pro-Tip
For the finest black lines on the whiskers and eyes, thin your black underglaze slightly with a drop of water. The paint will flow smoother, preventing jagged lines.
Step 2: Face Details
-
Draft the Design:
If you’re nervous about freehanding, lightly sketch the cat’s face on the inside curve of the bowl using a regular pencil. The graphite will burn off in the kiln, leaving the design behind. -
Paint the Nose:
Using your small detail brush and Light Pink underglaze, paint a small, inverted triangle for the nose. Soften the corners slightly so it looks like a soft heart. -
Outline the Mouth:
With Black underglaze and the very tip of your detail brush, draw a ‘J’ curve coming down from the center of the nose to the left. Mirror this on the right side to form the classic cat smile. -
Add Sleeping Eyes:
Position your brush above the mouth area. Paint two gentle ‘U’ shapes for the closed eyes. I find that keeping the lines slightly thicker in the middle and tapering the ends makes them look sweeter. -
Draw Whiskers:
On the cheeks, paint three quick, confident strokes on each side for whiskers. Let them curve slightly downward to match the relaxed mood of the face. -
Add Eyelashes:
Wait for the eyes to dry for a minute, then add a tiny, singular lash tick to the outer corner of each eye for a bit of character.
Level Up: Tail Handle
Before firing, sculpt a small, curved coil of clay and attach it to the side of the bowl to look like a cat tail wrapping around, or paint a tail on the back side.
Step 3: Exterior Decoration
-
Paint the Rim:
Dip your medium round brush in the Light Pink underglaze. Run it along the very rim of the bowl. Don’t worry if it’s perfectly straight; a wobble adds to the handmade charm. -
Add Rustic Stripes:
Continue using the Light Pink to paint 2-3 horizontal bands just below the rim on the outside. Apply the paint somewhat dryly to create that textured, streaky look seen in the photo. -
Create Paw Prints:
Switch back to Black underglaze. Along the bottom half of the exterior, paint a large oval for the main pad of the paw. -
Finish the Paws:
Above the large oval, add four smaller dots for toes. Repeat this pattern around the base of the bowl, spacing them out evenly.
Step 4: Finishing Touches
-
Check for Mistakes:
inspect your work. If you smudged black paint on the white background, you can gently scratch it off with a toothpick once it’s dry. -
Apply Clear Glaze:
Once all underglaze is completely dry, apply 2-3 coats of clear dipping or brushing glaze over the entire piece (except the very bottom foot ring). -
Fire the Piece:
Place the bowl in the kiln and fire according to the clay and glaze specifications (usually Cone 06 or Cone 6).
Now you have a cozy bowl ready for your morning cereal or a warm soup
Frog in a Sweater Scene
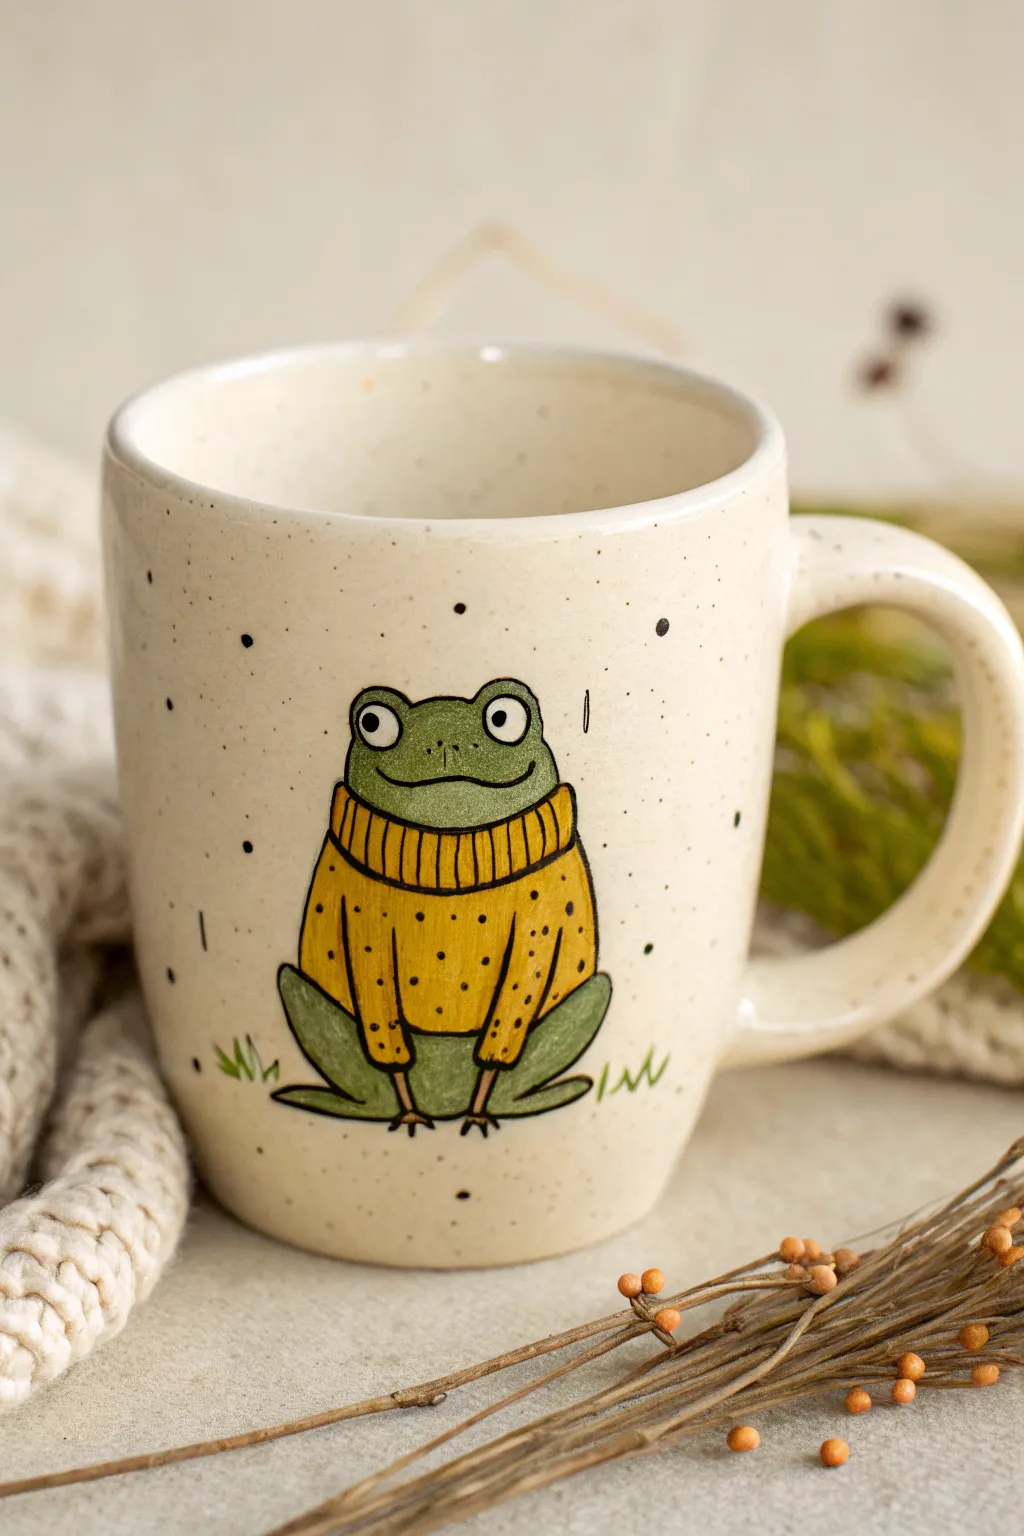
Wrap your hands around something heartwarming with this adorable speckled mug featuring a dapper frog in his favorite winter knit. The soft cream glaze and simple illustrative style make this a forgiving and delightful project for painters of all levels.
How-To Guide
Materials
- Bisque fired ceramic mug (smooth surface)
- Pencil (No. 2 or standard graphite)
- Underglaze paints: Sage Green, Mustard Yellow, Cream/Off-White, Black
- Small round paintbrush (size 2 or 4)
- Fine liner brush (size 0 or 00)
- Speckled clear glaze (or clear glaze + splatter tool)
- Sponge and water
- Palette or ceramic tile for mixing
Step 1: Preparation and Sketching
-
Clean the bisque:
Begin by wiping down your bisque mug with a damp sponge. This removes any dust that might prevent the glaze from adhering properly. -
Position your subject:
Decide where your frog will sit. This design works best centered on the side of the mug facing out when held. -
Draft the frog’s body:
Lightly sketch a large oval shape for the body sitting on the ground. Don’t worry about erasing; pencil marks burn off in the kiln. -
Add the head and sweater:
Draw the frog’s head as a smaller oval overlapping the top of the body. Sketch a thick collar right under the chin to create the turtleneck. -
Detail the limbs:
Sketch the legs folded up on either side of the body, typical of a sitting frog, and add two thin arms hanging down over the belly.
Step 2: Painting the Base Colors
-
Paint the skin:
Using your sage green underglaze and the round brush, fill in the head, the folded legs, and the small hands. Two to three coats are best for solid coverage. -
Fill in the sweater:
Switch to mustard yellow and paint the main body of the sweater and the turtleneck collar. Ensure you paint around the arms you sketched earlier. -
Let it dry:
Allow the base colors to dry until they are chalky and not shiny. This prevents colors from bleeding into each other during detailing. -
Whiten the eyes:
With a clean brush, add two small circles of cream or white for the eyes at the top of the head.
Needle Tool Trick
If your black outlines get too thick or wobbly, let them dry, then gently scratch away the excess paint with a needle tool or toothpick to sharpen the line.
Step 3: Fine Lining and Details
-
Load the liner brush:
Slightly water down a small amount of black underglaze so it flows like ink. I find this helps create smooth, unbroken lines. -
Outline the frog:
Carefully trace the outer edge of the frog’s body, head, and legs with the black underglaze. -
Define the sweater texture:
Add vertical lines on the turtleneck collar to mimic ribbing. Draw curved vertical lines on the sleeves and bottom hem for the knit effect. -
Add sweater patterns:
Using the very tip of your brush, add tiny black dots scattered across the yellow sweater to enhance the textured look. -
Face details:
Paint small black pupils inside the white eyes. Add a wide, slightly wavy line for the mouth and two tiny dots for nostrils. -
Grounding details:
Add a few zig-zag tufts of grass near the frog’s feet so he isn’t floating in space. -
Atmospheric specks:
If you want extra texture before glazing, flick a few tiny dots of black ink around the background space, though the speckled glaze will help with this too.
Seasonal Switch-Up
Change the vibe easily by painting the sweater red with white snowflakes for a holiday theme, or pastel pink with flowers for spring.
Step 4: Glazing and Firing
-
Apply clear glaze:
Once the illustrative work is completely dry, dip or brush on a speckled clear glaze over the entire mug. -
Clean the foot:
Wipe any glaze off the very bottom rim (the foot) of the mug to prevent it sticking to the kiln shelf. -
Fire the piece:
Fire the mug according to the clay and glaze specifications, typically to Cone 6 for stoneware durability.
Now you have a charming little companion to keep your coffee company on slow mornings
Soft Squiggles and Dots
Embrace the beauty of asymmetry with this modern ceramic design featuring soft pink arches, sage green squiggles, and delicate gold foliage. The speckled clay body adds a natural texture that grounds the abstract shapes for a perfectly balanced piece.
Step-by-Step Guide
Materials
- Bisque-fired ceramic plate (speckled clay body recommended)
- Underglazes: Dusty Rose, Sage Green, Metallic Gold (or luster)
- Flat shader brush (size 6 or 8)
- Fine liner brush (size 0 or 00)
- Small round brush (size 2)
- Dotting tool or back of a paintbrush
- Sponge and water
- Clear dipping glaze (transparent)
- Kiln access
Step 1: Preparation & Base Shapes
-
Clean surface:
Begin by wiping down your bisque plate with a damp sponge. This removes any dust that could prevent the glaze from adhering properly. -
Plan placement:
Visualize the composition. You want a balance between negative space and colored elements. Notice how the large pink shapes sit opposite each other for balance. -
Paint pink arches:
Using the flat shader brush loaded with Dusty Rose, paint two large, solid semi-circles or ‘soft arches’ on opposite sides of the plate interior. Keep the edges smooth but don’t worry about perfection. -
Second coat:
Once the first layer is dry to the touch (it will look chalky), apply a second coat of pink to ensure solid opacity. Three coats is usually the magic number for solid coverage. -
Green squiggle clusters:
Switch to your small round brush and Sage Green underglaze. Paint clustered groups of curved lines. Think of these as deconstructed rainbows or grassy tufts. -
Layering transparency:
For the green squiggles, I like to apply just one or two coats if I want a slightly translucent, watercolor effect, or three for solid bold lines.
Pro Tip: Pencil First
Sketch your design lightly with a regular No. 2 pencil on the bisque before painting. The graphite burns off completely in the kiln, leaving no trace behind
Step 2: Detailed Patterning
-
Large dot clusters:
Using the Dusty Rose again, create circular clusters of dots. You aren’t painting a solid circle, but rather arranging small dots to form a circular shape. -
Dotting technique:
Use a dotting tool or the wooden end of your paintbrush for uniform sizes. Dip the tool into the paint and press straight down. Reload frequently. -
Varying density:
Make the dots slightly denser in the center of the cluster and looser at the edges to soften the look. -
Leafy branches:
Load a fine liner brush with your Metallic Gold underglaze (or a dark tan if you don’t use gold luster). Paint thin, delicate stems extending into the white space. -
Adding leaves:
Add simple V-shaped leaves along the stems. Keep your pressure light to maintain thin lines. -
Gold accents:
Using the very tip of your liner brush or a toothpick, add tiny scattered gold dots floating around the green squiggles and in empty spaces. -
Final assembly:
Check for any smudges or unwanted drips. You can scratch these off gently with a toothpick or clean them with a slightly damp stiff brush.
Troubleshooting: Streaky Glaze
If your large pink shapes look streaky, apply coats in alternating directions (horizontal, then vertical) to create a smooth, solid finish
Step 3: Glazing & Firing
-
Clear glaze application:
Once all underglaze is completely dry, dip the entire plate into a clear transparent glaze. -
Checking thickness:
Ensure the glaze coat is even. If you poured the glaze instead of dipping, watch out for drip marks. -
Foot cleaning:
Wipe the bottom foot of the plate completely clean with a wet sponge to prevent it from sticking to the kiln shelf. -
Kiln firing:
Fire the piece according to your clay and glaze specifications (typically Cone 5 or 6 for stoneware).
Now you have a serene, modern plate ready for your next meal or display
Negative Space Heart Window
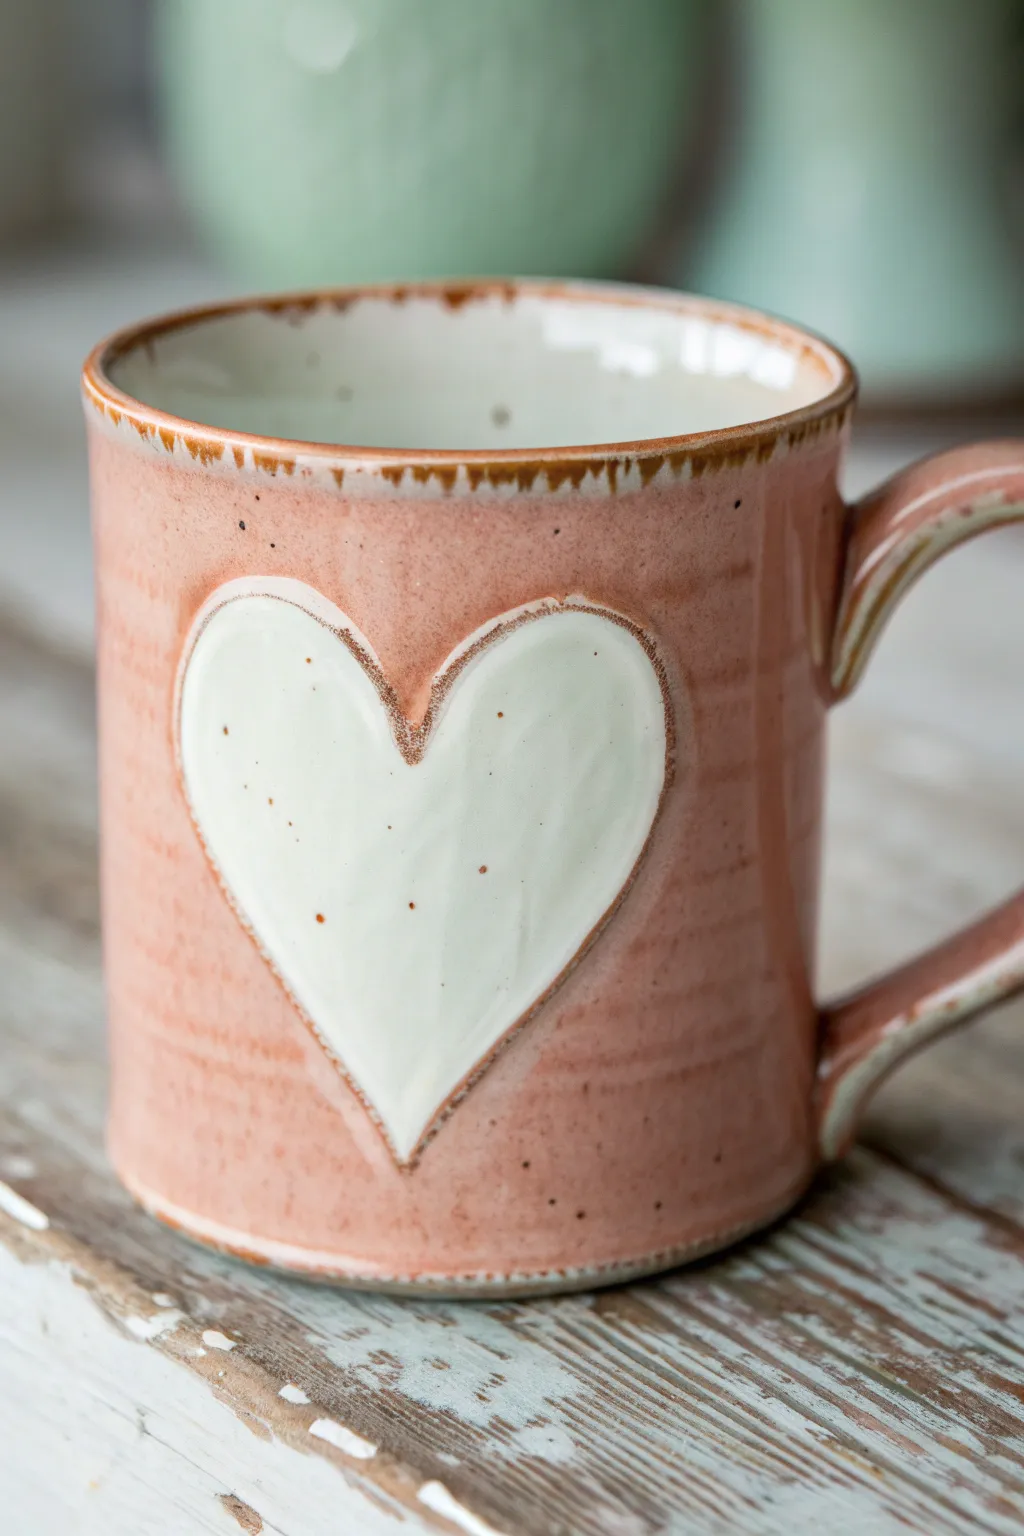
Embrace a cozy, farmhouse aesthetic with this delightful pottery project that features a creamy negative-space heart peeking through a textured dusty pink glaze. The exposed clay textures and organic rim details give this mug a handmade warmth perfect for your morning coffee.
How-To Guide
Materials
- Bisque-fired ceramic mug (preferably with horizontal ridge texture)
- Dusty pink or terracotta ceramic glaze
- Cream or off-white ceramic glaze
- Dark brown oxide wash or chestnut glaze (for rim)
- Self-adhesive vinyl or contact paper
- Scissors or craft knife
- Fan brush (medium)
- Detail round brush (small)
- Sponge
- Bowl of water
- Pencil
Step 1: Preparation and Masking
-
Clean the bisque:
Start by wiping your bisque-fired mug with a slightly damp sponge. This removes any dust or oils from handling that might repel the glaze. -
Create your heart stencil:
Draw a symmetrical heart shape on your self-adhesive vinyl or contact paper. The size should fit comfortably on the mug’s curve without wrapping too far around. -
Cut the stencil:
Carefully cut out the heart shape using scissors. You will be using the heart shape itself as a sticker, not the outer frame. -
Apply the heart mask:
Peel the backing off your vinyl heart and stick it firmly onto the center of the mug face. Press down especially hard on the edges to ensure a tight seal against the textured ridges.
Uneven Lines?
If glaze bleeds under your sticker due to deep texture ridges, wait until the glaze is bone dry, then scratch the excess away with a wooden skewer.
Step 2: Glazing the Interior and Exterior
-
Glaze the interior:
Pour your cream or off-white glaze into the mug. Roll it around to coat the entire inside surface evenly, then pour the excess back into your glaze container. -
Wipe the rim:
While the interior is drying slightly, take a damp sponge and clean any cream glaze drips off the rim and the exterior of the mug. -
Apply the pink base coat:
Using a soft fan brush, apply the first coat of dusty pink glaze to the entire exterior, painting right over your heart sticker. Ensure you get glaze into all the horizontal texture grooves. -
Let it dry:
Wait until the first coat loses its sheen and feels dry to the touch before proceeding. -
Apply second and third coats:
Apply two more coats of the pink glaze to build up opacity. If your glaze is translucent, I sometimes add a fourth thin layer to get that solid, yummy color. -
Final dry time:
Allow the exterior glaze to dry completely. It should be powdery to the touch.
Step 3: Reveal and Detail
-
Remove the mask:
Using a pin tool or the edge of a craft knife, very gently lift the corner of your heart sticker and peel it off. This reveals the bare bisque underneath. -
Clean the edges:
If any pink glaze bled under the sticker, gently scrape it away with a cleanup tool or a stiff, damp brush to crisp up the heart outline. -
Glaze the heart:
Use a small detail brush to carefully fill in the heart shape with three coats of the same cream glaze used for the interior. Leave a tiny hairline gap between the cream heart and the pink surround if you want a distinct border. -
Rim detailing:
Dip a small sponge or brush into dark brown oxide wash or chestnut glaze. Gently dab it along the very top rim of the mug to create that toasted, rustic edge. -
Handle accents:
Apply a little of the brown accent glaze to the edges of the handle as well, mimicking the wear patterns of vintage enamelware. -
Speckling (Optional):
If you want the speckled look shown in the photo, load a stiff toothbrush with a tiny bit of brown iron oxide wash and flick the bristles to spray fine dots over the heart and exterior. -
Final inspection:
Check the bottom of the mug to ensure it’s free of glaze. Wipe it clean with a sponge to prevent it from sticking to the kiln shelf. -
Fire:
Fire the mug in the kiln according to your glaze manufacturer’s instructions (typically cone 5 or 6 for stoneware).
Add Depth
Before the final firing, gently wipe back a tiny bit of the pink glaze on the ridges with a sponge. This highlights the texture before you fire.
Enjoy sipping from your new favorite handmade mug that feels as lovely as it looks
Sgraffito Doodles on Pastels
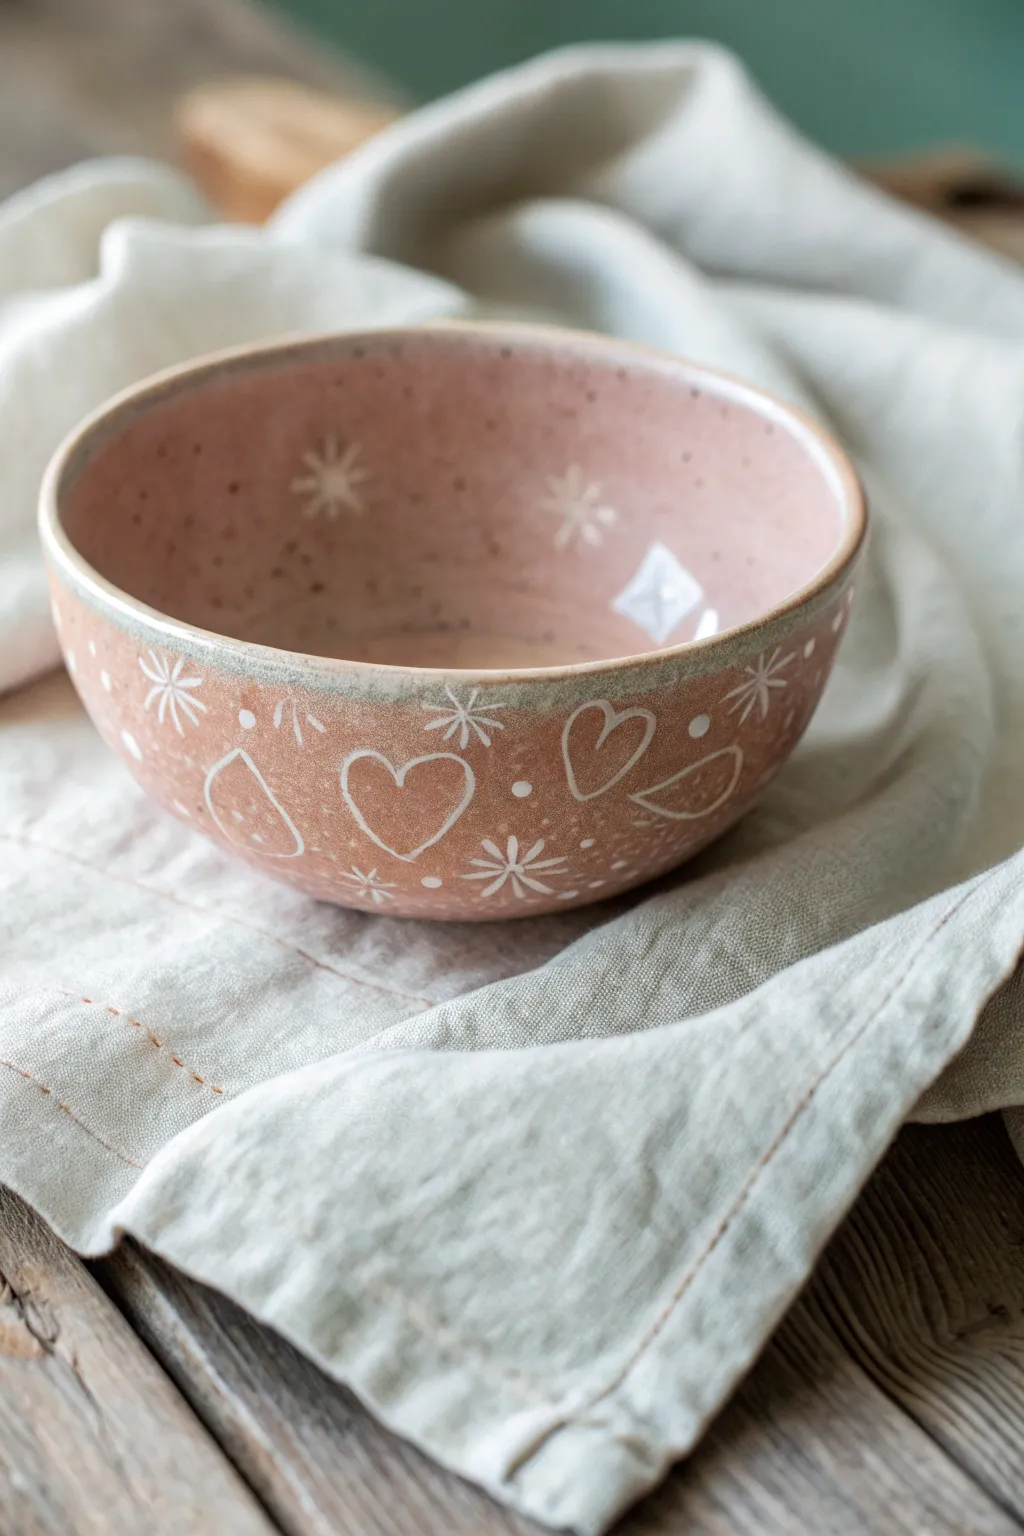
This charming bowl combines soft, earthy pink tones with playful white doodle designs carved through the glaze. The technique captures a sweet, folk-art aesthetic featuring hand-drawn hearts and twinkling stars that feels cozy and personal.
Step-by-Step
Materials
- Bisque-fired ceramic bowl
- Underglazes: Light terracotta/dusty pink and white
- Soft fan brush
- Sgraffito tool or needle tool
- Sponge
- Clear dipping glaze
- Kiln access
Step 1: Preparation & Base Coat
-
Clean the Bisque:
Start by gently wiping your bisque bowl with a slightly damp sponge to remove any kiln dust. This ensures your underglaze applies smoothly without peeling later. -
First Coat Application:
Using a soft fan brush, apply a generous layer of the dusty pink underglaze to the entire exterior of the bowl. Make sure your strokes are even to avoid ridges. -
Layering Up:
Let the first coat dry until it loses its sheen, then apply a second and third coat. You want a solid, opaque color base so the white clay body is completely hidden. -
Interior Glazing:
While the outside dries, paint the interior with the same dusty pink underglaze. For that speckled look inside, I like to flick a stiff toothbrush loaded with watered-down brown underglaze into the bowl once the pink is dry. -
Drying Time:
Allow the bowl to dry until the underglaze is firm to the touch but still slightly cool—leather hard is perfect for carving.
Oops! Flaking Paint?
If underglaze flakes while carving, it was likely too dry. Mist the surface lightly with water and wait a moment, or carve when the next layer is leather hard.
Step 2: Carving the Design
-
Planning the Pattern:
Visualize a repeating pattern around the rim. The main motifs are simple outline hearts and starbursts, interspersed with little dots. -
Carving Hearts:
Use your sgraffito tool to gently scratch through the pink layer to reveal the white bisque beneath. Draw freehand hearts spaced evenly around the bowl’s mid-section. Don’t worry about perfection; the wobble adds charm. -
Adding Starbursts:
Between the hearts and slightly higher up near the rim, carve eight-pointed starbursts. Start with a simple cross, then add diagonal lines through the center. -
Doodling Details:
Fill the empty negative spaces with small dots or tiny circles. Varying the pressure on your tool will change the size of your dots. -
Rim Detail:
Carve a thin, uneven line just below the actual rim of the bowl to create a border that frames your doodle artwork. -
Interior Carving:
Repeat a few starburst motifs on the upper inside wall of the bowl so the design peeks out when the bowl is empty. -
Clean Up:
Use a large, dry soft brush to gently sweep away the ‘crumbs’ of carved underglaze. Be careful not to smear the design if the underglaze is still damp.
Sharp Lines Secret
Keep your sgraffito tool sharp! A loop tool with a fresh edge cuts cleaner lines than a dull needle tool, reducing those jagged crumbs.
Step 3: Finishing & Firing
-
Rim Accents:
If desired, sponge a tiny bit of darker brown or grey underglaze lightly along the very top edge of the rim for a rustic, vintage finish. -
Bone Dry:
Let the piece dry completely. Any moisture left in the clay can cause issues during the final glazing steps. -
Clear Glaze Application:
Dip the entire bowl into a clear, food-safe dipping glaze. Hold it submerged for about 3 seconds, then lift and shake off the excess. -
Foot Cleaning:
Wipe the bottom foot of the bowl completely clean with a wet sponge to prevent it from sticking to the kiln shelf. -
Instruction for Firing:
Fire the bowl in the kiln according to the clay and glaze manufacturer’s instructions (typically Cone 06 or Cone 6 depending on your materials).
Once fired, you will have a delightful, food-safe bowl perfect for morning oats or displaying on a shelf
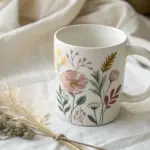

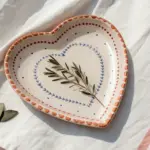

Have a question or want to share your own experience? I'd love to hear from you in the comments below!