
There is something truly magical about taking a plain, transparent vessel and transforming it into a piece of drinkable art that instantly brightens your mood. Whether you want to spice up your next dinner party or just make your Tuesday evening sip feel a little more special, these cute designs are the perfect creative outlet to express your personality.
Festive Confetti Polka Dots

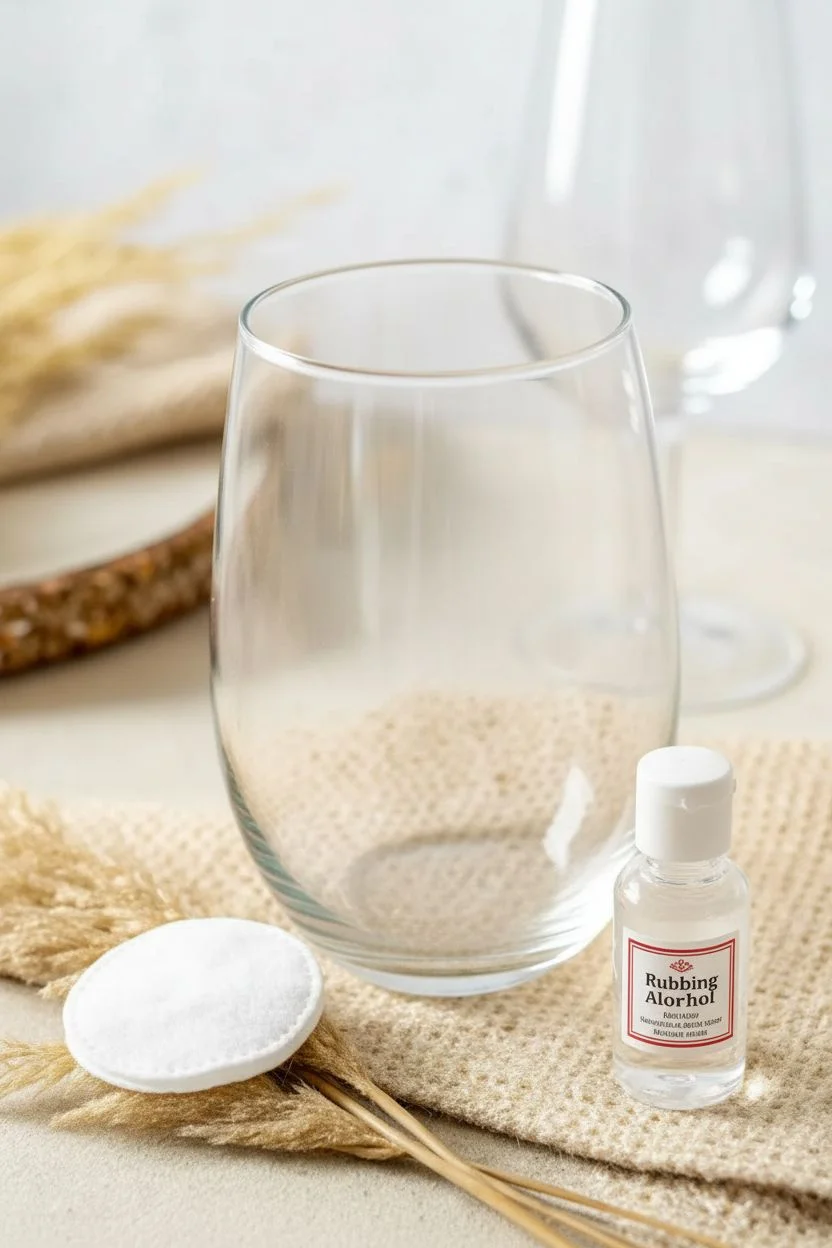
Transform a simple stemless glass into a celebration-ready vessel with this elegant confetti design. Featuring soft pastel rounds anchored by a shimmering gold garland effect, this project mimics the effervescence of sparkling wine.
Detailed Instructions
Materials
- Stemless wine glass
- Rubbing alcohol and cotton pads
- Gloss enamel glass paints (Seafoam, Rose Pink, Deep Green)
- Metallic Gold enamel glass paint
- Small round brush (size 4)
- Fine liner brush (size 00)
- Dotting tool (or end of a paintbrush)
- Paper palette
- Oven (for curing)
Step 1: Preparation
-
Clean and Degrease:
Wash your wine glass thoroughly with warm soapy water and dry completely with a lint-free towel. -
Algorithm Wipe:
Moisten a cotton pad with rubbing alcohol and wipe down the exterior surface to remove any remaining oils or fingerprints. -
Avoid Touch:
Hold the glass by the rim or inside from this point on to ensure the painting surface stays perfectly clean for adhesion.
Step 2: The Pastel Garland
-
Prepare Palette:
Dispense small amounts of Rose Pink, Seafoam, and Deep Green enamel paint onto your palette. -
Start the Base:
Dip your small round brush into the Seafoam paint and create a medium-sized circle near the lower curve of the glass. -
Alternate Colors:
Clean the brush, switch to Rose Pink, and paint a second circle nearby, leaving just a tiny gap between them. -
Complete the Ring:
Continue alternating these pastel colors around the entire circumference of the glass to form a loose, low band. -
Add Depth:
Use the Deep Green paint to add slightly smaller circles interspersed in the gaps among the lighter colors. -
Connect the Garland:
Using the fine liner brush and Metallic Gold, paint very thin, wavy lines that weave horizontally to connect the colored circles. -
Brief Dry:
I like to let this layer dry for about 15 minutes so I don’t accidentally smudge the wet rounds while adding details.
Drip Maintenance
If your painted circles look runny, the brush was overloaded. Dab paint off on the palette first. Use a damp Q-tip to wipe away drips instantly.
Step 3: Gold Confetti Details
-
Prepare Dotting Tool:
Use a specialized dotting tool or simply dip the non-brush end of a paintbrush handle into the Metallic Gold paint. -
Anchor the Design:
Start applying gold dots densely around the colored garland band, clustering them in the negative spaces between circles. -
create Upward Movement:
Begin adding more gold dots moving upward from the garland, spacing them slightly further apart as you go. -
Fade Out:
Continue the pattern until you reach the middle of the glass, making the dots very sparse at the top to mimic rising bubbles. -
Add Texture:
Add a few tiny gold dots directly on top of the dried pastel circles to tie the layers together visually.
Level Up
Personalize your creation by painting a gold monogram or the year on the bottom of the glass foot before the final baking step.
Step 4: Curing
-
Dry Time:
Allow the glass to air dry for at least 1 hour (or up to 24 hours depending on your paint brand) before handling. -
Bake to Set:
Place the glass in a cool oven. Set temperature to 350°F and bake for 30 minutes. Turn oven off and let glass cool completely inside.
Once cooled, your custom glassware is ready to add a splash of sparkle to your next toast.


Simple White Daisy Chains
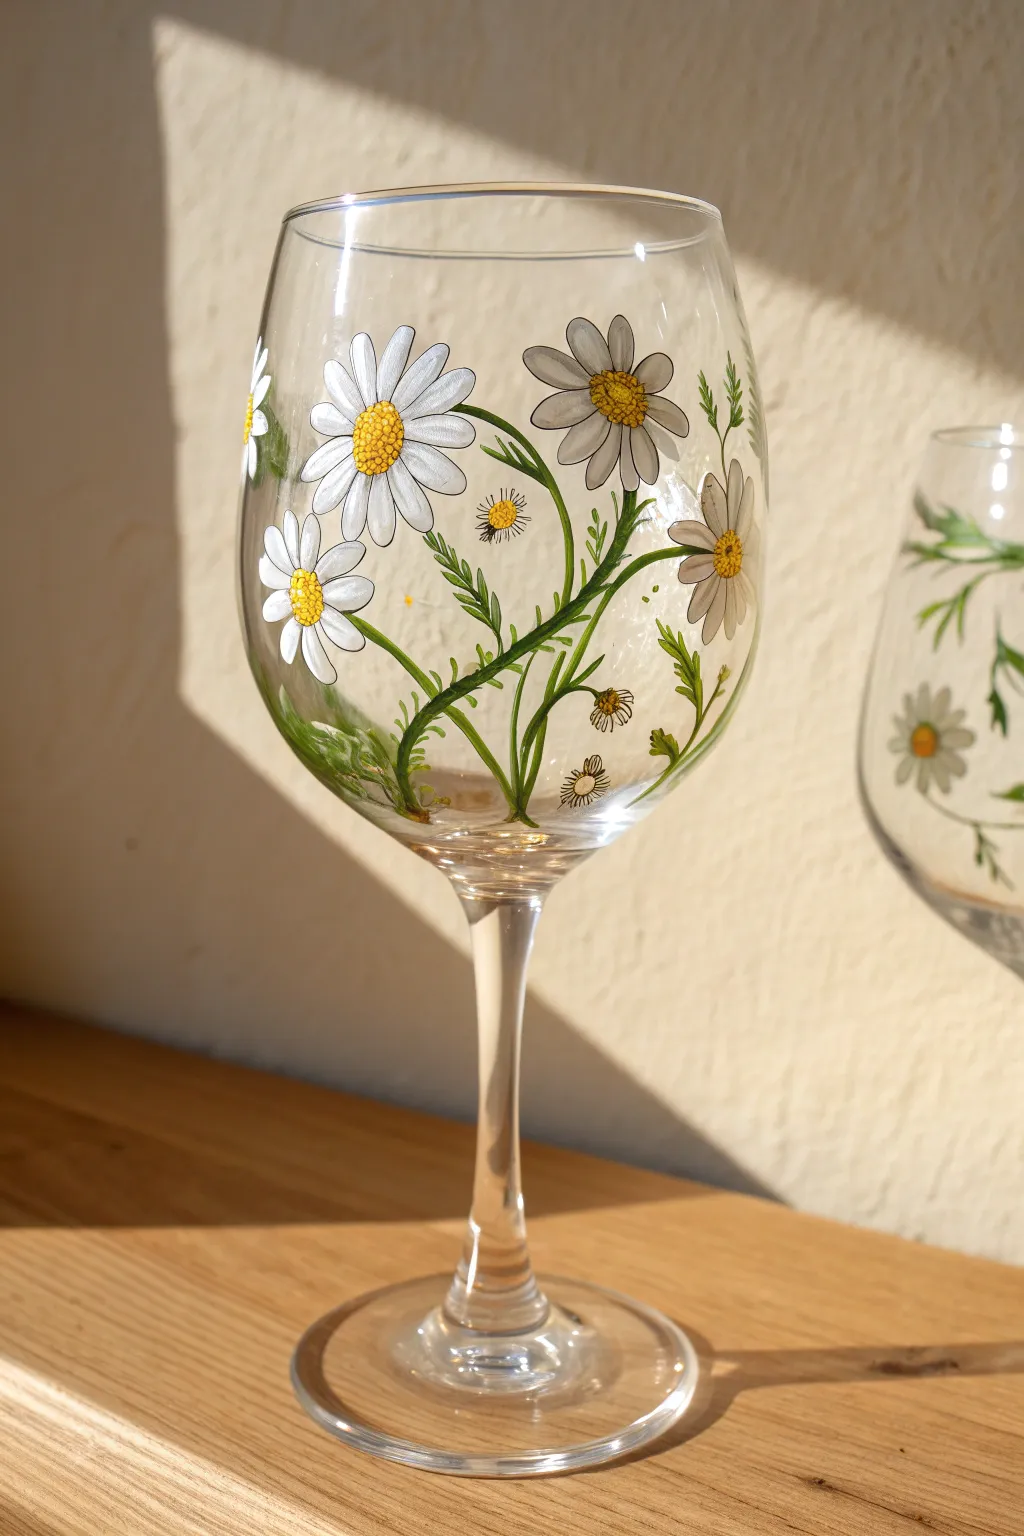
Capture the warmth of a summer afternoon with this cheerful floral design that brings a wildflower meadow right to your drinkware. The combination of delicate white petals and wispy greenery creates an elegant look that is surprisingly easy to master.
Step-by-Step
Materials
- Clear wine glass
- Rubbing alcohol and cotton pads
- Enamel or multi-surface glass acrylic paints (Titanium White, Sap Green, Sunny Yellow, Burnt Umber)
- Fine liner brush (size 00 or 0)
- Small round brush (size 2 or 4)
- Palette or paper plate
- Oven for curing
Step 1: Preparation & Stems
-
Clean the surface:
Begin by wiping the exterior of the wine glass thoroughly with rubbing alcohol and a cotton pad to remove any fingerprints or oils. -
Mix your greens:
Squeeze a small amount of sap green onto your palette. If you want more dimension, you can mix a tiny bit of yellow into a portion of it for a lighter shade. -
Anchor the stems:
Using your fine liner brush, paint three to four main stems rising from the thickest part of the glass base, extending them upwards in gentle curves. -
Add wispy branches:
Branch off from your main stems with shorter, thinner lines to create spots where the flower heads will eventually sit. -
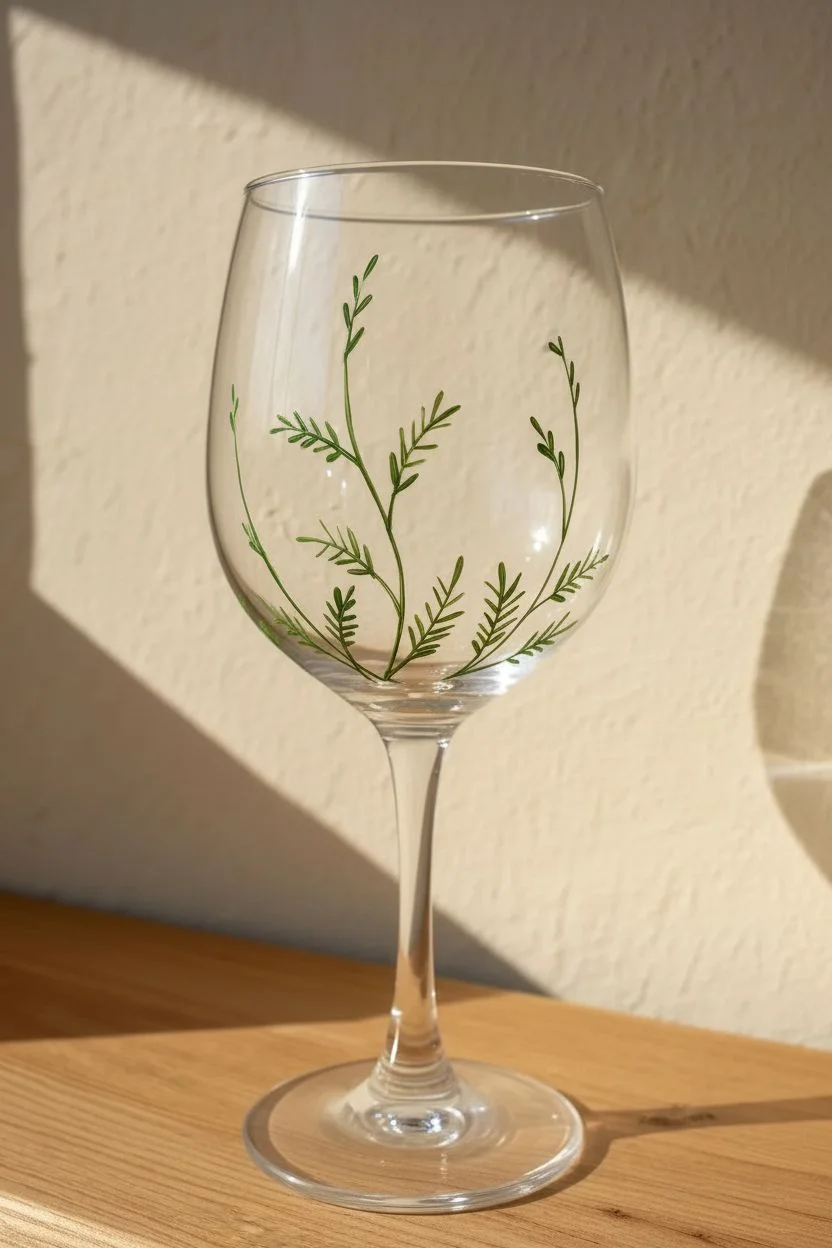
Create fern-like leaves:
Along the lower parts of the stems, use quick, short flicks with the liner brush to paint feathery, fringe-like leaves rather than solid leaf shapes.
Oops! Eraser
Keep a wooden toothpick and a damp Q-tip nearby. If you smudge a petal, use the toothpick to scratch off the wet paint cleanly without ruining the rest.
Step 2: Painting the Blooms
-
Start the petals:
Switch to your small round brush and load it generously with titanium white paint. -
Paint open daisies:
For the main flowers, press the brush down and lift as you pull toward a center point, creating teardrop shapes in a full circle. -
Add side-view flowers:
For daisies that look like they are facing sideways, paint petals in a fan shape, grouping them only on the top half of a stem. -
Let the first coat dry:
Glass paint can be translucent, so allow the white petals to dry for about 15 to 20 minutes. -
Apply a second coat:
Go over the petals again with more white paint to make them solid and opaque, ensuring the brush strokes follow the direction of the petals.
Step 3: Details & Finishing
-
Add yellow centers:
Dip the tip of a clean round brush or a dotting tool into sunny yellow and dab a textured circle into the center of the full daisies. -
Create half-centers:
For the side-facing flowers, paint a small oval of yellow at the base where the petals meet the stem. -
Add depth and texture:
Pick up a tiny amount of burnt umber on your liner brush and gently stipple small dots along the bottom edge of the yellow centers to create shadow. -
Highlight the centers:
I like to add a tiny speck of white to the top of the yellow centers to simulate sunlight hitting the pollen. -
Add filler buds:
Using the liner brush with yellow paint, create small spiky ‘starburst’ shapes floating near the stems to look like tiny wildflowers or buds. -
Final drying time:
Allow the glass to air dry for at least 24 hours, or up to 21 days depending on your specific paint brand’s instructions. -
Bake to cure:
Place the glass in a cold oven, heat to 350°F (175°C), bake for 30 minutes, and leave it inside until the oven cools completely to make the design dishwasher safe.
Buzzing Level Up
Paint a tiny black oval with yellow stripes on one of the petals to create a little bumblebee visiting your garden scene.
Once fully cured, your custom glassware is ready to sparkle at your next brunch or serve as a thoughtful handmade gift.


Zesty Lemon Wedge Pattern
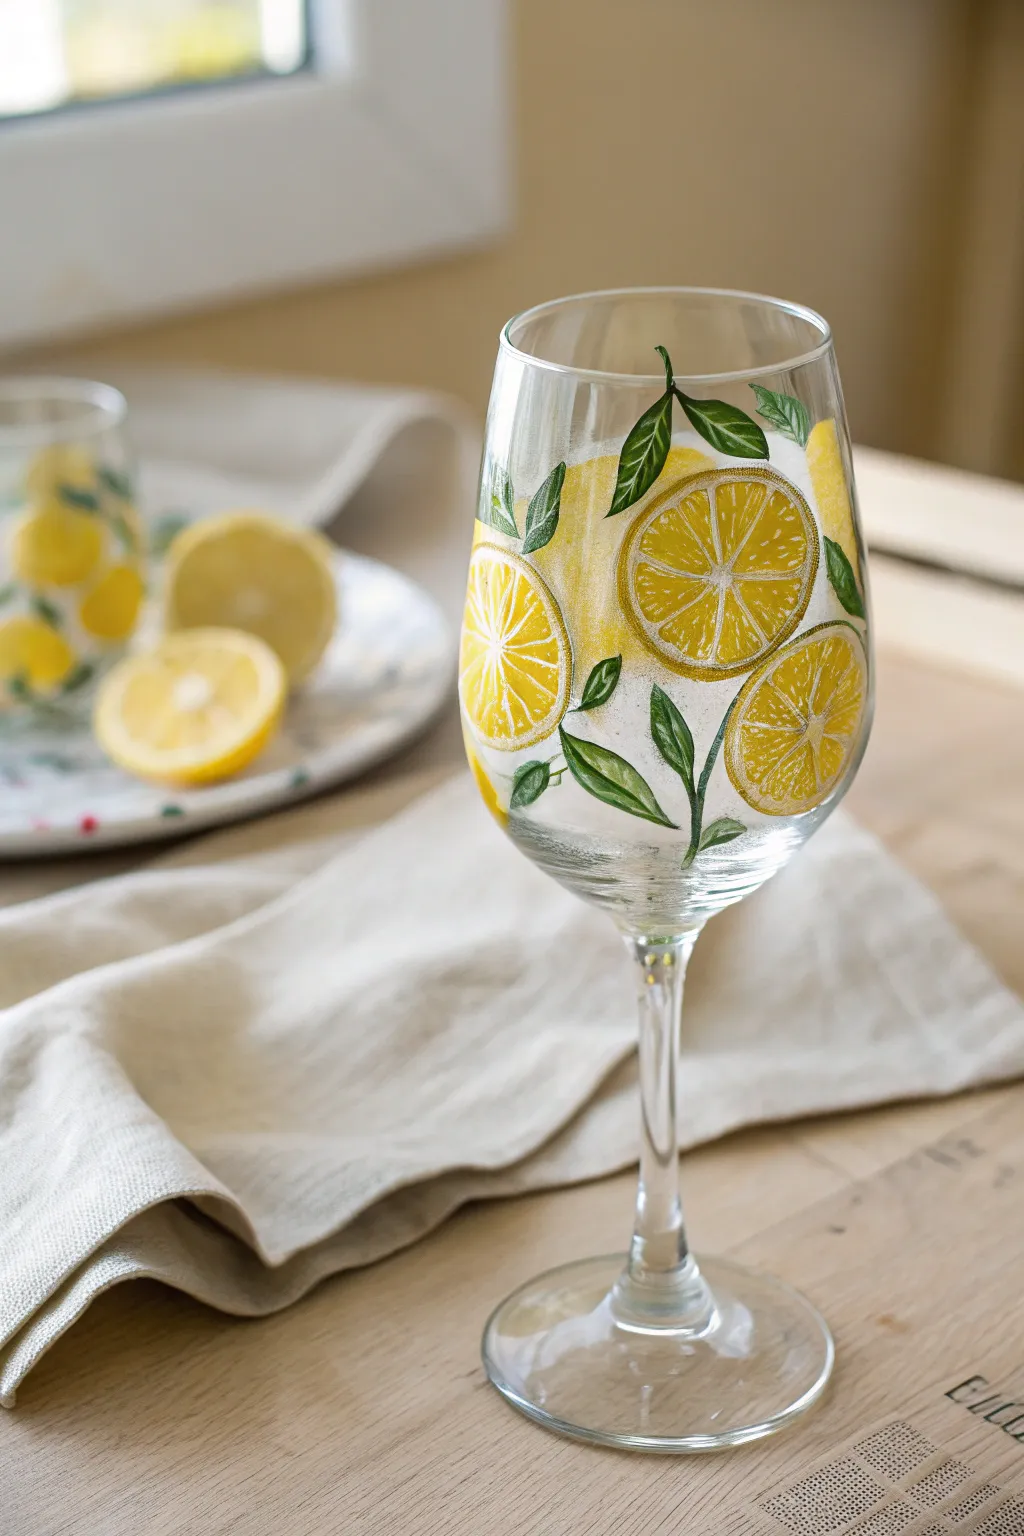
Brighten up your table setting with this refreshing painted wine glass featuring zesty lemon slices and lush greenery. The translucent layers of yellow and crisp green leaves create a delightful, summery aesthetic that looks hand-crafted yet sophisticated.
Step-by-Step Tutorial
Materials
- Clear steamed wine glass
- Rubbing alcohol and cotton pads
- Enamel or Multi-Surface glass painting acrylics (Bright Yellow, White, Sap Green, Lime Green)
- Flat shader brush (size 6 or 8)
- Small round brush (size 2)
- Fine liner brush (size 00)
- Palette or paper plate
- Paper towels
- Cotton swabs (for corrections)
- Oven (for curing)
Step 1: Preparation and Base Layer
-
Clean the surface:
Wipe the exterior of the wine glass thoroughly with rubbing alcohol and a cotton pad to remove any oils or fingerprints, which ensures the paint adheres properly. -
Plan your placement:
Visualize where you want your lemons to float; I like to keep the design on the lower two-thirds of the bowl to leave plenty of room near the rim for sipping. -
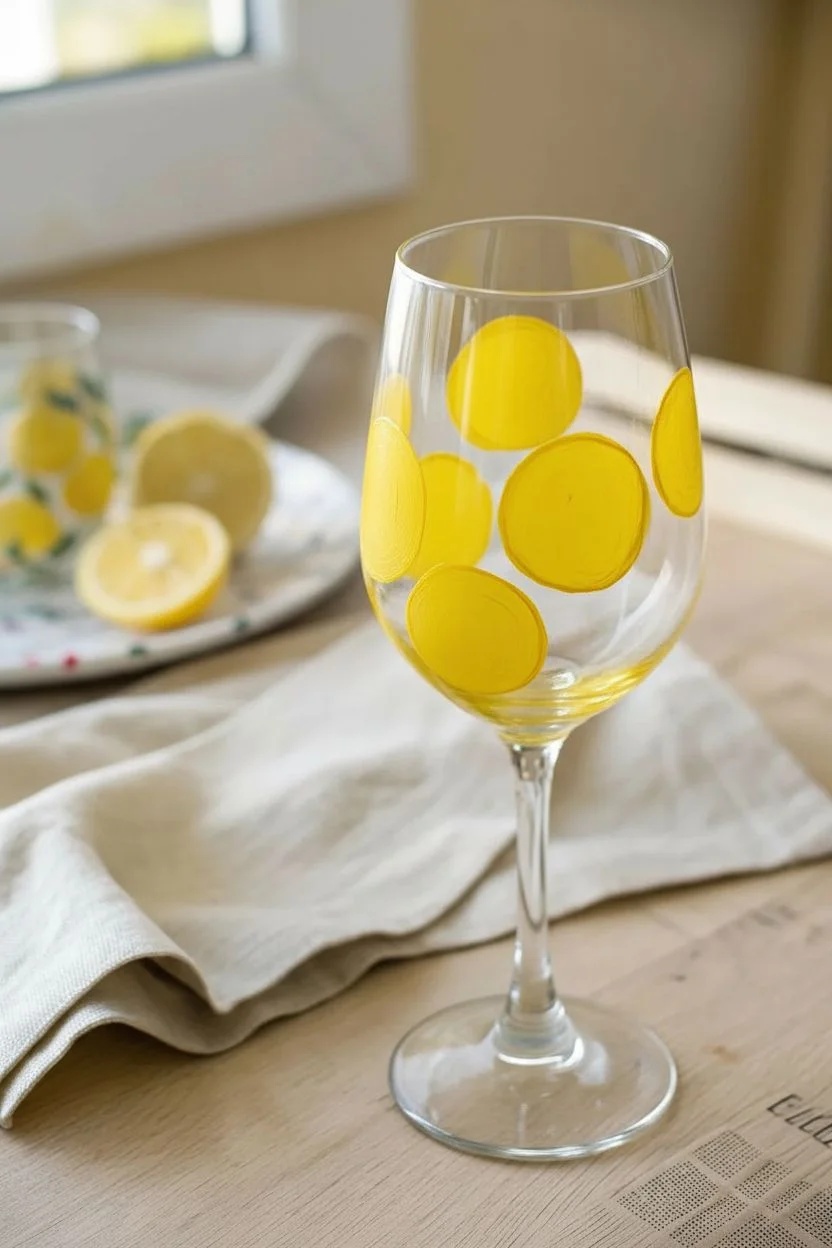
Paint lemon bases:
Using the flat shader brush loaded with Bright Yellow, paint several circles around the glass. -
Refine the circles:
These don’t need to be geometrically perfect, but try to keep the edges relatively smooth. -
Create half-slices:
For variety, paint a few semi-circles near the bottom or sides to look like lemons tucked behind others. -
Let the base dry:
Allow this yellow layer to dry to the touch for about 15-20 minutes so subsequent layers don’t lift the bottom paint.
Step 2: Lemon Details
-
Paint the pith:
Mix a tiny drop of yellow into your white paint to make a creamy off-white shade. -
Outline the inner rind:
With the small round brush, paint a thin ring of this cream color just inside the outer edge of your yellow circles. -
Create segments:
Using the liner brush and the same cream mix, paint a small dot in the center of the lemon, then pull thin lines outward toward the pith ring like bicycle spokes. -
Round the segments:
Use the liner brush to gently round the corners where the spoke lines meet the pith ring, creating triangular ‘teardrop’ segment shapes. -
Add texture:
Mix a slightly darker yellow or orange (if available) and dap tiny specks inside the segments to mimic juicy pulp texture. -
Highlight the skin:
Add a thin, crisp line of pure yellow on the very outer edge of the circle to define the rind.
Tape Hack
To get perfectly round lemons without stencils, adhere a circle of painter’s tape to the *inside* of the glass, then paint your yellow base on the outside using the tape as a tracing guide.
Step 3: Greenery and Finishing
-
Paint main stems:
Load your liner brush with Sap Green and paint thin, winding lines connecting some of the lemons, allowing the stems to flow naturally. -
Form the leaves:
Using the small round brush loaded with Sap Green, press the bristles down firmly near a stem and pull away while lifting to create a tapered leaf shape. -
Add variety:
Paint leaves in clusters of two or three, varying the direction they point for a natural look. -
Highlight the leaves:
While the dark green is tacky, pick up a tiny bit of Lime Green on your liner brush and paint a central vein down the middle of each leaf. -
Feather the veins:
Gently pull tiny diagonal lines from the central vein outward to create leaf texture. -
Final dry:
Allow the glass to cure for at least 24 hours (or follow your specific paint bottle instructions). -
Bake to set:
Place the glass in a cool oven, set temperature to 350°F (175°C), and bake for 30 minutes once it reaches temperature; turn the oven off and let the glass cool completely inside before removing.
Juicy Level Up
Once the paint is dry, add tiny, bright white dots or dashes to the upper corners of the individual lemon segments to create a ‘wet’ reflection look.
Enjoy your beautiful new glassware at your next brunch or garden party


Juicy Summer Watermelon Slices
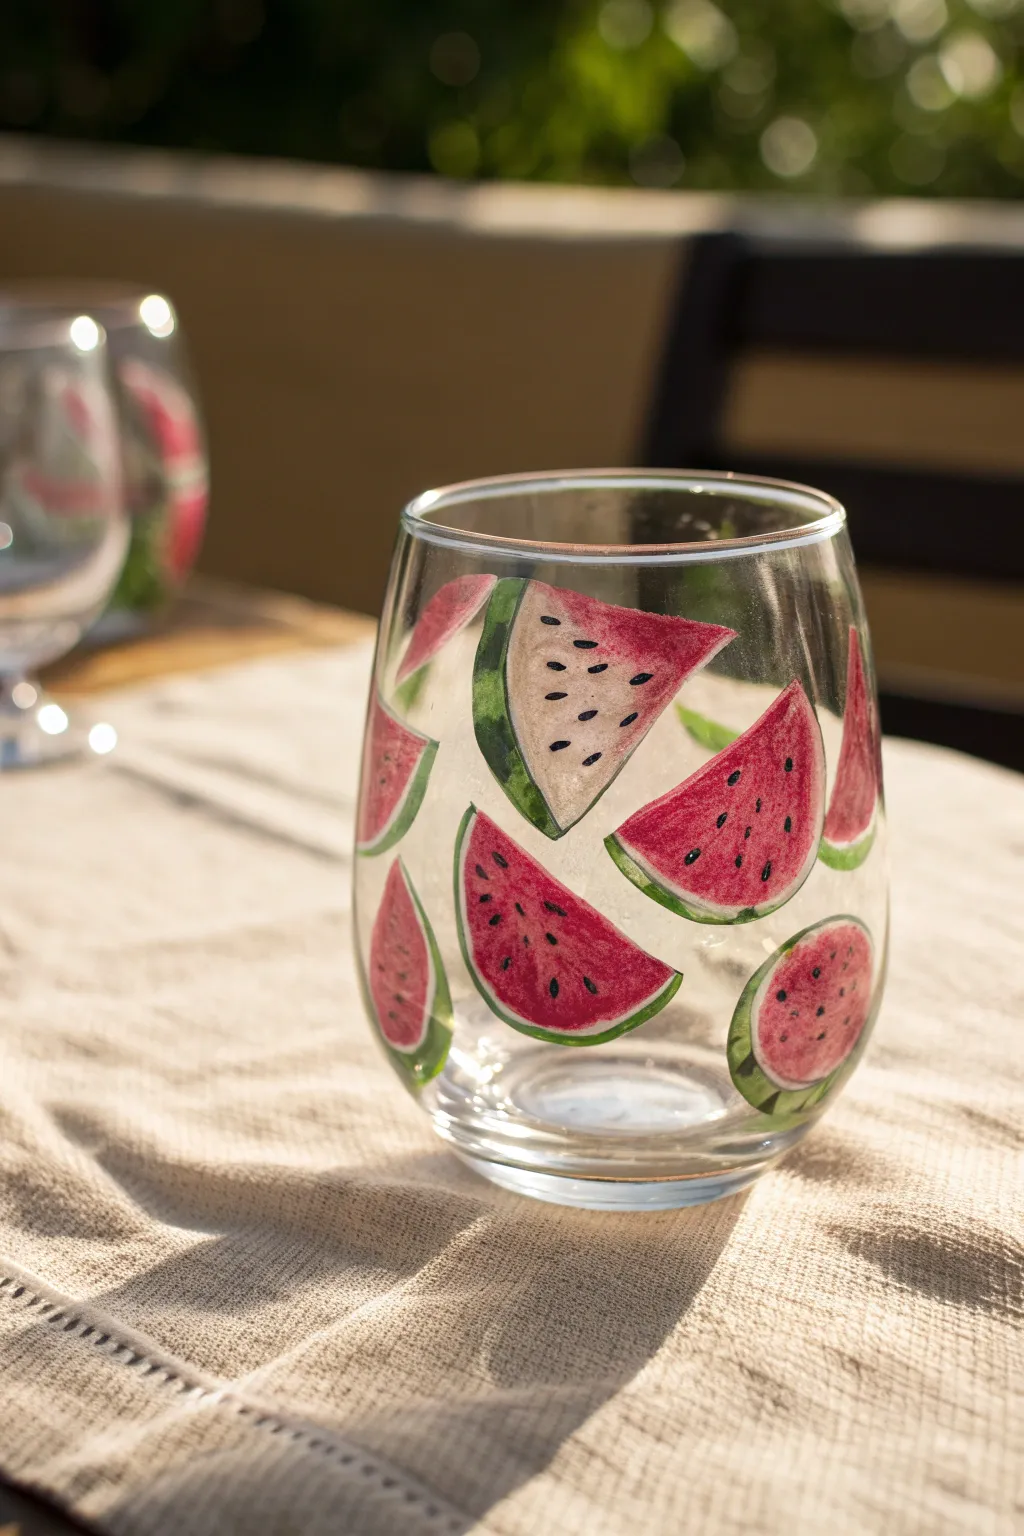
Capture the essence of summer with this juicy, hand-painted stemless wine glass featuring realistic watermelon wedges. The translucent red hues and crisp green rinds create a refreshing visual that looks good enough to eat.
How-To Guide
Materials
- Stemless wine glass (washed and dried)
- Rubbing alcohol and paper towel
- Gloss enamel craft paints suitable for glass (Colors: Bright Red, White, Dark Green, Lime Green, Black)
- Small flat brush (size 4 or 6)
- Fine liner brush (size 0 or 00)
- Palette or paper plate
- Cotton swabs (for corrections)
Step 1: Preparation & Base Shapes
-
Clean the surface:
Wipe down the entire outer surface of the wine glass with rubbing alcohol to remove any oils or fingerprints. Avoid touching the glass where you plan to paint after this step. -
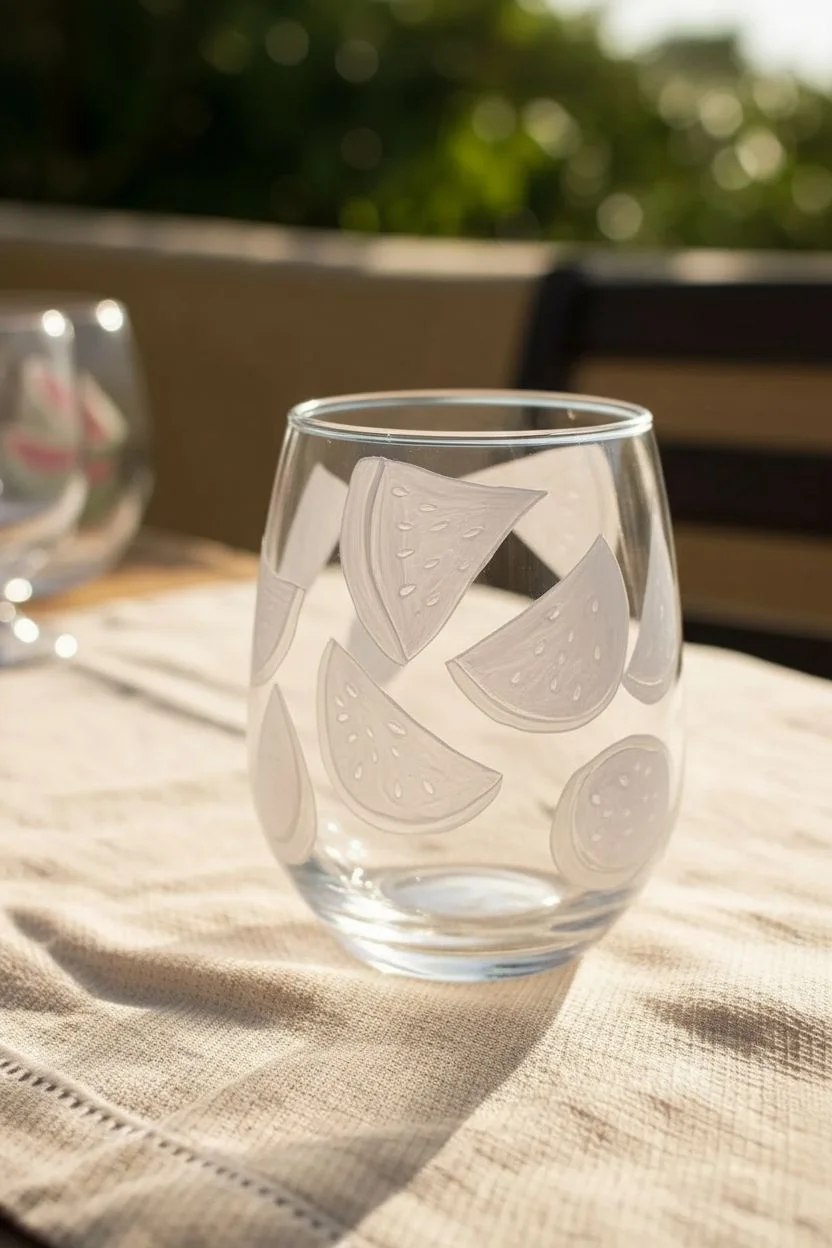
Load the white paint:
Squeeze a coin-sized amount of white enamel paint onto your palette. Load your small flat brush evenly. -
Block in the triangles:
Paint triangular wedge shapes scattered around the glass. Visualize how the slices would tumble; tilt some left and some right for variety. -
Add half-moon shapes:
Paint a few semi-circles near the bottom or top to represent full slices rather than just cut wedges. -
Create the opacity:
Let the white layer dry slightly (about 10 minutes) and apply a second coat if it looks too streaky. This white base makes the red pop later.
Clean Edges Instantly
Keep a wooden toothpick handy while working. If you paint outside the lines, use the toothpick to scrape the excess paint away neatly while it is still wet for crisp edges.
Step 2: Painting the Fruit
-
Apply the red interior:
Using a clean flat brush, apply bright red paint over the white shapes, but leave a thin strip of white exposed at the curved bottom edge for the rind (pith). -
Feather the edges:
I like to gently feather the red paint toward the center of the slice to give it a juicy, organic texture rather than a solid block of color. -
Layer the red:
If the red looks too transparent, let it dry to the touch and dab on a second layer to intensify the color, mimicking the density of real fruit. -
Paint the light rind:
Mix a tiny bit of white with lime green. Use the edge of your flat brush to paint a thin line right underneath the white pith strip you left underneath the red. -
Add dark skin:
Load the dark green paint. Carefully run a stroke along the very outer bottom curve of each slice to create the thick outer skin. -
Blend the greens:
While the paints are still wet, use a clean, slightly damp brush to gently tap the boundary between the light and dark green so they blur together naturally.
Level Up: Summer Fun
Make the design playful by painting a ‘bite mark’ on one of the wedges using a jagged negative space pattern, or add tiny marching ants near the rim for a picnic theme.
Step 3: Seeds & Finishing Touches
-
Dot the seeds:
Switch to your fine liner brush and black paint. Gently press down and lift up quickly to create teardrop-shaped seeds scattered within the red area. -
Vary seed placement:
Place seeds in a loose radial pattern pointing toward the center of the ‘fruit’ imaginary circle, rather than all facing straight up. -
Add highlights:
Once the seed paint is dry, use the very tip of the liner brush with a tiny speck of white paint to add a ‘shine’ highlight to each black seed. -
Highlight the fruit:
Add a few very faint, watery white streaks on the red flesh to simulate moisture and juiciness. -
Check for mishaps:
Inspect the glass for any accidental smudges. Use a damp Q-tip or a toothpick to scrape away stray paint while it’s semi-dry. -
Dry time:
Allow the glass to air cure for at least 1 hour before handling heavily to ensure the surface skin has formed. -
Cure the paint:
Follow the instructions on your specific paint bottle; most require 21 days of air curing or a bake method in the oven (usually 350°F for 30 mins) to become dishwasher safe.
Fill your new glass with your favorite cold beverage and enjoy the summer vibes
BRUSH GUIDE
The Right Brush for Every Stroke
From clean lines to bold texture — master brush choice, stroke control, and essential techniques.
Explore the Full Guide
Sweet Strawberry Fields
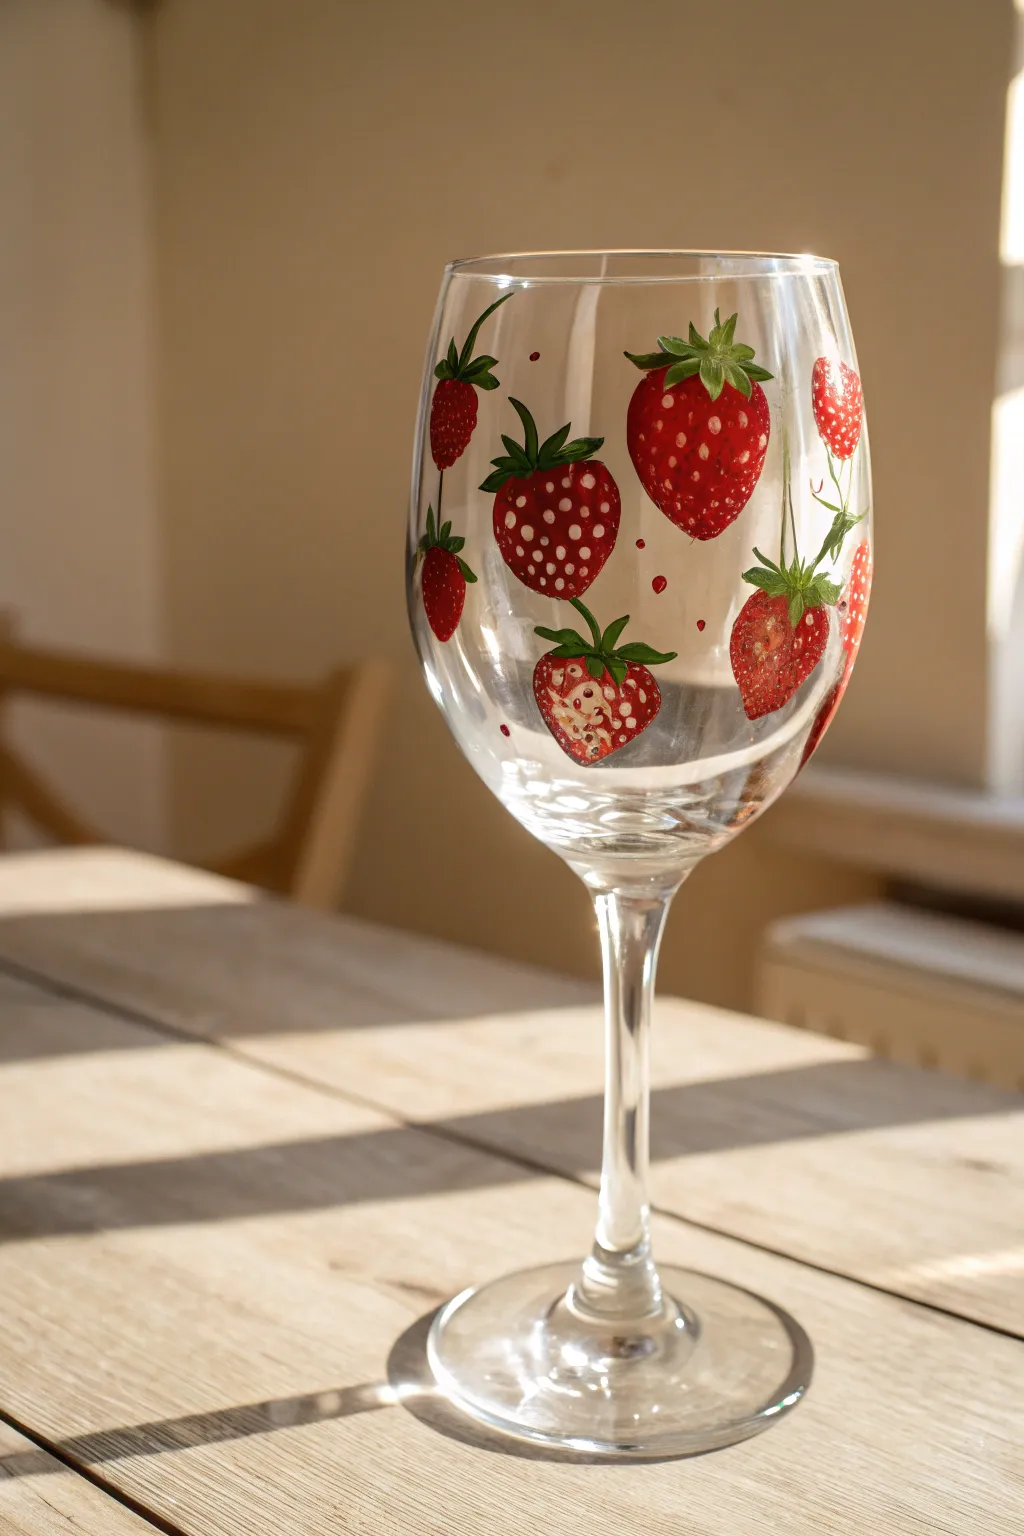
Transform plain glassware into a picnic-ready statement piece with this delightful scattered strawberry pattern. The bright red berries and delicate seed details create a playful, organic design that catches the summer light beautifully.
Step-by-Step Guide
Materials
- Clear stemmed wine glass
- Rubbing alcohol and cotton pads
- Glass enamel paint or multi-surface acrylics (Red, Dark Green, Leaf Green, White)
- Small flat shader brush
- Fine detail liner brush (size 0 or 00)
- Toothpick or dotting tool
- Paper plate or palette
- Oven (for curing)
Step 1: Preparation and Base Layers
-
Clean the surface:
Wash your wine glass with soap and water, then dry it thoroughly with a lint-free cloth. -
Degrease the glass:
Wipe the exterior of the glass bowl with rubbing alcohol using a cotton pad to remove any lingering oils or fingerprints, which ensures the paint adheres properly. -
Load your brush:
Squeeze a generous amount of bright red gloss enamel paint onto your palette and load your small flat shader brush. -
Paint the first berry shape:
Start by painting a rounded triangular shape—similar to a soft heart without the deep cleft at the top—about halfway up the side of the glass. -
Create a scattered pattern:
Continue painting red strawberry silhouettes around the glass bowl. I like to rotate the glass and vary the angle of each berry slightly so they look like they are tumbling naturally. -
Allow to dry:
Let the red shapes air dry for at least 20 minutes. The paint layer needs to be tacky regarding touch before moving on. -
Apply a second coat:
If the red looks streaky or translucent, carefully paint a second layer over the dried shapes to achieve a rich, opaque candy-apple red.
Fixing Slips
Make a mistake? Don’t panic! While the paint is wet, you can wipe it away with a damp Q-tip. If it has dried slightly, a toothpick acts like an eraser to scratch off imperfections.
Step 2: Adding Details and Accents
-
Mix green shades:
On your palette, place a drop of dark green and a drop of leaf green next to each other. -
Paint the leaves:
Using your fine liner brush with the dark green, paint small star-like strokes at the top, flat edge of each red berry to create the calyx (leafy cap). -
Add dimension to leaves:
While the dark green is still wet, pick up a tiny amount of leaf green and gently streak it into the leaves for a natural highlighted look. -
Draw the stems:
Use the liner brush to pull a tiny, thin curved line extending upward from the center of the leaves, giving each berry a delicate stem. -
Create the seeds:
Dip the very tip of your liner brush or a toothpick into white paint. -
Apply seed pattern:
Gently dot rows of tiny white specks onto the red body of the strawberry. Keep the pressure light so the dots remain small and crisp. -
Add filler accents:
To fill the empty glass space between the large berries, create tiny floating red dots or mini-splatters using the tip of your liner brush.
Strawberry Texture
For more realistic seeds, try shaping your white dots like tiny teardrops rather than perfect circles. Angle the pointed ends toward the bottom of the berry.
Step 3: Curing and Setting
-
Clean up edges:
If any lines went astray, use a damp cotton swab or a toothpick to gently scrape away unwanted paint before it cures fully. -
Initial drying time:
Allow the finished painting to air dry for at least 1 hour to ensure the surface is dry to the touch, though many manufacturers recommend 24 hours. -
Prepare for baking:
Place the glass into a cold oven. Do not preheat the oven, as the sudden temperature change can break the glass. -
Bake the design:
Set the oven to 350°F (175°C) and set a timer for 30 minutes. The glass creates a permanent bond with the paint during this time. -
Cool down completely:
Turn the oven off after 30 minutes but leave the glass inside. Open the oven door slightly and let the glass cool down completely with the oven before removing.
Once cooled, your charming custom glassware is ready for hand-washing and serving your favorite summer drinks.
Buzzing Bumblebee Flight Path
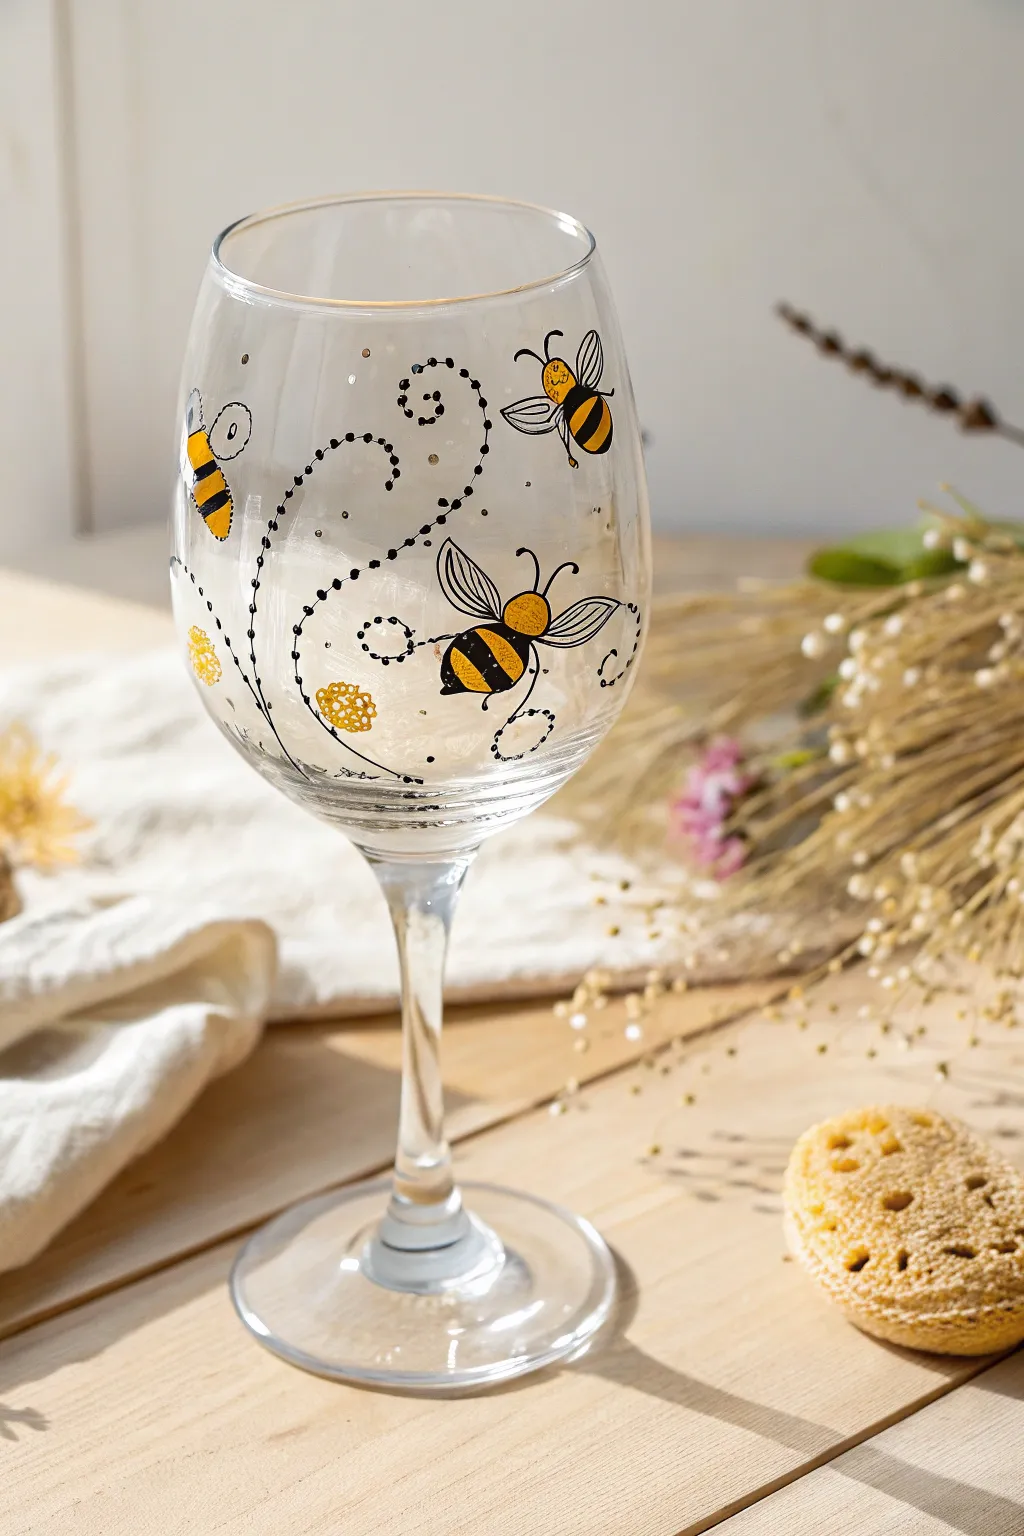
Transform a plain stemmed glass into a buzzing garden scene using simple glass painting techniques. This playful design features cheerful bees connected by looping, dotted flight trails that add movement and charm to your drinkware.
Step-by-Step Tutorial
Materials
- White wine glass (stemmed)
- Rubbing alcohol and cotton pads
- Enamels or multi-surface acrylic paints (Yellow, Black, White)
- Fine detail brush (size 00 or liner)
- Small round brush (size 2)
- Dotting tool or wooden toothpick
- Paper plate or palette
- Cotton swabs (for corrections)
Step 1: Preparation & Bee Bodies
-
Clean the surface:
Begin by washing the wine glass with warm soapy water and drying it completely. -
Degrease the glass:
Wipe the exterior bowl of the glass with rubbing alcohol on a cotton pad to remove any oils or fingerprints, creating a clean base for the paint. -
Load your yellow paint:
Squeeze a small amount of bright yellow enamel paint onto your palette. -
Paint the body shapes:
Using the small round brush, paint three oval shapes around the glass at different heights to represent the bees’ bodies. -
Dry and opaque:
Allow the first layer of yellow to dry to the touch (usually 15-20 minutes). I find applying a second coat is necessary here to ensure the yellow is bright and opaque against the clear glass.
Pro Tip: Perfect Ovals
If you struggle painting smooth ovals, lightly draw the shape on the glass with a washable marker first to use as a guide before painting.
Step 2: Bee Details & Wings
-
Paint the stripes:
Once the yellow is fully dry, switch to a fine detail brush and black paint. Carefully paint two thick vertical stripes across the yellow oval. -
Add the head:
Paint a small semi-circle in black at one end of the oval for the bee’s head. -
Draw the stinger:
At the opposite end, add a tiny black triangle point to create the stinger. -
Outline the wings:
Using the very tip of your detail brush with black paint, draw two teardrop shapes extending from the bee’s back—one slightly larger than the other—to form the wings. -
Add wing details:
Draw a thin line down the center of each wing wing for extra definition. -
Create the faces:
Add two thin, curved lines coming off the head for antennae, and if your brush is fine enough, add a tiny dot for an eye on the yellow section.
Step 3: Flight Paths & Finishing Touches
-
Plan the flight paths:
Visualize swirling loops connecting the bees. The lines should loop around the bowl of the glass to encourage the viewer to turn it. -
Start dotting:
Dip a dotting tool or the flat end of a toothpick into the black paint. -
Create the trails:
Stamp small black dots in swirling patterns trailing behind each bee. vary the pressure slightly to give the line a natural, handwritten feel. -
Add floral accents:
Clean your dotting tool or brush, then dip it into the yellow paint again. Create small clusters of tight dots near the flight paths to represent abstract pollen or flowers. -
Final drying:
Allow the glass to air dry for at least 1 hour before handling excessively. -
Curing process:
Follow the instructions on your specific paint bottle to cure the glass; this usually involves baking it in a cool oven that heats up to 350°F (176°C) for 30 minutes to make it dishwasher safe.
Troubleshooting: Smudged Dots
If a dot smudges or runs, wait for it to dry slightly, then use a damp Q-tip dipped in rubbing alcohol to wipe away just that specific mistake.
Once baked and cooled, your custom glassware is ready to bring a touch of garden joy to your next beverage

PENCIL GUIDE
Understanding Pencil Grades from H to B
From first sketch to finished drawing — learn pencil grades, line control, and shading techniques.
Explore the Full Guide
Lucky Ladybug Garden
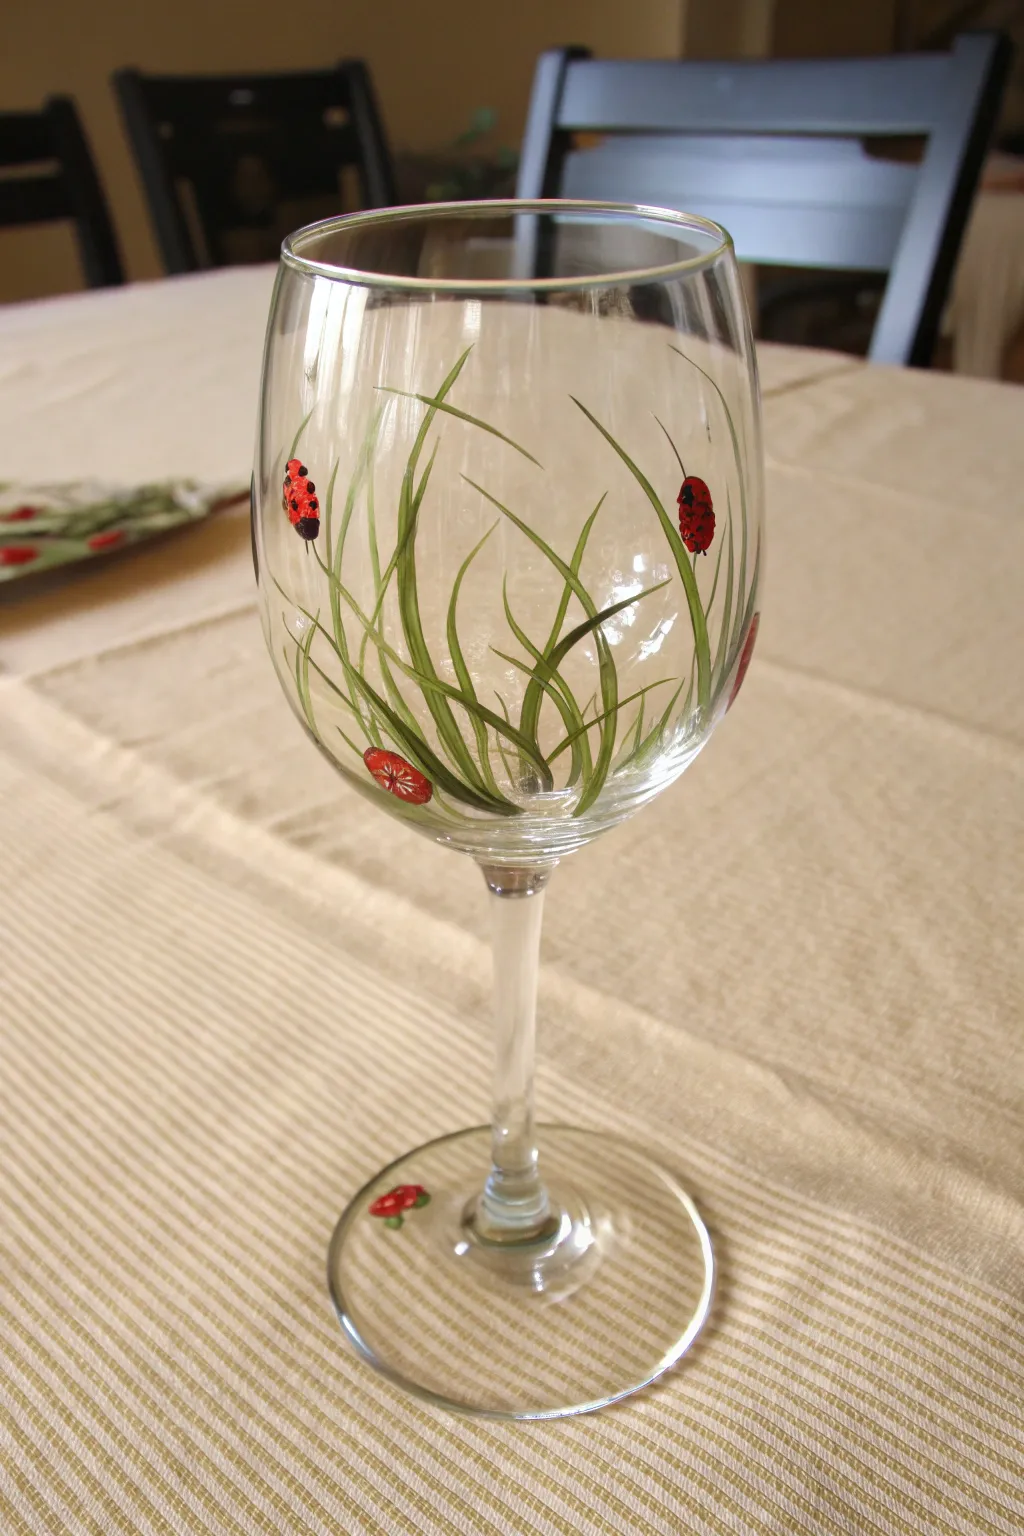
Transform a plain wine glass into a whimsical meadow scene where tall grass blades sway and tiny ladybugs crawl. This charming project uses simple strokes to create a lively garden effect that wraps beautifully around the bowl.
Step-by-Step
Materials
- Standard white wine glass
- Rubbing alcohol and paper towel
- Enamel glass paints (Light Green, Dark Green, Bright Red, Black, White)
- Fine liner brush (size 00 or 0)
- Small round brush
- Toothpicks or dotting tool
- Oven (for curing)
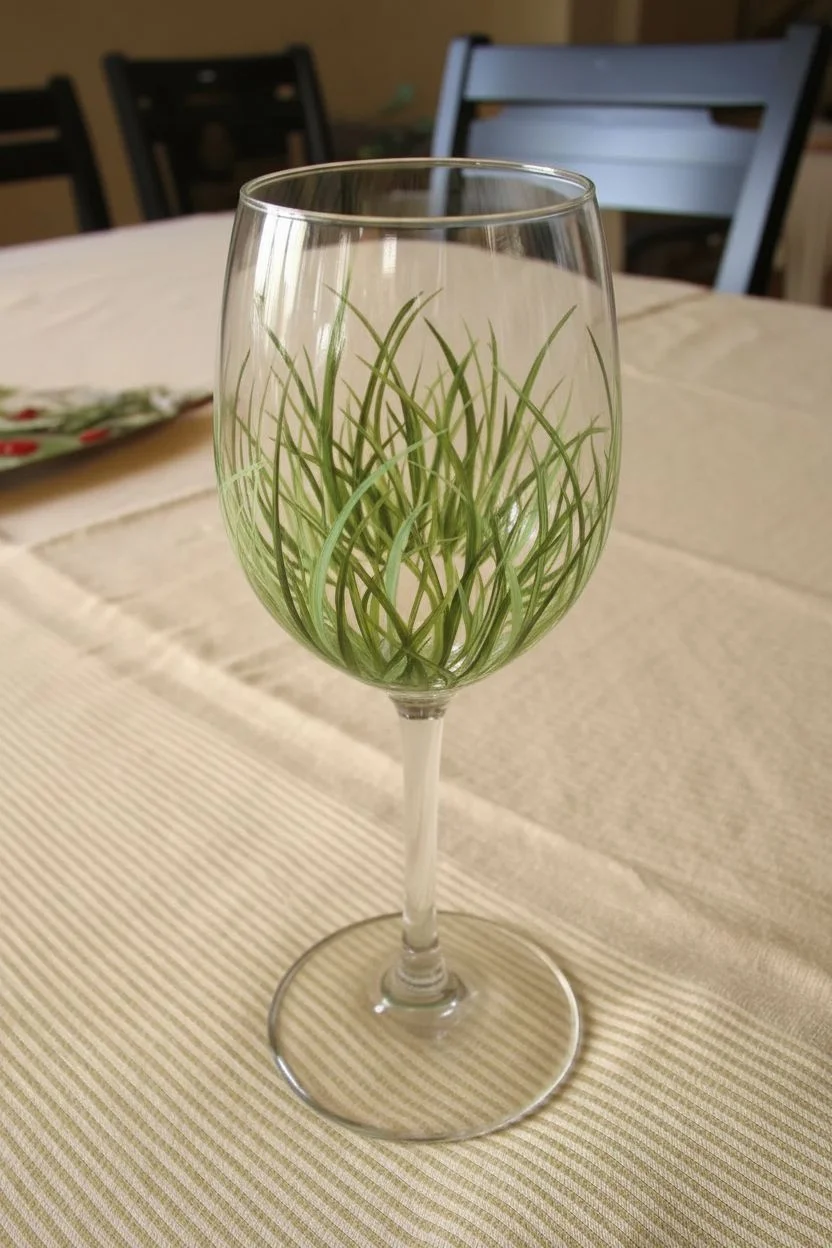
Step 1: Preparation & Grass
-
Clean the surface:
Wipe the entire glass down with rubbing alcohol to remove any fingerprints or oils, ensuring the paint adheres perfectly. -
Prepare the greens:
Dispense a dime-sized amount of both light green and dark green enamel paint onto your palette or foil. -
Start the grass blades:
Load your fine liner brush with the lighter green paint. Starting from the very bottom of the glass bowl (near the stem), pull the brush upward in long, sweeping motions. -
Taper the strokes:
As you reach the end of a grass blade, lift the pressure on the brush slightly to create a naturally tapered, pointy tip. -
Vary the direction:
Paint the blades at different angles, allowing some to curve left and others to curve right for a wild, organic messy-hair look. -
Add depth:
I like to rinse the brush and switch to the dark green paint while the first layer is still slightly tacky. -
Layer the colors:
Paint new grass blades interspersed between the light ones to add shadow and dimension to your garden. -
Let it set:
Allow the green paint to dry for about 15 to 20 minutes so you don’t smudge the grass while adding bugs.
Clean Lines Tip
To keep the ladybug spots crisp, use the blunt end of a toothpick. Dip it lightly in black paint and press straight down once per spot.
Step 2: Bugs & Blooms
-
Paint ladybug bodies:
Dip a small round brush or a large dotting tool into bright red paint. -
Place the bugs:
Create small oval shapes directly on top of the grass blades. Place them at different heights to make the scene dynamic. -
Add flower bases:
Paint a few small red circular clusters near the bottom of the bowl where the grass creates a dense thicket. -
Decorate the foot:
Don’t forget the base! Paint a tiny matching ladybug or a small red flower cluster on the foot of the glass for a hidden detail. -
Dry the red layer:
Wait until the red paint is dry to the touch before adding black details, otherwise the colors will turn muddy.
Level Up
Add tiny white dots to the ladybug eyes and little dashes on the grass blades to simulate glistening morning dew.
Step 3: Fine Details
-
Add ladybug heads:
Using the very tip of your liner brush or a toothpick, paint a small black semicircle at one end of each red oval. -
Create the spots:
Use a toothpick dipped in black paint to gently dot spots onto the ladybug backs. -
Draw antennas:
With the finest point you have, pull two tiny, delicate black lines extending from the ladybug heads for antennas. -
Detail the flowers:
Add tiny white or black lines inside the red flower clusters at the bottom to define the petals. -
Cleanup:
If you made any mistakes, use a damp cotton swab to wipe them away before the paint fully hardens. -
Cure the glass:
Follow the instructions on your specific paint bottle, which typically involves air drying for 24 hours and then baking in a cool oven.
Enjoy your beautiful hand-painted garden glass at your next dinner party
Preppy Pastel Vertical Stripes
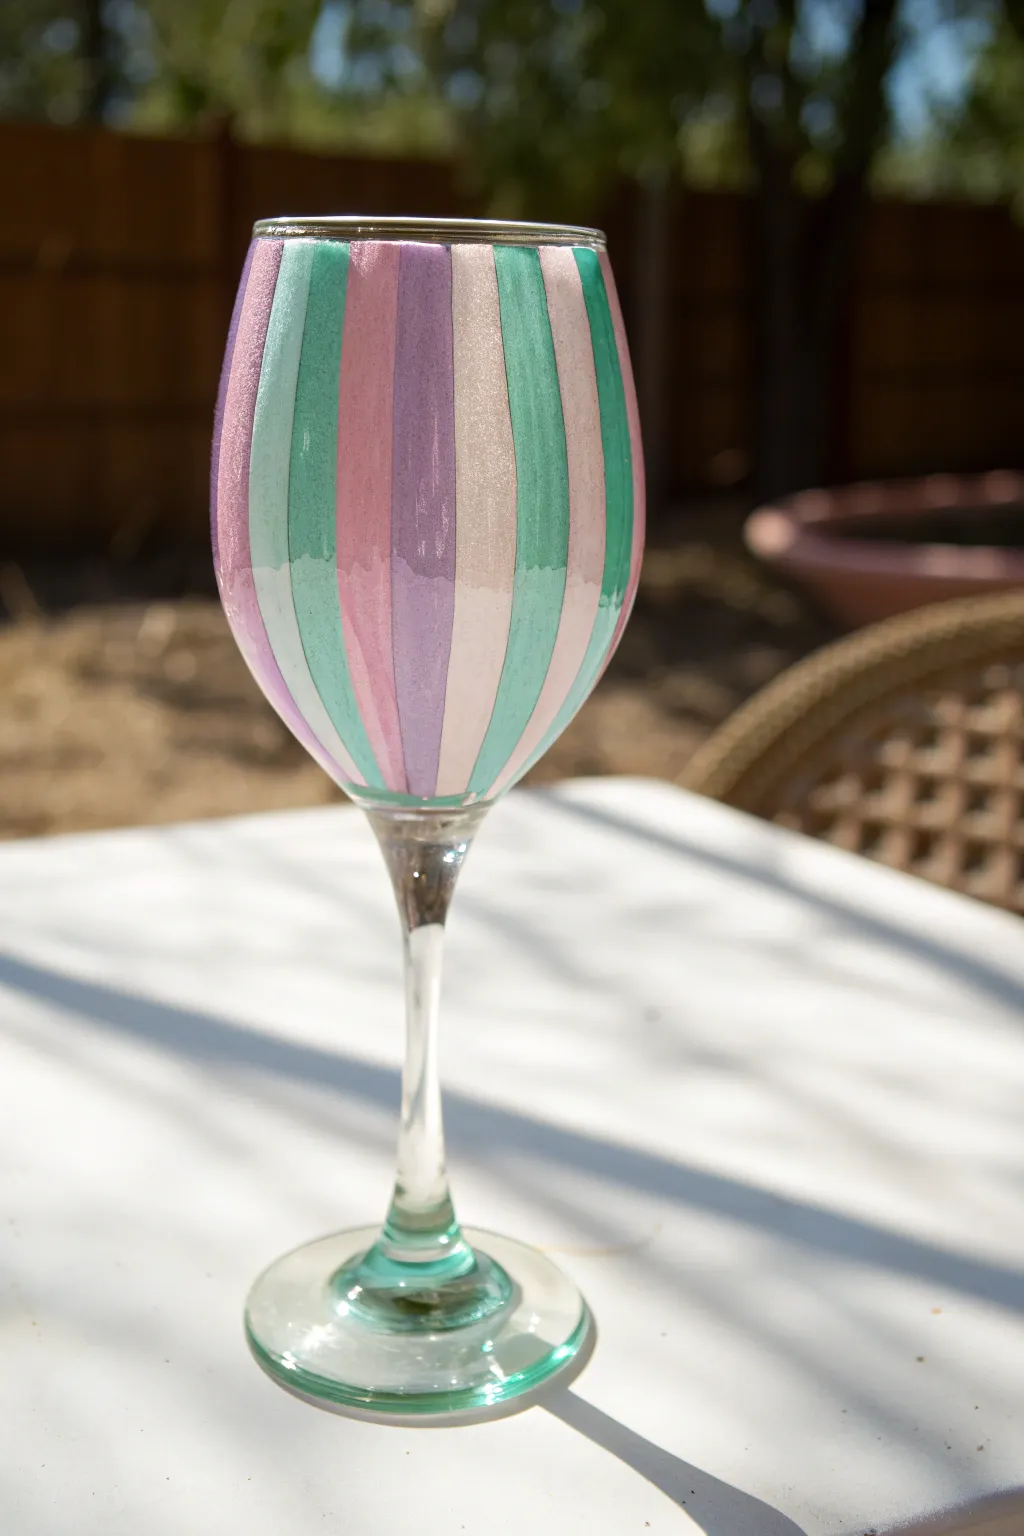
Bring a splash of summer charm to your table with these delightful pastel-striped wine glasses. The vertical pattern lengthens the look of the bowl while the soft color palette creates a fun, preppy aesthetic perfect for picnics or parties.
Step-by-Step Tutorial
Materials
- Glass wine glass (standard white wine shape works best)
- Rubbing alcohol
- Cotton pads
- Multi-surface acrylic enamel paint (Mint Green, Baby Pink, Lavender, Pearl White)
- Flat shader brush (size 8 or 10)
- Cotton swabs
- Paper plate or palette
- Paper towels
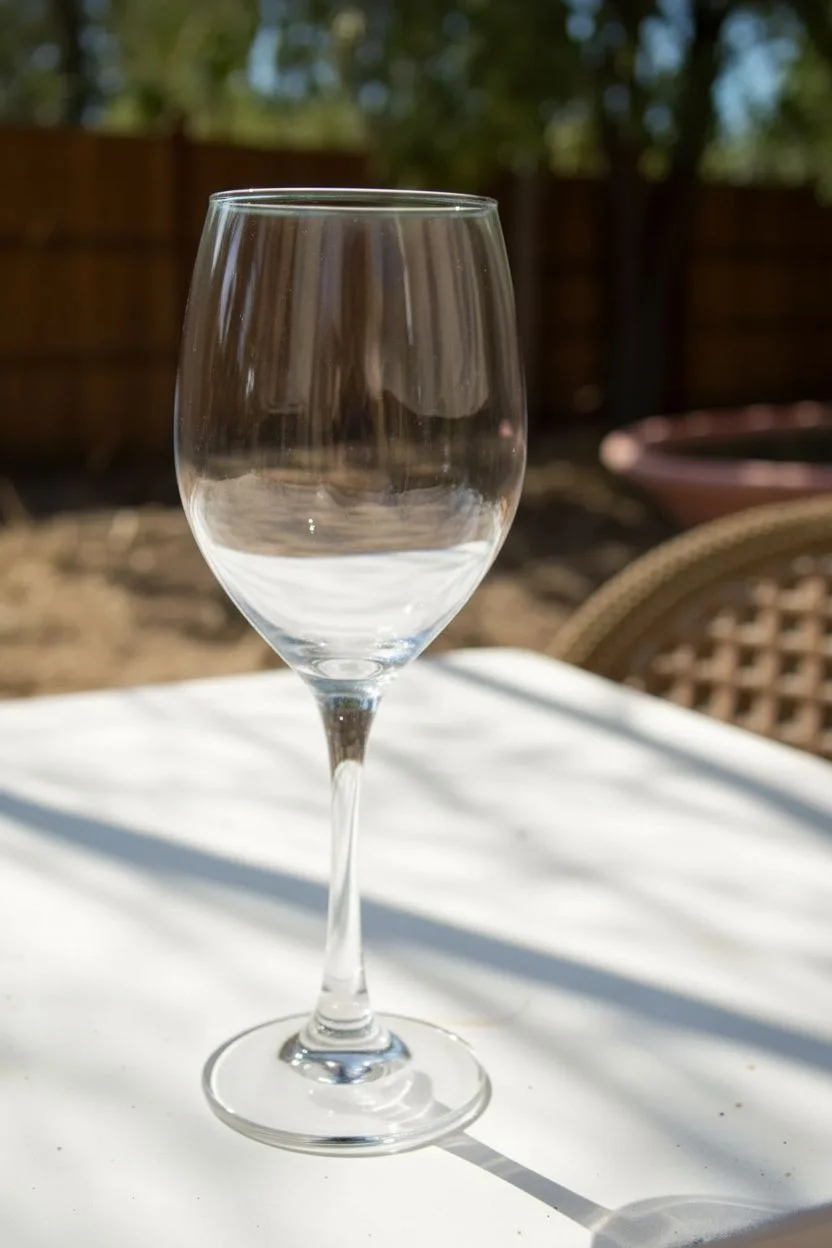
Step 1: Glass Preparation
-
Wash the glass:
Start by thoroughly washing your wine glass with warm, soapy water to remove any sticker residue or dust. -
Degrease the surface:
Once dried, wipe the entire exterior of the bowl with rubbing alcohol on a cotton pad to remove oily fingerprints, which ensures the paint adheres properly. -
Plan your spacing:
Visualize the glass divided into quadrants first to help navigate the spacing, aiming for a repeating pattern of Green, Pink, Purple, and White.
Stripes Stay Straight
Look at the destination (the stem), not the brush, while pulling your paint stroke down. This helps your hand naturally travel in a straighter line.
Step 2: painting the Stripes
-
Load the first color:
Squeeze a dime-sized amount of Mint Green enamel onto your palette and load your flat shader brush generously so it glides smoothly. -
Anchor your hand:
Because we are freehanding these stripes for a painterly look, place your pinky finger against the glass stem to stabilize your hand. -
Paint the first stripes:
Starting about a half-inch below the rim, pull the brush straight down toward the stem in one confident stroke. -
Continue the color:
Rotate the glass and paint your next green stripe, leaving a gap roughly three times the width of your brush to accommodate the other three colors later. -
Dry briefly:
Let the green stripes set for about 10 to 15 minutes; I find this prevents accidental smearing when you start the next color. -
Apply the Pink:
Clean your brush thoroughly and switch to Baby Pink. -
Fill the first gap:
Paint a pink stripe directly to the right of every green stripe, trying to keep the gap between them as narrow as possible without the wet paints touching. -
Add the Lavender:
Repeat the process with the Lavender paint, placing these stripes to the right of the pink ones. -
Finish with Pearl White:
Fill the final remaining gaps with the Pearl White paint to complete the recurring pattern.
Level Up: Glam Borders
After the stripes dry, use a fine-tip gold paint pen to outline the vertical edges of each stripe for a high-end, gilded cloisonné effect.
Step 3: Finishing Touches
-
Check opacity:
Hold the glass up to the light; if some stripes look too sheer, carefully apply a second coat over the specific color once the first layer is dry to the touch. -
Clean the rim:
Use a damp cotton swab to wipe away any stray paint marks near the top, ensuring there is a clean, clear glass border where your lips will touch. -
Clean the distinct end points:
Similarly, use a clean celestial swab to tidy up the bottom of the stripes near the stem so they all end at the same uniform line. -
Initial dry time:
Allow the glass to air dry for at least one hour before handling it extensively. -
Cure the paint:
For a durable finish, place the glass in a cool oven, set the temperature to 350°F (175°C), and bake for 30 minutes, turning the oven off and letting the glass cool down inside completely.
Fill your new custom glass with your favorite vintage and enjoy the colorful view.


Desert Chic Flowering Cacti
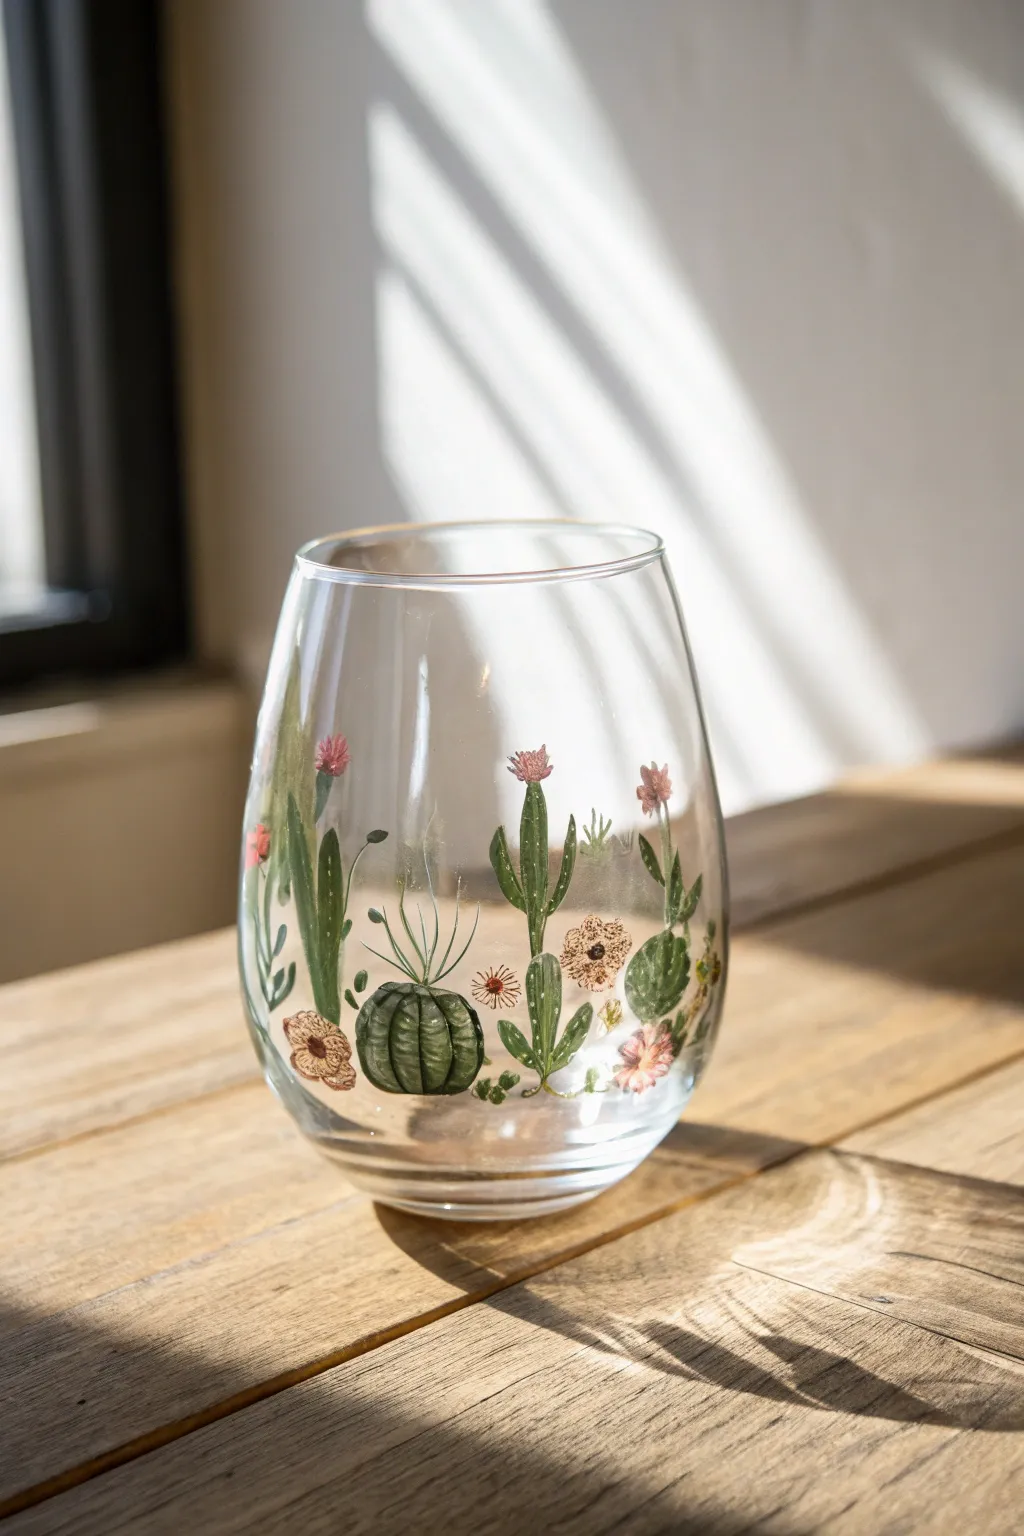
Transform a plain stemless wine glass into a trendy desert oasis with this hand-painted cactus design. Using specialized glass paints, you will create translucent, watercolor-style succulents accented with delicate pink blooms.
How-To Guide
Materials
- Stemless wine glass
- Rubbing alcohol
- Enamel or multi-surface acrylic glass paints (forest green, olive, sage, coral, pink, brown, white)
- Small round brush (size 2)
- Fine liner brush (size 00 or 10/0)
- Cotton swabs
- Paper and pencil
- Masking tape
Step 1: Preparation and Base Shapes
-
Clean the surface:
Wash the wine glass thoroughly with warm soapy water and dry it completely. Wipe the exterior with a paper towel soaked in rubbing alcohol to remove any oily fingerprints. -
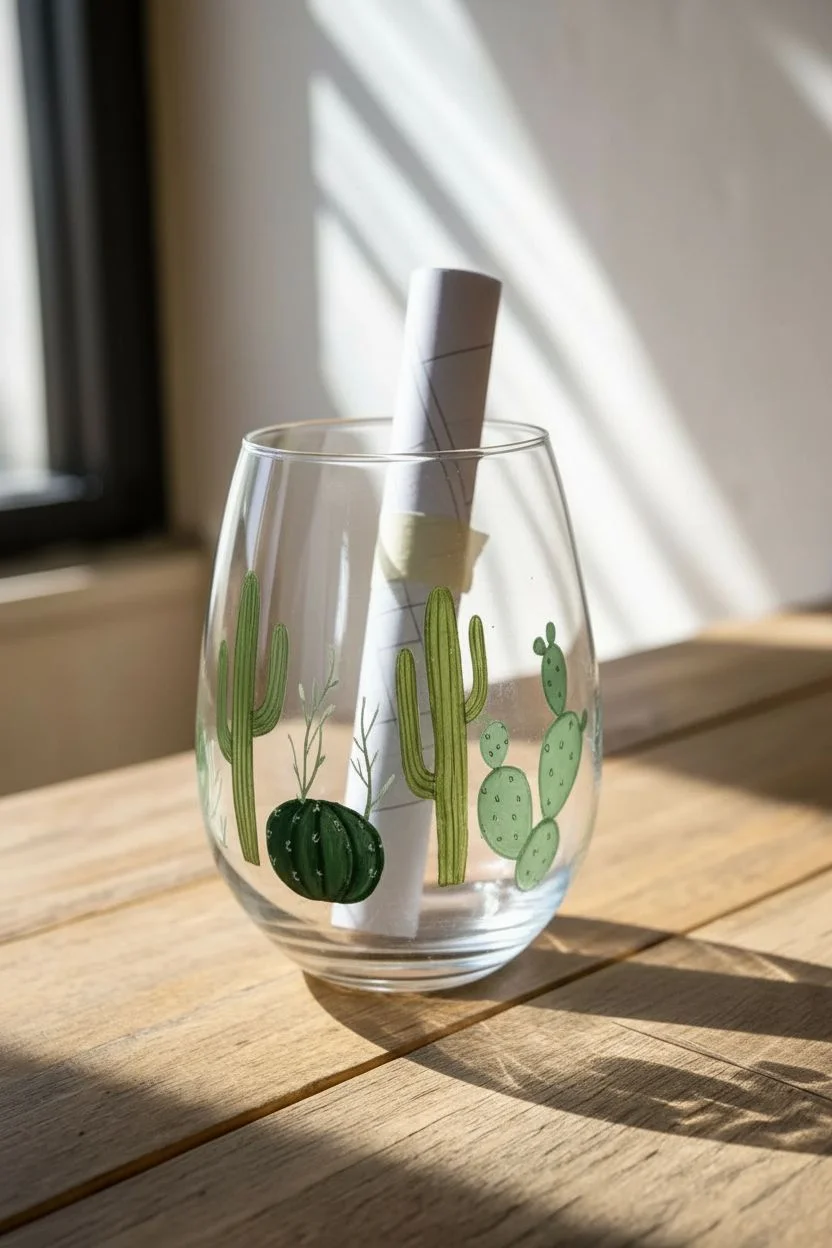
Create a guide:
Sketch your cactus arrangement—including a round barrel cactus, a tall column cactus, and a prickly pear—on a small strip of paper. Roll the paper and place it inside the glass, taping it in place to serve as a tracing guide. -
Mix your greens:
Squeeze out your various green paints onto a palette. I like to mix a little white into the olive green to create a soft sage color for variety among the plants. -
Paint the barrel cactus:
Using the size 2 round brush, paint a stout, oval shape near the bottom of the glass using your darkest forest green. Keep the paint layer thin enough to remain slightly translucent. -
Paint the tall cactus:
Rinse your brush and switch to a medium olive green. Paint a tall, slender column with a few vertical arms branching upward, mimicking a Saguaro shape. -
Add prickly pear pads:
Using a lighter sage mix, paint connected teardrop shapes to form the pads of a prickly pear cactus. -
Fill with foliage:
Add a few thin, wispy stems or aloe-style spikes in between the main cacti using the tip of your round brush to balance the composition.
Fixing Smudges
Keep damp cotton swabs nearby while painting. If you make a mistake or smudge a line, wipe it away quickly while the paint is wet to maintain crisp edges.
Step 2: Details and Flowers
-
Dry time:
Allow the base green shapes to dry for about 15 to 20 minutes. They should be tacky but not wet before you add details. -
Stripe the barrel cactus:
Mix a slightly lighter green and paint vertical curved stripes down the dark barrel cactus to create the look of ribs and dimension. -
Add spines:
Switch to your fine liner brush. Using white or very light green paint, add tiny ‘V’ shapes or simple dots along the edges and ridges of the tall cactus and prickly pear pads. -
Detail the barrel spines:
For the barrel cactus, use the liner brush to paint very fine, short lines radiating from the lighter vertical ribs you painted earlier. -
Paint cactus blooms:
Dip the round brush into pink or coral paint. Dab small, fluffy tufts on the very tops of the tall cactus arms to represent blooming flowers. -
Add wildflowers:
Paint larger, open-faced flowers near the base of the glass between the cacti. Use five distinct brush strokes for petals in coral or brown tones. -
Detail flower centers:
Once the flowers are touch-dry, use the tip of your liner brush or a toothpick to add tiny dots of dark brown or black in the center of the blooms. -
Final foliage accents:
Paint very fine, dark green stems connecting the ground flowers, weaving them visually behind the main cactus shapes.
Step 3: Finishing Touches
-
Remove the guide:
Carefully remove the paper guide from inside the glass. Check your design against a white background to ensure the opacity is to your liking. -
Clean up edges:
Moisten a cotton swab with a little water or rubbing alcohol and gently wipe away any stray paint marks or uneven edges. -
Cure the paint:
Follow the specific curing instructions on your paint bottle. This typically involves letting the glass air dry for 21 days or baking it in a cool oven that heats up to 350°F (175°C) for 30 minutes.
Add Some Sparkle
For a bit of glam, add tiny dots of metallic gold enamel paint to the centers of the wildflowers or the tips of the cactus spines after the colors dry.
Enjoy your beautiful new glassware at your next gathering or gift it to a plant-loving friend
Delicate Pink Cherry Blossoms
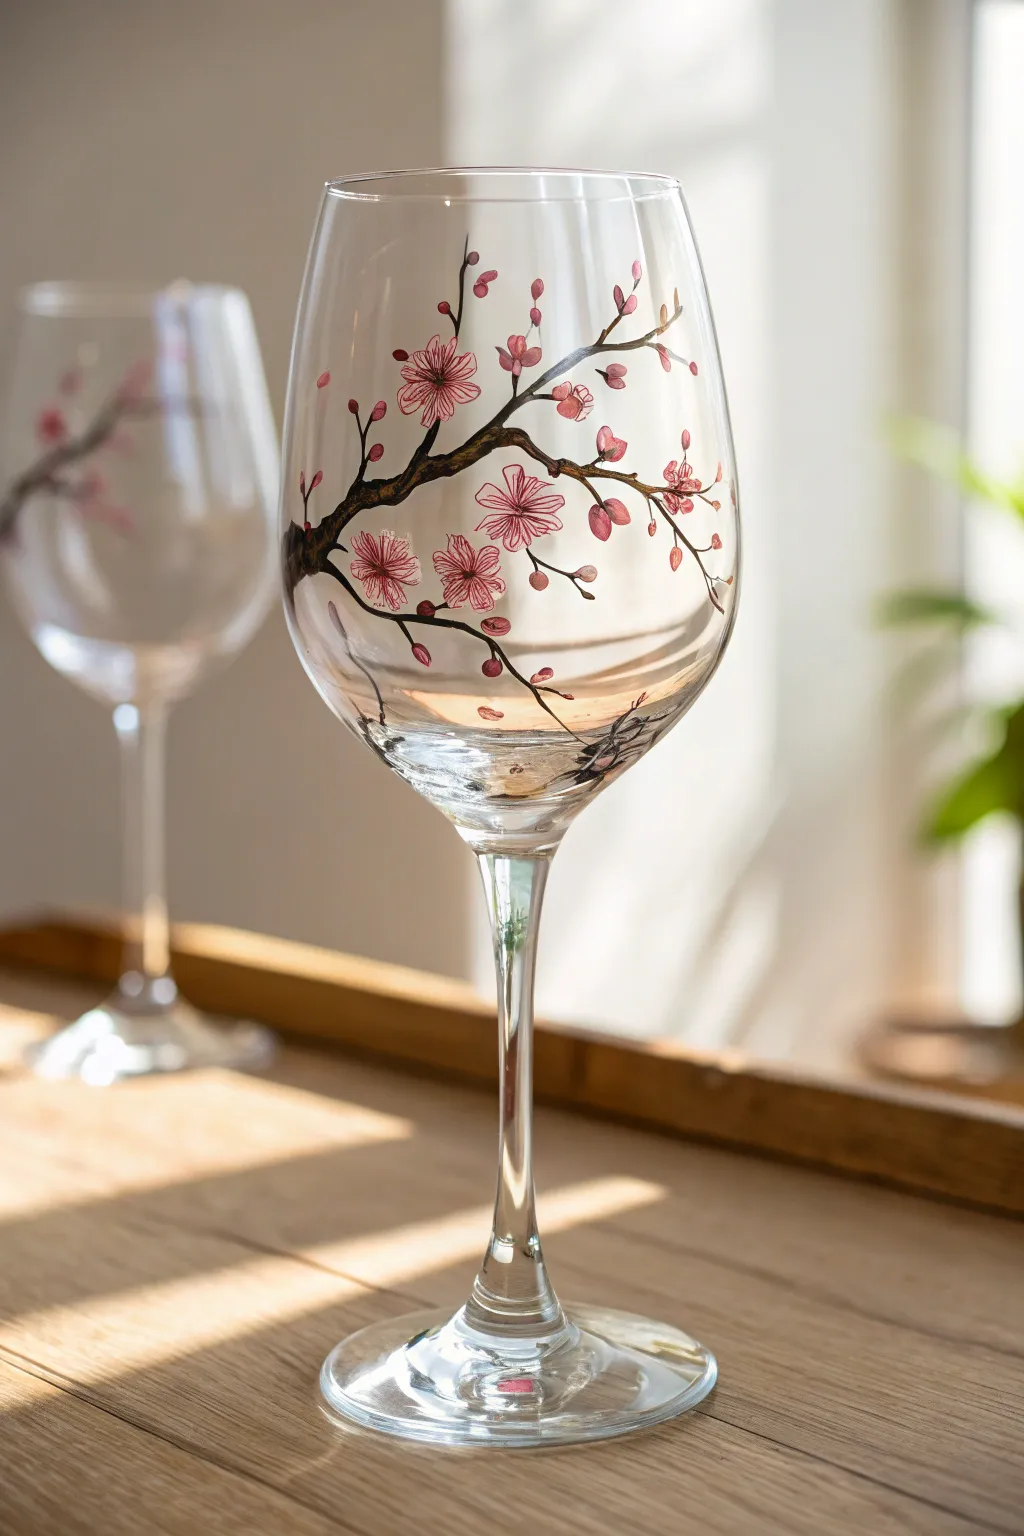
Capture the fleeting beauty of cherry blossoms with this delicate glass painting project. The fine branches and translucent pink petals wrap elegantly around the bowl, making every sip feel like a garden party.
Step-by-Step
Materials
- Clear white wine glass
- Rubbing alcohol and cotton pads
- Gloss enamel glass paints (Dark Brown, Titanium White, Light Pink, Magenta)
- Fine liner brush (size 00 or 0)
- Small round brush (size 2)
- Palette or small paper plate
- Cotton swabs (for clean-up)
- Oven (for baking/curing)
Step 1: Preparation & Branch Network
-
Clean surface:
Before you begin, thoroughly wipe the exterior of the wine glass with rubbing alcohol to remove any oils or fingerprints. This ensures the paint adheres properly. -
Load the liner:
Squeeze a small amount of Dark Brown enamel onto your palette. Using your fine liner brush, thin the paint slightly with a drop of water if it feels too thick to drag smoothly. -
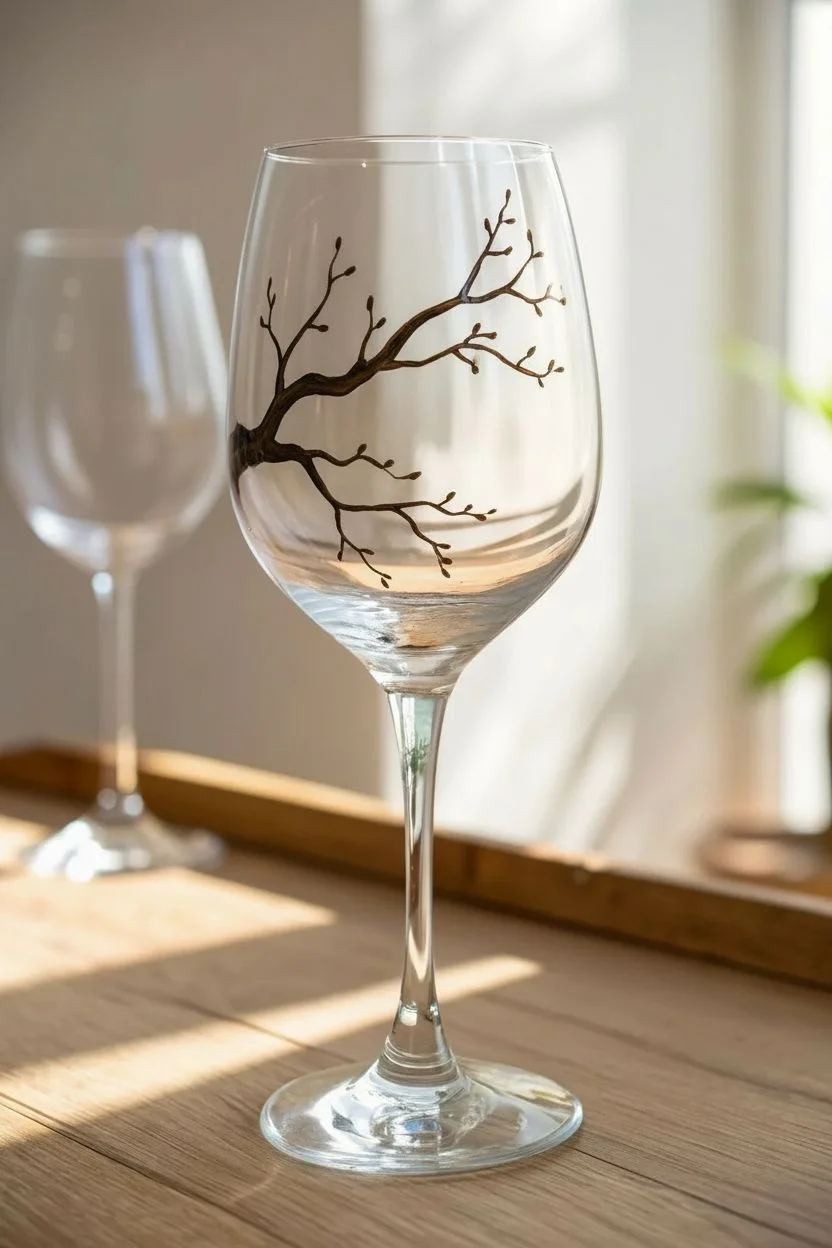
Anchor the branch:
Start painting the main branch from the left side of the glass, about halfway up the bowl. Paint a horizontal, slightly undulating line that tapers off as it reaches the right side. -
Create offshoots:
From the main branch, pull out thinner sub-branches extending upward and downward. I find that rolling the brush slightly between my fingers creates a natural, organic twist. -
Refine the twigs:
Add very short, tiny jagged lines coming off the sub-branches. These will serve as the connection points for your buds and blooms later. -
Thicken the base:
Go back to the starting point of your main branch and thicken it slightly, making the wood look sturdy where it enters the composition.
Steady Hand Tip
Place a rolled-up hand towel or a sock filled with rice inside the glass. This stabilizes the round surface on the table so you can paint without it rolling away.
Step 2: Blossoms & Details
-
Mix your pinks:
Prepare two shades of pink on your palette: a very pale pastel pink (mix White with a drop of Pink) and a medium rose pink. -
Paint main blooms:
Using the size 2 round brush and the pale pink, paint five-petal flower shapes at various intersections of the branches. Keep the paint somewhat thin for a delicate look. -
Add side profiles:
Paint a few flowers that look like they are facing sideways or downwards by only painting three petals, formed in a small cup shape. -
Add buds:
Dip the tip of your round brush into the darker Magenta paint. Gently press small, teardrop shapes onto the tips of the smallest twigs to create unopened buds. -
Outline the petals:
Once the base pink is touch-dry, switch back to your clean liner brush. Load it with Magenta and carefully outline the petals of the main flowers to define their shape. -
Deepen the buds:
Add a tiny stroke of the diluted Dark Brown or Magenta to the base of each bud where it connects to the branch. -
Create stamens:
Inside the open flowers, use your liner brush to flick very fine lines of Magenta radiating from the center outward. -
Pollen dots:
Dot the ends of those tiny stamen lines with a speck of Dark Brown or deep red to mimic the pollen anthers. -
Highlighting:
Add tiny, whisper-thin streaks of pure Titanium White on the upper edges of a few petals. This gives them a glossy, light-catching dimension. -
Clean up:
If any lines went astray, dampen a cotton swab with water (or alcohol if the paint is dry) and carefully wipe away the mistake. -
Cure the glass:
Allow the glass to air dry for 1 hour. Place it in a cool oven, heat to 350°F (175°C), bake for 30 minutes, then turn the oven off and let the glass cool completely inside before removing.
Level Up: Falling Petals
Paint two or three loose petals drifting near the bottom of the bowl or on the base of the glass to create a sense of movement and wind.
Once cured, fill your beautiful new glass with your favorite rosé to complement the pink hues of your artwork.
Whimsical Red Toadstools
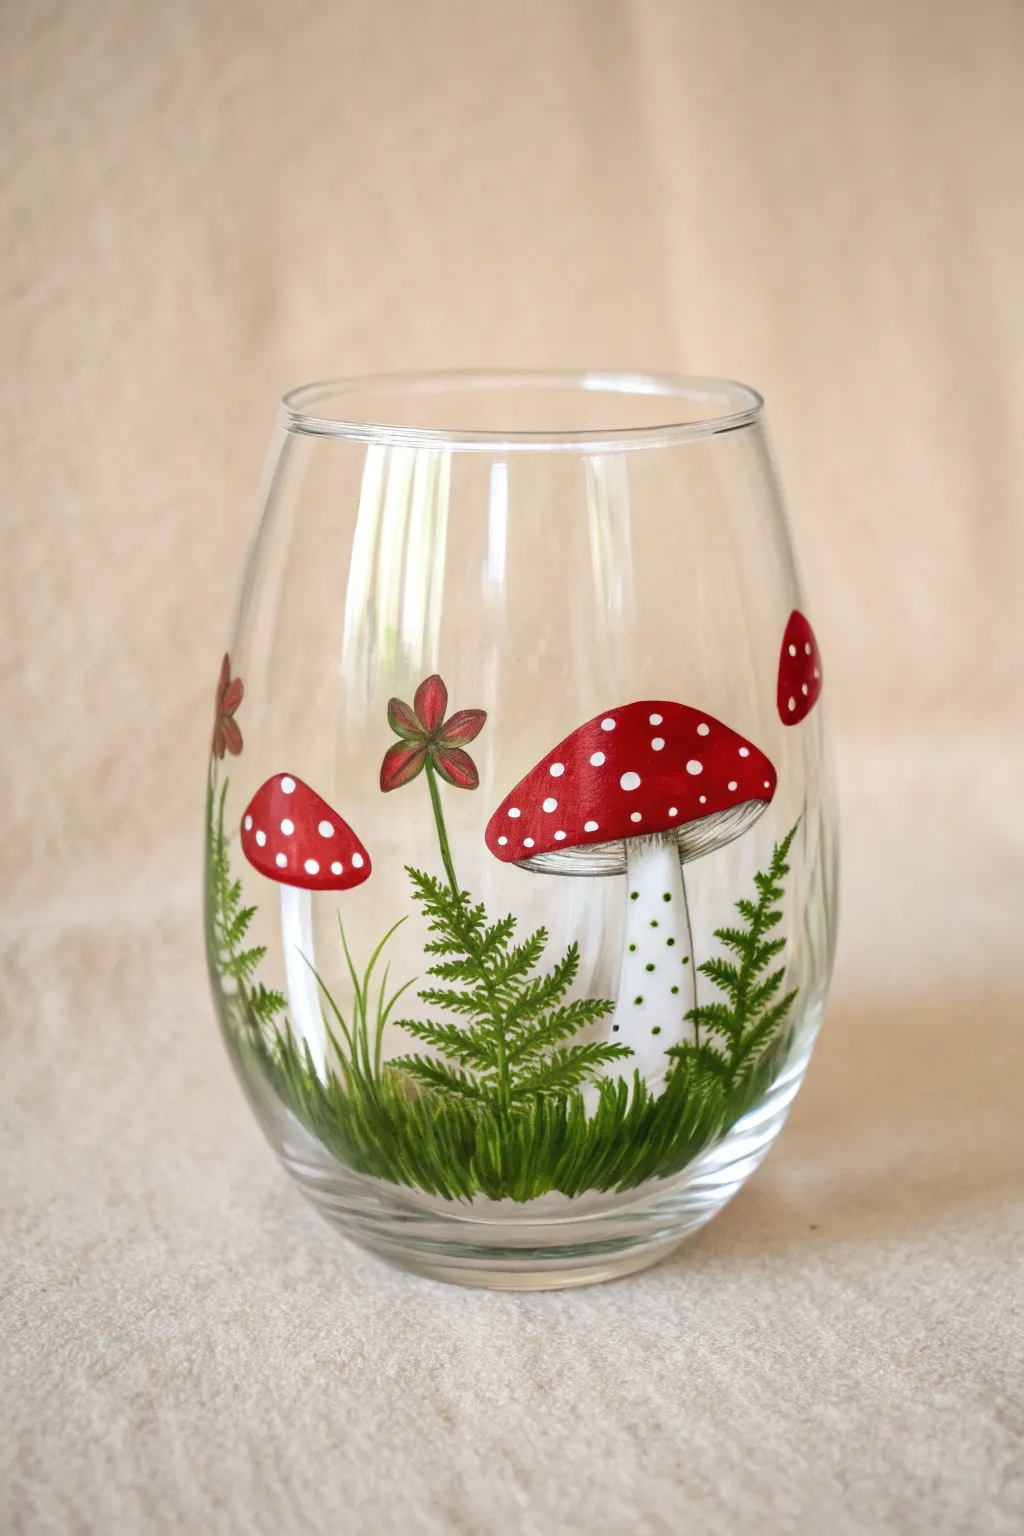
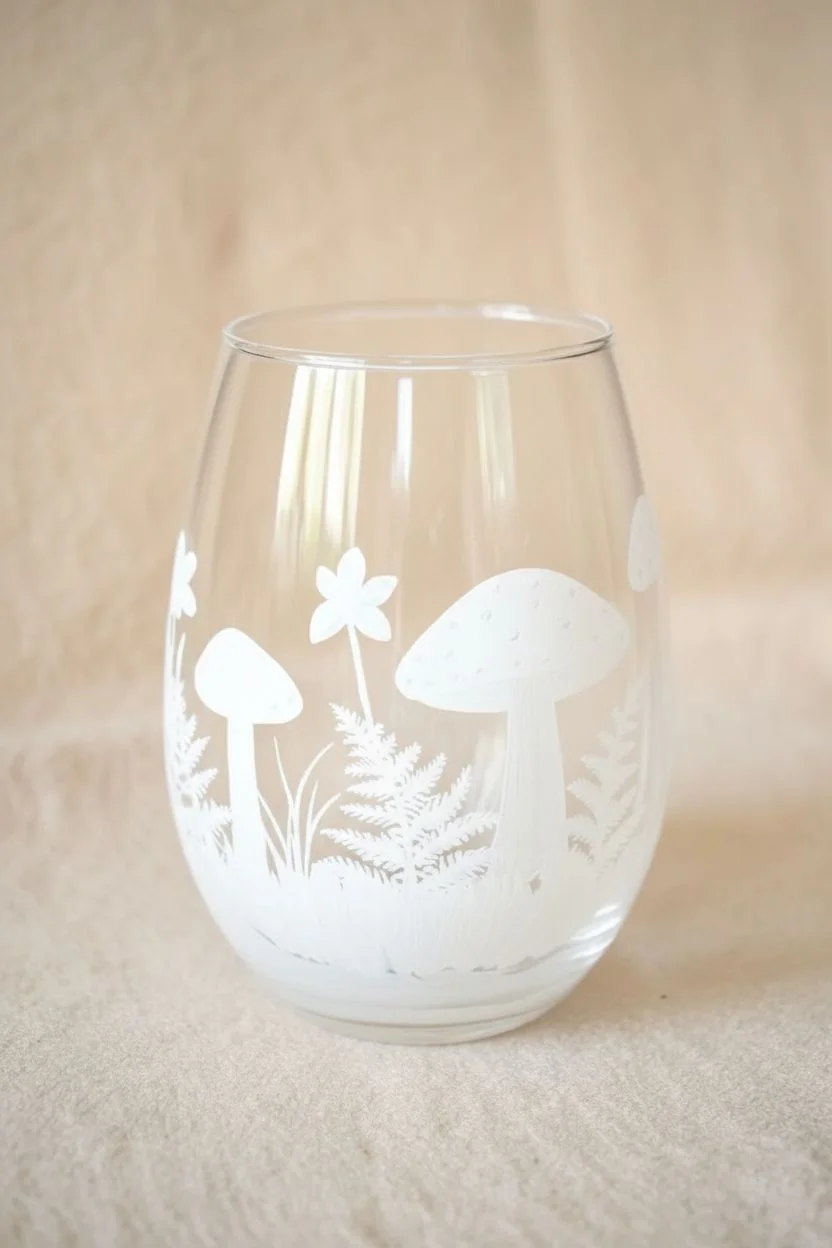
Transform an ordinary stemless wine glass into a magical woodland scene featuring vibrant fly agaric mushrooms and delicate ferns. This project uses glass enamels to create a durable, semi-transparent design that looks lovely filled with white wine or water.
Step-by-Step Guide
Materials
- Stemless wine glass (washed and dried)
- Enamel glass paints (Opaque White, Crimson Red, Sap Green, Lime Green, Raw Umber/Black)
- Rubbing alcohol and cotton pads
- Fine liner brush (size 00)
- Small round brush (size 2)
- Dotting tool or toothpick
- Paper towels
- Oven (for curing)
Step 1: Preparation & Base Layers
-
Clean surface:
Wipe the entire outer surface of the glass with rubbing alcohol on a cotton pad to remove oils and fingerprints. Avoid touching the painting area after this. -
Plan placement:
I find it helpful to tape a small sketch of the mushrooms inside the glass facing outward to use as a tracing guide, but freehand painting works too. -
Base whites:
Using the round brush and white enamel paint, block out the silhouette of the mushroom stems and caps. Painting white first ensures the red will pop against the clear glass. -
Dry time:
Allow this white base layer to dry to the touch (usually 1 hour) before adding colors on top.
Step 2: Mushroom Details
-
Red caps:
Paint over the white cap areas with Crimson Red. Apply a second coat if needed for rich, opaque coverage. -
Stem shading:
Mix a tiny dot of Raw Umber or Black into your white paint to make a very pale grey. Lightly shade the sides of the stems to give them a cylindrical look. -
Under-cap gills:
For the open mushroom, use the liner brush and the pale grey mix to paint very fine lines radiating from the stem to the edge of the cap to mimic gills. -
Skirt detail:
Paint a small, ruffled ring (the annulus) around the stem just below the cap using pure white.
Paint Slipping?
If paint streaks or lifts, the glass is too slick. Apply very thin base layers and let them dry fully between coats. Don’t overload the brush.
Step 3: Foliage & Flowers
-
Grass base:
Load your brush with Sap Green. Create the grassy ground level by flicking the brush upward from the bottom of the glass with short, quick strokes. -
Fern structure:
Draw thin, curved lines rising from the grass using the liner brush to create the central stems of the ferns. -
Fern fronds:
Using short, angled strokes in Lime Green, add leaves along both sides of the fern stems, tapering them smaller near the top. -
Flower stems:
Paint solitary, thin green lines rising vertically among the ferns for the wildflowers. -
Flower petals:
Add simple four-petal flowers in red or deep pink at the top of the single stems.
Level Up
Paint the design on the reverse side of the glass so looking through the front gives it natural depth, then seal the back with clear varnish.
Step 4: Finishing Touches
-
Cap spots:
Dip the handle end of a paintbrush or a dotting tool into white paint. Gently dot varying sizes of white spots onto the red mushroom caps. -
Stem texture:
Add tiny, minuscule dots of Green or Black on the lower part of the mushroom stems for realistic texture. -
Corrections:
If you smudge any paint, use a damp toothpick or a cotton swab dipped in alcohol to erase the mistake before it sets. -
Curing:
Follow your paint bottle’s specific instructions for curing. This typically involves placing the glass in a cool oven, heating to 350°F, baking for 30 minutes, and letting it cool inside the oven.
Once baked, your whimsical forest glass is ready for hand-washing and enjoying a cozy drink.
Tropical Pink Flamingos
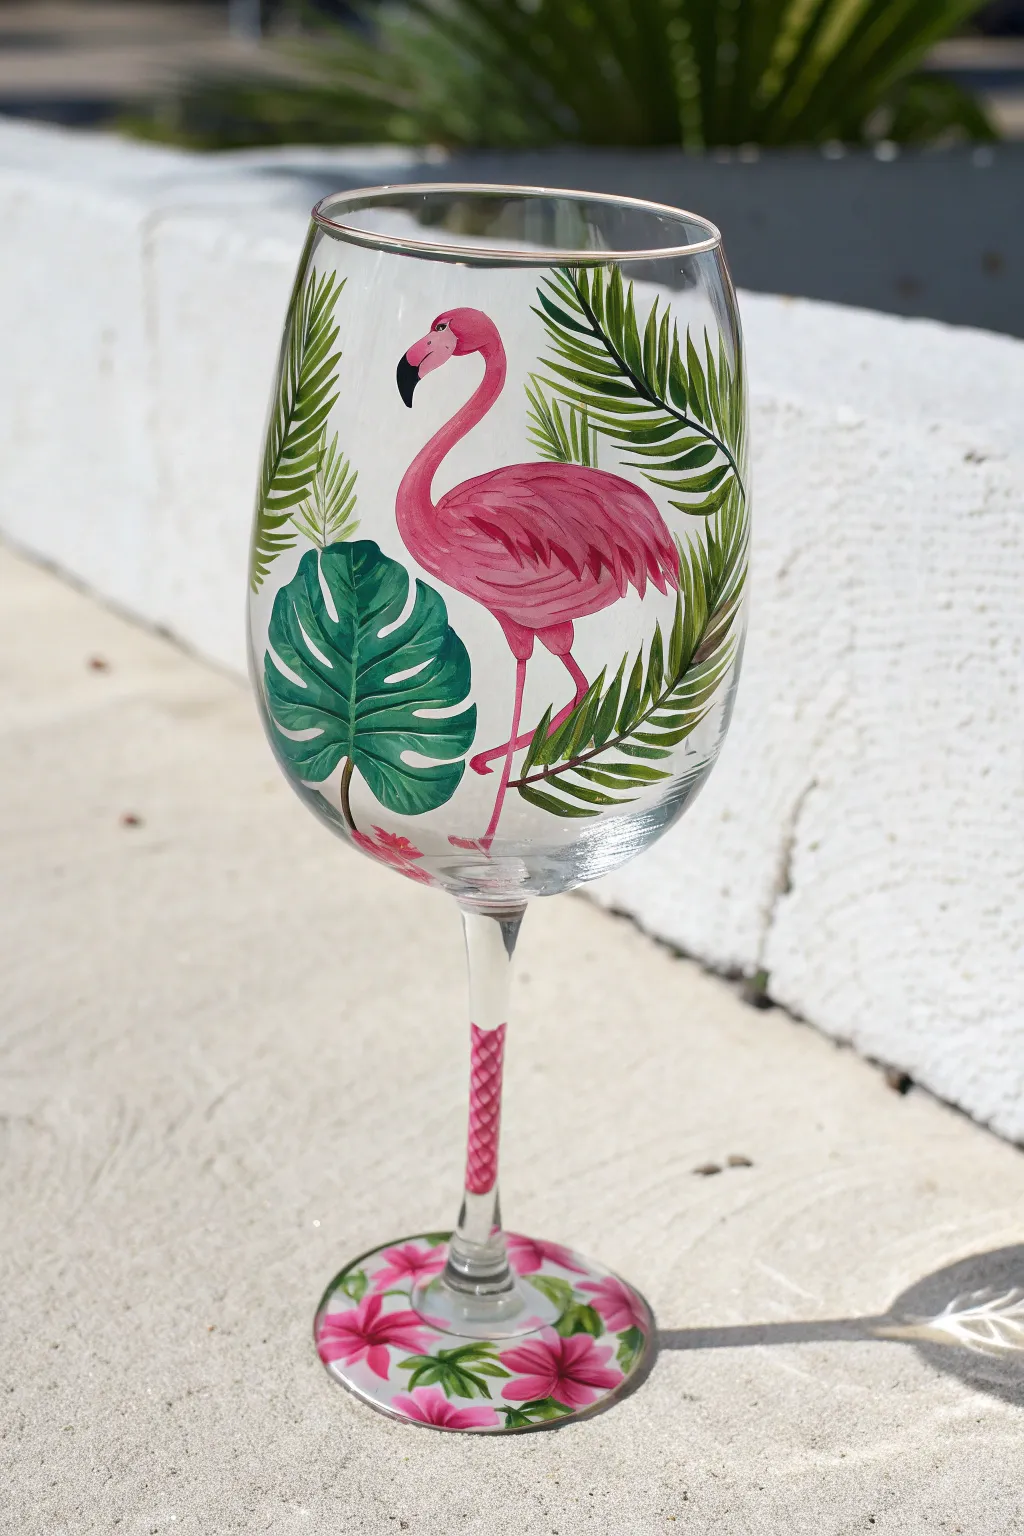
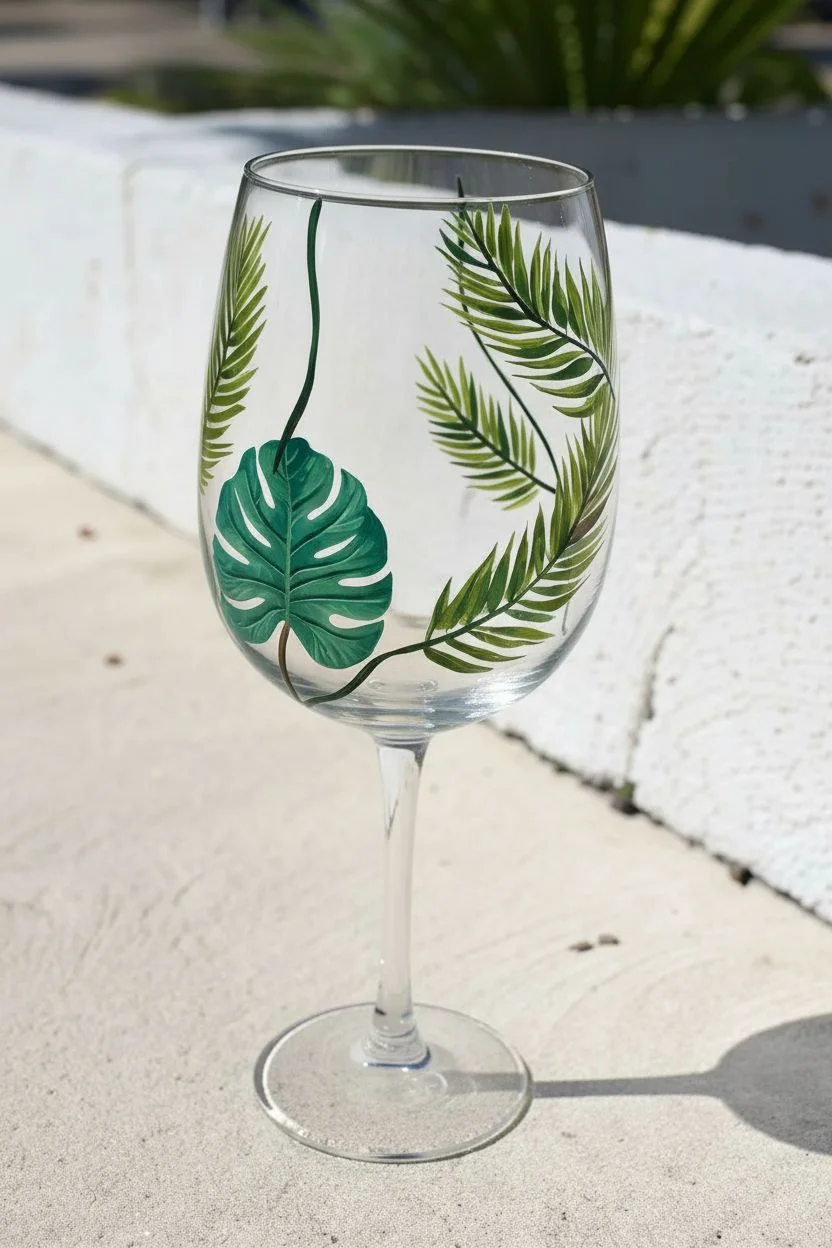
Bring the vacation vibes to your next happy hour with this vibrant tropical wine glass featuring a graceful flamingo amidst lush greenery. The combination of bright pinks and deep greens makes this a standout piece that looks lovely from the bowl all the way down to the decorated base.
Step-by-Step Tutorial
Materials
- Large wine glass
- Rubbing alcohol and cotton pads
- Enamel glass paints (Hot Pink, Light Pink, Dark Green, Lime Green, White, Black)
- Fine liner brush (size 0 or 00)
- Small flat brush
- Medium round brush
- Palette or small plate
- Paper towels
Step 1: Setting the Tropical Scene
-
Prep the surface:
Before painting, wipe the entire exterior of the glass with rubbing alcohol on a cotton pad to remove oils and fingerprints, ensuring the paint adheres properly. -
Paint the Monstera leaf:
Using a flat brush and dark green mixed with a touch of white for a teal hue, paint a large heart-shaped leaf on the lower left curve of the bowl, leaving small notches for the iconic Monstera look. -
Detail the Monstera:
While the green is still slightly wet, blend in a lighter green highlight on the top half of the leaf to create dimension, then paint a thin centerline. -
Draft the palm fronds:
Switch to a liner brush and dark green paint. Draw thin, curved lines extending from the top and right sides of the glass to act as the spines/stems for the palm leaves. -
Fill in the palm leaves:
Using a flicking motion, paint thin, wispy leaves coming off the stems. I like to alternate between dark green and lime green strokes here to create a sense of light filtering through the foliage.
Slippery Paint?
glass is non-porous, so paint might slide or look streaky. If the pink looks transparent, let the first coat dry completely (about 20 mins) before gently dabbing on a second layer.
Step 2: Painting the Flamingo Centerpiece
-
Outline the body:
Mix your hot pink paint. In the center open space, paint a curved oval for the body and extend a graceful ‘S’ shape upward for the neck. -
Fill and feather:
Fill in the body shape with solid pink. Once the base coat is tacky, use a small round brush with a darker magenta mix to add curved strokes across the wing area, simulating layers of feathers. -
Create the legs:
With your finest liner brush and the hot pink paint, draw two very thin legs—one straight down, and one bent at the knee in a classic flamingo pose. -
Paint the beak:
At the end of the neck, paint a curved beak shape. Use white near the face, transitioning into a black tip. This high contrast brings the character to life. -
Add the eye:
Using the very tip of your liner brush or a toothpick, place a tiny black dot for the eye within the white area of the face.
Make it Sparkle
For a glamorous finish, outline the rim of the glass with a thin line of metallic gold glass paint, or add tiny gold dots to the center of the hibiscus flowers on the base.
Step 3: Finishing the Stem and Base
-
Decorate the stem:
On the lower half of the glass stem, paint a textured pattern using pink paint. Small crisscross strokes emulate a wrapped or woven look. -
Start the base flowers:
Move to the foot of the glass. Paint several five-petaled hibiscus flowers using your bright pink paint, spacing them out slightly. -
Add base greenery:
Fill the gaps between the pink flowers with small green brushstrokes to represent leaves, tying the design back to the bowl. -
Highlight the flowers:
Add darker pink lines radiating from the center of each hibiscus flower to give the petals depth. -
Cure the glass:
Follow the manufacturer instructions on your paint bottle exactly. This usually implies air drying for 24 hours, then baking the glass in a cool oven to set the design permanently.
Once baked and cooled, your tropical masterpiece is ready for a refreshing drink
Under the Sea Goldfish
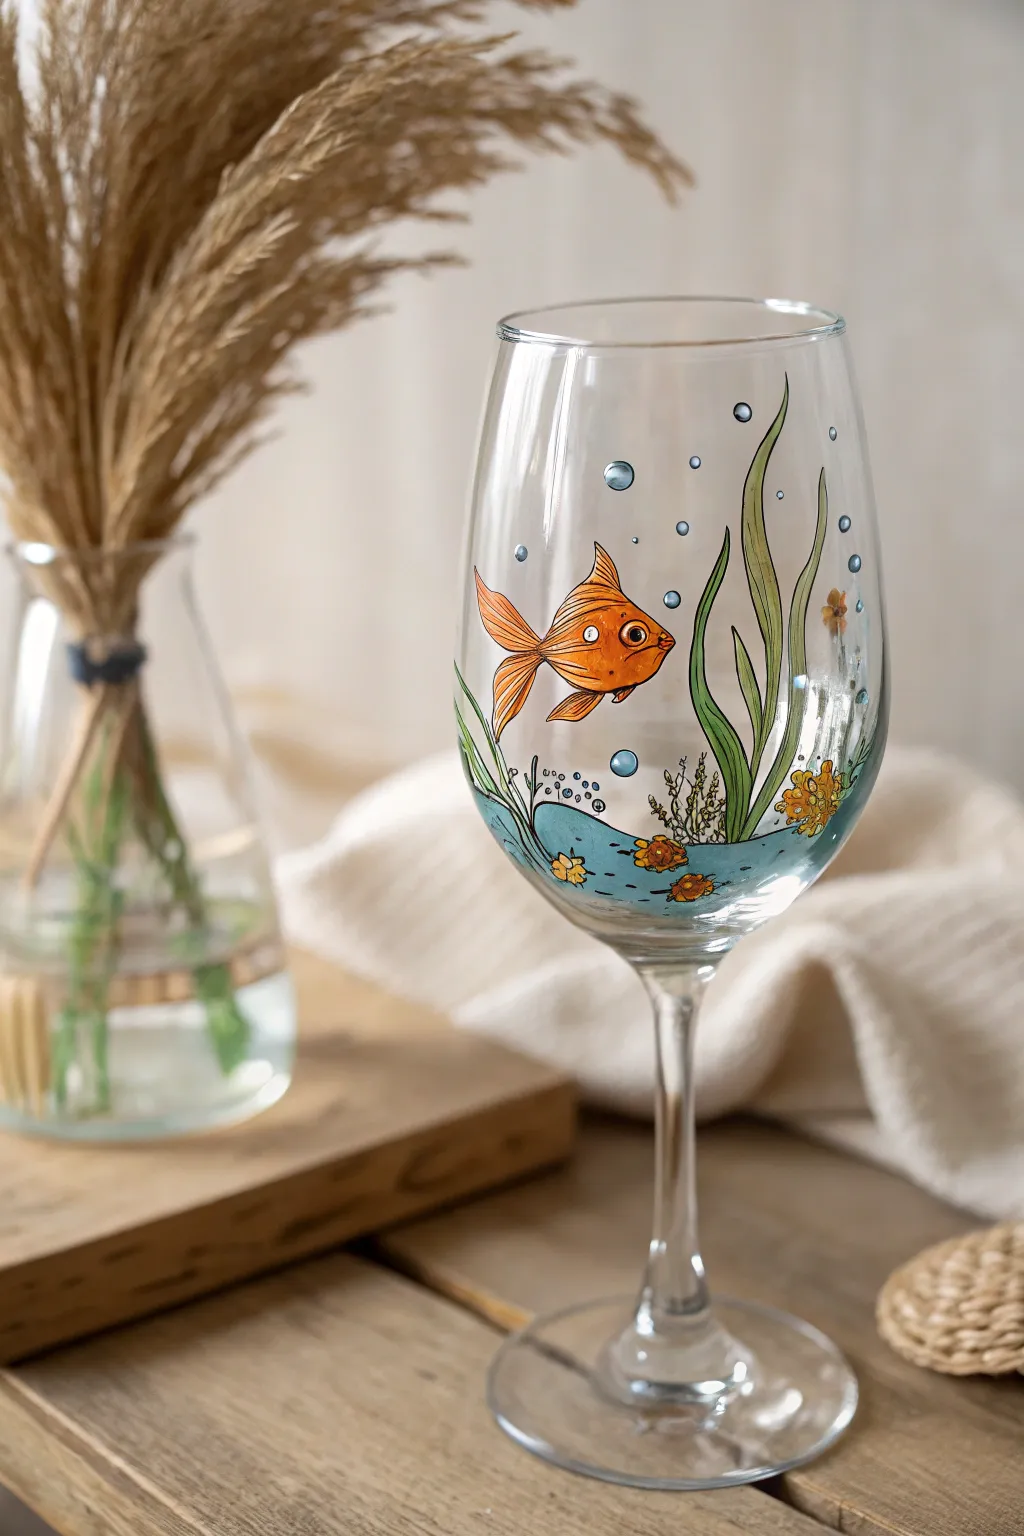
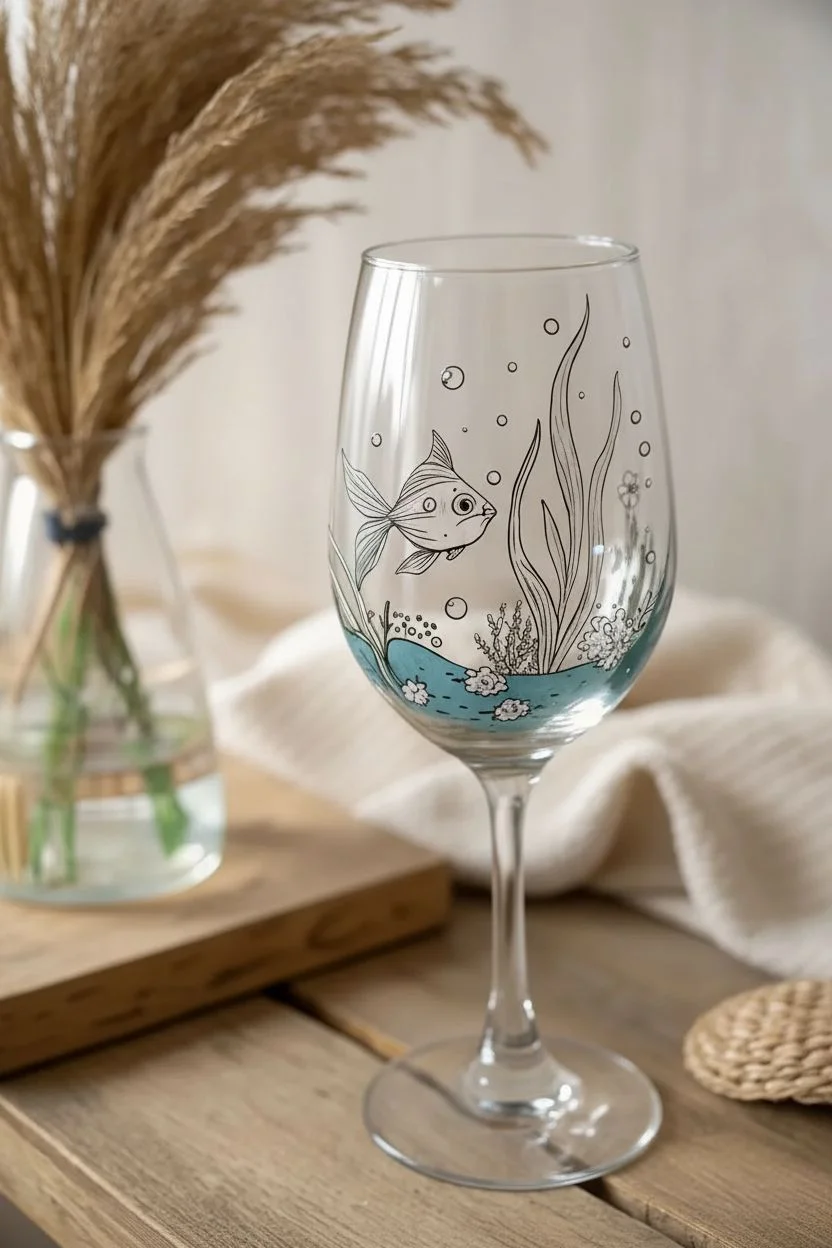
Turn a simple wine glass into a playful aquatic scene with this charming goldfish illustration. The transparent nature of the glass creates a fishbowl effect, featuring a bright orange friend swimming among seaweed and bubbles.
Step-by-Step
Materials
- Clear white wine glass
- Rubbing alcohol and cotton pad
- Glass enamel paints (Orange, leaf green, dark green, light blue, yellow, black, white)
- Fine liner brush (size 0 or 00)
- Small round brush (size 2)
- Black oil-based paint pen (extra fine tip) – optional alternative to black paint
- Paper towels
- Q-tips (for cleanup)
Step 1: Preparation and Outlining
-
Clean the surface:
Wipe the entire outer surface of the wine glass with rubbing alcohol to remove any fingerprints or oils, ensuring the paint adheres properly. -
Outline the fish body:
Using a fine liner brush loaded with black enamel (or a black paint pen), draw a plump oval shape in the center of the glass bowl for the goldfish’s body. -
Add fin details:
Sketch a triangular dorsal fin on top, two flowing tail fins at the back, and a small pectoral fin on the side using the same black outline. -
Draw the seaweed:
Create tall, wavy lines rising from the bottom of the bowl to mimic seagrass. Vary the heights, making some strands curve around the fish. -
Define the seabed:
Draw a wavy horizontal line near the bottom of the bowl to mark the top of the water/sand line, connecting the bases of your seaweed plants. -
Sketch underwater elements:
Add small circles of varying sizes scattered upwards for bubbles and draw catchy little rock or coral clusters along the bottom line. -
Let outlines set:
Allow the black skeletal outlines to dry for about an hour so they don’t smear when you add color.
Step 2: Adding Color
-
Paint the goldfish:
Fill in the fish’s body with bright orange enamel using the small round brush, being careful to stay within the black outlines. -
Detail the fins:
Use a slightly watered-down orange (or mix in a tiny dot of yellow) to paint the fins, giving them a slightly more translucent look than the body. -
Color the seaweed:
Paint the seagrass blades with leaf green. For visual interest, I like to mix a little white into the green for a few strands to create depth. -
Fill the water bed:
Paint the area below your wavy bottom line with light blue. You can apply this thinly to keep it semi-transparent like water. -
Paint the coral:
Dab yellow and orange paint onto the small rock or coral shapes at the bottom for little pops of warm color.
Don’t drip!
Glass is a slippery surface. Load your brush with less paint than you think you need. It is better to do two thin coats than one thick coat that might drip down the curve.
Step 3: Highlights and Curing
-
Create the bubbles:
Fill the scattered small circles with light blue paint to create the rising air bubbles. -
Give the fish sight:
Paint a solid white circle for the eye. Once dry, add a smaller black pupil, and finish with a tiny white spec for a reflection highlight. -
Add bubble reflections:
Using your finest brush and white paint, add a tiny curved comma shape to the top right of the blue bubbles to make them look spherical. -
Refine the lines:
If any color went over the edges, carefully re-trace the black outlines with your liner brush to make the illustration crisp and cartoon-like. -
Dry and cure:
Let the glass sit for at least 24 hours. To make it dishwasher safe (check your paint’s specific instructions), place the glass in a cool oven, heat to 350°F for 30 minutes, and let it cool inside.
Make it 3D
Paint the seaweed on the *outside* of the glass and the fish on the *inside* (reverse the order). This creates physical depth between the plants and the swimmer!
Once baked and cooled, your custom glassware is ready to make a splash at your next dinner party.
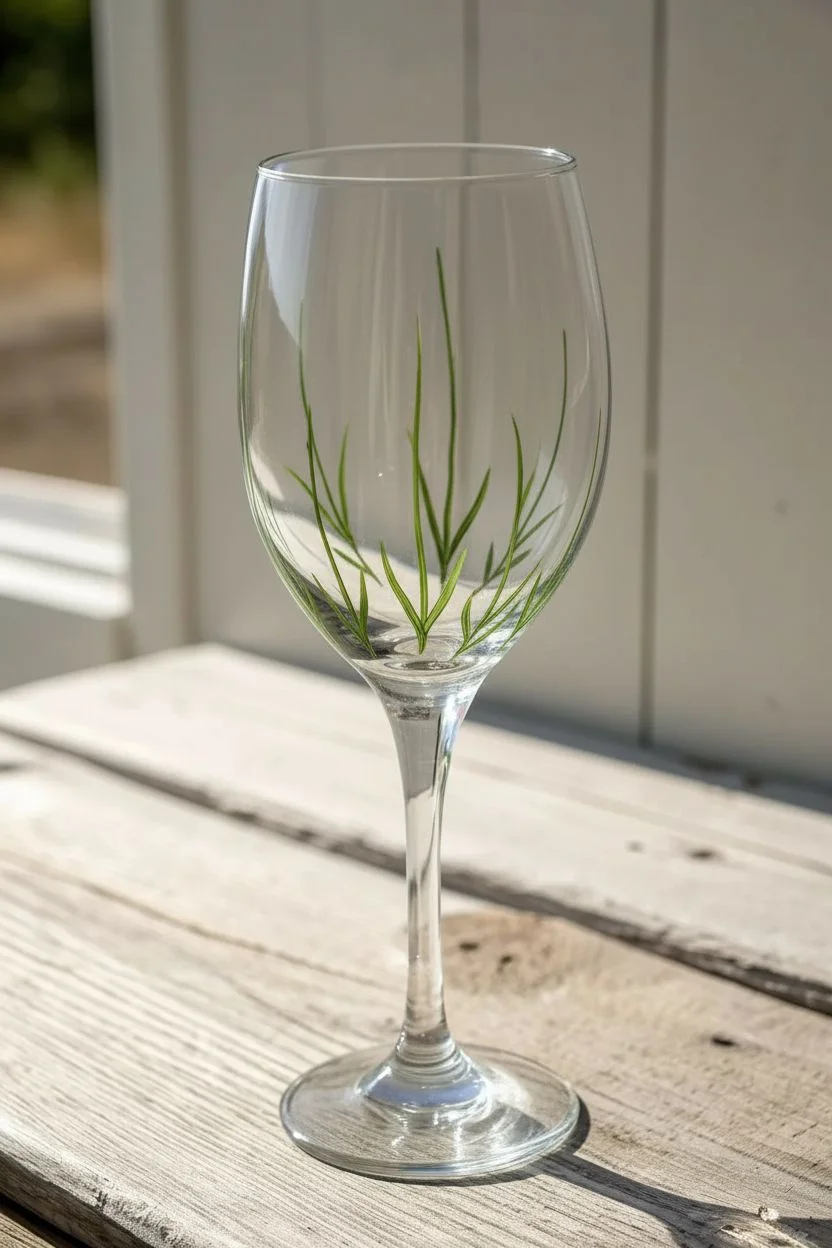
Calming Lavender Sprigs
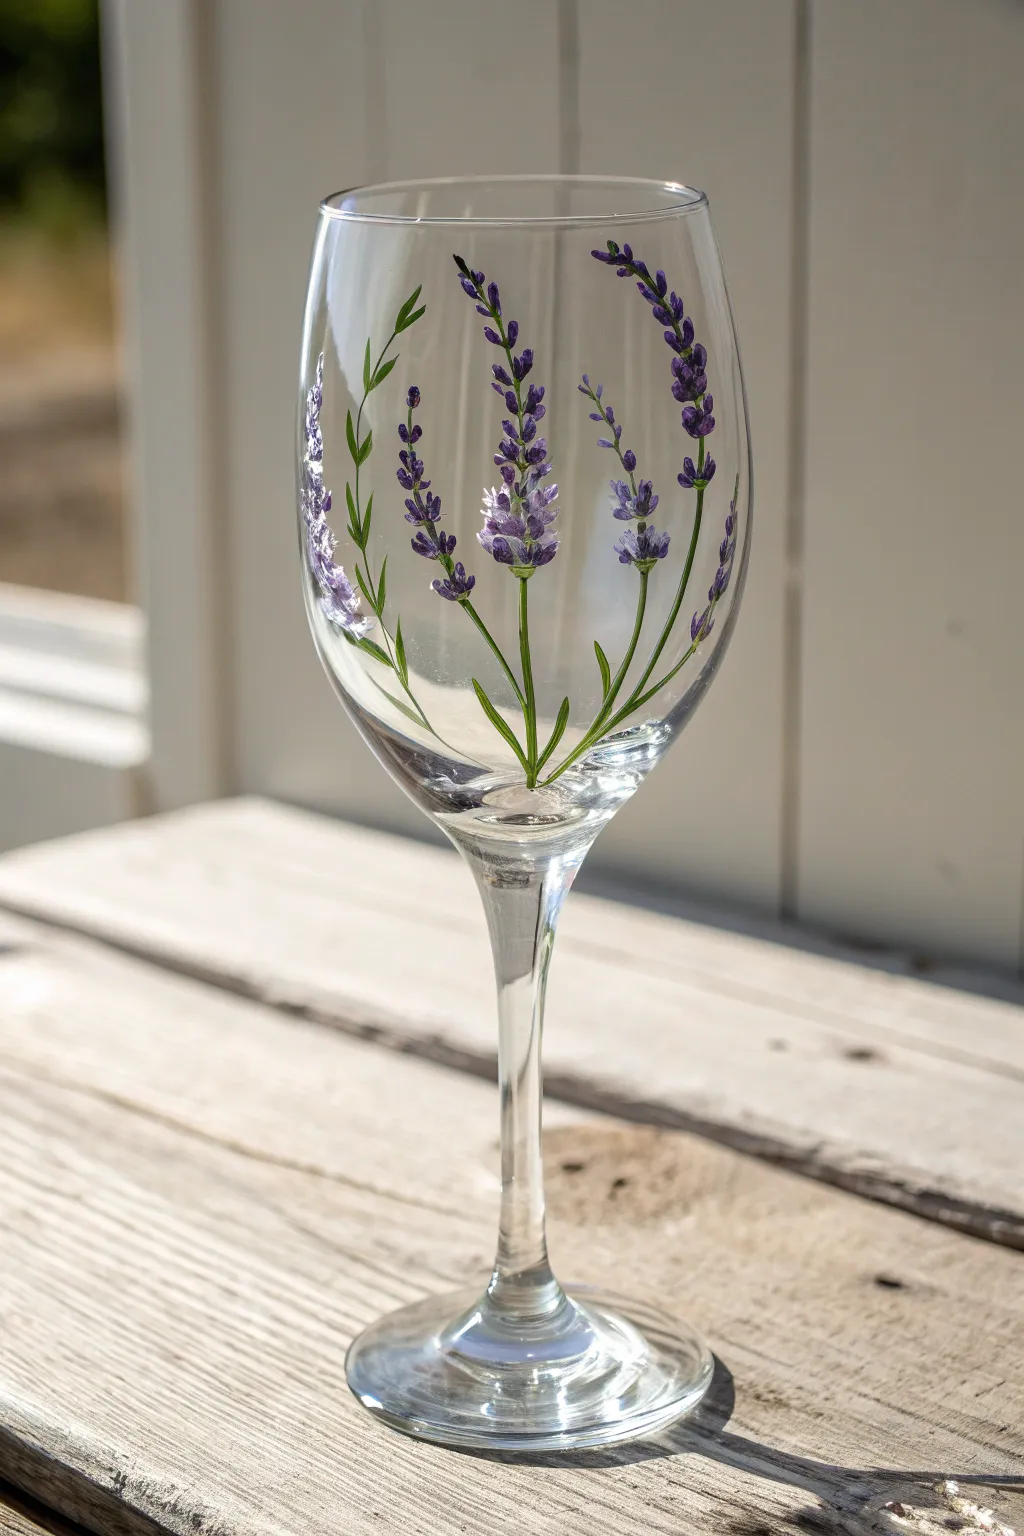
Bring the soothing charm of a French garden to your table with this delicate painted wine glass project. The translucent purple blooms and slender green stems create a sophisticated, botanical look that is surprisingly simple to achieve.
Step-by-Step Tutorial
Materials
- Clear wine glass
- Rubbing alcohol
- Cotton pads
- sEnamel glass paint (Sap Green)
- Enamel glass paint (Dark Violet)
- Enamel glass paint (White)
- Fine liner brush (size 0 or 00)
- Small round brush (size 1 or 2)
- Paint palette
- Paper towels
- Oven (for curing)
Step 1: Preparation & Stems
-
Clean the surface:
Wipe the exterior of the wine glass bowl thoroughly with rubbing alcohol and a cotton pad to remove any oils or fingerprints. Let it air dry completely. -
Load the liner brush:
Dispense a small amount of Sap Green enamel paint onto your palette. Dip your fine liner brush in, rolling it slightly to keep the tip sharp and pointed. -
Paint the first stem:
Starting from the very bottom of the bowl where it meets the stem, paint a thin, slightly curved line extending upward about halfway up the glass. -
Add variance:
Paint 3 to 4 additional stems around the glass, varying their heights and curvature slightly so they don’t look too uniform. -
Form the leaves:
Using the same liner brush and green paint, press gently near the base of a stem and pull outward and upward to create thin, lance-shaped leaves. -
distribute foliage:
Add pairs of leaves at intervals along the lower half of each stem, leaving the top half bare for the flowers. -
Check opacity:
If the green looks too transparent, wait about 20 minutes for it to tack up, then carefully retrace the lines to deepen the color.
Slippery Paint?
If the paint slides or separates on the glass, the surface likely has oil residue. Wipe it again with alcohol. Apply paint in thin layers, letting each dry briefly to build grip.
Step 2: Painting the Blooms
-
Mix the base purple:
On your palette, use the Dark Violet paint as is. If it’s very thick, I like to thin it just a tiny bit with a medium designed for glass paint, though it’s usually fine straight from the bottle. -
Start the flower base:
Switch to your small round brush. Dip the tip into the Dark Violet. -
Dab the buds:
Starting just above the last green leaves on a stem, gently dab small dots of purple in vertical rows, keeping them close to the stem line. -
Shape the sprig:
Continue dabbing upward, making the cluster of dots slightly wider at the bottom and tapering to a point at the top to mimic a lavender cone. -
Repeat for all stems:
Apply this dark purple base layer to all the stems you painted earlier. Let this layer dry for about 15 to 20 minutes. -
Mix a highlight color:
While the base dries, mix a small amount of White paint with the Dark Violet to create a soft lavender shade. -
Add dimension:
Using the very tip of your brush, dab small accents of the lighter lavender mixture on top of the dark purple buds. -
Focus the highlights:
Concentrate these lighter dabs near the center and top of each flower cluster to make them look round and voluminous. -
Final tips:
add a few tiny, individual dots floating just off the main cluster to represent loose petals or buds, giving the piece a breezy feel.
Step 3: Curing
-
Dry time:
Allow the finished painting to air dry for at least 1 hour (or up to 24 hours depending on the brand instructions) before handling. -
Bake to set:
Place the glass in a cold oven. Set the temperature to 350°F (175°C) and bake for 30 minutes. Turn the oven off and let the glass cool down completely inside the oven to prevent cracking.
Rustic Touch
Make this a perfect gift by tying a piece of twine around the stem of the glass and tucking in a real sprig of dried lavender for a beautiful, scented presentation.
Now you have a stunning, dishwasher-safe piece of art ready for your next relaxing evening
Winter Birch Trees and Cardinals
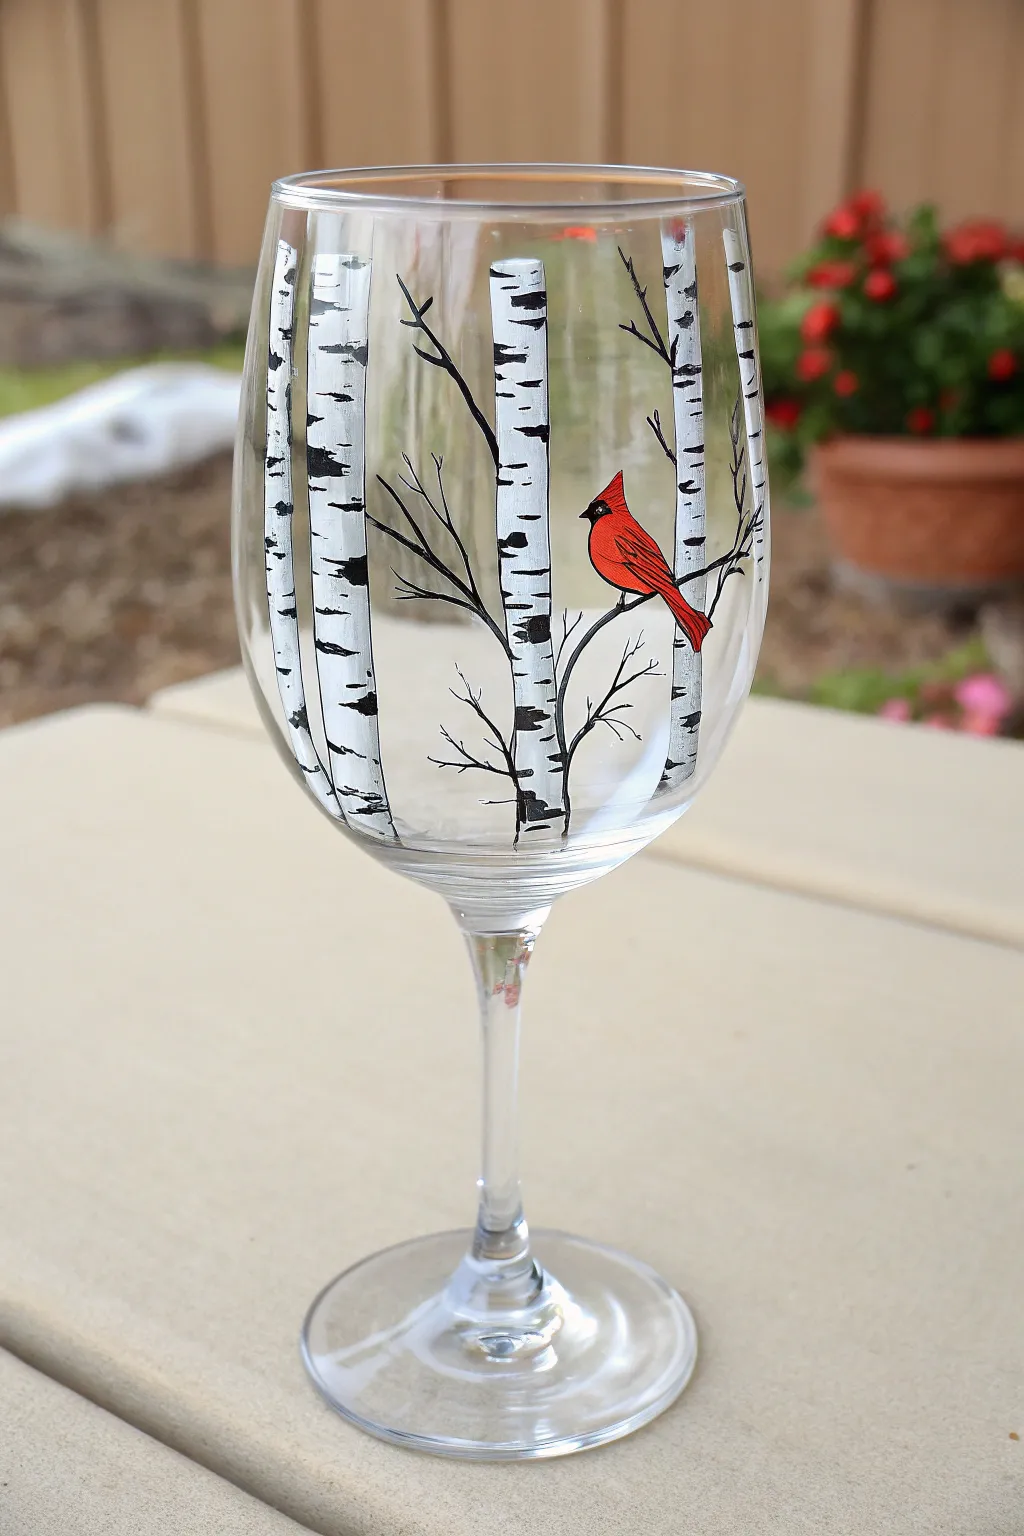
Transform a plain piece of stemware into a serene winter forest scene featuring snowy birch trees and a vibrant red cardinal. This hand-painted project creates a beautiful functional art piece perfect for holiday gifts or cozy nights in.
Step-by-Step
Materials
- Clear wine glass
- Rubbing alcohol and cotton pads
- Enamels or Multi-Surface Acrylics (White, Black, Bright Red)
- Flat shader brush (size 6 or 8)
- Fine liner brush (size 00 or 0)
- Paper plate or palette
- Oven (for curing)
Step 1: Preparation & Base
-
Clean the surface:
Wash your wine glass thoroughly with warm soapy water and dry it completely with a lint-free cloth. -
Degrease the glass:
Wipe the exterior of the glassbowl with rubbing alcohol using a cotton pad to remove any oils or fingerprints that could prevent the paint from sticking. -
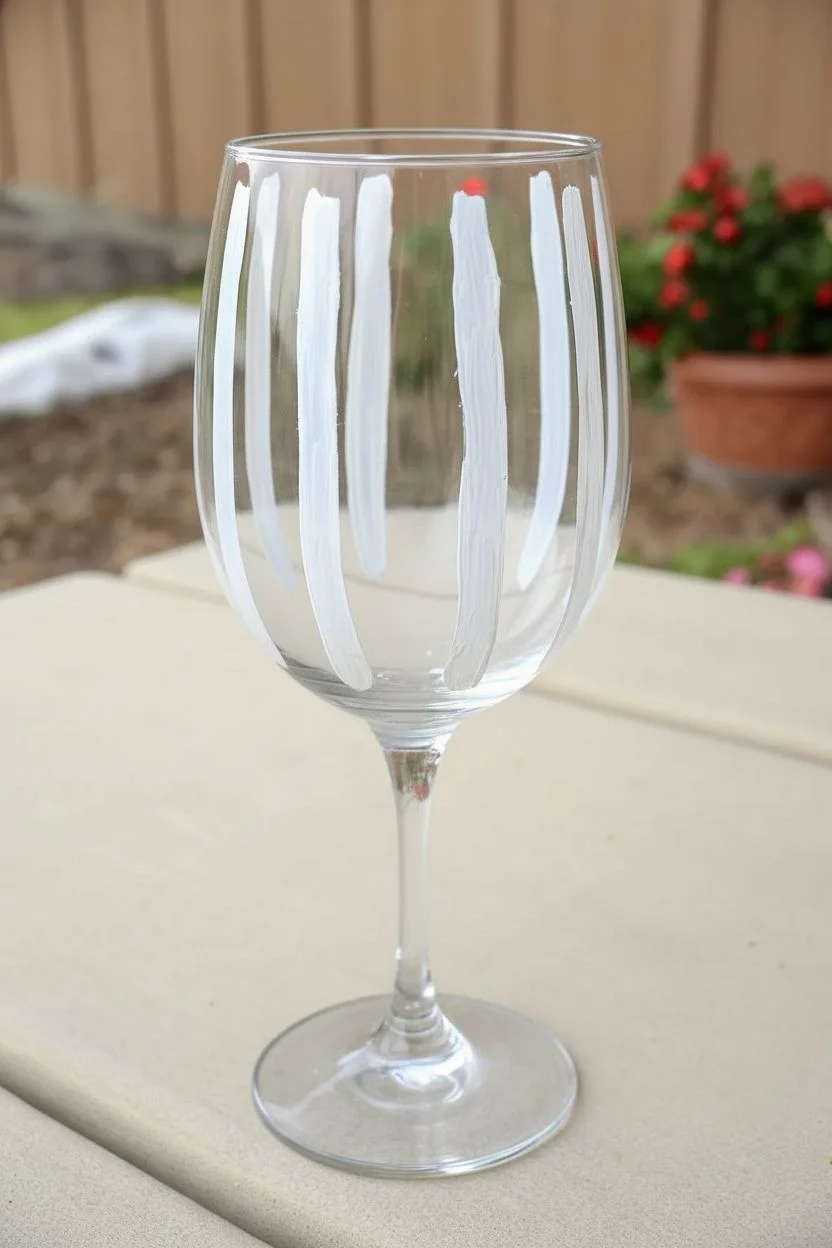
Load the flat brush:
Squeeze a generous amount of white enamel paint onto your palette and load your flat shader brush fully. -
Paint the first trunk:
Starting near the bottom where the bowl meets the stem, pull the brush straight up toward the rim to create a tree trunk. Stop about a half-inch below the rim where your lips would touch. -
Create the forest:
Continue painting vertical white stripes around the glass, spacing them irregularly. Feel free to make some trunks slightly wider than others for variety. -
Allow to set:
Let the white paint dry for about 15 to 20 minutes. If the coverage looks too sheer, I usually apply a second coat at this stage for a solid, snowy look.
Step 2: Detailing the Trees
-
Switch brushes:
Clean your flat brush and pick up the fine liner brush. Dip it into the black paint. -
Add bark texture:
Paint small, horizontal notches and dashes across the white trunks. Vary the pressure to make some lines thick and others thin. -
Create branches:
Using the very tip of the liner brush, drag thin black lines extending outward from the trunks into the clear glass space. -
Form twigs:
Add smaller ‘Y’ shaped twigs branching off your main black lines to create a skeletal, wintry tree structure.
Paint Slipping?
If the paint slides around or separates on the glass, you likely have too much paint on the brush or the glass wasn’t fully degreased. Wipe clean and re-clean with alcohol.
Step 3: The Cardinal & Finish
-
Choose a perch:
Select a sturdy-looking black branch where you want your bird to sit. -
Paint the body:
Using clean red paint on a small round or liner brush, paint a teardrop shape sitting on top of the chosen branch. -
Add head and tail:
Add a small triangle on top for the crest and drag a longer stroke downward past the branch for the tail feathers. -
Detail the face:
Once the red needs to be tacky or dry, use a tiny dot of black paint to create the cardinal’s signature mask and beak area on the face. -
Cleanup:
Use a damp cotton swab or toothpick to gently scrape away any paint that went outside your intended lines or got too close to the drinking rim. -
Cure the paint:
Allow the glass to air dry for 1 hour (or per bottle instructions), then place it in a cool oven. Turn heat to 350°F, bake for 30 mins, then turn oven off and let it cool inside.
Wintery Sparkle
Before the white tree paint dries completely, lightly sprinkle ultra-fine clear glitter over the trunks. This mimics the shimmer of ice on birch bark in the sunlight.
Now you have a stunning, dishwasher-safe piece of winter art ready to hold your favorite beverage.
Playful Pet Paw Prints
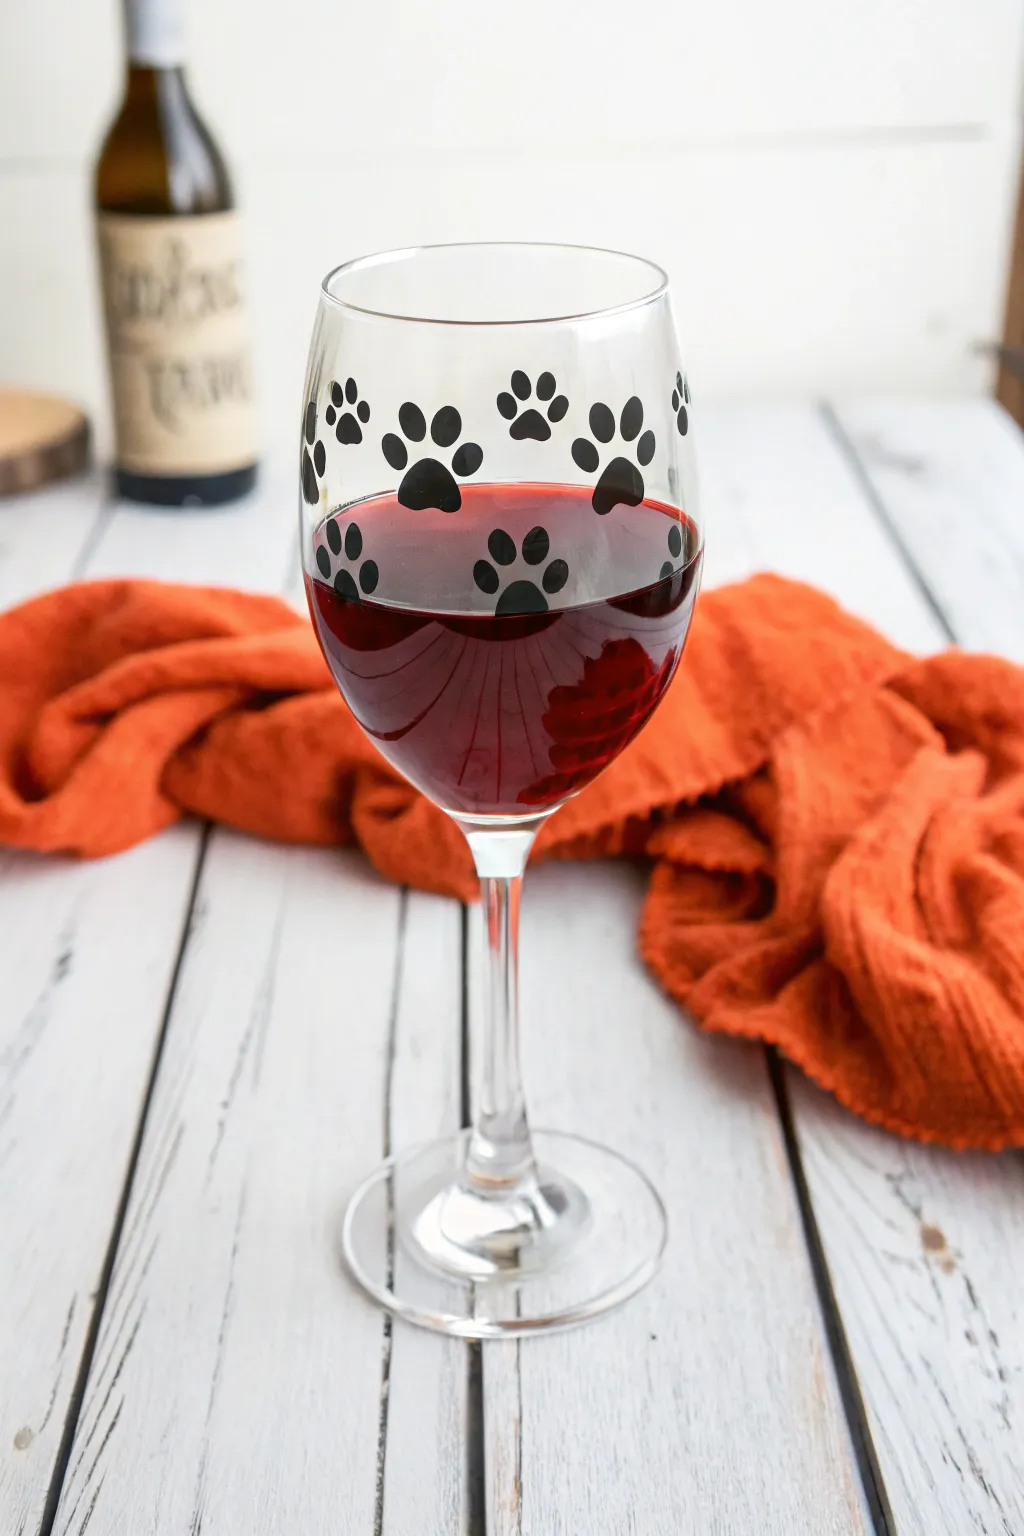
Celebrate your furry friend with this adorable and simple DIY project that transforms plain stemware into a custom tribute. These crisp black paw prints add a playful touch to your glass, perfect for a relaxing evening or a gift for a fellow pet lover.
Step-by-Step Tutorial
Materials
- Clear wine glass
- Rubbing alcohol
- Cotton balls or pads
- Black enamel glass paint (e.g., FolkArt Enamel)
- Small round paintbrush (size #2)
- Dotting tool or paintbrush handle
- Paper towels
- Cotton swabs (for cleanup)
- Oven (for curing)
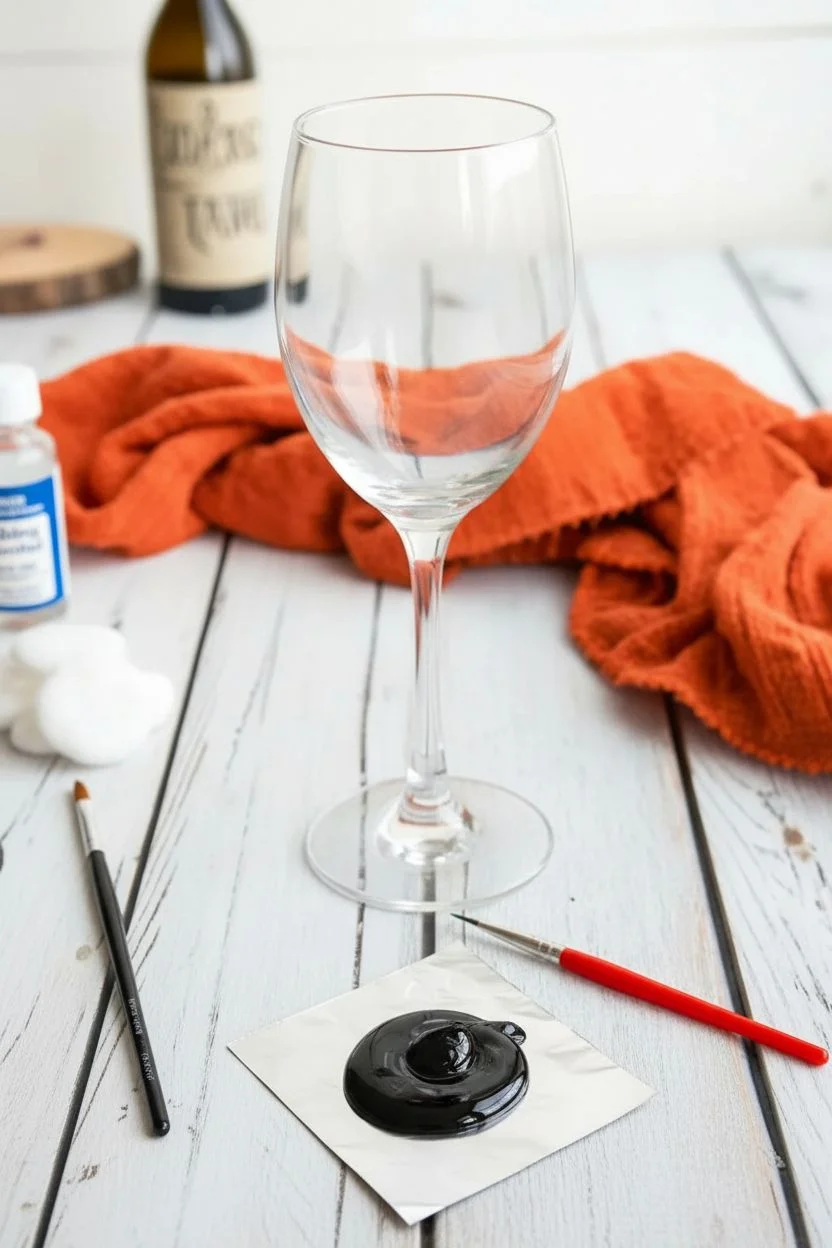
Step 1: Glass Preparation
-
Wash the glass:
Start by thoroughly washing your wine glass with warm, soapy water to remove any dust or retail stickers. -
Degrease the surface:
Moisten a cotton ball with rubbing alcohol and wipe down the entire exterior bowl of the glass. -
Dry and secure:
Allow the alcohol to air dry completely, ensuring you don’t touch the painting area with your fingers again, as skin oils can prevent paint adhesion. -
Prepare your palette:
Squeeze a small amount of black enamel glass paint onto a palette or a piece of foil.
Oops! Smudged Paint?
Don’t panic! Use a clean toothpick to scratch off dried mistakes, or a cotton swab dipped in rubbing alcohol to wipe away wet errors instantly.
Step 2: Painting the Paw Prints
-
Paint the main pads:
Using your small round brush, paint the large central pad of the paw print first. -
Shape the pad:
Aim for a soft, upside-down triangle shape with rounded corners, or a squat heart shape without the sharp point. -
Create a pattern:
Continue painting these main pads scattered randomly around the upper half of the glass bowl, leaving space between them for the toes. -
Switch tools:
Dip a dedicated dotting tool, or simply the non-brush end of your paintbrush handle, into the black paint. -
Add the toes:
Press four distinct dots in an arch relative to the top of each main pad to create the toes. -
Refine the shape:
If the dots look too circular, use your small brush to slightly elongate them so they look more like oval paw prints. -
Rotate and repeat:
I find it helpful to place a towel on the table and rotate the glass on its side to keep my hand steady while reaching different angles. -
Quality check:
Hold the glass up to the light to check for transparency; if the black looks thin, specific enamel paints may allow for a second coat after a brief drying period.
Step 3: Cleanup and Curing
-
Fix mistakes:
If you have any jagged edges or accidental smudges, use a damp cotton swab or a toothpick to gently scrape away the excess paint while it is still wet. -
Initial drying:
Let the glass sit undisturbed for at least one hour to allow the surface to harden slightly. -
Load the oven:
Place your glass into a cold oven; do not preheat, as sudden temperature changes can shatter the glass. -
Bake the design:
Set the temperature to 350°F (or the manufacturer’s instruction on your specific paint bottle) and bake for 30 minutes. -
Cool down:
Turn off the oven and leave the glass inside; allow it to cool down completely to room temperature before removing.
Level Up: Personalize It
Make it extra special by using white paint to write a pet’s name on the base of the glass, or paint one single paw print in your pet’s collar color.
Now your custom glassware is ready to be filled with your favorite vintage for a cozy night in by the fire
Glowing Nighttime Fireflies
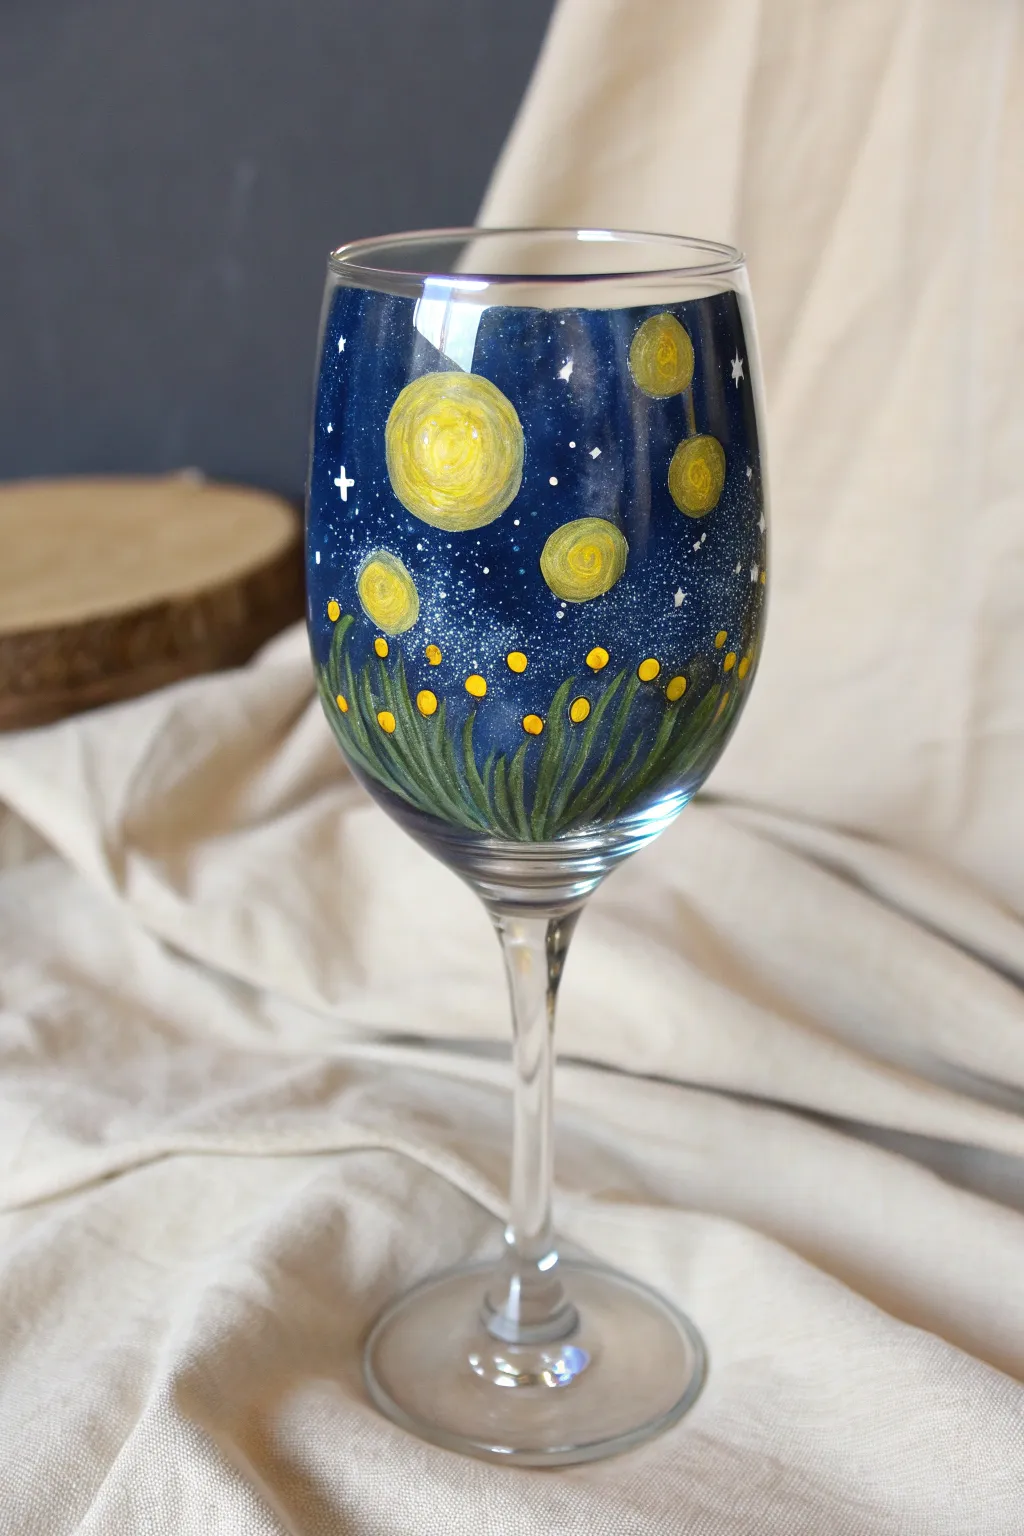
Capture the magic of a summer evening by transforming plain stemware into a glowing work of art. This project layers deep blue hues with bright pops of yellow to create a scene featuring a galaxy sky and fireflies dancing in the grass.
Step-by-Step Tutorial
Materials
- Clear wine glass
- Rubbing alcohol and cotton pads
- Enamel or multi-surface acrylic paints (Navy Blue, Titanium White, Sunny Yellow, Dark Green, Leaf Green)
- Painter’s tape
- Medium flat brush
- Fine liner brush
- Old toothbrush
- Paper plate or palette
Step 1: Prepping the Canvas
-
Clean the surface:
Before painting, wipe the entire exterior of the wine glass with rubbing alcohol and a cotton pad. This removes oils and fingerprints that prevent paint adhesion. -
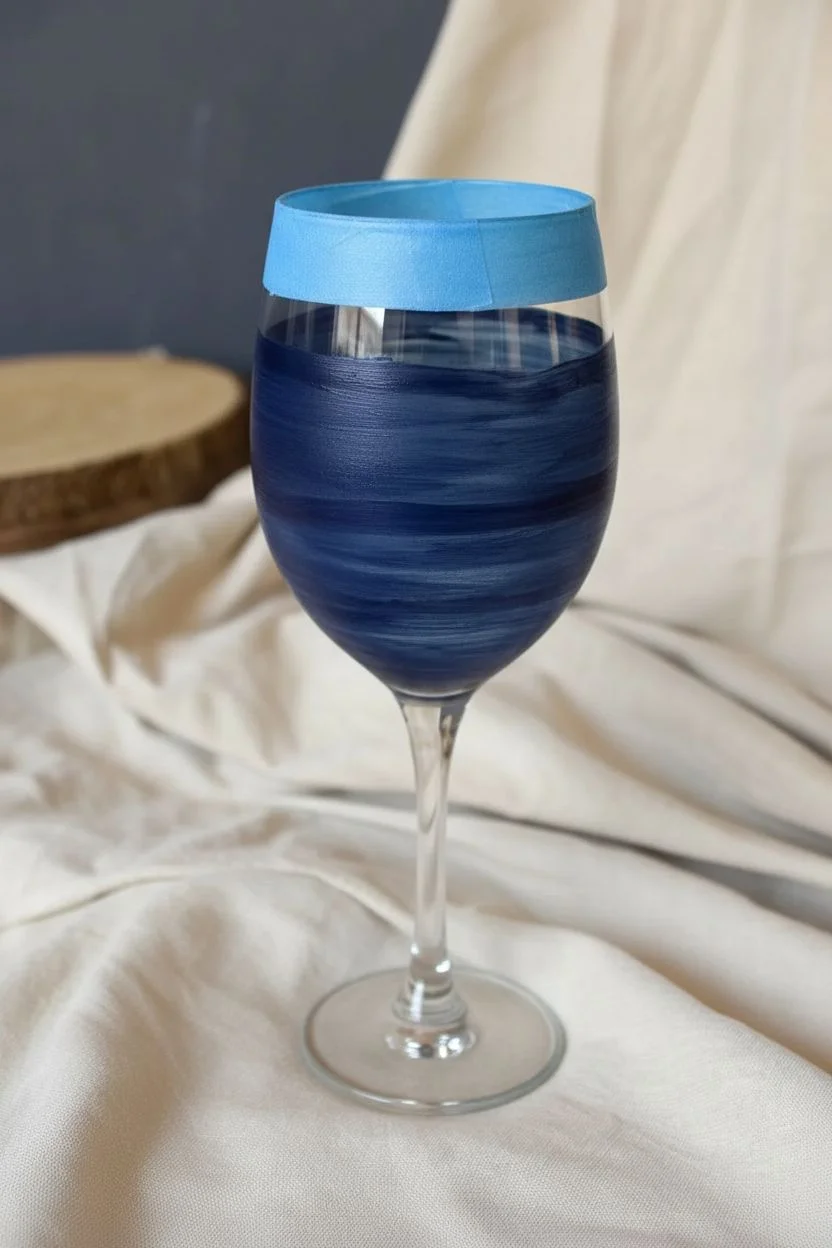
Tape the rim:
Place a strip of painter’s tape around the top rim of the glass. This ensures you leave a clean, safe space for drinking that won’t touch your lips.
Streaky Blue Paint?
Glass is slippery! Apply the first coat thinly and let it dry completely. Don’t overwork wet paint. A second or third coat will hide the streaks and create that solid night sky opacity.
Step 2: Painting the Galaxy
-
Base coat:
Using your medium flat brush, apply a coat of Navy Blue paint starting just below the tape line and extending down to where the bowl meets the stem. -
Let it set:
Allow this first layer to dry for about 15 to 20 minutes. Don’t worry if it looks sheer; glass paint often requires layers. -
Build opacity:
Apply a second coat of Navy Blue. If you want a deeper night sky, you can mix a tiny drop of black into your blue for this layer. -
Create the mist:
While the blue is still tacky, lightly dab a tiny amount of white paint in a few random spots and blend it softly with a clean brush to create a nebulous, milky-way effect. -
Splatter stars:
Dip an old toothbrush into white paint, then run your thumb across the bristles to flick a fine mist of specks onto the blue sky. I like to cover the stem with a paper towel during this step to keep it clean. -
Detail stars:
Use the tip of your fine liner brush to paint a few distinct, larger white stars or small crosses to add variety to the galaxy.
Seal the Deal
To make this washable, place the glass in a cold oven, heat to 350°F, bake for 30 mins, then let it cool completely inside the oven before removing. This heat-cures the enamel.
Step 3: Celestial Bodies
-
Paint the moons:
Using a clean brush, paint three or four medium-sized circles in the upper sky area using Sunny Yellow. -
Add texture:
While the yellow circles are wet, swirl in a tiny bit of white paint to give them a cratered, glowing texture rather than a flat color. -
Dry completely:
Let the sky and moon elements dry completely before moving to the grass layer to prevent muddy colors.
Step 4: The Meadow & Fireflies
-
Base grass:
Mix Dark Green with a touch of Navy Blue. Using the liner brush, paint upward strokes starting from the very bottom of the bowl, flicking your wrist to create tapered grass blades. -
Vary the height:
Keep the grass generally low, covering the bottom third of the painted area, but let some long blades reach up towards the stars. -
Highlight the grass:
Switch to Leaf Green (or mix yellow into your dark green) and layer thinner, lighter grass blades over the dark ones to add dimension. -
Add fireflies:
Dip the handle end of a paintbrush into Sunny Yellow and stamp dots randomly amongst the grass blades. -
Firefly centers:
Once the yellow dots are dry, add a minuscule spec of white to the center of a few fireflies to make them look like they are truly glowing.
Step 5: Finishing Touches
-
Remove tape:
Carefully peel off the painter’s tape while the paint is dry to the touch but not fully cured to avoid peeling up the edge. -
Clean up:
Use a cotton swab dipped in alcohol to tidy up any stray paint on the stem or the clear base of the glass.
Now you have a stunning, hand-painted vessel perfect for enjoying a drink under the real stars.
Sunset Ombre Gradients
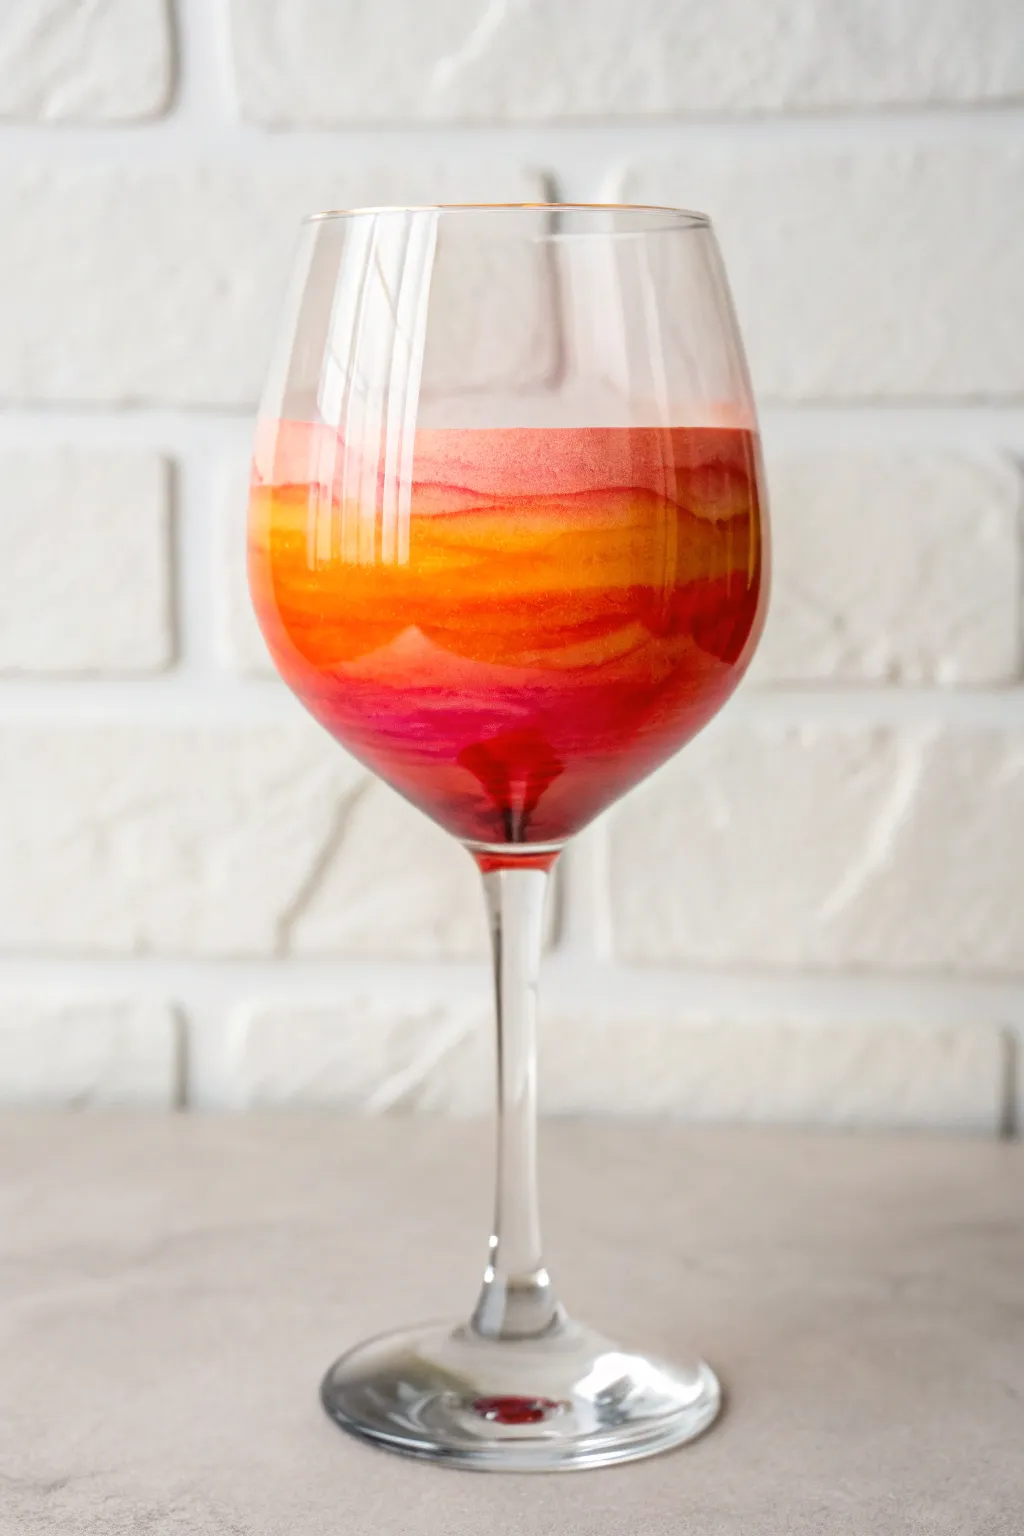
Capture the warmth of a golden hour evening right on your stemware with this stunning ombre aesthetic. By layering transparent glass paints in wavy bands, you create a dimensional, watercolor-like sunset effect that glows beautifully against candlelight.
Step-by-Step Guide
Materials
- Large clear wine glass
- Rubbing alcohol and cotton pads
- Transparent glass paints (Deep Red, Bright Orange, Golden Yellow, Coral/Pink)
- Painting medium or thinner (specific to your brand of glass paint)
- Soft flat synthetic brush (size 6 or 8)
- Small mixing palette
- Paper towels
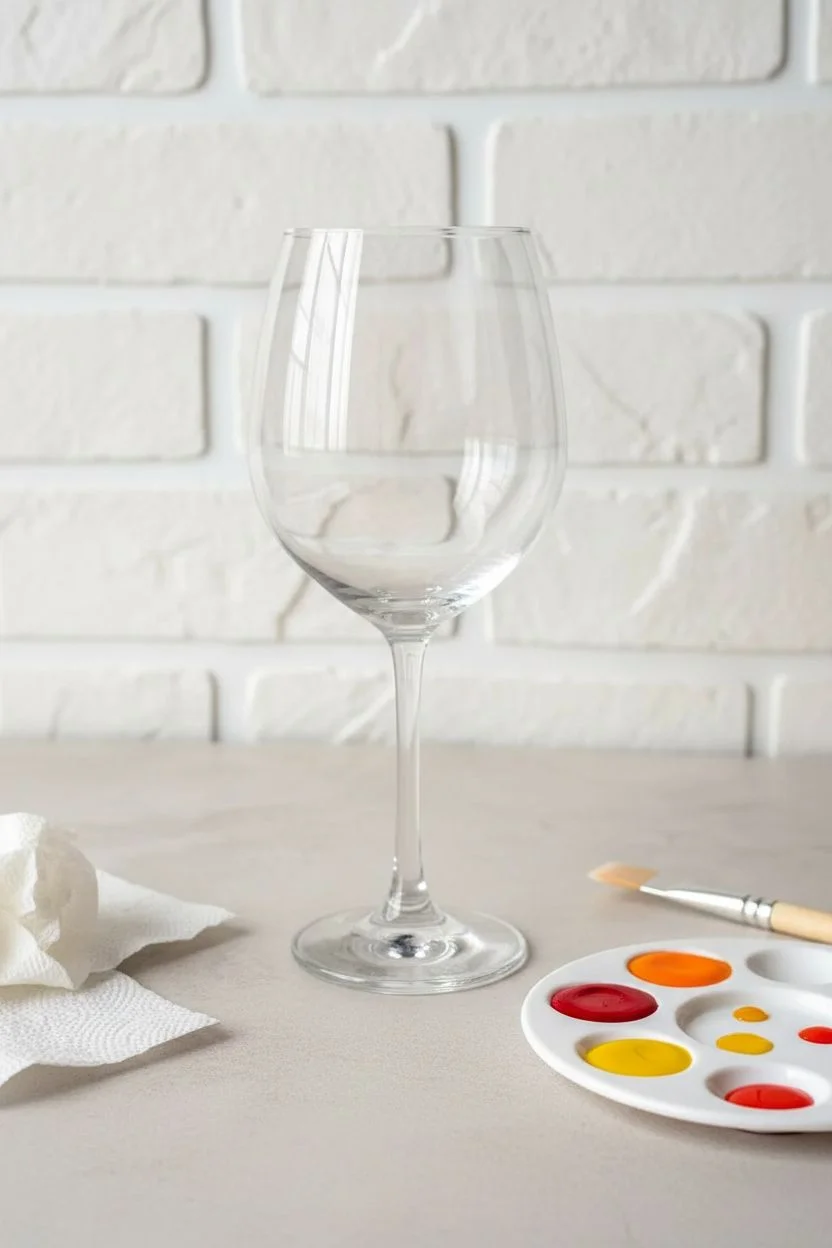
Step 1: Preparation
-
Clean the surface:
Wash your wine glass thoroughly with warm soapy water to remove any dust or sticker residue. -
Degrease the glass:
Soak a cotton pad with rubbing alcohol and wipe down the exterior of the bowl where you plan to paint. This removes finger oils that prevent paint adhesion. -
Dry completely:
Allow the alcohol to evaporate completely; avoid touching the cleaning area with your bare hands. -
Prepare the palette:
Dispense a dime-sized amount of each paint color onto your palette. -
Thin the consistency:
Mix a drop or two of thinner or medium into the paints. You want a watercolor consistency that is transparent but not dripping wet.
Step 2: Painting the Sunset Layers
-
Load the brush:
Start with your deepest red color. Load your flat brush fully so the stroke will be fluid. -
Paint the base:
Apply the red paint at the very bottom of the bowl, near where it meets the stem. -
Create the first wave:
Bring the red color up about an inch, painting a slightly uneven, wavy line across the glass to mimic a rolling landscape. -
Clean the brush:
Wipe your brush on a paper towel and rinse quickly to prepare for the next tone. -
Apply the orange band:
Pick up the bright orange paint and apply a band directly above the red layer. -
Blend the transition:
I like to gently drag the wet orange paint slightly over the top edge of the red to create a soft, overlapping blend. -
Add texture:
Keep your brush strokes horizontal and slightly wavy; don’t try to make straight lines as the organic ridges add to the charm. -
Transition to yellow:
Move the brush up again, this time loading it with the golden yellow hue. -
Paint the middle horizon:
Apply the yellow band, following the wavy contour of the orange layer below it. -
Feather the edges:
Use a very light hand to feather the bottom of the yellow into the top of the orange so there are no harsh separation lines. -
Finish with pink:
For the highest layer, use the coral or pale pink shade. -
Fade out the top:
Paint this final wavy band, but add a little extra thinner to your brush so the top edge fades naturally into the clear glass.
Fixing Drips
If the paint is too runny and starts sliding down, keep the glass upside down for the first 10 minutes of drying. Gravity will pull the paint toward the rim, keeping the layers intact.
Step 3: Curing
-
Inspect the work:
Hold the glass up to the light to check for any bare spots and dab in extra color if needed while wet. -
Air dry:
Place the glass upside down or on a drying rack and let it air dry for at least 24 hours. -
Bake to set:
Follow the instructions on your specific paint bottle for baking (usually placing in a cold oven, heating to 325°F/160°C, and baking for 40 minutes) to make it dishwasher safe.
Make it Sparkle
Once the sunset layers are dry but before baking, dab tiny dots of gold glass paint along the transitions of the colors to mimic the sun glinting off clouds.
Enjoy your beautiful new glassware that brings a relaxing sunset vibe to every drink
Seasonal Floral Wreaths
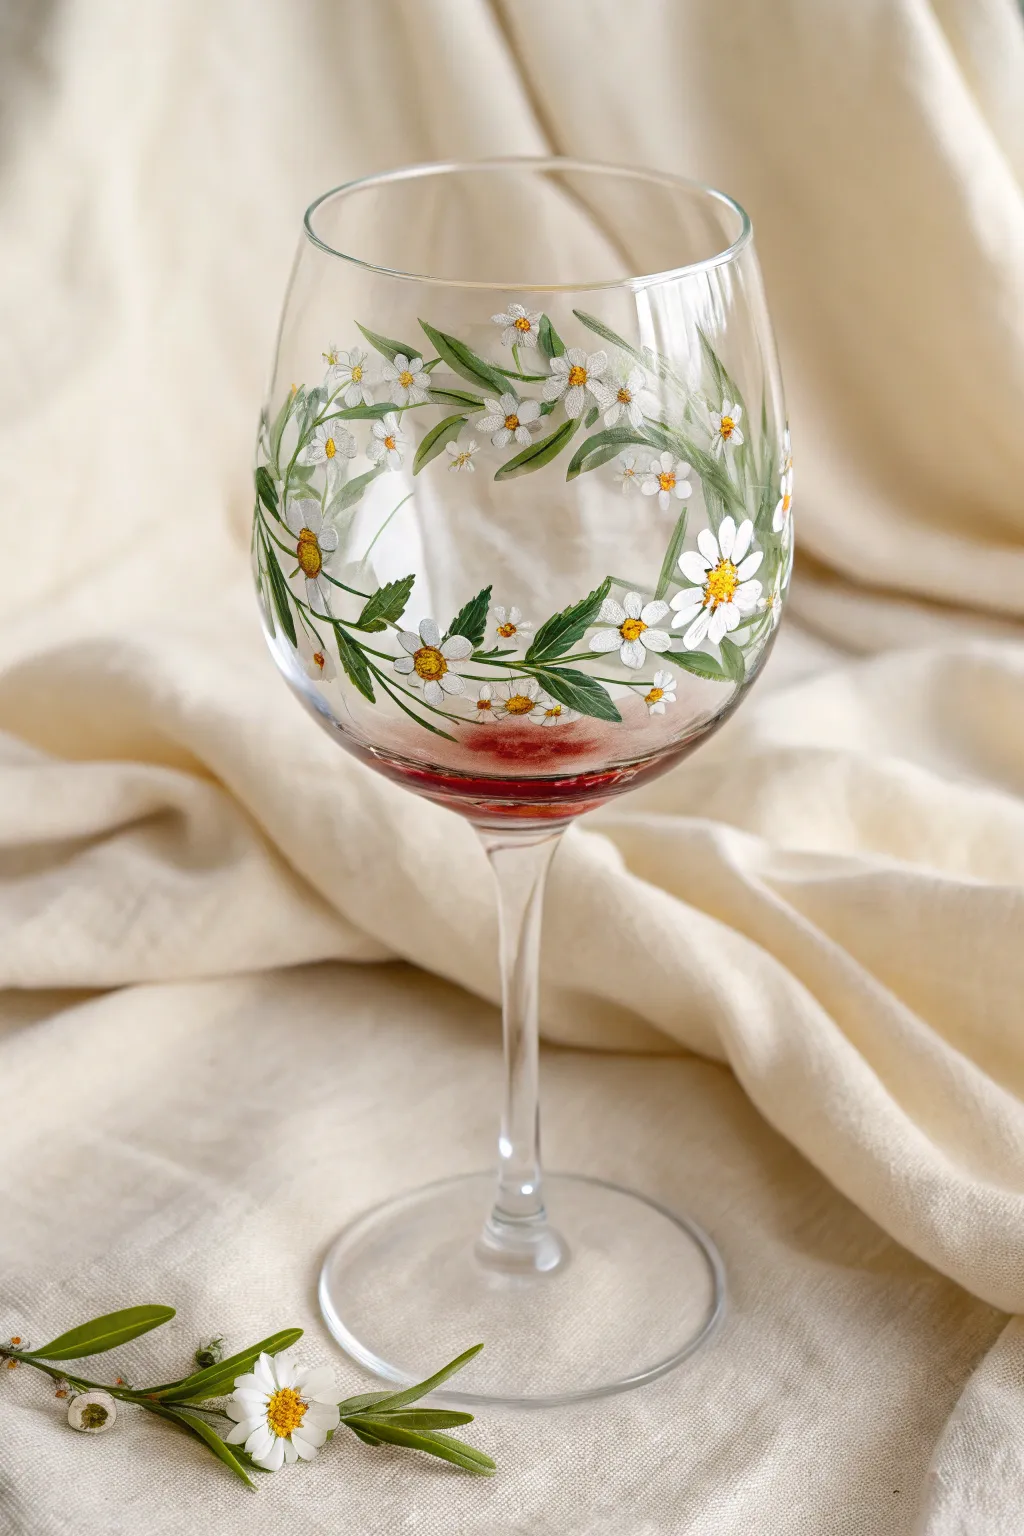
Transform an ordinary wine glass into a blooming garden with this delicate floral wreath design. Using simple strokes and layering, you will create a translucent, elegant piece perfect for spring gatherings.
Step-by-Step
Materials
- Clear stemmed wine glass
- Rubbing alcohol and cotton pads
- Gloss enamel glass paints (Opaque White, Olive Green, Forest Green, Golden Yellow, Burnt Sienna)
- Small round brush (size 1 or 2)
- Fine liner brush (size 00)
- Paper plate or palette
- Cotton swabs (for clean up)
- Oven (for curing)
Step 1: Preparation & Mapping
-
Clean the surface:
Thoroughly wipe down the outside of the wine glass bowl with rubbing alcohol on a cotton pad to remove any oils or fingerprints. Let it air dry completely. -
Plan the wreath placement:
Visualize a band around the widest part of the glass bowl. You can make small dot guides with a dry-erase marker to keep your wreath circle level, though a little asymmetry adds charm.
Don’t Overload the Brush
Glass is slippery! If you carry too much paint on your brush, it will slide around and create ridges. Use less paint and build up layers for a smoother finish.
Step 2: Painting the Greenery
-
Mix your greens:
Squeeze out your Olive Green and Forest Green onto the palette. Do not mix them fully; leave them side-by-side so you can pick up variations of color. -
Draft the vines:
Using the fine liner brush and Olive Green, paint thin, curving lines connecting in a loose circle around the glass to act as the main stems. -
Paint base leaves:
Switch to the small round brush. Load it with Olive Green and gently press and lift to create elongated teardrop leaf shapes growing from the vines. -
Add depth:
While the base green is still wet, pick up a tiny amount of Forest Green and paint smaller leaves tucked behind the lighter ones to create volume. -
Create leaf details:
Use the liner brush to pull thin veins through the larger leaves. I like to let this dry briefly so the green doesn’t muddify the white petals coming next.
Add a Personal Touch
Make it a set! Paint different wildflowers on each glass—like lavender, poppies, or buttercups—to create a mixed bouquet collection so guests never mix up their drinks.
Step 3: Blooms & Details
-
Paint main daisies:
Using the round brush and Opaque White, paint petals by pressing the belly of the brush down and lifting up toward the center of where the flower will be. -
Vary the angles:
Paint some flowers fully facing forward (circular shape) and others as oval side-views to make the wreath look dimensional. -
Add flower buds:
Paint small, tight white clusters near the tips of the vines to represent unbloomed daisies. -
Build opacity:
Glass paint can be sheer. Once the first layer of white is tacky, dab a second layer of white on the petals to make them stand out against the glass. -
Stipple the centers:
Dip the handle end of a paintbrush into Golden Yellow and dot it into the center of the open daisies to create a perfect round circle. -
Texturize the pollen:
Using the very tip of your fine liner brush, tap tiny dots of Burnt Sienna onto the bottom edge of the yellow centers to give them a 3D shading effect. -
Final highlights:
Add microscopic dots of white on the top edge of the yellow centers and on the tips of the greenest leaves to mimic sunlight hitting the wreath. -
Clean edges:
If you smudged any paint, use a damp cotton swab to wipe away the error before it sets hard.
Step 4: Curing
-
Air dry first:
Allow the glass to dry undisturbed for at least 1 hour (or up to 24 hours depending on brand instructions) before handling. -
Bake to set:
Place the glass in a cool oven. Set temperature to 350°F (175°C) and bake for 30 minutes. Turn the oven off and let the glass cool down completely inside the oven to prevent cracking.
Enjoy sipping from your beautiful, hand-painted garden goblet at your next spring celebration


Have a question or want to share your own experience? I'd love to hear from you in the comments below!