When I want something instantly cheerful on my paint table, I reach for daisy rock painting—it’s simple, sunny, and ridiculously satisfying. Here are my favorite daisy rock painting ideas, starting with the classic looks everyone loves and drifting into more playful, artsy twists.
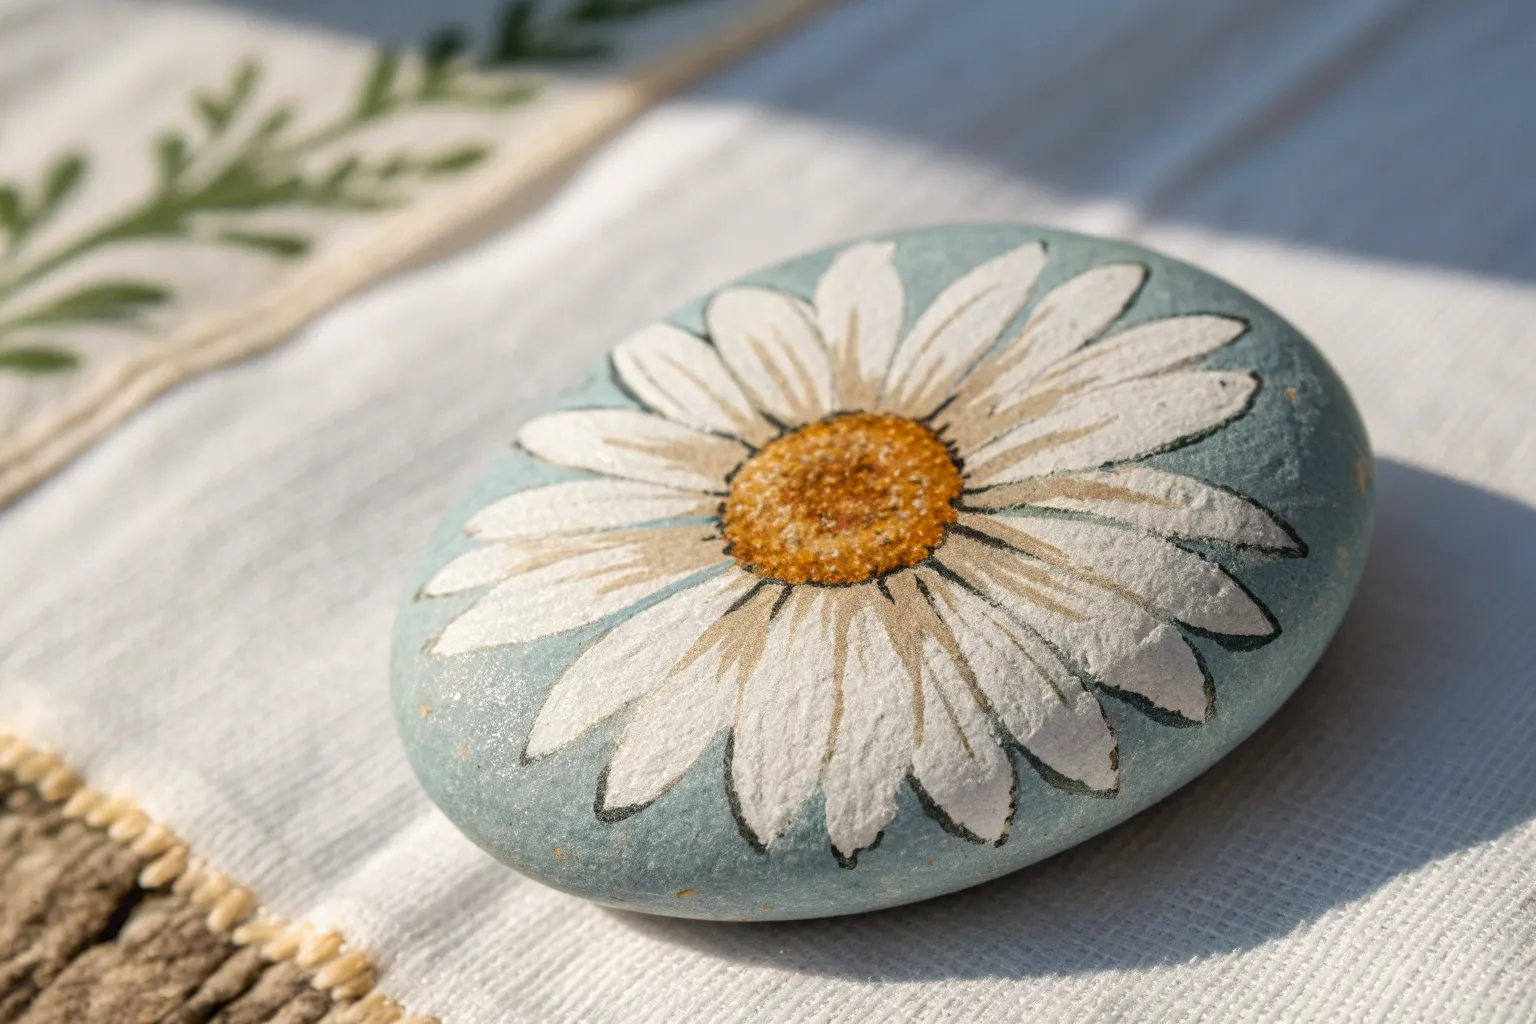
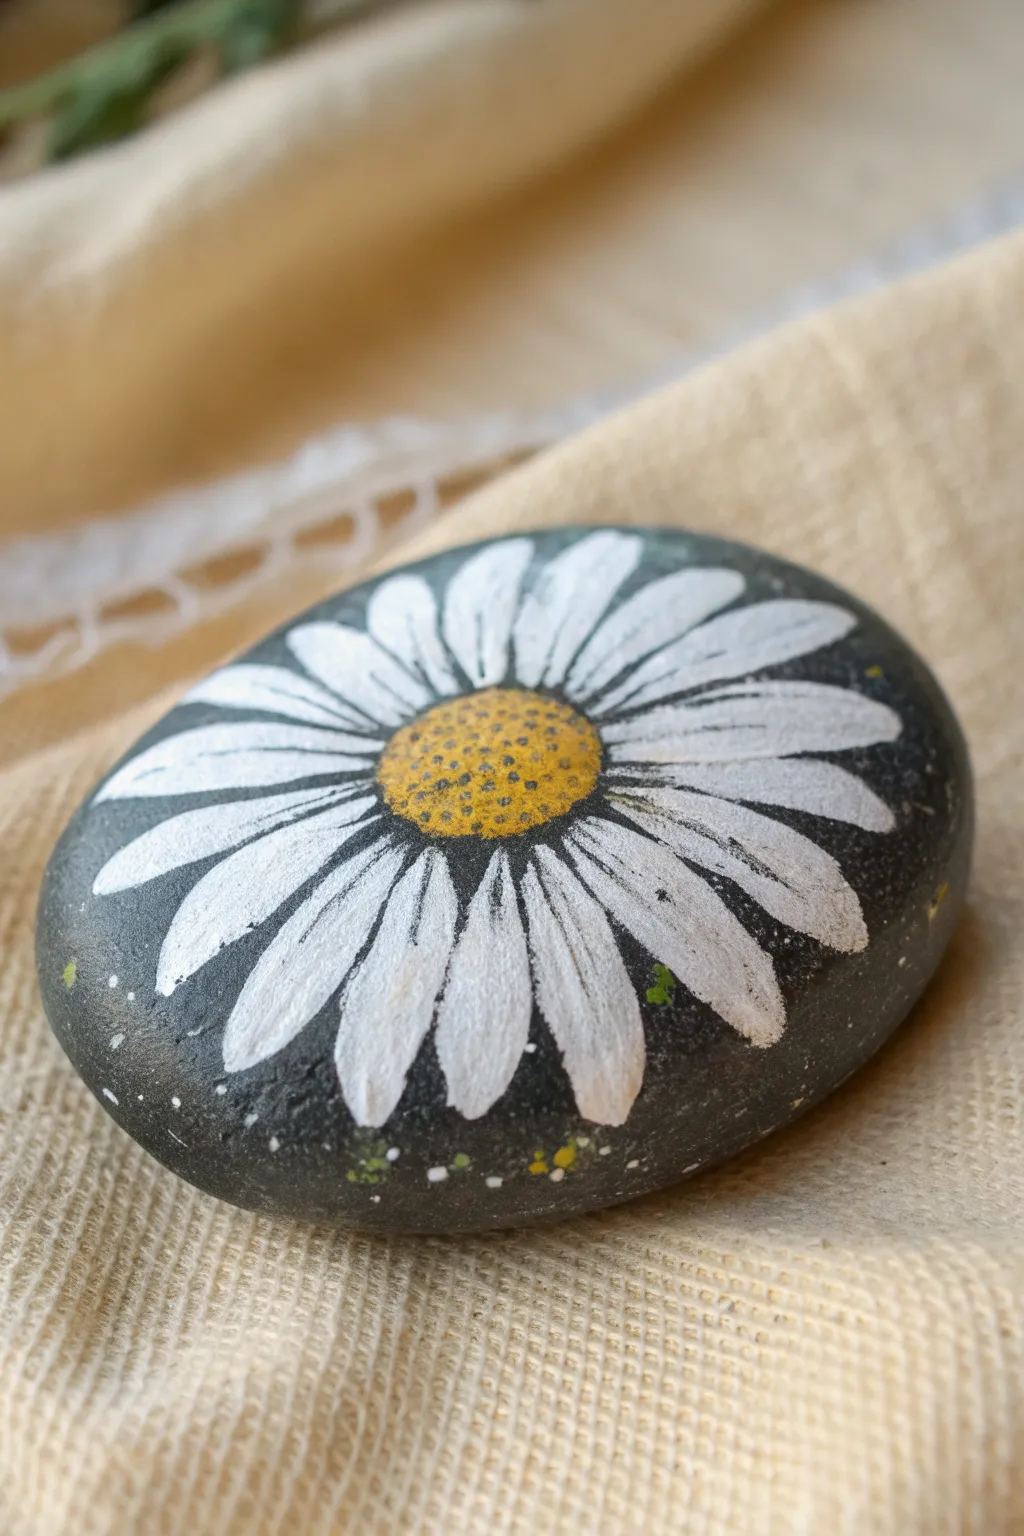
Single Statement Daisy on Bold Background
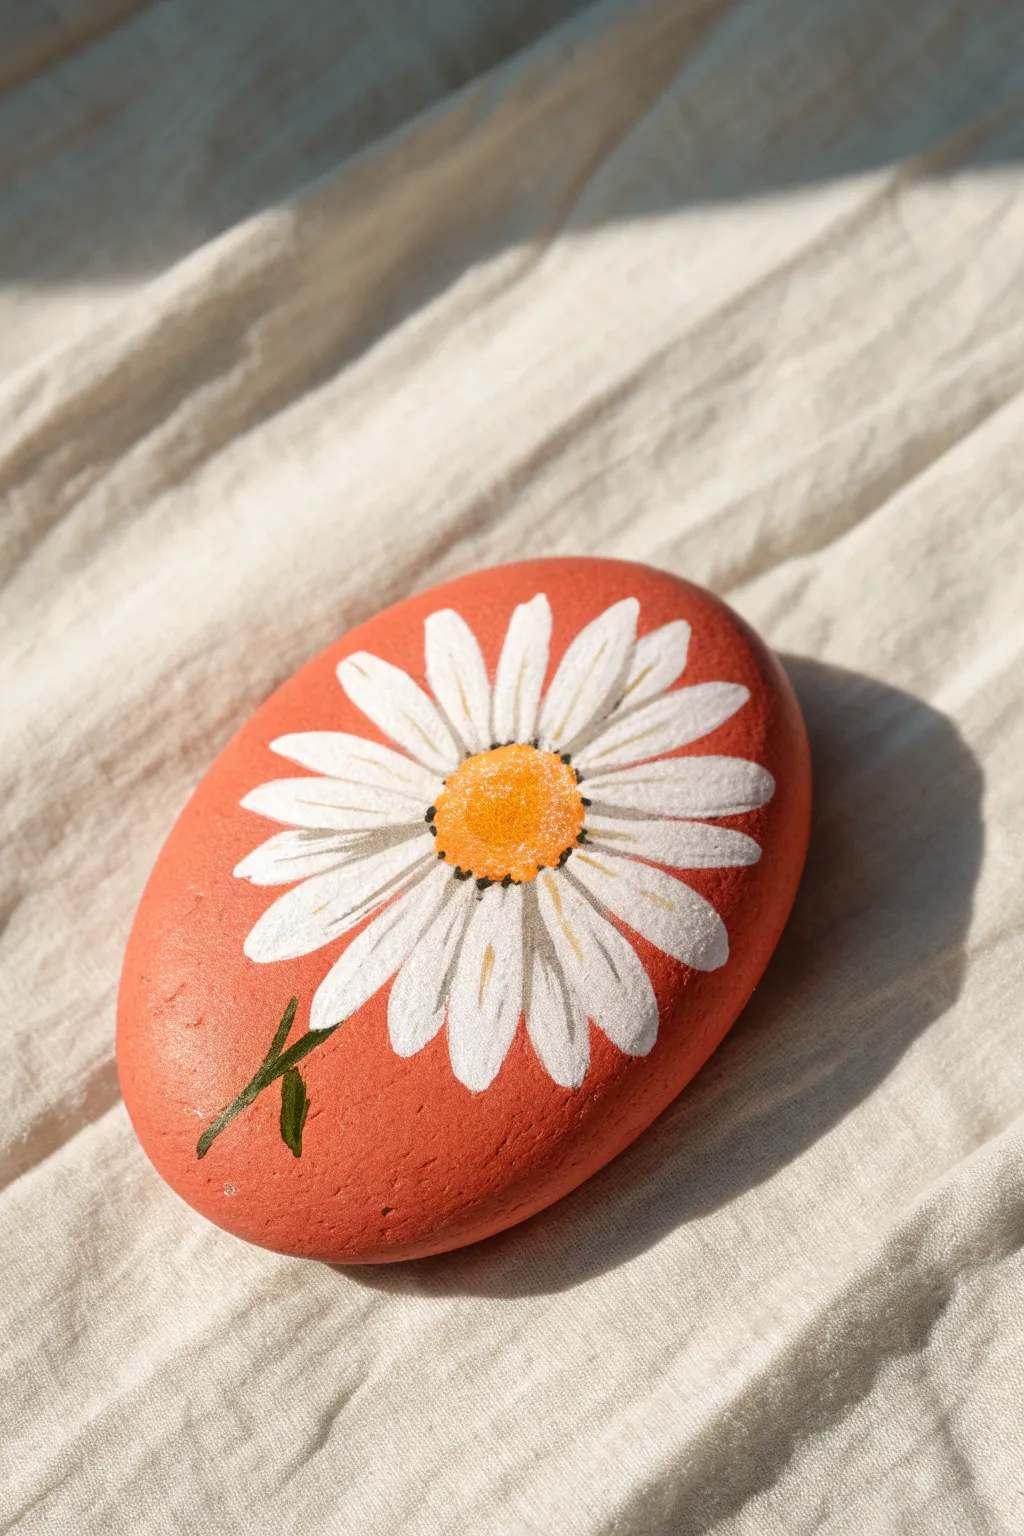
Transform a smooth river rock into a piece of botanical art with this warm and inviting design. The bold, earthy background color makes the crisp white petals of the daisy pop, creating a striking contrast that feels both modern and rustic.
Detailed Instructions
Materials
- Smooth oval river rock
- Acrylic paint (Coral/Terracotta, Titanium White, Golden Yellow, Orange, Deep Green)
- Flat paintbrush (medium size)
- Round paintbrush (small size suitable for petals)
- Detail brush (size 0 or 00)
- Graphite pencil (optional)
- Matte or glossy sealant spray
- Water cup and paper towels
Step 1: Preparation & Base Coat
-
Clean the surface:
Begin by washing your rock with warm soapy water to remove any dirt or oils that might prevent the paint from sticking. -
Dry thoroughly:
Pat the stone dry with a towel and let it air dry completely to ensure no moisture remains in the pores of the rock. -
Mix the background color:
Blend a warm terracotta shade using orange acrylic paint with a touch of brown or red. Aim for a vibrant, earthy coral hue similar to the reference image. -
Apply the first coat:
Using a flat paintbrush, cover the entire top surface of the rock with your terracotta mixture. Long, smooth strokes work best here. -
Add a second layer:
Once the first layer is dry to the touch, apply a second coat to ensure solid, opaque coverage without any streaks. Let this base dry completely before moving on.
Uneven Coverage?
If your white paint looks streaky over the dark orange, stop! Let it dry fully, then apply another thin coat. Don’t overwork wet paint or it will lift.
Step 2: Painting the Daisy
-
Position the center:
Visualize where the flower center will sit—slightly off-center looks natural. Using your medium round brush and mixed Golden Yellow, paint a rough circle. -
Texturize the center:
While the yellow is wet, dab in small touches of orange paint, particularly around the bottom/left edge of the center, to create a stippled, pollen-like texture. -
Draft the petals:
If you’re nervous about freehanding, lightly sketch petal outlines radiating from the center using a graphite pencil, but keep lines faint. -
Paint the first petal layer:
Load your small round brush with Titanium White. Paint the long, slender petals extending outward. Don’t worry if the paint looks a bit sheer; we will layer it. -
Shape the petal tips:
Ensure the tips of the petals are slightly rounded or softly pointed, rather than squared off, to mimic a real daisy. -
Intensify the white:
I usually let the first white layer dry for about ten minutes, then go over each petal again to make the white bright and solid against the dark background. -
Add petal details:
Mix a tiny drop of grey or diluted black with white. Paint very thin, faint lines down the center of a few lower petals to suggest texture and shadow.
Add Subtle Shading
Mix a very light grey wash and brush it solely at the base of the petals (nearest the yellow center) to make the flower look more 3D and cupped.
Step 3: Finishing Touches
-
Refine the flower core:
Take your detail brush and add tiny dots of dark brown or black right where the yellow center meets the white petals. This adds depth and separation. -
Paint the stem:
Using the detail brush and Deep Green paint, draw a thin, slightly curved line extending from between the lower petals toward the edge of the rock. -
Add tiny leaves:
Paint two small, slender leaves or sepals branching off the stem near the base of the flower. -
Clean up edges:
If any white paint strayed too far, use your terracotta mix and a detail brush to tidy up the outlines of the petals. -
Seal the artwork:
Once the rock is fully dry (wait at least an hour or two), spray it with a clear acrylic sealer to protect the paint from chipping and weather.
Place this cheerful rock in a garden pot or on a windowsill to enjoy a bloom that lasts all year round


Classic White Daisy With Black Outline
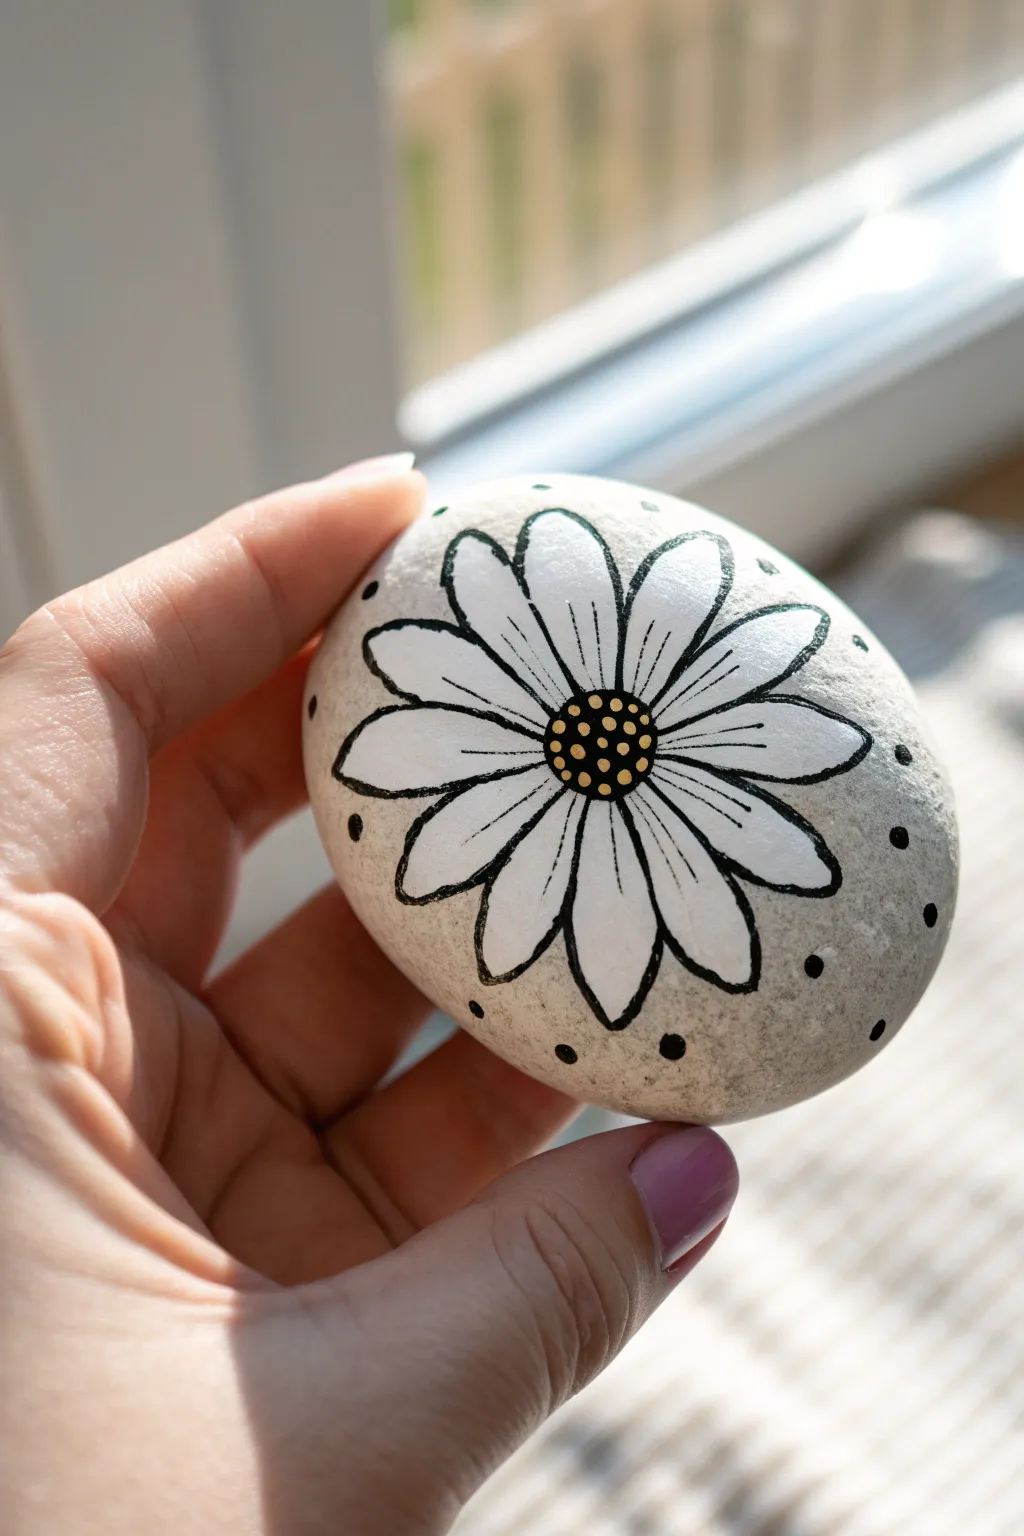
This charming nature-inspired piece brings a simple white daisy to life on a smooth river stone. The hand-drawn black outlines give it a whimsical, sketchbook feel that contrasts beautifully with the clean white petals.
How-To Guide
Materials
- Smooth, oval river rock (light grey or white)
- White acrylic paint or paint pen (medium tip)
- Black fine-point permanent marker or acrylic paint pen (extra fine)
- Yellow acrylic paint or paint pen
- Pencil and eraser
- Matte or satin spray sealant
Step 1: Preparation and Base
-
Clean surface:
Begin by thoroughly washing your rock with soapy water to remove any dirt or oils that might prevent the paint from sticking. -
Dry completely:
Allow the stone to dry completely before you start. Moisture trapped inside can ruin your work later. -
Initial sketch:
Lightly sketch a circle in the center of the rock for the flower’s center using a pencil. -
Petal placement:
Sketch long, oval-shaped petals radiating outward from the center circle. Aim for about 10-12 petals that stretch almost to the rock’s edge.
Pro Tip: Pen Flow
Test your paint pens on a scrap piece of paper before touching the rock. This prevents sudden blobs of ink from ruining your delicate outlines.
Step 2: Painting the Daisy
-
Fill the center:
Using yellow acrylic paint or a yellow paint pen, fill in the central circle. Don’t worry about it being perfectly opaque just yet; we add details on top later. -
Fill the petals:
Use your white acrylic paint or medium paint pen to color in each petal. Apply the paint smoothly, following the curve of the leaf. -
Layering up:
White paint often looks translucent on darker rocks. Let the first coat dry fully, then apply a second coat to make the white pop brightly. -
Dry time:
Wait for all the paint layers to be completely dry to the touch. Painting over wet acrylic will cause smudging.
Troubleshooting: Smearing Ink
If your black outlines smear when sealing, you likely didn’t wait long enough. Let the marker cure for at least 24 hours before applying any spray varnish.
Step 3: Outlining and Detail
-
Start the outlines:
Using an extra-fine black paint pen or permanent marker, carefully trace the outline of the yellow center. -
Trace the petals:
Outline each white petal with the black pen. I like to keep a loose hand here to maintain that charming ‘doodled’ look rather than perfection. -
Add petal definition:
Draw a single, thin line down the center of each petal, starting from the center and stopping about halfway up the petal. -
Inner details:
In the gap between petals near the center, add tiny ‘V’ shapes or partial lines to show where petals overlap or emerge. -
Create the center grid:
On the yellow center, use your black pen to draw small dots in a tight grid pattern to resemble seeds. -
Add white highlights:
Once the black dots are dry, place smaller, tiny white dots in the gaps between some of the black seeds for texture. -
Decorative border:
Around the flower, on the bare stone, add small black dots spaced evenly apart. This frames the design nicely.
Step 4: Finishing Touches
-
Erase guidelines:
Check for any visible pencil lines from your initial sketch and gently erase them if the paint is fully cured. -
Seal the work:
Finish by spraying the rock with a clear matte or satin sealant. Do this in a well-ventilated area to protect your art from chipping.
Place your lovely daisy rock on a desk or in the garden to brighten up your day


Tiny All-Over Daisy Pattern
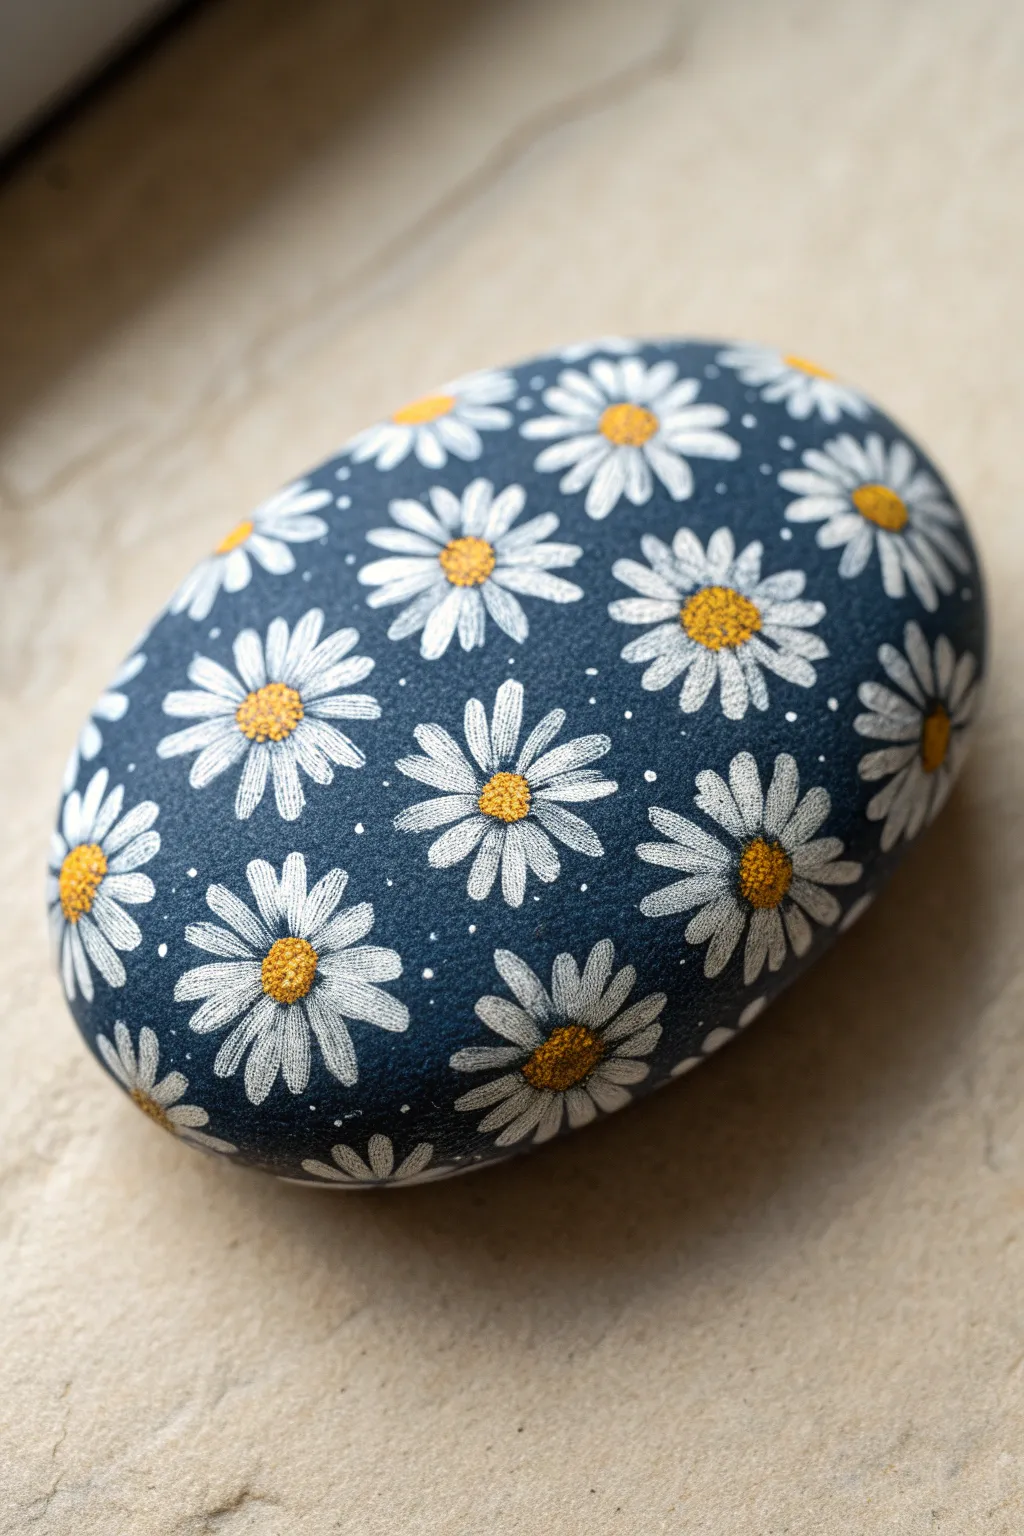
Transform a smooth river stone into a stunning piece of floral art with this intricate all-over pattern. The deep midnight blue background makes the delicate white petals and textured yellow centers pop, creating a sophisticated look that fits perfectly in any garden or on a desk.
Step-by-Step Tutorial
Materials
- Smooth, oval river stone (flat surface is best)
- Acrylic paint: dark navy blue or midnight blue
- Acrylic paint: titanium white
- Acrylic paint: golden yellow and ochre
- Wide flat brush (for base coat)
- Fine detail brush (size 0 or 00)
- Small round brush (size 1)
- Dotting tool or toothpick
- Matte or satin spray varnish
Step 1: Base Preparation
-
Clean the canvas:
Begin by thoroughly washing your stone with warm soapy water to remove any dirt or oils that might repel the paint. Let it dry completely in the sun or with a hair dryer. -
Apply the dark base:
Load your wide flat brush with the dark navy blue acrylic paint. Apply a smooth, even coat over the entire top surface of the rock. Let it dry, then flip it over to paint the bottom if you want a fully finished piece. -
Second coat for opacity:
Once the first layer is dry to the touch, apply a second coat of the navy blue. This ensures a rich, opaque background without any stone color showing through. Allow this base to cure fully before starting the flowers.
Paint Consistency Tip
If your white paint feels too thick or draggy, mix in a singular drop of water. Ink-like consistency helps create sharp, pointed petal tips.
Step 2: Painting the Daisies
-
Map out flower centers:
Using a small round brush and a mix of golden yellow, lightly dab small circles where you want each daisy to sit. Space them somewhat evenly but keep the placement natural and random. Don’t worry about perfection; these are just guides. -
Create the first petals:
Dip your fine detail brush into titanium white paint. For your first flower, paint thin, elongated petals radiating outward from one of the yellow centers. Use a light touch to keep the tips pointed. -
Layering petals:
Continue painting petals around the center. I find it helpful to paint the four main directional petals (north, south, east, west) first, then fill in the gaps between them to ensure even spacing. -
Variation in size:
As you move to other flowers, vary their orientation slighty. Paint some complete daisy shapes in the middle, and partial ‘half-daisies’ near the edges of the rock to create the illusion that the pattern continues endlessly. -
Refining the white:
Acrylic white can be translucent. Once your first layer of petals dries, go back over them with a second coat of white to make them bright and crisp against the dark background. -
Adding texture to petals:
For a realistic look, use your finest brush to add very faint, thin grey lines (mix a tiny dot of black into white) at the base of the petals near the center. This adds dimension and separation.
Level Up: Bee Friendly
Paint a tiny bumblebee landing on one of the daisies. Use a micro-brush for black and yellow stripes, and dilute white paint for transparent wings.
Step 3: Detailing and Finishing
-
Texturing the centers:
Mix a darker ochre or orange-yellow. Use a dotting tool or the very tip of a brush to stipule tiny dots over the yellow centers. This mimics the fuzzy texture of a real daisy’s disk. -
Highlighting the centers:
Add a few tiny dots of pure white or pale yellow to the top-left side of each flower center. This creates a little highlight that makes the centers look spherical and 3D. -
Adding tiny specks:
To fill the negative space and add a magical quality, use a toothpick to create tiny white dots in the blue areas between the flowers. Keep them sparse and random. -
Check the edges:
Inspect the sides of your rock. Ensure the partial flowers wrap neatly around the curve, fading out naturally rather than ending abruptly. -
Final dry time:
Let the entire rock sit for at least 24 hours to ensure all layers of paint are completely dry and cured. -
Seal the artwork:
Finish by spraying the rock with a matte or satin varnish. Hold the can about 10-12 inches away and apply light coats to protect the paint from chipping without creating a thick, sticky glaze.
Now you have a beautiful, permanent bouquet that will never wilt


Daisy Border Around the Rock Edge
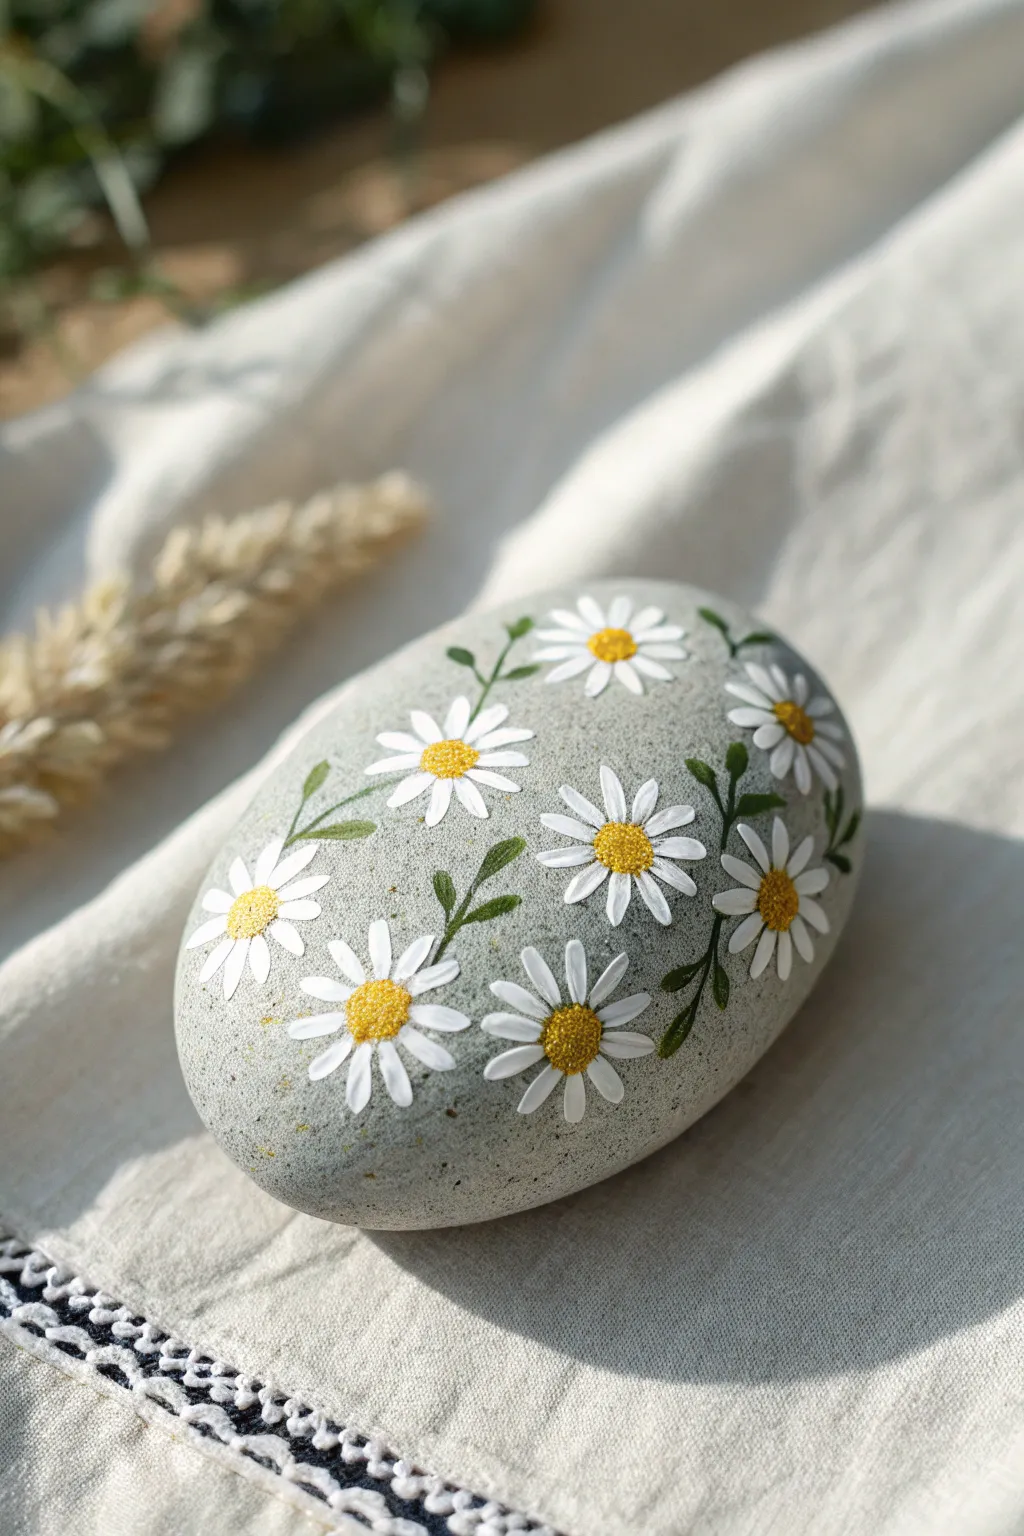
Transform a simple grey stone into a blooming meadow with this delicate daisy pattern that feels like a breath of fresh air. The design uses crisp white petals and textured yellow centers to create a realistic yet charming floral arrangement that wraps beautifully around the rock’s surface.
Detailed Instructions
Materials
- Smooth, oval river rock (medium grey)
- White acrylic paint (high opacity)
- Golden yellow acrylic paint
- Dark olive green acrylic paint
- Fine detail brush (size 0 or 00)
- Small round brush (size 1 or 2)
- Dotting tool (small size) or toothpick
- Matte finish artist sealer spray
Step 1: Preparation & Layout
-
Clean the canvas:
Begin by washing your rock thoroughly with soap and water to remove any dirt or oils. Let it dry completely before starting, as moisture trapped in the stone can cause paint to peel later. -
Visualize the placement:
Look at the shape of your rock and mentally plan where your main flowers will sit. For this design, aim for an organic scatter rather than a rigid grid, allowing some flowers to sit near the edges.
Step 2: Painting the Foliage
-
Start with stems:
Dip your fine detail brush into the dark olive green paint. Paint thin, curving lines to act as stems connecting the imaginary flower heads. Keep the pressure light to ensure the lines remain delicate. -
Add the leaves:
Along the stems, paint small, elongated teardrop shapes for the leaves. I find it works best to press the brush down slightly at the base of the leaf and lift up as you drag outward to create a sharp point. -
Let the greenery dry:
Allow the green layer to dry completely. Since the white petals will overlap parts of the stems, the green paint needs to be fully set to avoid muddying the crisp white color.
Petal Perfection
If your white paint isn’t covering well, paint the petal shape in light grey first. Let it dry, then paint white over it. The grey acts as a primer for the white.
Step 3: Creating the Blooms
-
Paint the first petal layer:
Using your size 1 round brush loaded with white paint, create the petals. Start from the outer tip of the petal and stroke inward toward the center of where the flower will be. -
Space the petals:
Paint 10-12 petals per flower, leaving a small open circle in the middle for the yellow center. Don’t worry if they aren’t perfectly symmetrical; variation makes them look more natural. -
Assess opacity:
Acrylic white can be transparent on dark rocks. Once the first layer is dry, apply a second coat of white to the petals to make them pop brightly against the grey stone background. -
Refine the edges:
Use your finest brush to touch up the tips of the petals if needed, ensuring they have clean, rounded ends rather than ragged brushstrokes.
Add a Bee Friend
Paint a tiny yellow oval with black stripes hovering near one of the daisies to add a surprisingly cute narrative element to your painted meadow scene.
Step 4: Adding the Centers & Details
-
Add the yellow base:
Dip a small dotting tool or the back of a paintbrush into the golden yellow paint. Place a solid dot in the center of each flower. -
Create texture:
While the yellow paint is still slightly wet or immediately after applying fresh paint, tap it gently with the tip of a toothpick or a dry stiff brush to give it a rough, pollen-like texture. -
Adding depth:
Mix a tiny amount of brown or darker orange into your yellow. Dab just a few tiny specks of this darker shade on the bottom edge of the yellow centers to simulate shadow and dimension. -
Highlight the leaves:
If you want extra realism, mix a little white into your green paint and add a very subtle highlight line on the upper curve of a few leaves. -
Final drying time:
Let the entire rock sit undisturbed for at least an hour to ensure the thickest parts of the paint (the centers) are cured. -
Seal the artwork:
Take the rock to a well-ventilated area and apply a light coat of matte spray sealer. This protects the paint from chipping without adding an unnatural glossy shine.
Place your finished stone in a garden pot or on a sunny windowsill to enjoy spring vibes all year round
BRUSH GUIDE
The Right Brush for Every Stroke
From clean lines to bold texture — master brush choice, stroke control, and essential techniques.
Explore the Full Guide
Mini Meadow Scene With Scattered Daisies
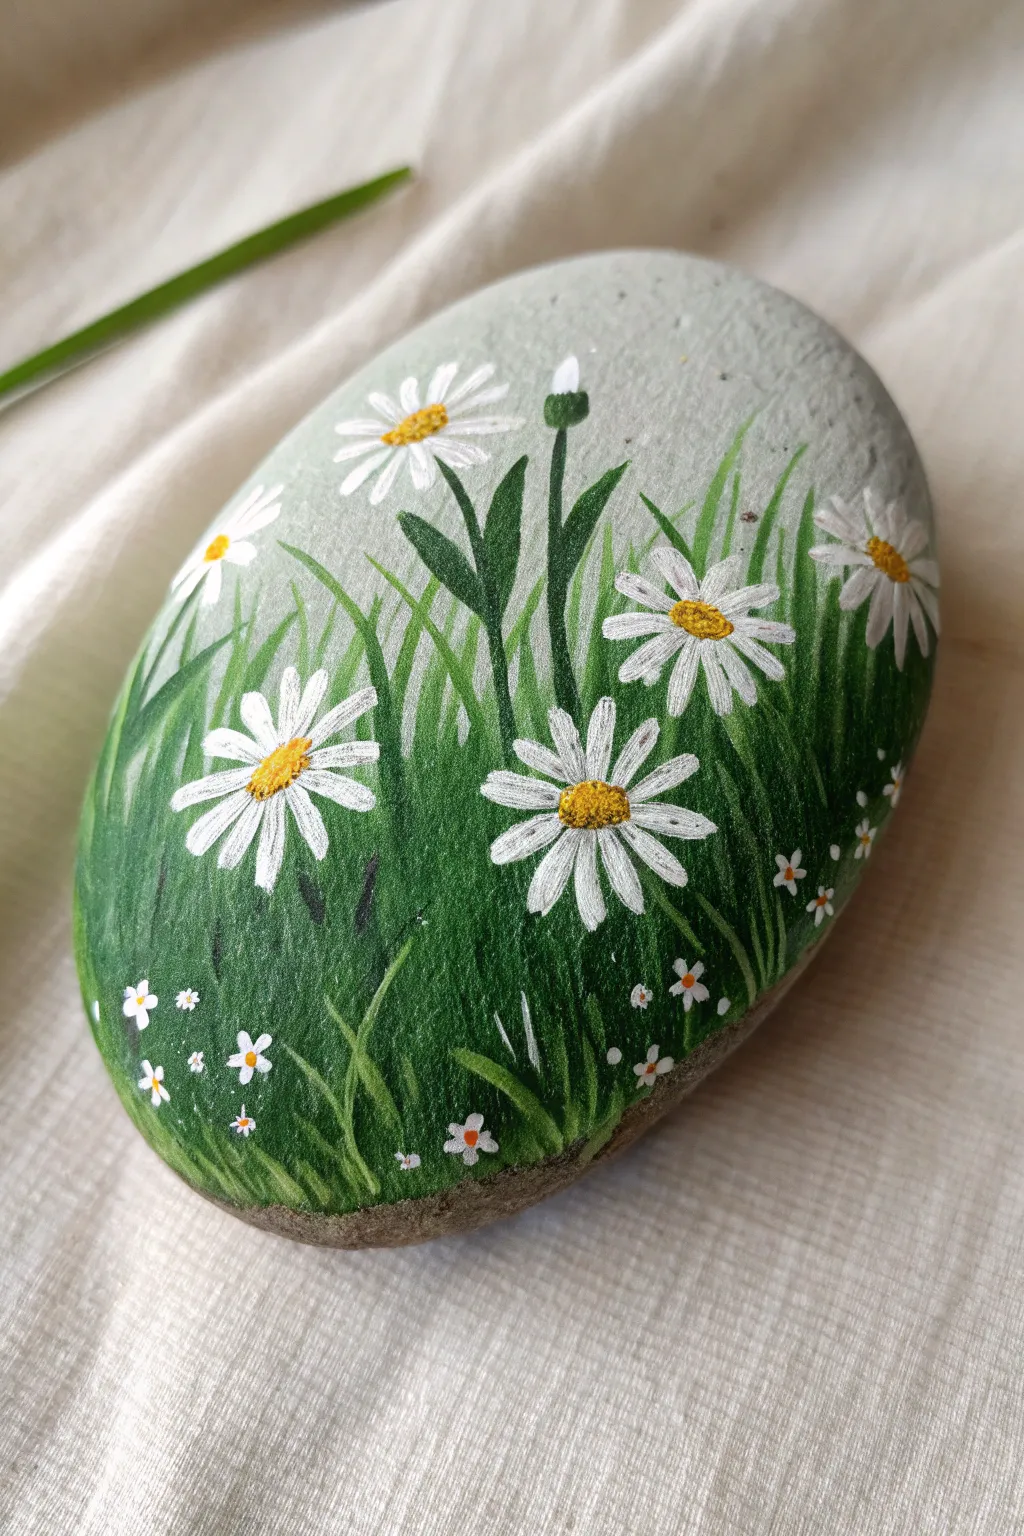
Transform a smooth, grey stone into a lush little pasture filled with cheerful blooms. This design uses layered strokes of green to build depth before adding vibrant white daisies that seem to pop right off the rock.
Step-by-Step
Materials
- Smooth, oval river rock (grey tones work best)
- Acrylic paints (dark green, sap green, lime green, white, yellow/ochre)
- Small flat brush
- Fine liner brush (size 0 or 00)
- Dotting tool or toothpick
- Matte or satin varnish sealant
- Water cup and paper towels
Step 1: Preparing the Grassy Base
-
Clean surface:
Begin by washing your stone with soapy water and drying it completely to ensure the paint adheres properly. -
Base grass layer:
Load a small flat brush with dark green paint mixed with a tiny drop of black or brown. Paint upward strokes starting from the bottom of the rock, lifting your brush as you go up to create tapering grass blades. -
Mid-tone grass:
While the dark layer is still slightly tacky or just dry, switch to a standard sap green. Paint a second layer of grass blades, slightly shorter than the first, filling in gaps to create density. -
Highlight grass:
Mix a lime green or add a touch of yellow to your green. Using a fine liner brush, flick thin, light-colored grass blades primarily in the foreground and areas where the light would hit. -
Extend the stems:
Visualize where your main daisies will sit. Paint strong, slightly thicker green stems reaching up towards the top half of the rock using your liner brush. -
Add leaves:
Paint jagged, lance-shaped leaves attached to the main stems using a darker green to anchor the composition visually.
Natural Petal Tip
Don’t make petals perfect! vary their length and curve some slightly sideways. Real flowers are rarely perfectly symmetrical.
Step 2: Painting the Main Daisies
-
Map flower centers:
With a very light touch or a pencil, mark small dots where the centers of your five main daisies will be. -
First petal layer:
Using white paint and a fine liner brush, paint thin, elongated petals radiating from your center marks. Don’t worry about opacity yet; just get the shape. -
Second petal layer:
Once the white is dry, add a second coat to the petals. I like to make the petals slightly wider at the tips and tapered near the center for a realistic look. -
Painting the centers:
Use a dotting tool to place a circle of yellow paint in the center of each daisy. -
Texturing the centers:
While the yellow is wet, dab a tiny bit of orange or ochre on the bottom edge of each center to create a shadow and 3D effect. -
Adding texture dots:
Once the centers are dry, use a toothpick to add tiny white or light yellow stippling dots on top of the yellow for pollen texture.
Step 3: Details and Finishing
-
Adding the bud:
Near the top, paint a small green oval on a stem, then add a tiny sliver of white peeking out the top to represent a daisy about to bloom. -
Tiny wildflowers:
Using the smallest tip of your dotting tool or a toothpick, add clusters of tiny white 5-petal flowers near the bottom of the rock to fill the empty green space. -
Tiny flower centers:
Place a microscopic dot of orange or yellow in the center of these tiny filler flowers. -
Final highlights:
Add a few very faint, almost translucent white lines in the grass to suggest movement or wind. -
Seal the rock:
Allow the stone to dry for at least 24 hours, then apply a coat of matte or satin varnish to protect your meadow scene from chipping.
Add Flying Friends
Paint a tiny ladybug climbing a grass blade or a small bumblebee hovering near the large daisy to bring the scene to life.
Place your finished meadow rock in a potted plant or on a windowsill to enjoy a touch of spring all year round
Daisy Mandala in Circular Rings
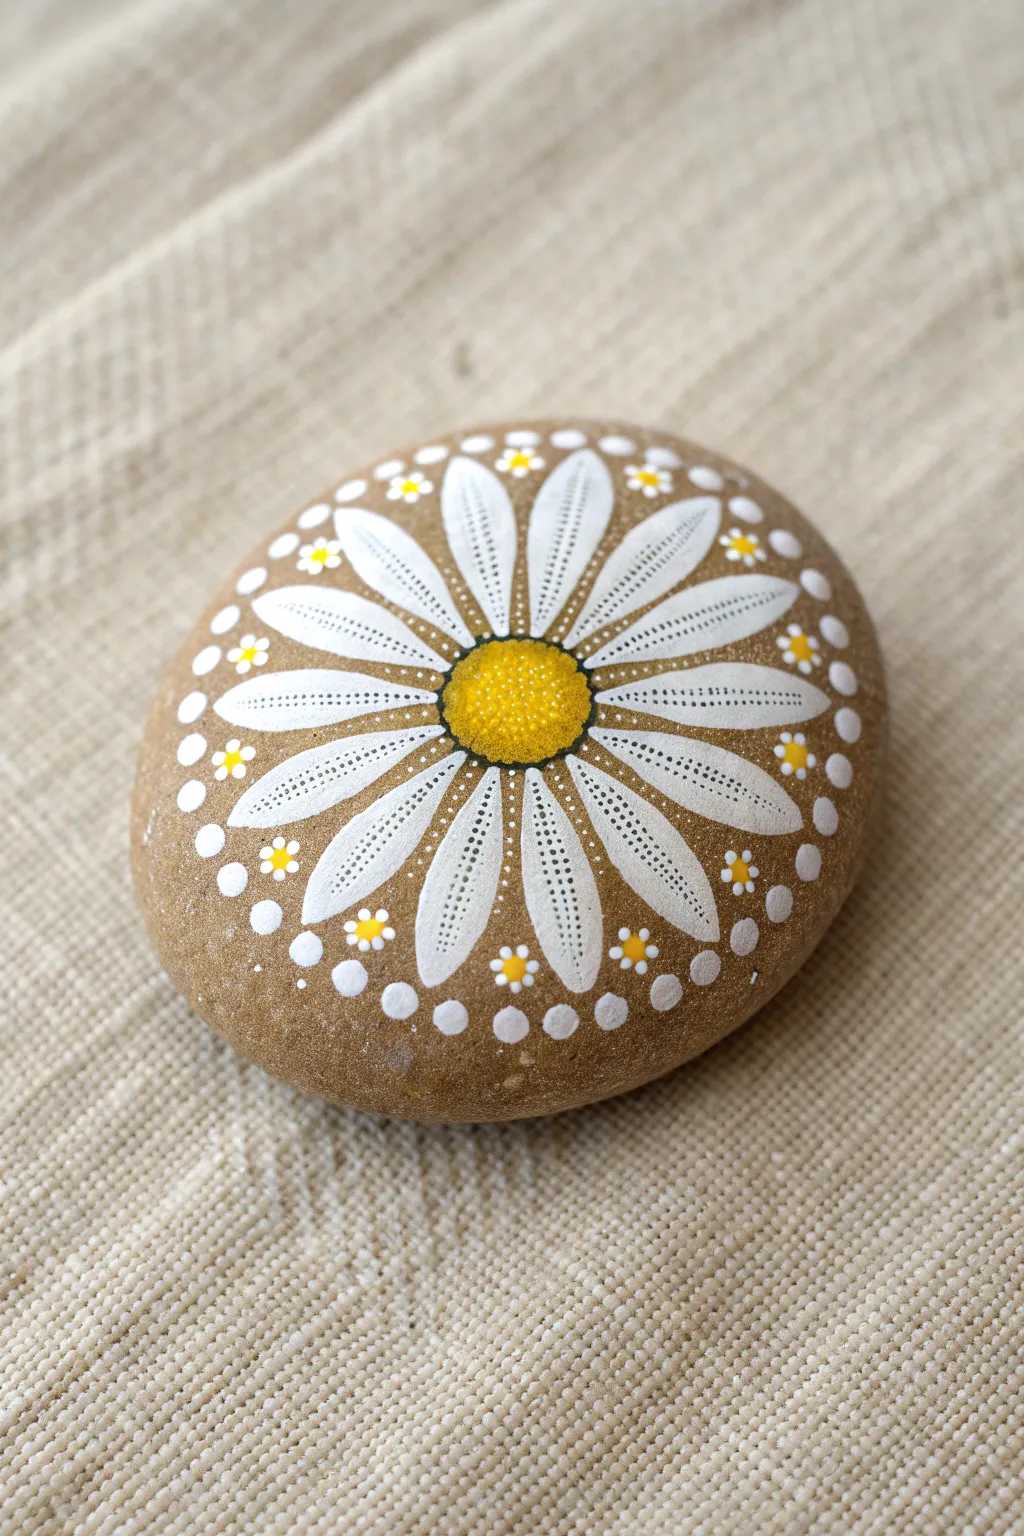
Transform a simple river rock into a stunning piece of art with this detailed daisy mandala design. The symmetrical white petals and sunny yellow center create a calming, radiating effect that perfectly complements the natural stone surface.
How-To Guide
Materials
- Smooth, round river rock (approx. 3-4 inches wide)
- White acrylic paint (high opacity)
- Yellow acrylic paint (bright/warm tone)
- Small round paintbrush (size 1 or 2)
- Fine liner brush (size 00 or 000)
- Dotting tool set (various ball sizes)
- Pencil (for light sketching)
- Acrylic matte or gloss varnish
Step 1: Base and Center
-
Clean surface:
Begin by washing your stone with soap and warm water to remove any dirt or oils, then let it dry completely to ensure the paint adheres properly. -
Sketch the center:
Lightly draw a circle in the very center of the stone using a pencil. This will be the heart of your daisy. -
Paint the yellow heart:
Fill in your pencil circle with bright yellow acrylic paint. You may need two coats to get a solid, opaque color. -
Add texture:
Once the yellow base is dry, take a very small dotting tool or the tip of a toothpick dipped in a slightly lighter or darker yellow (or white) and stipple tiny dots all over the yellow circle to create a pollen-like texture. -
Outline the center:
Carefully outline the yellow circle with a fine black line or very dark brown to separate it cleanly from the petals.
Uneven Dots?
If dots look uneven or have crater centers, your paint is too thick. Add a drop of flow medium or water to the paint to get a creamy consistency.
Step 2: Petals and Details
-
Mark petal positions:
Lightly mark four points around the yellow center (top, bottom, left, right) to guide your petal placement, ensuring symmetry. -
Paint main petals:
Using a small round brush loaded with white paint, paint long, teardrop-shaped petals radiating from the center marks. Press down near the center and lift usually as you pull outward to create a point. -
Fill the gaps:
Paint additional petals in the spaces between your four main guide petals until you have a full circle of white petals surrounding the yellow center. -
Sharpen the edges:
Go back over the petal edges with a liner brush to make sure they are crisp and the tips are sharp. Let the white paint dry fully. -
Add dotted spines:
Dip a fine stylus or needle tool into black paint (or dark brown). Carefully create a line of miniature dots running down the center vein of each white petal, starting from the center and fading out.
Add Sparkle
Once the paint is dry, add a tiny dot of metallic gold paint to the center of every mini-flower for an extra luxurious shimmering effect.
Step 3: Outer Rim Decoration
-
Create the dot border:
Using a medium-sized dotting tool, place a large white dot just beyond the tip of every petal. -
Add spacer dots:
Place a slightly smaller white dot in the V-shape space between the tips of adjacent petals. -
Paint mini-flowers:
In the gap between the petals, below the spacer dots, create tiny five-petal flowers using a very small dotting tool and yellow paint for the centers. -
Add flower petals:
Use your smallest tool to place five tiny white dots around the yellow centers you just made, completing the mini-flowers. -
Final flourish:
Walk the dots around the outer rim if you have extra space, adding decreasingly smaller dots to fill any voids. -
Seal:
Allow the stone to cure for 24 hours, then apply a layer of varnish to protect your beautiful mandala from scratches and weathering.
Place this cheerful stone in your garden or on your desk for a daily reminder of sunny skies

PENCIL GUIDE
Understanding Pencil Grades from H to B
From first sketch to finished drawing — learn pencil grades, line control, and shading techniques.
Explore the Full Guide
Daisy With a Busy Little Pollinator

This charming nature-inspired piece features a bold, classic daisy painted on a dark river stone, accompanied by a tiny bee friend that seems to buzz alongside. The high contrast of white petals against the dark stone makes for a striking garden decoration or paperweight.
Detailed Instructions
Materials
- Smooth, dark river rock (flat oval shape is best)
- White acrylic paint (high opacity)
- Yellow ochre or golden yellow acrylic paint
- Green acrylic paint (olive or sap green)
- Black acrylic paint
- Fine detail paintbrushes (liner brush and small round brush)
- Pencil or white charcoal pencil
- Matte or glossy varnish (optional)
Step 1: Preparation & Base shapes
-
Clean the canvas:
Before starting, scrub your rock thoroughly with soap and water to remove any dirt or oils. Let it dry completely so the paint adheres properly. -
Draft the design:
Using a white charcoal pencil or a regular pencil (if you can see the graphite sheen), lightly sketch a circle in the center for the flower head and lines radiating outward for the petals. -
Paint the center:
Load a small round brush with golden yellow paint. Dab a textured, slightly imperfect circle in the middle of your rock. Stippling the paint (dabbing up and down) helps create a pollen-like texture.
Paint opacity fix
If your white paint looks streaky or gray, don’t keep brushing wet paint. Let it fully dry, then dab—don’t drag—a second layer on top.
Step 2: Painting the Daisy
-
First layer of petals:
Using white paint and a small round brush, paint the petals radiating from the yellow center. Keep the strokes wider near the outside and tapering slightly as they touch the center. -
Build opacity:
White paint on dark rocks often looks translucent at first. Allow the first layer to dry, then apply a second coat to make the petals bright and crisp. -
Add petal details:
Once the white is dry, take a very fine liner brush with tiny amount of black or grey paint. Add subtle lines down the center of a few petals to give them dimension and a natural, ribbed look. -
Paint the stem:
Mix a natural green shade. Starting from the right side of the flower, paint a thin, curved stem that trails off the edge of the rock. -
Add the bud:
At the top of your green stem, paint a small green tear-drop shape. Add a tiny sliver of white and yellow at the top to suggest a flower bud just beginning to open.
Pro Tip: Natural lines
For the thin black lines on the petals, distract your hand slightly or hold the brush loosely. A wobbly line looks more organic than a perfect one.
Step 3: The Tiny Bee Companion
-
Place the bee:
Decide where your bee will go. In the reference, the bee is actually painted on the fabric near the rock for a photo trick, but for a lasting artwork, paint it on the bottom left corner of the stone surface itself. -
Bee body:
Paint two small ovals connecting to each other using yellow paint. This forms the head and the main body. -
Stripes and stinger:
Once the yellow is dry, use your finest liner brush and black paint to add stripes across the body. Add a tiny black dot for the eye and a small point for the stinger. -
Wings:
Using watered-down white paint (to make it semi-transparent), paint two small teardrop loops on the bee’s back for wings. Outline them very faintly with black if needed for visibility. -
Final touches:
Add tiny black legs underneath the bee using the lightest touch of your liner brush.
Step 4: Finishing
-
Clean up edges:
If you smudged any white paint onto the dark rock background, used a damp cotton swab to wipe it away or cover it with a little black or dark grey paint to match the stone. -
Seal the work:
Allow the entire rock to dry for at least 24 hours. Apply a coat of spray varnish or brush-on sealer to protect your painting from scratches and weather.
Place your finished rock in the garden or on a desk to bring a permanent spot of sunshine to your day
Negative-Space Daisy on a Painted Field
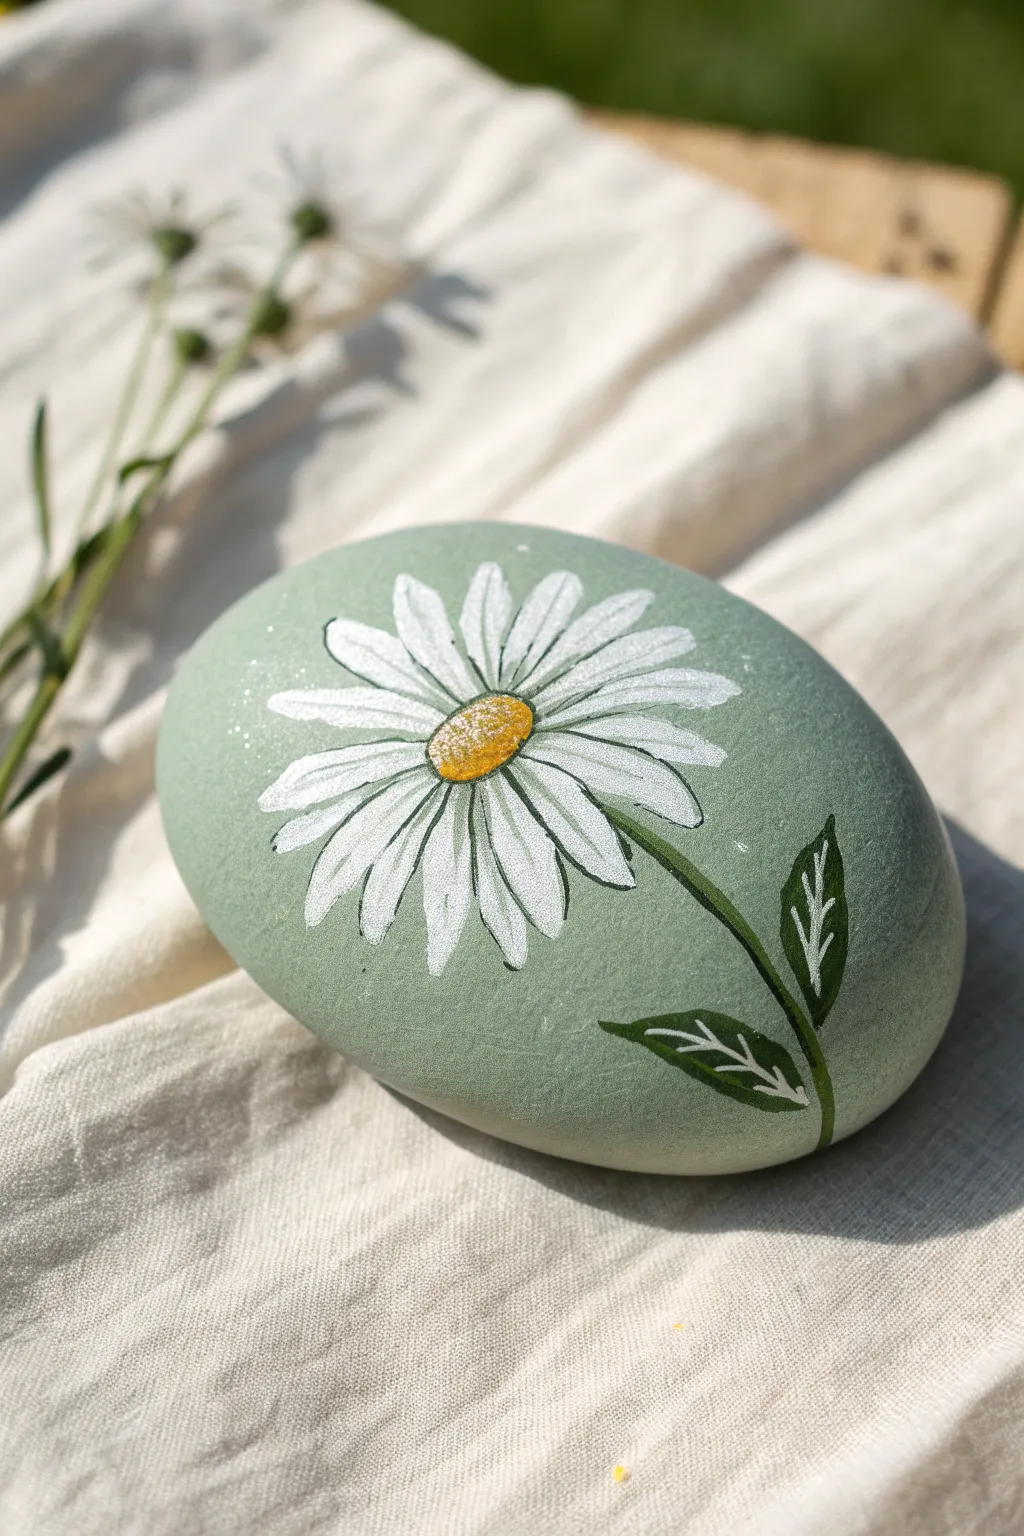
Transform a smooth river rock into a peaceful piece of decor with this calming sage green design. The crisp white petals pop beautifully against the muted background, creating a natural look that’s perfect for garden accents or paperweights.
Step-by-Step Guide
Materials
- Smooth oval river rock (approx. 3-4 inches wide)
- Acrylic paint: Sage Green (or mix green + white + tiny drop of black)
- Acrylic paint: White, Titanium White
- Acrylic paint: Golden Yellow, Burnt Sienna (brown)
- Acrylic paint: Forest Green
- Flat brush (medium size)
- Round brush (size 2 or 4)
- Detail liner brush (size 0 or 00)
- Pencil (HB or lighter)
- Sealing spray (matte or satin finish)
- Posca paint pens (optional, for fine lines)
Step 1: Preparation & Base Coat
-
Clean the canvas:
Start by scrubbing your rock with warm, soapy water to remove any dirt or oils that might prevent the paint from sticking. Let it dry completely in the sun or use a hairdryer to speed things up. -
Mix the background color:
If you don’t have a pre-mixed sage green, create your own by mixing a medium green with plenty of white to soften it, then add a tiny dot of black or brown to desaturate the color for that muted, earthy tone. -
Apply the first coat:
Using a flat brush, cover the top surface of the rock with your sage green mix. Don’t worry about full opacity yet; thin layers dry faster and smoother. -
Build opaque coverage:
Once the first layer is dry to the touch, apply a second coat. Depending on your paint quality, you might need a third coat to ensure the dark rock color is completely hidden.
Step 2: Drafting the Design
-
Sketch the center:
Lightly draw a small oval shape with your pencil slightly off-center on the rock. This will be the flower’s disk. -
Map out the petals:
Sketch the petals radiating outward from the center oval. Aim for long, slender shapes that slightly overlap. It’s okay if your pencil lines are a bit visible; the paint will cover them. -
Add stem and leaves:
Draw a gently curved line extending downwards for the stem, along with two leaves branching off near the bottom right.
Smooth Operator
To get those petals super crisp, slightly dilute your white paint with a drop of water. It should be the consistency of heavy cream for smoother flow.
Step 3: Painting the Daisy
-
Block in the petals:
Using your round brush and Titanium White, fill in the petal shapes. Start from the tip of the petal and pull your stroke toward the center. -
Layer the white:
White paint is notoriously translucent. I usually let the first layer dry for 10 minutes and then apply a second layer to make the brightness truly pop against the green. -
Paint the center:
Fill the center oval with Golden Yellow. Use a generous amount of paint to give it a slightly raised texture if desired. -
Add center dimension:
Before the yellow fully dries, dab a tiny bit of Burnt Sienna or darker orange on the lower edge of the yellow oval to create a shadow, giving the center a domed 3D look. -
Texture the center:
Once the yellow is dry, use your smallest detail brush or a toothpick to stipple tiny white or pale yellow dots onto the top edge of the center for a pollen effect.
Shaky Hands?
If painting fine outlines is difficult with a brush, use an ultra-fine point waterproof marker or a Posca pen after the base paint is 100% dry.
Step 4: Details & Definition
-
Outline the petals:
Use a detail liner brush with slightly watered-down black or dark grey paint (or a fine-tip paint pen) to outline the petals. Keep the lines very thin and delicate, breaking them occasionally for a natural look. -
Add petal veins:
Paint very faint, short lines inside the petals near the center to show the texture and fold of the flower. -
Paint the greenery:
Fill in the stem and leaf shapes with Forest Green using your round brush. -
Detail the leaves:
Once the green is dry, use your detail brush and white paint to draw the central vein and side veins on the leaves. This negative-style detail ties the leaves visually to the white flower. -
Final shading:
Mix a tiny bit of the background sage green with a drop of black. Use this to paint very thin shadow lines along one side of the stem and under the petals where they overlap. -
Seal the artwork:
Allow the rock to cure for at least 24 hours. Once fully dry, apply a matte or satin spray sealer to protect your painting from chipping and UV damage.
Place your finished stone in a sunny spot on your desk or give it to a friend as a small token of cheer


Textured Yellow Centers With Stippling
Transform a smooth, lark river stone into a piece of art with this bold daisy design. The standout feature is the textured yellow center created with careful stippling, set against contrasting white petals for a striking finish.
Step-by-Step Tutorial
Materials
- Smooth, dark river rock (oval or round)
- White acrylic paint
- Yellow ochre or deep yellow acrylic paint
- Burnt sienna or light brown acrylic paint
- Small round paintbrush (size 2 or 4)
- Fine liner brush (size 0 or 00)
- Dotting tool or toothpick
- Matte or satin varnish sealer
Step 1: Base and Placement
-
Clean surface:
Begin by washing your rock with soapy water and drying it completely to ensure the paint adheres properly. -
Center point:
Using a very light pencil mark or a tiny dot of yellow paint, mark the approximate center of where your flower head will sit. This helps keep the petals balanced. -
Petal guide:
Imagine a clock face on your rock. Paint four small white guide dashes at the 12, 3, 6, and 9 o’clock positions radiating from your center mark.
Uneven Petal Coverage?
If the dark rock shows through your white paint, don’t overload the brush. Instead, paint three thin layers, letting each dry fully, for a smooth, opaque finish.
Step 2: Painting the Petals
-
Base petals:
Using your small round brush loaded with white acrylic, stroke outwards from the center to create elongated teardrop shapes at your four guide points. -
Filling the gaps:
Paint additional petals in the spaces between your initial four strokes. Aim for equal spacing, but slight variations make it look more organic. -
Petal shape:
Widen the outer edge of each petal slightly, tapering it as it meets the center. The petals should be long and somewhat narrow. -
Second layer:
Allow the first layer of white to dry completely. Apply a second coat to ensure the petals are bright and opaque against the dark stone. -
Layering petals:
If you have wider gaps, paint a few partial petals appearing to sit ‘behind’ the main ones. Use slightly less paint on your brush here to create a subtle depth. -
Fine tuning edges:
Switch to your fine liner brush to crisp up the edges of any ragged petals for a clean silhouette.
Pro Tip: Highlight Placement
Imagine a light source from the top right. Place lighter yellow stippled dots there and darker brown dots on the opposite lower side for instant 3D volume.
Step 3: The Stippled Center
-
Yellow base:
Paint a solid circle of yellow ochre in the middle, overlapping the base of the white petals slightly to connect them. -
Drying time:
Let this yellow circle dry thoroughly. If it looks streaky, add a second thin coat. -
Preparing to stipple:
Squeeze a small amount of burnt sienna or light brown paint onto your palette. You want a color darker than your yellow but not black. -
Stippling texture:
Dip the very tip of a fine brush, a dotting tool, or a toothpick into the brown paint. Gently tap tiny dots over the yellow center. -
Density control:
Concentrate more brown dots near the bottom-left edge of the center to suggest shadow, and place fewer dots near the top-right to simulate a highlight. -
Highlight dots:
I like to mix a tiny bit of white into the yellow and add just a few micro-dots on the upper right side of the center for extra dimension.
Step 4: Finishing Touches
-
Accent leaves:
If desired, mix a muted green and dab a few tiny spots around the perimeter as abstract foliage suggestions. -
Spatter effect:
Dip an old toothbrush or stiff brush in watered-down white or lime green paint. Flick the bristles to create a fine mist of speckles across the rock surface for a pollen effect. -
Final dry:
Let the entire rock dry for at least 24 hours to ensure moisture creates no cloudiness under the varnish. -
Sealing:
Apply a coat of matte or satin varnish to protect your artwork from chipping and UV light.
Place your finished daisy rock in a garden pot or on a windowsill to brighten up the space
Soft Blended Daisy in Watercolor Style
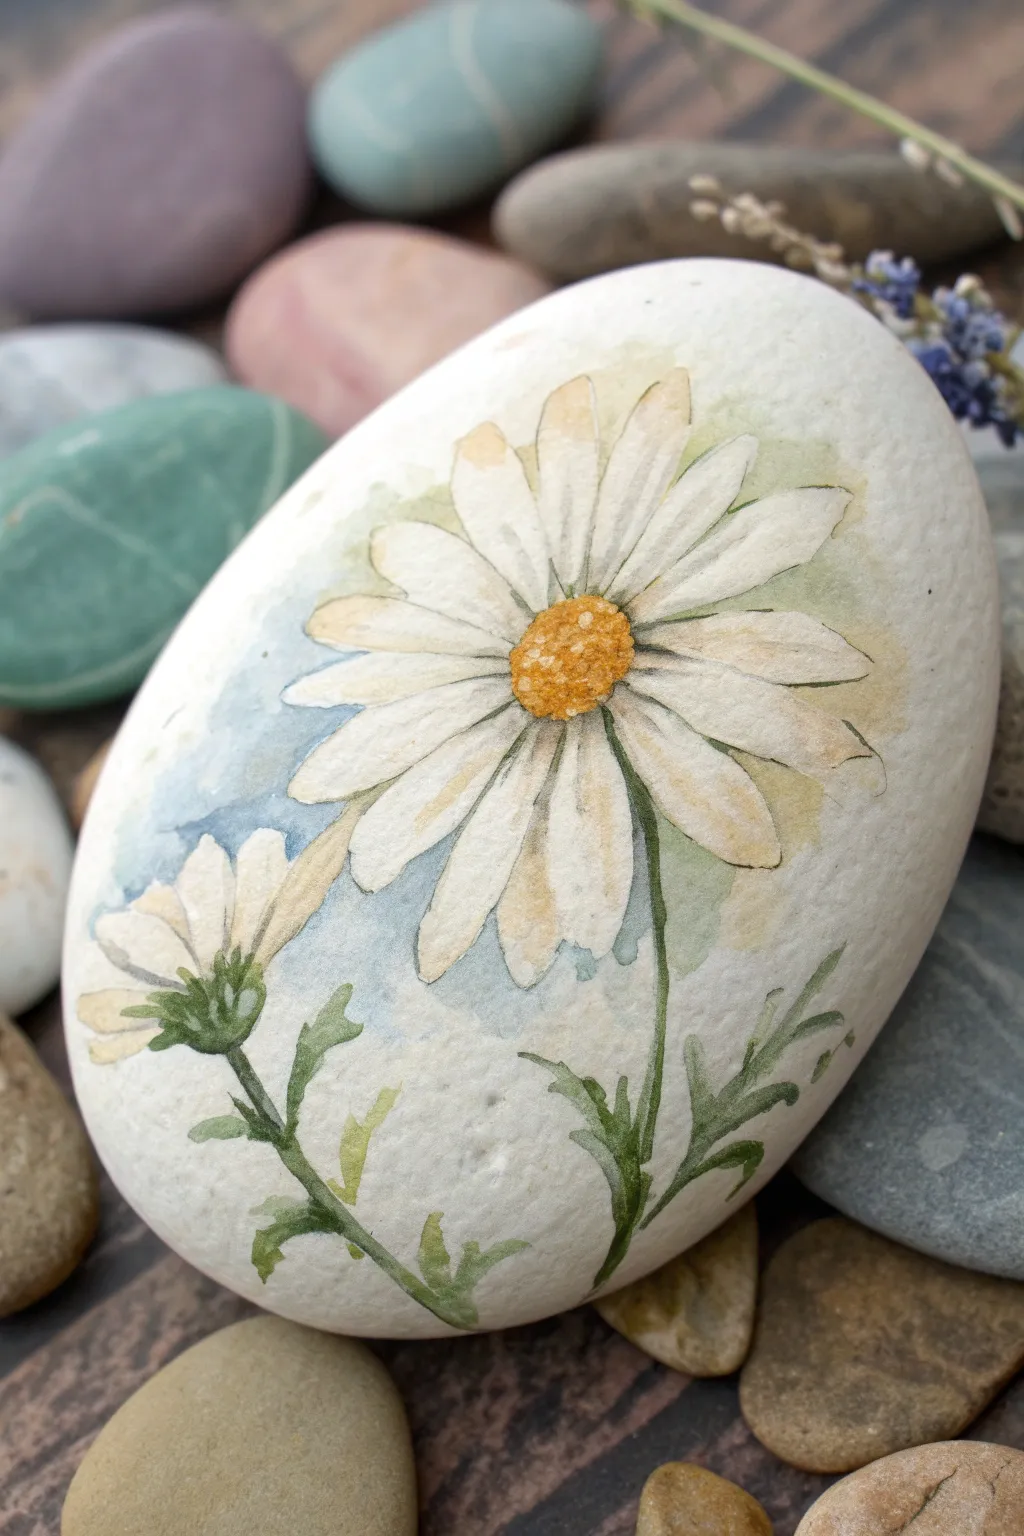
Capture the delicate translucency of fresh flowers with this soft, painterly design on smooth stone. By mimicking watercolor techniques with diluted acrylics or watercolor pencils, you’ll create gentle petals that seemingly float on the rock’s surface.
Step-by-Step Guide
Materials
- Smooth, white oval river rock (very clean surface)
- Pencil (H or HB for light lines)
- Acrylic paints (White, Yellow Ochre, Burnt Sienna, Sap Green, Phthalo Blue)
- Glazing medium or water for thinning paint
- Small round brushes (size 0, 1, and 2)
- Fine liner brush (size 00 or 000)
- Paper towel
- Matte spray varnish
Step 1: Preparation and Sketching
-
Surface Prep:
Ensure your rock is perfectly clean and dry. If the natural stone isn’t pure white, apply two thin coats of white acrylic gesso or white acrylic paint to create a bright canvas, letting it dry completely between layers. -
Initial Sketch:
Using a hard pencil gently, sketch a large oval near the center-top for the main flower head and a smaller oval to the lower left for the bud. Keep lines incredibly faint so they don’t show through the translucent paint later. -
Mapping Petals:
Lightly draw the petals radiating from the centers. For the main daisy, make the petals slightly irregular and overlapping. Sketch thin, curved stems connecting the flowers to the bottom of the rock.
Muddy colors?
Layering wet acrylics too quickly creates brown mud. Let each wash dry completely before glazing the next color over it.
Step 2: Creating the Background Wash
-
Mixing the Wash:
Mix a tiny drop of Phthalo Blue with plenty of water or glazing medium to create a transparent, watery blue wash. Do the same with a touch of Sap Green for a grassy hue. -
Applying the Sky:
Using a size 2 brush, dab the watery blue paint loosely around the left side of the main flower. Let the edges fade out into the white rock rather than creating a hard border. -
Adding Greenery:
While the blue is still slightly damp, introduce the watery green wash near the bottom and right side of the flower, allowing the colors to bleed together softly where they meet.
Add subtle texture
Sprinkle a tiny pinch of salt onto the wet blue background wash. Brush it off when dry for a blooming, textured watercolor effect.
Step 3: Painting the Petals
-
Base Petal Layer:
Dilute your white acrylic or use a very pale creamy wash. Fill in the petals, avoiding the center disk. This layer should be semi-transparent to maintain that watercolor look. -
Adding Shadows:
Mix a tiny amount of yellow ochre or grey into your glazing liquid. With a size 1 brush, glaze the bottom edges of the petals and the areas where petals overlap to create subtle depth. -
Defining Edges:
Once the previous layers are dry, take your fine liner brush with slightly darker diluted grey or brown paint. Carefully outline select parts of the petals—don’t outline everything perfectly; broken lines look more artistic.
Step 4: The Flower Centers
-
Golden Base:
Fill the center disk of the main daisy with a wash of Yellow Ochre. Dab the paint on to create a textured, rather than smooth, surface. -
Texturing the Center:
Using the tip of a size 0 brush and Burnt Sienna, stipulate small dots primarily on the lower half of the yellow circle to create a shadowed, 3D effect. -
Highlighting:
Add tiny dots of pure white on the upper left side of the yellow center to suggest light hitting the pollen.
Step 5: Stems and Foliage
-
Painting Stems:
Mix Sap Green with a touch of brown for a natural olive tone. Using a steady hand and the liner brush, paint the thin stems following your initial sketch lines. -
Adding Leaves:
Paint jagged, fern-like leaves extending from the stems. Keep the paint translucent at the tips and more opaque near the stem. -
Connecting the Bud:
For the smaller flower on the left, paint the green sepal cup at the base of the petals, blending it gently upward into the white petal shapes.
Step 6: Final Details
-
Refining Lines:
I like to go back in with my finest brush and sharpen just a few specific details, like the point where a petal meets the center or the jagged edge of a leaf. -
Softening Harshness:
If any lines look too stark, take a damp clean brush and gently rub the edge to blur it slightly, enhancing the watercolor illusion. -
Sealing:
Allow the rock to dry for at least 24 hours. Seal with a matte spray varnish to protect the delicate paint layers without adding an unnatural glossy shine.
Now you have a serene piece of stone art that captures the fleeting beauty of a garden daisy to keep forever
Metallic Touches on Petals and Centers
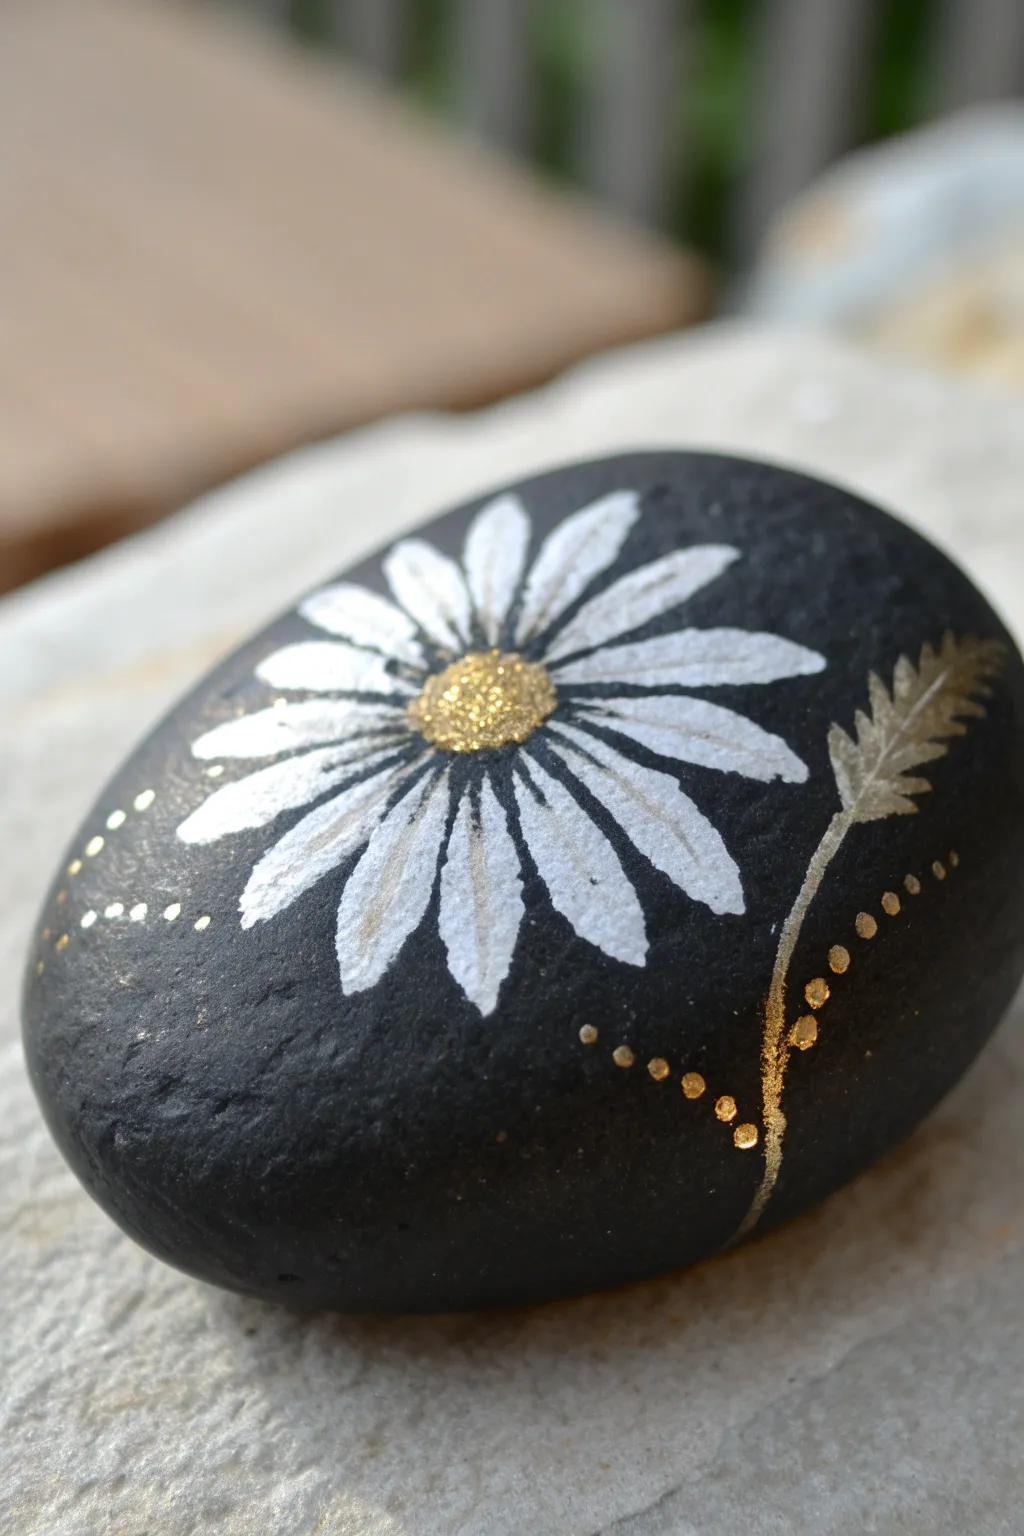
This elegant rock painting design features a striking white daisy set against a deep matte black background for maximum contrast. The addition of metallic gold accents on the center and leaves gives the piece a sophisticated, shimmering finish perfect for garden decor or paperweights.
How-To Guide
Materials
- Smooth, rounded river rock
- Black acrylic paint (matte finish preferred)
- White acrylic paint
- Metallic gold acrylic paint
- Gold glitter paint (optional, for extra sparkle)
- Flat paintbrush (medium size)
- Small round paintbrush (size 1 or 2)
- Very fine liner brush or detail brush
- Dotting tool or toothpick
- Spray varnish or sealant
Step 1: Preparing the Canvas
-
Clean the stone:
Before you begin, scrub your rock with warm soapy water to remove any dirt or oils. Let it dry completely in the sun or with a towel. -
Base coat application:
Using a flat brush, apply a smooth coat of black acrylic paint over the entire top surface of the rock. You don’t need to paint the very bottom if it will just be sitting on a shelf. -
Ensure opacity:
Once the first layer is dry to the touch, apply a second coat of black to ensure no stone color shows through. A solid, opaque background is key for the white petals to pop. -
Let it cure:
Allow the black base coat to dry thoroughly. Impatience here can lead to muddy colors later, so I usually give it at least 20 minutes.
Step 2: Painting the Daisy
-
Draft the center:
Visualize where the flower center will go. Using your small round brush and a tiny bit of white paint, mark a small dot slightly off-center to guide your petal placement. -
Paint the first petals:
Load your round brush with white paint. Starting near your center dot, press down and pull outward to create a teardrop shape. Paint four main petals at the 12, 3, 6, and 9 o’clock positions to establish symmetry. -
Fill in the gaps:
Paint additional white petals in the spaces between your four main petals. Aim for a slightly loose, organic look rather than perfect uniformity. -
Enhance opacity:
White paint on a black background often looks translucent at first. Once the first layer of petals is dry, carefully paint a second layer of white over each petal to make them bright and crisp. -
Add the center:
Dip your round brush or a dotting tool into metallic gold paint. Dab a generous circle right in the middle of your petals, overlapping the inner ends slightly. -
Texture the center:
While the gold paint is wet, stipple it gently with the brush tip or add a touch of gold glitter paint to give the center a textured, pollen-like appearance.
Sharper Petals Tip
If you struggle with petal shapes, practice the ‘press and lift’ stroke on paper first. Press hard for the wide part, then lift while dragging for the tip.
Step 3: Adding Metallic Accents
-
Draft the stem:
Using a fine liner brush loaded with metallic gold paint, draw a thin, curving line extending from the bottom of the flower down the side of the rock. -
Paint the leaf:
From the gold stem, paint a fern-like leaf. Use short, feathery strokes pulling away from the stem to create the leaf vanes. -
Add detail dots:
Dip a small dotting tool or a toothpick into the gold paint. Create a curved line of tiny dots swooping away from the flower or along the stem for a decorative touch. -
Highlight the petals:
Mix a tiny amount of gold with white, or use a very sheer gold wash. Paint thin, subtle streaks down the center of a few petals to tie the metallic theme together. -
Final touches:
Inspect your rock for any stray marks. You can touch up the background with black paint if needed to sharpen the edges of your petals. -
Seal the artwork:
Once the entire design is bone dry (give it a few hours), spray it with a clear acrylic sealer. This protects the paint from chipping and enhances the shine of the gold.
Level Up: 3D Glitter
For a tactile center, mix clear drying craft glue with loose chunky gold glitter and mound it in the flower center instead of just using flat paint.
Place your finished stone in a sunny spot where the light can catch the metallic details.
Hand-Lettered Word With a Daisy Accent
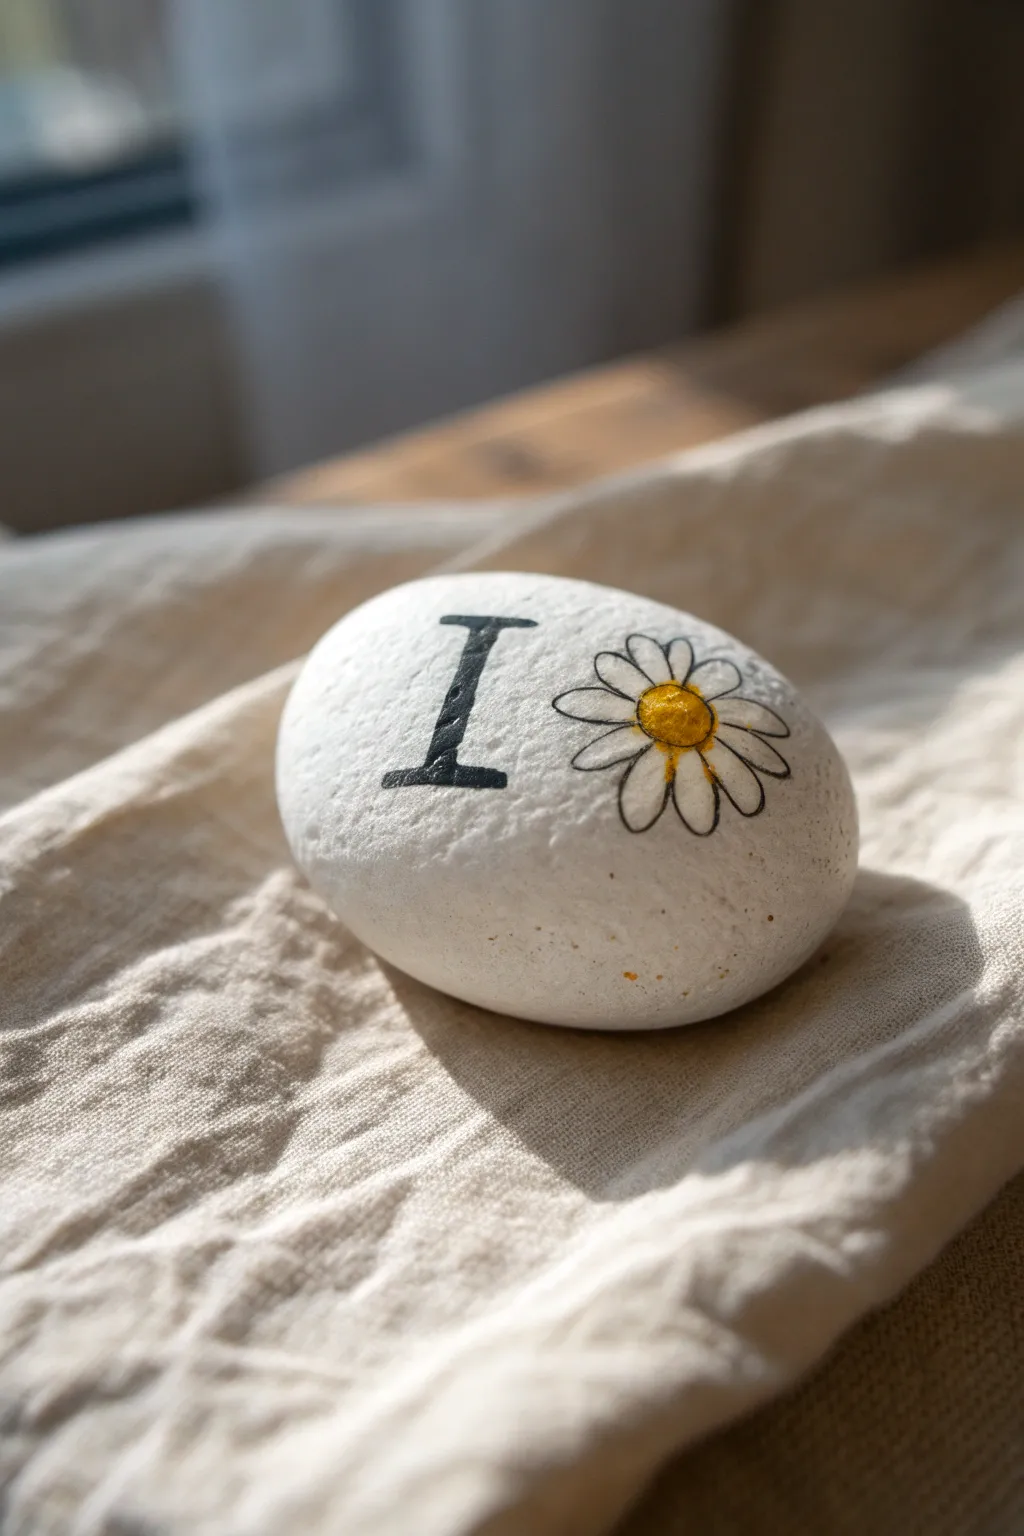
This minimalist project combines stark typography with a delicate floral illustration for a look that is both modern and sweet. The smooth white background makes the black serif letter and the pop of yellow in the daisy really stand out.
Detailed Instructions
Materials
- Smooth, rounded river rock
- White acrylic paint (matte finish)
- Black fine-line permanent marker or acrylic paint pen (extra fine tip)
- Yellow acrylic paint or paint pen
- Flat paintbrush (medium size)
- Small round detail brush (optional)
- Pencil with eraser
- Spray varnish or matte sealer
Step 1: Base Preparation
-
Clean the stone:
Begin by washing your stone thoroughly with warm soapy water to remove any dirt or oils. Let it dry completely in the sun or with a towel. -
Apply the first coat:
Using your flat paintbrush, apply a layer of white acrylic paint across the entire top surface of the rock. Don’t worry if it looks slightly streaky at first. -
Let it dry:
Allow this first layer to dry fully. If you rush this, the next layer might lift the paint underneath. -
Apply the second coat:
Paint a second coat of white, moving your brush in a cross-hatch direction to the first coat to smooth out the texture. This ensures a solid, opaque canvas for your design. -
Final cure:
Wait until the rock is completely dry to the touch before moving on to the sketching phase.
Ink Smearing?
If your black outlines bleed when sealing, switch to a spray sealant for the first coat instead of brush-on varnish to lock the ink in place.
Step 2: Sketching the Design
-
Pencil positioning:
Lightly visualize the center of the rock. You want the letter ‘I’ to occupy the left half and the daisy to occupy the right half. -
Draft the letter:
Using a pencil very lightly, draw a vertical capital serif ‘I’. Focus on getting the top and bottom visual weights balanced. -
Mark the flower center:
To the right of the letter, draw a small circle for the center of your daisy. -
Sketch petals:
Draw elongated oval shapes radiating generally outward from the center circle. They don’t need to be perfectly symmetrical; a slight hand-drawn feel adds charm.
Clean Edges
For the sharpest serif lines on the letter ‘I’, use a tiny piece of washi tape as a stencil masking guide while you fill in the black shape.
Step 3: Inking and Coloring
-
Outline the letter:
Take your black fine-line marker or paint pen and carefully trace over the pencil lines of your letter ‘I’. -
Fill the letter:
Once outlined, color in the body of the ‘I’ until it is solid black. I like to use slow strokes here to keep the edges crisp. -
Outline the flower center:
Trace the circle for the flower’s center with the fine black pen. -
Outline the petals:
carefully trace the petals. If your pencil lines overlap, prioritize the petal shapes that would be ‘in front’ visually. -
Add petal details:
Draw a tiny, short line at the base of each petal, originating from the center circle, to give the flower dimension. -
Paint the center:
Using yellow paint or a yellow paint pen, fill in the center circle. You can dab it on to create a slightly textured pollen look. -
Erase guidelines:
Wait until the black ink is 100% dry to avoid smudging, then gently erase any visible pencil marks.
Step 4: Sealing
-
Initial spray:
Hold a spray varnish about 10-12 inches away and apply a very light mist coat. Using a brush-on sealer immediately could smear the black ink. -
Final coat:
After the mist coat is dry, you can apply a heavier coat of sealer effectively protecting your artwork from the elements.
Now you have a beautifully personalized rock perfect for a garden accent or a thoughtful gift
Night-Sky Daisies With Starry Speckles
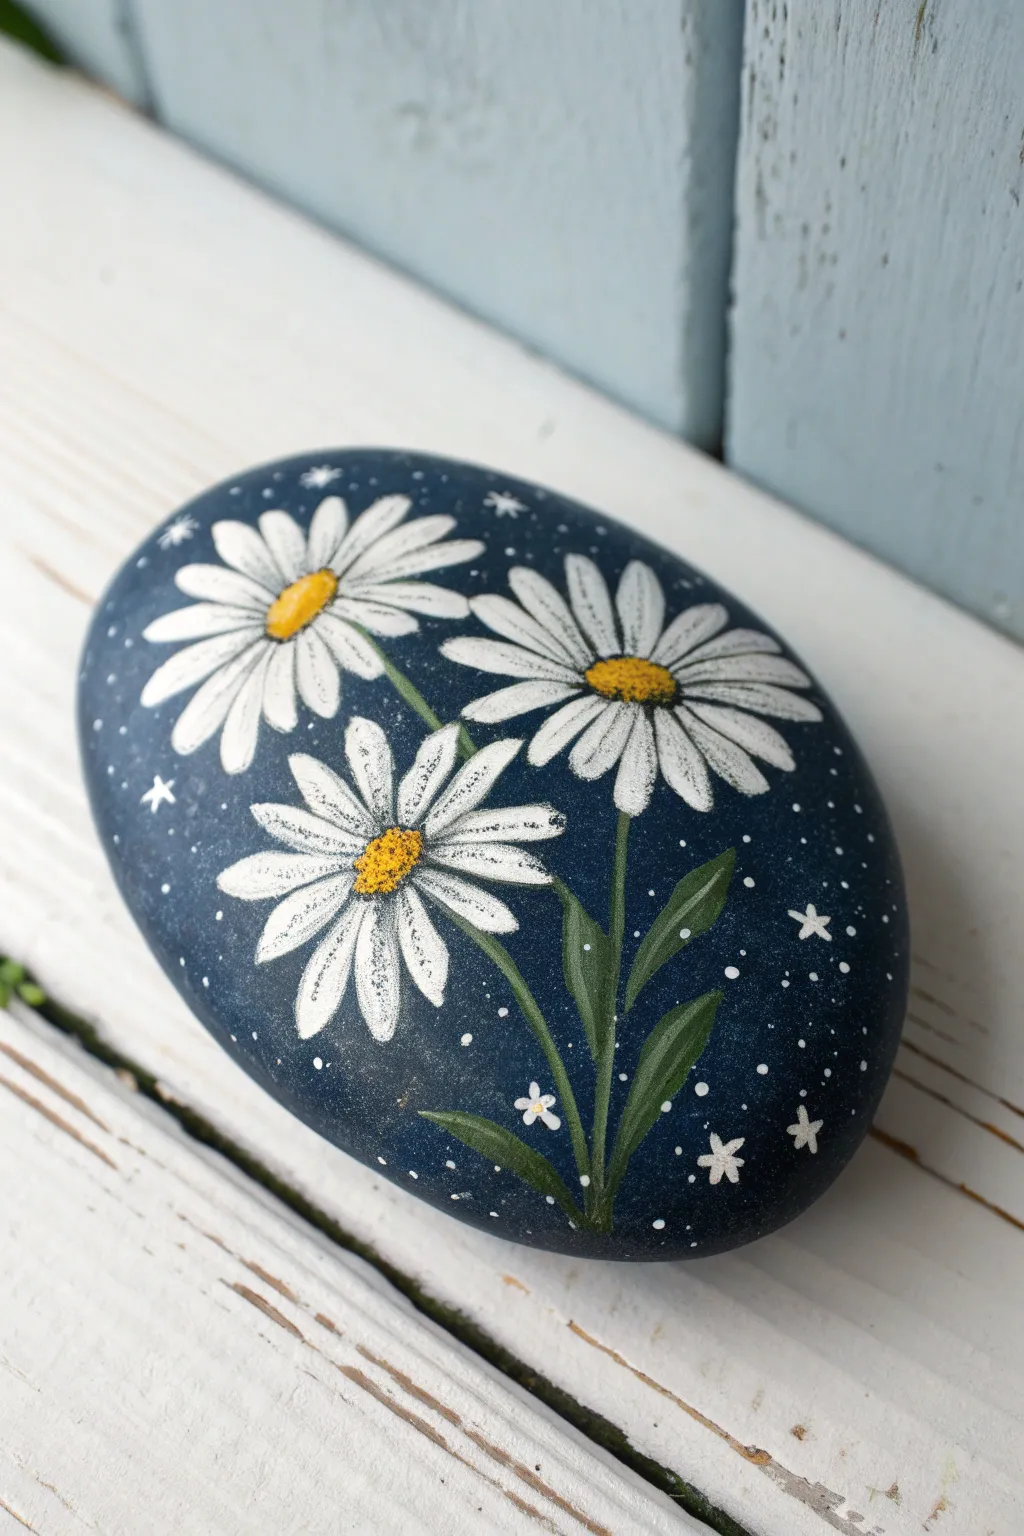
Transform a smooth river rock into a dreamy evening scene with this striking daisy design. Using a deep midnight-blue backdrop makes the crisp white petals and tiny stars pop with beautiful contrast.
Step-by-Step Tutorial
Materials
- Smooth, oval river rock (cleaned and dried)
- Acrylic paints: Navy Blue, Titanium White, Golden Yellow, Olive Green, Black
- Flat brush (medium size)
- Round liner brush (size 0 or 00 for fine details)
- Small round brush (size 2-4)
- Dotting tool or toothpick
- Water cup and paper towels
- Clear spray sealer (matte or gloss)
Step 1: Preparing the Night Sky
-
Base Coat:
Begin by painting the entire top surface of your clean rock with a coat of navy blue acrylic paint. You may need to wrap the color slightly around the sides for a finished look. -
Deepening the Blue:
While the blue is wet, I sometimes like to mix a tiny drop of black into a fresh blob of blue and blend it near the bottom edge. This creates a subtle gradient, resembling a deep night sky. -
Second Coat:
Allow the first layer to dry completely. Apply a second coat of blue to ensure solid, opaque coverage where no rock texture shows through. -
Dry Time:
Let the background dry fully before moving on. The surface must be non-tacky so the white paint doesn’t pick up any blue pigment.
Petal Perfection
If your brush bristles split while painting petals, add a tiny drop of water to your white paint. Ink-like consistency is easier to pull into sharp points.
Step 2: Painting the Daisy Blooms
-
Mapping the Centers:
Visualize where your three flowers will sit. Use a very light pencil mark or a tiny dot of white paint to mark the central spot for each of the three flower heads to keep your spacing balanced. -
First Layer of Petals:
Using your small round brush and titanium white, paint the petals radiating outward from your center marks. Press down near the center and lift up as you stroke outward to create a tapered petal shape. -
Building Opacity:
White paint is often translucent. Once the first petal layer is dry, go over each petal again with fresh white paint to make them bright and solid. -
Painting the Centers:
Load a small round brush with golden yellow. Dab a textured oval or circle in the center of each flower, overlapping the base of the white petals slightly. -
Adding Center Texture:
Mix a tiny bit of brown or diluted black into your yellow. Stipple tiny dots along the bottom edge of the yellow centers to give them a 3D, fuzzy appearance.
Oops! Blue Smudge?
If blue works its way into your white flower, don’t wipe it! Let it dry completely, then paint over the mistake with opaque white. Wiping just makes a gray mess.
Step 3: Stems and Stars
-
Drawing Stems:
Take your fine liner brush and olive green paint. Draw thin, curving lines extending from the bottom of the main flower cluster down toward the base of the rock. -
Adding Leaves:
Paint slender, elongated leaves growing out from the stems. Use one smooth stroke, pressing down in the middle of the leaf and lifting at the end for a sharp point. -
Highlighting Greenery:
Mix a little white or yellow into your green. Add subtle highlight lines on the upper curves of the leaves and stems to mimic moonlight reflecting on them. -
Detailing Petals:
For extra realism, use your finest liner brush with very diluted grey or barely-there lines to define the separation between overlapping petals. -
Painting Stars:
Using a liner brush and pure white paint, create small asterisks (*) randomly in the blue space. Keep them tiny and delicate. -
Creating Stardust:
Dip a dotting tool or the tip of a toothpick into white paint. Add tiny speckles around the flowers and existing stars to fill the empty space with magical dust. -
Final Sealing:
Wait at least 24 hours for all paint to cure. Spray the rock with a clear acrylic sealer to protect your artwork from chipping and fading.
Place your finished starry daisy rock in a garden pot or on a sunny windowsill to enjoy


Have a question or want to share your own experience? I'd love to hear from you in the comments below!