If you’re craving dark anime vibes in your sketchbook, you’re in the perfect headspace for it. I love how a few bold choices—heavy shadows, sharp expressions, and eerie symbols—can turn a simple character into a whole story.
Shadowed Hood Antihero
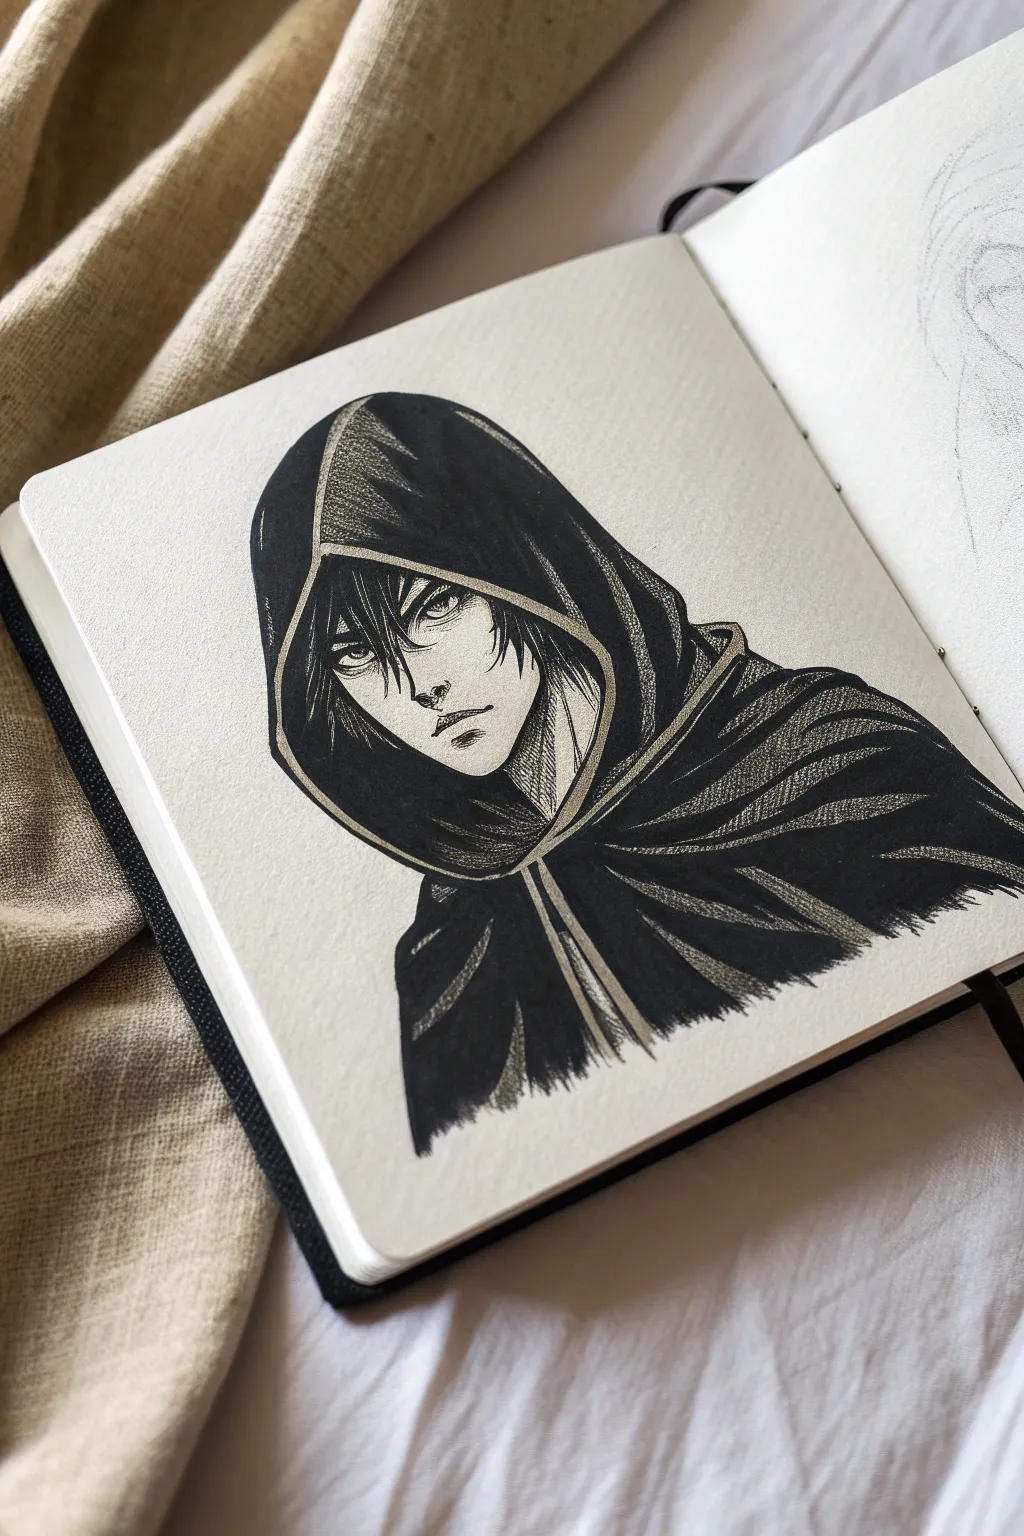
Master the art of high-contrast shadowing with this striking anime portrait. This project uses deep, inky blacks against crisp white paper to create a mysterious antihero hidden within a heavy cloak.
Detailed Instructions
Materials
- Heavyweight sketchbook paper (smooth or bristol vellum finish)
- HB or 2H graphite pencil for sketching
- Fine liner pens (0.1mm, 0.3mm, 0.5mm)
- Brush pen or thick black marker (alcohol-based preferred for smoothness)
- White gel pen (optional for highlights)
- Kneaded eraser
- Ruler (optional)
Step 1: Structuring the Character
-
Establish the Head Shape:
Begin with a light oval for the head, slightly tilted. Draw a vertical center line to guide facial symmetry and a horizontal line for eye placement, keeping the chin relatively sharp and angular. -
Draft the Hood’s Outline:
Sketch a large, triangular shape encompassing the head. The hood should drape loosely, so extend the lines well beyond the skull to suggest heavy fabric. -
Define the Hood Opening:
Draw the inner opening of the hood. This should be an almond-like shape framing the face, creating a distinct border where the fabric folds back on itself. -
Sketch the Neck and Shoulders:
Add the neck lines extending from the jaw. Simply suggest the shoulders sloping downwards, preparing the area where the cloak will bunch up and drape. -
Draft Facial Features:
Place the eyes along your guideline. They should be narrow and sharp. Add a small indication for the nose and a simple, unsmiling line for the mouth to convey a serious mood.
Ink Bleeding Control
If your markers bleed through or feather, your paper is likely too thin. Place a scrap sheet behind your page, or switch to smooth Bristol board which handles heavy ink loads much better.
Step 2: Detailed Drawing & Inking
-
Refine the Hair:
Draw messy, jagged bangs falling over the forehead and partially obscuring the eyes. The hair should look slightly unkempt, adding to the rogueish aesthetic. -
Detail the Hood Folds:
Using your pencil, mark where the deep shadows will go. The fabric isn’t flat; it has ripples. Draw curved lines radiating from the neck and shoulders to indicate tension in the cloth. -
Start the Fine Linework:
Switch to a 0.1mm or 0.3mm fine liner. Carefully outline the eyes, nose, and mouth. Keep the lines crisp and confident, avoiding scratching strokes. -
Outline the Silhouette:
Use a slightly thicker pen (0.5mm) for the outer contours of the hood and the main fabric folds. This line weight hierarchy separates the character from the clothing. -
Ink the Hair:
Ink the hair strands carefully. I prefer to leave gaps in the black fill of the hair to represent highlights, rather than inking it solid black immediately. -
Create the Fabric Trim:
Draw a double line along the edge of the hood opening to create a hem or trim. This small detail adds significant realism to the garment.
Step 3: Mastering the Shadows
-
Map the Black Areas:
Before filling, lightly pencil an ‘X’ or circle in all the areas that need to be solid black. This helps prevent accidental filling of highlight zones. -
Fill the Deepest Blacks:
Take your brush pen or thick marker and fill in the large shadowed areas of the hood and cloak. Ensure the coverage is solid and consistent. -
Feathering the Edges:
This is crucial: where the black shadow meets the light fabric, use rapid, flicking strokes with a fine liner. This ‘hatching’ textures the transition, making it look like woven fabric rather than plastic. -
Cross-Hatching the Mid-Tones:
On the lighter parts of the hood (like the top curve), use parallel hatching lines with a 0.1mm pen to suggest gray values without coloring it solid. -
Shadowing the Face:
Add subtle hatching under the hair bangs and beneath the chin. Keep the facial shading minimal to maintain the high contrast look. -
Refining the Hair Texture:
Go back into the black hair sections and use a white gel pen if you lost any highlights, or sharpen the tips of the dark strands with your finest pen. -
Texture the Cloak:
Add sweepy, scratchy dry-brush effects or very fine hatching lines in the direction of the folds on the black areas to give the cloak a worn, linen-like appearance. -
Final Cleanup:
Wait at least 10 minutes for all ink to dry completely. Gently erase the underlying pencil structure with your kneaded eraser to reveal the stark black and white contrast.
Pro Tip: Directional Strokes
Always align your hatching strokes with the curve of the fabric. If a fold curves downward, your shading lines should follow that same arc to define volume.
Now you have a moody, dramatic character study that captures the essence of dark fantasy anime styles


Bandaged Fighter With Quiet Bruises
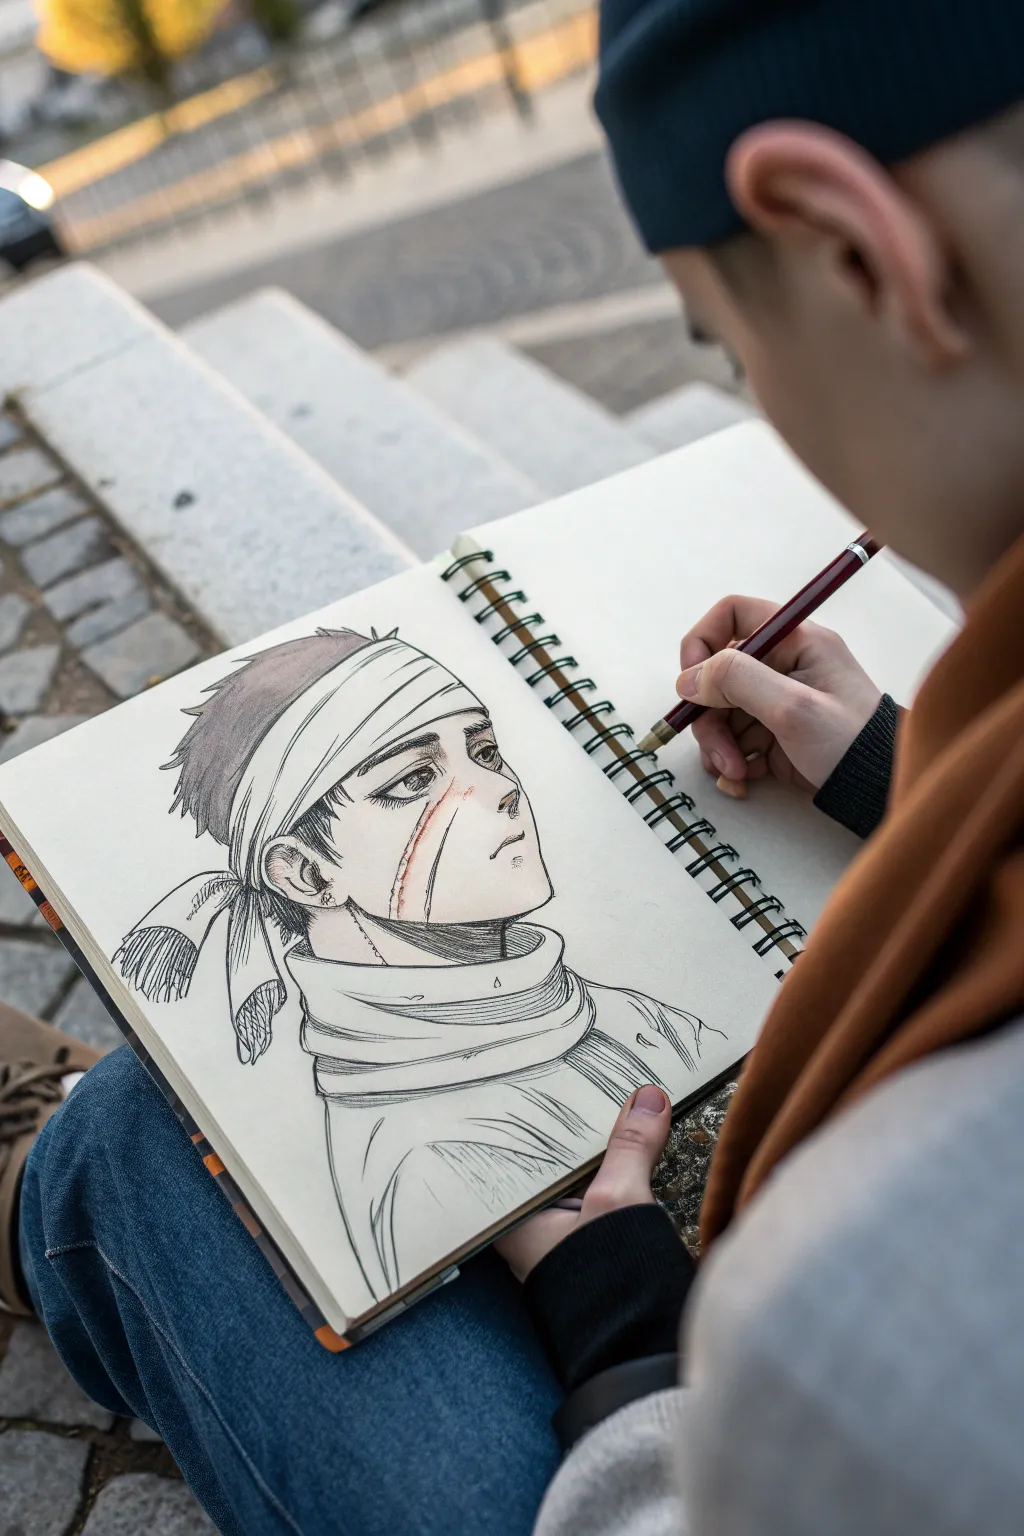
Capture the solemn resilience of a battle-worn character with this striking anime portrait. This project focuses on clean linework combined with subtle color accents to create a mood of quiet strength and recovery.
Step-by-Step Tutorial
Materials
- Spiral-bound sketchbook (heavyweight paper)
- Mechanical pencil (0.5mm HB or 2B)
- Fine liner pens (0.1mm, 0.3mm, and 0.5mm, black)
- Colored pencils or alcohol markers (skin tones, light red/pink)
- White gel pen (optional for highlights)
- Kneaded eraser
Step 1: Drafting the Structure
-
Head shape basics:
Start with a light circle for the cranium. Draw a vertical line curving down for the jawline, keeping the chin relatively sharp and angular typical of anime styles. -
Profile guidelines:
Mark the eye line about halfway down the face. Sketch a gentle curve for the nose and mouth profile, turning the head slightly to a three-quarter view. -
Neck and shoulders:
extend two lines down for the neck, making it thick enough to show strength. Sketch the rough bulk of the scarf or high collar wrapping loosely around the neck. -
Bandage placement:
Map out the forehead bandage. Draw curving parallel lines wrapping around the forehead and the back of the head. Don’t make them perfectly straight; fabric follows the skull’s curve. -
Hair blocking:
Sketch the hair tufts peeking out above the bandage and near the ears. Keep the strokes jagged and short for a ‘cropped’ look.
Clean Lines Only
Smudged ink ruins the mood. Place a scrap piece of paper under your drawing hand as you work. This acts as a shield, protecting your paper from oils and preventing ink drag.
Step 2: Refining the Features
-
The soulful eye:
Draw the eye shape carefully using the 0.5mm mechanical pencil. The upper lid should be heavy and angular. Draw a large iris but leave the pupil somewhat small to convey a distant look. -
Nose and mouth details:
Define the small, pointed nose. Place the mouth low, drawing a simple, slightly downturned line to suggest a serious or melancholy expression. -
Adding the scar:
Lightly sketch the long scar running diagonally down the cheek. Keep the edges ragged rather than a perfectly straight surgical line. -
Bandage texture:
Add the knot of the bandage at the back of the head. Draw two loose ends hanging down, adding fraying details at the tips for realism. -
Clothing folds:
Flesh out the scarf or collar. Add varying line weights to show creases and folds where the fabric bunches up around the neck.
Level Up: Atmospheric wear
Use a dry gray marker to add ‘dirt’ smudges on the bandage and cheek. It makes the battle damage feel fresh and gritty rather than purely aesthetic.
Step 3: Inking and Coloring
-
Outline the face:
Switch to your 0.3mm fine liner. Trace the jawline and ear with confident, clean strokes. I prefer using a slightly thicker line (0.5mm) on the underside of the jaw for shadow weight. -
Detailing the hair:
Ink the hair with quick flicking motions. Fill in the darker sections of the hair with solid black ink or heavy hatching, leaving gaps for highlights. -
Inking the bandages:
Use the 0.1mm pen for the bandages. Keep these lines thinner to suggest a lighter fabric texture compared to the hair or jaw. -
Fabric texture:
Ink the scarf. Use broken lines or hatching in the deep folds to suggest shadow without coloring the whole area black. -
Erasing pencil marks:
Wait for the ink to dry completely—give it at least five minutes to avoid smudges. Gently erase all underlying graphite sketches. -
Skin tone base:
Using a light peach or beige pencil/marker, add a very faint wash of color to the face and neck. Keep it subtle; manga style often leaves large skin areas white. -
Coloring the injury:
Use a light red or pink pencil for the scar. Apply more pressure in the center of the cut and fade it out at the edges to make it look inflamed. -
Bruising effects:
Add a touch of reddish-pink under the eye and slightly on the nose tip to give the character a flushed, feverish, or bruised appearance. -
Final hatching:
Return with your finest pen (0.1mm) to add cross-hatching shadows under the chin, beneath the bandage knot, and in the deepest folds of the collar.
Take a moment to admire the emotion conveyed in the simple lines you’ve created.


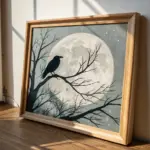
Fallen Angel With Tarnished Halo
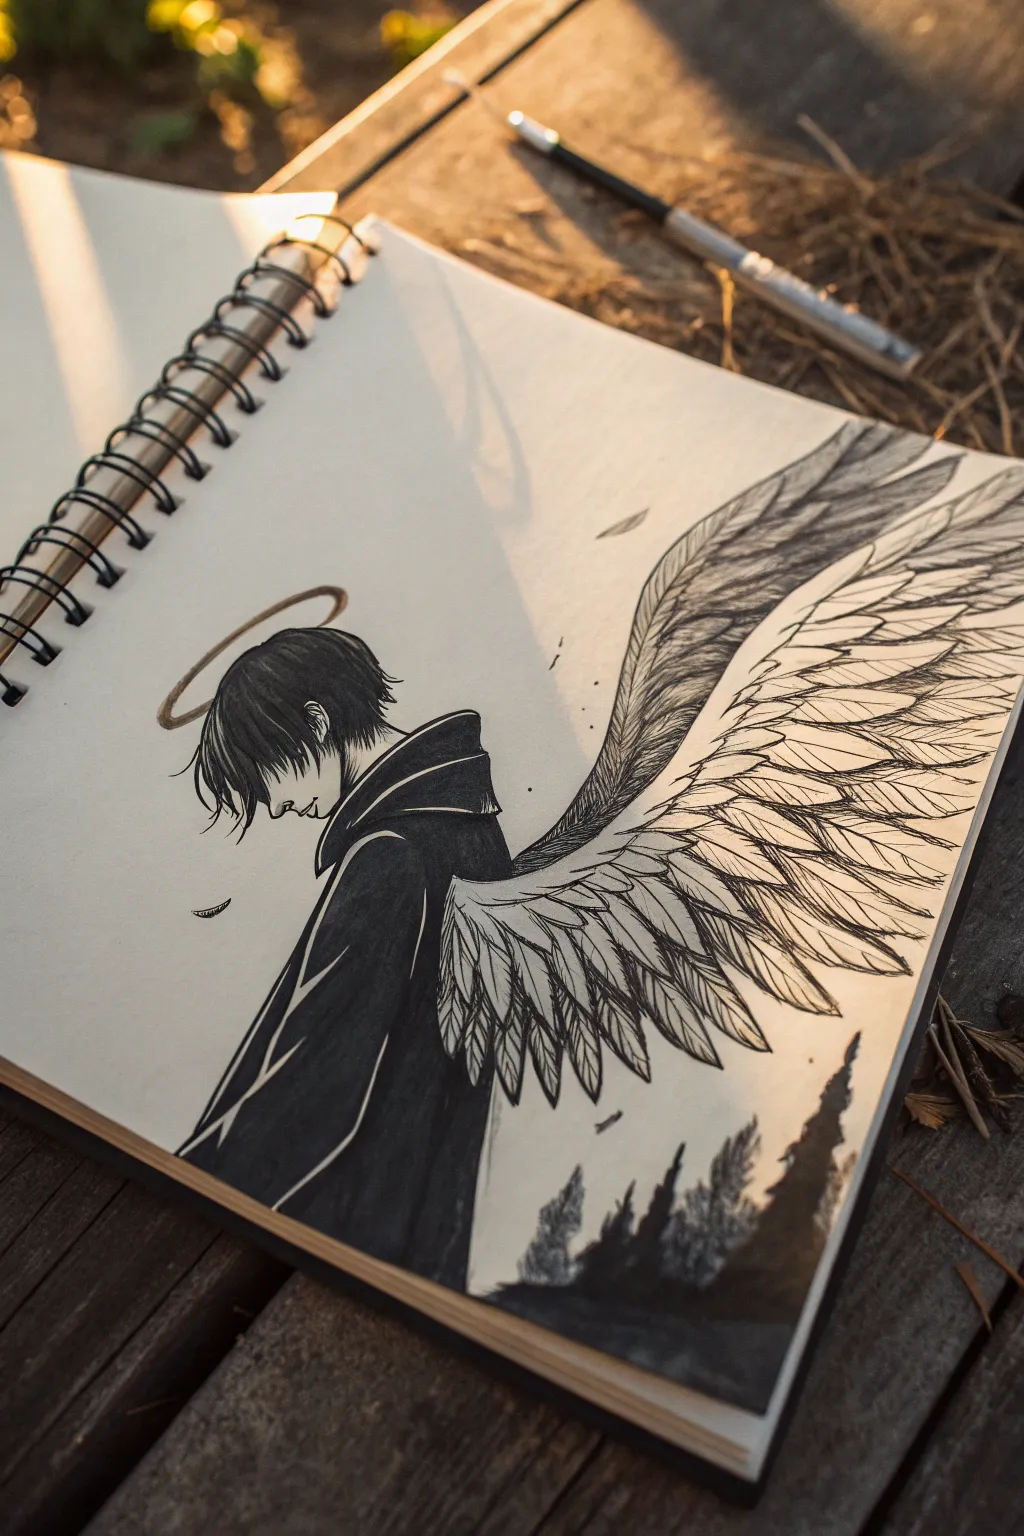
Capture the moody elegance of a fallen angel with this striking drawing that balances deep, solid blacks with intricate feather detailing. This project explores high-contrast inking techniques to create an atmospheric, emotional anime-style portrait.
Detailed Instructions
Materials
- Sketchbook with smooth, heavy paper (mixed media or bristol board recommended)
- HB or 2B pencil for sketching
- Kneadable eraser
- Fine liner pens (sizes 0.05, 0.1, 0.3, and 0.5)
- Brush pen or thick black marker for large fill areas
- White gel pen (optional for highlights)
- Ruler (optional)
Step 1: Laying the Foundation
-
Profile Sketch:
Start with a light pencil sketch of the head in profile. Draw a gentle curve for the forehead, a slightly pointed nose, and a neutral mouth in profile. Keep the jawline sharp to fit the anime aesthetic. -
Hair Guidelines:
Rough in the hair shape. The hair should be messy and hang over the eyes, covering the forehead and touching the nape of the neck. Think of it as jagged, triangular clumps rather than individual strands. -
Defining the Torso:
Sketch the upper body at a slight angle. The character wears a cloak or hoodie, so focus on the drape of the fabric rather than anatomy. Draw the raised collar behind the neck and the sloped shoulder line. -
Halo Placement:
Draw an oval floating just above the head. To make it look like a halo, keep the line weight uneven or ‘broken’ in places to suggest it’s tarnished or fading. -
Wing Structure:
Sketch the large wing extending from the back. Start with the main ‘arm’ bone structure curving upward and outward, then map out three layers of feathers: short covert feathers at the top, medium ones in the middle, and long flight feathers at the tips.
Ink Smearing?
If your hand drags ink across the paper, place a clean scrap sheet under your drawing hand. Also, work from left to right (if right-handed) to avoid fresh ink.
Step 2: Inking the Character
-
Hair Outlines:
Switch to a 0.1 or 0.3 pen. Ink the hair strands using quick, confident flicks to keep the tips sharp. Leave gaps where highlights might naturally hit the crown of the head. -
Facial Features:
Carefully ink the profile line. Use a very thin 0.05 pen for the nose and lips to keep them delicate. Add a small, sharp line for the visible eye beneath the bangs. -
Cloak Outline:
Outline the cloak with a thicker 0.5 pen. Focus on the folds in the fabric—specifically where the hood gathers around the neck and how the cloth drapes down the back. -
Filling the Darks:
Use your brush pen or thick marker to fill in the cloak completely. Leave thin white lines along the crests of the fabric folds; this negative space defines the shape without needing outlines. -
Halo Texturing:
Ink the halo with a scratchy, uneven texture. Instead of a solid ring, use stippling or broken lines to give it that ghostly, ethereal quality.
Step 3: Feathers and Finish
-
Wing Bone Definition:
Ink the top ridge of the wing with short, dense hatch marks to simulate fur or downy feathers. This should be much darker than the rest of the wing to anchor it to the body. -
Individual Feathers:
Outline the individual feathers using a 0.1 pen. Make sure they overlap naturally—the feathers closer to the body should sit on top of the ones extending outward. -
Feather Texture:
Inside each large feather, draw a central spine (rachis). From that spine, add delicate diagonal hatching lines to show the barbs of the feather. Don’t fill them completely; keep the texture light. -
Adding Depth:
Go back into the wing with a 0.3 pen and darken the areas where feathers overlap. These cast shadows add necessary volume so the wing doesn’t look flat. -
Atmospheric Elements:
Draw the silhouette of pine trees or jagged rocks at the very bottom of the page in solid black. This grounds the character in a setting. -
Final Debris:
Add a few loose feathers floating in the air around the character. Draw small specks or dots to simulate dust motes or a disintegrating atmosphere.
Dramatic Pop
Use a metallic gold or silver pen for just the halo and the edges of the floating feathers. This mixed-media touch adds a supernatural glow against the black ink.
Enjoy the contrast of the deep black ink against the intricate feather work as your dark angel takes flight

Gothic Uniform and Thorn Accessories
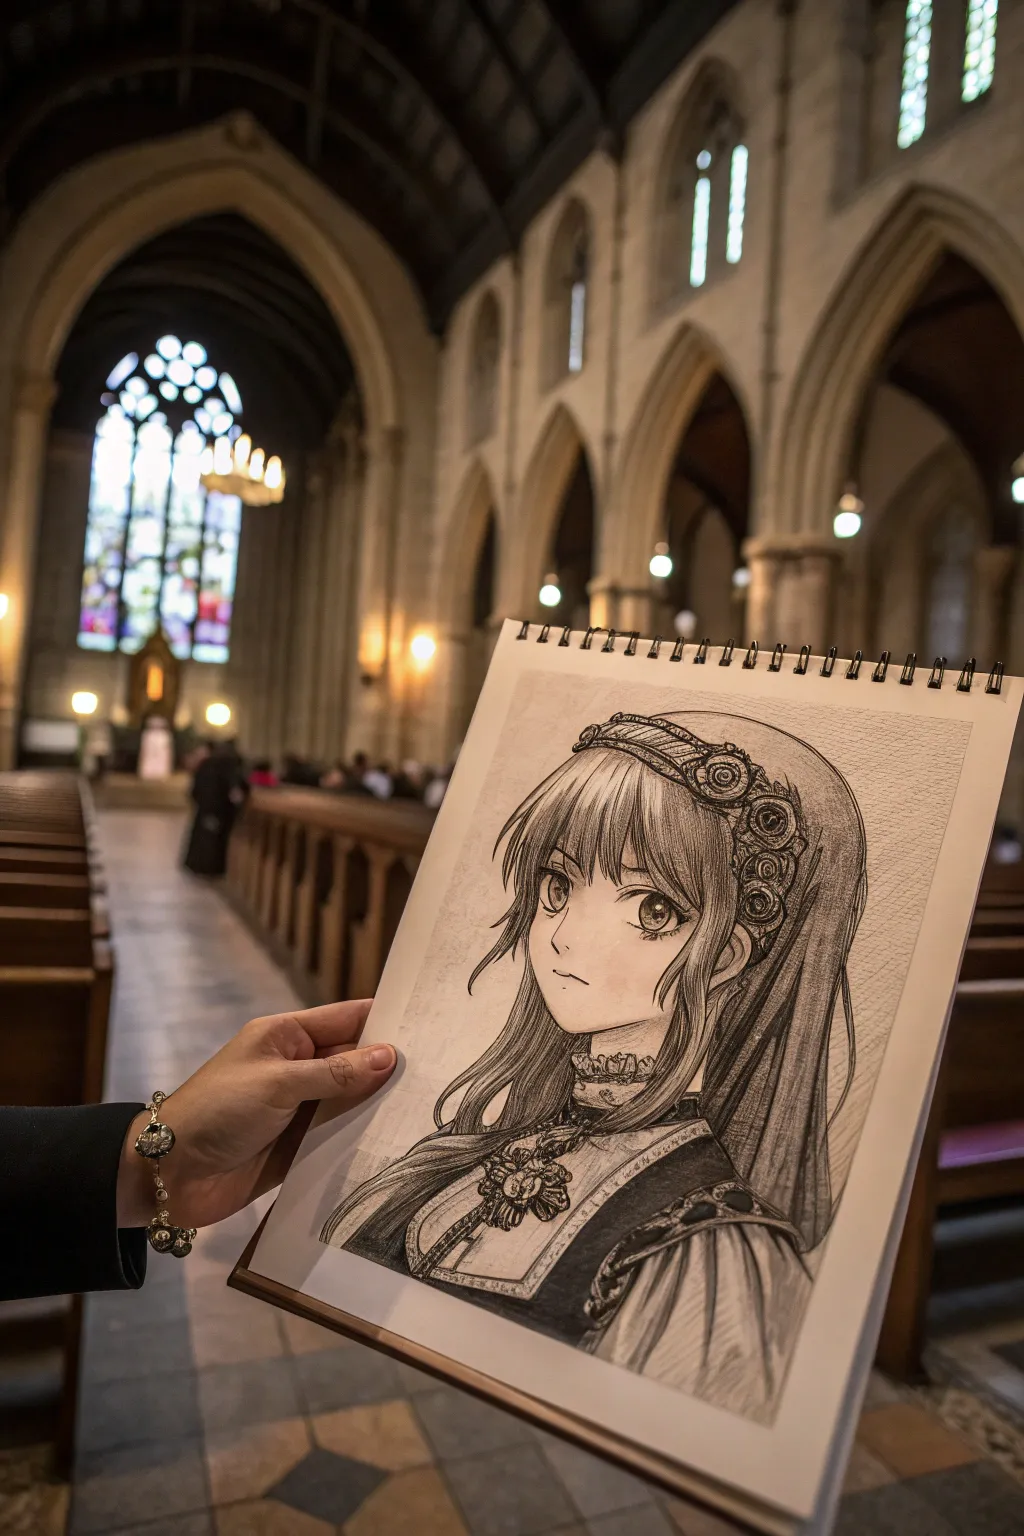
Capture the solemn elegance of a Gothic-inspired anime character with this detailed pencil study. This project focuses on intricate clothing textures, expressive eyes, and soft shading to bring a regal yet dark atmosphere to life on paper.
Step-by-Step Guide
Materials
- Spiral-bound sketchbook (heavyweight paper)
- Graphite pencils (HB, 2B, 4B, 6B)
- Mechanical pencil (0.5mm HB for details)
- Kneaded eraser
- Blending stump (tortillon)
- T-square or ruler (optional for proportions)
- Fixative spray
Step 1: Laying the Foundations
-
Basic head shape:
Start with a light HB pencil to sketch a circle for the cranium. Draw a vertical centerline and a horizontal line for the eyes. Extend the jawline downwards, keeping it slightly rounded for a classic anime aesthetic. -
Mapping facial features:
Place large, almond-shaped eyes along the horizontal guide. Mark a small dash for the nose and a simple line for the mouth, keeping the expression neutral or slightly melancholic. -
Hair and headdress outline:
Sketch the bangs falling straight over the forehead. Loosely outline the shape of the veil and headdress, ensuring it sits naturally on the curve of the head rather than looking flat.
Eye Depth Trick
Make the top of the iris darker than the bottom. Gradient shading downwards creates the illusion of eyelashes casting a shadow, adding instant depth.
Step 2: Refining the Face
-
Detailing the eyes:
Switch to a mechanical pencil for precision. Draw the upper lash line thick and dark. Add large pupils and highlights—one main reflection and smaller secondary ones—to give the eyes a glassy, soulful look. -
Nose and mouth refinement:
Darken the nose slightly, keeping it minimal. Refine the mouth with a small shadow beneath the bottom lip to suggest volume. -
Shading the skin:
Use a 2B pencil to lightly shade under the bangs, the neck, and the side of the face. Use a blending stump to smooth these shadows out for a porcelain-skin effect.
Add a Vignette
Lightly shade the background corners of the paper or add Gothic arch shapes behind her to frame the portrait and enhance the atmospheric mood.
Step 3: The Gothic Attire
-
Headdress roses:
Draw the circular bases for the roses on the headband. Spiral outwards from the center of each flower to create petals. Don’t worry about perfect symmetry; organic shapes look more realistic. -
Veil drapery:
Extend lines from the headdress down past the shoulders. Add long, vertical fold lines to suggest the weight of the fabric draping behind her hair. -
The ornate collar:
Sketch a high collar with ruffled edges. I like to draw small ‘U’ shapes connected together to mimic lace texture. Add the decorative brooch in the center. -
Bodice details:
Outline the bodice panels. Draw the decorative banding that runs down the front, filling it with small patterns or cross-hatching to suggest embroidery.
Step 4: Texturing and Shading
-
Hair strands:
Using a sharp 4B pencil, draw the hair in sections. Use long, confident strokes that follow the curvature of the head. Leave gaps of white paper for highlights on the crown of the head. -
Deepening the blacks:
Use a 6B pencil to fill in the darkest parts of the outfit, such as the sides of the bodice and the deep folds of the veil. This high contrast is key to the dark anime style. -
Metal and jewelry:
For the brooch and headband details, shade heavily but leave sharp, white edges to simulate the reflective shine of metal. -
Veil transparency:
Shade the veil with vertical strokes using a 2B pencil. Cross-hatch lightly in the darker areas but keep it lighter than the hair to differentiate the materials. -
Final texture pass:
Go back over the rose petals and lace with your finest mechanical pencil to sharpen the edges. Add tiny stray hairs to the bangs for a more natural look. -
Clean up:
Use your kneaded eraser to lift any graphite smudges from the face or high-contrast areas. Strengthen the outer silhouette line to make the character pop against the paper.
Once sealed with fixative, your sombre masterpiece is ready to haunt your sketchbook with its delicate beauty

PENCIL GUIDE
Understanding Pencil Grades from H to B
From first sketch to finished drawing — learn pencil grades, line control, and shading techniques.
Explore the Full Guide
Vampire-Like Bite and Lace Collar
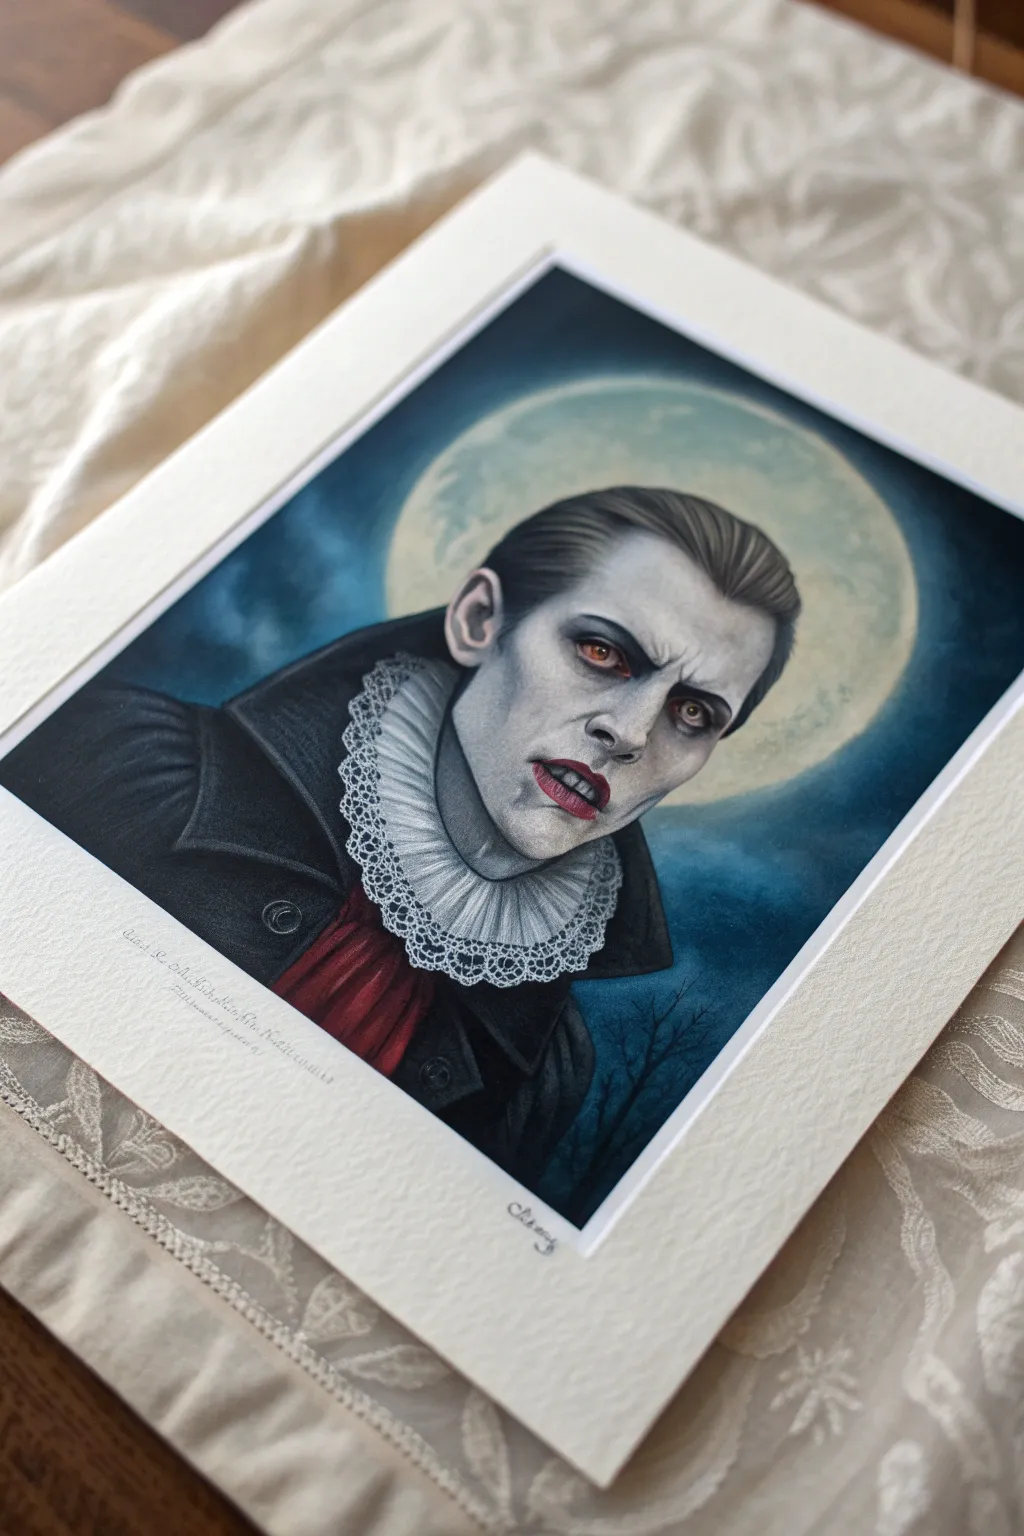
Capture the allure of the night with this brooding vampire portrait set against a striking full moon. This tutorial guides you through creating a semi-realistic, dark anime-style illustration characterized by intricate lace details and piercing red eyes.
How-To Guide
Materials
- High-quality watercolor paper or mixed media board
- Pencil (HB or 2B) for sketching
- Kneaded eraser
- Artist-grade colored pencils (prismacolor or polychromos recommended)
- Black fine-liner pens (0.05mm and 0.1mm)
- White gel pen or white gouache paint
- Blending stumps or odorless mineral spirits (optional)
- Soft brushes for blending
Step 1: Forming the Shadows
-
Initial Sketch:
Begin by sketching the basic anatomy of the head and shoulders lightly with your pencil. Focus on the sharp angles of the cheekbones and the intense, slightly downward tilt of the brow. -
Defining Features:
Refine the facial features, paying close attention to the almond-shaped eyes and the slightly parted lips revealing a hint of fangs. Sketch the outline of the large lace collar encircling the neck. -
Background Blocking:
Lightly draw a perfect circle behind the head to represent the moon. Sketch rough, jagged lines for the bare tree branches in the lower right corner. -
Guthrie Inking:
Go over your final lines with a very light hand, just to map out the distinct areas. Unlike traditional anime, you don’t want thick black outlines everywhere; keep lines delicate, especially around the face.
Lace Pro-Tip
Don’t draw every single thread. Suggest the lace texture by focusing on the repeating geometric shapes along the edge, then use shading to imply the mesh-like interior.
Step 2: The Pale Flesh & Piercing Eyes
-
Base Skin Tone:
Using a very light cool gray or pale blue pencil, lay down a soft base layer over the skin. Avoid warm tones; we want an undead, marble-like pallor. -
Facial Shadows:
Deepen the shadows around the eye sockets, under the nose, and below the cheekbones using a medium cool gray. Blend softly towards the highlight areas. -
The Eyes:
Color the irises with a vivid crimson red. Outline the iris in black and add the pupil. Leave a tiny speck of white paper or use a gel pen later for the catchlight. -
Eye Detail:
Add dark reddish-brown shading around the eyelids to give him a tired, eternal look. -
Lips and Blood:
Color the lips with a muted red, darkening the corners. Add a very subtle trail of red near the fang to hint at recent feeding.
Level Up: Dynamic Lighting
Add a faint blue rim light to the edge of the jacket and hair on the side facing the moon. This integrates the figure into the environment instantly.
Step 3: Textile Textures
-
The Patterned Ruff:
This is the most intricate part. Using your finest black pen (0.05mm) or a very sharp white pencil on a grey base, draw loop-like patterns to mimic the lace structure. I find it easier to draw the negative space. -
Lace Dimension:
Shade the folds of the ruff where the fabric gathers at the neck using cool grey to create volume, making the front loops appear brighter. -
Velvet Jacket:
Color the jacket with a deep black pencil. Press firmly for the darkest shadows but use lighter pressure on the shoulders to suggest a fabric sheen. -
The Cravat:
Fill in the fabric beneath the lace collar with a deep burgundy or blood red, shading the vertical folds to show the fabric’s drape.
Step 4: Atmosphere and Moonlight
-
Moon Surface:
Color the moon with pale yellows and creams. Add soft grey blotches to replicate lunar craters, keeping the edges of the moon crisp against the sky. -
Night Sky:
Fill the background with a gradient of indigo and midnight blue, getting darker as you move away from the moon glow. -
Hair Texture:
Draw the hair using sharp, sweeping strokes of black and dark grey. Leave some strands lighter grey to represent the reflection of the moonlight. -
Final Highlights:
Use a white gel pen or gouache to add sharp highlights to the eyes, the wetness of the lips, and the highest points of the lace collar. -
Softening:
If drawings look too grainy, use a blending stump to smooth out the skin texture one last time for a porcelain finish.
Now mount your finished piece in a classic mat board to complete the gothic gallery aesthetic
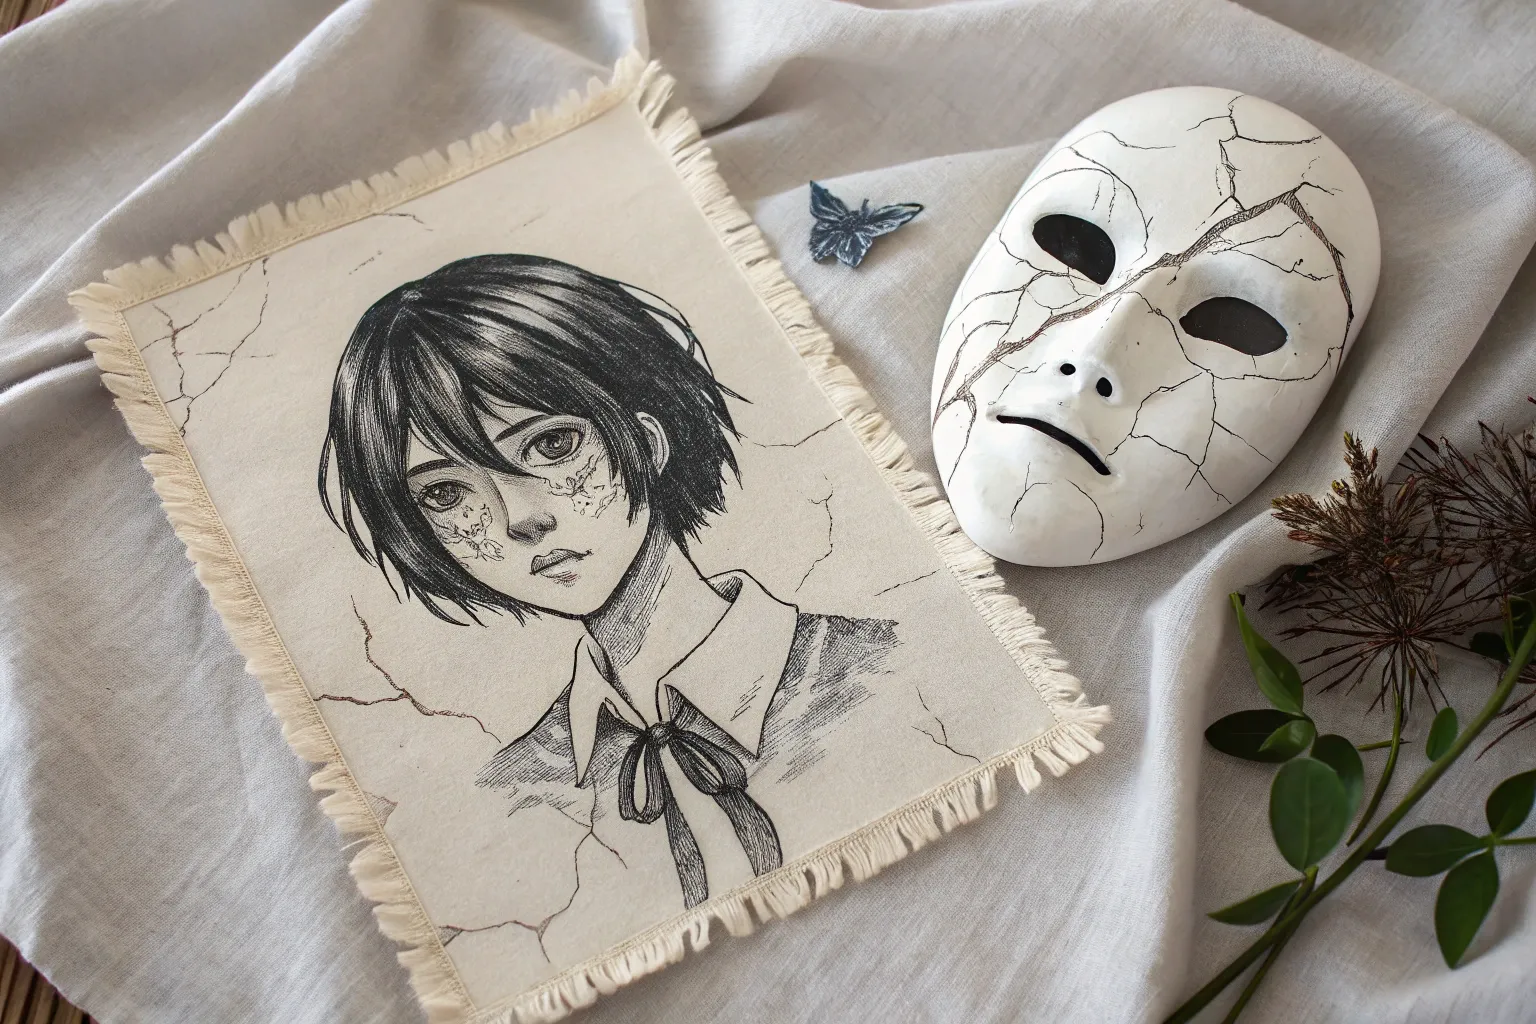
Manic Grin Close-Up
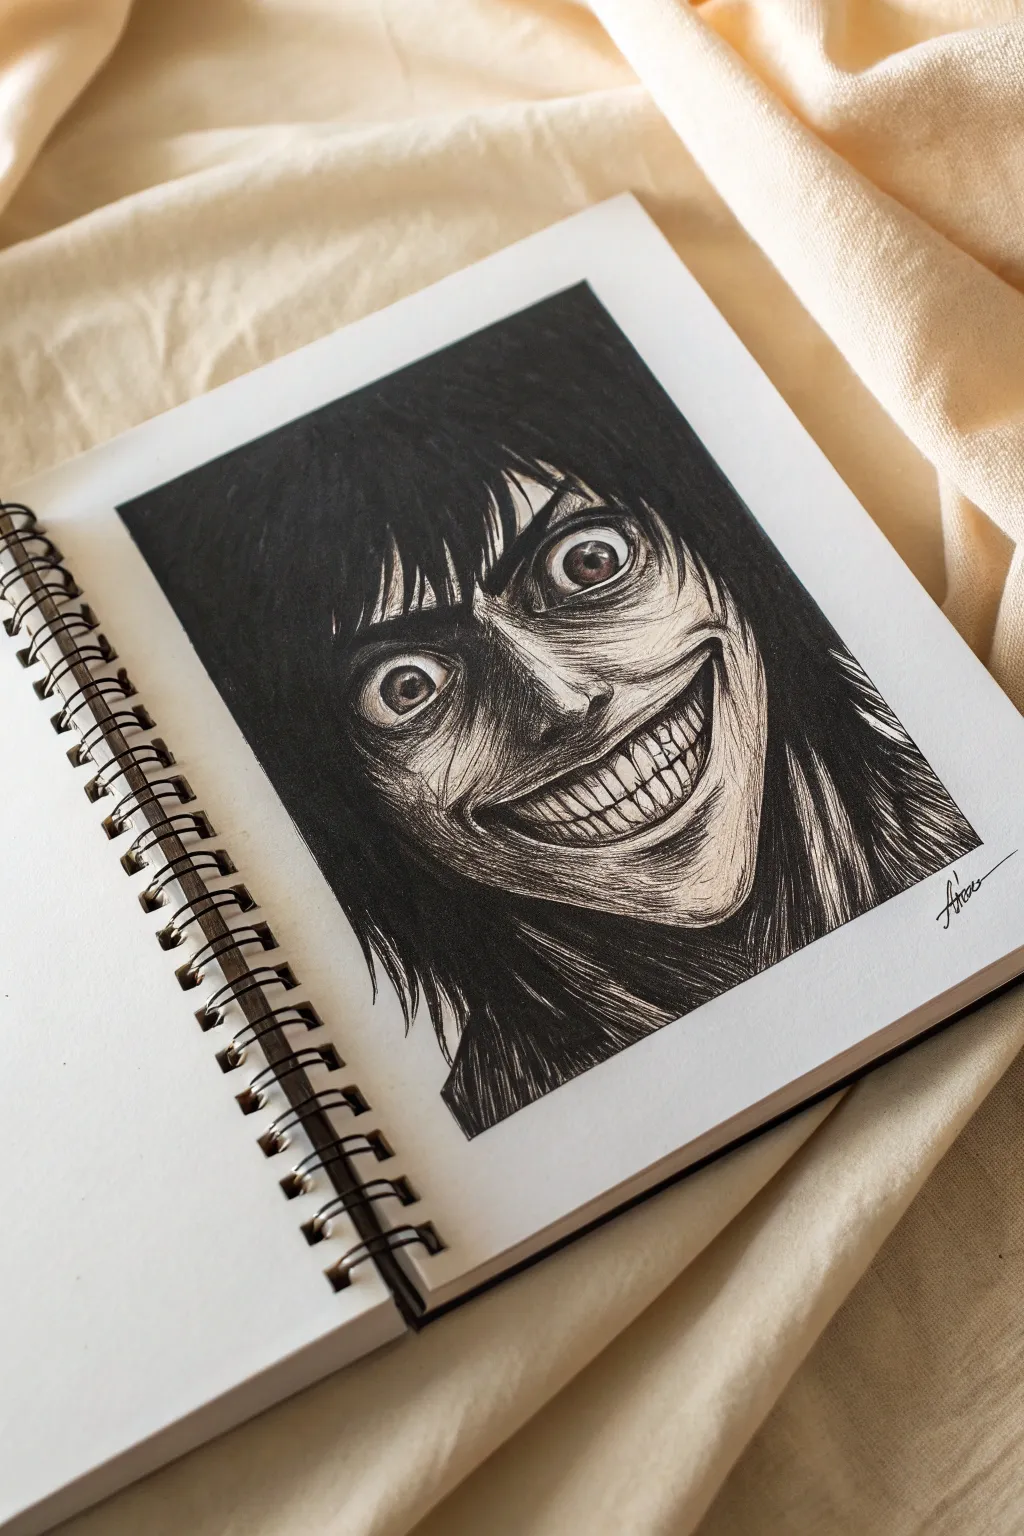
Capture the intense, eerie energy of dark anime with this high-contrast portrait featuring a wide, manic smile. Using deep blacks and sharp hatched lines, you’ll create a striking visual that emphasizes texture and dramatic shadowing.
Detailed Instructions
Materials
- Acid-free sketchbook paper (smooth texture preferred)
- HB graphite pencil
- Kneaded eraser
- Fine liner pens (sizes 0.05, 0.1, 0.3, and 0.5)
- Black brush pen or wide marker for fill
- Ruler (optional for framing)
Step 1: Drafting the Visage
-
Frame the composition:
Begin by lightly sketching a rectangular border in your sketchbook to contain the drawing. This hard edge contrasts nicely with the organic chaos inside. -
Establish basic proportions:
Lightly sketch an oval for the head. Place a horizontal guideline slightly below the center for the eyes, and another low guideline for the mouth. -
Sketch the facial features:
Draw two wide circles for the eyes, making the irises small to create that ‘crazed’ look. Outline a very wide, U-shaped mouth that stretches fully cheek-to-cheek, showing both top and bottom teeth. -
Refine the hair outline:
Block in the hair shape. It should frame the face tightly with jagged, uneven bangs hanging over the forehead. Don’t worry about individual strands yet; just get the silhouette. -
Detail the teeth and nose:
Carefully draw the individual teeth. They should be numerous and slightly clenched. Add the nose bridge with sharp, angular lines rather than soft curves.
Smudge Alert
Heavy black markers take longer to dry than fine liners. Place a scrap piece of paper under your drawing hand to prevent dragging wet ink across the finished face.
Step 2: Inking Phase One: Technical Lines
-
Outline the main features:
Using a 0.3 pen, go over your pencil lines for the eyes, nose, and the outer shape of the face. Keep the line weight consistent for now. -
Define the grin:
Switch to a 0.1 pen for the teeth. Precision is key here; you want them to look sharp and separated. Use a slightly thicker 0.3 or 0.5 line for the gum line and outer lips to add weight. -
Establish the pupils:
Draw the small pupils with a 0.5 pen. Leave tiny white highlights if you want a glint, or keep them pitch black for a dead-eyed stare. -
Erase guidelines:
Once the foundational ink is completely dry, gently run your kneaded eraser over the page to remove all graphite sketches.
Level Up: Blood Spatter
For a grittier finish, load a stiff brush with diluted red ink or watercolor. Flick the bristles to spray tiny droplets across the drawing for a chaotic, violent effect.
Step 3: Inking Phase Two: Shadow and Texture
-
Fill the heavy blacks:
Use your brush pen or marker to fill in the large background area behind the head and the main bulk involving the hair. Be careful around the loose strands; leave negative space for white hair highlights. -
Create skin texture:
With your 0.05 pen, start hatching (drawing closely spaced parallel lines) across the face. Follow the curvature of the cheekbones and forehead. I find that curving the strokes slightly helps the face look round rather than flat. -
Deepen the eye sockets:
Add heavy cross-hatching around the eyes to create sunken, dark circles. This is crucial for the manic aesthetic. -
Shade the nose and cheeks:
Use vertical hatching lines down the sides of the nose and diagonal lines under the cheekbones to carve out the skeletal structure. -
Detail the hair strands:
Where the black hair meets the face, use a 0.1 pen to flick quick lines outward, creating a transitioning texture from the solid black mass to individual strands. -
Add grit to the teeth:
Add very subtle, tiny hatching lines near the gum line on the teeth. This makes them look grimy rather than perfectly polished. -
Refine the final contrast:
Look for areas that need more depth—usually under the chin and around the corners of the mouth—and go back in with your 0.3 pen to densify the hatching.
Now you have a chilling portrait that stares right back at you from the page
BRUSH GUIDE
The Right Brush for Every Stroke
From clean lines to bold texture — master brush choice, stroke control, and essential techniques.
Explore the Full Guide
Skeletal Hand Emerging From Shadow
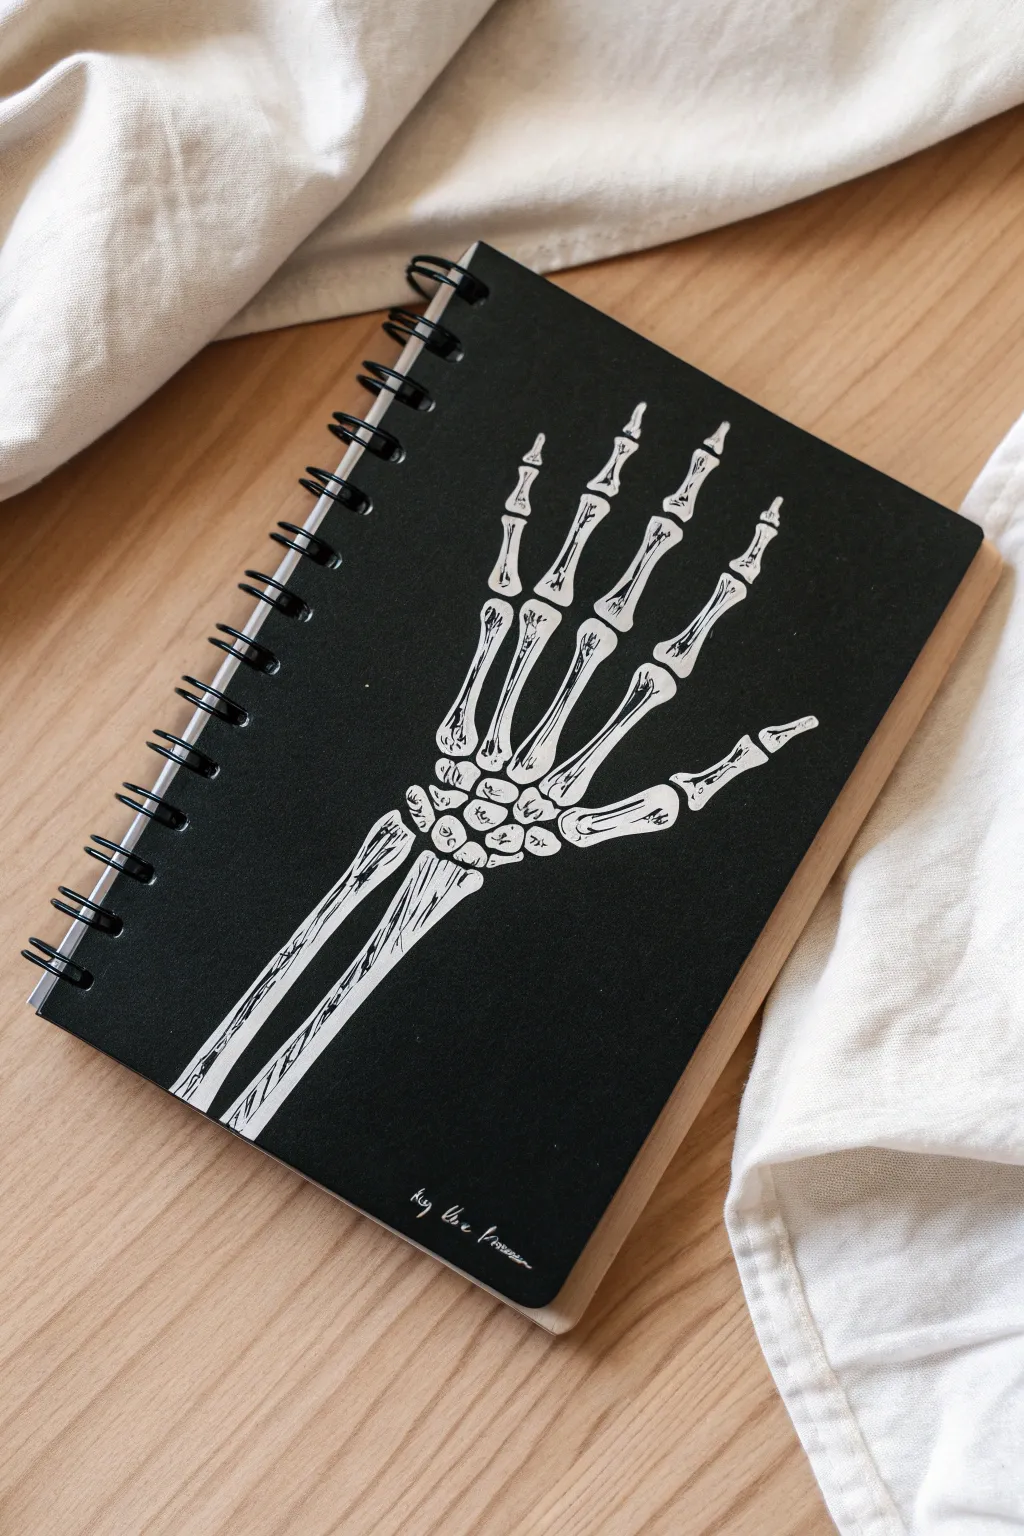
Transform a plain black sketchbook into a statement piece with this striking high-contrast skeletal illustration. The stark white ink against the matte black background creates a bold, edgy aesthetic perfect for your dark anime sketches.
Step-by-Step Tutorial
Materials
- Hardcover spiral sketchbook (black cover)
- White gel pen (e.g., Gelly Roll 08 or 10)
- White paint marker (fine tip, like Posca PC-1M)
- Graphite transfer paper (white or yellow)
- Pencil for sketching
- Reference image of a skeletal hand
- Masking tape or painter’s tape
- Fixative spray (matte finish)
Step 1: Preparation & Drafting
-
Surface Prep:
Begin by wiping down the front cover of your black sketchbook with a slightly damp cloth to remove any oils or dust. Let it dry completely. Clean surfaces ensure the ink adheres properly without skipping. -
Grid or Transfer Setup:
If you aren’t comfortable drawing freehand, print out a reference image of a skeleton hand sized to fit your notebook cover. Tape a sheet of white transfer paper onto the cover, followed by your reference image on top. -
Tracing the Foundations:
Using a ballpoint pen or firm pencil, trace the outline of the bones. Press firmly enough to transfer the chalky residue onto the black cover but not so hard that you dent the cardboard. Focus on the main shapes: the radius, ulna, carpals, and phalanges. -
Freehand Sketching (Alternative):
If I’m drawing freehand, I like to use a white charcoal pencil or a grey pastel pencil to lightly map out the structure directly on the cover. These marks are easy to wipe away later if you make a mistake. -
Review the Sketch:
Remove the transfer paper and check your faint white lines. The lines should be barely visible but clear enough to guide your permanent ink work. Lightly refine any wonky shapes with a white coloring pencil if needed.
Smudge Patrol
Gel ink sits on top of glossy covers and smears easily. If you smear it, quickly wipe it away with a damp Q-tip before it sets, then dry the spot instantly with a tissue.
Step 2: Inking the Bones
-
Initial Outlining:
Take your fine-tip white paint marker. Start outlining the wrist bones (carpals) first. Keep your hand steady and pull the pen towards you for smoother lines. Don’t worry about filling them in yet; just get the crisp outer edge defined. -
Drawing the Forearm:
Extend the lines down for the two arm bones. Replicate the sketchy texture shown in the image by breaking the long lines slightly rather than drawing one continuous perfect stroke. This adds character to the drawing. -
Defining the Fingers:
Work your way up the fingers. Remember that finger bones (phalanges) widen at the joints. Pay attention to the spacing between the fingers to ensure the hand looks relaxed and natural. -
Thickening the Shadows:
Switch to your white gel pen for more detail. Go back over the shadow areas of the bones. Instead of colouring them in solid white, use hatching lines or stippling to suggest texture and depth. -
Adding Highlights:
Identify where the light hits the bones—usually the center of the shafts and the knuckles. Use the paint marker again here to make these areas the brightest white on the page.
Step 3: Refining & Finishing
-
Creating Texture:
Use the gel pen to add small interior cracks and fissures on the bone surface. These tiny imperfections make the stylized drawing look more interesting and less like a sticker. -
Detailing the Joints:
Add small, curved strokes around the knuckles to define the rounded bone ends. This separation is crucial so the fingers don’t look like single long sticks. -
Contrast Check:
Step back and look at the image from a distance. If any white areas look translucent or grey distinct against the black paper, add a second layer of paint marker once the first layer is fully dry. -
Signing Your Work:
Find a small spot, perhaps near the bottom right or along the arm bone, to add your signature. Keep it small and use the finest tip pen you have so it doesn’t distract from the main art. -
Drying Time:
Let the notebook sit open or flat for at least an hour. Gel pens on non-porous covers can take surprisingly long to cure and are easy to smudge if you rush. -
Sealing the Deal:
To protect your drawing from rubbing off in your bag, take the notebook outside and apply a light, even coat of matte fixative spray. Do two light coats rather than one heavy one to avoid dripping.
Glow Up
Trace over your final white lines with glow-in-the-dark paint using a fine detail brush. Your skeletal hand will phantomly appear when the lights go out!
Now you have a custom, eerie notebook that perfectly accurately houses your darkest creative ideas.
Animal Skull Headpiece Spirit Hunter
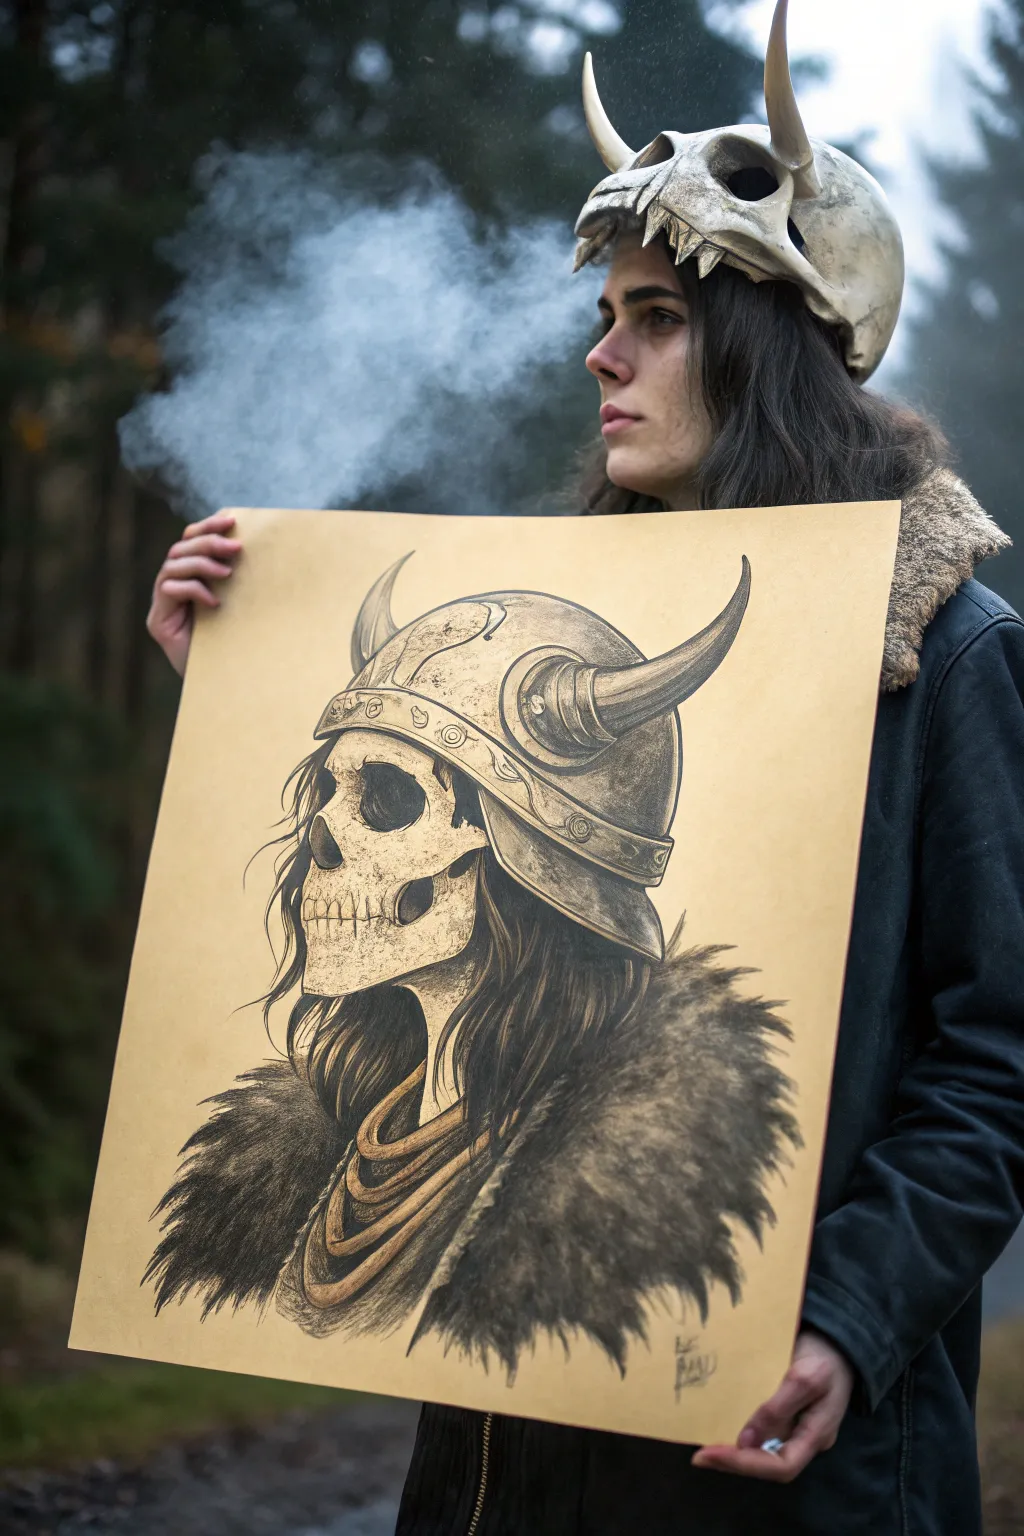
Capture the eerie beauty of a skeletal warrior with this large-scale drawing project that blends dark fantasy with intricate textures. Using charcoal and graphite on toned paper, you’ll create a striking contrast between weathered bone, metallic armor, and soft fur.
Detailed Instructions
Materials
- Large sheet of tan or beige toned paper (A2 or 18×24 inches)
- Graphite pencils (HB, 2B, 4B)
- Charcoal pencils (Soft, Medium, Hard)
- Compressed charcoal stick for large dark areas
- White charcoal pencil or white pastel pencil
- Kneaded eraser
- Blending stumps (tortillons)
- Soft brush (for sweeping away eraser dust)
- Fixative spray
Step 1: Laying the Foundations
-
Analyze the composition:
Begin by observing the overall shape of the figure. The subject is in profile, facing left, with a prominent horned helmet and a cascading fur collar. Lightly mark the top of the helmet and the bottom of the fur to ensure the drawing fits comfortably on your large sheet. -
Sketch the helmet shape:
Using an HB graphite pencil, lightly outline the dome of the helmet. Sketch the rim that runs across the forehead and extends back to cover the neck. Add the curved, sweeping lines for the two horns protruding from the sides. -
Structure the skull:
Below the helmet rim, rough in the shape of the skull. Pay attention to the deep socket for the eye, the hollow of the nose cavity, and the jawline. Ensure the jaw connects logically to where the ear would be under the helmet. -
Outline the fur and hair:
Sketch the wavy strands of hair falling from beneath the helmet. Then, outline the large, fluffy mass of the fur collar draped around the shoulders. Keep these lines loose and organic compared to the rigid helmet.
Keep it clean
Place a scrap piece of paper under your drawing hand. This prevents natural oils and friction from your skin from smudging your charcoal work as you move across the large paper.
Step 2: Defining the Bone Structure
-
Detail the eye socket and nose:
Switch to a 2B graphite pencil to refine the skull. Darken the interior of the eye socket and nasal cavity, but don’t make them pitch black yet. Add cracking details and porous textures around the edges of the bone. -
Draw the teeth and jaw:
Carefully draw the individual teeth. Remember that teeth are not perfectly uniform squares; give them slight irregularities and roots. Define the mandible and the cheekbone (zygomatic arch) with sharper lines to show the rigid bone structure. -
Shade the skull:
Use a medium charcoal pencil to add shadows under the cheekbone and jaw. Smudge lightly with a blending stump to create smooth transitions on the bone surface. I like to leave the paper’s natural tone as the mid-tone for the bone.
Step 3: Crafting the Armor
-
Detail the helmet rim:
Add the decorative band often found on viking helmets. Draw small circles for rivets along the rim and faint, swirling engravings on the dome of the helmet to suggest aged metal. -
Texture the metal:
Use a combination of graphite and hard charcoal to shade the helmet. Create distinct highlights and shadows to mimic a metallic sheen. The horns should have ridges or growth rings; draw these as curved lines wrapping around the horn shape. -
Deepen the helmet shadows:
Use a compressed charcoal stick or soft charcoal pencil to darken the shadowed side of the helmet and the areas where the horns connect. This high contrast makes the metal look heavy and solid.
Muddied textures?
If your fur looks like a solid blob, use your kneaded eraser to lift out small, jagged shapes. This ‘reverse drawing’ technique brings back the texture of individual tufts.
Step 4: Adding Texture and Depth
-
Draw the hair:
With a soft charcoal pencil, draw long, flowing strokes for the hair. Focus on the negative space—the dark gaps between strands—to give the hair depth. Keep the strokes fluid. -
Render the fur collar:
This is the darkest part of the drawing. Use broad strokes with compressed charcoal to build up the mass of the fur. Then, use quick, flicking motions at the edges to create the spiky, jagged texture of individual tufts. -
Detail the necklaces:
Between the jaw and the fur, draw the layered necklaces or fabric folds. Use graphite for these to differentiate the texture from the matte charcoal of the fur. Add highlights to the ridges to make them pop.
Step 5: Highlights and Final Touches
-
Apply white highlights:
This step brings the drawing to life. Use your white charcoal pencil to add sharp highlights to the rim of the helmet, the tips of the horns, the teeth, and the brow ridge. Add subtle white strokes to the top of the fur to suggest lighting. -
Refine the contrasts:
Step back and assess your values. Darken the deepest shadows—specifically in the eye socket and under the jaw—with your softest charcoal. Ensure the distinction between bone, metal, hair, and fur is clear through texture. -
Clean up edges:
Use your kneaded eraser to lift any stray charcoal dust from the background area, keeping the negative space clean so the silhouette stands out. Sign your work at the bottom. -
Seal the artwork:
Charcoal smudges easily, so take your drawing outside or to a well-ventilated area. Hold the can 12 inches away and apply a light coat of fixative spray to preserve your hard work.
Hang your finished piece in a spot with good lighting to let those white highlights really shine


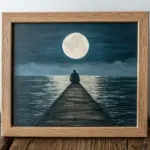
Cigarette Smoke and Streetlight Noir
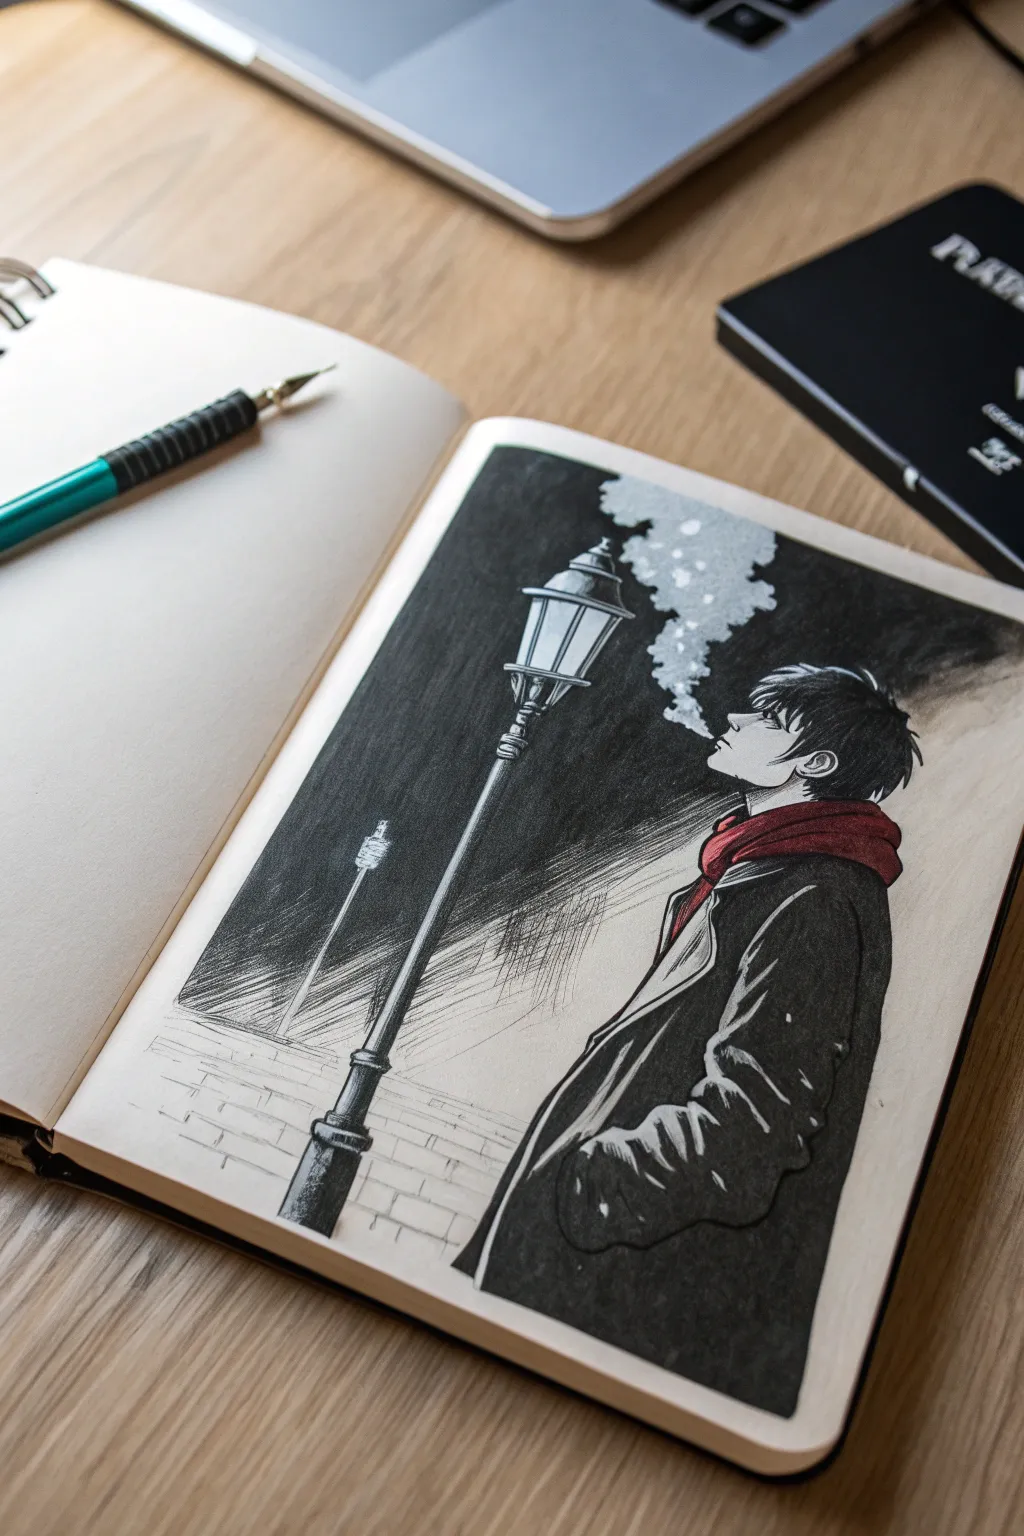
This moody, high-contrast illustration captures a solitary figure in a classic noir setting, using heavy blacks to frame the glow of a streetlamp. The striking pop of red on the scarf adds immediate visual interest to an otherwise monochrome scene.
Step-by-Step Tutorial
Materials
- Sketchbook with smooth heavyweight paper (150gsm+)
- Mechanical pencil (HB or 2B) for sketching
- Kneaded eraser
- Fine liner pens (0.1mm, 0.3mm, 0.5mm)
- Black alcohol-based marker or India ink with a brush
- Red alcohol marker (deep crimson)
- White gel pen
Step 1: Setting the Scene
-
Establish the Perspective:
Begin with a light pencil sketch. Draw a diagonal line sloping downwards from left to right to establish the perspective of the street wall behind the character. Place a vertical line for the main lamppost about a third of the way into the page. -
Sketch the Character Silhouette:
On the right side, block out the character’s profile. Focus on the sharp upturned chin and the messy, spiky hair characteristic of anime styles. Don’t worry about facial details yet; just get the head shape and shoulder slump correct. -
Draft the Coat and Scarf:
Add the bulky shape of the coat, letting it drape naturally over the shoulders. Sketch the scarf loosely wrapped around the neck, ensuring the folds look soft against the stiffer coat fabric. -
Refine the Lamppost:
Detail the main streetlamp. Draw the lantern housing with its glass panes and the decorative metalwork on the post. Add a smaller, distant streetlight further down the diagonal wall line to create depth. -
Pencil in the Smoke:
Lightly outline the cloud of smoke or breath escaping the character’s mouth. Keep the edges irregular and bubbling upwards toward the light source. -
Groundwork Detail:
Sketch faint horizontal and vertical lines at the bottom left to suggest a brick or pavestone wall texture behind the lamppost.
Step 2: Inking the Forms
-
Outline the Character:
Switch to a 0.3mm fine liner. Carefully ink the character’s profile, hair, and the folds of the coat. Use broken lines for the hair tips to keep them looking soft. -
Inking the Scarf:
Outline the scarf folds. I prefer using a slightly thicker line here to separate it from the coat, emphasizing it as the focal point. -
Technical Detail on the Lamp:
Use a 0.1mm pen to ink the delicate details of the streetlamp housing. Be precise with the straight lines of the glass panels. -
Erase the Pencil:
Once the ink is completely dry, gently erase all your pencil guides with the kneaded eraser to reveal the clean line art.
Bleeding Lines?
If your black marker bleeds into the white areas (like the smoke), wait for it to dry fully, then use a white gouache or a thick paint pen to clean up and reclaim those bright edges.
Step 3: Contrast and Color
-
Applying the Red:
Take your deep crimson alcohol marker and fill in the scarf. Apply a second layer to the shadow areas where the fabric folds under to create volume. -
Heavy Black Background:
This is the most critical step for the ‘noir’ look. Use a broad black marker or brush pen to fill the large negative space behind the lamp and character. Leave the area immediately around the smoke and the lamp glass pure white to represent the glow. -
Coat Shading:
Color the character’s coat solid black, but leave thin white highlight strips along the edges of the lapels, shoulders, and arm folds. This ‘rim lighting’ technique separates the dark coat from the dark background. -
Hatching the Light:
Use a fine liner to add rapid hatching lines extending from the light source into the darkness. These lines should fade as they get further from the lamp, simulating light rays cutting through fog. -
Refining the Smoke:
Use stippling (dots) and small hatching lines around the edges of the white smoke cloud to blend it softly into the black background. It shouldn’t have a hard outline. -
Texture on the Wall:
Lightly ink the brick pattern on the lower left wall. Don’t draw every single brick; just enough to suggest texture fading into the dark. -
Final Highlights:
Use a white gel pen to add sharp highlights to the character’s eye, the wetness of the lips, and the metal shine on the lamppost. Add a few dots within the smoke cloud for sparkle.
Make it Winter
Transform the scene into a snowy night by flicking small droplets of white acrylic paint or white ink across the dark background using an old toothbrush.
Now you have a moody, atmospheric piece that perfectly balances light and shadow.
Broken Mirror Reflection Twist
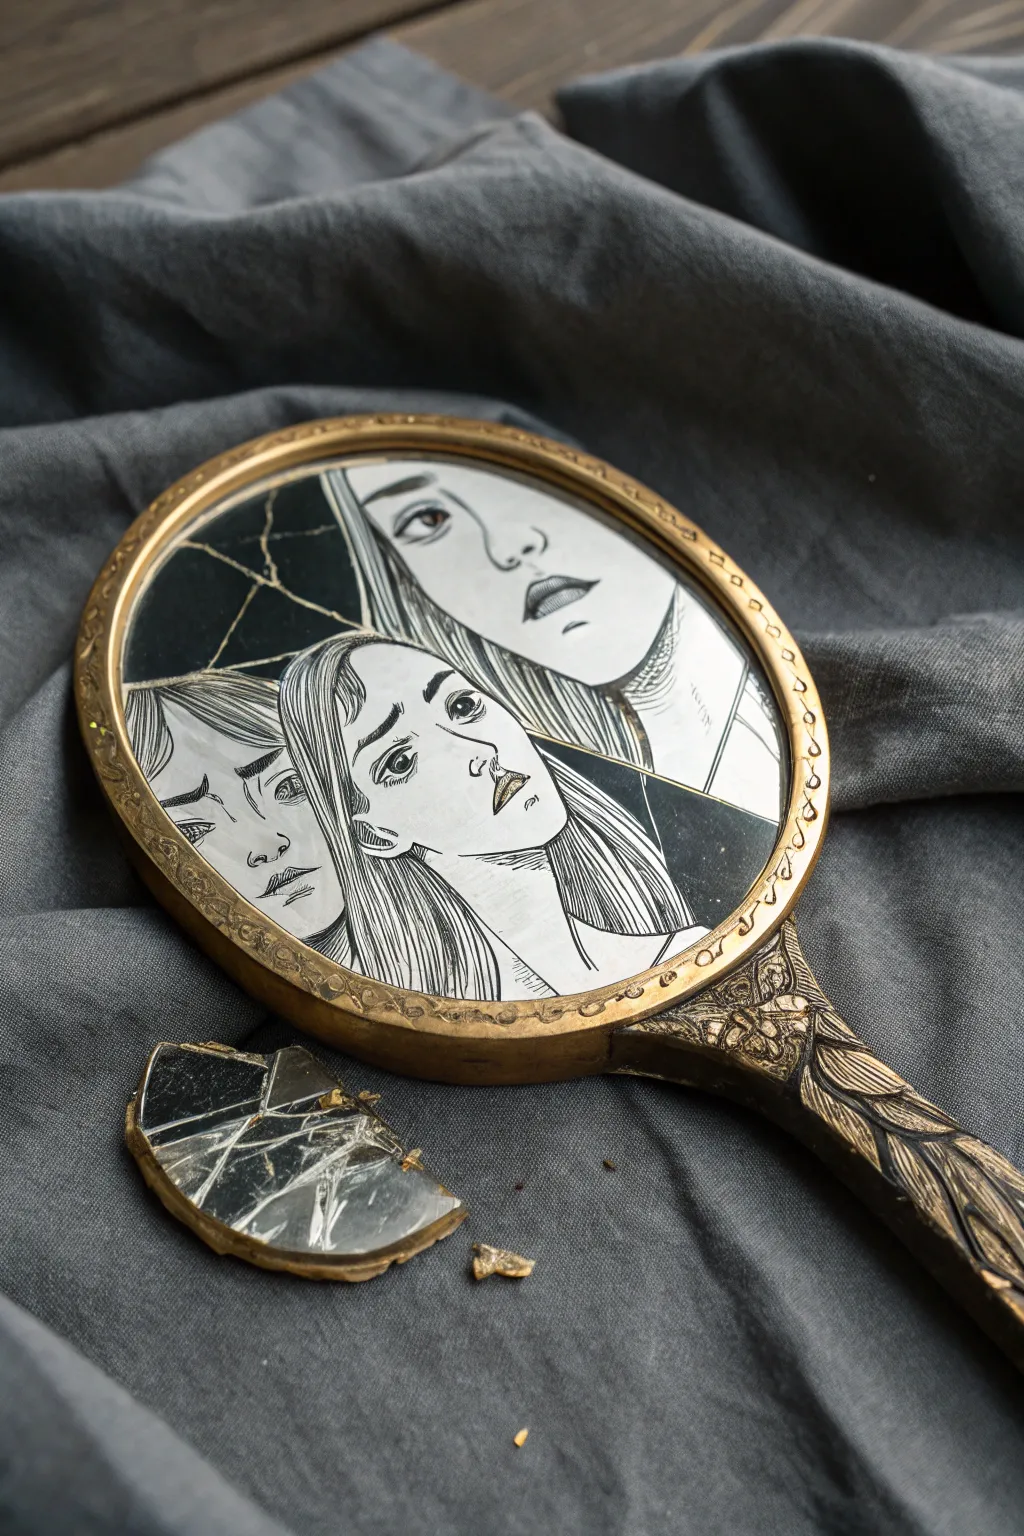
Transform a vintage vanity mirror into a haunting piece of dark anime decor by replacing the reflection with fragmented ink illustrations. This project plays with the concept of broken identities, using simple line art and negative space to create a moody, shattered effect.
How-To Guide
Materials
- Vintage handheld mirror (with frame)
- Heavyweight bristol board or drawing paper
- Fine liner pens (0.05, 0.3, and 0.5mm)
- Black alcohol marker or India ink
- Pencil and eraser
- Craft knife or scalpel
- Hammer and towel (for breaking glass safely)
- Strong craft glue or E6000
- Protective gloves and eyewear
Step 1: Preparing the Canvas
-
Safety check:
Before doing anything, put on your safety glasses and gloves. Breaking glass is the first step, and safety is non-negotiable. -
Break the mirror:
Wrap the mirror completely in a thick towel. Place it on a hard surface and give the center a firm, controlled tap with a hammer. You want large cracks, not pulverized dust. -
Remove shards:
Carefully unwrap the towel. Using gloves or tweezers, remove the broken shards of mirror glass. Keep the largest pieces intact; you can discard tiny splinters. Clean the empty frame thoroughly. -
Trace the frame:
Place your mirror frame face down onto your bristol board. Trace the inner oval shape lightly with a pencil to define your drawing area.
Step 2: Creating the Illustration
-
Draft the layout:
Within your traced oval, sketch three distinct character faces. Position them so they look like they are wedged together, perhaps looking in different directions to emphasize the fractured theme. -
Design the cracks:
Take the actual broken mirror shards you saved and arrange them loosely over your sketch. Lightly trace the jagged edges of the glass shards onto the paper to see where natural breaks would occur. -
Inking the lines:
Remove the glass and start inking. Use a 0.3mm pen for the main facial features—eyes, nose, and lips. I find a thicker 0.5mm line works best for the outer jawlines and hair outlines. -
Adding details:
Switch to your 0.05mm pen for delicate hatching. Add shading under the neck, around the eyes, and texturing in the hair strands. -
Filling the void:
Identify the negative spaces between the faces and the ‘cracks’ you traced earlier. Fill these areas completely black using a marker or India ink to mimic the darkness behind a broken mirror. -
Cut and fit:
Once the ink is fully dry, cut out the oval illustration. Test fit it inside the mirror frame; trim the edges slightly if it buckles.
Adding Realism
Draw faint white lines with a gel pen across the black inked areas where the glass shards sit. This mimics the reflection of scratches on the glass surface.
Step 3: Assembly & Finishing
-
Secure the art:
Apply a thin layer of glue to the backing of the mirror frame and press your illustration firmly into place. -
Re-gluing shards:
select a few of the larger mirror shards you saved. Apply strong adhesive to the back of the glass pieces. -
Placement strategy:
Glue the shards directly onto the drawing, aligning them with the ‘crack’ lines you drew earlier. Leave large portions of the drawing exposed, only covering edges or specific sections for a mixed-media look. -
The fallen piece:
For the final touch, take a medium-sized shard and a scrap of your drawing paper. Glue the paper to the shard, trim the excess, and draw a partial eye or mouth on it. -
Final display:
Place this loose, illustrated shard next to the mirror handle when displaying the piece to suggest a fragment that has just fallen out.
Mirror Won’t Break Cleanly?
If the mirror is glued too tight to the backing, use a heat gun to soften the old adhesive before prying the shards out. This prevents the frame from snapping.
Now you have a striking, melancholy art piece that perfectly captures the fractured beauty of the dark anime aesthetic
Cursed Doll Companion Scene

Capture a blend of creepy and cute with this stitched voodoo doll illustration. Using rich graphite or charcoal creates deep moody shadows, while a single pop of red brings the character’s heart to life on the page.
Step-by-Step Tutorial
Materials
- Spiral-bound sketchbook (heavyweight paper)
- Graphite pencils (HB for sketching, 4B or 6B for shading)
- Charcoal stick or pencil (for darkest blacks)
- Red colored pencil or fine liner marker
- Blending stump or tortillon
- Kneaded eraser
Step 1: Drafting the Shapes
-
Head and Body Outline:
Start with a light HB pencil to sketch a large, slightly flattened circle for the head. Directly below it, draw a pill-shaped oval for the torso, making it slightly smaller than the head to emphasize that ‘chibi’ proportion. -
Limbs and Position:
Attach two simple tubular shapes for the arms, letting them hang somewhat limply at the sides. Add two stout, cylindrical shapes for the legs at the bottom, finishing them with rounded oval feet. -
Dividing Lines:
Draw faint guidelines across the face to help position the features. You’ll want the eye line to be fairly low on the face to give it that cute-but-unsettling look.
Step 2: Adding Character Details
-
The Big Eyes:
Sketch two large, uneven circles for the eyes. I like to make one slightly larger than the other to enhance the eerie, handmade feel. Draw smaller circles inside for the pupils. -
Stitches and Seams:
Draw a jagged horizontal line across the mouth area. Add small vertical hatch marks along this line to look like thread stitches. Repeat this stitching effect where the limbs attach to the body and down the center of the torso. -
Hair and Texture:
Add a small tuft of spiky hair at the very top of the head using quick, upward strokes. Sketch a few loose threads or pins sticking out of the head for extra detail. -
The Heart:
Place a small, tilted heart shape on the upper left side of the chest (the doll’s right). Make sure the outline is distinct.
Texture Trick
Place a piece of rough sandpaper or textured fabric underneath your paper while shading with the pencil. This will transfer a unique grain pattern to your doll’s ‘skin’.
Step 3: Shading and Definition
-
Darkening the Outlines:
Switch to your 4B pencil or a charcoal pencil. Go over your initial outlines with a heavier hand, making the lines irregular and textured rather than perfectly smooth to mimic fabric. -
Filling the Eyes:
Color in the pupils with your darkest charcoal, pressing firmly to get a solid black. Leave a tiny white spec in each pupil for a highlight, which brings the doll to life. -
Texture Shading:
Use the side of your soft pencil to lightly shade the entire body. I find that using a circular scribbling motion creates a fuzzy, felt-like texture better than smooth shading. -
Deepening Shadows:
Concentrate darker heavy shading around the edges of the head and torso to create volume. Add shadows under the chin and where the arms overlap the body.
Level Up: Mixed Media
Glue actual small pieces of thread or real tiny buttons onto the eyes and mouth area for a creepy 3D mixed-media effect that pops off the page.
Step 4: Final Touches
-
Blending:
Use a blending stump to smudge the graphite gently. Don’t over-blend; you want to keep some of that raw, grainy texture visible to maintain the ‘old fabric’ appearance. -
The Pop of Red:
Take your red colored pencil or marker and carefully fill in the heart patch on the chest. This intense color against the monochrome grey creates a striking focal point. -
Grounding Shadow:
Add a scribbled cast shadow underneath the doll’s feet using horizontal strokes. This grounds the figure so it doesn’t look like it’s floating in space. -
Clean Up:
Use a kneaded eraser to pick up any accidental smudges around the drawing, keeping the background stark and clean.
Now you have a wonderfully gloomy little companion to keep your sketchbook company
Ink Drips and Manga-Style Shadows
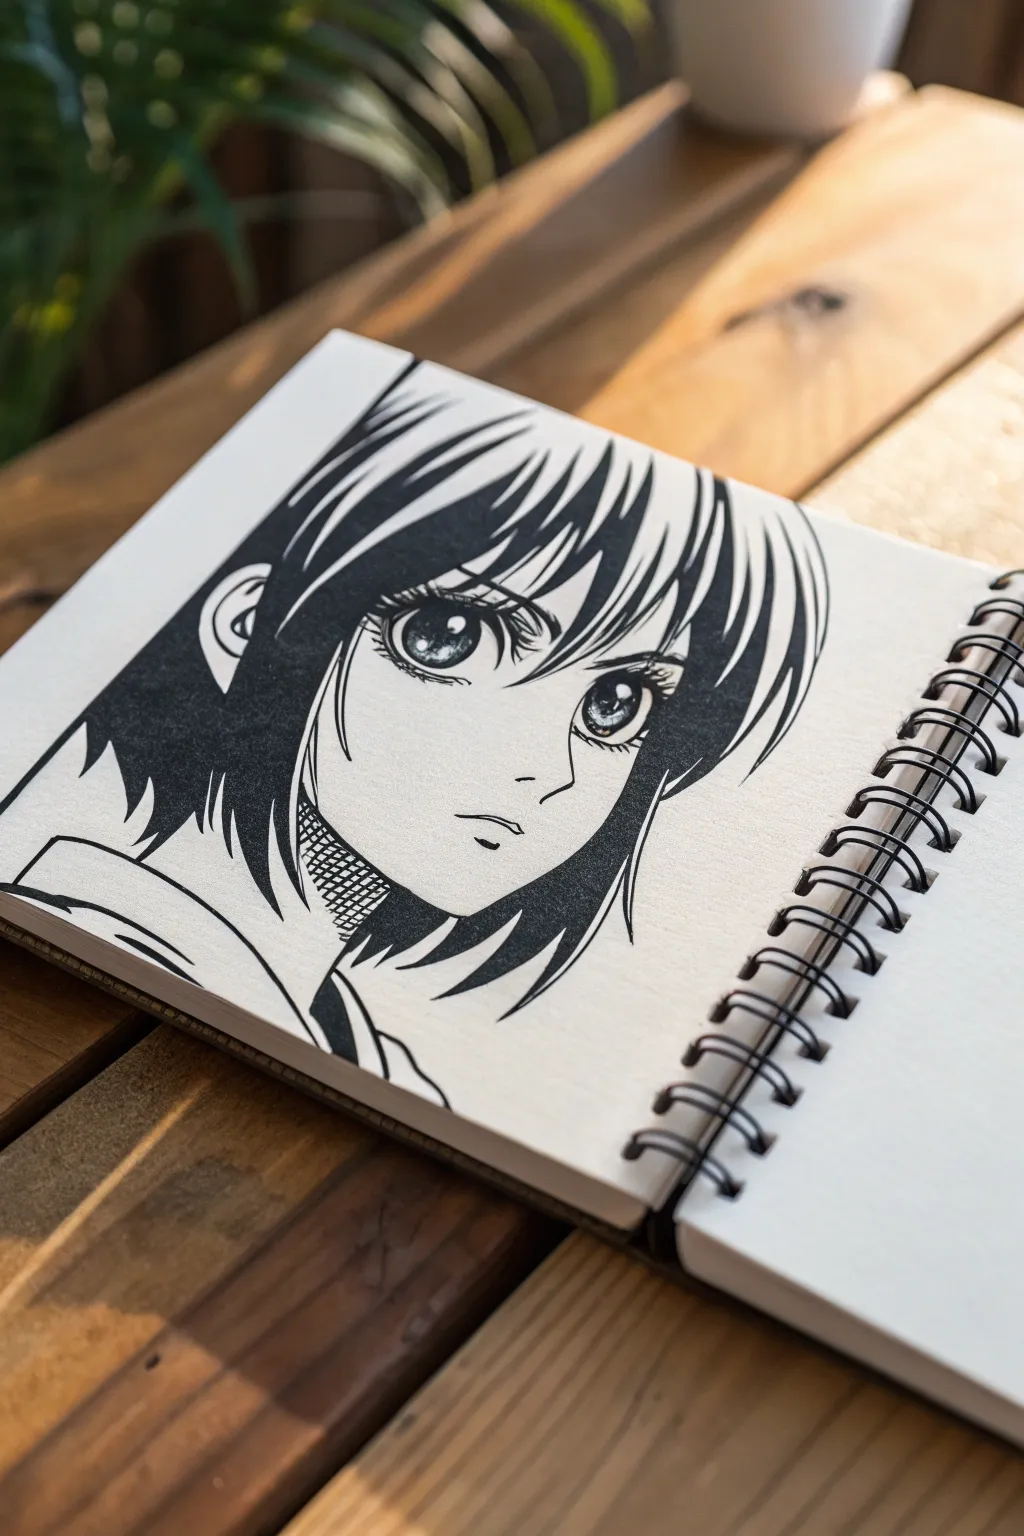
Capture the intense, soulful look of classic manga with this striking pen and ink portrait. Using deep black fills and precise linework, you’ll create a dramatic character study that pops right off the sketchbook page.
Step-by-Step
Materials
- Spiral-bound sketchbook (smooth bristol or mixed media paper preferred)
- HB or 2H graphite pencil for sketching
- Kneaded eraser
- Fine liner pens (0.05mm, 0.1mm, 0.3mm)
- Black brush pen or broad marker for large fills
- White gel pen for highlights
- Ruler (optional)
Step 1: Pencil Structure
-
Lay the Foundation:
Begin with a light circle for the cranium. Draw a vertical center line slightly off-center to the left to indicate a 3/4 view, then sketch the jawline coming down to a soft point for the chin. -
Map Facial Features:
Draw a horizontal guideline across the center of the face for the eyes. Position the nose as a small tick mark halfway between the eyes and chin, and place the mouth just below that. -
Draft the Eyes:
Sketch large, expressive almond shapes for the eyes. The eye on the left (viewer’s left) should be slightly narrower due to the perspective. Draw large circular irises that take up most of the vertical space within the eye. -
Outline the Hair:
Rough in the hair completely covering the forehead with jagged bangs. Let the side strands frame the face, cutting in sharply towards the cheeks. Keep distinct sections for shading later. -
Refine the Expression:
Tighten the pencil lines. Add the small ear on the left side, peeking out from the hair. Ensure the mouth is a simple, slightly downturned line to convey a serious emotion.
Step 2: Inking the Details
-
Start the Eyes:
Switch to your 0.1mm fine liner. Carefully trace the upper eyelash line, making it thick and bold. Draw the outline of the iris and pupil, leaving a distinct circle for the light reflection. -
Detail the Iris:
Using the 0.05mm pen, add tiny hatching lines inside the iris, radiating from the pupil. I usually darken the top half of the iris significantly to show the shadow from the eyelid. -
Lashes and Brows:
Add individual lashes to the outer corners with quick, flicking motions. Draw the eyebrows as thin, arched lines hidden partially by the bangs. -
The Nose and Mouth:
Ink the nose as a minimal shadow—just a small angle or dot. Ink the mouth line delicately, perhaps breaking the line in the middle for a softer look. -
Face Contour:
Trace the jawline and chin with a steady hand using the 0.3mm pen. Keep the line weight consistent but slightly thicker than the facial features.
Smudge Alert
Brush pens deposit a lot of ink that dries slowly. Place a scrap piece of paper under your drawing hand to prevent dragging your palm through wet ink and ruining the crisp white areas.
Step 3: Heavy Blacks & Textures
-
Hair Outlines:
Ink the main spikes of the hair. Focus on sharp, tapering points at the ends of the strands. The flow should feel heavy and straighter, typical of this art style. -
Shadow Mapping:
Before filling, lightly mark with your pencil where the deep shadows will fall on the hair. This usually happens under the layers of bangs and towards the back of the head. -
Filling the Darks:
Use your brush pen or broad marker to fill in the dark sections of the hair. Leave bands of white paper untouched across the crown and bangs to represent glossy highlights. -
Cross-Hatching the Neck:
For the shadow under the chin on the neck, use a cross-hatching technique with the 0.1mm pen. Create a mesh of diagonal lines to simulate a mid-tone shadow rather than solid black. -
Clothing Suggestion:
ink the collar of the shirt simply. Don’t over-detail this area; the focus should remain on the face. A few clean lines to suggest the fabric folds are sufficient.
Hair Flow Pro-Tip
When inking hair, always pull your pen strokes outward toward the tip of the strand. Lifting the pen at the end of the stroke creates a natural, sharp taper that mimics real hair texture.
Step 4: Final Touches
-
Clean Up:
Wait at least 10-15 minutes to ensure the ink is completely dry. Gently erase all remaining pencil guidelines with the kneaded eraser to reveal the crisp contrast. -
Enhance Highlights:
Take your white gel pen and add tiny dots of shine to the eyes if they got too dark. You can also run a thin white line along the edge of hair strands that overlap if they merged too much. -
Weight Check:
Look at the overall balance. If the eyes don’t pop enough, thicken the upper lash line one last time with the 0.3mm pen.
Now you have a stunning, high-contrast manga portrait that perfectly captures that moody, inked aesthetic
Glitch Distortion Horror Portrait

Capture the unsettling intensity of a psychological thriller with this striking anime portrait. This project combines traditional ink drawing techniques with a vibrant, glitch-inspired red outline to create a piece that feels both nostalgic and dangerously sharp.
How-To Guide
Materials
- Heavyweight mixed-media paper or Bristol board (white or off-white)
- Black India ink or high-quality black gouache
- Fine liner pens (sizes 0.1, 0.3, and 0.5)
- Red acrylic paint or red Posca marker
- Small round brush (size 2)
- Flat brush (for large black areas)
- Pencil (HB or 2B) and eraser
- Ruler
- Masking tape
Step 1: Planning and Sketching
-
Define the Composition:
Start by taping down your paper to a hard surface to prevent buckling. Use your ruler to lightly mark out a rectangular border where the background will end, leaving a generous white margin around the edges. -
Sketch the Base Portrait:
Lightly sketch the character’s head and shoulders. Focus on a intense, forward-facing gaze. Draw the large, expressive eyes typical of the style, but keep one slightly wider to suggest instability. Sketch the spiky, unruly hair that frames the face. -
Add Distortion Details:
Instead of drawing a clean outline for the hair and shoulders, sketch a jagged, almost vibrating line around the silhouette. This will act as the guide for your red ‘glitch’ effect later.
Step 2: Inking and Filling
-
Outline the Features:
Switch to your 0.3 fine liner. Carefully ink the facial features—the eyes, nose, and mouth. Use short, hatched lines under the eyes to create bags or shadows, emphasizing a tired, haunted look. -
Detail the Hair:
Use the 0.5 pen for the main chunks of hair. Don’t outline every single strand; instead, focus on the shadows where clumps of hair overlap. Leave the tops of the hair open or very light to suggest bright lighting. -
Fill the Heavy Blacks:
Using your flat brush and India ink (or black gouache), fill in the character’s clothing. This high-contrast look is essential. Ensure the black is solid and opaque; you may need a second coat once the first dries. -
Create the Background:
Paint the background rectangle with a dark grey or a washed-out black to differentiate it from the deep black clothing. Leave jagged, shard-like negative spaces behind the character to enhance the shattered glass vibe. -
Add Texture:
Once the large black areas are dry, go back in with a white gel pen or white ink if you need to reclaim any lost highlights, particularly in the eyes or on the glossy texture of the clothing.
Uneven Coverage?
If your black fill looks streaky, don’t overwork it while wet. Let it dry completely, then apply a second thin layer perpendicular to the first stroke.
Step 3: The Glitch Effect
-
Apply the Red Halo:
Take your red acrylic paint or Posca marker. Outline the entire character silhouette with a vibrant red line. Don’t make it smooth; create a ‘step’ or ‘staircase’ pattern, mimicking digital pixelation or a heart-rate monitor line. -
Intensify the Eyes:
Carefully paint the irises red. Leave a small white reflection dot to keep the eyes looking wet and alive. This pop of color connects the gaze to the glitch outline. -
Add Scattered Artifacts:
Using the tip of your small brush or the marker, dot small red specks around the background area. These ‘dead pixels’ add to the atmosphere of corruption and noise. -
Final Clean Up:
Wait for all ink and paint to be completely dry. Gently erase any visible pencil sketch lines that weren’t covered by ink. Peel off your masking tape slowly to reveal the crisp white border.
Level Up: Retro Screen
Overlay a subtle grid of horizontal white lines across the finished drawing using a ruler and white gel pen to mimic an old CRT monitor scanline effect.
Hang this intense portrait on your wall to add a touch of dark anime aesthetic to your space


Have a question or want to share your own experience? I'd love to hear from you in the comments below!