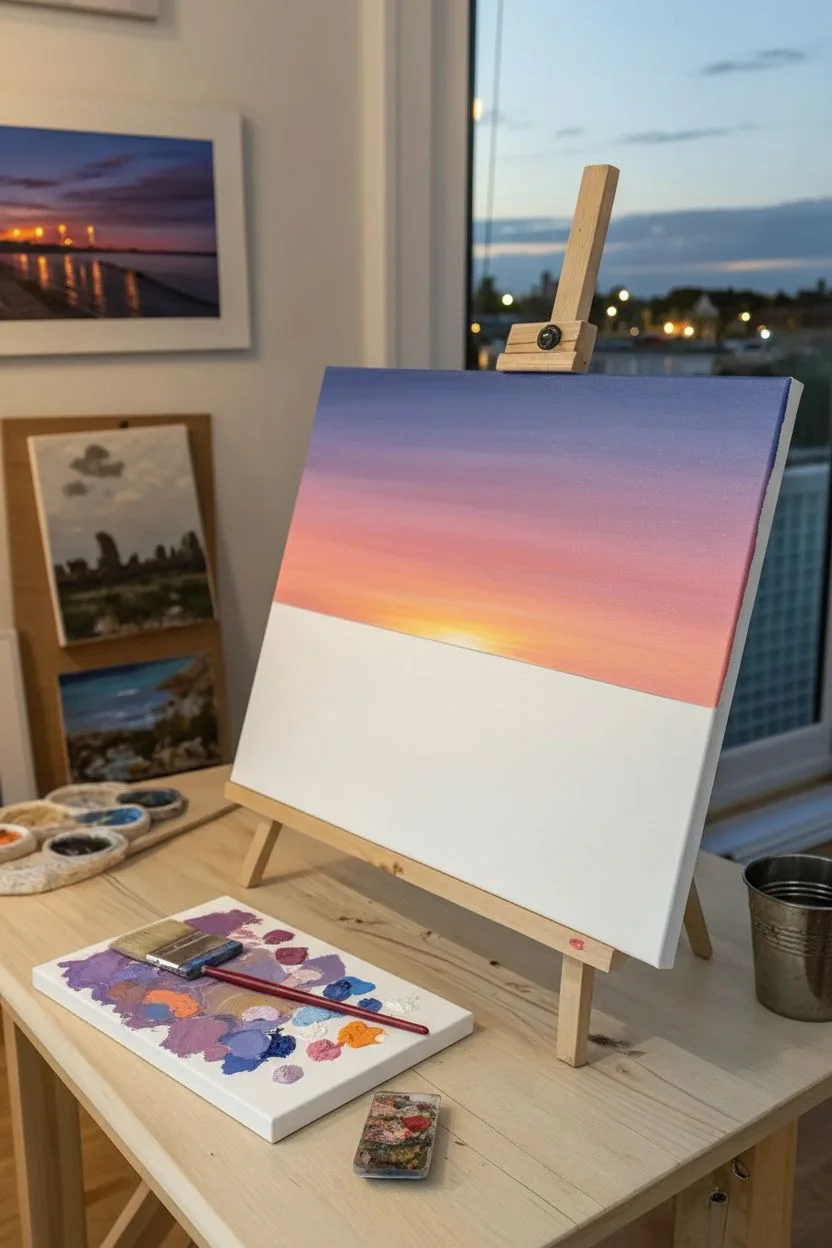
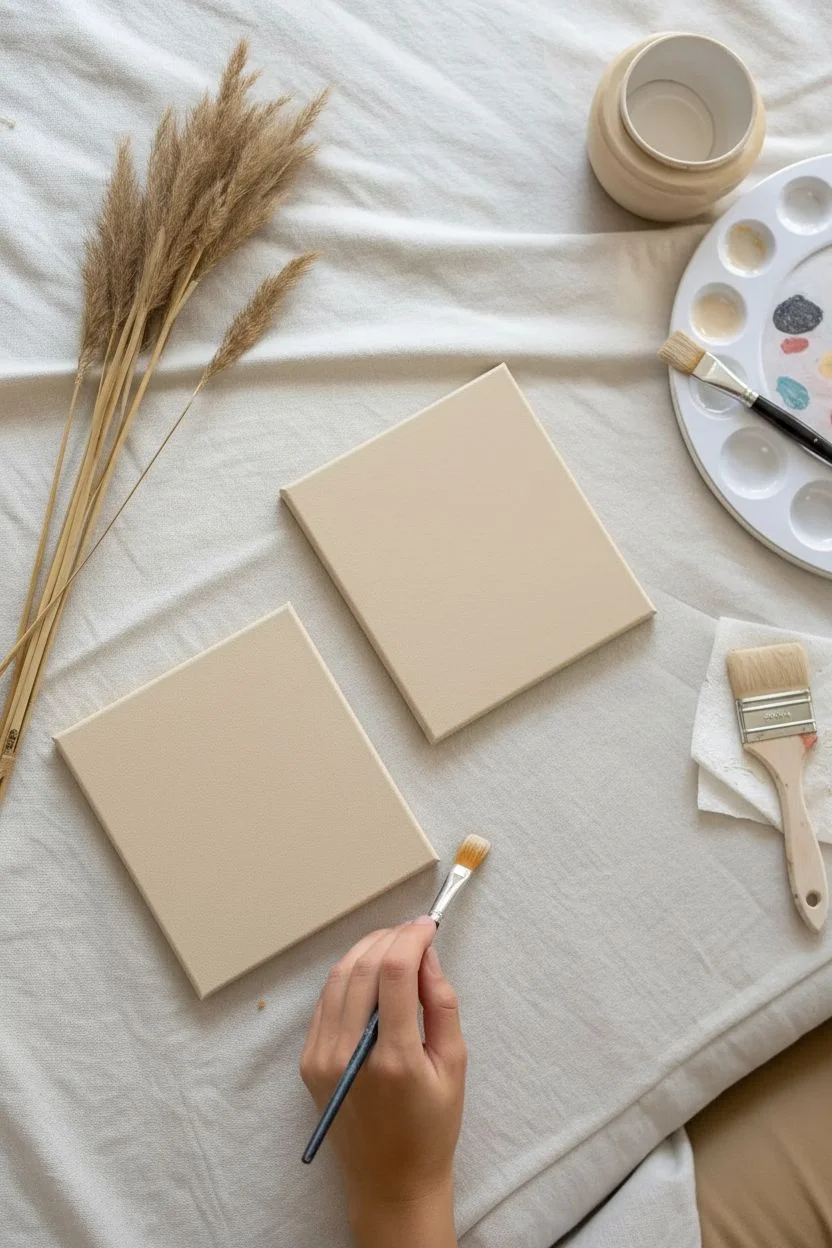
A painting date night is my favorite kind of cozy—creative, low-pressure, and honestly way more romantic than it sounds. You’ll end the night with a sweet memory you can hang on the wall (or laugh about forever), even if you’re both total beginners.
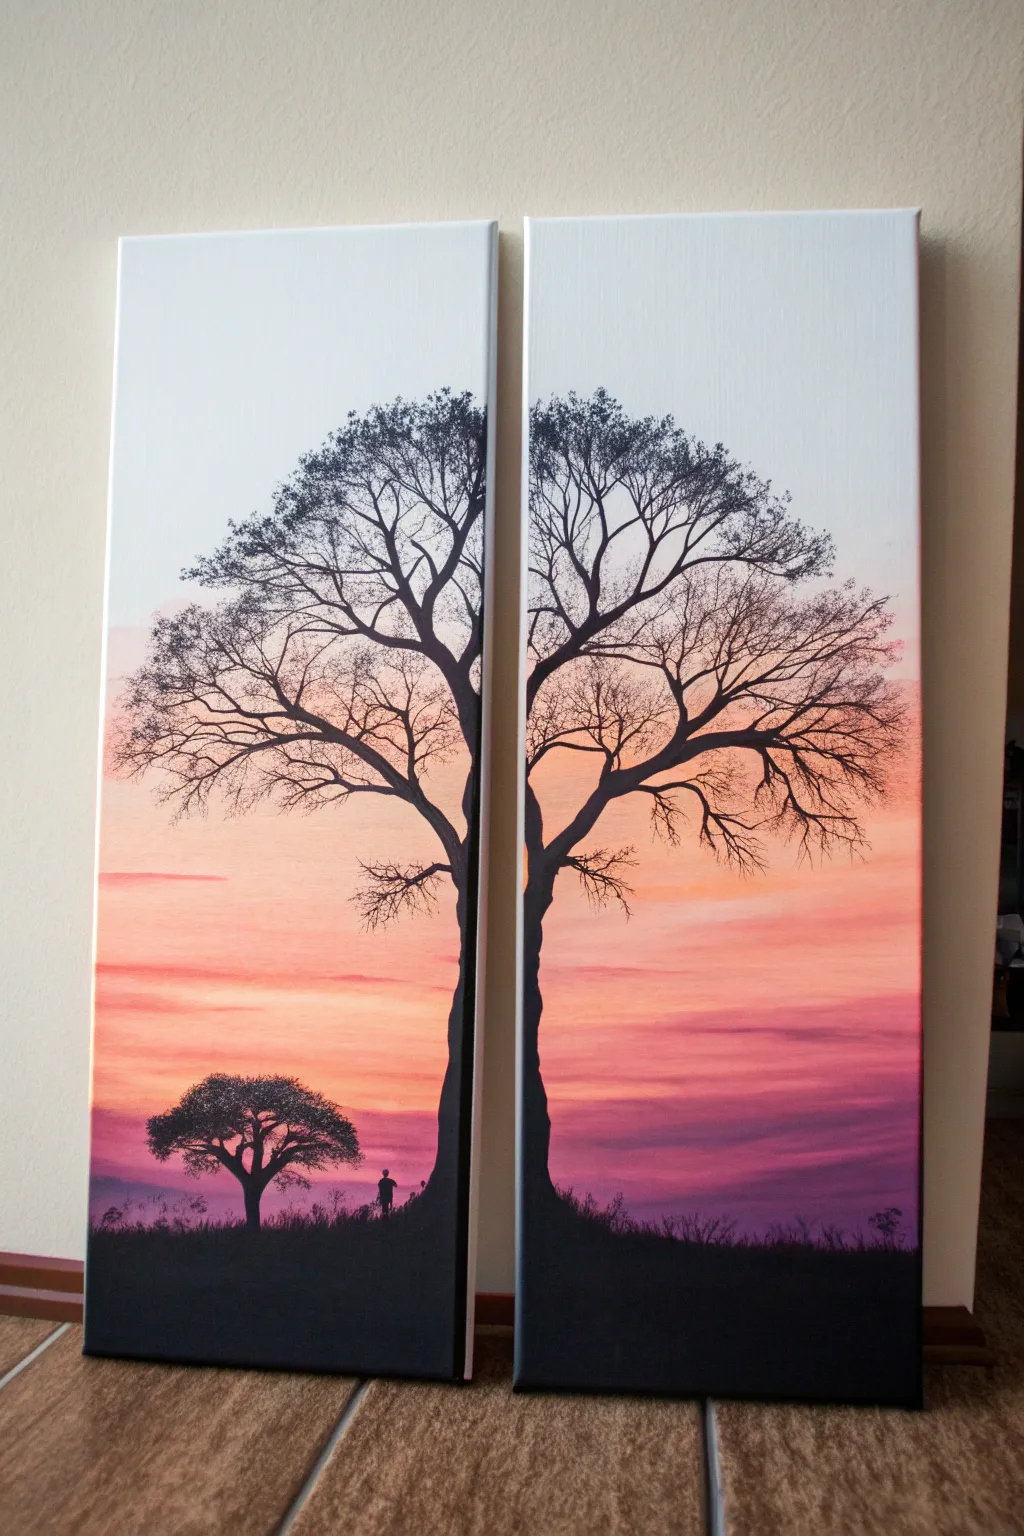
Split-Canvas Sunset Silhouette of You Two
Capture a romantic moment forever with this striking two-panel artwork that spans across separate canvases. Using warm sunset gradients and bold black silhouettes, you will create a cohesive scene that feels both intimate and expansive.
Step-by-Step Tutorial
Materials
- Two 16×20 inch stretched canvases
- Acrylic paints: Titanium White, Cadmium Yellow, Orange, Alizarin Crimson, Burnt Umber, Mars Black
- Large flat brush (2-3 inch)
- Medium filbert brush
- Small round detail brush (size 1 or 2)
- Pencil and eraser
- Reference photo of couple’s silhouette
- Palette or paper plate
- Jar of water
- Paper towels
Step 1: Planning and Preparation
-
Set the Stage:
Place your two canvases side-by-side on your work surface, touching each other. Treat them as one single large surface for the initial sketching and background painting phases. -
Sketch the Horizon:
Lightly draw a horizontal line across the lower third of both canvases to mark the top of the grassy hill. Ensure the line continues naturally from the left canvas to the right canvas. -
Outline the Couple:
Using your reference photo, lightly sketch the silhouette of the couple on the right canvas. Focus on the overall shape and posture rather than tiny details, as this will be filled in with solid black later. -
Position the Tree:
On the left canvas, sketch the trunk and main branches of a large tree. Let some of the branches reach toward the right edge, visually connecting the two panels.
Fixing Gradients
If your sky blending looks choppy, wait for it to dry completely. Then, apply a thin glaze of water and paint over the area to smooth out the transition without lifting the layer below.
Step 2: Creating the Sunset Gradient
-
Mix the Sky Colors:
Prepare a gradient palette: pure yellow, orange mixed with a touch of red, and a deep reddish-purple for the very top. Keep your white paint handy to soften transitions. -
Paint the Upper Sky:
For the top third of both canvases, use the large flat brush to apply the reddish-purple mixture. Use long, horizontal strokes that span across both canvases to ensure the color matches perfectly. -
Blend Downward:
While the top is still wet, introduce the orange mixture below it. Blend the colors where they meet using back-and-forth strokes to create a soft, seamless transition. -
Add the Golden Glow:
Paint the yellow mixture just above your horizon line. Blend it upward into the orange section, creating a glowing effect where the sun will eventually sit. -
Define the Sun:
Use a mix of white and yellow to paint a small, bright circle on the horizon line of the left canvas, peeking through where the grass will be. -
Paint the Clouds:
Mix a soft purple-grey using crimson, blue, and white. With a filbert brush, tap in horizontal cloud streaks across the sky, focusing on the upper corners for dramatic effect.
Make It Personal
Swap the tree for a silhouette of your city’s skyline, or add a pet silhouette sitting next to the couple to truly represent your little family.
Step 3: Painting the Silhouettes
-
Block in the Ground:
Switch to Mars Black. Paint the entire area below the horizon line on both canvases solid black. You can add a tiny bit of Burnt Umber to warm it up, but keep it very dark. -
Add Texture to Grass:
Before the black ground dries completely, use a dry, bristly brush to flick upward strokes along the top edge of the hill. This creates the look of tall grasses silhouetted against the bright sunset. -
Fill the Couple:
Using a medium round brush and black paint, carefully fill in your sketch of the couple. Work slowly around the faces to keep the profiles distinct and recognizable. -
Detail the Clothing:
I find it helpful to use the small detail brush for things like hair strands or fabric folds at the edges of the silhouette, keeping the lines crisp against the colorful background. -
Paint the Tree Trunk:
On the left canvas, paint the tree trunk black. Make the base wider and taper it as it goes up. Use a slightly shaky hand to create natural-looking bark texture. -
Add Leaves:
Use an old, splayed brush or a sea sponge dipped in black paint to dab foliage onto the tree branches. Leave some gaps so the sunset colors peek through the leaves.
Step 4: Final Touches
-
Connect the Panels:
Double-check the edges where the two canvases meet. Ensure the horizon line, clouds, and any crossing branches align perfectly when the canvases are hung together. -
Paint the Edges:
Paint the sides (depth) of the canvases black or extend the image around the corners. This gives a professional ‘gallery wrap’ finish without needing a frame. -
Varnish:
Once fully dry (give it overnight), apply a coat of satin or gloss varnish to protect the paint and deepen the contrast of the blacks.
Hang your masterpieces about an inch apart to enjoy the dynamic split-view effect


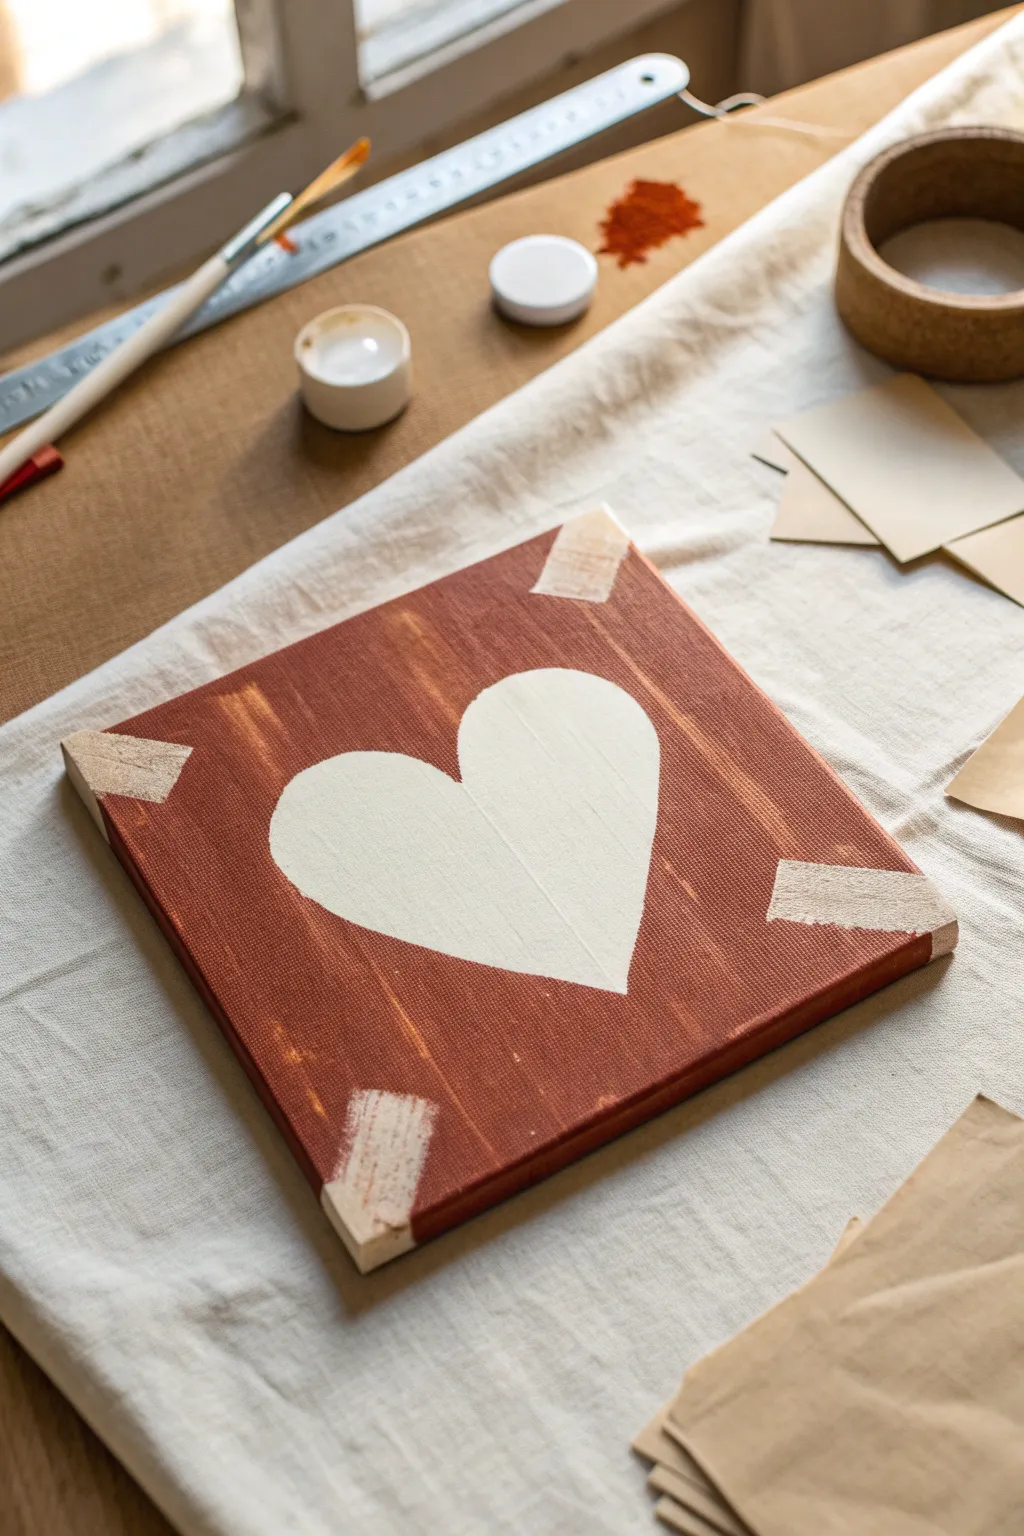
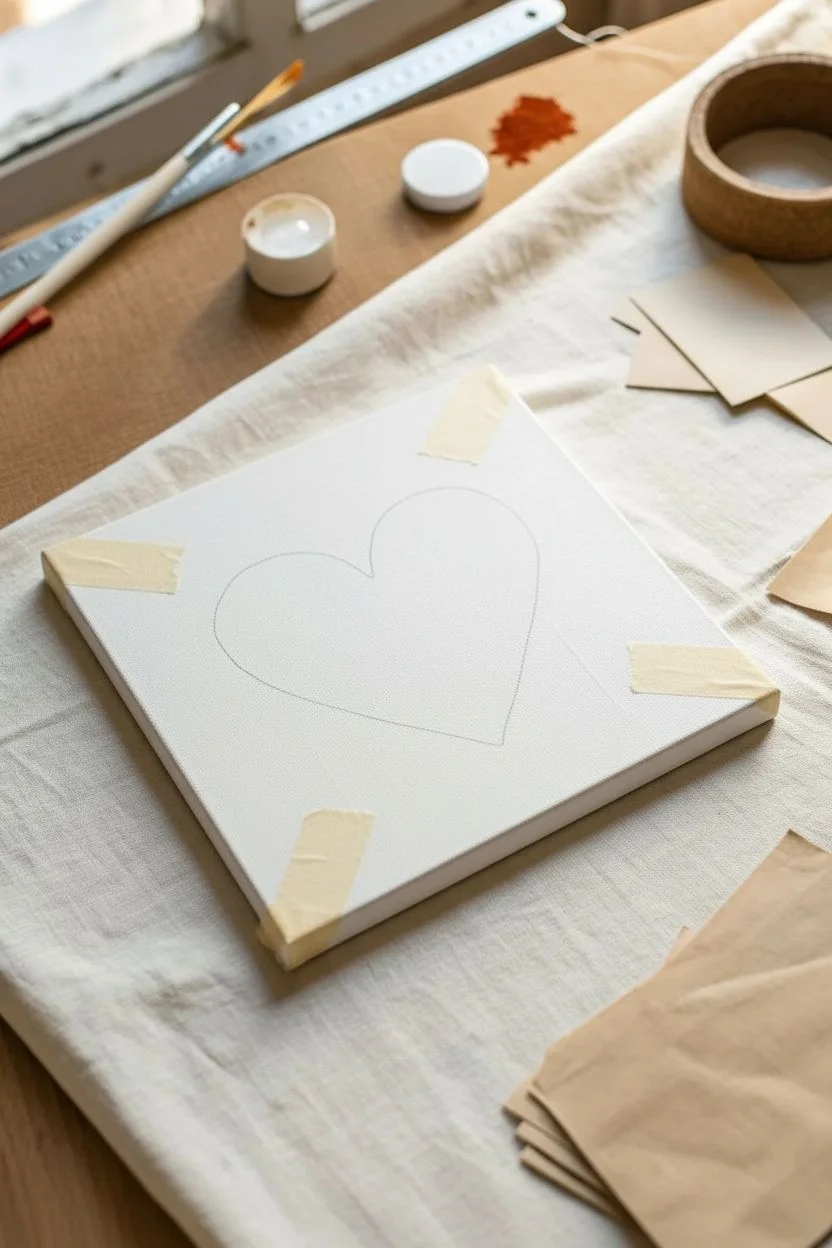
Matching Half-Heart Diptych That Connects in the Middle
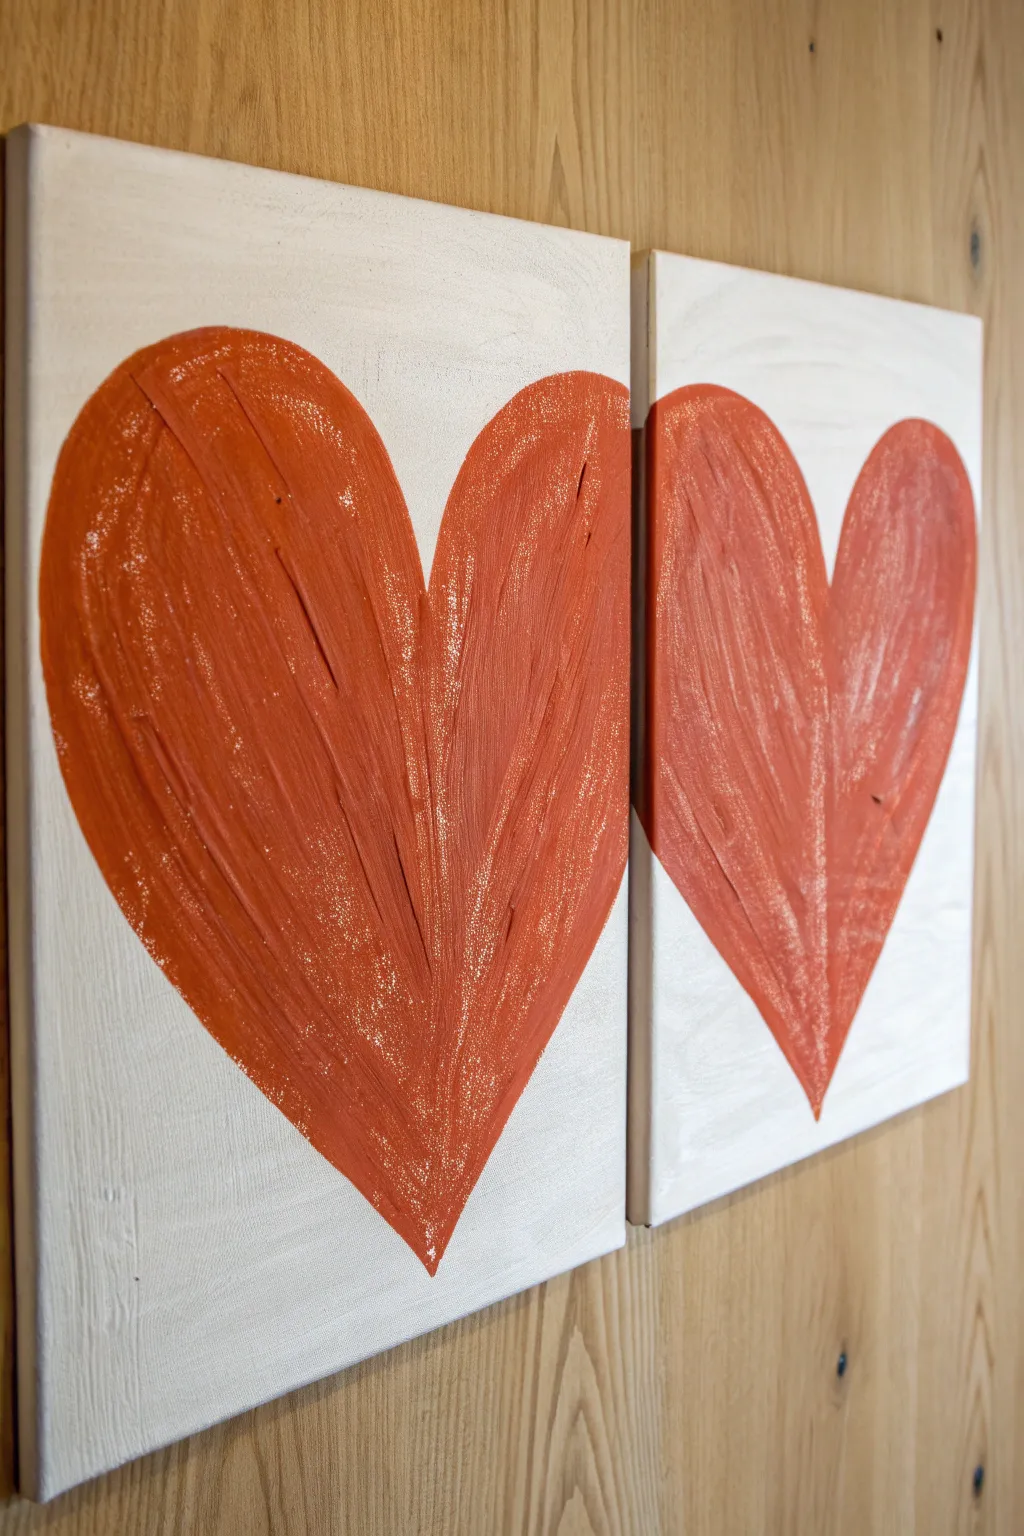
This romantic painting project uses two canvases to create a seamless, unified artwork perfect for couples to paint together. The textured, bold red hearts bridge the gap between two panels, symbolizing connection and unity in a modern, minimalist style.
How-To Guide
Materials
- Two stretched canvases (ideally rectangular, e.g., 11×14 or 16×20 inches)
- White acrylic paint (titanium white)
- Red acrylic paint (cadmium red or similar bold shade)
- Wide flat paintbrush (2-3 inches) for background
- Medium flat or filbert paintbrush (1 inch) for the hearts
- Pencil for sketching
- Ruler or straight edge
- Painter’s tape or masking tape
- Palette or paper plate
- Water cup and paper towels
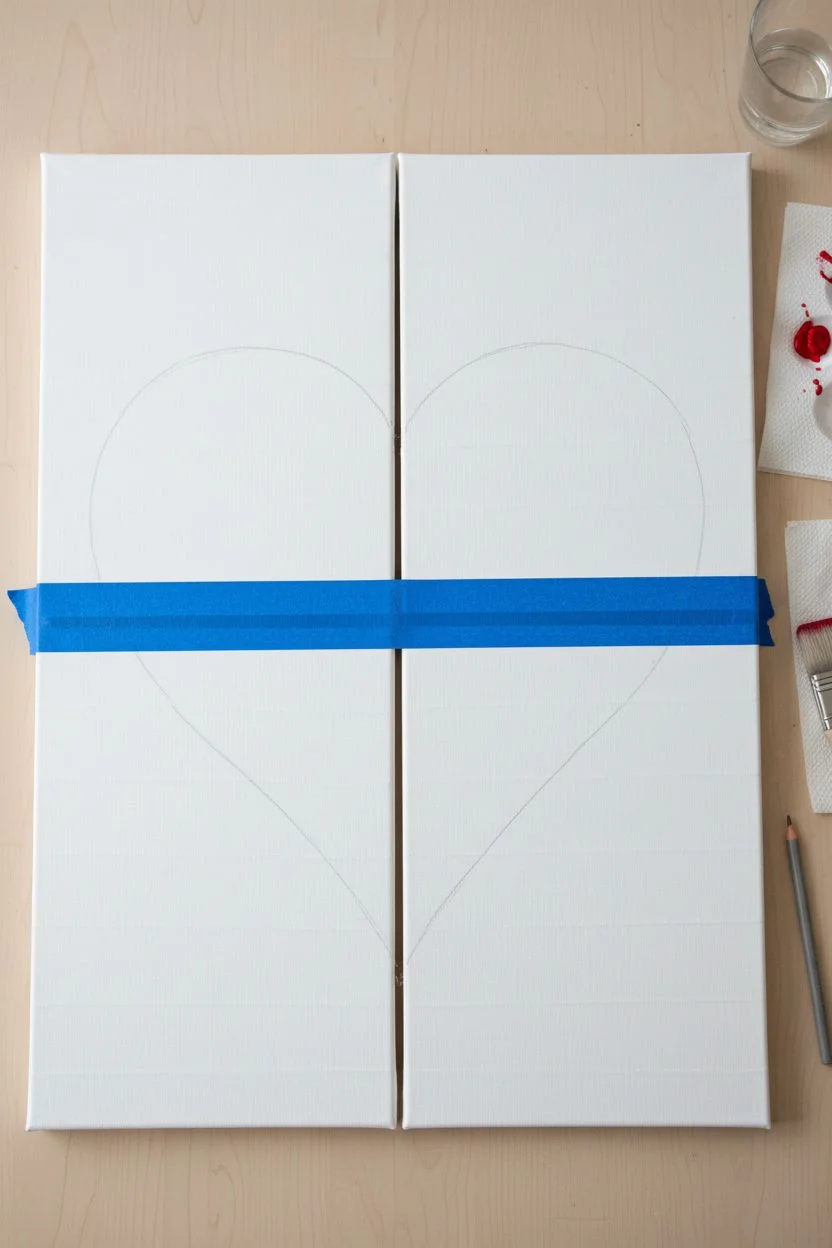
Step 1: Preparing the Canvases
-
Connect the canvases:
Place your two canvases side-by-side on a flat surface. They need to be touching completely. Flip them over carefully and use a strip of masking tape on the back to distinctively hold them together while you work; this prevents them from shifting while you sketch the design across the gap. -
Prime the background:
Squeeze out a generous amount of Titanium White paint. Using your wide flat brush, cover the entire front surface of both canvases. Brush in smooth, horizontal strokes to create a subtle texture. -
Paint the edges:
Don’t forget the sides. Paint the outer edges of the canvases white as well for a finished look. Leave the inner edges (where the canvases touch) unpainted for now to prevent sticking. -
Let it dry:
Allow the white background to dry completely. It should be dry to the touch before you start sketching. If you are impatient like me, a hair dryer on a cool setting speeds this up significantly.
Pro Tip: Texture Master
For that rustic, streaky look seen in the photo, use an old, stiff-bristled brush. A worn-out brush separates the paint better than a soft new one, creating those lovely ridges.
Step 2: Mapping the Hearts
-
Mark the center point:
Find the vertical center line where the two canvases meet. Determine how large you want your main heart shapes to be. The design features a large heart shape that appears to span across both canvases, or two large hearts leaning into each other. -
Sketch the left heart:
On the left canvas, use a pencil to lightly sketch a large, elongated heart shape. The right curve of this heart should extend right up to the edge of the canvas, aiming to ‘touch’ the partner canvas. -
Sketch the right heart:
Mirror the process on the right canvas. Draw a similarly sized heart shape. Ensure the left curve of this heart meets the edge exactly where the left canvas’s heart ended, creating the illusion of continuity. -
Refine the shapes:
Step back and look at the symmetry. The hearts don’t need to be mathematically perfect—organic shapes look better here—but the connection point in the middle is crucial. Adjust your pencil lines until the flow looks natural.
Level Up: Initials & Dates
Personalize the artwork by using a fine liner brush with white paint to carve small initials or a special date into the wet red paint near the bottom point of the heart.
Step 3: Painting the Hearts
-
Prepare the red paint:
Load your medium brush with a heavy amount of red acrylic paint. You want thick, opaque coverage for this step. Do not add water, as you want to retain the brushstroke texture. -
Outline the shapes:
Carefully paint along the pencil outline of the heart on the left canvas first to establish the boundary. Repeat for the right canvas. -
Fill with vertical strokes:
Fill in the body of the hearts using long, vertical sweeping strokes. Start from the top curve and pull the brush down toward the point of the heart. -
Create texture:
Go back over the wet paint with your brush. Instead of smoothing it perfectly, intentionally leave streaks and ridges in the paint. This directional texture mimics the grain of muscle or wood and adds visual interest. -
Check the connection:
Pay distinct attention to the seam where the canvases meet. Ensure the red paint goes right to the edge on both sides so the image doesn’t ‘break’ when hung together. -
Add highlights (optional):
If your red looks too flat, strip a tiny bit of white paint onto your dirty red brush. Add one or two very subtle lighter streaks following the curve of the heart to give it volume.
Step 4: Finishing Touches
-
Separate the canvases:
Once the paint is tacky but not fully dry, carefully remove the tape from the back and separate the canvases. This prevents the paint from bridging the gap and tearing later. -
Clean the inner edges:
Check the inner edges for any red drips. If needed, touch up the inner sides with a little white paint for a crisp, clean look. -
Final dry:
Lay the canvases flat separately to let the thick red paint dry completely overnight.
Hang your matching masterpieces side-by-side with a small gap to enjoy your symbol of connection on the wall


Two Trees Forming One Heart Canopy

Create a stunning romantic diptych where two separate canvases come together to form a beautiful, unified landscape. This project features dramatic silhouette trees set against a vibrant, blended sunset gradient, perfect for a cooperative painting night.
Detailed Instructions
Materials
- Two long rectangular canvases (e.g., 10×30 or 12×36 inches)
- Acrylic paints: Titanium White, Lemon Yellow, Orange, Magenta, Deep Violet, Black
- Large flat wash brush (2-inch)
- Medium flat brush (1-inch)
- Small round detail brush (size 0 or 1)
- Painter’s tape
- Palette or paper plates
- Cup of water and paper towels
Step 1: Setting the Stage
-
Prepare the workspace:
Lay out both canvases side-by-side on a flat surface. Since this is a continuous painting across two panels, push them right up against each other so they touch. -
Secure the joint:
Place a piece of painter’s tape on the *back* of the canvases to hold them firmly together while you paint the background. This ensures your horizon lines and color gradients match perfectly. -
Mix your colors:
Squeeze out generous amounts of white, yellow, orange, magenta, and violet onto your palette. You want the colors ready to go because acrylics dry fast, and blending requires wet paint.
Step 2: Painting the Sky Gradient
-
Start at the top:
Using your large wash brush, start at the very top of the canvases with pure Titanium White mixed with the tiniest touching of light grey or blue if desired, though the reference uses a very pale, bright white. -
Introduce the pale peach:
Moving down about a third of the way, pick up a little Orange and a lot of White. Blend this pale peach color smoothly into the white section above using long, horizontal strokes across both canvases. -
Intensify the sunset:
As you move to the middle section, add more Orange and a touch of Magenta to your brush. Paint bold horizontal streaks, letting the colors overlap to create soft transitions. -
Deepen the horizon:
For the bottom third, transition into pure Magenta and finally mix in Deep Violet near the very bottom. This creates the moody, dusk-like atmosphere at the ground level. -
Add cloud texture:
While the paint is still slightly tacky, wipe your brush dry and lightly drag it horizontally across the transition zones to create wispy, cloud-like streaks. -
Let it dry completely:
Allow the background to dry fully. This is crucial because you don’t want the crisp black silhouettes to muddy up with the colorful sky.
Seamless Blending
Keep your brush wet but not dripping when blending the sky. If the paint drags, mist the canvas lightly with water to help the colors glide.
Step 3: Silhouette Trees
-
Sketch the trunks:
You can lightly sketch the tree shapes with a pencil first. Draw the main trunk of the large tree split right down the gap between the canvases. One half of the trunk goes on the left canvas, the other on the right. -
Paint the trunk base:
Using Black paint and a medium flat brush, fill in the grassy ground at the bottom and the thick base of the tree trunks. The ground should be uneven to look natural. -
Paint the main branches:
Switch to a smaller brush. extend the main branches outward and upward. The branches on the left canvas should curve left, and the right ones curve right, creating a rounded canopy shape. -
Add fine twigs:
This is the most detailed part. Use your smallest round brush (size 0) with slightly watered-down black paint (inky consistency) to flick out hundreds of tiny twigs at the ends of the branches. -
Create the smaller tree:
On the left canvas, slightly above the horizon line in the distance, paint a smaller, singular umbrella-shaped tree to add depth to the scene. -
Add tiny details:
Look closely at your ground line. Use the tip of your small brush to flick up tiny blades of grass along the black hill silhouette to break up the hard edge. -
Paint the figures:
If desired, paint a tiny silhouette of a person or a couple standing on the horizon line near the large tree on the left canvas. Keep it simple—just shapes, no details. -
Separate the canvases:
Once the paint is dry to the touch, flip the canvases over and carefully remove the tape holding them together. -
Paint the edges:
Don’t forget to paint the sides of your canvases! Continue the black ground and the sky gradients around the edges for a polished, gallery-ready look.
Hidden Initials
Use the tiny twig branches to subtly ‘carve’ your initials into the tree trunk or hide them within the complex web of upper branches.
Hang these canvases with a small one-inch gap between them to let the image naturally bridge the space on your wall


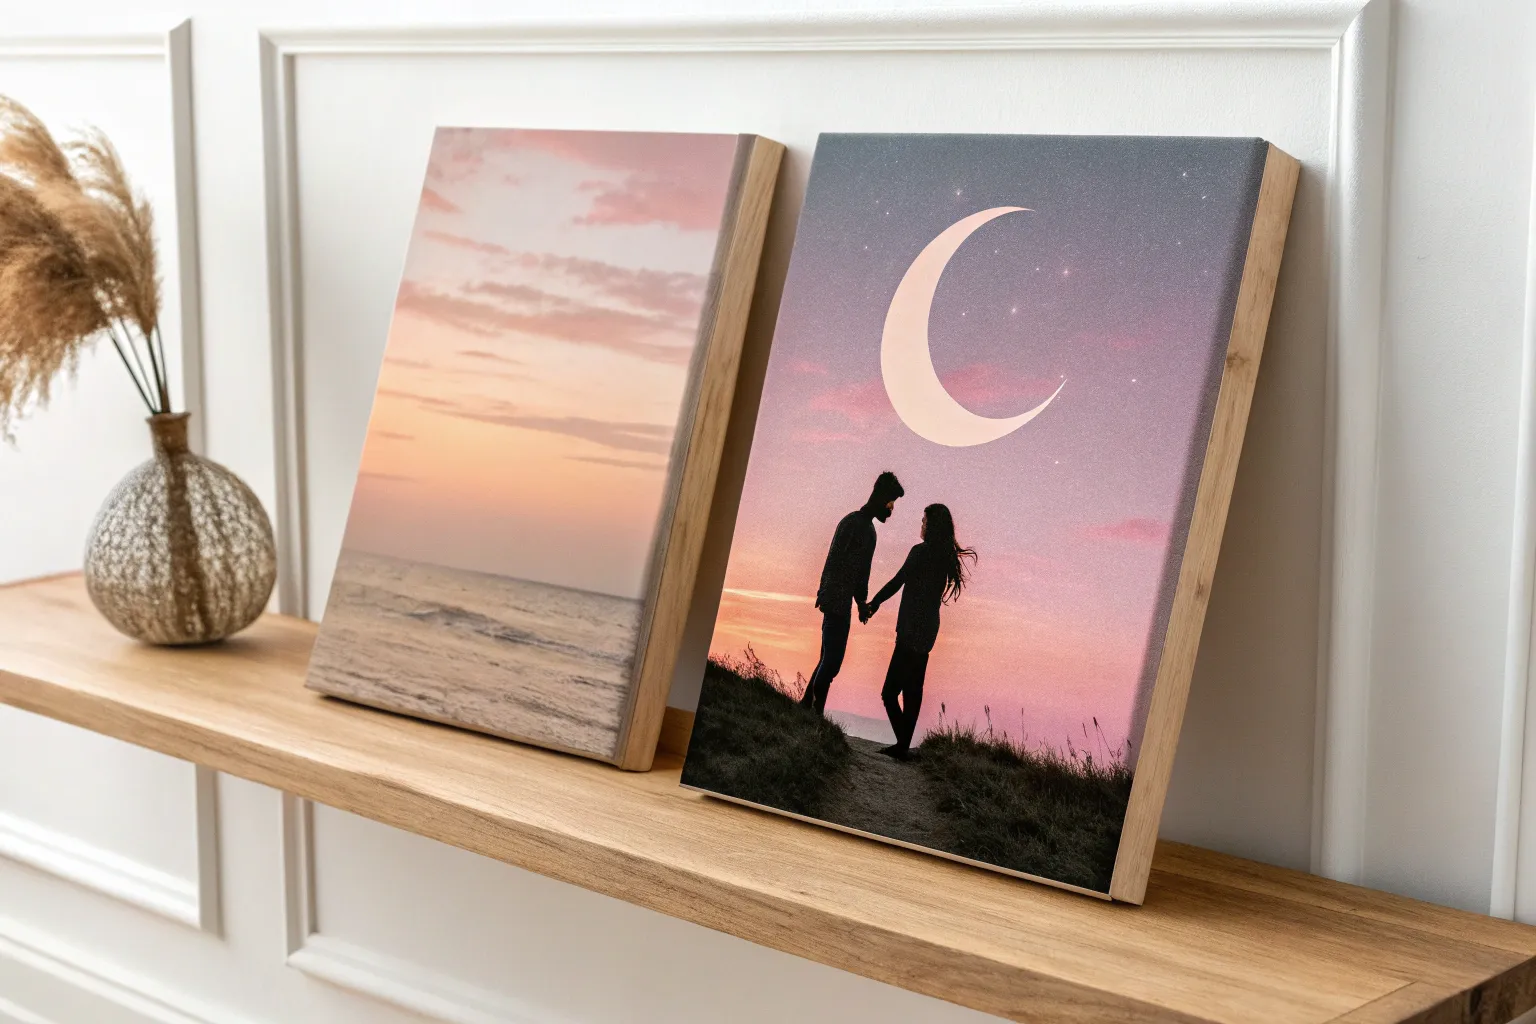
Couple Under a Moonlit Sky Across Two Canvases
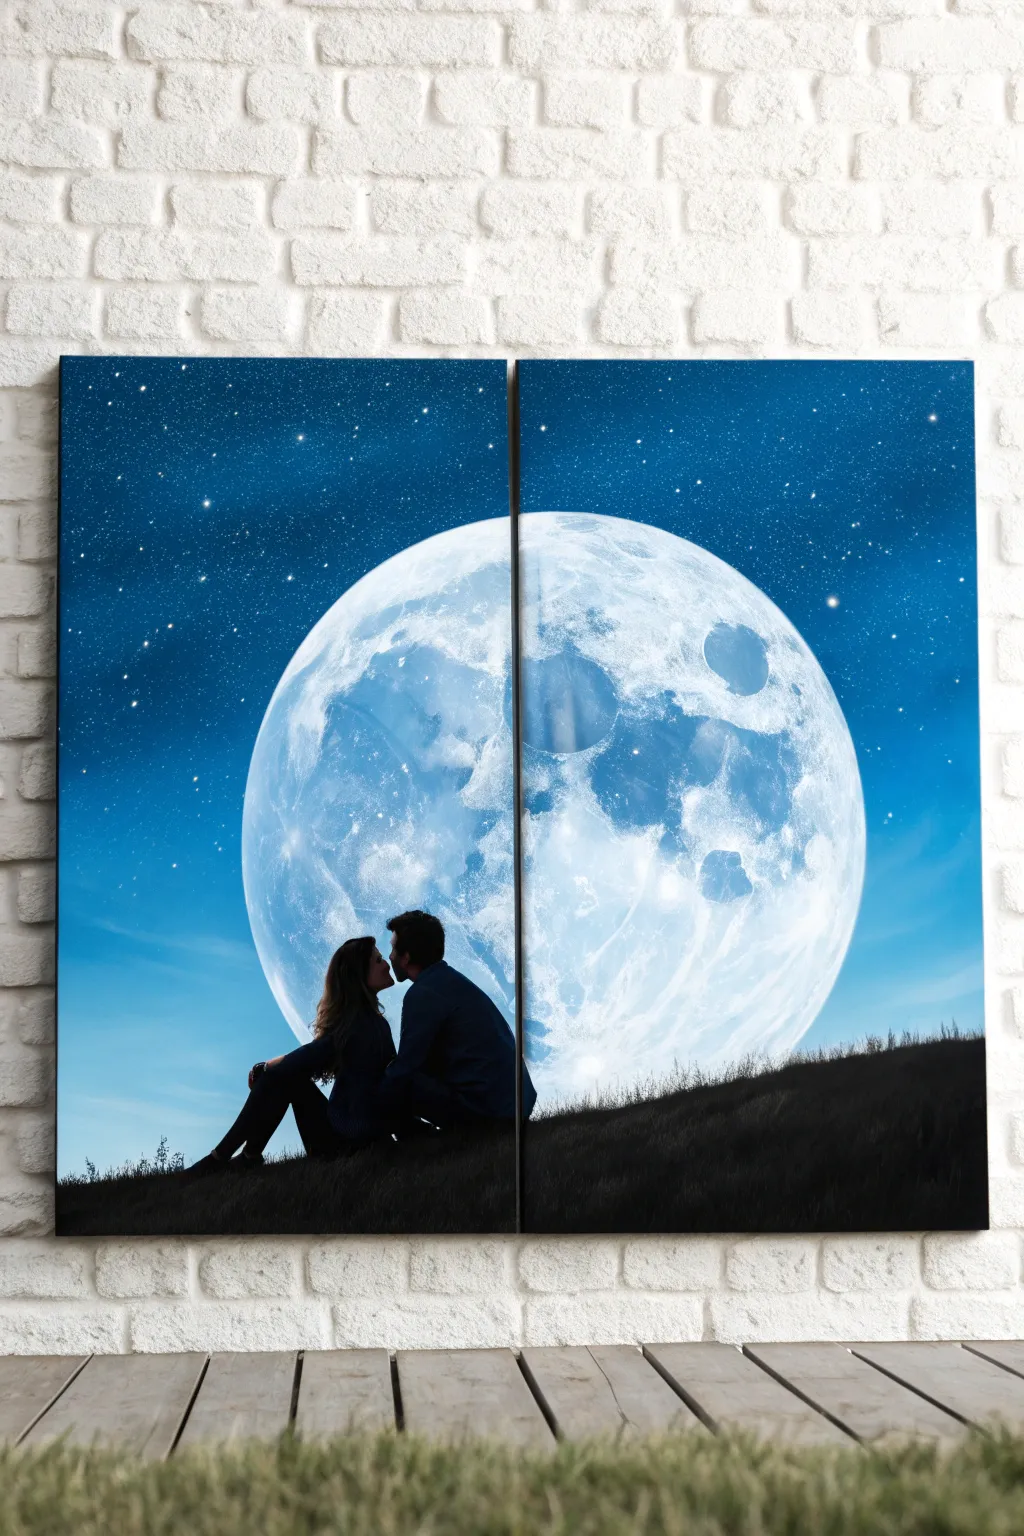
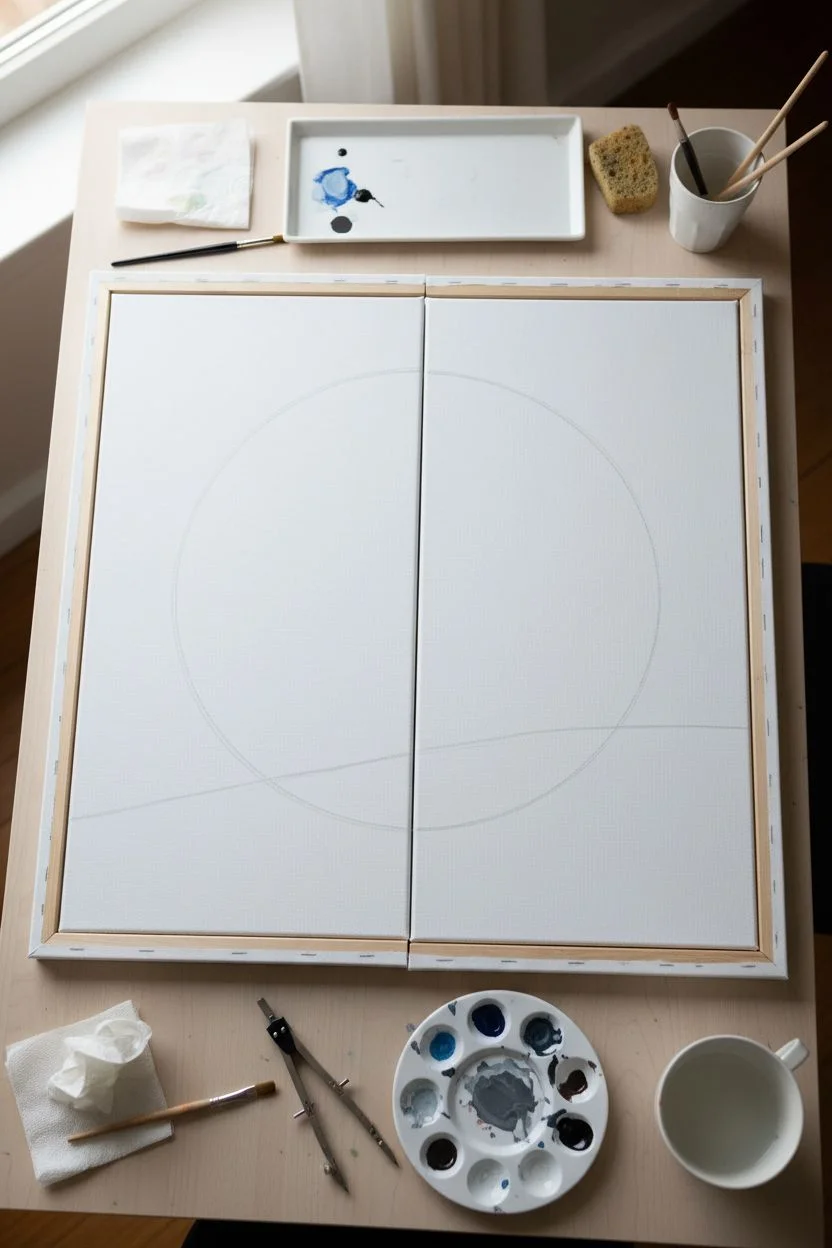
This romantic two-canvas diptych creates a stunning unified scene when hung together, making it the perfect collaborative project for a date night. You’ll create a glowing supermoon set against a deep blue starry abyss, with a sweet silhouette of a couple grounding the composition.
How-To Guide
Materials
- Two rectangular canvases (same size, e.g., 16×20 inches)
- Acrylic paints: Carbon Black, Titanium White, Phthalo Blue, Ultramarine Blue, Prussian Blue
- Large flat brush (1-2 inch) for background
- Medium filbert brush for clouds and blending
- Small round detail brush (size 0 or 1)
- Sea sponge (natural or synthetic)
- Toothbrush (for stars)
- Chalk or pastel pencil (white or light blue)
- Compass or large circular object (like a dinner plate or pot lid)
- Palette and water cup
- Paper towels
Step 1: Setting the Scene
-
Prepare your workspace:
Place your two canvases side-by-side on your work surface so they touch. Treat them as one single large surface for the initial sketching and painting phases to ensure the image aligns perfectly. -
Sketch the moon barrier:
Find a large circular object or use a compass to draw a large circle right in the center, spanning across both canvases. This will be your moon. Ensure the split between canvases runs directly through the middle of the circle. -
Outline the hills:
Sketch a sloping hill line near the bottom third of the canvases. The slope should rise gently from left to right, crossing the gap between the canvases seamlessly.
Uneven Moon Edges?
If your moon circle looks wobbly, wait for the paint to dry fully. Then, use a small flat brush with the background blue color to ‘cut in’ and tidy up the outside edge of the circle.
Step 2: Painting the Midnight Sky
-
Mix your sky gradients:
Create a gradient palette for the sky. You’ll want a very dark midnight blue (Prussian Blue mixed with a touch of Black) for the top corners, transitioning to a pure Ultramarine, and finally a lighter blue (Ultramarine mixed with White) near the moon and horizon line. -
Block in the dark sky:
Using your large flat brush, paint the outer corners and top edges with your darkest blue mix. Paint right up to the chalk line of your moon circle, but be careful not to go inside it. -
Blend the transition:
While the dark paint is still wet, introduce the medium blue shade as you move closer to the moon. Use long, sweeping strokes to blend the colors, ensuring a smooth transition free of hard lines. -
Add the horizon glow:
Paint the area immediately surrounding the moon and just above the hill line with your lightest blue mix. This creates an atmospheric glow. Blend this upward into the darker blues. -
Let the sky dry:
Allow the background sky to dry completely before moving on to the stars. This prevents the white speckles from turning into muddy smears. -
Create the stars:
Dilute a small amount of white paint with water until it’s inky. Dip an old toothbrush into this mix, then run your thumb across the bristles to flick tiny specks of ‘starlight’ across the blue sky areas. Add a few larger stars manually with a detail brush.
Softer Moon Glow
To make the moon really pop, dry brush a tiny amount of translucent white paint extending just slightly OUTSIDE the moon’s crisp edge into the blue sky for a hazy halo effect.
Step 3: Creating the Moon
-
Base coat the moon:
Fill in the large moon circle with a solid coat of Titanium White. It may need two coats to be fully opaque against the canvas. -
Sponge in craters:
Mix a very light grey (White with a tiny dot of Black or Blue). Dampen your sea sponge, dip it in the grey, and dab off the excess. Lightly sponge texture onto the white moon to create the ‘seas’ or maria. -
Detail the texture:
While the sponge texture is damp, use a clean, dry brush to soften some edges. Use a slightly darker grey to deepen specific craters, particularly creating a few darker, defined circular shapes on the right canvas. -
Add highlights:
Once the grey texture is dry, go back with pure Titanium White on your detail brush to add bright highlights to the rims of the craters and the brightest parts of the moon’s surface.
Step 4: The Silhouette
-
Paint the terrain:
Using pure Carbon Black and a medium flat brush, fill in the hill section at the bottom. Ensure the top edge is slightly uneven to mimic grass and earth. -
Sketch the couple:
Lightly sketch the outline of the couple sitting on the hill with your chalk pencil. Position them on the left canvas, overlapping heavily with the bright moon so their silhouette stands out clearly. -
Fill the silhouette:
With your smallest round brush and Carbon Black, carefully fill in the couple’s shapes. Pay close attention to the profiles of the faces—noses, chins, and foreheads need to be crisp for the effect to work. -
Add grassy details:
Use the tip of your detail brush or a fan brush to flick tiny, upward strokes along the top edge of the black hill. This creates the illusion of grass blades silhouetted against the bright moon and sky. -
Final touches:
Check the alignment between the two canvases one last time. If any lines (like the hill or a moon crater) don’t match up perfectly across the gap, touch them up now.
Now hang your masterpieces with a small gap in between and enjoy your romantic view
BRUSH GUIDE
The Right Brush for Every Stroke
From clean lines to bold texture — master brush choice, stroke control, and essential techniques.
Explore the Full Guide
Kissing Silhouette With a Glowing Backlight
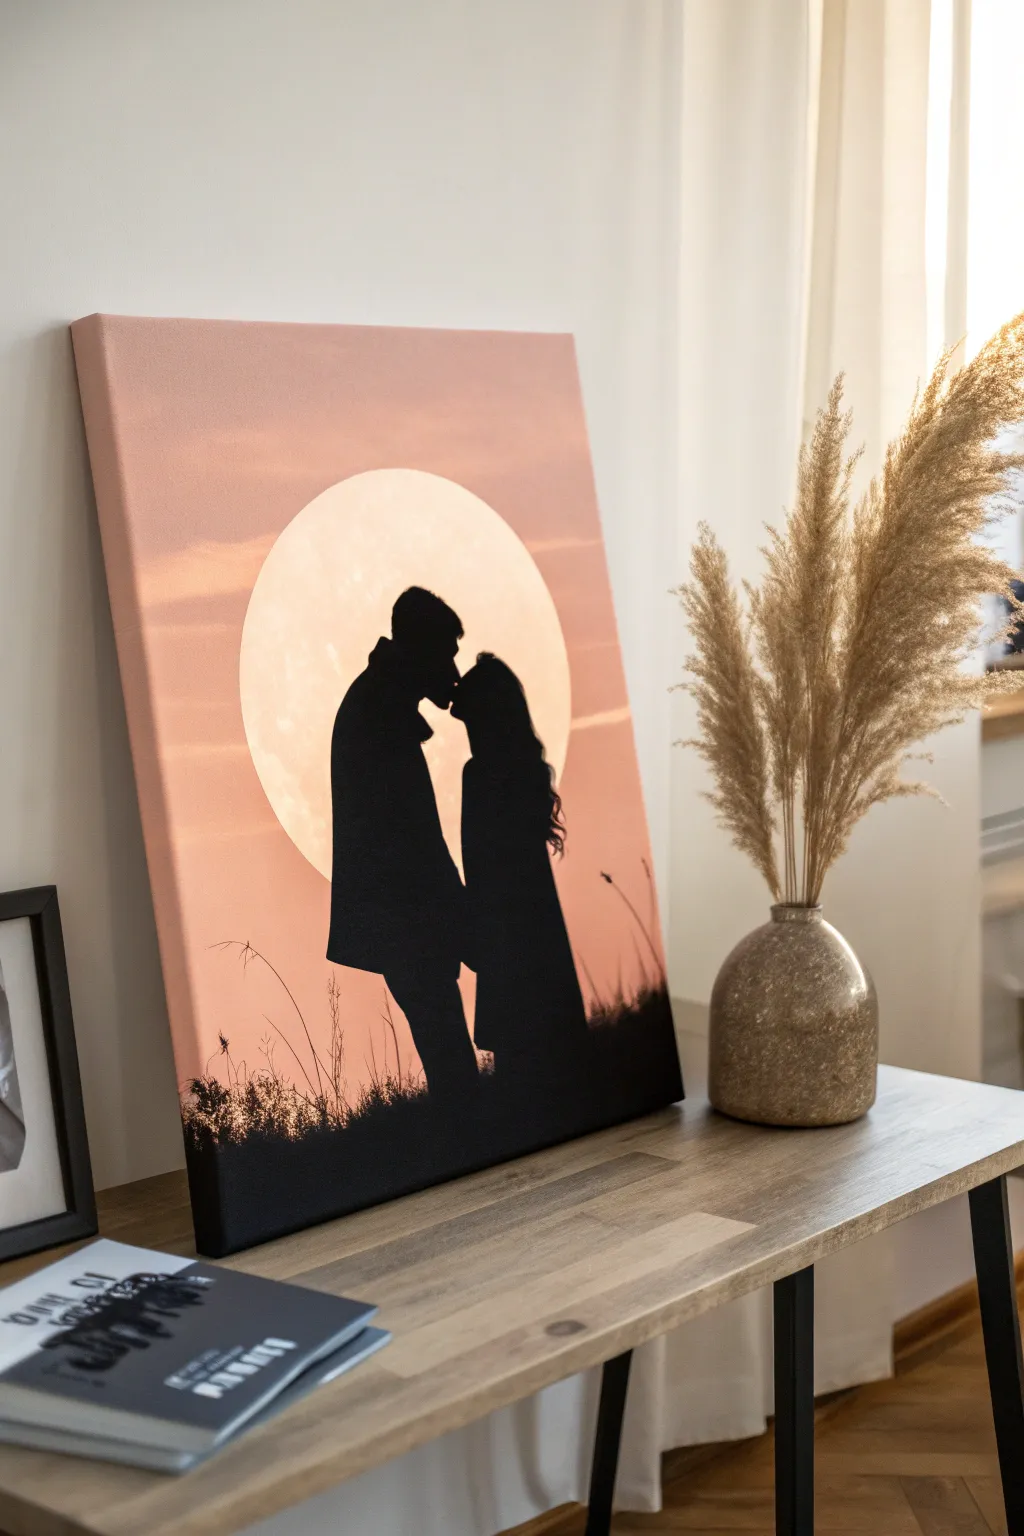
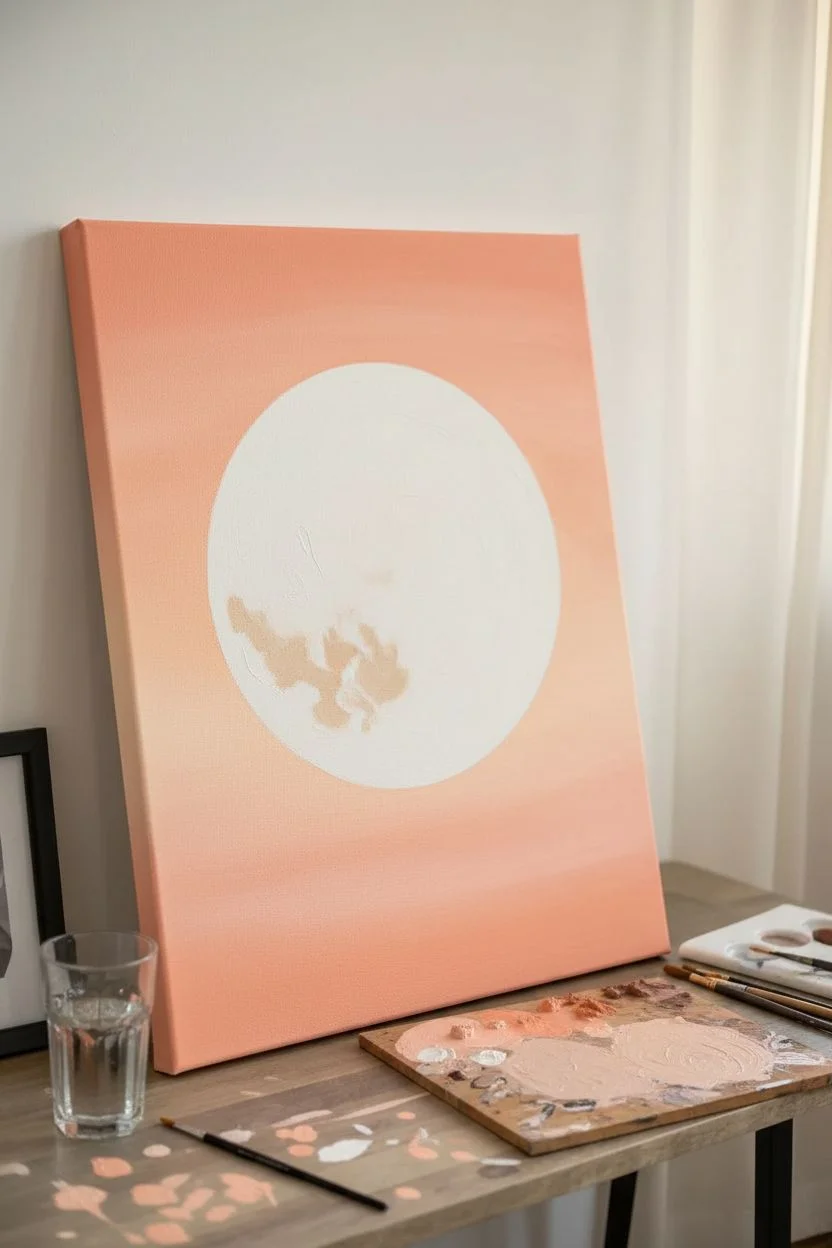
Capture a tender moment forever with this striking silhouette painting that looks far more complicated than it actually is. By focusing on a glowing lunar backdrop and crisp black figures, you’ll create a piece of art that radiates warmth and romance.
Detailed Instructions
Materials
- Rectangular stretched canvas (e.g., 16×20 inches)
- Acrylic paints: Titanium White, Mars Black, Peach, Light Pink, Warm Beige
- Large flat brush (1-2 inch)
- Medium round brush
- Fine detail liner brush
- Circular object for tracing (plate or bowl) or a compass
- Pencil
- Palette or paper plate
- Cup of water and paper towels
Step 1: Setting the Scene
-
Prepare the canvas:
Start with a clean, dry canvas. If you want a smoother surface for the silhouette later, you can apply a thin coat of gesso and sand it lightly once dry, though standard store-bought canvases are usually ready to go. -
Map out the moon:
Decide where you want your moon to sit. Place your circular object (like a dinner plate) slightly off-center on the canvas and lightly trace around it with a pencil. This ensures a perfect geometrical shape. -
Mix the sky gradient:
On your palette, prepare a large amount of a soft peach color and a lighter warm beige. You want enough paint to cover the background quickly without stopping to remix.
Uneven Moon Edges?
If your hand shakes while painting around the moon, let the paint dry fully. Then, trace your plate again over the dry paint and use the pencil line as a guide to clean up the edges with fresh paint.
Step 2: Painting the Backdrop
-
Paint the moon:
Using a clean brush, fill in the moon circle with Titanium White mixed with a tiny drop of Warm Beige. It needs to be bright but not blindingly stark white. Paint carefully along the pencil edge to keep it crisp. -
Add lunar texture:
While the moon paint is still wet, dab in very subtle touches of slightly darker beige or pale gray to create crater suggestions. Keep this minimal; the backlight effect works best if the moon remains bright. -
Apply the sky base:
Using your large flat brush, apply the peach paint starting from the top edges of the canvas, working downwards. Ensure your brush strokes are horizontal and smooth. -
Blend the gradient:
As you move closer to the moon and the horizon line, blend in the Light Pink and Warm Beige. The sky should be darker at the top and corners, getting softer and lighter near the moon and the horizon. -
Refine the moon’s edge:
Carefully cut in around the painted moon with your sky color. If you accidentally paint over the moon’s edge, wait for it to dry and re-touch the circle with white. -
Add wispy clouds:
Using a dry brush with a tiny amount of the peach color, lightly sweep horizontal streaks across the moon’s surface and the surrounding sky to create the illusion of thin, passing clouds.
Make it Personal
Change the silhouette to match your reality! Add a dog sitting at their feet, change the hairstyles, or adjust the height difference between the figures to represent you and your partner more accurately.
Step 3: Creating the Silhouette
-
Draft the figures:
Once the background is completely dry—this is crucial—lightly sketch the outline of the couple. Focus on the negative space between their faces; getting the profiles right here is more important than the bodies. -
Block in the black:
Load your medium round brush with Mars Black paint. Outline your figures first, steadying your hand against the canvas. Fill in the bodies solidly, ensuring the paint is opaque. -
Refine the profiles:
Switch to your fine detail liner brush to sharpen the noses, chins, and lips. The silhouettes need crisp edges against the bright moon to really pop. -
Paint hair details:
Use the very tip of the liner brush to pull out tiny strands of hair for the female figure. Flick the brush quickly outward to create natural-looking waves that catch the light. -
Establish the ground:
Paint an uneven, jagged black line across the bottom of the canvas to represent the ground. Fill everything below this line with solid black.
Step 4: Final Touches
-
Add tall grasses:
Using the liner brush, paint thin, vertical strokes rising from the black ground. Make them varying heights and lean them slightly in different directions to look natural. -
Create seed heads:
On the taller grass stalks, dab tiny uneven spots at the tips to mimic seed heads or wildflowers in silhouette. -
Final inspection:
Step back and look for any tiny pinholes of light showing through the black silhouette. Fill these in with a second coat of black if necessary to make the figures completely solid.
Now step back and admire the warm, romantic atmosphere you have crafted on canvas
Two Lovebirds on a Wire, Each Partner Paints One Bird
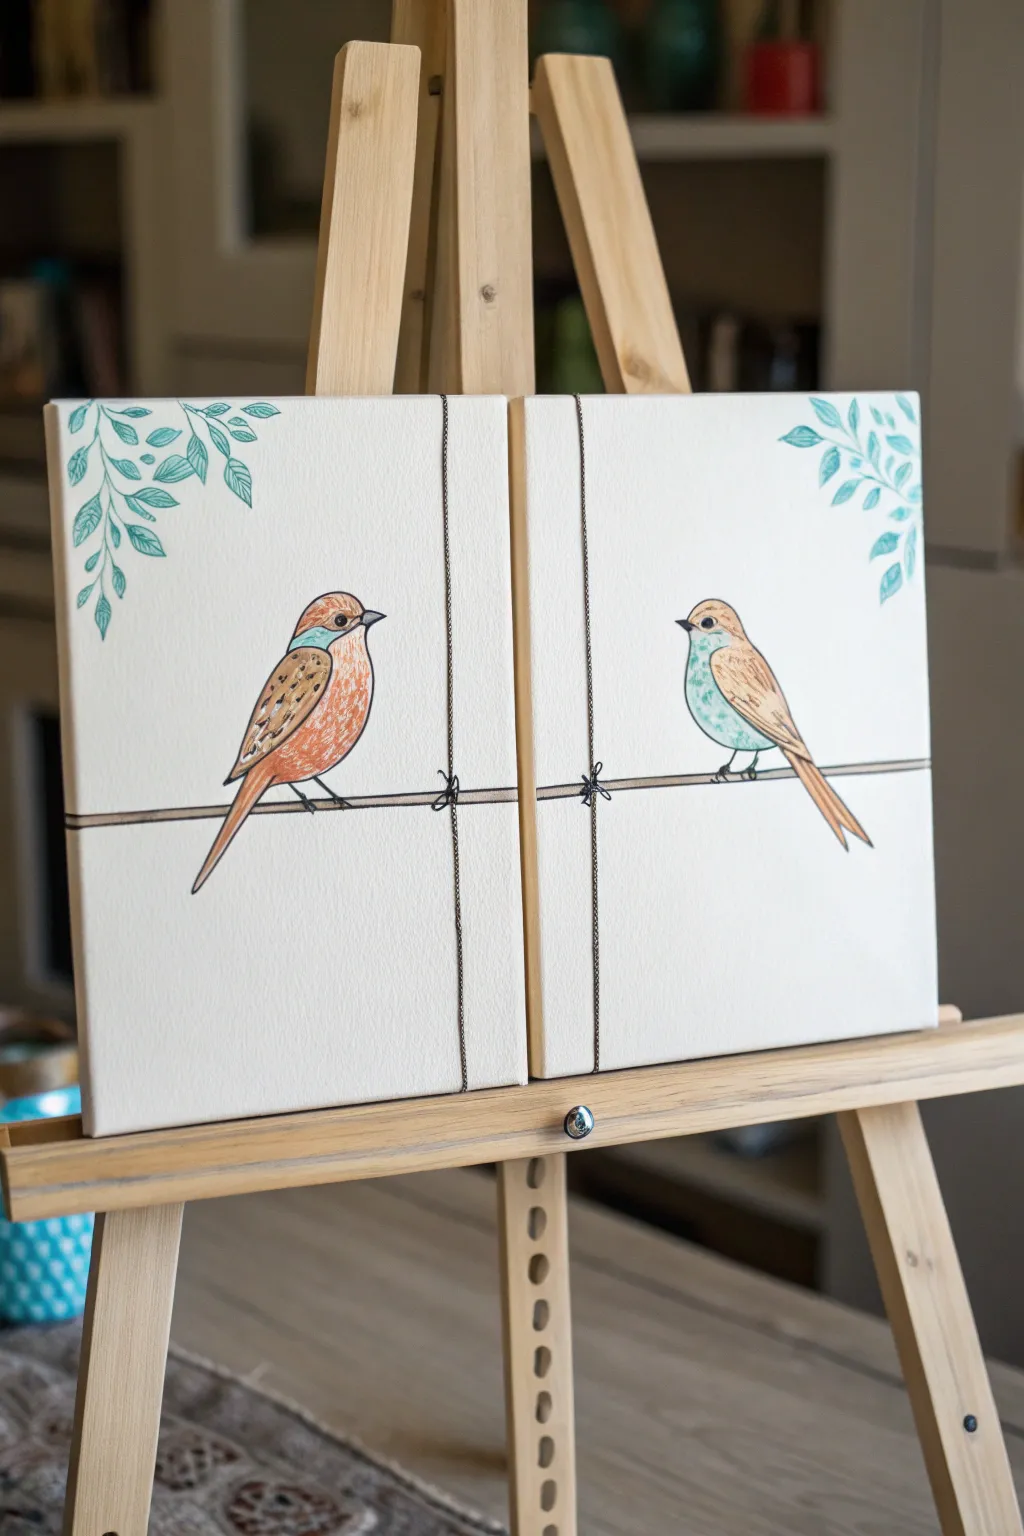
Create a charming connection with this partner painting project where two individual canvases come together to form a single scene. Featuring stylized, sketched birds perched on a shared wire, this diptych uses soft washes of color and delicate line work for a whimsical finish.
Step-by-Step Guide
Materials
- Two 10×10 inch stretched canvases
- Pencil and eraser
- Black fine-point permanent ink pen or acrylic paint marker
- Acrylic paints (black, white, turquoise, teal, orange/rust, light brown)
- Small round paintbrushes (sizes 2 and 4)
- Fine liner brush (size 0 or 00)
- Ruler or straight edge
- Palette or paper plate
- Water cup and paper towels
Step 1: Planning and Sketching
-
Set the Stage:
Place your two canvases side-by-side on your easel or workspace, ensuring the edges touch. This is crucial because your horizon line (the wire) needs to flow continuously across both panels. -
Draw the Wire:
Lay your ruler across both canvases about one-third of the way up from the bottom. Lightly sketch a straight horizontal line that spans the entire width of both canvases. -
Adding Detail to the Wire:
Draw a second line just barely below the first to give the wire thickness. Where the two canvases meet, sketch a tiny, loose bow or knot shape centered directly on the gap, making it look like the wire is tied together there. -
Outline the Birds:
Sketch a bird on each canvas. The left bird generally faces right, and the right bird faces left, looking at each other. Keep the shapes simple: an oval for the body, a smaller circle for the head, and a long triangular tail extending diagonally downward. -
Add Foliage Accents:
In the upper outer corner of each canvas (top left for the left canvas, top right for the right), sketch cascading leafy vines. Draw a main stem curving inward with small, almond-shaped leaves branching off.
Uneven Wire?
If your horizontal line doesn’t match perfectly when the canvases touch, thicken the line slightly on both sides to mask the discrepancy.
Step 2: Inking the Outlines
-
Trace Over Pencil:
Using your fine-point black permanent pen or a very steady hand with a fine liner brush and black paint, trace over all your pencil lines. Don’t worry if the lines are slightly shaky; a ‘sketched’ look adds character here. -
Enhance Bird Details:
Add details to your birds with the ink. Draw the round eye with a small highlight, define the beak, and add wing feathers using loop or scalloped shapes. Draw thin legs gripping the wire. -
Add Vertical Strings:
Draw a thin vertical line falling from the top edge of the canvas down to the ‘knot’ on the wire. Do this on both canvases to look like the wire is suspended. -
Erase Guidelines:
Once the ink is completely dry (give it a few minutes to avoid smudging), gently erase any visible pencil marks to clean up the canvas.
Level Up: Metallic Pop
Use a gold or copper metallic paint pen to trace over just the wing feathers or the leaves for a dull shine that catches the light.
Step 3: Painting the Colors
-
Paint the Wire String:
Mix a very watery black or dark grey paint. Carefully fill in the horizontal wire and the vertical hanging strings. The paint should be thin enough to see the texture of the canvas. -
Color the Leaves:
Mix a soft teal color using turquoise and white. Paint the leaves in the corners, keeping the paint application fairly transparent or ‘washy’ rather than opaque. -
Paint the Left Bird: Belly:
For the left bird, mix an orange-rust color. Paint the belly area and the upper wing, stippling the brush slightly to suggest feathery texture. -
Paint the Left Bird: Accents:
Use a light turquoise to paint a small patch on the bird’s neck or shoulder. Use light brown for the primary flight feathers on the wing and tail. -
Paint the Right Bird: Belly:
Reverse the color scheme for the bird on the right. Paint the chest and belly in the soft turquoise or mint green shade. -
Paint the Right Bird: Wings:
Paint the wing and tail feathers in a warm light brown or tan color. You can dilute the paint slightly with water to let the white canvas brighten the tone. -
Add Feather Texture:
Once the base colors are dry, take your black pen or fine brush again. Add tiny hatched lines, dots, or small ‘v’ shapes over the painted areas to simulate intricate feather patterns and shadows.
Step 4: Final Touches
-
Highlight the Eyes:
Dip the very tip of a toothpick or the handle of a brush into white paint. Place a tiny dot inside the black eye of each bird to bring them to life. -
Refine the Knot:
Darken the little bow or knot at the center junction point with black paint so it stands out as the focal point connecting the two pieces.
Step back and admire how your two separate creations unite into one sweet scene

PENCIL GUIDE
Understanding Pencil Grades from H to B
From first sketch to finished drawing — learn pencil grades, line control, and shading techniques.
Explore the Full Guide
Night Sky With Constellations That Connect Your Initials
Bring the cosmos into your home with these striking twin galaxy paintings featuring stylized zodiac constellations. The deep, nebulous blends of indigo and violet create a dreamy backdrop for stark white star maps that seem to glow against the darkness.
Step-by-Step
Materials
- Two stretched canvases (e.g., 16×20 inches)
- Acrylic paints: black, navy blue, ultramarine, bright violet, magenta, and white
- Large flat paintbrush
- Sponge applicators or a natural sea sponge
- Small round detail brush (size 0 or 1)
- Old toothbrush
- Ruler
- Chalk or a white pastel pencil
- Cup of water and palette (or paper plate)
- Paper towels
Step 1: Creating the Galaxy Background
-
Base coat:
Begin by painting the entire surface of both canvases with a solid coat of black acrylic paint. Don’t forget to paint the sides for a finished look. Let this layer dry completely before moving on. -
Deep blue blending:
Mix a small amount of black into your navy blue to create a midnight shade. Using a sponge, dab this color randomly across the canvas, leaving some areas pure black. Work in diagonal drifts to mimic the flow of a nebula. -
Adding vibrant hues:
While the previous layer is still slightly tacky, sponge on your ultramarine blue and bright violet. Focus these brighter colors in the centers of your blue drifts to create depth and dimension. -
Highlighting with magenta:
Sparingly dab magenta or pink into the lightest purple areas. Soften the edges by gently blotting with a clean part of your sponge to ensure smooth transitions between the colors. -
Creating the stars:
Thin down a small amount of white paint with water until it has an ink-like consistency. -
Splatter technique:
Dip an old toothbrush into the thinned white paint. Point the bristles toward the canvas and run your thumb across them to spray fine mist droplets over the dark background. -
Adding prominent stars:
Use the handle of a small paintbrush or the very tip of your detail brush to dot larger, distinct stars in the darker negative spaces. I like to add tiny ‘cross’ shapes on a few of the biggest stars to make them twinkle. -
Drying time:
Allow the galaxy background to dry thoroughly for at least an hour. The surface must be completely dry before you sketch the constellations to prevent the chalk from smudging the paint.
Star Splatter Mess?
If you accidentally splatter a huge blob of white paint, don’t wipe it! Let it dry, then sponge a bit of black or blue over it to turn it into a distant planet or dark star.
Step 2: Mapping the Constellations
-
Choose your design:
Decide on your pattern. You can use real zodiac constellations like Gemini or Virgo, or create a custom celestial map linking your initials together. -
Sketching placement:
Lightly draw the main points of your constellation using chalk or a white pastel pencil. This allows you to wipe away mistakes easily with a damp cloth. -
Connecting the dots:
Use a ruler and your chalk to lightly draw straight lines connecting your star points. Double-check your proportions to ensure the image is centered on the canvas. -
Painting the main stars:
Load your small round detail brush with pure white paint (not thinned). Paint solid white circles over your chalk marks where the main stars are located. Vary the sizes slightly for a natural look. -
Refining the connections:
Using the detail brush and a steady hand, paint over your connecting chalk lines. You can make these solid lines or broken dashed lines depending on the style you prefer. -
Adding geometric details:
To mimic the technical look of a star map, paint tiny perpendicular hash marks across some of the connecting lines. -
Clean up:
Once the white detailed paint is fully dry, gently wipe away any visible remaining chalk lines with a slightly damp paper towel.
Add Some Shimmer
Mix a tiny amount of silver metallic paint or fine glitter into your white paint for the constellation lines to make the artwork catch the light as you walk by.
Hang these side-by-side to create a stunning window into deep space right on your wall
Paint-and-Sip Still Life: Glasses, Snacks, and Candlelight
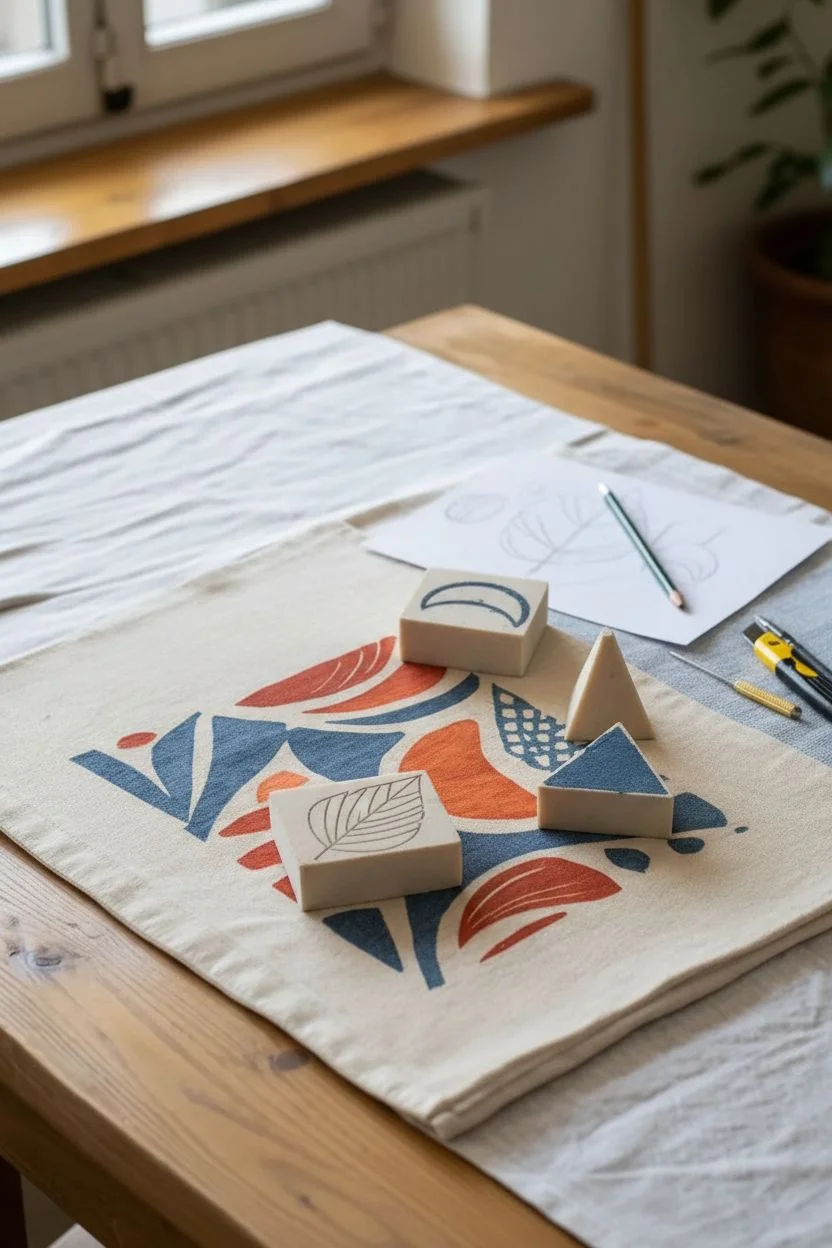
Transform plain linen into a modern dining statement with this bold geometric placemat project. Using block printing or stenciling techniques, you’ll create a lively composition of abstract leaves and half-moons in warm terracotta and cool indigo tones.
How-To Guide
Materials
- Plain linen or cotton canvas placemat (beige/oatmeal)
- Fabric paint (Terracotta/Burnt Orange, Deep Indigo/Navy Blue)
- Linoleum carving block or high-density foam sheet
- Carving tools (V-gouge and U-gouge)
- Foam pouncer or sponge brush
- Pencil and paper for sketching
- X-Acto knife or craft scissors
- Small paintbrush (for touch-ups)
- Iron and pressing cloth
Step 1: Design & Preparation
-
Sketch your motifs:
Begin by sketching the primary shapes on a piece of paper. You want three main elements: a stylized leaf-like shape with internal stripes, a solid crescent or semi-circle, and a triangular connector shape with curved edges. Keep the lines bold and simple. -
Transfer to block:
Place your linoleum block or foam sheet face up. Use a pencil to draw your shapes onto the surface. Remember that whatever you carve will be the negative space (the fabric color), and the raised areas will hold the paint. If you are using foam, you can simply cut the shapes out with scissors to create stamps. -
Carve the details:
Using your V-gouge, carefully carve away the negative space. For the striped leaf motif seen in the image, carve out thin lines to create the white separation between the segments. For the grid pattern shape, carve a cross-hatch design. -
Prepare the fabric:
Iron your textile placemat flat to remove any creases. Lay it on a hard, flat surface protected by scrap paper or a plastic sheet to prevent paint bleed-through.
Uneven Print?
Don’t panic! Light patches are part of the block-print aesthetic. If it’s too patchy, use a stiff brush to stipple paint into the light areas while wet.
Step 2: Printing Process
-
Plan placement:
Lay your carved blocks or foam stamps onto the dry fabric without ink first to visualize the composition. The design in the image uses a mirrored, symmetrical layout that radiates from the center. -
Load the indigo:
Pour a small amount of deep indigo fabric paint onto a palette. lightly dab your foam pouncer into the paint, then tap it evenly onto your first stamp—specifically the blue triangular/curved connector shapes. -
Print the blue layer:
Press the stamp firmly onto the fabric. Apply even pressure with the palm of your hand, rocking slightly to ensure the edges catch. Lift the stamp straight up. Repeat this for all the blue sections of the design, creating the framework. -
Load the terracotta:
Clean your pouncer or grab a fresh one. Load the terracotta orange paint onto your leaf and semi-circle stamps. I prefer to do a test print on a paper scrap first to ensure the paint isn’t too gloopy. -
Print the orange accents:
Carefully align the orange stamps within the negative spaces left by the blue framework. Press firmly and lift. The imperfect registration where colors almost touch adds to the hand-crafted charm. -
Add the grid detail:
If you carved the cross-hatched semi-circle, ink that up with blue now and stamp it near the top or bottom edges to balance the composition. -
Freehand dots:
Dip the handle end of a paintbrush into the blue paint. Gently dot the fabric around the outer edges of the design to create the festive confetti-like spots seen in the reference.
Pro Tip: Foam vs. Lino
For this soft, textured look, high-density craft foam is actually better than lino. It absorbs more paint and creates that lovely, soft edge texture.
Step 3: Finishing Touches
-
Touch up:
Inspect your print. If some areas look too faint, you can use a fine paintbrush with a tiny bit of paint to carefully fill in the solid areas, though aiming for perfect solid coverage isn’t necessary for this rustic look. -
Dry completely:
Let the placemat sit undisturbed for at least 24 hours. The paint needs to cure fully before it interacts with heat. -
Heat set:
Once fully dry, place a thin pressing cloth (step in: an old pillowcase works wonders here) over the painted design. Run a hot iron, no steam, over the artwork for 3-5 minutes to permanently set the ink into the fibers.
Your table is now set with a piece of functional art that brings a warm, artisanal vibe to your next dinner date


Paint Each Other’s Portraits in a Simple, Stylized Way
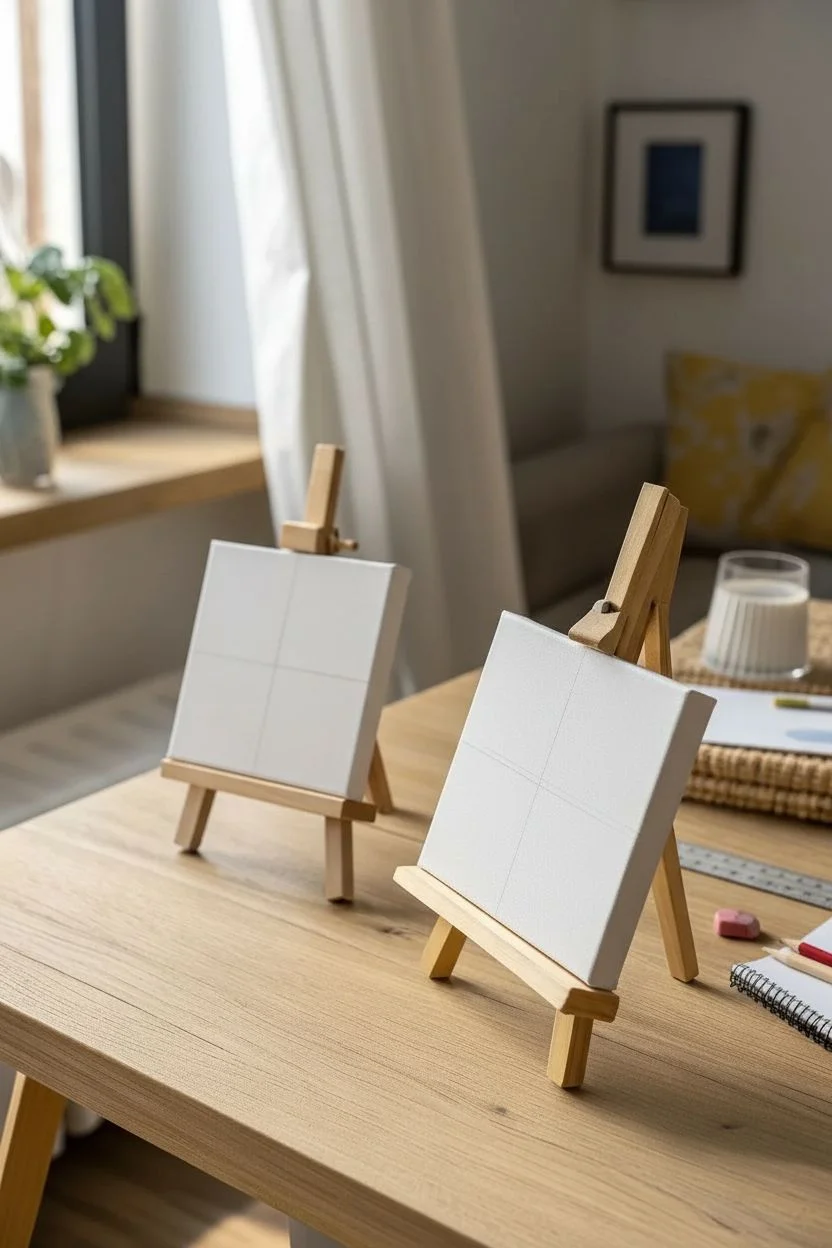
Embrace the bold simplicity of geometric abstraction with this dual canvas project that plays with primary colors and balance. The result is a striking pair of complementary artworks featuring clean lines and vibrant hues, perfect for adding a pop of minimalist charm to any shelf or desk.
Step-by-Step Guide
Materials
- Two small square canvases (approx. 4×4 or 6×6 inches)
- Two mini wooden table easels
- Acrylic paints: Primary Red, Primary Yellow, Primary Blue, Titanium White
- Flat shader brushes (size 4, 6, or 8 depending on canvas size)
- Ruler or straight edge
- Pencil
- Painter’s tape or masking tape (1/4 inch width is ideal)
- Palette or mixing plate
- Cup of water and paper towels
- Eraser
Step 1: Preparation and Grid Layout
-
Prepare the canvases:
Set up your workspace by placing both mini easels side-by-side. Inspect your canvases to ensure the surfaces are clean and free of dust. If they aren’t pre-primed, apply a thin coat of gesso and let it dry completely. -
Measure the center point:
Using your ruler, measure the exact vertical center of the first canvas and make a small tick mark with your pencil at the top and bottom edges. -
Draw the vertical axis:
Connect the top and bottom marks with a very light pencil line. Press gently so the graphite doesn’t smudge into your paint later. -
Measure the horizontal axis:
Repeat the measuring process to find the horizontal center. Mark both side edges. -
Complete the grid:
Draw the horizontal line across to create a perfect cross, dividing the canvas into four equal quadrants. Repeat all measuring and drawing steps for the second canvas. -
Mask the lines (optional):
If you struggle with painting straight edges freehand, apply thin painter’s tape directly over your pencil lines. This creates a barrier between the color blocks. If you prefer a hand-painted look like the example, skip the tape.
Crisp Lines Without Tape
Load only one side of your flat brush with paint. Glide the clean side along your pencil line, letting the loaded side deposit paint. This keeps the edge sharp and prevents bleed-under.
Step 2: Color Mixing and Application
-
Mix the light blue:
Squeeze out some Primary Blue and a generous amount of Titanium White onto your palette. Mix them until you achieve a soft, sky-blue tone. -
Mix the dark blue:
Set aside a portion of pure Primary Blue. You can add a tiny dot of black or purple if you want to deepen it, or use it straight from the tube for a classic look. -
Prepare red and yellow:
Dispense your Primary Red and Primary Yellow onto the palette. I like to add a tiny drop of white to the yellow to improve its opacity, as yellow acrylics can be naturally transparent. -
Paint the first quadrant (Canvas 1):
On the first canvas, paint the top-left square with Primary Red. Use a flat brush to cut in clean edges along the pencil lines first, then fill the center. -
Paint the second quadrant (Canvas 1):
Clean your brush thoroughly. Paint the top-right square with your bright Yellow mixture. -
Paint the third quadrant (Canvas 1):
Move to the bottom-left square and fill it with your mixed Light Blue. -
Finish Canvas 1:
Complete the first artwork by painting the remaining bottom-right square with the Dark Blue. Check for consistent coverage. -
Paint the first quadrant (Canvas 2):
Switch to the second canvas. Paint the top-left square Yellow to create contrast with the first painting. -
Paint the second quadrant (Canvas 2):
Paint the top-right square with Primary Red. -
Paint the third quadrant (Canvas 2):
Fill the bottom-left square with Primary Red again. Note that in this variation, we are using red twice to change the rhythm of the pair. -
Finish Canvas 2:
Complete the set by painting the final bottom-right square with your Light Blue mixture.
Texture Play
Instead of smooth strokes, use a palette knife or heavy brush application to create impasto texture. Thick, raised paint adds a tactile dimension that makes simple squares feel luxurious.
Step 3: Refining and Sealing
-
Review the edges:
If you used tape, wait until the paint is tacky (not fully wet, not bone dry) to peel it off gently. If you free-handed, use a small liner brush with white paint to clean up the dividing lines if they look messy. -
Touch up opacity:
Look closely at the yellow and red sections. If the canvas texture shows through too much, apply a second coat once the first layer is dry. -
Clean visible borders:
Paint the outer sides of the canvas white for a gallery-wrapped look, or carry the quadrant colors over the edge if you prefer a continuous block effect. -
Final drying time:
Let both paintings sit undisturbed for at least an hour before handling them or placing them back on display.
Set your finished miniature masterpieces on their easels and enjoy the vibrant geometry you’ve created together
Paint the Same Reference Photo, Then Swap and Add Details
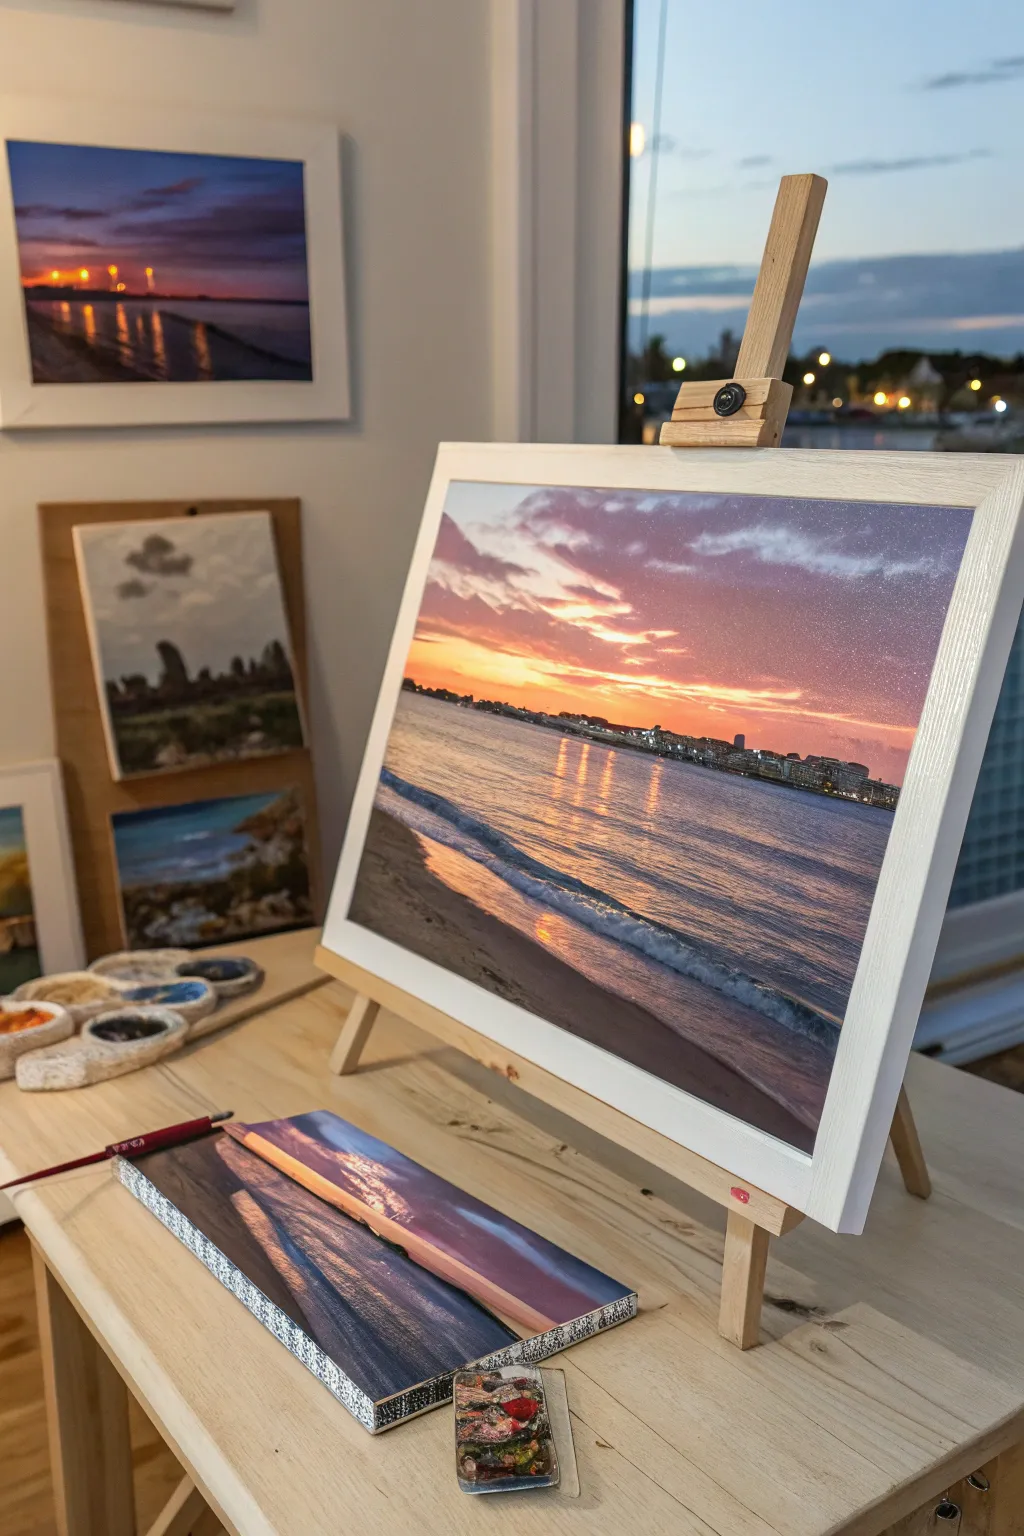
Capture the serene beauty of a coastal sunset with this acrylic painting project, perfect for a cozy date night. Using a shared reference photo, you’ll learn to blend a vibrant gradient sky and reflect those warm hues onto calm waters.
Step-by-Step
Materials
- Canvas panel (framed or unframed) or stretched canvas
- Wooden tabletop easel
- Acrylic paints (Titanium White, Mars Black, Cadmium Yellow, Alizarin Crimson, Ultramarine Blue, Phthalo Blue)
- Palette or mixing tray
- Set of brushes (1-inch flat brush, medium filbert, lush round)
- Small fine liner brush
- Water cup and paper towels
- Reference photo of a sunset (printed or on a tablet)
Step 1: Setting the Scene
-
Prepare the canvas:
Set up your canvas on the easel. If you are starting with a raw canvas, apply a coat of gesso to prime the surface and let it dry completely. A smooth surface helps the sky gradient blend easier. -
Establish the horizon:
Using a ruler or a steady hand, draw a light pencil line across the canvas about one-third of the way up from the bottom. This separates your sky from the water. -
Block in the sky colors:
Starting at the top of the canvas, brush on a mix of Ultramarine Blue and a touch of Alizarin Crimson to create a deep twilight purple. -
Create the gradient:
As you move down toward the horizon, gradually mix in more white and Alizarin Crimson to transition into pinks. Just above the horizon line, blend in Cadmium Yellow mixed with White for the glowing sunset effect. -
Blend the sky:
With a clean, slightly damp large flat brush, gently sweep back and forth horizontally across the transition areas while the paint is still wet to create a smooth, cloud-like softness.
Step 2: Water and Reflections
-
Base the water:
Below the horizon line, paint the water area. Use a darker version of your sky colors—deep blues and purples—near the bottom shoreline, fading into lighter reflected pinks and oranges near the horizon. -
Add shimmering reflections:
While the water base is tacky, take your yellow-orange sky mix and paint vertical, dashed strokes directly under the brightest part of the sunset to show light reflecting on the waves. -
Paint the shoreline:
Mix Mars Black with a little brown or dark blue to create a dark silhouette color. Paint the sandy foreground area at the very bottom left, sweeping it diagonally upwards. -
Detail the waves:
Using a liner brush and watered-down Titanium White, paint thin, rolling lines where the water meets the sand to create the look of gentle foam.
Muddy Colors?
If your sunrise turns brown, stop! Yellow and purple are complementary colors and make brown when mixed. Let the purple layer dry completely before painting yellow near it.
Step 3: Cityscape and Details
-
Silhouette the city:
along the horizon line, use a small round brush and your dark silhouette color to dab in tiny rectangular shapes representing distant buildings. -
Vary the heights:
Make sure the buildings vary in height and width to create organic interest, rather than a uniform block. -
Add distant lights:
Once the black silhouette is dry, use the tip of a toothpick or a fine liner brush with pure white (or pale yellow) to place tiny dots of light amongst the buildings. -
Enhance the clouds:
Return to the sky with a small filbert brush. Mix a soft grey-purple and scumble in a few wispy clouds over the pink sections, ensuring the edges are soft and irregular. -
Swap and refine:
If doing this as a date night challenge, swap paintings now! Look at your partner’s work and add one small detail, like a brighter highlight on a wave or a specific building shape.
Pro Tip: Glazing
For an intense glow, let the painting dry, then apply a thin glaze of transparent yellow or orange over the sun area. It boosts vibrancy instantly.
Step 4: Final Touches
-
Review contrast:
Step back and check the contrast between the dark foreground and the bright sunset. If the foreground looks too flat, dry brush a little lighter sand color over the texture. -
Frame it:
If you painted on a plain panel, you can now insert it into a white frame to make the colors pop, exactly like the reference image.
Enjoy the relaxed atmosphere as you admire your finished seascape together
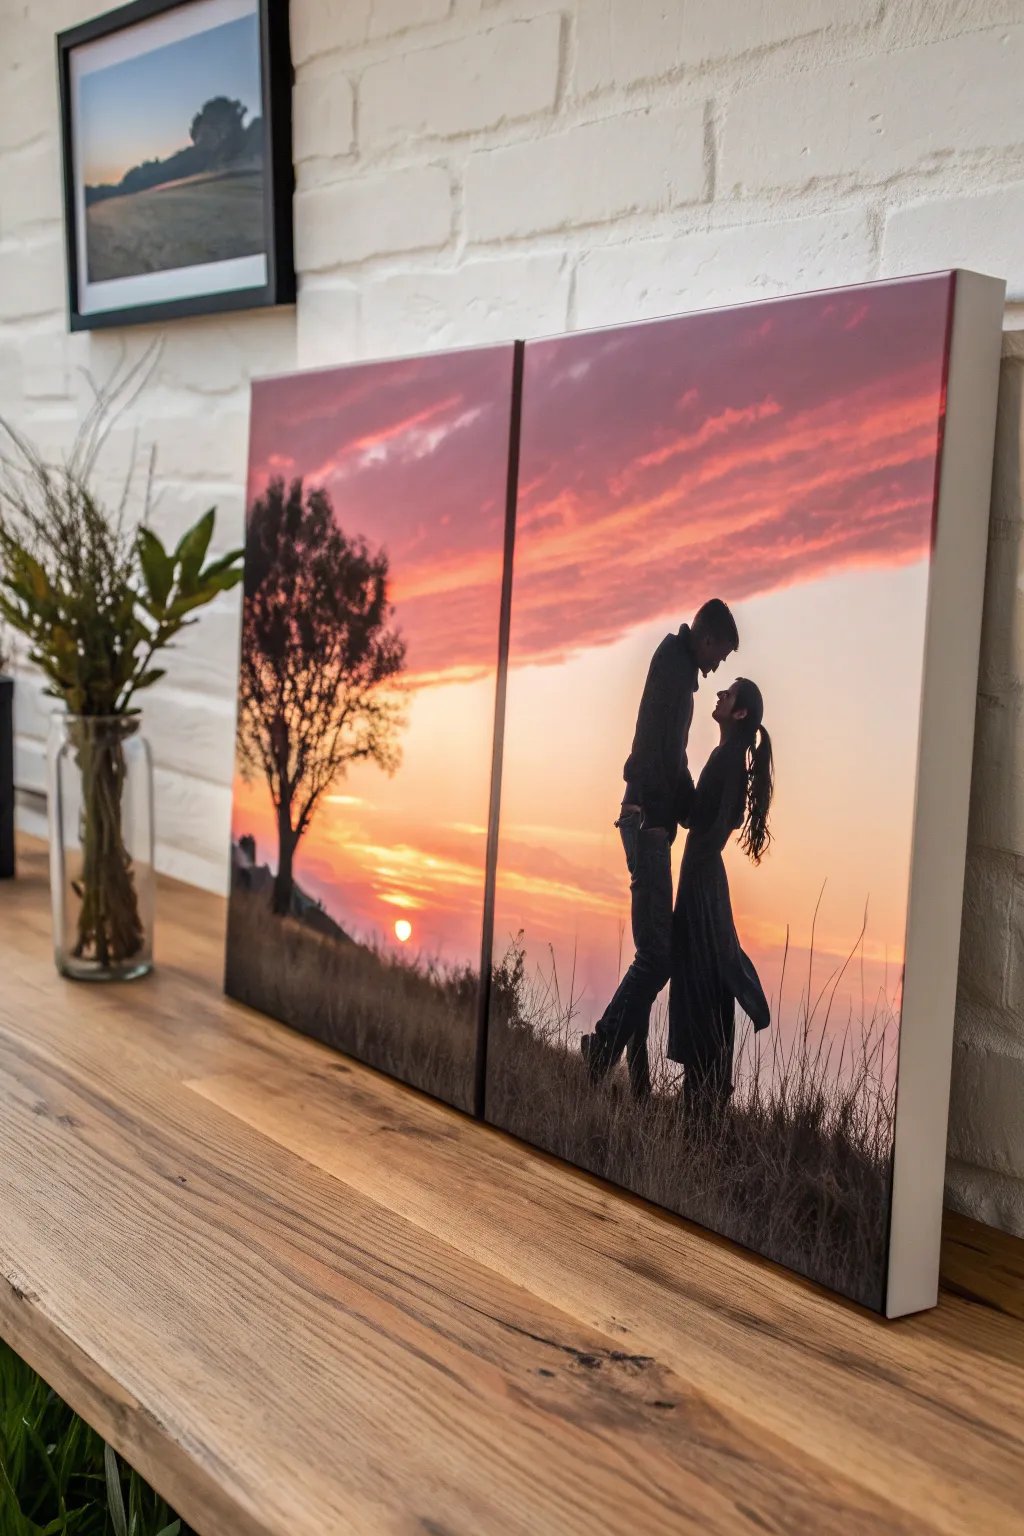
Memory Postcard Paintings From a Favorite Trip Together
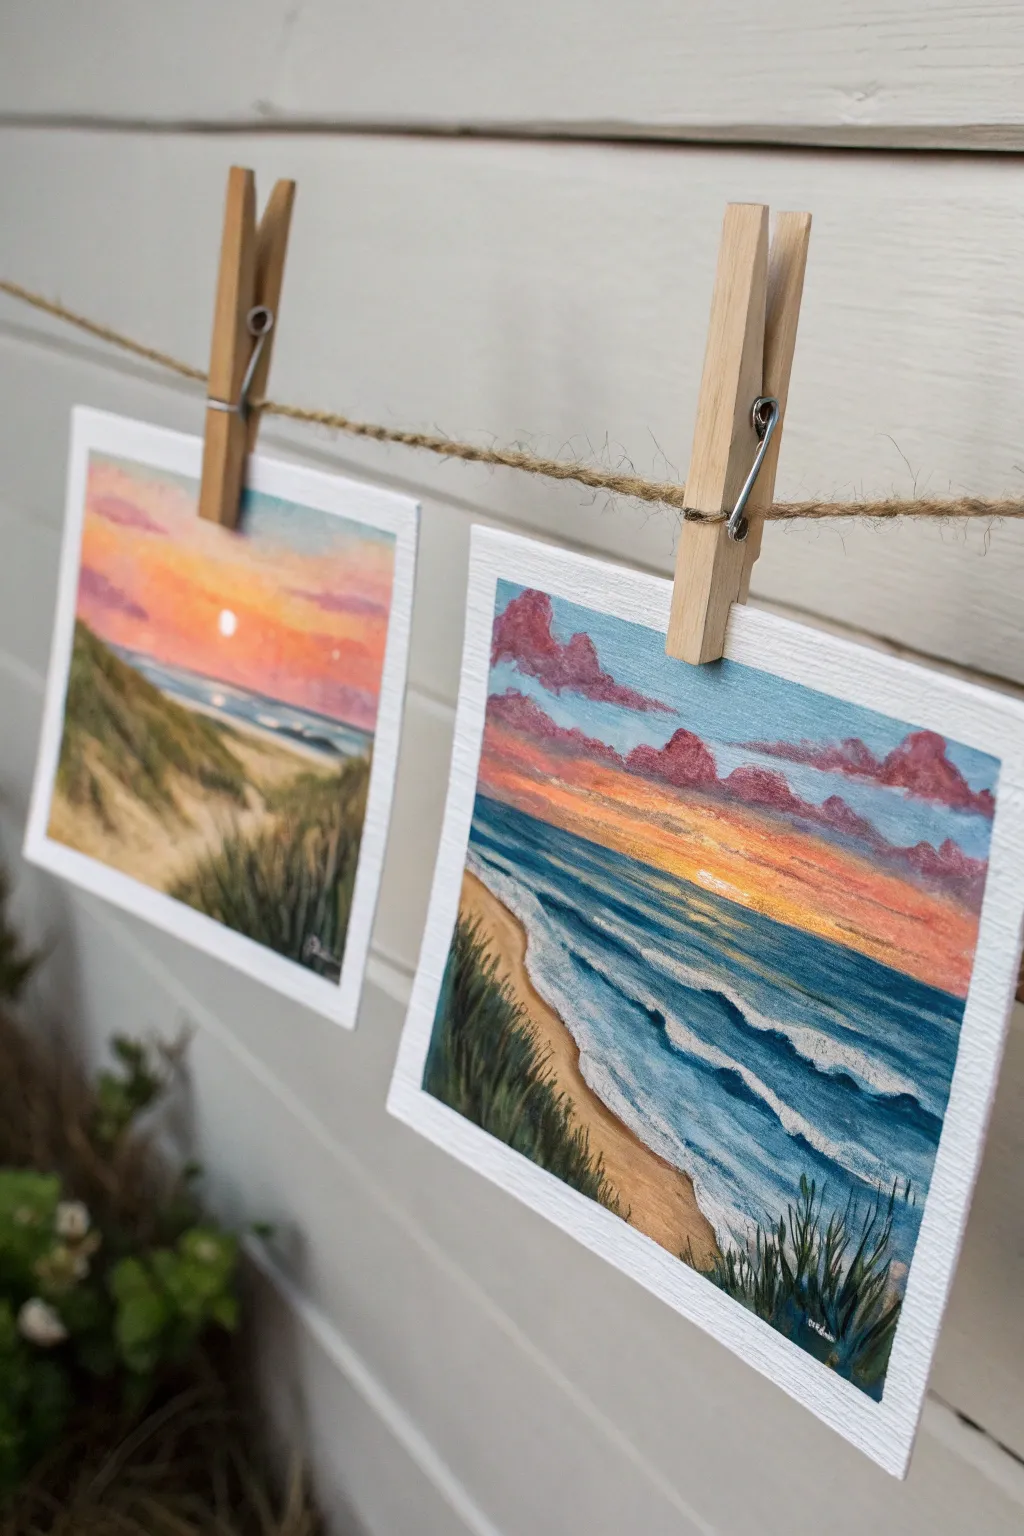
Capture the magic of golden hour with these charming square seascape paintings that look wonderful displayed on a simple string. Using a vibrant palette of acrylics, you’ll recreate the soft glow of a beach sunset and the rhythmic motion of crashing waves on a petite canvas.
Step-by-Step Tutorial
Materials
- Heavyweight watercolor paper or canvas sheet (cut into 4×4 squares)
- Acrylic paints (primary blue, turquoise, titanium white, cadmium yellow, orange, magenta, burnt sienna, sap green)
- Painter’s tape or artist tape
- Flat shader brushes (sizes 4 and 6)
- Small round detail brush (size 1)
- Palette or paper plate
- Water cup and paper towel
- Jute twine and wooden clothespins for display
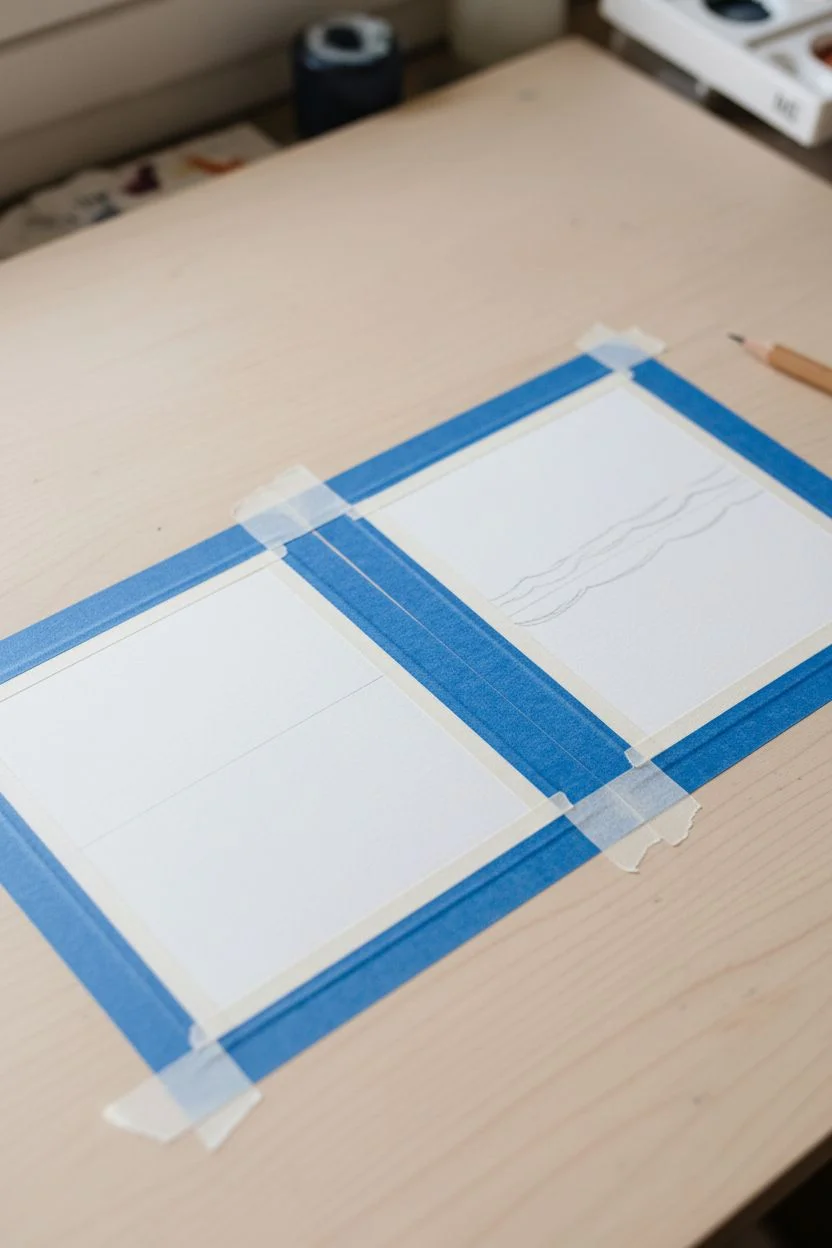
Step 1: Preparing the Mini Canvas
-
Prep your surface:
Cut your watercolor paper or canvas sheet into 4×4 inch squares. Tape the edges down to your work surface using artist tape, creating a clean white border about 1/4 inch wide around the perimeter. -
Observe the horizon:
For the left painting (dunes), draw a light pencil line for the horizon about two-thirds up the paper. For the right painting (active waves), place the horizon line just above the middle.
Wet-on-Wet Blending
For the smoothest sunset gradients, keep your brush slightly damp and work quickly. If the paint drags, mist the paper with water.
Step 2: Painting the Sky (Dune Scene)
-
Block in the sky gradient:
Start with titanium white mixed with a touch of yellow near the horizon line. As you move upward, blend in orange and then a soft magenta at the very top. Use a damp flat brush to smooth the transitions. -
Add cloud wisps:
While the sky is still slightly tacky, use a small amount of purple-gray mixed from magenta and blue to streak in soft, horizontal clouds near the top.
Step 3: Creating the Dunes (Left Painting)
-
Base coat the sand:
Mix titanium white, burnt sienna, and a tiny bit of yellow to create a warm sand color. Fill in the bottom two-thirds of the painting with diagonal broad strokes representing the slopes of the dunes. -
Define the shadows:
Mix a darker version of your sand color by adding more burnt sienna and a touch of blue. Paint the shadowed sides of the dunes, ensuring the light source comes from the setting sun in the center. -
Paint the ocean strip:
Between the dunes and the sky, paint a thin strip of turquoise blue. Add a tiny dot of pure white directly under the sun area for the reflection on the water. -
Add dune grass texture:
Using your smallest round brush and a mix of sap green and burnt sienna, flick upward strokes from the bottom corners to create wild dune grasses. Vary the pressure to make the tips taper naturally.
Postcard Backing
Turn these into real mementos by gluing the painted paper onto stiff cardstock. Write a memory from the trip on the back.
Step 4: Painting the Sunset Waves (Right Painting)
-
Create a dramatic sky:
Paint a vibrant gradient starting with bright orange at the horizon, fading into a cool blue at the top. Let this layer dry completely. -
Paint fluffy clouds:
Mix magenta with a touch of white. Dab in puffy, cumulus-style clouds floating in the upper blue section. Add highlights to the bottom edges of the clouds with pale orange to reflect the sunset. -
Block in the ocean:
Fill the area below the horizon with a deep teal blue. As you get closer to the bottom left corner where the sand will be, lighten the blue with white. -
Form the waves:
Use a flat brush with titanium white to paint horizontal lines that curve slightly as they approach the shore. These become the crests of the waves. -
Create beach transition:
Paint the bottom left corner with your warm sand mixture (white, sienna, yellow). Gently blend the wet sand color into the shallow water for a transparent look. -
Add sea foam details:
Using the small round brush and thick white paint, stipple texture along the edge of the waves where they are crashing. Add faint foam trails in the shallow water pulling back from the sand. -
Foreground grasses:
Just like the dune painting, anchor the composition with dark green sea oats in the bottom right corner. Short, decisive upward flicks work best here.
Step 5: Finishing Touches
-
Add sun highlights:
Place a tiny, pure white circle for the sun on the horizon of both paintings. Add a final glaze of yellow around it if you want extra glow. -
Reveal the border:
Wait until the paint is completely bone dry to the touch. Slowly peel away the artist tape at a 45-degree angle to reveal the crisp clean edges. -
Display:
Hang a length of jute twine horizontally. Use small wooden clothespins to clip the top center of each painting to the string.
Enjoy seeing your favorite travel memories brighten up the wall with color
Handprint Heart Painting for a Sweet, Messy Moment
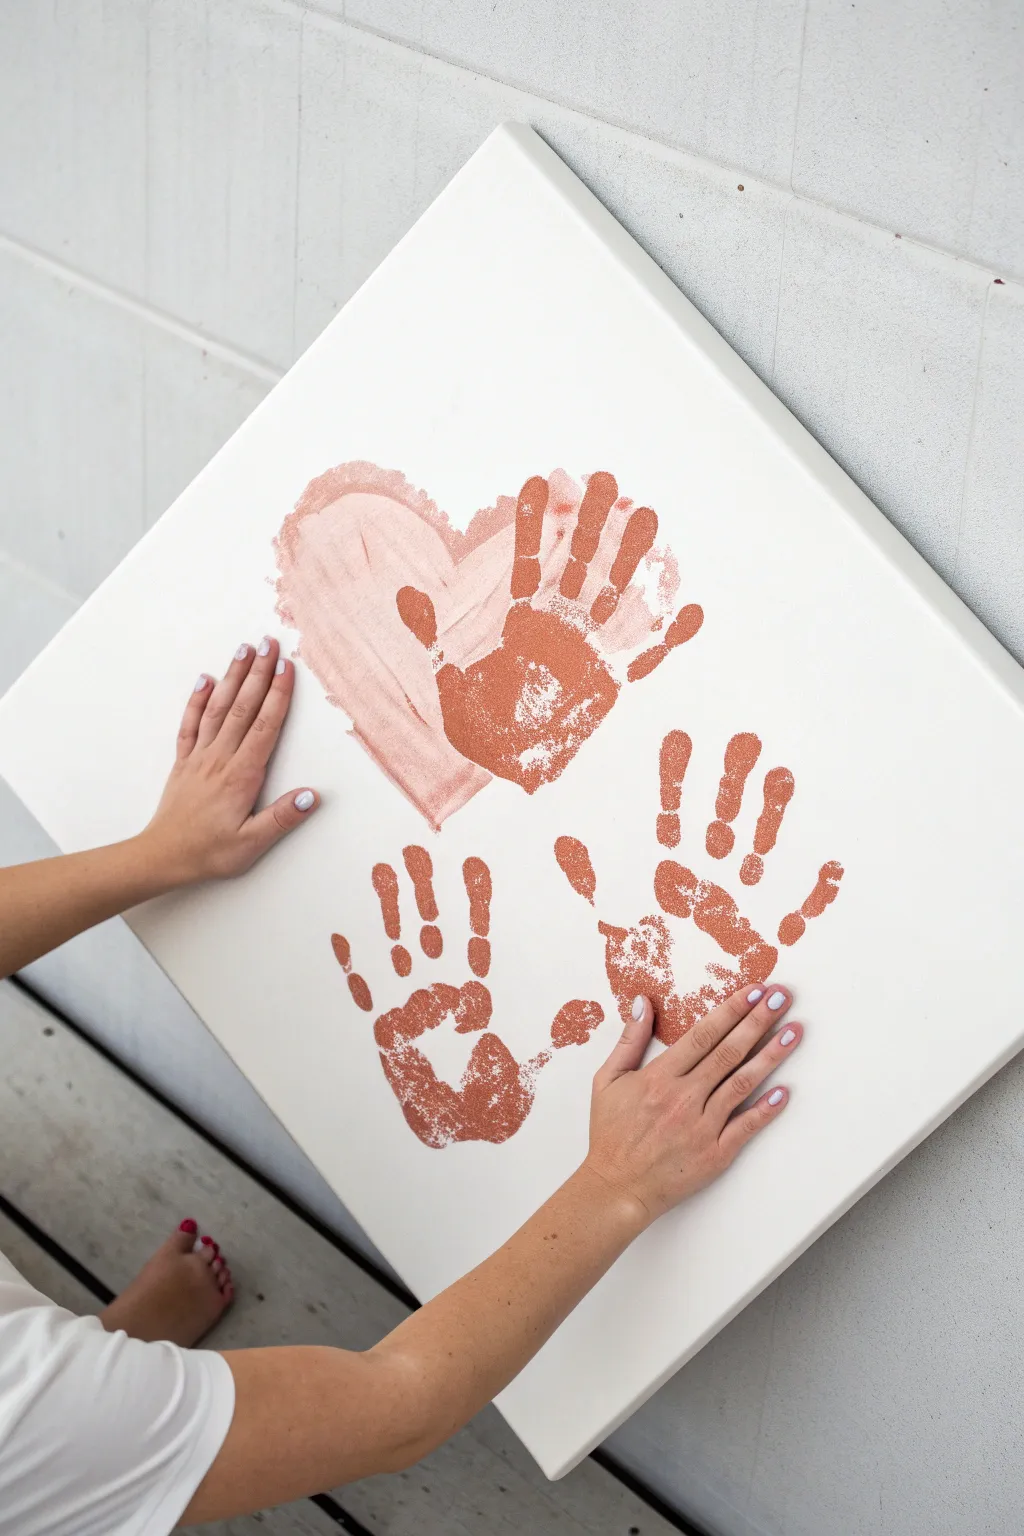
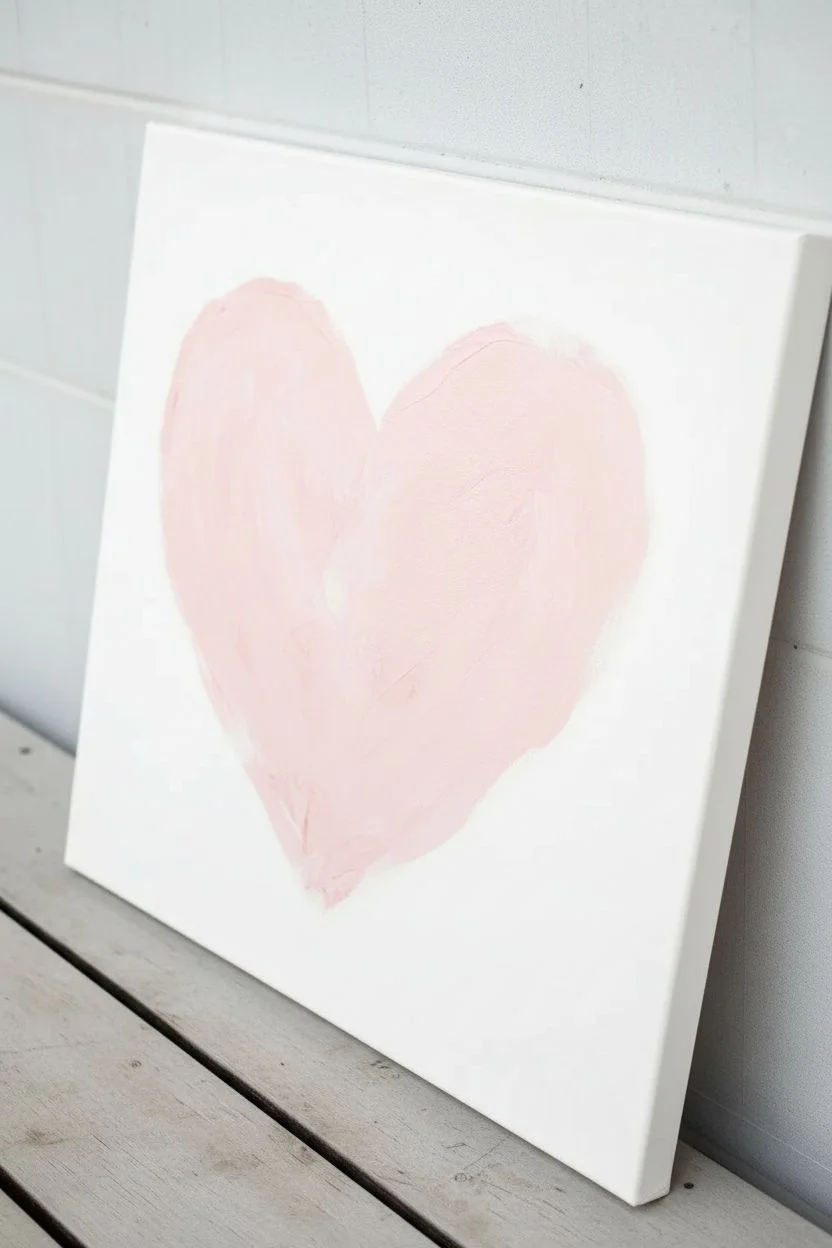
Create a sentimental keepsake that captures a moment in time with this elegant handprint canvas. Using shimmering copper and soft blush tones, you’ll layer a painted heart beneath your own handprints for a modern, minimalist piece of art.
Step-by-Step Guide
Materials
- Square stretched canvas (approx. 20×20 inches or similar)
- Acrylic paint in Rose Gold or Copper (metallic finish recommended)
- Acrylic paint in Soft Pastel Pink or Blush
- Large flat paintbrush (1-2 inch width)
- Paper plates or palette
- Baby wipes or damp paper towels (essential for cleanup)
- Pencil (optional for sketching)
Step 1: Painting the Heart Base
-
Prepare your palette:
Squeeze a generous amount of the soft pastel pink paint onto your paper plate. You want enough to cover a large heart shape without needing to stop and mix more. -
Visualize the placement:
Look at the canvas and decide where you want the heart. In the reference, it sits slightly off-center in the upper left quadrant, leaving room for handprints below and to the right. -
Sketch lightly (optional):
If you are nervous about free-handing, lightly sketch a simple heart shape with a pencil. Keep the lines very faint so they don’t show through the light paint. -
Paint the first curve:
Using the large flat paintbrush, load up your pink paint and create the left lobe of the heart. Use broad, sweeping strokes to give it a painterly texture rather than a perfect solid fill. -
Complete the heart shape:
Paint the right lobe to meet the left at the bottom point. Don’t worry about perfect symmetry; a slightly organic, rough-edged look adds to the charm of this piece. -
Feather the edges:
Go back over the edges of the heart with a slightly drier brush to create a soft, brushed-out effect. This prevents the heart from looking like a sticker and makes it feel more artistic. -
Let it dry completely:
This is crucial. The pink base layer must be 100% dry before you add the handprints, or the colors will smear together muddily. Give it at least 20-30 minutes.
Smudged Print?
If a hand slides and smears, don’t panic. Take a damp Q-tip and gently wipe away the excess smudge while wet. If it stains, wait for it to dry and touch up with white paint.
Step 2: Adding the Handprints
-
Prepare the metallic paint:
Pour a puddle of the rose gold or copper metallic paint onto a clean paper plate. Spread it out slightly so it’s easier to dip into or brush on. -
Coat the first hand:
Decide whose hand goes where. For the print on the heart, paint the palm and fingers of the hand thoroughly using a brush. Brushing the paint on ensures a more even coat than dipping. -
Place the overlapping print:
Carefully press the painted hand onto the dried pink heart. I find it helps to press down on each knuckle individually to ensure good contact with the canvas texture. -
Lift carefully:
Lift the hand straight up—peel it off specifically from palm to fingertips—to avoid smudging the metallic paint. -
Clean up quickly:
Immediately use baby wipes to clean the paint off the hand before it dries, then dry the hand with a towel. -
Position the second hand:
Apply the copper paint to the second person’s hand (or the other hand). Position this one in the lower right area of the canvas, angling the fingers slightly upward. -
Press and lift:
Firmly press the second hand onto the white background space, hold for a few seconds, and lift straight up to reveal the print. -
Add the final print:
Coat the hand for the third print. Position this one in the bottom left area, balancing out the composition. Press firmly and lift cleanly. -
Touch up if needed:
If a print is missing a major section, you can carefully dab a tiny bit of paint with your finger to fill it in, but usually, the imperfections make it look authentic. -
Final dry time:
Let the thick metallic paint dry completely overnight. Metallic acrylics often take a little longer to cure than standard matte paints.
Pro Tip: Better Texture
Place a hard book or board underneath the canvas canvas directly where the hand will press. Canvases have ‘give’ in the middle, and the hard surface ensures a crisp, detailed print.
Hang your collaborative masterpiece in a place where you’ll see it every day to remind you of your bond
Paint Your Favorite Love Song as Color and Shapes
Transform the rhythm and flow of your favorite love song into a bold, abstract masterpiece using flowing curves and earthy tones. This project captures the essence of sound through sweeping waves of burnt orange, navy, and cream, punctuated by rhythmic dots that mimic a musical beat.
Step-by-Step Tutorial
Materials
- Two square stretched canvases (12×12 or similar)
- Acrylic paints: Burnt Orange (Rust), Navy Blue, Light Grey/Taupe, and Titanium White
- Medium flat brush (3/4 inch)
- Small round detail brush (size 1 or 2)
- Pencil and eraser
- Paper plate or palette
- Painter’s tape or stencil tape (optional for edges)
- Cup of water and paper towels
Step 1: Planning the Flow
-
Prepare the workspace:
Lay down newspaper or a drop cloth to protect your table. Set your two canvases side-by-side. If you want the design to flow continuously from one canvas to the next, like a diptych, ensure they are touching or very close together. -
Paint the edges:
Before starting the main design, paint the outer edges of the canvases in a solid Navy Blue. This gives the finished piece a polished, framed look without needing an actual frame. -
Sketch the major curves:
Using a pencil very lightly, draw large, sweeping ‘S’ curves that travel from the bottom corner to the top corner. Think of these as the verses and choruses of your song. -
Create parallel bands:
Add secondary lines running parallel to your main curves to create thick bands of varying widths. Leave narrow gaps between these bands; these gaps will later become the crisp white separators.
Clean Curves Pro-Tip
Struggling to paint smooth curves? Dilute your white paint with a drop of water. Inky, fluid paint glides off the brush easier than thick paint, giving you sharper, confident lines.
Step 2: Blocking in Color
-
Mix the rust tone:
Squeeze out your Burnt Orange paint. If it feels too bright, mix in a tiny dot of Navy Blue or brown to create that earthy, terra-cotta warmth seen in the reference. -
Paint the large rust sections:
Identify the largest, most dominant curves on your sketch. Fill these in with your rust mixture using the flat brush. I like to use long, smooth strokes that follow the direction of the curve to keep the texture clean. -
Apply the navy sections:
Wash your brush thoroughly, then fill in the alternating bands with Navy Blue. These darker sections ground the piece and provide strong contrast against the warm rust. -
Add the neutral tones:
Use the Light Grey or Taupe paint for the remaining curved sections. This neutral color acts as a bridge between the warm and cool tones, balancing the composition. -
Paint the corners:
Don’t forget the corners of the canvas. Fill the bottom left and top right corners with opposing colors (rust vs. navy) to maintain visual balance. -
Second coats:
Let the first layer dry completely (about 15-20 minutes). Apply a second coat to all colored sections to ensure the canvas weave is covered and the colors are opaque and rich.
Fixing Wobbly Dots
If a dot smudges or isn’t round, let it dry completely. Don’t wipe it wet! Once dry, paint over it with the background color, let that dry, and re-dot.
Step 3: Refining and Detailing
-
Define the separators:
Using your small round brush or the edge of a clean flat brush, paint the narrow gaps between the colored bands with Titanium White. These lines should be crisp but don’t have to be mechanically perfect; a little hand-painted wobble adds character. -
Smooth the white lines:
Go over the white lines a second time if the underlying canvas or messy edges from the color blocks are showing through. -
Start the dot work:
Make a small puddle of Titanium White paint. Dip the handle end (the non-brush end) of your small paintbrush into the paint. This is the easiest way to make uniform dots. -
Apply the rhythmic dots:
Gently press the paint-dipped handle onto the canvas along specific curves, primarily bordering the rust sections. Space them evenly to mimic a steady drumbeat or tempo. -
Vary dot placement:
Add a second row of smaller dots on the interior of the navy curves using a smaller tool, like a toothpick or a smaller brush handle, to create visual variety. -
Create the scratch texture (optional):
To mimic the slightly weathered look in the original, wait until the paint is mostly dry but slightly tacky. Lightly drag a dry, rough bristle brush or fine sandpaper over the rust sections to give it a vintage, vinyl-sleeve texture. -
Final inspection:
Check for any uneven edges where colors meet the white lines. Touch up with the appropriate color using your smallest brush.
Hang your abstract soundscapes together to visualize the harmony of your favorite song
Mirror Painting: One Paints, the Other Echoes the Same Strokes
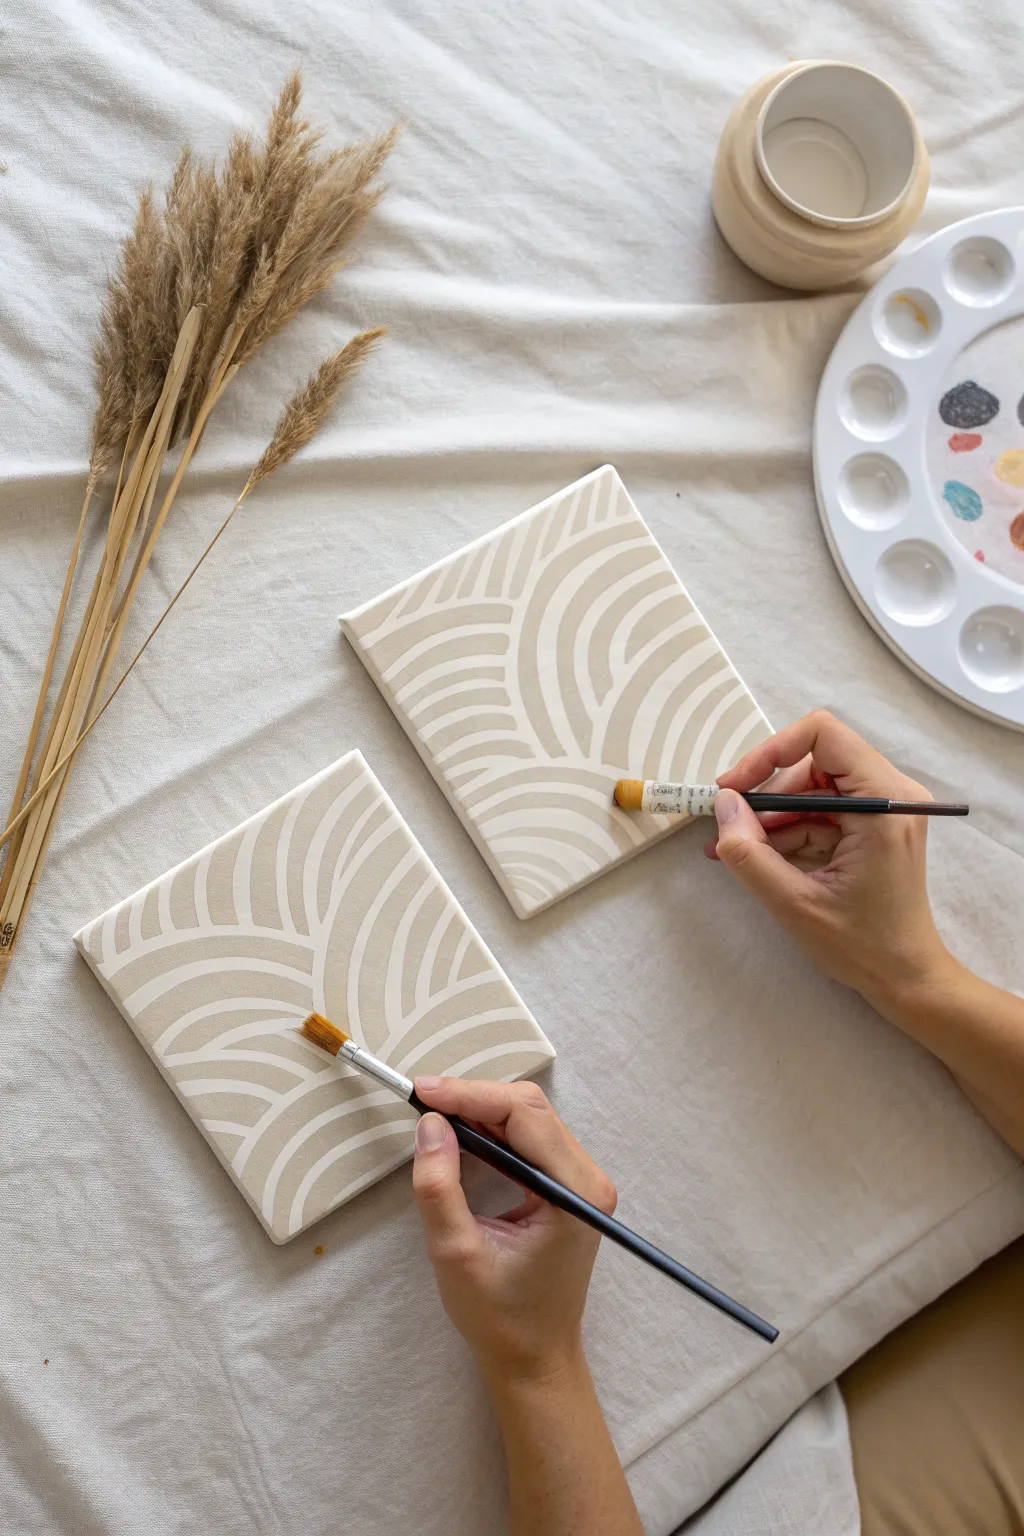
Embrace the rhythm of connection with this soothing geometric painting exercise, where two hands create a seamless tapestry of curves. The result is a pair of minimalist, beige-and-white artworks that stand beautifully alone but create a unified statement when hung together.
Step-by-Step
Materials
- Two small square canvases (approx. 6×6 or 8×8 inches)
- Acrylic paint: Warm Beige or Sand color
- Acrylic paint: Titanium White
- Two medium flat brushes (size 6 or 8)
- Two fine detail brushes (optional, for touch-ups)
- Palette or mixing plate
- Cup of water
- Paper towels
- Pencil (HB or H)
- Ruler
Step 1: Preparation & Base Coat
-
Set the scene:
Arrange your workspace so you and your partner are sitting side-by-side or across from each other, each with your own canvas and tools within easy reach. -
Mix your base color:
Prepare a generous amount of the warm beige acrylic paint on your palette. If you need to mix colors to get the right shade, do it now so the background is consistent across both canvases. -
Apply the background:
Using the flat brushes, paint the entire surface of both canvases with the beige paint. Use smooth, horizontal strokes for an even finish. -
Paint the edges:
Don’t forget to paint the sides of the canvas for a professional, gallery-wrapped look. -
Let it dry completely:
Allow the base coat to dry fully. This is a great time to grab a snack or choose a playlist. If the coverage looks thin, apply a second coat and let dry again.
Uneven Lines?
If your curves feel shaky or uneven, try painting faster. A confident, quick stroke is usually smoother than a slow, hesitant one. You can also rest your pinky on the canvas for stability.
Step 2: Drafting the Design
-
Identify the center point:
Visualize a center point at the bottom edge of your canvas. The design radiates outward from this central axis. -
Sketch the primary curves:
Lightly sketch the main structural lines with a pencil. Start with a large arc that sweeps from the bottom center up towards the top corners. -
Divide the space:
Draw a vertical line down the center if you want perfect symmetry, or sketch freehand curves that mimic rolling hills or rainbows. -
Mirror the design:
Partner 2 should attempt to sketch the same layout on their canvas. It doesn’t need to be mathematically identical; the charm lies in the slight variations of your individual hands.
Step 3: Painting the Pattern
-
Load the white paint:
Clean your flat brush thoroughly and load it with Titanium White paint. You want the paint to be fluid but opaque. -
Start the first arc:
Choose one section of your pencil sketch—perhaps the bottom left curve. Paint a steady, even band of white following the curve. -
Follow the leader:
Wait for your partner to paint the corresponding stroke on their canvas before moving to the next line. -
Create spacing:
Leave a gap of the beige background text showing between your white strokes. Use the width of your brush as a guide for spacing. -
Build the fan pattern:
Continue adding parallel curved lines, stacking them like a rainbow. Keep your wrist loose to maintain smooth curves. -
Navigate intersections:
Where two sets of curves meet (like at the center line), allow the white bands to angle sharply or stop abruptly to create a defined ‘seam’ down the middle. -
Refine the edges:
I prefer to use a smaller detail brush here to sharpen the ends of the lines where they meet the canvas edge or the center seam. -
Review and touch up:
Look at both canvases together. If any beige lines look too thick, widen the white strokes slightly to balance the negative space. -
Final drying:
Let the white paint dry completely before handling or hanging the finished pieces.
Add Texture
Mix a small amount of baking soda or modeling paste into your white paint before applying the curves. This adds a raised, tactile 3D effect to the geometric pattern.
Hang your twin masterpieces side by side to celebrate your shared creativity
Romantic Negative Space Painting With Tape-Resist Shapes
This charmingly rustic painting project uses negative space to reveal a clean, bright heart amidst a warm, textured background. It is a wonderfully simple technique that produces high-impact, professional-looking results—perfect for a relaxed date night art session.
Step-by-Step Tutorial
Materials
- Small square stretched canvas (approx. 8×8 or 10×10 inches)
- Masking tape or painter’s tape (various widths)
- Acrylic paint (Red Oxide, Burnt Sienna, or Deep Red)
- White or cream acrylic paint (for the base)
- Flat paintbrush (medium size)
- Scissors
- Pencil (optional)
- Cardstock or thick paper (for stencil making only)
Step 1: Preparation & Masking
-
Prime the surface:
Begin by observing your canvas. If it is raw, you will need to paint the entire surface with a coat of white or cream acrylic paint. Let this dry completely before moving on. -
Create your heart guide:
Cut a heart shape out of cardstock or thick paper that fits nicely within the center of your canvas. This will serve as your tracing template. -
Trace the heart:
Lightly place the paper heart in the center of the white canvas and trace the outline very faintly with a pencil. -
Mask the heart shape:
Using masking tape, carefully fill in the heart shape you just traced. You will likely need to overlap strips of tape to cover the area. -
Trimming the tape:
To get the curve of the heart perfect, use scissors to cut small pieces of tape, or create the curve by layering smaller, torn/cut pieces along the pencil line until the full heart is masked off. -
Seal the edges:
I like to run a fingernail or the back of a spoon firmly along the edges of the heart masking tape. This prevents the top coat of paint from bleeding underneath. -
Corner accents:
Tear four short strips of masking tape. Place one diagonally across each corner of the canvas to create a raw, unpainted border effect later. -
Pressing down firmly:
Just like with the heart, ensure these corner strips are pressed down firmly to keep your white lines crisp.
Seal Prior to Painting
To get razor-sharp lines, paint a thin layer of white over your tape edges first. This seals the tape, so any bleed-through is white-on-white.
Step 2: Painting & Revealing
-
Mix your color:
Squeeze out your reddish-brown acrylic paint. If you want the rustic look from the photo, don’t mix it too thoroughly on the palette; some streaks of lighter red are nice. -
Apply the first pass:
Using a flat brush, begin painting over the entire canvas, including right over the tape. Paint in vertical strokes for a consistent grain. -
Adding texture:
While the paint is still wet, you can lightly drag a dry brush through it to create subtle vertical streaks, mimicking a wood grain effect. -
Painting the sides:
Make sure to carry the paint over the edges of the stretched canvas for a finished, gallery-wrapped look. -
Let it dry partially:
Allow the paint to set until it is tacky but not fully hardened. This is usually about 10-15 minutes depending on the thickness of your paint. -
The corner reveal:
Gently peel back the tape on the four corners first. Pull the tape away from the paint at a sharp angle to get a clean line. -
Revealing the heart:
Locate the edge of your heart masking. Very slowly peel the tape up. If you layered multiple pieces, you may need to pick them off one by one. -
Final touch-ups:
If a little bit of red paint bled under the tape, use a small detail brush and your original white paint to carefully clean up the edges.
Torn Canvas Paper?
If removing tape tears the canvas paper, you pulled too fast or the paint was too dry. Heat the tape slightly with a hair dryer before peeling.
Enjoy displaying your simplistic symbol of love this date night
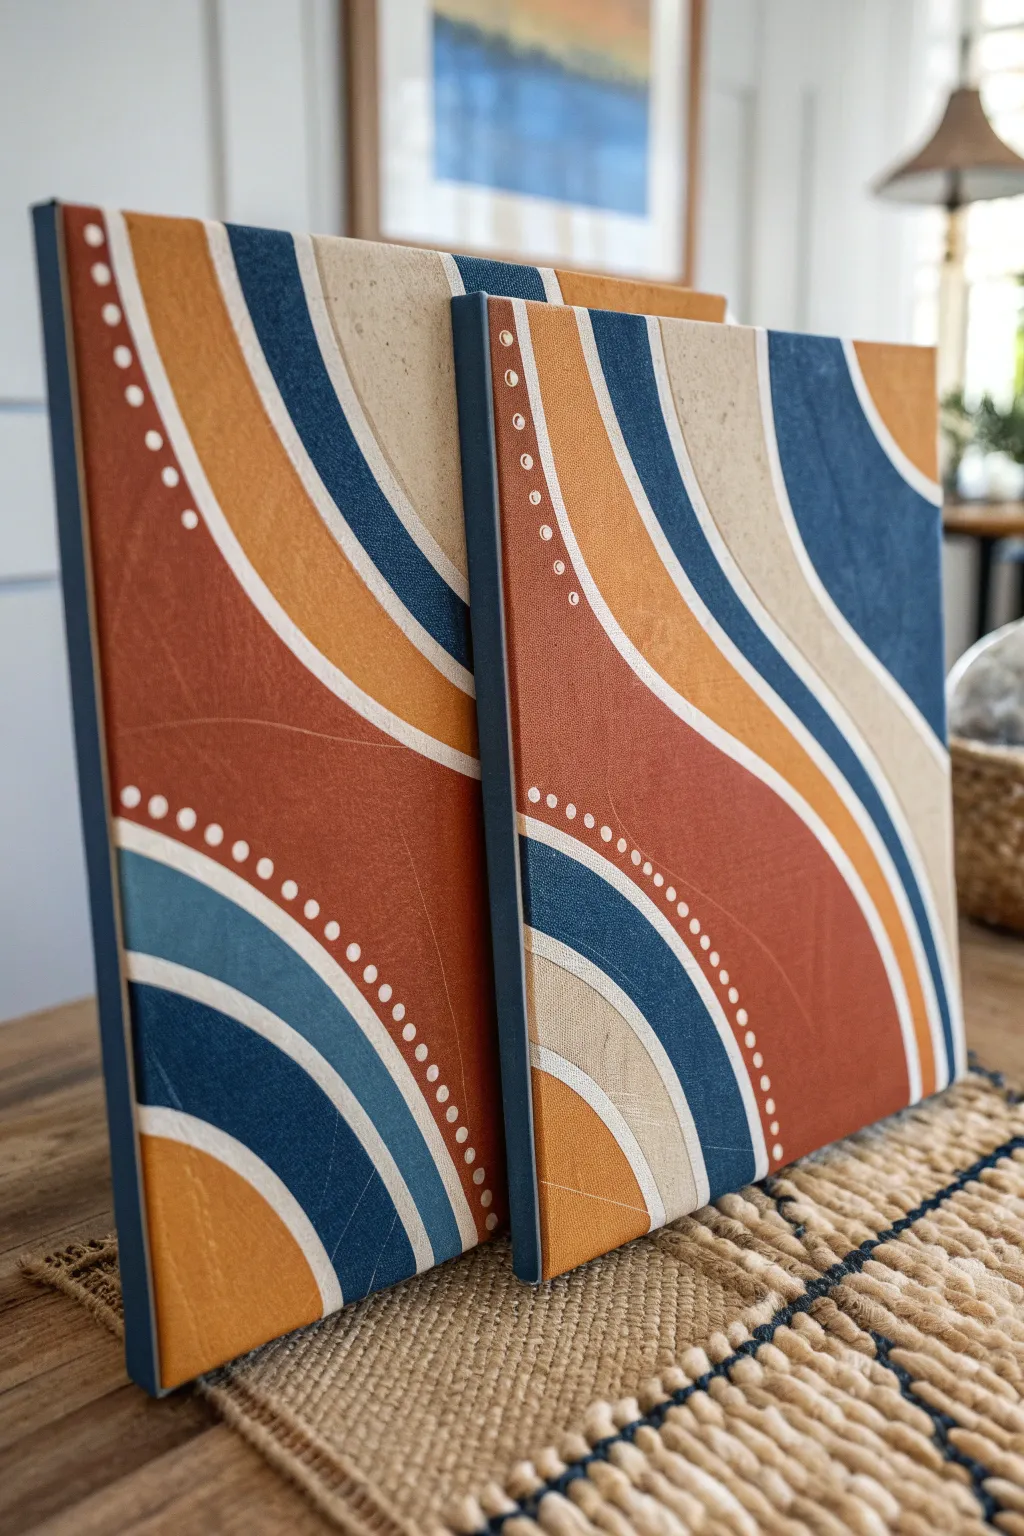
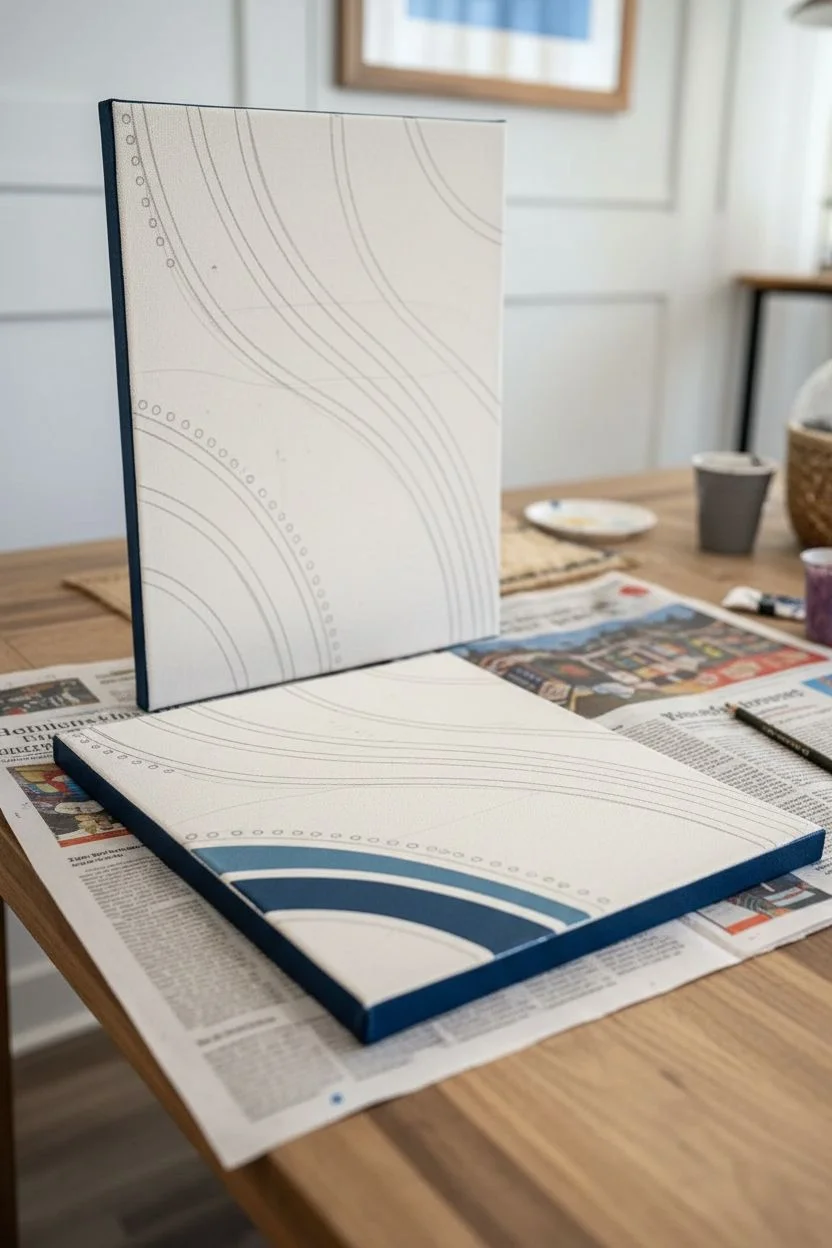
Secret Message Underpainting: Paint Over a Note to Each Other
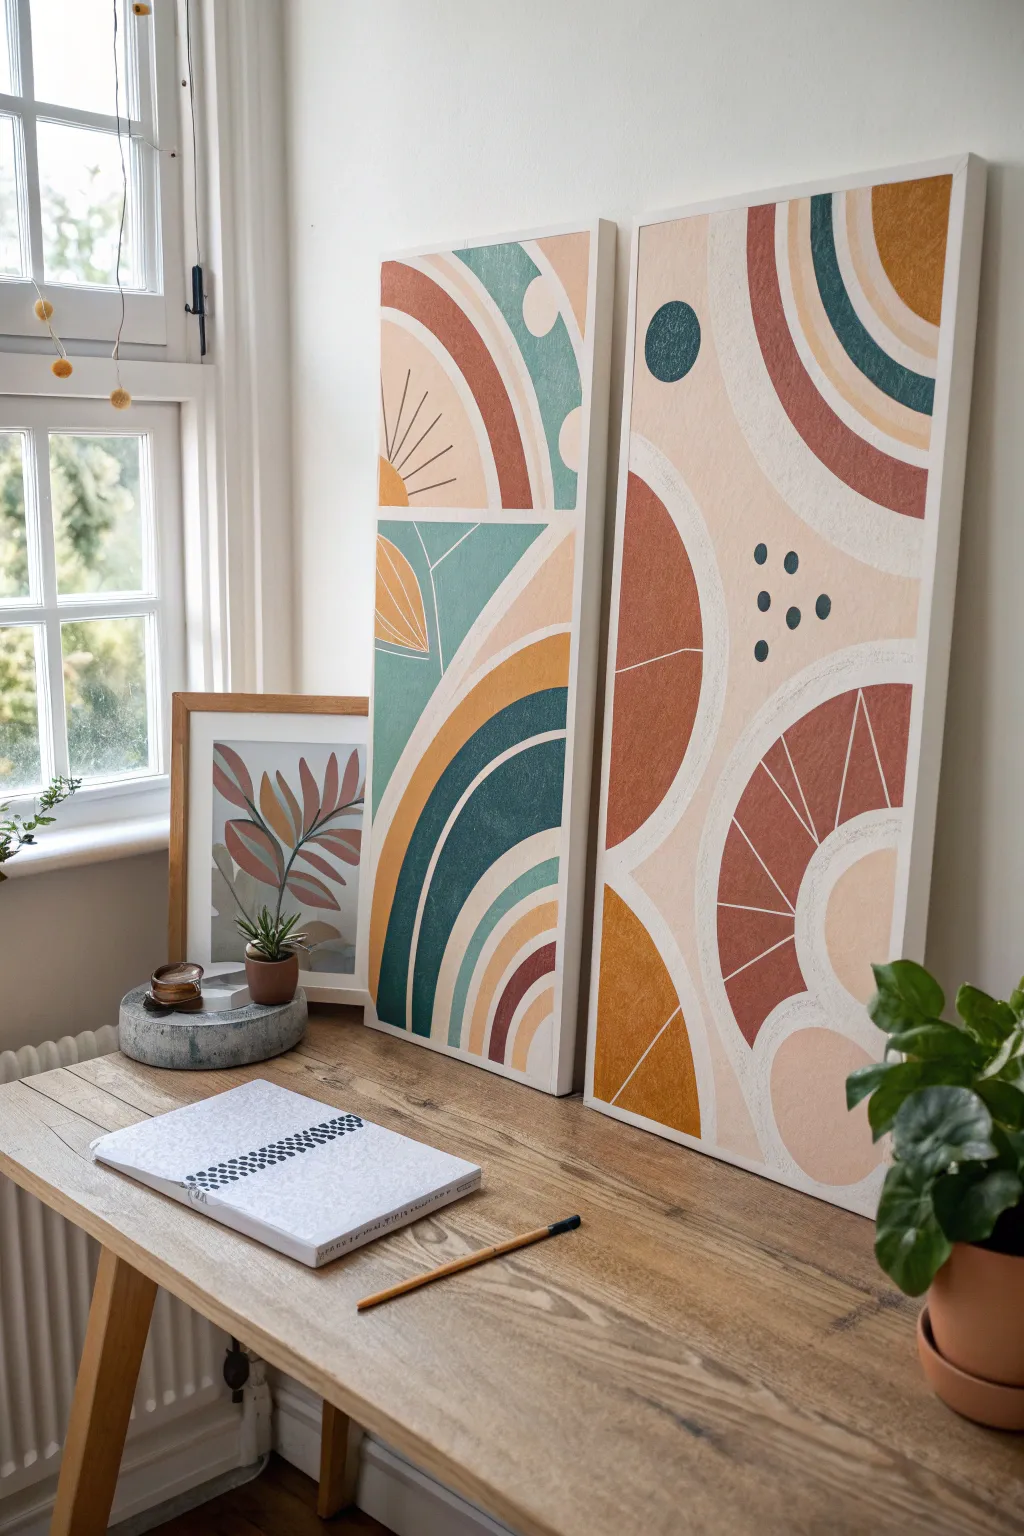
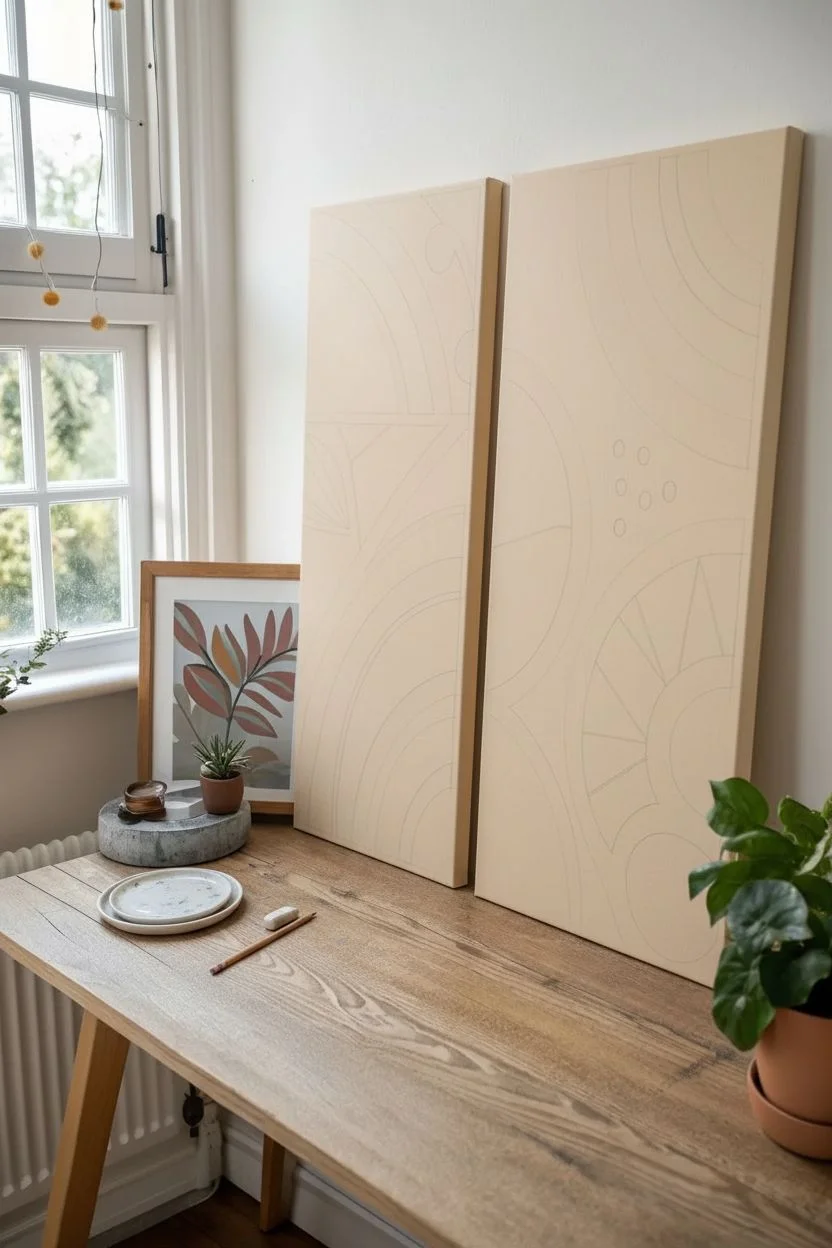
Recreate this stunning two-piece abstract set that combines earthy tones with modern arches and organic shapes. The matte, textured finish gives these paintings a high-end, designer feel that perfectly complements a shared creative evening.
Detailed Instructions
Materials
- Two large rectangular stretched canvases (e.g., 12×36 inches)
- Acrylic paints (terracotta, mustard yellow, deep teal, beige/cream, white)
- Texture medium or modeling paste (optional for texture)
- Set of flat synthetic brushes (various widths: 1-inch, 1/2-inch)
- Round detail brush
- Pencil and eraser
- Ruler or straight edge
- Circular objects for tracing (plates, bowls) or a compass
- Painter’s palette or paper plates
- Cup of water and paper towels
Step 1: Planning and Underpainting
-
Secret Message Layer:
Since this is a date night project, start by writing a secret note, wish, or memory to your partner directly on the blank canvas using a light pencil or even a pale wash of paint. It will be covered up, but you’ll both know it’s there. -
Base Coat:
Mix a large amount of your beige or cream color. Apply a solid, even coat across the entire surface of both canvases to cover your secret message and prime the surface. Let this dry completely. -
Sketching the Composition:
Using a pencil, lightly map out your geometric shapes. Focus on large, sweeping arches that start from the edges. Use a ruler for the straight division lines and trace circular objects to get perfect curves for the dots and sun shapes. -
Creating Balance:
When sketching, try to mirror elements across the two canvases without making them identical. If you place a heavy arch on the bottom left of one canvas, balance it with a shape on the top right of the other.
Step 2: Blocking in Color
-
Mixing Earthy Tones:
Prepare your palette. To get that muted boho look, I like to mix a tiny dot of black or brown into bright colors like teal or yellow to desaturate them slightly. -
Painting the Arches:
Start with the largest shapes first. Fill in the thick terracotta arches using your wide flat brush. Don’t worry about perfect edges yet; focus on opaque coverage. -
Adding the Teal:
Move on to the teal sections. Use a clean flat brush to block in the contrasting cool-toned shapes. Apply two thin coats rather than one thick one for a smoother finish. -
Mustard Accents:
Paint the mustard yellow sections, which act as highlights. These are often the smaller semi-circles or inner arches in this design. -
Drying Time:
Allow these main color blocks to dry for at least 20 minutes before moving on to adjacent shapes to prevent colors from bleeding into each other.
Fixing Wobbly Lines
If your curved edges look shaky, wait for the paint to dry fully. Then, use a white paint marker or a detail brush with the background color to carefully crisp up the boundary.
Step 3: Refining and Detailing
-
Crisp Edges:
Once the base blocks are dry, use a smaller flat brush to carefully rigidify the lines where two colors meet. You can use a steady hand or apply painter’s tape for strictly straight lines. -
White Space Definition:
Go back in with your beige/cream background color to clean up the spacing between arches. This negative space is crucial for the design to ‘breathe’. -
Line Work:
Using your fine round brush and slightly thinned white or cream paint, add the thin lines radiating inside the semi-circles (resembling sun rays or grapefruit segments). -
Adding Dots:
Dip the handle end of a paintbrush into your teal or terracotta paint and dot it onto the canvas to create the clustered circle patterns shown in the open spaces. -
Texture Check:
If you want the textured look seen in the photo, you can dry-brush a lighter shade over the solid colored areas to give a slightly weathered, canvas-like feel. -
Final Touches:
Step back and look at both canvases side-by-side. Touch up any inconsistent hues or wobbly edges. Once dry, sign your names on the bottom edge or the back.
Level Up: Texture
Mix baking soda or modeling paste into your acrylics before painting. This creates a gritty, plaster-like texture that makes the artwork look expensive and professionally made.
Hang your new diptych side-by-side to enjoy a permanent reminder of your creative collaboration


Have a question or want to share your own experience? I'd love to hear from you in the comments below!