Deer are one of my favorite subjects because you can paint them sweet and simple or wildly dramatic, and they still feel instantly recognizable. Here are a bunch of deer painting ideas you can try right away, from classic woodland scenes to more unexpected, creative twists.
Deer Silhouette at Sunset

Capture the serene beauty of twilight with this atmospheric watercolor piece featuring a majestic deer silhouette. Using wet-on-wet techniques, you will create a soft, gradient sky that transitions from deep purple to warm gold, framing a crisp black foreground.
Detailed Instructions
Materials
- Cold press watercolor paper (deckled edge optional)
- Watercolor paints (Indigo, Purple/Magenta, Orange, Yellow)
- Black Gouache or very concentrated Black Watercolor
- White Gouache or White Gel Pen
- Masking tape
- Round brushes (Size 4 and 8)
- Detail brush (Size 0 or 00)
- Jar of clean water
- Paper towels
- Mixing palette
Step 1: Painting the Sunset Sky
-
Prepare your paper:
Tape down your watercolor paper to a sturdy board to prevent warping. If you are using deckled edge paper like in the photo, you might want to tape just the very corners or float the paper by wetting the back so it sticks to a waterproof board. -
Wet the surface:
Using your largest clean brush, apply a generous even coat of clean water across the entire upper two-thirds of the paper where the sky will be. The paper should glisten but not have puddles. -
Apply the top sky color:
Load your size 8 brush with a mix of purple and a touch of indigo. Gently sweep this color across the top third of the wet paper, allowing the pigment to bloom downwards naturally. -
Transition to warmth:
Rinse your brush thoroughly. Pick up a vibrant orange or coral color. Apply this directly below the purple, slightly overlapping the edges so they blend together into a soft mauve transition. -
Create the horizon glow:
Finally, while the paper is still damp, paint a yellow-gold band near the bottom of the sky area. Let this fade out to almost white paper where the sun will be, keeping the area just above the horizon lightest. -
Lift out the sun:
While the paint is still damp but not soaking wet, rinse your brush and dry it on a paper towel. Gently lift the paint in a circular motion near the horizon to create a soft, pale sun. You may need to repeat this ‘lift and wipe’ motion a few times. -
Let it dry completely:
This is crucial. The paper must be bone dry before you add the crisp silhouette details. You can use a hairdryer on a low setting to speed this up.
Keep it fluid
Work quickly on the sky layer. If the paper starts to dry while you are blending colors, stop fussing or you’ll get ‘cauliflower’ blooms and hard edges.
Step 2: Adding the Landscape and Deer
-
Paint the distant trees:
Mix a dark grey using your indigo and black. With a size 4 brush, paint a jagged, uneven line across the horizon to represent a distant forest line. Keep these shapes small and slightly diluted so they look far away. -
Outline the foreground hill:
Switch to your black gouache for maximum opacity. Draw the rolling outline of the hill in the foreground, making sure it rises higher on the right side where the deer will stand. -
Fill in the foreground:
Fill the entire hill area with solid black. I find that using gouache here gives a velvety, matte finish that watercolor sometimes struggles to achieve. -
Sketch the deer shape:
If you aren’t confident painting freehand, lightly sketch the deer’s outline with a pencil on top of the dry sky. Focus on the posture—proud chest, head held high. -
Paint the deer body:
Using your size 4 brush and black gouache, carefully fill in the body of the deer. Ensure the legs connect grounded to the hill. -
Detail the antlers:
Switch to your smallest detail brush (size 0). With a steady hand, paint the branching antlers. Paint from the base of the skull outwards, tapering your strokes so the tips are thin and sharp. -
Add grassy texture:
Using the same detail brush, flick quick, short upward strokes along the top edge of the black hill to create the look of wild grass silhouetted against the light. -
Add stars:
Once everything is dry, use a tiny dot of white gouache or a white gel pen to add a few subtle stars in the darker purple section of the sky.
Sun isn’t round?
If lifting paint didn’t make a perfect circle for the sun, don’t worry. Once the sky is dry, you can paint a crisp circle using slightly watered-down white gouache.
Now you have a tranquil twilight scene that perfectly captures the stillness of nature


Doe and Fawn Moment
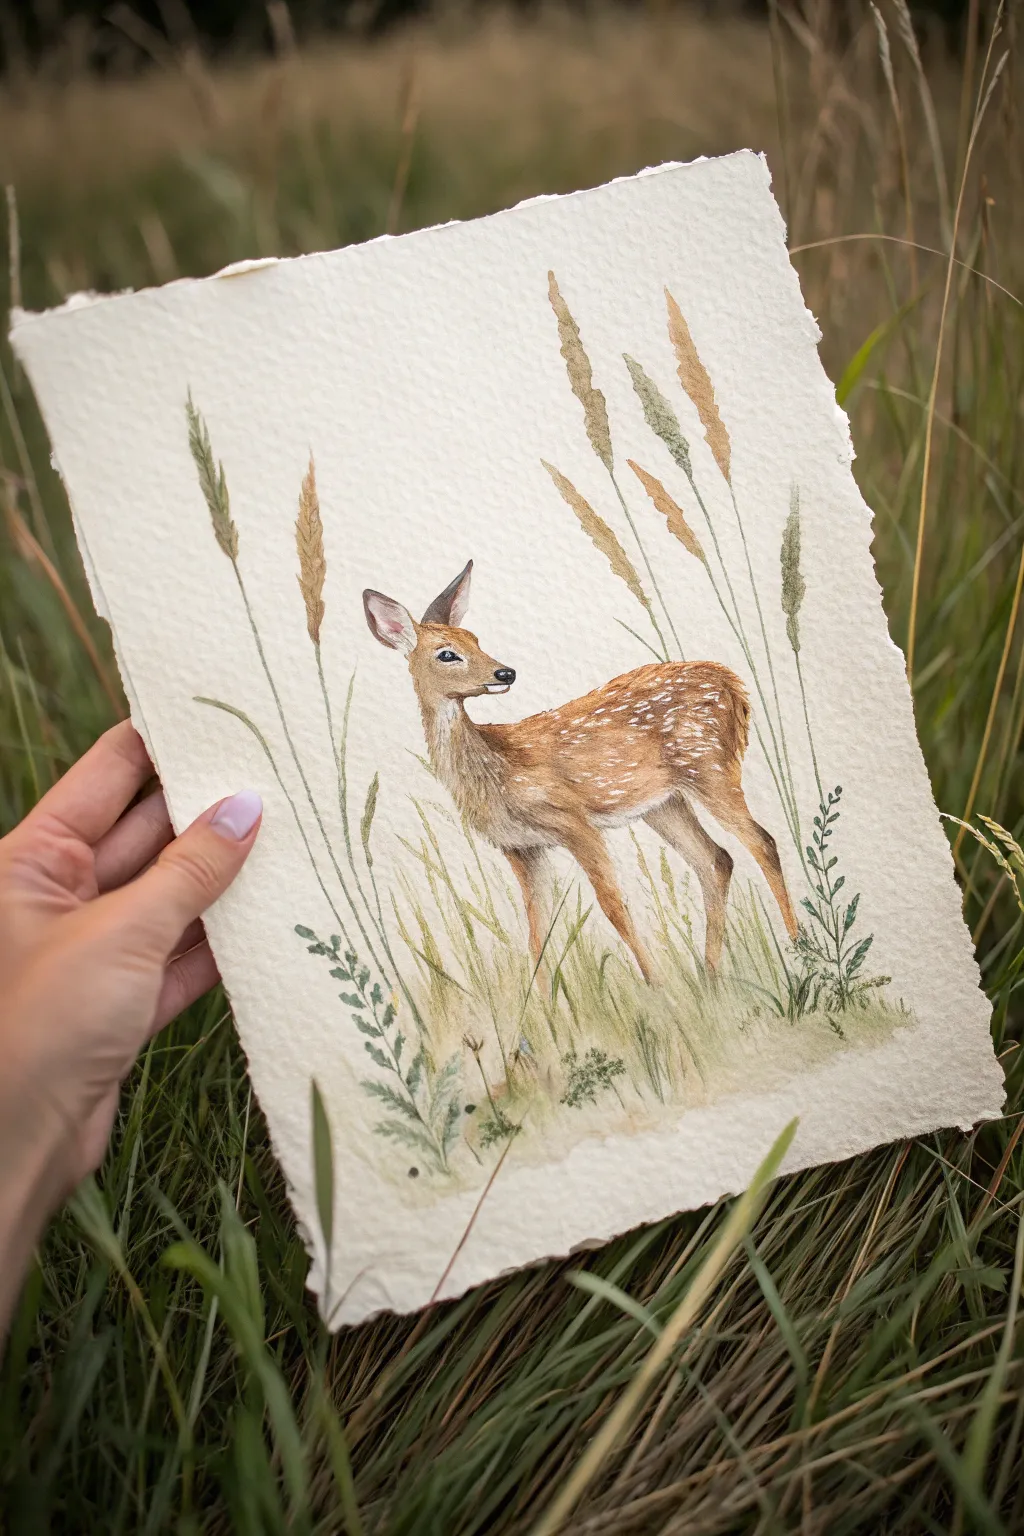
Capture the stillness of nature with this delicate watercolor study of a young deer pausing amidst tall grasses. The soft texture of handmade paper complements the warm, earthy tones of the fawn’s coat and the gentle sway of the field vegetation.
Step-by-Step Guide
Materials
- Cold press watercolor paper (preferably handmade with deckled edges, approx. 300gsm)
- Watercolor paints (Burnt Sienna, Yellow Ochre, Raw Umber, Sap Green, Payne’s Grey, Burnt Umber)
- Round brushes (sizes 2, 4, and 0 for fine details)
- White gouache or white gel pen
- HB pencil and kneaded eraser
- Two jars of water
- Paper towel
- Masking fluid (optional)
Step 1: Sketching the Composition
-
Rough shapes:
Begin with a very light pencil sketch on your textured paper. Draw an oval for the body and a smaller, slightly triangular shape for the head, connecting them with a gentle curve for the neck. -
Refining the deer:
Refine the outline of the deer. Pay attention to the alert posture of the ears and the slender legs. Sketch the position of the eye, nose, and the separation of the hooves. -
Planning the foliage:
Lightly sketch long, vertical lines to indicate where the tall grass stalks and seed heads will go. Don’t draw every single blade; just map out the main clusters framing the deer.
Deckle Edge Charm
To mimic the handmade paper look if you have standard paper, carefully tear the edges against a ruler rather than cutting them. This adds a rustic, organic feel.
Step 2: Painting the Deer
-
Base coat:
Mix a watery wash of Yellow Ochre and a touch of Burnt Sienna. Apply this to the deer’s body, avoiding the belly, inner ears, and throat, which remain white. -
Building texture under wet:
While the base layer is still slightly damp, drop in stronger Burnt Sienna along the back and top of the head to create a soft, furry gradient. -
Deepening shadows:
Once dry, mix Burnt Umber with a tiny bit of Payne’s Grey. Use a size 2 brush to paint the shadows under the neck, the back of the legs, and the inside of the far legs to create depth. -
Facial details:
Switch to your size 0 brush. Use a dark mix of Burnt Umber and Payne’s Grey to carefully paint the eye, leaving a tiny speck involved paper for the highlight. Paint the nose leather black. -
Fur texture:
Using a relatively dry brush techniques with Burnt Sienna, add small, directional strokes on the neck and shoulder to mimic the direction of fur growth. -
The spots:
If you masked the spots earlier, rub off the masking fluid now. If not, use white gouache or a gel pen to dot the characteristic fawn spots along the spine and flank.
Step 3: Painting the Flora
-
Stalk structure:
Mix a muted Sap Green with a little Yellow Ochre. Using the tip of your size 2 or 4 brush, paint long, fluid lines for the grass stems, varying the pressure to make them look organic. -
Seed heads:
For the seed heads at the top of the stalks, use a stippling motion with colors ranging from brownish-orange to muted olive green. Keep the edges ragged to look like seeds. -
Foreground grasses:
Paint the shorter grasses at the deer’s feet using quick, upward strokes. Use lighter greens and yellows here to suggest sunlight hitting the lower vegetation. -
Adding variety:
Introduce a cooler, darker green (Sap Green + Payne’s Grey) for the leafy weeds in the bottom corners to frame the composition and ground the animal.
Spotting Technique
For natural-looking fawn spots, slightly dampen the area first and tap white gouache into it. The color will bloom slightly, creating soft, realistic fur edges.
Step 4: Final Touches
-
Grounding wash:
Apply a very pale, watery wash of green and brown horizontally across the bottom area where the hooves meet the grass to connect the animal to the environment. -
Detail check:
Use your finest brush to sharpen the deer’s hooves with dark brown and add thin whiskers near the muzzle.
Step back and admire how the natural textures of the paper enhance the woodland feel of your painting


Close-Up Deer Portrait
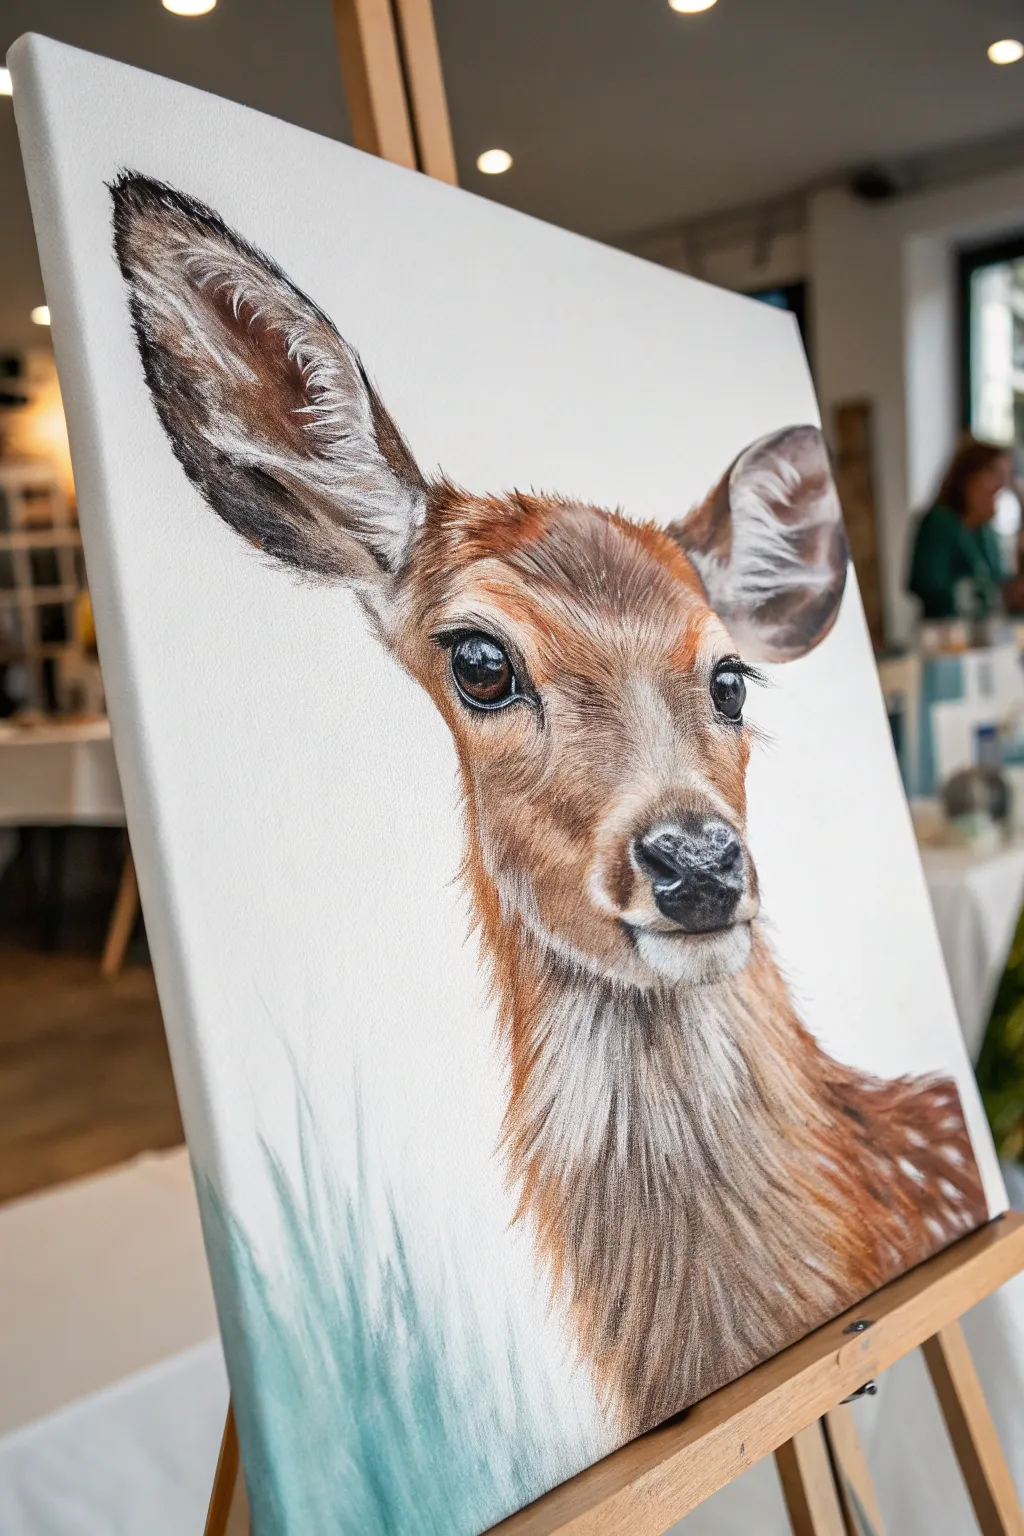
Capture the gentle spirit of a deer with this detailed close-up portrait that focuses on soulful eyes and intricate fur texture. The stark white background creates a striking contrast, making the warm russet tones of the animal truly pop.
Detailed Instructions
Materials
- Stretched canvas (11×14 or similar)
- Acrylic paints (burnt sienna, raw umber, yellow ochre, titanium white, mars black, phthalo green)
- Fine detail brushes (sizes 0, 00, and 1)
- Small flat shader brush (size 4)
- Glazing medium
- Water container
- Palette
- HB pencil
Step 1: Sketch and Underpainting
-
Establish the outline:
Begin by lightly sketching the deer’s head on your canvas using an HB pencil. Focus on getting the proportions of the ears correct—they are quite large compared to the face—and ensure the eyes are placed symmetrically. -
Block in base colors:
Mix burnt sienna with a touch of yellow ochre to create a warm mid-tone. Apply this color loosely over the face and neck areas, avoiding the eyes, nose, and inner ears. -
Define the darks:
Using raw umber, carefully paint the darker areas inside the ears, the bridge of the nose, and the shadowed side of the neck to establish value structure early on. -
Map the white areas:
Block in titanium white around the muzzle, the throat patch, and the fluffy edges of the inner ears. Don’t worry about texture yet; just get the color placement right.
Fur Flow Tip
Always check reference photos for fur direction. The hair pattern changes drastically from the nose (short/down) to the ears (swirling/outward).
Step 2: Facial Features
-
Paint the eyes:
The eyes are the soul of this piece. Paint the iris with a dark mix of burnt umber and black. While wet, lift a tiny crescent shape at the bottom for reflection, paint the pupil solid black, and add a sharp white highlight near the top. -
Detail the nose:
Use a mix of black and white to make a dark grey for the nose pad. Stipple the paint on with a small round brush to create a bumpy, wet texture. -
Refine the nostrils:
Deepen the nostrils with pure black, softening the edges slightly so they recede naturally into the snout. -
Add eye details:
With your smallest liner brush (size 00) and thinned black paint, add the delicate eyelashes. Long, sweeping strokes work best here.
Step 3: Creating Fur Texture
-
Layering the coat:
Mix a lighter tan using burnt sienna, yellow ochre, and white. Starting at the nose bridge, paint short, directional strokes that follow the bone structure of the face. -
Building ear fluff:
The inside of the ear needs a soft, feathery look. Use a scumbling technique with dry white paint over the dark underpainting you laid down earlier. -
Neck fur direction:
Moving down the neck, lengthen your brushstrokes. The fur here is coarser and longer. I find it helpful to mix a little glazing medium into the paint to help the strokes flow smoother. -
Adding highlights:
Mix titanium white with a tiny dot of yellow ochre. Using your finest brush, add individual hairs over the bridge of the nose and above the eyes to create a shimmering effect. -
Shadowing the fur:
Go back in with raw umber and darken the areas where fur clumps together, particularly under the jawline and at the base of the ears.
Winter Coat Variant
Make this a winter scene by cooling down your palette. Swap the yellow ochre for grey tones and add tiny snowflakes resting on the eyelashes.
Step 4: Final Touches
-
Muzzle whiskers:
Dilute a dark grey paint until it is inky. Swiftly paint the tiny pores and whisker spots on the muzzle area. -
Abstract grass base:
Mix titanium white with a hint of phthalo green and maybe a teal if you have it. Paint loose, upward strokes at the very bottom left of the canvas. -
Blend the vegetation:
While the green is still wet, dry brush it upward so it fades into the white background, suggesting grass without painting every blade. -
Clean up:
Step back and check your negative space. Use pure white paint to clean up any edges around the deer where your fur strokes might have gotten too messy.
Once the final highlight is dry, you’ll have a stunning woodland portrait ready to hang.


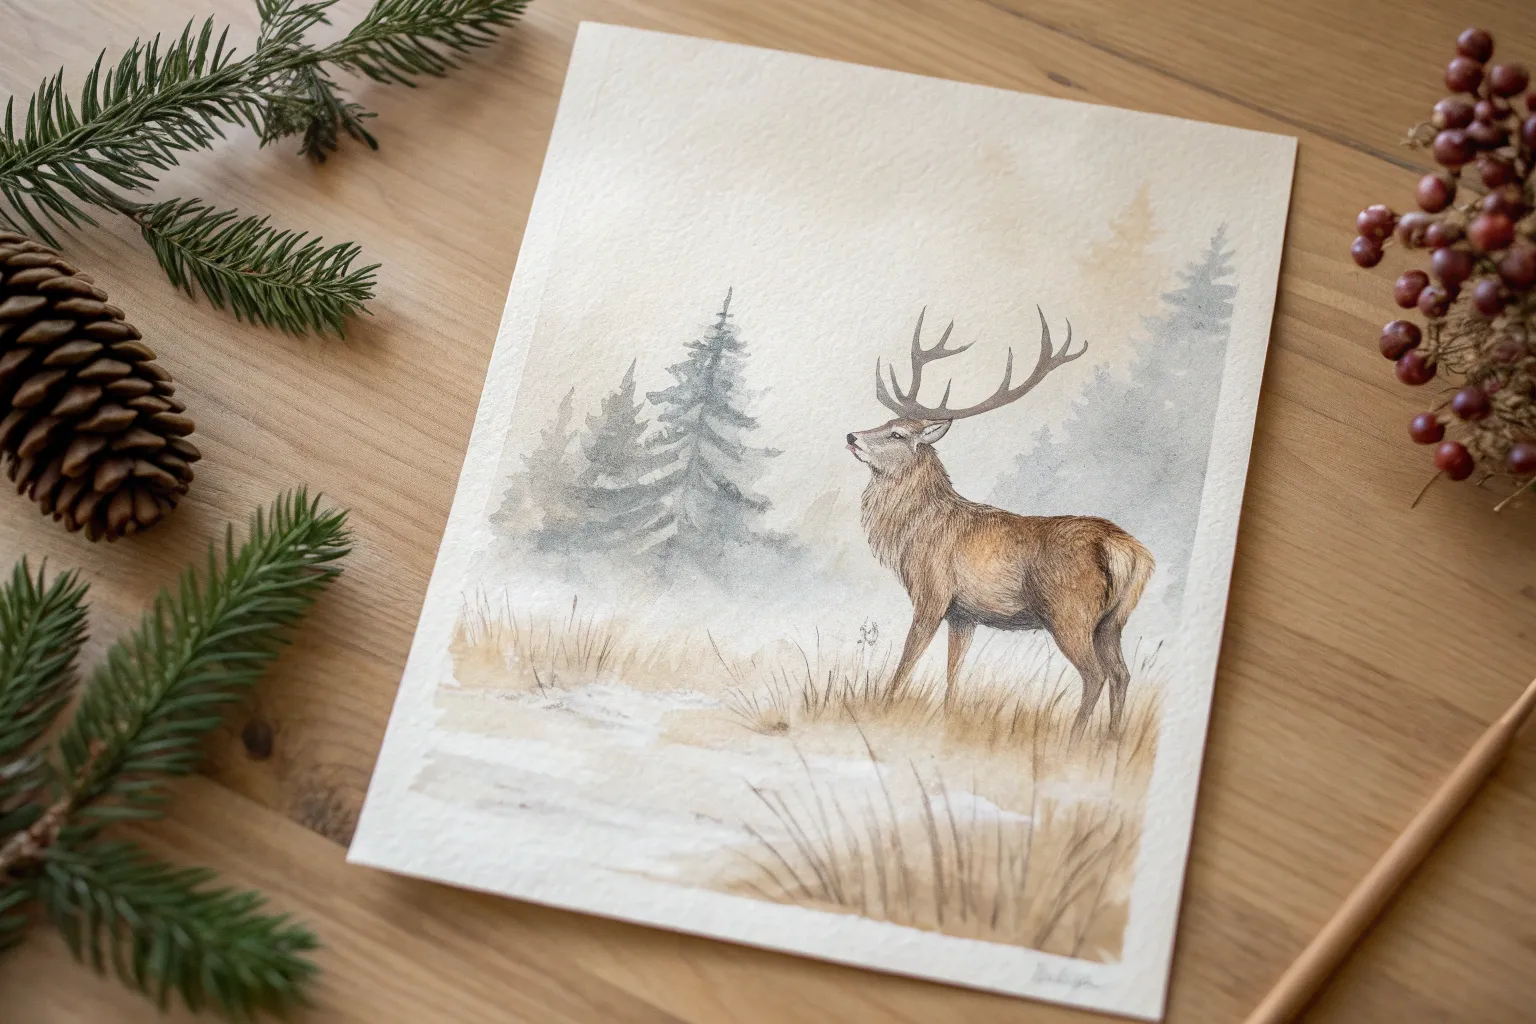
Buck With Antlers as the Focal Point
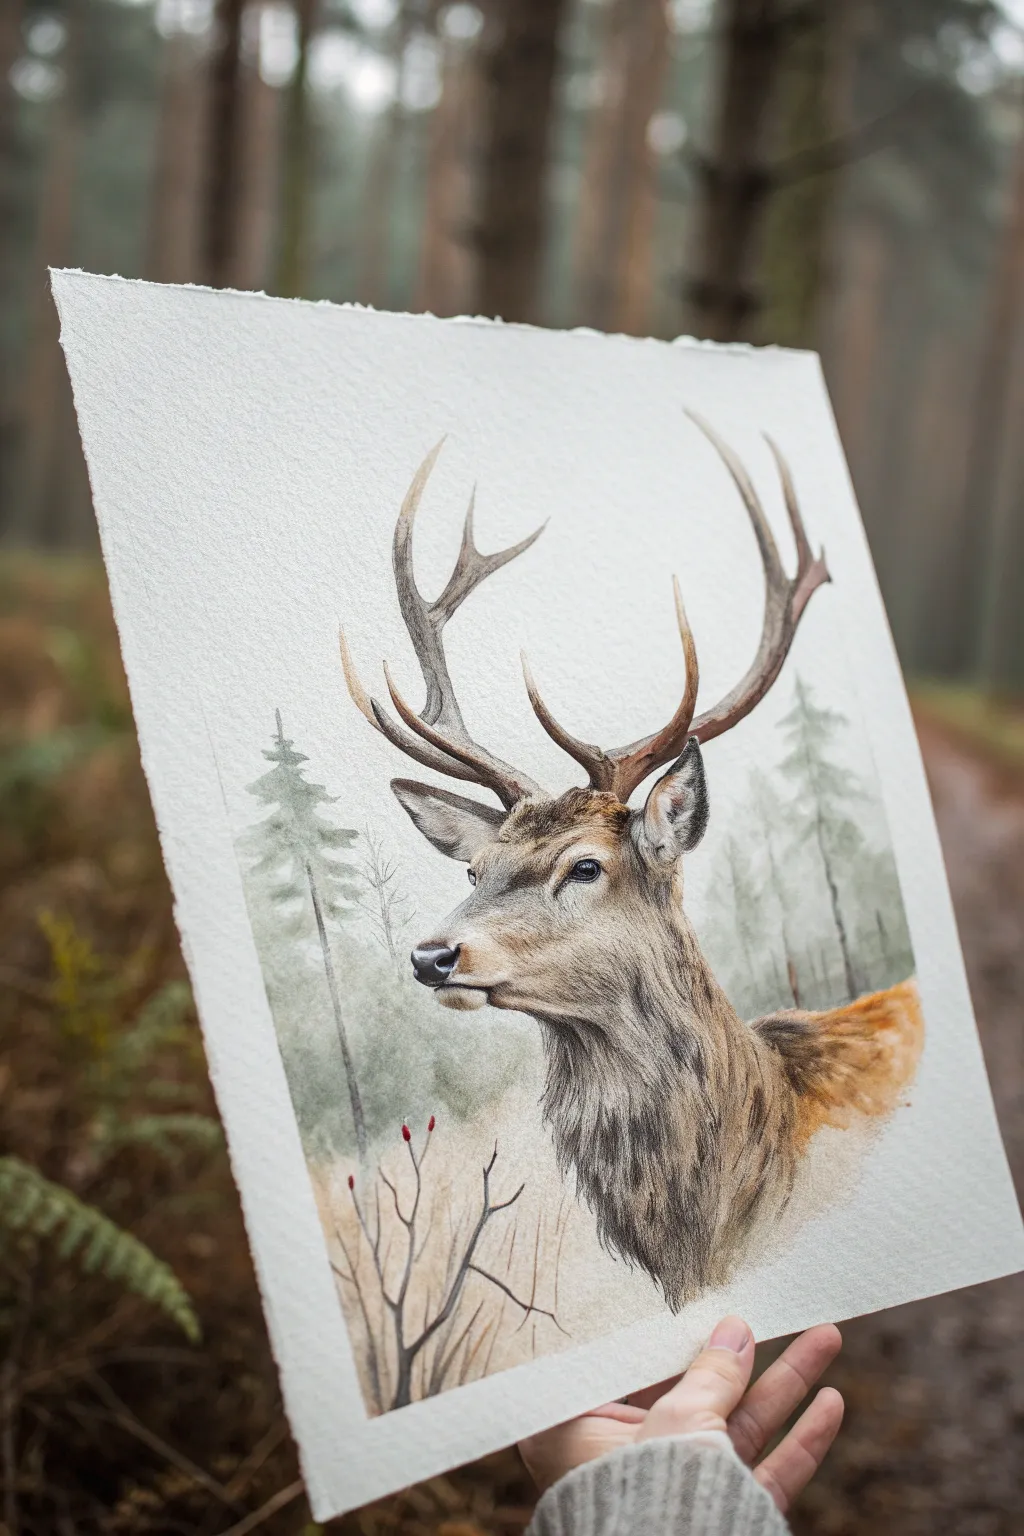
Capture the majestic presence of a red deer stag with this detailed mixed-media tutorial. By combining soft watercolor washes for the atmosphere with precise pencil work for the fur, you’ll create a piece that feels both dreamy and lifelike.
How-To Guide
Materials
- Cold-pressed watercolor paper (300 gsm)
- Watercolor paints (Sepia, Burnt Sienna, Payne’s Grey, Yellow Ochre, Sap Green)
- Round watercolor brushes (sizes 4 and 8)
- Colored pencils (Dark Brown, Black, Grey, Cream/White)
- HB graphite pencil for sketching
- Kneaded eraser
- Fine liner pen (Black or Dark Brown, optional)
- Masking tape (if not using a block)
Step 1: Sketching and Background
-
Prepare the outline:
Begin with a light HB pencil sketch of the stag’s profile. Focus on the triangular shape of the head, the curve of the neck, and the sweeping lines of the antlers. Keep your lines faint so they won’t show through the paint later. -
Map the features:
delicately mark the position of the eye, the nostril, and the inner ear details. Don’t worry about individual hairs yet; just define the main volumes of the muscles and bone structure. -
Create a wet canvas:
Using clean water and a large brush, wet the area surrounding the deer, but be careful to keep the deer itself dry. This technique allows us to create a soft, out-of-focus background. -
Wash in the forest:
While the background paper is damp, drop in watery mixes of Payne’s Grey and Sap Green. Let the colors bleed naturally. Paint faint, vertical strokes to suggest distant pine trees, keeping them pale and indistinct. -
Ground the scene:
Add a touch of Yellow Ochre and Sepia to the bottom of the background to suggest dry grasses or forest floor. Let this entire background layer dry completely before moving on.
Wet-on-Wet Trouble?
If your background trees are bleeding too much into a blob, your paper was too wet. Let it dry slightly until it has a satin sheen, not a puddle, before adding paint.
Step 2: Watercolor Base Layers
-
Base coat for the fur:
Mix a diluted wash of Yellow Ochre and a tiny touch of Burnt Sienna. Apply this over the stag’s face and neck, leaving the area around the eye and under the chin lighter (use plain water to soften edges here). -
Deepening the coat:
Once the first wash is semi-dry, take a stronger mix of Burnt Sienna and Sepia. Dab this onto the darker areas: the back of the neck, the shadows of the ear, and the shoulder area. -
Antler foundation:
Paint the antlers with a pale wash of Sepia and Payne’s Grey. While wet, drop slightly darker pigment near the base of the antlers to show texture and weight. -
Shadow mapping:
Using a size 4 brush and a cool grey mix, gently paint the shadow shapes under the jawline and inside the ear to start building three-dimensional form.
Level Up: Deckle Edge
To mimic the photo’s rustic look, tear your paper edges against a ruler instead of cutting them. This ‘deckle edge’ adds an artisanal, classic sketchbook feel.
Step 3: Detailing Textures
-
Defining the eye:
Switch to a fine brush with concentrated Black or heavy Sepia watercolor. Paint the eye carefully, leaving a tiny white spot unpainted for the reflection catchlight—this brings the animal to life. -
Fur texture with pencils:
Wait for the paint to be bone dry. Take a sharpened dark brown colored pencil and start drawing short, directional strokes to mimic fur. flow with the anatomy, following the curve of the neck down. -
Deepening contrast:
Layer black colored pencil strokes over the darkest shadow areas: deep inside the ear, the nostril, and the thickest part of the neck fur (the ruff). -
Antler ridges:
Use a grey colored pencil to add the ridges and bumps on the antlers. Keep the strokes jagged and organic, rather than perfectly smooth lines. -
Highlighting:
I find using a cream or white colored pencil works wonders here to pick out the lighter hairs on the muzzle and around the eye. Press firmly to make it show up over the watercolor wash. -
Foreground branches:
Using a fine liner or a very thin brush with Sepia, paint the thin, twiggy branches in the immediate foreground. Keep lines crisp to contrast with the blurry background trees. -
Final touches:
Add tiny red dots to the foreground twigs for berries. Review the whole piece and darken the pupil one last time if it has faded.
Now you have a stunning, atmospheric portrait ready to frame or gift.
BRUSH GUIDE
The Right Brush for Every Stroke
From clean lines to bold texture — master brush choice, stroke control, and essential techniques.
Explore the Full Guide
Deer by a Reflective Pond
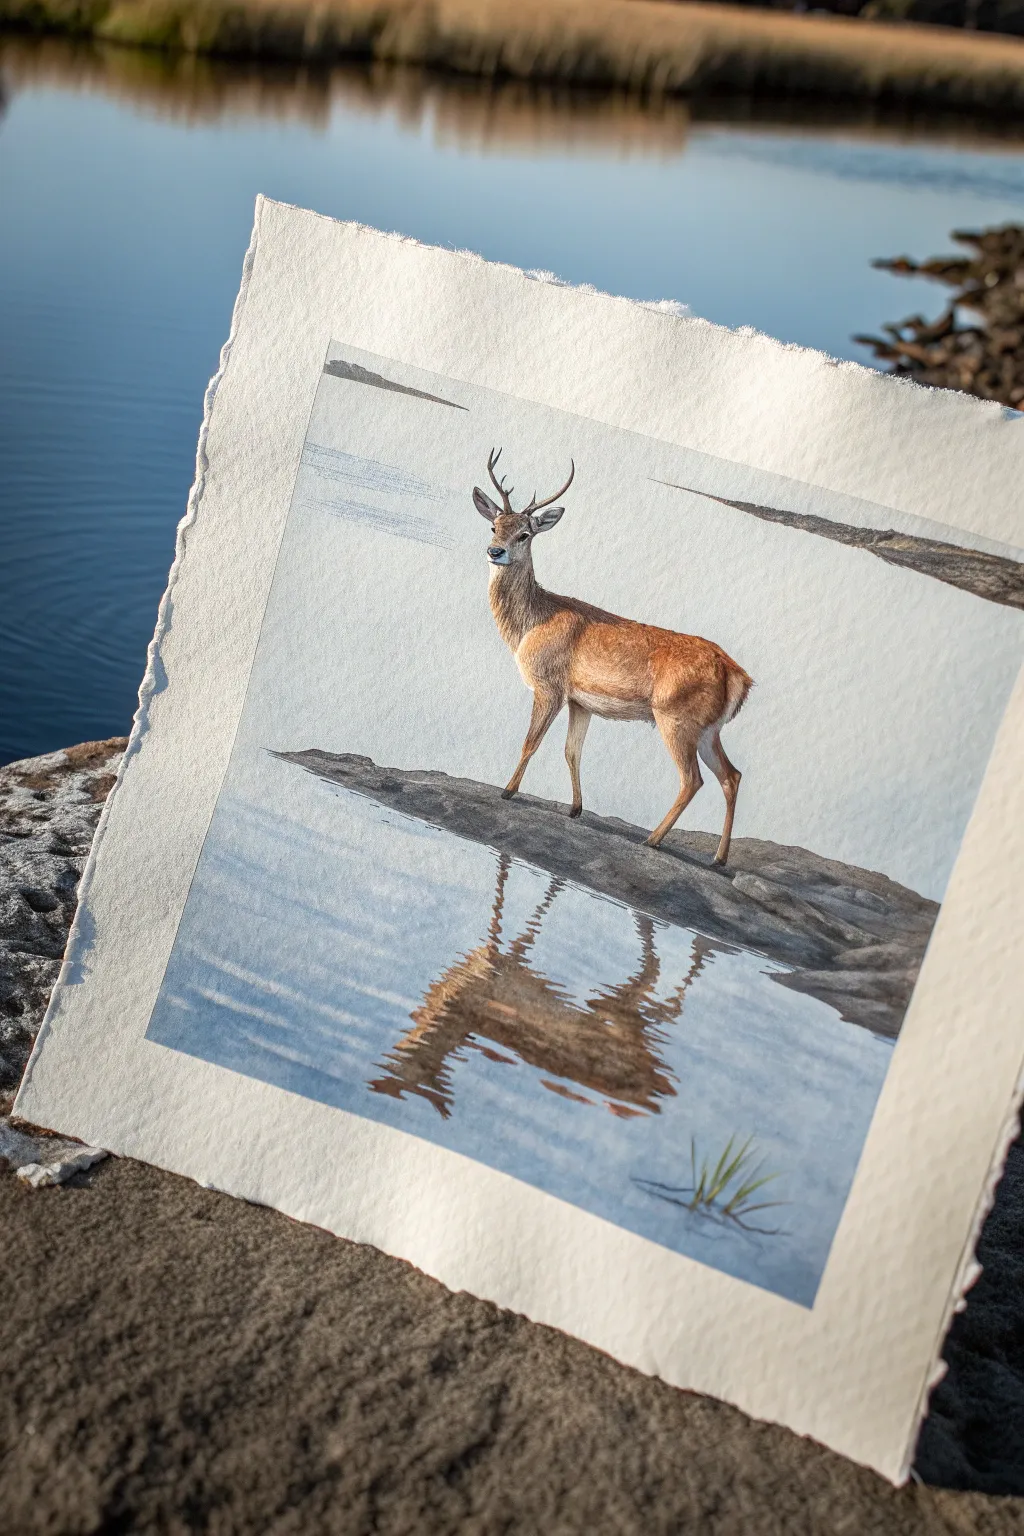
Capture the stillness of nature with this serene watercolor study of a deer poised on a rocky outcrop. The composition balances the warm, detailed fur of the animal against a cool, soft background and a striking water reflection.
Step-by-Step
Materials
- Cold press watercolor paper (140lb/300gsm), preferably with deckled edges
- Watercolor paints (Burnt Sienna, Yellow Ochre, Ultramarine Blue, Burnt Umber, Payne’s Grey, Alizarin Crimson)
- Round watercolor brushes (Size 2, 6, and 10)
- Masking fluid (optional)
- Pencil (HB or 2H)
- Kneaded eraser
- Two jars of water
- Paper towels
- Palette for mixing
Step 1: Sketching and Preparation
-
Establish the horizon:
Begin by lightly drawing a horizon line about one-third down from the top of the paper. This will separate your background water from the rocky foreground. -
Sketch the rocky outcrop:
Draw the jagged, triangular shape of the rock jutting in from the right side. Keep the lines organic and uneven to mimic natural stone. -
Outline the deer:
Place the deer standing atop the rock. Focus on the graceful curve of the neck and the alert posture. Use very light pencil strokes so they won’t show through the transparent paint later. -
Map the reflection:
Lightly sketch the inverted shape of the deer and rock in the water below. The reflection should be slightly distorted and less detailed than the main subject.
Muddy Reflection?
If your reflection looks too solid or muddy, wait for it to dry, then gently scrub horizontal lines with a clean, stiff damp brush to lift pigment and create ripples.
Step 2: Painting the Background and Water
-
First wash for the sky/water:
Mix a very dilute wash of Ultramarine Blue with a touch of Payne’s Grey. Apply this to the entire background area behind the deer, keeping it extremely pale to suggest a hazy, distant atmosphere. -
Deepen the foreground water:
While the wash is still damp but not soaking, add a slightly stronger mix of the blue to the bottom third of the paper. Let this dry completely before moving on. -
Adding distant land:
Using a size 6 brush and a watery mix of Payne’s Grey and Burnt Umber, paint the thin slivers of distant land near the horizon line. Keep edges soft to maintain depth.
Step 3: The Deer and Rock
-
Base coat for the deer:
Mix Yellow Ochre with a tiny bit of Burnt Sienna. Apply a flat, light wash over the deer’s body, leaving small white highlights on the nose and inner ears. -
Building fur texture:
Once the base is dry, use your size 2 brush with a richer Burnt Sienna. Use tiny, flickering strokes to build up the fur texture, especially around the neck and haunches. -
Deepening shadows:
Mix Burnt Umber and Ultramarine to create a deep shadow tone. Apply this to the underside of the belly, legs, and under the neck to give the deer volume and form. -
Painting the antlers and face:
Switch to your smallest brush for the antlers and facial features. Use a dark grey-brown for the eyes and nose, ensuring crisp, sharp edges for focus. -
Base layer for the rock:
Paint the rocky outcrop with a mix of Payne’s Grey and Burnt Umber. While wet, drop in hints of pure grey to create varied stone textures. -
Rock texture and cracks:
When the rock base is dry, use a ‘dry brush’ technique with darker pigment to drag across the surface, highlighting the rough texture and defining the cracks.
Deckled Edge Look
To get the rough paper edge seen in the photo, tear your watercolor paper against a metal ruler instead of cutting it with scissors before you start painting.
Step 4: The Reflection and Details
-
Start the reflection:
Wet the area of the water where the reflection will fall. Drop in the same colors used for the deer (Burnt Sienna/Ochre) but keep them much looser. -
Distort the image:
I find it helpful to use horizontal strokes here to break up the image, mimicking ripples on the water surface. Do not paint detailed fur; focus on shapes and colors. -
Reflecting the legs:
Paint the reflected legs as wavy, elongated vertical shapes that connect with the real legs at the rock’s edge. -
Adding water grass:
In the bottom right corner, use a rigger brush or size 2 bright to flick upward with a green-grey mix, creating a small tuft of marsh grass breaking the surface. -
Final ripples:
Using a clean, damp brush, lift out a few horizontal lines across the reflection to suggest water movement cutting through the mirrored image.
Step back and admire the tranquil atmosphere you’ve created with just a few colors and careful brushwork
Minimal Line Art Deer With Wash
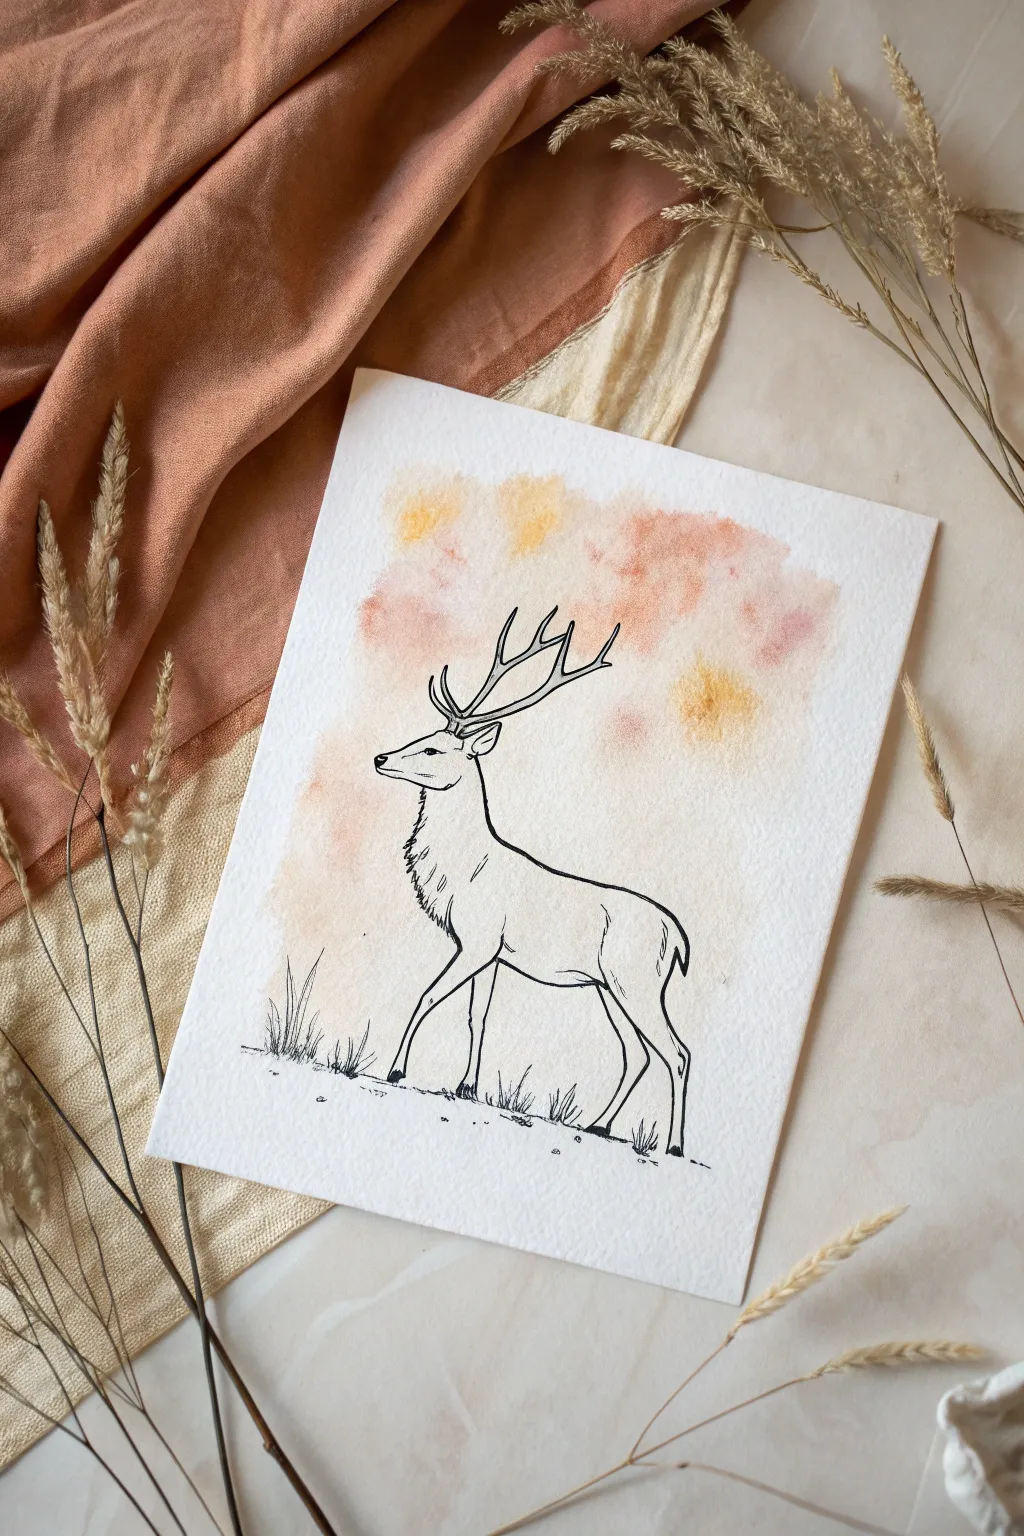
This elegant project combines the stark simplicity of ink illustration with the softness of a watercolor wash. The result is a dreamy, ethereal piece where a crisp, black deer profile stands out against a backdrop of warm, diffused autumn tones.
Step-by-Step
Materials
- Cold press watercolor paper (300 gsm)
- Fine liner pens (sizes 03 and 05, waterproof)
- Pencil (HB or 2H)
- Kneaded eraser
- Watercolor paints (Yellow Ochre, Burnt Sienna, Burnt Umber)
- Medium round watercolor brush (size 6 or 8)
- Jar of clean water
- Paper towels
- Masking tape (optional)
Step 1: Preparation and Sketching
-
Prepare your paper:
Begin by securing your watercolor paper to a flat surface if you wish, or simply have your sheet ready. Cold press paper adds a lovely texture that enhances the wash effect. -
Sketch the basic shapes:
Using a light hand and your HB pencil, block out the general shape of the deer. Start with an oval for the chest and a smaller circle for the head, connecting them with a curved neck line. -
Refine the silhouette:
Flesh out the legs and body. The front leg should step forward slightly to create movement. Keep the belly line relatively straight but soft. -
Detail the head and antlers:
Sketch the antlers branching upward and backward. Don’t worry about perfection; draw organic, branching curves. Add the ear just below the antler base and define the snout.
Ink Smearing?
If your ink bleeds when you add water, your pen isn’t fully waterproof. Test your pen on a scrap piece first, or apply the watercolor wash first, let it dry, and ink over top.
Step 2: Creating the Ink Outline
-
Inking the head:
Switch to your 03 fine liner. Carefully trace your pencil lines for the face, eye, and antlers. I like to keep the antler tips sharp and clean. -
Texture the neck:
Instead of a solid line for the neck fur, use short, jagged strokes to simulate the texture of a thick winter coat down the front of the chest. -
Outline the body:
Continue with the 05 pen for the back and legs. Use confident, smooth strokes for the back and legs. A slightly thicker line weight here grounds the animal. -
Add separation lines:
Draw the separation line for the rear leg muscle and the shoulder blade to give the deer anatomical volume without shading. -
Ground the subject:
Sketch simple, vertical grass tufts around the hooves. Add a broken horizontal line underneath to suggest the ground without drawing a full horizon. -
Erase guidelines:
Wait at least 15 minutes to ensure the ink is completely dry. Gently use your kneaded eraser to lift all visible pencil marks.
Try Metallic Accents
Once the piece is totally dry, trace over just the antlers with a gold gel pen or metallic watercolor paint. It catches the light beautifuly against the matte wash.
Step 3: Applying the Watercolor Wash
-
Prepare the palette:
Mix three puddles of paint: a watery Yellow Ochre, a dilute Burnt Sienna, and a touch of Burnt Umber mixed with pink or red for warmth. -
Wet the paper:
With a clean brush and clear water, wet the area around the deer’s head and upper back. This wet-on-wet technique allows the colors to bloom softly. -
Drop in yellow:
Touch your brush loaded with Yellow Ochre into the wet areas. Let the pigment spread naturally; don’t overwork it. -
Add warmth:
While the paper is still damp, dab the Burnt Sienna and pinkish mix into the spaces between the yellow. Focus this color cloud behind the head and antlers. -
Soften edges:
Clean your brush, leave it slightly damp, and gently feather out the edges of the paint blobs so they fade into the white paper invisibly. -
Add texture marks:
Before the wash is fully dry, you can flick a tiny amount of concentrated paint onto the wash for subtle speckling, or dab a tissue to lift pigment for clouds. -
Final dry:
Let the painting dry completely flat. The colors will lighten as they dry, leaving a ghostly, atmospheric background.
Frame this piece in a simple wood frame to complement the organic tones of your new artwork

PENCIL GUIDE
Understanding Pencil Grades from H to B
From first sketch to finished drawing — learn pencil grades, line control, and shading techniques.
Explore the Full Guide
Loose Watercolor Deer Splashes
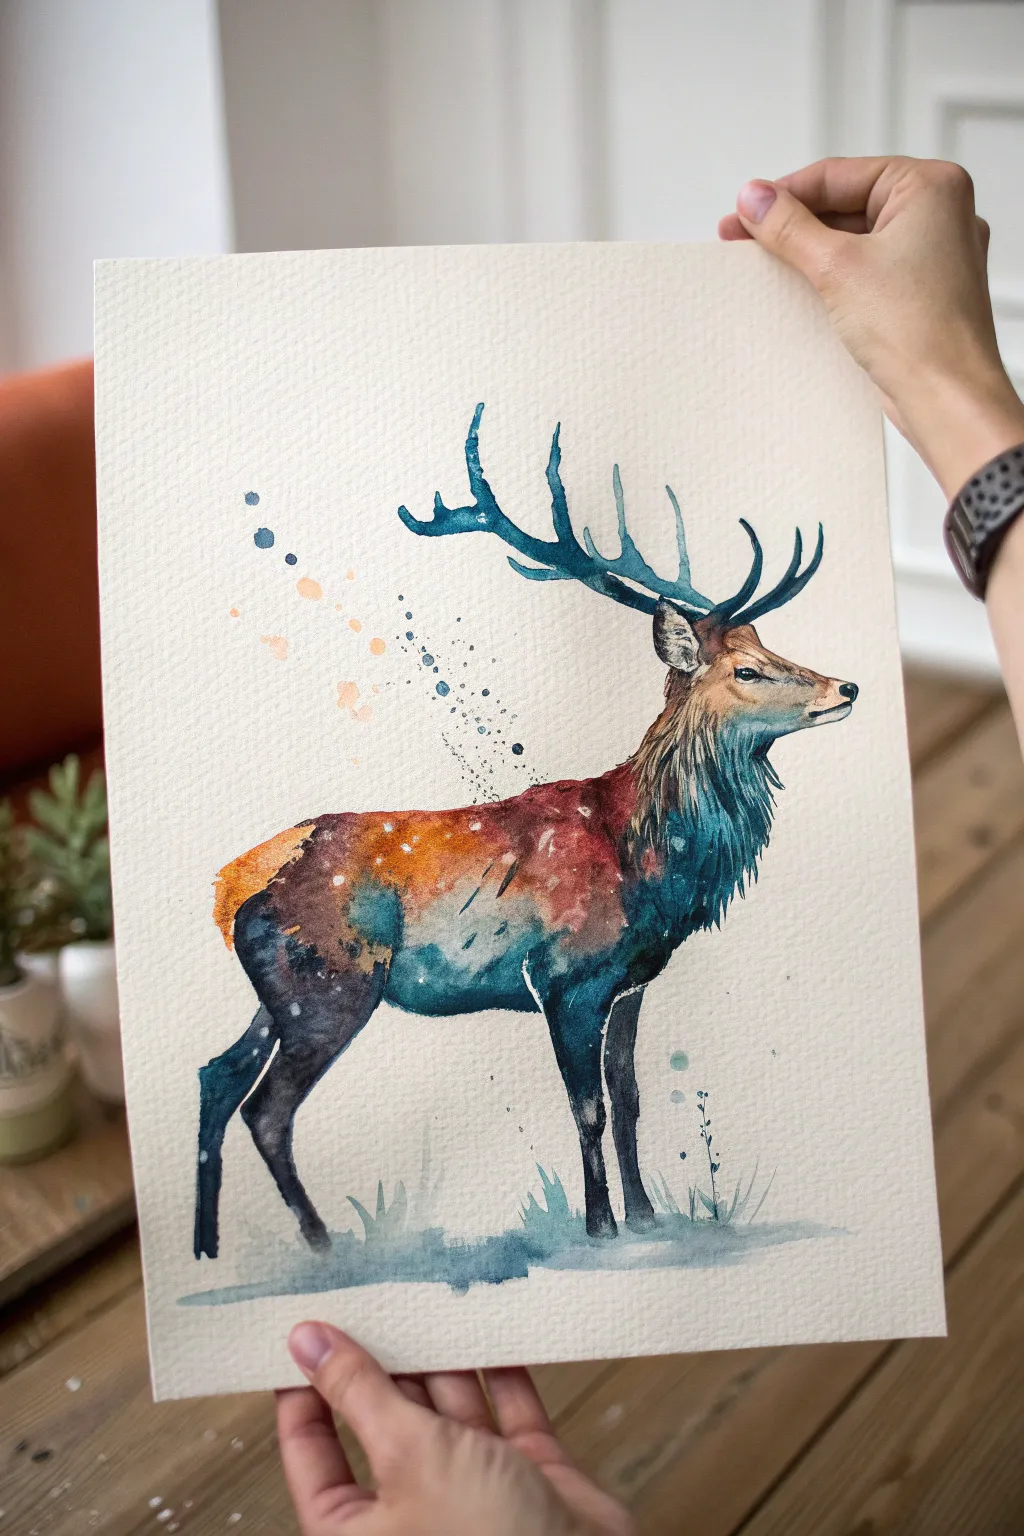
Capture the wild elegance of a stag with this expressive watercolor project that balances realistic detail with loose, artistic splashes. The striking contrast between warm rusty oranges and deep teal blues creates a moody, atmospheric portrait perfect for your wall.
Step-by-Step Guide
Materials
- Cold press watercolor paper (300 gsm/140 lb)
- Watercolor paints: Burnt Sienna, Burnt Umber, Indigo, Prussian Blue, Turquoise, Yellow Ochre
- Round watercolor brushes: Size 2 (fine detail), Size 6 (general), Size 10 or 12 (large washes)
- Pencil (HB or 2B) and kneaded eraser
- Masking fluid (optional)
- Two jars of water
- Paper towels
- Palette for mixing
Step 1: Sketching the Form
-
Outline the stag:
Begin with a light pencil sketch of the stag’s silhouette. Focus on the regal posture: the head held high, the curve of the chest, and the strong legs. Don’t worry about fur texture yet; just get the main proportions correct. -
Detail the antlers:
Sketch the antlers branching upward. They don’t need to be perfectly symmetrical; organic curves look more natural. Ensure the base connects firmly to the head near the ears. -
Refine the face:
Add the eye placement, the snout, and the ear. Keep your pencil lines faint so they won’t show through the transparent watercolor layers later.
Control Your Bloom
For the soft blends on the body, ensure your paper is uniformly damp. If it’s starting to dry in patches, you’ll get hard water lines instead of soft gradients.
Step 2: Painting the Head & Antlers
-
Start with the eye:
Using your smallest brush (size 2) and a mix of Burnt Umber and Indigo, carefully paint the eye, leaving a tiny speck of white paper for the highlight. This brings the animal to life immediately. -
Base layer for the face:
Wash a light mix of Yellow Ochre and Burnt Sienna over the face, avoiding the nose tip and the white patch under the chin. While wet, drop in a tiny bit of darker brown near the ear. -
Paint the antlers:
Mix a cool, dark teal using Prussian Blue and a touch of Burnt Umber. With your size 6 brush, paint the antlers. I like to let the color fade slightly at the tips for atmospheric perspective. -
Add antler texture:
While the antlers are still damp, drop in pure Indigo at the base where they meet the head to create depth and shadow.
Muddy Colors?
If the orange and blue mix into an ugly brown, you over-worked it. Let the colors touch on the wet paper and mix themselves—don’t scrub them together with the brush.
Step 3: Creating the Body with Wet-in-Wet
-
Apply clean water:
Using your largest brush, wet the main body area (chest, back, and flank) with clean water. The paper should glisten but not have puddles. -
Drop in warm tones:
Load your brush with Burnt Sienna and dab it onto the wet paper along the back and rump. Let the pigment bloom and spread naturally. -
Introduce the cool tones:
While the orange section is still wet, introduce a rich Turquoise or Prussian Blue to the chest, neck, and underbelly. Allow the blue to touch the orange; where they meet, they will create a beautiful neutral greyish-brown. -
Darken the shadows:
Mix a strong Indigo solution. Drop this into the lower chest and the top of the legs while the paper is damp to establish the darkest values, giving volume to the deer. -
Salt texture (optional):
If you want extra texture on the back resembling spots, you can sprinkle a few grains of salt on the drying paint or wait until it’s dry and lift small spots with a damp brush.
Step 4: Structure & Details
-
Define the legs:
Once the body wash is damp (not soaking), switch to a size 6 brush. Paint the legs using a mix of Indigo and Burnt Umber. Keep the edges slightly crisp to differentiate them from the loose body. -
Add fur texture:
Using a relatively dry small brush, flick some fine lines around the neck and chest where the blue meets the brown. This dry-brush technique simulates coarse fur. -
Ground the figure:
Use a watery wash of blue-grey to paint simple, loose grass strokes around the hooves. This creates a base so the deer doesn’t look like it’s floating.
Step 5: Splatter & Finishing Touches
-
Create the splatter effect:
Load a wet brush with Turquoise or diluted Indigo. Hold it over the drawing (near the back or antlers) and tap the handle against another brush to send small droplets flying. This adds energy and movement. -
Add warm splatters:
Repeat the splatter process with a watery Burnt Sienna or Orange near the rear of the deer to balance the composition. -
Define white spots:
If you didn’t obscure them earlier, enhance the fawn-like white spots on the back by lifting pigment with a damp, clean brush or adding small touches of white gouache. -
Final assessment:
Step back and look at your contrast. If the darks have faded too much upon drying, glaze another layer of Indigo over the deepest shadow areas.
Frame your finished stag in a simple wood frame to complement those earthy tones
Storybook Deer in Floral Thicket
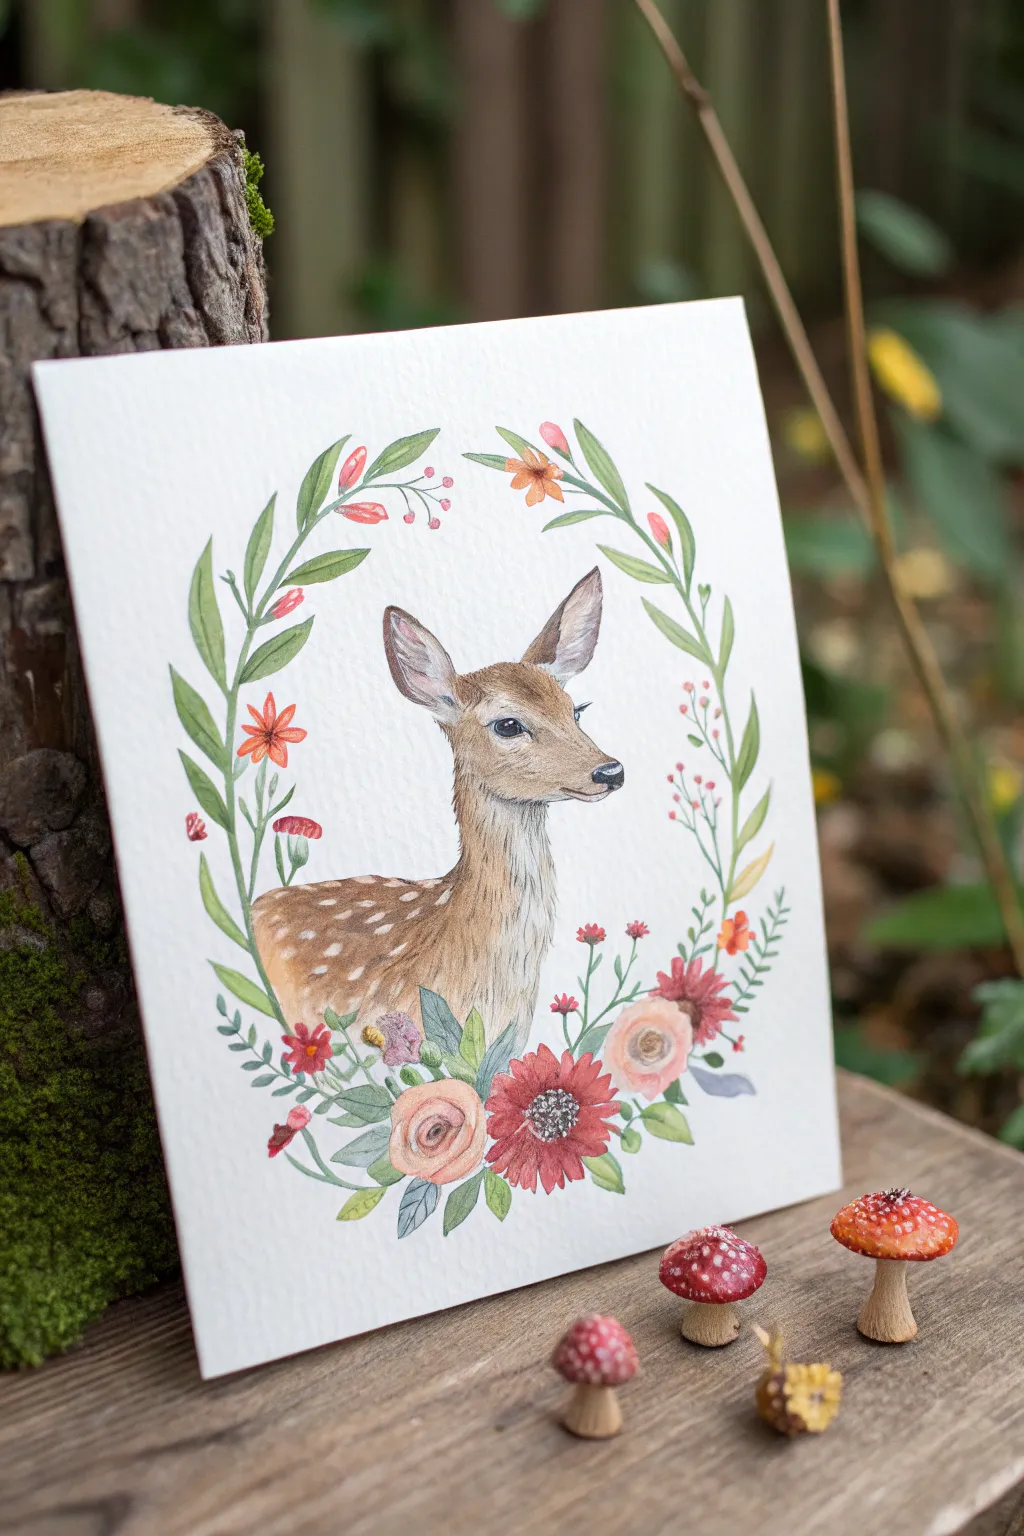
Capture the innocence of the forest with this delicate watercolor illustration featuring a young fawn framed by wildflowers. The soft textures of the fur and the vibrant botanicals come together to create a piece that feels straight out of a classic children’s storybook.
Step-by-Step
Materials
- Cold press watercolor paper (300 gsm)
- Watercolor paints (Burnt Sienna, Yellow Ochre, Sepia, Sap Green, Alizarin Crimson, Indigo)
- Small round brushes (Size 0, 2, and 4)
- HB or 2H pencil for sketching
- Kneaded eraser
- White gouache or white gel pen
- Masking fluid (optional but helpful)
- Clean water and paper towels
Step 1: Planning and Sketching
-
Establish the composition:
Begin by lightly drawing a large circle in the center of your paper to guide the wreath shape. Mark the center point where the fawn’s neck will begin. -
Outline the fawn:
Sketch the fawn’s head and neck profile within the circle. Focus on the large ears, the tapering muzzle, and the gentle curve of the neck. Keep your pencil pressure very light so graphite doesn’t muddy the paint later. -
Sketch the florals:
Draw the floral elements along the circle guide. Start with the larger focal flowers at the bottom center—gerbera daisies or zinnias work well—and trail smaller leaves and buds upwards to close the loop.
Fur Texture Tip
Don’t overwork the fur! Leave some areas of the initial wash smooth. The contrast between smooth washes and detailed pencil-like strokes creates the best illusion of softness.
Step 2: Painting the Fawn
-
Base wash and wet-on-wet:
Mix a watery wash of Yellow Ochre and a touch of Burnt Sienna. Apply this loosely to the fawn’s coat, avoiding the white spots on the back and the lighter under-chin area. Let the colors bleed slightly for softness. -
Building fur texture:
Once the base layer is dry, switch to your size 2 brush. Using a thicker mix of Burnt Sienna, paint short, directional strokes to mimic fur. Follow the contours of the neck and face. -
Deepening the shadows:
Mix Sepia with a bit of Indigo for the darkest areas. Carefully paint the eye, leaving a tiny white highlight unpainted, and darken the nose, inner ear, and shadow under the jaw. -
Refining the details:
Go back in with your smallest brush (size 0) and Sepia paint. Define the delicate eyelashes and individual hairs around the ears. I prefer to keep the strokes very fine here to maintain a realistic look. -
Adding the spots:
If you didn’t mask them out, lift color gently with a damp clean brush for the spots on the back, or wait until the end to add them with white gouache.
Muddy Colors?
If your floral colors are bleeding into the deer, you’re painting adjacent wet areas too quickly. Let the animal completely dry before starting any leaves that touch its outline.
Step 3: Painting the Floral Wreath
-
The greenery base:
Mix Sap Green with a little Indigo for variation. Paint the stems and leaves, using the tip of the brush for the stem and pressing down to expand the belly of the brush for the leaves. -
Leaf variation:
While the green is still slightly damp on some leaves, drop in a tiny bit of Yellow Ochre or Burnt Sienna to create autumnal variations and realistic color shifts. -
Primary blooms:
Paint the large focal flowers at the base using diluted Alizarin Crimson and touches of orange. Use loose, C-shaped strokes to suggest petals radiating from the center. -
Flower centers:
Once the petals are dry, add dark brown or black stippling (tiny dots) to the center of the main flowers to give them depth and texture. -
Tiny buds and berries:
Using a reddish-pink mix, paint the small buds near the top of the wreath and the tiny berries interspersed among the leaves. Connect them to the main stems with thin green lines. -
Balancing the composition:
Step back and look for empty spaces. Fill gaps with small sprigs of filler flowers or additional leaves to make the wreath feel lush without overcrowding the deer.
Step 4: Final Touches
-
Highlights and sparkle:
Using white gouache or a gel pen, add the final bright white spots to the fawn’s back if they aren’t distinct enough. Add a tiny dot to the eye for life. -
Erasure:
Wait until the painting is bone dry—touch it with the back of your hand to check for coldness. Gently erase any visible pencil lines with the kneaded eraser.
Now you have a sweet woodland friend ready to frame or turn into a charming greeting card


Have a question or want to share your own experience? I'd love to hear from you in the comments below!